

Page 1
Register your product and get support at
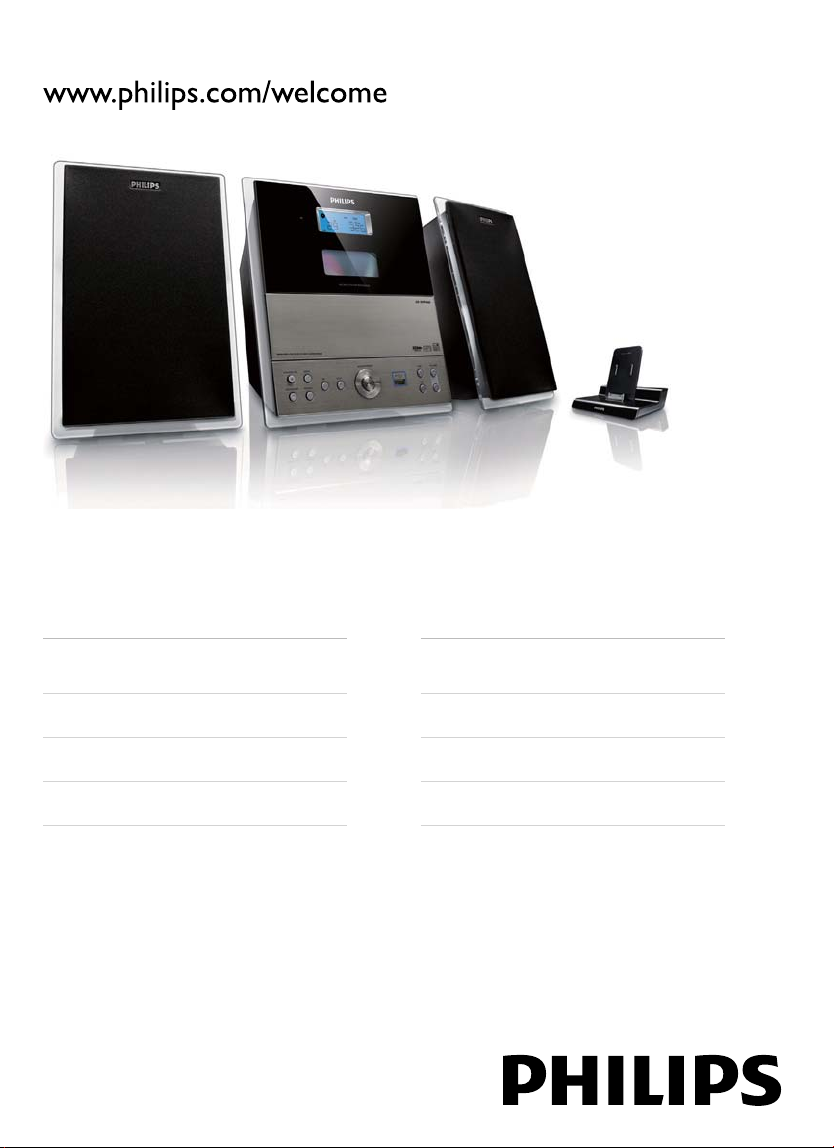
Micro System
MCM280D/12
EN User manual
DA Brugervejledning
DE Benutzerhandbuch
ES Användarhandbok
FR Mode d’emploi
IT Manuale utente
NL Gebruiksaanwijzing
SV Användarhandbok
Page 2

Contents
1 Important 2
Safety 2
Notice 4
2 Your Micro System 5
Introduction 5
What’s in the box 5
Overview of the main unit 6
Overview of the remote control 7
3 Get started 9
Mount the stand 9
Connect FM antenna 9
Connect speakers 9
Connect power 10
Prepare the remote control 10
Set clock 10
Turn on 11
4 Play 12
Play disc 12
Play from USB 12
Delete fi les in the USB device 12
Listen to an external device 12
8 Listen to the radio 17
Tune to a radio station 17
Program radio stations automatically 17
Program radio stations manually 17
Select a preset radio station 17
Show RDS information 18
Set RDS clock 18
9 Adjust sound 19
Adjust volume level 19
Select a preset sound effect 19
Enhance bass 19
Mute sound 19
10 Use more of your Micro System 20
Set the sleep timer 20
Set the alarm timer 20
Listen through headphone 20
11 Product information 21
Specifi cations 21
Supported MP3 disc formats 21
USB playability information 22
Maintenance 22
English
5 Play options 13
Repeat and random play 13
Program tracks 13
Display play information 13
6 Record 14
7 Play iPod/iPhone 15
Compatible iPod/iPhone 15
Load the iPod/iPhone 15
Listen to the iPod/iPhone 16
Charge the iPod/iPhone 16
Remove the iPod/iPhone 16
12 Troubleshooting 23
EN
1
Page 3

1 Important
Safety
a Read these instructions.
b Keep these instructions.
c Heed all warnings.
d Follow all instructions.
e Do not use this apparatus near water.
f Clean only with dry cloth.
g Do not block any ventilation openings.
Install in accordance with the
manufacturer’s instructions.
h Do not install near any heat sources
such as radiators, heat registers, stoves,
or other apparatus (including amplifi ers)
that produce heat.
i For countries with a polarized mains,
do not defeat the safety purpose of
the polarized or grounding-type plug.
A polarized plug has two blades with
one wider than the other. A grounding
type plug has two blades and a third
grounding prong. The wide blade or the
third prong is provided for your safety.
If the provided plug does not fi t into
your outlet, consult an electrician for
replacement of the obsolete outlet.
Caution: To prevent electric shock, match
the wide blade of the plug to the wide
slot, fully insert.
j Protect the power cord from being
walked on or pinched, particularly at
plugs, convenience receptacles, and
the point where they exit from the
apparatus.
k Only use attachments/accessories
specifi ed by the manufacturer.
l Use only with the cart, stand, tripod,
bracket, or table specifi ed by the
manufacturer or sold with the apparatus.
When a cart is used, use caution when
moving the cart/apparatus combination
to avoid injury from tip-over.
m Unplug this apparatus during lightning storms
or when unused for long periods of time.
n Refer all servicing to qualifi ed service
personnel. Servicing is required when
the apparatus has been damaged in any
way, such as power-supply cord or plug
is damaged, liquid has been spilled or
objects have fallen into the apparatus,
the apparatus has been exposed to rain
or moisture, does not operate normally,
or has been dropped.
o Battery usage CAUTION – To prevent
battery leakage which may result in
bodily injury, property damage, or
damage to the apparatus:
Install all batteries correctly, + and - •
as marked on the apparatus.
Do not mix batteries (old and new •
or carbon and alkaline, etc.).
Remove batteries when the unit is •
not used for a long time.
The batteries shall not be exposed •
to excessive heat such as sunshine,
fi re or the like.
p Apparatus shall not be exposed to
dripping or splashing.
q Do not place any sources of danger on
the apparatus (e.g. liquid fi lled objects,
lighted candles).
2 EN
Page 4
r This product may contain lead and
mercury. Disposal of these materials
may be regulated due to environmental
considerations. For disposal or recycling
information, please contact your local
authorities or the Electronic Industries
Alliance: www.eiae.org.
Warning
Never remove the casing of this apparatus. •
Never lubricate any par t of this apparatus.•
Never place this apparatus on other electrical •
equipment.
Keep this apparatus away from direc t sunlight, naked
•
fl ames or heat.
•
Never look into the laser beam inside this apparatus.
Ensure that you always have easy access to the power •
cord, plug or adaptor to disconnect this apparatus
from the power.
Where the MAINS plug or an appliance •
coupler is used as the disconnect device,
the disconnect device shall remain readily
operable.
Caution
Use of controls or adjustments or per formance of •
procedures other than herein may result in hazardous
radiation exposure or other unsafe operation.
To establish a safe volume level:
Set your volume control at a low setting. •
Slowly increase the sound until you can •
hear it comfortably and clearly, without
distortion.
Listen for reasonable periods of time:
Prolonged exposure to sound, even •
at normally ‘safe’ levels, can also cause
hearing loss.
Be sure to use your equipment •
reasonably and take appropriate breaks.
Be sure to observe the following guidelines
when using your headphones.
Listen at reasonable volumes for •
reasonable periods of time.
Be careful not to adjust the volume as •
your hearing adapts.
Do not turn up the volume so high that •
you can’t hear what’s around you.
You should use caution or temporarily •
discontinue use in potentially hazardous
situations. Do not use headphones while
operating a motorized vehicle, cycling,
skateboarding, etc.; it may create a traffi c
hazard and is illegal in many areas.
English
Hearing safety
Listen at a moderate volume.
Using headphones at a high volume can •
impair your hearing. This product can
produce sounds in decibel ranges that
may cause hearing loss for a normal
person, even for exposure less than a
minute. The higher decibel ranges are
offered for those that may have already
experienced some hearing loss.
Sound can be deceiving. Over time your •
hearing ‘comfort level’ adapts to higher
volumes of sound. So after prolonged
listening, what sounds ‘normal’ can
actually be loud and harmful to your
hearing. To guard against this, set your
volume to a safe level before your hearing
adapts and leave it there.
EN 3
Page 5
Notice
Any changes or modifi cations made to this
device that are not expressly approved by
Philips Consumer Lifestyle may void the user’s
authority to operate the equipment.
The making of unauthorized copies of
copy-protected material, including computer
programs, fi les, broadcasts and sound
recordings, may be an infringement of
copyrights and constitute a criminal offence.
This equipment should not be used for such
purposes.
Recording and playback of material might
require consent. See Copyright Act 1956 and
The Performer’s Protection Acts 1958 to
1972.
This apparatus includes this label:
This product complies with the
radio interference requirements
of the European Community.
This product complies with the
requirements of the following directives and
guidelines: 2004/108/EC + 2006/95/EC
Any changes or modifi cations made to this
device that are not expressly approved by
Philips Consumer Lifestyle may void the user’s
authority to operate the equipment.
When you see the crossed-out
wheel bin symbol attached to a
product, it means the product
is covered by the European
Directive 2002/96/EC:
Never dispose of your product
with other household waste.
Please inform yourself about the local rules
on the separate collection of electrical and
electronic products. The correct disposal of
your old product helps prevent potentially
negative consequences on the environment and
human health.
Your product contains batteries covered by the
European Directive 2006/66/EC, which cannot
be disposed of with normal household waste.
When you see the crossedout wheel bin symbol with the
chemical symbol ‘Pb’, it means
that the batteries comply with
the requirement set by the
directive for lead:
Please inform yourself about the
local rules on separate collection of batteries.
The correct disposal of batteries helps prevent
potentially negative consequences on the
environment and human health.
Environmental information
All unnecessary packaging has been omitted.
We have tried to make the packaging easy to
separate into three materials: cardboard (box),
paper pulp (buffer) and polyethylene (bags,
protective foam sheet.)
Your system consists of materials which can
be recycled and reused if disassembled by
a specialized company. Please observe the
local regulations regarding the disposal of
packaging materials, exhausted batteries and
old equipment.
Pb
Recycling
Your product is designed and
manufactured with high quality
materials and components,
which can be recycled and
reused.
4 EN
Page 6

2 Your Micro
What’s in the box
System
Congratulations on your purchase, and
welcome to Philips! To fully benefi t from the
support that Philips offers, register your product
at www.philips.com/welcome.
Introduction
With this apparatus, you can:
enjoy music from audio discs,iPod, •
iPhone, and other external devices
listen to radio stations•
record audio from discs to a USB •
storage device.
The apparatus offers you multiple sound effect
settings that enrich sound with Digital Sound
Control (DSC) and Dynamic Bass Boost (DBB).
The apparatus supports the following media
formats:
Check and identify the contents of your
package:
Main unit•
Power adapter•
Loudspeaker boxes x 2•
Remote control •
Dock for iPod/iPhone (with dock cable)•
Base•
User manul•
Quick star t guide•
Norge
Typeskilt fi nnes på apparatens underside.
Observer: Nettbryteren er sekundert
innkoplet. Den innebygde netdelen er
derfor ikke frakoplet nettet så lenge
apparatet er tilsluttet nettkontakten.
For å redusere faren for brann eller
elektrisk støt, skal apparatet ikke utsettes
for regn eller fuktighet.
English
Note
The type plate is located on the back of the apparatus.•
EN 5
Page 7

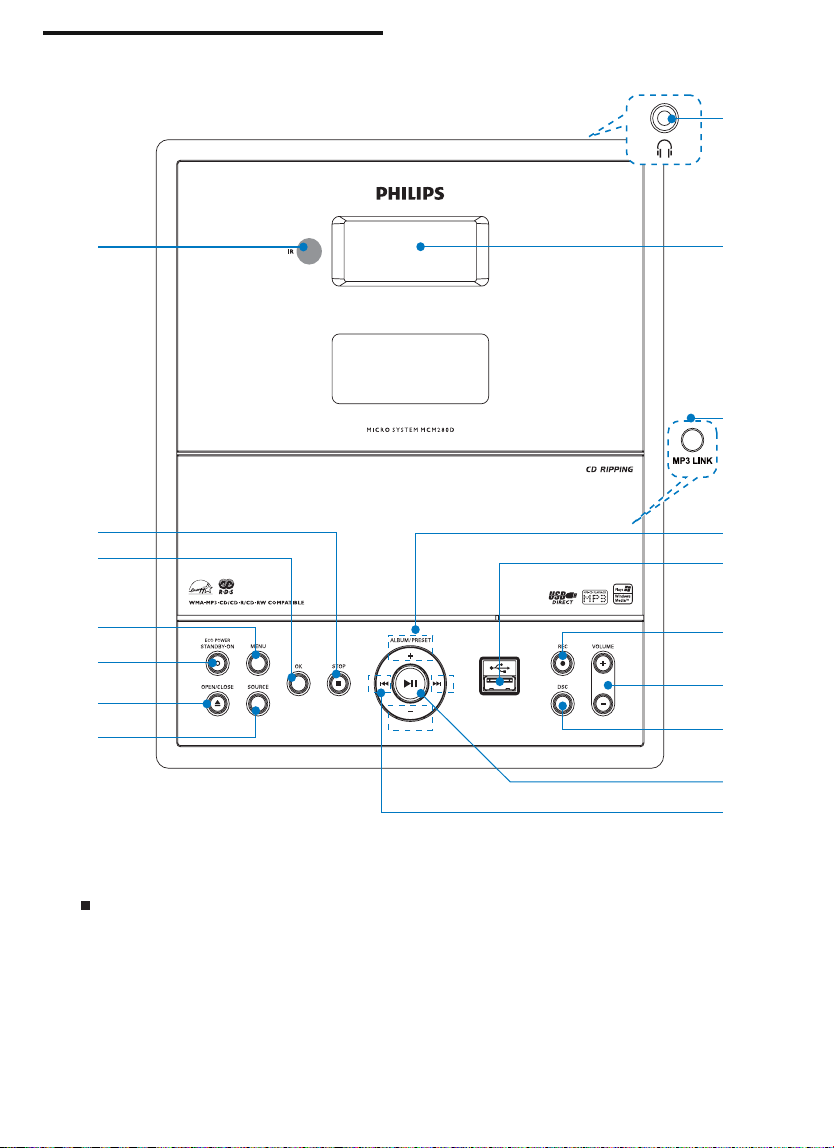
Overview of the main unit
p
a
b
c
d
e
f
g
h
q
i
j
k
l
m
n
o
a Remote control sensor
b
Stop play.•
Stop recording.•
Erase a program.•
c OK
Confi rm a selection.•
d MENU
Select the iPhone/iPod menu.•
6 EN
e STANDBY-ON
Turn on the unit, or switch to •
standby mode.
f OPEN/CLOSE
Open or close the disc •
compartment.
g SOURCE
Select a source.•
h Display panel
Page 8

Display current status.•
i ALBUM /PRESET+/-
Skip to the previous/next album.•
Select a preset radio station.•
Navigate in the iPod/iPhone menu.•
j
USB socket.•
k REC
Record audio fi les from a disc to a •
USB storage device.
l VOLUME+/-
Adjust volume.•
Adjust time.•
m DSC
Select a preset sound setting.•
n
Start or pause play.•
o
/
Skip to the previous/next track.•
Search within a track.•
Tune to a radio station.•
p
Connect headphone.•
Overview of the remote
control
a
b
c
d
e
f
g
h
i
j
k
,1.
.
QH
R
K
+
)
)
:
English
l
m
n
o
p
q
r
s
t
u
v
w
x
y
z
{
a
Switch to standby mode. •
b USB
Select USB device source.•
c CD
Select disc source.•
d MP3 LINK
Select external audio device source.•
e DISPLAY/CLOCK
EN 7
Page 9

Select display information during play.•
Set the clock.•
View the clock.•
f MENU
Select the iPhone/iPod menu.•
g
/
Tune to a radio station.•
Search within a track.•
h USB REC
Start record.•
Select a record mode.•
i
/
Skip to the previous/next track.•
Select a preset radio station.•
j Numeric keypad 0-9
Select a preset radio station.•
Select a track from a disc directly.•
k DSC
Select a preset sound setting.•
l TUNER
Select tuner source.•
m iPhone/iPod
Select iPhone or iPod source.•
n SLEEP
Set the sleep timer.•
o TIMER
Set the alarm timer.•
Activate or deactivate timer.•
p MUTE
Mute or restore volume.•
q
Navigate in the iPod/iPhone menu.•
Skip to the previous/next album.•
r OK
Confi rm a selection.•
s USB DEL
Delete fi les in a USB storage device.•
t
Start or pause play.•
u VOL +/-
Adjust volume.•
Adjust time.•
v
Stop play.•
Erase a program.•
w REPEAT
Select repeat play modes.•
x SHUFFLE
Select shuffl e play modes.•
y PROG
Program tracks.•
Program radio stations.•
z RDS/NEWS
For selected FM radio stations: •
display RDS information.
{ DBB
Turn on or off dynamic bass •
enhancement.
8 EN
Page 10
3 Get started
Connect FM antenna
Caution
Use of controls or adjustments or per formance of •
procedures other than herein may result in hazardous
radiation exposure or other unsafe operation.
Always follow the instructions in this chapter in
sequence.
If you contact Philips, you will be asked for the
model and serial number of this apparatus. The
model number and serial number are on the
back of the apparatus. Write the numbers here:
Model No. __________________________
Serial No. ___________________________
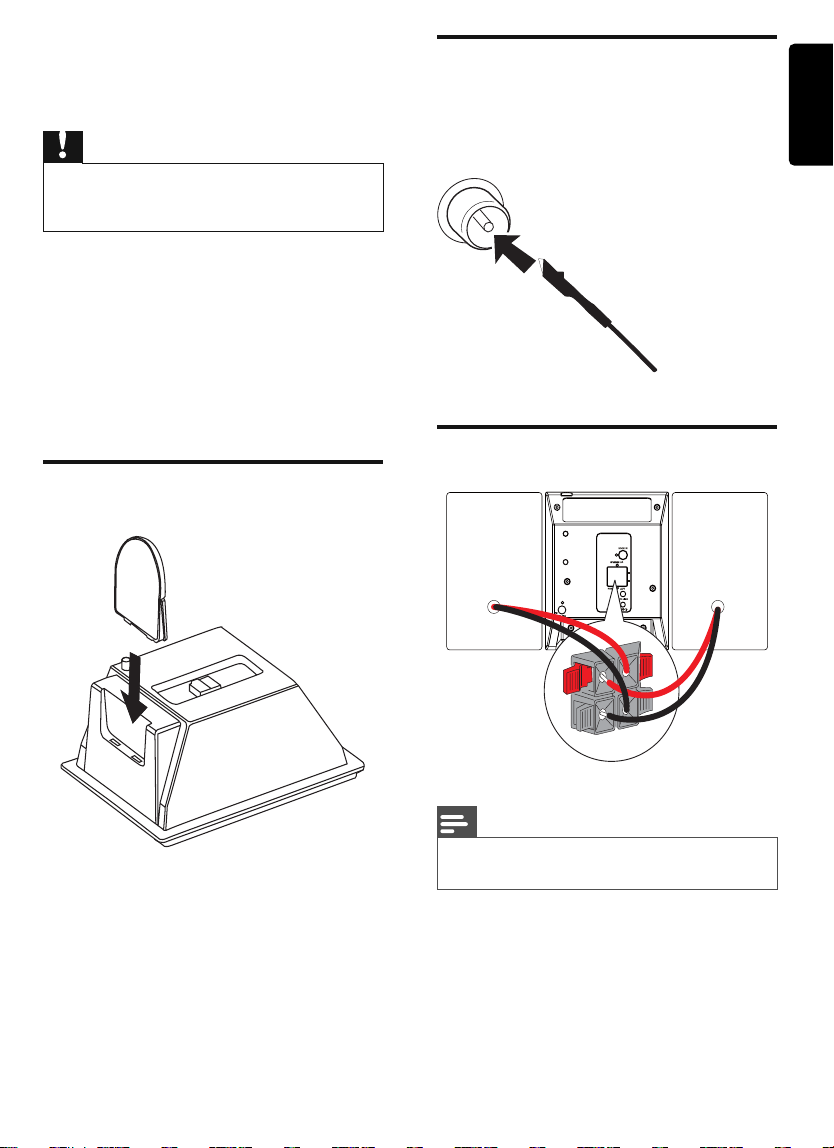
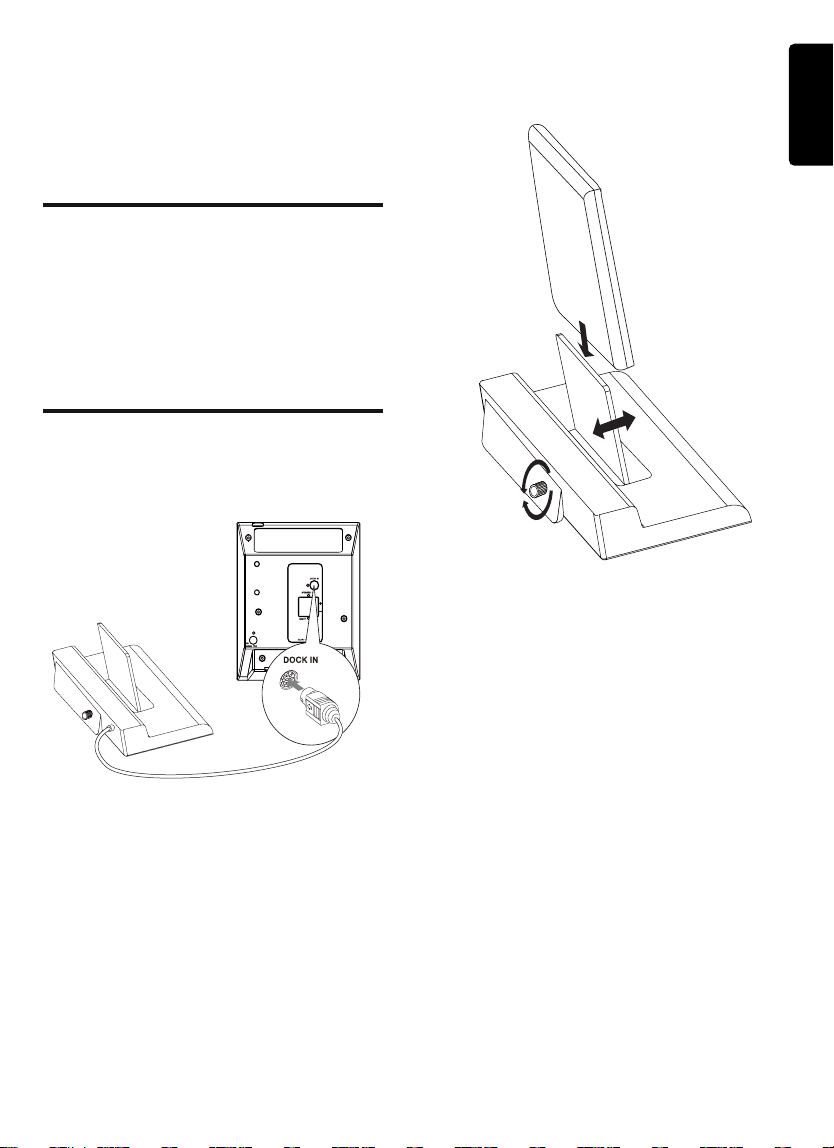
Mount the stand
1 Connect the supplied FM antenna to the
FM AERIAL socket on the back of the
main unit.
Connect speakers
English
1 Lay down the main unit and then slide the
base in the slot until it is fi xed.
L
R
Note
Ensure that the colors of the speaker wires and •
terminals are matched.
1 Hold down the socket fl ap.
2 Insert the stripped par t of the wire
completely.
Inser t the right speaker wires to •
“RIGHT”, left speaker wires to
“LEFT”.
EN 9
Page 11
Inser t the red/blue wires to “ • +”,
black wires to “ -”.
3 Release the socket fl ap.
Connect power
Caution
Risk of product damage! Ensure that the power supply •
voltage corresponds to the voltage printed on the back
or the underside of the apparatus.
Risk of electric shock! When you unplug the AC power •
cord, always pull the plug from the socket. Never pull
the cord.
Before connecting the AC power cord, ensure you
•
have completed all other connections.
1 Connect the power adapter to
the • DC IN jack on the rear of the
main unit
the power socket.•
Prepare the remote control
Caution
Risk of explosion! Keep batteries away from heat, •
sunshine or fi re. Never discard batteries in fi re.
For fi rst-time use:
1 Remove the protective tab to activate the
remote control battery.
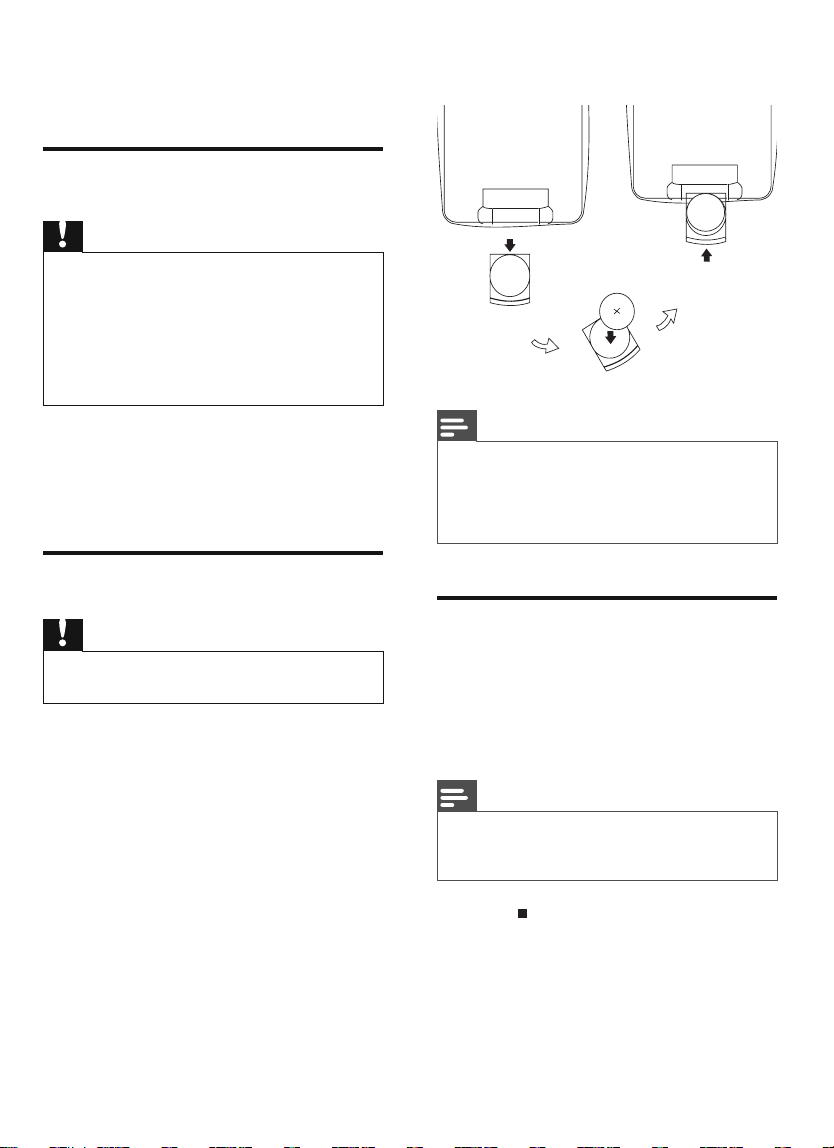
To replace the remote control battery:
1 Open the battery compartment.
2 Insert one CR2025 battery with correct
polarity (+/-) as indicated.
3 Close the battery compartment.
Note
Before pressing any function but ton on the remote •
control, fi rst select the correct source with the remote
control instead of the main unit.
•
If you are not going to use the remote control for a
long time, remove the bat ter y.
Set clock
1 In standby mode, press DISPLAY/
CLOCK to activate the clock setting
mode.
The hour digits are displayed and begin »
to blink.
Note
In Eco Power Standby mode, press • CLOCK to show
clock fi rst, then press and hold CLOCK to proceed
clock setting.
2 Press repeatedly to select 12 hour or
24 hour format.
3 Press VOL +/- to set the hour.
4 Press DISPLAY/CLOCK to confi rm.
The minute digits are displayed and »
begin to blink.
5 Press VOL +/- to set the minute.
10 EN
Page 12
6 Press DISPLAY/CLOCK to confi rm.
Turn on
1 Press STANDBY-ON on the main unit.
The apparatus switches to the last »
selected source.
Switch to standby
1 Press to switch the apparatus to
standby mode.
The backlight on the display panel is »
reduced.
The clock (if set) appears on the »
display panel.
Note
If no button is pressed over 15 minutes in Standby •
mode, the apparatus goes to Eco Power Standby mode
automatically and the backlight on the display turns off.
English
EN 11
Page 13

4 Play
Play disc
1 Press CD to select the disc source.
2 Press to open the disc tray.
3 Insert a disc with the printed side facing
up, then close the disc tray.
Play starts automatically.»
To pause/resume play, press •
To stop play, press •
For MP3/WMA fi les: to select an •
album, press
To skip to a track, press •
To search within a track, press and •
hold
/ . Release to resume
normal play.
Play from USB
Note
Ensure that the USB device contains playable audio •
content.
.
.
.
/ .
Delete fi les in the USB device
1 Press / to select a track.
2 Press USB DEL.
A confi rmation message is displayed.»
3 Press USB DEL again to confi rm.
To cancel, press •
After you delete the fi le, the USB play »
stops.
.
Listen to an external device
You can also listen to an external audio device
through this unit.
For an audio device with a headphone socket:
1 Press MP3 LINK to select the MP3 link
source.
2 Connect the supplied MP3 link cable to
the • MP3 LINK socket on this unit.
the headphone socket on an MP3 •
player.
3 Star t to play the MP3 player. (See the
user manual of the MP3 player)
1 Flip open the USB socket cover on the
front panel.
2 Insert the USB plug of a USB device into
the socket.
3 Press USB to select the USB source.
Play starts automatically.»
12 EN
To pause/resume play, press •
To stop play, press •
For MP3/WMA fi les: to select an •
album, press
To skip to a track, press •
To search within a track, press and •
hold
/ . Release to resume
normal play.
.
.
.
/ .
Page 14

5 Play options
Display play information
Repeat and random play
1 Press REPEAT or SHUFFLE repeatedly to
select:
• [REP] (repeat): the current track is
played repeatedly.
• [REP ALL] (repeat all): all tracks are
played repeatedly.
• [SHUF] (shuffl e): all tracks are played
randomly.
• [SHUF REP ALL] (repeat all
randomly): all tracks are played
repeatedly in random order.
2 To return to normal play, press REPEAT
or SHUFFLE repeatedly until play mode is
no longer displayed.
Program tracks
You can program a maximum of 20 tracks.
1 In CD/USB mode, at the stop position,
press PROG to activate the program
mode.
[PROG] (program) blinks on the »
display.
2 For MP3/WMA tracks, press to select
an album.
3 Press / to select a track number, then
press PROG to confi rm.
4 Repeat steps 2 to 3 to program more
tracks.
5 Press to play the programmed tracks.
During play, [PROG] (program) is »
displayed.
To erase the program, in the stop •
position, press
To review the program, in the stop •
position, press and hold PROG for
more than 2 seconds.
.
1 During play, press DISPLAY/CLOCK
repeatedly to select different play
information.
English
EN 13
Page 15
6 Record
You can record the audio fi les on a disc into a
USB device. Audio CD tracks and MP3 fi les are
recorded in .mp3 format, and WMA fi les are
recorded in .wma format.
The fi rst time you record to USB, a folder
called ‘PHILIPS’ is automatically created in the
USB device. Each time you record to USB, the
recorded fi les are stored in a sub-folder in the
‘PHILIPS’ folder. Files and sub-folders are named
numerically in the order in which they are
created.
1 Press CD to select the disc source.
2 Load a disc.
To select a track from which a •
recording star ts, press the numeric
buttons.
3 Plug a USB storage device into socket
of this apparatus.
4 Press USB REC repeatedly to select:
• [RIP ONE] (record one): record the
selected track.
• [RIP ALL] (record all): record all
tracks from the selected one.
Disc play starts automatically from the »
beginning of the disc/the selected track,
and the recording starts.
To stop recording, press •
.
Note
When space is not enough, • [USB FULL] (memory full)
is displayed.
If a recorded track lasts less than 10 seconds, it is not •
saved in the USB storage device.
14 EN
Page 16
7 Play iPod/iPhone
2 Turn the screw to loosen the support
plate.
You can enjoy audio from iPod/iPhone through
this apparatus.
Compatible iPod/iPhone
Compatible Apple iPod and iPhone models with
a 30-pin dock connector include:
iPod classic, iPod touch, iPod nano, iPod •
5th generation (video), iPod mini.
iPhone, iPhone 3G.•
Load the iPod/iPhone
1 Connect the dock to the apparatus.
English
3 Place the iPod/iPhone in the dock.
4 Turn the screw to fi x the iPod/iPhone
securely.
When the apparatus is connected to »
power, the docked iPod/iPhone begins
to charge.
EN 15
Page 17
Listen to the iPod/iPhone
1 Ensure that the iPod/iPhone is loaded
correctly.
2 Press iPhone/iPod to select iPod/iPhone
source.
The connected iPod/iPhone plays »
automatically.
To pause/resume play, press •
To skip to a track, press •
To search during play: press and hold •
/ , then release to resume normal
play.
To navigate the menu: press • MENU,
press
confi rm.
to select, then press OK to
.
/ .
Charge the iPod/iPhone
When the apparatus is connected to power, the
docked iPod/iPhone begins to charge.
Remove the iPod/iPhone
1 Pull the iPod/iPhone out of the dock.
Tip
If it is hard to pull out the iPod or iPhone, turn the •
screw clockwise to loosen the support.
16 EN
Page 18
8 Listen to the
radio
Tune to a radio station
Program radio stations
manually
English
Note
You can program a maximum of 40 FM radio stations.•
Note
For optimal reception, fully extend and adjust the •
position of the FM antenna.
1 Press TUNER to select the tuner source.
2 Press and hold / for more than 2
seconds.
[SEARCH] (search) is displayed.»
The radio tunes to a station with »
strong reception automatically.
3 Repeat step 2 to tune to more stations.
To tune to a weak station, press •
/ repeatedly until you fi nd optimal
reception.
Program radio stations
automatically
Note
You can program a maximum of 40 FM radio stations.•
1 In tuner mode, press and hold PROG
for more than 2 seconds to activate
automatic program mode.
[AUTO] (auto) is displayed.»
All available stations are programmed »
in the order of waveband reception
strength.
The fi rst programmed radio station is »
broadcast automatically.
1 Tune to a radio station.
2 Press PROG to activate program mode.
[PROG] (program) blinks on the »
display.
3 Press to allocate a number (1 to 40)
to this radio station, then press PROG to
confi rm.
The preset number and the frequency »
of the preset station are displayed.
4 Repeat the above steps to program other
stations.
Note
To overwrite a programmed station, store another •
station in its place.
Select a preset radio station
1 In tuner mode, press to select a
preset number.
EN 17
Page 19
Show RDS information
RDS (Radio Data System) is a service
that allows FM stations to show additional
information. If you tune to a RDS station, a RDS
icon and the station name are displayed.
1 Tune to a RDS station.
2 Press RDS/NEWS repeatedly to scroll
through the following information (if
available):
Station name»
Program type such as » [NEWS] (news(,
[SPORT] (spor t), [POP M] (pop
music)...
Frequency»
Set RDS clock
You can use time signal broadcast together with
the RDS signal to set the clock of the apparatus
automatically.
1 Tune to a RDS radio station that
transmits time signals.
2 Press and hold RDS/NEWS for more
than 2 seconds.
Note
The accuracy of the transmitted time depends on the •
RDS station that transmits the time signal.
18 EN
Page 20

9 Adjust sound
Adjust volume level
1 During play, press VOL +/- to increase/
decrease the volume level.
Select a preset sound effect
1 During play, press DSC repeatedly to
select:
[POP] (pop)•
[JAZZ] (jazz)•
[CLASSIC] (classic)•
[ROCK] (rock)•
[FLAT] (fl at)•
Enhance bass
1 During play, press DBB to turn on or off
dynamic bass enhancement.
If DBB is activated, DBB is displayed.»
Mute sound
English
1 During play, press MUTE to mute/unmute
sound.
EN 19
Page 21

10 Use more of
your Micro
System
Set the sleep timer
This unit can switch to standby automatically
after a preset period of time.
1 When the unit is turned on, press SLEEP
repeatedly to select a set period of time
(in minutes).
When sleep timer is activated, the »
display shows
To deactivate sleep timer
1 Press SLEEP repeatedly until “SLP OFF” is
displayed.
When sleep timer is deactivated, »
disappears on the display.
Set the alarm timer
.
8 Press TIMER to confi rm.
The timer is set and activated.»
Activate and deactivate the alarm
timer
1 Press TIMER repeatedly to activate or
deactivate the timer.
If the timer is activated, the display »
shows
If the timer is deactivated, »
disappears on the display.
Note
If disc /USB device source is selected and the track •
cannot be played, tuner is activated automatically.
.
Listen through headphone
1 Plug a headphone into the socket on
the unit.
This unit can be used as an alarm clock. The
DISC, TUNER or USB is activated to play at a
preset time.
1 Ensure that you have set the clock
correctly.
2 In standby mode, press and hold TIMER
for more than 2 seconds.
3 Press CD, TUNER, USB, iPhone/iPod to
select a source.
4 Press TIMER to confi rm.
The hour digits are displayed and begin »
to blink.
5 Press VOL +/- to set the hour.
6 Press TIMER to confi rm.
The minute digits are displayed and »
begin to blink.
7 Press VOL +/- to set the minute.
Page 22
11 Product
information
Note
Product information is subject to change without prior •
notice.
Specifi cations
Amplifi er
Rated Output Power 2X30W RMS
Frequency Response 60 - 16kHz, ±3dB
Signal to Noise Ratio >62dB
Disc
Laser Type Semiconductor
Disc Diameter 12cm/8cm
Support Disc CD-DA, CD-R,
CD-RW, MP3-CD,
WMA-CD
Audio DAC 24Bits / 44.1kHz
Total Harmonic
Distortion <1%
Frequency Response 60Hz -16kHz
S/N Ratio >62dBA
Tuner
Tuning Range FM: 87.5 - 108MHz
Tuning g r id 50 kHz (FM)
Total Harmonic
Distortion <3%
Signal to Noise Ratio >50 dB
Speakers
Speaker Impedance 6ohm
General information-Specs
Power adapter Model:
PAT065A19EU
Input: AC100240V~, 50/60Hz,
1.5A Output:
DC19V, 3.4A
Operation Power
Consumption 26 W
Standby Power
Consumption <2 W
Eco Standby Power
Consumption <1 W
Dimensions
- Main Unit (W x H x D)
-Speaker Box
(W x H x D)
Weight
- With Packing
- Main Unit
- Speaker Box
211 x 250 x
160 mm
158 x 250 x
193mm
5.85 kg
1.29 kg
2.39 kg
Supported MP3 disc formats
ISO9660, Joliet•
Maximum title number: 512 (depending •
on fi le name length)
Maximum album number: 255•
Supported sampling frequencies: 32 kHz, •
44.1kHz, 48 kHz
Supported Bit-rates: 32~256 (kbps), •
variable bit rates
English
EN 21
Page 23

USB playability information
Maintenance
Compatible USB devices:
USB fl ash memory (USB 2.0 or •
USB1.1)
USB fl ash players (USB 2.0 or •
USB1.1)
memory cards (requires an additional •
card reader to work with this
apparatus)
Supported formats:
USB or memory fi le format FAT12, •
FAT16, FAT32 (sector size: 512 bytes)
MP3 bit rate (data rate): 32-320 Kbps •
and variable bit rate
WMA v9 or earlier•
Directory nesting up to a maximum •
of 8 levels
Number of albums/ folders: •
maximum 99
Number of tracks/titles: maximum •
999
ID3 tag v2.0 or later•
File name in Unicode UTF8 •
(maximum length: 128 bytes)
Unsupported formats:
Empty albums: an empty album is an •
album that does not contain MP3/
WMA fi les, and is not be shown in
the display.
Unsupported fi le formats are •
skipped. For example, Word
documents (.doc) or MP3 fi les with
extension .dlf are ignored and not
played.
AAC, WAV, PCM audio fi les•
DRM protected WMA fi les (.wav, •
.m4a, .m4p, .mp4, .aac)
WMA fi les in Lossless format•
Clean the cabinet
Use a soft cloth slightly moistened with •
a mild detergent solution. Do not use
a solution containing alcohol, spirits,
ammonia or abrasives.
Clean discs
When a disc becomes dir ty, clean it with •
a cleaning cloth. Wipe the disc from the
centre out.
Do not use solvents such as benzene, •
thinner, commercially available cleaners,
or antistatic spray intended for analogue
records.
Clean the disc lens
After prolonged use, dir t or dust may •
accumulate at the disc lens. To ensure
good play quality, clean the disc lens
with Philips CD lens cleaner or any
commercially available cleaner. Follow the
instructions supplied with cleaner.
22 EN
Page 24

12 Troubleshooting
Caution
Never remove the casing of this apparatus.•
To keep the warranty valid, never try to repair
the system yourself.
If you encounter problems when using this
apparatus, check the following points before
requesting service. If the problem remains
unsolved, go to the Philips web site (www.
philips.com/support). When you contact Philips,
ensure that your apparatus is nearby and the
model number and serial number are available.
No power
Ensure that the AC power plug of the •
unit is connected properly.
Ensure that there is power at the AC •
outlet.
To save power, the system switches •
off automatically 15 minutes after track
play reaches the end and no control is
operated.
No sound or poor sound
Adjust the volume.•
Check that the speakers are connected •
correctly.
Check if the stripped speaker wires are •
clamped.
Left and right sound outputs reversed
Check the speaker connections and location.
No response from the unit
Disconnect and reconnect the AC power •
plug, then turn on the system again.
As a power-saving feature, the unit •
switches off automatically 15 minutes
after track play reaches the end and no
control is operated.
Remote control does not work
Before you press any function button, •
fi rst select the correct source with the
remote control instead of the main unit.
Reduce the distance between the remote •
control and the unit.
Inser t the battery with its polarities (+/– •
signs) aligned as indicated.
Replace the battery.•
Aim the remote control directly at the •
sensor on the front of the unit.
USB device not supported
The USB device is incompatible with the •
apparatus. Try another one.
No disc detected
Insert a disc.•
Check if the disc is inser ted upside down.•
Wait until the moisture condensation at •
the lens has cleared.
Replace or clean the disc.•
Use a fi nalized CD or correct format disc.•
Poor radio reception
Increase the distance between the unit •
and your TV or VCR.
Fully extend the FM antenna.•
Connect an outdoor FM antenna instead.•
Timer does not work
Set the clock correctly.•
Switch on the timer.•
Clock/timer setting erased
Power has been interrupted or the power •
plug has been disconnected.
Reset the clock/timer.•
English
EN 23
Page 25

Indholdsfortegnelse
1 Vigtigt 2
Sikkerhed 2
Meddelelse 4
2 Dit mikrosystem 5
Indledning 5
Hvad er der i kassen 5
Oversigt over hovedenheden 6
Oversigt over fjernbetjeningen 7
3 Kom godt i gang 9
Monter standeren 9
Tilslut FM-antenne 9
Tilslut højttalere 9
Tilslut strømmen 10
Gør fjernbetjeningen klar 10
Indstilling af ur 10
Tænd 10
4 Afspilning 12
Afspil disk 12
Afspilning fra USB-enhed 12
Slet fi ler på USB-enheden 12
Lyt til en ekstern enhed 12
8 Radiolytning 17
Find en radiostation. 17
Programmér radiostationer automatisk 17
Programmér radiostationer manuelt 17
Vælg en forudindstillet radiostation 17
Vis RDS-oplysninger 18
Indstil RDS-ur 18
9 Lydindstilling 19
Juster lydstyrken 19
Vælg en forudindstillet lydeffekt 19
Basforbedring 19
Slå lyden fra 19
10 Flere funktioner på dit mikrosystem 20
Indstil sleep-timeren 20
Indstil alarm-timeren 20
Lyt via hovedtelefon 20
11 Produktinformation 21
Specifi kationer 21
Understøttede MP3-diskformater 21
USB-afspilningsoplysninger 22
Vedligeholdelse 22
Dansk
5 Afspilningstilstande 13
Gentagen og vilkårlig afspilning 13
Programmér spor 13
Få vist afspilningsoplysninger 13
6 Optagelse 14
7 Afspil iPod/iPhone 15
Kompatibel iPod/iPhone 15
Indsæt iPod/iPhone 15
Lyt til iPod/iPhone’en 15
Oplad iPod/iPhone’en 16
Fjern iPod/iPhone’en 16
12 Fejlfi nding 23
DA
1
Page 26

1 Vigtigt
Sikkerhed
a Læs disse instruktioner.
b Opbevar disse instruktioner.
c Respekter alle advarsler.
d Følg alle instruktioner.
e Benyt ikke dette apparat i nærheden af
vand.
f Rengør kun enheden med en tør klud.
g Ventilationsåbninger må ikke blokeres.
Installer apparatet i overensstemmelse
med producentens instruktioner.
h Installer ikke apparatet i nærheden
af varmekilder som f.eks. radiatorer,
varmeapparater, ovne eller andre
apparater (inkl. forstærkere), der
producerer varme.
i I lande med et polariseret lysnet
må du ikke fjerne eller ændre
sikkerhedsforanstaltningerne for den
polariserede stikprop eller jordstikket.
En polariseret stikprop har to ben, hvor
det ene er bredere end det andet. En
stikprop med jord har to ben foruden
et tredje, der tjener som jordstik.
Det tredje ben øger sikkerheden ved
drift. Hvis stikproppen ikke passer
til stikkontakten, skal en autoriseret
elektriker udskifte den forældede
stikkontakt.
Advarsel: Med henblik på at forebygge
elektrisk stød skal stikproppen passe til
stikkontakten, og stikproppen skal sættes
hele vejen ind.
2 DA
j Sørg for, at netledningen ikke
trædes på, navnlig ved stikkene og
stikforbindelserne samt det sted, hvor
ledningen føres ud af apparatet.
k Brug kun tilbehør og ekstraudstyr, der
er godkendt af producenten.
l Brug kun vogne, stativer, beslag og
borde, der enten medfølger eller er
godkendt af producenten. Hvis du
bruger en vogn, skal du passe på, at
apparatet ikke vælter ned, når du fl ytter
den.
m Tag stikket ud af stikkontakten under
tordenvejr, eller hvis apparatet ikke skal
bruges gennem længere tid.
n Al servicering skal udføres af kvalifi ceret
personale. Apparatet skal serviceres,
hvis det er blevet beskadiget, f.eks.
hvis netledningen beskadiges, der er
blevet spildt væske på apparatet, der
er kommet fremmedlegemer ind i
apparatet, apparatet er blevet udsat for
regn eller fugt, eller hvis apparatet ikke
fungerer normalt eller er blevet tabt.
o ADVARSEL vedr. brug af batterier –
sådan forebygger du batterilækage, der
kan forårsage personskade, tingskade
eller produktskade:
Isæt alle batterier korrekt, og sørg •
for, at + og - vender, som det er vist
på enheden.
Bland ikke batterier (gamle og nye •
eller brunstens- og alkalinebatterier
osv.).
Fjern batterierne, hvis enheden ikke •
skal bruges gennem længere tid.
Batterierne må ikke udsættes for •
ekstrem varme som solskin, ild eller
lignende.
Page 27

p Apparatet må ikke udsættes for dryp
eller sprøjt.
q Placer aldrig farlige genstande på
apparatet (f.eks. væskefyldte genstande
eller tændte lys).
r Dette produkt kan indeholde bly
og kviksølv. Bortskaffelse af disse
materialer kan være reguleret i henhold
til miljømæssige bestemmelser. Hvis du
ønsker oplysninger om bortskaffelse
eller genbrug, skal du kontakte de lokale
myndigheder eller Electronic Industries
Alliance: www.eiae.org.
Advarsel
Kabinettet bør aldrig tages af apparatet. •
Forsøg aldrig at smøre nogen del på apparatet.•
Placer aldrig dette apparat på andet elektrisk udstyr.•
Udsæt ikke appar atet for direkte sollys, åben ild eller •
varmekilder.
Se aldrig på laserstrålen inde i dette apparat.
•
Sørg for, at du altid kan komme til ledningen, •
stikkontak ten eller adapteren, så du kan afbryde
strømmen til apparatet.
Hvis netstikket eller et apparatstik bruges •
til at afbryde enheden, skal disse kunne
betjenes.
Advarsel
Benyttes betjening og indstillinger på anden måde end •
anvist i denne brugsvejledning, er der risiko for, at du
udsætter dig for farlig bestråling og andre risici.
Høresikkerhed
Lyt ved moderat lydstyrke.
Brug af hovedtelefoner ved høj •
lydstyrke kan skade hørelsen. Dette
produkt kan frembringe lyd med
så høje decibelværdier, at det kan
forårsage høreskader for en normalt
hørende person, også selv om det kun
foregår i mindre end et minut. De høje
decibelværdier er for at imødekomme
de personer, der allerede lider af nedsat
hørelse.
Lyd kan snyde. Efter et stykke tid vil dine •
ører vænne sig til høj lyd og tilpasse sig en
mere kraftig lydstyrke. Så det, der efter
længere tids lytning forekommer normalt,
kan faktisk være meget højt og skadeligt
for hørelsen. Hvis du vil undgå det, kan du
indstille lydstyrken til et fornuftigt niveau,
før din hørelse vænner sig til lydstyrken,
og så lade være med at skrue op.
Sådan indstilles lydstyrken til et fornuftigt
niveau:
Indstil lydstyrken til et lavt niveau. •
Øg langsomt lydstyrken, til den når et •
behageligt niveau, hvor du kan høre lyden
klart uden forvrængning.
Undlad at lytte i for lange perioder ad
gangen:
For lang tids udsættelse for lydpåvirkning, •
selv ved et fornuftigt niveau, kan også
forårsage hørenedsættelse.
Sørg for at anvende udstyret på en •
fornuftig måde, og hold passende pauser.
Overhold følgende retningslinjer, når du
anvender dine hovedtelefoner.
Lyt ved en fornuftig lydstyrke i kortere •
tidsrum.
Vær omhyggelig med ikke at justere på •
lydstyrken undervejs, da din hørelse
tilpasser sig lydniveauet.
Undlad at skrue så højt op for lyden, •
at du ikke kan høre, hvad der foregår
omkring dig.
Du bør være ekstra forsigtig eller slukke •
midlertidigt i potentielt farlige situationer.
Undlad at bruge hovedtelefonerne, mens
du fører et motoriseret køretøj, cykler,
står på skateboard o.l., da det kan føre til
farlige situationer i trafi kken. Desuden er
det ulovligt i mange områder.
Dansk
DA
3
Page 28
Meddelelse
Enhver ændring af dette apparat, som ikke er
godkendt af Philips Consumer Lifestyle, kan
annullere brugerens ret til at betjene dette
udstyr.
Uautoriseret kopiering af kopibeskyttet
materiale, herunder computerprogrammer,
fi ler, udsendelser og lydindspilninger, kan være
i strid med reglerne om ophavsret og med
lovgivningen. Dette udstyr bør ikke bruges til
disse formål
Optagelse og afspilning af materiale kan være
betinget af samtykke. Se Copyright Act 1956
og The Performer’s Protection Acts 1958 to
1972.
Dette apparat omfatter denne etiket:
underlagt det europæiske direktiv 2002/96/
EC:
Bortskaf aldrig produktet
sammen med andet
husholdningsaffald. Sørg for
at kende de lokale regler om
separat indsamling af elektriske
og elektroniske produkter.
Korrekt bortskaffelse af udtjente
produkter er med til at forhindre negativ
påvirkning af miljøet og menneskers helbred.
Dit produkt indeholder batterier, som falder
ind under EU-direktiv 2006/66/EC. De må
ikke bortskaffes sammen med almindeligt
husholdningsaffald.
Når et produkt er forsynet med
symbolet med en overkrydset
affaldsspand på hjul med det
kemiske symbol “Pb”, betyder
det, at batterierne overholder
de krav, der fi ndes i direktivet
om bly:
Du bør undersøge de lokale indsamlingsregler
for batterier. Den korrekte bortskaffelse af
batterier er med til at forhindre potentielt
negativ påvirkning af miljø og menneskers
helbred.
Pb
Dette produkt overholder EU’s
krav om radiointerferens.
Produktet overholder følgende
direktiver og retningslinjer:
2004/108/EC + 2006/95/EC
Enhver ændring af dette apparat, som ikke er
godkendt af Philips Consumer Lifestyle, kan
annullere brugerens ret til at betjene dette
udstyr.
Genanvendelse
Dit produkt er udviklet og
fremstillet i materialer og
komponenter af høj kvalitet, som
kan genbruges.
Når et produkt bærer et
affaldsspandssymbol med
et kryds på, betyder det, at produktet er
4 DA
Miljøoplysninger
Al unødvendig emballage er udeladt.
Emballagen er forenklet og består af tre
materialer: Pap (kasse), papirmasse (buffer) og
polyethylen (poser, beskyttende skumfolie).
Systemet består af materiale, der kan
genbruges, hvis det adskilles af et specialfi rma.
Overhold de lokale regler angående
udsmidning af emballage, opbrugte batterier
og gammelt udstyr.
Advarsel: Usynlig laserstråling ved åbning når
sikkerhedsafbrydere er ude af funktion. Undgå
utsættelse for stråling.
Bemærk: Netafbryderen er sekundært
indkoblet og ofbryder ikke strømmen fra
nettet. Den indbyggede netdel er derfor
tilsluttet til lysnettet så længe netstikket
sidder i stikkontakten.
Page 29

2 Dit mikrosystem
Tillykke med dit køb, og velkommen til Philips!
Hvis du vil have fuldt udbytte af den support,
som Philips tilbyder, kan du registrere dit
produkt på www.philips.com/welcome.
Indledning
Med dette apparat kan du:
nyde musik fra lyddiske, iPod, iPhone •
og andre eksterne enheder
lytte til radiostationer•
optage lyd fra diske til en USB-•
lagringsenhed.
Apparatet giver dig fl ere lydindstillinger, der
beriger lyden med DSC (Digital Sound Control)
og DBB (Dynamic Bass Boost).
Apparatet understøtter følgende
medieformater:
Hvad er der i kassen
Kontroller og identifi cer indholdet af pakken:
Hovedenhed•
Strømadapter•
Højttalerkasser x 2•
Fjernbetjening •
Dock til iPod/iPhone (med dockkabel)•
Base•
Brugervejledning•
Lynvejledning•
Dansk
Identifi kationspladen fi ndes bag på apparatet.•
Bemærk
DA 5
Page 30
Oversigt over hovedenheden
p
a
b
c
d
e
f
g
h
q
i
j
k
l
m
n
o
a Fjernbetjeningssensor
b
Stop afspilning.•
Stop optagelse.•
Slet et program.•
c OK
Bekræft et valg.•
d MENU
6 DA
Vælg iPhone/iPod-menuen.•
e STANDBY-ON
Tænd for apparatet, eller skift til •
standby-tilstand .
f OPEN/CLOSE
Åbn eller luk diskskuffen.•
g SOURCE
Vælg en kilde.•
Page 31

h Skærmpanel
Vis aktuel status•
i ALBUM /PRESET+/-
Gå til forrige/næste album.•
Vælg en forudindstillet radiostation.•
Naviger i iPod/iPhone-menuen.•
j
USB-stik.•
k REC
Optag lydfi ler fra en disk til en USB-•
lagringsenhed.
l VOLUME+/-
Juster lydstyrke.•
Indstil klokkeslæt.•
m DSC
Vælg en forudindstillet lydindstilling.•
n
Start eller sæt afspilning på pause.•
o
/
Gå til forrige/næste spor.•
Søg inden for et spor.•
Find en radiostation.•
p
Tilslut hovedtelefoner.•
Oversigt over
fjernbetjeningen
a
b
c
d
e
f
g
h
i
j
k
,1.
.
K
+
)
m
n
o
p
q
r
s
t
u
v
w
)
x
y
:
z
{
Dansk
l
QH
R
a
Skift til standbytilstand. •
b USB
Vælg USB-enhed som kilde.•
c CD
Vælg diskkilde.•
d MP3 LINK
Vælg ekstern lydenhed som kilde.•
e DISPLAY/CLOCK
DA 7
Page 32

Vælg display-oplysninger under •
afspilning.
Indstil uret.•
Vis uret.•
f MENU
Vælg iPhone/iPod-menuen.•
g
/
Find en radiostation.•
Søg inden for et spor.•
h USB REC
Start optagelse.•
Vælg en optagetilstand.•
i
/
Gå til forrige/næste spor.•
Vælg en forudindstillet radiostation.•
j Numerisk tastatur 0-9
Vælg en forudindstillet radiostation.•
Vælg et spor direkte fra en disk.•
k DSC
Vælg en forudindstillet lydindstilling.•
l TUNER
Vælg en tunerkilde.•
m iPhone/iPod
Vælg iPhone- eller iPod-kilde.•
n SLEEP
Indstil sleep-timeren.•
o TIMER
Indstil alarm-timer.•
Aktiver eller deaktiver timer.•
p MUTE
Skift mellem lyd og lydløs.•
q
Naviger i iPod/iPhone-menuen.•
Gå til forrige/næste album.•
r OK
Bekræft et valg.•
s USB DEL
Sletning af fi ler på en USB-•
lagringsenhed.
t
Start eller sæt afspilning på pause.•
u VOL +/-
Juster lydstyrke.•
Indstil klokkeslæt.•
v
Stop afspilning.•
Slet et program.•
w REPEAT
Vælg tilstande for gentaget afspilning.•
x SHUFFLE
Vælg tilstande for vilkårlig afspilning.•
y PROG
Programmér spor.•
Programmér radiostationer.•
z RDS/NEWS
Til valgte FM-radiostationer: Vis •
RDS-oplysninger.
{ DBB
Tænd eller sluk for dynamisk •
basforstærkning.
8 DA
Page 33

3 Kom godt i gang
Advarsel
Benyttes betjening og indstillinger på anden måde end •
anvist i denne brugsvejledning, er der risiko for, at du
udsætter dig for farlig bestråling eller anden form for
risikabel drift.
Følg altid instruktionerne i dette afsnit i den
angivne rækkefølge.
Hvis du kontakter Philips, vil du blive bedt om
apparatets modelnummer og serienummer.
Modelnummeret og serienummeret står bag på
apparatet. Skriv numrene her:
Modelnr. __________________________
Serienr. ___________________________
Monter standeren
Tilslut højttalere
R
Dansk
L
1 Læg hovedenheden ned, og skub derefter
basen i hullet, indtil den sidder fast.
Tilslut FM-antenne
1 Slut den medfølgende FM-antenne til FM
AERIAL-stikket bag på hovedenheden.
Bemærk
Sørg for, at far ver ne på højttalerkablerne og •
terminalerne matcher.
1 Hold stikdækslet nede.
2 Indsæt hele den afi solerede del af kablet.
Tilslut kablerne til den højre højttaler •
til “ RIGHT” og kablerne til den
venstre højttaler til “LEFT”.
Tilslut de røde/blå kabler til “ • +” og
de sorte kabler til “ -”.
3 Slip stikdækslet.
DA 9
Page 34

Tilslut strømmen
Advarsel
Risiko for produk tskade! Kontroller, at •
forsyningsspændingen svarer til den spænding, der er
trykt bag på eller på undersiden af produk tet.
•
Risiko for elektrisk stød! Tag altid stikket ud af
kontakten, når netledningen skal frakobles. Hiv aldrig
i ledningen.
Før du tilslutter netledningen, skal du sørge for at have
•
udfør t alle andre tilslutninger.
1 Slut strømadapteren til
• DC IN-stikket bag på hovedenheden
stikkontakten.•
Bemærk
Før du trykker på fjernbetjeningens funktionsknapper, •
skal du vælge den korrekte kilde vha. fjernbetjeningen
og ikke vha. hovedenheden.
•
Batteriet skal tages ud, hvis f jernbetjeningen ikke skal
bruges i længere tid.
Indstilling af ur
1 Tryk på DISPLAY/CLOCK i
standbytilstand for at aktivere tilstanden
for indstilling af uret.
Timecifrene vises og begynder at »
blinke.
Gør fjernbetjeningen klar
Advarsel
Risiko for ek splosion! Opbevar ikke batterier i •
nærheden af varmekilder, sollys eller ild. Kast aldrig
batterier i ild.
Første gang, du anvender apparatet:
1 Fjern beskyttelsen for at aktivere
fjernbetjeningens batteri.
Sådan udskiftes batteriet i fjernbetjeningen:
1 Åbn batterirummet.
2 Indsæt et CR2025-batteri med korrekt
polaritet (+/-) som angivet.
3 Luk batterirummet.
Bemærk
I Eco Power-standbytilstand skal du trykke på •
CLOCK (Ur) for at vise uret først og derefter trykke
på CLOCK og holde den nede for at gå videre til
indstillingen af uret.
2 Tryk på gentagne gange for at vælge
12- eller 24-timers format.
3 Tryk på VOL +/- for at indstille timetallet.
4 Tryk på DISPLAY/CLOCK for at
bekræfte.
Minutcifrene vises, og de begynder at »
blinke.
5 Tryk på VOL +/- for at indstille
minuttallet.
6 Tryk på DISPLAY/CLOCK for at
bekræfte.
Tænd
1 Tryk på STANDBY-ON på
hovedenheden.
Enheden skifter til den sidst valgte kilde.»
10 DA
Page 35

Skift til standby
1 Tryk på for at sætte apparatet i
standbytilstand.
Baggrundsbelysningen på displayet »
svækkes.
Uret (hvis det er indstillet) vises på »
displayet.
Bemærk
Hvis der ikke bliver trykket på nogen knapper i •
standby tilstand, går apparatet automatisk i Eco Powerstandbytilstand, og skærmens baggrundsbelysning
slukkes.
Dansk
DA 11
Page 36

4 Afspilning
Afspil disk
1 Tryk på CD for at vælge diskkilden.
2 Tryk på for at åbne diskskuffen.
3 Ilæg en disk med etiketsiden opad, og luk
derefter skuffen.
Afspilning starter automatisk.»
Tryk på •
pause/genoptage afspilning.
Tryk på •
For MP3/WMA-fi ler: Vælg et album •
ved at trykke på
Tryk på •
over.
Søg inden for et spor ved at holde •
/ nede. Slip knappen for at
fortsætte den normale afspilning.
Afspilning fra USB-enhed
Bemærk
Kontroller, at USB-enheden indeholder lydindhold, der •
kan afspilles.
for at sætte afspilning på
for at afbryde afspilningen.
.
/ for at springe et spor
Slet fi ler på USB-enheden
1 Tryk på / for at vælge et nummer.
2 Tryk på USB DEL.
Der vises en bekræftelsesmeddelelse.»
3 Tryk på USB DEL igen for at bekræfte.
Tryk på •
Efter du har slettet fi len, stopper USB-»
afspilningen.
for at annullere.
Lyt til en ekstern enhed
Du kan også lytte til en ekstern lydenhed via
enheden.
For en lydenhed med et stik til
hovedtelefoner:
1 Tryk på MP3 LINK for at vælge MP3-
linket som kilde.
2 Slut det medfølgende MP3 Link-kabel til:
• MP3 LINK-stikket på denne enhed.
stikket til hovedtelefoner på en MP3-•
afspiller.
3 Star t afspilning af MP3-afspilleren. (Se
brugervejledningen til MP3-afspilleren)
1 Åbn dækslet til USB-stikket på
frontpanelet.
2 Sæt USB-enhedens USB-stik i stikket.
3 Tryk på USB for at vælge USB-kilden.
Afspilning starter automatisk.»
Tryk på •
pause/genoptage afspilning.
Tryk på •
For MP3/WMA-fi ler: Vælg et album •
ved at trykke på
Tryk på •
over.
Søg inden for et spor ved at holde •
/ nede. Slip knappen for at
fortsætte den normale afspilning.
12 DA
for at sætte afspilning på
for at afbryde afspilningen.
.
/ for at springe et spor
Page 37

5 Afspilningstil-
stande
Gentagen og vilkårlig
afspilning
1 Tryk på REPEAT eller SHUFFLE gentagne
gange for at vælge:
• [REP] (gentag): Det aktuelle spor
afspilles gentagne gange.
• [REP ALL] (gentag alle): Alle spor
afspilles gentagne gange.
• [SHUF] (bland): Alle spor afspilles i
vilkårlig rækkefølge.
• [SHUF REP ALL] (gentag alle i
tilfældig rækkefølge): Alle spor
afspilles gentagne gange i tilfældig
rækkefølge.
2 For at vende tilbage til normal
afspilning skal du trykke på REPEAT
eller SHUFFLE gentagne gange, indtil
afspilningsstilstanden ikke længere vises.
Under afspilning vises [PROG] »
(program).
Hvis du vil slette programmeringen, •
skal du trykke på
stopposition.
Hvis du vil gennemse programmet, •
skal du holde PROG nede i mere
end 2 sekunder, mens du er i
stopposition.
, mens du er i
Få vist afspilningsoplysninger
1 Under afspilning skal du trykke på
DISPLAY/CLOCK gentagne gange for at
vælge afspilningsoplysninger.
Dansk
Programmér spor
Du kan højst programmere 20 spor.
1 I stopposition i CD/USB-tilstand skal
du trykke på PROG for at aktivere
programtilstanden.
[PROG] blinker på displayet.»
2 MP3/WMA-spor: Tryk på for at vælge
et album.
3 Tryk på / for at vælge et spornummer,
og tryk derefter på PROG for at
bekræfte.
4 Gentag trin 2 til 3 for at programmere
fl ere spor.
5 Tryk på for at afspille de
programmerede spor.
DA 13
Page 38

6 Optagelse
Du kan optage lydfi lerne fra en disk over på en
USB-enhed. Audio-CD-spor og MP3-fi ler bliver
optaget i .mp3-format, og WMA-fi ler optages i
.wma-format.
Første gang du optager på USB, oprettes en
mappe med navnet “PHILIPS” automatisk på
USB-enheden. Hver gang du optager på USB,
gemmes de optagne fi ler i en undermappe
i “PHILIPS”-mappen. Filer og undermapper
navngives numerisk i den rækkefølge, de
oprettes.
1 Tryk på CD for at vælge diskkilden.
2 Ilæg en disk.
For at vælge et spor, hvorfra •
optagelsen skal star te, skal du trykke
på de numeriske knapper.
3 Isæt en USB-lagringsenhed i -stikket på
dette apparat.
4 Tryk på USB REC gentagne gange for at
vælge:
• [RIP ONE] (optag ét): Det valgte
spor optages..
• [RIP ALL] (optag alle): Alle spor fra
det valgte optages.
Diskafspilning starter automatisk fra »
begyndelsen af disken/det valgte spor,
og optagelsen starter.
Tryk på •
for at stoppe optagelsen.
Bemærk
Når der ikke er plads nok, vises • [USB FULL]
(hukommelse fuld).
Hvis det optagede nummer varer mindre end 10 •
sekunder, gemmes det ikke på USB -lagringsenheden.
14 DA
Page 39

7 Afspil iPod/
iPhone
Du kan lytte til lyd fra iPod/iPhone via dette
apparat.
Kompatibel iPod/iPhone
Kompatible Apple iPod- og iPhone-modeller
med 30-bens dockstik:
iPod classic, iPod touch, iPod nano, iPod •
5. generation (video), iPod mini.
iPhone, iPhone 3G.•
Indsæt iPod/iPhone
1 Slut docken til apparatet.
2 Drej skruen for at løsne
understøttelsespladen.
Dansk
3 Placer iPod/iPhone’en i docken.
4 Drej skruen for at fastgøre iPod/
iPhone’en sikkert.
Når apparatet sluttes til strømmen, »
begynder iPod/iPhone’en i docken at
oplade.
Lyt til iPod/iPhone’en
1 Kontroller, at iPod/iPhone’en er indsat
korrekt.
2 Tryk på iPhone/iPod for at vælge iPod/
iPhone-kilde.
Den tilsluttede iPod/iPhone afspiller »
automatisk.
Tryk på •
pause/genoptage afspilning.
Tryk på •
over.
for at sætte afspilning på
/ for at springe et spor
DA 15
Page 40

Søgning under afspilning: Hold •
/ nede, og giv derefter slip for at
genoptage normal afspilning.
Navigering i menuen: Tryk på • MENU,
tryk på
tryk derefter på OK for at bekræfte.
for at foretage et valg, og
Oplad iPod/iPhone’en
Når apparatet sluttes til strømmen, begynder
iPod/iPhone’en i docken at oplade.
Fjern iPod/iPhone’en
1 Tag iPod/iPhone’en ud af docken.
Tip
Hvis det er svær t at tage iPod’en eller iPhone’en ud, •
skal du dreje skruen med uret for at løsne støtten.
16 DA
Page 41

8 Radiolytning
Programmér radiostationer
manuelt
Find en radiostation.
Bemærk
For optimal modtagelse skal du trække FM-antennen •
helt ud og justere dens position.
1 Tryk på TUNER for at vælge tunerkilden.
2 Hold / nede i mere end 2 sekunder.
[SEARCH] (søgning) vises.»
Radioen stiller automatisk ind på en »
station med stærkt signal.
3 Gentag trin 2 for at fi nde fl ere stationer.
For at stille ind på en svag station •
skal du trykke på
gange, indtil du fi nder den optimale
modtagelse.
/ gentagne
Programmér radiostationer
automatisk
Bemærk
Du kan højst programmere 40 FM-radiostationer.•
1 I tunertilstanden skal du trykke på
PROG og holde den nede i mere end 2
sekunder for at aktivere den automatiske
programmeringstilstand.
[AUTO] (automatisk) vises.»
Alle tilgængelige stationer bliver »
programmeret i rækkefølge efter
bølgebåndsmodtagelsens styrke.
Den først programmerede radiostation »
afspilles automatisk.
Bemærk
Du kan højst programmere 40 FM-radiostationer.•
1 Find en radiostation.
2 Tryk på PROG for at aktivere
programmeringstilstanden.
[PROG] blinker på displayet.»
3 Tryk på for at tilknytte et nummer
(mellem 1 og 40) til denne radiostation,
og tryk derefter på PROG for at
bekræfte.
Det forudindstillede nummer og »
frekvensen på den forudindstillede
station vises.
4 Gentag ovenstående trin for at
programmere fl ere stationer.
Bemærk
Hvis du vil overskrive en programmeret station, skal •
du gemme en anden station på dens plads.
Vælg en forudindstillet
radiostation
1 I tunertilstand skal du trykke på for at
vælge et forudindstillet nummer.
Dansk
DA 17
Page 42

Vis RDS-oplysninger
RDS (Radio Data System) er en tjeneste,
der giver FM-stationer mulighed for at vise
yderligere oplysninger. Hvis du stiller ind
på en RDS-station, vises et RDS-ikon og
stationsnavnet.
1 Find en RDS-station.
2 Tryk på RDS/NEWS fl ere gange for at
rulle gennem følgende oplysninger (hvis
de er tilgængelige):
Stationsnavn»
Programtype, f.eks. » [NEWS]
(nyheder), [SPORT] (sport), [POP M]
(popmusik)...
Frekvens»
Indstil RDS-ur
Du kan bruge udsendelse af tidssignal sammen
med RDS-signalet til at indstille uret på
apparatet automatisk.
1 Find en RDS-radiostation, der overfører
tidssignaler.
2 Hold RDS/NEWS nede i mere end 2
sekunder.
Bemærk
Nøjagtigheden af den overfør te tid afhænger af den •
RDS-station, der sender tidssignalet.
18 DA
Page 43

9 Lydindstilling
Juster lydstyrken
1 Under afspilning skal du trykke på
VOL +/- for at skrue op eller ned for
lydstyrken.
Vælg en forudindstillet
lydeffekt
1 Under afspilning skal du trykke på DSC
gentagne gange for at vælge:
[POP] (pop)•
[JAZZ] (jazz)•
[CLASSIC] (klassisk)•
[ROCK] (rock)•
[FLAT] (fl ad)•
Basforbedring
1 Under afspilning skal du trykke på DBB
for at slå dynamisk basforbedring fra eller
til.
Hvis DBB er aktiveret, vises DBB.»
Dansk
Slå lyden fra
1 Under afspilning skal du trykke på MUTE
for at slå lyden fra/til.
DA 19
Page 44

10 Flere funktioner
på dit
mikrosystem
Indstil sleep-timeren
Denne enhed kan automatisk skifte til standby
efter en forudindstillet periode.
1 Mens enheden er tændt, skal du trykke
fl ere gange på SLEEP for at vælge et fast
tidsinterval (i minutter).
Når sleep-timeren er aktiveret, viser »
displayet
Sådan deaktiveres sleep-timeren
1 Tryk på SLEEP gentagne gange, indtil “SLP
OFF” vises.
Når sleep-timeren deaktiveres, »
forsvinder
.
fra displayet.
7 Tryk på VOL +/- for at indstille
minuttallet.
8 Tryk på TIMER for at bekræfte.
Timeren er indstillet og aktiveret.»
Aktivering og deaktivering af alarmtimeren
1 Tryk på TIMER gentagne gange for at
aktivere eller deaktivere timeren.
Hvis timeren er aktiveret, viser »
displayet
Hvis timeren er deaktiveret, forsvinder »
fra displayet.
Bemærk
Hvis disk/USB-kilden vælges, og det valgte spor ikke •
kan spilles, ak tiveres tuneren automatisk .
.
Lyt via hovedtelefon
Indstil alarm-timeren
Denne enhed kan bruges som vækkeur. DISK,
TUNER eller USB aktiveres til afspilning på et
forudindstillet tidspunkt.
1 Kontroller, at du har indstillet uret
korrekt.
2 I standbytilstand holdes TIMER nede i
mere end 2 sekunder.
3 Tryk på CD, TUNER, USB, iPhone/iPod
for at vælge en kilde.
4 Tryk på TIMER for at bekræfte.
Timecifrene vises og begynder at »
blinke.
5 Tryk på VOL +/- for at indstille timetallet.
6 Tryk på TIMER for at bekræfte.
Minutcifrene vises, og de begynder at »
blinke.
1 Slut en hovedtelefon til -stikket på
enheden.
Page 45

11 Produktinforma-
tion
Bemærk
Produktinformation kan ændres uden varsel.•
Specifi kationer
Forstærker
Vurderet effekt 2 x 30 W RMS
Frekvensgang 60 - 16 kHz, ± 3 dB
Signal-/støjforhold >62 dB
Disk
Lasertype Halvleder
Diskdiameter 12 cm/8 cm
Understøttet disk CD-DA, CD-R,
CD-RW, MP3-CD,
WMA-CD
Audio DAC 24 bit/44,1 kHz
Samlet harmonisk
forvrængning < 1 %
Frekvenskurve 60 Hz -16 kHz
S/N ratio >62 dBA
Tuner
Indstillingsområde FM: 87,5 - 108
MHz
Indstillingstrin 50 kHz (FM)
Samlet harmonisk
forvrængning < 3%
Signal-/støjforhold >50 dB
Højttalere
Højttalerimpedans 6 ohm
Specifi kationer - Generel information
Strømadapter Model:
PAT065A19EU
Input: AC 100-240
V~, 50/60 Hz, 1,5
A output: DC 19 V,
3,4 A
Strømforbrug ved drift 26 W
Strømforbrug ved
standby <2 W
Strømforbrug ved Eco-
standby <1 W
Mål
– Hovedenhed
(B x H x D)
–Højttalerkabinet
(B x H x D)
Vægt
- Med emballage
- Hovedenhed
- Højttalerkabinet
211 x 250 x 160
mm
158 x 250 x 193
mm
5,85 kg
1,29 kg
2,39 kg
Understøttede MP3diskformater
ISO9660, Joliet•
Maksimalt antal titler: 512 (afhængigt af •
fi lnavnenes længde)
Maksimalt antal album: 255•
Understøttede samplingfrekvenser: 32 •
kHz, 44,1 kHz, 48 kHz
Understøttede bit-hastigheder: 32~256 •
(kbps), variable bithastigheder
Dansk
DA 21
Page 46

USB-afspilningsoplysninger
Vedligeholdelse
Kompatible USB-enheder:
USB-fl ash-hukommelse (USB 2.0 •
eller USB 1.1)
USB-fl ash-afspillere (USB 2.0 eller •
USB 1.1)
hukommelseskort (kræver en ekstra •
kortlæser for at fungere sammen
med dette apparat)
Understøttede formater:
USB- eller hukommelsesfi lformat •
FAT12, FAT16, FAT32
(sektorstørrelse: 512 bytes)
MP3-bithastighed (datahastighed): 32 •
- 320 Kbps og variabel bithastighed
WMA v9 eller ældre•
Mappen har op til 8 niveauer •
indlejret
Antal album/mapper: maksimum 99•
Antal spor/titler: maksimum 999•
ID3-mærke v2.0 eller nyere•
Filnavn i Unicode UTF8 (maksimal •
længde: 128 byte)
Ikke-understøttede formater:
Tomme album: Et tomt album er et •
album, der ikke indeholder MP3/
WMA-fi ler, og det vises ikke på
displayet.
Ikke-understøttede fi lformater •
springes over. Eksempelvis bliver
Word-dokumenter (.doc) og MP3fi ler med fi ltypenavnet .dlf ignoreret,
og de afspilles ikke.
AAC-, WAV-, PCM-lydfi ler•
DRM-beskyttede WMA-fi ler (.wav, •
.m4a, .m4p, .mp4, .aac)
WMA-fi ler i Lossless-format•
Rengør kabinettet
Brug en klud, der er let fugtet med en •
mild opløsning af et rengøringsmiddel.
Benyt ikke rengøringsmidler, som
indeholder alkohol, sprit, ammoniak eller
slibemidler.
Rengøring af diske
Når en disk bliver snavset, kan du rengøre •
den med en renseklud. Aftør disken fra
midten og ud til kanten.
Brug ikke opløsningsmidler som benzen, •
fortynder, andre tilgængelige rensemidler
eller antistatisk spray beregnet til analoge
grammofonplader.
Rengør disklinser
Efter lang tids brug kan der sætte sig •
snavs eller støv på den optiske linse. For
at sikre god afspilningskvalitet skal linsen
rengøres med Philips CD Lens Cleaner
eller et andet egnet rengøringsmiddel.
Følg instruktionerne til produktet.
22 DA
Page 47

12 Fejlfinding
Advarsel
Kabinettet bør aldrig tages af apparatet.•
Prøv aldrig selv at reparere systemet, da
garantien i så fald bortfalder.
Hvis der opstår fejl på apparatet, bør du
kontrollere følgende punkter, inden du bestiller
reparation. Hvis der fortsat er problemer, skal
du gå til Philips’ websted (www.philips.com/
support). Hav dit apparat, modelnummer og
serienummer i nærheden, når du kontakter
Philips.
Ingen strøm
Kontroller, at enhedens strømkabel er •
korrekt tilsluttet.
Kontroller, at der er strøm i stikkontakten.•
For at spare strøm slukker systemet •
automatisk 15 minutter efter, at
afspilningen af spor er afsluttet, hvis der
ikke i mellemtiden er blevet betjent
nogen knapper.
Ingen lyd eller dårlig lyd
Juster lydstyrken.•
Kontroller, at højttalerne er tilsluttet •
korrekt.
Kontroller, om de blottede højttalerkabler •
er fastklemte.
Der er byttet om på lydoutputtet fra venstre
og højre
Kontroller højttalertilslutningerne og
-placeringen.
Ingen reaktion fra enheden
Fjern strømkablet, og tilslut det igen, og •
tænd derefter for systemet igen.
Som en strømbesparende funktion •
slukker enheden automatisk 15 minutter
efter, at afspilningen af spor er slut, hvis
der ikke i mellemtiden er blevet betjent
nogen knapper.
Fjernbetjeningen fungerer ikke
Inden du trykker på en funktionsknap, •
skal du først vælge den korrekte kilde
med fjernbetjeningen i stedet for på
hovedenheden.
Prøv at formindske afstanden mellem •
fjernbetjeningen og enheden.
Isæt batteriet således, at dets poler (+/–) •
vender som vist.
Udskift batteriet.•
Peg fjernbetjeningen direkte mod •
sensoren på forsiden af enheden.
USB-enheden understøttes ikke
USB-enheden er ikke kompatibel med •
enheden. Prøv en anden.
Der blev ikke fundet nogen disk
Indsæt en disk.•
Kontroller, om disken er sat omvendt i.•
Vent, indtil kondensen på linsen er •
fordampet.
Udskift eller rengør disken.•
Brug en færdiggjort CD eller en disk med •
korrekt format.
Dårlig radiomodtagelse
Øg afstanden mellem enheden og dit TV •
eller din VCR.
Træk FM-antennen helt ud.•
Tilslut en udendørs FM-antenne i stedet •
for.
Timeren fungerer ikke
Indstil uret korrekt.•
Aktiver timeren.•
Ur-/timerindstillingen er blevet slettet
Strømmen er blevet afbrudt, eller •
strømkablet er blevet frakoblet.
Indstil uret/timeren igen.•
Dansk
DA 23
Page 48

Inhaltsangabe
1 Wichtig 2
Sicherheit 2
Hinweis 4
2 Ihr Mikrosystem 6
Einführung 6
Lieferumfang 6
Übersicht über das Hauptgerät 7
Übersicht über die Fernbedienung 8
3 Erste Schritte 10
Montieren des Standfußes 10
Anschließen der UKW-Antenne 10
Anschließen von Lautsprechern 10
An die Stromversorgung anschließen 11
Vorbereiten der Fernbedienung 11
Einstellen der Uhr 11
Einschalten 12
4 Wiedergabe 13
Wiedergeben einer CD 13
Wiedergabe von USB 13
Löschen von Dateien auf dem USB-Gerät 13
Wiedergabe von einem externen Gerät 13
5 Wiedergabeoptionen 15
Wiedergabewiederholung und
Zufallswiedergabe 15
Programmieren von Titeln 15
Anzeigen von Wiedergabeinformationen 15
8 Anhören des Radios 19
Einstellen eines Radiosenders 19
Automatisches Programmieren von
Radiosendern 19
Manuelles Programmieren von
Radiosendern 19
Auswählen eines voreingestellten
Radiosenders 19
Anzeigen von RDS-Informationen 20
Einstellen der RDS-Uhrzeit 20
9 Anpassen von Toneinstellungen 21
Anpassen der Lautstärke 21
Auswählen eines vordefi nierten SoundEffekts 21
Bass verstärken 21
Stummschalten 21
10 Weitere Funktionen Ihres
Microsystems 22
Einstellen des Sleep-Timers 22
Einstellen des Alarm-Timers 22
Verwenden von Kopfhörern 22
11 Produktinformationen 23
Technische Daten 23
Unterstützte MP3-Discformate 23
Informationen zur USBWiedergabefähigkeit 24
Wartung 24
Deutsch
6 Aufnahme 16
7 Wiedergeben von iPod/iPhone 17
Kompatible iPod/iPhone-Modelle 17
Laden des iPods/iPhones 17
Wiedergeben von iPod/iPhone 17
Aufl aden des iPod/iPhone 18
Entnehmen des iPod/iPhone 18
12 Fehlerbehebung 25
DE
1
Page 49

1 Wichtig
Sicherheit
a Lesen Sie diese Hinweise.
b Bewahren Sie diese Hinweise auf.
c Beachten Sie alle Warnungen.
d Befolgen Sie alle Anweisungen.
e Verwenden Sie dieses Gerät nicht in der
Nähe von Wasser.
f Säubern Sie das Gerät nur mit einem
trockenen Tuch.
g Blockieren Sie keine
Belüftungsöffnungen. Führen Sie die
Installation gemäß den Angaben des
Herstellers durch.
h Stellen Sie das Gerät nicht in der Nähe
von Wärmequellen wie Heizkörpern,
Wärmezählern, Öfen oder anderen
Geräten (einschließlich Verstärkern) auf,
die Wärme erzeugen.
i Für Länder mit polarisiertem
Stromanschluss: Umgehen Sie
keinesfalls die Sicherheitsfunktion des
gepolten oder geerdeten Steckers.
Ein gepolter Stecker verfügt über
zwei Kontaktzungen, wobei eine
breiter ist. Ein geerdeter Stecker hat
zwei Kontaktzungen und zusätzlich
einen Erdungsstift. Die breitere
Kontaktzunge oder der dritte Stift
dienen der Sicherheit. Wenn der im
Lieferumfang enthaltene Stecker nicht
in Ihre Steckdose passt, wenden Sie sich
an einen Elektriker, der die Steckdose
ersetzt.
Achtung: Um einen Stromschlag zu
vermeiden, stecken Sie den breiten
Kontakt des Steckers vollständig in den
breiten Schlitz.
j Schützen Sie das Netzkabel, damit
niemand auf das Kabel tritt oder
es geknickt wird. Insbesondere
darf dies nicht an den Steckern, an
den Steckdosen oder an der Stelle
geschehen, an der die Kabel das Gerät
verlassen.
k Verwenden Sie ausschließlich vom
Hersteller angegebenes Zubehör.
l Verwenden Sie das Gerät nur mit dem
vom Hersteller angegebenen bzw. mit
dem Gerät verkauften Wagen, Ständer,
Stativ, Halter oder Tisch. Achten Sie bei
Verwendung eines Wagens darauf, dass
bei einem Verschieben das Gerät nicht
herunterfällt und zu Verletzungen führt.
m Trennen Sie bei einem Gewitter oder
bei Nichtverwendung über einen
längeren Zeitraum das Gerät von der
Stromversorgung.
n Überlassen Sie Wartungsarbeiten stets
einem qualifi zierten Techniker. Eine
Wartung ist immer dann erforderlich,
wenn das Gerät beschädigt wurde.
Dazu zählen Beschädigungen des Kabels
oder Netzsteckers, ein Eindringen von
Flüssigkeiten oder Gegenständen in das
Gerät oder Fälle, in denen das Gerät
Regen oder Feuchtigkeit ausgesetzt
wurde, es nicht ordnungsgemäß
funktioniert oder fallen gelassen wurde.
o VORSICHTSHINWEIS zur
Batteriehandhabung: Achten Sie auf
2 DE
Page 50

folgende Punkte, um ein Auslaufen
der Batterien zu verhindern, was
zu Verletzungen, Sachschäden oder
Schäden am Gerät führen kann:
Setzen Sie die Batterien gemäß den •
Markierungen “+” und “-” am Gerät
korrekt ein.
Verwenden Sie keine Kombination •
älterer und neuer Batterien oder
unterschiedlicher Batterietypen
(Zink-Kohle, Alkali-Mangan usw.).
Nehmen Sie die Batterien aus dem •
Gerät, wenn es eine längere Zeit
nicht verwendet wird.
Die Batterien dürfen nicht zu starker •
Wärme durch Sonneneinstrahlung,
Feuer o. ä. ausgesetzt werden.
p Das Gerät darf nicht mit Flüssigkeiten
benetzt oder bespritzt werden.
q Auf das Gerät dürfen keine möglichen
Gefahrenquellen gestellt werden (z. B.
mit einer Flüssigkeit gefüllte Behältnisse,
brennende Kerzen).
r Dieses Produkt kann Blei und
Quecksilber enthalten. Möglicherweise
unterliegt die Entsorgung
dieser Materialien speziellen
Umweltvorschriften. Wenden Sie
sich für Informationen zur Entsorgung
bzw. zum Recyceln an Ihre örtlichen
Behörden oder an die Electronic
Industries Alliance: www.eiae.org.
Warnung
Öffnen Sie auf keinen Fall das Gehäuse des Geräts. •
Fetten Sie niemals Teile dieses Geräts ein.•
Stellen Sie dieses Gerät niemals auf andere elektrische •
Geräte.
Setzen Sie dieses Gerät nicht direktem Sonnenlicht,
•
offenem Feuer oder Wärme aus.
Schauen Sie nie in den Laserstrahl im Inneren des •
Geräts.
Stellen Sie sicher, dass das Netzkabel oder der Stecker •
immer leicht zugänglich sind, sodass Sie das Gerät
schnell von der Stromversorgung trennen können.
Wenn der Netzstecker bzw. •
Gerätestecker als Trennvorrichtung
verwendet wird, muss die
Trennvorrichtung frei zugänglich bleiben.
Achtung
Die Verwendung von Steuerelementen, •
Einstellungen oder Vorgehensweisen, die von dieser
Darstellung abweichen, können zu gefährlichen
Strahlenbelastungen oder anderen Sicherheitsrisiken
führen.
Gehörschutz
Wählen Sie eine moderate Lautstärke.
Das Verwenden von Kopfhörern bei •
zu hoher Lautstärke kann Ihrem Gehör
schaden. Dieses Produkt kann Töne in
einem Dezibelbereich wiedergeben,
der bei einem gesunden Menschen
bereits nach weniger als einer Minute zu
Gehörschäden führen kann. Der höhere
Dezibelbereich ist für Personen gedacht,
die bereits unter einer Beeinträchtigung
ihres Hörvermögens leiden.
Die Lautstärke kann täuschen. Die als •
angenehm empfundene Lautstärke
erhöht sich mit der Zeit. Deswegen
kann es vorkommen, dass nach längerem
Zuhören als “normal” empfunden wird,
was in Wirklichkeit sehr laut und für Ihr
Gehör schädlich ist. Um diesen Effekt zu
vermeiden, sollten Sie Ihre Lautstärke aus
einem sicheren Bereich auswählen, bevor
sich ihr Gehör daran gewöhnt, und Sie
sollten diese Einstellung nicht verändern.
So fi nden Sie Ihren sicheren Lautstärkepegel:
Stellen Sie den Lautstärkeregler auf eine •
geringe Lautstärke.
Erhöhen Sie langsam die Lautstärke, bis •
der Ton klar und deutlich zu hören ist.
Hören Sie nur eine angemessene Zeit:
Bei sehr intensiver Nutzung kann •
auch eine “sichere” Lautstärke zu
Gehörschäden führen.
Deutsch
DE
3
Page 51

Verwenden Sie deshalb Ihre Geräte in •
vernünftiger Weise, und pausieren Sie in
angemessenen Zeitabständen.
Beachten Sie bei der Verwendung von
Kopfhörern folgende Richtlinien:
Hören Sie nur bei angemessener •
Lautstärke und nur eine angemessene
Zeit lang.
Achten Sie darauf, auch nach Gewöhnung •
an einen Lautstärkepegel, diesen nicht zu
erhöhen.
Stellen Sie die Lautstärke nur so hoch •
ein, dass Sie Umgebungsgeräusche noch
wahrnehmen können.
Bei potentiell gefährlichen Situationen •
sollten Sie sehr vorsichtig sein oder die
Verwendung kurzzeitig unterbrechen.
Verwenden Sie die Kopfhörer nicht,
während Sie ein motorisiertes Fahrzeug
führen, Fahrrad oder Skateboard
usw. fahren. Dies könnte für den
Straßenverkehr gefährlich sein und ist in
vielen Ländern verboten.
Hinweis
Änderungen oder Modifi zierungen des Geräts,
die nicht ausdrücklich von Philips Consumer
Lifestyle genehmigt wurden, können zum
Erlöschen der Betriebserlaubnis führen.
Das unbefugte Kopieren von
kopiergeschütztem Material wie z. B.
Computerprogrammen, Dateien,
Sendungen und Tonaufnahmen kann eine
Urheberrechtsverletzung und somit eine
Straftat darstellen. Dieses Gerät darf für
solche Zwecke nicht verwendet werden.
Die Aufnahme und Wiedergabe von
Materialien bedarf möglicherweise der
Zustimmung. Siehe Copyright Act 1956 und
Performer’s Protection Acts 1958 bis 1972.
Dieses Gerät hat das folgende Etikett:
Dieses Produkt entspricht den
Richtlinien der Europäischen
Union zu Funkstörungen.
Dieses Produkt entspricht den folgenden
Richtlinien: 2004/108/EC und 2006/95/EC.
Änderungen oder Modifi zierungen des Geräts,
die nicht ausdrücklich von Philips Consumer
Lifestyle genehmigt wurden, können zum
Erlöschen der Betriebserlaubnis führen.
Recycling
Ihr Gerät wurde unter
Verwendung hochwertiger
Materialien und Komponenten
entwickelt und hergestellt, die
recycelt und wiederverwendet
werden können.
Befi ndet sich das Symbol einer
durchgestrichenen Abfalltonne
auf Rädern auf dem Gerät,
bedeutet dies, dass für dieses
Gerät die Europäische Richtlinie
2002/96/EG gilt.
Entsorgen Sie dieses Produkt
nie mit dem restlichen Hausmüll. Bitte
informieren Sie sich über die örtlichen
Bestimmungen zur getrennten Entsorgung von
elektrischen und elektronischen Produkten.
Durch die korrekte Entsorgung Ihrer Altgeräte
werden Umwelt und Menschen vor möglichen
negativen Folgen geschützt.
Ihr Produkt enthält Batterien,
die der Europäischen Richtlinie
2006/66/EG unterliegen. Diese
dürfen nicht mit dem normalen
Haushaltsmüll entsorgt werden.
Befi ndet sich eine
durchgestrichene Abfalltonne
Pb
4 DE
Page 52

auf Rädern sowie das chemische Symbol
“Pb” auf dem Gerät, bedeutet dies, dass die
Batterien den Anforderungen der Richtlinie
für bleihaltige Geräte entsprechen:
Informieren Sie sich über die geltenden
Bestimmungen Ihres Landes zur separaten
Sammlung von Batterien. Die korrekte
Entsorgung von Batterien hilft, negative
Auswirkungen auf Umwelt und Gesundheit zu
vermeiden.
Hinweise zum Umweltschutz
Auf überfl üssiges Verpackungsmaterial wurde
verzichtet. Wir haben die Verpackung so
gestaltet, dass sie aus nur drei Materialien
besteht: Karton, Zellulose (Dämmmaterial)
und Polyethylen (Beutel, Schutzfolie).
Ihr System besteht aus Materialien, die
wiederverwendet werden können, wenn
Sie von einem Spezialunternehmen
entsorgt werden. Beachten Sie die
örtlichen Vorschriften zur Entsorgung von
Verpackungsmaterial, verbrauchten Batterien
und Altgeräten.
Deutsch
DE 5
Page 53

2 Ihr Mikrosystem
Herzlichen Glückwunsch zu Ihrem Kauf
und willkommen bei Philips! Um das
Kundendienstangebot von Philips vollständig
nutzen zu können, sollten Sie Ihr Produkt unter
www.philips.com/welcome registrieren.
Einführung
Mit diesem Gerät können Sie:
Musik von Audio-Discs, Ihrem iPod •
bzw. iPhone und anderen externen
Geräten genießen,
Radiosender hören,•
von Audio-Discs auf USB-•
Speichergeräte aufnehmen.
Dieses Gerät bietet verschiedene
Soundeffekteinstellungen, die mit Digital Sound
Control (DSC) und Dynamic Bass Boost (DBB)
zu einem satteren Klang beitragen.
Dieses Gerät unterstützt die folgenden
Medienformate:
Lieferumfang
Prüfen Sie zunächst den Verpackungsinhalt:
Hauptgerät•
Netzteil•
Lautsprecherbox x 2•
Fernbedienung •
Dock für iPod/iPhone (mit Dock-Kabel)•
Basisstation•
Benutzerhandbuch•
Schnellstartanleitung•
Hinweis
Das Typenetikett befi ndet sich auf der Rück seite des •
Geräts.
6 DE
Page 54

Übersicht über das
Hauptgerät
p
a
b
c
d
e
f
g
h
Deutsch
q
i
j
k
l
m
n
o
a Fernbedienungssensor
b
Wiedergabe stoppen•
Beenden der Aufnahme•
Löschen eines Programms•
c OK
Auswahl bestätigen•
d MENU
Auswählen des iPod/iPhone-Menüs•
e STANDBY-ON
Einschalten des Geräts oder •
Wechseln in den Standby-Modus
f OPEN/CLOSE
Öffnen oder Schließen des Disc-•
Fachs
DE 7
Page 55

g SOURCE
Auswählen einer Quelle•
h Display
Anzeigen des aktuellen Status•
i ALBUM /PRESET+/-
Springen zum vorhergehenden / •
nächsten Album
Auswählen eines voreingestellten •
Radiosenders
Navigieren durch das iPod/iPhone-•
Menü
j
USB-Buchse•
k REC
Aufnehmen von Audio-Dateien von •
einer Disc auf ein USB-Speichergerät
l VOLUME+/-
Einstellen der Lautstärke•
Einstellen der Uhrzeit•
m DSC
Auswählen einer Soundeinstellung •
für Filme
n
Starten oder Unterbrechen der •
Wiedergabe
o
/
Springen zum vorherigen/nächsten •
Titel
Suche innerhalb eines Titels•
Einstellen eines Radiosenders•
p
Anschließen von Kopfhörern•
Übersicht über die
Fernbedienung
a
b
c
d
e
f
g
h
i
j
k
a
b USB
c CD
d MP3 LINK
,1.
.
Wechseln in den Standby-Modus•
Auswählen der USB-Gerätequelle•
Auswählen der Disc-Quelle•
Auswählen einer externen •
Audiogerätequelle
K
+
)
m
n
o
p
q
r
s
t
u
v
w
)
x
y
:
z
{
l
QH
R
8 DE
Page 56

e DISPLAY/CLOCK
Auswählen der •
Anzeigeinformationen während der
Wiedergabe
Einstellen der Uhr•
Anzeigen der Uhr•
f MENU
Auswählen des iPod/iPhone-Menüs•
g
/
Einstellen eines Radiosenders•
Suche innerhalb eines Titels•
h USB REC
Starten der Aufnahme•
Auswählen eines Aufnahmemodus•
i
/
Springen zum vorherigen/nächsten •
Titel
Auswählen eines voreingestellten •
Radiosenders
j Zifferntasten 0–9
Auswählen eines voreingestellten •
Radiosenders
Direktes Auswählen eines Titels von •
einer Disc
k DSC
Auswählen einer Soundeinstellung •
für Filme
l TUNER
Auswählen der Tuner-Quelle•
m iPhone/iPod
Auswählen eines iPhones/iPods als •
Quelle
n SLEEP
Einstellen des Sleep Timers•
o TIMER
Einstellen der Alarmfunktion•
Aktivieren oder Deaktivieren des •
Timers
p MUTE
Stummschalten oder erneutes •
Einschalten des Tons
q
Navigieren durch das iPod/iPhone-•
Menü
Springen zum vorhergehenden / •
nächsten Album
r OK
Auswahl bestätigen•
s USB DEL
Löschen von Dateien auf einem •
USB-Speichergerät
t
Starten oder Unterbrechen der •
Wiedergabe
u VOL +/-
Einstellen der Lautstärke•
Einstellen der Uhrzeit•
v
Wiedergabe stoppen•
Löschen eines Programms•
w REPEAT
Auswählen der •
Wiedergabewiederholungsmodi
x SHUFFLE
Auswählen der •
Zufallswiedergabemodi
y PROG
Programmieren von Titeln•
Programmieren von Radiosendern•
z RDS/NEWS
Anzeigen der RDS-Informationen für •
ausgewählte UKW-Radiosender
{ DBB
Aktivieren oder Deaktivieren der •
dynamischen Bassverstärkung
Deutsch
DE 9
Page 57

3 Erste Schritte
Anschließen der UKWAntenne
Achtung
Die Verwendung von Steuerelementen, •
Einstellungen oder Vorgehensweisen, die von dieser
Darstellung abweichen, können zu gefährlichen
Strahlenbelastungen oder anderen Sicherheitsrisiken
führen.
Folgen Sie den Anweisungen in diesem Kapitel
immer nacheinander.
Wenn Sie mit Philips Kontakt aufnehmen,
werden Sie nach der Modell- und
Seriennummer Ihres Geräts gefragt. Die
Modell- und Seriennummer befi ndet sich auf
der Rückseite des Geräts. Notieren Sie die
Nummern:
Modell-Nr. __________________________
Serien-Nr. ___________________________
Montieren des Standfußes
1 Schließen Sie die im Lieferumfang
enthaltene UKW-Antenne an die FM
AERIAL-Buchse auf der Rückseite des
Geräts an.
Anschließen von
Lautsprechern
1 Legen Sie das Hauptgerät hin, und
schieben Sie die Basisstation in den dafür
vorgesehenen Steckplatz, bis sie ganz
eingesetzt ist.
10 DE
L
R
Hinweis
Stellen Sie sicher, dass die Farben der •
Lautsprecherkabel mit den Farben der Anschlüsse
übereinstimmen.
1 Halten Sie die Buchsenklappe nach unten.
2 Führen Sie den abisolier ten Teil des
Kabels vollständig ein.
Page 58

Stecken Sie die rechten •
Lautsprecherkabel in den
Anschluss “ RIGHT” und die linken
Lautsprecherkabel in den Anschluss
“LEFT” ein.
Führen Sie die rot/blauen Kabel in •
“+” ein, die schwarzen Kabel in “ -”.
3 Lassen Sie die Buchsenklappe los.
An die Stromversorgung
anschließen
2 Setzen Sie wie abgebildet eine CR2025-
Batterie mit der korrekten Polarität (+/-)
ein.
3 Schließen Sie das Batteriefach.
Achtung
Beschädigung des Produkts möglich! Prüfen Sie, ob die •
Stromspannung mit dem aufgedruckten Wert auf der
Rück- oder Unterseite des Geräts übereinstimmt.
Stromschlaggefahr! Ziehen Sie immer am Stecker, •
wenn Sie das Netzkabel von der Stromver sorgung
trennen. Ziehen Sie nicht am Netzkabel.
Vergewissern Sie sich vor dem Anschließen des •
Netzkabels, dass alle anderen Verbindungen
hergestellt wurden.
1 Schließen Sie das Netzteil an
die • DC IN-Buchse an der Rückseite
des Hauptgeräts
und eine Steckdose an.•
Vorbereiten der
Fernbedienung
Achtung
Explosionsgefahr! Halten Sie den Akku von Hitze, •
Sonnenlicht und Feuer fern. Werfen Sie die Akkus
niemals ins Feuer.
Bei der ersten Verwendung:
1 Entfernen Sie den Schutzstreifen, um die
Batterie der Fernbedienung zu aktivieren.
So tauschen Sie die Batterie in der
Fernbedienung aus:
1 Öffnen Sie das Batteriefach.
Deutsch
Hinweis
Bevor Sie eine Funk tionstaste auf der Fer nbedienung •
betätigen, wählen Sie zunächst die passende Quelle
über die Fernbedienung anstatt über das Hauptgerät
aus.
Nehmen Sie die Batterie aus der Fernbedienung •
heraus, wenn Sie diese längere Zeit nicht verwendet
haben.
Einstellen der Uhr
1 Drücken Sie im Standby-
Modus DISPLAY/CLOCK, um den
Modus für die Uhrzeiteinstellung
aufzurufen.
Die Ziffern für die Stundenanzeige »
werden angezeigt und blinken.
Hinweis
Drücken Sie im Eco Power-Standby-Modus die Taste •
CLOCK, um zunächst die Uhr anzuzeigen. Halten
Sie anschließend die Taste CLOCK gedrückt, um die
Uhreinstellungen aufzurufen.
2 Drücken Sie wiederholt auf , um
das 12- oder das 24-Stundenformat
auszuwählen.
DE 11
Page 59

3 Drücken Sie auf VOL +/-, um die Stunde
einzustellen.
4 Drücken Sie zur Bestätigung DISPLAY/
CLOCK.
Die Ziffern für die Minutenanzeige »
werden angezeigt und blinken.
5 Drücken Sie auf VOL +/-, um die Minuten
einzustellen.
6 Drücken Sie zur Bestätigung DISPLAY/
CLOCK.
Einschalten
1 Drücken Sie am Hauptgerät die Taste
STANDBY-ON.
Das Gerät wechselt zur zuletzt »
ausgewählten Quelle.
In den Standby-Modus schalten
1 Drücken Sie die Taste , um das Gerät in
den Standby-Modus zu schalten.
Die Hintergrundbeleuchtung im »
Anzeigefeld wird abgesenkt.
Im Anzeigefeld wird die Uhr angezeigt »
(sofern eingestellt).
Hinweis
Wenn im Standby-Modus länger als 15 Minuten keine •
Taste gedrückt wird, wechselt das Gerät automatisch
in den Eco Power-Standby- Modus, und die
Hintergr undbeleuchtung des Displays wird deaktiviert.
12 DE
Page 60

4 Wiedergabe
Wiedergeben einer CD
1 Drücken Sie CD, um die Disc-Quelle
auszuwählen.
2 Drücken Sie , um das Disc-Fach zu
öffnen.
3 Legen Sie eine CD mit der bedruckten
Seite nach oben ein, und schließen Sie das
Disc-Fach.
Die Wiedergabe startet automatisch.»
Um die Wiedergabe anzuhalten bzw. •
fortzusetzen, drücken Sie die Taste
.
Um die Wiedergabe zu beenden, •
drücken Sie die Taste
Drücken Sie für MP3/WMA-Dateien •
auf
, um ein Album auszuwählen.
Um einen Titel zu überspringen, •
drücken Sie auf
Um innerhalb eines Titels zu •
suchen, halten Sie die Taste
/ gedrückt. Lassen Sie die Taste
los, um zur normalen Wiedergabe
zurückzukehren.
Wiedergabe von USB
.
/ .
Um die Wiedergabe anzuhalten bzw. •
fortzusetzen, drücken Sie die Taste
.
Um die Wiedergabe zu beenden, •
drücken Sie die Taste
Drücken Sie für MP3/WMA-Dateien •
auf
, um ein Album auszuwählen.
Um einen Titel zu überspringen, •
drücken Sie auf
Um innerhalb eines Titels zu •
suchen, halten Sie die Taste
/ gedrückt. Lassen Sie die Taste
los, um zur normalen Wiedergabe
zurückzukehren.
.
/ .
Löschen von Dateien auf dem
USB-Gerät
1 Drücken Sie / , um einen Titel
auszuwählen.
2 Drücken Sie die Taste USB DEL.
Es wird eine Bestätigungsnachricht »
angezeigt.
3 Drücken Sie zur Bestätigung erneut die
Taste USB DEL
Drücken Sie zum Abbrechen die •
Taste
.
Nach dem Löschen der Datei wird die »
USB-Wiedergabe beendet.
Deutsch
Hinweis
Überprüfen Sie, ob auf dem USB-Gerät abspielbarer •
Audioinhalt vorhanden ist.
1 Öffnen Sie die Abdeckung der USB-
Buchse auf der Vorderseite.
2 Stecken Sie den USB-Stecker des USB-
Geräts in die Buchse.
3 Drücken Sie auf USB, um USB als Quelle
auszuwählen.
Die Wiedergabe startet automatisch.»
Wiedergabe von einem
externen Gerät
Sie können mit diesem Gerät auch Musik von
einem externen Audiogerät wiedergeben.
Bei Verwendung eines Audiogeräts mit
Kopfhörerbuchse:
1 Drücken Sie die Taste MP3 LINK, um
MP3-Link als Quelle auszuwählen.
2 Schließen Sie das mitgelieferte MP3 Link-
Kabel an folgende Buchsen an:
DE 13
Page 61

die • MP3 LINK-Buchse an diesem
Gerät.
die Kopfhörerbuchse an einem MP3-•
Player.
3 Star ten Sie die Wiedergabe vom MP3-
Player. (Informationen dazu fi nden Sie im
Benutzerhandbuch des MP3-Players.)
14 DE
Page 62

5 Wiedergabeo-
ptionen
Wiedergabewiederholung
und Zufallswiedergabe
1 Drücken Sie wiederholt REPEAT
oder SHUFFLE, um eine dieser Optionen
auszuwählen:
• [REP] (Wiederholen): Der
aktuelle Titel wird wiederholt
wiedergegeben.
• [REP ALL] (Alle wiederholen):
Alle Titel werden wiederholt
wiedergegeben.
• [SHUF] (Zufallswiedergabe): Alle
Titel werden in zufälliger Reihenfolge
wiedergegeben.
• [SHUF REP ALL] (Wiederholte
Zufallswiedergabe): Alle Titel
werden in zufälliger Reihenfolge und
wiederholt wiedergegeben.
2 Um zur normalen Wiedergabe
zurückzukehren, drücken Sie
wiederholt REPEAT oder SHUFFLE, bis
kein Wiedergabemodus mehr angezeigt
wird.
anschließend PROG, um die Auswahl zu
bestätigen.
4 Wiederholen Sie die Schritte 2 und 3, um
weitere Titel zu programmieren.
5 Drücken Sie auf , um die
programmierten Titel abzuspielen.
Während der Wiedergabe wird »
[PROG] (Programm) angezeigt.
Um ein Programm zu löschen, •
drücken Sie in der Stopp-Position
auf
.
Um ein Programm zu überprüfen, •
halten Sie in der Stopp-Position
PROG mindestens 2 Sekunden
gedrückt.
Anzeigen von
Wiedergabeinformationen
1 Drücken Sie während der Wiedergabe
wiederholt die Taste DISPLAY/CLOCK,
um andere Wiedergabeinformationen
anzuzeigen.
Deutsch
Programmieren von Titeln
Sie können bis zu 20 Titel programmieren.
1 Drücken Sie zum Aktivieren des
Programmiermodus auf PROG, während
sich das Gerät im CD/USB-Modus und in
der Stopp-Position befi ndet.
[PROG] (Programm) blinkt im Display.»
2 Drücken Sie für MP3/WMA-Titel auf ,
um ein Album auszuwählen.
3 Drücken Sie / , um eine
Titelnummer auszuwählen. Drücken Sie
DE 15
Page 63

6 Aufnahme
Sie können die Audiodateien einer Disc auf ein
USB-Gerät aufnehmen. Titel von Audio-CDs
und MP3-Dateien werden im .mp3-Format
aufgenommen, während WMA-Dateien im
.wma-Format aufgenommen werden.
Wenn Sie zum ersten Mal eine USBAufnahme durchführen, wird auf dem USBGerät automatisch der Ordner “PHILIPS”
erstellt. Bei jeder USB-Aufnahme werden die
aufgenommenen Dateien in einem Unterordner
dieses Ordners gespeichert. Die Benennung der
Dateien und Unterordner erfolgt numerisch in
der Reihenfolge ihrer Erstellung.
1 Drücken Sie CD, um die Disc-Quelle
auszuwählen.
2 Legen Sie eine Disc ein.
Wenn Sie einen Titel auswählen •
möchten, bei dem die Aufnahme
beginnen soll, drücken Sie die
entsprechende Zifferntaste.
3 Schließen Sie ein USB-Speichergerät an
die
-Buchse dieses Geräts an.
4 Drücken Sie wiederholt auf USB REC,
um eine dieser Optionen auszuwählen:
• [RIP ONE] (Einen Titel aufnehmen):
Der ausgewählte Titel wird
aufgenommen.
• [RIP ALL] (Alle aufnehmen):
Alle ausgewählten Titel werden
aufgenommen.
Die Disc wird automatisch vom Anfang »
der Disc/des ausgewählten Titels
wiedergegeben, und die Aufnahme
beginnt.
Um die Aufnahme zu beenden, •
drücken Sie die Taste
.
Hinweis
Wenn nicht genügend Speicherplatz vorhanden ist, •
wird [USB FULL] (Speicher voll) angezeigt.
Ist ein aufgenommner Titel weniger als 10 Sekunden, •
wird er nicht auf dem USB-Speichergerät gespeichert.
16 DE
Page 64

7 Wiedergeben
von iPod/iPhone
Mit diesem Gerät können Sie Audioinhalte von
einem iPod oder iPhone genießen.
Kompatible iPod/iPhoneModelle
Folgende Apple iPod- und iPhone-Modelle mit
30-Pin-Dockinganschluss sind kompatibel:
iPod classic, iPod touch, iPod nano, iPod •
der 5. Generation (Video) und iPod mini.
iPhone und iPhone 3G•
Laden des iPods/iPhones
1 Schließen Sie das Dock an das Gerät an.
2 Lockern Sie die Schraube, um die
Rückplatte zu lösen.
Deutsch
3 Setzen Sie den iPod oder das iPhone in
das Dock ein.
4 Drehen Sie die Schraube fest, um den
iPod/das iPhone sicher zu fi xieren.
Wenn das Gerät an eine Steckdose »
angeschlossen ist, wird der iPod oder
das iPhone aufgeladen.
Wiedergeben von iPod/
iPhone
1 Stellen Sie sicher, dass der iPod bzw. das
iPhone korrekt eingesetzt ist.
2 Drücken Sie die Taste iPhone/iPod, um
den iPod bzw. das iPhone als Quelle
auszuwählen.
Der angeschlossene iPod bzw. das »
iPhone beginnt automatisch mit der
Wiedergabe.
DE 17
Page 65

Um die Wiedergabe anzuhalten bzw. •
fortzusetzen, drücken Sie die Taste
.
Um einen Titel zu überspringen, •
drücken Sie auf
So führen Sie während der •
Wiedergabe einen Suchlauf durch:
Halten Sie
die Taste loslassen, wird die normale
Wiedergabe fortgesetzt.
So wählen Sie Menüeinträge aus: •
Drücken Sie die Tasten MENU
und
, und bestätigen Sie die
Auswahl mit der Taste OK.
/ .
/ gedrückt. Sobald Sie
Aufl aden des iPod/iPhone
Wenn das Gerät an eine Steckdose
angeschlossen ist, wird der iPod oder das
iPhone aufgeladen.
Entnehmen des iPod/iPhone
1 Entnehmen Sie den iPod bzw. das iPhone
aus der Ladestation.
Tipp
Wenn sich der iPod bzw. das iPhone nur schwer •
entnehmen lässt, drehen Sie die Schraube im
Uhrzeigersinn, um die Rückplatte zu lösen.
18 DE
Page 66

8 Anhören des
Radios
Einstellen eines Radiosenders
Alle verfügbaren Sender werden »
nacheinander je nach WellenbandEmpfangsstärke programmiert.
Der erste programmier te Radiosender »
wird automatisch wiedergeben.
Hinweis
Für einen optimalen UK W-Empfang fahren Sie die •
UKW-Antenne vollständig aus und richten sie aus.
1 Drücken Sie auf TUNER, um die Tuner-
Quelle auszuwählen.
2 Halten Sie die Taste / mindestens
2 Sekunden lang gedrückt.
[SEARCH] (Suche) wird angezeigt.»
Das Radio wechselt automatisch zu »
einem Sender mit hoher Signalstärke.
3 Wiederholen Sie Schritt 2, um weitere
Sender einzustellen.
Um einen Sender mit schwacher •
Signalstärke auszuwählen, drücken
Sie wiederholt
Empfang optimal ist.
/ , bis der
Automatisches
Programmieren von
Radiosendern
Hinweis
Sie können maximal 40 UKW-Radiosender •
programmieren.
Manuelles Programmieren
von Radiosendern
Hinweis
Sie können maximal 40 UKW-Radiosender •
programmieren.
Deutsch
1 Stellen Sie einen Radiosender ein.
2 Drücken Sie auf PROG, um den
Programmiermodus aufzurufen.
[PROG] (Programm) blinkt im Display.»
3 Drücken Sie auf , um diesem
Radiosender eine Nummer zuzuweisen
(1 bis 40); drücken Sie anschließend zur
Bestätigung auf PROG.
Die Voreinstellungsnummer und die »
Frequenz des voreingestellten Senders
werden angezeigt.
4 Wiederholen Sie die oben beschriebenen
Schritte, um weitere Sender zu
programmieren.
Hinweis
Um einen programmierten Sender zu überschreiben, •
speichern Sie einen anderen Sender auf diesem
Speicherplatz.
1 Halten Sie im Tuner-Modus die
Taste PROG mindestens 2 Sekunden
lang gedrückt, um den automatischen
Programmiermodus zu aktivieren.
[AUTO] (Auto) wird angezeigt.»
Auswählen eines
voreingestellten Radiosenders
1 Drücken Sie im Tuner-Modus , um
eine voreingestellte Sendernummer
auszuwählen.
DE 19
Page 67

Anzeigen von RDSInformationen
Bei RDS (Radio Data System) handelt es
sich um einen Dienst, der es UKW-Sendern
ermöglicht, zusätzliche Informationen zu
übermitteln. Wenn Sie einen RDS-Sender
einstellen, werden das RDS-Symbol und der
Name des Senders angezeigt.
1 Stellen Sie einen RDS-Sender ein.
2 Drücken Sie wiederholt auf RDS/NEWS,
um folgende Informationen aufzurufen
(sofern verfügbar):
Sendername»
Programmart, zum Beispiel » [NEWS]
(Nachrichten), [SPORT] (Sport), [POP
M] (Popmusik) usw.
Frequenz»
Einstellen der RDS-Uhrzeit
Sie können das mit dem RDS-Signal gesendete
Zeitsignal verwenden, um die Uhr des Geräts
automatisch einzustellen.
1 Stellen Sie einen RDS-Radiosender ein,
der Zeitsignale überträgt.
2 Halten Sie die Taste RDS/NEWS
mindestens 2 Sekunden lang gedrückt.
Hinweis
Die Genauigkeit der übermittelten Zeit hängt von dem •
RDS-Sender ab, der das Zeitsignal aussendet.
20 DE
Page 68

9 Anpassen von
Toneinstellungen
Anpassen der Lautstärke
1 Drücken Sie während der Wiedergabe
die Taste VOL +/-, um den
Lautstärkepegel zu erhöhen bzw. zu
verringern.
Auswählen eines
vordefi nierten Sound-Effekts
1 Drücken Sie während der Wiedergabe
wiederholt auf DSC, um eine der
folgenden Optionen auszuwählen:
[POP] (Pop)•
[JAZZ] (Jazz)•
[CLASSIC] (Klassik)•
[ROCK] (Rock)•
[FLAT] (Gedämpft)•
Deutsch
Bass verstärken
1 Drücken Sie während der Wiedergabe
die Taste DBB, um die dynamische
Bassverstärkung ein- oder auszuschalten.
Wenn DBB aktiviert ist, wird [DBB] »
angezeigt.
Stummschalten
1 Drücken Sie während der
Wiedergabe MUTE, um die
Stummschaltung zu aktivieren/
deaktivieren.
DE 21
Page 69

10 Weitere
Funktionen Ihres
Microsystems
Einstellen des Sleep-Timers
6 Drücken Sie zur Bestätigung TIMER.
Die Ziffern für die Minutenanzeige »
werden angezeigt und blinken.
7 Drücken Sie auf VOL +/-, um die Minuten
einzustellen.
8 Drücken Sie zur Bestätigung TIMER.
Der Timer ist gestellt und aktiviert.»
Dieses Gerät kann nach einem einstellbaren
Zeitraum automatisch in den Standby-Modus
wechseln.
1 Drücken Sie bei eingeschaltetem Gerät
wiederholt auf SLEEP, um einen Zeitraum
(in Minuten) auszuwählen.
Wenn der Sleep-Timer aktiviert ist, »
wird auf dem Display
Deaktivieren des Sleep-Timers
angezeigt.
1 Drücken Sie wiederholt auf SLEEP, bis
“SLP OFF” angezeigt wird.
Wenn der Sleep-Timer deaktiviert ist, »
wird
nicht mehr auf dem Display
angezeigt.
Einstellen des Alarm-Timers
Dieses Gerät kann als Wecker genutzt werden.
DISC, TUNER oder USB werden aktiviert,
um an einem vorgegebenen Zeitpunkt die
Wiedergabe zu starten.
1 Stellen Sie sicher, dass die Uhrzeit korrekt
eingestellt ist.
2 Halten Sie im Standby-Modus die Taste
TIMER mindestens 2 Sekunden gedrückt.
3 Drücken Sie CD, TUNER, USB
oder iPhone/iPod, um eine Quelle
auszuwählen.
4 Drücken Sie zur Bestätigung TIMER.
Die Ziffern für die Stundenanzeige »
werden angezeigt und blinken.
5 Drücken Sie auf VOL +/-, um die Stunde
einzustellen.
Aktivieren oder Deaktivieren des
Alarm-Timers
1 Drücken Sie wiederholt auf TIMER,
um den Timer zu aktivieren oder zu
deaktivieren.
Wenn der Timer aktiviert ist, wird auf »
dem Display
Wenn der Timer deaktiviert ist, erlischt »
die Anzeige
Hinweis
Ist DISC/USB als Gerätequelle ausgewählt, und •
kann der Titel nicht wiedergegeben werden, wird
automatisch der Tuner aktiviert.
angezeigt.
auf dem Display.
Verwenden von Kopfhörern
1 Schließen Sie einen Kopfhörer an die
-Buchse des Geräts an.
22 DE
Page 70

11 Produktinforma-
tionen
Hinweis
Die Produktinformation können ohne vorherige •
Ankündigung geändert werden.
Technische Daten
Verstärker
Ausgangsleistung 2 X 30 W RMS
Frequenzgang 60 – 16 kHz,
± 3 dB
Signal/Rausch-Verhältnis >62 dB
Disc
Lasertyp Halbleiter
Disc-Durchmesser 12 cm/8 cm
Unterstützte Disc-
Typen
Audio DAC 24 Bits / 44,1 kHz
Klirrfaktor < 1 %
Frequenzgang 60 Hz -16 kHz
S/N Ratio > 62 dBA
CD-DA, CD-R,
CD-RW, MP3-CD,
WMA-CD
Lautsprecher
Lautsprecherimpedanz 6 Ohm
Allgemeine Informationen –
Technische Daten
Netzteil Modell:
PAT065A19EU
Eingangsleistung:
AC 100 – 240 V~,
50/60 Hz, 1,5 A
Ausgangsleistung:
DC 19 V, 3,4 A
BetriebsStromverbrauch 26 W
StandbyStromverbrauch < 2 W
Eco-StandbyStromverbrauch < 1 W
Abmessungen
–Hauptgerät
(B x H x T)
- Lautsprecherbox
(B x H x T)
Gewicht
- Inklusive Verpackung
- Hauptgerät
- Lautsprecherbox
211 x 250 x 160 mm
158 x 250 x 193 mm
5,85 kg
1,29 kg
2,39 kg
Unterstützte MP3Discformate
Deutsch
Tuner
Empfangsbereich UKW: 87,5 bis
108 MHz
Abstimmungsbereich 50 kHz (UKW)
Klirrfaktor <3 %
Signal/Rausch-
Verhältnis >50 dB
ISO9660, Joliet•
Maximale Anzahl von Titeln: 512 (je nach •
Länge des Dateinamens)
Maximale Anzahl von Alben: 255•
Unterstützte Sampling-Frequenz: 32 kHz, •
44,1 kHz, 48 kHz
Unterstützte Bitraten: 32 bis 256 KBit/s, •
variable Bitraten
DE 23
Page 71

Informationen zur USBWiedergabefähigkeit
WMA-Dateien im Lossless-Format•
Kompatible USB-Geräte:
USB-Flash-Speicher (USB 2.0 oder •
USB 1.1)
USB-Flash-Player (USB 2.0 oder •
USB 1.1)
Speicherkarten (zusätzliches •
Kartenlesegerät zum Einsatz mit
diesem Gerät erforderlich)
Unterstützte Formate:
USB- oder Speicher-Dateiformat •
FAT12, FAT16, FAT32
(Abschnittsgröße: 512 Byte)
MP3-Bitrate •
(Übertragungsgeschwindigkeit):
32–320 Kbit/s und variable Bitrate
WMA Version 9 oder ältere •
Versionen
Die Verschachtelung von •
Verzeichnissen ist auf maximal
8 Ebenen beschränkt.
Anzahl der Alben/Ordner: maximal •
99
Anzahl der Tracks/Titel: maximal 999•
ID3-Tag Version 2.0 oder neuere •
Versionen
Dateiname in Unicode UTF8 •
(maximale Länge: 128 Byte)
Nicht unterstützte Formate:
Leere Alben: Ein leeres Album ist •
ein Album, das keine MP3-/WMADateien enthält und im Display nicht
angezeigt wird.
Nicht unterstützte Dateiformate •
werden übersprungen. So werden
beispielsweise Word-Dokumente
(.doc) oder MP3-Dateien mit der
Erweiterung .dlf ignoriert und nicht
wiedergegeben.
AAC-, WAV-, PCM-Audiodateien•
DRM-geschützte WMA-Dateien •
(.wav, .m4a, .m4p, .mp4, .aac)
Wartung
Reinigen des Gehäuses
Verwenden Sie ein weiches, mit •
einer milden Reinigungslösung leicht
angefeuchtetes Tuch. Verwenden Sie
keine Lösung, die Alkohol, Spirituosen,
Ammoniak oder Scheuermittel enthält.
Reinigen von Discs
Ist eine Disc verschmutzt, reinigen Sie sie •
mit einem Reinigungstuch. Wischen Sie
die Disc von der Mitte nach außen hin ab.
Verwenden Sie keine Lösungsmittel, wie •
Benzol, Verdünner, im Handel erhältliche
Reinigungsmittel oder für analoge
Schallplatten entwickeltes Antistatikspray.
Reinigen der Disc-Linse
Nach längerem Gebrauch kann •
sich Schmutz oder Staub auf der
optischen Linse ablagern. Um eine gute
Wiedergabequalität zu gewährleisten,
reinigen Sie die optische Linse mit Philips
CD-Linsenreiniger oder einem im Handel
erhältlichen Linsenreiniger. Befolgen Sie
die Anweisungen zu dem Reiniger.
24 DE
Page 72

12 Fehlerbehebung
Achtung
Öffnen Sie auf keinen Fall das Gehäuse des Geräts.•
Bei eigenhändigen Reparaturversuchen verfällt
die Garantie.
Wenn Sie bei der Verwendung dieses Geräts
Probleme feststellen, prüfen Sie bitte die
folgenden Punkte, bevor Sie Serviceleistungen
anfordern. Besteht das Problem auch weiterhin,
besuchen Sie die Philips Website unter
www.philips.com/support. Wenn Sie Philips
kontaktieren, stellen Sie sicher, dass sich das
Gerät in der Nähe befi ndet und die Modellund Seriennummer verfügbar sind.
Keine Stromversorgung
Prüfen Sie, ob der Netzstecker des •
Geräts ordnungsgemäß angeschlossen
wurde.
Stellen Sie sicher, dass die Steckdose •
Strom führt.
Die Energiesparfunktion schaltet das •
System automatisch aus, wenn Sie
innerhalb von 15 Minuten nach der
letzten Wiedergabe keine Taste betätigt
haben.
Kein Ton oder verzerrter Ton
Stellen Sie die Lautstärke ein.•
Überprüfen Sie, ob die Lautsprecher •
korrekt angeschlossen sind.
Überprüfen Sie, ob der abisolierte Teil •
des Lautsprecherkabels angeklemmt ist.
Die Audioausgänge für links und rechts sind
vertauscht
Überprüfen Sie die Lautsprecheranschlüsse
und ihre Position.
Das Gerät reagiert nicht
Ziehen Sie den Netzstecker, und •
schließen Sie ihn wieder an. Schalten Sie
anschließend das Gerät erneut ein.
Die Energiesparfunktion schaltet das •
Gerät automatisch aus, wenn Sie
innerhalb von 15 Minuten nach der
letzten Wiedergabe keine Taste betätigt
haben.
Die Fernbedienung funktioniert nicht
Wählen Sie die passende Quelle •
zunächst über die Fernbedienung statt
über das Hauptgerät aus, bevor Sie eine
Funktionstaste betätigen.
Verringern Sie den Abstand zwischen der •
Fernbedienung und dem Gerät.
Achten Sie beim Einsetzen der •
Batterie auf die korrekte Lage der Pole
(“+/–”-Zeichen) gemäß Angabe.
Tauschen Sie die Batterie aus.•
Richten Sie die Fernbedienung direkt auf •
den Sensor, der sich auf der Vorderseite
des Geräts befi ndet.
USB-Gerät wird nicht unterstützt
USB-Gerät ist nicht mit dem Gerät •
kompatibel. Versuchen Sie, ein anderes
Gerät anzuschließen.
Disc wird nicht erkannt
Legen Sie eine Disc ein.•
Überprüfen Sie, ob Sie die Disc mit der •
beschrifteten Seite nach oben eingelegt
haben.
Warten Sie bis die kondensierte •
Feuchtigkeit auf der Linse verdunstet ist.
Ersetzen oder reinigen Sie die Disc.•
Benutzen Sie eine fi nalisierte CD oder •
eine korrekt formatierte Disc.
Schlechter Radioempfang
Erhöhen Sie den Abstand vom Gerät zu •
Fernsehgeräten oder Videorekordern.
Ziehen Sie die UKW-Antenne ganz •
heraus.
Schließen Sie eine UKW-Außenantenne •
an.
Die Zeitschaltuhr funktioniert nicht
Stellen Sie die Uhrzeit korrekt ein.•
Schalten Sie die Zeitschaltuhr ein.•
Die Uhrzeit-/Zeitschaltuhreinstellung wurde
gelöscht
Die Stromversorgung wurde •
unterbrochen bzw. das Netzkabel wurde
vom Netz getrennt.
Stellen Sie die Uhrzeit-/•
Zeitschaltuhreinstellungen erneut ein.
Deutsch
DE 25
Page 73

Contenido
1 Importante 2
Seguridad 2
Aviso 4
2 Su microcadena 6
Introducción 6
Contenido de la caja 6
Descripción de la unidad principal 7
Descripción del control remoto 8
3 Introducción 10
Montaje del soporte 10
Conexión de la antena FM 10
Conexión de los altavoces 10
Conecte la corriente 11
Preparación del control remoto 11
Ajuste del reloj 11
Encendido 12
4 Reproducción 13
Reproducción de discos 13
Reproducción desde un dispositivo USB 13
Eliminación de archivos en el dispositivo
USB 13
Cómo escuchar un dispositivo externo 13
5 Opciones de reproducción 14
Repetición y reproducción aleatoria 14
Programación de pistas 14
Cómo mostrar la información de
reproducción 14
8 Cómo escuchar la radio 18
Sintonización de una emisora de radio 18
Programación automática de emisoras de
radio 18
Programación manual de emisoras de radio 18
Selección de una emisora de radio
presintonizada 18
Cómo mostrar la información RDS 19
Ajuste del reloj a través de RDS 19
9 Ajuste del sonido 20
Ajuste del nivel de volumen 20
Selección de un efecto de sonido
preestablecido 20
Mejora de graves 20
Silenciamiento del sonido 20
10 Otros usos de la microcadena 21
Ajuste del temporizador de desconexión
automática 21
Ajuste del temporizador de alarma 21
Cómo escuchar a través de los auriculares 21
11 Información del producto 22
Especifi caciones 22
Formatos de disco MP3 compatibles 22
Información sobre reproducción de USB 23
Mantenimiento 23
12 Solución de problemas 24
Español
6 Grabación 15
7 Reproducción desde el iPod/iPhone 16
Modelos de iPod/iPhone compatibles 16
Colocación del iPod/iPhone 16
Cómo escuchar el iPod/iPhone 16
Carga del iPod/iPhone 17
Cómo quitar el iPod/iPhone 17
ES
1
Page 74

1 Importante
Seguridad
a Lea estas instrucciones.
b Guarde estas instrucciones.
c Preste atención a todas las advertencias.
d Siga todas las instrucciones.
e No use este aparato cerca del agua.
f Utilice únicamente un paño seco para la
limpieza.
g No bloquee las aberturas de ventilación.
Realice la instalación de acuerdo con las
indicaciones del fabricante.
h No instale cerca ninguna fuente de calor
como, por ejemplo, radiadores, rejillas
de calefacción, hornos u otros aparatos
que produzcan calor (incluidos los
amplifi cadores).
i En países con red eléctrica polarizada,
no suprima la función de seguridad del
enchufe polarizado o con conexión a
tierra. Un enchufe polarizado tiene dos
conectores planos, uno más ancho que
el otro. Un enchufe con conexión a
tierra tiene dos conectores planos y un
tercer conector de conexión a tierra. El
conector plano más ancho o el tercer
conector le ofrecen seguridad adicional.
Si el enchufe suministrado no encaja
correctamente en la toma de corriente,
consulte a un electricista para cambiar el
conector obsoleto.
Atención: Para evitar riesgos de descarga
eléctrica, el ancho de los conectores
planos debe coincidir con el ancho de la
ranura de conexión y el enchufe debe
insertarse por completo.
j Evite que se pise o doble el cable de
alimentación, en particular junto a los
enchufes, tomas de corriente y en el
punto donde salen del aparato.
k Use exclusivamente los dispositivos/
accesorios indicados por el fabricante.
l Use únicamente el carrito, soporte,
trípode o mesa indicados por el
fabricante o que se incluya con el
aparato. Cuando use un carrito, tenga
cuidado al mover juntos el carrito y el
aparato para evitar lesiones, ya que se
puede volcar.
m Desenchufe el aparato durante las
tormentas eléctricas o cuando no lo
utilice durante un periodo largo de
tiempo.
n El servicio técnico debe realizarlo
siempre personal cualifi cado. Se
requerirá servicio de asistencia técnica
cuando el aparato sufra algún tipo de
daño como, por ejemplo, que el cable de
alimentación o el enchufe estén dañados,
que se haya derramado líquido o hayan
caído objetos dentro del aparato, que
éste se haya expuesto a la lluvia o
humedad, que no funcione normalmente
o que se haya caído.
o ATENCIÓN con el uso de las pilas.
Para evitar fugas de las pilas que puedan
causar lesiones corporales, daños en la
propiedad o al aparato:
2 ES
Page 75

Instale todas las pilas correctamente •
siguiendo las indicaciones de + y del aparato.
No mezcle pilas (antiguas y nuevas, o •
de carbón y alcalinas, etc.).
Quite las pilas cuando no use la •
unidad durante un periodo largo de
tiempo.
No exponga las pilas a temperaturas •
altas, como las que emiten la luz
solar, el fuego o similares.
p No exponga el aparato a goteos ni
salpicaduras.
q No coloque sobre el aparato objetos
que puedan suponer un peligro (por
ejemplo, objetos que contengan líquido
o velas encendidas).
r Este producto puede contener
plomo y mercurio. Es posible que la
eliminación de estos materiales se
encuentre bajo regulación debido a
causas medioambientales. Para obtener
información sobre la eliminación o el
reciclaje, póngase en contacto con las
autoridades locales o con Electronic
Industries Alliance: www.eiae.org.
s No permita que los niños utilicen sin
vigilancia aparatos eléctricos.
No permita que los niños o adultos
con capacidades físicas, sensoriales o
mentales reducidas o personas con falta
de experiencia/ conocimiento, utilicen
aparatos eléctricos sin vigilancia.
Advertencia
No quite nunca la carcasa de este aparato. •
No lubrique ninguna pieza de este aparato.•
No coloque nunca este aparato sobre otro equipo •
eléctrico.
No exponga el aparato a la luz solar directa, al calor o •
a las llamas.
No mire nunca al haz láser que está dentro del •
aparato.
Asegúrese de tener siempre un fácil acceso al cable •
de alimentación, al enchufe o al adaptador para
desconectar el aparato de la corriente.
Si usa el enchufe de alimentación o un •
adaptador para desconectar el aparato,
éstos deberán estar siempre a mano.
Precaución
El uso de controles, los ajustes o el funcionamiento •
distintos a los aquí descritos pueden producir
exposición a la radiación u otras situaciones de peligro.
Seguridad auditiva
Utilice un nivel de sonido moderado.
El uso de los auriculares a un nivel de •
sonido elevado puede dañar el oído. Este
producto produce sonidos con rangos
de decibelios que pueden provocar una
pérdida auditiva a una persona con un
nivel auditivo normal, incluso en el caso
de una exposición inferior a un minuto.
Los rangos de decibelios más elevados
se ofrecen para aquellas personas que
tengan cierta defi ciencia auditiva.
El nivel de sonido puede ser engañoso. •
Con el paso del tiempo, el “nivel de
comodidad” de escucha se adapta a los
niveles de sonido más elevados. Por lo
tanto, tras una escucha prolongada, el
sonido de un nivel “normal” puede ser
en realidad de tono elevado y perjudicial
para el oído. Para protegerse contra
esto, ajuste el nivel de sonido a un nivel
seguro antes de que su oído se adapte y
manténgalo así.
Para establecer un nivel de sonido seguro:
Fije el control de volumen en un ajuste •
bajo.
Aumente poco a poco el sonido hasta •
poder oírlo de manera cómoda y clara,
sin distorsión.
Escuche durante períodos de tiempo
razonables:
La exposición prolongada al sonido, •
incluso a niveles “seguros”, también
puede provocar una pérdida auditiva.
Español
ES
3
Page 76

Asegúrese de utilizar su equipo de •
forma razonable y realice los descansos
oportunos.
Asegúrese de respetar las siguientes pautas
cuando use los auriculares.
Escuche a niveles de sonido razonables •
durante períodos de tiempo razonables.
Tenga cuidado de no ajustar el nivel de •
sonido mientras se adapta su oído.
No suba el nivel de sonido hasta tal •
punto que no pueda escuchar lo que le
rodea.
En situaciones posiblemente peligrosas, •
debe tener precaución o interrumpir
temporalmente el uso. No utilice los
auriculares cuando conduzca un vehículo
motorizado, ni cuando practique ciclismo,
skateboard, etc., ya que podría suponer
un riesgo para el tráfi co y es ilegal en
muchas zonas.
Aviso
Cualquier cambio o modifi cación
que se realice en este dispositivo
que no esté aprobada
expresamente por Philips
Consumer Lifestyle puede anular la autoridad
del usuario para utilizar el equipo.
Este producto cumple los requisitos de
interferencias de radio de la Comunidad
Europea.
Este producto cumple los requisitos de las
siguientes directivas y directrices: 2004/108/
CE y 2006/95/CE.
Cualquier cambio o modifi cación que se
realice en este dispositivo que no esté
aprobada expresamente por Philips Consumer
Lifestyle puede anular la autoridad del usuario
para utilizar el equipo.
Reciclaje
El producto se ha diseñado
y fabricado con materiales y
componentes de alta calidad,
que se pueden reciclar y volver
a utilizar.
Cuando vea este símbolo de
contenedor de ruedas tachado
en un producto, indica que éste
cumple la directiva europea
2002/96/EC:
Nunca tire el producto con
la basura normal del hogar.
Infórmese de la legislación local
sobre la recogida selectiva
de productos eléctricos y
electrónicos. El desecho
correcto de un producto usado
ayuda a evitar potencialmente
consecuencias negativas para
el medio ambiente y la salud
humana.
El producto contiene pilas contempladas por
la directiva europea 2006/66/EC, que no se
deben tirar con la basura normal del hogar.
Cuando vea este símbolo de contenedor de
ruedas tachado con el símbolo de sustancia
química “Pb”, indica que las pilas cumplen los
requisitos establecidos en la directiva acerca
del plomo:
Infórmese de la legislación local sobre la
recogida selectiva de pilas. El desecho
correcto de las pilas ayuda a evitar
consecuencias potencialmente negativas para
el medio ambiente y la salud humana.
La copia no autorizada de material
protegido contra copia, incluidos programas
informáticos, archivos, emisiones y grabaciones
de sonido, puede infringir los derechos de
copyright y constituir un delito. Este equipo no
se debe utilizar para tales fi nes.
La grabación y reproducción de material
pueden exigir una autorización. Consulte la
Copyright Act (ley sobre copyright) de 1956
Pb
4 ES
Page 77

y The Performer’s Protection Acts (leyes de
protección de los intérpretes) de 1958 a 1972.
Este aparato incluye esta etiqueta:
Información medioambiental
Se ha suprimido el embalaje innecesario.
Hemos intentado que el embalaje sea fácil de
separar en tres materiales: cartón (caja), pasta
de papel (corcho) y polietileno (bolsas, lámina
de espuma protectora).
El sistema se compone de materiales que
se pueden reciclar y volver a utilizar si lo
desmonta una empresa especializada. Siga
la normativa local acerca del desecho de
materiales de embalaje, pilas agotadas y
equipos antiguos.
Español
ES 5
Page 78

2 Su microcadena
Le felicitamos por su compra y le damos
la bienvenida a Philips. Para benefi ciarse
totalmente de la asistencia que ofrece Philips,
registre su producto en www.philips.com/
welcome.
Introducción
Con este dispositivo podrá:
disfrutar de la música de discos •
de audio, iPod, iPhone y otros
dispositivos externos
escuchar emisoras de radio•
grabar audio de un disco a un •
dispositivo de almacenamiento USB.
El equipo ofrece diversos ajustes de efectos
de sonido que lo enriquecen mediante Digital
Sound Control (DSC, control digital del sonido)
y Dynamic Bass Boost (DBB, refuerzo dinámico
de graves).
El equipo admite los siguientes formatos
multimedia:
Contenido de la caja
Compruebe e identifi que el contenido del
paquete:
Unidad principal•
Adaptador de corriente•
2 altavoces•
Control remoto •
Base para iPod/iPhone (con cable)•
Base•
Manual de usuario•
Guía de confi guración rápida•
Nota
La placa de identifi cación está situada en la parte •
posterior del dispositivo.
6 ES
Page 79

Descripción de la unidad
principal
p
a
b
c
d
e
f
g
h
q
Español
i
j
k
l
m
n
o
a Sensor del control remoto
b
Detiene la reproducción.•
Detiene la grabación.•
Borra un programa.•
c OK
Confi rmar una selección.•
d MENU
Selecciona el menú del iPhone/iPod.•
e STANDBY-ON
Enciende la unidad o la cambia al •
modo de espera.
f OPEN/CLOSE
Abre o cierra el compartimento de discos.•
ES 7
Page 80

g SOURCE
Selecciona una fuente.•
h Pantalla
Muestra el estado actual.•
i ALBUM /PRESET+/-
Salta al álbum anterior o siguiente.•
Selecciona una emisora de radio •
presintonizada.
Navega por el menú del iPod/iPhone.•
j
Toma USB .•
k REC
Graba archivos de audio de un disco •
a un dispositivo de almacenamiento
USB.
l VOLUME+/-
Ajusta el volumen.•
Ajusta la hora.•
m DSC
Selecciona un ajuste de sonido •
preestablecido.
n
Inicia la reproducción del disco o •
hace una pausa.
o
/
Salta a la pista anterior o siguiente.•
Busca dentro de una pista.•
Sintoniza una emisora de radio.•
p
Conecte los auriculares.•
Descripción del control
remoto
a
b
c
d
e
f
g
h
i
j
k
,1.
.
QH
R
K
+
)
)
:
l
m
n
o
p
q
r
s
t
u
v
w
x
y
z
{
8 ES
a
Cambio a modo de espera. .•
b USB
Selecciona la fuente del dispositivo •
USB.
c CD
Selecciona la fuente de disco.•
d MP3 LINK
Page 81

Selecciona la fuente del dispositivo •
de audio externo.
e DISPLAY/CLOCK
Selecciona la información de pantalla •
durante la reproducción.
Ajusta el reloj.•
Muestra el reloj.•
f MENU
Selecciona el menú del iPhone/iPod.•
g
/
Sintoniza una emisora de radio.•
Busca dentro de una pista.•
h USB REC
Comienza la grabación.•
Selecciona un modo de grabación.•
i
/
Salta a la pista anterior o siguiente.•
Selecciona una emisora de radio •
presintonizada.
j Teclado numérico 0-9
Selecciona una emisora de radio •
presintonizada.
Selecciona directamente una pista •
del disco.
k DSC
Selecciona un ajuste de sonido •
preestablecido.
l TUNER
Selecciona el sintonizador como •
fuente.
m iPhone/iPod
Selecciona el iPhone o el iPod como •
fuente.
n SLEEP
Ajusta el temporizador de •
desconexión automática.
o TIMER
Ajusta el temporizador de la alarma.•
Activa o desactiva el temporizador.•
p MUTE
Silencia o restaura el nivel de sonido.•
q
Navega por el menú del iPod/iPhone.•
Salta al álbum anterior o siguiente.•
r OK
Confi rmar una selección.•
s USB DEL
Elimina archivos de un dispositivo de •
almacenamiento USB.
t
Inicia la reproducción del disco o •
hace una pausa.
u VOL +/-
Ajusta el volumen.•
Ajusta la hora.•
v
Detiene la reproducción.•
Borra un programa.•
w REPEAT
Selecciona los modos de repetición •
de la reproducción.
x SHUFFLE
Selecciona los modos de •
reproducción aleatoria.
y PROG
Programa pistas.•
Programa emisoras de radio.•
z RDS/NEWS
Para determinadas emisoras de radio •
FM: muestra información RDS
{ DBB
Activa o desactiva la mejora •
dinámica de graves.
Español
ES 9
Page 82

3 Introducción
Precaución
El uso de otros controles, ajustes o procedimientos •
distintos de los especifi cados en este manual puede
causar una peligrosa exposición a la radiación u otros
funcionamientos no seguros.
Siga siempre las instrucciones de este capítulo
en orden.
Si se pone en contacto con Philips, se le
preguntará el número de serie y de modelo del
aparato. El número de modelo y el número de
serie se encuentran en la parte posterior del
aparato. Escriba los números aquí:
Número de modelo
__________________________
Número de serie
___________________________
Montaje del soporte
Conexión de la antena FM
1 Conecte la antena FM suministrada a la
toma FM AERIAL de la par te posterior
de la unidad principal.
Conexión de los altavoces
1 Incline la unidad principal y deslice su base
en la ranura hasta que quede fi ja.
10 ES
L
R
Nota
Asegúrese de que los colores de los cables del altavoz •
y los terminales coinciden.
1 Presione hacia abajo la pestaña de la
toma.
2 Inserte la parte desnuda del cable por
completo.
Inser te los cables del altavoz derecho •
en “ RIGHT” y los del altavoz
izquierdo en “ LEFT”.
Page 83

Inser te los cables rojo/azul en “ • +” y
los cables negros en “ -”.
3 Suelte la pestaña de la toma.
Conecte la corriente
Precaución
Riesgo de daños en el producto. Compruebe que el •
voltaje de la fuente de alimentación se corresponde
con el voltaje impreso en la par te posterior o inferior
del aparato.
Riesgo de descarga eléctrica. Cuando desenchufe el •
cable de alimentación de CA , tire siempre de la clavija
de la toma. No tire nunca del cable.
Antes de conectar el cable de alimentación de CA,
•
asegúrese de que ha realizado correctamente las
demás conexiones.
1 Conecte el adaptador de corriente a
la toma • DC IN situada en la parte
posterior de la unidad principal
la toma de corriente.•
Nota
Antes de pulsar cualquier botón de función del control •
remoto, seleccione la fuente correcta con el control
remoto en lugar de hacerlo con la unidad principal.
Si no va a utilizar el control remoto durante un •
período largo de tiempo, quite la pila.
Español
Preparación del control
remoto
Precaución
Riesgo de explosión. Mantenga las pilas alejadas del •
calor, la luz del sol o el fuego. Nunca tire las pilas al
fuego.
Cuando utilice el equipo por primera vez:
1 Quite la pestaña protectora para activar
la pila del control remoto.
Para cambiar la pila del control remoto:
1 Abra el compartimento de las pilas.
2 Inserte una pila CR2025 con la polaridad
correcta (+/-) tal y como se indica.
3 Cierre el compar timento de las pilas.
Ajuste del reloj
1 En el modo de espera, mantenga pulsado
DISPLAY/CLOCK para activar el modo
de ajuste del reloj.
Aparecerán los dígitos de la hora y »
empezarán a parpadear.
Nota
En el modo de espera de bajo consumo, pulse • CLOCK
para mostrar el reloj primero y después mantenga
pulsado CLOCK para confi gurar el reloj.
2 Pulse repetidamente para seleccionar
el formato de 12 ó 24 horas.
3 Pulse VOL +/- para ajustar la hora.
4 Pulse DISPLAY/CLOCK para confi rmar.
Aparecerán los dígitos de los minutos y »
empezarán a parpadear.
ES 11
Page 84

5 Pulse VOL +/- para ajustar los minutos.
6 Pulse DISPLAY/CLOCK para confi rmar.
Encendido
1 Pulse STANDBY-ON en la unidad
principal.
El equipo cambia a la última fuente »
seleccionada.
Pasar al modo de espera
1 Pulse para poner el dispositivo en
modo de espera.
La retroiluminación del panel de »
visualización se atenúa.
En el panel de visualización aparecerá »
el reloj (si está ajustado).
Nota
Si no se pulsa ningún botón durante 15 minutos •
mientras la unidad está en modo de espera, la
unidad cambia al modo de espera de bajo consumo
automáticamente y la retroiluminación de la pantalla
se apaga.
12 ES
Page 85

4 Reproducción
Reproducción de discos
1 Pulse CD para seleccionar la fuente de
disco.
2 Pulse para abrir la bandeja de discos.
3 Inserte un disco con la cara impresa hacia
arriba y cierre la bandeja de discos.
La reproducción se inicia »
automáticamente.
Para hacer una pausa/reanudar la •
reproducción, pulse
Para detener la reproducción, pulse •
.
Para archivos MP3/WMA: para •
seleccionar un álbum, pulse
Para saltar directamente a una pista, •
pulse
/ .
Para realizar una búsqueda dentro •
de una pista, mantenga pulsado
/ . Suelte el botón para reanudar la
reproducción normal.
.
.
Para hacer una pausa/reanudar la •
reproducción, pulse
Para detener la reproducción, pulse •
Para archivos MP3/WMA: para •
seleccionar un álbum, pulse
Para saltar directamente a una pista, •
pulse
/ .
Para realizar una búsqueda dentro •
de una pista, mantenga pulsado
/ . Suelte el botón para reanudar la
reproducción normal.
.
.
Eliminación de archivos en el
dispositivo USB
1 Pulse / para seleccionar una pista.
2 Pulse USB DEL.
Aparece un mensaje de confi rmación.»
3 Vuelva a pulsar USB DEL para confi rmar.
Para cancelar, pulse •
Después de eliminar el archivo, la »
reproducción desde el dispositivo USB
se detiene.
.
.
Español
Reproducción desde un
dispositivo USB
Nota
Asegúrese de que el dispositivo USB contiene archivos •
de audio con un formato que se pueda reproducir.
1 Gire la cubierta de la toma USB en el
panel frontal.
2 Inserte el conector USB de un dispositivo
USB en la toma.
3 Pulse USB para seleccionar el dispositivo
USB como fuente.
La reproducción se inicia »
automáticamente.
Cómo escuchar un
dispositivo externo
También puede escuchar un dispositivo de
audio externo a través de esta unidad.
Para un dispositivo de audio con toma de
auriculares:
1 Pulse MP3 LINK para seleccionar la
fuente de conexión MP3.
2 Conecte el cable de conexión MP3
suministrado a
la toma • MP3 LINK de esta unidad.
la toma de auriculares de un •
reproductor MP3.
3 Inicie la reproducción en el reproductor
de MP3. (Consulte el manual de usuario
del reproductor de MP3).
ES 13
Page 86

5 Opciones de
reproducción
Repetición y reproducción
aleatoria
1 Pulse REPEAT o SHUFFLE
repetidamente hasta seleccionar:
• [REP] (repetir): la pista actual se
reproduce una y otra vez.
• [REP ALL] (repetir todo): todas las
pistas se reproducen una y otra vez.
• [SHUF] (aleatorio): todas las pistas
se reproducen de forma aleatoria.
• [REP ALL SHUF] (repetir todo
aleatoriamente): todas las pistas se
reproducen una y otra vez de forma
aleatoria.
2 Para volver a la reproducción normal,
pulse REPEAT o SHUFFLE varias veces
hasta que el modo de reproducción
desaparezca.
Durante la reproducción, aparece »
[PROG] (programa).
Para borrar el programa, pulse •
la posición de parada.
Para revisar el programa, en la •
posición de parada, mantenga
pulsado PROG durante más de 2
segundos.
en
Cómo mostrar la información
de reproducción
1 Durante la reproducción, pulse DISPLAY/
CLOCK repetidamente para seleccionar
diferente información de reproducción.
Programación de pistas
Puede programar un máximo de 20 pistas.
1 En el modo de CD/USB, cuando la acción
esté detenida, pulse PROG para activar el
modo de programa.
[PROG] (programa) parpadea en la »
pantalla.
2 Para pistas MP3/WMA, pulse para
seleccionar un álbum.
3 Pulse / para seleccionar un número de
pista y, a continuación, pulse PROG para
confi rmar.
4 Repita los pasos 2 y 3 para programar
más pistas.
5 Pulse para reproducir las pistas
programadas.
14 ES
Page 87

6 Grabación
Puede grabar archivos de audio de un disco en
un dispositivo USB. Las pistas de CD de audio y
los archivos MP3 se graban en formato .mp3, y
los archivos WMA se graban en formato .wma.
La primera vez que grabe en un USB, se creará
automáticamente una carpeta llamada “PHILIPS”
en dicho dispositivo. Cada vez que grabe en
un USB, los archivos grabados se guardarán en
una subcarpeta de la carpeta “PHILIPS”. Los
archivos y las subcarpetas se nombran de forma
numérica en el orden en que fueron creados.
1 Pulse CD para seleccionar la fuente de
disco.
2 Cargue un disco.
Para seleccionar la pista desde la cual •
desea iniciar la grabación, pulse los
botones numéricos.
3 Conecte un dispositivo de
almacenamiento USB en la toma
este aparato.
4 Pulse USB REC repetidamente hasta
seleccionar:
• [RIP ONE] (grabar una): se graba la
pista seleccionada.
• [RIP ALL] (grabar todo): se graban
todas las pistas a partir de la
seleccionada.
La reproducción del disco se inicia »
automáticamente desde el principio
del disco, o desde la pista seleccionada,
y comienza la grabación.
Para detener la grabación, pulse •
de
.
Español
Nota
Cuando no hay espacio sufi ciente, aparece, • [USB
FULL] (memoria llena).
Si una pista grabada dura menos de 10 segundos, no se •
guarda en el dispositivo de almacenamiento USB.
ES 15
Page 88

7 Reproducción
desde el iPod/
iPhone
Puede disfrutar del sonido del iPod/iPhone a
través de este dispositivo.
Modelos de iPod/iPhone
compatibles
Los modelos compatibles de iPod y de iPhone
de Apple con conectores de base de 30 patillas
incluyen:
iPod classic, iPod touch, iPod nano, iPod •
de quinta generación (vídeo) y iPod mini.
iPhone y iPhone 3G.•
Colocación del iPod/iPhone
1 Conecte la base del iPod/iPhone al
dispositivo.
2 Gire el tonillo para afl ojar la placa de
sujeción.
3 Coloque el iPod/iPhone en la base.
4 Gire el tornillo para fi jar el iPod/iPhone
fi r m e m e n t e .
Cuando el dispositivo está conectado »
a la fuente de alimentación, el
reproductor iPod/iPhone que esté
colocado en la base comenzará a
cargarse.
16 ES
Cómo escuchar el iPod/
iPhone
1 Asegúrese de que el iPod/iPhone está
colocado correctamente.
2 Pulse iPhone/iPod para seleccionar el
iPod/iPhone como fuente.
El iPod/iPhone conectado inicia la »
reproducción automáticamente.
Page 89

Para hacer una pausa/reanudar la •
reproducción, pulse
Para saltar directamente a una pista, •
pulse
/ .
Para buscar durante la reproducción, •
mantenga pulsado
para reanudar la reproducción
normal.
Para navegar por el menú, pulse •
MENU y pulse
una opción; luego pulse OK para
confi rmar.
.
/ y suéltelo
para seleccionar
Carga del iPod/iPhone
Cuando el dispositivo está conectado a
la fuente de alimentación, el reproductor
iPod/iPhone que esté colocado en la base
comenzará a cargarse.
Cómo quitar el iPod/iPhone
1 Tire del iPod/iPhone para quitarlo de la
base.
Español
Consejo
Si cues ta sacarlo, gire el tornillo en el sentido de las •
agujas del reloj para afl ojar la sujeción.
ES 17
Page 90

8 Cómo escuchar
la radio
Sintonización de una emisora
de radio
Nota
Para una recepción óptima, extienda por completo la •
antena FM y ajuste su posición.
1 Pulse TUNER para seleccionar el
sintonizador como fuente.
2 Mantenga pulsado / durante más de
2 segundos.
Aparece [SEARCH] (buscar).»
La radio sintoniza automáticamente »
una emisora de recepción fuerte.
3 Repita el paso 2 para sintonizar más
emisoras.
Para sintonizar una emisora de •
recepción débil, pulse
repetidamente hasta obtener una
recepción óptima.
Programación automática de
emisoras de radio
Nota
Puede programar un máximo de 40 emisoras de r adio •
FM.
/
Todas las emisoras disponibles se »
programan en el orden de potencia de
recepción de la banda de ondas.
La primera emisora de radio »
programada se retransmite
automáticamente.
Programación manual de
emisoras de radio
Nota
Puede programar un máximo de 40 emisoras de r adio •
FM.
1 Sintonice una emisora de radio.
2 Pulse PROG para activar el modo de
programa.
[PROG] (programa) parpadea en la »
pantalla.
3 Pulse para asignar un número (del
1 al 40) a esta emisora de radio; a
continuación, pulse PROG para confi rmar.
Aparecen el número de presintonía »
y la frecuencia de la emisora
presintonizada.
4 Repita los pasos anteriores para
programar otras emisoras.
Nota
Para sobrescribir una emisora programada, guarde •
otra emisora en su lugar.
1 En el modo de sintonizador, mantenga
pulsado PROG durante más de
2 segundos para activar el modo de
programa automático.
Aparece [AUTO] (automático).»
18 ES
Selección de una emisora de
radio presintonizada
1 En el modo de sintonizador, pulse
para seleccionar un número de
presintonía.
Page 91

Cómo mostrar la información
RDS
El sistema de datos por radio RDS (del
inglés Radio Data System) es un servicio que
permite a las emisoras FM mostrar información
adicional. Si sintoniza una emisora RDS,
aparecerán un icono RDS y el nombre de la
emisora.
1 Sintonice una emisora RDS.
2 Pulse RDS/NEWS varias veces para
desplazarse por la siguiente información
(si está disponible):
Nombre de la emisora»
Tipo de programa, por ejemplo, »
[NEWS] (noticias), [SPORT]
(deportes), [POP M] (música pop)...
Frecuencia»
Ajuste del reloj a través de
RDS
Puede usar la transmisión de la señal
horaria junto con la señal RDS para ajustar
automáticamente el reloj del dispositivo.
1 Sintonice con una emisora de radio RDS
que transmita señales horarias.
2 Mantenga pulsado RDS/NEWS durante
más de 2 segundos.
Español
Nota
La precisión de la hora transmitida depende de la •
emisora RDS que transmite la señal horaria.
ES 19
Page 92

9 Ajuste del
sonido
Ajuste del nivel de volumen
1 Durante la reproducción, pulse VOL
+/- para aumentar o disminuir el nivel de
volumen.
Selección de un efecto de
sonido preestablecido
1 Durante la reproducción, pulse DSC
varias veces para seleccionar:
[POP] (pop)•
[JAZZ] (jazz)•
[CLASSIC] (clásica)•
[ROCK] (rock)•
[FLAT] (sin efectos)•
Mejora de graves
1 Durante la reproducción, pulse DBB para
activar o desactivar la mejora dinámica de
graves.
Si se activa la mejora dinámica de »
graves, aparece “DBB”.
Silenciamiento del sonido
1 Durante la reproducción, pulse MUTE
para activar o desactivar la función de
silencio.
20 ES
Page 93

10 Otros usos de la
microcadena
Ajuste del temporizador de
desconexión automática
Esta unidad se puede poner automáticamente
en modo de espera transcurrido un periodo de
tiempo predefi nido.
1 Cuando la unidad esté encendida, pulse
SLEEP varias veces para seleccionar
un periodo de tiempo establecido (en
minutos).
Si el temporizador de desconexión »
automática está activado, la pantalla
muestra
Para desactivar el temporizador de
desconexión automática
1 Pulse SLEEP repetidamente hasta que
se muestre “SLP OFF” (desconexión
automática desactivada).
Si el temporizador de desconexión »
automática está desactivado,
desaparece de la pantalla.
.
5 Pulse VOL +/- para ajustar la hora.
6 Pulse TIMER para confi rmar.
Aparecerán los dígitos de los minutos y »
empezarán a parpadear.
7 Pulse VOL +/- para ajustar los minutos.
8 Pulse TIMER para confi rmar.
El temporizador está ajustado y »
activado.
Activación y desactivación del
temporizador de alarma
1 Pulse TIMER repetidamente para activar
o desactivar el temporizador.
Si el temporizador está activado, la »
pantalla muestra
Si el temporizador está desactivado, »
desaparece de la pantalla.
Nota
Si se selecciona el disco o el dispositivo USB como •
fuente, pero no se puede reproducir una pista, el
sintonizador se activa automáticamente.
.
Español
Ajuste del temporizador de
alarma
Esta unidad se puede se puede utilizar como
despertador. El modo de disco, sintonizador o
dispositivo USB se activa y se reproduce a la
hora fi jada.
1 Asegúrese de que ha ajustado el reloj
correctamente.
2 En el modo de espera, mantenga pulsado
TIMER durante más de 2 segundos.
3 Pulse CD, TUNER, USB o iPhone/iPod
para seleccionar una fuente.
4 Pulse TIMER para confi rmar.
Aparecerán los dígitos de la hora y »
empezarán a parpadear.
Cómo escuchar a través de
los auriculares
1 Enchufe los auriculares en la toma de la
unidad.
ES 21
Page 94

11 Información del
producto
Nota
La información del producto puede cambiar sin previo •
aviso.
Especifi caciones
Amplifi cador
Potencia de salida 2 X 30 W RMS
Respuesta de frecuencia 60-16 kHz, ± 3 dB
Relación señal/ruido >62 dB
Disco
Tipo de láser Semiconductor
Diámetro del disco 12 cm/8 cm
Discos compatibles CD-DA, CD-R,
CD-RW, MP3-CD y
WMA-CD
DAC de audio 24 bits/44,1 kHz
Distorsión armónica
total <1%
Respuesta de
frecuencia 60 Hz-16 kHz
Relación S/R >62 dBA
Sintonizador
Rango de sintonización FM: 87.5-
108 MHz
Intervalo de sintonización 50 kHz (FM)
Distorsión armónica total <3%
Relación señal/ruido >50 dB
Altavoces
Impedancia del altavoz 6 ohmios
Información general: especifi caciones
Adaptador de corriente Modelo:
PAT065A19EU
Entrada: CA 100240 V~, 50/60 Hz,
1,5 A Salida: CC
19 V, 3,4 A
Consumo de energía en
funcionamiento 26 W
Consumo de energía en
modo de espera <2 W
Consumo de energía en
modo de espera de bajo
consumo <1 W
Dimensiones
– Unidad principal (ancho
x alto x profundo)
– Altavoz (ancho x alto x
profundo)
Peso
- Con embalaje
- Unidad principal
- Altavoz
211 x 250 x
160 mm
158 x 250 x
193 mm
5,85 kg
1,29 kg
2,39 kg
Formatos de disco MP3
compatibles
ISO9660 y Joliet•
Número máximo de títulos: 512 (en •
función de la longitud del nombre del
archivo)
Número máximo de álbumes: 255•
Frecuencias de muestreo compatibles: •
32 kHz, 44,1 kHz, 48 kHz
Velocidades de bits compatibles: 32~256 •
(kbps), velocidades de bits variables
22 ES
Page 95

Información sobre
reproducción de USB
Dispositivos USB compatibles:
Memoria fl ash USB (USB 2.0 o USB •
1.1)
Reproductores fl ash USB (USB 2.0 o •
USB 1.1)
Tarjetas de memoria (requieren •
un lector de tarjetas adicional para
funcionar en este dispositivo).
Formatos compatibles:
USB o formato de archivo de •
memoria FAT12, FAT16, FAT32
(tamaño de sector: 512 bytes)
Velocidad de bits (velocidad de •
datos) de MP3: 32-320 Kbps y
velocidad de bits variable
WMA v9 o anterior•
Directorios anidados hasta un •
máximo de 8 niveles
Número de álbumes/carpetas: 99 •
como máximo
Número de pistas/títulos: 999 como •
máximo
Etiqueta ID3 v2.0 o superior•
Nombre de archivo en Unicode •
UTF8 (longitud máxima: 128 bytes)
Formatos no compatibles:
Álbumes vacíos: un álbum vacío es •
aquel que no contiene archivos MP3
o WMA y que no se mostrará en la
pantalla.
Los formatos de archivo no •
compatibles se omiten. Por ejemplo,
los documentos de Word (.doc) o
los archivos MP3 con la extensión .dlf
se omiten y no se reproducen.
Archivos de audio AAC, WAV y •
PCM.
Archivos WMA con protección DRM •
(.wav; .m4a; .m4p; .mp4 y .aac)
Archivos WMA con formato sin •
pérdidas
Mantenimiento
Limpieza de la carcasa
Utilice un paño suave ligeramente •
humedecido con un detergente que no
sea agresivo. No utilice ninguna solución
que contenga alcohol, licor, amoniaco, o
abrasivos
Limpieza de los discos
Cuando un disco se ensucie, límpielo •
con un paño de limpieza. Limpie el disco
desde el centro hacia afuera.
No utilice disolventes como benceno, •
diluyentes, limpiadores disponibles en
comercios o pulverizadores antiestáticos
para discos analógicos.
Limpieza de la lente del disco
Después de un uso prolongado, se puede •
acumular polvo o suciedad en la lente del
disco. Para garantizar una buena calidad
de reproducción, limpie la lente del disco
con limpiador para lentes de CD de
Philips o cualquier limpiador disponible
en los comercios. Siga las instrucciones
proporcionadas con el limpiador.
Español
ES 23
Page 96

12 Solución de
problemas
Precaución
No quite nunca la carcasa de este aparato.•
Para que la garantía mantenga su validez, no
trate nunca de reparar el sistema usted mismo.
Si tiene problemas al usar este aparato,
compruebe los siguientes puntos antes de
llamar al servicio técnico. Si no consigue
resolver el problema, vaya al sitio Web de
Philips (www.philips.com/support). Cuando se
ponga en contacto con Philips, asegúrese de
que el dispositivo esté cerca y de tener a mano
el número de modelo y el número de serie.
No hay alimentación
Asegúrese de que el enchufe de •
alimentación de CA de la unidad esté
bien conectado.
Asegúrese de que haya corriente en la •
toma de CA.
Para ahorrar energía, el sistema se apaga •
automáticamente 15 minutos después
de llegar a la última pista, si no se utiliza
ningún control.
No hay sonido o éste tiene baja calidad
Ajuste el volumen.•
Compruebe que los altavoces están •
conectados correctamente.
Compruebe que las partes desnudas de •
los cables están bien insertadas en los
conectores.
Las salidas de sonido izquierda y derecha
están invertidas
Compruebe las conexiones de los altavoces y
la ubicación de éstos.
La unidad no responde
Desconecte y vuelva a conectar el •
enchufe de alimentación de CA; a
continuación, encienda de nuevo el
sistema.
Como característica de ahorro •
de energía, la unidad se apaga
automáticamente 15 minutos después
de llegar a la última pista, si no se utiliza
ningún control.
El control remoto no funciona
Antes de pulsar cualquier botón de •
función, seleccione la fuente correcta con
el control remoto en lugar de hacerlo con
la unidad principal.
Reduzca la distancia entre el control •
remoto y la unidad.
Inser te la pila con la polaridad (signos •
+/–) alineada como se indica.
Sustituya la pila.•
Apunte con el control remoto •
directamente al sensor situado en la
parte frontal de la unidad.
El dispositivo USB no es compatible
El dispositivo USB no es compatible con •
el equipo. Pruebe con otro.
No se detecta el disco
Inserte un disco.•
Compruebe si el disco se ha insertado al •
revés.
Espere hasta que la condensación de •
humedad en la lente haya desaparecido.
Sustituya o limpie el disco.•
Use un CD que esté fi nalizado o un disco
•
con el formato correcto.
La recepción de radio es débil
Aumente la distancia entre la unidad y el •
televisor o el vídeo.
Extienda por completo la antena FM.•
Conecte una antena FM exterior.•
El temporizador no funciona
Ajuste el reloj correctamente.•
Active el temporizador.•
Se ha borrado el ajuste del reloj o del
temporizador
Se ha interrumpido la corriente eléctrica •
o se ha desconectado el enchufe de
alimentación.
Restablezca el reloj/temporizador.•
24 ES
Page 97

Table des matières
1 Important 2
Sécurité 2
Avis 4
2 Votre microchaîne 6
Introduction 6
Contenu de l’emballage 6
Présentation de l’unité principale 7
Présentation de la télécommande 8
3 Guide de démarrage 10
Fixation du support 10
Connexion de l’antenne FM 10
Connexion des enceintes 10
Alimentation 11
Préparation de la télécommande 11
Réglage de l’horloge 11
Mise sous tension 12
4 Lecture 13
Lecture d’un disque 13
Lecture à partir d’un périphérique USB 13
Suppression de fi chiers du périphérique
USB 13
Diffusion de fi chiers audio stockés sur un
périphérique externe 13
5 Options de lecture 14
Lecture répétée et aléatoire 14
Programmation des pistes 14
Affi chage des informations de lecture 14
8 Écoute de la radio 18
Réglage d’une station de radio 18
Programmation automatique des stations
de radio 18
Programmation manuelle des stations de
radio 18
Sélection d’une station de radio
présélectionnée 18
Affi chage des informations RDS 19
Réglage de l’horloge par RDS 19
9 Réglage du son 20
Réglage du volume sonore 20
Sélection d’un effet sonore prédéfi ni 20
Renforcement des basses 20
Désactivation du son 20
10 Utilisation avancée de votre
microchaîne 21
Réglage de l’arrêt programmé 21
Réglage de l’alarme 21
Utilisation du casque 21
11 Informations sur les produits 22
Caractéristiques techniques 22
Formats de disque MP3 pris en charge 23
Informations de compatibilité USB 23
Entretien 23
12 Dépannage 24
Français
6 Enregistrement 15
7 Lecture à partir d’un iPod/iPhone 16
iPod/iPhone compatibles 16
Charge de l’iPod/iPhone 16
Écoute de l’iPod/iPhone 16
Charge de l’iPod/iPhone 17
Retrait de l’iPod/iPhone 17
FR
1
Page 98

1 Important
Sécurité
a Lisez attentivement ces consignes.
b Conservez soigneusement ces consignes.
c Tenez compte de tous les
avertissements.
d Respectez toutes les consignes.
e N’utilisez pas cet appareil à proximité
d’une source d’eau.
f Nettoyez l’appareil avec un chiffon sec
uniquement.
g N’obstruez pas les orifi ces de
ventilation. Installez l’appareil
conformément aux consignes du
fabricant.
h N’installez pas l’appareil à proximité
de sources de chaleur telles que
des radiateurs, registres de chaleur,
poêles ou autres appareils (incluant les
amplifi cateurs) produisant de la chaleur.
i Pour les pays où l’alimentation secteur
est polarisée, respectez la fonction de
sécurité de la fi che polarisée ou de mise
à la terre. Une fi che polarisée possède
deux broches dont l’une est plus large
que l’autre. Une fi che de mise à la terre
possède deux broches et une patte de
mise à la terre. La broche large ou la
troisième patte est fournie pour des
raisons de sécurité. Si la fi che fournie
n’est pas adaptée à votre support de
prise, demandez à un électricien de vous
le remplacer.
Remarques : pour éviter tout risque
de choc électrique, veillez à aligner la
broche large de la fi che sur l’orifi ce large
correspondant, en l’insérant au maximum.
j Évitez de marcher sur le cordon
d’alimentation ou de le pincer,
notamment au niveau des fi ches, des
prises de courant et de son point de
sortie sur l’appareil.
k Utilisez uniquement les pièces de
fi xation/accessoires spécifi é(e)s par le
fabricant.
l Utilisez uniquement l’appareil avec le
chariot, le socle, le trépied, le support
ou la table spécifi é(e) par le fabricant ou
vendu(e) avec l’appareil. Lorsque vous
utilisez un chariot, prenez garde à ne pas
le faire basculer avec l’appareil lorsque
vous le déplacez. Vous risqueriez de
vous blesser.
m Débranchez cet appareil en cas d’orage
ou pendant les longues périodes
d’inutilisation.
n Confi ez toutes les tâches de
maintenance à un personnel qualifi é. Des
travaux de maintenance sont nécessaires
en cas d’endommagement de l’appareil :
par exemple, endommagement du
cordon d’alimentation ou de la fi che,
déversement de liquide ou chute
d’objets à l’intérieur de l’appareil,
exposition de l’appareil à la pluie ou à
l’humidité, dysfonctionnement ou chute
de l’appareil.
o Utilisation des piles – ATTENTION –
Pour éviter les fuites de piles pouvant
endommager l’appareil ou entraîner
2 FR
Page 99

des blessures corporelles ou des dégâts
matériels, respectez les consignes
suivantes :
Installez correctement toutes les •
piles, en prenant garde aux sens +
et - indiqués sur l’appareil.
Ne mélangez pas les piles (neuves et •
anciennes, au carbone et alcalines,
etc.).
Retirez les piles du compartiment si •
vous n’utilisez pas l’appareil pendant
une longue période.
Les piles ne doivent pas être •
exposées à une chaleur excessive
(lumière du soleil, feu ou source
assimilée).
p Votre appareil ne doit pas être exposé
aux fuites goutte à goutte ou aux
éclaboussures.
q Ne placez pas d’objets susceptibles
d’endommager votre appareil à
proximité de celui-ci (par exemple,
objets remplis de liquide ou bougies
allumées).
r Ce produit peut contenir du plomb et
du mercure. La mise au rebut de ces
substances peut être réglementée afi n
de préserver l’environnement. Pour
plus d’informations sur le traitement
ou le recyclage des produits, veuillez
contacter les autorités locales ou
l’Electronic Industries Alliance à
l’adresse www.eiae.org.
Avertissement
Ne retirez jamais le boî tier de cet appareil. •
Ne graissez jamais aucun composant de cet appareil.•
Ne posez jamais cet appareil sur un autre équipement •
électrique.
Conservez cet appareil à l’abri des rayons du soleil, des •
fl ammes nues et de toute source de chaleur.
Ne regardez jamais le rayon laser émis par l’appareil.•
Veillez à maintenir un accès facile au cordon •
d’alimentation, à la fi che ou à l’adaptateur pour
débrancher l’appareil.
Si la prise d’alimentation ou un coupleur •
d’appareil est utilisé comme dispositif de
découplage, celui-ci doit rester facilement
accessible.
Attention
L’utilisation de commandes ou de réglages, ou de toute •
autre procédure que celles données dans ce document
risque d’exposer l’utilisateur à une utilisation ou à des
radiations dangereuses.
Sécurité d’écoute
Écoutez à un volume modéré.
L’utilisation des écouteurs à un volume •
élevé peut entraîner des pertes
auditives. Ce produit peut générer un
volume sonore capable de détériorer
les fonctions auditives d’un individu
aux facultés normales, même en cas
d’exposition inférieure à une minute. Les
niveaux sonores élevés sont destinés aux
personnes ayant déjà subi une diminution
de leurs capacités auditives.
Le son peut être trompeur. Au fi l du •
temps, votre niveau de confort auditif
s’adapte à des volumes plus élevés. Après
une écoute prolongée, un niveau sonore
élevé et nuisible à vos capacités auditives
pourra vous sembler normal. Pour éviter
cela, réglez le volume à un niveau non
nuisible assez longtemps pour que votre
ouïe s’y habitue et ne le changez plus.
Pour défi nir un volume non nuisible :
Réglez le volume sur un niveau peu élevé. •
Augmentez progressivement le volume, •
jusqu’à ce que vous puissiez entendre le
son confor tablement et clairement, sans
distorsion.
Limitez les périodes d’écoute :
Une exposition prolongée au son, même •
à des niveaux normaux et non nuisibles,
peut entraîner des per tes auditives.
Veillez à utiliser votre équipement de •
façon raisonnable et à interrompre
l’écoute de temps en temps.
Français
FR
3
Page 100

Veillez à respecter les recommandations
suivantes lors de l’utilisation de vos
écouteurs.
Écoutez à des volumes raisonnables •
pendant des durées raisonnables.
Veillez à ne pas régler le volume lorsque •
votre ouïe est en phase d’adaptation.
Ne réglez pas le volume de sorte que •
vous n’entendiez plus les sons de votre
environnement.
Faites preuve de prudence dans •
l’utilisation des écouteurs ou arrêtez
l’utilisation dans des situations
potentiellement dangereuses. N’utilisez
pas les écouteurs lorsque vous conduisez
ou que vous êtes en vélo, sur un skate,
etc. : cette utilisation peut s’avérer
dangereuse sur la route et est illégale
dans de nombreuses régions.
Avis
Toute modifi cation apportée à cet appareil
qui ne serait pas approuvée expressément
par Philips Consumer Lifestyle peut invalider
l’habilitation de l’utilisateur à utiliser l’appareil.
Ce produit est conforme aux
spécifi cations d’interférence
radio de la Communauté
Européenne.
Ce produit est conforme aux spécifi cations
des directives et des normes suivantes :
2004/108/EC, 2006/95/EC.
Toute modifi cation apportée à cet appareil
qui ne serait pas approuvée expressément
par Philips Consumer Lifestyle peut invalider
l’habilitation de l’utilisateur à utiliser l’appareil.
Recyclage
Votre produit a été conçu et
fabriqué avec des matériaux
et des composants de haute
qualité pouvant être recyclés et
réutilisés.
La présence du symbole de
poubelle barrée indique que le produit est
conforme à la directive européenne 2002/96/
CE:
Ne jetez pas ce produit
avec les ordures ménagères
ordinaires. Renseignez-vous
sur les dispositions en vigueur
dans votre région concernant la
collecte séparée des appareils
électriques et électroniques.
La mise au rebut correcte de l’ancien produit
permet de préserver l’environnement et la
santé.
Votre produit contient des piles relevant de
la Directive européenne 2006/66/EC qui
ne doivent pas être mises au rebut avec les
déchets ménagers.
Lorsque le symbole de poubelle sur roues
barrée accompagné du symbole chimique «
Pb » fi gure sur un produit, cela
signifi e que les piles contenues
dans ce produit relèvent de la
directive sur le plomb :
Renseignez-vous sur les
réglementations locales
concernant la collecte séparée
des piles. La mise au rebut citoyenne de
votre produit usagé permet de protéger
l’environnement et la santé.
La réalisation de copies non autorisées de
contenu protégé contre la copie, notamment
de programmes informatiques, fi chiers,
diffusions et enregistrement sonores, peut
représenter une violation de droits d’auteur et
une infraction à la loi. Cet appareil ne doit en
aucun cas être utilisé à de telles fi ns.
Pb
4 FR
 Loading...