

Philips MCM149/96, MCM149 User Manual

Micro Hi-Fi System
Register your product and get support at
www.philips.com/welcome
User manual
MCM149

2
CAUTION
Use of controls or adjustments or
performance of procedures other
than herein may result in hazardous
radiation exposure or other unsafe
operation.
3
#
%
&
1
$
^
*
(
!
1
2
PULL TO OPEN
STANDBY-ON
iR
OPEN/CLOSE
MICRO SYSTEM MCM149
CD/CD-R/CD-RW COMPATIBLE
)
5
0
4
3mm
ALB/
PRESET
™
¡
£
9
PROG.
CLOCK/DISPLAY
≤
6
3
4
5
@
SOURCE
ALBUM/PRESET
DBB
VOL
TUNING
VOL
MODE PROG
PULL TO OPEN
7
8
9
0
3

4

Index
English ------------------------------------------------ 6
English
5

Contents
English
General Information
Supplied accessories ............................................ 7
Environmental Information ................................ 7
Safety Information ................................................ 7
Hearing Safety ....................................................... 8
Preparations
Rear connections ................................................. 9
Inserting batteries into the Remote Control ...
................................................................................ 10
Using the Remote Control to operate the
system ................................................................... 10
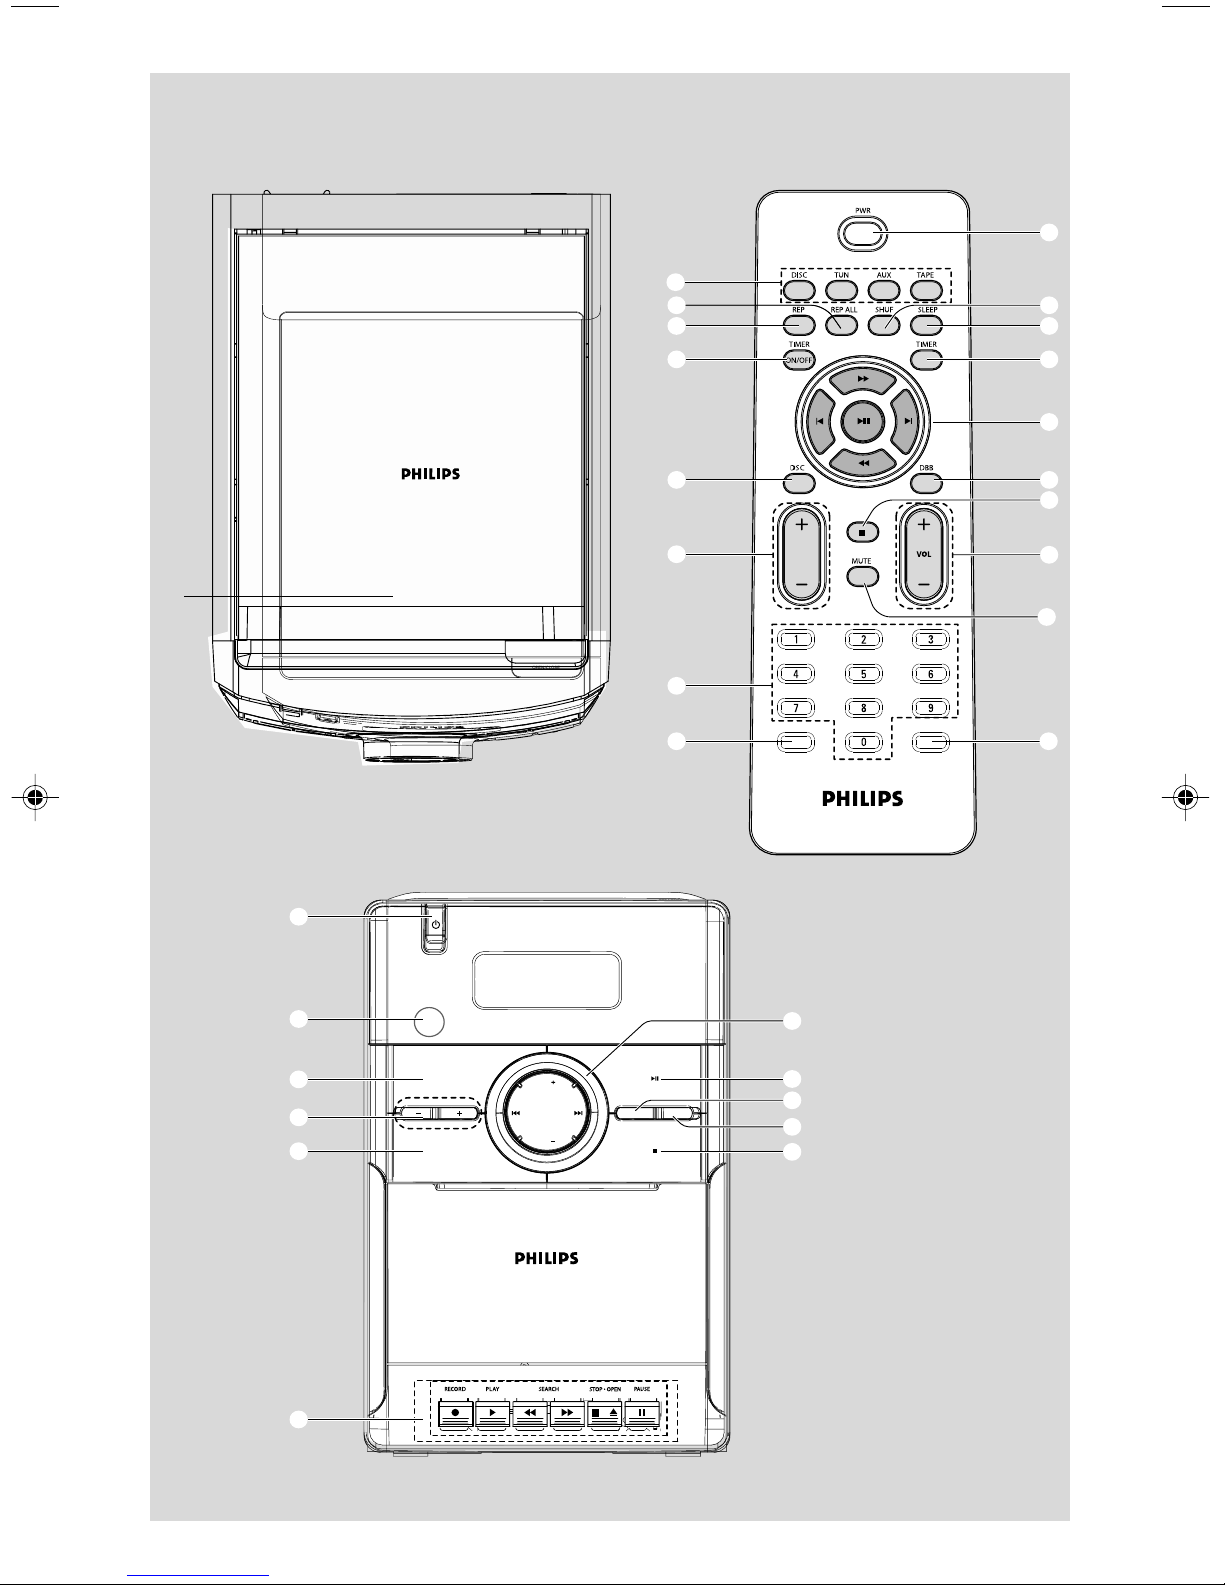
Controls
Controls on the system and remote control ...
................................................................................ 11
Controls available on the remote control only
................................................................................ 11
Basic Functions
Plug and Play (for tuner installlation) ............. 12
Switching the system on ................................... 12
Power-saving automatic standby ..................... 12
Adjusting volume and sound............................ 12
Ta pe Operation / Recording
Tape playback ...................................................... 16
General information on recording ................. 16
Synchro start CD recording ............................ 16
Recording from the radio................................. 17
Other Connection
Listening to an external source ...................... 17
Maintenance.............................................. 18
Clock/Timer
Setting the clock ................................................. 19
Setting the timer ................................................. 19
Activating and deactivating TIMER ................. 19
Activating and deactivating SLEEP .................. 19
Specifications ........................................... 20
Tr oubleshooting ............................. 21~22
CD/MP3 Operation
Loading a disc ...................................................... 13
Basic playback controls ..................................... 13
Playing an MP3 disc ..................................... 13~14
Different play modes: SHUFFLE and REPEAT ...
................................................................................ 14
Programming track numbers ........................... 14
Reviewing the programme ............................... 14
Erasing the programme ..................................... 14
Radio Reception
Tuning to radio stations .................................... 15
Programming radio stations ............................. 15
Automatic programming .........................................15
Manual programming ............................................... 15
Tuning to preset radio stations ....................... 15
6

General Information
Congratulations on your purchase and welcome
to Philips!
To fully benefit from the support that Philips
offers, register your product at www.philips.com/
welcome.
IMPORTANT!
PLEASE NOTE THAT THE VOLTAGE
SELECTOR LOCATED AT THE REAR OF
THIS SYSTEM IS PRESET AT 110V FROM
THE FACTORY. FOR COUNTRIES THAT
OPERATE AT 220V-240V, PLEASE ADJUST
TO 220V-240V BEFORE YOU SWITCH ON
THE SYSTEM.
Supplied accessories
–2 speaker boxes
– remote control
Environmental Information
All unnecessary packaging has been omitted. We
have tried to make the packaging easy to
separate into three materials: cardboard (box),
polystyrene foam (buffer) and polyethylene (bags,
protective foam sheet).
● Install the unit near the AC outlet and where the
AC power plug can be easily reached.
● Place the system in a location with adequate
ventilation to prevent internal heat build-up in
your system. Allow at least 10 cm (4 inches)
clearance from the rear and the top of the unit
and 5 cm (2 inches) from each side.
● The ventilation should not be impeded by
covering the ventilation openings with items,
such as newspapers, table-cloths, curtains, etc.
● Do not expose the system, batteries or discs to
excessive moisture, rain, sand or heat sources
caused by heating equipment or direct sunlight.
● No naked flame sources, such as lighted candles,
should be placed on the apparatus.
● No objects filled with liquids, such as vases, shall
be placed on the apparatus.
● If the system is brought directly from a cold to a
warm location, or is placed in a very damp room,
moisture may condense on the lens of the disc
unit inside the system. Should this occur, the CD
player would not operate normally. Leave the
power on for about one hour with no disc in the
system until normal playback is possible.
English
Your system consists of materials which can be
recycled and reused if disassembled by a
specialized company. Please observe the local
regulations regarding the disposal of packaging
materials, exhausted batteries and old
equipment.
Safety Information
● Before operating the system, check that the
operating voltage indicated on the typeplate (or
the voltage indication beside the voltage
selector) of your system is identical with the
voltage of your local power supply. If not, please
consult your dealer.
● Place the system on a flat, hard and stable
surface.
● Where the MAINS plug or an appliance coupler
is used as the disconnet device, the disconnet
device shall remain readily operable.
● The apparatus shall not be exposed to
dripping or splashing.
● The mechanical par ts of the set contain self-
lubricating bearings and must not be oiled or
lubricated.
● When the system is switched to Standby
mode, it is still consuming some power.
To disconnect the system from the
power supply completely, remove the AC
power plug from the wall socket.
7
 Loading...