

Page 1
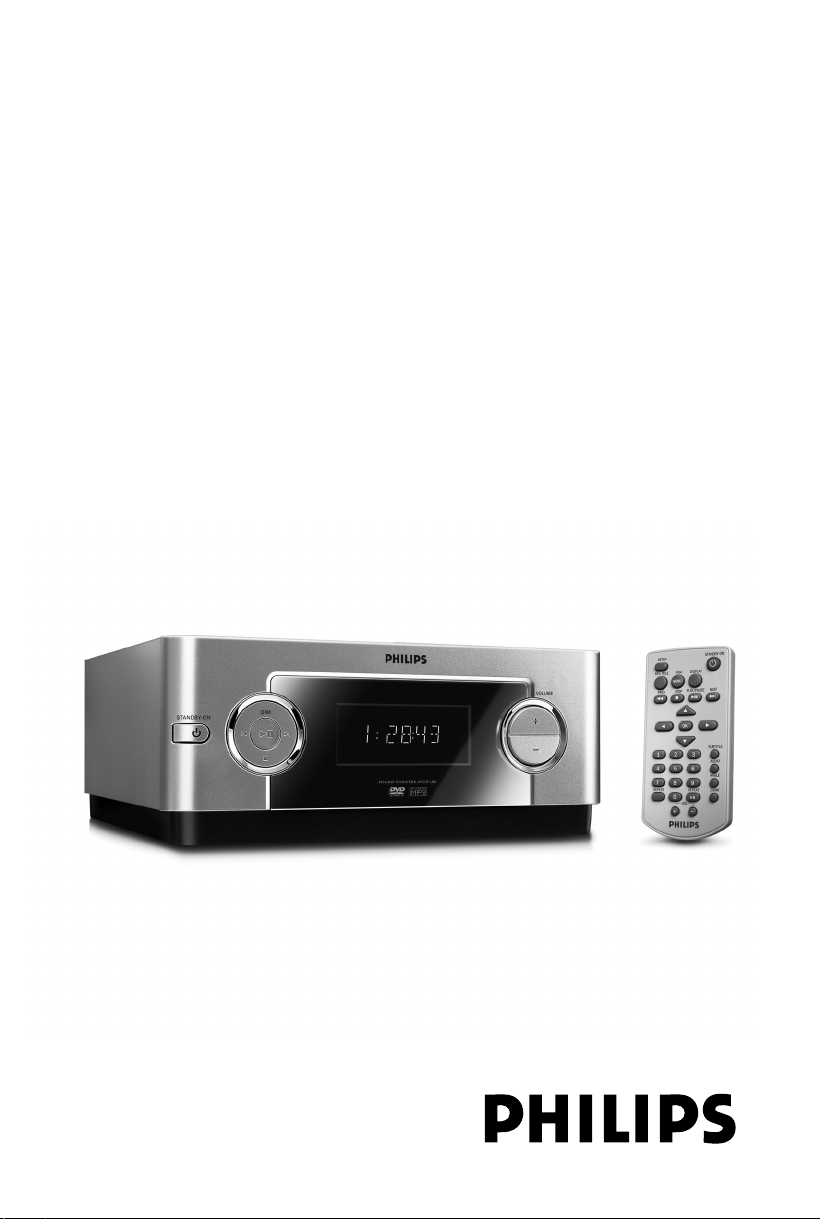
DVD Micro Theater
User Manual
MCD106
Page 2

Manufactured under license from Dolby
Laboratories. Dolby and the double-D symbol
are trademarks of Dolby Laboratories.
This product incorporates copyright protection
technology that is protected by method claims of
certain U.S. patents and other intellectual
property rights owned by Macrovision
Corporation and other rights owners. Use of this
copyright protection technology must be
authorized by Macrovision Corporation, and is
intended for home and other limited viewing
uses only unless otherwise authorized by
Macrovision Corporation. Reserve engineering
or disassembly is prohibited.
2
Page 3
Contents
General Information
Supplied accessories ............................................ 4
Safety information ................................................ 4
Maintenance .......................................................... 4
Environment information ................................... 4
Connections
Step 1: Connecting TV set .................................. 5
Using Video in jack (CVBS)
Using an accessory RF modulator
Step2: Connecting the power cord .................. 6
Step3: Connecting to a stereo system............. 6
Functional Overview
Controls on the system...................................... 7
Remote control .................................................... 8
Getting Started
Step 1: Using the Remote Control................... 9
Step 2: Setting up the TV ............................. 9~10
Selecting the color system that matches
your TV set
Step 3: Setting language preference ................ 10
Setting the Language
Disc Operations
Playable Discs ...................................................... 11
Region Codes ...................................................... 11
Playing discs ......................................................... 11
Using the Disc Menu .................................. 11~12
Using PBC feature (available f or 2.0 version
VCD only)
Resuming playback...............................................12
Selecting and searching ..................................... 12
Selecting a different track/chapter
Fast forwarding/reversing
Slow forwarding/reversing
Vo lume control ................................................... 12
Display Dim ......................................................... 12
Different play modes:......................................... 13
REPEAT
REPEAT A-B
Viewing the disc playback information .......... 13
Viewing from another angle ............................. 14
ZOOM.................................................................. 14
AUDIO ................................................................. 14
SUBTITLE ............................................................. 14
Playing MP3/Picture disc(JPEG, Kodak)... 14~15
Playing an MP3 disc
Playing a JPEG file (slide show)
Playing MP3 music and JPEG pictures
simultaneously
Playing a Kodak picture CD
DVD MENU Operations
Using the System Setup menu options ... 16~17
Screen Saver
Setting the TV TYPE
Changing the password
restricting playback by setting rating level
Default
Using the Audio Setup menu option .............. 18
Dynamic Range
Using the Speaker Setup menu option .......... 18
Specifications ........................... 19
Troubleshooting .................. 20~21
Glossary ................................... 22
English
3
Page 4
General Information
English
Supplied accessories
–Remote control with two batteries
–Composite video cable (yellow)
–Audio cables (white/red)
–User Manual
If any item is damaged or missing, contact
your retailer or Philips.
Safety information
• The standby switch does not disconnect the
apparatus from mains.
• Where the MAINS plug or an appliance coupler
is used as the disconnect device, the disconnect
device shall remain readily operable.
• Place the system on a flat, hard and stable
surface.
• The apparatus shall not be exposed to
dripping or splashing.
• Install the unit near the AC outlet and where the
AC power plug can be easily reached.
• Place the system in a location with adequate
ventilation to prevent internal heat build-up in
your system. Allow at least 10 cm (4 inches)
clearance from the rear and the top of the unit
and 5 cm (2 inches) from each side.
• The ventilation should not be impeded by
covering the ventilation openings with items,
such as newspapers, table-cloths, curtains, etc.
• Do not expose the system, batteries or discs to
excessive moisture, rain, sand or heat sources
caused by heating equipment or direct sunlight.
• No naked flame sources, such as lighted candles,
should be placed on the apparatus.
• No objects filled with liquids, such as vases, shall
be placed on the apparatus.
• If the system is brought directly from a cold to a
warm location, or is placed in a very damp room,
moisture may condense on the lens of the disc
unit inside the system. Should this occur, the CD
player would not operate normally. Leave the
power on for about one hour with no disc in the
system until normal playback is possible.
• The mechanical parts of the set contain self-
lubricating bearings and must not be oiled or
lubricated.
• When the system is switched to Standby
mode, it is still consuming some power.
To disconnect the system from the
power supply completely, remove the AC
power plug from the wall socket.
Maintenance
• When a disc becomes dirty, clean it with a
cleaning cloth. Wipe the disc from the center out,
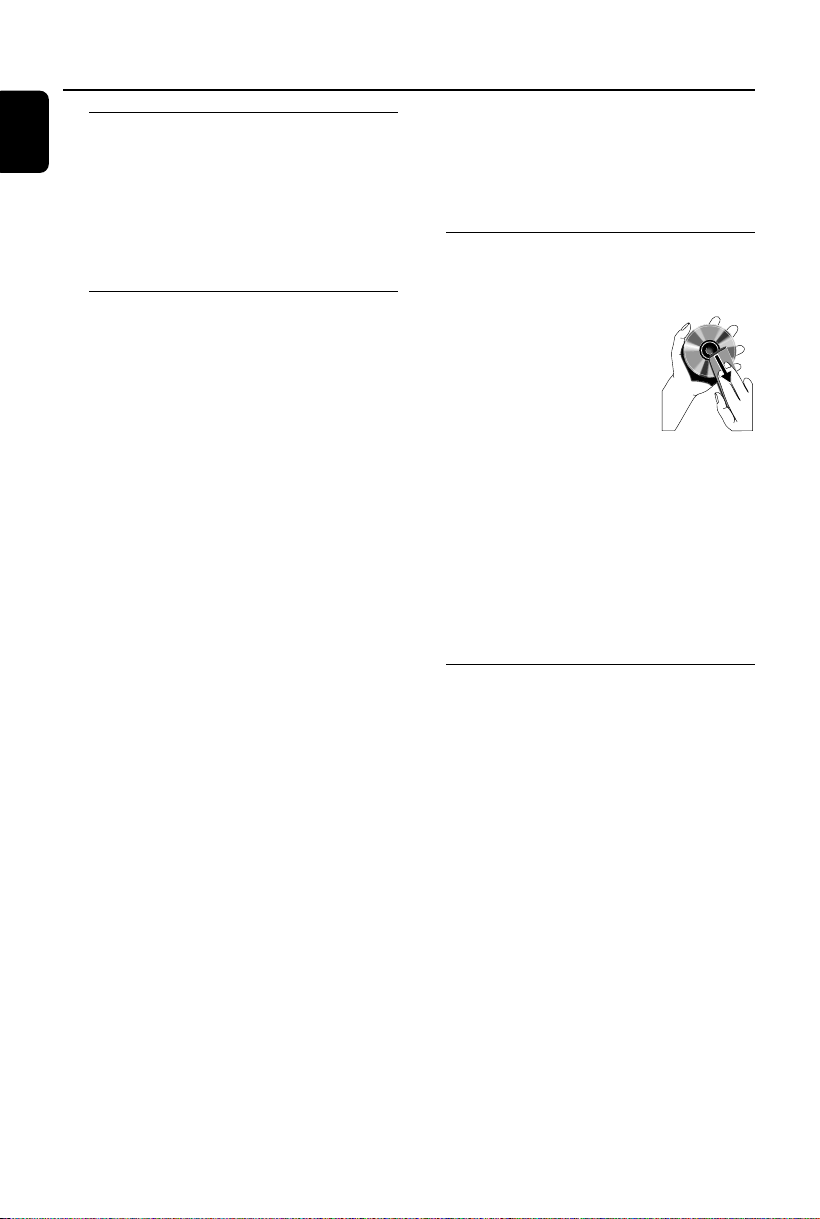
in a straight line.
• Do not expose the player,
batteries or discs to humidity,
rain, sand or excessive heat
(caused by heating equipment or
direct sunlight). Always keep the
disc tray closed to avoid dust on
the lens.
• Do not use solvents such as benzene, thinner,
commercially available cleaners, or anti-static
spray intended for colour discs.
• The lens may cloud over when the pla yer is
suddenly moved from cold to warm
surroundings, making it impossible to play a disc.
Leave the player in the war m environment until
the moisture evaporates.
Environmental information
All unnecessary packaging has been omitted. We
have tried to make the packaging easy to
separate into three materials: cardboard (box),
polystyrene foam (buffer) and polyethylene (bags,
protective foam sheet).
Your system consists of materials which can be
recycled and reused if disassembled by a
specialised company. Please observe the local
regulations regarding the disposal of packaging
materials, exhausted batteries and old
equipment.
4
Page 5
Connections
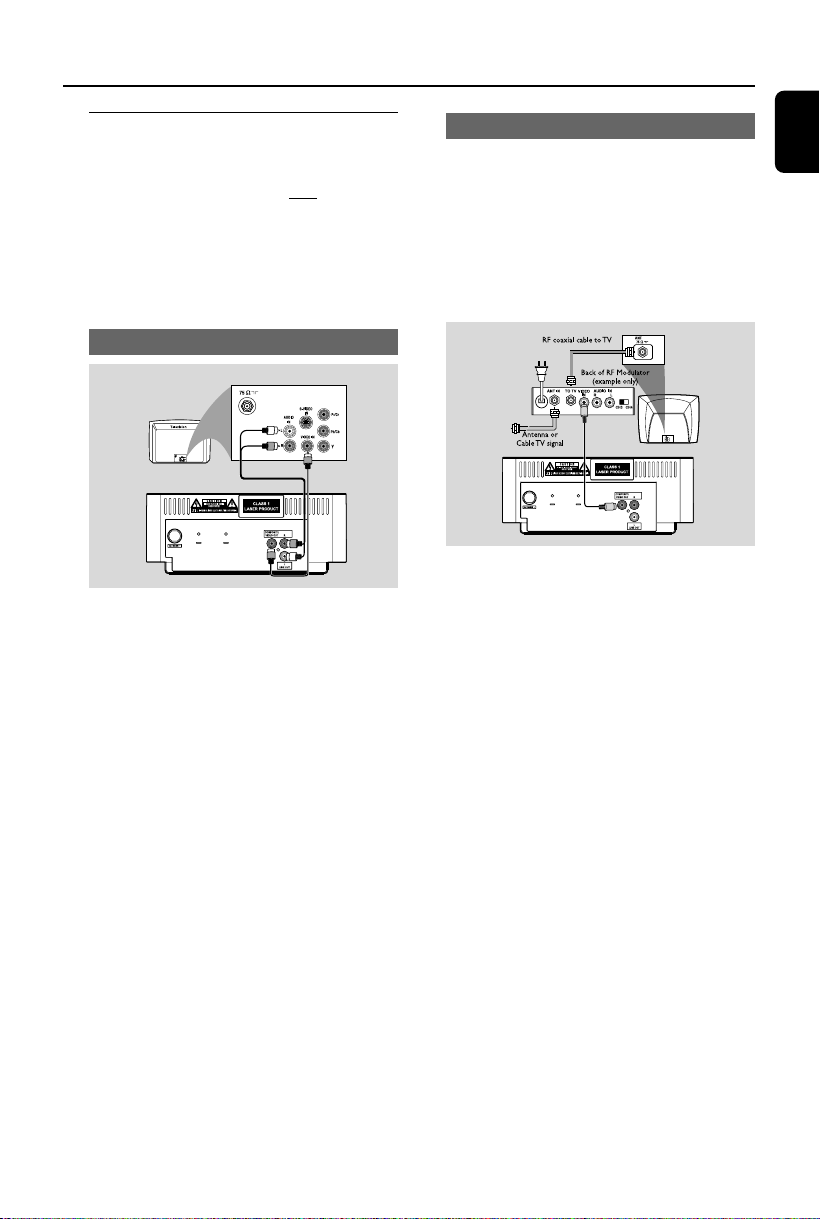
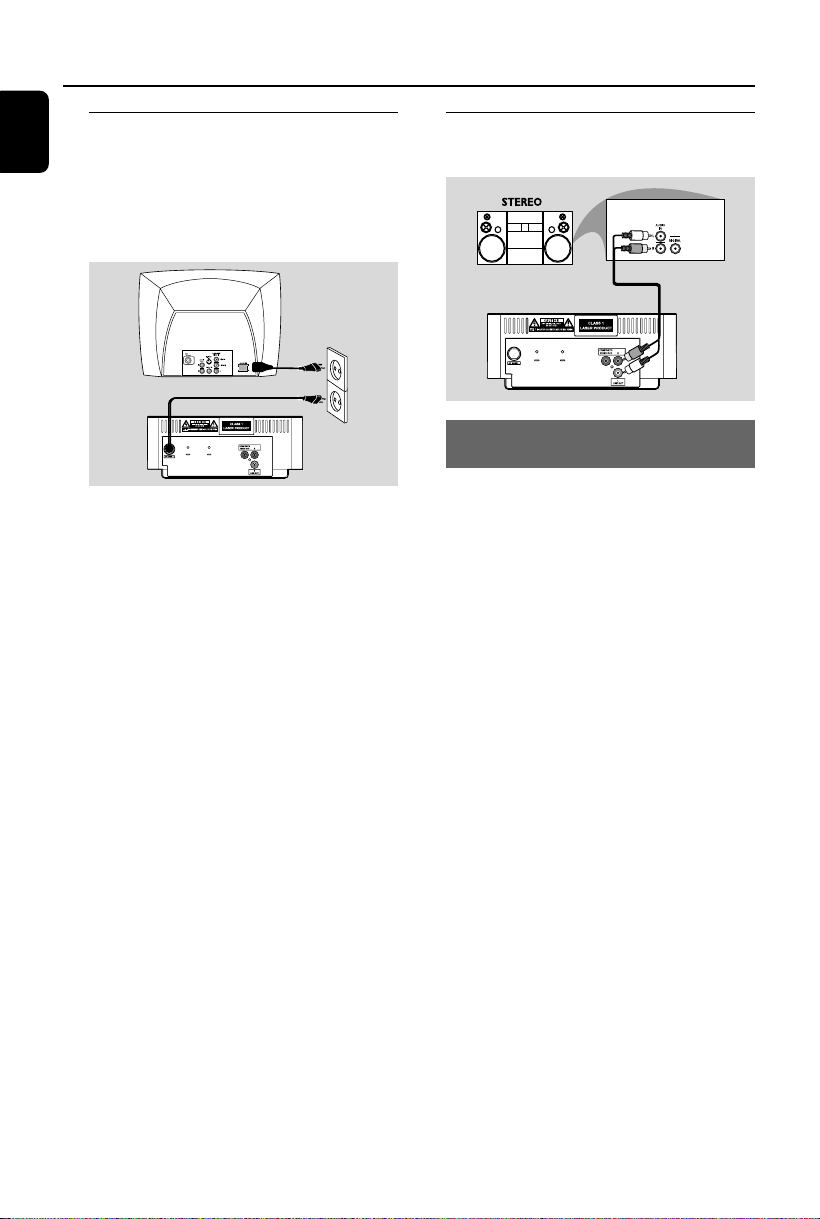
Step 1: Connecting TV set
IMPORTANT!
–You only need to make one video
connection from the following options,
according to the capabilities of your TV
system.
– Connect the system directly to the
TV set.
Using Video In jack (CVBS)
• Use the supplied composite video cable (yellow)
to connect the system’s COMPOSITE VIDEO
jack to the video input jack (or labeled as A/V In,
Video In, Composite or Baseband) on the TV set.
• To listen to disc playback of the system through
the TV, use the audio cables (white/red) to
connect LINE OUT (L/R) jacks to the
corresponding AUDIO IN jacks on the TV set.
Using an accessory RF modulator
IMPORTANT!
– If your TV set only has a single
Antenna In jack (or labeled as 75 ohm or
RF In), you will need a RF modulator in
order to view the DVD playback via TV.
See your electronics retailer or contact
Philips for details on RF modulator
availability and operations.
• Use the supplied composite cable (yellow) to
connect the system’s COMPOSITE VIDEO jack
to the video input jack on the RF modulator.
• Use the RF coaxial cable (not supplied) to
connect the RF modulator to your TV’s RF jack.
English
5
Page 6
Connections
English
Step 2: Connecting the power
cord
IMPORTANT!
– Never make or change any
connection with the power switched on.
• After everything is connected properly, plug in
the AC power cord to the power socket.
Note:
– Refer to the type plate on the rear or bottom
of the system for identification and supply ratings.
Step 3: Connecting to a stereo
system
Stereo system has Dolby Pro Logic or
right/left Audio In sockets
• Use the supplied composite video cable (yellow)
to connect the system’s COMPOSITE VIDEO
jack to the video input jack (or labeled as A/V In,
Video In, Composite or Baseband) on your TV.
• Use the audio cables (white/red) to connect
LINE OUT (L/R) jacks to the corresponding
AUDIO IN jacks on the stereo system.
6
Page 7
Functional Overview
English
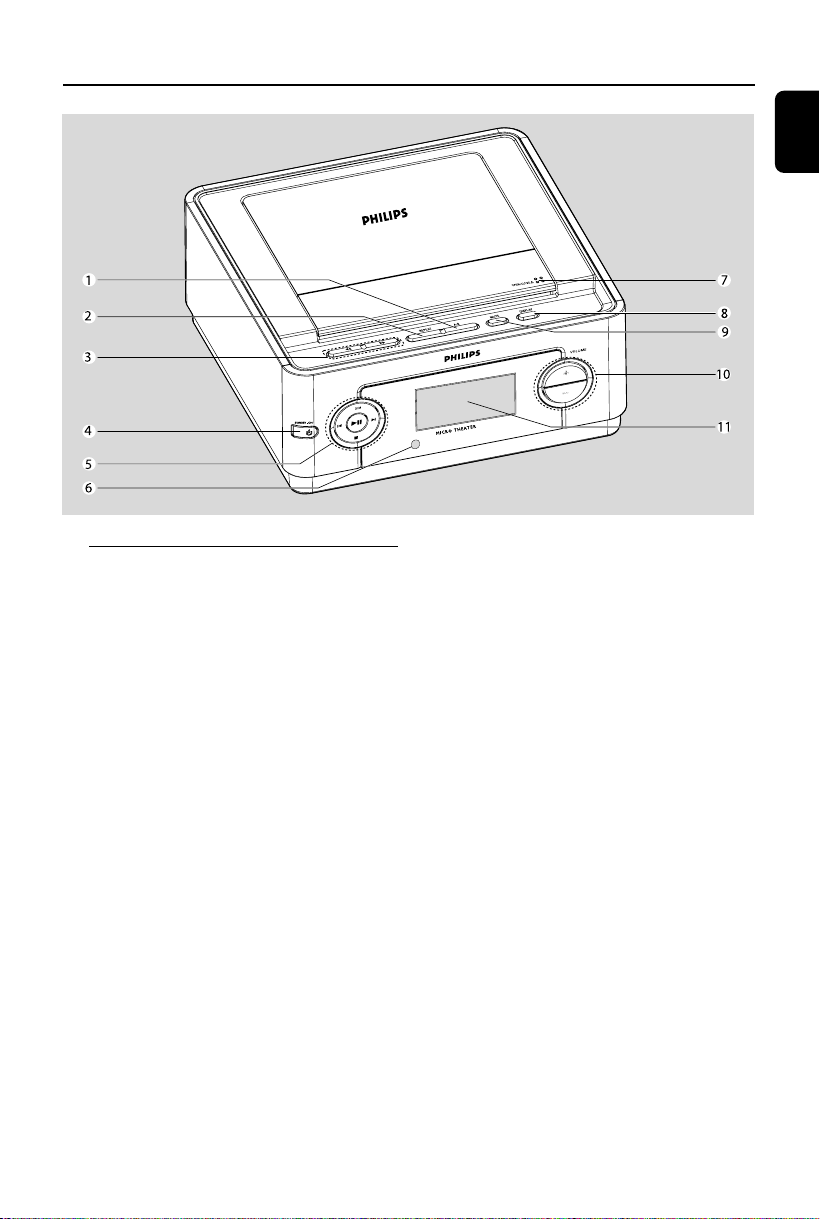
Controls on the system
1A-B
–repeats playback of a specific section within a
chapter or a track.
2 REPEAT
– selects various repeat modes.
3 à / á
–fast searches backward/forward in a disc at
different speeds.
4STANDBY-ON B
–switches the system on or to standby mode.
5 ÉÅ
– star ts or interrupts disc playback
DIM
–selects different levels of br ightness for display
panel.
í/ë
–press to skip to the previous/next chapter/title/
track.
Ç
– stops disc playback.
6iR Sensor
– point the remote control towards this sensor.
7OPEN/CLOSE ç
– opens or closes the disc door.
8DISPLAY
–displays the current status and or disc
information.
9 MUTE
–disables or enables sound output.
10 VOLUME +/-
– adjusts the volume upward/downward.
11 Display panel
–shows the current status of the DVD player.
7
Page 8
Functional Overview
English
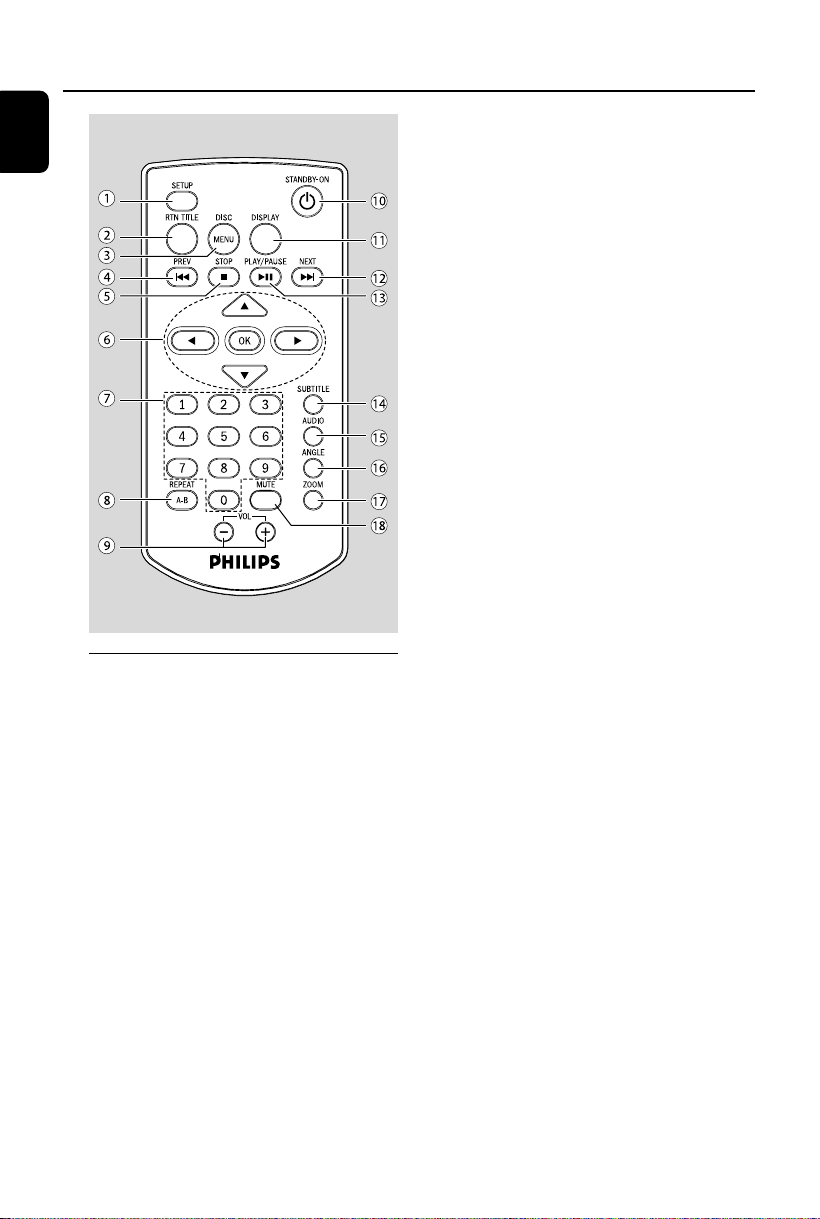
Remote Control
1 SETUP
– enters or exits the system menu..
2RTN TITLE
–to go back to previous menu/show title menu.
3DISC MENU
–for DVD, enters or exits disc contents menu.
–for VCD/SVCD, toggle between PBC ON or
OFF.
4 PREV Ià
– skips to the previous chapter/title/track.
– hold to fast searches backward in a disc at
different speeds.
5STOP Ç
– stops disc playback.
6OK
–confirms a selection.
▼ / ▲ / Ñ/É
–selects an item in a menu.
–mov es an enlarged picture down/up/left/right.
▲
–select the slow speed.
7Numeric Keypad (0-9)
–inputs a tr ack/title/chapter number of the disc.
8 REPEAT A-B
–selects various repeat mode, or
–repeats playback of a specific section within a
chapter or a track.
9VOL +/-
– adjusts the volume upward/downward.
10 STANDBY-ON B
–switches the system on or to standby mode.
11 DISPLAY
–displays the current status and or disc
information.
12 NEXT áI
–skips to the next chapter/title/track.
– hold to fast searches forward in a disc at
different speeds.
13 PLAY/PAUSE ÉÅ
– starts or interrupts disc playback.
14 SUBTITLE
–selects a subtitle language.
15 AUDIO
–selects an audio language(DVD/VCD) or an
audio channel
16 ANGLE
–view the same scene from different angels.
17 ZOOM
–zoom in or out the picture .
18 MUTE
–disables or enables sound output.
8
Page 9
Getting Started
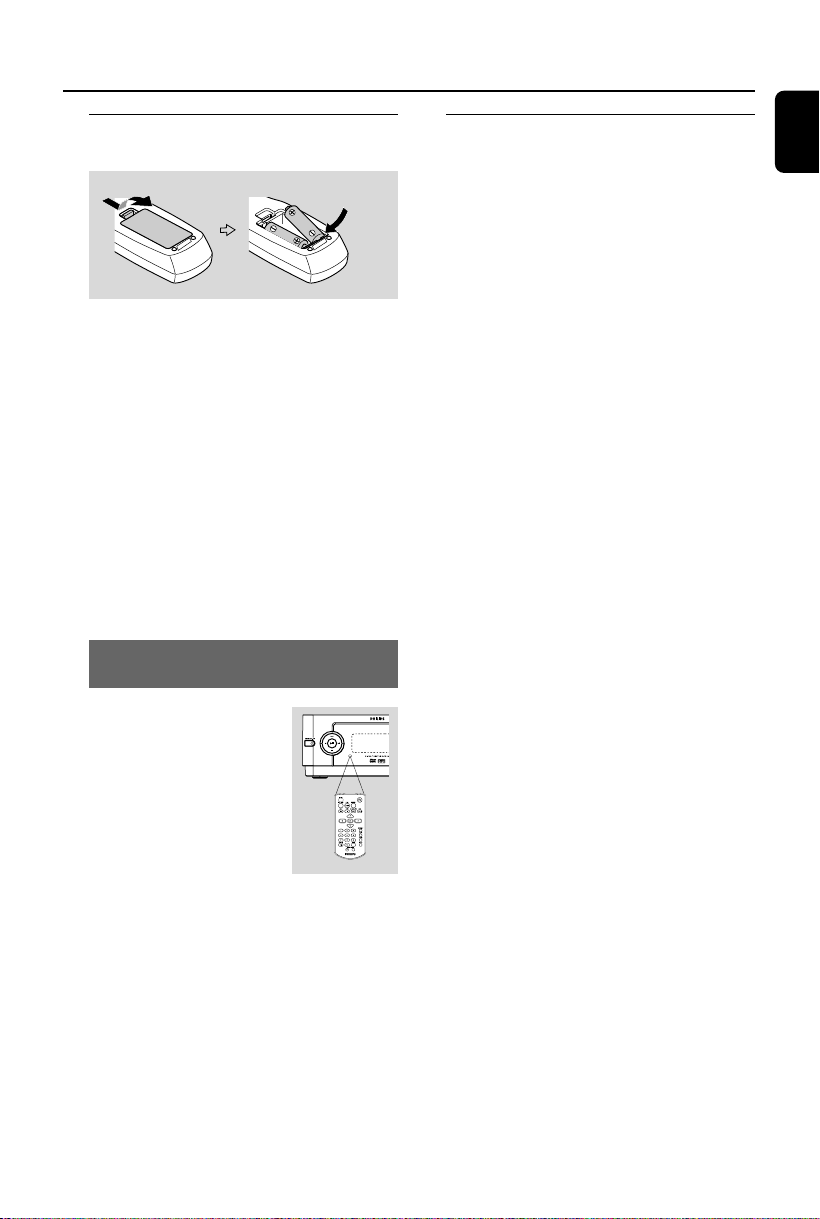
Step 1: Using the Remote
Control
1. Open the battery compar tment.
2. Insert two batteries type AAA, following the
indications (+/-) inside the compartment.
3. Close the cover.
CAUTION!
–Remove batteries if they are
exhausted or if the remote is not to be
used for a long time.
–Do not use old and new or different
types of batteries in combination.
–Batteries contain chemical
substances, so they should be disposed of
properly.
Using the Remote Control to operate
the Player
Step 2: Setting up the TV
English
IMPORTANT!
Make sure you have completed all the
necessary connections. (See “Connecting
TV”).
1. Press STANDBY-ON B on the DVD player
to turn it on.
2. Turn on the TV and set to the cor rect video-in
channel. You should see the blue Philips DVD
background screen on the TV.
➜ Usually these channels are between the
lowest and highest channels and may be called
FRONT, A/V IN, or VIDEO. See your TV manual
for more details.
➜ Or, you may go to channel 1 on your TV,
then press the Channel up button repeatedly
until you see the Video In channel.
➜ Or, set the TV to channel 3 or 4 if you are
using an RF modulator.
3. If you are using external equipment, (e.g. audio
system), turn it on and select the appropriate
input source for the DVD player output. Refer to
the equipment user’s manual for detail.
1. Aim the Remote Control
directly at the remote sensor
(IR) on the front panel.
2. Do not put any objects
between the remote control
and the DVD player while
operating the DVD player.
9
Page 10
Getting Started
English
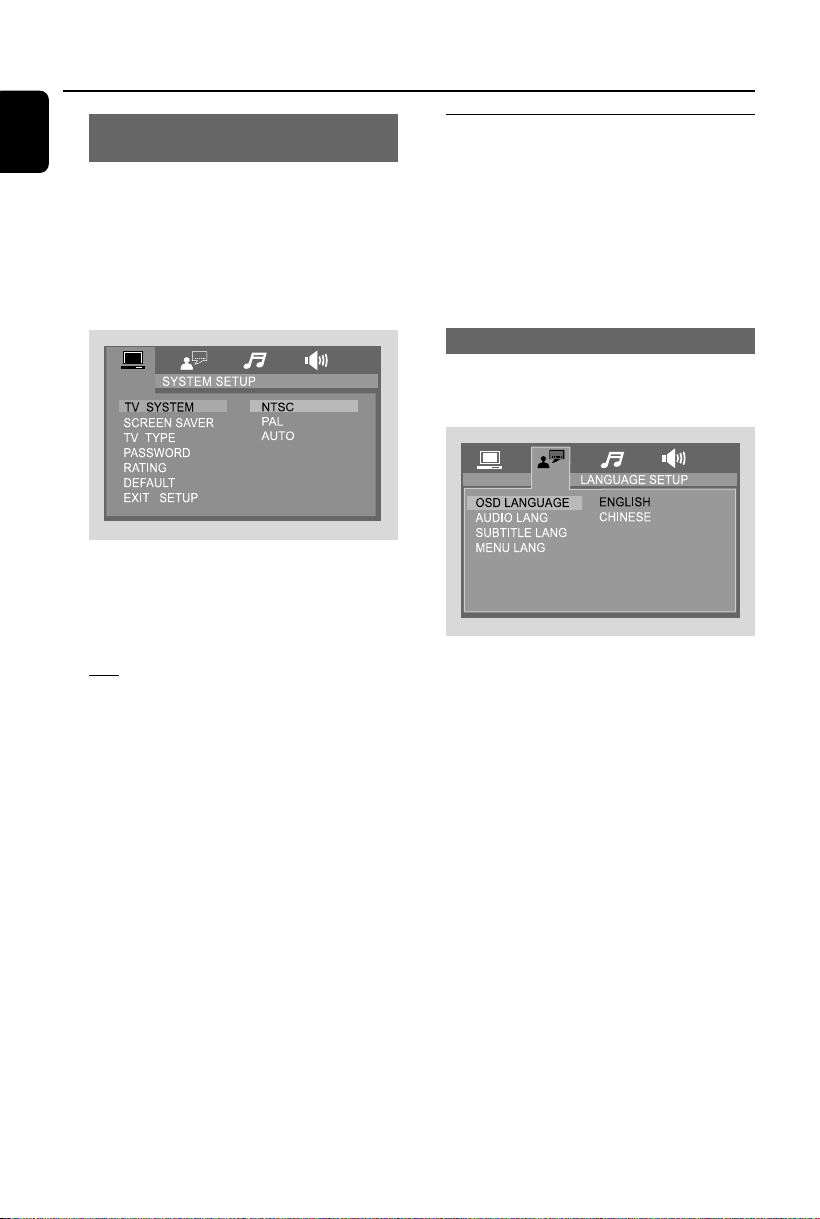
Selecting the color system that matches
your TV set
This DVD player is compatible with both NTSC
and PAL. For the playback of a DVD disc on this
DVD player, the color systems of the DVD, TV
set and DVD player should match.
1. Press SETUP.
2. Press ▼ to select TV SYSTEM in System
Setup Page, then press É.
3. Press ▼ / ▲ to select one of the options below:
NTSC
– Select this if the connected TV set is NTSC
system. It will change the video signal of a PAL
video disc and output to NTSC system.
PAL
– Select this if the connected TV set is PAL
system. It will change the video signal of an
NTSC disc and output to PAL format.
AUTO
– Select this if the connected TV set is
compatible with both NTSC and PAL (multi
system). The output format will be consistent wit
the video signal of the disc.
4. Select an item and press OK.
To remove the menu
Press SETUP.
Step 3: Setting language
preference
You can select your own preferred language
settings. This DVD player will automatically switch
to the selected language whenever you load a
disc. If the language selected is not available on
the disc, the disc’s default language will be used
instead. The OSD language in the system menu
will remain once selected.
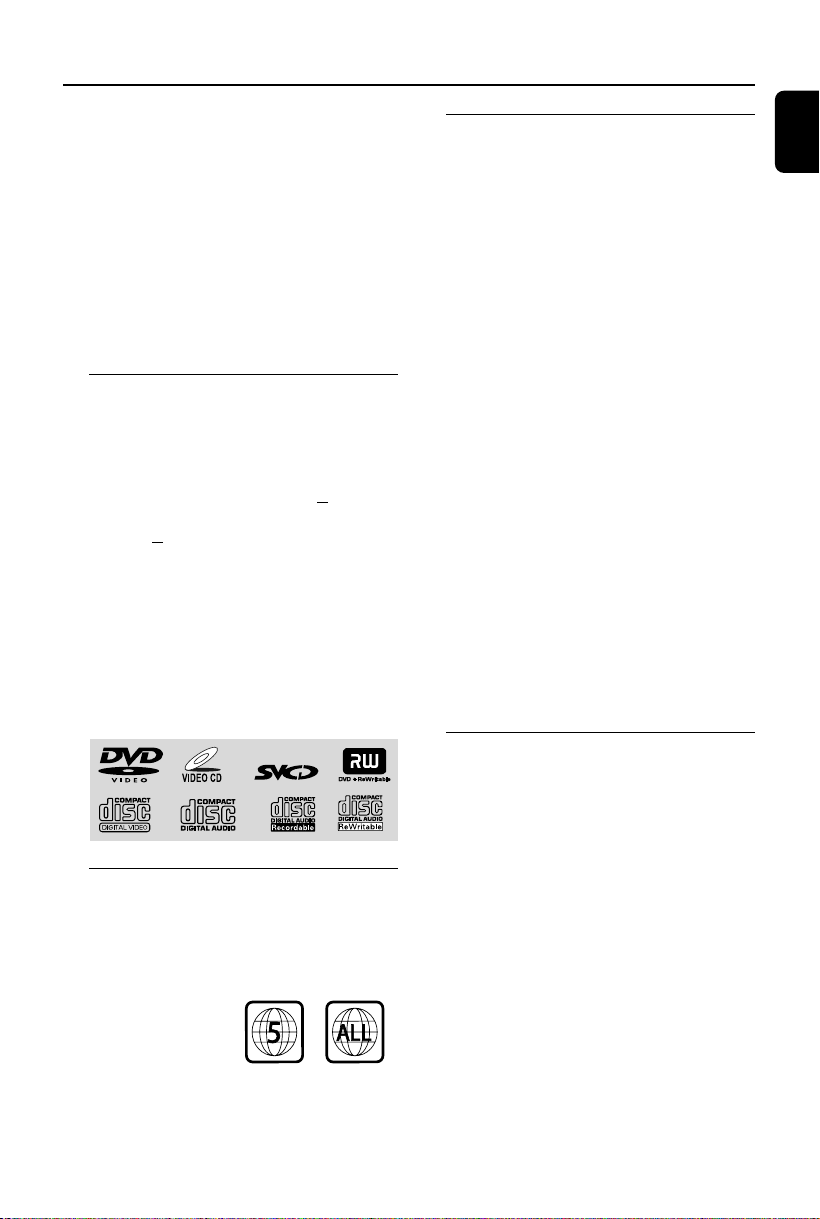
Setting the Language
1. Press SETUP.
2. PressÑ/Ékeys on the remote control to select
Language Setup page, then press ▼.
3. Press ▼ / ▲ keys to highlight one of the
options below, then press É.
OSD LANGUAGE
– Select this to change the language of this
DVD player screen display menu. The menu
language (on-screen display) for the system will
remain as you set it.
AUDIO LANG
– Select this to change disc soundtrack
language (also see page 14)
SUBTITLE LANG
– Select this to change the subtitle language
(also see page 14)
MENU LANG
– Select this to change the language of the disc
menu.
4. Press ▼ / ▲ keys to select a language and press
OK.
5. Repeat step 3 - 4 for other language settings.
10
To remove the menu
Press SETUP.
Page 11
Disc Operations
IMPORTANT!
–Depending on the DVD or VIDEO CD,
some operations may be different or
restricted.
– If the “INVALID KEY” appears on the
TV screen when a button is pressed, it
means the function is not available on
the current disc or at the current time.
–Do not push on the disc tray or put
any objects other than disc on the disc
tray. Doing so may cause the disc player
malfunction.
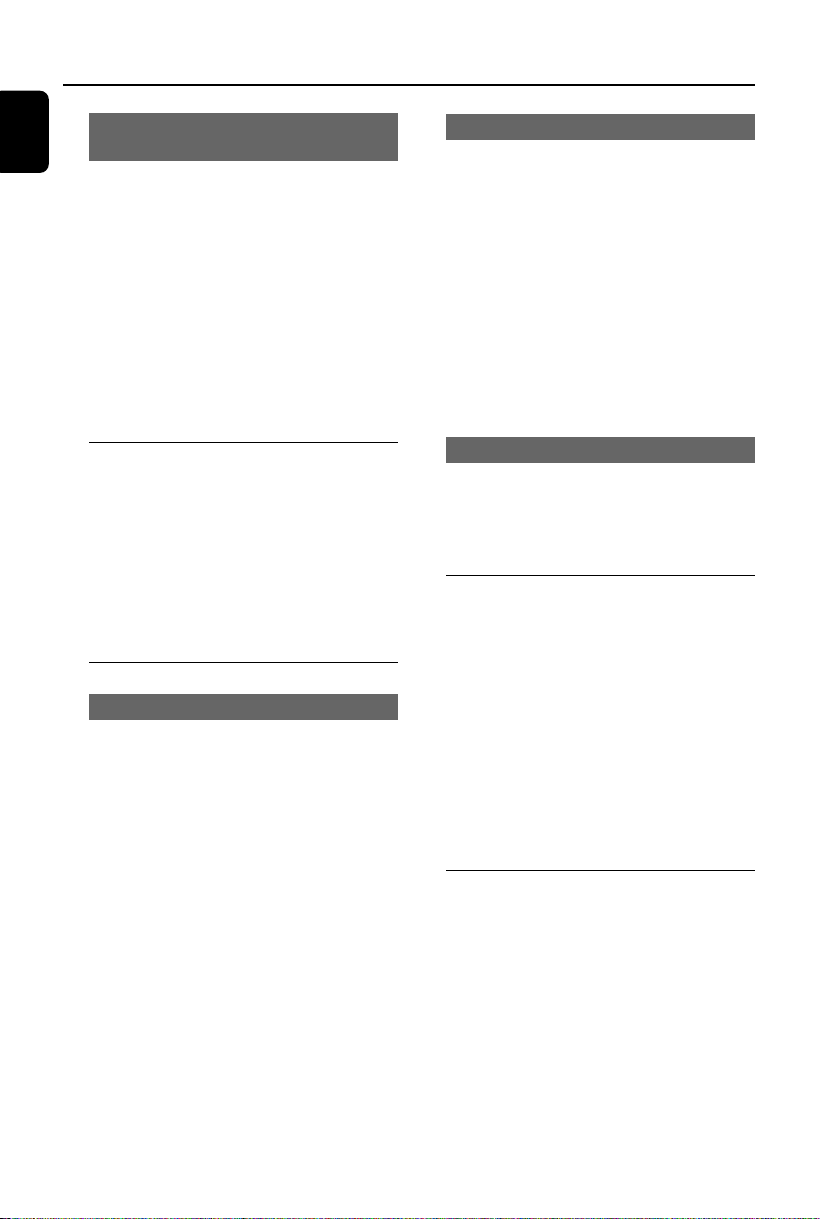
Playable Discs
Your DVD Player will play:
–Digital Versatile Discs (DVDs)
–Video CDs (VCDs)
–Super Video CDs (SVCDs)
–Finalised DVD recordable (DVD+R)
–Digital Versatile Discs + Rewritable
(DVD+RW)
–Audio Compact Discs (CDs)
–MP3 discs, picture (Kodak, JPEG) files on CD-
R (W)
–ISO 9660/UDF format
–JPEG resolution support up to 3073 x 2048
– Supported sampling frequencies: 32kHz,
44.1kHz, 48kHz.
– Supported Bit-rates: 32~256 (kbps), variable
bit rates (average 128 kbps)
Region Codes
DVD discs and players are designed with
regional restrictions. Before playing a disc, make
sure the disc is for the same region as your
player. The regional code for this unit is indicated
at the bottom panel.
Playing discs
1. Press STANDBY-ON B to turn on the DVD
player.
2. Push OPEN/CLOSE ç on the top of the
system to open the disc tray.
3. Insert a disc with the pr int side facing up and
close the disc tray.
4. Playback will start automatically (depending on
the disc type).
➜ If a disc menu appears on the TV, see
“Using the Disc Menu”.
➜ If the disc is locked by parental control, you
must enter your four-digit password. (See
“Changing the password”).
To interrupt playback
• Press PLAY/PAUSE ÉÅ.
• To resume playback, press PLAY/PAUSE ÉÅ
again.
To stop playback
• Press STOPÇ twice.
Note:
– As a power-saving feature, the system will
automatically switch to Standby mode if you don’t
press any button within 15 minutes in the stop
mode.
Using the Disc Menu
1. During playback, press DISC MENU on the
remote control to return to disc menu or press
RTN TITLE to return to title menu.
➜ If the current disc/title has a menu, the menu
will appear on the screen. Otherwise, the disc
menu will be displayed.
2. Press ▼ / ▲ / Ñ / É to select the desired title
or chapter, and then press PLAY/PAUSE ÉÅ
or OK.
➜ Playback start from the selected title or
chapter.
English
Note:
– If you are having trouble playing a certain disc,
remove the disc and try a different one. Improper
formatted disc will not play on this DVD Player.
11
Page 12
Disc Operations
English
Using PBC feature (available for
2.0-version VCD only)
PBC playback allows you to play Video CD
interactively, following the menu on the display.
• Press DISC MENU to toggle between PBC
ON and PBC OFF.
Playing a disc with PBC function
• If PBC OFF, the system will start playback
automatically.
• If PBC ON, the PBC menu (if available) will
appear on the TV screen for selection. Use the
numeric keys (0-9) to enter your choice.
➜ To return to the previous menu, press RT N
TITLE on the remote control.
Fast forwarding/reversing
For DVD/VCD/MP3:
1. During playback, press à / á repeatedly on
front panel or press and hold PREV Ià /
NEXT áI to select fast search speed in
forward (FF) or reverse (FR) playback.
2. To resume to normal playback, pressÉÅ .
Or, press à / á repeatedly on front panel or
press and hold PREV Ià /NEXT áI until “
PLAY ” is displayed on the TV screen.
Helpful hints:
– Fast searching forward/backward is available
only within the same track.
Resuming playback
• During playback, press STOPÇ once to stop
the playback in resume mode, then press PLAY/
PA U S E ÉÅ to star t playback from where you
have stopped.
To cancel the resume mode
• In the stop position, press STOPÇ again to
fully stop the playback. Or open the disc door, or
switch the system to standby mode.
Selecting and searching
Selecting a different track/chapter
For DVD/VCD/CD/MP3:
• During playback, briefly pressí/ëon front
panel or press PREV Ià / NEXT áI on
remote control to select previous or next track/
chapter.
Or,
use the Numeric Keypad (0-9) on the
remote control to directly input your track
number.
➜ After selecting, playback will automatically
start from the beginning of the selected track.
Helpful hints:
– Some VCDs have a single track, so track
selecting or an invalid input value for the current
disc will be ingored.
– If the player has been set to repeat chapter
(track), pressing this button will replay the same
chapter (track) from its beginning.
Slow forwarding/reversing
1. During playback, press ▲ repeatedly to select
slow motion speed.
2. To resume to normal playback, press PLAY/
PAU SE ÉÅ.
Volume control
Press VOLUME +/- or VOL +/- on the remote
to increase or decrease the volume level.
➜ The volume value from “00” to “32” .
To s w itch off the volume temporarily
• Press MUTE or Volume level set to 0.
➜ Playback will continue without sound and
“MUTE” is displayed on TV screen.
• To activate sound reproduction, you can:
– press MUTE again;
– press VOLUME + or VOL + to release the
mute;
Display dim
• Press DIM repeatedly on the front panel to
select different levels of brightness for the display:
Full brightness, Medium brightness or Dimmest
display.
12
Page 13
Disc Operations
Different play modes: REPEAT
and REPEAT A-B
REPEAT
For DVDs/VCD/CD/CDG/MP3
• During playback, press REPEAT A-B on the
remote control or press REPEAT button on
the front panel repeatedly to choose desired
repeat play modes.
➜ For VCD with PBC feature, PBC must be
turned off first.
For DVDs
REPEAT CHAPTER: Repeats the current
chapter
REPEAT TITLE: Repeats the current title
REPEAT OFF: Switchs off repeat play mode
For C Ds/CDGs/VCDs/SVCDs with PBC
OFF
REPEAT ONE: Repeats the current track
REPEAT ALL: Plays all the tracks repeatedly
REPEAT OFF: Switchs off repeat play mode
For MP3/JPEG
REPEAT ONE: Repeats the current track
REPEAT DIR: Plays all the tracks in the
directory repeatedly
REPEAT ALL: Plays all the content repeatedly
REPEAT OFF: Switchs off repeat play mode
• To retur n to normal playback, press REPEAT
A-B on the remote control or press REPEAT
button on the front panel repeatedly until
“REPEAT OFF” is displayed.
Repeat A-B
You can play a specific section in a chapter/track
repeatedly.
1. Press REPEAT A-B on the remote control
repeatedly or press A-B on the front panel to
choose start point.
2. Press REPEAT A-B on the remote control
repeatedly or press A-B on the front panel to
choose end point.
➜ The passage will now repeat continuously.
3. To resume normal play, press REPEAT A-B on
the remote control repeatedly or press A-B on
the front panel again.
Note:
– The A-B function can only be set within the
same chapter or track.
Viewing the disc playback
information
You can view the disc information (e.g., current
title / chapter / track number, total playing time
or remaining time on the disc) without
interrupting the disc playback.
1. During playback, press DISPLAY on the
remote control or front panel.
➜ The available disc information appears.
For DVDs:
TT xx/xx CH xx/xx TIME xx : xx : xx
For CDs / CDGs / MP3 / VCDs with PBC
OFF
TRK xx/xx TIME xx : xx : xx
For VCDs with PBC ON
TRK xx/xx PBC TIME xx : xx : xx
2. Press Ñ/É to select an item.
3. Use the numeric keys (0-9) to input the
number/time, and press OK to confirm.
➜ The playback skips to the chosen time or
selected title/chapter/track.
Note:
– For CDG discs, it only can select track number.
Viewing from another angle
If the playing DVD disc is recorded with multiple
camera angles. This allows you to view the
picture from different angles. Angle selection is
determined by the disc format.
• During playback, press ANGEL button to select
the different angle.
Note:
– If the playing DVD disc is single-angle type, this
button is useless.
– The maximum number of angle stipulated by
the manufacturers is 9/9.
English
13
Page 14
Disc Operations
English
ZOOM
Zooming allows you to enlarge the video/ JPEG
image during playback.
• During playback, press ZOOM repeatedly to
change the zooming scale.
ZOOM 2 ➜ ZOOM 3 ➜ ZOOM 4 ➜ ZOOM
1/2 ➜ ZOOM 1/3 ➜ ZOOM 1/4 ➜ ZOOM:
OFF
• To pan through the enlarged image, press ▼/▲ /
Ñ/É buttons.
• Press ZOOM repeatedly to exit ZOOM mode.
(ZOOM OFF)
AUDIO
This operation works only on DVDs with
multiple soundtrack language or VCDs with
multiple audio channel.
For DVDs
• On the remote control, press AUDIO
repeatedly to select the desired language for
sound track.
➜ The feature is disc dependant.
For VCDs
• Press AUDIO repeatedly to select the audio
channel for sound output displayed on the TV
screen.
MONO L ➜ MONO R ➜ MIX MONO ➜
STEREO
SUBTITLE (DVD only)
• Press repeatedly SUBTITLE on the remote
control to select different subtitle languages.
➜ The feature is disc dependant.
Playing MP3/picture disc (JPEG,
Kodak)
IMPORTANT!
–You have to turn on your TV set and
set to the correct Video In channel.
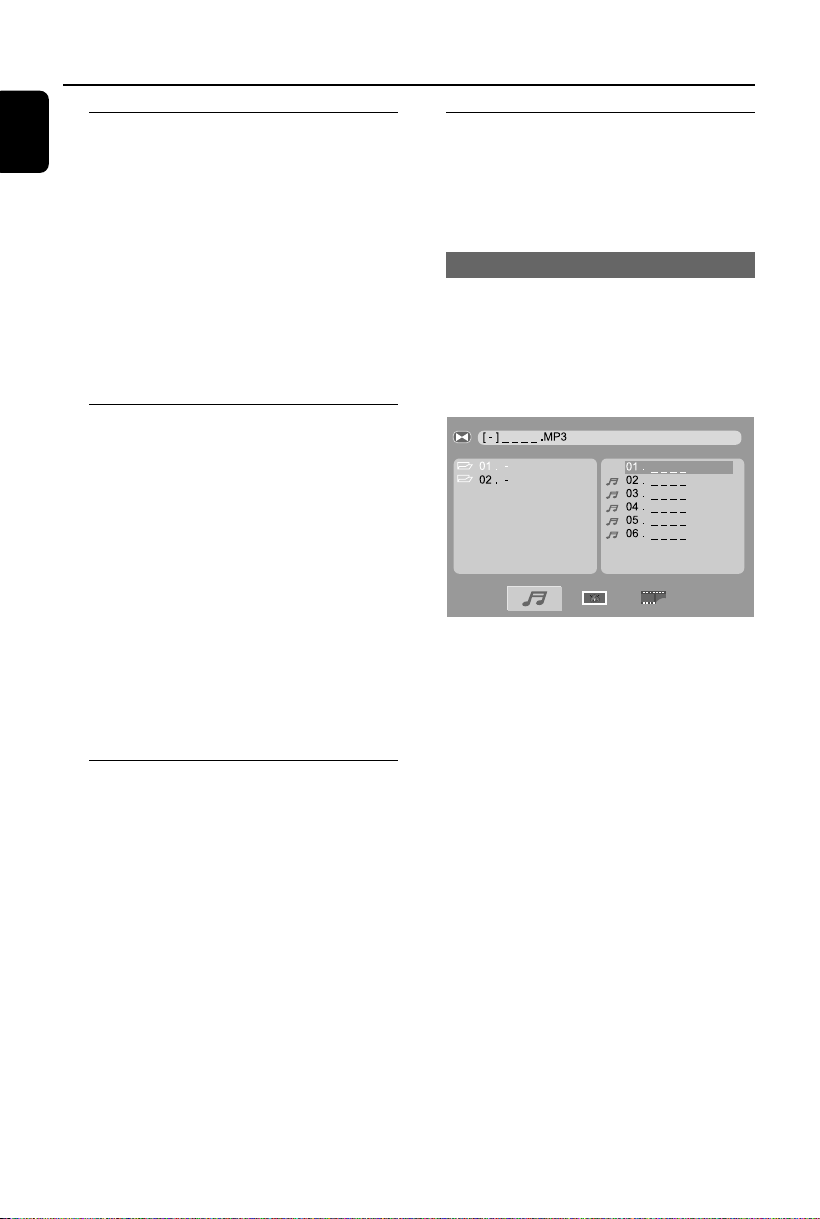
Playing an MP3 disc
1. Load an MP3 disc.
➜ The disc reading time may exceed 30
seconds due to complexity of the directory/file
configuration.
➜ Playback starts automatically and content
menu appears.
2. Use ▼/▲ /Ñ/É keys to select the album and
then press OK.
3. Use ▼/▲ /Ñ/É keys to select a track in the
album, then press OK to start playback from the
selected file to the end of the album.
• During playback, use the numeric keys (0-9)
to select a desired file from the disc menu and
press OK.
4. Pressí/ëon front panel or PREV Ià /
NEXT áI on remote control to select
previous/next track.
5. To stop playback, press STOPÇ twice.
14
Page 15
DVD Menu Operations
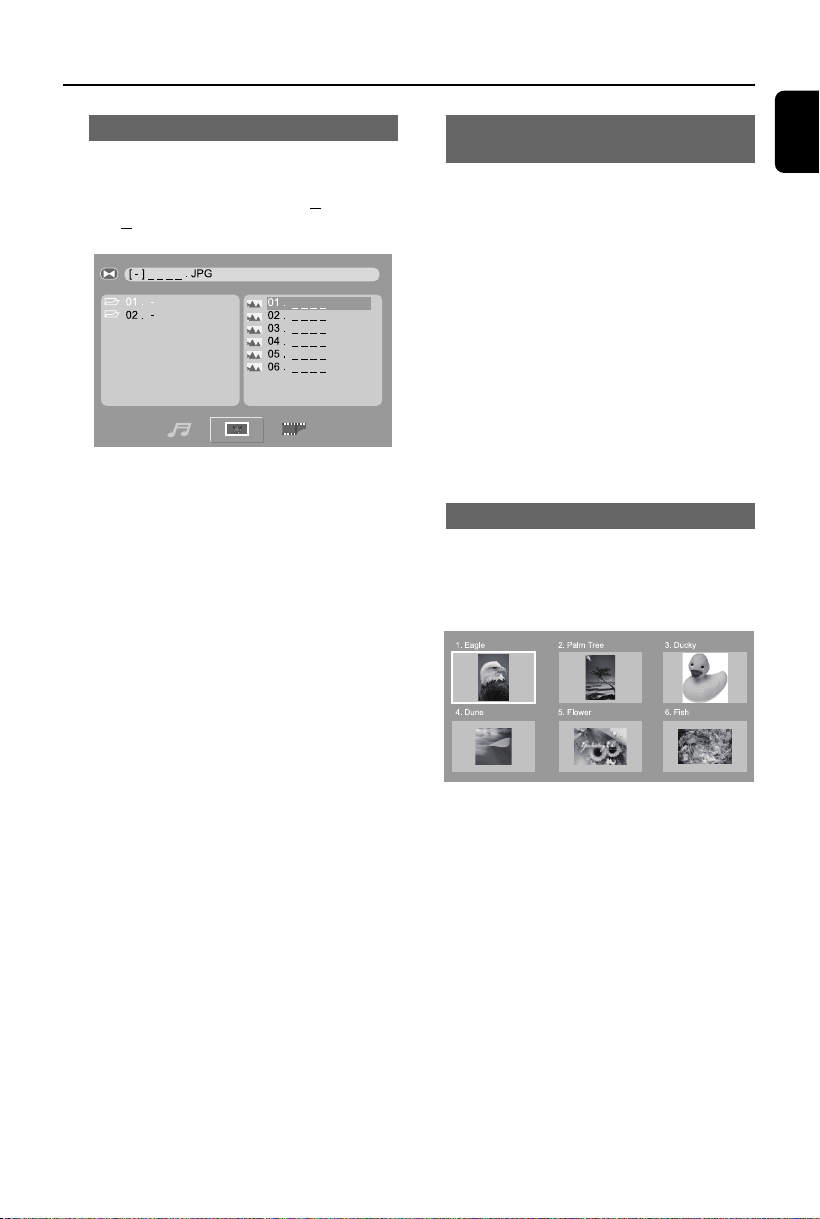
Playing a JPEG file (slide show)
You can display JPEG pictures in the selected
folder to roll automatically one after the other.
1. Insert a JPEG photo CD (CD, DVD+RW,
DVD+R)
➜ The content menu appears.
2. Use ▼/▲ /Ñ/É keys to select the folder and
file, then press OK to start the slide show
playback.
During playback, you can
• Pressí/ë on front panel or PREV Ià /
NEXT áI on remote control to select
previous/next file.
• Press Ñ/É to rotate the picture 90
anticlockwise or clockwise.
o
• Press ▼/▲ to flip the picture vertically or
horizontally.
Playing MP3 music and JPEG pictures
simultaneously
You can create a musical slide show if the disc
contains both the MP3 music and JPEG picture
files.
1. Insert a MP3 disc that contains music and
pictures.
2. During music playback, press ▼/▲ keys to select
a desired picture file from the disc menu and
press OK.
➜ The picture files will be played back through
to the end of the folder.
➜ The music keeps playing back and will be
repeated if reaches the end of the selected
album, playlist or track.
3. To stop simultaneous playback, press STOP Ç
twice.
Playing a Kodak picture CD
1. Insert a Kodak picture disc.
➜ Playback will start automatically.
2. To stop playback, press STOP Ç.
➜ 6 thumbnail pictures will appear on the TV.
English
Note:
– It may require longer time for the DVD player
to display the disc content on the TV due to the
large number of picture compiled into one disc.
3. Use ▼/▲ /Ñ/É to navigate within the menu
and press OK to start playback.
15
Page 16
DVD Menu Operations
English
Using the System Setup menu
options
This DVD setup is carried out via your TV set,
enabling you to customize the DVD player to
suit your particular requirements.
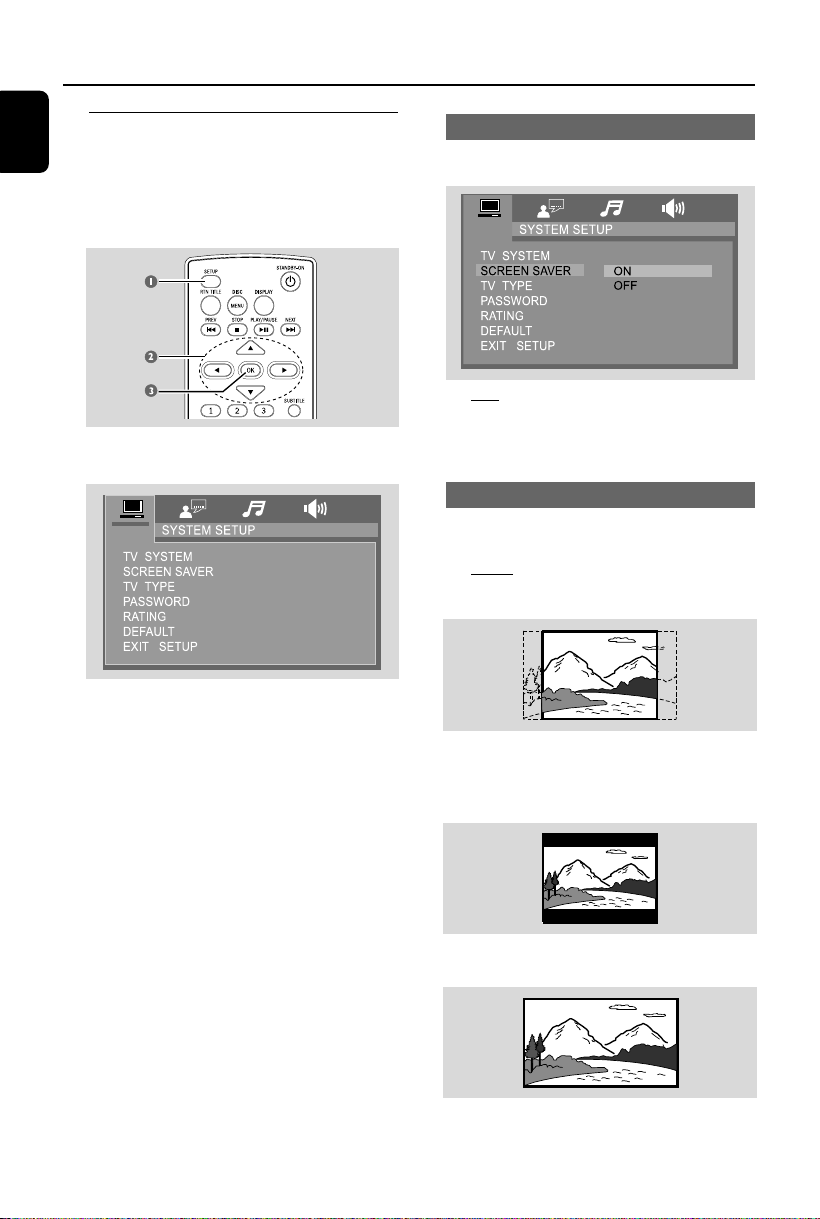
1. Press SETUP.
➜ The setup will appear across the TV screen.
Screen Saver
This function is used to turn the screen saver on
or off.
➜ ON: In STOP or tray open mode, if no
actions are performed about 5 minutes, the
screen saver will be activated.
➜ OFF: Screen saver is disabled.
Setting the TV TYPE
Set the aspect ratio of the DVD Player according
to the TV you have connected.
➜ 4:3PS(pan scan): If you have a normal TV
and want both sides of the picture to be
trimmed or formatted to fit your TV screen.
2. Press ▼/▲ /Ñ/É on the remote control to
navigate in the menu.
3. Press OK to confirm your setting.
To remove the menu
• Press SETUP to exit the menu.
Note:
– Some of the features in the System Menu
Options are described in “Getting Started”.
16
➜ 4:3LB (letter box): If you have a normal
TV. In this case, a wide picture with black bands
on the upper and lower portions of the TV
screen will be displayed.
➜ 16:9:(wide screen): If you have a wide-
screen TV.
Page 17
DVD Menu Operations
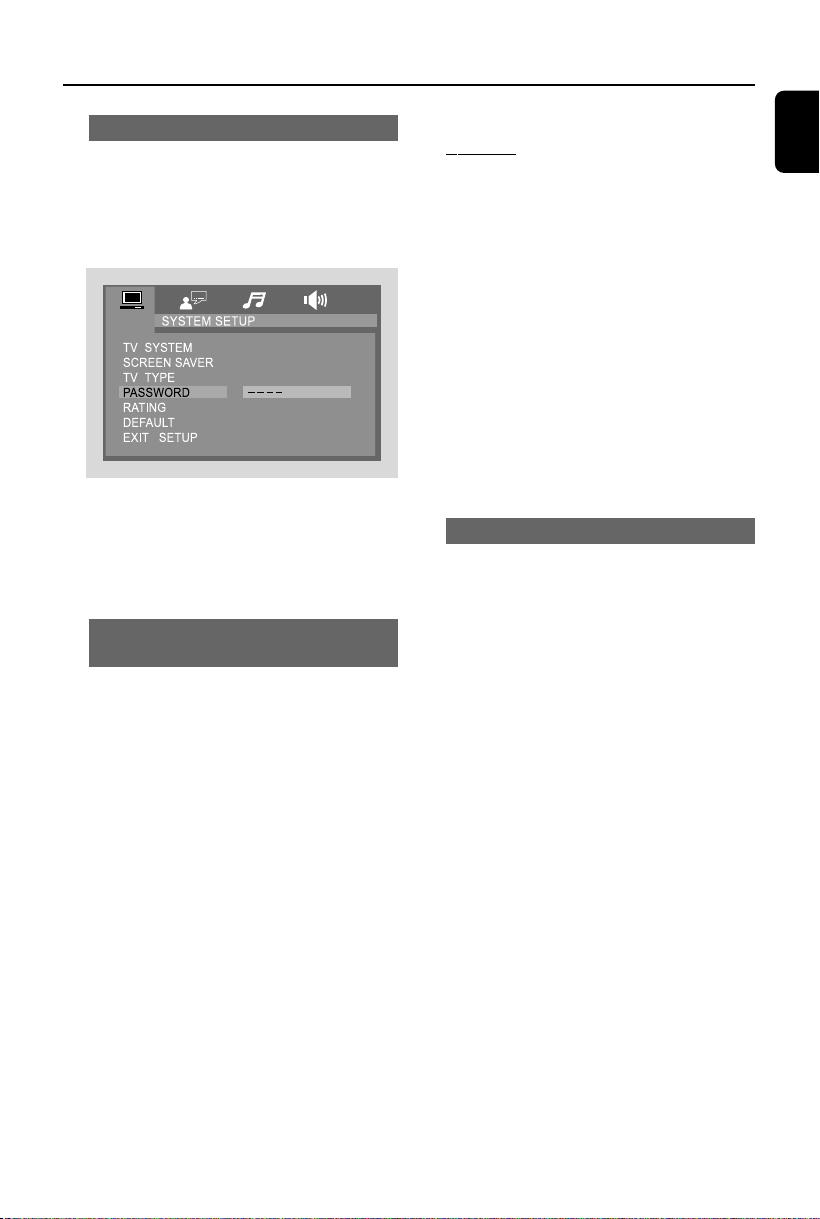
Changing the password
You can change the four-digit code used as
Password.
1. Press SETUP.
2. Press ▼/▲ /Ñ/Éon the remote control to
select PASSWORD and pressÉ.
3. Use the numeric keys (0-9) to enter your
current four-digit code, then press OK.
➜ The password supplied by default is 0000.
4. PressÉ, then enter the new four-digit password.
5. Press OK to confirm.
Restricting playback by setting rating
level
Some DVDs may have a parental level assigned
to the complete disc or to certain scenes on the
disc. This feature lets you set a playback limitation
level. The rating levels are from 1 to 8 and are
country specific. You can prohibit the playing of
certain discs that are not suitable for your
children or have certain discs played with
alternative scenes.
1. Press SETUP.
2. Press ▼/▲ /Ñ/É on the remote control to
select RATING and press É.
➜ You need to enter the password at first.
3. Press ▼/▲ to select a rating level and press OK.
➜ DVDs r ated above the level you select will
not play unless you enter your four-digit
password or choose a higher level rating.
4. Use the numeric keys (0-9) to enter your
current four-digit code.
Rating explanations
8 ADULT – material for adults only; viewed
only by adults due to graphic sexual scenes,
violence, or language.
7 NC-17 – No children under age 17; not
recommended for children under age 17.
5~6 PG-R – Parental Guidance – Restricted;
recommended that parents restrict children
under 17 from viewing or allow them to view
only when supervised by a parent or adult
guardian.
4 PG 13 – Material is unsuitable for children
under age 13.
3 PG – Parental Guidance suggested.
2 G – General Audience; recommended as
acceptable for viewers of all ages.
1 KID SAFE – Kids material; recommended
especially for children and viewers of all ages.
Default
If RESTORE is selected, all the items in the setup
menu will be reset to default setting, except
Rating Setting and Password.
English
17
Page 18
DVD Menu Operations
English
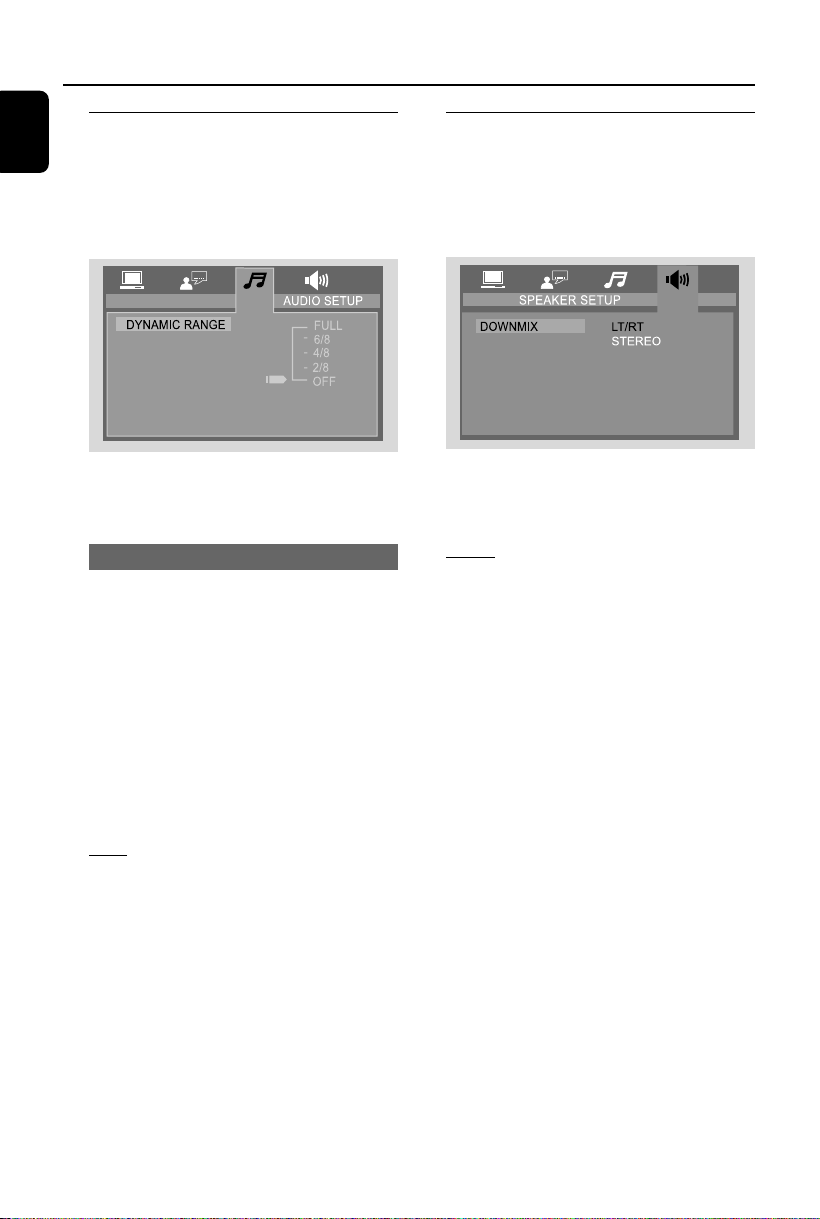
Using the Audio Setup menu
options
1. Press SETUP.
2. PressÑ/Éto select AUDIO SETUP, t hen
press ▼.
➜ The system setup menu appears.
Using the Speaker Setup menu
option
1. In disc mode, press SETUP.
2. PressÑ/Éto select SPEAKER SETUP, then
press ▼.
➜ The system setup menu appears.
3. Press ▼/▲ /Ñ/Éon the remote control to
navigate in the menu.
4. Press OK to confirm your setting.
Dynamic Range
Select the Dynamic Rang to fit the individual
listening situation of the audience.
1. Press ▼ to select DYNAMIC RANGE in
AUDIO SETUP page, then pressÉto access.
2. Press ▼/▲ to select a setting and press OK to
confirm.
➜ The variable range is from FULL, 7/8~1/8 or
OFF
FULL: Audio with fully compressed Dynamic
Range.
7/8~1/8: Audio with partially compressed
Dynamic Range.
OFF: Audio with uncompressed Dynamic
Range.
3. Press ▼ to select the DOWNMIX, then press
Éto access.
4. Press ▼/▲ to select a setting and press OK to
confirm.
LT/RT: Select this option if your DVD player is
connnected to a Dolby Pro Logic decoder.
STEREO: Select this when output delivers
sound from only the two front speakers.
18
Page 19

Picture
Aspect ratio ............................................................ 4:3, 16:9
D/A Converter .................................. 10 bit, 108 MHz
Sound
Signal to noise ratio ..........................90 dB, A-weight
Distortion and Noise ................................ 1 kHz 0.2%
Sound System ............................................ Dolby Digital
Convenience
Child protection ......................................... Rating Level
Pow e r
Power supply .............................. 110-240V, 50-60 Hz
Standby power consumption ...................... < 1.5 W
Power consumption .................................................. 8 W
Cabinet
Dimensions (W x H x D) 218 x 90 x 221.5 mm
Net Weight ............................................................ 1.095 kg
Packaging Dimensions (H x W x D) ..........................
.......................................................... 248 x 267 x 130 mm
Gross weight............................................................... 1.5 kg
Specifications
English
19
Page 20

Troubleshooting
English
WARNING
Under no circumstances should you try to repair the system yourself, as this will invalidate the
warranty. Do not open the system as there is a risk of electric shock.
If a fault occurs, first check the points listed below before taking the system for repair. If you
are unable to remedy a problem by following these hints, consult your dealer or Philips for
help.
Problem
No power.
No picture.
Distorted or poor picture.
Completely distorted picture or black/
white picture.
The aspect ratio of the screen cannot be
changed even though you have set the TV
shape.
Solution
✔ Check if the AC power cord is properly
connected.
✔ Press STANDBY ONB on the DVD System or
Source buttons on the remote to turn on the
power.
✔ Check if the TV is switched on.
✔ Check the video connection.
✔ Set your TV to the correct Video In channel. This
channel is usually near channel 00. Or, you may
have a button on the TV remote control that
selects Auxiliar y or A/V IN channel. See your TV
owner’s manual for details. Or, change channels
at the TV until you see DVD screen on the TV.
✔ Sometimes a small amount of picture distortion
may appear. This is not a malfunction.
✔ Clean the disc.
✔ TV has a colour system standard. If the disc’s or
DVD system’s colour system is different than
your TV’s colour system, the picture may be
distorted or colourless.
✔ The aspect ratio is fixed on the DVD disc.
✔ Depending on the TV, it may not be possible to
change the aspect ratio.
No sound or distorted sound.
20
✔ Adjust the volume.
✔ Check that the speakers are connected
correctly.
✔ Replace the speaker cables.
✔ The system is in pause, slow motion or fast
forward/reverse mode, press ÉÅ (or ÉÅ on
the remote) to resume normal play mode.
Page 21

Troubleshooting
The micro DVD player does not start
playback.
The DVD micro system does not
respond when the buttons are pressed.
Cannot activate some features, such as
Subtitles, or multi-language Audio.
The remote control does not function.
✔ Insert a readable disc with the playback side
facing down.
✔ Check the disc type, colour system and regional
code. Check for any scr atches or smudges on
the disc.
✔ Press SETUP to turn off the setup menu
screen.
✔ Cancel the parental control rating function or
change the rating level.
✔ Moisture has condensed inside the system.
Remove the disc and leave the system turned
on for about an hour.
✔ Disconnect the power plug from the outlet and
insert again.
✔ Multi-language sound or subtitle is not
recorded on the DVD.
✔ Changing the language for the sound or subtitle
is prohibited on the DVD.
✔ The features may not be available on the disc.
✔ Point the remote control at the remote sensor
of the unit.
✔ Reduce the distance to the player.
✔ Remove any possible obstacles.
✔ Replace the battery with new one.
✔ Check that the battery is loaded correctly.
English
21
Page 22

Glossary
English
Analog: Sound that has not been turned into
numbers. Analog sound varies, while digital sound
has specific numerical values. These jacks send
audio through two channels, the left and right.
Aspect ratio: The ratio of ver tical and
horizontal sizes of a displayed image . The
horizontal vs. ver tical ratio of conventional TVs. is
4:3, and that of wide-screens is 16:9.
AUDIO OUT Jacks: Jacks on the back of the
DVD System that send audio to another system
(TV set, Stereo, etc.).
Bit Rate: The amount of data used to hold a
given length of music; measured in kilobits per
second, or kbps. Or, the speed at which you
record. Generally, the higher the bit rate the
better the sound quality. However, higher bit
rates use more space on a Disc.
Chapter: Sections of a picture or a music
piece on a DVD that are smaller than titles. A
title is composed of several chapters. Each
chapter is assigned a chapter number enabling
you to locate the chapter you want.
Disc menu: A screen display prepared for the
selection of images, sound, subtitles, multi-angles,
etc recorded on a DVD.
Dolby Digital: A surround sound system
developed by Dolby Laboratories containing up
to six channels of digital audio (front left and
right, surround left and right and center).
JPEG: A still-picture data compression system
proposed by the Joint Photographic Expert
Group, which features small decrease in image
quality in spite of its high compression ratio.
MP3: A file format with a sound data
compression system, “MPE” is the abbreviation of
Motion Picture Experts Group 1 (or MPEG-1)
Audio Layer 3. Through the MP3 format, one
CD-R or CD-RW can contain about 10 times as
much data volume as a regular CD can.
Multichannel: DVD is specified to have all
sound tracks constitute one sound field.
Multichannel refers to a structure of sound
tracks having three or more channels.
Rating: A function of the DVD to limit
playback of the disc by the age of the users
according to the limitation level in each country.
The limitation varies from disc to disc; when it is
activated, playback will be prohibited if the
software’s level is higher than the user-set level.
PCM (Pulse Code Modulation): A system
for converting analog sound signal to digital
signal for later processing without data
compression.
Playback control (PBC): Refer s to the signal
recorded on video CDs or SVCDs for
reproduction control. By using screen menus
recorded on a Video CD or SVCD that supports
PBC, you can enjoy interactive-type software as
well as software having a search function.
Region code: A system allowing discs to be
played only in preset regions. This unit will only
play discs that have compatible region codes. You
can find the region code of your unit from the
product label. Some discs are compatible with
more than one region (or ALL regions).
Title: The longest section of a picture or music
feature on DVD, music, etc., in video software, or
the entire album in audio software. Each title is
assigned a title number enabling you to locate
the title you want.
VIDEO OUT jack: Jack on the back of the
DVD System that sends video to TV.
22
Page 23
English
Русский
Meet Philips at the Internet
http://www.philips.com
MCD106
CLASS 1
LASER PRODUCT
Printed in China PDCC-JH-0724
 Loading...