

Page 1
1
General information
This Quick use guide gives a rough overview and helps
to quickly start with basic steps. Please read the supplied
user´s manual for detailed information.
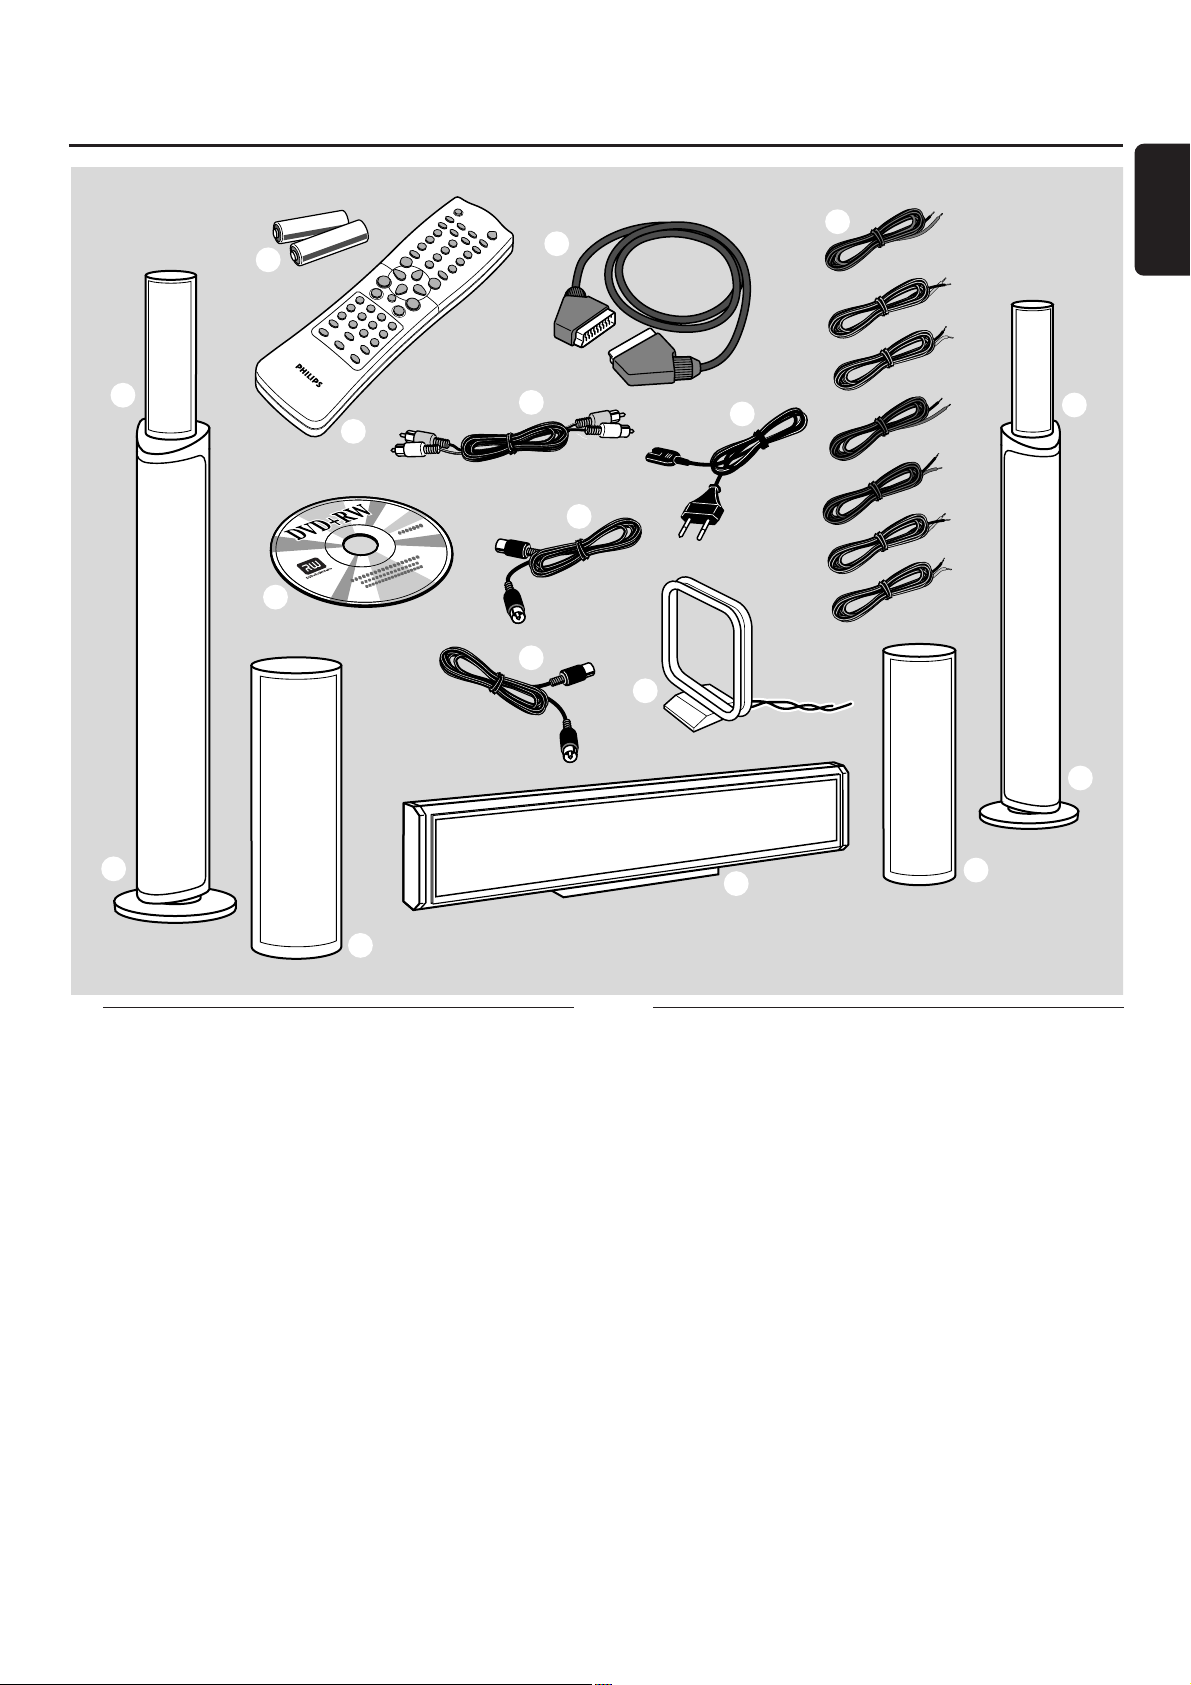
Supplied accessories
1 2 batteries for the remote control, type AA
2 1 remote control
3 1 blank DVD+RW disc
4 1 SCART cable
5 1 cinch audio cable
6 1 TV antenna cable
7 1 FM antenna cable
8 1 MW loop antenna
9 1 AC mains cable
0 7 speaker cables with colour coded ends
! 2 front speakers and 2 rear speakers
@ 2 subwoofers integrated in the speaker stands
# 1 centre speaker
Quick use guide LX9000R
7
2
1
3
!
!
@
@
!
0
9
8
!
#
4
5
6
English
Page 2
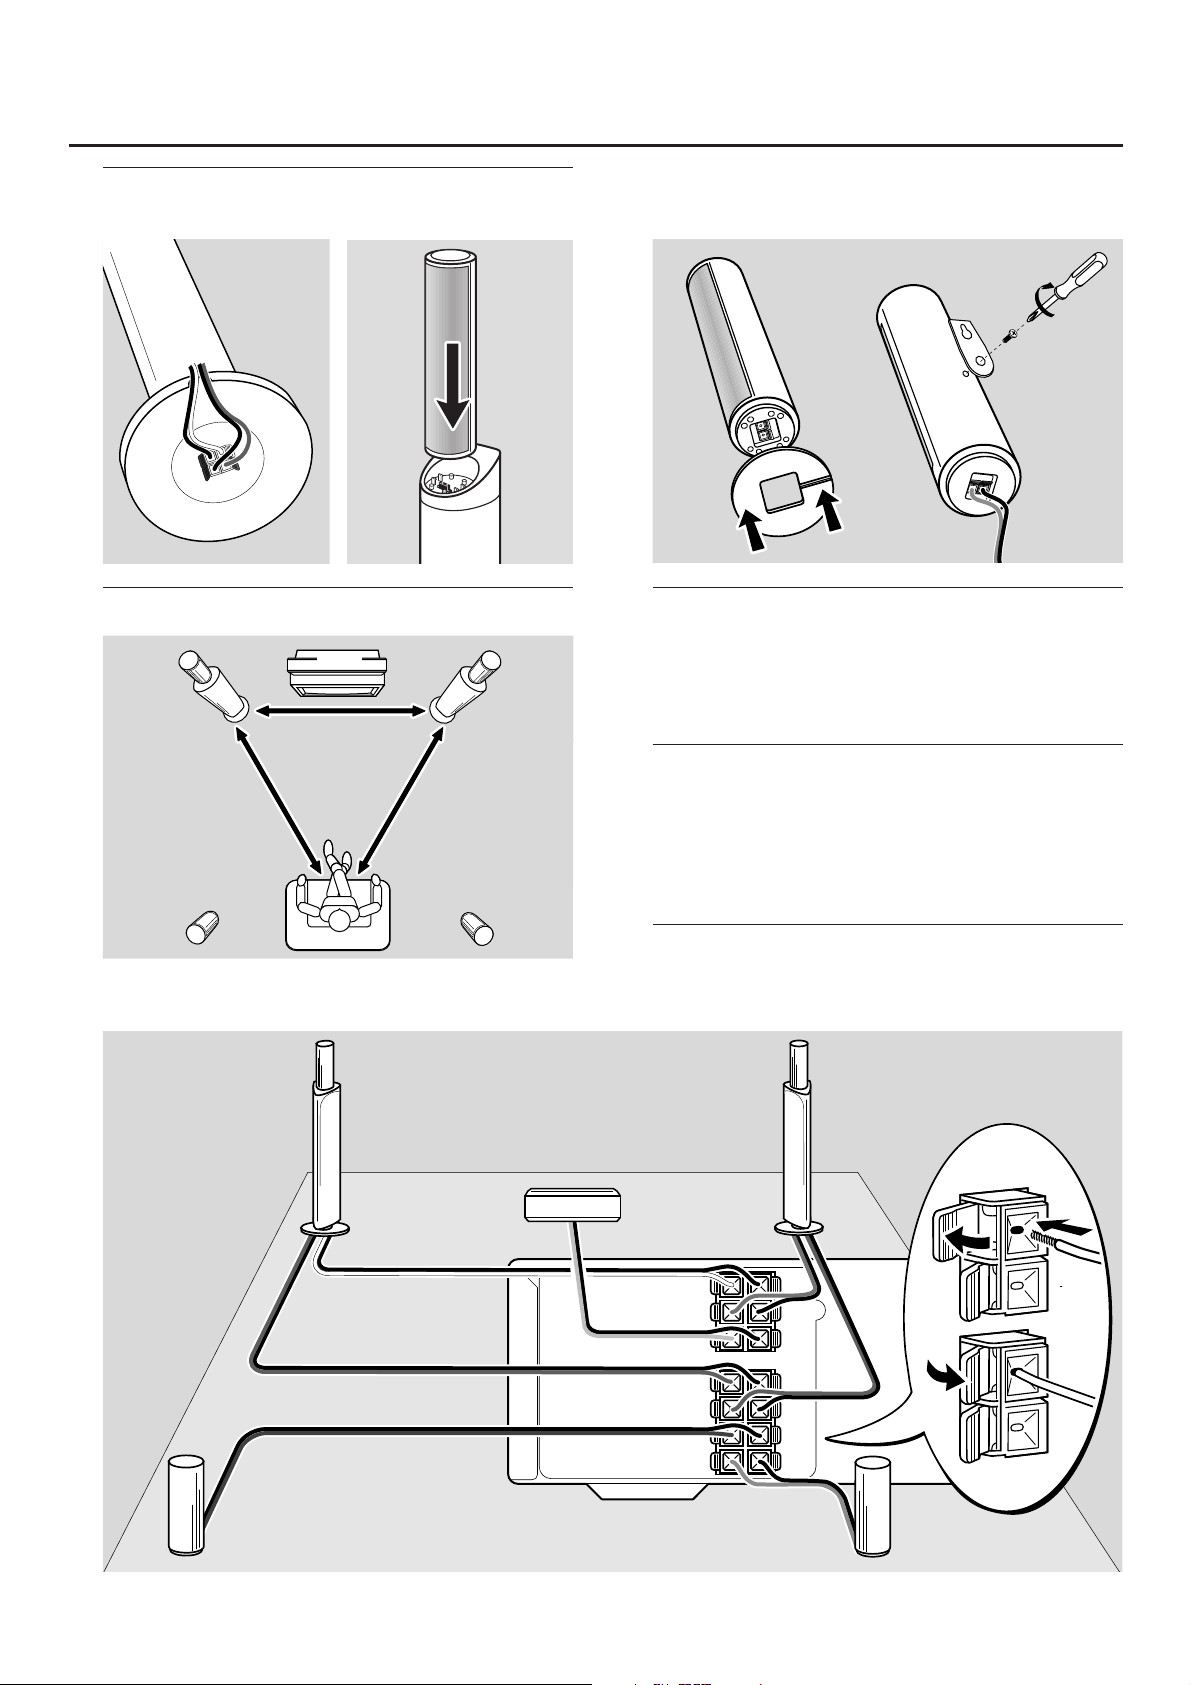
Assembling the speakers
Subwoofers and front speakers
Positioning the speakers
Rear speakers
Connecting the speakers
Connect the speakers using the supplied speaker cables.
Match the colours of the speaker sockets and the speaker
cables:
Speaker
++ −−
Front Left white black
Front Right red black
Centre green black
Subwoofer Left violet black
Subwoofer Right violet black
Rear Left blue black
Rear Right grey black
2
Quick use guide LX9000R
CENT.
4 Ω
SURR
LEFT
4 Ω
SURR
RIGHT
4 Ω
SUB
LEFT
8 Ω
FRONT
LEFT
4 Ω
FRONT
RIGHT
4 Ω
SUB
RIGHT
8 Ω
front L
subwoofer L
rear L rear R
centre
front R
subwoofer R
front R,
subwoofer R
front L,
subwoofer L
rear L rear R
centre
or
to place the
rear speakers
on a shelf or
on the floor
to hang the
rear speakers
on the wall
Page 3

Quick use guide LX9000R
3
Connections
Scart inputs/outputs of your other appliances can be
named:
– TO TV/MONITOR, EURO-AV OUT,…
– AUX, EXT, I/0, EURO-AV IN,…
Initial installation
When you connect the DVD recorder system to the mains
supply for the first time, you need to perform some basic
settings. Please observe the TV screen and the display of
the DVD recorder system.
1 Switch on your TV.
2 Connect the supplied mains cable to AC MAINS ~ and to
the wall socket. If the DVD recorder system is in demo
mode, press 2 to cancel the demo mode.
➜ IS TV ON? is displayed on the DVD recorder system.
3 If necessary set the TV to the correct audio/video channel
for the DVD recorder system. Such channels may be called
AUX or AUXILIARY IN,AUDIO/VIDEO or A/V IN, EXT1,
EXT2 or EXTERNAL IN, etc.These channels are often near
channel 00.
Note: If your TV supports EasyLink, the TV and the DVD
recorder system exchange information via the SCART cable.
In this case, EasyLink loading data from TV,please
wait will appear on the TV.Some of the following settings will
be done automatically then.
4 ➜ The menu Menu Language appears on the TV screen.
Press 3 or 4 to select the language in which the display
messages should appear on the TV screen.Then press OK.
5 ➜ The menu Audio language appears.
Press 3 or 4 to select the language in which DVDs should
preferably be played, if the language is available on the disc.
Then press OK.
TV ANTENNA
IN
TV OUT
EXT 2
EXT 1
MW FM
AUX I/0
TO TV I/0
L
R
L
R
DIGITAL OUT
DIGITAL IN
OPTICAL IN
LINE IN 1 LINE IN 2 LINE OUT
MAINS ~
RADIO
EXT. IN
TO TV
TO TV
DIGITAL OUT
DIGITAL IN
OPTICAL
OUT
TV OUT
ANTENNA
EXT IN
ANTENNA IN
AM ANTENNA
FM ANTENNA
TV ANTENNA
Make sure all
other connections
have been made
before connecting
the mains cable to
AC MAINS ~ and
to the wall socket.
Page 4

6 ➜ The menu Subtitle Language appears.
Press 3 or 4 to select the language in which subtitles
should preferably be displayed, if subtitles in the language
are available on the disc.Then press OK.
Note: Some DVDs may override your audio and subtitle
language selection. In this case, you have to select the audio
and subtitle language in the DVDs Disc Menu.
7 ➜ The menu TV Shape appears.
Press 3 or 4 to select the screen format.This setting will
have an effect only with DVDs supporting different screen
formats.
➜ 4:3 letterbox: for a wide-screen picture (cinema
format) on a conventional 4:3 TV set with black borders
at the top and bottom of the screen.
➜ 4:3 panscan: for a full-height picture with cropped
edges.
➜ 16:9: for a wide-screen TV set.
Then press OK.
8 ➜ The menu Country appears.
Press 3 or 4 to select the country where the
DVD recorder system is used. If your country does not
appear, select Other.Then press OK.
9 ➜ If you have connected the antenna - press OK
appears.
If you connected the DVD recorder system to a
TV antenna or a cable TV system, press OK.
If not, connect the antenna as described in “Connecting the
TV antenna”, then press OK.
➜ Autoinstall appears and the automatic search for
TV channels starts.This may take several minutes. As soon
as the search is complete, Autoinstall complete
appears.
10 Press SYSTEM MENU.
➜ CONTINUE WITH SPECIAL AUDIO SETTINGS is
scrolled on the DVD recorder system.
Next, you will be asked
– about the distances between the speakers and your
preferred listening position and
– to which socket you connected your TV and other
appliances.
11 If you want to continue with these advanced settings:
Press OK. For details, see “Advanced settings” on page 17 in
the user´s manual.
If you do not want to continue, the standard settings
below will be used for the speaker distances and the
connections:
Press 4 to select NO, then press OK to confirm.
➜ AUTOINSTALL is displayed.The DVD recorder system
searches for available radio stations and stores them in its
memory.
➜ After the search INSTALLATION COMPLETE is
scrolled and a radio station is played.The DVD recorder
system is ready to play.
Standard settings for the speaker distances and
the connected appliances
To change these settings later on, see “When adding
appliances or changing the connections of appliances” and
“When changing the speaker setup” in the user´s manual.
appliance is connected to
TV EXT 1 TO TV I/O
satellite receiver EXT 2 AUX I/O
VCR (video recorder) EXT 2 AUX I/O
game console EXT 2 AUX I/O
CD player DIGITAL IN
CD recorder LINE IN 1
tape deck LINE IN 2
Note:The satellite receiver,VCR and game console are
connected in a “chain”. See illustration on the page to the left.
Quick use guide LX9000R
4
3 m
3 m
3 m
1.5 m 1.5 m
English
Page 5

5
Discs for playback and recording
– DVD+R
can be recorded once and played
on standard DVD players and
DVD recorders, if finalised.
– DVD+RW
can be recorded, erased and
re-recorded many times and played on
DVD+RW compatible DVD players
and DVD recorders if finalised.
Discs for playback only
Discs with the following logos can be played:
Playback
1 Press OPEN/CLOSE / on the set to open the drawer and
insert a disc (printed side up) in the tray.
2 Press OPEN/CLOSE / on the set again. If necessary, press
PLAY/PAUSEÉÅ to start playback.
00
To interrupt playback, press PLAY/PAUSEÉÅ.
00
To resume playback, press PLAY/PAUSEÉÅ again.
3 To stop playback press STOP.
Selecting a source
● Turn SOURCE on the DVD recorder system or keep a
source key on the remote control pressed for 1 second to
select either:
– the disc in the DVD recorder system
– MONITOR: the internal TV tuner of the DVD
recorder system (only selectable by pressing
DVD/MON on the remote control)
– TV: the TV
– CAM1: a camcorder connected to CAM 1
– CAM2: a camcorder connected to CAM 2
– SAT: a connected satellite receiver
– VCR: a connected VCR (video recorder)
– GAME: a connected game console
– the radio tuner of the DVD recorder system
– TAPE: a connected tape deck or similar audio
recording appliance
– CDR: a connected CD recorder
– CD: a connected CD player/changer
➜ The sound of the source is played on the DVD recorder
system.
Note: If SOURCE NOT AVAILABLE is scrolled please read
“When adding appliances or changing the connections of
appliances” in the user´s manual.
q
p
k
f
r
j
i
n
m
e
l
o
Quick use guide LX9000R
Page 6

Selecting a recording mode
● Before recording, press REC MODE repeatedly to select
the desired recording mode:
mode quality recording time
HQ better than DVD 60 minutes
SP DVD 120 minutes
SP+ better than S-VHS 150 minutes
LP S-VHS 180 minutes
EP better than VHS 240 minutes
EP+ VHS 360 minutes
Recording a TV programme with
safe record
1 Switch your TV set on. If necessary set the TV to the
correct audio/video channel for the DVD recorder system.
Such channels may be called AUX or AUXILIARY IN,
AUDIO/VIDEO or A/V IN, EXT1, EXT2 or EXTERNAL IN,
etc.These channels are often near channel 00.
2 Load a DVD+R disc or DVD+RW disc on which you want
to record in the tray.
3 Press DVD/MON on the remote control as often as
necessary to see the currently selected TV channel.
4 Press CH+ or CH- on the remote control as often as
necessary to select the desired TV channel (programme
number) from which you wish to record.
5 Keep REC/OTR on the remote control pressed until
SAFE RECO is displayed.
6 Press STOP 9 to stop recording.
Recording from other appliances
1 Switch your TV set on. If necessary set the TV to the
correct audio/video channel for the DVD recorder system.
Such channels may be called AUX or AUXILIARY IN,
AUDIO/VIDEO or A/V IN, EXT1, EXT2 or EXTERNAL IN,
etc.These channels are often near channel 00.
2 Load a disc on which you want to record in the tray.
3 Press on the remote control either:
SAT: to record from a connected satellite receiver.
CAM1/2: to record from a connected video camera. Press
the button repeatedly to toggle between camera 1
(analogue input) and camera 2 (digital i.Link input).
VCR/GAME: to record from a connected video cassette
recorder or a game console. Press the button repeatedly to
toggle between video cassette recorder and game console.
4 Press RECORD on the DVD recorder system or REC/OTR
on the remote control to start recording.
Note: Recordings on a DVD+RW disc are started from the
current position. From there on, earlier recordings may be
overwritten without notice, unless the disc is write protected.
00
To interrupt recording press PLAY/PAUSEÉÅ.
00
To resume recording press PLAY/PAUSEÉÅ again.
5 Press STOP 9 to stop recording.
Quick use guide LX9000R
3103 306 1952.1 VieChr0317
 Loading...