

Page 1

User Manual
English
Lumify Ultrasound System
Page 2

Page 3

Contents
Contents
1 Read This First.......................................................................................................................................... 9
Intended Audience.......................................................................................................................................... 10
Intended Use................................................................................................................................................... 10
Warnings......................................................................................................................................................... 11
Warning Symbols............................................................................................................................................ 12
User Information Components....................................................................................................................... 12
User Information Conventions........................................................................................................................ 13
Upgrades and Updates................................................................................................................................... 16
Supplies and Accessories................................................................................................................................ 16
Customer Service............................................................................................................................................ 17
Recycling, Reuse, and Disposal....................................................................................................................... 17
2 Safety..................................................................................................................................................... 21
Basic Safety..................................................................................................................................................... 21
Electrical Safety............................................................................................................................................... 24
Defibrillators...................................................................................................................................... 27
Fire Safety.......................................................................................................................................... 28
Equipment Protection..................................................................................................................................... 28
Product Compatibility..................................................................................................................................... 30
Symbols........................................................................................................................................................... 30
Biological Safety.............................................................................................................................................. 33
FDA Medical Alert on Latex............................................................................................................... 35
ALARA Education Program................................................................................................................ 37
Output Display................................................................................................................................... 41
Control Effects................................................................................................................................... 44
Related Guidance Documents........................................................................................................... 46
Philips Healthcare 4535 618 58571_A/795 * MAY 2016
Lumify Ultrasound System 3
Page 4

Contents
Acoustic Output and Measurement.................................................................................................. 46
Acoustic Output Tables...................................................................................................................... 50
Acoustic Measurement Precision and Uncertainty........................................................................... 50
Operator Safety.............................................................................................................................................. 51
Repetitive Strain Injury ..................................................................................................................... 51
Philips Transducers............................................................................................................................ 52
Glutaraldehyde Exposure.................................................................................................................. 52
Infection Control................................................................................................................................ 52
Electromagnetic Compatibility ....................................................................................................................... 53
Electrostatic Discharge Precautions.................................................................................................. 55
Electromagnetic Emissions................................................................................................................ 55
Approved Cables for Electromagnetic Compliance........................................................................... 56
Approved Transducers for Electromagnetic Compliance.................................................................. 57
Approved Accessories for Electromagnetic Compliance................................................................... 57
Electromagnetic Immunity................................................................................................................ 58
Electromagnetic Interference............................................................................................................ 61
Recommended Separation Distance................................................................................................. 62
Avoiding Electromagnetic Interference............................................................................................. 64
Use Restrictions Due to Interference................................................................................................ 65
3 System Overview.................................................................................................................................... 67
Device Requirements...................................................................................................................................... 67
System Capabilities......................................................................................................................................... 68
Measurements................................................................................................................................... 68
Transducer Types............................................................................................................................... 68
Indications for Use and Supporting Transducers............................................................................... 69
Patient Data Protection..................................................................................................................... 70
Wireless Networking......................................................................................................................... 70
System Components....................................................................................................................................... 71
Data Storage ..................................................................................................................................... 72
System Settings............................................................................................................................................... 72
System Information........................................................................................................................................ 73
4 Lumify Ultrasound System
Philips Healthcare 4535 618 58571_A/795 * MAY 2016
Page 5

Contents
4 Using the System.................................................................................................................................... 75
Downloading and Installing the Lumify App................................................................................................... 75
Registration and Entitlement.......................................................................................................................... 75
Registering Your Transducers......................................................................................................................... 76
Giving Lumify Access to Shared Device Storage............................................................................................. 76
Updating the Lumify App................................................................................................................................ 77
Viewing the App Walkthrough........................................................................................................................ 77
Canceling Your Subscription........................................................................................................................... 77
Turning the System On and Off....................................................................................................................... 78
Setting the System Time and Date.................................................................................................................. 79
Setting the Thermal Index Display.................................................................................................................. 79
Imaging Display............................................................................................................................................... 79
Quick Exams.................................................................................................................................................... 82
Starting Quick Exams......................................................................................................................... 82
Using Your Device's Camera as a Barcode Scanner........................................................................................ 84
Saving Barcode Formats.................................................................................................................... 85
Supported Barcode Formats.............................................................................................................. 85
Connecting Transducers................................................................................................................................. 86
Deleting Patient Data and Lumify Settings..................................................................................................... 86
Modality Worklist........................................................................................................................................... 86
Adding a Modality Worklist Server.................................................................................................... 87
Modifying or Deleting a Modality Worklist Server............................................................................ 88
5 Performing an Exam............................................................................................................................... 89
Starting New Exams........................................................................................................................................ 89
Searching in the Worklist................................................................................................................................ 91
Changing Presets During Exams...................................................................................................................... 92
Philips Healthcare 4535 618 58571_A/795 * MAY 2016
Editing Patient Data........................................................................................................................................ 92
Lumify Ultrasound System 5
Page 6

Contents
Reviewing Saved Exams.................................................................................................................................. 92
Restarting a Paused Exam............................................................................................................................... 93
Imaging Modes............................................................................................................................................... 93
2D Mode............................................................................................................................................ 93
Using 2D Mode.................................................................................................................................. 93
Color Mode ....................................................................................................................................... 94
Using Color Mode.............................................................................................................................. 94
Imaging Features............................................................................................................................................ 95
AutoSCAN.......................................................................................................................................... 95
Zoom Magnification........................................................................................................................... 95
Full-Screen View................................................................................................................................ 96
Displaying a Centerline...................................................................................................................... 96
Performing a 2D Distance Measurement....................................................................................................... 96
Measurement Accuracy.................................................................................................................................. 97
Measurement Accuracy Tables ...................................................................................................................... 98
Acquiring Images............................................................................................................................................. 98
Acquiring Loops.............................................................................................................................................. 99
Annotation...................................................................................................................................................... 99
Adding Labels..................................................................................................................................... 99
Ending an Exam............................................................................................................................................. 100
6 Review.................................................................................................................................................. 103
Starting Review During an Exam................................................................................................................... 103
Starting Review After an Exam..................................................................................................................... 103
Navigating Thumbnails and Images.............................................................................................................. 103
Playing Loops................................................................................................................................................ 104
E-mailing Images........................................................................................................................................... 105
Deleting Images and Loops........................................................................................................................... 106
Exporting Exams............................................................................................................................................ 106
6 Lumify Ultrasound System
Philips Healthcare 4535 618 58571_A/795 * MAY 2016
Page 7

Contents
Showing or Hiding Patient Data on Exported Images................................................................................... 107
E-mailing Exams............................................................................................................................................ 108
Deleting Exams............................................................................................................................................. 109
Configuring Export Destinations................................................................................................................... 109
Export Destination Settings.......................................................................................................................... 110
Editing Export Destinations........................................................................................................................... 112
Viewing the Export Queue............................................................................................................................ 113
Enabling DICOM Logging............................................................................................................................... 113
7 Transducers.......................................................................................................................................... 115
Transducer Safety......................................................................................................................................... 115
Clinical Applications and Transducers........................................................................................................... 116
Transducer Maintenance ............................................................................................................................. 116
Acoustic Artifacts.......................................................................................................................................... 117
Transducer Covers........................................................................................................................................ 120
Ultrasound Transmission Gels...................................................................................................................... 121
Transducer Storage....................................................................................................................................... 122
Storage for Transport ..................................................................................................................... 122
Daily and Long-Term Storage.......................................................................................................... 123
Testing Transducers...................................................................................................................................... 123
8 Transducer Care.................................................................................................................................... 125
Transducer Care and Operator Safety.......................................................................................................... 125
Latex Product Alert.......................................................................................................................... 130
Transducer Care Methods............................................................................................................................ 131
Transducer and Cable Cleaning..................................................................................................................... 132
Cleaning a Transducer..................................................................................................................... 133
Low-level Disinfecting of Transducers.......................................................................................................... 135
Philips Healthcare 4535 618 58571_A/795 * MAY 2016
Lumify Ultrasound System 7
Page 8

Contents
High-level Disinfecting of Transducers.......................................................................................................... 137
Minimizing the Effects of Residual Disinfectant.............................................................................. 139
Disinfectants Compatibility........................................................................................................................... 140
Disinfectants and Cleaning Solutions for Transducers.................................................................... 142
9 System Maintenance............................................................................................................................ 151
Device Maintenance..................................................................................................................................... 151
Transducer Maintenance ............................................................................................................................. 152
Sending System Logs..................................................................................................................................... 153
Viewing Audit Logs........................................................................................................................................ 153
Troubleshooting............................................................................................................................................ 153
Error Messages............................................................................................................................................. 154
For Assistance............................................................................................................................................... 155
10 Specifications........................................................................................................................................ 157
System Specifications................................................................................................................................... 157
Safety and Regulatory Requirements........................................................................................................... 158
Index.................................................................................................................................................... 159
8 Lumify Ultrasound System
Philips Healthcare 4535 618 58571_A/795 * MAY 2016
Page 9

Read This First
1
CAUTION
United States federal law restricts this device to sale by or on the order of a physician.
Read This First
This manual is intended to assist you with the safe and effective operation of your Philips
product. Before attempting to operate the product, read this manual and strictly observe all
warnings and cautions. Pay special attention to the information in the “Safety” section.
The user information for your Philips product describes the most extensive configuration of the
product, with the maximum number of options and accessories. Some functions described may
be unavailable on your product's configuration.
This document and the information contained in it is proprietary and confidential information
of Philips Healthcare ("Philips") and may not be reproduced, copied in whole or in part,
adapted, modified, disclosed to others, or disseminated without the prior written permission of
the Philips Legal Department. This document is intended to be used either by customers, and is
licensed to them as part of their Philips equipment purchase, or to meet regulatory
commitments as required by the FDA under 21 CFR 1020.30 (and any amendments to it) and
other local regulatory requirements. Use of this document by unauthorized persons is strictly
prohibited.
Philips provides this document without warranty of any kind, implied or expressed, including,
but not limited to, the implied warranties of merchantability and fitness for a particular
purpose.
Philips has taken care to ensure the accuracy of this document. However, Philips assumes no
liability for errors or omissions and reserves the right to make changes without further notice to
any products herein to improve reliability, function, or design. Philips may make improvements
or changes in the products or programs described in this document at any time.
Philips Healthcare 4535 618 58571_A/795 * MAY 2016
Lumify Ultrasound System 9
Page 10

Read This First Intended Audience
Unauthorized copying of this document, in addition to infringing copyright, might reduce the
ability of Philips to provide accurate and current information to users.
Non-Philips product names may be trademarks of their respective owners.
Intended Audience
Before you use your user information, you need to be familiar with ultrasound techniques.
Sonography training and clinical procedures are not included here.
This document is intended for healthcare professionals who operate and maintain your Philips
product.
Intended Use
The intended use of the product is diagnostic ultrasound imaging and fluid flow analysis of the
human body. See “Indications for Use and Supporting Transducers” on page 69.The product
shall provide the ability for gathering clinically acceptable images and ultrasound data for the
clinical applications and anatomies listed in the table provided in “Clinical Applications and
Transducers” on page 116. The intended use environments include clinics, hospitals, and
clinical point-of-care for diagnosis of patients.
This product is intended to be installed, used, and operated only in accordance with the safety
procedures and operating instructions given in the product user information, and only for the
purposes for which it was designed. However, nothing stated in the user information reduces
your responsibility for sound clinical judgment and best clinical procedure.
The Lumify Ultrasound System is intended for diagnostic ultrasound imaging in B-mode
(2D mode) and in color Doppler (color flow). The system is indicated for diagnostic ultrasound
imaging and fluid flow analysis in the following applications: Fetal/Obstetric, Abdominal,
Urology, Gynecological, Cardiac Fetal, Small Organ, Musculoskeletal, Peripheral Vessel, and
Carotid. Lumify is intended for use in environments where healthcare is provided by healthcare
professionals, with the exception of home, air, and emergency vehicles.
10 Lumify Ultrasound System
Philips Healthcare 4535 618 58571_A/795 * MAY 2016
Page 11

Warnings Read This First
WARNING
Do not use the system for purposes other than those intended and expressly stated by
Philips. Do not misuse the system, and do not use or operate the system incorrectly.
Installation, use, and operation of this product are subject to the law in the jurisdictions in
which the product is used. Install, use, and operate the product only in such ways that do not
conflict with applicable laws or regulations, which have the force of law.
Use of the product for purposes other than those intended and expressly stated by Philips, as
well as incorrect use or operation, may relieve Philips or its agents from all or some
responsibility for resultant noncompliance, damage, or injury.
WARNING
System users are responsible for image quality and diagnosis. Inspect the data that is being
used for the analysis and diagnosis, and ensure that the data is sufficient both spatially and
temporally for the measurement approach being used.
Warnings
Before using the system, read these warnings and the “Safety” on page 21 section.
WARNING
Do not operate this system in the presence of flammable gases or anesthetics. Explosion can
result. The system is not compliant in AP/APG environments as defined by IEC 60601-1.
Philips Healthcare 4535 618 58571_A/795 * MAY 2016
Lumify Ultrasound System 11
Page 12

Read This First Warning Symbols
WARNING
Medical equipment must be installed and put into service according to the special
electromagnetic compatibility (EMC) guidelines provided in the “Safety” on page 21
section.
WARNING
The use of portable and mobile radio-frequency (RF) communications equipment can affect
the operation of medical equipment.
Warning Symbols
The system uses various warning symbols. For symbols used on the system, see “Symbols” on
page 30.
User Information Components
The user information provided with your product includes the following components:
• User Information CD: Includes all of the user information, except the Operating Notes.
• Operating Notes: Contains information that clarifies certain product responses that might
be misunderstood or cause user difficulty.
• User Manual: Provided with the product and included on the CD. The User Manual
introduces you to features and concepts, helps you set up your system, contains
comprehensive instructions for using the system and includes important safety information.
• Acoustic Output Tables: Included on the CD, it contains information about acoustic output
and patient-applied part temperatures.
• Medical Ultrasound Safety: Included on the CD, it contains information on bioeffects and
biophysics, prudent use, and implementing ALARA (as low as reasonably achievable).
12 Lumify Ultrasound System
Philips Healthcare 4535 618 58571_A/795 * MAY 2016
Page 13

User Information Conventions Read This First
• Shared Roles for System and Data Security: Included on the CD, it contains guidelines to
help you understand security recommendations for your Philips product and information on
Philips' efforts to help you prevent security breaches.
Some user information is also available on the Support section of the Lumify portal:
www.philips.com/lumify
User Information Conventions
The user information for your product uses the following typographical conventions to assist
you in finding and understanding information:
• All procedures are numbered, and all subprocedures are lettered. You must complete steps
in the sequence they are presented to ensure success.
• Bulleted lists indicate general information about a particular function or procedure. They do
not imply a sequential procedure.
• Control names and menu items or titles are spelled as they are on the system, and they
appear in bold text.
• Symbols appear as they appear on the system.
• System and ultrasound system refer to the combination of a Philips transducer, the Philips
Lumify app, and a compatible Android device.
• Device refers to a Lumify-compatible Android device.
• Operating system refers to the Android operating system.
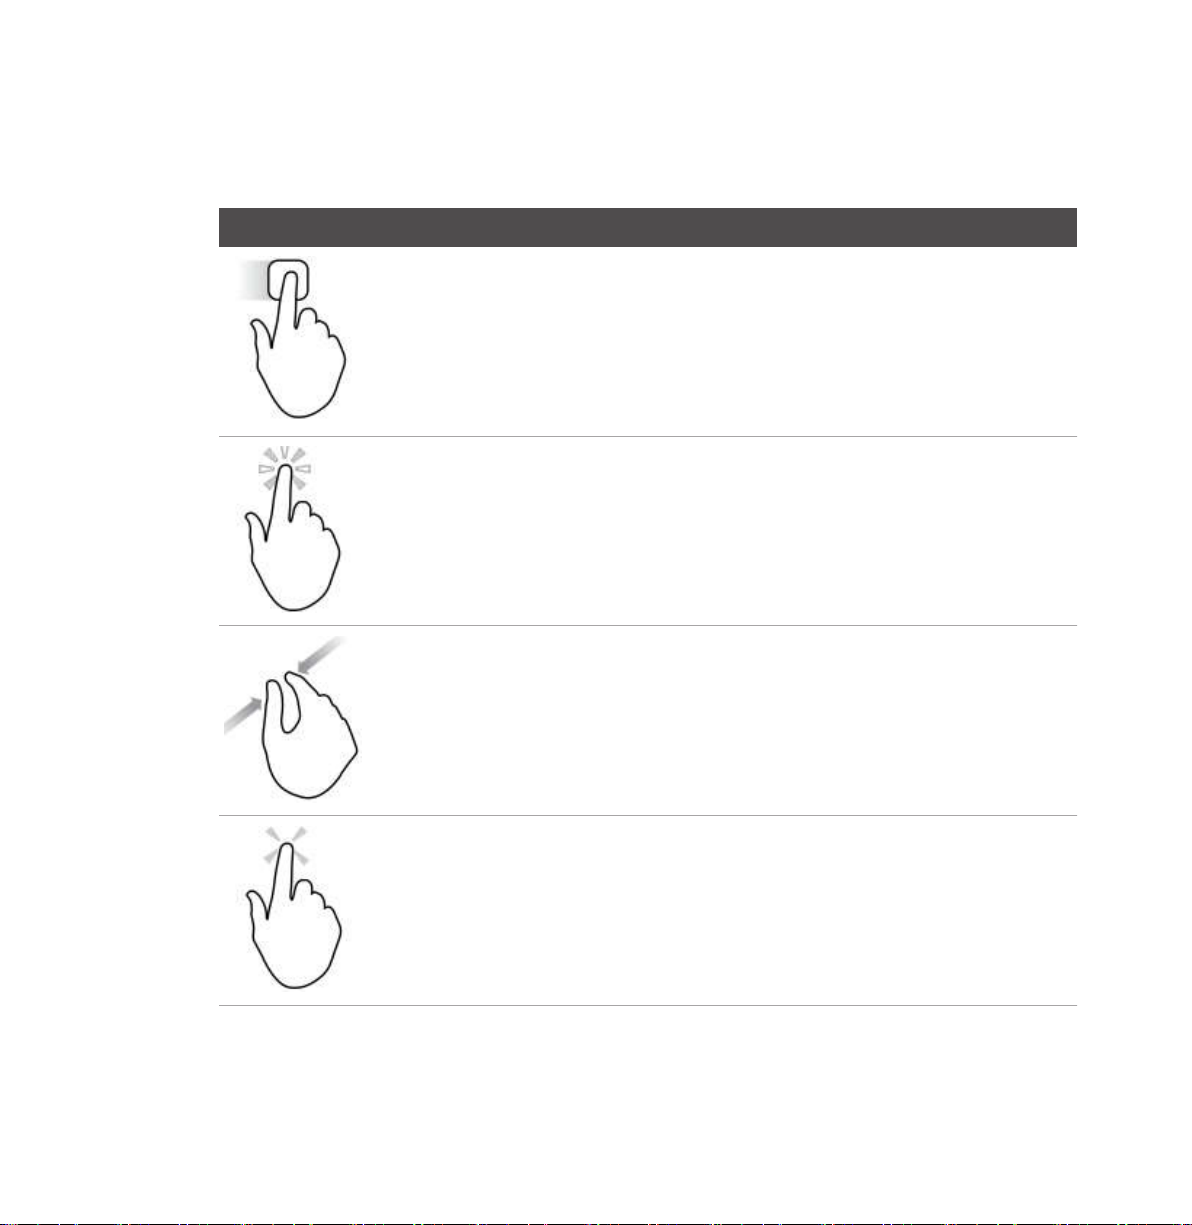
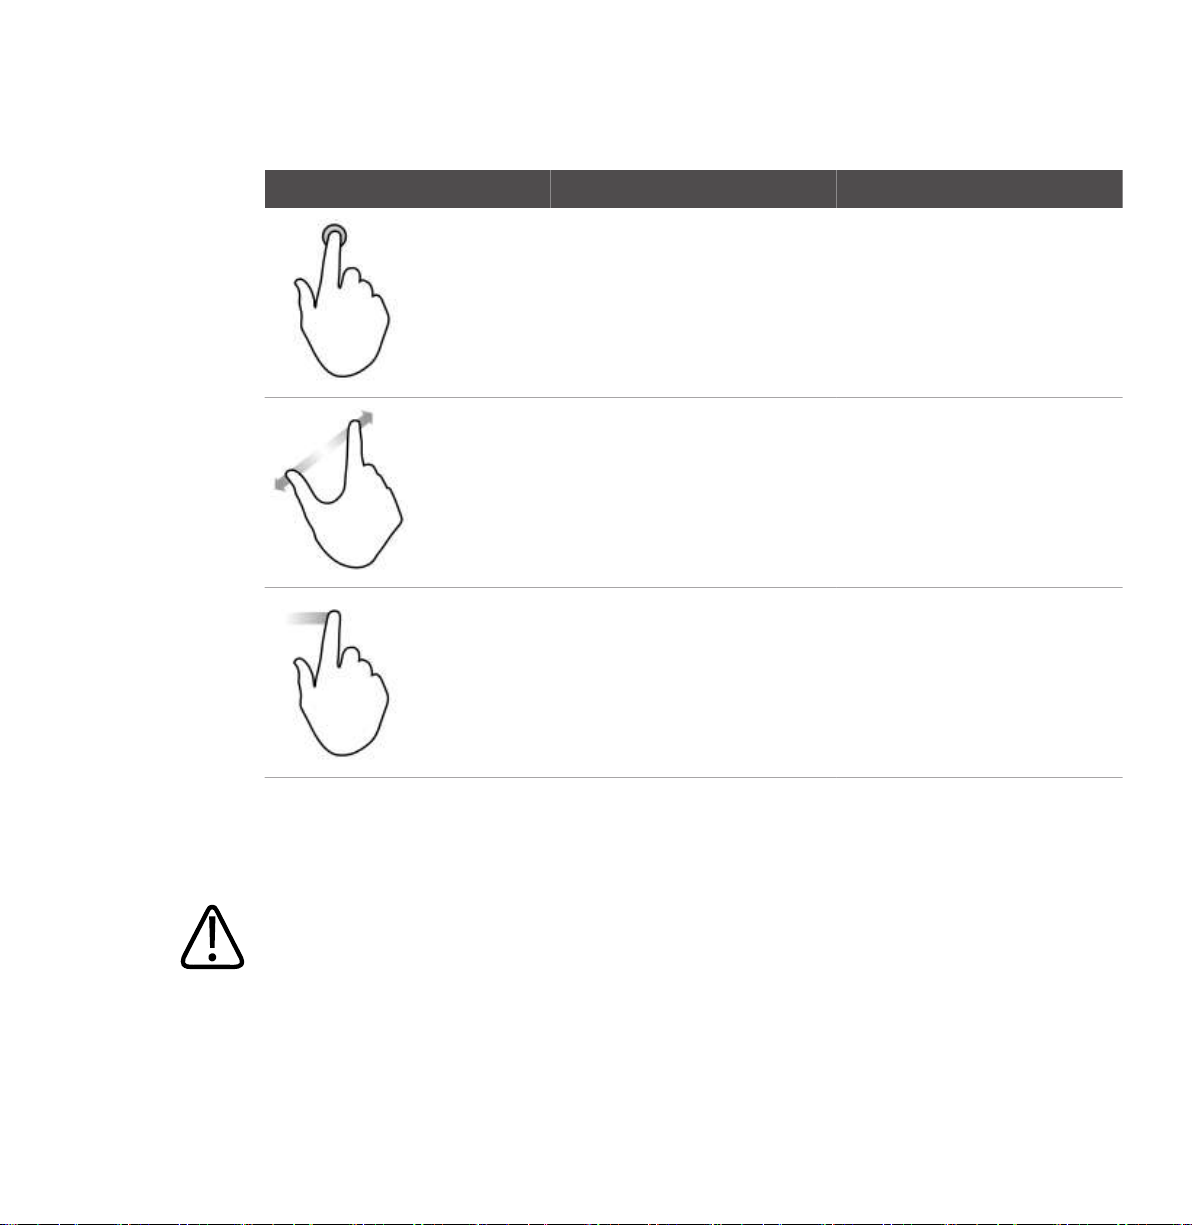
The following touch gestures are used to control your system.
Philips Healthcare 4535 618 58571_A/795 * MAY 2016
Lumify Ultrasound System 13
Page 14
Read This First User Information Conventions
Touch Gestures
Gesture Name Description
Drag Touch the screen with a finger and
move the finger across the screen
without lifting the finger.
Double tap Touch the screen briefly twice with
the same finger.
Pinch Touch the screen with two fingers
and move them toward each other.
Touch Touch a control with your finger.
14 Lumify Ultrasound System
Philips Healthcare 4535 618 58571_A/795 * MAY 2016
Page 15
User Information Conventions Read This First
Gesture Name Description
Touch and hold Touch the screen for a short time
without moving your finger.
Spread Touch the screen with two fingers
and move them apart.
Swipe Touch the screen with your finger
and move the finger in a quick
motion right, left, up, or down.
Information that is essential for the safe and effective use of your product appears throughout
your user information as follows:
WARNING
Warnings highlight information vital to the safety of you, the operator, and the patient.
Philips Healthcare 4535 618 58571_A/795 * MAY 2016
Lumify Ultrasound System 15
Page 16

Read This First Upgrades and Updates
CAUTION
Cautions highlight ways that you could damage the product and consequently void your
warranty or service contract or ways that you could lose patient or system data.
NOTE
Notes bring your attention to important information that will help you operate the product
more effectively.
Upgrades and Updates
Philips is committed to innovation and continued improvement. Upgrades may be announced
that consist of hardware or software improvements. Updated user information will accompany
those upgrades.
For more information, see “Updating the Lumify App” on page 77.
Supplies and Accessories
To order supplies and accessories, visit the Lumify portal (www.philips.com/lumify), or contact
CIVCO Medical Solutions:
CIVCO Medical Solutions
102 First Street South, Kalona, IA 52247‑9589
Telephone: 800‑445‑6741 (USA and Canada), +1 319‑248‑6757 (International)
Fax: 877‑329‑2482 (USA and Canada), +1 319‑248‑6660 (International)
E-mail: [email protected]
Internet: www.civco.com
16 Lumify Ultrasound System
Philips Healthcare 4535 618 58571_A/795 * MAY 2016
Page 17

Customer Service Read This First
System Accessories
Item Additional Information
Cables See “Approved Cables for Electromagnetic Compliance”
on page 56.
Transducers See “Clinical Applications and Transducers” on page 116.
Customer Service
Customer service representatives are available worldwide to answer questions and to provide
maintenance and service. Please contact your local Philips representative for assistance. You
can also visit the Lumify portal or contact the following office for referral to a customer service
representative:
www.philips.com/lumify
Philips Ultrasound, Inc.
22100 Bothell Everett Hwy, Bothell, WA 98021-8431, USA
1-844-MYLUMIFY
Recycling, Reuse, and Disposal
Philips is concerned with helping protect the natural environment and helping ensure
continued safe and effective use of this system through proper support, maintenance, and
training. Philips designs and manufactures equipment in compliance with relevant guidelines
for environmental protection. As long as the equipment is properly operated and maintained, it
presents no risk to the environment. However, the equipment may contain materials that could
be harmful to the environment if disposed of incorrectly. Use of such materials is essential for
the implementation of certain functions and for meeting certain statutory and other
requirements.
Philips Healthcare 4535 618 58571_A/795 * MAY 2016
Lumify Ultrasound System 17
Page 18

Read This First Recycling, Reuse, and Disposal
Recycling, reuse, and disposal information in this document is directed mainly at the entity with
legal authority over the equipment. Operators are usually uninvolved in disposal, except in the
case of certain batteries.
Final Disposal of Your Device
At the end of your Lumify subscription, you must return your transducer or transducers to
Philips. Do not dispose of the transducers. For more information, see the Support section of the
Lumify portal:
www.philips.com/lumify
Final disposal of your device is when you dispose of the device in such a way that it can no
longer be used for its intended purpose.
For information on proper disposal of your device, see the documentation that accompanies
your device.
WARNING
Do not dispose of the device (or any parts of it) with industrial or domestic waste. The
system may contain materials such as lead, tungsten, or oil, or other hazardous substances
that can cause serious environmental pollution. The device also contains privacy-sensitive
information, which should be properly removed (scrubbed). Philips advises you to contact
your Philips service organization before disposing of this system.
Discarding Batteries
Batteries are internal to the device. The device should be discarded in an environmentally safe
manner. Properly dispose of the device according to local regulations.
18 Lumify Ultrasound System
Philips Healthcare 4535 618 58571_A/795 * MAY 2016
Page 19

Recycling, Reuse, and Disposal Read This First
WARNING
Do not disassemble, puncture, or incinerate batteries. Be careful not to short the battery
terminals, because that could result in a fire hazard.
WARNING
Use caution when handling, using, and testing the batteries. Do not short circuit, crush,
drop, mutilate, puncture, apply reverse polarity, expose to high temperatures, or
disassemble. Misuse or abuse could cause physical injury.
WARNING
If electrolyte leakage occurs, wash your skin with large amounts of water, to prevent skin
irritation and inflammation.
Philips Healthcare 4535 618 58571_A/795 * MAY 2016
Lumify Ultrasound System 19
Page 20

Read This First Recycling, Reuse, and Disposal
20 Lumify Ultrasound System
Philips Healthcare 4535 618 58571_A/795 * MAY 2016
Page 21

Basic Safety Safety
Safety
2
Please read this information before using your ultrasound system. It applies to the device, the
transducers, and the software. This section covers general safety information only. Safety
information that applies only to a specific task is included in the procedure for that task.
The combination of a Philips transducer, the Philips Lumify app, and a compatible Android
device is considered a medical device. This device is intended for use by, or by the order of, and
under the supervision of a licensed physician qualified to direct the use of the device.
WARNING
Warnings highlight information vital to the safety of you, the operator, and the patient.
CAUTION
Cautions highlight ways that you could damage the product and consequently void your
warranty or service contract or ways that you could lose patient or system data.
Basic Safety
WARNING
Do not use the system for any application until you have read, understood, and know all the
safety information, safety procedures, and emergency procedures contained in this "Safety"
section. Operating the system without a proper awareness of safe use could lead to fatal or
other serious personal injury.
Philips Healthcare 4535 618 58571_A/795 * MAY 2016
Lumify Ultrasound System 21
Page 22

Safety Basic Safety
WARNING
If any part of the system is known or suspected to be defective or incorrectly adjusted, do
not use the system until it is repaired. Operating the system with defective or incorrectly
adjusted components could expose you and the patient to safety hazards.
WARNING
Do not use the system for any application until you are adequately and properly trained on
its safe and effective operation. If you are unsure of your ability to operate the system
safely and effectively, do not use it. Operation of the system without proper and adequate
training could lead to fatal or other serious personal injury.
WARNING
Do not operate the system with patients unless you have an adequate understanding of its
capabilities and functions. Using the system without such understanding may compromise
the system's effectiveness and the safety of the patient, you, and others.
WARNING
Never attempt to remove, modify, override, or frustrate any safety device on the system.
Interfering with safety devices could lead to fatal or other serious personal injury.
WARNING
Use the system only for its intended purposes and do not misuse the system. Do not use the
system with any product that Philips does not recognize as compatible with the system.
Operation of the product for unintended purposes, or with incompatible products, could
lead to fatal or other serious injury.
22 Lumify Ultrasound System
Philips Healthcare 4535 618 58571_A/795 * MAY 2016
Page 23

Basic Safety Safety
WARNING
Stop use immediately if the system or the transducer appear to be malfunctioning. Contact
your Philips representative immediately.
WARNING
You are responsible for configuring your device in accordance with your institution's security
policies. Notifications and alerts from third-party applications may interfere with an exam.
WARNING
Thin needles can bend when entering tissue. Actual position must be verified by identifying
the echoes from the needle.
WARNING
Do not perform a needle procedure if the needle is not visible.
WARNING
Reverberation or other tissue artifacts may produce false needle images, which can cause
confusion in locating the actual needle image. Ensure that you are not using a false needle
image to locate the needle.
Philips Healthcare 4535 618 58571_A/795 * MAY 2016
Lumify Ultrasound System 23
Page 24

Safety Electrical Safety
Electrical Safety
The transducer and software, along with a representative device, have been verified as
compliant with IEC 60601‑1. The transducers meet Type BF isolated applied part requirements.
When the transducer and software are used in conjunction with a device compliant with
IEC 60950‑1, the system meets IEC 60601‑1 requirements for Class II/internally powered
equipment. (The safety standards met by this system are included in the “Specifications” on
page 157 section.) For maximum safety, observe these warnings and cautions:
WARNING
Devices that are compliant with IEC 60950-1 have not been evaluated for compliance with
the IEC 60601-1 temperature limits for patient contact. Therefore, only the operator is
allowed to handle the device.
WARNING
Do not operate this system in the presence of flammable gases or anesthetics. Explosion can
result. The system is not compliant in AP/APG environments as defined by IEC 60601-1.
WARNING
To avoid risk of electrical shock hazards, always inspect the transducer before use. Check the
face, housing, and cable before use. Do not use if the face is cracked, chipped, or torn; the
housing is damaged; or the cable is abraded.
WARNING
All patient-contact devices, such as transducers, pencil probes, and ECG leads not specifically
indicated as defibrillation-proof, must be removed from patient contact before application
of a high-voltage defibrillation pulse. See “Defibrillators” on page 27.
24 Lumify Ultrasound System
Philips Healthcare 4535 618 58571_A/795 * MAY 2016
Page 25

Electrical Safety Safety
WARNING
Ultrasound equipment in normal operation, as with other medical electronic diagnostic
equipment, uses high-frequency electrical signals that can interfere with pacemaker
operation. Though the possibility of interference is slight, be alert to this potential hazard
and stop system operation immediately if you note interference with a pacemaker.
WARNING
When using additional peripheral equipment that is to be interconnected by functional
connection, the combination is considered to be a medical electrical system. It is your
responsibility to comply with IEC 60601-1 and test the system to those requirements. If you
have questions, contact your Philips representative.
WARNING
Patient-applied parts meet the standard IEC 60601-1. Applied voltages exceeding the
standard, although unlikely, may result in electrical shock to the patient or operator.
WARNING
Connection of optional devices not supplied by Philips Ultrasound could result in electrical
shock. When such optional devices are connected to your ultrasound system, ensure that
the total system earth leakage current does not exceed 500 µA.
WARNING
To avoid risk of electrical shock, do not use any transducer that has been immersed beyond
the specified cleaning or disinfection level.
Philips Healthcare 4535 618 58571_A/795 * MAY 2016
Lumify Ultrasound System 25
Page 26

Safety Electrical Safety
WARNING
Electrosurgical units (ESUs) and other devices intentionally introduce radio frequency
electromagnetic fields or currents into patients. Because imaging ultrasound frequencies are
coincidentally in the radio frequency range, ultrasound transducer circuits are susceptible to
radio frequency interference. While an ESU is in use, severe noise interferes with the blackand-white image and completely obliterates the color image.
WARNING
To avoid risk of a burn hazard, do not use transducers with high-frequency surgical
equipment. A burn hazard may result from a defect in the high-frequency surgical neutral
electrode connection.
WARNING
Using cables, transducers, and accessories other than those specified for use with the
system may result in increased emissions from, or decreased immunity of, the system.
CAUTION
Use of the system in the presence of an electromagnetic field can cause momentary
degradation of the ultrasound image. When interference is present or intermittent, use
caution when continuing to use the system. If interference occurs often, review the
environment in which the system is being used to identify possible sources of radiated
emissions. These emissions could be from other electrical devices used within the same
room or an adjacent room. Communication devices such as cellular phones and pagers can
cause these emissions. The existence of radio, TV, or microwave transmission equipment
located nearby can cause emissions. In cases where EMI is causing disturbance, it may be
necessary to relocate your system.
26 Lumify Ultrasound System
Philips Healthcare 4535 618 58571_A/795 * MAY 2016
Page 27

Electrical Safety Safety
CAUTION
For information on electromagnetic emissions and immunity as it applies to the system, see
“Electromagnetic Compatibility ” on page 53. Ensure that the operating environment of
your system meets the conditions specified in the referenced information. Operating the
system in an environment that does not meet those conditions may degrade system
performance.
Defibrillators
Observe the following warnings when a defibrillation is required while using the ultrasound
system.
WARNING
Before defibrillation, always remove all patient-applied parts from the patient.
WARNING
Before defibrillation, always disconnect invasive transducers that remain in contact with the
patient from the system.
WARNING
A disposable transducer cover provides no protective electrical insulation against
defibrillation.
Philips Healthcare 4535 618 58571_A/795 * MAY 2016
Lumify Ultrasound System 27
Page 28

Safety Equipment Protection
WARNING
A small hole in the outer layer of the transducer opens a conductive path to grounded metal
parts of the transducer. The secondary arcing that could occur during defibrillation could
cause patient burns. The risk of burns is reduced, but not eliminated, by using an
ungrounded defibrillator.
Use defibrillators that do not have grounded patient circuits. To determine whether a
defibrillator patient circuit is grounded, see the defibrillator service guide, or consult a
biomedical engineer.
Fire Safety
WARNING
On electrical or chemical fires, use only extinguishers that are specifically labeled for those
purposes. Using water or other liquids on an electrical fire can lead to fatal or other serious
personal injury. Before attempting to fight a fire, if it is safe to do so, attempt to isolate the
product from electrical and other supplies, to reduce the risk of electrical shock.
Use of electrical products in an environment for which they were not designed can lead to fire
or explosion. Fire regulations for the type of medical area being used should be fully applied,
observed, and enforced. Fire extinguishers should be available for both electrical and
nonelectrical fires.
Equipment Protection
Follow these precautions to protect your system:
28 Lumify Ultrasound System
Philips Healthcare 4535 618 58571_A/795 * MAY 2016
Page 29

Equipment Protection Safety
CAUTION
Excessive bending or twisting of cables on patient-applied parts may cause failure or
intermittent operation of the system.
CAUTION
In general, only the area of the transducer acoustic window is liquid-tight. Except where
specified in specific transducer-cleaning instructions, do not immerse the remainder of a
transducer in any liquid.
CAUTION
Do not submerge the transducer connector in solution. The cables and transducer bodies are
liquid‑tight, but the connectors are not.
CAUTION
Do not use abrasive cleaners, or acetone, MEK, paint thinner, or other strong solvents on
the system, peripherals, or transducers.
CAUTION
If systems, transducers, and peripherals have been in an environment below 10°C (50°F),
allow them to reach room temperature before connecting or turning them on. Philips
recommends allowing 24 hours for complete normalization. Otherwise, condensation inside
the devices could cause damage. If the device was only briefly exposed to temperatures
below 10°C (50°F), then the time required for the device to return to room temperature
could be significantly less than 24 hours.
Philips Healthcare 4535 618 58571_A/795 * MAY 2016
Lumify Ultrasound System 29
Page 30
Safety Product Compatibility
Product Compatibility
Do not use your system in combination with other products or components, unless Philips
expressly recognizes those other products or components as compatible. For information about
such products and components, contact your Philips representative.
Changes and additions to the system should be made only by Philips or by third parties
expressly authorized by Philips to do so. Such changes and additions must comply with all
applicable laws and regulations that have the force of law within the jurisdictions concerned,
and best engineering practices.
WARNING
System changes and additions that are made without the appropriate training or by using
unapproved spare parts may void the Philips warranty. As with all complex technical
products, maintenance by unqualified persons or using unapproved spare parts carries
serious risks of system damage and personal injury.
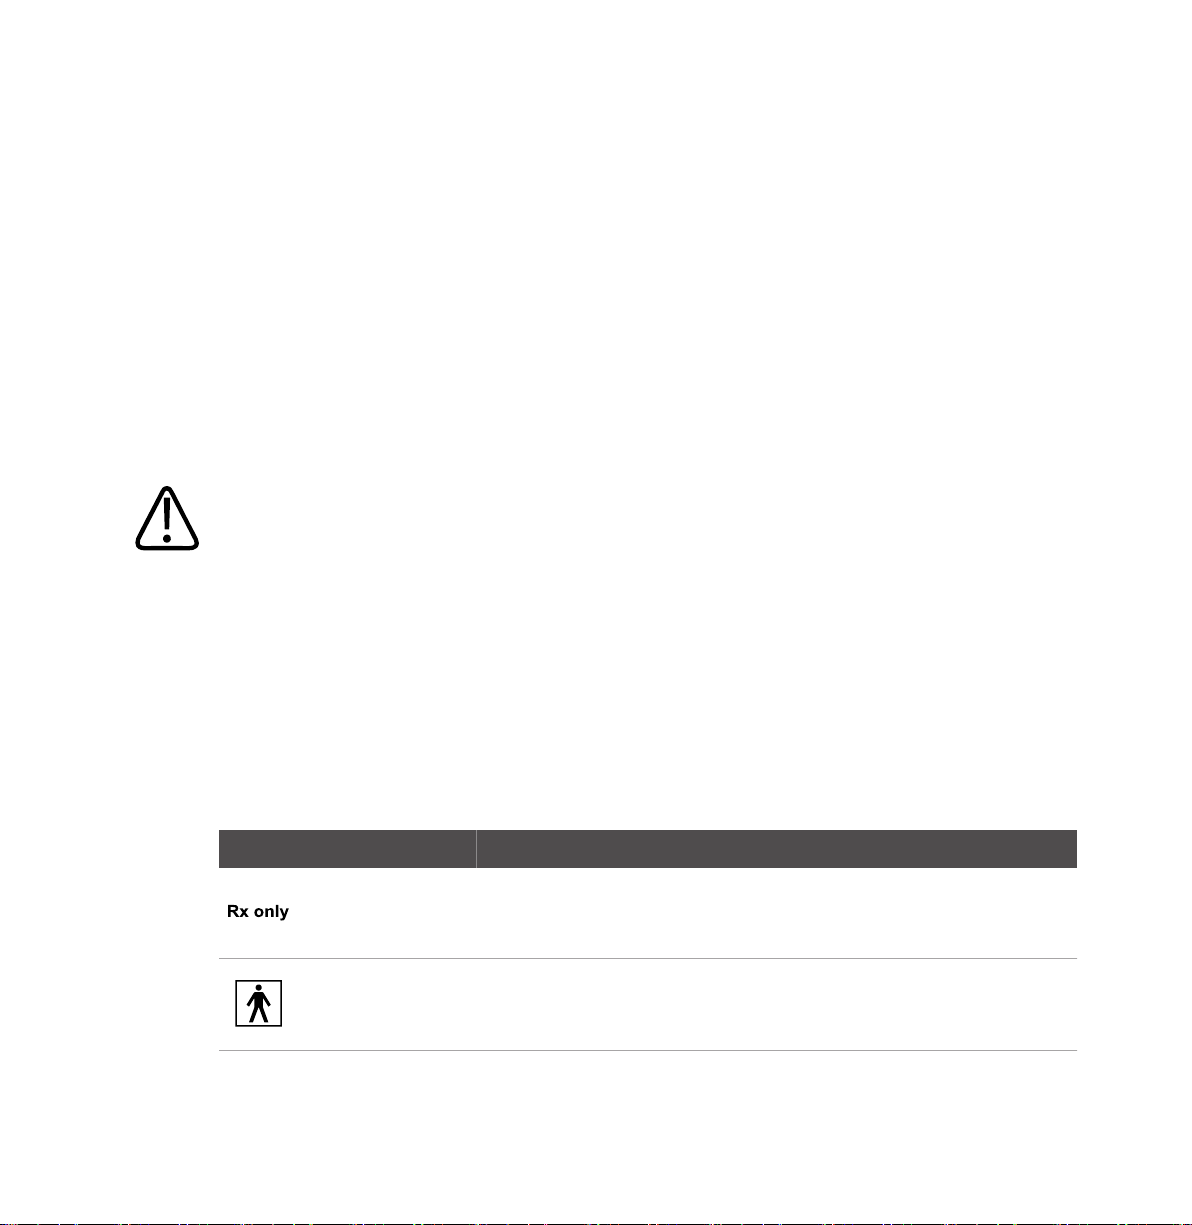
Symbols
The International Electrotechnical Commission (IEC) has established a set of symbols for
medical electronic equipment that classify a connection or warn of potential hazards. Of those
symbols, the following may be used on your Philips product and its accessories and packaging.
Symbol Description
USA federal law restricts this device to sale by or on the order of a physician.
Isolated patient connection (Type BF applied part).
30 Lumify Ultrasound System
Philips Healthcare 4535 618 58571_A/795 * MAY 2016
Page 31
Symbols Safety
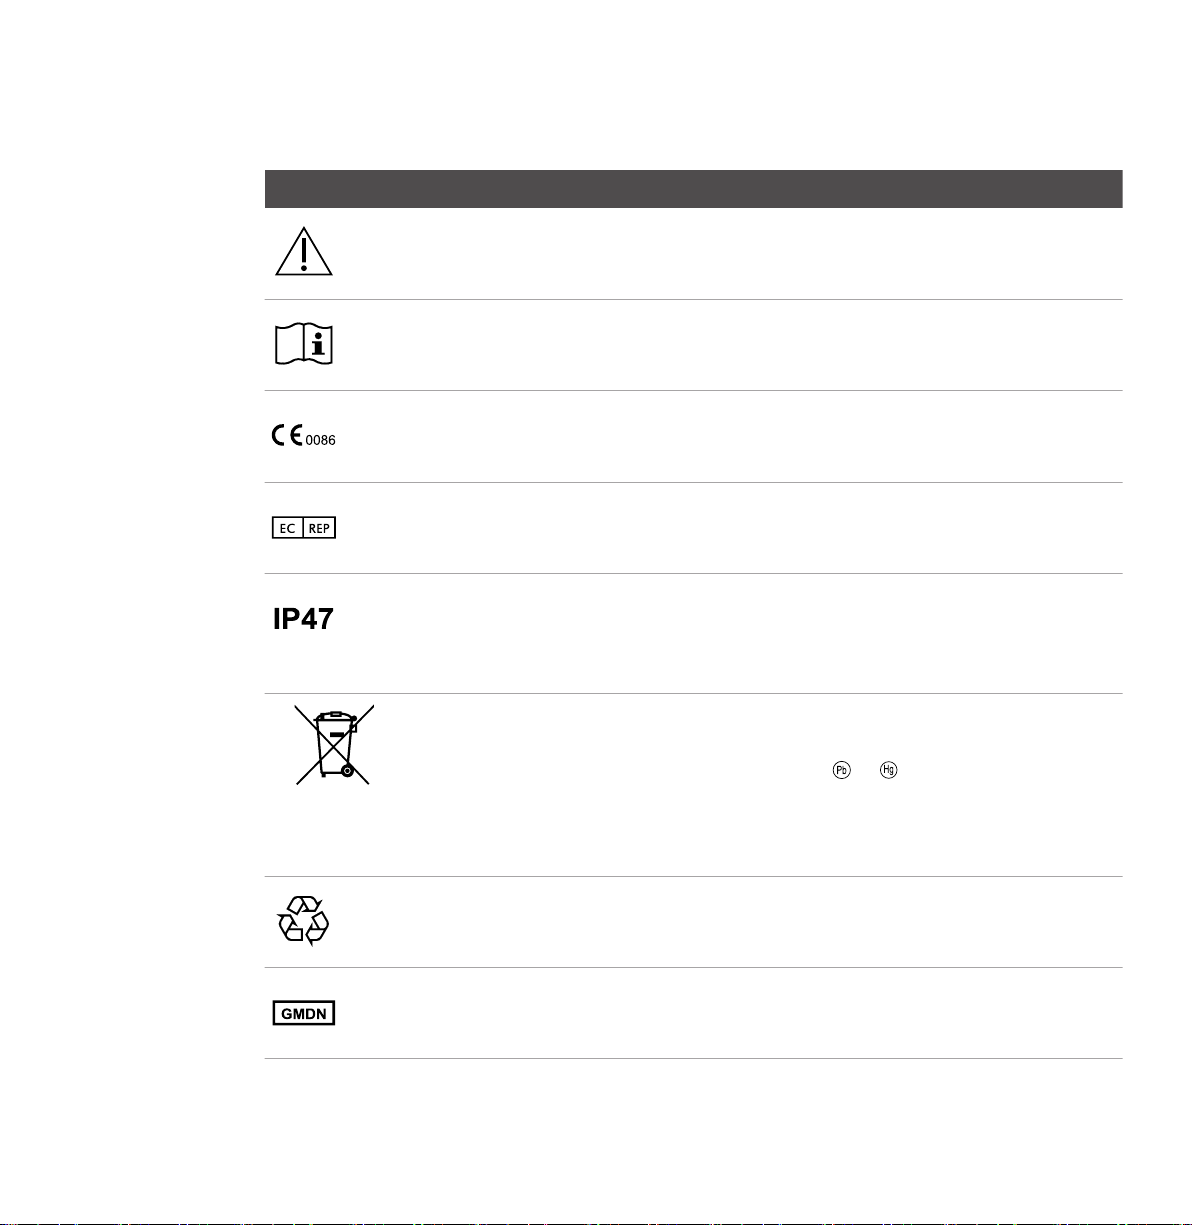
Symbol Description
Identifies a caution.
Indicates that the user should see the instructions for use for safety
information.
Indicates conformance with European Council Directive 93/42/EEC.
EU Authorized Representative
Indicates that the equipment inside the enclosure is protected against ingress of
solid foreign objects having a diameter of 1.0 mm and greater. Indicates that the
device is protected against the effects of immersion. This degree of protection
can apply to transducers and foot-operated devices.
Indicates the need for separate collection for electrical and electronic
equipment in compliance with the Waste Electrical and Electronic Equipment
(WEEE) Directive. When accompanied by or , components of the device
may contain lead or mercury, respectively, which must be recycled or disposed
of in accordance with local, state, or federal laws. The backlight lamps in an LCD
system monitor contain mercury.
Do not throw away. Dispose of in accordance with local, state, or federal laws.
Global Medical Device Nomenclature Code
Philips Healthcare 4535 618 58571_A/795 * MAY 2016
Lumify Ultrasound System 31
Page 32
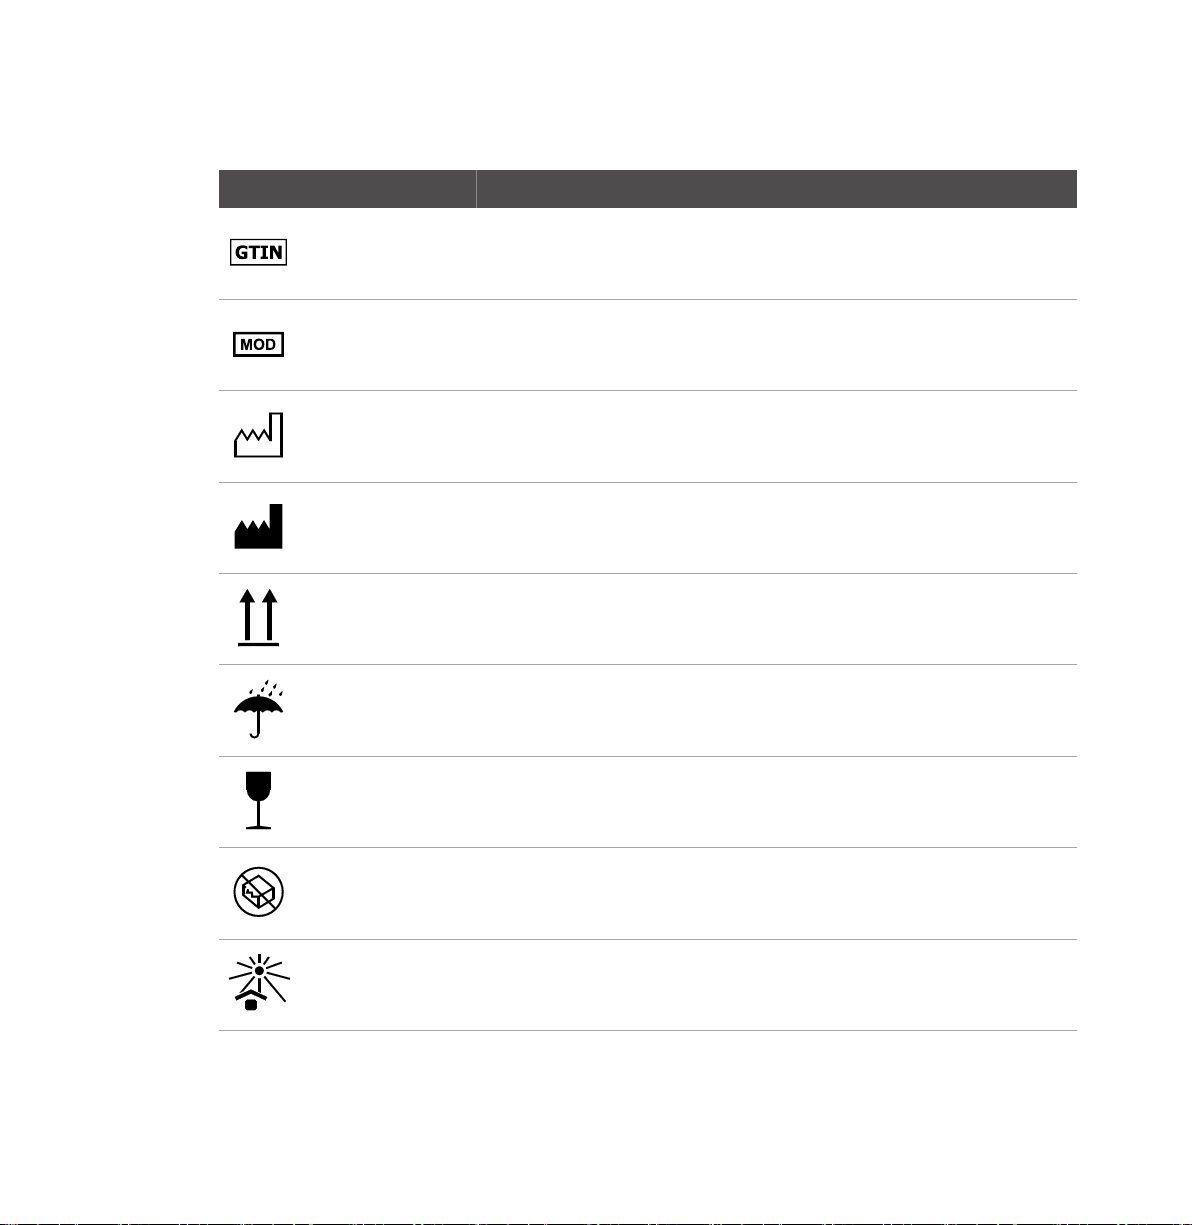
Safety Symbols
Symbol Description
Global Trade Item Number
Model name for the device.
Identifies the date of manufacture.
Identifies the legal manufacturer.
This side up: Points toward the side of the shipping crate that should be kept
facing up.
Indicates that the device should be kept dry.
Indicates that the device is fragile; handle with care.
Do not use if damaged.
Keep away from sunlight.
32 Lumify Ultrasound System
Philips Healthcare 4535 618 58571_A/795 * MAY 2016
Page 33
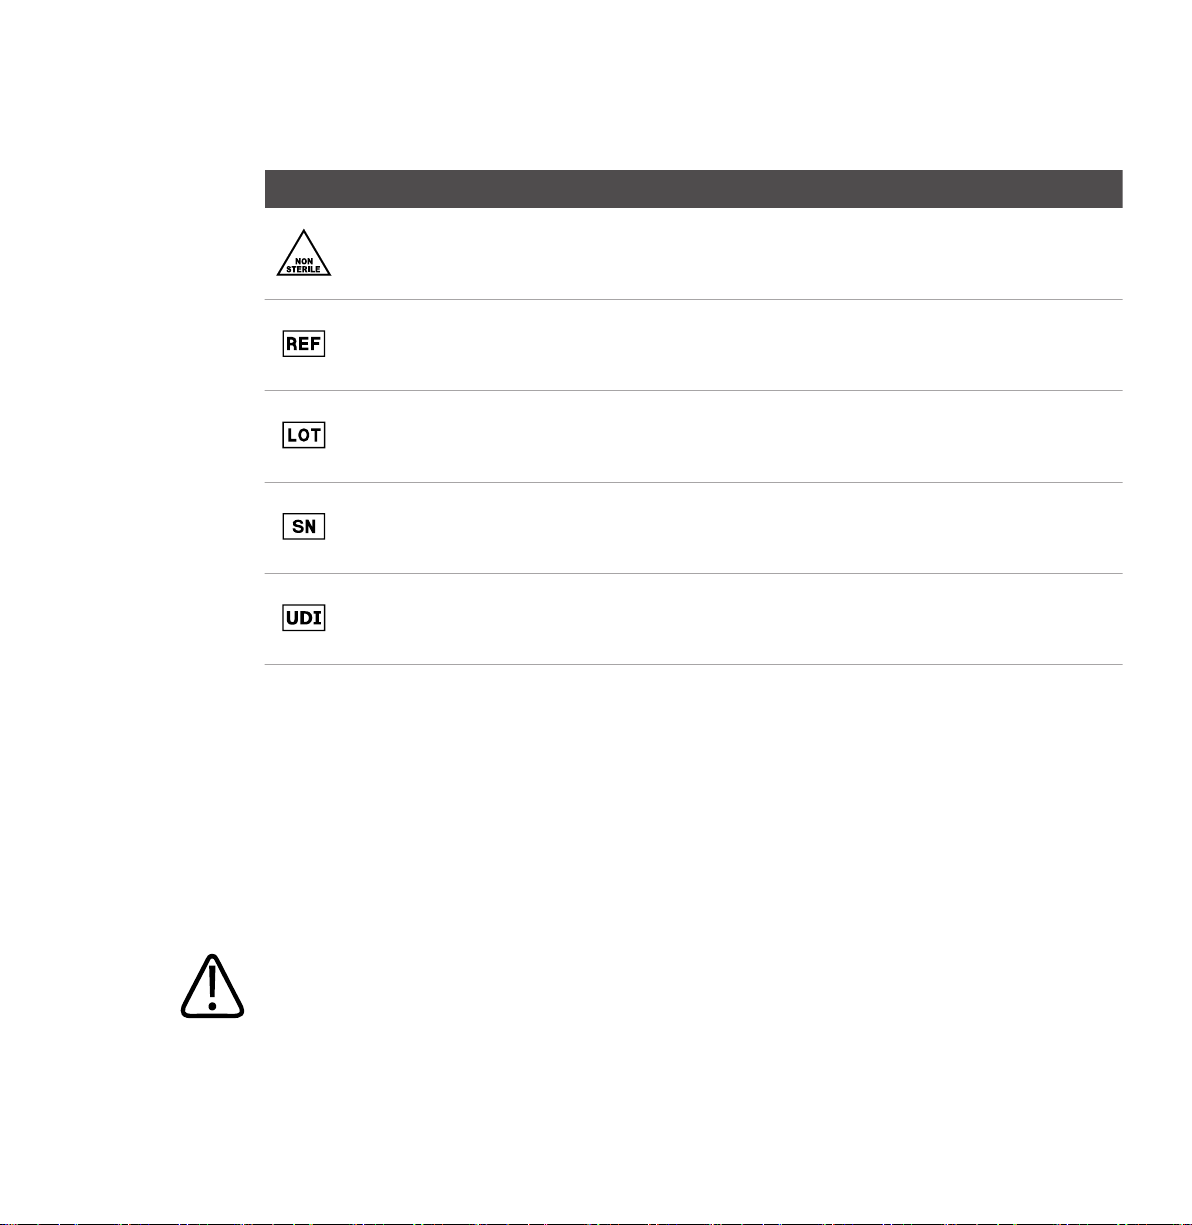
Biological Safety Safety
Symbol Description
Non-sterile.
Catalog number.
Batch code.
Serial number.
Unique Device Identifier.
Biological Safety
This section contains information about biological safety and a discussion of the prudent use of
the system.
A list of precautions related to biological safety follows; observe these precautions when using
the system. For more information, see Medical Ultrasound Safety on your User Information CD.
WARNING
Do not use the system if an error message on the display indicates that a hazardous
condition exists. Note the error code, turn off power to the system, and call your customer
service representative.
Philips Healthcare 4535 618 58571_A/795 * MAY 2016
Lumify Ultrasound System 33
Page 34

Safety Biological Safety
WARNING
Do not use a system that exhibits erratic or inconsistent image updating. Discontinuities in
the scanning sequence indicate a hardware failure that must be corrected before use.
WARNING
Perform ultrasound procedures prudently. Use the ALARA (as low as reasonably achievable)
principle.
WARNING
Use only acoustic standoffs that have been approved by Philips Ultrasound. For information
on ordering approved accessories, see “Supplies and Accessories” on page 16.
WARNING
Transducer covers may contain natural rubber latex. Those covers may cause allergic
reactions in some individuals. See “FDA Medical Alert on Latex” on page 35.
WARNING
If a sterile transducer cover becomes compromised during an intraoperative application
involving a patient with transmissible spongiform encephalopathy, such as CreutzfeldtJakob disease, follow the guidelines of the U.S. Centers for Disease Control and this
document from the World Health Organization: WHO/CDS/ APH/2000/3, WHO Infection
Control Guidelines for Transmissible Spongiform Encephalopathies. The transducers for your
system cannot be decontaminated using a heat process.
34 Lumify Ultrasound System
Philips Healthcare 4535 618 58571_A/795 * MAY 2016
Page 35

Biological Safety Safety
WARNING
If the system becomes contaminated internally with bodily fluids carrying pathogens, you
must immediately notify your Philips service representative. Components inside the system
cannot be disinfected. In that case, the system must be disposed of as biohazardous
material in accordance with local or federal laws.
WARNING
Select the correct application when starting an exam, and remain in that application
throughout the exam. Some applications are for parts of the body that require lower limits
for acoustic output.
FDA Medical Alert on Latex
March 29, 1991, Allergic Reactions to Latex-Containing Medical Devices
Because of reports of severe allergic reactions to medical devices containing latex (natural
rubber), the FDA is advising health care professionals to identify their latex sensitive patients
and be prepared to treat allergic reactions promptly. Patient reactions to latex have ranged
from contact urticaria to systemic anaphylaxis. Latex is a component of many medical devices,
including surgical and examination gloves, catheters, intubation tubes, anesthesia masks, and
dental dams.
Reports to the FDA of allergic reactions to latex-containing medical devices have increased
lately. One brand of latex cuffed enema tips was recently recalled after several patients died as
a result of anaphylactoid reactions during barium enema procedures. More reports of latex
sensitivity have also been found in the medical literature. Repeated exposure to latex both in
medical devices and in other consumer products may be part of the reason that the prevalence
of latex sensitivity appears to be increasing. For example, it has been reported that 6% to 7% of
surgical personnel and 18% to 40% of spina bifida patients are latex sensitive.
Philips Healthcare 4535 618 58571_A/795 * MAY 2016
Lumify Ultrasound System 35
Page 36

Safety Biological Safety
Proteins in the latex itself appear to be the primary source of the allergic reactions. Although it
is not now known how much protein is likely to cause severe reactions, the FDA is working with
manufacturers of latex-containing medical devices to make protein levels in their products as
low as possible.
FDA’s recommendations to health professionals in regard to this problem are as follows:
• When taking general histories of patients, include questions about latex sensitivity. For
surgical and radiology patients, spina bifida patients and health care workers, this
recommendation is especially important. Questions about itching, rash or wheezing after
wearing latex gloves or inflating a toy balloon may be useful. Patients with positive histories
should have their charts flagged.
• If latex sensitivity is suspected, consider using devices made with alternative materials, such
as plastic. For example, a health professional could wear a non-latex glove over the latex
glove if the patient is sensitive. If both the health professional and the patient are sensitive,
a latex middle glove could be used. (Latex gloves labeled “Hypoallergenic” may not always
prevent adverse reactions.)
• Whenever latex-containing medical devices are used, especially when the latex comes in
contact with mucous membranes, be alert to the possibility of an allergic reaction.
• If an allergic reaction does occur and latex is suspected, advise the patient of a possible
latex sensitivity and consider an immunologic evaluation.
• Advise the patient to tell health professionals and emergency personnel about any known
latex sensitivity before undergoing medical procedures. Consider advising patients with
severe latex sensitivity to wear a medical identification bracelet.
The FDA is asking health professionals to report incidents of adverse reactions to latex or other
materials used in medical devices. (See the October 1990 FDA Drug Bulletin.) To report an
incident, contact the FDA Problem Reporting Program, MedWatch, at 1-800-332-1088, or on
the Internet:
www.fda.gov/Safety/MedWatch/
For a single copy of a reference list on latex sensitivity, write to: LATEX, FDA, HFZ-220, Rockville,
MD 20857.
36 Lumify Ultrasound System
Philips Healthcare 4535 618 58571_A/795 * MAY 2016
Page 37

Biological Safety Safety
NOTE
The transducers described in this document do not contain natural rubber latex that contacts
humans. Natural rubber latex is not used on any Philips ultrasound transducer.
ALARA Education Program
The guiding principle for the use of diagnostic ultrasound is defined by the "as low as
reasonably achievable" (ALARA) principle. The decision as to what is reasonable has been left to
the judgment and insight of qualified personnel. No set of rules can be formulated that would
be sufficiently complete to dictate the correct response to every circumstance. By keeping
ultrasound exposure as low as possible, while obtaining diagnostic images, users can minimize
ultrasonic bioeffects.
Since the threshold for diagnostic ultrasound bioeffects is undetermined, it is the sonographer’s
responsibility to control total energy transmitted into the patient. The sonographer must
reconcile exposure time with diagnostic image quality. To ensure diagnostic image quality and
limit exposure time, an ultrasound system provides controls that can be manipulated during the
exam to optimize the results of the exam.
The ability of the user to abide by the ALARA principle is important. Advances in diagnostic
ultrasound, not only in the technology but in the applications of that technology, have resulted
in the need for more and better information to guide the user. The output display indices are
designed to provide that important information.
There are a number of variables which affect the way in which the output display indices can be
used to implement the ALARA principle. These variables include index values, body size,
location of the bone relative to the focal point, attenuation in the body, and ultrasound
exposure time. Exposure time is an especially useful variable, because it is controlled by the
user. The ability to limit the index values over time supports the ALARA principle.
Applying ALARA
The system imaging mode used depends upon the information needed. 2D imaging provides
anatomical information, while Color imaging provides information about blood flow.
Philips Healthcare 4535 618 58571_A/795 * MAY 2016
Lumify Ultrasound System 37
Understanding the nature of the imaging mode being used allows the sonographer to apply the
Page 38

Safety Biological Safety
ALARA principle with informed judgment. Additionally, the transducer frequency, system setup
values, scanning techniques, and operator experience allow the sonographer to meet the
definition of the ALARA principle.
The decision as to the amount of acoustic output is, in the final analysis, up to the system
operator. This decision must be based on the following factors: type of patient, type of exam,
patient history, ease or difficulty of obtaining diagnostically useful information, and the
potential localized heating of the patient due to transducer surface temperatures. Prudent use
of the system occurs when patient exposure is limited to the lowest index reading for the
shortest amount of time necessary to achieve acceptable diagnostic results.
Although a high index reading does not mean that a bioeffect is actually occurring, a high index
reading should be taken seriously. Every effort should be made to reduce the possible effects of
a high index reading. Limiting exposure time is an effective way to accomplish this goal.
There are several system controls that the operator can use to adjust the image quality and
limit the acoustic intensity. These controls are related to the techniques that an operator might
use to implement ALARA. These controls can be divided into three categories: direct, indirect,
and receiver controls.
Acoustic Output Limits
This ultrasound system maintains acoustic output below the appropriate limits for each
application, as listed here. The significant difference in magnitude emphasizes the need to
select the correct application and remain in that application, so the correct application limits
are in use for the appropriate application.
Limits for Non-Ophthalmic Applications
• I
spta.3
≤ 720 mW/cm
2
• MI ≤ 1.9
• TI ≤ 6.0
Direct Controls
Application selection and the output-power control directly affect acoustic intensity. There are
different ranges of allowable intensity or output based on your selection. Selecting the correct
range of acoustic intensity for the application is one of the first things that occurs in any exam.
38 Lumify Ultrasound System
Philips Healthcare 4535 618 58571_A/795 * MAY 2016
Page 39

Biological Safety Safety
For example, peripheral vascular intensity levels are not recommended for fetal exams. Some
systems automatically select the proper range for a particular application, while others require
manual selection. Ultimately, the user has the responsibility for proper clinical use. The
ultrasound system provides both automatic (default) settings and manual (user-selectable)
settings.
Output power has direct impact on acoustic intensity. Once the application has been
established, the power control can be used to increase or decrease the intensity output. The
power control allows you to select intensity levels less than the established maximum. Prudent
use dictates that you select the lowest output intensity that is consistent with good image
quality.
Indirect Controls
The indirect controls are those that have an indirect effect on acoustic intensity. These controls
affect imaging mode, pulse repetition frequency, focus depth, pulse length, and transducer
selection.
The choice of imaging mode determines the nature of the ultrasound beam. 2D is a scanning
mode; Doppler is a stationary or unscanned mode. A stationary ultrasound beam concentrates
energy in a single location. A moving or scanned ultrasound beam disperses the energy over an
area and the beam is concentrated on the same area for a fraction of the time as that of an
unscanned mode.
Focus of the ultrasound beam affects the image resolution. To maintain or increase resolution
at a different focus requires a variation in output over the focal zone. This variation of output is
a function of system optimization. Different exams require different focal depths. Setting the
focus at the proper depth improves the resolution of the structure of interest.
Transducer selection indirectly affects intensity. Tissue attenuation changes with frequency.
The higher the transducer operating frequency, the greater the attenuation of the ultrasonic
energy. A higher transducer operating frequency requires more output intensity to scan at a
deeper depth. To scan deeper at the same output intensity, a lower transducer frequency is
required. Using more gain and output beyond a point, without corresponding increases in
image quality, can mean that a lower frequency transducer is needed.
Philips Healthcare 4535 618 58571_A/795 * MAY 2016
Lumify Ultrasound System 39
Page 40

Safety Biological Safety
Receiver Controls
Receiver controls are used by the operator to improve image quality. These controls have no
effect on output. Receiver controls only affect how the ultrasound echo is received. These
controls include gain, time gain compensation (TGC), dynamic range, and image processing. The
important thing to remember, relative to output, is that receiver controls should be optimized
before output is increased. For example, before increasing output, optimize gain to improve
image quality.
An Example of Applying the ALARA Principle
An ultrasound scan of a patient’s liver begins with selecting the appropriate transducer
frequency. After selecting the transducer and the application, which are based on patient
anatomy, adjustments to output power should be made to ensure that the lowest possible
setting is used to acquire an image. After the image is acquired, adjusting the focus of the
transducer, and then increasing the receiver gain to produce a uniform representation of the
tissue follows. If an adequate image can be obtained with the increase in gain, then a decrease
in output should be made. Only after making these adjustments should you increase output to
the next level.
Having acquired the 2D display of the liver, Color can be used to localize blood flow. As with the
2D image display, gain and image processing controls must be optimized before increasing
output.
In summary: Select the correct transducer frequency and application for the job; start with a
low output level; and optimize the image by using focus, receiver gain, and other imaging
controls. If the image is not diagnostically useful at this point, then increase output.
Additional Considerations
Ensure that scanning time is kept to a minimum, and ensure that only medically required
scanning is performed. Never compromise quality by rushing through an exam. A poor exam
may require a follow‑up, which ultimately increases exposure time. Diagnostic ultrasound is an
important tool in medicine, and like any tool, it should be used efficiently and effectively.
40 Lumify Ultrasound System
Philips Healthcare 4535 618 58571_A/795 * MAY 2016
Page 41

Biological Safety Safety
Output Display
The system output display comprises two basic indices: a mechanical index and a thermal index.
The mechanical index is continuously displayed over the range of 0.0 to 1.9, in increments of
0.1.
The thermal index further consists of the following indices: soft tissue (TIS), bone (TIB), and
cranial bone (TIC). Only one of these is displayed at any time. Each transducer application has a
default selection that is appropriate for that combination. The TIB, TIS, or TIC is continuously
displayed over the range of 0.0 to maximum output, based on the transducer and application,
in increments of 0.1. For the location of the output display, see “Imaging Display” on page 79.
The application-specific nature of the default setting is also an important factor of index
behavior. A default setting is a system control state that is preset by the manufacturer or the
operator. The system has default index settings for the transducer application. The default
settings are invoked automatically by the ultrasound system when power is turned on, when
new patient data is entered into the system database, or when an application change occurs.
The decision as to which of the three thermal indices to display should be based on the
following criteria:
• Appropriate index for the application: TIS is used for imaging soft tissue, TIB for a focus at or
near bone, and TIC for imaging through bone near the surface, as in a cranial exam.
• Mitigating factors that might create artificially high or low thermal index readings: location
of fluid or bone, or blood flow. For example, is there a highly attenuating tissue path so that
the actual potential for local zone heating is less than the thermal index displays?
• Scanned modes versus unscanned modes of operation affect the thermal index. For
scanned modes, heating tends to be near the surface; for unscanned modes, the potential
for heating tends to be deeper in the focal zone.
• Always limit ultrasound exposure time. Do not rush the exam. Ensure that the indices are
kept to a minimum and that exposure time is limited without compromising diagnostic
sensitivity.
Philips Healthcare 4535 618 58571_A/795 * MAY 2016
Lumify Ultrasound System 41
Page 42

Safety Biological Safety
Mechanical Index (MI) Display
Mechanical bioeffects are threshold phenomena that occur when a certain level of output is
exceeded. The threshold level varies, however, with the type of tissue. The potential for
mechanical bioeffects varies with peak rarefactional pressure and ultrasound frequency. The MI
accounts for these two factors. The higher the MI value, the greater the likelihood of
mechanical bioeffects occurring. There is no specific MI value that means that a mechanical
effect is actually occurring. The MI should be used as a guide for implementing the ALARA
principle.
Thermal Index (TI) Displays
The TI informs the user about the conditions that exist that might lead to an increase in
temperature at the surface of the body, within the body tissue, or at the point of focus of the
ultrasound beam on bone. That is, the TI informs the user of the potential for temperature rise
in body tissue. It is an estimate of temperature increase in body tissue with specific properties.
The actual amount of any temperature rise is influenced by factors such as tissue type,
vascularity, mode of operation, and others. The TI should be used as a guide for implementing
the ALARA principle.
The bone thermal index (TIB) informs the user about potential heating at or near the focus after
the ultrasound beam has passed through soft tissue or fluid; for example, at or near second- or
third-trimester fetal bone.
The cranial bone thermal index (TIC) informs the user about the potential heating of bone at or
near the surface; for example, cranial bone.
The soft tissue thermal index (TIS) informs the user about the potential for heating within soft
homogeneous tissue.
You can choose to display TIS, TIC, or TIB. For details on changing the TI display, see “Setting the
Thermal Index Display” on page 79.
Mechanical and Thermal Indices Display Precision and Accuracy
The MI and TI precision is 0.1 unit on the system.
42 Lumify Ultrasound System
Philips Healthcare 4535 618 58571_A/795 * MAY 2016
Page 43

Biological Safety Safety
The MI and TI display accuracy estimates for the system are given in Acoustic Output Tables, on
your User Information CD. Those accuracy estimates are based on the variability range of
transducers and systems, inherent acoustic output modeling errors, and measurement
variability, as discussed in this section.
The displayed values should be interpreted as relative information to help the system operator
achieve the ALARA principle through prudent use of the system. The values should not be
interpreted as actual physical values in interrogated tissue or organs. The initial data that is
used to support the output display is derived from laboratory measurements based on the
American Institute of Ultrasound in Medicine (AIUM) measurement standard. The
measurements are then put into algorithms for calculating the displayed output values.
Many of the assumptions used in the process of measurement and calculation are conservative
in nature. Overestimation of actual in situ intensity exposure, for the vast majority of tissue
paths, is built into the measurement and calculation process. For example:
• The measured water tank values are derated using a conservative, industry standard,
attenuation coefficient of 0.3 dB/cm‑MHz.
• Conservative values for tissue characteristics were selected for use in the TI models.
Conservative values for tissue or bone absorption rates, blood perfusion rates, blood heat
capacity, and tissue thermal conductivity were selected.
• Steady State temperature rise is assumed in the industry standard TI models, and the
assumption is made that the ultrasound transducer is held steady in one position long
enough for steady state to be reached.
A number of factors are considered when estimating the accuracy of the displayed values:
hardware variations, estimation algorithm accuracy, and measurement variability. Variability
among transducers and systems is a significant factor. Transducer variability results from
piezoelectric crystal efficiencies, process-related impedance differences, and sensitive lensfocusing parameter variations. Differences in system pulser voltage control and efficiencies is
also a contributor to variability. There are inherent uncertainties in the algorithms used to
estimate acoustic output values over the range of possible system operating conditions and
pulser voltages. Inaccuracies in laboratory measurements are related to, among others,
differences in hydrophone calibration and performance, positioning, alignment, and digitization
tolerances, and variability among test operators.
Philips Healthcare 4535 618 58571_A/795 * MAY 2016
Lumify Ultrasound System 43
Page 44

Safety Biological Safety
The conservative assumptions of the output estimation algorithms of linear propagation, at all
depths, through a 0.3 dB/cm‑MHz attenuative medium is not considered in the accuracy
estimate for the display. Neither linear propagation, nor uniform attenuation at the 0.3 dB/
cm‑MHz rate, occur in water tank measurements or in most tissue paths in the body. In the
body, different tissues and organs have dissimilar attenuation characteristics. In water, there is
almost no attenuation. In the body, and in particular, in water tank measurements, nonlinear
propagation and saturation losses occur as pulser voltages increase.
Therefore, the display accuracy estimates are based on the variability range of transducers and
systems, inherent acoustic output modeling errors, and measurement variability. Display
accuracy estimates are not based on errors in, or caused by measuring according to, the AIUM
measurement standards, or the effects of nonlinear loss on the measured values.
Control Effects
Controls Affecting the Indices
As various system controls are adjusted, the TI and MI values may change. This will be most
apparent as the output power control is adjusted; but other system controls affect the
on‑screen output values.
Power
The output power control affects the system acoustic output. Two real‑time output values are
on the display: TI and MI. They change as the system responds to power-control adjustments.
In combined modes, such as simultaneous Color and 2D, the individual modes each add to the
total TI. One mode will be the dominant contributor to this total. The displayed MI will be from
the mode with the largest MI value.
2D Controls
• Focus: Changing the focal depth will change MI. Generally, higher MI values will occur when
the focal depth is near the natural focus of the transducer.
44 Lumify Ultrasound System
Philips Healthcare 4535 618 58571_A/795 * MAY 2016
Page 45

Biological Safety Safety
• Zoom: Increasing the zoom magnification by spreading the display may increase frame rate.
This action will increase the TI. The number of focal zones may also increase automatically
to improve resolution. This action may change the MI, because the peak MI can occur at a
different depth.
Color Controls
• Color Sector Width: Narrower color sector width will increase color frame rate and the TI
will increase. The system may automatically decrease pulser voltage to stay below the
system maximum. A decrease in pulser voltage will decrease the MI.
• Color Sector Depth: Deeper color sector depth may automatically decrease color frame rate
or select a new color focal zone or color pulse length. The TI will change due to the
combination of these effects. Generally, the TI will decrease with increased color sector
depth. MI will correspond to the MI of the dominant pulse type which is a color pulse.
Other Control Effects
• 2D Depth: An increase in 2D depth will automatically decrease the 2D frame rate. This will
decrease the TI. The system may also automatically choose a deeper 2D focal depth. A
change of focal depth may change the MI. The MI displayed is that of the zone with the
largest MI value.
• Application: Acoustic output defaults are set when you select an application. Factory
defaults vary with transducer, application, and mode. Defaults have been chosen below the
FDA limits for intended use.
• Imaging Mode Controls: When a new imaging mode is selected, both the TI and MI may
change to default settings. Each mode has a corresponding pulse repetition frequency and
maximum intensity point. In combined or simultaneous modes, the TI is the sum of the
contribution from the modes enabled, and the displayed MI is the largest of the MI values
associated with each mode and focal zone enabled. The system will return to the previously
selected state if a mode is turned off and then reselected.
Philips Healthcare 4535 618 58571_A/795 * MAY 2016
Lumify Ultrasound System 45
Page 46

Safety Biological Safety
• Transducer: Each transducer type has unique specifications for contact area, beam shape,
and center frequency. Defaults are initialized when you select a transducer. Factory defaults
vary with transducer, application, and selected mode. Defaults have been chosen below the
FDA limits for intended use.
Related Guidance Documents
For more information about ultrasonic bioeffects and related topics, see the following:
• "Bioeffects and Safety of Diagnostic Ultrasound." AIUM Report, January 28, 1993.
• "American Institute of Ultrasound in Medicine Bioeffects Consensus Report." Journal of
Ultrasound in Medicine, Vol. 27, Issue 4, April 2008.
• Acoustic Output Measurement Standard for Diagnostic Ultrasound Equipment. (AIUM,
NEMA, 2004)
• Third Edition of the AIUM Medical Ultrasound Safety brochure, 2014. (A copy of this
document is provided with each system.)
• Information for Manufacturers Seeking Marketing Clearance of Diagnostic Ultrasound
Systems and Transducers. FDA, September 2008.
• Standard for Real‑Time Display of Thermal and Mechanical Acoustic Output Indices on
Diagnostic Ultrasound Equipment. (AIUM, NEMA, 2004)
• WFUMB. "Symposium on Safety of Ultrasound in Medicine: Conclusions and
Recommendations on Thermal and Non‑Thermal Mechanisms for Biological Effects of
Ultrasound." Ultrasound in Medicine and Biology, 1998: Vol. 24, Supplement 1.
Acoustic Output and Measurement
Since the initial use of diagnostic ultrasound, the possible human bioeffects from ultrasound
exposure have been studied by various scientific and medical institutions. In October 1987, the
American Institute of Ultrasound in Medicine (AIUM) ratified a report prepared by its Bioeffects
Committee ("Bioeffects Considerations for the Safety of Diagnostic Ultrasound." Journal of
Ultrasound in Medicine, Vol. 7, No. 9 Supplement, September 1988), sometimes referred to as
46 Lumify Ultrasound System
Philips Healthcare 4535 618 58571_A/795 * MAY 2016
Page 47

Biological Safety Safety
the Stowe Report, which reviewed available data on possible effects of ultrasound exposure.
Another report, “Bioeffects and Safety of Diagnostic Ultrasound,” dated January 28, 1993,
provides more-current information.
The acoustic output for this system has been measured and calculated in accordance with the
“Acoustic Output Measurement Standard for Diagnostic Ultrasound Equipment” (Revision 3,
AIUM, NEMA, 2004), the “Standard for Real-Time Display of Thermal and Mechanical Acoustic
Output Indices on Diagnostic Ultrasound Equipment” (Revision 2, AIUM, NEMA, 2004), and the
September 2008 FDA document "Information for Manufacturers Seeking Marketing Clearance
of Diagnostic Ultrasound Systems and Transducers."
In Situ, Derated, and Water Value Intensities
All intensity parameters are measured in water. Since water absorbs very little acoustic energy,
these water measurements represent a worst case value. Biological tissue does absorb acoustic
energy. The true value of the intensity at any point depends on the amount and type of tissue
and the frequency of the ultrasound that passes through the tissue. The intensity value in the
tissue, In Situ, has been estimated by using the following formula:
In Situ = Water [e
-0.23alf
]
Where:
Variable Value
In Situ In Situ intensity value
Water Water value intensity
e 2.7183
a Attenuation factor
Tissue a(dB/cm-MHz)
Amniotic Fluid 0.006
Brain 0.53
Heart 0.66
Philips Healthcare 4535 618 58571_A/795 * MAY 2016
Lumify Ultrasound System 47
Page 48

Safety Biological Safety
Variable Value
Kidney 0.79
Liver 0.43
Muscle 0.55
l Skin line to measurement depth (cm)
f Center frequency of the transducer/system/mode combination (MHz)
Since the ultrasonic path during an examination is likely to pass through varying lengths and
types of tissue, it is difficult to estimate the true in situ intensity. An attenuation factor of 0.3 is
used for general reporting purposes; therefore, the In Situ value which is commonly reported
uses the formula:
In Situ derated = Water [e
-0.069lf
]
Since this value is not the true in situ intensity, the term “derated” is used.
Mathematical derating of water based measurements using the 0.3 dB/cm‑MHz coefficient may
yield lower acoustic exposure values than would be measured in a homogenous 0.3 dB/
cm‑MHz tissue. This is true because nonlinearly propagating acoustic energy waveforms
experience more distortion, saturation, and absorption in water than in tissue, where
attenuation present all along the tissue path will dampen the buildup of nonlinear effects.
The maximum derated and the maximum water values do not always occur at the same
operating conditions; therefore, the reported maximum water and derated values may not be
related by the in situ (derated) formula. For example: A multi-zone array transducer that has
maximum water value intensities in its deepest zone may have its largest derated intensity in
one of its shallowest focal zones.
Conclusions Regarding Tissue Models and Equipment Survey
Tissue models are necessary to estimate attenuation and acoustic exposure levels in situ from
measurements of acoustic output made in water. Presently, available models may be limited in
their accuracy because of varying tissue paths during diagnostic ultrasound exposures and
uncertainties in acoustical properties of soft tissues. No single tissue model is adequate for
48 Lumify Ultrasound System
Philips Healthcare 4535 618 58571_A/795 * MAY 2016
Page 49

Biological Safety Safety
predicting exposures in all situations from measurements made in water, and continued
improvement and verification of these models is necessary for making exposure assessments
for specific applications.
A homogeneous tissue model with an attenuation coefficient of 0.3 dB/cm‑MHz throughout the
beam path is commonly used when estimating exposure levels. The model is conservative in
that it overestimates the in situ acoustic exposure when the path between the transducer and
the site of interest is composed entirely of soft tissue, because the attenuation coefficient of
soft tissue is generally higher than 0.3 dB/cm‑MHz. When the path contains significant amounts
of fluid, as in many first- and second-trimester pregnancies scanned transabdominally, this
model may underestimate the in situ acoustical exposure. The amount of underestimation
depends on each specific situation. For example, when the beam path is longer than 3 cm and
the propagation medium is predominantly fluid (conditions that may exist during
transabdominal OB scans), a more accurate value for the derating term is 0.1 dB/cm‑MHz.
Fixed-path tissue models, in which soft tissue thickness is held constant, sometimes are used to
estimate in situ acoustical exposures when the beam path is longer than 3 cm and consists
largely of fluid. When this model is used to estimate maximum exposure to the fetus during
transabdominal scans, a value of 1 dB/cm‑MHz may be used during all trimesters.
The maximum acoustic output levels of diagnostic ultrasound devices extend over a broad
range of values:
• A survey of 1990-equipment models yielded mechanical index (MI) values between 0.1 and
1 at their highest output settings. Maximum MI values of approximately 2 are known to
occur for currently available equipment. Maximum MI values are similar for real-time 2D,
M-mode, PW Doppler, and Color flow imaging.
• Computed estimates of upper limits to temperature elevations during transabdominal scans
were obtained in a survey of 1988 and 1990 PW Doppler equipment. The vast majority of
models yielded upper limits less than 1°C and 4°C for exposures of first-trimester fetal
tissue and second-trimester fetal bone, respectively. The largest values obtained were
approximately 1.5°C for first-trimester fetal tissue and 7°C for second-trimester fetal bone.
Estimated maximum temperature elevations given here are for a “fixed-path” tissue model
and are for devices having Ispta (derated) values greater than 500 mW/cm2. The
Philips Healthcare 4535 618 58571_A/795 * MAY 2016
Lumify Ultrasound System 49
Page 50

Safety Biological Safety
temperature elevations for fetal bone and tissue were computed based on calculation
procedures given in Sections 4.3.2.1 through 4.3.2.6 in "Bioeffects and Safety of Diagnostic
Ultrasound" (AIUM Report, January 28, 1993).
Acoustic Output Tables
Acoustic output tables are in Acoustic Output Tables, on your User Information CD.
Acoustic Measurement Precision and Uncertainty
All table entries have been obtained at the same operating conditions that give rise to the
maximum index value in the first column of the tables. Measurement precision and uncertainty
for power, pressure, intensity, and center frequency are listed in the following tables.
NOTE
Per Section 6.4 of the Output Display Standard, measurement precision on the following
quantities is determined by making repeated measurements and stating the standard
deviation as a percentage.
50 Lumify Ultrasound System
Acoustic Measurement Precision
Quantity Precision (Percentage Standard Deviation)
Pr is the underated peak rarefactional pressure
measured in megapascals (MPa).
Wo is the ultrasonic power in milliwatts (mW). 6.2%
fc is the center frequency in megahertz (MHz)
(NEMA UD-2 definition).
PII.3 is the derated spatial-peak pulse intensity
integral in joules per square centimeter (J/cm2).
Pr: 5.4%
<1%
PII.3: 3.2%
Philips Healthcare 4535 618 58571_A/795 * MAY 2016
Page 51

Operator Safety Safety
Acoustic Measurement Uncertainty
Quantity Measurement Uncertainty (Percentage, 95%
Confidence Value)
Pr is the underated peak rarefactional pressure
measured in megapascals (MPa).
Wo is the ultrasonic power in milliwatts (mW). ±10%
fc is the center frequency in megahertz (MHz)
(NEMA UD-2 definition).
PII.3 is the derated spatial-peak pulse intensity
integral in joules per square centimeter (J/cm2).
Operator Safety
Pr: ±11.3%
±4.7%
PII.3: +18% to -23%
The following issues and situations can affect operator safety when you are using an ultrasound
system.
Repetitive Strain Injury
Repetitive ultrasound scanning has been associated with carpal tunnel syndrome (CTS) and
related musculoskeletal problems. Some investigators have looked at a large population of
sonographers with different types of equipment. An article, with feedback from a smaller
geographical area, makes the following recommendations:
• Maintain your joints in optimum positions with a balanced posture while scanning.
• Allow frequent breaks to give soft tissue a chance to recuperate from awkward positions
and repetitive movement.
• Avoid gripping the transducer with excessive force.
Philips Healthcare 4535 618 58571_A/795 * MAY 2016
Lumify Ultrasound System 51
Page 52

Safety Operator Safety
Repetitive Strain References
Pike, I., et al. "Prevalence of Musculoskeletal Disorders and Related Work and Personal Factors
Among Diagnostic Medical Sonographers." Journal of Diagnostic Medical Sonographers, Vol. 13,
No. 5: 219-227, September 1997.
Necas, M. "Musculoskeletal Symptomatology and Repetitive Strain Injuries in Diagnostic
Medical Sonographer." Journal of Diagnostic Medical Sonographers, 266-227, November/
December 1996.
Philips Transducers
Use only transducers that are approved by Philips for use with your Philips ultrasound system.
See “Clinical Applications and Transducers” on page 116 for a list of the transducers that are
compatible with your ultrasound system.
Glutaraldehyde Exposure
The United States Occupational Safety and Health Administration (OSHA) has issued a
regulation covering levels of acceptable glutaraldehyde exposure in the working environment.
Philips does not sell glutaraldehyde-based disinfectants with its products, but this type of
disinfectant is recommended for the disinfection of transducers used in TEE, intraoperative,
endocavity, and biopsy procedures.
To reduce the presence of glutaraldehyde fumes in the air, be sure to use a covered or
ventilated soaking basin. Such systems are commercially available.
Infection Control
Issues related to infection control affect the operator and the patient. Follow the infectioncontrol procedures established in your facility for the protection of both the staff and the
patient.
52 Lumify Ultrasound System
Philips Healthcare 4535 618 58571_A/795 * MAY 2016
Page 53

Electromagnetic Compatibility Safety
Removing Blood and Infectious Material from the System
It is important to clean and maintain the ultrasound system and peripherals. If the equipment
has come in contact with blood or infectious material, clean and disinfect the system and
peripherals according to the instructions in the “System Maintenance” section.
Disposable Drape
If you believe contamination of the system might occur during an exam, Philips recommends
that you take universal precautions and cover the system with a disposable drape. Consult your
facility's rules regarding equipment use in the presence of infectious disease.
Electromagnetic Compatibility
Electromagnetic compatibility (EMC) is defined as the ability of a product, a device, or a system
to function satisfactorily in the presence of the electromagnetic phenomena that exists in the
location of the product, the device, or the system being used; and, in addition, to not introduce
intolerable electromagnetic disturbances to anything in that same environment.
Electromagnetic immunity is the ability of a product, a device, or a system to function
satisfactorily in the presence of electromagnetic interference (EMI).
Electromagnetic emissions is the ability of a product, a device, or a system to introduce
intolerable electromagnetic disturbances into the use environment.
Your system has been manufactured in compliance with existing electromagnetic compatibility
requirements. Use of this system in the presence of an electromagnetic field can cause
momentary degradation of the image quality. If this occurs often, review the environment in
which the system is being used to identify possible sources of radiated emissions. These
emissions could be from other electrical devices used within the same room or an adjacent
room, or from portable and mobile RF communications equipment such as cellular phones and
pagers, or from the existence of radio, TV, or microwave transmission equipment located
nearby. In cases where electromagnetic interference (EMI) is causing disturbances, it may be
necessary to relocate your system.
Philips Healthcare 4535 618 58571_A/795 * MAY 2016
Lumify Ultrasound System 53
Page 54

Safety Electromagnetic Compatibility
The transducer and representative Android device are classified as Group 1, Class A equipment
in accordance with international standard CISPR 11 for radiated and conducted electromagnetic
disturbances. Compliance with this standard allows the system to be used in all establishments
except domestic establishments and those directly connected to the public low-voltage power
supply network that supplies buildings used for domestic purposes. If the system is used in a
residential environment (for which CISPR 11 Class B is normally required), you may need to
relocate or reorient the system to offer adequate protection from radio frequency
communication services.
WARNING
Using cables, transducers, or accessories other than those specified for use with the system
may result in increased emissions or decreased immunity of the system.
CAUTION
Medical equipment has special precautions regarding EMC and must be installed and put
into service according to the EMC information provided in the system’s accompanying
documents.
This section includes information on electromagnetic emissions and immunity as it applies to
the system. Ensure that the operating environment of your system meets the conditions
specified in the referenced information. Operating the system in an environment that does not
meet these conditions may degrade system performance.
The information and warnings contained in this and other sections should be observed when
installing and using the system to ensure its EMC.
NOTE
See the other electrical-safety warnings and cautions in this section.
54 Lumify Ultrasound System
Philips Healthcare 4535 618 58571_A/795 * MAY 2016
Page 55

Electromagnetic Compatibility Safety
Electrostatic Discharge Precautions
Electrostatic discharge (ESD), commonly referred to as a static shock, is a naturally occurring
phenomenon that results in the flow of an electrical charge from a higher charged object or
person to a lower charged object or person. ESD is most prevalent during conditions of low
humidity, which can be caused by heating or air-conditioning. During low humidity conditions,
electrical charges naturally build up on individuals and objects and can create static discharges.
The following cautions can help to reduce ESD effect:
CAUTION
The following precautions can help to reduce ESD: anti-static spray on carpets; anti-static
spray on linoleum; anti-static mats; or a ground wire connection between the system and
the patient table or bed.
CAUTION
On connectors labeled with the ESD sensitivity symbol , do not touch the connector pins,
and always observe the preceding ESD precautions when handling or connecting
transducers.
Electromagnetic Emissions
The system is intended for use in the electromagnetic environment specified in the table. The
customer or the user of the system should ensure that it is used in such an environment.
Philips Healthcare 4535 618 58571_A/795 * MAY 2016
Lumify Ultrasound System 55
Page 56

Safety Electromagnetic Compatibility
Electromagnetic Emissions: Environment Guidance
Emissions Test Compliance Electromagnetic Environment
Guidance
RF emissions, CISPR 11 Group 1 The system uses RF energy only for its
internal function. Therefore, its RF
emissions are very low and are not
likely to cause any interference in
nearby electronic equipment.
RF emissions, CISPR 11 Class A The system is suitable for use in all
Harmonic emissions, IEC 61000-3-2 Class A
Voltage fluctuations/flicker
emissions, IEC 61000-3-3
Approved Cables for Electromagnetic Compliance
Complies
establishments, except domestic
establishments and those directly
connected to the public low-voltage
power supply network that supplies
buildings used for domestic purposes.
Cables connected to the system may affect its emissions. Use only the cable types and lengths
listed here.
WARNING
Using cables, transducers, and accessories other than those specified for use with the
system may result in increased emissions from, or decreased immunity of, the system.
56 Lumify Ultrasound System
Approved Cables
Cable Length Philips Part
Number
Transducer Cable Kit (C5-2 , L12-4) 1.25 m (4 ft) 453561806941
Philips Healthcare 4535 618 58571_A/795 * MAY 2016
Page 57

Electromagnetic Compatibility Safety
Approved Transducers for Electromagnetic Compliance
The imaging transducers used with the system may affect its emissions. The transducers listed
in “Clinical Applications and Transducers” on page 116, when used with the system, have been
tested to comply with the Group 1, Class A emissions, as required by international standard
CISPR 11. Use only those transducers.
WARNING
Using cables, transducers, and accessories other than those specified for use with the
system may result in increased emissions from, or decreased immunity of, the system.
Approved Accessories for Electromagnetic Compliance
Accessories used with the system may affect its emissions. The accessories listed here, when
used with the system, have been tested to comply with the Group 1, Class A emissions as
required by International Standard CISPR 11. Use only the accessories listed here.
When connecting other accessories to the system, such as a printer or computer, it is the user’s
responsibility to ensure the electromagnetic compatibility of the system. Use only CISPR 11 or
CISPR 22, Class A- or B-compliant devices, unless otherwise noted.
WARNING
Using cables, transducers, and accessories other than those specified for use with the
system may result in increased emissions from, or decreased immunity of, the system.
Philips Healthcare 4535 618 58571_A/795 * MAY 2016
Lumify Ultrasound System 57
Page 58

Safety Electromagnetic Compatibility
Approved Accessories
Accessory Manufacturer Model Number
Ultrasonic imaging transducer Philips Use only the transducers listed in
“Clinical Applications and
Transducers” on page 116.
Electromagnetic Immunity
The system is intended for use in the electromagnetic environment specified here. The
customer or the user of the system should ensure that it is used in such an environment.
CAUTION
Cables, transducers, and accessories connected to the system may affect its immunity to the
electromagnetic phenomena listed here. Use only approved accessories, cables, and
transducers to minimize the chance of performance degradation of the system due to those
types of electromagnetic phenomena.
NOTE
The guidelines specified here may not apply in all situations. Electromagnetic propagation is
affected by absorption and reflection from structures, objects, and people.
NOTE
UT is the AC power voltage before application of the test level.
58 Lumify Ultrasound System
Philips Healthcare 4535 618 58571_A/795 * MAY 2016
Page 59

Electromagnetic Compatibility Safety
NOTE
At 80 MHz and 800 MHz, the separation distance for the higher frequency range applies.
Electromagnetic Immunity: Environment Guidance
Immunity Test IEC 60601 Test Level Compliance Level Electromagnetic
Environment Guidance
Electrostatic discharge
(ESD), IEC 61000-4-2
Electrical fast transient/
burst, IEC 61000-4-4
Surge, IEC 61000-4-5 Not applicable. The device
8 kV air discharge, 6 kV
contact discharge
Not applicable. The device
does not function on AC
power
does not function on AC
power
8 kV air discharge, 6 kV
contact discharge
- - Mains power quality should
- - Mains power quality should
Floors should be wood,
concrete, or ceramic tile. If
floors are covered with
synthetic material, the
relative humidity should be
at least 30%.
be that of a typical
commercial or hospital
environment.
be that of a typical
commercial or hospital
environment.
Philips Healthcare 4535 618 58571_A/795 * MAY 2016
Lumify Ultrasound System 59
Page 60

Safety Electromagnetic Compatibility
Immunity Test IEC 60601 Test Level Compliance Level Electromagnetic
Environment Guidance
Voltage dips, short
interruptions, and voltage
variations on power supply
input lines, IEC 61000-4-11
Power frequency
(50/60 Hz) magnetic field,
IEC 61000-4-8
Conducted RF,
IEC 61000-4-6
Radiated RF, IEC 61000-4-3 3 V/m 3 V/m For recommended
Not applicable. The device
does not function on AC
power
3 A/m 3 A/m Power frequency magnetic
3 VRMS 3 VRMS For recommended
- - Mains power quality should
be that of a typical
commercial or hospital
environment. If you require
continued operation during
power mains interruptions,
Philips recommends that
the system be powered
from an uninterruptible
power supply or a battery.
fields should be at levels
characteristic of a typical
location in a typical
commercial or hospital
environment.
separation distances, see
“Recommended Separation
Distance” on page 62.
separation distances, see
“Recommended Separation
Distance” on page 62.
Although most remote devices comply with their applicable standards for immunity, those
device requirements may not be as stringent as those required for medical equipment. It is the
responsibility of the installer and the user of this remote customer-supplied equipment to
ensure that it functions properly in the electromagnetic environment where the system is
60 Lumify Ultrasound System
Philips Healthcare 4535 618 58571_A/795 * MAY 2016
Page 61

Electromagnetic Compatibility Safety
installed. Philips suggests that the installer or the user of such a system consult with experts in
the field of electromagnetic compatibility and safety for guidance to ensure the safe and
effective use of the created system.
Electromagnetic Interference
Electromagnetic interference may appear in many ways on the system and depends on the
mode the equipment is operating in, the imaging control settings, the type of transducer being
used, the type of electromagnetic phenomena, and the intensity level of the phenomena.
CAUTION
When interference is present or intermittent, use caution when continuing to use the
system.
NOTE
Electromagnetic phenomena are not always present and may be transitory in nature. It may
be extremely difficult to identify the source of the interference.
NOTE
The following table describes a few typical interferences seen in imaging systems. It is
impossible to describe all manifestations of interference, because it depends on many
parameters of the transmitting device, such as the type of modulation used by the signal
carrier, the source type, and the transmitted level. It is also possible for the interference to
degrade the imaging system's performance and not be visible in the image. If the diagnostic
results are suspicious, other means should be used to confirm the diagnosis.
Philips Healthcare 4535 618 58571_A/795 * MAY 2016
Lumify Ultrasound System 61
Page 62

Safety Electromagnetic Compatibility
Typical Interference on Ultrasonic Imaging Systems
Imaging Mode ESD
2D Change of operating mode,
Color Change of operating mode,
1
system settings, or system
reset. Brief flashes in the
displayed or recorded
image.
system settings, or system
reset. Brief flashes in the
displayed or recorded
image.
RF
For sector imaging
transducers, white radial
bands or flashes in the
center lines of the image.
For linear imaging
transducers, white vertical
bands, sometimes more
pronounced on the sides of
the image.
Color flashes, radial or
vertical bands, increase in
background noise, or
changes in image color.
2
Power Line
White dots, dashes, or
diagonal lines near the
center of the image.
Color flashes, dots, dashes,
or changes in the color
noise level.
3
1. Electrostatic discharge (ESD) caused by discharging of electric charge buildup on insulated
surfaces or persons.
2. Radio frequency (RF) energy from RF transmitting equipment such as portable phones,
handheld radios, wireless devices, commercial radio and TV stations, and so on.
3. Conducted interference on power lines or connected cables caused by other equipment,
such as switching power supplies, electrical controls, and natural phenomena such as
lightning.
Recommended Separation Distance
The following table provides recommended separation distances, which are guidelines on the
distances that any RF transmitting equipment should be kept away from the ultrasound system
to reduce the risk of interference with the system. Portable and mobile RF communications
equipment should be used no closer to any part of the system, including cables, than the
recommended separation distance calculated from the equation applicable to the frequency of
62 Lumify Ultrasound System
Philips Healthcare 4535 618 58571_A/795 * MAY 2016
Page 63

Electromagnetic Compatibility Safety
the transmitter. Field strengths from fixed RF transmitters, as determined by an
electromagnetic site survey, should be less than the compliance level in each frequency range
as noted in the table. Interference may occur in the vicinity of equipment marked with the
following symbol:
.
Field strengths from fixed transmitters, such as base stations for radio (cellular/cordless)
telephones and land mobile radios, amateur radio, AM and FM radio broadcast, and TV
broadcast, cannot be predicted theoretically with accuracy. To assess the electromagnetic
environment due to fixed RF transmitters, an electromagnetic site survey should be considered.
If the measured field strength in the location in which the system is used exceeds the applicable
RF compliance level in the table, the system should be observed to verify normal operation. If
abnormal performance is observed, additional measures may be necessary, such as reorienting
or relocating the system.
NOTE
At 80 MHz and 800 MHz, the higher frequency range applies.
NOTE
The recommended separation distance guidelines in the following table may not apply to all
situations. Electromagnetic propagation is affected by absorption and reflection from
structures, objects, and people.
The information provided here, in conjunction with “Electromagnetic Interference” on page 61,
provides guidance on conducted and radiated interference from portable and fixed RF
transmitting equipment.
Philips Healthcare 4535 618 58571_A/795 * MAY 2016
Lumify Ultrasound System 63
Page 64

Safety Electromagnetic Compatibility
Recommended Separation Distances by Transmitter Frequency
Rated Maximum Output
Power of Transmitter
(Watts)
0.01 0.35 m (13.8 in) 0.12 m (4.7 in) 0.23 m (9.1 in)
0.1 1.1 m (3.6 ft) 0.38 m (15 in) 0.73 m (28.7 in)
1 3.5 m (11.5 ft) 1.2 m (3.9 ft) 2.3 m (7.5 ft)
10 11 m (36.1 ft) 3.8 m (12.5 ft) 7.3 m (24 ft)
100 35 m (114.8 ft) 12 m (39.4 ft) 23 m (75.5 ft)
150 kHz to 80 MHz 80 to 800 MHz 800 MHz to 2.5 GHz
Ultrasound systems can be sensitive to RF interference in the transducer passband. For
example, for a 5-MHz imaging transducer, the frequency range of interference from a 3-V/m
field may be from 2 to 10 MHz and manifest itself as described in “Electromagnetic
Interference” on page 61.
As an example, if a portable transmitter has maximum radiated power of 1 W and an operating
frequency of 156 MHz, it should only be operated at distances greater than 1.2 m (3.9 ft) from
the system. Likewise, a 0.01-W Bluetooth wireless LAN device operating at 2.4 GHz should be
placed no closer than 0.24 m (9.5 in) from any part of the system.
Avoiding Electromagnetic Interference
A medical device can either generate or receive electromagnetic interference. The EMC
standards describe tests for both emitted and received interference. Emission tests deal with
interference generated by the device being tested. Philips ultrasound systems do not generate
interference based on the tests described in the referenced standards.
An ultrasound system is designed to receive signals at radio frequencies and is therefore
susceptible to interference generated by RF energy sources. Examples of other sources of
interference are medical devices, information technology products, and radio and television
transmission towers. Tracing the source of radiated interference can be a difficult task.
Customers should consider the following in an attempt to locate the source:
64 Lumify Ultrasound System
Philips Healthcare 4535 618 58571_A/795 * MAY 2016
Page 65

Electromagnetic Compatibility Safety
• Is the interference intermittent or constant?
• Does the interference show up only with one transducer or with several transducers?
• Do two different transducers operating at the same frequency have the same problem?
• Is the interference present if the system is moved to a different location in the facility?
• Can the EMC coupling path be attenuated? For example, placement of a transducer or
printer close to an ECG cable can increase electromagnetic interference. Moving the cable
or other medical equipment away from the location of the transducer or printer can result
in reduced electromagnetic interference.
The answers to these questions will help determine if the problem resides with the system or
the scanning environment. After you answer the questions, contact your Philips service
representative.
Use Restrictions Due to Interference
The physician must determine if an artifact caused by radiated interference will have a negative
impact on image quality and the subsequent diagnosis.
Philips Healthcare 4535 618 58571_A/795 * MAY 2016
Lumify Ultrasound System 65
Page 66

Safety Electromagnetic Compatibility
66 Lumify Ultrasound System
Philips Healthcare 4535 618 58571_A/795 * MAY 2016
Page 67

Device Requirements System Overview
System Overview
3
Use this section to acquaint yourself with the ultrasound system and its components.
Device Requirements
WARNING
Using the Lumify app on a device that does not meet the minimum specification may result
in poor image quality, unexpected results, and possible misdiagnosis.
Philips Healthcare 4535 618 58571_A/795 * MAY 2016
For a list of devices that Philips has tested and determined to be compatible with the Lumify
app, visit the Lumify portal:
www.philips.com/Lumify-Compatible-Devices
Although Philips cannot guarantee that the Lumify app will work on a device that is not on the
list of compatible devices, these are the minimum device specifications. Your device must meet
all of the following specifications:
• Minimum 50 MB of storage space (plus more for patient data storage)
• Color display, minimum 14 cm (5.5 in)
• Touch interface
• Internally mounted speakers
• IEC 60950-1-compliant
• Date/time configuration
• Full compliance with USB On-The-Go standard
• 1280 x 800 resolution (minimum)
• Android 4.3 or later operating system
1
Lumify Ultrasound System 67
Page 68

System Overview System Capabilities
• NVIDIA Tegra 3 Quad-Core CPU, 1.2 GHz (minimum)
• Wireless or cellular networking capability
• Access to ports 80 and 443
1
Philips verifies that the devices on the Compatible Tablets list on the Lumify portal
(www.philips.com/Lumify-Compatible-Devices) comply with the USB On-The-Go standard.
System Capabilities
The Lumify Ultrasound System is intended for abdominal (including gallbladder and lung),
general imaging, musculoskeletal, OB/GYN, small parts (small organ), superficial, and vascular
applications. It can be used for 2D and Color imaging. The system provides a 2D distance
measurement tool.
NOTE
Voice-to-text capability depends upon your device's support for the feature and on your
wireless or cellular connection.
Measurements
The system provides tools for measuring distance.
After you perform measurements, you can save the measurement by acquiring an image that
contains the measurement. The system displays one measurement at a time.
Transducer Types
Available transducer types are curved array and linear array transducers. Applications for
specific transducers are listed in “Clinical Applications and Transducers” on page 116.
68 Lumify Ultrasound System
Philips Healthcare 4535 618 58571_A/795 * MAY 2016
Page 69

System Capabilities System Overview
Indications for Use and Supporting Transducers
CAUTION
United States federal law restricts this device to sale by or on the order of a physician.
Lumify is a prescription ultrasound device intended for use by licensed healthcare
professionals.
Use only transducers that are approved by Philips for use with your Philips ultrasound system.
The following are the indications for use for this system and the transducers supporting each
indication.
System Indications for Use and Supporting Transducers
Indication for Use Supporting Transducers
Abdominal C5-2, L12-4
Carotid L12-4
Fetal Echo C5-2
Fetal/Obstetric C5-2
Gynecological C5-2
Musculoskeletal L12-4
Peripheral Vessel L12-4
Small Parts L12-4
Urology C5-2
Philips Healthcare 4535 618 58571_A/795 * MAY 2016
Lumify Ultrasound System 69
Page 70

System Overview System Capabilities
Patient Data Protection
The Lumify app does not encrypt patient data. It is your responsibility to configure your device
to meet your local security policies and regulatory requirements. Consult your healthcare-IT
security department to ensure that your device is configured in accordance with your specific
requirements for information security.
Philips recommends that you protect patient data by encrypting your device and setting a
password or passcode as a screen lock for your device, in accordance with your institution's
security policies and requirements. For instructions, see the documentation that accompanies
your device.
When you are finished using the system, you can briefly press the On/Off control on the device
to lock the screen and prevent unauthorized access to patient data, or you can simply shut
down the system, which logs you off automatically. For more information about patient data
protection, see Shared Roles for System and Data Security on your User Information CD or in
the Support section of the Lumify portal:
www.philips.com/lumify
The Lumify Ultrasound System is not intended for long-term storage of patient data. Export
exams frequently and delete them after they are exported. You can hide patient data on
exported images and loops (see “Exporting Exams” on page 106 and “Showing or Hiding
Patient Data on Exported Images” on page 107). You can also delete all patient data from the
Lumify system (see “Deleting Patient Data and Lumify Settings” on page 86).
Wireless Networking
For information about configuring your device for wireless networking, see the documentation
that accompanies your device.
It is your responsibility to configure the wireless network security mechanisms that are
compatible with your network. Consult your healthcare IT security department to ensure that
your device is configured in accordance with your specific requirements for information
security.
70 Lumify Ultrasound System
Philips Healthcare 4535 618 58571_A/795 * MAY 2016
Page 71
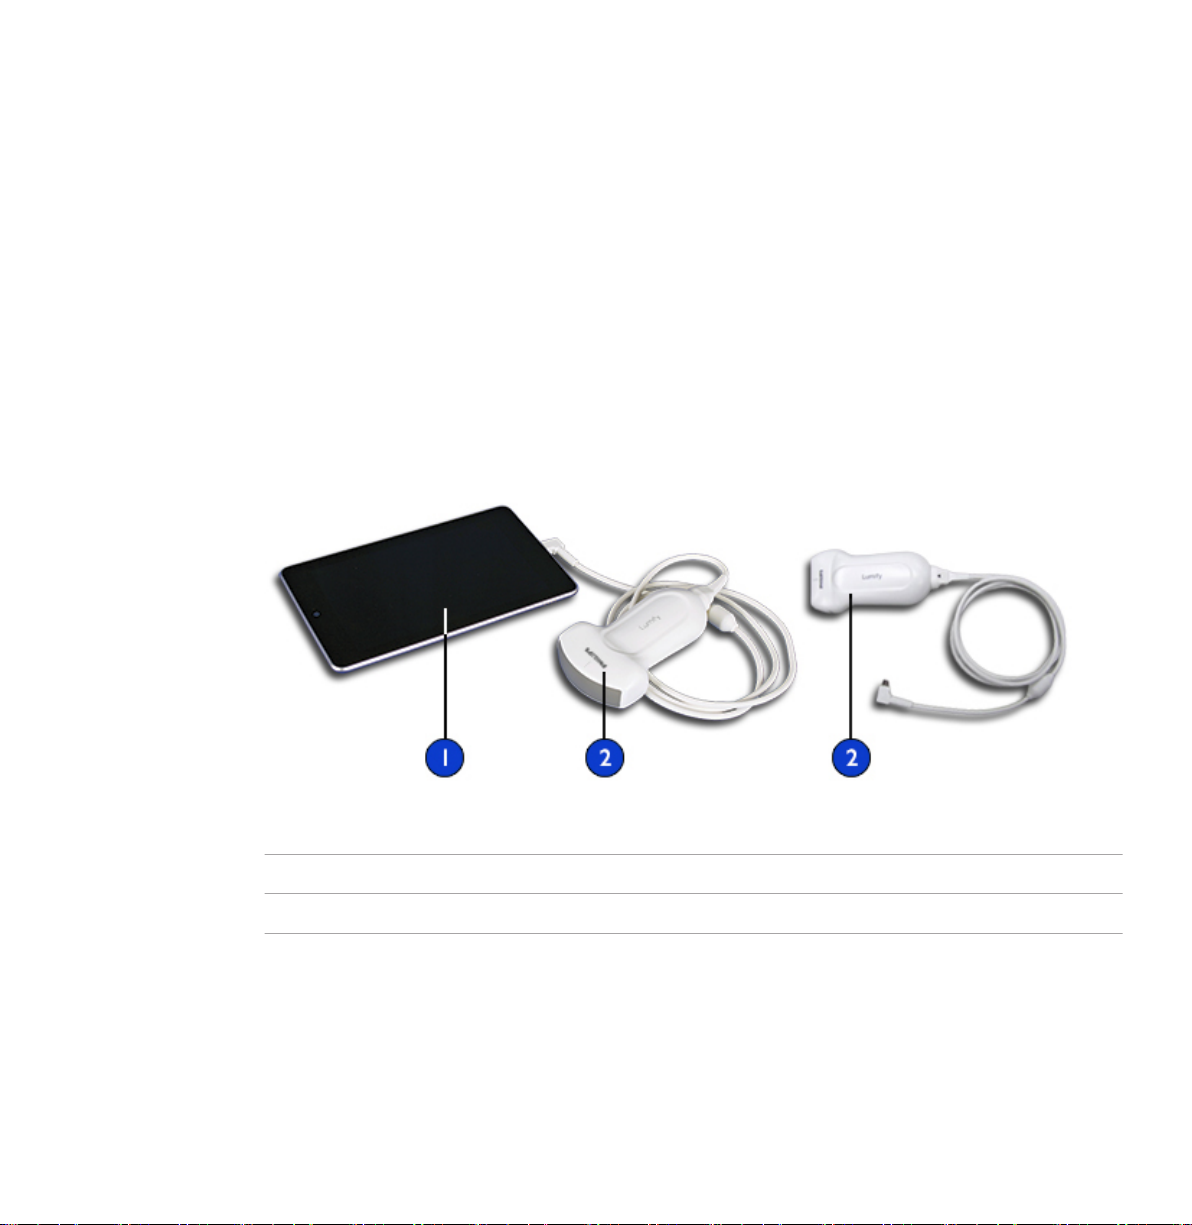
System Components System Overview
System Components
The system consists of the following:
• The Philips Lumify app, available for download from the Google Play Store
• One or more Lumify Philips transducers, available with your Lumify subscription
• A compatible Android device (for a list of compatible devices, visit the Lumify portal:
www.philips.com/Lumify-Compatible-Devices)
• A carrying bag
• User information (see “User Information Components” on page 12)
System Components
1 Android device
2 Transducer
Philips Healthcare 4535 618 58571_A/795 * MAY 2016
Lumify Ultrasound System 71
Page 72

System Overview System Settings
Data Storage
You can export exams and images to a DICOM PACS, to a network share, or to a local directory.
You can also e-mail images. Supported e-mail applications include Gmail, K-9 Mail, Yahoo,
Outlook, and Inbox. For more information, see “Exporting Exams” on page 106, “E-mailing
Exams” on page 108 and “E-mailing Images” on page 105.
System Settings
To configure the settings for your system, touch and then select Settings .
Name Description
Audit Logs Allows you to view audit logs, which contain actions such as exam start, exam end,
and exam export or e-mail. For more information, see “Viewing Audit Logs” on page
153.
Barcode Scanner Allows you to add and rearrange barcode formats.
Control Orientation Allows you to set the orientation of the display. To set the location of the imaging
controls, touch Left or Right.
Loop Duration Allows you to control the duration of a loop. To set the loop length (in seconds), drag
the slider. For more information about acquiring loops, see “Acquiring Loops” on page
99.
Patient Database Allows you to repair or reset the patient database. To remove corruption in the
system, touch Repair Database. To delete all patient data and reset the database,
touch Reset Database. For more information, see “Deleting Patient Data and Lumify
Settings” on page 86.
Power Control Displays a control that you can use to adjust the output power.
Power Saving Allows you to specify that the system reduce the frame rate while you are in the
imaging display but not actively scanning a patient. Reducing the frame rate saves
power and extends battery life.
72 Lumify Ultrasound System
Philips Healthcare 4535 618 58571_A/795 * MAY 2016
Page 73

System Information System Overview
Name Description
System Logs Allows you to send logs to Philips in case of a system problem. For more information,
see “Sending System Logs” on page 153.
Thermal Index Display Allows you to select the thermal index that you want to display. For more
information, see “Setting the Thermal Index Display” on page 79.
Transducer Tests Allows you to run a series of tests to diagnose image quality issues, transducer
recognition issues, or specific transducer error messages. For more information, see
“Testing Transducers” on page 123.
System Information
System information is available in the About dialog box (touch and then touch About).
Name Description
Documents and Support Provides links to legal documents, privacy information, the Lumify portal, the Lumify
User Manual, and open-source software licenses.
EU164 Allows Philips to use this information to identify and to match your device with
system logs if you require assistance.
Software Version Provides the Lumify app version.
Tablet Identifier Allows Philips to use this information to identify and to match your device with
system logs if you require assistance.
Transducer Serial Number Provides the transducer serial number. The system automatically records the
transducer serial number when you connect the transducer to the system.
Philips Healthcare 4535 618 58571_A/795 * MAY 2016
Lumify Ultrasound System 73
Page 74

System Overview System Information
74 Lumify Ultrasound System
Philips Healthcare 4535 618 58571_A/795 * MAY 2016
Page 75

Downloading and Installing the Lumify App Using the System
Using the System
4
The topics that follow will help you understand and use the features of the system.
Downloading and Installing the Lumify App
The Lumify app is available from the Google Play Store. The Google Play Store (https://
play.google.com) is a digital media store, operated by Google, from which you can download
apps for the Android operating system. Before you install the Lumify app, make sure that your
device meets or exceeds the minimum specifications (see “Device Requirements” on page 67)
and visit the Lumify portal for a list of compatible devices:
www.philips.com/Lumify-Compatible-Devices
1. On your Lumify-compatible Android device, open the Google Play Store.
2. Search for Lumify. If you cannot find Lumify, your device may not meet the minimum
specifications. For more information, visit the Lumify portal for a list of compatible devices:
www.philips.com/Lumify-Compatible-Devices
3. Follow the displayed instructions to download and install the Lumify app.
Registration and Entitlement
Before you can use the Lumify app, you must register one or more transducers. The Lumify app
prompts you to register when you first connect the transducer to your device.
At least once a month, make sure that your device is connected to a wireless or cellular
network, with the Lumify app open and your transducers connected, so that the system can
automatically reregister your transducers.
Philips Healthcare 4535 618 58571_A/795 * MAY 2016
Lumify Ultrasound System 75
Page 76

Using the System Registering Your Transducers
NOTE
If you upgrade the Lumify app or the Android operating system, the system prompts you to
reregister the next time you connect a transducer.
Registering Your Transducers
1. Make sure that your device is connected to a wireless or cellular network.
2. Start the Lumify App.
3. Connect your Philips transducer to your device. The first time you connect the transducer
to your device, the device prompts you to Open Lumify When This USB Device is
Connected. Select Use By Default For This USB Device, and then touch OK. The Lumify app
performs a system check and registers your transducer.
4. On the Registration Complete display, touch Accept to begin using the system.
If registration fails, see “Troubleshooting” on page 153, or visit the Lumify portal for FAQs and
troubleshooting tips:
www.philips.com/lumify
Giving Lumify Access to Shared Device Storage
Lumify uses shared device storage for the patient database and to access your device's camera
for barcode scanning.
Some versions of the Android operating system require that you specify that an app is allowed
access to shared device storage. If your device prompts you to allow Lumify to access photos,
media, or files on your device, touch Allow. If you touch Deny, you cannot use Lumify until you
give access to shared device storage in the Android App Permissions settings.
76 Lumify Ultrasound System
Philips Healthcare 4535 618 58571_A/795 * MAY 2016
Page 77

Updating the Lumify App Using the System
Updating the Lumify App
You can configure your device to update apps individually or allow them to be updated
automatically.
If your Lumify-compatible device is configured to automatically update apps, the Lumify app
updates automatically when an update is available, unless the update includes a permissions
change. In that case, you are prompted to update the Lumify app.
If your device is configured to update apps individually, you can obtain the latest Lumify update
from the Google Play Store. For more information, search for "update apps" in Google Play
Help.
Viewing the App Walkthrough
The first time you start the Lumify app, it displays a walkthrough tutorial to familiarize you with
the features of the system. To begin an exam after the walkthrough ends, touch Start Scanning.
You can view the walkthrough at any time.
Touch , and then touch Walkthrough .
Canceling Your Subscription
To cancel your subscription, visit the Lumify portal:
www.philips.com/lumify
Philips Healthcare 4535 618 58571_A/795 * MAY 2016
Lumify Ultrasound System 77
Page 78

Using the System Turning the System On and Off
Turning the System On and Off
WARNING
Failing to end the current exam before starting a new exam can result in data being acquired
and stored under the wrong patient name. If you close the Lumify app without ending the
exam, the system pauses the exam.
NOTE
If battery power is unavailable, or if the battery charge level is critically low, disconnect the
transducer and charge your device.
NOTE
Philips recommends that your device be fully charged before you start imaging. To avoid
unexpected battery discharging, charge your device at regular intervals, or when the device
displays the low-battery warning.
78 Lumify Ultrasound System
Before you turn on your device, disconnect the transducer and all peripheral devices.
Before you turn off your device, end the current exam.
For instructions on turning the system on or off, see the documentation that accompanies your
device.
Philips Healthcare 4535 618 58571_A/795 * MAY 2016
Page 79

Setting the System Time and Date Using the System
Setting the System Time and Date
The Lumify app uses your device's clock and calendar function to display the time and date on
the imaging display, and to provide a time stamp on patient exams and acquired images. If you
change the time or date on your device, the Lumify app prompts you to restart.
For instructions on changing the time and date, see the documentation that accompanies your
device.
Setting the Thermal Index Display
You can set which of the thermal indices to display depending on the type of tissue you are
imaging.
1. Touch and select Settings .
2. In Thermal Index Display, select the thermal index you want.
Imaging Display
The imaging display contains an ultrasound image, exam and image information, indicators, and
system controls.
The exam information includes the patient data, the current time and date, and the MI and TI
values. The system does not display patient data until you start an exam.
Image information is displayed next to the image. This includes the transducer and selected
preset. The controls area contains depth, gain, freeze, mode, and power controls. The location
of the controls area changes depending on the orientation of your device.
Philips Healthcare 4535 618 58571_A/795 * MAY 2016
Lumify Ultrasound System 79
Page 80
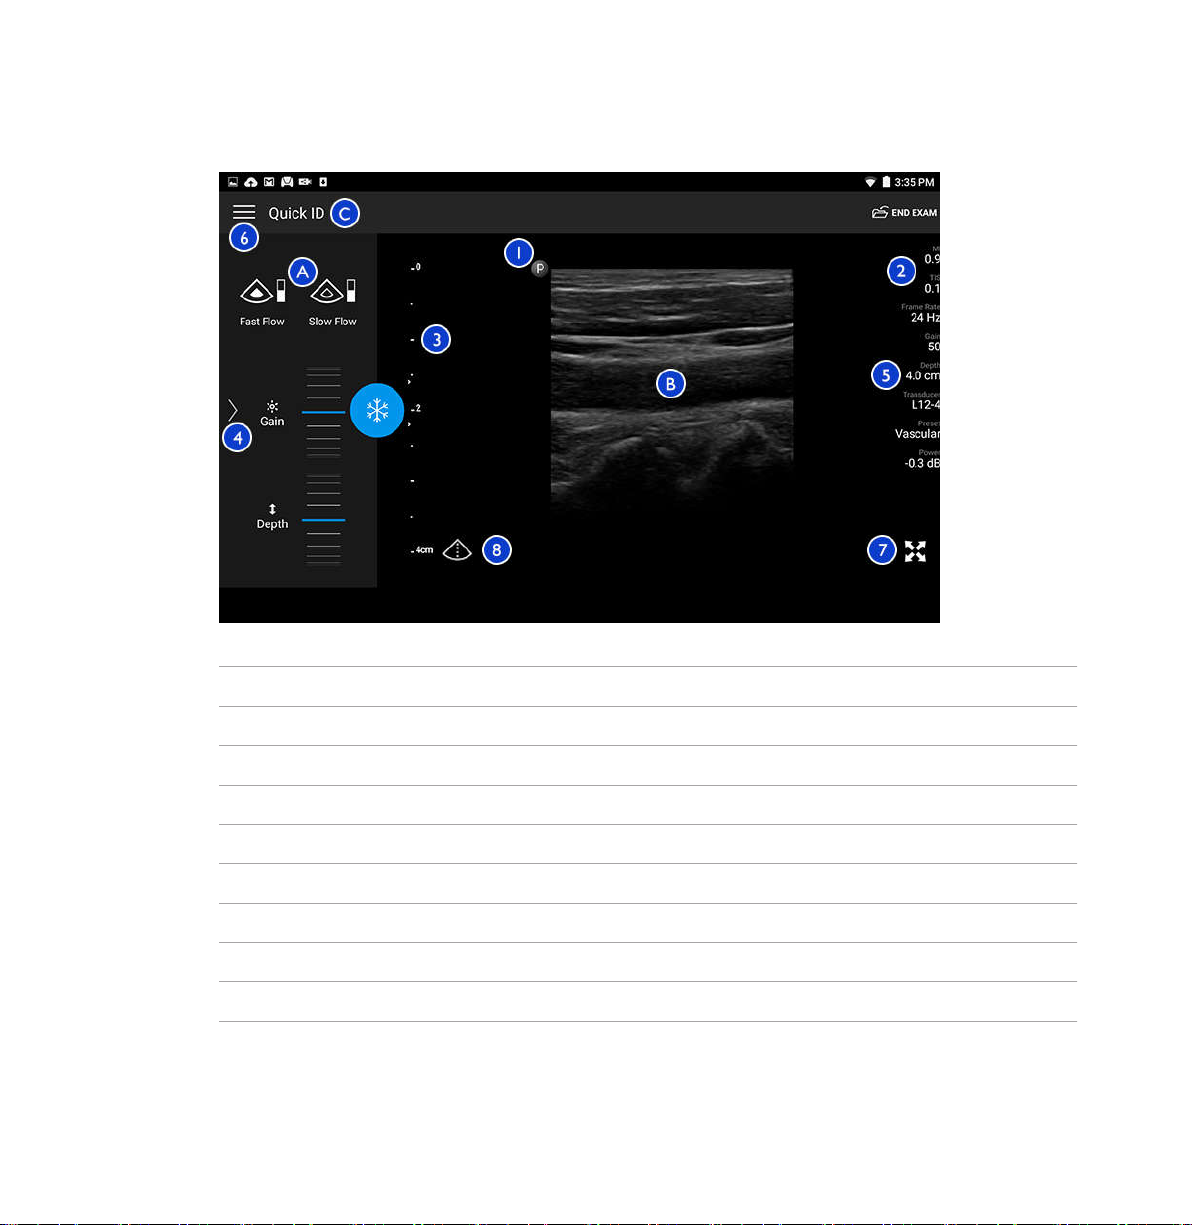
Using the System Imaging Display
Imaging Display (Landscape Orientation)
A Controls area
B Image area
C Patient information
1 Scan plane orientation marker
2 MI and TI values
3 Focal indicator
4 Page indicator: Touch the indicator to go to the next page of controls, or swipe to move between pages.
5 Image information
6 Review and settings menu
80 Lumify Ultrasound System
Philips Healthcare 4535 618 58571_A/795 * MAY 2016
Page 81
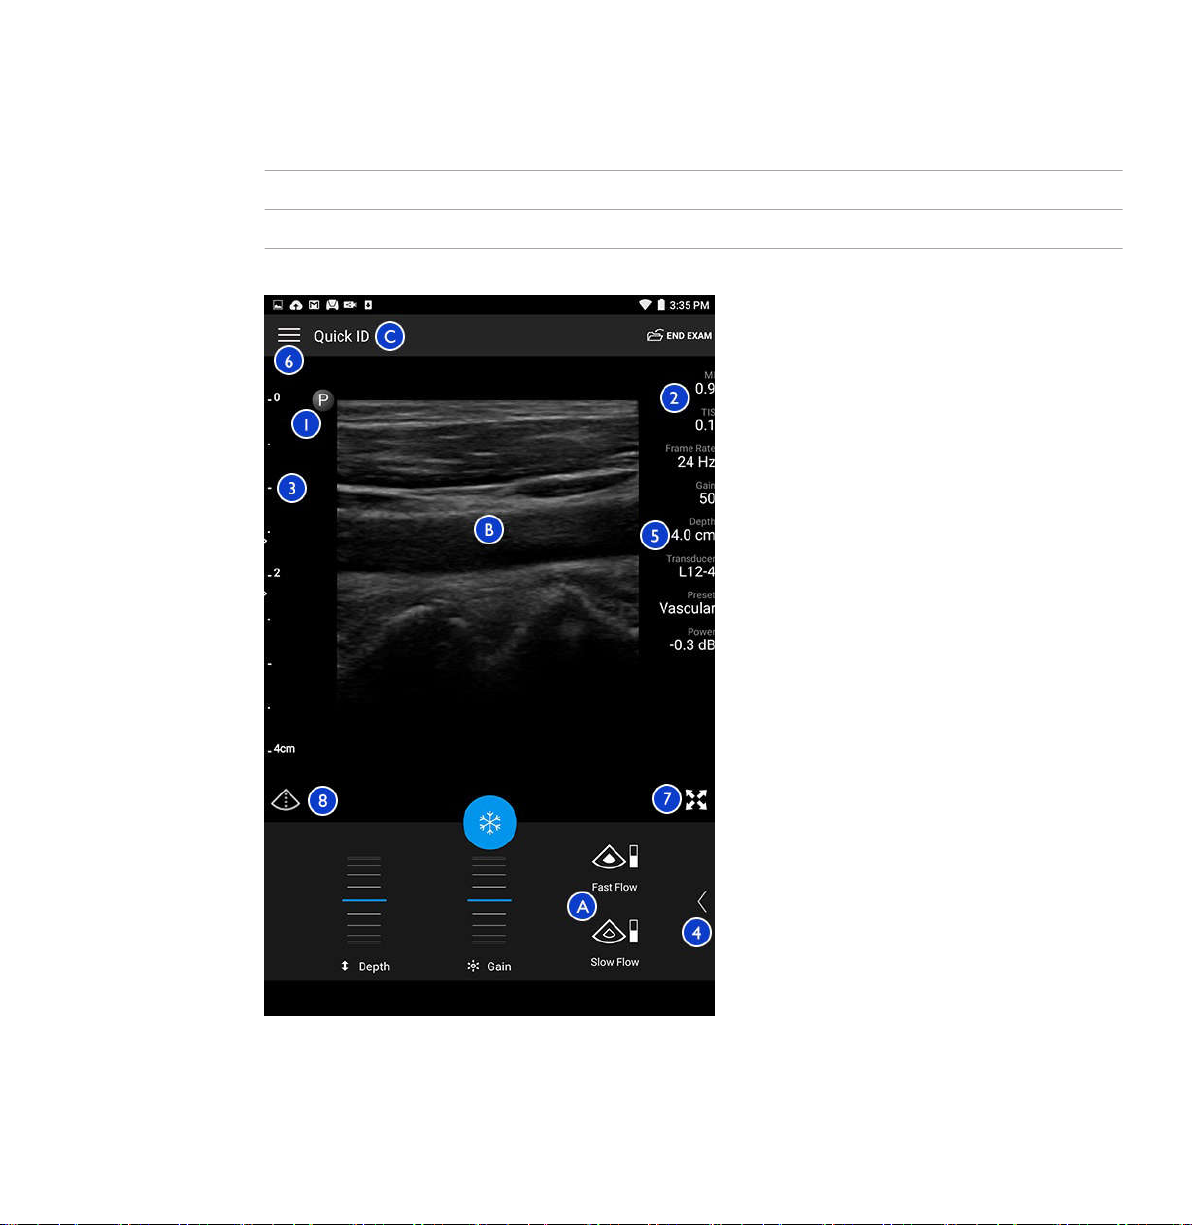
Imaging Display Using the System
7 Full-screen view control
8 Centerline control
In portrait orientation, the location of the controls area changes.
Imaging Display (Portrait Orientation)
Philips Healthcare 4535 618 58571_A/795 * MAY 2016
Lumify Ultrasound System 81
Page 82

Using the System Quick Exams
A Controls area
B Image area
C Patient information
1 Scan plane orientation marker
2 MI and TI values
3 Focal indicator
4 Page indicator: Touch the indicator to go to the next page of controls, or swipe to move between pages.
5 Image information
6 Review and settings menu
7 Full-screen view control
8 Centerline control
Quick Exams
In an emergency, you can start an exam without entering patient data. This is called a quick
exam. During a quick exam, the system provides a medical record number (MRN) and the words
Quick ID appear as the patient's last name.
You can edit patient data until you end the exam.
Starting Quick Exams
CAUTION
You cannot edit patient information after you end the exam. After you end the exam, you
can only view patient information. You cannot edit data for previous exams.
82 Lumify Ultrasound System
Philips Healthcare 4535 618 58571_A/795 * MAY 2016
Page 83
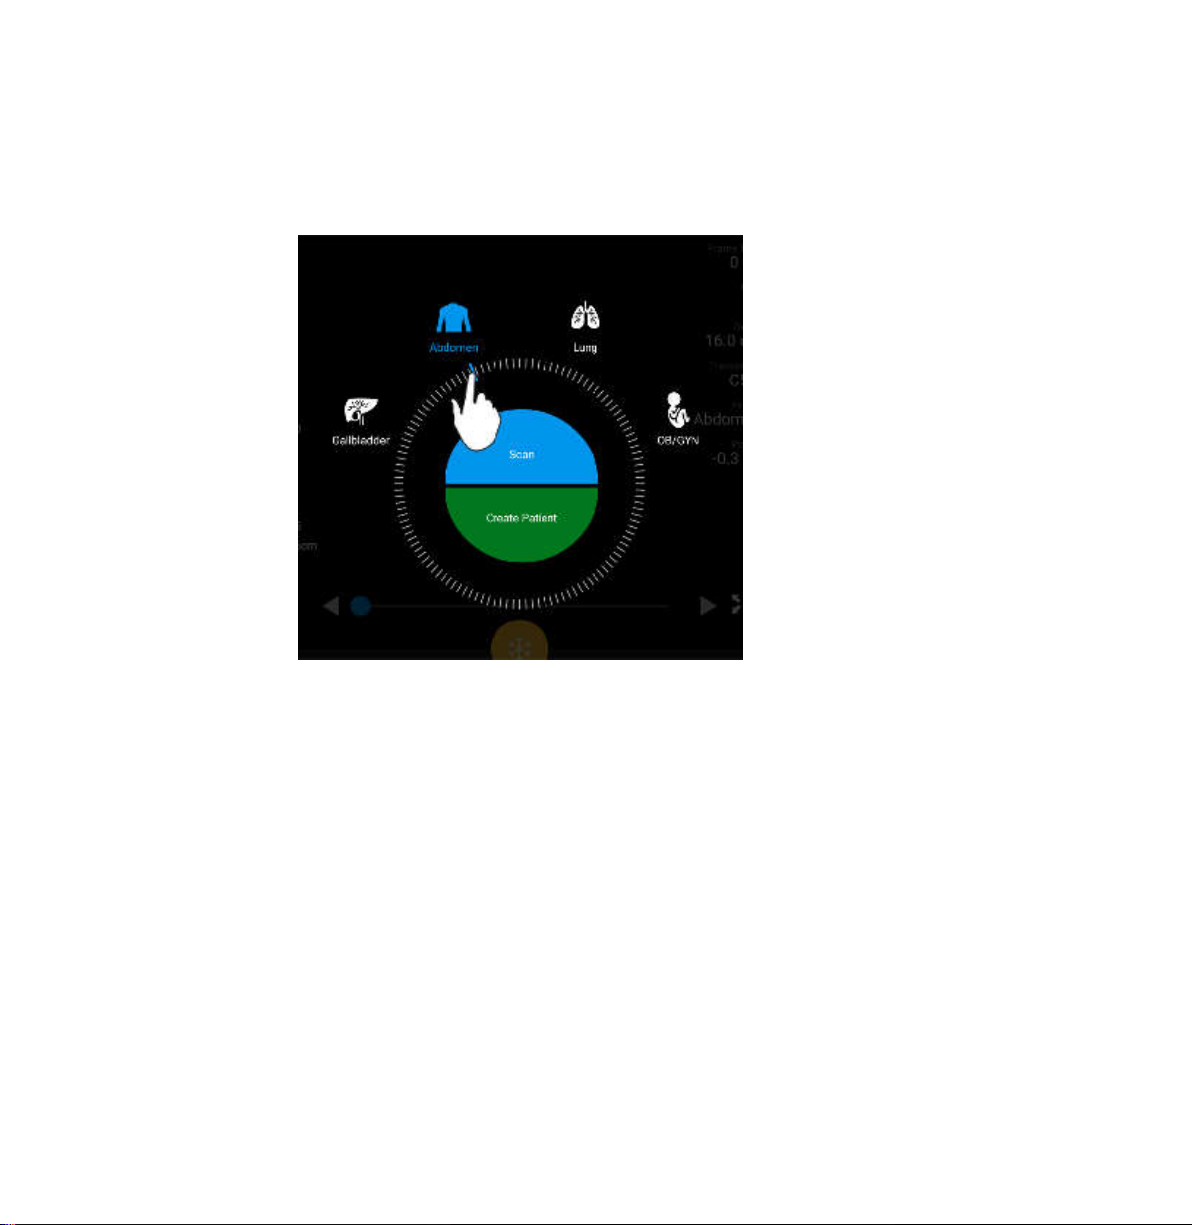
Quick Exams Using the System
1. On the Scan/Create Patient display, touch an exam preset or drag the selector on the
preset selector wheel to the exam preset you want.
Drag the Wheel Selector to Select a Preset
2. Touch Scan. You can now begin imaging if you do not want to add any patient information.
3. To add patient information:
a. On the imaging display, touch Quick ID.
b. On the Patient Info display, type the patient information, query a Modality Worklist
(MWL), or scan a barcode. For more information, see “Starting New Exams” on page
89.
c. Touch Save and Return.
d. Resume imaging.
Philips Healthcare 4535 618 58571_A/795 * MAY 2016
Lumify Ultrasound System 83
Page 84

Using the System Using Your Device's Camera as a Barcode Scanner
Using Your Device's Camera as a Barcode Scanner
You can use your device's camera to scan barcodes and populate patient information fields.
You can save multiple barcode formats. See “Saving Barcode Formats” on page 85.
The first time you scan a barcode format, you must map the format to at least one patient
information field. Lumify remembers this information for subsequent barcode scans of the
same format.
The barcode you scan must meet the following conditions or Lumify will return an error:
• There is a delimiter between strings.
• The values must be unique.
• The delimiter is a non-alphanumeric, single character.
If you receive an error message, create a sample barcode where each field is a unique value and
follow the steps in the following procedure to scan and map the format.
You can scan in either portrait or landscape orientation.
1. On the Patient Info form, touch Scan Barcode .
2. If prompted, touch Allow to allow Lumify to use your device's camera.
3. Use the viewfinder to place the horizontal red line across the barcode. Make sure that the
entire barcode is included in the viewfinder, perpendicular to the red line. If sound is
enabled on your device, it beeps when Lumify scans the code.
4. If this is the first time you have scanned this barcode format, do the following:
a. Type a Format Nickname and touch Continue. Lumify displays the patient information
fields from the barcode.
b. In Barcode Configuration, drag the barcode text to the corresponding patient data
entry field (to adjust your selection, drag and . Alternatively, type the patient
information fields exactly as they appear in the displayed barcode result. Each field's
value must be unique (for example, you cannot enter the same value for the Last Name
and the First Name).
5. Touch Save.
84 Lumify Ultrasound System
Philips Healthcare 4535 618 58571_A/795 * MAY 2016
Page 85

Using Your Device's Camera as a Barcode Scanner Using the System
Saving Barcode Formats
You can save multiple barcode formats. When Lumify scans a barcode, it searches the formats
for the best match.
1. Do either of the following:
• In the barcode viewfinder, touch .
• Touch , select Settings , and then touch Barcode Settings.
2. In Barcode Settings, do any of the following:
• To add a new barcode format, touch Add New and scan a barcode. Type a name for the
barcode and touch Continue.
Lumify displays the patient information fields from the barcode result. In Barcode
Configuration, drag the barcode text to the corresponding patient data entry field (to
adjust your selection, drag and . Alternatively, type the patient information fields
exactly as they appear in the displayed barcode result. Each field's value must be unique
(for example, you cannot enter the same value for the Last Name and the First Name)
and you must complete at least one field. Touch Save.
• To rearrange barcode formats, drag the entries.
• To remove a barcode format, touch .
Supported Barcode Formats
Lumify supports the following barcode formats:
Format Symbologies
1D Product Barcodes UPC-A, UPC-E, EAN-8, EAN-13
1D Industrial Barcodes Code 39, Code 93, Code 128, Codabar, ITF-14, RSS-14,
RSS-Expanded
Matrix (2D) Barcodes QR Code, Data Matrix, Aztec, PDF 417
Philips Healthcare 4535 618 58571_A/795 * MAY 2016
Lumify Ultrasound System 85
Page 86

Using the System Connecting Transducers
Connecting Transducers
Plug the transducer into the USB port on the device. When initialization is complete, the name
of the transducer appears on the imaging display.
When you first connect a transducer, the Android operating system prompts you to select
whether the Lumify app should open when the transducer (USB device) is connected. If you
select Use By Default For This USB Device and touch OK, the Lumify app opens whenever the
transducer is connected, regardless of which app is currently open on the device.
Deleting Patient Data and Lumify Settings
You can delete all patient data and Lumify settings from the system, including data from the
current exam.
To delete patient data from exported images and loops, see “Showing or Hiding Patient Data on
Exported Images” on page 107.
Do one of the following:
• To delete only patient data, touch and select Settings . Touch Reset Database.
Touch Yes to confirm.
• To delete patient data and all Lumify settings, including registration information, DICOM
logs, and audit logs, in the Android operating system, go to Settings. Touch Apps, touch
Lumify, and then touch Clear Data.
Modality Worklist
You can load patient data and select a scheduled procedure from a DICOM Modality Worklist
Server (MWL) instead of entering the patient data manually.
Before you can use the modality worklist feature, you must add a DICOM Modality Worklist
server.
86 Lumify Ultrasound System
Philips Healthcare 4535 618 58571_A/795 * MAY 2016
Page 87

Modality Worklist Using the System
Adding a Modality Worklist Server
1. Do one of the following:
• Touch , and then touch Setup Modality Worklist .
• On the Patient Info form, touch Query MWL , and then touch Setup .
NOTE
If you have previously added a Modality Worklist server, Query MWL will query the server,
instead of letting you access Setup.
Philips Healthcare 4535 618 58571_A/795 * MAY 2016
2. In Setup Worklists, touch Add New.
3. In the Setup MWL Server dialog box, type or select values from the menus for the
following:
• Server Nickname
• Device AE Title (the AE title for your device)
• Peer AE Title (the AE title for the Modality Worklist server)
• Hostname or IP (use a DNS or a static IP address)
• DNS Suffix
• Port (the port number for the Modality Worklist server)
4. Select Query Options.
5. To specify advanced connection settings, select Show Advanced Options:
• DNS Suffix: The DNS name without the hostname
• Read Timeout (Sec): The network reply timeout
• Connection Timeout (Sec): The DICOM ARTIM timeout
6. To test the connection to the server, touch Test.
Lumify Ultrasound System 87
Page 88

Using the System Modality Worklist
7. Touch Save.
Modifying or Deleting a Modality Worklist Server
1.
Touch and then touch Setup Modality Worklist .
2. Select the Modality Worklist server you want to modify or delete.
3. Do one of the following:
• To modify the Modality Worklist server, type settings or select options, and then touch
Save.
• To delete the Modality Worklist server, touch .
88 Lumify Ultrasound System
Philips Healthcare 4535 618 58571_A/795 * MAY 2016
Page 89

Starting New Exams Performing an Exam
Performing an Exam
5
This section guides you through procedures commonly used in performing patient exams with
the system. These procedures include entering patient data, acquiring and reviewing images,
and making measurements.
Have a backup system present during critical exams to ensure completion of the exam in the
event that the primary system fails.
NOTE
You are responsible for configuring your device in accordance with your institution's security
policies. Notifications and alerts from third-party applications may interfere with an exam.
Starting New Exams
1. On the Scan/Create Patient display, touch an exam preset or drag the selector on the
preset selector wheel to the exam preset you want.
Philips Healthcare 4535 618 58571_A/795 * MAY 2016
Lumify Ultrasound System 89
Page 90
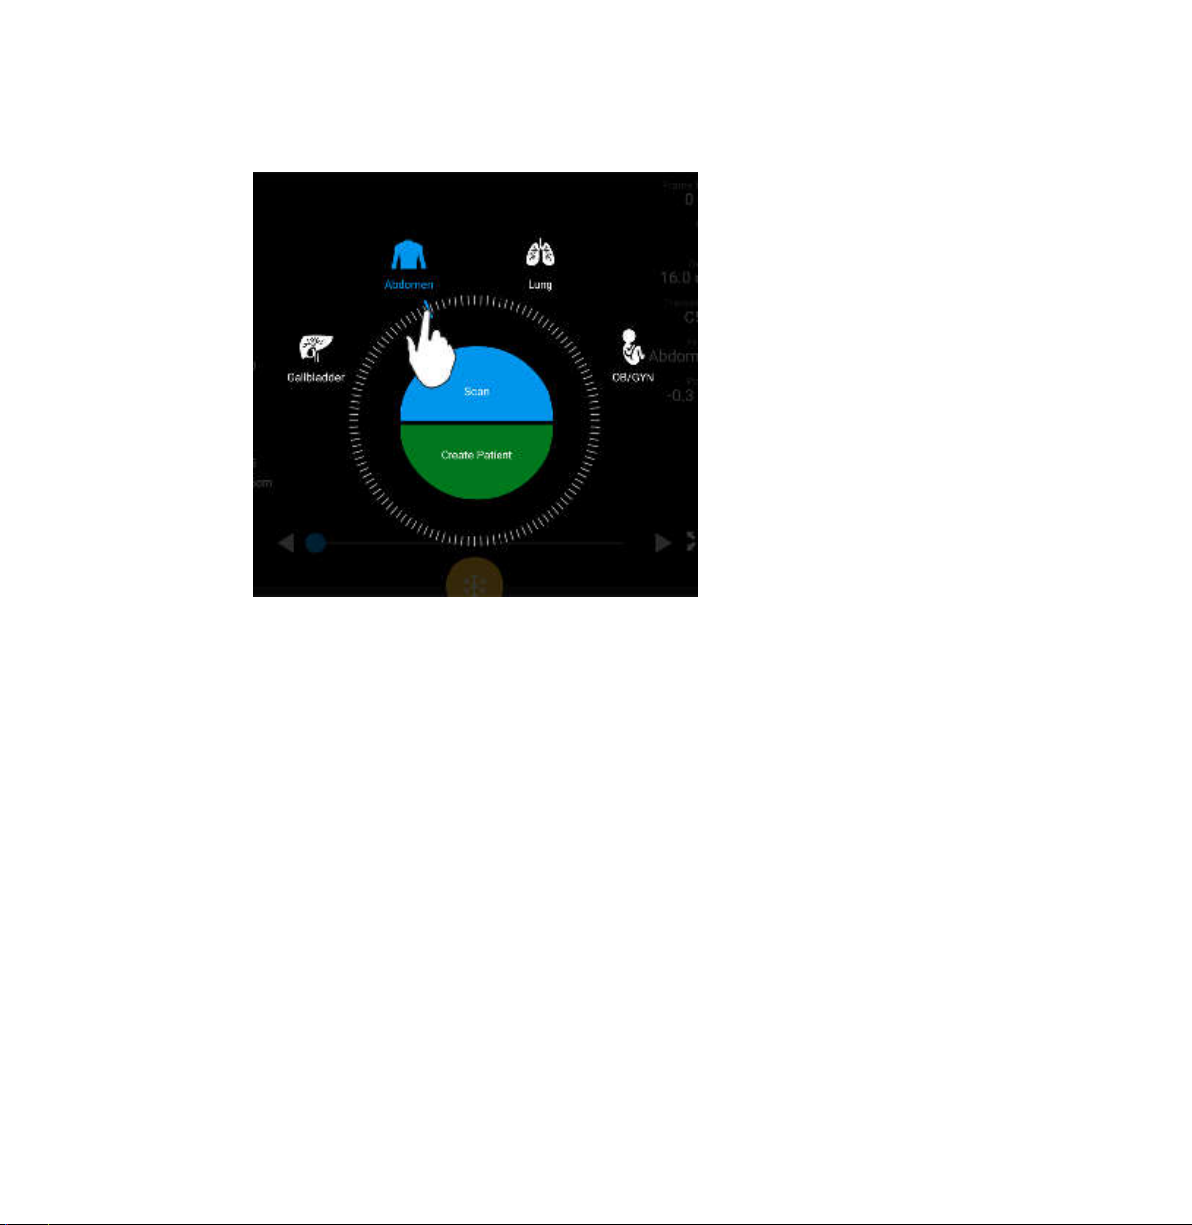
Performing an Exam Starting New Exams
Drag the Wheel Selector to Select a Preset
2. Do one of the following:
• To create a temporary Quick ID and start scanning immediately, touch Scan. The
imaging display appears, and you can begin scanning. For more information, see
“Starting Quick Exams” on page 82.
• To manually enter patient information before you begin scanning, touch Create Patient.
To show additional Patient Info fields, select Show Detailed Form. To begin scanning,
touch Start Exam.
NOTE
The last name is required. If you do not enter a medical record number (MRN), the system
creates an MRN for the exam. If the system finds a matching MRN in the patient database, the
system completes the remaining Patient Info fields.
90 Lumify Ultrasound System
Philips Healthcare 4535 618 58571_A/795 * MAY 2016
Page 91

Searching in the Worklist Performing an Exam
3. To search a Modality Worklist for a specific exam, touch Create Patient and then touch
Query MWL (see “Searching in the Worklist” on page 91).
4. To enter data into the system by scanning a patient's barcode, touch Create Patient and
then touch Scan Barcode (see “Using Your Device's Camera as a Barcode Scanner” on
page 84).
Searching in the Worklist
You can search for a specific exam from a Modality Worklist by using Query MWL on the
Patient Info form. Before you can search for a Modality Worklist exam, you must configure a
connection to a Modality Worklist server (see “Adding a Modality Worklist Server” on page 87).
1.
Touch Query MWL on the Patient Info form.
2. Select the Modality Worklist server you want to query.
3. In the Enter Advanced Query Information dialog box, do any of the following:
• To search for a patient by Patient Name, MRN, Accession #, or Requested Procedure
ID, type search criteria.
• To search for all patients, leave all fields blank.
• To insert a wildcard symbol (*) in the Patient Name or MRN field that allows the system
to replace or represent one or more characters, touch Insert Wildcard. For example,
type 45678 in the MRN field and then touch Insert Wildcard to allow the system to
return all MRNs that begin with 45678 (456781, 456782, 456783, and so on.)
4. Touch Search.
5. Do any of the following:
• To see additional entries, swipe down.
• To filter the Query Results, touch Search All Fields and type criteria. The system
displays results that meet the criteria.
6. Select the patient from Query Results.
Philips Healthcare 4535 618 58571_A/795 * MAY 2016
Lumify Ultrasound System 91
Page 92

Performing an Exam Changing Presets During Exams
Changing Presets During Exams
You can change presets during an active exam.
1. Touch .
2. Under Current Exam , touch a preset.
Editing Patient Data
CAUTION
You cannot edit patient information after you end the exam. After you end the exam, you
can only view patient information. You cannot edit data for previous exams.
92 Lumify Ultrasound System
1. Touch and select Edit Patient Info.
2. Touch the field you want to edit and use the keyboard to replace, insert, or delete text. To
show additional Patient Info fields, select Show Detailed Form.
3. Touch Save and Return.
Reviewing Saved Exams
You can review saved exams.
1. Touch .
2. Select Saved Exams .
3. Select an exam from the list. The exam opens in Review.
4. In the Review display, do any of the following:
Philips Healthcare 4535 618 58571_A/795 * MAY 2016
Page 93

Restarting a Paused Exam Performing an Exam
• To delete images from a saved exam, see “Deleting Images and Loops” on page 106.
• To e-mail images from a saved exam, see “E-mailing Images” on page 105.
• To export the exam, see “Exporting Exams” on page 106.
5. To exit the Review display and return to the current exam, touch and select Current
Exam .
Restarting a Paused Exam
If you leave an exam or close the system, you can return to the open exam within 24 hours by
touching and selecting Current Exam .
Imaging Modes
Available imaging modes are 2D and Color.
2D Mode
2D mode is the most commonly used imaging mode. In 2D mode, the image is displayed in
grayscale.
Using 2D Mode
1. Start an exam. The system enters 2D mode.
2. Optimize the image, using the controls in the controls area. If necessary, touch the page
indicator ( or ) or swipe to move between controls pages.
• To control the image gain, adjust the Gain dial.
Philips Healthcare 4535 618 58571_A/795 * MAY 2016
Lumify Ultrasound System 93
Page 94
Performing an Exam Imaging Modes
• To increase or decrease the distance from the face of the transducer to the deepest
point in the displayed image, use the Depth
• To increase or decrease the power output, use the Power dial.
• To view part of the image in more detail, spread your thumb and finger to zoom in on
that area of the image. For more information, see “Zoom Magnification” on page 95.
• To view the image in full-screen view, touch in the lower right corner of the image.
For more information, see “Full-Screen View” on page 96.
• To display a centerline on the image, touch . For more information, see “Displaying a
Centerline” on page 96.
Color Mode
In Color mode, a color box is overlaid on the 2D image; its size and position can be adjusted
within the 2D image. The velocity and direction of flow in the color box are represented with
different colors for direction and different shades for velocity. The colors being used appear in
the color bar in the upper right corner of the imaging display.
Two color modes are available: Fast Flow (high color scale for arterial flow) and Slow Flow (low
color scale for venous flow).
Using Color Mode
dial.
1. In 2D mode, optimize the image.
2. If necessary, touch the page indicator ( or ) or swipe to display Fast Flow or
Slow Flow .
3. Touch Fast Flow or Slow Flow .
4. To position the color box on the anatomy of interest, drag the color box. (If you drag
outside the color box, you pan the image.)
94 Lumify Ultrasound System
Philips Healthcare 4535 618 58571_A/795 * MAY 2016
Page 95

Imaging Features Performing an Exam
5. To change the size of the color box, pinch or spread inside the color box. (If you pinch or
spread outside the color box, you zoom the image.)
6. To control the color gain, adjust the Gain dial.
7. To view the image in full-screen view, touch in the lower right corner of the image. For
more information, see “Full-Screen View” on page 96.
8. To display a centerline on the image, touch . For more information, see “Displaying a
Centerline” on page 96.
9. To exit Color imaging, touch Fast Flow or Slow Flow .
Imaging Features
The system offers imaging features that provide improved imaging and greater flexibility when
you are imaging a patient.
AutoSCAN
AutoSCAN automatically and continuously optimizes 2D image brightness at the default gain.
AutoSCAN is always on.
Zoom Magnification
Using Zoom magnification, you can magnify a region of interest in an image for closer
examination.
With your thumb and finger, spread to expand or pinch to reduce the specific area of the
image. Touch the image and move your finger to pan or move the magnified image.
Philips Healthcare 4535 618 58571_A/795 * MAY 2016
Lumify Ultrasound System 95
Page 96

Performing an Exam Performing a 2D Distance Measurement
NOTE
If you spread or pinch inside a color box, you resize the color box instead of zooming.
Full-Screen View
You can specify that Lumify display live or frozen images in full-screen view, including in
Review.
1. To view an image in full-screen view, touch in the lower right corner of the image.
2. To restore normal viewing, touch .
Displaying a Centerline
You can display a centerline during live imaging (including when an image is frozen) to assist
with needle guidance. The line is included in acquired images or loops.
To display the centerline, touch on the lower left corner of the imaging display. To hide the
centerline, touch again.
Performing a 2D Distance Measurement
A 2D distance measurement uses two calipers to measure the length of a straight line between
the two points.
You cannot zoom an image while you are using the 2D distance measurement tool. The system
removes measurements from the image when it is unfrozen or when the exam ends. To retain
the measurement on an image, acquire it (see “Acquiring Images” on page 98).
96 Lumify Ultrasound System
Philips Healthcare 4535 618 58571_A/795 * MAY 2016
Page 97

Measurement Accuracy Performing an Exam
If you want to make a measurement and then annotate it, make sure that your device's fullscreen view is disabled. If full-screen view is enabled on your device, the measurement is
hidden when you touch
make an annotation on a measurement in Lumify full-screen view (see “Annotation” on page
99 and “Full-Screen View” on page 96).
1. Obtain the 2D image you want to measure and touch .
2. Touch Measure . The word Distance and an initial value appear at the top of the
image.
3. Touch the first caliper and drag to position it.
4. Touch the second caliper and drag to position it. The results update as the distance
between the calipers changes.
5. To save an image with the distance shown, touch Save Image .
6. To remove the measurement, touch Measure .
Measurement Accuracy
You can use the ultrasound system to make measurements on ultrasound images. The
measurements are then used with other clinical data to make a diagnosis.
. To restore the measurement, touch . You can, however,
Making a diagnosis based solely on measurements is not recommended. There are numerous
factors to consider when using quantified data from any ultrasound imaging system. A careful
analysis of those factors indicates that the accuracy of each measurement is highly dependent
on image quality. Image quality in turn is highly dependent on system design, operator scanning
technique, familiarity with system controls and, most important, patient echogenicity.
Philips Healthcare 4535 618 58571_A/795 * MAY 2016
Lumify Ultrasound System 97
Page 98
Performing an Exam Measurement Accuracy Tables
WARNING
System users are responsible for image quality and diagnosis. Inspect the data that is being
used for the analysis and diagnosis and ensure that the data is sufficient both spatially and
temporally for the measurement approach being used.
Measurement Accuracy Tables
2D Measurement Range and Accuracy
Measurement Accuracy Maximum Range
Axial Distance ≤ ± 2% or 2 mm >30.0 cm
Lateral Distance ≤ ± 2.5% or 3 mm >40.0 cm
Diagonal Distance ≤ ± 2% or 2 mm >32.0 cm
Acquiring Images
You can acquire and save a still image from the current exam. The acquired image is saved in
the patient exam, and a thumbnail of it is available in the Review display.
Acquiring an Image in Live Imaging
Touch Save Image . The system beeps when the image acquisition is complete.
Acquiring an Image in Live Imaging to Measure or Annotate
Touch , and then do any of the following:
• To select a frame to acquire, drag the scroll bar or touch or to move through the
images in the cineloop sequence to display the image that you want to acquire.
98 Lumify Ultrasound System
Philips Healthcare 4535 618 58571_A/795 * MAY 2016
Page 99

Acquiring Loops Performing an Exam
• To make a measurement, touch Measure . For more information, see “Performing
a 2D Distance Measurement” on page 96.
• To add a label, touch Annotate . For more information, see “Adding Labels” on
page 99.
• To save the image to the patient exam, touch Save Image . The system beeps when
the image acquisition is complete.
Acquiring Loops
You can acquire and save a loop from the current exam. The acquired loop is saved in the
patient exam, and a thumbnail of it is available in the Review display. Loops in Review have the
icon in the lower right corner of the thumbnail.
The system captures loops prospectively. You can specify the loop length duration in Settings.
For more information, see “System Settings” on page 72.
To acquire a loop during live imaging, touch Save Loop . To stop acquisition, touch Stop.
The system beeps and a confirmation statement appears on the imaging display when the loop
has been saved.
Annotation
You can place text labels on an image to identify anatomical structures and locations.
Adding Labels
Philips Healthcare 4535 618 58571_A/795 * MAY 2016
Lumify Ultrasound System 99
Page 100

Performing an Exam Ending an Exam
1. Obtain the image you want to annotate and touch .
2. If necessary, touch the page indicator ( or ) or swipe to display Annotate .
3. Touch Annotate .
4. Use the keyboard to type a label. Auto-words appear to the left and right of the letters you
are typing. You can touch an auto-word to add it to your label.
5. Drag the label into position in the imaging area.
6. To edit a label:
a. Touch the label. A line and the keyboard appear beneath it.
b. Touch a starting point in the label and begin typing, or use the Backspace key to erase
letters.
c. Touch anywhere in the imaging area to exit annotation.
7. To delete a label, touch and hold the label. Touch Delete Annotation when it appears.
Ending an Exam
WARNING
Failing to end the current exam before starting a new exam can result in data being acquired
and stored under the wrong patient name. If you turn off the system without ending the
exam, the system pauses the exam before shutting down.
100 Lumify Ultrasound System
Each time you finish an exam, you must end the exam to save images and other exam data. You
cannot end an exam while in Review.
Philips Healthcare 4535 618 58571_A/795 * MAY 2016
 Loading...