

Page 1
a
F
la
vo
rs
f
ra
me
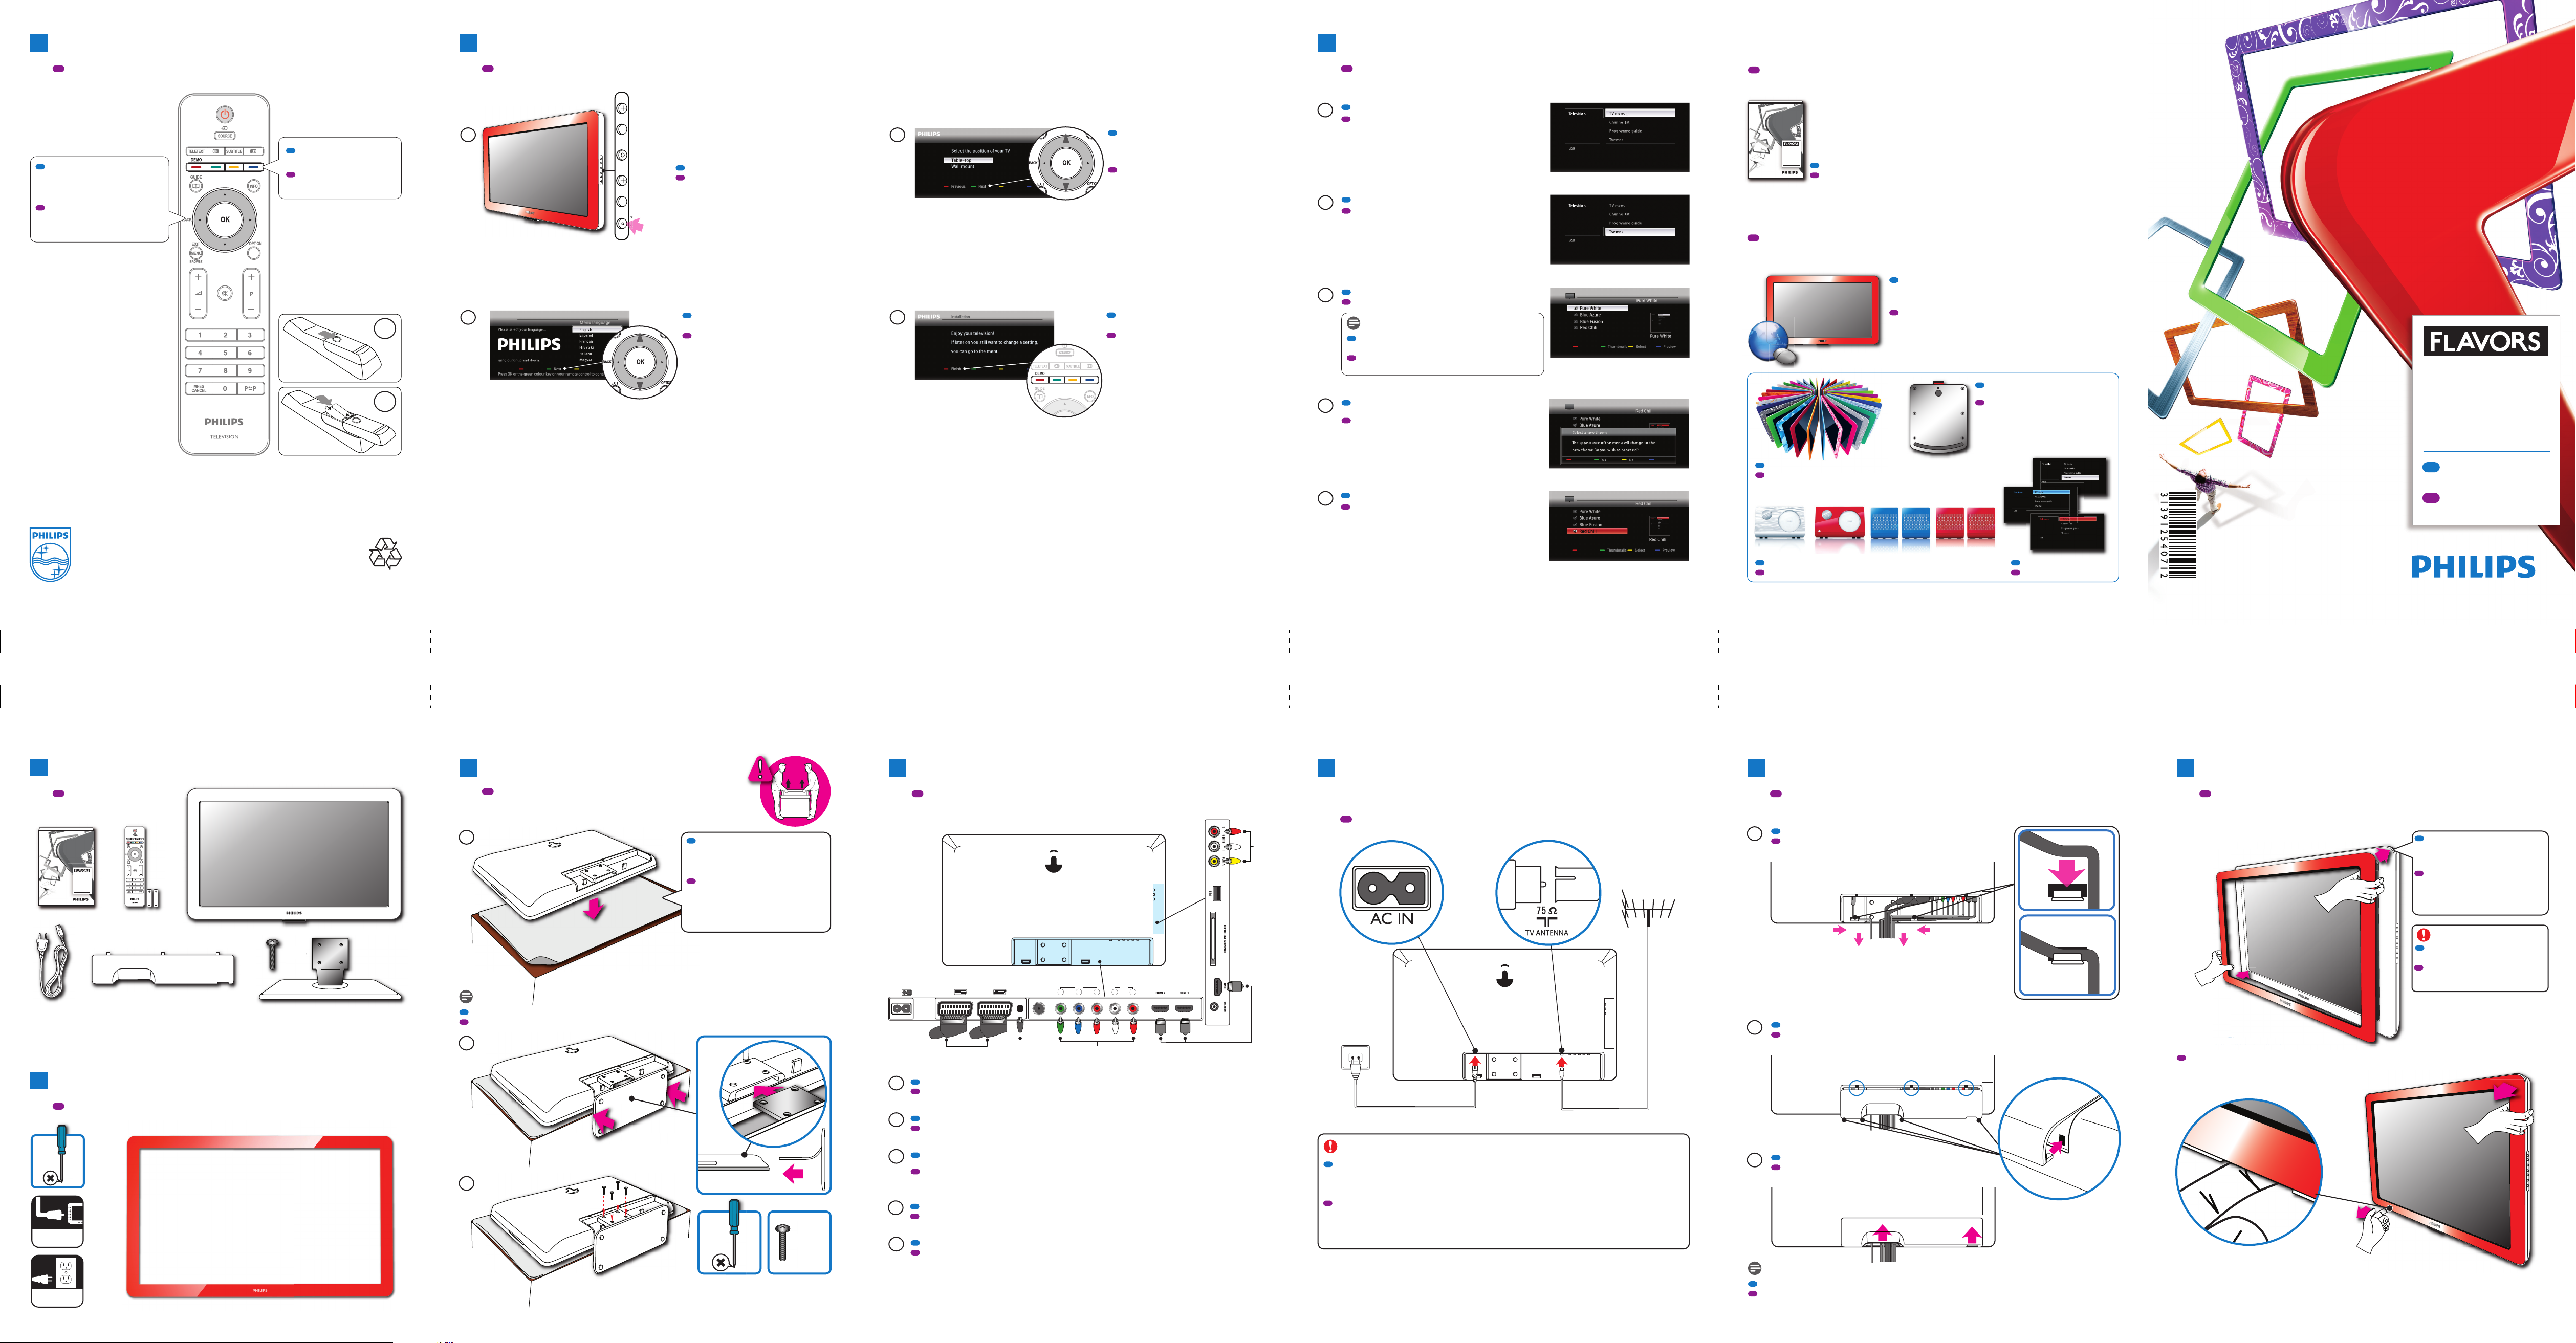
Use the remote control
Register your product and get support at
www.philips.com/avors
22PFL6403D/12
32PFL6403D/12
42PFL6403D/12
EN User Manual
IT Manuale D’uso
Register your product and get support at
www.philips.com/avors
22PFL6403D/12
32PFL6403D/12
42PFL6403D/12
EN User Manual
IT Manuale D’uso
OWER
8
Run first time setup
9
Apply a menu theme
10
For more information
IT
Utilizzare il telecomando
Navigation and OK keys
Press Î,ïor Í, Æ to navigate the
TV menu. Press OK to conrm a
selection.
Tasti di navigazione e OK
Premere Î,ï o Í, Æ per sfogliare
il menu TV. Premere OK per c
onfermare una selezione.
Colour buttons
Press to select a task
Pulsanti colorati
Premere per selezionare una
funzione
i
ii
IT
Eseguire la configurazione iniziale
i
Press POWER to switch on the TV
POWERPROGRAMMENUVOLUME
POWERPROGRAMMENUVOLUME
ii
Premere POWER per accendere il televisore
Press ï or Î to select your language,
and then press the Green button
Premere ï o Î per selezionare la lingua,
quindi premere il pulsante verde
iii
iv
Press ï or Î to select the position of
your TV, and then press the Green button.
Follow the on-screen instructions
for first time setup.
Premere ï o Î per selezionare la
posizione del televisore, quindi premere il
pulsante verde. Seguire le istruzioni a video
per la configurazione iniziale.
When first time setup is complete, press
the Red button to watch TV
Al termine della configurazione iniziale,
premereil pulsante rosso per guardare
la televisione
IT
Applicare un tema del menu
Press MENU. The main menu appears.
i
Premere MENU. Viene visualizzato il menu principale.
Press ï to select [Themes], and then press OK
ii
Premere ï per selezionare [Temi], quindi premere OK
iii
iv
Press ï or Î to to select a theme to apply
Premere ï o Î per selezionare un tema da applicare
To view all available themes on one screen, press the
Green button
Per visualizzare tutti i temi disponibili in un'unica
schermata, premere il pulsante verde
Press the Yellow button to apply the theme.
A confirmation screen appears.
Premere il pulsante giallo per applicare il tema.
Viene visualizzata una schermata di conferma.
IT
Per ulteriori informazioni
RU
For more information on how to use your TV, see the Flavors User Manual
Per informazioni complete sull'utilizzo del televisore, consultare il manuale dell'utente Flavors
For more Flavors
IT
Per ulteriori informazioni su Flavors
Visit www.philips.com/flavors to explore and buy
new Flavors frames, a Flavors wall mount
and other exciting Flavors products. Check the
site regularly for new menu themes!
Visitare il sito Web www.philips.com/flavors per
esplorare e acquistare le nuove strutture Flavors,
il montaggio a parete Flavorse altri straordinari
prodotti Flavors. Controlla reregolarmente il sito
per nuovi temi del menu.
Flavors wall mount
(purchase 42FWF1013/00 for this TV)
Montaggio a parete Flavors (acquistare
42FWF1013/00 per questo televisore)
Quick Start Guide
42PFL6403D/12
Register your product and get support at
www.philips.com/avors
Specications are subject to change without notice
Trademarks are the property of Koninklijke Philips Electronics N.V.
or their respective owners
2008 © Koninklijke Philips Electronics N.V. All rights reserved.
www.philips.com
Press the Green button to confirm selection of the theme.
v
Premere il pulsante verde per confermare la selezione
del tema.
Flavors frames
Strutture Flavors
Flavors DVD Home Theatre System
Sistema Home Theatre con DVD Flavors
Menu themes
Temi del menu
EN
TV installation
Installazione del
IT
televisore
Check what’s in the box
1
IT
Contenuto della confezione
x 4
Secure the TV stand
3
IT
Fissare il supporto del televisore
i
Do not secure the TV stand if wall mounting the TV. Skip to Connect your devices.
Non fissare il supporto del televisore per il montaggio a parete. Andare a Collegare i dispositivi.
Remove the foam bag covering the TV
and place it on a flat table.
Carefully position the TV face-down
on this protective surface.
Estrarre la protezione di polistirolo
dalla confezione di imballaggio e
posizionarla su una superficie piana.
Collocare attentamente il televisore a
faccia in giù sopra tale protezione.
ii
Connect your devices
4
IT
Collegare i dispositivi
AC IN ~
SPDIF
EXT 1EXT 2
v
TV
OUT
ANTENNA
iv
EXT 3
Connect the mains cord and
5
antenna
IT
Collegare il cavo di alimentazione e l'antenna
i
AUDIO
IN
R
L
PrPbY
ii
Tidy cables and slide on the cover
6
IT
Sistemare i cavi e fare scorrere il copricavi in posizione di chiusura
Route all cables to the center using the cable guides
i
Dirigere tutti i cavi verso il centro utilizzando le guide dei cavi
Align the cable cover with the indicated slots
ii
Allineare il copricavi con le fessure indicate
i
ii
iii
Mount a Flavors frame
7
IT
Montare una struttura Flavors
Dismount a Flavors frame
Smontare una struttura Flavors
Align the Flavors frame with the
front of the TV, being careful not to
scratch the TV screen. Magnets snap
the frame into place.
Allineare la struttura Flavors con la
parte anteriore del televisore facendo
attenzione a non graffiare lo schermo
del televisore. I magneti consentono
di fissare la struttura in posizione.
Be careful not to place your fingers
under the frame when mounting.
Fare attenzione a non mettere le
dita sotto la struttura durante il
montaggio.
VIDEO and AUDIO L/R: Connect composite devices such as VCRs. Average video quality.
What else you will need
2
IT
Altri strumenti necessari
iii
Antenna
x 4
AC
i
VIDEO e AUDIO L/R: Collegare i dispositivi Composite come i videoregistratori. Qualità video media.
HDMI: Connect HD devices such as Blu-ray players. Best digital video quality.
ii
HDMI: Collegare i dispositivi HD come i lettori Blu-ray. Qualità video digitale ottima.
Y Pb Pr (EXT 3) and AUDIO IN L/R: Connect component devices such as DVD players.
iii
Best analogue video quality.
Y Pb Pr (EXT 3) e AUDIO IN L/R: Collegare i dispositivi Component come i lettori DVD.
Qualità video analogica ottima.
iv
SPDIF OUT (Optical): Output TV audio to digital audio systems
SPDIF OUT (Optical): Dall'uscita audio del televisore ai sistemi audio digitali
SCART (EXT 1/2): Connect SCART devices such as DVD players. Good analogue video quality.
v
SCART (EXT 1/2): Collegare i dispositivi SCART come i lettori DVD. Qualità video analogica buona.
•
Before you connect the TV to the power outlet, ensure that the power voltage matches the value
printed under the cable cover.
•
To easily disconnect the TV from the power outlet, ensure that you have full access to the power cord
at all times. When you disconnect the power cord, always pull the plug, never the cable.
•
Prima di collegare il televisore alla presa di corrente accer tarsi che la tensione di alimentazione corrisponda
al valore stampato sotto il copricavi.
•
Per scollegare facilmente il televisore dalla presa di corrente, accertarsi di poter accedere al cavo di
alimentazione in qualsiasi momento. Estrarre sempre il cavo di alimentazione afferrando la spina e non
il cavo.
iii
Slide on the cable cover
Fare scorrere il copricavi in posizione di chiusura
If wall mounting the TV, continue with the instructions in the Flavors Wall Mount Guide
Per il montaggio a parete del televisore, continuare con le istruzioni fornite nella guida
per il montaggio a parete Flavors
 Loading...