

Page 1
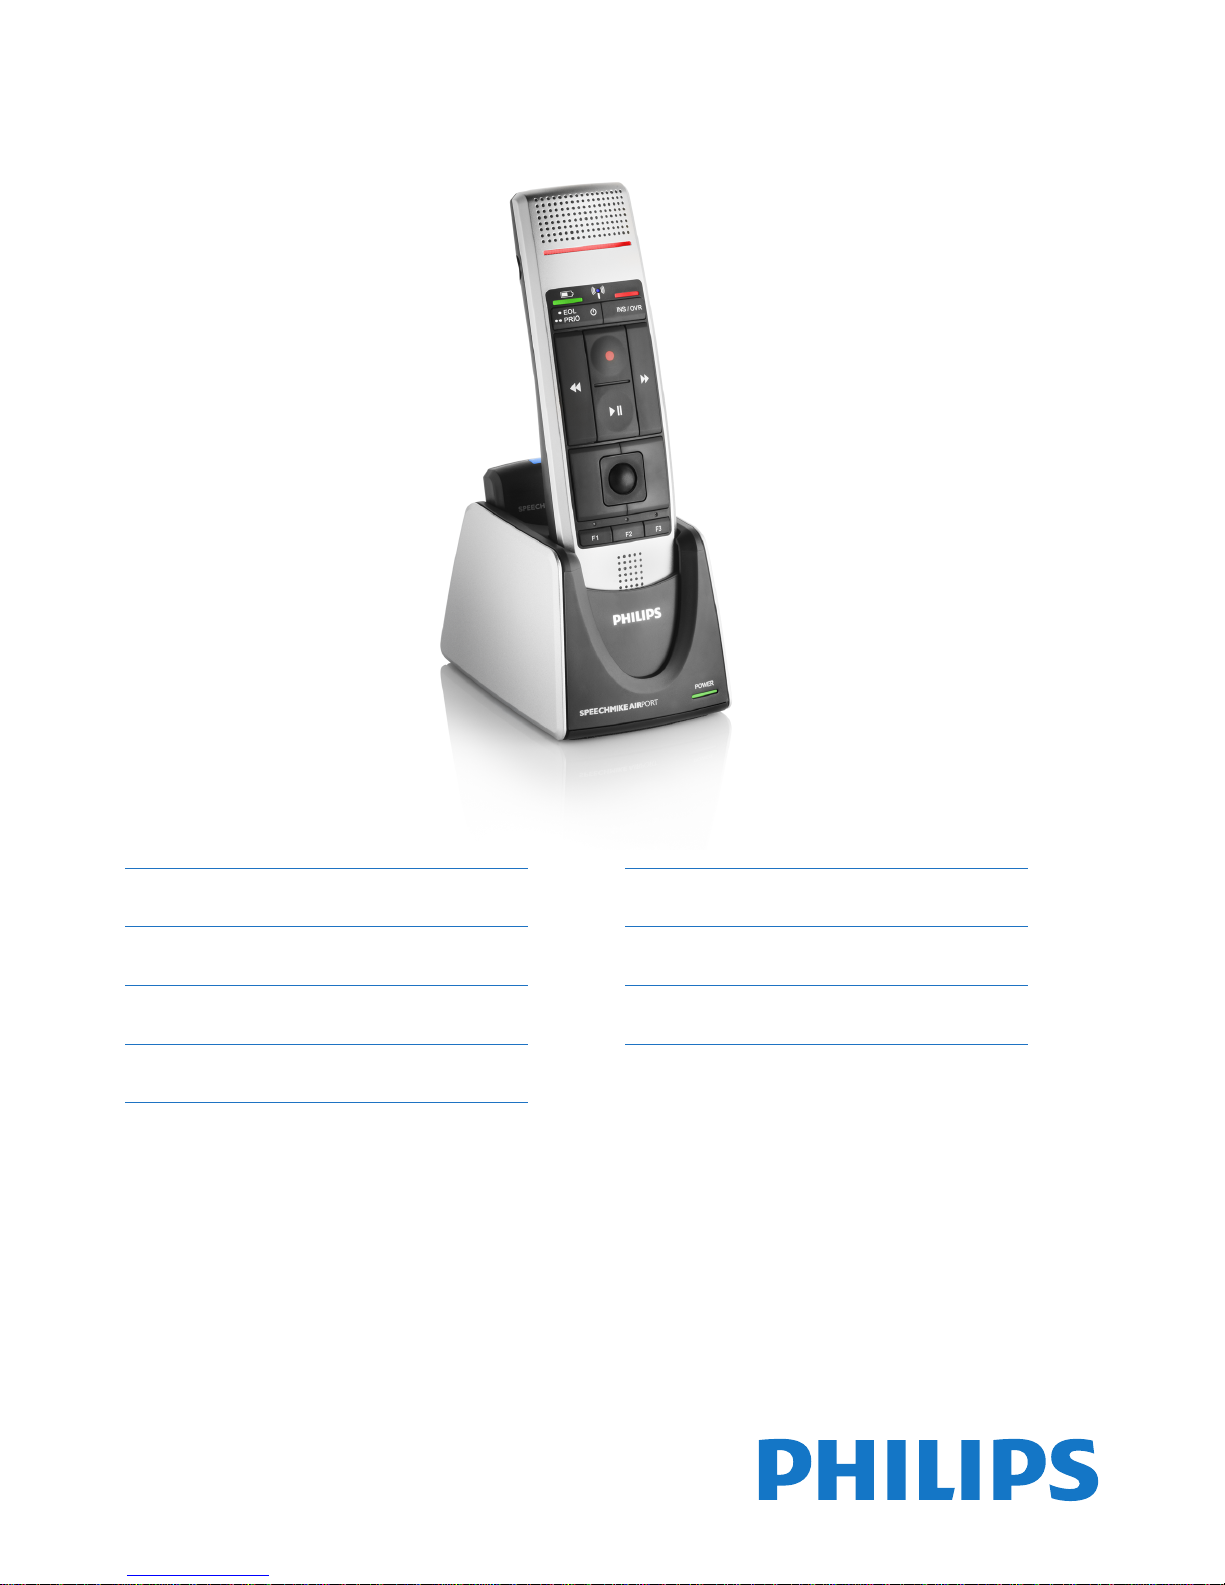
IT Manuale di istruzioni xx
NL Gebruikershandleiding xx
SV Användarhandbok xx
LFH3000
without SpeechExec
dictation software
LFH3005
with SpeechExec
dictation software
EN User manual 3
DE Benutzerhandbuch xx
FR Manuel de l‘utilisateur xx
ES Manual del usuario xx
For product information and support, visit
www.philips.com/dictation SPEECHMIKE AIR
Page 2

Page 3

3User manual
4 Use your SpeechMike Air 19
4.1 Create a recording 19
4.2 Playback a recorded file 19
4.2.1 Playback using the SpeechMike 19
4.2.2 Playback in the recorder window 20
4.2.3 Playback in the worklist window 20
4.3 Edit a previously recorded file 20
4.4 Finish, suspend or cancel a recording 20
4.5 Record an instruction 21
4.5.1 Record a spoken instruction 21
4.5.2 Record a special instruction 21
4.6 Delete 21
4.6.1 Delete part of a dictation file 21
4.6.2 Delete a dictation file 22
5 Use more of your SpeechMike
Air 23
5.1 Customize the SpeechMike 23
5.1.1 Customize SpeechMike keys and
settings 23
5.1.2 Use application shortcuts 24
5.1.3 Update the firmware 25
5.2 Record with a headset or an external
microphone 26
6 Technical data 27
7 Frequently asked questions 28
1 Important 4
2 Your SpeechMike Air 7
2.1 What’s in the box 7
2.2 Overview SpeechMike Air 8
2.2.1 Dictation microphone 8
2.2.2 Docking station 9
2.2.3 Receiver module 9
2.3 Overview SpeechExec dictation
software (only included in LFH3005) 10
2.3.1 SpeechExec work list window 10
2.3.2 SpeechExec recorder and player window
(expanded mode) 11
3 Get started 13
3.1 Install the software 13
3.2 Connect the docking station 13
3.3 Insert the batteries 14
3.4 Charge the batteries 14
3.4.1 Charging using the docking station and
the AC charger 14
3.4.2 Charging using the docking station and
the USB cable 15
3.4.3 Charging directly through the
SpeechMike 15
3.5 Learn about the battery charge level 15
3.6 Turning on/o the SpeechMike 16
3.7 Set up the wireless connection
manually 16
3.7.1 Set up the wireless connection manually
using the docking station 16
3.7.2 Set up the wireless connection manually
using the receiver module 16
3.8 Learn about wireless connectivity 17
3.9 Power-save mode 17
3.10 Locate the SpeechMike 17
3.11 Attach the neckband 17
3.12 Start SpeechExec dictation software
(only for LFH3005) 18
3.12.1 About the USB license dongle 18
3.12.2 Create a SpeechExec user profile 18
3.12.3 SpeechExec help 18
User manual
ENGLISH
Page 4

4 User manual
Important (for models supplied with
headphones):
Philips guarantees compliance with the
maximum sound power of its audio players
as determined by relevant regulatory bodies,
but only with the original model of provided
headphones. If these headphones need
replacement, we recommend that you contact
your retailer to order a Philips model identical
to that of the original.
Small children
Your device and its enhancements may contain
small parts. Keep them out of the reach of small
children.
Operating environment
This device meets RF exposure guidelines
when used either in the normal use position
against the ear or when positioned at least 2.2
centimetres (7/8 inch) away from the body.
When a carry case, belt clip, or holder is used
for body-worn operation, it should not contain
metal and should position the device the abovestated distance from your body.
Parts of the device are magnetic. Metallic
materials may be attracted to the device. Do
not place credit cards or other magnetic storage
media near the device, because information
stored on them may be erased.
Medical devices
Operation of any radio transmitting equipment
may interfere with the functionality of
inadequately protected medical devices. Consult
a physician or the manufacturer of the medical
device to determine if they are adequately
shielded from external RF energy or if you have
any questions. Switch o your device in health
care facilities when any regulations posted in
these areas instruct you to do so. Hospitals or
health care facilities may be using equipment
Important1
Philips reserves the right to change products at
any time without being obliged to adjust earlier
supplies accordingly.
The material in this manual is believed
adequate for the intended use of the system.
If the product, or its individual modules or
procedures, are used for purposes other than
those specified herein, confirmation of their
validity and suitability must be obtained.
Safety
To avoid a short circuit, do not expose the •
product to rain or water.
Do not expose the device to excessive heat •
caused by heating equipment or direct sunlight.
Protect the cables from being pinched, •
particularly at plugs and the point where they
exit from the unit.
All wireless devices may be susceptible to •
interference, which could aect performance.
Back up your files. Philips is not responsible •
for any loss of data.
Hearing safety
Observe the following guidelines when using
your headphones:
Listen at reasonable volumes for reasonable •
periods of time.
Be careful not to adjust the volume higher as •
your hearing adapts.
Do not turn up the volume so high that you •
can’t hear what’s around you.
You should use caution or temporarily discon-•
tinue use in potentially hazardous situations.
Do not use headphones while operating a •
motorized vehicle, cycling, or skateboarding,
etc. It may create a trac hazard and is illegal
in many areas.
Page 5

5User manual
the device. Check regularly that all wireless
device equipment in your vehicle is mounted
and operating properly. Do not store or carry
flammable liquids, gases, or explosive materials
in the same compartment as the device, its
parts, or enhancements. For vehicles equipped
with an air bag, remember that air bags inflate
with great force.
Using your device while flying in aircraft is
prohibited. Switch o your device before
boarding an aircraft. The use of wireless
teledevices in an aircraft may be dangerous
to the operation of the aircraft, disrupt the
wireless telephone network, and may be illegal.
Potentially explosive environments
Switch o your device when in any area with
a potentially explosive atmosphere, and obey
all signs and instructions. Potentially explosive
atmospheres include areas where you would
normally be advised to turn o your vehicle
engine. Sparks in such areas could cause an
explosion or fire resulting in bodily injury or
even death. Switch o the device at refuelling
points such as near gas pumps at service
stations. Observe restrictions on the use of
radio equipment in fuel depots, storage, and
distribution areas; chemical plants; or where
blasting operations are in progress.
Areas with a potentially explosive atmosphere
are often, but not always, clearly marked. They
include below deck on boats, chemical transfer
or storage facilities and areas where the air
contains chemicals or particles such as grain,
dust, or metal powders. You should check with
the manufacturers of vehicles using liquefied
petroleum gas (such as propane or butane) to
determine if this device can be safely used in
their vicinity.
Compliance with EMF
Koninklijke Philips Electronics N.V. manufactures
and sells many products targeted at consumers,
which, like any electronic apparatus, in
that could be sensitive to external RF energy.
Implanted medical devices
Manufacturers of medical devices recommend
that a minimum separation of 15.3 centimetres
(6 inches) should be maintained between a
wireless device and an implanted medical device,
such as a pacemaker or implanted cardioverter
defibrillator, to avoid potential interference
with the medical device. Persons who have such
devices should:
Always keep the wireless device more than •
15.3 centimetres (6 inches) from the medical
device when the wireless device is turned on.
Not carry the wireless device in a breast •
pocket.
Turn the wireless device o immediately •
if there is any reason to suspect that
interference is taking place.
Read and follow the directions from the •
manufacturer of their implanted medical
device.
If you have any questions about using your
wireless device with an implanted medical
device, consult your health care provider.
Hearing aids
Some digital wireless devices may interfere
with some hearing aids. If interference occurs,
consult your service provider.
Vehicles
RF signals may aect improperly installed or
inadequately shielded electronic systems in
motor vehicles such as electronic fuel injection
systems, electronic antiskid (antilock) braking
systems, electronic speed control systems, and
air bag systems. For more information, check
with the manufacturer, or its representative, of
your vehicle or any equipment that has been
added.
Only qualified personnel should service the
device or install the device in a vehicle. Faulty
installation or service may be dangerous and
may invalidate any warranty that may apply to
ENGLISH
Page 6

6 User manual
general have the ability to emit and receive
electromagnetic signals. One of Philips’ leading
Business Principles is to take all necessary
health and safety measures for our products,
to comply with all applicable legal requirements
and to stay well within the EMF standards
applicable at the time of producing the products.
Philips is committed to develop, produce and
market products that cause no adverse health
eects. Philips confirms that if its products are
handled properly for their intended use, they
are safe to use according to scientific evidence
available today. Philips plays an active role in the
development of international EMF and safety
standards, enabling Philips to anticipate further
developments in standardisation for early
integration in its products.
Disposal of your old product
Your product is designed and manufactured •
with high quality materials and components
that can be recycled and re-used.
When this crossed-out wheeled bin •
symbol is attached to a product, it
indicates that the product is covered
by the European Directive 2002/96/EC.
Become informed about your local separate •
collection system for electrical and electronic
products.
Act according to your local rules and do •
not dispose of old products with normal
household waste. The correct disposal of old
products will help prevent potential negative
consequences for the environment and human
health.
Batteries (including built-in rechargeable •
batteries) contain substances that may pollute
the environment. All batteries should be
disposed of at an ocial collection point.
Page 7
7User manual
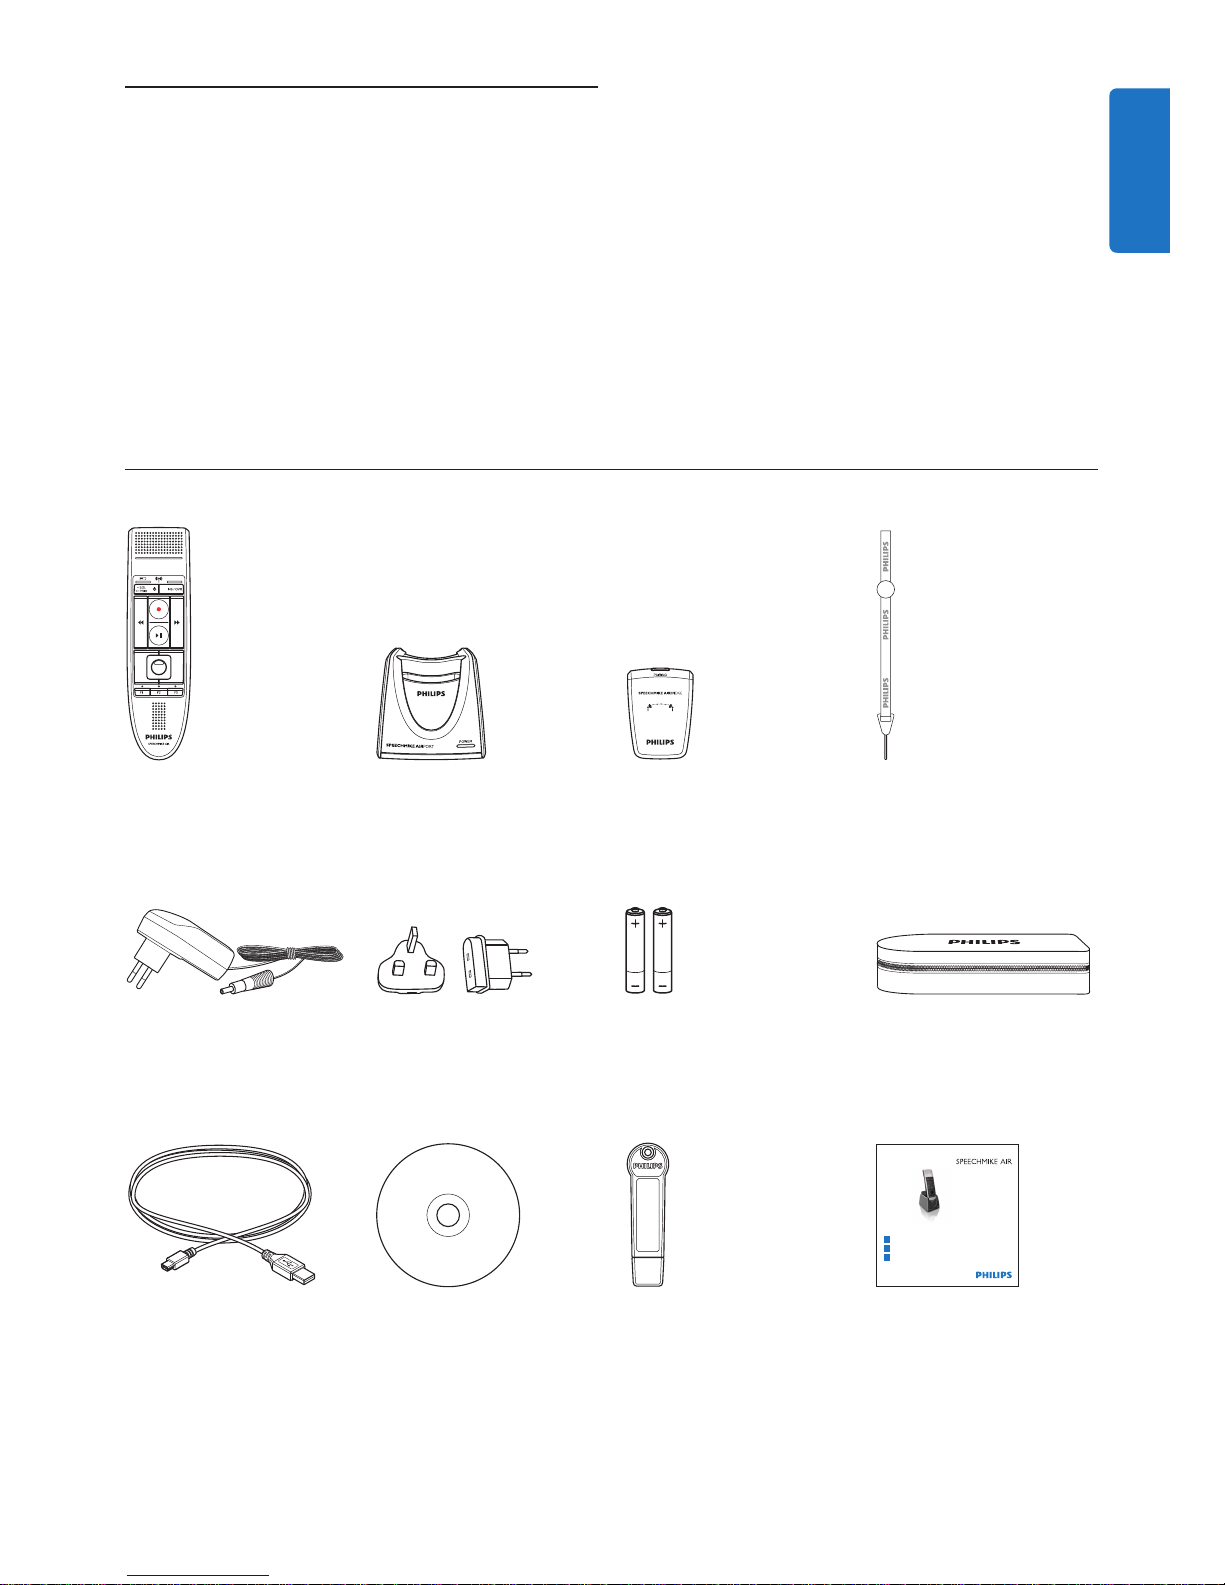
What’s in the box2.1
Your SpeechMike Air2
Congratulations on your purchase and welcome
to Philips!
To fully benefit from the service that Philips
oers, visit our Website for support information
such as user manuals, software downloads,
warranty information and more:
www.philips.com/dictation.
Dictation
microphone
Docking station Receiver module Neckband
PouchRechargeable batteries
LFH3000
LFH3005
LFH3010
LFH3015
LFH3020
LFH3025
For product information and support, visit
www.philips.com/dictation
Quick start guide
1
2
3
Install
Conncet
Record
AC charger
Quick start guideCD-ROM containing
software and user
manual
Exchangeable charging
pins
AC charger
USB cable USB license dongle
(only included in
LFH3005)
ENGLISH
Page 8
8 User manual
1
4
3
5
6
7
8
9
11
12
14
15
13
16
17
2
10
18
19
20
21
23
22
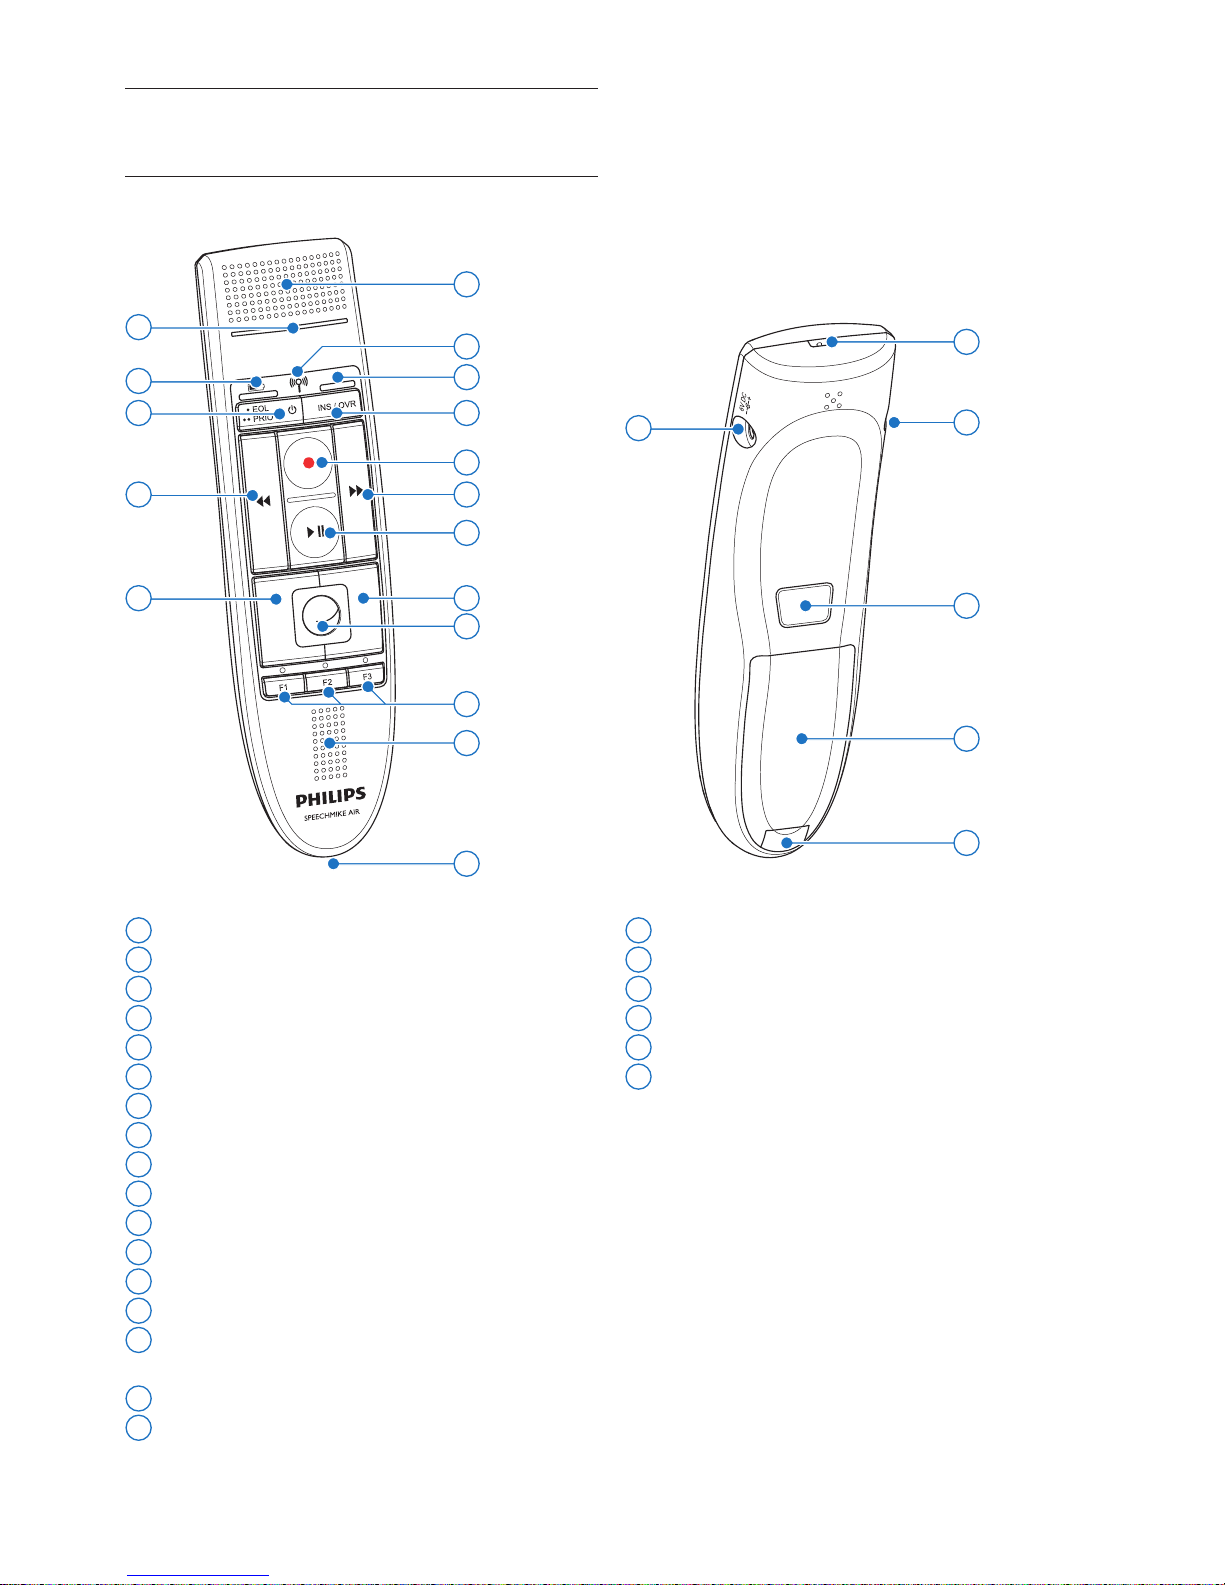
1 Microphone
2
i Wireless connection indicator light
3
Insert indicator light
4
INS/OVR Insert/overwrite key
5
d Record key
6
b Fast forward key
7
e Play/pause key
8
Right mouse button
9
Trackball
10
F1, F2, F3 Programmable function keys
11
Speaker
12
Docking station connector
13
Record indicator light
14
h Batterie charge level indicator light
15
a On/O, •EOL end-of-letter key,
••PRIO priority key
16
c Rewind key
17
Left mouse button
Overview SpeechMike Air2.2
Dictation microphone2.2.1
18
Strap hole
19
Headset connector
20
Left mouse button
21
Batterie cover
22
Batterie cover release button
23
Charger connector
Page 9
9User manual
25
24
27
26
28
29
30
31
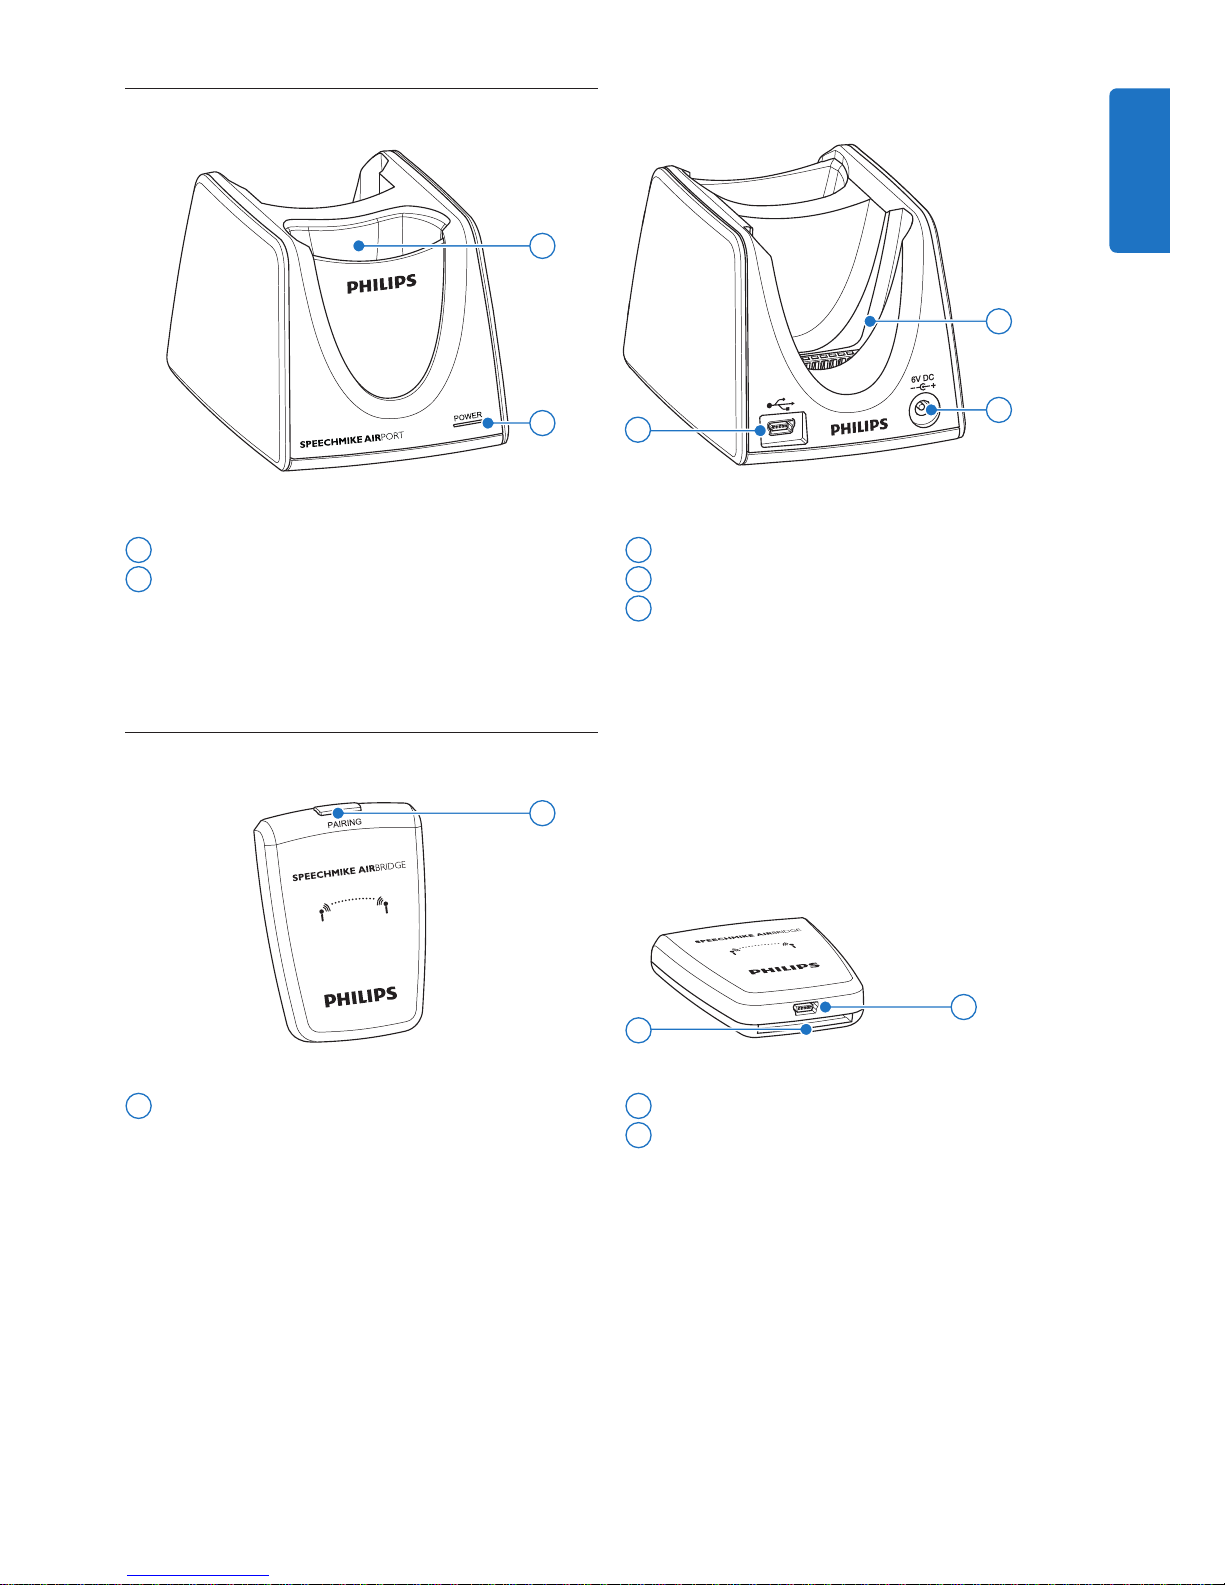
Docking station2.2.2
24
SpeechMike docking slot
25
Power indicator light
26
Receiver module docking slot
27
Charger connector
28
Mini USB connector
Receiver module2.2.3
29
Pairing key
30
USB connector
31
Docking station connector
ENGLISH
Page 10
10 User manual
Overview SpeechExec dictation software (only included in LFH3005)2.3
Recording and playback of dictation files with the SpeechMike requires dictation software such
as Philips SpeechExec to be installed on the computer. If the SpeechMike is used with third-party
software other than Philips SpeechExec, some features may not be present or function dierently.
For detailed information, refer to the documentation delivered with the software.
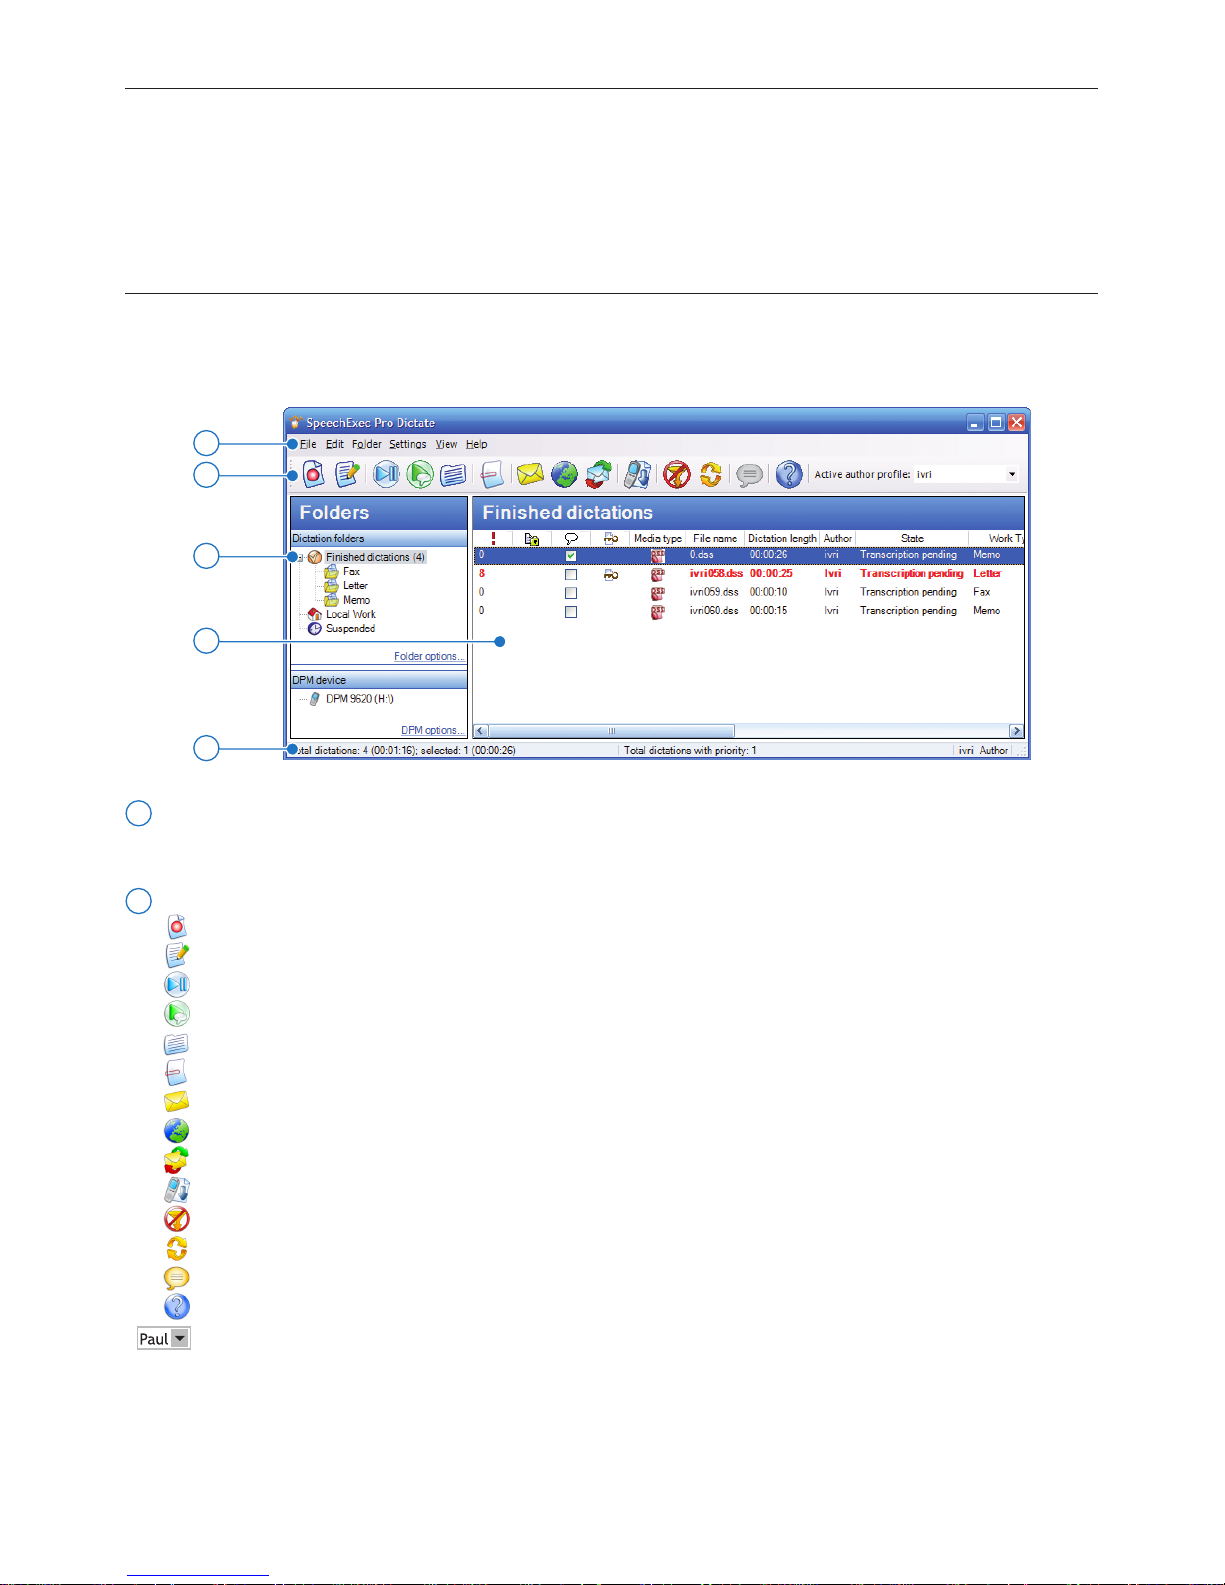
SpeechExec work list window2.3.1
The work list allows you to manage the dictation file list, define dictation properties and change
various settings.
1
2
3
4
5
1 Menu bar: The menu bar contains menu commands that perform various tasks, such as to
manage dictations, make and change settings and configure SpeechExec.
2 Toolbar: Many functions can be controlled using the toolbar buttons:
Create a new dictation file
Open the selected dictation files and continue recording
Start/stop playback of the selected dictation file
Play Special Instruction
Displays the dictation properties of a file
Open an attached document
Send the selected dictation files via email
Upload dictation files to an FTP server
Send and receive emails with dictations via a connected email system
Start downloading from a connected Digital Pocket Memo to a PC
Apply (and cancel) the defined filter to the dictation file list
Refresh the information displayed in the work list
Submit the selected dictation file to an installed speech recognition software
Open the help function
Active author profile: Select the author profile from the drop-down list
Page 11
11User manual
3 Folder list: The folder list displays the folder structure. The structure depends on personal or
pre-configured settings. Click the plus sign at the left of a folder to expand the tree and display
a folder‘s sub-folders.
4 Dictation file list: The dictation file list displays information about the dictation files stored in
the selected folder. The columns display the properties of the dictation files. Change the focus
between the tree view and the dictation list view by clicking inside each pane.
5 Status bar: The status bar at the bottom of the window displays information on dictation
management such as the number of dictation files in the selected folder, the number of dictation
files with priority status assigned, and the name and role of the current user.
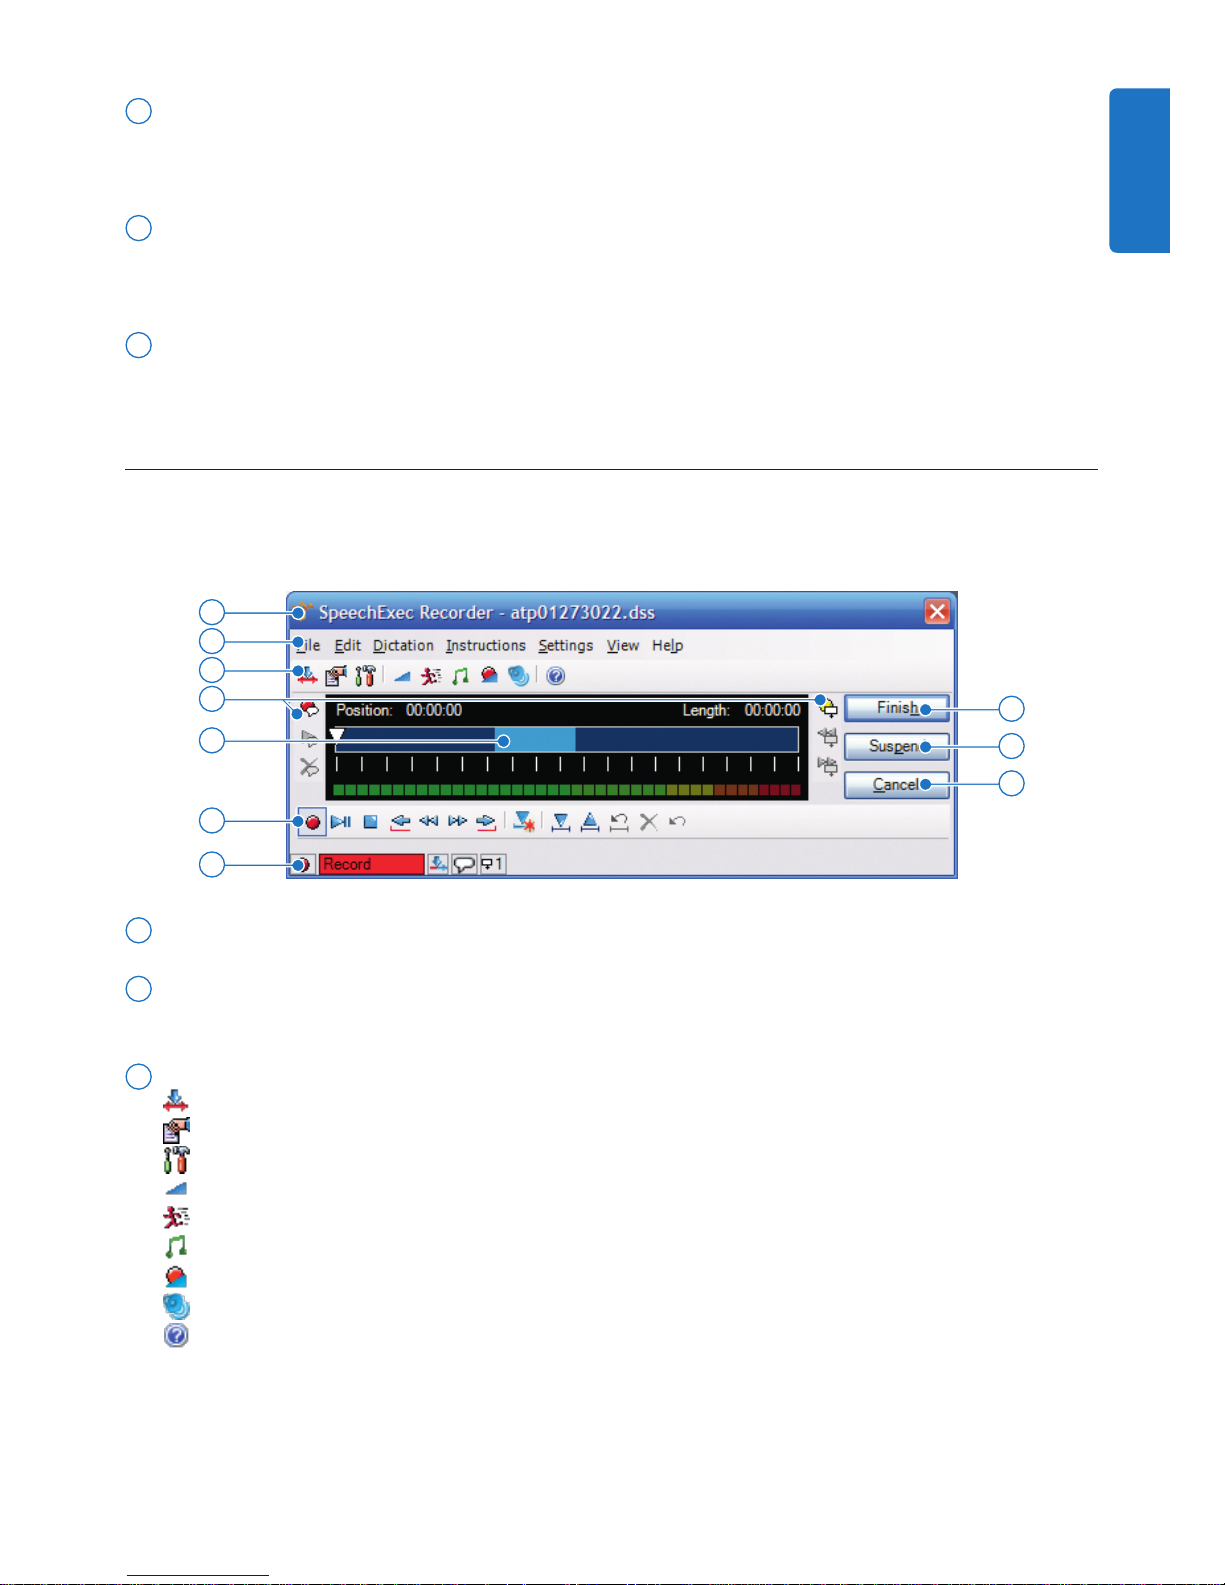
SpeechExec recorder and player window (expanded mode)2.3.2
The recorder/player module is a desktop window that allows the user to record and playback sound
files.
7
8
10
11
12
6
9
13
15
14
6 Title bar: Displays the file name.
7 Menu bar: Contains menu command icons for performing various tasks, such as recording and
editing dictation files and changing dictation properties.
8
Toolbar: Most functions available in the player window can be controlled by these buttons:
Switches between Insert and Overwrite modes
Displays the dictation properties dialog
Displays the audio settings dialog
Adjusts playback volume
Adjusts playback speed
Adjusts the playback tone
Adjusts the record volume
Select the device for sound playback
Opens the help function
ENGLISH
Page 12

12 User manual
9 Instructions: Instructions are recorded comments by the author that are directed to the person
transcribing the dictation file. See Record an instruction on page 21 for more information.
Record a special instruction
Play back special instruction
Delete a special instruction
Record a spoken instruction
Jump to the previous spoken instruction
Jump to the next spoken instruction
10 Position slider: Displays file information such as file length and the current position in the
sound file during recording or playback. The length of the recording is displayed in HH:MM:SS
(hours:minutes:seconds) above the slider.
11 Control and positioning buttons:
Start/stop recording
Start/pause playback
Stop the current action (recording, playback)
Jump to the beginning of the dictation
Fast rewind
Fast forward
Jump to the end of the dictation
Mark the beginning of a section to be deleted
Mark the end of a section to be deleted
Remove the deletion marks
Delete a marked section
Undo the last deletion
12 Status bar: displays the current dictation activity (such as stop, play, rewind, etc.).
13 Finish: Close the dictation file and mark it as finished. The dictation file is moved to the Finished
dictations folder.
14 Suspend: Close the dictation file and mark it as suspended, meaning that work on the dictation
file is interrupted temporarily and will be continued at a later time. The dictation file is saved in
the Suspended folder.
15 Close: Close the dictation file without saving the changes that have been made to it.
Page 13
13User manual
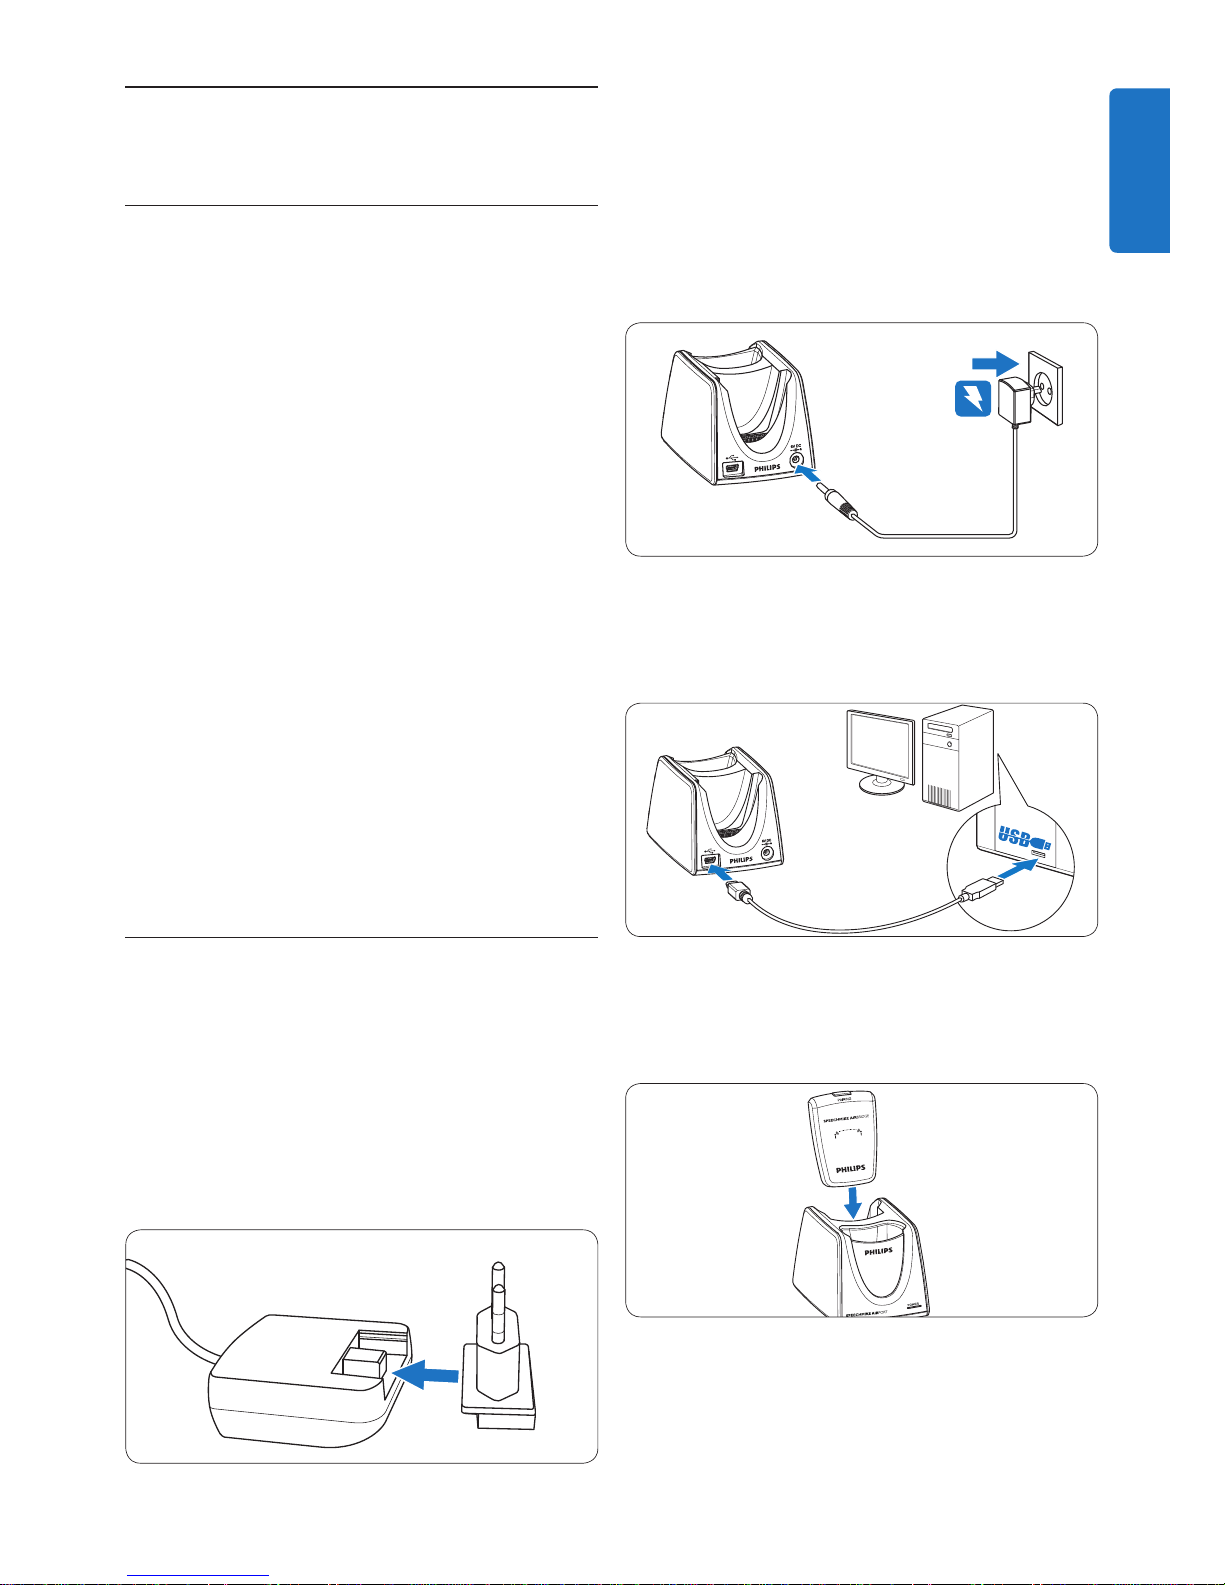
Plug the charger into a wall outlet and 2
connect the charger cable to the charger
connector of the docking station.
Connect the USB cable to the USB port of 3
the computer and the mini USB connector
of the docking station.
Insert the receiver module into the 4
corresponding slot of the docking station
and press it down firmly until it locks.
Get started3
Install the software3.1
Recording and playback of dictations with the
SpeechMike requires dictation software such
as Philips SpeechExec to be installed on the
computer. When third-party dictation software
other than Philips SpeechExec is used, driver
software must be installed before connecting
the SpeechMike.
C Important
Administrator rights are required to install
the software. For more help, contact your
administrator.
Turn on the computer.1
Insert the installation CD in the CD-ROM 2
drive. The set-up program should start
automatically. If it does not, open the CD
contents in Windows Explorer and doubleclick the autorun.exe file.
Click the 3 Install button.
Follow the on-screen instructions of the 4
set-up program.
Connect the docking station3.2
The charger comes with four plugs, one for 1
most European countries, one for the UK,
one for the US and Canada and one for
Australia. Before you use the charger for the
first time select the correct plug fitting the
wall outlets in your country and mount it
onto the power adapter.
ENGLISH
Page 14
14 User manual
D Notes
Do not mix batteries of dierent types and/•
or brands.
Remove the batteries if you will not be using •
the SpeechMike for an extended period
of time. Leaking batteries may damage the
SpeechMike.
Stop recording before replacing the batteries. •
Removing the batteries during recording may
result in data loss.
Charge the batteries3.4
The rechargeable Philips batteries LFH9154 can
be charged in the SpeechMike using the docking
station in combination with the USB cable or
the AC charger. It is also possible to charge the
batteries by directly connecting the AC charger
to the SpeechMike. A complete recharge cycle
takes about 2.5 hours.
B Warning
Use only the original charger. Using
another charger may damage the device.
D Notes
Batteries other than the supplied Philips •
batteries LFH9154 cannot be charged.
Fully charge the batteries before first use.•
Charging using the docking station 3.4.1
and the AC charger
The rechargeable Philips batteries LFH9154 can
be charged in the SpeechMike using the docking
station in combination with the AC charger.
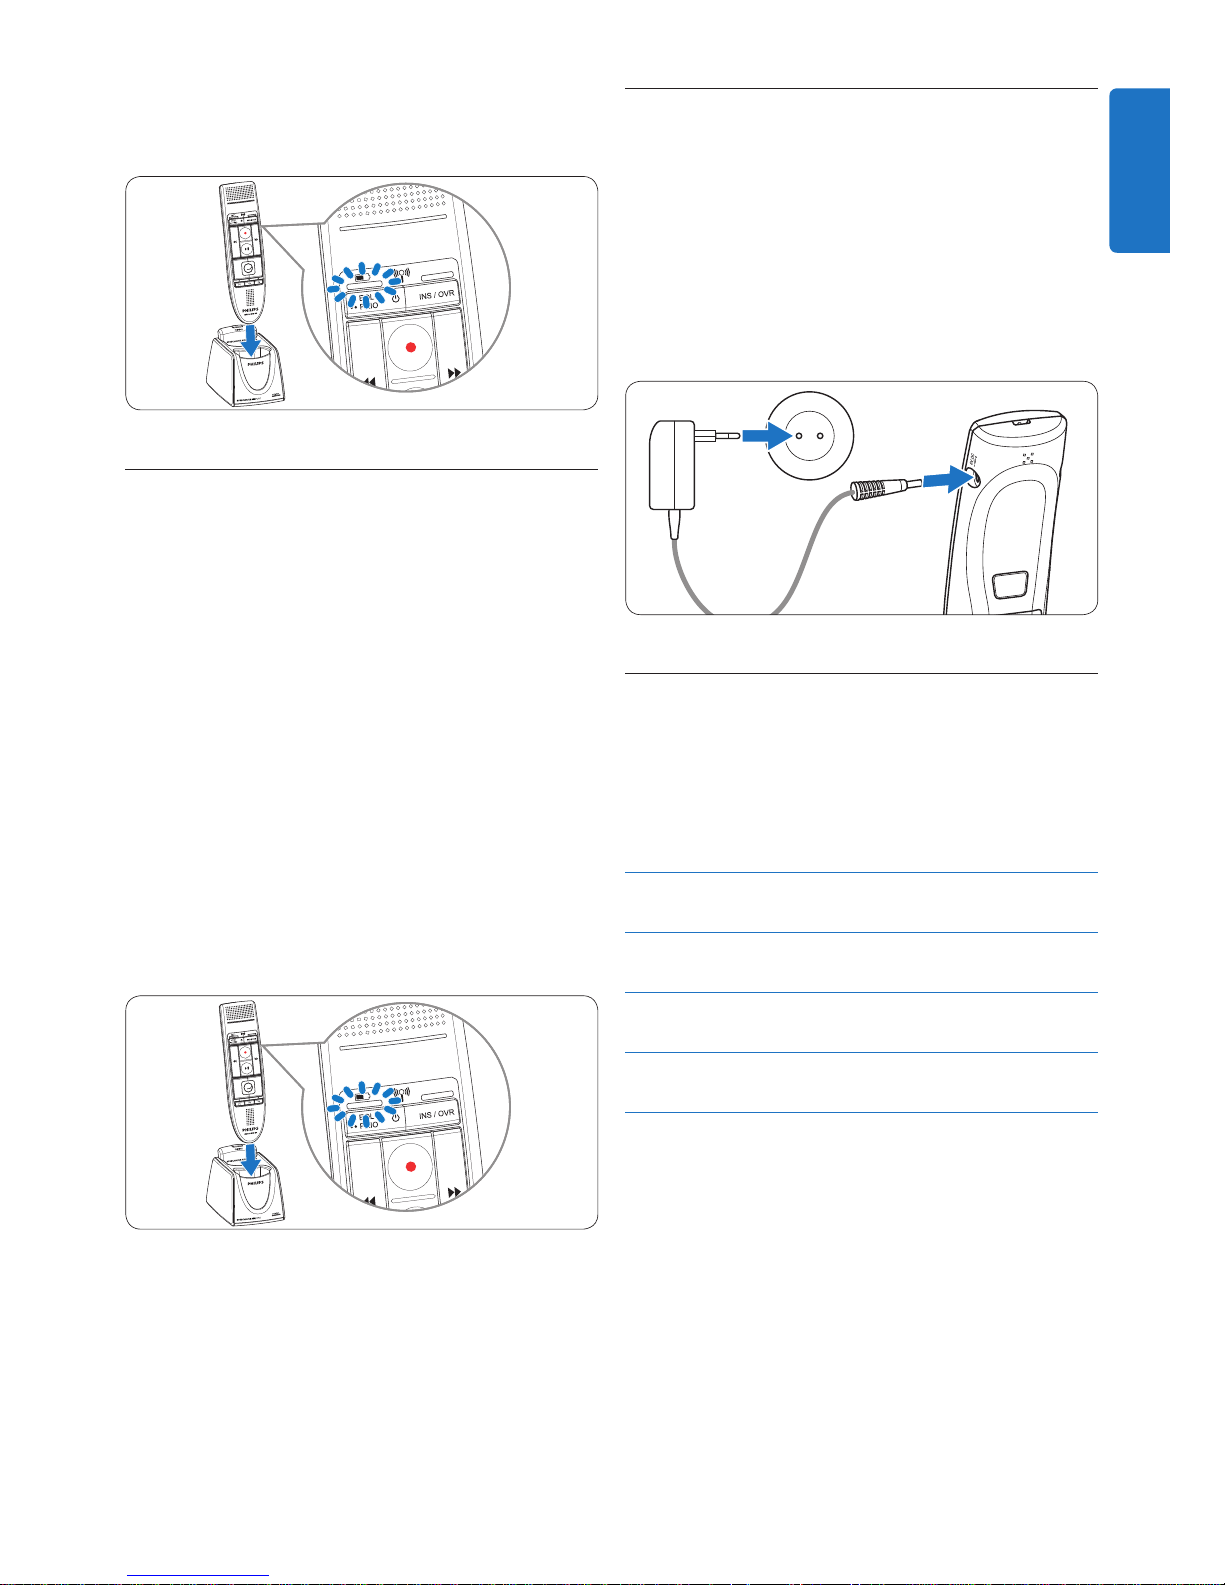
Ensure that the AC charger is connected 1
to the docking station (see chapter 3.2 for
more information).
Insert the SpeechMike into the docking slot 2
of the docking station and press it down
firmly until it locks.
The battery level charge indicator flashes •
green, orange and red alternately during
charging.
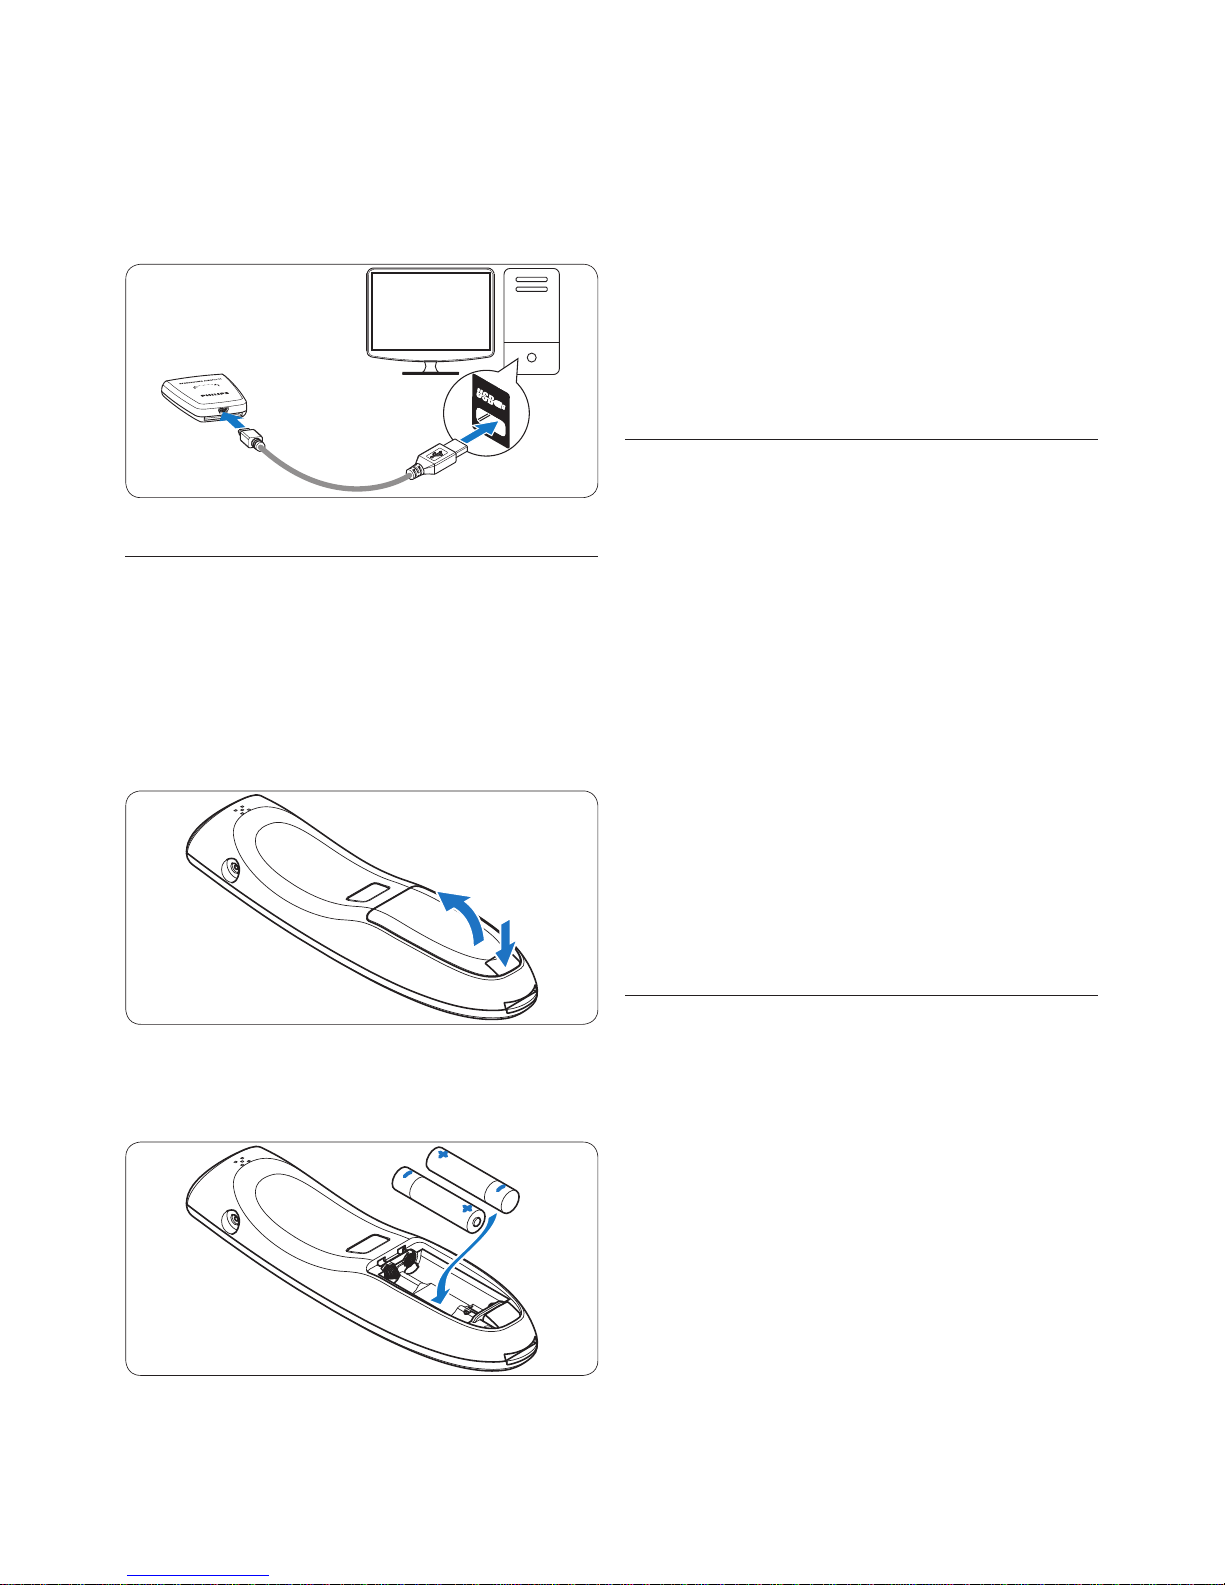
E Tip
For the mobile user, the receiver module can
be used without the docking station by directly
connecting it to the computer using the USB
cable.
Insert the batteries 3.3
The SpeechMike can be operated with the
rechargeable Philips batteries LFH9154 or AAA
alkaline batteries.
Press down the battery cover release button 1
and open the battery cover.
Place the batteries in the correct polarity as 2
indicated and close the cover.
Page 15
15User manual
Charging directly through the 3.4.3
SpeechMike
The rechargeable Philips batteries LFH9154
can be charged in the SpeechMike by directly
connecting the AC charger to the SpeechMike.
Plug the charger into a wall outlet and 1
connect the charger cable to the charger
connector of the SpeechMike.
Learn about the battery charge 3.5
level
Immediately after turning the SpeechMike on or
when the SpeechMike is placed in the docking
station, the battery charge level indicator light
will indicate the battery status.
Battery charge
level indicator
Battery status
Green 30% or more of charge
remaining
Orange Less than 30% of charge
remaining
Red Less than 10% of charge
remaining
The battery charge level indicator will
continuously flash red with about 30 seconds of
recording time remaining.
The battery level charge indicator glows green •
when charging is complete.
Charging using the docking station 3.4.2
and the USB cable
The rechargeable Philips batteries LFH9154 can
be charged in the SpeechMike using the docking
station in combination with the USB cable.
Ensure that the docking station is connected 1
to the computer using the USB cable (see
chapter 3.2 for more information).
Insert the SpeechMike into the docking slot 2
of the docking station and press it down
firmly until it locks.
The battery level charge indicator flashes •
green, orange and red alternately during
charging.
The battery level charge indicator glows green •
when charging is complete.
D Notes
The computer must be switched on when •
charging the batteries with the USB cable.
If the USB port of the computer does not •
supply enough power supply capacity, use the
AC charger.
ENGLISH
Page 16
16 User manual
docking slot of the docking station and press
it down firmly until it locks.
Press and hold the pairing key 3
[PAIRING] on
the receiver module for 3 seconds.
The receiver module enters pairing mode, and •
the pairing key starts to flash blue quickly.
If the connection succeeds, the wireless •
connection indicator on the SpeechMike and
the pairing key on the receiver module glow
blue permanently.
Set up the wireless connection 3.7.2
manually using the receiver module
If the receiver module is used without the
docking station, follow these steps to set up the
wireless connection manually.
Ensure that the receiver module is 1
connected to the computer with the USB
cable and that the computer is switched on.
Press and hold the pairing key 2
[PAIRING] on
the receiver module for 3 seconds.
The receiver module enters pairing mode, and
the pairing key starts to flash blue quickly.
Switch on the SpeechMike and press the 3
function keys
F1 and F3 simultaneously for 1
second.
Turning on/o the SpeechMike3.6
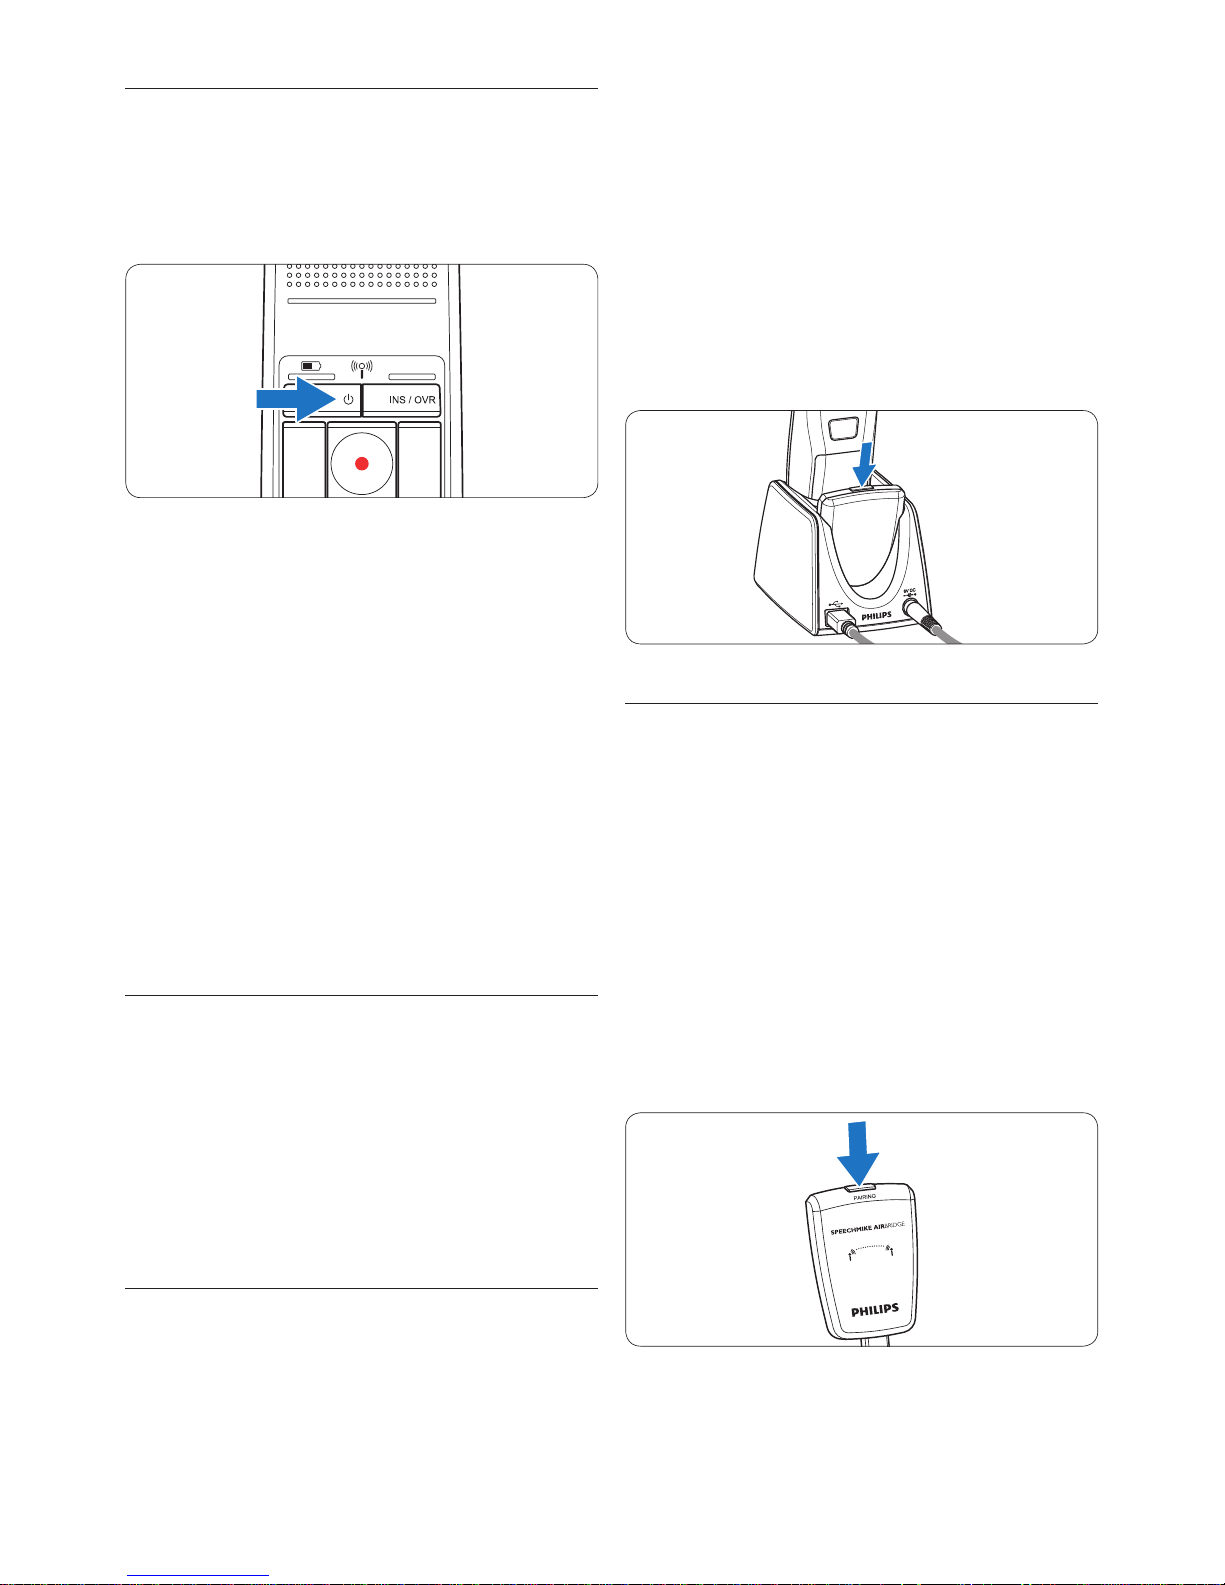
To turn on the SpeechMike, press and hold 1
a On/O for about 2 seconds. The battery
indicator will light up.
Once turned on the SpeechMike will 2
reconnect automatically to the docking
station.
The wireless connection indicator on the •
SpeechMike flashes blue while the connection
is being established.
If the connection succeeds, the blue indicator •
lights permanently.
If the automatic wireless connection fails, set •
up the connection manually (see below).
To turn o the SpeechMike, press and 3
hold a On/O for about 2 seconds. The
SpeechMike beeps, and the battery indicator
will light up red briefly.
Set up the wireless connection 3.7
manually
The SpeechMike and the receiver module are
paired by factory default and usually do not not
need to be connected manually. If the automatic
wireless connection fails or if you want to pair
the SpeechMike with another receiver module,
set up the connection manually.
Set up the wireless connection 3.7.1
manually using the docking station
Ensure that the receiver module is inserted 1
in the docking station.
Switch on the SpeechMike, insert it into the 2
Page 17
17User manual
If you leave the reception area of the docking
station a vibrating alert notifies you that the
wireless connection between the docking
station and the dictation microphone may be
interrupted.
Power-save mode3.9
If the SpeechMike is not used for more than two
hours, it will automatically power down to save
battery life. Turn the unit on by pressing a On/
O until the batterie indicator lights up.
Locate the SpeechMike3.10
Press the pairing key 1
[PAIRING] on the
receiver module briefly.
The SpeechMike connected to this receiver
module beeps.
Attach the neckband3.11
The neckband can be used for hands-free
recording while at the same time ensuring a
constant distance between the mouth and the
microphone. Thread the neckband as shown,
and tighten it.
If the connection succeeds, the wireless
connection indicator on the SpeechMike and
the pairing key on the receiver module glow blue
permanently.
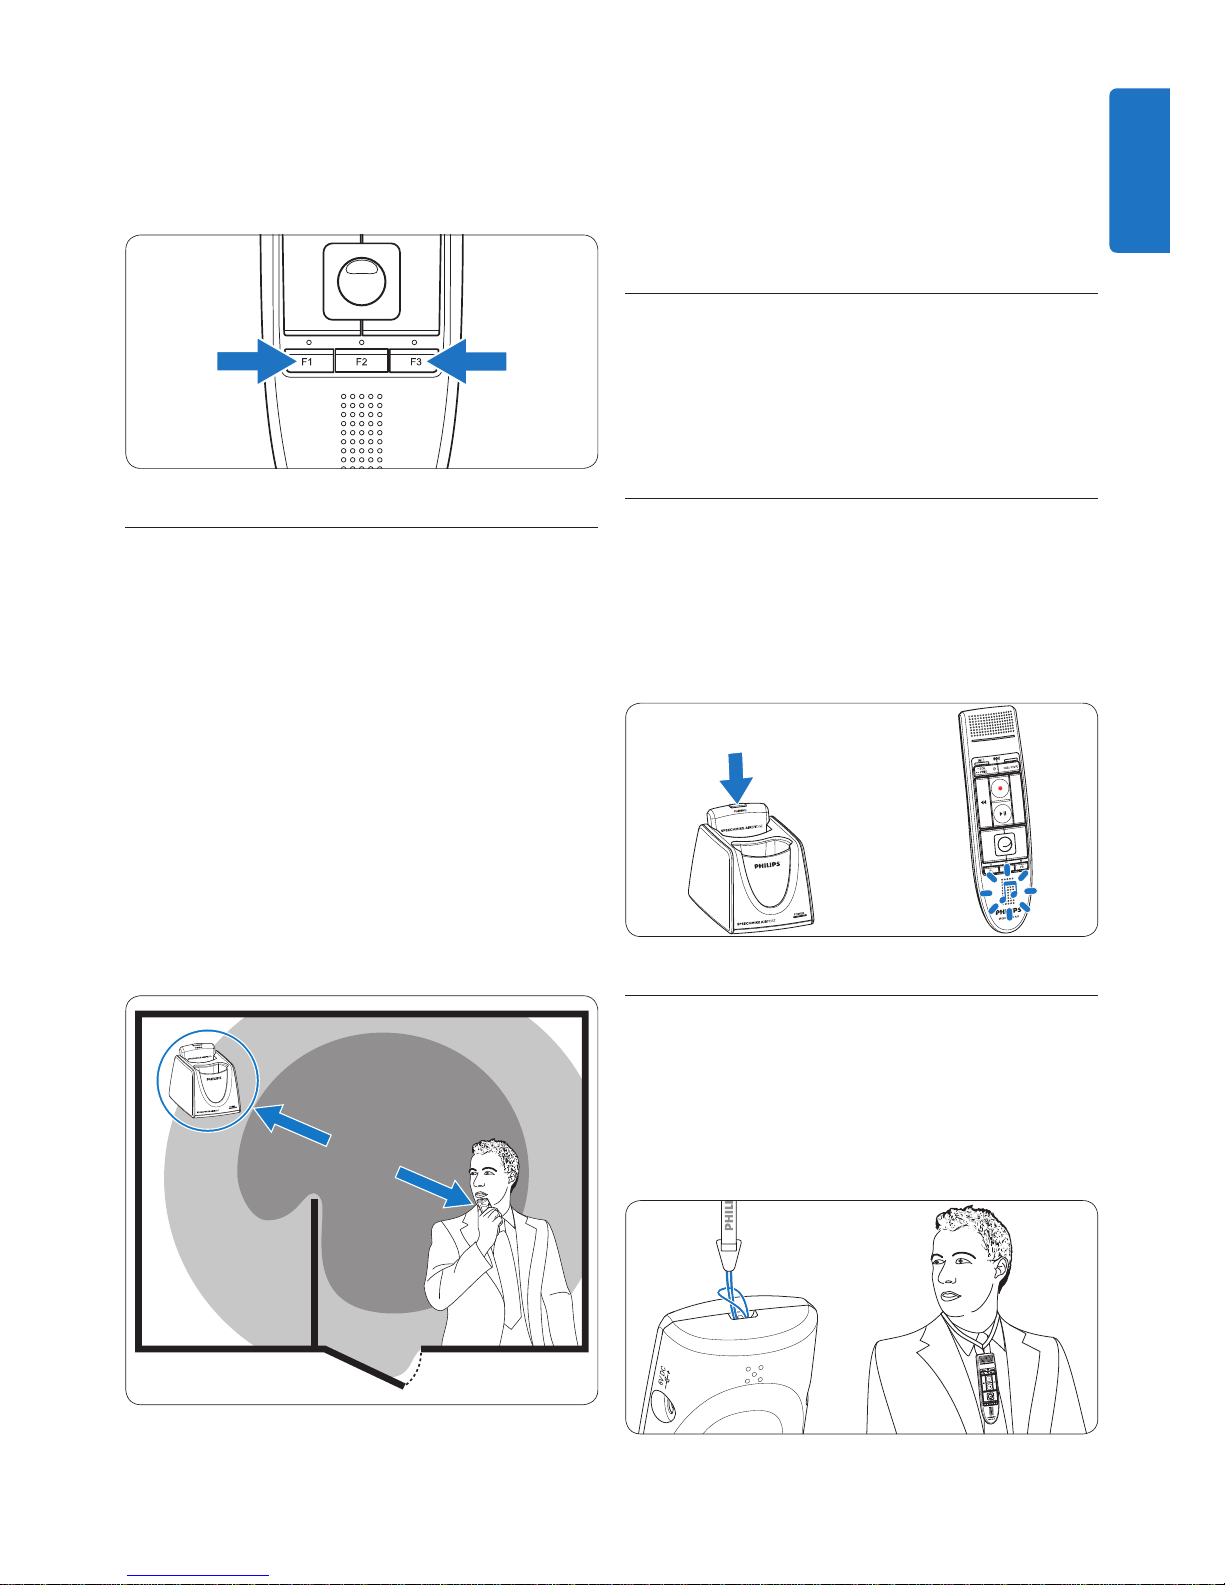
3.8 Learn about wireless connectivity
The SpeechMike uses wireless technology
to make a connection between the dictation
microphone and the docking station.
A wireless connection does not require that the
dictation microphone and the docking station
be in line of sight, but the maximum distance
between the devices is 10 meters (33 feet). The
closer the devices are to each other, the better
is the performance. The optimal operating range
is shown in dark grey in the picture. The
connection is subject to interference from
distance and obstructions (shown in light grey)
or other electronic devices.
<10 m/33 ft
ENGLISH
Page 18
18 User manual
To install SpeechExec on a second computer,
the license must be transferred from the first
computer back to the USB dongle by clicking
Help > License information… on the SpeechExec
menu bar, then installed on the second
computer.
Create a SpeechExec user profile3.12.2
When using SpeechExec for the first time, a
wizard guides you through the step-by-step
configuration process to create a new user
profile and configure your initial key settings.
Follow the on-screen instructions to:
specify an author name that will be used to •
identify your dictations
define the name and the (network) path •
where your finished dictations will be stored
set the default • Work type (letter, memo, fax or
report) assigned to new dictations.
E Tip
If working in a network, select a folder on
a mapped network drive to store finished
dictations. Transcriptionists will then be able to
access the folder and map their pending folders
to your finished dictations folder.
SpeechExec help3.12.3
For detailed information about using the
SpeechExec software, see the help function. To
start the help function:
Press F1 on the keyboard•
Click the •
button on the toolbar in the
worklist or recorder window.
Start SpeechExec dictation software 3.12
(only for LFH3005)
If the option to start SpeechExec automatically
was selected in the settings menu, open
the program by clicking the
icon in the
notification area of the Windows task bar. To
manually start the program, open the Windows
start menu in Windows and select Programs >
SpeechExec (Pro) Dictate.
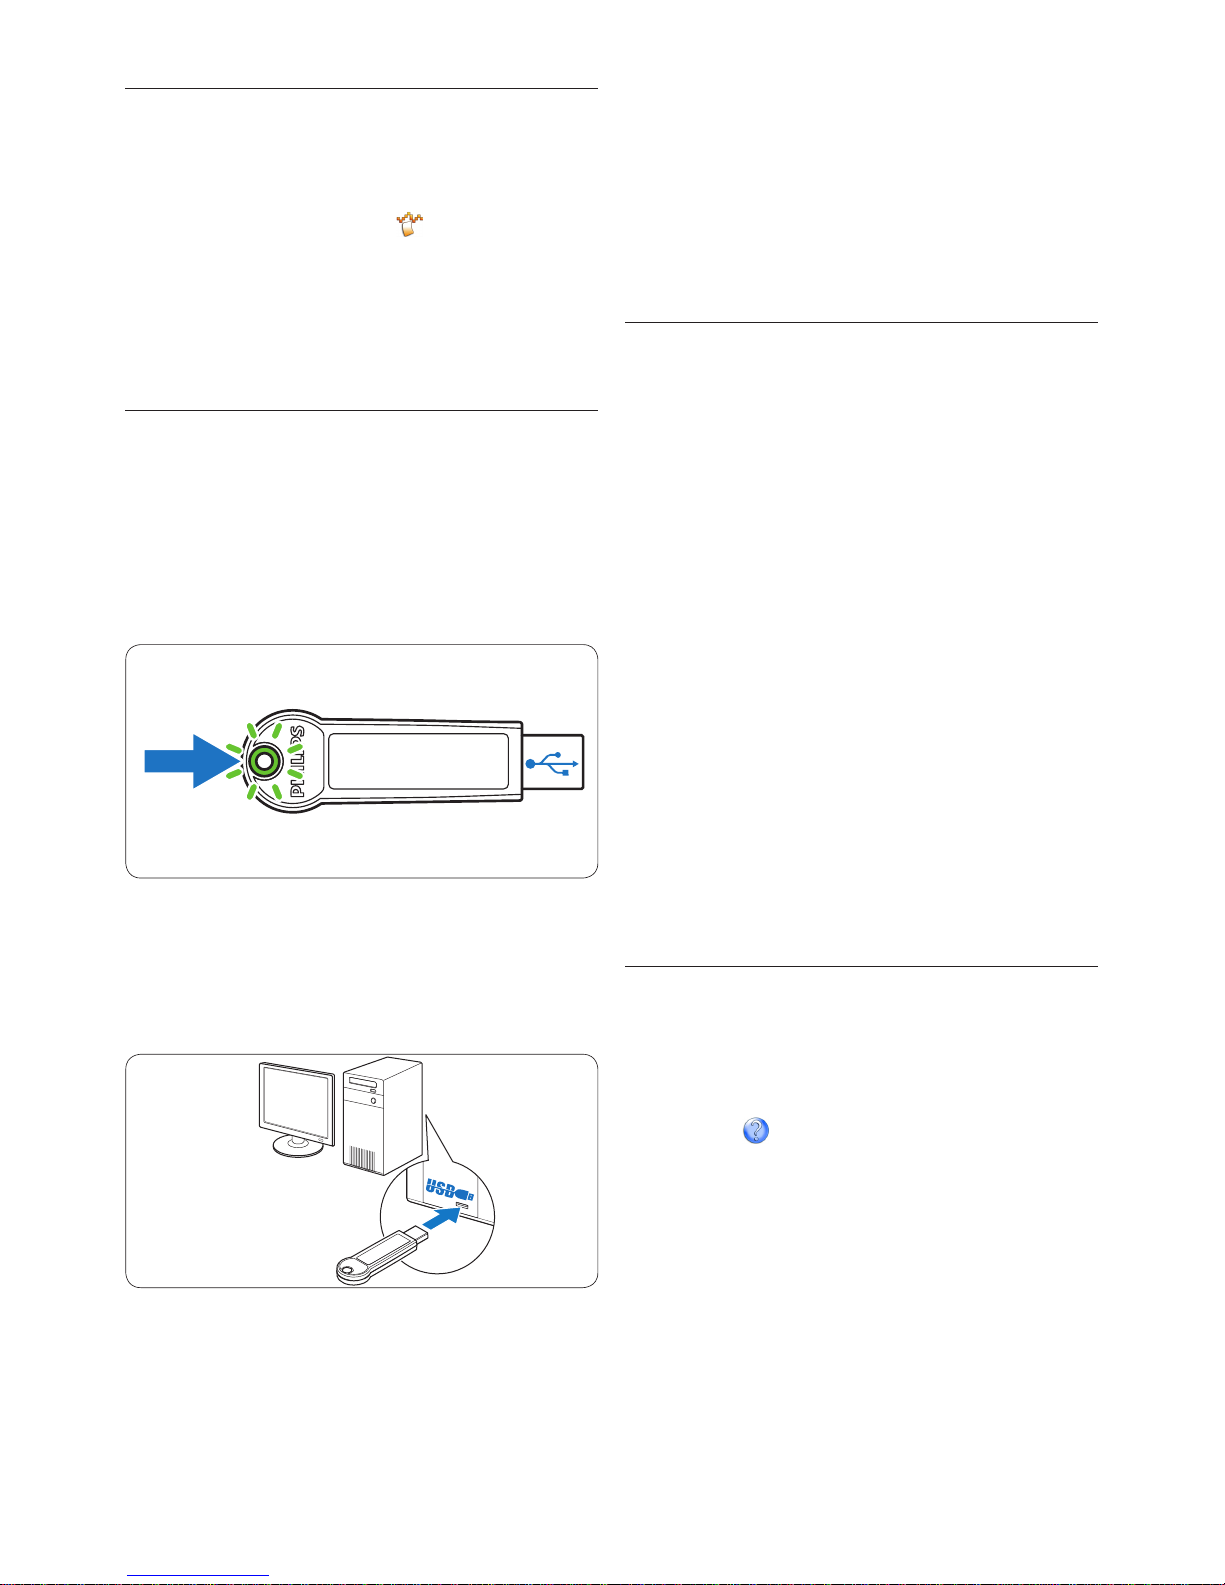
About the USB license dongle3.12.1
The USB license dongle contains the license for
SpeechExec Pro Dictate. During installation of
the SpeechExec, the license on the USB dongle
can be transferred to one computer or kept on
the USB dongle. A three-color LED indicates
the status of the license.
If the license is not downloaded to a computer,
the USB dongle must remain connected to the
computer while working with the application.
The LED of the USB dongle is green.
If the license is downloaded to a computer,
SpeechExec can only be installed and used on the
computer where the license resides. The LED
of the USB dongle changes from green to yellow
when the license is downloaded to the computer.
Page 19

19User manual
meters (33 feet). If you leave the reception
area of the docking station a vibrating alert
notifies you that the wireless connection
between the docking station and the dictation
microphone may be interrupted. Re-enter the
reception area of the docking station. When
the wireless connection is interrupted, the
dictation software stops recording. See Learn
about wireless connectivity on page 17 for more
information about wireless connectivity.
During recording, the on-screen view •
remains on the recorder window, while the
SpeechExec window may be visible in the
background. The SpeechExec window does
not accept user input until recording is
finished, canceled or suspended.
E Tip
Click the •
button on in the recorder
window to adjust the recording volume.
Use ‘Push-To-Dictate’ recording to start •
recording immediately when pressing the
d
RECORD key on the SpeechMike. When
releasing the d
RECORD key, recording will
stop. ‘Push-To-Dictate’ can be enabled in the
Settings menu of the SpeechExec Recorder
window (under Audio Settings > Recording).
Playback a recorded file4.2
Various playback functions can be controlled
by the SpeechMike, in the recorder window or
worklist window.
Playback using the SpeechMike4.2.1
Double-click the dictation file in the work 1
list or select a dictation file and click the
CONTINUE button on the toolbar.
The dictation file is opened in the recorder
window.
To rewind, press and hold the 2 c key on the
Use your SpeechMike Air4
This chapter describes how to use the
SpeechMike with Philips SpeechExec dictation
software. If the SpeechMike is used with thirdparty software other than Philips SpeechExec,
some features may not be present or function
dierently. For detailed information, refer to the
documentation delivered with the software.
Create a recording4.1
The docking station or the receiver module 1
must be connected to the computer with
the USB cable.
Press the 2 d
RECORD key to create a new
recording and enter Record standby mode.
The recorder window is displayed.•
The record indicator light flashes red (in •
overwrite mode) or green (in insert mode).
Press the 3 e key and start speaking.
The record indicator light glows in red (in
overwrite mode) or green (in insert mode) while
recording.
For short pauses, press the 4 e key. To
continue recording, press the e key again.
To stop recording, press the 5 d
RECORD key.
Press the 6
•EOL/••PRIO key to mark the
recording as finished.
The dictation file is moved to the • Finished
dictations folder.
The recorder window closes and the work list •
window is displayed.
To assign priority status to the recording, 7
press the
•EOL/••PRIO key again within half
a second.
D Note
For best results, results, speak clearly •
and keep the microphone about 5 to 10
centimeters (2 to 4 inches) away from your
mouth.
The maximum distance between the docking •
station and the dictation microphone is 10
ENGLISH
Page 20

20 User manual
Double-click the dictation file in the work 1
list or select a dictation file and click the
CONTINUE button on the toolbar.
The dictation file is opened in the recorder
window.
Set the desired edit mode (insert or 2
overwrite) before starting recording. To
switch between insert and overwrite modes,
press the
INS/OVR key on the SpeechMike
while stopped.
The green insert indicator light of the
SpeechMike becomes lit in insert mode.
Play, forward or rewind to the position 3
where the insertion should be made.
Press the 4 d
RECORD key to enter Record
standby mode.
The record indicator light flashes red (in
overwrite mode) or green (in insert mode).
Press the 5 e key and start speaking.
The record indicator light glows in red (in
overwrite mode) or green (in insert mode) while
recording.
To stop recording, press the 6 d
RECORD key.
Finish, suspend or cancel a 4.4
recording
To mark a recording as finished, press the
•EOL/••PRIO key on the SpeechMike or click
on the
FINISH button in the recorder
window. The dictation file is moved to the
Finished dictations folder. SpeechExec oers
additional options for finished dictations, such as
conversion to a pre-defined format, sending via
email, uploading to an FTP server or copying to
the backup folder.
Alternatively, a recording can be marked as
suspended by clicking on the
SUSPEND
button in the recorder window. Mark a
recording as suspended to temporarily interrupt
recording and finish it later. The recording is
saved in the Suspended folder.
Clicking the
CLOSE button in the recorder
window cancels the recording without saving it.
SpeechMike. When rewinding reaches the
desired position, release the c key.
To fast forward, press and hold the 3 b key
on the SpeechMike. When forwarding
reaches the desired position, release the b
key.
To start playback, press the 4 e key on the
SpeechMike. To stop playback, press the e
key again.
Playback in the recorder window4.2.2
Double-click the dictation file in the work 1
list or select a dictation file and click the
CONTINUE button on the toolbar.
The dictation file is opened in the recorder
window.
To rewind, click the 2
button on the
player toolbar. When rewinding reaches the
desired position, click the
PLAY/PAUSE
button on the player toolbar.
To fast forward, click the 3
button on the
player toolbar. When forwarding reaches the
desired position, click the
PLAY/PAUSE
button on the player toolbar.
To start playback, click the 4
PLAY/PAUSE
button on the player toolbar. To stop
playback, click again the
PLAY/PAUSE
button on the player toolbar.
Playback in the worklist window4.2.3
Select a dictation file and click the 1
PLAY/PAUSE button on the worklist toolbar
to start/stop playback.
Edit a previously recorded file4.3
A previously recorded file can be edited if
transcription has not begun. You can edit a file
by inserting an additional portion, overwriting
part of the recording or appending a recording
at the end of the file.
Page 21
21User manual
more spoken instructions (see Delete part of a
dictation file on page 21 for more information)
or by recording over the spoken instruction
(see Playback a recorded file on page 19 for more
information about the overwrite recording
mode).
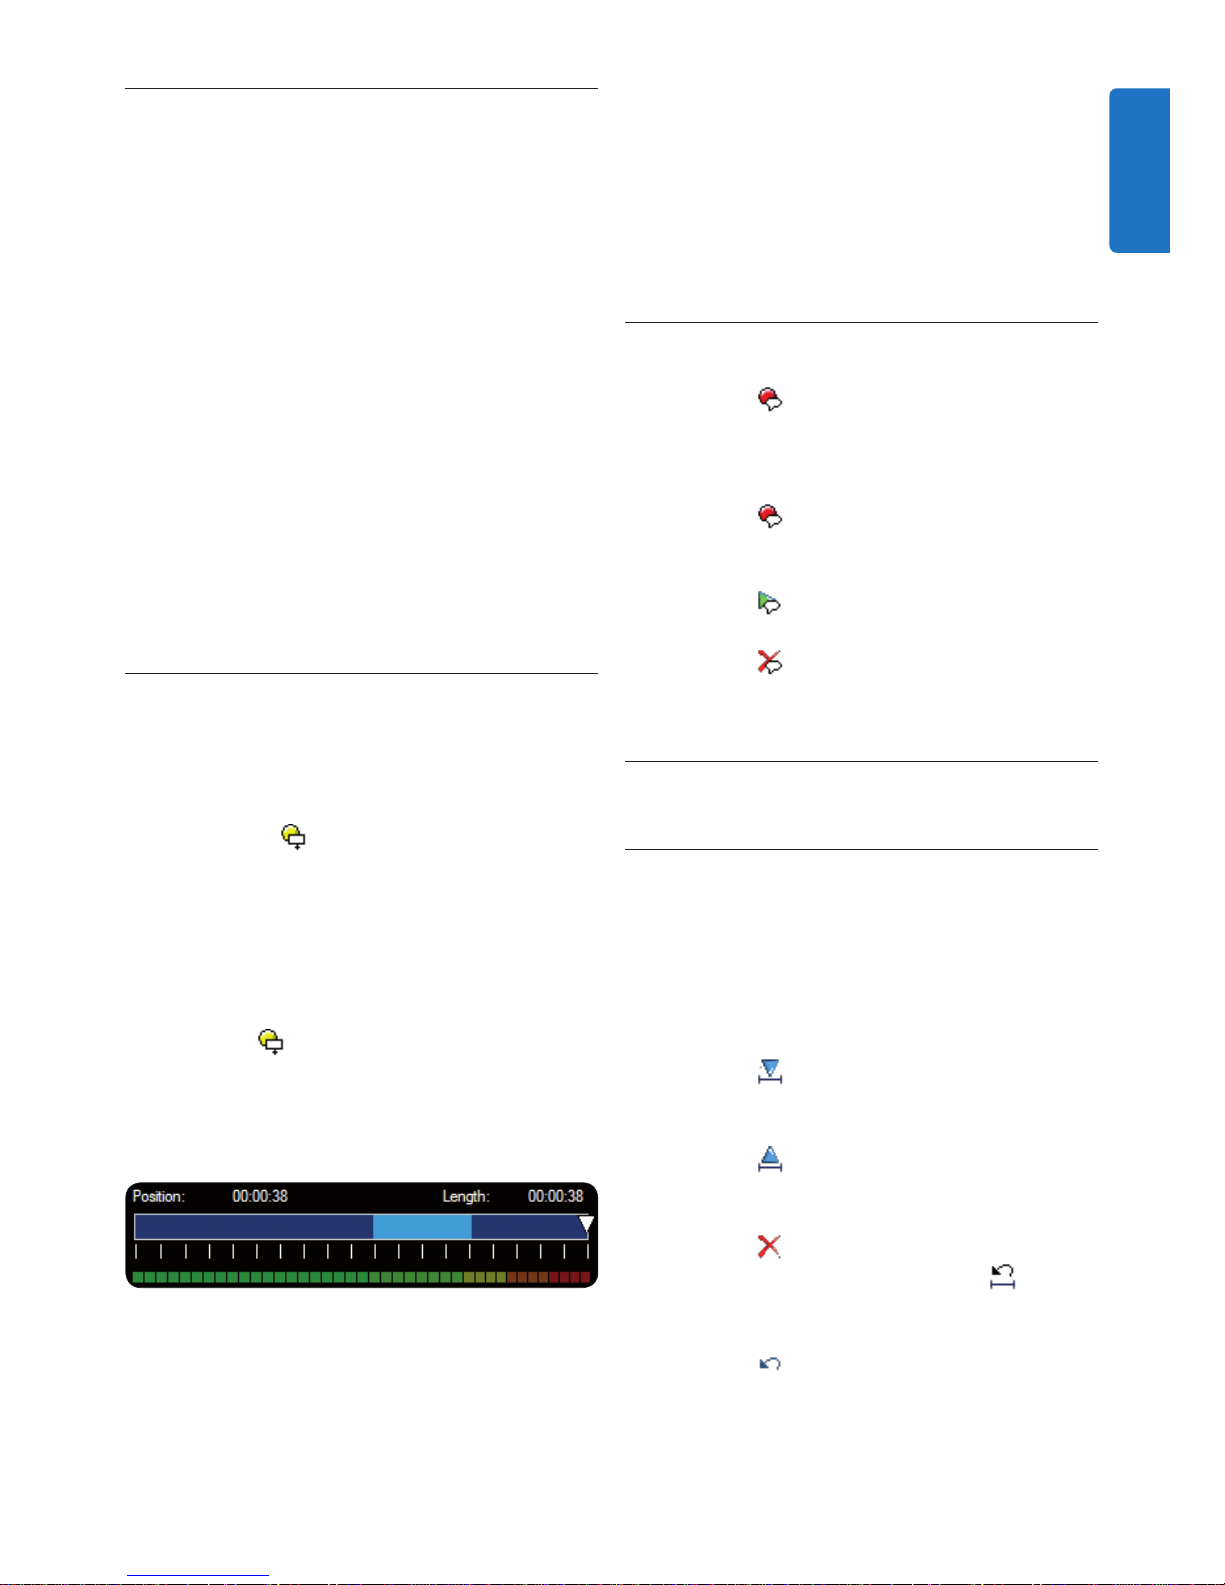
Record a special instruction4.5.2
Click the 1
button in the recorder window.
Dictate the special instruction. Special 2
instructions are stored in a separate sound
file and attached to the dictation.
Click the 3
button again in the recorder
window when the special instruction is
complete.
Click the 4
button in the recorder window
to play back the special instruction.
Click the 5
button in the recorder window
to delete the special instruction.
Delete4.6
4.6.1 Delete part of a dictation file
Follow these steps to delete a section from a
dictation file:
Navigate to the beginning of the section to 1
be deleted by playback or fast forward/fast
rewind.
Click the 2
button in the recorder window.
Navigate to the end of the section to be 3
deleted.
Click the 4
button in the recorder window.
The section is marked with a red frame in
the position slider.
Click the 5
button in the recorder window
to delete the section or click the
button
to remove the deletion marks (the red
frame) without deleting the section.
Click the 6
button to undo the last
deletion.
Record an instruction4.5
Instructions are recorded comments by
the author that are directed to the person
transcribing the dictation. SpeechExec supports
two types of instructions:
Spoken instructions• are stored within the
dictation sound file at the position where the
instruction was actually recorded. (Examples
of spoken instructions might include the
correct spelling of a name or technical term
or instructions to insert a new paragraph.)
Special instructions• are usually recorded at the
start of a dictation with special information
relating to the dictation. Special instructions
are stored in a separate sound file. (Examples
of special instructions might include document
formatting instructions, names of individuals to
receive copies, or delivery instructions.)
Record a spoken instruction4.5.1
The current dictation status must be 1
RECORD.
To add a spoken instruction:2
Click the •
button in the SpeechExec
recorder window.
Press and hold the •
INS/OVR key on the
SpeechMike.
Dictate the instruction. The instruction will 3
be recorded into the dictation file without
overwriting your dictation.
Click the 4
button again or release the
button on the SpeechMike when the
spoken instruction is complete. The spoken
instruction is displayed as a light blue bar in
the position slider.
Continue or stop recording.5
D Note
A spoken instruction can be deleted just like
any other part of a dictation file by deleting the
section of the recording that includes one or
ENGLISH
Page 22

22 User manual
Delete a dictation file4.6.2
Follow these steps to delete a dictation file
entirely:
Select the dictation files to be deleted in the 1
work list. To select more than one file, press
and hold
SHIFT on the keyboard and click on
the files to be selected.
Click on 2 Edit > Delete on the menu bar or
press the
DELETE key on the keyboard to
delete the selected dictation files.
Page 23
23User manual
Use more of your 5
SpeechMike Air
Customize the SpeechMike5.1
Use the Device Control Center software to
customize the SpeechMike to suit individual user
needs.
The software allows to assign dierent functions
to each key, enable or disable certain features
and also to start and control applications with
the SpeechMike.
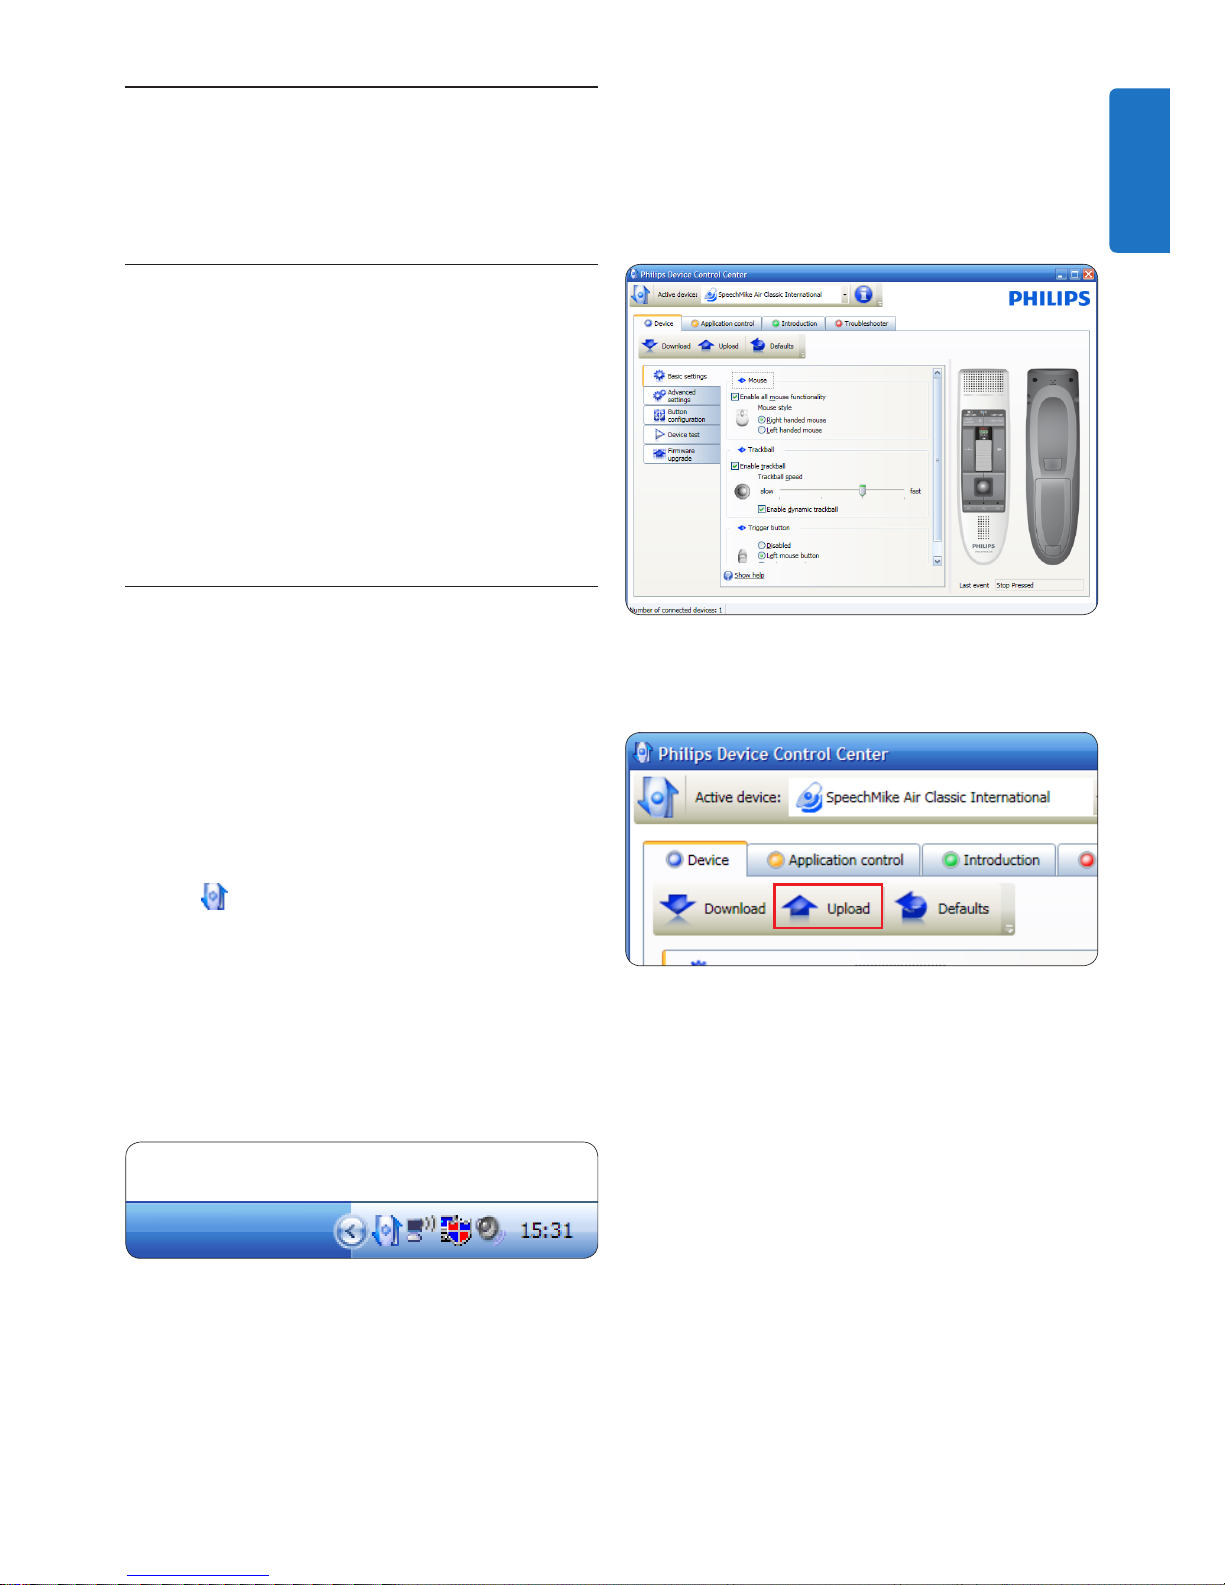
Customize SpeechMike keys and 5.1.1
settings
Ensure that the docking station is connected 1
to the computer with the USB cable and
that the wireless connection to the dictation
microphone is established.
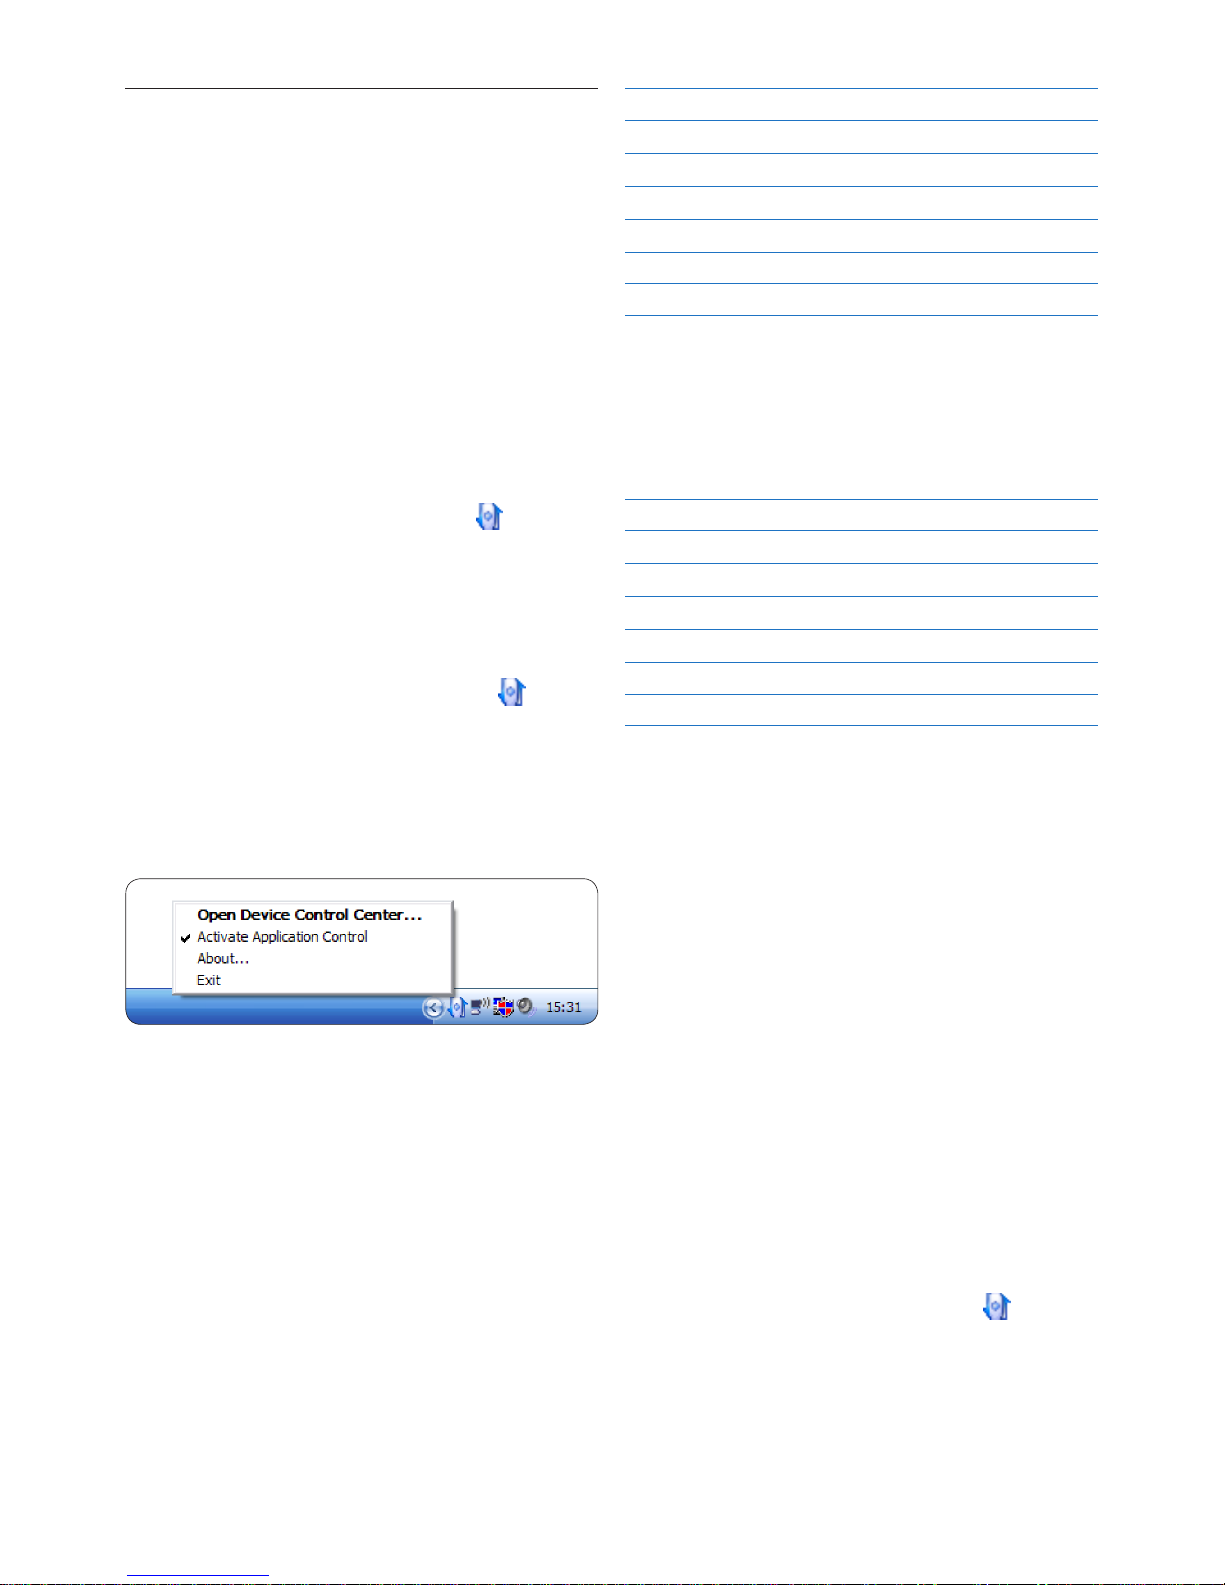
If the option to start the2 Device Control
Center automatically was selected during
installation, open the program by clicking
the
icon in the notification area of the
Windows task bar. To manually start the
program, open the Windows start menu in
Windows and select All Programs > Philips
Speech Control > Philips Device Control
Center.
The current settings are automatically
downloaded from the connected SpeechMike.
On the 3 Device tab, configure device settings
and select the function to be assigned to
each key.
Click the 4 Upload button to save the new
settings.
D Note
Settings cannot be changed when the battery •
charge level of the SpeechMike is below 10
% (when the battery charge level indicator is
red). Charge the dictation microphone before
changing the settings.
The SpeechMike can be reset to its factory •
default configuration by clicking the Defaults
button. Click the Upload button to save the
default settings.
E Tip
To test settings and key functions, use the Device
test section on the Device tab.
ENGLISH
Page 24
24 User manual
SpeechMike key Assigned shortcut
d Record
Record (push to dictate)
e Play/Stop
Play from cursor position
c Rewind
Move cursor backwards
b Fast forward
Move cursor forwards
•EOL/••PRIO
Mark backwards
INS/OVR
Open correction window
Powerpoint profile
Use this profile to control Powerpoint
presentations with the SpeechMike. The
following settings are defined:
SpeechMike key Assigned shortcut
d Record
Black screen
e Play/Stop
White Screen
c Rewind
Go to previous slide
b Fast forward
Go to next slide
•EOL/••PRIO
End slide show
INS/OVR
Show/hide cursor
D Note
Philips cannot guarantee the proper function of
all assigned shortcuts, since shortcuts can dier
among versions and languages.
Program a custom profile
It is possible to program shortcuts for other
applications to control application functions
with the keys of the SpeechMike. to start and
control other applications with the keys on the
SpeechMike.
Ensure that the docking station is connected 1
to the computer with the USB cable and
that the wireless connection to the dictation
microphone is established.
If the option to start the2 Device Control Center
automatically was selected during installation,
open the program by clicking the
icon in
the notification area of the Windows task
bar. To manually start the program, open the
Windows start menu in Windows and select
All Programs > Philips Speech Control >
Philips Device Control Center.
Use application shortcuts5.1.2
The Device Control Center software allows to
start and control other applications with the
keys on the SpeechMike.
The Device Control Center software includes
pre-installed profiles that make the SpeechMike
ready for immediate operation with Dragon
NaturallySpeaking speech recognition software
and Microsoft Powerpoint. Additional profiles
for other applications can be programmed.
If the option to start the1 Device Control
Center automatically was selected during
installation, the application icon
appears
in the notification area of the Windows task
bar. To manually start the program, open the
Windows start menu in Windows and select
All Programs > Philips Speech Control >
Philips Device Control Center.
Right-click on the application icon 2
in
the notification area of the Windows task
bar and verify that ‘Acitvate application
control’ is enabled. If the option is disabled,
the configured settings and buttons will not
function for any of the target applications.
D Note
Exit Philips SpeechExec software when using
application shortcuts to prevent unintentional
recording when controlling other applications.
Default profile
The default profile is applied automatically when
there is no profile assigned to an application in
focus. This profile is set up to control Dragon
NaturallySpeaking with your SpeechMike. The
following settings are defined:
Page 25
25User manual
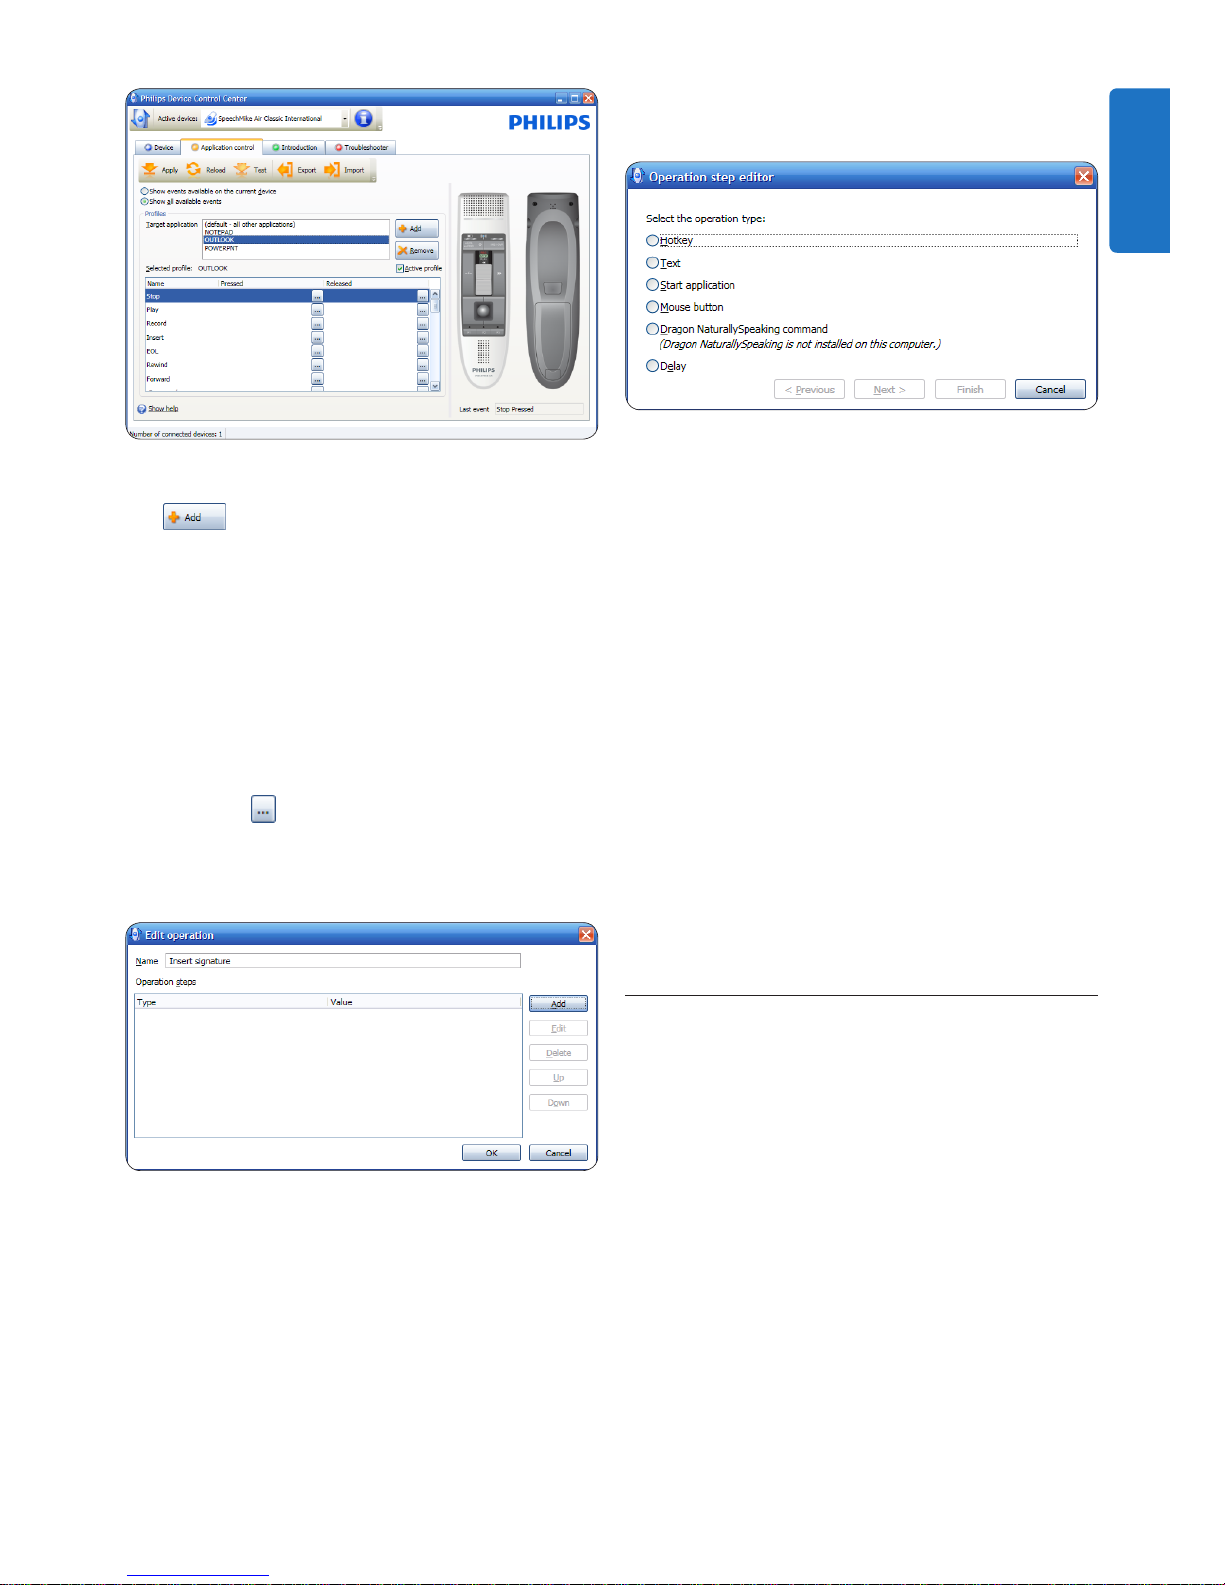
Dragon NaturallySpeaking command•
Delay•
You can add one operation or a sequence of 7
operations for every shortcut.
Click the 8 Apply button to save the new
settings.
D Note
The Device Control Center cannot be used
to program application shortcuts for Philips
SpeechExec software. Shortcuts for Philips
SpeechExec can be configured in the General
settings menu of SpeechExec. See the SpeechExec
application help for more information.
E Tip
Application control configuration settings can be
saved into files and imported later to apply the
same configuration settings to several devices.
Update the firmware5.1.3
Your SpeechMike is controlled by an internal
program called firmware. Newer versions of the
firmware may have been released after you have
purchased the SpeechMike.
Download the firmware update for your 1
SpeechMike model from www.philips.com/
dictation.
Ensure that the docking station is connected 2
to a wall outlet with the AC charger and
to the computer with the USB cable.
The dictation microphone must be in the
docking slot of the docking station.
If the option to start the3 Device Control
Center automatically was selected during
On the tab 3 Application control, click the
button to create a new profile.
Browse and select the application 4
executable and click on
OPEN.
A profile for the selected application will be
added to the list of profiles.
D Note
Exit the target application during
configuration. Open the application when
the device configuration settings are saved.
Select a button from the button colum and 5
click the
icon to assign a shortcut. You
can assign dierent shortcuts for pressing
and releasing a button.
The shortcut editor window is displayed.
Enter name for the shortcut and click 6
the Add button add an opertion for the
shortcut. The following options are available:
Hotkey: Assign a keyboard shortcut•
Text: Enter the text to be inserted when •
a key on the SpeechMike is pressed
Start an application by pressing a key on •
the SpeechMike
Mouse button•
ENGLISH
Page 26
26 User manual
installation, open the program by clicking
the
icon in the notification area of the
Windows task bar. To manually start the
program, open the Windows start menu in
Windows and select All Programs > Philips
Speech Control > Philips Device Control
Center.
On the 4 Device tab, click on Firmware
update.
Click the 5 Import button and select the
folder with the firmware files to be
imported.
Click the 6 Upgrade button to install the new
firmware.
The firmware upgrade takes about 30 •
seconds.
During firmware upgrade the indicator lights •
of the SpeechMike will be flashing.
When the firmware update is finished, the •
green battery indicator will light up.
B Warning
Do not remove the dictation microphone from
the docking station during firmware upgrade.
This might damage your product.
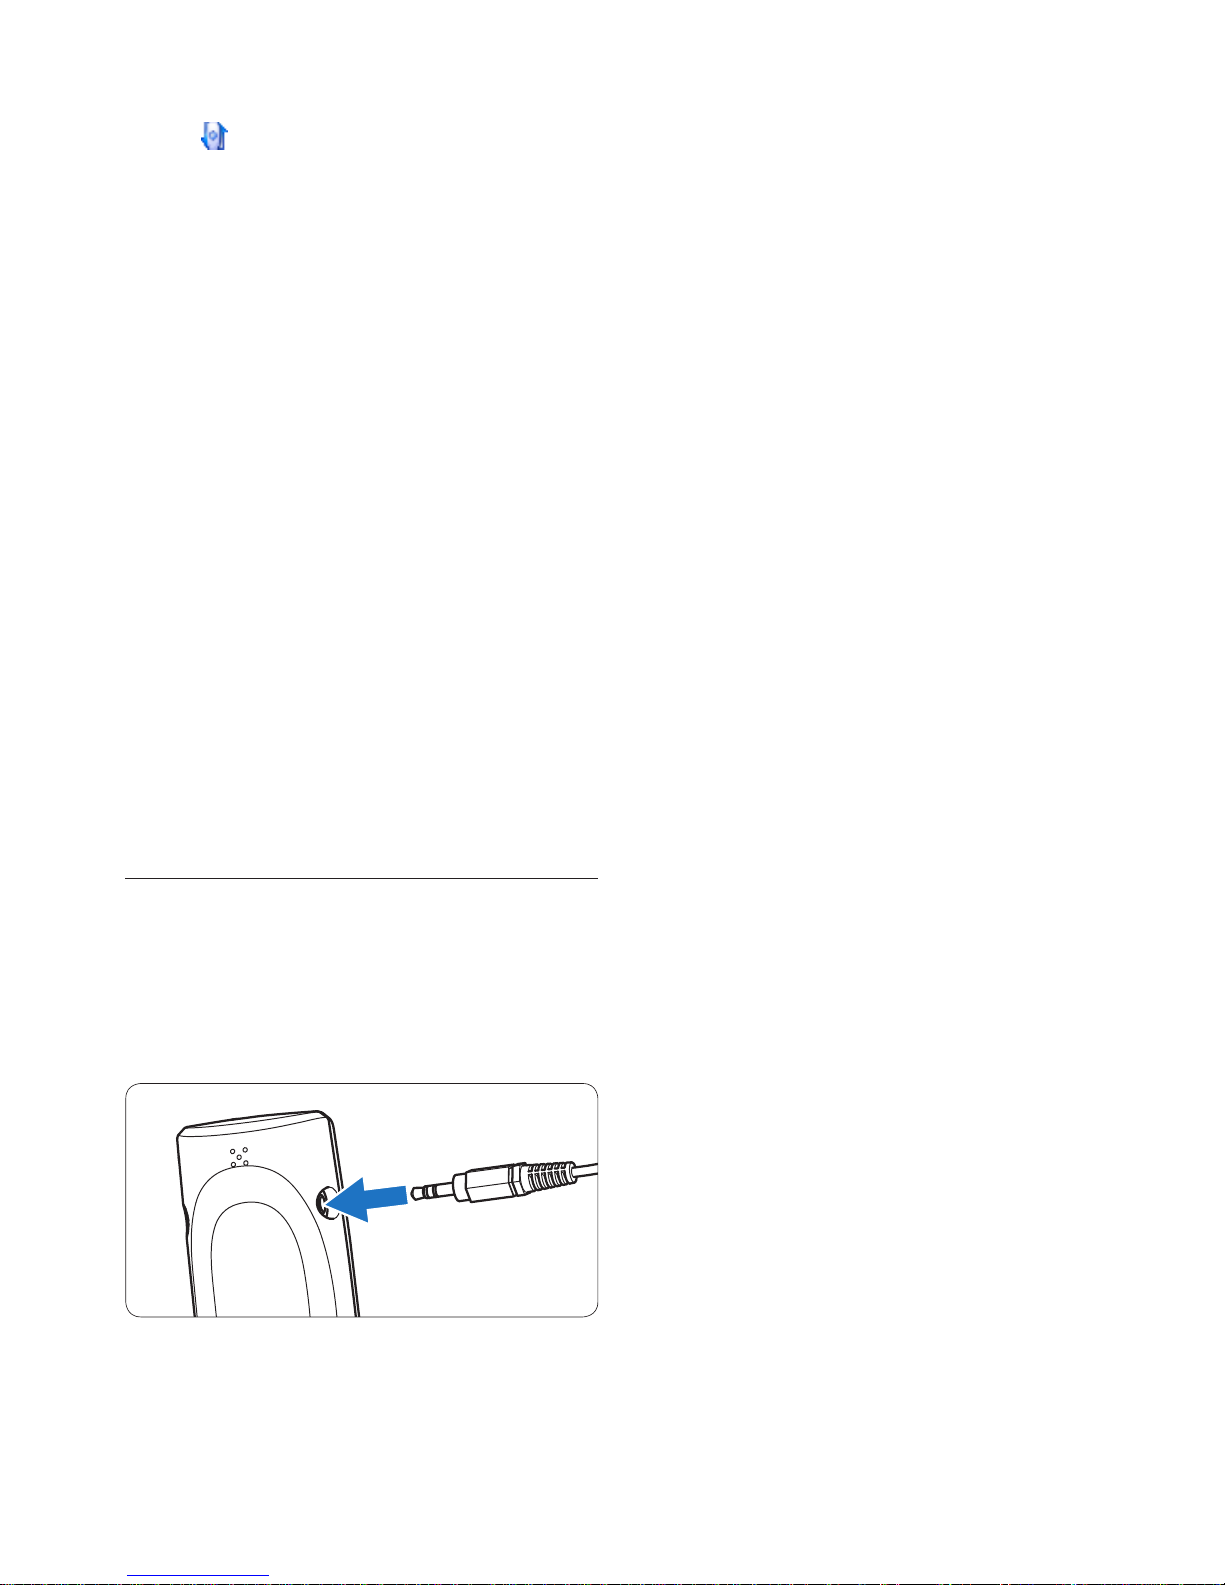
Record with a headset or an 5.2
external microphone
Connect a compatible headset or external
microphone to the SpeechMike. The internal
microphone is switched o when an external
microphone is connected.
Page 27

27User manual
Green specifications
Compliant to 2002/95/EC (RoHS)•
Lead-free soldered product•
Operation conditions
Temperature: 5° – 45° C / 41° – 113° F•
Humidity: 10 % – 90 %•
Optional accesssories
Philips noise-canceling headset LFH3090•
Philips SpeechMike Air wireless docking •
station LFH3050
Technical data6
Connectivity
Bluetooth connction with operating range up •
to 10 meters (33 feet)
USB: Mini-USB 2.0 female (high speed, xx •
Mbit/s)
DC in: 6 V•
Headset: 3.5 mm, impedance x kΩ•
Speaker
Built-in xx mm round, dynamic speaker•
Acoustic frequency response: xxx – xxx Hz•
Output power: > xxx mW•
Specifications
Product dimensions (W x D x H): •
x × x × x mm / x × x × x inch
Weight: x g / x oz (including batteries)•
System requirements
Pentium III, 500 MHz and 512 MB RAM; •
Recommended: Pentium IV or similar, 1 GHz
and 1 GB RAM
100 MB hard disk space for SpeechExec, 250 •
MB for Microsoft .NET Framework
One free USB port•
Recommended minimum transfer rate for •
LAN: 100 Mbit/s
Windows Vista, Windows XP (with Service •
Pack 2), Windows 2000 (with Service Pack 4)
Power
Battery type: two Philips AAA Ni-MH •
rechargeable batteries (LFH 9154) or two
AAA batteries (LR03 or R03)
Power supply: 6 V DC / 850 mA•
Up to xx hours of recording (with Philips •
rechargeable batteries LFH9154)
Up to xxx hours of standby time•
Typical time for a full charge: 2.5 hours•
ENGLISH
Page 28

28 User manual
The SpeechMike is connected to the
computer but sound will play on the
computer’s speaker only
Windows XP can support only one
playback device at a time and may
require setting the playback device back
to “SpeechMike Air” if another playback
device was enabled after the SpeechMike
was installed.
Set via Start > Settings > Control Panel > •
Sound and Audio Devices > Audio (tab)
Or, right-click the speaker icon if it’s in the •
toolbar and select Adjust Audio Properties
Windows Vista can support more than
one playback device at a time, but if you
disable the device for playback it is also
disabled for recording. You may need
to right-click and select “Show disabled
devices” to change the setting.
Set via Start > Control Panel > Sound > •
Playback (tab)
Or, right-click the speaker icon if it’s in your •
toolbar and select playback devices
Frequently asked questions7
The operating system stops responding
after restart
Using the Philips SpeechMike together
with certain USB hubs may cause the
operating system to stop responding
when the computer is started.
Unplug the SpeechMike before starting the PC
and reconnect it afterwards. We recommend
replacing the USB hub or connecting your
SpeechMike directly to the USB port of the
computer.
The SpeechMike is completely without
function
Some computer providers limit the
output power of USB ports to 100mA.
These ports may not provide enough
power for the SpeechMike to function
properly.
Use the AC charger.
Connect the SpeechMike via the self-powered
hub.
The SpeechMike does not respond to
input commands
The wireless connection to the docking
station may be interrupted.
Check the wireless connection.
Start the pairing process as described in this
user manual.
The dictation microphone does not
switch on
The battery is very low.
Charge the dictation microphone.
The dictation microphone does not
connect to the docking station
Pairings may have been reset or dictation
microphone has been previously paired
with another docking station.
Start the pairing process as described in this
user manual.
Page 29

Federal Communications Commission
Notice
This equipment has been tested and found
to comply with the limits for a Class B digital
device, pursuant to part 15 of the FCC Rules.
These limits are designed to provide reasonable
protection against harmful interference in
a residential installation. This equipment
generates, uses, and can radiate radio frequency
energy and, if not installed and used in
accordance with the instructions, may cause
harmful interference to radio communications.
However, there is no guarantee that
interference will not occur in a particular
installation. If this equipment does cause harmful
interference to radio or television reception,
which can be determined by turning the
equipment o and on, the user is encouraged to
try to correct the interference by one or more
of the following measures:
Reorient or relocate the receiving antenna.•
Increase the separation between the •
equipment and the receiver.
Connect the equipment into an outlet on •
a circuit dierent from that to which the
receiver is connected.
Consult the dealer or an experienced radio •
or television technician for help.
Modifications
The FCC requires the user to be notified that
any changes or modifications made to this
device that are not expressly approved by Philips
may void the user’s authority to operate the
equipment.
Cables
Connections to this device must be made with
shielded cables with metallic RFI/EMI connector
hoods to maintain compliance with FCC Rules
and Regulations.
Canadian notice
This Class B digital apparatus meets all
requirements of the Canadian InterferenceCausing Equipment Regulations.
Avis Canadien
Cet appareil numérique de la classe B respecte
toutes les exigences du Règlement sur le
matériel brouilleur du Canada.
Declaration of Conformity
Model Number: LFH3000, LFH3010,
LFH3020
Trade Name: Philips SpeechMike Air
Responsible Party: Philips Speech Processing
Address: 64 Perimeter Center East,
Atlanta, GA 30346, USA
Telephone number: 888-260-6261
Website: www.philips.com/dictation
Tested to comply with
FCC standards
f
LFH3000, LFH3010, LFH3020
FOR HOME OR OFFICE USE
This device complies with Part 15 of the FCC
Rules. Operation is subject to the following two
conditions: 1) This device may not cause harmful
interference. 2)This device must accept any
interference received, including interference that
may cause undesired operation.
CE Declaration of Conformity
Philips confirms that the product corresponds
to the relevant guidelines of the European
Union.
Page 30

Specifications are subject to change without notice.
Trademarks are the property of Royal Philips Electronics or their respective owners.
© 2009 Royal Philips Electronics. All rights reserved.
Document Version 1.0, 13/08/2009.
Discover the comprehensive range of professional dictation products from Philips
www.philips.com/dictation
 Loading...