

Philips LCD FLAT TV User Manual


Introduction
English
Thank you for purchasing this television set.
This handbook has been designed to help you install and operate your TV set.
We would strongly recommend that you read it thoroughly.
Ta b le of Contents
Installation
Presentation of the LCD Television . . . . . . . . . . . . . . . . . . . . . . . . . . . . . . . . . . . . .2
Remote control . . . . . . . . . . . . . . . . . . . . . . . . . . . . . . . . . . . . . . . . . . . . . . . . . . . .2
Remote control keys . . . . . . . . . . . . . . . . . . . . . . . . . . . . . . . . . . . . . . . . . . . . . .3-4
Installing your television set . . . . . . . . . . . . . . . . . . . . . . . . . . . . . . . . . . . . . . . . . .5
Quick installation . . . . . . . . . . . . . . . . . . . . . . . . . . . . . . . . . . . . . . . . . . . . . . . . . .5
Program sort . . . . . . . . . . . . . . . . . . . . . . . . . . . . . . . . . . . . . . . . . . . . . . . . . . . . . .6
Manual store . . . . . . . . . . . . . . . . . . . . . . . . . . . . . . . . . . . . . . . . . . . . . . . . . . . . . .6
Other settings in the Install menu . . . . . . . . . . . . . . . . . . . . . . . . . . . . . . . . . . . . .6
Operation
Picture settings . . . . . . . . . . . . . . . . . . . . . . . . . . . . . . . . . . . . . . . . . . . . . . . . . . . .7
Sound adjustments . . . . . . . . . . . . . . . . . . . . . . . . . . . . . . . . . . . . . . . . . . . . . . . . .7
Feature settings . . . . . . . . . . . . . . . . . . . . . . . . . . . . . . . . . . . . . . . . . . . . . . . . . . . .7
Screen Formats . . . . . . . . . . . . . . . . . . . . . . . . . . . . . . . . . . . . . . . . . . . . . . . . . . . .8
Teletext . . . . . . . . . . . . . . . . . . . . . . . . . . . . . . . . . . . . . . . . . . . . . . . . . . . . . . . . . .9
Using in PC monitor mode . . . . . . . . . . . . . . . . . . . . . . . . . . . . . . . . . . . . . . . . . .10
Using in HD (High Definition) Mode . . . . . . . . . . . . . . . . . . . . . . . . . . . . . . . . . .11
°
Peripherals
Video recorder . . . . . . . . . . . . . . . . . . . . . . . . . . . . . . . . . . . . . . . . . . . . . . . . . . .12
Other equipment . . . . . . . . . . . . . . . . . . . . . . . . . . . . . . . . . . . . . . . . . . . . . . . . .13
Side connections . . . . . . . . . . . . . . . . . . . . . . . . . . . . . . . . . . . . . . . . . . . . . . . . . .13
HD equipment . . . . . . . . . . . . . . . . . . . . . . . . . . . . . . . . . . . . . . . . . . . . . . . . . . . .13
Computer . . . . . . . . . . . . . . . . . . . . . . . . . . . . . . . . . . . . . . . . . . . . . . . . . . . . . . .13
Practical information
Tips . . . . . . . . . . . . . . . . . . . . . . . . . . . . . . . . . . . . . . . . . . . . . . . . . . . . . . . . . . . .14
Glossary . . . . . . . . . . . . . . . . . . . . . . . . . . . . . . . . . . . . . . . . . . . . . . . . . . . . . . . .14
Recycling
The packaging of this product is intended to be recycled.Apply to the local authorities for
correct disposal.
Disposal of your old product.
Your product is designed and manufactured with high quality materials and components,
which can be recycled and reused.When this crossed-out wheeled bin symbol is attached
to a product it means the product is covered by the European Directive 2002/96/EC.Please
inform yourself about the local separate collection system for electrical and electronic
products.
Please act according to your local rules and do not dispose of your old products with your
normal househols waste.The correct disposal of your old product will help prevent
potential negative consequences for the environment and human health.
1
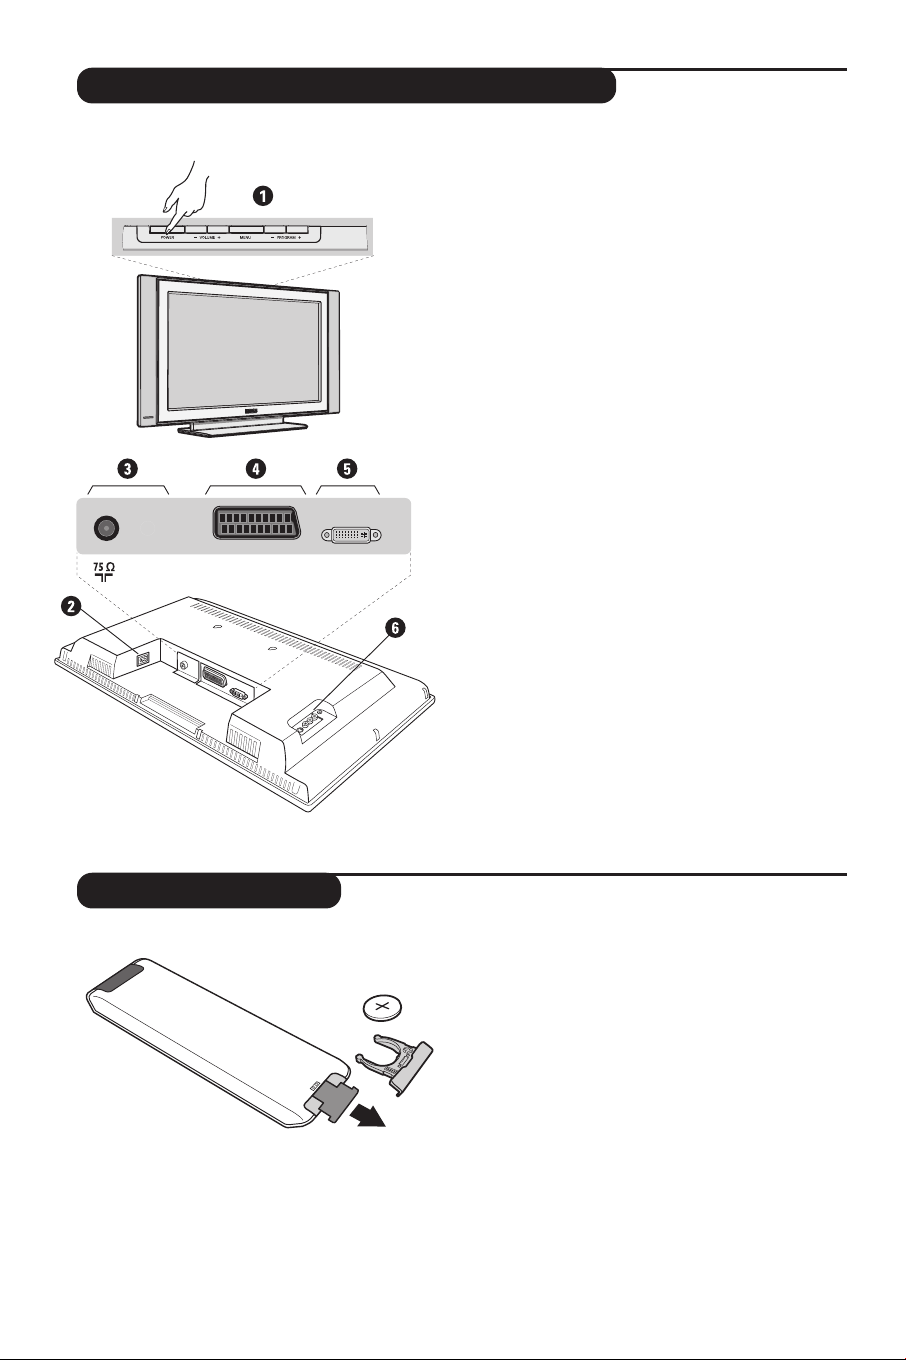
Presentation of the LCD Television
&
Television keys:
POWER: to switch the TV on or off.
•
•
VOLUME -/+: to adjust sound level.
•
MENU: to access or close menus.
The PROGRAM -/+ keys can be used to select
an adjustment and the VOLUME -/+ keys to
make that adjustment.
•
PROGRAM -/+ (- P +): to select programmes.
Rear of set :
The main connections are made at the bottom
of the television.
DVI-I InEXT 1
For more details on connections see page 12.
é Power socket
“ TV aerial socket
‘ EXT1 socket
( DVI-I input for connecting a HD (high
definition)* equipment or computer with DVI
output.
§ Side connections
* Depending on version.
Remote control
2
CR 2025
Pull out the plastic insulation sheet from the
battery,this will activate the remote control.
The battery supplied with the appliance does
not contain mercury or nickel cadmium so as to
protect the environment.Please do not discard
your used batteries, but use the recycling
methods available (consult your distributor).

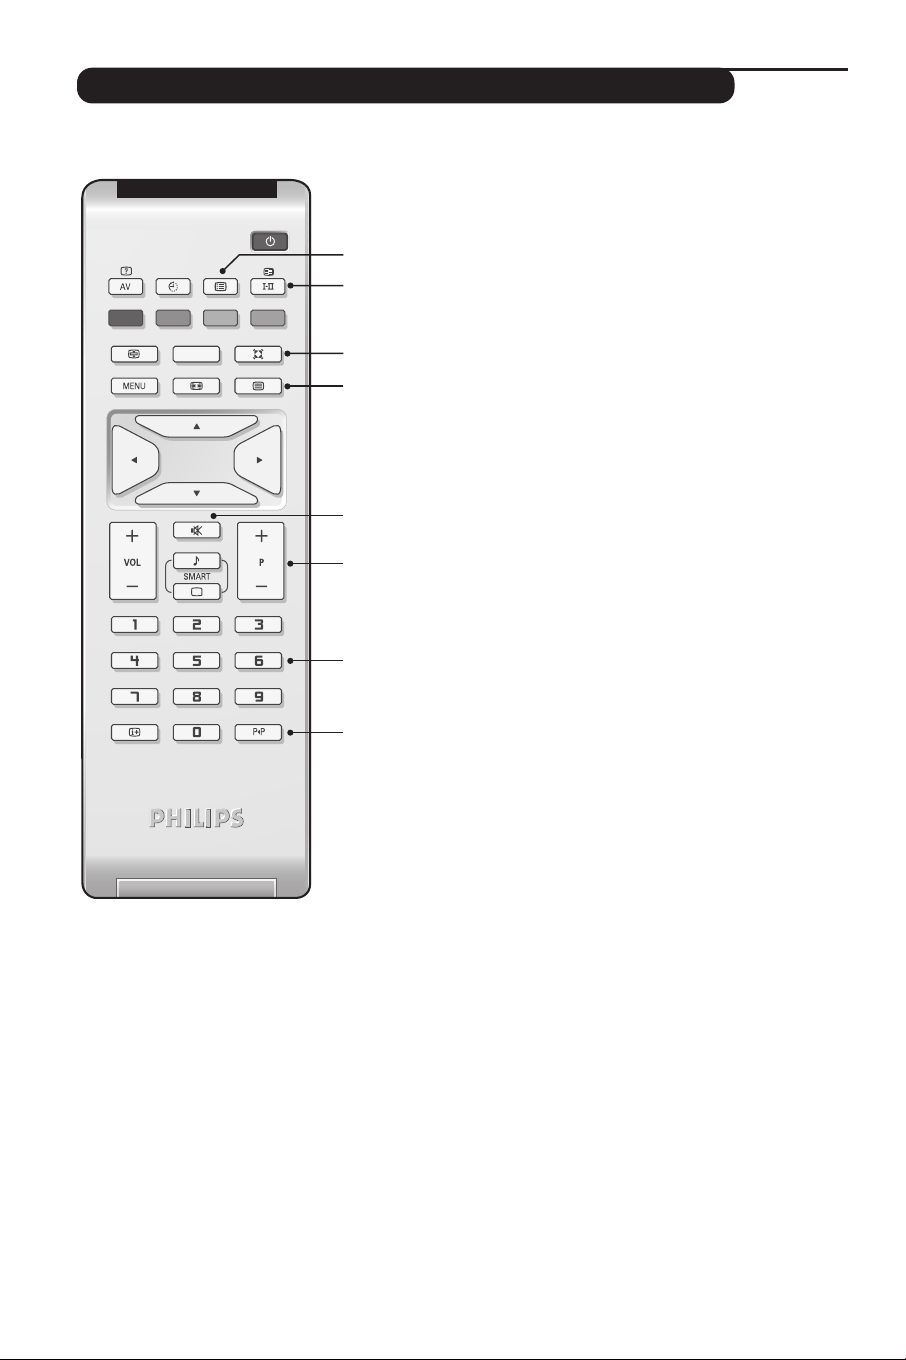
Remote Control Keys for LCD TV Functions
1) . (STANDBY)
To set the TV to standby mode.To switch the TV set on
again, press P –/+, 0 to 9 or AV keys.
2) Sleeptimer
To select the length of time before the set automatically
switches to standby (from 0 to 240 minutes)
3) AV
To display Source List to select TV or peripheral
equipment connected to EXT1, AV/S-VHS, PC or
HD (p. 12).
ÓŸÅ Teletext keys (p.9)
4)
5) Unused key.
6) MENU
To call up or exit the TV menus.
∏ Screen Format (p.8)
7)
8) Cursor (
These 4 keys are used to move around the menus.
9) Volume
To adjust the sound level.
ª m Smart picture and sound
10)
Used to access a series of predefined picture and sound
settings.
The personal position relates to settings selected from the
menus.
Ë Screen information
11)
To display / remove the programme number, the time,
the sound mode and the time remaining on the timer.
Hold down for 5 seconds to permanently display the
programme number on the screen.
<>≤≥)
1)
2)
3)
4)
5)
6)
7)
8)
9)
10)
11)
3
Remote Control Keys for LCD TV Functions
12) ı List of programmes
To display / clear the list of programmes.Use the keys
<> to select a programme and the key ≥ to
(12
(13
(14
(15
(16
(17
(18
(19
display it.
ù Sound mode
13)
Used to force programmes in Stereo and Nicam Stereo
to Mono or,for bilingual programmes, to choose
between Dual I or Dual II.
The Mono indication is red when in forced position.
Q Surround Sound
14)
To activate / deactivate the surround sound effect. In
stereo,this gives the impression that the speakers are
further apart. For models equipped with Virtual Dolby
Surround*, you can experience Dolby Surround Pro
Logic sound effects.
¤ Teletext (p. 9)
15)
[ Mute
16)
To mute or restore the sound.
17) P -/+ Selecting TV programmes
To move up or down a programme.
mode are displayed for a few seconds.
sound
For some TV programmes the title of the programme
appears at the bottom of the screen.
18) 0/9 Numerical keys
For direct access to programmes.For a 2 digit
programme number, the 2
before the dash disappears.
Á Previous programme
19)
To access the previously viewed programme.
nd
digit must be entered
The number and the
* Manufactured under license from Dolby Laboratories.“Dolby”
and the double-D symbols are trademarks of Dolby
Laboratories.
4
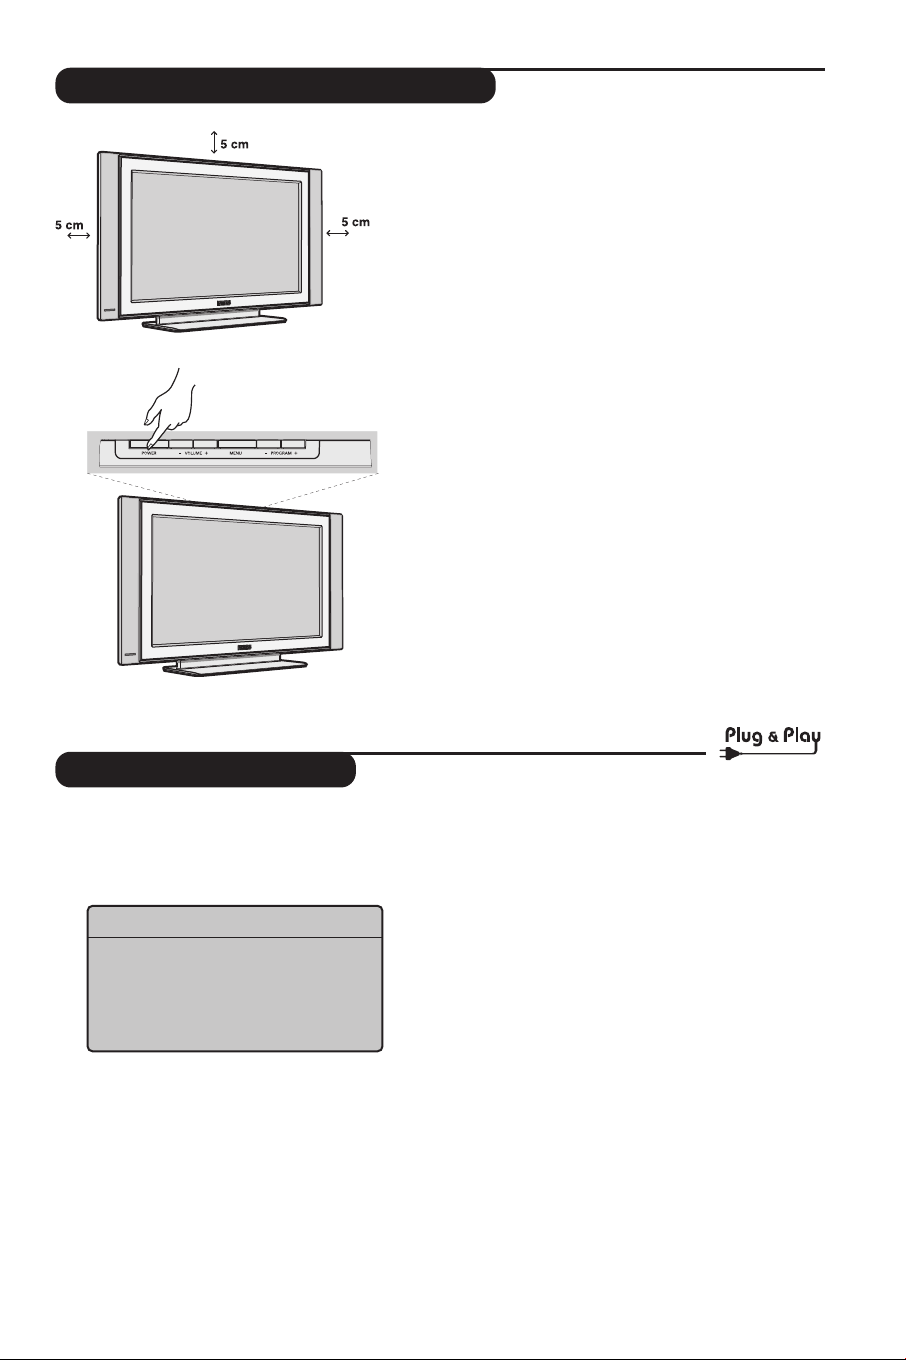
Installing your television set
& Positioning the television set
Place your TV on a solid stable surface.To avoid
danger do not expose the TV to water,or a heat
source (e.g. lamp,candle, radiator).Do not
obstruct the ventilation grid at the rear.
é
Connecting the aerials
• Insert the aerial plug into the : socket at the
rear of the set.
• Connect the power lead to the television and the
mains plug into the wall socket (220-240 V/50 Hz).
For connecting other appliances see page p.12.
“
Switching on
To switch on the set, press the POWER key.A
green indicator comes on and the screen lights
up. Go straight to the Quick Installation chapter.
If the TV remains in standby mode(red indicator),
press the
The indicator will flash when you use the remote control.
P -/+ key on the remote control.
Quick installation
When you turn on the TV set for the first time,
a menu is displayed on screen.This menu
prompts you to select the country and language
for the menus:
Plug’n’Play
Country
Í GB Æ
If the menu is not displayed, press the
to display the menu.
& Use the
select your country and confirm with
If your country does not appear in the list, select
choice “. . .”
é Next select your language using the
and confirm with
<> keys on the remote control to
Language
Í English Æ
MENU key
<> keys
≥.
≥.
“ The search starts automatically.All the available
TV programmes will be stored. This operation
takes a few minutes.The display shows the
progress of the search and the number of
programs found.At the end of the search, the
menu disappears.
To exit or interrupt the search, press MENU. If no
programme is found, consult the possible solutions p. 14.
‘ If the transmitter or cable network sends the
automatic sort signal, the programs will be
numbered correctly. In this case, the installation
is complete.
( If this is not the case, you need to use the Sort
menu to number the programs correctly.
Some transmitters or cable networks broadcast their
own sort parameters (region, language,etc.). In this
case, indicate your choice using the
validate with
≥.
<> keys and
5
 Loading...