

Page 1
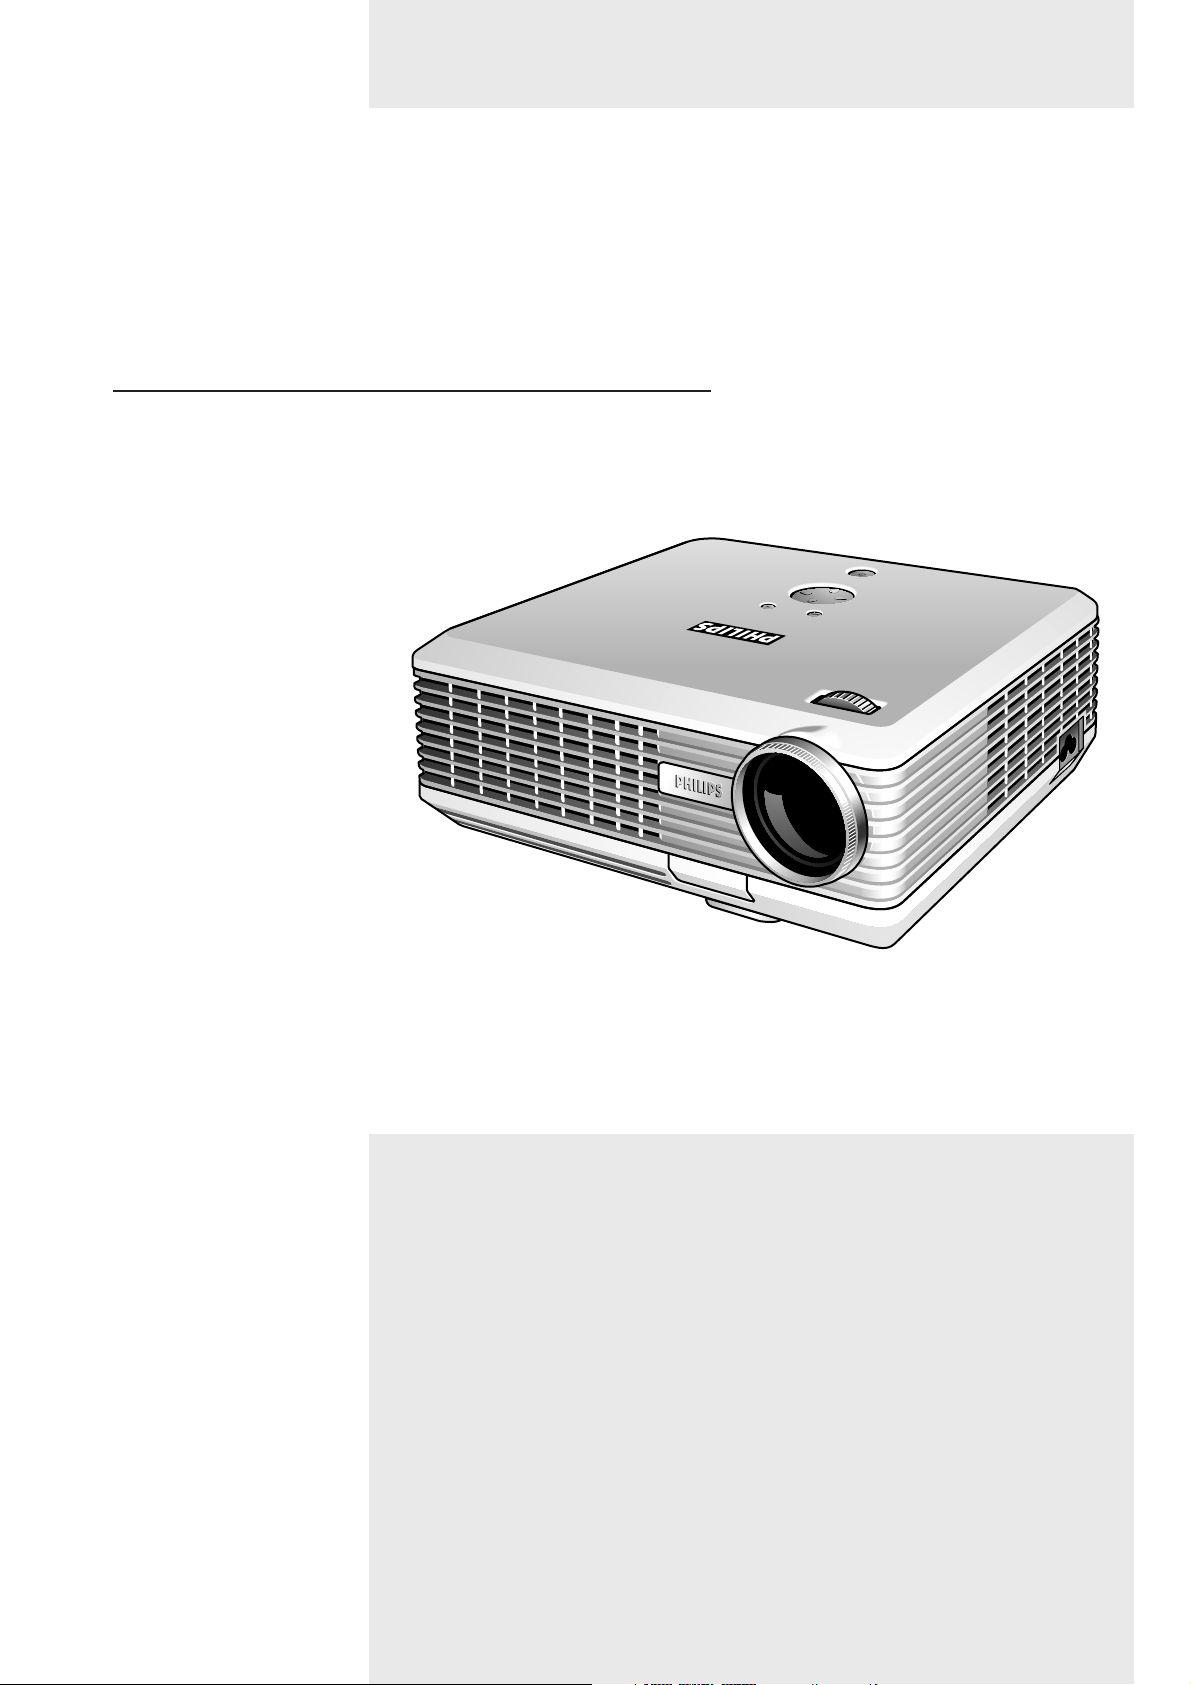
multimedia projector
bCool SV1
Philips
User guide
English
Page 2

>
4
Packaging contents 4
Optional accessories 5
Service accessories 5
6-9
Controls 6-7
Remote control 8
Connections 9
10-12
Positioning the projector and screen 10
Turning on the projector 10
Adjusting the focus and size of the image 11
Adjusting the vertical and horizontal angle of the projector 11
To raise the projector 11
To lower the projector 11
Keystone correction 11
Moving/transporting the projector 11
Preparation 11
Moving/transporting the projector 11
Inserting the batteries in the remote control 12
13-16
General information 13
Computer input 13
USB connection (Universal Serial Bus) 13
Video input 13
Connecting to a computer 14
Connecting to video equipment 15-16
CVBS (Video) 15
S-VHS (S-Video) 15
Scart connection 15
Component/HDTV (YPbPr/ YCbCr) 16
1. Introduction
2. Functional overview
3. Set up
4. Installation
Philips Multimedia Projector 2 English User guide bCool SV1
Index
Page 3

<
17-30
Preparation 17
General 17
Messages 17
General explanation 17
Feedback messages 17
Some examples 17
On Screen Display Menu 18-23
Menu tree 18-19
General explanation 20
Computer adjustments 21
Picture adjustments 21
Video series adjustments 21
Picture adjustments 21
General adjustments 22-23
'Features' adjustments 22
Setup adjustments 23
Theft deterrence - SecurityMax 24-30
What to do if... 24
Introduction 24
Setting up SecurityMax 25
Setting a Security code 25
Changing your Security code 26
Entering your personal star t-up text 27
Setting the Shutdown timer 27
Unlocking the projector after shutdown 28
Update the shutdown timer 28
Disable the shutdown timer 29
Removing SecurityMax protection 30
Exit SecurityMax 30
31-33
Cleaning 31
Cleaning the cabinet 31
Cleaning the lens 31
Lamp 32
Lamp replacement 32
Resetting the lamplife time 33
34-36
End of life directives
Philips is paying a lot of attention to producing environmentally-friendly in green focal areas.
Your new product contains materials which can be recycled and reused. At the end of its life
specialised companies can dismantle the discarded product to concentrate the reusable
materials and to minimise the amount of materials to be disposed of.
Please ensure you dispose of your old product according to local regulations.
5. Operation
6. Maintenance
7.Troubleshooting
Philips Multimedia Projector 3 English User guide bCool SV1
Index
Page 4
Congratulations on your purchase.You have selected one of the most sophisticated and reliable
products on the market today. We are sure that when used properly, it will bring you years of
enjoyment.You will want to keep this manual available, as it is a convenient source of information
about your projector. For your own protection and prolonged operation of your projector, please
read the enclosed Safety Sheet. Make sure the following statement is on the Safety Sheet:
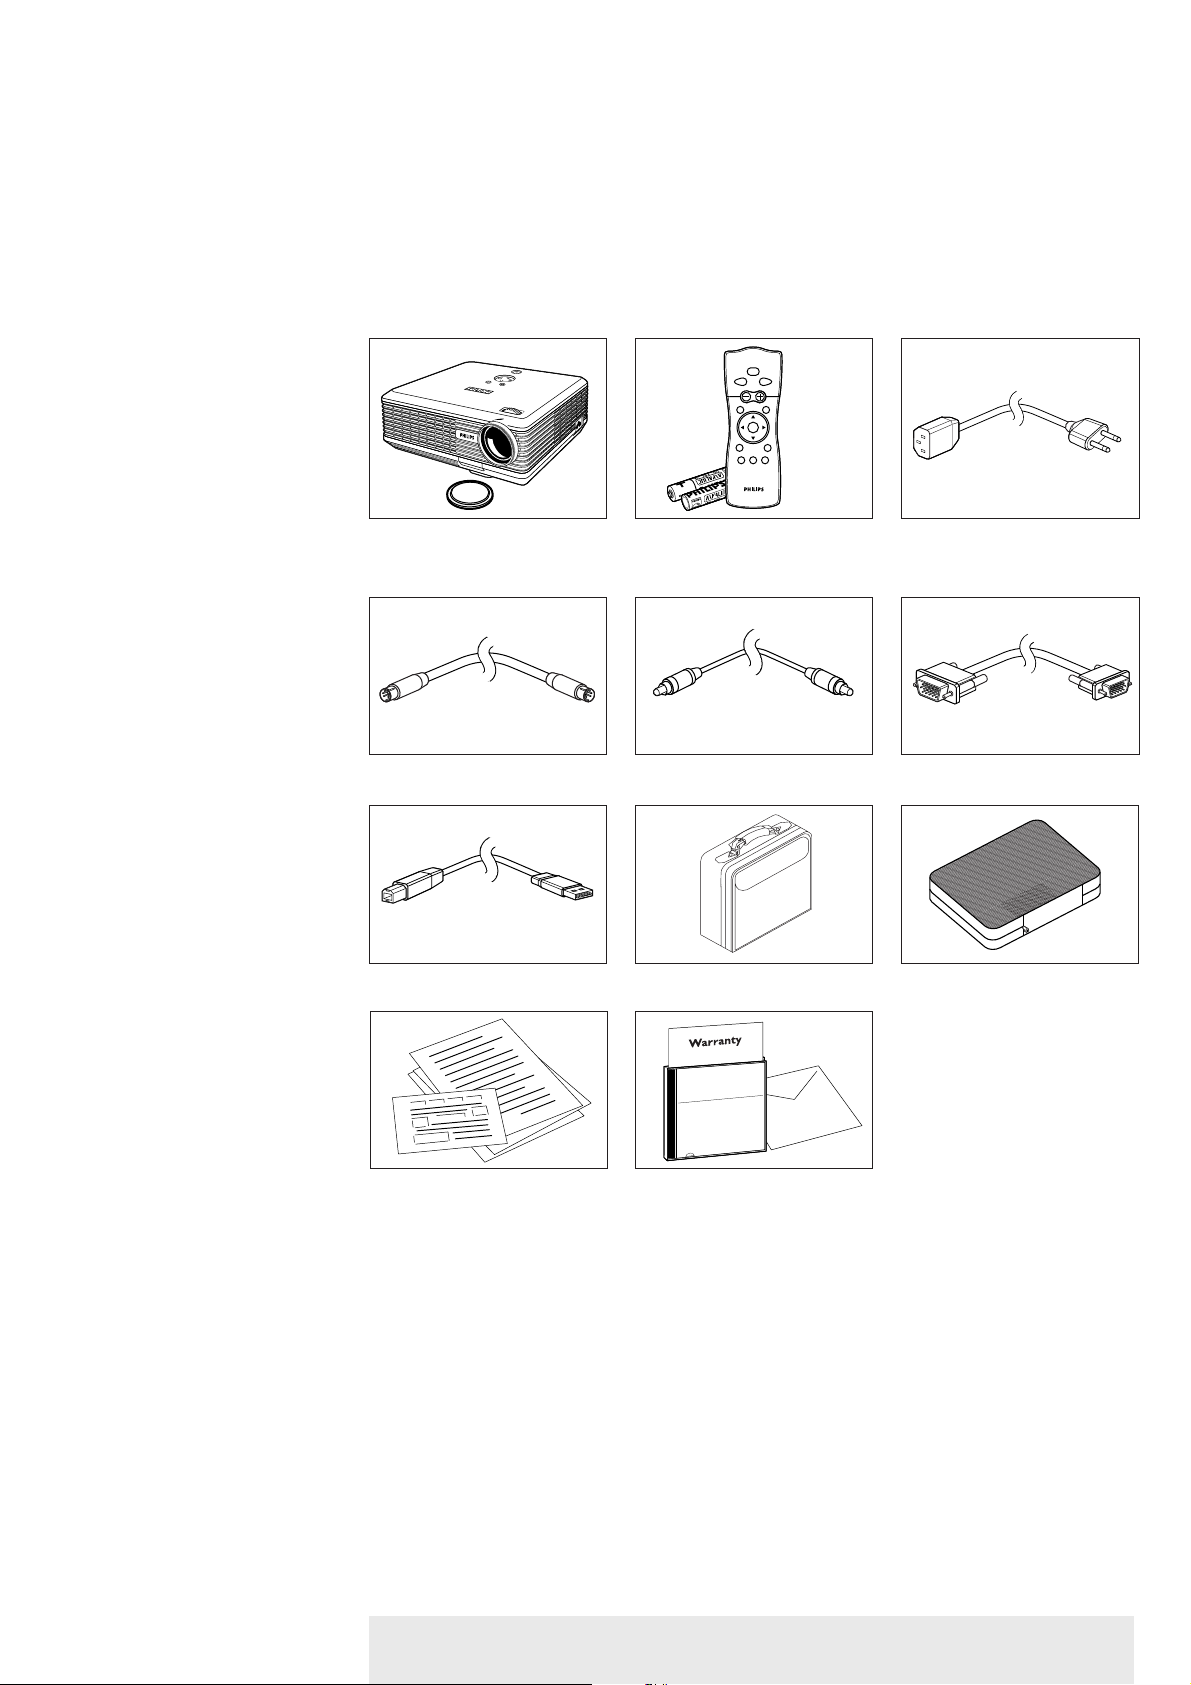
Please confirm that the following items are packed in the projector box.They are provided to
help you use or set up your projector.
Projector - Lens cap Remote control + batteries Mains Lead
Two AAA batteries
S-Video cable Composite Video cable VGA cable
USB cable Softbag Cable pouch
Quick set up Card and Cd-rom (with Projection
Safety Sheet Assistant, Warranty card,
SecurityMax, User Guide,
Spec. sheet and more.)
When moving this projector, you must prevent small metallic objects from entering
inside of the projector.This projector is not intended to be routinely carried.
This product may contain lead and mercury. Disposal of these materials may be
regulated due to environmental considerations. For disposal or recycling information,
please contact your local authorities or the Electronic Industries Alliance:
www.eiae.org
>
Packaging contents
WARNING
Philips Multimedia Projector 4 English User guide bCool SV1
1. Introduction
VOolume
OKMenu
A/V Mute
Mute
D-ZoomD-FreezeSource
Mouse RIGHTLEFT
RIightLeft
Standby
On
Page 5

The following accessories are available from your dealer:
• LCA3126/00 - 180W replacement lamp - 8670 931 26009
• LCA2218/00 - Ceiling mount - 8670 922 18009
• LCA5311/00 - RCA/VGA component video adaptor cable - 8670 953 11009
The following accessories are available from our Service Organization:
• Laser pointer remote Control - 3139 228 62631
• Compact remote control - 3139 228 62641
• User Guide (Cd- rom) - 3122 435 96321
Optional accessories
Service accessories
Philips Multimedia Projector 5 English User guide bCool SV1
1. Introduction <
Page 6

>
To activate and deactivate the menu.
To confirm actions in the menu when the menu is on screen.
When the menu is active, use the Cursor to navigate through the OSD menu.The Cursor
works with up/down and left/right button operation.
To automatically adjust frequency, tracking, horizontal and vertical position.
With most signal sources, Auto Image provides the best results.
To turn the projector on or off.
The Standby indicator (text on button/ring around button):
In Power on mode:
– the light blinks green when the projector is warming up;
– light is green when the projector is on.;
In Power off mode:
– light is red when the projector is off. (Standby);
– the light blinks red when the projector is cooling down.
Light turns red when there is a temperature problem.
– Fast blinks red (0.5 sec On, 0.5 sec Off) when lamp star t has failed.
– Fast blinks red (1 sec On, 1 sec Off) in case of fan error.
To select the current projection source (Computer, YPbPr,YCbCr, RGBS, S-Video or Video).The
button toggles between the six signals.
To adjust the size of the image.
To adjust the focus of the image.
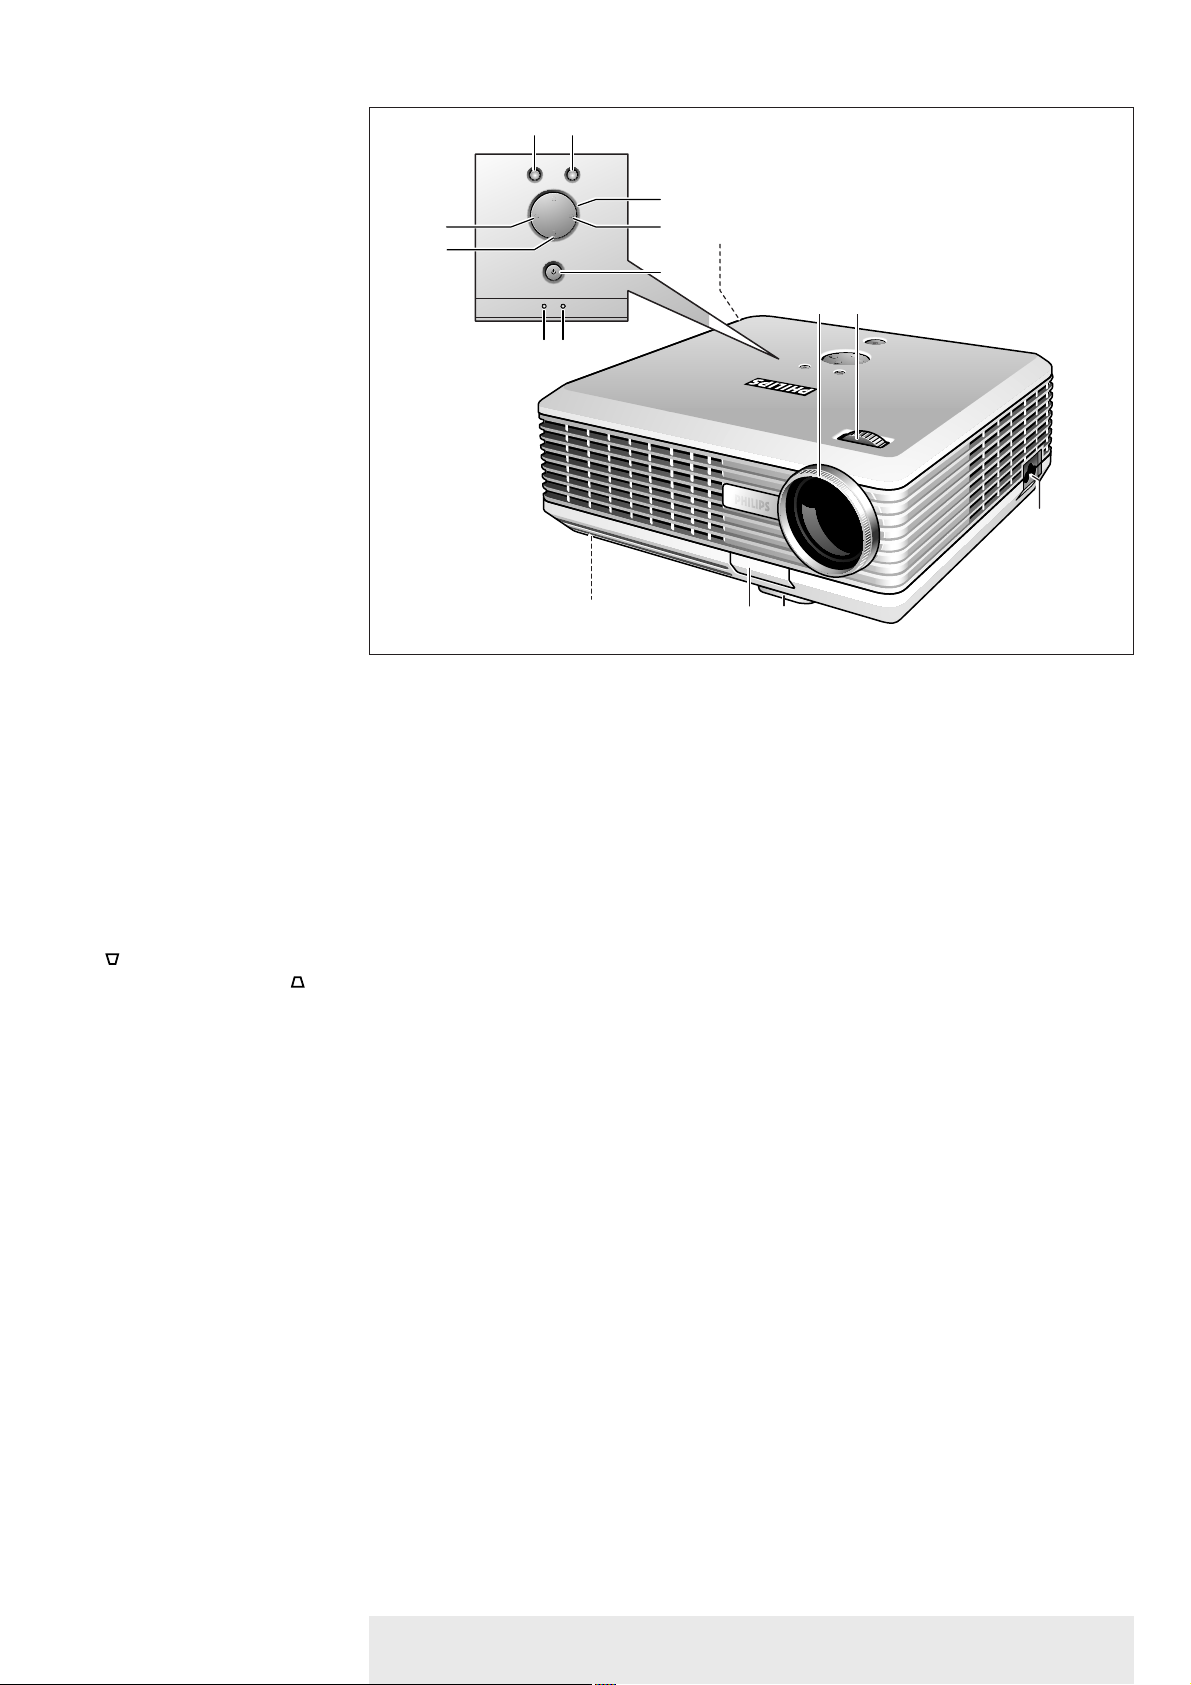
Menu 1
OK 2
Cursor Control 3
Auto Image 4
Standby/
Standby indicator 5
Temperature indicator 6
Lamp indicator 7
Source 8
Zoom Ring 9
Focus Ring 0
Philips Multimedia Projector 6 English User guide bCool SV1
2. Functional overview
Controls
2
1
Menu
OK
Menu
OK
3
48
5
^
Source Auto Image
Source Auto Image
Lamp
Temp.
Lamp
Temp.
6
7
%
90
!
$
#@
Page 7
<
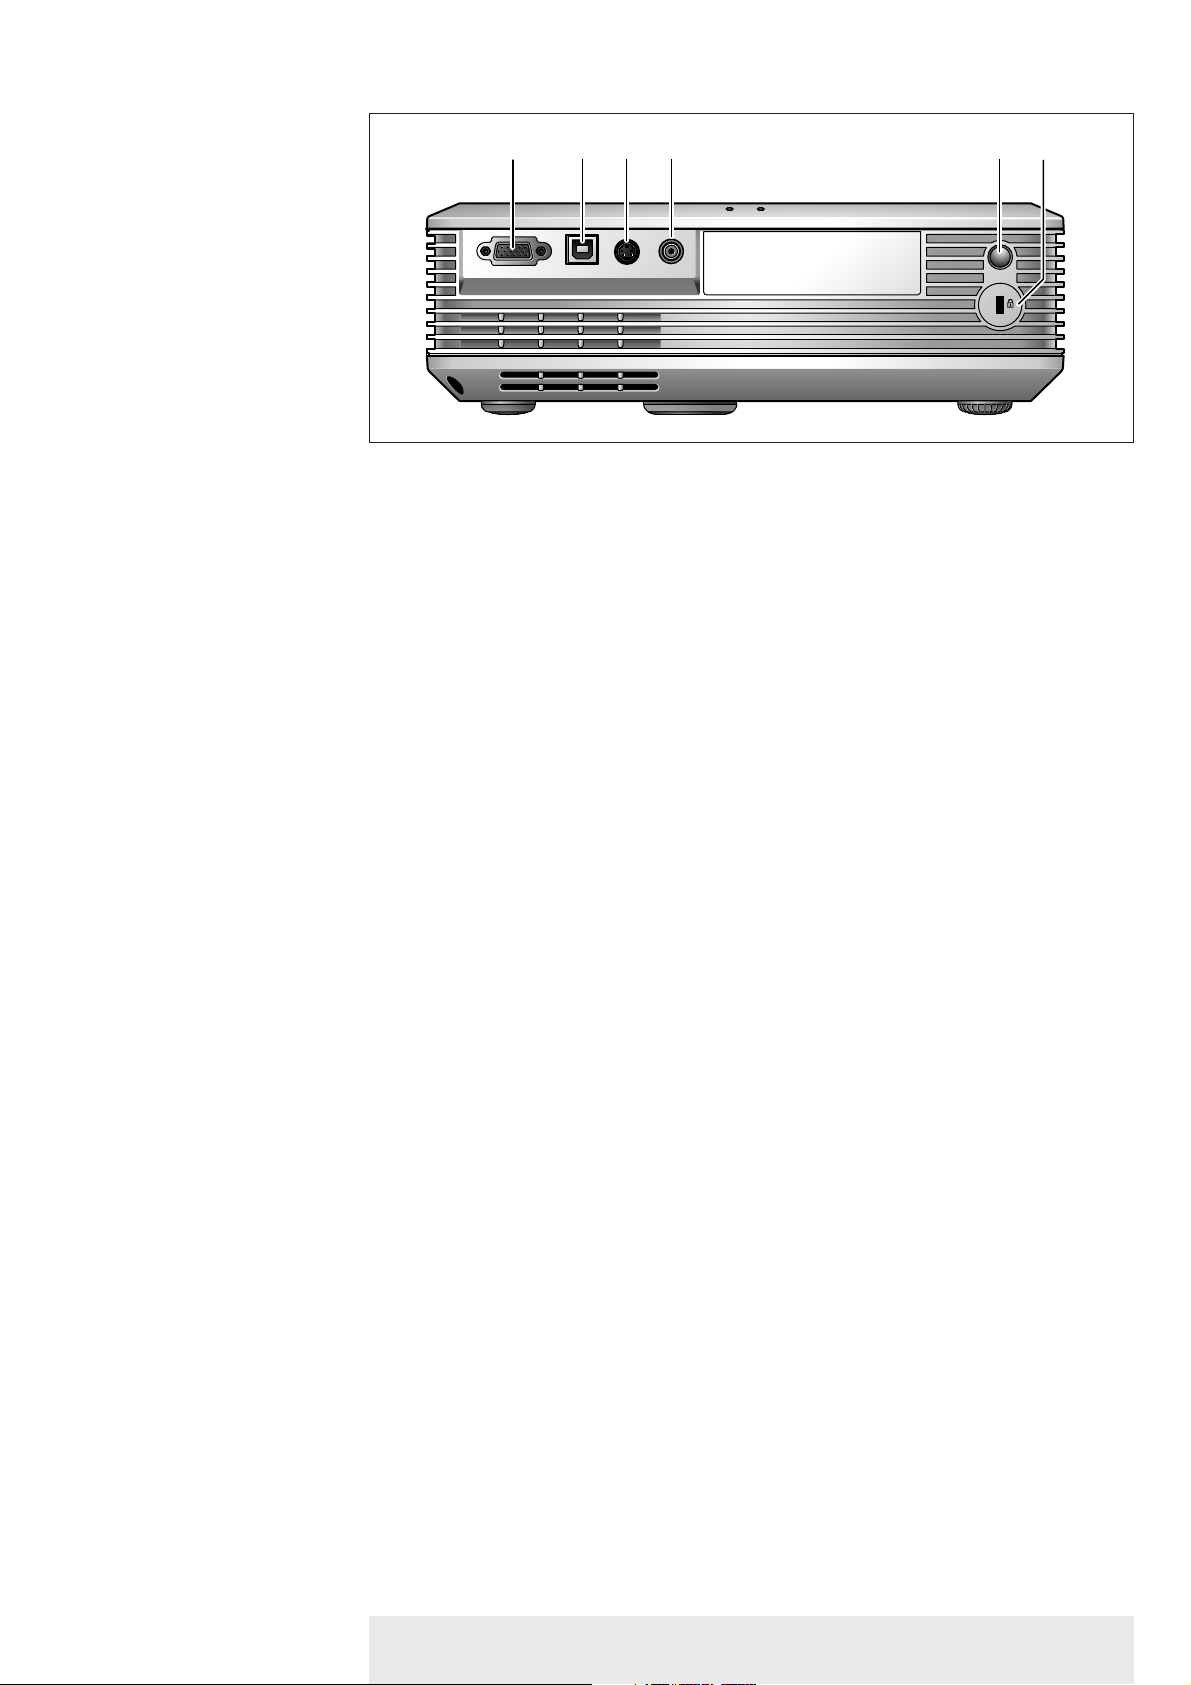
To connect the projector to the mains.
To release the elevator foot.
To adjust the ver tical angle of the projector.
To adjust a possible oblique displayed picture.
To correct picture distortion of the vertical keystone type by internal scaling.
Mains inlet socket !
Elevator button @
Elevator foot #
Lamp compartment $
Horizontal adjuster %
Keystone correction
keys ^
Philips Multimedia Projector 7 English User guide bCool SV1
2. Functional overview Controls
2
1
Menu
OK
Menu
OK
3
48
5
%
90
!
^
Source Auto Image
Source Auto Image
Lamp
Temp.
Lamp
Temp.
6
7
$
#@
Page 8
2. Functional overview
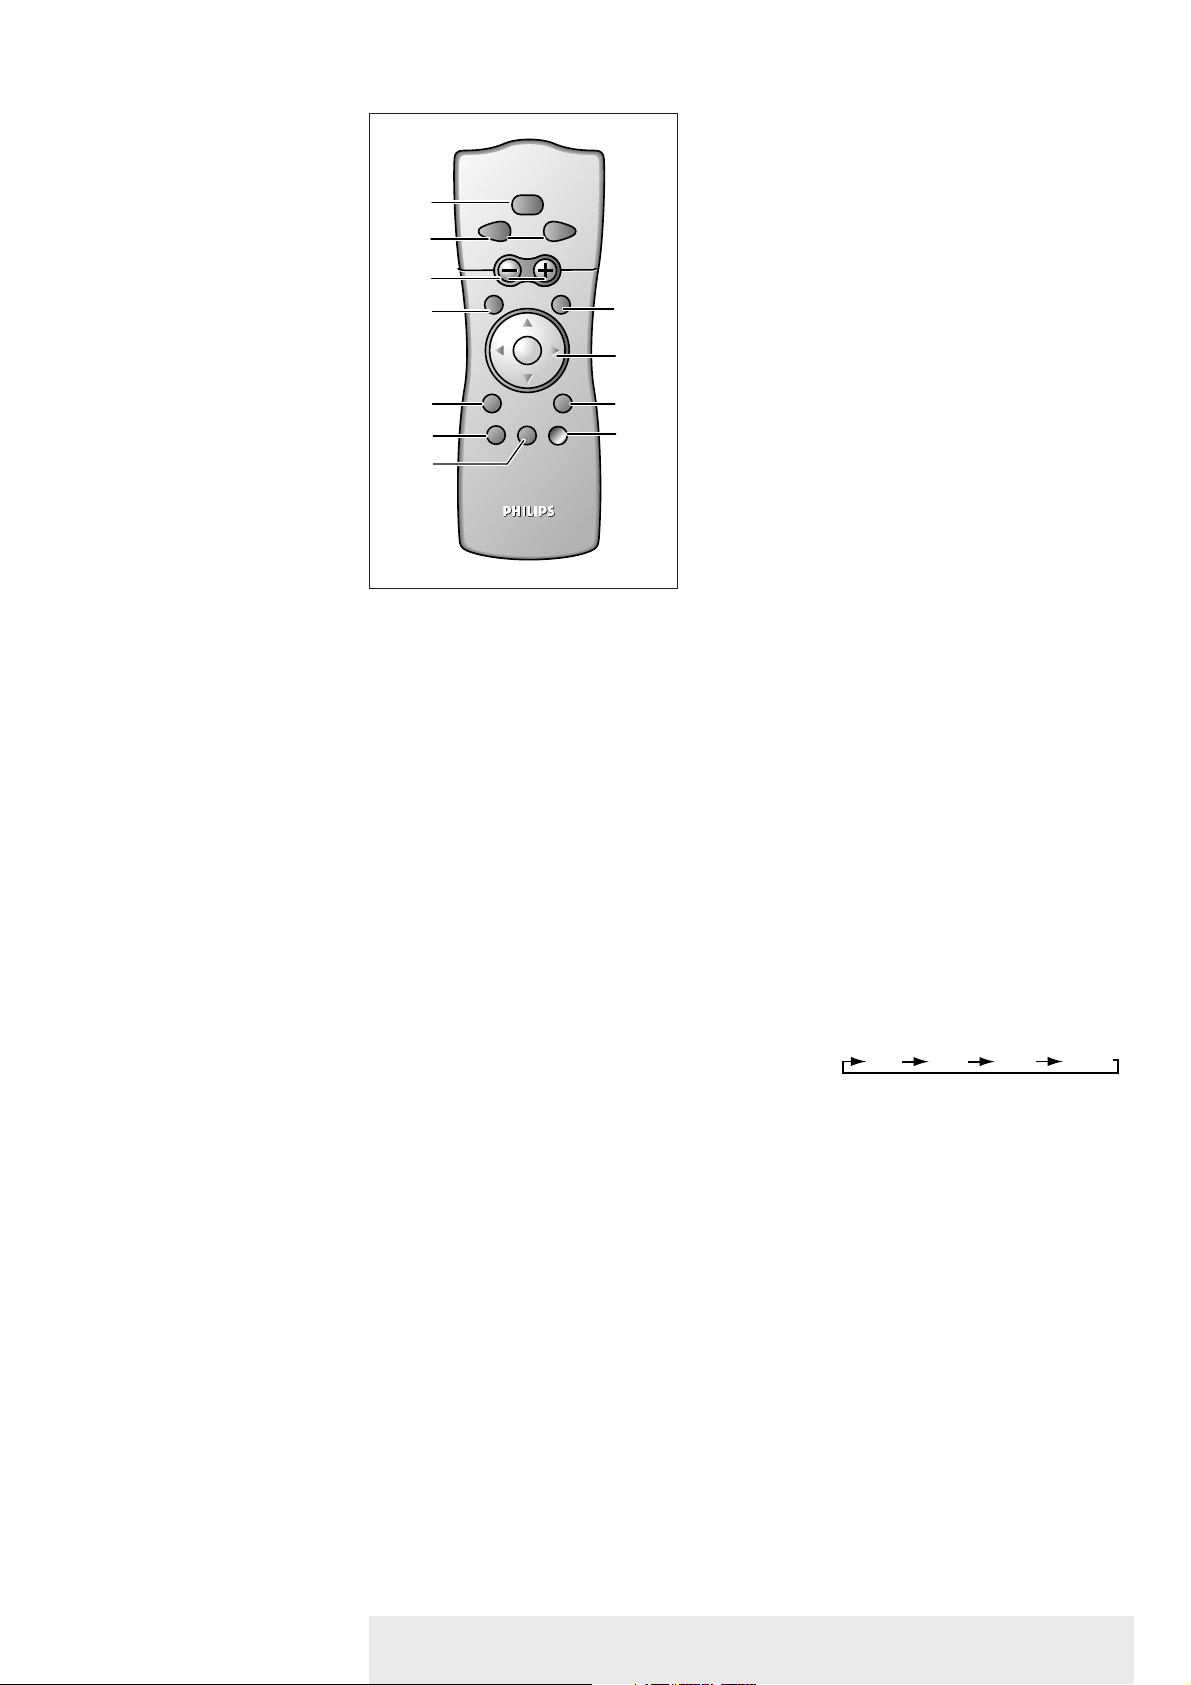
To turn the projector on or off in the Power/Standby mode.
Function as the Left and Right mouse buttons of your pc when USB connection has been made.
To adjust the volume.This model does not support this function.
To activate and de-activate the menu.
To mute the sound of the projector.This model does not support this function.
To select the current projection source (Computer, YPbPr,YCbCr, RGBS, S-Video or Video).
The button toggles between the six signals.
To capture a (moving) picture.The button toggles between the Freeze mode and the display
situation.
To magnify the size of the projected image. Use Cursor control to select the zoom center and
press D(igital)-Zoom to select the required zoom factor:
The button toggles between the various zoom factors.
To mute the sound of the projector and the picture.This model only supports Video Mute.
To manipulate the mouse cursor on the connected computer as long as the menu is not active.
When the menu is active use the Cursor to navigate through the OSD menu.The Cursor
works with up/down and left/right button operation.
The Cursor Control can only function as a mouse cursor when projector and computer are connected
via the USB connectors. Windows 98®, Windows ME®, Windows 2000®or Windows XP®should be
installed on the computer when you make the USB connection.
To confirm actions in the menu when the menu is on screen.
The maximum range of the remote control is approximately 7 m (± 25 feet).
Stand by On 1
Mouse Left/Right 2
– Volume + 3
Menu 4
Mute 5
Source 6
D(igital)-Freeze 7
D(igital)-Zoom 8
A(udio)/V(ideo) Mute 9
Cursor Control 0
Note
OK !
Note
Philips Multimedia Projector 8 English User guide bCool SV1
<Remote control
Standby
1
2
3
4
5
6
7
On
RightLeft
MOUSE
VOLUME
OKMENU
!
0
Mute
A/V Mute
D-ZOOMD-FREEZESOURCE
9
8
x 1 x 4 x 9 x 16
Page 9
Data source connections
– Input socket to connect to the Data out terminal of a computer.
– Input socket to connect to DVD- and HDTV-video equipment
This socket can be connected to the following output sockets:YCbCr,YPbPr, RGBS
(Composite sync), RGBHV.
In-/Output socket to connect a PC or Apple Macintosh computer equipped with a USB
downlink connection.When USB connection is used, the mouse cursor on the connected
computer can be controlled through the projector remote control. Make sure Windows 98®,
Windows ME®, Windows 2000®or Windows XP®is installed on the computer.
Video source connections
Input socket to connect to the S-Video out socket of a S-VHS video recorder, a VCR,
Laser Disc player, DVD player, video camera or TV with AV output socket.
This socket can be connected to a S-Video/S-VHS (Y/C) output socket.
Input socket to connect to the Video out socket of a video recorder, Laser Disc player, video
camera, DVD player, or TV with AV output socket.
This socket can be connected to CVBS output sockets.
Other connections
To receive the signals from the remote control.
To inser t an optional locking device (Kensington lock).
Data in 1
USB 2
S-Video 3
Video 4
IR sensor 5
Lock slit 6
Philips Multimedia Projector 9 English User guide bCool SV1
2. Functional overview
<Connections
54321
6
Data in S-Video Video
Data in S-Video Video
USB
USB
Page 10
3. Set up >
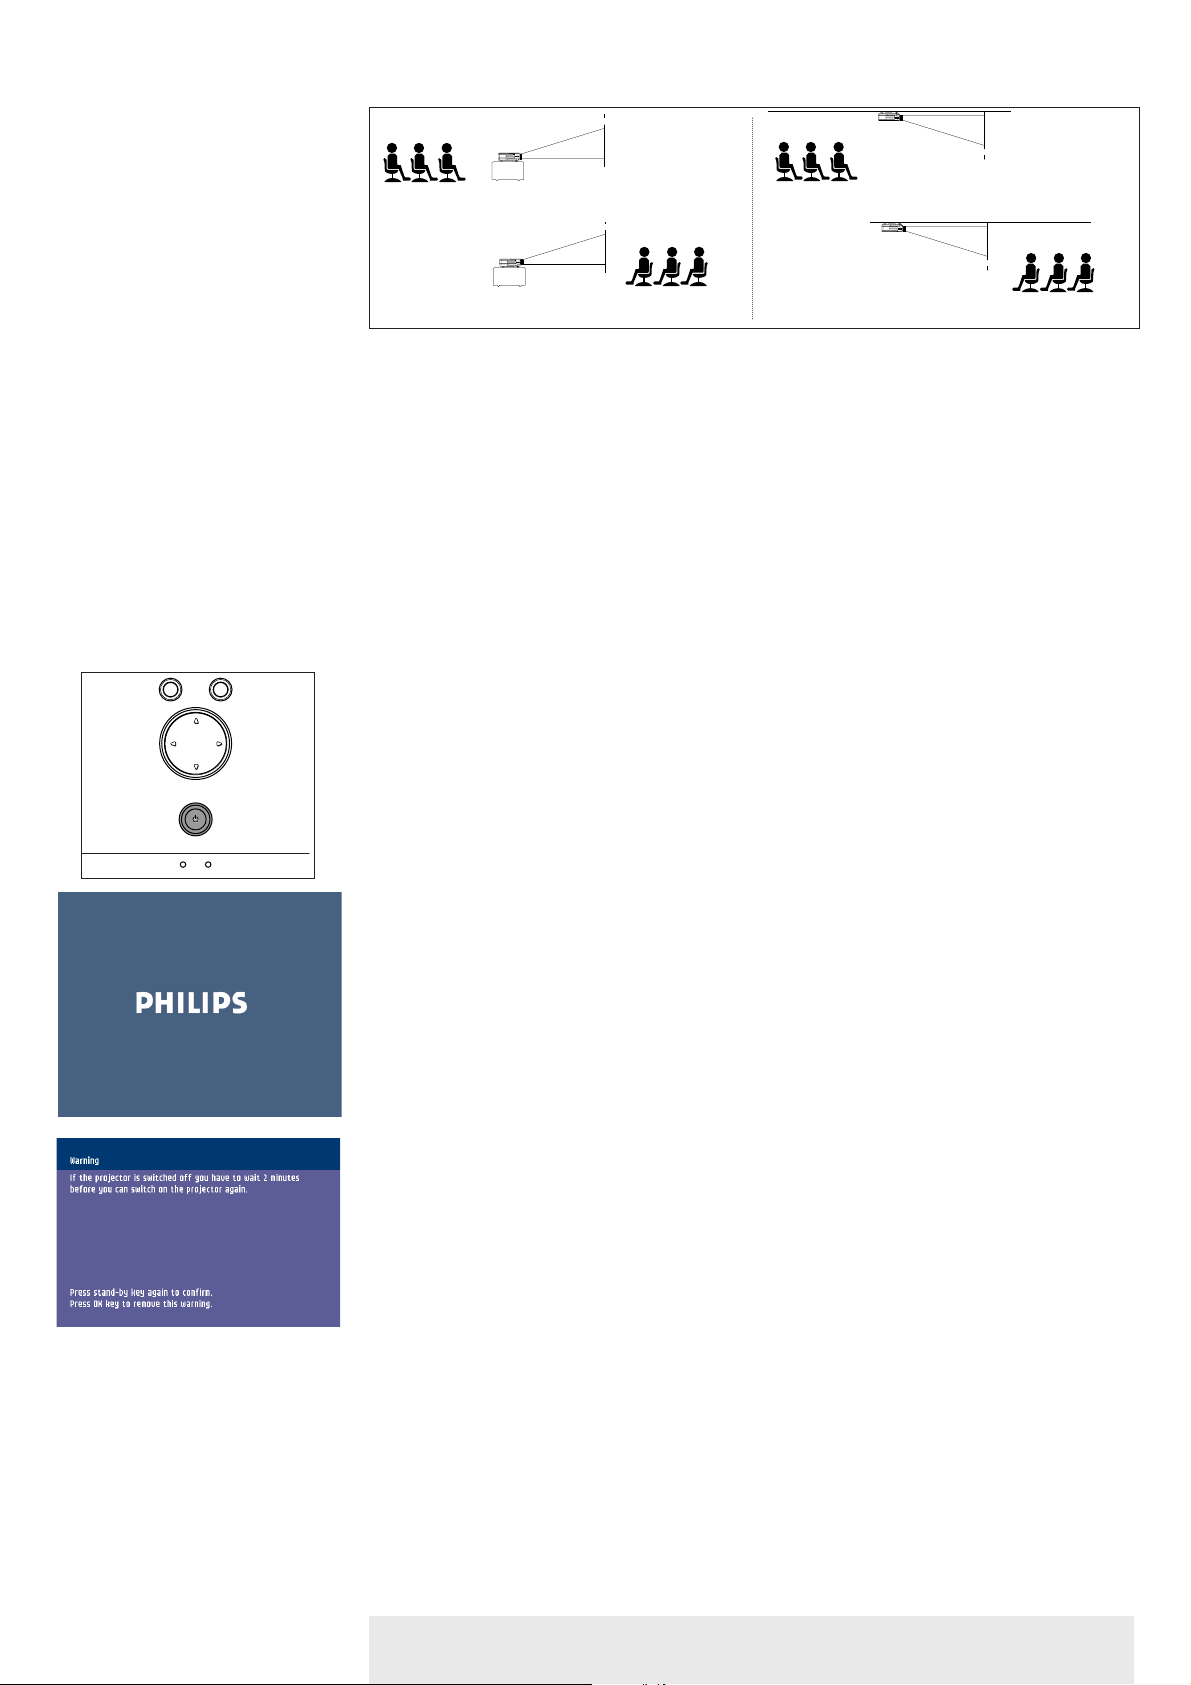
• Place the projector on a stable, level surface out of direct sunlight and away from sources of
excessive dust, dir t, heat, water, moisture, vibration and strong magnetic fields.
• Allow sufficient cooling of the product by keeping all air inlets and outlets clear from
obstructions.
• Position the projector in such way that the viewers cannot watch into the projector light beam.
• Choose a screen size suitable for the number of viewers and the size of the room.
• Picture quality is best when you sit directly in front of the projector screen.
• The projector can be used for front projection, rear projection and ceiling projection
applications. As default factory setting, the projector has been set up for front projection.
You can change to rear or ceiling projection via the ‘Mirror’ function in the ‘Setup’ menu.
• For more information, check the Projection Assistance application on the Cd-rom.
1 Insert the mains lead into the projector's Mains inlet socket and connect it to the wall socket.
– The Standby indicator light is red indicating the projector is now in the Standby mode.
2 Remove the lens cap.
3 Press the Standby button on the projector or remote control to turn on the projector.
– The Standby indicator light blinks green indicating the projector is now warming up.
– When the projection lamp is on, the Standby indicator light turns green after the start-up
screen has appeared for several seconds.
4 Press the Standby button twice to switch the projector back into the Standby mode.
– The Standby Warning screen will appear for 20 seconds.
– The projector will now go into Standby mode.
5 To switch off the mains supply completely, disconnect the mains lead.
– Save energy! Please put the projector in the Standby position if you are not going to use the
projector for more than 15 minutes.
– When no signal inputs are detected for 15 minutes, the projector automatically returns to
Standby (‘Auto Standby’).
– Before disconnecting the mains lead, make sure that the cooling fan has stopped
(about 2 minutes after the projector returned to Standby).
Positioning the projector and
screen
Turning on the projector
Notes
Philips Multimedia Projector 10 English User guide bCool SV1
SCREEN
SCREEN
SCREEN
SCREEN
Front projection Ceiling front projection
Rear projection Ceiling rear projection
Temp.
OK
Menu
Source Auto Image
Lamp
Temp.
OK
Menu
Source Auto Image
Lamp
Page 11
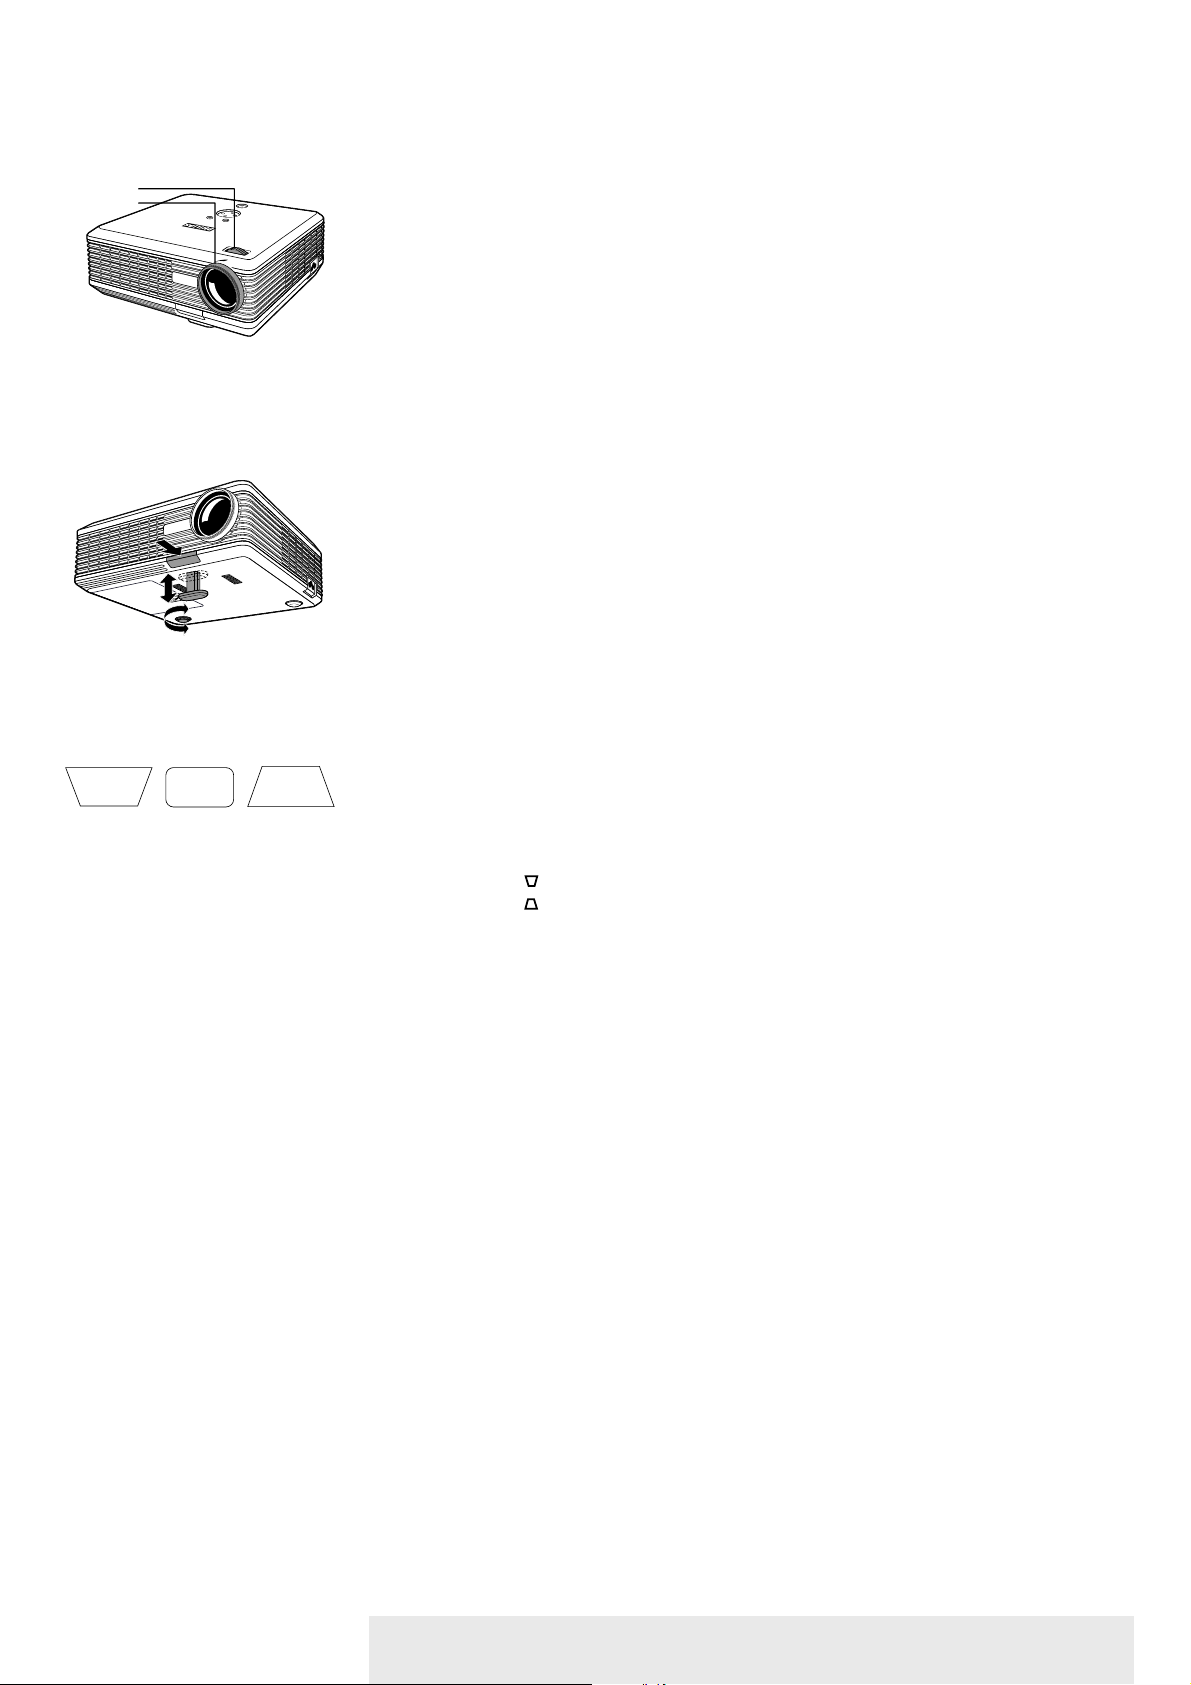
• Use the Zoom ring to adjust the size of the image.
• Use the Focus ring to adjust the focus of the image.
To raise the projector
1 Press the Elevator button (A).
2 Raise the projector to the desired display angle,
then release the button to lock the elevator foot (B) into position.
3 Use the horizontal adjuster (C) to fine-tune the display angle.
To lower the projector
1 Press the Elevator button (A).
2 Lower the projector to the desired display angle,
then release the button to lock the elevator foot (B) into position.
3 Use the horizontal adjuster (C) to fine-tune the display angle.
If the projector and screen are not properly placed, the picture will be distorted, producing a
keystoned image (picture top width larger than picture bottom width or vice versa). When a
keystoned image occurs the 4:3 ratio will still be guaranteed.This is especially important when
the projector is being used together with an ‘intelligent whiteboard’.
‘Keystone correction’ allows you to correct picture distortion of the vertical keystone type by
internal scaling.
• Use Keystone to widen the image.
• Use Keystone to narrow the image.
These functions are also accessible through the ‘Keystone’ option in the ‘Setup’ menu of the On
Screen Display (OSD) menu.
Preparation
1 Press the Standby button twice to put the projector in Power/Standby.
– The Standby indicator light is red.
2 Wait until the cooling fan has stopped (about 2 minutes after the projector has been put in
Standby) and disconnect the mains lead and all other cables.
3 Put the lens cap back in place to prevent damage to the front of the lens when
moving/transporting the projector.
Never place the projector on the side where the connections are located.
Moving/transporting the projector
The projector contains many glass and precision parts. If you need to transport the projector,
please follow these packing instructions to prevent accidental damage to the projector.
• When you are hand-carrying the projector, be sure to use a carrying case like the softbag
supplied.
• When shipping the projector, use the original packaging material if possible. If you do not
have the original packaging, use equivalent materials, placing plenty of cushioning around the
projector.
• When transporting the projector as freight or checked luggage, first put it in the softbag
supplied, then pack it in a firm box, using cushioning around the case.
Adjusting the focus and
size of the image
Adjusting the vertical and
horizontal angle of the
projector
Keystone correction
Moving/transporting the
projector
Philips Multimedia Projector 11 English User guide bCool SV1
3. Set up
>
Zoom ring
Focus ring
A
B
C
Page 12

1 Push and slide the lid in the direction of the arrow.
2 Install Install two AAA Alkaline batteries as indicated inside the battery compartment.
3 Replace the lid and snap it into place.
The maximum range of the remote control is approximately 7 m (± 25 feet).
Inserting the batteries in
the remote control
Note
Philips Multimedia Projector 12 English User guide bCool SV1
3. Set up <
Page 13

Computer input
The data input is suitable for both Apple Macintosh computers (Power Book and Power Mac) as well
as for IBM compatible PCs.The projector is Microsoft®,Windows®95/98/ME/2000/XP compatible
and accepts input signals from all computers that meet following specifications:
• Multi scan VGA-SXGA
• Horizontal scan rate: 15-70 kHz
• Vertical refresh rate: 43-85 Hz
• Bandwidth: 110 MHz
• Display Data Channel DDC: 2B
The data output of IBM compatible PCs can be connected directly to the Data in socket of the
projector using standard data cables.When connecting the projector to a Macintosh computer
equipped with a 2 row, 15 pin connector, a VGA/MAC adaptor (available at your PC store) is required.
If your computer is equipped with a 3 row connector, no adaptor is needed.
USB connection (Universal Serial Bus)
The Universal Serial Bus (USB) connector allows you to connect to computers equipped with a USB
interface, resulting in real hot plug and play presentation.
Mouse control:
By connecting USB, the mouse function on the Remote Control automatically gets installed.
You can now manipulate the mouse cursor on the computer and on the screen, by using the Cursor
on the remote control.The Mouse Left/Right buttons on the remote control, function as Left and Right
mouse buttons of your pc.
Based on the specific hardware and software configuration available, Apple Macintosh computer users could
experience incomplete or erratic USB -functionality.These problems are not related to the performance of
your projector.
Video input
The projector accepts the input signal of all major video formats, including NTSC 3.58, 4.43, PAL B, G,
D, H, I, N, M, SECAM and HDTV (480i/P, 576P, 720P, 1080i) signals.The projector will recognize these
standards and adapt to them automatically. With the ‘Picture format’ feature, you can select one of five
picture format options: 4:3, 16:9, letter box, pan & scan or 4:3 original screen.
Always turn off the projector and external equipment before making any connections.
General information
Note
CAUTION
Philips Multimedia Projector 13 English User guide bCool SV1
4. Installation <General information
Page 14

<
1 Connect the Data (out) socket of the computer to the Data in socket of the projector and
secure the plugs by tightening the thumb screws.
For this, use the VGA cable supplied (1).
2 Connect the USB (upstream) socket of the projector to the USB downstream por t of the
computer.
For this, use the USB cable supplied (2).
– You can now manipulate the mouse cursor on the computer and on the screen, using
Cursor Control on the remote control. When using the USB connection, make sure
Windows 98®, Windows ME®, Windows 2000®or Windows XP®is installed on the
computer.
– The display settings of the computer will be changed to fit the capability of the projector.
• Once the hook-ups have been completed, turn the projector on first and then the PC.
Philips Multimedia Projector 14 English User guide bCool SV1
4. Installation
Connecting to a computer
Data in S-Video Video
1
Data out
USB
2
Computer
USB
Page 15

>
1 Connect the Video (out) socket of a VCR, Laser Disc player, video camera or TV to the
Video (in) socket of the projector.
For this, use the Composite video cable (1) supplied.
1 Connect the S-Video (out) socket of a S-VHS video recorder, Laser Disc player, video
camera or TV to the S-Video (in) socket of the projector.
For this, use the S-video cable (2) supplied.
CVBS (Video)
1 Connect an optional Scart/RCA Audio Video adapter to the Scart connector of the VCR,
Laser Disc player, video camera or TV.
2 Plug the Composite video cable supplied into both the adapter and the Video (in) socket of
the projector.
CVBS (Video)
S-VHS (S-Video)
Scart connection
Scart adapter
(not for USA version)
Philips Multimedia Projector 15 English User guide bCool SV1
4. Installation
Connecting to video equipment
CVBS only
Data in S-Video Video
S-VHS only
USB
2
1
VCR
S-Video
Video
out
out
CVBS only
Page 16

<
Pr,Y, Pb / Cr,Y, Cb
1 Connect an optional D-sub to HDTV/Component cable (1) to the Data in socket of the
projector.
Connect the plugs at the other end of the cable to the appropriate output sockets of your
Component- or HDTV-video equipment (Pr, Y, Pb / Cr,Y, Cb).
Component/HDTV
Philips Multimedia Projector 16 English User guide bCool SV1
4. Installation
Connecting to video equipment
Data in S-Video Video
USB
1
3b
Cr
Y
Cb
Pr
Y
Pb
R
G
B
Component/HDTV
Equipment
DVD player, Settop Box,
HDTV receiver, etc.
Page 17

<
1 Press the Standby button to turn on the projector.
– The Standby indicator starts blinking green.
– When the projection lamp is on, the Standby indicator lights up green after the start-up
screen is on for several seconds.
2 Select the required source (Computer, YPbPr,YCbCr, RGBS, S-Video or Video) by pressing
the Source button.
When only one input source is connected, this source will automatically be selected (‘Auto Source’). When
more input sources are connected, the source with the highest priority will be selected (Computer,YPbPr,
YCbCr, RGBS, S-Video or Video). Source selection can be changed in the ‘Setup’ menu.
3 Switch on the computer or start video playback.
– A feedback message appears on the screen, indicating the selected source.
General explanation
Messages are displayed in the center of the screen.The problem is described in the header of
the message display. Suggestion(s) to solve the problem are displayed in the lower part of the
message display.These messages cannot be suppressed.
Feedback messages
Feedback messages are displayed in the top right corner of the screen.They are displayed when:
- when a data or video signal is present
- when no signal is present
- when an input source is changed
- when A/V Mute is activated
Some examples
These messages will only be displayed when the menu option ‘Feedback’ is set to ‘On’ in the ‘Setup’
menu. All messages will be removed automatically after 4 seconds.
Computer selected as source
General
Note
Messages
Philips Multimedia Projector 17 English User guide bCool SV1
5. Operation
Video selected as source S-Video selected as source YPbPr selected as source
no input signal A/V muted
Preparation
Temp.
OK
Menu
Source Auto Image
Lamp
Temp.
OK
Menu
Source Auto Image
Lamp
Page 18

>
All video and data adjustments and settings (except A/V Mute) are done through On Screen
Displays with the help of Menu, OK and Cursor Control on the projector or the remote control.
The projector is set to standard settings at the factory. However, you can adjust these settings to
suit your own preferences.
The projector menu screens allow you to adjust the various projector settings (for both
Computer and Video). For explanation and operation see next pages.
COMPUTER MODE
Main menu Sub menu Setting
Picture Brightness 0 100
Contrast 0 100
Sharpness 0 4
Frequency 500 2000
Phase 0 31
Colour tracking 0 5
Colour temperature 5000K, 6500K, 7300K,
9300K
Auto sync OK
VIDEO/S-VIDEO MODE
Main menu Sub menu Setting
Picture Brightness 0 100
Contrast 0 100
Sharpness 0 12
Colour 0 100
Tint - 50 50
Colour tracking 0 5
Colour temperature 5000K, 6500K, 7300K,
9300K
GENERAL ADJUSTMENTS/SETTINGS
Main menu Sub menu Setting
Features PIP Off On
PIP location OK
Zoom 1x, 4x, 9x, 16x
Freeze Off On
Child lock Off On
Sleep timer 0 min. 180 min.
Menu tree
Philips Multimedia Projector 18 English User guide bCool SV1
5. Operation On Screen Display Menu
Temp.
OK
Menu
Source Auto Image
Lamp
Temp.
OK
Menu
Source Auto Image
Lamp
Page 19

GENERAL ADJUSTMENTS/SETTINGS
Main menu Sub menu Setting
Setup Language Eng.
Deu.
Esp.
Fra.
Ita.
Ned.
Por.
Chi.
Keystone
- 50 50
Mirror
Source
Auto
Computer
YPbPr
YCbCr
RGBS
S-Video
Video
Factory settings OK
Picture format
4:3
16:9
Letter box
Pan & Scan
Compact
System information Description
Feedback Off On
Lamp counter OK
Smart Dimmer Off On
SecurityMax OK
Menu tree
Philips Multimedia Projector 19 English User guide bCool SV1
5. Operation >On Screen Display Menu
AB
AB
B
A
AB
Page 20

>
1 Press Menu.
– The menu bar appears on the screen.
2 Use Cursor to navigate left or right to any other item in the menu bar.
3 Use Cursor down to enter the sub menu.
4 Select the item to be adjusted by moving the Cursor up or down.When more items are
available than can be shown in one screen, move the cursor down to go to the next list of
items. When you want to go back to the first list, move the cursor up.
5 Adjust the selected item, using the Cursor left or right.
6 Select the next item to be adjusted in the sub menu and adjust as described above.
7 Press Menu to close the On Screen Display.
General explanation
Philips Multimedia Projector 20 English User guide bCool SV1
5. Operation On Screen Display Menu
Temp.
OK
Menu
Source Auto Image
Lamp
Temp.
OK
Menu
Source Auto Image
Lamp
Page 21

For computer signal input, the following ‘Picture’ adjustments can be made:
Picture adjustments
• Press Menu and select ‘Picture’ in the menu bar. The following ‘Picture’ adjustments can now
be made according to the instructions under ‘General explanation’:
– Brightness
adjusts brightness of the displayed picture.
– Contrast
adjusts the overall contrast intensity.
– Sharpness
controls the contour impression of the picture.
– Frequency
changes the display data frequency to match the frequency of your computer’s graphic
card. If you experience a vertical flickering bar, use this function to make an adjustment.
– Phase
minimizes picture imperfections.When connecting the projector to your PC for the first
time, be sure to adjust the phase control for optimal readability of the projected text.
– Colour tracking
adjusts the degamma settings. Adjustment of the setting will change the colour
performance of the display.
– Colour Temperature
adjusts the colour temperature.The higher the temperature the cooler the screen will
look.The lower the temperature the warmer the screen will look.
– Auto sync
automatically adjusts frequency, tracking, horizontal and vertical position. With most signal
sources, Auto sync provides the best results.
For YPbPr,YCbCr, RGBS, S-Video or Video signal input, the following ‘Picture’ adjustments can be
made:
Picture adjustments
• Press Menu and select ‘Picture’ in the menu bar. The following ‘Picture’ adjustments can now
be made according to the instructions under ‘General explanation’:
– Brightness
adjusts brightness of the displayed picture.
– Contrast
adjusts the overall contrast intensity.
– Sharpness
controls the contour impression of the picture.
– Colour
adjusts a video image from black and white to fully saturated colour.
– Tint
adjusts the colour balance of red and green.
– Colour tracking
adjusts the degamma settings. Adjustment of the setting will change the colour
performance of the display.
– Colour Temperature
adjusts the colour temperature.The higher the temperature, the cooler the screen will
look.The lower the temperature the warmer the screen will look.
Computer adjustments
Video series adjustments
Philips Multimedia Projector 21 English User guide bCool SV1
5. Operation On Screen Display Menu >
Temp.
OK
Menu
Source Auto Image
Lamp
Temp.
OK
Menu
Source Auto Image
Lamp
Page 22

'Features' adjustments
Press Menu and select ‘Features’ in the menu bar. The following ‘Features’ adjustments can now
be made according to the instructions under ‘General explanation’:
– PIP (Picture In Picture)
turns the PIP window on and off. PIP enables projection from a second source in the
currently projected computer or component video picture. The currently projected
computer or component video picture can also be used as input source.
Please note that the second source can only be displayed in the PIP window when the main
screen is displaying a computer or component video source (or no source at all). Any invalid
combination will result in a black PIP window for the main screen has priority.
– PIP location
selects the location of the PIP window in the main screen.
– Zoom
enlarges a part of the picture. Use Cursor to select the zoom center and select the
required zoom factor: 1 x, 4 x, 9 x or 16 x.
– Freeze
captures a moving picture (still picture).
– Child lock
de-activates the control keypad of the projector.
– Sleep timer
turns Sleep timer mode off or selects the delay time after which the projector
automatically switches to Standby.
General adjustments
Philips Multimedia Projector 22 English User guide bCool SV1
5. Operation On Screen Display Menu >
Temp.
OK
Menu
Source Auto Image
Lamp
Temp.
OK
Menu
Source Auto Image
Lamp
Page 23

Setup adjustments
• Press Menu and select Setup in the menu bar.The following Setup adjustments can now be
made according to the instructions under ‘General explanation’:
– Language
selects the required menu language.
– Keystone
corrects picture distortion of the vertical keystone type by internal scaling.
– Mirror
mirrors the picture for use of the projector in various positions with respect to the
user(s) and the projection screen.
-- Source
selects the current projection source (Computer,YPbPr, YCbCr, RGBS, S-Video or Video). If
you select ‘Auto’, the projector will always automatically search for available input signals.
– Factory settings
resets all user settings to the default factory settings.
– Picture Format
selects one of five picture format options (4:3, 16:9, letter box, pan & scan and
4:3 original).
– System information
the System Information sub menu contains an overview of the most relevant projector
settings, including information on the hardware and software configuration.
-- Feedback
to suppress OSD messages. Warning or error messages however are never suppressed.
-- Lamp counter
to show the operating time of the lamp, which can be reset after a new lamp has been
installed.
-- SmartDimmer
turns on the power saving mode by reducing the lamp power from 180W to 150W.
When SmartDimmer is turned on (150W), the audible (fan) noise will be reduced and
gray scales in the picture are optimized. When Smar tDimmer is turned off (180W), peak
brightness in the picture is obtained. Default setting for data and component sources
(Data in) is Off; default setting for video sources (Video, S-Video) is On.
-- SecurityMax
the SecurityMax menu item allows you take a number of precautions against unauthorized use
of your projector.You can, for example, set your own code protected start-up screen and
shutdown timer which make theft unattractive to any potential thief.
See chapter ‘Theft deterrence - SecurityMax’ hereafter.
Philips Multimedia Projector 23 English User guide bCool SV1
5. Operation On Screen Display Menu >
Temp.
OK
Menu
Source Auto Image
Lamp
Temp.
OK
Menu
Source Auto Image
Lamp
Page 24

When handled with care, your projector offers you years of enjoyment. And of course handling
with care also means preventing your valuable projector from being stolen.As a useful
protection aid, Philips offers you SecurityMax.
• SecurityMax is a menu item that works as a theft deterring feature. Unauthorized use of
your projector is prevented once you have set up the projector with the remote control.
• A code protected start-up screen and shutdown timer will make theft unattractive to any
potential thief.
• WARNING stickers inform potential thiefs that the projector is protected.
• Nevertheless, this feature does not guarantee that your projector cannot be stolen.
Therefore, Philips advises you to store your projection equipment in place to prevent
unauthorized use of your security code.
What to do if...
Please handle your projector with care and carefully safeguard your security code!
If your security code is lost, it can only be reset at an authorized service center.
When a projector is brought to the service center for repair, and the problem turns out to be
caused by a lost security code, the service center will reset the security code.
However, the cost of resetting the security code is not covered under the
manufacturer's warranty.
In the unfortunate event that your projector is stolen, Philips cannot be held responsible, nor
take any action.We advise you to report the theft immediately at the nearest police station.
Introduction
With the use of SecurityMax, the owner of this projector can enforce a number of security
features:
– Personalized start-up text
A start-up screen with custom text, set by the owner, will be displayed.
E.g. This projector belongs to...
– Shutdown timer
Enables the owner to set a limited number of operating hours. When the time has expired,
the projector will turn off and be locked from further operation. The owner is able to
unlock the projector.
– Security code
The personal security code gives access to the SecurityMax security features.The security
code is not required for normal use of the projector. It only needs to be entered to change
the security feature settings (Personalized start-up text and Shutdown timer).
In a user-friendly interface, 4 tabs appear on screen.
Just click a tab to display a submenu in which you can specify your theft protection settings.
Theft deterrence -
SecurityMax
Philips Multimedia Projector 24 English User guide bCool SV1
5. Operation On Screen Display Menu >
Page 25

Setting up SecurityMax
1 Make sure the projector is properly connected (see the user manual on the manual CD-ROM).
2 Turn on the projector.
– The projector Startup screen will be projected.
3 Press Menu and select ‘Setup’ in the menu bar. Select the SecurityMax item.
– The SecurityMax main window appears. Each tab represents a specific SecurityMax feature.
Setting a Security code
1 Click the Security code tab in the main window.
– The Security code window appears with the Characters selection table.
2 Enter current code in the first field: enter 0000 as a default value by using 4-directional
Cursor Control to select "0" in the selection table and press the OK button to save.
Philips Multimedia Projector 25 English User guide bCool SV1
5. Operation On Screen Display Menu >
Page 26

3 Enter your new code in the second field by using the 4-directional Cursor Control to select
characters in the selection table and press the OK button to save.The code may consist of
any combination of 4 characters and/or digits.
4 To confirm, also enter your new code in the third field.
5 Click the OK button.
6 Click the Menu button to close this window.
Changing your Security code
1 Click the Security code tab in the main window.
– The Security code window appears with the Characters selection table.
2 Enter your current code in the first field by using the 4-directional Cursor Control to select
characters in the selection table.
3 Enter your new code in the second field.
4 To confirm, enter your new code in the third field.
5 Click the OK button.
6 Click the Menu button to close this window.
Entering the wrong code three times in a row will lock the projector for 30 minutes.
Leave the projector turned on during this time and then unlock as described under ‘Unlocking the
projector after shutdown’. If you turn off the projector before the full 30 minutes have past, it will be
locked again for the remaining time before turning on again.
Note
Philips Multimedia Projector 26 English User guide bCool SV1
5. Operation On Screen Display Menu >
Page 27

Entering your personal start-up text
1 Click the Personal start-up text tab in the main window.
– The Personal start-up text window appears, followed by the Characters Selection table.
2 Enter your start-up text directly in the text field with a maximum of 4 lines of 25 characters
each. E.g. This projector belongs to...
Use Cursor Control to select characters in the selection table.
3 Click the OK button.
4. Click the Menu button to close this window.
– Your own Personal start-up screen will now be projected each time the projector is turned
on.The screen will be projected for about 30 seconds and cannot be suppressed.
Setting the Shutdown timer
1 Click the Shutdown timer tab in the main window.
– The Shutdown timer window appears.
2 Select a new value (1~1000 hrs) in the bar by using the Cursor control left /right.
Philips Multimedia Projector 27 English User guide bCool SV1
>5. Operation On Screen Display Menu
Page 28

3 Click the OK button.
– The shutdown timer value has been changed.
4 Click the Menu button to close this window.
The end user is responsible for the consequences of setting the Shutdown timer.
– When less than 10 operating hours are left, the Shutdown warning screen will be projected
each time the projector is turned on.This gives you the opportunity to increase the number
of operating hours (see above) before the projector will be shut down and cannot be used
any longer.
When ignoring this warning all consequences are for the the end user.
– When shutdown time has expired, operating the projector is no longer possible.
– The Locked warning screen will be projected with the SecurityMax symbol flashing.
• To continue the use of the projector, you will have to unlock it as described in the next
chapter.
Unlocking the projector after shutdown
When the shutdown time has expired, the projector turns off and is locked from further use.
The owner is able to unlock the projector by updating or disabling the shutdown timer.
Note
Note
Philips Multimedia Projector 28 English User guide bCool SV1
5. Operation On Screen Display Menu >
Page 29

Update the shutdown timer
1 Make sure the projector is properly connected (see the user manual on the manual CD-ROM).
2 Turn on the projector.
– The Locked warning screen will be projected.
3 Click the Menu button.
– The Security code query window appears.
4 Enter your security code.
5 Click the OK button.
– The projector is now unlocked.
You may follow the same procedure as described in "Setting the Shutdown timer" to set the Shutdown
timer again.
Disable the shutdown timer
See ‘Removing SecurityMax protection’
Note
Philips Multimedia Projector 29 English User guide bCool SV1
5. Operation On Screen Display Menu >
Page 30

Removing SecurityMax protection
1 Click the Remove protection tab in the main window.
– The Remove protection window appears.
2 Select the item you want to disable by using the Cursor Control up/down.
3 Select Yes/No by using the Cursor Control left/right.
4 Click the OK button.
5 Click the Menu button to close this window.
Exit SecurityMax
1 Exit SecurityMax by pressing the Menu button.
Philips Multimedia Projector 30 English User guide bCool SV1
5. Operation On Screen Display Menu <
Page 31

Turn off and disconnect the projector before cleaning.
1 Press the Standby button twice to turn off the projector.
– The Standby indicator light turns red.
2 Wait until the cooling fan has stopped (about 1 minute after the projector has been put in
Standby) and disconnect the mains lead and all other cables.
Cleaning the cabinet
• When the cabinet is dusty, clean it by gently wiping with a soft cloth.
• A chamois leather slightly moistened with water is sufficient for cleaning the housing.
• Do not use cleaning agents as they may harm the housing.
Cleaning the lens
• When the lens is dirty or dusty, first blow the dust off and then gently wipe with a soft
brush or lens cleaning paper. Never touch the lens with your fingers.
– The lens is likely to become mouldy if left dirty.
Cleaning
Caution
Philips Multimedia Projector 31 English User guide bCool SV1
6. Maintenance >
Temp.
OK
Menu
Source Auto Image
Lamp
Temp.
OK
Menu
Source Auto Image
Lamp
Page 32

>
When operation time reaches the last 100 hours of the average lamplife, the message ‘Lamp life
has almost exceeded’ will be displayed on the screen. When operation time reaches 1500 hours,
the message ‘Lamplife has exceeded’ will be displayed.
The lamplife remaining can be checked using the OSD menu.
1 Press Menu.
2 Use Cursor Control to move the cursor to ‘Setup’.
3 Use Cursor Control to select ‘Lamp counter’.
1 Turn off the projector and wait until the lamp has cooled down before disconnecting the
projector. Remove the mains lead from both projector and wall socket. Turn the projector
over.
2 Press tab (A) and remove the lamp door.
3 Unscrew the screws (B).
4 Grasp the lamp holder handle and carefully pull the lamp holder out of the projector.
• Do not tilt. If the inner tube is broken, glass particles may fall out.
• Keep lamp holder opening to your right.
Do not touch lamp or point lamp holder opening at anyone.
5 Carefully remove the new lamp housing from its package.
• Always use the same type of lamp.
See ‘Optional accessories’ for the correct type of lamp for your projector.
• Do not touch lamp or point lamp housing opening at anyone.
• Do not drop, as the impact may cause the lamp to break.
6 Place the lamp holder in the guiding slots and insert into the lamp compartment.
7 Tighten the screws (B).
8 Put the lamp door back in place and press tab (A) back in its original position.
9 Insert the mains lead into both the projector Mains inlet socket and the wall socket.
10 Press the Standby button to turn on the projector.
11 Reset the lamplife time (see ‘Resetting the lamplife time’).
12 Dispose of the old lamp in special chemical disposal bins.
Lamp
Lamp Replacement
Philips Multimedia Projector 32 English User guide bCool SV1
6. Maintenance
OK
Menu
OK
Menu
Source Auto Image
Source Auto Image
Lamp
Temp.
Lamp
Temp.
A
B
B
B
B
B
B
A
Page 33

>
1 Press Menu.
– The menu bar appears on the screen.
2 Use Cursor Control to select ‘Setup’ in the menu bar.
3 Use Cursor Control to select ‘Lamp counter’ in the sub menu.
4 Press OK to reset the lamp counter.
5 If required, select another item you wish to adjust or press Menu to exit.
Resetting the lamplife
time
Philips Multimedia Projector 33 English User guide bCool SV1
6. Maintenance
Temp.
OK
Menu
Source Auto Image
Lamp
Temp.
OK
Menu
Source Auto Image
Lamp
Page 34

>
If a fault occurs, first check the points listed below before taking the projector for repair.
If you are unable to correct a problem by following these hints, consult your dealer or service
center.
Under no circumstances should you try to repair the projector yourself as this could void your
warranty.
– Possible cause
• Solution
General
– Mains lead is not correctly connected.
• Check the mains lead connection.
– Lamp holder cover is not closed correctly or the lamp holder is damaged.
• Check cover for proper closure (see ‘Lamp replacement’ under ‘Maintenance’).
– Signal cable not correctly connected.
• Check signal cable connection.
– The projector is in Off position.
• Press the Standby button to turn the projector on.
In Video series mode
– Keystoning is applied on a high resolution component signal.
• Decrease keystoning until the image is correctly displayed.
For this use the ‘Keystone’ option in the ‘Setup’ menu.
In Data mode
-- Partial, scrolling or incorrectly displayed image.
• Use the 'Auto Sync' option in the ‘Picture’ menu.
– Input resolution is too high (and keystoning is applied).
• If you wish to keep the keystone correction, decrease the input resolution until the image is
correctly displayed.
For this, refer to the User Guide or support information of the computer.
• If you wish to keep the input resolution as it is, decrease keystoning until the image is
correctly displayed. For this, use ‘Keystone correction’ option in the ‘Settings’ menu.
– Input resolution is too high (and no keystoning is applied).
• Decrease the input resolution until the image is correctly displayed.
For this, refer to the User Guide or support information of the computer.
Warning
Read as follows
Problem
Image is not or incorrectly
displayed
Philips Multimedia Projector 34 English User guide bCool SV1
7.Troubleshooting
Page 35

>
• Adjust ‘Brightness’, ‘Contrast or ‘Colour tracking’ (see ’Picture adjustment’ under ‘Operation’ -
‘On Screen Display Menu’).
• Reset all projector settings in the ‘Setup’ menu (‘Factory settings’).
– Image is not focused.
• Adjust focus ring.
– Distance between projector and screen is not correct.
• Adjust the distance between the projector and the screen.
– Signal cable is not correctly connected.
• Check signal cable connection.
– Signal cable is not correctly connected.
• Check signal cable connection.
– Distance is too great.
• Reduce distance.
– Batteries are exhausted.
• Replace batteries (see ‘Inser ting the batteries in the remote control’).
– IR sensor is obstructed.
• Remove obstacle.
Lamp indicator
– Red blinking (0.5sec. On, 0.5sec. Off): lamp start has failed.
• Disconnect projector from the mains. Reconnect and restart. If this does not solve the
problem, replace the lamp. See ’Maintenance.’
– Red blinking (1sec. On, 1sec. Off): the fans are locked.
• The projector will automatically shut down. If this problem continues, contact your Service
Center.
Temp. (temperature) indicator
– Lights up red: temperature error.
• Disconnect projector from the mains. Reconnect and restart.
If this does not solve the problem, contact your Service Center.
Standby indicator (text on Standby button/ring around Standby button)
– Lights up green: Power on mode.
– Green blinking: warming up in Power on mode.
– Lights up red: Standby mode.
– Red blinking: cooling down in Power off mode.
Poor color
Image is blurred
Picture rolls
The projector does not
react to commands from
the remote control
Indicators
Philips Multimedia Projector 35 English User guide bCool SV1
7.Troubleshooting
Page 36

– ’Childlock’ active.
• Switch off ‘Childlock’ in the ‘Features’ menu.
• Check proper installation of the batteries in the remote control and/or replace the batteries.
• Check the projector to make sure it is receiving signal from the remote control.
• Check that the USB cable has been properly connected.
• Check that both projector and computer are turned on.
• Unplug the USB cable and then reconnect.
• Connect another USB device (mouse, scanner, webcam, etc.) and see if it works.
If it does not work, there is a problem with the computer.
• Also, refer to the User Guide or support information of the computer.
– ‘Windows’ did not manage to install the driver correctly. In this case the ‘Device manager’ will
contain a catagory ‘Other devices'.
• Disconnect the projector.
• Remove all items listed under ‘Other devices’ in the ‘Device manager’.
• Restart the computer.
• Reconnect the projector.
No reaction when pressing
keys on local keyboard
The mouse cursor does
not react when using the
cursor control on the
remote control
Philips Multimedia Projector 36 English User guide bCool SV1
7.Troubleshooting <
 Loading...