


Ill II II S »R 'V o' /
q"q 00000 "0 03294
DATA/VIDEO PROJECTOR
OWNER'S MANUAL
PHILIPS
MODEL LC 3000
PHILIPS
PLEASE SEE INSIDE COVER
FOR 3 IMPORTANT STEPS
TO TAKE BEFORE
OPERATING YOUR
NEW PROJECTOR

PHILIPS
SmartVeiy smart:
WARRANTY
REGISTRATION
CARD
Return your Warranty Registration Card today
to ensure you receive all the benefits you're entitled
Once your PHILIPS purchase is registered, you're eligible to receive all the privileges of owning a
PHILIPS product. So complete and return the Warranty Registration Card enclosed with your purchase
at once. And take advantage of these important benefits.
■ Warranty
Verification
Registering your product within
10 days confirms your right to
maximum protection under the
terms and conditions of your
PHILIPS warranty.
■ Owner
Confirmation
Your completed Warranty
Registration Card serves as
verificaton of ownership in the
event of product theft or loss.
PHILIPS
SmartVery smart:
Congratulations on your purchase,
and welcome to the 'family'!
Dear PHILIPS product owner
Thank you for your confidence in PHILIPS. You've selected
one of the best-built, best-backed products available today.
And we'll do everything in our power to keep you happy with
your purchase for many years to come.
As a member of the PHILIPS 'family', you're entitled to
protection by one of the most comprehensive warranties and
outstanding service networks in the industry.
What's more, your purchase guarantees you'll receive all the
information and special offers for which you qualify, plus easy
access to accessories from our convenient home shopping
network.
And most importantly you can count on our uncompromising
commitment to your total satisfaction.
All of this is our way of saying welcome and thanks for inves
ting in a PHILIPS product.
Sincerely,
Robert Minkhorst ^
President and Chief Executive Officer
P.S. Remember, to get the most from your PHILIPS
product, you must return your Warranty Registration
Card within 10 days. So piease maii it to us right now!
_____
■ Model
Registration
Returning your Warranty
Registration Card right away
guarantees you'll receive all the
information and special offers
which you qualify for as the
owner of your model.
Know these safety symbols
CAUTIOIM
RISK OF ELECTRIC SHOCK
A
CAUTION: To reduce the risk of electric shock, do not
remove cover (or back). No user*servlceable parts
inside. Refer servicing to qualified service personnel.
DO NOT OPEN
A
A This 'bolt of lightning' indicates
uninsulated material within your
unit may cause an electrical shock.
For the safety of everyone in your
household, please do not remove
product covering.
A The 'exclamation point' calls
attention to features for which you
should read the enclosed literature
closely to prevent operating and
maintenance problems.
WARNING: To prevent fire or
shock hazard, do not expose
this equipment to rain or
moisture.
CAUTION: To prevent electric
shock, match wide blade of plug
to wide slot, and fully insert.
For Customer Use
Enter below the Serial No.
which is located on the rear of
the cabinet. Retain this informa
tion for future reference.
Model No.
Serial No.
____________________

Table of Contents
Gcttinp Started
Waming/Precautions................................................................. 2
How your Projector works........................................................ 4
Description of Projector Controls
Description of Remote Control
Setting-up the Projector + Screen........................................... 10
Antenna/Cable TVA^CR Connections
Audio connections
External speakers, Audio Output Jacks,
Personal computer.................................................................. 15
Basic Projector Operation
Zoom and Focus..................................................................... 17
On-Serccn Features
* How to Use On-Screen Menus............................................ 18
AUDIO Control Adjustments
* Bass, Treble, Balance.......................................................... 20
* Stereo
..................................................................................
* Expand................................................................................. 22
VIDEO Control Adjustments
* Bright, Contrast, Color, Tint, Shatp
INPUT Tuning Control Adjustments
* Tuning Cable/Notmal.......................................................... 24
* Channel Scan....................................................................... 25
* Picture Source - AUX 1, AUX 2 & AUX 3
* Picture Source - S-Video..................................................... 27
* Picture Source - Antenna
DATA INPUT Control Adjustments
* To select Data Input
FEATURES Control Adjustments
* Timeset................................................................................ 30
* Options................................................................................ 31
* Captions............................................................................... 32
* Channel Control.................................................................. 33
* Censor AUX/S-Video
* Review Censor Memory...................................................... 36
* Personal Preferences
* Autostart.............................................................................. 39
LENS CONTROL with remote
* Zoom................................................................................... 40
* Focus................................................................................... 40
............................................................
.........................................................
...........................................................
............................................
................................................
..................................
......................................................
....................................
........................
....................................................
13
16
21
23
26
28
29
35
37
CLOSED CAPTIONING Adjustments.................................. 41
DATA MENU Control Adjustments
* Image - Phase, Brightness, Contrast
5
8
* Audio - Bass, Treble, Balance, Sound Mode, Expand ... 43
* Setup - Hor. position. Vert, position.
Personal Preference, Curtain, Computer Ident
* Data exit.............................................................................. 45
Remote Control Oneration
* How to Operate VCRs with the Projector Remote
* How to Set Remote to work your VCR -
Search Method........................................................................ 48
* How to Operate Cable Converters with the
Projector Remote.................................................................... 49
* Timer................................................................................... 52
* Closing/Opening Curtain
Replacing the Lamp................................................................ 54
General Information
Tips if something isn't working
Technical Specifications......................................................... 57
Accessories............................................................................. 57
Glossary of Terms
Warranty................................................................................. 59
....................................................
..................................................................
...................................
.......................
...........
..............................................
42
44
46
53
56
58
This device complies with Part 15 of the FCC Rides.
Operation is subject to the following two conditions: (1)
This device may not cause harmful interference, and (2)
this device must accept any interference received,
including interference that may cause undesired
operation.
WARNING: TO PREVENT HRE OR SHOCK
HAZARD DO NOT
EXPOSE THIS UNIT TO RAIN OR EXCESSIVE
MOISTURE.
The Model and Serial Numbers are found on the back of this Projector. Please record these numbers and purchase date in the space belov
Refer to them whenever you ask your dealer about this Projector.
Model No. ...........................................................................................................................................................................................
Serial No. ............................................................................................................................................................................................
Purchase Date ...............................................................
Please attach your sales receipt to this book and keep it for future reference.

our Projector is a compact unit which
enables you to project large TV pictures
Y
onto screens, just like a slide or movie
projector.
Inside your Projector are two main
sections:
• the Electronic section which handles
the signals coming from your computer
or video source
• the Optical section which projects
the pictures onto your screen.
The picture is built up inside the
projector on three Liquid Crystal panels,
one for each of the three primary colors
(red, green and blue). The optical
system combines these into one highquality, full-color picture which is then
projected onto your screen.
The Projector uses a zoom lens so you
can easily change the picture size to fit
your screen.
How YOUR Projector Works
FEATURES
Compact Projector with 2x zoom lens,
giving pictures from 40 to 140 inches
wide. Zoom and focus manually and via
remote control.
Liquid Crystal Display panels for high
quality pictures. Long life metal Halide
Lamp. Multi beam light collection for
excellent comer brighmess.
On-Screen graphics display for feature
controls such as channel programming,
timer settings, and color adjustments.
Infrared Remote Control operates your
Projector and many VCRs and Cable
TV Converters.
Standard Broadcast (VHF/UHF) or
Cable TV (CATV) channel capability.
Automatic channel programming for
quick, and easy selection of favorite
stations in your area.
Channel Control for blanking of
channels and AudioA^ideo cotmections
preventing not authorized users from
watching.
Stereo-Ready TV for receiving TV
programs broadcast in stereo sound or
(SAP) bilingual broadcast. Internal,
monaural speaker. Connects to audio
hi-fi systems for stereo sound.
Closed Captioning (CC) is available for
4 data channels with Text and
Captionings utilizing 2 languages for
broadcasts and pre-recorded tapes (when
CC is available)
AudioA^ideo jackpanel for direct
cotmections of accessories such as
VCRs.
RGB Inputs
Timer which automatically turns the
Projector OFF after a preset time
period.

Getting Started ^ Protector Controls
The picture is projected from here onto
your screen
LOUDSPEATCER
Hidden behind the front grille
POAVER ON/STAND BY
Lights when Projector is ON.
-------------
FOCUS CONTROT. RTNO
Turning this makes the picture on your
screen sharper.
ZOOM CONTROL RTNQ
Turning this makes the picture on your
screen larger or smaller.
Push the front control
door to make it swing
open. Push it again to
close.
Side view
INDICATOR LAMPS
Stereo SAP
(red) (yellow) (red)
•
ERROR
Controls are isehind the swing-out front control door. See next page for details.

Getting Started - Projector Controls (continued)
Projector Front Panel Buttons and Jacks
POWER ON / STAND BY BUTTON
VOLUME A (UP).
•W (DOWN> BUTTONS
Press to adjust the Projector sound
level.
CHANNEL A (UP).
yr (DOWN) BUTTONS
Press to scan up or down through the
channel numbers.
MENU BUTTONS
Press the MENU button to display OnScreen feature controls.
Press ADV(ance) to move through the list
of On-Screen features.
Press A to get a menu of a selected OnScreen feature.
Press A and
selected.
In Menu mode, press STATUS (EXIT) to
switch On-Screen displays OFF.
In normal mode, press STATUS (EXIT)
once to get short display of settings, twice
to get long, more detailed display.
'y
------------------
to adjust the menu item
S.-VHS (AUX3)
Jack for S-VHS, Video input from VCR or
camcorder.
AUDIO TACKS
L(eft) jack for left-channel audio input.
R(ight) jack for right-channel audio input.
VIDEO IN (AUX 3)
RCA Jack for VCR or camcorder.
HEADPHONES " A "
Jack for headphones (6,3 mm).
You can switch off the internal speaker with
the IN IEKNAUEXiEkNAL speaker switch
on die back of the Projector (See page 7).
MIRROR
This button controls an internal electronic
“mirror” which determines how the picture
appears on your screen. You only need to use
this control when you want to use the
Projector with a rear projection screen or
minor. Each time you press the button it
changes the orientation of the picture on
your screen (See page 11).
The Projector 'remembers' its last setting.

Getting Started - Protector Controls (continued)

Remote Control Unit
M(enu)
Press the M button to display On-Screen
feature controls. Press A. or ▼ buttons to
move forward and backward through the
list of On Screen items. The menu buttons
can also be used for zoom/ focus (See below).
ZOOM AND FOCUS BUTTONS
The A yf buttons are to control ZOOM.
The - + buttons are to control FOCUS.
You can enable/disable the zoom and focus
controls using the LENS CONTROL
menu (See page 40).
Remote control of zoom and focus is not
possible when the menu is activated (After
pressing M button).
(-•> AND f-h) BUTTONS
Press to select an On-Screen menu item
and adjust settings.
VCR BUTTONS
For use of VCR (Video Cassette Recorder)
buttons see "How to Operate VCRs with
the Projector remote" on page 41.
VOLUME BUTTON
Press to adjust the sound level.
(i n
BUTTONS
--------------------------------
STATUS/EXIT BUTTON
Press to see the current channel number or
source on the Projector screen. Also press
this button to clear the screen after control
adjustments.
MUTE BUTTON
Press to turn the sound OFF on the TV
Projector. Press again to return the sound to
its previous level.
CHannel SCAN BUTTON
Press to scan up or down through the
channel numbers.
•A/CH (Alternate Channel) BUTTON
1. Press to select the previously-viewed
channel. For example: You are watching
channel 4 and change to channel 10 (usmg
the number buttons). Press A/CH and your
Projector will return to channel 4. Press A/
CH again and your Projector will return to
channel 10.
2. When the Projector is in the DATA
INPUT mode press A/CH to blank the
projected picture with a pre-defined curtain
(See page 53 for details).
NUMBER BUTTONS
Press these buttons to select TV channels.
Press two number buttons to select single
digit channels. For example: To select
chaimel 6, press “0” first and then “6”.
RESET BUTTON
Selection of 5 personal preference settings
and one Factory preset.
To load the supplied (9 Volt)
battery into the remote:
<s> Remove the battery
compartment lid on the back of the
remote.
Place the battery in the remote.
Be sure to line the (+) and (-) ends of the
battery up correcdy.
------------------------------
I BEGIN I
TV-VCR-CBL SWITCH
Slide to TV to operate your Projector, slide
to VCR to operate a VCR, slide to CBL to
operate a Cable Converter.
TIMER BUTTON
Set the Projector to turn itself OFF
automatically. See page 52 for derails.
TV-VCR-CBL BUTTONS
Press to turn the TV Projector, accessory
cable converters and VCRs ON and OFF
(See pages 46 thru 48 for details).
<S> Reattach the battery lid.
Bottom of remote control unit

Remote Control Operation of a VCR
When using the Projector remote with your
VCR, first make certain it is set to control the
VCR by the REMOTE CODE or
SEARCH method. See page 44-
1 / Slide the TV-VCR-CBL button
e remote to the VCR position.
on
Point the front of the remote
towards the front of the VCR (remote
sensor window) when pressing buttons.
Remember. The VCR function
buttons on the Projector remote will
not operate your VCR if it does not have
those features.
1^ Remember. Position TV on this
remote means Projector.
RECORD BUTTON
Hold the RECORD button down and then
press the PLAY button to begin a VCR
recording.
REW(TND> BUTTON
Press to rewind tapes. For some VCRs you
may need to press the STOP button first,
then REWIND. In the Playback mode, hold
REW button down to view picture moving
rapidly in reverse.
TV..VCR BUTTON
Press to the VCR position (“VCR”
indicator on the VCR will light) to view
die playback of a tape. Press again to place
in the TV position (“VCR” indicator on
the VCR will go OFF) to view one program
on the TV while recording another program
on the VCR.
TV>VCR-CBL SWITCH-----------------------Slide to VCR to control your VCR, using
the remote.
POWER BUTTON
Press to turn the VCR ON and OFF.
-------------------------
-----------------------------
PLAYBUTTON
Press to playback a tape. Hold down after
pressing the RECORD button to start a
recording.
EF (FAST FORWARD) BUTTON
Press to rapidly advance the tape. For some
VCRs you may need to press STOP first, then
FF. In Playback mode, hold button down to
view the picture moving rapidly in the forward
direction.
CHfannel) SCAN BUTTONS
Press to scan up or down through VCR
chaimel numbers.
STOP BUTTON
Press to stop the tape.
PAUSE BUTTON
Press to temporarily stop the tape during a
playback or recording. Press again to release
PAUSE.
NUMBER BUTTONS
Press buttons for direct VCR channel
selections or menu items.

Getting Started - Setting up the Projector + Screen
roper installation of your Projector will
ensure that you make the most ofthe
P
set's features. Read all of pages 10 throu^
12 carefidly before starting to install your
Projector.
1) Choose the screen position
You get maximum picture contrast when
the least ambient light fells on the
screen. Place the screen where light from
windows, room lighting etc. does not
disturb the picture.
2) Choose the Projector position
Ideally, the Projector should be located
at about the same height from the floor
as the top of the screen and directly in
front of it
1. LIGHTING
2. MOUNTING
The Projector can be placed on a wallmounted shelf (minimum size 17 x 24
inches), a cabinet top, or a rack can also
be used. Make sure you can hide the
cables connected to the set
The Projector has adjustable feet at the
rear. Turn these if you need to point the
Projector downwards to the screen.
Side view
Top of screen
Projection Screen
Top view
SO"
Side view
10
to
lower
(Continued on next page)
to
raise

Getting Started - Setting up the Projector + Screen (continued)
If you cannot put the Projector at the
same height as the top of the screen, but
rather lower, you have two choices:
2 A. The front of the Projector can be
tilted upwards; the picture will not then be
perfectly rectangular when the screen
hangs vertically. This is called the
"keystone” effect.
Note: The Projector should not be tilted
up or down more than 15 degrees from its
normal horizontal position.
2B. If you want to use the Projector with a
rear projection screen or in a ceiling mount
(Projector positioned upside down), you
will need to change the internal mirror.
You do this using the button marked
MIRROR which is behind the swing-out
control door on the front panel. Each time
you press MIRROR, the picture on the
screen changes orientation.
SAMPLE SET-UP FOR TABLE TOP USE
3) Choose the size of screen
Choose a screen size that fits the planned
seating capacity and room dimensions.
A good guide is:
* Two times the screen width should equal
the distance from the screen to the front
row of seats
* Six times the screen width should equal
die distance from the screen to the back
row of seats.
2B. REAR PROJECTION
viewers
3. CHOOSING THE SCREEN SIZE
Top view
viewers | ^ 2 x screen width ^ ^
Back
row ^
11
6 X screen width
Front
row
i
screen
width

Getting Started - Setting up the Protector + Screen (continued)
Your Projector has a 2x zoom lens. This
means that the picture you get on the
screen at maximum magnification is twice
as big as that projected at minimum
magnification. For example, at a distance
of 22 feet you get a lOO-inch picture on
the screen at lull magnification. You can
use the zoom lens to reduce this to 50
inches at minimum magnification.
If you want a picture size of 100 inches,
the Projector can be between about 22
and 44 feet from the screen. Choose a
screen and projection distance in the
middle of the zoom range (mid-range
magnification). This gives the best
picture quality and means you can fit the
picture exacdy to your screen by zooming
in or out a little.
The table alongside shows you typical
picture sizes at various distances. More
information is given in the "Technical
Specification" on page 57.
3) Choose the type of screen
Choose the type of screen-mount you
prefer (stand type, wall-mount, pull-down
etc).
Choose a screen with a width to height
ratio of 4:3 (aspect ratio of 133) to match
the NTSC picture format. A black
masking border around the screen will
give a crisp rectangular picture.
MAGNIRCATION
Maximum and minimum magnification (examples)
minimum picture size
at 22 feet distance
Mid - range magnification (examples)
38 feet
Distance from Projector to screen (in feet)
Picture width in
inches
Maximum
magnification
40 9
maximum picture size
at 22 feet distance
Mid-range
magnification
13 18
Minimum
magnification
The picture appears brightest (highest
gain) when you sit directly in Ifont of it
and gets dimmer as you move to the sides.
Try to keep the viewing angle as narrow
as possible for most viewers.
Choose the type of screen surfece best
suited to your room and viewing
conditions:
Pearlescent - highest gain, narrow
viewing angles.
Silver lenticular - medium gain, wide
viewing angles. This type of screen is not
recommended.
Matt white - wide viewing angles, needs
darkened room.
If in doubt, consult your dealer on the
best choice of screen for your room.
60
14
19
80 18 25
100
Larger picture sizes can be reached by putting the Projector at a
greater distance.
For best results, choose your screen and projection distance using
mid-range magnification of the zoom lens.
22 31
26
35
44
12

Getting Started - Antenna/Cable TV7VCR Connections
irst connect your Antenna or CABLE TV
signal to the Projector. There is only one 75
F
ohm antenna plug on the ixick of your TV
Projector ' and that's where the antenna goes.
BEGIN I
Back of Projector
<P
signal) has a round cable (75 ohm) with a
metal prong (F-connector) on the end,
then you're ready to coimect it to your
Projector.
IF your antenna has flat twin-lead wire (300
ohm), you first need to attach the antenna
wires to the screws on an adapter (300 to 75
ohm).
< 2>.
(or cable) onto the ANTENNA plug at the
back of the Projector.
<l>
button at the rear is switched ON.
Press the POWER ON/STAND BY button at
die front panel to turn the Projector ON. You'll
see a green ligjit above the button and, after about
a minute, you should see a picture on the screen. It
may not be sharp or the size you want, so first you
may have to adjust the picture.
IF your antenna (or CABLE TV
Push the round end of the adapter
Make sure the MAIN POWER
Turn the zoom control until the
picture is the size you want. Then turn the
focus control until it is sharp.
Open the control door (See page 5)
and press the CH(armel) UP button. You
should see local charmels flash by.
I Try it out First make sure your
Projector is properly aimed at the screen. If
you're not sure how to do this, go back and
follow the instructions on pages 10 thru 12.
Remember. If the Projector is
connected to a CABLE TV (CATV) signal, be
sure to set the Projector for that type of signal
(See page 24).
Focus
Projector Front Panel
Vi,.:......................
13

Gettesìg Started - Antenna/Cable TVA^CR Connections
ou may have two separate antennas. For
instance, one antenna for VHF channels
Y
(2-13) and the other antenna for UHF
channels (14-69).
BEGIN
For homes with separate antennas you will
need an optional "combiner" before you can
connect to your Projector.
<i> Attach the separate antennas to the
correct screws on the combiner.
Push the round end of the combiner
onto the ANTENNA plug on the rear of the
Projector.
Remember. You get the best picture
when you use high quality coax cables and
cormectors. Ask your dealer for advice.
Back of Projector
To order any optional accessory, contact your
dealer or call the toll-free accessory
ordering number
(1-800-851-8885) :
UHF/VHF Combiner
75 - 300 D. Adapter
300 - 75 a Adapter...........483521827003
......
SBV1133A01
..........
SBV 1113A01
CONNECTING A VCR
0 connect a VCR to the Projector:
T
I BEGIN I
Connect your antenna or Cable TV
signal to the IN FROM ANT(enna) input on
your VCR.
Back of Projector
cxxi-_
tal om
OuldoorVHAJHF
Antenna
Connect the OUT TO TV plug on
the VCR to the ANTENNA plug on the
Projector using the connecting cable supplied
with the VCR.
<l>
VCR with the Projector remote.
Read page 46 on how to operate a
Round Cable
75 ohm Supplied with VCR
14
^ <p>
VCR

Getting Started - Audio Connections
EXTERNAL SPEAKERS
'’ou can connect external speakers to enjoy
stereo TV programs.
BEGIN I
Connect external speakers to die
speaker wire terminals on the Projector.
Speakers; 8 ohm, 10 watt minimum.
Turn Projector on. Select AUDIO
Menu and place the Projector in the
STEREO mode (See page 21).
Place the speakers so you enjoy
good stereo sound.
AUDIO OUTPUT JACKS
he AUDIO OUT(put) jacks on the rear of
the Projector may be used to play the sound
T
of TV programs througji an audio hi-fi system.
I BEGIN I
Back of Projector
L □
O EXTERNAL SPEAKERS O
gg
4
External Speakers
Projector Back Panel
Connect the R(ight)and L(eft)
AUDIO OUT(put) jacks on the Projector
to the R and L AUDIO IN (put) jacks on
your amplifier or sound system.
Nv' First turn your Projector on; then
your audio system. Adjust the sound level
coming from the Projector with the audio
amplifier VOLUME control.
Remember. The audio system may
have to be in AUX mode to play the sound
of TV programs.
PC (VGA OR MAC II-INPUT)
ou can connect a personal computer to
display the computerscreens onto the
Y
Projector screen
<L>
Projector.
First turn OFF your computer and
AUDIO SYSTEM
Computer Back Panel
Use a Sub'D plug to connect your
computer to the DATA input socket.
If available, connect the audio (R+L,
or mono) to the RCA jacks of AUX 2 (See
page 7).
15

Getting Started - Basic Protector Operation
ou can operate your Projector using the
nY
controls on the set itself.
I BEGIN I
<i> Press in the MAIN POWER button at
the back of the set to turn the Projector ON.
(For new sets this button is on).
Press the POWER ON/STANDBY
button on the front of the Projector.
A green light above the button lights up.
Projector Back Panel
<l>;
(DOWN) buttons to adjust the sound level.
(DOWN
(EXDWN) buttons to select TV channels.
To receive all channels in your area you can also
use automatic CHANNEL SCAN
(See page 25 for details).
theTast'Viewed charmel is selected
automatically and its number appears briefly on
the screen. After that, just press the STATUS/
EXIT button to see what charmel the Projector
a 'sparking' noise may be heard. This is quite
normal.
Press the VOLUME A (UP) or'T
Press the CHAl^EL A (UP) or
Remember. When you first switch on,
Remember. EKiring starting of the set
TO SWITCH OFF
I BEGIN I
Stand By:
<i> Press die POWER ON/STAND BY
button on the front of die Projector.
Completely off:
<S> Press the MAIN POWER button
(at the back of the Projector ) so it goes to
the OUT position.
’ Remember. After switching off
widithe POWER ON/STAND BY button
(or with the Remote ) the cooling fan will
run for a few more minutes. It is advised
not to press the MAIN POWER button
before the fan has stopped.
((pj
TF 1
Front of Projector
Projector Back Panel
• EXTERNAL SPEAKERS O
16

MANUALLY
he zoom lens on your projector can be
adjusted by hand to nud<e the picture on
T
the screen larger or smaller. It also has a focus
control to make the picture sharp.
It is best to adjust the picture size first and
dten the focus.
I
BEGIN
I
<i> Turn the Zoom Control ring
until the picture on the screen is the size
you want.
<t> Turn the Focus Control ring
until the picture is sharp.
Zoom and Focus
USING THE REMOTE
BEGIN i
<i> Press one of the zoom buttons on
the remote until the picture on the screen
is die size you want. You will see the word
“ZOOM" on the screen while you do this.
Press one of the focus buttons on
the remote so that you see the word
“FOCUS“ on the screen. Press the focus
buttons until the word is as sharp as
possible. This is the best focus.
1^ Remember. The zoom and focus
hmctions on your remote can be disabled
via the menu (See page 18 and 40).
Zoom Adjustments
Focus Adjustments
17

How TO Use On-Screen Menus with Remote
You make adjustments to your projected
picture and sound using On-Screen Menus.
To get them on your screen, first press the
M(enu) button on your remote; you should
then see this MAIN MENU. It is called a
menu because, like in a restaurant, it lists the
choices available to you. You will notice that
the first item 1. AUDIO is highlighted.
This means it is selected. The other available
selections are white.
When you are switched to On-Screen
Menus, the lens zoom and focus buttons on
your remote work differently. The zoom
buttons now let you step up and down
through the menu choices. Try it. Press the
lower zoom button and watch how each menu
item is highlighted in turn.
Now we'll try changing the treble sound (the
high notes). Press M(enu) button to highlight
"1. AUDIO". Then press the "+" button to get
a menu of all the choices available for
adjusting the sound.
You should now see a picture like the one on
the right here. Notice that there is a new
element at the top of your picture. It has a
solid blue bar. There is a" - " (minus) sign on
the left and a "+" (plus) sign on the right. We
will now make the blue bar longer and shorter
to adjust the treble sound.
MAIN MENU Screen
TELEVISION ADJUSTMENTS
1. AUDIO
2. VIDEO
3. INPUT
4. DATA INPUT
5. FEATURES
6. LENS CONTROL
7. CLOSED CAPTIONING
1.BASS
2. TREBLE
3. BALANCE
4. STEREO
5. EXPAND
BASS Adjustments
Press the lower zoom button ('Y') to
highlight "2. TREBLE". You could also push a
number button, in this case 2, to select treble
in a direct manner. Then press the"+" button
and watch the blue bar get longer. Press the
" - " button to make the blue bar shorter. As
you make these changes, you will hear the
sound changing to give you more or less
treble. The Projector is set in the factory to
give the best general performance when the
blue bar reaches the middle position as shown
in our diagram. But you can adjust things to
suit yourself. When you're happy with the
treble sound you can adjust some other items
in the same way if you wish.
(Continued on next page)
Remote
1.BASS
|2. TREBLE I
3. BALANCE
4. STEREO
5. EXPAND
TREBLE Adjustments
18
(Continued on next page)

How TO Use On Screen Menus wito Remote (continued)
Most of the other menus work as described on
the previous page except that you don't
always have the blue bar; sometimes you get a
choice of two or three items instead.
To try this out, press the lower zoom button
(^ ) to highlight "4. STEREO". You should
get a display like the one on the right here.
Press the" -" or"+" buttons to highlight in
turn MONO, STEREO or SAP (Second
Audio Program).
If there is no SAP being broadcast, you will
see the message SAP NOT AVAILABLE
when you try to select it. You may see other
messages like this when using some of the
odier displays.
You can get back to the MAIN MENU at
any time by pressing M(enu).
You can also switch the On-Screen Displays
OFF at any time by pressing the STATUS/
EXIT button.
MONO I STEREO | SAP
1. BASS
2. TREBLE
3. BALANCE
|4. STEREOl
5. EXPAND
STEREO Screen
19
Remote

Audio Control Adjustments with Remote
TO SELECT AUDIO CONTROLS
<l> Press M(enu) button on the remote
to show MAIN MENU.
Press 1 on the remote to select
AUDIO (on the MAIN MENU).
Press number of the desired feature
on the remote (See below).
1^ Remember. The highlighted item is
ready for adjustment.
l.BASS 2. TREBLE 3. BALANCE
MAIN MENU Screen
TELEVISION ADJUSTMENTS
|1. AUDIO I
2. VIDEO
3. INPUT
4. DATA INPUT
5. FEATURES
6. LENS CONTROL
7. CLOSED CAPTIONING
eyond the normal volume level controls,
your Projector also has individual sound
B
controb for BASS (low frequency), TREBLE
(hi^ frequency), and Speaker BALANCE
sound.
BEGIN
With the AUDIO Menu displayed,
press 1 for BASS, 2 for TREBLE, or 3 for
BALANCE.
<l> Press the (+) or (-) buttons to
adjust the sound to levels your prefer.
<l> Press the STATUS/EXIT button
to clear the screen.
Go to next adjustment or remember,
when the bar scale is centered, speaker
BALANCE is centered between the
Projector's right and left side speakers.
AUDIO Screen:
BASS Adjustment Selected
^________________L.
h.BASS I
2. TREBLE
3. BALANCE
4. STEREO
5. EXPAND
20

Audio Control Adjustments (continued)
4. STEREO
our Projector is céle to receive broadcast
stereo TV programs. The Projector is
Y
equipped uñé an amplifier and
tivin-speaker connector to which external speakers
can be connected to hear stereo sound.
Tl\e stereo indicator (on the front of the
Projected) will ligjit when a stereo broadcast is
received.
I BEGIN I
With the AUDIO Menu displayed,
press 4 for STEREO.
Press the (+) or (-) buttons to place
the TV in the STEREO mode.
The word STEREO is highlighted to confirm
setting.
MONO STEREO SAP
1. BASS
2. TREBLE
3. BALANCE
4. STEREO
5. EXPAND
AUDIO Screen:
STEREO Adjustment Selected
<S> Go to next adjustment or press the
STATUS/EXIT button to clear the screen
1^ Remember. If a stereo signal is not
available and the Projector is placed in the
STEREO mode, sound from the Projector will
remain monaural (mono).
SECOND AUDIO PROGRAM (SAP) is
part of the stereo broadcast system. SAP is a
third audio track that is sometimes used to
broadcast foreign language translations of TV
programs.
Tlie SAP indicator will light on the front of
the Projector when SAP is available with the
selected channel.
If a SAP signal is not available, “SAP NOT
AVAILABLE” will appear on the Projector
screen.
So © ©
I RlSff I I SHÜ»)
WTIR __
® o
I
.....
____
-POWtt
21
Remote

Audio Control Adjustments (continued)
5. EXPAND
xpanded sound am be used to add greater
E
depth and dimension to both monaural
(MONO) and STEREO sound.
I BEGIN I
<i> With the AUDIO Menu displayed,
press button 5 for EXPAND.
<a>:
the Projector in the EXPAND sound mode.
The word “EXPANDED” is highlighted to
confirm setting.
<l> Press the STATUS/EXIT button to
clear the screen.
nonstandard transmission conditions the
stereo signal received by the Projector may be
unsuitable for the EXPANDED mode. If this
condition exists, you may still receive quality
stereo (or mono) sound by turning the
EXPAND mode OFF (set Projector to
NORMAL).
Expanded sound can only be heard with
external speakers connected.
Press the (+) or (-) buttons to place
Remember. Under some
NORMAL EXPANDED
1. BASS
2. TREBLE
3. BALANCE
4. STEREO
5. EXPAND
AUDIO Screen:
EXPANDED Sound Adjustment
Selected
So © ©
,„d © © ©
©
I tiSil I |suif|
Remote
22

Video Control Adjustments
TO SELECT VIDEO CONTROLS
I BEGIN
<i>
Press M(enu) button on the remote
to show the main menu.
Press 2 on the remote to select
VIDEO (on the main menu).
<S>
Press number of the desired feature
on the remote.
1^ Remember. The highlighted item is
ready for adjustment.
l.BRIGHT 2.CONTRAST
3.COLOR 4.TINT 5.SHARP
0 adjust your Projector color and picture
controls, select a channel and follow the
T
steps shown below:
I BEGIN
Select BRIGHT, CONTRAST,
COLOR, TINT, or SHARP picture control.
With the VIDEO Menu displayed, press 1 for
BRIGHT, 2 for CONTRAST, etc.
MAIN MENU Screen
TELEVISION ADJUSTMENTS
1. AUDIO
|2. VIDEO I
3. INPUT
4. DATA INPUT
5. FEATURES
6. LENS CONTROL
7. CLOSED CAPTIONING
|1. BRIGHT I
2. CONTRAST
3. COLOR
4. TINT
5. SHARP
VIDEO Screen:
BRIGHT Adj'ustment
(Also for PICTURE, COLOR)
Press the (+) or (-) buttons to
adjust the selected control.
<l> Press the STATUS/EXIT button to
clear the screen.
Remember, when the bar scale b
centered, control settings are at normal mid
range levels.
BRIGHTNESS; Press (-) or (+) to see more
or less detail in dark scenes.
CONTRAST: Press (-) or (+) to adjust the
white level.
COLOR; Press (-) or (+) to add or
eliminate color.
TINT; Press (-) or (+) to obtain natural
skin tones. (Is not available in RGB)
SHARPNESS; Press (-) or (+) to improve
detail in the picture.
Remote
23
1. BRIGHT
2. CONTRAST
3. COLOR
|4. TINT 1
5. SHARP
VIDEO Screen:
TINT Adjustment
Selected
NORMAL
1. BRIGHT
2. CONTRAST
3. COLOR
4. TINT
Is. SHARP 1
VIDEO Screen:
SHARP Adjustment
Selected
ENHANCED

Input (Tuning) Control Adjustments
TO SELECT INPUT CONTROLS
I BEGIN I
Press the M(enu) button on the
remote to show the main menu.
MAIN MENU Screen
TELEVISION ADJUSTMENTS
Press 3 on the remote to select
INPUT (on the main menu).
Press the NUMBER button of the
desired feature on the remote.
Remember. The highlighted item is
ready for adjustment.
1. TUNING
ou need to make sure that the Projector is
set to pick up either Cable TV stations err
Y
Antenm signals. In other words, the Projector
needs to know whether you have connected a
Cable TV signal or a normal antenna to its
ANTENNA plug.
1. AUDIO
2. VIDEO
|3. INPUT I
4. DATA INPUT
5. FEATURES
6. LENS CONTROL
7. CLOSED CAPTIONING
Remote
I NORMAL I CABLE
ll.TUNING I
2. CHANNEL SCAN
3. PICTURE SOURCE
BEGIN
<i> With the INPUT Menu displayed,
press button 1 for TUNING.
Press the (+) or (-) buttons to place
the Projector in either
CABLE if you DO have Cable TV
connected to the Projector.
Channels 1-125 (excluding 95-97)
available
NORMAL if you have an Anterma
connected to the Projector.
Channels 2-69 available.
<l> Press the STATUS/EXIT button
to clear the screen.
Remember. Certain channel
numbers have been added to the Projector's
program memory at the factory. See the
following page on how to set the Projector to
select only the channel numbers available in
your area.
INPUT Screen:
TUNING Adj'ustment
Selected
Remote
(Continued on next page)
24

Input (Tuning) Control Adjustments (continued)
2. CHANNEL SCAN
ou can autormticaRy preset the Projector to
select only the channel numbers available
Y
in your area (or on your Cable TV system).
Only channels added into the Projector's memory
will be selected when the CH(annel) A (UP)
▼ (DOWN) buttons are pressed on the remote.
I BEGIN I
I NORMAL I CABLE
1. TUNING
|2. CHANNEL SCAN I
3. PICTURE SOURCE
______
INPUT Screen:
CHANNEL SCAN
Selected
<i> With the INPUT Menu displayed,
press 2 for CHANNEL SCAN.
Press the A ▼ buttons on the
remote to select AUTO PROGRAM
CHANNELS.
Press the (+) or (-) buttons to begin
the AUTO PROGRAMMING of channel
numbers.
CHANNEL SCAN "ON" confirms the
channels as they are added into memory.
"FINISHED" appears when the Auto
Programming is complete and the Input
Menu is displayed again.
Press the STATUS/EXIT button
to clear the screen.
Try it out. Press the CHANNEL
A
or ▼ buttons and "scan" from channel to
channel.
CHANNEL ’ SCAN
69
ON
I SELECT CHANNELS I
AUTO-PROGRAM CHANNELS
So ©,
SO©
®
PUSH El TO AUTO-PROGRAM
FAVORITE STATION MEMORY
SELECT CHANNELS
I AUTO-PROGRAM CHANNELS I
CHANNEL ' SCAN
2 ON
AUTO-PROGRAMMING
CHANNEL SCAN
69
________
,
----
1^ Remember. To add additional
channels to (or delete unwanted channels
from) the Projector's memory, see the
SELECT CHANNELS section shown below.
To manually add (or delete) channels into the
FAVORITE STATION MEMORY;
BEGIN I
o With the INPUT Menu displayed,
press 2 for CHANNEL SCAN.
Press the A ▼ buttons to select
die SELECT CHANNELS control position.
Press the CH(annel) A (UP) ▼
(EGWN) buttons to select channel you wish
to add (or delete).
Note: The channel NUMBER buttons (on
the remote) may also be used to select
channels.
Press the (+) or (-) buttons to add
or delete channels.
AUTO-PROGRAMMING
FINISHED
Remote
CHANNEL SCAN
69
SELECT CHANNELS
AUTO-PROGRAM CHANNELS
ON
"ON" appears to confirm that a channel
has been added.
"__appears below the word SCAN to
confirm a channel has been deleted.
25

Input (Tuning) Control Adjustments (continued)
3. PICTURE SOURCE - AUX 1,2 and 3
he Projector's Picture Source controls allow
you to use the INPUT jacks (Audio,
T
Video and S(uper)'Video located on the jront and
rear of the Projector. The Projector's INPUT
jacks may be used for direct picture and sound
connections with VCRs (or Video Disc Players,
etc) that have their oivn Audio/Video OUTPUT
jacks.
To view the playback of a VCR tape (or Video
Disc) by using the Audio/Video jacks on the
Projector:
BEGIN I
Connect the VIDEO OUT jack
from the VCR (or CDV) to the AUXl
VIDEO IN jack on the Projector.
Coimect the AUDIO OUT jacks
R(ight) and L(eft) from the VCR to the
AUX 1 AUDIO IN jacks on the Projector.
Select PICTURE SOURCE control
on the Projector.
Back of Projector
/
's' IfiUfil <
'rt :;D~
—X
ttiTiminiiiffiTiiiTiiirmiTif
CU
---------------
BB
1 ..
CD on
TELEVISION ADJUSTMENTS
1. AUDIO
2. VIDEO
|3. INPUT I
4. DATA INPUT
5. FEATURES
6. LENS CONTROL
7. CLOSED CAPTIONING
With the INPUT Menu displayed, press 3 for
PICTURE SOURCE
Press the (+) or (-) buttons to place
the Projector in the AUX 1 mode.
"AUX 1" is highlighted to confirm the
setting.
Press STATUS/EXIT to clear screen.
Turn the VCR (or CDV) ON and playback
the tape (or disc) in a normal manner.
Connections and operation of the
Projector's AUX 2 and 3 INPUT jacks are frie
same as those described for the AUX 1 jacks
(except" AUX 2 or 3" is selected as the
PICTURE SOURCE)
VCR
AOTENNA RGB
IAUX 1 I AUX 2 AUX 3
1. TUNING
2. CHANNEL SCAN
|3. PICTURE SOURCE I
INPUT Screen:
PICTURE SOURCE
Adjustment
Selected
PICTURE SOURCE RGB
Connect RGB and SYNC to the AUX 2
inputs and select RGB as picture source.
(The SYNC signal must be composite
negative sync.)
(Continued on next page)
(Continued on next page)
26

Input (Tuning) Control Adtustments (continued)
3. PICTURE SOURCE - S-VIDEO
he S(uper)'VIDEO connection available
on the rear of the Projector can result in far
T
better picture clarity and detail, for the playback of
VCR tapes or Video Discs, than the normal
antenna connections.
Note: The VCR (or Compact Disc Player) must
be equipped with a S-VIDEO OUT(put) jack in
order to complete the connections shown on this
page.
I BEGIN I
Connect the S-VIDEO (or S-VHS)
OUT jack from the VCR (or CDV) to the
S-VIDEO IN jack on the Projector.
<S>,
R(ight) and L(eft) from the VCR to the
AUX 1 AUDIO IN jacks on the Projector.
<l>:
on the Projector.
With the INPUT Menu displayed, press 3 for
PICTURESOURCE.
Connect the AUDIO OUT jacks
Select PICTURE SOURCE control
Back of Projector
<S>:
die Projector in the AUX 1 mode for
S-VIDEO 1.
"AUX 1" is highlighted to confirm the
setting.
<S>
place it in the S-VIDEO (or S-VHS)
playback mode. Insert S-VHS cassette tape
and playback in a normal manner.
Press STATUS/EXIT to see: S-VIDEO 10:04.
connecting cable will be supplied with the
S-VHS VCR (or Compact Disc Player).
S-Video (or S-VHS) and audio can also be
connected to the front panel jacks (AUX 3)
Press the (+) or (-) buttons to place
Turn the VCR (or CDV) ON and
Remember. The S-VIDEO
S-VIDEO OUT
VCR
ANTENNA
I AUX 1 I AUX 2 AUX 3
1. TUNING
2. CHANNEL SCAN
|3. PICTURE SOURCE I
INPUT Screen:
PICTURE SOURCE
Adjustment
Selected
RGB
27

Input (Tuning) Control Adjustments (continued)
3. PICTURE SOURCE-TV PROJECTOR
he AUDIO/VIDEO OUT(put) jacks cm
your Projector can be used to record TV
T
programs on VCRs equipped with AUDIO/
VIDEO IN(put) jacks or to connect a TV or
monitor.
To record TV programs by using the AUDIO/
VIDEO jacks on the TV Projector:
Connect the VIDEO OUT jack
from the Projector to the VIDEO IN jack on
the VCR.
Connect the AUDIO OUT jacks
R(ight) and L(eft) from the Projector to the
AUDIO IN jacks on the VCR.
<l>:
on the Projector.
With the INPUT Menu displayed, press 3 for
PICTURE SOURCE
Select PICTURE SOURCE control
Back of Projector
Press the (+) or (-) buttons to place
the TV Projector in the ANTENNA mode.
"ANTENNA" is highlighted to confirm the
setting.
Select the TV charmel to be recorded.
Turn the VCR ON. Place cassette
tape in unit and place the VCR in the
RECORD mode.
1^;
to the selected input, i.e. what you are
watching on your Projector.
However, with the RGB input selected, there
is no video output available.
INPUT SELECTOR switch, place it in the
LINE or CAMERA position.
Remember. AUX 1 output is related
Remember, if the VCR has an
VCR
I ANTENNA I RGB
AUX 1 AUX 2 AUX 3
1. TUNING
2. CHANNEL SCAN
|3. PICTURE SOURCE I
INPUT Screen
Since the Projector must be ON for the VCR
to record. Unattended Timer Recordings with
the VCR are possible, but not recommended
with this connection.
28

TO SELECT DATA INPUT
Data Input
TELEVISION ADJUSTMENTS
Press the M(enu) button on the
remote control to show the main menu.
Press 4 on the remote control to
select DATA INPUT.
Select PICTURE SOURCE control
on the Projector.
The menu disappears and the Projector is in
die DATA mode.
Remember. To adjust the DATA
MENU controls see pages 42 thru 43.
1. AUDIO
2. VIDEO
3. INPUT
|4. DATA INPUT!
5. FEATURES
6. LENS CONTROL
7. CLOSED CAPTIONING
29

Feature Control Adjustments with Remote
TO SELECT FEATURE CONTROLS
I BEGIN I
Press M(enu) button on die remote
to show MAIN MENU.to show I
<l>:
FEATUI
FEATURES (on the Main Menu).
<S>:
on the remote.
ready for adjustment
Press 5 on the remote to select
Press number of the desired feature
Remember, the highlighted item is
1. TIMESET
our Projector is equipped with an on-screen
clock. During normal operation the clock
Y
will appear on the screen with every channel
change (and whenever the STATUS/EXIT
button is pressed).
<P
With the FEATURES Menu displayed,
press 1 for TIMESET.
Clock and "ENTER CURRENT TIME"
appears on the screen.
Select TIMESET control.
TELEVISION ADJUSTMENTS
1.AUDIO
E VIDEO
a INPUT
4.DATAINPUr
la FEATURES ~l
6. LENS CONTROL
7. CLOSED CAPTIONING
MAIN Screen
PUSH El TO MODIFYTIME
Ii.timesetI
2. OPTIONS
3. CAPTIONS
4. CHANNEL CONTROL
a PERSONALPREFERENCE
6. OPERATING HOURS TIMER
7. AUTOSTART
Remote
FEATURES Screen
PUSH [+] TO MODIFYTIME
|1. TIMESET I •
2. OPTIONS
3. CAPTIONS
4. CHANNEL CONTROL
5. PERSONAL PREFERENCE
6. OPERATING HOURS TIMER
7. AUTOSTART
FEATURES Screen
Press the (+) or (-) buttons to set
the time or use 0 to 9 buttons.
<S>:
the minutes portion of the clock or use 0 to 9
digits.
<ci>
the selection arrow to the hours portion of
the clock.
Press the (+) or (-) buttons to set the hours
portion of the clock.
4> Press the STATUS/EXIT button
to start the clock and clear the screen.
activated when the projector is in the DATA
mode (See page 29).
Press the (+) or (-) buttons to set
Press the AT buttons to move
Remember. This function carmot be
30
rXKI.
fc
5| ^
VI
_________________
© © ©
© ® ©
© ® ®
Qs3 G)
uni
____ ________
rS~)(T5r)riT)
\ wwa I
Remote
TIMESET Adjustment
hours
2SS.
5l
1
ÿ
TIMESET Adjustment
minutes

Feature Control Adjustments (continued)
2. OPTIONS
ptions albw you to vary the size and
location of the on screen dock and channel
O
information.
I BEGIN I
To adjust TIME DISPLAY options:
o Select OPTIONS control.
With the FEATURES Menu displayed, press
2 for OPTIONS.
NORMAL, HALF-HOUR, and
CONTINUOUS display options appear.
FEATURES Screen
PUSH 0 TO MODIFY
DISPLAY OPTIONS
1.TIMESET
12. OPTIONS I
3. CAPTIONS
4. CHANNEL CONTROL
5. PERSONAL PREFERENCE
6. OPERATINGHOURSTIMER
7. AUTOSTART
<§>
Press the (+) or (-) buttons to
select the desired time display.
To adjust CHANNEL DISPLAY options:
<L>
With OPTIONS Menu displayed,
press 2 for CHANNEL DISPLAY.
Press the (+) or (-) buttons to
select the desired chaimel display.
To adjust TUNING DISPLAYSIZE options:
With OPTIONS Menu displayed,
preSTs for TUNING DISPLAY SIZE
Press the (+) or (-) buttons to
select the desired tuning display.
PNORMAL4
TIME AND CHANNEL DISPLAY OPTIONS
l> CONTINUOUS 4 l> HALF-HOUR 4
TIME or CHANNEL appears
briefly on screen when the
Projector is turned on or channek
are changed. Text is large size
(TIME lower right; CH upper left).
▻ NORMALS
12
1 WXYZl
Large size CHANNEL (and
CAPTION, if set) appears in
upper left of screen.
Time appears in lower right.
31
TIME or CHANNEL remains on
screen continually (lower
comers).
TUNING DISPLAY OPTIONS
12:34 12 9:26
CHANNEL (and CAPTION, if
set) appears in lower left comer
of the screen. TIME will not
appear (unless set as a
continuous display option).
TIME or CHANNEL appears on
screen every 30 minutes.
>8iyiALL<

Feature Control Adjustments (continued)
3. CAPTIONS
aption is a four character caUout that may
be set to appear with the on-screen channel
C
number.
When set, the Caption will appear during channel
changes and when the STATUS/EXIT button is
pressed.
Example Caption: WXYZ (for a TV station's
call letters.)
BEGIN I
Select CAPTIONS control.
PUSH 0 TO MODIFY
CHANNEL CAPTION MEMORY
1. TIMESET
2. OPTIONS
|3. CAPTIONSl ■
4. CHANNEL CONTROL
5. PERSONAL PREFERENCE
6. OPERATING HOURS TIMER
7. AUTOSTART
FEATURES Screen
With the FEATURES Menu displayed, press
3 for CAPTIONS.
"CHANNEL CAPTION" appears on the
screen.
<P
(or Number buttons) to select channel to be
captioned.
Press the CH up/down
<s> Press the (+) or (-) buttons to
select the desired letter (or number)
character.
Press the (+) button to scan forward through
the list of available characters. Press the (-)
button to scan back through the list.
Press the
the arrow indicator to the next character
space, and repeat step 3.
A.
▼ buttons to move
CHANNEL CAPTION
9
W —
t
CAPTION Adjustment
<l> Press the STATUS/EXIT button
when all desired channels have been
captioned.
32

Feature Control Adjustments (continued)
4. CHANNEL CONTROL
hannel control (CC) allows you to
"CENSOR" (or blank out) any channel
you consider undesireable for unauthorized persons
to watch. A channel under Channel Control
cannot be viewed untd the correct access code is
entered to unlock the channel for viewing.
To set the Channel Code:
I BEGIN I
<P
display.
With the FEATURES Menu displayed, press
4 for CHANNEL CONTROL.
"REPROGRAM CODE" appears on die
screen.
Select CHANNEL CONTROL
PUSH 1+] TO MODIFY
CENSOR FUNCTIONS
1. TIMESET
2. OPTIONS
3. CAPTIONS
k CHANNEL CONTROL I •
5. PERSONAL PREFERENCE
6. OPERATING HOURS TIMER
7. AUTOSTART
__________
FEATURES Screen
PUSH [+] TO REPROGRAM
ACCESS CODE
Press the(+) or (-) buttons to set
the CC code.
"ENTER ACCESS CODE" appears on
screen.
Press your last defined access code
on the remote. (For new sets this is 0000)
"XXXX" apprears on screen as you press the
number buttons.
"ENTER NEW CODE" appears on screen.
N./' Enter a new four digit number code
using the remote.
"ACCESS CODE REPROGRAMMED"
appears on screen to confirm the new CC
code.
Note ; If you press a wrong accès code in step
<3>, then "INCORRECT ACCESS CODE"
will appear on screen instead of "ENTER
NEW CODE".
You will have again the possibility to access
die correct code.
Should you have forgotten your code, enter
twice 4, 7,1.1. This will get you to "ENTER
NEW CODE"
Remote
11-REPROGRAM CODE
2.CENSOR VIEWING
ENTER ACCESS CODE ■
REPROGRAM CODE
ENTER NEW CODE
REPROGRAM CODE |
-----------
' Remember. After setting the CC
codego to the following section to see how to
place desired channels under Channel
Control.
It isn't possible to unlock a preset CC code
without changing to a new CC code number.
A CC code number change should alert the
authorized person that the code has been
altered and the blanked out channel has been
viewed.
CHANNEL CONTROL Screen:
REPROGRAM CODE
Adjustment
(Continued on next page)
33

Feature Control Adjustments (continued)
4. CHANNEL CONTROL
fter the Channel Control Code has been
A
set (see previous page), follow the steps
below to select the channek you want to censor or
blank out.
I BEGIN I
<x>
display.
With the FEATURES Menu displayed, press
4 for CHANNEL CONTROL
<l> Select CENSOR VIEWING
display (press 2 on the remote).
Select CHANNEL CONTROL
PUSH 0 TO MODIFY
CENSOR FUNCTIONS
1. TIMESET
2. OPTIONS
3. CAPTIONS
|4. CHANNEL CONTROL I
5. PERSONAL PREFERENCE
6. OPERATING HOURS TIMER
7. AUTOSTART
___________
FEATURES Screen
PUSH 0 TO REPROGRAM
ACCESS CODE
"ENTER ACCESS CODE appears on screen.
<s> Enter correct CC CODE number
(on the remote).
"CHANNEL CENSOR" appears on screen.
<i> Press CH(atmel) A ▼ or Number
buttons to select the desired channel to be
placed under CHANNEL CONTROL.
<s> Press the (+) or (-) buttons to place
selected channel under CHANNEL
CONTROL.
Repeat steps 4 and 5 for any additional
channels you wish to blank out.
1.REPROGRAM CODE
|2.CENSOR VIEWING |
ENTER ACCESS CODE ■
I CENSOR VIEWING
CHANNEL
12 ON
ICENSOR CHANNELS
CENSOR AUX/S-VIDEO
REVIEW CENSOR MEMORY
CENSOR
CHANNEL CONTROL Screen:
CENSOR VIEWING
Adjustment -
CENSOR CHANNELS
34
(Continued on next page)

Feature Control Adjustments (continued)
CENSOR AUX / S-VIDEO
ou 1TU15 also censor the use of the Audio/
Video IN(put) jacks on the rear of the
Y
Projector. This way viewing VCR or Video Disc
material (using the AjVjackpanel connections)
can be prevented (unless the CC code is known).
To place the AUX(iliary) S-VIDEO IN(put)
jacks under CItannel Control:
BEGIN
PUSH 0 TO MODIFY
CENSOR FUNCTIONS
1. TIMESET
2. OPTIONS
3. CAPTIONS__________
kCHANNELCONTROL I ''V
5. PERSONAL PREFERENCE
6. OPERATING HOURS TIMER
7. AUTOSTART
FEATURES Screen
<i>
displayed, press
AUX/S-VIDEO position.
"SIGNAL INPUT CENSOR" appears on
screen.
<2>
A/V jacks and S-VIDEO IN(put) under
Channel Control.
"ON" appears under the word CENSOR to
confirm the setting.
number will now have to be entered before
the jackpanel IN (puts) can be selected for
use.
With CENSOR VIEWING screen
A.
▼ to select CENSOR
Press (+) or (-) buttons to place
Remember. The correct CC Code
PUSH [+] TO REPROGRAM
ACCESS CODE
PREPROGRAM CODE
|2.CENSOR VIEWING
ENTER ACCESS CODE
I CENSOR VIEWING |
SIGNAL INPUT
AUX/S-VIDEO
CENSOR CHANNELS
[CENSOR AUX/S-VIDEOn
REVIEW CENSOR MEMORY
±
---------
CENSOR
35
CHANNEL CONTROL Screen:
CENSOR VIEWING
Adjustment - CENSOR
AUX/S-VIDEO
(Continued on next page)

Feature Control Adjustments (continued)
REVIEW CENSOR MEMORY
‘^0 quickly check which channels have been
placed under Channd Control:
I BEGIN I
<i> With CENSOR CHANNELS
screen dispkyed, press
REVIEW CENSOR MEMORY position.
"CENSORED CHANNELS" appears on
screen with a listing of all channels that have
been placed under Channel Control (CC).
<2>
Press (+) or (-) buttons to scroll
through the censor memory.
A.
▼ to select
PUSH 0 TO MODIFY
CENSOR FUNCTIONS
1. TIMESET
2. OPTIONS
3. CAPTIONS
kCHANNELCONTROL I
5. PERSONAL PREFERENCE
6. OPERATING HOURS TIMER
7. AUTOSTART
___________
FEATURES Screen
PUSH [+] TO REPROGRAM
ACCESS CODE
1.REPROGRAM CODE
I2.CENSOR VIEWING
1^1
Remember. Once the CC code has
been correctly entered for one blanked out
charmel, all channels (and
A/V jacks) under
Channel Control will be unlocked.
This makes viewing more convenient by
eliminating the need to enter the CC code
each time a Charmel Control channel is
selected.
When the Projector is turned OFF and back
ON again, Channel Control is back in place.
ENTER ACCESS CODE
CENSOR VIEWING
CENSORED CHANNELS
4
13 WXYZ
17 ABCD
CENSOR CHANNELS
CENSOR AUX/S-VIDEO
[REVIEWCENSOR MEMORY]
-----------
1
------
CHANNEL CONTROL Screen:
CENSOR VIEWING
Adjustment - REVIEW
CENSOR MEMORY
36

Feature Control Adjustments (continued)
5. PERSONAL PREFERENCE
he Personal Preference button (located on
the remote) will return the Projector to
T
Specific preset sources and their picture and audio
level settings.
Five Personal Preference settings are available,
so that the setting^ of each source can be stored
(e.g. AUX 1 for VCR settings, 5.ANT. far TV
clmnnel settings).
PUSH [+1 TO MODIFY
PRESET PICTURE CONTROLS
1. TIMESET
2. OPTIONS
3. CAPTIONS
4. CHANNEL CONTROL
5. [PERSONAL PREFERENCE I
6. OPERATING HOURS TIMER
7. AUTOSTART
BEGIN
<i>
and picture controls to settings you personally
prefer (See pages 20-23).
Press 5 (FEATURES).
With the FEATURES Menu displayed, press
5 for PERSONAL PREFERENCE.
the settings you have made in step <1>.
"SELECT P. PREF ITEM TO STORE TV
SETTINGS " appears on screen. Five levels
are available.
remote to select one of the listed levels.
"P. PREF CAPTION" appears on screen.
Select a source and adjust the audio
Press M(enu).
Press the (+) or (-) buttons to store
Press the AT buttons on the
FEATURES Screen
PUSH 0 TO STORE
TV SETTINGS AS P. PREF.
I I.P. PREF STORE I
2.P. PREF MODIFY
SELECT P. PREF ITEM
TO STORE TV SETTINGS
1.AUX1
2. AUX 2
3. AUX 3
4. RGB
5. ANT.
P. PREF
i
CAPTION
1
VUX1
t
Press the (+) or (-) buttons if you
want to change the CAPTION tide for the
selected P. PREF. level (e.g. "VCR" instead of
AUX 1).
Press the
each new character space. Example Caption:
VCR.
When the P. PREF. caption is complete, press
the STATUS/EXIT button to clear the
screen.
A T
buttons to move indicator to
PERSONAL PREFERENCE
Screen; 1. P. PREF. STORE
Writing a name
(Continued on next page)
37

Feature Control Adjustments (continued)
rj^o recall the Personal Preference:
I BEGIN I
<i> Press RESET (Personal Preference)
button on the remote.
"PERSONAL PREFERENCES" list (with
caption) appears on screen.
<2>.
remote to select one of the listed personal
preference levels.
Source, picture and audio settings will change
to the preset levels you selected in the set-up
procedure on the previous page.
P
P. PREF. setting.
<i> Press M(enu).
Press 5(FEATURES).
Press 5(PERSONAL PREFERENCE).
With the P. PREF Menu displayed, press 2 for
P. PREF MODIFY.
"SELECT P.PREF ITEM FOR
MODIFICATION" appears on screen.
Press the
REF(erence). MODIFY is available to
quickly make changes to any existing
A.
▼ buttons on the
[ BEGIN I
© © ©
© © ©
PHILIPS
L
_________
Remote
PERSONAL PREFERENCES
1.AUX1
2. AUX2
3. AUX3
4. RGB
5. ANT.
6. FACTORY PRE-SETS
PERSONAL PREFERENCE
select
PUSH 0TO MODIFY
PREVIOUS P. PREF. SETTINGS
I.P. PREF STORE
|2.P. PREF MODIFY |
PERSONAL PREFERENCE
Screen
Select desired P. PREF from list
Example: press 1 for AUX 1.
<s> Press 1 on the remote.
"P. PREF CAPTION" appears on screen.
<S> Press A ▼ buttons to select the
desired adjustment item.
Press the (-f) or (-) buttons to
adjust the highlighted item.
1^;
selected as source then the modified pref.
setting will not change the source selection.
Remember. When "NONE" is
© © ©
© © ©
S © © ©
0
fónfwinn
PHILIPS
\
__________
Remote
38
SELECT P. PREF ITEM
FOR MODIHCATION
h.AUXI Ì
2. AUX 2
3. AUX 3
4. RGB
5. ANT.
t
P. PREF CAPTION
1
BRfTE —\—
PICT —i—
COLOR —i—
TINT —I—
SHARP-NORMAL
LENS-ENHAN
SOURCE-ANTENNA CC-OFF
y
PERSONAL PREFERENCE
Screen: 2. P. PREF MODIFY
Adjustment
AUX1
1
BASS —I—
TREB —i—
BAL —i—
MODE■STEREO
EXPAND-OFF
CHANNEL-02

Feature Control Adjustments (continued)
7. AUTOSTART
f the Projector is turned on with the main
I
switch and autostart is activated, the
Projector will start with the main pttwre
connected to the last selected source. If the source
is ANTENNA, the Projector will tune to the last
selected channel.
[ BEGIN
<P
With the FEATURES menu displayed press 7
for AUTOSTART.
die function ON or OFF.
Select AUTOSTART control.
Press the (+) or (-) buttons to turn
PUSH [+] TO TURN
AUTOSTART ON OR OFF
1. TIMESET
2. OPTIONS
3. CAPTIONS
4. CHANNEL CONTROL
5. PERSONAL PREFERENCE
6. OPERATING HOURS TIMER
|7. AUTOSTART |
39

40

Closed Captioning Adjustments
bseA Captionning allows you to read
the mice content of tekvision programs on
C
the screen. Designed to help the hearing impaired
this feature uses on-screen "text boxes" to show
dialogue and conversations whik the TV
program is in progress.
Remember. Broadcast stations will
often use spelling abbreviations, symbols,
dropouts and other grammatical shortcuts in
order to keep pace with the on-screen
actions. These type factors vary depending
upon the source of the captioned text
material and do not indicate a need for
service on the part of the Projector.
[ BEGIN I
Press M(enu) button on the remote
to show MAIN MENU.
TELEVISION ADJUSTMENTS
1. AUDIO
2. VIDEO
a INPUT
4.DATAINPUT
aPEATUFES
6. LENS CONTROL
|7. CLOSED CAPTIONING I
PUSH 0 TO MODIFY
TIME
Il.TIMESET 1
2. OPTIONS
3. CAPTIONS
4. CHANNEL CONTROL
5. PERSONAL PREFERENCE
6. OPERATING HOURS TIMER
7. AUTOSTART
<P
CLOSED CAPTIONING (on the MAIN
MENU).
CAPTIONING will only be displayed when
available in the selected TV channel, tape or
any chosen source.
<l>
select CLOSED CAPTIONING mode.
Selecting OFF will remove CLOSED
CAPTIONING information. Selecting
CAPTIONS will display video related text
on the screen (e.g. for sub-tides). Selecting
TEXT will display messages encoded in the
video you are watching.
channel 1 or 2. Channel 1 contains text in
language 1 and charmel 2 in the second
language (when available).
Press 7 on the remote to select
Remember. CLOSED
Press the (+) or (-) buttons to
Press the Jk. ▼ buttons to select
CAPnONSTEXT
I1.MODE I
aCHANNEL
Press the STATUS/EXIT button
to return to the MAIN MENU.
NOTE: Not all TV programs and product commercials are made for
broadcast with Closed Caption (CC) information included. Neither are all
Closed Caption modes necessarily being used by a broadcast station during
the transmission of a closed caption program. Refer to your area's TV
program listings for the stations and times of Closed Caption shows.
41

Data Menu Control Adjustments
l.IMAGE - PHASE,
BRIGHTNESS, CONTRAST
eyond the normal picture levels, you can
also control the image of projected
B
computer pictures.
To adjust these settings, the Projector must be in
the DATA mode (See page 29).
BEGIN
With the DATA mode selected
press M(enu) on the remote.
The DATA MENU appears on screen.
With the DATA MENU selected
press 1 for IMAGE.
The first ring-menu (PHASE) appears on
screen.
<l>
remote to select another ring-menu
displayed (BRIGHTNES or CONTRAST).
adjust the setting of the ring-menu
displayed.
<l> Press M(enu) again to return to
the DATA MENU.
centered, control settings are at normal mid
range levels.
Press the A ▼ buttons on the
Press the (+) or (-) buttons to
Remember. When the bar scale is
42

43

Data Menu Control Adjustments (continued)
3.SETUP - HOR. POSITION,
VERT. POSITION, PERSONAL
PREFERENCE, CURTAIN,
COMPUTER IDENT.
o adjust die setup of the computer image
displayed, the Projector must be in die
T
DATA mode (See page 29).
DATA MENU
1. IMAGE
2. AUDIO
|3. SETUP I
4. DATA EXIT
I BEGIN I
<i>
press M(enu) on the remote.
The DATA MENU appears on screen.
<S>N
press 3 for SETUP.
The first ring-menu (HOR(izontal).
POSITION) appears on screen.
<3> :
remote to select another ring-menu displayed
(VERT(ical). POSITION, PERSONAL
PREFERENCE, CURTAIN or COMPUTER
IDENT(ification).).
<S>:
adjust the setting of the ring-menu displayed.
DATA MENU.
With the DATA mode selected
With the DATA MENU selected
Press the Jk. ▼ buttons on the
Press the (+) or (—) buttons to
Press M(enu) again to return to the
HOR. P(
- Illllllllll
VERT. P
- Illllllllll
PERSONAL PREFERENCE
- STORE +
CURTAIN
- RED +
COMPUTER IDENT.
- AUTOMATIC +
>
DSITION
>
<
>
f
OSITION
>
> f
>
<
>
f
>
<
>
f
>
<
>
f
A
Remember. When the bar scale is
centered, control settings are at normal mid
range levels.
PERSONAL PREFERENCE: After pressing
the (+) or (—) button the current setting for
the DATA mode will be stored. The text
"VALUES STORED" will be displayed
briefly.
CURT AN: Press (+) or (—) to change the
curtain color. The following colors can be
selected: red, green blue, yellow, magenta,
cyan, white and black.
COMPUTER IDENT.: The projector is able
to automatically identify the cormected type
of computer signal. However, if the connected
computer signal does not match the known
signal standards, automatic identification can
be overruled. Press the (+) or (-) button to
select AUTOMATIC, VGA 480, VGA 400,
VGA 350 or MAC-11.
44

Data Menu Control Adjustments (continued)
4.DATA EXIT
s long as the Projector is in the DATA
mode, only the DATA MENU items can
A
be selected and adjusted.
To return to the normal mode, you have to exit
die DATA mode first.
I BEGIN I
DATA MENU
1. IMAGE
2. AUDIO
3. SETUP
|4. DATA E>aT|
<x>
press the M(enu) on the remote. The
DATA MENU appears on the screen.
<S>N
press 4 for DATA EXIT.
With the DATA mode selected
With the DATA MENU selected
45

How TO Operate VCRs with the Protector Remote
our remote control is set to work your
Projector and many infrared remote (IR)
Y
control VCRs. However, an easy one-time step
may be necessary before the remote will work
your VCR.
Try this initial check to see if going on to the
foUowing section is necessary.
I BEGIN I
Slide the TV-VCR (Video
Cassette Recorder)'CBL (Cable) switch on
the remote to VCR.
Point remote toward VCR and
press the VCR POWER button.
© © ©
<l>
IF YES, 1^1 and try the other VCR
buttons on the remote. If they also work the
VCR, then the remote is ready and no
further steps are needed.
IF NO, continue.
remote code number (see table alongside)
for your brand VCR before going through
the simple "1, 2, 3, 4" steps on the following
page.
you may have to try more than the first twodigit code given in order to locate your
VCR's remote control.
(Continued on next page)
Does the remote turn the VCR on?
First look up a TWO-DIGIT
If more than one number is listed,
Remote Control
Remote Control VCR Chart
VCR REMOTE
BRAND CODE№ BRAND CODE№
Akai
Audio Dynamics 14, 21, 29 NEC 14, 21, 29
Broksonic 31 Panasonic 01
Cannon 01
Capehart 33 Philco
Craig
Curtis Mathes 01,42,43
Daewoo
DBX
Dynatech
Emerson
Fisher 06,07,08 Scott 19
Funai
GE
Goldstar
Hitachi 03
Instant Replay
JC Penney
JVC 14
Kenwood
Lloyds 27
Magnavox 00,01, 02,05,27, 28
Magnin
Marantz 29
Memorex
Minolta
Mitsubishi
Montgomery Ward
24, 25,36
07,30 Philips 00,01,02,05, 27, 28
33 RCA
14, 21,29
27
20,31,34,40 Sanyo
27, 28
01 Sharp 11,12
23 Shintom 35
01 Sound Design 27
01,03, 23,29 Sylvania 00,01,02,05,27, 28
13,14
30 Thomas
01,07, 23,27
03 Video Concepts 28, 29
16,17,38,39 Yamaha 14, 28, 29
12 Zenith
VCR
Multitech
Pentax
Quasar 01
Realistic
Samsung 22,30
Sears
Sony
Symphonic
Tatung
Teac
Teknika 26, 27
TMK 20
Toshiba 18,19
REMOTE
27,28
02,03
01,02, 27
03,04,32,42,43
07,11, 12,23
07,13
03,08, 23
09,10,41
14, 27
27
14
27
15
46

How TO Operate VCRs with the Projector Remote (cont.)
ow that you have looked up the two-digit
Remote Code Number for your brand of
N
VCR (on previous page), you are ready to follow
the four simple steps behw:
Please read through steps I - 4 before beginning.
BEGIN
<i> Slide the TV-VCR (Video Cassette
Recorder)'CBL (Cable) switch
to VCR.
<l> Press and release the RECORD
button, and then press and release the VCR
POWER button.
<3>
VCR POWER button, ENTER THE TWO
DIGIT CODE NUMBER for the desired
VCR (see list).
The remote is now ready to send commands to
the VCR.
die VCR POWER button on the remote to
turn the VCR on.
buttons on the remote should now operate the
VCR.
1^ Remember, if this 1, 2,3, 4 procedure
doesn't work the first time, repeat steps using
the same remote code number.
IF after a second attempt the remote does not
operate your VCR, and there are more code
numbers listed for your brand VCR, try the
next listed code number.
Within ten seconds after releasing the
Point the remote at the VCR. Press
^ Try it out. The channel and VCR
© ©
© © ©
© © ®
OUn] (Ò)
(~^
PHILIPS
Remote
IF after repeated attempts the code number
procedure does not work your VCR, try the
"VCR SEARCH" method.
(Continued on next page)
47

How To Set Remote to Work your VCR - Search Method
our Projector remote can be set to work
your VCR by what is caUed the SEARCH
Y
method.
IF the "REMOTE CODE" number method
shown in the previous section did not set your
remote to work your VCR, then follow the five
easy steps listed below:
Please read throu^i steps 1-5 before beginning.
I BEGIN I
Slide the TV-VCR (Video Cassette
Recorder)-CBL (Cable) switch
to VCR.
Press the POWER button on the
VCR to turn VCR on.
TV/VCR
© © ©
Remote
<S>:
front of the VCR.
Point the remote toward the VCR.
HOLD DOWN the A/CH (Alternate
Channel) and VCR POWER buttons at the
same time. KEEP HOLDING BUTTONS
DOWN.
VCR. Channel Numbers will SCAN UP when
the VCR has been identified. This may take up
to two minutes.
<s> Release the A/CH and VCR
POWER buttons as soon as channel numbers
start to scan up. The VCR code has been
identified and the remote is ready to operate
the VCR.
Stand at least six feet away from the
Watch the Chaimel Indicator to the
W/VCR _ _,
<=) © ©
© ©
© ® ©
©
Remote
Remember. A minute or two can
seem very long, but the code should be located
within two minutes.
Don't scan more than five channels (in
SEARCH mode) or the two minute search
cycle will have to be repeated.
If no channel change happens within two
minutes, repeat steps 1-5. Should a channel
change still not occur, the remote will not
operate the desired VCR.
48

How TO Operate Cable Converters with the Projector Remote
our remote control is set to work your
Projector and many infrared remote (IR)
Y
control Cable Converters. However, an easy
one-time step may be necessary before the
remote will work your Converter.
Try this initial check to see if going on to the
folhwing section is necessary.
Cable
I BEGIN I
Slide the TV-VCR (Video
Cassette Recorder)-CBL (Cable) switch on
the remote to CBL.
Point remote toward Cable
Converter and press the CBL POWER
button.
Cbes the remote turn the
Converter on?
Converter
IF YES, 1^ and try the CH(annel)
A (UP) ▼ (EXDWN) and number buttons
on the remote. If they also work the
Converter, then the remote is ready and no
further steps are needed.
IF NO, continue.
First look up a TWO-DIGIT
remote code number (see table alongside) for
your brand Converter before going through
the simple "1, 2,3,4" steps on the following
page.
If more than one number is listed,
you may have to try more than the first twodigit code given in order to locate your
Converter's remote control.
Remote Control Cable Converter Code Chart
CONVERTER REMOTE
BRAND
Archer
Diamond 23
Hamlin 15,15
Hitachi
Jerrold 01,02,03,04,05,30
Macom 29
Magnavox 17,26,31
Oak 26
Oak Sigma 06
Panasonic 18,35
Magnavox
Pioneer 09,32
Rembrant 33
Regency 10,11
Scientific Adanta 08, 22
Sheritech
Sylvania
Texscan 16
Tocom 12,13
Universal 36
Viewstar Philips 26
Zenith
CODE№
19, 20, 21,24, 26
28
25
34
16
07
49
(Continued on next page)
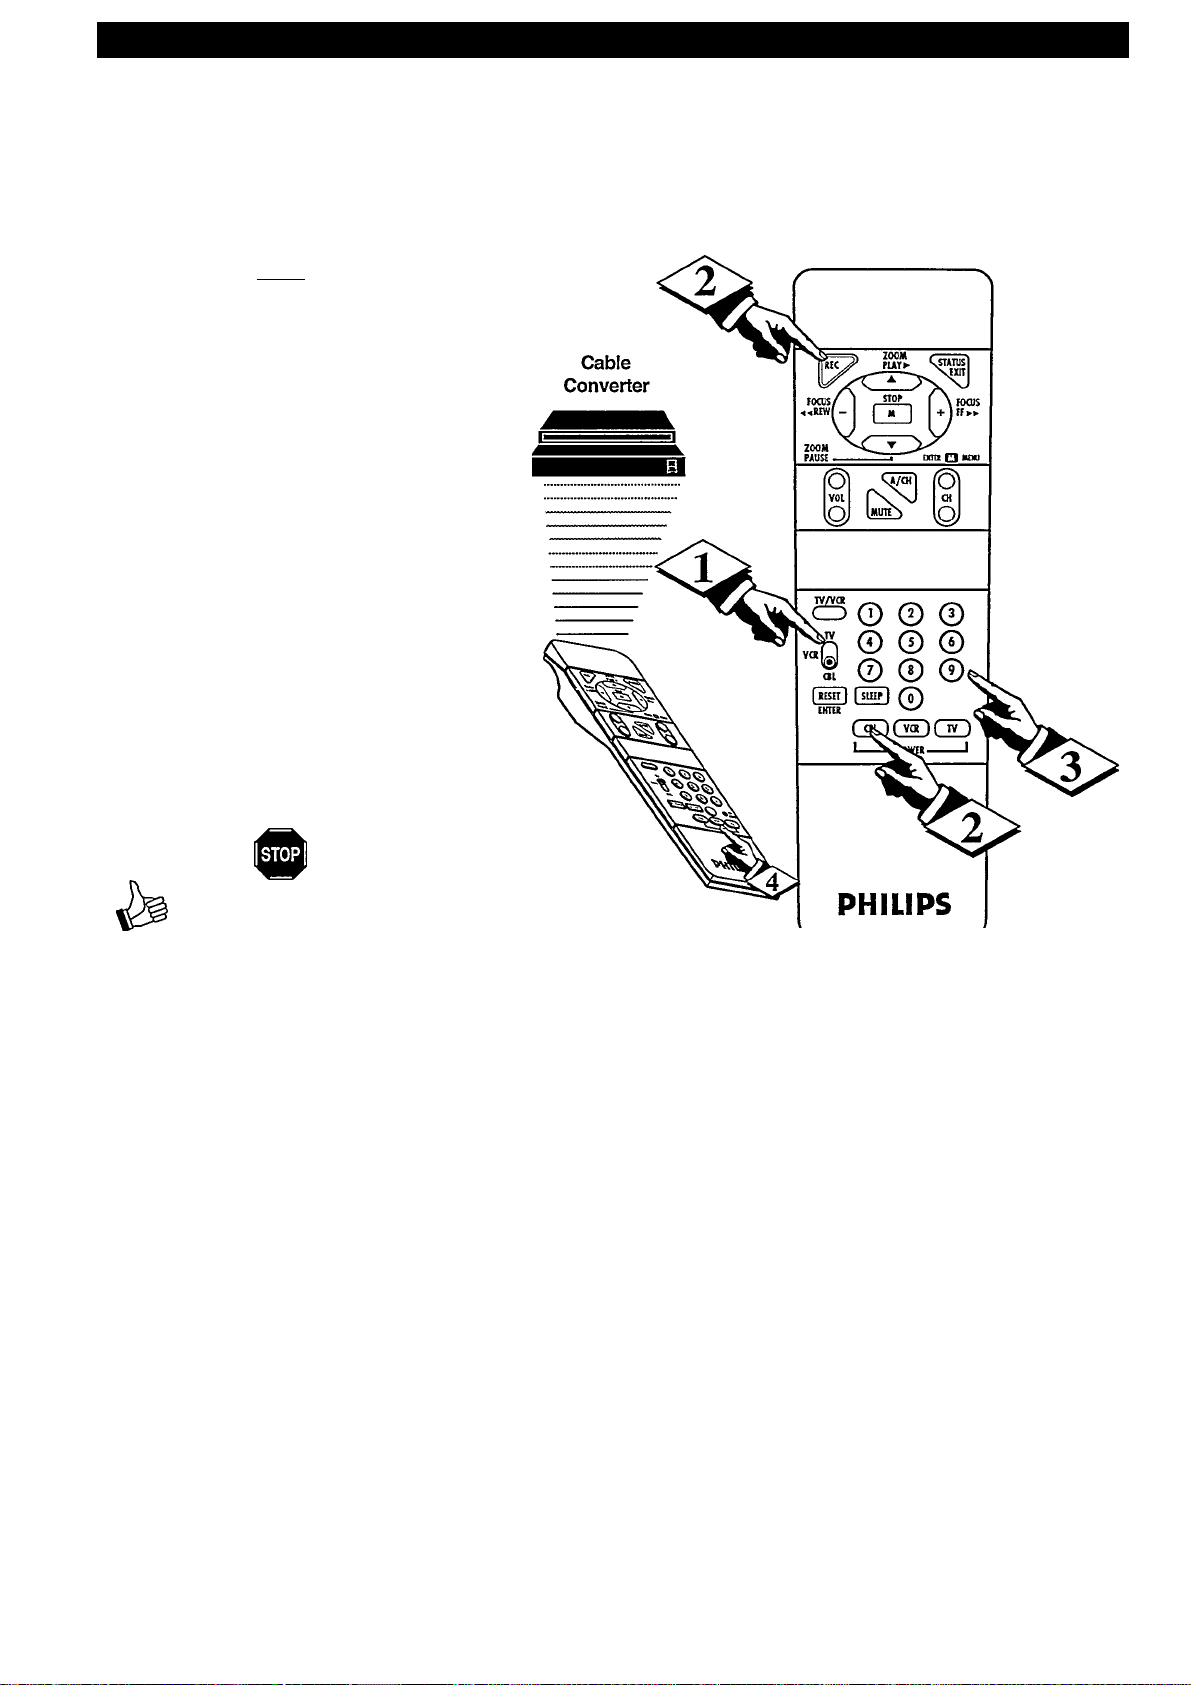
How TO Operate Cable Converters with the Projector Remote
’ow that you have looked up the two-di^t
Remote Code Number for your brand of
N
Cable Converter (on previous page), you are
ready to follow the four simple steps below.
Please read throng steps i - 4 before beginning.
BEGIN
<A> Slide the TV-VCR (Video
Cassette Recorder)'CBL (Cable) switch
to CBL.
Press and release the RECORD
button, and then press and release the CBL
(Cable) POWER button.
<2>
the CBL POWER button, ENTER THE
TWO DIGIT CODE NUMBER for the
desired Converter (see list).
The remote is now ready to send commands
to the Converter.
<^4>
Press the CBL POWER button on the
remote to turn the Converter on.
POWER buttons on the remote should now
operate the Converter.
1^ Remember, if this 1, 2,3,4
procedure doesn't work the first time, repeat
steps using the same remote code number.
IF after a second attempt the remote does
not operate your Converter, and there are
more code numbers listed for your brand
Converter, try the next listed code number.
Within ten seconds after releasing
Point the remote at the Converter.
Try it out. The channel and
Remote
IF after repeated attempts the code number
procedure does not work your Converter, try
the "CONVERTER SEARCH" method.
(Continued on next page)
50

How To Set Remote to Work your Cable Converter - Search
our Projector remote can be set to work
your Cable Converter by what is called the
Y
SEARCH method.
IF the "REMOTE CODE" number method
shown in the previous section did not set your
remote to work your Converter, then follow the
jive easy steps listed below:
A
VCR
rv/vcR
j
© © ©
Remote
Please read throu^ steps I - 5 before beginning.
I BEGIN
<P
Cassette Recorder)-CBL (Cable) switch
to CBL.
Converter to turn Converter ON.
<S>:
the front of the Converter.
Point the remote toward the Converter.
HOLD DOWN the A/CH (Alternate
Channel) and CBL POWER buttons at the
same time. KEEP HOLDING BUTTONS
DOWN.
die Converter. Channel Numbers will
SCAN UP when the Converter has been
identified. This may take up to two minutes.
<l> Release the A/CH and CBL
POWER buttons as soon as channel
numbers start to scan up. The Converter
code has been identified and the remote is
ready to operate the Converter.
Slide the TV-VCR (Video
Press the POWER button on the
Stand at least six feet away from
Watch the Channel Indicator on
I RESET
ENTER
■ © ® ©
0 ©
0 ©
© ® ©
0
( C8L ) ( VCR ) ( TV )
1 _^SiER
____
I
Remote
Remember. A minute or two can
seem very long, but the code should be
located within two minutes.
Don't scan more than five channels (in
SEARCH mode) or the two minute search
cycle will have to be repeated.
If no channel change happens within two
minutes, repeat steps 1-5. Should a channel
change still not occur, the remote ■will not
operate the desired Converter.
51
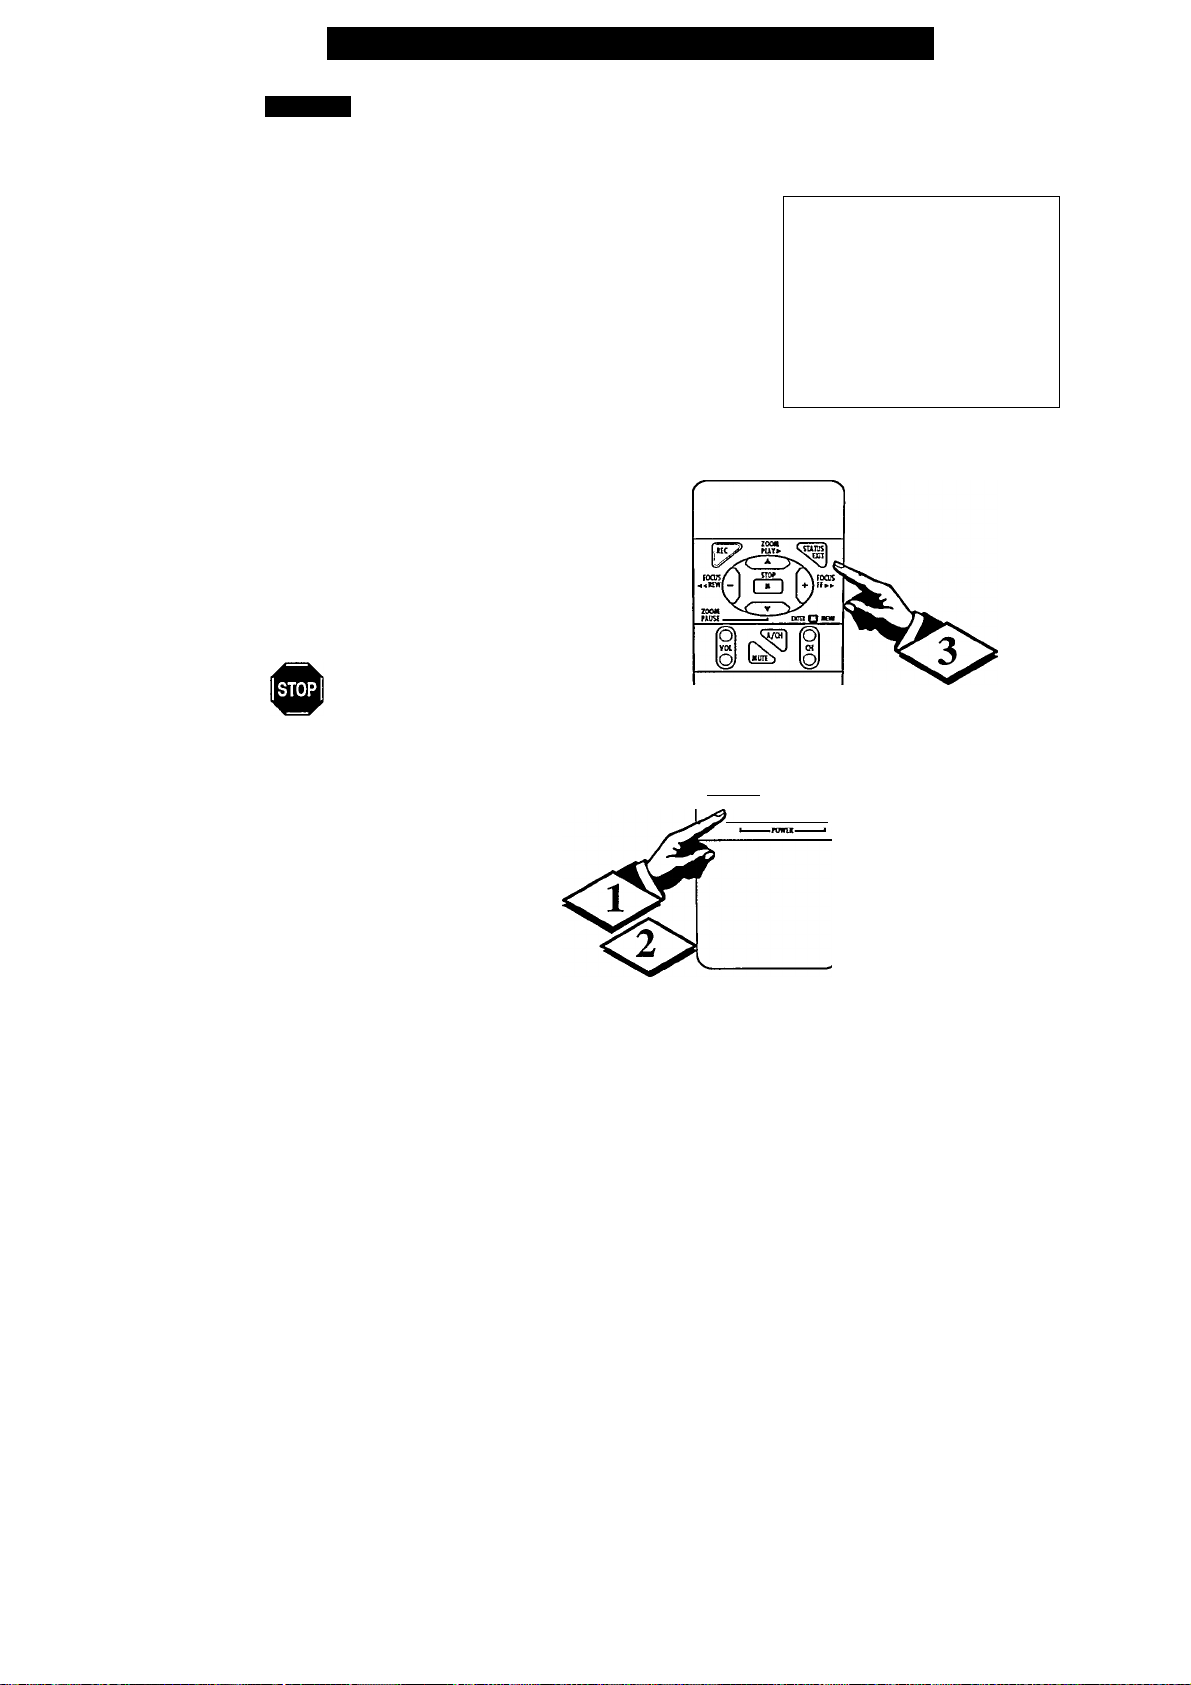
Remotie Control Operation - Timer
TIMER
ave you ever forgotten to turn off the
H
Projector and found it the next day with a
test pattern screeching in your ears? Well, your
Projector can save you all that trouble by
automatically turning itself off.
BEGIN
Press the TIMER button on the
remote.
'TIMER' 0:(X)" appears on screen.
N/ Press the TIMER button
repeatedly to select the amount of time
before the Projector will turn OFF.
TIMER
--------
TIMER Screen
------
0:00
0:30
1:00
1:30
2:00
<S>:
to clear the screen.
1^ Remember. If you ever want to see
how many minutes are left before the
Projector shuts oif, reselect the TIMER
display.
If you ever want to stop a TIMER setting,
reset the timer to 0:00 (or you could just
turn the Projector off and then back on to
cancel a setting).
Press the STATUS/EXIT button
So © ©
© © ©
s © © ©
Igatl |!ng| (7)
WIU
_____ __________
ronCv5~)nO
Remote
52

Remote Control Operation - Curtain
CLOSING/OPENING
THE CURTAIN
ou can use the curtain control to blank the
displayed computer picture. The saeen will
Y
be blanked in the color selected (See page 44) ■
This option can be useful when there is a
waiting time between changing computer
screens.
TIte Projector must be in the DATA mode (See
page 29).
BEGIN
<P
press button A/CH on the remote.
The screen is blanked and the curtain is
closed in the selected color.
any other button on the remote) to open
the curtain again.
cannot be used if a source other than
DATA has been selected.
If die curtain is closed, the color can be
changed by pressing the CH up/dovm
button.
With the DATA mode activated,
Press the button A/CH again (or
Remember, the curtain function
53

Replacing The Lamp
he lamp used as the Нфг source in your
Projector will eventually have to be replaced.
T
Shordy after 2,000 hours of viewing, you will see a
warning display on your screen:
FOR BEST PERFORMANCE
PLEASE REPLACE LAMP.
RESET OPERATING HOURS TIMER
When you see this warning, the lamp should be
replaced as soon as possible to restore brightness
and to avoid sudden bum-out.
Remember. A spare lamp can be
stored in a special compartment concealed
behind the front grille. It is advisable to
purchase a spare lamp. This will minimize
possible loss of viewing time.
BEGIN
Switch off your Projector and unplug
the power line.
FOR BEST
PERFORMANCE
PLEASE REPLACE LAMP
RESET OPERATING HOURS TIMER
SEE USER MANUAL
LAMP Screen
Front of Projector
<2>
IMPORTANT. In operation the lamp runs
very hot. You can bum yourself severely if you
handle the lamp when it is hot.
Ф:
the Projector to release the front grille. Lift the
grille completely off.
Take the spare lamp out of the compartment or
box and remove the plastic bag. Hold the lamp
by its base, using your right hand; DO NOT
TOUCH THE GLASS.
<s> Using the thumb and forefinger of
your left hand, press the lamp spring clips
together and swing the clip assembly up and
over to the right. Lift out the old lamp and
discard it by putting it in the trash can. DO
NOT put it in a fire.
If you see broken glass inside the Projector do
not continue. Call your serviceman who will
take the required action.
Wait for the lamp to cool. THIS IS
Press the grille catch on the side of
Pull off the lamp base connector.
<6>
’ Insert the new lamp, making sure that
the flat part of the base is positioned as shown
in the diagram.
(Continued on next page)
54

<S> Hold the spring clips between the
tliumb and forefinger of your left hand and
swing the assembly back into position over the
lamp base. Press the clips together, push down
and release them so they lock into position.
Replacing The Lamp (continued)
<8>
Push the lamp coimector onto its base
until you feel a slight 'click'. Make sure the
cable fits between the spring clips as shown in
the diagram.
Replace the spare lamp cover.
<#■ Press the front grille back into
position making sure that the front left side
latch clicks firmly into its slot.
<U> Plug in the power line and press the
ON switch.
OPERATING HOURS TIMER
fter replacing the lamp, you must reset the
operating hours timer.
A
I BEGIN I
<P
remote) to show MAIN MENU.
<S>
FEATURES (on the MAIN Menu).
OPERATING HOURS TIMER.
Press 2 on the remote to select RESET
OPERATING HOURS.
<!> You will see the operating hours
screen with 0000 HRS.
Press MENU (or M button on the
Press 5 on the remote to select
Press 6 on the remote to select
Press + to reset OPERATING HOURS.
PUSH 0TO VIEW OR RESET
OPERATING HOURS TIMER
1. TIMESET
2. OPTIONS
3. CAPTIONS
4. CHANNEL CONTROL
5. PERSONAL PREFERENCE
16. OPERATING HOURS TIMER
7. AUTOSTART
1253 HOURS
11. OPERATING HOURS_____________
2. RESET OPERATING HOURS
PUSH QtO RESET
OPERATING HOURS
1. OPERATING HOURS
|2. RESET OPERATING HOURS |
FEATURES Screen
OPERATING HOURS TIMER
MENU Screen
0000 HOURS
11. OPERATING HOURS 1
2. RESET OPERATING HOURS
<$> Press the STATUS/EXIT button to
return to normal viewing.
55

Tips if Something isn’t Working
Tykase make these simple checks before caking for
service. These tips can save you time and
money since charges for Projector installation and
adjustment of customer controls are not covered
under your warranty.
NO POWER
NO PICTURE
NO SOUND
REMOTE DOES NOT WORK
This Projector is equipped with protective circuitry that shuts the Projector
OFF in case of moderate power suites. Should this occur turn the Projector
back ON by pressing the POWER ON/STAND BY button, or unplug and
then replug the power cord at the AC oudet.
This feature is not designed to prevent damage due to high voltage, such as
lightning, which is not covered by your warranty.
Check the Projector power cord. Unplug the Projector, wait 2 minutes, then
reinsert plug into outlet and push POWER button again.
Check main power switch on back of Projector.
Check if the front grill is mounted properly.
Check antetuia connections on the rear of the Projector. Are they properly
secured to the antenna plug on the V Projector?
Check the CABLE/NORMAL display for correct position.
Check INPUT display for correct position. Using the VCR/AUX position
without a signal source will result in a blank screen.
Check the VOLUME buttons.
Check the MUTE button on the remote control.
Check the INT.(ERNAL)/EXT.(ERNAL) speaker switch on the rear of the
Projector. EXT. position cuts sound of the Projector’s internal speakers off.
Check battery.
Clean the remote and the remote sensor window on the Projector.
Check the TV/VCR/CBL switch on the remote for correct position.
For example: the switch must be in the TV position to send commands to the
Projector.
TV DISPLAYS WRONG
CHANNEL
YOU CAN'T ’ESCAPE* FROM
A MENU
WRONG MENU APPEARS
THE ERROR LED BLINKS
ALL THE TIME
and
MESSAGE "REPLACE
PROTECTION LAMP"
THE ERROR LED AND ONE
OR TWO OTHER LEDS
BT JNKS ALL THE TIME
(See page 5)
Repeat channel selection.
Add desired chatmel numbers (CHANNEL DISPLAY) into memory.
Check CABLE/NORMAL display for correct position.
Press STATUS/EXIT on the remote control. If that doesn't work, press the
POWER OFF stvitch on the back of the Projector and immediately SWITCH
ON again.
If the DATA menu appears, go to page 45 for instructions on how to exit
DATA mode.
If the MAIN menu appears, go to page 29 for instructions on how to enter and
control DATA mode adjustments.
The lamp needs changing.
Go to page 54 for instructions on how to do this.
There is a problem inside the set.
Don't tty to ftx it yourself; call your dealer for help.
Maybe the set 'ran' too hot. Check if ventilation slots are blocked.
SET DOES NOT START
IMMEDIATELY
If you try to restart the set a short time after switching it off, it is possible that the
lamp does not turn on immediately. In this situation the POWER button light
blinks. The set will restart automatically widiin a few minutes.
If die set does not restart within 2 minutes, it will switch off and the error LED starts
blinking. Wait until the blinking has stopped and switch on the set again.
If die set does not start within 2 minutes, replace the larr^.
If die set still does not start, please contact your dealer.
56

Technical Specification
Optical display system
Projector using metal halide gas discharge
projection lamp source in an optical
system with three liquid crystal panels and
a combination of folding and dichroic
mirrors.
Liquid Crystal Panels
Panel size: 2.8 inch diagonally
Display system: transmission type liquid
crystal panels
Drive system: TFD-R (Thin Film Diodereset) active matrix
LCD resolution
640 lines, 480 columns
Color
16.8 million colors
Horizontal scan rate
15.6,31.4'36 kHz
(video, VGA, MAC-11)
Lens
F = 4.5, zoom lens with
range f = 150 to 300 mm
Image size (mid-range magnification)
40 inch wide at 13 feet from screen
140 inch wide at 43 feet from screen
Lamp
Metal halide gas discharge lamp
MHD 200
Type of tuning
Frequency synthesis
Method of tuning
Programmable scan on set: scan plus direct
access from remote control
Broadcast tuning range
Channels 2 to 13 and 14 to 69
Cable tuning range
122 channels
2 to 13, A-1, A-2, A-6 to A-8, A to I, J to
W, W+1 toW+82
Remote Control
IR with a TVA^CR/Cable switch and
buttons for cable power, VCR power, TV
power, mute, volume up and down,
channel up and down, alternate chaimel,
TV/VCR, record, play, stop, pause, fast
forward/rewind, sleep, reset (per. pref. set.),
status/exit, -, +, menu, zoom -, zoom +,
focus -, focus +, 10-digit keypad
Inputs
One RF, two S-video, two composite video
and one RGB/composite video and 15 pin
Sub-D data graphic.
Outputs
Selected source - S-video (loop from AUX
1 or 3), video and stereo audio, no video
output from RGB.
External speaker connections
Stereo - spring-loaded clips
Internal audio amplifier
2 x 10 watts for external speakers
1 X 10 watts for internal speaker
Internal speaker
One 3 1/3 inch
Audio frequency response
Speaker connectors 40 Hz to 16 kHz,
line out 40 Hz to 16 kHz.
Special features
MTS stereo TV tuner closed captioning, 1/
4-inch headphone jack, five personal
preference menu settings for picture and
audio, front panel inputs, mirror button for
adjusting picture for front projection, rear
projection or via mirror systems, remote
control of zoom and focus.
Rated voltage
100 to 140 V AC
Rated frequency
60 Hz
Power consumption
300 W average, 350 W peak
Working temperature
4rF to 95°F (5°C to 35°C)
Casing
Metal
External dimensions
8 X 22 X 15 inches (200 x 554 x 390 mm)
Weight
Approx 48 lbs (22 kg)
Accessories included
Remote Control
Battery (9v)
Lens cap
Users manual
Safety Tips leaflet
Warranty
RF connector extension
VGA cable
57

Glossary OF Terms
Baiun * An antenna adapter device used to match the end plug of
an outdoor or indoor antenna wire to the Antenna input terminal
on a Television or VCR.
Cable Converter Box* Device for receiving and decoding Cable
TV signals.
Channel Reminder * Places the channel number for the currently
viewed TV program on the Projector screen. Channel number will
remain on the screen until the Reminder feature is turned OFF.
Coaxial Cable * A single solid antenna wire normally matched
with a metal plug (F-type) end connector that screws (or pushes)
directly onto a 75 Ohm input found on the Television or VCR.
Display * An on-screen message or graphics that help the user
operate and adjust his Projector feature controls. See On Screen
Displays (OSD).
Direct Audio/Video Inputs/Outputs * Located on the rear of the
Projector these connectors (RCA phono type plug) are used for the
input or output of audio and video signals.
Designed for use with VCRs (or other accessories) in order to
receive higher picture resolution and offer a variety of sound
connection options.
Focus* Adjusting the sharpness of the picture by changing the
lens setting.
LCD Liquid Crystal Display * A new type of screen display
which is used instead of the conventional cathode ray tube. In this
Projector, the picture is formed on LCD displays inside the
projection unit and then projected onto a screen like a slide or
movie, (see How Your Projector Works on page 4)
Menu * An on-screen listing of feature controls shown on the
Projection screen that are made available for user adjustments.
Multichannel Television Sound (MTS) * The broadcast standard
that allows for stereo sound to be transmitted with the picture. The
MTS system actually consists of three audio channels. Two
channels are for the stereo (right/left) signals, and a third Separate
Audio Program (SAP) channel can be used for bilingual or other
broadcast applications.
Separate Audio Program (SAP) * A third audio channel provided
for in the Multichannel Television Sound (MTS) broadcast
standard. The most frequently proposed use for SAP is the
simultaneous bilingual broadcast of TV program material.
Status * Allows the user to quickly confirm what channel number
is currently being viewed. Status can also be used to clear the
Projector of on screen displays or information (rather than waiting
for the displays to ‘time out’ or automatically disappear from the
screen).
S-VHS or S-Video* A higher quality version of the VHS standard
for videorecorders and other devices, such as CD-I players.
Twin lead wire * The more commonly used name for the two
strand 300 Ohm antenna wire used with many indoor and outdoor
antenna systems. In many cases this type of anterma wire requires
an additional adapter (or balun) in order to connect to the 75 Ohm
input terminals designed into the more recent Televisions and
VCRs.
TV Bands* Two possible settings:
Antenna
This consists of two types of frequencies: VHF (Very high
Frequency) channels received by the tuner on channels 2 to 13;
UHF (Ultra High Frequency) charmels received by the timer on
channels 14 to 69.
CATV Cable TV
The second possible setting for TV band tuning. This term means
the unit is capable of receiving standard and unscrambled channels
on cable without the use of a cable decoder or converter box.
VCR (Video Cassette Recorder)* Device for playing pre-recorded
video casssette tapes. Can also be used to record pictures and sound
from an external source, such as a cable TV signal.
Zoom* Changing the size of the picture by changing the lens
settings.
On Screen Displays (OSD) * Refers to the wording or messages
generated by the television (or VCR) to help the user with specific
feature controls (control adjustment, programming etc.)
Programming * The procedure of adding or deleting channel
numbers into the Projector’s memory circuits. In this way the
Projector ‘remembers’ only the locally available or desired channel
numbers and skips over any unwanted channel numbers.
Remote Sensor Window * A window or opening on the Projector
control panel through which infrared remote control command
signals are received.
58

Limited Warranty
LIMITED WARRANTY
PROJECTOR
One (1) Year Free Carry-In Service Labor Warranty
Six (6) Month Exchange Warranty Projector Lamp
One (1) Year Exchange Warranty Parts
For purchases outside the U.S., see applicable warranty from country of purchase.
This warranty gives you specific legal rights and you may also have other rights which vary from state to state.
Parts and Labor
For one year (six montlis for die Projector Lamp) after installation, a
Philips Factory Service Center (see below) will repair any product
defect and replace any defective part without charge to you for parts
or labor.
What die Purchaser Must Do
Before you call for service, check your operating instruction booklet.
A slight adjustment of die customer controls discussed in your
iiistniction booklet may save you a service call.
How to get Warranty Service
Due to the sophisticated nature of this product warranty service will
be provided by a Philips Factory Service Center. If you feel you
require warranty service, or need to discuss a problem about your LCD
Projector, please contact the Philips Factory Service Center listed
below. If it is determined that the Projector needs to be repaired, you
will be given a return authorization number. Carefully pack the LCD
Projector in secure packaging for safe shipment.
Be sure that you retain the carton and all packing materials
from diis unit. These materials are specifically designed for
shipping this product.
Deliver or ship the Projector freight prepaid and insured to the
Factory Service Center.
Philips Factory Service Center
5164 Blazer Parkway
Dublin, OH 43017
(614) 792-1495
YOU MUST PRESENT PROOF OF THE DATE ON
WHICH THE LCD PROJECTOR TV WAS FIRST
PURCHASED (SALES RECEIPT OR OTHER EVIDENCE)
WHEN REQUESTING SERVICE OR REPLACEMENT
PART WARRANTY PERFORMANCE.
Also please include a description of the problem when returning
product for repair. Following warranty repair, the unit will be returned
to you freight prepaid. Be sure to include your complete return address
on die outside of the carton.
Warranty Exclusions
Your Warranty Does Not Cover;
Labor charges for Projector installation or set-up, adjustment of
customer or preference controls, and installation or repair of antenna
systems outside the Projector.
Product repair and/or part replacement because of misuse, accident,
unauthorized repair or other cause not within the control of Philips
Consumer Electronics Company.
Reception problems caused by signal conditions or cable or antenna
systems outside the Projector.
A Projector purchased, used or serviced outside the U.S.A. Puerto
Rico and the Virgin Islands.
Incidental or consequential damages resulting from the product. Some
states do not allow the exclusion of incidental or consequential
damages, so the above exclusion may not apply to you.
ALL IMPLIED WARRANTIES INCLUDING IMPLIED
WARRANTIES OF MERCHANTABILITY AND HTNESS
FOR A PARTICULAR PURPOSE, ARE LIMITED IN
DURATION TO THE DURATION OF THIS EXPRESS
WARRANTY. Some states do not allow limitations on how long
an implied warranty lasts, so the above limitation may not apply
to you.
IMPORTANT REMINDER
PLEASE HLL OUT AND MAIL YOUR WARRANTY
REGISTRATION CARD PROMPTLY. IT WILL BE EASIER
FOR US TO NOTIFY YOU IF IT SHOULD EVER BE
REQUIRED.
How to get Warranty Service After the Warranty Expires
Out of warranty service can be obtained under die following
arrangements:
• Contact the Philips Factory Service Center at (614) 792-1495
to obtain service.
• Pack your product in a safe carton for shipment.
• Mail the product to the Philips Factory Service Center listed in
'How to Get Warranty Service'. Also include a letter inside the carton
describing the problem and listing your name, address and phone
number.
Please write your model and Serial numbers below. The numbers
are located on the back of your unit. Please remember to have
these numbers on hand any time you call.
MODEL NO.
SERIAL NO.
________________________
________________________
IB 6758-E001
PHILIPS SERVICE COMPANY
P.O. BOX 555 • JEFFERSON CITY, TENNESSEE 37760
(615) 475-8869
59

3122.126.04361
 Loading...