

Page 1
/
abc PHILIPS
Page 2
Safety instructions
Please read and follow all warnings and instructions.
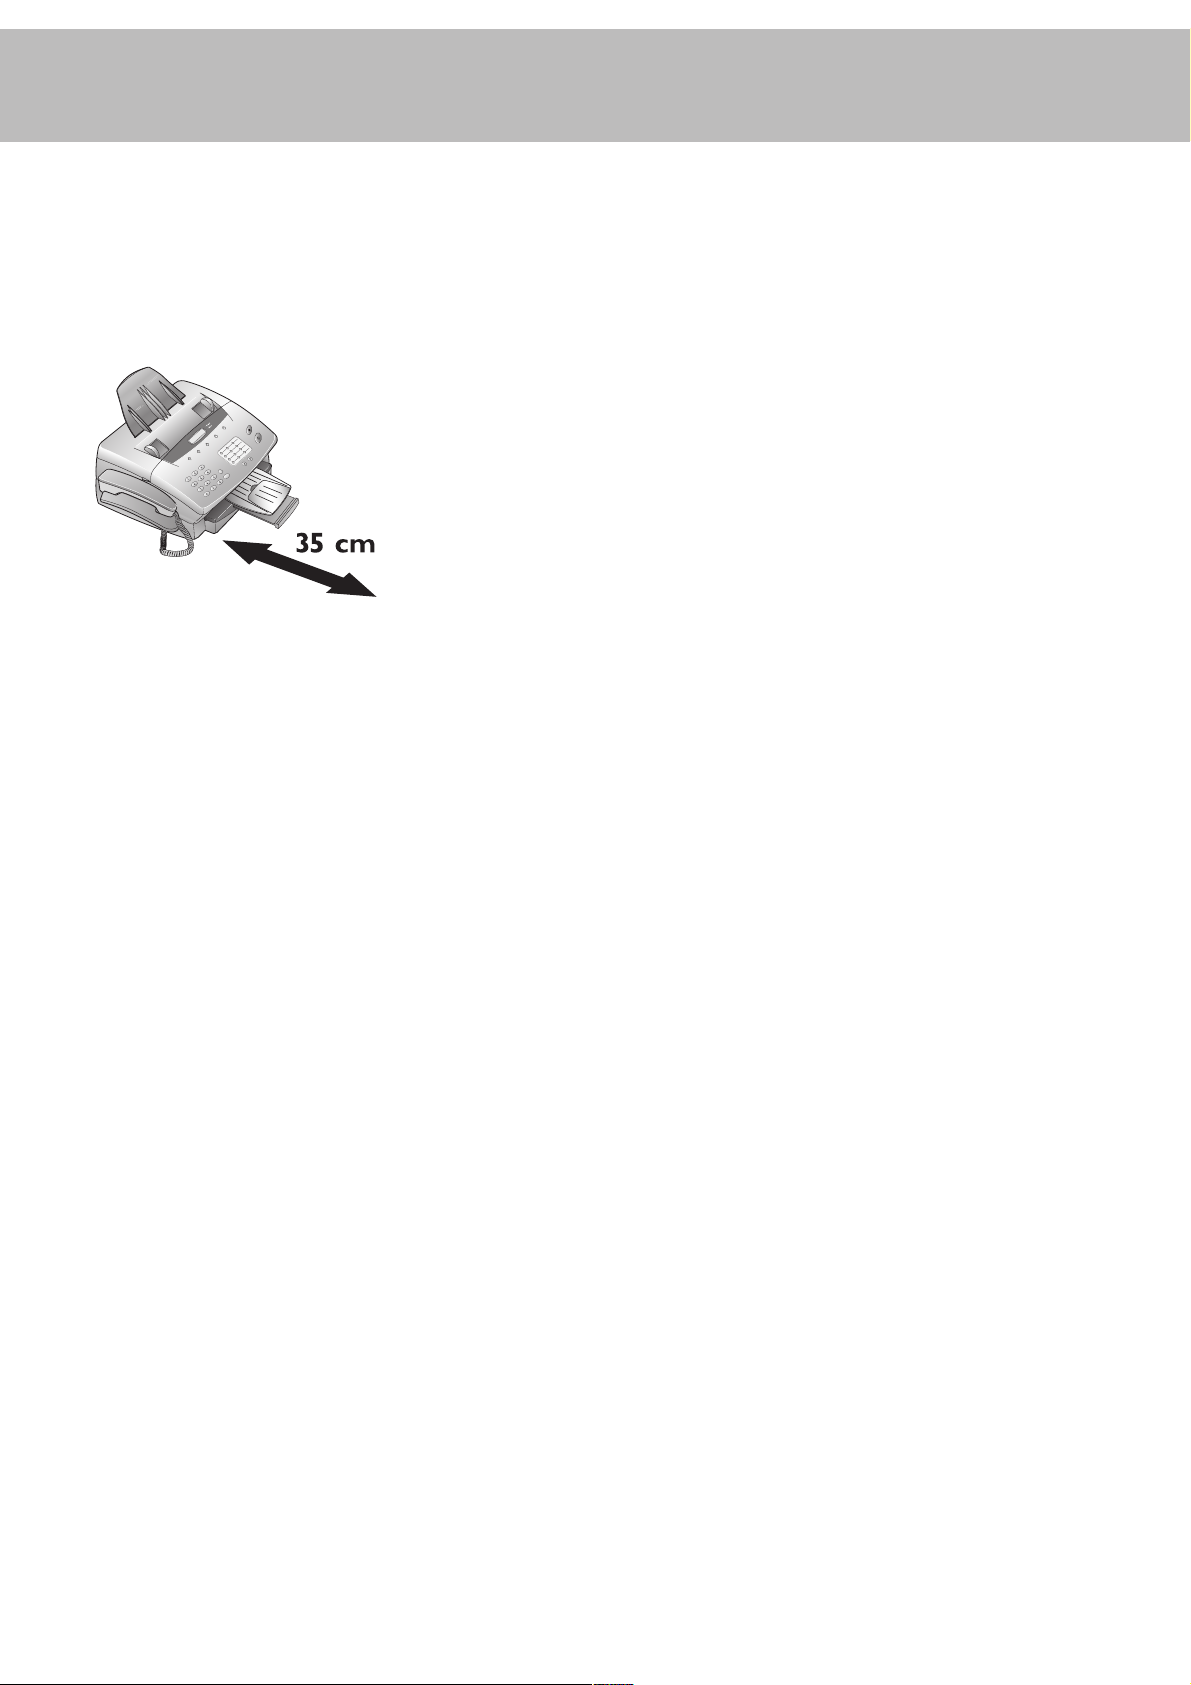
Ensure the machine is stable and secure on a level surface. The
surface should be smooth and horizontal. Do not place the
machine on carpet. The fax machine may be damaged if it falls
and may cause serious injury, especially to small children.
Do not place anything in front of the fax machine, as this will
obstruct the document feeder.
Do not place the fax machine in direct sunlight. Do not place it
near to a radiator, heater, radio, television or air conditioning
unit. Do not allow it to come into contact with dust, water or
chemicals.
To avoid risk of overheating do not cover your fax machine.
Place the fax machine so that air can circulate freely. Do not
operate it in enclosed spaces such as cabinets, cupboards or
drawers. Do not cover the fax machine with tablecloths, paper
or folders. Do not place the fax machine on soft surfaces such as
beds, duvets, cushions, sofas or carpets as there is a risk of
overheating and fire.
Do not expose your fax machine to rain or other liquids, as
there is a risk of electric shock or fire.
Disconnect the fax machine from the mains and the telephone
line during thunderstorms. If this is not possible, avoid using
the fax machine or the telephone during the storm. There is a
risk of electric shock from lightning and risk of damage to the
machine.
If there is a power failure neither the fax machine nor the telephone will work.
During a power failure the numbers and names stored in the
telephone book and the speed dial keys and other data will be
saved with the aid of a backup battery. If the battery is dead, the
information will be lost.
If there is a power failure any faxes stored in the memory will be
lost.
This fax machine is only intended for use in the country in
which it was purchased. It meets the requirements of the telephone companies.
Do not connect the mains or telephone line in a damp atmosphere, unless the connectors are especially adapted. Do not touch
sockets or telephone connectors with wet hands.
If you want to use a cordless phone, place the base station at
least 15 cm away from the fax machine to avoid interference.
Do not touch telephone wires or mains cables where the insulation is missing or damaged unless they are already disconnected.
Ensure the cabling is safe and does not present a trip hazard as
this may damage both the cable and the fax machine.
Unplug the fax machine from the mains and the telephone line
before cleaning.
Do not use liquid or aerosol cleaners such as sprays or polishes.
Never spill liquid of any kind into the machine. There is a risk
of electric shock or other injury. The machine may be damaged.
If liquid is accidentally spilled into the machine, unplug the
machine immediately and have it inspected.
If the display is broken, a weak acid may leak out. Avoid contact
with skin and eyes.
If the casing or the mains cable is damaged, unplug the fax
machine. The cover of the fax machine may only be opened by
authorized service personnel.
Your machine has been tested to EN 60950 or IEC 60825-1
and may only be operated on telephone networks and power
supplies that conform to these standards.
2
Page 3

Contents
Installation..........................4
Packaging ..................................................................................... 4
Description .................................................................................. 5
Controls ....................................................................................... 6
Accessories ................................................................................... 7
Inserting paper............................................................................ 8
Inserting toner ............................................................................ 8
Changing toner ........................................................................... 9
Connecting the fax machine ...................................................... 9
Additional telephones.............................................................. 10
ISDN connection...................................................................... 11
Private branch exchange (PABX) ............................................. 11
Computer connection * ........................................................... 11
Basic settings................... 12
Country selection ...................................................................... 12
Display language ....................................................................... 12
Help............................................................................................ 12
Your number ............................................................................ 12
Your name................................................................................. 12
Time and date ........................................................................... 12
Volume ...................................................................................... 12
Energy save mode .................................................................... 13
Toner save mode ...................................................................... 13
List of settings .......................................................................... 13
Fax switch ........................ 14
TEL mode................................................................................. 14
FAX mode................................................................................. 14
AUT mode ................................................................................ 14
TAM mode ............................................................................... 14
Fax reception from a different phone..................................... 14
Fax .................................... 18
Inserting a document ............................................................... 18
Sending a fax ............................................................................. 18
Resolution ................................................................................. 18
Reducing .................................................................................... 18
Memory ..................................................................................... 19
Sending later .............................................................................. 20
Sending with code .................................................................... 20
Receive polling .......................................................................... 20
Transmit polling ....................................................................... 20
Transmission speed .................................................................. 21
Reception speed ........................................................................ 21
Transmission report ................................................................. 21
Reception report ....................................................................... 21
Copy - scan - print .......... 22
Copy ........................................................................................... 22
Scan * ......................................................................................... 22
Printing from the PC * ............................................................ 22
Troubleshooting .............. 23
Error codes ...................... 25
Annex ............................... 27
Technical data............................................................................. 27
Glossary ..................................................................................... 27
Guarantee .................................................................................. 28
Order service.............................................................................. 28
Declaration of conformity ....................................................... 29
Index................................. 30
Telephone......................... 15
Making a call .............................................................................. 15
Re-dialling .................................................................................. 15
Speed dialling ............................................................................ 15
Phonebook................................................................................ 15
Groups ...................................................................................... 16
Calling line identification ......................................................... 16
Printing a journal ...................................................................... 17
* only for LPF 755
3
Page 4
Installation
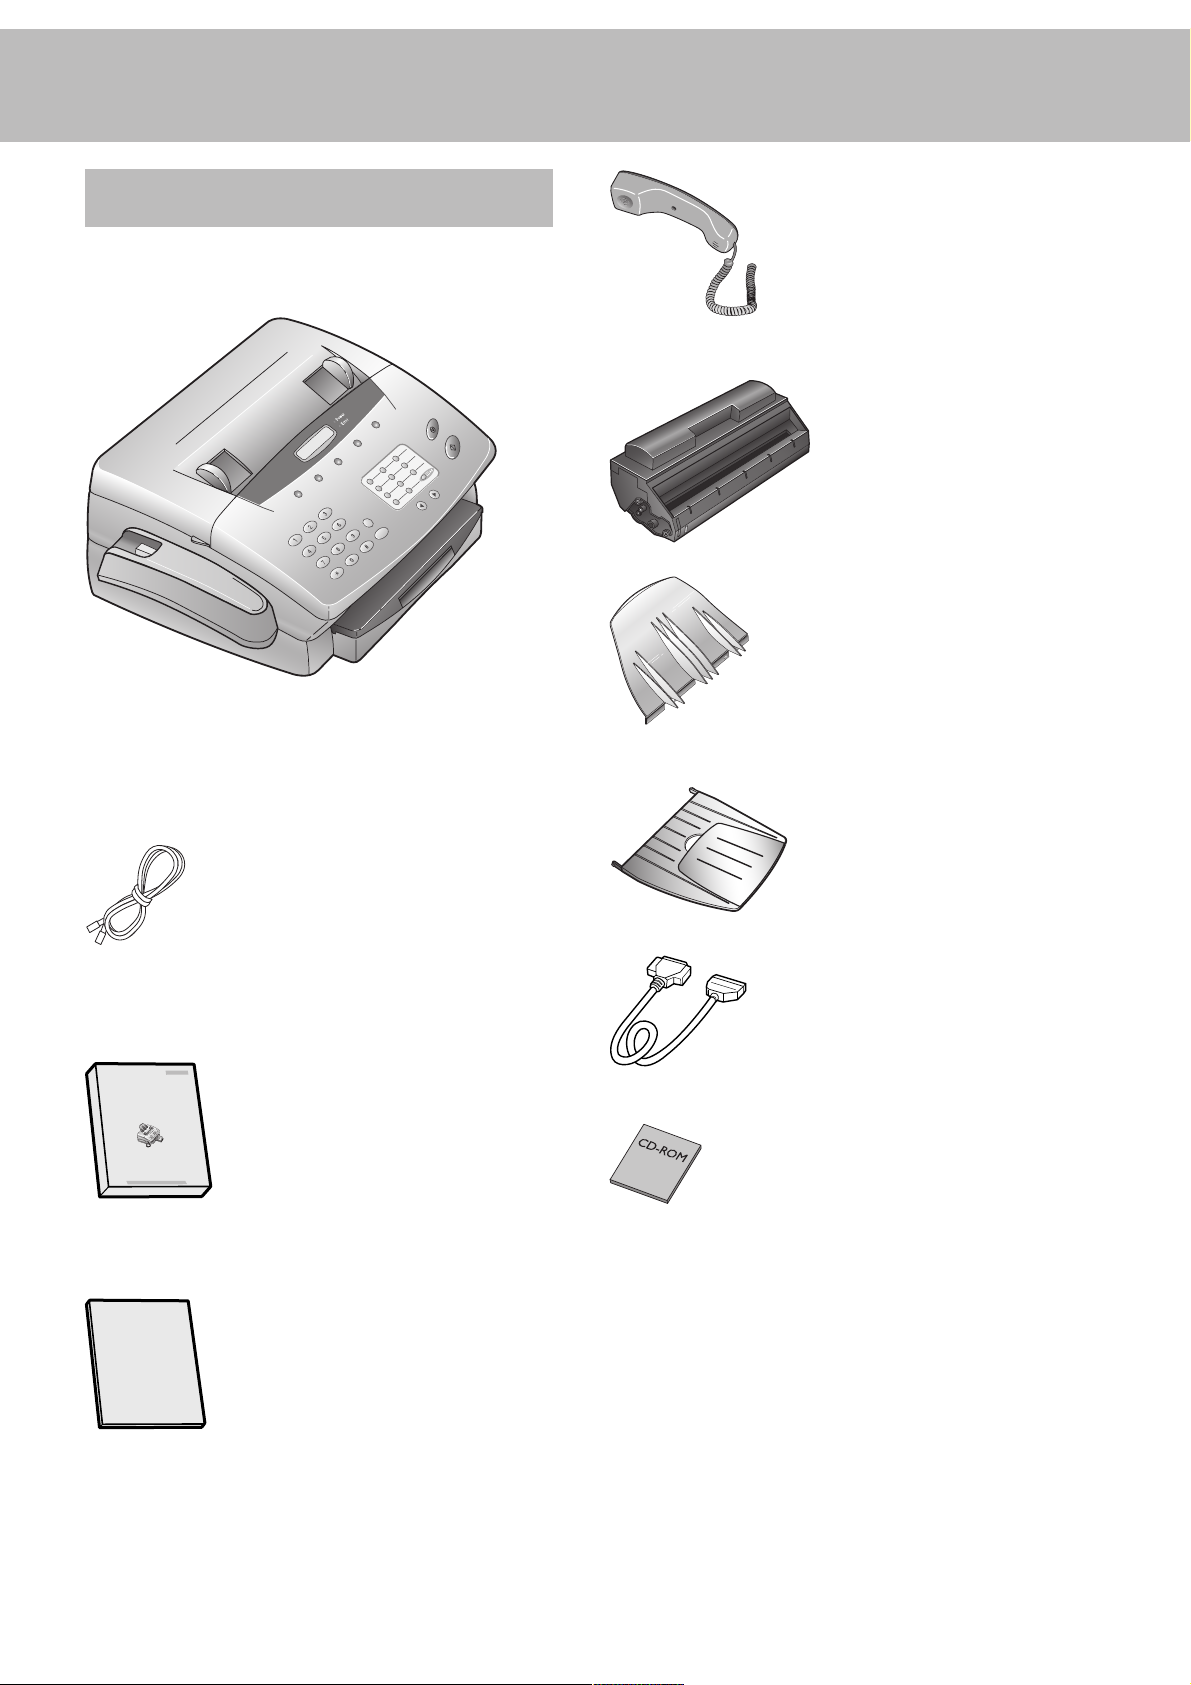
Packaging
The shipment includes the following parts:
Telephone handset with spiral cable
Toner cartridge
Document holder
Fax machine with paper tray
Telephone cable with connector
User Manual
Document exit tray
Printer cable*
CD-Rom for connecting to a computer*
* only included for LPF 755
4
Installation Guide
Page 5
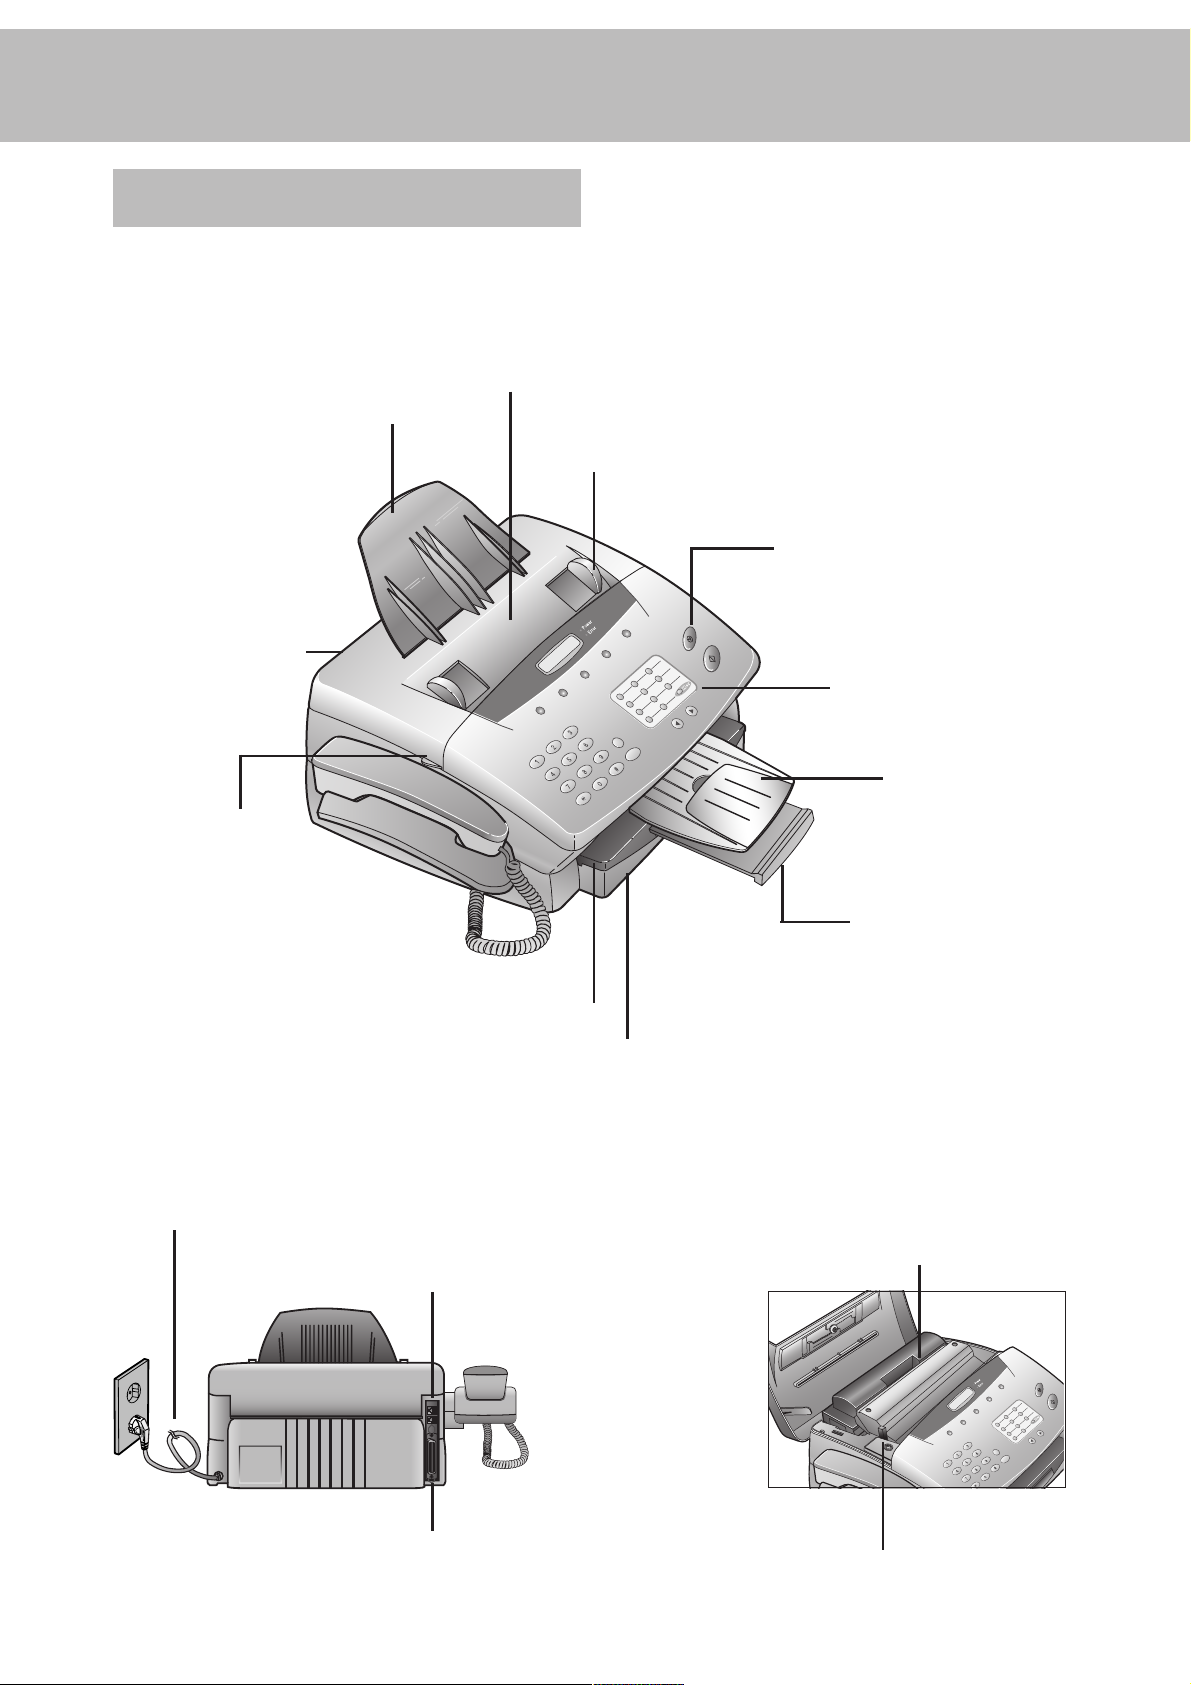
Description
Document holder
Cover
Document feeder
(Maximum 15 pages)
Document guide
Control panel
Space for entering names
Document exit tray
Cover grip
Mains cable
Paper exit tray
pull out of paper tray
Cover for paper tray
Paper tray
(Maximum 125 pages)
Toner cartridge
Telephone cable
Port for printer cable
only for LPF 755
Paper eject lever
5
Page 6
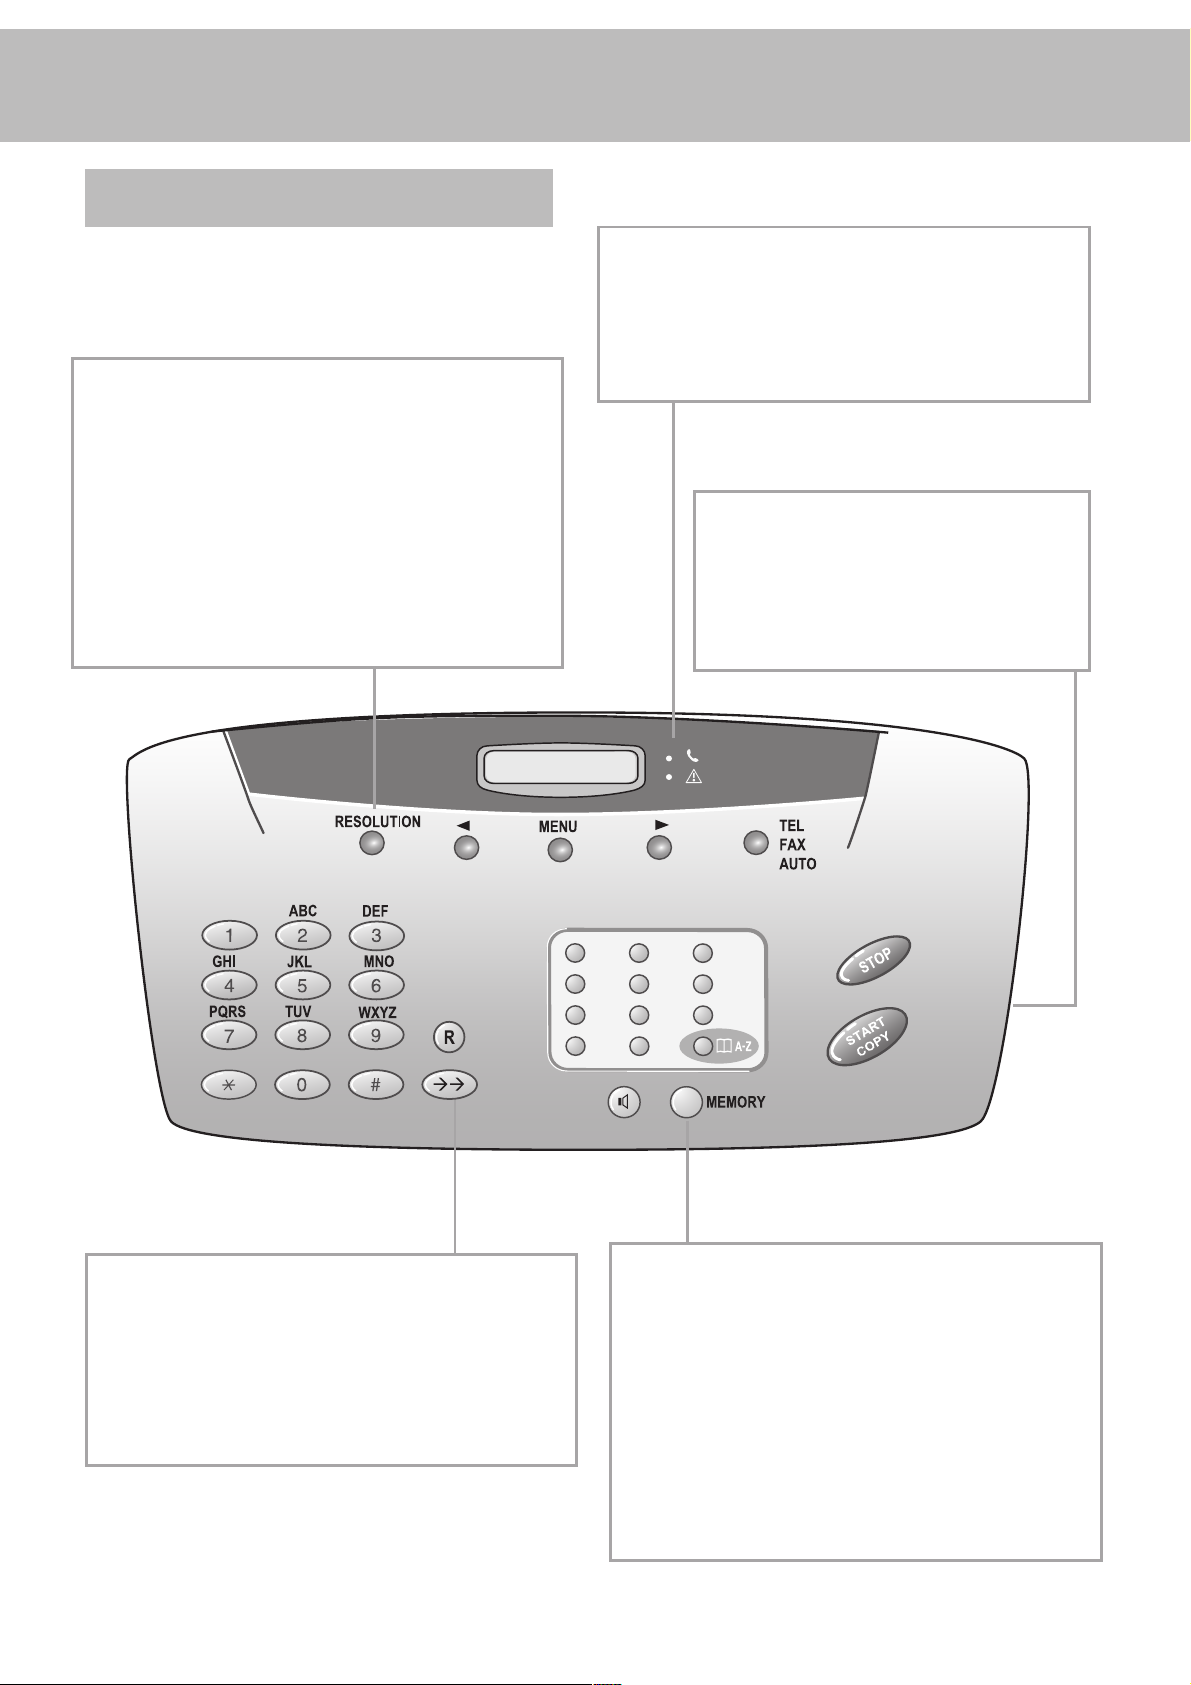
Controls
RESOLUTION
Improves the clarity of text and drawings when sending and
copying
u
Select options / set volume / move display cursor
MENU
Use to select functions
g
Indicates that you are making a telephone call/dialing on-hook/
printing from the PC (Laserfax 755 only)
v
If this symbol flashes please read the display
STOP
Interrupts the process / ejects the document /
cancels the input
TEL/FAX/AUTO
Set receive mode (TEL/FAX/AUTO/TAM)
START/COPY
Starts fax transfer or copies document
R
For special functions e.g. when using a PABX or accessing functions provided by your telephone provider (toggling, call waiting, etc.)
PP
Redial the last five numbers dialed / insert a pause between two
digits
6
Speed dial keys
Dial stored numbers
m A-Z
Look up names and telephone numbers
l
On-hook dialing. Press this key to signal a voice request after
sending or receiving documents
MEMORY
Memory functions
Page 7
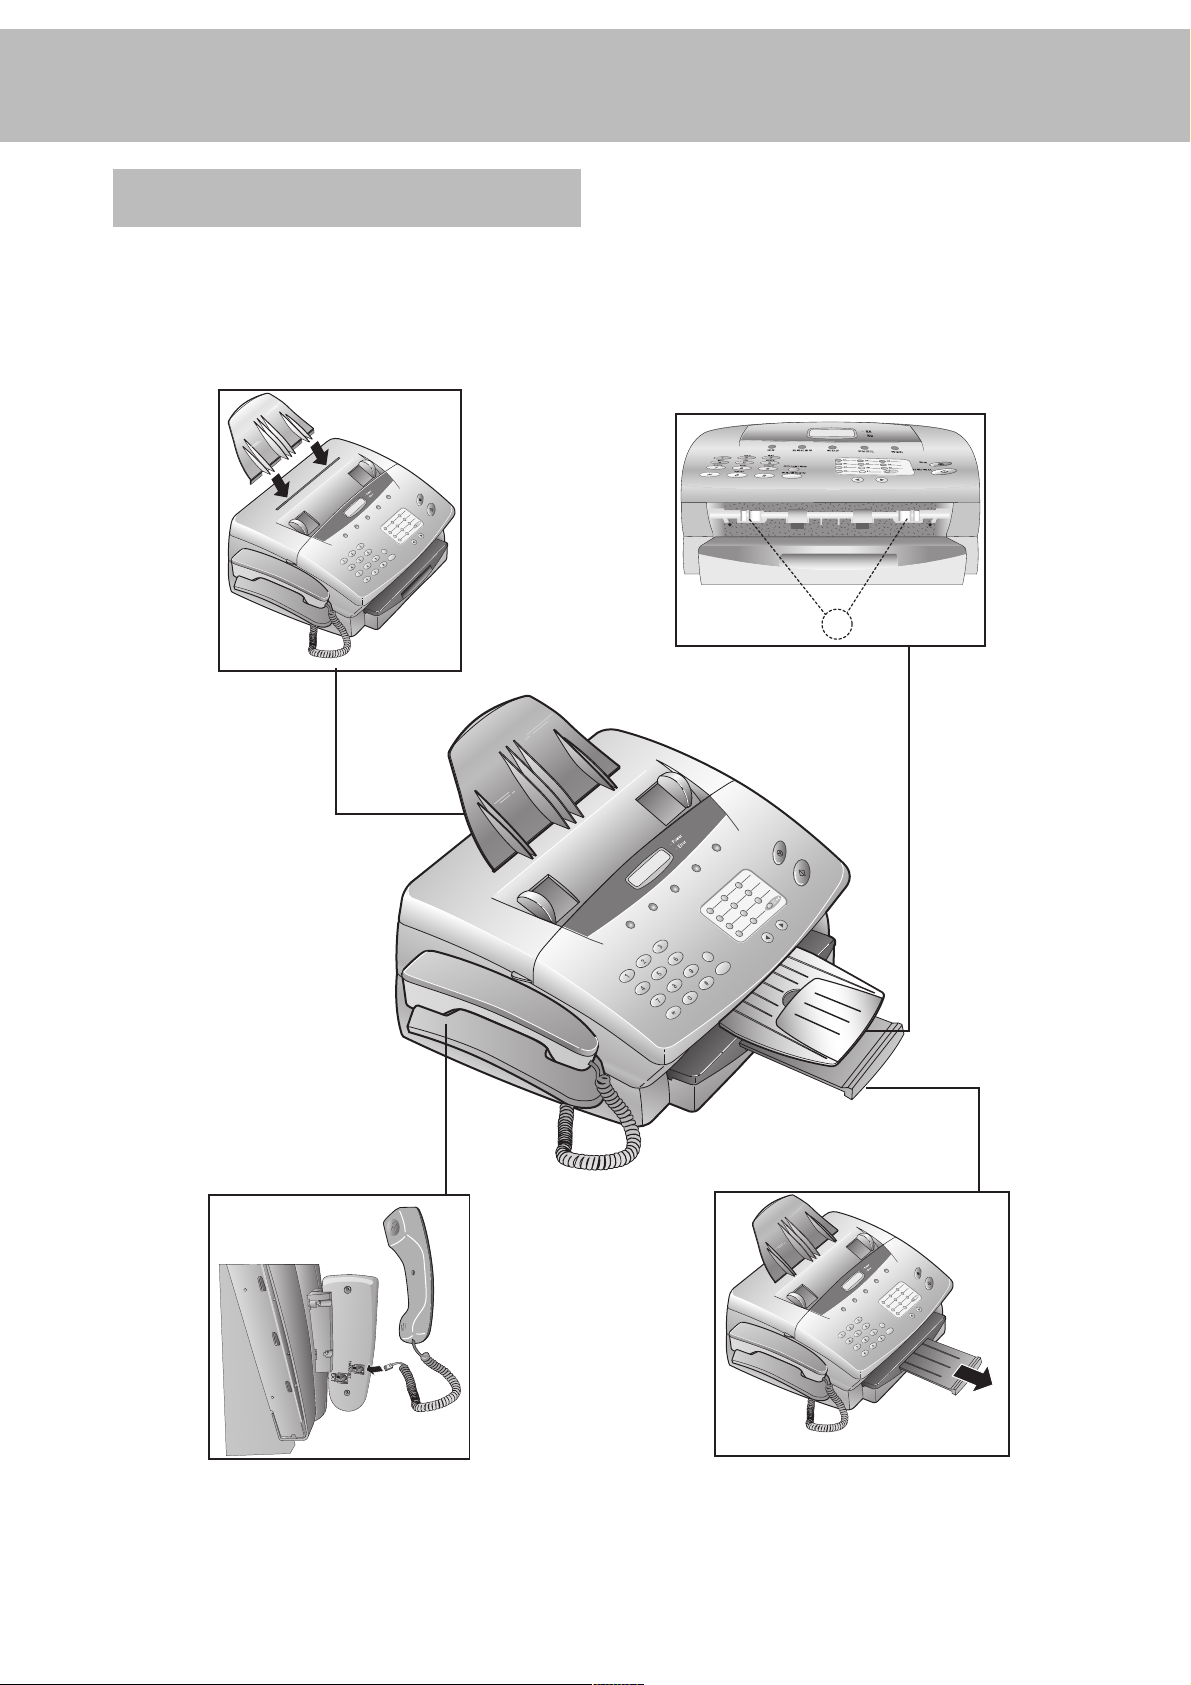
Accessories
Document holder
Insert the paper holder firmly into the opening behind the
document feeder until it blocks.
Document exit tray
Insert the document exit tray gently into the opening under the
control panel. For non-standard documents (e.g. larger than
A4) just extend the tray.
A
Fax machine handset
Insert the handset with the spiral cable into the socket marked
HANDSET on the underside of the machine. For details
on connecting further devices to the EXT socket see Installa-
tion/Additional devices.
Paper exit tray
The paper exit tray is permanently attached to the paper tray.
When pulling out the paper exit tray keep one hand on the
paper tray.
7
Page 8
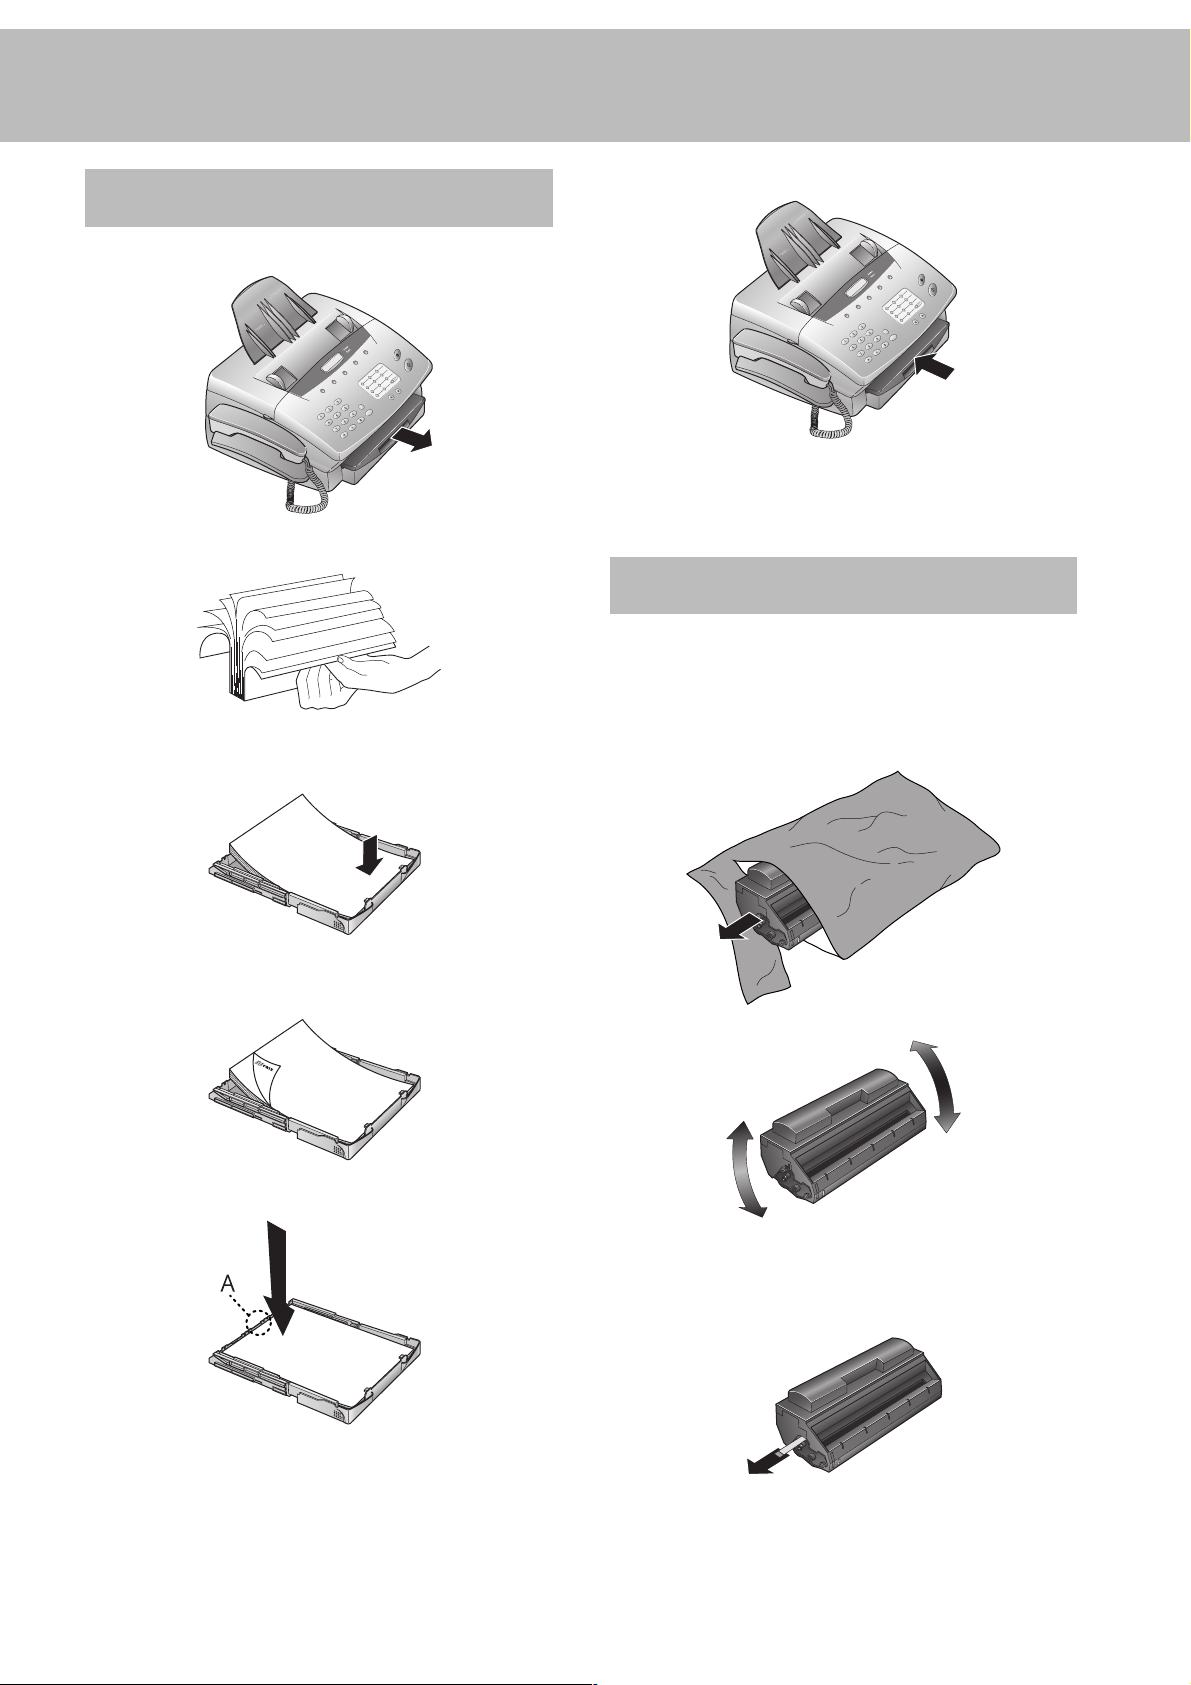
Inserting paper
1 Pull out the paper tray.
2 Fan the paper to prevent more than one sheet being drawn
through at a time.
6 Carefully push in the paper tray.
v Do not fill the paper tray above the mark. Do
not insert paper when the machine is printing.
Do not use paper that has already been printed
by a laser printer as this can lead to paper jams.
Inserting toner
Before you can send, receive or copy documents, there must be
a toner cartridge in the fax machine. A free toner cartridge is
included with your fax machine.
3 Open the cover of the paper tray and insert paper up to the
mark (Standard A4 210 x 297 mm, 80 g/m2). The tray holds
up to 125 sheets.
4 Insert documents that need to be printed or copied (such as
templates or headed paper) with the printed side (face)
down.
5 Push the paper down until the small lever (A) locks into
place. Replace the cover.
1 Take the cartridge out of the packaging and remove the
extra paper.
2 Shake the toner several times to improve the print quality.
v Do not touch the underside of the toner car-
tridge as this can affect the print quality.
3 Carefully pull out the tab on the left-hand side of the car-
tridge.
8
Page 9
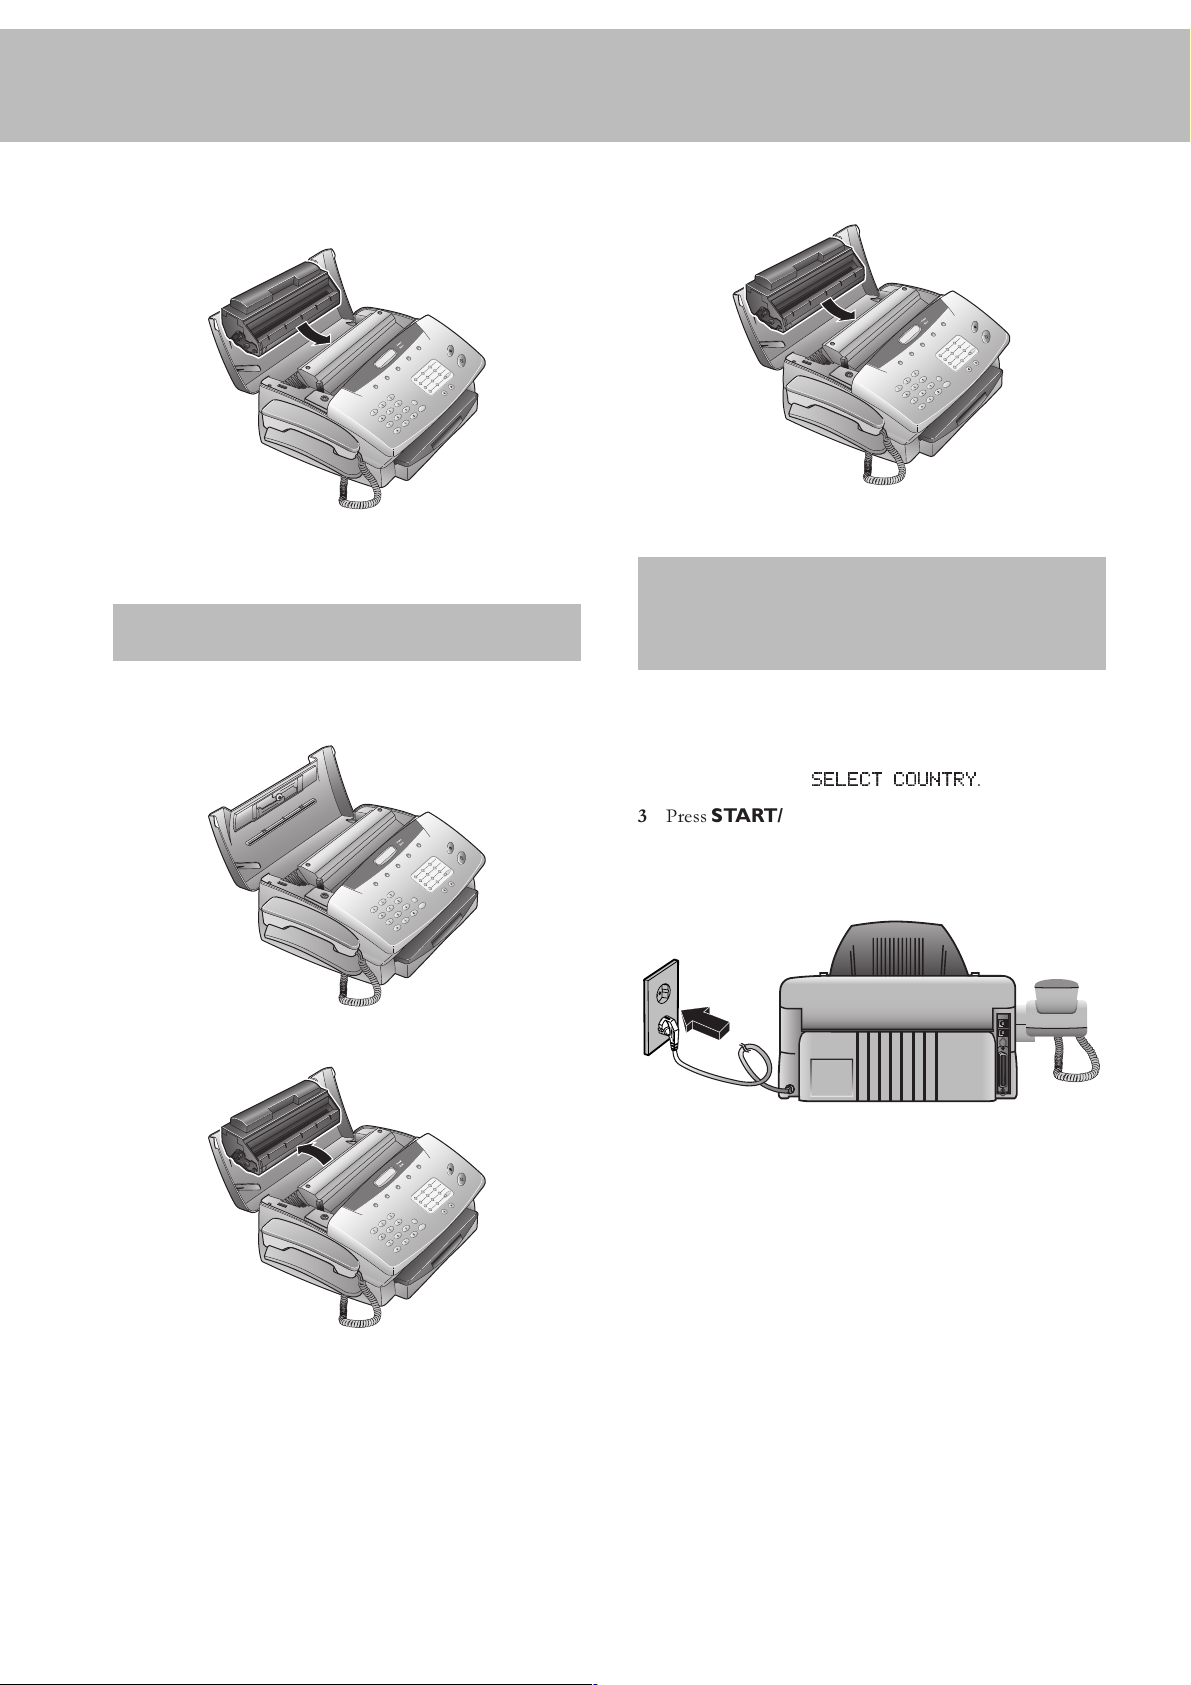
4 Grip the cover at the sides and fold it backwards. Insert the
toner cartridge into the holder until it locks and then close
the cover.
D Only use PHILIPS original toner PFA721. You can order
toner cartridges directly from PHILIPS. (See Annex/Order
Service)
4 Insert the new toner in the holder until it locks and then
close the cover.
D Keep the open/used toner in its original packaging or wrap
it in a cloth and return it to your local retailer.
Connecting the fax
Changing toner
1 Follow points 1-3 under Inserting a toner cartridge.
2 Grip the cover at the sides and fold it backwards.
3 Remove the toner cartridge by grasping it firmly in the mid-
dle and pulling upwards.
machine
To the mains
1 Plug the fax machine into the wall socket.
2 The display shows
3 Press START/COPY and choose the country where the
fax machine will be used with u.
4 Confirm with START/COPY. After warming up the ma-
chine passes into the energy save mode.
SELECT COUNTRY
.
9
Page 10
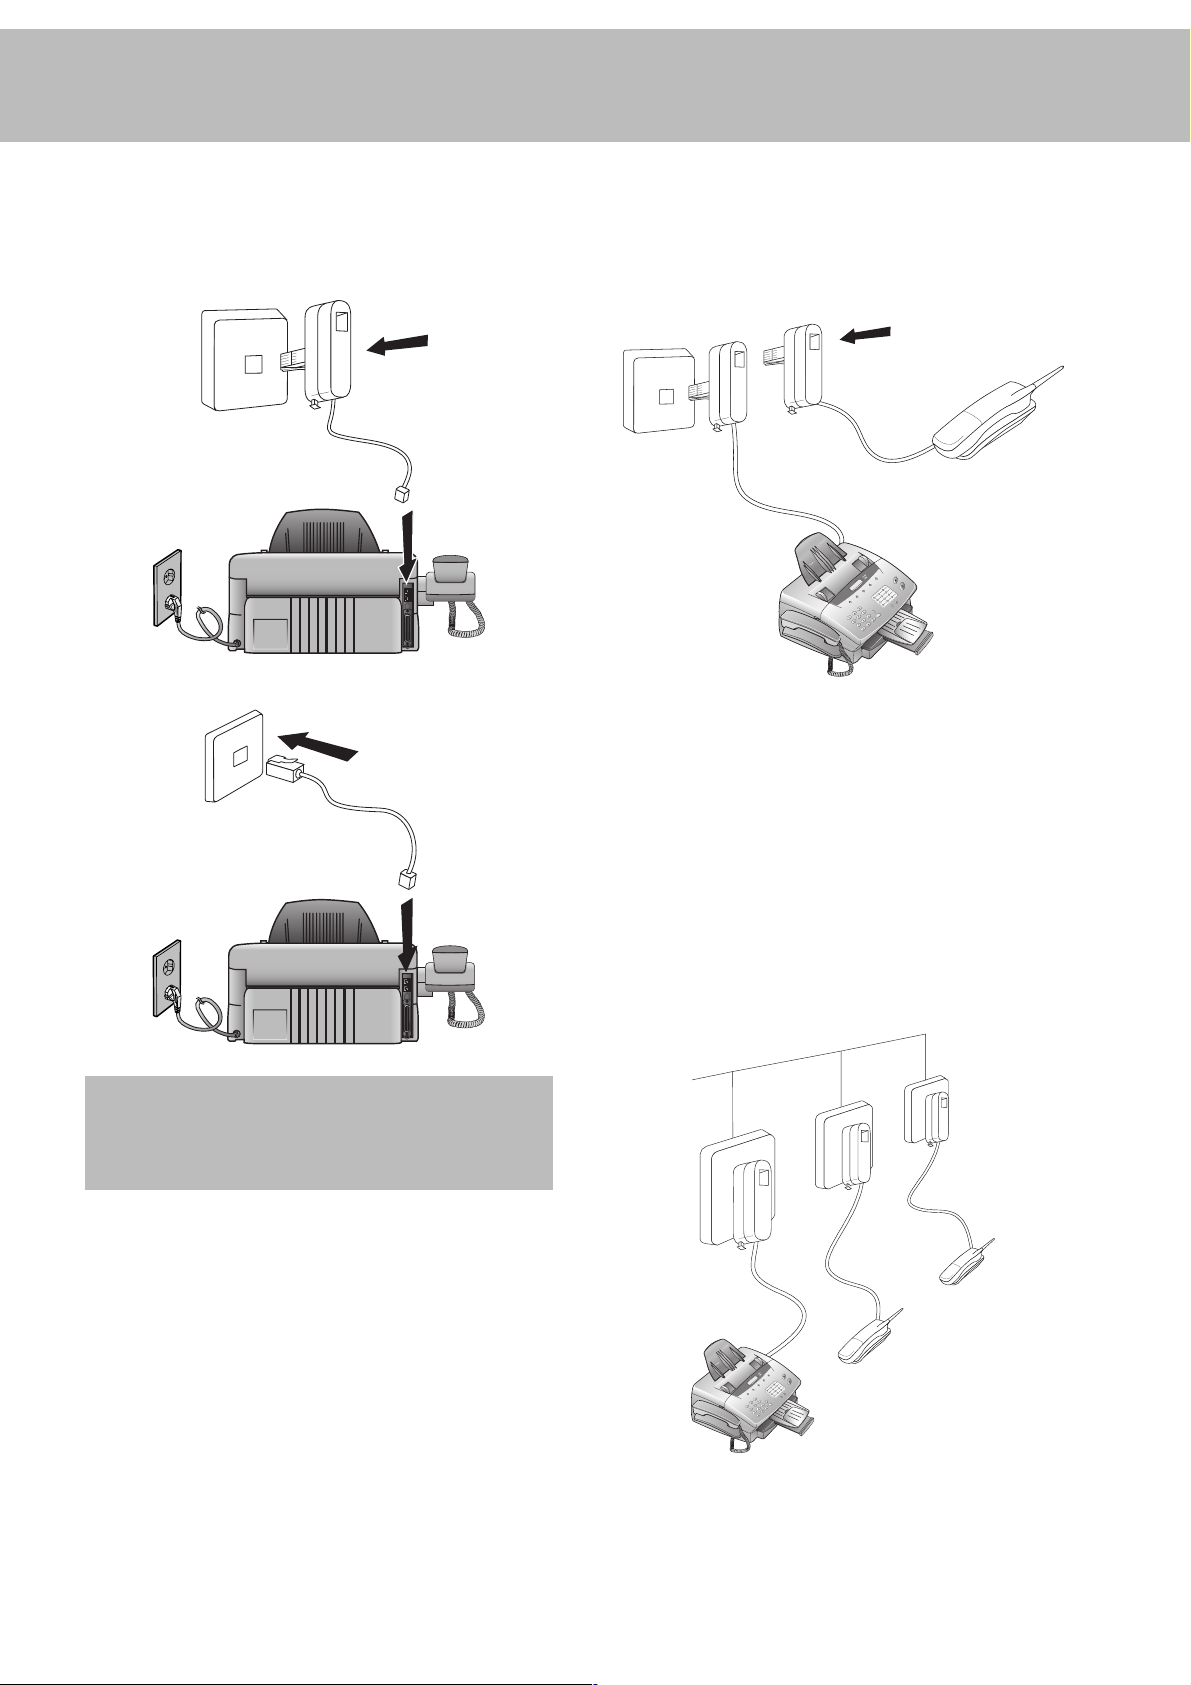
To the telephone line
Same socket
Connect the telephone cable to the fax machine by inserting it
into the socket labeled LINE on the rear of the machine.
In the UK
For all other countries
(not in all countries)
You can connect additional devices to the same telephone socket.
Make sure the fax machine is the first device connected to the
line.
Connecting additional devices to the same socket ensures you
the optimal functionality of your fax switch. Your fax machine
can control the additional devices.
Separate sockets
Additional telephones
In addition to your fax machine you can connect other devices
to your telephone line such as cordless phones, answering machines, charge counters or modems to a single telephone line.
For UK: As long as the Ringer Equivalent Number (REN value)
on the line doesnt exceed 4. The REN value of this fax is 1.
If you want to use other equipment with your fax machine
please contact your dealer.
(not in all countries)
You can connect additional devices to separate sockets on the
same line even if they are in different rooms.
Please note: If you connect additional devices to separate sockets (e.g. in separate rooms) your fax switch cannot control them
(which means that your fax machine behaves like any ordinary
fax machine). Therefore we recommend you to connect your
additional devices to the same socket.
10
Page 11

ISDN connection
Your fax machine does not support ISDN fax (Group 4). It is
an analog (Group 3) fax machine. It cannot be directly connected to an ISDN connection but requires an (analog) adapter
or an ISDN system with connections for analog terminals. For
further information please see the user guide for your ISDN
system.
Requirements
For Windows® 9X, ME:
Pentium® 166 MHz or higher, at least 32 MB RAM
For Windows® NT, 2000 or XP:
Pentium II® or higher, at least 64 MB RAM
VGA screen
Private branch exchange (PABX)
PABXs are common in large companies. ISDN systems that are
now often used in homes are also PABXs. To obtain a connection from an extension on such a system to the public network
a digit must be dialed before each call to get an outside line.
1 To connect your fax machine to a PABX press MENU and
336. Then press START/COPY. The display shows
LINE TYPE: PSTN
2 Use u to select the PABX mode:
3 Press START/COPY and then STOP twice.
v The exchange code is provided by the manufac-
turer. It may be 0, R (known as FLASH on some
systems) or any other digit.
D In case your PABX requires R to obtain an outside line but
it is still not possible to get through to the line, your system
might not be according to the most recent regulations.
Therefore some technical settings have to be changed on
your fax machine. Please refer to your Fax Call Centre (see
backside of the cover).
.
LINE TYPE: PABX
Computer
connection
(Laserfax 755 only)
In order to be able to use your fax machine as a printer and
scanner in conjunction with your computer, you must connect
it to the computer and install the software provided with the
fax machine.
parallel port: IEEE 1284 ECP
.
Connection
1 Make sure that the fax machine and the computer are both
unplugged from the power supply.
2 Insert the printer cable to the corresponding sockets of the
computer and of the fax machine.
3 Reconnect the fax machine to the mains and switch on the
computer.
Software installation
1 Close down all programs on the computer.
2 Insert the installation CD provided with the fax machine.
3 Start the program setup.exe on the installation CD. Fol-
low the instructions on the screen.
4 Once this is complete, re-start the computer.
D To uninstall the FAX printer software select the menu Pro-
grams / FAX printer / Uninstall FAX printer.
11
Page 12

Basic settings
3 Enter your name using the keypad. Use > to move the
Country selection
1 To select the country press MENU and 18. The display
shows
18 COUNTRY
2 Press START/COPY and use u to select the country,
where the fax machine will be used.
3 Confirm with START/COPY and press STOP twice.
.
cursor one position to the right. Use < to delete the last
digit. To delete the whole entry press STOP.
Key character
0 space . - 0 + ?/ : * % ! ( ) [
11
2 A B C 2 a b c Ä Å Æ Ç ä å æ ç
3 D E F 3 d e f
Display language
1 To set the display language press MENU then 17. The
display shows
1 Press START/COPY. Use u to select the display lan-
guage.
1 To confirm the entry press START/COPY and then STOP
twice.
17 LANGUAGE
.
Help
1 Press MENU, 667 and START/COPY.
2 A list of functions (including a brief description of the
main functions) is printed.
Your number
When you enter your number, it will appear on the recipient's
fax printout. You can enter up to 20 digits for your number.
1 Press MENU and 14. The display shows
NUMBER
2 Then press START/COPY. The display shows
NUM
3 Enter your telephone or fax number using the digit keys.
Use > to move the cursor one position to the right. Use
< to delete the last digit. To delete the whole entry press
STOP.
4 Confirm the entry by pressing START/COPY and then
STOP twice.
.
.
14 Your
Enter
4 G H I 4 g h i
5 J K L 5 j k l
6 M N O 6 m n o Ñ Ö ñ ö
7 P Q R S 7 p q r s
8 T U V 8 t u v Ü ü
9 W X Y Z 9 w x y z
4 Confirm the entry by pressing START/COPY and then
STOP twice.
D Your name and your telephone number are transmit-
ted at the top of each page (the first 4 mm) together with
the date, time and page number.
Time and date
1 Press MENU then 16. The display shows
2 Press START/COPY:
3 Enter the year using the keypad.
4 Press START/COPY. The display shows
5 Enter the month (e.g. 05 for May).
6 Press START/COPY and enter the day (e.g. 07 for 7
May 2002).
7 Finalise the entry by pressing START/COPY. The display
shows
TIME 00:00
8 Enter the exact time (e.g. 2330 for 23:30). The dis-
play shows
9 To confirm the entry press START/COPY and then STOP
twice.
TIME 23:30
YEAR: 2002
.
.
DATE/TIME
.
MONTH: 05
.
.
Your name
You can use the digit keys to write up to 32 letters to enter your
name. Each key is assigned several letters (see table). By pressing
a digit key several times you can reach the next character in the
table. After the fifth character the row starts again.
1 Press MENU and 15. The display shows
NaME
.
2 Press START/COPY. The display shows
12
ENTeR NaME
15 Your
Volume
Ringing tone
You can set the volume of the ringing tone when the machine
is in standby mode or is actually ringing.
1 Press u. You will see the current setting displayed for
.
approximately 3 seconds and hear the volume.
2 To change the value, press u until the desired volume is
reached.
Page 13

v If the volume level is set to zero, no ringing tone
will be heard but faxes will still be automatically received.
Loudspeaker
1 Press l to set the loudspeaker volume.
2 Set the volume using u.
3 Exit using l or STOP.
Key tones
1 Press MENU and 22. The display shows
VOL
.
2 Press START/COPY. Use u to select the volume of
the key tones.
3 To confirm the entry press START/COPY and then STOP
twice.
BEEPER
Energy save mode
Energy save mode reduces the energy consumption in standby
mode. You can select how many minutes after the last entry
before energy save mode is activated.
1 Press MENU and 335. The display shows
MODE
.
2 Press START/COPY. Use u to select
3 Press START/COPY. Use u to select
60
minutes or
4 To confirm the entry press START/COPY and then STOP
three times.
OFF
.
POWER SAVE
5, 15, 30,
SAVE
.
Toner save mode
The toner save mode decreases the consumption of the toner.
Printing quality may fall off.
1 Press MENU and 335. The display shows
MODE
.
2 Press START/COPY. Use u to select
3 Press START/COPY. Use u to select ON or
4 To confirm the entry press START/COPY and then STOP
three times.
TONER SAVE
SAVE
OFF
.
List of settings
You can print out a list of all functions and settings currently
available.
1 Press MENU, 666 and START/COPY.
2 A list of all settings is printed.
.
13
Page 14

Fax switch
The built-in fax switch enables a single telephone connection to
be used to make phone calls, send and receive faxes and use
extra devices. There are four operating modes. Your machine is
preset to FAX mode.
1 The desired operating mode can be selected using TEL/
FAX/AUTO. Press the button until the desired mode
appears.
TEL mode
In TEL mode your fax machine behaves like a normal telephone.
If you receive a fax call (you will hear a high-pitched tone or
nothing at all) you can press START/COPY to start fax recep-
tion. Automatic fax reception is turned off.
Fax reception from a different phone
If you pick up another phone and hear a fax call (you will hear
a high-pitched tone or nothing at all) you can start the fax machine using a code. If this does not work, press START/COPY
on the fax machine.
1 To define the code press MENU and 224. The dis-
play shows
2 Press START/COPY. Use u to select ON or
3 Press START/COPY and enter the last digit of the code.
This always starts with *5.
REMOTE FAX START
.
OFF
.
FAX mode
In FAX mode the machine rings twice and then answers automatically. This mode is suitable for fax operation.
AUT mode
In AUT mode your machine will ring up to nine times depending on the setting and will decide whether the incoming
call is a voice or fax call. Faxes are received automatically.
1 To set the number of rings press MENU and 222.
The display shows
2 Press START/COPY and enter the desired number of
rings.
3 Press START/COPY and then STOP twice.
AUTO RING COUNT
.
TAM mode
In this mode you can connect an external telephone answering
machine. Ensure that the number of rings is greater than the
number of rings set on the external answering machine.
4 Press START/COPY and then STOP twice.
1 To set the number of rings press MENU and 223.
2 Press START/COPY and enter the desired number of
rings.
3 Press START/COPY and then STOP twice.
v If the volume level is set to zero, no ringing tone
will be heard but faxes will still be automatically received.
14
Page 15

Telephone
Making a call
1 Key in the number you want to dial.
2 Lift the handset.
D If you want to dial without lifting the handset, press l.
Re-dialling
By means of PP you can redial the last five numbers.
1 Press PP.
2 Press u until the number you want appears.
3 The machine will dial the number automatically.
Speed dialling
There are eleven speed dial keys for numbers you use regularly.
Storing numbers
1 Press MENU and 1. The display shows
DIAL
.
11 SPEED
Speed dial list
1 Press MENU, 662 and START/COPY.
2 The speed dial list will be printed out.
Phonebook
Your fax machine has space to store around 99 names and
numbers. The precise number will depend on the length of the
entries.
Storing numbers
1 Press MENU and 12.
2 Press START/COPY.
3 Use u to select
COPY to confirm.
4 Enter a name using the digit keys (up to 32 characters) and
press START/COPY.
5 Enter the telephone number. Press START/COPY to con-
firm.
6 Press STOP three times to end the function.
ENTRY: NEW
and press START/
2 Press START/COPY.
3 Press the speed dial key where you want to store the entry
and confirm by pressing START/COPY.
4 Enter a name using the digit keys (up to 32 characters) and
press START/COPY.
5 Enter the telephone number. Press START/COPY to con-
firm.
6 Press STOP three times to end the function.
Using speed dial
1 Press the relevant speed dial key.
2 Lift the handset or, if you want to send a fax, press START/
COPY.
Changing speed dial
entries
1 Press MENU and 1.
2 Press START/COPY.
3 Press the relevant speed dial key and press START/COPY
to confirm.
4 Enter a name using the digit keys (up to 32 characters) and
press START/COPY.
5 Enter the telephone number. Press START/COPY to con-
firm.
Using the phonebook
1 Press a and START/COPY. The first name in the
alphabet will appear on the display. Use u to select the
desired entry.
2 Lift the handset or, if you want to send a fax, press START/
COPY.
Correcting entries
1 Press MENU and 12 and then START/COPY.
2 Use u to select
COPY to confirm.
3 Press START/COPY again and use u to find the en-
try you want to correct.
4 Press START/COPY and make the changes.
5 Press START/COPY again and then STOP twice to end
the function.
ENTRY: OLD
and press START/
Deleting entries
1 Press MENU and 12 and then START/COPY.
2 Use u to select
COPY to confirm.
3 Press START/COPY again and use u to find the en-
try you want to delete.
4 Press STOP.
ENTRY: OLD
and press START/
6 Press STOP three times to end the function.
15
Page 16

5 Use u to select
to confirm. If you don't want to delete the entry, press
STOP.
6 Press STOP twice to end the function.
DELETE? Y
and press START/COPY
4a If you want to enter further numbers, use u to select
ANOTHER? Y
b When you have finished entering numbers, use u to
select
ANOTHER? N
and enter the numbers you want.
. Then press START/COPY.
Printing the phonebook
1 Press MENU, 663 and then START/COPY.
2 The telephone numbers stored are printed out.
Groups
You can combine entries in your phonebook into groups so
you can send a fax to several people at the same time, for example.
Setting up a group
1 Press MENU, 13 and then START/COPY. The dis-
play shows
2 Use u to select the digit under which you want to store
the group (max of five groups), e.g.
3 Press START/COPY.
4 Enter a name for the group using the digit keys (up to 32
characters) and press START/COPY.
5 Enter the first telephone number. Press START/COPY
to confirm. The display shows
13 GROUPS
.
NUMBER: 01
GROUP NO.: 01
.
5 The document is scanned and automatically sent.
Canceling
To cancel automatic redial, press MENU, 776 and START/
COPY. Press START/COPY again to confirm.
D If you want to clear the fax from the memory, press STOP.
D If the line is busy, automatic redial is activated.
Correcting groups
1 Press MENU, 13 and then START/COPY.
2 Use u to select the group you want to change and press
START/COPY to confirm.
3 Use uto select
COPY.
4 You can now change the name of the group. When you
.
have done this, press START/COPY.
5 Change the entry you want to change and press START/
COPY.
6 Press STOP four times to end the function.
ENTRY: OLD
and press START/
Deleting a group
6 The machine will automatically ask you for the next number
(maximum of ten). Press START/COPY to confirm each
time.
7 Press STOP four times to end the function.
Sending to a group
1 Place the document to be faxed (maximum of 15 sheets)
face down in the document feeder.
2 Press MEMORY 2 and START/COPY. The display
shows
2 BROADCAST
a If you want to sent the fax immediately, select 1
press START/COPY.
b If you want to send the fax later select 2
time you want to send it (within 24 hours, e.g. 18 30
for 6.30 pm) and press START/COPY.
3 Use u to select the group and press START/COPY.
.
NOW
and
LATER
, enter the
1 Press MENU, 13 and then START/COPY.
2 Use u to select the group you want to delete and press
START/COPY to confirm.
3 Use u to select
DELETE? Y
and press START/COPY.
Group overview
1 Press MENU and 664 and START/COPY.
2 The group overview is printed out.
Calling line identification
(not available in all countries)
Your fax machine can display the telephone number of the
caller before you lift the handset. Check with your telephone
company whether you can activate this function on your telephone line.
The numbers of the last twenty callers are stored.
16
Page 17

Printing a caller list
The caller list contains the numbers of the last twenty telephone
and fax calls received, provided the callers have activated calling
line identification.
1 Press MENU, 665 and then START/COPY.
2 The caller list is printed out.
The caller list can be printed out automatically as soon as it
reaches twenty entries.
1 Press MENU and 227. The display shows
PRINT
.
2 Press START/COPY and use u to select
ID LIST
3 Press START/COPY and use u to select ON or
4 Press START/COPY and then STOP three times to end
the function.
.
27 AUTO
2 CALLER
OFF
Printing a journal
The journal contains the numbers of the last forty calls or faxes
sent or received.
1 Press MENU, 66 and then START/COPY.
2 The journal is printed out.
The journal can be printed out automatically.
1 Press MENU and 227. The display shows
PRINT
.
2 Press START/COPY and use u to select
LOG LIST
3 Press START/COPY and use u to select ON or
.
27 AUTO
1 CALL
OFF
.
.
4 Press START/COPY and then STOP three times to end
the function.
17
Page 18

Fax
v It is best only to use A4 documents (80 g/m2).
Documents smaller than A5 may jam in the machine.
v Do not try to send documents that are
... damp, coated with correction fluid, dirty or have
coated surfaces,
... written on in soft pencil, ink, crayon or char-
coal,
... taken from newspaper (printers ink!),
... held by paper clips or staples; always remove
these before faxing,
... wrinkled or torn,
... glued together, too thick or too thin or covered
with any adhesive notes ("Post-It®" notes),
Sending a fax
1 Dial the number.
2 To improve the image quality press RESOLUTION .
3 Press START/COPY.
Transmission starts. If the fax machine is unable to establish a
connection, it will redial automatically after a certain time.
D If you wish to cancel automatic redial with the document
still in the machine, press STOP. The document will be
ejected.
D If you wish to cancel automatic redial without ejecting the
document, press MENU, 773 and then START/
COPY. Press START/COPY to confirm.
... made of foil or continuous paper.
Inserting a document
1 Place the document face down in the document feeder
(maximum of 15 sheets).
2 Adjust the guides to match the width of the document.
Resolution
Your fax machine has four different resolutions. In addition to
STANDARD
drawings),
tographs and other such images). Keep pressing RESOLU-
TION until the display shows the option you want.
(for faxes), there is
SUPER FINE
(for copies) and
FINE
(for small print and
PHOTO
(for pho-
Reducing
To ensure that faxes that are longer than A4 are printed out on
one page, you can automatically reduce the page. You can define
the extent to which the page is reduced.
Automatic
If this function is activated, an over-long fax is reduced by the
amount specified in the function described below (see Limit).
1 Press MENU and 334. The display shows
DUCTION
2 Press START/COPY and use u to select
DUCTION
.
.
34 RE-
AUTO RE-
18
3 Press START/COPY and use uto select ON or
4 Press START/COPY and then STOP three times to end
the function.
OFF
Limit
This function lets you select the amount by which an over-long
fax is to be reduced.
1 Press MENU and 334. The display shows
DUCTION
2 Press START/COPY and use u to select
OLD
3 Press START/COPY use u to select a value between
0
and
4 Press START/COPY and then STOP three times.
.
30
.
mm.
34 RE-
THRESH-
.
Page 19

Memory
If there is no paper in the paper tray or if the toner is empty,
incoming faxes will be stored in memory (around 120 pages
according to Slerexe letter). If an incoming fax has been stored
in memory the display will show
paper tray is refilled or the toner replaced all the faxes stored in
memory can be printed out (see Printing from memory).
When a fax has been printed it is deleted from memory. If
printing is interrupted all the faxes that have not yet been printed
in full remain in memory. Once the memory is full no further
pages can be stored.
FAX IN MEMORY
. Once the
Canceling
1 Press MEMORY, 4 and START/COPY. The display
shows
ARE YOU SURE?
2 Press START/COPY to delete the faxes from memory.
If the line is busy, automatic redial is activated.
1 If you wish to cancel automatic redial, press MENU,
774 and then START/COPY.
2 Press START/COPY again to confirm.
D A power failure will clear the faxes from memory.
Broadcast
Printing later
You can choose whether faxes are to be printed immediately
from memory or later.
1 Press MENU, 333. The display shows
MODE
. Press START/COPY.
2 Use u to select
soon as the paper tray is refilled) or
are printed out when you want).
3 Press START/COPY and then STOP twice.
PRINT NOW
(faxes are printed out as
PRINT LATER
33 MEMORY
(faxes
Printing from memory
If there is a document in memory the display will show
IN MEMORY
1 Press MEMORY and 3.
2 Press START/COPY. If faxes are stored they will be printed
out.
.
FAX
Sending from memory
You can scan in documents, store them in memory and send
them from memory. When they have been sent, the faxes are
cleared from memory.
1 Place the document to be faxed (maximum of 15 sheets)
loosely in the document feeder, face down.
2 Press MEMORY, 2 and START/COPY.
a If you want to sent the fax immediately, select 1
press START/COPY.
b If you want to send the fax later select 2
press START/COPY. Enter the time you want to send it
(within 24 hours, e.g.18 30 for 6.30 pm) and press
START/COPY.
3 Enter the fax number and press START/COPY. The docu-
ment will be scanned and sent.
NOW
LATER
and
, and
You can send the fax either to a group you have already stored
or to individual telephone numbers.
1 Place the document to be faxed (maximum of 15 sheets)
loosely in the document feeder, face down.
2 Press MEMORY and 2. The display shows
CAST
. Press START/COPY.
a If you want to sent the fax immediately, select 1
press START/COPY.
b If you want to send the fax later select 2
press START/COPY. Enter the time you want to send it
(within 24 hours, e.g. 18 30 for 6.30 pm) and press
START/COPY.
3 The display shows:
recipients:
a If you want to sent the fax to a group, use u to select
GROUP
and press START/COPY. Use u to select the
group. You can also use the digit keys to select a group.
b If you want to send the fax to specific telephone numbers,
use u to select
COPY. Enter the telephone number and press START/
COPY. If you want to enter further numbers, use u
to select
COPY to confirm. When you have finished adding numbers, press
4 Finally, press START/COPY. The document will be
scanned and automatically sent.
Broadcast list
The broadcast list contains the numbers of all the addresses in
a broadcast (up to 50 telephone numbers).
1 Press MENU and 664. The display shows
LIST
2 Press START/COPY. The list will be printed out.
ANOTHER ? Y
ANOTHER? N
.
DIAL NUM.: GROUP
ENTER NUMBER
and enter the press START/
.
2 BROAD-
NOW
and
LATER
and
. Enter the
and press START/
64 GROUP
Clearing memory
With this function you can delete faxes or documents from
memory.
1 Press MEMORY, 4 and START/COPY. The display
shows
ARE YOU SURE?
19
Page 20
2 Press START/COPY to delete the faxes from memory or
press STOP to cancel.
1 Press MENU, 552. The display shows
ING RX
. Press START/COPY.
52 POLL-
Sending later
If you wish to take advantage of off-peak telephone charges or
if you know that the person to whom you are sending a fax is
available only at certain times you can set up your fax machine to
send a fax automatically at a later time (within 24 hours).
1 Place the document to be faxed (maximum of 15 sheets)
loosely in the document feeder, face down.
2 Press MENU, 44. The display shows
LATER
. Press START/COPY two times.
3 Enter the time you want to send it (within 24 hours, e.g.
18 30 for 6.30 pm) and press START/COPY.
4 Enter the fax number and press START/COPY.
Canceling
If you remove the document the delayed fax job will be canceled.
You can also cancel the time. To do this, press MENU, 77
and START/COPY. The display shows
Press START/COPY again to confirm.
41 SEND
ARE YOU SURE?
Sending with code
If your fax partner has entered a code to protect the fax reception please follow the procedure:
1 Place the document to be faxed (maximum of 15 sheets)
loosely in the document feeder, face down.
2 Use u to select
3 Enter the code (up to 20 digits) and press START/COPY.
4 Enter the telephone number and press START/COPY.
WITH CODE
and press START/COPY.
Delayed polling
If you wish to take advantage of off-peak telephone charges
you can poll a fax at a later time (within 24 hours).
1 Press MENU, 552. The display shows
ING RX
2 You now have two options:
a If you want to poll a fax without a code, use u to select
LATER
24 hours, e.g. 18 30 for 6.30 pm) and press START/
COPY.
b If you want to enter a code, use u to select
and press START/COPY. Enter a time for polling and
press START/COPY. Now enter the code (up to 20 dig-
its) and press START/COPY.
3 Enter the fax number and press START/COPY.
D If the line is busy, automatic redial is activated. If you wish
to cancel automatic redial, press MENU and 775.The
display shows
two times.
D If you wish to cancel the entire process, press MENU,
771 and START/COPY.
. Press START/COPY.
and press START/COPY. Enter a time (within
75 POLL REDIAL
. Press START/COPY
52 POLL-
LATER/C
2 Press MENU, 442 and START/COPY.
3 Enter the code which you have received from your fax part-
ner (up to 20 digits) and press START/COPY.
4 Enter the fax number and press START/COPY.
Receive polling
This function enables you to receive documents that have been
stored for you in a remote fax machine.
Quick polling
1 Press MENU, 552. The display shows
ING RX
2 Select the telephone number and press START/COPY
two times.
. Press START/COPY.
Receive polling with code
If your fax partner has entered a code to protect the documents,
proceed as follows:
52 POLL-
Transmit polling
You can program your fax machine to send documents when it
is polled by a remote fax machine.
1 Place the document to be faxed (maximum of 15 sheets)
loosely in the document feeder, face down.
2 Press MENU and 55. The display shows
ING TX
3 You can now choose whether or not to protect the fax
against unauthorized access.
a If you want to protect the fax, use u to select
CODE
digits) and press START/COPY. Anyone you give this
code to will be able to poll the fax.
b If you do not want to use a code, use u to select
and press START/COPY.
The process is canceled as soon as you remove the document
from the fax machine.
D Poll coding is based on the international ITU standard.
However, there are manufacturers who use different procedures. Their machines are therefore not compatible.
. Press START/COPY.
and press START/COPY. Enter a code (up to 20
51 POLL-
WITH
NOW
20
Page 21

D If you send faxes to or poll faxes from fax databases, some
of these databases allow you to append the subaddress
directly to the telephone number. This will save you telephone charges. First enter the telephone number of the
database and press R. Now enter the subaddress. If you are
not sure whether your fax polling service supports
subaddresses, contact the service provider.
Reception report
In the default setting, a reception report is printed out only in
the event of a transmission error. However, you can change this
setting so that a reception report is printed for every fax received, only in the event of an error or never.
Transmission speed
If the telephone connection used for transmission is poor,
transmission errors may occur at normal speed (14,400 bps). In
such cases it is best to reduce the speed. When you have successfully sent the fax, remember to set your fax machine back to the
standard speed.
1 Press MENU and 33:
2 Press START/COPY and use u to select the speed
you want.
3 Press START/COPY and then STOP twice.
31 TX SPEED
.
Reception speed
If the telephone connection used for reception is poor, errors
may occur at normal speed (14,400 bps). In such cases it is best
to reduce the speed. When you have successfully received the
fax, remember to set your fax machine back to the standard
speed.
1 Press MENU and 332:
32 RX SPEED
.
1 Press MENU and 226:
2 Press START/COPY and use u to select
OFF
or ON.
3 Press START/COPY and then STOP twice.
26 RX REPORT
.
ERROR,
2 Press START/COPY and use u to select the speed
you want.
3 Press START/COPY and then STOP twice.
Transmission report
In the default setting, a transmission report is printed out only
in the event of a transmission error. However, you can change
this setting so that a transmission report is printed for every fax
transmitted, only in the event of an error or never.
1 Press MENU and 225:
2 Press START/COPY and use u to select
ON
or
OFF
.
3 Press START/COPY and then STOP twice.
25 TX REPORT
.
ERROR,
21
Page 22

Copy - scan - print
Copy
You can use your fax machine to make copies of an original.
Resolution
age quality press RESOLUTION (see chapter Fax / Resolu-
tion).
1 Place the document (maximum of 15 sheets) in the docu-
STANDARD
ment feeder, face down.
is set by default. To select a better im-
2 There are two ways you can call up the scan function:
a Click on the START symbol on the left lower edge of your
screen. Choose the Program menu and select FAX printer.
A sub-menu will appear. Select the Imaging Software.
Choose the command Scan New in the pull down menu
File.
b Open the graphics program into which you wish to scan.
Select as source the FAX scanner driver and choose the command to aquire an image.
3 The FAX scanner window will open.
2 To select a better image quality press RESOLUTION.
Single copies
1 To make a single copy of the original, press START/COPY
three times. Copying starts immediately.
Multiple copies and
enlarging/reducing
1 To make multiple copies of the original, press START/
COPY once.
2 The display shows
keys to enter the number of copies you want (maximum
of 99). Press START/COPY.
3 The display shows
reduce the copy.
You can reduce the copy to 50% and enlarge it up to 200%.
4 Press START/COPY. The fax machine will scan the first
page of the document and start copying it.
COPY COUNT: 01
SIZE: 100%
. Use u to enlarge or
. Use the digit
Scan
4 Select the desired scan settings.
5 Press the Scan command.
6 Once the scanning procedure is completed, the image of
the document can be stored.
D If you click on the Help command, on-line help will
open.
Printing from the PC
If the software installation has been performed successfully,
your fax machine is now set up as a standard printer. You can
now print out on the fax machine from any program you like.
1 Simply choose the print command in the application from
which you wish to print.
2 You can modify the printer settings for each respective ap-
plication. If you give a print command or select printer
installation, a dialogue box opens. Select the command which
will take you to printer setting and make the desired modifications.
3 In Control Panel, you can modify the printer settings for
all applications. Highlight the FAX printer and under File
/ Properties make the desired modifications.
(only for fax machines with a PC interface)
1 Place your documents face down (maximum of 15 sheets)
in the document feeder.
22
4 Under File / set as default you can determine whether
you wish to use the fax machine as a standard printer or
not.
D You may also click on the Help command. The overview
of on-line help will open.
Page 23

Troubleshooting
Maintenance
PAPER JAM
Received faxes or copies are not ejected.
CHECK PAPER
Check DOCUMENT
SERVICE
Problems faxing or printing
Cannot send a fax.
Open the cover and take the toner out of the machine. Pull
the green lever towards you. Carefully remove the paper
without tearing it.
Take out the paper cassette and remove the paper. Fan it and
straighten it on a smooth surface and replace it.
Press STOP. The document will be ejected. If not, pull it
gently out of the machine.
Disconnect the machine from the mains and plug it back in.
If the display still says
services.
Check that the recipient's machine is working.
Check whether the display shows an error message.
Lift the handset to check whether you are getting dial tone. If
not, check the telephone connection.
SERVICE
please contact customer
Cannot receive a fax.
You or the recipient has received a blank sheet.
Your document has been sent without an error message but
has not been printed out on the recipient's machine.
The documents you send are arriving with loss of quality.
Received faxes and copies are too light.
Check that you have selected the FAX, AUTO or TA M
mode.
Lift the handset to check whether you are getting dial tone. If
not, check the telephone connection.
The sender has faxed the back of the document.
Check the machine by making a copy of the document.
If the copy is OK the recipient's fax machine may be faulty.
Ask the recipient if their machine is working.
Check the document or increase the resolution. Reduce the
transmission speed. Check the machine by making a copy of
the document. If the copy is OK the recipient's fax machine
may be faulty.
Make a copy of any document. If the copy is OK there is a
problem with the sender's fax machine. Inform the sender.
If the copy is also too light the toner is almost all gone.
Shake the cartridge a few times. If the toner cartridge is
empty, replace it. You can obtain toner from specialist retailers
or directly from Philips (see Annex / Order service). Only use
PHILIPS original PFA 721 toner cartridges.
23
Page 24

There are white lines on the printout.
Clean the toner drum with a soft cloth.
There are black lines on the printout.
Problems with the connection
No dial tone.
Receive polling does not work.
The toner cartridge is damaged and must be replaced. Only
use PHILIPS original PFA 721 toner cartridges. You can order
them directly from Philips (see Annex/Order service).
Check that the machine is connected to the mains and to a
telephone line.
Check that the machine from which you are trying to receive
faxes is set for automatic fax operation and for polling. If you
need a code, check you have the right one.
24
Page 25

Error codes
Error codes when sending faxes
# 102
# 104
# 105
# 109
# 110
# 111
# 113
Problem
No document in the feeder.
Fault on the telephone line.
The receiving fax machine has a transmission error.
The receiving fax machine is not responding.
There is no signal from the receiving fax machine at the end
of transmission.
An error message is sent by the receiving fax machine at the
end of transmission.
The receiving fax machine requests a second transmission as
there were too many transmission errors in the first transmission.
# 114
# 115
Error codes when receiving faxes
# 152
# 153
# 154
# 158
The document is too long.
Transmission of one page took too long (more than eight
minutes).
Problem
An error message is received from the sending fax machine at
the start of reception.
The person polling the fax has entered an incorrect password
The sending fax machine does not send a signal at the start
of reception.
The sending fax machine does not send a standard signal.
# 160
# 161
The machine is not correctly connected to the telephone line
or there is no signal from the sending fax machine.
At the end of the reception process the sending fax machine
does not send a signal or the connection was interrupted.
25
Page 26

# 166
There are repeated errors in the received data.
# 167
# 168
# 169
Other error codes
# 201
# 202
The data received contains so many errors that a second
transmission is needed.
At the start of password-protected polling the machine
detects that the wrong password has been entered on the
sending fax machine.
In attempting to poll a fax, the machine detects that the
sending fax machine has not been set up correctly for polling.
Problem
The correct protocol signal is not sent during the transmission process.
The correct protocol signal is not sent during the reception
process.
# 205
# 206
STOP BUTTON PRESSED
NO REPONSE
Transmission is canceled by the other fax user.
There is not enough memory capacity during transmission.
The STOP button was pressed during transmission.
The other fax user does not answer during transmission and
the connection is interrupted.
26
Page 27

Annex
Technical data
Compatibility ITU-T Group 3
Connection type Exchange line (PSTN) /
Extension (PABX)
Flash times Exchange line (PSTN): 100 ms
Extension (PABX): 100 ms
Document size Width: 128-218 mm
Length: 128-356 mm
Document feeder max. 15 pages (80 g/m2)
Paper A4 210x297 mm, 80 g/m
Capacity of paper tray max. 125 sheets
Maximum scan width 208 mm
Scan and copy resolution:
horizontal 8 points/mm (200 dpi)
vertical standard 3.85 lines/mm (200x98 dpi)
vertical fine 7.7 lines/mm (200x196 dpi)
vertical super fine 15.4 lines/mm (200x300 dpi)
photo 64 greyscales
Print resolution 600x600 dpi
Data compression
scheme MH, MR
Modulation V29, V27ter, V23, V21, V17
Transmission speeds 14k4/12k2/9600/7200/4800/2400
bps
Fax memory 2 MB, approx. 120 pages
Recording method Laser Jet
Toner capacity Initial cartridge approx. 1000 pages,
PFA 721 approx. 3000 pages
Speed dial 11 entries
Phonebook 99 entries
Group dial 5 entries, maximum of 10 digits
each
Dimensions (WxDxH) 449x325x165 mm excl. paper holder
Weight Approx. 8 kg
Power draw Standby: less than 15 W
Operation: less than 200 W
Mains connection 220-240 V / 50-60 Hz
Temperature range 10-32°C
Relative humidity 20-80 % (relative)
2
Glossary
Additional fax machine, additional telephone: You can use your fax
machine with additional equipment such as cordless phones
and answering machines connected to a single telephone line.
Calling line identification: When you receive a call the telephone
number of the caller is displayed (not in all countries).
Document: The typed or handwritten sheet, sketch or drawing
you want to fax to someone else.
DTMF (Dual Tone Multiple Frequency): This tone dialing signal
lets you start the fax machine from any phone that has tone
dialing.
Fax switch, ring patterns: The fax switch analyzes incoming calls
and selects the appropriate ring pattern. It detects whether the
call is a normal voice call or a fax call. In TEL mode, faxes have
to be received manually; in other modes they are received automatically.
Hook flash function: Press R to access a wide range of new
services from the telephone company (toggling, call waiting,
etc.).
ITU (International Telecommunications Union): An international
body that publishes telecommunications standards.
Laserjet: A printing method in which black powder (see Toner
cartridge) is burnt onto paper by means of a laser.
Memory: Faxes that are not printed out are stored in memory.
PABX, number for outside line: PABXs (private automatic branch
exchanges) are installed in all companies over a certain size. They
provide a kind of internal telephone network. To obtain an
outside line from a PABX you need to dial a particular digit.
Paper: Standard A4 paper (210x297 mm, 80 g/m2)
Polling: This lets you receive documents stored in another fax
machine.
Pulse dialing: Pulse dialing is the old dialing method in which
each number dialed produces a certain number of pulses.
Receive polling: This lets you receive documents stored in another
fax machine.
Sender ID: The name and telephone number of the user can be
entered on most fax machines. This sender ID is printed out
on the transmission report and also appears on fax machines to
which you send documents.
Toggling: Switching from one call to another and back again.
Toner cartridge: This contains the black powder, known as toner,
that is transferred to the paper by heat. White stripes on the
printout indicate that the toner is running out. The cartridge
can be shaken to provide a short-term solution, but will need
replacing before long.
Security EN 60950, IEC 60825-1
Interference To EN 55022 class B
Immunity To EN 55024
27
Page 28

Guarantee
(UK Terms and Conditions)
- unsuitable operating conditions, particularly of temperature
and humidity; or
- repair or maintenance of the equipment by persons not authorised by SAGEM; or
ATTENTION
At the beginning of April 2002, SAGEM SA bought the
PHILIPS fax business unit. SAGEM SA is now the European
Number 1 in fax and offers a complete range of fax terminals
with Internet access and SMS function, multifunctional terminals and servers covering the needs of all its customers - from
home-users to multinational organisations.
In order to apply the guarantee, you should contact your dealer.
Proof of purchase will be required. Should malfunctioning
arise, the dealer will advise you what to do.
If you bought your equipment from SAGEM directly, the following shall apply :
A SAGEM undertakes to remedy by repair, free of charge for
labour and replacement parts, any defects in the equipment
during a period of twelve (12) months from the date of original delivery of the Equipment, where those defects are a result
of faulty workmanship.
During this twelve month guarantee period, the defective equipment will be repaired free of charge; the customer must however return the defective equipment at his/her own expense, to
the address given by SAGEM After Sales Department, the phone
number of which can be found on the delivery slip. Unless the
customer has concluded with SAGEM a maintenance contract
in respect of the equipment which specifically provides for repairs to be carried out at the customer's premises, the repairs
will not be carried out on the equipment at the customer's
premises.
The following sentence applies to purchases of equipment for
the customer's trade, business or profession. Except as otherwise expressly provided in this Document and to the extent
permitted by law, SAGEM makes no representations or warranties, express or implied, statutory or otherwise, and to such
extent, all terms and conditions implied by law are hereby excluded.
This guarantee does not affect the Customer's statutory rights.
B Exclusions From Guarantee
SAGEM shall have no liability under the guarantee in respect
of :
o damage, defects breakdown or malfunction due to :
- failure to properly follow the installation process and instructions for use; or
o wear and tear from normal daily use of the equipment and its
accessories
o damage due to insufficient or bad packaging of equipment
when returned to SAGEM
o supply of new versions of software
o work on any equipment or software modified or added without the prior written consent of SAGEM
o malfunctions not resulting from the Equipment or from
software installed in user workstations for the purpose of use
of the equipment
o communication problems related to an unsuitable environment, including :
- problems related to access and/or connection to the Internet
such as interruptions by access networks or malfunction of the
line used by the subscriber or his correspondent
- transmission faults (for example poor geographical coverage
by radio transmitters, interference or poor line quality)
- the local network fault (wiring, servers, workstations) or the
failure of the transmission network
o the normal servicing (as defined in the user guide supplied
with the equipment) as well as malfunctioning due to servicing
not being carried out, servicing costs are in any event always
borne by the customer.
C In the cases set forth in § B) as well as after expiry of the
twelve month guarantee period, the customer must ask SAGEM
for an estimate, and he/she must accept the estimate and agree
to pay the charges mentioned in it before returning the equipment to SAGEM. The repair and delivery costs will be invoiced
to the customer.
The foregoing shall apply unless otherwise agreed in writing
with the customer and only for the UK. If any provision of
this guarantee shall be held to be in whole or in part invalid or
illegal due to an obligatory rule applicable to consumers pursuant to their national legislation, such invalidity or illegality shall
not impair or affect the remaining provisions or parts of this
guarantee.
Please note that only Philips toner cartridges should be used.
Your Philips guarantee does not cover damage to your fax machine that may be caused by the use of any other toner cartridges.
- an external cause to the equipment (including but not limited
to, lightening, fire, shock or water damage of any nature); or
- modifications made without the written approval of SAGEM
SA; or
- a failure or neglect to maintain the equipment or inappropriate
maintenance; or
28
Order service
You can order toner cartridges and cleaning accessories at your
local dealer or directly from Philips (free delivery) on Freefone
0800 358 08 07 (United Kingdom).
Page 29

Declaration of conformity
We,
SAGEM Communication Austria GmbH
Gutheil-Schoder-Gasse 17
A-1230 Wien, Österreich
declare under our sole responsibility that the product
Plain paper Fax
PHILIPS LPF 725
to which this declaration relates is in conformity with the
following standard(s) or other normative document(s):
Safety:
EN 60950:1992 + A1:1993 + A2:1993 + A3:1995 + A4:1997
+ A11:1997
Electromagnetic Compatibility:
EN 55022:1998 class B, EN 55024:1998
following the provisions of the Directive 1999/5/EC on
radio equipment and telecommunication terminal equipment
and the mutual recognition of their conformity.
Wien, 2002-05-10 Nicolas DENIS
Managing Director
=====================================================================================
We,
SAGEM Communication Austria GmbH
Gutheil-Schoder-Gasse 17
A-1230 Wien, Österreich
declare under our sole responsibility that the product
Plain paper Fax
PHILIPS LPF 755
to which this declaration relates is in conformity with the
following standard(s) or other normative document(s):
Safety:
EN 60950:1992 + A1:1993 + A2:1993 + A3:1995 + A4:1997
+ A11:1997
Electromagnetic Compatibility:
EN 55022:1998 class B, EN 55024:1998
following the provisions of the Directive 1999/5/EC on
radio equipment and telecommunication terminal equipment
and the mutual recognition of their conformity.
Wien, 2002-05-10 Nicolas DENIS
Managing Director
29
Page 30

Index
A
A-Z
key 6
accessories 7
additional
telephone 14
annex 27
AUT
mode 14
B
book
telephone 6
C
cable
printer 4
telephone 4
caller
identification 16
cartridge
toner 4
CD-ROM 4
character
enter 12
code
error 25
computer
CD-ROM 4
connect 4
install 4
print 22
scan 22
connection 9
computer 9
PABX 11
power supply 9
type 27
copy 6
enlarge 22
multiple pages 22
reduce 22
single page 22
cover
grip 5
D
date
enter 12
delete
entry 6
group 16
telephone book 15
description
machine 5
dial
speed 6
without handset 15
display
lamp 6
document
insert 18
security 18
E
enlarge
copy 22
enter
character 12
date and time 12
number 15
entry
delete 6
error
code 25
F
fax
mode 14
polling 20
reduction 18
resolution 18
fax switch 14
flash
time 27
G
glossary 27
grip
cover 5
group 16
delete 16
list 16
guarantee 28
H
handset 7
Help 22
I
identification
caller 16
image quality
key 6
insert
document 18
paper 8
install
computer 9
instruction
safety 2
interrupt
process 6
ISDN
connection 11
K
key
A-Z 6
MEMORY 6
MENU 6
R 6
RESOLUTION 6
speed dial 6
START/COPY 6
STOP 6
TEL/FAX/AUT 6, 14
L
lamp
display 6
list
group 16
settings 13
M
machine
description 5
make a call 15
MEMORY
touche 6
memory
key 6
print 19
print later 19
send later 20
MENU
key 6
mode 14
AUT 14
FAX 14
TAM 14
TEL 14
N
name
enter 12
number
enter 12
identification 16
redial 6
O
options
select 6
other telephone 14
P
paper
insert 8
quality 8
paper tray 8
PC
print 22
scan 22
polling
fax 20
power
connection 9
print
computer 22
group list 16
later 19
memory 19
PC 22
resolution 27
printer software
uninstall 11
private branch exchange
connection 11
R
R
key 6
reception mode
TEL/FAX/AUTO 6
redial
number 6
reduce
copy 22
fax 18
value 18
resolution 18
key 6
print 27
scanner 27
ring pattern 14
S
safety
instructions 2
scan
computer 22
PC 22
resolution 27
send
later 20
service
order 29
settings
list 13
START/COPY
key 6
STOP
key 6
30
Page 31

T
TAM
mode 14
TEL
mode 14
TEL/FAX/AUT
key 14
TEL/FAX/AUTO
key 6
telephone 15
additional 14
other 14
telephone book
delete 15
time
enter 12
flash 27
toner 4
tray
document ejection 7
type
connection 27
U
uninstall
printer software 11
V
value
reduction 18
Y
your name 12
your number 12
31
Page 32

http://www.fax.philips.com
Internet keyword: Philips Fax
E-mail: fax.infoline@philips.com
United Kingdom
Tel.: 0870 124 37 37
Fax: 0870 124 02 02
The CE mark confirms that the machine corresponds to the
relevant guidelines of the European Union.
This product is intended for use on an analogue public
switched network (PSTN) and for use in the country indicated on the label of the box. The usage in other countries
could cause malfunction.
For further information please contact your national technical
support centre. Initially contact your dealer if problems occur
during operation.
This operation manual has been printed on chlorine-free,
recycled paper, in line with the highest standards of environmental friendliness.
abc
5103 506 1903.1 GB/INT (LPF 725/755)
The used cardboard packaging as well as the cardboard
protecting your facility at its sides made of waste paper can be
recycled like waste paper; corresponding to your countrys
demands dispose the plastic foils either for recycling or with
your rubbish.
This electronic facility contains recyclable material. At the end
of use of this facility please inform yourself about the
corresponding recycling demands of your country.
Technical changes and errors excepted.
Copyright 2002 © Sagem Communication Austria GmbH
 Loading...