

Page 1

wearable digital camera
key007/ 0078/ 0079
key008
user manual
Page 2

2
Contents
Quick start .............................................................................. 3
Safety / Maintenance ............................................................. 4-5
Controls ................................................................................... 6-7
Minimum computer system requirements ...................... 8
About KEY camera ............................................................... 8
Supplied accessories ............................................................. 9
Neck strap................................................................................ 9
Power supply .......................................................................... 10
POWER indicator .................................................................. 11
Switching on/ off .................................................................... 12
MEMORY indicator ................................................................ 13
Taking pictures, lighting level ............................................... 14
Transferring / viewing pictures ........................................... 15-17
Mass storage ........................................................................... 18
Photo Manager ....................................................................... 19
Troubleshooting ..................................................................... 20-21
Technical data ......................................................................... 22
© Koninklijke Philips Electronics N.V. ,2003.
All rights reserved. Reproduction, copying, usage, modifying, hiring, renting, public performance,
transmission and / or broadcasting in whole or in part is prohibited without the wr itten consent of Philips.
Page 3
3
Quick start
Congratulations & welcome to Philips wearable digital products.
To get started, follow the 4 steps as shown.
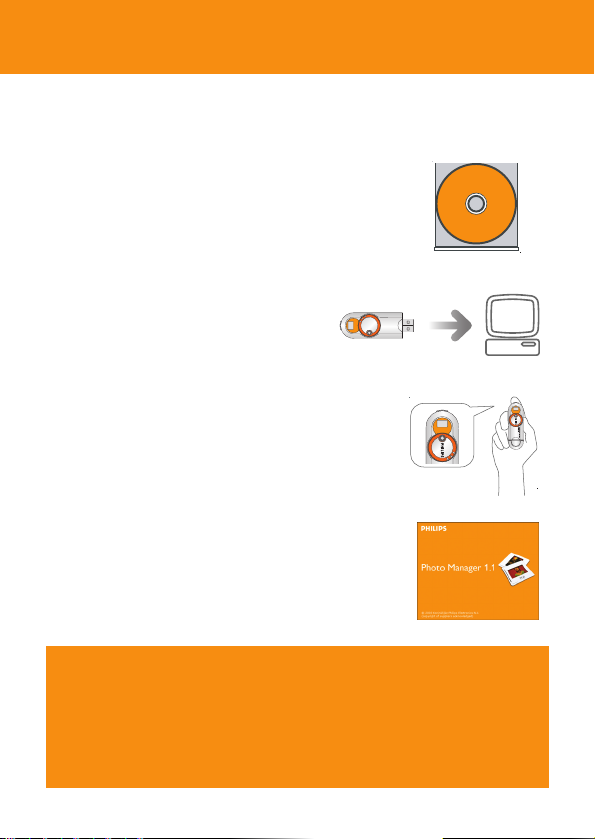
1 Installation
• Insert the supplied installation CD into your
computer’s CD-ROM drive.
– The installation process is automatically launched
for first-time application users.
2 Charging
• Charge up your camera (about 3 hours)
before using it. Detach the USB cover &
connect the camera to your computer’s
USB port.
• Turn on your computer.
3 Taking pictures
Adjust the power control to the on position.
• Hold the camera upright and frame your subject
through the viewfinder.
• Press the shutter button.
4 Transferring pictures to your PC
• Connect the camera to your computer’s USB port
to transfer your photos.
– You can transfer and manage your files with Photo
Manager or simply use Windows Explorer!
CAUTION!
For Windows 98 users only:
WHEN CONNECTING THE CAMERA FOR THE VERY FIRST TIME TO CHARGE
UP/ TRANSFER FILES, MAKE SURE YOU ONLY DO SO AFTER YOU HAVE
INSERTED THE SUPPLIED CD-ROM INTO THE CD-ROM DRIVE FOR
INSTALLATION OF THE REQUIRED DRIVERS.
Page 4

4
Safety / maintenance
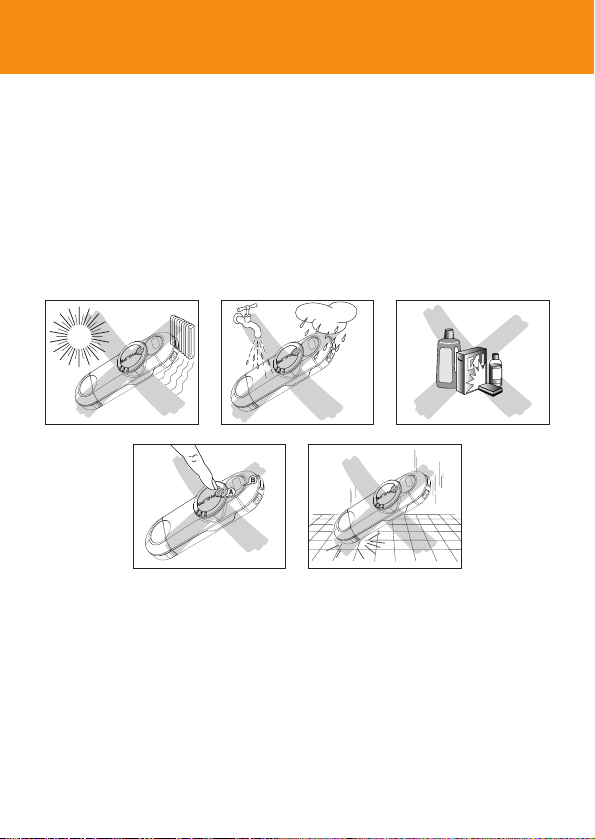
Take care when using KEY camera
• Traffic safety: do not use while driving or cycling as you may cause an
accident.
• Child safety: KEY camera neck strap is not a toy. Special care should be
taken if handled by young children. Avoid placing the neck strap around the
neck of a child to prevent strangulation!
To avoid damage or malfunction:
• do not expose to excessive heat caused by heating equipment or direct
sunlight.
• this product is not waterproof: do not allow your camera to be
submersed in water, avoid exposing the USB socket to water.Water
entering the camera may cause major damage and rusting.
• do not use any cleaning agents containing alcohol, ammonia, benzene, or
abrasives as these may harm the set.
• avoid touching the lens A and viewfinder B with your fingers.To
remove fingerprints, use a soft damp cloth.
• prevent damage to your eyes: do not look at the sun through the
viewfinder!
• Avoid sudden changes of temperature as this may cause condensation on
the lens and viewfinder. Allow the camera to adjust to the surrounding
temperature.
• do not drop your camera or allow objects to fall on camera. Strong shocks
and vibrations may cause malfunction.
Safety & satisfaction
• To enjoy your Philips product, please read and operate the set according to
the instructions inside our user manual (on the CD-ROM.)
Page 5
• active mobile phones & strong magnetic fields in the vicinity may
cause interference.
• the supplied software CD-ROM is not an audio CD. Playing CD-ROMs on
audio equipment may damage your audio equipment!
5
Safety / maintenance
Environmental information
We have reduced the packaging to its minimum and made it easy to separate
into mono materials: PET, paper and aluminum foil.
Your set consists of material which can be recycled if disassembled by a
specialized company. Please observe the local regulations to dispose of
packaging, and old equipment.
Page 6
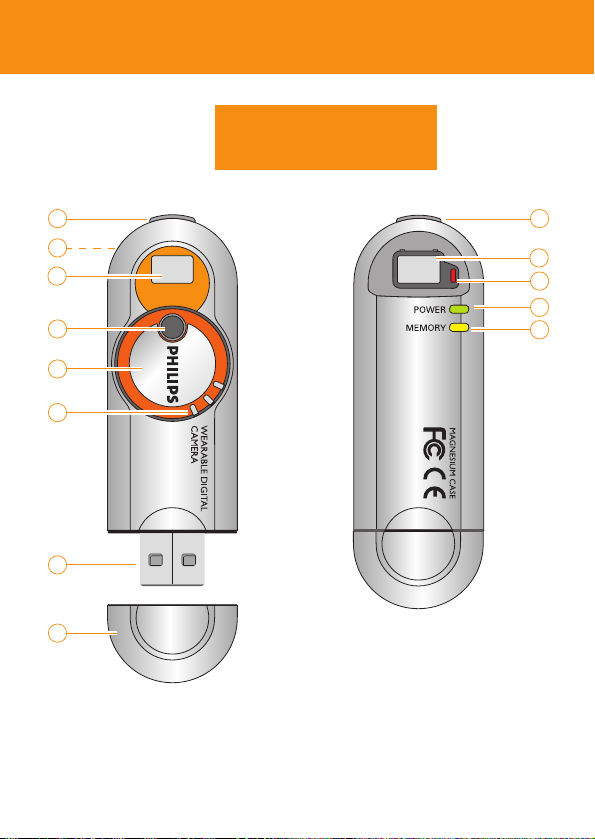
Controls
6
KEY007/0078/0079
KEY008
1
2
3
4
5
6
7
8
1
3
9
10
11
Page 7

Controls
7
1 shutter button
press halfway down to help check
lighting levels. Press all the way
down to take your picture.
2 metal strap hole
attach the supplied neck strap
here.
3 viewfinder window
to help frame your picture subject
4 lens
automatically opens when power
on.The lens is closed when the
power is off.
TIP:
– Make sure the lens is not obstructed /
covered when taking snaps!
5 power on/ off
turn clockwise to switch on,
turn anti-clockwise to switch off.
6 grip
place your finger/ thumb here to
turn the power control.
7 USB port
Connect to your computer’s USB
port to charge the camera/
transfer files.
8 USB cover
detach the protective USB cover
to reveal the camera’s USB port.
9 Light level sensor
When you press the shutter
button halfway, the sensor lights
up red/ blinks/ remains unlit
according to surrounding light
level conditions.
0 POWER
indicator lights up green/ blinks
according to power status/ file
transfer.
! MEMORY
indicator lights up yellow/ blinks/
remains unlit according to the
available memory on the camera.
The model and production numbers can be found next to the USB port
(please remove the USB cover to see)
Page 8

Windows system requirements
– Pentium® MMX 166MHZ processor or better
– USB port with Windows 98 / Me / 2000 / XP
– 96MB RAM
– 50MB free hard disk space
– CD ROM drive
– video display card
For Windows 98 users only:
• WHEN CONNECTING THE CAMERA FOR THE VERY FIRST TIME TO
CHARGE UP/ TRANSFER FILES, MAKE SURE YOU ONLY DO SO AFTER
YOU HAVE INSERTED THE SUPPLIED CD-ROM INTO THE CD-ROM
DRIVE FOR INSTALLTION OF THE REQUIRED DRIVERS.
Mac system requirements
– G3 or better
– Mac OS 9 - X
About KEY camera
KEY camera is a solid state, wearable, digital camera:
– captures VGA (640 x 480) resolution still images
– stores hundreds of still images in JPEG format
– 1.3 Mega pixel output when you use with the supplied picture
enhancement software
– transfers image files using Windows File Manager or Windows
Explorer, when the camera is connected via USB to your computer
– directly powered through your computer during file transfer to the camera.
Minimum computer system requirements
8
CAUTION!
Computers that were upgraded from Windows 95 may not have USB
compatibility!
Page 9

Supplied accessories
9
Make sure these items are in the package. If any item is missing, please contact
your dealer.
1x CD-ROM (Photo Manager software & user manuals)
1x Quick Start Guide
1x neck strap
1x Safety & Warranty booklet
Neck strap
Thread the neck strap through the hole as
shown.
Page 10

Power supply
10
This camera is powered by a built-in USB
rechargeable lithium battery which you can
charge direct from your computer.
TIP:
– When you use the camera for the ver y first time,
you’ll need to charge the battery before taking
pictures.
USB rechargeable battery
1 Check the camera is in the power off
position. Detach the USB cover.
2 Turn on your computer.
3 Connect the camera’s USB port to the USB
port of your computer.
➜ You will hear a double beep. Charging
starts immediately.While charging the
POWER (green) indicator blinks.
➜ Make sure you leave your PC switched
on during charging. After approx. 3
hours, the battery is fully charged,
4 Disconnect the camera and replace the USB
cover.
TIP:
– When you detach the USB cover, keep it in a safe place.
– To avoid damaging the USB port, always replace the USB cover when not connecting to
your computer.
– During USB connection/ batter y charging, by default taking pictures is not possible.
– For Mac users: When connecting the camera to your computer, avoid using the USB
connection on your Mac keyboard as it doesn't have sufficient power to detect your
camera.
Page 11

The POWER indicator lights up green according to battery power level.
Battery power POWER indicator
fully charged lit
low* blinks
empty unlit
TIP:
* when the camera is connected to your computer for battery charging/ file transfer, the
POWER indicator also blinks.
POWER indicator
11
fully charged
Page 12

12
Switching On/ Off
Switching on
Turn the power control 90° clockwise as
shown.
➜ You will hear a click.The POWER (green)
indicator lights up and you will hear a
double beep. PHILIPS is in the vertical
position and the lens is revealed.
Switching off manually
Turn the power control 90° anti-clockwise as
shown.
➜ You will hear a click.The POWER light goes
out. PHILIPS is in the horizontal position
and the lens is covered for protection.
TIP:
– Always turn off your camera when not taking
pictures. This will both save energy and prevent
photos being accidentally taken.
Auto-power down
To help save battery power, the camera
automatically powers down after 60 seconds if
you are not taking pictures.
TIP:
– If you want to resume taking pictures after auto-
power down, you’ll need to ‘wake up’ the camera
again:
1 Manually turn the power control anti-clockwise (off
position).
2 Turn clockwise to power on position.
Power on
Power off
Page 13

When using the camera, check the MEMORY indicator for the free memory
available:
MEMORY
Memory size indicator
over 3MB lights up yellow
less than 3MB blinks
less than 100KB unlit
TIP:
– Memory low! When the MEMORY indicator is unlit, your camera cannot take pictures.
To free the memor y, you will need to transfer and store your pictures /files on your
computer.
13
MEMORY indicator
over 3MB space available
Page 14

1 Hold the camera upright in your hand.
2 To frame your pictures
Look though the viewfinder to frame your
subject inside the window.
3 To take your pictures
Keep the camera steady and gently press
the shutter button halfway down.
➜ KEY detects the light level conditions.
Check the light level sensor to see
whether your surrounding has sufficient
light for a good picture.
Light level condition Sensor response
good unlit
low blinks red
poor lit
4 Press the shutter button all the way down to capture and store your
picture.
➜ KEY camera beeps when a picture is taken.
TIP:
– For best results, check the status of all 3 indicators (including POWER and MEMORY) on
the camera when taking pictures.
– Make sure the lens is not obstructed / covered when taking snaps!
Taking pictures, lighting level
14
Press
Low lighting conditions!
Page 15

When you connect the camera to your computer via the USB port, your
computer operating system will recognize KEY camera as a USB Mass Storage
Device (MSD).
KEY camera image files are stored in JPEG format as follows:
\DCIM\100PHILIPS\KEY7xxxx.jpg (for KEY 007/0078/0079 models)
\DCIM\100PHILIPS\KEY8xxxx.jpg (for KEY 008 models)
where xxxx is a JPEG file number (0001 to 9999).
Once you have the files to your computer, you
can use normal file operations to e.g. copy,
delete, rename your files.
Transferring / viewing pictures
1 Detach the USB cover.
2 Connect the camera’s USB socket to the
USB port of your computer.
➜ The POWER indicator blinks.
3 For details, please see the next pages of this chapter for PC and Mac users
respectively.
4 After viewing, unplug the camera from the USB port.
5 Replace the USB cover.
15
Transferring / viewing pictures
CAUTION!
Windows 98 users only
WHEN CONNECTING THE CAMERA FOR THE VERY FIRST TIME TO CHARGE
UP/ TRANSFER FILES, MAKE SURE YOU ONLY DO SO AFTER YOU HAVE
INSERTED THE SUPPLIED CD-ROM INTO THE CD-ROM DRIVE FOR
INSTALLATION OF THE REQUIRED DRIVERS.
Page 16

For PC users
When connected via the USB, the camera is detected and automatically
located as Removable Disk/ Device.
1 Launch Windows File Manager or Windows Explorer to access the
Removable Disk.
Transferring / viewing pictures
16
2 Click onto Removable Disk ➜ DCIM ➜100PHDSC to access your
pictures.
3 In Windows Explorer, click Thumbnails to see the picture overview.
4 Click on the file you want to open.
5 When you have finished viewing your files, click the hardware icon at
the bottom of the screen, and follow the screen instructions.
6 When the Safe to Remove Hardware dialogue box appears, click OK.
Page 17

For Mac users
When connected via the USB, the camera is detected and shown as a new
icon named KEYRING00X on your desktop screen (where X refers
to your model number).
TIP:
– When connecting the camera to your computer, avoid using the USB connection on your
Mac keyboard as it doesn't have sufficient power to detect your camera.
1 Click onto to access the Removable Disk.
2 Click on DCIM ➜100PHDSC to access your pictures.
3 Click on the file you want to open.
Transferring / viewing pictures
17
4 When you have finished viewing your files, drag to the Trash
icon on your desktop.
Page 18

TIP:
– Transferring and deleting pictures from your camera via your computer helps free up
memory space on your camera for more new pictures.
– Check the MEMORY indicator when taking pictures on your camera (see page 13).
– When connecting the camera to your computer, avoid using the USB connection on your
Mac keyboard as it doesn't have sufficient power to detect your camera.
Using your KEY camera as a Mass Storage Device
KEY camera can also function as mass storage device for :
• conveniently transferring other files on your camera, such as Word
documents, Powerpoint presentations, PDFs, etc.
• transferring and sharing files (copy, transfer, etc.) from computer to
computer.
Mass storage
18
Page 19

19
Photo Manager
About Photo Manager (for Microsoft Windows OS users only)
• Photo Manager is ideal for organizing the photos that are transferred
from your digital camera to your computer.
• Allows you to categorize, move, copy and edit your photos in an intuitive,
user-friendly environment.
1 Install the Photo Manager software from the installation CD-ROM onto
your computer.
• After installation, the Photo Manager icon appears on your desktop.
• On your task tray bar, the Monitor Program icon appears. This will
detect your camera and launch Photo Manager automatically each time you
connect your camera to your PC.
2 Please refer to the operating instructions in the Photo Manager user
manual.
Page 20

20
Troubleshooting
If a fault occurs, first check the points listed below before taking the set for
repair. If you are unable to remedy a problem by following these hints, consult
your dealer or service center.
WARNING!
Do not dismantle the unit as there is a risk of electric shock! Under no
circumstances should you try to repair the set yourself, as this will invalidate the
warranty.
No picture is taken, but I press the shutter button all the way down
– Built-in battery drained.
• Charge the battery (see page 10)
– Camera memory capacity full.
• Transfer pictures / other files to your computer to free memory space
(see page 15-17)
– Camera is connected to the PC’s USB port
• Unplug the camera from the USB port
– Poor light condition
• Check the surrounding light conditions
– The camera may have automatically powered off.
• Switch the camera off and switch on again (see page 12)
No reaction to controls
– Built-in battery drained.
• Charge the battery (see page 10)
Unusually slow rate of file transfer to/ from my camera
– Win XP OS operating on non-optimal Device Manager setting.
• With your camera connected to your PC, modify your default setting by
clicking on the following:
1 From the taskbar, click Start ➜ Settings ➜ Control Panel ➜ System
➜ System Properties ➜ Hardware ➜ Device Manager ➜ Disk
drives.
2 Select and double click on your camera model name Philips Keyring
0XX USB Device to enter the Philips Keyring XXX USB Device
Properties dialogue box (where XXX refers to your model number).
Page 21

21
3 Select the field Policies ➜ Optimize for performance ➜ OK.
4 Transfer your files again.
TIP:
After selecting the Optimize for performance option, please click the Safe Removal
icon at the bottom of the screen whenever you unplug the camera from your PC.
USB does not seem to work
– USB connection loose
• Check camera is securely connected and connections to your computer
are correct.
– Wrong Windows version.
• Your computer must be equipped with Windows 98 or better (see
page 8).
– USB driver not installed.
• For Windows 98 users only, check you have installed the USB driver
provided from the installation CD-ROM (see page 3).
– Camera connected to Mac keyboard.
• Avoid using the USB connection on your Mac keyboard as it doesn't
have sufficient power to detect your camera. Connect on e.g. the rear
of your Mac’s CPU instead.
Pictures are poor/ blurred/ too dark
_ Picture taken in low/ poor lighting.
• Check the light level sensor when taking pictures. (see page 14)
– Lens obstructed/ covered.
• Be careful where you place your fingers! (see page 14)
– Camera shook during the shot.
• Keep a steady hand (see page 14)
For the latest FAQ,product information & news visit:
http://www.philips.com/support or
http://www.audio.philips.com
Troubleshooting
Page 22

22
Technical data
sensor resolution 307,200 pixels
optical image size 1/4”
optical lens fixed focus length
viewfinder plastic with red LED indication
LED indicators red (light level sensor)
green (POWER)
yellow (MEMORY)
built-in battery rechargeable lithium (via USB)
PC interface USB 1.1
internal memory capacity
for KEY007/ 0078/ 0079 model number 64MB
for KEY008 model number 128MB
case material magnesium camera body,
plastic USB cover
Power up time under 3 seconds
auto power off 60 seconds
shot to shot time under 2.5 seconds
dimensions 86 mm x 28 mm x 18 mm
weight 30 g
PHILIPS reserves the right to make design and specification changes
for product improvement without prior notice.
Page 23

KEY007
KEY0078
KEY0079
KEY008
W
Meet Philips at the Internet
http://www.philips.com
http://www.audio.philips.com
lkw324/hk
 Loading...