

Philips JR32RWDVK/00, JR32RWDVK/05, JR32RWDV/17, JR32RWDV/00M User Manual [nl]

•Wie installiere ich dieses Laufwerk auf meinem PC?
Verwendung der Software mit diesem Laufwerk
• Comment installer cette unité sur le PC?
Comment utiliser les logiciels de cet appareil?
• Come installare questa unità sul PC?
Come usare il software con questa unità?
• Hoe installeert u dit station op uw PC?
Hoe gebruik ik de programma's?
• ¿Cómo instalar esta unidad en su PC?
¿Cómo utilizar el software con esta unidad?
How to install this drive on your PC?
How to use the software with this drive?
For JR32RWDV using
Roxio and PowerDVD
Version 3.0.2
39329.0_JR32RWDV_ZW 13-03-2003 16:24 Pagina 1
Installation How to install this drive on my computer? 3
Installation Das Anschließen des Laufwerks an einen Computer 3
Installation Comment raccorder l’appareil à un ordinateur 3
Installazione Come connettere l'unità ad un computer 3
Installeren Hoe sluit ik de brander aan op een computer? 3
Instalación Cómo conectar la unidad al ordenador 3
Video How to play a DVD-Video or a Video CD on my JackRabbit?17
Video Wie eine DVD-Video oder eine Video-CD auf meinem
JackRabbit abspielen? 17
Vidéo Comment lire un DVD vidéo ou un Video-CD sur
JackRabbit? 17
Video Come riprodurre un video DVD o un CD video sul proprio
JackRabbit 17
Video Hoe kan ik een DVD-Video of een Video CD op mijn
JackRabbit afspelen? 17
Vídeo ¿Cómo reproducir un DVD-Video o un Video CD en el
JackRabbit? 17
Copy How to copy a CD? 21
Kopieren Wie eine CD zu kopieren? 21
Copie Comment copier un CD? 21
Copia Come copiare un CD? 21
Kopiëren Hoe kopieer ik een CD? 21
Copia ¿Cómo copiar un CD? 21
Data How to make a CD containing data, MP3s or JPEGS? 27
Daten Wie erstelle ich eine CD, die Daten, MP3s oder
JPEG-Bilder enthält? 27
Données Comment graver un CD qui doit contenir des données,
des fichiers MP3 ou des images au format JPEG? 27
Dati Come masterizzare un CD che deve contenire dati, file
MP3 o immagini in formato JPEG? 27
Gegevens Hoe maakt u een CD met gegevens-, MP3- of
JPEG-bestanden? 27
Datos ¿Cómo crear un CD que contenga datos, archivos MP3
o archivos JPEG? 27
Music How to make a music CD? 35
Musik Wie einer Musik-CD zu erstellen? 35
Musique Comment créer un CD audio? 35
Musica Come creare un CD Musicale? 35
Muziek Hoe maak ik zelf muziek-CD's? 35
Música ¿Cómo crear un CD de música? 35
Information More information about my JackRabbit 43
Information Mehr Informationen über meinen JackRabbit 43
Information Informations ultérieures à propos du JackRabbit. 43
Informazione Ulteriori informazioni sul JackRabbit 43
Informatie Verdere informatie over mijn JackRabbit 43
Información Más información acerca de mi JackRabbit 43
Contents - Inhalt - Sommaire - Indice - Inhoud - Índice
2
?
39329.0_JR32RWDV_ZW 13-03-2003 16:24 Pagina 2
3
The next pages show you how to
install your new JackRabbit on the PC.
Since there are many brands and types
of PC's available, the next photographs
show only examples on how your drive
could be installed.
For specific information on your PC,
please refer to your PC manual or
contact your local dealer.
Auf den nächsten Seiten wird
beschrieben, wie Sie Ihren neuen
JackRabbit in den PC einbauen können.
Da es viele verschiedene PC-Marken
und –Typen gibt, zeigen die folgenden
Fotos nur Beispiele dafür, wie Ihr
Laufwerk eingebaut werden kann.
Für spezielle Informationen zu Ihrem PC
beachten Sie bitte Ihr PC-Handbuch,
oder wenden Sie sich an Ihren Händler
vor Ort.
Les pages qui suivent illustrent la
procédure d’installation de votre
nouveau graveur JackRabbit dans
l’ordinateur.
Il existe un grand nombre de marques
et de modèles d’ordinateurs. Les photos
suivantes ne sont présentées qu’à titre
d’illustration de la procédure à suivre
pour installer l’appareil.
Pour des informations spécifiques sur
votre ordinateur, reportez-vous à son
mode d’emploi ou contactez votre
revendeur.
Nelle prossime pagine verranno date
informazioni su come installare
JackRabbit sul PC.
Poiché esistono molte marche e tipi di
PC, le prossime foto mostreranno solo
esempi di come l'unità possa essere
installata.
Per informazioni specifiche sul proprio
PC, fare riferimento al manuale PC o
rivolgersi al proprio rivenditore locale.
De volgende pagina's beschrijven het
installeren van de nieuwe JackRabbit in
uw PC. Omdat er vele soorten en
merken computers zijn, zullen de hierna
volgende afbeeldingen hoogstwaarschijnlijk niet exact overeenkomen met
uw eigen situatie. Ze dienen slechts ter
illustratie van het installeren.
Raadpleeg voor specifieke informatie
over uw eigen computer de handleiding
van uw PC, of neem contact op met uw
leverancier.
Las páginas siguientes muestran cómo
instalar su nueva JackRabbit en el PC.
de ordenadores personales
disponibles, las fotografías siguientes
muestran sólo algunos ejemplos de
cómo podría instalarse la unidad.
Para obtener información específica
sobre su ordenador personal, por favor
consulte el manual de su PC o póngase
en contacto con su distribuidor local.
UK D F
I NL E
How to install this drive
on my computer?
Das Anschließen des Laufwerks an einen Computer?
Comment raccorder l’appareil à un ordinateur?
Come connettere l'unità ad un computer?
Hoe sluit ik de brander aan op een computer?
Cómo conectar la unidad a un ordenador?
3
39329.0_JR32RWDV_ZW 13-03-2003 16:24 Pagina 3
4
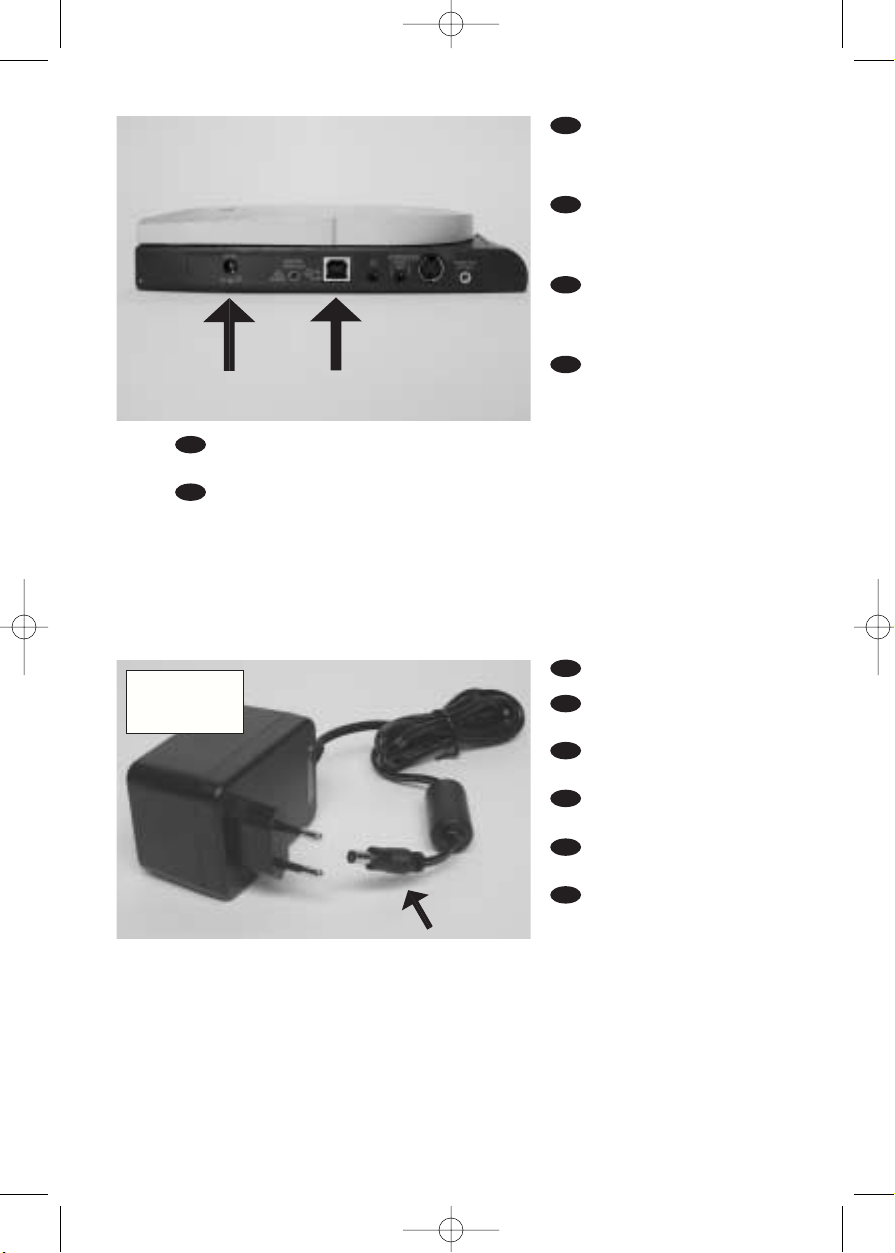
At the left side, you will
find the plugs you need for
connecting your JackRabbit to
your computer.
An der linken Seite finden Sie die Stecker, die Sie für
den Anschluss Ihres JackRabbit
an Ihren Computer benötigen.
À gauche vous pouvez
voir les prises nécessaires pour
le raccordement du JackRabbit
à l’ordinateur.
A sinistra si possono
vedere le prese necessarie per
il collegamento del JackRabbit
al computer.
Aan de linkerkant vindt u de stekkers die u nodig heeft voor het verbinden van uw
JackRabbit met uw computer
A la izquierda encontrará los conectores necesarios para conectar la unidad
JackRabbit a su ordenador
UK
D
F
I
NL
E
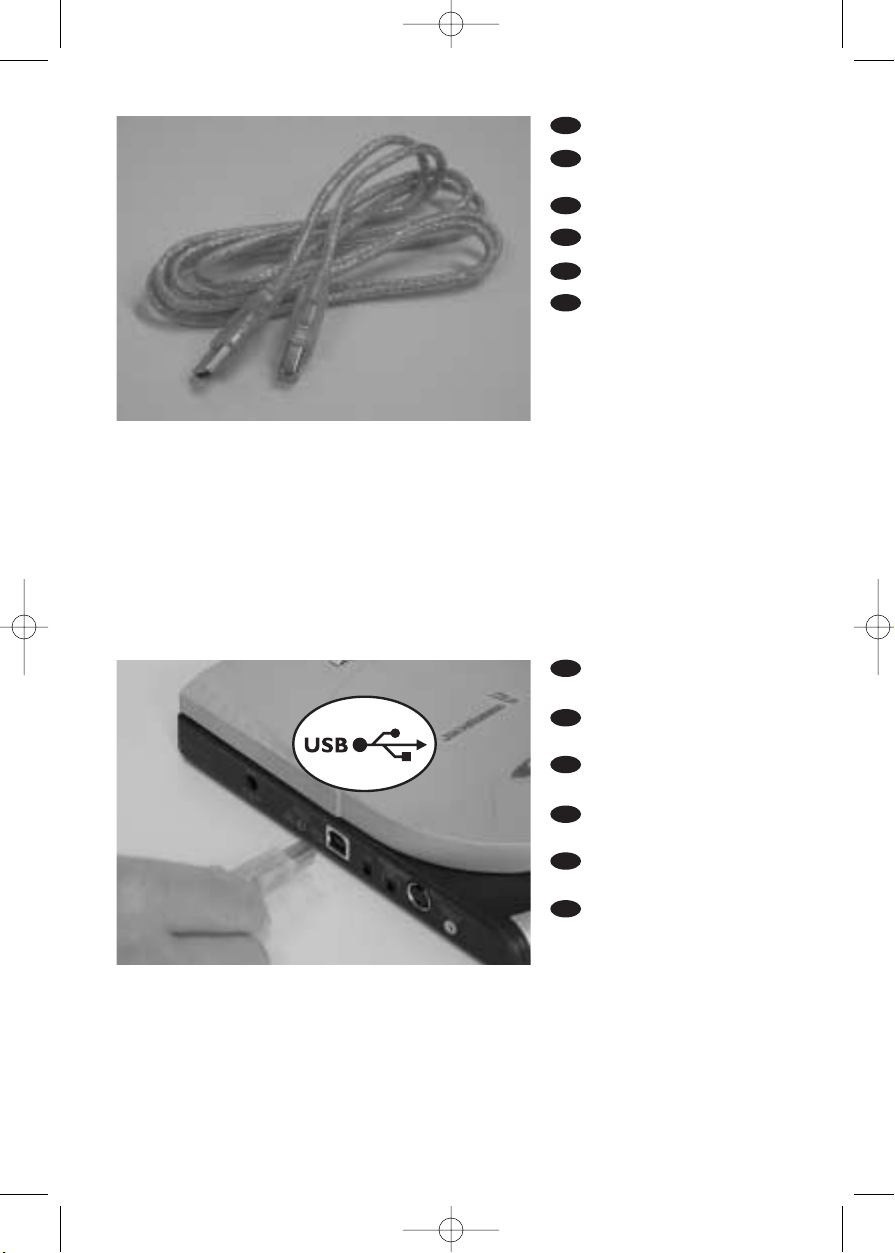
Ta ke the power cable.
Nehmen Sie das Netzkabel
Prenez le cordon
d’alimentation.
Prendere il cavetto
d’alimentazione.
Neem de netvoedingskabel.
Tome el cable de
alimentación eléctrica
UK
D
F
I
NL
E
2
1
DC 12V
JACK
USB
D
R
IV
E
Country
Specific
39329.0_JR32RWDV_ZW 13-03-2003 16:24 Pagina 4
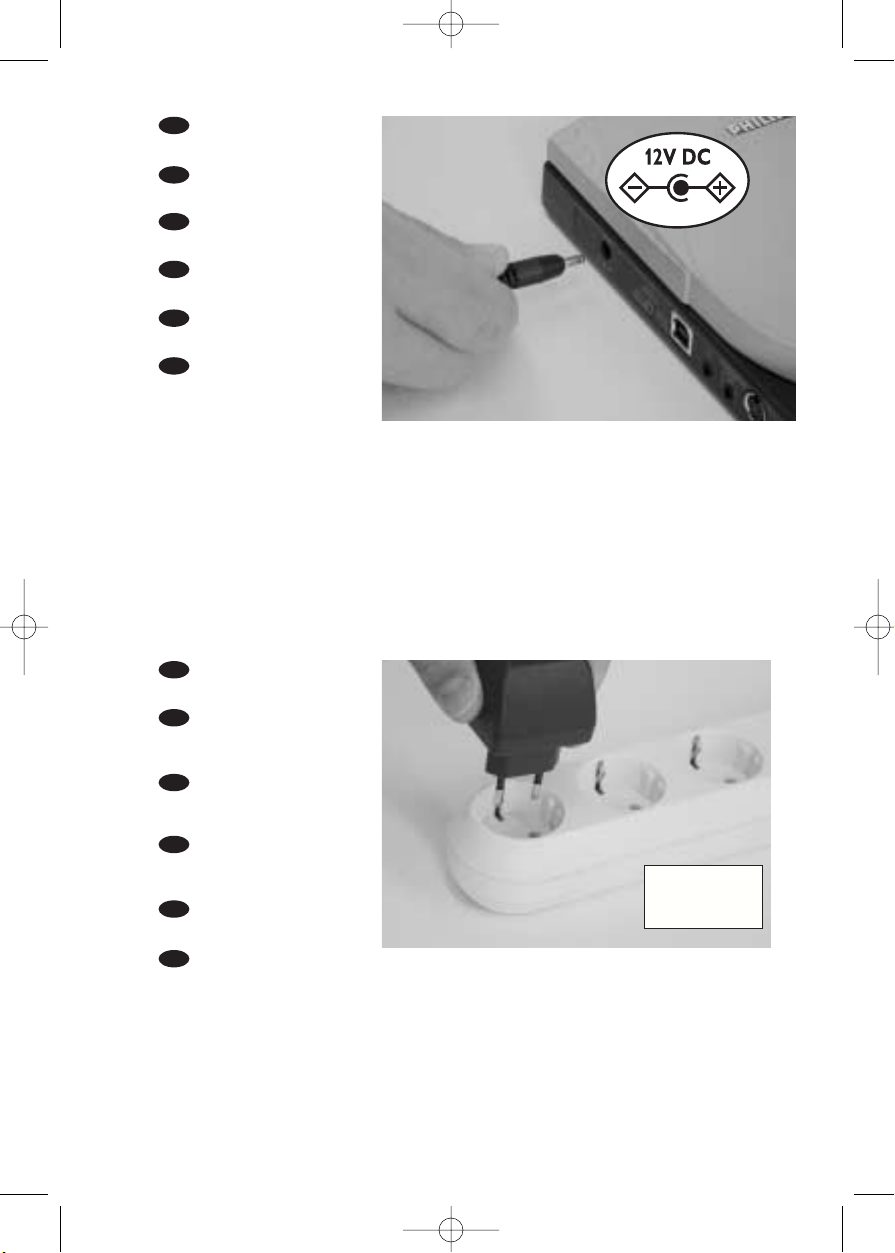
Insert the power cable in
the JackRabbit.
Stecken Sie das Netz-
kabel in den JackRabbit.
Insérez le cordon d’ali-
mentation dans le JackRabbit.
Inserire il cavetto d’ali-
mentazione nel JackRabbit.
Steek de netvoedings-
kabel in de JackRabbit.
Conecte el cable de
alimentación en la unidad
JackRabbit.
UK
D
F
NL
E
Connect the power cable
to a wall outlet.
Schließen Sie das Netzkabel an eine Wandsteckdose
an.
Branchez le cordon
d’alimentation à une prise secteur.
Collegare il cavetto
d’alimentazione a una spina di
corrente.
Verbind the netvoedings-
kabel met een stopcontact.
Conecte el cable de
alimentación a una toma de
corriente de la pared.
UK
D
F
I
NL
E
4
3
5
Country
Specific
I
39329.0_JR32RWDV_ZW 13-03-2003 16:24 Pagina 5
6
Ta ke the USB cable.
Nehmen Sie das USB-
Kabel.
Prenez le câble USB.
Prendere il cavetto USB.
Neem de USB-kabel.
Tome el cable USB.
UK
D
F
I
NL
E
Connect the USB cable
to your JackRabbit.
Schließen Sie das USB-
Kabel an Ihren JackRabbit an.
Raccordez le câble USB
au JackRabbit.
Collegare il cavetto USB
al JackRabbit.
Verbind the USB-kabel
met uw JackRabbit.
Conecte el cable USB a
su equipo JackRabbit.
UK
D
F
I
NL
E
6
5
+
39329.0_JR32RWDV_ZW 13-03-2003 16:24 Pagina 6
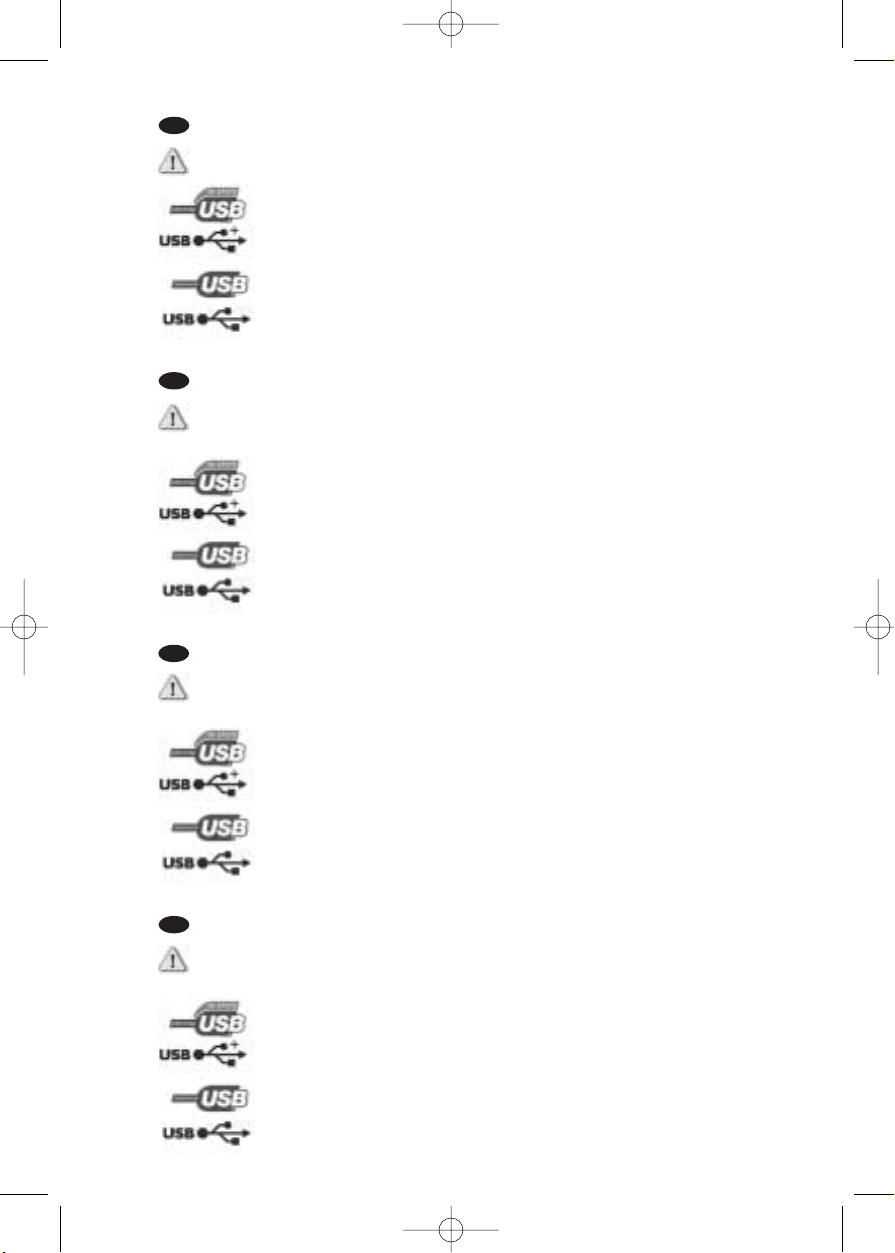
Search for the USB connector on your PC. Note the difference between the fast
USB 2.0 and the slow USB 1.
When using USB 1.x, you can not play DVD-video as this is too slow.
Fast USB 2.0 maximum speeds:
32x writing on CD-Recordable
10x rewriting on CD-ReWritable
40x reading on CD
12x reading on DVD
Slow USB 1.0 or 1.1 maximum speeds:
4x writing on CD-Recordable
4x rewriting on CD-ReWritable
6x reading on CD
0,7x reading on DVD
Playing DVD-video not possible
UK
D
I
7
7
Suchen Sie den USB-Anschluss an Ihrem PC. Beachten Sie den Unterschied
zwischen dem schnellen USB 2.0 und dem langsamen USB 1.
Wenn Sie USB 1.x verwenden,können Sie keine DVD-Videos abspielen, da es zu
langsam ist.
Maximale Geschwindigkeiten des schnellen USB 2.0:
32x Schreiben auf CD-R
10x Schreiben auf CD-RW
40x Lesen von CD
12x Lesen von DVD
Maximale Geschwindigkeiten des langsamen USB 1.0 oder 1.1:
4x Schreiben auf CD-R
4x Schreiben auf CD-RW
6x Lesen von CD
0,7x Lesen von DVD
Abspielen von DVD-Video nicht möglich
Trouvez le port USB du PC. Notez la différence entre le rapide USB 2.0 et le
lent USB 1.
Si vous utilisez l’USB 1.x, vous ne pourrez pas lire les DVD-vidéo, à cause de la lenteur
de ce type de raccordement.
Vitesses maximum du rapide USB 2.0 :
32x en écriture pour les CD-R gravables
10x en écriture pour les CD-RW réinscriptibles
40x en lecture des CD
12x en lecture des DVD
Vitesses maximum du lent USB 1.0 ou 1.1 :
4x en écriture pour les CD-R gravables
4x en écriture pour les CD-RW réinscriptibles
6x en lecture des CD
0,7x en lecture des DVD
La lecture des DVD-vidéo n’est pas donc possible.
Individuare il porto USB del PC. Notate la differenza tra il rapido USB 2.0 e il lento
USB 1.
Se si utilizza l’USB 1.x, non si potranno riprodurre i video su DVD,data la lentezza di
questo tipo di collegamento.
Velocità massime del veloce USB 2.0:
32x in scrittura su CD-R masterizzabili
10x in riscrittura su CD-RW rimasterizzabili
40x in lettura di CD
12x in lettura di DVD
Velocità massime del lento USB 1.0 o 1.1:
4x in scrittura su CD-R masterizzabili
4x in riscrittura su CD-RW rimasterizzabili
6x in lettura di CD
0,7x in lettura di DVD
La riproduzione di video su DVD non è quindi possibile
F
39329.0_JR32RWDV_ZW 13-03-2003 16:24 Pagina 7

8
Connect the USB cable
to the computer.
Do not plug in yet in case
you use Microsoft
Windows 98 Second Edition
Schließen Sie das USB-
Kabel an den Computer an.
Noch nicht anschließen,
wenn Sie Microsoft
Windows 98 Second Edition
verwenden.
Raccorder le câble USB
à l’ordinateur.
Si vous utilisez Microsoft
Windows 98 Second
Edition, n’effectuez pas encore le
raccordement.
Collegare il cavetto USB al computer.
Non connettere a questo punto se si utilizza Microsoft Windows 98 Second Edition
Verbind the USB-kabel met de computer.
Sluit hem nog niet aan als u Microsoft Windows 98 Second Edition gebruikt
Conecte el cable USB al ordenador.
No lo conecte aún en caso que utilice Windows 98 de Microsoft Segunda edición
UK
D
F
I
NL
E
8
+
NL
E
Zoek de USB-aansluiting op uw PC. Let op het verschil tussen de snelle USB 2.0
en de langzame USB 1.
Wanneer u gebruikmaakt van USB 1.x,dan kunt u geen DVD afspelen omdat deze te
langzaam is.
Maximum snelheden van de snelle USB 2.0:
32x schrijven op CD-Recordable
10x herschrijven op CD-Recordable
40x lezen op CD
12x lezen op DVD
Maximum snelheden langzame USB 1.0 of 1.1:
4x schrijven op CD-Recordable
4x herschrijven op CD-Recordable
6x lezen op CD
0,7x lezen op DVD
Afspelen van DVD video is niet mogelijk
7
Busque el conector USB de su PC. Observe la diferencia entre la conexión rápida
USB 2.0 y la conexión lenta USB 1.
Si utiliza USB 1.x no podrá reproducir vídeo en DVD, ya que se trata de una conexión
demasiado lenta.
Velocidades máximas de la conexión USB 2.0:
32x en escritura en CD-R (compact disc grabable)
10x en re-escritura en CD-R
40x en lectura en CD
12x en lectura en DVD
Velocidades máximas de la conexión USB 1.0 o 1.1 lenta:
4x en escritura en CD-R (compact disc grabable)
4x en re-escritura en CD-R
6x en lectura en CD
0,7x en lectura en DVD
No es posible reproducir vídeo en DVD
39329.0_JR32RWDV_ZW 13-03-2003 16:24 Pagina 8
9
9
Precautions
What to do.
We recommend you to remove all previous or other CD recording software and
DVD reading software to avoid interference between different software packages
and software versions.
If one drive requires "NERO" software while the other drive requires "Easy CD
Creator" software for burning CDs, the accompanying "InCD" and "Direct CD"
software will interfere with each other. Leave out one of the two software
programs, either InCD or Direct CD.
Do you have...
...CD recording software or DVD
reading software already present on
your computer?
..more than one CD-Recorder or a
software conflict between "InCD"
and "Direct CD"?
UK
D
F
Vorsichtsmaßnahmen
Vorsichtsmaßnahmen
Wir empfehlen, dass Sie alle vorherigen oder anderen Softwareanwendungen für das
Brennen von CDs und Lesen von DVDs deinstallieren, um Störungen zu vermeiden,
die aufgrund verschiedener Softwarepakete und Softwareversionen auftreten können.
Wenn eines der Laufwerke die Software "NERO" erfordert, während das andere
Laufwerk die Software "Easy CD Creator" für das Brennen von CDs erfordert, stören
sich die beigefügten Softwareprogramme "InCD" und "Direct CD". Verzichten Sie auf
eines der beiden Softwareprogramme, entweder auf InCD oder Direct CD.
Haben Sie...
...bereits Software für das Brennen
von CDs oder das Lesen von DVDs
auf Ihrem Computer?
...mehr als einen CD-Rekorder oder
einen Softwarekonflikt zwischen
"InCD" und "Direct CD"?"?
Précautions
Conseil
Désinstallez tous les logiciels de gravure de CD ou de lecture de DVD déjà installés
sur votre ordinateur, afin d’éviter toute interférence entre ces logiciels et les logiciels
du CD d’installation ou entre différentes versions des logiciels.
Si un graveur exige le logiciel Nero tandis que l’autre nécessite Easy CD Creator
pour graver des CD, les logiciels auxiliaires InCD et Direct CD se gêneront
mutuellement. Abandonnez un de ces deux logiciels : InCD ou Direct CD.
Situation
Des logiciels de gravure de CD ou
de lecture de DVD sont installés sur
l’ordinateur.
Plusieurs logiciels de gravure de CD
sont installés ou il existe un conflit
entre InCD et Direct CD.
Precauzioni
Soluzione
Si raccomanda di eliminare tutti gli altri software per la scrittura dei CD e per la
lettura dei DVD per evitare interferenze fra i vari pacchetti e versioni software.
Se un'unità ha bisogno del software "NERO" mentre l'altra unità richiede "Easy CD
Creator" per la masterizzazione dei CD, i software "InCD" e "Direct CD"
entreranno in conflitto reciproco. Escludere uno dei due programmi software, InCd
oppure Direct CD.
Situazione
Il software per la scrittura dei CD o
il software di lettura dei DVD è già
presente sul computer.
Presenza di più di un masterizzatore Cd o conflitto di software fra
"InCD" e "Direct CD"
Qué hacer.
Le recomendamos que quite todos los programas anteriores de grabación de CD y
de lectura de DVD para evitar interferencias entre los distintos paquetes y versiones
de software.
Si alguna unidad requiere el software "NERO" mientras otra unidad requiere el software "Easy CD Creator" para grabar CD, los programas "InCD" y "Direct CD" que se
incluyen producirán interferencias entre si. Deje uno de los dos programas, bien sea
InCD o Direct CD.
¿Tiene...
...ya instalado software de grabación
de CD o de DVD en su ordenador?
...más de un grabador de CD un
conflicto de software entre "InCD" y
"Direct CD"?
E
I
Voorzorgsmaatregelen
Wat u moet doen.
We raden u aan alle vorige en andere versies van CD-brandersoftware en
DVD-afspeelsoftware te verwijderen. Dit om te voorkomen dat er conflicten tussen
de verschillende software(versies) kunnen ontstaan.
Als de ene brander "NERO"-software gebruikt terwijl de andere brander "Easy CD
Creator"-software gebruikt om CD's te branden, zullen de bijbehorende programma's
"InCD" en "Direct CD" met elkaar in conflict komen. Installeer één van beide
programma's niet, kies voor òf InCD òf voor Direct CD.
Heeft u ...
... nu al CD-brandersoftware of
DVD-afspeelsoftware op uw computer staan?
...meer dan één CD-brander in uw
PC of is er een softwareconflict
tussen "InCD" en "Direct CD"?
NL
39329.0_JR32RWDV_ZW 13-03-2003 16:24 Pagina 9
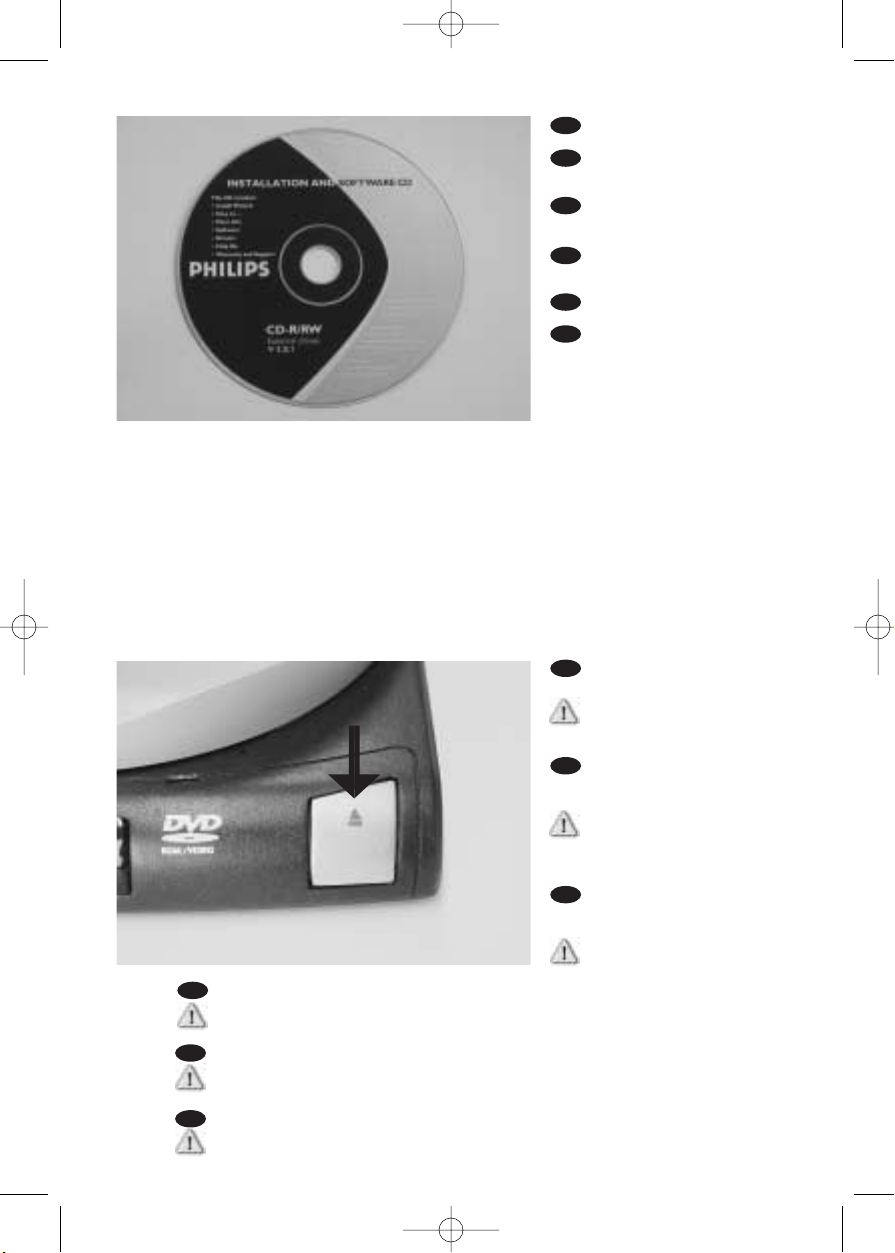
Open the drive by
pushing the Open button.
Skip this step if you use
Microsoft Windows 98
Second Edition.
Öffnen Sie das Laufwerk,indem Sie die ÖffnenTaste drücken
Überspringen Sie diesen
Schritt, wenn Sie Microsoft
Windows 98 Second Edition
verwenden.
Ouvrez la trappe du
lecteur en appuyant sur le
bouton "Open".
Sautez ce pas si vous uti-
lisez Microsoft Windows
98 Deuxième Édition.
Aprite il lettore premendo sul pulsante "Open".
Saltare questa fase se si utilizza Microsoft Windows 98 Seconda Edizione
Open de drive door te drukken op de Open-knop.
Sla deze stap over als u gebruikmaakt van Microsoft Windows 98 Second Edition.
Abra la unidad pulsando el botón Open (Abrir).
Vaya al paso siguiente si utiliza Microsoft Windows 98 Segunda Edición.
10
Ta ke the Install disc.
Nehmen Sie die
Installations-CD.
Prenez le CD
d’installation.
Prendete il CD
d’installazione.
Neem de Installatieschijf.
Tome el disco de
instalación.
UK
D
F
I
NL
E
UK
D
F
I
NL
E
11
10
39329.0_JR32RWDV_ZW 13-03-2003 16:24 Pagina 10
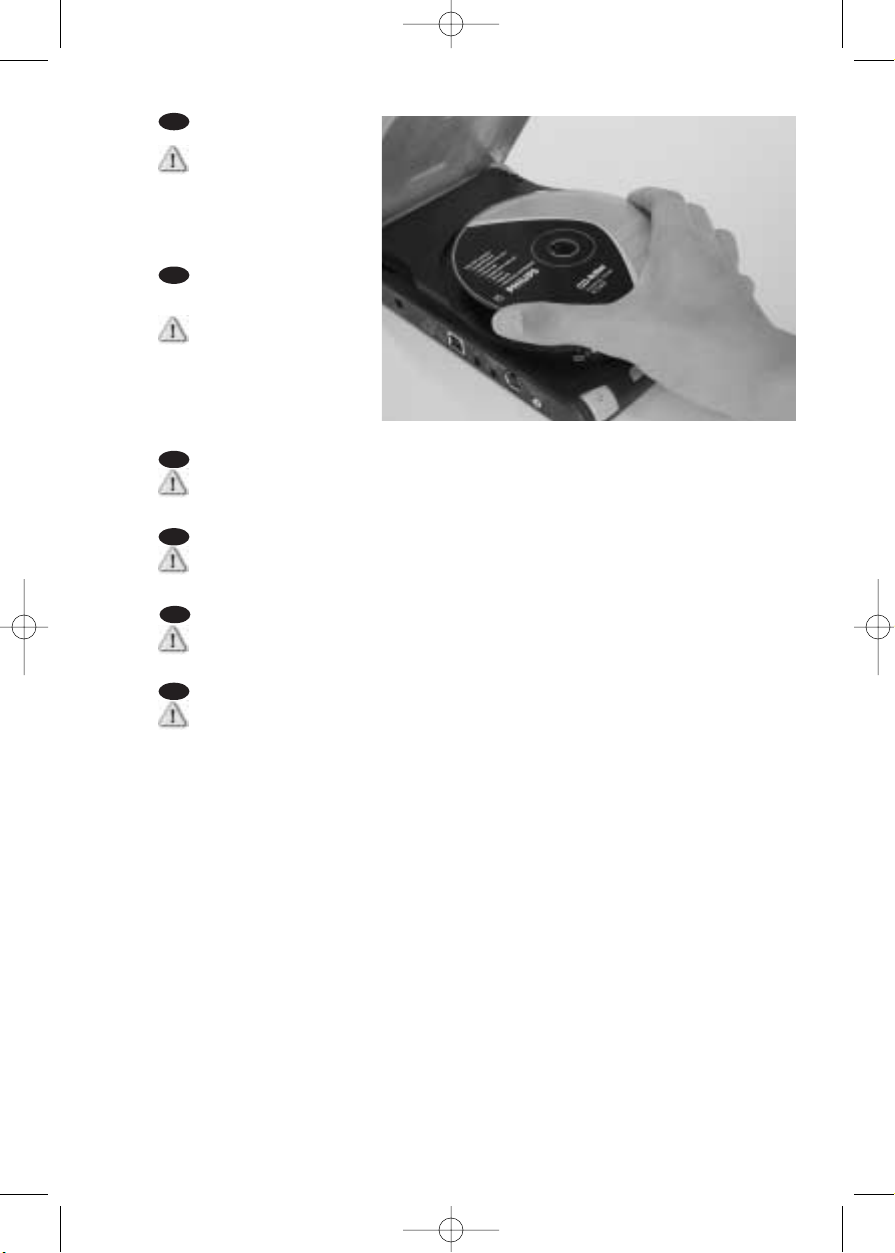
Insert the installation disc
and close the cover.
When you use Windows 98
Second Edition, you will have
to put the disc into a CDROM drive in your computer.If you do not
have a CDROM in your computer,
please refer to the More Info
chapter at the end of this booklet.
Legen Sie die InstallationsCD ein und schließen Sie die Abdeckung.
Wenn Sie 98 Second Edition
verwenden, müssen Sie die
CD in ein CDROM-Laufwerk in
Ihrem Computer einlegen.Wenn
Sie kein CDROM-Laufwerk an
Ihrem Computer haben, sehen Sie
im Kapitel "Weitere Informationen"
am Ende dieser Broschüre nach.
Insérez le CD d’installation et refermez la trappe.
Si vous utilisez Microsoft Windows 98 Deuxième Édition, vous devrez insérer le CD dans
un lecteur de CD-ROM de l’ordinateur.Si l’ordinateur ne dispose pas de lecteurs de CDROM,veuillez vous référer au Chapitre « Informations ultérieures » à la fin de ce même Manuel.
Inserire il CD d’installazione e richiudere lo sportellino.
Se si utilizza Windows 98 Seconda Edizione, si dovrà inserire il CD in un lettore di
CD-ROM del computer.Se non si dispone di un lettore di CD-ROM nel computer,far
riferimento al capitolo Ulteriori informazioni alla fine di questo Manuale.
Leg de installatieschijf in de drive en sluit het deksel.
Als u gebruikmaakt van Windows 98 Second Edition, dan moet u de schijf in een
CD-ROM-drive leggen in uw computer.Als u geen CD-ROM-drive heeft in uw computer,
ga dan naar het hoofdstuk Meer Informatie aan het eind van dit boekje.
Introduzca el disco de instalación y cierre la cubierta.
Si utiliza Windows 98 Segunda Edición, tendrá que poner el disco en un lector de CDROM de su ordenador.Si no tiene CD-ROM en su ordenador, por favor consulte el capítulo Más
información al final de esta guía.
UK
D
F
I
E
12
11
NL
39329.0_JR32RWDV_ZW 13-03-2003 16:24 Pagina 11
12
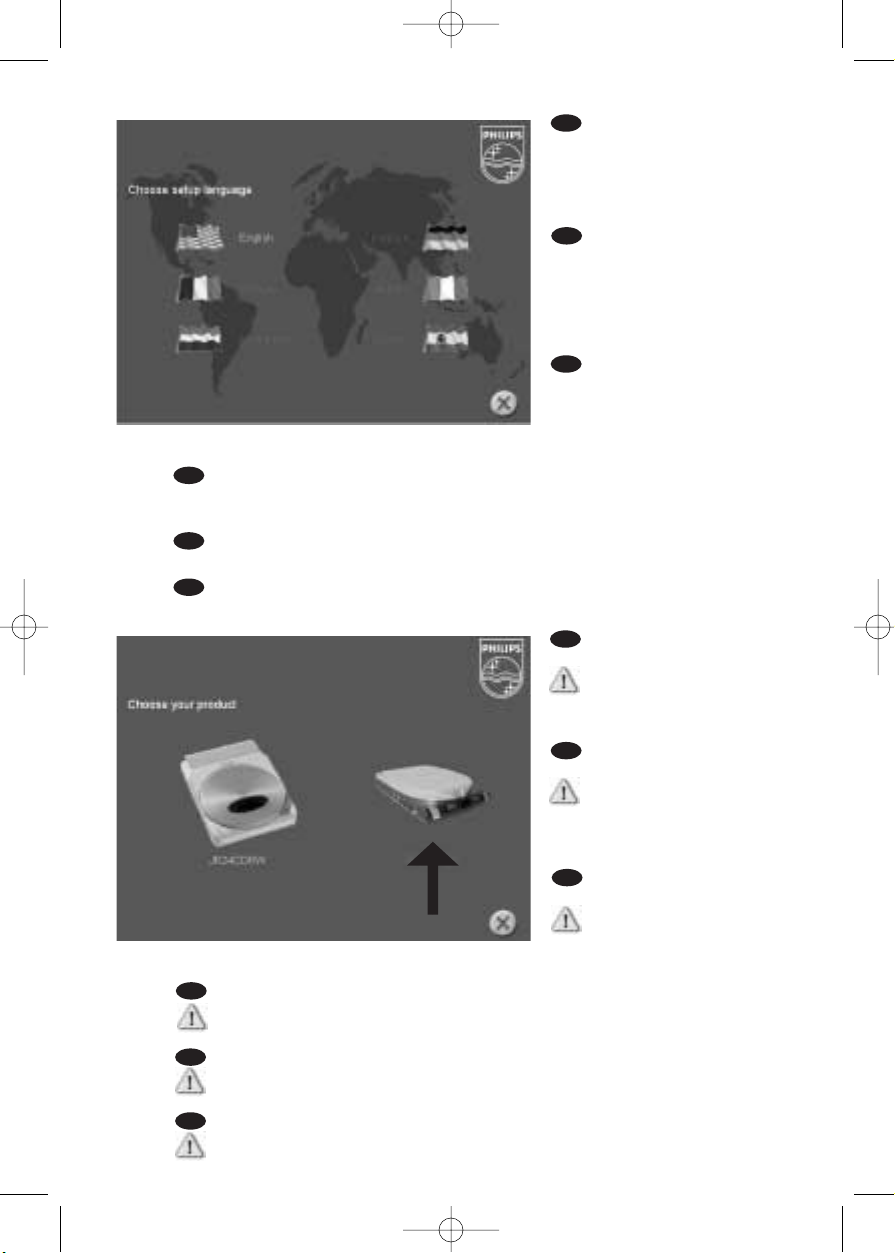
Choose your product (the
JR32RWDV).
If you use Windows 98
Second Edition, please plug
in the USB cable now as described
in step 6 and choose your product.
Wählen Sie Ihr Produkt
(den JR32RWDV).
Wenn Sie Windows 98
Second Edition verwenden,
stecken Sie jetzt das USB-Kabel wie
in Schritt 6 beschrieben ein und
wählen Sie Ihr Produkt.
Sélectionnez le produit
(dans cet exemple, JR32RWDV).
Si vous utilisez Microsoft
Windows 98 Deuxième
Édition, raccordez le câble USB
comme décrit au pas 6 et sélectionnez le produit.
Selezionare il prodotto (JR32RWDV).
Se si utilizza Windows 98 Seconda Edizione, collegare il cavetto USB come descritto dalla
Fase 6 e selezionare il prodotto.
Kies uw product (de JR32RWDV).
Als u gebruikmaakt van Windows 98 Second Edition, plug dan de USB-kabel nu in zoals
beschreven in stap 6 en kies uw product.
Elija su producto (la unidad JR32RWDV).
Si utiliza Windows 98 Segunda Edición, por favor conecte el cable USB ahora según se
describe en el Paso 6 y elija su producto.
UK
D
F
I
NL
E
14
Choose the language to be
displayed in the Setup program.
(If not, double-click "My Computer",
then the "Philips RW" drive icon
and finally "Setup.exe" to start the
CD.)
Wählen Sie die Sprache für
das Installationsprogramm. (Sollte
dies nicht geschehen, doppelklicken
Sie auf "Arbeitsplatz", dann auf das
Laufwerkssymbol "Philips RW" und
schließlich auf die Datei Setup.exe",
um die CD zu starten.)
Choisissez la langue à afficher dans le programme d’installation. (Si ce n'est pas le cas,
double-cliquez sur Poste de
travail, double-cliquez sur l'icône
Philips RW et double-cliquez sur Setup.exe pour lancer l'installation.)
Scegliere la lingua che sarà visualizzata nel programma di installazione. (altrimenti fare
doppio clic su "risorse del computer", quindi sull'icona dell'unità "Philips_RW" e quindi su
"Setup.exe" per avviare il CD).
Kies de taal voor het Setup-programma.(Start de cd niet vanzelf,dubbelklik dan achtereenvolgens op de pictogrammen "Deze computer", "Philips_RW" en "Setup.exe" om de cd te starten.)
Elija el idioma que aparecerá en el programa de configuración. (Si no es así,haga doble clic
en "Mi PC", luego en el icono de la unidad "Philips_RW" y finalmente en "Setup.exe" para iniciar
el CD.)
D
F
I
NL
13
UK
E
39329.0_JR32RWDV_ZW 13-03-2003 16:24 Pagina 12
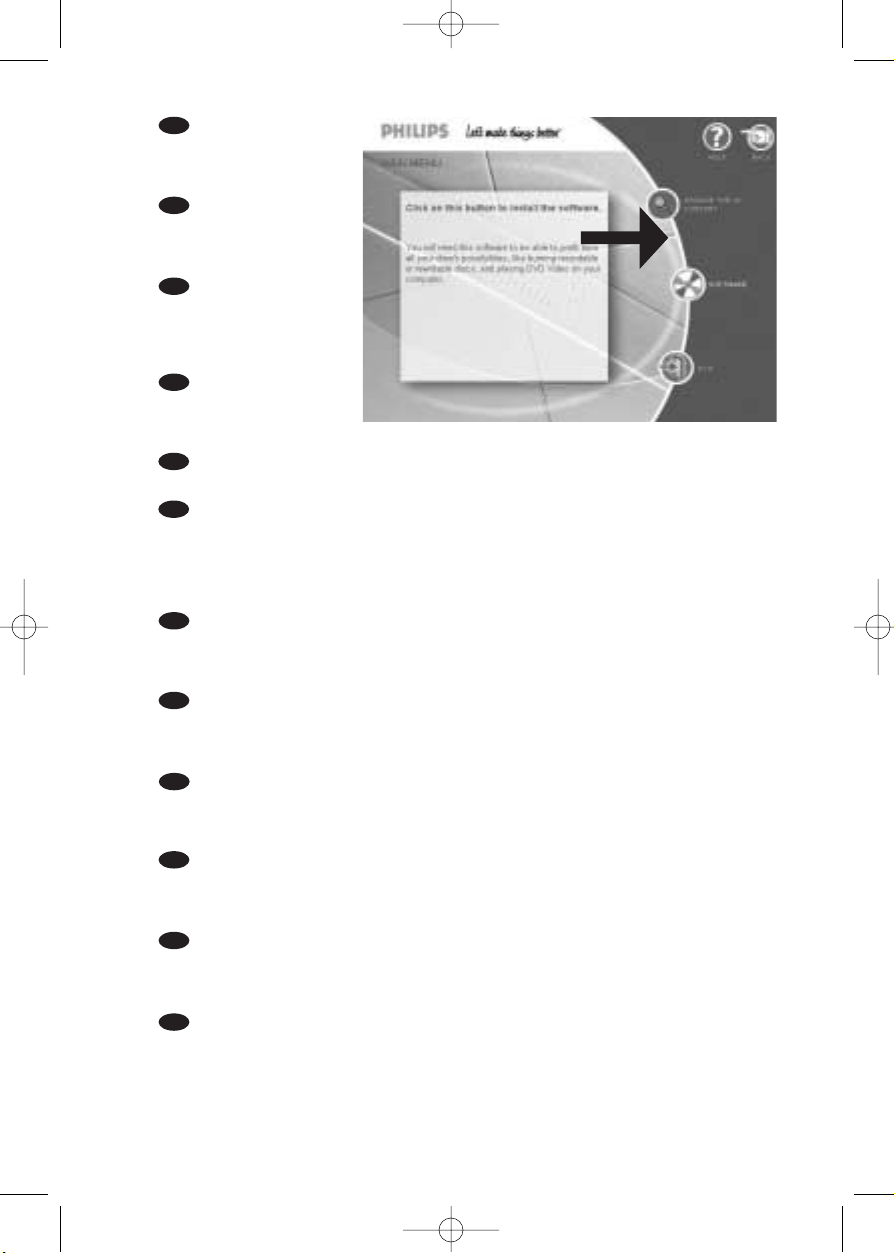
Choose "Software".
Please wait while the necessary
software will be installed on
your computer.
Wählen Sie "Software".
Bitte warten Sie, während die
benötigte Software auf Ihrem
Computer installiert wird.
Sélectionnez "Software"
(progiciel).
Veuillez attendre pendant
l’installation du progiciel
nécessaire sur l’ordinateur.
Selezionare "Software".
Attendere mentre il programma necessario viene installato
sul computer.
Kies "Software".
Wacht terwijl de benodigde software wordt geïnstalleerd op uw computer.
Elija la opción "Software".
Por favor espere mientras se instala el software necesario en su ordenador.
UK
D
F
I
NL
E
16
Congratulations.
Your Philips drive is now ready for use.
How to use it and what software applications you need to perform your tasks,is
described in the next chapters of this User Manual.
Glückwunsch.
Ihr Philips-Laufwerk ist nun einsatzbereit.Wie Sie es verwenden und welche SoftwareAnwendungen Sie benötigen, um Ihre Aufgaben durchzuführen,wird in den nächsten
Kapiteln dieses Benutzerhandbuchs beschrieben.
Tous nos compliments.
L’unité Philips est maintenant fine prête pour son utilisation. Le mode d’emploi et le type
de programmes d’application nécessaires pour l’exécution des tâches prévues sont
décrits par les chapitres suivants de ce même Manuel.
Congratulazioni.
L’unità Philips è ora pronta per il suo utilizzo. Il modo di impiego e il tipo di programmi
applicativi necessari per l’esecuzione dei compiti previsti vengono descritti nei capitoli
successive di questo Manuale.
Gefeliciteerd.
Uw Philips drive is nu klaar voor gebruik. Hoe u het apparaat gebruikt en welke software-applicaties u nodig heeft voor het uitvoeren van uw taken wordt beschreven in de
volgende hoofdstukken van deze Gebruikershandleiding.
Felicitaciones.
Su equipo Philips está ahora preparado para ser utilizado. Los próximos capítulos de este
Manual de usuario describen cómo utilizarlo y qué aplicaciones de software necesita
para realizar distintas tareas.
UK
D
I
NL
E
15
13
F
39329.0_JR32RWDV_ZW 13-03-2003 16:24 Pagina 13
14
When using the
JackRabbit on your computer,
the remote control and the
left power button have no
function.
- When switching off the
computer, unplugging the
USB connection or the
power cable, the drive will
automatically switch off.
- If you keep the power
supply plugged in, you may
use the open button to
eject the disc.
- Unplug the power supply if
you want to deactivate your
drive completely.
Wenn Sie JackRabbit mit Ihrem Computer verwenden, haben die Fernsteuerung
und die linke Netztaste keine Funktion.
- Wenn Sie den Computer ausschalten,den USB-Anschluss oder das Netzkabel trennen, wird das Laufwerk automatisch ausgeschaltet.
- Wenn Sie das Netzkabel angeschlossen lassen,können Sie die Öffnen-Taste verwenden, um die Disk auszuwerfen.
- Ziehen Sie den Stromstecker, wenn Sie Ihr Laufwerk vollständig deaktivieren möchten.
Quand on emploi le JackRabbit sur l’ordinateur, la télécommande et le bouton
gauche de mise sous tension ne présentent aucune fonction.
- Quand on met l’ordinateur hors tension, on débranche le raccordement USB ou le
cordon d’alimentation, l’unité est automatiquement mise hors tension.
- Si vous gardez branchée l’alimentation, vous pouvez vous servir du bouton "Open"
pour éjecter le CD.
- Débranchez l’alimentation si vous désirez désactiver complètement l’unité.
Quando si impiega il JackRabbit sul computer, il telecomando e il pulsante sinistro
di accensione non presentano alcuna funzione.
- Quando si spegne il computer, si stacca il collegamento USB o il cavetto di alimentazione, l’unità viene automaticamente spenta.
- Se si mantiene collegata l’alimentazione, si può impiegare il pulsante "Open" per espellere il CD.
- Staccare l’alimentazione se si desidera disattivare completamente l’unità.
Wanneer u de JackRabbit gebruikt op uw computer, hebben de afstandsbediening
en de linker voedingsknop geen functie.
- Het station schakelt automatisch uit wanneer u de computer uitschakelt,de aansluitkabel (USB) of de netvoedingskabel lostrekt.
- Als u de voeding aangesloten laat zitten, kunt u altijd met de OPEN-knop het deksel
openen.
- Trek de netstekker uit het stopcontact als u het station volledig wilt uitschakelen.
Cuando utilice el equipo JackRabbit en su ordenador, el mando a distancia y el
botón de encendido de la izquierda no están operativos.
- Al apagar el ordenador, si desconecta el cable USB o el cable de alimentación eléctrica
el equipo se apagará automáticamente.
- Si mantiene la conexión eléctrica, podrá utilizar el botón de apertura para expulsar el
disco.
- Desconecte la alimentación eléctrica si desea desactivar la unidad totalmente.
UK
D
F
I
NL
E
17
39329.0_JR32RWDV_ZW 13-03-2003 16:24 Pagina 14
18
15
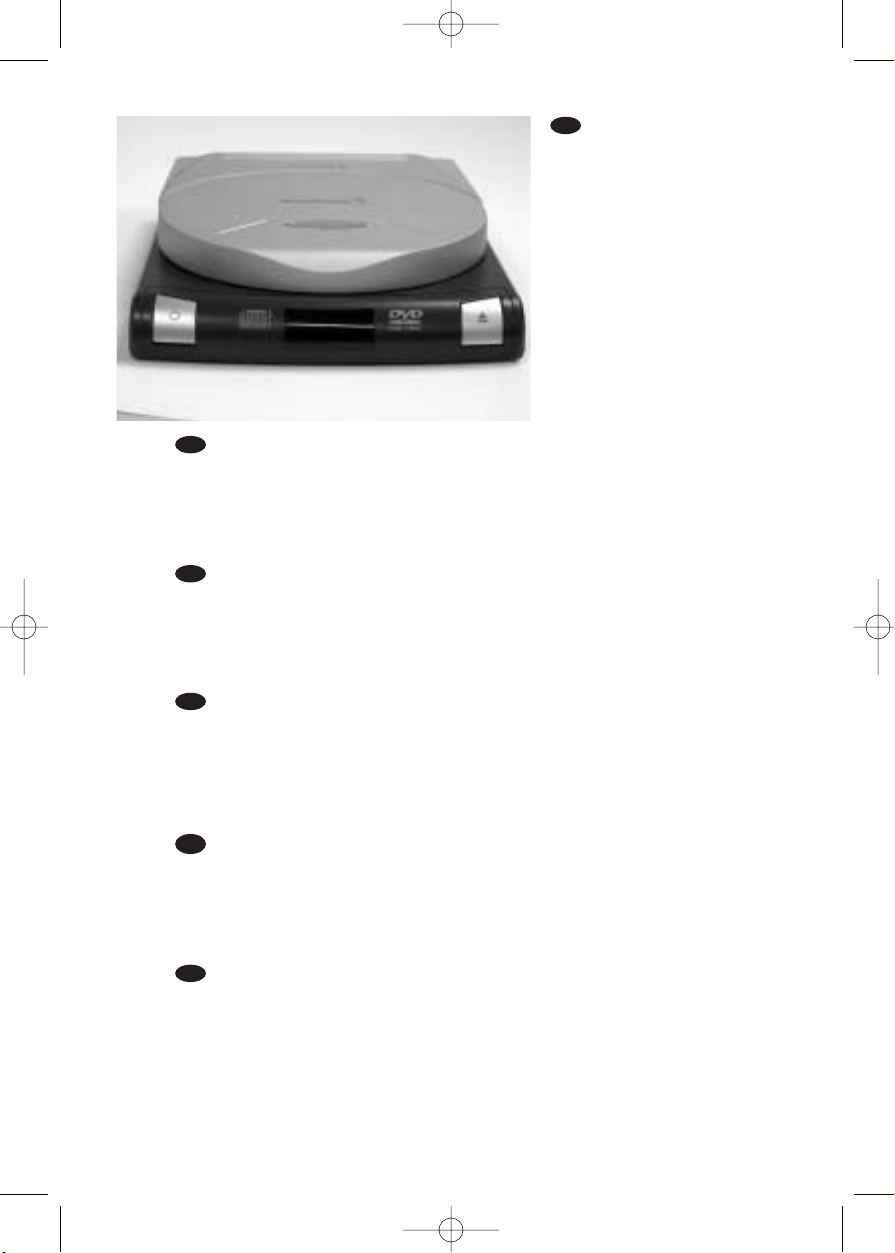
No disc in the JackRabbit
Keine Disk im JackRabbit
Aucun CD présent dans
le JackRabbit
Nessun CD presente nel
JackRabbit
Geen schijfje in de JackRabbit
No hay ningún disco en el
equipo JackRabbit
UK
D
F
I
NL
E
CD in the JackRabbit
CD im JackRabbit
CD présent dans le JackRabbit
CD presente nel JackRabbit
CD in de JackRabbit
Hay un CD en el equipo
JackRabbit
Reading a CD
CD wird gelesen
CD en lecture
CD in lettura
CD lezen
Se está leyendo un CD
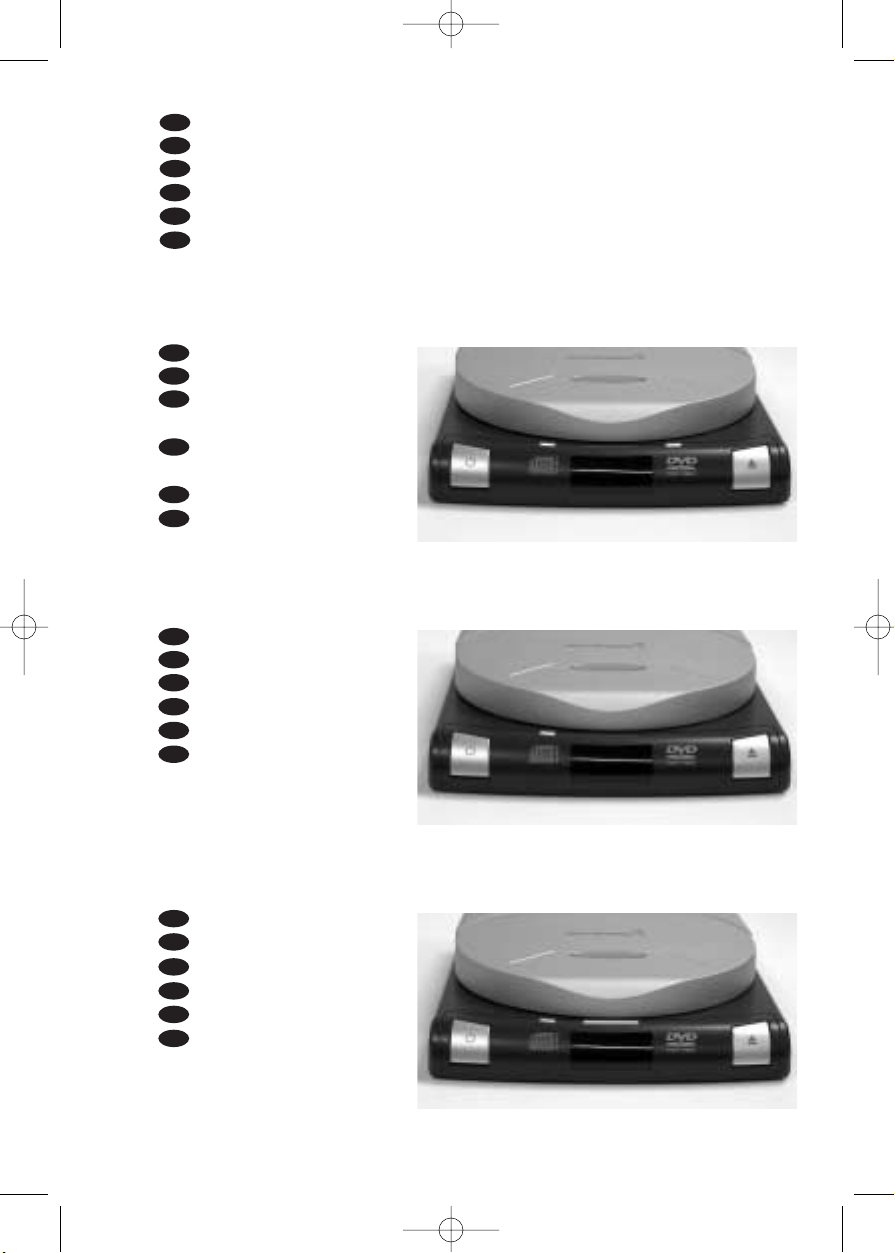
The leds on the front of the JackRabbit have following meaning:
Die LEDs an der Vorderseite des JackRabbit haben die folgende Bedeutung:
Les témoins à DEL sur le panneau avant du JackRabbit signifient cela:
Le spie a LED sul pannello frontale del JackRabbit presentano i seguenti significati:
De controlelampjes aan de voorkant van de JackRabbit hebben de volgende betekenis:
Los indicadores LED en el frontal del equipo JackRabbit tienen el siguiente
significado::
UK
D
F
I
NL
E
UK
D
F
I
NL
E
UK
D
F
I
NL
E
39329.0_JR32RWDV_ZW 13-03-2003 16:24 Pagina 15
16
Writing a CD
CD wird geschrieben
CD en gravure
CD in masterizzazione
CD schrijven
Se está grabando un CD
DVD in the JackRabbit
DVD im JackRabbit
DVD présent dans le JackRabbit
DVD presente nel JackRabbit
DVD in de JackRabbit
Hay un DVD en el equipo JackRabbit
Reading a DVD
DVD wird gelesen
DVD en lecture
DVD in lettura
DVD lezen
Se está leyendo un DVD
18
UK
D
F
I
NL
E
UK
D
F
I
NL
E
UK
D
F
I
NL
E
For extra information on the individual items of this chapter,go to the chapter "More
Information about the JackRabbit" on page 43 of this document.
Weitere Informationen zu den einzelnen Themen dieses Kapitels finden Sie im Kapitel
"More Information about the JackRabbit" (Weitere Informationen zum Jack Rabbit) auf Seite 43
dieses Dokuments.
Pour plus d’informations sur les éléments de ce chapitre, reportez-vous à la section
"Informations complémentaires sur le JackRabbit", à la page 43 de ce document.
Per maggiori informazioni sui singoli elementi di questo capitolo vedere la sezione "More
Information about the JackRabbit" (Ulteriori informazioni su JackRabbit) a pagina 43 di questo
documento.
Wilt u meer weten over deze onderwerpen,ga dan naar het hoofdstuk "Meer informatie over
de JackRabbit" op pagina 43 van dit document.
Para obtener información adicional sobre estos puntos concretos de este capítulo,vaya al
capítulo "Más información acerca de JackRabbit" en la página 43 de este documento.
UK
D
F
I
NL
E
39329.0_JR32RWDV_ZW 13-03-2003 16:24 Pagina 16
The application software used here is:
PowerDVD from CyberLink
17
This manual shows an example of how
to play a DVD Video or a Video CD on
your JackRabbit.
You can only watch video if your
JackRabbit is attached to a working
USB 2 connector!
A USB 1.x connection does not allow to
transfer enough data for watching video.
Dieses Handbuch zeigt an einem
Beispiel, wie eine DVD-Video oder eine
Video-CD in Ihrem JackRabbit abgespielt wird.
Sie können nur Videos ansehen, wenn
Ihr JackRabbit an einen funktionierenden USB 2-Anschluss angeschlossen ist!
Ein USB 1.x-Anschluss kann nicht
genug Daten übertragen, um Videos
anzusehen.
Ce Manuel présente un exemple de
comment lire un DVD-vidéo ou un
Vidéo-CD sur le JackRabbit.
Vous pouvez lire un disque vidéo seulement si le JackRabbit est raccordé à un
port USB 2 qui fonctionne !
Un raccordement de type USB 1.x ne
permet pas un transfert de données
assez rapide pour pouvoir lire un disque
vidéo.
Questo Manuale illustra un esempio di
come riprodurre un DVD Video o un
Video CD sul JackRabbit.
Si può guardare un video soltanto se il
JackRabbit è collegato a un porto USB
2 funzionante!
Un collegamento di tipo USB 1.x non
permette un trasferimento di dati abbastanza rapido per guardare un video.
Deze handleiding laat u een voorbeeld
zien hoe u een DVD of een Video-CD
kunt afspelen op uw JackRabbit.
U kunt alleen een DVD bekijken als uw
JackRabbit is verbonden met een werkende USB 2-aansluiting!
Met een USB 1.x-verbinding kunnen
niet genoeg data worden overgebracht
om naar een DVD te kijken.
Este manual muestra un ejemplo de
cómo reproducir un DVD Vídeo o un
Vídeo CD en su equipo JackRabbit.
Sólo podrá ver vídeo si su equipo
JackRabbit está conectado mediante
una conexión USB 2 operativa.
Una conexión USB 1.x no permite
transferir datos suficientes para ver
vídeo.
UK D F
I NL E
How to play a DVD-Video
or a Video CD
on my JackRabbit?
Ein DVD-Video oder eine Video-CD auf meinem JackRabbit abspielen
Comment lire un DVD vidéo ou un Video-CD sur JackRabbit?
Come riprodurre un video DVD o un CD video sul proprio JackRabbit?
Hoe kan ik een DVD-Video of een Video CD op mijn JackRabbit afspelen?
¿Cómo reproducir un DVD-Video o un Video CD en el JackRabbit?
39329.0_JR32RWDV_ZW 13-03-2003 16:24 Pagina 17
18
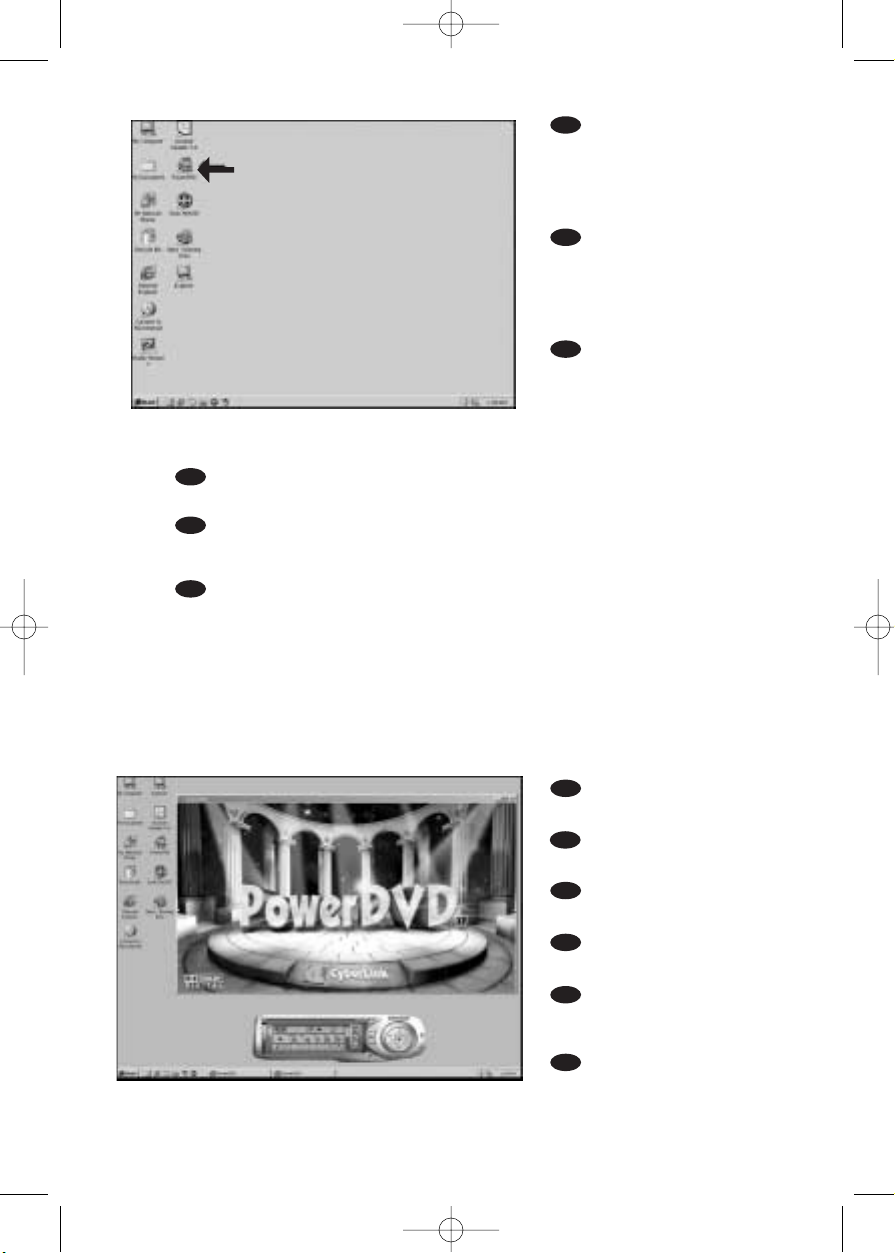
Normally,PowerDVD
will start automatically when a
Video DVD is inserted.
If this is not the case, start
"PowerDVD" from the
desktop.
Normalerweise startet
PowerDVD automatisch,
wenn eine Video-DVD
eingelegt wird.Wenn dies
nicht der Fall ist, starten Sie
PowerDVD vom Desktop aus.
Normalement, Power
DVD démarre
automatiquement lors de
l’introduction d’un DVD vidéo
dans le lecteur. Si ce n’est pas
le cas, lancez PowerDVD à
partir du bureau.
In genere PowerDVD si avvia automaticamente quando viene inserito un DVD
video.Se ciò non accadesse, avviare PowerDVD dalla scrivania.
Normaal gesproken start het programma PowerDVD automatisch als er een
video-DVD in het station wordt geplaatst.Is dit niet het geval, start het programma
PowerDVD dan vanaf het bureaublad.
Normalmente PowerDVD se inicia automáticamente cuando se coloca un disco
de vídeo DVD. Si no fuera así, inicie PowerDVD desde el escritorio.
The start screen of
PowerDVD.
Der Startbildschirm von
PowerDVD.
L’écran d’accueil de
PowerDVD s’affiche.
La finestra di avvio di
PowerDVD.
Dit is het
openingsscherm van
PowerDVD.
La pantalla de inicio de
PowerDVD.
2
1
UK
F
I
NL
E
UK
F
I
NL
E
D
D
39329.0_JR32RWDV_ZW 13-03-2003 16:24 Pagina 18
 Loading...