

Philips JR12CDRWK/05, JR12CDRWK/00, JR32RWDVK/00, JR32RWDVK/05, JR24CDRWK/05 User Manual [de]
...Page 1
Page 2

1. What discs to use
1.1 CD-Recordable / CD-ReWritable: What are the differences and when should you use each type?
For optimum results it is extremely important that you use the right type of disc for your Philips CDReWriter or DVD+RW drive.
First you should choose between using a CD-R or a CD-RW disc, depending on your specific
application. The main difference between the two is that CD-R discs cannot be reused, since the data
can be burned into them only once. CD-RW discs can be erased, however, and used over and over,
hundreds of times. See the table below for an overview of application examples.
Disc Type Writable Erasable Use
CD-ROM No No To distribute information.
CD-R Yes No To archive your data permanently.
To share data with users who have a standard CD-ROM
drive.
For use in older CD-ROM drives (which cannot read CDRW).
For audio CDs (most audio players cannot read CD-RW).
CD-RW Yes Yes For work in progress, such as presentations, documents,
etc.
To make weekly archives of your hard drive.
To transport large files between home and office.
For testing purposes before recording on CD-R
You should always use high-quality discs from well-known manufacturers for the best results when
(re)writing disc at higher speeds. The importance of disc quality increases with higher disc writing
speeds (expressed as x times the original standard CD data rate of 150 kB/s, or 1x). Since this Philips
ReWriter drive can (re)write at high speeds, and the faster you write the less time it takes to produce a
CD, we recommend that you use brand-name Recordable/ReWritable discs (preferably from Philips)
for which the speed rating is explicitly specified on the packaging (i.e., Multi Speed, High Speed).
Always use discs with a speed rating that is equal to or higher than the speed rating of your
Philips CD-ReWriter or DVD+RW drive .
HINTS:
Use CD-ReWritables, which are reusable, until you are comfortable with the recording software. If you
make a mistake, you can redo the recording without wasting a disc. After you record successfully to a
CD-ReWritable, repeat the recording onto a CD Recordable.
But if you want to check whether the actual burning of the disc will be successful, it is better to use the
"test write" option from the recording software, since burning speeds for CD-RW are usually limited to
lower values than burning speeds for CD-R. Most problems that occur during the creation of a disc are
buffer underruns, which occur if the source data cannot be delivered fast enough by your computer to
the CD-RW or DVD+RW drive. (Recent writing technology developments, like the proprietary Philips
“Seamless Link ” technology, are aimed at eliminating the problems this effect can cause.) The
likelihood of a buffer underrun greatly increases with higher writing speeds. So using a CD-RW for
checking the writing speed is not recommended, because, if the write operation on CD-RW (at a lower
speed) is OK, this is absolut ely no guarantee that writing on CD-R (at high speed) will also be OK.
Page 3

Writing speed and strategy
1.2
Reliability before speed...
With Philips advanced CD-RW or DVD+RW drives you can be sure of the data that you read and
write.
The primary mission of the high-speed CD-RW or DVD+RW drives that Philips produces is to
safeguard your written data. The drive will always choose the best speed for writing your discs to
ensure the highest data integrity possible. This optimal speed may be lower than that claimed by the
disc manufacturer, or the disc may be defective in some way (dirty, scratched, etc.), but we take the
view that the most important thing is your data, so we go to the lower speed.
Not only do we safeguard your data for play back on your Philips CD-RW drive, but we ensure
compatibility with all major CD-ROM drives on the market through exhaustive testing in our Quality
Laboratories. You can send your finalized CD-R disc to anybody in the world with the knowledge that
they will be able to read it.
We recommend that you use only Philips CD-R and CD-RW discs to ensure the highest quality written
data and audio discs. See also: http://www.ce-europe.philips.com
The drive will perform an optimization check (OPC) to determine the best writing strategy at the
highest (re)writing speed possible. If it finds none, it will try to find the best writing strategy for lower
(re)writing speeds. The test is done in the OPC area (the inside of the disc). If the OPC area is not
representative of the rest of the disc (which may be often the case with media of marginal quality), this
may result in subsequent read problems on third-party CD-ROMs and even on Philips drives. So we
guarantee only that the specific Philips drive which wrote the disc will be able to read it back, at the
highest possible speed the drive determined for that disc.
Recently a number of new proprietary technologies have been developed by Philips that overcome the
problems generated by non-optimal circumstances during writing to discs. These new technologies
encompass: “ Seamless Link ” , “Thermo Balanced Writing”, and Self-Learning.
Page 4

1.3 Copying discs, copyright and copy protection
The Philips CD-RW or DVD+RW drive is designed to assist you in reproducing material in which you
own the copyright or for which you have obtained permission to copy from the copyright owner. Unless
you own the copyright or have permission to copy from the copyright owner, you may be violating
copyright law and be subject to payment of damages and other remedies. If you are uncertain about
your rights, contact your legal advisor.
When you are going to make a copy of your CD, follow the instructions from the copier software.
Some CD-ROMs employ copy protection techniques, so making backups of these discs is normally
not possible. You may be able to copy them, but the copy will not function because the software on
the copied CD-ROM itself performs certain checks and recognizes that it has been copied.
Page 5

1.4 MultiRead
You will always be able to read CD-RW discs in the CD-RW drive you created them in, but they often
cannot be read in older CD-ROM drives or CD players that do not comply with the 'MultiRead'
specification.
The recorded tracks on a CD-RW disc are read in the same way as regular CD tracks: by detecting
transitions between low and high reflectance, and measuring the length of the periods between the
transitions. The only difference is that the reflectance is about one-third of that of the original CD
specification. That is why many older CD-ROM drives or CD players cannot read CD-RW discs.
Using modern techniques this presents no problem. The 'MultiRead' specification drawn up by Philips
and Hewlett Packard and approved by the Optical Storage Technology Association (OSTA) provides
for the necessary adjustments, thus solving any compatibility issues for all modern CD-ROM or DVD
drives and CD players.
The following table is a short summary of which CD drive types can read discs created with certain
application/media combinations:
Function CD Type Target drives
CD-RW MultiRead CD-ROM drive with UDF reader Drag and drop (UDF packet
writing)
CD-R
(Closed)
Most CD-ROM drives
CD-RW MultiRead CD-ROM drive Copying CDs
CD-R Any CD-ROM drive
CD-RW MultiRead CD-ROM drive Creation of audio CDs
CD-R Any CD-ROM drive, home/car CD player
CD-RW MultiRead CD-ROM drive Creation of data CDs
CD-R Any CD-ROM drive
Page 6

CD format
1.5
Your Philips CD Rewriter can both record and read all popular CD formats to and from a CD-R/RW
disc. The list of formats may vary for different drive types. Always consult the Technical Specifications
for your drive, to be sure of the formats supported by your drive.
Your Philips CD ReWriter may also be equipped with an analog audio output terminal (headphone
plug) for playback of audio CDs and data CDs containing MP3 files. If you insert and play an audio CD
or data CD with MP3 files, you will be able to listen to the music by connecting headphones or
speakers to the headphone plug on the CD-ReWriter drive. (Only available on some models!)
Page 7

1.6 X-minutes CDs ( > 74 minutes)
The Philips ReWriter drive can handle copying CDs with a capacity of more than 74 minutes, which
are now becoming commonplace.
Please download the 'Technical Specifications' for your drive (see the chapter Downloads) if you want
to check for details.
Page 8

1.7 Choosing your CDs
You may use conventional CD-RW and CD-R discs (8 cm discs for 21 minutes, or 12 cm discs for 74
or 80 minutes) with your Philips CD-ReWriter drive. For best results, Philips recommends that you use
only Philips CD-RW and CD-R discs.
Make sure that the discs are rated for use at high (re)writing speeds.
Choose between CD-R and CD-RW depending on your application and the target drive for the created
disc. See the text about disc applications and target drives.
Page 9

program groups contain the application pro
gram icon and other items (Help files, Electronic
2. How to use your drive
2.1 Copying CD-ROMs, Photo CDs, Video CDs, Audio CDs, etc.
Copying a CD is a simple process using the software delivered with the drive and installed for you by
the Setup program. This can take from only a few minutes up to 80 minutes per disc, depending on the
specifications of your drive and the recording speed. See also copyright & copy protection.
1. Quit all other programs on your PC while you are creating discs. Other programs will slow the
process and may complicate or even interrupt the recording.
2. Place the source CD in the CD-ROM drive .
3. Put a blank disc in your CD-ReWriter or DVD+RW . Be sure the speed of the blank CD matches
that of your CD-ReWriter or DVD+RW drive.
4. Start the 'CD Copier' recording software . Dialog boxes will lead you through the options.
5. Set your preferences, including those for recording speed. The CD-ROM must read the data
at least as fast as the CD-ReWriter will write it.
6. Start recording. Using your computer for other applications while duplicating CDs may interfere
with the duplication process. Activities that use very little of your computer's resources should be
no problem. But if moving your mouse causes an error, you should write at lower speeds. If a
problem should occur (buffer underrun), the burning process will be terminated and the application
will report errors. In most cases the CD will be lost (except if you were writing to a CD-RW disc, or
when your writer has the “Seamless Link ” feature).
HELPFUL HINTS:
· Disc-to-disc copying, write-on-the-fly, and high-speed recordings are more likely to have data
transfer errors because the source data delivery may be too slow. Your system configuration and
your computer's capabilities limit the source data speed. If necessary, record at a lower speed to
avoid errors. “Write on the fly” recordings are made when the data is read from the CD-ROM
directly, while it is being copied to the CD-ReWriter. Such recordings are more sensitive to data
stream interruptions and prone to errors. Please also see: “Seamless Link ”
· Copying the source material to a folder on the hard drive of your PC can greatly increase your rate
of success.
· Use CD-ReWritables, which are reusable, until you are comfortable with the recording software. If
you make a mistake, you can redo the recording without wasting a disc. After you have recorded
successfully to a CD-ReWritable, repeat the recording onto a CD Recordable.
But if you want to check whether the actual burning of the disc will be successful, it is better to use
the “test write” option from the recording software, since burning speeds for CD-RW are usually
limited to lower values than burning speeds for CD-R. Most problems that occur during the creation
of a disc are buffer underruns, which occur if the source data cannot be delivered fast enough by
your comput er to the CD-RW or DVD+RW drive. The likelihood of a buffer underrun greatly
increases with higher writing speeds. (Please also see: “Seamless Link ”) So using a CD-RW for
checking the writing speed is not recommended, because, if the write operation on CD-RW (at a
lower speed) is OK, this is absolutely no guarantee that writing on CD-R (at high speed) will also
be OK.
· If your computer has only a CD-ReWriter or DVD+RW drive, you can still copy CDs. However,
you’ll have to use that one drive as both the source drive and the destination drive, which will add
significant time to the process.
· For copying audio CDs: Make sure your CD-ROM drive can read audio digitally. (Refer to the
manufacturer’s owner’s manual.) Drives that read only analog signals work too, but the sound
quality deteriorates each time you copy a copy.
· For detailed information about the use of the software, please read the information accompanying
the individual software packages. Each software package usually creates its own program group in
the Windows Start Menu, which is activated by clicking on the Windows Start button. These
Page 10

Manuals, Uninstall Wizards, Readme files, etc.) for that specific software package. All available
information is usually accessible via the software's program group, or through the Help options
within the program.
· For more tips and info: visit www.roxio.com
Page 11

2.2 How to make your own audio CD
You are not limited to copying existing CDs. It is also possible to create a music CD with your own
content, to combine individual tracks from existing CDs or other audio source files with each other, or
to fill an entire CD-R with your own audio material in the CD-DA format of regular Audio CDs.
1. Start the recording software .
2. To record audio tracks, you first need to create a CD layout, which is a list of tracks in their
recording order. Simply click the source material (CD track or sound file) you want to record, and
drag it from the Explorer window to the Audio CD Layout window (NOTE: not the Data CD Layout
window !).
3. Repeat this for each track and file you want to record.
4. Finally, insert a blank CD and start the CD recording process.
More information in Helpful Hints and online at http://music.cnet.com.
Page 12

2.3 How to make a data CD
You are not limited to copying existing CD-ROMs. It is also possible to create a CD with your own
content.
1. Start the recording software .
2. To record files and folders, you first need to create a CD layout, which is a list of files and folders,
as they will be recorded. Simply click the source material (file or folder) you want to record and
drag it from the Explorer window to the Data CD Layout window.
3. Repeat this for each file and folder you want to record.
4. Finally, insert a blank CD and start the CD recording process.
More information in Helpful Hints.
Page 13

2.4 How to append audio or data to a disc
If a disc was not used to its full capacity the first time you recorded on it, and you did not close the disc
(see below), then you can add extra audio tracks or data sessions to the disc.
Closed session:
If you want to listen to an audio CD on a home or car CD player, you must close the session first. You
can put additional audio tracks on the disc afterwards, but only the tracks in the first session will be
accessible (“seen”) by most CD players. Leaving the session open is only an option when writing
Audio. When writing data, the recording software will always automatically close the session.
Closed disc:
The user has the option to close the disc or not. The Close Disc option write-protects the CD. When
this operation has been performed, no more audio or data can be recorded to the CD.
Open disc:
1. Place the disc that has not been closed into the CD-ReWriter or DVD+RW drive .
2. Start the recording software .
3. Simply click the extra source material you want to record, and drag it from the Explorer window to
the CD Layout window to add it to the existing content.
4. Repeat this for each file and folder you want to record.
5. Finally, start the CD recording process.
Page 14

2.5 How to use your CD-RW or DVD+RW drive as a disk drive
Install 'Packet Writing' software on your computer to be able to access CD-R/RW discs directly in your
CD-ReWriter or DVD+RW drive, just like any other disk drive to which data can be written.
This software will load automatically each time you start Windo ws. It runs in the background, so that
you may read and write from and to the CD-R/RW disc in the drive from within Windows Explorer or
any other Windows application (word processor, spreadsheet, etc.).
The CD-R/RW disc used for this purpose stays 'open' and can only be read on computers that have
'Packet Writing' software or a UDF Reader installed. Alternatively, the 'Packet Writing' software can be
used to close the current session, thereby making the disc readable for regular 'MultiRead' drives.
After this, data can still be added to the disc by opening a new session.
NOTE: On CD-R discs, files cannot actually be erased or overwritten, but they can be made invisible
and written again when updating files.
Page 15

2.6 How to combine audio and data (mixed mode)
Perform these steps to write a Mixed-Mode CD:
1. Prepare the data portion of your CD, just as described in How to make a data CD. (Select the
data files you want to add and drag them into the Data CD Layout window.)
2. Click the Audio CD Layout tab.
3. Prepare the audio portion of your CD, just as described in How to make your own audio CD.
(Select the songs you want to record and drag them into the Audio CD Layout window.)
4. A message box notifies you that the disc settings have automatically been changed to support
Mixed-Mode CDs.
5. Finally, insert a blank CD and start the CD recording process.
The recording software begins creating your Mixed-Mode CD. It records the files listed in the Data CD
Layout tab in the first track, then records the songs listed in the Audio CD Layout tab in the following
tracks. All tracks (data and audio) are recorded in a single session.
Page 16

2.7 Starting applications with Blue Button
Newer drive types will have a button with the Blue Button-logo next to it. Watch for the logo because
the button itself might not be blue on all drive types. See the “Instructions for use” for the position of
the Blue Button.
Pressing this button on your drive brings up a window with useful access buttons for several web sites
and disc applications.
Option 1: Using the Blue Button
Press the Blue Button with the logo next to it on the drive or double-click the Blue Button icon in the
Windows system tray or restart the Blue Button program via the ‘Programs/Philips external drive’
program group. This will open a window with three buttons. This will open a window with three buttons.
You need to meet some requirements for the Blue Button feature to work:
1. The drive must be connected to your computer and it must be switched on (if applicable).
2. You must have completed the Philips installation wizard included with your drive.
3. You must have an Internet browser installed and configured for your system.
4. The resident Blue Button application (the icon in the system tray) must be active on your computer.
This will be the default setting after installation. However, you may also decide to disable the
system tray icon. In addition, please be aware that some versions of Windows® may automatically
hide inactive system tray icons.
5. Should you have disabled the Blue Button program, you may re-activate it by clicking on the item
‘Blue Button’ in your Philips program group (For Mac: open the Blue Button program file in the
Applications/Blue Button map). Doing this will open the Blue Button window on your screen but it
might it not activate the Blue Button on the drive itself. If necessary, please reboot your computer
to load the resident Blue Button application (the icon in the system tray) for opening the Blue
Button window with the Blue Button on your drive.
Your options in the Blue Button window
After opening the interface window, you will see a number of buttons and a menu bar.
Page 17

2.8 What is “EasyWrite”?
EasyWrite is a new open standard for dragging and dropping files to CD-RW and DVD+RW discs, as
initiated by the Mount Rainier group formed by Philips, Compaq, Microsoft and Sony, and supported
by over 40 industry leaders.
EasyWrite combines the simplicity of a floppy disk, the large storage capacity of CDs and DVDs, and
the robustness needed for frequent storing, moving and sharing of your data, audio, image and text
files.
Simple
EasyWrite operates like a regular drive, just like a hard disk or floppy drive, and uses
regular CD-RW and DVD+RW discs. This means that you can instantly drag and drop
files to a RW disc and back again.
Fast
EasyWrite is fast. Insert a new CD-RW or DVD+RW into the drive. Within seconds,
you can start dragging and dropping files. The drive handles formatting in the
background causing no additional delays. Even if you eject the disc before
background formatting is complete, the disc will still be readable in all MultiRead CDROM and DVD-ROM drives. (Ejecting might take up to 1 - 4 minutes if the background
formatting has not finished yet. If it has finished, the ejecting will be almost
immediate.)
Robust
EasyWrite embodies a dramatically improved defect management system, resulting in
less sensitivity to disc wear and scratches. You will always have the highest reliability
of recorded data during many years of disc usage, in all circumstances!
Compatibility and Operating System Support
Discs written with EasyWrite are backward compatible and can be read (not recorded) by virtually all
CD-ROM, CD-R, CD-RW, DVD-ROM and DVD+RW drives. Reading EasyWrite discs on older
systems is done by software that is placed on every EasyWrite-recorded disc. It enables virtually all
computers to read EasyWrite recorded discs.
EasyWrite will be included in future ve rsions of popular operating systems, including Windows and
Linux. Apple is also expected to join.
What do I need to use the “EasyWrite”?
• First, you need a (Philips) CD-RW or DVD-RW drive with full EasyWrite functionality. You can
recognize this capability by checking for the EasyWrite logo on the front of the drive or on
the product label (external drives).
• At the moment ‘bridge’ application software, as delivered on the installation CD accompanying
the EasyWrite drive, remains necessary.
Philips supports the following bridge applications:
1. DirectCD from Roxio.
Please install the DirectCD version delivered with the drive.
Make sure the version number is 5.3.1.154 or higher.
Page 18

2.9 What is DVD?
DVD (Digital Versatile Disc) is the new optical storage medium that combines an enormous
amount of digital storage capacity with the convenience of the well-known Compact Disc.
Pre-recorded DVDs may have a dat capacity from 4.7 up to 17.1 GB. In addition, most players will be
capable of playing Recordable/ReWritable DVDs with a storage capacity of 4.7 GB.
To give you an idea of what this means in practice: 4.7 GB is more than enough storage capacity for
more than 7 CD-ROMs, or four hours of digital video with a crystal-clear picture resolution including
several spoken languages and subtitle languages.
There are three main applications for DVDs:
1) Data on DVD
DVD data disc access works just like with any disk storage station in your computer. Just put a DVD
data disc in the DVD drive and you may browse through its content just like with any other drive in
your computer.
DVD data discs have the same functionality as CD-ROMs (except for their largely greater data
capacity of course). With the auto-start feature enabled for the DVD drive, a DVD data disc may
automatically start a program from the DVD itself, for example, a disc browser or a presentation.
2) Games on DVD
The popular game platforms like GameCube, Xbox and PlayStation2 use DVD discs for distributing
their games. These DVD Game discs will not play on DVD-R/RW/ROM drives. You will need specific
PC Game CDs or DVDs to be able play these games through a DVD-R/RW/ROM drive.
Sometimes a DVD Game discs may contain a DVD Video part with trailers or music or clips that can
be played through the DVD Video player functionality of the drive (see below).
3) Video on DVD
The most popular application of DVD-ROM drives is playing pre-recorded DVD-Video on your
computer monitor.
For this you will need software in the form of a DVD Player program like the one you may install from
the installation CD: PowerDVD. (If you want to know how to use PowerDVD, please read in the
document “How to use the software with this drive?” the chapter on “How to play a DVD-Video or a
Video CD on my computer?”.
The DVD Player program you have installed on your computer will display the DVD menu that is
present on the DVD-Video. This menu gives you full control over the disc options and works just the
same as if the disc would be played on a Home Cinema DVD Player.
Always use the Help file - and other documentation delivered with the DVD Player program - for
information on program settings and optimizing the player for your system. Also, read your computer
Page 19

manual and the graphics card manual if you want to know more about hardware settings and
capabilities.
Special features (how to watch DVDs on a TV screen)
1) Connecting your computer to a television
If your computer has a TV OUT for displaying your computer screen on a television and a line-out for
connecting an external audio system to your computer, you may be able to display DVD-Video on your
television screen.
You will need to consult your television manual, your computer manual and graphics card manual to
see what cables to use, what connections to make, and what set tings to change to activate the TV
OUT. We stress that making these computer & graphics card connections and troubleshooting any
problems is something NOT related to the DVD drive, and is therefore not a subject for service and
support.
2) Connecting your DVD drive to a television
Some (external) DVD drives may have outputs for connecting the drive directly to a television. In those
cases, the appropriate cables will probably be delivered with the drive and sometimes there will be a
remote control for operating the drive. Always consult the “Instructions for use” of the drive for how to
make the right connections, how to use the drive as a separate DVD-Video player, and for
troubleshooting.
Page 20

2. InCD from Ahead Software.
Please install the InCD version delivered with the drive.
Make sure the version number is 3.31.1 or higher.
Notes:
• When using DirectCD from Roxio:
To eject the CD from the drive, either push the eject but ton on the drive or apply a “soft eject”.
DirectCD will display a message that this will take approx. 1-4 minutes. (Ejecting might take
up to 1 - 4 minutes if the background formatting has not finished yet. If it has finished, the
ejecting will be almost immediate.)
• When using InCD from Ahead Software.
In today’s InCD versions, a “soft eject” must be applied to eject the disc from the drive. (Do not
use the eject button on the drive.) The disc eject process will take approx. 1 - 4 minutes.
(Ejecting might take up to 1 - 4 minutes if the background formatting has not finished yet. If it
has finished, the ejecting will be almost immediate.) InCD does not inform you of the progress
during this time.
Check out the Philips and Mount Rainier web sites for more information.
www.philips.com/pcstuff
www.mt-rainier.org
Page 21
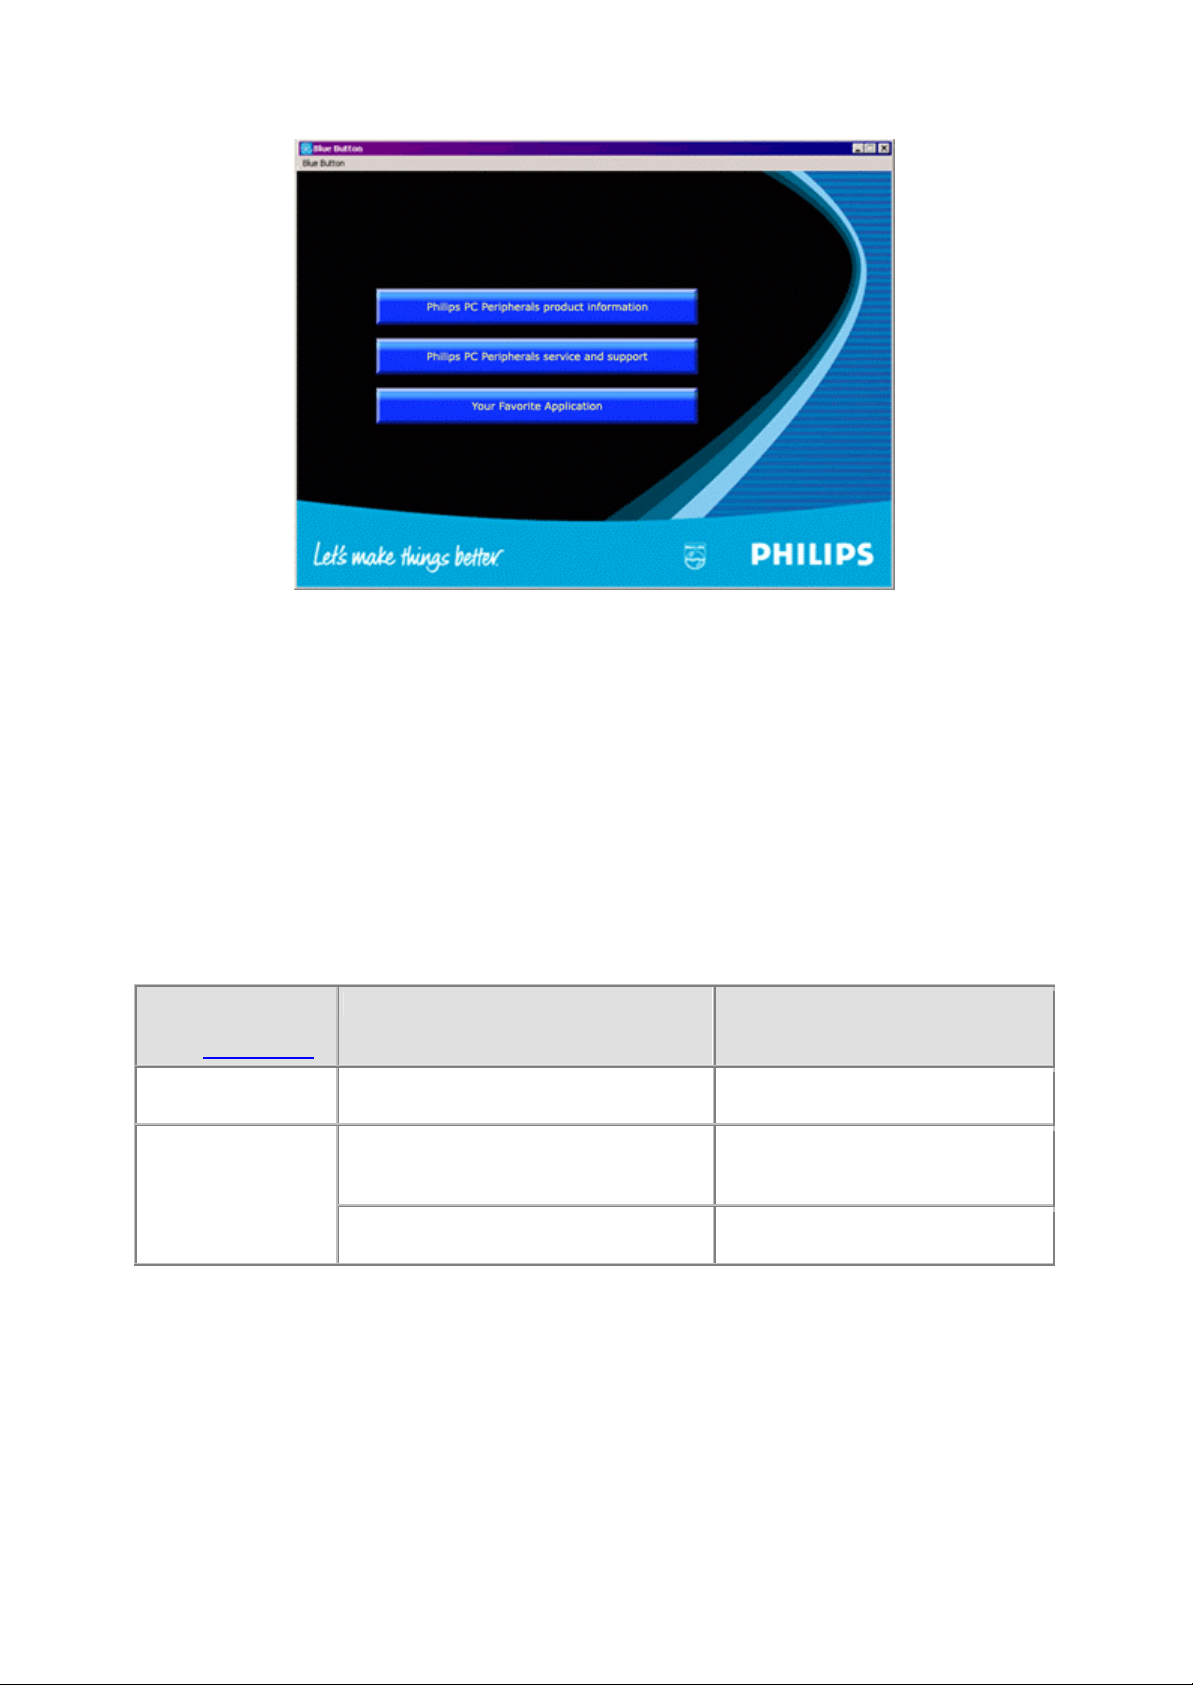
Button 1
Clicking this button will open your Internet browser and link you to the Philips PC Peripherals product
information web page.
Button 2
Clicking this button will open your Internet browser and link you to the Philips PC Peripherals
Service&Support web page.
Button 3
Click this button to open the application program associated with the type of disc in the drive.
NOTE: This table shows the default settings of the Blue Button program.
If you have changed your preferences (see below), other applications may be launched when pushing
the Blue Button.
Disc type in the
drive
(see: Discs to use)
CD-R/RW discs Start a recorder / rewriter application. See your ‘Recorder’ setting in the
CD-ROM, CD Audio
Changing your preferences (in the Blue Button menu from the menu bar)
Click on Blue Button in the menu bar to open the menu. Click on Options in this menu to open the
Options window.
Launch...
1. A Media Player for an audio disc a
Video CD or a DVD (if applicable).
2. A disc explorer program for a data
disc.
Clicking button 3 will... As determined by...
CD tab of the Options menu.
See your ‘Player’ setting in the CD
tab of the Options menu.
See your ‘Explorer’ setting in the CD
tab of the Options menu.
Page 22

Click the Browser tab to change the Internet browser program used for opening the web pages.
Click the CD tab to be able to change the programs used for opening the disc. These settings have
been automatically detected during installation, but may be changed manually at any time. Click
next to one of the settings to browse for other executable programs (*.exe for Windows®) you want to
open for that specific application.
(Actual applications may vary)
Option 2: Keeping the Blue Button pressed
Keeping the Blue Button pressed for 2 seconds or more opens your Internet browser program and
points you directly to a drive support website for downloading the latest firmware for your drive
automatically. Please follow the instructions given on that website.
Blue Button: The fastest way to results
Page 23

3. General information on CD-R/RW
3.1 Settings / configuration
When connecting an external drive to your computer, certain cable connections and settings are
essential for the correct operation of that drive.
1. Cable connections
2. Hardware settings
3. Software settings
4. Firmware updates
Cable connections
To be able to use the drive, it is essential that you connect the data cable and the power cable
correctly to the drive.
1. Please open the lid and remove the plastic transport protection insert before you start using the
drive for the first time.
2. Take the cable for the interface you have chosen to use and plug it into the appropriate connector
on the drive.
3. Plug the other end of the cable into the appropriate connector on your PC.
Always consult your computer manual for assistance .
4. Plug the small power plug into the drive.
5. Plug the mains adapter into the mains socket and, if applicable, use the on/off button to switch on
the drive.
6. Windows will automatically start the 'Add/Found New Hardware Wizard' dialog. Please complete
this dialog to install the necessary driver for your new drive. Refer to the installation CD (or the
location to which you have downloaded the driver files from the Internet if you do not have a CD
drive yet) when asked for the location of any driver files.
Hardware settings
Your controller (e.g. USB, FireWire) should be working correctly.
You can check this in the Windows Device Manager (Click on the My Computer icon on your desktop,
right-click Properties, then click on the Device Manager tab).
Page 24
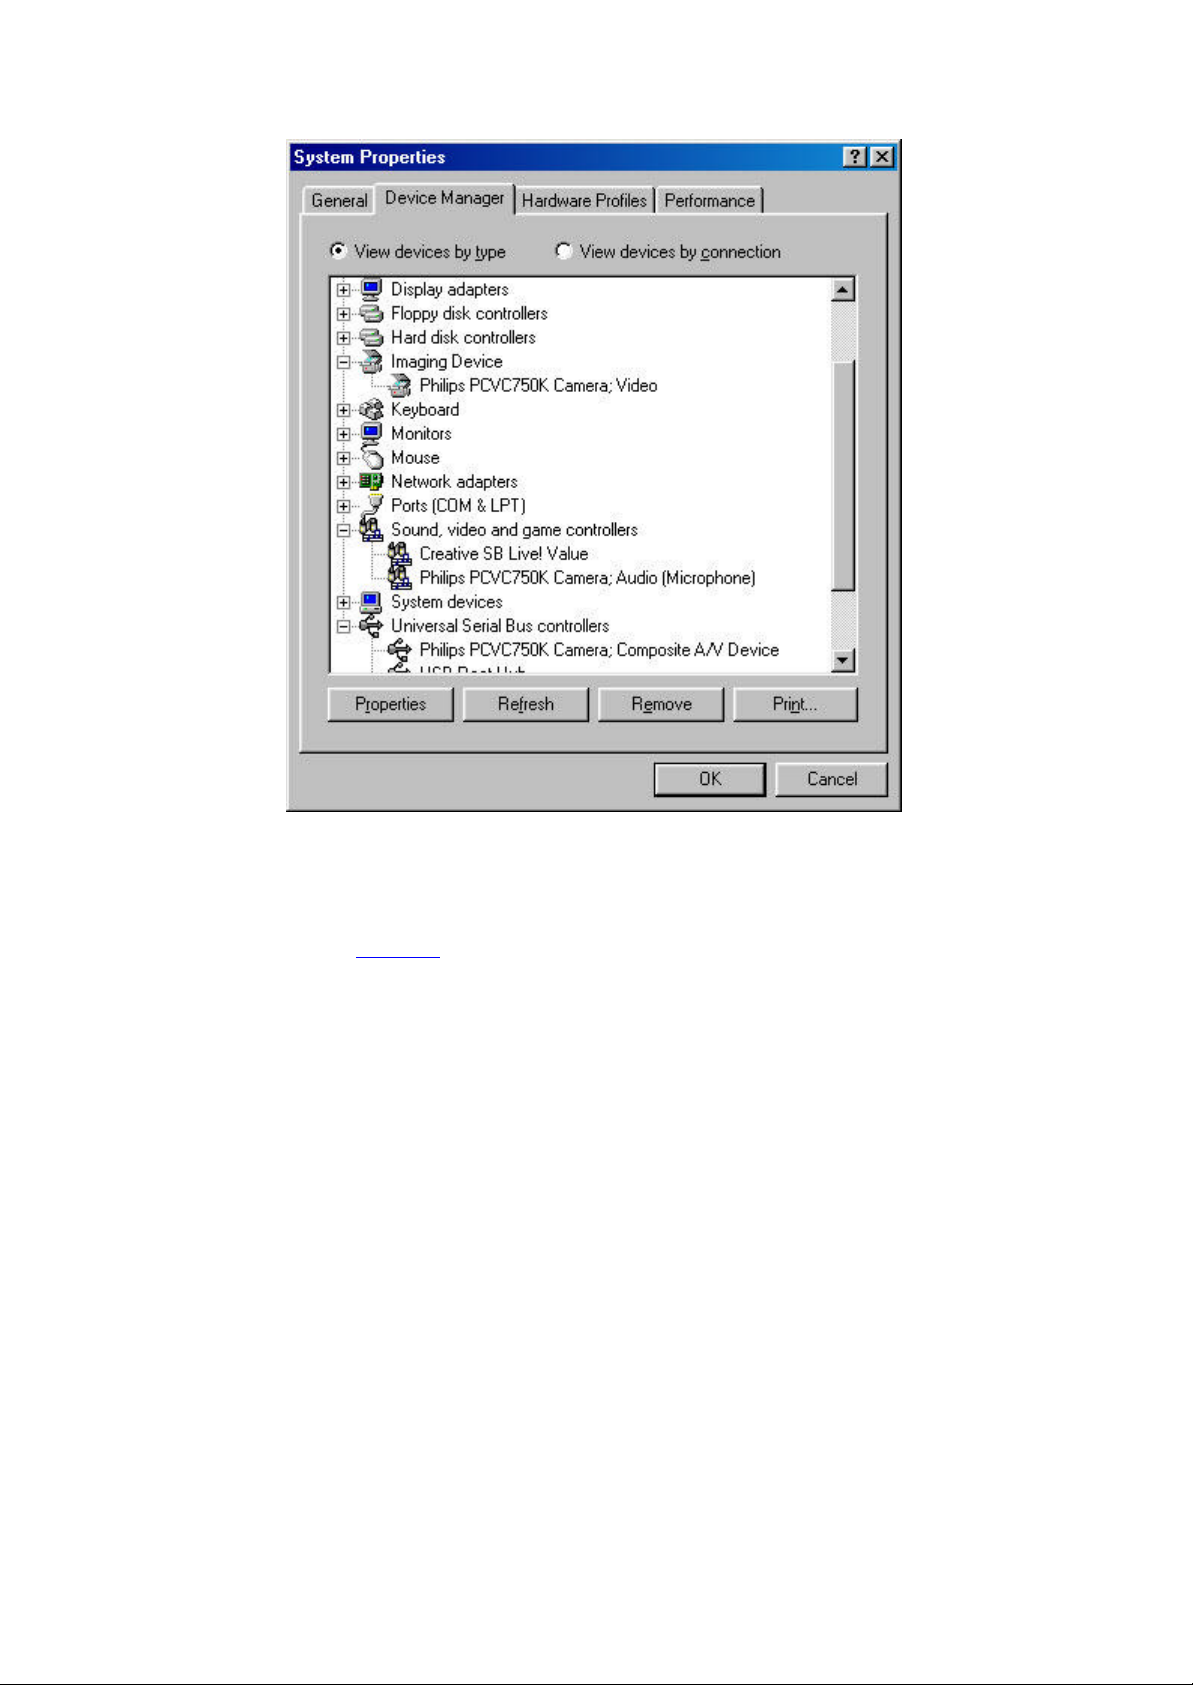
Let's look at USB for instance: an icon with the name 'Universal serial bus controller' should be visible.
Click on this icon and Windows will tell you if this part of your computer system is operating correctly.
Similarly, FireWire and other controllers can be checked.
More info: go to chapter 'Interfaces'.
Software settings
BIOS
Your computer's Basic Input/Output System (BIOS) controls the hardware start -up, when (re-)booting
your computer. Usually, during this start -up, the BIOS will search for internal controller devices in your
system. But sometimes this BIOS search for individual controllers has been disabled, for instance for
serial port controllers and USB.
So always check whether your BIOS allows detection of the controller you want to connect the
external drive to, otherwise the Windows operating system will not be able to use the drive.
For checking and/or changing your BIOS settings, watch closely for any texts appearing on your
screen during start -up of your computer. You will have to press the key mentioned on the screen (e.g.
F2, Delete, Esc, etc.) to go to the BIOS settings menu. Then find the peripheral device menu and
make sure the controller you want to connect the external drive to is set to "ENABLED".
APPLICATION SOFTWARE
You do not need any special software for reading discs with the external drive. When your operating
system detects the drive, it will automatically assign it a new drive letter. You may use it as any other
CD-ROM drive connected to your system.
Page 25

But for writing data to a disc, you will have to install a CD Writer software package. Such software is
provided on the installation CD. Run Setup.exe from the CD and start the Application software setup
from the Main Menu to install the application software for writing discs.
Firmware upgrades
The embedded software in the drive itself can also be updated with newer software versions. Go to the
Philips Support web site for downloading the necessary software tools and firmware updates. See
Downloads for more information.
See http://www.pctechguide.com/search.htm for an explanation of any terms in the text above.
Page 26

3.2 Erasing / formatting CD-RWs
Erasing a CD-RW disc is performed by returning the material in the recording layer back to its
crystalline state. This is done by an annealing process, consisting of heating the layer to a temperature
of about 200ºC (i.e. lower than the melting point) and maintaining that temperature for an extended
period of time (in practice, this may take up to 37 minutes for a complete disc). The disc is then
returned to its original, completely unrecorded state.
A much faster 'on the fly' erasing facility is also available, allowing the last recorded trac k to be erased
simply by erasing the subcode reference to that track while leaving the recorded data in place in the
recording layer. This method usually requires no more than 1 or 2 minutes.
Finally, the direct overwrite strategy combines the write and erase techniques. In this case, new pits
are written in the recording layer using the same pulsed laser beam energy as in the standard writing
strategy. However, in the areas between the newly recorded pits, a lower-energy, non-pulsed laser
beam is used to write new crystalline lands. The laser beam is repeatedly switched to the lowerenergy erase level between the new pits, resulting in complete erasure of the data that was formerly
contained in these areas.
Page 27

3.3 Track-at-Once, Disc-at-Once, Session-at Once and Packet
Writing
There are four basic methods of writing to a compact disc: Track-at-Once, Disc-at-Once, Session-atOnce and Packet Writing. These are independent of both the physical format and the file system in
which a disc may be written.
Track-at-Once
In Track-at-Once recording, the recording laser is turned off after each track is finished, and turned on
again when a new track must be written, even if several tracks are being written in a single recording
operation.
Tracks recorded in Track-at-Once mode are separated by gaps. If a data track is followed by an audio
track, the gap is 2 or 3 seconds. The gap between audio tracks is usually 2 seconds.
The software can do nothing to suppress or reduce the gap, unless both recorder and software
support variable-gap Track-at-Once. This feature allows you to set the size of the gap, from near zero
(2 sectors, or 2/75 of a second) to 8 seconds, before each audio track on an audio disc.
Disc-at-Once
In Disc-at-Once recording, one or more tracks are recorded, without turning off the recording laser,
until the disc is closed. Disc-at-Once recording requires a blank disc, and cannot be used for
MultiSession recording.
Disc-at-Once is primarily needed for recording audio discs with a variable (or no) gap between tracks
(for example, live concerts).
Session-at-Once (NOT supported by all drive models!!)
Session-at-Once is used primarily for CD Extra. In Session-at-Once recording, a first session
containing multiple audio tracks is recorded in a single pass, then the laser is turned off, but the disc is
not closed. Then a second (data) session is written and closed.
Packet Writing
Packet writing is a method of writing data on a CD in small increments, in accordance with the
industry-standard UDF specification. Not every CD-ROM drive can read packet -written discs. Packet
writing is a feature that must be built into the recorder's hardware. It cannot be implemented by a
firmware upgrade.
Two kinds of packets can be written: fixed-length and variable-length. Fixed-length packets are more
suitable for CD-RW in order to support random erase, because it would be cumbersome and slow to
keep track of a large, constantly-changing file system if the packets were not written in fixed locations.
The drawback is that these fixed packets, with a length of 64 kilobytes, take up a great deal of
overhead space on the disc. The normal data capacity of a CD-RW disc formatted for writing in fixedlength packets is about 500 megabytes.
Variable-length packets save space, because the size of the packet can vary with the size of the data
being written. This is more useful when writing to a standard CD-R disc, because these are write-once
media, and it is not necessary to track and allocate free space when files are 'erased'. (NOTE: On CDR discs, files cannot actually be erased, but can be made invisible.)
For more info visit: www.roxio.com or www.nero.com
Page 28

Seamless Link
3.4
Seamless Link protects the disc writing process against the effects of buffer underrun.
Today, many advances in CD writing technology are not only related to speed and to ensuring optimal
write operations on nearly all media, but also to writing integrity.
However, users with older systems may still be presented with an occasional buffer underrun error
message. Though a less frequent error for users of new computer systems, buffer underrun still is an
annoying problem as the recordable media will be irretrievably lost. For both users of new and older
systems, Philips Seamless Link offers an excellent solution for minimizing this disastrous effect of
buffer underrun.
About Buffer Underrun
Buffer underrun can occur when the users’ computer cannot supply a steady and uninterrupted flow of
data from the data source, typically a CD-ROM or hard disk drive, to the memory buffer of the CD or
DVD writer drive.
If this transfer of data, to the drive memory, is interrupted long enough to empty the write buffer in the
drive, then the writing process stops and the disc is ruined. Buffer underrun occurs most frequently
when users are writing in either Track-at-Once (TAO) or Disc-at-Once (DAO) mode.
Possible causes for buffer underrun:
· Insufficient processing power (low speed CPU, insufficient RAM size, no DMA support)
· System configuration not optimal (DMA switched off)
· Too much user interaction during writing (starting or running additional applications, thermal
recalibration of older hard disk types)
· Insufficient performance of the source drive (CD-ROM, hard disk, network drive)
· Scratched or dirty source media (source drive needs multiple retries to read the data successfully)
The solution? Seamless Link from Philips
Seamless Link, the Philips solution, detects the clues of an imminent buffer underrun ahead of time. It
pauses the writing in a controlled way, and restarts the writing when the danger of the buffer underrun
is gone.
Seamless Link technology, however, does not prevent the occurance of buffer underruns. Seamless
Link only acts to prevent buffer underruns from wasting a disc, it is not a speed or quality optimization
algorithm. For speed and quality optimization it is always better to try and remove the cause for the
buffer underruns.
How Seamless Link Works
Seamless Link constantly monitors the writer buffer level. If this level drops below a threshold value,
the writing process is stopped in a controlled way. This means that the data stream from the buffer to
the disc is halted, and it allows the buffer to be filled up again.
The exact location on the disc, where the write operation was stopped, is stored in the drive’s internal
memory. In the meantime, the buffer level is continuously monitored and as soon as the buffer is full
Page 29

again Seamless Link resumes the writing process from the exact spot where the writing stopped. This
type of writing eliminates the gap, which occurs between two individual writing operations during
traditional writing. Hence the name Seamless Link.
Page 30
3.5 Thermo-Balanced Writing (TBW)
Introduction
TBW intelligent drive technology, developed and patented by Philips, is a powerful new feature that
assures data integrity by physically testing each disc, then tuning the output of the recording laser, and
choosing the recording speed to suit each individual disc.
Even if the drive determines to use a recording speed lower than the maximum possible, it will always
choose the maximum speed which can safely be used for the inserted disc.
This results in an "intelligent" drive, which adapts its behaviour to suit the precise requirements of each
individual disc, ensuring the best possible recording quality on all media. It provides a very high
success rate even when recording on discs of a quality below the internationally recognised standards.
The Philips 12x8x32x ReWriter internal drives were the first products utilising TBW technology and
from these drives onwards, all Philips ReWriter drives have this feature.
IMPORTANT NOTE: ReWriter drives also write CD-RW discs of course. However, TBW technology is
not applicable to the RW function as ReWritable discs utilise a completely different recording
methodology than Recordable discs.
The problem
Numerous recordable disc manufacturers all over the world are now producing what has become a
commodity item. Unfortunately, in some cases, the quality of these discs is not in accordance with
global standards for this media. There may be areas on the disc surface with an insufficient amount of
recording medium (in addition to scratches, dirt marks or other surface defects), or even gross
mechanical damage which results in imbalance.
Unfortunately, there is no reliable way a consumer can judge what he or she is buying (there exists no
universal authoritative quality logo on the disc packaging). So when you buy and "burn" what are
effectively sub-standard discs, any resulting problems are more likely to be attributed to the CD drive
unit than to the disc. It is a question of compatibility, something you as the end user implicitly desire,
but are unable to verify yourself.
The solution
Philips has applied considerable effort to developing and testing an "on board" system of selfcalibration for recording CD-R discs. It is part of a continuous Philips programme that is devoted to the
perfection of writer technology, and particularly, to anticipating and solving end user problems, thereby
enabling greater ease of use.
The Philips solution lies in a technique designated TBW [Thermo-Balanced Writing] , a feature which is
to be introduced in all new Philips ReWriter drives.
Page 31

TBW, in partnership with a Self-Learning process, adds intelligence to the drive and enables it to
automatically make decisions, about how to process and write a new disc. The proces s is in many
ways similar to the way in which fax machines initially communicate. They detect what kind of partner
machine is at the other end of a connection, so that the two can transfer data properly and without
user intervention.
The heart of this Philips solution consists of new hardware and firmware that is built into the drive,
including the TBW algorithm, which evaluates the disc and determines the burn parameters.
The intelligent TBW algorithm
1. On insertion of a disc into the drive with intention to write, a fast sequence of physical tests are
performed on the disc to determine its’ characteristics. These tests determine precisely the power
dosage of the laser burn pulses that need to be applied to that particular disc. The time this takes
will usually go unnoticed by the end user.
2. If this initial test shows some discrepancies, then the algorithm performs more burn/read iterations
for testing the disc, recalculates the required burn pulse data, and, if necessary, automatically
reassigs the disk to the next lower drive speed that is available, without any intervention by the
user.
3. The end users will be informed of the new selected recording speed via the application.
4. After final testing, recording can begin. The burn process tailors the laser pulses, so as to give
exactly the right amount of heat for creating a sequence of signal pits, all with the right size and
density. The result is an optimal ratio of reflectivity between pits and lands, with the correct size
and spacing. Thus the drive maintains a high degree of accuracy in writing, readability and above
all, compatibility.
End-users may notice that recording takes place more slowly (or faster!) than expected (e.g.
compared to the information on the disc packaging), but they should almost never see a wasted disc,
as a result of a recording failure due to this type of problem.
In other words, a TBW intelligent drive can calibrate itself and automatically compensates for variables
in the recording media; and every disc is treated individually. This feedback system offers another
advantage: If the laser characteristics vary over time or if it suffers from a build-up of dirt, the effect on
its output will automatically be compensated for by the TBW feature. This makes for greater reliability
and a longer useful life of the drive itself.
More info: www.philips.com/pcstuff
Page 32

3.6 Recommended links
Standards Organizations
OSTA: http://www.osta.org
ISO: http://www.iso.ch
JPEG/MPEG working group: http://www.cselt.it/mpeg
Philips Sites
Philips S&V for Audio Products: www.philips.com/pcstuff
Philips PCStuff Site: http://www.philips.com/pcstuff
Philips Standards Site: http://www.licensing.philips.com/
ISV Site
FAQs: www.roxio.com or www.nero.com
Other
Microsoft Windows Site: http://www.microsoft.com
WHQL site: http://www.microsoft.com/HWTEST/default.asp
Page 33

3.7 CD-R/ RW technology
Differences between CD-R/CD-RW discs and standard CD
The main physical difference between these two disc types and the standard prerecorded CD (audio
CD or CD-ROM) is that the latter has no recording layer; the information is permanently stamped in
the aluminium reflecting layer.
The CD-R and CD-RW discs
CD-R and CD-RW discs have the same basic disc structure but with significant detail differences. The
CD-R disc has a dye-based recording layer, with a reflectivity of 40 - 70 %, while the CD-RW disc has
a phase-change recording layer with a reflectivity of 15 - 25 %.
Both discs have an additional reflecting layer: golden for the CD-R, which accounts for that disc's
distinctive appearance, and silver (aluminium) for the CD-RW.
Both disc types have a track spiral, which is preformed during manufacture, onto which the audio data
is written during the recording process. This track ensures that the recorder follows the same spiral
pattern as a conventional CD, and has the same width of 0.6 mm and pitch of 1.6 mm as a
conventional CD. In addition to the spiral pattern, the track has a slight superimposed sinusoidal
excursion of ± 0.3 mm at a frequency of 22.05 kHz.
Page 34

3.8 Interfaces
Interfaces are used for connecting peripheral devices to your computer. Check the technical
specifications of your computer and of the product you bought for availability of these interfaces.
Overview
interface alias connection speed compatible with
USB 1.1
(max. speed 4x4x6)
USB 2.0 hi-speed USB 480 Mbps itself and USB 1.1
IEEE 1394 FireWire; iLink 400 Mbps itself only
lo-speed USB 1,5 Mbps
full-speed USB 12 Mbps
itself only
General
Connecting
Both USB and FireWire support ‘hot -plugging’ which means that you do not have to switch off the
computer before making the connection. And that you do not have to restart Windows every time you
connect a new device. The controller driver will detect the external drive as new hardware. It can be
used within a few seconds without the need to restart the computer.
Disconnecting
The computer may crash if you unplug the drive while it is actively providing a data stream to an
application on your computer. To avoid problems, first close all applications that use data from the
drive and only then unplug your external drive. Do not unplug the drive while writing to a disc, this may
render your disc useless. Some operating systems support a disconnect feature through an icon in the
system tray, e.g. . If available, always use this disconnect option before unplugging the drive.
Bandwidth restrictions
As the drive is an external device, it shares the bandwidth of the controller port with all other
peripherals connected to that controller. If these devices are active (video data transfer, speakers
providing sound, scanners performing a scan), the remaining bandwidth may be restricted to
read/write speeds lower than those listed in the 'Technical specifications' as the maximum speed for
that port.
USB 1.1 or
Compatibility
USB 1.1 devices may be connected to USB 2.0 adapters or hubs, but will run at USB 1.1 speeds only.
USB 2.0 or
Hi-Speed compatibility
USB 2.0 devices may fall back to USB 1.1 speeds if not all USB 2.0 system requirements are met. If
this is being done without notifying the user, then the limited transfer speeds may be the only
Page 35

indication you get of this problem. Therefore, always check your USB 2.0 controller before seeking
technical assistance on drive transfer speed problems.
Some of the Hi-Speed USB 2.0 system requirements are:
1. Use a very powerful computer for hosting the Hi-Speed USB 2.0 interface.
2. Most USB 2.0 interfaces require 128 MB RAM.
3. Bus mastering support needs to be enabled.
4. Use the newest Hi-Speed USB 2.0 drivers.
5. Use software that supports Hi-Speed USB 2.0.
6. Use of Hi-Speed USB 2.0 certified cables.
Compatibility
Connecting a USB 2.0 device to a USB 2.0 adapter or hub through USB1.1 devices and/or cables, will
result in running the USB 2.0 device at USB 1.1 speeds only. Please always use the Hi-Speed cable
supplied with the product to avoid any problems.
IEEE 1394
FireWire / IEEE 1394 is also a high speed and ‘hot-pluggable’ interface for external devices. For the
user it works the same as USB, but it is not interchangeable with either USB 2.0 or USB 1.1.
More info: www.usb.org and www.apple.com/firewire
Page 36

4. Downloads
Updates
Flash tool for firmware updates + Readme http://www.philips.com/pcstuff
Info
Instructions For Use http://www.philips.com/pcstuff
Page 37

Thank you for buying a Philips Multimedi@solutions product! This product is designed for you to
Your Philips Warranty
offer high quality performance, ease of use and ease of installation.
Product Asia Pacific Region Europe Region North America Region
CD/DVDRW/PC-CAMS/-SPEAKERS 12 months 24 months* 12 months
PC-SOUNDCARD 12 months 24 months* 36 months
If you have any question, please check Philips W.W.W. before you contact us, as you may find the
answer already there. Should you come across any more difficulty during installation or use, before you
contact Philips Technical Support, please prepare the following information so that we could solve
your problem more quickly.
Purchase date
Name ...
Address ...
Postal code +city ...
Country ...
Telephone ...
Fax ...
Email (Internet) ...
Philips product + type nr.+S/N ...
PC Environment Processor: 486/Pentium I-II-III. Internal memory: ...
Other cards installed:...
Other system(MAC) Operating system..
Question ...
You can reach Philips in the following ways (in order of preference):
Europe Region
In case your Philips product is not working correctly,please contact first our helpdesk to assist you.
If the helpdesk conclude with you that the product is defective, contact your Philips Dealer where
you bought the product.
In the event you require service whilst in another country, or your dealer does no longer exist or sel
Philips products, contact our helpdesk for support to solve the problem.
For helpdesk tel nrs. see the numbers in this warranty booklet.
You can also contact the Helpdesk by Email: pcperipheral@xtrasource.com
or by FAX: +31-53-486-0060
European Helpdesk:
BelgiŒum 02-275-0701 Luxembourg 408-443-5501 Italy 02-48-27-11-53
Danmark 35-25-87-61 Netherlands 053-482-9800 Norway 22-70-82-50
Germany 0696-698-4712 Austria 01-546-575-603 Ireland 01-601-1161
Finland 09-2290-1908 Portugal 0800-831-363 Sweden 08-632-0016
France 03-8717-0033 Spain 09-17-45-62-46 Greece 00800-3122-1223
UK Π0207-949-0069 Switserland 02-23-10-21-16 Cyprus 800-92256
Open also during evenings and weekend.
Software: Windows:.../DOS:/ OS/2: ... Application program: ...
World Wide Web: http://www.philips.com/pcstuff
North America Region ( USA,Canada and the virgin Islands )
Customer Support Telephone:
CD-RW 888-541-5837 DVD ROM 888-541-7794 PC Cameras 800 835 3506
World Wide Web: http://www.philips.com/pcstuff
Asia Pacific Region
World Wide Web: http://www.philips.com/pcstuff
Please contact your own dealer/distributor.
THIS GUARANTEE CARD DOES NOT COVER ACCESSORIES BELONGING TO THE PRODUCT.
Page 38

1. Types de disques
1.1 CD enregistrable ou CD réinscriptible : quelles sont les différences et quand utiliser quel type ?
Pour obtenir des résultats optimaux, il est très important que vous utilisiez le type de disque approprié
avec votre graveur CD-ReWriter ou DVD+RW Philips.
Il convient d’abord de choisir entre disque enregistrable (CD-R) et disque réinscriptible (CD-RW) en
fonction de l’application envisagée. La principale différence réside dans le fait que les CD-R ne
peuvent être effacés et réutilisés, car ils ne peuvent être gravés qu’une seule fois. Par contre, les CDRW peuvent être effacés et réutilisés (regravés) plusieurs centaines de fois. Le tableau suivant
présente les différentes applications possibles par type de disque :
Type de
disque
CD-ROM Non Non Diffusion d’informations.
CD-R Oui Non Archivage permanent de données.
CD-RW Oui Oui Travaux en cours (présentations, documents, etc.).
Il convient de toujours utiliser des disques de haute qualité de marques reconnues pour obtenir les
meilleurs résultats lors de la gravure de CD réinscriptibles à des vitesses élevées. L’importance de la
qualité du disque augmente avec la vitesse de gravure dès que celle-ci dépasse 2x, où « x »
représente la vitesse standard de transfert de données des disques compacts, c’est-à-dire 150 kb/s ou
1x. Ce graveur CD-ReWriter Philips est capable de graver à des vitesses bien supérieures à 2x. En
outre, comme plus la vitesse de gravure est élevée, moins il faut de temps pour produire un disque,
nous vous recommandons d’utiliser des disques CD-R ou CD-RW de marque (préférentiellement
Philips) qui indiquent spécifiquement les vitesses de gravure autorisées sur l’emballage (Multi Speed,
16x ou 10x pour CD-RW ou des vitesses supérieures).
Vous devez toujours utiliser des disques présentant une vitesse au moins égale à celle de
votre graveur CD-ReWriter ou DVD+RW Philips..
Enregistrable Effaçable Usage
Partage de données avec des utilisateurs disposant d’un
lecteur de CD-ROM.
Utilisation dans les anciens lecteurs de CD-ROM (qui ne
reconnaissent pas les CD-RW).
Création de disques compacts audionumériques (la
plupart des lecteurs de CD standard ne reconnaissent pas
les CD-RW).
Archivage hebdomadaire du disque dur.
Transfert de gros fichiers entre la maison et le bureau.
Essai avant enregistrement sur CD-R.
CONSEILS:
Nous vous recommandons d’utiliser des disques réinscriptibles (réutilisables) jusqu’à ce que vous
vous soyez familiarisé avec le logiciel de gravure. Si vous commettez une erreur, vous pourrez ainsi
recommencer l’enregistrement sans perdre de disque. Lorsque vous aurez réussi l’opération avec un
disque réinscriptible, vous pourrez répéter l’enregistrement sur un simple disque enregistrable.
Cependant, si vous souhaitez vérifier si la gravure effective du disque sera correcte, il est préférable
d’utiliser la fonction « essai d’écriture » du logiciel de gravure, car la vitesse de gravure des CD-RW
est généralement inférieure à celle applicable aux CD-R. La plupart des problèmes qui se produisent
au cours de la création d’un disque sont dus à des sous -alimentations de la mémoire tampon,
phénomènes qui se produisent si les données source ne peuvent être fournies assez rapidement par
Page 39

l’ordinateur au graveur de CD-RW ou DVD+RW. (Les techniques d’écriture développées récemment,
telles que Seamless Link de Philips, visent à éliminer les problèmes que cet effet peut entraîner.) La
probabilité d’une sous -alimentation de la mémoire tampon augmente considérablement avec des
vitesses de gravure plus élevées. Par ailleurs, il n’est pas recommandé d’utiliser un CD-RW pour
vérifier la vitesse de gravure car, si l’écriture sur un CD-RW (à une vitesse inférieure) est correcte, il
n’est pas absolument sûr que celle sur un CD-R (à haute vitesse) sera correcte elle aussi.
Page 40

1.2 Vitesse et méthode de gravure
Reliability before speed...
Les graveurs de CD-RW ou DVD+RW évolués de Philips assurent l’intégrité des données en lecture
comme en écriture.
Les graveurs à haute vitesse que Philips fabrique ont pour mission première la sauvegarde de vos
données gravées. Ainsi, le graveur optera toujours pour la vitesse de gravure la mieux adaptée, afin
de garantir l’intégrité la plus élevée possible de vos données. Cette vitesse optimale peut être
inférieure à celle revendiquée par le constructeur du disque (ce peut être le cas si le disque est
endommagé, empoussiéré, rayé, etc.), mais le graveur Philips part du principe que vos données sont
bien plus importantes que la vitesse et, par conséquent, choisira une vitesse inférieure si cela s’avère
nécessaire.
Les données gravées sont préparées non seulement pour être lues par votre graveur de CD-RW
Philips, mais pour être compatibles avec les principaux lecteurs de CD-ROM du marché. Cette
compatibilité est assurée par de nombreux essais approfondis réalisés dans les laboratoires de qualité
de Philips. Vous pourrez ainsi envoyer votre disque enregistré à n’importe qui dans le monde entier en
étant sûr que cette personne pourra le lire.
Nous recommandons l’utilisation exclusive de disques CD-R et CD-RW Philips afin de garantir la plus
haute qualité de gravure de disques de données et audionumériques. À ce sujet, consultez également
le site http://www.ce-europe.philips.com.
Le graveur effectuera un contrôle d’optimisation (OPC) pour déterminer la meilleure méthode
d’écriture à la plus haute vitesse d’écriture ou de réécriture possible. S’il n’en détermine aucune, il
essayera de trouver la meilleure méthode pour la vitesse inférieure, et ainsi de suite. Ce test est
réalisé dans la zone OPC (face intérieure du disque). Si la zone OPC n’est pas représentative du
reste du disque (ce qui est souvent le cas avec les supports de moindre qualité), des problèmes de
lecture peuvent se présenter ultérieurement sur les lecteurs de CD-ROM tiers sur lesquels le disque
sera lu, voire sur des lecteurs Philips. Nous ne pouvons donc garantir la lecture des disques gravés
que sur le lecteur Philips qui a servi de graveur, à la plus haute vitesse possible que le graveur a
déterminé pour ce disque.
Philips a récemment mis au point un certain nombre de nouvelles techniques propriétaires afin de
résoudre les problèmes générés par les mauvaises conditions d’écriture sur les disques. Ces
nouvelles techniques sont appelées Seamless Link , Thermo Balanced Writing et Self-Learning.
Page 41

1.3 Copie de disque, droits d’auteur et protection contre la copie
Le graveur de CD-RW ou DVD+RW Philips est conçu pour vous aider à reproduire des données dont
vous détenez les droits ou pour lesquels vous avez obtenu une autorisation de copie de la part du
détenteur des droits d’auteur. À moins que vous ne déteniez les droits d’auteur ou ne disposiez d’une
autorisation de copie obtenue du détenteur des droits, il est possible que vous violiez la législation sur
les droits d’auteur ou que vous soyez redevables du paiement de dommages -intérêts ou d’autres
moyens de réparation. Si vous n’êtes pas sûr de la propriété des droits relatifs aux données à copier,
contactez votre conseiller juridique.
Lorsque vous êtes prêt à procéder à la gravure de votre disque, suivez les instructions du logiciel de
copie.
Certains CD-ROM font appel à des techniques de protection contre la copie. Il n’est normalement pas
possible de copier ces disques. Cependant, si vous réussissez malgré tout à les copier, la copie ne
fonctionnera pas car le logiciel copié sur le CD-ROM effectuera certains contrôles et déterminera qu’il
s’agit d’une copie.
Page 42

1.4 Lecture multiple MultiRead
Il est toujours possible de lire les disques réinscriptibles avec le graveur qui les a créés. Cette lecture
n’est souvent pas possible sur d’anciens lecteurs de CD-ROM ou de CD qui ne se conforment pas à la
spécification MultiRead.
Les pistes enregistrées sur un disque réinscriptible (CD-RW) sont lues de la même façon que les
pistes d’un disque compact normal, c’est-à-dire en détectant les changements de réflexion (haute et
basse) et en mesurant le temps entre ces changements. La seule différence réside dans le fait que la
réflexion des CD-RW présente une intensité correspondant environ à un tiers de celle des CD
conformes à la spécifi cation originale. C’est la raison pour laquelle d’anciens lecteurs de CD-ROM ou
de disques compacts audionumériques ne peuvent lire les disques réinscriptibles.
Avec les techniques modernes, ceci ne présente pas de problème. La spécification MultiRead établie
par Philips et Hewlett Packard et approuvée par le groupement Optical Storage Technology
Association (OSTA) prévoit les ajustements nécessaires et, ce faisant, résout toutes les questions de
compatibilité pour tous les lecteurs de CD-ROM, de DVD et de CD modernes.
Le tableau suivant présente quels types de lecteurs de CD sont capables de lire les disques créés
avec quelles combinaisons d’application et de support :
Fonction Type de
Glisser-déposer (écriture par
paquets UDF)
Lecteurs cibles
CD
CD-RW Lecteur de CD-ROM MultiRead avec lecteur
UDF
CD-R
(clôturé)
CD-RW Lecteur de CD-ROM MultiRead Copie de CD
CD-R Tout lecteur de CD-ROM
CD-RW Lecteur de CD-ROM MultiRead Création de CD audio
CD-R Tout lecteur de CD-ROM, lecteur de CD de
CD-RW Lecteur de CD-ROM MultiRead Création de CD de données
CD-R Tout lecteur de CD-ROM
La plupart des lecteurs de CD -ROM
salon/voiture
Page 43

1.5 Format des disques compacts
Votre graveur de CD-R/RW Philips peut à la fois enregistrer et lire tous les formats de CD répandus
sur le marché. La liste des formats peut varier en fonction du type de lecteur. Pour déterminer avec
précision les formats pris en charge par le graveur, reportez -vous aux caractéristiques techniques de
celui-ci.
Votre graveur Philips CD ReWriter est également équipé d'une prise de sortie audio analogique (prise
casque) pour la lecture de CD audio et de CD MP3. Si vous insérez et lisez un CD audio ou un CD de
données comprenant des fichiers MP3, vous pourrez écouter la musique en connectant un casque ou
des haut -parleurs à la prise casque située sur le graveur. (Uniquement sur certains modèles !)
Page 44

1.6 CD de xx minutes ( > 74 minutes)
Le graveur Philips ReWriter peut copier des CD d’une capacité de plus de 74 minutes, qui sont de
plus en plus répandus actuellement.
Pour plus de détails, téléchargez les 'Caractéristiques techniques' de votre graveur (voir
Téléchargement).
Page 45

1.7 Choix des CD
Le graveur CD-ReWriter Philips vous permet d’utiliser des disques CD-RW et CD-R traditionnels (8
cm pour 21 minutes ou 12 cm pour 74 ou 80 minutes). Pour obtenir les meilleurs résultats, Philips
vous recommande d’utiliser exclusivement des disques CD-RW et CD-R de marque Philips.
Vous devez vous assurer que les disques sont certifiés aptes à être gravés à haute vitesse.
Le choix entre CD-R et CD-RW dépend de l’application envisagée et du lecteur sur lequel le disque
créé sera lu. Pour plus d’informations, reportez -vous aux tableaux concernant les applications des
disques et les lecteurs cibles .
Page 46

un CD
-
RW pour vérifier la vitesse de gravure car, si l’écriture sur un CD
-
RW (à une vitesse
2. Utilisation du graveur
2.1 Copie de CD-ROM, de Photo-CD, de Vidéo-CD, de CD audio...
La copie d’un disque est un processus qui s’effectue très simplement avec le logiciel fourni avec le
graveur et installé par le programme d’installation. Cela peut prendre de quelques minutes à 80
minutes par disque, en fonction des caractéristiques du graveur et de la vitesse d’enregistrement.
Reportez-vous également à la section consacrée aux droits d’auteur et à la protection contre la copie.
1. Quittez tous les programmes tournant sur votre ordinateur avant de commencer
l’enregistrement d’un disque. Tout autre programme ralentirait le processus et pourrait compliquer
voire interrompre l’enregistrement.
2. Placez le CD source dans le lecteur de CD-ROM.
3. Introduisez un disque vierge dans le graveur CD-ReWriter ou DVD+RW . Veillez à ce que la
vitesse du disque vierge corresponde à celle du graveur CD-ReWriter ou DVD+RW.
4. Lancez le logiciel d’enregistrement CD Copier. Des boîtes de dialogue vous présenteront les
différentes options qui vous sont offertes.
5. Définissez vos préférences, y compris celles concernant la vitesse d’enregistrement. Le
lecteur de CD-ROM doit pouvoir lire les données au moins même vite que le CD-ReWriter ne les
écrit.
6. Lancez l’enregistrement. L’utilisation de l’ordinateur pour d’autres applications pendant la copie
de disques peut avoir des conséquences négatives sur le processus de duplication. Les activités
n’utilisant que peu les ressources de l’ordinateur ne posent toutefois pas de problème. Mais si le
seul déplacement de la souris cause une erreur, il est préférable d’effectuer la gravure à une
vitesse inférieure. Si un problème survient (sous -alimentation de la mémoire tampon), le processus
de gravure se termine et l’application rapporte les erreurs détectées. Dans la plupart des cas, le
CD sera perdu (sauf si vous gravez un disque réinscriptible ou si votre graveur prend en charge la
technique Seamless Link ).
CONSEILS PRATIQUES:
· La copie directe de disque à disque, l’écriture à la volée et les enregistrements à haute vitesse
sont les méthodes d’écriture les plus sensibles aux erreurs de transfert de données car
l’alimentation en données source peut être trop lente (sous -alimentation). Le débit des données
source peut être limité par la configuration du système et par la capacité de traitement de
l’ordinateur. Si nécessaire, vous devrez enregistrer à des vites ses inférieures pour éviter toute
erreur. Les enregistrements par « écriture à la volée » s’effectuent en lisant le disque source au
moment même où les données sont gravées sur le CD-ReWriter. Ces enregistrements sont plus
sensibles aux interruptions du fl ux de données et, par conséquent, sont fréquemment à la base
d’erreurs. Reportez -vous également à la section Seamless Link.
· Copier les données source dans un dossier du disque dur de l’ordinateur augmente
significativement vos chances de succès.
· Nous vous recommandons d’utiliser des disques réinscriptibles (réutilisables) jusqu’à ce que vous
vous soyez familiarisé avec le logiciel de gravure. Si vous commettez une erreur, vous pourrez
ainsi recommencer l’enregistrement sans perdre de disque. Lorsque vous aurez réussi l’opération
avec un disque réinscriptible, vous pourrez répéter l’enregistrement sur un simple disque
enregistrable.
Cependant, si vous souhaitez vérifier si la gravure effective du disque sera correcte, il est
préférable d’utiliser la fonction « essai d’écriture » du logiciel de gravure, car la vitesse de gravure
des CD-RW est généralement inférieure à celle applicable aux CD-R. La plupart des problèmes qui
se produisent au cours de la création d’un disque sont dus à des sous -alimentations de la mémoire
tampon, phénomènes qui se produisent si les données source ne peuvent être fournies assez
rapidement par l’ordinateur au graveur de CD-RW ou DVD+RW. La probabilité d’une sous alimentation de la mémoire tampon augmente considérablement avec des vitesses de gravure plus
élevées. (Voir également la section Seamless Link.) Par ailleurs, il n’est pas recommandé d’utiliser
Page 47

inférieure) est correcte, il n’est pas absolument sûr que celle sur un CD-R (à haute vitesse) sera
correcte elle aussi.
· Si votre ordinateur ne possède qu’un seul lecteur de CD, à savoir le CD-ReWriter ou DVD+RW,
vous pourrez copier des disques, mais vous devrez utiliser ce lecteur à la fois comme lecteur
source et comme graveur cible, ce qui augmentera le temps nécessaire à la copie.
· Pour plus d’informations sur l’utilisation des logiciels d’application, reportez -vous aux documents
accompagnant les différents logiciels concernés. Habituellement, chaque application crée son
propre groupe de programmes dans le menu de démarrage de Windows. Vous pouvez y accéder
facilement en cliquant sur le bouton Démarrer de Windows. Ces groupes de programmes
comprennent l’icône des applications ainsi que d’autres éléments (des fichiers d’aide, des manuels
électroniques, des assistants de désinstallation, des fichiers lisezmoi, etc.) associés aux
applications concernées. Toutes les informations disponibles sont généralement accessibles via le
groupe de programmes du logiciel ou via les options d’aide du programme même.
· Pour d’autres conseils et d’informations, visitez le site www.roxio.com.
Page 48

2.2 Création de vos propres CD audio
Vous ne devez pas nécessairement vous limiter à la copie de disques existants. Il est également
possible de créer des disques avec des morceaux que vous aurez composés vous -même, de
combiner des morceaux de disques existants ou de fichiers audio source ou de remplir un CD-R entier
de votre propre production audio au format CD-DA des disques audionumériques normaux.
1. Lancez le logiciel d’enregistrement.
2. Pour enregistrer des plages musicales, vous devez d’abord créer une structure de disque, qui
correspond à la liste des morceaux dans l’ordre de leur enregistrement. Il vous suffit de cliquer sur
le matériel source (les plages du CD ou les fichiers audio) que vous souhaitez enregistrer, puis de
les faire glisser de la fenêtre de l’Explorateur vers la fenêtre Structure du CD audio (Audio CD
Layout). Veillez à ne pas les faire glisser vers la fenêtre Structure du CD de données !
3. Répétez cette procédure pour chaque plage et fichier à enregistrer.
4. Enfin, introduisez un disque vierge et lancez le processus d’enregistrement.
Pour plus d’informations, consultez la section Conseils pratiques et le site http://music.cnet.com.
Page 49

2.3 Création de disques de données
Vous ne devez pas nécessairement vous limiter à la copie de CD-ROM existants. En effet, vous
pouvez créer des disques avec votre propre production.
1. Lancez le logiciel d’enregistrement.
2. Pour enregistrer des fichiers et des dossiers, vous devez d’abord créer une structure de disque,
qui correspond à la liste des fichiers et des dossiers dans l’ordre de leur enregistrement. >Il vous
suffit de cliquer sur le matériel source (les fichiers ou les dossiers) que vous souhaitez enregistrer,
puis de les faire glisser de la fenêtre de l’Explorateur vers la fenêtre Structure du CD de
données (Data CD Layout).
3. Répétez cette procédure pour chaque fichier et dossier à enregistrer.
4. Enfin, introduisez un disque vierge et lancez le processus d’enregistrement.
Pour plus d’informations, reportez -vous à la section Conseils pratiques.
Page 50

2.4 Ajout de pistes musicales ou de données à un disque
Si un disque n’a pas été rempli au maximum la première fois que vous l’avez gravé et si vous n’avez
pas clôturé le disque (voir ci-dessous), vous pouvez y ajouter des pistes audio ou des sessions de
données.
Session clôturée:
si vous souhaitez écouter un CD audio sur un lecteur de salon ou de voiture, vous devez d’abord
clôturer la session. Vous pourrez ensuite ajouter des pistes audio sur le disque, mais seules les pistes
de la première session seront accessibles (« vues ») par la plupart des lecteurs de CD. Laisser une
session ouverte n’est possible que lors de l’écriture d’un disque audionumérique. Lors de l’écriture de
données, le logiciel d’enregistrement clôture toujours automatiquement la session.
Disque clôturé:
vous pouvez choisir de clôturer le disque ou non. L’option Clôturer le disque a pour effet de protéger
le CD contre toute nouvelle écriture. Une fois cette opération effectuée, il n’est plus possible
d’enregistrer de pistes sonores ou de données sur le CD.
Disque ouvert:
1. Placez le disque non clôturé dans le graveur CD-ReWriter ou DVD+RW .
2. Lancez le logiciel d’enregistrement.
3. Cliquez ensuite sur le matériel source à ajouter, puis faites -le glisser de la fenêtre de l’Explorateur
vers la fenêtre Structure du CD (CD Layout) pour l’ajouter au contenu existant.
4. Répétez cette procédure pour chaque fichier et dossier à enregistrer.
5. Enfin, lancez le processus d’enregistrement du CD.
Page 51

2.5 Utilisation du graveur de CD-RW ou DVD+RW comme unité de
disque (lecteur)
Pour pouvoir accéder directement à vos disques CD-R ou CD-RW dans le graveur CD-ReWriter ou
DVD+RW comme n’importe quelle autre unité de disque (lecteur Windows) sur laquelle des données
peuvent être lues et enregistrées, vous devez installer le logiciel d’écriture par paquets.
Ce logiciel se chargera automatiquement en mémoire à chaque démarrage de Windows et
s’exécutera en arrière-plan de telle façon que vous puissiez lire et écrire des données sur le disque
CD-R ou CD-RW qui se trouve dans le graveur depuis Windows Explorer ou toute autre application
Windows (traitement de texte, tableur, etc.).
Le disque CD-R ou CD-RW utilisé à cette fin reste alors « ouvert » et ne peut être lu que sur les
ordinateurs sur lesquels un logiciel d’écriture par paquets ou un lecteur UDF est installé. Il est
également possible d’utiliser le logiciel d’écriture par paquets pour clôturer la session en cours, de
telle sorte que le disque soit lisible par les lecteurs à lecture multiple « MultiRead ». Par la suite, il sera
encore possible d’ajouter des données sur le disque en ouvrant une nouvelle session.
Remarque: il n’est pas possible d’effacer ou d’éc raser les fichiers enregistrés sur les disques CD-R,
mais ces fichiers peuvent être rendus invisibles et réécrits lors d’une mise à jour des fichiers.
Page 52

2.6 Combinaison de pistes musicales et de données (mode mixte)
Pour graver un CD en mode mixte, procédez comme suit:
1. Préparez la partie « données » du disque selon les instructions de la section Création d’un CD de
données. (Sélectionnez les fichiers de données à ajouter et faites-les glisser vers la fenêtre
Structure du CD de données.)
2. Cliquez sur l’onglet Structure du CD audio.
3. Préparez la partie « audio » du disque selon les instructions de la section Création de vos
propres CD audio. (Sélectionnez les pistes à enregistrer et faites -les glisser vers la fenêtre
Structure du CD audio.)
4. Un message vous indique que les paramètres du disque ont été automatiquement modifiés
pour prendre en charge les CD en mode mixte.
5. Enfin, introduisez un disque vierge et lancez le processus d’enregistrement.
Le logiciel d’enregistrement commence à créer le CD en mode mixte. Il enregistre dans la première
piste les fichiers listés dans l’onglet Structure du CD de données, puis enregistre les plages musicales
listées dans l’onglet Structure du CD audio dans les pistes suivantes. Toutes les pistes (données et
audio) sont enregistrées lors d’une seule session.
Page 53

2.7 Lancement d’applications avec Blue Button
Les modèles de lecteur récents présentent un bouton accompagné du logo Blue Button. Comme le
bouton n’est pas forcément bleu, c’est le logo qui indique la disponibilité de la fonction Blue Button.
Pour déterminer la position du bouton Blue Button, reportez -vous au mode d’emploi.
Une simple pression sur ce bouton a pour effet d’afficher une fenêtre comportant des boutons d’accès
à plusieurs sites internet et à des applications utiles.
Option 1 : Utilisation du bouton Blue Button
Appuyez sur le bouton Blue Button accompagné du logo sur le lecteur ou double-cliquez sur l’icône
Blue Button dans la barre système de Windows. Vous pouvez également relancer le programme Blue
Button via le groupe de programmes Philips external drive.
La fonction Blue Button exige que plusieurs conditions soient réunies:
1. Le lecteur doit être raccordé à l’ordinateur, et il doit être allumé (le cas échéant).
2. L’Assistant d’installation Philips (fourni avec le lecteur) doit avoir été exécuté.
3. Vous devez disposer d’un navigateur internet installé et configuré.
4. L’application résidente Blue Button (l’icône de la barre système) doit être active. C’est la
configuration par défaut après l’installation. Cependant, vous pouvez choisir de désactiver cette
icône de la barre système. Il est à noter par ailleurs que certaines versions de Windows®
masquent automatiquement les icônes inactives de la barre système.
5. Si vous avez désactivé le programme Blue Button, vous pouvez le réactiver en cliquant sur l’option
Blue Button du groupe de programmes Philips. (Sur Mac, ouvrez le fichier de programme Blue
Button dans le dossier Applications/Blue Button.) Vous ouvrez ainsi la fenêtre Blue Button à
l’écran. Il se peut cependant que le bouton Blue Button du lecteur lui-même ne soit pas activé.
Dans ce cas, vous devez réinitialiser votre ordinateur pour charger l’application Blue Button
résidente (l’icône de la barre système), de façon à ce que la fenêtre Blue Button puisse être
ouverte à l’aide du bouton Blue Button du lecteur.
Options de la fenêtre Blue Button
La fenêtre d’interface qui s’ouvre affiche un certain nombre de boutons ainsi qu’une barre de menus.
Page 54

2.8 Qu’est-ce que « EasyWrite » ?
EasyWrite est une nouvelle norme ouverte destinée à gérer le glisser-déposer de fichiers vers des
disques CD-RW et DVD+RW. Elle a été élaborée par le groupe Mount Rainier formé par Philips,
Compaq, Microsoft et Sony, et est soutenue par plus de 40 entreprises de premier plan de l’industrie.
EasyWrite allie la simplicité de la disquette, la grande capacité du disque compact et du DVD et la
robustesse nécessaire à des opérations fréquentes de stockage, de déplacement et de partage de
fichiers de données, audio, image et texte.
Simple
EasyWrite fonctionne comme un lecteur ordinaire tel un disque dur ou un lecteur de
disquette, mais utilise des disques CD-RW et DVD+RW. Cela signifie qu’elle permet
le glisser-déposer instantané de fichiers sur un disque réinscriptible.
Rapide
EasyWrite est rapide. Il vous suffit d’introduire un disque CD-RW ou DVD+RW dans le
graveur et, en quelques secondes, vous pouvez effectuer des transferts de fichiers
dans un sens ou dans l’autre. Le lecteur gère le formatage du disque en arrière-plan
sans entraîner de retard dans les opérations de copie. Même si vous éjectez le disque
avant que le formatage en arrière-plan soit terminé, le disque restera lisible dans tout
lecteur de CD-ROM et de DVD-ROM MultiRead. (L’éjection peut prendre entre 1 et 4
minutes si le formatage en arrière-plan n’est pas encore terminé. S’il est terminé,
l’éjection s’effectue presque immédiatement.)
Robuste
EasyWrite intègre un système de gestion des défauts considérablement amélioré afin
que les opérations de lecture et d’écriture soient moins sensibles à l’usure et aux
rayures des disques. Vous bénéficiez ainsi d’une fiabilité sans égale de vos données
enregistrées pendant de nombreuses années d’utilisation des disques, dans toutes
les circonstances !
Compatibilité et systèmes d’exploitation
Les disques écrits à l’aide d’EasyWrite sont compatibles avec les équipements existants et peuvent
être lus (et non enregistrés) par presque tous les lecteurs de CD-ROM, de CD-R, de CD-RW, de DVDROM et de DVD+RW. La lecture des disques EasyWrite sur d’anciens systèmes est assurée par un
logiciel placé sur chaque disque enregistré à l’aide d’EasyWrite. Ce logiciel permet à quasi tous les
ordinateurs de lire les disques EasyWrite.
EasyWrite sera intégré dans les versions futures des systèmes d’exploitation les plus répandus, dont
Windows et Linux. Il est également prévu qu’Apple se joigne au groupe.
De quoi ai-je besoin pour utiliser EasyWrite ?
• D’abord, vous devez disposer d’un graveur de CD-RW ou de DVD+RW (Philips) doté de la
fonctionnalité EasyWrite complète. Cette fonctionnalité est signalée par le logo EasyWrite
apposé sur la face avant du graveur ou sur l’étiquette du produit (unités externes).
Page 55

2.9 Qu’est-ce que le DVD ?
Le DVD (Digital Versatile Disc) est le nouveau support de stockage optique qui allie une
capacité de stockage de données numériques considérable et la simplicité d’emploi du disque
compact.
Les DVD préenregistrés peuvent présent er une capacité de stockage de données allant de 4,7 à 17,1
Go. En outre, la plupart des lecteurs peuvent lire les DVD enregistrables et réinscriptibles d’une
capacité de stockage de 4,7 Go.
Pour mieux se représenter ce que cela signifie en pratique, il faut savoir qu’une capacité de 4,7 Go
correspond à la capacité additionnée de plus de 7 CD-ROM, ou à des heures de vidéo numérique à
haute résolution avec plusieurs pistes sonores et sous -titres en différentes langues.
Le DVD a trois domaines d’application principaux :
1) Données
L’accès à un disque DVD de données s’effectue comme pour n’importe quel support de stockage de
données sur disque sur votre ordinateur. Il suffit en effet d’introduire un disque DVD de données dans
le lecteur de DVD et d’en parcourir le contenu comme avec n’importe quel autre lecteur de
l’ordinateur.
Les disques DVD de données présentent la même fonctionnalité que les CD-ROM, mis à part qu’ils
présentent une capacité de stockage de données beaucoup plus importante, bien entendu. Si la
fonction de démarrage automatique est activée pour le lecteur de DVD, l’introduction d’un disque DVD
de données dans le lecteur peut lancer un programme pour le DVD, un gestionnaire de fichiers ou un
programme de présentation, par exemple.
2) Jeux
Les plates -formes de jeux populaires telles que GameCube, Xbox et PlayStation2 utilisent des
disques DVD pour diffuser leurs jeux. Ces disques DVD de jeu ne peuvent pas être lus sur des
lecteurs de DVD-ROM, de DVD-R ou de DVD-RW ordinaires. Les lecteurs de DVD ordinaires peuvent
par contre lire des CD ou des DVD de jeu créés spécifiquement pour les ordinateurs de type PC.
Il arrive toutefois également que les disques DVD de jeu contiennent des séquences vidéo, comme
des bandes -annonces, de la musique ou des clips, qui peuvent être lues par la fonctionnalité de
lecture vidéo de ces lecteurs (voir ci-dessous).
3) Vidéo
L’application la plus courante des lecteurs de DVD-ROM est celle qui consiste à lire des DVD vidéo
préenregistrés et à les regarder sur le moniteur de l’ordinateur.
Pour que cela soit possible, il est nécessaire d’utiliser un logiciel de lecture de DVD, comme celui que
vous pouvez installer à partir du CD d’installation, PowerDVD. (Si vous souhaitez apprendre à utiliser
PowerDVD, consultez le chapitre « Comment lire un DVD vidéo ou un Video-CD sur l’ordinateur »
dans le document « Comment utiliser les logiciels ».)
Page 56

Le programme de lecture des DVD que vous avez installé sur l’ordinateur affiche le menu DVD
présent sur le disque DVD vidéo. Ce menu donne accès à toutes les options proposées par le disque
et fonctionne comme si le disque était lu sur un lecteur de DVD de salon.
Pour apprendre à utiliser les réglages du programme et à optimiser le lecteur pour votre système,
reportez-vous au fichier d’aide ainsi qu’à la documentation fournie avec le programme de lecture de
DVD. Consultez également le mode d’emploi de votre ordinateur ainsi que celui de votre carte
graphique pour en savoir plus sur les paramètres et les capacités de votre matériel.
Fonctions spéciales
Visionnage de DVD sur l’écran d’un poste de télévision
1) Raccordement de l’ordinateur au poste de télévision
Si votre ordinateur dispose d’une sortie TV OUT permettant d’afficher l’écran de votre ordinateur sur
un téléviseur et d’une sortie ligne pour raccorder l’ordinateur à une chaîne stéréo ou audio-vidéo, vous
pouvez regarder des DVD à l’écran de votre télévision.
Pour savoir quels câbles utiliser, quels raccordements effectuer et quels réglages modifier pour activer
la sortie TV OUT, reportez -vous au mode d’emploi du poste de télévision, de l’ordinateur et de la carte
graphique. Il est à noter ici que ces connexions informatiques et graphiques ainsi que les problèmes
qui peuvent éventuellement en découler ne sont PAS liés au lecteur de DVD ; ils n’entrent donc pas
dans le cadre du service et de l’assistance fournis en ce qui concerne le lecteur de DVD.
2) Raccordement du lecteur de DVD au poste de télévision
Certains lecteurs de DVD (externes) peuvent être dotés de sorties permettant le raccordement direct
du lecteur à un téléviseur. Dans une telle situation, les câbles appropriés peuvent être fournis avec le
lecteur, celui-ci pouvant également être accompagné d’une télécommande. Pour effectuer les
raccordements appropriés, utiliser le lecteur comme lecteur de DVD vidéo séparé ou résoudre les
éventuelles difficultés rencontrées, il convient de toujours consulter le mode d’emploi du lecteur.
Page 57

• Pour l’instant, il est encore nécessaire de disposer d’une application transitionnelle, fournie
sur le CD d’installation accompagnant le graveur EasyWrite.
Philips reconnaît les applications transitionnelles suivantes :
1. DirectCD de Roxio
Installez la version de DirectCD fournie avec le graveur.
Assurez-vous qu’il s’agit bien de la version 5.3.1.154 ou d’une version supérieure.
2. InCD de Ahead Software
Installez la version de InCD fournie avec le graveur.
Assurez-vous qu’il s’agit bien de la version 3.31.1 ou d’une version supérieure.
Remarques :
• DirectCD de Roxio
Pour éjecter le CD du graveur, vous devez soit appuyer sur le bouton d’éjection de l’appareil,
soit éjecter le disque via le logiciel. DirectCD affiche un message indiquant que cette
opération prendra entre 1 et 4 minutes. (L’éjection peut prendre entre 1 et 4 minutes si le
formatage en arrière-plan n’est pas encore terminé. S’il est terminé, l’éjection s’effectue
presque immédiatement.)
• InCD de Ahead Software
Dans les versions actuelles d’InCD, l’éjection du disque de l’appareil doit absolument être
réalisée via le logiciel. (Ne pas utiliser le bouton d’éjection de l’appareil.) Le processus
d’éjection du disque prend entre 1 et 4 minutes. (L’éjection peut prendre entre 1 et 4 minutes
si le formatage en arrière-plan n’est pas encore terminé. S’il est terminé, l’éjection s’effectue
presque immédiatement.) InCD n’indique pas l’état d’avancement de l’opération pendant ce
temps.
Pour plus d’informations, visitez les sites inte rnet de Philips et de Mount Rainier.
www.philips.com/pcstuff
www.mt-rainier.org
Page 58

Bouton 1
Un clic sur ce bouton a pour effet d’ouvrir le navigateur internet et d’accéder à la page d’informations
sur les produits périphériques pour PC du site Philips.
Bouton 2
Un clic sur ce bouton a pour effet d’ouvrir le navigateur internet et d’accéder à la page de service et
d’assistance pour les périphériques PC du site Philips.
Bouton 3
Un clic sur ce bouton a pour effet d’ouvrir l’application associée au type de disque dans le lecteur.
NOTE: Le tableau suivant présente les paramètres par défaut du programme Blue Button. Si vous
avez modifié vos préférences (voir ci-dessous), une pression sur le bouton Blue Button peut lancer
d’autres applications.
Type de disque dans le
lecteur
(voir Disques à utiliser)
CD-R et CD-RW Lancement d’une application
d’enregistrement ou de réécriture.
CD-ROM, CD audio
Modification des préférences (dans le menu Blue Button de la barre de menus)
Cliquez sur Blue Button, dans la barre de menus, pour ouvrir le menu. Dans le menu qui s’affiche,
cliquez sur Options pour ouvrir la fenêtre Options.
Lancement...
1. Lecteur multimédia pour un disque audio,
un Vidéo-CD ou un DVD (le cas échéant).
2. Explorateur de disque pour un disque de
données.
Action du bouton 3 Paramètre
Paramètre Enregistreur dans
l’onglet CD du menu Options.
Paramètre Lecteur dans
l’onglet CD du menu Options.
Paramètre Explorateur dans
l’onglet CD du menu Options.
Page 59

Cliquez sur l’onglet Navigateur si vous souhaitez définir un autre navigateur pour ouvrir les pages
web.
Cliquez sur l’onglet CD si vous souhaitez définir d’autres programmes de lecture des données. Ces
paramètres sont définis automatiquement au cours de l’installation, mais ils peuvent être modifiés
manuellement à tout moment. Cliquez sur le bouton à côté des paramètres pour parcourir le
disque à la recherche d’autres programme exécutables (*.exe pour Windows®) à ouvrir pour
l’application concernée.
(Les valeurs réelles peuvent varier.)
Option 2 : Pressi on prolongée sur le bouton Blue Button
Une pression prolongée sur le bouton Blue Button (pendant au moins deux secondes) permet d’ouvrir
le navigateur internet et d’accéder directement au site de téléchargement du microprogramme le plus
récent du lecteur. Vous pouvez alors suivre les instructions données sur le site internet.
Blue Button : la voie directe vers la solution
Page 60

3. Informations générales sur les CD-R et CD/RW
3.1 Paramètres et configuration
Lors de la connexion d’un graveur externe à l’ordinateur, il est nécessaire de réaliser différents
raccordements et paramétrages pour que le périphérique fonctionne convenablement.
1. Connexion des câbles
2. Paramétrage du matériel
3. Paramétrage du logiciel
4. Mise à jour du microprogramme
Connexion des câbles
Pour pouvoir utiliser le périphérique, il est essentiel que vous connectiez le câble de données et le
câble d’alimentation correctement.
1. Ouvrez le couvercle et retirez la pièce de protection en plastique avant de mettre l’appareil en
service.
2. Raccordez le câble de l’interface que vous avez choisie au connecteur approprié sur le graveur.
3. Raccordez l’autre bout du câble au connecteur approprié de l’ordinateur.
Pour obtenir de l’aide, consultez le manuel de votre ordinateur.
4. Branchez la petite fiche du câble d’alimentation sur la prise du graveur.
5. Branchez la fiche secteur sur la prise de courant et, si nécessaire, allumez le graveur en
actionnant l’interrupteur marche-arrêt.
6. Windows lance automatiquement l’assistant d’ajout/détection d’un nouveau matériel. Complétez
cette boîte de dialogue pour installer les pilotes nécessaires au graveur. Lorsque Windows
demande de préciser l’emplacement des fichiers pilotes, indiquez le CD d’installation (ou
l’emplacement auquel vous avez téléchargé les fichiers pilotes de l’internet, si vous n’avez pas
encore de lecteur de CD).
Paramétrage matériel
Le contrôleur USB ou FireWire doit fonctionner correctement.
Pour vérifier son fonctionnement, vous devez accéder au Gestionnaire de périphériques (cliquez sur
l’icône Poste de travail du bureau avec le bouton droit et sélectionnez Propriétés, puis cliquez sur
l’onglet Gestionnaire de périphériques).
Page 61

Une section intitulée Contrôleur de bus USB, par exemple, doit s’y trouver. Il convient alors de cliquer
sur l’icône en question. Windows indiquera si cet élément du système fonctionne correctement.
Pour plus d'infos : voir Interfaces
Paramétrage logiciel
BIOS
Le système d’entrée/sortie de base (BIOS, Basic Input/Output System) de l’ordinateur gère le
démarrage matériel lors de l’initialisation (démarrage ou redémarrage) de la machine. Généralement,
le BIOS recherche pendant cette initialisation tous les périphériques connectés aux contrôleurs
internes de l’ordinateur. Parfois, il est possible de désactiver cette recherche pour des contrôleurs
individuels, par exemple pour les contrôleurs des ports série et USB.
Vous devez donc vérifier si le BIOS autorise la détection pour le contrôleur auquel vous souhaitez
connecter le graveur externe, sinon le système d’exploitation Windows risque de ne pas pouvoir
utiliser ce lecteur.
Pour vérifier ou modifier les paramètres du BIOS, il convient d’examiner le texte qui s’affiche à l’écran
au cours du démarrage de l’ordinateur. Pour accéder au menu des paramètres du BIOS, vous devez
en effet appuyer sur la touche indiquée à l’écran (F1, F2, Suppr, Échap, etc.). Ensuite, vous devez
rechercher le menu des périphériques et veiller à ce que le contrôleur auquel le graveur externe doit
être connecté soit activé (ENABLED).
APPLICATION
Vous n’avez besoin d’aucune application spéciale pour lire les disques à l’aide du lecteur externe. Dès
que le système d’exploitation détecte le lecteur, il lui affecte automatiquement une nouvelle lettre de
Page 62

lecteur. Vous pouvez donc utiliser votre graveur comme n’importe quel lecteur de CD-ROM connecté
à l’ordinateur.
Cependant, pour pouvoir écrire des données sur un disque, vous devez installer une application de
gravure. Le CD d’installation comprend un tel logiciel. Pour l’installer, vous devez exécuter le
programme Setup.Exe qui se trouve sur le disque et lancer, dans le menu principal, l’installation du
logiciel de gravure.
Mise à jour du microprogramme
Le logiciel intégré dans le lecteur même peut également être mis à jour selon la disponibilité de
nouvelles versions logicielles. Pour télécharger les outils logiciels et les mises à jour du
microprogramme nécessaires, rendez -vous au site web de support Philips. Pour plus d’informations,
reportez-vous à la section Téléchargements.
Pour une explication des termes cités ci-dessus, consultez la page
http://www.pctechguide.com/search.htm.
Page 63

RW
3.2 Effacement et formatage des CD -
L’effacement d’un disque réinscriptible (CD-RW) est effectué en faisant revenir la matière de la
couche d’enregistrement à son état cristallin. Ce changement d’état est réalisé à l’aide d’un processus
de recuisson qui consiste à chauffer la couche à une température d’environ 200° C (inférieure au point
de fusion) et à maintenir cette température pendant un certain temps (en pratique, cela peut prendre
jusqu’à 37 minutes pour un disque complet). Le disque revient ainsi à son état d’origine,
complètement vierge.
Il est également possible de faire appel à la méthode d’effacement « à la volée », beaucoup plus
rapide, qui permet d’effacer la dernière piste enregistrée simplement en effaçant la référence du sous code de cette piste, sans effacer effectivement les données enregistrées dans la couche
d’enregistrement. Cette méthode ne requiert généralement pas plus de 1 ou 2 minutes.
Enfin, la méthode d’écrasement direct combine les techniques d’écriture et d’effacement. Dans ce cas,
de nouvelles cuvettes sont réalisées dans la couche d’enregistrement à l’aide de la même énergie
laser à impulsion que celle utilisée dans la méthode d’écriture standard. Cependant, dans les zones
situées entre les nouvelles cuvettes, un faisceau laser à basse énergie et continu crée de nouvelles
zones cristallines. Le faisceau laser bascule de façon répétée au niveau d’effacement à basse énergie
entre les nouvelles cuvettes, ce qui permet d’effacer complètement les données précédemment
enregistrées dans ces zones.
Page 64

3.3 Méthodes d’écriture Track-at-Once, Disc-at-Once, Session-at-
Once et par paquets
Il existe quatre méthodes de base pour écrire un disque compact: Track-at-Once (une piste à la fois),
Disc-at-One (toutes les pistes à la fois), Session-at-Once (une session à la fois) et Écriture par
paquets. Ces méthodes sont indépendant es du format physique et du système de fichiers des
disques.
Track at Once — une piste à la fois
Pendant un enregistrement TAO (Track-at-Once), le laser d’enregistrement s’éteint à la fin de chaque
piste et se rallume lorsqu’une nouvelle piste doit être écrite, même si plusieurs pistes sont écrites au
cours d’une même opération d’enregistrement.
Les pistes enregistrées en mode TAO sont séparées par un temps de silence. Si une piste de
données est suivie d’une piste audio, ce temps dure 2 ou 3 secondes. Le silence entre pistes audio
est généralement de 2 secondes.
Le temps de silence ne peut être modifié par logiciel à moins que tant le périphérique d’enregistrement
que le logiciel ne prennent en charge le mode TAO à silence variable. Cette fonction permet de
déterminer la durée du silence, de presque zéro (2 secteurs, soit 2/75 de seconde) à 8 secondes,
avant chaque piste audio sur un disque audionumérique.
Disc at Once — toutes les pistes à la fois
En mode DAO (Disc-at-Once), une ou plusieurs pistes sont enregistrées sans éteindre le laser
d’enregistrement avant que le disque soit clôturé. Ce mode nécessite un disque vierge et ne peut être
utilisé en mode multisession.
Il est principalement utilisé pour enregistrer des disques audionumériques avec silence variable ou nul
entre pistes (par exemple des disques de concerts).
Session-at-Once — une session à la fois (Attention : tous les modèles de
graveur ne prennent pas cette fonction en charge !!)
Le mode SAO (Session-at-Once) est principalement utilisé pour les CD-Extra. Lors d’un tel
enregistrement, une première session contenant plusieurs pistes audio est enregistrée en une seule
opération, puis le laser est arrêté, mais le disque n’est pas clôturé. Ensuite, une seconde session (de
données) est écrite et clôturée.
Écriture par paquets
L’écriture par paquets est une méthode d’écriture progressive conforme à la spécification UDF définie
par l’industrie. Tous les lecteurs de CD-ROM ne sont pas capables de lire les disques écrits par
paquets. C’est une fonction qui doit être intégrée dans le matériel du périphérique d’enregistrement.
Elle ne peut être mise en œuvre par mise à jour du microprogramme.
Deux types de paquets peuvent être enregistrés : à longueur fixe et à longueur variable. Les paquets
à longueur fixe conviennent mieux à la technique d’effacement aléatoire des CD-RW. En effet, si les
paquets n’étaient pas écrits en des points déterminés du disque, le programme devrait analyser un
grand système de fichiers en évolution constante, ce qui constituerait une opération très lourde et très
lente. L’inconvénient est que ces paquets fixes, d’une longueur de 64 kilo-octets, prennent beaucoup
de place sur le disque. Ainsi, la capacité normale d’un disque réinscriptible formaté en vue d’une
écriture par paquets fixes est d’environ 500 mégaoctets.
Les paquets à longueur variable permettent d’économiser de l’espace disque, car la taille du paquet
peut varier en fonction du volume des données à écrire. Cette méthode est plus utile lors de la gravure
d’un disque enregistrable normal, parce qu’il s’agit d’un support à écriture unique et qu’il n’est pas
nécessaire de suivre le système de fichiers ni d’attribuer de l’espace libre lorsque les fichiers sont «
Page 65

effacés ». (Il est à noter que sur les disques CD-R, les fichiers ne sont pas réellement effacés, mais ils
sont rendus invisibles.)
Pour plus d’informations, visitez le site www.roxio.com ou www.nero.com.
Page 66

Seamless Link
3.4
La technique Seamless Link protège le processus d’écriture du disque contre les effets de la sous alimentation de la mémoire tampon.
Aujourd’hui, un grand nombre des progrès réalisés dans la technique d’écriture des disques compacts
ne sont pas uniquement liés à la vitesse, mais à l’intégrité de l’écriture et à sa qualité sur presque tous
les supports.
Cependant, les utilisateurs de systèmes plus anciens peuvent encore être confrontés
occasionnellement au message d’erreur indiquant une sous -alimentation de la mémoire tampon. Bien
que cette erreur apparaisse bien moins souvent pour les utilisateurs d’ordinateurs récents, la sous alimentation de la mémoire tampon reste un problème ennuyeux parce qu’elle entraîne la perte
irrémédiable du support d’enregistrement. Pour les utilisateurs de systèmes récents ou plus anciens,
la technique Seamless Link de Philips offre une excellente solution car elle réduit presque à néant
l’effet désastreux de ce problème.
Sous-alimentation de la mémoire tampon
Une sous -alimentation de la mémoire tampon peut se produire lorsque l’ordinateur ne peut fournir un
flux constant et ininterrompu de données de la source de données, généralement un CD-ROM ou un
disque dur, à la mémoire tampon du graveur de CD ou de DVD.
Si ce transfert de données dans la mémoire du graveur est interrompu assez longtemps pour vider la
mémoire tampon d’écriture intégrée, le processus d’écriture s’arrête et le disque est perdu. Cette
sous-alimentation de la mémoire tampon se produit le plus souvent lors d’une écriture en mode TAO
(Track-at-Once, c.-à-d. une piste à la fois) ou DAO (Disc-at-Once, c.-à-d. toutes les pistes à la fois).
Causes possibles de la sous-alimentation de la mémoire tampon:
· Puissance de traitement insuffisante (processeur lent, mémoire vive insuffisante, pas de prise en
charge de l’accès direct à la mémoire – DMA)
· Configuration système non optimale (accès direct à la mémoire – DMA – désactivé)
· Interaction excessive avec l’utilisateur au cours de l’écriture (lancement ou exécution d’applications
supplémentaires, recalibrage thermique d’anciens types de disques durs)
· Performances insuffisantes du lecteur source (CD-ROM, disque dur, lecteur réseau)
· Support source rayé ou sale (le lecteur source doit effectuer des lectures répétées pour lire les
données correctement)
Solution: Seamless Link
La solution de Philips, appelée Seamless Link, détecte à l’avance les signes d’une sous -alimentation
imminente de la mémoire tampon. Elle interrompt l’écriture de façon maîtrisée et la relance lorsque
tout risque de sous -alimentation est écarté.
La technique Seamless Link n’empêche cependant pas la survenance de cette sous -alimentation. Elle
n’agit qu’en vue d’empêcher la sous -alimentation de faire perdre un disque ; elle ne constitue pas un
algorithme d’optimisation de la vitesse ou de la qualité. À ces égards, pour une optimisation de la
vitesse et de la qualité, il est toujours préférable d’éliminer la cause de la sous -alimentation.
Page 67

Principe de fonctionnement de Seamless Link
Seamless Link contrôle en permanence le niveau de la mémoire tampon du graveur. Si ce niveau
chute en deçà d’une valeur seuil, le processus d’écriture est arrêté de façon maîtrisée. Ainsi, le flux de
données de la mémoire tampon vers le disque est interrompu et permet à la mémoire de se remplir à
nouveau.
L’emplacement exact sur le disque où l’écriture s’est arrêtée est enregistré dans la mémoire interne du
graveur. Entre-temps, le niveau de la mémoire tampon continue d’être contrôlé. Dès que la mémoire
est à nouveau remplie, Seamless Link reprend l’écriture à l’endroit exact où elle s’était arrêtée. Cette
méthode d’écriture élimine le trou qui se crée entre deux opérations d’écriture individuelles au cours
d’une écriture classique. C’est de ce principe que la technique tire son nom.
Page 68

3.5 Thermo-Balanced Writing (TBW)
Introduction
La technique du graveur intelligent TBW mise au point et brevetée par Philips est une nouvelle
fonction puissante permettant d’assurer l’intégrité des données enregistrées. Elle consiste à tester
physiquement chaque disque, puis à régler la puissance de sortie du laser d’enregistrement et à
choisir la vitesse d’enregistrement en fonction du disque testé.
Si le graveur choisit d’utiliser une vitesse d’enregistrement inférieure à la vitesse maximale possible, il
détermine toujours la vitesse maximale qui peut être utilisée en toute sécurité pour le disque
concerné.
TCette technique permet d’obtenir un graveur « intelligent » qui adapte son comportement aux
caractéristiques du disque afin de garantir la plus haute qualité d’enregistrement pour tous les
supports. Elle offre un taux de réussite très élevé même lors d’enregistrements sur des disques de
qualité inférieure aux normes internationales reconnues.
Les graveurs internes ReWriter 12x8x32x Philips ont été les premiers produits à exploiter cette
technique TBW. Depuis, tous les nouveaux graveurs Philips en sont dotés.
IMPORTANT: Même si les graveurs ReWriter sont capables de graver des disques réinscriptibles
(CD-RW), la technique TBW ne s’applique pas à ces gravures, car les disques réinscriptibles utilisent
une méthode d’enregistrement tout à fait différente des disques enregistrables.
Problème
De nombreux fabricants de disques enregistrables dans le monde entier produisent aujourd’hui ce qui
est devenu un produit de grande consommation. Malheureusement, la qualité de ces disques n’est
parfois pas conforme aux normes internationales. Certaines zones du disque peuvent ainsi ne pas
présenter une quantité suffisante de matière permettant l’enregistrement (outre les rayures, griffures,
salissures et autres défauts de surface), ou de graves défauts mécaniques peuvent déséquilibrer le
disque.
Le consommateur ne peut déterminer avec certitude la qualité de ce qu’il achète, car il n’existe pas de
logo de qualité décerné par une autorité universelle et apposé sur l’emballage du disque. Par
conséquent, le consommateur peut acheter et graver en pratique des disques de qualité inférieure, qui
ne correspondent pas aux normes de l’industrie, et aura naturellement tendance à incriminer plus
facilement le graveur que le disque en cas de problème. Il s’agit là d’un problème de compatibilité, où
l’utilisateur désire implicitement des caractéristiques qu’il ne peut vérifier lui-même.
Solution
Philips a consenti d’importants efforts dans le développement et la mise au point d’un système
d’autocalibrage « embarqué » pour la gravure des disques enregistrables. Ces efforts font partie
intégrante du programme continu de Philips consacré au perfectionnement des techniques d’écriture
Page 69

et, en particulier, à l’anticipation et à la résolution des problèmes rencontrés par les utilisateurs, en vue
de parvenir à une plus grande facilité d’emploi.
La solution de Philips réside dans une technique appelée Thermo-Balanced Writing (TBW), intégrée
dans tous les nouveaux graveurs ReWriter Philips.
En association avec le processus d’autoapprentissage Self-Learning, elle dote le graveur d’une
intelligence et lui permet de prendre automatiquement des décisions en ce qui concerne le traitement
et la gravure d’un nouveau disque. Ce processus ressemble en de nombreux aspects à la façon dont
les télécopieurs communiquent pour détecter le type d’équipement à l’autre bout de la ligne afin de
transférer des données correctement, sans que l’utilisateur ne doive connaître ce qui se trouve de
l’autre côté.
Cette solution Philips est mise en œuvre sous forme de composant matériel et logiciel
(microprogramme) intégré au graveur, l’algorithme TBW évaluant le disque et déterminant les
paramètres de gravure appropriés.
Algorithme intelligent TBW
1. Lors de l’insertion d’un disque à graver dans l’appareil, une série de tests physiques rapides est
effectuée sur le disque afin de déterminer ses caractéristiques. Ces tests déterminent précisément
la puissance des impulsions de gravure que le laser doit appliquer au disque. Le temps nécessaire
à ces tests est généralement trop court pour être remarqué par l’utilisateur.
2. Si cette première série de tests révèle des écarts, l’algorithme exécute une nouvelle série d’essais
de gravure et de lecture et recalcule les valeurs d’impulsion de gravure requises. Si nécessaire, il
fait passer le disque à la vitesse inférieure suivante sans intervention de l’utilisateur.
3. Dans ce cas, l’application informe l’utilisateur de la nouvelle vitesse de gravure.
4. L’enregistrement peut commencer après les derniers essais. Le processus de gravure détermine
alors précisément les impulsions du laser de façon à produire la quantité exacte de chaleur pour
créer une série de microtrous à la taille et à l’intensité appropriées. Il en résulte un rapport optimal
de réflectivité entre les trous et la surface de la matière, une taille correcte et un espacement
adéquat. Le graveur est ainsi capable de maintenir un degré élevé de précision en écriture, en
lecture et, par-dessus tout, en compatibilité.
L’utilisateur s’apercevra peut -être que l’enregistrement est plus lent (ou plus rapide !) que prévu (par
rapport aux informations sur l’emballage du disque), mais il ne sera probablement jamais confronté à
la perte d’un disque suite à une erreur d’enregistrement due à ce type de problème.
En d’autres termes, un graveur intelligent TBW peut se calibrer lui-même et, ainsi, compenser
automatiquement les inégalités du support d’enregistrement, d’autant plus que chaque disque est
testé individuellement. Ce système de réaction offre un autre avantage : si les caractéristiques du
laser changent avec le temps ou si le laser est empoussiéré, la fonctionnalité TBW modifiera
automatiquement ses réglages de façon à assurer un enregistrement parfait. Ce système contribue
ainsi à obtenir une plus grande fiabilité et une plus longue durée de vie du graveur.
Plus d’infos : www.philips.com/pcstuff
Page 70

3.6 Liens recommandés
Instituts et organisations de normalisation
OSTA: http://www.osta.org
ISO: http://www.iso.ch
Groupe de travail JPEG/MPEG: http://www.cselt.it/mpeg
Sites Philips
Produits audio Philips: www.philips.com/pcstuff
Produits informatiques Philips: http://www.philips.com/pcstuff
Normes Philips: http://www.licensing.philips.com/
Site ISV
FAQ: www.roxio.com ou www.nero.com
Autres
Site Microsoft Windows: http://www.microsoft.com
Site WHQL: http://www.microsoft.com/HWTEST/default.asp
Page 71

3.7 Technologie des disques enregistrables (CD-R) et
réinscriptibles (CD-RW)
Différences entre les disques CD-R ou CD-RW et les disques compacts standard
Les deux types de disques enregistrables diffèrent du disque compact préenregistré (CD audio ou CDROM) sur le plan physique par le fait que le disque compact standard ne possède pas de couche
d’enregistrement. Les informations sont gravées de façon permanente dans la couche de réflexion en
aluminium.
CD-R et CD-RW
Les disques CD-R et CD-RW présentent la même structure de disque de base, mais diffèrent par
quelques détails importants. Le CD-R possède une couche d’enregistrement teintée, présentant une
réflectivité située entre 40 et 70 %, tandis que le CD-RW possède une couche d’enregistrement à
changement de phase présentant une réflectivité située entre 15 et 25 %.
Ces deux types de disques ont une couche réfl échissante supplémentaire: une couche dorée pour le
CD-R, qui lui donne sa couleur distinctive, et une couche argentée (aluminium) pour le CD-RW.
Ils se caractérisent tous deux par une piste en spirale préformée pendant la fabrication sur laquelle les
données audio sont enregistrées au cours du processus d’enregistrement. Cette piste fait en sorte
que le périphérique d’enregistrement suive une spirale identique à celle d’un CD traditionnel. Elle
présente une largeur de 0,6 mm et un espacement de 1,6 mm, comme les disques compacts
standard. Outre cette forme en spirale, la piste présente une légère excursion sinusoïdale superposée
de ± 0,3 mm à une fréquence de 22,05 kHz.
Page 72

3.8 Interfaces
Les interfaces servent à connecter des périphériques à votre ordinateur. Vérifiez les caractéristiques
techniques de votre ordinateur et de l’appareil que vous avez acheté afin de déterminer si vous
disposez des interfaces appropriées.
Vue d’ensemble
Interface Nom commun Vitesse de connexion Compatibilité
USB 1.1(Max. 4x4x6)
USB 2.0 USB haute vitesse 480 Mb/s USB 2.0 et USB 1.1
IEEE 1394 FireWire; iLink 400 Mb/s Interne
USB basse vitesse 1,5 Mb/s
USB vitesse normale 12 Mb/s
Interne
Généralités
Connexion
Les interfaces USB et FireWire autorisent toutes deux le branchement à chaud, c’est-à-dire que vous
ne devez pas éteindre l’ordinateur avant de connecter un appareil et que vous ne devez pas relancer
Windows chaque fois que vous rac cordez un nouveau périphérique. Le pilote du contrôleur détecte le
lecteur externe comme un nouvel élément matériel. Il peut ainsi être utilisé dans les quelques
secondes qui suivent son branchement, sans devoir réinitialiser l'ordinateur.
Déconnexion
Si vous débranchez le lecteur alors que celui-ci est en train de fournir un flux de données à une
application de votre ordinateur, ce dernier peut se bloquer. Pour éviter tout problème de ce type, vous
devez d’abord fermer toutes les applications utilisant les données du lecteur. Certains systèmes
d’exploitation offrent une fonction de déconnexion par le biais d’une icône dans la barre système, p.
ex. . Si vous disposez d’une telle fonction, utilisez toujours l’option de déconnexion avant de
débrancher le lecteur. En outre, il convient de ne jamais débrancher le graveur pendant la gravure
d'un disque, cela pourrait rendre le disque inutilisable.
Limitation de la bande passante
Étant donné que le lecteur est un périphérique externe, il partage la bande passante du port du
contrôleur avec tous les autres périphériques connectés à ce contrôleur. Si ces périphériques sont
actifs (transfert de données vidéo, diffusion de sons par des haut-parleurs ou numérisation à l'aide
d'un scanner), la bande passante restante peut être limitée et ne permettre que des vitesses de
lecture ou d'écriture inférieures à celles mentionnées dans les caractéristiques techniques en tant que
vitesses maximales pour le port en question.
USB 1.1 ou
Compatibilité
Il est possible de connec ter des périphériques USB 1.1 à des adaptateurs hôte ou à des
concentrateurs USB 2.0, mais ces périphériques fonctionneront uniquement à des vitesses
correspondant à la norme USB 1.1.
USB 2.0 ou
Page 73

Compatibilité à haute vitesse
Les périphériques USB 2.0 peuvent utiliser des vitesses inférieures, correspondant à la norme USB
1.1, si toutes les conditions nécessaires au fonctionnement à la norme USB 2.0 ne sont pas réunies.
Ces vitesses de transfert limitées peuvent constituer l’unique indication de cette situation. Nous vous
recommandons par conséquent de toujours vérifier votre contrôleur d’hôte USB 2.0 avant de requérir
une assistance technique pour ces problèmes de vitesse de transfert.
La norme haute vitesse USB 2.0 requiert notamment la configuration système suivante:
1. Ordinateur de gestion de l’interface haute vitesse USB 2.0 très puissant.
2. La plupart des interfaces USB 2.0 nécessitent 128 Mo de mémoire vive.
3. Activation de la prise en charge de la maîtrise de bus.
4. Utilisation des pilotes haute vitesse USB 2.0 les plus récents.
5. Utilisation de logiciels prenant en charge l’USB 2.0 haute vitesse.
6. Utilisation de câbles certifiés USB 2.0 haute vitesse.
Compatibilité
La connexion d’un périphérique USB 2.0 à un adaptateur hôte ou à un concentrateur USB 2.0 par le
biais de périphériques ou de câbles USB 1.1 empêche les périphériques USB 2.0 de fonctionner à
haute vitesse. Pour éviter tout problème de ce type, il convient de toujours utiliser le câble haute
vitesse fourni avec l’appareil.
IEEE 1394
FireWire / IEEE 1394 est également une interface à haute vitesse et à branchement à chaud pour
périphériques externes. Du point de vue de l’utilisateur, elle est identique à l’USB 2.0, mais elle n’est
compatible ni avec l’USB 2.0 ni avec l’USB 1.1.
Pour plus d'infos : www.usb.org et www.apple.com/firewire
Page 74

4. Téléchargements
Mises à jour
Programme flash pour la mise à jour du
microprogramme + Readme
http://www.philips.com/pcstuff
Infos
Mode d’emploi http://www.philips.com/pcstuff
Page 75

Votre Garantie des produits Philips
Merci d’avoir acheté ce produit d’ Ajout du Philpis Multimedi@solutions, qui est conçu pour
fournir un rendement de haute qualité, en plus de son installation et son utilisation aisées.
Produit Europe
CDRW/DVD+RW 24 mois
PC-Carte-Son/-Haut-parleurs 24 mois
Si vous avez des questions, veuillez vérifier le W.W.W. de Philips avant de nous contacter, car
peut-être y trouverez-vous une réponse. Si vous avez des difficultés d’installation, veuillez tout
d’abord préparer la fiche de renseignements suivante afin que nous puissions mieux résoudrc
votre problème plus rapidement.
Nom ...
Adresse ...
Ville, Code Postal ...
Pays ...
Numéro de téléphone ...
Numéro de fax ...
Adresse d’E-Mail (Internet) ...
Produi Philips et numéro d’immatriculation ...
Description de votre PC et Processeur: (486/Pentium I II III AMD) ...
Software utilisé avec carte
Autres: MAC Programme dÌapplication: ...
Question ...
Vous pouvez contacter les services de Philips de la façon suivante (par ordre de prérence):
En cas de dysfonctionnement de votre appareil Philips, veuillez vous adresser en premier lieu
à notre bureau d'assistance.
Si notre bureau d'assistance conclut que l'appareil est défectueux, veuillez vous adresser au magasin
Philips ou vous l'avez acheté.
Dans le cas où vous auriez besoin d'assistance dans un pays étranger ou si vous étiez dans
l'impossibilité de contacter le magasin où vous avez acheté l'appareil, adressez-vous à notre
bureau d' assistance pour résoudre le probléme.
(pour une liste de numéros de téléphone des bureaux d'assistance, consultez la liste de numéros
européens dans ce livret de garantie.)
E-Mail:pcperipheral@xtrasource.com
Fax:+31 53 4860060
Tarif normal
Autriche 01-546-575-603 Luxembourg 408-443-5501 Italie 02-48-27-11-53
Belgique 02-275-0701 Pays-Bas 053-482-9800 Irelande 01-601-1161
Danemark 35-25-87-61 Portugal 0800-831-363 Norvége 22-70-82-50
Finlande 0922901908 Espagne 09-17-45-62-46 Royaume-Uni 0207-949-0069
France 03-8717-0033 Suéde 08-632-0016 Grèce 00800-3122-1223
Allemagne 0696-698-4712 Suisse 02-23-10-21-16 Chypre 800-92256
Mémoire interne: ...
Système d’exploitation: (Windows, Linux, DOS, ou OS/2) ...
Programme dÌapplication: ...
Ouvert 24h/24, 7 jours/7
W.W.W.: http://www.philips.com/pcstuff
LA CARTE DE GARANTE NE COUVRE PAS LES ACCESSOIRES APPARTENANT À CE PRODUIT
Page 76

ReWritable: Worin liegt der Unterschied und
1. Verwendung der verschiedenen CD-Typen
1.1 CD-Recordable/CDwann soll welcher Typ verwendet werden?
Für ein optimales Ergebnis ist es äußerst wichtig, daß Sie den richtigen CD-Typ für Ihr Philips CDReWriter- oder DVD+RW -Laufwerk verwenden.
Sie sollten als erstes zwischen CR-R und CD-RW auswählen, was von Ihrer jeweiligen Anwendung
abhängt. Der Hauptunterschied zwischen beiden ist, daß CD-Rs nicht erneut verwendet werden
können, da nur ein einmaliges Beschreiben mit Daten bei diesem Rohlingtyp möglich ist. CD-RWs
dagegen können gelöscht und unzählige Male erneut beschrieben werden. Eine Übersicht mit
Anwendungsbeispielen finden Sie in der nachfolgenden Tabelle.
CD-Typ Beschreibbar Löschbar Verwendung
CD-ROM Nein Nein Zum Verteilen von Informationen.
CD-R Ja Nein Zur permanenten Archivierung von Daten.
Zur gemeinsamen Verwendung von Daten mit anderen
Benutzern, die ein Standard-CD-ROM-Laufwerk haben.
Zur Verwendung in älteren CD-ROM-Laufwerken (die
keine CD-RWs lesen können).
Für Audio-CDs (die meisten Audio-CD-Player können
keine CD-RWs lesen).
CD-RW Ja Ja Für laufende Arbeiten wie Präsentationen, Dokumente etc.
Für die wöchentliche Archivierung Ihrer Festplatte.
Zum Hin- und Hertransportieren von großen Dateien
zwischen Ihrer Wohnung und Ihrem Büro.
Für Testzwecke vor dem Aufnehmen auf CD-R
Verwenden Sie immer hochqualitative Rohlinge von bekannten Herstellern, um optimale Ergebnisse
beim (Wieder)beschreiben von CDs mit höheren Geschwindigkeiten zu erzielen. Je höher die CDSchreibgeschwindigkeit über 2x liegt, umso wichtiger ist die CD-Qualität. x steht hier für die
ursprüngliche Standard-CD-Datenübertragungsgeschwindigkeit von 150 kB/s bzw. 1x. Und da dieses
Philips CD-ReWriter-Laufwerk beim (Wieder)beschreiben eine weit höhere Geschwindigkeit als 2x
erreicht (und je schneller die Schreibgeschwindigkeit, um so kürzer die CD-Aufnahmezeit), empfehlen
wir Ihnen die Verwendung von Marken-CD-Rs/RWs (vorzugsweise von Philips), auf deren Packung
die zulässigen Geschwindigkeiten ausdrücklich angegeben sind (und zwar Multi Speed, 16x oder 10x
für CD-RW oder höher).
Verwenden Sie immer CDs mit Geschwindigkeitsangaben, die mindestens der angegebe nen
Geschwindigkeit Ihres Philips CD-ReWriter- oder DVD+RW -Laufwerks entsprechen.
HINWEISE:
Verwenden Sie CD-RWs, die Sie erneut verwenden können, bis Sie mit der Aufnahmesoftware
vertraut sind. Wenn Sie einen Fehler machen, können Sie die Aufnahme erneut vornehmen, ohne
eine CD zu verschwenden. Wenn Ihnen dann die Aufnahme auf CD-RW gelungen ist, wiederholen Sie
die Aufnahme auf einer CD-R.
Wenn Sie jedoch überprüfen möchten, ob das eigentliche Brennen der CD klappt, sollten Sie besser
die Testschreiboption (Test Write) der Aufnahmesoftware verwenden, da Brenngeschwindigkeiten für
CD-RWs normalerweise niedriger sind als für CD-Rs. Zu den häufigsten Problemen beim Brennen
einer CD gehören Pufferunterläufe, die auftreten, wenn die Ursprungsdaten nicht schnell genug vom
Computer an das CD-RW- oder DVD+RW -Laufwerk übertragen werden können. (Die neusten
Schreibtechnologien wie beispielsweise die Philips -proprietäre Technologie “Seamless Link” sollen die
durch diesen Effekt verursachten Probleme beseitigen.) Bei höheren Schreibgeschwindigkeiten nimmt
Page 77

die Wahrscheinlichkeit eines Pufferunterlaufs erheblich zu. Es ist also nicht empfehlenswert, eine CDRW zum Überprüfen der Schreibgeschwindigkeit zu verwenden. Denn wenn das Schreiben auf CDRW (mit einer niedrigeren Geschwindigkeit) problemlos verläuft, bietet das absolut noch keine
Garantie dafür, daß das Schreiben auf CD-R (mit einer höheren Geschwindigkeit) auch problemlos
verlaufen wird.
Page 78

1.2 Schreibgeschwindigkeit und Schreibstrategie
Zuverlässigkeit wichtiger als Geschwindigkeit...
Die modernen CD-RW- oder DVD+RW -Laufwerke von Philips sind beim Lesen und Schreiben Ihrer
Daten absolut zuverlässig.
Bei den CD-RW- oder DVD+RW -Laufwerken mit hohen Geschwindigkeiten hat Philips sich die
Sicherheit Ihrer geschriebenen Daten als oberstes Ziel gesetzt. Das Laufwerk verwendet zum
Beschreiben Ihrer CDs immer die optimale Geschwindigkeit, um höchstmögliche Datenintegrität zu
gewährleisten. Es kann vork ommen, daß die optimale Geschwindigkeit unter der vom
Rohlinghersteller angegebenen Geschwindigkeit liegt oder daß die CD irgendwo einen Defekt hat
(Schmutz, Kratzer etc.);in dem Fall sind wir der Meinung, daß Ihre Daten weitaus wichtiger sind als die
Geschwindigkeit, und wählen eine niedrigere Geschwindigkeit.
Wir sichern nicht nur Ihre Daten für die Wiedergabe auf Ihrem Philips CD-RW-Laufwerk, sondern wir
gewährleisten durch intensive Tests in unseren Qualitätslabors auch die Kompatibilität mit allen
gängigen CD-ROM-Laufwerken auf dem Markt. Sie können also die von Ihnen gebrannten CD-Rs
beruhigt in die ganze Welt verschicken, da Sie sicher sein können, daß sie von jedem gelesen werden
können.
Wir empfehlen Ihnen, nur Philips CD-Rs und CD-RWs zu verwenden, um höchste Qualität bei Ihren
geschriebenen Daten und Audio-CDs zu gewährleisten. Siehe auch: http://www.ce-europe.philips.com
Das Laufwerk führt eine Optimierungsprüfung (OPC) durch, um die beste Schreibstrategie bei der
höchstmöglichen (Wiederbe)schreibgeschwindigkeit zu ermitteln. Wenn es keine findet, versucht es,
die beste Schreibstrategie für niedrigere (Wiederbe)schreibgeschwindigkeiten zu ermitteln. Die
Prüfung erfolgt in dem OPC-Bereich (Innenseite der CD). Wenn der OPC-Bereich nicht repräsentativ
für die übrige CD ist (was häufig bei Medien von geringer Qualität vorkommt), kann es später zu
Leseproblemen auf CD-ROM-Laufwerken anderer Hersteller und sogar auf Philips -Laufwerken
kommen. Wir garantieren also nur, daß das Philips -Laufwerk, das die CD beschrieben hat, sie auch
lesen kann, und zwar bei der höchstmöglichen Geschwindigkeit, die das Laufwerk für die jeweilige CD
ermittelt hat.
In letzter Zeit hat Philips eine Reihe neuer proprietärer Technologien entwickelt, die die während des
Brennens von CDs bei nicht optimalen Bedingungen entstandenen Probleme eliminieren. Diese
neuen Technologien heißen “Seamless Link ” , “Thermo Balanced Writing” und Self-Learning.
Page 79

1.3 Kopieren von CDs, Copyright und Kopierschutz
Das Philips CD-RW- oder DVD+RW -Laufwerk ist dafür konzipiert, Sie bei der Vervielfältigung von
Materialien zu unterstützen, deren Copyright -Inhaber Sie sind bzw. für deren Vervielfältigung Sie die
Genehmigung vom Copyright -Inhaber erhalten haben. Wenn Sie nicht der Copyright-Inhaber sind
bzw. nicht die Genehmigung zur Vervielfältigung vom Copyright-Inhaber erhalten haben, verstoßen
Sie möglicherweise gegen das Copyright gesetz und können zur Zahlung von Schadenersatz und
anderen Forderungen verpflichtet werden. Wenn Sie über Ihre Rechte nicht informiert sind, wenden
Sie sich an Ihren Rechtsberater.
Wenn Sie eine Kopie einer CD herstellen wollen, beachten Sie die Anweisungen der Kopiersoftware.
Bei manchen CD-ROMs sind Antikopiertechniken eingebaut, weshalb normalerweise ein Backup
dieser CDs nicht möglich ist. Es gelingt Ihnen eventuell, sie zu kopieren, die Kopie funktioniert aber
nicht, da die Software auf der kopierten CD-ROM bestimmte Prüfungen durchführt und erkennt, daß
es sich um eine Kopie handelt.
Page 80

1.4 MultiRead
Sie können CD-RWs immer mit dem CD-RW-Laufwerk lesen, auf dem Sie sie gebrannt haben; viele
CD-RWs können aber nicht von älteren CD-ROM-Laufwerken bzw. CD-Playern gelesen werden, die
der 'MultiRead'-Spezifikation nicht entsprechen.
Die aufgenommenen Tracks auf einer CD-RW werden mit demselben Verfahren gelesen wie normale
CD-Tracks, und zwar durch Erfassung der Übergänge zwischen niedriger und hoher Reflexion und
Messung der zeitlichen Länge zwischen diesen Übergängen. Der einzige Unterschied liegt darin, daß
die Reflexion ca. ein Drittel der Reflexion der Original-CD-Spezifikation beträgt. Darum können auch
viele ältere CD-ROM-Laufwerke und CD-Player keine CD-RWs lesen.
Für moderne Techniken stellt das kein Problem dar. Die von Philips und Hewlett Packard entwickelte
und von der Optical Storage Technology Association (OSTA) genehmigte 'MultiRead'-Spezifikation
enthält die erforderlichen Einstellungen zur Lösung sämtlicher Kompatibilitätsprobleme bei allen
modernen CD-ROM- oder DVD-Laufwerken und CD-Playern.
Die folgende Tabelle enthält eine Kurzübersicht darüber, welche CD-Laufwerke CDs lesen können,
die mit bestimmten Anwendungs -/Medienkombinationen erstellt wurden.
Funktion CD-Typ Ziellaufwerke
CD-RW MultiRead-CD-ROM-Laufwerk mit UDF Reader Drag&Drop (UDF-
Paketschreiben)
CD-R
(geschlossen)
Die meisten CD-ROM-Laufwerke
CD-RW MultiRead-CD-ROM-Laufwerk Kopieren von CDs
CD-R Jedes beliebige CD-ROM-Laufwerk
CD-RW MultiRead-CD-ROM-Laufwerk Brennen von Audio-CDs
CD-R Jedes beliebige CD-ROM-Laufwerk,
Heim-/Auto-CD-Player
CD-RW MultiRead-CD-ROM-Laufwerk Brennen von Daten-CDs
CD-R Jedes beliebige CD-ROM-Laufwerk
Page 81

Format
1.5 CD-
Ihr Philips -CD-Rewriter kann alle bekannten CD-Formate von CD-Rs/RWs lesen und auf diese
schreiben. Die Liste der Formate können für die verschiedenen Laufwerkstypen variieren. Die von
Ihrem Laufwerk unterstützten Formate finden Sie in den technischen Spezifikationen Ihres Laufwerks.
Ihr Philips -CD-ReWriter ist möglicherweise auch mit einem analogen Audioausgang (einer
Kopfhörerbuchse) für die Wiedergabe von Audio-CDs und Daten-CDs mit MP3-Dateien ausgestattet.
Wenn Sie eine Audio-CD oder Daten-CD mit MP3-Dateien einlegen und abspielen, können Sie die
Musik hören, indem Sie Kopfhörer oder Lautsprecher an die Kopfhörerbuchse am CD-REWriter
anschließen. (Nicht bei allen Modellen verfügbar!)
Page 82

1.6 Xminütige CDs ( > 74 Minuten)
Das Philips -ReWriter-Laufwerk kann CDs mit einer Speicherkapazität von über 74 Minuten kopieren,
die jetzt alltäglich werden.
Bitte laden Sie die "technischen Spezifikationen" für Ihr Laufwerk herunter. (Im Kapitel Downloads
können Sie detaillierte Informationen finden.)
Page 83

1.7 Auswahl der richtigen CD
Sie können bei Ihrem Philips CD-ReWriter-Laufwerk herkömmliche CD-RWs und CD-Rs (8-cm-CDs
für 21 Minuten oder 12-cm-CDs für 74 oder 80 Minuten) verwenden. Für ein optimales Ergebnis
empfiehlt Philips, nur CD-RWs und CD-Rs von Philips zu verwenden.
Achten Sie darauf, daß die Datenträger zur Verwendung bei hohen
(Wiederbe)schreibgeschwindigkeiten geeignet sind.
Ob Sie eine CD-R oder eine CD-RW auswählen, hängt von Ihrer Anwendung und dem Ziellaufwerk für
die hergestellte CD ab. Beachten Sie die Abschnitte über CD-Anwendungen und Ziellaufwerke.
Page 84

2. Einsatzbereiche des Laufwerks
2.1 Kopieren von CD-ROMs, Foto-CDs, Video-CDs, Audio- CDs etc.
Das Kopieren einer CD ist ein einfacher Vorgang mit der Software, die mit dem Laufwerk geliefert und
von dem Setup-Programm für Sie installiert wird. Dieser Vorgang kann, abhängig von den
Spezifikationen Ihres Laufwerks und der Aufzeichnungsgeschwindigkeit, nur wenige Minuten in
Anspruch nehmen oder bis zu 80 Minuten je CD dauern. Beachten Sie auch copyright & Kopierschutz.
1. Beenden Sie alle anderen Programme auf Ihrem PC , wenn Sie CDs brennen. Die anderen
Programme verlangsamen den Vorgang und können Probleme und sogar Unterbrechungen bei
der Aufzeichnung verursachen.
2. Legen Sie die Original-CD in das CD-ROM-Laufwerk ein.
3. Legen Sie eine leere CD in Ihr CD-ReWriter- oder DVD+RW -Laufwerk ein. Achten Sie darauf,
daß die Geschwindigkeit der leeren CD der Geschwindigkeit Ihres CD-ReWriter- oder DVD+RW Laufwerks entspricht.
4. Starten Sie die Aufnahmesoftware 'CD Copier'. Mit den Dialogfeldern werden Sie durch die
Optionen geführt.
5. Nehmen Sie Ihre Einstellungen vor, stellen Sie auch die Aufnahmegeschwindigkeit ein. Die
CD-ROM muß die Daten mindestens so schnell lesen, wie das CD-ReWriter-Laufwerk sie schreibt.
6. Beginnen Sie die Aufnahme. Wenn Sie Ihren Computer während des Kopierens von CDs für
andere Anwendungen nutzen, kann es zu Störungen beim Kopiervorgang kommen.
Anwendungen, die nur sehr wenige Ressourcen auf Ihrem Computer in Anspruch nehmen, dürften
jedoch kein Problem darstellen. Wenn aber das Bewegen der Maus zu einem Fehler führt, sollten
Sie mit niedrigeren Geschwindigkeiten schreiben. Sollte ein Fehler auftreten (Pufferunterlauf), wird
der Brennvorgang abgebrochen, und die Anwendung gibt Fehlermeldungen aus. In den meisten
Fällen ist die CD dann unbrauchbar (es sei denn, Sie haben eine CD-RW beschrieben oder Ihr
Laufwerk verfügt über die Funktion “Seamless Link ”).
NÜTZLICHE HINWEISE:
· Beim Kopieren von einer CD zu einer anderen, bei Write-on-the-Fly-Aufnahmen und Aufnahmen
mit hohen Geschwindigkeiten kommt es häufiger zu Datenübertragungsfehlern, weil die
Ursprungsdaten möglicherweise zu langsam übertragen werden. Die Geschwindigkeit der
Ursprungsdaten wird durch die Systemkonfiguration und die Leistung Ihres Computers
eingeschränkt. Verwenden Sie bei Ihren Aufnahmen gegebenenfalls eine niedrigere
Geschwindigkeit, um Fehler zu vermeiden. Von Write-on-the-Fly-Aufnahmen spricht man, wenn die
Daten beim Kopieren in das CD-ReWriter-Laufwerk direkt von der CD-ROM gelesen werden.
Diese Aufnahmen sind anfälliger für Unterbrechungen des Datenstroms und führen deshalb
schneller zu Fehlern. Beachten Sie auch “Seamless Link ”.
· Sie können die Fehlerrate beträchtlich senken, indem Sie das Originalmaterial in einen Ordner auf
der Festplatte Ihres PCs kopieren.
· Verwenden Sie wiederverwendbare CD-RWs, bis Sie mit der Aufnahmesoftware vertraut sind.
Wenn Sie einen Fehler machen, können Sie die Aufnahme erneut vornehmen, ohne eine CD zu
verschwenden. Wenn Ihnen dann die Aufnahme auf CD-RW gelungen ist, wiederholen Sie die
Aufnahme auf einer CD-R.
Wenn Sie jedoch überprüfen möchten, ob das eigentliche Brennen der CD klappt, sollten Sie
besser die Testschreiboption (Test Write) der Aufnahmesoftware verwenden, da
Brenngeschwindigkeiten für CD-RWs normalerweise niedriger sind als für CD-Rs. Bei höheren
Schreibgeschwindigkeiten nimmt die Wahrscheinlichkeit eines Pufferunterlaufs erheblich zu.
(Beachten Sie auch “Seamless Link ”.) Es ist also nicht empfehlenswert, eine CD-RW zum
Überprüfen der Schreibgeschwindigkeit zu verwenden; denn wenn das Schreiben auf CD-RW (mit
einer niedrigeren Geschwindigkeit) problemlos verläuft, bietet das absolut noch keine Garantie
dafür, daß das Schreiben auf CD-R (mit einer höheren Geschwindigkeit) auch problemlos
verlaufen wird.
Page 85

· Selbst wenn Ihr Computer nur ein CD-ReWriter- oder DVD+RW -Laufwerk hat, können Sie CDs
kopieren. Sie müssen allerdings dieses eine Laufwerk sowohl als Ausgangslaufwerk als auch als
Ziellaufwerk verwenden, wodurch der Vorgang natürlich wesentlich länger dauert.
· Zum Kopieren von Audio-CDs: Vergewissern Sie sich, daß Ihr CD-ROM-Laufwerk Ton digital lesen
kann. (Beachten Sie die Betriebsanleitung des Herstellers.) Sie können auch Laufwerke
verwenden, die nur analoge Signale lesen können, die Tonqualität nimmt jedoch bei jedem
weiteren Kopieren einer Kopie ab.
· Detaillierte Informationen zur Benutzung der Softwarepakete finden Sie in der
Begleitdokumentation der einzelnen Softwarepakete. Normalerweise erstellt jedes Softwarepaket
eine eigene Programmgruppe im Start -Menü von Windows, das durch Klicken auf die WindowsSchaltfläche 'Start' geöffnet wird. In diesen Programmgruppen finden Sie das Symbol des
Anwendungsprogramms sowie weitere Elemente für das jeweilige Softwarepaket (Hilfe-Dateien,
elektronische Handbücher, Uninstall-Assistenten, Readme-Dateien usw.). Auf alle verfügbaren
Informationen kann gewöhnlich über die Programmgruppe der Software oder über die HilfeOptionen des Programms selbst zugegriffen werden.
· Weitere Tips und Informationen finden Sie www.roxio.com
Page 86

2.2 Brennen Ihrer eigenen Audio- CD
Sie müssen sich nicht auf das Kopieren vorhandener CDs beschränken. Sie können auch eine MusikCD mit Ihrem persönlichen Inhalt herstellen, um einzelne Tracks von vorhandenen CDs oder aus
anderen Audio-Quelldateien zu kombinieren oder eine ganze CD-R mit Ihrem eigenen Tonmaterial in
dem für normale Audio-CDs gängigen CD-DA-Format zu füllen.
1. Starten Sie die Aufnahmesoftware .
2. Zum Aufnehmen von Audio-Tracks müssen Sie zuerst ein CD-Layout erstellen; das ist eine Liste
von Tracks in der Reihenfolge ihrer Aufnahme. Klicken Sie einfach auf das Originalmaterial (CD-
Tracks oder Tondateien), das Sie aufnehmen möchten, und ziehen Sie es dann aus dem
Explorer-Fenster in das Fenster Audio CD Layout (HINWEIS: nicht das Fenster "Data CD
Layout"!).
3. Wiederholen Sie diesen Vorgang für alle Tracks und Dateien, die Sie aufnehmen möchten.
4. Legen Sie dann eine leere CD ein und starten Sie die CD-Aufnahme.
Weitere Informationen finden Sie unter Nützliche Hinweise und online unter http://music.cnet.com.
Page 87

2.3 Brennen einer Daten- CD
Sie müssen sich nicht auf das Kopieren vorhandener CD-ROMs beschränken. Sie können auch eine
CD mit Ihrem persönlichen Inhalt herstellen.
1. Starten Sie die Aufnahmesoftware .
2. Zum Aufnehmen von Dateien und Ordnern müssen Sie zuerst ein CD-Layout erstellen; das ist
eine Liste von Dateien und Ordnern in der Reihenfolge ihrer Aufnahme. Klicken Sie einfach auf
das Originalmaterial (Dateien bzw. Ordner), das Sie aufnehmen möchten, und ziehen Sie es dann
aus dem Explorer-Fenster in das Fenster "Data CD Layout".
3. Wiederholen Sie diesen Vorgang für alle Dateien und Ordner, die Sie aufnehmen möchten.
4. Legen Sie dann eine leere CD ein und starten Sie die CD-Aufnahme.
Weitere Informationen finden Sie unter Nützliche Hinweise.
Page 88

2.4 Anfügen von Audio oder Daten an eine CD
Wenn eine CD bei der ersten Aufnahme nicht ganz voll beschrieben wird und Sie die CD nicht
geschlossen haben (siehe unten), können Sie der CD weitere Audio-Tracks bzw. Daten-Sessions
anfügen.
Geschlossene Session:
Wenn Sie eine Audio-CD auf einem Heim- oder Auto-CD-Player anhören möchten, müssen Sie die
Session zuerst schließen. Sie können der CD später weitere Audio-Tracks hinzufügen, aber nur die
Tracks der ersten Session sind für die meisten CD-Player zugänglich ("sichtbar"). Sie können die
Session nur beim Schreiben von Audio offenlassen. Beim Schreiben von Daten wird die Session
immer automatisch von der Aufnahmesoftware geschlossen.
Geschlossene CD:
Der Benutzer kann entscheiden, ob er die CD schließen will. Wird die Option "Close Disc" ausgewählt,
ist die CD schreibgeschützt. Dann können kein Ton und keine weiteren Daten mehr auf der CD
aufgenommen werden.
Offene CD:
1. Legen Sie die nicht abgeschlossene CD in das CD-ReWriter- oder DVD+RW -Laufwerk ein.
2. Starten Sie die Aufnahmesoftware .
3. Klicken Sie einfach auf das zusätzliche Originalmaterial, das Sie aufnehmen möchten, und
ziehen Sie es aus dem Explorer-Fenster in das Fenster "CD Layout", um es dem vorhandenen
Inhalt hinzuzufügen.
4. Wiederholen Sie diesen Vorgang für alle Dateien und Ordne r, die Sie aufnehmen möchten.
5. Starten Sie dann die CD-Aufnahme.
Page 89

2.5 Verwendung des CD-RW- oder DVD+RW-Laufwerks als
Datenträgerlaufwerk
Installieren Sie die Software "Packet Writing" auf Ihrem Computer, damit Sie wie bei jedem anderen
Datenträgerlaufwerk, in das Daten geschrieben werden können, auch bei Ihrem CD-ReWriter- oder
DVD+RW-Laufwerk direkt auf CD-Rs/RWs zugreifen können.
Diese Software wird bei jedem Start von Windows automatisch geladen und wird im Hintergrund
ausgeführt, damit Sie von Windows -Explorer oder jeder anderen Windows-Anwendung
(Textverarbeitung, Tabellenkalkulation etc.) aus von den CD-Rs/RWs in dem Laufwerk lesen und auf
diese schreiben können.
Die für diesen Zweck verwendete CD-R/RW bleibt 'offen' und kann nur auf Computern gelesen
werden, auf denen die Software "Packet Writing" oder ein UDF Reader installiert ist. Außerdem kann
die "Packet Writing" -Software zum Schließen der aktuellen Session verwendet werden, wodurch die
CD für normale MultiRead-Laufwerke lesbar wird. Danach können der CD weiterhin Daten hinzugefügt
werden, indem eine neue Session geöffnet wird.
Hinweis: Auf CD-Rs können Dateien nicht wirklich gelöscht oder überschrieben werden, sie können
aber unsichtbar gemacht und beim Aktualisieren der Dateien neu geschrieben werden.
Page 90

2.6 Kombinieren von Audio und Daten (Mixed Mode)
Gehen Sie zum Brennen einer Mixed-Mode-CD folgendermaßen vor:
1. Bereiten Sie den Datenteil Ihrer CD wie unter Brennen einer Daten-CD beschrieben vor. (Wählen
Sie die Datendateien aus, die Sie hinzufügen möchten, und ziehen Sie sie in das Fenster "Data
CD Layout".)
2. Klicken Sie auf das Register "Audio CD Layout".
3. Bereiten Sie den Audioteil Ihrer CD wie unter Brennen Ihrer eigenen Audio-CD beschrieben vor.
(Wählen Sie die Musikstücke aus, die Sie aufnehmen möchten, und ziehen Sie sie in das Fenster
"Audio CD Layout".)
4. In einem Nachrichtenfenster wird Ihnen mitgeteilt, daß zur Unterstützung von Mixed-Mode-CDs die
CD-Einstellungen automatisch geändert wurden.
5. Legen Sie dann eine leere CD ein und starten Sie die CD-Aufnahme.
Die Aufnahmesoftware beginnt mit dem Brennen Ihrer Mixed-Mode-CD. Sie nimmt im ersten Track die
Dateien in dem Register "Data CD Layout" und danach in den folgenden Tracks die Musikstücke in
dem Register "Audio CD Layout" auf. Alle Tracks (Daten und Audio) werden in einer einzigen Session
aufgenommen.
Page 91

2.7 Anwendungen mit Blue Button starten
Neuere Laufwerkstypen besitzen eine Taste mit einem Blue-Button-Logo. Achten Sie auf das Logo, da
die Taste selbst möglicherweise nicht bei allen Laufwerkstypen blau ist. In der Bedienungsanweisung
ist die Position der Blue-Button-Taste beschrieben.
Wenn Sie diese Taste an Ihrem Laufwerk drücken, wird ein Fenster mit nützlichen Schaltflächen
geöffnet, die zu verschiedenen Websites und CD-Anwendungen führen.
1. Möglichkeit: Blue Button verwenden
Drücken Sie die Blue-Button-Taste mit dem nebenstehenden -Logo auf dem Laufwerk,
doppelklicken Sie auf dem Blue-Button-Symbol im Windows -Systemtray oder starten Sie das
Programm Blue Button neu über die Programmgruppe "Programs/Philips external drive"
(Programme/Externe Laufwerke von Philips).
Es müssen einige Bedingungen erfüllt sein, damit Blue Button funktioniert.
1. Das Laufwerk muss an Ihren Computer angeschlossen und angeschaltet sein (bei Bedarf).
2. Sie müssen den mit Ihrem Laufwerk gelieferten Philips -Installationsassistenten ausgeführt haben.
3. Sie müssen einen Internetbrowser installiert und für Ihre System konfiguriert haben.
4. Die gespeicherte Blue-Button-Anwendung (das Symbol im Systemtray) muss auf Ihrem Computer
aktiviert sein. Das ist die Standardeinstellung nach der Installation. Sie können das Systemtray Symbol jedoch auch deaktivieren. Bitte beachten Sie auch, dass einige Versionen von Windows®
inaktive Systemtray -Symbole nicht anzeigen.
5. Wenn Sie das Blue-Button-Programm deaktiviert haben, können Sie es wieder aktivieren, indem
Sie in Ihrer Philips -Programmgruppe auf "Blue Button" klicken. (Beim Mac: Öffnen Sie die BlueButton-Programmdatei in der Map Applications/Blue Button (Anwendungen/Blue Button).) Dadurch
wird das Blue-Button-Fenster auf Ihrem Bildschirm geöffnet. Möglicherweise wird Blue Button
jedoch auf dem Laufwerk selbst nicht aktiviert. Führen Sie bei Bedarf einen Neustart Ihres
Computers durch, um die gespeicherte Blue-Button-Anwendung (das Symbol im Systemtray) zu
laden und das Blue-Button-Fenster mit Blue Button auf Ihrem Laufwerk zu öffnen.
Ihre Möglichkeiten im Blue-Button-Fenster
Nach dem Öffnen des Schnittstellenfensters sehen Sie eine Reihe von Schaltflächen und eine
Menüleiste.
Page 92

2.8 Was ist “EasyWrite”?
EasyWrite ist ein neuer offener Standard für das Ziehen und Ablegen von Dateien auf CD-RWs und
DVD+RWs, der von der von Philips, Compaq, Microsoft und Sony ins Leben gerufenen Mount Rainier
Gruppe initiiert wurde und von über 40 Branchenführern unterstützt wird.
EasyWrite kombiniert die Einfachheit einer Diskette und die große Speicherkapazität von CDs und
DVDs mit der Robustheit, die für häufiges Speichern, Datenübertragungen und den Austausch von
Daten-, Audio-, Bild- und Textdateien benötigt wird.
Einfach
EasyWrite funktioniert wie ein normales Laufwerk, genau wie eine Festplatte oder
eine Diskette, und verwendet normale CD-RWs und DVD+RWs. Das bedeutet, dass
Sie sofort Dateien zu einer RW ziehen und dort ablegen können und sie auch zurück
verschieben können.
Schnell
EasyWrite ist schnell. Legen Sie eine neue CD-RW oder DVD+RW in das Laufwerk.
Innerhalb von Sekunden können Sie anfangen, Dateien zu ziehen und abzulegen.
Das Laufwerk erledigt die Formatierung im Hintergrund, ohne zusätzliche
Verzögerungen zu verursachen. Selbst wenn Sie die CD-RW oder DVD+RW
entnehmen, bevor die Formatierung im Hintergrund beendet ist, kann die CD-RW
oder DVD+RW von allen MultiRead-CD-ROM- und -DVD-ROM-Laufwerken gelesen
werden. (Die Ausgabe kann bis zu 1 - 4 Minuten dauern, wenn die Formatierung im
Hintergrund noch nicht beendet ist. Wenn sie beendet ist, erfolgt die Ausgabe fast
sofort.)
Robust
EasyWrite besitzt ein deutlich verbessertes Fehler-Management-System, das zu
verringerter Empfindlichkeit für Abnutzung und Kratzer auf den CD-RWs und
DVD+RWs führt. Während der vielen Jahre der Medienverwendung ist immer die
höchste Zuverlässigkeit der gespeicherten Daten gewährleistet, unter allen
Umständen!
Kompatibilität und Betriebssystemunterstützung
Mit EasyWrite beschriebene Medien sind abwärtskompatibel und können von fast allen CD-ROM-,
CD-R-, CD-RW-, DVD-ROM und DVD+RW -Laufwerken gelesen (nicht beschrieben) werden. Das
Lesen von EasyWrite-Medien erfolgt in älteren Systemen durch Software, die sich auf jedem mit
EasyWrite beschriebenen Medium befindet. Das ermöglicht es beinahe jedem Computer, mit
EasyWrite beschriebene Medien zu lesen.
EasyWrite wird in künftigen Versionen gängiger Betriebssysteme enthalten sein, auch in Windows und
Linux. Es wird erwartet, dass Apple sich ebenfalls ans chließt.
Was benötige ich, um “EasyWrite” nutzen zu können?
• Vor allem benötigen Sie ein (Philips -)CD-RW- oder DVD-RW-Laufwerk mit voller EasyWriteFunktionalität. Sie erkennen die EasyWrite-Fähigkeit am EasyWrite-Logo an der
Vorderseite des Laufwerks oder auf dem Produktschild (bei externen Laufwerken).
Page 93

2.9 Was ist DVD?
Eine DVD (Digital Versatile Disc, dt. digitale Video-Disk) ist das neue optische
Speichermedium, das eine enorme digitale Speicherkapazität mit dem Komfort der bekannten
CD kombiniert.
Eine voraufgezeichnete DVD hat eine Kapazität von 4,7 bis 17,1 GB. Außerdem können die meisten
Player einer beschreibbare/wiederbeschreibbare DVD mit einer Speicherkapazität von 4,7 GB
abspielen.
In der Praxis bedeutet das: 4,7 GB bieten mehr als genug Speicherkapazität für über 7 CD-ROMs
oder für Stunden eines digitalen Videos mit einer kristallklaren Bildauflösung, einschließlich
verschiedener Sprachen für die Sprachausgabe und für die Untertitel.
Es gibt drei Hauptanwendungen für DVDs:
1) Daten auf DVD
Der Zugriff auf Daten-DVDs funktioniert wie bei jeder anderen Speicherstation in Ihrem Computer.
Legen Sie einfach eine Daten-DVD in das DVD-Laufwerk und durchsuchen Sie deren Inhalt, wie bei
jedem anderen Laufwerk in Ihrem Computer.
Daten-DVDs haben die gleiche Funktionalität wie CD-ROMs (abgesehen von Ihrer sehr viel größeren
Datenkapazität). Wenn die Autostart -Funktion für das DVD-Laufwerk aktiviert ist, kann eine DatenDVD automatisch ein Programm von der DVD starten, z.B. einen Browser für die DVD oder eine
Präsentation.
2) Spiele auf DVD
Die Spiele bekannter Spieleplattformen, wie z.B. GameCube, Xbox und PlayStation2, werden auf
DVDs vertrieben. Diese Spiele-DVDs können nicht auf DVD-R/RW/ROM-Laufwerken abgespielt
werden. Sie benötigen spezielle PC-Spiele-CDs oder -DVDs, um diese Spiele mit einem DVDR/RW/ROM-Laufwerk abspielen zu können.
Manchmal kann eine Spiele-DVD ein DVD-Video mit Trailern, Musik oder Clips enthalten, die über die
DVD-Video-Player-Funktionalität des Laufwerks abgespielt werden können (siehe unten).
3) Videos auf DVD
Die bekannteste Anwendung der DVD-ROM-Laufwerke ist das Abspielen voraufgezeichneter VideoDVDs auf Ihrem Monitor.
Dafür benötigen Sie Software in Form eines DVD-Player-Programms, wie z.B. das Programm, das Sie
von der Installations -CD installieren können: PowerDVD. (Wenn Sie mehr über die Verwendung von
PowerDVD wissen möchten, lesen Sie bitte in der Datei “How to use the software with this drive?” (Die
Software mit diesem Laufwerk verwenden) den Abschnitt “How to play a DVD-Video or a Video CD on
my computer?” (Eine Video-DVD oder eine Video-CD auf meinem Computer abspielen).
Page 94

Das DVD-Player-Programm, das Sie auf Ihrem Computer installiert haben, zeigt das DVD-Menü der
Video-DVD. Dieses Menü bietet Ihnen die vollständige Kontrolle über die Optionen der DVD, es
funktioniert wie beim DVD-Player einer Heimkinoanlage.
Verwenden Sie immer die Hilfedatei und andere mit dem DVD-Player-Programm gelieferte Dateien,
um Informationen über die Programmeinstellungen und die Optimierung des Players für Ihr System zu
erhalten. Lesen Sie auch das Handbuch Ihres Computers und Ihrer Grafikkarte, wenn Sie mehr über
die Hardwareeinstellungen und -leistungsfähigkeit erfahren möchten.
Besonderheiten (DVDs auf einem Fernsehbildschirm ansehen)
1) Anschluss Ihres Computers an einen Fernseher
Wenn Ihr Computer einen TV OUT (Ausgang für Anschluss an Fernseher) für die Anzeige Ihres
Computerbildschirms auf einem Fernsehbildschirm und einen Ausgang für den Anschluss an ein
externes Audiosystem an Ihren Computer besitzt, können Sie möglicherweise eine Video-DVD auf
Ihrem Fernsehbildschirm anzeigen.
Sie müssen das Handbuch Ihres Fernsehers, Ihres Computers und Ihrer Grafikkarte durchlesen, um
herauszufinden, welche Kabel Sie benötigen, welche Anschlüsse Sie vornehmen müssen und welche
Einstellungen Sie ändern müssen, um den Ausgang TV OUT zu aktivieren. Wir betonen, dass diese
Anschlüsse an den Computer und die Grafikkarte sowie die Fehlerbehebung NICHT direkt mit dem
DVD-Laufwerk zu tun haben und daher nicht von unserem Service und Support abgedeckt sind.
2) Anschluss Ihres DVD-Laufwerks an einen Fernseher
Einige (externe) DVD-Laufwerke besitzen Anschlüsse für die direkte Anbindung des Laufwerks an
einen Fernseher. In diesem Fall wurden die passenden Kabel wahrscheinlich mit dem Laufwerk
geliefert, und manchmal gibt es eine Fernbedienung für die Bedienung des Laufwerks. Lesen Sie
immer die Bedienungsanleitung des Laufwerks, um Hinweise zu den richtigen Anschlüssen, die
Verwendung des Laufwerks als separaten DVD-Video-Player oder zur Fehlerbehebung zu erhalten.
Page 95

• Im Moment benötigen Sie außerdem eine “Überbrückungs”-Anwendungssoftware, die sich auf
der zum EasyWrite-Laufwerk gehörenden Installations -CD befindet.
Philips unterstützt die folgende Überbrückungssoftware:
1. DirectCD von Roxio.
Bitte installieren Sie die mit dem Laufwerk gelieferte Version von DirectCD.
Vergewissern Sie sich, dass die Versionsnummer 5.3.1.154 oder höher ist.
2. InCD von Ahead Software.
Bitte installieren Sie die mit dem Laufwerk gelieferte Version von InCD.
Vergewissern Sie sich, dass die Versionsnummer 3.31.1 oder höher ist.
Hinweis:
• Wenn Sie DirectCD von Roxio verwenden:
Drücken Sie, um die CD aus dem Laufwerk auszugeben, entweder die Taste Eject am
Laufwerk oder verwenden Sie die “gedämpfte Ausgabe”. DirectCD zeigt eine Nachricht an,
dass das ca. 1-4 Minuten dauert. (Die Ausgabe kann bis zu 1 - 4 Minuten dauern, wenn die
Formatierung im Hintergrund noch nicht beendet ist. Wenn sie beendet ist, erfolgt die
Ausgabe fast sofort.)
• Wenn Sie InCD von Ahead Software verwenden:
In den aktuellen Versionen von InCD muss die “gedämpfte Ausgabe” verwendet werden, um
das Medium aus dem Laufwerk auszugeben. (Verwenden Sie nicht die Taste Eject am
Laufwerk.) Die Ausgabe des Mediums dauert ca. 1 - 4 Minuten. (Die Ausgabe kann bis zu 1 4 Minuten dauern, wenn die Formatierung im Hintergrund noch nicht beendet ist. Wenn sie
beendet ist, erfolgt die Aus gabe fast sofort.) InCD informiert Sie während dessen nicht über
den Fortschritt des Prozesses.
Weitere Informationen finden Sie auf den Websites von Philips und Mount Rainier.
www.philips.com/pcstuff
www.mt-rainier.org
Page 96

Schaltfläche 1
Wenn Sie auf diese Schaltfläche klicken, wird Ihr Internetbrowser geöffnet und die
Produktinformations-Website für PC-Peripheriegeräte von Philips wird angezeigt.
Schaltfläche 2
Wenn Sie auf diese Schaltfläche klicken, wird Ihr Internetbrowser geöffnet und die Website für den
Service und Support für PC-Peripheriegeräte von Philips wird angezeigt.
Schaltfläche 3
Klicken Sie auf diese Schaltfläche, um das mit dem CD-Typ im Laufwerk verknüpfte
Anwendungsprogramm zu öffnen.
HINWEIS: Die nachstehende Tabelle enthält die Voreinstellungen des Blue-Button-Programms. Wenn
Sie Ihre persönlichen Einstellungen (siehe unten) verändert haben, werden möglicherweise andere
Anwendungen geöffnet, wenn Sie die Blue-Button-Taste drücken.
CD-Typ im Laufwerk
(siehe: Discs to use)
CD-Rs/RWs Starten Sie eine Brenner-/ Rewriter-
CD-ROMs, CD Audios
Ihre Einstellungen ändern (im Blue -Button-Menü über die Menüleiste)
Klicken Sie in der Menüleiste auf Blue Button, um das Menü zu öffnen. Klicken Sie in diesem Menü
auf Optionen, um das Fenster Optionen zu öffnen.
Klicken Sie auf die Schaltfläche 3
und...
Anwendung.
Starten Sie...
1. Einen Media-Player für eine AudioCD, eine Video-CD oder ggf. für eine
DVD.
2. Ein CD-Explorer-Programm für eine
Daten-CD.
Festgelegt durch...
Siehe Ihre "Rekorder" -Einstellung im
Menü Optionen in der Registerkarte
CD.
Siehe Ihre "Player" -Einstellung im
Menü Optionen in der Registerkarte
CD.
Siehe Ihre "Explorer" -Einstellung im
Menü Optionen in der Registerkarte
CD.
Page 97

(Die eingestellten Anwendungen können
variieren.)
Klicken Sie auf die Registerkarte Browser, um einen neuen Internetbrowser für das Öffnen der
Websites einzustellen.
Klicken Sie auf die Registerkarte CD, um die Programme einzustellen, die für das Öffnen der CDs
verwendet werden sollen. Diese Einstellungen wurden während der Installation automatisch erkannt,
können jedoch ederzeit manuell geändert werden. Klicken Sie neben einer der Einstellungen auf ,
um andere ausführbare Programm zu suchen (*.exe für Windows®), die Sie für diese Anwendung
öffnen möchten.
2. Möglichkeit: Die Blue-Button-Taste gedrückt halten
Wenn Sie die Taste Blue Button mindestens 2 Sekunden gedrückt halten, wird Ihr Internetbrowser
geöffnet und die Laufwerks-Support-Website für das Herunterladen der neuesten Firmware für Ihr
Laufwerk wird automatisch geöffnet. Bitte beachten Sie die Anweisungen auf dieser Website.
Blue Button: Der schnellste Weg zum Erfolg.
Page 98

3. Informationsüberblick zu CD-R/RW
3.1 Einstellungen/Konfiguration
Beim Anschluß eines externen Laufwerks an Ihren Computer sind bestimmte Kabelanschlüsse und
Einstellungen für den einwandfreien Betrieb Ihres Laufwerks äußerst wichtig.
1. Kabelanschlüsse
2. Hardware-Einstellungen
3. Software-Einstellungen
4. Firmware-Updates
Kabelanschlüsse
Um das Laufwerk verwenden zu können, müssen Sie das Datenkabel und das Netzkabel
ordnungsgemäß an das Laufwerk anschließen.
1. Bitte öffnen Sie den Deckel und entfernen Sie den eingelegten Transportschutz aus Plastik, bevor
Sie das Laufwerk in Betrieb nehmen.
2. Stecken Sie das Kabel der von Ihnen gewählten Schnittstelle in den entsprechenden Anschluß an
dem Laufwerk ein.
3. Stecken Sie das andere Ende des Kabels in den entsprechenden Anschluß an dem PC ein.
Schlagen Sie zwecks Hilfe immer in Ihrem Computerhandbuch nach.
4. Stecken Sie den kleinen Netzstecker in das Laufwerk ein.
5. Stecken Sie den Netzadapter in die Netzsteckdose ein und schalten Sie das Laufwerk
gegebenenfalls mit dem Ein-/Ausschalter des Laufwerks ein.
6. Windows startet das Dialogfeld 'Hardware-Assistent' automatisch. Füllen Sie dieses Dialogfeld aus,
um den erforderlichen Treiber für Ihr neues Laufwerk zu installieren. Geben Sie die InstallationsCD an (oder das Verzeichnis, in das Sie die Treiberdateien aus dem Internet heruntergeladen
haben, falls Sie noch kein CD-ROM-Laufwerk besitzen), wenn Sie nach der Speicherstelle der
Treiberdateien gefragt werden.
Hardware-Einstellungen
Ihr Controller (z.B. USB, FireWire) sollte ordnungsgemäß arbeiten.
Dies können Sie in dem Windows -Geräte-Manager überprüfen (klicken Sie auf das Symbol
'Arbeitsplatz' auf Ihrem Desktop, klicken Sie mit der rechten Maustaste auf 'Eigenschaften' und klicken
Sie dann auf die Registerkarte 'Geräte-Manager').
Page 99

Nehmen wir als Beispiel USB: Es sollte ein Symbol mit dem Titel 'Universeller serieller Bus Controller'
sichtbar sein. Klicken Sie auf dieses Symbol. Dann zeigt Windows an, ob diese Komponente Ihres
Computersystems ordnungsgemäß arbeitet. Auf die gleiche Weise können auch FireWire und andere
Controller überprüft werden.
Weitere Informationen: Gehen Sie zu Kapitel "Interfaces".
Software-Einstellungen
BIOS
Das BIOS (Basic Input/Output System) Ihres Computers steuert das Booten Ihrer Hardware beim
(Neu)start Ihres Computers. Bei diesem Bootvorgang sucht das BIOS normalerweise nach internen
Controllergeräten in Ihrem System. In manchen Fällen kann diese BIOS-Suche für einzelne Controller,
z.B. Controller für serielle Ports und USB, deaktiviert werden.
Prüfen Sie also immer, ob Ihr BIOS die Suche nach dem Controller, an den Sie das externe Laufwerk
anschließen wollen, unterstützt; wenn nicht, kann das Windows -Betriebssystem das Laufwerk nicht
verwenden.
Um die BIOS-Einstellungen zu überprüfen und/ oder zu ändern, achten Sie genau auf die
entsprechenden Informationen, die beim Booten Ihres Computers auf dem Bildschirm erscheinen. Um
auf das Menü mit den BIOS-Einstellungen zugreifen zu können, müssen Sie die auf dem Bildschirm
genannte Taste drücken (z. B. F2, Entf., Esc etc.). Suchen Sie dann das Menü mit den
Peripheriegeräten und achten Sie darauf, daß der Controller, an den Sie das externe Laufwerk
anschließen wollen, auf "ENABLED" eingestellt ist.
Page 100

ANWENDUNGSSOFTWARE
Zum Lesen von Datenträgern mit dem externen Laufwerk benötigen Sie keine spezielle Software.
Wenn Ihr Betriebssystem das Laufwerk findet, ordnet es diesem automatisch einen neuen
Laufwerksbuchstaben zu. Sie können es dann wie jedes andere an Ihren Rechner angeschlossene
CD-ROM-Laufwerk verwenden.
Zum Schreiben von Daten auf einen Datenträger müssen Sie allerdings ein CD Writer-Softwarepaket
installieren. Diese Software finden Sie auf die Installations -CD. Um die Anwendungssoftware zum
Brennen von Datenträgern zu installieren, führen Sie Setup.exe von der CD aus und starten Sie den
Setup-Vorgang der Anwendungssoftware in dem Hauptmenü.
Firmware -Upgrades
Die in dem Laufwerk selbst eingebettete Software kann auch mit neueren Softwareversionen
aktualisiert werden. Gehen Sie zu der Philips Support-Website, um die erforderlichen Software-Tools
und Firmware-Updates herunterzuladen. Weitere Informationen finden Sie unter Downloads.
Eine Erläuterung der in dem vorausgehenden Text verwendeten Begriffe finden Sie unter
http://www.pctechguide.com/search.htm
 Loading...