

Page 1
USER’S GUIDE
1101-284-08 Rev. 1
Important! Read First ......................................
Fastener Legend...............................................
Front and Back Plates.......................................
Rear Shaft Assembly.........................................
Front Shaft to Keel............................................
Front Height Shaft to Spine...............................
Saw Spine to Keel.............................................
Rear Height Screw to Keel................................
Pitch Adjustor Assembly....................................
Rear Spine Guide.............................................
Pitch Adjustor/ Spine Guide..............................
Front Spine Guide............................................
Saw Blade Guides............................................
Transmission Check.........................................
Travelers...........................................................
Keel Assembly to Frame...................................
Assembly Detail................................................
Dovetail Ways...................................................
Inside Dovetail Sliders......................................
Table Bumpers..................................................
Outside Dovetail Sliders....................................
Fence and Trap Clamps....................................
Saw Blade.........................................................
Blade Alignment................................................
Cursor and Flip Down Stops............................
Blade Height Stop.............................................
Optional Stand..................................................
Stand Corner Key.............................................
Lubrication Guide.............................................
Cutting guide....................................................
Notes ...............................................................
Parts List..........................................................
1
4
5
5
6
6
7
7
8
8
9
9
10
10
11
11
12
12
13
13
14
14
15
15
16
16
17
18
19
20
21
22
Made in the USA
www.BridgeCityTools.com
Page 2

I M P O R T A N T : R E A D F I R S T !
Thank you for your purchase of the Jointmaker Pro!
Your experience with this innovative new tool should be
nothing but positive. Towards that objective we are asking you to
contact us with any questions regarding assembly or use of the
Jointmaker Pro. We can be reached by either phone or email:
1.800.253.3332
John Economaki: john@bridgecitytools.com
(JM-P inventor)
Michael Berg: michael@bridgecitytools.com
(Production Manager/Designer/Woodworker)
We have also created a forum dedicated to the Jointmaker Pro
for fellow owners to share and exchange ideas;
http://www.bridgecitytools.com/discussion/
We recommend you visit this forum periodically for exciting new
ideas, tips and tricks. NOTE: This is a moderated forum and
we will do our best to keep it positive, exciting and a useful resource.
OVERVIEW
The Jointmaker Pro is the world’s rst stationary hand crosscut saw and will accurately allow you to make most of the cuts
required in wood joinery plus a myriad of other sawing applications.
Consisting primarily of two independent linear tables mounted
over specially designed, ne-toothed saw blades, the Jointmaker Pro redenes the meaning of “cut by hand.” Using no electrical power, the Jointmaker Pro is designed specically to make
precision cuts for the most demanding craftspeople with as little
noise as possible, and without the need for dust collection. Understanding how this tool works—what it can and cannot do—is
your key to a successful and fruitful experience.
Cutting wood accurately by hand requires a great deal of prac-
tice and is difcult for many, particularly those new to the craft.
With the Jointmaker Pro, people of all ages and experience levels can achieve results that are MORE ACCURATE than cuts
made with power equipment. Furthermore, the cuts are unparalleled in quality creating opportunities for new and exciting ideas
not possible with traditional techniques.
At this time, please take a few minutes and peruse the assembly
section of this guide to become familiar with the nomenclature of
the Jointmaker Pro. This will make the remainder of this section
much easier to understand.
SAFETY
Your Jointmaker Pro is no different than any other sharp tool—
use common sense!
Although it may seem safe to take risks because the saw blade
is stationary—and the only motion is provided by YOU—safety
should never be taken for granted.
Etched on the top of each sliding table is a graphic element that
is designed to remind you of the risk to your ngers. It may seem
obvious, but we strongly recommend keeping your ngers out of
this zone, especially when the blade is tilted.
After you have spent an hour or two using the Jointmaker Pro
we hope you share your new found ability with other members of
your family—this tool can be enjoyed by many who like making
gallery quality cuts in a noise free environment!
SAW RIGIDITY AND ERGONOMICS
Under all circumstances, the Jointmaker Pro needs to be rmly
anchored to a work surface or attached to a stand. If the saw
moves while cutting your accuracy and enjoyment of the tool will
be less than optimal.
The front table height of the Jointmaker Pro should be an inch
or so below your belt line. At this height, you will be able to make
a full stroke without undue stress on your back or arms. If possible, we recommend that the rear of the Jointmaker Pro be
approximately three inches higher than the front. This incline
shortens the stroke of your arms, increases your ability to see
your work and reduces strain on your lower back during long
work sessions.
WORK HOLDING REQUIREMENTS
Traditionally when cutting wood with a hand saw you clamp the
material to be cut to a workbench or hold your stock in a vise.
With either method, the stock should always be rmly anchored
in order to achieve optimal, and accurate, results.
The same work holding requirements are true when making most
cuts with the Jointmaker Pro. The sliding table is analogous to
a workbench surface and the angled trap clamps act as a vise.
These elements become particularly crucial with the Jointmaker
Pro because unlike any other hand sawing experience, you are
cutting from the bottom up as opposed to top down. Without
your stock rmly anchored to the sliding tables, the negative
feed (the tendency of the wood to ride up over the top of the
blade) becomes difcult to manage with hand strength alone. In
almost all cases, we strongly recommend that you utilize these
work holding aids for accuracy and blade longevity. When using
the blade in a tilted position, trap clamping is mandatory.
1
Page 3

SAW BLADES & DEPTH OF CUT
All of the saw blades currently designed for the Jointmaker Pro
contain between 350 and 460 teeth over their length. Because
the blade is inclined (the front of the blade is lower than the back
of the blade) in relation to the table surfaces, each tooth bears
the exact same workload.
For example, a piece of walnut with a 1/2” x 1/2” cross-section
can be cut in half with one stroke using the standard crosscut
blade. To correctly set the blade for this cut, you would adjust
the blade so that the rst couple of teeth are below table height,
and the last tooth of the saw blade is set with the pitch adjustor
to approximately 1/32” above the stock of the wood. With the
stock held rmly against the fence, one stroke and the cut is
complete, smooth and accurate. See the Cutting Guide page 20
for more details.
You will know when your blade is dull because of the resistance
you sense with cutting or the quality of the cut is not smooth
to the touch. Blades are not designed to be sharpened—they
are disposable. Replacement blades can be found at; www.
bridgecitytools.com or by calling 1-800-253-3332.
NOTE: Please visit www.bridgecitytools.com to view the Jointmaker Pro videos!
THE FENCES AND HAND PLACEMENT
The Jointmaker Pro utilizes two fences that are normally bridged
by a sacricial wooden fence. The only time you do not use both
tables is when you are cutting face miters.
This example is possible because the standard JM-P crosscut
blade has approximately 400 teeth. Using the stock and set-up
described above, each tooth of the saw has a chip load of just
over one one-thousandth of an inch (.5/400 = 0.00125”). It is
the combination of the chip load, precise linear movement and
blade rigidity that makes Jointmaker Pro cuts unparalleled in
quality or accuracy.
For wider stock (where more teeth are simultaneously engaged
with the stock), multiple passes are required utilizing a smaller
depth of cut per pass.
For example, 1/2” thick walnut 4” in width would dictate that you
set the saw up with the rst couple of teeth below table height
(using the hand crank at the front of the JMP) and the last tooth
approximately 1/16” above the table (using the Pitch Adjustor).
With this set-up, it will take 8 passes to cut the stock in half. Be-
tween each pass the blade is raised approximately 1/16”. In this
situation, the 400 teeth are required to cut approximately 1/16th
of material per pass. The chip load is now one ten-thousandth
of an inch (.0625/400) per tooth! However, because the board is
4” in width, more teeth are engaged during each pass creating
more resistance. More resistance requires smaller bites for the
cuts to feel almost effortless.
The only “guide” we can provide for tailoring your technique to
accommodate the myriad of different species and sizes of wood
is to emphasize that the effort required to cut any wood should
be minimal. Harder material or wider stock requires smaller bites
and more passes. If you are overly aggressive, you will dramatically shorten blade life and the quality of your cuts will suffer.
After a short “getting acquainted” period all of this will become
second nature.
As a reference, one full revolution of the crank handle raises the
blade exactly .055” or slightly less than 1/16”. You will discover
that extremely dense woods will require blade height adjustments as small as 1/8 of a revolution between cuts and some
softwoods can be cut with 3 full revolutions for each pass! It is
your job to discover the optimal settings for ease of use according to your own preferences and applications.
You will soon discover the general purpose cross-cut blade that
ships with the JM-P will do the majority of cuts (.4mm x 28). The
16 tooth rip blade is useful for cutting tenons and dovetails if you
have many to cut. The .3mm crosscut is ideal for small stock
but does not track well in deep cuts (it is so thin it will follow the
density changes of the wood being cut).
There are two sacricial fences, one is straight and the other
has an angled face. Use the straight fence for joinery and the
trap fence for crosscuts. We recommend the fences be locked
in the forward position for all cuts of 4” or less in width. For stock
wider than 4 inches, slide the fences to the back position.
When possible, your hands should be directly over the center of
the dovetailed ways on each side of the saw blade. As your experience with the saw grows, you will learn that you can use one
hand to make your strokes and the other will be raising the blade
on the return stroke. This combination is efcient and fast.
We recommend that your rst cuts be made with both hands
employed during the sawing strokes.
NOTE: The table tops are orange for a reason; you can write on
them with a pencil. For example, once you have the fence set
to 90 degrees, you can scribe a pencil line along the fence and
use this line as a reference. Please visit our website to view the
video on how we set angles on the Jointmaker Pro.
STUPID MISTAKES WE HAVE MADE
We have ruined several blades because of human error. Please
review this section to learn from our mistakes.
•MAKE SURE THE KEEL, THE FENCES, AND YOUR CLAMPS
are all TIGHT before sawing. This will eliminate 80% of the
mistakes we have made.
•Lower the blade below table height after each session. Horizontal surfaces attract things, and the blades are easily damaged with contact by metal objects or heavy wood.
•It is helpful to have an old toothbrush nearby to periodically
clean wood bers that may be embedded in the gullets of the
blade. This is particularly helpful when using the rip blade.
•Lastly, enjoy the fact that you are the motor. Let the saw do the
work and use as many passes as needed to accomplish your
tasks. WE GUARANTEE that aggressive sawing techniques are
going to be expensive for you.
2
Page 4

LUBRICATION
Before EACH SESSION, we recommend you check the tables
for slop (easy to x—see step 19 on page 14) and lubricate
the ways with aTeon based dry-lm lubrication. You want your
tables to slide as smoothly as possible. For example, at trade
shows, we lubricate the ways three or four times over an eight
hour period.
Please review the lubrication guide on page 19 for all other lubrication locations (this is done once or twice a year depending
on use.)
ASSEMBLY
Step-by-step assembly instructions are included in this Users
Guide. Please contact us if you have any difculties assembling
the Jointmaker Pro. We also have posted on our website videos
showing how we align the blade to the ways and proper table
adjustments. They are not difcult to do but the videos may increase your understanding of these two important adjustments.
Your Jointmaker Pro is fully warranted for defects in workmanship. Please notify us immediately if you have encountered adefective component. We will replace it immediately.
CALIBRATION
LINEAR TABLE ADJUSTMENTS The Jointmaker Pro was
designed to perform as quietly as possible. The two dovetailed
aluminum rails on each side of the blade are xed in place by
the front and back plates—they are not adjustable. Underneath
each sliding table are two acetyl dovetailed sliders. The slider
closest to the saw blade on each table is xed (non-adjustable).
The acetyl slider furthest from the saw blade on each table is
adjustable and when properly tensioned, both tables will slide
smoothly without any lateral slop. You will periodically adjust the
tension on these two ways over time for optimal performance
—this process usually takes two or three minutes and is fully
demonstrated in the assembly video.
SAW GUIDES The saw blade of the Jointmaker Pro moves
up and down between two blade guides that literally pinch the
blade. One guide is black, the other is blue. Once assembled,
the blue guide is the only guide that is adjusted when changing between blades of different thicknesses. The black guide is
never adjusted.
FRONT AND BACK PLATE TRAVELERS The saw blade and
the components that raise and lower the blade are attached to
an aluminum keel. The keel is attached to acetal travelers that
allow the blade to tilt up to 45 degrees in either direction by riding in arcs milled into the front and back plates.
The two acetyl travelers must glide in the front and back plates
without any slop. There are two nylon set screws in each traveler that allow for this adjustment. If these nylon set screws are
not properly adjusted, the keel will not remain parallel to the
ways.
YOUR FIRST CUT
Once your Jointmaker Pro is properly set-up, you are ready to
make your rst cut.
We recommend practicing your rst cut on a small dowel rod,
1/4” – 1/2” in diameter. Set the leading edge of the crosscut
blade slightly below table height, and using the pitch adjustor, raise the rear of the blade until it is slightly taller than your
stock.
Before you make a cut, take a couple of “dry runs” to get a feel
for the resistance of the tables in motion. When comfortable,
hold your material rmly against the fence and with one smooth,
controlled push, cut your stock. You will discover after just a
few passes the rhythm required for incredible results. As the
density/width of your stock changes, you will sense the need to
reduce depth of cut and increase the number of passes. THERE
ARE NO GUIDELINES other than to offer that the feedback you
sense from the cutting action will dictate any adjustments you
will need to make for effortless cutting.
We invite you to visit our website (www.bridgecitytools.com) to
view videos of how we cut different materials.
YOUR EXPERIENCES WITH THE JOINTMAKER PRO MATTER!
Please share your experiences and ideas regarding the Jointmaker Pro with fellow users! This new and exciting tool is capable of extraordinary applications, some that may be understood
only by dedicated users. Please share and/or inquire by participating in the user forums located at www.bridgecitytools.com.
Thank you again for your purchase of the jointmaker pro. please
share pictures and stories with us as you employ this remarkable new tool in your shop!!
John Economaki
President
TOOLS REQUIRED FOR ASSEMBLY
A at table surface is the best place to assemble the
Jointmaker Pro.
#2 Philips Head Screwdriver
Small Hammer
9/16” Open ended wrench or Adjustable Wrench
Needle Nose Pliers
3
Page 5
NOTES
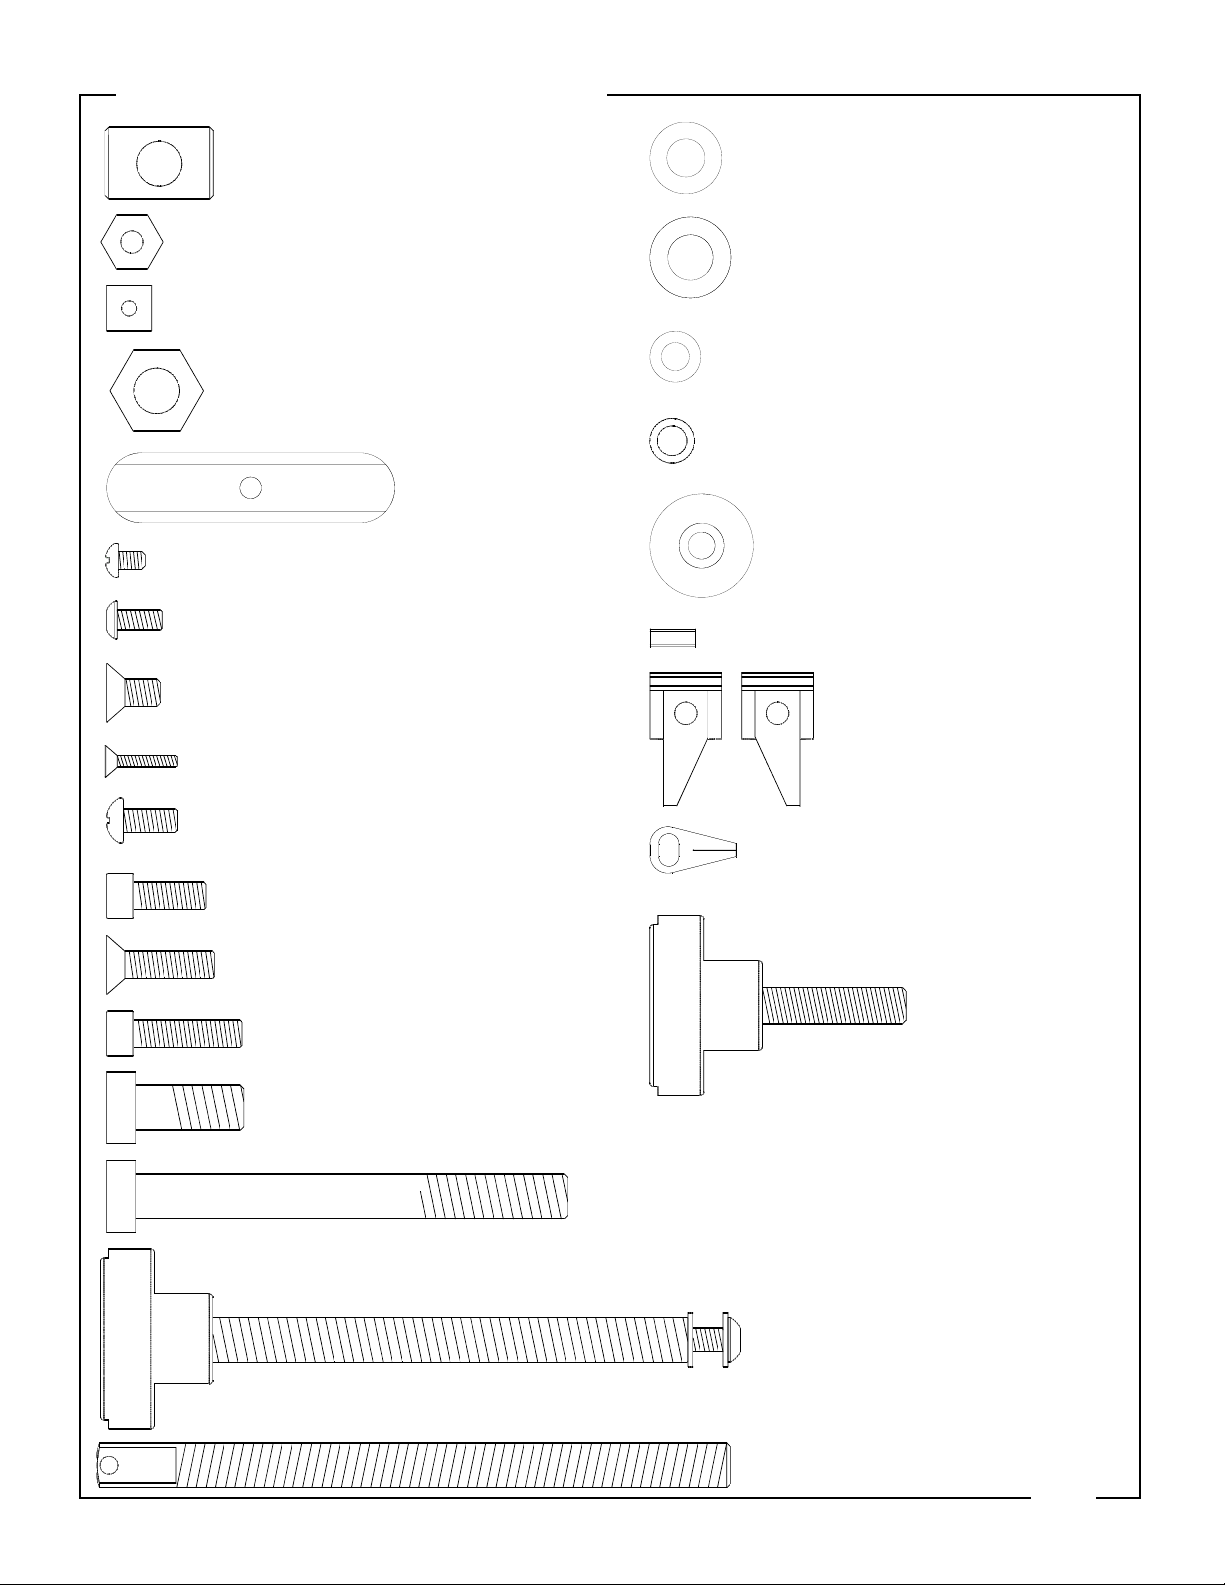
FASTENER LEGEND
Pitch Screw Barrel Nut x 1
10-32 Nut x 6
6-32 Nut x 4
3/8-16 Jam Nut x 1
Dovetail Nut x 2
5-40 x 3/16” Philips Head Screw x 5
6-32 x 5/16” Button Head Cap Screw x 4
10-32 x 3/8” Socket Flat Head Screw x 2
4-40 x 1/2” Socket Flat Head Screw x 1
.684” OD Steel Flat Washers x 6
Acetyl Washers x 4
.354 OD Steel Washer x 20
.310 Shim Washer x 2
Rubber Bumper x 4
Spring Pin x 1
Finger Stops, Left and
RIght 2 each
8-32 x 3/8” Philips Head Screw x 4
10-32 x 1/2” Socket Head Cap Screw x 4
10-32 x 3/4” Socket Flat Head Screw x 48
10-32 x 3/4” Socket Head Cap Screw x 20
5/16-18 x 3/4” Bolt x 4
Acrylic Indicator x 1
Keel Knobs x 2
5/16-18 x 2-1/2” Bolt
5/16-18 Pitch Adjustor with Screws
and washers x 1
5/16-18 Left Hand Height Screw x 1
4
Page 6
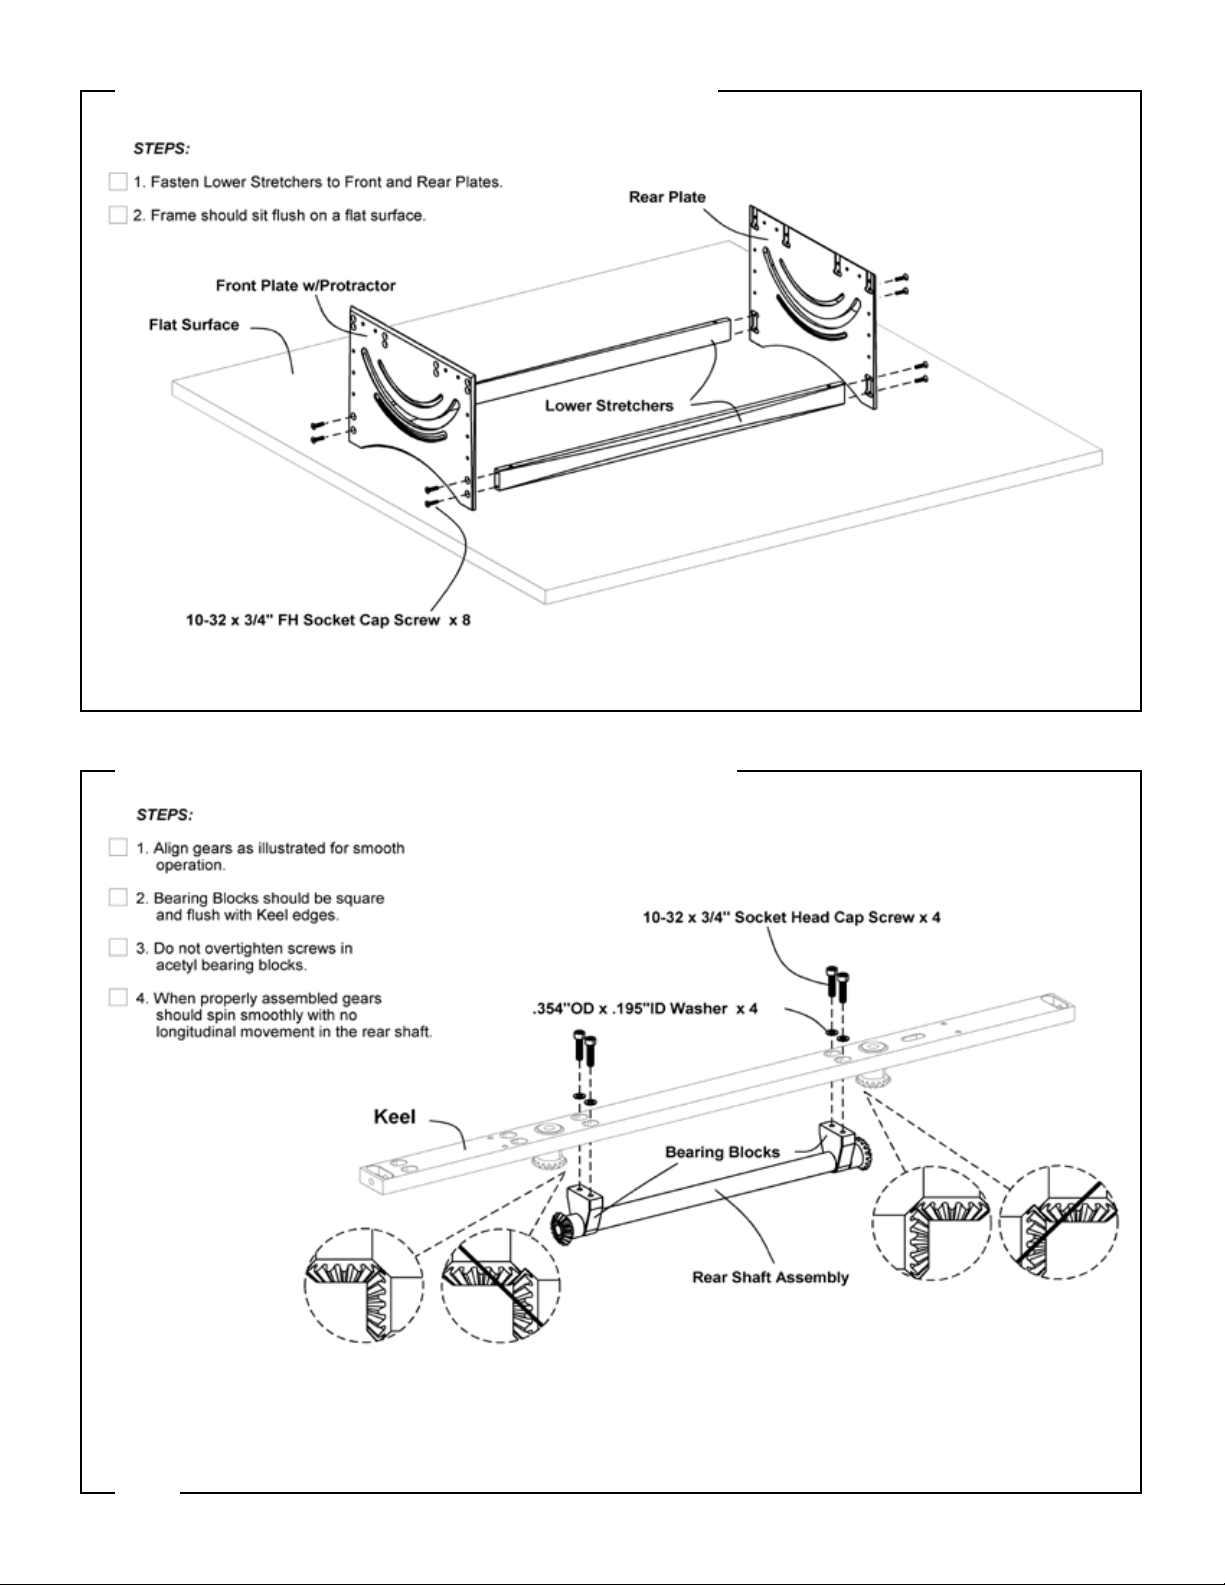
1. FRONT & BACK PLATES
2. REAR SHAFT ASSEMBLY
5
Page 7
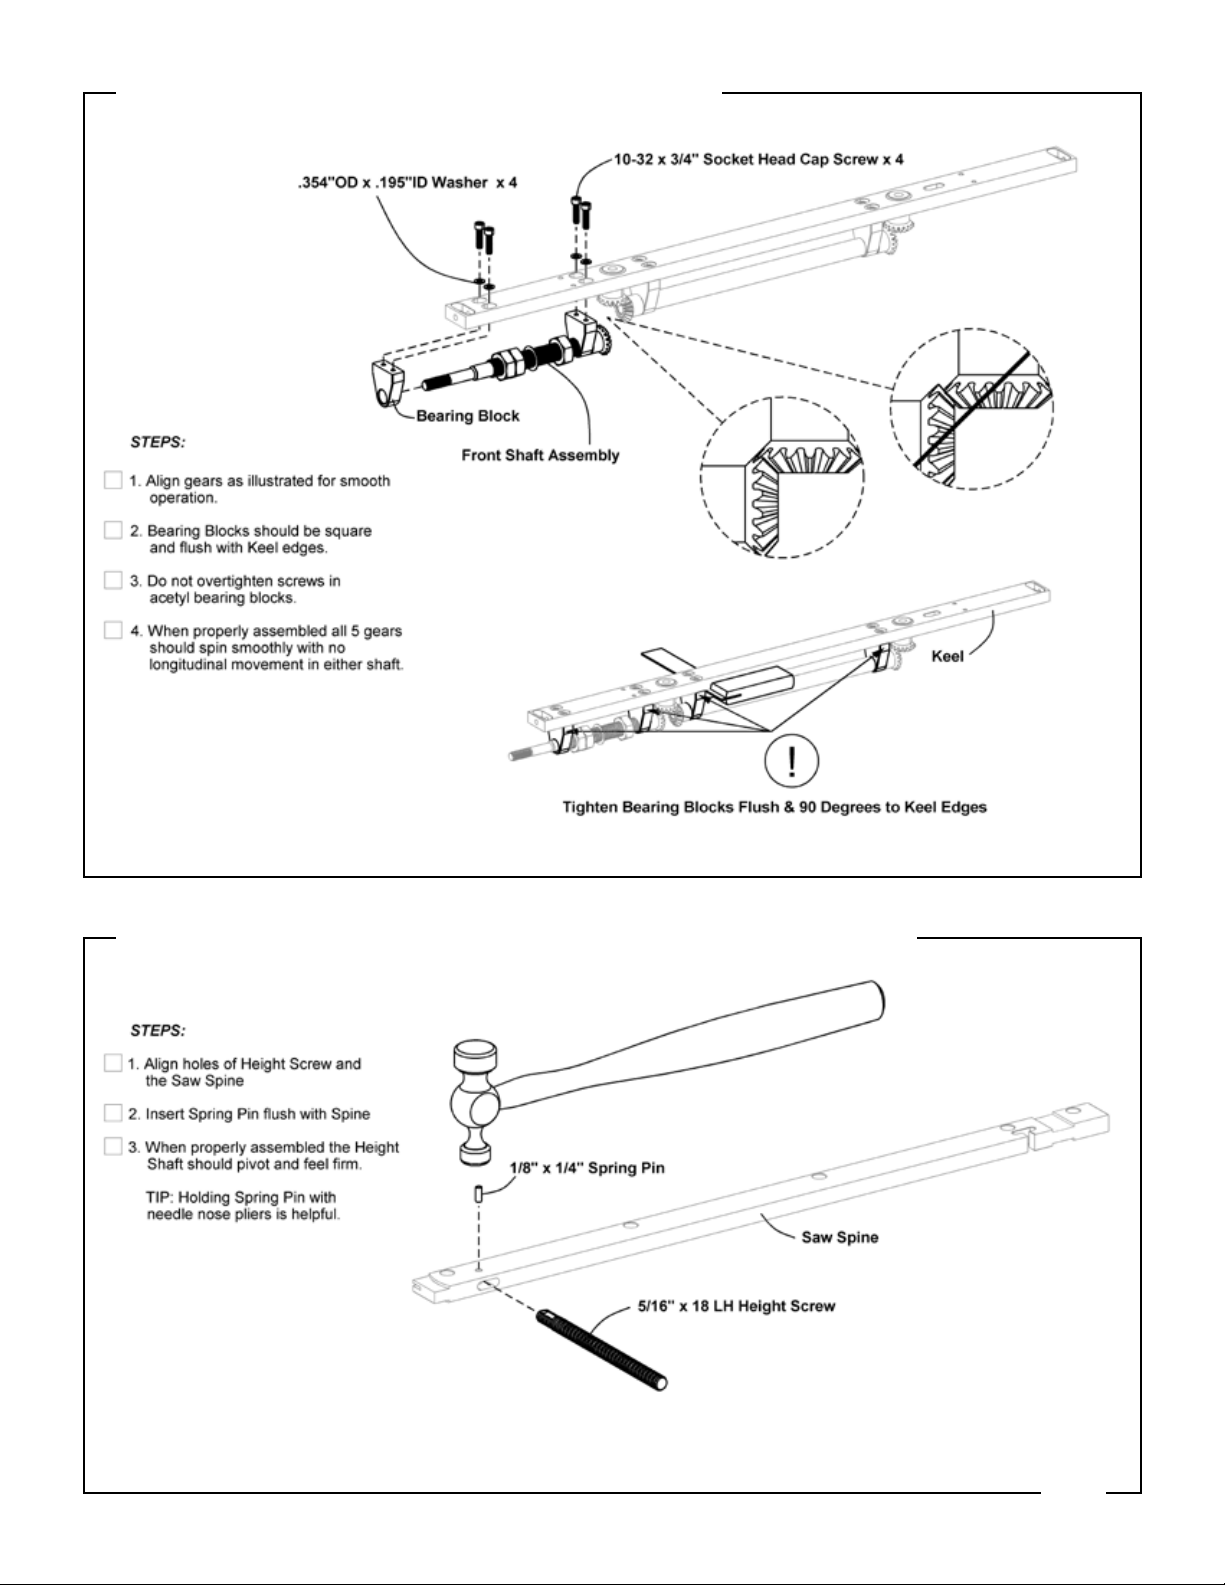
3. FRONT SHAFT TO KEEL
4. FRONT HEIGHT SHAFT TO SPINE
6
Page 8

5. SAW SPINE TO KEEL
6. REAR HEIGHT SCREW TO KEEL
7
Page 9

7. PITCH ADJUSTOR ASSEMBLY
8. REAR SPINE GUIDE
8
Page 10

9. PITCH ADJUSTOR/SPINE GUIDE
10. FRONT SPINE GUIDE
9
Page 11

11. SAW BLADE GUIDES
12. TRANSMISSION CHECK
10
Page 12

13. TRAVELERS
14. KEEL ASSEMBLY TO FRAME
11
Page 13

15. ASSEMBLY DETAIL
16. DOVETAIL WAYS
12
Page 14

17. INSIDE DOVETAIL SLIDERS
18. TABLE BUMPERS
13
Page 15

19. OUTSIDE DOVETAIL SLIDERS
www.BridgeCityTools.com
20. FENCE AND TRAP CLAMPS
14
Page 16

21. SAW BLADE
22. BLADE ALIGNMENT
www.BridgeCityTools.com
15
Page 17

23. CURSOR AND FLIP DOWN STOPS
24. BLADE HEIGHT STOP
www.BridgeCityTools.com
16
Page 18

25. OPTIONAL STAND
17
Page 19

26. STAND CORNER KEY
18
Page 20

27. LUBRICATION GUIDE
NOTES
tm
tm
tm
19
Page 21

NOTES
CUTTING GUIDE
N
20
Page 22

NOTES
21
Page 23

JM-P ACCESSORIES
Rip Blade blades 1101-201RB6
Rip Blade blades 1101-201RB3 (5 Pack)
Cross Cut B 32 TPI blades 1101-201RB2 (5 Pack)
Cross Cut B 32 TPI blades 1101-201RB5
Cross Cut A 28 TPI blades 1101-201RB4
Cross Cut A 28 TPI blades 1101-201RB1 (5 Pack)
Trap Fence
1101-201-02
Finger Stops (4 pack) 1101-201-07
Teon™ Lube 2 oz. 1101-201-04
Indicator 1101-201-05
Trap Jaws, Left and Right
1101-201-01
Straight Fence
1101-201-03
18 degree Dovetail Router Bit 1101-201-06
1/4” Shank, 1/2” OD
JMP - Stand 1101-201B
22
Page 24

SATISFACTION GUARANTEE
If, for any reason, you are not 100% sased with your purchase,
simply contact us WITHIN 90 DAYS of receipt for possible remedies, including return instrucons. Should you require a return authorizaon,
please contact us for packaging requirements. DO NOT DISASSEMBLE
your Jointmaker Pro.
For our full return/repair policy, please refer to our website.
www.BridgeCityTools.com
BRIDGE CITY TOOL WORKS
A Division of Fine Tools, LLC
2545 SW Spring Garden St., Ste. 120
Portland, Oregon 97219
LOCAL (503) 282.6997
TOLL FREE (800) 253.3332
FAX (503) 287.1085
www.BridgeCityTools.com
© 2009 Fine Tools, LLC
All rights reserved
 Loading...