

Page 1

HDTV R
ECEIVER
U
SER GUIDE
Page 2

Philips HD receiver User Guide
1
Safety Instruction
Be sure to read this User’s Manual before starting the operation of the receiver.
Never open the cover. It is dangerous to touch the inside of the receiver due to
possible electric hazard.
When the receiver is unused for a long time, unplug the power cord.
Do not use a damaged power cord that may cause a fire or an electric shock.
Place the HD receiver in well ventilated and no-heat environment.
When connecting cables, the receiver must have been powered off.
Page 3

Philips HD receiver User Guide
2
CONTENTS
CHAPTER 1. INTRODUCTION................................................................5
1.1. I
NTRODUCTION
..................................................................................................5
CHAPTER 2. SETUP AND CONNECTION...............................................6
2.3. C
ONNECTING TO
TV
OR MONITOR
.....................................................................6
2.3. V
IDEO SETUP
...................................................................................................10
2.3. C
HANNEL SETUP
...............................................................................................12
2.4. F
RONT AND REAR PANEL
...................................................................................14
2.5. J
ACKS AND CABLES
..........................................................................................16
CHAPTER 3. USING THE REMOTE........................................................18
3.1. R
EMOTE CONTROL BUTTONS
.............................................................................18
3.2. P
ROGRAMMING THE REMOTE CONTROL
............................................................20
CHAPTER 4. BASIC OPERATION.........................................................21
4.1. M
ENU TREE
......................................................................................................21
4.2. H
OW TO USE THE MENU
....................................................................................22
4.3. N
AVIGATION KEYS AND ICONS
..........................................................................23
4.4. C
HANNEL BANNER AND ICONS
..........................................................................24
4.5. C
HANNEL STATION AND ALTERNATE LANGUAGE
..................................................25
4.6. M
ULTIPLE FUNCTIONS OF
INFO KEY...................................................................26
CHAPTER 5. USING THE PROGRAM GUIDES......................................27
5.1. G
RID GUIDE AND LIST GUIDE
............................................................................27
5.2. W
HAT CAN YOU GET IN THE PROGRAM GUIDE
...................................................28
5.3. T
UNE OR SCHEDULE
? ........................................................................................30
Page 4

Philips HD receiver User Guide
3
CHAPTER 6. USER PREFERENCE ..........................................................31
6.1. S
ET FAVORITE CHANNELS
..................................................................................31
6.2. S
ET SCHEDULE
..................................................................................................32
6.3. S
ET COLOR
.....................................................................................................33
6.4. S
ET CLOSED CAPTION
......................................................................................34
6.5. S
ET FAVORITE MENUS
.......................................................................................35
6.6. S
ET GUIDE FORMAT
..........................................................................................36
CHAPTER 7. PARENTAL CONTROL .....................................................37
7.1. C
HANGE PASSWORD
.......................................................................................37
7.2. S
ET RATING LIMIT
..............................................................................................38
7.3. S
ET CHANNEL LIMIT
..........................................................................................39
7.4. S
ET HOUR LIMIT
................................................................................................40
CHAPTER 8. SYSTEM SETUP.................................................................41
8.1. S
YSTEM SETUP
..................................................................................................41
8.2. C
HANNEL SETUP
...............................................................................................41
8.3. S
CAN CHANNELS
.............................................................................................42
8.4. S
CAN TERRESTRIAL
............................................................................................43
8.5. S
CAN CABLE
...................................................................................................44
8.6. M
ODIFY CHANNELS
.........................................................................................46
8.7. C
HECK SIGNAL
................................................................................................48
8.8. V
IDEO SETUP
...................................................................................................49
8.9. S
ET MONITOR TYPE
/ F
ORMAT
...........................................................................50
8.10. S
ET OUTPUT MODE
...........................................................................................51
8.11. A
UDIO SETUP
...................................................................................................52
8.12. S
ELECT DEFAULT LANGUAGE
..............................................................................53
8.13. S
ELECT
SPDIF O
UTPUT
.....................................................................................54
8.14. S
ET VOLUME CONTROL
....................................................................................55
8.15. C
LOCK SETUP
..................................................................................................56
8.16. S
ELECT TIME ZONE
............................................................................................57
8.17. S
ETUP CLOCK
..................................................................................................58
8.18. S
ET CLOCK MODE
...........................................................................................59
8.19. S
ET DATE/TIME
.................................................................................................60
8.20. S
ET
DST ..........................................................................................................61
8.21. F
ACTORY DEFAULT
...........................................................................................62
Page 5

Philips HD receiver User Guide
4
CHAPTER 9. APPENDIX.......................................................................63
9.1. T
ROUBLE SHOOTING
.........................................................................................63
9.2. S
PECIFICATION
.................................................................................................65
9.3. F
IRMWARE DOWNLOAD
....................................................................................70
G
LOSSARY OF TERMS
..................................................................................................75
Page 6

Philips HD receiver User Guide
5
CHAPTER
1
I
NTRODUCTION
1.1. I
NTRODUCTION
Your HD receiver is capable of receive three types of signals : analog terrestrial (NTSC
format - National Television Systems Committee), digital terrestrial (ATSC format - Advanced
Television Systems Committee), and analog cable (NTSC format), and it supports two types
of display formats : ATSC and NTSC format. Also, it can decode ATSC compliant MPEG video
stream and Dolby – AC3 audio stream.
Your HD receiver allows you to select the format of the output video signal among 1080i,
720p, 480p, and 480i. Any digital/analog video input source can be converted to the userdefined format using up/down conversion functions.
Page 7

Philips HD receiver User Guide
6
CHAPTER
2
S
ETUP AND CONNECTION
2.3. C
ONNECTING TO
TV
OR MONITOR
Step 1. Unpack The System
Make sure to locate the remote control and the other cables and jacks that are included
with HD receiver.
Step 2. Connect Your HD Receiver To Other Component
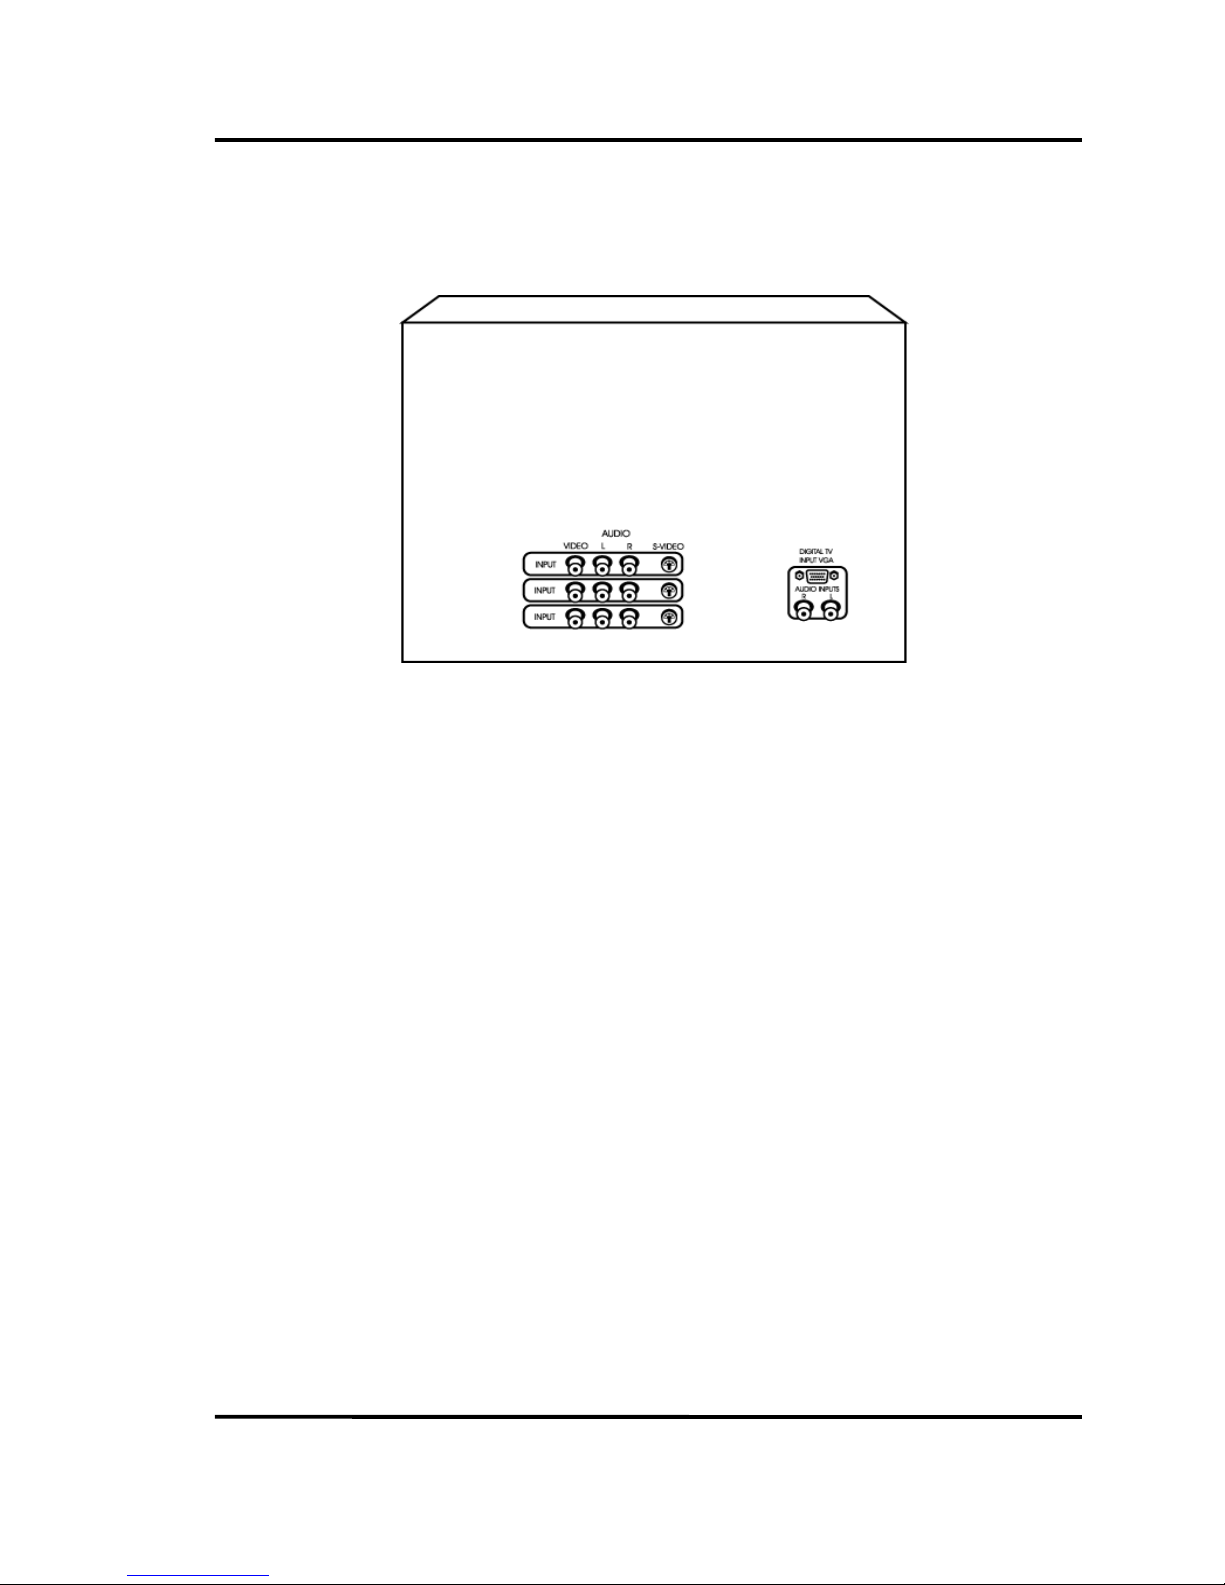
HD Receiver and Multimedia or HD Monitor
1. Connect Video cables
Using the VGA cable
Connect a VGA cable from your HD receiver’s VGA jack to the Multimedia or HD
monitor’s VGA input jack, usually labeled DIGITAL TV INPUT VGA.
Using the three RCA cables for YPbPr
Connect three RCA cables from your HD receiver’s YPbPr jack to the Multimedia or
HD monitor’s YPbPr input jack, usually labeled HD YPbPr.
Using the five RCA cables for RGBHV
Connect five RCA cables from your HD receiver’s RGBHV jack to the Multimedia or
HD monitor’s RGBHV input jack, usually labeled HD RGBHV.
2. Connect Audio cables
Using two RCA cables
Connect two RCA cables from the HD receiver’s AUDIO OUT Left (white color) and
Right (red color) jacks to the AUDIO IN Left, Right on the back of the Multimedia or
HD monitor.
Using Toslink cable (optional)
Page 8
Philips HD receiver User Guide
7
If you own a Dolby Digital receiver that uses a Toslink cable-type input, connect the
HD receiver to that receiver using a Toslink cable. it will operate on only digital
channel.
Back of Multimedia or HD monitor
3. Connect coaxial cables
Connect a coaxial cable from the VSB ANT IN jack on the back of your HD receiver
to terrestrial RF signal from antenna.
Connect another coaxial cable from CABLE jack on the back of your HD receiver to
cable signal from cable outlet.
Page 9
Philips HD receiver User Guide
8
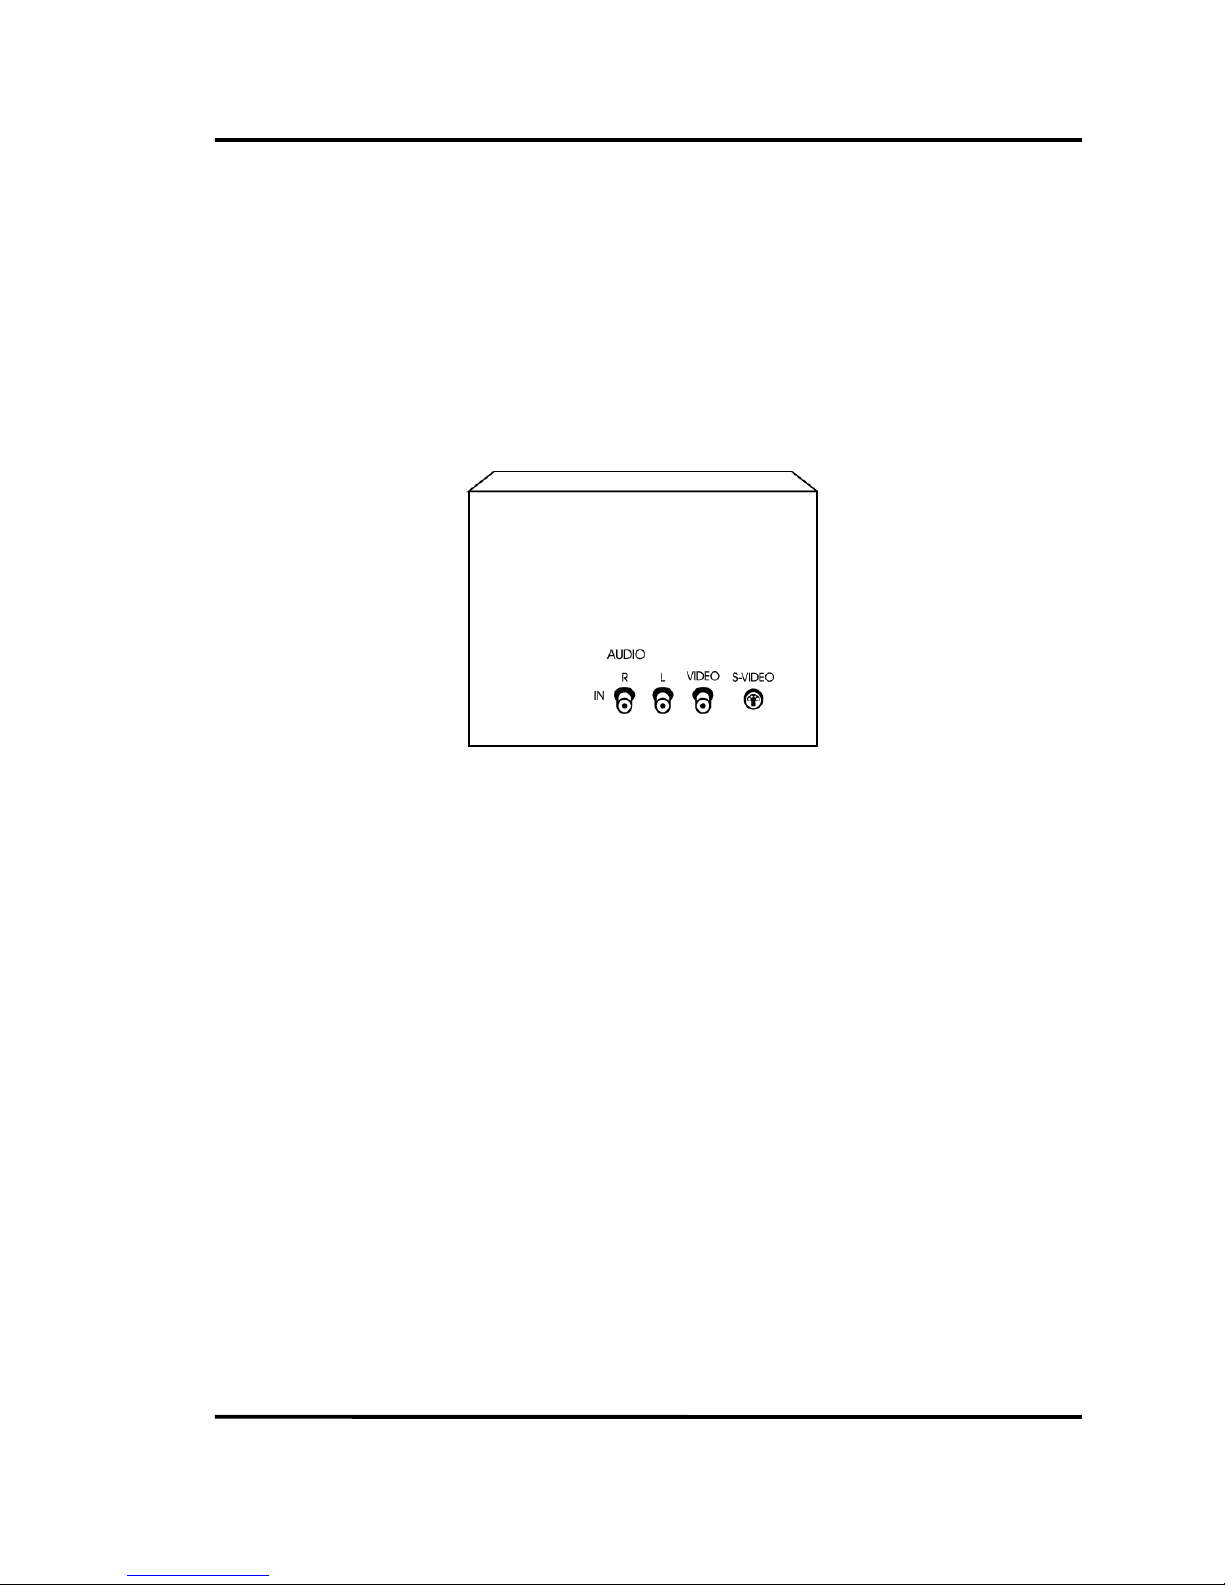
HD Receiver and Regular TV (or monitor)
1. Connect Video/Audio and S-Video cables (optional)
Connect an Video/Audio cable from the HD receiver’s VIDEO OUT (yellow color),
AUDIO OUT Left (white color) and Right (red color) jacks to the VIDEO IN, AUDIO IN
Left, Right on the back of the regular TV (or monitor).
Connect an S-Video cable from the HD receiver’s S-Video OUT jack to the TV’s S-
VIDEO IN jack.
Back of regular TV or monitor
2. Connect coaxial cables
Connect a coaxial cable from the VSB ANT IN jack on the back of your HD receiver
to terrestrial RF signal from antenna.
Connect another coaxial cable from CABLE jack on the back of your HD receiver to
cable signal from cable outlet.
Page 10

Philips HD receiver User Guide
9
Step 3. Place Batteries In The Remote Control
1. Remove the cover from the battery compartment.
2. Insert two batteries into the battery compartment, matching the + and – end of
each battery.
3. Replace the cover.
Step 4. Plug In And Turn On The System
1. Plug the power cord into a wall outlet.
2. Wait for a few seconds.
3. Turn on the your TV or monitor.
4. To turn on your HD receiver, press the HD STB button on the top of remote control.
5. Press POWER button on the remote control or the front panel.
Page 11
Philips HD receiver User Guide
10
2.3. V
IDEO SETUP
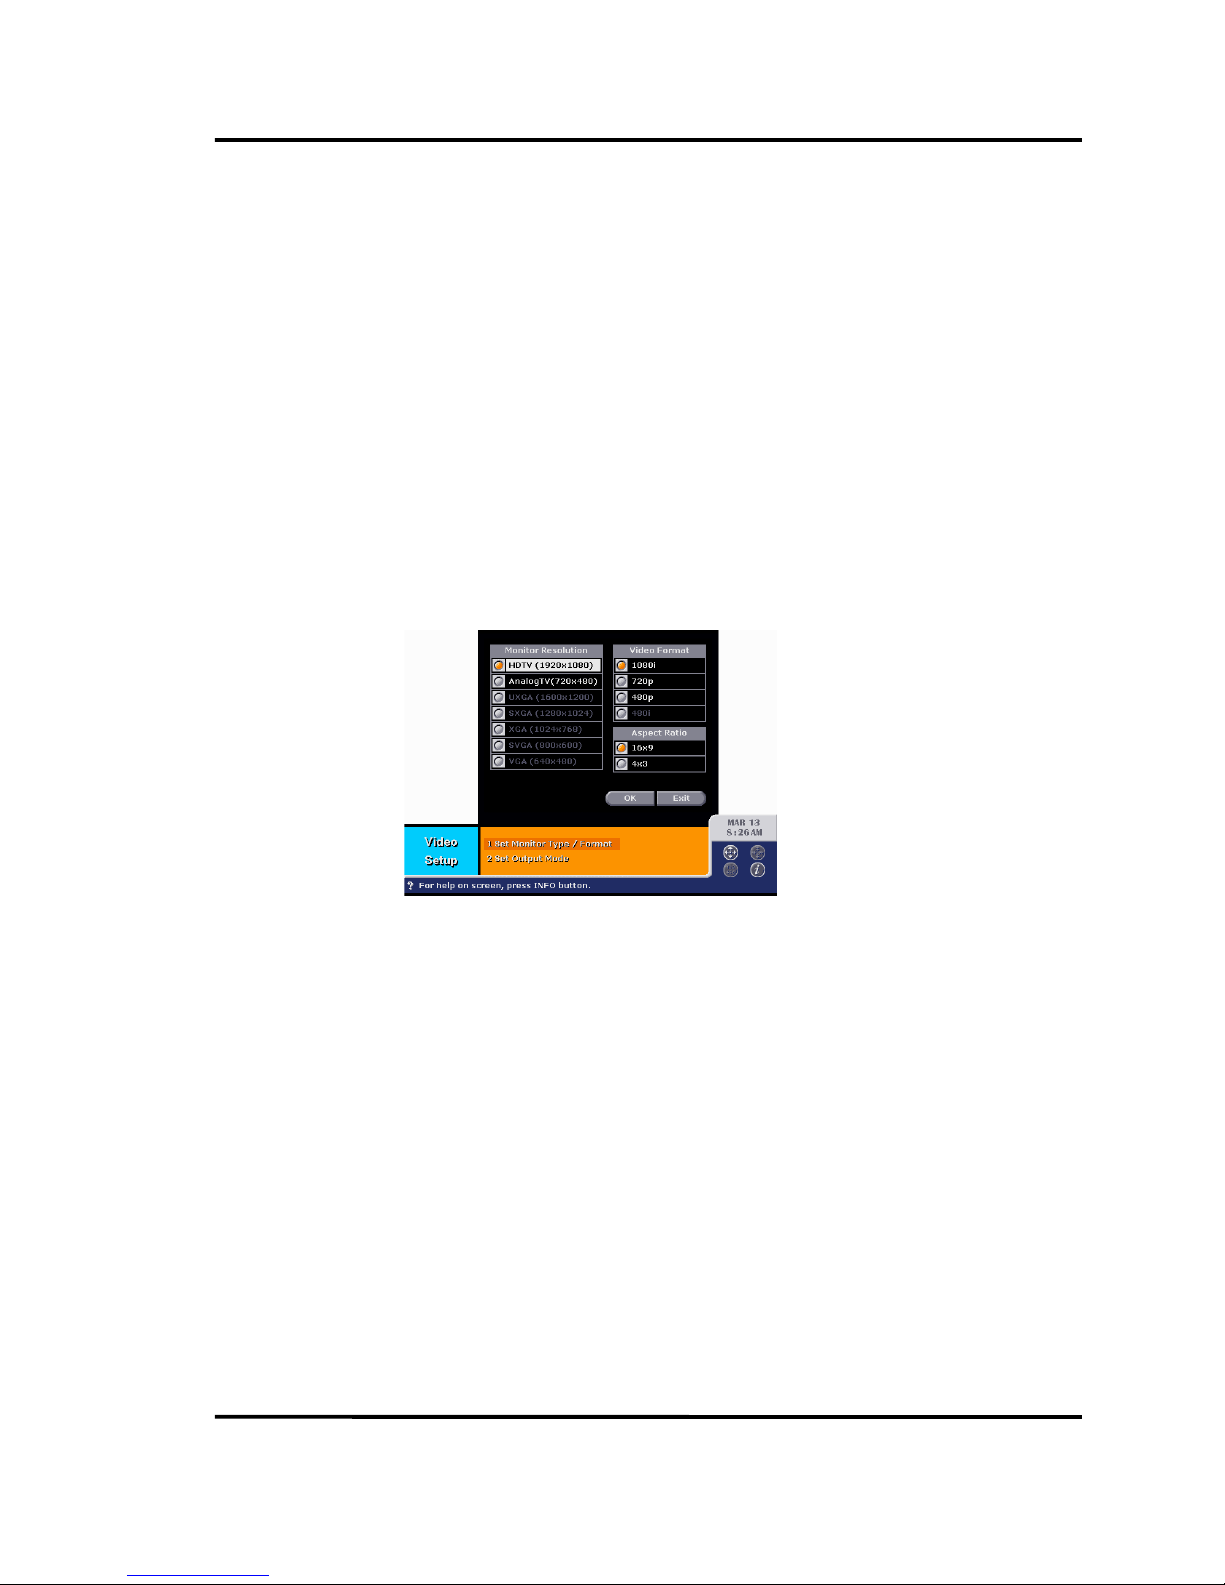
Setup Your Monitor Type And Video Format.
To select a video format :
1. Press MENU button on the remote control.
2. Select Setup from main menu.
3. Then, select Video Setup from Setup menu.
4. Then, select Set Monitor Type/Format menu from Video Setup menu.
5. Use the arrow buttons and SELECT button on the remote control to specify the
monitor type, video resolution, and aspect ratio of the TV or monitor you are using
with the HD receiver.
6. If you have HDTV, Multimedia monitor or HD monitor, select HDTV (1920X1080) from
Monitor Resolution, 1080i from Video Format, and 16X9 from Aspect Ratio. If you
have regular TV (including analog TV), select Analog TV (720X480) from Monitor
Resolution, 480i from Video Format, and 4X3 from Aspect Ratio. However, if you
have wide TV (16X9), set aspect ratio to 16X9 mode.
Page 12
Philips HD receiver User Guide
11
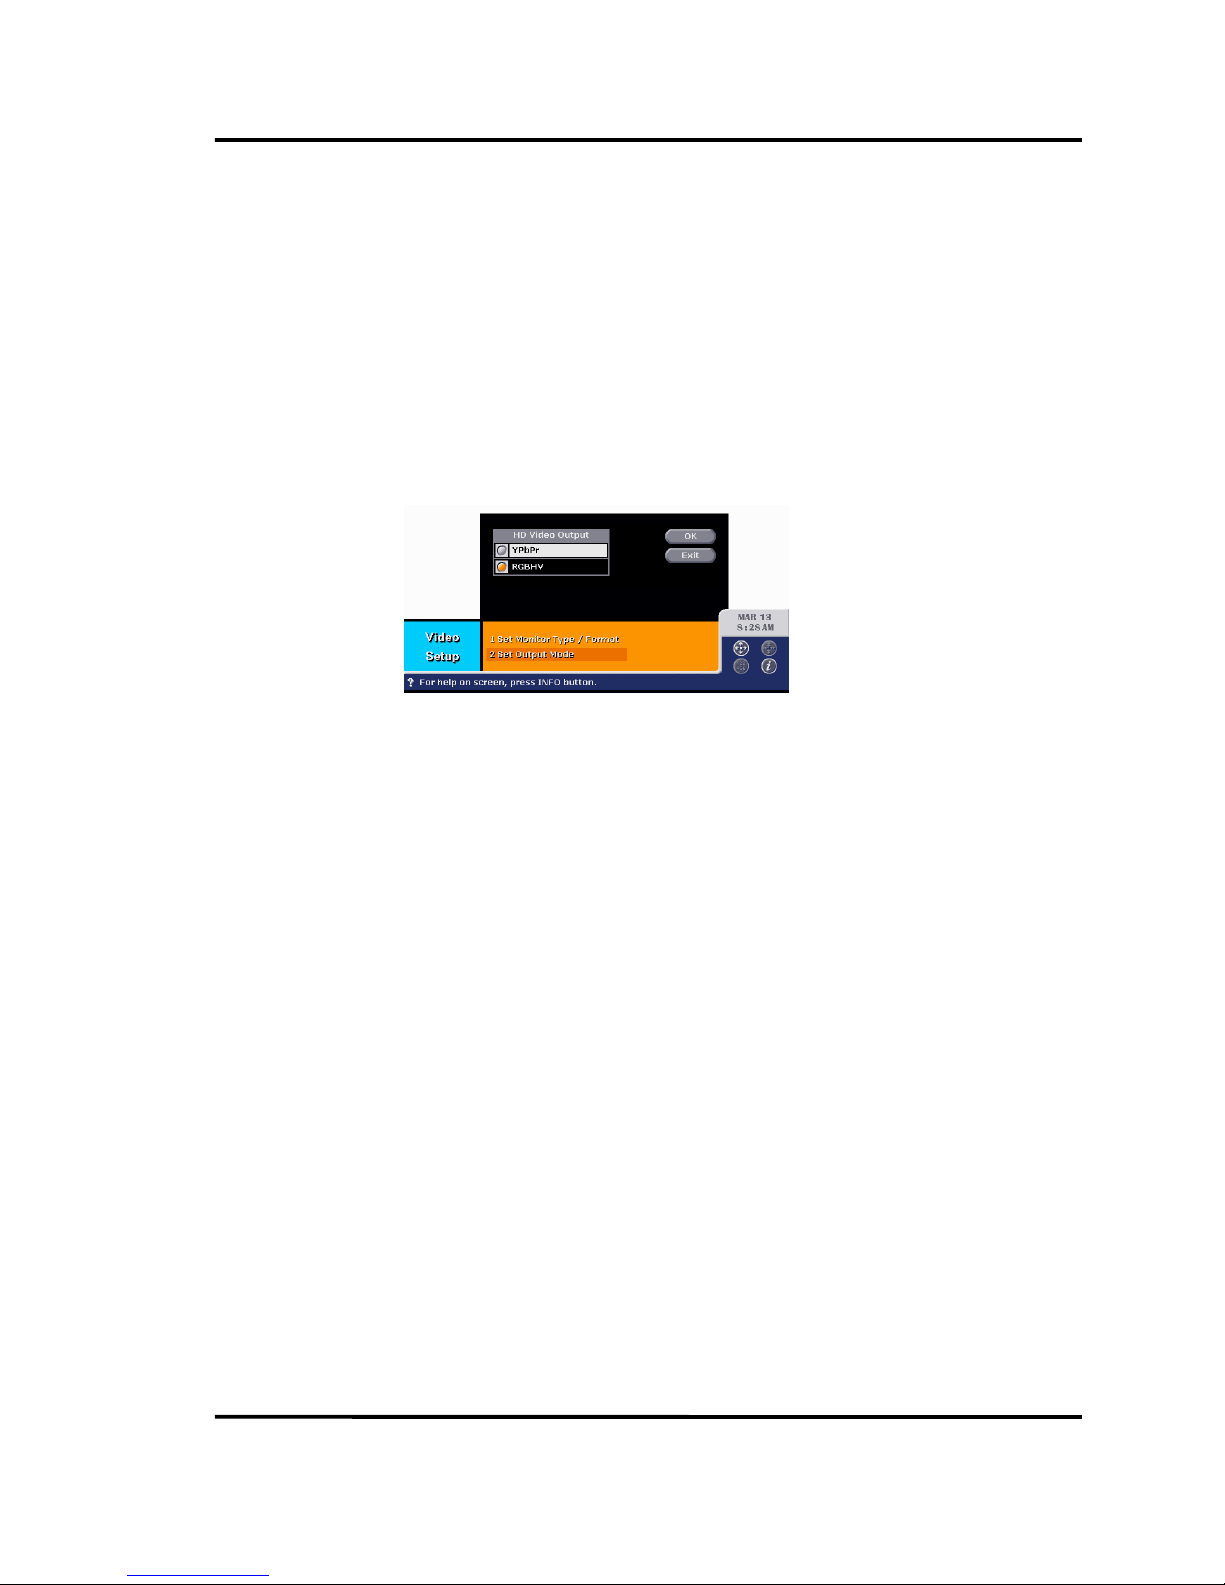
Setup Your HD Video Output Format.
To select a HD video format :
1. Press MENU button on the remote control.
2. Select Setup from main menu.
3. Then, select Video Setup from Setup menu.
4. Then, select Set Output Mode menu from Video Setup menu.
5. Use the arrow buttons and SELECT button on the remote control to specify the HD
video output format from the HD receiver.
6. If you connect YPbPr jack from your HD receiver to Multimedia or HD monitor, select
YPbPr mode from the menu. However, if you use RGBHV or VGA jack, select RGBHV
mode.
Page 13
Philips HD receiver User Guide
12
2.3. C
HANNEL SETUP
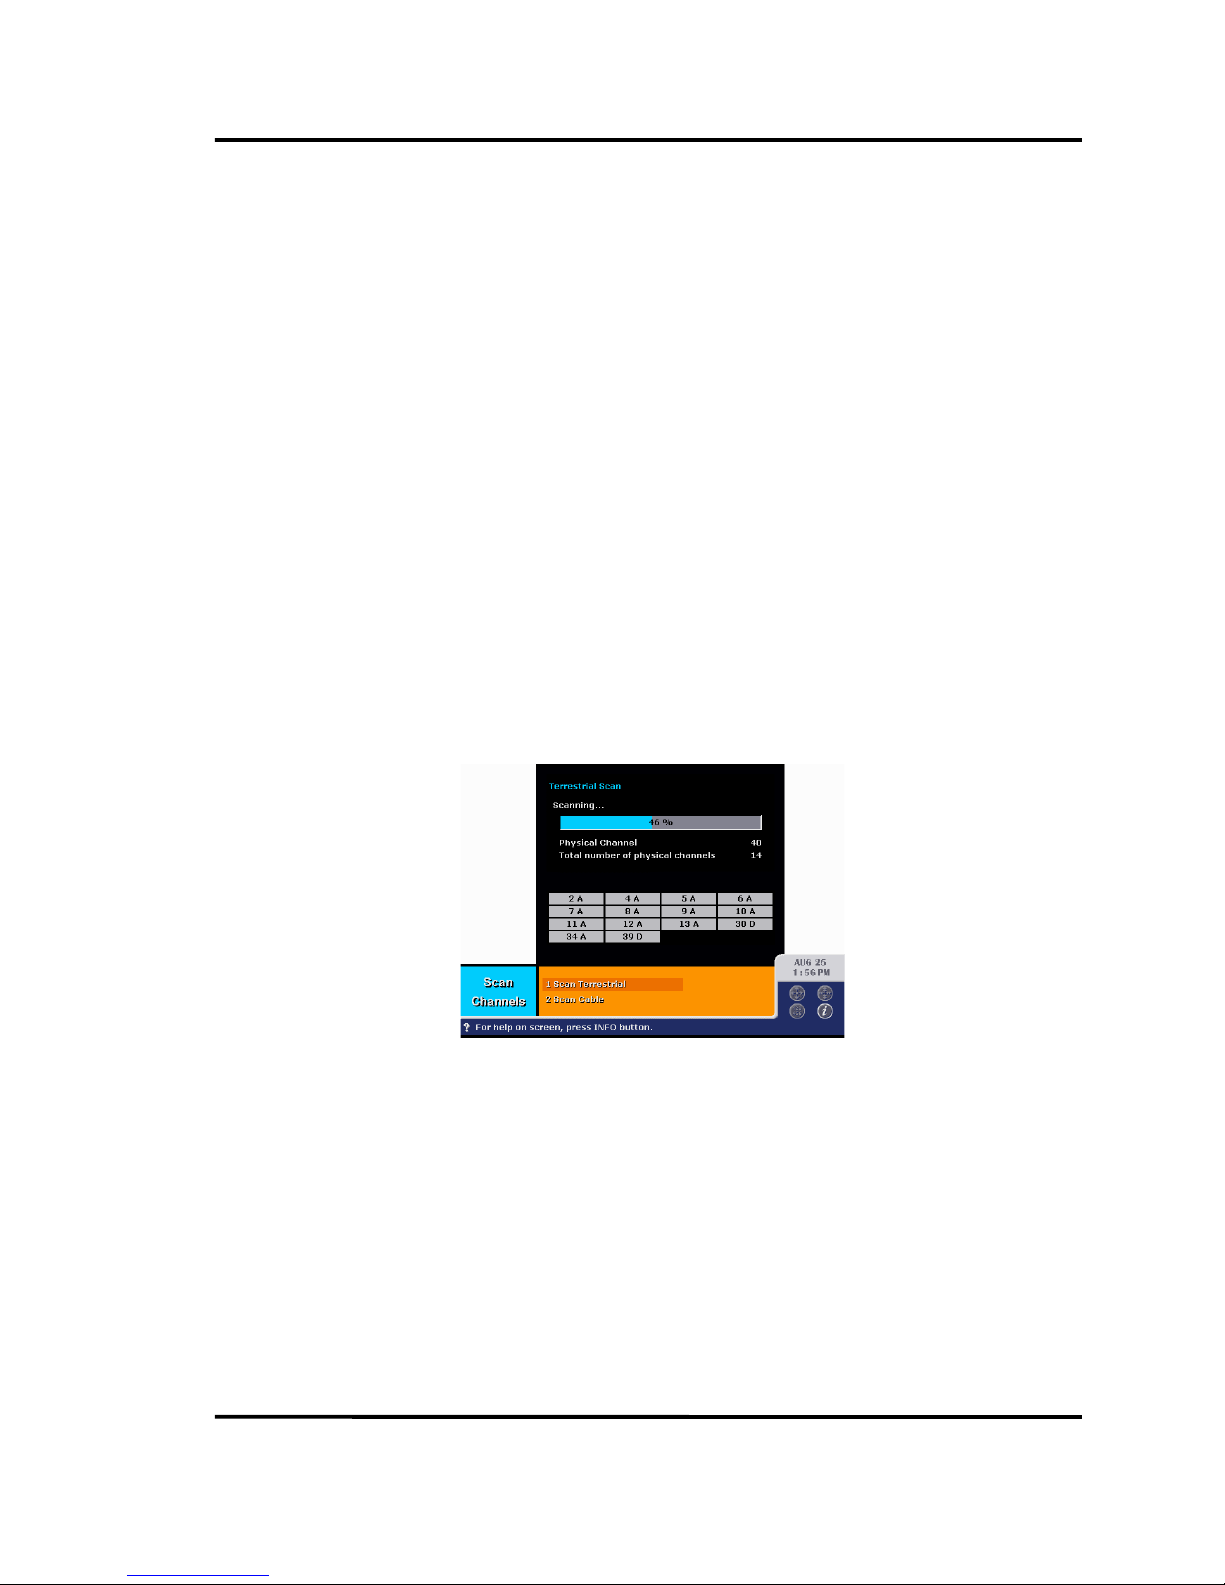
Scan Digital and Analog Terrestrial Channels
To scan terrestrial channels
1. Press MENU button on the remote control.
2. Select Setup from main menu.
3. Then, select Channel Setup from Setup menu.
4. Then, select Scan Channels menu from Channel Setup menu.
5. Then, select Scan Terrestrial menu from Scan Channels menu.
6. If you select OK button, HD receiver will search all available terrestrial channels. it
scans from channel 2 to 83 and builds the channel map.
Page 14
Philips HD receiver User Guide
13
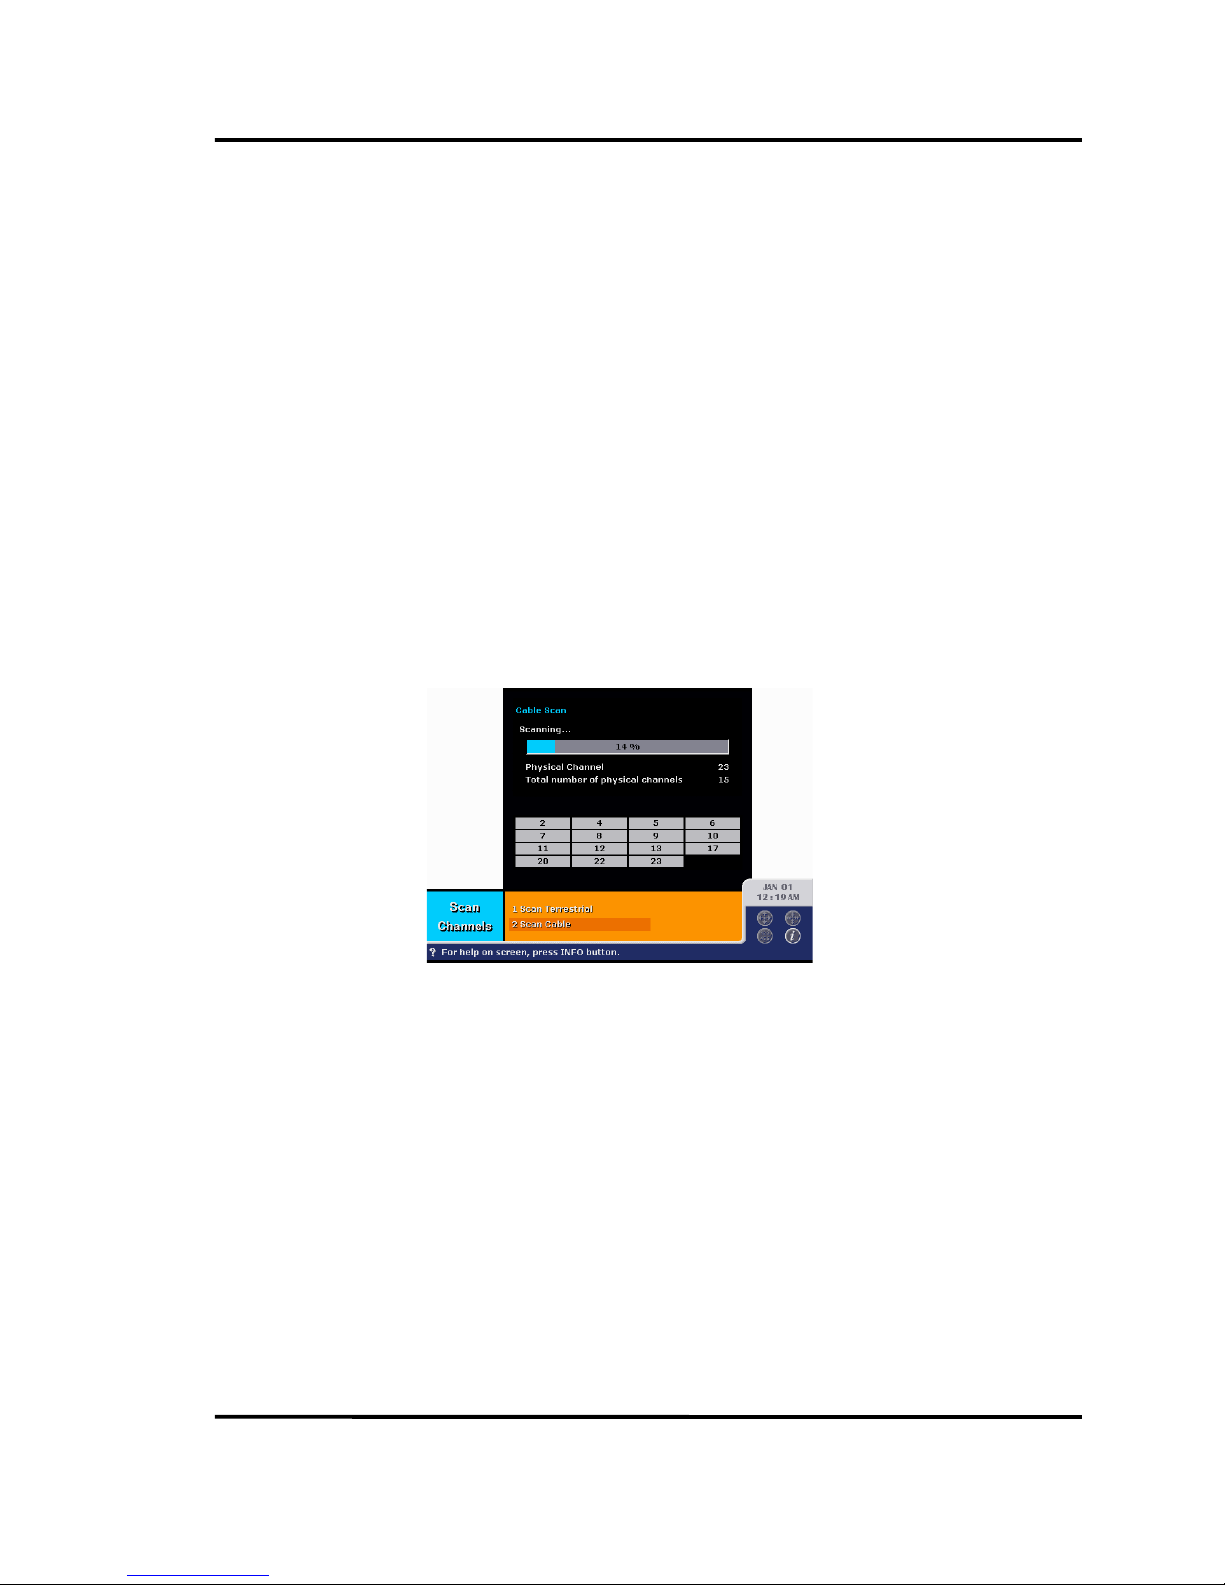
Scan Analog Cable Channels
To scan cable channels
1. Press MENU button on the remote control.
2. Select Setup from main menu.
3. Then, select Channel Setup from Setup menu.
4. Then, select Scan Channels menu from Channel Setup menu.
5. Then, select Scan Cable menu from Scan Channels menu.
6. Select your cable mode among STD, HRC and IRC.
7. If you select OK button, HD receiver will search all available cable channels and
modify the channel map.
Page 15
Philips HD receiver User Guide
14
2.4. F
RONT AND REAR PANEL
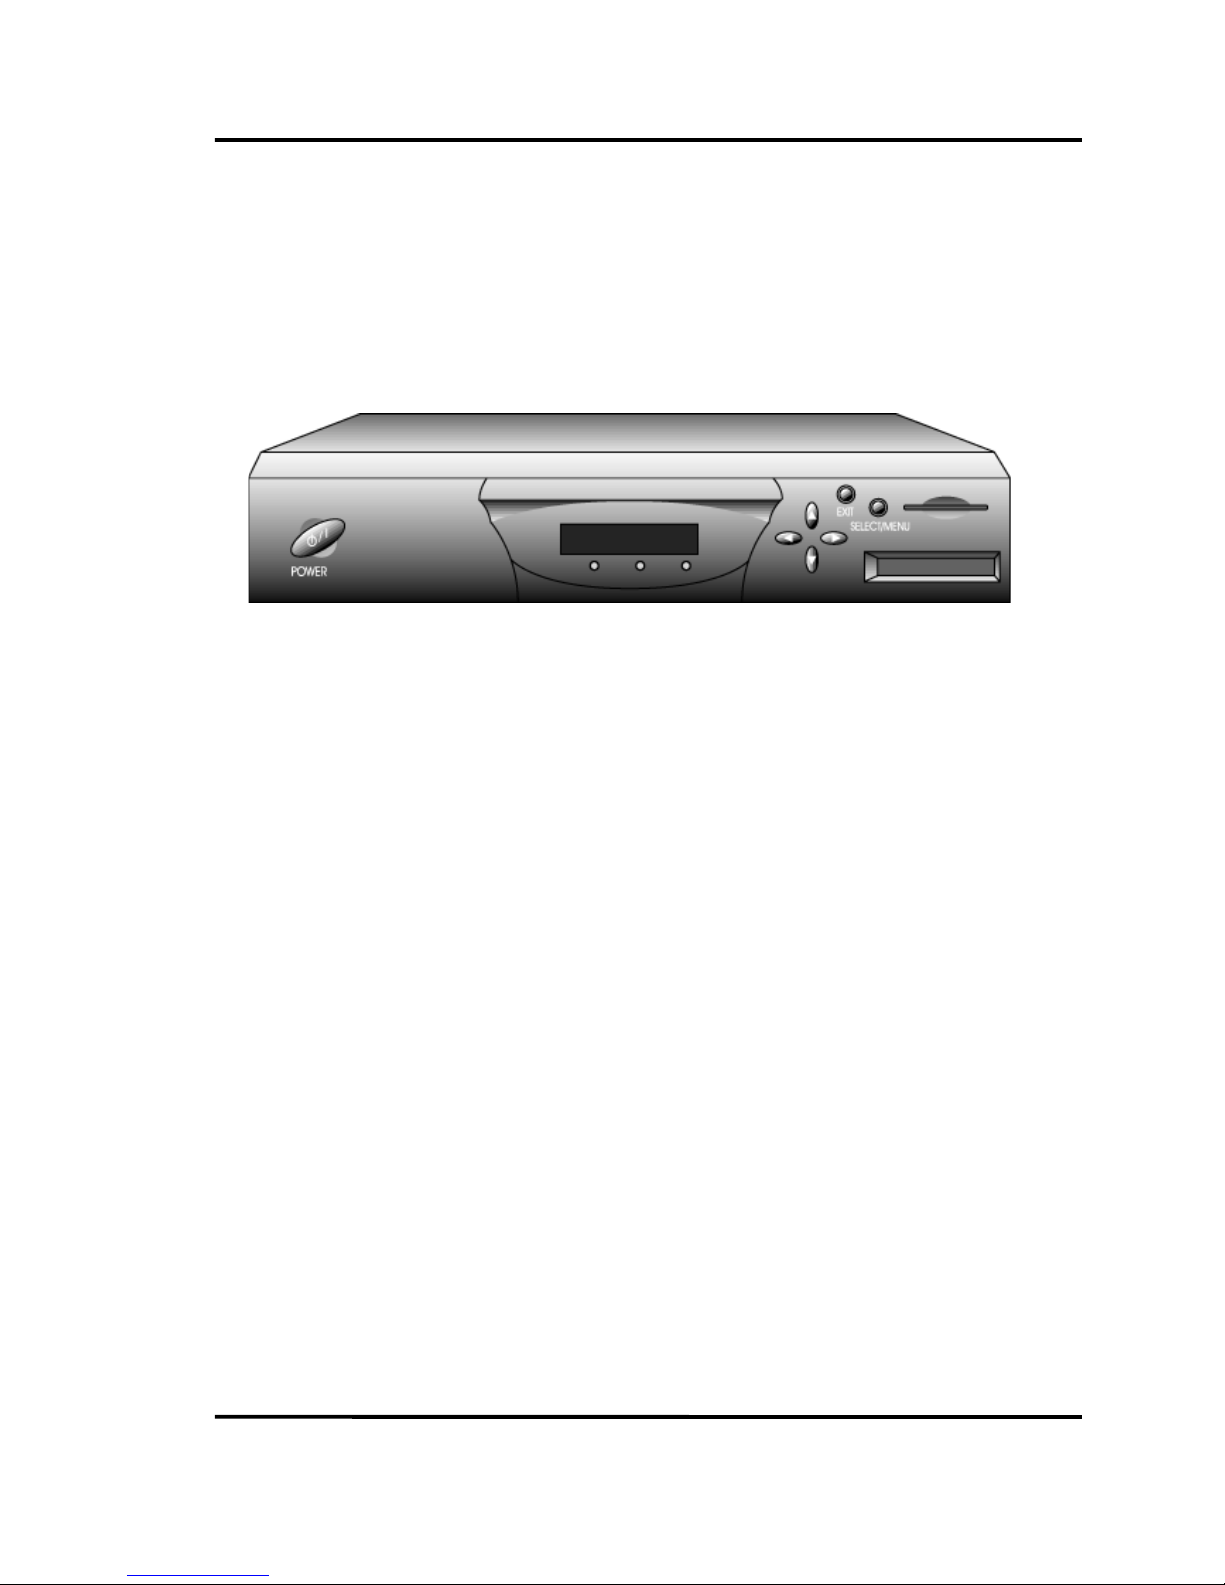
Front Of The HD Receiver
POWER Turn s the HD receiver on and off.
SELECT Selects highlighted items in the menu system. When in the normal
viewing state, if pressing this key, channel map (channel station) will
be displayed.
MENU / EXIT Brings up the main menu. When in the menu system, this key operates
as EXIT key.
Moves the highlight (cursor) up in the menu system. When in the
normal viewing state, scroll up through the current channel list.
Moves the highlight (cursor) down in the menu system. When in the
normal viewing state, scroll down through the current channel list.
Moves the highlight (cursor) left in the menu system. When in the
normal viewing state, scroll down through the favorite channel list.
Moves the highlight (cursor) right in the menu system. When in the
normal viewing state, scroll up through the favorite channel list.
Page 16
Philips HD receiver User Guide
15
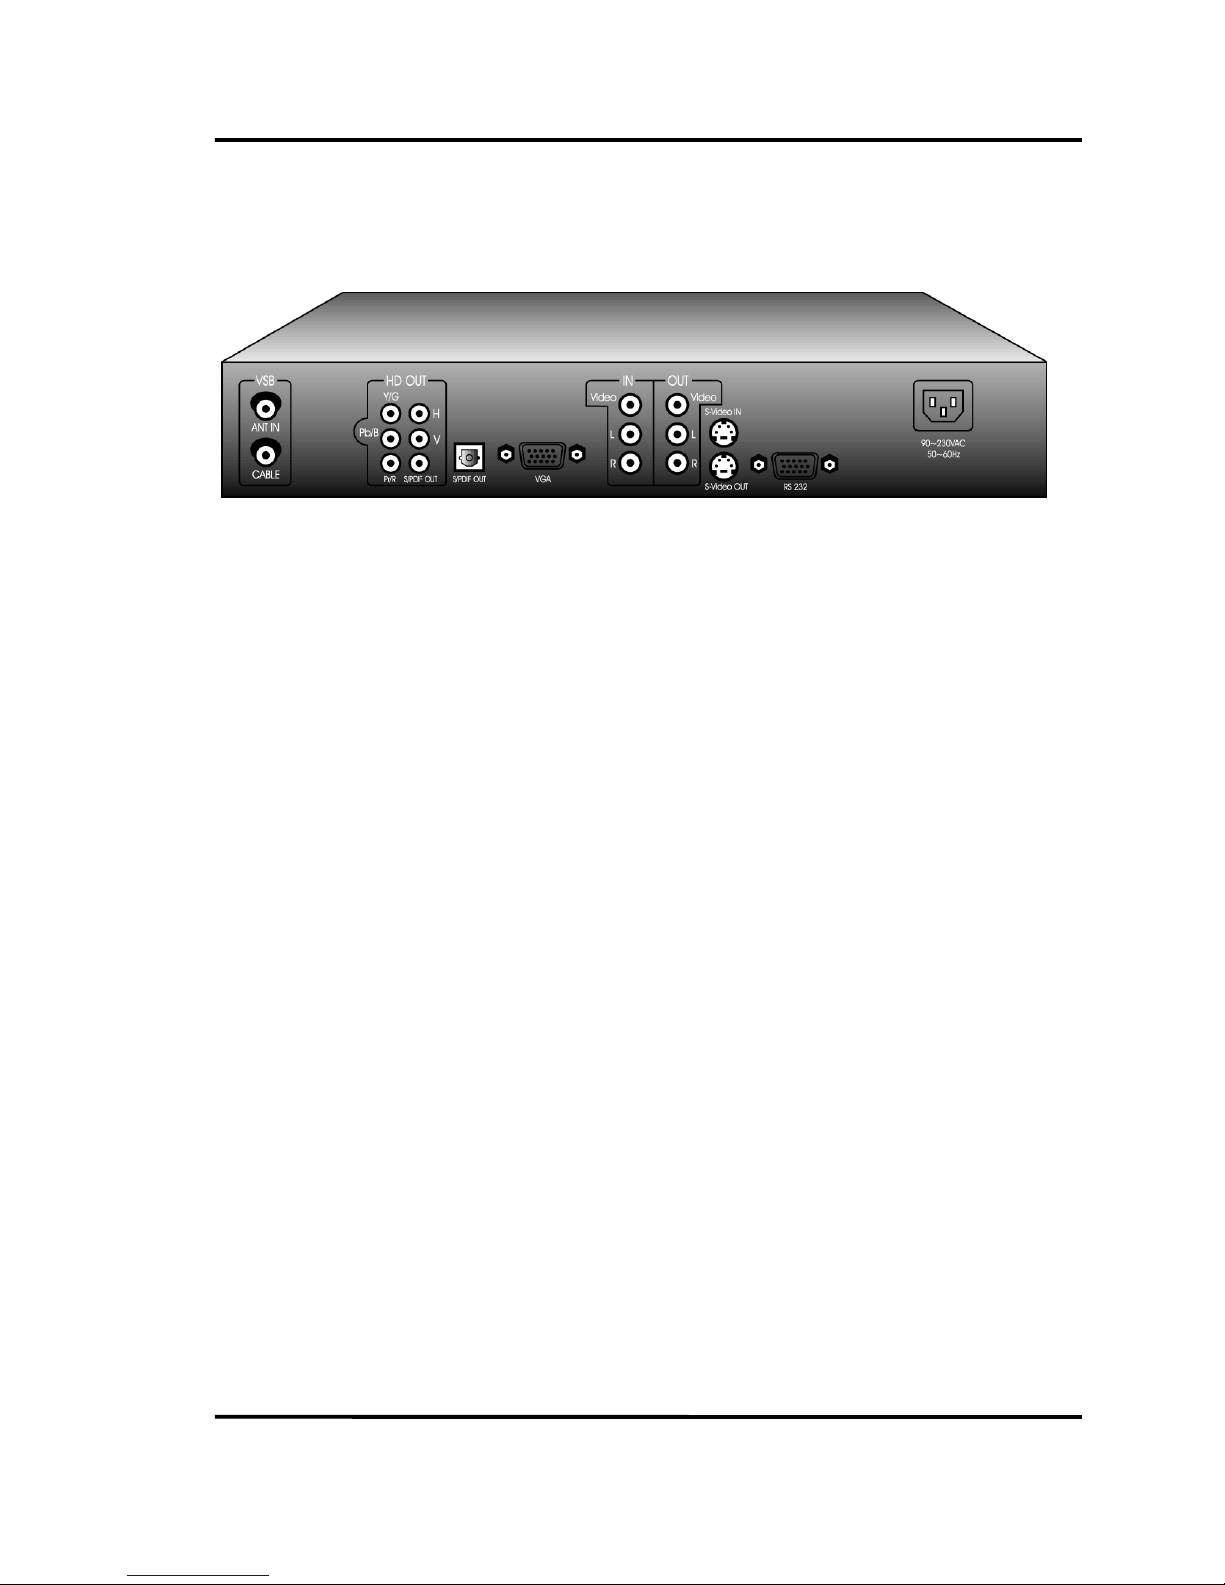
Back Of The HD Receiver
ANT IN Used to connect a terrestrial (off-air) antenna to the HD receiver.
CABLE Used to connect a cable signal to the HD receiver.
HD OUT Used to connect a YPbPr-compatible HD TV or monitor to the HD
receiver. Also, this can be used to connect a RGBHV-compatible HD
TV or monitor. These provide high definition picture quality when HD
programs in HD format are viewed.
S/PDIF OUT Used to connect a Dolby Digital decoder to your HD receiver using a
Toslink cable (or RCA cable). Dolby Digital provides good sound
quality.
VGA Used to connect a RGB-compatible HD TV or monitor to your HD
receiver. These provide high definition picture quality when HD
programs in HD format are viewed.
VIDEO IN/OUT If you use general TV (analog TV) but HD monitor, connect the TV to
VIDEO OUT of your HD receiver using a RCA cable. Also, if you have
VCR or DVD player, connect the VCR or DVD player to VIDEO IN of
your HD receiver using a RCA cable. Then, you can view the VCR or
DVD program.
S-VIDEO IN/OUT Provide better picture quality than above VIDEO IN/OUT. If your
general TV (analog TV) has S-Video capability, use this jack along
with the Audio jack to connect the HD receiver to your TV (or
monitor).
Page 17

Philips HD receiver User Guide
16
2.5. J
ACKS AND CABLES
RF Jacks and Coaxial F-typed Cables
The RF jacks and coaxial cables are necessary for reception of terrestrial (digital and
analog) and cable signals. The RF jacks on the HD receiver are labeled ANT IN and CABLE.
ANT IN is used for terrestrial signal and CABLE for cable signal.
Video/Audio Jacks and RCA-typed Cables
The Video/Audio jacks provide very good picture and stereo sound quality. If using NTSC
TV, three RCA-typed cables are required for one composite video signal and two audio
signals. If using Multimedia or HD monitor, five (or three) cables are required for RGBHV
video (or YPbPr video) and two (or one) cables for stereo sound (or S/PDIF out).
S-Video Jacks and Cables
S-Video Jack provide only the picture signal for NTSC TV. So it is used in conjunction with
audio cables (RCA-type).
Page 18
Philips HD receiver User Guide
17
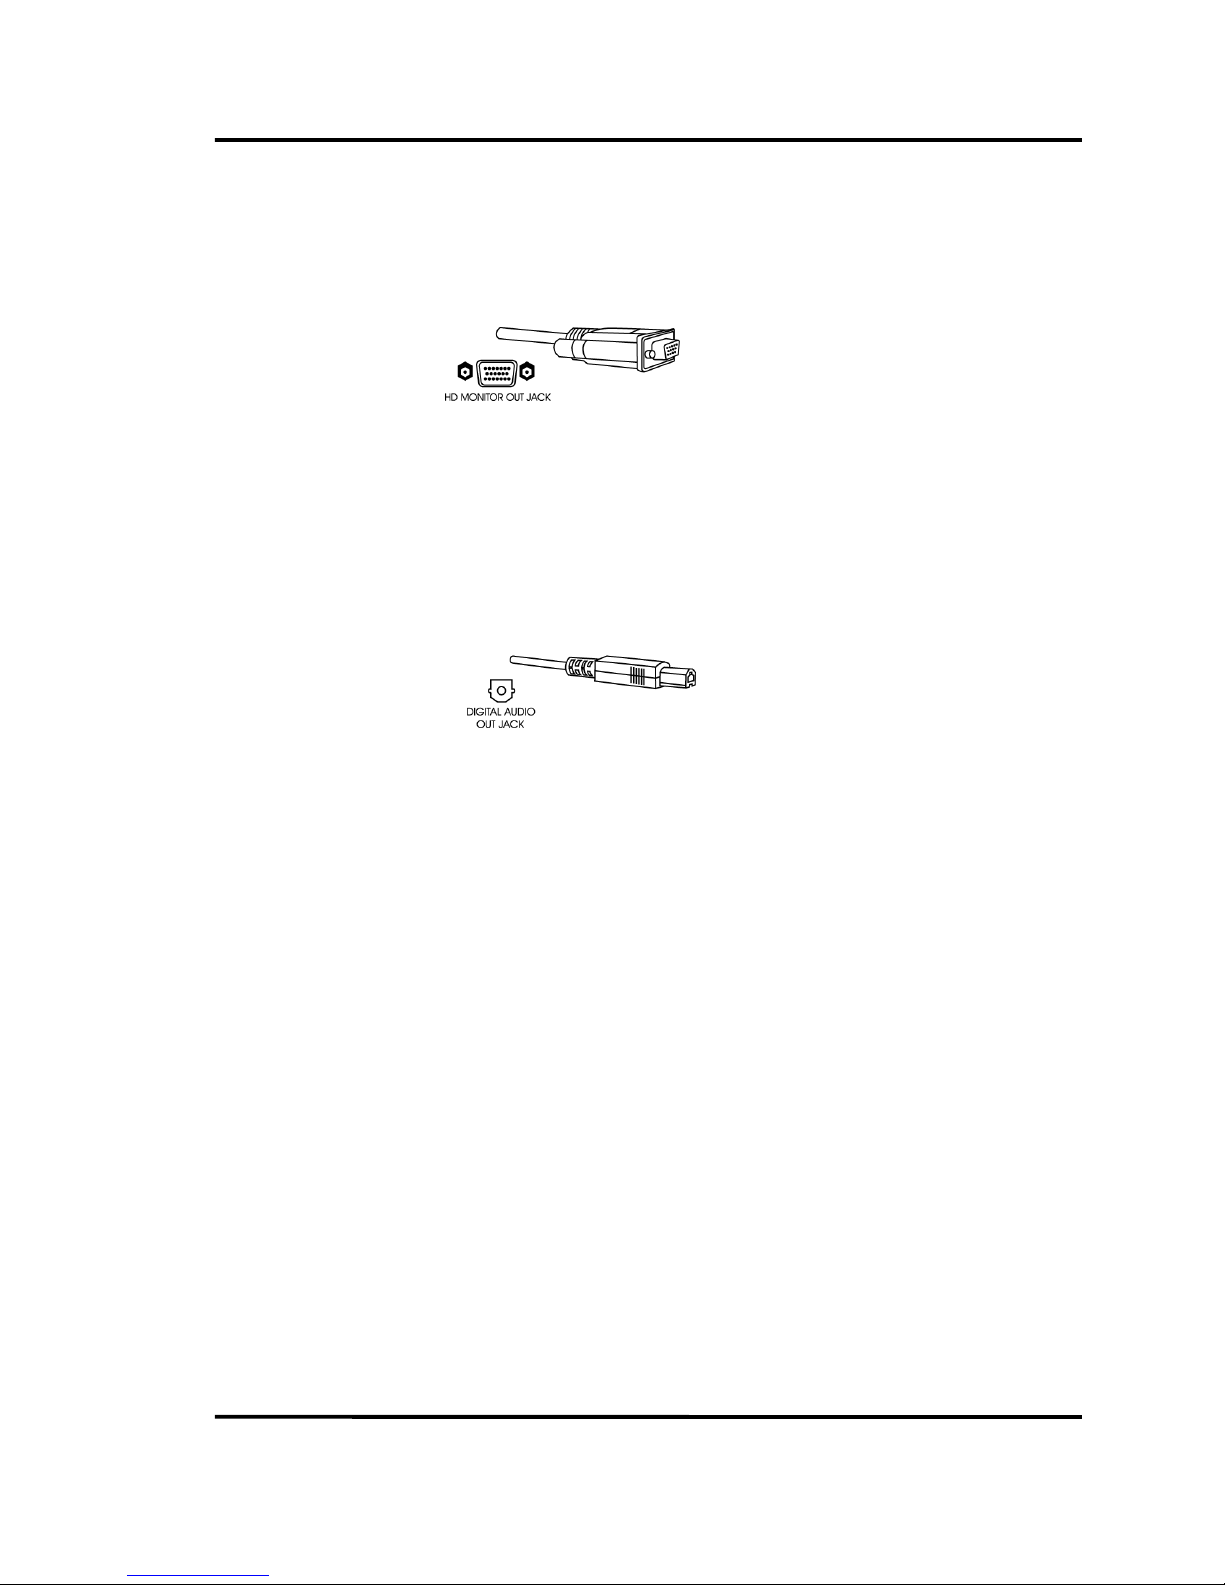
VGA Out Jack and VGA Cable
A VGA cable connects the HD receiver to RGB-compatible monitor via VGA Out jack.
S/PDIF Jack and Toslink Cable
The Toslink cable and S/PDIF OUT jack are used for connecting a Dolby Digital receiver. If
you own a Dolby Digital receiver that uses a Toslink cable-type input, connect the HD
receiver to that receiver using a Toslink cable.
Page 19
Philips HD receiver User Guide
18
CHAPTER
3
U
SING THE REMOTE
3.1. R
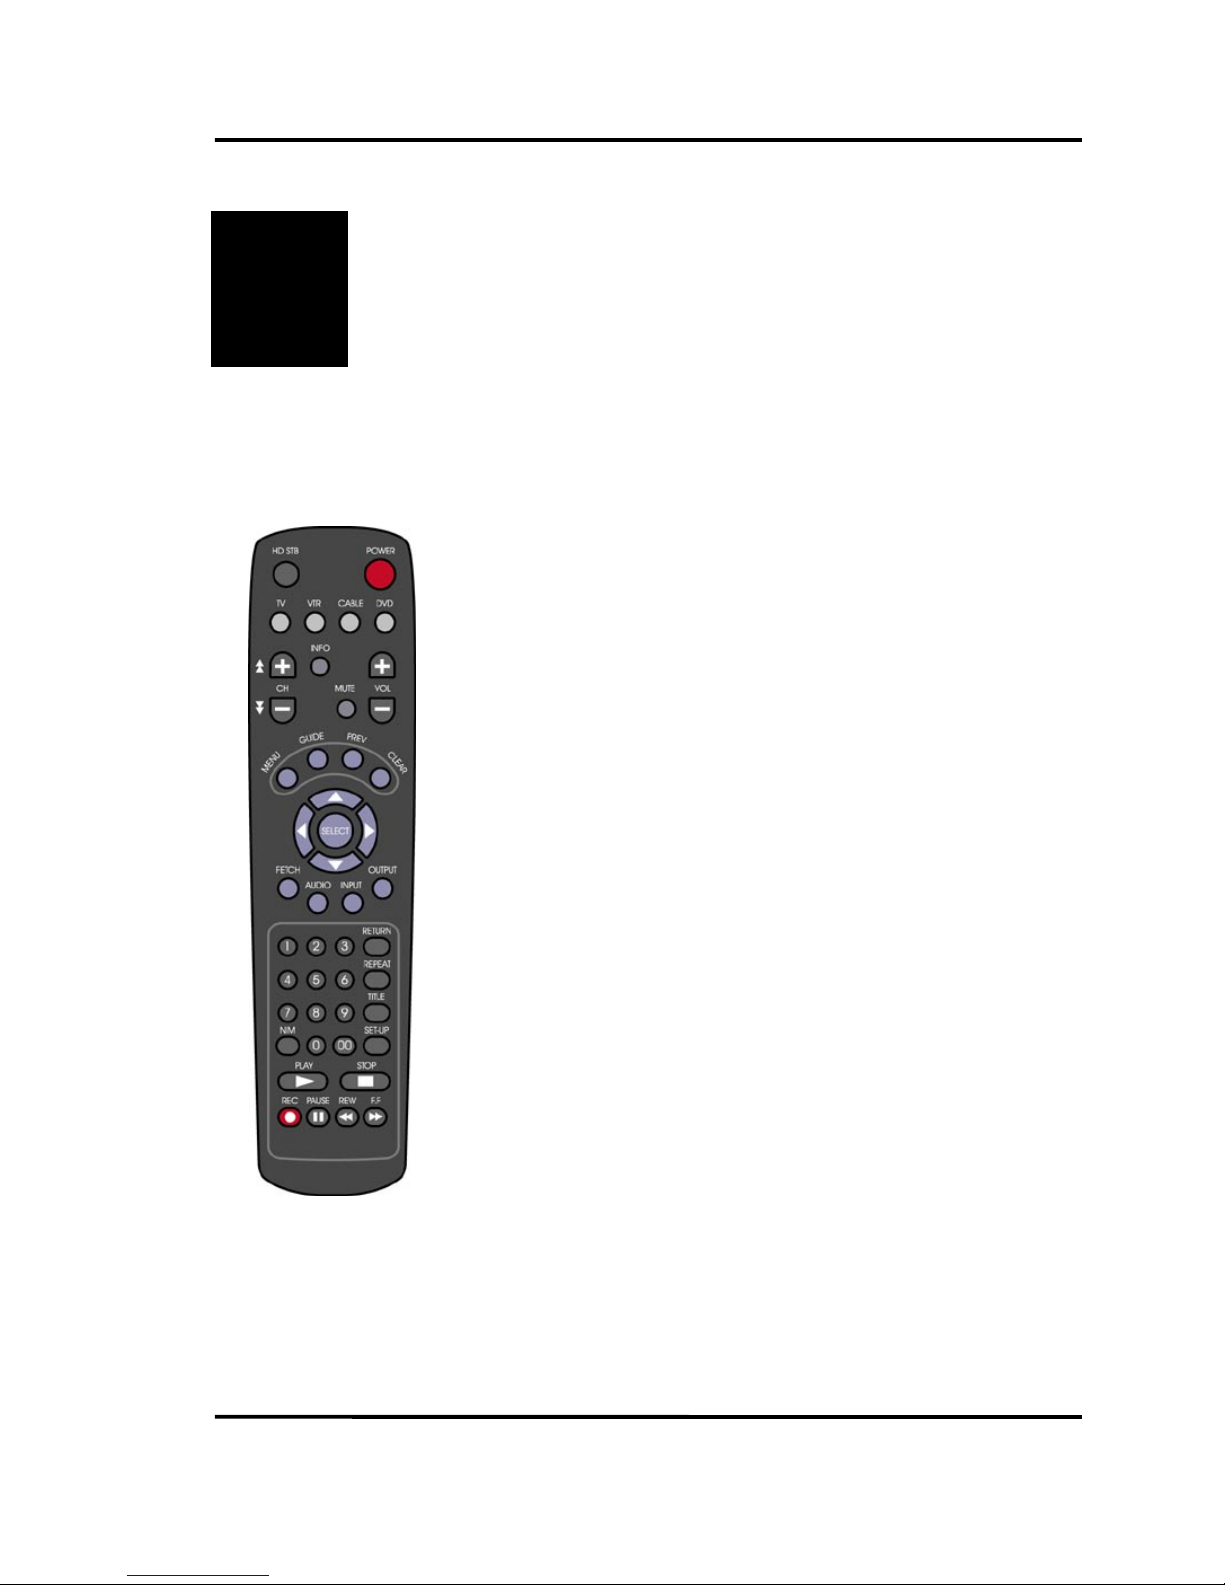
EMOTE CONTROL BUTTONS
POWER Turns the HD receiver on or off. If the
remote is in other component (VCR,
CABLE, DVD) and programmed,
POWER can turn other component on
or off.
HD STB tells the remote to control the HD
receiver.
TV If programmed, tells the remote to
control your TV
VCR If programmed, tells the remote to
control your VCR.
CABLE If programmed, tells the remote to
control your CABLE BOX.
DVD If programmed, tells the remote to
control your DVD player.
CH +/ - Scroll up/down through the current
channel list. When in the menu
system, used to scroll page up/down
through item list on the correspond
menu.
INFO Brings up program information of
current channel via channel banner.
If pressing one more, channel banner
will be removed. If pressing when in
the menu system, direct help
message will be displayed.
NIM Used to selecting NIM (Network
Interface Module), terrestrial or cable
along with entering channel numbers
directly.
Page 20

Philips HD receiver User Guide
19
VOL +/- Control audio volume level. When programmed, adjusts the
TV, VCR, CABLE, or DVD’s audio volume. When in the grid
program guide, used to scroll page right/left on the time axis.
MENU Brings up the main menu wherever you are on the menu
system.
GUIDE Brigns up the program guide where you are on the menu
system. If pressing one more, guide mode will be toggled grid
or list. Default value is grid.
PREV Moves to the previous channel when pressing in the normal
viewing. When in the menu system, moves to the previous
stage.
CLEAR Removes OSD (on screen display) on menu system and return
to normal viewing.
ARROWS UP/DOWN Scroll up/down through the current channel list. When in the
menu system, used to scroll up/down through item list on the
correspond menu.
ARROWS LEFT/RIGHT Scroll up/down through the favorite channel list. When in the
menu system, used to scroll left/right through item list on the
correspond menu.
SELECT Displays the channel station (current channel list) in the
normal viewing. When in the menu system, selects highlighted
item.
FETCH Jumps to your favorite menu from normal viewing. If pressing
when in the menu system, save or delete correspond menu
from favorite menu list.
AUDIO Selects alternate audio or SAP (secondary audio program) of
current channel. If there is no response, current channel has
no alternate audio.
INPUT Select the input source among NIM (VSB), VIDEO IN (CVBS),
and S-VIDEO IN (SVHS).
DIGIT BUTTONS Enter channel numbers directly to change channel.
PLAY, STOP, REC, PAUSE, REW, F.F
Control VCR, DVD player if programmed.
Page 21

Philips HD receiver User Guide
20
3.2. P
ROGRAMMING THE REMOTE CONTROL
Your remote control is universal, so it controls most brands of remote controllable
component, such as TVs, VCRs, Cable boxes, and DVD players if programmed.
Program Your Component
1. Press/hold correspond button (TV, VCR, CABLE, DVD) on the remote control to
program your component.
2. Press your three digit remote control code of brand.
3. Release the button.
4. Check if the remote is working correctly.
Once the remote has been programmed successfully, you are ready to use it to control
your TV, VCR, Cable box, or DVD player.
Page 22
Philips HD receiver User Guide
21
CHAPTER
4
B
ASIC OPERATION
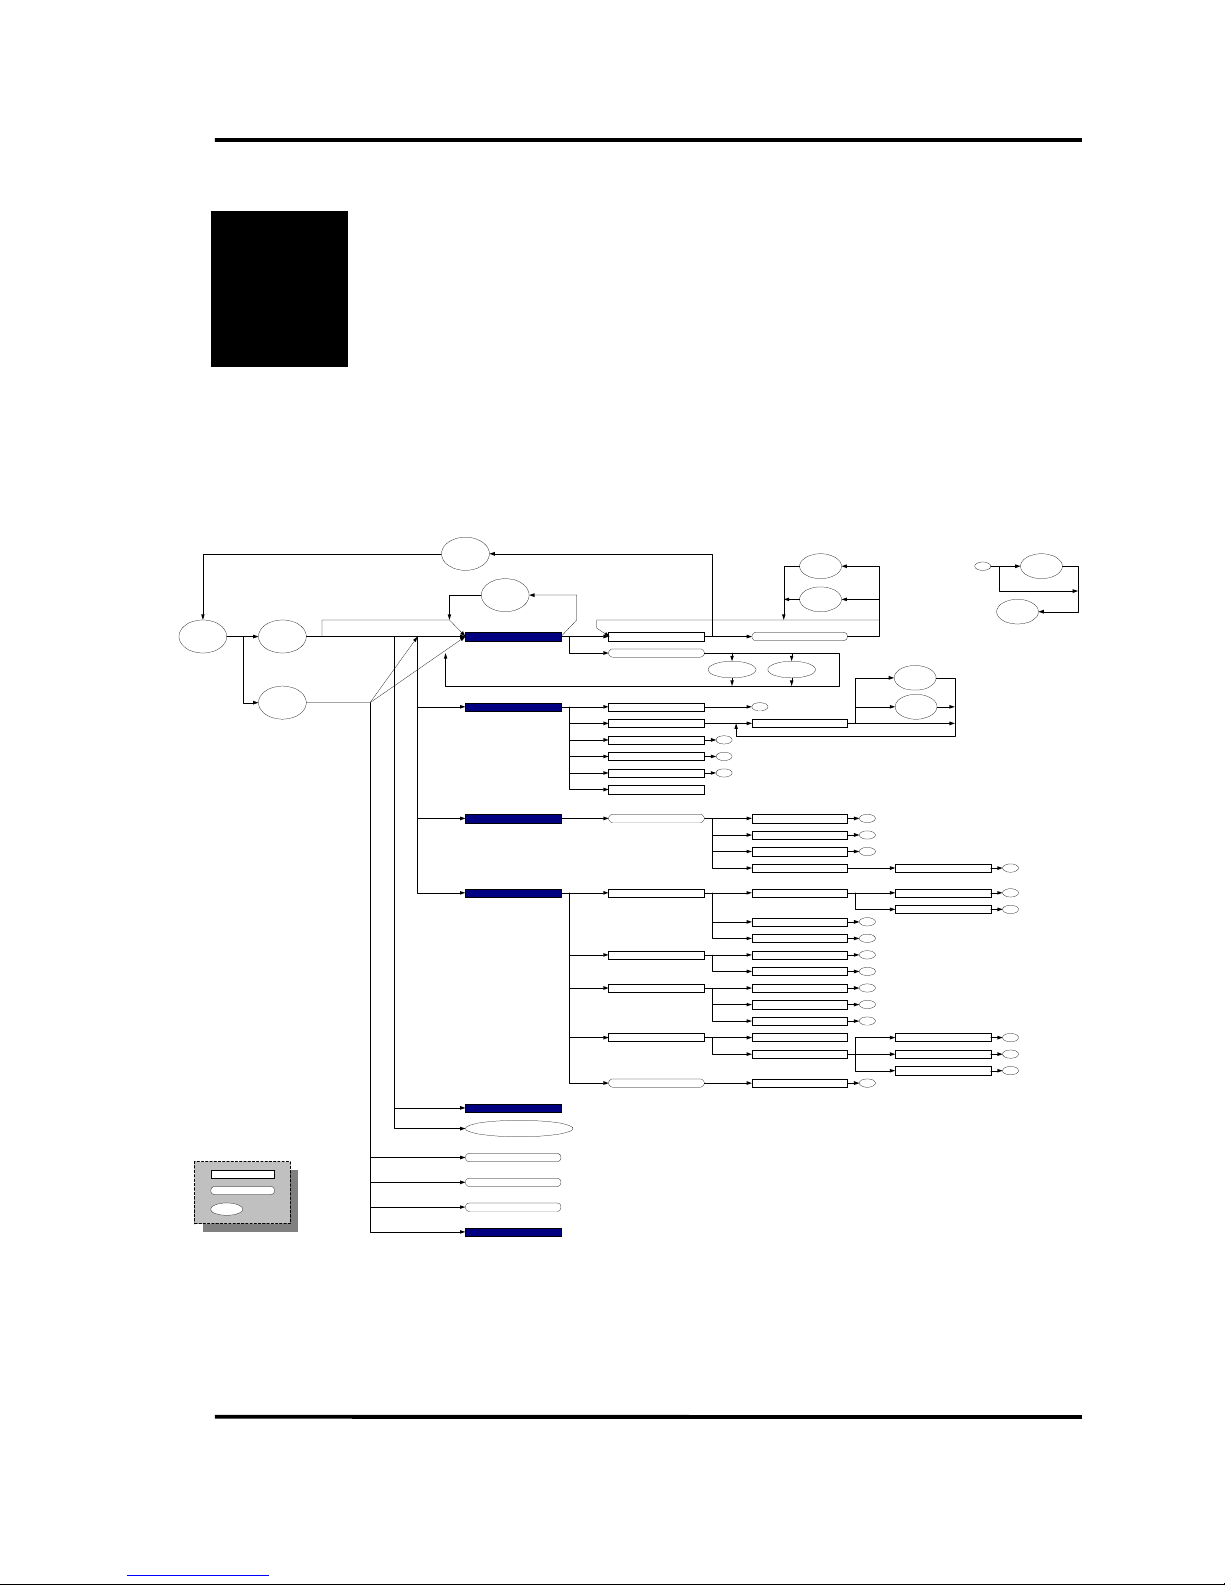
4.1. M
ENU TREE
1. Program Guide Schedule
MENU
GUIDE
1. Set Favorite Channels
3. Set Color
4. Set Closed Caption
2. Set Schedule
2. User Preference
2. Set Rating Limit
4. Set Hour Limit
3. Set Channel Limit
1. Change Password3. Parental Controls
5. Factory Default
4. System Setup 1. Channel Setup
2. Video Setup
1. Select Default Language
2. Select SPDIF Output
3. Audio Setup
1. Select Time Zone
2. Setup Clock
4. Clock Setup
System Status
MENU+SELECT+
RIGHT
Detailed Pgm Information
5. Set FavoriteMenus
Normal
Viewing
User's Input
Thru Front
User's Input
Thru
Remote
Language Selection
Input Selection
Tune to
Channel
GUIDE
MENU
AUDIO
INPUT
Toggle
Guide
Format
GUIDE
Tune
Schedule
Store
Schedule
Delete
Schedule
Rescan All
EITs
INFO
Update Selection
Rescan EIT
All
Current
Cancel
Exit
Delete
OK
Edit Scehdule
Store
Schedule
Delete
Schedule
Store
Settings
OK
Edit Hour Limit
A
Exit
To
Previous
Screen
A
SELECT
OK
Exit
Delete
A
A
A
A
A
A
A
A
Inquire Password
Inquire Password A
Screen
State
Dialog Box
6. Set Guide Format
A
2. Modify Channels
3. Check Signal
1. Scan Channels
A
A
Change Video Output Format
(1080i > 720p > 480p > 480i)
MENU+SELECT+
LEFT
Favorite Menus
FETCH
Channel Selection
SELECT
1. Set Monitor Type / Format
2. Set Output Mode
A
A
1. Scan Terrestrial
2. Scan Cable
A
A
2. Set Date/Time
3. Set DST
3. Set Volume Control
1. Set Clock Mode A
A
A
A
Page 23
Philips HD receiver User Guide
22
4.2. H
OW TO USE THE MENU
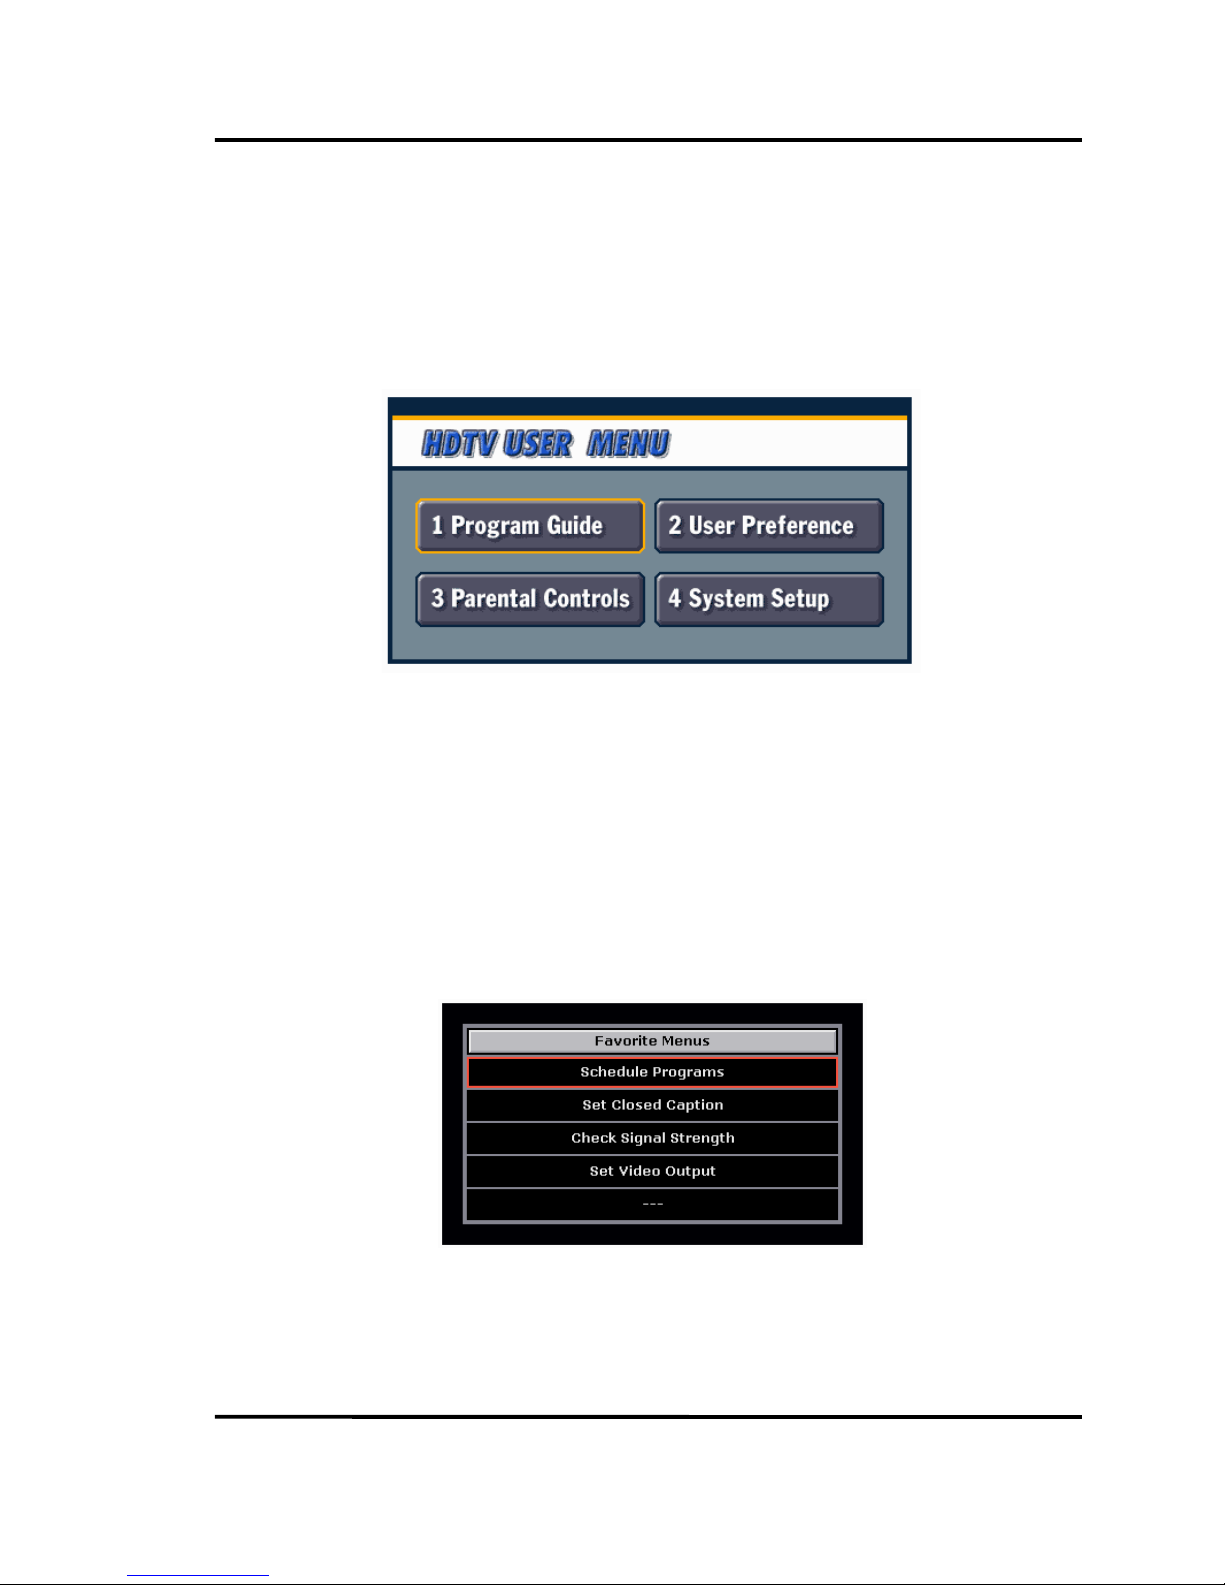
You can enter the main menu by pressing MENU key. Use arrow keys to move the cursor
and press SELECT key to select a menu. More detailed key operation is described in Section
4.3.
HD receiver provide fast ways to access the Program Guide and other menus.
If you want to go directly to the Program Guide menu, press GUIDE key. HD receiver
responds to GUIDE key wherever you are in the menu tree.
If you have set some frequently accessed menus as the favorite menu, the access to one
of the favorite menus is just two steps away. Press FETCH and select wanted menu. More
details on how to set the favorite menu can be found in Section 6.5.
Page 24
Philips HD receiver User Guide
23
4.3. N
AVIGATION KEYS AND ICONS
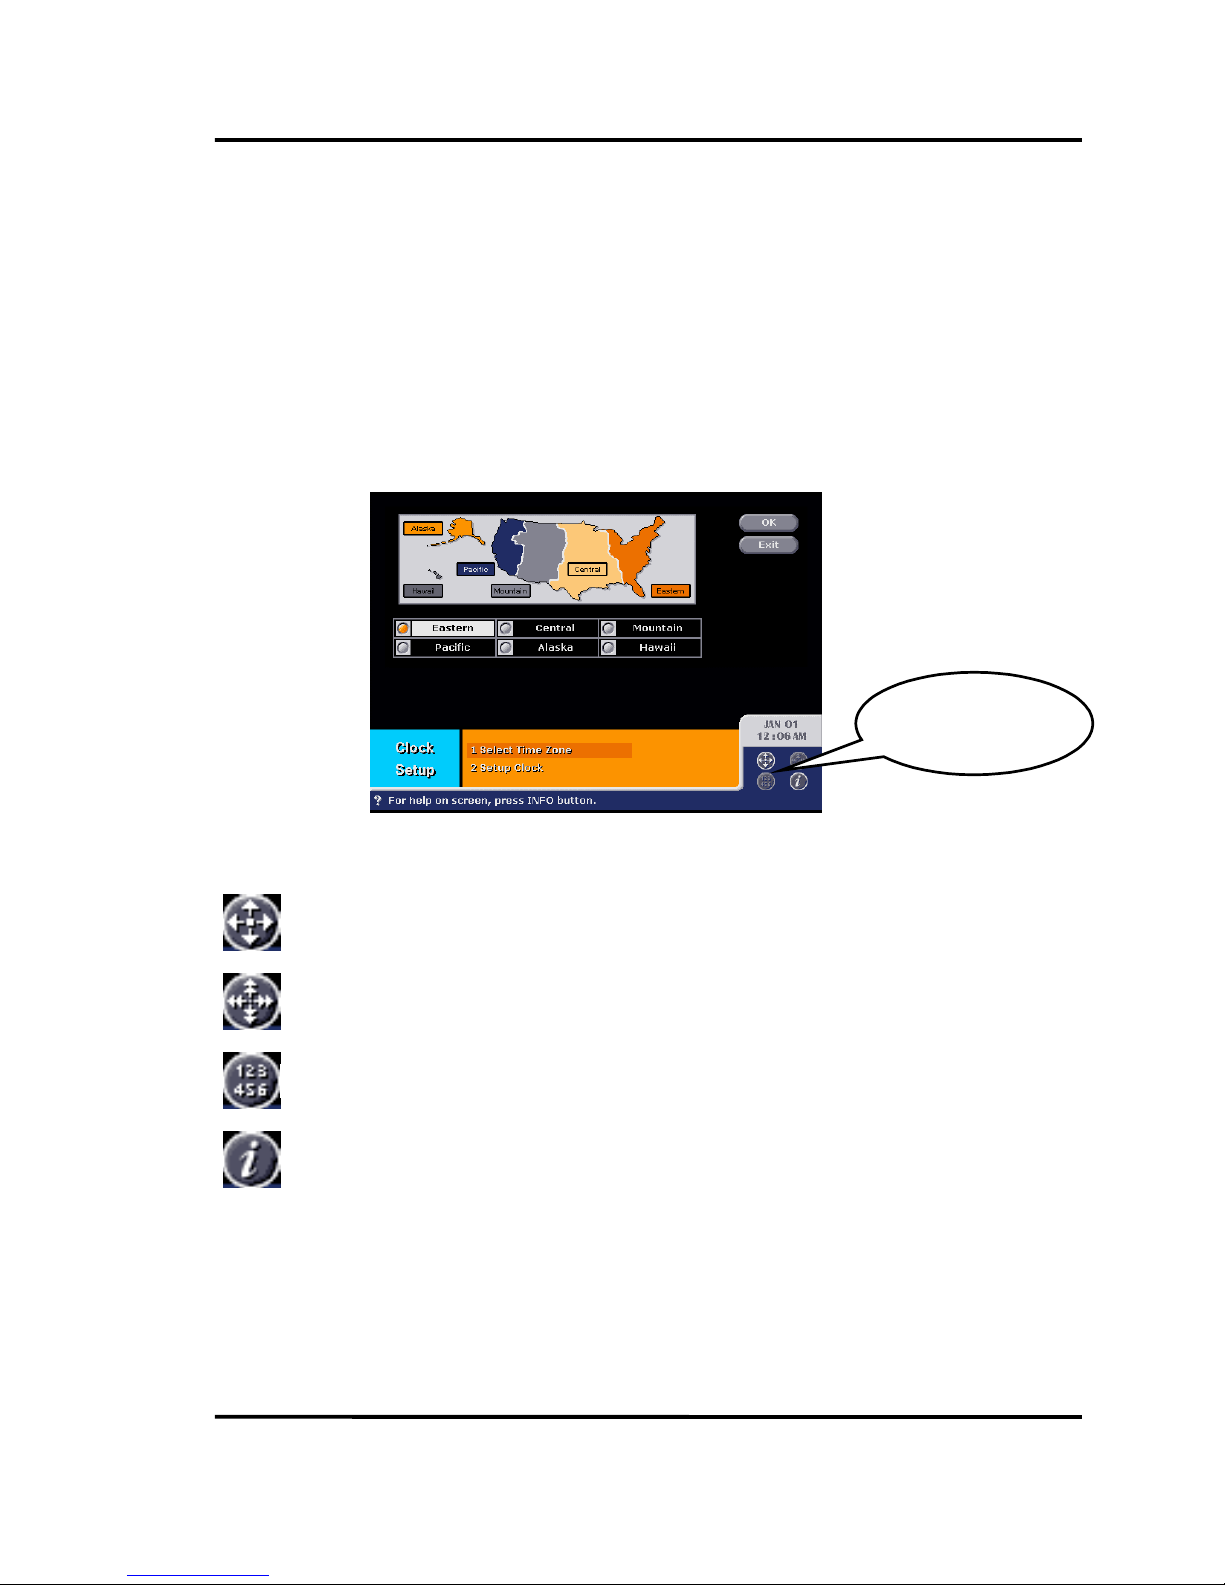
While you are navigating menus, you can see four icons in the right-bottom of the
screen. Each icon shows what remote key set you can use to navigate the current menu.
Depending on what menu you have selected, some icons in the menu may turn to grey,
not high-lighted. That means relevant remote keys do not work in the menu.
Four arrow keys, up, down, left, and right.
These icons
show what remote
keys are available.
Four page keys, page up, page down, page left, and page right.
Ten numeric keys, from zero to nine.
INFO key.
Page 25
Philips HD receiver User Guide
24
4.4. C
HANNEL BANNER AND ICONS
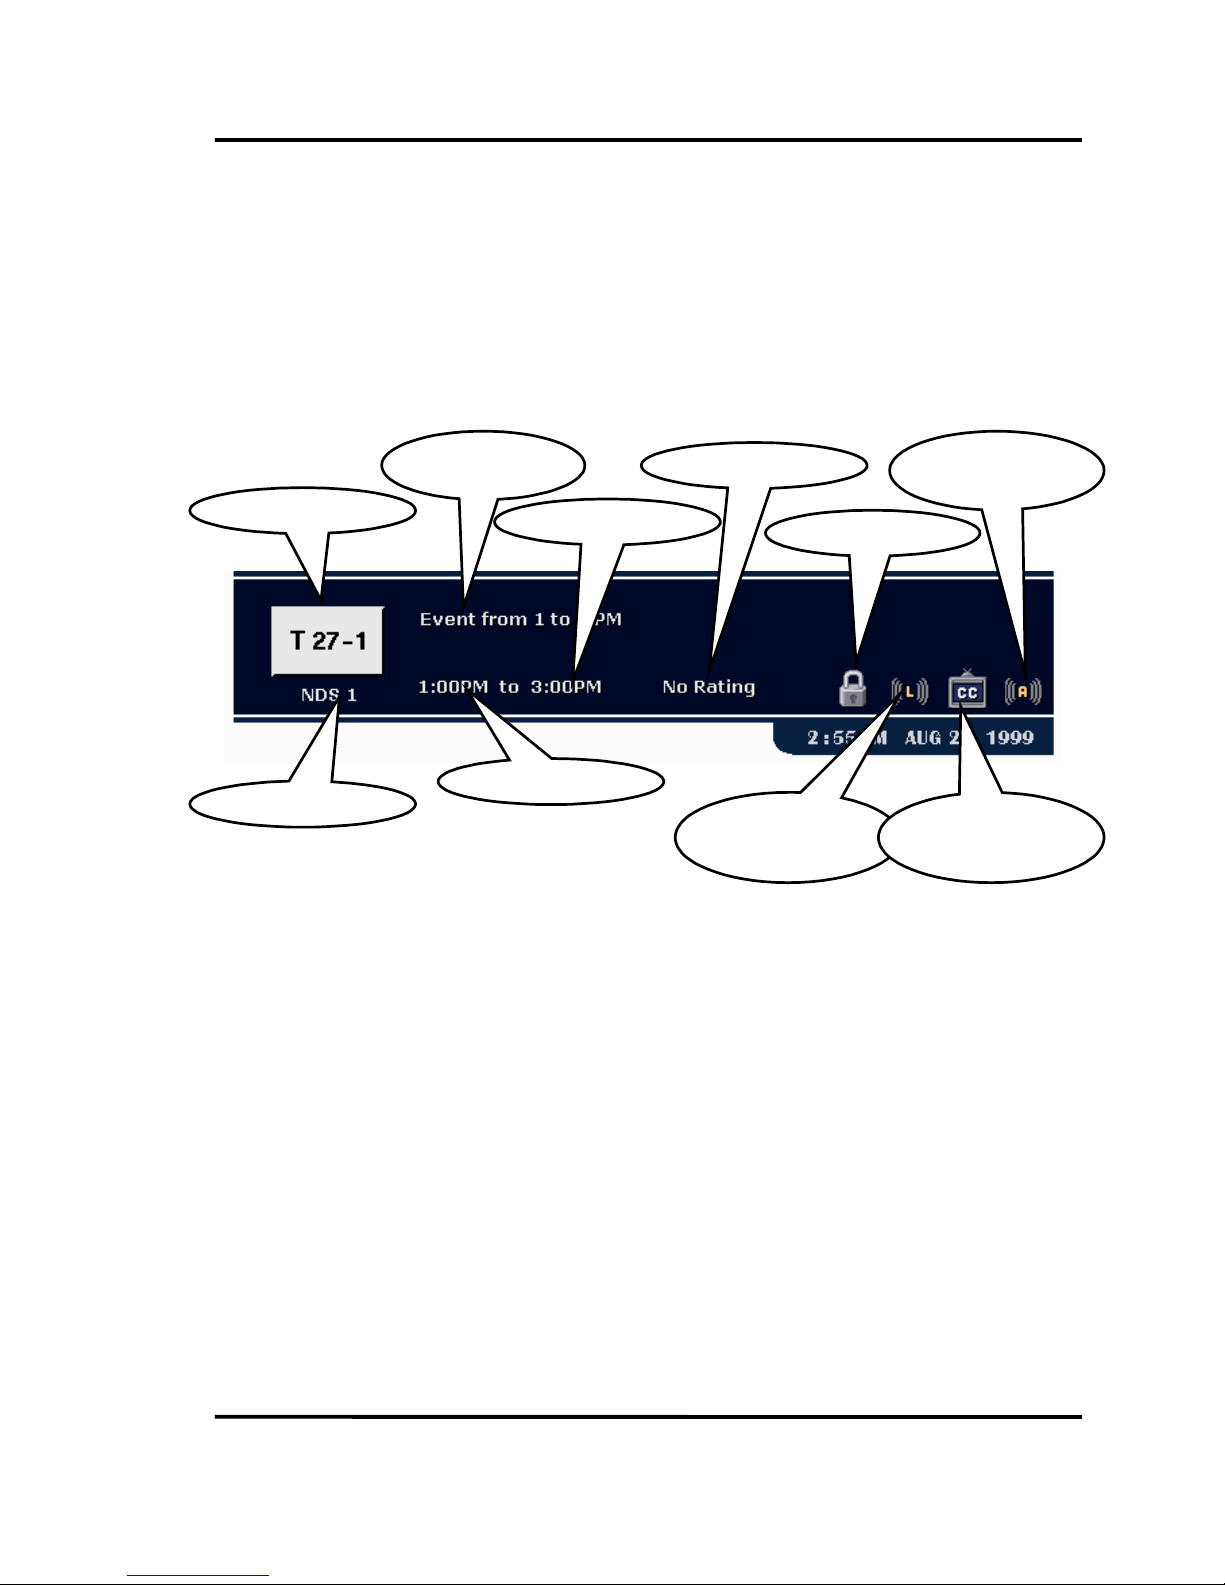
When turning on power and changing channels, HD receiver displays the Channel
Banner in which shows information on the current program.
The information in the Channel Banner includes channel number, channel name(callsign), program title, broadcasting time, rate information, lock status, alternate language
availability, closed caption availability, audio channel information, and current time. Some
information is depicted as icons as shown in the above figure. The meaning of the each
field in the Channel Banner must be self-explaining, but the lock icon needs more
explanation.
Channel Number
Channel Name
Program Title
Program Start Time
Program End Time
Program Rating
Limit is in effect
Having Alternate
Language Tracks
Closed Caption
Included
Audi o O nl y
Channel
Page 26
Philips HD receiver User Guide
25
4.5. C
HANNEL STATION AND ALTERNATE LANGUAGE
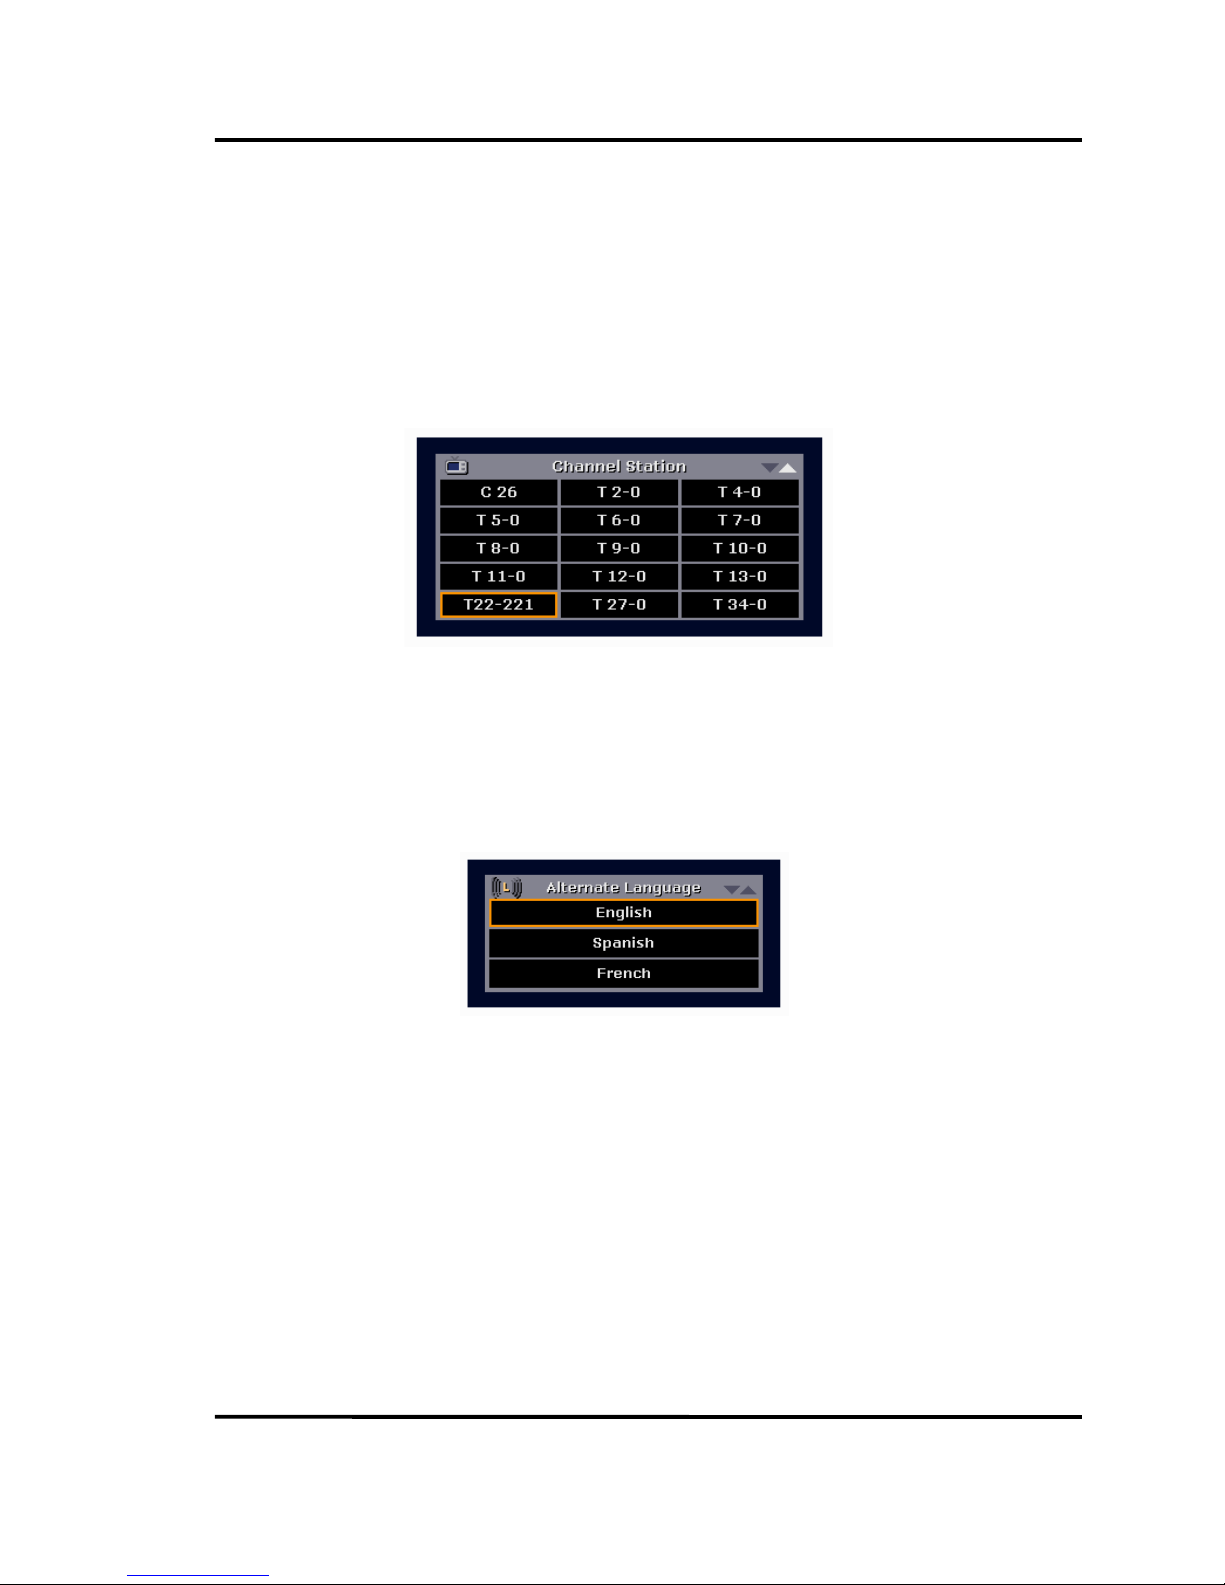
When pressing SELECT button in normal viewing, HD receiver displays channel station
including all channels in the channel map, analog or digital.
Also, when pressing AUDIO button in normal viewing, HD receiver displays alternate
language (or SAP) box including alternate audio programs in current channel. If there is no
response, current channel has no alternate audio.
Page 27
Philips HD receiver User Guide
26
4.6. M
ULTIPLE FUNCTIONS OF
INFO KEY
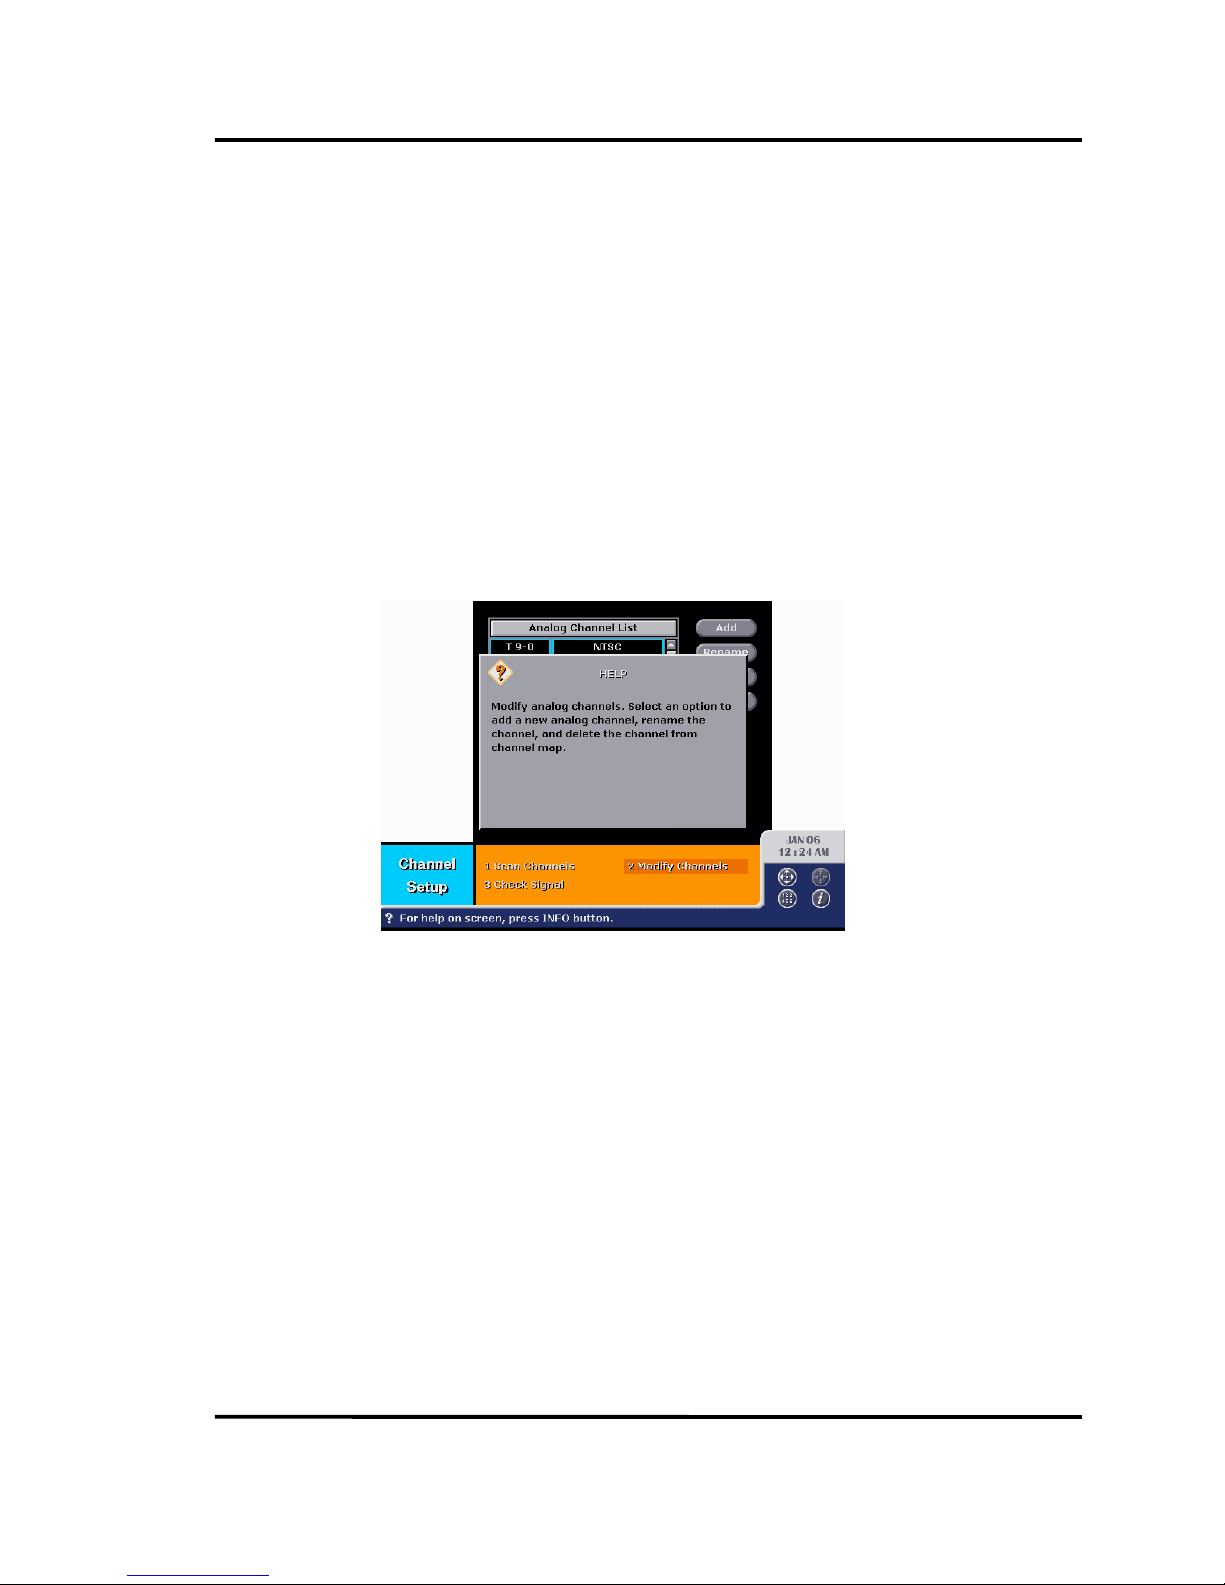
While you are navigating the menus, you can use INFO key to get a brief help message
for a menu.
Pressing INFO key in normal viewing functions differently. By pressing INFO key, you can
turn on and off the Channel Banner that is described in Section 4.4.
In the Program Guide the INFO key is used to update PSIP table and refresh the Program
Guide contents. Details are in Chapter 5.
Page 28
Philips HD receiver User Guide
27
CHAPTER
5
U
SING THE PROGRAM GUIDES
5.1. G
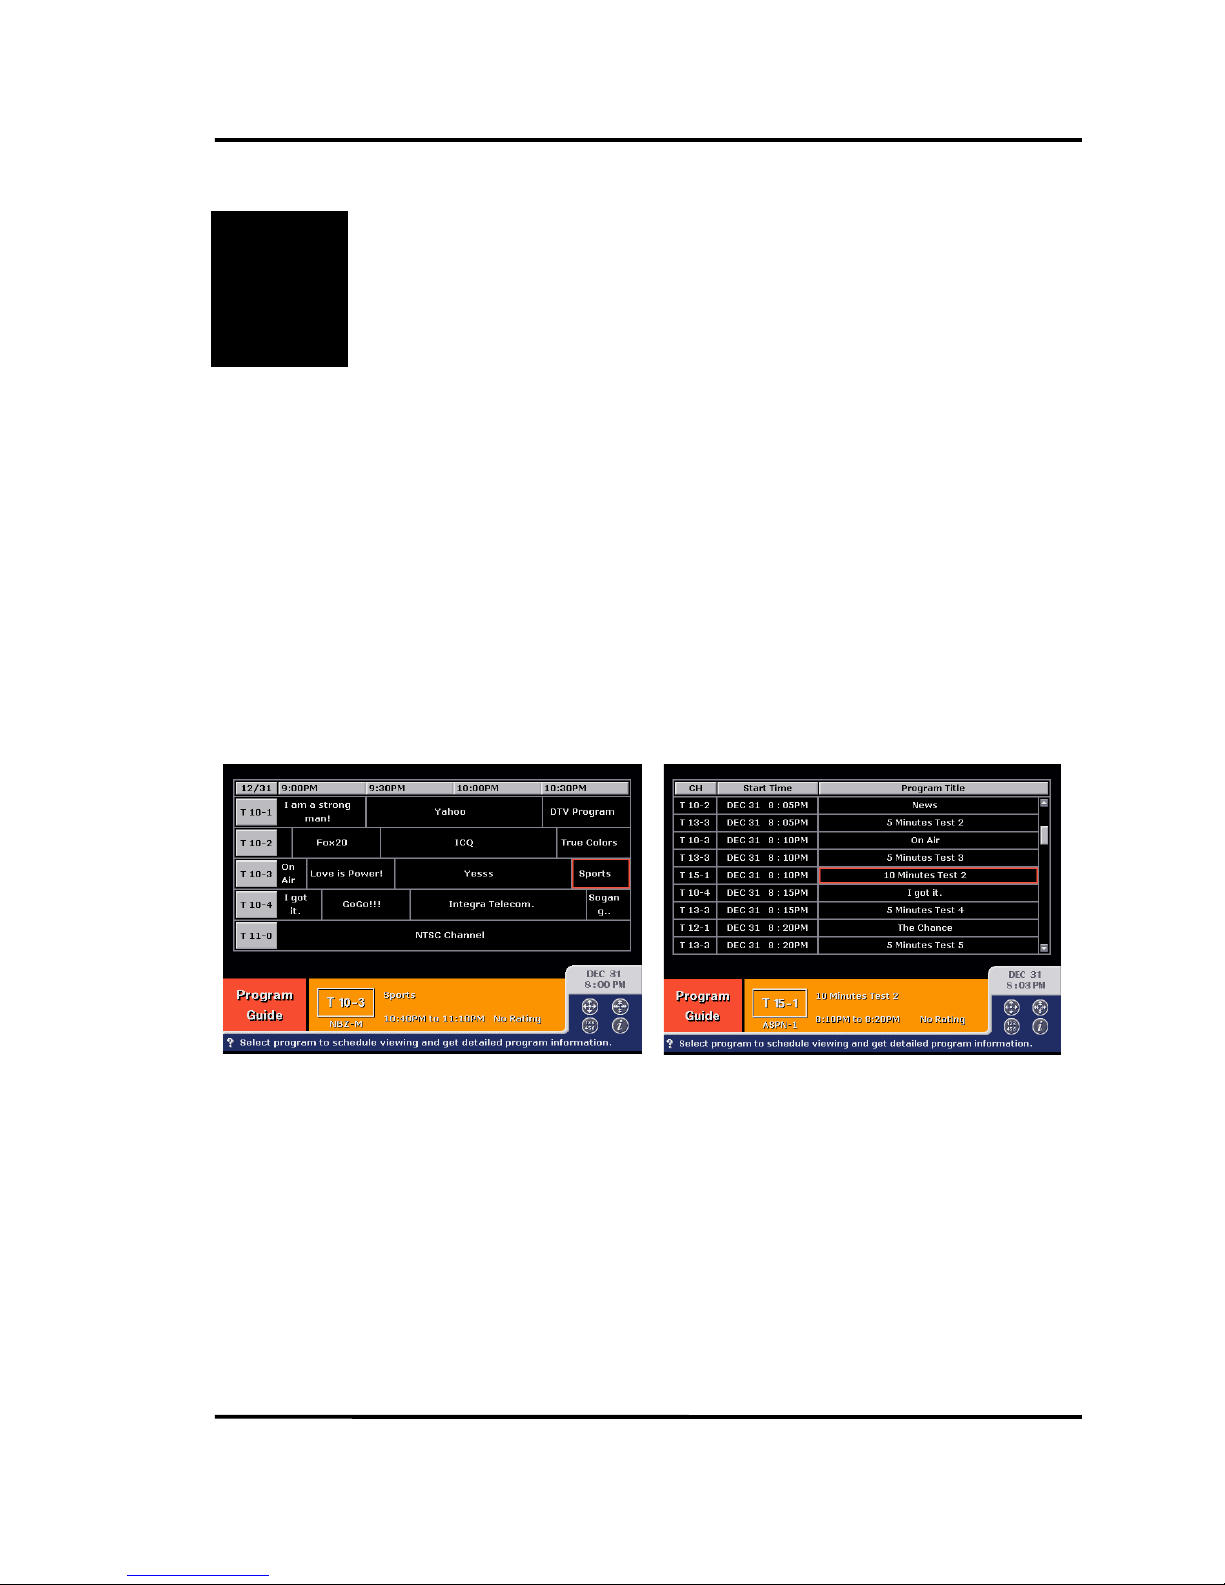
RID GUIDE AND LIST GUIDE
In the Program Guide, you can navigate all available channels and see what’s on the
channels. You can get general information on the programs and, where available, can get
detailed information such as actors, story, category and so on. While navigating the
Program Guide, you can tune to an attractive program or book it for future watching, using
the Set Schedule menu called from the Program Guide.
The Program Guide is organized in two different way, in grid format and list format. The
Grid Guide looks like the TV guide you can see in newspaper. The List Guide is a time-sorted
version of the Grid Guide. You can search for a program one by one in starting time order to
see what is the nearest program in time.
Page 29
Philips HD receiver User Guide
28
5.2. W
HAT CAN YOU GET IN THE PROGRAM GUIDE
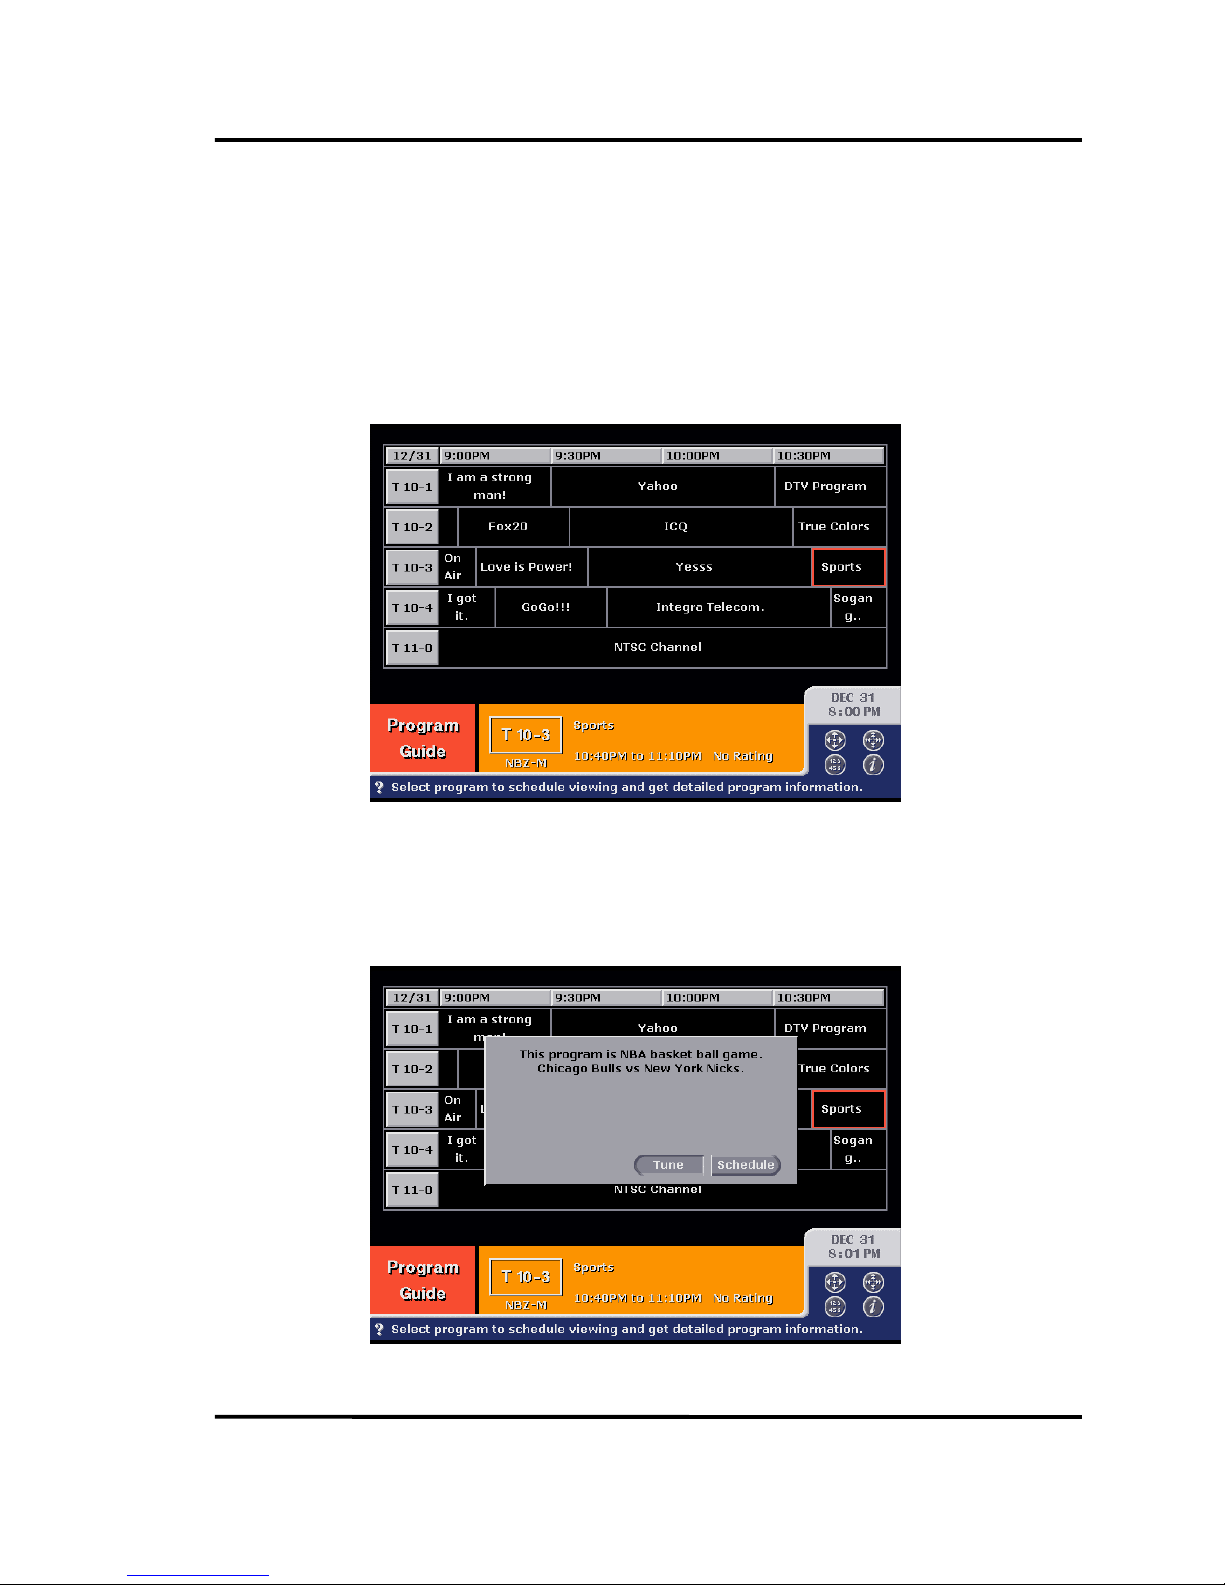
The Program Guide menu has the Guide Banner at bottom of the screen. The Guide
Banner shows information on the program selected under the cursor. As from the Channel
Banner, you can get channel number, channel name (call-sign), program title,
broadcasting time, and rating information.
If you want more detailed information, press SELECT key. Then, HD receiver acquires ETT
table and displays the detailed information. For example, if you place cursor on program
titled “Sports”, the Program Guide tells you the program is an NBA match, Bulls vs. Nicks.
Page 30
Philips HD receiver User Guide
29
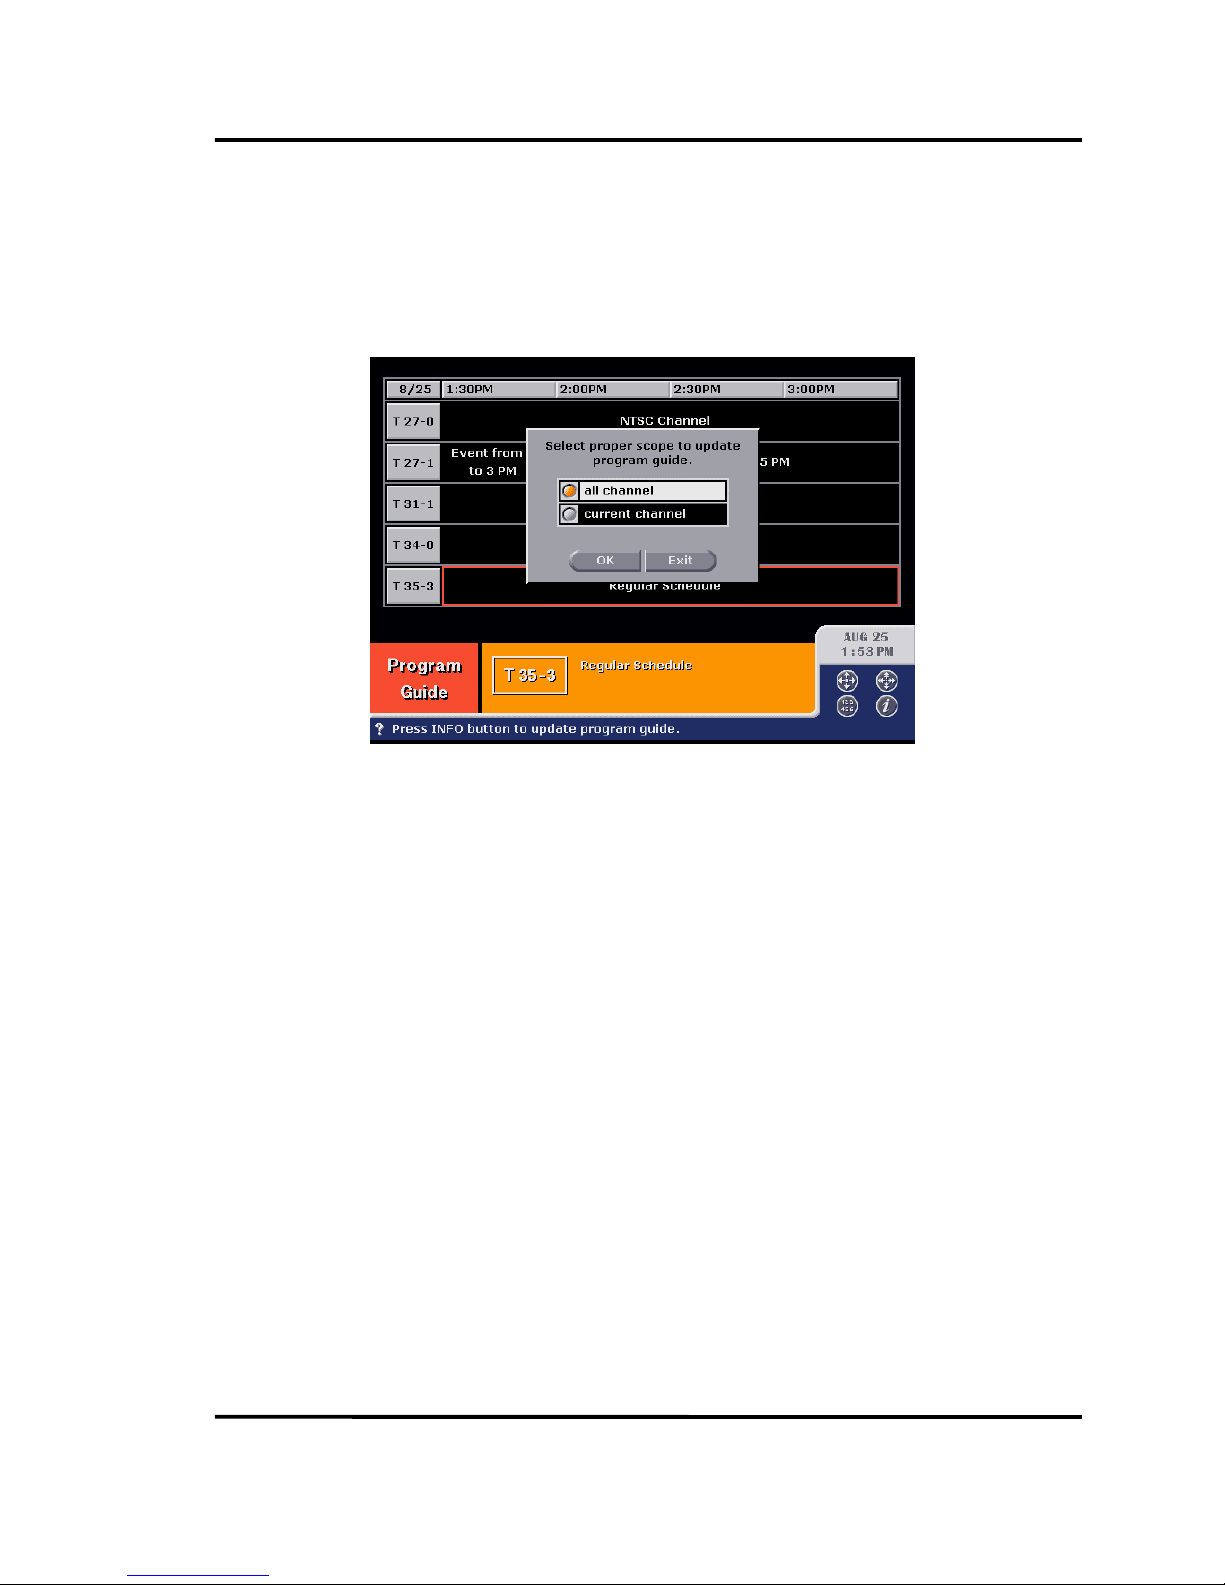
If you want to update PSIP table and refresh the Program Guide contents, press INFO
key. Then, HD receiver will acquire EIT tables and refresh program guide. Other example is
shown below.
Page 31
Philips HD receiver User Guide
30
5.3. T
UNE OR SCHEDULE
?
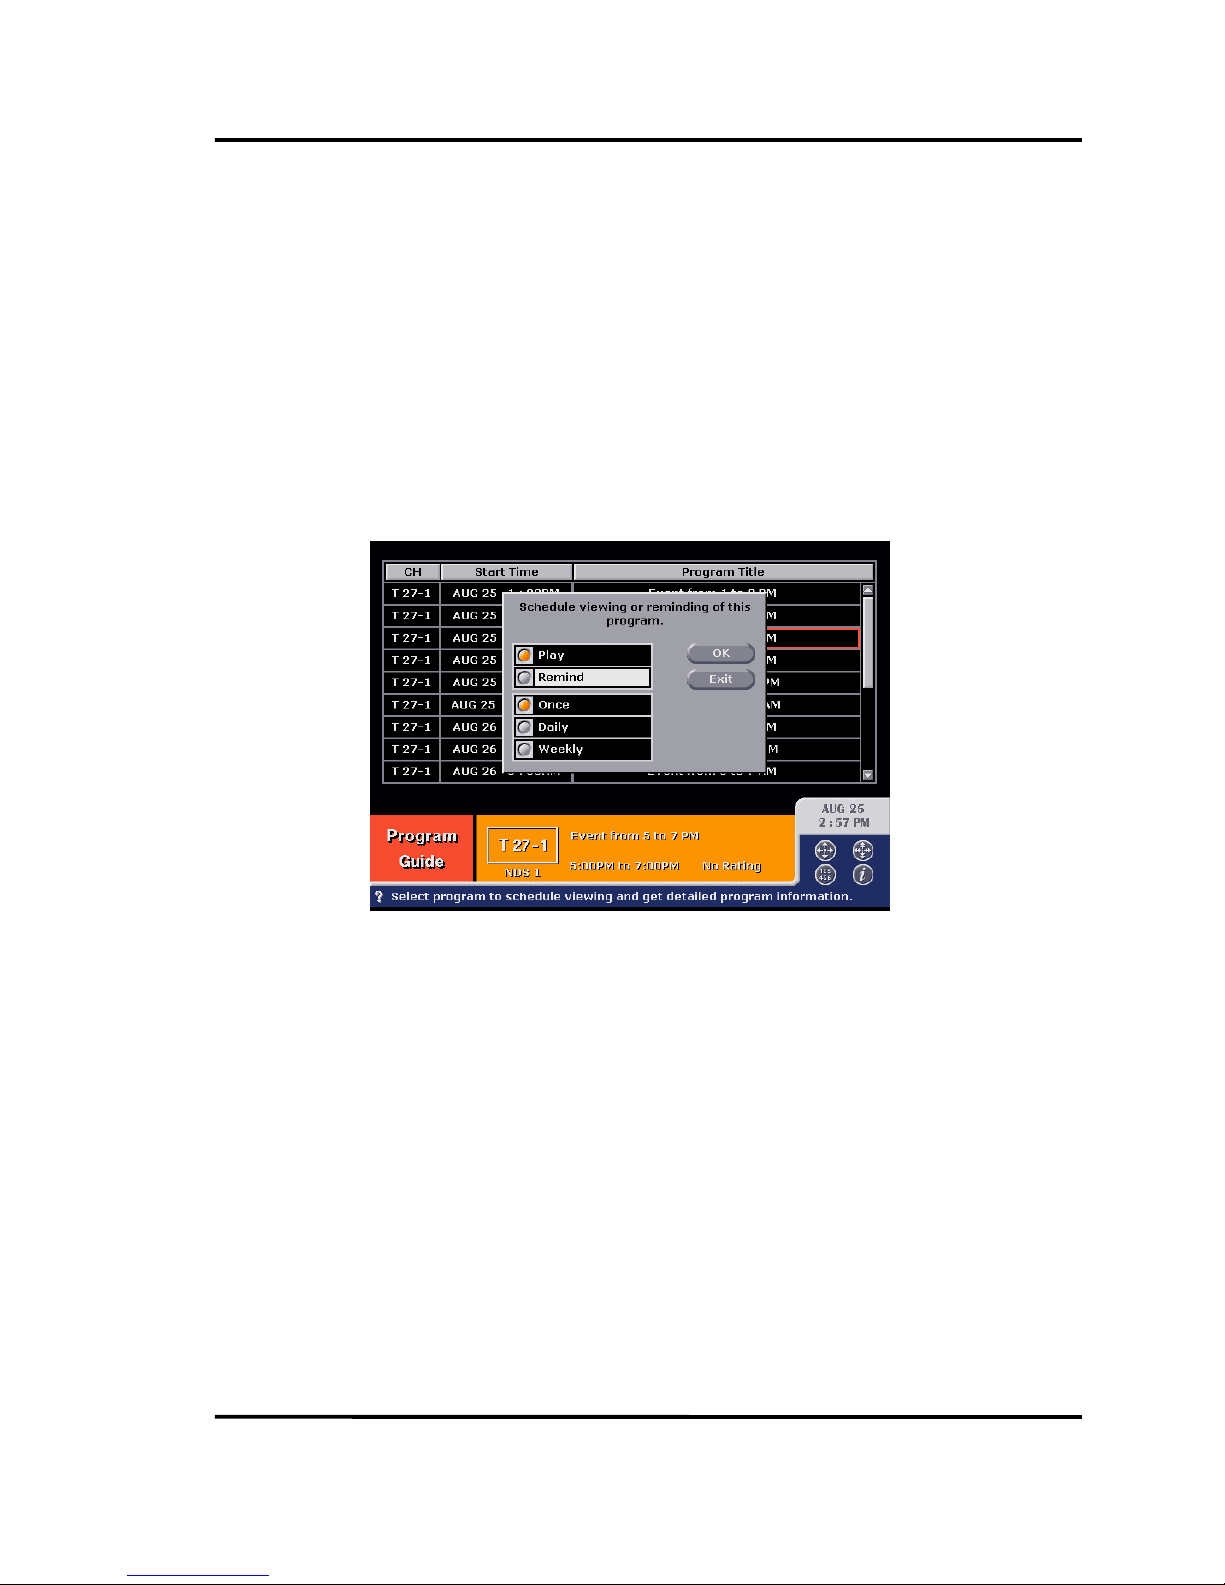
In the Detailed Information you can see two buttons, Tune and Schedule. Select Tune
button to tune to the channel, T10-3 in the above example.
Also, select Schedule button to book the program in the schedule. Other example is
shown below.
Page 32
Philips HD receiver User Guide
31
CHAPTER
6
U
SER PREFERENCE
6.1. S
ET FAVORITE CHANNELS
How to Get
There
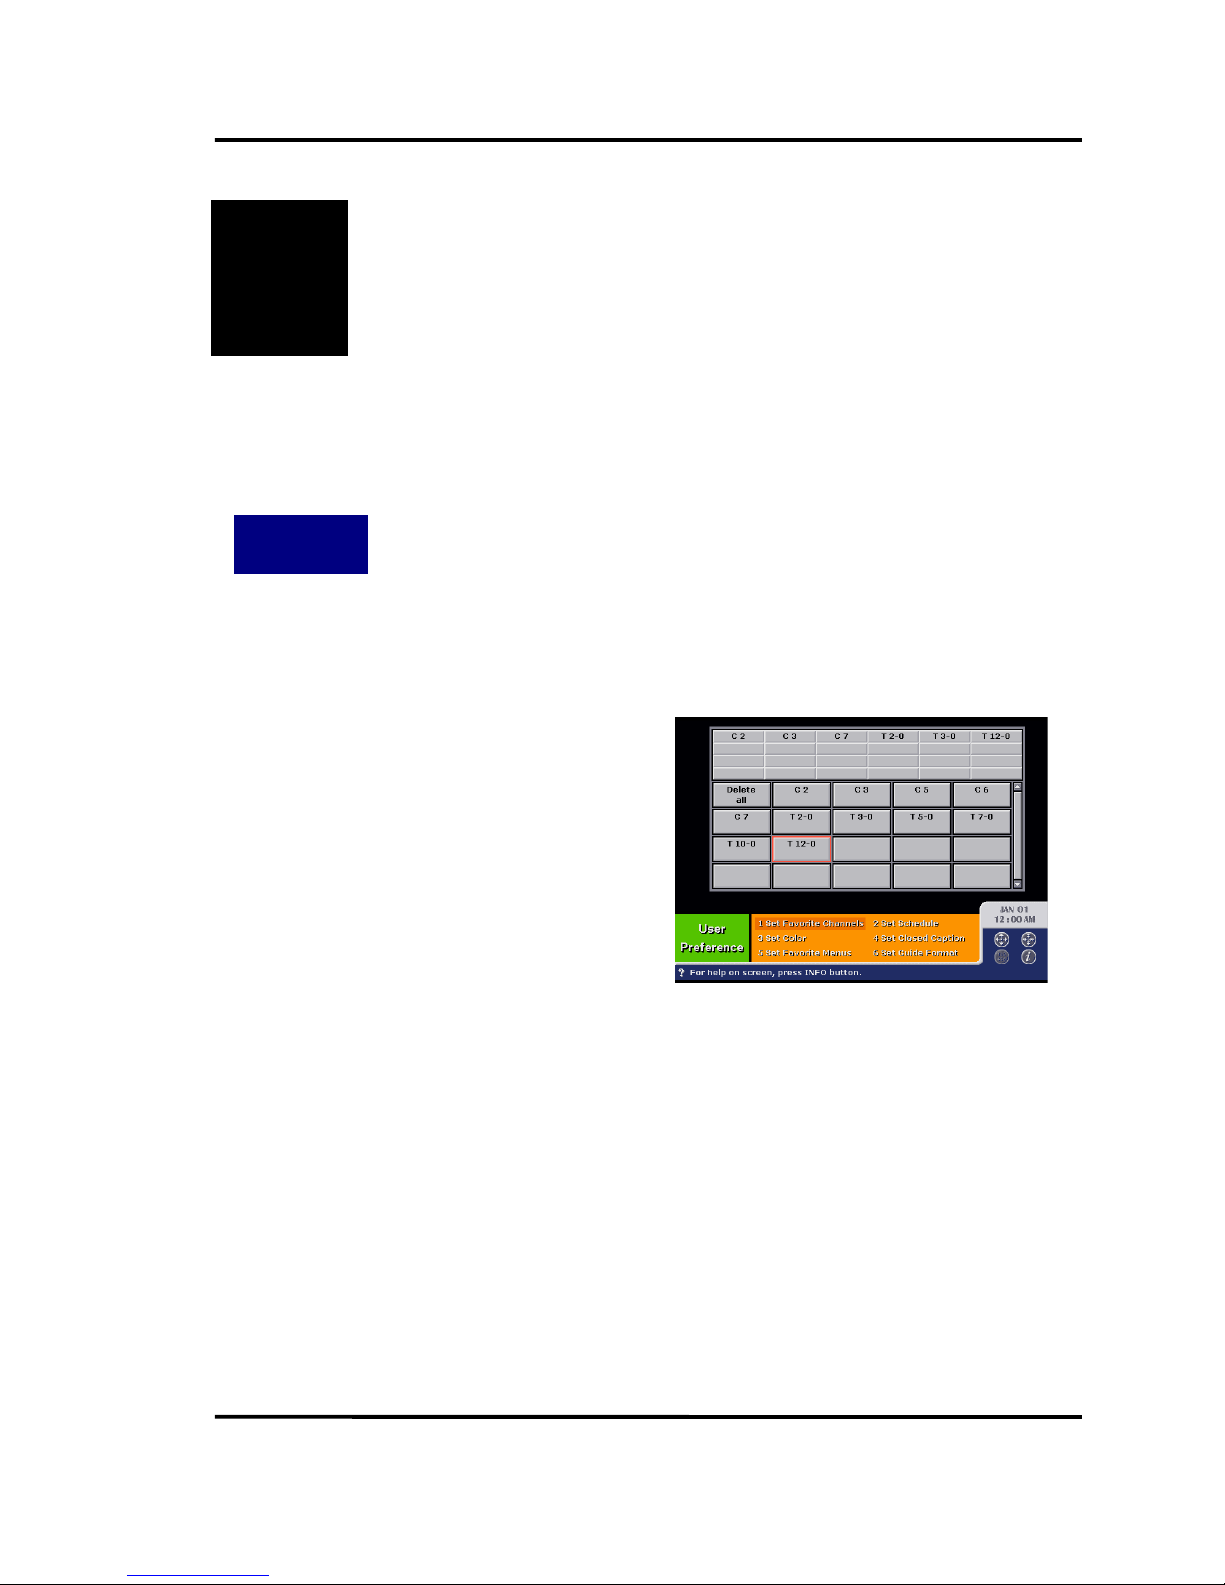
Main Menu ⇒⇒⇒⇒ User Preference [2] ⇒⇒⇒⇒ Set Favorite Channels [1]
The Set Favorite Channels menu allows you to select your favorite channels from many
ones provided by HD receiver. You can navigate the favorite channels by pressing left or
right arrow key in normal viewing.
In the Set Favorite Channels menu, you
can see the favorite channel list that
shows you which channels are selected as
favorite channels. If you have not selected
any channel so far, the list shall be empty.
Below the list are the available
channels. User can move the cursor and
select to add or delete a favorite channel.
To delete the full list of the favorite
channel, select Delete All button.
Page 33
Philips HD receiver User Guide
32
6.2. S
ET SCHEDULE
How to Get
There
Main Menu ⇒⇒⇒⇒ User Preference [2] ⇒⇒⇒⇒ Set Schedule [2]
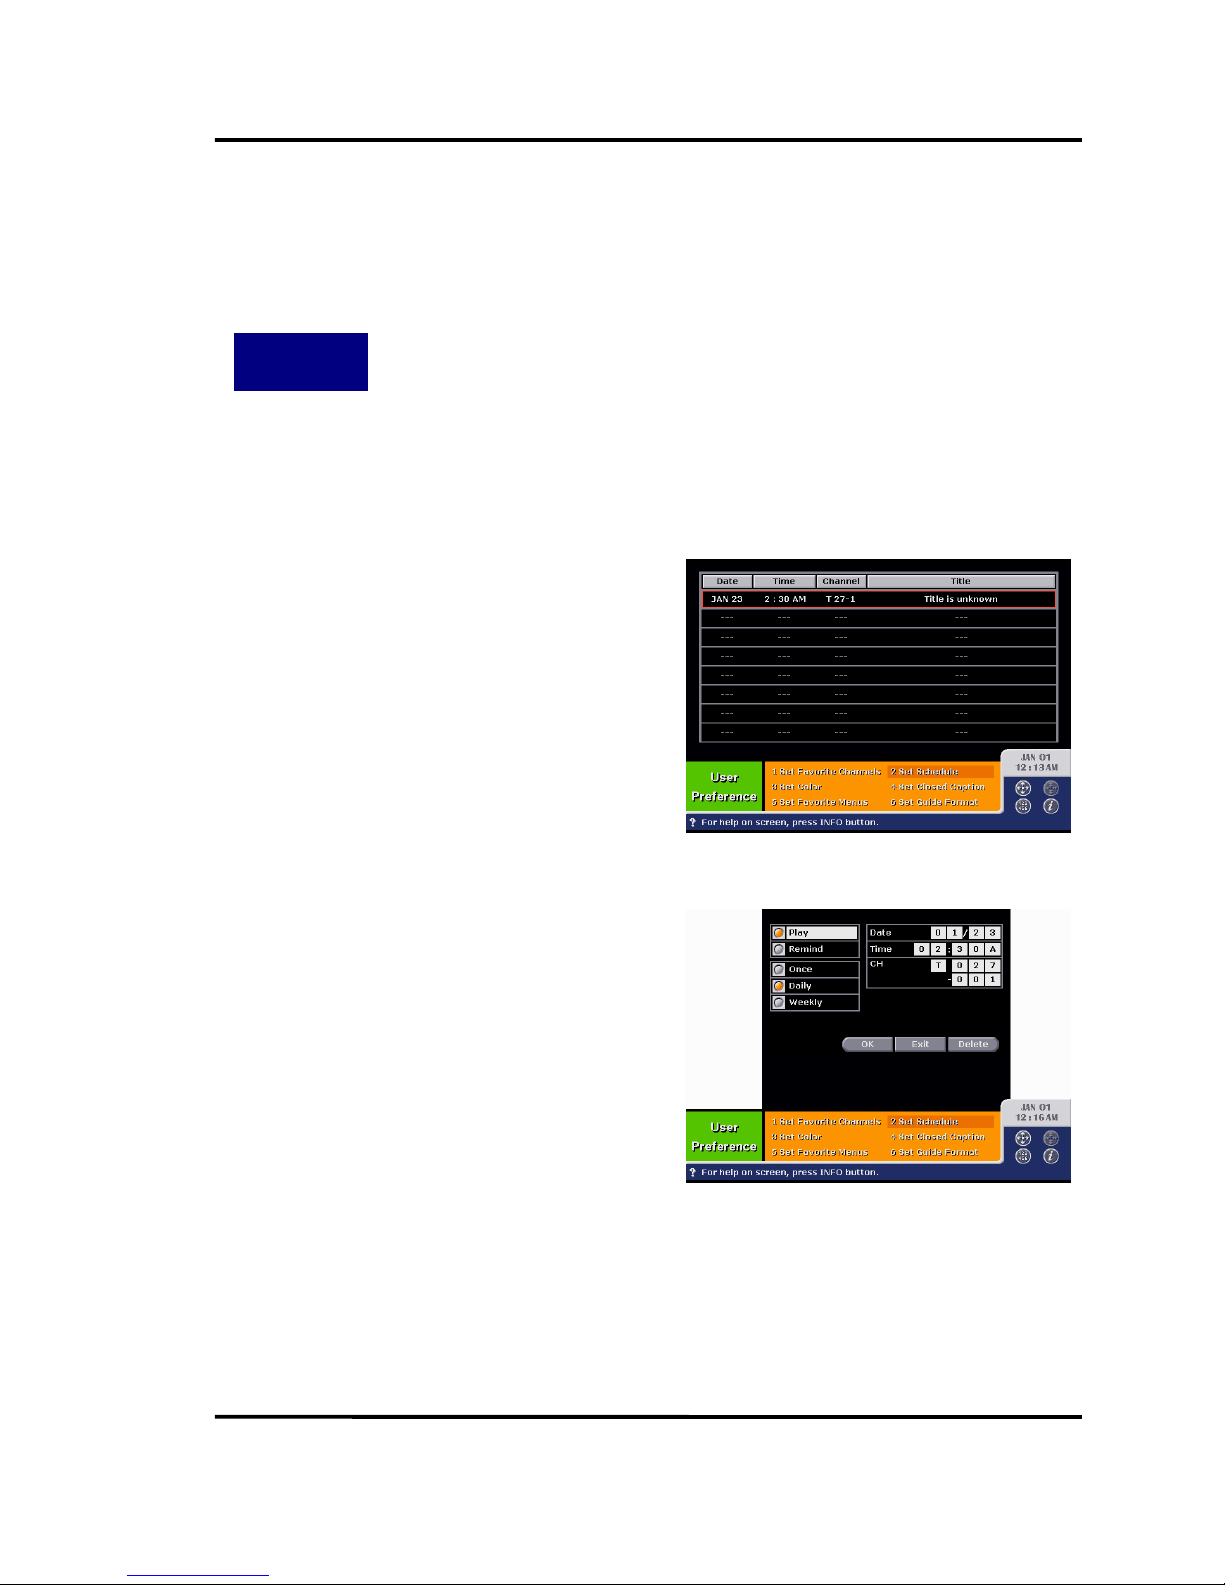
The Set Schedule Menu displays reserved future programs you have selected in the
Program Guide or in this menu. When it’s time for any reserved programs to be on-air, the
HD receiver tunes to the program or displays a notifying dialog box depending on the
Play/Remind radio box selection.
If you select the Set Schedule menu, HD
receiver displays the list of reserved
channels. You can select any empty slot
to add a new reservation. Selecting a non-
empty slot lead you to the edit menu of
the reserved program.
By selecting any slot in the Set Schedule
menu, you can add or edit a program
schedule. You shall decide the start date
and time of the program, and the
channel.
The Daily/Weekly/Monthly radio box
decide if the schedule is valid once or
periodically on the weekly/monthly basis.
The Play/Remind radio box allows you to
select the HD STB operation when the
program starts. Selecting Play allows HD
STB to tune to the program without your
intervention while your watching other
program. Selecting Remind makes HD STB
to display a dialog box that notify you of
the start of the program.
If you want to cancel the selected
schedule, choose Delete button.
Page 34
Philips HD receiver User Guide
33
6.3. S
ET COLOR
How to Get
There
Main Menu ⇒⇒⇒⇒ User Preference [2] ⇒⇒⇒⇒ Set Color [3]
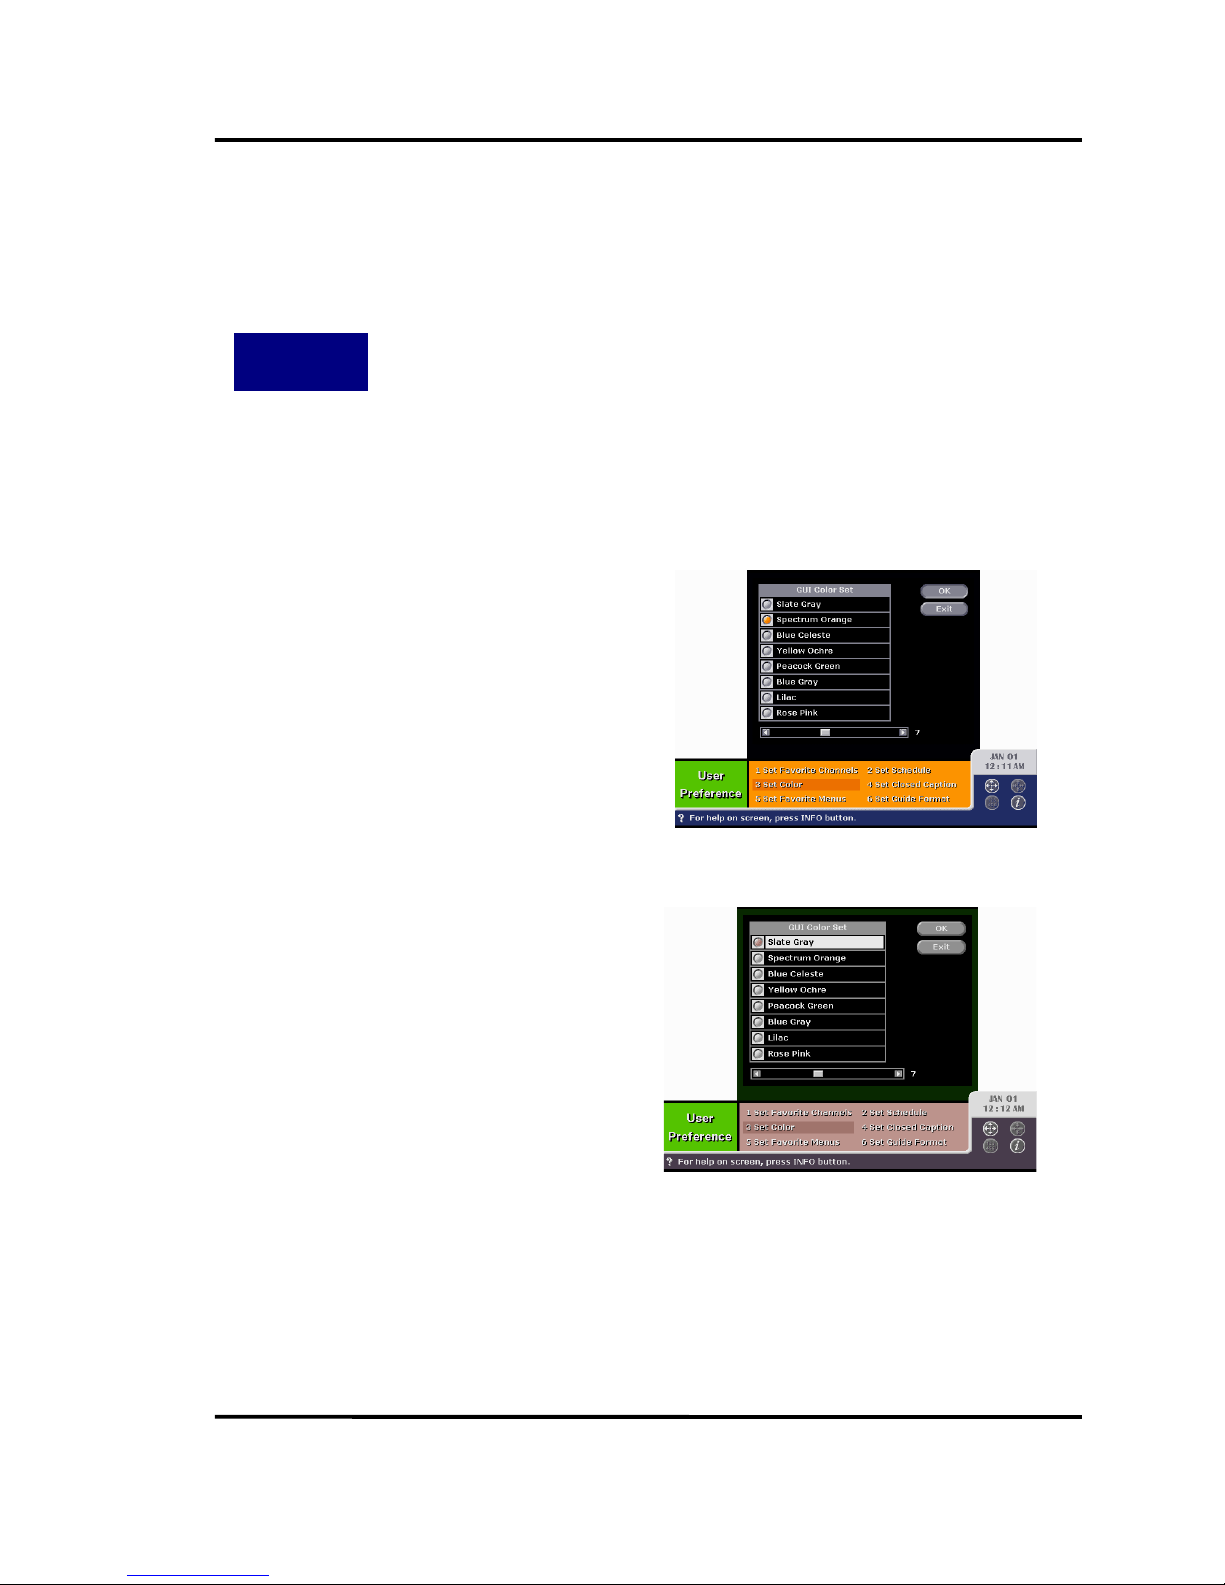
HD receiver has eight different color palettes for user’s preference. The factory setting
has Slate Gray as a default palette. If you prefer any other color set, you can change the
palette in this menu. Adding to the palette selection, you can also choose the transparency
level of the OSD background.
Choose any palette you want using the
radio box.
To change the transparency level, move
down the cursor to the scroll bar at the
bottom of the menu, and move the thumb
using left/right arrow key. Level 1 is most
transparent and level 15 is most opaque.
On your choosing a palette, the color
change will be effective immediately as
shown on the right figure. Select OK button
to preserve the change permanently.
Page 35
Philips HD receiver User Guide
34
6.4. S
ET CLOSED CAPTION
How to Get
There
Main Menu ⇒⇒⇒⇒ User Preference [2] ⇒⇒⇒⇒ Set Closed Caption [4]
While watching a digital TV program, you can see the digital closed caption, which is an
enhanced form of the current closed caption you can see in analog TV. The digital closed
caption can display caption in multiple languages in multiple windows on the screen.
HD receiver can acquire analog TV signal and support conventional analog close
caption. The Set Closed Caption menu allows you to control digital and analog closed
caption acquisition.
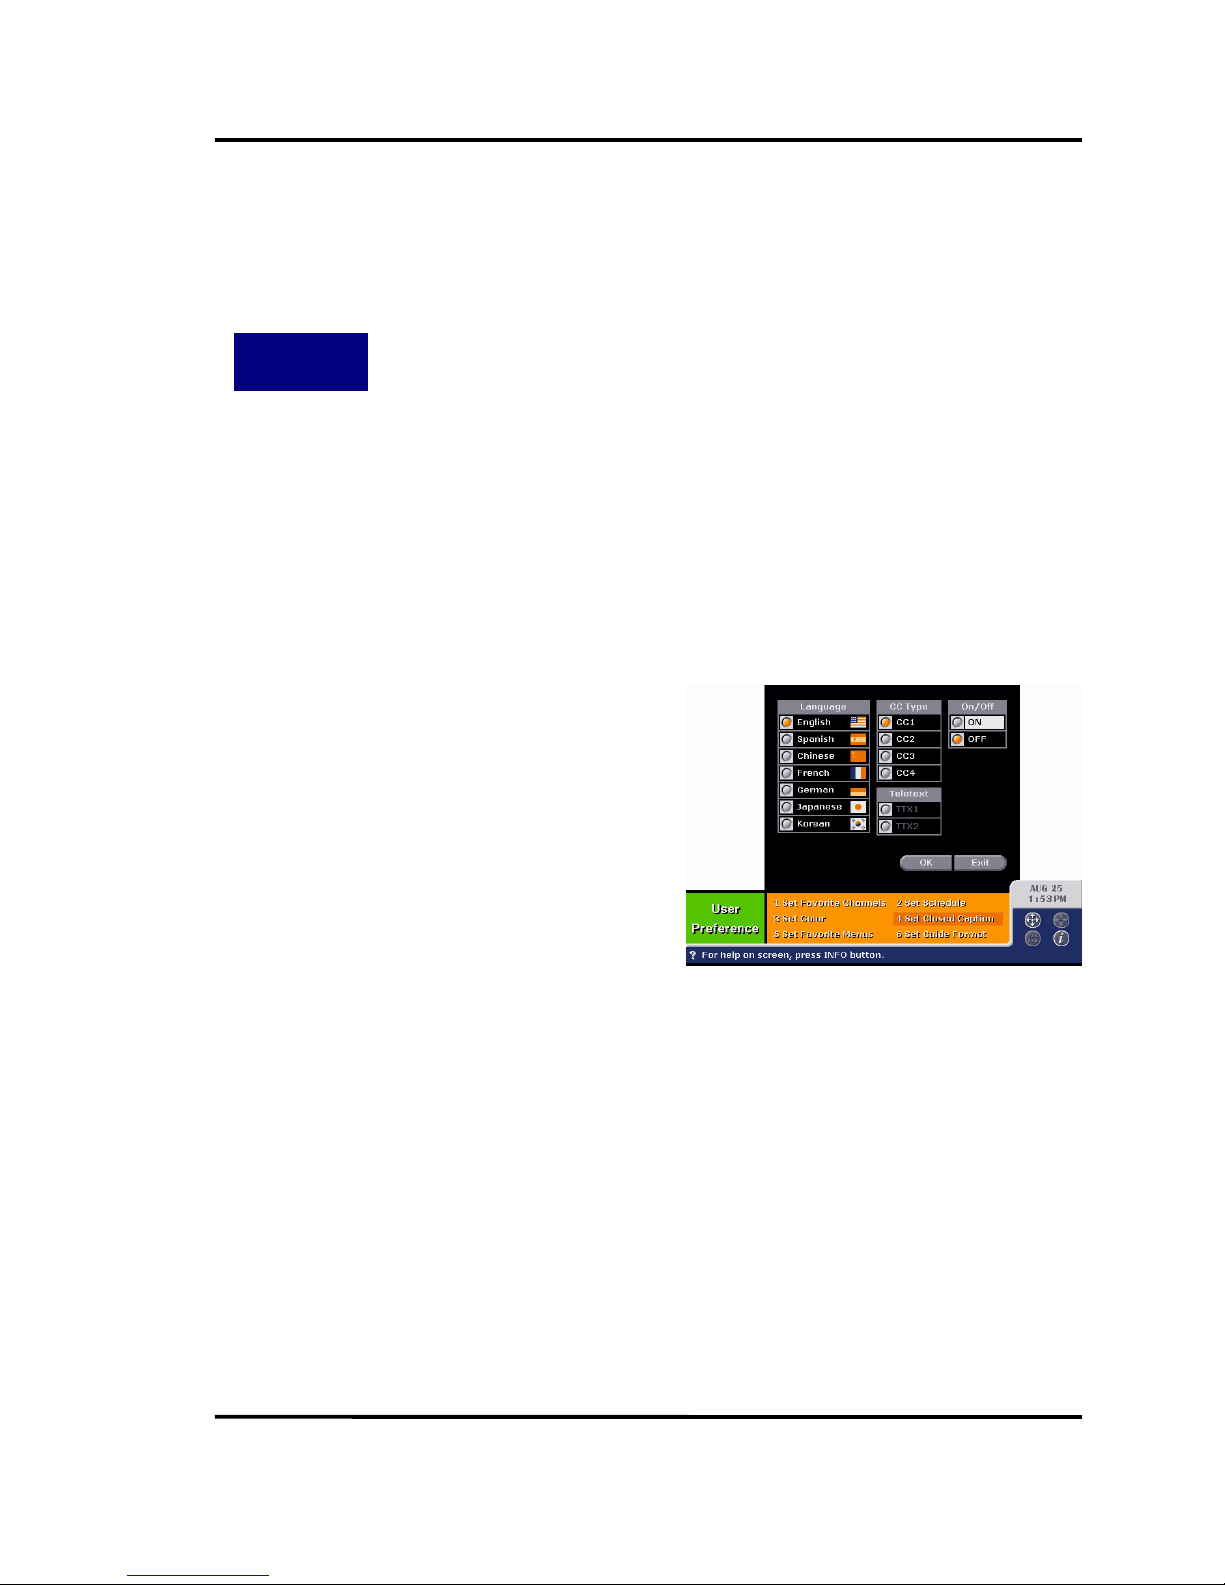
Select preferred language for the
closed caption in the Language radio box.
This selection is effective to the digital
closed caption only.
Select closed caption type in the CC
Type radio box. This selection is effective to
the analog closed caption only.
Enable/disable the closed caption
display in the On/Off radio box. This
selection is effective to both the analog
closed caption and the digital closed
caption.
Page 36
Philips HD receiver User Guide
35
6.5. S
ET FAVORITE MENUS
How to Get
There
Main Menu ⇒⇒⇒⇒ User Preference [2] ⇒⇒⇒⇒ Set Favorite Menus [5]
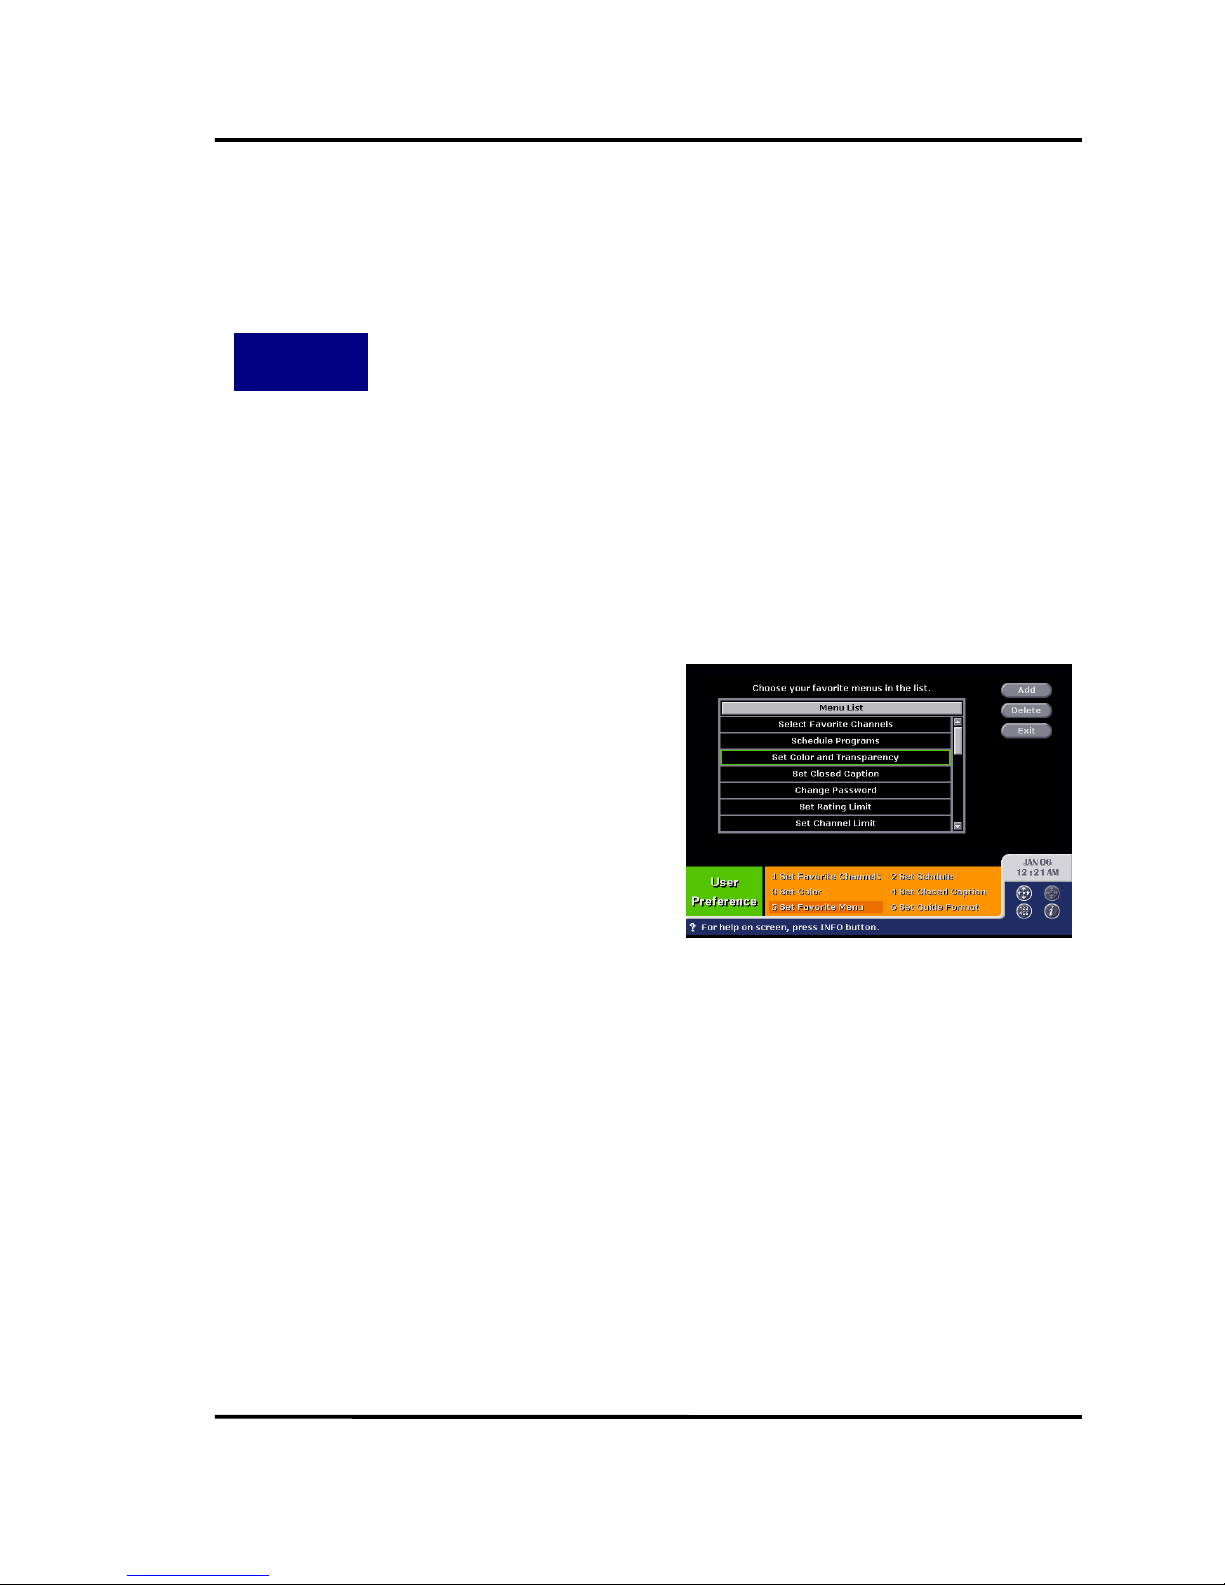
HD receiver has many useful features that need your explicit configuration to use them.
To support easy configuration, the GUI system of HD receiver provides you more than 40
graphical menu screens, some of which you access frequently and some of which you do
less frequently, or even never.
The Set Favorite Menu allows you to select frequently accessed menu screens and to
access them with much less key inputs. You can directly access the menu in the favorite
menu list by pressing FETCH key on the remote and selecting a wanted menu. It’s much
easier than navigating the menu tree step by step.
To add a menu to the favorite menu list,
select a wanted menu in the list and
select Add button.
You can access the selected menu by
pressing FETCH key while watching a
program.
To delete a menu from the favorite
menu list, select a wanted menu in the list
and select Delete button.
You have alternative way to add/delete
a menu to/from the favorite menu list.
Press FETCH key in a menu screen you
Page 37

Philips HD receiver User Guide
36
6.6. S
ET GUIDE FORMAT
How to Get
There
Main Menu ⇒⇒⇒⇒ User Preference [2] ⇒⇒⇒⇒ Set Guide Format [6]
As described in Chapter 5, HD receiver supports two modes of the program guide, the
grid format and the list format. You can toggle the guide format using the Set Guide Format
menu. Selecting this menu is equivalent to pressing GUIDE button in the Program Guide
screen.
Page 38
Philips HD receiver User Guide
37
CHAPTER
7
P
ARENTAL CONTROL
7.1. C
HANGE PASSWORD
How to Get
There
Main Menu ⇒⇒⇒⇒ Parental Control [3] ⇒⇒⇒⇒ Change Password [1]
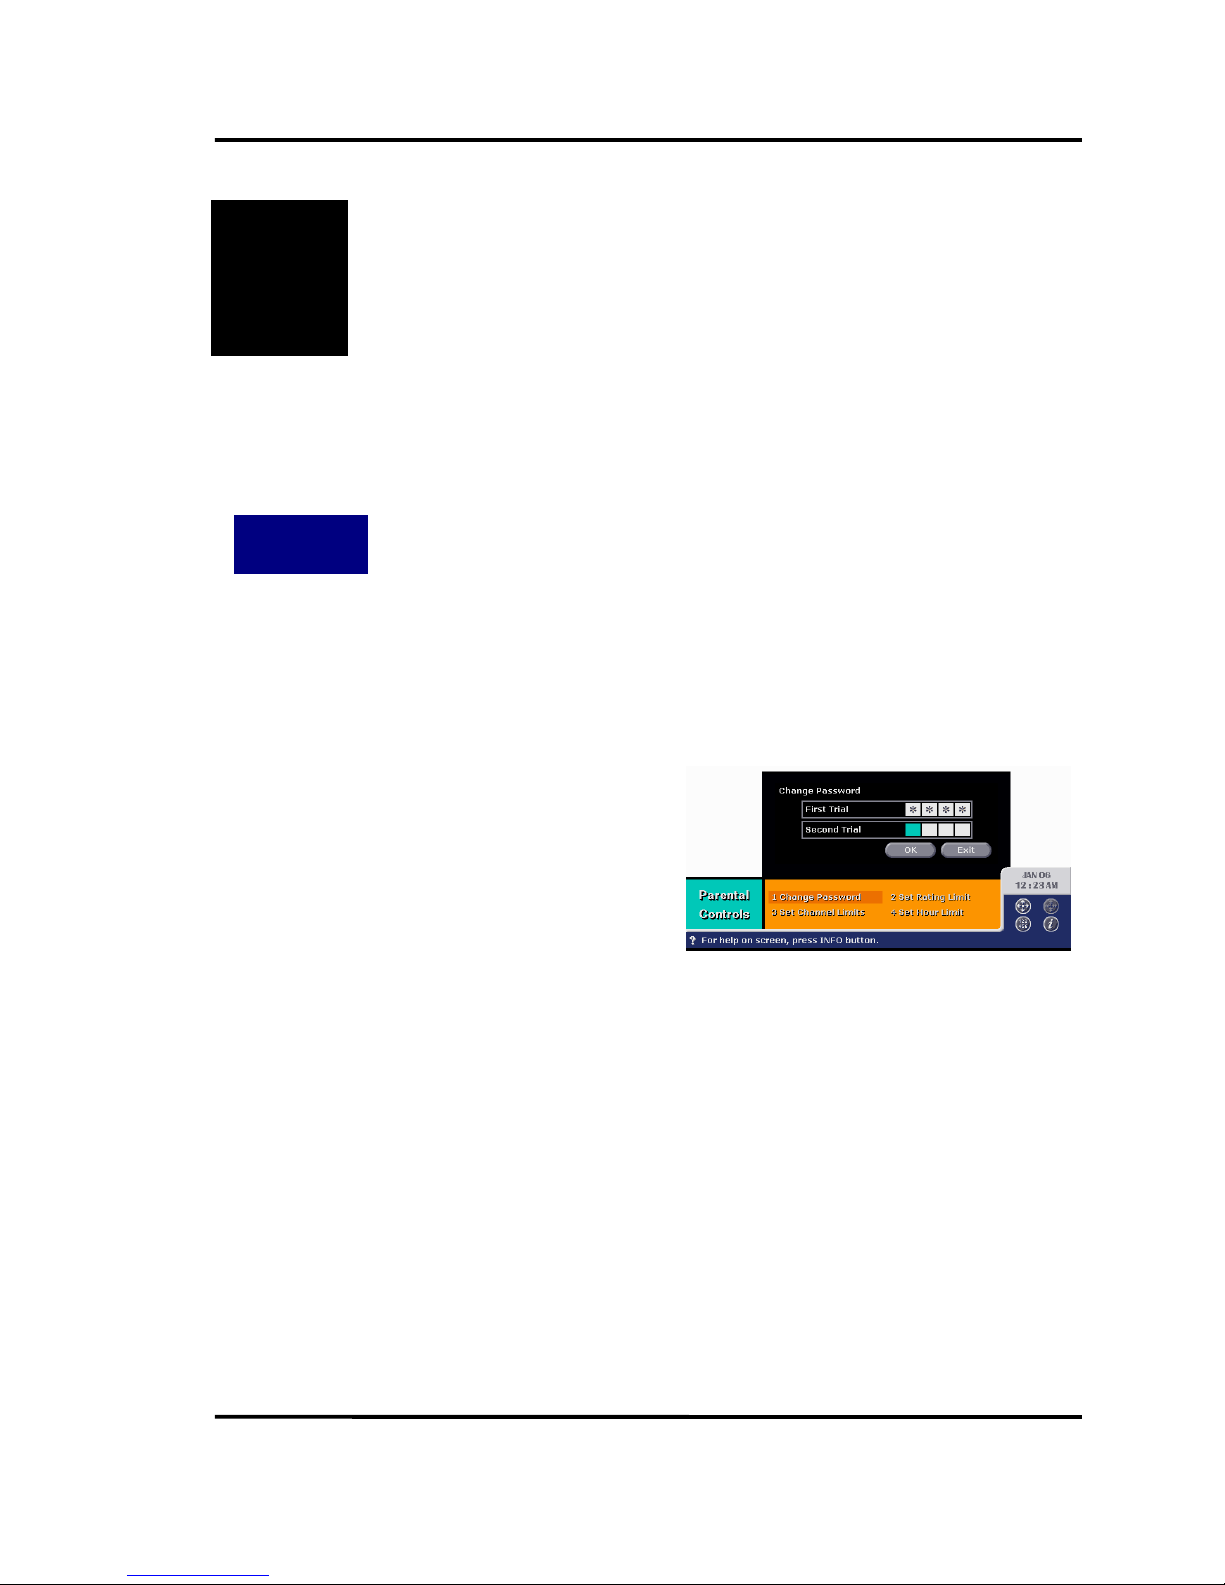
The Change Password menu allows you to change the password that will be used for
accessing Parent Control menu, overriding predefined limits, and resetting the system.
Type a new password in the First Trial text
box. You can change the digit by pressing
arrow key upward or downward. After
having typed a digit, press right arrow key
to move the cursor to next digit.
Type the password again in the Second
Trial text box for confirmation.
Select OK button. If the change is not
successful, follow above sequence once
Page 39
Philips HD receiver User Guide
38
7.2. S
ET RATING LIMIT
How to Get
There
Main Menu ⇒⇒⇒⇒ Parental Control [3] ⇒⇒⇒⇒ Set Rating Limit [2]
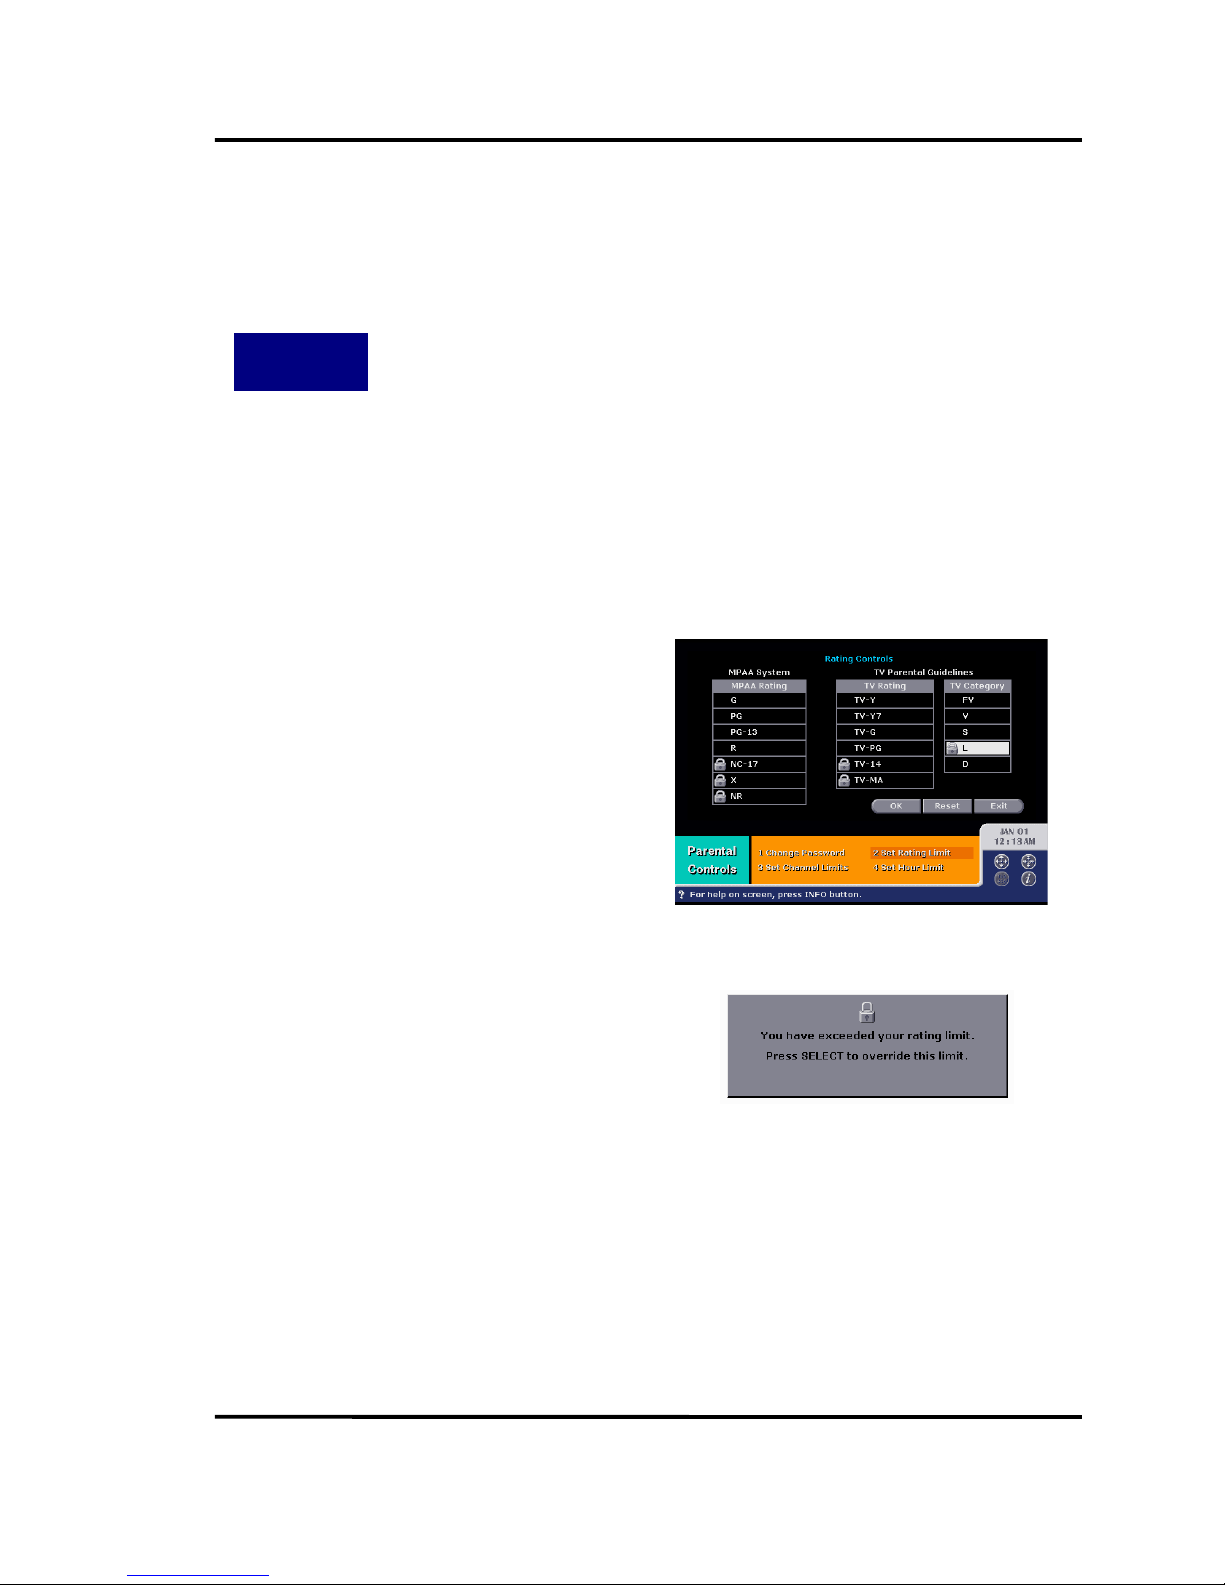
The Set Rating Limit allows you to prevent rated programs from being watched. The
rating information of a program can be achieved from EIT and RRT table for a digital TV
program, and from VCHIP information for a analog TV program. HD receiver is compliant
with EIA-766 rating system for ATSC DTV.
If you want to watch any program whose rate is over the limit defined in the Set Rating Limit,
you have to type correct password to override the rating limit.
Select MPAA rating limit in the MPAA
Rating radio box.
Select TV rating limit in the TV Parental
Guidelines radio box.
Select OK button. If you want to clear
current rating limit, select Reset button.
When you are tuning to the program
whose rating violates the user-defined
rating limit, HD STB displays the Password
Inquiry dialog box.
Typing correct password overrides the
limit and enables you to watch the
program.
Page 40
Philips HD receiver User Guide
39
7.3. S
ET CHANNEL LIMIT
How to Get
There
Main Menu ⇒⇒⇒⇒ Parental Control [3] ⇒⇒⇒⇒ Set Channel Limit [3]
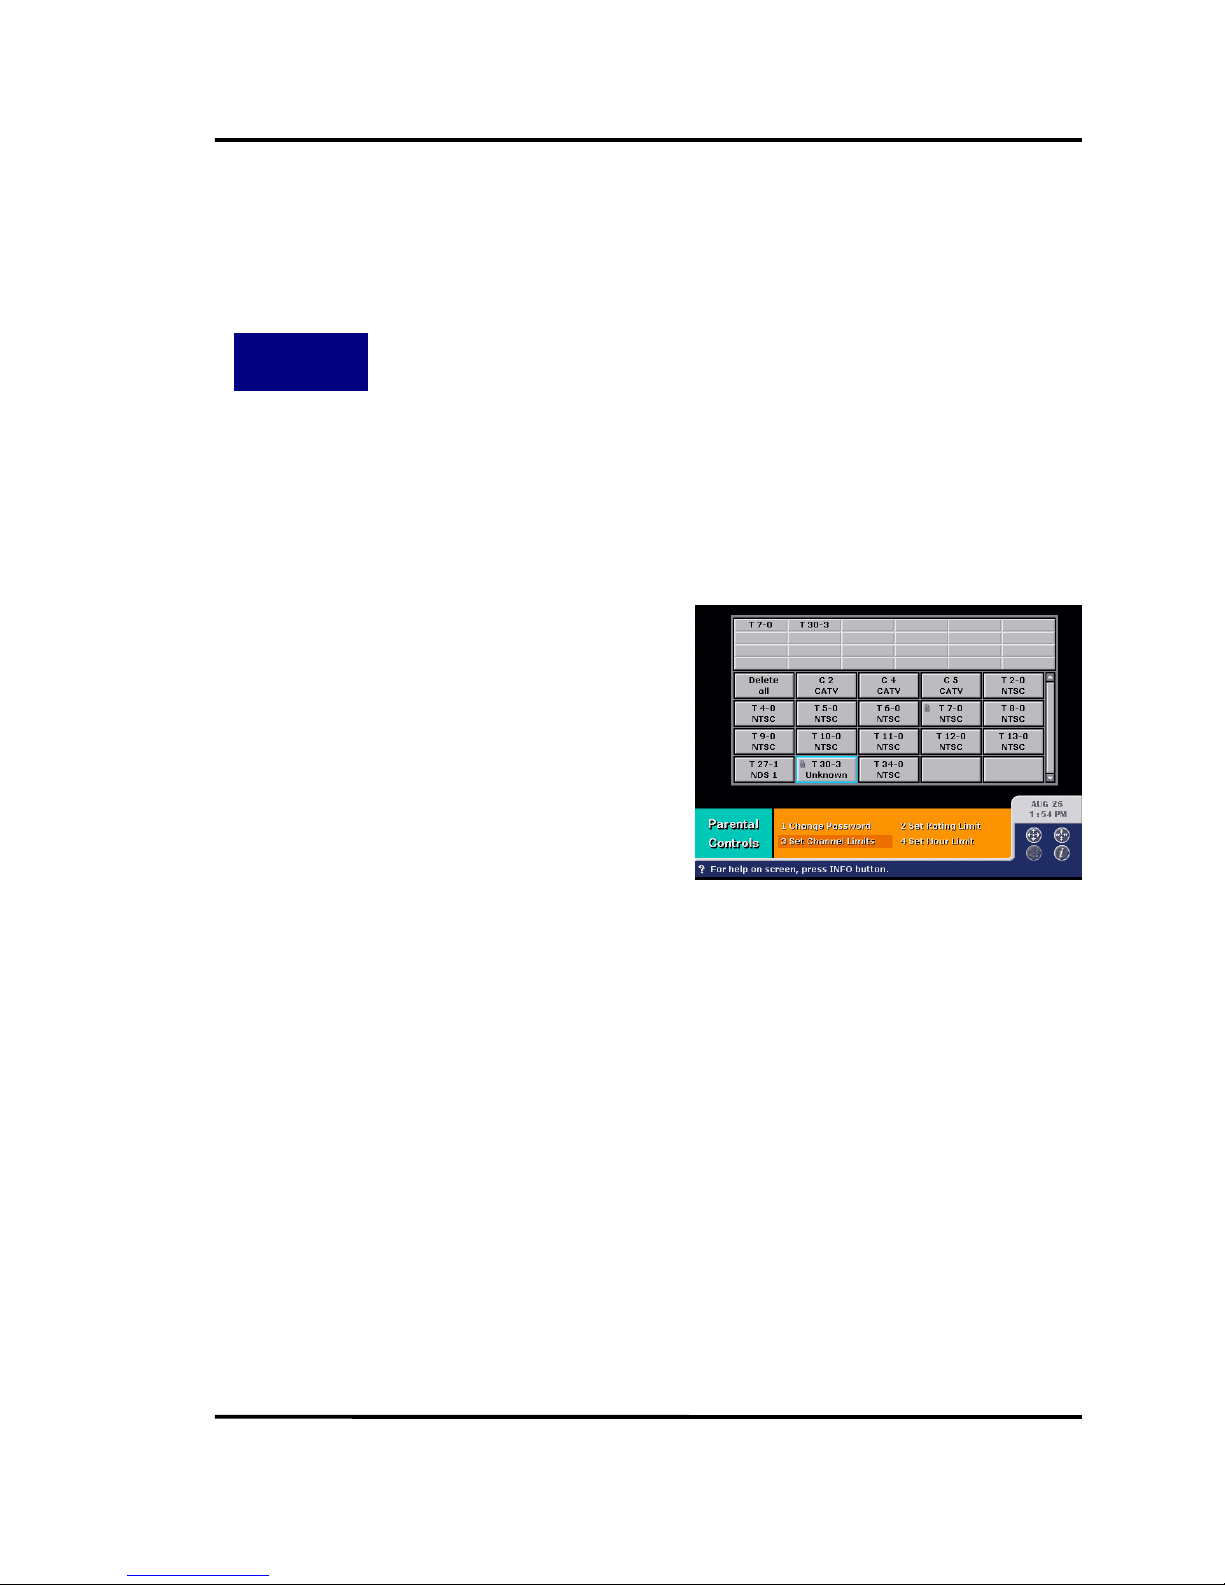
The Set Channel Limit allows you to prevent programs from being watched on specific
channels, such as adult channels.
If you want to watch program of the limited channel, you have to type correct password
to override the channel limit.
In the Set Channel Limit menu, you can
see the limited channel list that shows you
which channels are selected as limited
channels. If you have not selected any
channel so far, the list shall be empty.
Below the list are the available
channels. User can move the cursor and
select to add or delete a limited channel.
To delete the full list of the limited
channels, select Delete All button.
Page 41
Philips HD receiver User Guide
40
7.4. S
ET HOUR LIMIT
How to Get
There
Main Menu ⇒⇒⇒⇒ Parental Control [3] ⇒⇒⇒⇒ Set Hour Limit [4]
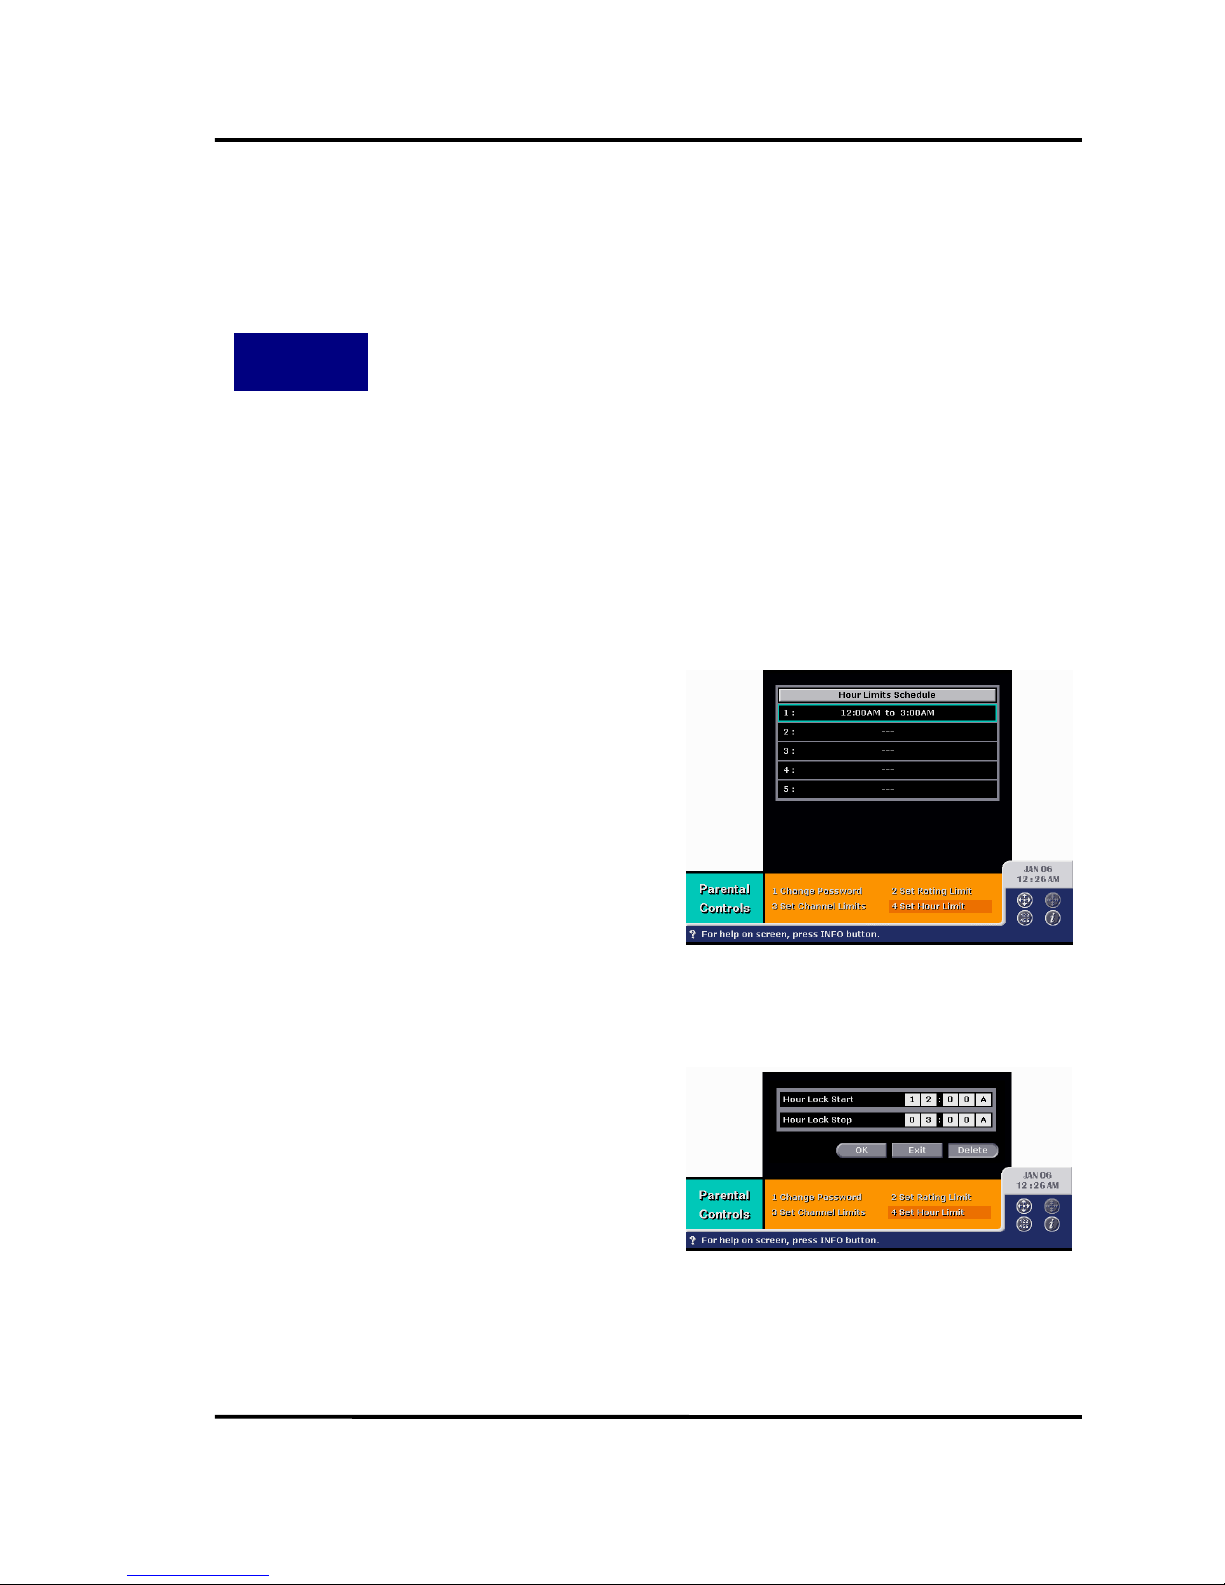
The Set Hour Limit allows you to prevent programs from being watched during userdefined hours.
If you want to watch program during the limited time, you have to type correct
password to override the hour limit.
You can set up to five hour limits and these multiple limits can be useful if you want to
prevent your children from watching TV during 6~9 o’clock in the morning, 8~11 o’clock and
12~3 o’clock at night, for example.
Select any slot to edit the hour limit.
Type the start and the end time of the
limit.
If you want to set multiple limits, select
another slot and repeat the procedure.
Page 42
Philips HD receiver User Guide
41
CHAPTER
8
S
YSTEM SETUP
8.1. S
YSTEM SETUP
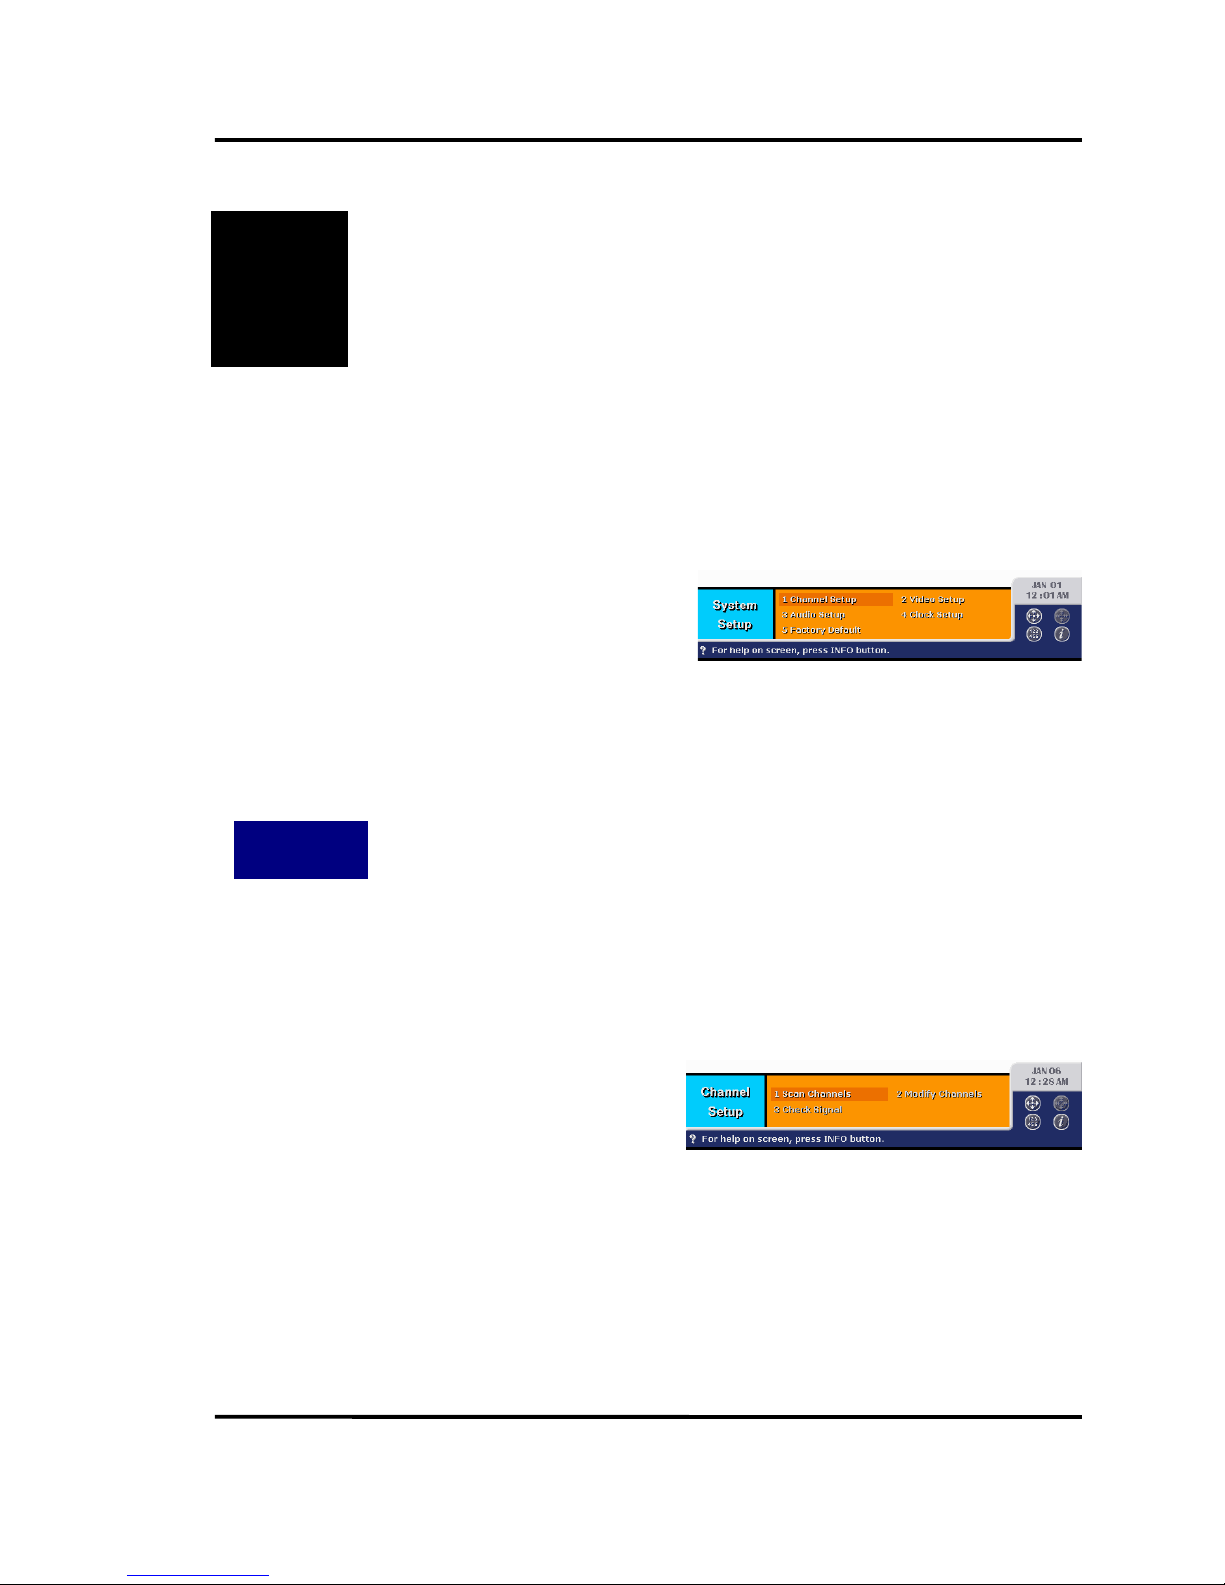
The System Setup menu includes channel setup, video setup, audio setup, clock setup,
and factory default.
8.2. C
HANNEL SETUP
How to Get
There
Main Menu ⇒⇒⇒⇒ System Setup [4] ⇒⇒⇒⇒ Channel Setup [1]
The Channel Setup menu allows you to search available channels from the Network
Interface Modules with which HD receiver is equipped. HD receiver has three NIMs for
terrestrial and cable. You can search available channels in two different ways, full search
and signal check.
Select the Scan Channels menu for full
search of signals from specific NIM.
Select the Modify Channels menu to
edit analog channels from terrestrial and
cable.
Select the Signal Check menu to search
and check a signal from specific NIM.
Page 43
Philips HD receiver User Guide
42
8.3. S
CAN CHANNELS
How to Get
There
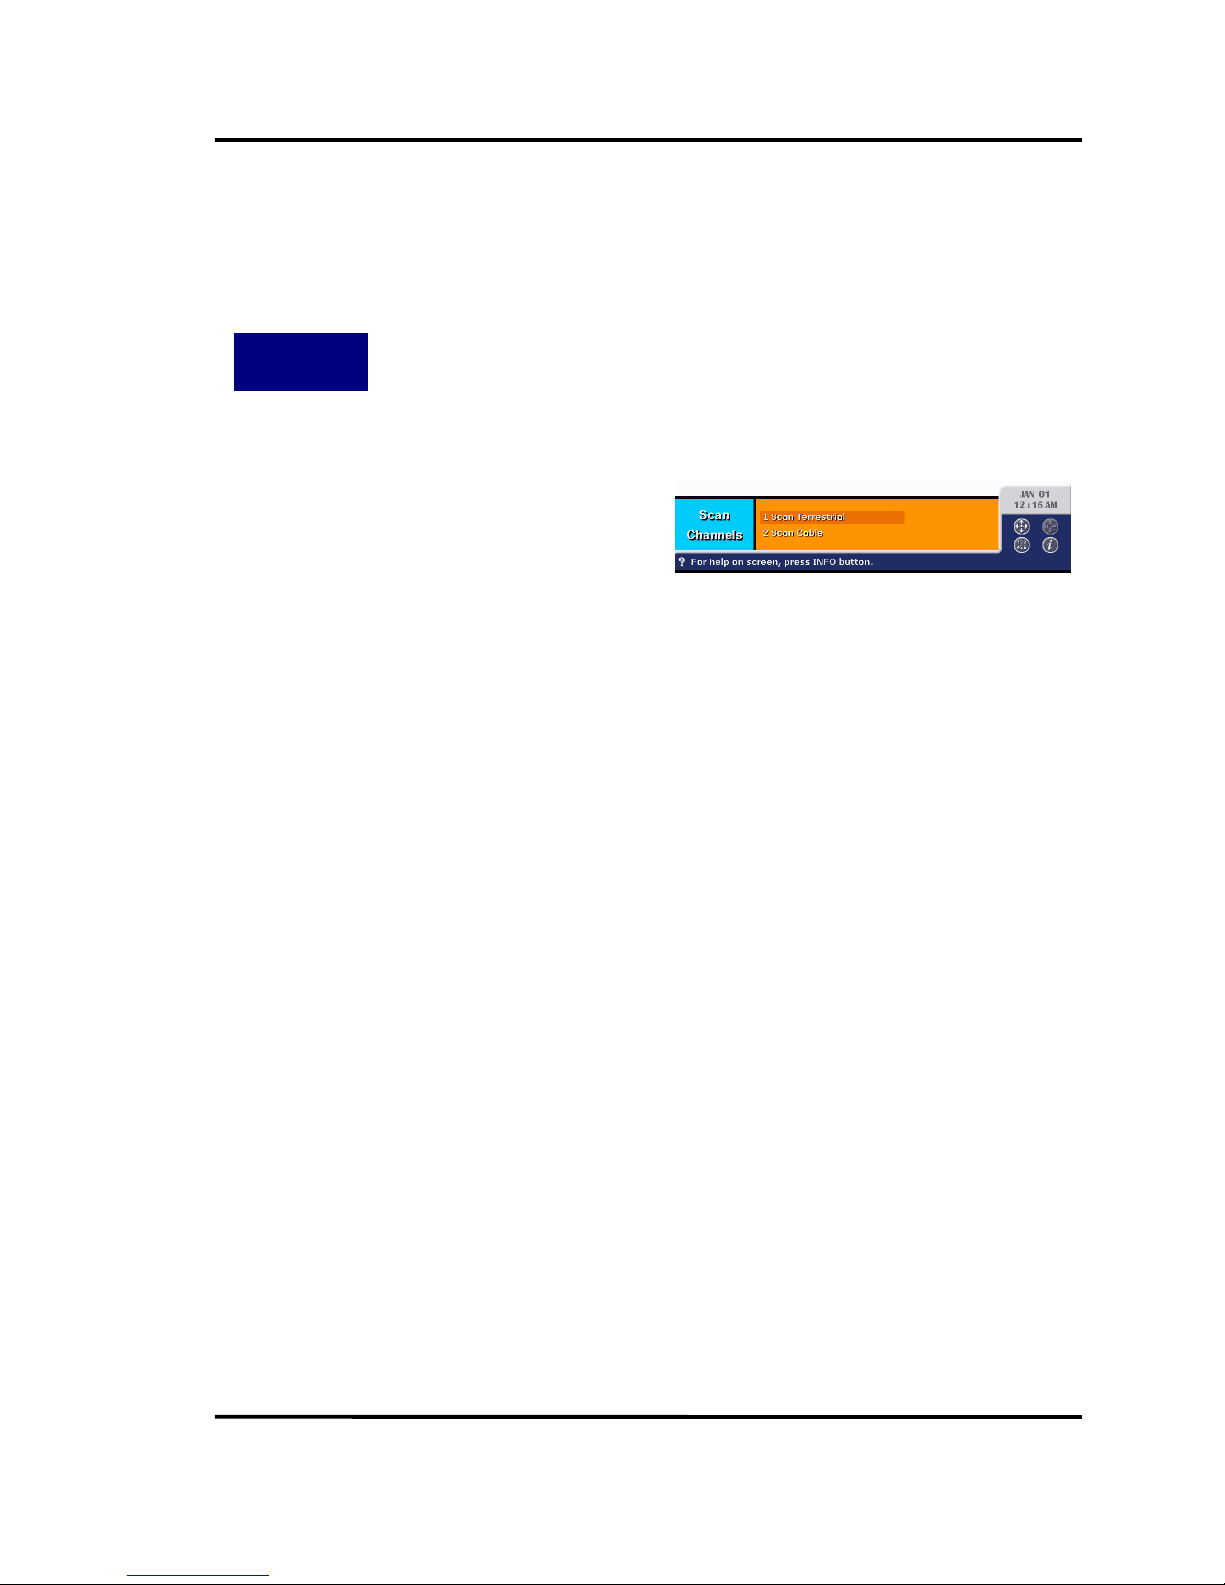
Main Menu ⇒⇒⇒⇒ System Setup [4] ⇒⇒⇒⇒ Channel Setup [1] ⇒⇒⇒⇒ Scan Channels [1]
Select a NIM to scan.
Page 44
Philips HD receiver User Guide
43
8.4. S
CAN TERRESTRIAL
How to Get
There
Main Menu ⇒⇒⇒⇒ System Setup [4] ⇒⇒⇒⇒ Channel Setup [1] ⇒⇒⇒⇒ Scan Channels [1]
⇒⇒⇒⇒ Scan Terrestrial [1]
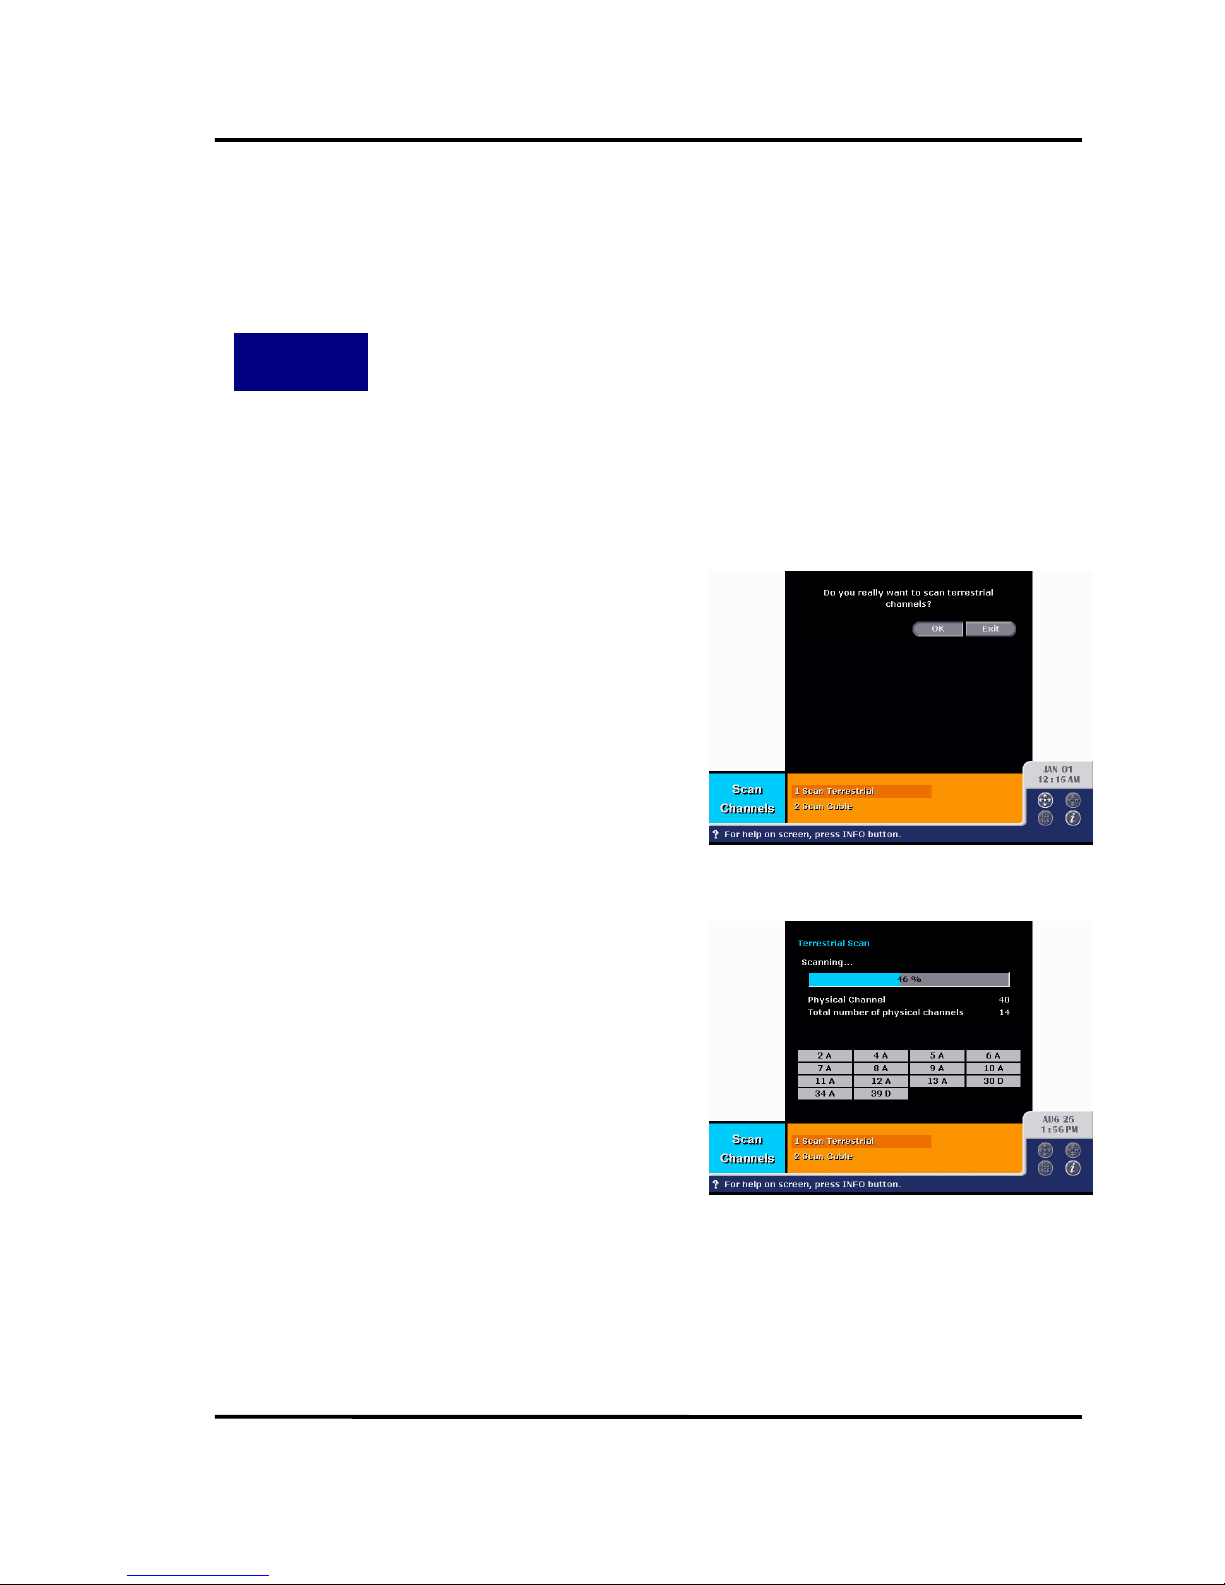
The Scan Terrestrial allows you to search available terrestrial channels. HD receiver scans
from channel 2 to 83 and builds the channel map. You can navigate channels only after
the channel map is built.
Select OK button if you want to
proceed. It will take couple of time to
finish the scanning.
While scanning, HD STB displays the
progress bar and the number of channels
acquired so far. The bottom of the screen
shows the list of the acquired channels. 2A
means analog channel 2, and 30D digital
channel 30.
You can skip or cancel the scanning by
pressing PREV or CLEAR key on the remote.
The channel map built so far is preserved.
Page 45
Philips HD receiver User Guide
44
8.5. S
CAN CABLE
How to Get
There
Main Menu ⇒⇒⇒⇒ System Setup [4] ⇒⇒⇒⇒ Channel Setup [1] ⇒⇒⇒⇒ Scan Channels [1]
⇒⇒⇒⇒ Scan Cable [2]
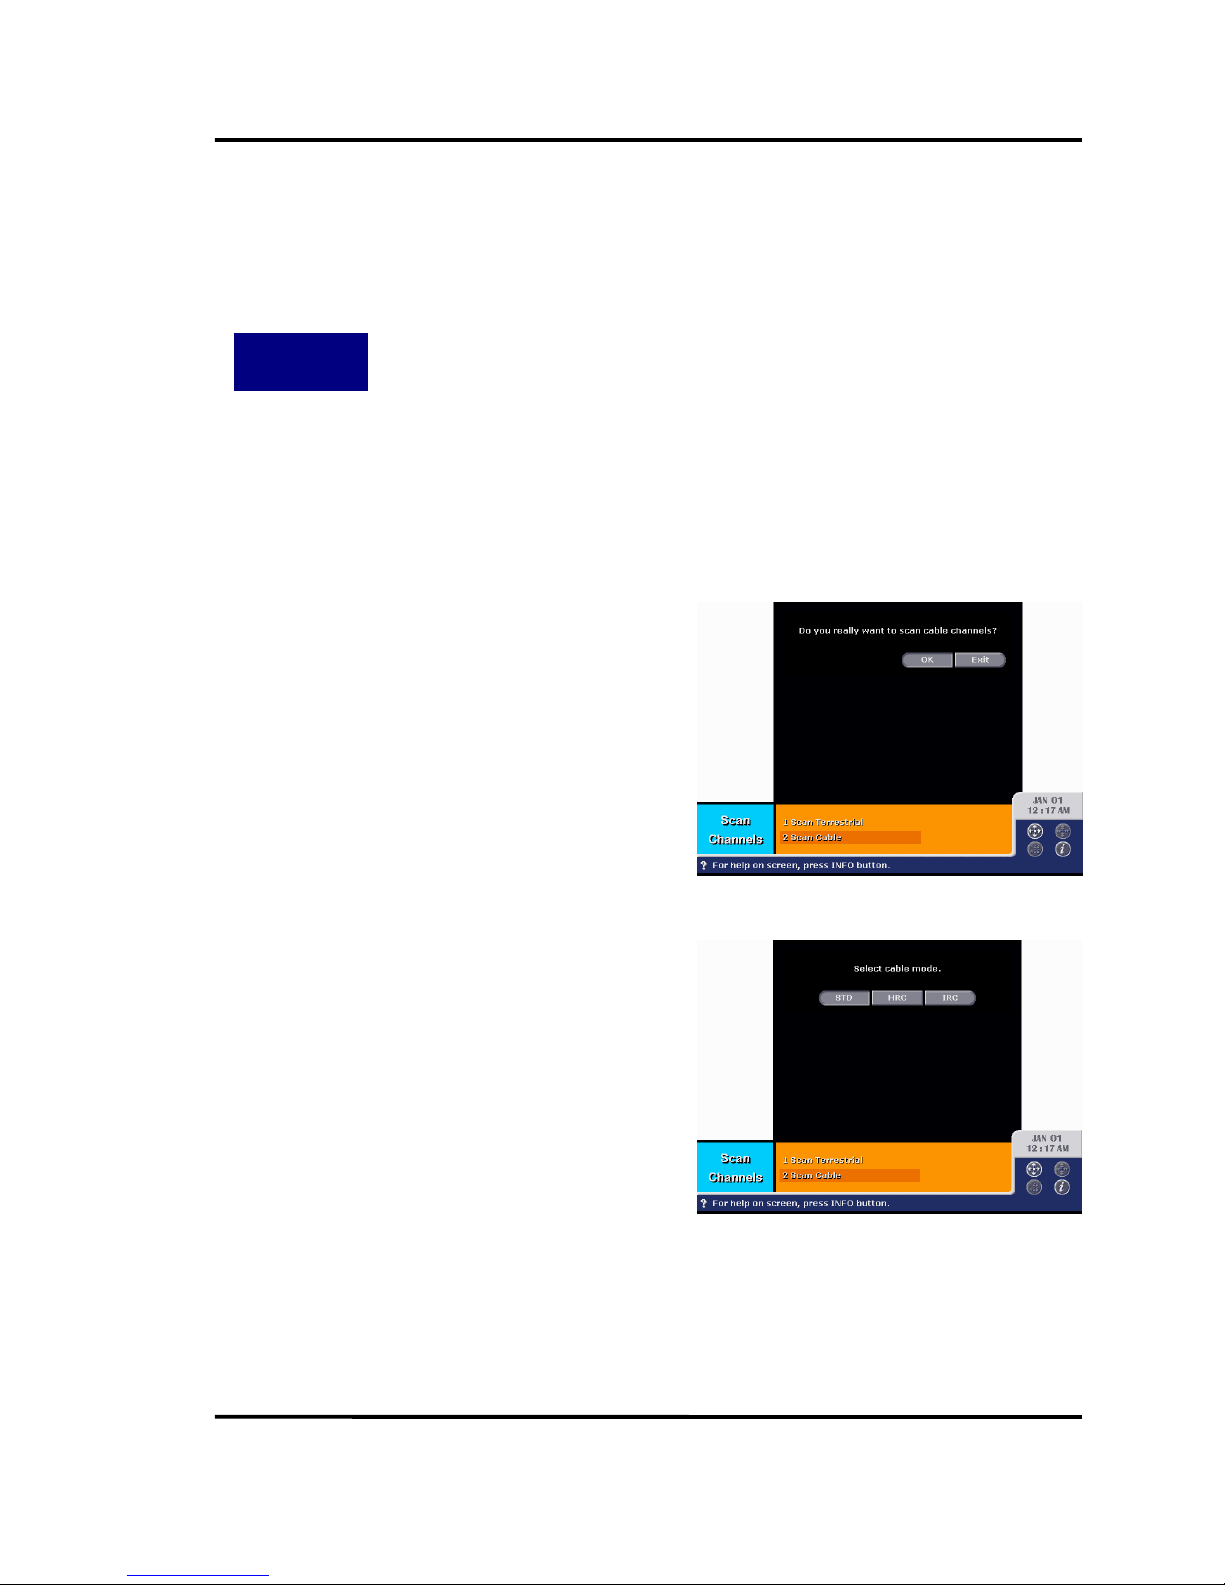
The Scan Cable allows you to search available analog cable channels. HD receiver
supports three frequency modes, Standard, HRC and IRC. HD receiver scans from channel 1
to 156 and builds the channel map. You can navigate channels only after the channel map
is built.
Select OK button.
Select cable frequency mode. It will
take couple of time to finish the scanning.
Page 46
Philips HD receiver User Guide
45
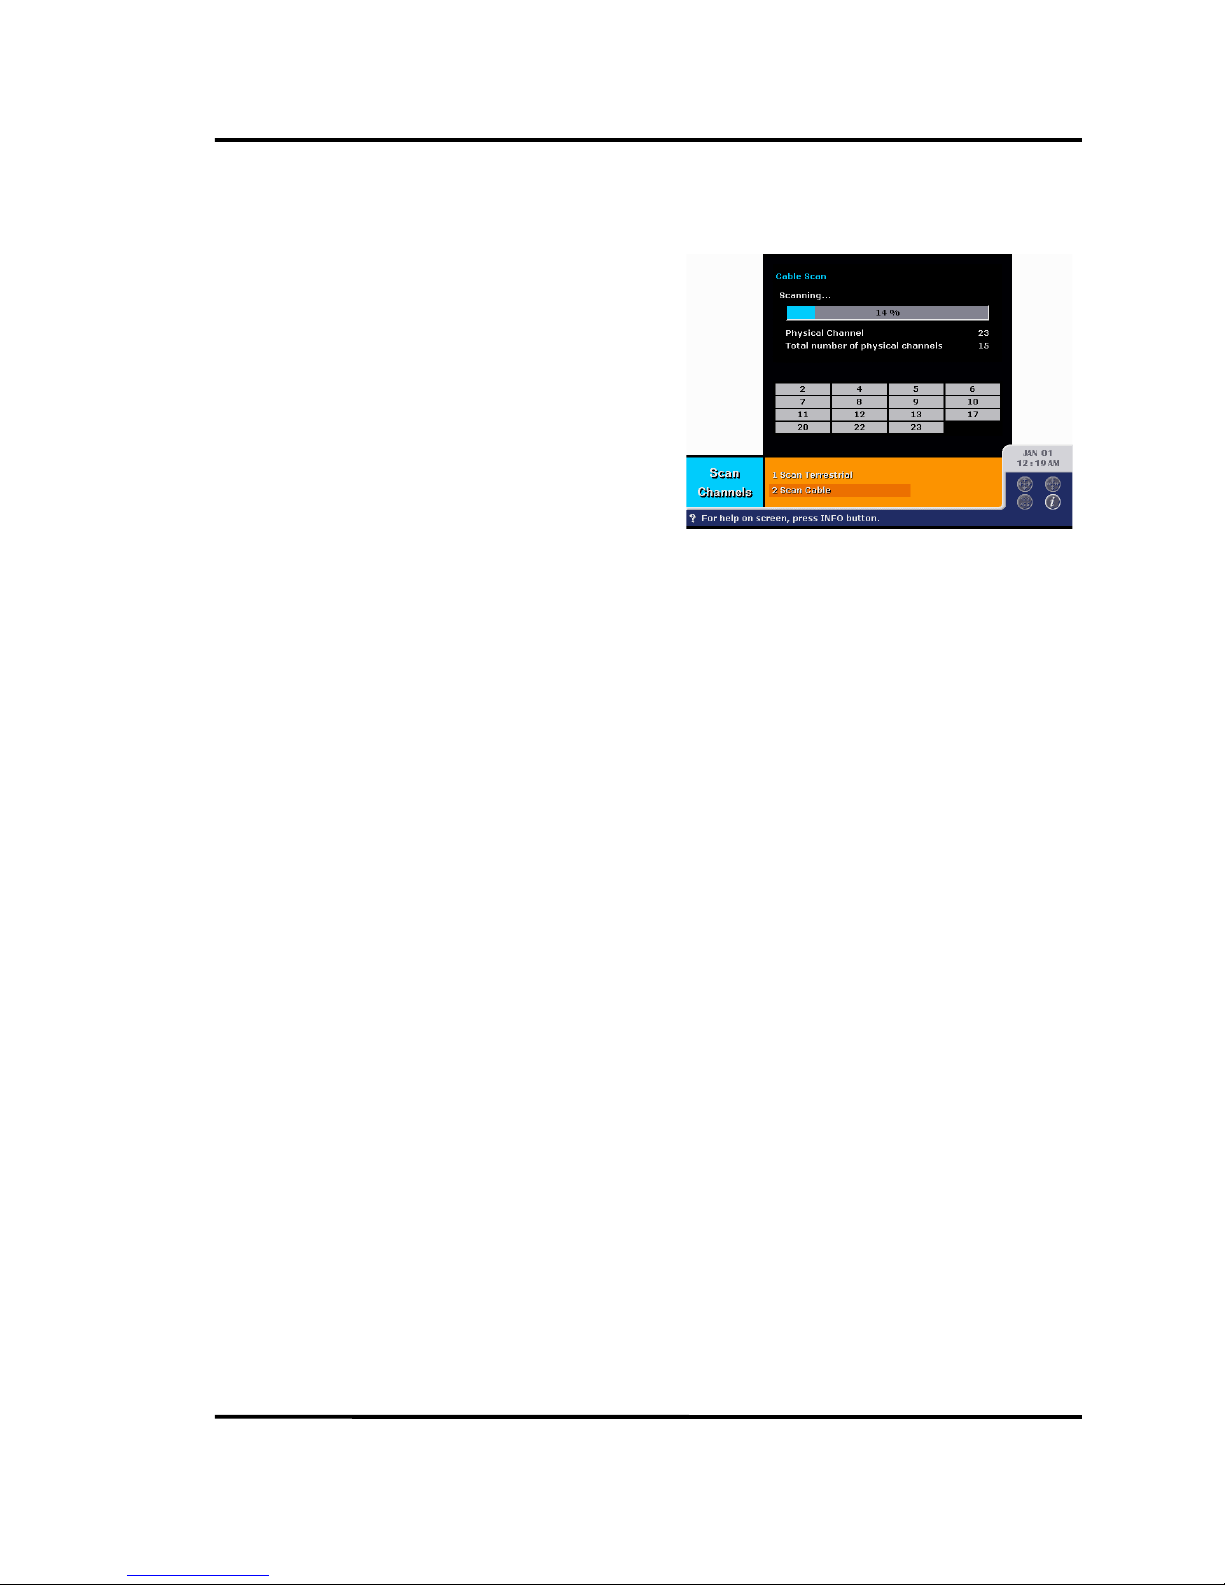
While scanning, HD STB displays the
progress bar and the number of channels
acquired so far. The bottom of the screen
shows the list of the acquired channels.
You can skip or cancel the scanning by
pressing PREV or CLEAR key on the remote.
The channel map built so far is preserved.
Page 47
Philips HD receiver User Guide
46
8.6. M
ODIFY CHANNELS
How to Get
There
Main Menu ⇒⇒⇒⇒ System Setup [4] ⇒⇒⇒⇒ Channel Setup [1] ⇒⇒⇒⇒ Modify Channels [2]
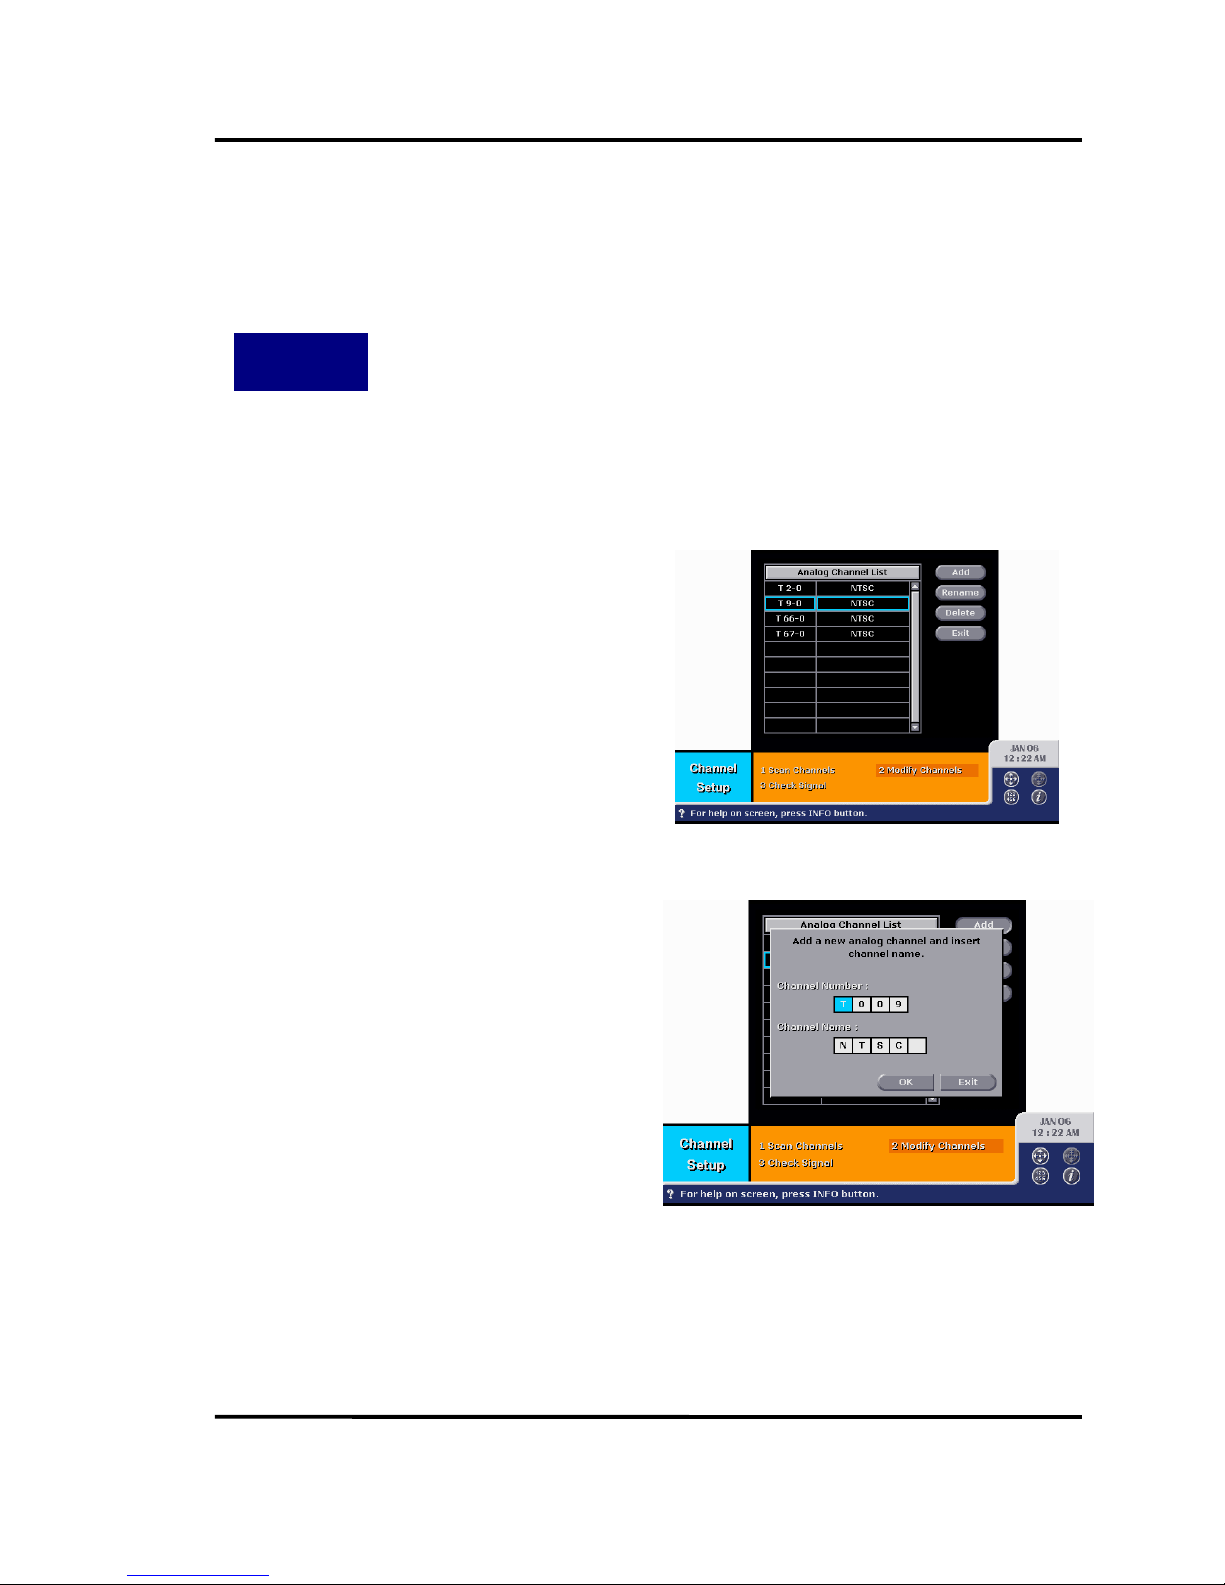
The bad or weak signal may result in the wrong scanning result especially for analog
channels. You can add any missing analog channels and delete unwanted analog
channels.
To add a new analog channel, select
Add button.
Type the Channel Number. You can
decide NIM type of the channel by select
T for terrestrial and C for cable.
Type the Channel Name. This cannel
name will be used as a call sign in the
Banner and the Program Guide.
Select OK button.
Page 48
Philips HD receiver User Guide
47
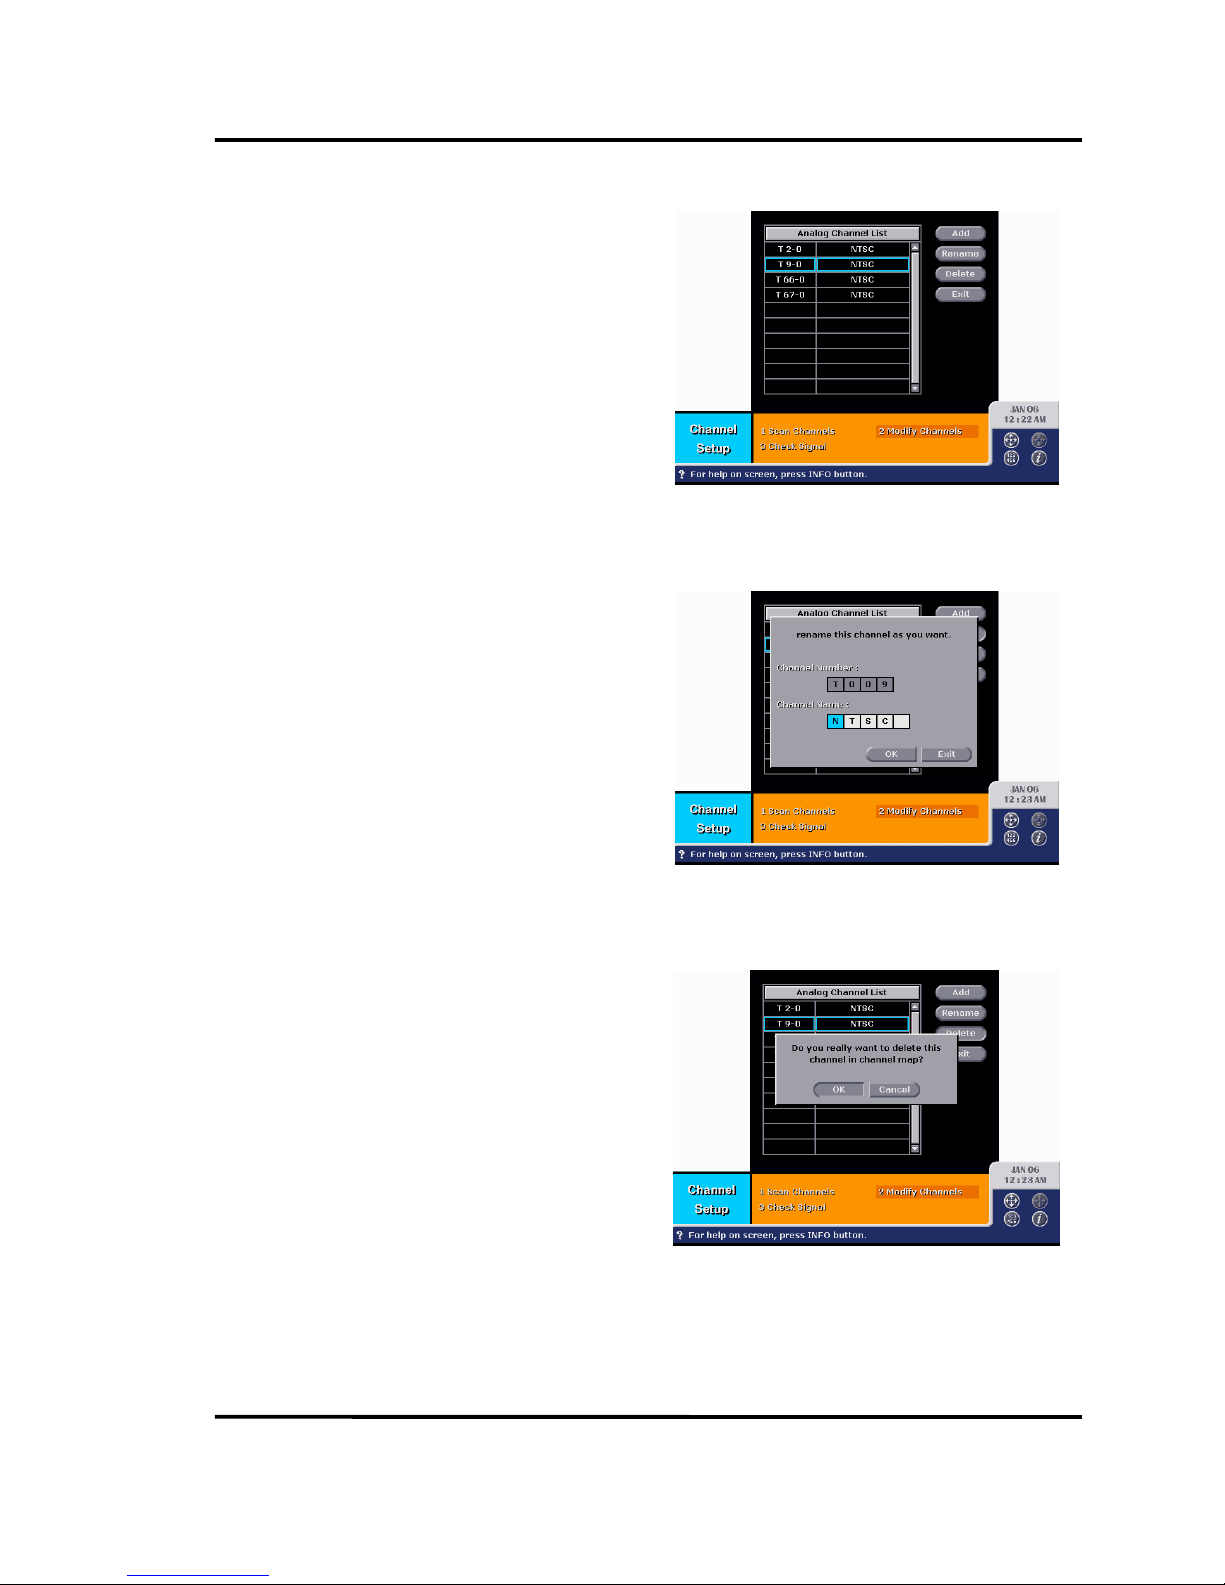
To rename a channel, place cursor on
the channel and select the Rename
button.
Type new Channel Name. This cannel
name will be used as a call sign in the
Banner and the Program Guide.
Select OK button.
To delete a channel, select Delete
button. The channel will be delete of the
channel map immediately.
Page 49
Philips HD receiver User Guide
48
8.7. C
HECK SIGNAL
How to Get
There
Main Menu ⇒⇒⇒⇒ System Setup [4] ⇒⇒⇒⇒ Channel Setup [1] ⇒⇒⇒⇒ Check Signal [3]
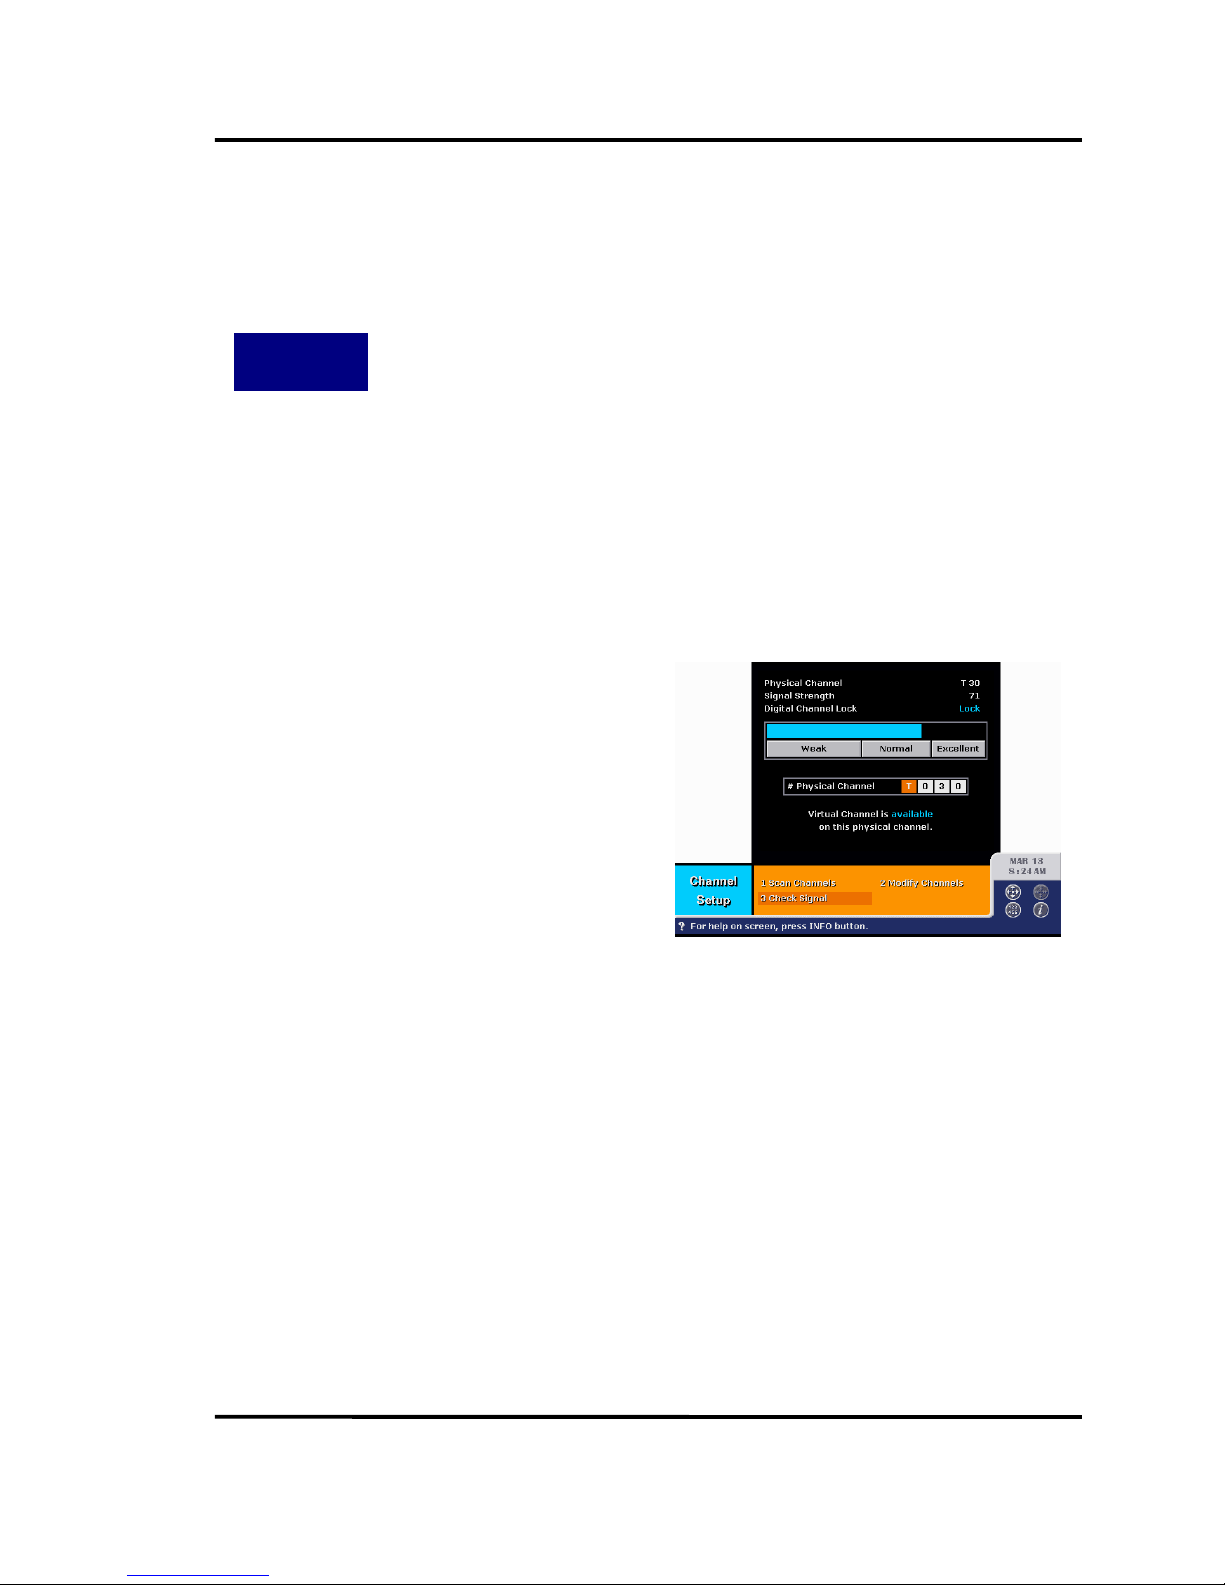
The Check Signal allows you to check the signal strength and to acquire the signal. If the
signal is available, the channel will be added to the channel map.
This menu is useful to pointing terrestrial antenna. If you know the physical channel
number that is on-air, you can get the channel map in this menu without full scanning
described in Section 8.3 to 8.4.
Type the physical channel number to
test and press SELECT key. You can decide
NIM type of the channel by select T for
terrestrial, C for cable.
Change the direction of the antenna to
get good quality if signal is weak.
If signal is sufficiently strong, HD STB builds
the channel map.
Page 50
Philips HD receiver User Guide
49
8.8. V
IDEO SETUP
How to Get
There
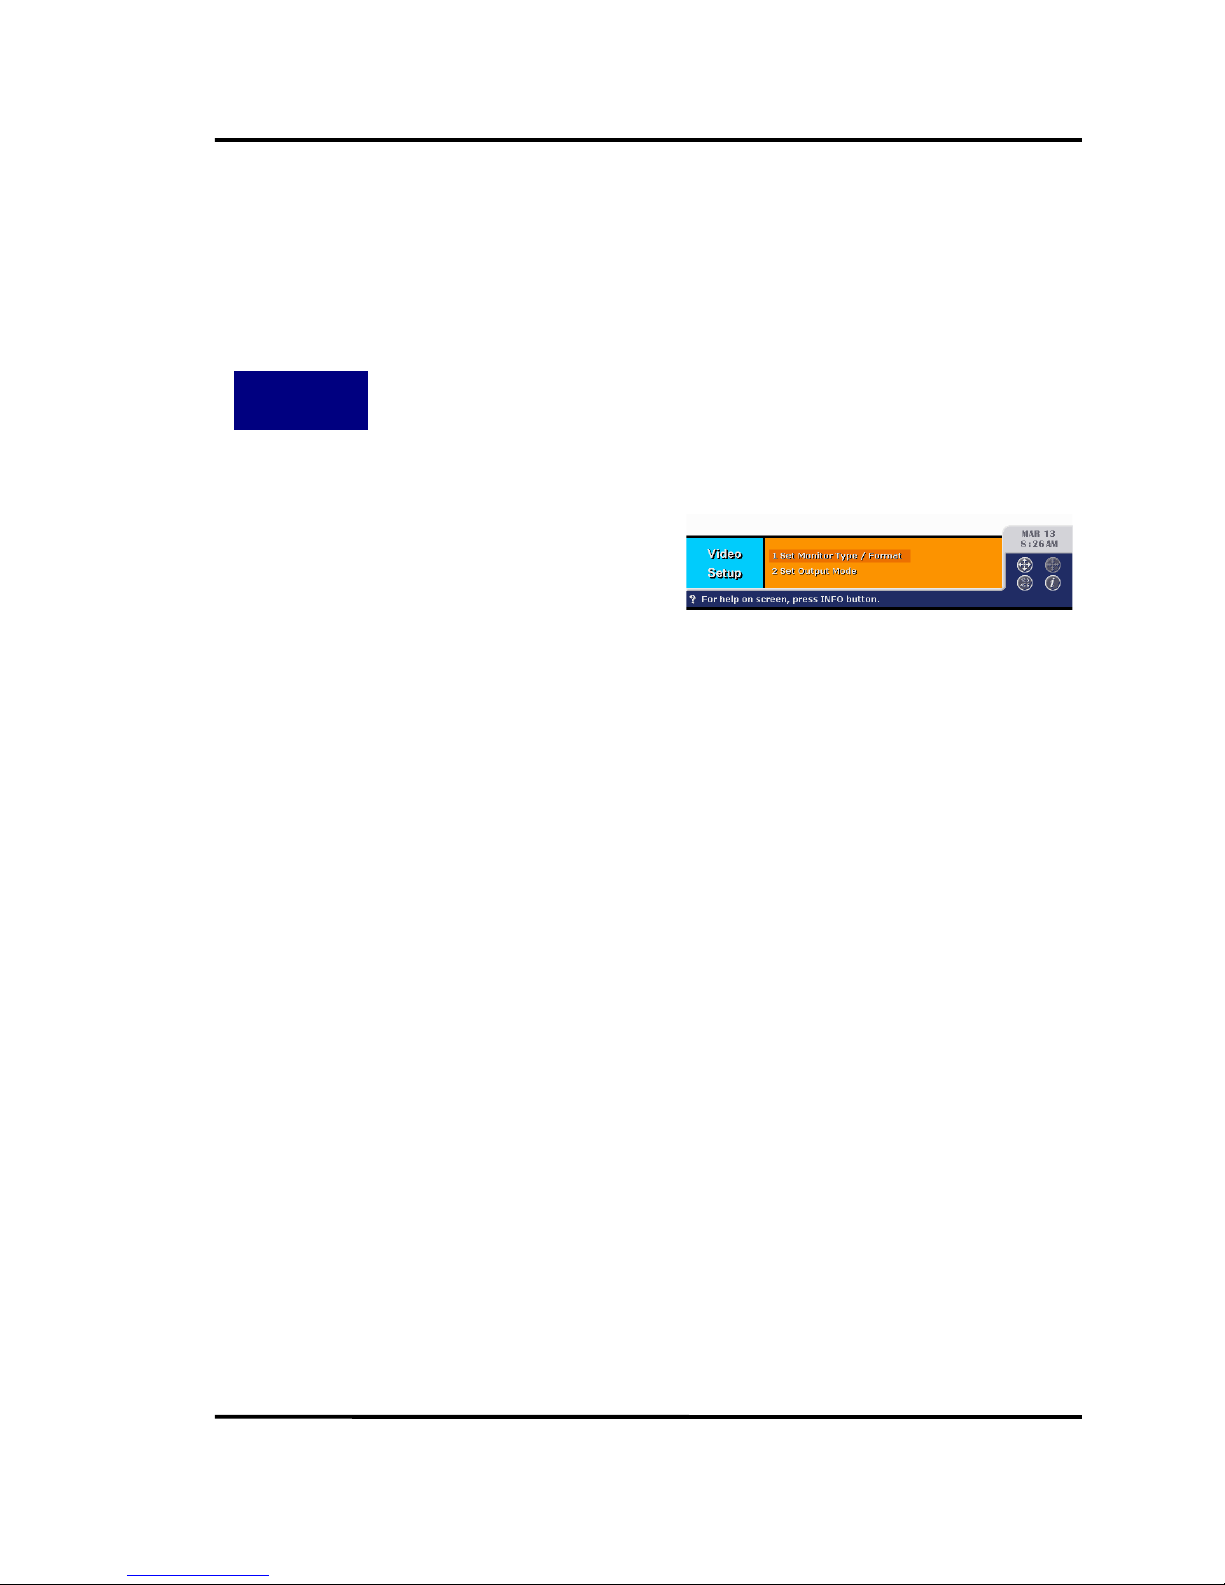
Main Menu ⇒⇒⇒⇒ System Setup [4] ⇒⇒⇒⇒ Video Setup [2]
Set monitor type / format or HD output
mode.
Page 51
Philips HD receiver User Guide
50
8.9. S
ET MONITOR TYPE
/ F
ORMAT
How to Get
There
Main Menu ⇒⇒⇒⇒ System Setup [4] ⇒⇒⇒⇒ Video Setup [2] ⇒⇒⇒⇒ Set Monitor
Type/Format [1]
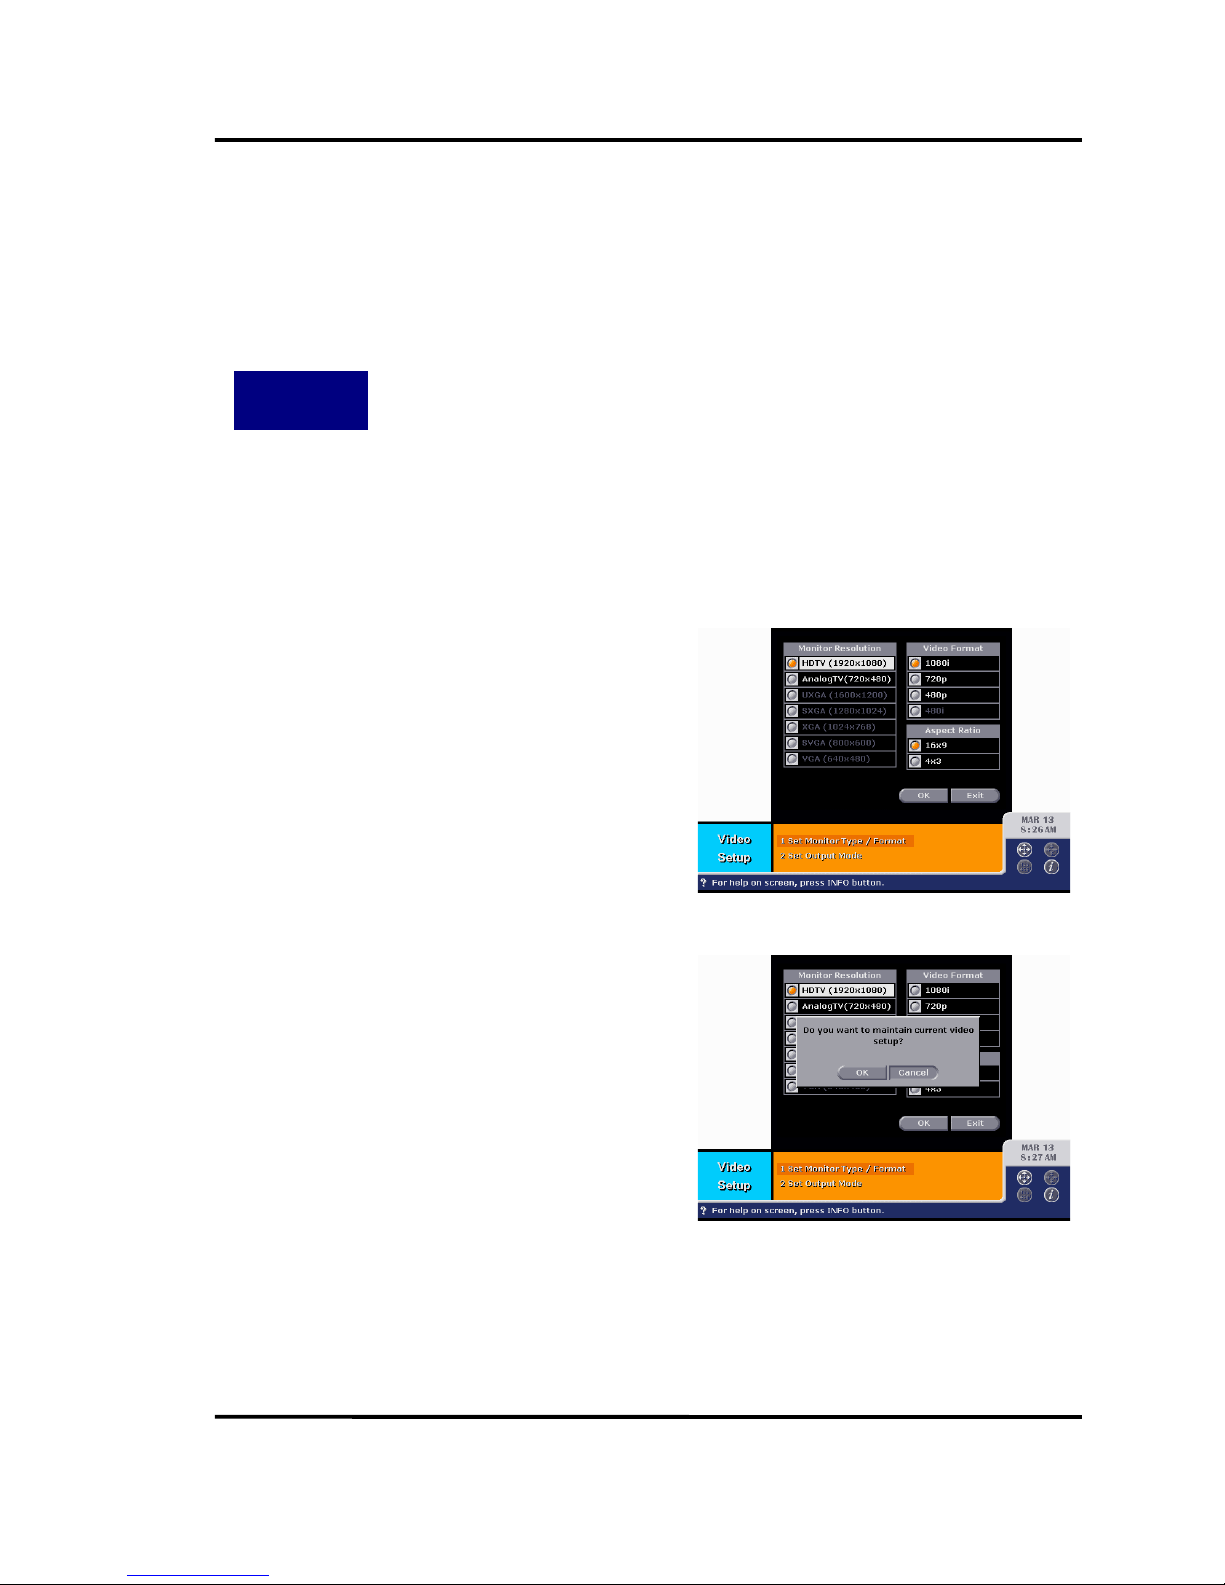
The Set Monitor Type/Format menu allows you to select the format of the output video
signal. Any digital/analog video source will be converted to the user-defined format. HD
receiver can support 1080I/720P/480P/480I video output formats.
Select the monitor type in the Monitor
Resolution radio box. The number in the
parenthesis is the maximum resolution of
your monitor. You should select actual
output resolution in the Video Format radio
box.
Select the aspect ratio of your monitor in
the Aspect Ratio radio box.
Select OK button.
If your monitor supports the selected
video format and the cable connection is
correct, you can see the confirmation
dialog box. Select OK button.
Select the aspect ratio of your monitor in
the Aspect Ratio radio box.
Select OK button.
If your monitor does not display nothing,
don’t be embarrassed and just wait for
seconds. The video will recover to its
previous state.
Page 52
Philips HD receiver User Guide
51
8.10. S
ET OUTPUT MODE
How to Get
There
Main Menu ⇒⇒⇒⇒ System Setup [4] ⇒⇒⇒⇒ Video Setup [2] ⇒⇒⇒⇒ Set Output Mode [2]
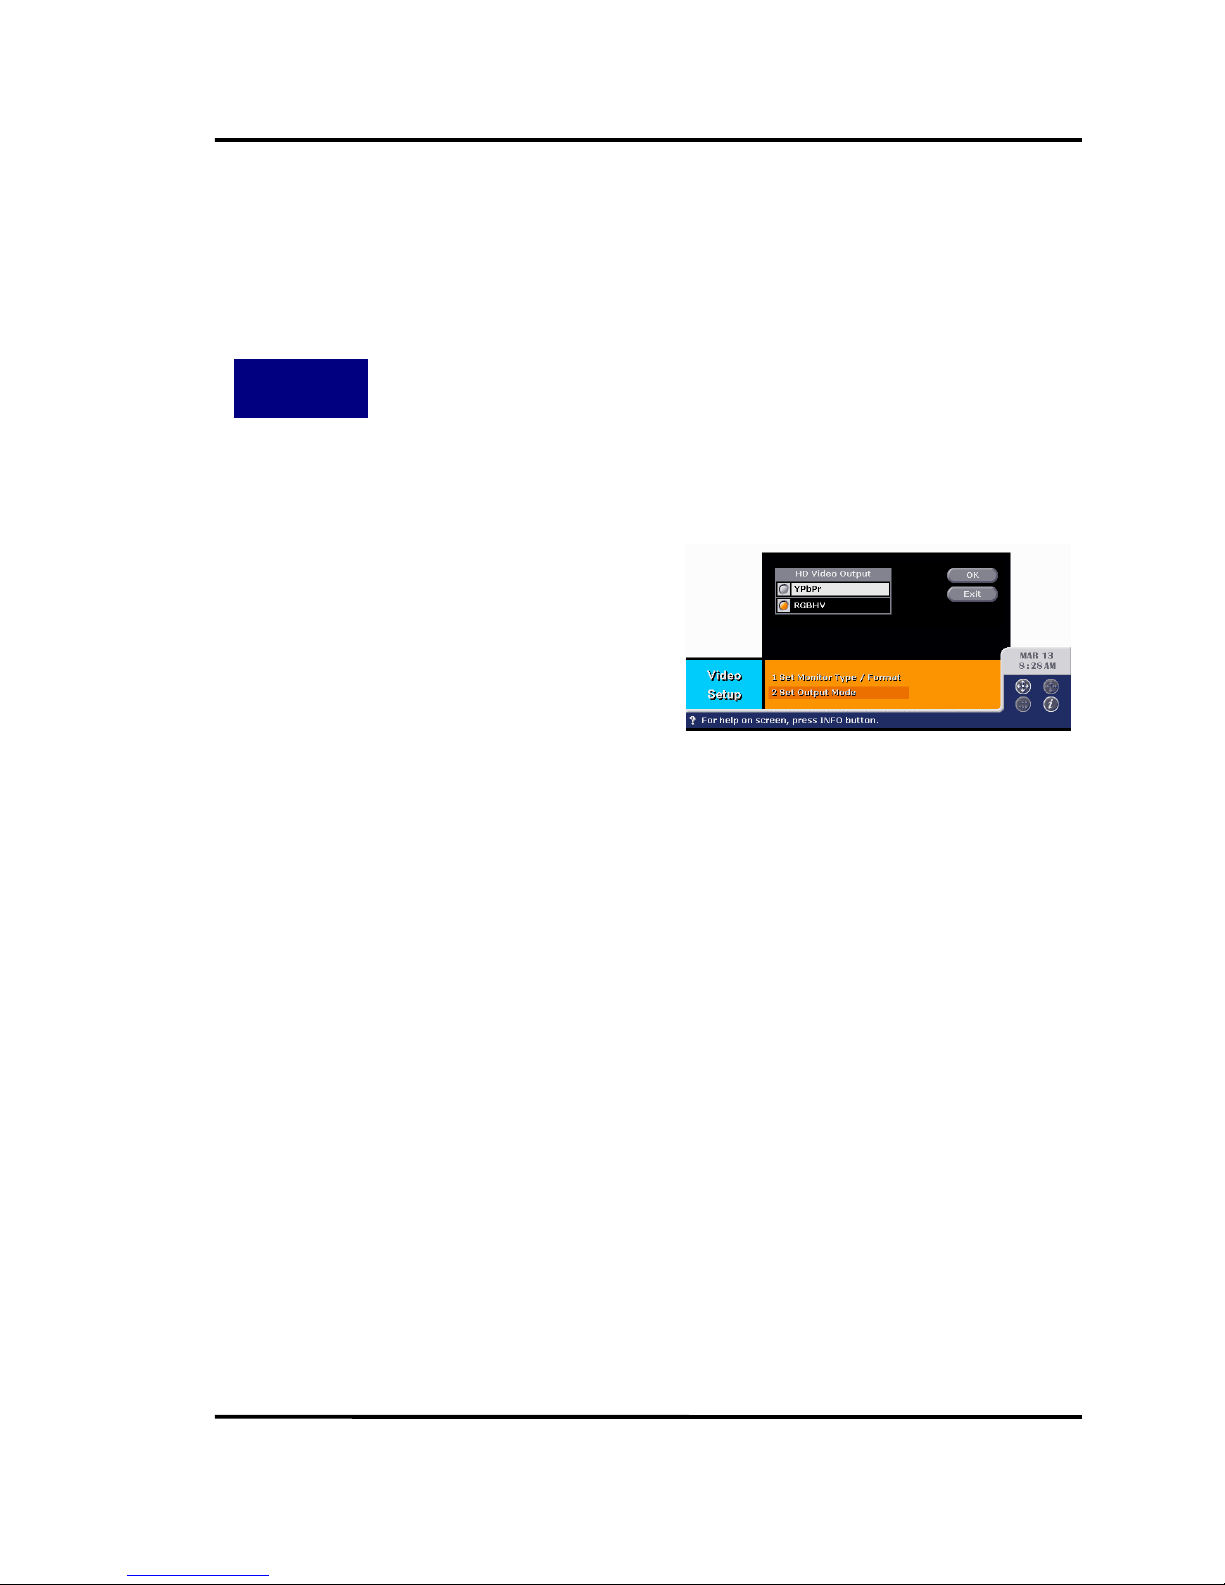
The Set Ouput Mode menu allows you to select the HD output mode, YPbPr or RGBHV.
Select the output mode in the HD video
output radio box.
Select OK button.
Page 53

Philips HD receiver User Guide
52
8.11. A
UDIO SETUP
How to Get
There
Main Menu ⇒⇒⇒⇒ System Setup [4] ⇒⇒⇒⇒ Audio Setup [3]
Digital TV channel can include multiple audio tracks for a program to support multiple
language. If you set your preferred language, HD receiver searches the language in the
audio tracks and, if found, decodes and display the audio. If not, it just decodes English
audio track.
The audio you hear from the speaker can be feed forward to other equipment such as
Dolby Pro Logic decoder, amplifier, external AC-3 decoder, etc. HD receiver supports SPDIF
digital audio output for the feed-forward. You can select the audio output to be PCM or
AC-3.
T910 support auto volume control. You can set audio of all channels to same value using
auto audio level control.
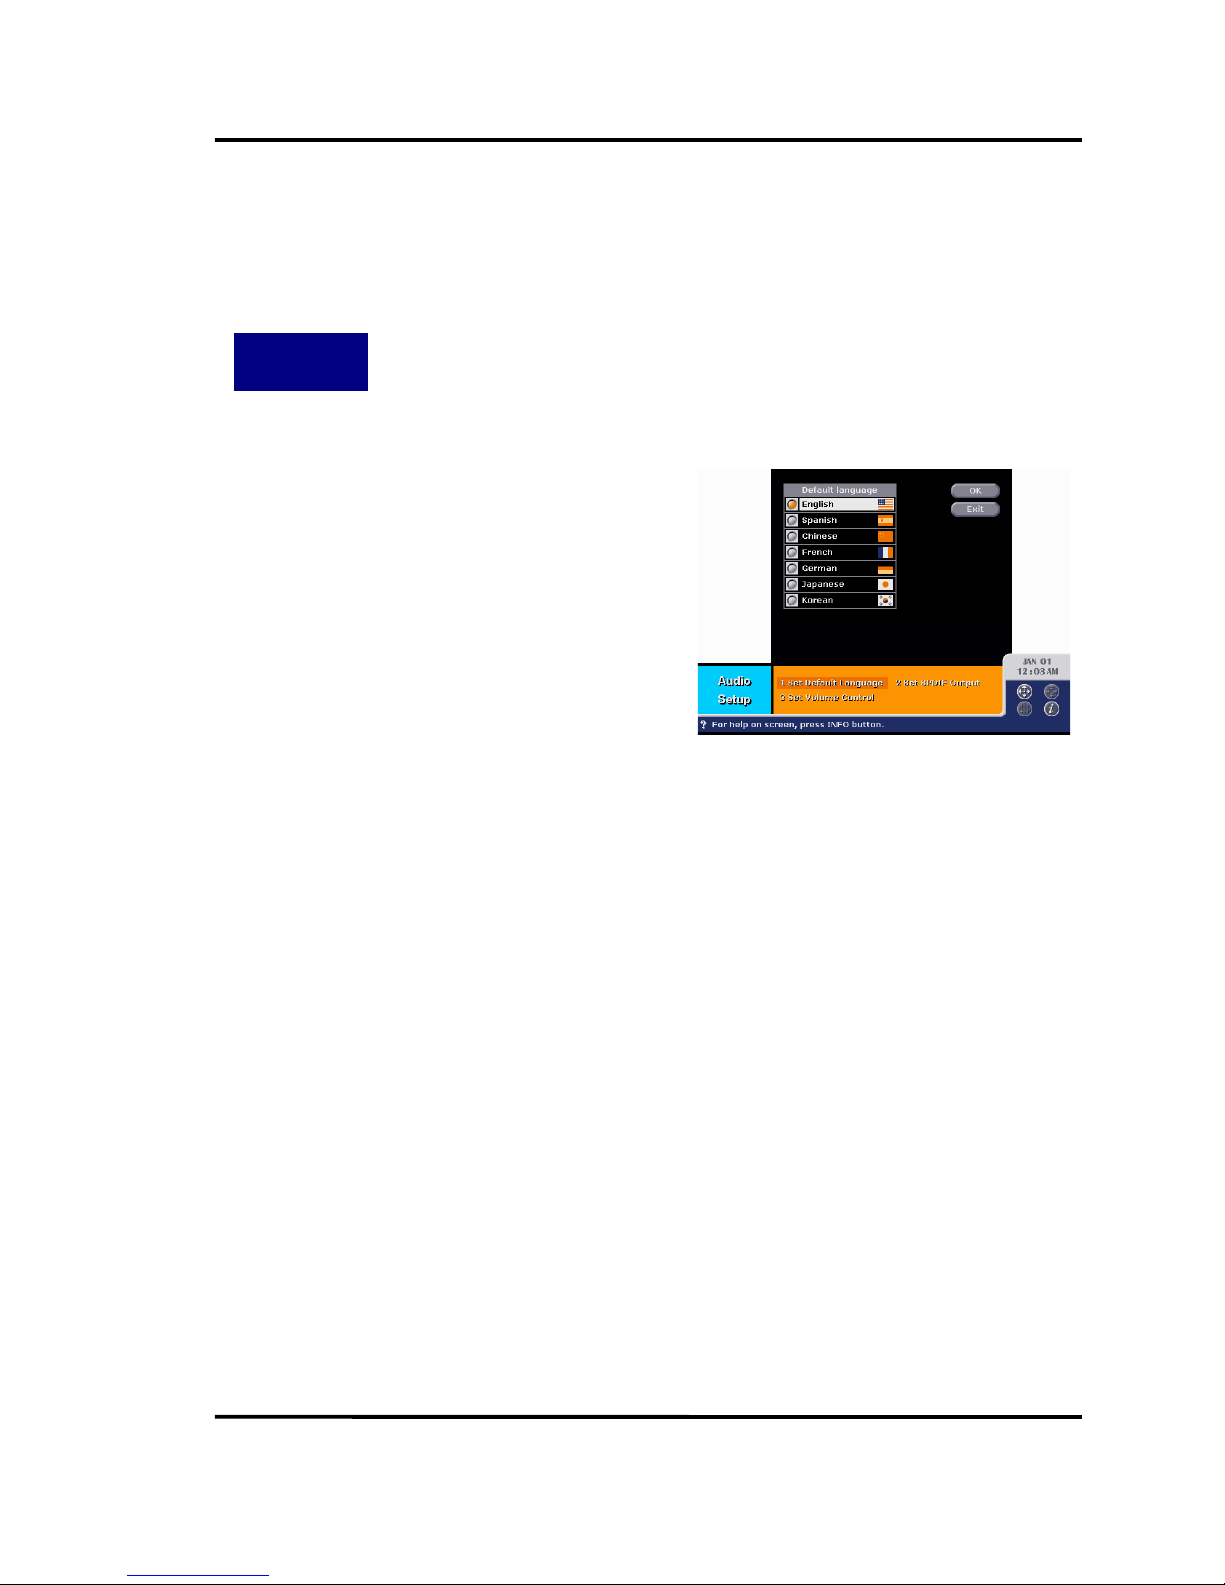
Select the Select Default Language
menu to set your preferred audio
language.
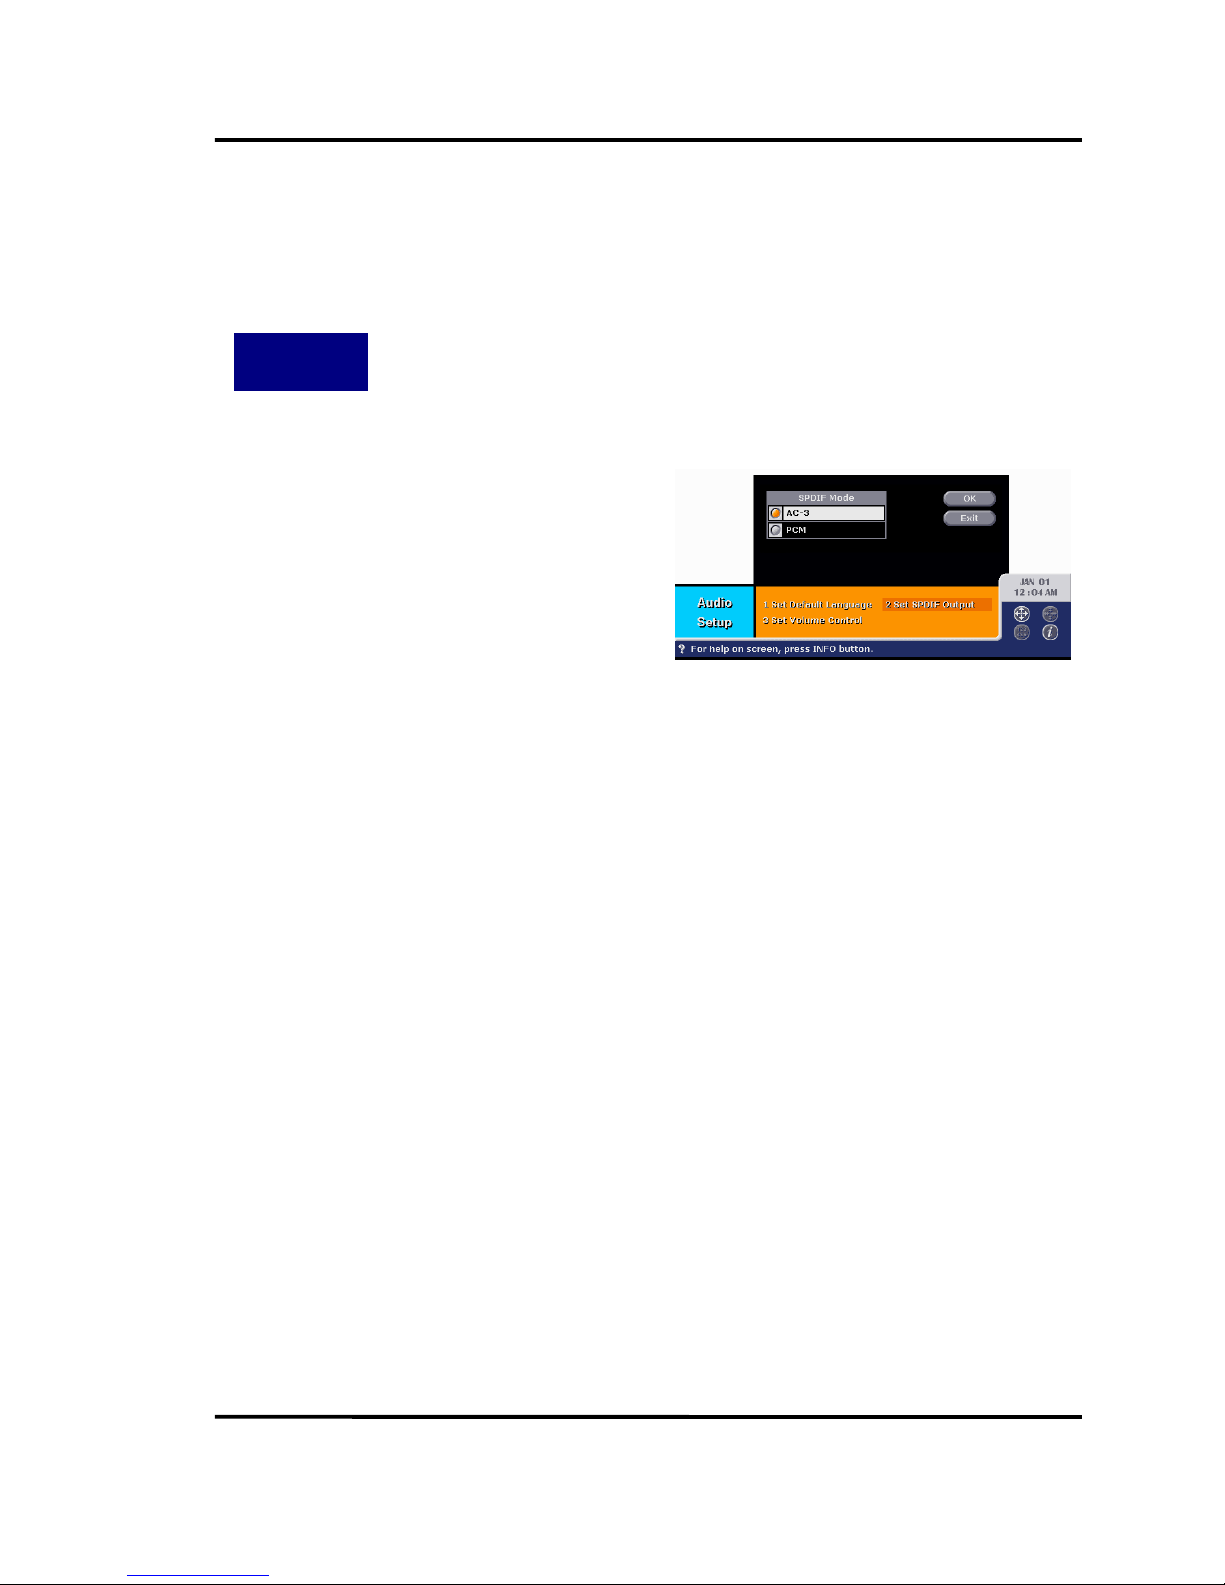
Select the Set SPDIF Output to select
digital output format.
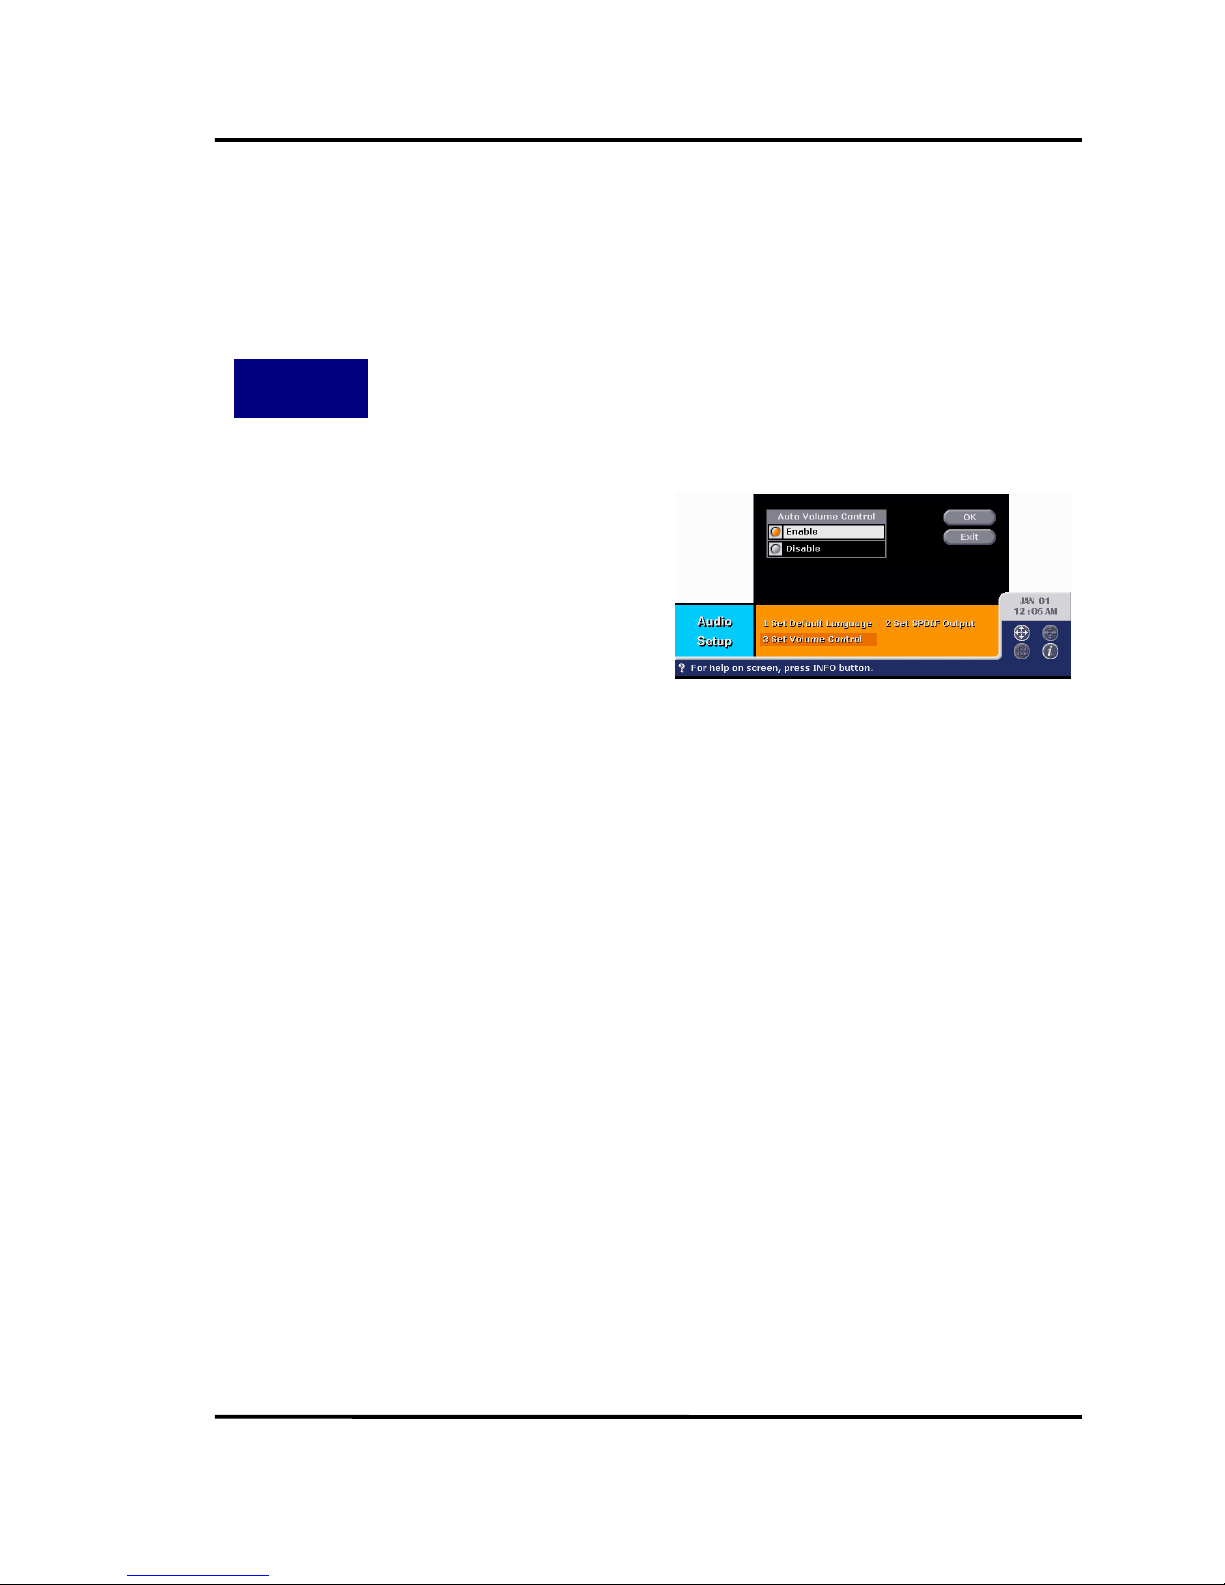
Select the Set Volume Control to enable
or disable auto volume control.
Page 54
Philips HD receiver User Guide
53
8.12. S
ELECT DEFAULT LANGUAGE
How to Get
There
Main Menu ⇒⇒⇒⇒ System Setup [4] ⇒⇒⇒⇒ Audio Setup [3] ⇒⇒⇒⇒ Select Default
Language [1]
Select your preferred audio language in
the Default Language radio box.
Select OK button.
Page 55
Philips HD receiver User Guide
54
8.13. S
ELECT
SPDIF O
UTPUT
How to Get
There
Main Menu ⇒⇒⇒⇒ System Setup [4] ⇒⇒⇒⇒ Audio Setup [3] ⇒⇒⇒⇒ Select SPDIF Output [2]
Select the SPDIF Mode radio box.
Select OK button.
Page 56
Philips HD receiver User Guide
55
8.14. S
ET VOLUME CONTROL
How to Get
There
Main Menu ⇒⇒⇒⇒ System Setup [4] ⇒⇒⇒⇒ Audio Setup [3] ⇒⇒⇒⇒ Set Volume Control [3]
Select the Auto Volume Control radio
box.
Select OK button.
Page 57
Philips HD receiver User Guide
56
8.15. C
LOCK SETUP
How to Get
There
Main Menu ⇒⇒⇒⇒ System Setup [4] ⇒⇒⇒⇒ Clock Setup [4]
In digital TV system, broadcaster sends the time information, and the receiver is
supposed to use it to display consistent Program Guide information. Some broadcasters,
however, fail to send correct time information, and in this case you should set your clock for
yourself.
Another important information you should tell HD receiver is where you live in the time
zone. This information is used to calculate accurate local time.
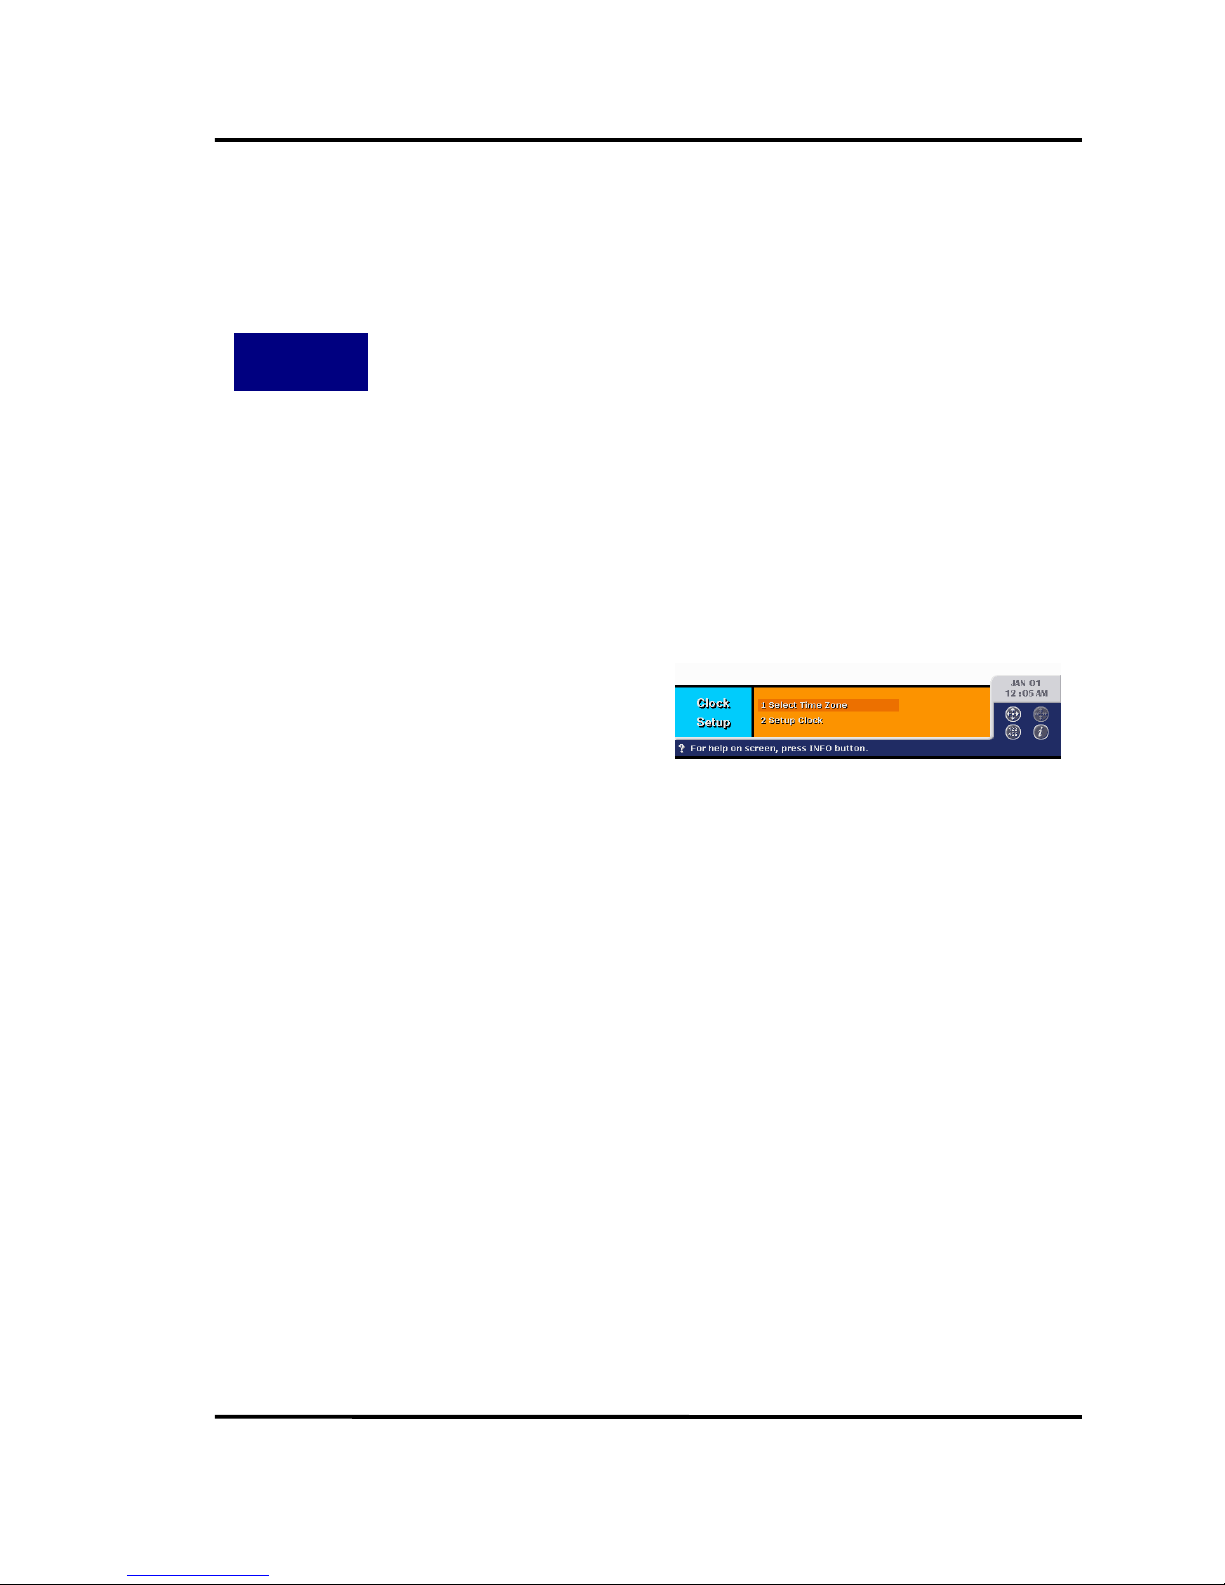
Select the Select Time Zone menu to set
your time zone.
Select the Setup Clock to set the clock
mode, auto or manual, the current clock
and the start and end time of the daylight
saving time.
Page 58
Philips HD receiver User Guide
57
8.16. S
ELECT TIME ZONE
How to Get
There
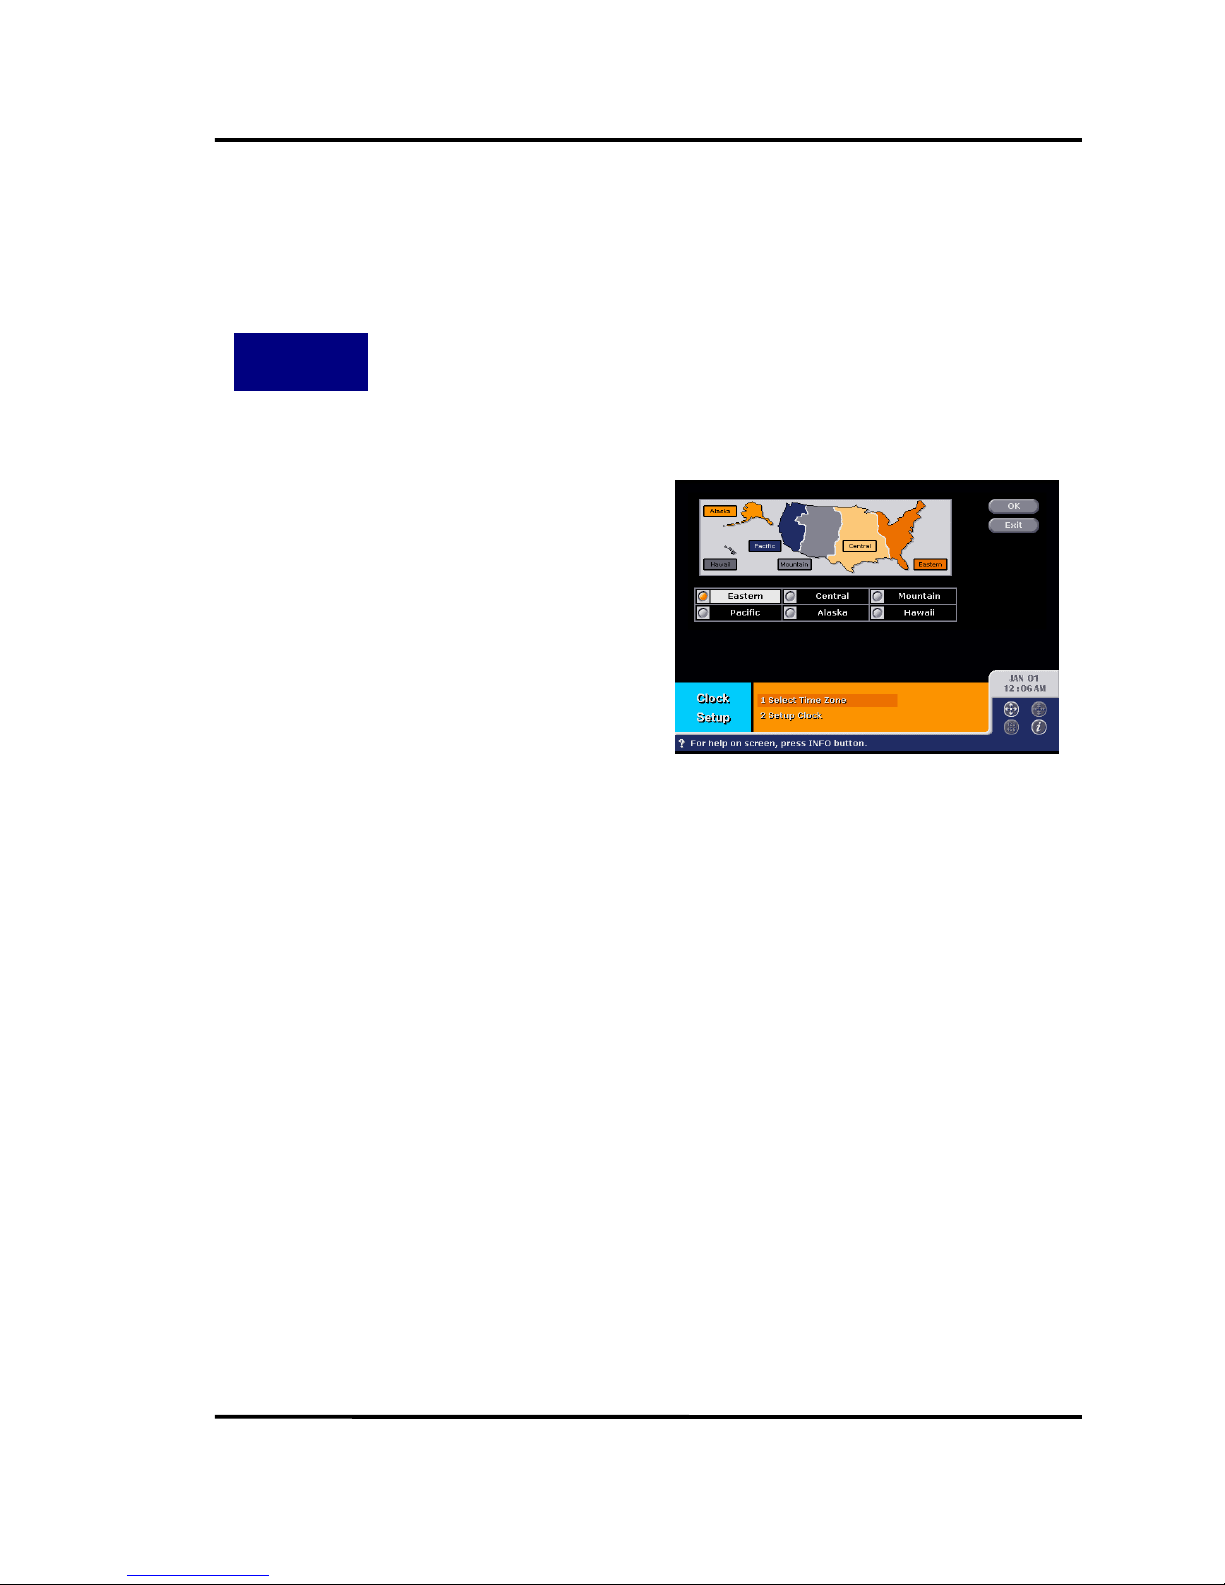
Main Menu ⇒⇒⇒⇒ System Setup [4] ⇒⇒⇒⇒ Clock Setup [4] ⇒⇒⇒⇒ Select Time Zone [1]
Select your time zone.
Select OK button.
Page 59
Philips HD receiver User Guide
58
8.17. S
ETUP CLOCK
How to Get
There
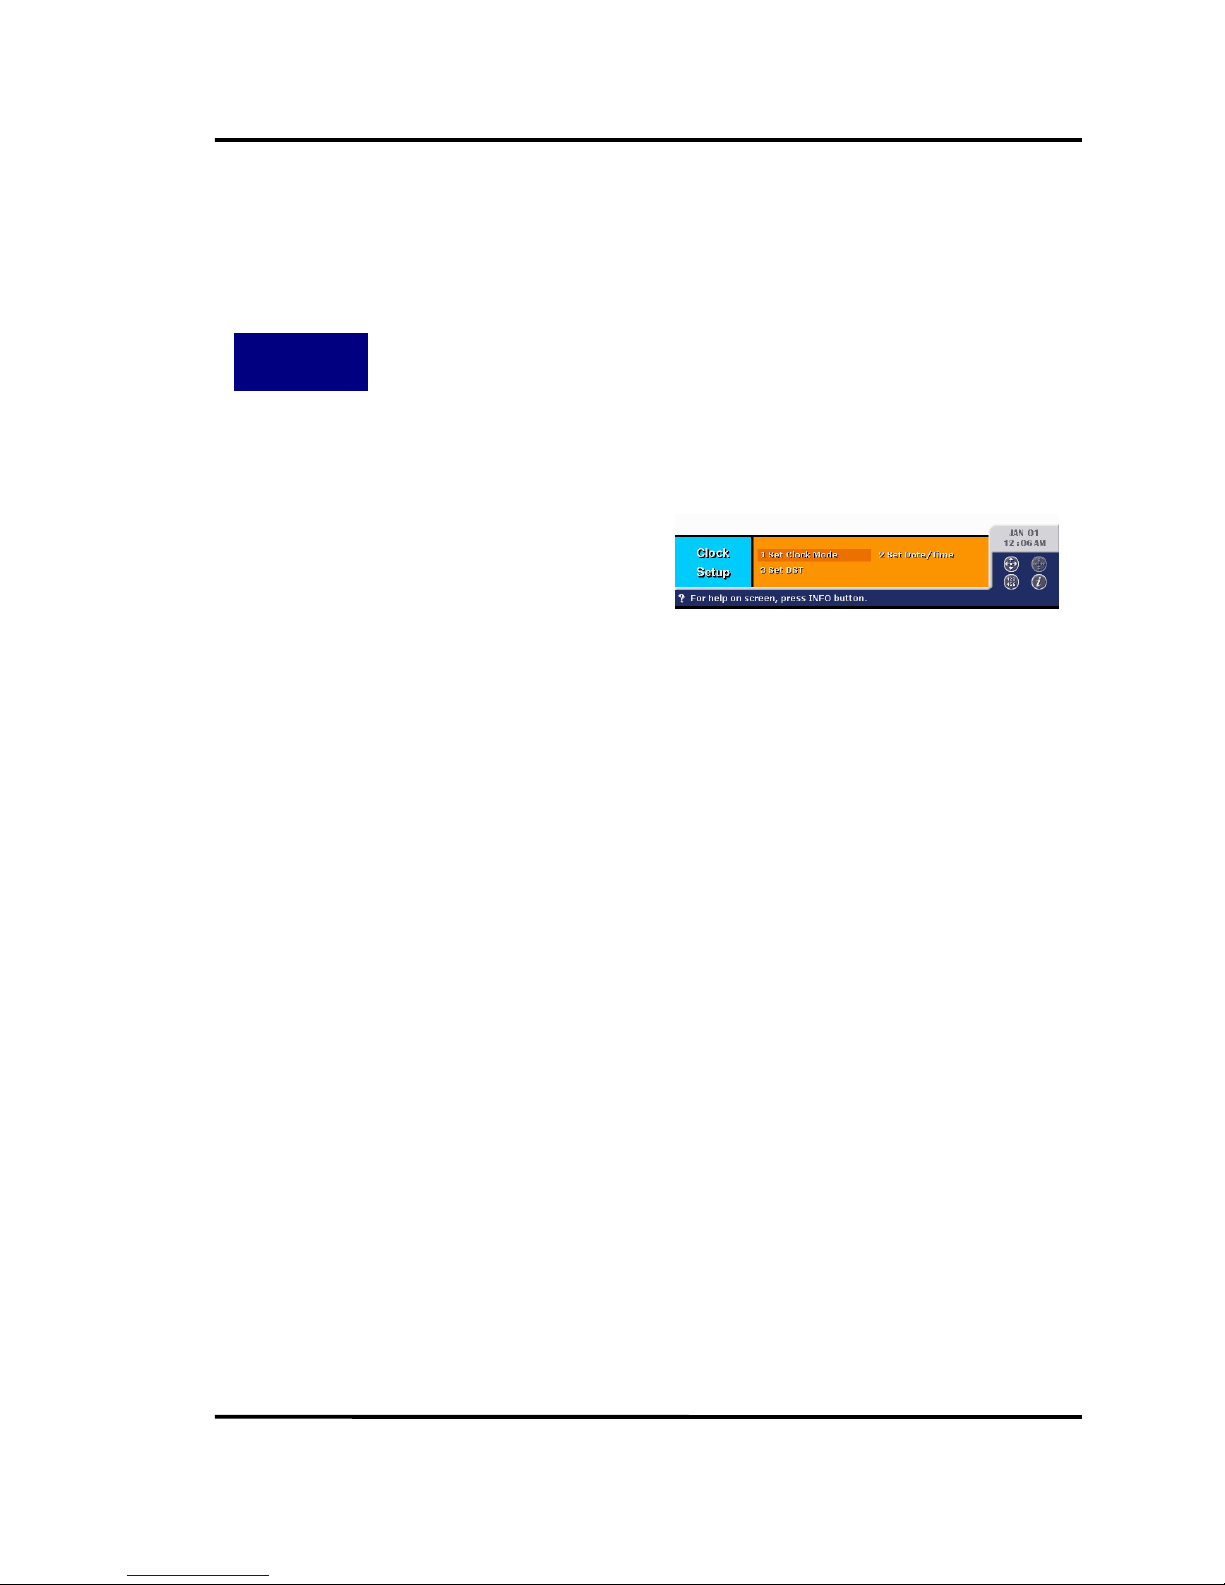
Main Menu ⇒⇒⇒⇒ System Setup [4] ⇒⇒⇒⇒ Clock Setup [4] ⇒⇒⇒⇒ Setup Clock [2]
Select the Set Clock Mode, Set
Date/Time or Set DST.
Page 60
Philips HD receiver User Guide
59
8.18. S
ET CLOCK MODE
How to Get
There
Main Menu ⇒⇒⇒⇒ System Setup [4] ⇒⇒⇒⇒ Clock Setup [4] ⇒⇒⇒⇒ Setup Clock [2] ⇒⇒⇒⇒ Set
Clock Mode [1]
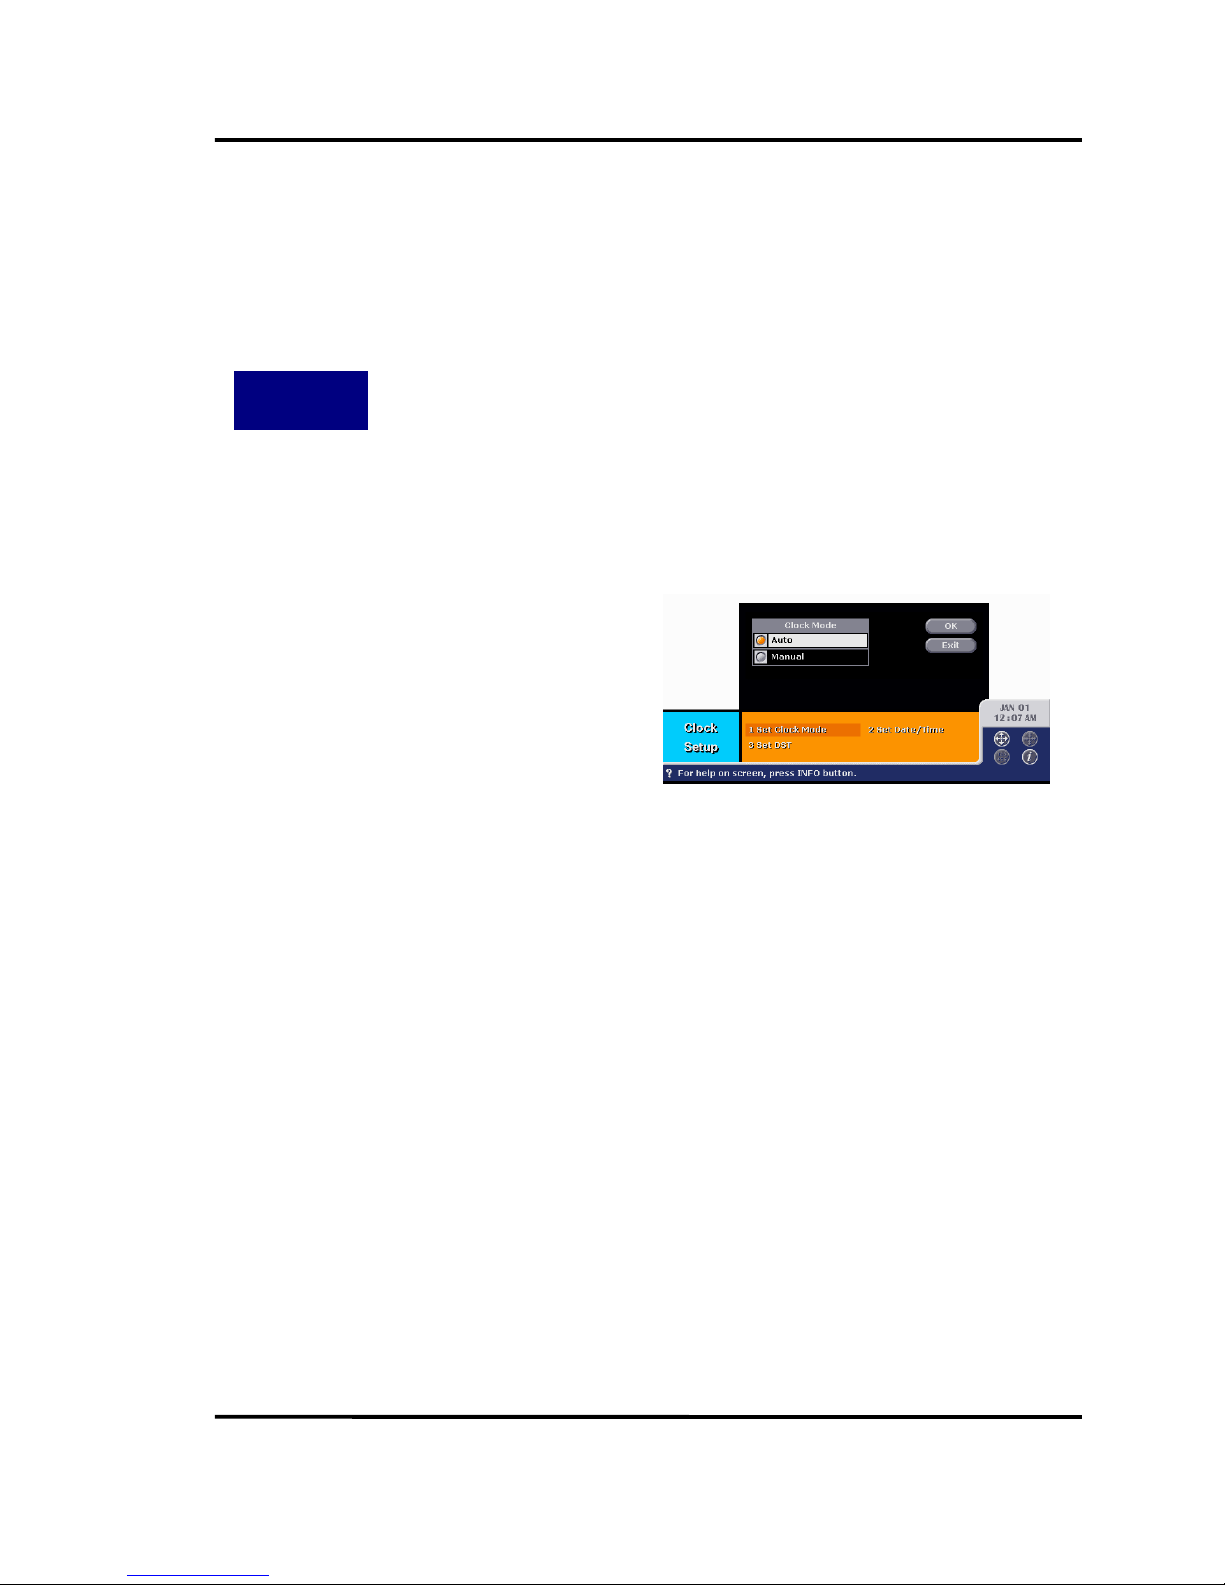
If you set clock mode to auto, HD receiver will receive time information from
broadcaster, however, if you set clock mode to manual, you should set your clock and
daylight saving time for yourself in Set Date/Time and Set DST menu.
Set clock mode, auto or manual.
Select OK button
Page 61
Philips HD receiver User Guide
60
8.19. S
ET DAT E/TIME
How to Get
There
Main Menu ⇒⇒⇒⇒ System Setup [4] ⇒⇒⇒⇒ Clock Setup [4] ⇒⇒⇒⇒ Setup Clock [2] ⇒⇒⇒⇒ Set
Date/Time [2]
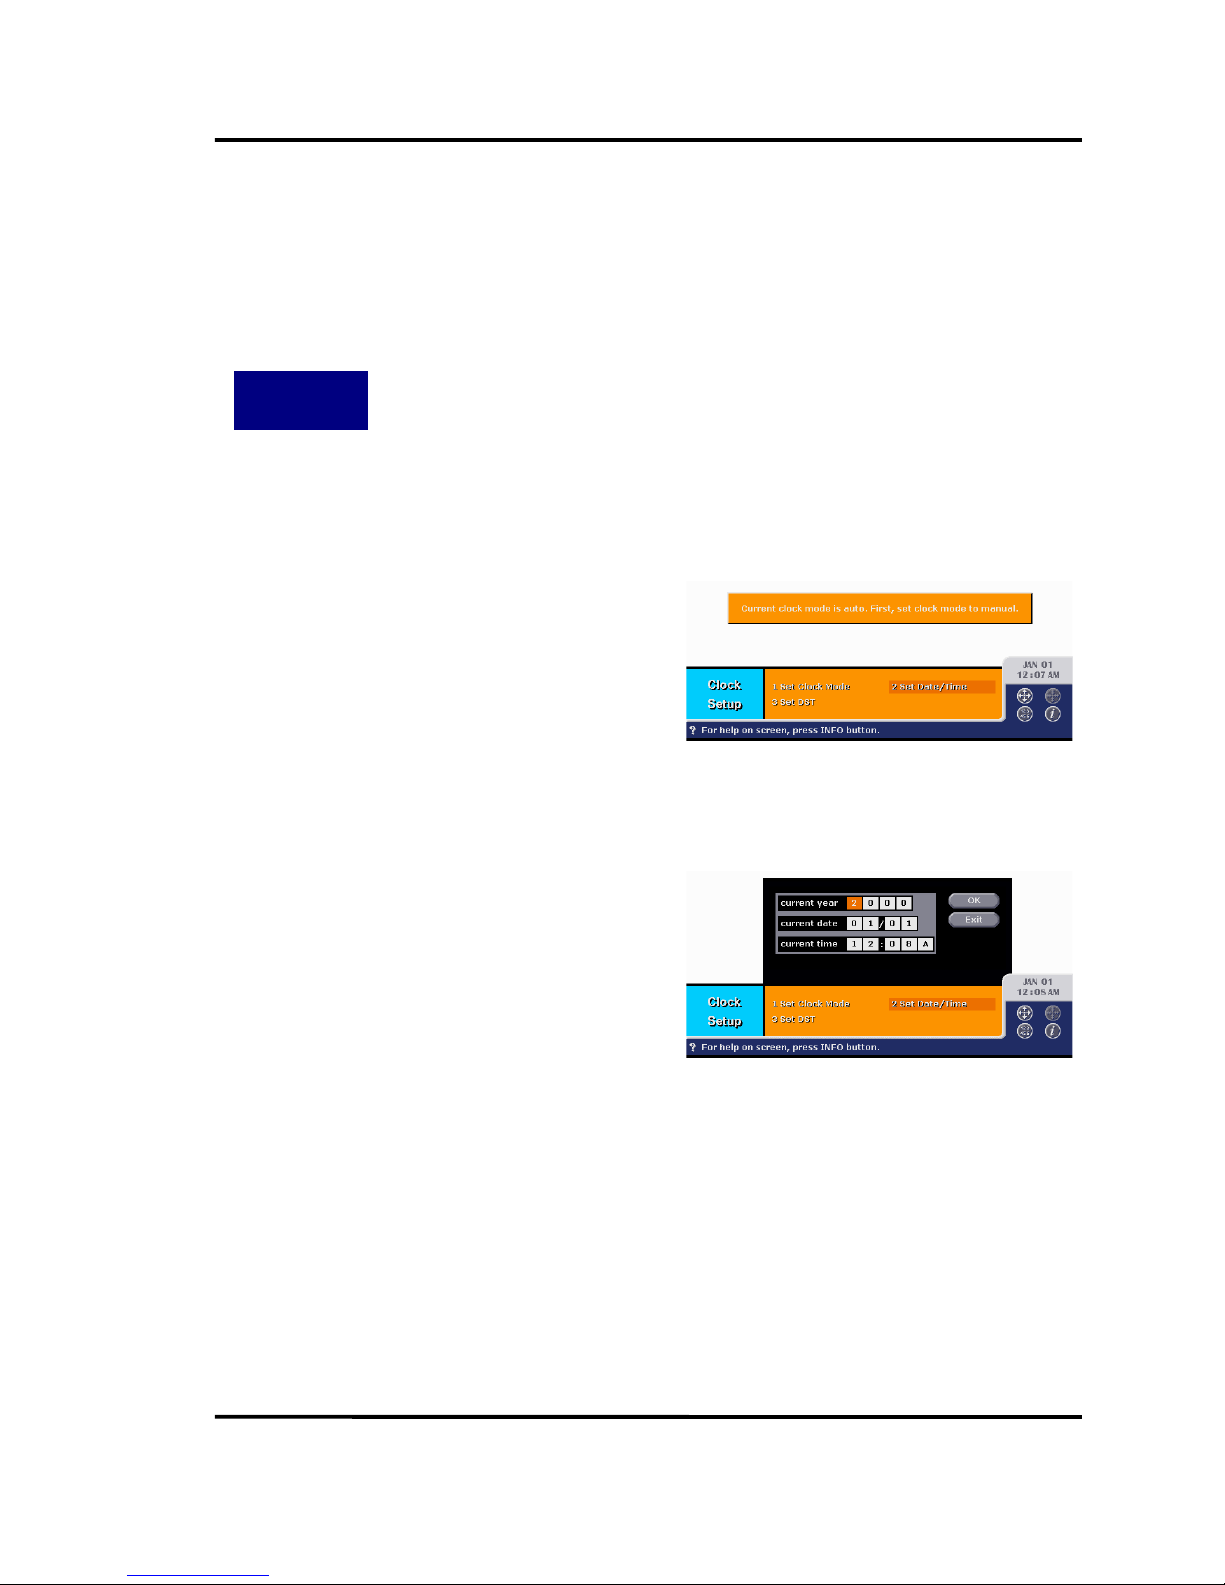
If you have set clock mode to auto, you can’t enter Set Date/Time and Set DST menu. If
you try to enter the menu, error message will be displayed as shown below.
Set current time and date.
Select OK button.
Page 62
Philips HD receiver User Guide
61
8.20. S
ET
DST
How to Get
There
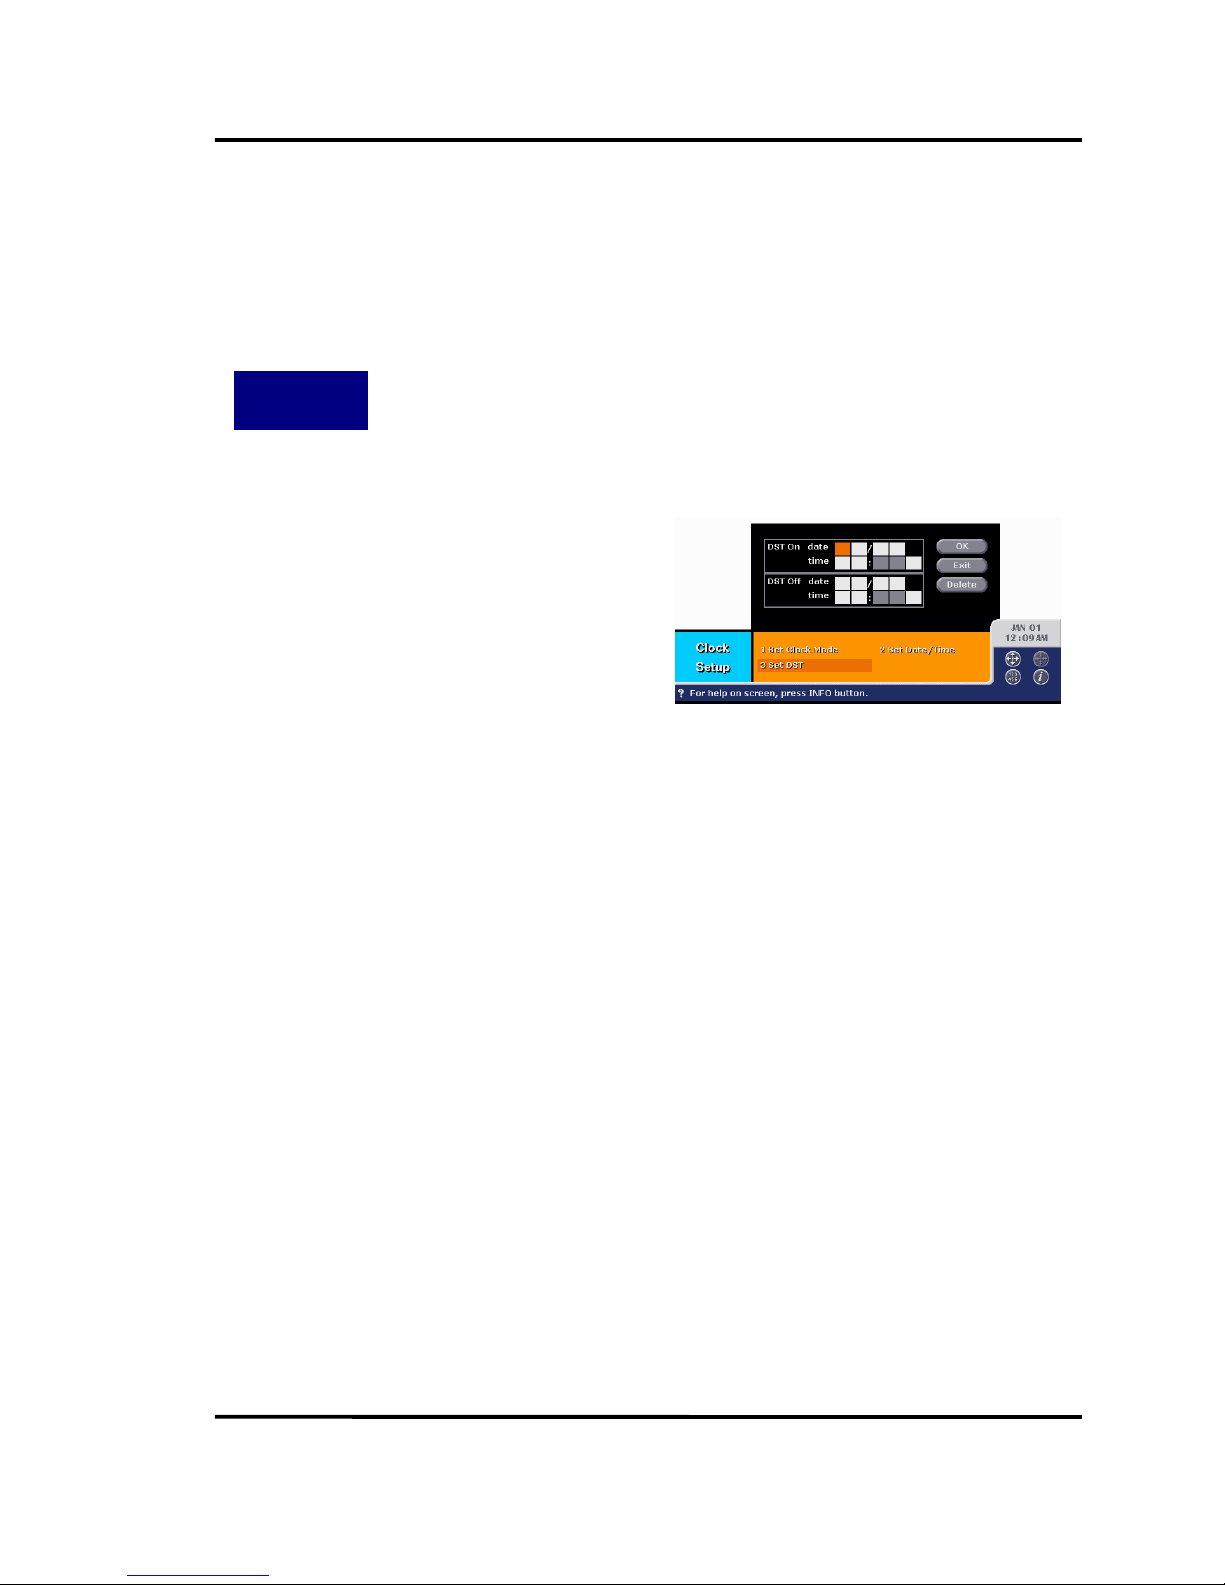
Main Menu ⇒⇒⇒⇒ System Setup [4] ⇒⇒⇒⇒ Clock Setup [4] ⇒⇒⇒⇒ Setup Clock [2] ⇒⇒⇒⇒ Set
DST [3]
Set DST start and end time.
Select OK button.
Page 63
Philips HD receiver User Guide
62
8.21. F
ACTORY DEFAULT
How to Get
There
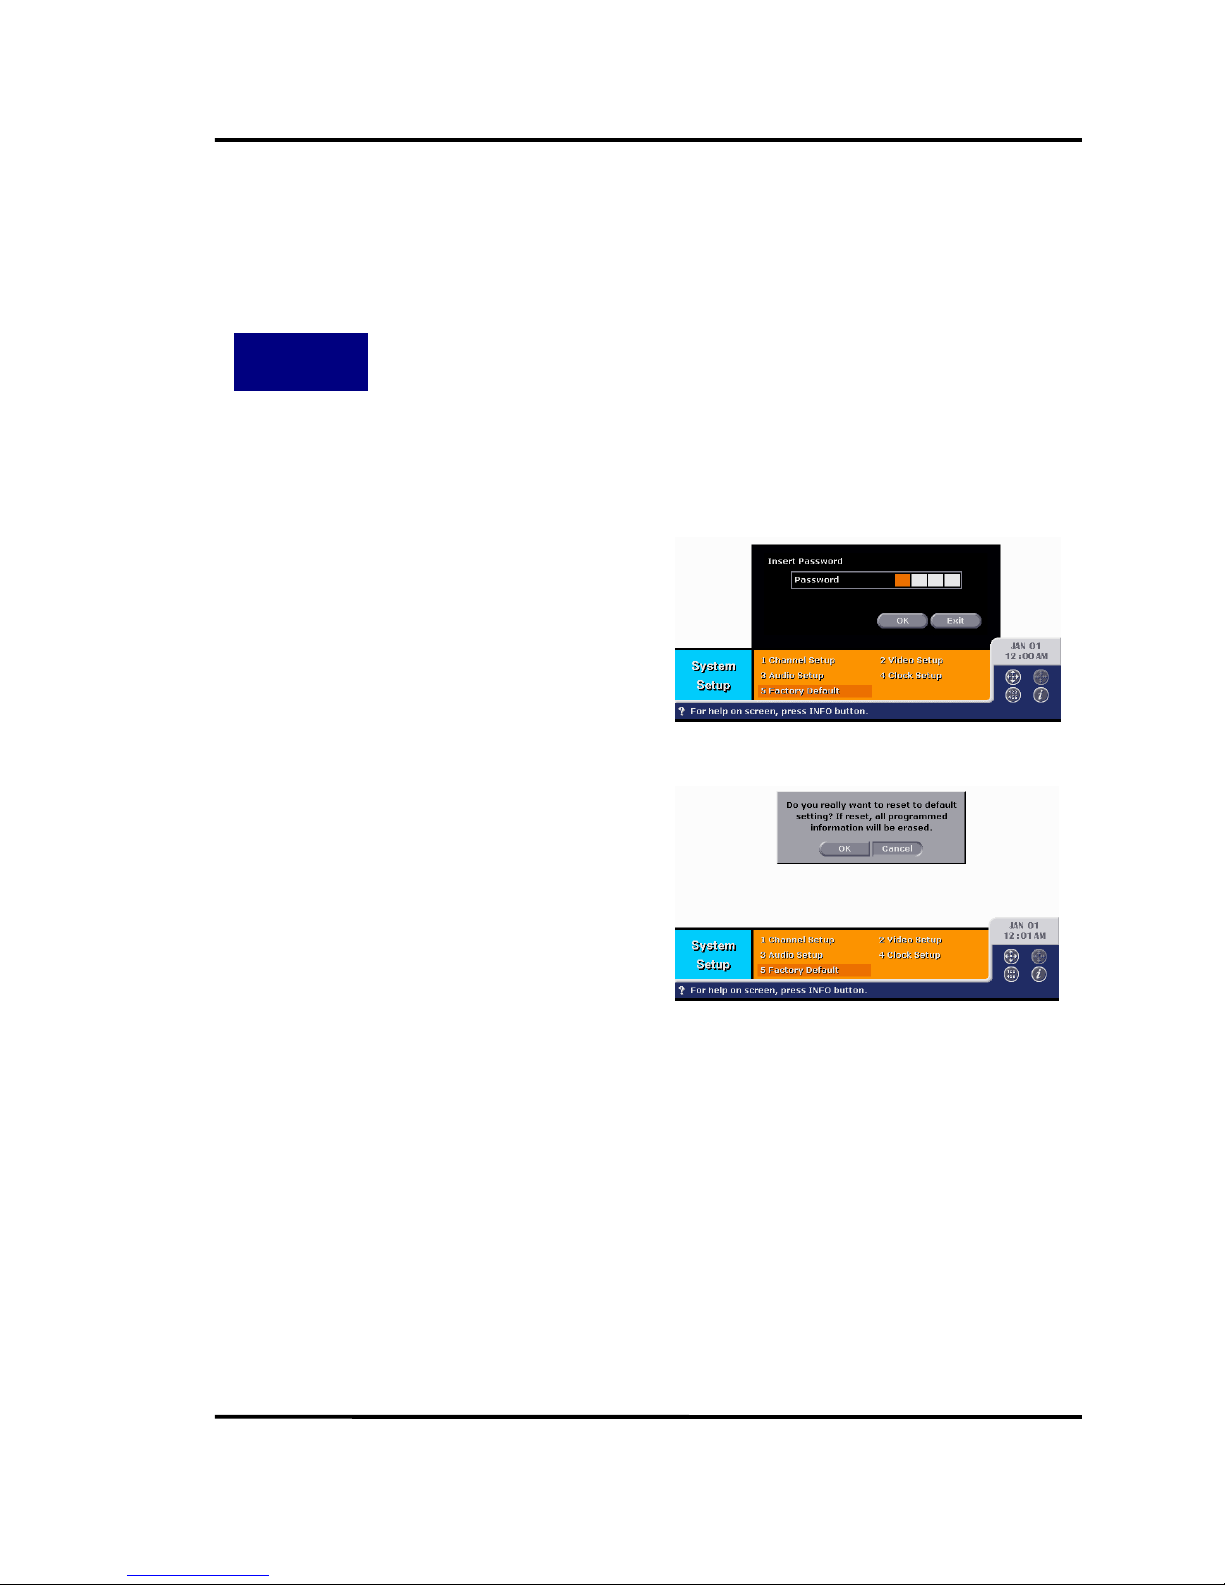
Main Menu ⇒⇒⇒⇒ System Setup [4] ⇒⇒⇒⇒ Factory Default [5]
The Factory Default menu allows you to reset all set-ups you made so far. Every menu
setup will recovers to its factory default, and the channel map will be removed.
First, you should insert password to reset
all set-ups.
Select OK button if you want to
proceed. Select Cancel button, if not.
Page 64
Philips HD receiver User Guide
63
CHAPTER
9
A
PPENDIX
9.1. T
ROUBLE SHOOTING
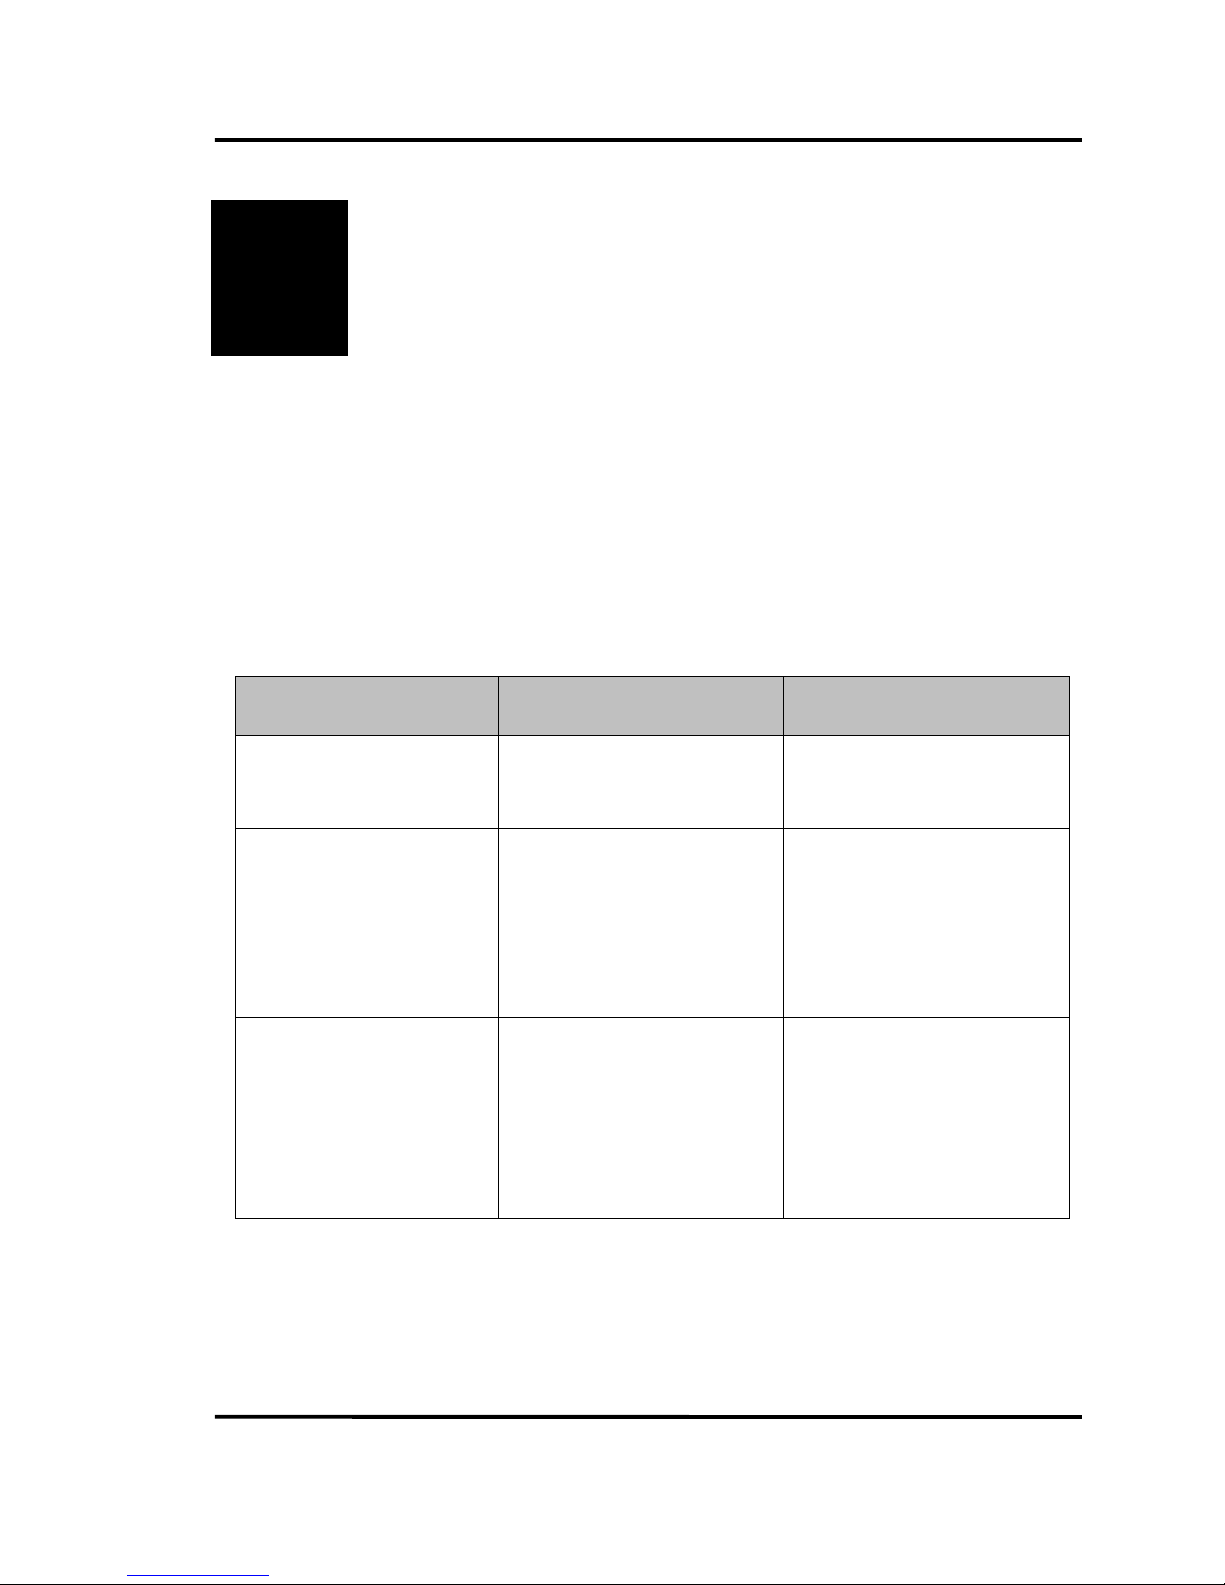
There may be various reasons for the abnormal operation of the HD receiver. Check the
receiver according to the procedure shown blow.
If the HD receiver does not work properly after checking it, please contact the dealer.
Don’t open the receiver cover. It may cause a dangerous situation.
Symptom Cause Remedy
The display on front panel
does not light up.
The power cord is not pluged
in.
Check that power cord is
plugged in to the wall outlet.
No picture or sound
Wrong connection of the
Video/Audio output of the
HD receiver to TV or monitor.
Audio muting.
TV power off.
Connect the Video/Audio
output of the HD receiver to
TV or monitor correctly.
Press the MUTE button.
Turn TV on.
No channel or signal
The HD receiver can’t
receive the signal
Check the antenna cable,
or connect the cable to the
HD receiver correctly.
Page 65

Philips HD receiver User Guide
64
Symptom Cause Remedy
The remote control does
not working
The batteries of the remote
control are not inserted or
exhausted.
The remote control is not set
correctly.
Check whether the batteries
are inserted correctly in your
remote control. Also, check
the batteries whether they
are exhausted, then, replace
new ones.
Press correspond button (TV,
VCR, CABLE, DVD) of
component to use. If it still
does not working, program it
again as described in
Section 3.2
Sound okay, but picture
poor
Signal is weak, or antenna
connection is wrong.
Check the signal strength in
the check signal menu. If the
signal is weak, check
antenna connection.
Blank screen
Wrong connection of the
Video/Audio input or output
of the HD receiver.
There may not be any
program on at that time.
Connect the Video/Audio
input or output of the HD
receiver to other
components correctly.
Try another channel, or try
current channel after.
Page 66

Philips HD receiver User Guide
65
9.2. S
PECIFICATION
1. General Descriptions
ATSC Compliant Consumer HDTV STB
8VSB Digital/Analog Terrestrial Reception
STD/HRC/IRC Analog Cable Reception
MPEG2 MP@HL
Video Decoding
Dolby AC-3/MPEG1 and MPEG2 Audio Decoding
1080i/720p/480p YUV/RGB Multiplexed Video Output (User Selectable)
480i CVBS/SVHS Video Output (User Selectable)
Down-mixed 2 Channel Audio Output for AC-3
5.1 Channel/PCM SPDIF Digital Audio Output for AC-3
External CVBS./VHS Video Input
External Stereo/SPDIF Audio Input
Full Support of EPG Compliant with ATSC PSIP Specification
Automatic Channel Scan and PSIP Update Algorithm
Parental Guidance and Rating Control
Program Scheduling
Favorite Channel Selection
Default Audio Language Selection
GUI Palette Selection
EIA608 Analog/Digital Closed Caption
Page 67
Philips HD receiver User Guide
66
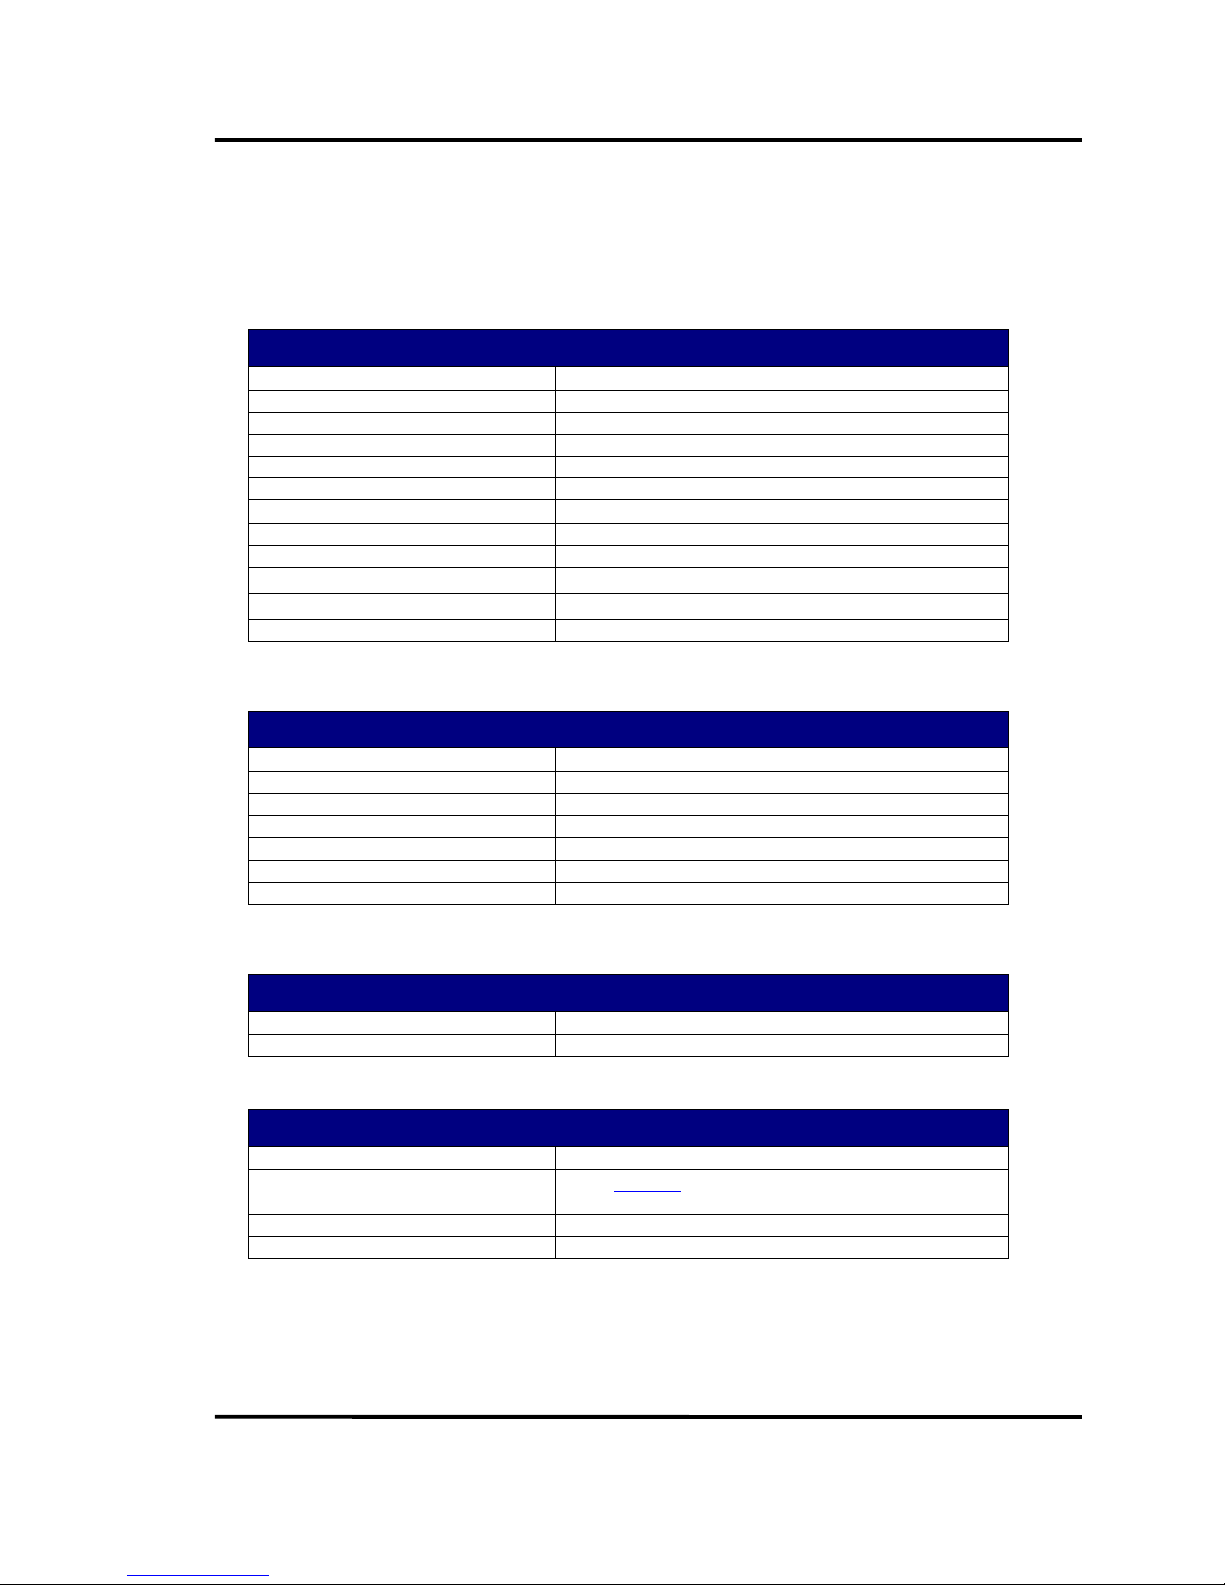
2. Inputs and Outputs
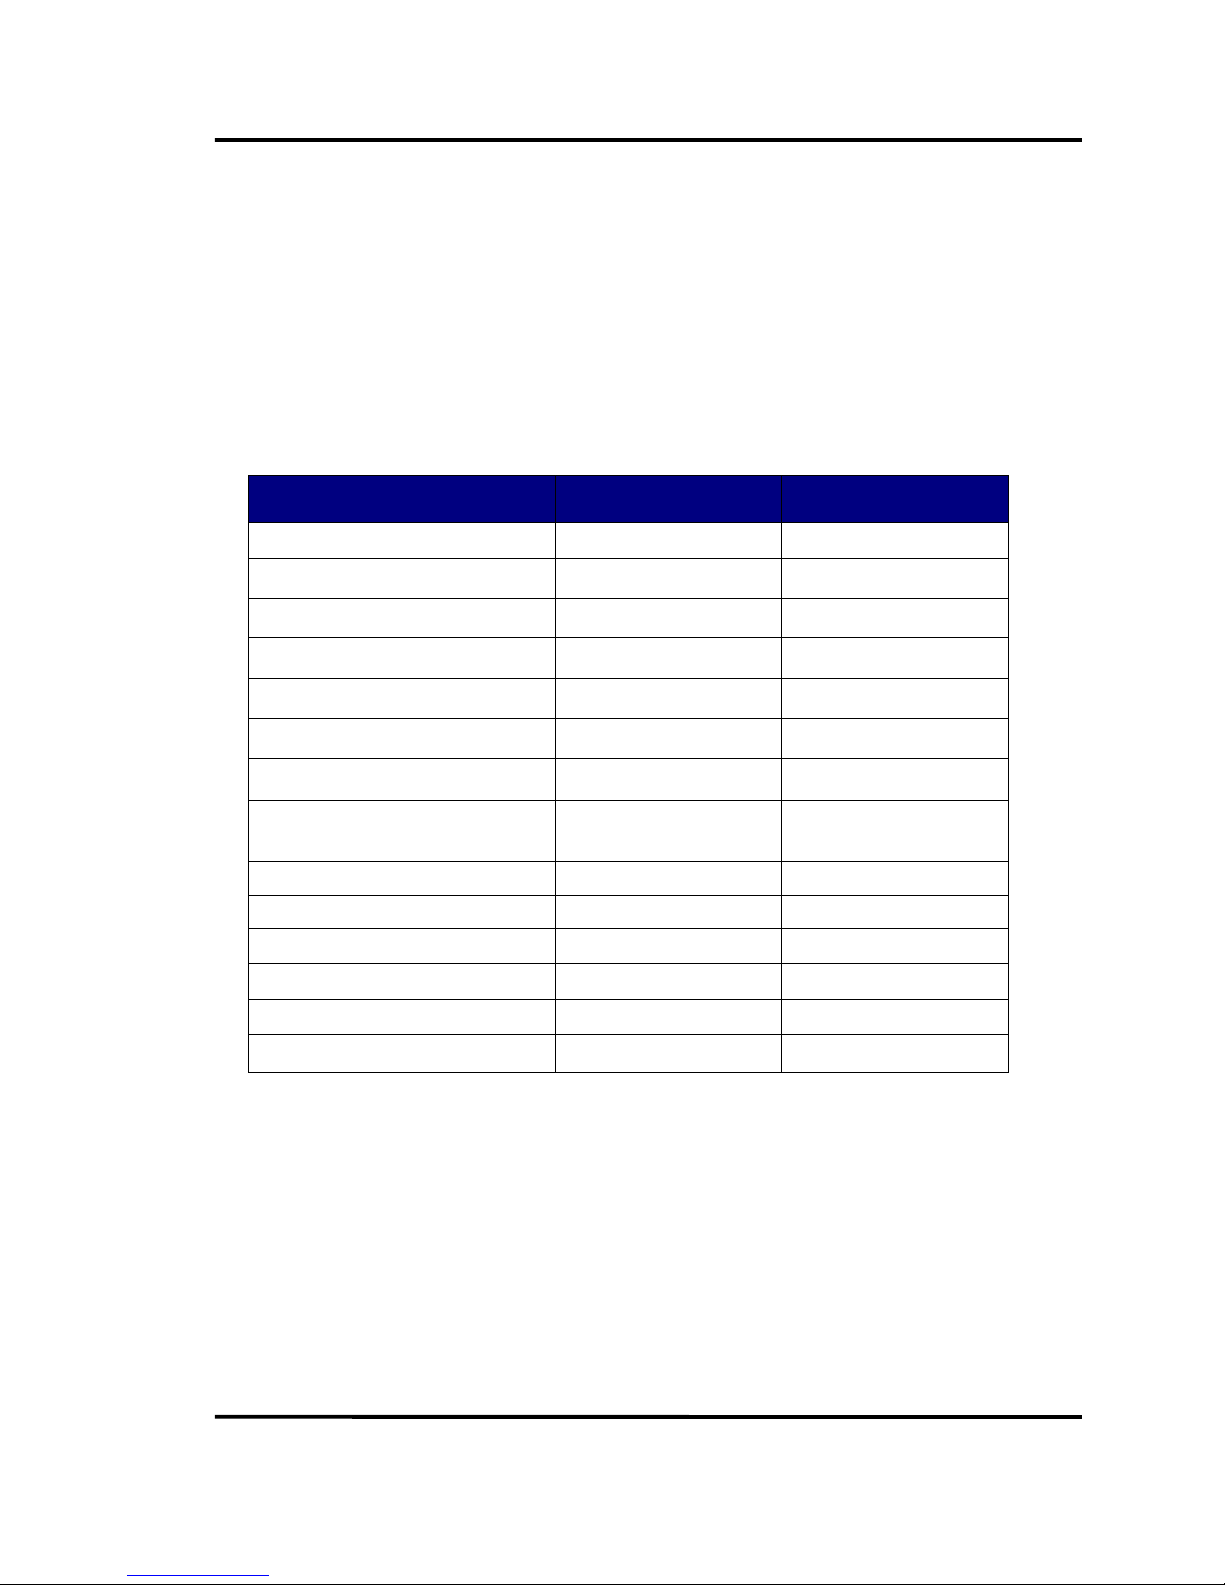
HD receiver supports multiple NIM inputs and multiple baseband AV IO’s as described in
Table 1 below. Baseband AV IO’s includes digital interfaces adding to analog ones, which is
SPDIF. Future model will include IEEE1394 transport stream interface and DFP interface.
Adding to the AV signals IOs, HD receiver includes RS232 port for SW download and
status monitoring and control.
Port Type Connected To/From
Digital/Analog Terrestrial RF Input F Type Female VSB NIM
Digital Satellite RF Input F Type Female QPSK NIM
Analog Cable RF Input F Type Female VSB NIM
External CVBS SD Video Input RCA Female NTSC Decoder
External SVHS SD Video Input SVHS NTSC Decoder
Exter nal Ste reo Audio I npu t 2xR CA Femal e Audio I n put Swi tch
External SPDIF Audio Input Toslink SPDIF Decoder
YUVHV/RGBHV HD Video
Multiplexed Output
5xRCA Female Video DAC
VGA HD Video Output VGA Female Video DAC
CVBS SD Video Output RCA Female NTSC Encoder
SVHS SD Video Output SVHS NTSC Encoder
Stere o/D own Mixe d Aud io Output 2x RCA F emale Audio O utp ut S witch
SPDIF Audio Output Toslink Audio Output Switch
RS232 Low Speed Data Port 9 Pin D-SUB Male CPU
Table 1. Inputs and outputs
Page 68
Philips HD receiver User Guide
67
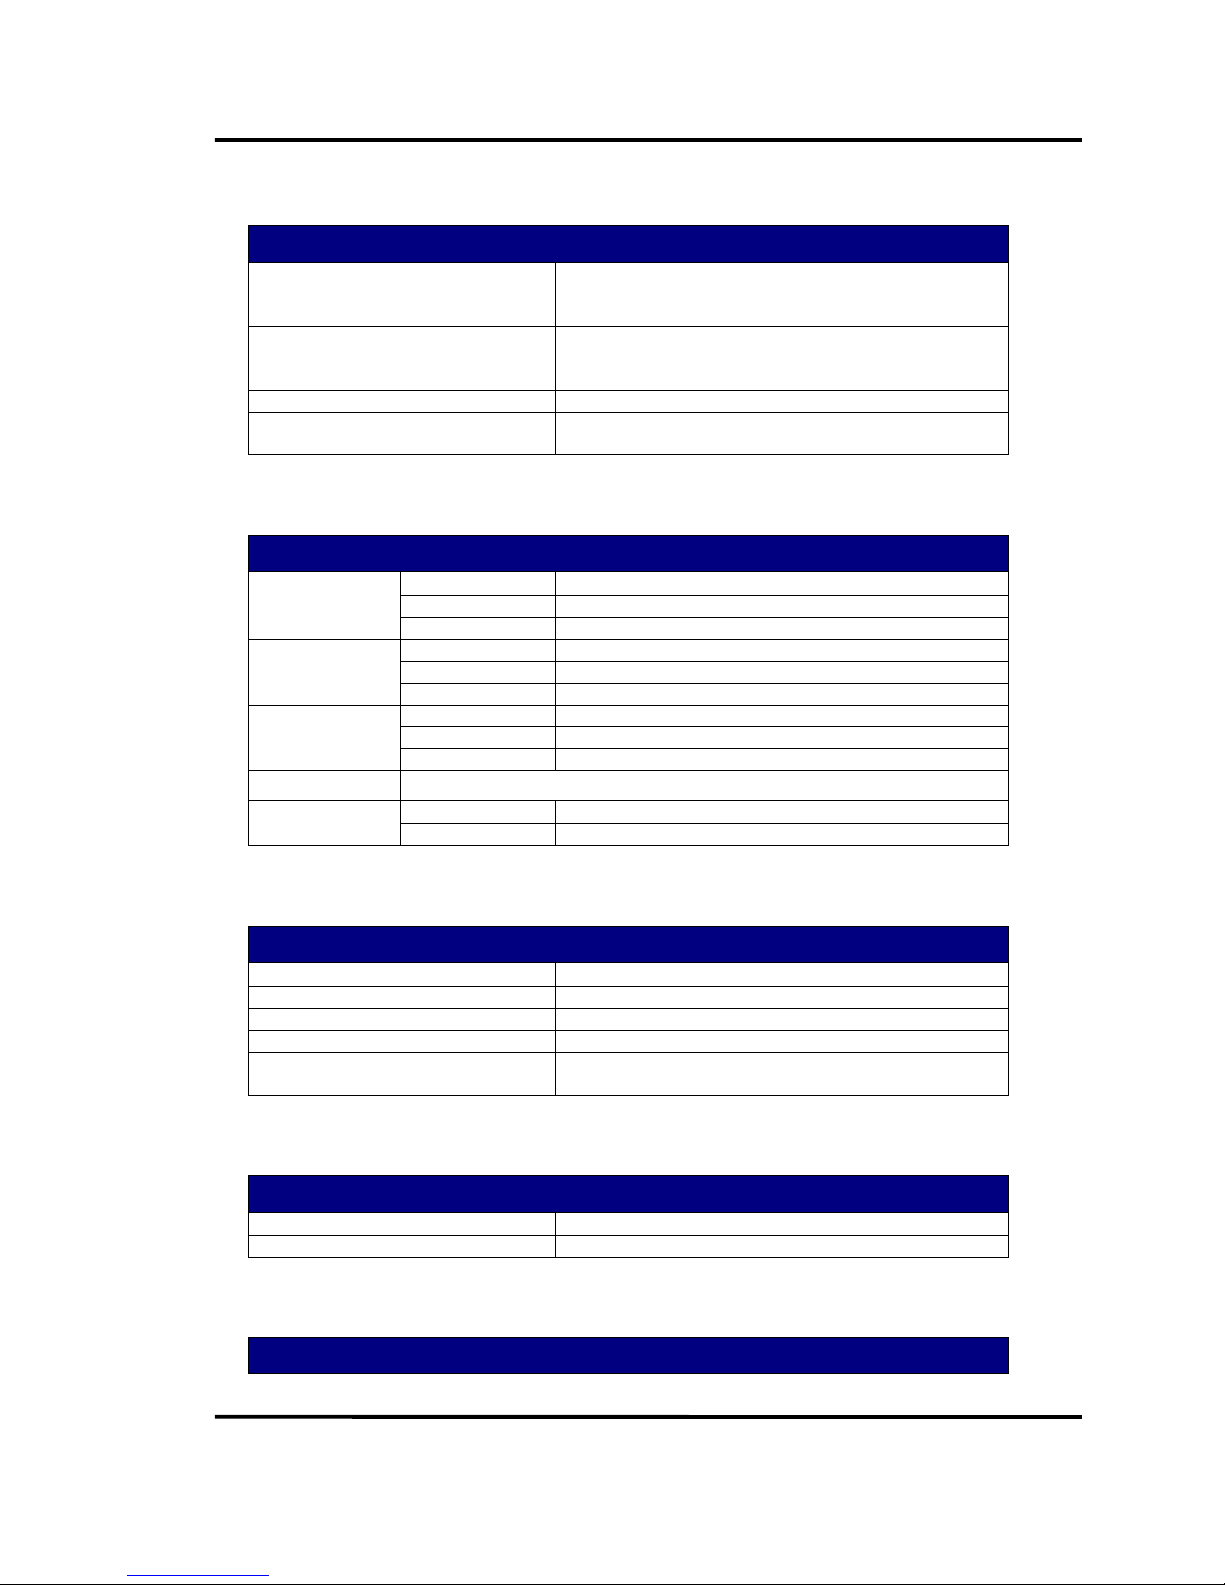
3. Electric Specification
Tuner & Channel
Type F-Type, IEC169-24 Female x 2
Frequency Rage 50 MHz to 862 MHz
Input Range -12 dBm to –80 dBm
SNR 15.4 dB TOV
Input Impedance 75 Ω Unbalanced
Digital IF Frequency 44 MHz
Analog IF Frequency 45.75 MHz
IF Bandwidth 6MHz
Demodulation 6 MHz
Input Symbol Rate 10.76 Ms/sec
FEC Decoder Convoluted Code Rate 1/2
Equalization Range -4 to 44.6 µsec
System & Memory
Main Process ST20-TP4 C2 Core
Flash Memory 2 MB
System RAM 4 MB
MPEG SDRAM 16 MB
EEPROM 8 KB
Front 7 Keys
Remote 47 Keys, Universal Type
MPEG Transport
Standard MPEG2 ISO/IEC 13818-1 Transport Stream
Rate Up To 80 Mbps
Video Decoding
Standard MPEG2 ISO/IEC 13818-2
Capability
Up To
MP@HL
All 18 ATSC Formats
Output 1080i/720p/480p/480I
Aspect Ratio 4:3, 16:9 Pan & Scan
Page 69
Philips HD receiver User Guide
68
Audio Decoding
Standard
Dolby Digital (AC-3)
MPEG2 Later 2
MPEG1 Layer 1/2
Output
Do wn- mi x ed 2 Cha nnel Anal og Au dio
5.1 Channel PCM/AC3 Digital Audio in SPDIF (Coaxial
and Optical)
Sampling Rate 32/44.1/48 kHz
Frequency Response
20~20kHz < ±2dB
60~18kHz < ±0.5dB
Video Output Characteristics
Y 1.0 Vpp (Picture 0.7 Vpp, Sync 0.3 Vpp)
PbPr ± 0.35 Vpp (Positive Polarity)
YPbPr
Impedance 75 Ω
RGB 0.7 Vpp (Positive Polarity)
HV Sync TTL (Negative)
RGBHV
Impedance 75 Ω
RGB 0.7 Vpp (Positive Polarity)
HV Sync TTL (Negative)
VGA
Impedance 75 Ω
Composite 1 Vpp 75 Ω
Y 1 Vpp 75 Ω
SVHS
C 0.286 Vpp 75 Ω
Power Supply
Input Voltage AC90 to 260 V (50/60 Hz)
Type PWM Regulator
Power Consumption Max 60 W
Standby Power Max 10 W
Protection
Separate Internal Fuse
The Input Shall Have Lightning Protection
Physical Specifications
Size (W x H x D) 380 x 60 x 280 mm
Weight 3.5 kg
Environmental Condition
Page 70

Philips HD receiver User Guide
69
Operating Temperature 0 to 40 °C
Storage Temperature -10 to 50 °C
Operating Humidity 10 to 85 % RH, Non-condensing
Storage humidity 5 to 90 % RH, Non-condensing
Page 71
Philips HD receiver User Guide
70
9.3. F
IRMWARE DOWNLOAD
When HD receiver boots up, the boot loader in the Flash ROM waits for user’s key input for
firmware update. By sending any message to HD receiver through RS-232 port within five
seconds after boot-up, you can activate the firmware update procedure. If you have serial
cable and PC, you can download a new firmware using HyperTerminal in MS Windows.
Step 1
Connect PC and HD receiver using a serial cable. Open HyperTerminal in Accessories
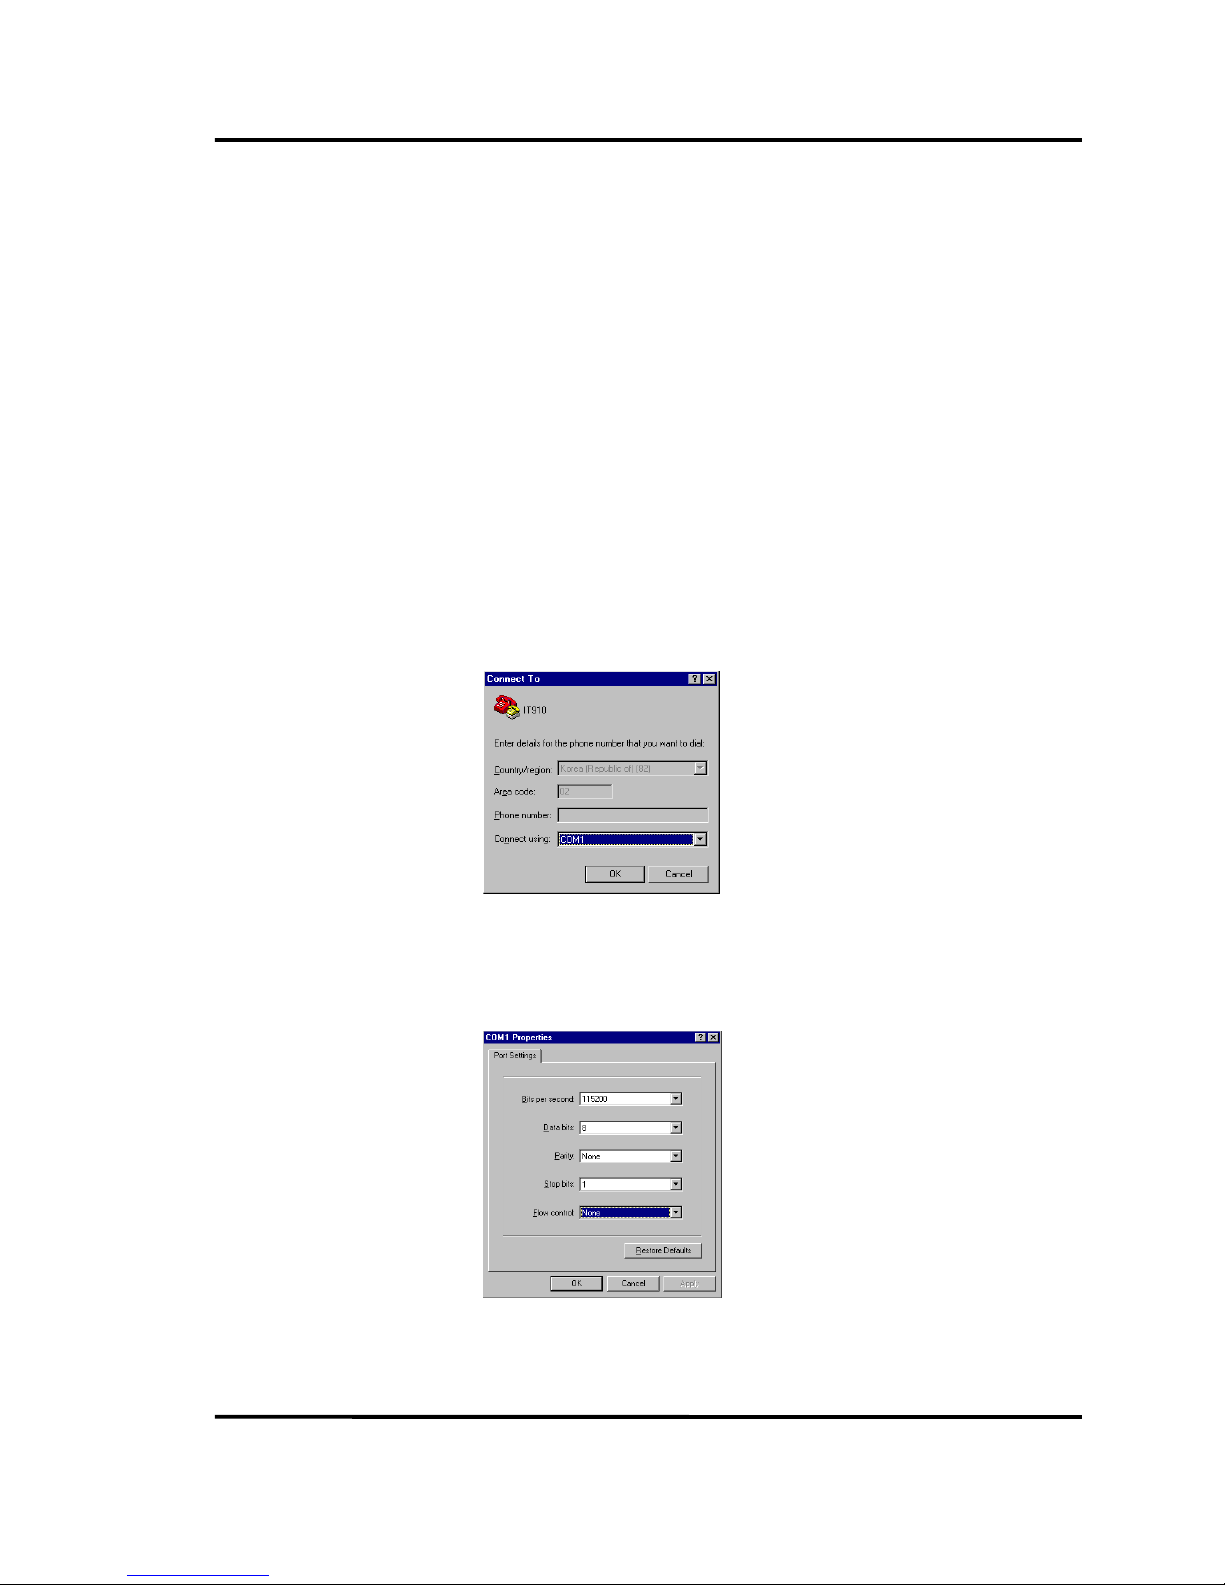
Group and set communication port.
Step 2
Set port property as shown in figure below.
Page 72
Philips HD receiver User Guide
71
Step 3
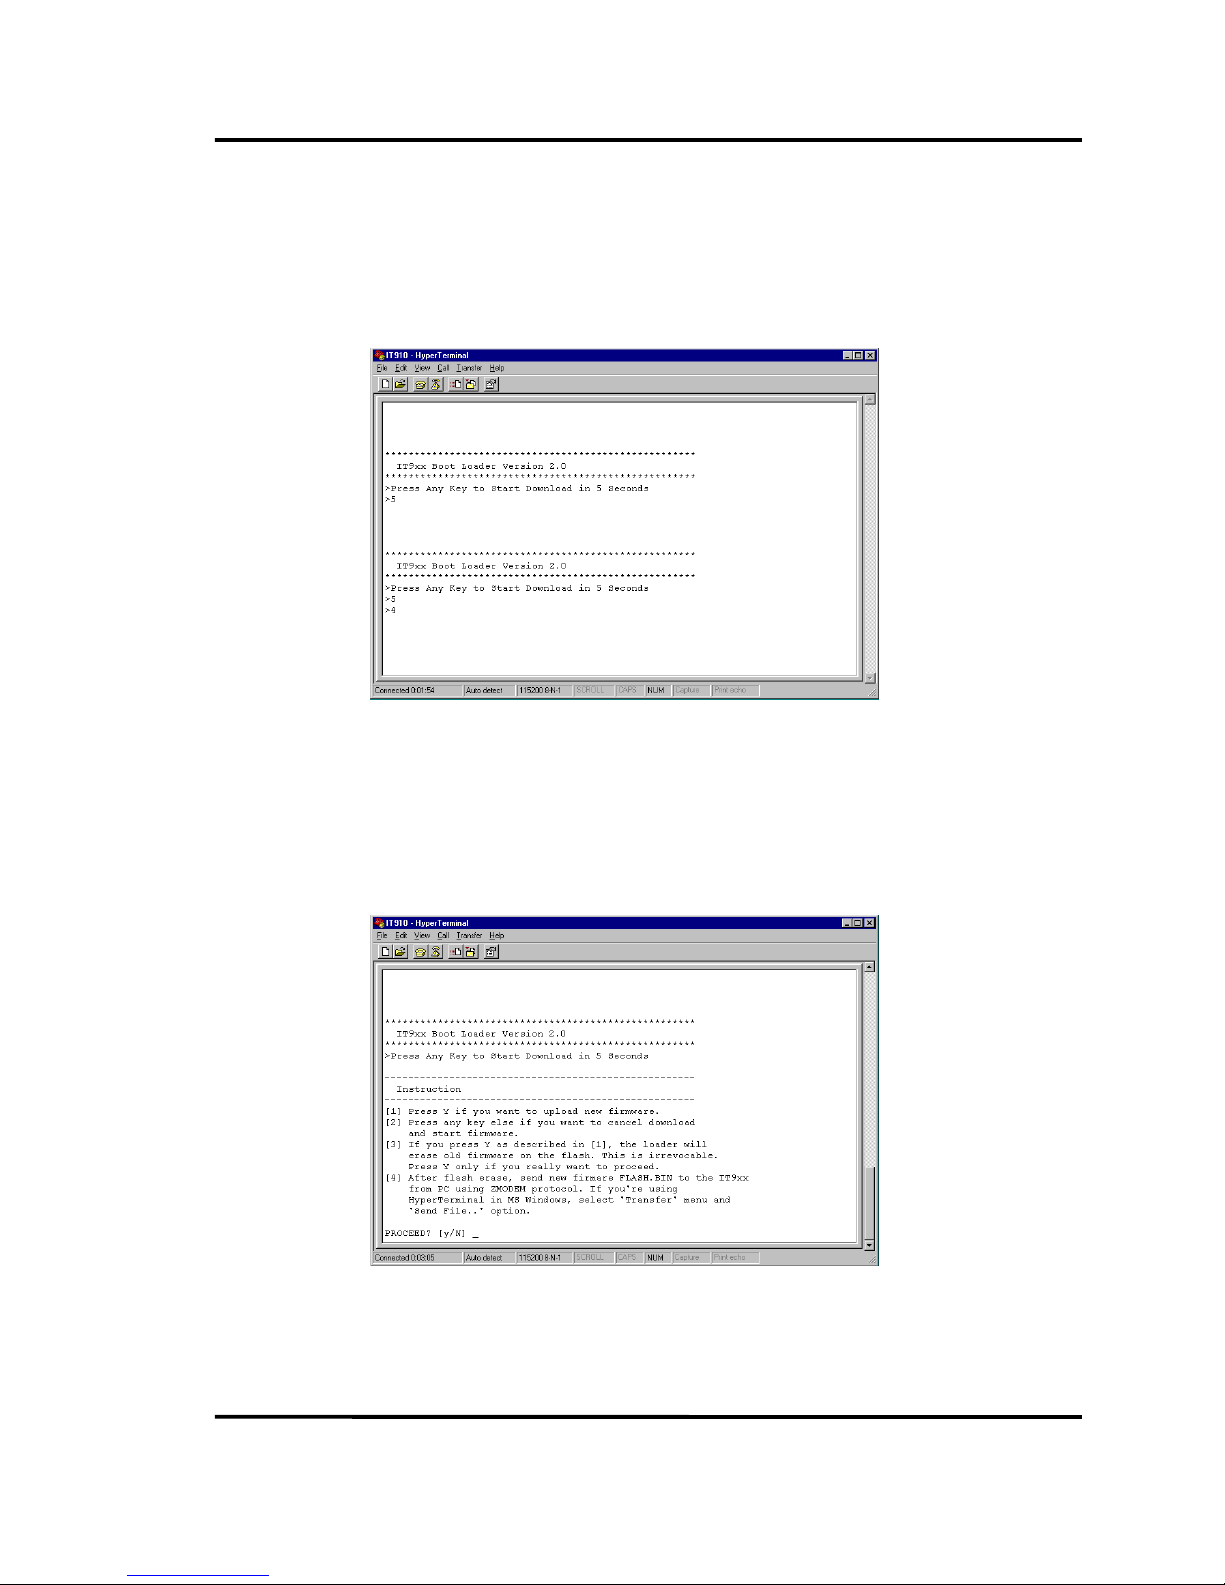
If you plug out and on HD receiver, the boot loader starts and will count five seconds.
Press any key within five seconds if you want to download a new firmware.
Step 4
If you press any key, instruction message will be displayed as shown in figure below. Press y
key if you want to proceed to download a new firmware.
Page 73
Philips HD receiver User Guide
72
Step 5
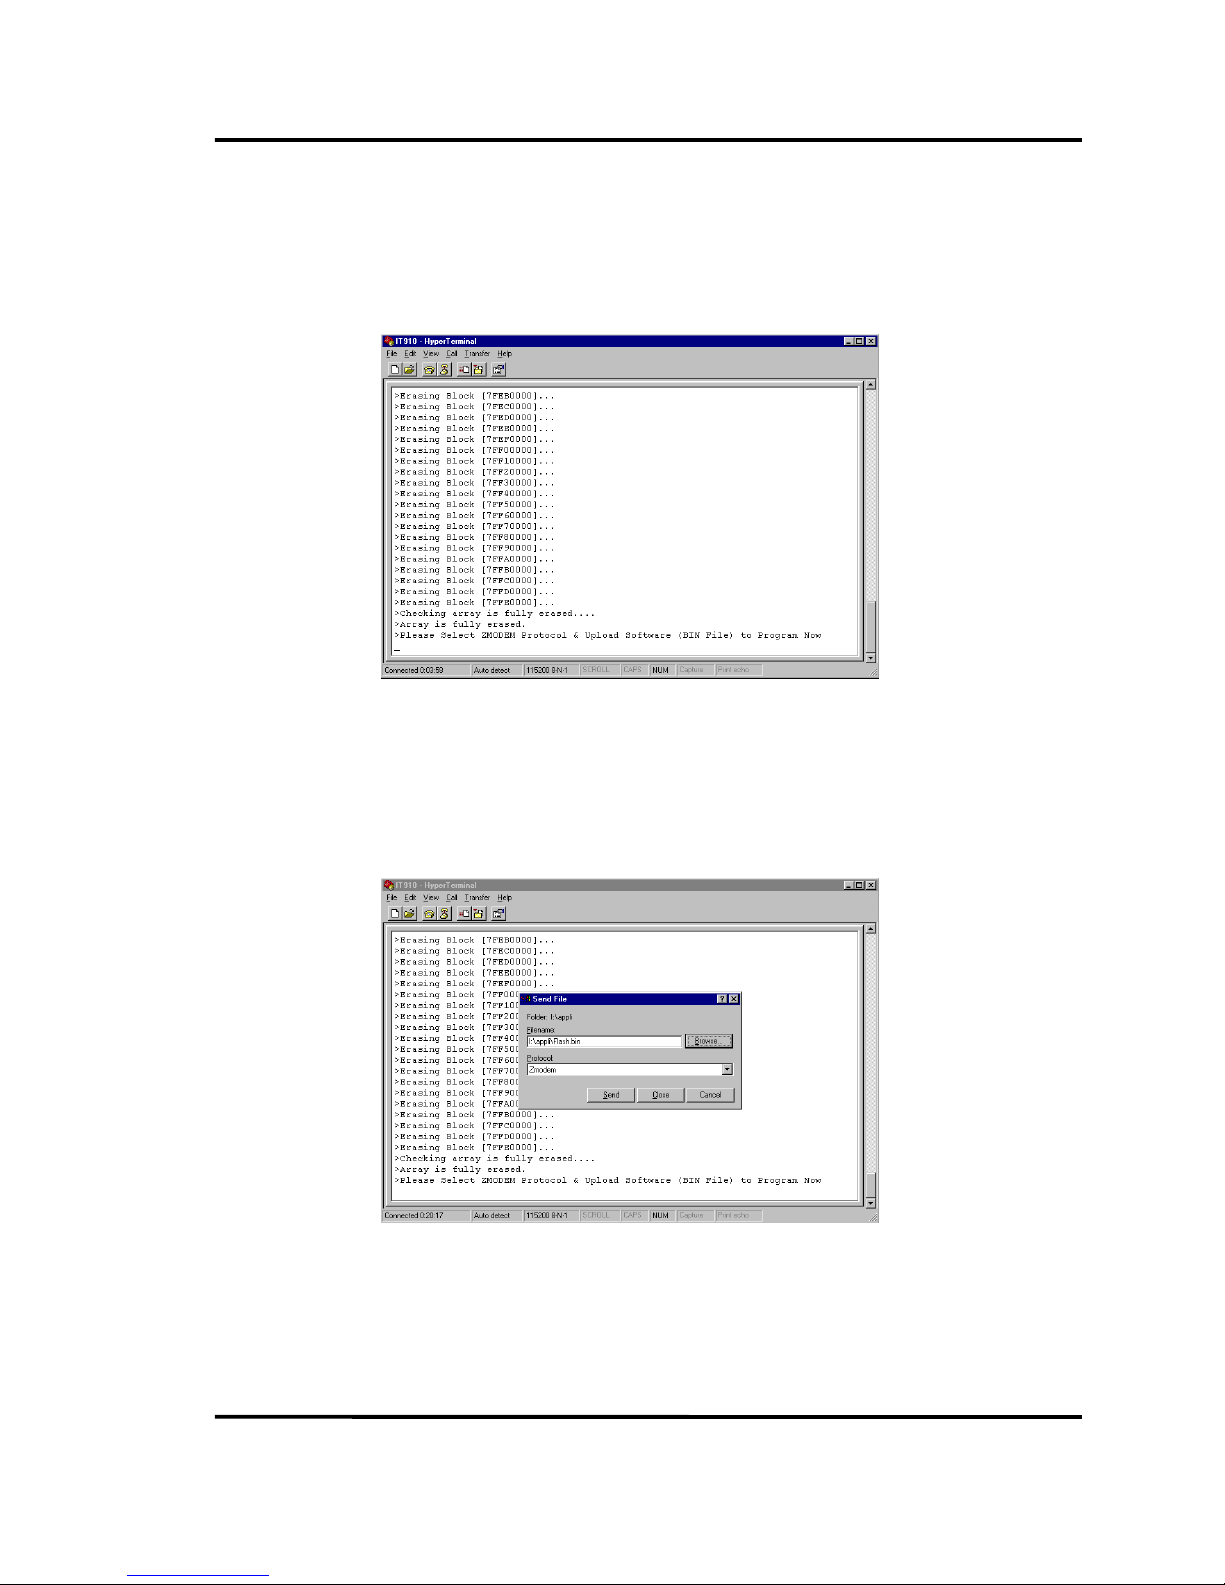
Loader will erase old firmware on the flash and start to receive a new firmware FLASH.BIN
from PC using ZMODEM protocol. If you’re using HyperTerminal in MS Windows, select
‘Transfer’ menu and ‘Send File…’ option.
Step 6
Select Send button after typing path and FLASH.BIN in Filename box
Page 74
Philips HD receiver User Guide
73
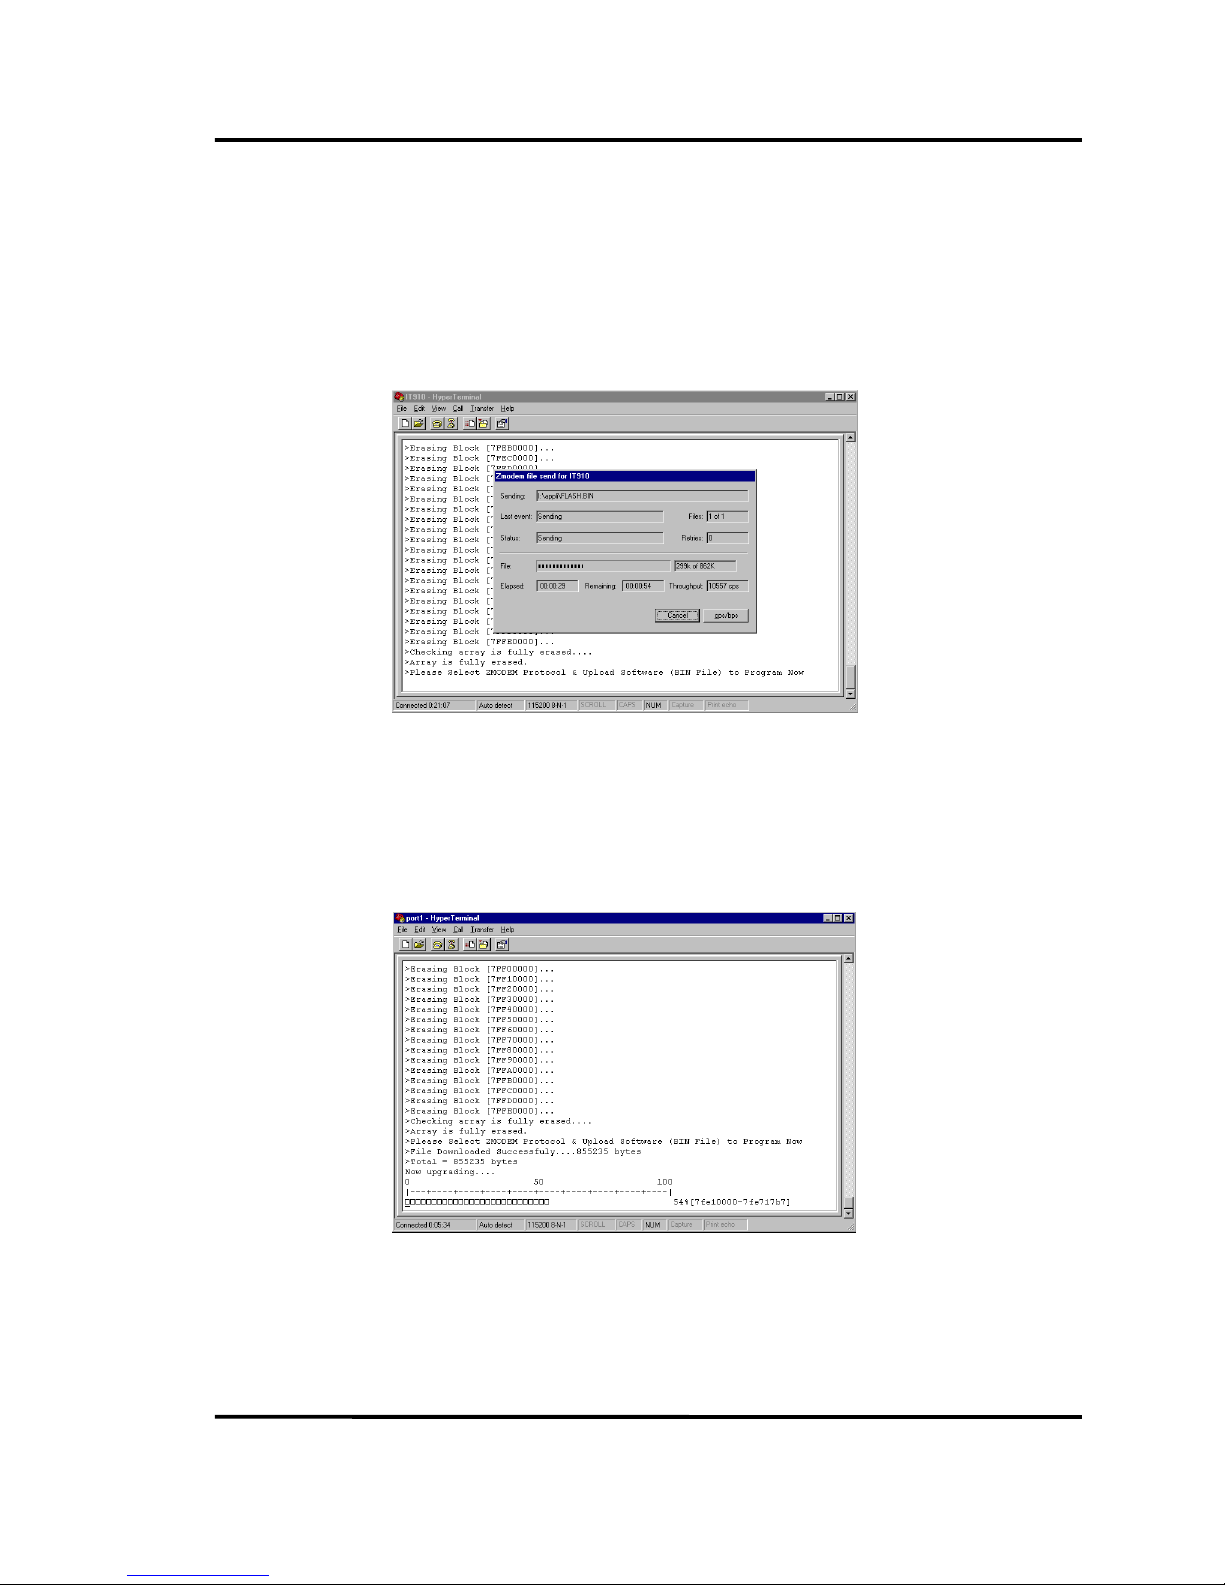
Step 7
A new firmware is transmitted from PC to HD receiver using ZMODEM protocol as shown in
figure below.
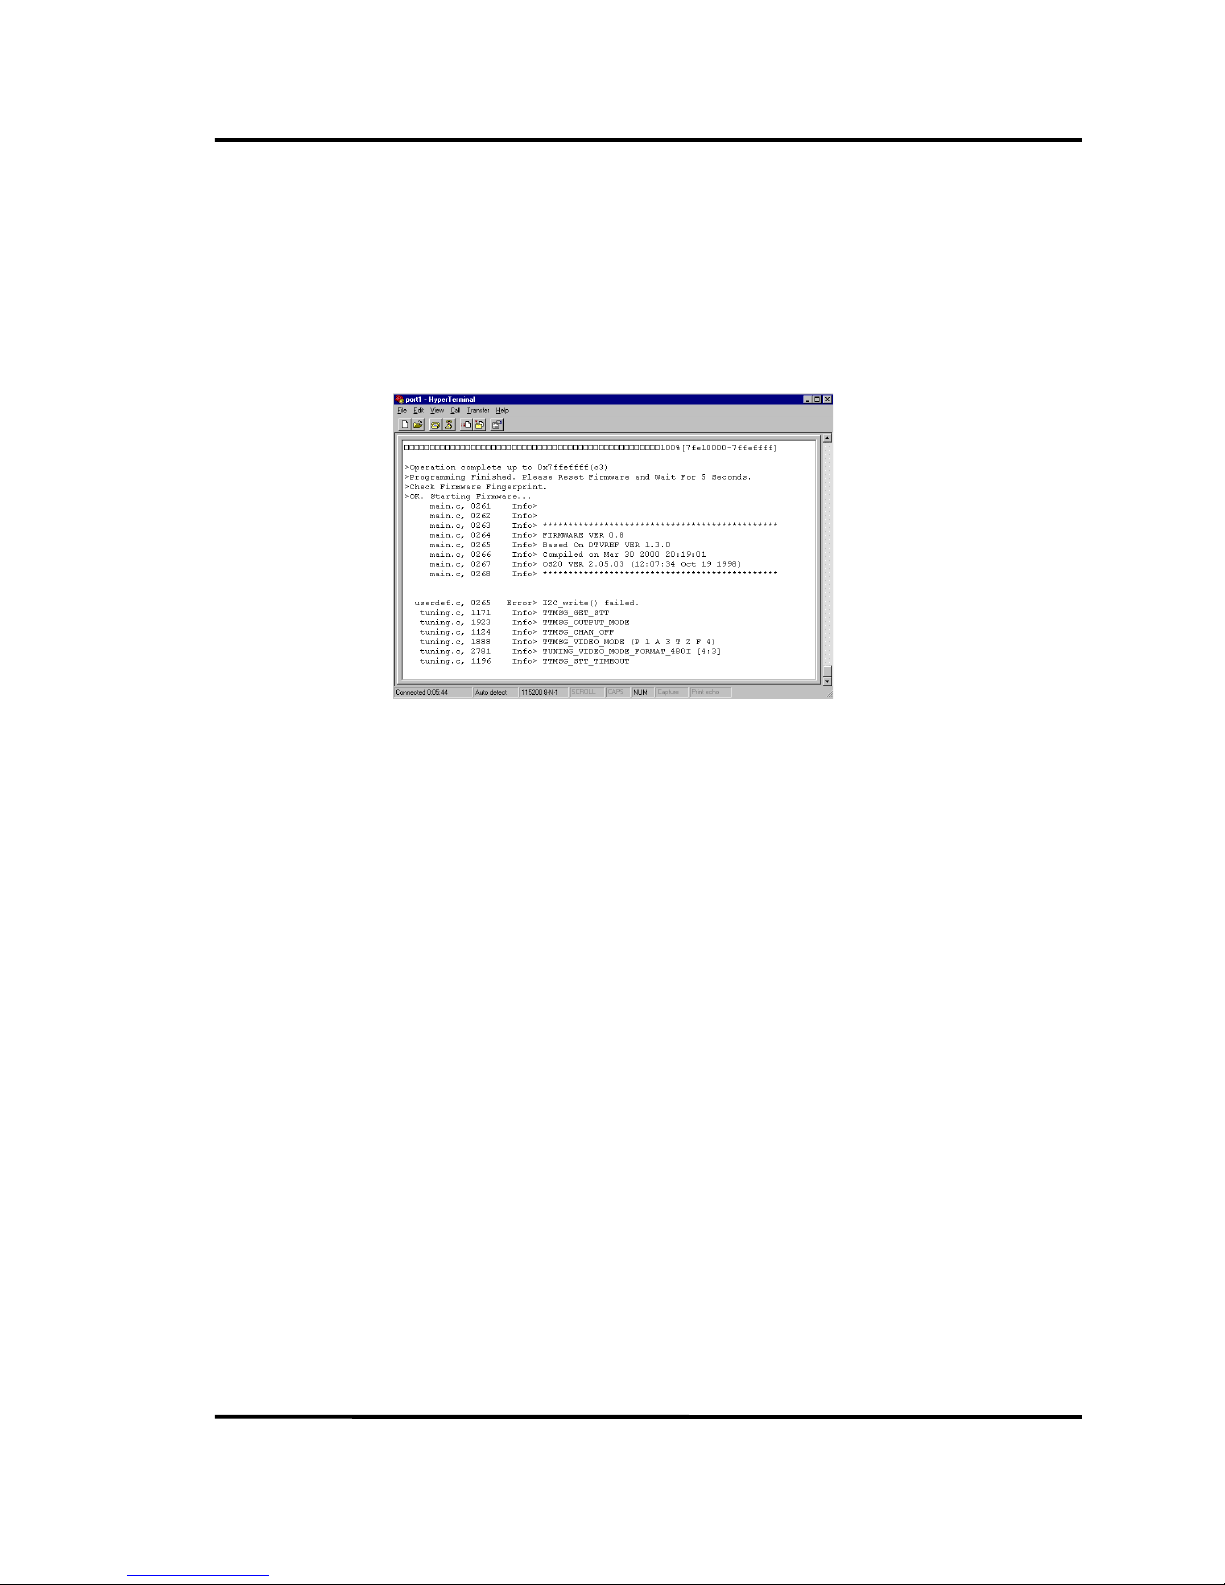
Step 8
If the download is successful, the boot loader will start to upgrade firmware automatically.
Page 75
Philips HD receiver User Guide
74
Step 9
After the update is finished, HD receiver will reboot itself automatically and start new
firmware.
Page 76

Philips HD receiver User Guide
75
G
LOSSARY OF TERMS
Alternate Audio Alternate Audio Program on the digital channel.
Auto Volume Control Sets audio volume level of all channels to same value.
Clock Mode Auto - clock by time information received from broadcaster.
Manual – clock setting for yourself in Set Date/Time and Set DST
menu.
DST Daylight Saving Time.
DVD Digital Video Disk.
Factory Default Reset all–setup value to default.
Grid Guide Program Guide formatted grid type.
GUI Graphic User Interface.
HD High Definition.
List Guide Program Guide formatted list type.
NIM Network Interface Module.
OSD On Screen Display.
RGBHV Video format including red, green, yellow, horizontal sync and
vertical sync.
SAP Secondary Audio Program on the analog channel.
STB Set top Box.
Time Zone Area where same standard time is used.
Toslink Cable An optical cable used by Dolby Digital receiver.
YPbPr Video format including Y (luminance), Pb and Pr (chrominance).
 Loading...