

Philips I600, DECT I600 User Manual

SOPHO iSMobile
DECT Cordless Handset
I600
USER GUIDE

Published by:
PHILIPS COMMUNICATION SYSTEMS
HILVERSUM, THE NETHERLANDS
Great care has been taken to ensu re the accuracy and completeness
of the information contained in these operating instructions.
If, however, you should find a mistake or an omission, or have a
suggestion aimed at improving this User Guide, then please
inform us at the following address:
PHILIPS BUSINESS COMMUNICATIONS
CUSTOMER SERVICES
P. O . B O X 3 2
1200 JD HILVERSUM
THE NETHERLANDS
© Philips Communication Systems B.V. 2004
All rights reserved. No part of these operating instructions may be
reproduced without the prior written permission of the copyright
owner.
Order number: 9600 065 64001
User Guide DECT I600
Date: October 2004

1
Contents
General Information..........5
Further Documentation........................5
Important Safety
Information.........................6
Sensitive Electronic Environment........6
Power Supply ...........................................6
Safety Precautions...................................6
Usage .........................................................7
Installation ..........................8
Installation Site ........................................8
Commissioning your Handset..............8
Installing the Charger.......................... 10
Important Battery
Information.......................11
Charging and Discharging .................. 11
Charging the Batteries ....12
Commissioning ..................................... 12
Charging and Operating Times......... 12
Charge Display ..................................... 12
Initial Setup and
Operation .........................14
Handset Subscription(Checking In) . 14
Keys and Display...............15
Display Arrangement .......................... 15
Symbols in the Display........................ 15
Top Line / Symbol Line ....................... 16
Information Line / Text Lines ............ 16
Softkey Line........................................... 17
Illumination............................................ 17
Softkeys and Other Keys 18
Softkey: Arrow Keys ........................... 18
Deleting characters ............................. 18
Softkey: OK........................................... 19
Softkey: Options .................................. 19
Softkey: Esc ........................................... 19
Softkey: Redial ...................................... 19
Softkey: Menu ....................................... 19
Automatic Hide.................................... 19
Receiver Key......................................... 19
Loudspeaker Key / Signal Key ........... 20
Key Lock ................................................ 20
Number Keys........................................ 20
Switching Off ........................................ 20
SOS Key ................................................. 20
Example: Menu ..................................... 21
Example: Telephone Book ................. 21
Entering a Telephone Number ......... 21
Calling............................... 22
Handset On / Off................................. 22
Setting the volume............................... 22
Handsfree .............................................. 22
Speaker/Hands-free Use..................... 22
Muting..................................................... 22
Making a Call......................................... 22
Making a Call from the
Last Number / Redial List ........... 23
Making a Call from the Telephone
Book................................................. 24
Making a Call from the Caller List... 24
Selection ................................................ 25
Making a SOS Call ............................... 25
Mandown Call....................................... 25
Muting Ringer ....................................... 26
Answering a Call .................................. 26
Changes During a Connection ......... 26
Enquiry Call / Call Transfer ............... 27

2
Message waiting indication
for Voice Mail....................28
Messages ...........................29
The Menus: Operating
Features ............................31
Example.................................................. 31
Menu Timer........................................... 32
Menu: Telephone Book
Settings .............................33
Opening the Telephone Book........... 33
Entering Characters / Names ........... 33
Searching an Entry ............................... 34
Adding a New Entry............................ 34
Editing an Entry .................................... 35
Deleting an Entry................................. 35
Deleting all Entries .............................. 35
Adding an Entry to the Caller Filter
.35
Quick Call.............................................. 35
Transferring Phone Numbers to
the Telephone Book...................... 36
Menu: Redial List..............37
Menu: Caller List..............38
Missed and Rejected Calls ................. 38
Calling ..................................................... 38
Menu: Messages................40
Writing a Message ............................... 40
Message Details.................................... 41
Reading a Message ............................... 41
Sending Message................................... 41
Deleting a Message .............................. 41
Deleting all Messages .......................... 41
Menu: Key Lock ............... 42
Key Lock On / Off ............................... 42
Menu: Ringer Settings..... 43
Melody.................................................... 43
Type......................................................... 43
Device .................................................... 43
Volume ................................................... 43
Menu: Volume Settings... 44
Earpiece ................................................. 44
Speaker (Hands-free).......................... 44
Menu: Caller Filter .......... 45
Editing the Caller Filter List .............. 45
Setting the Caller Filter...................... 45
Transferring Phone Numbers to
the Caller Filter ............................. 45
Menu: System .................. 46
Registration Code ............................... 46
Registering the Handset to
the DECT System ......................... 46
Selecting the DECT System .............. 46
Automatic Search System .................. 47
Deleting a System ................................ 47
Changing a System’s Name and
Phone Number .............................. 47
Equipment ID (IPEI)............................. 47
Menu: Telephone
Options............................. 48
Alarm...................................................... 48
User Name............................................ 48
Changing the Language....................... 49
Emergency Call / SOS Number........ 49
Mandown Call....................................... 49
Attention tones.................................... 50

3
Silent Charging...................................... 50
Charger Answer................................... 50
Auto.Quick Hook ................................ 50
Auto Answer......................................... 51
Message Options.................................. 51
Display Contrast .................................. 51
Menu: Security
Functions ..........................52
Changing the PIN ................................. 52
Read-Only.............................................. 52
Resetting the Handset ........................ 52
Menu Shortcuts................53
Buzzer on / off ...................................... 53
Silent Charging on / off....................... 53
User Name............................................ 53
Registering / Deregistering ................ 53
Mandown Call on / off ........................ 53
Toggle the Ringer ................................. 53
Key Lock on .......................................... 53
Accessories .......................54
Care and Maintenance.....56
Menu Tree.........................57
Technical Data .................58


5
1 General Information
The Philips DECT I600 is a cordless system terminal for use
in conjunction with a communications system.
The Philips DECT I600 is suitable for use in office, in outdoor or in dusty environments. The handset offers the following special features:
■ SOS key for one touch emergency call or message
■ mandown sensor triggers emergency call automatically
■ complies with protection class IP54 (splash- and dust
proof)
Get to know your telephone equipment. You will discover
many new functions that simplify communication and organisation considerably.
Further
Documentation
Refer also to the other documentation supplied with the
components of your communications system.

6
2 Important Safety
Information
Only use this product in countries where the relevant authorities have authorised its operation.
This product complies with IP54 – according to IEC 529 /
EN 60 529.
Sensitive
Electronic
Environment
Any radio-based equipment can potentially cause interference
with other equipment and can be interfered from other equipment. This also applies for DECT equipment. However, due
to the very low transmission power level, interferences are unlikely. Research proves that operational DECT phones normally don't influence electronic equipment. However some
precautions must be taken into account for sensitive electronic
equipment e.g. sensitive laboratory equipment. When DECT
phones operate in very close range to sensitive electronic
equipment, incidental influence can appear. You are advised
not to place the DECT phone on or close (less then 10 cm) to
this kind of equipment, even in stand-by mode.
Power Supply The mains voltage of the adapter should match the local mains
voltage, this can be 110 V or 230 V. Check if both voltages do
match before installing the charger and adapter.
Safety
Precautions
Please observe the following notes on safety when setting up,
connecting and using the handset:
■ Do not open the handset or charger, this could expose you
to high voltages. Have all repairs carried out by authorized
service personnel.
■ Connect to approved accessories only.
■ Do not allow the handset and charger to come into contact
with water or chemicals.

7
■ Only use the plug-in AC adapter and battery type sup-
plied.
■ Do not use AC adapters which are visibly damaged
(cracked or broken housing) and keep the ventilation slits
on the plug-in AC adapters free.
WARNING!
Never touch the charger and the battery contacts with conductive objects such as keys, paper clips, rings or bracelets!
■ Do not use the handsets in vehicles or in hazardous loca-
tions.
■ This product contains magnetic material. Be aware that
small metallic objects may stick for example to the loudspeaker. This may deteriorate the audio quality and can be
harmful.
Usage Like all other cordless telephones, this handset uses radio sig-
nals which do not guarantee a connection set-up under all circumstances. Generally, you should therefore not rely exclusively on cordless telephones when making indispensable calls
(e.g. medical emergencies).

8
3 Installation
Installation Site Place the charging s tat ion on a fl at, even surface. D o not place
the charging station or accessories near:
■ water, moisture or damp areas
■ heat sources, direct sunlight or inadequately ventilated ar-
eas
■ devices that produce strong magnetic fields, electrical
devices, fluorescent lamps, computers, radios, television
sets, fax machines and telephone terminals
■ areas where the equipment may be covered, penetrated by
fluids and where its ventilation is impaired
■ areas where there is excessive dust, and areas subject to vi-
bration, shock or extreme temperature fluctuations
■ Place and/or store the handset and accessories out of the
reach of small children.
Commissioning
your Handset
Your handset is only operational after the battery pack has
been charged. You can then use the handset to make and receive calls.
Please refer to the section Important Battery Information starting on page 11.
If your handset does not have the MEM card preinstalle d, you
also need to install the supplied MEM card in order to use the
handset. The MEM card saves important data, such as personal settings and the telephone book.
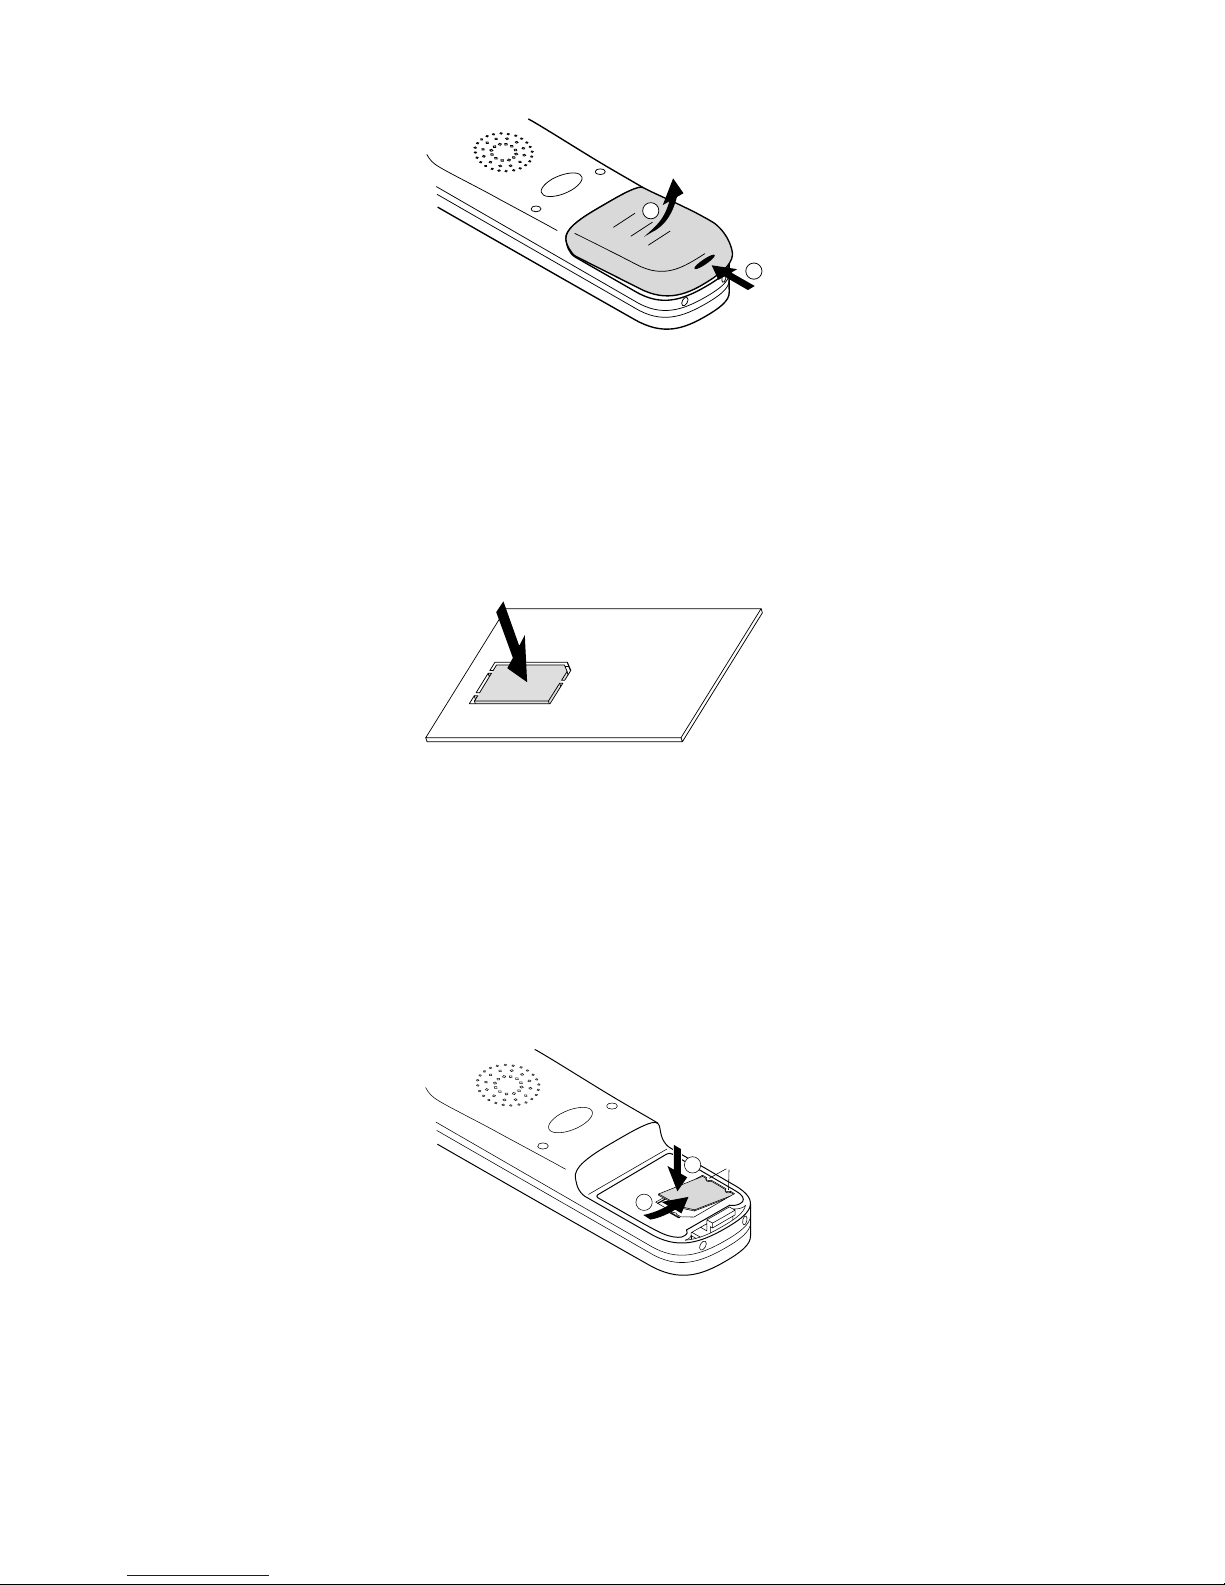
Removing the battery pack
The MEM card tray is located under the battery pack on the
back of the handset. Make sure, the handset is switched off. To
remove the battery pack, place the handset with the display
downwards on a flat surface. Press the lever (1) and lift up the
battery pack at the same time (2).
9
Removing the battery pack
Extracting the MEM card from its frame
The MEM card is delivered with a larger frame. First r emove
the MEM card from its frame. Do not touch the metal contacts.
Extracting the MEM card from its frame
Installing the MEM card
Place the MEM card into the MEM card tray with the notch
in position b and the metal contacts face down. Shift the
MEM card under the two small crescents a (1). Press the
MEM card downwards until the small tag b locks (2).
Installing the MEM card
1
2
2
1
a
b
10
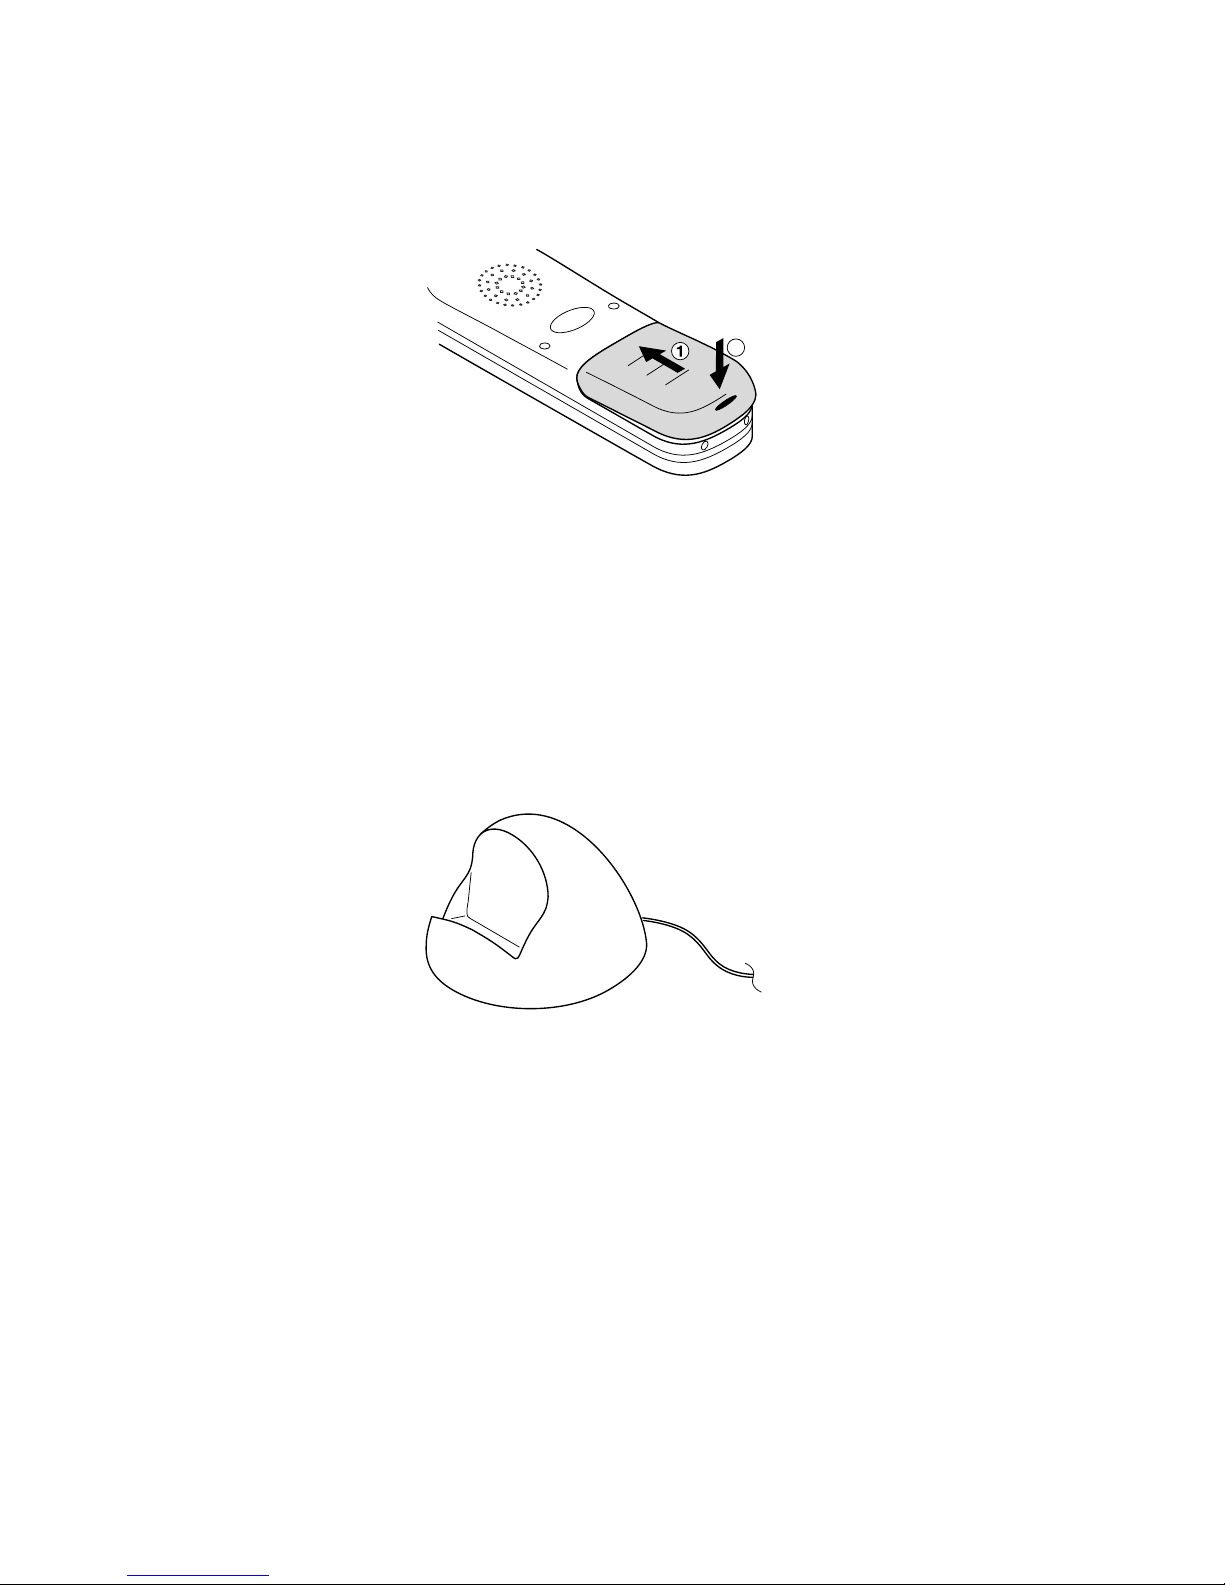
Re-inserting the battery pack
Push the battery pack into the casing (1). Press the battery
pack downwards until it locks (2).
Re-inserting the battery pack
Installing the
Charger
To operate the charging station you need a mains connection.
Check if the mains voltage does match the AC adapter mains
voltage.
Connect the cable of the adapter plug to the socket on the underside of the charging station, and then insert the adapter
plug into the mains socket.
The charger (basic)
2

11
4 Important Battery
Information
Use the battery pack only as directed. Nev er use a damaged or
flat battery pack.
Heat and cold reduce the performance and the lifetime of the
battery pack. A handset with either a hot or a cold battery pack
may not function temporarily, even when the battery pack is
fully charged.
Dispose of used batteries in accordance with local regulations.
Please make use of any recycling facilities available.
WARNING! Never throw a battery pack into a fire.
Charging and
Discharging
The battery pack can be charged and discharged hundreds of
times, but it will eventually be used up. When the operating
time (i. e. talk and stand- by tim e ) has become noticeably
shorter than normal, the battery pack should be replaced.
In order to achieve long operating times, you should dis charge
the battery pack at intervals by not placing the handset in the
charging station and leaving it switched on until it switches itself off. Only use this method to discharge the battery pack.
Extreme fluctuations in temperature have an effect on the
charging capacity of the battery pack.

12
5 Charging the Batteries
Commissioning Charge the battery pack for approx. five to six hours before us-
ing your handset for the first time. This safety measure extends
the lifetime of your battery pack. The maximum performance
of the battery pack is only reached after three to five charging/
discharging cycles.
Place the handset in the charging station regularly in order to
reach the optimum battery charge.
It is absolutely essential that you only use the rechargeable battery pack authorised by the manufacturer. The manufacturer
does not accept any responsibility for malfunction or damage
when other types of rechargeable battery or normal batteries
are used.
Charging and
Operating
Times
Charging time: approx. 5 hours.
Tal k tim e : up to 8 hours (fully charged).
Stand-by time: up to 100 hours (fully charged).
Note: Batteries with an unknown charging status are fully
charged in approx. 14 hours.
Charge Display The charging status of the battery is shown in the display as
follows:
80 - 100 % charged
60 - 80 % charged
40 - 60 % charged
20 - 40 % charged
0 - 20 % charged
(frame flashes) batteries
are empty: alert tone has
been given.

13
Your handset has a battery management system that has to determine the limits of the battery charging status before it can
display an accurate charge level.
When the battery has been replaced, the charge level is not
correctly displayed until a whole charge and discharge cycle has been completed.
When the handset is in the charging station, the flashing or lit
sections indicate charging and the charge level.
Charge warning
When the battery capacity is nearly exhausted, the battery
symbol will flash in the display. If the battery warning tone is
switched on, you will hear the battery warning tone (refer also
to the section “Attention tones” in the chapter entitled Menu:
Te l e p h on e O p t i o n s starting on page 48).
If you are making a call at the time, you still have up to three
minutes of talk time before the handset switches itself off. If
you are not making a call and the handset is not in the charging station, “Battery empty” appears in the display . You can no
longer make a telephone call now.

14
6 Initial Setup and
Operation
Handset
Subscription
(Checking In)
Your handset can be operated in up to ten different communications systems. To be able to do this, it must be subscribed to
every system, this means: the handset must be checked in.
Note: If you handset is preinstalled by your supplier, no
check-in operation is necessary.
Enrol your handset in the communications system as described
in the chapter Menu: System starting on page 46.
Subscription
The handset will store a subscription record for each communications system it has been checked into. Each subscription
record includes a name; whenever the handset enters the range
of a base station, this name will be appear in the handset’s display.
Registration
Once the handset has been subscribed to (checked into) one or
more communications systems you can make and r eceive calls.
If you have activated the Auto Search feature (see page 47),
the handset will automatically register with the nearest base
station in its range (provided the handset is in the idle state). If
you do not want to use the auto search feature, you can manual register the handset with a base station using the subscription record stored in the handset.
15
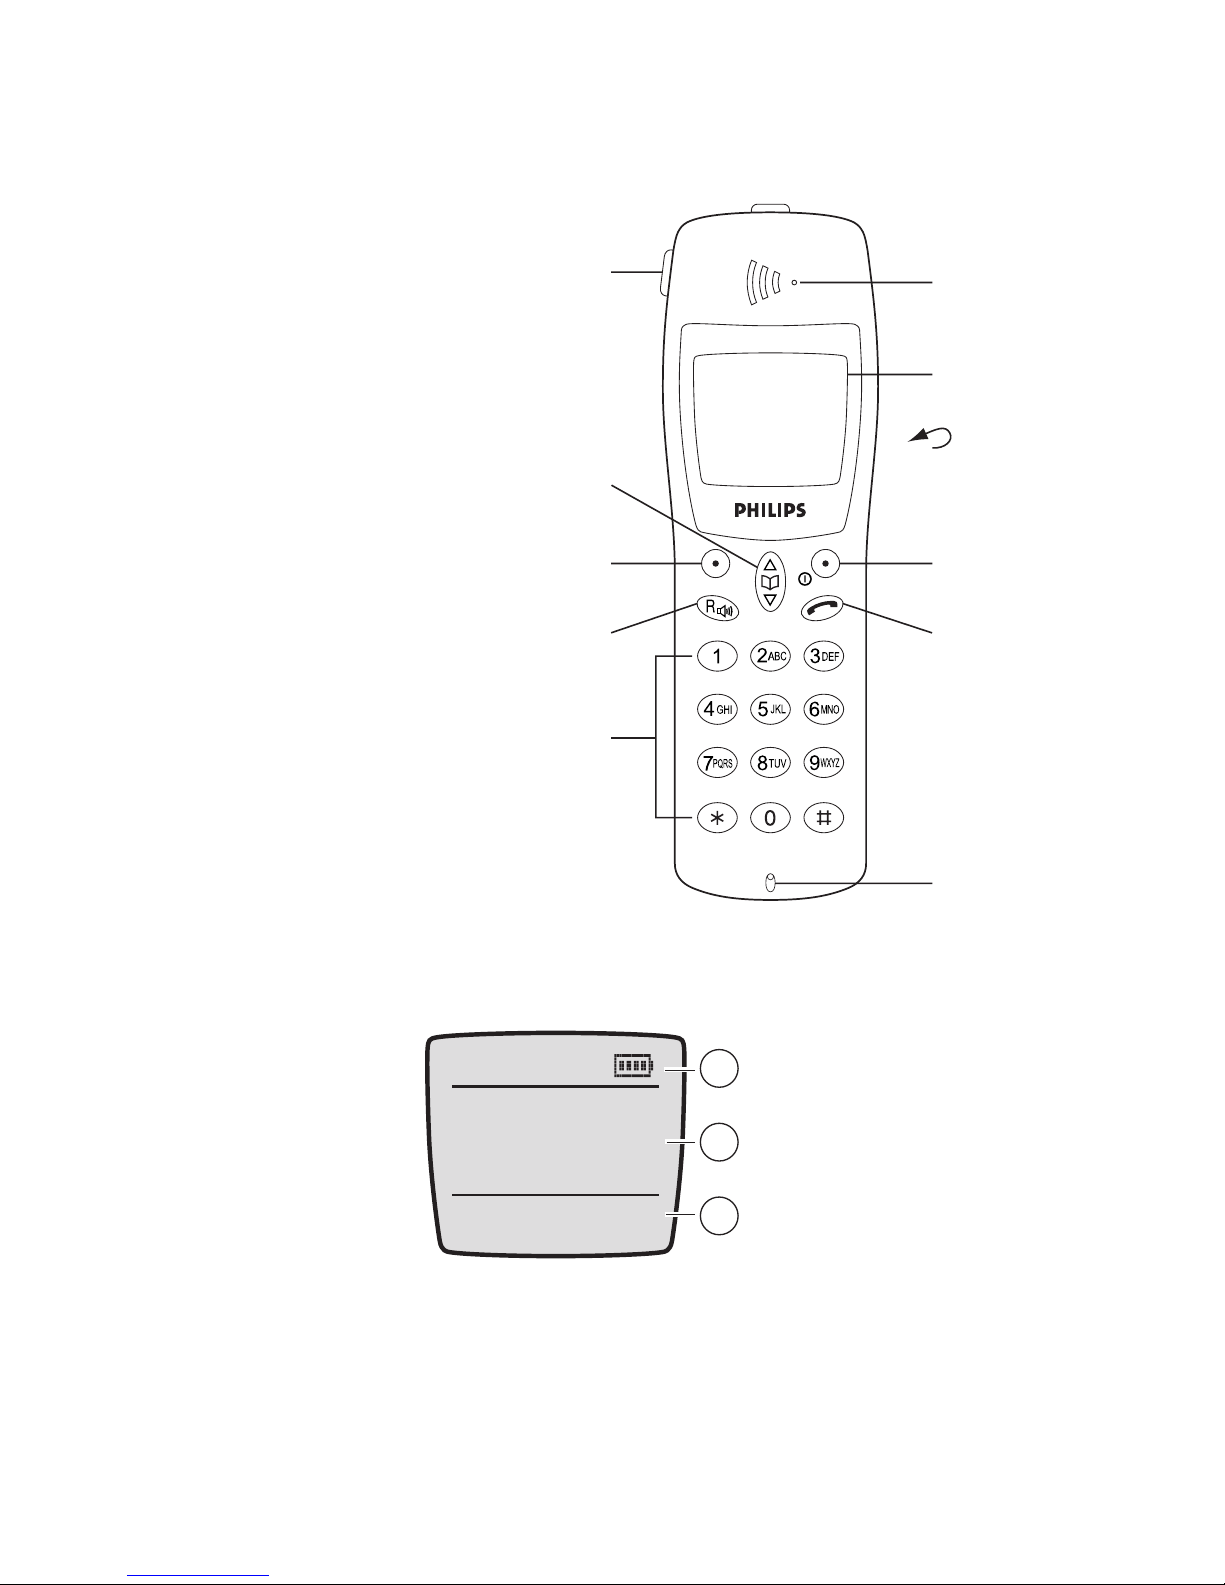
7 Keys and Display
Operating Elements on the Handset
Display
Arrangement
Symbols in the
Display
Rear:
Loudspeaker
Earpiece
Display
Softkey
Hook key
Microphone
SOS key
Softkey
Keypad
Loudspeaker key /
Signal key
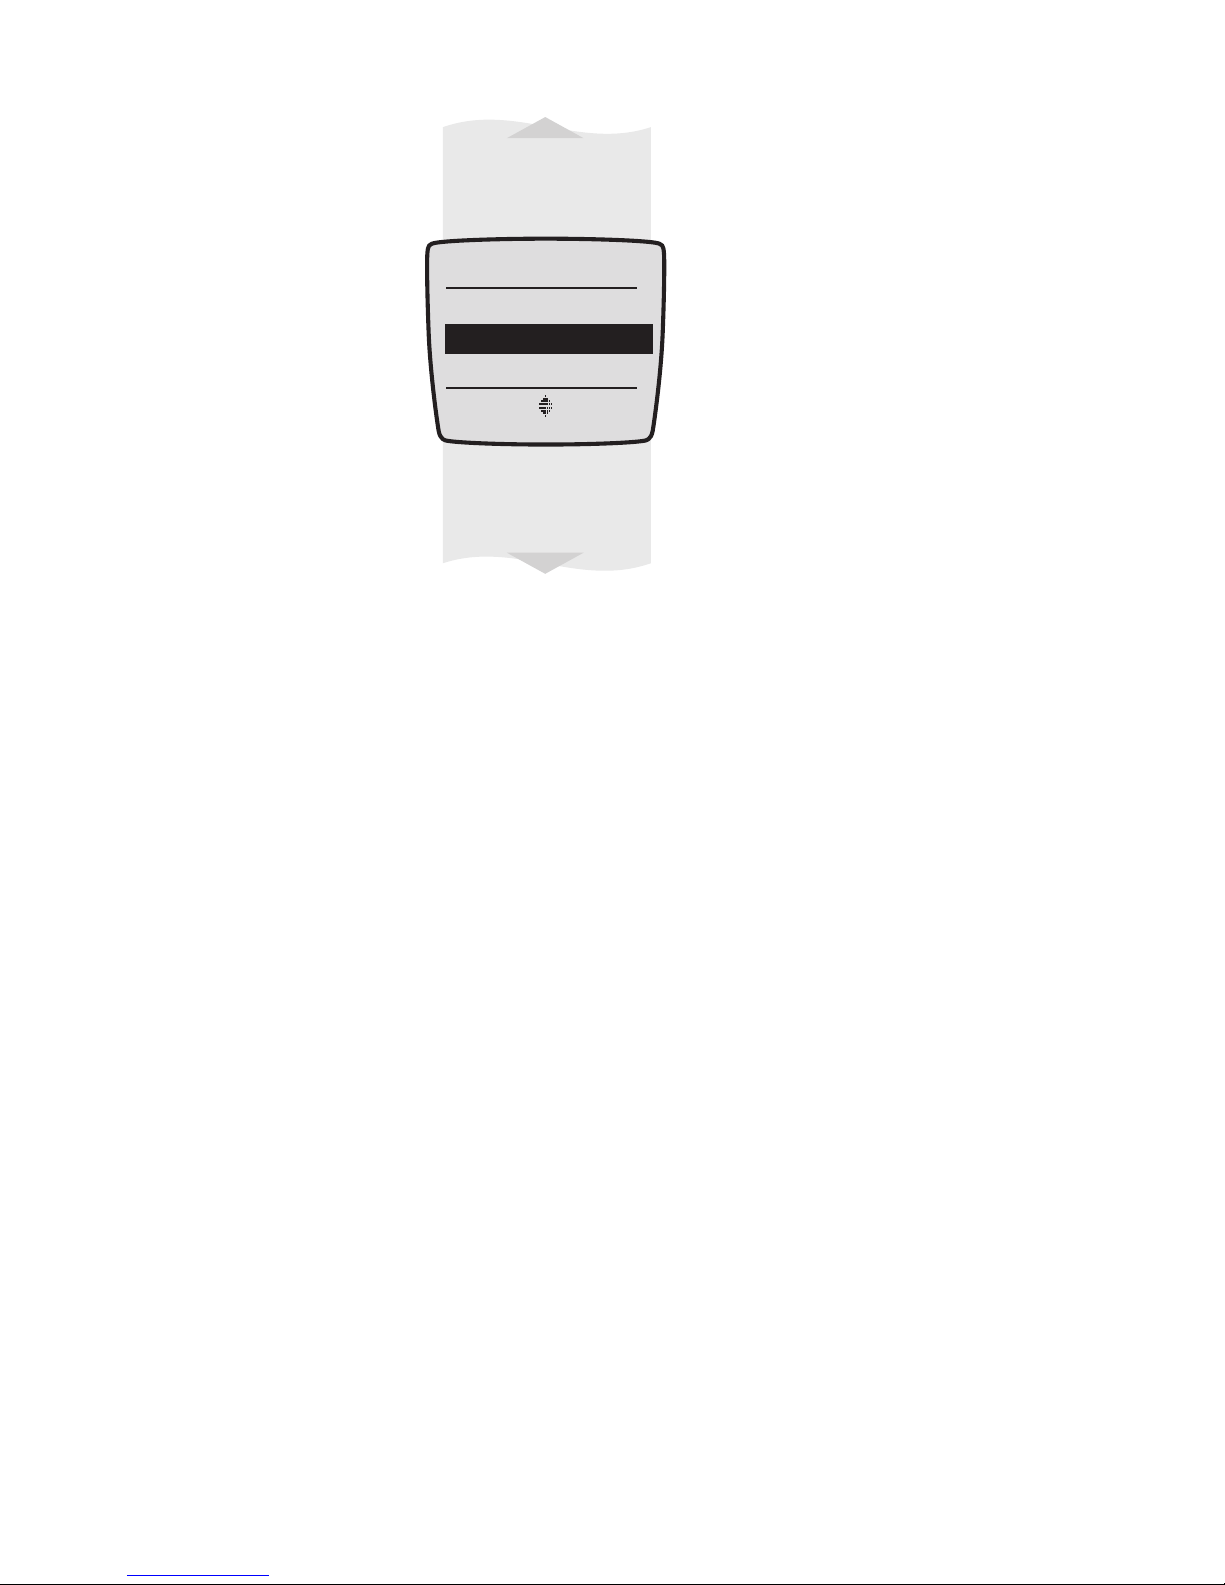
Arrow keys
1 Symbol l ine
2 Information/text lines:
display messages and …
in idle mode: status and time
in calling mode: call numbers
or names of callers/called
subscribers. (The time is only
displayed when supported by
your telephone system.)
3 Softkey line
‹ œ »
Menu ¤
Station 1 125
12:15
¬
1
2
3

16
Top Line /
Symbol Line
In the top line of the display, information is given concerning
the current status of the telephone during a call or in stand-by
mode. When using the menus, this line displays the text Menu.
In idle state the top line is replaced by the symbol line.
Information
Line /
Te x t L i n e s
The middle lines of the display provide information on the
current call status or menu lists and texts.
In the idle state, the display shows the name of the base station, the programmed user name (see also page 47) and the internal telephone number (if programmed) as well as the current time.
Ringer deactivated
Caller filter active
Quality of the radio connection (four bars means a
stable radio connection; a single bar means an unstable
radio connection)
On: Handset has a connection
Flashing: Handset has an incoming call
On: Handsfree is activated
Microphone muted
On: New message
Flashing: Message memory is full
Flashing: Message in voice box
Charge status of the batteries
On: Keypad is locked
(Next to time): Alarm on
œ
¢
»
‡
º
17
Softkey Line The texts and symbols in this line r efer to the keys underneath.
The contents of the line change according to the operating status.
Illumination The display is automatically illuminated when calls are re-
ceived or when you press a key. The illumination is automatically switched off again ten seconds after the last key was
pressed.
Selection lists (e.g. caller filter) and
the features menu are displayed as a
three-line excerpt. The lines can be
moved up or down via the arrow
keys.
A selectable entry is shown inversely
with a dark background.
Menu
OK Esc
Ringer Settings
Volume Settings
Caller Filter
System
Telephone Option
Security
Caller List
Messages
Key Lock
 Loading...