

Page 1
DiamondClean
9000
Page 2
Page 3
4
3
5
6
8
12
14
13
11
10
7
9
1
2
1
Page 4

Page 5

English 6
Deutsch 30
Español 58
Français 84
Italiano 111
Nederlands 137
Português 164
Ελληνικά
190
Page 6

English
6
Introduction
Congratulations on your new Philips Sonicare power toothbrush!
Superior plaque removal, whiter teeth and healthier gums are at your
fingertips. Using Sonicare’s combination of gentle sonic technology
and clinically developed and proven features, you can be confident
that you’re getting the very best clean, every time. Further support
and product registration are available to you at:
http://www.philips.com/welcome.
Welcome to the Philips Sonicare family!
Intended Use
DiamondClean series power toothbrushes are intended to remove
adherent plaque and food debris from the teeth to reduce tooth
decay and improve and maintain oral health. DiamondClean series
power toothbrushes are intended for consumer home use. Use by
children should be with adult supervision.
Important safety information
Read this important information carefully before you use the
appliance and save it for future reference.
Note: The accessories and features of different models vary. For
example, some models come with a sanitizer or are equipped with
Bluetooth.
Danger
- Keep the charger and/or sanitizer away
from water. Do not place or store the
appliance where it can fall or be pulled into
a tub or sink.
- Do not immerse the charger and/or sanitizer
in water or any other liquid.
English
Page 7

English
- After cleaning, make sure the charger
and/or sanitizer is completely dry before
you connect it to the wall socket.
Warning
- This appliance can be used by children and
persons with reduced physical, sensory or
mental capabilities or lack of experience
and knowledge if they have been given
supervision or instruction concerning use of
the appliance in a safe way and understand
the hazards involved. Cleaning and user
maintenance shall not be made by children
without supervision.
- Children shall not play with the appliance.
- If the appliance is damaged in any way
(brush head, toothbrush handle, charger
and/or sanitizer), stop using it.
- The mains cord cannot be replaced. If the
mains cord is damaged, discard the charger
and/or sanitizer.
- Always replace the charger and/or sanitizer
with one of the original type in order to
avoid a hazard.
7
Page 8

English
8
- This appliance contains no user-serviceable
parts. If the appliance is damaged, contact
the Consumer Care Center in your country
(see 'Warranty and support').
- Keep the cord away from heated surfaces.
- Do not use the charger and/or sanitizer
outdoors or near heated surfaces.
Caution
- Do not clean the brush head, handle,
charger, charger cover or sanitizer in the
dishwasher.
- If you have had oral or gum surgery in the
previous 2 months, consult your dentist
before you use this appliance.
- Consult your dentist if excessive bleeding
occurs after using this appliance or if
bleeding continues to occur after 1 week of
use. Also consult your dentist if you
experience discomfort or pain when you use
this appliance.
Page 9

English
- This Philips appliance complies with the
safety standards for electromagnetic
devices. If you have a pacemaker or other
implanted device, contact your doctor or the
appliance manufacturer of the implanted
appliance prior to use.
- If you have medical concerns, consult your
doctor before you use this appliance.
- This appliance has only been designed for
cleaning teeth, gums and tongue. Do not
use it for any other purpose. Stop using the
appliance and contact your doctor if you
experience any discomfort or pain.
- This appliance is a personal care device and
is not intended for use on multiple patients
in a dental practice or institution.
- Do not use other brush heads than the ones
recommended by Philips Sonicare.
- Stop using a brush head with crushed or
bent bristles. Replace the brush head every
3 months or sooner if signs of wear appear.
9
Page 10

English
10
- If your toothpaste contains peroxide, baking
soda or bicarbonate (common in whitening
toothpastes), thoroughly clean the brush
head with soap and water after each use.
This prevents possible cracking of the
plastic.
- Avoid direct contact with products that
contain essential oils or coconut oil. Contact
may result in bristle tufts dislodging.
Electromagnetic fields (EMF)
This Philips appliance complies with all applicable standards and
regulations regarding exposure to electromagnetic fields.
Radio Equipment Directive
Hereby, Philips declares that electric toothbrushes with radio
frequency interface (Bluetooth) are in compliance with Directive
2014/53/EU.
The full text of the EU declaration of conformity is available at the
following internet address: www.philips.com/support
The radio frequency interface in this product operates at 13.56MHz.
The maximum RF power transmitted by the appliance is 30.16dBm.
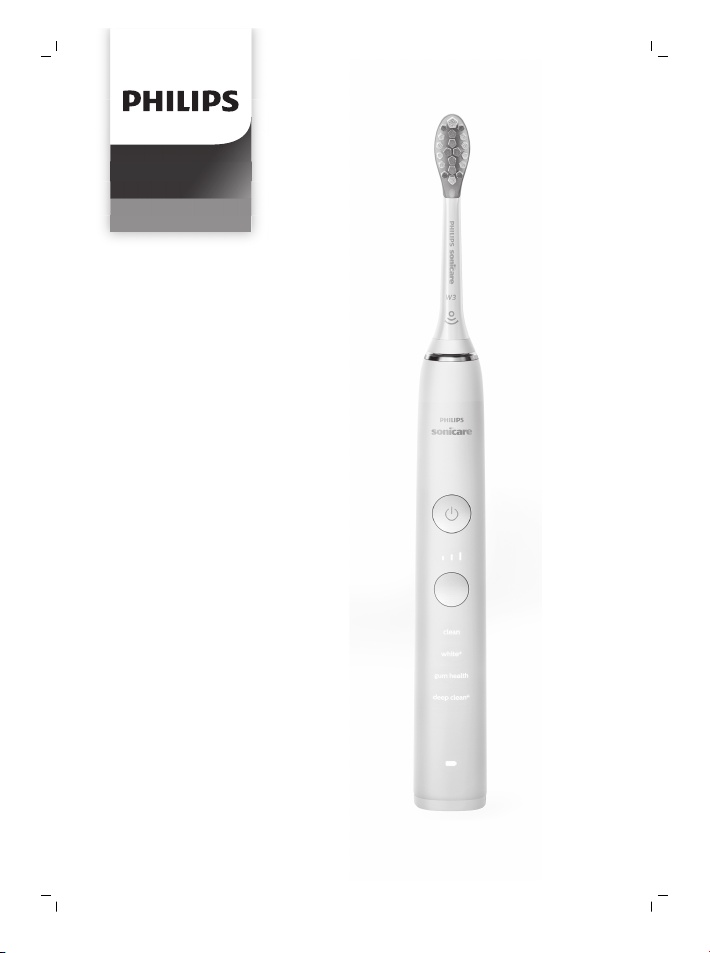
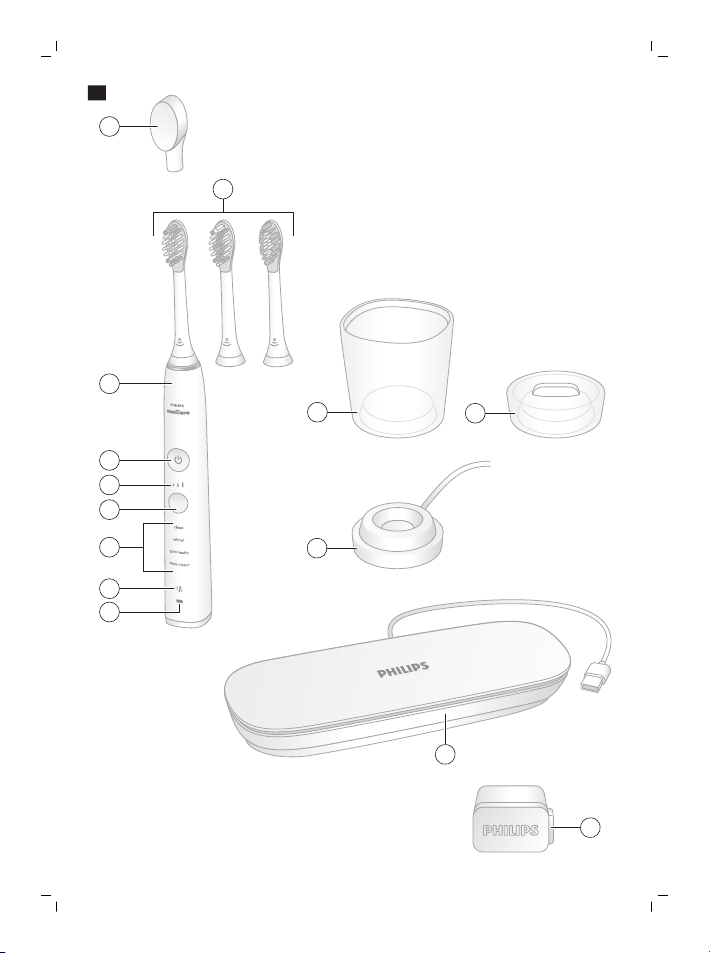
Your Philips Sonicare (Fig. 1)
1 Hygienic travel cap
2 Smart brush heads*
3 Handle
4 Power on/off button
5 Intensity light
6 Mode/intensity button
7 Modes
8 Brush head replacement reminder light
Page 11

English
9 Battery indication
10 Charging glass
11 Charging stand
12 Charging base
13 (Charging)Travel case*
14 USB wall adapter*
* Note: The content of the box may vary based on the model
purchased.
Sonicare app – Getting Started
The Sonicare app pairs with your toothbrush to provide you a
connected experience. By connecting your toothbrush to your
Sonicare app account, you will be able to:
- Easily review your progress report for ways to improve your
brushing routine
- Receive personalized tips and recommendations for managing
your oral health
To start using the Sonicare app:
1 Download the Sonicare app to your phone
2 Open the app and follow the guided steps
3 Pair your toothbrush with the app
4 Create your account
5 Complete firmware update, if prompted, to access the latest
improvements and features.
6 Brush regularly
You are ready to start your connected experience. Be sure to brush
regularly. You can receive updates to help improve your oral
healthcare.
Note: Make sure your phone’s Bluetooth is turned on when using the
app. Your toothbrush uses the Bluetooth connection to transfer your
brushing data to the app. If you have questions about why your
brushing data is collected, be sure to review the Sonicare Privacy
Statement, available throughout the app setup process.
11
Page 12
English
12
Sonicare app – Track and improve your oral health care
Your Sonicare power toothbrush is equipped with smart sensors to
provide you with feedback about your brushing habits, including:
- Daily brushing sessions
- Time spent during each brushing session
- Applied brushing pressure
- Brush head replacement reminder (based on actual use)
The Sonicare app collects the data provided by the smart sensors
and tracks your brushing habits over time.
Each of the features available in the app are designed to help you
understand your brushing habits and provide you with simple
recommendations for improving and maintaining your oral health.
You will receive personalized brushing information in the Sonicare
app.
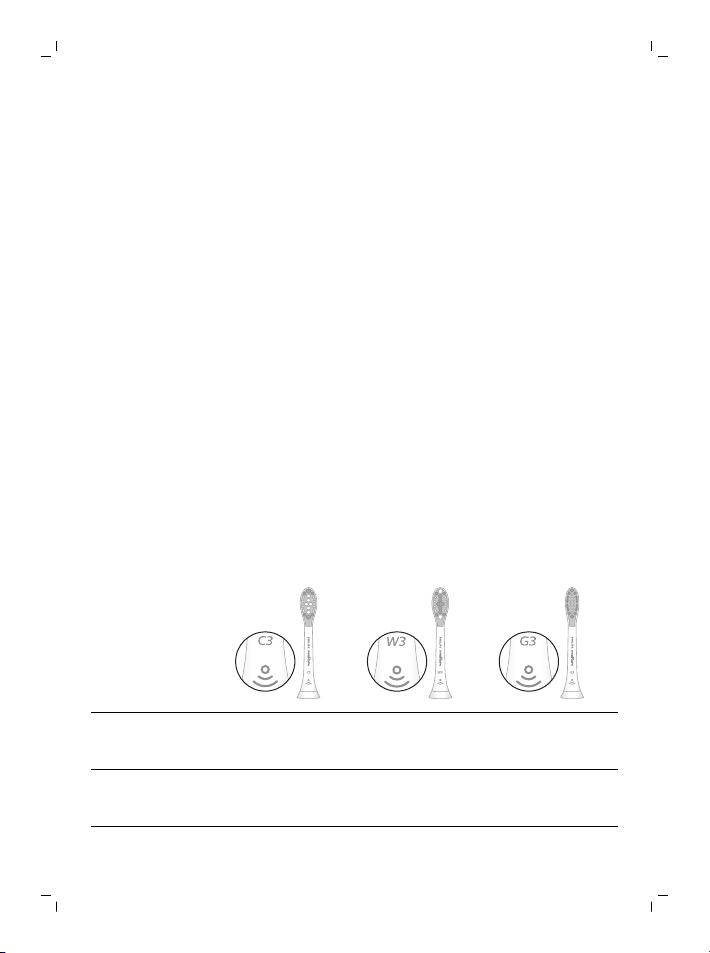
Brush heads
To see what type of brush head you have, check the label at the
bottom of the brush head. The symbol at the bottom of the brush
head indicates that it is a smart brush head, equipped with the
BrushSync technology.
Brush head
name
Brush head
label
Premium
Plaque Control
C3 W3 G3
Premium White Premium Gum
Care
Page 13

45°
English
13
Benefit
To explore our full range of brush heads, go to
www.philips.com/toothbrush-heads for more information.
Plaque removal Plaque and
stain removal
Healthier gums
Using your Philips Sonicare
Brushing instructions
1 Push the brush head firmly onto the handle. Wet the bristles and
apply toothpaste.
Note: It is normal to see a slight gap between the brush head and
the handle. This allows the brush head to vibrate properly.
2 Place the toothbrush bristles against the teeth at a slight angle (45
degrees), apply light pressure to make the bristles reach the
gumline or slightly beneath the gumline.
Note: Keep the center of the brush head in contact with the teeth
at all times.
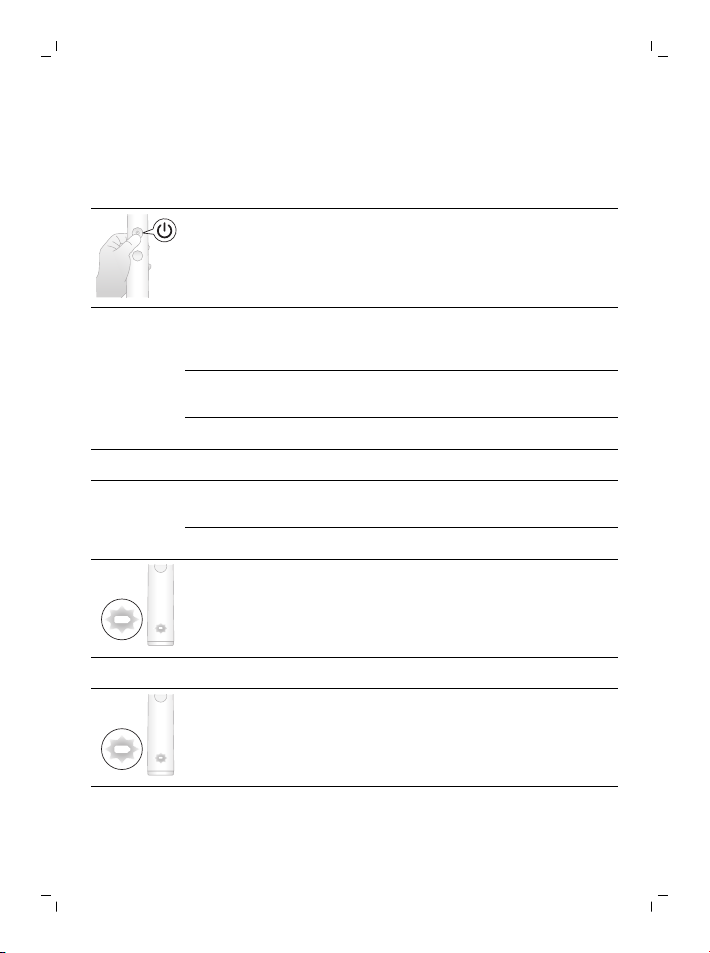
3 Press the power on/off button to turn on the Philips Sonicare.
Page 14

English
14
4 Apply light pressure to maximize Philips Sonicare’s effectiveness
and let the Philips Sonicare toothbrush do the brushing for you.
Gently move the brush head slowly across the teeth in a small
back and forth motion so the longer bristles reach between your
teeth. Continue this motion throughout the brushing cycle.
Note: Different modes are available (see 'Brushing modes').
5 To clean the inside surfaces of the front teeth, tilt the brush handle
semi-upright and make several vertical overlapping brushing
strokes on each tooth.
Note:
- A change in vibration from the handle alerts you when you apply
too much pressure (see 'Pressure sensor').
- Your Philips Sonicare toothbrush is safe to use on braces, dental
modifications and dental restorations (fillings, crowns, veneers)
- Do not use your power toothbrush in the shower.
BrushSync technology
BrushSync technology enables your brush heads to communicate
with your handle using a microchip. The symbol at the bottom of the
Page 15

English
brush head indicates that it is equipped with the BrushSync
technology. This enables the following features:
- Brush head mode pairing
- Brush head replacement reminder
15
Brushing modes
Your power toothbrush is equipped with 4 different modes: clean,
white+, gum health and deep clean+.
Based on the smart brush head you use, the optimal mode and
intensity will be selected automatically by the BrushSync technology.
To manually change the mode, press the mode/intensity button while
the toothbrush is off with the brush head attached.
* Note:
- All brush heads work with each mode.
- When the Philips Sonicare toothbrush is used in clinical studies, it
must be used at high intensity, with the EasyStart feature turned off.
Brush head mode pairing
Brush heads with BrushSync technology are equipped with a
microchip which communicates to the handle and automatically pairs
it with the recommended mode and intensity.
Note:If you change modes/intensity, the brush head will remember
the last used setting. If you wish to brush with the recommended
setting, you can find the recommended mode/intensity in ‘Brushing
Modes’.
Page 16
English
16
Brush head mode pairing
Brush heads with BrushSync technology are equipped with a
microchip which communicates to the handle and automatically pairs
it with the recommended mode and intensity.
Note:If you change modes/intensity, the brush head will remember
the last used setting. If you wish to brush with the recommended
setting, you can find the recommended mode/intensity in the
following table.
clean and deep
clean+
white+ gum health
Benefit
Recommended
brush head
Recommended
intensity level
Total brushing
time
Plaque removal Plaque and
Premium
Plaque Control
(C3)
3 3 3
clean: 2
minutes
deep clean+: 3
minutes*
surface stains
removal
Premium White
(W3)
2 minutes and
40 seconds
Plaque removal
and gum
massage
Premium Gum
Care (G3)
3 minutes and
20 seconds
Page 17

1
2
3
4
5
6
1
2
3
4
5
6
1
2
3
4
5
6
7
8
1
2
3
4
5
6
7
8
10
9
English
17
clean and deep
white+ gum health
clean+
How to brush
clean: Brush
each segment
for 20 seconds
deep clean+:
Brush each
segment for 30
seconds*
Brush each
segment for 20
seconds,
then brush
segments 7 and
8 for 20
seconds each.
Brush each
segment for 20
seconds,
then brush
segments 7, 8,
9 and 10 for 20
seconds each.
*Note: When brushing with the Sonicare app in 'deep clean+' mode,
the brushing time will be 2 minutes.
Intensity settings
Your power toothbrush comes with 3 different intensity settings:
- low intensity (one bar)
- medium intensity (two bars)
- high intensity (three bars)
Page 18
English
18
When attached to the handle, the smart brush head will automatically
select the recommended intensity. To manually change the intensity,
turn on the handle and press the mode/intensity button.
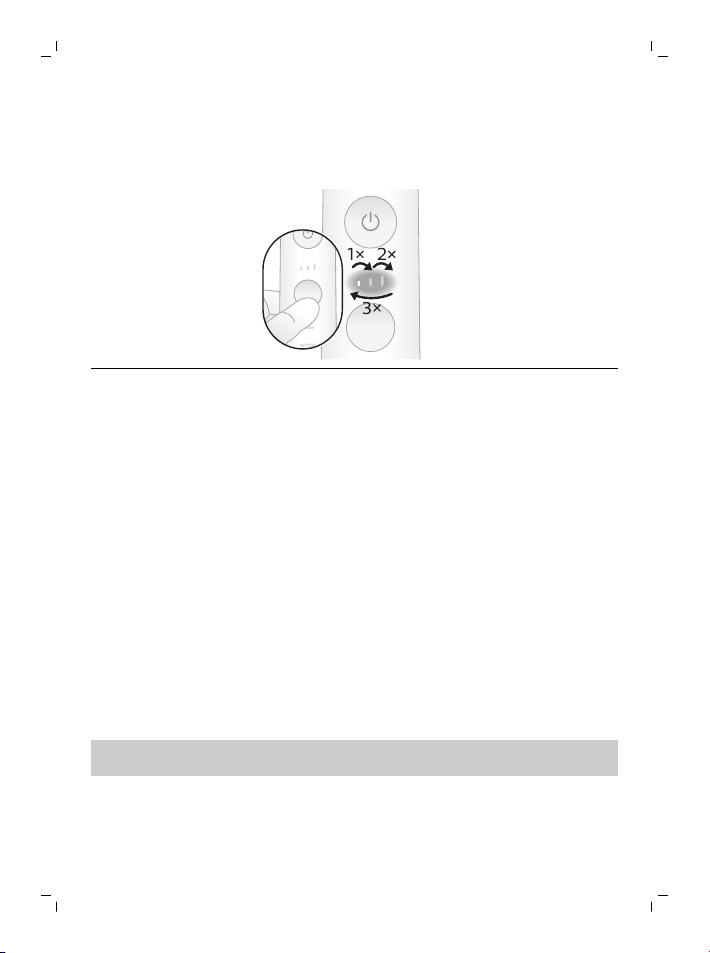
While toothbrush is
ON, press this
button to change
the intensity setting
Features
- BrushPacer
- Pressure sensor
- Brush head replacement reminder
- EasyStart
BrushPacer
The BrushPacer features indicates when you have to move to the
next section of your teeth with a brief change in vibration.
The toothbrush turns off automatically at the end of the brushing
session.
Pressure sensor
Your Philips Sonicare measures the pressure you apply while
brushing to protect your gums and teeth from damage.
If you apply too much pressure, the handle will change its vibration
until you reduce the pressure.
Note: The Pressure Sensor comes activated with your product. To
deactivate this feature, see 'Activating or deactivating features'.
Brush head replacement reminder
Over time, the handle will track the wear of your smart brush head by
measuring:
Page 19
English
- The overall pressure you apply while brushing
- The total time you have brushed with your brush head
Once your brush head is no longer effective, the brush head
replacement reminder will blink amber and the handle will make a
series of beeps and tones.
Note: The brush head replacement reminder comes activated with
your product. To deactivate this feature, see 'Activating or
deactivating features'.
EasyStart
The EasyStart feature gently increases the power of the handle over
the first 14 brushings to help you get used to the brushing power of
the Philips Sonicare.
The EasyStart feature works with all modes.
Note: The EasyStart feature comes deactivated with your product. To
activate EasyStart, see 'Activating or deactivating features'.
19
Charging and battery status
Charging on charger base
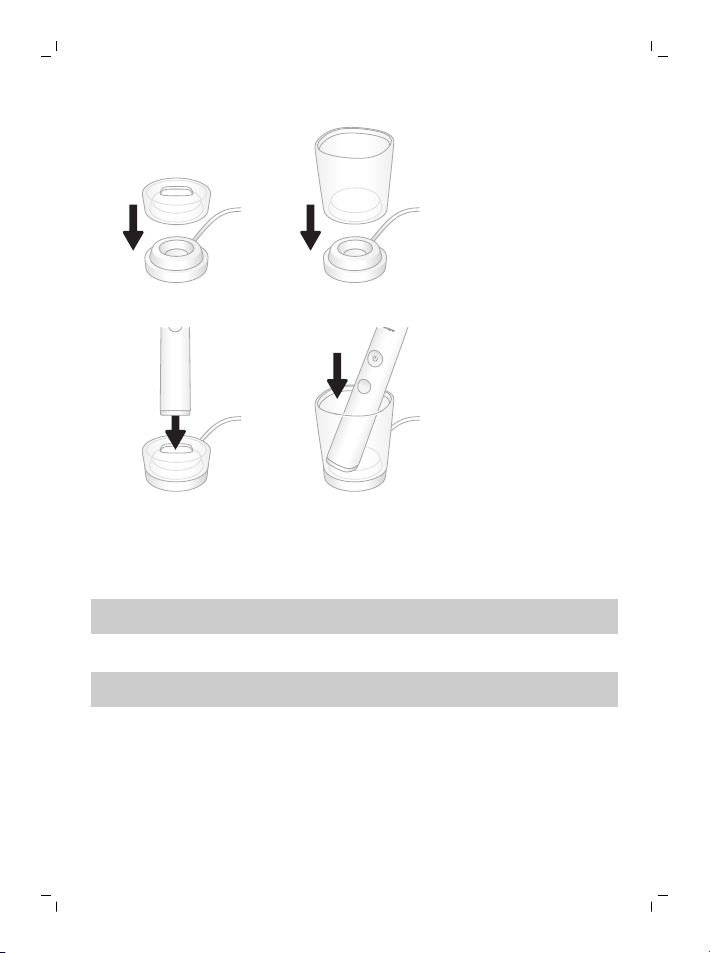
1 Plug the cord of the charging base into an electrical outlet.
2 Place the charging stand or the charging glass on the charging
base.
Page 20
English
20
3 Place the handle on the charging stand or in the charging glass.
4 The charger will charge your toothbrush until it is fully charged.
The handle is charging when the battery indication is blinking white.
When the handle is fully charged, the battery indication illuminates
white for 30 seconds and then turns off.
Note: Your handle comes pre-charged for first use. After first use,
charge for at least 24 hours.
Charging with the travel case*
*Note: The charging travel case may not be included depending on
the model purchased.
1 Take the USB cable from the bottom of the charging travel case.
2 Connect the charging travel case to 5V DC input power either from:
-
The USB adapter provided
-
a UL-listed or certified to ANSI/UL 60950-1 personal
computer's standard USB connector or,
-
a UL-listed or certified to ANSI/UL 60950-1 LPS power supply
with USB output port or,
Page 21

English
-
a UL-listed or certified 1310 Class 2 power supply.
Important: The wall adapter must be a safe extra low
voltage source, compatible with the electrical ratings
marked on the bottom of the device.
3 The travel case charges your toothbrush until your toothbrush is
fully charged.
Battery Status (handle on plugged in charger)
When the handle is placed on the charger or in the travel case, the
battery indication will communicate the battery level.
Battery status Battery indication
Charging Blinks in white
Full Illuminates white for 30 seconds
and then turns off.
Battery Status (when handle is not placed on Charger)
When you turn on the handle, the battery light at the bottom of the
handle will indicate the status of the battery.
Battery status Battery indication Sound
Full Illuminated in white -
Partially full Blinks white -
Low Blinks amber The handle emits 3
beeps
21
Empty Blinks amber The handle emits 2
sets of 5 beeps
Activating or deactivating features
You can activate or deactivate the following features of your
toothbrush:
- EasyStart
Page 22
English
22
- Brush head replacement reminder
- Pressure sensor
Step 1: Place the handle on the charging stand or in the
charging glass.
Step 2: Press and hold power button for:
Easy start Brush head
replacement
reminder
3 seconds Up to 5
seconds
¯ ¯ ¯
Step 3: Let go power button when you hear
1 beep 1 beep and
then 2 beeps
¯ ¯ ¯
If you see the battery indication blink white 2 times and
hear 3 tones from low to high, then the feature has
been activated.
OR
If you see battery indication blink white once and hear
3 tones high to low, then the feature has been
deactivated.
Pressure sensor
Up to 7 seconds
1 beep, 2 beeps and
then 3 beeps
Cleaning
- All parts can be cleaned with a damp cloth or rinsed with warm
water.
Page 23

English
- Remove the brush head from the handle and rinse it thoroughly.
- Rinse the entire handle, especially the brush head connection, at
least once a week.
23
Caution: Do not push on the rubber seal at the top of the handle.
Gently clean around the rubber seal.
Page 24

English
24
Cautions:
- Do not clean the brush head, travel cap, handle, charger or travel
case in the dishwasher.
- Do not use isopropyl alcohol, vinegar, bleach, or any other house
hold cleaning products, to clean the handle as this may cause
discoloration.
- Unplug the charger before you clean it.
- Do not use essential oils to clean the brush heads as this can
cause damage.
Storage
If you are not going to use the product for an extended period of
time, unplug it from the electrical outlet, clean it and store it in a cool
and dry place away from direct sunlight.
Frequently asked questions
Question Answer
Can I leave my Sonicare on the
charger between brushings?
Yes, you can always keep your
Philips Sonicare toothbrush on a
plugged-in charger. This does
not affect the battery lifetime.
Page 25

Question Answer
English
25
Will other brush heads fit my
Philips Sonicare toothbrush?
How often do I need to replace
my brush head?
Is my Philips Sonicare toothbrush
waterproof?
What phones are compatible
with the Philips Sonicare app?
What other Philips Sonicare
toothbrushes can I use with the
Philips Sonicare app?
All Philips Sonicare electric
toothbrush brush heads that
snap on will fit your toothbrush.
However, not all are equipped
with BrushSync technology. You
can identify the brush heads with
BrushSync technology by the
icon at the base of the brush
head.
We advise you to replace your
Philips Sonicare brush head after
3 months of use (based on
brushing twice a day for 2
minutes each session).The brush
head replacement reminder will
also notify you when it is time to
replace your brush head.
Yes, your Philips Sonicare
toothbrush is waterproof.
However, never put your handle
in a dishwasher to clean it. And
do not use it in the shower.
The Philips Sonicare app support
Android OS, and Apple iOS. For
the most up to date version of
the Philips Sonicare app check
out the Android Play Store or
Apple App Store. Mobile devices
must have Bluetooth 4.0 or
newer.
You can only use Philips
Sonicare Flexcare Platinum
Connected, DiamondClean
Smart, DiamondClean 9000 and
ExpertClean toothbrushes with
the Sonicare app. Look for the
Bluetooth symbol on the front
panel of the package.
Page 26

English
26
Recycling
- This symbol means that this product shall not be disposed of with
normal household waste (2012/19/EU).
- This symbol means that this product contains a built-in
rechargeable battery which shall not be disposed of with normal
household waste (2006/66/EC). Please take your product to an
official collection point or a Philips service center to have a
professional remove the rechargeable battery.
- Follow your country’s rules for the separate collection of electrical
and electronic products and rechargeable batteries. Correct
disposal helps prevent negative consequences for the
environment and human health.
Removing the rechargeable battery at the end of lifetime
Warning
- Only remove the rechargeable battery when you discard the
handle.
- Make sure the battery is completely empty when you remove it.
- Any attempt to remove the battery will void the warranty.
For assistance, visit our website at www.philips.com/support or call
1-800-243-3050 toll free.
Removing the rechargeable battery
Warning: Only remove the rechargeable battery when you discard the
appliance. Make sure the battery is completely empty when you
remove it.
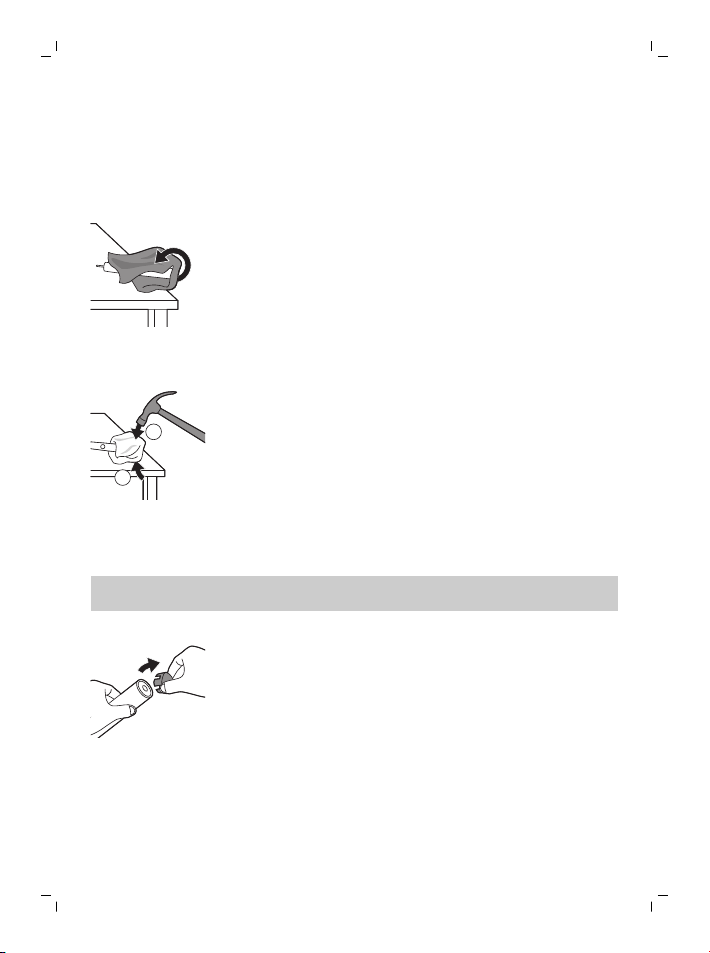
To remove the rechargeable battery, you need a towel or cloth, a
hammer and a flat-head (standard) screwdriver. Observe basic safety
precautions when you follow the procedure outlined below. Be sure
to protect your eyes, hands, fingers, and the surface on which you
work.
Page 27
1
2
English
1 To deplete the rechargeable battery of any charge, remove the
handle from the charger, turn on the Philips Sonicare and let it run
until it stops. Repeat this step until you can no longer turn on the
Philips Sonicare.
2 Remove and discard the brush head. Cover the entire handle with
a towel or cloth.
3 Hold the top of the handle with one hand and strike the handle
housing 0.5 inch above the bottom end. Strike firmly with a
hammer on all 4 sides to eject the end cap.
Note: You may have to hit on the end several times to break the
internal snap connections.
27
4 Remove the end cap from the toothbrush handle. If the end cap
does not release easily from the housing, repeat step 3 until the
end cap is released.
Page 28

English
28
5 Holding the handle upside down, press the shaft down on a hard
surface. If the internal components do not easily release from the
housing, repeat step 3 until the internal components are released.
6 Wedge the screwdriver between the battery and the black frame
at the bottom of the internal components. Then pry the
screwdriver away from the battery to break the bottom of the
black frame.
7 Insert the screwdriver between the bottom of the battery and the
black frame to break the metal tab connecting the battery to the
green printed circuit board. This will release the bottom end of the
battery from the frame.
Page 29

English
8 Grab the battery and pull it away from the internal components to
break the second metal battery tab.
Caution: Be aware of the sharp edges of the battery tabs so as to
avoid injury to your fingers.
9 Cover the battery contacts with tape to prevent any electrical short
from residual battery charge. The rechargeable battery can now be
recycled and the rest of the product discarded appropriately.
Note: Do not throw away the appliance with the normal household
waste at the end of its life, but hand it in at an official collection
point for recycling. By doing this, you help to preserve the
environment.
29
Warranty and support
If you need information or support, please visit
www.philips.com/support or read the international warranty leaflet.
Warranty restrictions
The terms of the international warranty do not cover the following:
- Brush heads.
- Damage caused by use of unauthorized replacement parts.
- Damage caused by misuse, abuse, neglect, alterations or
unauthorized repair.
- Normal wear and tear, including chips, scratches, abrasions,
discoloration or fading.
Page 30

Deutsch
30
Einführung
Herzlichen Glückwunsch zu Ihrer neuen Philips Sonicare
Elektrozahnbürste! Mit ihr können Sie einfach auf Knopfdruck eine
gründlichere Plaque-Entfernung, weißere Zähne und gesünderes
Zahnfleisch erreichen. Die Verbindung von sanfter Schalltechnologie
mit klinisch entwickelten und nachgewiesenen Funktionen stellt
sicher, dass Sie Ihre Zähne bei jedem Putzen bestmöglich reinigen.
Weitere Unterstützung und die Möglichkeit zur Registrierung Ihres
Produkts finden Sie unter: http://www.philips.com/welcome.
Willkommen bei der Philips Sonicare Familie!
Vorgesehener Verwendungszweck
Elektrische Zahnbürsten der Serie DiamondClean sind zur Entfernung
von Plaque und Speiseresten von den Zähnen, zur Reduzierung von
Karies sowie zur Verbesserung und Aufrechterhaltung der
Mundgesundheit vorgesehen. Elektrische Zahnbürsten der Serie
DiamondClean sind für den privaten Gebrauch durch Verbraucher
vorgesehen. Die Benutzung durch Kinder muss unter Aufsicht
Erwachsener erfolgen.
Wichtige Sicherheitsinformationen
Lesen Sie diese wichtigen Informationen vor dem Gebrauch des
Geräts aufmerksam durch und bewahren Sie sie für eine spätere
Verwendung auf.
Hinweis: Die Zubehörteile und die Funktionen der verschiedenen
Modelle variieren. So verfügen beispielsweise einige Modelle über
eine UV-Reinigungsstation oder sind mit Bluetooth ausgestattet.
Deutsch
Page 31

Deutsch
Gefahr
- Halten Sie das Ladegerät und/oder die UVReinigungsstation von Wasser fern.
Platzieren Sie das Gerät so, dass es nicht in
ein Waschbecken oder eine Badewanne
fallen kann.
- Tauchen Sie das Ladegerät und/oder die
UV-Reinigungsstation nicht in Wasser oder
andere Flüssigkeiten.
- Achten Sie nach dem Reinigen darauf, dass
das Ladegerät und/oder die UVReinigungsstation vollständig trocken sind,
bevor Sie diese an die Netzsteckdose
anschließen.
31
Page 32

Deutsch
32
Vorsicht
- Dieses Gerät kann von Kindern und
Personen mit verringerten physischen,
sensorischen oder psychischen Fähigkeiten
oder Mangel an Erfahrung und Kenntnis
verwendet werden, wenn sie bei der
Verwendung beaufsichtigt werden oder
Anleitung zum sicheren Gebrauch des
Geräts erhalten und die Gefahren
verstanden haben. Die Reinigung und Pflege
des Geräts darf von Kindern nicht ohne
Aufsicht durchgeführt werden.
- Kinder dürfen nicht mit dem Gerät spielen.
- Benutzen Sie das Gerät nicht, wenn es
beschädigt ist (Bürstenkopf, Handstück,
Ladegerät und/oder UV-Reinigungsstation).
- Das Netzkabel kann nicht ersetzt werden. Ist
das Netzkabel beschädigt, müssen Sie das
Ladegerät und/oder die UVReinigungsstation entsorgen.
- Tauschen Sie das Ladegerät bzw. die UVReinigungsstation immer durch ein OriginalErsatzgerät aus, um Gefährdungen zu
vermeiden.
Page 33

Deutsch
- Dieses Gerät enthält keine Teile, die vom
Benutzer repariert werden können. Wenn
das Gerät beschädigt ist, wenden Sie sich
bitte an das Service‑Center in Ihrem Land
(siehe 'Garantie und Support').
- Halten Sie das Netzkabel von heißen
Oberflächen fern.
- Verwenden Sie das Ladegerät und/oder die
UV-Reinigungsstation nie im Freien oder in
der Nähe von heißen Oberflächen.
Achtung
- Bürstenkopf, Halter, Ladegerät, die
Abdeckung des Ladegeräts oder UVReinigungsstation dürfen nicht in der
Spülmaschine gereinigt werden.
- Wenn in den vergangenen 2Monaten ein
chirurgischer Eingriff an Ihren Zähnen oder
am Zahnfleisch vorgenommen wurde,
sollten Sie vor Benutzung des Geräts Ihren
Zahnarzt konsultieren.
33
Page 34

Deutsch
34
- Konsultieren Sie Ihren Zahnarzt, wenn nach
Benutzung dieses Geräts übermäßiges
Zahnfleischbluten auftritt oder
Zahnfleischbluten länger als eine Woche
anhält. Konsultieren Sie außerdem Ihren
Zahnarzt, wenn bei der Benutzung dieses
Geräts Unbehagen oder Schmerzen
auftreten.
- Dieses Philips Gerät erfüllt die
Sicherheitsstandards für
elektromagnetische Geräte. Wenden Sie
sich als Träger eines Herzschrittmachers
oder eines anderen Implantats vor der
Verwendung dieses Geräts an Ihren Arzt
oder den Hersteller des implantierten
Geräts.
- Sollten Sie Bedenken wegen Ihrer
Gesundheit haben, konsultieren Sie vor
Benutzung dieses Geräts Ihren Arzt.
- Dieses Gerät ist ausschließlich zum Reinigen
von Zähnen, Zahnfleisch und Zunge
gedacht. Benutzen Sie es nicht für andere
Zwecke. Falls Beschwerden oder Schmerzen
auftreten, verwenden Sie das Gerät nicht
mehr, und wenden Sie sich an Ihren Arzt.
Page 35

Deutsch
- Dieses Gerät ist ein Gerät zur individuellen
Mundpflege und nicht für die Verwendung
durch mehrere Patienten in einer
Zahnarztpraxis oder Zahnklinik geeignet.
- Benutzen Sie nur die von Philips Sonicare
für diese Zahnbürste empfohlenen
Bürstenköpfe.
- Unterlassen Sie es, einen Bürstenkopf mit
abgeknickten oder zerdrückten Borsten zu
verwenden. Ersetzen Sie den Bürstenkopf
alle 3Monate oder früher, falls Anzeichen
von Abnutzung auftreten.
- Bei Verwendung peroxid-, natron- oder
bikarbonathaltiger Zahnpasta (üblich in
Weißmacher-Zahnpasta) sollten Sie den
Bürstenkopf nach jedem Gebrauch
gründlich mit einem milden
Reinigungsmittel und Wasser reinigen. Dies
verhindert ein mögliches Brechen des
Plastiks.
- Direkten Kontakt mit Produkten vermeiden,
die ätherische Öle oder Kokosöl enthalten.
Bei Kontakt besteht die Gefahr, dass sich
Borsten vom Bürstenkopf lösen.
35
Page 36

Deutsch
36
Elektromagnetische Felder (EMF)
Dieses Philips-Gerät erfüllt alle einschlägigen Normen und
Vorschriften zur Exposition gegenüber elektromagnetischen Feldern.
Gerät mit Funkkomponenten
Hiermit erklärt Philips, dass elektrische Zahnbürsten mit
Funkschnittstelle (Bluetooth) die Vorschriften von Richtlinie
2014/53/EU erfüllen.
Der vollständige Text der EU-Konformitätserklärung ist unter der
folgenden Internetadresse verfügbar: www.philips.com/support
Die Funkschnittstelle in diesem Produkt arbeitet bei 13,56MHz.
Die maximale vom Gerät abgestrahlte Funkleistung beträgt
+30,16dBm.
Ihre Philips Sonicare (Abb. 1)
1 Hygienische Schutzkappe
2 Smart-Bürstenköpfe*
3 Griff
4 Ein-/Ausschalter
5 Lichtintensität
6 Modus‑/Intensitätstaste
7 Betriebsarten
8 Erinnerungsleuchte für den Austausch des Bürstenkopfes
9 Ladeanzeige
10 Ladeglas
11 Ladegerät
12 Ladestation
13 Reiseetui (mit Ladefunktion)*
14 USB-Wandadapter*
* Hinweis: Abhängig vom gekauften Modell kann der
Packungsinhalt variieren.
Page 37

Deutsch
37
Sonicare App – erste Schritte
Die Sonicare App bietet Ihnen interaktive Funktionen zur Vernetzung
an. Wenn Sie Ihre Zahnbürste mit Ihrem Sonicare App-Konto
verbinden, können Sie Nachstehendes tun:
- Mühelos Ihren Fortschrittsbericht ansehen, um Ihre Mundpflege zu
verbessern.
- Sie erhalten persönlich auf Sie abgestimmte Tipps und
Empfehlungen für Ihre Mundpflege
Um mit der Verwendung der Sonicare App zu beginnen:
1 Laden Sie die Sonicare App auf Ihr Smartphone
2 Öffnen Sie die App und folgen Sie den Schritt-für-Schritt-
Anleitungen
3 Koppeln Sie Ihre Zahnbürste mit der App
4 Erstellen Sie Ihr Konto
5 Führen Sie die Firmware-Aktualisierung durch, um Zugriff auf die
neuesten Verbesserungen und Funktionen zu erhalten.
6 Putzen Sie regelmäßig Ihre Zähne
Sie sind bereit für Ihr vernetztes Zahnputzerlebnis. Achten Sie darauf,
regelmäßig zu putzen. Sie können Aktualisierungen zur Verbesserung
Ihrer Mundpflege erhalten.
Hinweis: Stellen Sie bei der Verwendung der App sicher, dass
Bluetooth auf Ihrem Telefon aktiviert ist. Ihre Zahnbürste verwendet
die Bluetooth-Verbindung, um Ihre Putzdaten an die App zu senden.
Wenn Sie Fragen haben, warum Ihre Putzdaten erfasst werden, lesen
Sie bitte die Datenschutzerklärung von Sonicare. Diese ist während
der gesamten Einrichtung der App verfügbar.
Sonicare App – verfolgen und verbessern Sie Ihre Mundpflege
Ihre elektrische Zahnbürste von Sonicare ist ausgestattet mit SmartSensoren, die Ihnen Feedback geben zu Ihren Putzgewohnheiten,
einschließlich zu:
- Täglichem Putzen
- Zeitabständen zwischen den einzelnen Putzzyklen
- Anpressdruck beim Putzen
Page 38

Deutsch
38
- Bürstenkopfaustausch-Erinnerung (basierend auf dem
tatsächlichen Gebrauch)
Die Sonicare-App sammelt die Daten, die von den Smart-Sensoren
übermittelt werden und verfolgt Ihre Putzgewohnheiten im Laufe der
Zeit.
Die einzelnen Funktionen der App helfen Ihnen dabei, Ihre
Putzgewohnheiten zu verstehen und versorgen Sie mit einfachen
Empfehlungen zur Verbesserung und zum Erhalt Ihrer
Mundgesundheit. In der Sonicare App erhalten Sie persönlich auf Sie
abgestimmte Putzinformationen.
Bürstenköpfe
Den Bürstenkopftyp finden Sie auf dem Etikett auf der Unterseite des
Bürstenkopfes. Das Symbol an der Unterseite des Bürstenkopfes
bezeichnet einen intelligenten Bürstenkopf mit BrushSyncTechnologie.
Bürstenkopfna
me
Bürstenkopfeti
kett
Vorteil
Weitere Informationen über unsere gesamtes Bürstenkopfsortiment
finden Sie unter www.philips.com/toothbrush-heads .
PremiumPlaqu
e Control
C3 W3 G3
PlaqueEntfernung
PremiumWhite PremiumGum
Entfernung von
Plaque und
Verfärbungen
Care
Gesünderes
Zahnfleisch
Page 39

45°
Deutsch
Die Philips Sonicare benutzen
Putzanleitung
1 Schieben Sie den Bürstenkopf fest auf das Handstück. Feuchten
Sie die Borsten an, und tragen Sie Zahnpasta auf.
Hinweis: Ein kleiner Zwischenraum zwischen Bürstenkopf und
Handstück ist normal. Dadurch kann der Bürstenkopf
ordnungsgemäß vibrieren.
2 Setzen Sie die Borsten der Zahnbürste in einem Winkel von ca.
45Grad auf die Zähne, und wenden Sie etwas Druck an, sodass
die Borsten den Zahnfleischrand erreichen oder leicht darüber
hinaus reichen.
Hinweis: Halten Sie die Mitte des Bürstenkopfes jederzeit im
Kontakt mit den Zähnen.
3 Drücken Sie zum Einschalten der Philips Sonicare den Ein-
/Ausschalter.
39
Page 40

Deutsch
40
4 Für eine optimale Zahnpflege putzen Sie die Zähne nur mit
leichtem Druck und überlassen der Philips Sonicare die eigentliche
Arbeit. Führen Sie den Bürstenkopf langsam in kleinen Vorwärtsund Rückwärtsbewegungen so über die Zähne, dass die längeren
Borsten in die Zahnzwischenräume gelangen. Verfahren Sie auf
diese Weise bis zum Ende des Putzvorgangs.
Hinweis: Verschiedene Modi sind verfügbar (siehe 'Putzmodi').
5 Zum Reinigen der Innenseite der Frontzähne kippen Sie das
Handstück halb aufrecht, und führen Sie an jedem Zahn mehrere
vertikale, überlappende Bürstenkopfbewegungen aus.
Hinweis:
- Eine Änderung der Vibration warnt Sie, wenn Sie zu starken
Druck (siehe 'Drucksensor') anwenden.
- Ihre Philips Sonicare Zahnbürste kann unbedenklich benutzt
werden mit Zahnspangen, Zahnschmuck und Zahnersatz
(Füllungen, Kronen, Verblendschalen)
- Verwenden Sie die elektrische Zahnbürste nicht in der Dusche.
Page 41

Deutsch
BrushSync-Technologie
Die BrushSync-Technologie ermöglicht mithilfe eines Mikrochips die
Kommunikation zwischen Bürstenkopf und Handstück. Das Symbol
an der Unterseite des Bürstenkopfes bezeichnet einen Bürstenkopf
mit BrushSync-Technologie. Dadurch werden die folgenden
Funktionen ermöglicht:
- Bürstenkopf-Kopplungsmodus
- Bürstenkopfaustausch-Erinnerung
Putzmodi
Die elektrische Zahnbürste verfügt über 4 verschiedene Modi: Clean,
White+, Gum Health und Deep Clean+.
Je nach Wahl Ihres verwendeten Bürstenkopfes werden die
optimalen Einstellungen für Modi und Intensität automatisch durch
die BrushSync-Technologie ausgewählt.
Um den Modus manuell zu ändern, drücken Sie die Modus/Intensitätstaste, während die Zahnbürste mit aufgesetztem Kopf
ausgeschaltet ist.
41
* Hinweis:
- Alle Bürstenköpfe funktionieren mit jedem Modus.
- Wenn die Philips Sonicare Zahnbürste in klinischen Studien
eingesetzt wird, muss sie auf hoher Intensitätsstufe mit
ausgeschalteter EasyStart-Funktion verwendet werden.
Page 42

Deutsch
42
Bürstenkopf-Kopplungsmodus
Bürstenköpfe mit BrushSync-Technologie verfügen über einen
Mikrochip, der mit dem Bürstengriff kommuniziert und diesen
automatisch auf den empfohlenen Modus und die richtige Intensität
einstellt.
Hinweis: Ändern Sie den Modus oder die Intensität, erinnert sich der
Bürstenkopf an die zuletzt verwendete Einstellung. Wenn Sie die
Bürste mit der empfohlenen Einstellung verwenden möchten, finden
Sie die empfohlenen Einstellungen für Modus/Intensität im Abschnitt
"Putzmodi".
Bürstenkopf-Kopplungsmodus
Bürstenköpfe mit BrushSync-Technologie verfügen über einen
Mikrochip, der mit dem Bürstengriff kommuniziert und diesen
automatisch auf den empfohlenen Modus und die richtige Intensität
einstellt.
Hinweis: Ändern Sie den Modus oder die Intensität, erinnert sich der
Bürstenkopf an die zuletzt verwendete Einstellung. Wenn Sie die
Bürste mit der empfohlenen Einstellung verwenden möchten, finden
Sie die empfohlenen Einstellungen für Modus/Intensität in der
nachfolgenden Tabelle.
Clean und
Deep Clean+
White+ Gum Health
Vorteil
Empfohlen
Bürstenkopf
Empfohlen
Intensitätsstu
fe
PlaqueEntfernung
PremiumPlaqu
e Control (C3)
3 3 3
Entfernung von
Plaque und
oberflächlichen
Verfärbungen
PremiumWhite
(W3)
PlaqueEntfernung und
Zahnfleischmas
sage
Premium
GumCare (G3)
Page 43

1
2
3
4
5
6
1
2
3
4
5
6
1
2
3
4
5
6
7
8
1
2
3
4
5
6
7
8
10
9
Deutsch
43
Gesamtputz
zeit
So putzen Sie
richtig
Clean und
Deep Clean+
Clean:
2Minuten
Deep Clean+: 3
Minuten*
Clean: Putzen
Sie jeden
Abschnitt für 20
Sekunden
Deep Clean+:
Putzen Sie
jeden Abschnitt
für 30
Sekunden*
White+ Gum Health
2Minuten und
40Sekunden
Putzen Sie
jeden Abschnitt
für 20
Sekunden,
putzen Sie
dann
Abschnitte 7
und 8 jeweils
20Sekunden.
3Minuten und
20Sekunden
Putzen Sie
jeden Abschnitt
für 20
Sekunden,
putzen Sie
dann
Abschnitte 7, 8,
9 und 10 jeweils
20Sekunden.
*Hinweis: Wenn Sie mit der Sonicare App die Zähne mit der
Einstellung "Deep Clean"putzen, beträgt die Putzdauer 2 Minuten.
Page 44

Deutsch
44
Intensitätsstufen
Ihre elektrische Zahnbürste verfügt über 3 verschiedene
Intensitätseinstellungen:
- niedrige Intensität (ein Balken)
- mittlere Intensität (zwei Balken)
- hohe Intensität (drei Balken)
Der Bürstenkopf stellt sich beim Aufstecken auf das Handstück
automatisch auf die empfohlene Intensität ein. Um manuell die
Intensität manuell zu ändern, schalten Sie das Handstück ein, und
drücken Sie die Taste Modus/Intensität.
Während die
Zahnbürste
eingeschaltet ist,
drücken Sie diese
Taste, um die
Intensitätseinstel
lungen zu ändern.
Produktmerkmale
- BrushPacer
- Drucksensor
- Bürstenkopfaustausch-Erinnerung
- EasyStart
BrushPacer
Die BrushPacer-Funktion zeigt durch kurze Änderung der Vibration
an, wann Sie zum nächsten Zahnabschnitt wechseln sollten.
Die Zahnbürste schaltet sich nach Abschluss des Putzvorgangs
automatisch aus.
Drucksensor
Die Philips Sonicare misst den Anpressdruck beim Putzen, um das
Zahnfleisch und die Zähne vor Schäden zu schützen.
Page 45

Deutsch
Wenn Sie zu viel Druck anwenden, ändert der Griff die Vibration, bis
Sie den Druck verringern.
Hinweis: Der Drucksensor ist im Lieferzustand des Produkts aktiviert.
Zum Deaktivieren dieser Funktion siehe "Aktivieren oder Deaktivieren
von Funktionen".
45
Bürstenkopfaustausch-Erinnerung
Um die Abnutzung des intelligenten Bürstenkopfes zu verfolgen,
werden vom Handstück die folgenden Werte gemessen:
- Gesamter beim Putzen angewendeter Druck
- Die Gesamtzeit, die Sie mit Ihrem Bürstenkopf geputzt haben
Wenn die Wirkung des Bürstenkopfes nicht mehr ausreicht, blinkt die
Bürstenkopf-Austauscherinnerung gelb und das Handstück gibt eine
Serie von Signaltönen aus.
Hinweis: Die Bürstenkopfaustausch-Erinnerung ist im Lieferzustand
des Produkts aktiviert. Zum Deaktivieren dieser Funktion siehe
"Aktivieren oder Deaktivieren von Funktionen".
EasyStart
Mit der EasyStart-Funktion wird die Leistung des Handstücks über die
ersten 14Anwendungen schrittweise erhöht, damit Sie sich leichter an
die Putzleistung der Philips Sonicare gewöhnen.
Die EasyStart-Funktion funktioniert mit allen Modi.
Hinweis: Die EasyStart-Funktion ist im Lieferzustand des Produkts
deaktiviert. Informationen zum Aktivieren von EasyStart finden Sie
unter "Aktivieren oder Deaktivieren von Funktionen".
Page 46

Deutsch
46
Laden und Akkustatus
Aufladen auf der Ladestation
1 Schließen Sie das Kabel der Ladestation an eine Steckdose an.
2 Setzen Sie die Ladestation oder das Ladeglas auf die Ladestation.
3 Stellen Sie das Handstück auf die Ladestation oder in das
Ladeglas.
4 Das Ladegerät lädt die Zahnbürste, bis sie vollständig aufgeladen
ist.
Das Handstück wird aufgeladen, wenn die Akkuanzeige weiß blinkt.
Wenn das Handstück vollständig aufgeladen ist, leuchtet die
Akkuanzeige 30Sekunden lang weiß und erlischt dann.
Hinweis: Das Handstück wird für die erste Verwendung aufgeladen
geliefert. Laden Sie sie nach dem ersten Gebrauch mindestens
24Stunden lang auf.
Page 47

Deutsch
Aufladen mit dem Reiseetui*
*Hinweis: Das Lade-Reiseetui ist möglicherweise nicht im
Lieferumfang enthalten, je nach gekauftem Modell.
1 Nehmen Sie das USB-Kabel aus der Unterseite des Reiseladeetuis
heraus.
2 Schließen Sie den Eingang des Reiseladeetuis an 5V
Gleichspannung an. Als Stromquellen verwendbar sind:
-
Der USB-Adapter im Lieferumfang
-
standardmäßiger USB-Anschluss eines PCs mit ULKennzeichnung oder Zertifizierung gemäß ANSI/UL 60950-1
-
Netzteil mit USB-Ausgang mit UL-Kennzeichnung oder
Zertifizierung gemäß ANSI/UL 60950-1
-
Netzteil mit UL-Kennzeichnung oder Zertifizierung gemäß 1310
1310 Class 2.
Wichtig: Das Netzteil muss eine sichere
Kleinspannungsquelle sein und den auf der Gerätunterseite
angegebenen elektrischen Werten entsprechen.
3 Das Reiseetui lädt die Zahnbürste auf, bis sie vollständig
aufgeladen ist.
Akkustatus (Handstück auf eingestecktem Ladegerät)
Wenn das Handstück auf das Ladegerät oder das Reiseetui gesetzt
wird, zeigt die Ladeanzeige den Akkustand an.
Batteriestatus Ladeanzeige
Aufladen Blinkt weiß
47
Vollständig Leuchtet 30Sekunden lang weiß
und geht dann aus.
Akkustatus (wenn sich das Handstück nicht auf dem Ladegerät befindet)
Wenn Sie das Handstück einschalten, zeigt die Akkuleuchte unten am
Handstück den Akkustatus an.
Batteriestatus Ladeanzeige Ton
Page 48

Deutsch
48
Vollständig Weiß leuchtend -
Teilweise voll Blinkt weiß -
Niedrig Blinkt gelb Das Handstück gibt
drei Signaltöne aus.
Leer Blinkt gelb Das Handstück gibt 2
Serien von 5
Signaltönen aus.
Aktivieren oder Deaktivieren von Funktionen
Sie können die folgenden Funktionen Ihrer Zahnbürste aktivieren
oder deaktivieren:
- EasyStart
- Bürstenkopfaustausch-Erinnerung
- Drucksensor
Schritt1: Stellen Sie das Handstück auf die Ladestation
oder in das Ladeglas.
Schritt2: Halten Sie die Einschalttaste gedrückt für:
Easy Start Bürsten
kopfaus
tauschErinnerung
3Sekunden Bis zu
5Sekunden
¯ ¯ ¯
Schritt3: Lassen Sie die Einschalttaste los, wenn Sie
Folgendes hören:
Drucksensor
Bis zu 7Sekunden
Page 49

Deutsch
49
1 Signalton 1 Signalton und
dann 2
Signaltöne
¯ ¯ ¯
Wenn die Akkuanzeige 2-mal weiß blinkt und 3
aufsteigende Töne ausgibt, wurde die Funktion
aktiviert.
ODER
Wenn die Akkuanzeige einmal weiß blinkt und 3
absteigende Töne ausgibt, wurde die Funktion
deaktiviert.
1 Signalton, 2
Signaltöne, und dann
3 Signaltöne
Reinigung
- Alle Teile können mit einem feuchten Tuch gereinigt oder mit
warmem Wasser gespült werden.
- Nehmen Sie den Bürstenkopf vom Handstück ab, und spülen Sie
ihn gründlich ab.
Page 50

Deutsch
50
- Spülen Sie das gesamte Handstück, insbesondere die Verbindung
zum Bürstenkopf, mindestens einmal pro Woche.
Achtung: Drücken Sie nicht auf die Gummidichtung an der Oberseite
des Handstücks. Reinigen Sie vorsichtig auf die Gummidichtung.
Achtung.
- Bürstenkopf, Schutzkappe, Handstück, Ladegerät und Reiseetui
dürfen nicht in der Spülmaschine gereinigt werden.
- Verwenden Sie zur Reinigung des Bürstengriffs keinen
Isopropylalkohol, Essig, Bleichmittel oder andere
Haushaltsreinigungsprodukte. Dies könnte ein Ausbleichen des
Bürstengriffs zur Folge haben.
Page 51

Deutsch
- Ziehen Sie vor dem Reinigen des Ladegeräts den Netzstecker aus
der Steckdose.
- Verwenden Sie zum Reinigen von Bürstenköpfen keine
ätherischen Öle, da dies Schäden verursachen kann.
Aufbewahrung
Wenn Sie das Produkt über einen längeren Zeitraum nicht
verwenden, trennen Sie es vom Stromnetz, reinigen Sie es, und
bewahren Sie es an einem kühlen, trockenen Ort ohne direkte
Sonneneinstrahlung auf.
Häufig gestellte Fragen
Frage Antwort
51
Kann ich meine Sonicare
zwischen Putz-Zyklen auf dem
Ladegerät lassen?
Passen auch andere
Bürstenköpfe auf meine Philips
Sonicare Zahnbürste?
Ja, Sie können Ihre Philips
Sonicare Zahnbürste ständig auf
einem an das Stromnetz
angeschlossene Ladegerät
belassen. Dadurch wird die
Akkulebensdauer nicht
beeinträchtigt.
Alle Philips SonicareBürstenköpfe, die sich
aufstecken lassen, passen auf
Ihre elektrische Zahnbürste.
Allerdings sind nicht alle mit
BrushSync-Technologie
ausgestattet. Sie können die
Bürstenköpfe mit BrushSyncTechnologie anhand des
Symbols unten auf dem
Bürstenkopf identifizieren.
Page 52

Deutsch
52
Frage Antwort
Wie oft muss ich meinen
Bürstenkopf austauschen?
Ist meine Philips Sonicare
Zahnbürste wasserdicht?
Welche Telefone sind mit der
Philips Sonicare App
kompatibel?
Welche anderen Philips
Sonicare-Zahnbürsten kann ich
mit der Philips Sonicare App
verwenden?
Wir empfehlen Ihnen, Ihren
Philips Sonicare-Bürstenkopf
nach 3 Monaten Verwendung
auszuwechseln (bei zwei
zweiminütigen Putzzyklen pro
Tag). Die BürstenkopfAustauscherinnerung
benachrichtigt Sie ebenfalls,
wenn es Zeit ist, den Bürstenkopf
auszuwechseln.
Ja, Ihre Philips Sonicare
Zahnbürste ist wasserdicht. Das
Handstück darf jedoch
keinesfalls in der Spülmaschine
gereinigt werden. Die Benutzung
in der Dusche ist nicht zulässig.
Die Philips Sonicare App
unterstützt Android OS und
Apple iOS. Die neueste Version
der Philips Sonicare App finden
Sie auf Android Play Store
beziehungsweise Apple App
Store. Mobilgeräte müssen mit
Bluetooth 4.0 oder höher
ausgestattet sein.
Sie können ausschließlich
nachstehende elektrische
Zahnbürsten mit der Sonicare
App verwenden: Philips Sonicare
Flexcare Platinum Connected,
DiamondClean Smart,
DiamondClean 9000 und
ExpertClean. Suchen Sie nach
dem Bluetooth-Symbol auf der
Vorderseite der Packung.
Recycling
- Dieses Symbol bedeutet, dass das Produkt nicht mit dem
normalen Hausmüll entsorgt werden kann (2012/19/EU).
Page 53

Deutsch
- Dieses Symbol bedeutet, dass das Produkt einen Akku enthält, der
nicht mit dem normalen Hausmüll entsorgt werden darf
(2006/66/EG). Bitte geben Sie das Produkt bei einer offiziellen
Sammelstelle oder einem Philips Service-Center ab, um den Akku
fachgerecht ausbauen zu lassen.
1 Altgeräte/Altakkus/Batterien können kostenlos an geeigneten
Rücknahmestellen abgegeben werden.
2 Diese werden dort fachgerecht gesammelt oder zur
Wiederverwendung vorbereitet. Altgeräte/Altakkus/Batterien
können Schadstoffe enthalten, die der Umwelt und der
menschlichen Gesundheit schaden können. Enthaltene Rohstoffe
können durch ihre Wiederverwertung einen Beitrag zum
Umweltschutz leisten.
3 Die Löschung personenbezogener Daten auf den zu entsorgenden
Altgeräten muss vom Endnutzer eigenverantwortlich
vorgenommen werden.
4 Hinweise für Verbraucher in Deutschland: Die in Punkt 1 genannte
Rückgabe ist gesetzlich vorgeschrieben. Altgeräte mit Altbatterien
und/oder Altakkus, die nicht vom Altgerät umschlossen sind, sind
vor der Abgabe an einer Rücknahmestelle von diesen zu trennen.
Dies gilt nicht, falls die Altgeräte für eine Wiederverwendung noch
geeignet (d.h. funktionstüchtig) sind und von den anderen
Altgeräten getrennt werden. Sammel- und Rücknahmestellen in
DE: https://www.stiftung-ear.de/; für Batterien auch Rückgabe
im Handel möglich.
53
Entnehmen des Akkus am Ende der Lebensdauer
Vorsicht
- Bauen Sie den Akku nur zur Entsorgung des Handstücks aus.
- Vergewissern Sie sich, dass der Akku ganz leer ist, bevor Sie ihn
ausbauen.
- Bei dem Versuch, den Akku zu entfernen, erlöscht die Garantie.
Page 54

1
2
Deutsch
54
Unterstützung erhalten Sie auf unserer Website
www.philips.com/support oder unter der gebührenfreien
Telefonnummer 1-800-243-3050.
Entfernen des Akkus
Warnhinweis: Bauen Sie den wiederaufladbaren Akku nur zur
Entsorgung des Geräts aus. Vergewissern Sie sich, dass der Akku ganz
leer ist, bevor Sie ihn ausbauen.
Zum Entfernen des aufladbaren Akkus benötigen Sie ein Handtuch
oder Lappen sowie einen Hammer und einen Schlitzschraubendreher
(Standardschraubendreher).Beachten Sie grundlegende
Sicherheitsmaßnahmen, wenn Sie die unten angeführten Schritte
ausführen. Schützen Sie Ihre Augen, Hände und Finger sowie die
Oberfläche, auf der Sie arbeiten.
1 Um den Akku komplett zu entladen, nehmen Sie das Handstück
aus dem Ladegerät, schalten die Philips Sonicare ein und lassen
sie laufen, bis sie zum Stillstand kommt. Wiederholen Sie diesen
Vorgang, bis Sie die Philips Sonicare nicht mehr einschalten
können.
2 Nehmen Sie den Bürstenkopf vom Gerät ab und entsorgen Sie ihn.
Decken Sie das Handstück völlig mit einem Handtuch oder einem
Lappen ab.
Page 55

Deutsch
3 Halten Sie den oberen Teil des Handstücks mit einer Hand fest,
und schlagen Sie auf den unteren Teil des Handstückgehäuses, ca.
1 cm vom Ende entfernt. Klopfen Sie mit einem Hammer fest auf
alle 4 Seiten, um die Abdeckkappe zu lösen.
Hinweis: Möglicherweise müssen Sie mehrmals auf das Ende
klopfen, bis die Schnappverbindungen im Inneren brechen.
4 Entfernen Sie die Abdeckkappe vom Handstück der Zahnbürste.
Wenn die Abdeckkappe sich nicht leicht vom Gehäuse lösen lässt,
wiederholen Sie Schritt3, bis sich die Abdeckkappe löst.
5 Drehen Sie das Handstück auf den Kopf, und drücken Sie den
Schaft fest auf eine harte Unterlage. Wenn die Innenteile sich nicht
leicht vom Gehäuse lösen lassen, wiederholen Sie Schritt3, bis
sich die Innenteile lösen.
55
6 Stecken Sie den Schraubendreher zwischen den Akku und den
schwarzen Rahmen der internen Komponenten. Drücken Sie den
Schraubendreher dann vom Akku weg, um die Unterseite des
schwarzen Rahmens abzulösen.
Page 56

Deutsch
56
7 Stecken Sie den Schraubendreher zwischen die Unterseite des
Akkus und den schwarzen Rahmen, um die Metalllasche
aufzubrechen, die den Akku mit der grünen Platine verbindet.
Dadurch löst sich die Unterseite des Akkus vom Rahmen.
8 Fassen Sie den Akku, und ziehen Sie ihn von der internen
Komponente weg, um die zweite Metalllasche am Akku
aufzubrechen.
Achtung: Die Kanten der Akkulaschen sind scharf. Vermeiden Sie
Verletzungen der Finger.
9 Decken Sie die Akkukontakte mit Klebeband ab, um Kurzschlüsse
durch eine möglicherweise verbleibende Akkuladung zu
verhindern. Der wiederaufladbare Akku kann jetzt recycelt und der
Rest des Produkts kann ordnungsgemäß entsorgt werden.
Hinweis: Werfen Sie das Gerät am Ende der Lebensdauer nicht in
den normalen Hausmüll. Bringen Sie es zum Recycling zu einer
offiziellen Sammelstelle. So helfen Sie, die Umwelt zu schützen.
Page 57

Deutsch
Garantie und Support
Für Unterstützung und weitere Informationen besuchen Sie die
Philips Website unter www.philips.com/support, oder lesen Sie die
internationale Garantieschrift.
Garantieeinschränkungen
Die folgenden Geräteteile/Schäden unterliegen nichtden
Bedingungen der internationalen Garantie:
- Bürstenköpfe.
- Schäden, die durch den Gebrauch von nicht zugelassenen
Ersatzteilen verursacht werden.
- Schäden durch Missbrauch, falsche Benutzung, Fahrlässigkeit,
Manipulation oder Reparatur durch Unbefugte.
- Normale Abnutzungserscheinungen wie abgeschlagene Stellen,
Kratzer, Abschürfungen, Entfärbungen und Verblassen.
57
Page 58

Español
58
Introducción
¡Enhorabuena por la adquisición de su nuevo cepillo dental eléctrico
Philips Sonicare! Eliminación de la placa superior, dientes más
blancos y unas encías más sanas al alcance de su mano. Gracias a la
combinación de la suave tecnología sónica y las funciones
clínicamente desarrolladas y comprobadas de Sonicare, puede estar
seguro de que obtendrá los mejores resultados de limpieza en todo
momento. Más asistencia y registro del producto están disponibles
en: http://www.philips.com/welcome.
¡Le damos la bienvenida a la familia Philips Sonicare!
Uso indicado
La serie de cepillos dentales eléctricos DiamondClean está diseñada
para eliminar la placa y los restos de alimentos de los dientes con el
fin de reducir la caries y de mejorar y mantener la higiene bucal. Los
cepillos dentales eléctricos de la serie DiamondClean están
diseñados para el uso doméstico. Los niños deben usarlos bajo la
supervisión de un adulto.
Información de seguridad importante
Antes de usar el aparato, lea atentamente esta información
importante y consérvela por si necesitara consultarla en el futuro.
Nota: Los accesorios y características de los distintos modelos varían.
Por ejemplo, algunos modelos incluyen un esterilizador o están
equipados con Bluetooth.
Español
Page 59

Español
Peligro
- Mantenga el cargador y/o el higienizador
alejado del agua. No coloque ni guarde el
aparato en un lugar desde donde pueda
caerse a una bañera o fregadero.
- No sumerja el cargador y/o el higienizador
en agua u otros líquidos.
- Después de la limpieza, asegúrese de que el
cargador y/o el higienizador están
totalmente secos antes de conectarlos a la
toma de corriente.
Advertencia
- Este aparato puede ser usado por niños y
personas con capacidad física, psíquica o
sensorial reducida y por quienes no tengan
los conocimientos y la experiencia
necesarios, si han sido supervisados o
instruidos acerca del uso del aparato de
forma segura y siempre que sepan los
riesgos que conlleva su uso. Los niños no
deben limpiar el aparato ni realizar tareas
de mantenimiento sin supervisión.
- No permita que los niños jueguen con el
aparato.
59
Page 60

Español
60
- Deje de utilizar el aparato si está dañado
(en el cabezal del cepillo, mango, cargador
y/o higienizador).
- El cable de alimentación no se puede
sustituir. Si el cable de alimentación está
dañado, deseche el cargador y/o el
higienizador.
- Sustituya siempre el cargador y/o el
higienizador por otros del modelo original
para evitar situaciones de peligro.
- Este aparato no contiene piezas
manipulables por el usuario. Si el aparato
está dañado, póngase en contacto con el
Servicio de Atención al Cliente de su país
country (consulte 'Garantía y asistencia').
- Mantenga el cable lejos de superficies
calientes.
- No utilice el cargador ni el higienizador al
aire libre ni cerca de superficies calientes.
Precaución
- No lave el cabezal del cepillo, el mango, el
cargador, la cubierta del cargador ni el
higienizador en el lavavajillas.
Page 61

Español
- Consulte a su dentista antes de utilizar este
aparato si ha sufrido cirugía oral o de las
encías en los 2 últimos meses.
- Consulte a su dentista si se produce un
sangrado excesivo después de usar este
aparato, o si el sangrado continúa
produciéndose después de 1 semana de
uso. Consulte también a su dentista si
experimenta molestias o dolor al utilizar
este aparato.
- Este producto de Philips cumple las normas
de seguridad para dispositivos
electromagnéticos. Si tiene un marcapasos
o cualquier otro dispositivo implantado,
consulte a su médico o al fabricante del
dispositivo implantado antes de utilizar este
producto.
- Si tiene alguna duda médica, consulte a su
médico antes de utilizar este aparato.
- Este aparato ha sido diseñado únicamente
para limpiar los dientes, las encías y la
lengua. No lo utilice con ninguna otra
finalidad, Deje de utilizar el dispositivo o
consulte a su médico si experimenta
molestias o dolor.
61
Page 62

Español
62
- Se trata de un aparato de higiene personal y
no ha sido concebido para su uso en
múltiples pacientes de clínicas o
instituciones.
- No utilice otros cabezales que no sean los
recomendados por Philips Sonicare.
- No utilice un cabezal de cepillo si tiene las
cerdas aplastadas o curvadas. Sustituya el
cabezal del cepillo cada tresmeses o antes
si aparecen signos de desgaste.
- Si el dentífrico que utiliza contiene peróxido,
bicarbonato sódico u otro bicarbonato
(frecuentes en los dentífricos
blanqueadores), limpie bien el cabezal con
agua y jabón después de cada uso. Esto
evitará la aparición de posibles grietas en el
plástico.
- Evite el contacto directo con productos que
contengan aceites esenciales o aceite de
coco. El contacto con estos productos
puede ocasionar que se desprendan
mechones de cerdas.
Campos electromagnéticos (CEM)
Este Philips cumple los estándares y las normativas aplicables sobre
exposición a campos electromagnéticos.
Page 63

Español
63
Directiva de equipo radioeléctrico
Por la presente, Philips declara que los cepillos dentales eléctricos
con interfaz de radiofrecuencia (Bluetooth) cumplen la Directiva
2014/53/UE.
El texto completo de la declaración de conformidad de la UE se
encuentra disponible en la siguiente dirección de internet:
www.philips.com/support.
La interfaz de radiofrecuencia de este producto funciona a 13,56MHz.
El equipo transmite una potencia de radiofrecuencia máxima de
+30.16dBm.
Su Sonicare de Philips (Fig. 1)
1 Capuchón higiénico
2 Cabezales de cepillo inteligentes*
3 Mango
4 Botón de encendido/apagado
5 Piloto de intensidad
6 Botón de modo/intensidad
7 Modos
8 Piloto de recordatorio de sustitución del cabezal del cepillo
9 Indicación de la batería
10 Vaso de carga
11 Soporte de carga
12 Base de carga
13 Estuche (de carga) para viaje*
14 Adaptador USB de pared*
*Nota: El contenido de la caja puede variar en función del modelo
que adquiera.
Aplicación Sonicare: Antes de empezar
La aplicación Sonicare se empareja con el cepillo dental para ofrecer
una experiencia conectada. Al conectar su cepillo con su cuenta de la
aplicación Sonicare, podrá hacer lo siguiente:
- Revisar fácilmente su informe de progreso para conocer las formas
de mejorar su rutina de cepillado.
Page 64

Español
64
- Recibir consejos personalizados y recomendaciones para
administrar su salud bucal.
Para comenzar a usar la aplicación Sonicare:
1 Descargue la aplicación Sonicare en su teléfono
2 Abra la aplicación y siga los pasos guiados.
3 Empareje el cepillo dental con la aplicación
4 Cree su cuenta
5 Si se solicita, lleve a cabo la actualización del firmware para
acceder a las últimas mejoras y características.
6 Cepíllese los dientes con regularidad.
Ya está listo para comenzar su experiencia conectada. Asegúrese de
cepillarse con regularidad. Puede recibir actualizaciones para
ayudarle a mejorar su salud bucal.
Nota: Asegúrese de que la función Bluetooth esté activada en su
teléfono cuando utilice la aplicación. Su cepillo usa la conexión
Bluetooth para transferir sus datos de cepillado a la aplicación. Si
tiene alguna pregunta sobre por qué se recopilan sus datos de
cepillado, asegúrese de revisar la declaración de privacidad de
Sonicare, que está disponible durante todo el proceso de
configuración de la aplicación.
Aplicación Sonicare: Seguimiento y mejora de la salud bucal
Su cepillo eléctrico Sonicare está equipado con sensores inteligentes
para ofrecer sus comentarios sobre sus hábitos de cepillado,
incluidos:
- Sesiones diarias de cepillado
- Duración de cada sesión de cepillado
- Presión de cepillado aplicada
- Recordatorio de reemplazo del cabezal del cepillo (basado en el
uso real)
La aplicación Sonicare recopila los datos proporcionados por los
sensores inteligentes y hace un seguimiento de sus hábitos de
cepillado en el tiempo.
Page 65

Español
Cada una de las funciones disponibles en la aplicación está diseñada
para ayudarle a comprender sus hábitos de cepillado y ofrecerle
recomendaciones sencillas a fin de mejorar y mantener su salud
bucal. Recibirá información de cepillado personalizada en la
aplicación Sonicare.
Cabezales del cepillo
Para ver qué tipo de cabezal de cepillado tiene, consulte la etiqueta
ubicada en la parte inferior de este. El símbolo de la parte inferior del
cabezal de cepillado indica que es un cabezal de cepillado
inteligente, equipado con la tecnología BrushSync.
65
Nombre del
cabezal de
cepillado
Etiqueta del
cabezal de
cepillado
Ventaja
Para ver nuestra gama completa de cabezales de cepillado, visite
www.philips.com/toothbrush-heads para obtener más información.
Premium
Plaque Control
C3 W3 G3
Eliminación de
la placa
Premium White Premium Gum
Eliminación de
manchas y
placa
Care
Encías más
sanas
Uso del cepillo Sonicare de Philips
Instrucciones de cepillado
1 Presione con firmeza el cabezal de cepillado en el mango. Moje
las cerdas y aplique pasta de dientes.
Page 66

45°
Español
66
Nota: Es normal que haya un pequeño espacio entre el cabezal
del cepillo y el mango. Esto permite al cabezal de cepillado vibrar
correctamente.
2 Coloque las cerdas del cepillo sobre los dientes formando un
ángulo de 45 grados y aplique una ligera presión para que las
cerdas alcancen la línea de la encía o se queden ligeramente por
debajo de la encía.
Nota: Mantenga la parte central del cabezal del cepillo en
contacto con los dientes en todo momento.
3 Pulse el botón de encendido/apagado para encender Philips
Sonicare.
4 Ejerza una ligera presión para maximizar la eficacia del cepillo
dental Philips Sonicare y deje que este se encargue del cepillado.
Desplace suavemente el cabezal del cepillo por todos los dientes
con un pequeño movimiento hacia delante y hacia atrás, de forma
que las cerdas más largas lleguen a los espacios interdentales.
Continúe con este movimiento durante el ciclo de cepillado.
Page 67

Español
Nota: Hay diferentes modos disponibles (consulte 'Modos de
cepillado').
5 Para limpiar la superficie interior de los dientes anteriores, incline
el mango del cepillo y colóquelo en posición semivertical. Realice
varias pasadas superpuestas en vertical en cada diente.
Nota:
- Un cambio en la vibración del mango le avisa cuando está
ejerciendo demasiada presión (consulte 'Sensor de presión').
- El cepillo Philips Sonicare se puede utilizar de forma segura
sobre aparatos correctores, modificaciones y restauraciones
dentales (empastes, coronas, carillas).
- No utilice el cepillo dental eléctrico en la ducha.
67
Tecnología BrushSync
La tecnología BrushSync permite la comunicación entre los cabezales
de cepillado y el mango a través de un microchip. El símbolo situado
en la parte inferior del cabezal de cepillado indica que está equipado
con la tecnología BrushSync, que ofrece las siguientes funciones:
- Emparejamiento del modo del cabezal de cepillo
Page 68

Español
68
- Recordatorio de sustitución del cabezal del cepillo
Modos de cepillado
El cepillo de dientes eléctrico dispone de 4 modos distintos: limpieza,
limpieza+, salud de las encías y limpieza profunda+.
La tecnología BrushSync seleccionará automáticamente el modo y la
intensidad óptimos en función del cabezal del cepillo inteligente que
utiliza.
Para cambiar de modo manualmente, pulse el botón de
modo/intensidad mientras el cepillo de dientes está apagado con el
cabezal del cepillo conectado.
*Nota:
- Todos los cabezales de cepillado funcionan con todos los modos.
- Cuando se utiliza el cepillo dental Sonicare en estudios clínicos, se
debe usar a alta intensidad, con la función EasyStart desactivada.
Emparejamiento del modo del cabezal de cepillo
Los cabezales de cepillo con la tecnología BrushSync están
equipados con un microchip que se comunica con el mango y lo
empareja automáticamente con el modo y la intensidad
recomendados.
Nota: Si cambia de modo o de intensidad, el cabezal del cepillo
recordará el último ajuste utilizado. Si desea cepillarse con el ajuste
recomendado, puede encontrar el modo/intensidad recomendado
en "Modos de cepillado".
Page 69

Español
Emparejamiento del modo del cabezal de cepillo
Los cabezales de cepillo con la tecnología BrushSync están
equipados con un microchip que se comunica con el mango y lo
empareja automáticamente con el modo y la intensidad
recomendados.
Nota: Si cambia de modo o de intensidad, el cabezal del cepillo
recordará el último ajuste utilizado. Si desea cepillarse con el ajuste
recomendado, puede encontrar el modo/intensidad recomendado
en la tabla siguiente.
limpieza y
limpieza
profunda+
blanqueado+ salud de las
encías
69
Ventaja
Nivel
de cepillado
recomendado
Nivel
de intensidad
recomendado
Tiempo total
de cepillado
Eliminación de
la placa
Premium
Plaque Control
(C3)
3 3 3
limpieza: 2
minutos
limpieza
profunda+
3minutos*
Eliminación de
la placa y
manchas de la
superficie
Premium White
(W3)
2 minutos y 40
segundos
Eliminación de
la placa y
masaje de las
encías
Premium Gum
Care (G3)
3 minutos y 20
segundos
Page 70

1
2
3
4
5
6
1
2
3
4
5
6
1
2
3
4
5
6
7
8
1
2
3
4
5
6
7
8
10
9
70
Español
Modo de
cepillarse
limpieza y
limpieza
profunda+
limpieza:
Cepille cada
segmento
durante 20
segundos
limpieza
profunda+
cepille cada
segmento
durante 30
segundos*
blanqueado+ salud de las
encías
Cepille cada
segmento
durante 20
segundos,
a continuación,
los segmentos
7 y 8 durante
20 segundos
cada uno.
Cepille cada
segmento
durante 20
segundos,
a continuación,
los segmentos
7, 8, 9 y 10
durante 20
segundos cada
uno.
*Nota: Cuando se cepille los dientes con la aplicación Sonicare en el
modo 'limpieza profunda+', el tiempo de cepillado será 2 minutos.
Ajuste de intensidad
El cepillo dental eléctrico incluye 3 ajustes de intensidad diferentes:
- baja intensidad (una barra)
Page 71

Español
- intensidad media (dos barras)
- alta intensidad (tres barras)
El cabezal de cepillado inteligente seleccionará automáticamente la
intensidad recomendada cuando esté colocado en el mango. Para
cambiar la intensidad de forma manual, encienda el mango y pulse el
botón de modo/intensidad.
Con el cepillo
dental encendido,
pulse este botón
para cambiar el
ajuste de
intensidad.
Funciones
- BrushPacer
- Sensor de presión
- Recordatorio de sustitución del cabezal del cepillo
- EasyStart
BrushPacer
La función BrushPacer indica cuándo tiene que pasar a la siguiente
área de sus dientes con un breve cambio en la vibración.
El cepillo dental se apaga automáticamente al finalizar la sesión de
cepillado.
Sensor de presión
Su Philips Sonicare mide la presión que se aplica durante el cepillado
para proteger sus dientes y encías de cualquier daño.
Si aplica demasiada presión, el mango cambiará la vibración hasta
que usted reduzca la presión.
Nota: El Sensor de presión viene activado con el producto. Para
desactivar esta función, consulte 'Activar o desactivar funciones'.
71
Page 72

Español
72
Recordatorio de sustitución del cabezal del cepillo
Con el tiempo, el mango realizará un seguimiento del desgaste de su
cabezal de cepillado inteligente midiendo:
- La presión total que ejerce durante el cepillado
- El tiempo total que ha usado el cabezal del cepillo
Cuando el cabezal del cepillo pierda su eficacia, el recordatorio de
reemplazo del cabezal del cepillo parpadeará en ámbar y el mango
emitirá una serie de pitidos y tonos.
Nota: El recordatorio de sustitución del cabezal del cepillo viene
activado con el producto. Para desactivar esta función, consulte
'Activar o desactivar funciones'.
EasyStart
La función EasyStart aumenta paulatinamente la potencia del mango
a lo largo de los primeros 14 cepillados para ayudarle a
acostumbrarse a la potencia de cepillado del Philips Sonicare.
La función EasyStart funciona con todos los modos.
Nota: El producto viene con la función EasyStart desactivada. Para
activar EasyStart, consulte 'Activar o desactivar funciones'.
Carga y estado de la batería
Carga en la base del cargador
1 Enchufe el cable de la base de carga en una toma eléctrica.
2 Coloque el soporte de carga o el cristal de carga en la base de
carga.
Page 73

Español
3 Coloque el mango en el soporte de carga o en el cristal de carga.
4 El cargador cargará su cepillo dental hasta que esté totalmente
cargado.
El mango se está cargando cuando la indicación de la batería
parpadea en blanco. Cuando el mango está completamente cargado,
la indicación de la batería se ilumina en blanco durante 30 segundos
y luego se apaga.
Nota: El mango se suministra previamente cargado para el primer
uso. Después de utilizarlo por primera vez, cárguelo durante al menos
24horas.
73
Carga con el estuche de viaje*
*Nota: El estuche de carga puede no estar incluido en función del
modelo que adquiera.
1 Tome el cable USB de la parte inferior del estuche de viaje de
carga.
2 Conecte el estuche de viaje a la potencia de entrada de 5 V de CC
de:
Page 74

Español
74
-
El adaptador USB que se suministra
-
un conector USB estándar de un ordenador personal con
certificación UL o ANSI/UL 60950-1, o bien
-
una fuente de alimentación con certificación UL o ANSI/UL
60950-1 LPS con puerto USB de salida o,
-
una fuente de alimentación con certificación UL o 1310 clase 2.
Importante: El adaptador de pared debe ser una fuente de
tensión muy baja y segura, compatible con la potencia
eléctrica indicada en la parte inferior del dispositivo.
3 El estuche de viaje carga el cepillo dental hasta que queda
completamente cargado.
Estado de la batería (mango enchufado al cargador)
Cuando el mango se coloque en el cargador o en el estuche de viaje,
la indicación de la batería comunicará el nivel de la batería.
Estado de la batería Indicación de la batería
Carga Parpadea en blanco
Totalmente cargado Se ilumina en blanco durante 30
segundos y luego se apaga.
Estado de la batería (cuando el mango no está colocado en el cargador)
Cuando encienda el mango, la luz de la batería de la parte inferior del
mango indicará el estado de la batería.
Estado de la
batería
Indicación de la
batería
Sonido
Totalmente cargado Iluminado en blanco -
Parcialmente
cargado
Low (Baja) Parpadea en ámbar El mango emite 3
Parpadea en blanco -
pitidos
Page 75

Español
Vacío Parpadea en ámbar El mango emite 2
series de 5 pitidos
Activar o desactivar funciones
Es posible activar o desactivar las funciones siguientes del cepillo de
dientes:
- EasyStart
- Recordatorio de sustitución del cabezal del cepillo
- Sensor de presión
Paso 1: Coloque el mango en el soporte de carga o en
el cristal de carga.
Paso 2: Mantenga pulsado el botón de encendido para:
75
Easy-Start Recordatorio
3segundos Un máximo de
¯ ¯ ¯
Paso 3: Suelte el botón de encendido cuando oiga
1 pitido 1 pitido y, a
¯ ¯ ¯
Si la indicación de la batería parpadea en blanco 2
veces y oye 3 tonos de baja a alta intensidad, entonces
la función se ha activado.
de sustitución
del cabezal del
cepillo
5 segundos
continuación, 2
pitidos
Sensor de presión
Un máximo de 7
segundos
1 pitido, 2 pitidos y, a
continuación, 3
pitidos
Page 76

Español
76
O bien
Si la indicación de la batería parpadea en blanco una
vez y oye 3 tonos de alta a baja intensidad, la función
se ha desactivado.
Limpieza
- Todas las piezas se pueden limpiar con un paño húmedo o
enjuagarse con agua caliente.
- Quite el cabezal de cepillado del mango y enjuáguelo bien.
- Enjuague todo el mango, sobre todo la conexión del cabezal, al
menos una vez a la semana.
Page 77

Español
Precaución: No empuje la junta de goma de la parte superior del
mango. Limpie cuidadosamente alrededor de la junta de goma.
Precauciones:
- No lave el cabezal del cepillo, el capuchón, el mango, el cargador
ni el estuche de viaje en el lavavajillas.
- No utilice alcohol isopropílico, vinagre, lejía o cualquier otro
producto de limpieza doméstica para limpiar el mango, ya que
esto podría causar decoloración.
- Desenchufe el cargador antes de limpiarlo.
- No utilice aceites esenciales para limpiar los cabezales de
cepillado, ya que puede provocar daños.
77
Almacenamiento
Si no va a utilizar el producto durante un período de tiempo
prolongado, desenchúfelo de la toma de corriente, límpielo y
guárdelo en un lugar fresco, seco y alejado de la luz directa del sol.
Page 78

Español
78
Preguntas más frecuentes
Pregunta Respuesta
¿Puedo dejar el cepillo Sonicare
en el cargador entre cepillados?
¿Puedo usar otros cabezales de
cepillado en mi cepillo dental
Philips Sonicare?
¿Con qué frecuencia debo
sustituir el cabezal de cepillado?
¿Es mi cepillo dental Philips
Sonicare resistente al agua?
Sí, puede dejar el cepillo dental
Philips Sonicare siempre en un
cargador enchufado. Esto no
afecta a la vida útil de la batería.
Todos los cabezales de cepillos
eléctricos Philips Sonicare que
encajen serán adecuados para
su cepillo dental. Sin embargo,
no todos están equipados con la
tecnología BrushSync. Puede
identificar los cabezales de
tecnología BrushSync mediante
el icono ubicado en la base del
cabezal del cepillo.
Recomendamos reemplazar el
cabezal del cepillo Philips
Sonicare cada 3meses de uso
(suponiendo que realice 2
sesiones de 2 minutos de
cepillado al día). El recordatorio
de reemplazo del cabezal del
cepillo también avisa del
momento en que es necesario
cambiarlo.
Sí, su cepillo dental Philips
Sonicare es resistente al agua.
Sin embargo, no introduzca
nunca el mango en el lavavajillas
para limpiarlo. Y no lo utilice en
la ducha.
Page 79

Pregunta Respuesta
Español
79
¿Qué teléfonos son compatibles
con la aplicación Philips
Sonicare?
¿Qué otros cepillos dentales
Philips Sonicare puedo utilizar
con la aplicación Philips
Sonicare?
La aplicación de Philips Sonicare
es compatible con los sistemas
operativos Android y Apple iOS.
Busque la versión más reciente
de la aplicación de Philips
Sonicare en Android Play Store o
Apple App Store. Los dispositivos
móviles deben tener también
Bluetooth 4.0 o posterior.
Solo puede utilizar los cepillos
dentales Philips Sonicare
Flexcare Platinum Connected,
DiamondClean Smart,
DiamondClean 9000 y
ExpertClean con la aplicación
Sonicare. Busque el símbolo de
Bluetooth en el panel frontal del
paquete.
Reciclaje
- Este símbolo significa que este producto no debe desecharse con
la basura normal del hogar (2012/19/UE).
- Este símbolo significa que este producto contiene una batería
recargable integrada, que no debe desecharse con los residuos
domésticos normales (2006/66/EC). Lleve el producto a un punto
de recogida oficial o a un centro de asistencia de Philips para que
un profesional extraiga la batería recargable.
- Siga la normativa de su país para la recogida selectiva de
productos eléctricos y electrónicos y de baterías recargables. El
desechado correcto ayuda a evitar consecuencias negativas para
el medio ambiente y la salud humana.
Extracción de la batería recargable al final de la vida útil
Advertencia
- Quite la batería únicamente cuando deseche el mango.
Page 80

1
2
Español
80
- Asegúrese de que la batería está completamente descargada
cuando la quite.
- Cualquier intento de extraer la batería anulará la garantía.
Para obtener ayuda visite nuestro sitio web en
www.philips.com/support o llame gratuitamente al número
1-800-243-3050.
Extracción de la batería recargable
Advertencia: No quite la batería recargable hasta que deseche el
aparato. Asegúrese de que la batería está completamente agotada
cuando la quite.
Para extraer la batería recargable, utilice una toalla o un paño, un
martillo y un destornillador plano normal.Tenga en cuenta las
medidas de seguridad básicas cuando siga los procedimientos
descritos a continuación. Asegúrese de proteger sus ojos, manos,
dedos y la superficie en la que trabaja.
1 Para agotar la carga de la batería recargable, quite el mango del
cargador, encienda su cepillo Sonicare de Philips y déjelo
funcionar hasta que se pare. Repita esto hasta que ya no pueda
encender el cepillo Sonicare de Philips.
2 Retire y deseche el cabezal del cepillo. Cubra todo el mango con
una toalla o un paño.
Page 81

Español
3 Sujete la parte superior del mango con una mano y golpee la
carcasa del mango a 1,27cm por encima del extremo inferior.
Golpee firmemente con un martillo los cuatro lados para expulsar
la tapa.
Nota: Es posible que tenga que golpear el extremo varias veces
para romper las conexiones internas.
4 Retire la tapa del mango del cepillo. Si la tapa no se libera
fácilmente de la carcasa, repita el paso 3 hasta que la tapa se
suelte.
5 Sujete el mango boca abajo, presione el eje hacia abajo sobre una
superficie dura. Si los componentes internos no se sueltan de la
carcasa con facilidad, repita el paso 3 hasta que lo hagan.
81
6 Introduzca el destornillador entre la batería y el marco negro de la
parte inferior de los componentes internos. A continuación haga
palanca con el destornillador hacia el exterior de la batería para
romper la parte inferior del marco negro.
Page 82

Español
82
7 Inserte el destornillador entre la parte inferior de la batería y el
marco negro para romper la pestaña metálica que conecta la
batería con la placa de circuito impreso de color verde. Esto
separará el extremo inferior de la batería del marco negro.
8 Agarre la batería y tire de ella separándola de los componentes
internos para romper la segunda pestaña metálica de la batería.
Precaución: Tenga cuidado con los bordes afilados de las
pestañas de la batería para evitar lesiones en los dedos.
9 Cubra los contactos de la batería con cinta aislante para evitar
cualquier cortocircuito eléctrico provocado por la carga residual
de la batería. La batería recargable ya se puede reciclar y el resto
de materiales se pueden desechar de manera adecuada.
Nota: Al final de su vida útil, no tire el aparato junto con la basura
normal del hogar. Llévelo a un punto de recogida oficial para su
reciclado. De esta manera, ayudará a conservar el medio
ambiente.
Page 83

Español
Garantía y asistencia
Si necesita asistencia o información, visite www.philips.com/support
o lea el folleto de garantía internacional.
Restricciones de la garantía
La garantía internacional no cubre lo siguiente:
- Cabezales del cepillo.
- Deterioros causados por el uso de piezas de repuesto no
autorizadas.
- Deterioros causados por uso inapropiado, abusos, negligencias,
alteraciones o reparaciones no autorizadas.
- Desgaste normal, incluyendo arañazos, desportilladuras,
abrasiones, decoloraciones o pérdida gradual del color.
83
Page 84

Français
84
Introduction
Vous venez de vous procurer la nouvelle brosse à dents
PhilipsSonicare. Nous vous en félicitons! Cette brosse à dents
permet une meilleure élimination de la plaque dentaire, des dents
plus blanches et des gencives plus saines. La brosse à dents Sonicare
combine la technologie sonique et des fonctions à l’efficacité
éprouvée testée en laboratoire pour un nettoyage en douceur. Elle
vous garantit à chaque fois le meilleur des brossages. Pour
enregistrer votre produit et obtenir de l’aide supplémentaire, rendezvous à l’adresse: http://www.philips.fr/welcome.
Bienvenue dans l’univers de PhilipsSonicare!
Application
Les brosses à dents électriques de la série DiamondClean éliminent la
plaque dentaire et les résidus alimentaires des dents pour prévenir
les caries, et améliorer et maintenir la santé bucco-dentaire. Les
brosses à dents électriques de la série DiamondClean sont conçues
pour une utilisation à domicile. Leur utilisation par les enfants doit
être faite sous la supervision d'un adulte.
Informations de sécurité importantes
Lisez attentivement ces informations importantes avant d'utiliser
l'appareil et conservez-les pour un usage ultérieur.
Remarque: Les accessoires et les fonctionnalités peuvent varier
selon les modèles. Par exemple, certains modèles sont livrés avec un
assainisseur ou sont équipés de Bluetooth.
Français
Page 85

Français
Danger
- Évitez tout contact du chargeur et/ou de
l’assainisseur avec de l’eau. Ne placez pas et
ne rangez pas l’appareil dans un
emplacement situé à proximité d’une
baignoire ou d’un lavabo dans lequel il
risquerait de tomber.
- Ne plongez jamais le chargeur et/ou
l’assainisseur dans l’eau ou aucun autre
liquide.
- Après l’avoir nettoyé, assurez-vous que le
chargeur et/ou l’assainisseur est
complètement sec avant de le brancher sur
la prise secteur.
85
Page 86

Français
86
Avertissement
- Cet appareil peut être utilisé par des
enfants, des personnes dont les capacités
physiques, sensorielles ou intellectuelles
sont réduites ou des personnes manquant
d'expérience et de connaissances, à
condition que ces enfants ou personnes
soient sous surveillance ou qu'ils aient reçu
des instructions quant à l'utilisation
sécurisée de l'appareil et qu'ils aient pris
connaissance des dangers encourus. Le
nettoyage et l'entretien ne doivent pas être
effectués par des enfants sans surveillance.
- Les enfants ne doivent pas jouer avec
l'appareil.
- Si l’appareil (tête de brosse, manche de la
brosse à dents, chargeur et/ou assainisseur)
est endommagé, cessez de l’utiliser.
- Il est impossible de remplacer le cordon
d'alimentation. Si le cordon d’alimentation
est endommagé, vous devez mettre le
chargeur et/ou l’assainisseur au rebut.
Page 87

Français
- Remplacez systématiquement le chargeur
et/ou l’assainisseur par un
chargeur/assainisseur de même type pour
éviter tout accident.
- Cet appareil ne contient aucune pièce
réparable par l’utilisateur. Si l’appareil est
endommagé, contactez le Service
Consommateurs de votre pays (voir
'Garantie et assistance').
- Tenez le cordon d'alimentation à l'écart des
surfaces chauffantes.
- N’utilisez pas le chargeur et/ou
l’assainisseur à l’extérieur ou près de
surfaces chauffantes.
Attention
- Ne lavez jamais la tête de brosse, le
manche, le chargeur, le couvercle du
chargeur ou l’assainisseur au lave-vaisselle.
- Si vous avez reçu des soins buccodentaires, notamment au niveau des
gencives, au cours des deux derniers mois,
consultez votre dentiste avant d'utiliser cet
appareil.
87
Page 88

Français
88
- Consultez votre dentiste si vos gencives
saignent de manière excessive après
utilisation de cet appareil ou si le
saignement persiste après une semaine
d'utilisation. Consultez également votre
dentiste si vous éprouvez une gène ou une
douleur lorsque vous utilisez cet appareil.
- Cet appareil Philips est conforme aux
normes de sécurité relatives aux appareils
électromagnétiques. Si vous portez un
stimulateur cardiaque ou tout autre
dispositif implanté, consultez votre médecin
ou le fabricant du dispositif implanté avant
d’utiliser cet appareil.
- Si vous avez des problèmes de santé,
consultez votre médecin avant d'utiliser cet
appareil.
- Cet appareil a été conçu uniquement pour
le brossage des dents, des gencives et de la
langue. Ne l'utilisez jamais à d'autres fins. Si
son utilisation devait s'avérer inconfortable
ou douloureuse, cessez d'utiliser l'appareil
et consultez votre médecin.
Page 89

Français
- Cet appareil de soins personnel n’est pas
destiné à être utilisé sur plusieurs patients
dans les cabinets ou établissements
dentaires.
- N’utilisez pas d’autres têtes de brosse que
celles recommandées par Philips Sonicare.
- Cessez d'utiliser une tête de brosse dont les
poils sont écrasés ou tordus. Remplacez la
tête de brosse tous les 3mois ou plus tôt si
vous constatez des signes d'usure.
- Si votre dentifrice contient du peroxyde, du
bicarbonate de soude ou du bicarbonate
(couramment utilisés dans les dentifrices
blanchissants), veillez à bien nettoyer la tête
de brosse avec de l'eau savonneuse après
chaque utilisation. Cela permet de prévenir
toute fissure éventuelle du plastique.
- Évitez tout contact direct avec des produits
qui contiennent des huiles essentielles ou
de l'huile de coco. Un contact pourrait
conduire au délogement des brins de la
brosse.
89
Champs électromagnétiques (CEM)
Cet appareil Philips est conforme à toutes les normes et à tous les
règlements applicables relatifs à l'exposition aux champs
électromagnétiques.
Page 90

Français
90
Directive sur l'équipement radio
Par la présente, Philips déclare que les brosses à dents électriques
avec interface de fréquence radio (Bluetooth) sont conformes à la
directive 2014/53/UE.
Le texte intégral de la déclaration de conformité aux directives de
l’Union Européenne est disponible à l’adresse suivante:
www.philips.fr/support
L’interface de fréquence radio de ce produit fonctionne à une
fréquence de 13,56MHz.
Le rapport de puissance RF maximum de l’équipement est de
30,16dBm.
Votre brosse à dents Philips Sonicare (Fig. 1)
1 Capuchon de protection hygiénique
2 Têtes de brosse intelligentes*
3 Poignée
4 Bouton marche/arrêt
5 Voyant d'intensité
6 Bouton d'intensité et de mode
7 Modes
8 Voyant de rappel de remplacement de tête de brosse
9 Voyant de charge
10 Verre de charge
11 Socle de charge
12 Socle de charge
13 Coffret (chargeur) de voyage*
14 Adaptateur mural USB*
*Remarque: Le contenu de la boîte peut varier selon le modèle
acheté.
Application Sonicare – Pour démarrer
L'application Sonicare se connecte à votre brosse à dents pour vous
offrir une expérience connectée. En connectant votre brosse à dents
à votre compte dans l'application Sonicare, vous pourrez:
- Passer facilement en revue votre rapport de progression et
découvrir des façons d'améliorer votre cycle de brossage
Page 91

Français
- Recevoir des conseils et des recommandations personnalisés
relatives à la gestion de votre santé bucco-dentaire
Pour commencer à utiliser l'application Sonicare:
1 Téléchargez l’application Sonicare sur votre téléphone.
2 Ouvrez l'application et suivez les étapes guidées.
3 Associez votre brosse à dents à l’application.
4 Créez votre compte.
5 Effectuez la mise à jour du micrologiciel, si vous y êtes invité, afin
d'accéder aux dernières améliorations et fonctionnalités.
6 Brossez-vous les dents régulièrement
Vous êtes prêt à commencer votre expérience connectée. Veillez à
vous brosser les dents régulièrement. Vous pouvez recevoir des mises
à jour qui vous aideront à améliorer votre santé bucco-dentaire.
Remarque: Assurez-vous que la fonction Bluetooth de votre
téléphone est activée lorsque vous utilisez l'application. Votre brosse
à dents utilise la connexion Bluetooth pour transférer vos données de
brossage à l'application. Si vous avez des questions sur les raisons
pour lesquelles vos données de brossage sont recueillies, consultez
la déclaration de confidentialité de Sonicare, disponible tout au long
du processus d'installation de l'application.
91
Application Sonicare – Suivi et amélioration de votre santé bucco-dentaire
Votre brosse à dents Sonicare est dotée de capteurs intelligents pour
vous fournir des commentaires concernant vos habitudes de
brossage, notamment:
- Sessions de brossage quotidiennes
- Temps consacré à chaque session de brossage
- Pression de brossage exercée
- Rappel de remplacement de la tête de brosse (basé sur l'utilisation
réelle)
L'application Sonicare recueille les données fournies par les capteurs
intelligents et suit vos habitudes de brossage au fil du temps.
Chacune des fonctionnalités disponibles dans l'application est
conçue pour vous aider à comprendre vos habitudes de brossage et
Page 92

Français
92
vous fournir des recommandations simples pour améliorer et
maintenir votre santé bucco-dentaire. Vous recevrez des informations
de brossage personnalisées dans l'application Sonicare.
Têtes de brosse
Pour savoir quel est le type de tête de brosse dont vous disposez,
consultez l’indication au bas de la tête de brosse. Le symbole au bas
de la tête de brosse indique qu’il s’agit d’une tête de brosse
intelligente, équipée de la technologie BrushSync.
Nom de la tête
de brosse
Indication sur
la tête de
brosse
Avantage
Pour découvrir notre gamme complète de têtes de brosse, rendezvous sur www.philips.fr/toothbrush-heads.
Premium
Plaque Control
C3 W3 G3
Élimination de
la plaque
dentaire
Premium White Premium Gum
Élimination de
la plaque
dentaire et des
taches
Care
Gencives plus
saines
Utilisation de la brosse à dents Philips Sonicare
Instructions de brossage
1 Fixez fermement la tête de brosse sur le manche. Humidifiez les
soies et appliquez du dentifrice.
Page 93

45°
Français
Remarque: Le léger interstice existant entre la tête de brosse et le
manche est normal. Il permet à la tête de brosse de vibrer
correctement.
2 Placez les soies de la tête de brosse sur les dents, légèrement de
biais (45degrés), et appuyez légèrement pour qu'elles touchent
les gencives ou se placent légèrement sous les gencives.
Remarque: Maintenez le centre de la tête de brosse en contact
avec les dents en tout temps.
3 Allumez la brosse à dents PhilipsSonicare en appuyant sur le
bouton marche/arrêt.
93
4 Exercez une légère pression pour optimiser l'efficacité de la brosse
à dents Philips Sonicare et laissez l'appareil brosser vos dents.
Déplacez lentement la tête de brosse entre vos dents avec un
léger mouvement de va-et-vient, de sorte que les poils les plus
longs atteignent les espaces interdentaires. Continuez ce
mouvement pendant tout le cycle de brossage.
Page 94

Français
94
Remarque: Différents modes sont disponibles (voir 'Modes de
brossage').
5 Pour nettoyer la surface intérieure des dents avant, inclinez le
manche de la brosse à dents en position intermédiaire et
effectuez plusieurs mouvements de brosse verticaux sur chaque
dent en prenant soin de les faire se chevaucher.
Remarque:
- Une modification de la vibration du manche vous alerte lorsque
la pression exercée est trop forte (voir 'Capteur de pression').
- Votre brosse à dents PhilipsSonicare est compatible avec les
appareils orthodontiques, les modérations dentaires et les
restaurations dentaires (plombages, couronnes, facettes).
- N’utilisez pas votre brosse à dents sous la douche.
Technologie BrushSync
La technologie BrushSync permet à vos têtes de brosse de
communiquer avec votre manche à l’aide d’une puce. Le symbole au
bas de la tête de brosse indique qu’il s’agit d’une tête de brosse
Page 95

Français
équipée de la technologie BrushSync. Cette technologie offre les
fonctionnalités suivantes:
- Mode d'appariement de la tête de brosse
- Rappel de remplacement de la tête de brosse
Modes de brossage
Votre brosse à dents électrique est équipée de quatremodes
différents: Clean, White+, Gum health et Deep Clean+.
Selon la tête de brosse intelligente que vous utilisez, le mode et
l'intensité optimaux sont automatiquement sélectionnés par la
technologie BrushSync.
Pour changer manuellement de mode, appuyez sur le bouton
mode/intensité lorsque la brosse à dents est éteinte et la tête de
brosse fixée.
*Remarque:
- Toutes les têtes de brosse fonctionnent avec chaque mode.
- Lorsque la brosse à dents PhilipsSonicare est utilisée dans le cadre
d’études cliniques, elle doit être utilisée à haute intensité, avec la
fonctionEasyStart désactivée.
Mode d'appariement de la tête de brosse
Les têtes de brosse dotées de la technologie BrushSync sont
équipées d’une puce qui communique avec le manche et sélectionne
automatiquement le mode et l’intensité recommandés.
Remarque: si vous modifiez le mode ou l'intensité, la tête de brosse
mémorise le dernier réglage utilisé. Si vous souhaitez faire un
brossage avec le réglage recommandé, reportez-vous à la section
95
Page 96

Français
96
«Modes de brossage» pour connaître le mode ou l’intensité
recommandé.
Mode d'appariement de la tête de brosse
Les têtes de brosse dotées de la technologie BrushSync sont
équipées d’une puce qui communique avec le manche et sélectionne
automatiquement le mode et l’intensité recommandés.
Remarque: si vous modifiez le mode ou l'intensité, la tête de brosse
mémorise le dernier réglage utilisé. Si vous souhaitez faire un
brossage avec le réglage recommandé, consultez le tableau suivant
pour connaître le mode ou l'intensité recommandé.
Clean et Deep
Clean+
White+ Gum health
Avantage
Intensité
recommandée
Intensité
Recommandée
Temps total de
brossage
Élimination de
la plaque
dentaire
Premium
Plaque Control
(C3)
3 3 3
Clean:
2minutes
Deep Clean+:
3minutes*
Élimination de
la plaque
dentaire et des
taches en
surface
Premium White
(W3)
2minutes et
40secondes
Retrait de la
plaque dentaire
et massage des
gencives
Premium Gum
Care (G3)
3minutes et
20secondes
Page 97

1
2
3
4
5
6
1
2
3
4
5
6
1
2
3
4
5
6
7
8
1
2
3
4
5
6
7
8
10
9
Français
97
Clean et Deep
White+ Gum health
Clean+
Comment
brosser les
dents
Clean: Brossez
chaque partie
pendant
20secondes.
Deep Clean+:
Brossez chaque
partie pendant
30secondes*.
Brossez chaque
partie pendant
20secondes,
puis, brossez
les parties7
et8 pendant
20secondes
chacune.
Brossez chaque
partie pendant
20secondes,
puis, brossez
les parties7, 8,
9 et 10 pendant
20secondes
chacune.
*Remarque: Lors d'un brossage avec l'application Sonicare en mode
Deep clean+, le temps de brossage est de 2minutes.
Réglages d'intensité
Votre brosse à dents permet troisréglages d’intensité différents:
- intensité faible (une barre)
- Intensité moyenne (deuxbarres)
- intensité élevée (trois barres)
Page 98

Français
98
Lorsqu’elle est fixée au manche, la tête de brosse intelligente
sélectionne automatiquement l’intensité recommandée. Pour
modifier manuellement l’intensité, tournez le manche et appuyez sur
le bouton mode/intensité.
Lorsque la brosse à
dents est en
marche, appuyez
sur ce bouton pour
modifier le réglage
de l'intensité.
Caractéristiques
- BrushPacer
- Capteur de pression
- Rappel de remplacement de la tête de brosse
- FonctionEasyStart
BrushPacer
La fonctionBrushPacer vous signale à quel moment vous devez
passer à la partie suivante de vos dents en modifiant brièvement la
vibration.
La brosse à dents s'éteint automatiquement à la fin du brossage.
Capteur de pression
Votre brosse à dents PhilipsSonicare mesure la pression que vous
exercez lors du brossage afin de protéger vos dents et vos gencives.
Si vous exercez une pression trop forte, la vibration du manche est
modifiée jusqu’à ce que vous réduisiez la pression.
Remarque: Le capteur de pression est activé lorsque vous recevez
votre produit. Pour désactiver cette fonction, reportez-vous à la
section «Activation ou désactivation des fonctionnalités».
Rappel de remplacement de la tête de brosse
Pour cela, il mesure ce qui suit, au fil des brossages:
Page 99

Français
- La pression générale que vous exercez pendant le brossage
- La durée totale de brossage effectué avec la tête de brosse
Lorsque la tête de brosse n'est plus efficace, le rappel de
remplacement de la tête de brosse clignote en orange et le manche
émet une série de signaux sonores de différentes tonalités.
Remarque: La fonction de rappel de remplacement de tête de
brosse est activée lorsque vous recevez votre produit. Pour désactiver
cette fonction, reportez-vous à la section «Activation ou
désactivation des fonctionnalités».
99
FonctionEasyStart
La fonctionEasyStart augmente progressivement la puissance du
manche au fil des 14premiers brossages pour vous permettre de vous
habituer à la brosse à dents PhilipsSonicare.
La fonctionEasyStart fonctionne avec tous les modes.
Remarque: La fonctionEasyStart est désactivée lorsque vous
recevez le produit. Pour activer la fonctionEasyStart, reportez-vous à
la section «Activation ou désactivation des fonctionnalités».
Charge et niveau de la batterie
Charge sur le socle du chargeur
1 Branchez le cordon du socle de charge sur une prise électrique.
2 Placez le support de charge ou le verre de charge sur le socle de
charge.
Page 100

Français
100
3 Placez le manche sur le support ou le verre de charge.
4 Le chargeur charge entièrement votre brosse à dents.
Le manche se charge lorsque l'indicateur de batterie clignote en
blanc. Lorsque le manche est entièrement chargé, l'indicateur de
batterie s'allume en blanc pendant 30secondes, puis s'éteint.
Remarque: Votre manche est chargé pour sa première utilisation.
Après la première utilisation, chargez-le pendant au moins 24heures.
Charge avec le coffret de voyage*
*Remarque: Selon le modèle acheté, il est possible que le coffret de
charge de voyage ne soit pas inclus.
1 Retirez le câble USB du bas du coffret de voyage.
2 Connectez le coffret de voyage à une prise d'une puissance
d'entrée de 5V CC avec:
-
L'adaptateur USB fourni
-
un port USB standard de PC homologué UL ou certifié ANSI/UL
60950-1, ou
 Loading...