

Page 1
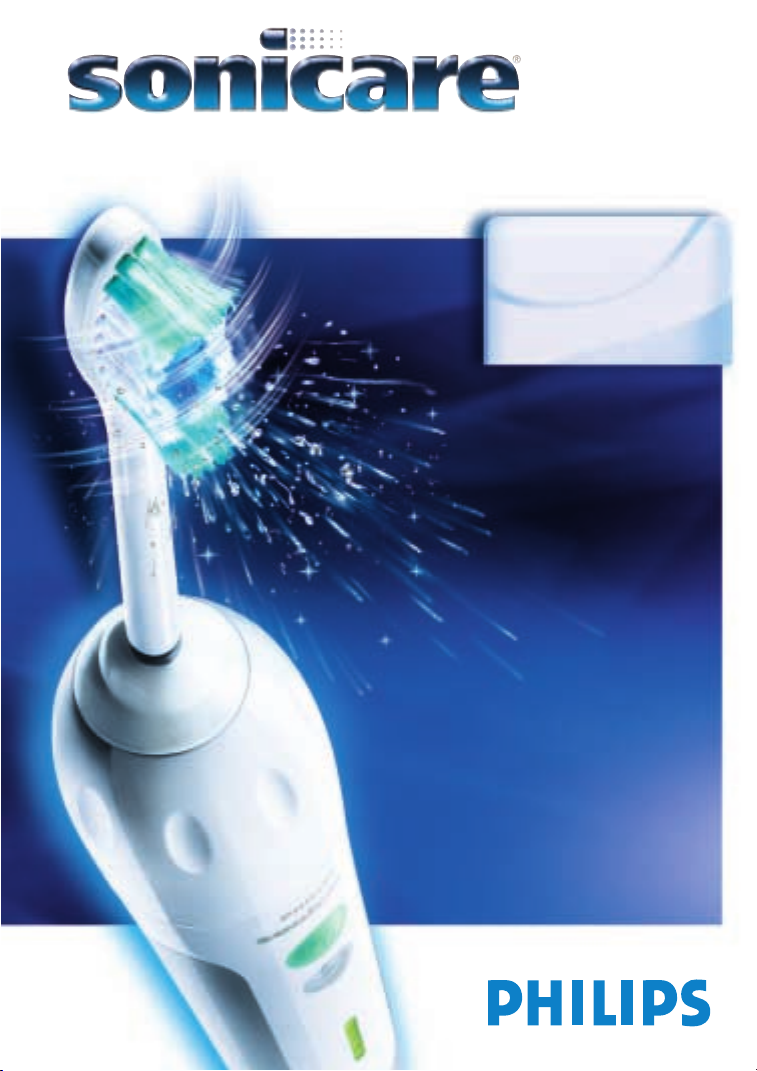
elite®
e7000
the sonic toothbrush
series
Page 2
2
1
A
B
C
D
E
F
G
H
I
J
Page 3

ENGLISH 4
FRANÇAIS 17
ESPAÑOL 31
SONICARE ELITE 7000
Page 4

ENGLISH4
Table of contents
General description 4
Important safeguards 4
Dangers 4-5
Warnings 5
Medical warnings 5
Customer Service Information 6
Preparing for use 6
Charging your Sonicare 7
Using the appliance 7-8
Features 9-12
Cleaning 12-13
Storage 13
Replacement 13
Battery recycling 14-15
Guarantee & service 15-16
Troubleshooting 16
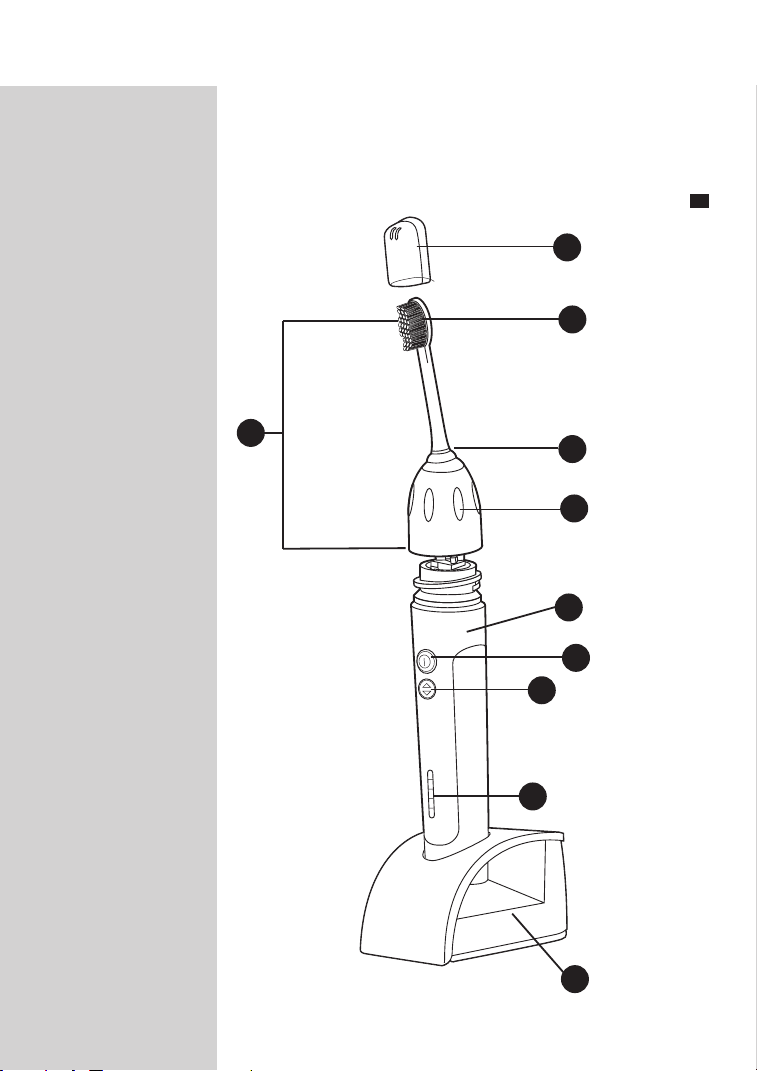
General description
A Travel cap
B Bristles
C Brush head
D Color code ring
E Removable nut
F Handle with soft grip
G Power on/off button
H Dual Speed Control button
I LED charging lights
J Charger
IMPORTANT SAFEGUARDS
READ ALL INSTRUCTIONS BEFORE USE
Sonicare\ has been carefully engineered for both effectiveness and
safety. However, basic safety precautions should always be followed
when using any electrical product, especially when children are present.
DANGERS
To reduce the risk of electrocution and fire:
1) DO NOT plug the charger into an incorrect voltage source outlet. It
has been designed for use with a specific electrical voltage. Refer to
the bottom (or back) of the charger for the correct voltage
specification.Voltage converters and plug adapters DO NOT
guarantee voltage compatibility. Never force the plug into an outlet.
2) DO NOT place or store the charger where it can fall or be pulled
into a tub, sink or toilet.
Page 5

ENGLISH 5
3) DO NOT place or drop the charger into water or other liquid.
4) DO NOT reach for a charger that has fallen into water. Unplug
immediately.
5) DO NOT use while taking a bath.
WARNINGS
To reduce the risk of burns, electrocution,fire or injury:
1) Close supervision is necessary when this product is used by or on
children or the disabled.
2) If you are unable to handle this product properly, discontinue use.
3) Use this product only for its intended use as described in this
booklet. Do not use attachments other than those recommended
by the manufacturer. See voltage information above.
4) Never operate the charger if it has a damaged cord or plug, if it has
been dropped or if the toothbrush handle has been damaged in any
way.This product contains no serviceable parts. If repair is needed
please refer to the Customer Service Information section of this
manual and contact one of our representatives.
5) Keep the cord away from heated surfaces.
6) If your favorite toothpaste includes peroxide, baking soda or other
bicarbonate (common in whitening toothpastes), it is important that
you thoroughly clean your brush head with soap and water after
each use.
7) Do not use charger base outdoors.
8) Unplug the charger base before cleaning and assure that it is dry
before plugging it into an electrical outlet.
9) Brush heads and charger base should never be placed in a
dishwasher for cleaning.
MEDICAL WARNINGS
1) Consult your dental professional before using this product if you
have had oral or gum surgery in the previous 2 months.
2) Contact your dental professional if excessive bleeding occurs after
using this product or bleeding continues to occur after 1 week of
use.
3) If you have any questions concerning usage with a pacemaker or
other implanted device, consult your physician or the implanted
device manufacturer prior to use. Sonicare has been tested and is
compliant with safety standards for electromagnetic devices.
4) Avoid using a brush head with crushed or bent bristles. Damaged
bristles may break off while brushing. In order to prevent this,
replace the brush head with a new one every 6 months or sooner if
signs of wear appear.
5) The Sonicare toothbrush is a personal care device and is not
intended for use on multiple patients in a dental office or institution.
6) This product is designed for cleaning teeth, gums and tongue only.
Do not use for any other purpose.
Page 6
ENGLISH6
Customer Service Information
If you have any questions after reading this manual, feel free to contact
our Customer Service Center or visit our website.
◗ Customer Service Center
1-800-682-7664 (North America), outside North America contact
your local Philips Customer Care Center.
◗ Internet Information
www.sonicare.com (North America) www.philips.com (outside North
America)
SAVE THESE INSTRUCTIONS
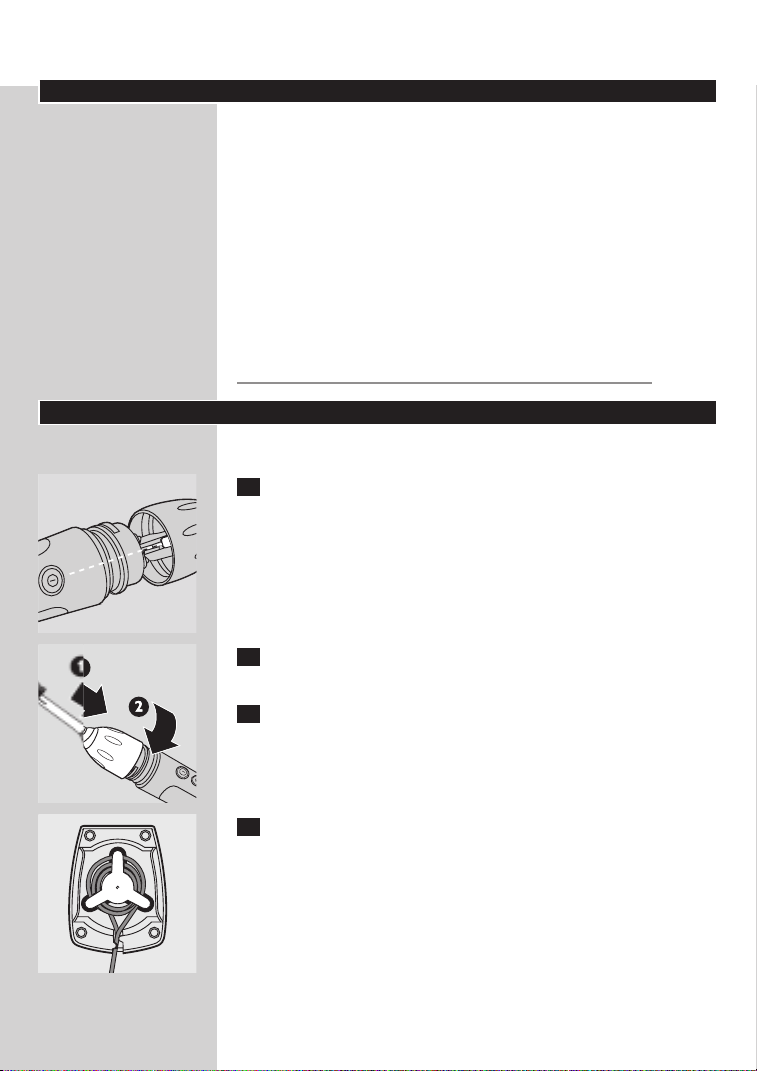
Preparing for use
To attach the Sonicare brush head:
1 Align the front of the brush head with the front of the
C
toothbrush handle. Match the bars on the brush head with the
notches inside the top of the handle and slide the brush head
onto the handle.
2 Screw the brush head nut clockwise until it is firmly tightened.
C
C
If the brush head rattles during use, tighten the nut further.
3 Remove the travel cap from your brush head when you are
ready to brush.
4 Use the cord wrap in the bottom of the charger to store
excess cord.
Page 7
ENGLISH 7
45
Charging your Sonicare\
Sonicare comes with the batteries completely discharged and should
be charged for at least 24 hours during the first few days of use.
◗ It is recommended that you keep your Sonicare in the charger
when not in use to maintain a full battery charge. It takes at least
24 hours to fully charge Sonicare's battery.
1 Be sure the bottom of the handle sits back securely in the
C
charger, making complete contact.
◗ Handles of other Sonicare models do not fit in this charger and
will therefore not charge effectively.Do not attempt to force a
handle into this charger as this will cause damage.
Using the appliance
Useful tips
◗ The brush head comes with a convenient travel cap. Remove the
travel cap from the brush head before turning on your Sonicare.
◗ Place the brush head in your mouth before turning on your
Sonicare, and be sure it is turned off before removing it from your
mouth, otherwise toothpaste may splatter.
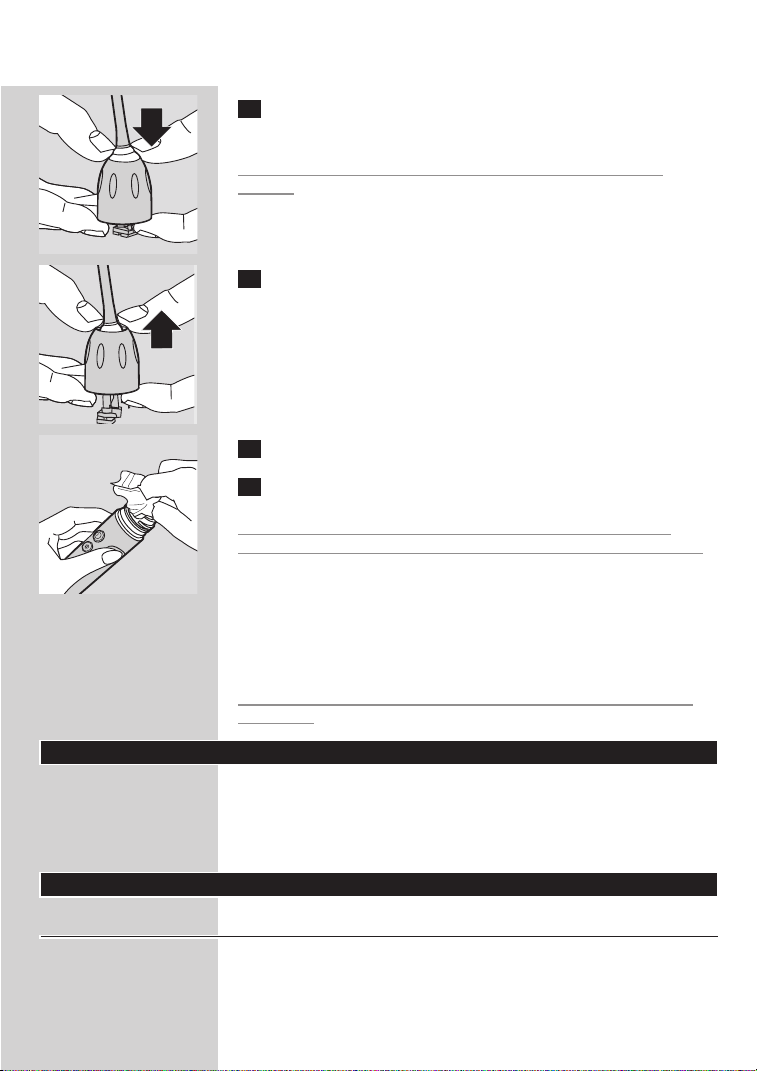
◗ Rinse the brush head and bristles after each use.
◗ Clean the brush head weekly, including under the nut.
◗ A fully charged Sonicare will provide approximately 2 weeks of
typical use (2 minutes of brushing twice a day),making it easy to
travel without the charger.
Remember: voltage converters and plug adapters DO NOT guarantee
voltage compatibility. Always check for voltage compatibility.
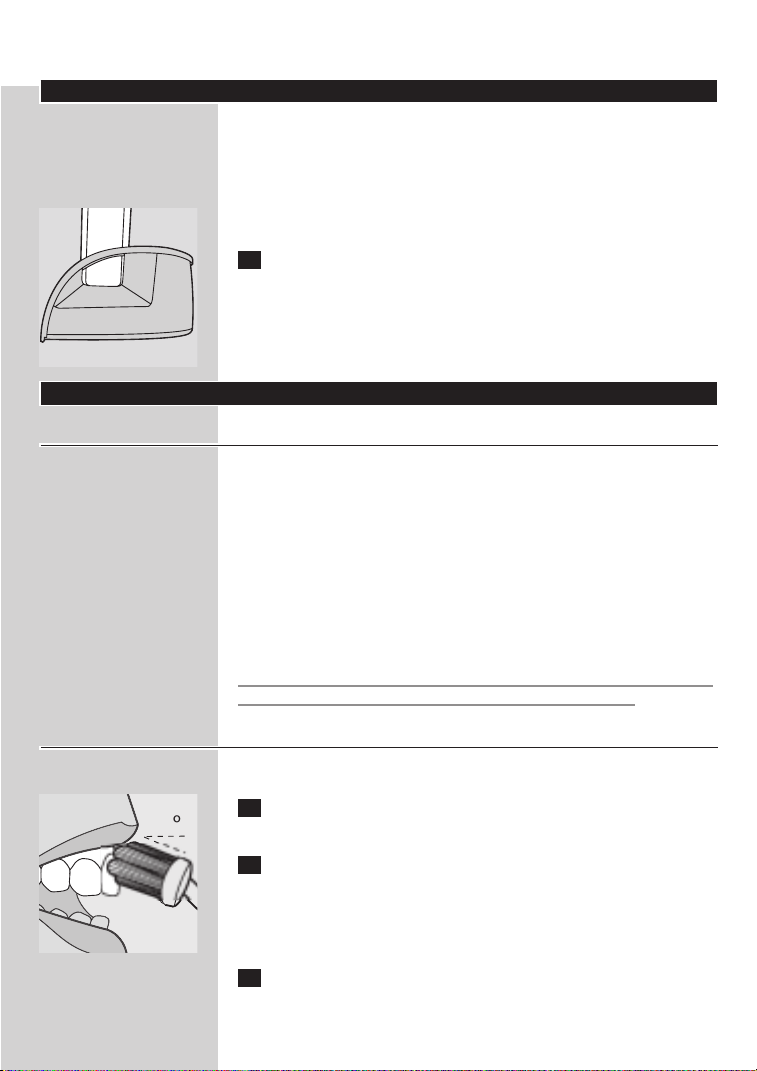
Brushing technique
Follow these simple steps to maximize your brushing experience:
1 Before turning the Sonicare on,place the bristles of the brush
C
head on your gumline at a 45-degree angle.
2 Hold the handle with a light grip, turn the Sonicare on, and
gently move the bristles in a small circular motion so the
longer bristles reach between your teeth.After a few seconds
glide the bristles to the next secion. Continue this routine
throughout your 2-minute brushing cycle.
3 To maximize Sonicare's effectiveness apply only light pressure
and let the Sonicare toothbrush do the brushing for you.
Do not scrub.
Page 8
ENGLISH8
5
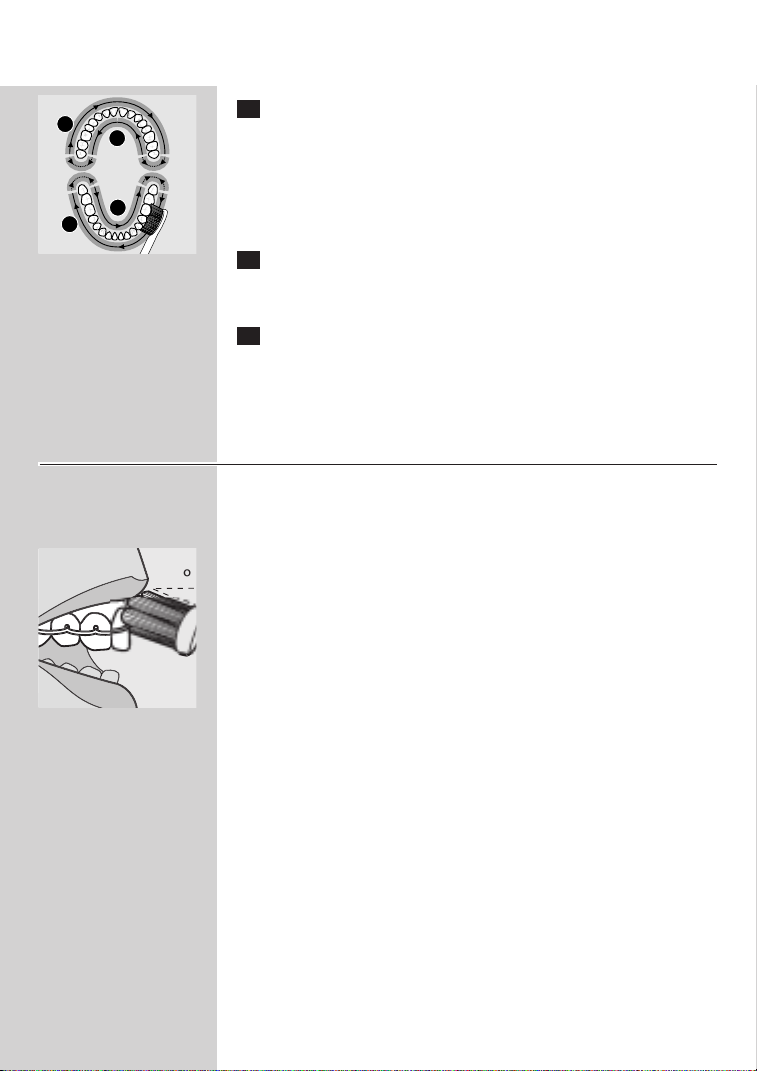
4 To make sure you brush evenly throughout the mouth,divide
1
2
4
3
C
your mouth into 4 sections: outside top,inside top, outside
bottom and inside bottom teeth. Begin brushing in section 1
(outside top teeth) and brush for 30 seconds before moving to
section 2 (inside top teeth). Continue brushing for 30 seconds
in each section progressing through all 4 sections until you've
brushed for 2 minutes.
5 After having completed the 2-minute brushing cycle, additional
time should be spent brushing the chewing surfaces of your
teeth.
6 Press the power button to turn the brush on and off as
needed.
◗ You may also brush your tongue, with the toothbrush turned on
or off, as you prefer.
Tips for specific oral care needs
◗ Stain removal
In areas where staining occurs, spend extra brushing time to assist with
stain removal.
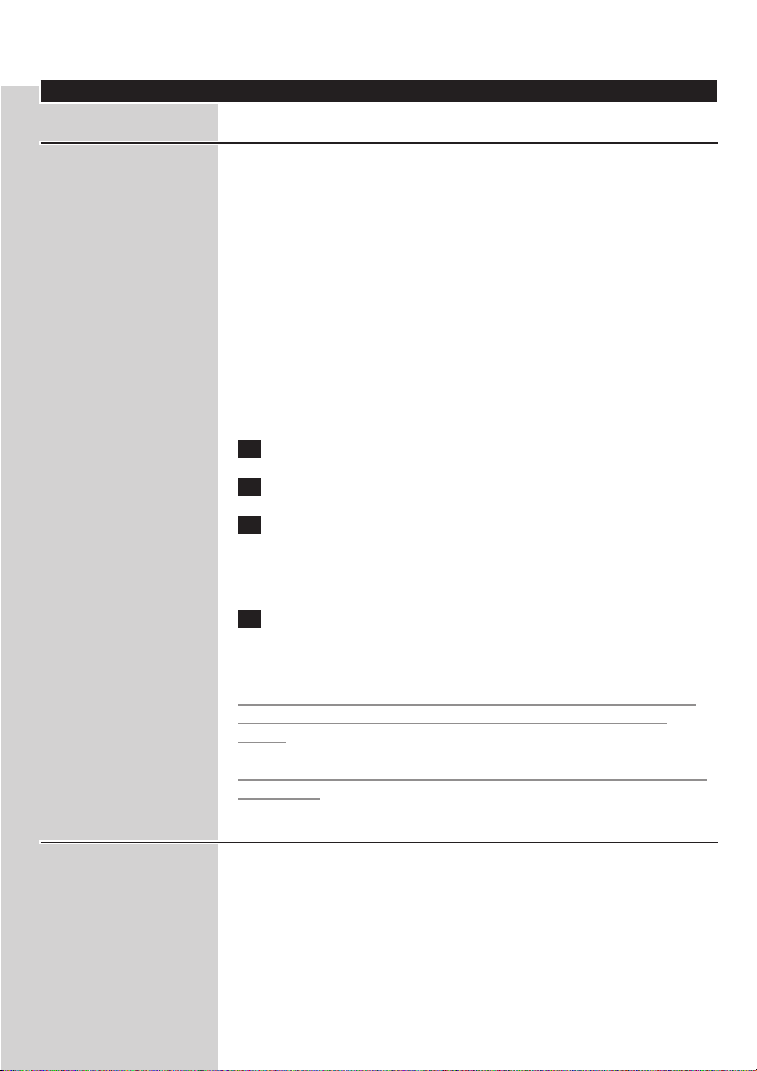
◗ Braces
C
4
The brush should be placed at a 45-degree angle between your
brackets and gumline. Using light pressure, gently move the bristles in a
small circular motion so that the long bristles reach between your
teeth for 2 seconds.Then gently turn (roll) the brush handle so the
bristles clean the bracket and the rest of the tooth before you move
the bristles to the next tooth. Continue this until you have brushed all
of your teeth. Please note that brush heads will wear out sooner when
used on braces.
◗ Dental restorations (dental work)
Use Sonicare on dental restorations (such as implants, caps, crowns,
bridges and fillings) as you would on your normal tooth surfaces to
reduce plaque build-up and improve gum health.Work the bristles
around all areas of the restoration for thorough cleaning.
◗ Periodontal pockets
Your dental professional may have indicated that you have periodontal
pockets, deep pockets where plaque bacteria collect. If this is the case,
after brushing for a full 2 minutes, spend extra time gently brushing
these areas to improve your gum health.
Page 9
ENGLISH 9
Features
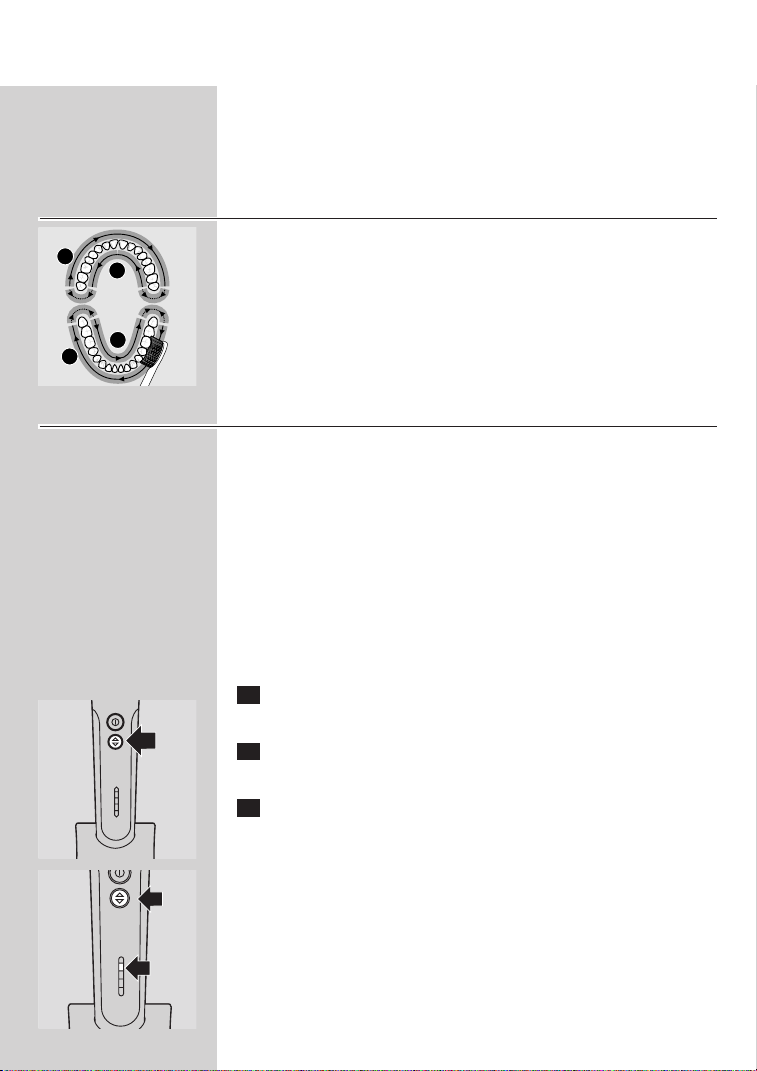
Easy-start\ brushing power ramp-up
◗ All Sonicare models come with the Easy-start feature activated,
which helps you get used to brushing with Sonicare.
◗ Brushing power will gently increase to full power over the first
14 brushings.
◗ The Easy-start feature is active if you hear 2 beeps immediately
after turning on your Sonicare. Once the appliance has reached
optimal brushing power (after the 14th brushing), you will no
longer hear the double beep at the beginning of your brushing
routine.
B
Note: Each of the first 14 brushings must be at least 1 minute in length
to properly advance through the Easy-start ramp-up cycle.
To deactivate or activate the Easy-start feature:
1 Attach your brush head to the handle.
2 Place the handle in the plugged-in charger.
3 To deactivate Easy-start feature:while handle is still in the
charger, press and hold the power button for 5 seconds.You
will hear 1 beep to indicate that the Easy-start feature has
been deactivated.
4 To reactivate Easy-start: while handle is still in the charger,
press and hold the power button for 5 seconds.You will hear 2
beeps to indicate that the Easy-start feature has been activated.
Using the Easy-start feature beyond the initial ramp-up period is not
recommended and reduces Sonicare's effectiveness in removing
plaque.
The Easy-start feature should be deactivated when Sonicare is used in
clinical trials.
Smartimer\ 2-minute timer
◗ All Sonicare models come with the Smartimer feature, which
automatically sets the brushing time to the 2 minutes
recommended by dental professionals.
◗ After 2 minutes, your Sonicare will automatically turn off the
toothbrush.
◗ If you wish to pause or stop brushing during your 2-minute cycle,
press the power button.Press the power button again and the
Smartimer will pick up where you left off.
Page 10
ENGLISH10
B
The Smartimer will automatically reset to the beginning of a 2-minute
cycle if:
- brushing is paused for 30 seconds or longer;
- the handle is returned to the charger.
Quadpacer\ 30-second interval timer
◗ Quadpacer makes sure that you brush all sections of your mouth
1
2
4
3
C
evenly and thoroughly.When using a two-minute brushing cycle,
you will hear a short beep and a pause in brushing action at 30, 60
and 90 second intervals.
Programmable Quadpacer timer (select models only)
The Programmable Quadpacer timer offers you the option of
customizing the Quadpacer performance in 1 of 3 ways:
◗ You may opt to keep the factory default setting of a 2-minute
brushing time with Quadpacer feature activated.
◗ You may choose to extend your brushing time to 2 1/2 minutes
by adding an additional timing interval of 30 seconds with
Quadpacer feature active.
◗ You may choose a 2-minute brushing time,but with the
Quadpacer feature turned off.
To change the Quadpacer settings:
1 Place the handle in the charger that is plugged into a live
electrical outlet.
2 Press the Dual Speed Control button briefly and note which
C
C
LED lights up.
3 Press and hold the Dual Speed Control button.Continue to
hold the button while the LEDs slowly cycle through the timing
interval setting options:
◗ Green LED in position 4: Quadpacer active (factory default
setting).
Page 11
ENGLISH 11
◗ Green LED in top (5th) position: 2 1/2 minute setting -
C
C
Quadpacer active with additional timing interval of 30 seconds.
◗ Yellow LED in bottom (1st) position: no timing intervals set -
Quadpacer not active.
4 To program the desired setting, release the button when the
LED corresponding to your choice lights up.
B
Note: Selecting 2 1/2 minutes brushing time reduces the number of
brushings available from a fully charged battery.
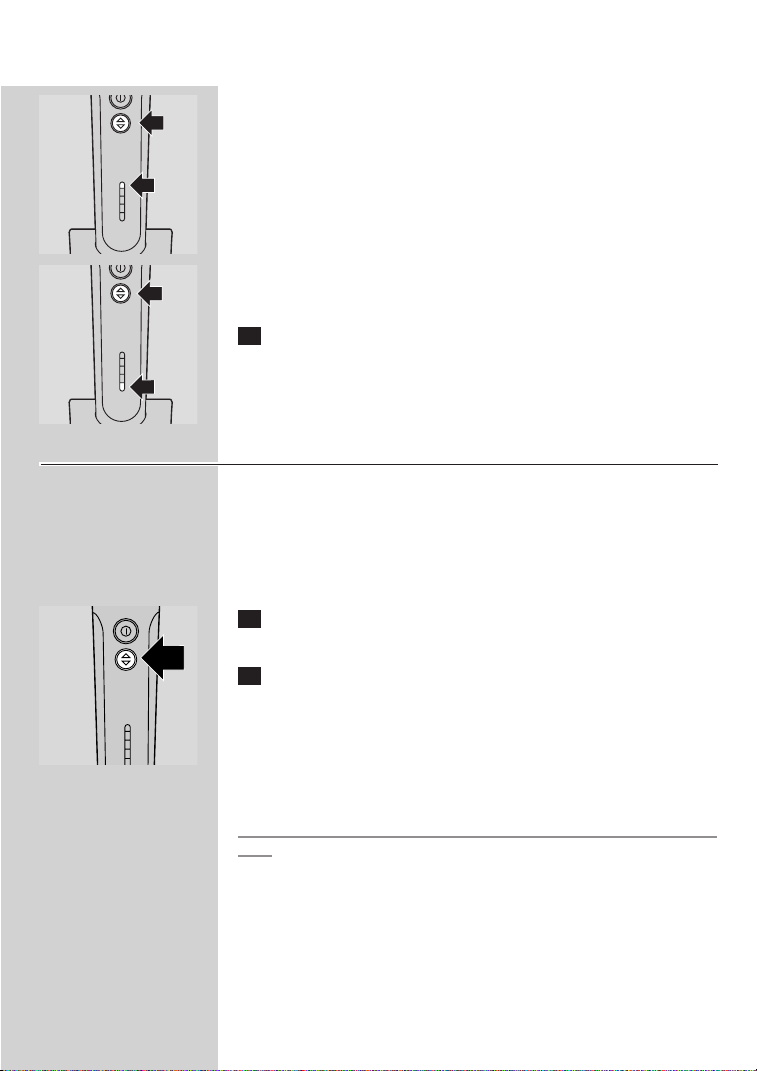
Dual Speed Control
The Dual Speed Control feature allows you to choose between 2 speed
settings: Normal speed for optimum brushing performance, or
Reduced speed when an even more gentle action is desired.
Each time you turn your Sonicare on, it will begin brushing at the
Normal speed setting.To change the speed setting:
1 From Normal to Reduced speed: press the Dual Speed Control
C
button once during brushing.
2 From Reduced to Normal speed: press the Dual Speed Control
button a second time during brushing.
A distinctive two-tone beep indicates that the speed setting has been
changed.
It is recommended that you brush at the Normal speed setting to
maintain optimal results.
The Normal setting should be selected when Sonicare is used in clinical
trials.
Page 12
ENGLISH12
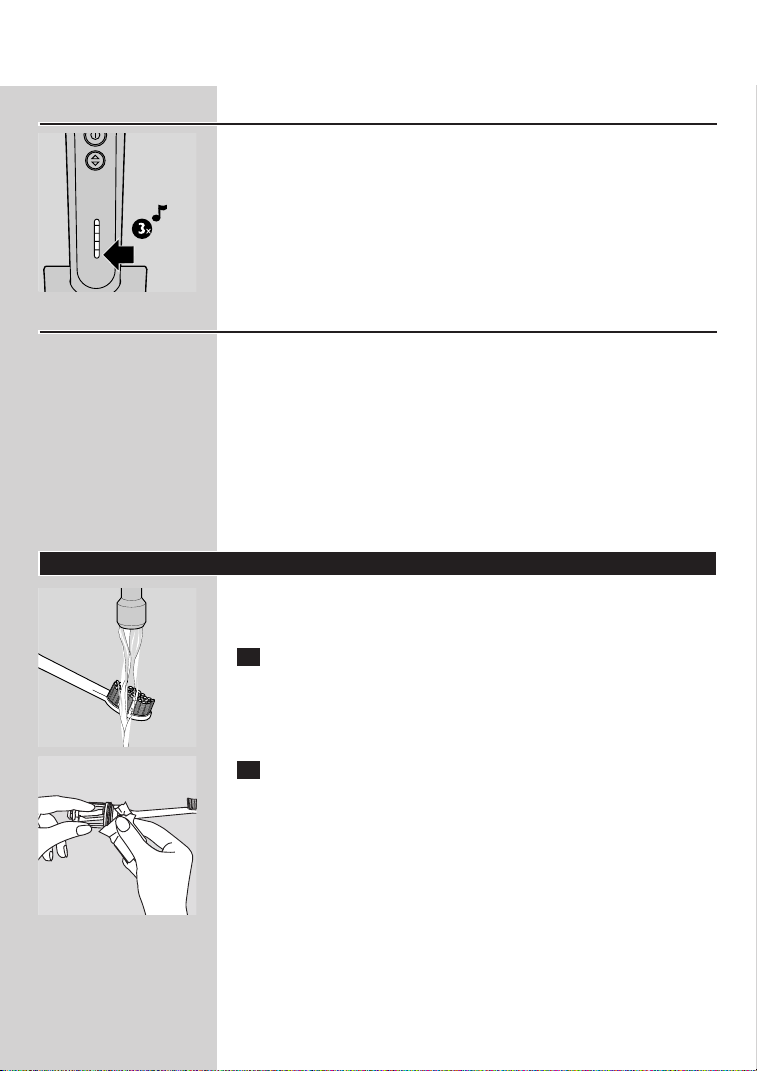
Battery Charge Indicator
◗ If the battery charge of your Sonicare is low, you will hear 3 beeps
C
after you have brushed your teeth for 2 minutes and the charge
indicator LED will blink yellow for 30 seconds.
A low charge indication signifies that 3 or fewer 2-minute brushings
remain.
When not in use, keep your Sonicare in the charger to maintain a full
battery charge.
Multiple-LED charge indicator
◗ When the handle is placed in the charger, the green charge
indicator LEDs will blink in a rising pattern as the battery charges.
The number of blinking LEDs indicates the level to which the
battery has been charged.
When the battery reaches full charge, the LEDs stop blinking and
illuminates continuously. About once a minute, the charge indicator
LEDs go out momentarily and then come back on.This indicates that
the battery is being maintained at full charge.The full charge indication
will persist until the handle is removed from the charger.
The blinking yellow LED indicates that fewer than 3 brushings remain.
Cleaning
By following these simple steps, you should get years of worry-free
brushing:
1 Rinse the brush head and bristles after each use, and air dry
C
C
only.
2 Clean the brush head at least once a week, including under the
nut.
Page 13
ENGLISH 13
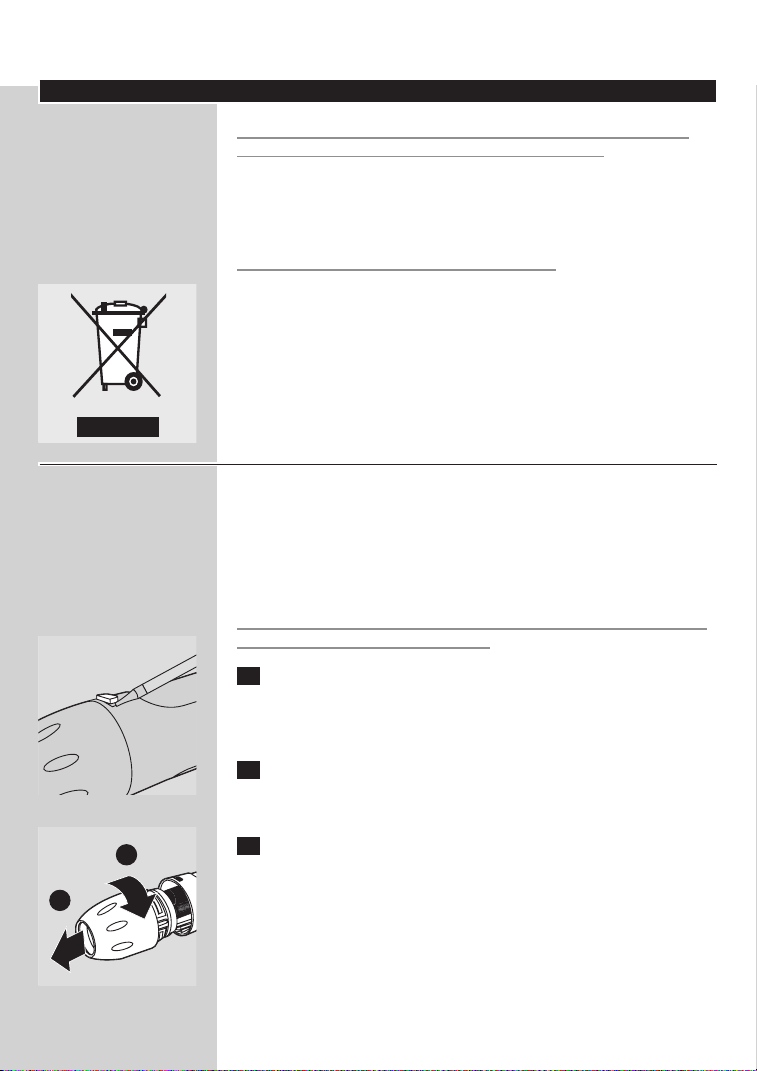
3 To remove the nut:
C
Press down gently on the white area.
Pull the nut over the top of the brush head.
Avoid using sharp objects to push on the seal as this may cause
damage.
4 To replace the nut,slip the nut over the brush head shaft and
C
C
pull until it clicks back on.
5 Clean the handle weekly.
6 Clean the charger periodically.
UNPLUG the charger before cleaning. After cleaning the charger
completely dry the charger before plugging it into an electrical outlet.
Mild soap, water and a moist cloth are recommended for cleaning your
Sonicare handle and charger.
Additional Cleaning Tip:
- The Sonicare handle is dishwasher safe. Remove the brush head and
charger before placing the handle only in the top rack of dishwasher.
NOTE:Brush heads and charger base should never be placed in the
dishwasher.
Storage
If the product is not to be used for an extended period of time it
should be unplugged from the electrical outlet, cleaned, stored in a cool
and dry area away from direct sunlight.The cord wrap can be used to
store power cord in an organized manner.
Replacement
Brush head
Replacing your brush head every 6 months is clinically proven to
remove more plaque.
Use only Sonicare replacement brush heads for this model.
Page 14
ENGLISH14
Battery recycling
HANDLE CONTAINS A NICKEL CADMIUM BATTERY. BATTERY
MUST BE RECYCLED OR DISPOSED OF PROPERLY.
◗ The battery inside your Sonicare cannot be replaced, but is easily
removed for recycling.At the end of product life and prior to
disposal, please remove the battery from the handle by following
the instructions below.
Please note that this process is NOT reversible.
◗ Do not throw the appliance away with the normal household
C
waste at the end of its life, but hand it in at an official collection
point for recycling. By doing this you will help to preserve the
environment.
Removing the batteries
◗ Please note that this process is NOT reversible.
To remove the batteries yourself, you will need a flat-head (standard)
screwdriver. Basic safety precautions should be observed when
following the procedure outlined below. Be sure to protect your eyes,
hands, fingers and the surface on which you are working.
CAUTION
Caution should be exercised when using any household tools (such as
a screwdriver) to remove the battery.
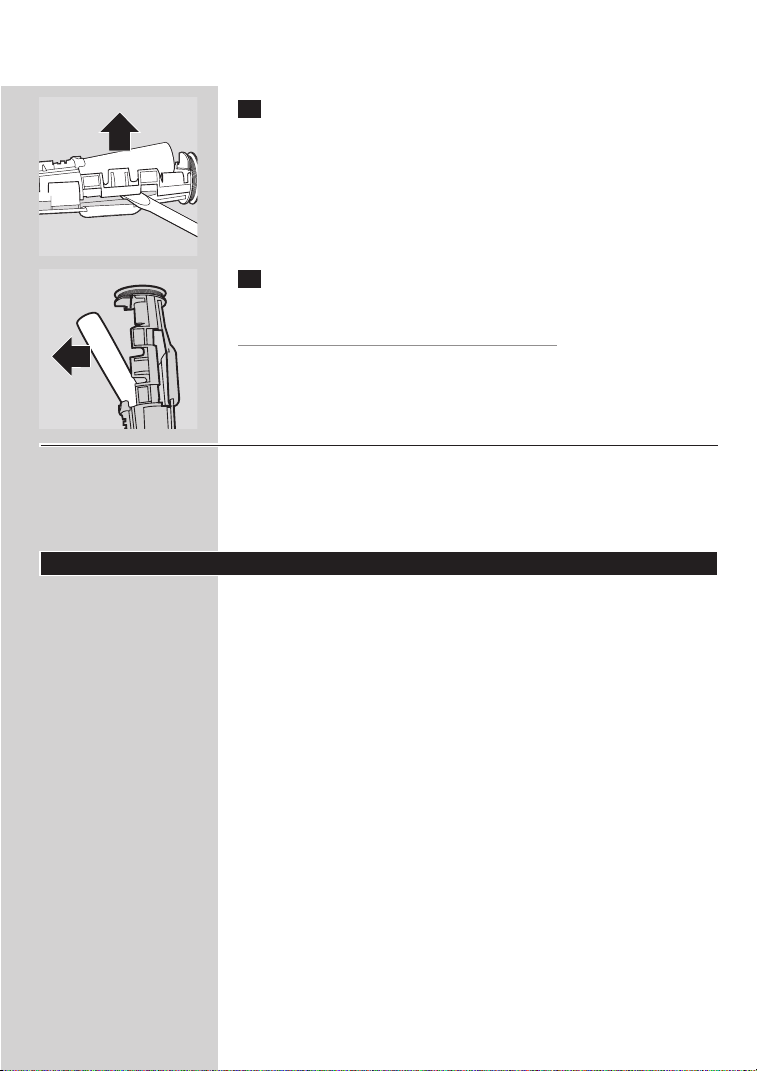
1 Deplete the battery of any charge by removing the handle from
the charger, turning the Sonicare on and allowing it to run until
it stops. Repeat this step until the product will no longer
operate.
2 Remove the soft-touch rib by inserting a screwdriver under it
C
A
B
C
and breaking it out.
3 Remove the nut from the brush head and place it onto the
handle.Tighten the nut onto the handle (A) until the housing
comes loose and then pull the nut forward (B).
The handle internals will come out of the housing along with the nut.
Page 15
ENGLISH 15
4 Insert a screwdriver between the electronic circuit board and
C
C
the plastic part close to each end of the battery; twist and
break the connection between the battery and the electronic
circuit board in 2 locations.
5 Separate the rechargeable battery from the appliance by means
of a screwdriver.
Please note that this process is NOT reversible.
US and Canada
For information on proper battery recycling, please visit the
Rechargeable Battery Recycling Corporation website at www.rbrc.org
or call (678)419-9990. (Philips Oral Healthcare. Inc. is not affiliated with
the RBRC.)
GUARANTEES AND SERVICE
SEE SEPARATE PHILIPS WORLDWIDE GUARANTEE LEAFLET FOR
STANDARD GUARANTEE.
GUARANTEE RESTRICTIONS
WHAT IS NOT COVERED UNDER WARRANTY:
- BRUSH HEADS
- DAMAGE CAUSED BY MISUSE, ABUSE, NEGLECT OR
ALTERATIONS
- NORMAL WEAR AND TEAR, INCLUDING CHIPS, SCRATCHES,
ABRASIONS, DISCOLORATION OR FADING
IMPLIED WARRANTIES
ANY IMPLIED WARRANTIES, INCLUDING IMPLIED WARRANTIES
OF MERCHANTABILITY AND FITNESS FOR A PARTICULAR
PURPOSE, SHALL BE LIMITED TO THE DURATION OF THE
EXPRESS WARRANTIES SET FORTH IN THIS LIMITED WARRANTY.
SOME STATES DO NOT ALLOW LIMITATIONS ON HOW LONG
AN IMPLIED WARRANTY LASTS, SO THE ABOVE LIMITATION MAY
NOT APPLY TO YOU.
LIMITATION OF REMEDIES
IN NO EVENT SHALL PHILIPS ORAL HEALTHCARE, INC. OR ANY
OF ITS AFFILIATED OR SUBSIDIARY COMPANIES BE LIABLE FOR
Page 16

ENGLISH16
ANY SPECIAL, INCIDENTAL OR CONSEQUENTIAL DAMAGES
BASED UPON BREACH OF WARRANTY, BREACH OF CONTRACT,
NEGLIGENCE,TORT, OR ANY OTHER LEGAL THEORY. SUCH
DAMAGES INCLUDE,WITHOUT LIMITATION, LOSS OF SAVINGS
OR REVENUE; LOSS OF PROFIT; LOSS OF USE;THE CLAIMS OF
THIRD PARTIES INCLUDING,WITHOUT LIMITATION,DENTISTS
AND DENTAL HYGIENISTS; AND COST OF ANY SUBSTITUTE
EQUIPMENT OR SERVICES. SOME STATES DO NOT ALLOW THE
EXCLUSION OR LIMITATION OF INCIDENTAL OR
CONSEQUENTIAL DAMAGES, SO THE ABOVE LIMITATION OR
EXCLUSION MAY NOT APPLY TO YOU.
Troubleshooting Guide
If you are unable to solve your problem by means of the troubleshooting guide below,in North
America contact 1-800-682-7664 or contact us online at www.sonicare.com. Outside North
America, contact the Philips Customer Care Center or contact us online at www.philips.com.
Problem
The Sonicare toothbrush does not work
I feel a tickling sensation when I use Sonicare.
The brush head rattles when I use Sonicare.
The brush head chatters against my teeth.
Brushing seems less powerful.
Unpleasant odor
The LED blinks yellow.What does this mean?
The appliance has an extra 30 seconds of
brushing time. What is this for?
Solution
Recharge your Sonicare for at least 24 hours.
Verify your Sonicare is plugged into a live electrical outlet and not into
an outlet controlled by a light switch.
You may need to re-attach or replace the brush head.
You may experience a slight tickling/tingling sensation when using
Sonicare for the first time. As you become accustomed to brushing
with Sonicare, this sensation will diminish.
Sonicare should produce a gentle hum during operation.Tightening
the brush head nut can eliminate excessive rattling. If rattling does not
stop, you may need to replace the brush head.
Make sure you have removed your travel cap before switching the
appliance on.
This can be avoided by keeping the brush head properly oriented,
with the brush head placed on the gumline at an angle of 45 degrees.
The handle may need recharging.
The Easy-start feature may be on and needs to be deactivated (see
'Features').
You may need to clean your brush head.
You may need to replace your brush head.
The Dual speed button may be set to reduced speed.
Clean the handle, brush head and charger thoroughly (see 'Cleaning').
Replace the brush head with a new one.
The blinking yellow LED indicates that fewer than 3 brushings remain.
Recharge your Sonicare for at least 24 hours.
This function provides additional time for brushing troublesome areas
where plaque collects and gum disease starts. It is recommended you
use the extra 30 seconds of brushing time to re-brush troublesome
areas, massage your gums, or brush your tongue (see 'Features').
Page 17

FRANÇAIS 17
Table des matières
Description générale 17
Mises en garde importantes 17
DANGERS 17-18
Avertissements 18
Avertissements médicaux 18-19
Informations Consommateurs 19
Préparation à l'emploi 19-20
Pour charger votre Sonicare 20
Utilisation de l'appareil 20-22
Caractéristiques spéciales 22-25
Nettoyage 26-27
Rangement 27
Remplacement 27
Recyclage des piles 27-28
Garantie et service 29
Résolution de problèmes 30
Description générale
A Capuchon de voyage
B Soies
C Tête de brossage
D Anneau de couleur
E Bague de serrage détachable
F Manche avec adhérence légère
G Bouton marche/arrêt
H Bouton de commande à deux vitesses
I Témoins de charge DEL
J Chargeur
MISES EN GARDE IMPORTANTES
LISEZ CE MODE D'EMPLOI AVANT UTILISATION
La brosse à dents Sonicare\ a été spécialement conçue pour une
utilisation sûre et efficace. Néanmoins,vous devez suivre quelques
mesures de sécurité élémentaires lorsque vous utilisez un produit
électrique, surtout s'il y a des enfants à proximité.
DANGERS
Pour diminuer le risque d'électrocution ou d’incendie:
1) NE branchez PAS le chargeur sur une prise dont le voltage est
inapproprié, car il a été conçu pour être utilisé avec une variation de
voltage précise. Les spécifications de voltage appropriées sont
indiquées au-dessous (ou à l'arrière) du chargeur. Les convertisseurs
de voltage et les adaptateurs de prises NE garantissent PAS la
compatibilité de voltage. Ne forcez jamais la fiche dans une prise.
Page 18

18
FRANÇAIS
2) NE placez PAS et NE rangez PAS le chargeur dans un endroit d'où il
peut tomber ou être tiré dans une baignoire, dans un lavabo ou
dans les toilettes.
3) Ne mettez PAS et NE laissez PAS tomber le chargeur dans l'eau ou
dans tout autre liquide.
4) NE touchez PAS le chargeur s'il est tombé dans l'eau. Débranchez-le
immédiatement.
6) Ne pas utiliser en prenant un bain.
AVERTISSEMENTS
Pour diminuer tout risque de brûlure, d'électrocution, d'incendie ou
d'accident:
1) Une surveillance attentive est nécessaire lorsque ce produit est
utilisé par ou sur des enfants et des personnes handicapées.
2) Si vous êtes incapable de manipuler ce produit de façon appropriée,
arrêtez de l'utiliser.
2) N'utilisez le produit que dans le but pour lequel il est conçu tel que
décrit dans ce mode d'emploi. N'utilisez pas d'accessoires qui n'ont
pas été recommandés par le fabricant.Voir les indications sur le
voltage ci-dessus.
4) N'utilisez jamais le chargeur si le cordon d'alimentation ou la fiche
sont endommagés, si on l'a fait tomber ou si le manche de la brosse
à dents est endommagé de quelque façon que ce soit. Ce produit
ne contient aucune pièce utilisable. Si vous devez le faire réparer,
veuillez consulter la section Informations Consommateurs du
présent manuel et communiquer avec l'un de nos représentants.
5) Ne placez pas le cordon d'alimentation près d'une surface chauffante.
6) Si votre pâte à dents préférée comprend du peroxyde d'hydrogène,
du bicarbonate de sodium ou tout autre bicarbonate (commun dans
les pâtes à dents à action blanchissante), il est important que vous
nettoyiez soigneusement votre tête de brossage sous l'eau avec du
savon après chaque utilisation.
7) N'utilisez pas le charger à l'extérieur.
8) Débrancher le chargeur avant de le nettoyer et s'assurer qu'il est
bien sec avant de rebrancher sur une prise.
9) Les têtes de brossage et le chargeur ne doivent jamais être lavés
dans un lave-vaisselle.
AVERTISSEMENTS MÉDICAUX
1) Consultez votre dentiste avant d'utiliser ce produit si vous avez subi
une chirurgie buccale ou gingivale au cours des 2 derniers mois.
2) Consultez votre dentiste si vos gencives saignent trop après avoir
utilisé ce produit ou si le saignement persiste plus d'une semaine.
3) Si vous avez des questions concernant l'utilisation de l'appareil avec
un stimulateur cardiaque ou tout autre dispositif implanté, consultez
votre médecin traitant ou le fabricant du dispositif implanté avant
utilisation. Sonicare a fait l'objet de tests et est conforme aux
normes de sécurité concernant les dispositifs électromagnétiques.
Page 19

FRANÇAIS
4) N'utilisez pas une tête de brossage avec des soies écrasées ou
tordues. Les soies endommagées peuvent se rompre pendant le
brossage. Pour éviter cela, remplacez les têtes de brossage tous les
6 mois ou plus tôt si des signes d'usure apparaissent.
5) La brosse à dents Sonicare est un appareil prévu pour des soins
personnels et n'est pas destinée à être utilisée sur plusieurs patients
dans les cabinets ou établissements dentaires.
6) Ce produit a été conçu pour le nettoyage des dents, des gencives et
de la langue uniquement. Ne l'utilisez pas pour d'autres fonctions.
Informations Consommateurs
Si vous avez des questions après avoir lu ce mode d'emploi, n'hésitez
pas à communiquer avec le Service Consommateurs ou à visiter notre
site Web.
◗ Service Consommateurs
1 800 682-7664 (Amérique du Nord). Si vous appelez de l'extérieur
de l'Amérique du Nord, communiquez avec le Service
Consommateurs Philips de votre pays.
◗ Informations Internet
www.sonicare.com (Amérique du Nord) www.philips.com (extérieur
de l'Amérique du Nord)
CONSERVEZ CES INSTRUCTIONS
19
Préparation à l'emploi
Pour fixer la tête de brossage Sonicare:
1 Alignez l'avant de la tête de brossage avec l'avant du manche de
C
C
la brosse à dents.Alignez les rainures de la tête de brossage
avec les rainures à l'intérieur de la partie supérieure du manche
et faites coulisser la tête de brossage sur le manche.
2 Tournez la bague de serrage de la tête de brossage dans le sens
des aiguilles d'une montre et vissez-la fermement. Si la tête de
brossage vibre pendant l'utilisation,resserrez la bague.
3 Retirez le capuchon de voyage de la tête de brossage lorsque
vous êtes prêt à vous brosser les dents.
Page 20

20
FRANÇAIS
4 Enroulez le cordon d'alimentation autour du support de
C
rangement au bas du chargeur.
Pour charger votre Sonicare\
La brosse à dents Sonicare est fournie avec les piles complètement
déchargées; elles doivent être chargées pendant au moins 24 heures
au cours des premiers jours d'utilisation.
◗ Il est recommandé de placer votre Sonicare sur le chargeur
lorsque vous ne l'utilisez pas pour garder les piles chargées.
Au moins 24 heures sont nécessaires pour charger complètement
les piles.
1 Assurez-vous que la partie inférieure du manche est
C
correctement fixée sur le chargeur.
◗ Les manches d'autres modèles Sonicare ne peuvent pas être fixés
sur ce chargeur, et ne pourront donc pas être chargés
correctement. N'essayez pas de fixer un autre manche en le
forçant, car vous pourriez causer des dommages.
Utilisation de l'appareil
Conseils utiles
◗ La tête de brossage est fournie avec un capuchon de voyage.
Retirez-le avant de mettre votre Sonicare en marche.
◗ Pour éviter les éclaboussures,placez la tête de brossage dans
votre bouche avant de mettre l'appareil Sonicare en marche et
arrêtez-le avant de la retirer de votre bouche.
◗ Rincez la tête de brossage et les soies après chaque utilisation.
◗ Nettoyez la tête de brossage chaque semaine,y compris sous la
bague de serrage.
◗ Un appareil Sonicare complètement chargé a une autonomie de
fonctionnement d'environ 2 semaines en usage normal (2 minutes
de brossage deux fois par jour). Il est donc très commode, car
vous pouvez partir en voyage sans le chargeur.
Attention: les convertisseurs de voltage et les adaptateurs de prises
NE garantissent PAS la compatibilité de voltage.Vérifiez toujours la
compatibilité de voltage.
Page 21

FRANÇAIS
45
21
Technique de brossage
Suivez ces étapes simples pour tirer le maximum de votre expérience
de brossage.
1 Avant de mettre l'appareil Sonicare en marche, placez les soies
C
1
2
4
3
C
de la tête de brossage sur le rebord gingival à un angle de
45 degrés.
2 Tenez le manche en serrant légèrement,mettez l'appareil
Sonicare en marche et déplacez doucement les soies en
effectuant un petit mouvement circulaire,de manière à ce que
les soies les plus longues passent entre vos dents.Après
quelques secondes, faites glisser les soies vers la section
suivante. Continuez ainsi jusqu'à ce que vous ayez terminé le
cycle de brossage de 2 minutes.
3 Afin d'optimiser l'efficacité de la Sonicare, exercez une pression
douce et laissez la brosse à dents Sonicare brosser vos dents
pour vous. Ne frottez pas.
4 Pour vous assurer que vous brossez bien toutes vos dents,
divisez votre cavité buccale en quatre sections: dents du haut
face externe, dents du haut face interne, dents du bas face
externe et dents du bas face interne. Commencez par la
première section (dents du haut face externe) et brossez vos
dents pendant 30 secondes avant de passer à la deuxième
section (dents du haut face interne). Continuez de brosser
chaque section pendant 30 secondes chacune jusqu'à ce que
les dents des 4 sections aient été brossées et que les 2 minutes
soient écoulées.
5 À la fin du cycle de brossage de 2 minutes, vous devrez brosser
pendant quelque temps la zone de mastication de vos dents.
6 Appuyez sur le bouton marche/arrêt pour mettre la brosse à
dents en marche ou pour l'arrêter.
◗ Vous pouvez aussi brosser votre langue avec la brosse à dents en
marche ou arrêtée, selon votre préférence.
Conseils d'utilisation pour divers soins spéciaux de la cavité
buccale
◗ Éliminer les taches sur les dents
Afin de mieux pouvoir éliminer les taches, brossez les surfaces à risque
plus longtemps.
Page 22

22
5
FRANÇAIS
4
Placez la brosse à un angle de 45 degrés, entre les verrous et le rebord
gingival. En appliquant une légère pression, déplacez doucement les
soies en effectuant un petit mouvement circulaire de manière à ce que
les soies les plus longues passent entre vos dents pendant 2 secondes.
Tournez (faites rouler) ensuite doucement le manche de la brosse de
manière à ce que les soies puissent nettoyer le verrou et le reste de la
dent, puis glissez les soies vers la dent suivante. Continuez ainsi jusqu'à
ce que vous ayez brossé toutes les dents.Veuillez noter que les têtes
de brossage s'usent plus rapidement lorsqu'elles sont utilisées sur un
appareil orthodontique.
◗ Restaurations dentaires (travail dentaire)
Utilisez la brosse à dents Sonicare sur les restaurations dentaires (ex.:
les implants, les jaquettes, les couronnes,les ponts et les obturations)
comme vous le feriez sur les surfaces de dents naturelles afin de
réduire l'accumulation de plaque et d'améliorer la santé de vos
gencives. Passez les soies autour de toutes les surfaces de restauration
pour bien les nettoyer.
◗ Poches parodontales
Votre dentiste vous a peut-être informé que vous avez des poches
parodontales, où la plaque bactérienne peut s'accumuler.Dans ce cas,
après avoir brossé les dents pendant 2 minutes, brossez doucement ces
zones pour améliorer la santé des gencives.
◗ Appareil orthodontique
C
Caractéristiques spéciales
Fonction Easy-start\ La force de brossage augmente
progressivement.
◗ Tous les modèles Sonicare sont dotés de la fonction Easy-start
activée, qui vous aide à vous habituer au brossage avec ce type de
brosse à dents.
◗ La puissance de brossage augmente doucement jusqu'à la
puissance maximale pendant les 14 premières utilisations.
◗ La fonction Easy-start est active si vous entendez 2 bips
immédiatement après avoir mis l'appareil en marche. Lorsqu'il a
atteint la force de brossage maximale (après le 14e cycle de
brossage), vous n'entendrez plus les 2 bips.
B
Remarque : Chacun des 14 premiers cycles de brossage doit durer au
moins 1 minute pour que la fonction Easy-start se déroule correctement.
Pour désactiver ou activer la fonction Easy-start:
1 Fixez la tête de brossage sur le manche.
2 Placez le manche sur le chargeur branché.
Page 23

FRANÇAIS
3 Pour désactiver la fonction Easy-start, appuyez sur le bouton
marche/arrêt du manche (toujours dans le chargeur) pendant
5 secondes.Vous entendrez un bip indiquant que la fonction
Easy-start est désactivée.
4 Pour réactiver la fonction Easy-start, appuyez sur le bouton
marche/arrêt du manche (toujours dans le chargeur) pendant
5 secondes.Vous entendrez deux bips indiquant que la fonction
Easy-start est réactivée.
L'utilisation prolongée de la fonction Easy-start n'est pas recommandée
et diminue l'efficacité de Sonicare pour éliminer la plaque dentaire.
La fonction Easy-start doit être désactivée lorsque la brosse à dents
Sonicare est utilisée pour des essais cliniques.
Fonction Smartimer\ Arrêt automatique après 2 minutes
◗ Tous les modèles Sonicare ont la fonction Smartimer, qui assure
automatiquement la durée de brossage optimale de 2 minutes
recommandée par les dentistes.
◗ Après 2 minutes, la brosse à dents Sonicare s'arrêtera
automatiquement.
◗ Si vous souhaitez effectuer une pause ou arrêter de vous brosser
les dents au cours du cycle de 2 minutes, appuyez sur le bouton
marche/arrêt. Lorsque vous appuyez à nouveau sur ce bouton, la
fonction Smartimer reprend là où elle s'est arrêtée.
23
B
Le Smartimer se remettra automatiquement au début du cycle de
2 minutes de brossage si:
- le brossage est interrompu pendant 30 secondes ou plus;
- le manche est replacé sur le chargeur.
Minuterie Quadpacer\ avec intervalle de 30 secondes
◗ La minuterie Quadpacer s'assure que vous brossez toutes les
1
2
4
3
C
sections de la cavité buccale de façon égale et au complet.Au
cours du cycle de brossage de 2 minutes, vous entendrez un bip
suivi d'une pause dans l'action de brossage à des intervalles de
30, 60 et 90 secondes.
Page 24

24
FRANÇAIS
Minuterie Quadpacer programmable (modèles sélectionnés)
La minuterie Quadpacer programmable vous offre la possibilité de
personnaliser la fonction Quadpacer selon 1 de 3 modalités:
◗ Vous pouvez conserver le réglage par défaut de 2 minutes de
brossage avec la fonction Quadpacer activée.
◗ Vous pouvez choisir de prolonger la durée du brossage à
2,5 minutes en ajoutant un intervalle supplémentaire de
30 secondes avec la fonction Quadpacer activée.
◗ Vous pouvez choisir une durée de brossage de 2 minutes, avec la
fonction Quadpacer désactivée.
Pour changer les réglages du Quadpacer:
1 Placez le manche sur le chargeur branché sur une prise de
courant alimentée.
2 Appuyez brièvement sur le bouton de contrôle à deux vitesses
C
C
et observez quels témoins lumineux DEL sont allumés.
3 Appuyez et maintenez appuyé le bouton de contrôle à deux
vitesses pendant que les témoins lumineux parcourent
lentement le temps d'intervalle des options d'installation:
◗ Témoin vert sur la position 4: la fonction Quadpacer est active
(réglage par défaut).
◗ Témoin vert sur la position supérieure (5e): réglage de 2,5 minutes
C
C
- la fonction Quadpacer est active avec une durée supplémentaire
de 30 secondes.
◗ Témoin jaune sur la position inférieure (1ère): aucun intervalle
réglé la fonction Quadpacer est désactivée.
4 Pour programmer le réglage souhaité,relâchez le bouton
lorsque le témoin correspondant à votre choix s'allume.
B
Remarque: La sélection de la durée de brossage de 2,5 minutes diminue
le nombre de cycles de brossage disponibles d'avec une brosse à dents
complètement chargée.
Page 25

FRANÇAIS
Contrôle à deux vitesses
La fonction Contrôle à deux vitesses vous permet de choisir entre
2 réglages de vitesse: vitesse normale pour une performance de
brossage optimale ou vitesse réduite pour un brossage plus doux.
Chaque fois que vous mettez votre appareil Sonicare en marche, la
brosse à dents commence par le réglage vitesse normale. Pour changer
le réglage de vitesse:
1 De la vitesse normale à la vitesse réduite: appuyez sur le bouton
C
de contrôle à deux vitesses une fois pendant le brossage.
2 De la vitesse réduite à la vitesse normale: appuyez sur le
bouton de contrôle à deux vitesses une deuxième fois pendant
le brossage.
Un bip distinctif à double tonalité se fait entendre pour indiquer que le
réglage de vitesse a été modifié.
Pour obtenir des résultats optimaux, il est recommandé de vous
brosser les dents en utilisant la vitesse normale.
Lorsque la brosse à dents Sonicare est utilisée pour des essais cliniques
le réglage vitesse normale doit être utilisé.
Témoin de charge des piles
◗ Si la charge des piles de l'appareil Sonicare est faible, vous
C
entendrez 3 bips à la fin du cycle de brossage de 2 minutes et le
témoin de charge DEL s'allumera en jaune et clignotera
rapidement pendant 30 secondes.
Le témoin de charge faible vous indique qu'il y a encore un maximum
de 3 cycles de 2 minutes de brossage restants.
Placez votre Sonicare sur le chargeur lorsque vous ne l'utilisez pas pour
que les piles demeurent complètement chargées.
25
Témoin de charge DEL multiple
◗ Lorsque vous mettez le manche sur le chargeur, les témoins de
charge verts commencent à clignoter un à un au fur et à mesure
que les piles se chargent. Le nombre des témoins allumés
clignotants indique le niveau de charge des piles.
Lorsque les piles sont complètement chargées, les témoins restent
allumés sans clignoter. Une fois à chaque minute, les témoins de charge
s'éteignent pendant un instant et se rallument à nouveau. Cela signifie
que les piles restent complètement chargées. Les témoins pour piles
complètement chargées restent allumés jusqu'à ce que le manche soit
retiré du chargeur.
Le témoin jaune clignotant indique qu'il reste moins de 3 cycles de
brossage.
Page 26

26
FRANÇAIS
Nettoyage
Si vous suivez ces étapes simples, vous ne vous soucierez plus du
brossage de vos dents pendant des années:
1 Rincez la tête de brossage et les soies après chaque utilisation
C
C
C
et laissez toujours sécher à l'air.
2 Nettoyez la tête de brossage au moins une fois par semaine,y
compris sous la bague de serrage.
3 Pour retirer la bague de serrage:
Appuyez doucement sur le système de fermeture.
Poussez la bague de serrage vers le haut pour l'ôter de la tête de
brossage.
N'utilisez pas d'objets pointus pour appuyer sur le système de
fermeture pour ne pas l'endommager.
4 Pour replacer la bague de serrage, coulissez-la le long du
C
C
manche jusqu'à ce que vous entendiez un clic.
5 Nettoyez le manche chaque semaine.
6 Nettoyez le chargeur périodiquement.
DÉBRANCHEZ le chargeur avant le nettoyage.Après le nettoyage du
chargeur,séchez-le complètement avant de le brancher sur une prise
de courant.
Page 27

FRANÇAIS
Vous pouvez nettoyer le chargeur et le manche de votre Sonicare à
l'aide d'un chiffon humide et d'un savon doux.
Conseil de nettoyage supplémentaire:
- Le manche Sonicare peut être nettoyé dans le lave-vaisselle. Retirez
la tête de brossage et le chargeur avant de placer le manche
seulement sur la grille supérieure du lave-vaisselle.
REMARQUE: Il ne faut jamais placer les têtes de brossage ni le
chargeur dans le lave-vaisselle.
Rangement
Si vous prévoyiez que l'appareil ne sera pas utilisé pour une période de
temps prolongée, il devrait être débranché, nettoyé et rangé dans un
endroit frais et sec à l'abri des rayons du soleil. Le support de
rangement peut être utilisé pour ranger le cordon d'alimentation.
Remplacement
Tête de brossage
Remplacez aux 6 mois : il a été cliniquement prové qu'elle enlève plus
de plaque.
N'utilisez que les modèles de remplacement de têtes de brossage
Sonicare pour ce modèle.
Recyclage des piles
27
LE MANCHE CONTIENT UNE PILE DE NICKEL-CADMIUM QUI
DOIT ÊTRE RECYCLÉE OU DÉPOSÉE DANS UN ENDROIT
ASSIGNÉ À CET EFFET.
◗ Les piles de votre Sonicare ne peuvent pas être remplacées, mais
peuvent être facilement retirées pour être recyclées. À la fin de la
durée utile du produit et avant de le jeter,veuillez retirer les piles
du manche en suivant les instructions ci-dessous.
Veuillez noter que ce processus n'est PAS réversible.
◗ Lorsqu'il ne fonctionne plus, ne jetez pas l'appareil avec les
C
ordures ménagères;déposez-le plutôt dans un point de collecte
de recyclage officiel.Vous contribuerez ainsi à la protection de
l'environnement.
Retirer les piles
◗ Veuillez noter que ce processus n'est PAS réversible.
Pour retirer les piles vous-même, il vous faudra un tournevis (standard)
à tête plate. Il est essentiel d'observer les mesures de sécurité
fondamentales lorsque vous effectuez la procédure indiquée ci-
Page 28

28
FRANÇAIS
B
A
dessous.Veillez à protéger vos yeux, mains et doigts, ainsi que la surface
sur laquelle vous travaillez.
AVERTISSEMENT
La prudence est de mise lorsque vous utilisez des outils (tel que le
tournevis) pour retirer les piles.
1 Déchargez les piles en retirant le manche du chargeur, en
mettant l'appareil en marche et en le laissant fonctionner
jusqu'à l'arrêt complet. Répétez la procédure jusqu'à ce que
l'appareil Sonicare ne fonctionne plus.
2 Retirez la plaque rainurée en introduisant un tournevis au-
C
C
dessous et en la cassant.
3 Retirez la bague de serrage de la tête de brossage et fixez-la
sur le manche. Serrez-la ensuite (A) jusqu'à ce que l'enveloppe
extérieure se détache et poussez la bague de serrage en avant
(B).
Le contenu du manche sortira de l'enveloppe extérieure avec la bague
de serrage.
4 Insérez un tournevis entre la plaque du circuit imprimé et la
C
C
partie en plastique près du fond des piles. Dévissez et cassez
les connections entre les piles et le circuit imprimé en
2 endroits.
5 Séparez les piles rechargeables de l'appareil à l'aide d'un
tournevis.
Veuillez noter que ce processus n'est PAS réversible.
États-Unis et Canada
Pour de l'information sur le recyclage approprié des piles, veuillez
visiter le site Web de la Rechargeable Battery Recycling Corporation à
l'adresse www.rbrc.org ou téléphonez à (678) 419-9990. (Philips Oral
Healthcare, Inc. n'est pas affiliée à RBRC).
Page 29

FRANÇAIS
GARANTIES ET SERVICE
CONSULTEZ SÉPARÉMENT LE DÉPLIANT SUR LA GARANTIE
INTERNATIONALE PHILIPS POUR LA GARANTIE STANDARD.
RESTRICTIONS DE GARANTIE
NE SONT PAS COUVERTS PAR LA GARANTIE:
- TÊTES DE BROSSAGE
- LES DOMMAGES CAUSÉS PAR UNE MAUVAISE UTILISATION,
NÉGLIGENCE OU ALTÉRATION OU ENCORE PAR UN ABUS.
- LES DÉTÉRIORATIONS QUI SONT DUES À L'USURE NORMALE
COMME LES FRAGMENTS, RAYURES,ABRASIONS ET
DÉCOLORATIONS.
GARANTIES IMPLICITES
TOUTES LES GARANTIES IMPLICITES,Y COMPRIS LES GARANTIES
DE QUALITÉ MARCHANDE ET D'ADAPTATION À UN USAGE
PARTICULIER, SONT LIMITÉES À LA DURÉE DES GARANTIES
EXPRESSES ÉNONCÉES DANS CETTE GARANTIE RESTREINTE.
COMME CERTAINS ÉTATS NE RECONNAISSENT PAS LES
RESTRICTIONS DE DURÉE DES GARANTIES IMPLICITES, LES
RESTRICTIONS CI-DESSUS PEUVENT NE PAS S'APPLIQUER À
VOUS.
RESTRICTION DES RECOURS
NI LA SOCIÉTÉ PHILIPS ORAL HEALTHCARE, INC. NI AUCUNE DE
SES SOCIÉTÉS ASSOCIÉES OU FILIALES NE POURRONT EN
AUCUN CAS ÊTRE TENUES RESPONSABLES POUR DES
DOMMAGES SPÉCIFIQUES,ACCESSOIRES OU CORRÉLATIFS À LA
SUITE D'UNE RUPTURE DE LA GARANTIE, D'UNE RUPTURE DE
CONTRAT, D'UNE NÉGLIGENCE,D'UNE FAUTE DÉLICTUELLE OU
DE TOUTE AUTRE THÉORIE LÉGALE. DE TELS DOMMAGES
COMPRENNENT, SANS S'Y LIMITER, UNE PERTE D'ÉCONOMIES
OU DE REVENUS; UNE PERTE DE PROFITS; UNE PERTE DE
JOUISSANCE; LES REVENDICATIONS DE TIERS,Y COMPRIS, SANS
S'Y LIMITER, LES DENTISTES ET HYGIÉNISTES DENTAIRES; AINSI
QUE LE COÛT D'ÉQUIPEMENTS OU DE SERVICES DE
REMPLACEMENT. COMME CERTAINS ÉTATS NE RECONNAISSENT
PAS L'EXCLUSION OU LA LIMITATION DES DOMMAGES
ACCESSOIRES OU CORRÉLATIFS, LES RESTRICTIONS OU
EXCLUSIONS CI-DESSUS PEUVENT NE PAS S'APPLIQUER À
VOUS.
29
Page 30

FRANÇAIS30
Guide de résolution de problèmes
Si vous ne pouvez pas résoudre le problème à l'aide du guide de résolution de problèmes ci-dessous
et que vous êtes en Amérique du Nord, téléphonez-nous au 1 800 682-7664 ou écrivez-nous à
l'adresse www.sonicare.com. Si vous êtes à l'extérieur de l'Amérique du Nord, adressez-vous à un
Centre Service Consommateurs Philips local ou communiquez avec nous en ligne à l'adresse
www.philips.com.
Problème
La brosse à dents Sonicare ne fonctionne pas.
J'ai une sensation de chatouillement lorsque
j'utilise la brosse à dents Sonicare.
La tête de brossage produit un cliquetis
lorsque j'utilise l'appareil Sonicare.
La tête de brossage «cliquète» sur les dents.
La force du brossage a diminué.
Odeur désagréable
Le témoin lumineux est jaune et clignote.
Qu'est-ce que cela signifie?
L'appareil a une durée de brossage
supplémentaire de 30 secondes. À quoi sertelle?
Solution
Rechargez votre brosse à dents pendant au moins 24 heures.
Assurez-vous que votre appareil Sonicare est branché sur une prise de
courant alimentée qui n'est pas contrôlée par un interrupteur.
Vous devez probablement refixer ou remplacer la tête de brossage.
Il est fort possible que vous ressentiez un léger chatouillement ou
fourmillement lorsque vous utilisez la brosse à dents Sonicare pour la
première fois. Cette sensation diminuera au fur et à mesure que vous
vous habituerez à la brosse à dents Sonicare.
L'appareil Sonicare peut produire une vibration légère lorsqu'il est en
marche. Resserrer la bague de serrage peut éliminer les vibrations
excessives. Si elles ne cessent pas, vous devrez probablement remplacer
la tête de brossage.
Assurez-vous que vous avez retiré le capuchon de voyage avant de
mettre l'appareil en marche.
Ceci peut être évité en dirigeant correctement la tête de brossage, soit
en plaçant les soies sur le rebord gingival à un angle de 45 degrés.
Le manche doit probablement être rechargé.
La fonction Easy-start est peut-être activée et doit être désactivée
(voir «Caractéristiques»).
Vous devez probablement nettoyer la tête de brossage.
Vous devez probablement remplacer la tête de brossage.
Le bouton de contrôle à deux vitesses est peut-être réglé à vitesse
réduite.
Nettoyez le manche, la tête de brossage et le chargeur soigneusement
(voir «Nettoyage»).
Remplacez la tête de brossage.
Le témoin jaune clignotant indique qu'il y a moins de 3 cycles de
brossage restants. Rechargez votre Sonicare pendant au moins
24 heures.
Cette fonction offre quelques secondes supplémentaires de brossage
des zones prédisposées au risque de l'apparition de la plaque et de
maladies des gencives. Il est recommandé d'utiliser ces 30 secondes
pour brosser à nouveau les zones à risque, pour masser les gencives ou
pour brosser votre langue (voir «Caractéristiques spéciales»).
Page 31

ESPAÑOL 31
Indice de Contenidos
Discripcion general 31
Precauciones importantes 31
Peligros 31-32
Advertencias 32
Advertencias médicas 32-33
Servicio de Información al Cliente 33
Preparación para su uso 33-34
Carga de Sonicare 34
Uso del aparato 34-36
Características 36-39
Limpieza 40-41
Almacenamiento 41
Sustitución 41
Reciclado de las baterías 41-42
Garantías y servicio 43
Guía de solución de problemas 44
Descripción general
A Capuchón
B Cerdas
C Cabezal del cepillo
D Arandela de código de color
E Tuerca desmontable
F Mango con empuñadura suave
G Botón de encendido/apagado
H Botón de control de 2 velocidades
I Pilotos LED de carga
J Cargador
PRECAUCIONES IMPORTANTES
LEA TODAS LAS INSTRUCCIONES ANTES DE
USARLO
Sonicare\ ha sido diseñado cuidadosamente teniendo en cuenta tanto
la eficacia como la seguridad. Sin embargo,se deben seguir siempre
unas precauciones básicas de seguridad al usar cualquier producto
eléctrico, especialmente cuando haya niños.
PELIGROS
Para reducir el riesgo de electrocución o incendio:
1) NO conecte el cargador a una toma de corriente de voltaje
incorrecto. Este producto se ha diseñado para utilizarlo con un
voltaje eléctrico determinado. Consulte las especificaciones de
voltaje en la base (o parte posterior) del cargador. Los
convertidores de voltaje y los adaptadores NO garantizan la
compatibilidad del voltaje. No fuerce nunca la clavija en el enchufe.
Page 32

32
ESPAÑOL
2) NO coloque ni guarde el cargador en un lugar desde donde pueda
caerse a una bañera, un lavabo o un inodoro.
3) NO coloque ni deje caer el cargador en agua ni en ningún otro
líquido.
4) NO intente coger un cargador que se haya caído al agua.
Desenchúfelo inmediatamente.
5) NO lo utilice mientras se baña.
ADVERTENCIAS
Para reducir el riesgo de quemaduras, electrocución, incendio o daños:
1) Es necesaria una estricta supervisión cuando este producto lo
utilicen niños o personas discapacitadas.
2) Si no puede utilizar este producto correctamente, deje de utilizarlo.
3) Utilice este producto sólo para el uso para el que está destinado tal
como se describe en este folleto. No utilice accesorios distintos a
los recomendados por el fabricante. Consulte la información
anterior sobre el voltaje.
4) No enchufe el cargador si tiene el cable o la clavija estropeados, si
se ha caído o si el mango del cepillo tiene algún tipo de deterioro.
Este producto no tiene piezas de recambio. Si es necesaria una
reparación, consulte la sección Servicio de Información al Cliente de
este manual y póngase en contacto con uno de nuestros
representantes.
5) Mantenga el cable de red alejado de superficies calientes.
6) Si su dentífrico favorito contiene peróxido, bicarbonato sódico u
otro bicarbonato (frecuentes en los dentífricos blanqueadores), es
importante que limpie bien el cabezal del cepillo con agua y jabón
después de cada uso.
7) No use el cargador en exteriores.
8) Desenchufe el cargador antes de limpiarlo y asegúrese the que esté
seco antes de enchufarlo a una toma de corriente.
9) Los cabezales del cepillo y el cargador no deben introducirse nunca
en el lavavajillas para limpiarlos.
ADVERTENCIAS MÉDICAS
1) Consulte a su dentista o higienista dental antes de utilizar este
producto si ha sufrido cirugía oral o de las encías en los 2 últimos
meses.
2) Consulte a su dentista o higienista dental si se produce un sangrado
excesivo después de usar este producto, o si el sangrado continúa
produciéndose después de 1 semana de uso.
3) Si tiene cualquier duda respecto a su uso con un marcapasos u otro
dispositivo implantado, consulte a su médico o al fabricante del
dispositivo implantado antes de usarlo. Sonicare ha sido sometido a
pruebas y cumple las normas de seguridad para dispositivos
electromagnéticos.
Page 33

ESPAÑOL
4) Evite usar un cabezal del cepillo si tiene las cerdas aplastadas o
dobladas. Las cerdas deterioradas pueden romperse durante el
cepillado. Con el fin de evitarlo, sustituya el cabezal del cepillo por
uno nuevo cada 6 meses o antes si aparecen signos de desgaste.
5) El cepillo dental Sonicare es un aparato de higiene personal y no ha
sido concebido para su uso en múltiples pacientes de clínicas
dentales o instituciones.
6) Este producto está diseñado para limpiar sólo los dientes, las encías
y la lengua. No lo use para ningún otro fin.
Servicio de Información al Cliente
Si después de leer este manual tiene alguna pregunta, no dude en
ponerse en contacto con el Centro de Atención al Cliente o visitar
nuestra página Web.
◗ Centro de Atención al Cliente
1-800-682-7664 (en Norteamérica). Fuera de Norteamérica, póngase
en contacto con el Centro de Atención al Cliente de Philips en su país.
◗ Información en Internet
www.sonicare.com (Norteamérica) www.philips.com (fuera de
Norteamérica)
CONSERVE ESTAS
33
INSTRUCCIONES
Preparación para su uso
Para fijar el cabezal del cepillo Sonicare:
1 Alinee la parte frontal del cabezal con la parte frontal del
C
C
mango del cepillo. Haga coincidir las varillas del cabezal con las
muescas del interior de la parte superior del mango, y deslice
el cabezal del cepillo en el mango.
2 Enrosque la tuerca del cabezal en el sentido de las agujas del
reloj hasta que quede bien apretado. Si el cabezal vibra durante
el cepillado, apriete más la tuerca.
Page 34

34
ESPAÑOL
3 Quite el capuchón del cabezal cuando esté listo para el
cepillado.
4 Utilice el recogecable de la base del cargador para guardar el
C
cable sobrante.
Carga de Sonicare\
El cepillo Sonicare viene con las baterías completamente descargadas, y
debe cargarse durante al menos 24 horas durante los primeros días de
uso.
◗ Se recomienda dejar el cepillo Sonicare en el cargador mientras
no se esté utilizando, con el fin de mantener la batería totalmente
cargada. Se necesitan al menos 24 horas para cargar
completamente la batería de Sonicare.
1 Asegúrese de que el mango encaja perfectamente en el
C
cargador y que hace buen contacto.
◗ Los mangos de otros modelos de Sonicare no encajan en este
cargador, y por tanto no se cargarán correctamente. No intente
encajar a la fuerza un mango en este cargador, ya que podría
dañarlo.
Uso del aparato
Consejos útiles
◗ El cabezal del cepillo tiene un práctico capuchón. Retire el
capuchón del cabezal antes de encender su Sonicare.
◗ Introduzca el cabezal del cepillo en su boca antes de poner su
Sonicare en marcha,y asegúrese de apagarlo antes de sacarlo de
su boca. De lo contrario, la pasta de dientes podría salpicar.
◗ Enjuague siempre el cabezal y las cerdas después de cada uso.
◗ Limpie el cabezal del cepillo cada semana, incluyendo la zona de
debajo de la tuerca.
◗ Un cepillo Sonicare totalmente cargado proporciona
aproximadamente 2 semanas de uso regular (2 minutos de
cepillado 2 veces al día). Esto hace que se pueda llevar de viaje sin
el cargador.
Recuerde: los convertidores de voltaje y los adaptadores para el
enchufe NO garantizan la compatibilidad de voltaje. Compruebe
siempre si el voltaje es compatible.
Page 35

ESPAÑOL
45
5
35
Técnica de cepillado
Siga estos sencillos pasos para maximizar su experiencia de cepillado:
1 Antes de encender el cepillo Sonicare, coloque las cerdas del
C
1
2
4
3
C
cabezal sobre la línea de las encías formando un ángulo de
45 grados.
2 Sujete ligeramente el mango y ponga en marcha el cepillo
Sonicare. Mueva con suavidad las cerdas con pequeños
movimientos circulares,para que las cerdas más largas lleguen
a las zonas interdentales.Transcurridos unos segundos, deslice
las cerdas a la siguiente sección. Repita esta operación hasta
completar un ciclo de cepillado de 2 minutos.
3 Para maximizar la eficacia de Sonicare, ejerza sólo una ligera
presión y deje que Sonicare se encargue del cepillado.
No frote.
4 Para asegurarse el cepillado uniforme de toda la boca, divida la
cavidad bucal en 4 secciones: parte superior externa de los
dientes, superior interna, inferior externa e inferior interna.
Comience el cepillado en la sección 1 (parte superior externa)
y cepille durante 30 segundos antes de pasar a la sección
2 (parte superior interna). Cepille cada una de las cuatro
secciones durante 30 segundos, hasta completar los 2 minutos.
5 Tras completar el ciclo de cepillado de 2 minutos, emplee un
tiempo adicional para cepillar la superficie de masticación de
los dientes.
6 Presione el botón de encendido/apagado para encender o
apagar el cepillo, según lo necesite.
◗ También puede cepillarse la lengua, con el cepillo encendido o
apagado, como prefiera.
Consejos para cuidados bucales específicos
◗ Eliminación de manchas dentales
En zonas donde se formen manchas, cepille durante unos segundos
más para ayudar a eliminarlas.
4
◗ Aparatos correctores
C
Debe colocar el cepillo formando un ángulo de 45 grados entre los
correctores y la línea de las encías. Ejerciendo una ligera presión, mueva
las cerdas haciendo pequeños movimientos circulares de forma que las
cerdas largas lleguen a las zonas interdentales durante 2 segundos.
Después gire con suavidad el mango del cepillo para que las cerdas
limpien el bracket y el resto del diente antes de pasar al siguiente
Page 36

36
ESPAÑOL
diente. Repita esta operación hasta que haya cepillado todos los
dientes.Tenga en cuenta que los cabezales del cepillo se gastarán antes
cuando se utilicen sobre ortodoncias.
◗ Restauraciones dentales
Utilice el cepillo Sonicare sobre las restauraciones dentales (tales como
implantes, fundas, coronas,puentes y empastes) tal y como lo haría
sobre sus dientes normales para reducir la placa y mejorar la salud de
las encías. Mueva las cerdas por todas las zonas de la restauración para
una limpieza completa.
◗ Bolsas periodontales
Quizás su dentista o higienista dental le haya dicho que tiene bolsas
periodontales, bolsas profundas en las que se acumula la placa
bacteriana. Si es así, después del cepillado de dos minutos, cepille
suavemente estas zonas durante un tiempo adicional para mejorar la
salud de sus encías.
Características
Aumento de potencia del cepillado Easy-start\
◗ Todos los modelos Sonicare incluyen la función Easy-start (fácil
encendido) activada, que le ayuda a acostumbrarse al cepillado
con Sonicare.
◗ Durante los catorce primeros usos,la potencia de cepillado irá
aumentando progresivamente hasta alcanzar la potencia total.
◗ La función Easy-start está activada si inmediatamente después de
encender el cepillo Sonicare escucha dos pitidos. Una vez
alcanzada la potencia de cepillado óptima (tras los catorce
primeros usos), ya no oirá el doble pitido al comenzar a cepillarse.
B
Nota: los 14 primeros cepillados deben tener una duración de al menos
1 minuto, para que el ciclo de regulación de cepillado Easy-start
funcione correctamente.
Para desactivar o activar la función Easy-start:
1 Fije el cabezal del cepillo al mango.
2 Coloque el mango en la base del cargador enchufada.
3 Para desactivar la función Easy-start: mientras el mango está en
la base del cargador, mantenga pulsado el botón de
encendido/apagado durante 5 segundos. Oirá un pitido que
indica que se ha desactivado la función Easy-start.
Page 37

ESPAÑOL
4 Para volver a activar la función Easy-start: mientras el mango
está en la base del cargador, mantenga pulsado el botón de
encendido/apagado durante 5 segundos. Oirá 2 pitidos que
indican que se ha activado la función Easy-start.
No se recomienda utilizar la función Easy-start más allá del periodo
inicial de regulación, ya que reduce la eficacia del cepillo Sonicare para
eliminación de la placa.
La función Easy-start se debe desactivar cuando se utilice el cepillo
Sonicare en ensayos clínicos.
Temporizador Smartimer\ de 2 minutos.
◗ Todos los modelos Sonicare incorporan la función Smartimer
(temporizador inteligente), que automáticamente cronometra el
ciclo de cepillado de dos minutos que recomiendan los dentistas.
◗ Transcurridos 2 minutos, el cepillo Sonicare se apagará
automáticamente.
◗ Si desea interrumpir o parar el cepillado durante esos dos
minutos, pulse el botón de encendido/apagado.Vuelva a pulsar el
botón de encendido/apagado y la función Smartimer continuará
desde donde se detuvo.
B
Smartimer se volverá a ajustar automáticamente al inicio de un ciclo de
2 minutos si:
- se detiene el cepillado durante 30 segundos o más,
- se vuelve a colocar el mango en el cargador.
37
Temporizador Quadpacer\ de intervalos de 30 segundos
◗ Quadpacer asegura que se cepilla todas las secciones de la boca de
1
2
C
forma uniforme y completa. Cuando realice un ciclo de cepillado de
2 minutos, oirá un pitido breve y notará una pequeña pausa en la
acción de cepillado en intervalos de 30, 60 y 90 segundos.
4
3
Temporizador Quadpacer programable (sólo en modelos
seleccionados)
El temporizador programable Quadpacer ofrece la posibilidad de
personalizar la función Quadpacer de una de estas 3 maneras:
◗ Puede optar por mantener el tiempo de cepillado de 2 minutos
definido de fábrica y la función de Quadpacer activada.
Page 38

38
ESPAÑOL
◗ Puede ampliar el tiempo de cepillado a dos minutos y medio,
añadiendo un intervalo adicional de 30 segundos con la función
de Quadpacer activada.
◗ Puede elegir un tiempo de cepillado de 2 minutos, pero con la
función de Quadpacer desactivada.
Para cambiar las posiciones del Quadpacer:
1 Coloque el mango en el cargador enchufado a una toma de
corriente activa.
2 Pulse brevemente el botón de control de velocidad dual y
C
C
observe qué piloto se ilumina.
3 Mantenga pulsado el botón de control de velocidad dual.
Manténgalo pulsado mientras se van iluminando los pilotos de
las opciones de intervalos de tiempo:
◗ Piloto verde en posición 4: Quadpacer activado (posición
predeterminada).
◗ Piloto verde en la posición superior (5ª): posición de 2,5 minutos.
C
C
Quadpacer activado con un intervalo de tiempo adicional de
30 segundos.
◗ Piloto amarillo en la posición inferior (1ª): ningún intervalo de
tiempo establecido; Quadpacer no está activado.
4 Para programar la opción deseada, suelte el botón cuando se
ilumine el piloto que se corresponda con dicha opción.
B
Nota: si selecciona un tiempo de cepillado de dos minutos y medio, se
reduce el número de cepillados disponibles con una batería
completamente cargada.
Page 39

ESPAÑOL
Control de velocidad dual
El control de velocidad dual permite elegir entre dos velocidades:
velocidad normal para un cepillado óptimo o velocidad reducida
cuando se desea un cepillado más suave.
Cada vez que encienda el cepillo Sonicare, éste comenzará a cepillar a
la velocidad normal. Para cambiar la velocidad:
1 De velocidad normal a reducida: durante el cepillado pulse el
C
botón de control de velocidad dual una vez.
2 De velocidad reducida a normal: durante el cepillado pulse el
botón de control de velocidad dual una segunda vez.
Un pitido de dos tonos indica que se ha cambiado la velocidad.
Se recomienda cepillar a velocidad normal para obtener un resultado
óptimo.
Se debe seleccionar la velocidad normal si se utiliza el cepillo Sonicare
en ensayos clínicos.
Indicador de carga de la batería
◗ Si el cepillo Sonicare tiene la batería baja, oirá tres pitidos después
C
de cepillarse durante dos minutos y el botón de indicador de
carga parpadeará en color amarillo durante 30 segundos.
El indicador de batería baja indica que quedan 3 cepillados o menos de
2 minutos.
Cuando no lo use, deje el cepillo Sonicare en el cargador para
mantener la batería llena.
39
Indicador de carga con varios pilotos
◗ Cuando el mango esté colocado en el cargador, el piloto verde
parpadeará cada vez más rápido a medida que la batería se carga.
El número de pilotos parpadeando indica el nivel de carga de la
batería.
Cuando la batería se carga completamente, el piloto dejará de
parpadear y permanecerá iluminado. Una vez cada minuto,
aproximadamente, el piloto del indicador de carga se apaga y se vuelve
a encender. Esto indica que la batería se mantiene completamente
cargada. El indicador de carga completa permanecerá hasta que se
retire el mango del cargador.
El piloto amarillo parpadeante indica que quedan menos de tres
cepillados.
Page 40

40 ESPAÑOL
Limpieza
Siguiendo estos sencillos consejos, disfrutará de años de cepillado sin
preocupaciones:
1 Enjuague el cabezal del cepillo y las cerdas después de cada uso
C
C
C
y séquelo sólo al aire.
2 Limpie el cabezal del cepillo al menos una vez a la semana,
también debajo de la tuerca.
3 Para quitar la tuerca:
Presione con suavidad la zona blanca.
Tire de la tuerca por encima de la parte superior del cabezal.
Evite utilizar objetos afilados para quitar el precinto ya que se podrían
ocasionar daños.
4 Para volver a colocar la tuerca,deslice la tuerca por el eje del
C
C
cabezal y tire hasta que encaje en su sitio.
5 Limpie el mango todas las semanas.
6 Limpie el cargador con frecuencia.
DESENCHUFE el cargador antes de limpiarlo. Después de limpiar el
cargador,séquelo bien antes de enchufarlo a la red.
Se recomienda el uso de jabón suave, agua y un paño húmedo para
limpiar el mango y la base del cargador del cepillo Sonicare.
Page 41

ESPAÑOL
Consejo adicional de limpieza:
- El mango de Sonicare se puede lavar en el lavavajillas.Quite el
cabezal del cepillo y el cargador antes de introducir el mango sólo en la
rejilla superior del lavavajillas.
NOTA: Los cabezales del cepillo y el cargador no deben introducirse
nunca en el lavavajillas.
Almacenamiento
Si no se va a utilizar el producto durante un periodo de tiempo
prolongado, se debe limpiar, desenchufar de la toma de corriente y
guardar en un lugar seco y fresco y alejado de la luz directa del sol. El
recogecable se puede usar para guardar el cable de alimentación de
una forma ordenada.
Sustitución
Cabezal del cepillo
Cambie el cabezal cada 6 meses; clínicamente probado para eliminar
más placa dental.
Utilice sólo cabezales de repuesto Sonicare para este modelo.
Reciclado de las baterías
EL MANGO CONTIENE UNA BATERÍA DE NÍQUEL CADMIO
QUE DEBE RECICLARSE O DESECHARSE ADECUADAMENTE.
41
◗ No se puede cambiar la batería del cepillo Sonicare, pero se
puede quitar fácilmente para reciclarla.Al final de la vida útil del
producto y antes de deshacerse de él, quite la batería del mango
siguiendo las instrucciones indicadas a continuación.
Tenga en cuenta que este proceso NO es reversible.
◗ Al final de su vida útil, no tire el aparato junto con la basura
C
normal del hogar. Llévelo a un punto de recogida oficial para su
reciclado.De esta manera ayudará a conservar el medio ambiente.
Extracción de la batería
◗ Tenga en cuenta que este proceso NO es reversible.
Para extraer la batería usted mismo, necesitará un destornillador de
cabeza plana (normal). Se deben tomar medidas de seguridad básicas
al seguir los procesos que se muestran a continuación.Asegúrese de
protegerse los ojos, manos y dedos, así como la superficie sobre la que
esté trabajando.
Page 42

42
ESPAÑOL
B
A
ADVERTENCIA
Debe tener cuidado cuando utilice cualquier herramienta doméstica
(como un destornillador) para extraer la batería.
1 Agote la carga de la batería; para ello,quite el mango del
cargador, encienda el cepillo Sonicare y deje que funcione hasta
que se detenga. Repita estos pasos hasta que el producto deje
de funcionar.
2 Retire la varilla blanda insertando un destornillador por debajo
C
C
C
y sacándola.
3 Quite la tuerca del cabezal y colóquela en el mango.Apriete la
tuerca en el mango (A) hasta que la carcasa quede suelta y tire
de la tuerca (B).
Los elementos situados en el interior del mango saldrán de la carcasa
junto con la tuerca.
4 Inserte un destornillador entre la placa del circuito electrónico
y la pieza de plástico junto a cada extremo de la batería; gire y
rompa la conexión entre la batería y la placa del circuito
electrónico en dos zonas.
5 Con un destornillador separe la batería recargable del aparato.
C
Tenga en cuenta que este proceso NO es reversible.
Estados Unidos y Canadá
Si desea obtener más información sobre el reciclaje de la batería, visite
el sitio Web de la sociedad de reciclaje de baterías recargables (RBRC)
en www.rbrc.org o llame al número (678)419-9990. (Philips Oral
Healthcare, Inc. no está asociada con RBRC).
Page 43

ESPAÑOL
GARANTÍAS Y SERVICIO
PARA OBTENER INFORMACIÓN SOBRE LA GARANTÍA
ESTÁNDAR, CONSULTE EL FOLLETO SEPARADO DE GARANTÍA
DE PHILIPS.
RESTRICCIONES DE LA GARANTÍA
ELEMENTOS NO CUBIERTOS POR LA GARANTÍA:
- CABEZALES DEL CEPILLO
- DETERIOROS CAUSADOS POR USO INAPROPIADO,ABUSOS,
DESCUIDOS O ALTERACIONES
- DESGASTE NORMAL, INCLUYENDO ARAÑAZOS,
DESPORTILLADURAS,ABRASIONES, DECOLORACIONES O
PÉRDIDA GRADUAL DEL COLOR.
GARANTÍAS IMPLÍCITAS
TODA GARANTÍA IMPLÍCITA, INCLUIDAS LAS GARANTÍAS
IMPLÍCITAS DE COMERCIALIZACIÓN Y ADECUACIÓN PARA UN
FIN PARTICULAR, ESTARÁN LIMITADAS A LA DURACIÓN DE LAS
GARANTÍAS EXPRESAS ESTABLECIDAS EN ESTA GARANTÍA
LIMITADA.ALGUNOS ESTADOS NO ADMITEN LÍMITES EN LA
DURACIÓN DE UNA GARANTÍA IMPLÍCITA, EN TAL CASO LA
LIMITACIÓN ANTERIOR NO SE APLICARÍA.
LIMITACIÓN DE RECURSOS
EN NINGÚN CASO PHILIPS ORAL HEALTHCARE, INC. O
CUALQUIERA DE SUS EMPRESAS AFILIADAS O SUBSIDIARIAS
SERÁ RESPONSABLE DE DAÑOS ESPECIALES,ACCIDENTALES O
DERIVADOS DEL INCUMPLIMIENTO DE LA GARANTÍA O DEL
CONTRATO, NEGLIGENCIA, AGRAVIO O CUALQUIER OTRA
BASE LEGAL. ESTOS DAÑOS INCLUYEN,SIN LÍMITE, PÉRDIDA DE
AHORROS O INGRESOS; LUCRO CESANTE; PÉRDIDA DE USO;
RECLAMACIONES DE TERCEROS, INCLUYENDO, SIN LÍMITE,
DENTISTAS E HIGIENISTAS DENTALES;Y COSTE DE EQUIPO O
SERVICIOS SUSTITUTIVOS.ALGUNOS ESTADOS NO ADMITEN
LA EXCLUSIÓN O LIMITACIÓN DE DAÑOS ACCIDENTALES O
DERIVADOS,EN TAL CASO, LA LIMITACIÓN O EXCLUSIÓN NO
SE APLICARÍA.
43
Page 44

44
ESPAÑOL
Guía de solución de problemas
Si no puede resolver los problemas con la siguiente guía, llame al número 1-800-682-7664 si se
encuentra en Norteamérica o visite nuestra página Web www.sonicare.com. Si está fuera de
Norteamérica, póngase en contacto con el Centro de atención al cliente o visite nuestra página Web
www.philips.com.
Problema
El cepillo Sonicare no funciona.
Siento un cosquilleo al utilizar el cepillo
Sonicare.
El cabezal se mueve cuando uso el cepillo
Sonicare.
El cabezal me golpea los dientes.
El cepillado no tiene tanta potencia.
Olor desagradable
El piloto parpadea en amarillo. ¿Qué significa?
El aparato tiene un tiempo extra de cepillado
de 30 segundos. ¿Para qué sirve?
Solución
Recargue el cepillo Sonicare durante al menos 24 horas.
Compruebe que el cepillo Sonicare está conectado a un enchufe activo
y no a un enchufe controlado por un interruptor.
Puede que tenga que volver a encajar o sustituir el cabezal del cepillo.
La primera vez que utiliza el cepillo Sonicare puede sentir un cosquilleo
u hormigueo. Esta sensación disminuirá a medida que se vaya
acostumbrando a cepillarse con Sonicare.
El cepillo Sonicare produce un movimiento suave durante el
funcionamiento. El movimiento excesivo se puede eliminar apretando
bien la tuerca del cabezal. Si el movimiento no cesa, es posible que
deba cambiar el cabezal.
Asegúrese de quitar el capuchón antes de encender el aparato
Para evitarlo mantenga el cabezal en la posición adecuada, con el
cabezal colocado sobre la línea de las encías y creando un ángulo de
45 grados.
Puede que haya que cargar el cepillo.
Puede que la función Easy-start esté conectada y deba desactivarla
(consulte 'Características').
Puede que tenga deba el cabezal del cepillo.
Puede que deba cambiar el cabezal del cepillo.
Es posible que el botón de velocidad dual esté en la posición de
velocidad reducida.
Limpie bien el mango, el cabezal y el cargador (consulte el capítulo
'Limpieza').
Sustituya el cabezal por otro nuevo.
Si el piloto parpadea en amarillo significa que quedan menos de
3 cepillados. Recargue el cepillo Sonicare durante al menos 24 horas.
Esta función proporciona tiempo adicional para cepillar las zonas
problemáticas en las que se acumula la placa y en las que comienzan las
enfermedades de las encías. Se recomienda utilizar estos 30 segundos
adicionales de cepillado para volver a cepillar zonas problemáticas, dar
un masaje a las encías o cepillar la lengua (consulte 'Características').
Page 45

454647
Page 46

Page 47

Page 48

North America:
1-800-682-7664
www.sonicare.com
© 2005 Philips Oral Healthcare, Inc. All rights reserved. PHILIPS and the Philips shield are registered
trademarks of Koninklijke Philips Electronics N.V. Quadpacer, Sonicare,Elite ,and the Sonicare logo
Philips Oral Healthcare, Inc.
35301 SE Center Street
Snoqualmie WA 98065
U.S.A.
Printed in U.S.A.
Printed on 100% recycled paper
Protected by U.S.and international patents. Other patents pending.
are trademarks of Philips Oral Healthcare, Inc.and/or KPENV.
Outside North America:
+1-425-396-2000
www.philips.com
4235 020 01173
 Loading...