

Page 1
Flexcare_4235_020_2279_3_BOOKLET_A6_bl.pdf 1 15-12-15 12:33
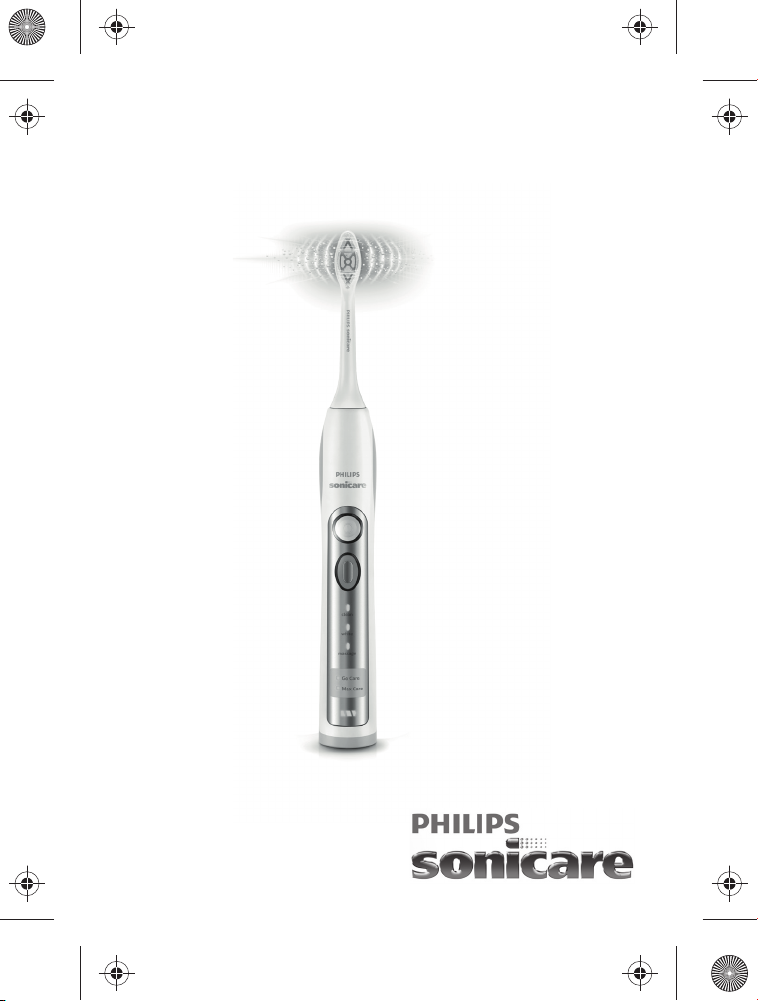
Philips FlexCare
echargeable Sonic Toothbrush
R
Page 2
Page 3
A
B
C
D
E
F
G
H
I
J
1
Page 4

Page 5

English 6
한국의 19
Page 6

English
6
Introduction
Congratulations on your purchase and welcome to Philips! To fully
benefit from the support that Philips offers, register your product at
www.philips.com/welcome.
Important
Read this user manual carefully before you use the appliance and
save it for future reference.
Danger
-
Keep the charger away from water. Do not place or store it over or
near water contained in a bathtub, washbasin, sink etc. Do not
immerse the charger in water or any other liquid. After cleaning,
make sure the charger is completely dry before you connect it to
the mains.
Warning
-
The mains cord cannot be replaced. If the mains cord is damaged,
discard the charger.
-
Always have the charger replaced with one of the original type in
order to avoid a hazard.
-
Do not use the charger outdoors or near heated surfaces.
-
If the appliance is damaged in any way (brush head, toothbrush
handle or charger), stop using it. This appliance contains no
serviceable parts. If the appliance is damaged, contact the
Consumer Care Centre in your country (see chapter ‘Guarantee
and support').
-
This appliance is not intended for use by persons (including
children) with reduced physical, sensory or mental capabilities, or
lack of experience and knowledge, unless they have been given
supervision or instruction concerning use of the appliance by a
person responsible for their safety.
English
Page 7

English
-
Children should be supervised to ensure that they do not play with
the appliance.
Caution
-
Do not clean the brush head, the handle, the charger, the charger
cover and/or the sanitiser in the dishwasher.
-
If you have had oral or gum surgery in the previous 2 months,
consult your dentist before you use the toothbrush.
-
Consult your dentist if excessive bleeding occurs after using this
toothbrush or if bleeding continues to occur after 1 week of
use.Also consult your dentist if you experience discomfort or pain
when you use the Sonicare.
-
The Sonicare toothbrush complies with the safety standards for
electromagnetic devices. If you have a pacemaker or other
implanted device, contact your physician or the device
manufacturer of the implanted device prior to use.
-
If you have medical concerns, consult your doctor before you use
the Sonicare.
-
This appliance has only been designed for cleaning teeth, gums
and tongue. Do not use it for any other purpose. Stop using the
appliance and contact your doctor if you experience any
discomfort or pain.
-
The Sonicare toothbrush is a personal care device and is not
intended for use on multiple patients in a dental practice or
institution.
-
Stop using a brush head with crushed or bent bristles. Replace the
brush head every 3 months or sooner if signs of wear appear.
-
Do not use other brush heads than the ones recommended by the
manufacturer.
-
If your toothpaste contains peroxide, baking soda or bicarbonate
(common in whitening toothpastes), thoroughly clean the brush
head with soap and water after each use.This prevents possible
cracking of the plastic.
7
Page 8

English
8
-
Do not insert objects into the air openings of the sanitiser or block
these air openings by placing it on a soft surface or in a position or
location where objects will block these openings (examples of
objects:
-
magazine, tissue paper and hair).
-
The UV light bulb is hot during and immediately after the sanitising
cycle. Do not touch the UV light bulb when it is hot.
-
Do not operate the sanitiser without the protective screen in place
to avoid contact with a hot bulb.
-
If the sanitiser has been used for 3 consecutive UV clean cycles
(i.e. 3 times in a row), switch it off for at least 30 minutes before
you start another UV clean cycle.
-
Discontinue use of the sanitiser if the UV light bulb remains on
when the door is open. UV light can be harmful to the human eye
and skin. Keep the sanitiser out of the reach of children at all times.
Electromagnetic fields (EMF)
This Philips appliance complies with all applicable standards and
regulations regarding exposure to electromagnetic fields.
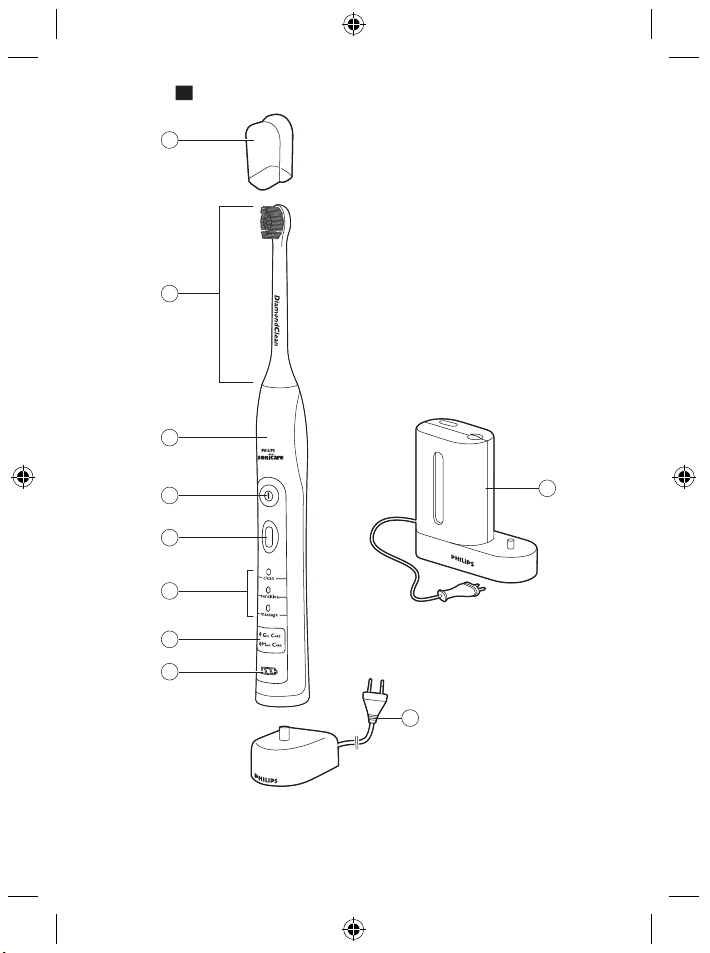
General description (Fig. 1)
a Hygienic travel cap
b Brush head
c Handle with soft grip
d Power on/off button
e Personalized brushing button
f Brushing modes (select models)
g Brushing routines (select models)
h Deluxe recharge gauge
i Travel charger
j UV sanitizer with integrated charger and cord wrap (select
models)
-
Not shown: UV light bulb
-
Not shown: Sanitizer drip tray
Page 9

English
-
Not shown: Protective screen for UV light bulb
Note: The content of the box may vary based on the model
purchased.
Preparing for use
Attaching the brush head
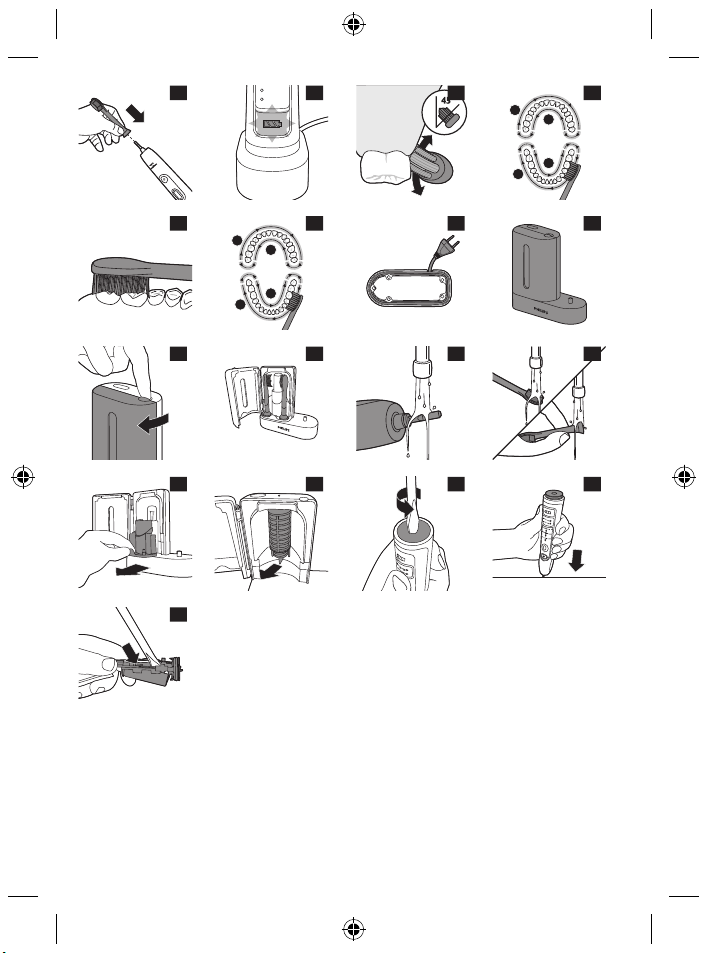
1 Align the brush head so the bristles point in the same direction as
the front of the handle (Fig. 2).
2 Firmly press the brush head down onto the metal shaft until it
stops.
Note: When the brush head is attached, it is normal that there is a
small gap between the brush head and the handle.
Charging your Philips Sonicare
1 Plug the charger in a wall socket.
2 Place the handle on the charger (Fig. 3)
-
The flashing light of the battery level indicator indicates that the
toothbrush is charging.
Deluxe recharge gauge:
Indicates amount of charge left in battery
-
3 green LEDs: 75-100%
-
2 green LEDs: 50-74%
-
1 green LED: 25-49%
-
1 flashing yellow LED: less than 25%
9
Note: If the battery charge of your Philips Sonicare is low, you hear 3
beeps and 1 LED on the recharge gauge flashes yellow for 30
seconds after the 2-minute brushing cycle.
Page 10
English
10
Note: To keep the battery fully charged at all times, you may keep
your Philips Sonicare on the charger when not in use. It takes at least
24 hours to fully charge the battery.
Using the appliance
Brushing instructions
1 Wet the bristles and apply a small amount of toothpaste.
2 Place the toothbrush bristles against the teeth at a slight angle (45
degrees), pressing firmly to make the bristles reach the gumline or
slightly beneath the gumline (Fig. 4).
Note: Keep the center of the brush in contact with the teeth at all
times.
3 Press the power on/off and mode button to turn on the Philips
Sonicare.
4 Apply light pressure to maximize Philips Sonicare’s effectiveness
and let the Philips Sonicare toothbrush do the brushing for you. Do
not scrub.
5 Gently move the brush head slowly across the teeth in a small
back and forth motion so the longer bristles reach between your
teeth. Continue this motion throughout the brushing cycle.
Note: To make sure you brush evenly throughout the mouth,
divide your mouth into 4 sections using the Quadpacer feature
(see chapter ‘Features’).
6 Begin brushing in section 1 (outside upper teeth) and brush for 30
seconds before you move to section 2 (inside upper teeth).
Continue brushing in section 3 (outside lower teeth) and brush for
30 seconds before you move to section 4 (inside lower teeth (Fig.
5)).
Note: When using the White mode, two additional 15 second
intervals can be used for polishing your front teeth.
Page 11

English
7 After you have completed the brushing cycle, you can spend
additional time brushing the chewing surfaces of your teeth and
areas where staining occurs. You can also brush your tongue, with
the toothbrush turned on or off, as you prefer (Fig. 6).
Your Philips Sonicare is safe to use on:
-
Braces (brush heads wear out sooner when used on braces).
-
Dental restorations (fillings, crowns, veneers).
Personalizing your brushing experience
Philips Sonicare automatically starts in the default Clean mode. To
personalize your brushing:
1 Prior to turning on the Philips Sonicare, press the personalized
brushing button to cycle through the modes and routines.
The green LED indicates the selected mode or routine.
Brushing modes
Clean mode
Standard mode for superior teeth cleaning.
Sensitive mode (specific types only)
Gentle, yet thorough, cleaning of sensitive teeth and gums.
White mode
2 minutes of Clean mode, with an additional 30 seconds of White
mode to focus on your visible front teeth.
White mode brushing instructions
1 Brush the first 2 minutes as explained in section 'Brushing
instructions'.
2 After the 2 minutes of Clean mode, the White mode starts with a
change in brushing sound and motion. This is your signal to start
brushing the upper front teeth for 15 seconds.
3 At the next beep and pause, move to the bottom front teeth for
the final 15 seconds of brushing.
11
Page 12

English
12
Massage mode
Mode for gentle gum stimulation.
Brushing routines
Go Care routine
1-minute brushing cycle in the Clean mode, for a quick clean. You
hear the Quadpacer signal at 15-second intervals.
Max Care routine
3-minute brushing cycle that combines the Clean and Massage
modes in one routine for a thorough mouth clean. There are 30
seconds of Clean mode and 15 seconds of Massage mode for each of
the 4 sections of your mouth. You will hear the Quadpacer signal at
45 second intervals.
Note: When Philips Sonicare is used in clinical studies, the default
2-minute Clean mode must be selected. The handle should be fully
charged. Deactivate the Easy-start feature and for areas where
excess staining occurs, an additional 30 seconds of brushing time can
be spent to assist with stain removal.
Features
Easy-start
This Philips Sonicare comes with the Easy-start feature activated.
The Easy-start feature gently increases the power over the first 14
brushings to help you get used to the brushing with the Philips
Sonicare.
Note: Each of the first 14 brushings must be at least 1 minute in length
to properly advance through the Easy-start ramp-up cycle.
Page 13
English
Activating or deactivating the Easy-start feature
1 Attach the brush head to the handle.
2 Place the handle in the plugged-in charger.
-
To deactivate Easy-start:
Press and hold the power on/off and mode button for 5 seconds.
You hear 1 beep to indicate that the Easy-start feature has been
deactivated.
-
To activate Easy-start:
Press and hold the power on/off and mode button for 5 seconds.
You hear 2 beeps to indicate that the Easy-start feature has been
activated.
Note: Using the Easy-start feature beyond the initial ramp-up period
is not recommended and reduces Philips Sonicare effectiveness in
removing plaque.
Note: Easy-start feature is only active in Clean Mode.
Smartimer
The Smartimer indicates that your brushing cycle is complete by
automatically turning off the toothbrush at the end of the brushing
cycle.
Dental professionals recommend brushing no less than 2 minutes
twice a day.
13
Quadpacer
-
The Quadpacer is an interval timer that has a short beep and
pause to remind you to brush the 4 sections of your mouth.
Depending on the brushing mode or brushing routine you have
selected, the Quadpacer beeps at different intervals during the
brushing cycle. See the ‘Brushing instructions’ and ‘Personalizing
your brushing experience’ sections (Fig. 7).
Page 14
English
14
The Quadpacer feature on this model has been activated. To
deactivate or reactivate the Quadpacer feature:
1 Place the handle with a brush head attached in the plugged-in
charger.
2 Press and hold the personalized brushing button until:
a You hear 1 beep to indicate the Quadpacer has been
deactivated.
b You hear 2 beeps to indicate the Quadpacer has been
activated.
Note: The Quadpacer feature cannot be deactivated on the preprogrammed Go Care and Max Care brushing routines.
Integrated cord wrap of UV sanitizer
You can store excess cord using the cord wrap feature built into the
bottom of the sanitizer (Fig. 8).
Sanitizing
-
With the UV sanitizer you can clean your brush head after every
use (Fig. 9).
Unplug the sanitizer, discontinue use and call Consumer Care if:
-
The UV light bulb remains on when the door is open.
-
The window is broken or missing from the sanitizer.
-
The sanitizer gives off smoke or a burning smell while it is
operating.
Note: UV light can be harmful to the human eye and skin. This device
should be kept out of reach of children at all times.
1 After brushing, rinse the brush head and shake off excess water.
Warning: Do not place the travel cap on the brush head
during sanitization.
Page 15
English
2 Place your finger in the door recess on top of the sanitizer and pull
open the door (Fig. 10).
3 Place the brush head on one of the 2 pegs in the sanitizer with the
bristles facing the light bulb (Fig. 11).
Note: Only clean Philips Sonicare snap-on brush heads in the
sanitizer.
Note: The Philips Sonicare for Kids brush head wears and
degrades in the UV sanitizer. You have to check and replace your
child's brush more frequently than regular Philips Sonicare brush
heads (See chapter 'Replacement').
4 Make sure the sanitizer is plugged into a live outlet of appropriate
voltage.
5 Close the door and press the green power on/off button once to
select the UV clean cycle.
Note: You can only turn on the sanitizer if the door is properly
closed.
Note: The sanitizer stops if you open the door during the sanitizing
cycle.
Note: The sanitizer cycle runs for 10 minutes and then
automatically shuts off.
-
The sanitizer is in operation when the light glows through the
window.
15
Cleaning
Warning: Do not clean the brush head, handle, travel
charger or the UV sanitizer in the dishwasher.
Page 16
English
16
Toothbrush handle
1 Remove the brush head and rinse the metal shaft area with warm
water. Make sure you remove any residual toothpaste (Fig. 12).
Caution: Do not push on the rubber seal on the metal shaft with
sharp objects, as this may cause damage.
2 Wipe the entire surface of the handle with a damp cloth.
Brush head
1 Rinse the brush head and bristles after each use (Fig. 13).
2 Remove the brush head from the handle and rinse the brush head
connection with warm water at least once a week.
Charger
1 Unplug the charger before you clean it.
2 Wipe the surface of the charger with a damp cloth. Make sure you
remove any toothpaste or other residue from the charger surfaces.
Sanitiser
Warning: Do not immerse the sanitizer in water or rinse it
under the faucet.
Warning: Do not clean the sanitizer when the UV light bulb
is hot.
For optimal effectiveness, it is recommended to clean your sanitizer
weekly.
1 Unplug the sanitizer.
2 Pull the drip tray straight out. Rinse the drip tray and wipe it clean
with a damp cloth (Fig. 14).
3 Clean all interior surfaces with a damp cloth.
Page 17

English
4 Remove the protective screen in front of the UV light bulb.
To remove the screen, grasp the edges next to the snaps, gently
squeeze and pull out the protective screen (Fig. 15).
5 Remove the UV light bulb.
To remove the light bulb, grasp it and pull it out of the metal clasp.
6 Clean the protective screen and the UV light bulb with a damp
cloth.
7 Reinsert the UV light bulb.
To reinsert the light bulb, align the bottom of the light bulb with
the metal clasp and push the bulb into the clasp.
8 Reinsert the protective screen.
To reinsert the screen, align the pegs on the screen with the slots
on the reflective surface near the UV light bulb. Push the screen
straight into the slots on the sanitizer.
17
Storage
If you are not going to use the product for a long time, unplug it, clean
it (see chapter 'Cleaning') and store it in a cool and dry place away
from direct sunlight. You can use the integrated cord wrap to store
excess cord of the UV sanitizer in an organized manner.
Replacement
Brush head
-
Replace Philips Sonicare brush heads every 3 months to achieve
optimal results.
-
Use only Philips Sonicare replacement brush heads.
UV light bulb
Replacement UV bulbs are available through the Philips Consumer
Care Centre in your country.
Page 18
English
18
Recycling
-
Do not throw away the product with the normal household waste
at the end of its life, but hand it in at an official collection point for
recycling. By doing this, you help to preserve the environment.
Removing the rechargeable battery
Warning: PLEASE NOTE THAT THIS PROCESS IS NOT
REVERSIBLE.
-
To remove the rechargeable battery, you need a flat-head
(standard) screwdriver. Observe basic safety precautions when
you follow the procedure outlined below. Be sure to protect your
eyes, hands, fingers, and the surface on which you work.
1 To deplete the rechargeable battery of any charge, remove the
handle from the charger, turn on the Philips Sonicare and let it run
until it stops. Repeat this step until you can no longer switch on
the Philips Sonicare.
2 Insert a screwdriver into the slot located at the bottom of the
handle and turn counterclockwise to release the bottom cap (Fig.
16).
3 Hold the handle upside down and push down on the shaft to
release the internal components of the handle (Fig. 17).
4 Insert the screwdriver under the circuit board, next to the battery
connections, and twist to break the connections. Remove the
circuit board and pry the battery from the plastic carrier (Fig. 18).
The rechargeable battery can now be recycled and the rest of the
product discarded appropriately.
Guarantee and support
If you need information or support, please visit
www.philips.com/support or read the separate worldwide guarantee
leaflet.
Page 19

한국의
소개
필립스 제품을 구입해 주셔서 감사합니다! 필립스가 드리는 지원 혜택을
최대한 누리시려면 www.philips.com/welcome에서 제품을
등록하십시오.
중요 사항
본 제품을 사용하기 전에 이 사용 설명서를 주의 깊게 읽고 나중에 참조할
수 있도록 잘 보관하십시오.
위험
-
충전기를 물기가 있는 곳에 두지 마십시오. 욕조, 세면대, 싱크대 등,
물이 가까이 있는 곳에서 사용하거나 보관하지 마십시오. 또한 물이나
기타 액체에 담그지 마십시오. 세척한 경우 충전기를 완전히 건조시킨
다음에 다시 전원에 연결하십시오.
경고
-
전원 코드는 교체할 수 없습니다. 전원 코드가 손상되면 충전기를
폐기해야 합니다.
-
위험할 수 있으므로 충전기는 반드시 정품으로 교체하여 사용하십시오.
-
충전기를 실외 또는 발열되는 표면 근처에서 사용하지 마십시오.
-
제품에 손상된 부분(칫솔모, 칫솔 손잡이 또는 충전기)이 나타나면
사용을 중단하십시오. 본 제품은 서비스를 받을 수 있는 부품이
없습니다. 제품이 손상될 경우 해당 지역의 고객 상담실에
문의하십시오('보증 및 지원' 부분 참조).
-
신체적인 감각 및 인지능력이 떨어지거나 경험과 지식이 풍부하지 않은
성인 및 어린이는 혼자 제품을 사용하지 말고 제품 사용과 관련하여
안전에 책임질 수 있도록 지시사항을 충분히 숙지한 사람의 도움을
받으십시오.
-
어린이가 제품을 가지고 놀지 못하도록 지도해 주십시오.
19
Page 20

한국의
20
주의
-
칫솔모, 손잡이, 충전기, 충전기 덮개 및 살균기를 식기세척기로
세척하지 마십시오.
-
최근 2개월 이내에 구강 또는 잇몸 수술을 받은 경우에는 칫솔을
사용하기 전에 치과 전문의와 상의하십시오.
-
본 제품을 사용한 후 출혈이 심하거나 1주일이 지나도 증상이 호전되지
않는다면 치과 전문의와 상의하십시오. 소닉케어 칫솔을 사용할 때
불편하거나 통증을 느끼는 경우에도 치과 전문의와 상의하십시오.
-
소닉케어 칫솔은 국내 안전 기준에 따라 전자파 장해 검정을 받은
제품입니다. 심장 박동 보조기 등 보조 기구를 이식 받은 경우에는
주치의나 해당 이식 기기의 제조업체에 문의하여 충분히 이해한 후
사용하십시오.
-
의료적 문제는 소닉케어를 사용하기 전에 치과 전문의와 상의하십시오.
-
본 제품으로는 치아와 잇몸 그리고 혀만 세정할 수 있으므로 다른
용도로는 사용하지 마십시오. 사용 중 불편함이나 통증이 느껴지면 제품
사용을 중단하고 의사와 상의하십시오.
-
소닉케어 칫솔은 개인 용품이므로 치과나 기타 의료 시설에서 공용으로
이용하지 마십시오.
-
칫솔모의 솔이 눕거나 휘면 사용을 중단하십시오. 3개월마다 또는
마모의 흔적이 보이면 그 전이라도 칫솔모를 교체하십시오.
-
제조업체에서 권장한 제품 이외의 칫솔모를 사용하지 마십시오.
-
사용하는 치약 성분에 과산화수소, 탄산수소나트륨, 중탄산염(미백 치약
주성분)이 포함된 경우, 이용하고 나서 칫솔모를 비누로 닦고 물로
깨끗이 씻어내십시오. 이렇게 해야 플라스틱 부분의 손상을 방지할 수
있습니다.
-
살균기의 통풍구에 이물질을 넣거나 살균기를 부드러운 표면이나
통풍구를 막을 수 있는 이물질이 있는 곳에 두지 마십시오(이물질 예:
-
잡지, 티슈, 머리카락).
-
살균 과정을 작동하는 도중이나 끝난 직후에는 UV 전구가 뜨겁습니다.
UV 전구가 뜨거울 때는 만지지 마십시오.
-
뜨거운 전구에 닿을 수 있으므로 보호 스크린 없이 살균기를 작동하지
마십시오.
-
살균기를 세 번 연속 사용한 경우 UV 살균 과정을 다시 시작하려면 최소
30분간 꺼두십시오.
Page 21
한국의
-
살균기의 문을 열었을 때 UV 전구가 켜진 상태인 경우 살균기 사용을
중단하십시오. 자외선은 눈과 피부에 해로울 수 있습니다. 살균기를
항상 어린이의 손이 닿지 않는 장소에 보관하십시오.
EMF(전자기장)
이 제품은 EMF(전자기장)와 관련된 모든 기준 및 규정을 준수합니다.
구성품 명칭(그림 1)
a 위생 칫솔모 캡
b 칫솔모
c 칫솔 손잡이부드러운 핸들그립
d 전원 버튼
e 맞춤형 칫솔질 버튼
f 칫솔질 모드(특정 모델만 해당)
g 칫솔질 과정(특정 모델만 해당)
h 고급 재충전 게이지
i 여행용 충전기
j 통합 충전기 및 코드 정리 기능이 있는 UV 살균기(특정 모델만 해당)
-
그림 표시 안 됨: UV 전구
-
그림 표시 안 됨: 살균기 받침대
-
그림 표시 안 됨: UV 전구 보호 스크린
참고: 제품 구성품은 구입한 모델에 따라 다릅니다.
21
사용 준비
칫솔모 부착 방법
1 칫솔모가 핸들 (그림 2) 앞부분을 향하도록 맞춥니다.
2 칫솔모를 금속 몸체에 꼭 눌러 고정시킵니다.
참고: 칫솔모 부착 시 칫솔모와 핸들 사이가 약간 벌어지는 것은
정상입니다.
Page 22
한국의
22
필립스 소닉케어 충전 방법
1 충전기를 벽면 콘센트에 꽂으십시오.
2 충전기 (그림 3)에 핸들을 꽂으십시오.
-
배터리 전력 표시등의 불빛이 깜박이면 칫솔이 충전되고 있다는
표시입니다.
고급 재충전 게이지:
배터리의 남은 용량 표시
-
녹색 LED 3개: 75-100%
-
녹색 LED 2개: 50-74%
-
녹색 LED 1개: 25-49%
-
깜빡이는 노란색 LED 1개: 25% 미만
참고: 필립스 소닉케어의 배터리 충전이 부족하면 2분 동안 양치질을 한
다음 3번의 신호음이 울리고 충전 게이지의 LED가 30초 동안 노란색으로
깜빡입니다.
참고: 배터리를 항상 완전히 충전된 상태로 유지하려면 필립스 소닉케어를
사용하지 않을 때에도 충전기에 꽂아 두십시오. 배터리를 완전히 충전하는
데는 최소 24시간이 걸립니다.
제품 사용
칫솔질 방법
1 칫솔모에 소량의 치약을 바르십시오.
2 칫솔모를 잇몸 (그림 4)에 45도 정도로 살짝 비스듬하게 올려 놓고 잇몸
경계 부분이나 그 약간 아래에 칫솔모가 닿도록 누릅니다.
참고: 항상 칫솔모 중앙이 치아에 닿아야 합니다.
3 전원 버튼을 눌러 필립스 소닉케어의 전원을 켭니다.
4 필립스 소닉케어의 효과를 극대화하려면 칫솔모를 치아에 세게
문지르지 마시고, 가볍게 미끄러지듯 사용하십시오. 문지르지 마십시오.
Page 23
한국의
5 치아를 향해 칫솔모를 앞 뒤로 약간씩 움직여서 칫솔모의 끝 부분이
치아 사이 사이에 위치하도록 합니다. 이 방식으로 치아 전체를
닦습니다.
참고: 입 안을 골고루 양치할 수 있도록 Quadpacer(쿼드페이서) 기능을
사용하여 입안을 네 구역으로 나누십시오(‘기능’란 참조).
6 1구역(윗니 바깥쪽)부터 칫솔질을 시작하여 30초 동안 닦은 후
2구역(윗니 안쪽)을 닦습니다. 그런 다음에는 3구역(아랫니 바깥쪽)을
30초 동안 닦고 4구역(아랫니 (그림 5) 안쪽)을 닦습니다.
참고: 화이트 모드를 사용할 경우 15초씩 두 번의 간격이 추가되어
앞니를 더욱 깨끗하게 닦을 수 있습니다.
7 칫솔질이 모두 끝나면 치아의 씹는 면과 착색이 있는 부분을 추가로
닦습니다. 혀도 닦을 수 있습니다. 혀를 닦을 때는 칫솔을 켜거나 끈 상태
중 선호 (그림 6)하는 방법을 선택하십시오.
필립스 소닉케어는 다음에 대해 사용해도 안전합니다.
-
치아 교정기(교정기에 사용하는 경우 칫솔모가 보다 빨리 마모될 수
있습니다.)
-
치아 보철물(신경치료, 크라운, 라미네이트)
사용자의 칫솔 습관 조절
필립스 소닉케어는 일반세정 모드에서 자동으로 시작됩니다. 칫솔질을
맞춤 조정하려면:
1 필립스 소닉케어의 전원을 켜기 전에 맞춤형 칫솔질 버튼을 눌러 모드와
과정을 전환합니다.
녹색 LED는 모드 또는 과정이 선택되었음을 나타냅니다.
23
칫솔질 모드
일반세정 모드
표준 모드로 탁월한 세정을 할 수 있습니다.
민감세정 모드(특정 모델만 해당)
민감한 치아와 잇몸을 부드럽게 세정합니다.
Page 24
한국의
24
미백 모드
2분의 일반세정 모드와 눈에 보이는 앞니에 중점을 둔 추가 30초의 미백
모드로 구성됩니다.
미백 모드 칫솔질 지침
1 '칫솔질 방법'란에 설명된 대로 처음 2분 동안 칫솔질을 합니다.
2 2분의 일반세정 모드가 지나면 칫솔질 소리 및 동작이 바뀌면서 미백
모드가 시작됩니다. 이것은 15초 동안 앞니 위쪽의 칫솔질을 시작하라는
신호입니다.
3 다음 신호음이 울리면서 일시 중지되면 아래쪽 앞니로 이동하여 마지막
15초 동안 칫솔질을 합니다.
마사지 모드
잇몸을 부드럽게 자극하는 모드입니다.
세정 과정
일반관리 과정
일반세정 모드에서 1분 동안 빠르게 닦아냅니다. 15초 간격으로 쿼드페이서
신호가 울립니다.
특별관리 과정
3분 양치는 일반세정 및 마사지 모드를 하나의 과정으로 연결해 입안
전체를 개운하게 해줍니다. 일반세정 모드 30초와 마사지 모드 15초 동안
입안의 4개 구역을 각각 관리합니다. 45초 간격으로 쿼드페이서 신호가
울립니다.
참고: 필립스 소닉케어를 임상 연구용으로 사용할 경우 기본 설정인 2분의
일반세정 모드를 선택해야 합니다. 또한 손잡이를 완전히 충전해야 합니다.
이지 스타트 기능을 해제하고 과잉 착색된 부분에는 착색 제거를 위해 양치
시간을 30초 더 추가할 수 있습니다.
Page 25
한국의
기능
이지스타트
이 필립스 소닉케어 모델에는 이지스타트 기능이 있습니다.
이지스타트 기능은 최초 14회 양치하는 동안 서서히 출력을 높여서 필립스
소닉케어를 이용한 양치질에 익숙해지도록 도와줍니다.
참고: 이지스타트 점증 사이클을 원활히 작동하기 위해서는 최초 14회의
칫솔질을 할 때 매번 최소 1분 이상 닦아야 합니다.
이지스타트 기능 설정 또는 해제 방법
1 소닉케어 핸들에 칫솔모를 부착하십시오.
2 전원에 연결된 충전기에 칫솔 손잡이를 꽂으십시오.
-
이지스타트 기능 해제:
전원 버튼을 누른 채로 모드 버튼을 5초 동안 누릅니다. 신호음이 1번
울리면 이지스타트 기능이 해제된 것입니다.
-
이지스타트 기능 작동:
전원 버튼을 누른 채로 모드 버튼을 5초 동안 누릅니다. 신호음이 2번
울리면 이지스타트 기능이 설정된 것입니다.
참고: 최초 점증 기간 이후에 이지스타트 기능을 사용하는 것은 필립스
소닉케어의 플라그 제거 성능을 저하시키므로 사용하지 않는 것이
좋습니다.
25
참고: 이지스타트 기능은 일반세정 모드에서만 작동합니다.
스마트타이머
스마트타이머는 칫솔질이 끝나면 칫솔을 자동으로 꺼서 칫솔질이
완료되었음을 나타냅니다.
치과 전문의는 하루에 두 번씩 2분 이상 칫솔질 하는 것을 권장합니다.
Page 26

한국의
26
쿼드페이서
-
쿼드페이서는 짧은 신호음과 일시 중지 동작으로 입안의 4개 구역을
양치할 수 있도록 알려 주는 간격 타이머입니다. 선택한 칫솔질 모드
또는 칫솔질 과정에 따라 쿼드페이서는 칫솔질 중 각각 다른 간격의
신호음을 울립니다. ‘칫솔질 방법’ 및 ‘사용자의 칫솔 습관 조절’ 부분
(그림 7)을 참조하십시오.
이 모델의 쿼드페이서 기능이 설정되었습니다. 쿼드페이서 기능을 해제
또는 다시 설정하려면:
1 전원이 연결된 충전기에 칫솔모가 결합된 칫솔 몸체를 꽂으십시오.
2 다음 신호가 들릴 때까지 맞춤형 칫솔질 버튼을 누르십시오.
a 신호음이 1번 울리면 쿼드페이서가 해제된 것입니다.
b 신호음이 2번 울리면 쿼드페이서가 설정된 것입니다.
참고: 쿼드페이서 기능은 일반 관리(Go Care) 및 특별 관리(Max Care)
칫솔질 과정에서는 사용할 수 없습니다.
UV 살균기의 통합 코드 정리
살균기 (그림 8) 바닥에 내장된 코드 정리 기능으로 사용하지 않는 코드를
보관할 수 있습니다.
살균
-
UV 살균기로 사용 (그림 9)한 칫솔모를 살균세정할 수 있습니다.
.
-
살균기 문을 열 때 UV 전구가 켜지는 경우
-
살균기 창이 깨졌거나 빠진 경우
-
살균기를 작동할 때 연기가 나거나 타는 냄새가 나는 경우
참고: 자외선은 눈과 피부에 해로울 수 있습니다. 제품을 항상 어린이의
손이 닿지 않는 장소에 보관하십시오.
1 칫솔질 후 칫솔모를 충분한 물로 헹구고 물기를 털어내십시오.
Page 27
한국의
경고: 살균 과정을 작동하는 중에는 칫솔모에 여행용 뚜껑을
씌우지 마십시오.
2 살균기 위쪽의 문 홈에 손가락을 넣고 문 (그림 10)을 당겨서 여십시오.
3 칫솔모가 전구 (그림 11)를 향하게 하여 살균기에 있는 2개의 걸이 중
하나에 칫솔모를 놓습니다.
참고: 필립스 소닉케어 스냅형 칫솔모만 살균기에서 세정할 수
있습니다.
참고: 어린이용 필립스 소닉케어 칫솔모는 UV 살균기에서 마모되고
품질이 저하됩니다. 따라서 어린이용 칫솔모의 경우 필립스 소닉케어
일반 칫솔모보다 더 자주 상태를 확인하고 교체해야 합니다('교체'란
참조).
4 살균기가 올바른 전압의 전원 콘센트에 꽂혔는지 확인하십시오.
5 살균기의 문을 닫고 녹색 전원 버튼을 한번 눌러 자외선 세정 과정을
선택합니다.
참고: 살균기의 문이 제대로 닫혀있는 경우에만 살균기를 켜십시오.
참고: 살균 과정을 작동하는 도중에 문을 연 경우 살균기가 작동을
멈춥니다.
참고: 살균 과정은 10분 동안 계속된 다음 자동으로 꺼집니다.
-
살균기 작동 중에는 불이 켜지며 창을 통해 확인할 수 있습니다.
27
세척
경고: 칫솔모, 손잡이, 여행용 충전기 또는 UV 살균기를
식기세척기로 세척하지 마십시오.
칫솔 핸들
1 칫솔모를 제거하고 금속 몸체 부분을 따뜻한 물로 헹굽니다. 남아 있는
치약 (그림 12)을 모두 제거해야 합니다.
Page 28
한국의
28
주의: 손상될 수 있으므로 금속 몸체 주위의 고무 덮개를 날카로운 물체로
누르지 마십시오.
2 젖은 천으로 손잡이의 표면을 전체적으로 닦으십시오.
칫솔모
1 사용 (그림 13) 후에는 항상 칫솔모를 물로 헹구십시오.
2 칫솔 핸들에서 칫솔모를 제거하고 매주 1회 칫솔모와 핸들 사이의 연결
부분을 따뜻한 물로 닦아 냅니다.
충전기
1 청소하기 전에 항상 충전기의 전원 코드를 뽑으십시오.
2 젖은 천으로 충전기의 표면을 닦으십시오. 치약이나 기타 이물질을
충전기 표면에서 제거했는지 확인하십시오.
살균기
경고: 살균기를 물에 담그거나 헹구지 마십시오.
경고: UV 전구가 뜨거울 때는 살균기를 세척하지 마십시오.
최적의 효과를 위해 살균기를 일주일에 한 번씩 닦으십시오.
1 살균기의 전원 코드를 뽑으십시오.
2 받침대를 정면으로 당기십시오. 받침대를 헹구고 젖은 천 (그림 14)을
사용하여 닦으십시오.
3 내부 표면을 젖은 천으로 닦으십시오.
4 UV 전구 앞의 보호 스크린을 제거하십시오.
보호 스크린 (그림 15)을 분리하려면 걸쇠 옆의 가장자리를 살짝 잡아
당기십시오.
5 자외선 전구 분리
전구를 잡고 금속 버클을 잡아당겨 전구를 분리하십시오.
6 보호 스크린을 세척하고 UV 전구를 젖은 천으로 닦으십시오.
Page 29

한국의
7 UV 전구를 다시 끼우십시오.
전구를 다시 끼우려면 전구 아래쪽의 금속 버클을 조정하여 버클쪽으로
누르십시오.
8 보호 스크린 재설치
스크린을 재설치하려면 스크린의 못을 UV 전구 부근에 있는 반사면의
슬롯에 맞추십시오. 스크린을 살균기의 슬롯 안으로 똑바로 밀어
넣으십시오.
보관
오랫동안 제품을 사용하지 않을 경우 제품의 전원을 뽑고 세척('청소'란
참조)한 다음, 직사광선이 없는 건냉한 곳에 보관하십시오. 통합 코드 정리
기능을 사용하여 UV 살균기의 코드를 정리해서 보관할 수 있습니다.
교체
칫솔모
-
최적의 결과를 얻으려면 3개월에 한 번씩 필립스 소닉케어 칫솔모로
교체하십시오.
-
필립스 소닉케어 교체용 칫솔모만 이용하십시오.
UV 전구
UV 전구는 필립스 고객 상담실에서 교체할 수 있습니다.
29
재활용
-
수명이 다 된 제품은 일반 가정용 쓰레기와 함께 버리지 말고 지정된
재활용품 수거 장소에 버리십시오. 이를 준수함으로써 환경 보호에
동참할 수 있습니다.
Page 30
한국의
30
충전식 배터리를 분리하는 방법
경고: 이 과정은 되돌릴 수 없습니다.
-
충전식 배터리를 분리하려면 일자형(표준) 드라이버가 필요합니다.
아래의 절차를 수행할 경우 기본적인 안전 주의 사항을 준수하십시오.
눈, 손, 손가락 및 작업대 표면을 보호하십시오.
1 완전히 방전되지 않은 충전식 배터리를 방전시키려면 충전기에서
핸들을 분리하고 필립스 소닉케어가 작동하지 않을 때까지 전원을 켜
둡니다. 필립스 소닉케어의 전원이 켜지지 않을 때까지 이 과정을
반복하십시오.
2 드라이버를 손잡이 아래쪽의 슬롯에 넣고 시계 반대 방향으로 돌려
아래쪽 뚜껑 (그림 16)을 풉니다.
3 핸들을 뒤집은 채로 샤프트를 아래로 눌러 핸들 (그림 17) 내부 부품을
분리합니다.
4 배터리 연결부 옆의 회로 기판 아래로 드라이버를 넣고 비틀어서 두
연결부를 분리하십시오. 회로 기판을 제거하고 플라스틱 부분 (그림
18)에서 배터리를 꺼내십시오.
충전식 배터리를 재활용 폐기물로 분리하고 제품의 나머지 부분은
적절하게 폐기하십시오.
보증 및 지원
보다 자세한 정보나 지원이 필요한 경우에는 www.philips.com/support
페이지를 방문하시거나 제품 보증서를 참조하십시오.
Page 31
한국의
31
Page 32

Page 33

Page 34
234
1
2
4
3
5
6
1
2
4
3
7891011121314151617
18
Page 35
Page 36
Flexcare_4235_020_2279_3_BOOKLET_A6_bl_back.pdf 1 15-12-15 11:49
www.philips.com/Sonicare
©2015 Koninklijke Philips N.V. (KPNV). All rights reserved.
Philips and the Philips shield are trademarks of KPNV.
Sonicare and the Sonicare logo are trademarks
of Philips Oral Healthcare, LLC and/or KPNV.
>
4235.020.2279.3 (12/2015)
75% recycled paper
 Loading...