

PHILIPS HX1620 User Manual [fr]
HX1630, HX1624, HX1622,
HX1620
1
2 3 4
5
8 9
11 12
14 15 16
6
7
10
13
ENGLISH
4203.000.5607.1
2/13
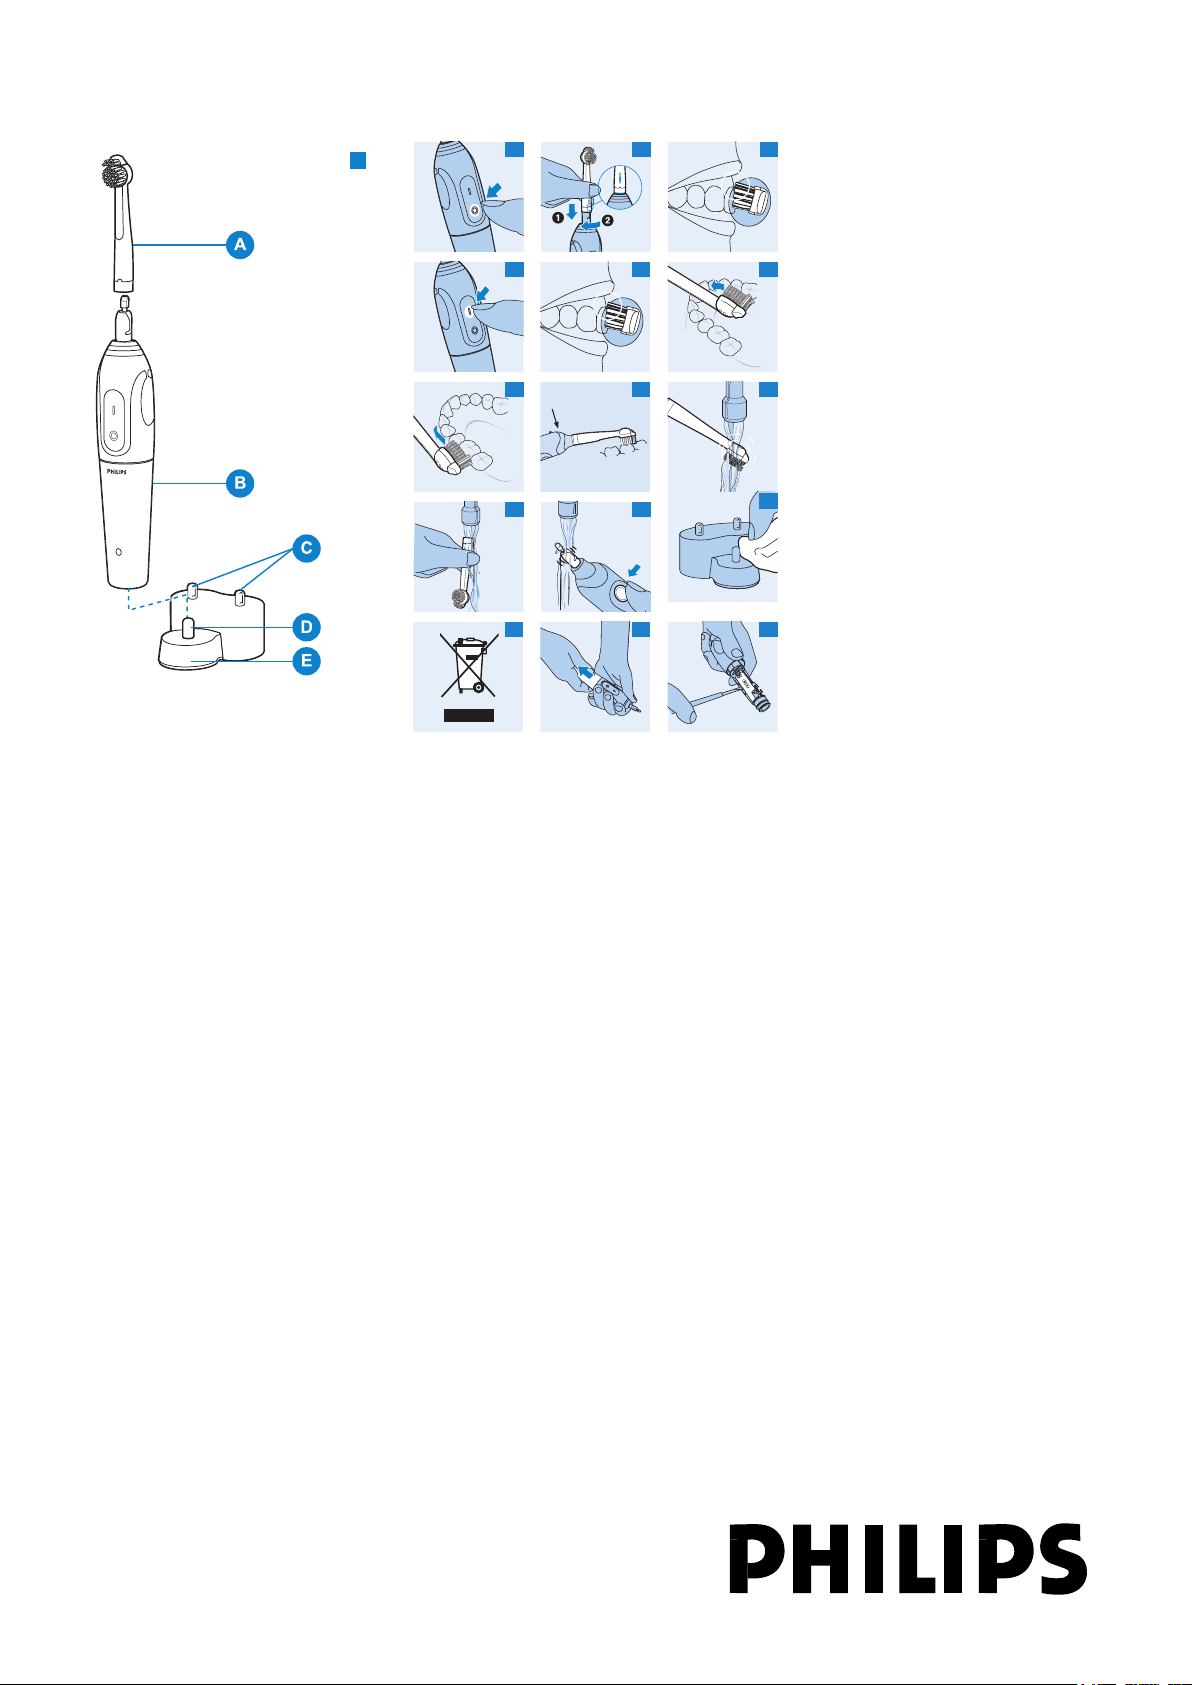
General description (Fig. 1)
A Brush head
B Handle
C Brush head storage pins
D Charger pin
E Charger
Important
Read this user manual carefully before you use the
appliance and save it for future reference.
Check if the voltage indicated on the bottom of
,
the charger corresponds to the local mains voltage
before you connect the appliance.
Keep the charger away from water. Do not place or
,
store it over or near water contained in a bathtub,
washbasin, sink etc. Do not immerse the charger in
water or any other liquid.
Never use the charger if it is damaged or if the
,
cord or plug is damaged.
The cord of the charger cannot be replaced. If the
,
cord is damaged, the charger must be discarded.
Make sure the socket is live when you recharge
,
the toothbrush. The electricity supply to sockets in
mirror cabinets over washbasins or shaver sockets
in bathrooms may be cut off when the light is
turned off.
If you have had oral or gum surgery in the previous
,
2 months, consult your dentist before you use the
toothbrush.
Do not use other brush heads than the ones
,
recommended by the manufacturer.
Replace the brush head every 3 months or sooner
,
if signs of wear appear, such as crushed or bent
bristles.
This appliance is not intended for use by persons
,
(including children) with reduced physical sensory
or mental capabilities, or lack of experience and
knowledge, unless they have been given supervision
or instruction concerning use of the appliance by a
person responsible for their safety.
Children should be supervised to ensure they do
,
not play with the appliance.
Electromagnetic elds (EMF)
This Philips appliance complies with all standards
regarding electromagnetic elds (EMF). If handled
properly and according to the instructions in this user
manual, the appliance is safe to use based on scientic
evidence available today.
Preparing for use
Charging the appliance
1 Charge the appliance for at least 16 hours before
you use it for the rst time.
Make sure the appliance is switched off when you
,
start to charge it (Fig. 2).
When the battery is being charged, the green
,
indicator light is on (HX1630 only).
You can leave the toothbrush in the charger and let
,
it charge continuously.
Optimising the lifetime of the battery
After you have charged the toothbrush for the rst time,
do not recharge it between brushings. Continue to use it
until the battery is empty before you recharge it again.
Recharge the appliance when the motor almost
stops running.
Repeat this procedure three times in a row.
To extend the lifetime of the battery, repeat this
procedure every 6 months.
Using the appliance
1 To mount the brush head on the toothbrush, insert
it into the bayonet catch and turn it clockwise a
quarter turn (Fig. 3).
This prevents the brush head from becoming detached
due to vibration.
2 Put toothpaste on the brush head.
3 Place the brush head in your mouth (Fig. 4).
4 Press the on/off button to switch on the
toothbrush and start to brush your teeth (Fig. 5).
For the best brushing method and the minimum
,
brushing time, see ‘Brushing tips’.
Brushing tips
Brushing method
1 Place the brush head against the tooth in such a
way that it covers the surface of the tooth as well
as the gum line (Fig. 6).
2 Hold the brush head in this position for a
few seconds and then move on to the next
tooth (Fig. 7).
The round brush head removes plaque from the teeth
and beneath the gum line.
The individually moving Active Tip cleans between the
teeth.
3 Guide the brush head carefully along the teeth and
molars (Fig. 8).
Tip: Make sure you clean all surfaces of the teeth (inside,
outside and chewing surface) as well as the gum line
properly. A xed brushing pattern prevents you from skipping
certain areas.
Tip: For optimal dental hygiene, use dental oss and
toothpicks in addition to the electric toothbrush.
Minimum brushing time
A brushing time of 2 minutes is generally long enough
to clean your teeth properly. If you want, you can brush
longer than 2 minutes for an even more thorough clean.
A red indicator light will blink to indicate that
,
2 minutes have passed (HX1630 only).
Note: If plaque is removed properly, the gums will have a
pink colour and will rmly surround the teeth. Healthy gums
do not bleed when you eat or brush your teeth.
Note: If your gums bleed slightly the rst few times you use
this toothbrush, this bleeding will generally stop after a few
days. If your gums continue to bleed, consult your dentist or
dental hygienist.
Gum protection
1 The Gum Protection system guarantees that you
will not exert too much pressure on the teeth and
gums.
2 If you exert too much pressure on the toothbrush,
you will feel and hear a click when the brush
head exes backwards. As soon as you reduce the
pressure, the brush head will return to its normal
position. This will protect your gums (Fig. 9)
Note: This will probably happen a few times when you
rst start using the brush. After some time you will have
discovered the optimal brushing pressure and the brush
head will ex backwards less often.
Cleaning and storage
1 Switch on the toothbrush and rinse the brush head
under a hot tap (max. 60 cC) (Fig. 10).
2 Switch off the toothbrush. Detach the brush head
and rinse the inside of the brush head (Fig. 11).
3 Switch on the toothbrush and rinse the drive
shaft under the tap to remove toothpaste
residues (Fig. 12).
4 Store the brush head on the brush head storage pin
on the charger.
5 Clean the charger with a moist cloth (Fig. 13).
Unplug the charger before you start to clean it.
Replacement
1 Replace the brush head every 3 months for the
best brushing results.
Also replace the brush head when the bristles start
,
to bend outwards.
You can obtain new brush heads from the shop where
you purchased the toothbrush.
All round Philips replacement brush heads can be used.
Environment
Do not throw away the appliance with the normal
,
household waste at the end of its life, but hand it in
at an ofcial collection point for recycling. By doing
this, you help to preserve the environment (Fig. 14).
The built-in rechargeable battery contains
,
substances that may pollute the environment.
Always remove the battery before you discard the
appliance and hand it in at an ofcial collection
point. Dispose of the battery at an ofcial collection
point for batteries. If you have trouble removing the
battery, you can also take the appliance to a Philips
service centre. The staff of this centre will remove
the battery for you and will dispose of it in an
environmentally safe way.
Disposal of the battery
Make sure the battery is completely empty when you
dispose of it.
1 Let the appliance run until it stops before you
remove the battery.
2 Open the handle (Fig. 15) .
3 Use a screwdriver to pry the battery out of the
battery holder (Fig. 16).
The toothbrush is no longer watertight once
the housing of the toothbrush has been open. When
you open the housing, your guarantee becomes invalid.
Guarantee & service
If you need information or if you have a problem, please
visit the Philips website at www.philips.com or contact
the Philips Customer Care Centre in your country
(you nd its phone number in the worldwide guarantee
leaet). If there is no Customer Care Centre in your
country, go to your local Philips dealer or contact the
Service Depar tment of Philips Domestic Appliances and
Personal Care BV.
Troubleshooting
If you are unable to solve your problem with the
information below, please contact the nearest Philips
service centre or the Philips Customer Care Centre in
your country. You can also contact us online at www.
philips.com.
Problem Solution
The toothbrush
does not work
at all, although it
has been in the
charger overnight.
The motor of the
toothbrush works,
but the brush head
doesn’t.
The brushing
power of the
toothbrush has
greatly decreased.
The toothbrush
doesn’t clean my
teeth as well as
before.
Make sure that the plug of the
charger is properly inser ted into
the wall socket.
Make sure the socket is live (see
chapter ‘Important’).
Make sure the toothbrush is
switched off and recharge it for
at least 16 hours.
Check if the brush head has
been properly attached to
appliance (see also chapter ‘Using
the appliance’).
The toothbrush must be
recharged. If you normally leave
the toothbrush in the charger
continuously, you may have to
extend the lifetime of the battery
as described in chapter ‘Preparing
for use’.
Replace the brush head.
DEUTSCH
4203.000.5607.1
3/13
Allgemeine Beschreibung (Abb. 1)
A Bürstenkopf
B Handstück
C Bürstenkopf-Aufbewahrungsstifte
D Ladestift
E Ladegerät
Wichtig
Lesen Sie diese Bedienungsanleitung vor dem Gebrauch
des Geräts aufmerksam durch und bewahren Sie sie für
eine spätere Verwendung auf.
Prüfen Sie vor Inbetriebnahme, ob die
,
Spannungsangabe auf der Unterseite des Ladegeräts
mit der örtlichen Netzspannung übereinstimmt.
Halten Sie das Ladegerät von Wasser fern. Stellen
,
Sie es nicht über oder direkt bei einer mit Wasser
gefüllten Badewanne bzw. einem Waschbecken ab.
Tauchen Sie das Ladegerät nicht in Wasser oder
andere Flüssigkeiten.
Benutzen Sie das Ladegerät nicht, wenn es
,
beschädigt ist oder wenn das Netzkabel oder der
Netzstecker defekt ist.
Das Kabel des Ladegeräts kann nicht ausgetauscht
,
werden. Ist das Kabel beschädigt, muss das
Ladegerät entsorgt werden.
Prüfen Sie vor dem Auaden der Zahnbürste,
,
ob die Steckdose kontinuierlich Strom führt.
Steckdosen in Badezimmerschränken über
Waschbecken sowie Rasierer-Steckdosen werden
häug zusammen mit der Raumbeleuchtung
ausgeschaltet.
Wenn in den vergangenen 2 Monaten ein
,
chirurgischer Eingriff an Ihren Zähnen oder am
Zahneisch vorgenommen wurde, sollten Sie
vor Benutzung der Zahnbürste Ihren Zahnarzt
konsultieren.
Benutzen Sie nur die vom Hersteller für diese
,
Zahnbürste empfohlenen Bürstenköpfe.
Tauschen Sie den Bürstenkopf spätestens nach
,
3 Monaten aus oder sobald
Abnutzungserscheinungen zu erkennen sind, wie z.
B. abgeknickte oder zerdrückte Borsten.
Dieses Gerät ist für Benutzer (einschl. Kinder)
,
mit eingeschränkten physischen, sensorischen
oder psychischen Fähigkeiten bzw. ohne jegliche
Erfahrung oder Vorwissen nur dann geeignet,
wenn eine geeignete Aufsicht oder ausführliche
Anweisungen zur Benutzung des Geräts
sichergestellt sind.
Achten Sie darauf, dass Kinder nicht mit dem Gerät
,
spielen.
Elektromagnetische Felder (EMF; Electro
Magnetic Fields)
Dieses Philips Gerät erfüllt sämtliche Normen bezüglich
elektromagnetischer Felder (EMF). Nach aktuellen
wissenschaftlichen Erkenntnissen ist das Gerät sicher im
Gebrauch, sofern es ordnungsgemäß und entsprechend
den Anweisungen in dieser Bedienungsanleitung
gehandhabt wird.
Für den Gebrauch vorbereiten
Das Gerät laden
1 Laden Sie das Gerät vor dem ersten Gebrauch
mindestens 16 Stunden lang auf.
Achten Sie darauf, dass das Gerät ausgeschaltet ist,
,
wenn Sie mit dem Laden beginnen (Abb. 2).
Beim Laden des Akkus leuchtet die grüne
,
Kontrollanzeige auf (nur HX1630).
Sie können die Zahnbürste zum kontinuierlichen
,
Nachladen im Ladegerät belassen.
Die Lebensdauer des Akkus optimieren
Laden Sie die Zahnbürste vor der ersten Benutzung
vollständig auf. Laden Sie sie aber nicht nach jeder
Anwendung neu auf. Benutzen Sie die Zahnbürste solange
ohne Nachladen, bis der Akku leer ist.
Laden Sie den Akku erst wieder auf, wenn der Motor
-
beinahe zum Stillstand kommt.
Wiederholen Sie diesen Vorgang dreimal
nacheinander.
Sie können die Lebensdauer des Akkus verlängern,
-
wenn Sie diesen Vorgang alle 6 Monate wiederholen.
Das Gerät benutzen
1 Um den Bürstenkopf aufzusetzen, setzen Sie ihn
in den Bajonettverschluss und sichern Sie ihn mit
einer Vierteldrehung im Uhrzeigersinn (Abb. 3).
Danach kann der Bürstenkopf nicht mehr durch die
Vibrationen gelockert werden.
2 Tragen Sie etwas Zahnpasta auf den Bürstenkopf
auf.
3 Halten Sie die Bürste an die Zähne (Abb. 4).
4 Betätigen Sie den Ein-/Ausschalter, um die
Zahnbürste einzuschalten und mit dem Putzen zu
beginnen (Abb. 5).
Unter “Hinweise zur Zahnpege” erhalten Sie
,
Informationen zur richtigen Technik sowie zur
Mindest-Putzzeit.
Hinweise zur Zahnpege
Putztechnik
1 Setzen Sie den Bürstenkopf so an die Zähne, dass
er die Zahnoberäche und den Zahneischrand
bedeckt (Abb. 6).
2 Halten Sie den Bürstenkopf einige Sekunden in
dieser Position, und führen Sie ihn dann zum
nächsten Zahn (Abb. 7).
Der runde Bürstenkopf entfernt die Plaque vom Zahn
und unterhalb des Zahneischrandes.
Die Interdentalbürste, die sich unabhängig von der runden
Bürste bewegt, reinigt die Zahnzwischenräume.
3 Führen Sie die Bürste sorgfältig an allen Zähnen
entlang (Abb. 8).
Tipp: Achten Sie darauf, dass alle Zahnächen – d. h. Innenund Außenächen sowie Kauächen und Zahneischrand gründlich gereinigt werden. Eine feste Putzroutine verhindert,
dass Sie gewisse Bereiche vernachlässigen.
Tipp: Zur optimalen Zahnpege wird ergänzend zur
elektrischen Zahnbürste die Verwendung von Zahnseide und
Zahnstochern empfohlen.
Mindest-Putzzeit
Normalerweise sind 2 Minuten ausreichend, um die
Zähne gründlich zu putzen. Für eine besonders gründliche
Reinigung können Sie die Zähne selbstverständlich auch
länger als 2 Minuten putzen.
Nach Ablauf von 2 Minuten blinkt eine rote
,
Kontrollanzeige (nur HX1630).
Hinweis: Wenn Sie die Plaque gründlich entfernt haben, hat
das umgebende Zahneisch eine hellrote Färbung und liegt
fest am Zahn an. Gesundes Zahneisch blutet nicht beim
Essen oder beim Zähneputzen.
Hinweis: Sollte es anfangs doch zu leichten
Zahneischblutungen kommen, so klingen sie in der Regel
nach einigen Tagen ab. Sollten die Beschwerden andauern,
konsultieren Sie bitte Ihren Zahnarzt.
Zahneischschutz
1 Die Druckkontrolle (das sog. Gum Protection
System) verhindert, dass Sie bei der Zahnpege
mit der Bürste zu stark auf Zähne und Zahneisch
drücken.
2 Drücken Sie den Bürstenkopf zu stark an, schnellt
der Bürstenaufsatz hörbar (“Klick”) und spürbar
zurück. So wird Ihr Zahneisch vor Beschädigungen
geschützt (Abb. 9).
Hinweis: Während der Eingewöhnungsphase wird Ihnen das
häuger passieren. Bald aber nden Sie automatisch den
richtigen Andruck, und der Bürstenaufsatz wird nur noch
selten zurückschnellen.
Reinigung und Aufbewahrung
1 Schalten Sie die Zahnbürste ein und spülen Sie den
Bürstenkopf unter ießendem warmen Wasser von
max. 60c°C ab (Abb. 10).
2 Schalten Sie die Zahnbürste aus. Nehmen Sie
den Bürstenkopf ab und spülen Sie ihn von innen
aus (Abb. 11).
3 Schalten Sie die Zahnbürste wieder ein und spülen
Sie den Schaft ab, um restliche Zahnpasta zu
entfernen (Abb. 12).
4 Stecken Sie den Bürstenkopf zur Aufbewahrung auf
den Stift am Ladegerät.
5 Reinigen Sie das Ladegerät mit einem feuchten
Tuch (Abb. 13).
Ziehen Sie vor dem Reinigen des Ladegeräts den
Netzstecker aus der Steckdose.
Ersatz
1 Das beste Ergebnis erhalten Sie, wenn Sie den
Bürstenkopf alle 3 Monate ersetzen.
Ersetzen Sie den Bürstenkopf auch, sobald sich die
,
Borsten nach außen verbiegen.
Neue Bürstenköpfe erhalten Sie dort, wo das Gerät
gekauft wurde.
Sie können universale PHILIPS Ersatz-Bürstenköpfe
verwenden.
Umweltschutz
Werfen Sie das Gerät am Ende der Lebensdauer
,
nicht in den normalen Hausmüll. Bringen Sie es zum
Recycling zu einer ofziellen Sammelstelle. Auf diese
Weise helfen Sie, die Umwelt zu schonen (Abb. 14).
Der integrierte Akku enthält Substanzen, die die
,
Umwelt gefährden können. Entfernen Sie den
Akku, bevor Sie das Gerät an einer ofziellen
Recyclingstelle abgeben. Geben Sie den gebrauchten
Akku bei einer Batteriesammelstelle ab. Falls Sie
beim Entfernen des Akkus Probleme haben, können
Sie das Gerät auch an ein Philips Service-Center
geben. Dort wird der Akku umweltgerecht entsorgt.
Den Akku entsorgen
Vergewissern Sie sich, dass der Akku ganz leer ist, bevor
Sie ihn entsorgen.
1 Lassen Sie vorher den Motor laufen, bis er stillsteht.
2 Öffnen Sie das Handstück (Abb. 15).
3 Nehmen Sie den Akku mithilfe eines
Schraubendrehers aus dem Akkuhalter (Abb. 16).
Nach dem Öffnen des Gehäuses ist die Zahnbürste
nicht mehr wasserdicht. Wenn Sie das Gehäuse öffnen,
erlischt Ihre Garantie.
Garantie und Kundendienst
Benötigen Sie weitere Informationen oder treten
Probleme auf, wenden Sie sich bitte an Ihren Philips-
Händler oder setzen Sie sich mit einem Philips Service-
Center in Ihrem Land in Verbindung (Telefonnummer
siehe Garantieschrift). Besuchen Sie auch die Philips
Website (www.philips.com). Sie können auch direkt die
Service-Abteilung von Philips Domestic Appliances and
Personal Care BV kontaktieren.

Fehlerbehebung
4203.000.5607.1
4/13
Sollten Sie eventuell auftretende Probleme anhand der
folgenden Informationen nicht lösen können, so wenden
Sie sich bitte an das Philips Service Center in Ihrem Land
oder nehmen Sie online über www.philips.com mit uns
Kontakt auf.
Problem Lösung
Die
Zahnbürste
funktioniert
nicht, obwohl
sie über Nacht
aufgeladen
wurde.
Prüfen Sie, ob der Netzstecker des
Ladegeräts fest in der Steckdose
steckt.
Prüfen Sie, ob die Steckdose
kontinuierlich Strom führt (siehe
Kapitel “Wichtig”).
Schalten Sie das Gerät aus, und
laden Sie den Akku mindestens
16 Stunden lang auf.
Der Motor
läuft, aber der
Bürstenkopf
funktioniert
nicht.
Die
Putzleistung
ist spürbar
schwächer
geworden.
Die
Zahnbürste
reinigt nicht
mehr so
gründlich wie
vorher.
Prüfen Sie, ob der Bürstenkopf
korrekt auf dem Handstück
angebracht ist (siehe auch Kapitel
“Das Gerät benutzen”).
Die Zahnbürste muss aufgeladen
werden. Wenn Sie die Zahnbürste
normalerweise im Ladegerät
aufbewahren, müssen Sie
die Lebensdauer des Akkus
möglicherweise optimieren. Befolgen
Sie dazu die Anweisungen im Kapitel
“Für den Gebrauch vorbereiten”.
Ersetzen Sie den Bürstenkopf.
 Loading...