

Page 1

1
sensiflex
power toothbrush
Page 2
22
Page 3
3144
Page 4

Page 5

ENGLISH 6
DANSK 12
DEUTSCH 18
SUOMI 24
NORSK 30
SVENSKA 36
HX2585, HX2538, HX1526, HX1518, HX1515, HX1514, HX1513,
HX1511, HX1510, HX1507
Page 6

6
ENGLISH6
Introduction
This unique electric toothbrush removes plaque better than a normal,
manual toothbrush. It also helps to protect your gums. When you exert
too much pressure while brushing, the brush head will automatically ex
back. Because of this clear signal, you will quickly adopt the right brushing
force. Clinical tests have shown that, thanks to this system, brushing with
the Philips Sensiex results in a better and safer brushing technique.
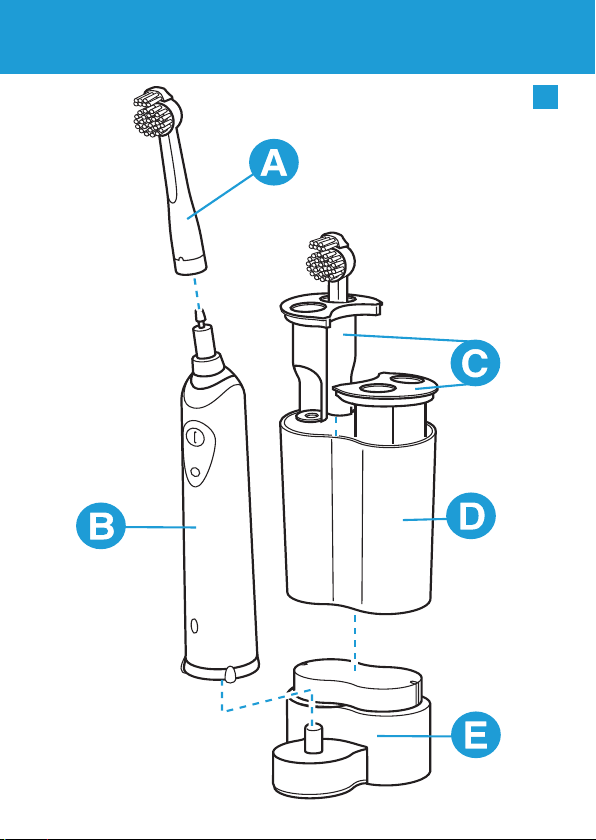
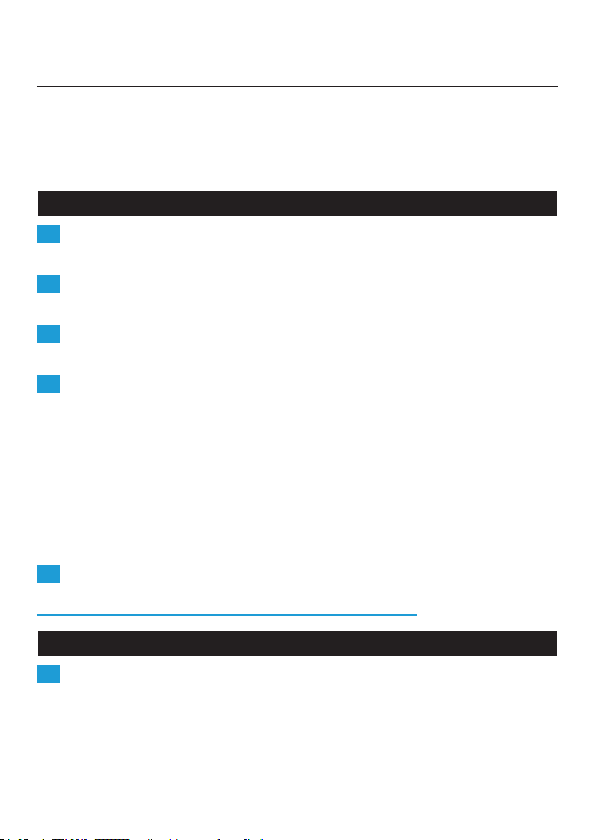
General description (Fig. 1)
A Brush attachment
B Handle
C Holder for 2 brush attachments
D Storage container
E Charger
F Holder for 2 brush attachments
Important
Read these instructions for use carefully before using the appliance and
save them for future reference.
The cord of the charging unit cannot be replaced. If the cord is
,
damaged, the charging unit must be discarded.
Make sure the socket is live when you recharge the toothbrush.
,
The electricity supply to sockets in mirror cabinets over
washbasins or shaver sockets in bathrooms may be cut off when
the light is turned off.
Preparing for use
Mounting the appliance to the wall
1 Mount the charging unit to the wall, using 2 screws (3.0x30mm)
and 2 wall plugs (S5) (not included). (Fig. 2)
Charging the appliance
1 Charge the appliance for at least 16 hours before using it for the
rst time.
Page 7
ENGLISH 7
Make sure the appliance is switched off when you start charging it.
,
(Fig. 3)
You can put the toothbrush in the stand and let it charge
,
continuously.
However, when you rst star t using the appliance, it is recommended that
you use it until the battery is empty. To do so, use the appliance in the
normal way without recharging it between the brushing sessions.
Recharge the appliance when the motor almost stops running. Repeat
this procedure 3 times in a row.
To extend the lifetime of the battery, repeat this procedure every 6
months.
Types HX2585, HX2538 and HX1526 only: when the battery is
,
being charged, the green pilot light is on. (Fig. 4)
You can put the toothbrush in the stand and let it charge
,
continuously.
Using the appliance
1 Mount the brush attachment onto the toothbrush by inserting it
into the bayonet catch and turning it clockwise a quarter of a turn.
(Fig. 5)
This will make it impossible for the brush attachment to become
detached due to vibration.
2 Put toothpaste on the brush head.
3 Place the brush head in your mouth. (Fig. 6)
4 Switch the appliance on by pressing the button and start brushing
your teeth. (Fig. 7)
For the best brushing method, minimal brushing time and brushing
,
functions of the appliance, see the ‘Brushing tips’ section below.
7
Brushing Tips
Brushing
1 Place the brush head against the tooth in such a way that it covers
the surface of the tooth as well as the gum line. (Fig. 8)
Page 8
8
ENGLISH8
2 Hold the brush head in this position for a few seconds and then
move on to the next tooth. (Fig. 9)
The round brush head removes plaque from the teeth and beneath the
gum line.
The individually moving Active Tip cleans between the teeth.
3 Guide the brush head carefully along the teeth and molars. (Fig. 10)
,
Make sure you clean all surfaces of the teeth (inside, outside and
chewing surface) as well as the gum line properly. A xed brushing
pattern will prevent you from skipping certain areas.
Gum Protection system
1 The Gum Protection system guarantees that you do not exert too
much pressure on the teeth and gums. (Fig. 11)
2 If you exert too much pressure on the toothbrush, you will feel and
hear the brush head exing backwards. As soon as you reduce the
pressure, the brush head will return to its normal position. This will
protect your gums. (Fig. 12)
This will probably happen a few times when you rst start using the
toothbrush. After some time you will have discovered the optimal
brushing pressure and the brush head will ex backwards less often.
Tip: If plaque is removed properly, the gums will have a pink colour and
will rmly surround the teeth. Healthy gums do not bleed when you eat
or brush your teeth (see also the section ‘Optimal dental hygiene’). If,
nevertheless, your gums bleed slightly the rst few times you use the
brush, this bleeding will generally stop after a few days. If it does not,
consult your dentist or dental hygienist.
Minimum brushing time: 2 minutes
In general, 2 minutes will be enough to clean your teeth properly.
Naturally, you can also brush longer than 2 minutes.
A red pilot light will blink to indicate that 2 minutes have passed
,
(types HX2585, HX2538 and HX1526 only). (Fig. 13)
Page 9
ENGLISH 9
Optimal dental hygiene
For optimal dental hygiene, it is recommended to use dental oss and
toothpicks in addition to the electric toothbrush.
You will nd more information about Philips Oral Healthcare products
and other Philips products on our Web site: www.philips.com.
Cleaning and storage
1 Switch the toothbrush on and rinse the brush attachment under
the tap with lukewarm water (max. 60 cC). (Fig. 14)
2 Switch the toothbrush off. Detach the brush attachment and rinse
the inside. (Fig. 15)
3 Switch the toothbrush on again and rinse the drive shaft under the
tap to wash away toothpaste residues. (Fig. 16)
4 Types HX1526, HX1515, HX1514, HX1513, HX1511, HX1510 and
HX1507 only: store the brush attachment on the pin on the
charging unit. Types HX2585, HX2538 and HX1526 only: store the
brush attachments (max. 4) in the storage container. (Fig. 17)
Types HX2585 and HX2538 only: you can also remove one of the
,
brush holders to be able to store a toothpaste tube in the storage
container. (Fig. 18)
The storage container and the brush holders can be removed from the
charging unit and cleaned in the dishwasher.
5 Clean the charging unit with a moist cloth. (Fig. 19)
Unplug the charging unit before you start cleaning it.
9
Replacement
1 Replace the brush attachment every 3 months for the best
brushing results.
The brush attachment should also be replaced when the bristles
,
start to bend outwards.
You can obtain new brush attachments from the shop in which you
purchased the toothbrush.
All round Philips replacement brush attachments can be used.
Page 10

10
ENGLISH10
Environment
Do not throw the appliance away with the normal household waste
,
at the end of its life, but hand it in at an ofcial collection point for
recycling. By doing this you will help to preserve the environment.
(Fig. 20)
The built-in rechargeable battery contains substances that may
,
pollute the environment. Always remove the battery before
discarding the appliance and handing it in at an ofcial collection
point. Dispose of the battery at an ofcial collection point for
batteries. If you have trouble removing the battery, you can also
take the appliance to a Philips service centre, which will remove the
battery for you and will dispose of it in an environmentally safe way.
1 The battery must be completely empty when you remove it. You
should therefore let the appliance run until it stops before
removing the battery.
2 Pick up the charging unit and place the toothbrush on the pin. Turn
the toothbrush anti-clockwise to unscrew the bottom of the
toothbrush. (Fig. 21)
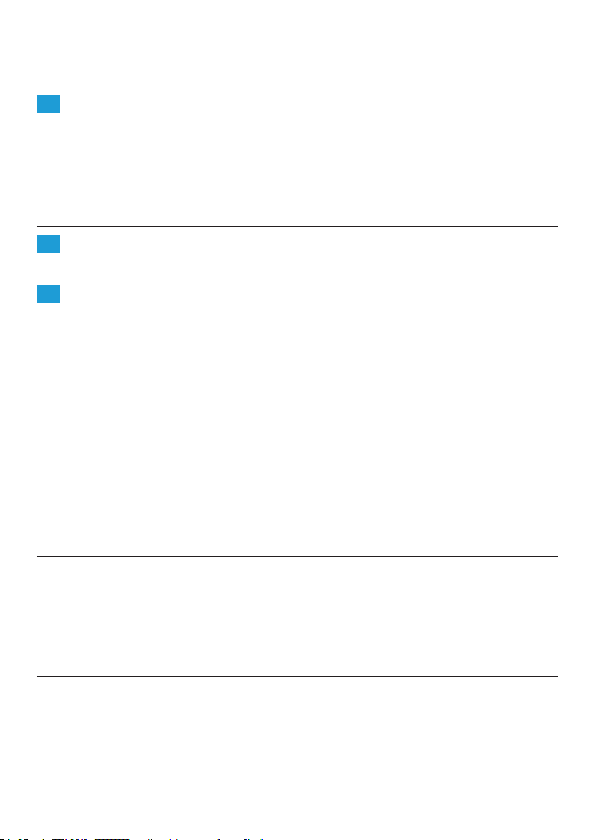
3 Turn the toothbrush upside down and press it down on a hard
surface to remove the battery holder. (Fig. 22)
4 Open the lid of the battery holder by hand or by means of a
screwdriver. (Fig. 23)
5 Lift the battery out of the battery holder by means of a
screwdriver. (Fig. 24)
After the bottom has been unscrewed, the appliance may not be
watertight anymore and the guarantee will become invalid.
Guarantee & service
If you need information or if you have a problem, please visit the Philips
web site at www.philips.com or contact the Philips Customer Care
Centre in your country (you will nd its phone number in the worldwide
guarantee leaet). If there is no Customer Care Centre in your country,
Page 11

ENGLISH 11
turn to your local Philips dealer or contact the Service Depar tment of
Philips Domestic Appliances and Personal Care BV.
Troubleshooting
If you are unable to solve your problem by means of the troubleshooting
guide below, please contact the nearest Philips service centre, the Philips
Customer Care Centre in your country or contact us online at
www.philips.com.
Problem Solution
The toothbrush does not
work at all, although it has
been in the charging unit
overnight.
The motor of the
toothbrush works, but
the brush head doesn’t.
The brushing power of
the appliance has greatly
decreased.
The teeth-cleaning
performance of the
toothbrush is not optimal
anymore.
Make sure that the plug of the charging
unit has been properly inserted into the
wall socket.
Make sure the socket is live (see also the
section ‘Important’).
Make sure the toothbrush is switched off
and recharge it for at least 16 hours.
Check if the brush attachment has been
properly connected to appliance (see also
the section ‘Using the appliance’).
The toothbrush must be recharged. If you
normally leave the toothbrush in the
charging unit continuously, you may have to
revive the battery as described in the
section ‘Charging’.
Remove the brush attachment and start
using a new one.
11
Page 12

12
DANSK
Introduktion
Denne unikke, elektriske tandbørste er betydeligt bedre til at fjerne plak
end en almindelig, manuel tandbørste. Udover optimal plakfjernelse
beskyttes tandkødet, idet børstehovedet automatisk “klikker” bagover, så
snart der trykkes for hårdt. Og på grund af dette klare signal, lærer du
hurtigt at anvende det ideelle børstetryk. Kliniske tests har vist, at man får
en bedre og mere sikker børsteteknik ved brug af Philips Sensiex.
Generel beskrivelse (g. 1)
A Børstetilbehør
B Håndtag
C Holder til 2 børster
D Opbevaringsboks
E Oplader
F Holder til 2 børster
Vigtigt
Læs brugsvejledningen omhyggeligt igennem, inden apparatet tages i brug,
og gem den til eventuel senere brug.
Ledningen til opladeenheden kan ikke udskiftes. Hvis ledningen
,
beskadiges, skal opladeenheden kasseres.
Vær sikker på, at stikkontakten, der anvendes til opladningen er
,
tændt. Vær opmærksom på, at stikkontakter i toiletskabe eller
specielle stik til barbermaskiner (i badeværelser) kan være afbrudt,
når lyset er slukket.
Klargøring
Montering på væg
1 Opladeenheden kan monteres på væggen ved hjælp af 2 skruer (3,0
x 30 mm) og 2 rawlplugs (S5) (medfølger ikke). (g. 2)
Opladning
1 Inden apparatet tages i brug første gang, skal det oplades i mindst
16 timer.
Page 13

DANSK 13
Kontrollér, at apparatet er slukket, når opladningen påbegyndes.
,
(g. 3)
,
Tandbørsten kan stå i opladeren til konstant opladning.
Når apparatet tages i brug første gang, anbefales det imidler tid at bruge
apparatet til batteriet er helt brugt op. Dette gøres ved at bruge
apparatet på normal vis uden at genoplade det mellem hver
tandbørstning. Genoplad apparatet, når motoren næsten stopper. Gentag
denne procedure 3 gange i træk.
For at forlænge batteriets levetid, gentages ovennævnte procedure hver 6.
måned.
Kun type HX2585, HX2538 og HX1526: Når batteriet oplades,
,
lyser den grønne kontrollampe. (g. 4)
Tandbørsten kan stå i opladeren til konstant opladning.
,
Sådan bruges apparatet
1 Sæt børsten ind i motordelens bajonetfatning og drej den en kvart
omgang højre om. (g. 5)
Dette sikrer, at børsten ikke falder af under brug.
2 Kom tandpasta på børsten.
3 Sæt børsten ind i munden. (g. 6)
4 Tænd for apparatet ved at trykke på knappen, og begynd at børste
tænderne. (g. 7)
,
Se afsnittet “Gode råd om tandbørstning”, som omhandler
børstemetoder, anbefalet minimum børstetid og apparatets
forskellige funktioner.
13
Gode råd om tandbørstning
Tandbørstning
1 Placér børstehovedet mod tanden, så det både dækker tandens
overade og tandlinjen mellem tand og tandkød. (g. 8)
2 Hold børsten i denne stilling et par sekunder og fortsæt derefter til
næste tand. (g. 9)
Det runde børstehoved fjerner plak fra tænderne og under tandlinjen.
Page 14
14
DANSK14
Den individuelt bevægelige Active Tip renser mellem tænderne.
3 Før omhyggeligt børsten langs med alle tænderne inkl.
kindtænderne. (g. 10)
Sørg for, at alle tandader (forside, bagside og tyggeade) samt
,
tandlinjen renses grundigt. Ved altid at bruge samme børstevane,
undgår man at komme til at springe nogle områder over.
Børstetryk-system som beskytter tandkødet
1 Børstetryk-systemet garanterer, at man ikke kan komme til at
trykke for hårdt mod tænder og tandkød. (g. 11)
2 Trykker man for hårdt med tandbørsten, både høres og føles et
“klik”, idet børstehovedet automatisk vipper bagover. Så snart
trykket lettes igen, vipper børstehovedet tilbage til sin normale
position. Dette giver en optimal beskyttelse af tandkødet. (g. 12)
Dette vil sikkert ske nogle gange i begyndelsen, men du vil hurtigt nde
ud af at anvende det optimale børstetryk.
Tips: Hvis plakken er fjernet tilstrækkeligt omhyggeligt, er tandkødet
lyserødt og ligger fast omkring tanden. Sundt tandkød bløder ikke, når
man spiser eller børster tænder (se også afsnittet “Optimal tandhygiejne”).
Hvis dine tænder alligevel bløder lidt de første par gange, du bruger
tandbørsten, vil det i de este tilfælde ophøre efter et par dage. Hvis ikke,
bør du kontakte din tandlæge eller tandplejer.
Anbefalet minimum børstetid: 2 minutter
Som hovedregel er 2 minutters børstetid nok til at rengøre tænderne,
men man kan naturligvis også bruge længere tid.
En rød kontrollampe blinker for at indikere, at der nu er gået 2
,
minutter (gælder kun type HX2585, HX2538 og HX1526). (g. 13)
Optimal tandhygiejne
For at opnå optimal tandhygiejne, anbefales det at bruge tandtråd og
tandstikkere udover elektrisk tandbørste.
Besøg vor hjemmeside: www.philips.com for yderligere oplysninger om
Philips-tandpleje samt øvrige Philips-produkter.
Page 15

DANSK 15
Rengøring og opbevaring
1 Tænd for tandbørsten, og skyl børsten med lunkent vand (maks.
60cC). (g. 14)
2 Sluk for tandbørsten. Tag børsten af og rens indersiden. (g. 15)
3 Tænd for tandbørste igen, og skyl drivakslen under rindende vand
for at fjerne rester af tandpasta. (g. 16)
4 Kun type HX1526, HX1515, HX1514, HX1513, HX1511,
HX1510 og HX1507: Opbevar børstetilbehøret på tappen i
opladeenheden. Type HX2585, HX2538 og HX1526: Opbevar
børstetilbehørsdelene (maks. 4) i opbevaringsboksen. (g. 17)
Kun type HX2585 og HX2538: Fjern eventuelt en af
,
børsteholderne for at give plads til opbevaring af en tube tandpasta
i stedet for. (g. 18)
Opbevaringsboks og børsteholdere kan fjernes fra opladeenheden og
vaskes i opvaskemaskine.
5 Rengør opladeenheden med en fugtig klud. (g. 19)
Tag stikket ud af stikkontakten, før opladeren rengøres.
Udskiftning
1 De bedste børsteresultater opnås, hvis børsten udskiftes hver 3.
måned.
Børsten bør også udskiftes, hvis børstehårene stritter ud til siderne.
,
Nye børster købes samme sted som tandbørsten.
All-round-børster fra Philips kan anvendes.
15
Miljøhensyn
Apparatet må ikke smides ud sammen med det almindelige
,
husholdningsaffald, når det til sin tid kasseres. Aevér det i stedet på
den kommunale genbrugsstation. På den måde er du med til at
beskytte miljøet. (g. 20)
Det indbyggede genopladelige batteri indeholder substanser, der
,
kan forurene miljøet. Tag derfor batteriet ud, før du skiller dig af
Page 16

16
DANSK16
med apparatet eller aeverer det på en genbrugsstation. Aevér
batteriet på et ofcielt indsamlingssted for brugte batterier. Du kan
også aevere apparatet til Philips, som gerne tager batteriet ud og
kasserer det på en miljømæssigt forsvarlig måde.
1 Batteriet skal være løbet helt tør for strøm, før det tages ud. Lad
derfor apparatet køre, indtil det stopper af sig selv.
2 Løft opladeren, og sæt tandbørsten på tappen. Drej tandbørsten
venstre om, så bunden skrues af tandbørsten. (g. 21)
3 Vend tandbørsten på hovedet, og pres den ned mod et hårdt
underlag, så batteriholderen frigøres. (g. 22)
4 Åbn låget til batteriholderen med hånden eller ved hjælp af en
skruetrækker. (g. 23)
5 Fjern batteriet med skruetrækkeren. (g. 24)
Garantien bortfalder, når bunden først har været skruet af, da apparatet
måske ikke længere er vandtæt.
Reklamationsret og service
For alle yderligere oplysninger eller ved eventuelle problemer med
apparatet henvises til Philips’ hjemmeside på adressen www.philips.com
eller det lokale Philips Kundecenter (telefonnumre ndes i vedlagte
“World-Wide Guarantee”-folder). Hvis der ikke ndes et kundecenter i
dit land, bedes du venligst kontakte din lokale Philips-forhandler eller
Serviceafdelingen i Philips Domestic Appliances and Personal Care BV.
Page 17

DANSK 17
Fejlnding
Er det ikke muligt at løse et eventuelt problem ved hjælp af nedenstående
fejlsøgnings-guide, bedes du venligst henvende dig til nærmeste Philips
Kundecenter eller kontakte os online på: www.philips.com.
Problem Løsning
Tandbørsten virker
ikke, selvom den har
stået til opladning
natten over.
Motoren i tandbørsten
fungerer, men ikke
børstehovedet.
Børstestyrken er
kraftigt nedsat.
Tandbørsten børster
ikke optimalt mere.
Vær sikker på, at stikket til opladeenheden sat
korrekt i stikkontakten.
Vær sikker på, at der er strøm i kontakten (se
også afsnittet “Vigtigt”).
Sørg for, at tandbørsten er slukket, og oplad
den i mindst 16 timer.
Kontrollér, om børsten er sat korrekt på
apparatet (se også afsnittet “Sådan bruges
apparatet”).
Tandbørsten skal genoplades. Står
tandbørsten normalt i opladeenheden til
konstant opladning, kan det være nødvendigt
at “genoplive” batteriet som beskrevet i
afsnittet “Opladning”.
Udskift børsten.
17
Page 18

18
DEUTSCH
Einführung
Diese innovative elektrische Zahnbürste entfernt Plaque gründlicher, als es
mit einer üblichen Handzahnbürste möglich ist. Gleichzeitig wird Ihr
Zahneisch besser geschützt: Wenn Sie beim Bürsten zu viel Druck
ausüben, federt der Bürstenkopf augenblicklich zurück. Durch dieses
deutliche Signal gewöhnen Sie sich in kurzer Zeit daran, den optimalen
Druck auf die Bürste auszuüben. Klinische Tests haben bewiesen, dass die
Philips Sensiex zu einer besseren und sichereren Technik beim
Zähneputzen führt.
Allgemeine Beschreibung (Abb. 1)
A Bürstenkopf
B Handstück
C Halter für 2 Bürstenköpfe
D Aufbewahrungsbehälter
E Ladegerät
F Halter für 2 Bürstenköpfe
Wichtig
Lesen Sie diese Bedienungsanleitung vor dem ersten Gebrauch des
Geräts sorgfältig durch, und bewahren Sie sie für eine spätere
Verwendung auf.
Das Kabel des Ladegeräts kann nicht ausgetauscht werden. Ist das
,
Kabel beschädigt, muss das Ladegerät entsorgt werden.
Prüfen Sie vor dem Auaden der Zahnbürste, ob die Steckdose
,
kontinuierlich Strom führt. Steckdosen in Badezimmerschränken
über Waschbecken sowie Rasierer-Steckdosen werden häug
zusammen mit der Raumbeleuchtung ausgeschaltet.
Für den Gebrauch vorbereiten
Das Ladegerät an der Wand anbringen
1 Zum Montieren des Ladegeräts an der Wand benötigen Sie
2 Schrauben (3,0 x 30 mm) und zwei Dübel (S 5) - nicht im
Lieferumfang enthalten. (Abb. 2)
Page 19

DEUTSCH 19
Das Gerät laden
1 Laden Sie vor dem ersten Gebrauch den Akku mindestens
16 Stunden lang auf.
Achten Sie darauf, dass das Gerät ausgeschaltet ist, wenn Sie mit
,
dem Laden beginnen. (Abb. 3)
Sie können die Zahnbürste zum kontinuierlichen Nachladen im
,
Ladegerät belassen.
Es empehlt sich aber, die Zahnbürste nach der ersten Inbetriebnahme
solange ohne Nachladen zu benutzen, bis der Akku leer ist. Benutzen Sie
darum die Zahnbürste in der gewohnten Weise, ohne sie zwischendurch
nachzuladen. Laden Sie den Akku erst wieder auf, wenn der Motor
beinahe zum Stillstand kommt. Wiederholen Sie diesen Vorgang dreimal
nacheinander.
Sie können die Lebensdauer des Akkus verlängern, wenn Sie diesen
Vorgang alle 6 Monate wiederholen.
(Nur Typen HX2585, HX2538 und HX1526:) Während des
,
Ladevorgangs leuchtet die grüne Kontrollanzeige. (Abb. 4)
Sie können die Zahnbürste zum kontinuierlichen Nachladen im
,
Ladegerät belassen.
Das Gerät verwenden
1 Bringen Sie den Bürstenkopf auf dem Handstück an. Setzen Sie ihn
in den Bajonettverschluss, und sichern Sie ihn mit einer
Vierteldrehung im Uhrzeigersinn. (Abb. 5)
Danach kann der Bürstenkopf nicht mehr durch die Vibrationen gelockert
werden.
2 Tragen Sie etwas Zahnpasta auf den Bürstenkopf auf.
3 Halten Sie die Bürste an die Zähne. (Abb. 6)
4 Drücken Sie auf die Taste, um das Gerät einzuschalten, und
beginnen Sie mit dem Zähneputzen. (Abb. 7)
Im folgenden Abschnitt “Hinweise zur Zahnpege” erhalten Sie
,
Informationen zur richtigen Technik, zur Mindest-Putzzeit sowie zu
den Funktionen des Geräts.
19
Page 20

20
DEUTSCH20
Hinweise zur Zahnpege
Die Zähne putzen
1 Setzen Sie den Bürstenkopf so an die Zähne, dass er die
Zahnoberäche und den Zahneischrand bedeckt. (Abb. 8)
2 Halten Sie den Bürstenkopf einige Sekunden in dieser Position, und
führen Sie ihn dann zum nächsten Zahn. (Abb. 9)
Der runde Bürstenkopf entfernt die Plaque vom Zahn und unterhalb des
Zahneischrandes.
Die Interdentalbürste, die sich unabhängig von der runden Bürste bewegt,
reinigt die Zahnzwischenräume.
3 Führen Sie die Bürste sorgfältig an allen Zähnen entlang. (Abb. 10)
Achten Sie darauf, dass alle Zahnächen – d. h. Innen- und
,
Außenächen sowie Kauächen und Zahneischrand - gründlich
gereinigt werden. Eine feste Putzroutine verhindert, dass Sie
gewisse Bereiche vernachlässigen.
Druckkontrolle
1 Die Druckkontrolle (das sog. Gum Protection System) verhindert,
dass Sie bei der Zahnpege mit der Bürste zu stark auf Zähne und
Zahneisch drücken. (Abb. 11)
2 Drücken Sie die Zahnbürste zu stark an, schnellt der Bürstenkopf
hörbar und spürbar zurück. Sobald Sie den Druck verringern, kehrt
der Bürstenkopf in seine ursprüngliche Position zurück. So wird Ihr
Zahneisch vor Verletzungen geschützt. (Abb. 12)
Während der Eingewöhnungsphase wird dies häuger passieren. Bald
aber nden Sie automatisch den richtigen Andruck, und der Bürstenkopf
wird nur noch selten zurückschnellen.
Hinweis: Wenn Sie die Plaque gründlich entfernt haben, hat das
umgebende Zahneisch eine hellrote Färbung und liegt fest am Zahn an.
Gesundes Zahneisch blutet nicht beim Essen oder beim Zähneputzen.
(Siehe Abschnitt “Die optimale Zahnpege”). Sollte es anfangs doch zu
leichten Blutungen kommen, so dauern sie in der Regel nur einige Tage an.
Sollten die Beschwerden andauern, konsultieren Sie bitte Ihren Zahnarzt.
Page 21

DEUTSCH 21
Mindest-Putzdauer: 2 Minuten
Normalerweise sind 2 Minuten ausreichend, um die Zähne gründlich zu
putzen. Sie können die Zähne selbstverständlich auch länger putzen.
(Nur Typen HX2585, HX2538 und HX1526:) Nach Ablauf von
,
2 Minuten blinkt eine rote Kontrollanzeige. (Abb. 13)
Die optimale Zahnpege
Zur optimalen Zahnpege wird ergänzend zur elektrischen Zahnbürste
die Verwendung von Zahnseide und Zahnstochern empfohlen.
Weitere Informationen zu Philips Zahnpegegeräten und anderen Philips
Produkten nden Sie auf unserer Website (www.philips.com).
Reinigung und Aufbewahrung
1 Schalten Sie die Zahnbürste ein, und spülen Sie den Bürstenkopf
unter ießendem lauwarmen Wasser von max. 60c°C ab. (Abb. 14)
2 Schalten Sie die Zahnbürste aus. Nehmen Sie den Bürstenkopf ab,
und spülen Sie ihn von innen aus. (Abb. 15)
3 Schalten Sie die Zahnbürste wieder ein, und spülen Sie den Schaft
ab, um restliche Zahnpasta zu entfernen. (Abb. 16)
4 Nur Typen HX1526, HX1515, HX1514, HX1513, HX1511,
HX1510 und HX1507: Bewahren Sie den Bürstenkopf auf dem Stift
des Ladegeräts auf. Nur Typen HX2585, HX2538 und HX1526:
Bewahren Sie die Bürstenköpfe (max. 4) im Behälter auf. (Abb. 17)
Nur Typen HX2585 und HX2538: Sie können auch einen Einsatz
,
herausnehmen, um eine Zahnpastatube im Behälter aufzubewahren.
(Abb. 18)
Der Behälter und die Einsätze lassen sich vom Ladegerät abnehmen und
im Geschirrspüler reinigen.
5 Reinigen Sie das Ladegerät mit einem feuchten Tuch. (Abb. 19)
Ziehen Sie den Netzstecker, bevor Sie das Ladegerät reinigen.
21
Page 22

22
DEUTSCH22
Ersatzteile
1 Das beste Ergebnis erhalten Sie, wenn Sie den Bürstenkopf alle
3 Monate ersetzen.
Ersetzen Sie den Bürstenkopf auch, sobald sich die Borsten nach
,
außen verbiegen.
Neue Bürstenköpfe erhalten Sie dort, wo das Gerät gekauft wurde.
Sie können universale PHILIPS Ersatz-Bürstenköpfe verwenden.
Umweltschutz
Werfen Sie das Gerät am Ende der Lebensdauer nicht in den
,
normalen Hausmüll. Bringen Sie es zum Recycling zu einer
ofziellen Sammelstelle. Auf diese Weise helfen Sie, die Umwelt zu
schonen. (Abb. 20)
Der integrierte Akku enthält Substanzen, die die Umwelt gefährden
,
können. Entfernen Sie den Akku, bevor Sie das Gerät entsorgen und
es an einer der ofziellen Recyclingstellen abgeben. Geben Sie den
gebrauchten Akku bei einer Batteriesammelstelle ab. Falls Sie beim
Entfernen des Akkus Probleme haben, können Sie das Gerät auch
an ein Philips Service-Center geben. Dort wird der Akku
umweltgerecht entsorgt.
1 Der Akku muss leer sein, wenn Sie ihn aus dem Gerät entnehmen.
Lassen Sie darum vorher den Motor laufen, bis er stillsteht.
2 Heben Sie das Ladegerät an, und setzen Sie die Zahnbürste auf den
Stift. Schrauben Sie die Unterseite des Handstücks gegen den
Uhrzeigersinn ab. (Abb. 21)
3 Drehen Sie die Zahnbürste um, und drücken Sie sie fest auf eine
harte Unterlage, um den Akkuhalter entnehmen zu können. (Abb. 22)
4 Öffnen Sie den Deckel des Akkuhalters mit der Hand oder mit
einem Schraubendreher. (Abb. 23)
5 Nehmen Sie den Akku mit Hilfe des Schraubendrehers aus dem
Akkuhalter. (Abb. 24)
Nach Öffnen des unteren Handstücks ist die Zahnbürste nicht mehr
wasserdicht. Damit erlischt die Garantie.
Page 23

DEUTSCH 23
Garantie und Kundendienst
Wenn Sie weitere Informationen oder Hilfe bei Problemen benötigen,
wenden Sie sich bitte an Ihren Philips-Händler, oder setzen Sie sich mit
einem Philips Service-Center in Ihrem Land in Verbindung (Tel. Nr.
0180/5356767). Besuchen Sie auch die Philips Website www.philips.com.
Fehlerbehebung
Sollten Sie eventuell auftretende Probleme anhand der folgenden Liste
nicht lösen können, so wenden Sie sich bitte an das Philips Service Center
in Ihrem Land, oder nehmen Sie online über www.philips.com mit uns
Kontakt auf.
Problem Lösung
Die Zahnbürste
funktioniert nicht,
obwohl sie über Nacht
aufgeladen wurde.
Der Motor läuft, aber
der Bürstenkopf
funktioniert nicht.
Die Putzleistung ist
spürbar schwächer
geworden.
Die Putzleistung des
Bürstenkopfes ist nicht
mehr zufrieden
stellend.
Stellen Sie sicher, dass der Stecker des
Ladegeräts richtig in der Steckdose sitzt.
Prüfen Sie, ob die Steckdose Strom führt.
(Siehe Abschnitt “Wichtig”.)
Schalten Sie das Gerät aus, und laden Sie den
Akku mindestens 16 Stunden lang auf.
Prüfen Sie, ob der Bürstenkopf korrekt auf
dem Handstück angebracht ist. (Siehe
Abschnitt “Das Gerät verwenden”)
Die Zahnbürste muss aufgeladen werden.
Wenn Sie die Zahnbürste normalerweise im
Ladegerät aufbewahren, müssen Sie den Akku
möglicherweise auffrischen. Befolgen Sie dazu
die Anweisungen im Abschnitt “Laden”.
Nehmen Sie den Bürstenkopf ab, und
ersetzen Sie ihn durch einen neuen.
23
Page 24

24
SUOMI24
Johdanto
Tämä ainutlaatuinen sähköhammasharja poistaa plakkia paremmin kuin
tavallinen hammasharja ja auttaa suojaamaan ikeniä. Jos harjatessasi painat
harjaa liian kovaa hampaita vasten, harja taipuu automaattisesti taaksepäin.
Tämän selkeän turvamekanismin avulla opit pian oikean
harjausvoimakkuuden. Kliinisissä testeissä on todettu, että Philips Sensiex
-sähköhammasharjan avulla paremman ja turvallisemman harjaustavan
oppiminen on helppoa.
Laitteen osat (Kuva 1)
A Harjaspää
B Kahvaosa
C Säilytyspaikka kahdelle (2) harjaspäälle
D Säilytysrasia
E Latauslaite
F Säilytyspaikka kahdelle (2) harjaspäälle
Tärkeää
Lue tämä käyttöohje huolellisesti ennen laitteen käyttöönottoa ja säilytä
ohje vastaisen varalle.
Latauslaitteen johtoa ei voi vaihtaa. Jos johto on vaurioitunut,
,
latauslaite on hävitettävä.
Varmista, että pistorasiaan tulee virtaa, kun lataat laitetta.
,
Kylpyhuoneiden peilikaappien tai parranajokoneille tarkoitettujen
pistorasioiden virta saattaa katketa, kun valo sammutetaan.
Käyttöönotto
Laitteen asentaminen seinälle
1 Kiinnitä latauslaite seinään 2 ruuvilla (3,0 x 30 mm) ja 2 propulla
(S5) (ei toimiteta laitteen mukana). (Kuva 2)
Lataaminen
1 Lataa laitetta vähintään 16 tuntia ennen ensimmäistä käyttökertaa.
Page 25

SUOMI 25
Varmista, että laitteen virta on katkaistu, kun aloitat lataamisen.
,
(Kuva 3)
Voit säilyttää hammasharjaa latauslaitteessa.
,
Ensimmäisen latauksen jälkeen laitetta kannattaa käyttää, kunnes akku on
tyhjä. Käytä laitetta aivan normaalilla tavalla lataamatta sitä harjauskertojen
välillä. Lataa laite uudelleen vasta, kun moottori melkein pysähtyy. Toista
sama 3 kertaa peräkkäin.
Toista tämä 6 kuukauden välein, niin akku kestää käyttökunnossa
pidempään.
Vain mallit HX2585, HX2538 ja HX1526: vihreä merkkivalo palaa,
,
kun laite latautuu. (Kuva 4)
Voit säilyttää hammasharjaa latauslaitteessa.
,
Käyttö
1 Asenna harjaspää hammasharjaan työntämällä se pikaliittimeen ja
kääntämällä neljäsosakierrosta myötäpäivään. (Kuva 5)
Tällöin tärinä ei irrota harjaa.
2 Laita harjaspäähän hammastahnaa.
3 Laita harjaspää suuhun. (Kuva 6)
4 Käynnistä laite painamalla käynnistyspainiketta ja harjaa hampaat.
(Kuva 7)
Lisätietoja parhaasta harjaustavasta, vähimmäisharjausajasta ja
,
laitteen harjausominaisuuksista on kohdassa Harjausvinkkejä.
Harjausvinkkejä
Harjaaminen
1 Aseta harjaspää hampaita vasten siten, että hammaspinta ja ienraja
peittyvät. (Kuva 8)
2 Pidä harjaa tässä asennossa muutama sekunti ja siirrä se sitten
seuraavan hampaan kohdalle. (Kuva 9)
Harjan pyöreä pää poistaa plakin hampaista ja ienrajasta.
Itsenäisesti liikkuva Active Tip -kärkiosa puhdistaa hammasvälit.
25
Page 26

26
SUOMI26
3 Ohjaa harjaa hitaasti etu- ja sivuhampaita pitkin. (Kuva 10)
Käy tarkkaan läpi hampaiden kaikki pinnat (sisä-, ulko- ja
,
purupinnat) sekä ienrajat. Kun harjaat hampaat aina samassa
järjestyksessä, muistat käsitellä kaikki pinnat.
Gum Protection -turvamekanismi
1 Gum Protection -turvamekanismi varmistaa, ettet paina harjaa liian
kovaa hampaita ja ikeniä vasten. (Kuva 11)
2 Jos painat harjalla liian kovaa, tunnet ja kuulet napsahduksen, kun
harjaspää taipuu taaksepäin ja näin suojaa ikeniä. Heti kun vähennät
painamista, harja palautuu normaaliin asentoon. (Kuva 12)
Näin tapahtuu todennäköisesti muutaman kerran, kun vielä tutustut harjan
toimintaan. Jonkin ajan kuluttua löydät oikean tekniikan, jolloin harja taipuu
yhä harvemmin.
Vinkki: Kun plakki on poistettu kunnolla, ikenet ovat vaaleanpunaiset ja
ympäröivät hampaita tukevasti. Terveet ikenet eivät vuoda verta syödessä
tai hampaita harjatessa (katso myös kohta Hampaiden hyvä hoito). Jos
ikenesi kuitenkin vuotavat jonkin verran verta muutamalla ensimmäisellä
harjauskerralla, se yleensä loppuu muutamassa päivässä. Jos näin ei
tapahdu, ota yhteys hammaslääkäriin tai hammashoitajaan.
Harjausaika: vähintään 2 minuuttia
Yleensä 2 minuuttia riittää puhdistamaan hampaat kunnolla. Tietenkin voit
halutessasi harjata yli 2 minuuttia.
Punainen merkkivalo alkaa vilkkua, kun 2 minuuttia on kulunut (vain
,
mallit HX2585, HX2538 ja HX1526). (Kuva 13)
Hampaiden hyvä hoito
Hyvään hampaiden hoitoon kuuluvat sähköhammasharjan lisäksi
hammaslangan ja hammastikkujen käyttäminen.
Lisätietoa Philips Oral Healthcare -laitteista ja muista Philips-tuotteista on
Internet-sivuillamme www.philips.com.
Page 27

SUOMI 27
Puhdistus ja säilytys
1 Käynnistä hammasharja ja huuhtele harja lämpimällä vedellä
(enintään 60cC). (Kuva 14)
2 Katkaise hammasharjasta virta. Irrota harjaspää ja huuhtele se
sisäpuolelta. (Kuva 15)
3 Kytke hammasharjaan uudelleen virta ja huuhtele käyttöakselista
hammastahnan jäänteet juoksevalla vedellä. (Kuva 16)
4 Vain malleissa HX1526, HX1515, HX1514, HX1513, HX1511,
HX1510 ja HX1507: voit säilyttää harjaa latauslaitteen tapissa. Vain
malleissa HX2585, HX2538 ja HX1526: voit säilyttää harjoja
(enintään 4 kpl) säilytysrasiassa. (Kuva 17)
Vain malleissa HX2585 ja HX2538: voit myös poistaa yhden
,
harjatelineen hammastahnaputkilon säilytystä varten. (Kuva 18)
Säilytyskotelo sisäosineen voidaan irrottaa latauslaitteesta ja pestä
astianpesukoneessa.
5 Pyyhi latauslaite puhtaaksi kostealla liinalla. (Kuva 19)
Irrota latauslaite pistorasiasta ennen puhdistuksen aloittamista.
Varaosat
1 Vaihda harjaspää kolmen kuukauden välein, jotta harjaustulos pysyy
hyvänä.
Harjaspää kannattaa vaihtaa myös silloin, kun harjakset alkavat
,
taipua ulospäin.
Vaihtoharjoja voi ostaa sähköhammasharjojen myyjiltä.
Voit käyttää täyspyöreää PHILIPS-vaihtoharjaa.
27
Ympäristöasiaa
Älä hävitä vanhoja laitteita tavallisen talousjätteen mukana, vaan
,
toimita ne valtuutettuun kierrätyspisteeseen. Näin autat
vähentämään ympäristölle aiheutuvia haittavaikutuksia. (Kuva 20)
Kiinteät ladattavat akut sisältävät ympäristölle haitallisia aineita.
,
Poista akku aina ennen laitteen toimittamista valtuutettuun
Page 28

28
SUOMI28
keräyspisteeseen, ja toimita se valtuutettuun akkujen
keräyspisteeseen. Jos et pysty irrottamaan akkua laitteesta, voit
toimittaa laitteen Philipsin huoltopalveluun, jossa akku poistetaan ja
laite hävitetään ympäristöystävällisellä tavalla.
1 Akun on irrotettaessa oltava aivan tyhjä. Anna laitteen käydä kunnes
se pysähtyy, ennen kuin poistat akun.
2 Ota latauslaite käteen ja aseta hammasharja tappiin. Kierrä
hammasharjaa vastapäivään niin että hammasharjan pohja aukeaa.
(Kuva 21)
3 Käännä hammasharja ylösalaisin ja paina sitä kovaa alustaa vasten,
niin että akkukotelo irtoaa. (Kuva 22)
4 Avaa akkukotelon kansi kädellä tai ruuvitaltan avulla (Kuva 23)
5 Nosta akku pois akkukotelosta ruuvitaltan avulla. (Kuva 24)
Pohjan avaamisen jälkeen laite ei ehkä enää ole vesitiivis eikä sen takuu
ole enää voimassa.
Takuu & huolto
Jos haluat lisätietoja tai laitteen suhteen on ongelmia, käy Philipsin
Internet-sivuilla osoitteessa www.philips.com tai ota yhteys Philipsin
asiakaspalveluun (puhelinnumero löytyy takuulehtisestä). Voit myös ottaa
yhteyden Philips-myyjään tai Philipsin valtuuttamaan huoltoliikkeeseen tai
suoraan Philips Domestic Appliances and Personal Care BV:n huoltoosastoon.
Page 29

SUOMI 29
Vianmääritys
Ellet onnistu ratkaisemaan ongelmaa tämän tarkistusluettelon avulla, ota
yhteys oman maasi Philips-asiakaspalveluun, Philipsin valtuuttamaan
huoltoliikkeeseen tai käy Internet-sivuillamme osoitteessa www.philips.com.
Ongelma Ratkaisu
Hammasharja ei toimi,
vaikka se on ollut
latauslaitteessa yön yli.
Hammasharjan moottori
käy, mutta harja ei liiku.
Laitteen harjausteho on
selvästi huonontunut.
Hammasharja ei enää
puhdista hampaita yhtä
hyvin.
Varmista, että latauslaitteen pistoke on
kunnolla pistorasiassa.
Varmista, että pistorasiaan tulee vir taa
(katso myös kohta Tärkeää).
Varmista, että hammasharjan virta on
katkaistu, ja lataa uudelleen vähintään
16 tuntia.
Varmista, että harja on kiinnitetty kunnolla
laitteeseen (katso myös kohta Laitteen
käyttö).
Hammasharja on ladattava uudelleen. Jos
yleensä säilytät hammasharjaa
latauslaitteessa, akun lataus kannattaa
purkaa kohdassa Lataus neuvotulla tavalla.
Vaihda tilalle uusi harjaspää.
29
Page 30

30
NORSK30
Innledning
Denne unike, elektriske tannbørsten fjerner plakk bedre enn en vanlig,
manuell tannbørste. Den hjelper også til med å beskytte tannkjøttet. Når
du pusser for hardt, bøyer børstehodet seg automatisk bakover. På grunn
av dette tydelige signalet vil du raskt nne riktig børstekraft. Takket være
dette systemet har kliniske tester vist at bruk av Philips Sensiex gir en
bedre og sikrere pusseteknikk.
Generell beskrivelse (g. 1)
A Børstehode
B Håndtak
C Holder med plass til to børstehoder
D Oppbevaringsbeholder
E Lader
F Holder med plass til to børstehoder
Viktig
Les denne bruksanvisningen nøye før apparatet tas i bruk, og ta vare på
den for senere referanse.
Ledningen til ladeenheten kan ikke byttes ut. Hvis ledningen er
,
ødelagt, må ladeenheten kastes.
Kontroller at det er strøm i stikkontakten som skal brukes til å lade
,
tannbørsten. Det kan hende at strømmen til enkelte stikkontakter
på baderommet brytes når lyset slås av.
Før bruk
Montere apparatet på veggen
1 Monter ladeenheten på veggen ved å bruke to skruer
(3,0 x 30 mm) og to veggplugger (S5) (følger ikke med). (g. 2)
Lade apparatet
1 Lad apparatet i minst 16 timer før du bruker det for første gang.
Sørg for at apparatet er slått av når det lades. (g. 3)
,
Du kan la tannbørsten stå i stativet og lade kontinuerlig.
,
Page 31

NORSK 31
Når du begynner å bruke apparatet, anbefales det imidlertid at du bruker
det til batteriet er tomt. Dette gjør du ved å bruke apparatet på vanlig
måte, uten å lade det mellom hver gang. Lad apparatet igjen når det er
like før motoren stopper. Gjenta denne fremgangsmåten tre ganger på
rad.
Du øker batteriets levetid hvis du gjentar denne fremgangsmåten hver
sjette måned.
Kun HX2585, HX2538 og HX1526: Når batteriet lades, lyser den
,
grønne indikatorlampen. (g. 4)
,
Du kan la tannbørsten stå i stativet og lade kontinuerlig.
Bruke apparatet
1 Monter børstehodet på tannbørsten ved å sette den ned i
bajonettlåsen og dreie den med klokken en kvart omdreining. (g.
5)
Børstehodet vil på den måten ikke kunne løsne på grunn av vibrasjon
under bruk.
2 Påfør tannkrem på børstehodet.
3 Stikk børstehodet inn i munnen. (g. 6)
4 Slå på apparatet ved å trykke på knappen, og begynn å pusse
tennene. (g. 7)
,
Hvis du vil vite mer om den beste pussemetoden, minimal pussetid
og apparatets pussefunksjoner, kan du se “Pussetips” nedenfor.
Pussetips
Pusse
1 Plasser børstehodet mot hver enkelt tann på en slik måte at hodet
dekker tannens overate i tillegg til tannkjøttkanten. (g. 8)
2 Hold børstehodet i denne stillingen i noen få sekunder, og gå
deretter videre til neste tann. (g. 9)
Det runde børstehodet fjerner plakk fra tennene og under
tannkjøttkanten.
Den aktive tuppen, som beveger seg uavhengig, rengjør mellom tennene.
31
Page 32

32
NORSK32
3 Før børstehodet forsiktig langs for- og hjørnetennene og jekslene.
(g. 10)
Kontroller at du rengjør alle overatene på tennene (innsiden,
,
utsiden og tyggeatene) i tillegg til tannkjøttkanten skikkelig. Et fast
pussemønster vil kunne hjelpe deg slik at du unngår å glemme noen
områder.
Gum Protection-system
1 Gum Protection-systemet gjør at du ikke bruker for mye kraft på
tennene og tannkjøttet. (g. 11)
2 Hvis du bruker for mye kraft på tannbørsten, føler og hører du et
klikk når børstehodet bøyes bakover. Med én gang du trykker
mindre, går børstehodet tilbake til vanlig stilling. På denne måten
beskyttes tannkjøttet. (g. 12)
Dette vil sannsynligvis skje noen ganger i begynnelsen når du bruker
tannbørsten. Etter en stund nner du ut hva som er optimalt børstetrykk,
og børstehodet bøyes ikke bakover så ofte.
Tips: Hvis plakk fjernes ordentlig, holder tannkjøttet seg rosa og ligger
stramt inntil tennene. Sunt tannkjøtt blør ikke når du spiser eller pusser
tennene (se også avsnittet “Optimal tannhygiene”). Det er imidlertid
ingen grunn til bekymring hvis tannkjøttet blør litt de første gangene du
bruker tannbørsten. Denne typen blødning vil vanligvis stanse ganske fort.
Hvis den ikke gjør det, bør du ta kontakt med en tannlege eller tannpleier.
Minste pussetid: to minutter
Vanligvis vil to minutter være nok til å rengjøre tennene ordentlig. Du kan
imidlertid selvfølgelig pusse tennene i mer enn to minutter.
Indikatorlampen blinker rødt for å vise at det er gått to minutter
,
(gjelder kun HX2585, HX2538 og HX1526). (g. 13)
Optimal tannhygiene
Vi anbefaler at du bruker tanntråd og tannpirkere i tillegg til den elektriske
tannbørsten for å sikre optimal tannhygiene.
Du nner mer informasjon om Philips’ tannpleieprodukter og andre
Philips-produkter på våre Internett-sider www.philips.com
Page 33

NORSK 33
Rengjøring og oppbevaring
1 Slå tannbørsten på, og skyll børstedelen under springen i lunkent
vann (maks. 60 cC). (g. 14)
2 Slå av tannbørsten. Ta av børstehodet, og skyll den innvendig.
(g. 15)
3 Slå på tannbørsten og skyll pluggen under springen for å skylle bort
rester etter tannkrem. (g. 16)
4 Kun HX1526, HX1515, HX1514, HX1513, HX1511, HX1510 og
HX1507: Oppbevar tannbørsten på tappen på ladeenheten. Kun
HX2585, HX2538 og HX1526: Oppbevar børstene (maks. re) i
oppbevaringsbeholderen. (g. 17)
Kun HX2585 og HX2538: Du kan også fjerne én av børsteholderne
,
for å oppbevare en tannkremtube i oppbevaringsbeholderen. (g.
18)
Du kan ta oppbevaringsbeholderen og børsteholderne av ladeenheten og
vaske den i oppvaskmaskin.
5 Rengjør ladeenheten med en fuktig klut. (g. 19)
Koble fra ladeenheten før du begynner å rengjøre den.
Utskifting
1 Skift børstehode hver tredje måned. På den måten får du optimale
pusseresultater.
Børstehodet bør også skiftes når børstehårene begynner å bøye
,
seg utover.
Du kan kjøpe nye børstehoder i butikken der du kjøpte tannbørsten.
Vanlige Philips-børstehoder kan brukes.
33
Miljø
Ikke kast apparatet som vanlig husholdningsavfall når det ikke kan
,
brukes lenger. Lever det på en gjenvinningsstasjon. Ved å gjøre dette
hjelper du til med å ta vare på miljøet. (g. 20)
Page 34

34
NORSK34
Det innebygde oppladbare batteriet består av stoffer som kan
,
forurense miljøet. Ta alltid ut batteriet før du kaster apparatet og
leverer det på et offentlig innsamlingssted. Lever batteriet på et
offentlig innsamlingssted for batterier. Hvis du har problemer med å
ta ut batteriet, kan du også ta apparatet med til et Philips-
servicesenter, der de vil ta ut batteriet for deg og behandle det på
en miljøvennlig måte.
1 Batteriet må være helt tomt når du tar det ut. Du må derfor la
apparatet gå helt til det stopper, før du tar ut batteriet.
2 Ta tak i ladeenheten, og sett tannbørsten på pluggen. Drei
tannbørsten mot klokken for å skru løs den nederste delen av
tannbørsten. (g. 21)
3 Snu tannbørsten opp ned, og trykk den ned mot en hard overate
for å fjerne batteriholderen. (g. 22)
4 Åpne lokket til batteriholderen for hånd eller ved hjelp av en
skrutrekker. (g. 23)
5 Vipp batteriet ut av batteriholderen ved hjelp av en skrutrekker. (g.
24)
Når du har skrudd løs bunnen på apparatet, kan det hende at apparatet
ikke er vanntett lenger, og garantien er heller ikke gyldig lenger.
Garanti og service
Hvis du trenger informasjon, eller hvis du har et spørsmål, kan du gå til
Philips’ Internett-sider på www.philips.com eller ta kontakt med Philips’
kundestøtte (du nner telefonnummeret i garantiheftet). Hvis det ikke
nnes noen kundestøtte der du bor, kan du ta kontakt med den lokale
Philips-forhandleren eller serviceavdelingen ved Philips Domestic
Appliances and Personal Care BV.
Page 35

NORSK 35
Feilsøking
Hvis du ikke får løst problemene ved å lese feilsøkingsveiledningen
nedenfor, kan du ta kontakt med nærmeste Philips-servicesenter, Philipskundestøtte der du bor, eller se ta kontakt på Internett på www.philips.com.
Problem Løsning
Tannbørsten virker ikke
i det hele tatt, selv om
den har stått i
ladeenheten over
natten.
Motoren på
tannbørsten virker, men
børsten virker ikke.
Børstekraften i
apparatet er betydelig
redusert.
Rengjøringsytelsen på
tannbørsten er ikke
lenger optimal.
Kontroller at støpselet på ladeenheten sitter
ordentlig i stikkontakten på veggen.
Kontroller at det er strøm i strømuttaket (se
også avsnittet Viktig).
Kontroller at tannbørsten er slått av, og lad
den på nytt i minst 16 timer.
Kontroller at børstehodet er festet ordentlig
på apparatet (se også avsnittet Bruke
apparatet).
Tannbørsten må lades opp på nytt. Hvis du
vanligvis lar tannbørsten stå i ladeenheten til
kontinuerlig lading, kan det hende at du må
gjenoppfriske batteriet slik det beskrives i
avsnittet “Lade apparatet”.
Ta av børstehodet og sett på et nytt.
35
Page 36

36
SVENSKA36
Introduktion
Med den här unika elektriska tandborsten avlägsnar du plack effektivare
än med en vanlig tandborste. Den skyddar också tandköttet. Om du
trycker för hår t mot tandköttet när du borstar böjs tandborsthuvudet
automatiskt bakåt. På så sätt lär du dig snabbt hur hårt du ska trycka.
Kliniska tester visar att Philips Sensiex ger bättre och säkrare
borstningsteknik tack vare det här systemet.
Allmän beskrivning (Bild 1)
A Borsttillbehör
B Handtag
C Hållare för 2 borsttillbehör
D Förvaringsställ
E Laddare
F Hållare för 2 borsttillbehör
Viktigt
Läs användningsinstruktionerna noga innan du använder apparaten, och
spara dem ifall du behöver dem igen.
Nätsladden till laddningsenheten kan inte bytas ut. Om nätsladden
,
skadas måste laddningsenheten kasseras.
Kontrollera att vägguttaget ger ström när du laddar tandborsten.
,
Strömförsörjningen till uttag i badrumsskåp ovanför handfat eller
uttag för rakapparater i badrum kan brytas när lampan släcks.
Förberedelser inför användning
Väggmontering
1 Montera laddningsenheten på väggen med två skruvar (3,0 x 30
mm) och två pluggar (S5) (medföljer inte). (Bild 2)
Ladda apparaten
1 Ladda apparaten i minst 16 timmar innan du använder den för
första gången.
Se till att apparaten är avstängd när du laddar den. (Bild 3)
,
Page 37

SVENSKA 37
Du kan ställa tandborsten i laddaren och låta den laddas hela tiden.
,
När du börjar använda tandborsten rekommenderar vi dock att du
använder den tills batteriet är helt tomt innan du laddar den på nytt.
Använd tandborsten utan att ladda den mellan borstningarna, och ladda
den sedan när motorn nästan slutar gå. Upprepa detta tre gånger efter
varandra.
För att förlänga batteriets livslängd bör du utföra den här proceduren en
gång i halvåret.
Endast modellerna HX2585, HX2538 och HX1526: När batteriet
,
laddas lyser den gröna indikeringslampan. (Bild 4)
,
Du kan ställa tandborsten i laddaren och låta den laddas hela tiden.
Använda apparaten
1 Sätt fast borsttillbehöret på tandborsten genom att sticka in det i
bajonettfattningen och vrida det medurs ett kvarts varv. (Bild 5)
Borsttillbehöret kan nu inte lossna av vibrationerna.
2 Lägg på tandkräm på borsthuvudet.
3 Placera borsthuvudet i munnen. (Bild 6)
4 Slå på apparaten genom att trycka på knappen och börja sedan
borsta tänderna. (Bild 7)
Information om bästa borstningsmetod, kortaste borstningstid och
,
apparatens funktioner nns i avsnittet Borstningstips nedan.
Borstningstips
Borstning
1 Placera borsthuvudet mot en tand så att det täcker såväl tandytan
som tandköttskanten. (Bild 8)
2 Håll kvar borsthuvudet i det läget under några sekunder och ytta
det sedan till nästa tand. (Bild 9)
Det runda borsthuvudet avlägsnar plack från tänderna och
tandköttskanten.
Active Tip-huvudet rör sig separat och borstar rent mellan tänderna.
37
Page 38

38
SVENSKA38
3 För borsthuvudet noggrant utmed tänderna (även kindtänderna).
(Bild 10)
Var noga med att borsta alla delar av tänderna (insidorna, utsidorna
,
och tuggytorna) och tandköttskanten ordentligt. Följ samma
borstningsmönster så att du inte hoppar över vissa områden.
Borsttryckskontroll
1 Borsttryckskontrollen gör att du inte kan trycka för hårt mot
tänderna och tandköttet. (Bild 11)
2 Om du trycker för hårt med tandborsten känner och hör du att
borsthuvudet fjädrar bakåt. Så fort du minskar på trycket återgår
borsthuvudet till sitt normala läge. På så sätt skyddas tandköttet.
(Bild 12)
Du kommer antagligen att trycka för hår t då och då när du börjar
använda tandborsten. Men efter ett tag lär du dig hur hårt du ska trycka,
och borsthuvudet kommer att fjädra tillbaka alltmer sällan.
Tips: Om du får bor t placken ordentligt är tandköttet rosa och omsluter
tänderna ordentligt. Friskt tandkött blöder inte när du äter eller borstar
tänderna (se även avsnittet Optimal tandhygien). Tandköttet kan dock
blöda en aning de första gångerna du använder borsten men blödningen
avtar vanligen efter några dagar. Om det inte slutar blöda kontaktar du din
tandläkare eller tandhygienist.
Kortaste borstningstid: två minuter
I allmänhet räcker det med två minuter för att borsta tänderna ordentligt.
Om du vill kan du naturligtvis borsta tänderna längre tid än så.
När två minuter har gått blinkar en röd indikeringslampa (endast
,
modellerna HX2585, HX2538 och HX1526). (Bild 13)
Optimal tandhygien
För optimal tandhygien rekommenderar vi att du använder tandtråd och
tandstickor förutom den elektriska tandborsten.
Mer information om Philips tandvårdsprodukter och andra Philips-
produkter nns på vår webbplats: www.philips.com.
Page 39

SVENSKA 39
Rengöring och förvaring
1 Slå på tandborsten och skölj borsttillbehöret under kranen med
ljummet vatten (max. 60
2 Stäng av tandborsten. Ta av borsttillbehöret och skölj det på insidan.
(Bild 15)
3 Slå på tandborsten igen och skölj drivaxeln under kranen för att
skölja bort tandkrämsrester. (Bild 16)
4 Endast modellerna HX1526, HX1515, HX1514, HX1513, HX1511,
HX1510 och HX1507: förvara borsttillbehöret på
laddningsenhetens stift. Endast modellerna HX2585, HX2538 och
HX1526: förvara borsttillbehören (max. 4) i förvaringsstället.
(Bild 17)
Endast modellerna HX2585 och HX2538: du kan även ta av en av
,
borsthållarna så att du får plats med en tandkrämstub i
förvaringsstället. (Bild 18)
Förvaringsstället och borsthållarna kan tas av från laddningsenheten och
rengöras i diskmaskin.
5 Rengör laddningsenheten med en fuktig trasa. (Bild 19)
Dra ur nätsladden innan du rengör laddningsenheten.
Byten
1 Byt ut borsttillbehöret var tredje månad för att få bästa
borstningsresultat.
Borsttillbehöret ska även bytas ut när borsten börjar spreta utåt.
,
Du kan köpa nya borsttillbehör i den affär där du köpte tandborsten.
Philips allround-borsttillbehör kan användas.
cC). (Bild 14)
39
Miljön
Kasta inte apparaten i hushållssoporna när den är förbrukad. Lämna
,
in den för återvinning vid en ofciell återvinningsstation, så hjälper
du till att skydda miljön. (Bild 20)
Page 40

40
SVENSKA40
Det inbyggda laddningsbara batteriet innehåller ämnen som kan
,
vara skadliga för miljön. Ta alltid ur batteriet innan du slänger
apparaten eller lämnar in den vid en ofciell återvinningsstation.
Lämna batteriet vid en ofciell återvinningsstation för batterier. Om
du har problem med att få ur batteriet kan du också ta med
apparaten till Philips serviceombud som kan hjälpa dig att ta ur
batteriet och göra dig av med det på ett miljövänligt sätt.
1 Batteriet måste vara helt urladdat när du tar ut det. Låt därför
apparaten gå tills den stannar innan du tar ut batteriet.
2 Ta upp laddningsenheten och placera tandborsten på stiftet. Vrid
tandborsten moturs för att skruva loss underdelen. (Bild 21)
3 Vänd tandborsten upp och ned och tryck den mot en hård yta för
att ta loss batterihållaren. (Bild 22)
4 Öppna locket till batterihållaren för hand eller med hjälp av en
skruvmejsel. (Bild 23)
5 Ta ut batteriet ur hållaren med hjälp av en skruvmejsel. (Bild 24)
När du en gång har skruvat loss underdelen är apparaten förmodligen
inte längre vattentät, och garantin gäller inte.
Garanti och service
Om du behöver information eller har problem med apparaten kan du
besöka Philips webbplats på www.philips.com eller kontakta Philips
kundtjänstcenter i ditt land (du hittar telefonnumret i garantibroschyren).
Om det inte nns något kundtjänstcenter i ditt land vänder du dig till din
lokala Philips-återförsäljare eller kontaktar serviceavdelningen på Philips
Domestic Appliances and Personal Care BV.
Page 41

SVENSKA 41
Felsökning
Om du inte kan lösa problemen med hjälp av felsökningsguiden nedan
ber vi dig att kontakta närmaste Philips serviceombud eller Philips
kundtjänstcenter i ditt land. Du kan också kontakta oss online på
www.philips.com.
Problem Lösning
Tandborsten fungerar
inte alls trots att den har
laddats under natten.
Tandborstens motor
fungerar, men inte själva
borsthuvudet.
Borstningskraften har
minskat avsevärt.
Tandborsten rengör inte
tänderna så bra längre.
Se till att laddningsenhetens kontakt är
ordentligt isatt i vägguttaget.
Kontrollera att uttaget är strömförande (se
även avsnittet Viktigt).
Kontrollera att tandborsten är avslagen och
ladda den i minst 16 timmar.
Kontrollera att borsttillbehöret är ordentligt
fastsatt på apparaten (se även avsnittet
Använda apparaten).
Tandborsten måste laddas. Om du alltid
förvarar tandborsten i laddningsenheten
kan du behöva ge batteriet nytt liv på det
sätt som beskrivs i avsnittet Laddning.
Byt ut borsttillbehöret mot ett nytt.
41
Page 42

42
15,6
16 hrs
1
2
2
1
2 3
4
6 7 8
10 11 12 13
14 15 16 17
18 19 20
5
9
21
Page 43

22 23 24
4343
Page 44

44
www.philips.com
u
4203.000.5532.1
 Loading...