

Page 1

sensiflex
power toothbrush
Page 2

234
Page 3
Page 4

Page 5

ENGLISH 6
POLSKI 16
ROMÂNĂ 26
РУССКИЙ 36
ČESKY 47
MAGYAR 57
SLOVENSKY 66
УКРАЇНСЬКІЙ 75
HRVATSKI 85
EESTI 94
LATVISKI 103
LIETUVIŠKAI 112
SLOVENŠŚINA 121
HX2585,HX2538,HX1526,HX1511BL,HX1511,HX1510
5
Page 6

Introduction
This unique, electric toothbrush removes plaque
better than a normal, manual toothbrush. It also
helps to protect your gums.When you exert too
much pressure while brushing, the brush head will
automatically flex back.Because of this clear signal,
you will quickly adopt the right brushing force.
Clinical tests have shown that,thanks to this
system,brushing with the Philips Sensiflex results
in a better and safer brushing technique.
Important
◗ The cord of the charging unit cannot be
replaced.If the cord is damaged,the charging
unit must be discarded.
◗ Make sure the socket is live when you
recharge the toothbrush.The electricity
supply to sockets in mirror cabinets over
washbasins or shaver sockets in bathrooms
may be cut off when the light is turned off.
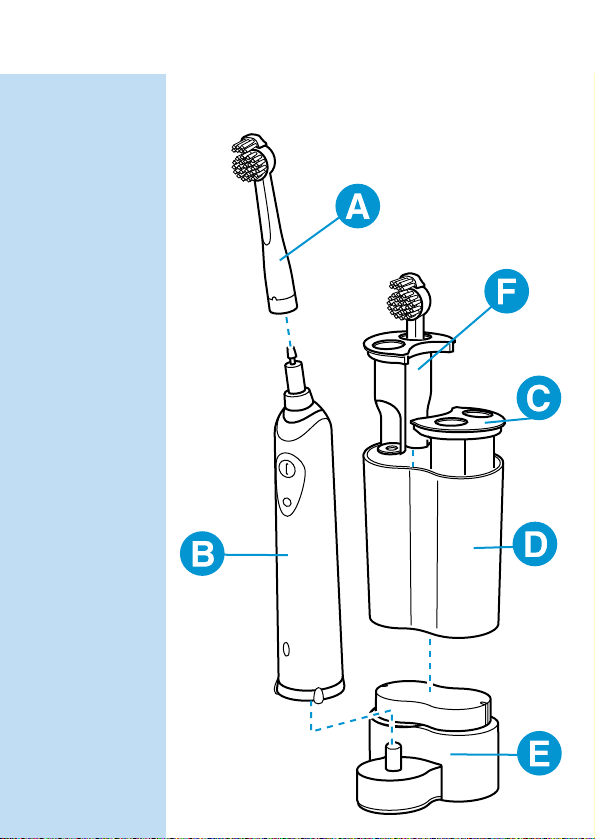
General description
A Brush
B Handle
C Insert for spare brush
D Storage container
E Charger
F Spare brush holder
ENGLISH6
Page 7

Preparing the appliance for use
Mounting the appliance to the wall
C
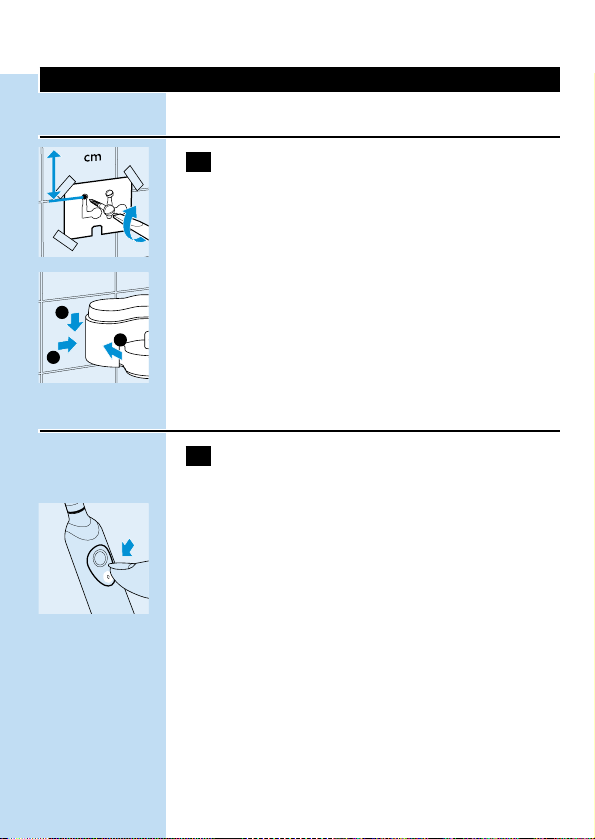
1 Mount the charging unit to the wall,using
2 screws (3.0x30mm) and 2 wall plugs (S5)
(not included).
C
◗ To drill the holes in the right places,you can
use the drilling stencil on the last page of
these directions for use.
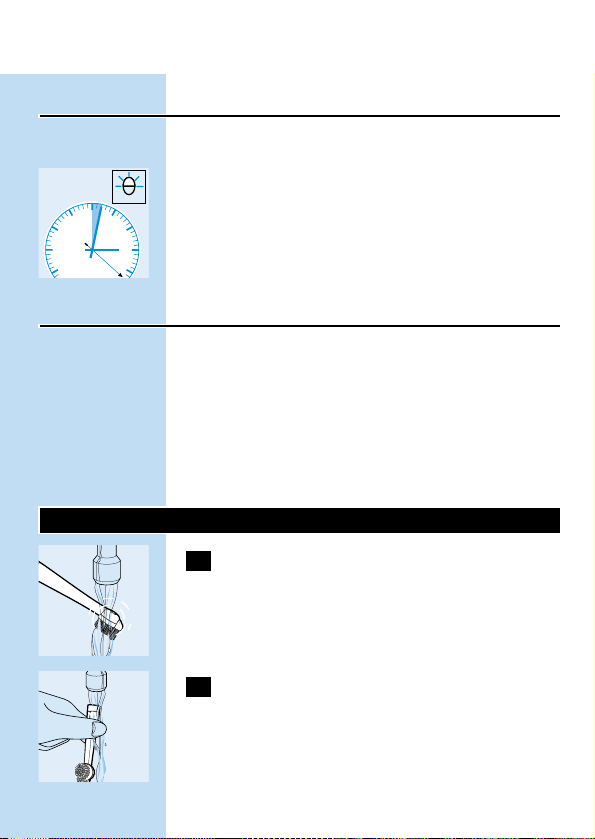
Charging the appliance
1 Charge the appliance for at least 16 hours
before using it for the first time.
C
◗ Make sure the appliance is switched off when
you start charging it.
◗ You can put the toothbrush in the stand and
let it charge continuously.
However, when you first start using the appliance,
it is recommended that you use it until the
battery is empty.To do so, use the appliance in the
normal way without recharging it between the
brushing sessions. Recharge the appliance when
the motor almost stops running. Repeat this
procedure 3 times in a row.
To extend the lifetime of the battery, repeat this
procedure every 6 months.
ENGLISH 7
15,6
3
1
2
Page 8

C
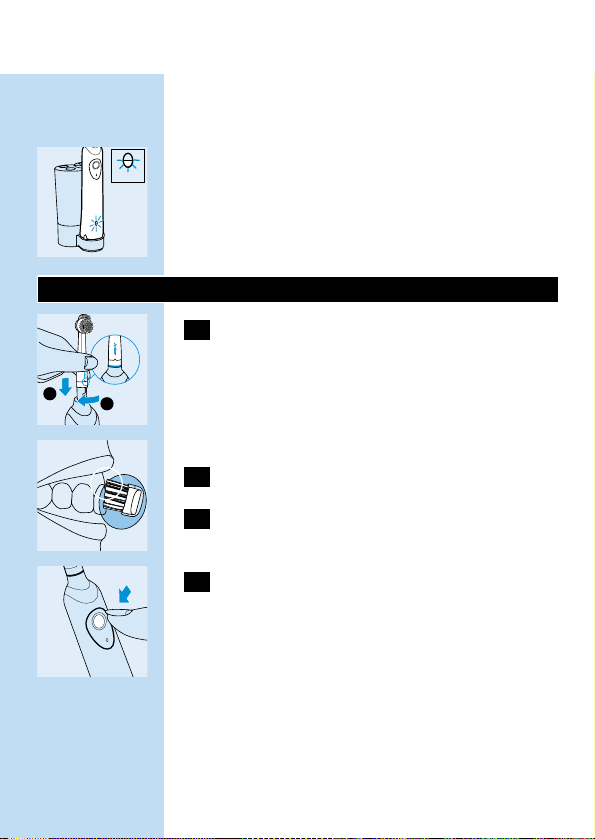
◗ Types HX2585,HX2538 and HX1526 only:
When the battery is being charged,the green
pilot light is on.
◗ You can put the toothbrush in the stand and
let it charge continuously.
Using the appliance
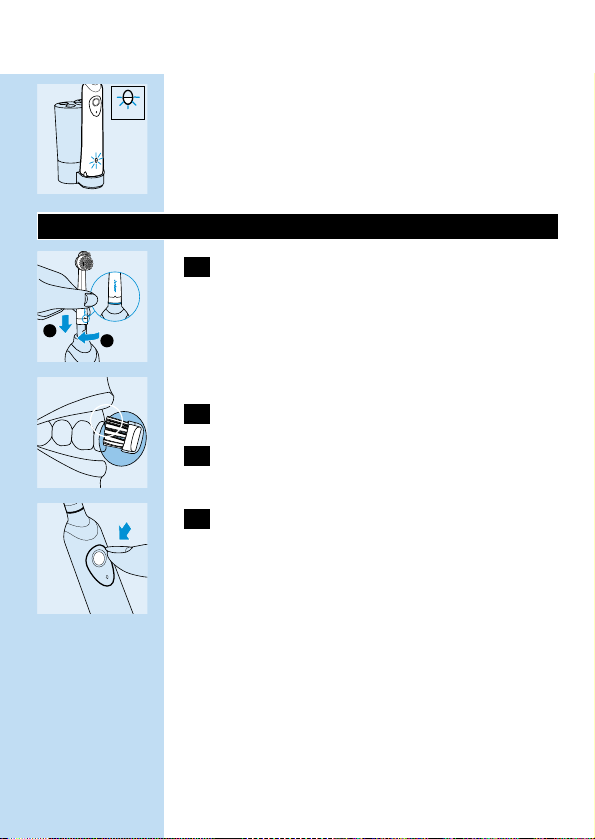
C
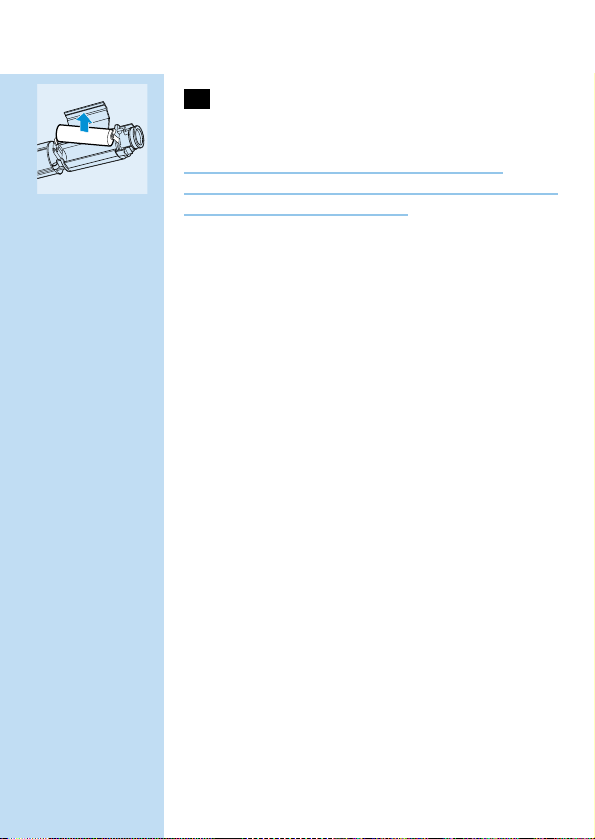
1 Mount the brush attachment onto the
toothbrush by inserting it into the bayonet
catch and turning it clockwise a quarter of
a turn.
This will make it impossible for the brush
attachment to become detached due to vibration.
2 Put toothpaste on the brush.
C
3 Place the brush head in your mouth.
C
4 Press the on button and start brushing
your teeth.
◗ For the best brushing method,minimal
brushing time and brushing functions of the
appliance,see the 'Brushing tips' section.
ENGLISH8
16 hrs
1
2
Page 9

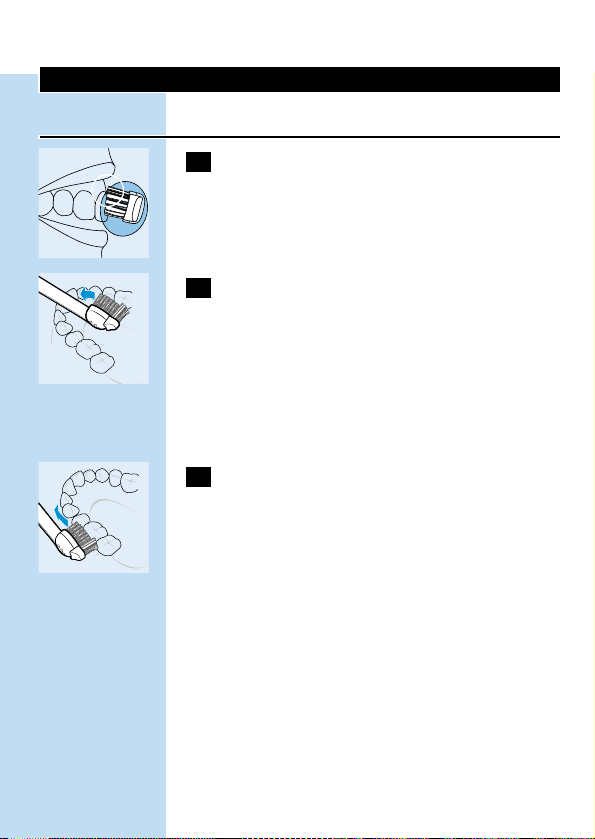
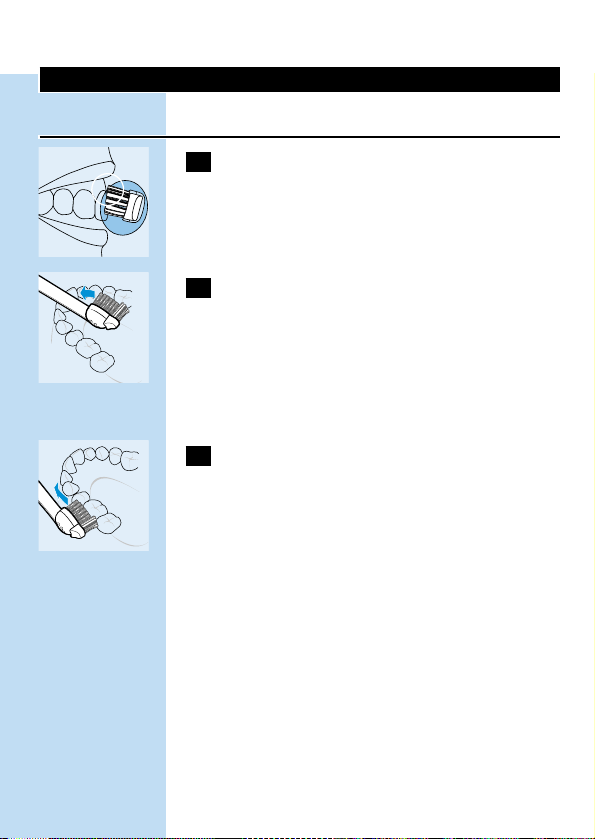
Brushing Tips
Brushing
C
1 Place the brush head against the tooth in
such a way that it covers the surface of the
tooth as well as the gum line.
C
2 Hold the brush head in this position for a
few seconds and then move on to the next
tooth.
The round brush head removes plaque from the
teeth and beneath the gum line.
The individually moving Active Tip cleans between
the teeth.
C
3 Guide the brush head carefully along the
teeth and molars.
◗ Make sure you clean all surfaces of the teeth
(inside,outside and chewing surface) as well
as the gum line properly.A fixed brushing
pattern will prevent you from skipping certain
areas.
◗ See also the brushing instructions on our
Internet site:www.philips.com.
ENGLISH 9
Page 10

Gum Protection
C
1 The Gum Protection system guarantees
that you will not exert too much pressure
on the teeth and gums.
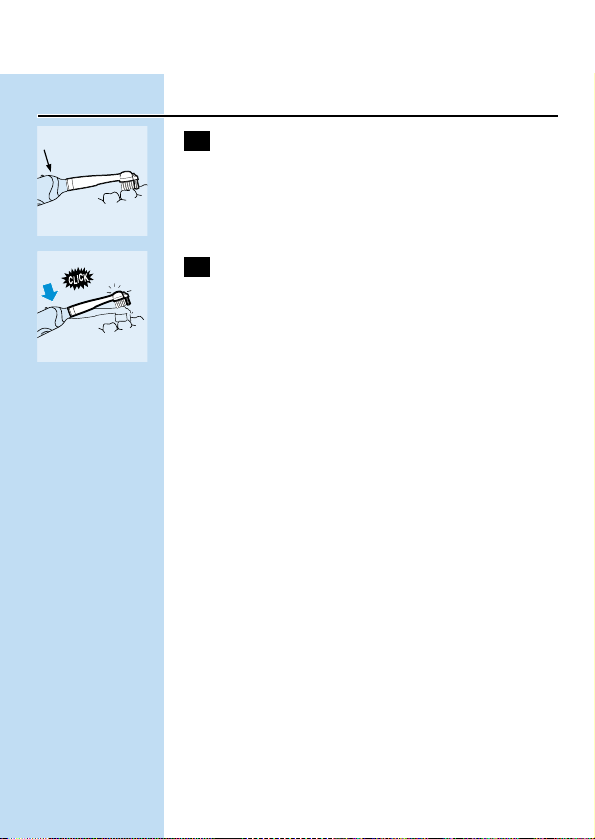
C
2 If you exert too much pressure on the
toothbrush,you will feel and hear a click
when the brush head flexes backwards.As
soon as you reduce the pressure,the
brush head will return to its normal
position.This will protect your gums.
This will probably happen a few times when you
first start using the brush.After some time you
will have discovered the optimal brushing
pressure and the brush head will flex backwards
less often.
Tip:If plaque is removed properly, the gums will
have a pink colour and will firmly surround the
teeth.Healthy gums do not bleed when you eat
or brush your teeth (see also the section
'Optimal dental hygiene').If,nevertheless, your
gums bleed slightly the first few times you use the
brush, this bleeding will generally stop after a few
days.If it does not,consult your dentist or dental
hygienist.
ENGLISH10
Page 11
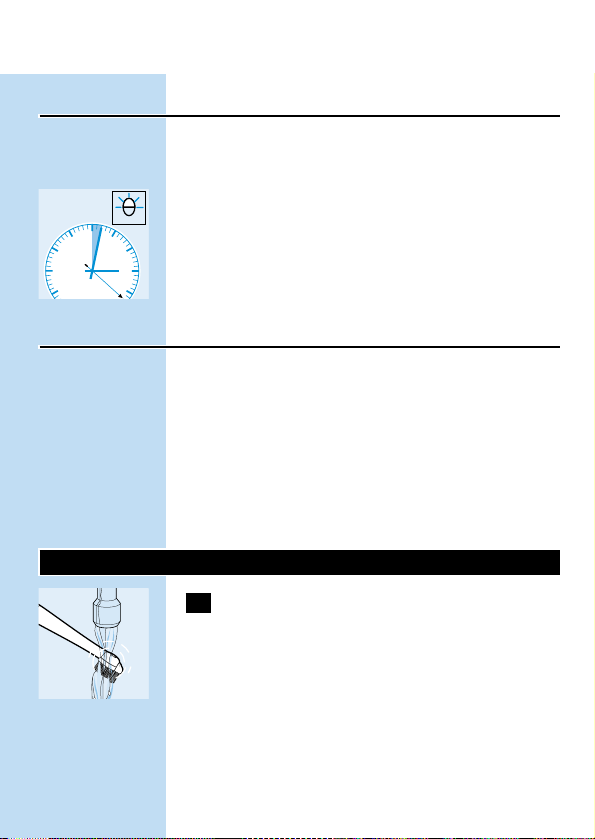
Minimum brushing time:2 minutes
In general, 2 minutes will be enough to clean your
teeth properly.Naturally, you can also brush
longer than 2 minutes.
C
◗ A red pilot light will blink to indicate that 2
minutes have passed (types HX2585,HX2538
and HX1526 only).
Optimal dental hygiene
For optimal dental hygiene, it is recommended to
use dental floss and toothpicks in addition to the
electric toothbrush.
You will find more information about Philips
Dental Care and other Philips products on our
Internet site: www.philips.com.
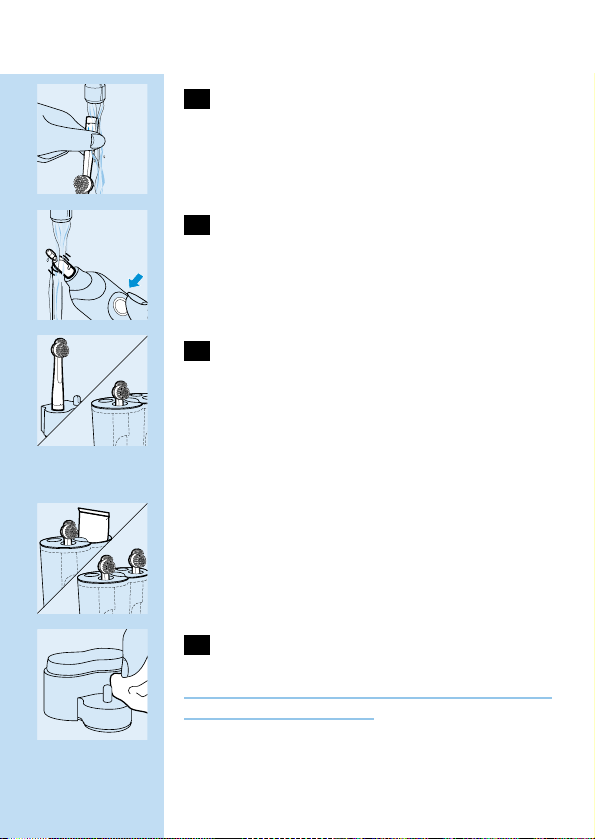
Cleaning and storing the appliance
C
1 Switch the toothbrush on and rinse the
brush attachment under the tap with
lukewarm water (max.60cC).
C
2 Switch the toothbrush off.Detach the
brush attachment and rinse the inside.
ENGLISH 11
Page 12
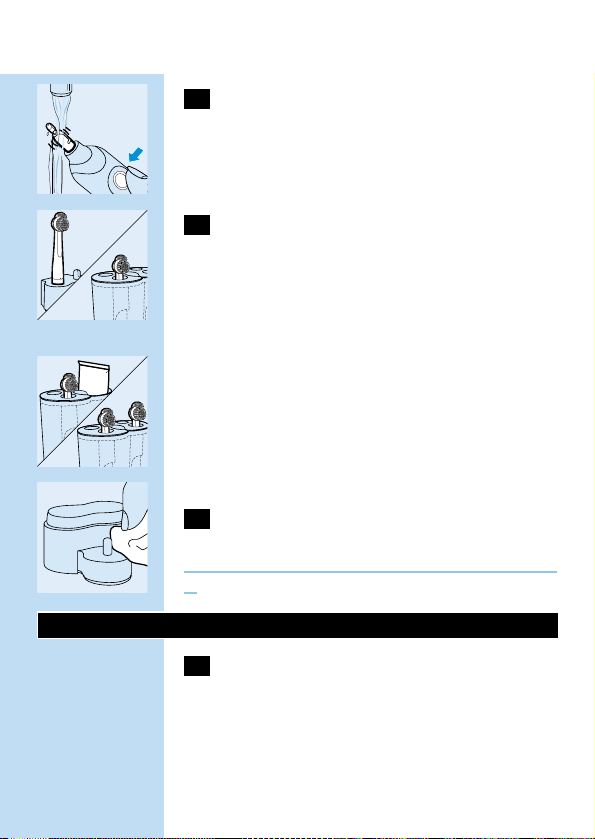
C
3 Switch the toothbrush on again to rinse
toothpaste residues from the drive shaft.
C
4 Types HX1526,HX1515,HX1511,
HX1510 and HX1507 only:store the
brush attachment on the pin on the
charging unit.Types HX2585 and HX2538
only:store up to 4 brush attachments in
the storage container.
C
◗ Types HX2585 and HX2538 only:instead of 2
brush attachments,you can also store a
toothpaste tube in the storage container.
The storage container and the inserts can be
removed from the charging unit and cleaned in
the dishwasher.
C
5 Clean the charging unit with a moist cloth.
Unplug the charging unit before you start cleaning
it.
Replacement
1 Replace the brush attachment every 3
months for the best brushing results.
◗ The brush attachment should also be replaced
when the bristles start to bend outwards.
ENGLISH12
Page 13
You can obtain new brush attachments from the
shop in which you purchased the toothbrush.
All-round PHILIPS replacement brush
attachments can be used.
Environment
When you discard the appliance in due course,
remove the battery and dispose of it in an
environmentally safe way.
◗ NB:You can also hand the appliance in at a
Philips Service Centre,which will dispose of
the battery for you.
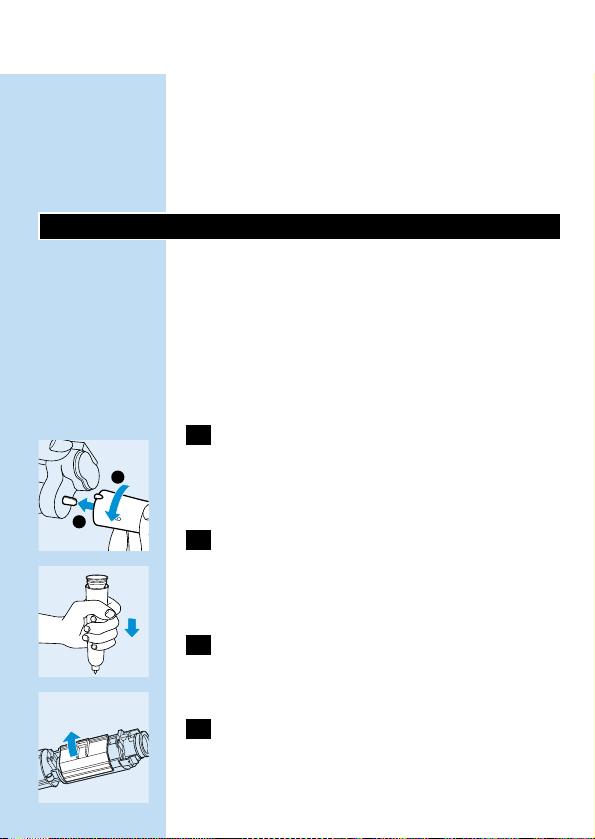
1 The battery must be completely empty
when you remove it.You should therefore
let the appliance run until it stops before
removing the battery.
C
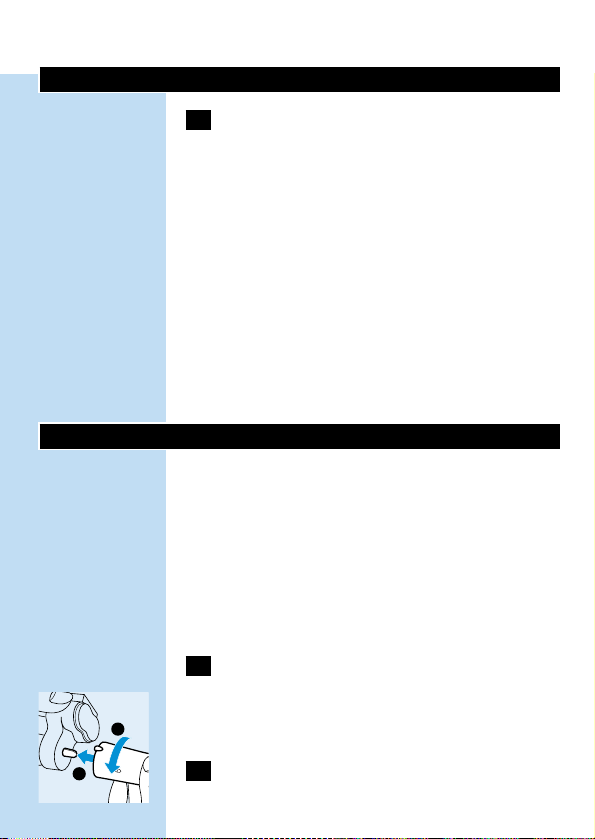
2 Pick up the charging unit and place the
toothbrush on the pin.Turn the
toothbrush anti-clockwise to unscrew the
bottom of the toothbrush.
C
3 Turn the toothbrush upside down and
press it down on a hard surface to remove
the battery holder.
C
4 Open the lid of the battery holder by hand
or by means of a screwdriver.
ENGLISH 13
2
1
Page 14
C
5 Lift the battery out of the battery holder
by means of a screwdriver.
After the bottom has been unscrewed,the
appliance may not be watertight anymore and the
guarantee will become invalid.
ENGLISH14
Page 15
Troubleshooting
If you are unable to solve your problem by means
of the troubleshooting guide below,please
contact the nearest Philips service centre, the
Philips Customer Care Centre in your country or
contact us online at www.philips.com.
Solution
Make sure that the plug of the charging unit is
properly connected to the mains.
Make sure the socket is live (see also the section
'Important').
Make sure the toothbrush is switched off and
recharge it for at least 16 hours.
Check if the brush attachment has been properly
connected to appliance (see also the section 'Using
the appliance').
The toothbrush must be recharged. If you normally
leave the toothbrush in the charging unit
continuously, you may have to revive the battery as
described in the 'Charging' section.
Remove the brush attachment and start using a
new one.
Problem
The toothbrush does not
work at all, although it has
been in the charging unit
overnight.
The motor of the
toothbrush works, but the
brush head doesn't.
The brushing power of the
appliance has greatly
decreased.
The teeth-cleaning
performance of the
toothbrush is not optimal
anymore.
ENGLISH 15
Page 16

Wstęp
Ta unikalna, elektryczna szczoteczka do zębów
usuwa osad nazębny lepiej niż tradycyjna, ręczna
szczoteczka. Chroni ona również twoje dziąsła.
Gdy wywierasz zbyt duży nacisk na szczoteczkę,
głowica automatycznie odsuwa się do tyłu. Dzięki
temu wyraźnemu sygnałowi możesz szybko
dostosować właściwy nacisk szczotkowania. Testy
kliniczne dowiodły, że dzięki temu systemowi
mycie zębów z wykorzystaniem szczoteczki Philips
Sensiflex pozwala wykształcić lepszą i
bezpieczniejszą technikę szczotkowania.
Ważne
◗ Przewód zasilający ładowarki nie podlega
wymianie.W przypadku uszkodzenia tego
przewodu należy pozbyć się całej ładowarki.
◗ Gdy ładujemy szczoteczkę należy sprawdzić,
czy w gniazdku znajduje się napięcie. Zasilanie
elektryczne do gniazdek znajdujących się w
oprawie luster nad umywalkami lub do
gniazdek przeznaczonych do golarek w
łazienkach może być odłączone przy
wyłączonym świetle.
Opis ogólny
A Szczoteczka
B Rączka
C Wkładka dla szczoteczki zapasowej
D Pojemnik do przechowywania szczoteczek
E Ładowarka
F Uchwyt dla szczoteczki zapasowej
POLSKI16
Page 17
Przygotowanie urządzenia do użycia
Montaż urządzenia na ścianie
C
1 Ładowarkę należy zamocować na ścianie
za pomocą dwóch śrub (3,0 x 30 mm)
oraz dwóch ściennych zatyczek (S5),
których nie ma w zestawie.
C
◗ Aby wywiercić otwory w dobrym miejscu,
posłużyć się można wzorcem narysowanym
na ostatniej stronie niniejszej instrukcji
obsługi.
Ładowanie urządzenia
1 Przed pierwszym użyciem należy ładować
urządzenie przez co najmniej16 godzin.
C
◗ Przed rozpoczęciem ładowania należy
sprawdzić czy urządzenie jest wyłączone.
◗ Szczoteczkę można pozostawić w swoim
stanowisku, pozwalając na jej ciągłe ładowanie.
Jednak gdy korzystamy z urządzenia po raz
pierwszy, zaleca się wykorzystanie go aż do
momentu wyczerpania się baterii.W tym celu
należy normalnie korzystać z urządzenia, nie
ładując go pomiędzy kolejnymi czynnościami
szczotkowania zębów. Ładowanie urządzenia
należy rozpocząć dopiero wtedy, gdy silnik niemal
zatrzymuje się. Procedurę tę należy powtórzyć
trzy razy pod rząd.
POLSKI 17
15,6
3
1
2
Page 18
Aby przedłużyć żywotność baterii powtarzaj tę
czynność co 6 miesięcy.
C
◗ Wyłącznie dla typów: HX2585,HX2538 oraz
HX1526: Podczas ładowania baterii świeci się
zielona lampka sygnalizacyjna.
◗ Szczoteczkę można pozostawić w swoim
stanowisku, pozwalając na jej ciągłe ładowanie.
Korzystanie z urządzenia
C
1 Załóż nasadkę szczoteczki na jej trzonek,
wciskając ją w uchwyt bagnetowy i
obracając nią o ćwierć obrotu w kierunku
zgodnym z ruchem wskazówek zegara.
Uniemożliwi to odłączenie się nasadki, co mogłyby
spowodować drgania.
2 Nałóż pastę na szczoteczkę.
C
3 Umieść głowicę szczoteczki w ustach.
C
4 Wciśnij przycisk włączający i rozpocznij
czyszczenie zębów.
◗ Aby wypracować najlepszą metod czyszczenia,
jak najbardziej skrócić czas czyszczenia i
maksymalnie wykorzystać funkcje
szczotkowania urządzenia,zapoznaj się z
treścią punktu: "Wskazówki dotyczące
czyszczenia".
POLSKI18
16 hrs
1
2
Page 19
Wskazówki dotyczące czyszczenia
Czyszczenie
C
1 Ustaw głowicę szczoteczki naprzeciwko
zęba tak, aby przykrywała ona
powierzchnię zęba oraz linię dziąseł.
C
2 Przez kilka sekund trzymaj głowicę
szczoteczki w tej pozycji, a następnie
przesuń ją do następnego zęba.
Okrągła głowica szczoteczki usuwa osad z zębów
oraz z powierzchni znajdujących się poniżej linii
dziąseł.
Poruszająca się niezależnie aktywna końcówka
czyści obszary pomiędzy zębami.
C
3 Kieruj głowicę szczoteczki ostrożnie
wzdłuż zębów przednich i zębów
trzonowych.
◗ Sprawdź czy dokładnie oczyściłeś
powierzchnię zębów - wewnątrz,z zewnątrz
oraz powierzchnie miażdżące - jak również
linię dziąseł. Dzięki ustalonemu wzorcowi
czyszczenia nie ominiesz żadnego z obszarów.
◗ Zapoznaj się również z instrukcjami
szczotkowania w naszej witrynie
internetowej: www.philips.com.
POLSKI 19
Page 20

Ochrona dziąseł
C
1 System ochrony dziąseł gwarantuje
optymalną siłę nacisku na zęby i dziąsła.
C
2 Gdy wywierasz zbyt duży nacisk na
szczoteczkę, poczujesz jak szczoteczka
odchyla się do tyłu i usłyszysz
charakterystyczny odgłos kliknięcia. Z
chwilą zmniejszenia nacisku głowica
szczoteczki powróci do swojego
normalnego położenia. Mechanizm ten
chroni twoje dziąsła przed podrażnieniem.
Rozpoczynając korzystanie ze szczoteczki,
spotkasz się z tym zjawiskiem prawdopodobnie
kilkakrotnie. Po pewnym czasie odkryjesz
optymalny nacisk szczoteczki i głowica szczoteczki
będzie coraz rzadziej odchylać się do tyłu.
Wskazówka: Jeśli osad usuwany jest w sposób
prawidłowy, dziąsła będą koloru różowego i będą
ściśle otaczać ząb. Zdrowe dziąsła nie krwawią
podczas jedzenia lub czyszczenia zębów
(optymalna higiena zębów). Jednak podczas
początkowego stosowania szczoteczki dziąsła
mogą lekko krwawić. Krwawienie to powinno
ustąpić po kilku dniach. Jeżeli nie ustąpi, należy
skontaktować się ze swoim dentystą lub
specjalistą zajmującym się higieną jamy ustnej.
POLSKI20
Page 21
Minimalny czas czyszczenia zębów: 2 minuty
Aby dokładnie wyczyścić zęby, wystarczą
zazwyczaj dwie minuty. Oczywiście czas
szczotkowania zębów może być dłuższy.
C
◗ Migotanie czerwonej lampki sygnalizacyjnej
oznacza, że czas dwóch minut minął
(wyłącznie dla typów HX2585, HX2538 oraz
HX1526).
Optymalna higiena jamy ustnej
Optymalna higiena jamy ustnej wymaga
stosowania, oprócz elektrycznej szczoteczki do
zębów, także nitki dentystycznej i wykałaczek.
Więcej informacji na temat produktów z serii
Philips Dental Care lub innych produktów marki
Philips znaleźć można w naszej witrynie
internetowej: www.philips.com.
Czyszczenie i przechowywanie urządzenia
C
1 Włącz szczoteczkę i wypłucz nasadkę
szczoteczki pod strumieniem bieżącej
letniej wody z kranu (maksymalnie 60cC).
POLSKI 21
Page 22
C
2 Wyłącz szczoteczkę, odłącz nasadkę
szczoteczki i opłucz jej wnętrze.
C
3 Aby wypłukać resztki pasty do zębów z
wałka napędowego, włącz szczoteczkę
ponownie.
C
4 Wyłącznie dla typów HX1526, HX1515,
HX1511, HX1510 oraz HX1507:
przechowuj nasadkę szczoteczki na szpilce
znajdującej się na ładowarce.Wyłącznie dla
typów HX2585 oraz HX2538: w
pojemniku przechowującym mieszczą się
cztery nasadki szczoteczki.
C
◗ Zamiast dwóch nasadek szczoteczki możesz
w pojemniku szczoteczki przechowywać
również tubę pasty do zębów.
Pojemnik przechowujący i wkładki można
odłączyć od ładowarki i umyć w zmywarce.
C
5 Oczyścić ładowarkę wilgotną szmatką.
Przed rozpoczęciem czyszczenia ładowarki należy
wyjąć wtyczkę z gniazdka.
POLSKI22
Page 23
Wymiana
1 Dla uzyskania najlepszych wyników
czyszczenia należy co trzy miesiące
wymieniać nasadki szczoteczek.
◗ Nasadkę szczoteczki powinno się wymieniać
również wtedy, gdy włosie szczoteczki zaczyna
się odchylać na zewnątrz.
Nowe nasadki szczoteczki można nabyć w tym
samym sklepie, w którym dokonałeś zakupu
szczoteczki.
Można korzystać z zaokrąglonych wymiennych
nasadek szczoteczki Philipsa.
Ochrona środowiska
Gdy chcesz pozbyć się urządzenia po jego
wyeksploatowaniu, wyjmij baterię i umieść ją w
miejscu bezpiecznym z punktu widzenia ochrony
środowiska.
◗ Uwaga: Możesz również przekazać urządzenie
do punktu serwisowego Philipsa,które zajmie
się właściwym usunięciem baterii.
1 Przed wyjęciem baterii powinna być ona
całkowicie wyeksploatowana.Dlatego z
urządzenia należy korzystać aż do chwili, w
której samo się ono zatrzyma.
C
2 Zdejmij ładowarkę i umieść szczoteczkę na
szpilce.Aby odkręcić dolną część
POLSKI 23
2
1
Page 24
szczoteczki, obróć ją w kierunku
przeciwnym do ruchu wskazówek zegara.
C
3 W celu usunięcia pojemnika na baterie
obróć szczoteczkę o 180c i dociśnij ją do
twardej powierzchni.
C
4 Korzystając ze śrubokręta otwórz
pokrywkę pojemnika na baterie.
C
5 Wysuń baterie z pojemnika posługując się
śrubokrętem.
Po odkręceniu dolnej części urządzenia może ono
przestać być wodoszczelne, co spowoduje
unieważnienie gwarancji.
POLSKI24
Page 25
Naprawianie usterek
Jeśli poniższe wskazówki okażą się
niewystarczające dla rozwiązania twojego
problemu, skontaktuj się z najbliższym punktem
serwisowym Philipsa, Działem Obsługi Klienta w
twoim kraju lub on-line z naszą firmą:
www.philips.com.
Rozwiązanie
Sprawdź czy wtyczka ładowarki jest prawidłowo
podłączona do sieci zasilającej.
Sprawdź czy w gniazdku jest napięcie (sprawdź
również rozdział "Ważne uwagi")
Sprawdź czy szczoteczka jest wyłączona i naładuj ją
ponownie przez co najmniej szesnaście godzin.
Sprawdź, czy nasadka szczoteczki została
prawidłowo dołączona do urządzenia (Sprawdź
również rozdział "Korzystanie z urządzenia").
Należy naładować szczoteczkę. Jeśli zazwyczaj
pozostawiasz szczoteczkę w ładowarce, może
okazać się konieczne zregenerowanie baterii
zgodnie z opisem w rozdziale "Ładowanie".
Zdejmij nasadkę szczoteczki i zacznij używać nowej.
Problem
Szczoteczka nie działa,
chociaż znajdowała się
przez całą noc w
ładowarce.
Silnik szczoteczki pracuje
lecz głowica szczoteczki nie
działa.
Moc szczotkowania
urządzenia wyraźnie się
zmniejszyła.
Działanie czyszczące
szczoteczki przestało być
optymalne.
POLSKI 25
Page 26

Introducere
Această periuţă de dinţi electrică, unică
îndepărtează placa dentară mai bine decât o
periuţă obişnuită, manuală.Vă ajută, de asemenea,
la protejarea gingiilor. Dacă exercitaţi o presiune
prea mare în timpul periajului, capul de periere va
sări înapoi. Datorită acestui semnal clar, veţi
adopta imediat presiunea potrivită.Teste clinice au
demonstrat că, datorită acestui sistem, periajul
dinţilor cu Philips Sensiflex reprezintă o tehnică
mai bună şi mai sigură.
Important
◗ Cablul de alimentare al încărcătorului nu
poate fi înlocuit. Dacă se deteriorează,
încărcătorul trebuie aruncat.
◗ Când încărcaţi periuţa de dinţi, aveţi grijă ca
priza să fie alimentată. Curentul electric ce
alimentează prizele din dulapurile de baie de
deasupra chiuvetei sau prizele pentru
aparatele de ras poate fi întrerupt dacă lumina
este stinsă.
Descriere generală
A Periuţă
B Mâner
C Insert pentru periuţa de rezervă
D Compartiment de depozitare
E Încărcător
F Suport periuţă de rezervă
ROMÂNĂ26
Page 27

Pregătirea aparatului pentru utilizare
Montarea aparatului pe perete
C
1 Montaţi încărcătorul pe perete, cu ajutorul
a 2 şuruburi (3x30mm) şi 2 fişe de perete
(S5) (neincluse).
C
◗ Pentru a da găuri în locurile corecte, puteţi
folosi tiparul de pe ultima pagină a acestui
manual de utilizare.
Încărcarea aparatului
1 Încărcaţi aparatul cel puţin 16 ore înainte
de prima utilizare.
C
◗ Asiguraţi-vă că aparatul este oprit când
începeţi să-l încărcaţi.
◗ Puteţi pune periuţa în suport şi o puteţi lăsa
să se încarce continuu.
Totuşi, când folosiţi aparatul pentru pr ima dată, vă
recomandăm să-l folosiţi până se descarcă
acumulatorul. Folosiţi aparatul în mod obişnuit
fără să-l reîncărcaţi între periaje. Reîncărcaţi
aparatul doar în momentul când motorul este pe
punctul de a se opri. Repetaţi această procedură
de 3 ori.
Pentru a prelungi perioada de funcţionare a
acumulatorului, repetaţi această procedură o dată
la 6 luni.
ROMÂNĂ 27
15,6
3
1
2
Page 28
C
◗ Doar HX2585, HX2538 şi HX1526: Când
acumulatorul se încarcă, ledul verde rămâne
aprins.
◗ Puteţi pune periuţa în suport şi o puteţi lăsa
să se încarce continuu.
Utilizarea aparatului
C
1 Montaţi periuţa pe accesoriul de fixare
introducând-o în baionetă şi înşurubând-o
în sensul acelor de ceasornic un sfert de
rotaţie.
Astfel, capul de periere nu se va desprinde în
momentul vibraţiilor.
2 Puneţi pastă de dinţi pe periuţă.
C
3 Introduceţi periuţa în gură.
C
4 Apăsaţi butonul pornire şi începeţi periajul
dentar.
◗ Pentru cea mai bună metodă de periaj dentar,
durata optimă şi funcţiile aparatului, consultaţi
capitolul "Sugestii pentru periaj dentar" de mai
jos.
ROMÂNĂ28
16 hrs
1
2
Page 29
Sugestii pentru periaj dentar
Periajul dentar
C
1 Poziţionaţi periuţa pe dinţi în aşa fel încât
aceasta să acopere atât suprafaţa dinţilor
cât şi gingia.
C
2 Ţineţi periuţa în această poziţie timp de
câteva secunde şi apoi deplasaţi-o pe
următorul dinte.
Periuţa cu cap rotund îndepărtează placa de pe
dinţi şi de sub gingii.
Capul de periere Active Tip individual permite
curăţarea spaţiilor interdentare.
C
3 Deplasaţi periuţa cu grijă de-a lungul
dinţilor şi măselelor.
◗ Curăţaţi toate suprafeţele dinţilor (interior,
exterior şi suprafaţa de mestecare) cât şi
gingiile. O metodă prestabilită vă ajută să nu
uitaţi anumite zone.
◗ Consultaţi, de asemenea, instrucţiunile de
periaj de pe site-ul nostru de Internet:
www.philips.com.
ROMÂNĂ 29
Page 30
Protejarea gingiilor
C
1 Sistemul de Protejare a Gingiilor
echilibrează presiunea exercitată de
dumneavoastră asupra dinţilor şi gingiilor.
C
2 Dacă exercitaţi o presiune prea mare pe
periuţă, veţi simţi şi auzi un clic când capul
periuţei sare înapoi. Când reduceţi
presiunea, capul periuţei revine la poziţia
normală.Astfel gingiile dumneavoastră vor
fi protejate.
Acest lucru se va întâmpla probabil de câteva ori
când veţi folosi periuţa de dinţi pentru prima dată.
După puţin timp, când veţi descoperi presiunea
optimă de periere, aceasta va sări înapoi din ce în
ce mai rar.
Sugestie: dacă placa dentară este corect
îndepărtată, gingiile vor avea o culoare rozalie şi
vor susţine ferm dinţii. Gingiile sănătoase nu
sângerează când mâncaţi sau vă spălaţi pe dinţi (a
se vedea, de asemenea, capitolul "Igienă dentară
optimă"). Dacă gingiile încep să sângereze totuşi
uşor în timpul primelor periaje dentare, acest
lucru ar trebui să înceteze după câteva zile. În caz
contrar,consultaţi dentistul.
ROMÂNĂ30
Page 31

Durata minimă de periere: 2 minute
În general, 2 minute sunt suficiente pentru a vă
spăla corect pe dinţi. Evident, puteţi prelungi
această perioadă.
C
◗ Un led roşu va clipi pentru a indica faptul că
cele 2 minute au trecut (doar modelele
HX2585, HX2538 şi HX1526).
Igienă dentară optimă
Pentru o igienă dentară optimă, se recomandă
utilizarea aţei dentare şi a scobitorilor pe lângă
periuţa de dinţi electrică.
Veţi găsi mai multe informaţii despre Igiena
Dentară Philips şi despre alte produse Philips pe
site-ul nostru de Internet: www.philips.com.
Curăţarea şi depozitarea aparatului
C
1 Porniţi periuţa de dinţi şi clătiţi accesoriul
de fixare sub jet de apă călduţă. (max.
60cC).
C
2 Opriţi periuţa de dinţi. Deşurubaţi
accesoriul de fixare şi clătiţi-l în interior.
ROMÂNĂ 31
Page 32

C
3 Porniţi din nou periuţa pentru a clăti
resturile de pastă de dinţi de pe ax.
C
4 Doar tipurile HX1526, HX1515, HX1511,
HX1510 şi HX1507: fixaţi periuţa pe
încărcător pentru depozitare. Doar tipurile
HX2585 şi HX2538: puteţi depozita până
la 4 accesorii periuţe în compartimentul de
depozitare.
C
◗ Doar tipurile HX2585 şi HX2538: în locul a
două periuţe, puteţi depozita pasta de dinţi în
compartimentul de depozitare.
Compartimentul de depozitare şi accesoriile
detaşabile pot fi scoase de pe încărcător şi spălate
în maşina de spălat vase.
C
5 Ştergeţi încărcătorul cu o cârpă umedă.
Scoateţi încărcătorul din priză înainte de a începe
curăţarea acestuia.
Înlocuire
1 Înlocuiţi accesoriul o dată la 3 luni pentru
a obţine cele mai bune rezultate.
◗ Periuţa trebuie, de asemenea,înlocuită când
perii încep să se încline.
ROMÂNĂ32
Page 33

Puteţi obţine accesorii de schimb la magazinul de
unde aţi cumpărat periuţa.
Puteţi folosi orice tip de periuţă de schimb cu cap
rotund, marca PHILIPS.
Protejarea mediului înconjurător
În momentul când aruncaţi aparatul, scoateţi
acumulatorul şi aruncaţi-l respectând normele de
protejare a mediului înconjurător.
◗ NB: Puteţi duce aparatul la un Centru Service
Philips care se va ocupa de acest lucru în locul
dumneavoastră.
1 Când scoateţi acumulatorul, acesta trebuie
să fie complet descărcat. Prin urmare, lăsaţi
aparatul să funcţioneze până se descarcă
complet înainte de a scoate acumulatorul.
C
2 Luaţi încărcătorul şi poziţionaţi periuţa pe
pivot. Răsuciţi periuţa în sens invers acelor
de ceasornic pentru a deşuruba baza
periuţei.
C
3 Întoarceţi periuţa cu capul în jos şi presaţi-
o de o suprafaţă dură pentru a scoate
compartimentul acumulatorului.
ROMÂNĂ 33
2
1
Page 34

C
4 Deschideţi capacul compartimentului.
C
5 Scoateţi acumulatorul cu ajutorul
şurubelniţei.
După ce aţi deşurubat baza aparatului, acesta nu
mai este etanş, iar garanţia nu mai este valabilă.
ROMÂNĂ34
Page 35

În cazul unor probleme
Dacă nu reuşiţi să rezolvaţi problema cu ajutorul
ghidului de mai jos, vă rugăm să contactaţi cel mai
apropiat centru service Philips, Centrul de Relaţii
cu Clienţii din ţara dumneavoastră sau să ne
contactaţi la www.philips.com.
Soluţie
Asiguraţi-vă că încărcătorul este corect introdus în
priză.
Asiguraţi-vă că priza este alimentată (consultaţi şi
capitolul "Important").
Asiguraţi-vă că periuţa este oprită şi reîncărcaţi-o cel
puţin 16 ore.
Verificaţi dacă aţi montat corect accesoriul pe aparat
(consultaţi şi capitolul "Utilizarea aparatului").
Periuţa de dinţi trebuie reîncărcată. Dacă lăsaţi de
obicei periuţa de dinţi în încărcător continuu, va
trebui să reactivaţi acumulatorul conform
instrucţiunilor de la capitolul "Încărcare".
Scoateţi capul periuţei şi folosiţi unul nou.
Problemă
Periuţa de dinţi nu
funcţionează deloc, deşi a
fost poziţionată pe
încărcător toată noaptea.
Motorul periuţei
funcţionează, dar capul de
periere nu.
Puterea de periere a
aparatului a scăzut simţitor.
Performanţa de curăţare a
dinţilor nu mai este optimă.
ROMÂNĂ 35
Page 36

Введение
Эта уникальная электрическая зубная щетка
удаляет зубной камень лучше чем обычная,
ручная щетка. Она также обеспечивает защиту
ваших десен. Если во время чистки зубов вы
прикладываете слишком большое усилие,
головка щетки автоматически отгибается
назад. Благодаря этому четкому сигналу вы
быстро подберете нужное чистящее усилие.
Клинические испытания показали, что при
использовании щетки Sensiflex производства
компании "Филипс" обеспечивается более
эффективная и более безопасная чистка зубов.
Внимание
◗ Шнур зарядного устройства не подлежит
замене. В случае повреждения шнура
зарядное устройство следует выбросить.
◗ При подзарядке зубной щетки убедитесь в
том, что розетка электросети находится
под напряжением.При выключении света
подача электроэнергии в электророзетки,
размещенные в зеркальных шкафах над
умывальными раковинами, или в
электророзетки для электробритвы в
ванных комнатах может прекратиться.
Общее описание
A Щетка
B Ручка
C Вставка для запасной щетки
D Футляр для хранения
РУССКИЙ36
Page 37

E Зарядное устройство
F Держатель запасной щетки
Подготовка прибора к работе
Крепление электроприбора на стене
C
1 Навесьте зарядное устройство на стену
с помощью 2 винтов (3,0х30 мм) и 2
пробок (S5) (в комплект поставки не
входят).
C
◗ Для того, чтобы точно просверлить
отверстия в стене, вы можете
воспользоваться трафаретом, нарисованным
на последней странице данного
руководства.
Как заряжать аккумуляторную батарею
1 Перед первым использованием
электроприбора необходимо заряжать
аккумуляторную батарею в течение по
крайней мере 16 часов.
C
◗ Перед тем, как начать зарядку батареи,
убедитесь в том, что прибор выключен.
◗ Вы можете оставить зубную щетку в
зарядном устройстве, при этом процесс
зарядки батареи будет происходить
постоянно.
Однако в самом начале применения
РУССКИЙ 37
15,6
3
1
2
Page 38

электрической щетки мы рекомендуем
пользоваться ею до полной разрядки батареи.
Для этого пользуйтесь щеткой в нормальном
режиме, не производя подзарядки между
процедурами чистки зубов. Подзарядите
прибор только после почти полной остановки
электродвигателя. Проделайте эту процедуру 3
раза подряд.
Для того, что увеличить срок службы батареи,
повторяйте эту процедуру один раз в полгода.
C
◗ Только модели HX2585, HX2538 и HX1526:
В процессе зарядки батареи горит зеленый
индикатор.
◗ Вы можете оставить зубную щетку в
зарядном устройстве, при этом процесс
зарядки батареи будет происходить
постоянно.
Пользование электроприбором
C
1 Установите чистящую насадку на
электрическую зубную щетку; вставив ее
в байонетный замок и повернув на
четверть оборота по часовой стрелке.
Благодаря этому действию разъединение
щетки и насадки при вибрации станет
невозможным.
2 Нанесите на щетку зубную пасту.
C
3 Приложите головку зубной щетки к
зубам.
РУССКИЙ38
16 hrs
1
2
Page 39

C
4 Нажмите на кнопку включения прибора
и начните чистить зубы.
◗ Для получения информации, касающейся
оптимального метода чистки зубов,
минимального времени чистки зубов и
функций зубной щетки см. раздел "Советы
по чистке зубов".
Советы по чистке зубов
Чистка зубов
C
1 Приложите головку зубной щетки к зубу
таким образом, чтобы она накрывала и
поверхность зуба, и пришеечную часть
десны.
C
2 В течение нескольких секунд
удерживайте щетку в этом положении,а
затем передвиньте ее к следующему
зубу.
Круглая головка щетки удаляет налет с зубов и
с пришеечной части десен.
Наконечник Active Tip, совершая независимые
движения, очищает пространство между
зубами.
C
3 Осторожно направляйте головку зубной
щетки вдоль резцов и коренных зубов.
РУССКИЙ 39
Page 40

◗ Убедитесь в том, что вы правильно чистите
все поверхности зубов (внутреннюю,
внешнюю и жевательную поверхности), а
также линию десен. Если вы каждый раз
будете чистить зубы в определенной
последовательности, это поможет вам не
пропускать определенные участки.
◗ См. также инструкции по чистке зубов на
нашем сайте:www
.philips.com.
Защита десен
C
1 Система защиты десен исключает
чрезмерное давление на зубы и десны
при чистке зубов.
C
2 Если вы нажмете слишком сильно на
зубную щетку, то почувствуете и
услышите щелчок в момент отклонения
головки щетки назад. Как только вы
уменьшите давление, головка щетки
вернется в нормальное положение. Это
защитит ваши десны.
Вероятно, это произойдет несколько раз в
самом начале пользования щеткой. Через
некоторое время вы найдете оптимальное
давление для чистки зубов и головка щетки
будет отклоняться назад реже.
Совет: При правильном удалении зубного
налета десны имеют розовый цвет и плотно
окружают зубы. Здоровые десны не
РУССКИЙ40
Page 41

кровоточат, когда вы едите или чистите зубы
(см. также раздел «Оптимальная гигиена
полости рта». Если ваши десны все же слегка
кровоточат на начальной стадии пользования
электрической щеткой, то, как правило, через
несколько дней это должно прекратиться. В
противном случае, вам следует
проконсультироваться со стоматологом.
Минимальная продолжительность чистки
зубов: 2 минуты.
В большинстве случаев, для того, чтобы как
следует почистить зубы, достаточно 2 минут.
Разумеется, вы можете чистить зубы и дольше.
C
◗ Мигание красного индикатора указывает на
то, что прошло 2 минуты (только модели
HX2585, HX2538 и HX1526).
Оптимальная гигиена полости рта
Для поддержания оптимальной гигиены
полости рта рекомендуется наряду с
электрической зубной щеткой пользоваться
нитью для чистки зубов и зубочистками.
Вы найдете дополнительную информацию,
касающуюся приборов по уходу за зубами и
другой продукции компании "Филипс" на
нашем сайте:www
.philips.com.
РУССКИЙ 41
Page 42

Очистка и хранение
электроприбора
C
1 Включите зубную щетку и промойте
чистящую насадку теплой
водопроводной водой (с температурой
не более 60cC).
C
2 Выключите зубную щетку. Снимите
чистящую насадку и промойте ее
изнутри.
C
3 Включите зубную щетку повторно,
чтобы смыть остатки зубной пасты с
приводного вала.
C
4 Только модели HX1526, HX1515,
HX1511, HX1510 и HX1507: храните
насадку щетки на стержне,
расположенном на зарядном устройстве.
Только модели HX2585 и HX2538:
храните до 4 насадок щетки в футляре
для хранения.
C
◗ Только модели HX2585 и HX2538: Вместо 2
насадок щетки вы можете хранить в
футляре для хранения тюбик с зубной
пастой.
РУССКИЙ42
Page 43

Вы можете вынимать из зарядного устройства
контейнер для хранения и чистящие насадки и
мыть их в посудомоечной машине.
C
5 Для очистки зарядного устройства
пользуйтесь влажной тканью.
Перед очисткой зарядного устройст
отключите его от электросети.
Замена частей
1 Для наилучших результатов чистки
зубов замену чистящей насадки следует
производить через каждые 3 месяца.
◗ Замену чистящей насадки следует
производить также в том случае, когда
щетина зубной щетки начинает выгибаться
наружу.
Вы можете приобрести новые чистящие
насадки в том же магазине, где покупали
зубную щетку.
Вы можете пользоваться сменными круговыми
чистящими насадками «Филипс».
РУССКИЙ 43
Page 44

Охрана окружающей среды
Прежде чем выбросить неисправный прибор,
извлеките из него аккумуляторную батарею и
утилизируйте ее в соответствии с
требованиями экологической безопасности.
◗ NB: Вы также можете передать прибор в
сервисный центр компании «Филипс», в
котором батареи прибора будут
утилизированы.
1 Следует вынимать только полностью
разряженную батарею. Поэтому, прежде
чем вынимать батарею, оставьте прибор
во включенном состоянии до ее полной
разрядки.
C
2 Возьмите в руки зарядное устройство и
поместите зубную щетку на стержень.
Чтобы отвинтить нижнюю часть зубной
щетки, поверните щетку против часовой
стрелки.
C
3 Чтобы извлечь батарею из отсека,
переверните зубную щетку и прижмите
ее к твердой поверхности.
C
4 С помощью отвертки откройте крышку
отсека для батареи.
РУССКИЙ44
2
1
Page 45

C
5 Извлеките батарею из отсека для
батареи, воспользовавшись отверткой.
После отвинчивания нижней части прибо
водонепроницаемость прибора может быт
утрачена, и прибор лишается гарантии.
РУССКИЙ 45
Page 46

Способ устранения
Убедитесь в том, что вилка зарядного устройства
подсоединена к сети надлежащим образом.
Убедитесь в том, что электророзетка находится
под напряжением (см. также раздел
«Внимание»).
Убедитесь в том, что зубная щетка выключена и
заряжайте ее в течение не менее 16 часов.
Проверьте правильность соединения чистящей
насадки с электроприбором (см. также раздел
«Пользование электроприбором»).
Необходимо произвести подзарядку зубной
щетки. Если зубная щетка обычно хранится в
зарядном устройстве, то вам, возможно,
придется восстанавливать батарею, как описано
в разделе «Как заряжать аккумуляторную
батарею».
Установите на щетку новую чистящую насадку.
Неисправность
Зубная щетка не
работает несмотря на то,
что она находилась в
зарядном устройстве в
течение ночи.
Электродвигатель зубной
щетки работает, но ее
головка неподвижна.
Чистящая способность
прибора значительно
ухудшилась.
Снизилось качество
чистки зубов с помощью
зубной щетки.
РУССКИЙ46
Устранение неисправностей
Если вы не можете устранить неисправности
самостоятельно, с помощью представленной
ниже инструкции по устранению
неисправностей, обращайтесь в ближайший
сервисный центр компании «Филипс», в центр
компании «Филипс» по обслуживанию
потребителей в своей стране или на Web-сайт
нашей компании по адресу: www.philips.com.
Page 47

Úvod
Tento jedinečný elektrický zubní kartáček
odstraňuje plag lépe než běžný zubní kartáček.
Současně též lépe chrání vaše dásně.V okamžiku,
kdy byste na kartáček nadměrně přitlačíli, odskočí
automaticky směrem dozadu. Po tomto jasném
signálu rychle tlak na kar táček zmenšíte. Klinické
testy prokázaly, že díky tomuto systému je čištění
zubů kartáčkem Philips Sensiflex lepší a
bezpečnější.
Důležité
◗ Přívodní kabel nelze vyměňovat. Pokud by se
vám poškodil, je třeba kartáček vyřadit.
◗ Před nabíjením akumulátoru v kartáčku, se
přesvědčte, že je zásuvka pod proudem.
Zásuvky umístěné v koupelnových skříňkách
nad umyvadlem mohou být často odpojeny
pokud osvětlení vypnete.
Všeobecný popis
A Kartáček
B Rukojeť
C Vložka pro náhradní kartáček
D Úschovné pouzdro
E Nabíječ
F Držák náhradního kartáčku
ČESKY 47
Page 48

Příprava přístroje k použití
Připevnění na stěnu
C
1 Nabíjecí jednoku upevněte dvěma šrouby
(3,0 X 30 mm) a dvěma hmoždinkami (S5)
(nejsou v příslušenství).
C
◗ Vyvrtejte dvě díry ve vhodném místě. Můžete
použít šablonu na poslední straně tohoto
návodu.
Nabíjení akumulátoru přístroje
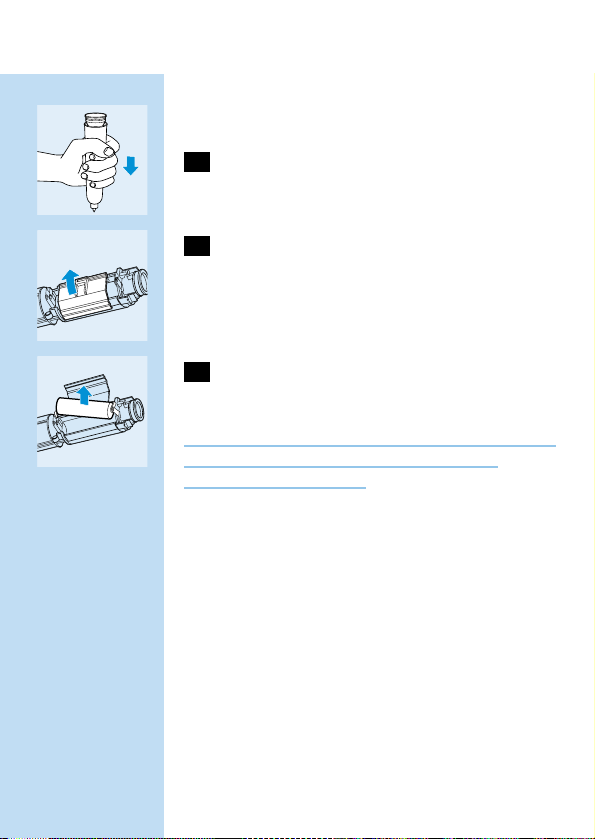
1 Před prvním použitím je třeba nabíjet
akumulátor přístroje nejméně po dobu 16
hodin.
C
◗ Zkontrolujte, zda byl před začátkem nabíjení
přístroj ve vypnutém stavu.
◗ Přístroj můžete ponechat v nabíjecí jednotce
trvale.
Před prvním nabitím je vhodné akumulátor
nejprve zcela vybít. Za tím účelem je třeba
ponechávat akumulátor mimo nabíjecí jednotku a
používat ho bez nabíjení tak dlouho, až se jeho
akumulátor zcela vybije. Pak akumulátor plně
nabijte.Tento proces opakujte třikrát za sebou.
Abyste prodloužili dobu života akumulátoru,
realizujte výše uvedený postup vždy po šesti
měsících.
ČESKY48
15,6
3
1
2
Page 49

C
◗ Pouze pro typy HX2585, HX2538 a HX1526:
Jakmile začnete akumulátor přístroje nabíjet,
rozsvítí se zelená kontrolka.
◗ Přístroj můžete ponechat v nabíjecí jednotce
trvale.
Použití přístroje
C
1 Kartáček nasaďte na těleso přístroje tak,
že ho zasunete do bajonetového uzávěru a
otočíte ho o čtvrtkruh ve směru pohybu
hodinových ruček.
Tím zajistíte, aby se kartáček vibracemi neuvolnil.
2 Na kartáček naneste zubní pastu.
C
3 Vložte kartáček do úst.
C
4 Stiskněte spínač a začněte si čistit zuby.
◗ Pro nejlepší výsledky při čištění, nejkratší dobu
čištění a funkci přístroje viz odstavec "Rady
pro čištění zubů".
ČESKY 49
16 hrs
1
2
Page 50

Rady pro čištění zubů
Čištění zubů
C
1 Nasaďte kartáček proti zubům tak, že
pokrývá povrch zubů stejně jako linii dásní.
C
2 Podržte kartáček v této poloze několik
sekund a pak přejděte k dalším zubům.
Kruhový kartáček odstraní plag ze zubů i z linie
dásní.
Individuálně se pohybující Active Tip vyčistí
prostor mezi zuby.
C
3 Veďte kartáček opatrně podél zubů i
stoliček.
◗ Ujistěte se, že jste vyčistili ceĺý povrch zubů
(vnitřní část, vnější část a skusové plochy) a
stejně tak i linii kolem dásní. Naučený a trvale
zachovávaný postup vám zabrání, abyste
některé části zubů vynechali.
◗ Můžete též nahlédnout na internetovou
stránku www.philips.com.
ČESKY50
Page 51

Ochrana dásní
C
1 Ochrana dásní systému Gum Protection
vám zabrání abyste vyvinuli při čištění
takový tlak na kartáček, který by vedl až k
poškození dásní.
C
2 Pokud by byl při čistění tlak na kartáček
nadměrný, uslyšíte zřetelné klapnutí a hlava
kartáčku odskočí směrem dozadu.V tom
okamžiku je třeba tlak na kartáček
zmenšit.Tím ochráníte dásně.
To pravděpodobně nastane vícekrát v době, kdy
budete kartáček používat nově. Zakrátko si však
navyknete udržovat na kartáček správný tlak a
hlavice kartáčku bude odskakovat méně často.
Doporučení: Jestliže je plag řádně odstraněn,
získají dásně růžovou barvu a budou pevně
obklopovat zuby. Zdravé dásně nebudou během
jídla nebo čištění zubů krvácet (viz též odstavec
"Optimální zubní hygiena"). Může se ovšem stát, že
vaše dásně budou nepatrně krvácet během
prvních dní používání tohoto kar táčku.Toto
krvácení však obvykle zakrátko ustane. Pokud by
trvalo, poraďte se se svým zubním lékařem.
Minimální doba čištění zubů: 2 minuty
Obecně postačují dvě minuty k tomu, aby vaše
zuby byly důkladně vyčištěné. Můžete si
samozřejmě čistit zuby i déle než 2 minuty.
ČESKY 51
Page 52

C
◗ Blikání červené kontrolky vás upozorní,že
uběhly dvě minuty čištění (pouze typy
HX2585, HX2538 a HX1526).
Optimální zubní hygiena
Pro optimální zubní hygienu je vhodné ještě
používat zubní vlasec a zubní párátko jako
doplněk k elektrickému zubnímu kartáčku.
Více informací o Philips Dental Care a o ostatních
výrobcích firmy Philips najdete na internetové
stránce www.philips.com.
Čištění a uložení přístroje
C
1 Zapněte přístroj a opláchněte kartáček
pod vlažnou tekoucí vodou (max.60cC).
C
2 Vypněte přístroj. Oddělte kartáček od
tělesa přístroje a umyjte ho uvnitř.
ČESKY52
Page 53

C
3 Opět zapněte přístroj a vymyjte zbytky
zubní pasty v hnacím hřídeli.
C
4 Pouze pro typy HX1526, HX1515,
HX1511, HX1510 a HX1507: kartáček
uchovávejte na hrotu nabíjecí jednotky.
Pouze pro typy HX2585 a HX2538: až 4
kartáčky můžete uchovávat v úschovném
pouzdru.
C
◗ Pouze pro typy HX 2585 a HX 2538: namísto
dvou kartáčků můžete v zásobníku uchovávat
též zubní pastu.
Úschovný zásobník lze odejmout od nabíjecí
jednotky a mýt i v myčce nádobí.
C
5 Nabíjecí jednotku čistěte navlhčeným
hadříkem.
Před čištěním nabíjecí jednotku vždy odpojte od
sítě.
Výměna dílů
1 Pro zajištění nejlepších výsledků při čištění
zubů je třeba kartáčky vyměnit vždy asi po
3 měsících.
◗ Kartáčky je třeba vyměnit vždy,když se jejich
štětiny začnou ohýbat směrem ven.
ČESKY 53
Page 54

Nové kartáčky můžete získat v prodejně, kde jste
přístroj zakoupili.
Používejte náhradní kartáčky PHILIPS All-round.
Ochrana životního prostředí
Když jednoho dne zrušíte celý přístroj, dříve než
ho vyhodíte, vyjměte z něj nejdříve akumulátor a
odevzdejte jej v příslušné sběrně.
◗ Poznámka: Můžete též kompletní přístroj
odevzdat v servisu firmy Philips, kde se již
postarají o jeho optimální likvidaci.
1 Akumulátor musíte nejdříve zcela vybít.
Ponechte proto přístroj v chodu, dokud se
sám nezastaví.
C
2 Vezměte nabíjecí jednotku a umístěte
přístroj na hrot.Otočte přístrojem proti
směru pohybu hodinových ruček,tím
odšroubujete jeho dno.
C
3 Otočte přístroj hlavou dolů a přitiskněte
jej proti tuhé podložce abyste mohli
vyjmout držák akumulátoru.
ČESKY54
2
1
Page 55

C
4 Otevře víčko držáku akumulátoru pomocí
šroubováku.
C
5 Akumulátor vyjměte pomocí šroubováku z
držáku.
Když bylo odšroubováno dno, není již přístroj
vodotěsný a ztrácí též nárok na záruku.
ČESKY 55
Page 56

Možné problémy
Pokud by se vyskytl jakýkoli problém, pokuste se
ho vyřešit podle následujících pokynů nebo se
spojte s Informačním střediskem firmy Philips.
Můžete též vyhledat internetovou stránku
www.philips.com.
Možné řešení
Zkontrolujte, zda byla zástrčka nabíjecí jednotky
řádně zasunuta do zásuvky.
Zkontorlujte, zda je v zásuvce proud (viz odstavec
"Důležité").
Zkontrolujte, zda byl zubní kartáček ve vypnutém
stavu a zda byl jeho akumulátor nabíjen nejméně 16
hodin.
Zkontrolujte, zda byl kartáček na přístroj řádně
nasazen (viz odstavec "Použití přístroje").
Akumulátor přístroje musí být nabit. Pokud
ponecháváte trvale přístroj v nabíjecí jednotce,
musíte oživit akumulátor podle pokynů v odstavci
"Nabíjení akumulátoru přístroje".
Vyměňte kartáček za nový.
Problém
Přístroj nepracuje, ačkoli
byl jeho akumulátor nabíjen
po celou noc.
Motor přístroje se otáčí, ale
kartáček nepracuje.
Výkon přístroje se zřetelně
zmenšil.
Čištění zubů se již nejeví
optimální.
ČESKY56
Page 57

Bevezetés
Ez az egyedi, elektromos fogkefe jobban eltávolítja
a fogkövet, mint a normál, kézi fogkefe. Ezenkívül
segít fogínye védelmében is. Ha kefélés közben túl
nagy nyomást gyakorol a fogkefére, a kefe
automatikusan visszahajlik.A jól hallható jel
segítségével gyorsan alkalmazkodni fog a helyes
kefe erohöz. Klinikai tesztek kimutatták, hogy
ennek a rendszernek köszönhetoen a Philips
Sensiflex fogkefét használva az eredmény jobb és
biztosabb fogmosási technika.
Fontos
◗ A töltőkészülék hálózati csatlakozó kábelét
nem lehet kicserélni. Ha a kábel megsérül, a
töltőkészüléket ki kell selejtezni.
◗ Ellenőrizze, hogy a fogkefe töltése közben
van-e feszültség a konnektorban.A
fürdőszoba mosdókagylója feletti tükrön lévő
konnektor vagy a borotva konnektor gyakran
feszültségmentessé válik, ha a világítást
kikapcsolja.
Általános leírás
A Kefe
B Fogantyú
C Betét tartalék kefe számára
D Tároló tartó
E Tölto
F Tartalék kefe tartó
MAGYAR 57
Page 58

A készülék előkészítése használatra
A készülék falra szerelése
C
1 A töltőkészülék falra szereléséhez
használjon 2 csavart (3,0x30 mm) és 2
tipplit (S5) (nem tartozék).
C
◗ Ahhoz, hogy a lyukakat megfelelő helyre fúrja,
használhatja a használati útmutató utolsó
oldalán látható sablont.
A készülék töltése
1 Első használat előtt legalább 16 óra hosszat
töltse a készüléket.
C
◗ Ellenőrizze, hogy a töltés kezdésekor a
készülék ki legyen kapcsolva.
◗ A fogkefét az állványra teheti és hagyhatja
folyamatosan töltődni.
Azonban mikor először kezdi használni a
készüléket, tanácsos addig használni, míg az
akkumlátor teljesen kimerül. Ehhez normál módon
használja a készüléket, de anélkül, hogy a
fogmosások között feltöltené. Csak akkor töltse fel
a készüléket, ha a motor megáll. Ismételje meg az
eljárást egymásután háromszor.
Az akkumulátor élettartamának növeléséhez ezt
az eljárást hat hónaponként ismételje meg.
MAGYAR58
15,6
3
1
2
Page 59

C
◗ Csak HX2585, HX2538 és HX1526
típusoknál: Miközben az akkumulátor töltodik,
a zöld jelzolámpa világít.
◗ A fogkefét az állványra teheti és hagyhatja
folyamatosan töltődni.
A készülék használata
C
1 Úgy tegye a kefét a fogkefébe, hogy
bedugja a bajonet zárig és balra elforgatja
negyed fordulattal.
Így a kefe rezgés közben nem tud leesni.
2 Tegyen fogkrémet a kefére.
C
3 Tegye a kefefejet a szájába.
C
4 Nyomja meg a bekapcsoló gombot és
kezdje el a fogát tisztítani.
◗ A legjobb fogmosási módszerhez csekély
kefélési ido és készülék kefélési muködtetés
szükséges, lásd a 'Fogmosási javaslatok' c.
részt.
MAGYAR 59
16 hrs
1
2
Page 60

Fogmosási ötletek
Tisztítás
C
1 Úgy helyezze a kefét a fogra,hogy befedje
a fog felületét és a fogíny szélét.
C
2 Tartsa a kefét néhány másodpercig ebben a
helyzetben, majd vigye át a következő
fogra.
A kerek kefefej eltávolítja a fogkövet a fogról és a
fogíny széle alól.
Az önállóan mozgó aktív csúcs kitisztítja a
fogközöket.
C
3 Vezesse a kefefejet óvatosan a fogakon és
az örlőfogakon.
◗ Vigyázzon arra, hogy a fog teljes felületét
alaposan megtisztítsa (belül, kívül és a
rágófelületet), valamint a fogínyt. Egy állandó
tisztítási sorrend megakadályozza,hogy
átugorjék egyes területeket.
◗ Lásd még a fogmosási útmutatót Internet
oldalunkon: www.philips.com.
Fogíny védelem
C
1 A fogínyvédő rendszer bizotosítja,hogy ne
gyakoroljon túl erős nyomást a fogakra és
a fogínyre.
MAGYAR60
Page 61

C
2 Ha túlságosan megnyomja a fogkefét,
érezni és hallani fog egy kattanást, amikor a
kefefej visszahajlik.Amint csökkenti a
nyomást,a kefefej visszahajlik normál
pozíciójába. Ez védi fogínyét.
Ez valószínűleg előfordul néhányszor, mikor
először kezdi el használni a fogkefét. Egy idő múlva
rá fog jönni az optimális kefenyomásra és a kefefej
ritkábban fog visszahajolni.
Javaslat: Ha alaposan eltávolította a fogkövet, a
fogíny rózsaszínű lesz és szorosan körülveszi a
fogat.Az egészséges fogíny nem vérzik evés vagy
fogmosás közben (lásd még az 'Optimális
fogápolás" c. részt).Ha fogínye kissé mégis vérzik a
fogkefe első használatakor, ez a vérzés általában
megszűnik néhány nap múlva. Ha nem, forduljon
fogorvosához.
A legkevesebb fogmosási idő: 2 perc
Általában 2 perc elegendő arra, hogy jól
megtisztítsa fogát.Természetesen 2 percnél
hosszabb ideig is folytathatja a fogmosást.
C
◗ A piros jelzolámpa világít annak jelzésére,
hogy 2 perc eltelt (csak HX2585, HX2538 és
HX1526 típusoknál).
Optimális fogápolás
Optimális fogápoláshoz javasoljuk, hogy az
elektromos fogkefe mellett használjon fogselymet
és fogvájót is.
MAGYAR 61
Page 62

A Philips fogápolásra és egyéb Philips termékekre
vonatkozólag további információt talál Internet
oldalunkon: www.philips.com.
A készülék tisztítása és tárolása
C
1 Kapcsolja be a fogkefét és a kefét öblítse le
csap alatt, langyos vízzel (max.60cC).
C
2 Kapcsolja ki a fogkefét.Vegye le a kefét és
öblítse le a belsejét.
C
3 Kapcsolja be ismét a fogkefét,hogy a
meghajtó nyélről leöblíthesse a fogkrém
maradékokat.
C
4 Csak HX1526, HX1515, HX1511, HX1510
és HX1507 típusoknál: tárolja a kefe
tartozékot a töltoegység csúcsán. Csak
HX2585 és HX2538 típusoknál: a tároló
tartóban legfeljebb 4 kefe tartozékot
tároljon.
MAGYAR62
Page 63

C
◗ Csak HX2585 és HX2538 típusoknál: 2 kefe
tartozék helyett egy fogkrémet is tárolhat a
tároló tartóban.
A tároló tartót és tartozékokat kiveheti a
töltőkészülékből és megtisztíthatja
mosogatógépben.
C
5 A töltőkészüléket nedves ruhával tisztítsa.
A tisztítás előtt húzza ki a töltőkészülék csatlakozó
dugóját a fali konnektorból.
Csere
1 A keféket minden 3 hónapban cserélje,
hogy a legjobb legyen a fogmosás
eredménye.
◗ A kefét akkor is ki kell cserélni, ha a sörték
kifelé hajlanak.
Új kefét abban az üzletben vásárolhat, ahol a
fogkefét vette.
Minden PHILIPS csere kefét lehet használni.
Környezetvédelem
Ha a készüléket végleg nem használja, vegye ki az
akkumulátort és selejtezze ki környezetbarát
módon.
MAGYAR 63
Page 64

◗ Megjegyzés: Átadhatja a készüléket a Philips
szerviznek is, ahol kiselejtezik az
akkumulátort.
1 Az akkumulátor kiselejtezéskor teljesen
legyen üres. Ezért mielőtt kiveszi az
akkumulátort, a készüléket addig
működtesse, amíg leáll.
C
2 Fogja meg a töltőkészüléket és helyezze
bele a fogkefét.Fordítsa el a fogkefét az
óra járásával ellenkező irányba,hogy
kicsavarja a fogkefe alját.
C
3 Fordítsa a fogkefét felső felével lefelé és
szorítsa egy kemény felülethez,hogy
kivegye az akkumulátor-tartót.
C
4 Nyissa ki az akkumulátor-tartó fedelét
csavarhúzóval.
C
5 Vegye ki az akkumulátort a tartóból
csavarhúzóval.
Miután kicsavarta az alját, a készülék nem lesz
többé vízálló és a garancia megszűnik.
MAGYAR64
2
1
Page 65

Hibaelhárítás
Ha az alábbi hibaelhárító útmutatás segítségével
nem tudja elhárítani a hibát, vegye fel a
kapcsolatot a legközelebbi Philips szervizzel, az
országában lévő Philips Ügyfélszolgálattal (Philips
Customer Care Centre) vagy lépjen velünk online
kapcsolatba: www.philips.com
MAGYAR 65
Elhárítás
Ellenőrizze, hogy a töltőkészülék csatlakozó dugója
jól érintkezik-e a hálózati konnektorban.
Ellenőrizze, hogy a konnektorban van-e feszültség
(lásd még a "Fontos" c. részt).
Ellenőrizze, hogy a fogkefe ki legyen kapcsolva és
töltse legalább 16 óra hosszat.
Ellenőrizze, hogy a kefét jól csatlakoztatta-e a
készülékhez (lásd még "A készülék használata" c.
részt).
A fogkefét fel kell tölteni. Ha általában folyamatosan
a töltőkészülékben tartja a fogkefét, fel kell
"élesztenie" az akkumulátort, a "Töltés" részben
leírtak szerint.
Vegye le a kefét és kezdjen újat használni.
Hiba
A fogkefe egyáltalán nem
működik, bár egész éjszaka
a töltőkészülékben állt.
A fogkefe motorja
működik, de a kefefej nem.
A készülék teljesítménye
nagyon lecsökkent.
A fogkefe fogtisztító
képessége nem optimális.
Page 66

Úvod
Táto jedinečná elektrická zubná kefka odstraňuje
zubný povlak lepšie ako bežná, ručná kefka.
Pomáha tiež chrániť Vaše ďasná. Keď ňou príliš
zatlačíte, hlava kefky sa automaticky zakloní
dozadu.Vďaka tomuto jasnému signálu si rýchlo
zvyknete na správny tlak kefky. Klinické testy
dokázali, že vďaka tomuto systému predstavuje
čistenie zubov s kefkou Philips Sensiflex lepšiu a
bezpečnejšiu techniku starostlivosti o chrup.
Dôležité upozornenie
◗ Nabíjacia jednotka kábla sa nedá vymeniť.Ak
sa Vám poškodí kábel, nabíjaciu jednotku treba
vyhodiť.
◗ Pri dobíjaní zubnej kefky sa presvedčte,či je v
zásuvke el. prúd.Prívod el. prúdu v zásuvke
nad umývadlom, alebo v zásuvke na holiaci
strojček môže byť po vypnutí svetiel
prerušený.
Všeobecný opis
A Kefka
B Rúčka
C Nástavec pre náhradnú kefku
D Nádoba na odkladanie
E Nabíjačka
F Náhradný držiak na kefky
SLOVENSKY66
Page 67

Príprava prístroja na použitie
Pripevnenie prístroja na stenu
C
1 Nabíjaciu jednotku pripevnite na stenu
pomocou 2 skrutiek (3,0x30mm) a 2
sieťových zásuviek (S5) (nie sú priložené).
C
◗ Na presné zameranie vŕtacích otvorov
môžete použiť šablónu nachádzajúcu sa na
poslednej strane návodu na použitie.
Nabíjanie prístroja
1 Prístroj pred prvým použitím nabíjajte
najmenej 16 hodín.
C
◗ Pred začatím nabíjania sa presvedčte,či je
prístroj vypnutý.
◗ Zúbnú kefku môžete dať do stojana a nechať
ju nepretržite nabíjať.
Pri prvom použití prístroja,Vám doporučujeme,
nechať ho ísť až do vybitia baterky. Prístroj
používajte normálnym spôsobom avšak bez
dobíjania medzi jednotlivými čisteniami. Prístroj
dobite, keď motor takmer zastane.Tento postup
zopakujte 3 razy za sebou.
Aby ste predĺžili životnosť baterky, opakujte
uvedený postup raz za 6 mesiacov.
SLOVENSKY 67
15,6
3
1
2
Page 68

SLOVENSKY68
C
◗ Len modely HX2585, HX2538,HX1526: Pri
nabíjaní batérie svieti zelené kontrolné svetlo.
◗ Zúbnú kefku môžete dať do stojana a nechať
ju nepretržite nabíjať.
Použitie prístroja
C
1 Kefkový nástavec zasuňte na zachytávací
špic a otočte v smere hodinových ručičiek
o štvrtinu.
Týmto znemožníte kefkovému nástavcu jeho
odpojenie počas vibrácie.
2 Na zubnú kefku dajte zubnú pastu.
C
3 Hlavu kefky so vložte do úst.
C
4 Stlačte spínač a začnite si čistiť zuby.
◗ Najlepší spôsob čistenia zubov,minimálny čas
čistenia a funkcie zubnej kefky nájdete v
odstavci "Rady pri čistení".
16 hrs
1
2
Page 69

Rady pri čistení
Čistenie zubov
C
1 Hlavu kefky priložte k zubom tak,aby
zakrývala povrch zubov ako aj líniu ďasien.
C
2 Hlavu kefky podržte v tejto polohe
niekoľko sekúnd a potom prejdite k
ďalšiemu zubu.
Zaokrúhlená hlava kefky odstraňuje zubný povlak
zo zubov a z ďasien.
Samostatne sa pohybujúce vyčnievajúce štetiny
čistia medzizubné priestory.
C
3 Hlavu kefky veďte opatrne pozdĺž zubov a
stoličiek.
◗ Dbajte, aby ste riadne vyčistili celý povrch
zubov (vnútro,vonkajšok a žuvací povrch) ako
aj ďasná. Fixovaný spôsob čistenia zubov Vám
zabráni preskakovať určité oblasti.
◗ Prečítajte si aj návod na čistenie zubov na
našej internetovej stránke:www.philips.com.
SLOVENSKY 69
Page 70

SLOVENSKY70
Ochrana ďasien
C
1 Ochranný systém ďasien zaručuje, že
nebude vyvinutý príliš silný tlak na zuby a
ďasná.
C
2 Ak kefku zatlačíte príliš silno,budete cítiť a
počuť cvaknutie, keď kefka odskočí
smerom dozadu.Akonáhle zmenšíte tlak,
hlava kefky sa vráti do jej pôvodnej polohy.
Týmto sú chránené Vaše ďasná.
Toto sa bude pravdepodobne diať pravidelne pri
prvých použitiach kefky. Po určitom čase zistíte
optimálny tlak a odskočenie kefky bude už len
občasnou záležitosťou.
Rada:Ak povlak dôkladne odstránite, ďasná budú
mať ružovú farbu a budú pevne obkolesovať
zuby. Zdravé ďasná pri jedení alebo čistení zubov
nekrvácajú (viď odstavec "Optimálna zubná
hygiena").
Ak Vaše zuby predsa len slabo krvácajú pri prvých
použitiach kefky, toto krvácanie zvykne po
niekoľkých dňoch prestať.Ak nie, konzultujte to s
Vašim zubárom alebo zubným hygienikom.
Minimálny čas čistenia zubov: 2 minúty
Vo všeobecnosti sú 2 minúty dostatočne veľa na
dôkladné vyčistenie zubov. Samozrejme, môžete
si ich čistiť aj dlhšie.
Page 71

SLOVENSKY 71
C
◗ Uplynutie 2 minút signalizuje blikanie
červeného kontrolného svetla (len modely
HX2585, HX2538 a HX1526 ).
Optimálna zubná hygiena
Pre optimálnu zubnú hygienu Vám doporučujeme
používať zubné nite a medzizubné kefky ako
doplnok k elektrickej zubnej kefke.
Viac informácii o starostlivosti o zuby a o ďalších
výrobkoch firmy Philips nájdete na našej
internetovej stránke: www.philips.com.
Čistenie o odkladanie prístroja
C
1 Zapnite zubnú kefku a opláchnite ju pod
vlažnou tečúcou vodou (max. 60cC).
C
2 Vypnite kefku. Odpojte kefkový nástavec a
opláchnite vnútro.
Page 72

SLOVENSKY72
C
3 Znovu zapnite zubnú kefku,aby ste
opláchli zvyšky zubnej pasty z hriadeľa.
C
4 Len modely HX1526, HX1515,HX1511,
HX1510 a HX1507: kefkový nástavec
odkladajte na tŕň nabíjacej jednotky s
kontaktmi. Len modely HX2585 a
HX2538: v úložnom priestore môžete
umiestniť až 4 kefkové nástavce.
C
◗ Len modely HX2585 a HX2538: namiesto 2
kefkových nástavcov môžete do úložneho
priestoru odložiť aj zubnú pastu.
Úložný priestor a jednotlivé nástavce môžete dať
dole z nabíjacej jednotky a umyť ich v umývačke
riadu.
C
5 Nabíjaciu jednotku umyte vlhkou utierkou.
Nabíjaciu jednotku pred umývaním odpojte z el
siete.
Výmena
1 Každé 3 mesiace vymeňte kefkový
nástavec, aby ste zachovali vynikajúce
výsledky čistenia.
◗ Hlavu kefky môžete vymeniť aj keď sa štetinky
začnú vykrúcať smerom von.
Page 73

SLOVENSKY 73
Nové kefkové nástavce dostanete kúpiť v tom
istom obchode ako ste kúpili zubnú kefku.
Môžete použiť všetky kefkové nástavce PHILIPS.
Životné prostredie
Ak chcete prístroj po ukončení jeho životnosti
odstrániť, vytiahnite baterku a odstráňte ju
spôsobom bezpečným pre životné prostredie.
◗ Poznámka: Prístroj môžete odniesť aj do
servisného centra Philips, kde odstránia
baterku za Vás.
1 Predtým, ako baterku vytiahnete, musí byť
úplne prázdna. Pred vytiahnutím baterky
nechajte prístroj ísť, až kým nezastane.
C
2 Zdvihnite nabíjaciu jednotku a zubnú kefku
dajte na špic. Potom ju otočte proti smeru
hodinových ručičiek, aby ste odskrutkovali
dno zubnej kefky.
C
3 Zubnú kefku obráťte naruby a zatlačte ju
na pevným povrch,aby ste odstránili
držadlo baterky.
C
4 Veko držadla baterky otvoríte pomocou
skrutkovača.
2
1
Page 74

SLOVENSKY74
Riešenie
Presvedčte sa, či je zástrčka nabíjacej jednotky riadne
zasunutá do zásuvky el. siete.
Presvedčte sa, či je v zásuvke prívod. el.prúdu (viď aj
odstavec "Dôležité upozornenie").
Presvedčte sa, či je zubná kefka vypnutá a potom ju
nabíjajte najmenej 16 hodín.
Skontrolujte, či ste kefkový nástavec riadne pripevnili
na prístroj (viď odstavec " Použitie prístroja").
Zubnú kefku musíte dobiť.Ak nechávate zubnú
kefku v nabíjacej jednotke, môže byť potrebné
obnoviť životnosť baterky podľa postupu v odseku
"Nabíjanie".
Dajte dole kefkový nástavec a začnite používať nový.
Problém
Zubná kefka nepracuje,
hoci bola celú noc v
nabíjacej jednotke.
Motor zubnej kefky
pracuje, hlava kefky však
nepracuje.
Sila čistenia zubnej kefky sa
výrazne znížila.
Kvalita čistenia zubnej kefky
už nie je optimálna.
C
5 Baterku vytiahnete z držadla pomocou
skrutkovača.
Po odskrutkovaní dna už nie je prístroj vodotesn
a záruka sa stáva neplatnou.
Odstraňovanie porúch
Ak nie ste schopní vyriešiť problém pomocou
doleuvedných rád, prosíme Vás, aby ste sa obrátili
na najbližšie servisné centrum Philips vo Vašej
krajine, alebo sa skontaktovali s nami online, na
www.philips.com.
Page 75

Вступ
Унікальна електрична зубна щітка усуває зубний
камінь краще за звичайну ручну щітку. Вона
також оберігає Ваші ясна. Якщо Ви надто
сильно давите на щітку, головка щітки
автоматично вигинається назад. Завдяки цьому
чіткому сигналу Ви швидко пристосуєте зусилля
при чищенні зубів. Клінічні випробування
показали, що завдяки цій системі чищення
щіткою "Sensiflex" від Philipsзабезпечує кращий
та безпечніший результат.
Увага
◗ Шнур зарядного пристрою замінювати не
можна. Якщо шнур зіпсувався, треба
позбавитись всього зарядного пристрою.
◗ Пересвідчіться, що розетка працює, перед
тим, як заряджати зубну щітку. Розетки у
дзеркальних шафах над ваннами або
розетки для гоління у ванних кімнатах
можуть не працювати, коли освітлення
вимкнено.
Загальний опис
A Щітка
B Ручка
C Вставка для запасної щітки
D Контейнер для зберігання
E Зарядний пристрій
F Тримач для запасної щітки
УКРАЇНСЬКІЙ 75
Page 76

Підготовка приладу до використання
Прикріплення пристрою до стіни
C
1 Прикріпіть зарядний пристрій до стіни,
застосовуючи 2 шурупи (3,0 х 30 мм) та
2 стінних кронштейна (S5, не
додаються).
C
◗ Щоб просвердлити отвори у належних
місцях, можна застосувати трафарет з
останньої сторінки цієї інструкції.
Зарядження пристрою
1 Заряджайте пристрій щонайменше
протягом 16годин перед першим
використанням.
C
◗ Перед початком зарядження
пересвідчіться, що пристрій вимкнено.
◗ Ви можете встановити щітку на підставку
та дати їй заряджатися безперервно.
Однак, коли Ви вперше використовуєте
пристрій, ми радимо використовувати його до
повного розрядження акумулятора. Для цього
використовуйте пристрій звичайним чином без
дозарядки між чищеннями. Почніть заряджати
пристрій, коли двигун вже майже зупиниться.
Повторіть цю процедуру 3 рази підряд.
76 УКРАЇНСЬКІЙ
15,6
3
1
2
Page 77

77
Щоб збільшити термін використання
акумулятора, повторюйте цю процедуру кожні
6 місяців.
C
◗ Тільки моделі HX2585, HX2538 та HX1526.
Коли акумулятор повністю зарядиться,
загориться зелена лампа.
◗ Ви можете встановити щітку на підставку
та дати їй заряджатися безперервно.
Використання приладу
C
1 Встановіть насадку на зубну щітку,
надівши її на штировий фіксатор і
повернувши за годинниковою стрілкою
на чверть оберту.
Завдяки цьому насадка не буде зсуватися під
час роботиівібрації.
2 Нанесіть зубну пасту на щітку.
C
3 Вставте щітку у рот.
C
4 Натисніть кнопку і починайте чистити
зуби.
◗ Про кращий спосіб чищення, мінімальний
час чищення та функції пристрою див.
"Поради до чищення".
УКРАЇНСЬКІЙ
16 hrs
1
2
Page 78

Поради щодо чищення
Чищення
C
1 Щітка повинна приставлятися до зубів
так, щоб вона покривала поверхню зуба
і лінію ясен.
C
2 Тримайте щітку у цьому положенні
декілька секунд, потім переходьте до
наступного зуба.
Кругла головка щітки знімає наліт із зубів та під
лінією ясен.
Активний кінчикActive Tip, що рухається
окремо, чистить щілини між зубами.
C
3 Пересувайте щітку ретельно вздовж
передніх та корінних зубів.
◗ Пересвідчіться, що Ви почистили всю
поверхню зубів (зсередини, зовні та
жувальну поверхню), а також лінію ясен.
Фіксована схема чищення гарантує те, що
Ви не пропустите жодне місце.
◗ Дивіться також інструкції по чищенню
зубів на нашій сторінці в Інтернеті:
www.philips.com.
78 УКРАЇНСЬКІЙ
Page 79

79
Захист ясен
C
1 Система захисту ясен гарантує, що Ви
не прикладатимете завеликий тиск до
зубів та ясен.
C
2 Якщо Ви прикладатимете завелике
зусилля до щітки, Ви відчуєте та почуєте
клацання - щітка відігнеться назад. Коли
Ви зменьшите зусилля, головка щітки
повернеться у звичайне положення. Це
захистить Ваші ясна.
Це може трапитися декілька разів, коли Ви
тільки починаєте використовувати щітку. Через
деякий час Ви пристосуєтесь до оптимального
зусилля і щітка буде вигинатися все рідше.
Порада: Якщо наліт знято правильно, ясна
мають бути рожевого кольоруі будуть щільно
охоплювати зуби. Здорові ясна не кровоточать,
коли Ви їсте або чистите зуби (дивіться також
розділ "Оптимальна гігієна зубів"). Якщо,
незважаючи на це, ясна трохи кровоточать у
перші рази при використанні щітки, ця
кровотеча має припинитися через декілька
днів. Якщо вона не припиниться, зверніться до
стоматолога.
УКРАЇНСЬКІЙ
Page 80

80
Мінімальний час чищення: 2 хвилини.
Взагалі, 2 хвилини достатньо для належно
чищення зубів. Звичайно, Ви можете чистити
зуби довше, ніж 2 хвилини.
C
◗ Червона лампа почне мигати, показуючи,
що сплинуло 2 хвилини (тільки моделі
HX2585, HX2538 та HX1526).
Оптимальна гігієна зубів
Для оптимальної зубної гігієни ми радимо
окрім зубної щітки застосовувати ще шовкову
нитку та зубочистку.
Ви можете отримати більше інформації про
вироби "Philips Dental Care" та інші вироби
фірми "Philips" на нашому сайті в Інтернеті:
www.philips.com.
Чищення та зберігання пристрою
C
1 Увімкніть зубну щітку та промийте
насадку під теплою водою з-під крана
(макс. 60cC).
C
2 Вимкніть щітку. Від'єднайте насадку та
промийте зсередини.
УКРАЇНСЬКІЙ
Page 81

81
C
3 Увімкніть щітку знову, щоб вимити
залишки пасти з приводного вала.
C
4 Тільки моделі HX1526, HX1515, HX1511,
HX1510 та HX1507: зберігайте насадку
щітки на стержні зарядного пристрою.
Тільки моделі HX2585 та HX2538:
зберігайте до 4 насадок щітки у
відділенні для зберігання.
C
◗ Тільки моделі HX2585 та HX2538: Окрім 2
насадок щітки Ви також можете зберігати у
відділенні для зберігання зубну пасту.
Коробку для зберігання та вставки можна
знімати з зарядного пристрою та мити в мийці.
C
5 Чистіть зарядний пристрій вологою
ганчіркою.
Перед тим, як чистити зарядний пристрій
від'єднайте його від мережі.
Заміна
1 Заміняйте насадку кожні 3 місяці для
найкращого результату чищення.
◗ Насадку також потрібно заміняти, коли
щетина починає вигинатися назовні.
УКРАЇНСЬКІЙ
Page 82

82
Ви можете придбати нову насадку у магазині,
де Ви придбали щітку.
Можна застосовувати будь-які змінні насадки
Philips.
Навколишнє середовище
Коли Ви викидаєте пристрій після того, як він
відпрацював належний час, витягніть
акумулятор та позбудьтеся його у спосіб,
небезпечний для оточуючого середовища.
◗ Зауваження:Ви також можете віднести
пристрій до сервісного центру Philips, де
акумулятор утилізують.
1 Коли Ви знімаєте акумулятор, він має
бути повністю розрядженим.Тому Вам
треба дати пристрою попрацювати
доти, доки він не зупиниться сам, і тільки
після цього витягти акумулятор.
C
2 Візьміть зарядний пристрій та встановіть
щітку на штир. Поверніть щітку проти
годинникової стрілки, щоб відкрутити її
нижню частину.
C
3 Поверніть щітку згори донизу та
натисніть донизу на жорсткій поверхні,
щоб зняти тримач акумулятора.
УКРАЇНСЬКІЙ
2
1
Page 83

83
C
4 Відкрийте кришку тримача акумулятора
рукою або викруткою.
C
5 Зніміть акумулятор з тримача за
допомогою викрутки.
Після того, як Ви відкрутили нижню частину
пристрій вже не буде вологостійким, а тому
гарантія на нього втрачається.
УКРАЇНСЬКІЙ
Page 84

Усунення неполадок
Якщо Ви не можете усунути проблему за
допомогою інструкції, зверніться до
найближчого сервісного центру Philips, Центру
обслуговування клієнтів Philips у Вашій країні,
або зв'яжіться з нами через сервер
www.philips.com.
Вирішення
Пересвідчіться, що зарядний пристрій
підключено до мережі належним чином.
Пересвідчіться, що у розетці є напруга (дивіться
розділ "Важлива інформація").
Пересвідчіться, що щітку вимкнено, та
заряджайте її ще раз щонайменше протягом 16
годин.
Перевірте, чи приєднано насадку до пристрою
належним чином (дивіться також розділ
"Використання пристрою").
Треба зарядити щітку. Якщо Ви звичайно
залишаєте щітку безперервно у зарядному
пристрої, Вам треба відновити акумулятор, як
описано у розділі "Зарядження".
Зніміть стару насадку та встановіть нову.
Проблема
Зубна щітка взагалі не
працює, хоча вона
залишалася у зарядному
пристрої протягом всієї
ночі.
Двигун щітки працює, але
головка щітки не
рухається.
Потужність чищення
пристрою значно
знизилася.
Щітка вже не чистить
зуби оптимальним чином.
УКРАЇНСЬКІЙ84
Page 85

Uvod
Ova jedinstvena električna četkica za zube uklanja
zubne naslage bolje od obične četkice.Takoūer
štiti desni. Uslijed jačeg pritiska tijekom pranja
zuba, glava četkice se automatski savija prema
natrag. Zbog toga jasnog signala brzo ćete se
naviknuti na pravilno rukovanje. Klinički testovi
pokazali su da, zahvaljujući ovom sustavu, Philips
Sensiflex omogućuje bolju i sigurniju tehniku
pranja zuba.
Važno
◗ Kabel punjača ne može se zamijeniti.Ako se
kabel ošteti, punjač se mora baciti.
◗ Prije punjenja provjerite ima li u utičnici
napajanja. Napajanje utičnica u toaletnim
ormarićima iznad umivaonika ili utičnica za
brojaći aparat u kupaonicama može se
prekinuti nakon gašenja svjetla.
Opći opis
A Četkica
A Ručka
A Utor za rezervnu četkicu
A Spremnik
A Punjač
A Držač za rezervnu četkicu
HRVATSKI 85
Page 86

Priprema aparata za uporabu
Montaža aparata na zid
C
1 Montirajte punjač na zid pomoću dva vijka
(3 x 30 mm) i 2 plastična klina (S5) (nisu
dio isporuke).
C
◗ Za bušenje rupa na odgovarajućim mjestima
možete se poslužiti shemom na posljednjoj
stranici ovih uputa.
Punjenje
1 Prije prve uporabe punite aparat najmanje
16 sati.
C
◗ Prije punjenja aparat mora biti isključen.
◗ Četkicu možete staviti na postolje tako da se
neprestano puni.
Ipak, kod prve uporabe, savjetujemo korištenje
četkice dok se baterija ne isprazni. Koristite
četkicu na uobičajeni način bez punjenja izmeūu
dva pranja. Napunite aparat kad se motor gotovo
zaustavi. Ponovite postupak 3 puta za redom.
Za dulji radni vijek baterije ponovite ovaj
postupak svakih 6 mjeseci.
C
◗ Samo modeli HX2585, HX2538 i HX1526:
Tijekom punjenja baterije, svijetli zelena
kontrolna žaruljica.
86 HRVATSKI
15,6
3
1
2
16 hrs
Page 87

87
◗ Četkicu možete staviti na postolje tako da se
neprestano puni.
Uporaba
C
1 Umetnite glavu u tijelo četkice i zakrenite
je udesno za 1/4.
Na taj način se glava četkice ne može odvojiti
uslijed vibracija.
2 Nanesite pastu na četkicu.
C
3 Stavite četkicu u usta.
C
4 Pritisnite tipku i počnite s pranjem zuba.
◗ Detalje o najboljim metodama i minimalnom
vremenu pranja zuba, te funkcijama aparata
pogledajte poglavlje "Savjeti".
Savjeti
Pranje zuba
C
1 Položite četkicu na zube tako da prekrije
površinu zuba kao i desni.
HRVATSKI
1
2
Page 88

88
C
2 Držite četkicu u tom položaju nekoliko
sekundi i zatim prijeūite na sljedeći zub.
Okrugla četkica uklanja naslage sa zuba i ispod
desni.
Active Tip čisti prostor izmeūu zuba.
C
3 Pažljivo pomičite četkicu preko zuba i
kutnjaka.
◗ Uvijek perite sve površine zuba (iznutra,
izvana i površinu za žvakanje) kao i desni.
Ravnomjerno četkanje sprječava preskakanje
odreūenih područja.
◗ Takoūer pogledajte upute na našim web
stranicama: www.philips.com.
Gum Protection sustav
C
1 Ovaj sustav sprječava prejaki pritisak na
zube i desni.
C
2 Vršite li preveliki pritisak na četkicu,čut
ćete i osjetiti "klik" kad se glava četkice
savine prema natrag.Čim smanjite pritisak,
glava četkice se vraća u normalni položaj.
Tako se štite Vaše desni.
To će se vjerojatno desiti nekoliko puta kod prvih
uporaba četkice. Nakon nekog vremena pritisak
postaje optimalan i glava četkice će se rjeūe
savijati unatrag.
HRVATSKI
Page 89

89
Savjet: ako su naslage dobro uklonjene, desni će
imati ružičastu boju i čvrsto će okruživati zube.
Zdrave desni ne krvare kad jedete ili perete zube
(takoūer pogledajte poglavlje "Optimalna zubna
higijena").Ako Vaše desni ipak malo krvare tijekom
prvih nekoliko uporaba četkice, to će prestati
nakon nekoliko dana.Ako desni krvare i dalje,
obratite se svom stomatologu.
Minimalno vrijeme pranja zuba: 2 minute
Općenito su 2 minute dovoljne za dobro pranje
zuba. Naravno, zube možete prati i dulje.
C
◗ Crvena kontrolna žaruljica označuje da su
prošle dvije minute (samo modeli HX2585,
HX2538 i HX1526).
Optimalna zubna higijena
Za optimalnu zubnu higijenu, osim električne
četkice koristite zubni konac i čačkalice.
Više informacija o njezi zuba i drugim Philips
proizvodima potražite na www.philips.com.
Čišćenje i pohranjivanje
C
1 Uključite aparat i isperite četkicu ispod
slavine mlakom vodom (maks. 60cC).
HRVATSKI
Page 90

90
C
2 Isključite četkicu. Odvojite glavu četkice i
isperite unutrašnjost.
C
3 Ponovo uključite četkicu za ispiranje
ostataka paste s pogonske osovine.
C
4 Samo modeli HX1526, HX1515, HX1511,
HX1510 i HX1507: spremite četkicu na
punjač. Samo modeli HX2585 i HX2538:
spremite do četiri četkice u spremnik.
C
◗ Samo modeli HX2585 i HX2538: umjesto
dvije rezervne četkice, u spremnik možete
pohraniti i pastu za zube.
Spremnik i odjeljci mogu se skinuti s punjača i
oprati u perilici posuūa.
C
5 Očistite punjač vlažnom krpom.
Prije čišćenja odspojite punjač iz napajanja.
Zamjena dijelova
1 Za najbolje rezultate zamijenite glavu
četkice svaka 3 mjeseca.
HRVATSKI
Page 91

91
◗ Glavu četkice potrebno je zamijeniti kad se
istroši.
Zamjenske dijelove možete kupiti u trgovini u
kojoj ste kupili četkicu.
Možete koristiti okrugle PHILIPS zamjenske
četkice.
Zaštita okoliša
Prije odbacivanja starog aparata izvadite bateriju i
odbacite je na način siguran za okoliš.
◗ NAPOMENA: Stari aparat možete odnijeti i u
ovlašteni servis u kojem će osoblje odbaciti
bateriju umjesto Vas.
1 Prije vaūenja, baterija mora biti potpuno
prazna. Stoga ostavite četkicu raditi dok se
baterija ne isprazni.
C
2 Podignite punjač i stavite četkicu na držač.
Zakrenite četkicu ulijevo kako bi odvrnuli
dno.
C
3 Okrenite četkicu naopako i pritisnite je na
tvrdu površinu za skidanje baterijskog
pretinca.
HRVATSKI
2
1
Page 92

92
C
4 Rukom ili odvijačem otvorite pokrov
baterijskog pretinca.
C
5 Odvijačem odignite bateriju iz pretinca.
Nakon odvrtanja dna četkica možda više neće biti
vodonepropusna i jamstvo se poništava.
HRVATSKI
Page 93

U slučaju problema
Ne možete li ukloniti problem pomoću donje
tablice, obratite se najbližem ovlaštenom servisu,
Philips predstavništvu u Vašoj zemlji ili posjetite
našu web stranicu, www.philips.com.
93
Rješenje
Provjerite je li utikač punjača dobro utaknut u
utičnicu.
Provjerite ima li u utičnici napajanja (takoūer
pogledajte poglavlje "Važno").
Provjerite je li četkica isključena i punite je najmanje
16 sati.
Provjerite je li glava četkice ispravno spojena na
aparat (pogledajte takoūer poglavlje "Uporaba").
Četkicu je potrebno napuniti.Ako obično
neprekidno ostavljate četkicu na punjaču, možda će
biti potrebno napuniti bateriju prema opisu u
poglavlju "Punjenje".
Skinite glavu četkice i zamijenite je novom.
Problem
Četkica uopće ne radi iako
je preko noći bila na
punjaču.
Motor četkice radi, ali glava
ne.
Snaga četkice je osjetno
umanjena.
Performanse četkice više
nisu optimalne.
HRVATSKI
Page 94

Sissejuhatus
See ainulaadne elektrihambahari eemaldab
hambakattu paremini kui harilik hambahari. Samas
aitab ta ka kaitsta teie igemeid. Kui vajutate
hambarjale puhastamise ajal liiga tugevasti, siis
paindub hambahari automaatselt tagasi. Selle
signaali abil õpite varsti tunnetama, missugust
vajutamistugevust tuleb kasutada. Kliiniliste
testidega on tõestatud, et puhastamine Philips
Sensiflex'iga tagab parema ja turvalisema
puhastamistehnika.
Tähtis
◗ Laadimisaluse toitejuhet pole võimalik
vahetada. Juhul,kui toitejuhe on vigastatud,
muutub laadimisalus kasutamiskõlbmatuks.
◗ Hambaharja akusid laadides veenduge, et
seinapistik töötab. Kui lülitate vannitoa peegli
juures oleva lambi põlema, võib voolutoide
katkeda teistes peeglikontaktides.
Seadme osad
A Hari
B Käepide
C Tarvik tagavaraharjale
D Hoidik
E Laadija
F Tagavaraharja hoidik
EESTI94
Page 95

Seadme kasutuselevõtt
Seadme seinale kinnitamine
C
1 Seadme seinale kinnitamiseks kasutage 2
kruvi (3.0x30mm) ja 2 seinapistikut (S5)
(neid pole kaasas).
C
◗ Kasutage shablooni kasutusjuhendi viimaselt
leheküljelt, et auke õigesse kohta seina sisse
puurida.
Seadme laadimine
1 Laadige akusid vähemalt 16 tundi enne
esimest kasutamiskorda.
C
◗ Veenduge, et seade oleks sisse lülitatud, kui
hakate seadet laadima.
◗ Te võite hambaharja alusel hoida ja lasta
akudel pidevalt laadida .
Seadme esmakordsel kasutamisel soovitame seda
kasutada, kuni akud on täiesti tühjaks saanud.
Selleks kasutage seadet nagu alati, kuid ärge
akusid laadige. Laadige akusid alles siis, kui mootor
on peaaegu seisma jäänud. Korrake seda 3 korda.
Akude tööiga pikendamiseks korrake seda võtet
iga 6 kuu tagant.
95EESTI
15,6
3
1
2
Page 96

96
C
◗ Ainult mudelitele HX2585, HX2538 ja
HX1526:Akude laadmise ajal süttib roheline
märgutuli.
◗ Te võite hambaharja alusel hoida ja lasta
akudel pidevalt laadida .
Seadme kasutamine
C
1 Kinnitage harjatarvik hambaharjas olevasse
õnarusse ja pöörake veerand pööret
päripäeva.
See tagab harjatarviku stabiilsuse vibratsiooni
ajaks.
2 Pange hambaharjale hambapastat.
C
3 Pange hambahari suhu.
C
4 Vajutage nuppu ja hakake hambaid
puhastama.
◗ Parima pesemismeetodi ja minimaalse
pesemisaja leidmiseks ning seadme erinevate
pesemisfunktsioonidega tutvumiseks vt.
'Nõuandeid hammaste puhastamiseks'.
EESTI
1
16 hrs
2
Page 97

Nõuandeid hammaste puhastamiseks
Hammaste puhastamine
C
1 Pange hambahari hammaste vastu nii, et
hari kataks nii hambaid kui ka igemepiiri.
C
2 Hoidke hambaharja sellises asendis mõni
sekund ja suunduge järgmise hamba
juurde.
Ümmargune hambaharjapea eemaldab
hambakatu nii hammastelt kui ka igemeilt.
Eraldi liikuv Activ Tip puhastab hammaste vahelt.
C
3 Liigutage hambaharja ettevaatlikult ühelt
hambalt teisele.
◗ Kontrollige, kas olete puhtaks teinud hamba ja
igeme igast küljest (sise-, välis- ja pealtpoolt).
Kindel puhastamistehnika ei lase teil vahele
jätta ühtegi puhastamist vajavat kohta.
◗ Vt. ka puhastamisjuhendit internetileheküljelt:
www.philips.com.
Igemete kaitse
C
1 Igemete kaitsesüsteem tagab optimaalse
vajutamistugevuse hammastele ja
igemetele.
97EESTI
Page 98

98
C
2 Liiga tugeva vajutamise korral paindub
hambahari tagasi ning te tunnete ja kuulete
klõpsatust. Õrnemalt vajutades paindub
hambahari tavaasendisse. Nii kaitsete oma
igemeid.
Hakates harja kasutama juhtub nii mitmeid kordi.
Mõne aja pärast saavutate optimaalse
vajutamistugevuse ja harjapea ei paindu enam nii
tihti tagasi.
Nõuanne: Kui hambakatt on eemaldatud hoolikalt,
peaksid igemed olema roosad ja tihedalt vastu
hambaid.Terved igemed ei veritse söömise või
hambapesu ajal (vt. ka 'Optimaalne
hambahügieen'). Kui igemed veritsevad
hambaharja kasutamise esimestel kordadel, peaks
see mõne päeva pärast mööduma. Juhul, kui
veritsemine jätkub, küsige nõu oma hambaarstilt
või hügieenikult.
Minimaalne puhastamisaeg: 2 minutit
Tavaliselt piisab 2 minutist, et hambaid korralikult
puhtaks teha. Loomulikult võite pesta ka kauem.
C
◗ Punane märgutuli hakkab vilkuma 2 minuti
möödudes (ainult mudelitel HX2585, HX2538
ja HX1526).
Optimaalne hambahügieen
Optimaalse hambahügieeni tagamiseks
soovitatakse elektrihambaharjaga koos kasutada
ka hambaniiti ja hambaorke.
EESTI
Page 99

99
Rohkem infot Philipsi hambahooldus- ja muudest
toodetest leiate Interneti leheküljelt:
www.philips.com
Seadme puhastamine ja hoidmine
C
1 Lülitage hambahari sisse ja loputage
hambaharja tarvikut voolava leige vee all
(maks. 60cC).
C
2 Lülitage hambahari välja. Eemaldage harja
tarvik ja loputage seda seestpoolt.
C
3 Lülitage hambahari uuesti sisse ja loputage
hambapasta jäägid pöörlevalt osalt.
C
4 Ainult mudelitel HX1526, HX1515,
HX1511, HX1510 ja HX1507: hoidke
harjatarvik laadimisaluse piil.Ainult
mudelitel HX2585 ja HX2538: võite hoida
hoidikus kuni 4 harjatarvikut.
EESTI
Page 100

100
C
◗ Ainult mudelitel HX2585 ja HX2538: kahe
harjatarviku asemel võib hoidikus hoida ka
hambapastat.
Tarvikute hoidikut ja tarvikuid võib eemaldada
laadimisaluselt ja pesta nõudepesumasinas.
C
5 Puhastage laadimisalus niiske lapiga.
Enne puhastamist eemaldage toitejuhtme pistik
seinapistikust .
Vahetamine
1 Parima tulemuse saavutamiseks vahetage
harjatarvikuid iga 3 kuu tagant.
◗ Harjatarvikuid peaks vahetama ka siis, kui
harjad hakkavad painduma väljapoole.
Uusi harjatarvikuid ostke kauplusest, kust hankisite
hambaharja.
Võite kasutada kõiki ümmargusi PHILIPS
harjatarvikuid.
Keskkond
Kui olete otsustanud seadmest loobuda,
eemaldage akud ja hävitage need
keskkonnasõbralikul moel.
EESTI
 Loading...