

Philips HX1513/65, HX1511/02, HX2538/02, HX1513/63, HX2585/02 User Manual
...
1
sensiflex
power toothbrush
22
3
1

44

HX2585, HX2538, HX1526, HX1518, HX1515, HX1514, HX1513,
HX1511, HX1510, HX1507
ENGLISH 6
DANSK 12
DEUTSCH 18
SUOMI 24
NORSK 30
SVENSKA 36

6
Introduction
This unique electric toothbrush removes plaque better than a normal,
manual toothbrush. It also helps to protect your gums. When you exert
too much pressure while brushing, the brush head will automatically ex
back. Because of this clear signal, you will quickly adopt the right brushing
force. Clinical tests have shown that, thanks to this system, brushing with
the Philips Sensiex results in a better and safer brushing technique.
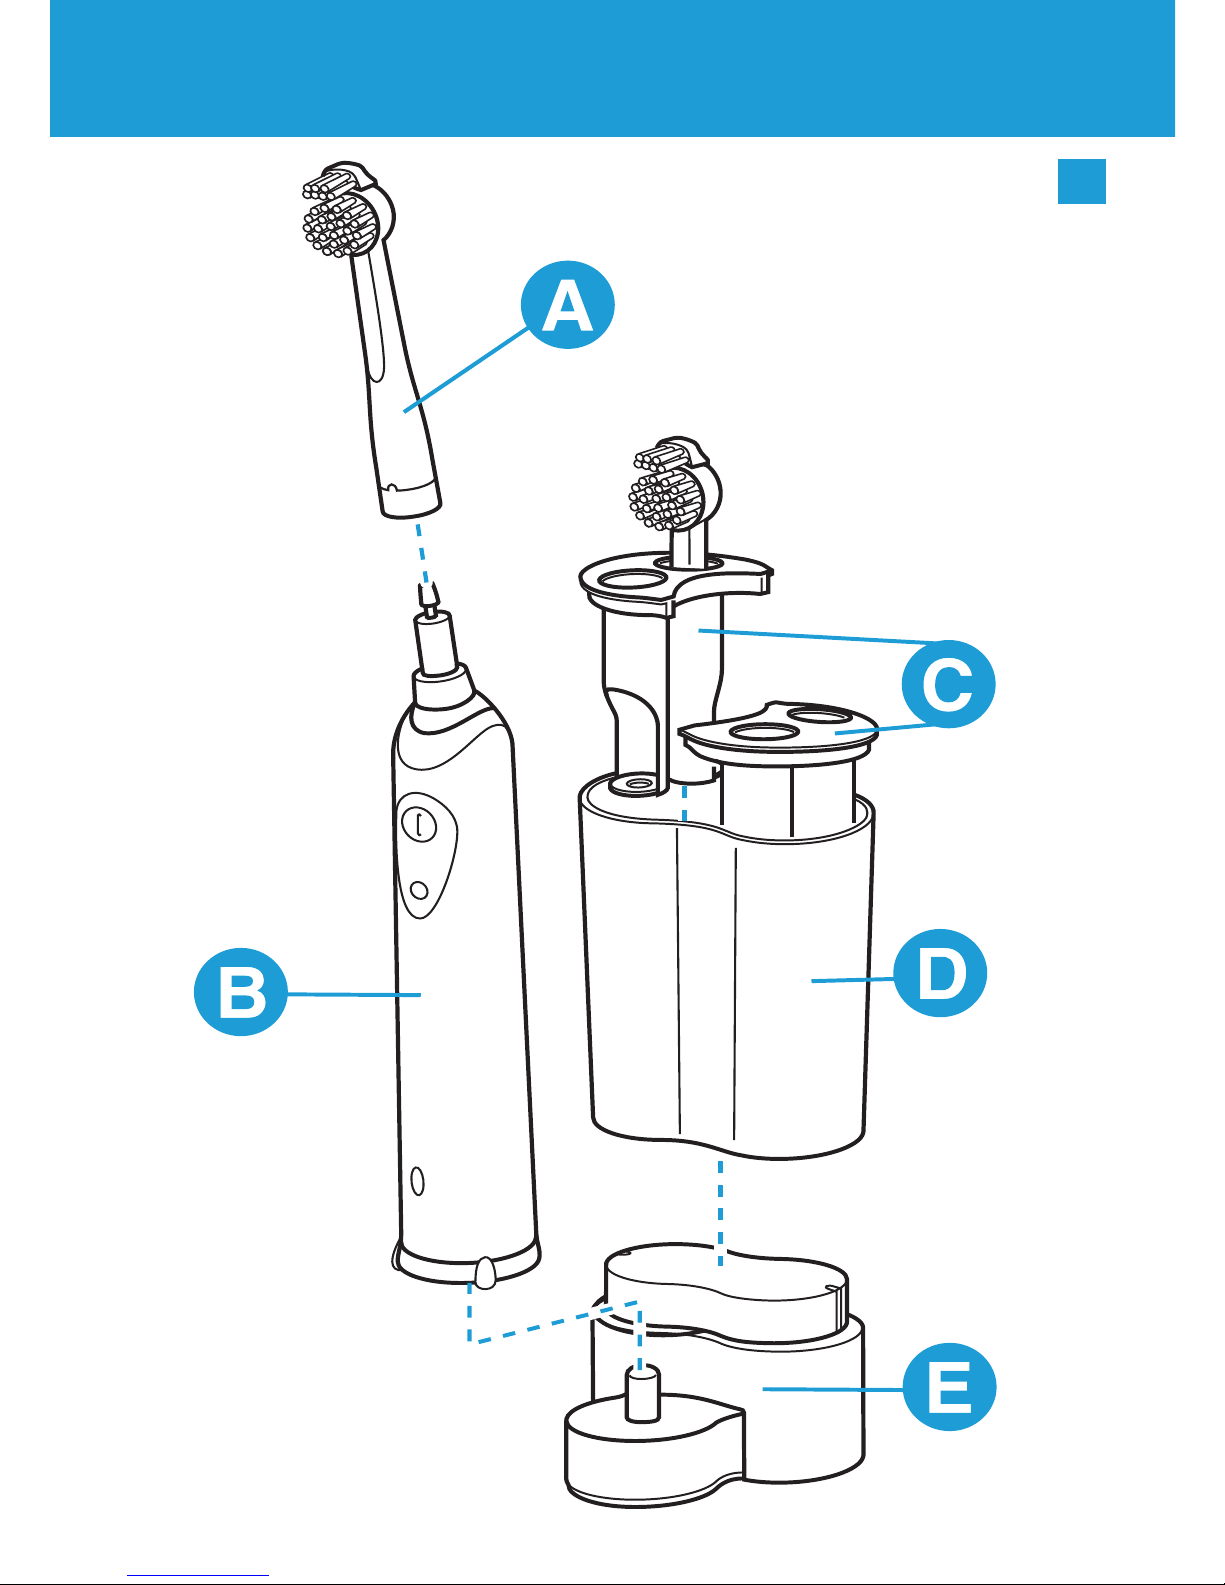
General description (Fig. 1)
A Brush attachment
B Handle
C Holder for 2 brush attachments
D Storage container
E Charger
F Holder for 2 brush attachments
Important
Read these instructions for use carefully before using the appliance and
save them for future reference.
The cord of the charging unit cannot be replaced. If the cord is
damaged, the charging unit must be discarded.
Make sure the socket is live when you recharge the toothbrush.
The electricity supply to sockets in mirror cabinets over
washbasins or shaver sockets in bathrooms may be cut off when
the light is turned off.
Preparing for use
Mounting the appliance to the wall
1 Mount the charging unit to the wall, using 2 screws (3.0x30mm)
and 2 wall plugs (S5) (not included). (Fig. 2)
Charging the appliance
1 Charge the appliance for at least 16 hours before using it for the
rst time.
,
,
ENGLISH6

7
Make sure the appliance is switched off when you start charging it.
(Fig. 3)
You can put the toothbrush in the stand and let it charge
continuously.
However, when you rst start using the appliance, it is recommended that
you use it until the battery is empty. To do so, use the appliance in the
normal way without recharging it between the brushing sessions.
Recharge the appliance when the motor almost stops running. Repeat
this procedure 3 times in a row.
To extend the lifetime of the battery, repeat this procedure every 6
months.
Types HX2585, HX2538 and HX1526 only: when the battery is
being charged, the green pilot light is on. (Fig. 4)
You can put the toothbrush in the stand and let it charge
continuously.
Using the appliance
1 Mount the brush attachment onto the toothbrush by inserting it
into the bayonet catch and turning it clockwise a quarter of a turn.
(Fig. 5)
This will make it impossible for the brush attachment to become
detached due to vibration.
2 Put toothpaste on the brush head.
3 Place the brush head in your mouth. (Fig. 6)
4 Switch the appliance on by pressing the button and start brushing
your teeth. (Fig. 7)
For the best brushing method, minimal brushing time and brushing
functions of the appliance, see the ‘Brushing tips’ section below.
Brushing Tips
Brushing
1 Place the brush head against the tooth in such a way that it covers
the surface of the tooth as well as the gum line. (Fig. 8)
,
,
,
,
,
ENGLISH 7

8
2 Hold the brush head in this position for a few seconds and then
move on to the next tooth. (Fig. 9)
The round brush head removes plaque from the teeth and beneath the
gum line.
The individually moving Active Tip cleans between the teeth.
3 Guide the brush head carefully along the teeth and molars. (Fig. 10)
Make sure you clean all surfaces of the teeth (inside, outside and
chewing surface) as well as the gum line properly. A xed brushing
pattern will prevent you from skipping certain areas.
Gum Protection system
1 The Gum Protection system guarantees that you do not exert too
much pressure on the teeth and gums. (Fig. 11)
2 If you exert too much pressure on the toothbrush, you will feel and
hear the brush head exing backwards. As soon as you reduce the
pressure, the brush head will return to its normal position. This will
protect your gums. (Fig. 12)
This will probably happen a few times when you rst start using the
toothbrush. After some time you will have discovered the optimal
brushing pressure and the brush head will ex backwards less often.
Tip: If plaque is removed properly, the gums will have a pink colour and
will rmly surround the teeth. Healthy gums do not bleed when you eat
or brush your teeth (see also the section ‘Optimal dental hygiene’). If,
nevertheless, your gums bleed slightly the rst few times you use the
brush, this bleeding will generally stop after a few days. If it does not,
consult your dentist or dental hygienist.
Minimum brushing time: 2 minutes
In general, 2 minutes will be enough to clean your teeth properly.
Naturally, you can also brush longer than 2 minutes.
A red pilot light will blink to indicate that 2 minutes have passed
(types HX2585, HX2538 and HX1526 only). (Fig. 13)
,
,
ENGLISH8

9
Optimal dental hygiene
For optimal dental hygiene, it is recommended to use dental oss and
toothpicks in addition to the electric toothbrush.
You will nd more information about Philips Oral Healthcare products
and other Philips products on our Web site: www.philips.com.
Cleaning and storage
1 Switch the toothbrush on and rinse the brush attachment under
the tap with lukewarm water (max. 60 cC). (Fig. 14)
2 Switch the toothbrush off. Detach the brush attachment and rinse
the inside. (Fig. 15)
3 Switch the toothbrush on again and rinse the drive shaft under the
tap to wash away toothpaste residues. (Fig. 16)
4 Types HX1526, HX1515, HX1514, HX1513, HX1511, HX1510 and
HX1507 only: store the brush attachment on the pin on the
charging unit. Types HX2585, HX2538 and HX1526 only: store the
brush attachments (max. 4) in the storage container. (Fig. 17)
Types HX2585 and HX2538 only: you can also remove one of the
brush holders to be able to store a toothpaste tube in the storage
container. (Fig. 18)
The storage container and the brush holders can be removed from the
charging unit and cleaned in the dishwasher.
5 Clean the charging unit with a moist cloth. (Fig. 19)
Unplug the charging unit before you start cleaning it.
Replacement
1 Replace the brush attachment every 3 months for the best
brushing results.
The brush attachment should also be replaced when the bristles
start to bend outwards.
You can obtain new brush attachments from the shop in which you
purchased the toothbrush.
All round Philips replacement brush attachments can be used.
,
,
ENGLISH 9

10
Environment
Do not throw the appliance away with the normal household waste
at the end of its life, but hand it in at an ofcial collection point for
recycling. By doing this you will help to preserve the environment.
(Fig. 20)
The built-in rechargeable battery contains substances that may
pollute the environment. Always remove the battery before
discarding the appliance and handing it in at an ofcial collection
point. Dispose of the battery at an ofcial collection point for
batteries. If you have trouble removing the battery, you can also
take the appliance to a Philips service centre, which will remove the
battery for you and will dispose of it in an environmentally safe way.
1 The battery must be completely empty when you remove it. You
should therefore let the appliance run until it stops before
removing the battery.
2 Pick up the charging unit and place the toothbrush on the pin. Turn
the toothbrush anti-clockwise to unscrew the bottom of the
toothbrush. (Fig. 21)
3 Turn the toothbrush upside down and press it down on a hard
surface to remove the battery holder. (Fig. 22)
4 Open the lid of the battery holder by hand or by means of a
screwdriver. (Fig. 23)
5 Lift the battery out of the battery holder by means of a
screwdriver. (Fig. 24)
After the bottom has been unscrewed, the appliance may not be
watertight anymore and the guarantee will become invalid.
Guarantee & service
If you need information or if you have a problem, please visit the Philips
web site at www.philips.com or contact the Philips Customer Care
Centre in your country (you will nd its phone number in the worldwide
guarantee leaet). If there is no Customer Care Centre in your country,
,
,
ENGLISH10

11
turn to your local Philips dealer or contact the Service Department of
Philips Domestic Appliances and Personal Care BV.
Troubleshooting
If you are unable to solve your problem by means of the troubleshooting
guide below, please contact the nearest Philips service centre, the Philips
Customer Care Centre in your country or contact us online at
www.philips.com.
Problem Solution
The toothbrush does not
work at all, although it has
been in the charging unit
overnight.
Make sure that the plug of the charging
unit has been properly inserted into the
wall socket.
Make sure the socket is live (see also the
section ‘Important’).
Make sure the toothbrush is switched off
and recharge it for at least 16 hours.
The motor of the
toothbrush works, but
the brush head doesn’t.
Check if the brush attachment has been
properly connected to appliance (see also
the section ‘Using the appliance’).
The brushing power of
the appliance has greatly
decreased.
The toothbrush must be recharged. If you
normally leave the toothbrush in the
charging unit continuously, you may have to
revive the battery as described in the
section ‘Charging’.
The teeth-cleaning
performance of the
toothbrush is not optimal
anymore.
Remove the brush attachment and start
using a new one.
ENGLISH 11

12
Introduktion
Denne unikke, elektriske tandbørste er betydeligt bedre til at fjerne plak
end en almindelig, manuel tandbørste. Udover optimal plakfjernelse
beskyttes tandkødet, idet børstehovedet automatisk “klikker” bagover, så
snart der trykkes for hårdt. Og på grund af dette klare signal, lærer du
hurtigt at anvende det ideelle børstetryk. Kliniske tests har vist, at man får
en bedre og mere sikker børsteteknik ved brug af Philips Sensiex.
Generel beskrivelse (g. 1)
A Børstetilbehør
B Håndtag
C Holder til 2 børster
D Opbevaringsboks
E Oplader
F Holder til 2 børster
Vigtigt
Læs brugsvejledningen omhyggeligt igennem, inden apparatet tages i brug,
og gem den til eventuel senere brug.
Ledningen til opladeenheden kan ikke udskiftes. Hvis ledningen
beskadiges, skal opladeenheden kasseres.
Vær sikker på, at stikkontakten, der anvendes til opladningen er
tændt. Vær opmærksom på, at stikkontakter i toiletskabe eller
specielle stik til barbermaskiner (i badeværelser) kan være afbrudt,
når lyset er slukket.
Klargøring
Montering på væg
1 Opladeenheden kan monteres på væggen ved hjælp af 2 skruer (3,0
x 30 mm) og 2 rawlplugs (S5) (medfølger ikke). (g. 2)
Opladning
1 Inden apparatet tages i brug første gang, skal det oplades i mindst
16 timer.
,
,
DANSK

13
Kontrollér, at apparatet er slukket, når opladningen påbegyndes.
(g. 3)
Tandbørsten kan stå i opladeren til konstant opladning.
Når apparatet tages i brug første gang, anbefales det imidlertid at bruge
apparatet til batteriet er helt brugt op. Dette gøres ved at bruge
apparatet på normal vis uden at genoplade det mellem hver
tandbørstning. Genoplad apparatet, når motoren næsten stopper. Gentag
denne procedure 3 gange i træk.
For at forlænge batteriets levetid, gentages ovennævnte procedure hver 6.
måned.
Kun type HX2585, HX2538 og HX1526: Når batteriet oplades,
lyser den grønne kontrollampe. (g. 4)
Tandbørsten kan stå i opladeren til konstant opladning.
Sådan bruges apparatet
1 Sæt børsten ind i motordelens bajonetfatning og drej den en kvart
omgang højre om. (g. 5)
Dette sikrer, at børsten ikke falder af under brug.
2 Kom tandpasta på børsten.
3 Sæt børsten ind i munden. (g. 6)
4 Tænd for apparatet ved at trykke på knappen, og begynd at børste
tænderne. (g. 7)
Se afsnittet “Gode råd om tandbørstning”, som omhandler
børstemetoder, anbefalet minimum børstetid og apparatets
forskellige funktioner.
Gode råd om tandbørstning
Tandbørstning
1 Placér børstehovedet mod tanden, så det både dækker tandens
overade og tandlinjen mellem tand og tandkød. (g. 8)
2 Hold børsten i denne stilling et par sekunder og fortsæt derefter til
næste tand. (g. 9)
Det runde børstehoved fjerner plak fra tænderne og under tandlinjen.
,
,
,
,
,
DANSK 13

14
Den individuelt bevægelige Active Tip renser mellem tænderne.
3 Før omhyggeligt børsten langs med alle tænderne inkl.
kindtænderne. (g. 10)
Sørg for, at alle tandader (forside, bagside og tyggeade) samt
tandlinjen renses grundigt. Ved altid at bruge samme børstevane,
undgår man at komme til at springe nogle områder over.
Børstetryk-system som beskytter tandkødet
1 Børstetryk-systemet garanterer, at man ikke kan komme til at
trykke for hårdt mod tænder og tandkød. (g. 11)
2 Trykker man for hårdt med tandbørsten, både høres og føles et
“klik”, idet børstehovedet automatisk vipper bagover. Så snart
trykket lettes igen, vipper børstehovedet tilbage til sin normale
position. Dette giver en optimal beskyttelse af tandkødet. (g. 12)
Dette vil sikkert ske nogle gange i begyndelsen, men du vil hurtigt nde
ud af at anvende det optimale børstetryk.
Tips: Hvis plakken er fjernet tilstrækkeligt omhyggeligt, er tandkødet
lyserødt og ligger fast omkring tanden. Sundt tandkød bløder ikke, når
man spiser eller børster tænder (se også afsnittet “Optimal tandhygiejne”).
Hvis dine tænder alligevel bløder lidt de første par gange, du bruger
tandbørsten, vil det i de este tilfælde ophøre efter et par dage. Hvis ikke,
bør du kontakte din tandlæge eller tandplejer.
Anbefalet minimum børstetid: 2 minutter
Som hovedregel er 2 minutters børstetid nok til at rengøre tænderne,
men man kan naturligvis også bruge længere tid.
En rød kontrollampe blinker for at indikere, at der nu er gået 2
minutter (gælder kun type HX2585, HX2538 og HX1526). (g. 13)
Optimal tandhygiejne
For at opnå optimal tandhygiejne, anbefales det at bruge tandtråd og
tandstikkere udover elektrisk tandbørste.
Besøg vor hjemmeside: www.philips.com for yderligere oplysninger om
Philips-tandpleje samt øvrige Philips-produkter.
,
,
DANSK14
 Loading...