

Philips HTS6600/12, HTS6600/05 User Manual

English
DVD HOME THEATRE SYSTEM
HTS6600
Read your Quick Start Guide and/or User Manual first for quick tips
that make using your Philips product more enjoyable.
Register your product and get support
at www.philips.com/welcome
User Manual 6
Manuel D’utilisation 56
Manual del usuario 106
Benutzerhandbuch 156
Gebruikershandleiding 206

2
Important notes for users in the
U.K.
Mains plug
This apparatus is tted with an approved 13
Amp plug. To change a fuse in this type of
plug proceed as follows:
1 Remove fuse cover and fuse.
2 Fix new fuse which should be a BS1362
5 Amp, A.S.T.A. or BSI approved type.
3 Re t the fuse cover.
If the tted plug is not suitable for your socket
outlets, it should be cut off and an appropriate
plug tted in its place.
If the mains plug contains a fuse, this should
have a value of 5 Amp. If a plug without a fuse
is used, the fuse at the distribution board
should not be greater than 5 Amp.
Note: The severed plug must be disposed of to
avoid a possible shock hazard should it be
inserted into a 13 Amp socket elsewhere.
How to connect a plug
The wires in the mains lead are coloured with
the following code: blue = neutral (N),
brown = live (L).
As these colours may not correspond with the
colour markings identifying the terminals in
your plug, proceed as follows:
– Connect the blue wire to the terminal
marked N or coloured black.
– Connect the brown wire to the terminal
marked L or coloured red.
– Do not connect either wire to the earth
terminal in the plug, marked E (or e) or
coloured green (or green and yellow).
Before replacing the plug cover, make certain
that the cord grip is clamped over the sheath
of the lead - not simply over the two wires.
Copyright in the U.K.
Recording and playback of material may
require consent. See Copyright Act 1956 and
The Performer’s Protection Acts 1958 to
1972.
ATTENTION!
For Customer Use:
Read carefully the information located at the
bottom or rear of your DVD Home Theatre
System and enter below the Serial No. Retain
this information for future reference.
Model No. HTS6600
Serial No. _______________
Norge
Typeskilt nnes på apparatens underside.
Observer: Nettbryteren er
sekundert innkoplet. Den innebygde
netdelen er derfor ikke frakoplet
nettet så lenge apparatet er
tilsluttet nettkontakten.
For
å redusere faren for brann eller elektrisk
støt, skal apparatet ikke utsettes for regn eller
fuktighet.
Italia
DICHIARAZIONE DI CONFORMITA’
Si dichiara che l’apparecchio HTS6600, Philips
risponde alle prescrizioni dell’art. 2 comma 1
del D.M. 28 Agosto 1995 n. 548.
Fatto a Eindhoven
Philips Consumer Electronics
Philips, Glaslaan 2
5616 JB Eindhoven, The Netherlands
3
English
LASER
Type Semiconductor laser
GaAIAs
Wave length 650 - 660 nm (DVD)
784 - 796 nm (CD)
Output Power 7 mW (DVD)
10 mW (VCD/CD)
Beam divergence 60 degrees
This product complies with the radio
interference requirements of the
European Community.
This product complies with
the requirements of the
following directives and
guidelines: 2006/95/EC +
89/336/EEC + 93/68/EEC
DK
Advarsel: Usynlig laserstråling ved
åbning når sikkerhedsafbrydere er ude
af funktion. Undgå utsættelse for
stråling.
Bemærk: Netafbryderen er sekundært
indkoblet og ofbryder ikke strømmen
fra nettet. Den indbyggede netdel er
derfor tilsluttet til lysnettet så længe
netstikket sidder i stikkontakten.
S
Klass 1 laseraparat
Varning! Om apparaten används på
annat sätt än i denna bruksanvisning
speci cerats, kan användaren utsättas
för osynlig laserstrålning, som
överskrider gränsen för laserklass 1.
Observera! Stömbrytaren är sekundärt
kopplad och bryter inte strömmen från
nätet. Den inbyggda nätdelen är därför
ansluten till elnätet så länge
stickproppen sitter i vägguttaget.
SF
Luokan 1 laserlaite
Varoitus! Laitteen käyttäminen muulla
kuin tässä käyttöohjeessa mainitulla
tavalla saattaa altistaa käyttäjän
turvallisuusluokan 1 ylittävälle
näkymättömälle lasersäteilylle.
Oikeus muutoksiin varataan. Laite ei
saa olla alttiina tippu-ja roiskevedelle.
Huom. Toiminnanvalitsin on kytketty
toisiopuolelle, eikä se kytke laitetta irti
sähköverkosta. Sisäänrakennettu
verkko-osa on kytkettynä
sähköverkkoon aina silloin, kun pistoke
on pistorasiassa.
CAUTION
VISIBLE AND INVISIBLE LASER RADIATION
WHEN OPEN. AVOID EXPOSURE TO BEAM
ADVARSEL
SYNLIG OG USYNLIG LASERSTRÅLING VED
ÅBNING UNDGÅ UDSÆTTELSE FOR
STRÅLING
VARNING
SYNLIG OCH OSYNLIG LASERSTRÅLNING
NÄR DENNA DEL ÄR ÖPPNAD BETRAKTA
EJ STRÅLEN
VARO!
AVATTAESSA OLET ALTTIINA NÄKYVÄLLE
JA NÄKYMÄTTÖMÄLLE LASER SÄTEILYLLE.
ÄLÄ KATSO SÄTEESEEN
VORSICHT
SICHTBARE UND UNSICHTBARE
LASERSTRAHLUNG WENN ABDECKUNG
GEÖFFNET NICHT DEM STRAHL
AUSSETZEN
ATTENTION
RAYONNEMENT LASER VISIBLE ET
INVISIBLE EN CAS D’OUVERTURE
EXPOSITION DANGEREUSE AU FAISCEAU
4
Disposal of your old product
Your product is designed and manufactured with high quality materials
and components, which can be recycled and reused.
When this crossed-out wheeled bin symbol is attached to a product it
means the product is covered by the European Directive 2002/96/EC.
Please inform yourself about the local separate collection system for
electrical and electronic products.
Please act according to your local rules and do not dispose of your old products with
your normal household waste. The correct disposal of your old product will help
prevent potential negative consequences for the environment and human health.
Se débarrasser de votre produit usagé (Français)
Votre produit est conçu et fabriqué avec des matériaux et des
composants de haute qualité, qui peuvent être recyclés et utilisés de
nouveau
.
Lorsque ce symbole d'une poubelle à roue barrée est attaché à un
produit, cela signifie que le produit est couvert par la Directive
Européenne 2002/96/EC.
Veuillez vous informer du système local de séparation des déchets
électriques et électroniques.
Veuillez agir selon les règles locales et ne pas jeter vos produits usagés avec les déchets
domestiques usuels. Jeter correctement votre produit usagé aidera à prévenir les
conséquences négatives potentielles contre l'environnement et la santé humaine.
Cómo deshacerse del producto usado (Español)
Su producto ha sido diseñado y fabricado con materiales y componentes de
alta calidad, que pueden ser reciclados y reutilizados.
Cuando vea este símbolo de una papelera con ruedas tachada junto a un
producto, esto significa que el producto está bajo la Directiva Europea
2002/96/EC
Deberá informarse sobre el sistema de reciclaje local separado para
productos eléctricos y electrónicos.
Siga las normas locales y no se deshaga de los productos usados tirándolos en la basura
normal de su hogar. El reciclaje correcto de su producto usado ayudará a evitar
consecuencias negativas para el medio ambiente y la saludde las persona.
Entsorgung Ihres Altgerätes (Deutsch)
Ihr Produkt ist aus hochqualitativen Materialien und Bestandteilen hergestellt,
die dem Recycling zugeführt und wiederverwertet werden können.
Falls dieses Symbol eines durchgestrichenen Müllcontainers auf Rollen auf
diesem Produkt angebracht ist, bedeutet dies, dass es von der Europäischen
Richtlinie 2002/96/EG erfasst wird.
Bitte informieren Sie sich über die örtlichen Sammelstellen für Elektroprodukte
und elektronische Geräte.
Bitte beachten Sie die lokalen Vorschriften und entsorgen Sie Ihre Altgeräte nicht mit dem
normalen Haushaltsmüll. Die korrekte Entsorgung Ihres Altgerätes ist ein Beitrag zur
Vermeidung möglicher negativer Folgen für die Umwelt und die menschliche Gesundhei.
Wegwerpen van uw afgedankt apparaat (Nederlands)
Uw apparaat werd ontworpen met en vervaardigd uit onderdelen en
materialen van superieure kwaliteit, die gerecycleerd en opnieuw gebruikt
kunnen worden.
Wanneer het symbool van een doorstreepte vuilnisemmer op wielen op
een product is bevestigd, betekent dit dat het product conform is de
Europese Richtlijn 2002/96/EC
Gelieve u te informeren in verband met het plaatselijke inzamelingsysteem
voor elektrische en elektronische apparaten.
Gelieve u te houden aan de plaatselijke reglementering en apparaten niet met het gewone
huisvuil mee te geven. Door afgedankte apparaten op een correcte manier weg te werpen
helpt u mogelijke negatieve gevolgen voor het milieu en de gezondheid te voorkomen.
‘CONSUMERS SHOULD NOTE THAT NOT ALL HIGH
DEFINITION TELEVISION SETS ARE FULLY
COMPATIBLE WITH THIS PRODUCT AND MAY CAUSE
ARTIFACTS TO BE DISPLAYED IN THE PICTURE. IN
CASE OF 525 OR 625 PROGRESSIVE SCAN PICTURE
PROBLEMS, IT IS RECOMMENDED THAT THE USER
SWITCH THE CONNECTION TO THE ‘STANDARD
DEFINITION’ OUTPUT. IF THERE ARE QUESTIONS
REGARDING OUR TV SET COMPATIBILITY WITH THIS
MODEL 525p AND 625p DVD PLAYER, PLEASE
CONTACT OUR CUSTOMER SERVICE CENTER.’
This product incorporates copyright protection
technology that is protected by method claims of
certain U.S. patents and other intellectual property
rights owned by Macrovision Corporation and
other rights owners. Use of this copyright
protection technology must be authorized by
Macrovision Corporation, and is intended for
home and other limited viewing uses only unless
otherwise authorized by Macrovision Corporation.
Reserve engineering or disassembly is prohibited.
5
EnglishFrançaisEspañolDeutschNederlands
HDMI, and HDMI logo and High-De nition
Multimedia Interface are trademarks or
registered trademarks of HDMI licensing LLC.
Manufactured under license from Dolby
Laboratories, Dolby, Pro Logic and the
double-D symbol are trademarks of Dolby
Laboratories.
Manufactured under license from one or
more of the following DTS, Inc. U.S. Pat.
No’s: 5,451,942; 5,956,674; 5,974,380;
5,978,762; 6,226,616; 6,487,535 and other U.
S. and world-wide patents issued and
pending. ”DTS” and “DTS Digital Surround”
are registered trademarks of DTS, Inc.
Copyright 1996, 2002-2006, DTS, Inc. All
Rights Reserved.
Windows Media and the Windows logo are
trademarks, or registered trademarks of
Microsoft Corporation in the United States
and/or other countries.
Index
DivX Ultra Certi ed products: DivX, DivX
Ultra Certi ed, and associated logos are
trademarks of DivX, Inc. and are used under
license.
English ------------------------------------ 6
Français ---------------------------------- 56
Español -------------------------------- 106
Deutsch -------------------------------- 156
Nederlands ---------------------------- 206

6
English
Table of contents
General
General Information ........................................................................................................ 8
Setup precautions .................................................................................................................................................8
Accessories supplied ...........................................................................................................................................8
About recycling .....................................................................................................................................................8
Product Overview
Main Unit ........................................................................................................................... 9
Remote Control .........................................................................................................10-12
Using the remote control ................................................................................................................................12
Connections
Basic Connections .....................................................................................................13-18
Step 1 : Placing the speakers ...........................................................................................................................13
Step 2 : Connecting to TV ...............................................................................................................................14
Option 1: Using the Scart socket ..........................................................................................................14
Option 2: Connecting to a HDMI-compatible TV ............................................................................14
Option 3: Connecting to a Progressive Scan TV or component video input ............................15
Step 3 : Connecting the speakers to subwoofer .......................................................................................16
Step 4 : Connecting the FM and AM/MW antennas .................................................................................17
Step 5 : Connecting the subwoofer to the main unit ...............................................................................17
Step 6 : Connecting the power cord ............................................................................................................18
Optional Connections ............................................................................................... 19-21
Connecting to cable box/satellite receiver and recorder/VCR ...........................................................19
Mounting the main unit on the wall ............................................................................................................ 20
Mounting the speakers on the wall ..............................................................................................................21
Basic Setup
Getting Started .........................................................................................................22-27
Finding the correct viewing channel ............................................................................................................22
Setting the speakers .................................................................................................................................22~23
Setting language preferences ...........................................................................................................................24
On-screen display (OSD) language ........................................................................................................24
Audio, Subtitle and Menu language for DVD playback .............................................................. 24-25
Setting the TV Display ..................................................................................................................................... 25
Setting up Progressive Scan feature ..............................................................................................................26
Switching to different play source .................................................................................................................27
Turning off to low power standby mode ..............................................................................................27
Disc Playback
Disc Operations ........................................................................................................ 28-35
Playable discs ...................................................................................................................................................... 28
Playing a disc ....................................................................................................................................................... 28
Basic playback controls .....................................................................................................................................29
Selecting various repeat/shuf e functions ...................................................................................................29
Programming disc tracks ................................................................................................................................. 30
Other playback features for video discs (DVD/VCD/SVCD) .......................................................30~32
Using the Disc Menu ................................................................................................................................. 30
Viewing playback information ..................................................................................................................31
Zooming in/out ............................................................................................................................................31
Changing subtitle language ......................................................................................................................31
Switching camera angles ............................................................................................................................31

7
English
Changing sound track language ...............................................................................................................32
Setting the delay times for audio playback ...........................................................................................32
Playback Control (VCD only) ..................................................................................................................32
Playing a MP3/WMA disc ................................................................................................................................33
Playing a JPEG image le (slide show) ......................................................................................................... 34
Preview function ......................................................................................................................................... 34
Zoom picture ............................................................................................................................................. 34
Rotating/ ipping the picture ................................................................................................................... 34
Playing MP3/WMA music and JPEG pictures simultaneously ................................................................35
Playing a DivX disc .............................................................................................................................................35
Playback other supported devices
Playback - USB device .................................................................................................... 36
Playing from USB ash drive or USB memory card reader....................................................................36
Playback - Other Audio Player ..................................................................................... 37
Playing from other portable audio player ....................................................................................................37
Setup Options
Setup Menu Options................................................................................................ 38- 44
Accessing the setup menu ............................................................................................................................... 38
General Setup Page ............................................................................................................................................39
Audio Setup Page ............................................................................................................................................... 40
Video Setup Page ......................................................................................................................................... 41-43
Preference Page ...........................................................................................................................................43-44
Radio Tuning
Radio Operations ...................................................................................................... 45-46
Tuning to radio stations ................................................................................................................................... 45
Presetting radio stations ................................................................................................................................. 45
Using auto install ..................................................................................................................................45-46
Using automatic preset ............................................................................................................................. 46
Using manual preset .................................................................................................................................. 46
Selecting a preset radio station ..................................................................................................................... 46
Deleting a preset radio station ...................................................................................................................... 46
Others
Sound and Volume Controls .........................................................................................47
Volume control ...................................................................................................................................................47
Adjusting the Bass/ Treble level .....................................................................................................................47
Selecting surround sound .................................................................................................................................47
Selecting digital sound effects .........................................................................................................................47
Other Features................................................................................................................ 48
Software upgrades ............................................................................................................................................ 48
Troub leshoo ting .........................................................................................................49 -51
Frequently Asked Questions (USB) ............................................................................. 52
Speci cations ..................................................................................................................53
Glossary...................................................................................................................... 54-55
Table of contents

8
English
General Information
WARNING!
This unit does not contain any userserviceable parts. Please leave all
maintenance work to quali ed
personnel.
Setup precautions
Finding a suitable location
– Place this unit on a at, hard and
stable surface. Never place the unit on a
carpet.
– Never place this unit on top of other
equipment that might heat it up (e.g.,
receiver or ampli er).
– Never put anything under this unit
(e.g., CDs, magazines).
– Install this unit near the AC outlet
where the AC power plug can be easily
reached.
Space for ventilation
– Place this unit in a location with
adequate ventilation to prevent internal
heat build up. Allow at least 10 cm (4”)
clearance from the rear and the top of
this unit and 5cm (2”) from the left and
right to prevent overheating.
Avoid high temperature, moisture,
water and dust
– This unit must not be exposed to
dripping or splashing.
– Never place any object or items that
can damage this unit (e.g., liquid lled
objects, lighted candles).
Accessories supplied
– 1 subwoofer
– 2 Ambisound speakers
– 2 sets of speaker wall mounting
brackets
– 1 set of main unit wall mounting
bracket
– 1 remote control with batteries
– 1 scart cable
– 1 audio cable (3.5mm to RCA)
– 1 FM wire antenna
– 1 AM/MW loop antenna
– 1 MP3 LINE-IN cable (for connecting
portable audio player)
– 1 micro bre cleaning cloth
– 1 power cable
– Quick Start Guide
About recycling
These operating instructions have been
printed on non-polluting paper. The
electronic equipment contains a large
number of materials that can be recycled.
If you are disposing of an old machine,
please take it to a recycling centre.
Please observe the local regulations
regarding disposal of packaging materials,
exhausted batteries and old equipment.
9
English
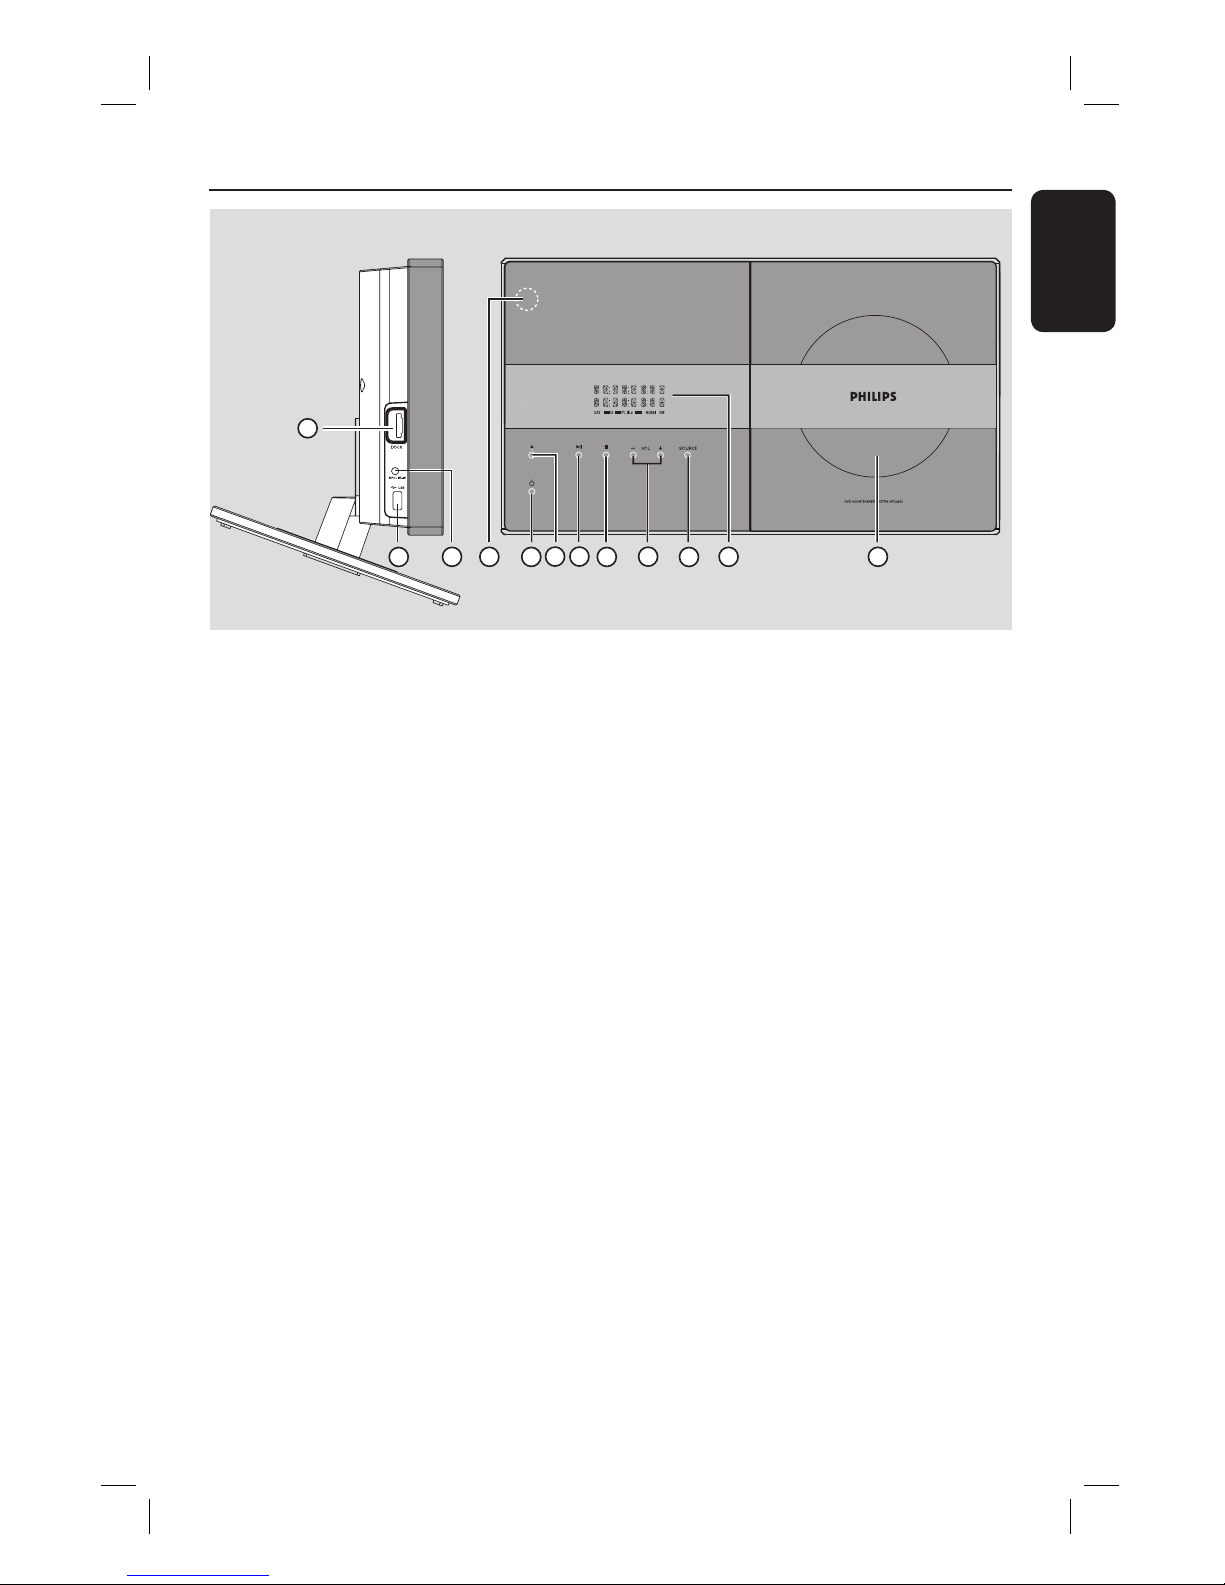
Main Unit
a DOCK socket
– Input for GoGear/iPod docking station
(optional feature - not available in
Europe).
b USB socket
– Input for USB ash drive or USB memory
card reader.
c MP3 LINE-IN socket
– Phono input for connecting to the
headphone out socket on your portable
audio player.
d iR sensor
– Point the remote control towards this
sensor.
e 2
– Turns on this unit or turns off to normal
standby mode.
– Press and hold to turn off to low power
standby mode.
f ç
– Opens/closes the disc compartment.
g u
– DISC: starts/pauses playback.
– RADIO: starts auto radio installation for
rst time setup.
h Ç
– Exits an operation.
– DISC: stops playback.
– RADIO: press and hold this button to
erase the current preset radio station.
i VOL +-
– Adjusts the volume level.
j SOURCE
– Selects the relevant active source mode:
DISC, MP3 LINE-IN, RADIO FM, RADIO
AM/MW, TV1, TV2, AUX1, AUX2 or
DIGITAL IN.
k Display panel
l Disc compartment
1
2
5
6 7
8
9
10
11
12
3
4
Front viewLeft side view
10
English
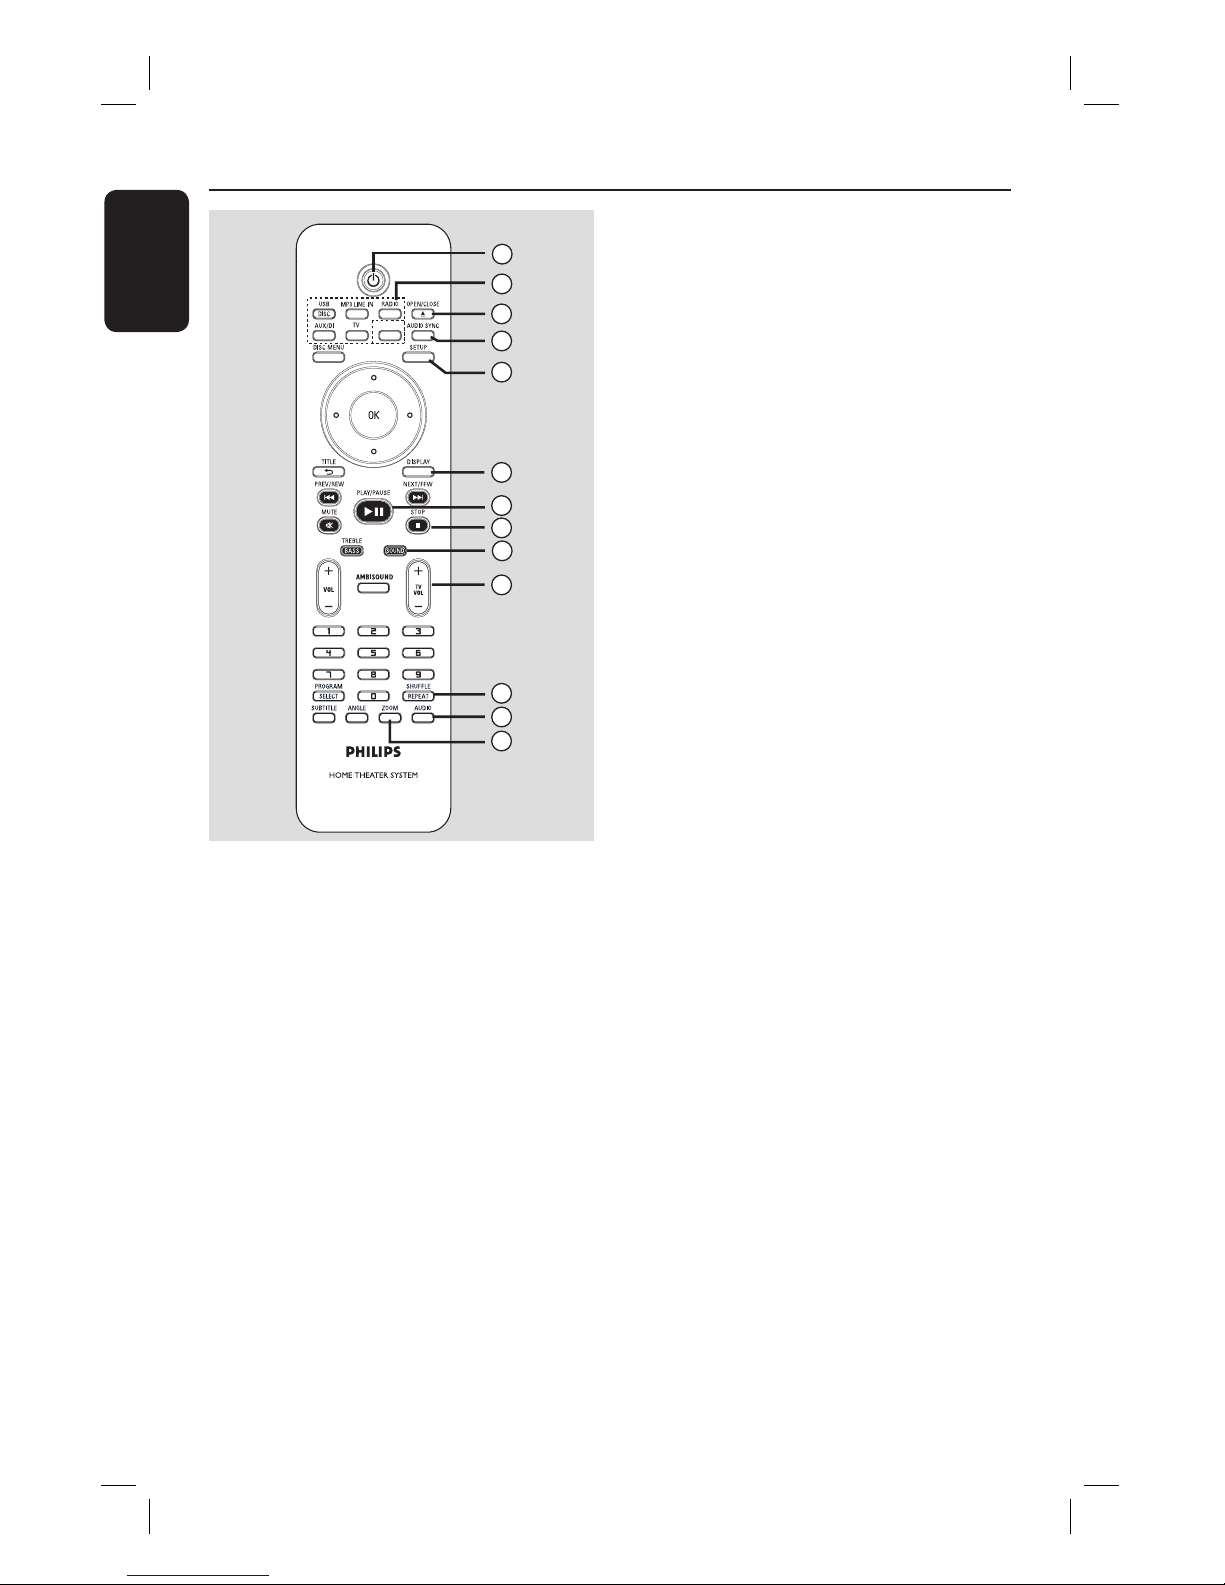
Remote Control
HDMI
2
3
4
5
6
7
8
9
10
11
12
1
13
Note:
There are two types of remote control
supplied with different HTS6600 versions.
The version with HDMI button has the
video upscaling up to 1080p.
a 2
– Turns off to normal standby mode.
– Press and hold to turn off to low power
standby mode.
b Source buttons
– DISC/USB: toggles between DISC or
USB mode.
DOCK: not functional in Europe region.
RADIO: toggles between FM and
AM/MW band.
AUX/DI: toggles between AUX1, AUX2
and DIGITAL IN external source mode.
MP3 LINE-IN: switches to the audio
device that is connected to the MP3
LINE-IN socket.
TV: switches to TV1 or TV2 mode. The
sound from the TV will output through
this unit’s speaker system.
HDMI (applicable only for version with
1080p)
– Toggles between different HDMI
resolution settings.
c OPEN/CLOSE ç
– Opens/closes the disc compartment.
d AUDIO SYNC
– Sets the audio output delay times if the
video playback is slower than the audio
output.
e SETUP
– Enters or exits the system setup menu.
f DISPLAY
– Displays the current status or disc
information.
g PLAY/PAUSE u
– DISC: starts/pauses playback.
– RADIO: starts auto radio installation for
rst time setup.
h STOP Ç
– Exits an operation.
– DISC: stops playback.
– RADIO: press and hold this button to
erase the current preset radio station.
i SOUND
– Selects a prede ned sound effect.
j TV VOL +-
– Adjusts the volume of the TV (for Philips
TVs or compatible brands only).
k REPEAT/SHUFFLE
– Selects various repeat or shuf e modes;
turns off repeat or shuf e mode.
l AUDIO
– DISC: selects an audio language/channel.
– RADIO: toggles between FM stereo and
mono mode.
m ZOOM
– Zoom in or out the picture on the TV.
11
English
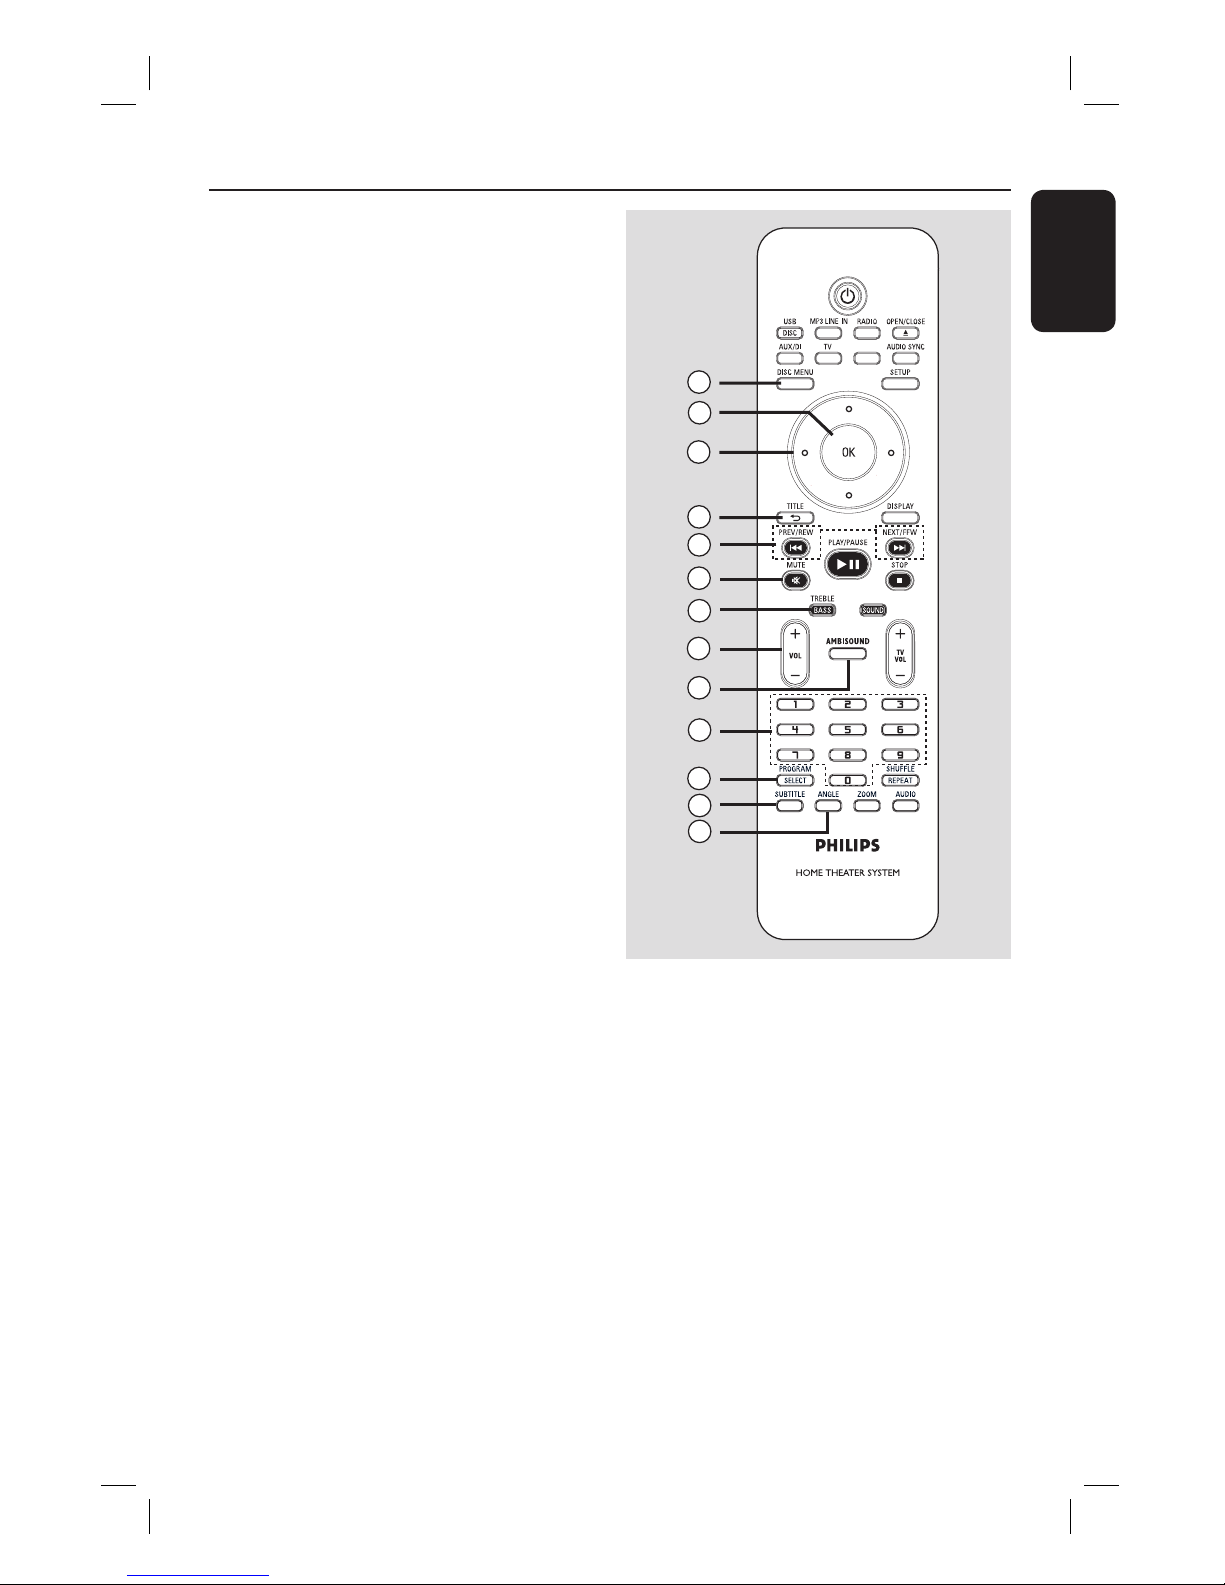
Remote Control (continued)
HDMI
14
15
16
17
18
19
20
21
22
23
24
25
26
n DISC MENU
– For DVD, enters or exits disc contents
menu.
– For VCD/SVCD, enters digest menu
while in stop mode; turns on/off PBC
mode during playback.
o OK
– Con rms an entry or selection.
p Cursor keys
– DISC: selects movement direction in the
menu.
– RADIO: press up or down to tune the
radio frequency.
– RADIO: press left or right to start auto
search.
q TITLE 2
– For DVD, go back to the previous menu.
– For VCD version 2.0 only;
During playback, display the disc title
menu or return to the main menu.
r PREV / REW ., NEXT / FFW >
– DISC: skips to the previous or next title/
chapter/track.
– DISC: press and hold this button for fast
forward and backward search.
– RADIO: selects a preset radio station.
s MUTE
– Mutes or restores the volume.
t TREBLE / BASS
– Toggles between Treble and Bass mode.
Immediately after toggling, adjust the
volume control to change the level
settings
u VOL +-
– Adjusts the volume level.
v AMBISOUND
– Switches the surround sound mode
between Auto, Multi-Channel and Stereo.
w Numeric keypad 0-9
– Enters a track/title number of the disc.
– Enters a number of a preset radio station.
x SELECT/PROGRAM
– DISC: starts programming.
– RADIO: press and hold this button to
start automatic/ manual preset
programming.
– Make multiple selection in the menu.
– Toggles between different HDMI
resolution settings (only applicable for
version without HDMI button).
y SUBTITLE
– Selects a DVD subtitle language.
z ANGLE
– Selects a different viewing angle of a DVD
movie (if available).
12
English
Remote Control (continued)
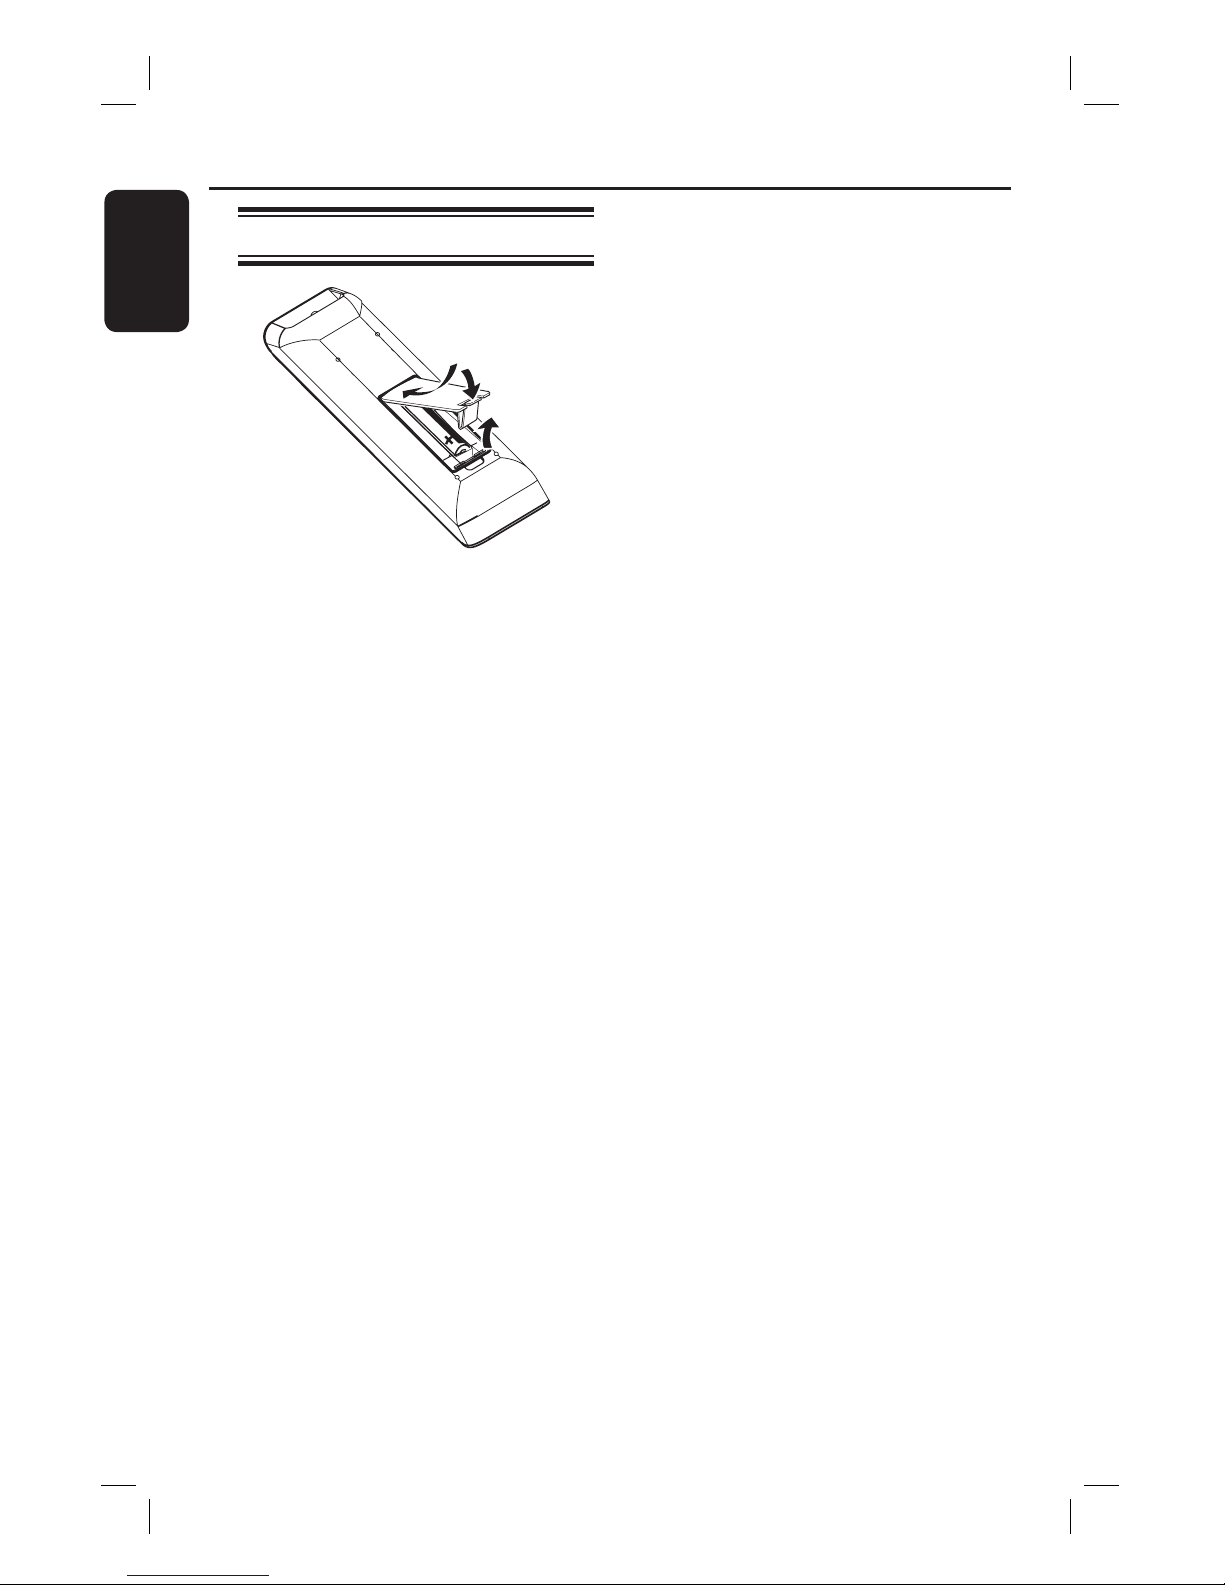
Using the remote control
A Open the battery compartment.
B Insert two batteries type R03 or AAA,
following the indications (+-) inside
the compartment.
C Close the cover.
D Point the remote control directly at the
remote sensor (iR) on the front panel.
E Select the source you wish to control by
pressing the DISC/USB, RADIO, AUX/DI,
MP3 LINE-IN or TV button on the
remote control.
F Then select the desired function (for
example ., >).
CAUTION!
– Remove batteries if they are
exhausted or if the remote control
is not to be used for a long time.
– Never mix batteries (old and new
or carbon and alkaline, etc.).
– Batteries contain chemical
substances, they should be disposed
of properly.
13
English
Basic Connections
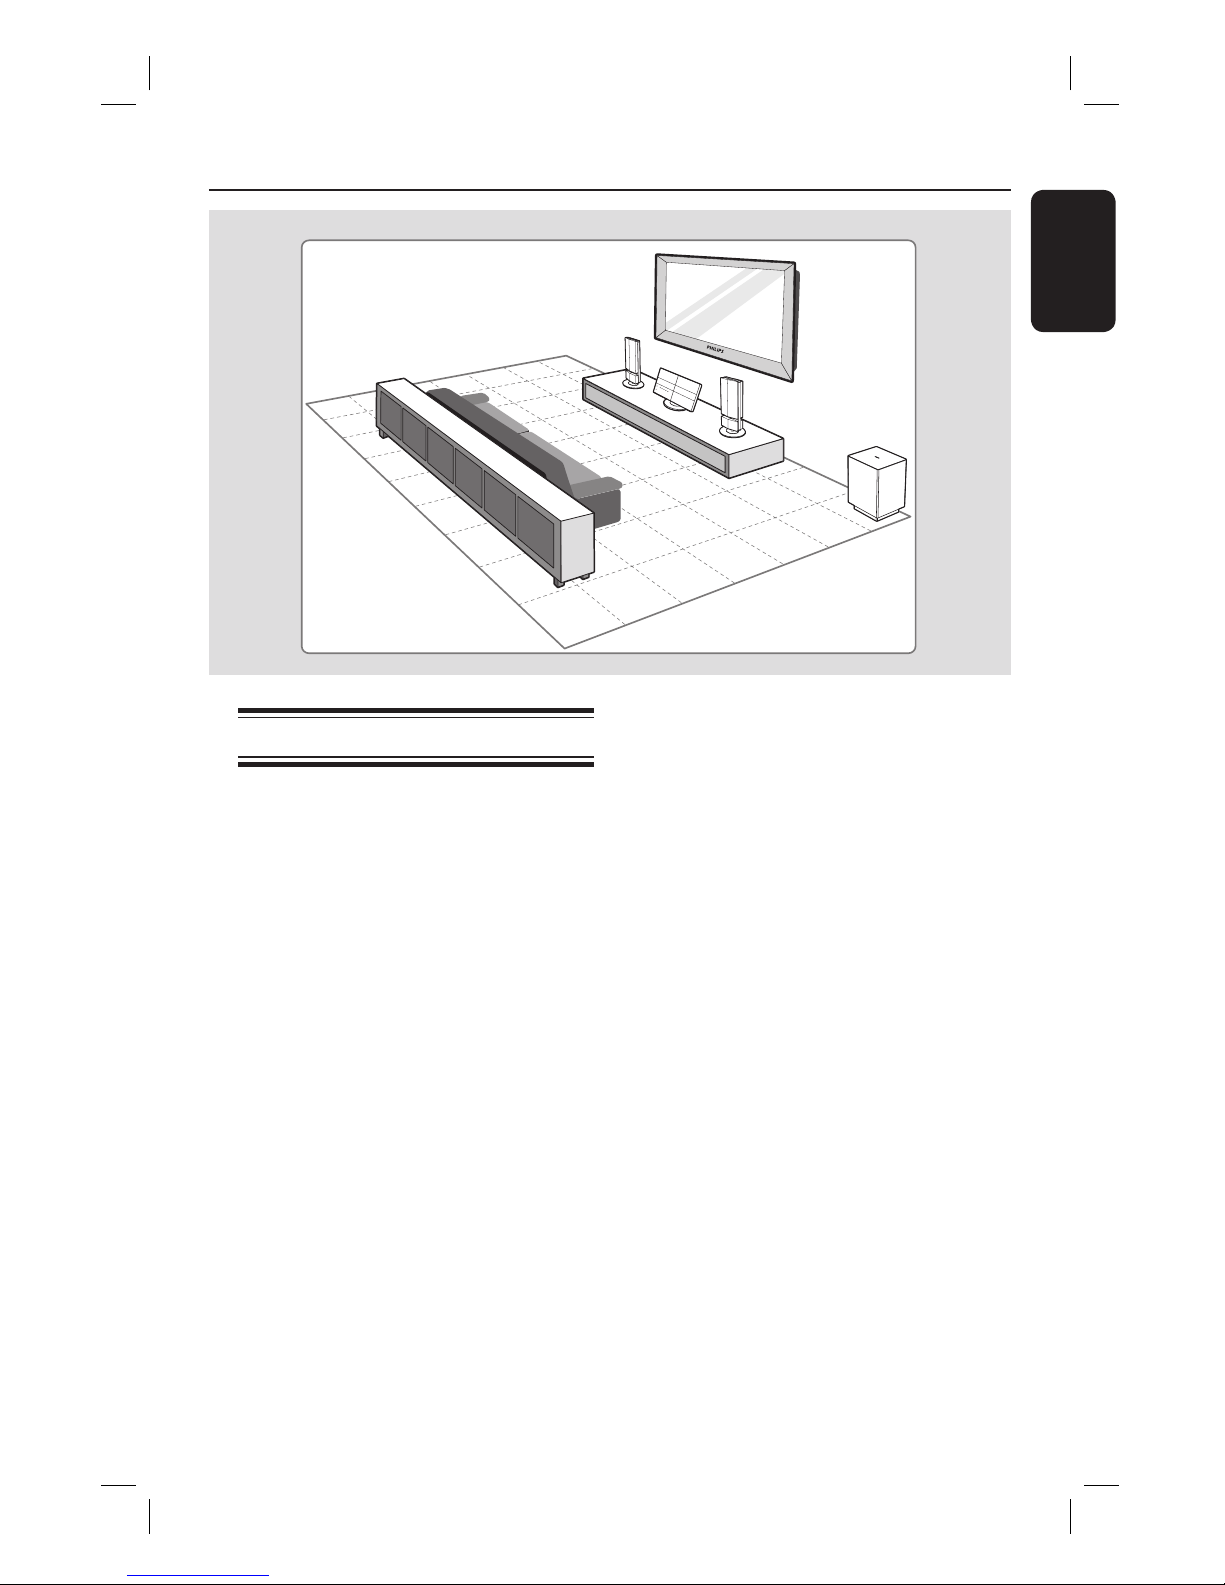
Step 1: Placing the speakers
The Philips Home Theatre System is
simple to install. However, proper system
placement is critical to ensure an
optimum sound experience.
Before you start ...
If you wish to mount the speakers on the
wall, see chapter ‘Optional Connections Mounting the speakers on the wall’.
A Place the speakers at the normal listening
ear level, equal distance from the TV and
face it straight ahead towards the
listening area.
RIGHT
LEFT
B Place the subwoofer at the corner of the
room. Otherwise, keep it at least one
metre away from the TV.
Helpful Hints:
– The placement diagram shown here is only
a guideline that provides great system
performance. You may nd other placement
choices that are more suitable for your room
layout that provide the sound experience you
enjoy.
– To avoid magnetic interference, never
position the front speakers too close to your
TV.
– Never place the speakers at an angle as it
would reduce the system performance.
– For speaker setting, see ‘Getting Started -
Setting the speakers’.

14
English
SCART OUT
(TV1)
HDMI OUT
COMPONENT
VIDEO OUT
TO SUBWOOFER
TV AUDIO IN
(TV 2)
HDMI OUT
Step 2: Connecting to TV
This connection enables you to view the
video playback from this unit. You only
need to choose one of the options
below to make the video connection.
– For a standard TV, follow option 1.
– For a HDMI TV, follow option 2.
– For a progressive scan TV, follow
option 3.
Before you start ...
Remove the main unit’s rear cover by
pushing down from the cover top.
Helpful Hint:
– It is important to connect this unit directly
to the TV in order to enjoy optimum video
quality.
Basic Connections (continued)
Option 1
Option 2
Option 1: Using the Scart socket
Use the scart cable to connect the
SCART OUT (TV1) socket on the
main unit to the corresponding SCART
input socket on the TV.
Helpful Hint:
– To hear the TV programmes through this
Home Theatre System, press TV button on
the remote control to select ‘TV1’.
Option 2: Connecting to a HDMIcompatible TV
HDMI (High De nition Multimedia
Interface) is a digital interface that allows
pure digital video transmission without
the loss of image quality.
A Use a HDMI cable (not supplied) to
connect the HDMI OUT on the main
unit to the HDMI IN on a HDMI-
compatible device (e.g., HDMI TV, HDCP
compliant DVI TV).
B When you have completed the necessary
connections, installation and set-up, see
‘Audio Setup Page and Video Setup Page’
for optimum HDMI audio and video
settings.
Helpful Hint:
– The HDMI is backward compatible with
some DVI devices using an appropriate
adaptor plug.
15
English
B If your TV accepts progressive signals,
proceed to chapter ‘Getting Started -
Setting up Progressive Scan feature’ for
detailed progressive feature setup.
C To hear the TV channels through this
unit, use the supplied audio cable to
connect the TV AUDIO IN (TV2) to
the AUDIO OUT sockets on the TV.
Helpful Hints:
– Audio connection is not required if the
main unit is connected to your TV using the
SCART connector.
– To hear the TV programmes through this
Home Theatre System, press TV button on
the remote control to select ‘TV2’ as the
sound source you want to listen to.
Basic Connections (continued)
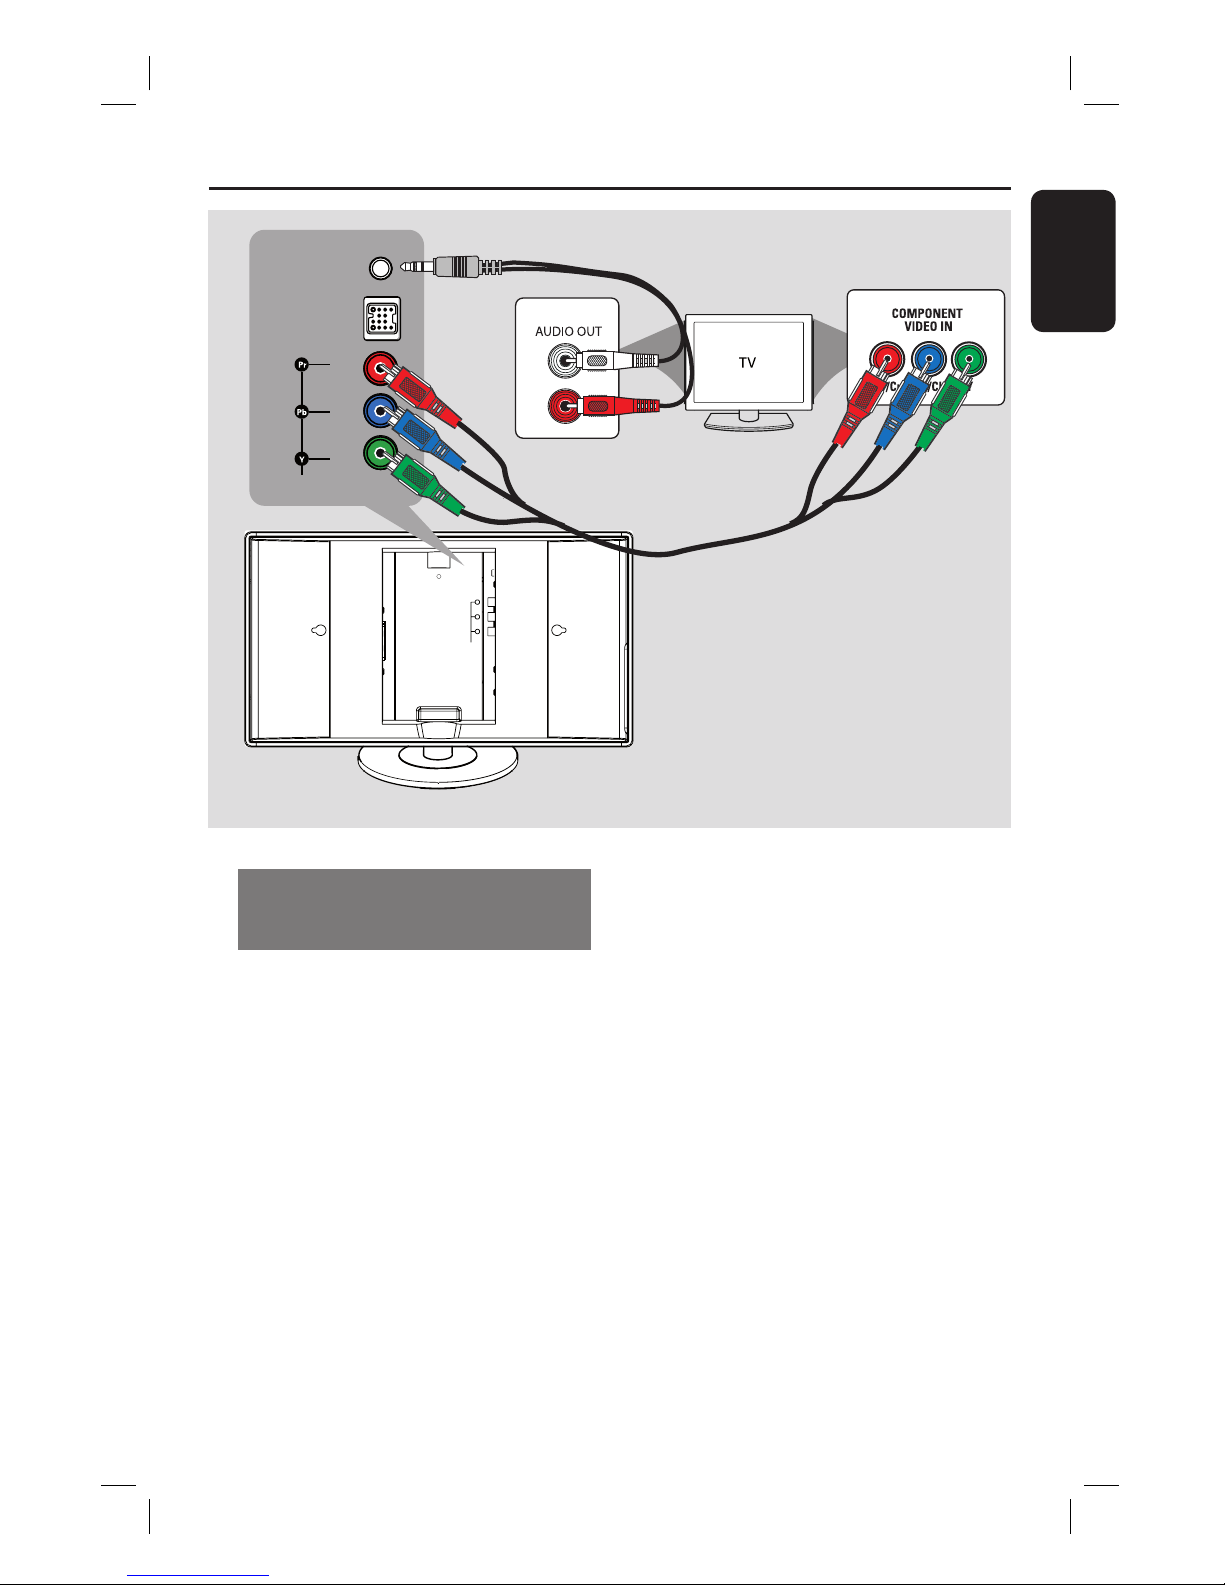
Option 3: Connecting to a
Progressive Scan TV or component
video input
The progressive scan video quality is only
available when using Y Pb Pr connection
and a progressive scan TV is required. It
provides superior picture quality when
watching DVD movies.
A Use the component video cables (red/
blue/green - not supplied) to connect the
COMPONENT VIDEO OUT
(Y Pb Pr) sockets on the main unit to
the corresponding component video
input sockets (or labelled as Y Pb/Cb
Pr/Cr or YUV) on the TV.
Option 3
Pr
Pb
Y
COMPONENT
VIDEO OUT
HDMI OUT
TO SUBWOOFER
SCART OUT
(TV1)
TV AUDIIO IN
(TV 2)
TV AUDIO IN
(TV 2)
COMPONENT
VIDEO OUT
TO SUBWOOFER
16
English
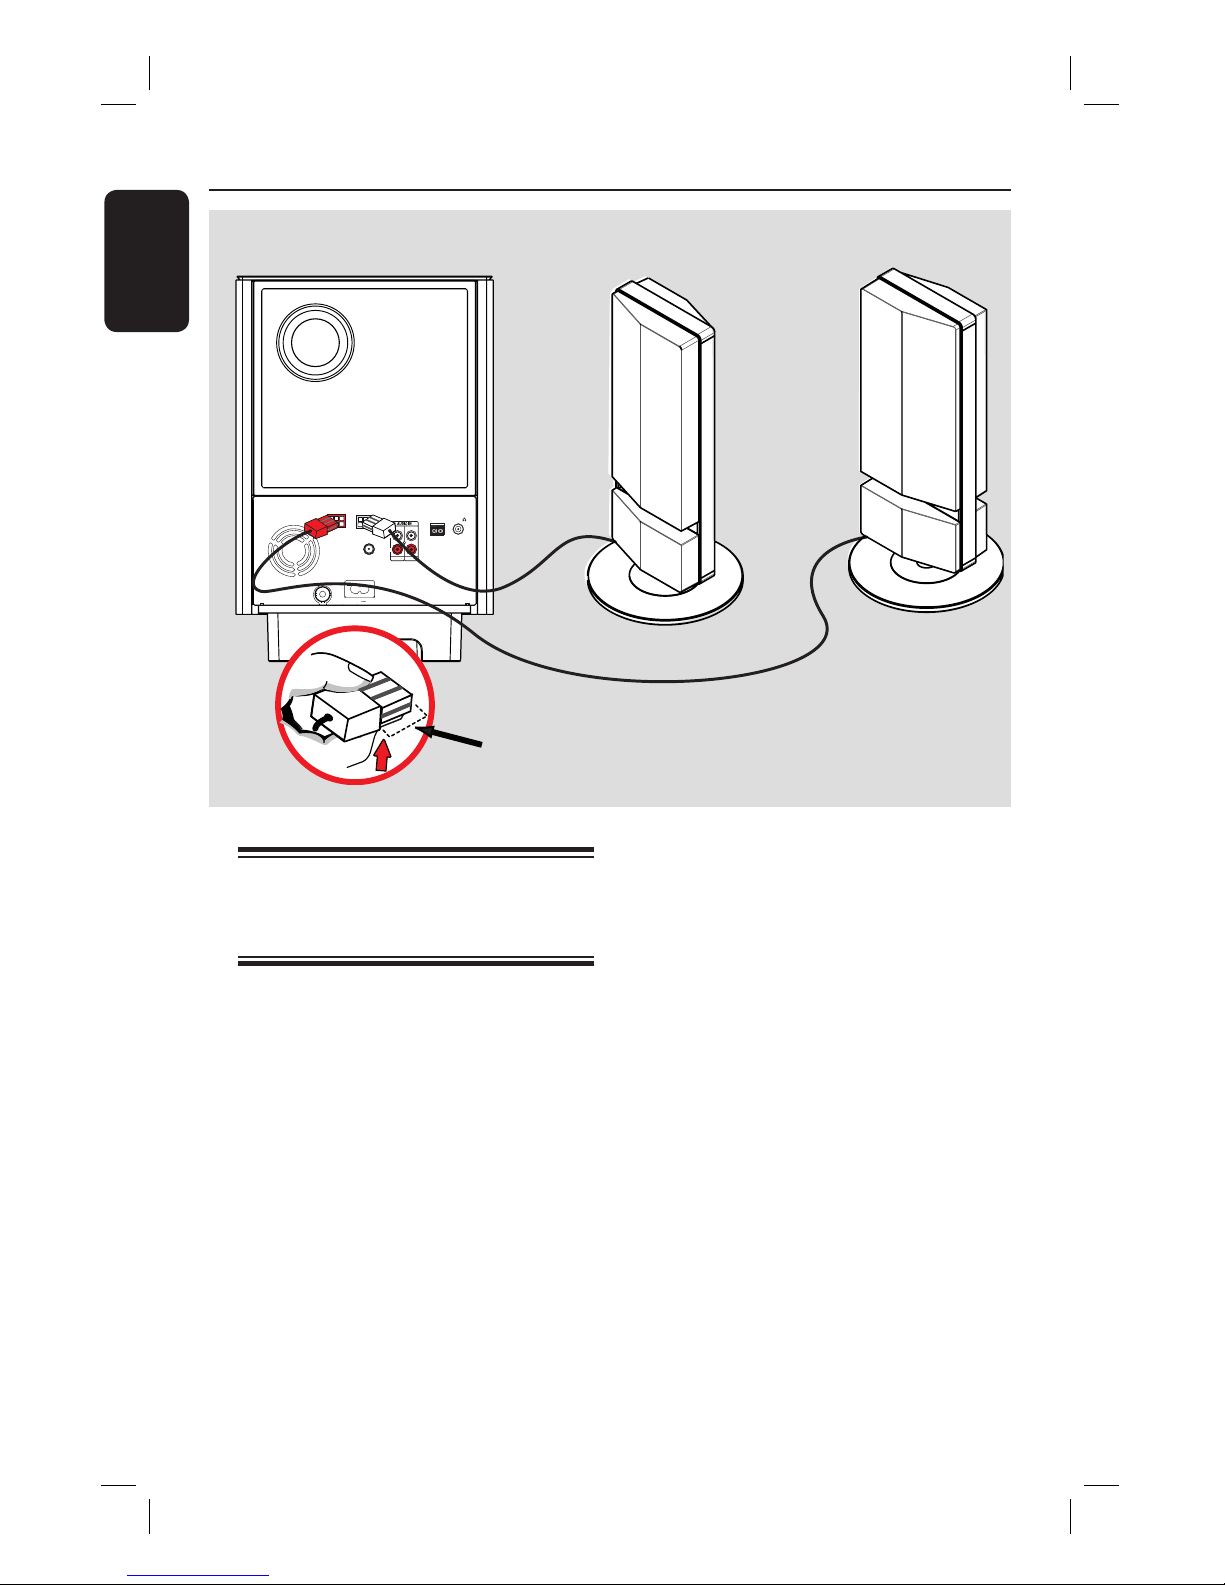
Step 3: Connecting the
speakers to
subwoofer
Connect the speakers to the matching
speaker sockets at the rear of the
subwoofer.
Helpful Hints:
– To prevent unwanted noise, never place
the speakers too close to the main unit,
subwoofer, AC power adapter, TV or any
other radiation sources.
– To disconnect the speakers, press down
the catch before pulling out the cable.
Basic Connections (continued)
LEFT
SPEAKER
TO MAIN UNIT
AM/MW
FM/MW ANTENNA
SPEAKERS
COAXIAL
DIGITAL IN
AUX 1
AUX 2
RIGHT LEFT
FM 75
R
L
MAINS
RIGHT
SPEAKER
Ensure this portion is fully
inserted into the socket.
17
English
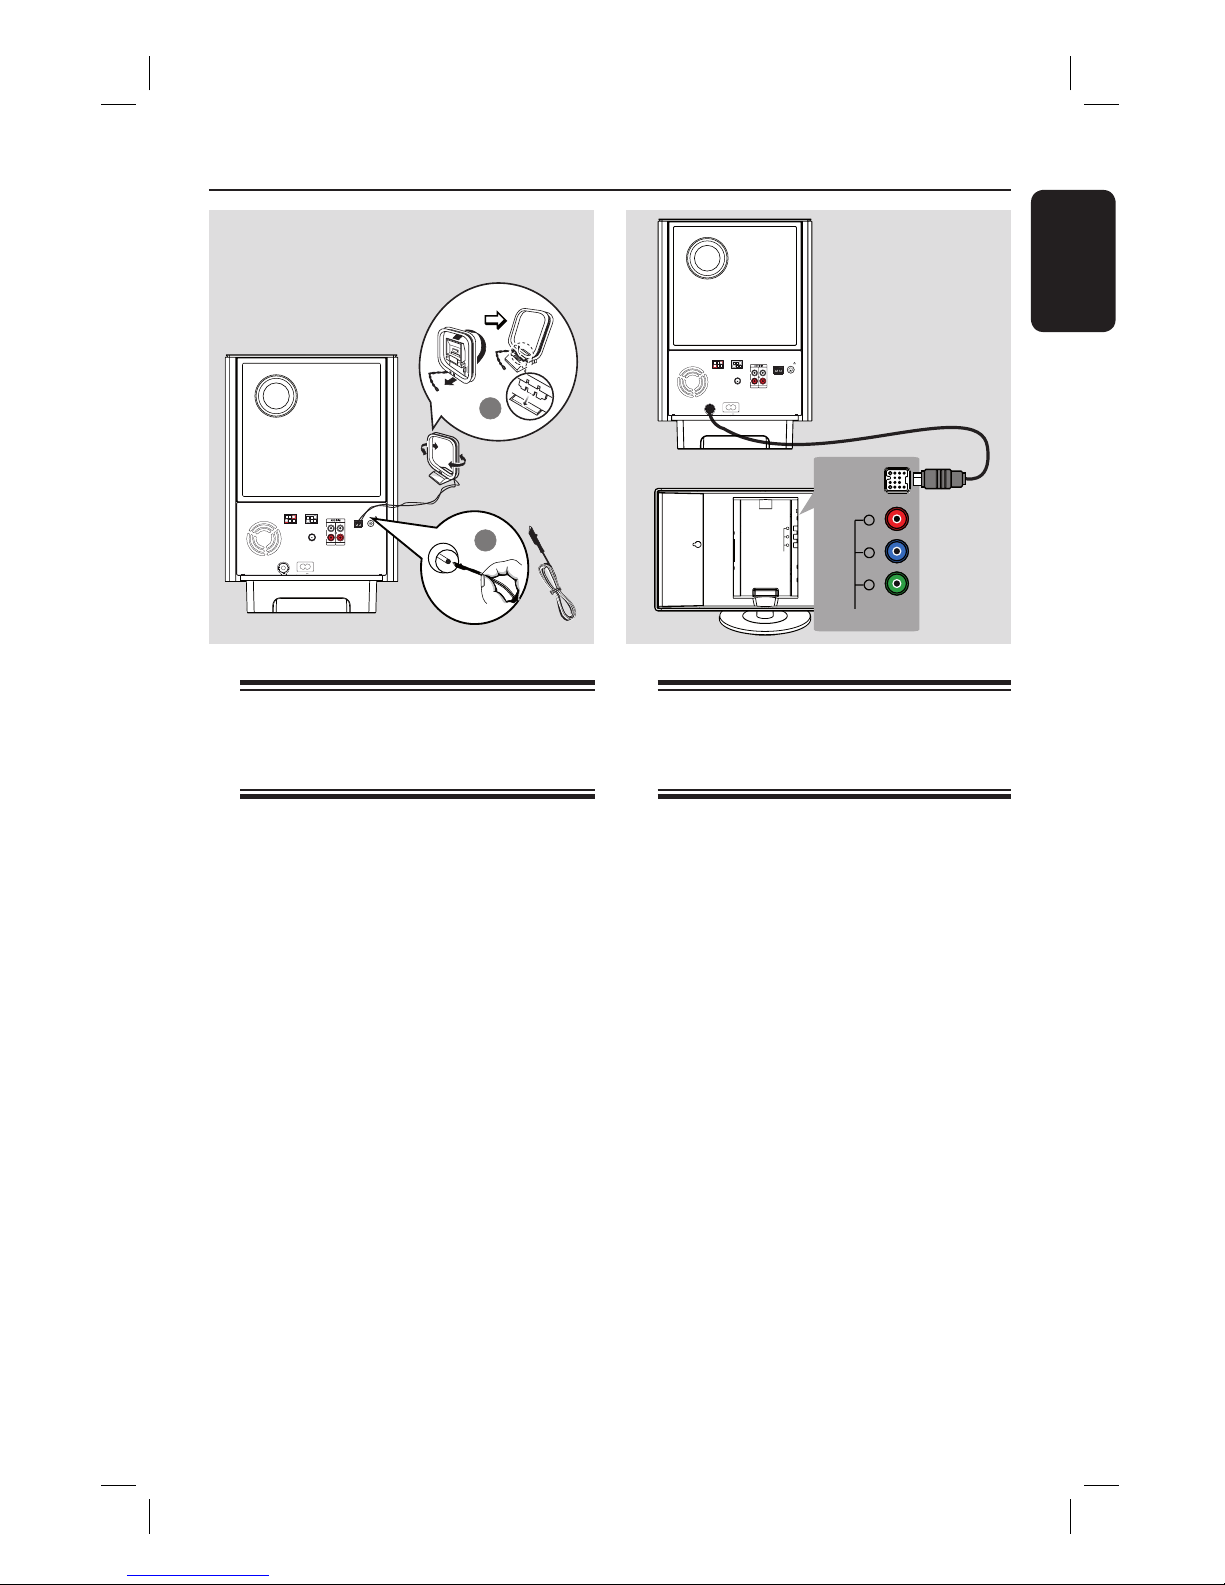
Step 4: Connecting the
FM and AM/MW
antennas
A Connect the supplied AM/MW loop
antenna to the AM/MW socket. Place
the AM/MW loop antenna on a shelf, or
attach it to a stand or wall.
B Connect the supplied FM antenna to the
FM 75 Ω socket. Extend the FM antenna
and x its ends to the wall.
For better FM stereo reception, connect
an external FM antenna (not supplied).
Helpful Hints:
– Adjust the position of the antennas for
optimal reception.
– Position the antennas as far away as
possible from your TV, VCR or other
radiation source to prevent any unwanted
interference.
Basic Connections (continued)
Step 5: Connecting the
subwoofer to the
main unit
Connect the cable from the subwoofer’s
TO MAIN UNIT to the TO
SUBWOOFER socket at the rear of
the main unit.
TO MAIN UNIT
AM/MW
FM/MW ANTENNA
SPEAKERS
COAXIAL
DIGITAL IN
AUX 1
AUX 2
RIGHT LEFT
FM 75
R
L
MAINS
1
2
x the claw
into the slot
FM antenna
AM/MW
antenna
Pr
Pb
Y
COMPONENT
VIDEO OUT
HDMI OUT
TO SUBWOOFER
SCART OUT
(TV1)
TV AUDIIO IN
(TV 2)
TO SUBWOOFER
COMPONENT
VIDEO OUT
Y
Pb
Pr
AM/MW
FM/MW ANTENNA
TO MAIN UNIT
SPEAKERS
COAXIAL
DIGITAL IN
AUX 1
AUX 2
RIGHT LEFT
FM 75
R
L
MAINS
 Loading...