

Page 1

Register your product and get support at
www.philips.com/welcome
HTS6100
EN DVD Home Theatre System 5
ES_LA DVD Home Theatre System 51
BT_BR DVD Home Theatre System 97
Page 2
México
Es necesario que lea cuidadosamente su instructivo
de manejo.
Descriptión: Reproductor de Disco de Video Digital
Modelo: HTS6100
Alimentacón: 110-127V/220-240V~50-60 Hz
Switcheable
Consumo: 150 W
Importador: Philips Mexicana, S.A. de C.V.
Domicilio: Av. La Palma No. 6,
Col. San Fernando, La Herradura
Huixquilucan, Edo de Mexico
C.P. 52784, Mexico
Localidad y Tel.: Tel. 52 69 90 00
Exportador: Philips Electronics HK, Ltd.
País de Origen: China
o
N
de Serie:
LEA CUICADOSAMENTE ESTE INSTRUCTIVO
ANTES DE USAR SU APARATO.
AVISO IMPORTANTE
Philips Mexicana, S.A. de C.V. no se hace
responsable por daños o desperfectos causados por:
– Maltrato, descuido o mal uso, presencia de
insectos o roedores (cucarachas, ratones etc.).
– Cuando el aparato no haya sido operarado
de acuerdo con el instructivo del uso, fuera
de los valores nominales y tolerancias de las
tensiones (voltaje), frecuencia (ciclaje) de
alimentación elétrica y las características
que deben renuir las instalaciones auxiliares.
– Por fenómenos naturales tales como:
temblores, inundaciones, incendios, descargas
electricas, rayos etc. o delitos causados por
terceros (choques asaltos, riñas, etc.).
2
Page 3
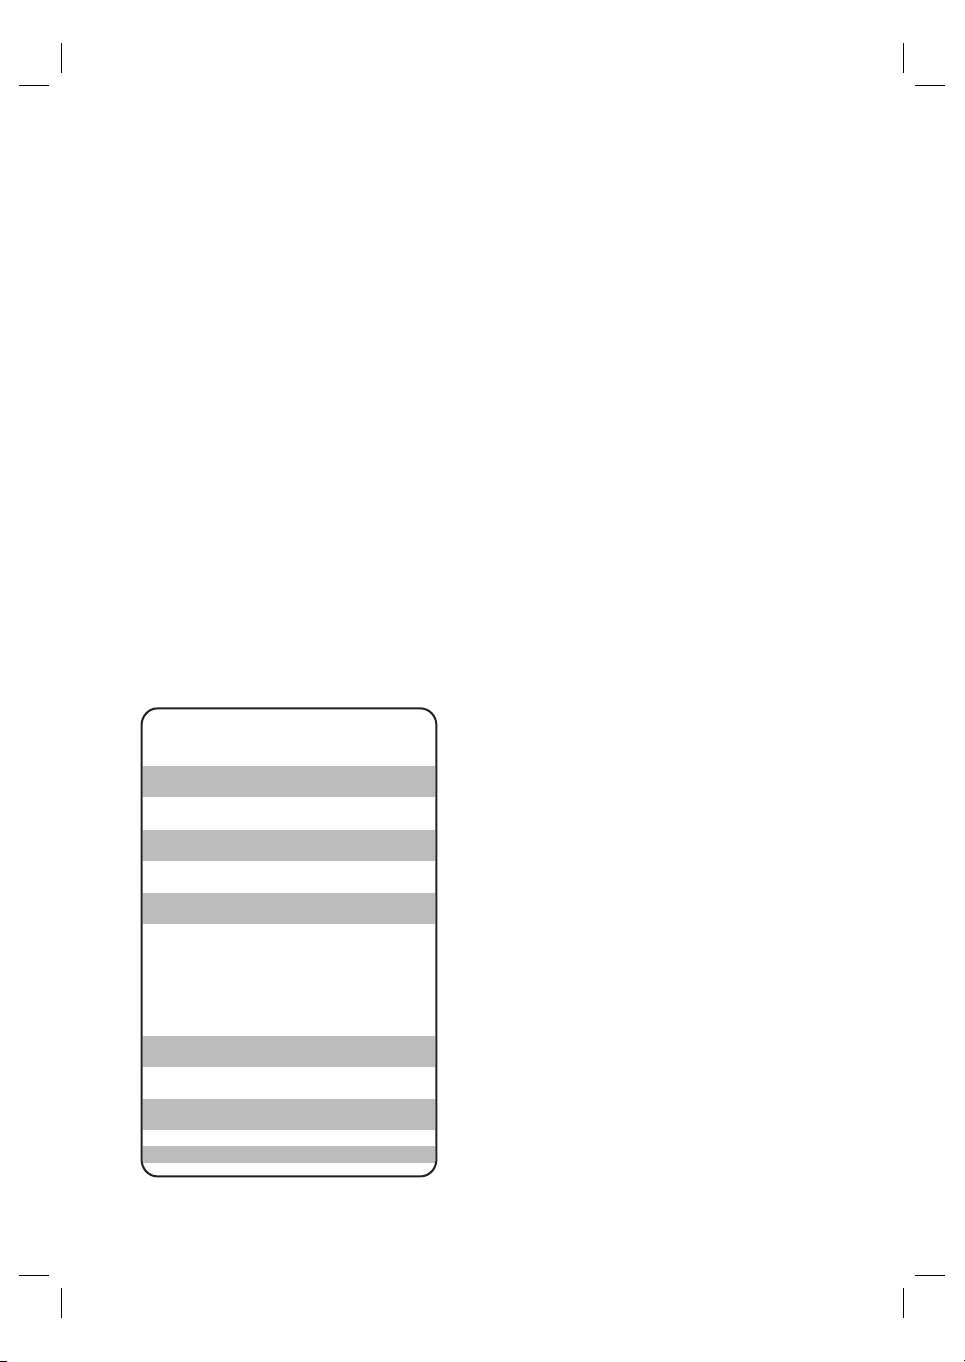
“Evite o uso prolongado do aparelho
com volume superior a 85 decibéis pois
isto poderá prejudicar a sua audição.”
Nível de Exemplos
Decibéis
30 Biblioteca silenciosa,
sussurros leves
40 Sala de estar, refrigerador,
quarto longe do trânsito
50 Trânsito leve, conversação
normal, escritório silencioso
60 Ar condicionado a uma distância
de 6 m, máquina de costura
70 Aspirador de pó, secador de cabelo,
restaurante ruidoso
80 Tráfego médio de cidade, coletor
de lixo, alarme de despertador
a uma distância de 60 cm
OS RUÍDOS ABAIXO PODEM SER PERIGOSOS
EM CASO DE EXPOSIÇÃO CONSTANTE
90 Metrô, motocicleta, tráfego de
caminhão, cortador de grama
100 Caminhão de lixo, serra elétrica,
furadeira pneumática
120 Show de banda de rock em frente
às caixas acústicas, trovão
140 Tiro de arma de fogo, avião a jato
180 Lançamento de foguete
3
Page 4
Manufactured under license from Dolby
Laboratories. Dolby, Pro Logic and the double-D
symbol are trademarks of Dolby Laboratories.
HDMI, and HDMI logo and High-Defi nition
Multimedia Interface are trademarks or
registered trademarks of HDMI licensing LLC.
Manufactured under license under U.S. Patent
#’s: 5,451,942; 5,956,674; 5,974,380; 5,978,762;
6,487,535 & other U.S. and worldwide patents
issued & pending. DTS and DTS Digital
Surround are registered trademarks and the
DTS logos and Symbol are trademarks of DTS,
Inc. © 1996-2007 DTS, Inc. All Rights Reserved.
DivX, DivX Ultra Certifi ed, and associated logos
are trademarks of DivX, Inc. and are used under
license.
Offi cial DivX® Ultra Certifi ed product.
Plays all versions of DivX ® video (including
DivX ® 6) with enhanced playback of DivX®
media fi les and the DivX® Media Format.
Windows Media and the Windows logo are
trademarks, or registered trademarks of
Microsoft Corporation in the United States and/
or other countries.
CLASS 1
LASER PRODUCT
The USB-IF Logos are trademarks of Universal
Serial Bus Implementers Forum, Inc.
ENERGY STAR and the ENERGY
STAR mark are registered U.S. marks
‘CONSUMERS SHOULD NOTE THAT NOT ALL HIGH
DEFINITION TELEVISION SETS ARE FULLY
COMPATIBLE WITH THIS PRODUCT AND MAY CAUSE
ARTIFACTS TO BE DISPLAYED IN THE PICTURE. IN
CASE OF 525 OR 625 PROGRESSIVE SCAN PICTURE
PROBLEMS, IT IS RECOMMENDED THAT THE USER
SWITCH THE CONNECTION TO THE ‘STANDARD
DEFINITION’ OUTPUT. IF THERE ARE QUESTIONS
REGARDING OUR TV SET COMPATIBILITY WITH THIS
MODEL 525p AND 625p DVD PLAYER, PLEASE
CONTACT OUR CUSTOMER SERVICE CENTER.’
LASER
Type Semiconductor laser
•
GaAIAs
Wave length 645 - 660 nm (DVD)
•
770 - 800 nm (CD)
Output Power 6 mW (DVD)
•
7 mW (VCD/CD)
Beam divergence 60 degrees
•
4
Page 5

Contents
1 Important 6
Safety and important notice 6
2 Your product 7
Features highlight 7
Product overview 8
3 Connect 11
Place the unit 11
Connect video cables 12
Connect subwoofer 14
Connect radio antenna 15
Connect audio cables/other devices 15
Mount the DVD Home Theatre unit 17
4 Get started 19
Prepare the remote control 19
Find the correct viewing channel 20
Start Ambisound setup 20
Turn on Progressive Scan 22
Activate EasyLink control 23
Select a play source 24
6 Adjust sound 35
Control the volume 35
Adjust Bass/Treble 35
Select Ambisound 35
Select a preset sound effect 36
7 Adjust settings 37
General setup 37
Audio setup 39
Video setup 40
Preference Setup 42
8 Additional information 45
Update software 45
Care 45
Specifi cations 46
9 Troubleshooting 47
10 Glossary 49
English
Contents
5 Play 25
Play from disc 25
Play video 26
Play music 29
Play photo 30
Play from USB device 31
Play from portable media player 32
Play from radio 32
EN 5
Page 6
1 Important
Recycle notice
Safety and important notice
Warning!
Risk of fi re or electric shock!
Ensure that air can circulate freely through the
•
ventilation holes on this unit . Allow at least 5~10 cm
clear ance around the unit.
•
Never expose this unit to direc t sunlight , naked
fl ames or heat.
•
Never place this uni t on other electr ical equipment.
•
Keep away from this unit during lightning storms.
•
Never remove the casing of this unit. Please leave all
maintenance work to qualifi ed personnel.
•
Keep this unit away from water, moisture and liquidfi lled objects.
Caution!
Remove batteries if they are exhaus ted or if the
•
remote control is not to be used for a long time .
•
Do not mix batteries (old and new or carbon and
alkaline, etc.).
•
Batteries contain chemical substances, they should
be disposed of prope rly.
•
Visible and invisible la ser radiation when open.
Avoid exposure to beam.
•
Wher e the MAINS plug or an appliance coupler is
used as the disconnect device, the disconnect device
shall r emain readily operable.
This electronic equipment contains a large
number of materials that can be recycled or
reused if disassembled by a specialised
company. If you are disposing of an old
machine, please take it to a recycling centre.
Please observe the local regulations regarding
disposal of packaging materials, exhausted
batteries and old equipment.
Copyright notice
This product incorporates copyright protection
technology that is protected by method claims
of certain U.S. patents and other intellectual
property rights owned by Macrovision
Corporation and other rights owners. Use of
this copyright protection technology must be
authorised by Macrovision Corporation, and is
intended for home and other limited viewing
uses only unless otherwise authorised by
Macrovision Corporation. Reverse engineering
or disassembly is prohibited.
6 EN
Page 7
2 Your product
ALL
4
Congratulations on your purchase, and
welcome to Philips! To fully benefi t from the
support that Philips offers, register your product
at www.philips.com/welcome.
Ambisound
Philips Ambisound technology reproduces
multi-channel surround sound with fewer
speakers to give an embracing surround
experience without the hassle of setting up a
full range of speaker systems.
English
The all-in-one SoundBar DVD Home Theatre is
designed to complement your home perfectly.
Enjoy the SoundBar DVD Home Theatre with
state-of-the-art Ambisound surround sound and
picture quality without the clutter of multiple
speakers.
Features highlight
Video upscaling to 1080p
You can now watch the DVDs in the highest
picture quality available for your HDTV. This
DVD Home Theatre offers full high-defi nition
video playback up to 1080p resolution for an
amazing viewing experience. A highly detailed
picture and increased sharpness delivers a more
true-to-life picture.
EasyLink
EasyLink uses the HDMI CEC (Consumer
Electronics Control) industry standard protocol
to share functionality with all HDMI CEC
compliant devices over HDMI. It enables the
connected devices to control each other with a
single remote control.
USB direct and MP3 link
Simply plug your USB device into the USB
socket to play your MP3/WMA/JPEG/DivX fi les;
or plug your portable media player to the MP3
LINK socket to enjoy the music play in superb
sound quality.
Sync the audio output with the video play
This DVD Home Theatre provides you the
feature of delaying the audio output if the video
signals that go directly to the TV is slower than
the audio streams.
Region codes
DVD movies are usually not released at the
same time in all regions of the world, thus all
DVD players are programmed to a specifi c
region code.
Countries DVD region code
Latin America
You r pro d uct
Note
Philips does not guarantee 100% interoperability
•
with all HDMI CEC devices.
EN 7
Page 8

Product overview
Remote control
a 2
Turn on this unit or turn off to standby
•
mode.
Press and hold to turn off this unit and
•
all the HDMI CEC compliant TV/
devices (for EasyLink control only).
b Z (Open/Close)
Open or close the disc compartment.
•
c Source buttons
DISC: switch to DISC mode. While in
•
disc mode, access or exit disc menu.
USB: switch to USB mode.
•
RADIO: switch to FM or AM/MW
•
band.
AUX/DI /MP3 LINK: switch to AUX1
•
INPUT, AUX2 INPUT, AUX3 INPUT,
DIGITAL INPUT or MP3 LINK that
corresponds to the socket you used to
connect the external device.
d HDMI
Select a video resolution setting for
•
HDMI output.
e INFO
Display the current status or disc
•
information.
Display photo fi les in 12 thumbnails
•
view.
f OPTIONS
Access or exit Options menu (this
•
menu provides various setting options).
g u (Play/Pause)
Start or pause disc play.
•
RADIO: start auto radio installation
•
(only available for fi rst time setup).
8 EN
Page 9

h x (Stop)
•
Stop disc play.
•
RADIO: erase the current preset radio
station.
i TREBLE / BASS
•
Switch to treble or bass mode. Then
press VOL +- to set its level setting.
j AUDIO SYNC
•
Select an audio language/channel.
•
Press and hold to access audio sync
setting. Then press VOL +- to set
the audio delay time.
•
RADIO: toggle between FM stereo and
mono mode.
k SOUND
•
Select a predefi ned sound effect.
l REPEAT / PROGRAM
•
Select various repeat or shuffl e modes;
turns off repeat or shuffl e mode.
•
RADIO: press this button to start
manual radio preset.
•
RADIO: press and hold this button to
start automatic radio preset.
m OK
•
Confi rm an entry or selection.
n Cursor buttons (v V b B)
Navigate through the on-screen menu.
•
Press left or right for fast backward or
•
forward search.
: press up or down to tune the
RADIO
•
radio frequency.
RADIO: press left or right to start auto
•
search.
o BACK / TITLE
•
Return to the previous display menu.
•
For DVD, go to title menu.
•
For VCD version 2.0 or SVCD with
PBC turned on: return to the menu
during playback.
p í/ ë (Previous/Next)
•
Skip to the previous or next title/
chapter/track.
•
RADIO: select a preset radio station.
q H (Mute)
•
Mute or restore the volume.
r VOL +-
•
Adjust the volume level.
s AMBISOUND
•
Select different surround sound
output: auto, multi-channel or stereo.
t Numeric buttons
•
Enter a preset number or item to play.
u SUBTITLE
• Select DVD or DivX subtitle language.
v ZOOM
•
Zoom in or out the picture on the TV.
w ANGLE
Select a different viewing angle of a
•
DVD movie.
English
You r pro d uct
EN 9
Page 10
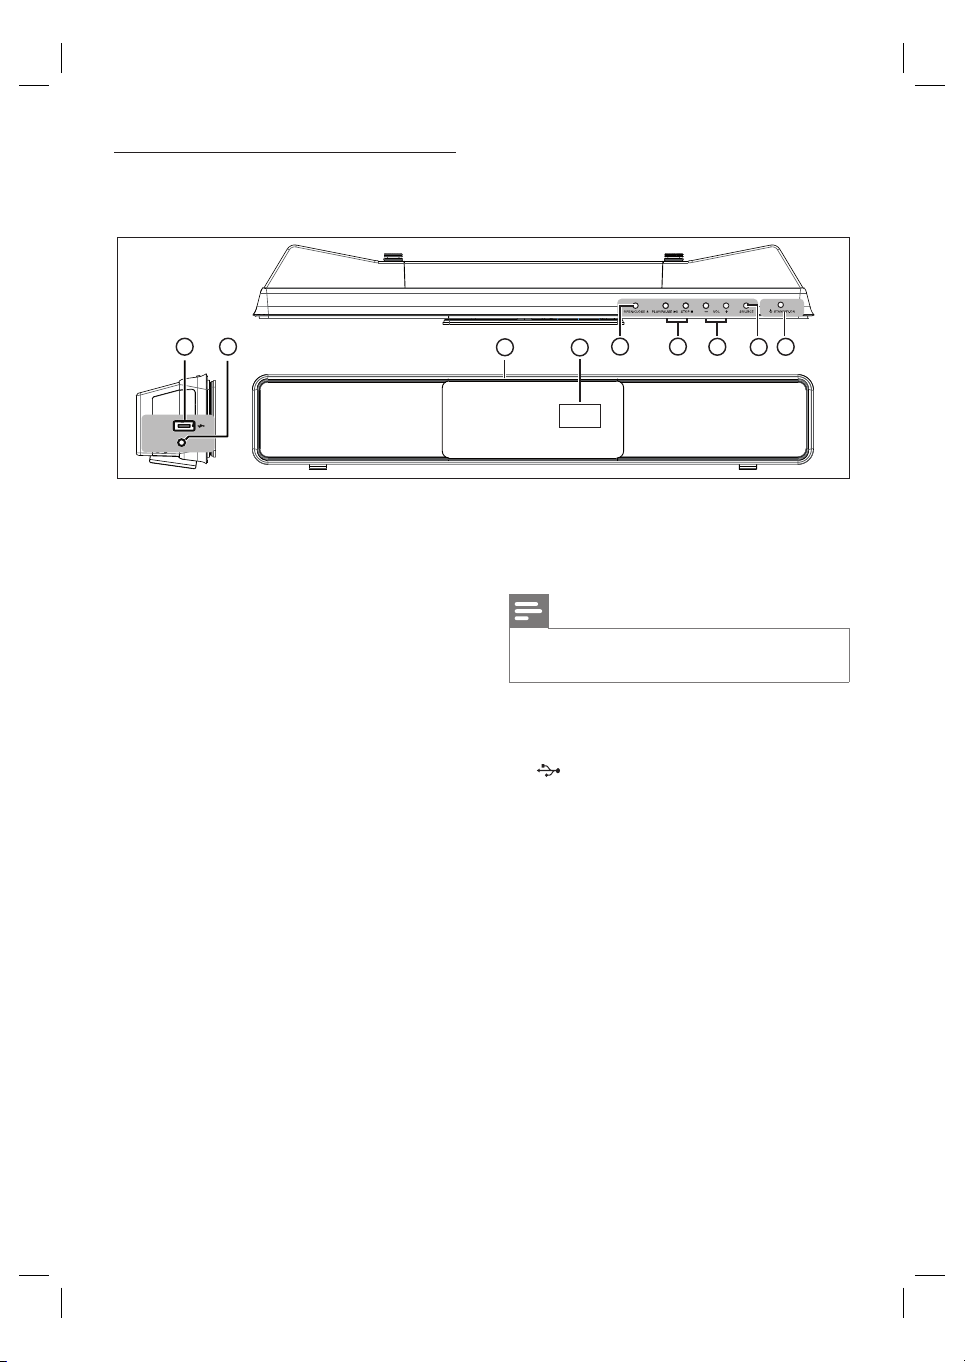
Main unit
8
9
MP3 LINK
a 2 STANDBY-ON
Turn on this unit or turn off to standby
•
mode.
Press and hold to turn on this unit from
•
a low power standby mode.
b SOURCE
Select a play media: DISC, USB, RADIO
•
FM, RADIO AM/MW, DIGITAL INPUT,
AUX1 INPUT, AUX2 INPUT, AUX3
INPUT or MP3 LINK.
c VOL +-
Adjust the volume level.
•
d PLAY PAUSE u
•
Start or pause disc play.
•
RADIO: start auto radio installation
(only available for fi rst time setup).
STOP x
Stop disc play.
•
RADIO: erase the current preset radio
•
station.
e OPEN CLOSE Z
Open or close the disc compartment.
•
45
3
7
6
2
f Display panel
g Disc compartment
Note
The following connections are located at the left side
•
panel of the unit.
h MP3 LINK socket
•
To connect portable audio player.
i (USB) socket
• To connect USB fl ash drive, USB
memory reader or digital camera.
1
10 EN
Page 11
3 Connect
This section describes the basic connections
required for this DVD Home Theatre unit
before it can be used.
Basic connections:
Place the unit
•
Connect video cables
•
Connect subwoofer
•
Connect radio antenna
•
Optional connections:
Connect audio cables/other devices
•
Connect audio from TV
•
Connect audio from cable box/
•
recorder/game console
Connect portable media player
•
Connect USB device
•
Mount the DVD Home Theatre unit
•
Note
Refer to t he ty pe plate at the rear or bottom of the
•
product for identifi cation and supply ratings.
•
Befor e you make or change any connec tions, ensure
that all the devices are disconnected from the power
outlet.
Place the unit
Place this unit on top of a table or mount it
•
on the wall (see chapter ‘Mount the DVD
Home Theatre unit’).
Never place this unit in an enclosed cabinet.
•
Install this unit near the AC outlet where
•
the AC power plug can be easily reached.
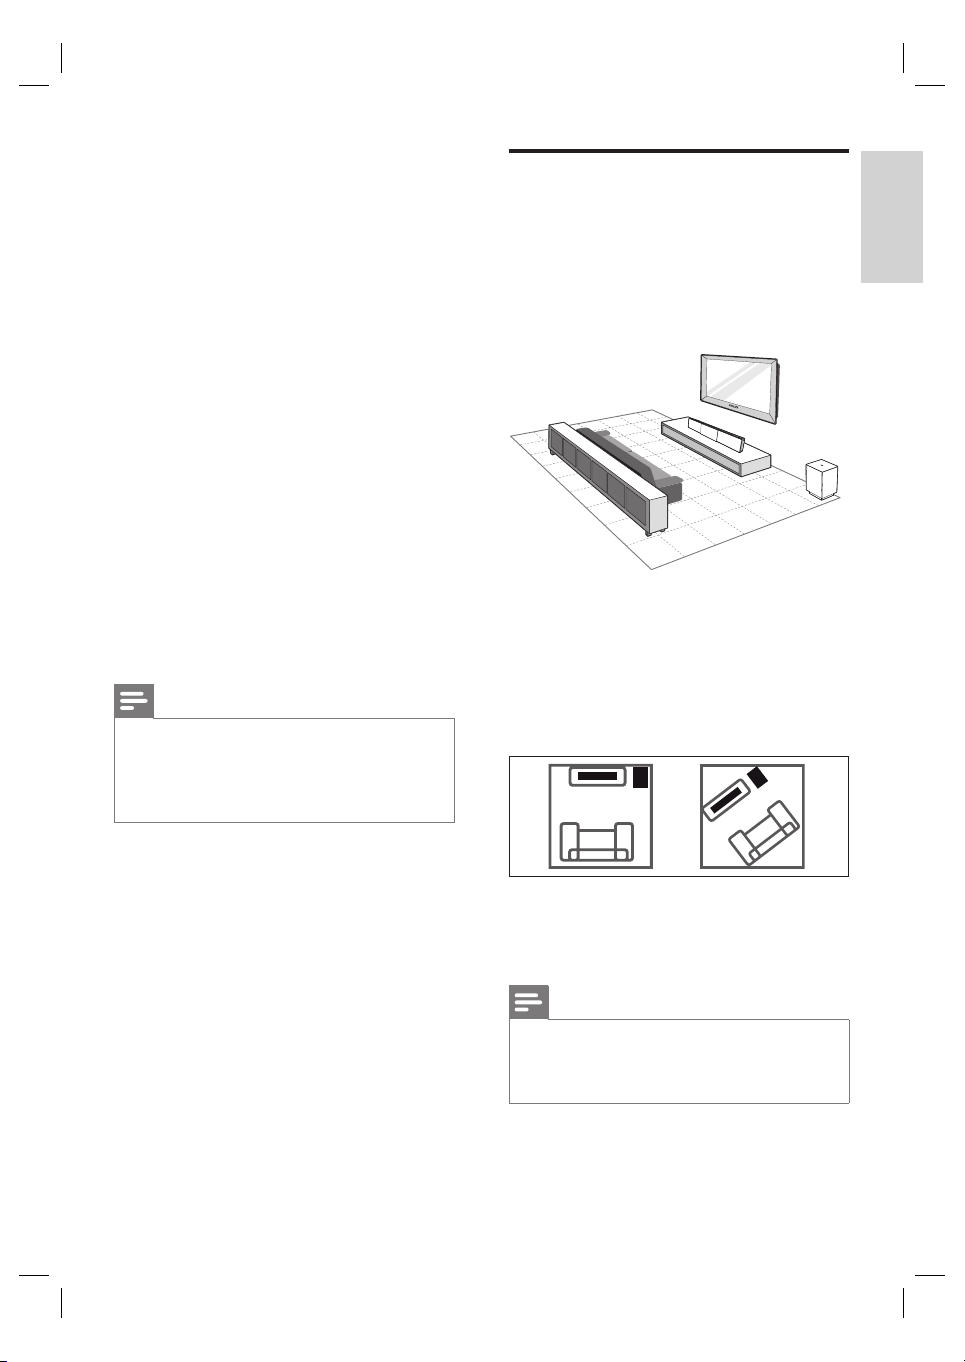
1 Place this DVD Home Theatre unit near to
the TV.
•
Place it at a height that is closest to the
listening ear-level.
2 Position this DVD Home Theatre so that it
is directly parallel to the listening area.
English
Connect
3 Place the subwoofer at the corner of the
room or at least one metre away from the
TV.
Note
You may purchase a separate table top stand that
•
can suppor t both your Philips Plasma/LCD TV and
this DVD Home Theatre unit from the nearest
Philips retailers.
EN 11
Page 12
Connect video cables
Before you connect
This section describes how to connect this
DVD Home Theatre unit to your TV so to
enable viewing of disc play.
Select the best video connection that your TV
can support.
Option 1: Connect to HDMI socket (for a
•
HDMI, DVI or HDCP-compliant TV).
Option 2: Connect to component video
•
socket (for a standard TV or Progressive
Scan TV).
Option 3: Connect to video (CVBS) socket
•
(for a standard TV).
Note
You must connect this unit directly to a T V.•
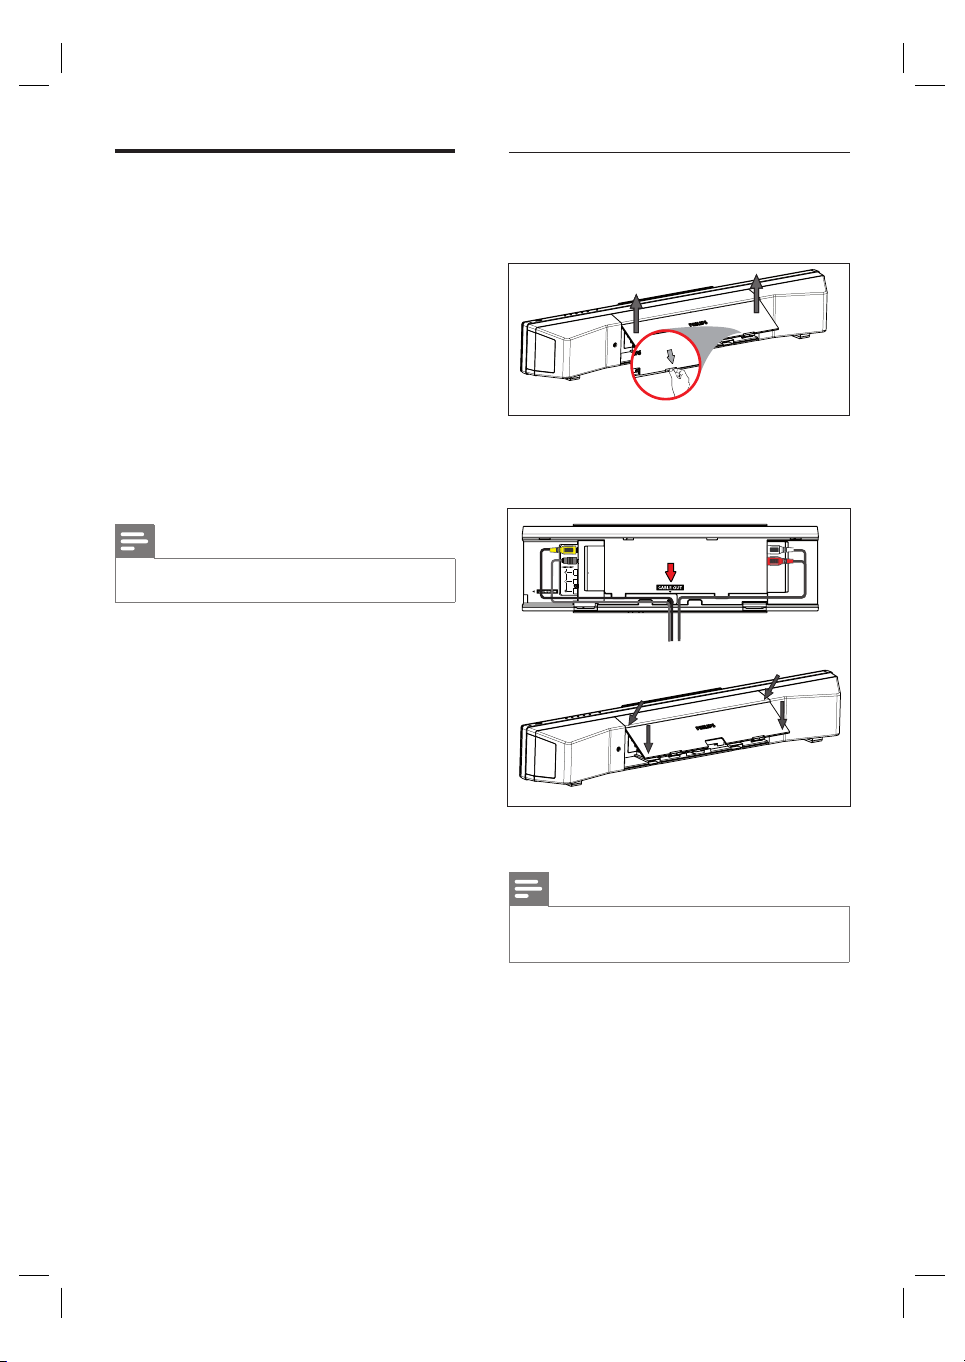
1 Push up the catches at the bottom of the
rear cover and lift it up.
2 Connect the cables to the corresponding
sockets and direct the cables to the
CABLE OUT point.
12 EN
3 Once complete, close the rear cover.
Note
All the cables must be placed properly inside the rear
•
panel in order for the rear cover to close.
Page 13
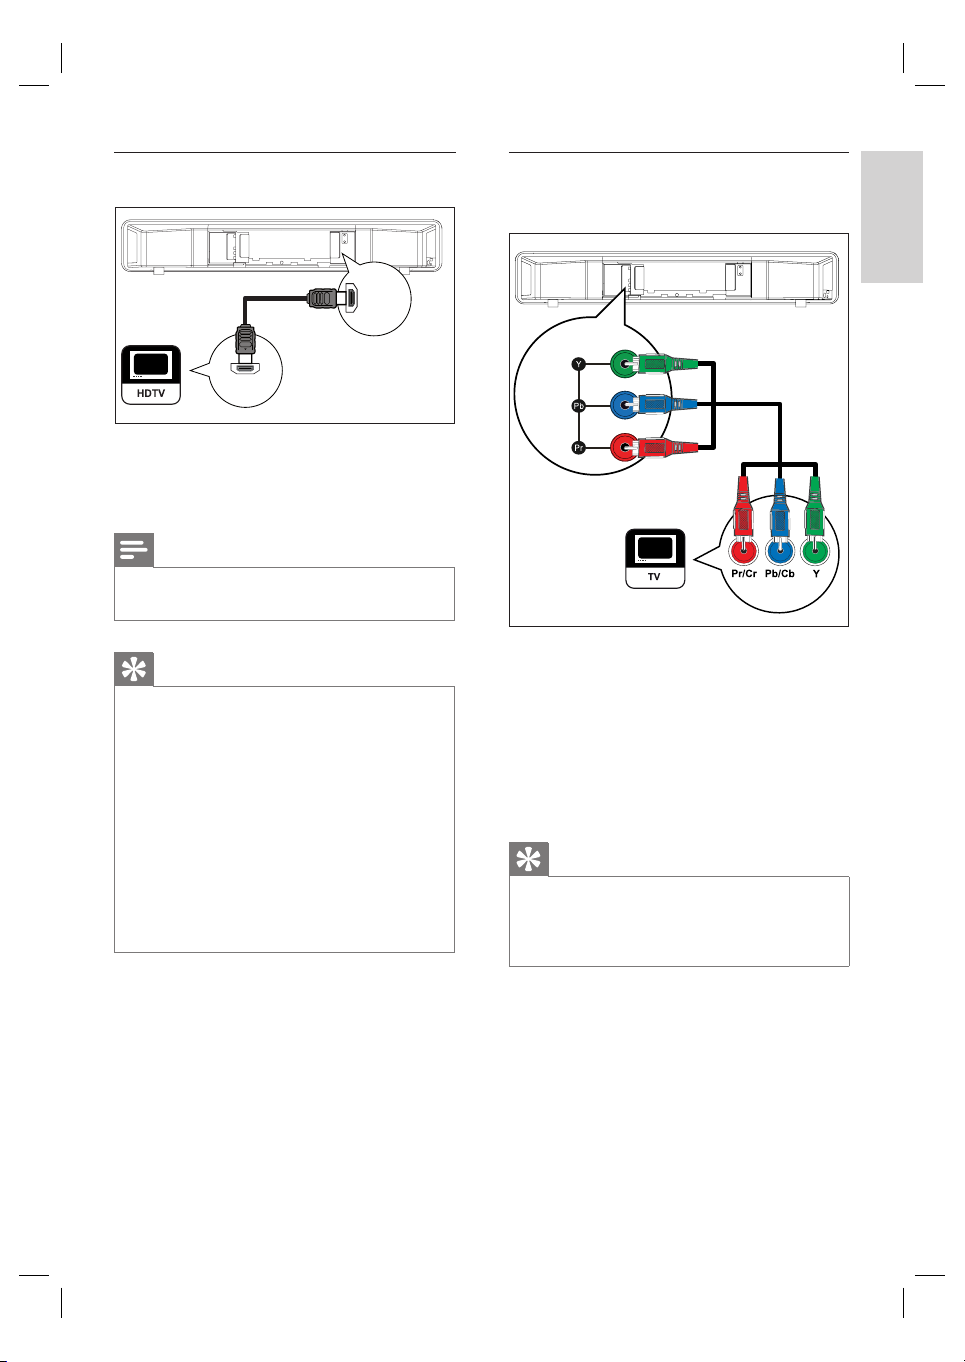
Option 1: Connect to HDMI socket
HDMI OUT
HDMI IN
1 Connect a HDMI cable (supplied) from the
HDMI OUT on this unit to the HDMI IN
socket on your TV.
Note
The HD MI connector is only compatible with HDMI
•
compliant T Vs and DVI-TVs.
Option 2: Connect to component
video socket
COMPONENT
VIDEO OUT
English
Connect
Tips
To optimise the video output, see chapter ‘Adjust
•
settings’ > [ Video Setup ] > [ HDMI Setup ] for
details.
•
This unit is HDMI CEC compatible. It enables
connected TV/device to control each other over
HDMI, see chapter ‘Activate Ea syL ink control’ for
details.
•
Use a HDMI/DVI adaptor in case your TV has only
a DVI connection. A n extra audio connec tion is
needed to complete this connection.
•
To route the audio from your TV to this DVD Home
Theatre unit, connec t an audio cable from the audio
input on this unit to the audio output on your T V.
•
This t ype of connec tions provide best pictur e quality.
1 Connect the component video cables (not
supplied) from the Y P
unit to the component video input sockets
on your TV.
If a progressive scan TV is used, you
•
may turn on the progressive scan mode
(see chapter ‘Turn on Progressive Scan’
for details).
Tips
The component video input socket on your TV may
•
be labelled as Y Pb/Cb Pr/Cr or YUV.
•
This t ype of connec tions provide good picture
quality.
B PR sockets on this
EN 13
Page 14
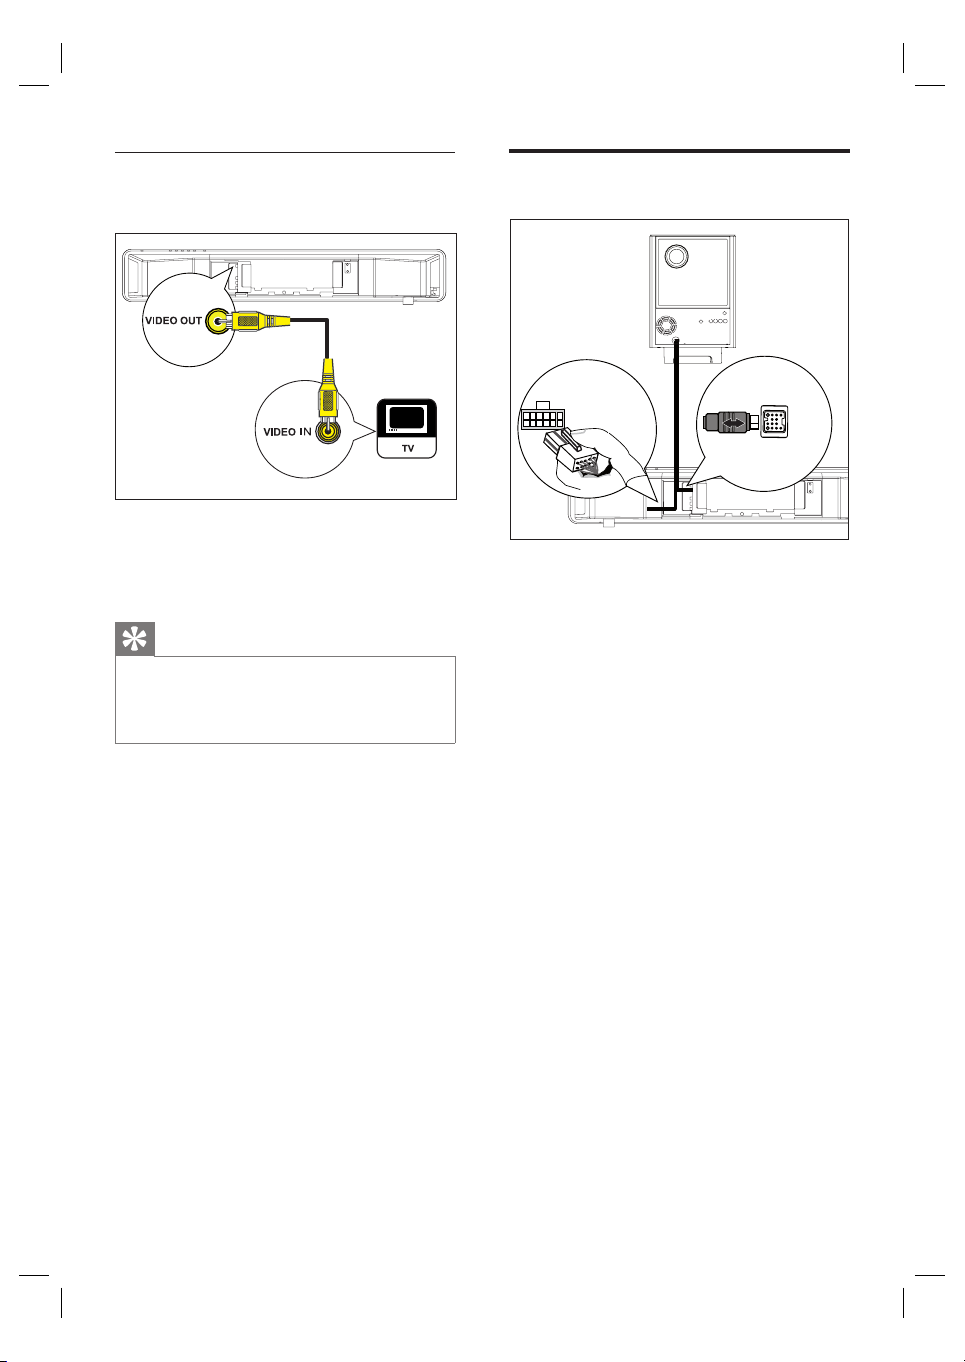
Option 3: Connect to Video (CVBS)
socket
1 Connect a composite video cable
(supplied) from the VIDEO OUT socket
on this unit to the video input socket on
your TV.
Tips
The video input socket on your TV may be labelled
•
as A/V IN, VIDEO IN , COMPOSITE or BASEBAND.
This t ype of connec tions provide standard picture
•
quality.
Connect subwoofer
1
2
LOUDSPEAKERS
3
TO SUBWOOFER
1 Unwind the subwoofer’s interconnect
cable at TO MAIN UNIT.
2 Connect the white end of the interconnect
cable to the LOUDSPEAKERS socket on
this unit.
3 Connect the grey end of the interconnect
cable to the TO SUBWOOFER socket on
this unit.
14 EN
Page 15
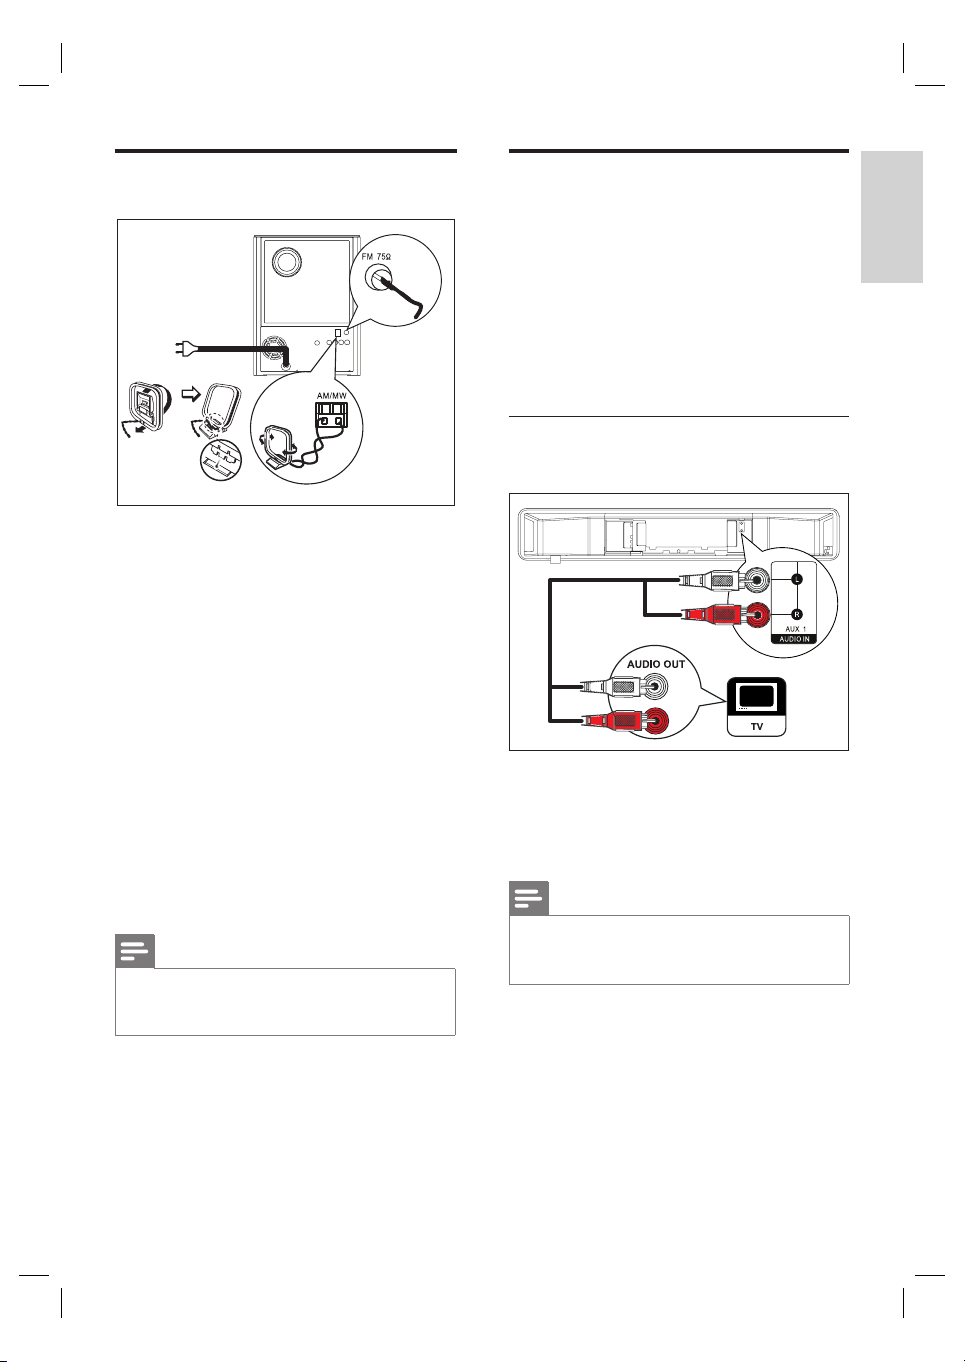
Connect radio antenna
3
4
2
1
1 Stand the AM/MW loop antenna
(supplied) upright to fi x its claw into the
slot.
2 Connect the AM/MW loop antenna to the
AM/MW socket. Then place the AM/MW
loop antenna on a shelf, or attach it to a
stand or wall.
3 Connect the FM antenna (supplied) to the
FM75Ω socket on this unit (for some
models, this cable has been connected).
Extend the FM antenna and fi x its ends to
the wall.
4 Connect the power cord when all the
required connections are complete and
you are ready to enjoy this DVD Home
Theatre unit.
Note
Befor e connect to power ou tlet, ensure that the
•
voltage selector (at the rear of this unit) is set to the
local power line voltage.
Connect audio cables/other
devices
This section describes how you can route the
sound from other devices to this DVD Home
Theatre unit in order to enjoy sound output or
audio play with multi-channel surround
capabilities.
Connect audio from TV
(also used for EasyLink control)
1 Connect an audio cable (not supplied)
from the AUDIO IN-AUX1 sockets on
this unit to the AUDIO OUT sockets on
your TV.
Note
To listen to t he audio output from this connection,
•
press AUX/DI /MP3 LINK repeatedly until ‘AUX1
INPUT’ is displayed on the display panel.
English
Connect
EN 15
Page 16
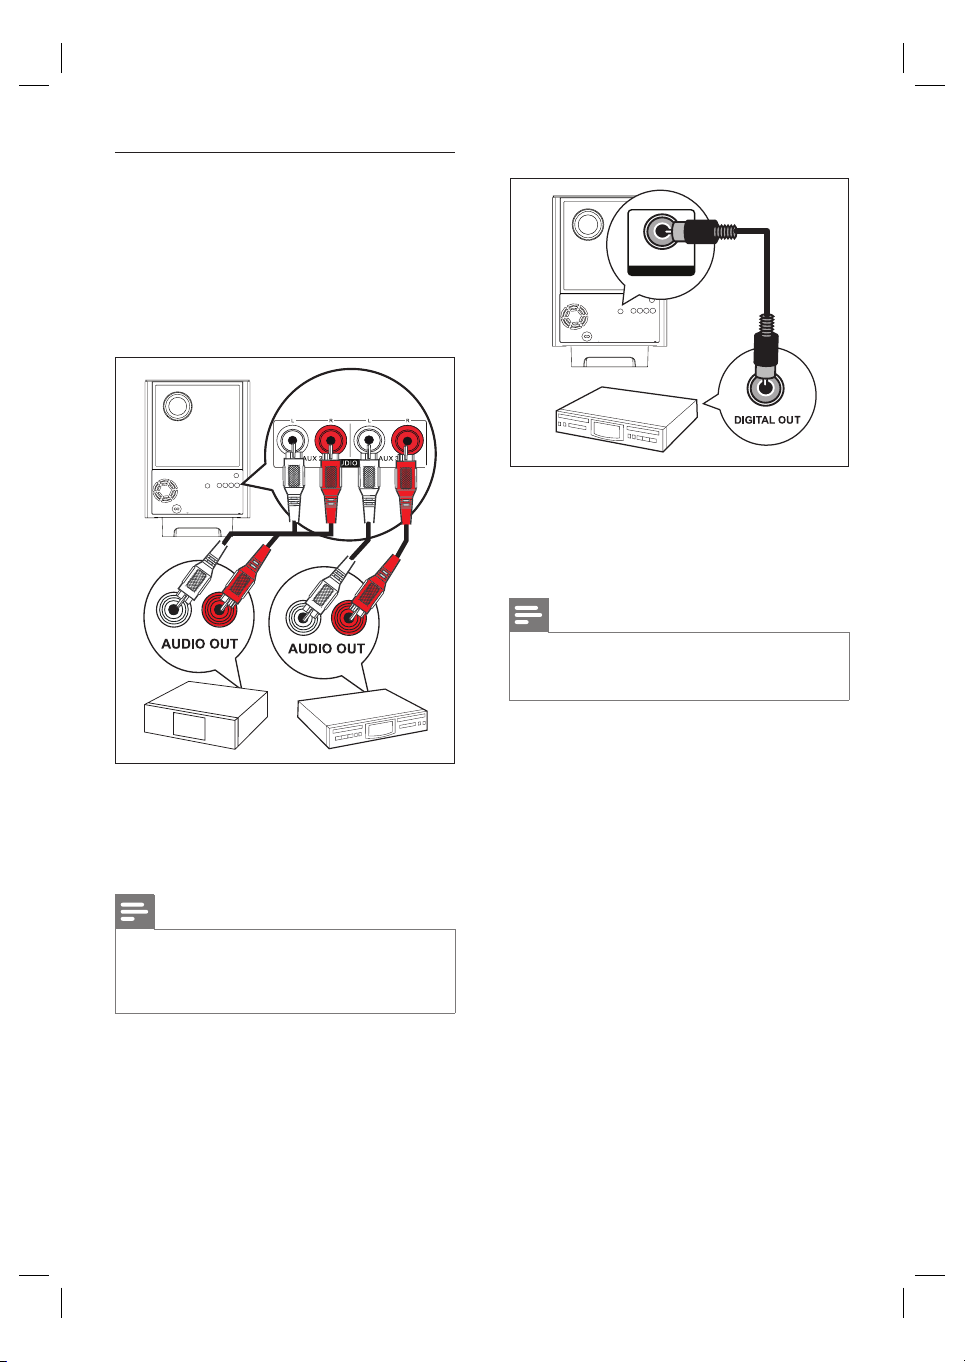
Connect audio from cable box/
recorder/game console
You can choose to connect to analogue or
digital socket depending on the device
capabilities.
Connect to analogue sockets
Connect to digital socket
COAXIAL
DIGITAL IN
1 Connect a coaxial cable (not supplied)
from the DIGITAL IN-COAXIAL socket
on the subwoofer to the COAXIAL/
DIGITAL OUT socket on the device.
Note
To listen to t he audio output from this connection,
•
press AUX/DI /MP3 LINK repeatedly until ‘DIGITAL
INPUT’ is displayed on the display panel.
1 Connect an audio cable (not supplied)
from the AUDIO IN-AUX2 or AUX3
sockets on the subwoofer to the AUDIO
OUT sockets on the device.
Note
To listen to t he audio output from this connection,
•
press AUX/DI /MP3 LINK repeatedly until ‘AUX2
INPUT’ or ‘AUX3 INPUT’ is displayed on the display
panel.
16 EN
Page 17
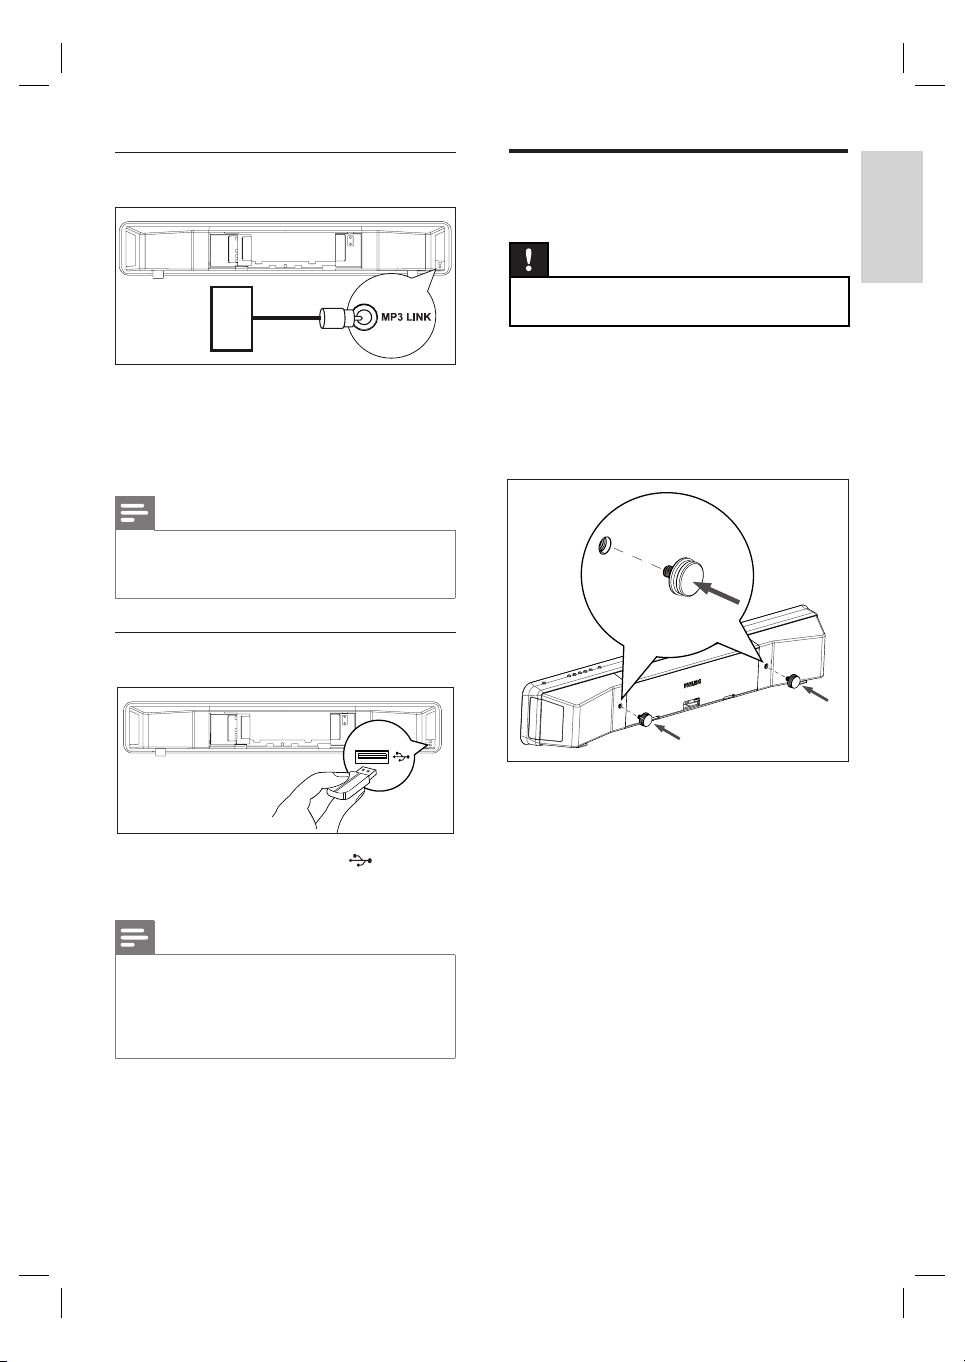
Connect portable media player
MP3
Mount the DVD Home
Theatre unit
Caution!
Risk of personal injur y and damage to the unit.
•
Allow only qualifi ed persons to mount the unit.
English
1 Connect a 3.5mm stereo audio cable
(supplied) from the MP3 LINK socket on
this unit to the phone socket on your
portable media player (such as MP3 player).
Note
To listen to t he audio output from this connection,
•
press AUX/DI /MP3 LINK repeatedly until ‘MP3
LINK’ is displayed on the display panel.
Connect USB device
1 Connect the USB device to (USB)
socket on this unit.
Note
This DVD Home Theatre unit can only play/view
•
MP3, WMA, DivX (Ultr a) or JPEG fi les that are
stored on such devices.
•
To listen to t he audio output from this connection,
press USB.
1 Ensure all the required cables are
connected to this unit and close the rear
cover.
2 Attach the supplied knobs to the rear of
this unit.
3 Turn this unit over so that its bottom faces
up.
4 Hold this unit fi rmly while removing the
rubber feet by pushing it towards the back
of this unit. Repeat the step to remove the
other rubber feet.
Connect
EN 17
Page 18
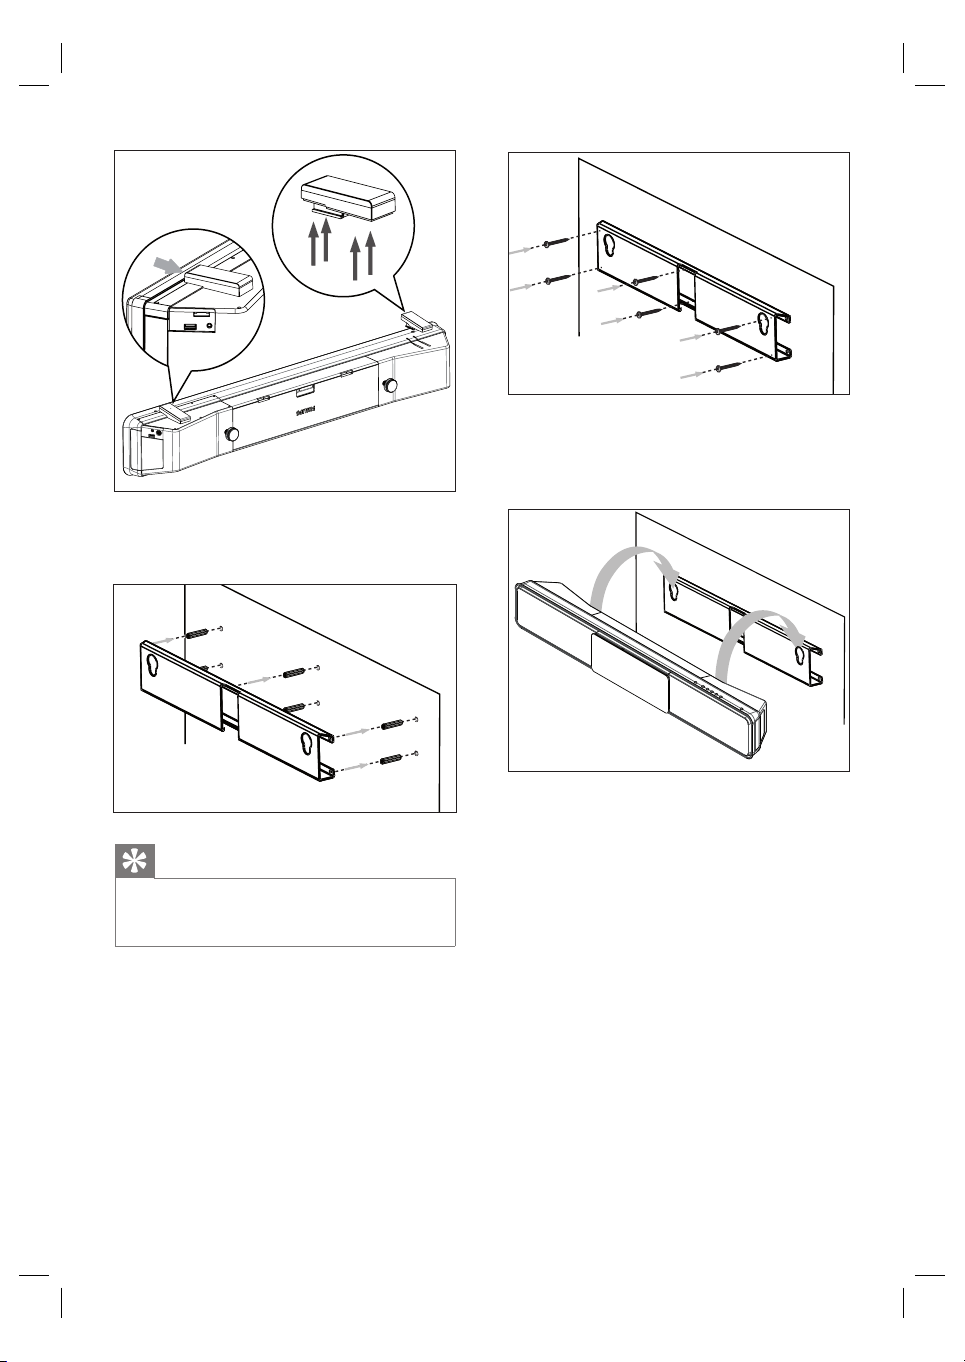
5 Position the supplied bracket on the wall,
drill the screw holes and insert the rubber
wall plugs (not supplied) into the holes.
Tips
To mount this DVD Home Theatre unit below your
•
TV, leave at least 10cm (4 inches) of space between
the TV and the bracket.
6 Secure the bracket onto the wall with
screws (not supplied).
7 Hook the DVD Home Theatre unit fi rmly
onto the mounted bracket. Slide the
knobs through the key holes and lock into
position.
18 EN
Page 19
4 Get started
Control a play source
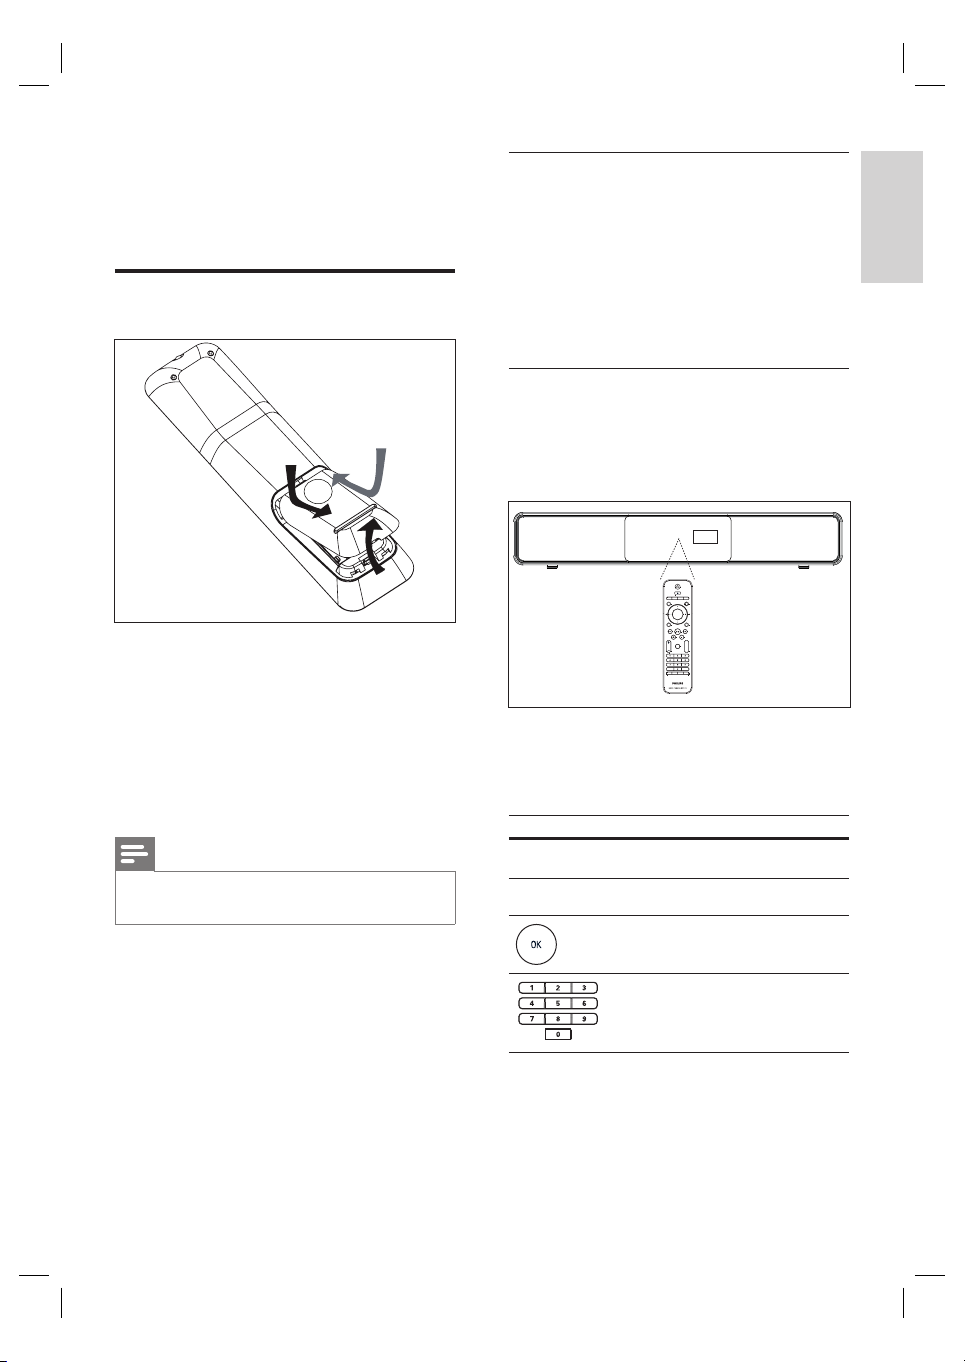
Prepare the remote control
1 Push to open the battery compartment
cover.
2 Insert two batteries type R03 or AAA.
Match the indications (+-) inside the
battery compartment.
3 Close the cover.
Note
If you ar e not going to use t he remote control for a
•
long time, remove the bat ter ies.
1 Select the source you wish to control by
pressing the DISC, USB, RADIO or
AUX/DI/MP3 LINK button.
2 Then select the desired function (for
example í, ë).
Navigate through the menu
1 Point the remote control directly at the
remote sensor on this unit and select the
desired function.
2 Use the following buttons on the remote
control to navigate through the on-screen
menus.
Button Action
v V
b B
Move up or down.
Move left or right.
Confi rm a selection.
English
Get started
Key in numbers.
EN 19
Page 20
Find the correct viewing
channel
Note
Befor e you star t, r emove the door stop tag on top of
•
the disc compartment door.
1 Press 2 to turn on the DVD Home
Theatre unit.
2 Press DISC to switch to disc mode
3 Turn on the TV and switch it to the
correct video-in channel.
•
You may go to the lowest channel on
your TV, then press the Channel Down
button on your TVs remote control
until you see the Video In channel.
•
You may press ° button repeatedly
on your TVs remote control.
Usually this channel is between the
•
lowest and highest channels and may
be called FRONT, A/V IN, VIDEO, etc..
Tips
Refer to your TVs user manual on how to select the
•
correct input on your T V.
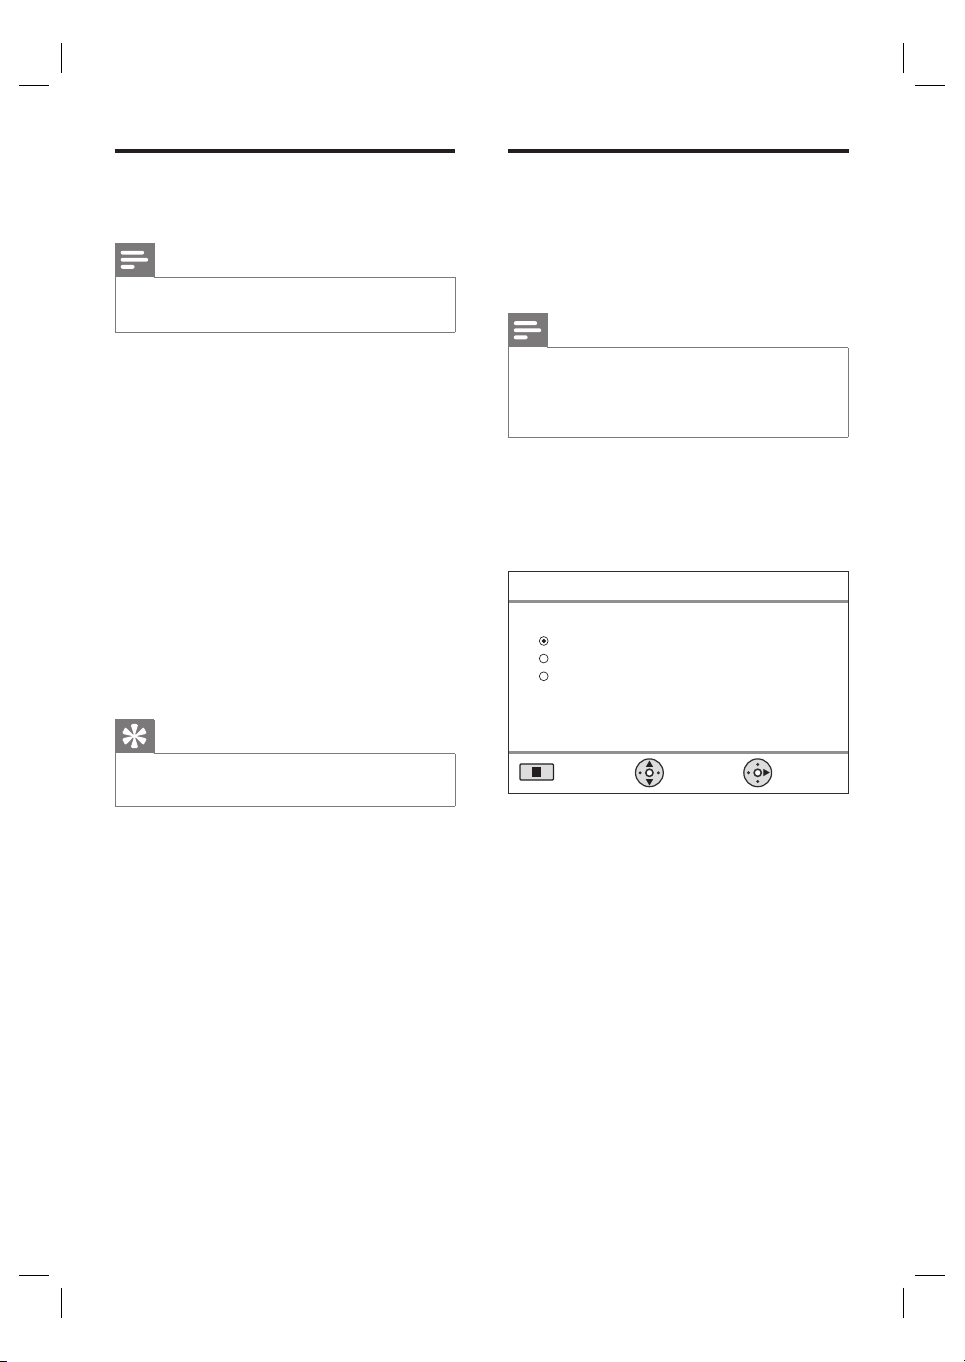
Start Ambisound setup
When you turn on this unit for the fi rst time,
follow the instructions on the TV to complete
the Ambisound setup in order to obtain the
best possible surround sound effect.
Note
Befor e you star t, ensure that you have made all the
•
required connections.
•
Complete the Ambisound setup for this unit before
you insert a disc to play.
1 Press DISC to switch to disc mode
2 Turn on the TV and switch it to the
correct video-in channel.
Language menu is displayed.
OSD Language
Please choose your language:
English
Espanõl
Português
Stop: Exit
Change
Select
20 EN
3 Select a language for on-screen display,
then press B.
A welcome message is displayed.
To skip the Ambisound setup, press x
•
to exit.
4 Press B to continue.
A message on the unit orientation is
displayed.
Page 21
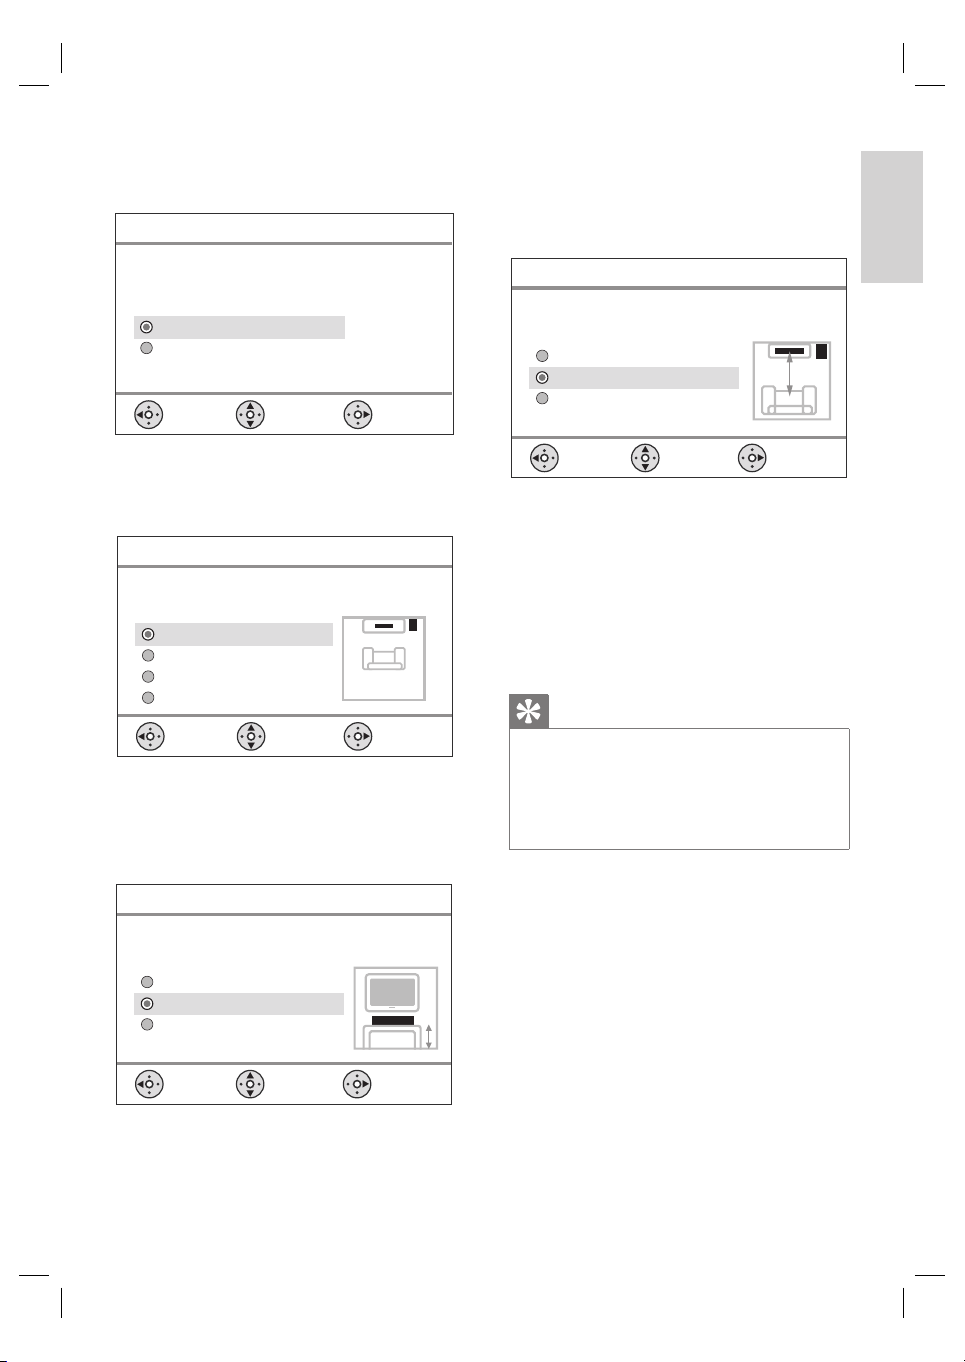
5 Press B to continue.
[ Room Acoustics ] menu is displayed.
Room Acoustics
Please select the type of walls that surround
your room:
Hard (Concrete, wood)
Soft (Curtains, open space)
Back
Change
Select
8 Select the height of which the DVD Home
Theatre unit (SoundBar) is placed, then
press B.
[ Listening Position ] menu is displayed.
Listening Position
Select the distance between your listening position
and the SoundBar system:
Near (> 2m / 78in )
Default (2-3m / 78-118in)
Far (< 3m / 118in)
English
Get started
6 Select the condition of the room, then
press B.
[ Room Placement ] menu is displayed.
Room Placement
Select the Sound Bar system placement position
in your room:
Middle of room
Corner of room
Near the right wall
Near the left wall
Back
Change
Select
7 Select the DVD Home Theatre unit
(SoundBar) placement in the room, then
press B.
[ Height ] menu is displayed.
Height
Select the height at which your SoundBar system
is placed:
High (> 1.2m / 47in)
Default (0.8-1.2m / 32-47in)
Low (< 0.8m / 32in )
Back
Change
Select
9 Select the distance between the listening
position and the speakers, then press B.
10 The speaker setting is complete, press B to
exit.
This DVD Home Theatre unit is now ready for
use.
Tips
To change the menu display language, see chapter
•
‘Adjusting settings’ - [ General setup ] > [ OSD
Language ] for details.
•
If you connect this unit to a HDMI CEC compliant
TV using a HDMI cable, i t switches automatically to
the menu display language as per your TV setting.
Back
Change
Select
EN 21
Page 22
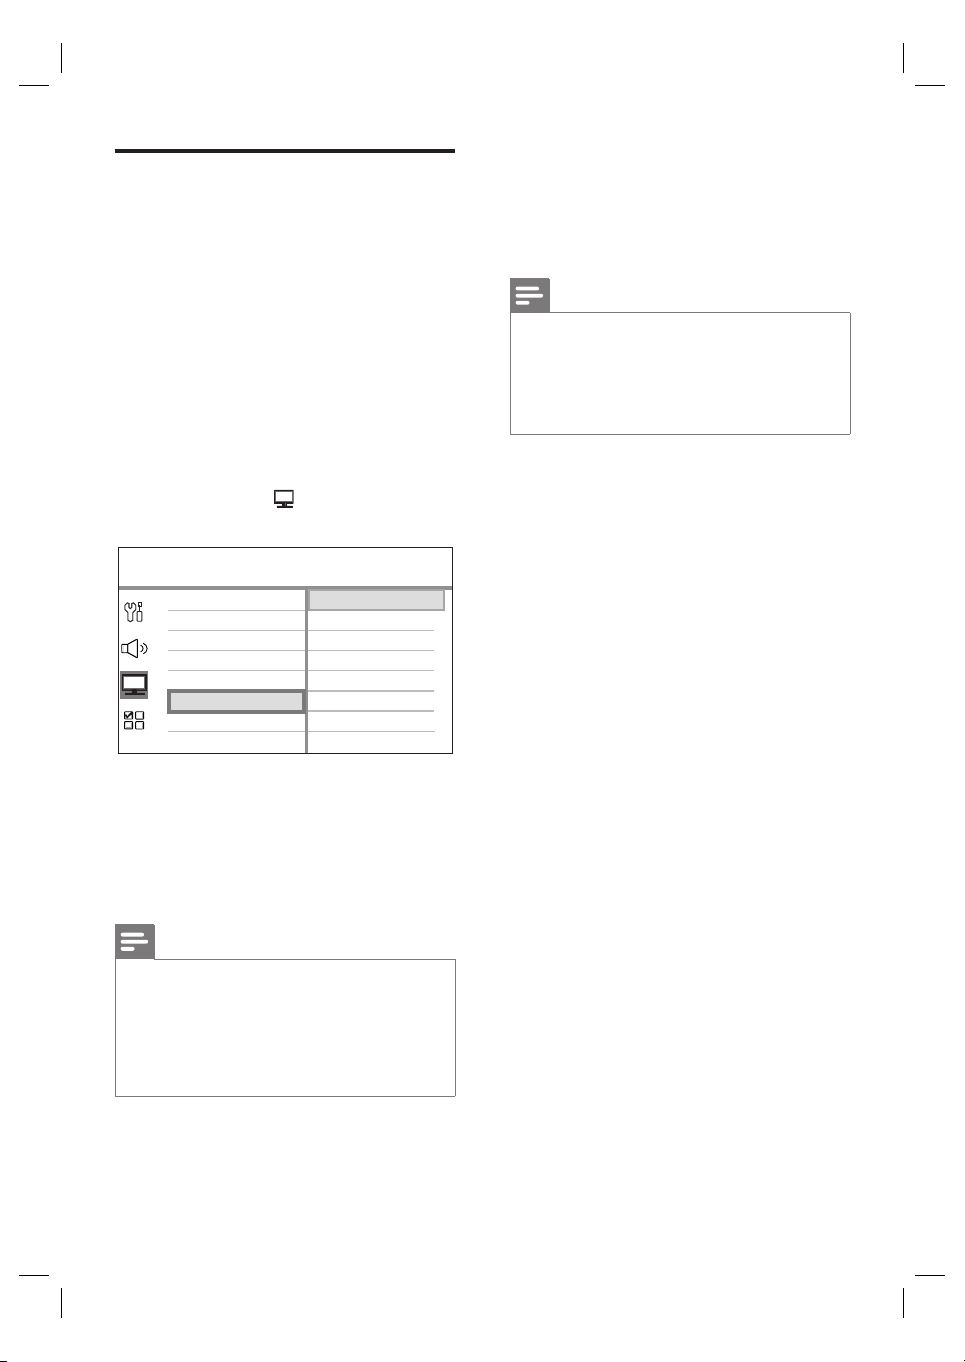
Turn on Progressive Scan
If you connect this unit to TV with the
component video connection (see chapter
‘Connect video cables - Option 2: Connect to
component video jack’ for details), you can turn
on the progressive scan output if your TV
supports progressive scan.
1 Turn on the TV to the correct viewing
channel for this unit.
2 Press DISC.
3 Press OPTIONS.
4 Press V to select [ Video Setup ] in the
menu, then press B.
Video Setup
TV Type
TV Display
Picture Settings
HDMI Setup
Closed Caption
Progressive
On
Off
7 To exit the menu, press OPTIONS.
8 You can now turn on the progressive scan
mode on your TV (see the TV user
manual).
Note
Ther e are some progressive scan T Vs that are
•
not fully compatible with this unit, resulting in an
unnatural picture when playing back a DVD VIDEO
disc in t he progressive scan mode. In such ca se, turn
off the progressive scan feature on t his unit and your
TV.
5 Select [ Progressive ] > [ On ]
OK.
A warning message is displayed.
To proceed, select [ OK ] in the menu
6
and press OK.
The progressive setup is complete.
Note
If a blank/distorted screen is displayed, wait for 15
•
seconds for the auto recover.
•
If no pic ture displayed, turn off the progressive scan
mode as follows:
1) Press Z to open the disc compar tment.
2) Press B.
3) Press SUBTITLE.
22 EN
then press
,
Page 23
Activate EasyLink control
This feature is only applicable if this unit is
connected to HDMI CEC compliant TV/device.
It enables all the linked devices response or
react to certain commands simultaneously with
one touch control.
1 Turn on the HDMI CEC operations on
your TV and other connected devices. See
TVs/devices manual for details.
2 You can now enjoy the EasyLink controls.
One touch play [ Auto Wake-up TV ]
When you press PLAY button, this unit will
wake- up from standby mode and start
disc play (if a video disc is found in the disc
compartment) and it will also turn on your
TV and switch to the correct viewing
channel.
One touch power off [ System Standby ]
When you press and hold STANDBY
button, it will turn off this unit and all the
linked devices to standby.
This unit also responses to standby
command from other HDMI CEC devices.
One touch audio input switching [ System
Audio Control ]
This unit is able to render the audio signals
from the active source. It switches
automatically to the corresponding audio
input and output the sound from its
speaker system.
Before you can enjoy this function, you
•
have to map the audio inputs to the
connected devices.
You can use any HDMI CEC TV/device
•
remote control to adjust the volume.
Note
To enable one touch play function, a video disc must
•
be placed in the disc compar tment before operation.
•
Philips does not guarantee 100% interoperability
with all HDMI CEC compliant dev ices.
Map the audio inputs to the
connected devices
Note
Befor e you star t, ensure that an audio connection
•
has been made between this uni t and your TV/
devices.
1 Press DISC.
2 Press OPTIONS.
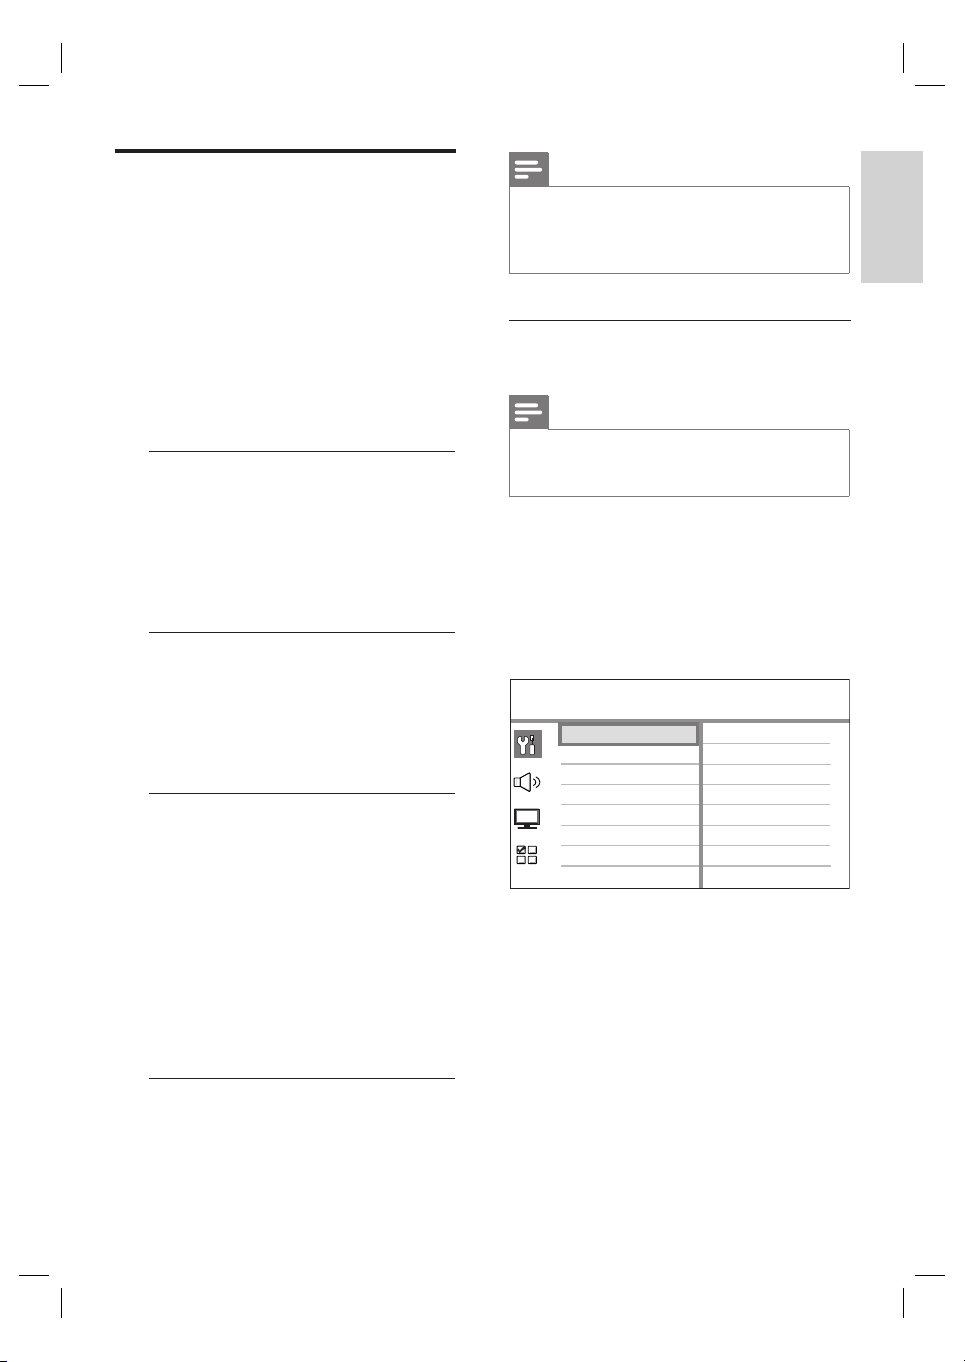
[ General Setup ] menu is displayed.
3 Press B.
4 Select [ EasyLink ], then press B.
General Setup
EasyLink
Disc Lock
Display Dim
OSD Language
Screen Saver
Sleep Timer
Standby Mode
DivX(R) VOD Code
[ Auto Wake-up TV ] and [ System
•
Auto Wake-up TV
System Standby
System Audio Control
Audio Input Mapping
Standby ] functions are turned on by
default in the factory.
5 Select [ System Audio Control ] > [ On ],
then press OK.
6 Select [ Audio Input Mapping ], then press
OK.
English
Get started
EN 23
Page 24
7 Select [ OK ] in the menu, then press OK
to start scanning of devices.
Once complete, audio input mapping
menu is displayed.
Audio Input Mapping
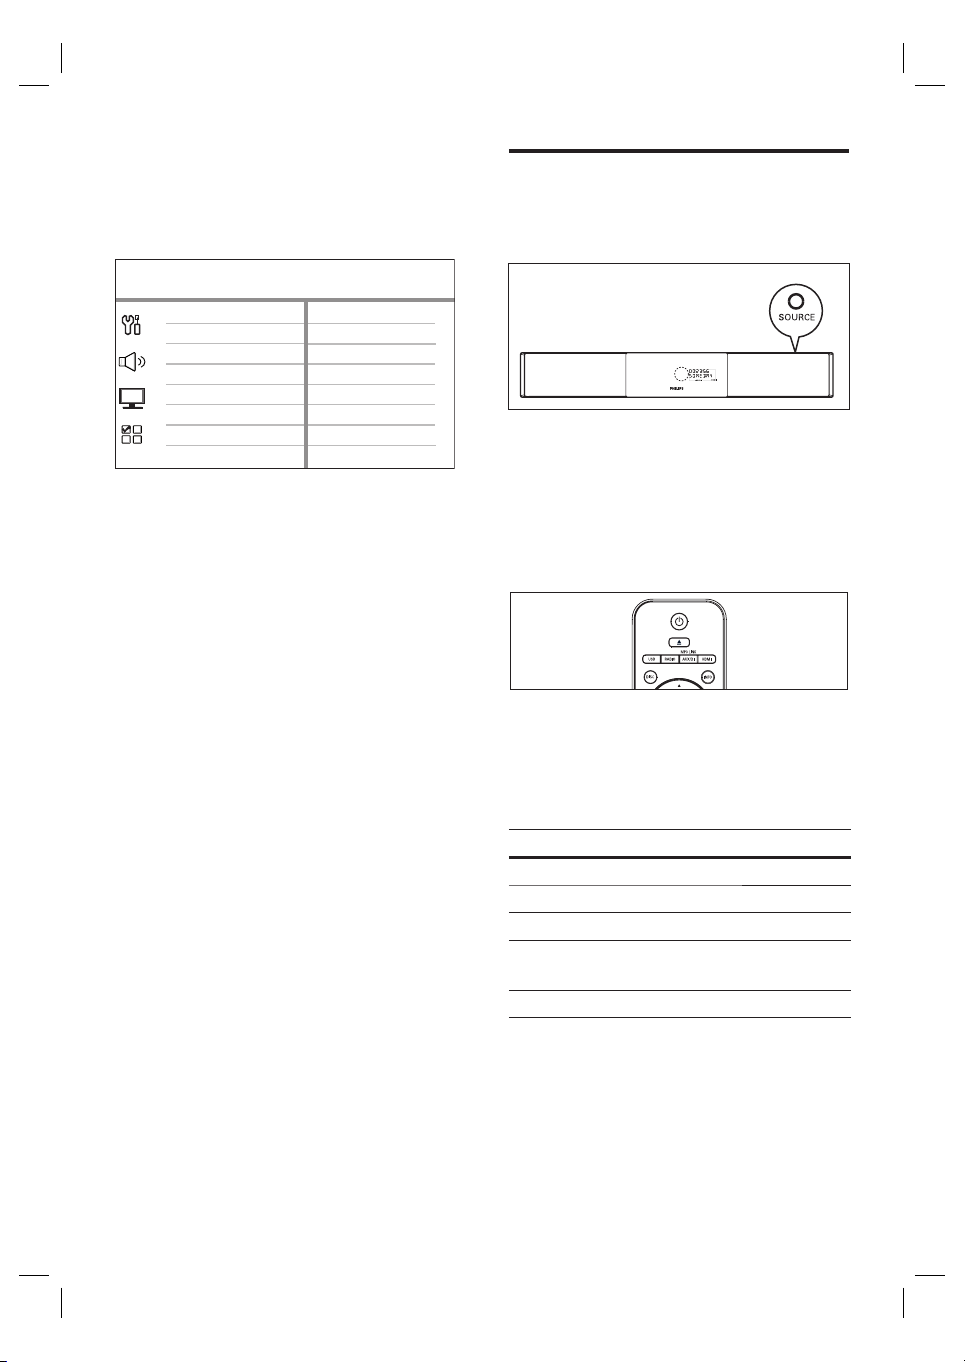
Select a play source
On the main unit
AUX1 Input
AUX2 Input
AUX3 Input
Digital Input
For example, if your TV audio is
•
TV
Other (non-HDMI)
connected to the AUX IN-AUX 1
sockets on this unit, select [ AUX1
Input ] and map with the TV (brand
name) at the right panel.
8 Select the audio input of this unit that is
used to connect to other HDMI device
(e.g. AUX1 Input, AUX2 Input), then press
B.
9 Select the correct device that connected
to this audio input, then press OK.
Repeat steps 8~9 to map other
•
connected devices.
10 To exit the menu, press OPTIONS.
1
Press SOURCE button repeatedly to
select: DISC > USB > RADIO FM >
RADIO AM/MW > DIGITAL INPUT >
AUX1 INPUT > AUX2 INPUT > AUX3
INPUT > MP3 LINK > DISC ...
On the remote control
Press DISC to switch to DISC mode.
•
Press USB to switch to USB mode.
•
Press RADIO to switch to FM or AM/MW
•
band.
Press AUX/DI /MP3 LINK repeatedly to
•
select other external devices.
Display Device connected to
AUX1 INPUT AUDIO IN-AUX1 sockets.
AUX2 INPUT AUDIO IN-AUX2 sockets.
AUX3 INPUT AUDIO IN-AUX3 sockets.
DIGITAL
INPUT
MP3 LINK MP3 LINK socket.
DIGITAL IN-COAXIAL
socket.
24 EN
Page 25
5 Play
Play from disc
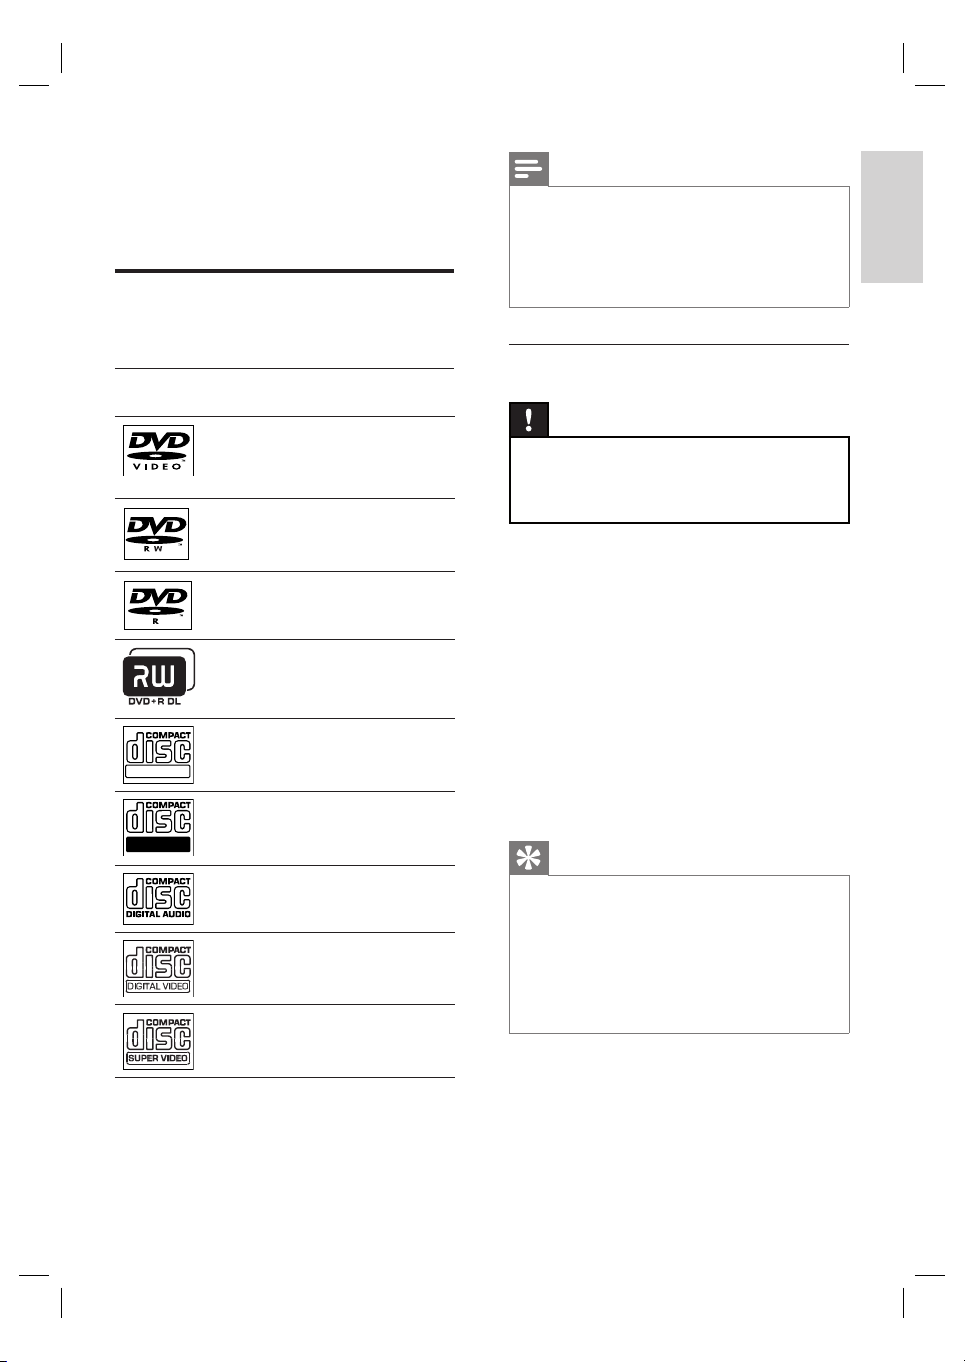
Playable discs
DVD Video
Region 4 (Latin America)•
DVD±RW
(DVD Rewritable)
DVD±R
(DVD Recordable)
DVD+R DL (DVD+R Double
Layer)
CD-RW (CD-Rewritable)
ReWritable
CD-R (CD-Recordable)
Note
DVDs and DVD players are designed with r egional
•
restrictions. Ensure that the DVD video you play is
for the same region zone as your player (indicated
on its rear).
•
This unit can support playback of the following fi le
formats: MP3/WMA/JPEG/DivX.
Play a disc
Caution!
Never place any objec ts other than discs into the
•
disc compartment.
•
Never touch the disc optical lens inside the disc
compar tment.
1 Press Z to open the disc compartment.
2 Insert a disc with its label facing up.
•
For double-sided disc, load the side to
play faces up.
3 Press Z to close the disc compartment
and start disc play.
•
To view disc play, turn on the TV to
the correct viewing channel for this
DVD Home Theatre unit.
4 To stop disc play, press x.
English
Play
Recordable
Audio CD (Compact Disc
Digital Audio)
Video CD
For mats 1. 0, 1.1, 2.0•
Super Video CD
Tips
If the password entry menu is displayed, you have to
•
key in the 6-digit password before i t can be played .
•
Screen saver displays automatically if the disc play
is stopped for abou t 15 minutes. To wake up from
screen saver, press DISC.
•
This unit automatically switches to standby mode if
you do not press any buttons within 30 minutes after
a disc ha s stopped playing.
EN 25
Page 26
Play video
Change video play
Note
For video disc, playback always resumes from the
•
point where it was last stopped. To st ar t playback
from the beginning, press í while the message is
displayed.
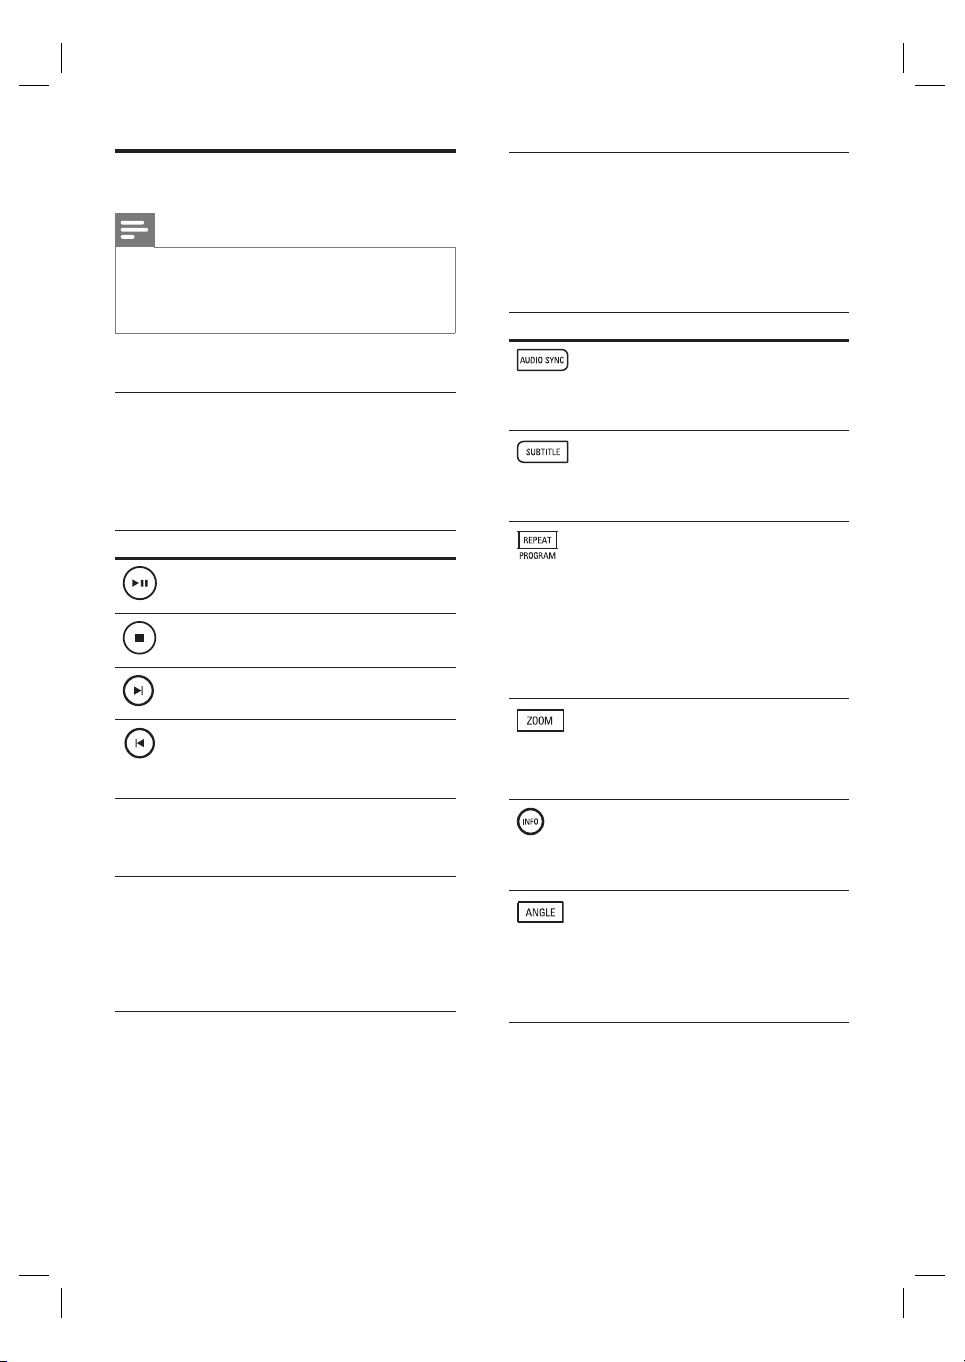
Control a title
1 Play a title.
2 Use the remote control to control the title.
Button Action
Pause/ resume play.
Stop play.
Jump to the next title/chapter.
Return to the beginning of the
current title/chapter or jump to
the previous title/chapter.
1 Play a title.
2 Use the remote control to change the
video play.
Button Action
Change audio language.
Only applicable to discs
•
with multiple audio
language or channel.
Change subtitle language.
Only applicable to discs
•
with multiple subtitle
language.
Toggle through various repeat/
shuffl e play mode; or turn off
repeat mode.
Repeat options vary
•
depending on the disc type.
For VCDs, repeat play is
•
only possible when the PBC
mode is turned off.
Zoom in/out.
To pan through the zoomed
•
image, press the cursor
buttons.
m M
v V
26 EN
Search backward/ forward.
To change search speed,
•
press this button repeatedly.
Slow motion reverse/ forward
play.
To change play speed, press
•
this button repeatedly.
For VCD, only forward play
•
is possible.
Display current play status.
You can change the video
•
play options here without
interrupting disc play.
View DVD play from different
camera angles.
Only applicable to DVDs
•
that contain sequences
recorded from different
camera angles.
Page 27
Access DVD menu
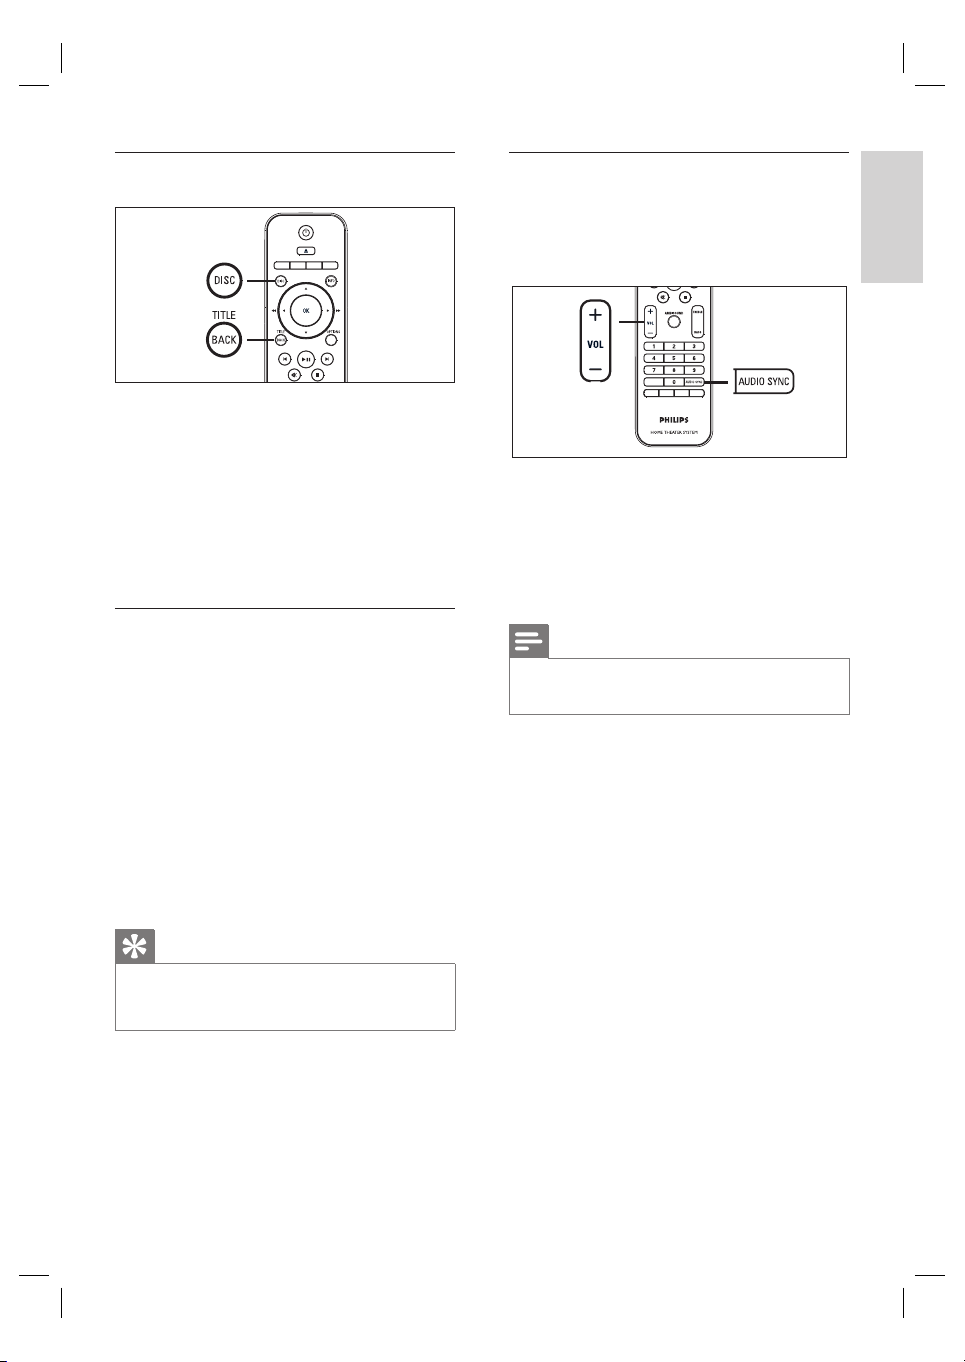
1 Press DISC to access disc main menu.
2 Select a play option, then press OK.
•
In some menus, press number buttons
to input your selection.
•
To return to the title menu during
playback, press TITLE.
Sync audio output with video play
If the video play is slower than the audio output
(sound does not match with the pictures), you
can delay the audio output to match the video.
1 Press and hold AUDIO SYNC until
‘AUDIO SYNC XXX’ is displayed.
‘XXX’ denotes the delay time.
•
2 Within fi ve seconds, press VOL +- to
set the delay time for audio output.
English
Play
Access VCD menu
The PBC (Playback Control) for VCD is turned
on by default in the factory. When you load in
a VCD, the contents menu is displayed.
1 Press vV to select a play option, then
press OK to start play.
If PBC is off, it skips the menu and starts
•
play from the fi rst title.
•
During playback, you can press BACK
to return to the menu (if the PBC
mode is on).
Tips
The default setting for PBC is on. To change the
•
default setting, see chapter ‘Adjust settings’ -
[ Preference Setup ] > [ PBC ] for details.
Note
If the volume control is not used within 5 seconds , it
•
resumes normal volume control function.
EN 27
Page 28
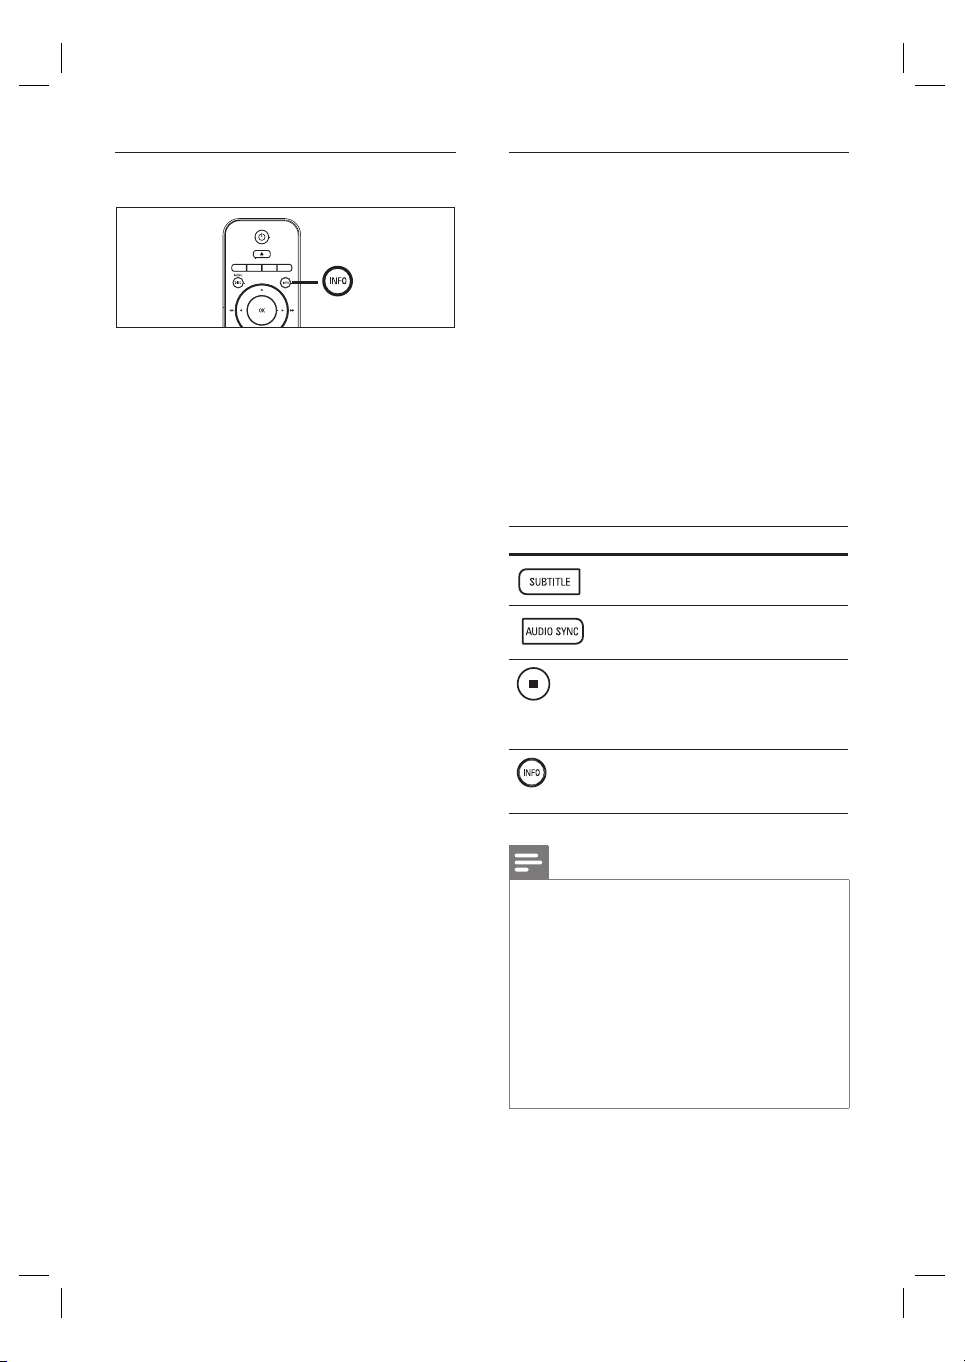
Quick skip play to a specifi c time
1 During playback, press INFO.
The disc status menu is displayed.
2 Select the current elapsed playing time in
the menu, then press OK.
•
[ TT Time ] (title time)
•
[ CH Time ] (chapter time)
•
[ Disc Time ] (disc time)
•
[ Track Time ] (track time)
3 Press the number buttons to change the
time where you want to skip to, then press
OK.
Play DivX® video
DivX video is a digital media format that retains
high quality despite a high rate of compression.
This unit is DivX® Certifi ed that allows you to
enjoy DivX video.
1 Insert a disc or USB that contains the DivX
videos.
2 Press DISC or USB.
A contents menu is displayed.
3 Select a title to play, then press u.
4 Use the remote control to control the
title.
Button Action
Change subtitle language.
Change audio language/track.
Stop play.
For DivX Ultra video, press
•
this button again to display
the contents menu.
Display DivX Ultra video
information.
28 EN
Note
Only those DivX videos that were rented or
•
purchased using the DivX registration code of this
unit can be played (see chapter ‘Adjust settings’ >
[ General Setup ] > [ DivX(R) VOD Code ] for
details).
•
If the subtitle does not appear correctly, change the
subtitle language (see chapter ‘Adjust settings’ [ Preference Setup ] > [ DivX Subtitle ] for details).
•
The subtitle can only be displayed up to an average
of 45 characters.
•
This unit can play DivX video fi les that are up to 4GB
in size.
Page 29
Play music
Note
For some commercial audio disc, playback may
•
resume from the point where it was la st stopped. To
start playback from fi rst track, press í.
Control a track
1 Play a track.
2 Use the remote control to control the
track.
Play MP3/WMA music
MP3/WMA is a type of highly compressed
audio fi le (fi les with .mp3 or .wma extensions).
1 Insert a disc or USB that contains the MP3/
WMA music.
2 Press DISC or USB.
A contents menu is displayed.
3 Select a folder, then press OK.
4 Select a track to play, then press u.
•
To return to the main menu, press v
until ‘Previous’ folder is selected, then
press OK.
English
Play
Button Action
Pause/ resume play.
Stop play.
Jump to the next track.
Return to the beginning of the
current track or jump to the
previous track.
Direct input the track number.
m M
Search backward/ forward.
To change search speed,
•
press this button repeatedly.
Toggle through various repeat/
shuffl e play mode; or turn off
repeat mode.
Repeat options vary
•
depending on the disc type.
Note
For CDs recorded in multiple sessions, only the fi rst
•
session is played.
•
This unit does not suppor t MP3PRO audio format .
If any special characters ar e present in the MP3 track
•
name (ID3) or album name, it might not be displayed
correctly on the screen bec ause these characters are
not suppor ted.
•
Some WMA is pr otec ted by Digital Rights
Management (DRM), it cannot be played on this unit .
•
Folders/fi les exceed the suppor ted fi le limit of this
unit will not be displayed or played.
Tips
To display the data disc content s without folders, see
•
chapter ‘Adjus t set tings’ - [ Preference Setup ] >
[ MP3/J PEG Nav ] for details.
EN 29
Page 30
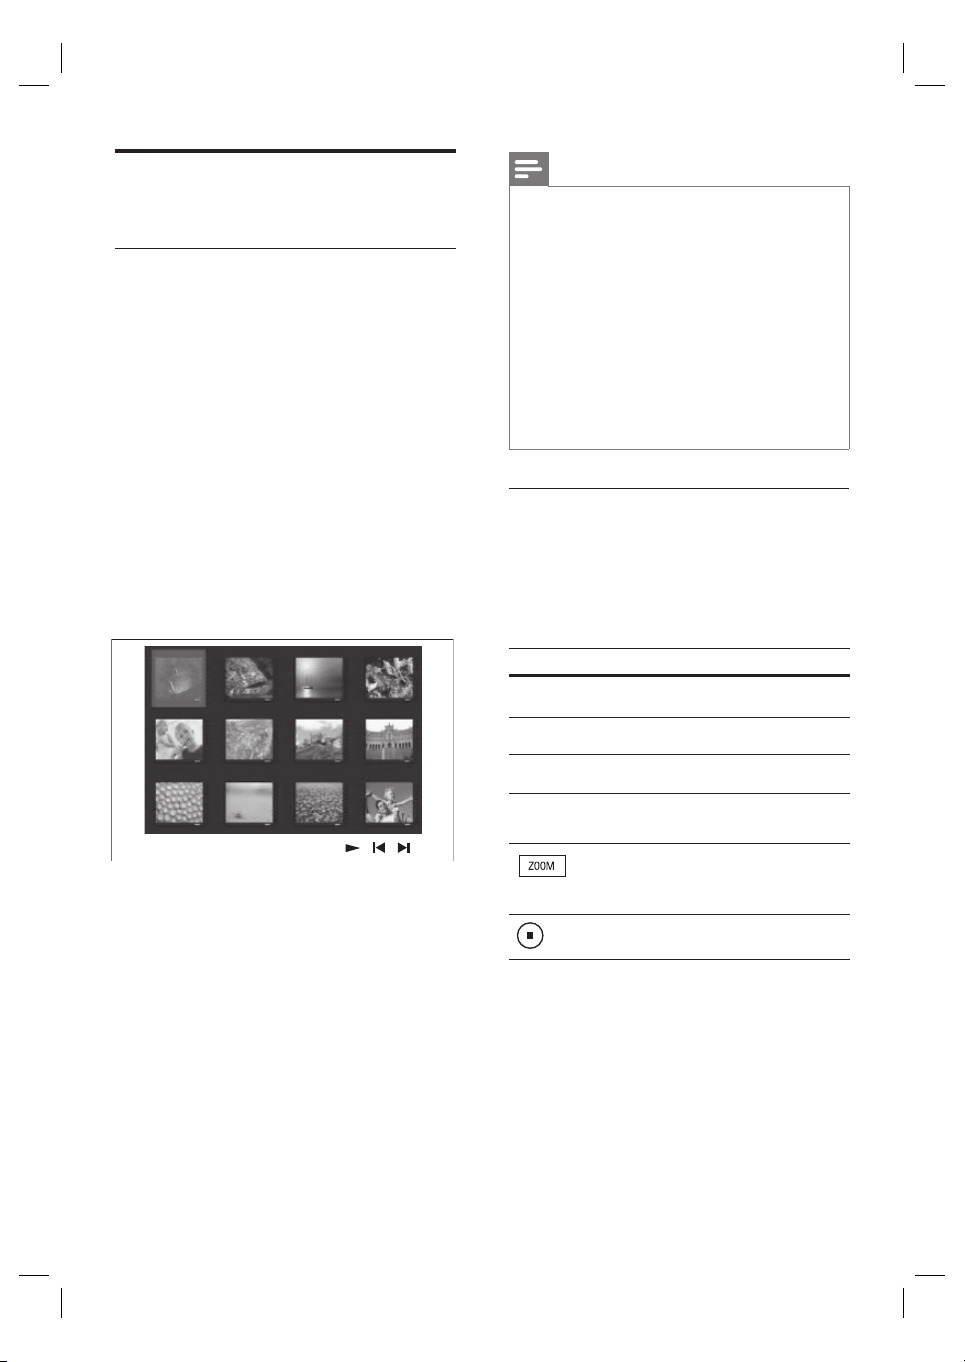
Play photo
Play photos as slideshow
This unit can play JPEG photos (fi les with .jpeg
or .jpg extensions).
1 Insert a disc or USB that contains the JPEG
photos.
2 Press DISC or USB.
For a Kodak disc, the slideshow begins
automatically.
For a JPEG disc, the photo menu is
displayed.
3 Select the folder/album you want to play.
•
To preview the photos in the folder/
album, press INFO.
Note
•
It may require longer time to display the disc
contents on the TV due to the large number of
songs /photos compiled onto one disc.
•
If the JPEG photo is not r ecorded wi th an ‘exif ’
type fi le, the actual thumbnail picture will not be
shown on the display. It will be replaced with a ‘blue
mountain’ thumbnail picture.
This unit can only display digital camera pictures
•
according to the JPEG-EXI F format, t ypically used by
almos t all digital camera s. It cannot display Motion
JPEG and pic tures in for mats other than JPEG, or
sound clips associated wi th pictur es.
Folders/fi les exceed the suppor ted fi le limit of this
•
unit will not be displayed or played.
Control photo play
1 Play photo slideshow.
2 Use the remote control to control the
photo.
Button Action
b
Skip to the previous photo.
To go to previous or next screen
•
display, press í / ë.
To select a photo, press the cursor
•
buttons.
To display the selected photo only,
•
press OK.
4 Press u to start slideshow play.
•
To return to the menu, press BACK.
30 EN
B
v
V
Skip to the next photo.
Rotate the photo clockwise.
Rotate the photo anticlockwise.
Zoom in/ out.
Play will pause while in
•
zoom mode.
Stop play.
Page 31
Play musical slideshow
Play MP3/WMA music fi les and JPEG photo
fi les simultaneously to create musical slideshow.
The MP3/WMA and JPEG fi les must be stored
on the same disc or USB device.
Play from USB device
This unit can only play/view MP3, WMA, DivX
(Ultra) or JPEG fi les that are stored on such
devices.
English
1 Play MP3/WMA music.
2 Navigate to the photo folder/album and
press u to start slideshow play.
Slideshow begins and continues till the
end of the photo folder or album.
Audio continues to play till the end of
the disc.
To return to the menu, press BACK.
•
3 To stop slideshow play, press x.
4 To stop music play, press x again.
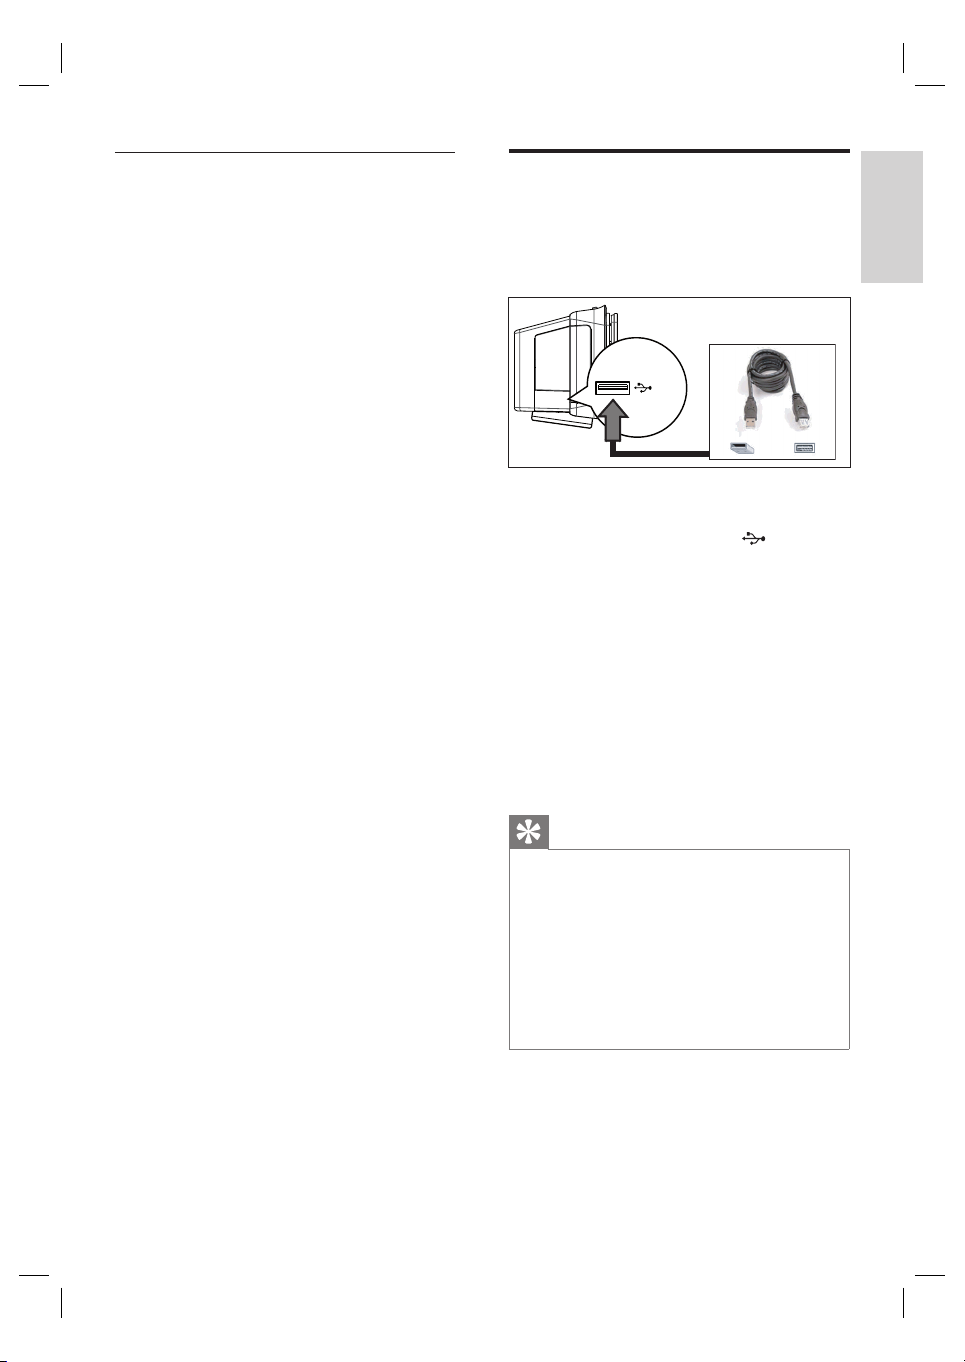
1 Connect a digital camera that comply with
the PTP standard, USB fl ash drive, or USB
memory card reader to the
socket on this unit.
(USB)
2 Press USB.
A contents menu is displayed.
3 Select a fi le to play, then press u.
•
For more information, see chapters
‘Play music, Play photo, Play video’ for
details.
4 To stop play, press x or remove the USB
device.
Tips
If the device does not fi t into the USB socket,
•
connect it through a USB extension cable.
•
If a multiple USB card reader is used, only one of the
connected USB dr ive contents can be accessed.
•
If a USB H DD is used, ensure that an auxiliar y
power cord connected to the USB HDD for proper
operations.
•
Digital camer as that use PTP protocol or require
additional programme ins tallation when connected
to a PC are not suppor ted.
Play
EN 31
Page 32
Play from portable media
player
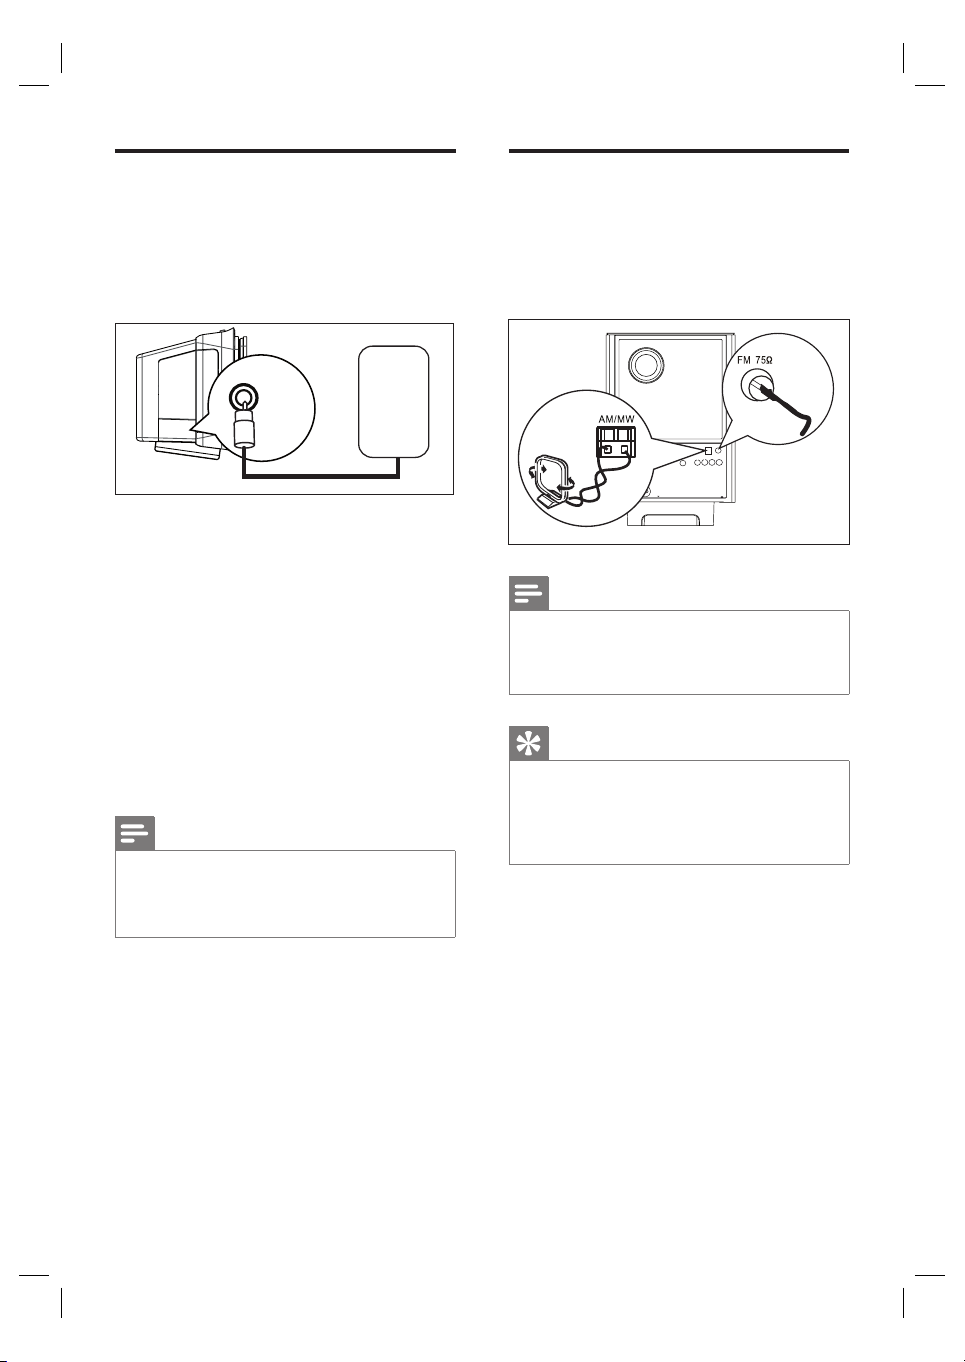
Simply connect your portable media player (e.g.
MP3 player) to this unit to enjoy superb sound
quality from your music collections.
Play from radio
Check if the FM antenna has been connected
to the subwoofer. If not, connect the supplied
FM antenna to the FM 75Ω socket and fi x its
ends to the wall.
MP3 LINK
MP3
1 Connect a 3.5mm stereo audio cable
(supplied) from the MP3 LINK socket on
this unit to the ‘headphone’ socket on your
portable media player.
2 Press AUX/DI /MP3 LINK repeatedly until
‘MP3 LINK’ is displayed.
3 Start play on your portable media player.
•
See chapter ‘Adjust Sound’ to enhance
the audio output.
4 To stop play, press STOP button on your
portable media player.
Note
Control playback is only possible on your por table
•
media player.
•
Stop play on the portable media player before you
switch to other play media /source.
Note
For China/Latin America region only, if you want to
•
receive AM/MW radio band, connect the AM loop
antenna (supplied) to the AM/MW sockets on this
DVD Home Theatre unit.
Tips
For better FM stereo reception, connec t an ex ternal
•
FM antenna (not supplied).
•
Position the antenna as far away as possible fr om
your T V, VCR or other radiation source to pr event
unwanted interference.
32 EN
Page 33
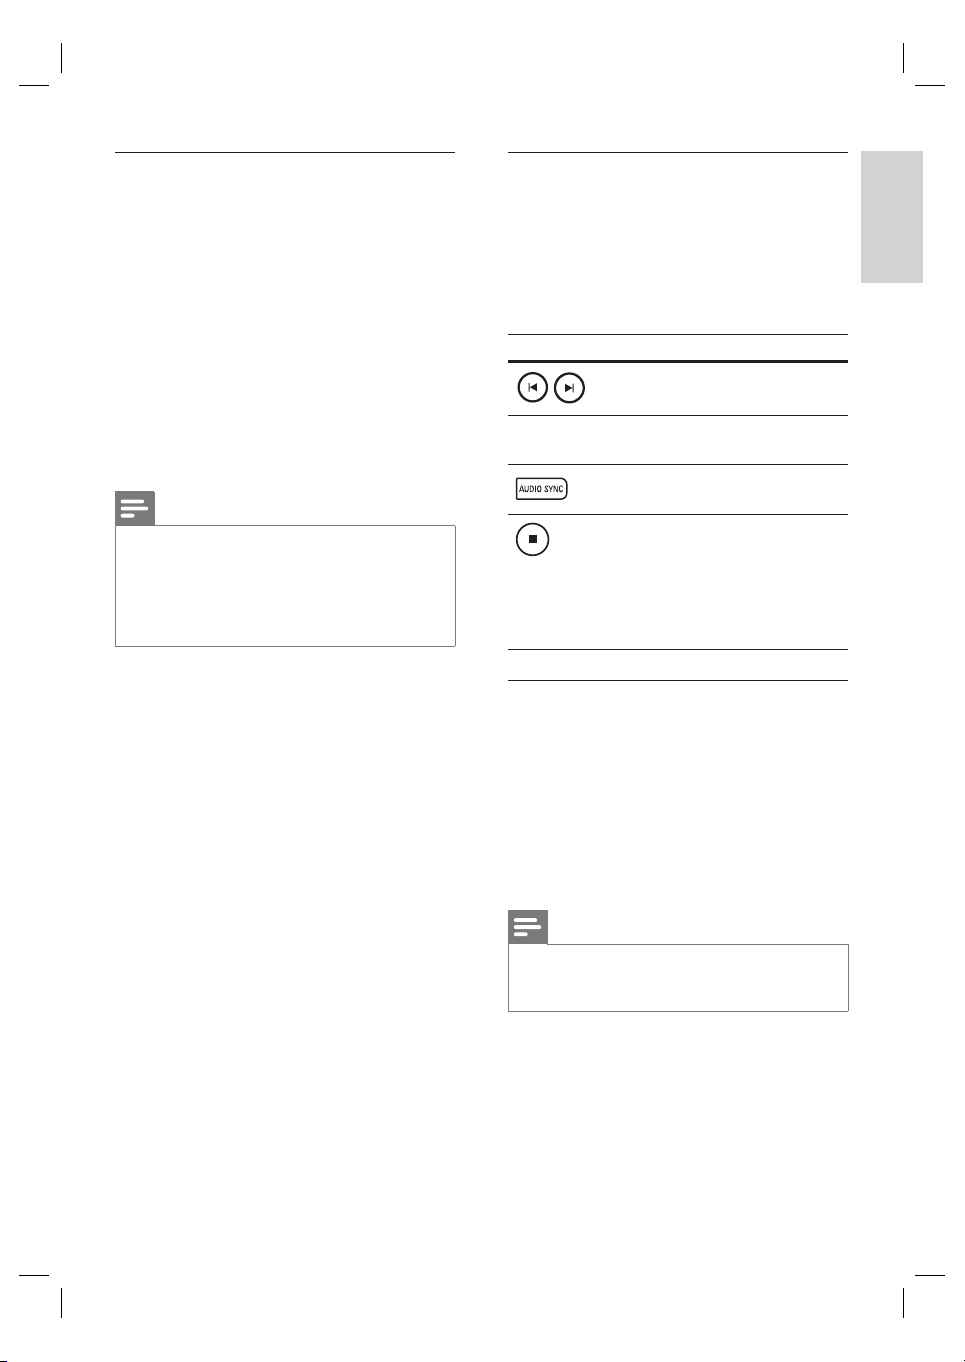
First time tuning
Listen to radio
The fi rst time when you access ‘RADIO’ mode,
follow the instructions to install the radio
stations.
1 Press RADIO.
’AUTO INSTALL ... PRESS PLAY’ is
displayed.
2 Press u.
All detected radio stations are stored.
Once complete, it tunes to the fi rst
preset radio station.
To stop auto tuning, press x.
•
Note
This unit can store up to a ma ximum of 40 FM radio
•
stations (20 radio st ations for AM/MW band).
•
If auto inst allation is not activated or less than 5
radio stations are stored, ‘AUTO INSTALL’ will be
displayed again the next time you turn on to radio
mode.
1 Press RADIO repeatedly to select ‘FM’ or
‘AM/MW’ band.
2 Use the remote control to control the
radio.
Button Action
Select a preset radio station.
m M
Tune the radio frequency
backward/ forward.
Toggle between FM stereo
and FM mono mode.
Press and hold this button to
delete the preset station from
the preset list.
The preset number for
•
other radio stations
remain unchanged
Reinstall all the radio stations
1 Press RADIO repeatedly to select ‘FM’ or
‘AM/MW’ band.
2 Press and hold PROGRAM until
‘STARTING INSTALL’ is displayed.
All previously stored radio stations will
be replaced.
English
Play
Note
If no stereo signal is detected or less than 5 stations
•
are detected during r adio installation, ‘CHECK
ANTENNA’ is displayed.
EN 33
Page 34

Search and store radio stations
individually
1 Press RADIO repeatedly to select ‘FM’ or
‘AM/MW’ band.
2 Press m M.
The radio frequency indication starts to
change until a radio station is detected.
3 Repeat step 2 until you tune to the radio
station you wish to store.
To fi netune the radio frequency, press
•
vV.
4 Press PROGRAM.
•
If no action is carried out within 20
seconds after the above step, it exits
the preset mode.
5 Press í ë (or the number buttons) to
select a preset number to store.
6 Press PROGRAM to confi rm.
Change tuning grid
In some countries, the frequency step between
adjacent channels in FM band is 50 kHz or
100 kHz (AM/MW band is 9 kHz or 10 kHz).
Note
This feature only applicable for cer tain region.
•
Change tuning grid erases all preset radio st ations.
•
1 Press RADIO repeatedly to select ‘FM’ or
‘AM/MW’ band.
2 Press x.
3 Press and hold u until ‘GRID 9’ or
‘GRID 10’ is displayed.
‘GRID 9’ for FM 50 kHz (or AM 9 kHz)
•
and ‘GRID 10’ for FM 100 kHz (or AM
10 kHz).
34 EN
Page 35
6 Adjust sound
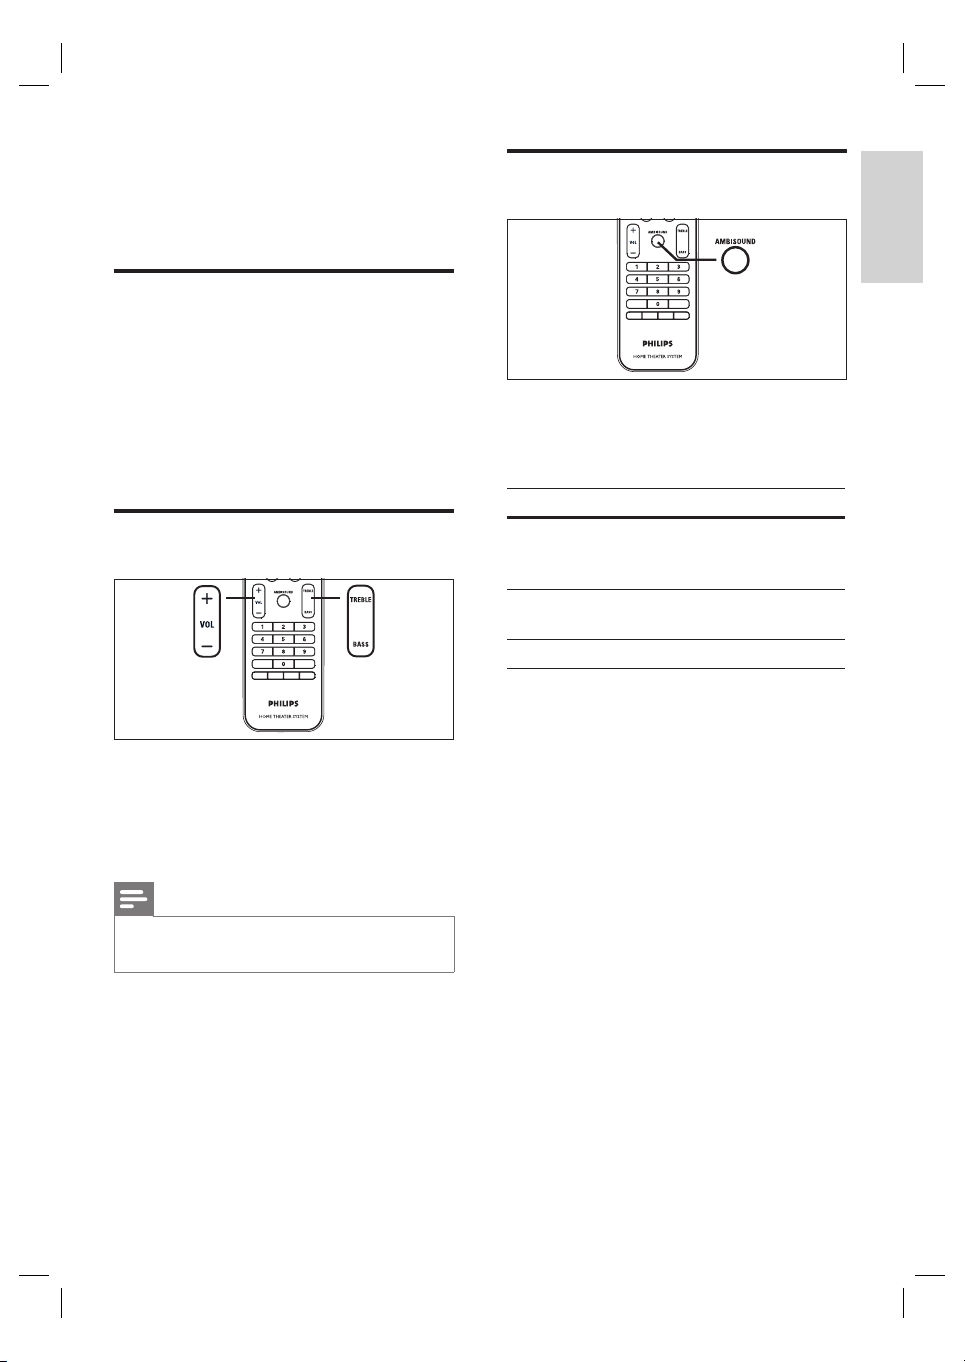
Control the volume
Press VOL +- to increase or decrease
1
the volume level.
•
To mute the volume, press H.
•
To restore the volume, press H again
or press the volume button.
Adjust Bass/Treble
Select Ambisound
1 Press AMBISOUND repeatedly to select a
best surround output that most suits the
video or music you play.
Options Descriptions
AUTO
MULTICHANNEL
STEREO
The surround output will be
selected based on the audio
stream of the played content.
Multi-channel surround sound.
Stereo sound.
English
Adjust sound
1 Press BASS / TREBLE.
2 Press VOL +-repeatedly to set the
level for low (BASS) or high (TREBLE)
tone.
Note
If the volume control is not used within 10 seconds , it
•
resumes normal volume control function.
EN 35
Page 36
Select a preset sound effect
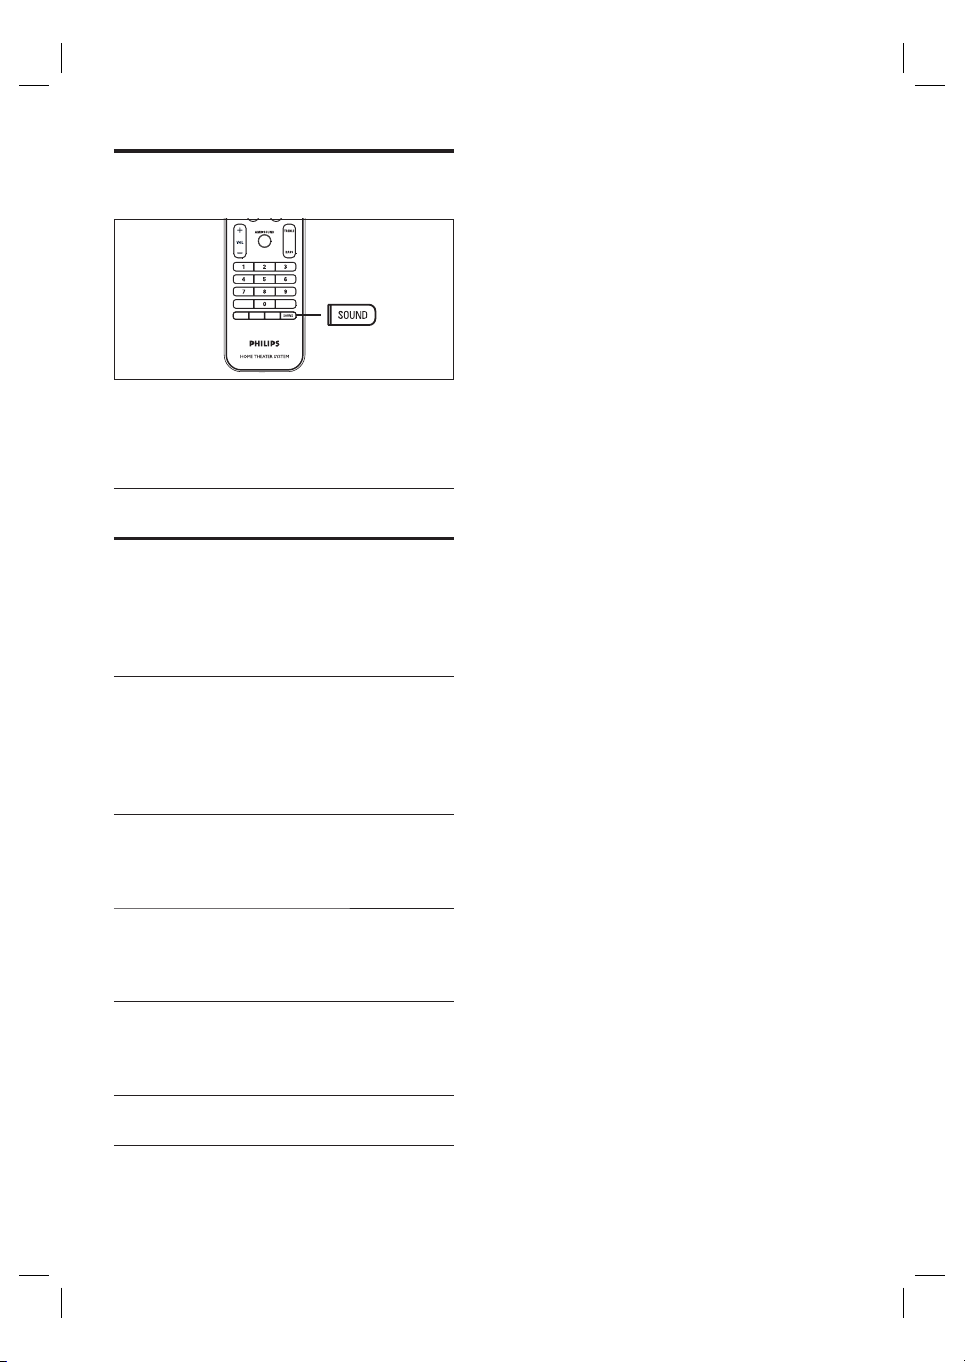
1 Press SOUND repeatedly to select a
sound effect that most suits the video or
music you play.
Video /
Music /
ACTION /
ROCK /
DRAMA /
JAZZ
CONCERT /
CLASSIC
GAMING /
PARTY
SPORTS
NEWS
Descriptions
Enhanced low and high
range for great sounding
movie effects and
atmosphere. Great for
action movies and rock/pop
music.
Clear mid and high range.
Recreates the atmosphere
of a live club with the artist
just in front of you. Good
for Jazz music and watching
dramas.
Flat and pure sound mode.
Ideal for listening to classical
music and watching live
concert DVDs.
Slightly enhanced low range
and strong mid range ideal
for party music and video
gaming.
Moderate mid range and
surround effects for clear
vocals and the atmosphere
of a live sports venue.
Enhanced mid range for
clear vocals/speech.
36 EN
Page 37
7 Adjust settings
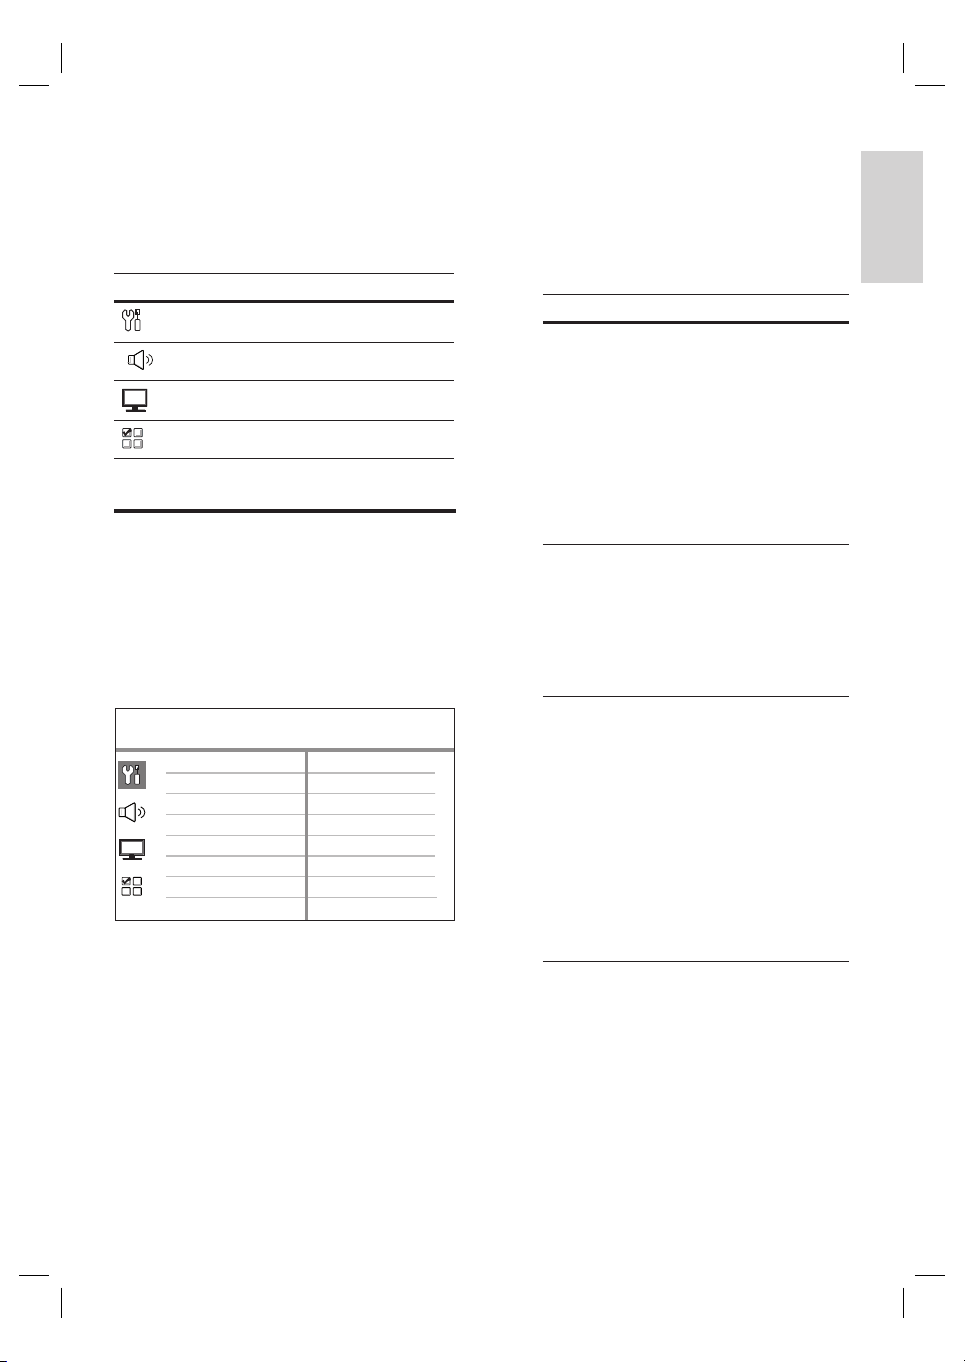
This section describes the various setting
options of this unit.
Symbol Options
[ General Setup ]
General setup
Press OPTIONS.
1
[ General Setup ] menu is displayed.
2 Press B.
3 Select an option, then press OK.
General Setup
EasyLink
Disc Lock
Display Dim
OSD Language
Screen Saver
Sleep Timer
Standby Mode
DivX(R) VOD Code
See the explanations of the above
•
options in the following pages.
4 Select a setting, then press OK.
To return to the previous menu, press
•
BACK.
To exit the menu, press OPTIONS.
•
[ Audio Setup ]
[ Video Setup ]
[ Preference Setup ]
[ EasyLink ]
This feature is only applicable if this unit is
connected to HDMI CEC compliant TV/
device. It enables all the linked devices
response or react to certain commands
simultaneously with one touch control.
Options Descriptions
[ Auto Wakeup TV ]
[ System
Standby ]
[ System Audio
Control ]
It wake-ups your TV
automatically when you
press PLAY to power up
this unit and start disc
play (if a video disc is
found in the disc
compartment).
To disable this feature,
•
select [ Off ]
Respond to standby
command from other
HDMI CEC compliant
TV/devices.
To disable this feature,
•
select [ Decline ].
It enables this DVD
Home Theatre unit to
switch automatically to
the audio input of the
active device.
To enable this feature,
•
select [ On ]. Then
proceed to [ Audio
Input Mapping ] to
scan and map all the
connected devices.
.
English
Adjust settings
EN 37
Page 38
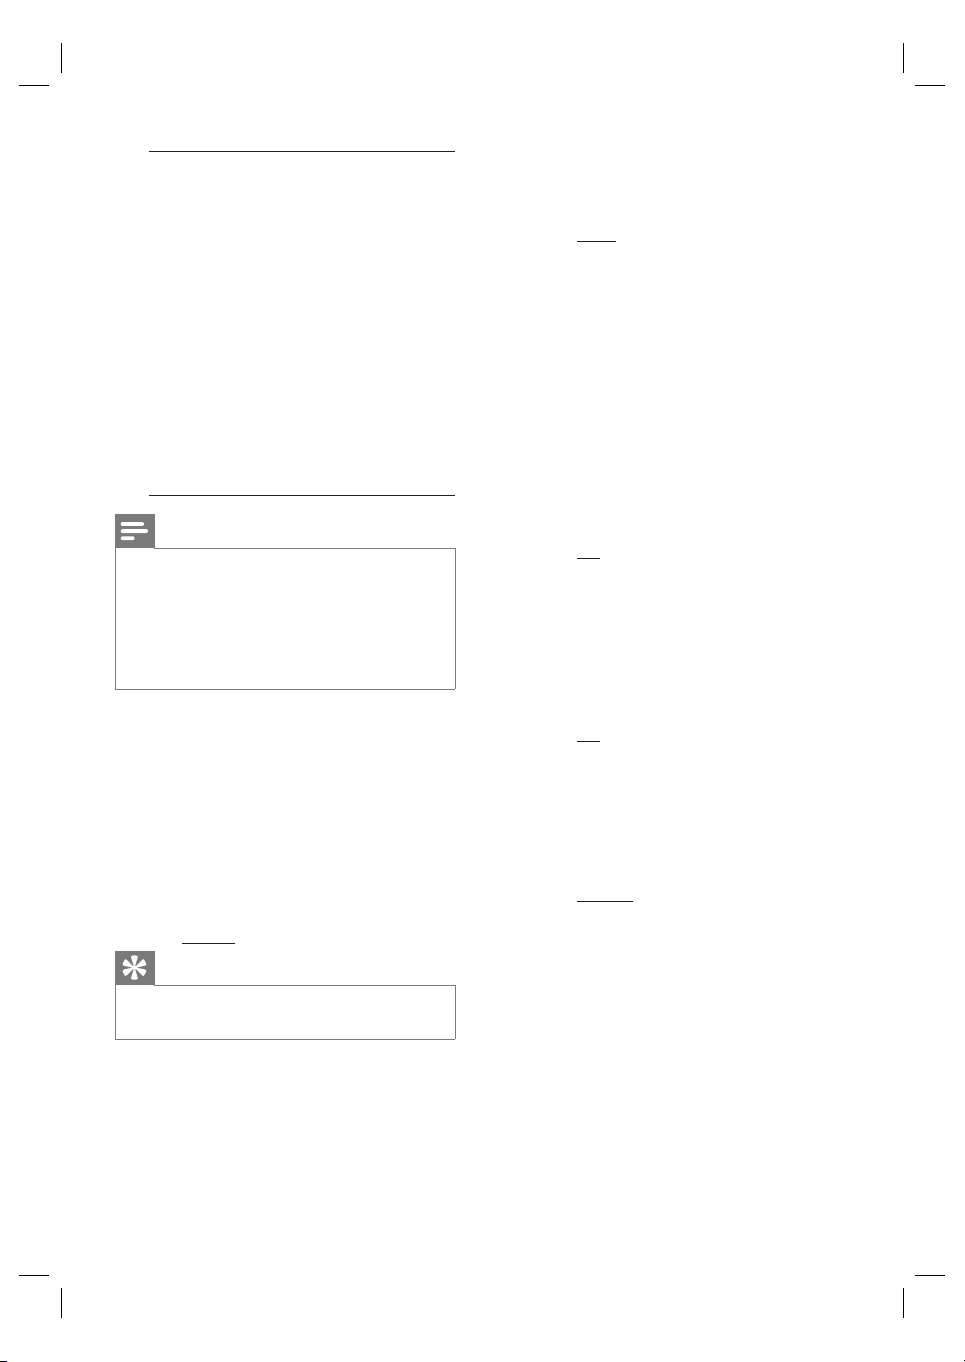
[ Audio Input
Mapping ]
Note
Your TV and other connected devices must be
•
compliant with HD MI CEC.
•
You must turn on the HDM I CEC operations on
your T V/devices before you can enjoy t he EasyLink
controls. See your TVs/devices manual for details.
•
Philips does not guarantee 100% interoperability
with all HDMI CEC compliant dev ices.
Map the audio input to
the connected TV/
devices correctly to
enable automatic
switching of input source.
1.
Press OK to start
scanning of devices.
2.
Select the audio input
to map (e.g. AUX1
Input, AUX2 Input),
then press B.
3.
Select the correct
device that connected
to this audio input,
then press OK.
[ Disc Lock ]
Set play restriction for a specifi c discs.
Before you start, place the disc in the disc
compartment (maximum 40 discs can be
locked).
[ Lock ] – restrict access to the current
•
disc. The next time you want to play
this disc or unlock it, you need to enter
the password.
[ Unlock ] – all discs can be played.
•
Tips
To set or change your pa ssword, go to
•
[ Preference Setup ] > [ Password ].
[ Display Dim ]
Change the brightness level of the display
panel to suit the lighting in your room.
•
[ 100% ] – normal brightness.
•
[ 70% ] – medium brightness.
•
[ 40% ] – dimmest display. The LEDs
and display icons will not be shown.
[ OSD Language ]
Select the default on-screen menu
language.
[ Screen Saver ]
Turn off or on the screen saver mode. It
helps to protect the TV screen from being
damage due to over exposure to a static
image for too long.
•
[ On ] – set the screen saver to appear
after 15 minutes of inactivity (for
example, in pause or stop mode).
•
[ Off ] – disable screen saver mode.
[ Sleep Timer ]
Switch to standby automatically after the
preset time.
•
[ Off ] – disable sleep mode.
•
[ 15, 30, 45, 60 mins ] – select the
count down time before it switches to
standby.
[ Standby Mode ]
Set the standby mode.
•
[ Normal ] – normal standby power
consumption.
•
[ Low Power ] – low standby power
consumption. However, it requires
longer time to power up.
38 EN
Page 39
[ DivX(R) VOD Code ]
Display the DivX® registration code.
Tips
Enter t his unit’s DivX registr ation code when you
•
rent or purchase video from w ww.divx.com /vod.
The DivX videos rented or purchased through the
DivX® VOD ( Video On Demand) ser vice can be
played only on the device to which it is r egis tered.
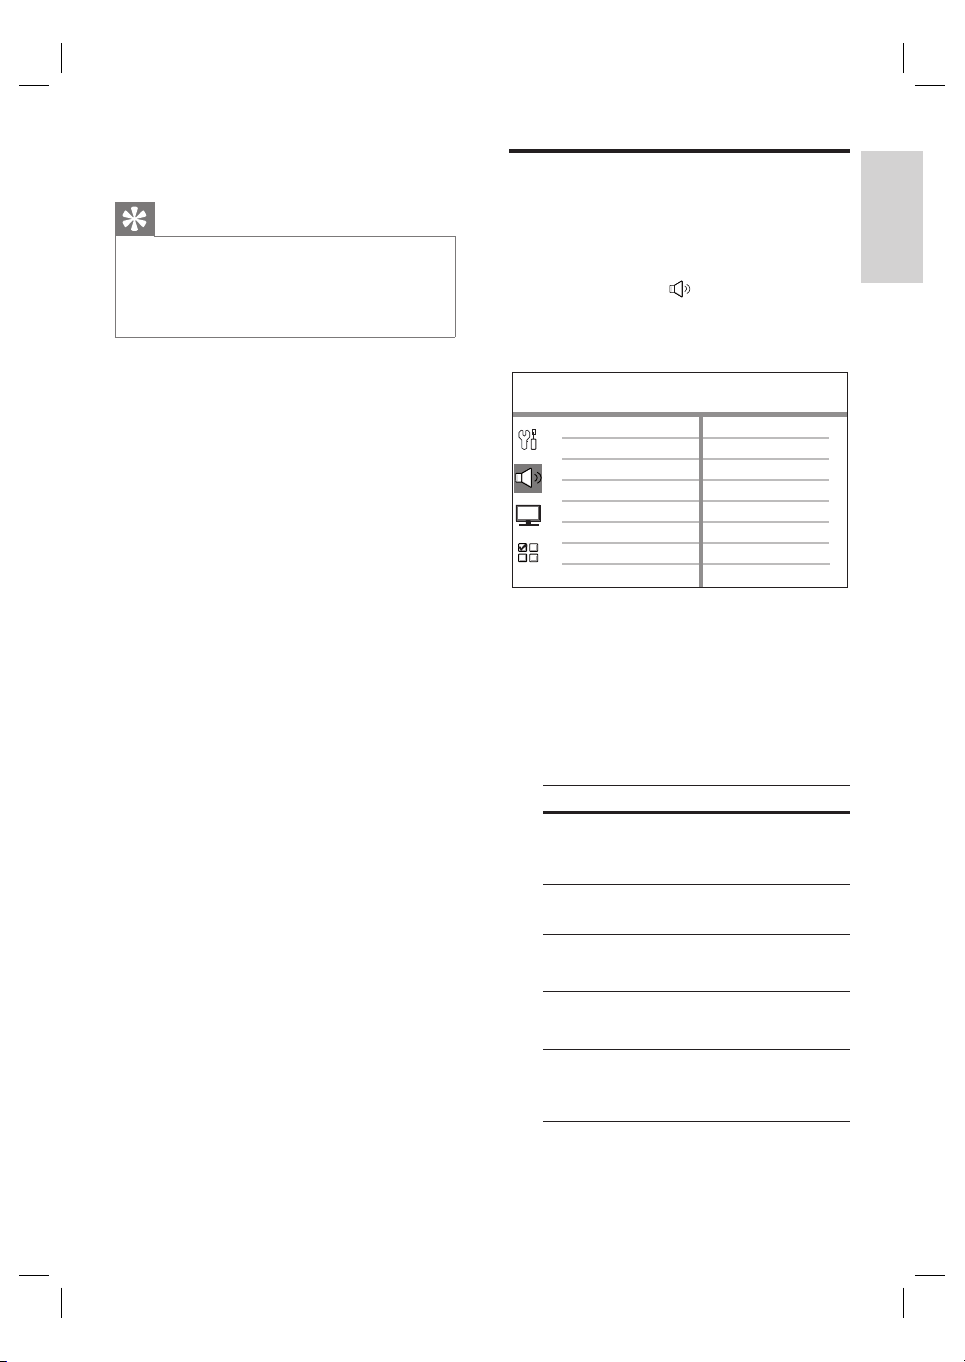
Audio setup
Press OPTIONS.
1
[ General Setup ] menu is displayed.
2 Press V to select [ Audio Setup ], then
press B.
3 Select an option, then press OK.
English
Audio Setup
Ambisound Setup
HDMI Audio
Night Mode
4 Select a setting, then press OK.
•
To return to the previous menu, press
BACK.
•
To exit the menu, press OPTIONS.
[ Ambisound Setup ]
Change the Ambisound setup.
Options Descriptions
[ Setup
Guide ]
[ Room
Acoustics ]
[ Room
Placement ]
Select this if you want to
go through the complete
Ambisound settings.
Select the type of walls
that surround your room.
Select this unit placement
in the room.
Adjust settings
[Height ] Select the height at which
this unit is placed.
[ Listening
Position ]
Select the distance
between your listening
position and this unit.
EN 39
Page 40

Tips
See chapter ‘Get Started - Start Ambisound setup’
•
for detailed information.
[ HDMI Audio ]
When you connect this unit and TV with
HDMI cable, select the audio output
setting for this connection.
•
[ On ] – the sound is output through
both your TV and this speaker system.
If the audio format on the disc is not
supported, it will be downmixed to
two-channel sound (linear-PCM).
•
[ Off ] – disable audio output from
your TV. The sound is only output
through this speaker system.
[ Night Mode ]
Make loud sound level softer and soft
sound level louder so that you can watch
the DVD movies at a low volume, without
disturbing others.
[ On ] – for quiet viewing at night
•
(DVDs only).
[ Off ] – enjoy surround sound with a
•
full dynamic range.
Video setup
Press OPTIONS.
1
[ General Setup ] menu is displayed.
2 Press V to select [ Video Setup ], then
press B.
3 Select an option, then press OK.
Video Setup
TV Type
TV Display
Picture Settings
HDMI Setup
Closed Caption
Progressive
See the explanations of the above
•
options in the following pages.
4 Select a setting, then press OK.
To return to the previous menu, press
•
BACK.
To exit the menu, press OPTIONS.
•
40 EN
Page 41
[ TV Type ]
Change this setting only if the video does
not appear correctly. By default, this
setting matches the most common setting
for TVs in your country.
•
[ PAL ] – for PAL-system TV.
•
[ NTSC ] – for NTSC-system TV.
•
[ Multi ] – for TV that is compatible
with both PAL and NTSC.
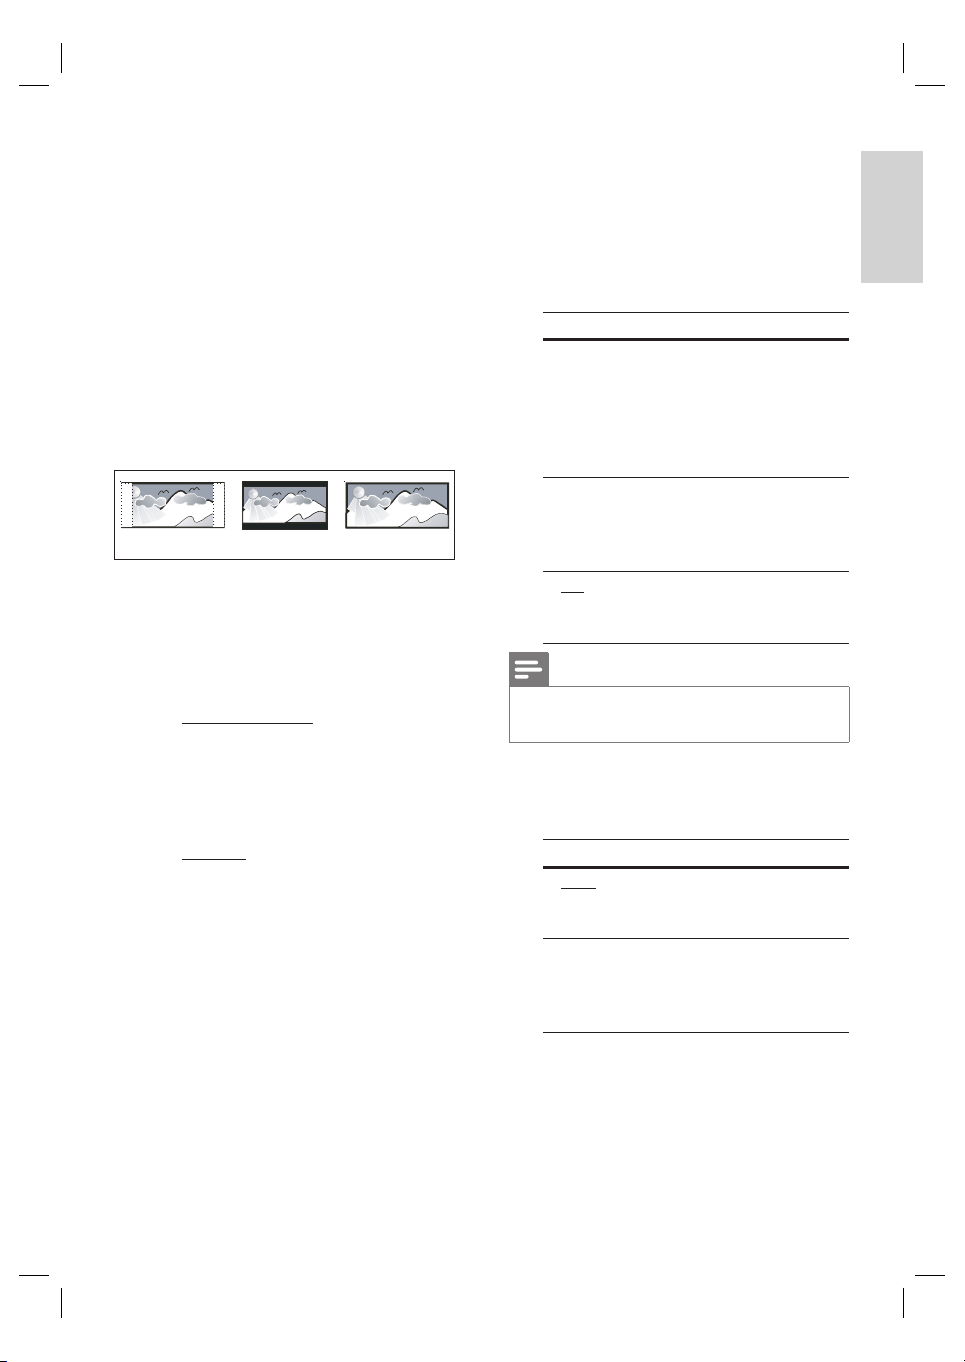
[ TV Display ]
Select the screen format according to how
you want the picture to appear on your
TV.
4:3 Pan Scan (PS)
•
[ 4:3 Pan Scan ] – for standard TV, a
4:3 Letter Box (LB)
16:9 (Wide Screen)
full-height screen display with the sides
trimmed.
•
[ 4:3 Letter Box ] – for standard TV, a
‘wide-screen’ display with black bars on
the top and bottom.
•
[ 16:9 Wide Screen ] – for wide-screen
TV (frame ratio 16:9).
[ HDMI Setup ]
When you connect this unit and TV with
HDMI cable, select the best HDMI setup
that your TV can support.
[ Wide Screen Format ] – defi ne the
•
wide screen format for disc play.
Options Descriptions
[ Superwide ] Centre position of the
screen is stretched less
than the side. This
setting is only applicable
if the video resolution is
set to 720p or 1080i/p.
[ 4:3 Pillar
Box ]
[ Off ] Picture will be displayed
Note
This setting is only available if you have set the [ TV
•
Display ] set ting to [ 16:9 Wide Screen ].
No stretching of the
picture. Black bars are
displayed on both sides
of the screen.
according to the format
of the disc.
English
Adjust settings
[ Picture Settings ]
Select a predefi ned set of picture colour
settings or customise your personal setting.
•
[ Standard ] – original colour setting.
•
[ Bright ] – vibrant colour setting.
•
[ Soft ] – warm colour setting.
•
[ Personal ] – customise the colour
setting. Set the level of brightness,
contrast, tint and colour saturation in
the menu, then press OK.
•
[ HDMI Video ] – select a video
resolution that is compatible with your
TV display capability.
Options Descriptions
[ Auto ] It detects and selects the
best supported video
resolution automatically.
[ 480p, 576p,
720p, 1080i,
1080p ]
Select a video resolution
that best supported by
your TV. See your TVs
manual for details.
EN 41
Page 42
Note
If the setting is not compatible with your TV, a
•
blank screen appears. Wait for 15 seconds for auto
recover or press HDMI repeatedly until the picture
appears.
[ Closed Caption ]
Turn on or off display captions.
•
[ On ] – show the sound effects in
subtitle. Only applicable to disc with
Closed Caption information included
and your TV supports this feature.
•
[ Off ] – disable closed caption.
[ Progressive ]
If your TV can support progressive signals,
you can activate the progressive scan
mode of this unit.
[ On ] – turn on progressive scan
•
mode.
[ Off ] – disable progressive scan mode.
•
Tips
See chapter ‘Get Star ted - Turn on Progressive Scan’
•
for detailed information.
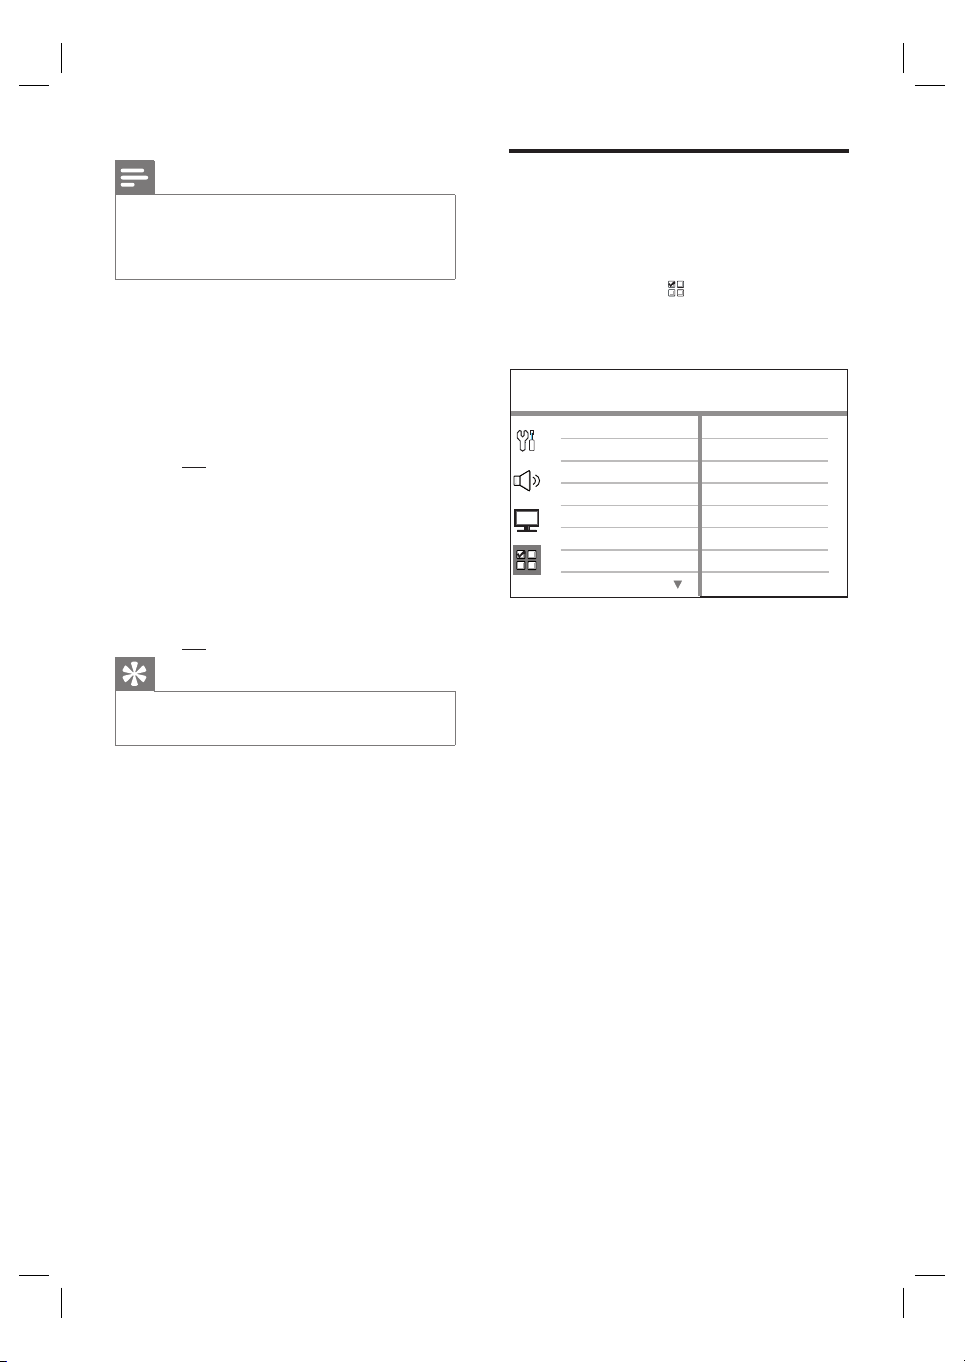
Preference Setup
Press OPTIONS.
1
[ General Setup ] menu is displayed.
2 Press V to select [ Preference Setup ],
then press B.
3 Select an option, then press OK.
Preference Setup
Audio
Subtitle
Disc Menu
Parental
PBC
MP3/JPEG Nav
Password
DivX Subtitle
See the explanations of the above
•
options in the following pages.
4 Select a setting, then press OK.
To return to the previous menu, press
•
BACK.
To exit the menu, press OPTIONS.
•
42 EN
Page 43
[ Audio ]
Select the default audio language for
DVDs.
[ Subtitle ]
Select the default subtitle language for
DVDs.
[ Disc Menu ]
Select the menu language for DVDs.
Note
If the language you have set is not available on the
•
disc, the disc uses its own default language.
•
For some DVDs, the subtitle/audio language can only
be changed from the disc menu.
•
To select t he languages that are not listed in the
menu, select [ Others ]. Then check the Language
Code list at the back of this user manual and key in
the respec tive 4-digit language code .
[ Parental ]
Restrict access to DVDs that are unsuitable
for your children. These types of DVDs
must be recorded with ratings.
1.
To start, press OK.
2.
Select a rating level in the menu, then
press
OK.
Press the
3.
number buttons to key in
your 6-digit password.
Note
Rated DVDs above the level you set in [ Parental ]
•
require a pa ssword to be played.
•
The ratings are countr y-dependent. To allow all discs
to play, select ‘ 8’.
•
Some DVDs have r atings printed on them but ar e
not recorded with ratings. This function has no
effect on such DVDs.
Tips
To set or change your pa ssword, go to
•
[ Preference Setup ] > [ Password ].
[ PBC ]
For VCDs/SVCDs recorded with PBC
(playback control,) you can access the disc
contents through an interactive menu.
[ On ] – an index menu is displayed
•
when you load a disc for play.
[ Off ] – skip the menu and start play
•
from the fi rst title.
[ MP3/JPEG Nav ]
Turn off or on MP3/WMA folder display
when you play a media that contains MP3/
WMA fi les.
[ Without Menu ] – display all the fi les.
•
[ With Menu ] – display the folders of
•
MP3/WMA fi les.
[ Password ]
Follow the instructions on the TV to set or
change the password for locked discs and
play restricted DVDs.
Change Password
Old Password
New Password
Confirm PWD
OK
1.
Press the number buttons to key
in ‘136900’ or your last set 6-digit
password at [ Old Password ] fi eld.
2.
Key in the new password at [ New
Password ] fi eld.
3.
Key in the new password again at
[ Confi rm PWD ] fi eld.
4.
Press OK to exit the menu.
Note
If you forget your 6- digit password, key in ‘ 136900’
•
before you set a new password.
English
Adjust settings
EN 43
Page 44
[ DivX Subtitle ]
Select a character set that supports the
DivX subtitle.
[ Standard ] English, Irish, Danish,
Estonian, Finnish, French,
German, Italian, Portuguese,
Luxembourgish, Norwegian
(Bokmål and Nynorsk),
Spanish, Swedish, Turkish
[ Central
Europe ]
Polish, Czech, Slovak,
Albanian, Hungarian,
Slovene, Croatian, Serbian
(Latin script), Romanian
[ Cyrillic ] Belarusian, Bulgarian,
Ukrainian, Macedonian,
Russian, Serbian
[ Greek ] Greek
[ Hebrew ] Hebrew
Note
Ensur e that the subtitle fi le has the exact same fi le
•
name as the movie fi le. If for example the fi lename of
the movie is ‘Movie .avi’, then you will need to name
the text fi le ‘Movie .sub’ or ‘Movie.sr t’.
[ Version Info ]
Display the software version of this unit.
Tips
This information is required when you want to fi nd
•
out if a newest software ver sion is available at the
Philips website that you may download and install on
this unit.
[ Default ]
Reset all the settings of this unit to factory
default, except for [ Disc Lock ],
[ Password ] and [ Parental ] settings
remain unchanged.
44 EN
Page 45
8 Additional
information
Update software
6 Insert the CD-R or USB fl ash drive to this
unit.
7 Press DISC or USB, then follow the
instruction on the TV to confi rm update
operation.
Note
Do not remove the CD-R or USB when software
•
updating is in progress .
English
Philips provides software upgrades to ensure
that this unit is compatible with the newest
formats.
To check for updates, compare the current
software version of this unit with the latest
software version available at the Philips website.
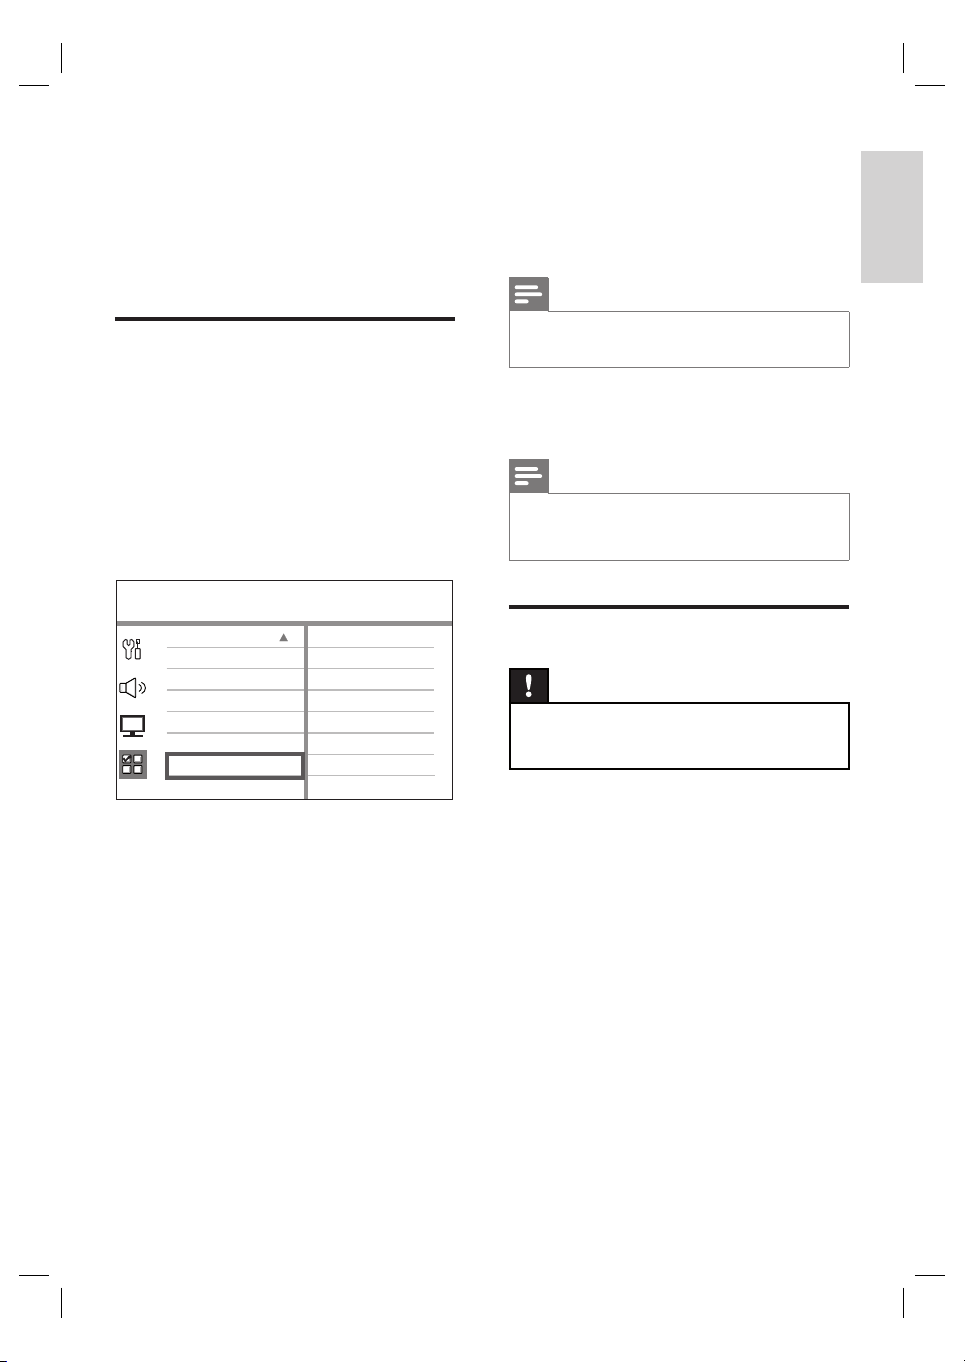
1 Press OPTIONS, .
Preference Setup
Disc Menu
Parental
PBC
MP3/JPEG Nav
Password
DivX Subtitle
Version Info
Default
2 Select [ Preference Setup ] > [ Version
Info ], then press OK.
3 Write down the version number, then
press OPTIONS to exit the menu.
4 Go to www.philips.com/support to check
the latest software version available for this
unit.
5 If the latest software version is higher than
the software version of this unit, download
it and store onto a CD-R or USB fl ash
drive
8 Once software update is complete, this
unit turns off to standby automatically.
Note
We recommend that you disconnect t he power cord
•
for a few seconds and connect again to r eboot the
system.
Care
Caution!
Never use solvents such as benzene, thinner,
•
cleaners available commercially, or anti-st atic sprays
intended for discs .
Clean discs
Wipe the disc with a micro fi bre cleaning cloth
from the centre to the edge in a straight line
movement.
Clean main unit screen
Wipe the screen surface with a micro fi bre
cleaning cloth.
Additional information
EN 45
Page 46

Specifi cations
Note
Specifi cation and design are subject to change
•
without notice.
Accessories supplied
•
Quick Start Guide
•
Remote control and batteries
•
Composite video cable (yellow)
•
HDMI cable
•
3.5mm stereo audio cable
•
Power cable
•
Subwoofer
•
Wall mount bracket and 2 wall mount knobs
•
FM wire antenna / AM-MW loop antenna
•
Round-to-Flat pin adaptor (for certain region only)
•
Micro fi bre cleaning cloth
Amplifi er
•
Total output power (Home Theatre): 600W
•
Frequency response: 20 Hz - 20 kHz / ±3dB
•
Signal-to-noise ratio: > 65 dB (CCIR)
•
Input sensitivity
•
AUX 1: 550 mV
•
MP3 LINK: 320 mV
Radio
•
Tuning range: FM 87.5-108 MHz (100 kHz),
AM/MW 531-1602 kHz (9 kHz)
AM/MW 530-1700 kHz (10 kHz)
•
26 dB quieting sensitivity: FM 22 dBf, AM 4μV/m
•
IF rejection ratio: FM 60 dB, AM 45 dB
•
Signal-to-noise ratio: FM 60 dB, AM 40 dB
•
Harmonic distortion: FM 3%, AM 5%
•
Frequency response: FM 180 Hz~9 kHz / ±6dB
•
Stereo separation: FM 26 dB (1 kHz)
•
Stereo Threshold: FM 23.5 dB
USB
Compatibility: Hi-Speed USB (2.0)
•
Class support: UMS (USB Mass Storage Class)
•
Power (Subwoofer)
Power supply: 110-127V / 220-240V ~50-60 Hz
•
Power consumption: 150 W
•
•
Standby power consumption
•
Normal: < 3 W
•
Low standby: < 0.3 W
•
System: Bass Refl ex System
•
Impedance: 4 ohm
•
Speaker drivers: 165 mm (6 1/2”) woofer
•
Frequency response: 30 Hz - 160 Hz
•
Dimensions (WxHxD): 295 x 440 x 295 (mm)
•
Weight: 10 kg
Disc
•
Laser Type: Semiconductor
•
Disc diameter: 12cm / 8cm
•
Video decording: MPEG1/ MPEG2 / DivX /
DivX Ultra
•
Video DAC: 12 bits, 148 MHz
•
Signal system: PAL / NTSC
•
Video S/N: 56 dB
•
Audio DAC: 24 bits / 192 kHz
•
Frequency response: 20 Hz - 20 kHz
•
PCM: IEC 60958
•
Dolby Digital, DTS: IEC60958, IEC61937
46 EN
Main unit
Dimensions (WxHxD): 958 x 163 x 141 (mm)
•
Net Weight: 7 kg
•
Centre speaker:
•
Speaker impedance: 8 ohm
•
Speaker drivers: 2x 63.5mm woofer + 19mm
•
tweeter
Frequency response: 190 Hz - 20 kHz
•
Left/Right surround speakers:
•
Speaker impedance: 8 ohm
•
Speaker drivers: 2x 63.5mm full range
•
Frequency response: 190 Hz - 20 kHz
•
Page 47
9 Troubleshooting
Warning!
Risk of elec tric shock. Never remove the casing of
•
this unit.
To keep the warranty valid, never try to repair the system yourself.
If you encounter problems when using this unit, check the following
points before requesting service. If the problem remains unsolved,
register your product and get support at www.philips.com/welcome.
Main unit
The buttons on this unit do
not work.
•
Disconnect this unit from the power outlet for a few minutes,
then connect again.
Ensure that the interconnect cable from the subwoofer is
•
connected to the DVD Home Theatre unit.
Picture
No picture. Refer to your TVs manual for correct video input channel
•
selection. Change the TV channel until you see the DVD screen.
Press DISC.
•
If this happens when you turn on the progressive scan setting or
•
change the TV type setting, you have to switch to its default
mode:
Press Z to open the disc compartment.
1.
Press B (for progressive scan) or b (for TV type).
2.
Press SUBTITLE.
3.
English
Tro ublesh ooting
No picture on HDMI
connection.
Check if the HDMI cable is faulty. Replace a new HDMI cable.
•
If this happens when you change the HDMI video resolution,
•
press HDMI repeatedly until the picture appears.
EN 47
Page 48

Sound
No sound. Ensure that the audio cables are connected and press the
No sound on HDMI
connection.
No sound from TV
programmes.
•
correct input source (for example, AUX/DI /MP3 LINK, USB) to
select the device you want to play.
•
You may not hear any sound from the HDMI output if the
connected device is non-HDCP compliant or only DVIcompatible.
Ensure that the [ HDMI Audio ] setting is turned on.
•
Connect an audio cable from the AUDIO input on this unit to
•
the AUDIO output on your TV. Then press AUX/DI /MP3
LINK repeatedly to select the corresponding audio input source.
Play
DivX video fi les cannot be
played.
The aspect ratio of the
screen is not aligned with
the TV display setting.
Ensure that the DivX fi le is encoded according to the ‘Home
•
Theatre Profi le’ with the DivX encoder.
Ensure that the DivX video fi le is complete.
•
The aspect ratio is fi xed on the DVD.•
DivX subtitle are not
displayed correctly.
The contents of the USB
fl ash drive cannot be read.
48 EN
Ensure that the subtitle fi le name is the same as the movie fi le
•
name.
Select the correct character set.
•
Press OPTIONS.
1.
Press B, then select [ DivX Subtitle ] in the menu.
2.
Select the character set that supports the subtitle.
3.
•
The USB fl ash drive format is not compatible with this unit.
•
Drive is formatted with different fi le system which is not
supported by this unit (e.g. NTFS).
•
Maximum size of memory supported is 160GB.
Page 49

10 Glossary
Aspect ratio
Aspect ratio refers to the length to height ratio
of TV screens. The ratio of a standard TV is
4:3, while the ratio of a high-defi nition or wide
TV is 16:9. The letter box allows you to enjoy
a picture with a wider perspective on a standard
4:3 screen.
DivX
The DivX code is a patent-pending, MPEG-4
based video compression technology,
developed by DivX Networks, Inc., that can
shrink digital video to sizes small enough to be
transported over the internet, while maintaining
high visual quality.
Dolby Digital
A surround sound system developed by Dolby
Laboratories containing up to six channels of
digital audio (front left and right, surround left
and right, centre and subwoofer).
HDMI
High-Defi nition Multimedia Interface (HDMI) is
a high-speed digital interface that can transmit
uncompressed high defi nition video and digital
multichannel audio. It delivers high quality
picture and sound quality, completely free from
noise. HDMI is fully backward-compatible with
DVI.
As required by the HDMI standard, connecting
to HDMI or DVI products without HDCP
(High-bandwidth Digital Content Protection)
will result in no Video or Audio output.
HDCP
High-bandwidth Digital Content Protection is a
specifi cation that provides a secure transmission
of digital contents between different devices (to
prevent unauthorised copyright).
JPEG
A very common digital still picture format. A
still-picture data compression system proposed
by the Joint Photographic Expert Group, which
features small decrease in image quality in spite
of its high compression ratio. Files are
recognised by their fi le extension ‘JPG or JPEG’.
MP3
A fi le format with a sound data compression
system. ‘MP3’ is the abbreviation of Motion
Picture Experts Group 1 (or MPEG-1) Audio
Layer3. By using the MP3 format, one CD-R or
CD-RW can contain about 10 times more data
than a regular CD. Files are recognised by their
fi le extension ‘.MP3’.
MPEG
Motion Picture Experts Group. A collection of
compression systems for digital audio and
video.
PBC
Playback Control. A system of navigating a
Video CD/Super VCD through on-screen
menus recorded onto the disc. You can enjoy
interactive playback and searching.
PCM
Pulse Code Modulation. A digital audio
encoding system.
Progressive Scan
The progressive scan displays twice the number
of frames per seconds than ordinary TV system.
It offers higher picture resolution and quality.
WMA
Windows Media™ Audio. Refers to an audio
compression technology developed by
Microsoft Corporation. WMA data can be
encoded by using Windows Media Player
version 9 or Windows Media Player for
Windows XP. Files are recognised by their fi le
extension ‘WMA’.
English
Glossary
EN 49
 Loading...