

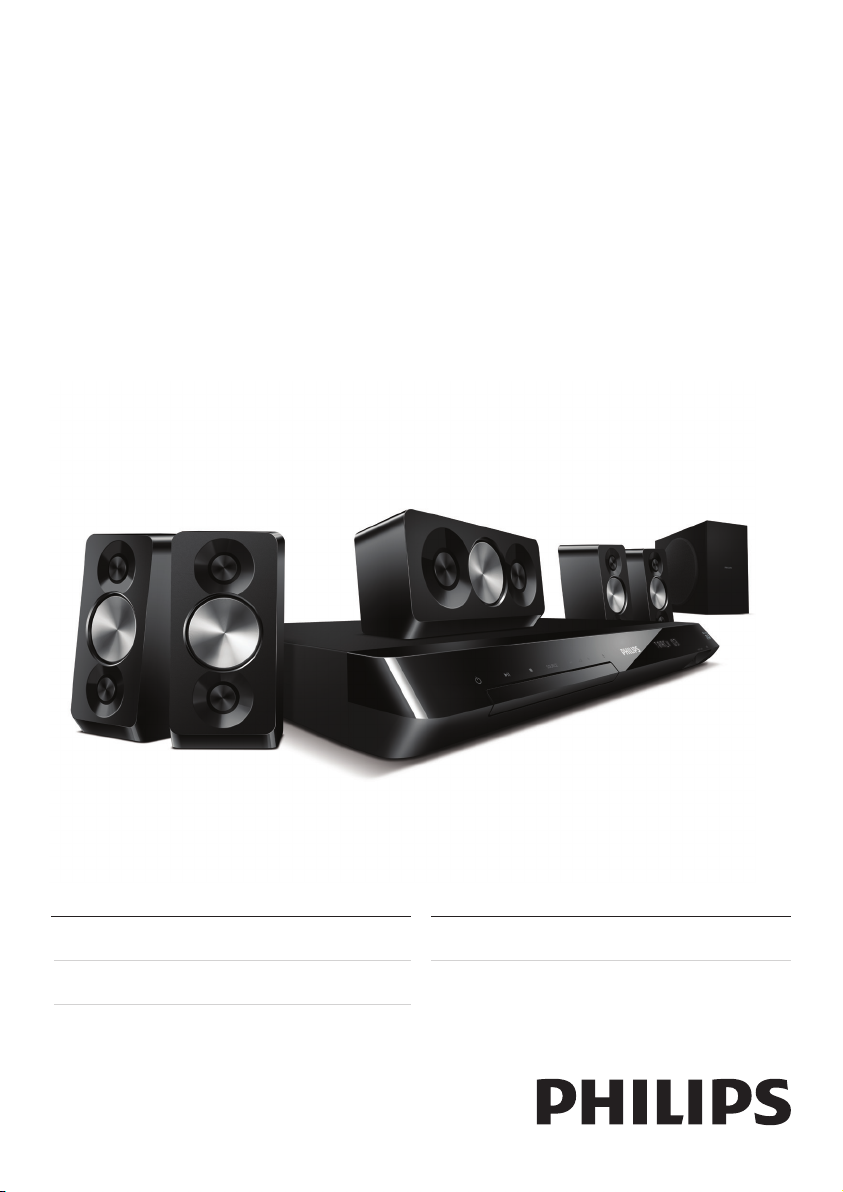
Philips HTS5563/55 instructions for use
Register your product and get support at
www.philips.com/welcome
HTS5563
Manual do Usuário
Manual del usuarioUser manual

Contents
1 Help and support 2
Use onscreen Help (user manual) 2
Navigate onscreen Help 2
2 Important 3
Safety 3
Care for your product 4
Care of the environment 4
3D health warning 4
3 Your home theater 5
Remote control 5
Main unit 6
Connectors 7
6 Change settings 25
Language settings 25
Picture and video settings 25
Audio settings 26
Parental control settings 26
Display settings 26
Energy saving settings 26
Speaker settings 27
Restore default settings 27
7 Update software 27
Check software version 27
Update software through USB 28
Update software through the Internet 28
Update the onscreen help 28
8 Productspecications 29
English
4 Connect and set up 8
Connect speakers 8
Connect to TV 9
Connect digital devices through HDMI 11
Connect audio from TV and other devices 11
Set up speakers 12
Set up EasyLink (HDMI-CEC control) 12
Connect and set up a home network 13
5 Use your home theater 14
Access the home menu 14
Discs 15
Data les 16
USB storage devices 17
Audio, video, and picture options 17
Radio 19
MP3 player 19
iPod or iPhone 20
Smartphone control 20
Browse Net TV 21
Browse PC through DLNA 23
Karaoke 23
Choose sound 24
9 Troubleshooting 33
10 Notice 35
Open source software 35
RMVB end user agreement (Asia Pacic
and China only) 35
Trademarks 35
11 Language code 37
12 Index 38
EN
1

1 Help and support
Navigate onscreen Help
Philips provides extensive online support. Visit our
website at www.philips.com/support to:
• download the complete user manual
• print the quick start guide
• watch video tutorials (available only for
selected models)
• nd answers to frequently answered
questions (FAQs)
• email us a question
• chat with our support representative.
Follow the instructions on the website to select
your language, and then enter your product model
number.
Alternatively, you can contact Philips Consumer
Care in your country. Before you contact Philips,
note down the model number and serial number
of your product. You can nd this information on
the back or bottom of your product.
Use onscreen Help (user
manual)
For easy access, the onscreen help (user manual) is
stored on your home theater.
The onscreen help has two panels.
• The left panel contains two tabs - Contents
and Index. Navigate the Contents or Index
to select a topic. The legends used to display
the Contents are as follows:
• : Press OK to expand the subtopics.
• : Press OK to collapse the subtopics,
or press Navigation buttons (up/down)
to select a topic.
• The right panel contains the content of the
selected topic. For additional help on the
content, scroll down the page to see Related
topics.
Use the home theater remote control to select
and navigate the onscreen help (see 'Navigate
onscreen Help' on page 2).
Press a button on your remote control to use
onscreen help.
Button Action
HELP Access or exit onscreen help.
OK Display the selected page, or
Navigation
buttons
BACK
(Previous)
(Next)
expand subtopics in Contents.
Up: Scroll up or move to the
previous page.
Down: Scroll down or move to the
next page.
Right: Navigate to the right panel or
next index entry.
Left: Navigate to the left panel or
previous index entry.
Move up in the Contents or Index.
From the right panel, move to the
Contents on the left panel.
Display the last viewed page in
history.
Display the next page from history.
2 EN

2 Important
Read and understand all instructions before you
use your product. If damage is caused by failure to
follow instructions, the warranty does not apply.
Safety
Riskofelectricshockorre!
• Never expose the product and accessories to
rain or water. Never place liquid containers,
such as vases, near the product. If liquids are
spilt on or into the product, disconnect it
from the power outlet immediately. Contact
Philips Consumer Care to have the product
checked before use.
• Never place the product and accessories
near naked ames or other heat sources,
including direct sunlight.
• Never insert objects into the ventilation slots
or other openings on the product.
• Where the mains plug or an appliance
coupler is used as the disconnect device,
the disconnect device shall remain readily
operable.
• Disconnect the product from the power
outlet before lightning storms.
• When you disconnect the power cord, always
pull the plug, never the cable.
Riskofshortcircuitorre!
• Before you connect the product to the
power outlet, ensure that the power voltage
matches the value printed on the back or
bottom of the product. Never connect the
product to the power outlet if the voltage is
different.
Riskofinjuryordamagetothehometheater!
• For wall-mountable products, use only the
supplied wall mount bracket. Secure the
wall mount to a wall that can support the
combined weight of the product and the
wall mount. Koninklijke Philips Electronics
N.V. bears no responsibility for improper wall
mounting that results in accident, injury or
damage.
• For speakers with stands, use only the
supplied stands. Secure the stands to the
speakers tightly. Place the assembled stands
on at, level surfaces that can support the
combined weight of the speaker and stand.
• Never place the product or any objects
on power cords or on other electrical
equipment.
• If the product is transported in temperatures
below 5°C, unpack the product and wait until
its temperature matches room temperature
before connecting it to the power outlet.
• Visible and invisible laser radiation when
open. Avoid exposure to beam.
• Do not touch the disc optical lens inside the
disc compartment.
• Parts of this product can be made of glass.
Handle with care to avoid injury and damage.
Riskofoverheating!
• Never install this product in a conned space.
Always leave a space of at least four inches
around the product for ventilation. Ensure
curtains or other objects never cover the
ventilation slots on the product.
Riskofcontamination!
• Do not mix batteries (old and new or carbon
and alkaine, etc.).
• Danger of explosion if batteries are
incorrectly replaced. Replace only with the
same or equivalent type.
• Remove batteries if they are exhausted or if
the remote control is not to be used for a
long time.
• Batteries contain chemical substances, they
should be disposed of properly.
Riskofswallowingbatteries!
• The product/remote control may contain
a coin/button type battery, which can be
swallowed. Keep the battery out of reach of
children at all times! If swallowed, the battery
can cause serious injury or death. Severe
internal burns can occur within two hours of
ingestion.
• If you suspect that a battery has been
swallowed or placed inside any part of the
body, seek immediate medical attention.
• When you change the batteries, always
keep all new and used batteries out of
reach of children. Ensure that the battery
compartment is completely secure after you
replace the battery.
• If the battery compar tment cannot be
completely secured, discontinue use of the
product. Keep out of reach of children and
contact the manufacturer.
English
EN
3

Care for your product
3D health warning
• Do not insert any objects other than discs
into the disc compartment.
• Do not insert warped or cracked discs into
the disc compartment.
• Remove discs from the disc compartment
if you are not using the product for an
extended period of time.
• Use only microber cloth to clean the
product.
Care of the environment
Your product is designed and manufactured with
high quality materials and components, which can
be recycled and reused.
When this crossed-out wheeled bin symbol is
attached to a product it means that the product
is covered by the European Directive 2002/96/
EC. Please inform yourself about the local separate
collection system for electrical and electronic
products.
Please act according to your local rules and do not
dispose of your old products with your normal
household waste.
Correct disposal of your old product helps to
prevent potential negative consequences for the
environment and human health.
If you or your family has a history of epilepsy
or photosensitive seizures, consult a medical
professional before exposing yourself to ashing
light sources, rapid image sequences or 3D
viewing.
To avoid discomfort such as dizziness, headache or
disorientation, we recommend not watching 3D
for extended periods of time. If you experience
any discomfort, stop watching 3D and do not
immediately engage in any potentially hazardous
activity (for example driving a car) until your
symptoms have disappeared. If symptoms persist,
do not resume watching 3D without consulting a
medical professional rst.
Parents should monitor their children during 3D
viewing and ensure they do not experience any
discomfort as mentioned above. Watching 3D is
not recommended for children under six years of
age as their visual system is not fully developed yet.
Your product contains batteries covered by the
European Directive 2006/66/EC, which cannot be
disposed with normal household waste.
Please inform yourself about the local rules on
separate collection of batteries because correct
disposal helps to prevent negative consequences
for the environmental and human health.
4 EN
3 Your home theater
Congratulations on your purchase, and welcome
to Philips! To fully benet from the support that
Philips offers, register your product at www.philips.
com/welcome.
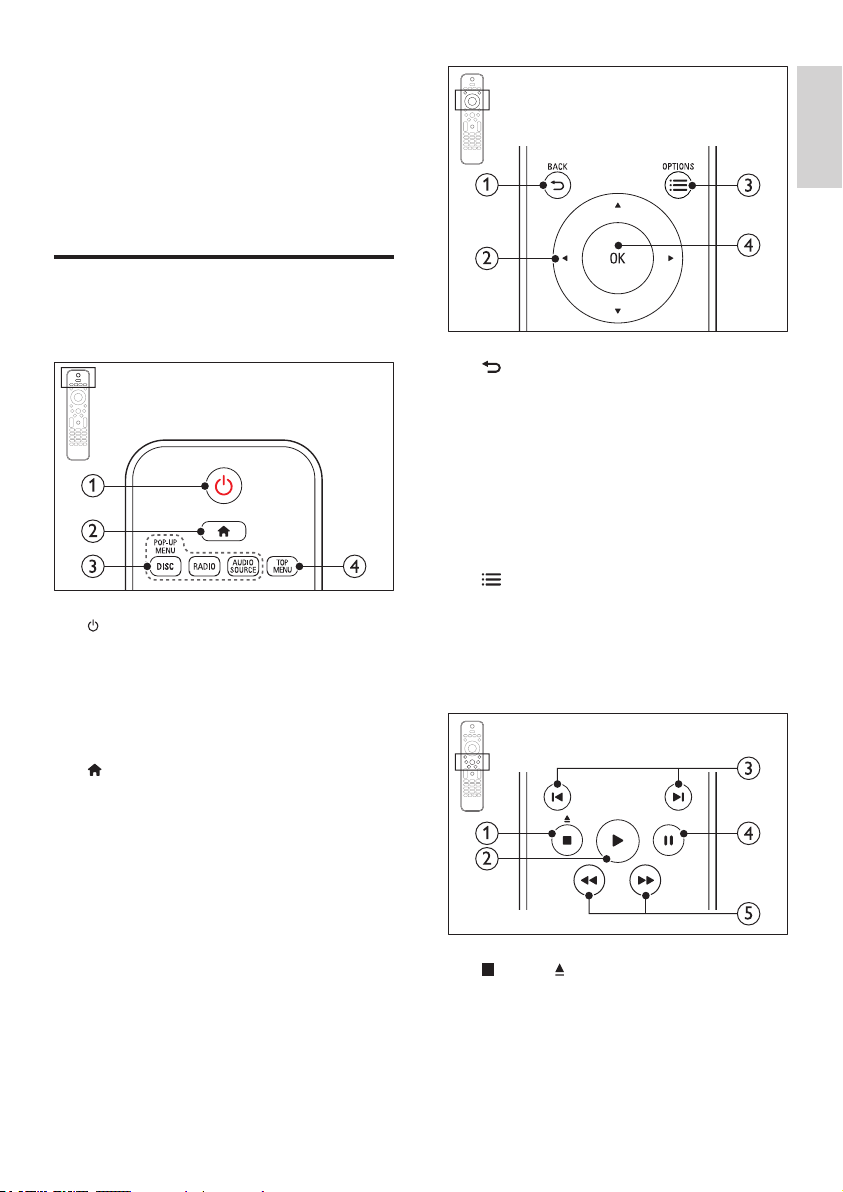
Remote control
This section includes an overview of the remote
control.
a (Standby-On)
• Switch the home theater on or to
standby.
• When EasyLink is enabled, press and hold
for at least three seconds to switch all
connected HDMI CEC compliant devices
to standby.
b (Home)
Access the home menu.
c Source buttons
• DISC/POP-UP MENU: Access or exit the
disc menu when you play a disc.
• RADIO: Switch to FM radio.
• AUDIO SOURCE: Select an audio input
source.
d TOP MENU
Access the main menu of a video disc.
English
a BACK
• Return to a previous menu screen.
• In radio mode, press and hold to erase
the current preset radio stations.
b Navigation buttons
• Navigate menus.
• In radio mode, press left or right to start
auto search.
• In radio mode, press up or down to tune
the radio frequency.
c OPTIONS
• Access more play options while playing a
disc or a USB storage device.
• In radio mode, set a radio station.
d OK
Conrm an entry or selection.
a (Stop) / (Eject/Open/Close)
• Stop play.
• Press and hold for three seconds to open
or close the disc compartment, or eject
the disc.
EN
5
b (Play)
Start or resume play.
c / (Previous/Next)
• Skip to the previous or next track,
chapter or le.
• In radio mode, select a preset radio
station.
d (Pause)
Pause play.
e / (Fast Backward/Fast Forward)
Search backwards or forward. Press
repeatedly to change the search speed.
a +/- (Volume)
Increase or decrease volume.
b SOUND SETTINGS
Access or exit sound options.
c (Mute)
Mute or restore volume.
d AUDIO
Select an audio language or channel.
a Alphanumeric buttons
Enter values or letters (using SMS style entry).
b REPEAT
Select or turn off repeat mode.
c DOCK for iPod
Switch to Philips dock for iPod or iPhone.
d SUBTITLE
Select subtitle language for video.
e Color buttons
Select tasks or options for Blu-ray discs.
f HELP
Access the onscreen help.
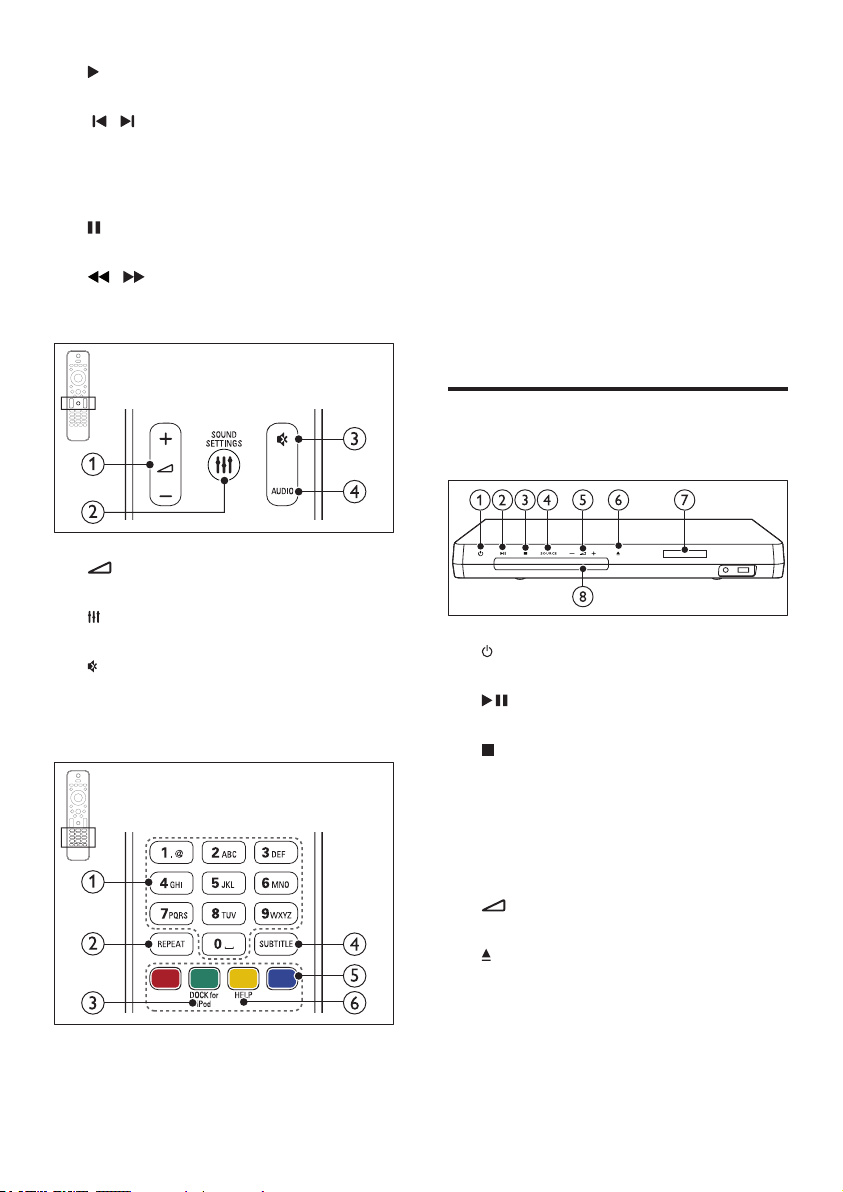
Main unit
This section includes an overview of the main unit.
a (Standby-On)
Switch the home theater on or to standby.
b (Play/Pause)
Start, pause or resume play.
c (Stop)
• Stop play.
• In radio mode, press and hold to erase
the current preset radio stations.
d SOURCE
Select an audio or video source for the home
theater.
e +/-
Increase or decrease volume.
f (Open/Close)
Open or close the disc compartment, or
eject the disc.
g Display panel
h Disc compartment
6 EN

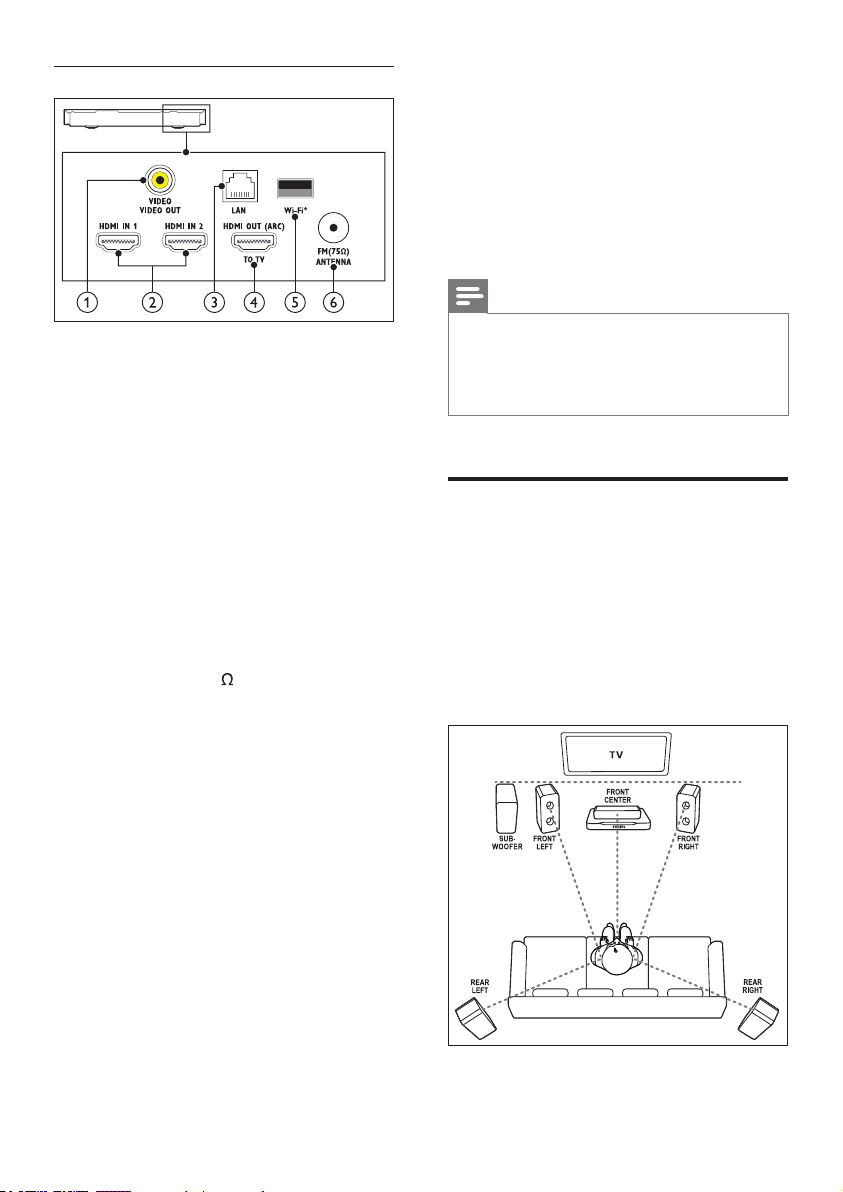
Connectors
Rear center
This section includes an overview of the
connectors available on your home theater.
Front connectors
a MUSIC iLINK / MIC (MIC is available only in
selected models)
Audio input from an MP3 player or a
microphone.
Audio input from a microphone. (Available
only in selected models)
b (USB)
Audio, video or picture input from a USB
storage device.
Rear left
English
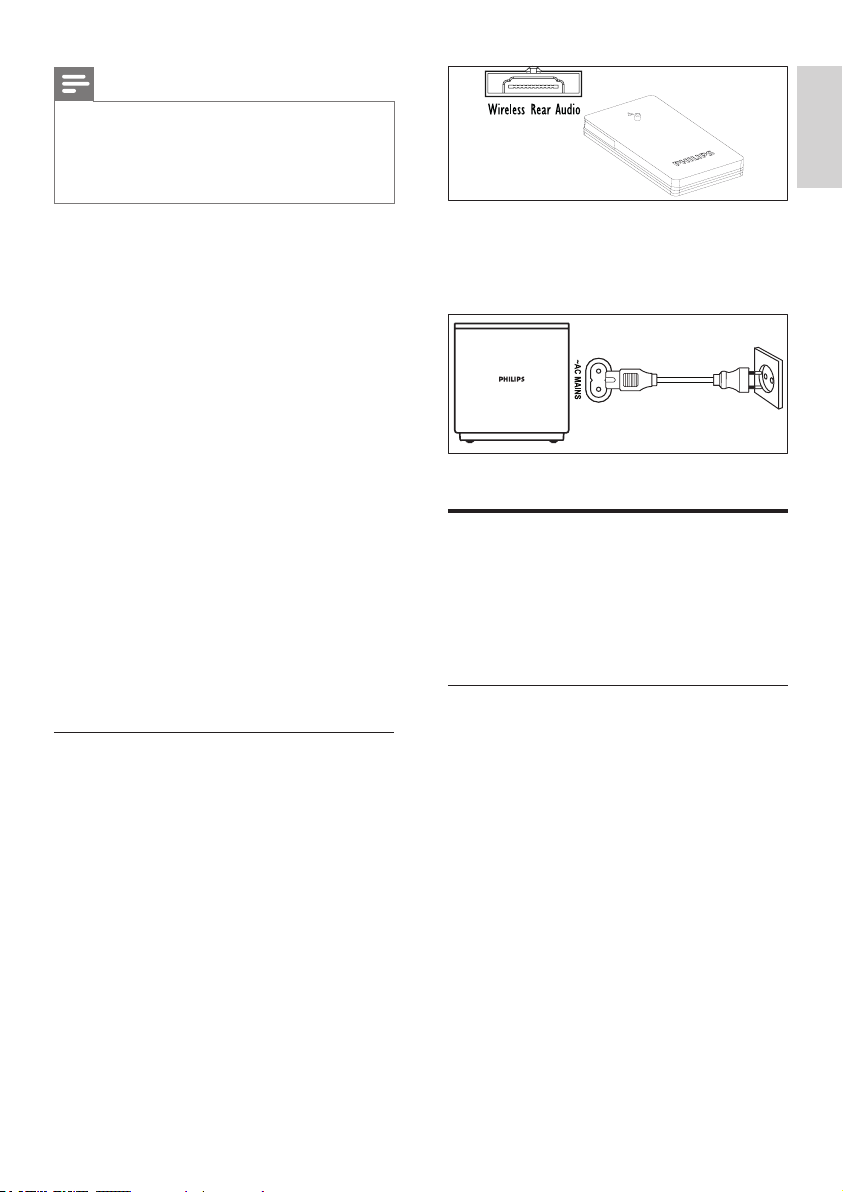
a Wireless Rear Audio
Connect to a Philips wireless module.(Model:
Philips RWSS5512, sold separately)
b DIGITAL IN-COAXIAL
Connect to a coaxial audio output on the TV
or a digital device.
a DIGITAL IN-OPTICAL
Connect to an optical audio output on the
TV or a digital device.
b AUDIO IN-AUX
Connect to an analog audio output on the TV
or an analog device.
a DOCK for iPod
Connect to a Philips dock for iPod or iPhone.
(Model: Philips DCK306x)
a SD CARD FOR VOD/BD-LIVE ONLY (Not
available in China)
Slot for SD card. The SD card is used to rent
online videos and access BD-Live.
a AC MAINS~
Connect to the power supply.
b SPEAKERS
Connect to the supplied speakers and
subwoofer.
EN
7
Rear right
4 Connect and set up
This section helps you connect your home theater
to a TV and other devices, and then set it up.
For information about the basic connections of
your home theater and accessories, see the quick
start guide. For a comprehensive interactive guide,
visit www.connectivityguide.philips.com.
a VIDEO-VIDEO OUT
Connect to the composite video input on
the TV.
b HDMI IN1 / HDMI IN2
Connect to the HDMI output on a digital
device.
c LAN
Connect to the LAN input on a broadband
modem or router.
d HDMI OUT (ARC)TO TV
Connect to the HDMI input on the TV.
e Wi-Fi
Connect to a Wi-Fi dongle (Model: Philips
WUB1110, sold separately).
f ANTENNA FM 75
Signal input from an antenna, cable or satellite.
Note
• For identication and supply ratings, see the type
plate at the back or bottom of the product.
• Before you make or change any connections,
make sure that all devices are disconnected from
the power outlet.
Connect speakers
The speaker cables are color-coded for easy
connection. To connect a speaker to your home
theater, match the color on the speaker cable to
the color on the connector.
Speaker position plays a critical role in setting up
a surround sound effect. For best effect, position
all the speakers towards the seating position and
place them close to your ear level (seated).
8 EN
Note
• Surround sound depends on factors such as
room shape and size, type of wall and ceiling,
windows and reective surfaces, and speaker
acoustics. Experiment with the speaker positions
to nd the optimum setting for you.
English
Follow these general guidelines for speakers
placement.
1 Seating position:
This is the center of your listening area.
2 FRONT CENTER (front center) speaker:
Place the center speaker directly in front of
the seating position, either above or below
your TV.
3 FRONT LEFT (front left) and FRONT
RIGHT (front right) speakers:
Place the left and right speakers in the front,
and at equal distance from the center speaker.
Make sure that the left, right, and the center
speakers are at equal distance from your
seating position.
4 REAR LEFT (rear left) and REAR RIGHT
(rear right) speakers:
Place the rear surround speakers to the left
and right side of your seating position, either
in line with it or slightly behind it.
5 SUBWOOFER (subwoofer):
Place the subwoofer at least one meter
to the left or right of the TV. Leave about
10-centimeter clearance from the wall.
Make your rear speakers wireless
Connect the rear speakers to your home theater
wirelessly using a wireless module accessory. For
details, see the wireless module user manual.
What you need
• A Philips wireless module. (Model: Philips
RWSS5512, sold separately)
1 Connect the wireless transmitter to the
Wireless Rear Audio connector on your
home theater.
2 Connect the rear speakers to the wireless
receiver.
3 Connect the wireless receiver to the power
supply.
Connect to TV
Connect your home theater to a TV to watch
videos. You can listen to the TV audio through your
home theater speakers.
Use the best quality connection available on your
home theater and TV.
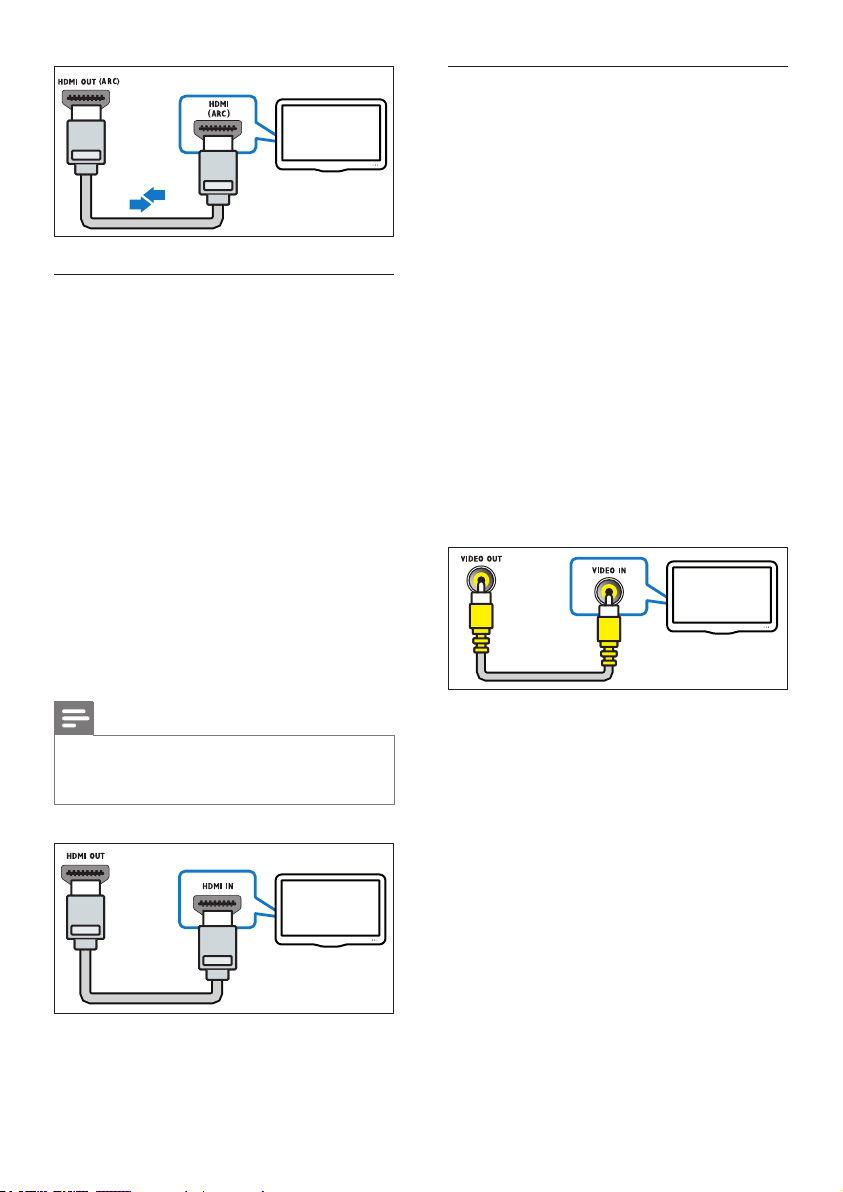
Option 1: Connect to TV through HDMI
(ARC)
Best quality video
Your home theater suppor ts HDMI version 1.4 Audio Return Channel (ARC). If your TV is HDMI
ARC compliant, you can hear the TV audio through
your home theater by using a single HDMI cable.
1 Using a High Speed HDMI cable, connect
the HDMI OUT (ARC) connector on your
home theater to the HDMI ARC connector
on the TV.
• The HDMI ARC connector on the TV
might be labeled differently. For details,
see the TV user manual.
2 On your TV, turn on HDMI-CEC operations.
For details, see the TV user manual.
• If you cannot hear the TV audio through
your home theater, set up the audio
manually (see 'Set up the audio' on page 13).
EN
9
TV
Option 2: Connect to TV through
standard HDMI
Best quality video
If your TV is not HDMI ARC compliant, connect
your home theater to the TV through a standard
HDMI connection.
1 Using a High Speed HDMI cable, connect the
HDMI OUT (ARC) connector on your home
theater to the HDMI connector on the TV.
2 Connect an audio cable to hear the TV audio
through your home theater (see 'Connect
audio from TV and other devices' on page
11).
3 On your TV, turn on HDMI-CEC operations.
For details, see the TV user manual.
• If you cannot hear the TV audio through
your home theater, set up the audio
manually (see 'Set up the audio' on page
13).
Option 3: Connect to the TV through
composite video
Basic quality video
If your TV does not have HDMI connectors, use
a composite video connection. A composite
connection does not support high-denition video.
1 Using a composite video cable, connect the
VIDEO connector on your home theater to
the VIDEO IN connector on the TV.
• The composite video connector might
be labeled AV IN, COMPOSITE, or
BASEBAND.
2 Connect an audio cable to hear the TV audio
through your home theater (see 'Connect
audio from TV and other devices' on page
11).
3 When you watch TV programs, press
SOURCE on your home theater repeatedly
to select the correct audio input.
4 When you watch videos, switch your TV to
the correct video input. For details, see the
TV user manual.
TV
Note
• If your TV has a DVI connector, you can use an
HDMI/DVI adapter to connect to TV. However,
some of the features may not be available.
TV
10 EN
Connect digital devices through
HDMI
Connect a digital device such as a set-top box,
games console, or camcorder to your home
theater through a single HDMI connection. When
you connect the devices in this way and play a le
or game, the
• video is automatically displayed on your TV,
and
• audio is automatically played on your home
theater.
1 Using a High Speed HDMI cable, connect the
HDMI OUT connector on your digital device
to the HDMI IN 1/2 on your home theater.
2 Connect your home theater to TV through
HDMI OUT (ARC).
• If the TV is not HDMI CEC compliant,
select the correct video input on your TV.
3 On the connected device, turn on HDMI-
CEC operations. For details, see the user
manual of the device.
• If you cannot hear the digital device
audio through your home theater, set
up the audio manually (see 'Set up the
audio' on page 13).
• You can also press SOURCE on your
home theater repeatedly to select the
correct HDMI input.
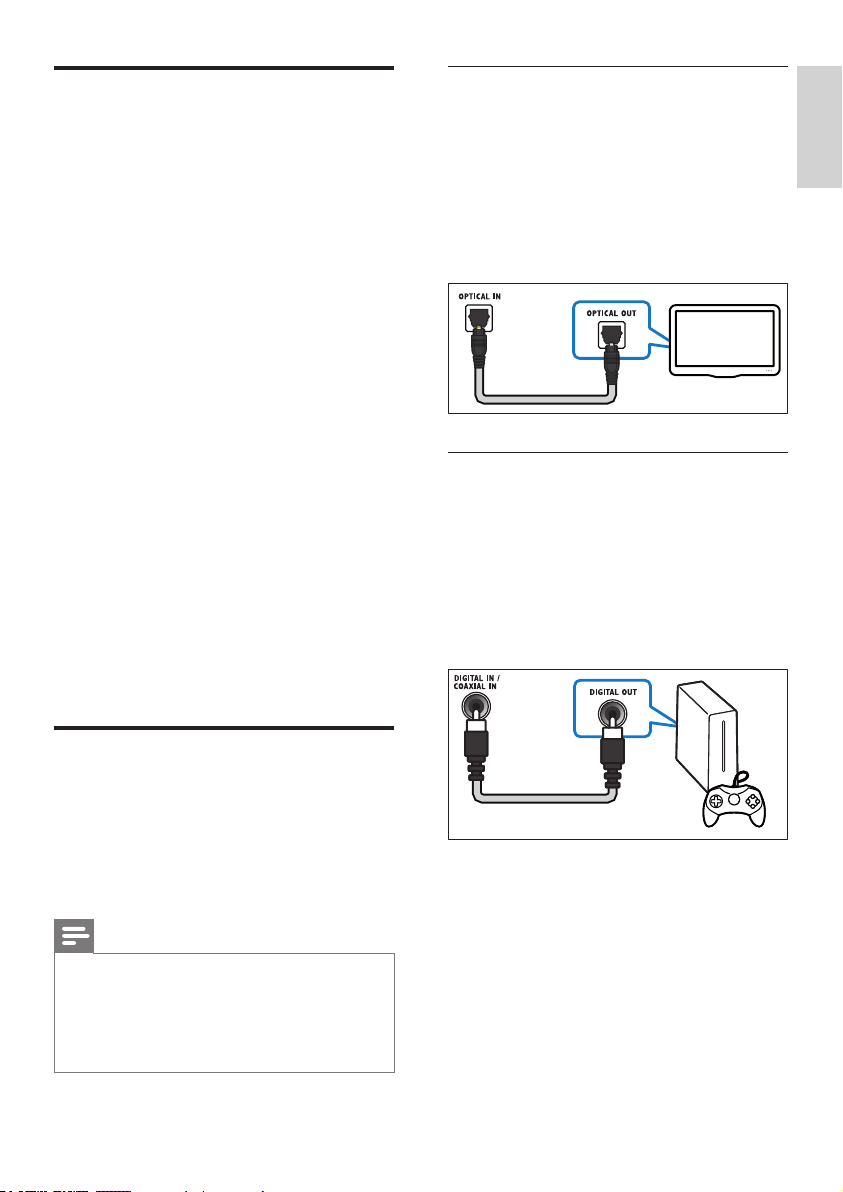
Option 1: Connect audio through a digital
optical cable
Best quality audio
1 Using an optical cable, connect the OPTICAL
connector on your home theater to the
OPTICAL OUT connector on the TV or
other device.
• The digital optical connector might be
labeled SPDIF or SPDIF OUT.
TV
Option 2: Connect audio through a digital
coaxial cable
Good quality audio
1 Using a coaxial cable, connect the COAXIAL
connector on your home theater to the
COAXIAL/DIGITAL OUT connector on the
TV or other device.
• The digital coaxial connector might be
labeled DIGITAL AUDIO OUT.
English
Connect audio from TV and
other devices
Play audio from TV or other devices through your
home theater speakers.
Use the best quality connection available on your
TV, home theater, and other devices.
Note
• The audio connections in this user manual
are only recommendations. You can use other
connections too.
• When your home theater and TV are connected
through HDMI ARC, an audio connection is not
required.
EN
11
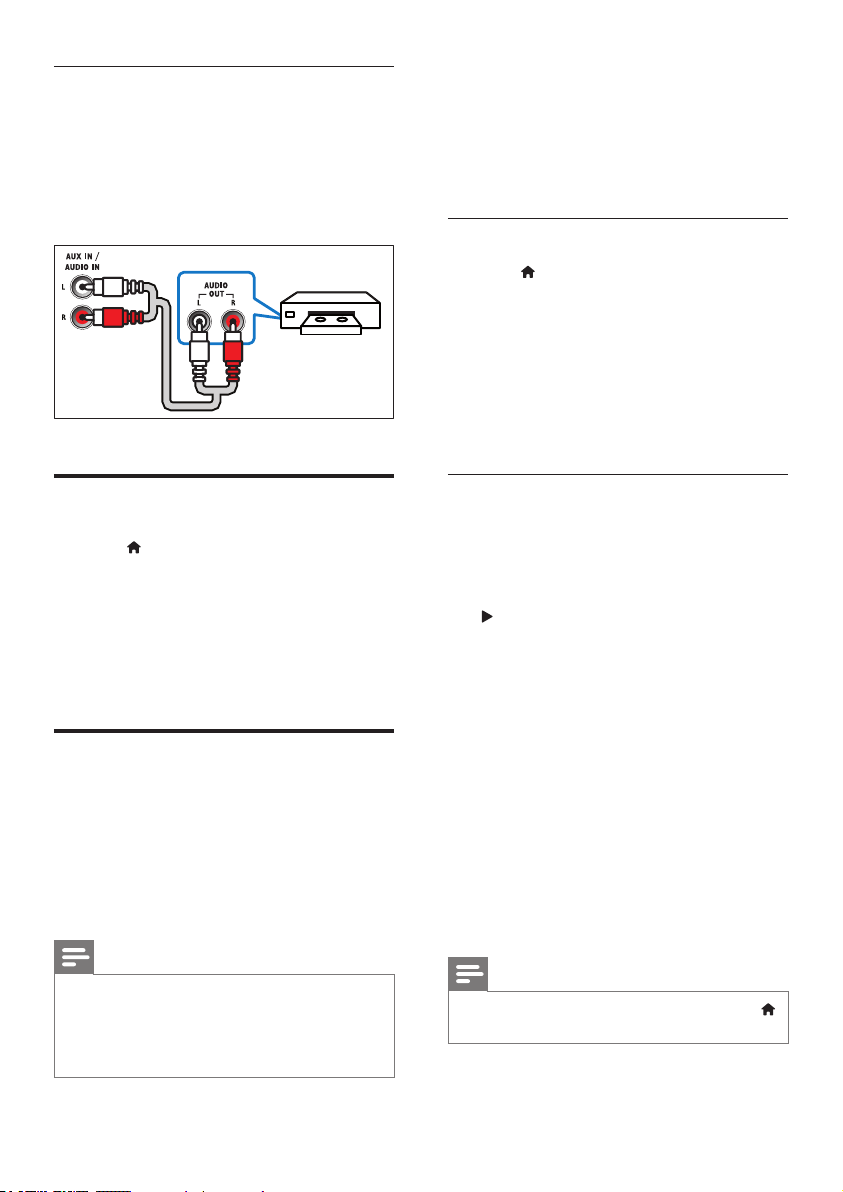
Option 3: Connect audio through analog
audio cables
Basic quality audio
1 Using an analog cable, connect the AUX
connectors on your home theater to the
AUDIO OUT connectors on the TV or other
device.
Before you start
• Connect your home theater to the HDMI-
CEC compliant device through HDMI
connection.
• Make the necessary connections described in
the quick start guide, and then switch the TV
to the correct source for your home theater.
Enable EasyLink
VCR
Set up speakers
1 Press (Home).
2 Select [Setup], and then press OK.
3 Select [Audio] > [Speaker setup]
4 Enter the distance for each speaker, and
then listen to the test tones and change
the volume. Experiment with the speaker
positions to nd the ideal setting.
Set up EasyLink (HDMI-CEC
control)
This home theater supports Philips EasyLink,
which uses the HDMI-CEC (Consumer Electronics
Control) protocol. EasyLink-compliant devices that
are connected through HDMI can be controlled
by a single remote control.
1 Press (Home).
2 Select [Setup], and then press OK.
3 Select [EasyLink] > [EasyLink] > [On] .
4 On your TV and other connected devices,
turn on HDMI-CEC control. For details, see
the user manual of the TV or other devices.
• On your TV, set the audio output to
'Amplier' (instead of TV speakers). For
details, see the TV user manual.
EasyLink controls
With EasyLink, you can control your home theater,
TV, and other connected HDMI-CEC compliant
devices with a single remote control.
• [One Touch Play] (One-touch play): When a
video disc is in the disc compartment, press
(Play) to wake up the TV from standby, and
then play a disc.
• [One Touch Standby] (One-touch standby):
If one-touch standby is enabled, your home
theater can switch to standby with the
remote control of the TV or other HDMICEC devices.
• [System Audio Control] (System audio
control): If system audio control is enabled,
the audio of the connected device is output
through your home theater speakers
automatically when you play the device.
• [Audio Input Mapping] (Audio input
mapping):If system audio control does not
work, map the connected device to the
correct audio input connector on your home
theater (see 'Set up the audio' on page 13).
Note
• Depending on the manufacturer, HDMI-CEC is
known by many names. For information on your
device, see the user manual of the device.
• Philips does not guarantee 100% interoperability
with all HDMI-CEC devices.
12 EN
Note
• To change the EasyLink control settings, press
(Home), select [Setup] > [EasyLink].
Set up the audio
If you cannot hear the audio output of a
connected device through your home theater
speakers, check that you have enabled Easylink on
all the devices (see 'Enable EasyLink' on page 12).
Then, set up the EasyLink audio control.
1 Press (Home).
2 Select [Setup], and then press OK.
3 Select [EasyLink] > [System Audio Control]
>[On].
• To play the audio from the TV speakers,
select [Off], and skip the following steps.
4 Select [EasyLink] > [Audio Input Mapping].
5 Follow the onscreen instructions to map the
connected device to the audio inputs on your
home theater.
• If you connect your home theater to the
TV through an HDMI ARC connection,
make sure that the TV audio is mapped
to the ARC input on your home theater.
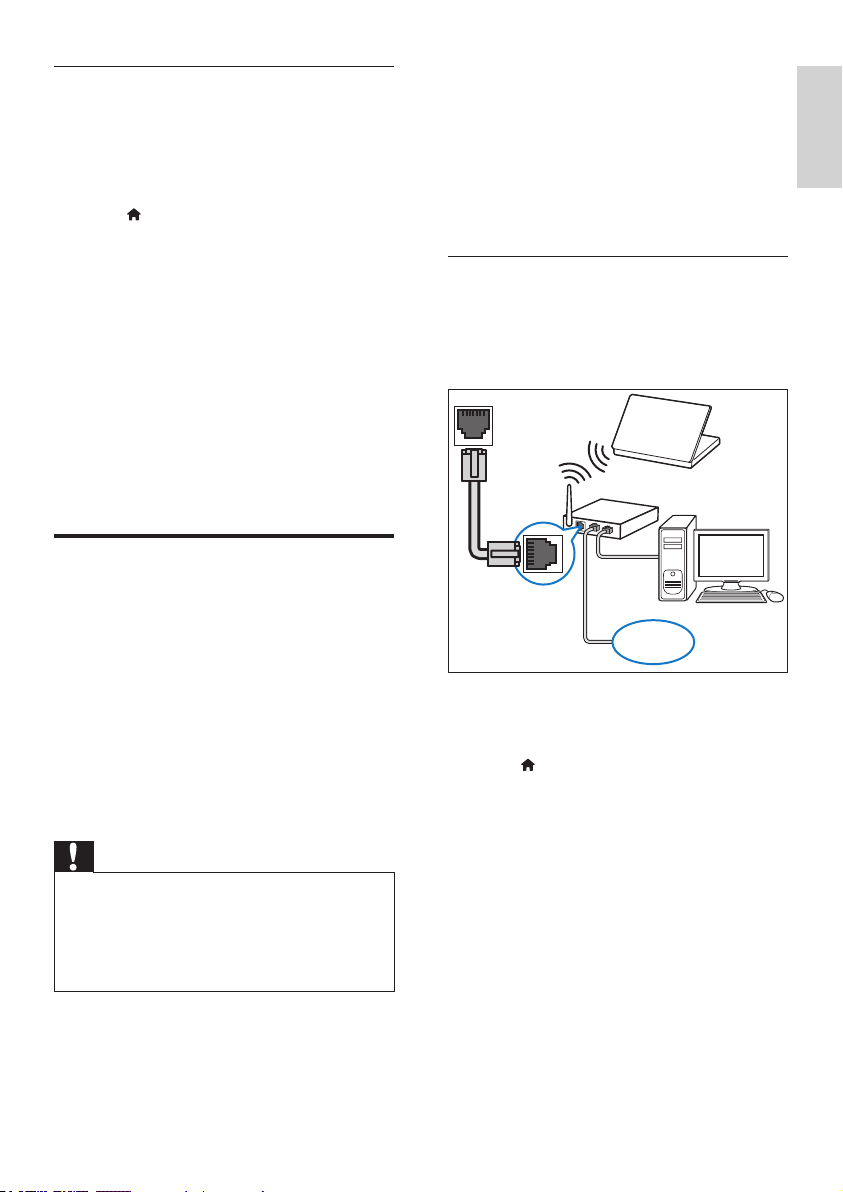
Connect and set up a home
network
Before you start
• For Net TV and software updates, make sure
that the network router has access to the
Internet with high-speed connection and is
not restricted by rewalls or other security
systems.
• Make the necessary connections described in
the quick start guide, and then switch the TV
to the correct source for your home theater.
Set up the wired network
What you need
• A network cable (RJ45 straight cable).
• A network router (with DHCP enabled).
LAN
English
Connect your home theater to a network router
through wired or wireless network connection,
and enjoy:
• Streamed multimedia content (see 'Browse
PC through DLNA' on page 23)
• Smartphone control
• Net TV (Not available in China) (see 'Browse
Net TV' on page 21)
• Software update (see 'Update software
through the Internet' on page 28)
Caution
• Familiarize yourself with the network router,
media server software and networking
principles. If necessary, read documentation that
accompanies the network components. Philips
is not responsible for lost, damaged, or corrupt
data.
www
1 Using a network cable, connect the LAN
connector on your home theater to the
network router.
2 Press (Home).
3 Select [Setup], and then press OK.
4 Select [Network] > [Network installation]
> [Wired (Ethernet)].
5 Follow the onscreen instructions to complete
the setup.
• If connection fails, select [Retry], and
then press OK.
6 Select [Finish], and then press OK to exit.
• To view the network settings, select
[Setup] > [Network] > [View network
settings].
13
EN
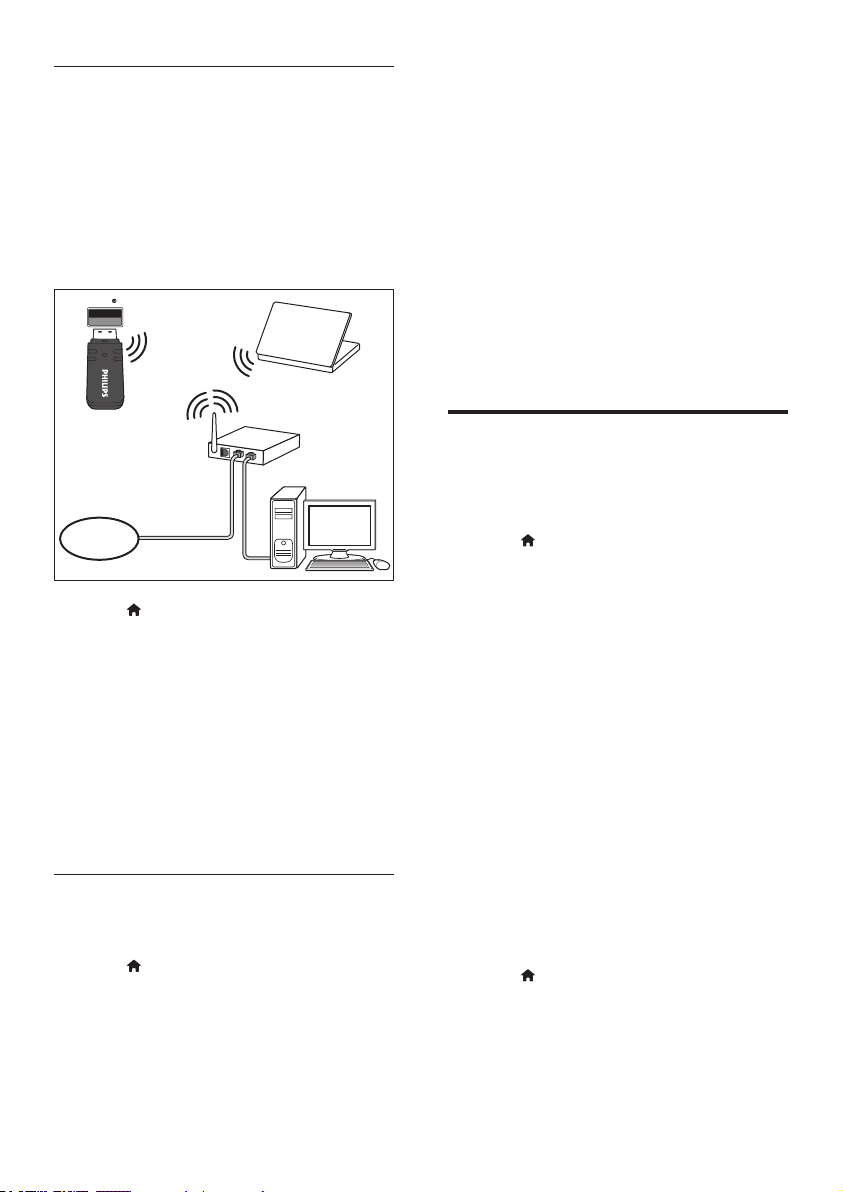
Set up the wireless network
Your home theater is Wi-Fi ready. Connect a Wi-Fi
dongle for easy access to a wireless network.
What you need
• A network router (with DHCP enabled). For
best wireless performance, coverage, and
compatibility, use 802.11n router;
• A Wi-Fi dongle (Model: Philips WUB1110)
Wi-Fi
www
1 Press (Home).
2 Select [Setup], and then press OK.
3 Select [Network] > [Network installation]
> [Wireless (Wi-Fi)], and then press OK.
4 Follow the onscreen instructions to select
and set up the wireless network.
• If connection fails, select [Retry], and
then press OK.
5 Select [Finish], and then press OK to exit.
• To view the network settings, select
[Setup] > [Network] > [View wireless
settings].
Personalize the network name
Name your home theater to easily identify it on
your home network.
1 Press (Home).
2 Select [Setup], and then press OK.
3 Select [Network] > [Name your Product:].
4 Press the Alphanumeric buttons to enter the
name.
5 Select [Done], and then press OK to exit.
5 Use your home
theater
This section helps you use the home theater to
play media from a wide range of sources.
Before you start
• Make the necessary connections described in
the quick start guide and the user manual.
• Complete the rst-time setup. First-time
setup appears when you turn on your home
theater or if you do not complete the setup.
• Switch the TV to the correct source for your
home theater (for example, HDMI, AV IN).
Access the home menu
The home menu provides easy access to
connected devices, setup and other useful features
in your home theater.
1 Press (Home).
» The home menu is displayed.
2 Press the Navigation buttons and OK to
select the following:
• [play Disc]: Star t disc play.
• [browse USB]: Access the USB content
browser
• [browse iPod]: Access the iPod or iPhone
content browser.
• [browse Net TV] (Not available in
China): Access Net TV.
• [browse PC]: Access the computer
content browser.
• [HDMI 1]: Select the digital device
connected to HDMI IN 1 on your home
theater.
• [HDMI 2]: Select the digital device
connected to HDMI IN 2 on your home
theater.
• [Setup]: Access menus to change video,
audio and other settings.
• [Help]: Access onscreen user manual.
3 Press (Home) to exit.
14 EN
 Loading...