

Page 1
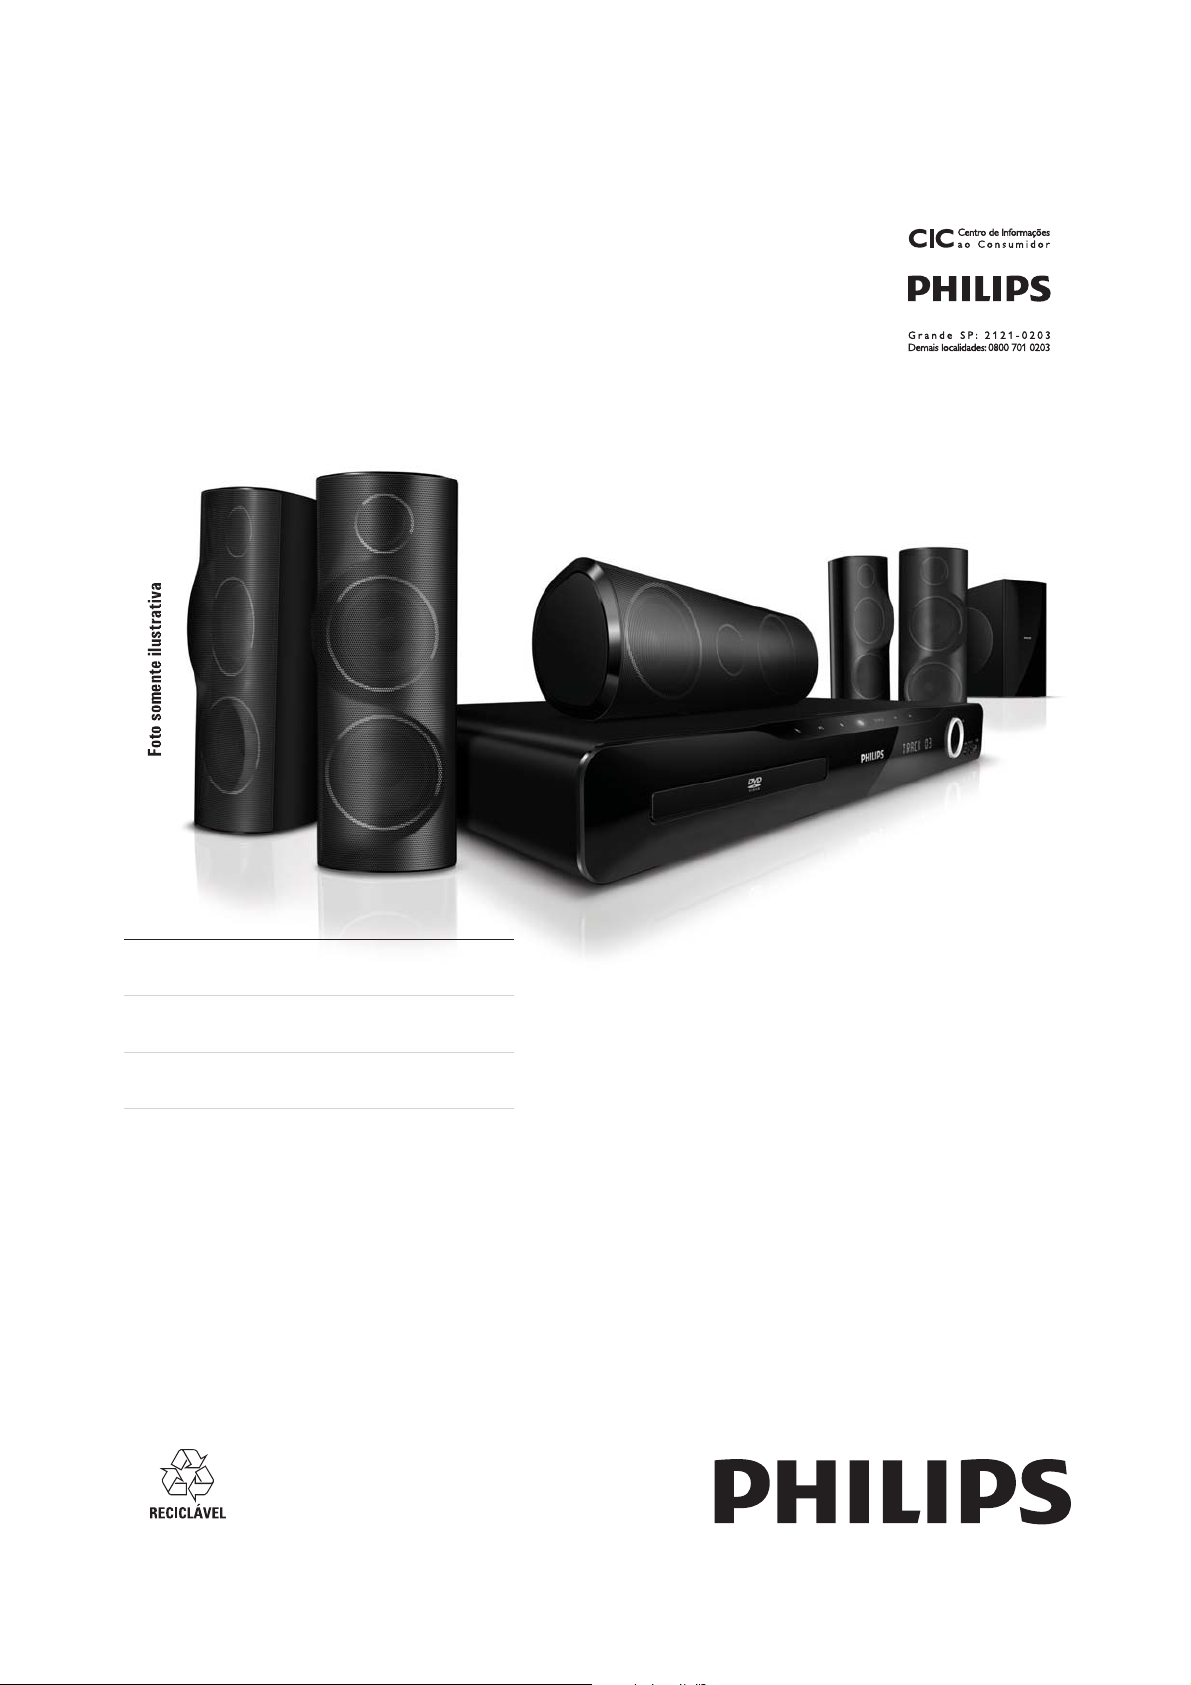
Registre seu produto e obtenha suporte em
www.philips.com/welcome
HTS5530
PT-BR Manual do Usuário
ES Manual del usuario
EN User manual
Page 2

Page 3
Contents
1 Notice 2
Copyright 2
About Progressive Scan
Trademarks
2
2
7 Update software 15
Check software version 15
Update software from a CD-R or USB
8 Product speci cations 15
9 Troubleshooting 17
2 Important 3
Safety 3
Product care
Disposal of your old product and batteries
3
4
10 Index 18
3 Your home theater 4
Main unit 4
Remote control
5
4 Connect your home theater 6
Connectors 6
Connect to the TV
Connect audio from TV or other devices
Connect a microphone
7
8
8
15
English
5 Use your home theater 9
Before you start 9
Choose your sound
Play a disc
Play from a USB storage device
More play features for disc or USB
Play from radio
Play audio from TV or other devices
Play from an MP3 player
Create MP3 audio les
9
9
10
11
11
12
12
12
6 Change settings 13
Access the setup menu 13
Change general settings
Change audio settings
Change video settings
Change preference settings
13
13
14
14
EN
1
Page 4
1 Notice
Copyright
This item incorporates copy protection technology
that is protected by U.S. patents and other
intellectual property rights of Rovi Corporation.
Reverse engineering and disassembly are
prohibited.
About Progressive Scan
Consumers should note that not all high de nition
television sets are fully compatible with this
product and may cause artifacts to be displayed in
the picture. In case of 525 or 625 progressive scan
picture problems, it is recommended that the user
switch the connection to the ‘standard de nition’
output. If there are questions regarding our TV set
compatibility with this model 525p and 625p DVD
player, please contact our customer service center.
Trademarks
DivX , DivX Certi ed and associated logos
are registered trademarks of DivX, Inc. and are
used under license.
ABOUT DIVX VIDEO: DivX
format created by DivX, Inc. This is an of cial
DivX Certi ed device that plays DivX video.
Visit www.divx.com for more information and
software tools to convert your les into DivX
video.
ABOUT DIVX VIDEO-ON-DEMAND: This
DivX Certi ed
order to play DivX Video-on-Demand (VOD)
content. To generate the registration code,
locate the DivX VOD section in your device
setup menu. Go to vod.divx.com with this code
to complete the registration process and learn
more about DivX VOD.
device must be registered in
Windows Media and the Windows logo are
trademarks, or registered trademarks of
Microsoft Corporation in the United States and/
or other countries.
is a digital video
Manufactured under license under U.S. Patent
#’s: 5,451,942; 5,956,674; 5,974,380; 5,978,762;
6,487,535 & other U.S. and worldwide patents
issued & pending. DTS and the Symbol are
registered trademarks & DTS Digital Surround
and the DTS logos are trademarks of DTS, Inc.
Product includes software.
Reserved.
DTS, Inc. All Rights
Manufactured under license from Dolby
Laboratories. Dolby, Pro Logic, and the
double-D symbol are trademarks of Dolby
Laboratories.
HDMI, and HDMI logo, and High-De nition
Multimedia Interface are trademarks or
registered trademarks of HDMI licensing LLC in
the United States and other countries.
The USB-IF Logos are trademarks of Universal
Serial Bus Implementers Forum, inc.
CLASS 1
LASER PRODUCT
2
EN
Page 5

2 Important
Read and understand all instructions before you
use your home theater. If damage is caused by
failure to follow instructions, the warranty does
not apply.
Safety
Risk of electric shock or re!
• Never expose the product and accessories
to rain or water. Never place liquid
containers, such as vases, near the product.
If liquids are spilt on or into the product,
disconnect it from the power outlet
immediately. Contact Philips Consumer
Care to have the product checked before
use.
• Never place the product and accessories
near naked ames or other heat sources,
including direct sunlight.
• Never insert objects into the ventilation
slots or other openings on the product.
• Where the mains plug or an appliance
coupler is used as the disconnect device,
the disconnect device shall remain readily
operable.
• Disconnect the product from the power
outlet before lightning storms.
• When you disconnect the power cord,
always pull the plug, never the cable.
Risk of short circuit or re!
• Before you connect the product to the
power outlet, ensure that the power
voltage matches the value printed on the
back or bottom of the product. Never
connect the product to the power outlet if
the voltage is different.
Risk of injury or damage to the home theater!
• For wall-mountable products, use only the
supplied wall mount bracket. Secure the
wall mount to a wall that can support the
combined weight of the product and the
wall mount. Koninklijke Philips Electronics
N.V. bears no responsibility for improper
wall mounting that results in accident, injury
or damage.
• For speakers with stands, use only the
supplied stands. Secure the stands to the
speakers tightly. Place the assembled stands
on at, level surfaces that can support the
combined weight of the speaker and stand.
• Never place the product or any objects
on power cords or on other electrical
equipment.
• If the product is transported in
temperatures below 5°C, unpack the
product and wait until its temperature
matches room temperature before
connecting it to the power outlet.
• Visible and invisible laser radiation when
open. Avoid exposure to beam.
• Do not touch the disc optical lens inside the
disc compartment.
Risk of overheating!
• Never install this product in a con ned
space. Always leave a space of at least four
inches around the product for ventilation.
Ensure curtains or other objects never
cover the ventilation slots on the product.
Risk of contamination!
• Do not mix batteries (old and new or
carbon and alkaline, etc.).
• Remove batteries if they are exhausted or
if the remote control is not to be used for a
long time.
• Batteries contain chemical substances, they
should be disposed of properly.
Product care
• Do not insert any objects other than discs
into the disc compartment.
• Do not insert warped or cracked discs into
the disc compartment.
• Remove discs from the disc compartment
if you are not using the product for an
extended period of time.
• Only use micro ber cloth to clean the
product.
English
EN
3
Page 6
Disposal of your old product
and batteries
Your product is designed and manufactured with
high quality materials and components, which can
be recycled and reused.
When this crossed-out wheeled bin symbol is
attached to a product it means that the product
is covered by the European Directive 2002/96/
EC. Please inform yourself about the local separate
collection system for electrical and electronic
products.
Please act according to your local rules and do not
dispose of your old products with your normal
household waste.
Correct disposal of your old product helps to
prevent potential negative consequences for the
environment and human health.
3 Your home theater
Congratulations on your purchase, and welcome
to Philips! To fully bene t from the support that
Philips offers, register your home theater at www.
philips.com/welcome.
Main unit
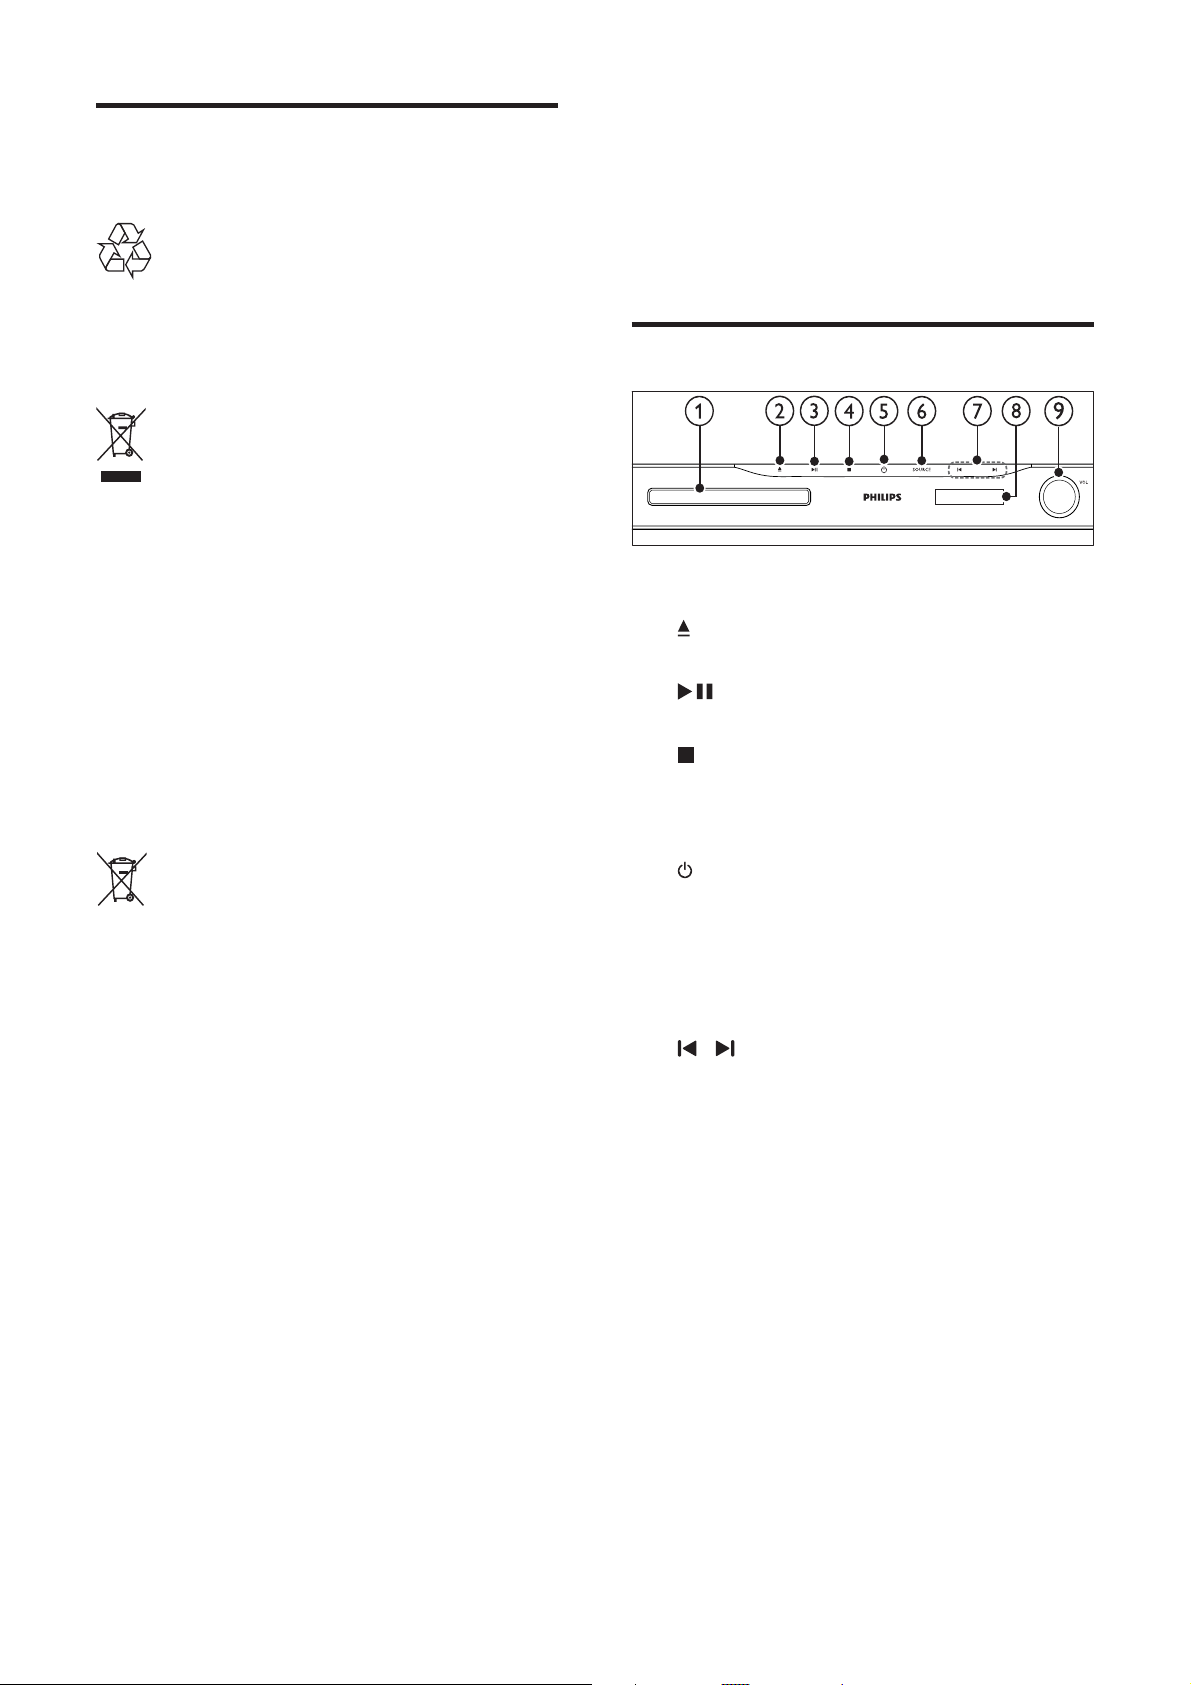
a Disc compartment
b ( Open/Close )
Opens or closes the disc compartment.
c ( Play/Pause )
Starts, pauses or resumes play.
d ( Stop )
• Stops play.
• In radio mode, erases the current
preset radio station.
Your product contains batteries covered by the
European Directive 2006/66/EC, which cannot be
disposed with normal household waste.
Please inform yourself about the local rules on
separate collection of batteries because correct
disposal helps to prevent negative consequences
for the environmental and human health.
e ( Standby-On )
Switches the home theater on or to
standby.
f SOURCE
Selects an audio/video source for the home
theater.
g /
• Skips to the previous or next track,
chapter or le.
• In radio mode, selects a preset radio
station.
h Display panel
i Volume control wheel
4
EN
Page 7
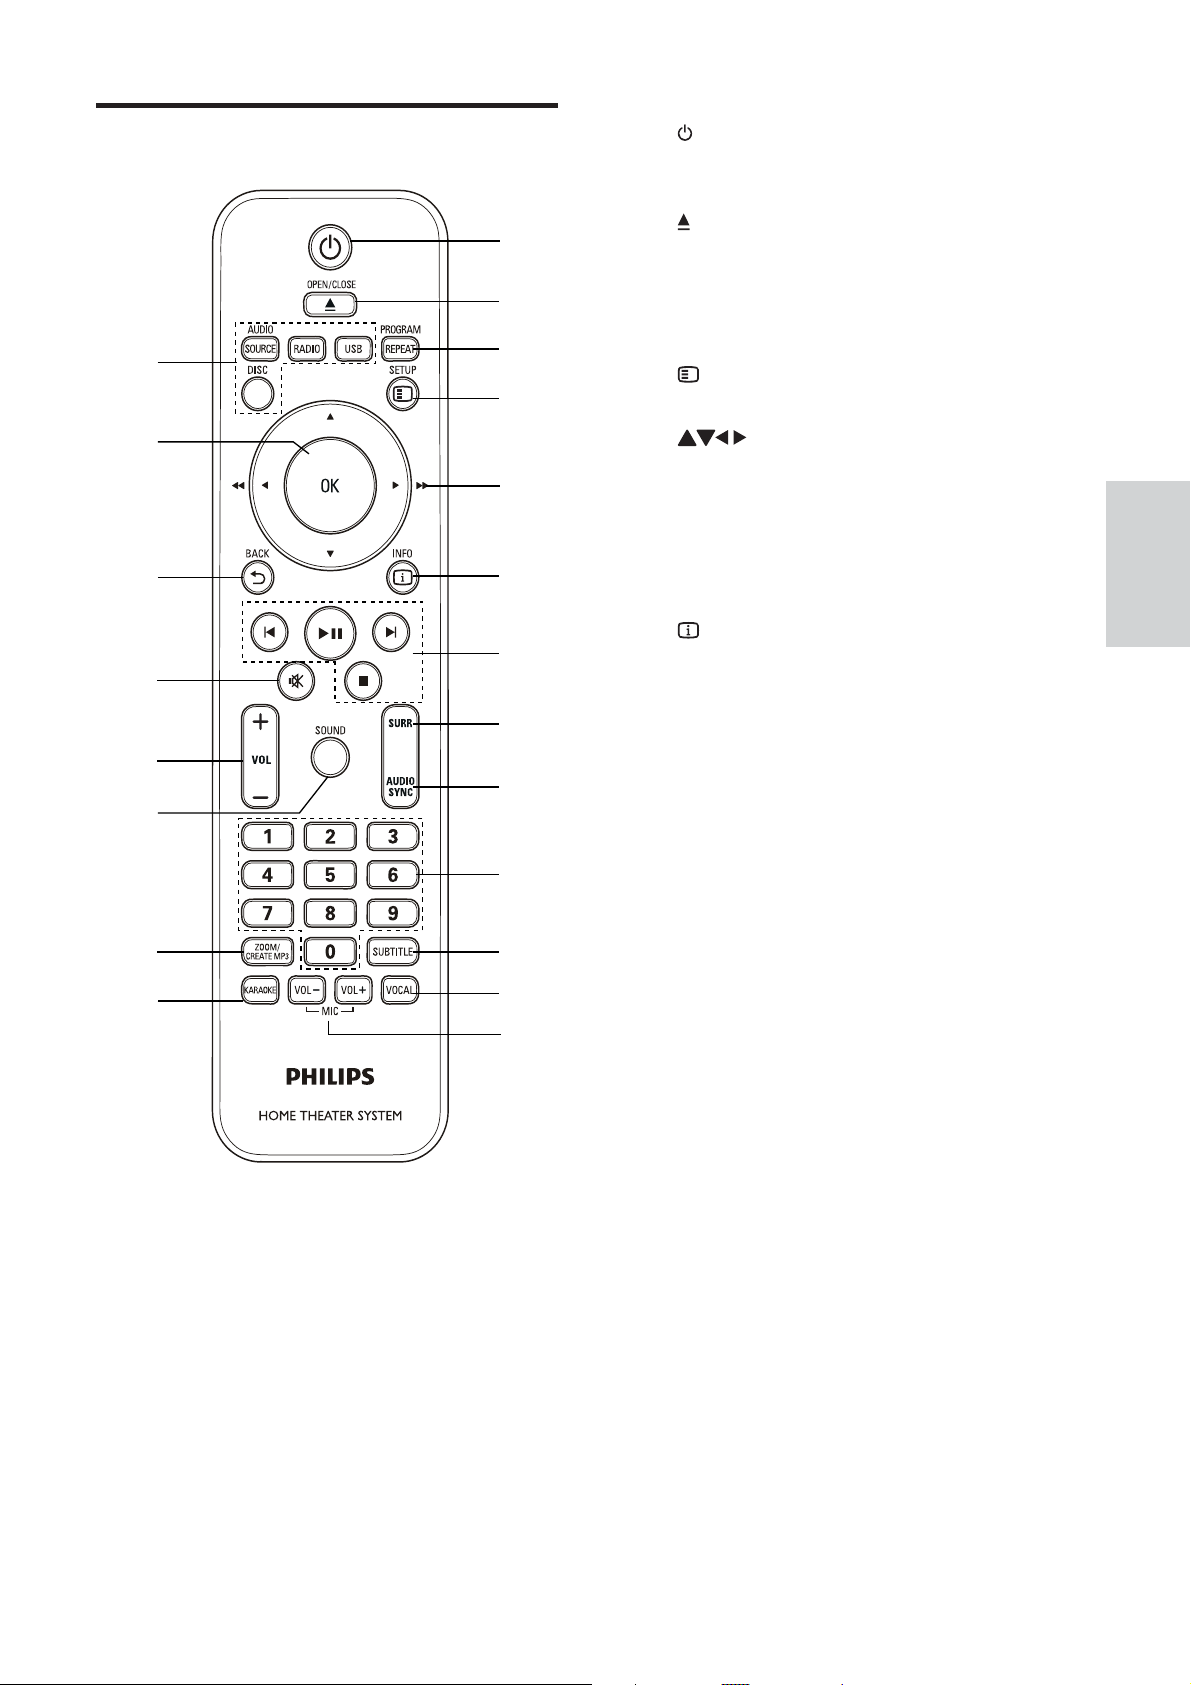
Remote control
a ( Standby-On )
Switches the home theater on or to
standby.
u
t
s
r
q
p
o
n
a
b
c
d
e
f
g
h
i
j
k
l
m
b OPEN/CLOSE
Opens or closes the disc compartment.
c REPEAT / PROGRAM
• Selects or turns off repeat mode.
• In radio mode, program radio stations.
d SETUP
Accesses or exits the setup menu.
e ( Navigation buttons )
• Navigate menus.
• In video mode, press left or right to
fast backward or fast forward.
• In radio mode, press left or right to
search a radio station; press up or
down to ne tune a radio frequency.
f INFO
Displays information about what is playing.
g Playback buttons
Control playback.
h SURR ( Surround Sound )
Switches to surround sound or stereo
sound.
i AUDIO SYNC
• Selects an audio language or channel.
• Press and hold to synchronize audio
with video. Use with +/- .
j Numeric buttons
Selects an item to play.
k SUBTITLE
Selects subtitle language for video.
English
l VOCAL
Turns off or on the vocal by changing the
audio channel.
m MIC VOL +/-
Increases or decreases microphone volume.
n KARAOKE
Toggles through various karaoke options.
o CREATE MP3 / ZOOM
• Accesses the menu to create MP3.
• Zooms into a video scene or picture.
p SOUND
Selects a sound mode.
EN
5
Page 8
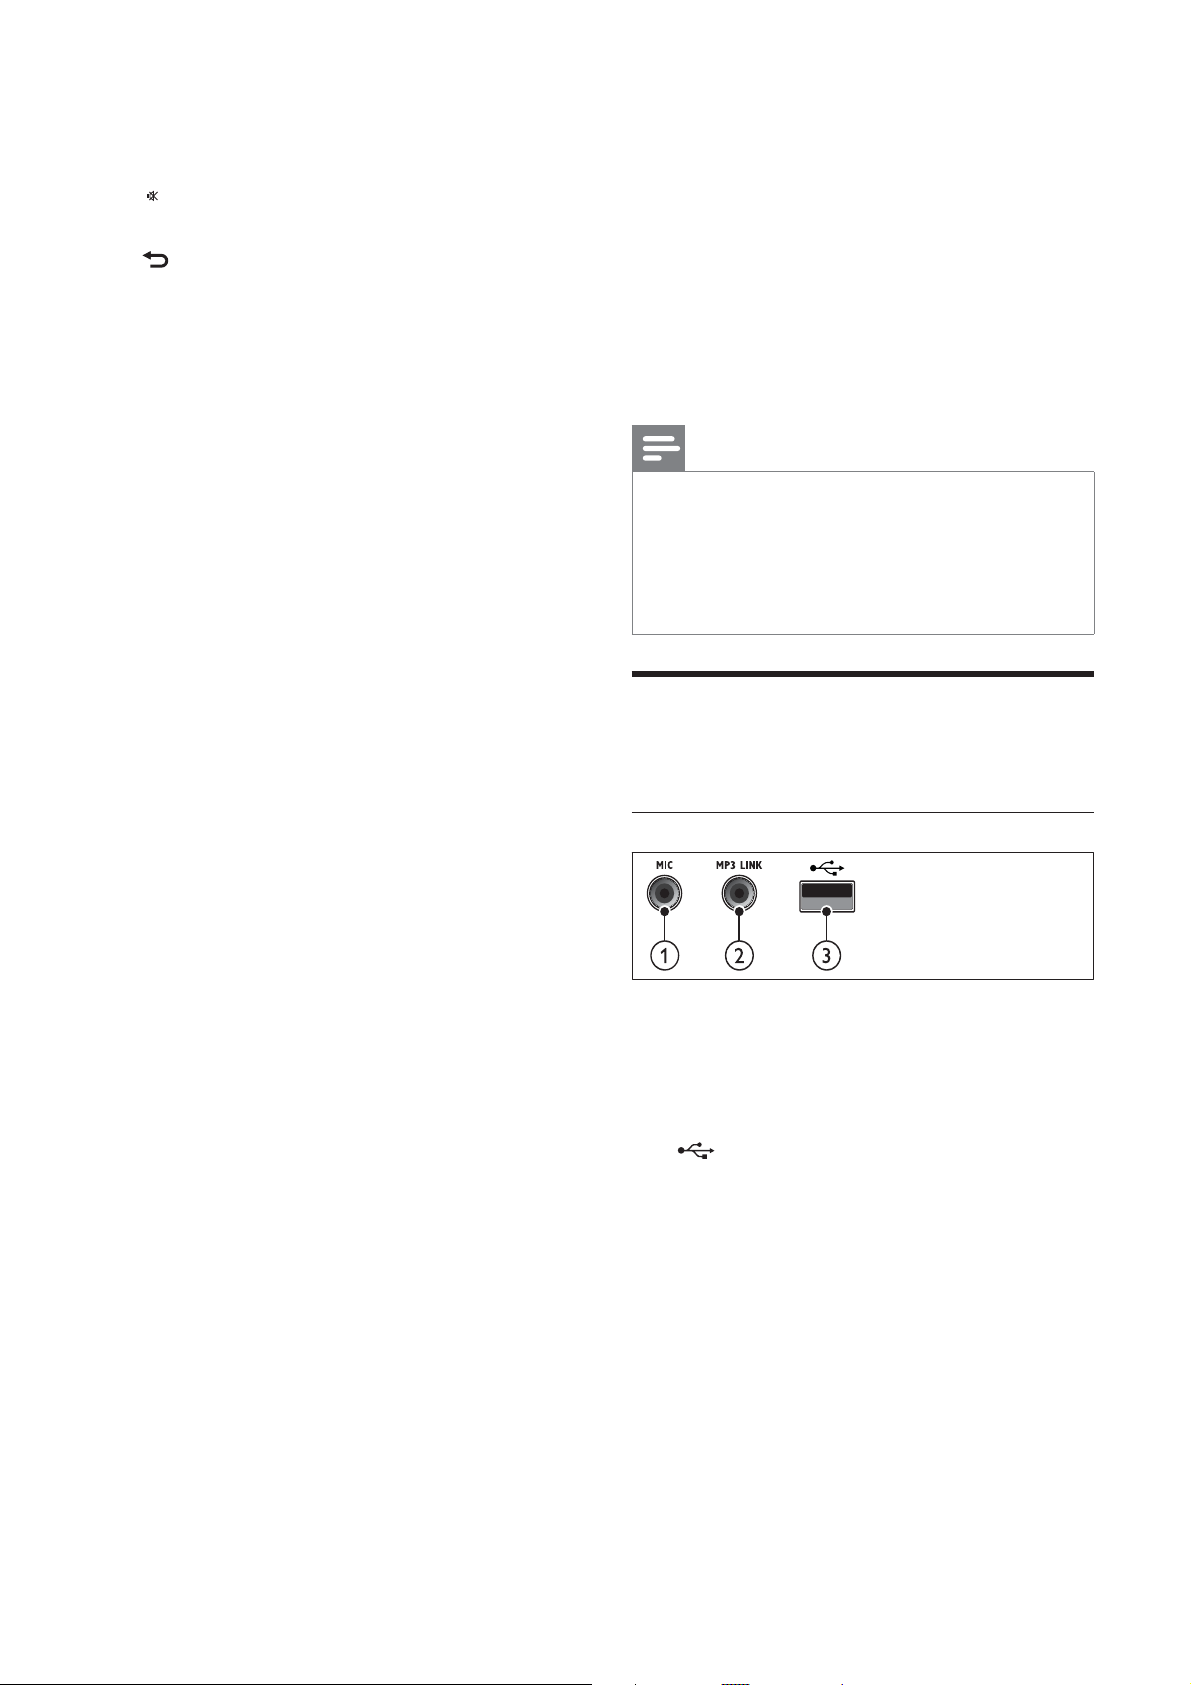
q VOL +/-
Increases or decreases volume.
4 Connect your home
r ( Mute )
Mutes or restores volume.
s BACK
Returns to a previous menu screen.
t OK
Con rms an entry or selection.
u Source buttons
• AUDIO SOURCE : Selects an audio
input source.
• RADIO : Switches to FM radio.
• USB : Switches to USB storage device.
• DISC : Switches to disc source.
theater
This section helps you connect your home theater
to a TV and other devices. The basic connections
of the home theater with its accessories are
provided in the Quick Start. For a comprehensive
interactive guide, see www.connectivityguide.
philips.com.
Note
• Refer to the type plate at the back or bottom
of the product for identi cation and supply
ratings.
• Before you make or change any connections,
ensure that all devices are disconnected from
the power outlet.
Connectors
Connect other devices to your home theater.
Front connectors
a MIC
Audio input from a microphone.
b MP3 LINK
Audio input from an MP3 player.
c ( USB )
Audio, video or picture input from a USB
storage device.
6
EN
Page 9
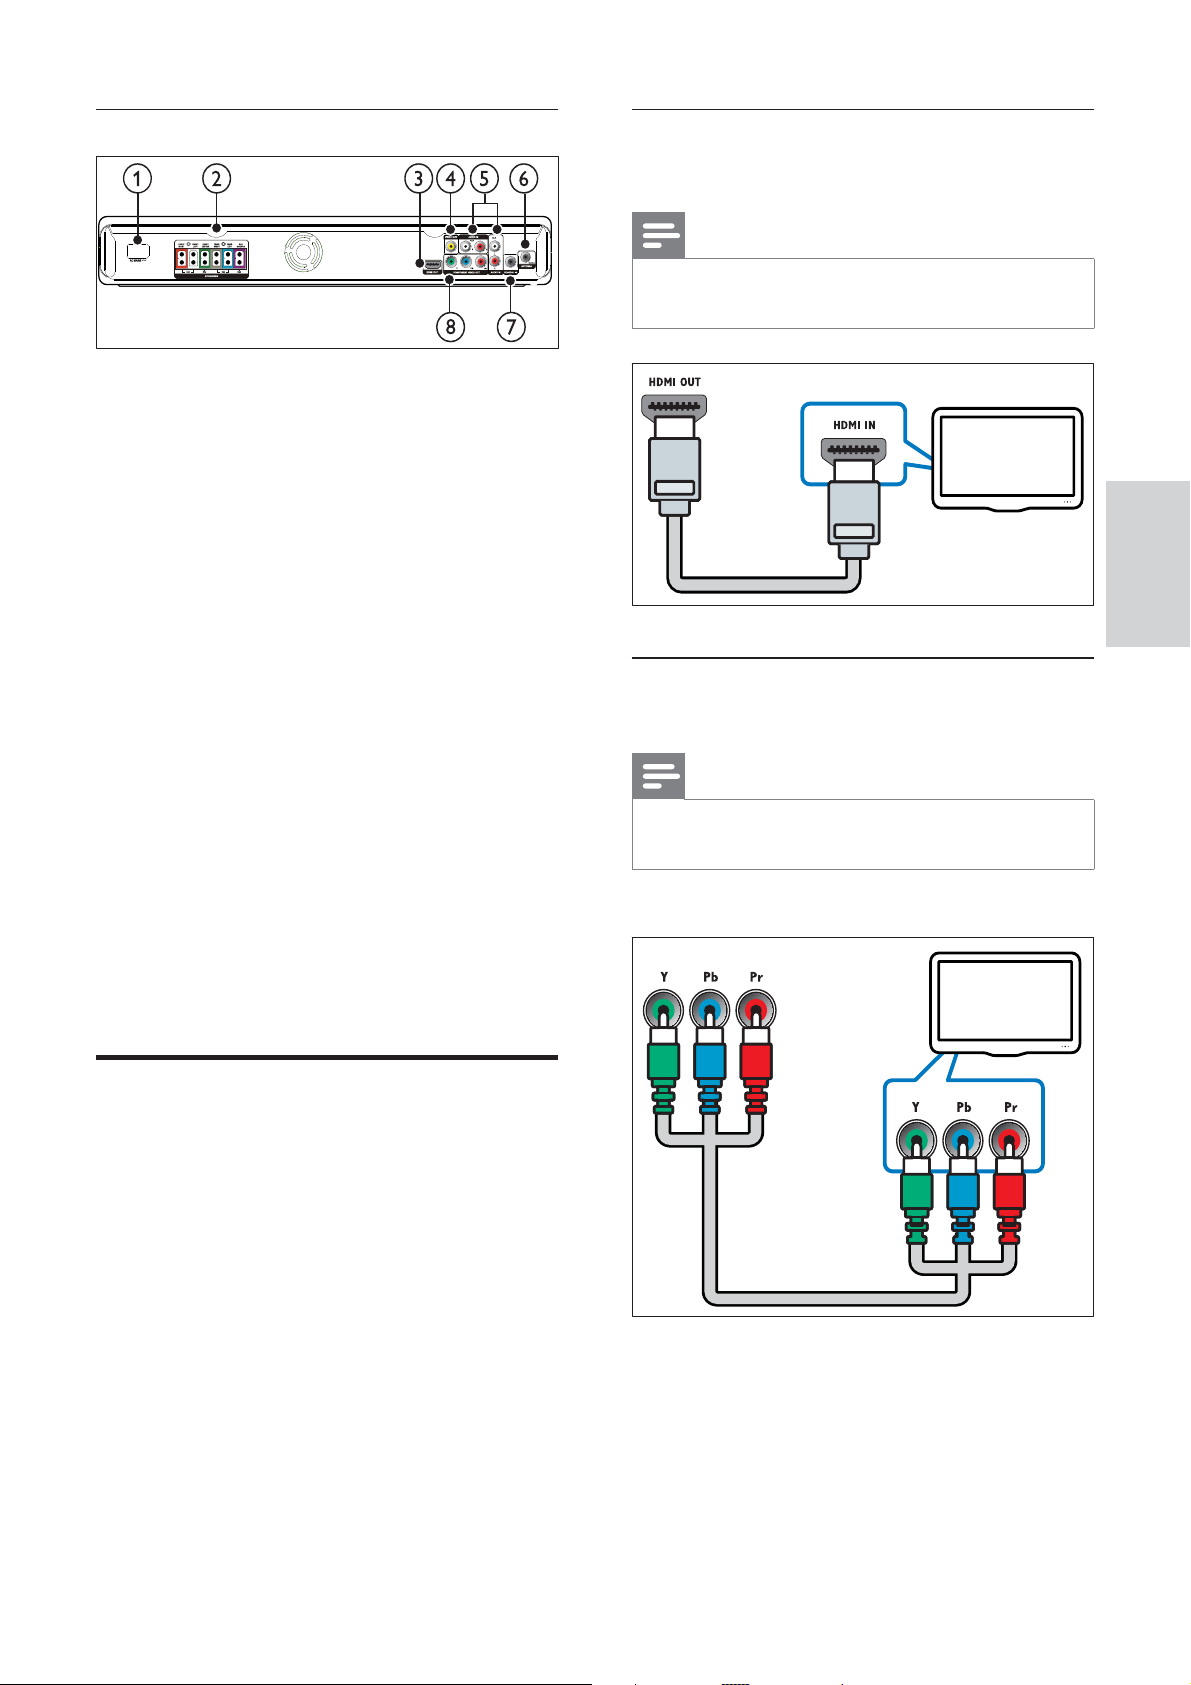
Back connectors
a AC MAINS~
Connects to the power supply.
Option 1: Connect to the TV through
HDMI
2
1
Note
• If the HDTV has a DVI connector, connect
using an HDMI/DVI adapter.
b SPEAKERS
Connects to the supplied speakers and
subwoofer.
c HDMI OUT
Connects to the HDMI input on the TV.
d VIDEO OUT
Connects to the composite video input on
the TV.
e AUDIO IN - AUX 1 / AUX 2
Connects to the analog audio output on the
TV or an analog device.
f FM ANTENNA
Connects the FM antenna for radio
reception.
g COAXIAL IN
Connects to the coaxial audio output on
the TV or a digital device.
h COMPONENT VIDEO OUT - Y Pb Pr
Connects to the component video input on
the TV.
TV
Option 2: Connect to the TV through
YPbPr (component video)
Note
• The component video cable or connector
might be labeled Y Cb Cr or YUV .
(Cable not supplied)
Component Video Out
TV
English
Connect to the TV
Connect your home theater directly to a TV
through one of the following connectors (from
highest to basic quality video):
a HDMI
b Component video
c Composite video
Component Video In
EN
7
Page 10
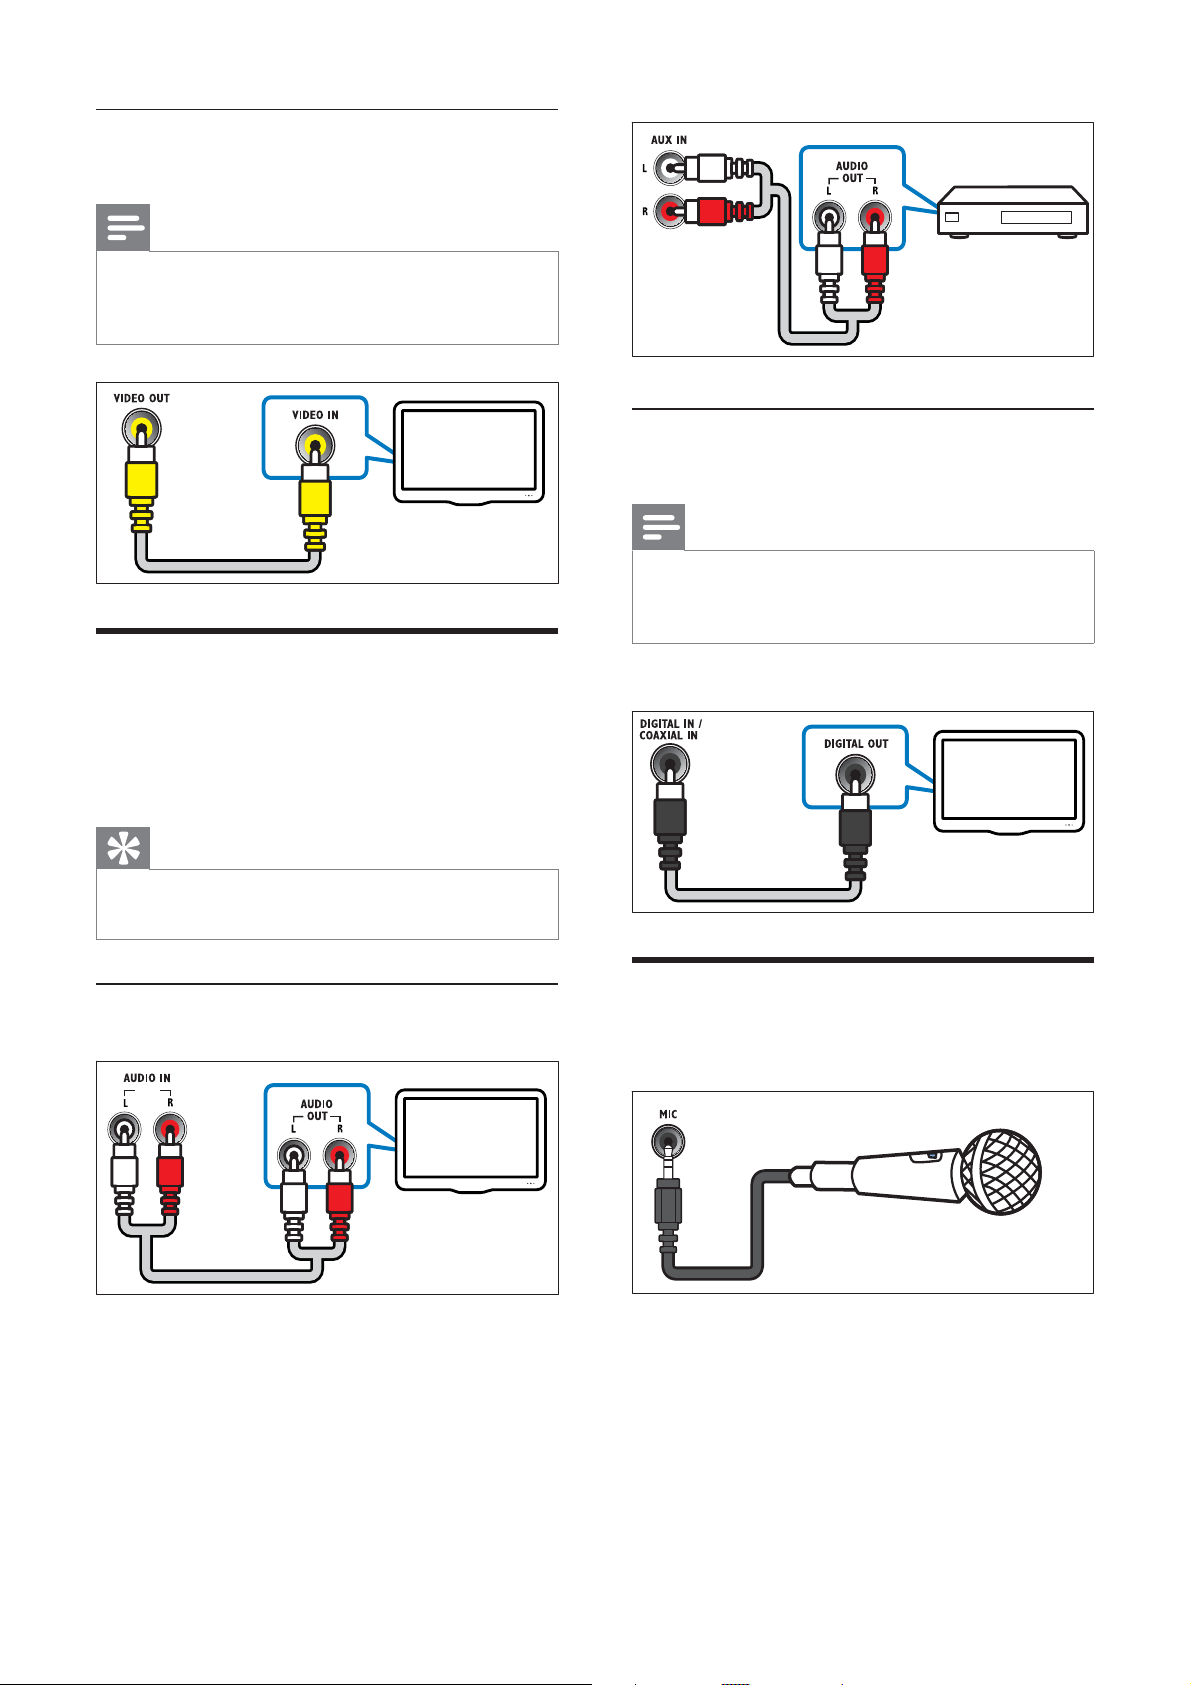
Option 3: Connect to the TV through
composite video (CVBS)
Note
• The composite video cable or connector might
be labeled AV IN , VIDEO IN , COMPOSITE or
BASEBAND .
TV
Connect audio from TV or
other devices
Use your home theater to play audio from the
TV or other devices such as a cable box.
Tip
• Press AUDIO SOURCE repeatedly to select
the audio output of your connection.
Option 1: Connect audio through analog
audio cables
Option 2: Connect audio through coaxial
cable
Note
• The digital coaxial cable or connector might be
labeled COAXIAL/DIGITAL OUT or SPDIF
OUT .
(Cable not supplied)
TV
Connect a microphone
(Microphone not supplied)
8
EN
TV
Page 11
5 Use your home
theater
This section helps you use the home theater to
play media from a wide range of sources.
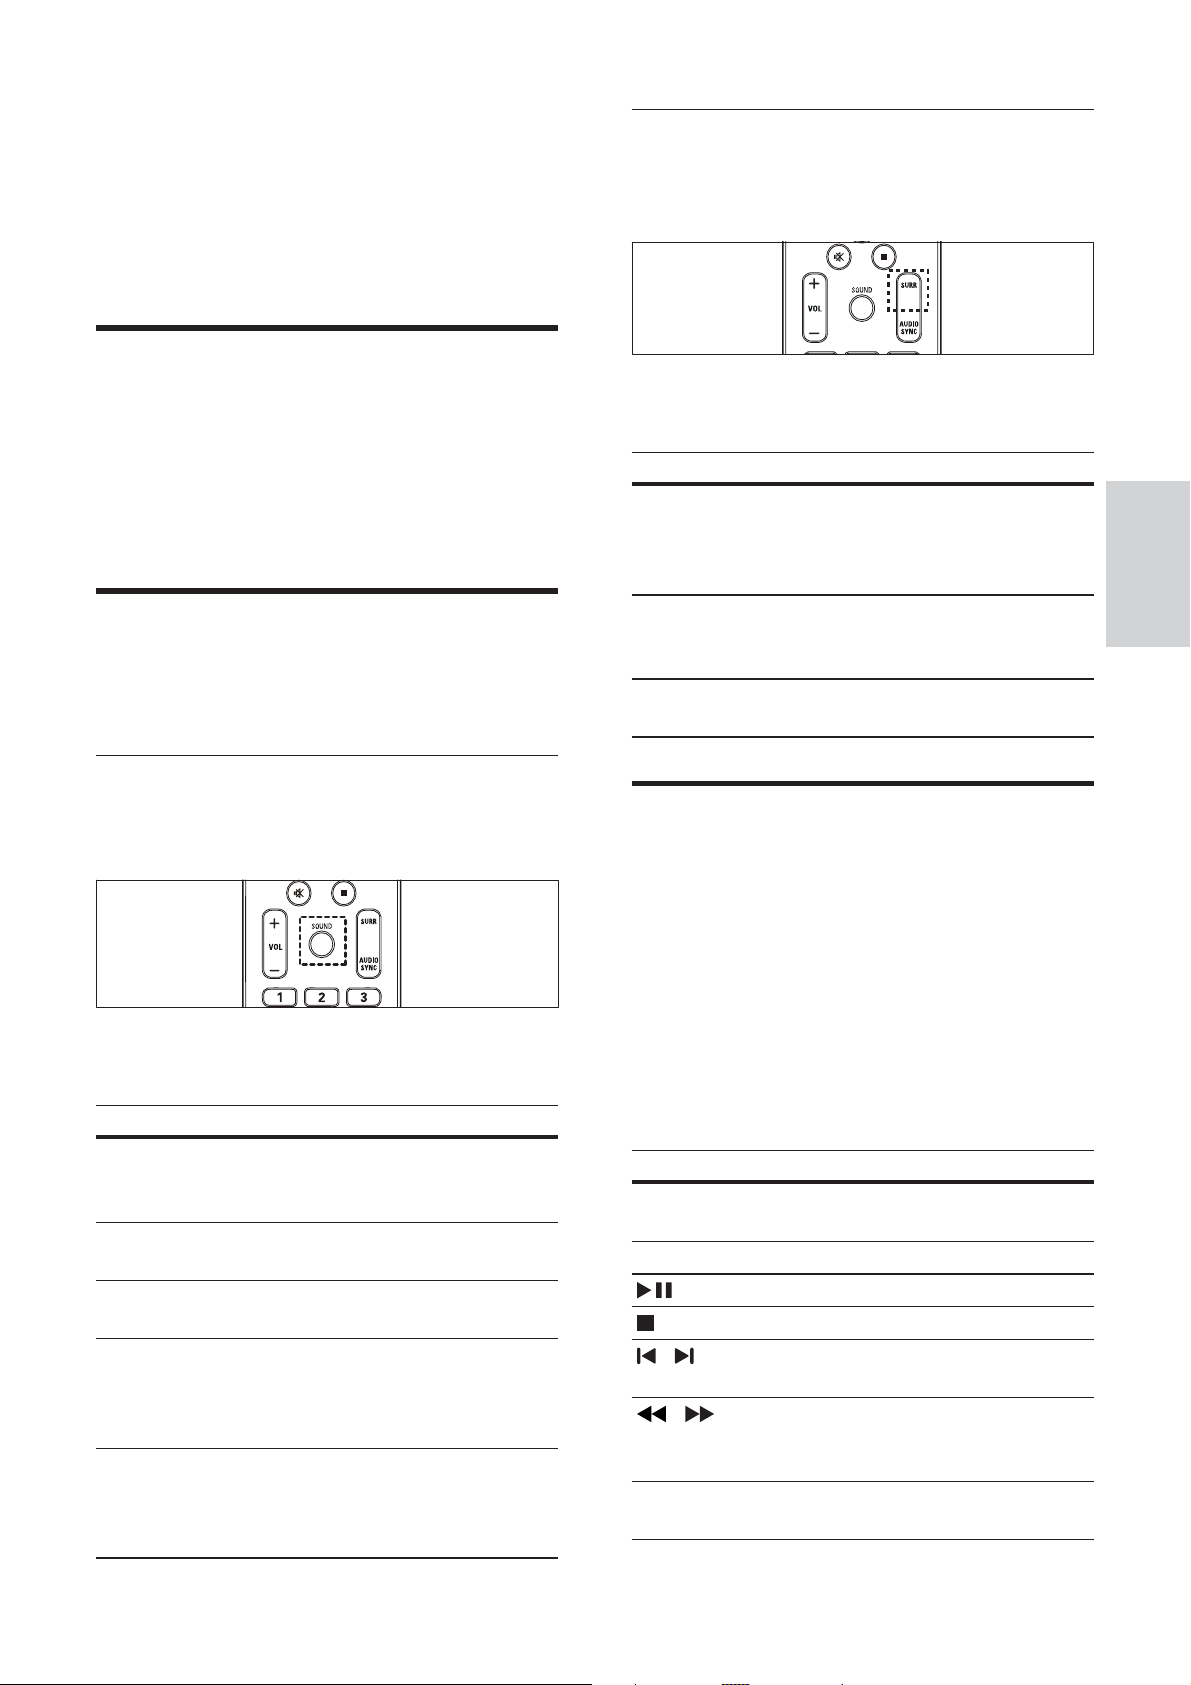
Change surround sound mode
Experience an immersive audio experience with
surround sound modes.
Before you start
Check that you:
• Make the necessary connections and
complete the setup as described in the
Quick Start.
• Switch the TV to the correct source for the
home theater.
Choose your sound
This section helps you choose the ideal sound for
your video or music.
Change sound mode
Select prede ned sound modes to suit your
video or music.
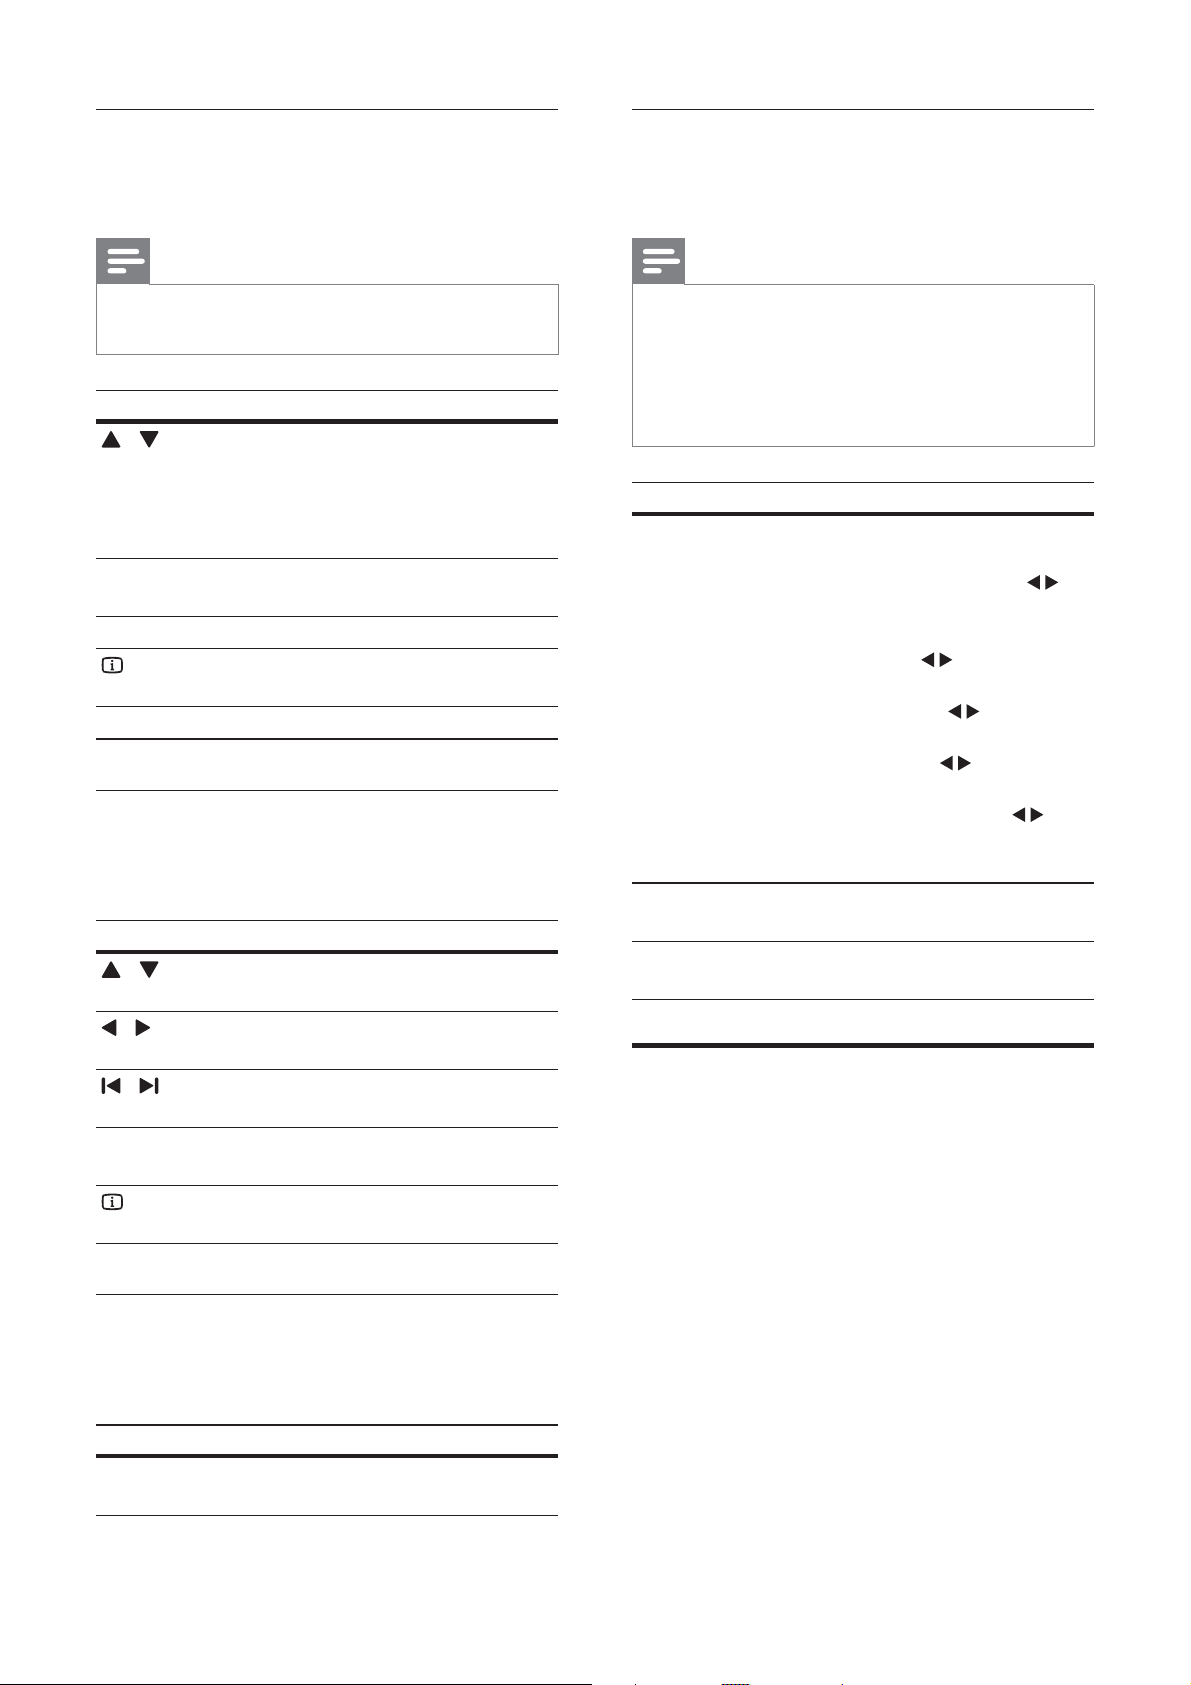
Press SOUND repeatedly to cycle through the
available sound modes.
Press SURR repeatedly to cycle through the
available surround modes.
Option Description
5CH
STEREO
MULTICHANNEL/
DPL II
STEREO Two-channel stereo sound. Ideal
Play a disc
The home theater can play a wide variety of
discs, including video, audio and mixed media (for
example, a CD-R that contains JPEG pictures and
MP3 music).
1 Insert a disc into the home theater.
2 Press DISC .
» The disc plays or the disc main menu
Enhances the stereo channel
output by duplicating the sound
output to the center and rear
speakers. Ideal for party music.
Immersive multi-channel
sound for an enhanced movie
experience.
for listening to music.
appears.
English
Sound mode Description
ACTION /
ROCK
DRAMA /
JAZZ
CONCERT /
CLASSIC
SPORTS Moderate mid-range and
NIGHT Dynamically controlled sound
Enhanced low and high-range.
Ideal for action movies and rock
or pop music.
Clear mid and high-range. Ideal
for drama movies and jazz music.
Neutral sound. Ideal for live
concerts and classical music.
surround effects for clear vocals
and the atmosphere of a live
sport venue.
mode suitable for watching
movies at night or for nonintrusive background music.
3 Press the following buttons to control play:
Button Action
Navigation
buttons
OK Con rms an entry or selection.
/
/
ZOOM Zooms into a video scene or
Navigate menus.
Starts, pauses or resumes play.
Stops play.
Skips to the previous or next
track, chapter or le.
Fast backwards or fast
forwards. Press repeatedly to
change the search speed.
picture.
EN
9
Page 12
Use video options
Use karaoke options
Access several useful features while viewing
video.
Note
• Available video options depend on the video
source.
Button Action
/
AUDIO
SYNC
SUBTITLE Selects subtitle language for video.
INFO
REPEAT Repeats a chapter or title.
Searches slow-backward or
slow-forward. Press repeatedly to
change the search speed.
For VCD/SVCD, slow-backward
search is not available.
Selects an audio language or
channel.
Displays information about what
is playing.
Use picture options
Access several useful features while viewing
pictures.
Button Action
/
/
/
REPEAT Repeats a single le in the folder
INFO
Flips the photo vertically or
horizontally.
Rotates the picture counterclockwise or clockwise.
Skips to the previous or next
picture.
or repeats the entire folder.
Displays photo albums in a
thumbnail overview.
Use audio options
Access several useful features while audio is
played.
Button Action
REPEAT Repeats a track or the
entire disc.
Access several useful features while playing
karaoke disc.
Note
• Ensure that a microphone (not supplied) is
connected to the MIC connector on this home
theater before play.
• Set the microphone volume to the minimum
level before connecting the microphone to
prevent howling.
Button Action
KARAOKE Toggles through various karaoke
options.
[Mic On] / [Mic Off] – Press
to turn on or off the microphone
output.
[Vol 20] – Press
default microphone volume level.
[Echo +15] – Press
echo level.
[Key +00] – Press
pitch level that match your voice.
[karaoke scoring] – Press
set karaoke scoring when playback
a DVD or VCD.
MIC VOL
+/-
VOCAL Turns off or on the vocal by
Increases or decreases
microphone volume.
changing the audio channel.
to set the
to set the
to set the
to
Play from a USB storage device
The home theater is tted with a USB connector
that allows you to view pictures, listen to music or
watch movies stored on a USB storage device.
1 Connect the USB storage device to the
home theater.
2 Press USB .
» A content browser appears.
3 Select a le, then press OK .
4 Press the playback buttons to control play
(see ‘Play a disc’ on page 9 ) .
10
EN
Page 13
Note
• If the USB storage device does not t into the
connector, use a USB extension cable.
• The home theater does not support digital
cameras that need a computer program to
display photos.
• The USB storage device must be FAT or DOS-
formatted, and Mass Storage Class compliant.
More play features for disc or USB
Repeat play a speci c section
Select sections of audio or video for repeat
playback.
1 During playback, press INFO .
2 Select [Repeat AB] in the menu.
3 Press OK to mark the start point.
4 Press OK again to mark the end point.
» Repeat play starts.
• To cancel repeat A-B, press INFO , select
[Repeat AB] > [Off] , then press OK .
Several advanced features are available for video
or picture playback from a disc or USB storage
device.
Play a musical slideshow
Play music and pictures simultaneously to create
a musical slideshow. The les must be stored on
the same disc or USB storage device.
1 Select a music track, then press OK .
2 Press BACK and go to the picture folder.
3 Select a picture, then press OK to start
slideshow.
4 Press to stop slideshow.
5 Press again to stop music.
Synchronize audio with video
If the audio and video are not synchronized, you
can delay the audio to match the video.
1 Press and hold AUDIO SYNC until the audio
sync message appears on the display panel.
2 Press +/- within ve seconds to sync the
audio with your video.
Quick skip play to a speci c time
Quick skip to a speci c part of a video by
entering the time of a scene.
1 During video play, press INFO .
2 Press the Navigation buttons and OK to
select:
• [TT Time] : Title time.
• [Ch Time] : Chapter time.
• [Disc Time] : Disc time.
• [Track Time] : Track time.
3 Enter the time of the scene, then press OK .
Note
• Repeat play is only possible within a track/
chapter.
Play from radio
The home theater can store up to 40 radio
stations.
1 Check that the FM antenna is connected.
2 Press RADIO .
» “ AUTO INSTALL...PRESS PLAY ’ appears
on the display panel if you have not
installed any radio stations. Press
.
3 Press the following buttons to control play:
Button Action
/
/
PROGRAM Manual: Press once to access
Note
• AM and digital radio are not supported.
• If no stereo signal is detected, you are
prompted to install the radio stations again.
• For the best reception, place the antenna away
from the TV or other sources of radiation.
Selects a preset radio station.
Searches for a radio station.
Fine tunes a radio frequency.
Press and hold to erase the
preset radio station.
Press to stop the installation of
radio stations.
program mode, and press again
to store the radio station.
Automatic: Press and hold for ve
seconds to reinstall radio stations.
English
EN
11
Page 14
Change tuning grid
In some countries, you can switch the FM tuning
grid between 50 kHz and 100 kHz. Changing
tuning grid erases all preset radio stations.
1 Press RADIO .
2 Press .
3 Press and hold until ‘GRID 9’ (50 kHz)
or ‘GRID 10’ (100 kHz) is displayed.
Play audio from TV or other
devices
CREATE MP3
OPTIONS
Speed Normal
Bitrate 128kbps
CRT ID3 Yes
Device USB1
SUMMARY
Select Track 0
Time 00:00
Start Exit
Track01 04:14
Track02 04:17
Track03 03:58
Track04 04:51
Track05 03:53
Track06 04:09
Track07 04:38
Select All
TRACK
Deselect All
Press AUDIO SOURCE repeatedly to select
the audio output of the connected device (see
‘Connect audio from TV or other devices’ on
page 8 ) .
Play from an MP3 player
Connect and play audio les from an MP3 player
or other external audio devices.
1 Connect the MP3 player to the home
theater as described in the Quick start
guide.
2 Press AUDIO SOURCE repeatedly until
‘ MP3 LINK ’ appears on the display panel.
3 Press the buttons on the MP3 player to
select and play audio les.
Create MP3 audio les
Use the home theater to convert audio CDs into
MP3 audio les.
1 Insert an audio CD (CDDA/HDCD) into
the home theater.
2 Connect a USB storage device to the home
theater.
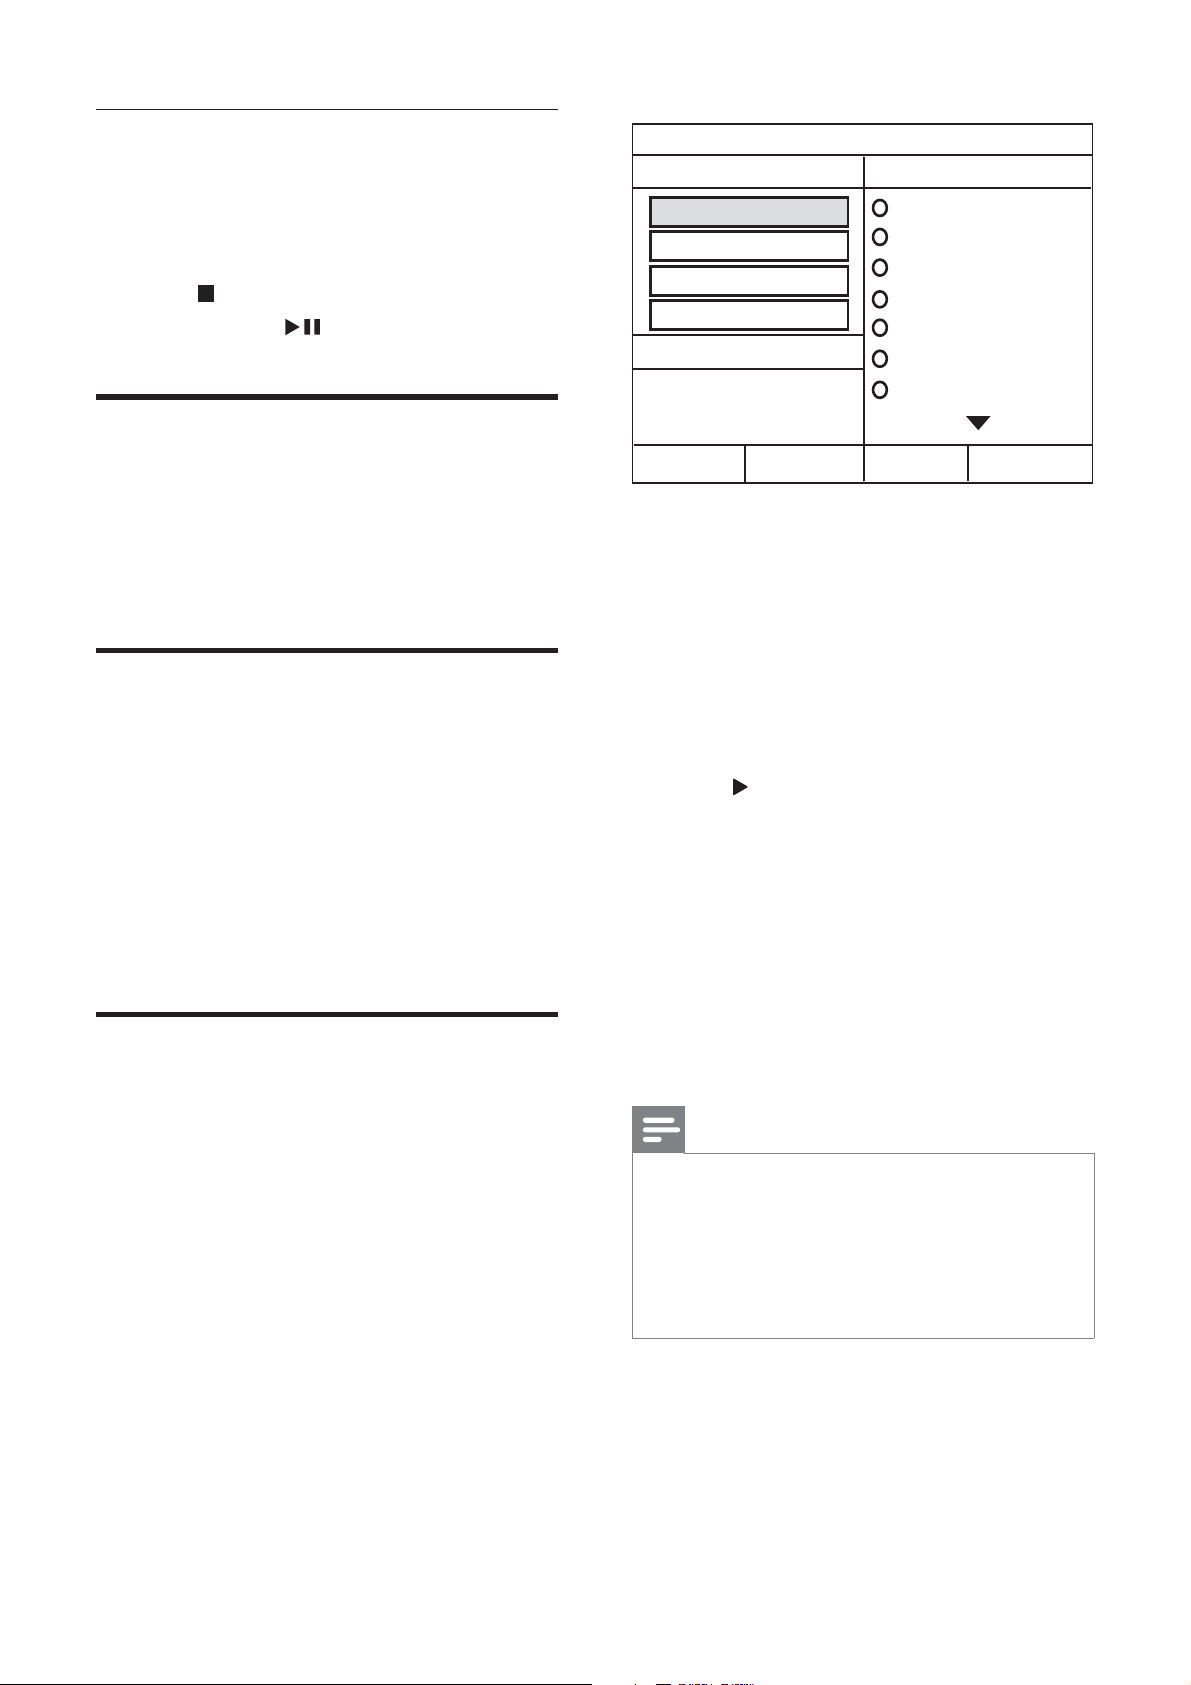
3 When audio is played, press CREATE MP3 .
4 Select [Yes] and press OK to con rm.
5 Select the settings in the [OPTIONS] panel,
then press OK .
• [Speed] : Selects the write-to- le
speed.
• [Bitrate] : Selects the conversion
quality.
• [CRT ID3] : Copies information on the
tracks in the MP3 les.
• [Device] : Selects the USB device
which you use to store the MP3 les.
6 Press to access the [TRACK] panel.
7 Select an audio track, then press OK .
• [Select All] : Selects all tracks.
• [ Deselect all ] : De-selects all tracks.
8 Select [Start] in the menu to convert, then
press OK .
» A new folder is created in the USB
storage device to store all the new MP3
audio les.
• To exit the menu, select [Exit] and
press OK .
Note
• During the conversion process, do not press
any buttons.
• DTS CDs and copy-protected CDs cannot be
converted.
• Write-protected or password-protected USB
storage device cannot be used to store MP3
les.
12
EN
Page 15
6 Change settings
Change general settings
This section helps you to change the settings of
your home theater.
Caution
• Most of the settings are already con gured
with the best value for the home theater.
Unless you have a speci c reason to change a
setting, it is best to leave it at the default value.
Access the setup menu
1 Press SETUP .
» The following menu appears.
Symbol Description
[General Setup]
[Audio Setup]
[Video Setup]
[Preference Setup]
1 Press SETUP .
2 Select [General Setup] , then press OK .
3 Select and adjust the following settings:
• [Disc Lock] : Restricts play to disc.
Password (PIN code) is required to
unlock the disc before play.
• [Display Dim] : Changes the brightness
of the display panel.
• [OSD Language] : Selects the on-
screen display menu language.
• [Screen Saver] : Enables or disables
screen saver mode. If enabled, the
screen enters idle mode after 10
minutes of inactivity (for example, in
pause or stop mode).
• [Sleep Timer] : Sets a sleep timer to
switch the home theater to standby
after a speci c time.
• [Auto Standby] : Enables or disables
auto standby. If enabled, the home
theater switches to standby after 30
minutes of inactivity (for example, in
pause or stop mode).
• [DivX® VOD Code] : Displays the
DivX VOD registration code for the
home theater.
4 Press OK to con rm your choice.
English
2 Select a setup menu, then press OK .
See the following sections for information
about how to change the settings of your
home theater.
3 Press BACK to return to the previous
menu, or press
Note
• You cannot change a setting that is grayed out.
SETUP to exit.
Note
• Before you purchase DivX videos and play
them on the home theater, register the home
theater on www.divx.com using the DivX
VOD code.
Change audio settings
1 Press SETUP .
2 Select [Audio Setup] , then press OK .
3 Select and adjust the following settings:
• [Speakers Volume] : Sets the volume
of each speaker to obtain the ideal
audio balance.
• [Speakers Delay] : Sets the delay time
for center and rear speakers to obtain
an equal audio transmission from all
the speakers.
• [HDMI Audio] : Enables or disables
HDMI audio output for the TV.
EN
13
Page 16
• [Audio Sync] : Sets a delay for audio
output when you play a video disc.
4 Press OK to con rm your choice.
Note
• For settings related to HDMI, the TV must be
connected through HDMI.
Change video settings
1 Press SETUP .
2 Select [Video Setup] , then press OK .
3 Select and adjust the following settings:
• [TV System] : Selects a TV system that
is compatible with the TV.
• [TV Display] : Selects a picture display
format to t the TV screen.
• [Progressive] : Enables or disables
progressive scan mode.
• [Picture Settings] : Selects a
prede ned color setting.
• [HD JPEG] : Enables or disables display
of high de nition JPEG images.
• [HDMI Setup] : Selects HDMI video
resolution and the wide screen display
format for the TV. The Wide Screen
Display option is only available for 16:9
wide screen TV display setting.
4 Press OK to con rm your choice.
Change preference settings
1 Press SETUP .
2 Select [Preference Setup] , then press OK .
3 Select and adjust the following settings:
• [Audio] : Selects audio language for
video.
• [Subtitle] : Selects subtitle language for
video.
• [Disc Menu] : Selects menu language
for video disc.
• [Parental] : Restricts access to discs
that are recorded with ratings. To
play all discs irrespective of the rating,
select level ‘8’.
• [PBC] : Displays or skips the content
menu for VCD and SVCD discs.
• [MP3/JPEG Display] : Displays the
MP3/JPEG folders or all the les.
• [Password] : Sets or changes a PIN
code to play a restricted disc. Enter
‘ 0000 ’ if you do not have a PIN or if
you have forgotten your PIN.
• [DivX Subtitle] : Selects a character
set that supports the DivX subtitle.
• [Version Info.] : Displays the software
version for the home theater.
• [Default] : Resets the home theater to
the default settings programmed at the
factory.
4 Press OK to con rm your choice.
Note
• The best setting is automatically selected for
the TV. If you need to change the setting,
ensure that the TV supports the new setting.
• Some video settings depend on the video
source, ensure that the disc and the TV
support the setting or feature.
• For settings related to HDMI, the TV must be
connected through HDMI.
• For settings related to progressive or
component video, the TV must be connected
through Component Video.
14
EN
Note
• If your preferred disc language is not available,
you can select [Other] from the list and enter
the 4-digit language code which can be found
at the back of this manual.
• If you select a language that is not available
on a disc, the home theater uses the default
language of the disc.
• You cannot reset disc lock, password (PIN
code) and parental control settings to their
default values.
Page 17
7 Update software
8 Product
To check for new updates, compare the current
software version of your home theater with the
latest software version (if available) on the Philips
web site.
Check software version
1 Press SETUP .
2 Select [Preference Setup] > [Version Info.] ,
then press OK .
» The software version is displayed.
Update software from a CD-R
or USB
1 Check for the latest software version on
www.philips.com/support.
• Search for your model and click on
‘software&drivers’.
2 Download the software onto a CD-R or
USB storage device.
3 Insert the CD-R or connect the USB
storage device to the home theater.
4 Follow the instructions on the TV to
con rm the update.
» When complete, the home theater
automatically switches off and on again.
• If not, disconnect the power cord for a few
seconds and then reconnect it.
Caution
• Do not turn off the power or remove the
CD-R or USB storage device when the
software update is in progress because you
might damage the home theater.
specifications
Note
• Speci cation and design are subject to change
without notice.
Region code
The type plate on the back or bottom of the
home theater shows which regions it supports
Country
Europe, United Kingdom
Asia Pacific, Taiwan, Korea
Latin America
Australia, New Zealand
Russia, India
China
DVD
Playback media
DVD-Video, DVD+R/+RW, DVD-R/-RW, DVD+R
DL, CD-R/CD-RW, Audio CD, Video CD/SVCD,
Picture CD, MP3-CD, WMA-CD, DivX-CD, USB
storage device
File Format
• Audio: .mp3, .wma
• Video: .divx, .divx ultra, .mpeg, .mpg, .wmv
(simple pro le)
• Picture: .jpeg, .jpg
Ampli er
• Total output power: 800 W RMS (10% THD)
• Frequency response: 20 Hz-20 kHz
• Signal-to-noise ratio: > 65 dB (CCIR) /
(A-weighted)
English
EN
15
Page 18

• Input sensitivity:
• AUX: 2 V
• MP3 LINK: 1 V
Video
• Signal system: PAL / NTSC
• HDMI output: 480i/576i, 480p/576p, 720p,
1080i, 1080p
Audio
• S/PDIF Digital audio input:
• Coaxial: IEC 60958-3
• Sampling frequency:
• MP3: 32 kHz, 44.1 kHz, 48 kHz
• WMA: 44.1 kHz, 48 kHz
• Constant bit rate:
• MP3: 112 kbps - 320 kbps
• WMA: 64 kbps - 192 kbps
Radio
• Tuning range: FM 87.5-108 MHz (50/100
kHz)
• Signal-to-noise ratio: FM 50 dB
• Frequency response: FM 180 Hz-10 kHz
USB
• Compatibility: Hi-Speed USB (2.0)
• Class support: UMS (USB Mass Storage
Class)
• File system: FAT16, FAT32
• Maximum memory support: < 160GB
Main Unit
• Power supply:
• Latin America/Asia Paci c: 110-
127V/220-240V; ~50-60Hz switchable
• Russia/China/India: 220-240V, ~50Hz
• Power consumption: 200 W
• Standby power consumption: 0.9 W
• Dimensions (WxHxD): 435 x 50 x 340 (mm)
• Weight: 3.56 kg
Subwoofer
• Total output power: 200 W RMS (10% THD)
• Impedance: 4 ohm
• Speaker drivers: 203 mm (8”) woofer
• Frequency response: 20 Hz-150 Hz
• Dimensions (WxHxD): 196 x 392 x 342.2
(mm)
• Weight: 6.3 kg
• Cable length: 3 m
Speakers
• Total output power:
• Center: 200 W RMS (10% THD)
• Front/Rear: 100 W RMS (10% THD)
per channel
• System: full range satellite
• Speaker impedance: 4 ohm (center), 8 ohm
(Front/Rear)
• Speaker drivers: 2 x 3” full range
• Frequency response: 150 Hz-20 kHz
• Dimensions (WxHxD):
• Center: 280 x 96 x 92 (mm)
• Front/Rear: 100 x 280 x 115 (mm)
• Weight:
• Center: 1.4 kg
• Front/Rear: 1 kg/each
• Cable length:
• Center: 2 m
• Front: 3 m
• Rear: 10 m
Laser speci cation
• Type: Semiconductor laser GaAIAs (CD)
• Wave length: 645 - 665 nm (DVD), 770 -
800 nm (CD)
• Output power: 6 mW (DVD), 7 mW
(VCD/CD)
• Beam divergence: 60 degrees.
16
EN
Page 19
9 Troubleshooting
Warning
• Risk of electric shock. Never remove the
casing of the product.
To keep the warranty valid, never try to repair the
product yourself.
If you have problems using this product, check the
following points before you request service. If you
still have a problem, register your product and get
support at www.philips.com/welcome.
If you contact Philips, you will be asked for the
model and serial number of your product. The
model number and serial number are on the back
or bottom of your product. Write the numbers
here:
Model No. __________________________
Serial No. ___________________________
Main unit
The buttons on this home theater do not work.
• Disconnect the home theater from the
power outlet for a few minutes, then
reconnect.
Sound
No sound.
• Ensure that the audio cables are connected
and select the correct input source (for
example, AUDIO SOURCE ) for the device
you want to play.
No sound on HDMI connection.
• You might not hear any sound if the
connected device is not HDCP (Highbandwidth Digital Content Protection)
compliant or only DVI compatible. Use an
analog or digital audio connection.
• Ensure that the [HDMI Audio] is enabled .
No sound from TV program.
• Connect an audio cable from the audio
input on the home theater to the audio
output on the TV, then press AUDIO
SOURCE repeatedly to select the correct
audio source.
Distorted sound or echo.
• Ensure that the TV volume is muted or set
to minimum if you are playing audio through
the home theater.
Audio and video are not synchronized.
• 1) Press and hold AUDIO SYNC . 2) Press
+/- within ve seconds.
Play
English
Picture
No picture.
• Ensure that the TV is switched to the
correct source for this home theater.
• If this happens when you change the TV
system, switch to its default mode: 1) Press
to open the disc compartment. 2) Press
the Numeric buttons ’3’ .
• If this happens when you switch on the
progressive scan mode, switch to its
default mode: 1) Press
disc compartment. 2) Press the Numeric
buttons ’1’ .
No picture on HDMI connection.
• Check if the HDMI cable is faulty. Replace
with a new HDMI cable.
• If this happens when you change the HDMI
video resolution, switch to its default mode:
1) Press
2) Press the Numeric buttons ‘1’ .
to open the disc compartment.
to open the
Disc cannot be played.
• Clean the disc.
• Ensure that the home theater supports the
disc (see ‘Product speci cations’ on page
15 ) .
• Ensure that the home theater supports the
region code of the DVD.
• For DVD±RW or DVD±R, ensure that the
disc is nalized.
DivX video les cannot be played.
• Ensure that the DivX le is encoded
according to the ‘Home Theater Pro le’
with the DivX encoder.
• Ensure that the DivX video le is complete.
DivX subtitles do not display correctly.
• Ensure that the subtitle le name is the
same as the movie le name.
• Select the correct character set: 1) Press
SETUP . 2) Select [Preference Setup] .
3) Select [DivX Subtitle] . 4) Select a
supported character set. 5) Press OK .
EN
17
Page 20

The contents of a USB storage device cannot be
read.
• Ensure that the format of the USB storage
device is compatible with the home theater
(see ‘Product speci cations’ on page 15 ) .
• Ensure that the USB storage device
is formatted with a le system that is
supported by the home theater (note that
NTFS is not supported).
‘No entry’ or ‘x’ sign appears on the TV.
• The operation is not possible.
10 Index
A
ampli er 15
audio
connection 8
language 14 , 10
settings 13
synchronize with video 11
C
care 3
change settings 13
connect
audio from TV 8 , 12
guide 6
microphone 8
other devices 8
TV 7
connectors 6
contact us 17
D
disc
play 9
supported discs 15
disposal of your product 4
DivX
subtitle 14
F
le formats 15
K
karaoke
microphone 8
L
language
audio 14
disc menu 14
on-screen display 13
subtitle 14
18
EN
Page 21

M
MP3
create MP3 les 12
play 12
O
overview
connectors 6
main unit 4
remote control 5
slideshow
play musical slideshow 11
software
update 15
version 15
sound
mode 9
surround 9
troubleshooting 17
subtitle
language 10
P
password 14
picture
slide show 11
troubleshooting 17
play
disc 9
MP3 player 12
options 9
radio 11
troubleshooting 17
USB storage device 10
product care 3
product speci cations 15
progressive scan 2
R
radio
play 11
program 11
tune 11
tuning grid 12
recycle 4
region code 15
remote control 5
repeat 9 , 11
T
time search video 11
troubleshooting 17
TV
audio from TV 8 , 12
connect 7
U
USB
play 10
software update 15
V
video
options 10
settings 14
synchronize with audio 11
English
S
safety 3
settings
audio 13
general 13
parental control 14
preferences 14
restore factory settings 14
video 14
EN
19
Page 22

20 EN
 Loading...