

Page 1

Register your product and get support at
www.philips.com/welcome
HTS3562
HTS3582
Page 2

Page 3

Contents
1 Important 2
Safety 2
Care for your product
Care of the environment
3D health warning
Help and support
5 Change settings 17
Language settings 17
Picture and video settings
Audio settings
Parental control settings
3
3
3
3
Display settings
Energy saving settings
Speaker settings
Restore default settings
18
18
18
18
19
19
19
English
2 Your home theater 4
Main unit 4
Connectors
Remote control
4
5
3 Connect and set up 6
Connect speakers 6
Connect to TV
Connect audio from TV and other devices
Set up speakers
Set up EasyLink (HDMI-CEC control)
Connect and set up a home network
7
8
9
9
10
4 Use your home theater 11
Access the home menu 11
Discs
Data fi les
USB storage devices
Audio, video, and picture options
Radio
MP3 player
Browse PC through DLNA
Karaoke
Choose sound
11
13
13
14
15
15
16
16
16
6 Update software 19
Check software version 19
Update software through USB
Update software through the Internet
7 Product specifi cations 20
8 Troubleshooting 23
9 Notice 24
Copyright 24
Compliance
Open source software
RMVB end user agreement (Asia Pacifi c
and China only)
Trademarks
10 Index 26
19
20
24
25
25
25
EN
1
Page 4

1 Important
Read and understand all instructions before you
use your product. If damage is caused by failure to
follow instructions, the warranty does not apply.
Safety
Risk of electric shock or fi re!
• Never expose the product and accessories to
rain or water. Never place liquid containers,
such as vases, near the product. If liquids are
spilt on or into the product, disconnect it
from the power outlet immediately. Contact
Philips Consumer Care to have the product
checked before use.
• Never place the product and accessories
near naked fl ames or other heat sources,
including direct sunlight.
• Never insert objects into the ventilation slots
or other openings on the product.
• Where the mains plug or an appliance coupler
is used as the disconnect device, the disconnect
device shall remain readily operable.
• Disconnect the product from the power
outlet before lightning storms.
• When you disconnect the power cord, always
pull the plug, never the cable.
Risk of short circuit or fi re!
• Before you connect the product to the
power outlet, ensure that the power voltage
matches the value printed on the back or
bottom of the product. Never connect the
product to the power outlet if the voltage is
different.
Risk of injury or damage to the home theater!
• For wall-mountable products, use only the
supplied wall mount bracket. Secure the
wall mount to a wall that can support the
combined weight of the product and the wall
mount. Koninklijke Philips Electronics N.V. bears
no responsibility for improper wall mounting
that results in accident, injury or damage.
• For speakers with stands, use only the
supplied stands. Secure the stands to the
speakers tightly. Place the assembled stands
on fl at, level surfaces that can support the
combined weight of the speaker and stand.
• Never place the product or any objects on
power cords or on other electrical equipment.
• If the product is transpor ted in temperatures
below 5°C, unpack the product and wait until
its temperature matches room temperature
before connecting it to the power outlet.
• Visible and invisible laser radiation when
open. Avoid exposure to beam.
• Do not touch the disc optical lens inside the
disc compartment.
• Parts of this product can be made of glass.
Handle with care to avoid injury and damage.
Risk of overheating!
• Never install this product in a confi ned space.
Always leave a space of at least four inches
around the product for ventilation. Ensure
curtains or other objects never cover the
ventilation slots on the product.
Risk of contamination!
• Do not mix batteries (old and new or carbon
and alkaine, etc.).
• Danger of explosion if batteries are
incorrectly replaced. Replace only with the
same or equivalent type.
• Remove batteries if they are exhausted or if
the remote control is not to be used for a
long time.
• Batteries contain chemical substances, they
should be disposed of properly.
Risk of swallowing batteries!
• The product/remote control may contain
a coin/button type battery, which can be
swallowed. Keep the battery out of reach of
children at all times! If swallowed, the battery
can cause serious injury or death. Severe
internal burns can occur within two hours of
ingestion.
• If you suspect that a battery has been
swallowed or placed inside any part of the
body, seek immediate medical attention.
• When you change the batteries, always
keep all new and used batteries out of
reach of children. Ensure that the battery
compartment is completely secure after you
replace the battery.
• If the battery compartment cannot be
completely secured, discontinue use of the
product. Keep out of reach of children and
contact the manufacturer.
2 EN
Page 5
Care for your product
3D health warning
• Do not inser t any objects other than discs
into the disc compartment.
• Do not insert warped or cracked discs into
the disc compartment.
• Remove discs from the disc compartment
if you are not using the product for an
extended period of time.
• Use only microfi ber cloth to clean the
product.
Care of the environment
Your product is designed and manufactured with
high quality materials and components, which can
be recycled and reused.
When this crossed-out wheeled bin symbol is
attached to a product it means that the product
is covered by the European Directive 2002/96/
EC. Please inform yourself about the local separate
collection system for electrical and electronic
products.
Please act according to your local rules and do not
dispose of your old products with your normal
household waste.
Correct disposal of your old product helps to
prevent potential negative consequences for the
environment and human health.
Your product contains batteries covered by the
European Directive 2006/66/EC, which cannot be
disposed with normal household waste.
Please inform yourself about the local rules on
separate collection of batteries because correct
disposal helps to prevent negative consequences
for the environmental and human health.
If you or your family has a history of epilepsy
or photosensitive seizures, consult a medical
professional before exposing yourself to fl ashing
light sources, rapid image sequences or 3D
viewing.
To avoid discomfort such as dizziness, headache or
disorientation, we recommend not watching 3D
for extended periods of time. If you experience
any discomfort, stop watching 3D and do not
immediately engage in any potentially hazardous
activity (for example driving a car) until your
symptoms have disappeared. If symptoms persist,
do not resume watching 3D without consulting a
medical professional fi rst.
Parents should monitor their children during 3D
viewing and ensure they do not experience any
discomfort as mentioned above. Watching 3D is
not recommended for children under six years of
age as their visual system is not fully developed yet.
Help and support
Philips provides extensive online support. Visit our
website at www.philips.com/support to:
• download the complete user manual
• print the quick star t guide
• watch video tutorials (available only for
selected models)
• fi nd answers to frequently answered
questions (FAQs)
• email us a question
• chat with our support representative.
Follow the instructions on the website to select
your language, and then enter your product model
number.
Alternatively, you can contact Philips Consumer
Care in your country. Before you contact Philips,
note down the model number and serial number
of your product. You can fi nd this information on
the back or bottom of your product.
English
EN
3
Page 6

2 Your home theater
Congratulations on your purchase, and welcome
to Philips! To fully benefi t from the support that
Philips offers, register your product at www.philips.
com/welcome.
a ( USB )
• Audio, video or picture input from a USB
storage device.
• Connect to a Wi-Fi dongle (Model:
Philips WUB1110, sold separately).
b MIC
Audio input from a microphone.
c MUSIC iLINK
Audio input from an MP3 player.
Main unit
This section includes an overview of the main unit.
a Disc compartment
b Display panel
c ( Open/Close )
Open or close the disc compartment, or
eject the disc.
d ( Play/Pause )
Start, pause or resume play.
e SOURCE
Select an audio or video source for the home
theater.
f ( Standby-On )
Switch the home theater on or to standby.
Connectors
This section includes an overview of the
connectors available on your home theater.
Front connectors
Rear connectors
FM
ANTENNA
a AC MAINS
Connect to the power supply.
b AUDIO IN - AUX
Connect to an analog audio output on the TV
or an analog device.
c VIDEO OUT
Connect to the composite video input on
the TV.
d HDMI OUT (ARC)
Connect to the HDMI input on the TV.
e LAN
Connect to the LAN input on a broadband
modem or router.
f DIGITAL IN - OPTICAL
Connect to an optical audio output on the
TV or a digital device.
g DIGITAL IN - COAXIAL
Connect to a coaxial audio output on the TV
or a digital device.
h ANTENNA FM
Signal input from an antenna. (Fixed FM
antenna for some models)
i SPEAKERS
Connect to the supplied speakers and
subwoofer.
4 EN
Page 7

Remote control
This section includes an overview of the remote
control.
1
2
3
4
5
6
7
8
9
10
11
12
13
14
15
16
17
18
19
20
21
a ( Standby-On )
• Switch the home theater on or to standby.
• When EasyLink is enabled, press and hold
for at least three seconds to switch all
connected HDMI CEC compliant devices
to standby.
b ( Home )
Access the home menu.
c Source buttons
• DISC / POP-UP MENU : Switch to disc
source. Access or exit the disc menu
when you play a disc.
• RADIO : Switch to FM radio.
• AUDIO SOURCE : Select an audio input
source.
d BACK
• Return to a previous menu screen.
• In radio mode, press and hold to erase
the current preset radio stations.
e Navigation buttons
• Navigate menus.
• In radio mode, press left or right to start
auto search.
• In radio mode, press up or down to tune
the radio frequency.
f OK
Confi rm an entry or selection.
g / ( Previous/Next )
• Skip to the previous or next track,
chapter or fi le.
• In radio mode, select a preset radio station.
h ( Stop ) / ( Eject / Open/Close )
• Stop play.
• Press and hold for three seconds to open
or close the disc compartment, or eject
the disc.
i / ( Fast Backward / Fast Forward )
Search backwards or forward. Press
repeatedly to change the search speed.
j +/- ( Volume )
Increase or decrease volume.
k SOUND SETTINGS
Access or exit sound options.
l Alphanumeric buttons
Enter values or letters (using SMS style entr y).
m REPEAT
Select or turn off repeat mode.
n TOP MENU
Access the main menu of a disc.
o OPTIONS
• Access more play options while playing a
disc or a USB storage device.
• In radio mode, set a radio station.
English
EN
5
Page 8
p ( Play )
Start or resume play.
q ( Pause )
Pause play.
r ( Mute )
Mute or restore volume.
s AUDIO
Select an audio language or channel.
t SUBTITLE
Select subtitle language for video.
u Color buttons
Select tasks or options for Blu-ray discs.
3 Connect and set up
This section helps you connect your home theater
to a TV and other devices, and then set it up.
For information about the basic connections of
your home theater and accessories, see the quick
start guide. For a comprehensive interactive guide,
visit www.connectivityguide.philips.com.
Note
For identifi cation and supply ratings, see the type
•
plate at the back or bottom of the product.
• Before you make or change any connections,
make sure that all devices are disconnected from
the power outlet.
Connect speakers
The speaker cables are color-coded for easy
connection. To connect a speaker to your home
theater, match the color on the speaker cable to
the color on the connector.
Speaker position plays a critical role in setting up
a surround sound effect. For best effect, position
all the speakers towards the seating position and
place them close to your ear level (seated).
6 EN
Page 9
Note
Surround sound depends on factors such as
•
room shape and size, type of wall and ceiling,
windows and refl ective surfaces, and speaker
acoustics. Experiment with the speaker positions
to fi nd the optimum setting for you.
Follow these general guidelines for speakers placement.
1 Seating position:
This is the center of your listening area.
2 FRONT CENTER (front center) speaker:
Place the center speaker directly in front of the
seating position, either above or below your TV.
3 FRONT LEFT (front left) and FRONT
RIGHT (front right) speakers:
Place the left and right speakers in the front, and
at equal distance from the center speaker. Make
sure that the left, right, and the center speakers
are at equal distance from your seating position.
4 REAR LEFT (rear left) and REAR RIGHT
(rear right) speakers:
Place the rear surround speakers to the left
and right side of your seating position, either
in line with it or slightly behind it.
5 SUBWOOFER (subwoofer):
Place the subwoofer at least one meter
to the left or right of the TV. Leave about
10-centimeter clearance from the wall.
Connect to TV
Connect your home theater to a TV to watch
videos. You can listen to the TV audio through your
home theater speakers.
Use the best quality connection available on your
home theater and TV.
• The HDMI ARC connector on the TV
might be labeled differently. For details,
see the TV user manual.
2 On your TV, turn on HDMI-CEC operations.
For details, see the TV user manual.
• If you cannot hear the TV audio through
your home theater, set up the audio
manually (see 'Set up the audio' on page 10 ) .
TV
Option 2: Connect to TV through
standard HDMI
Best quality video
If your TV is not HDMI ARC compliant, connect
your home theater to the TV through a standard
HDMI connection.
1 Using a High Speed HDMI cable, connect the
HDMI OUT (ARC) connector on your home
theater to the HDMI connector on the TV.
2 Connect an audio cable to hear the TV audio
through your home theater (see 'Connect
audio from TV and other devices' on page 8 ) .
3 On your TV, turn on HDMI-CEC operations.
For details, see the TV user manual.
• If you cannot hear the TV audio through
your home theater, set up the audio
manually (see 'Set up the audio' on page 10 ) .
Note
English
Option 1: Connect to TV through HDMI
(ARC)
Best quality video
Your home theater supports HDMI version 1.4 Audio Return Channel (ARC). If your TV is HDMI
ARC compliant, you can hear the TV audio through
your home theater by using a single HDMI cable.
1 Using a High Speed HDMI cable, connect
the HDMI OUT (ARC) connector on your
home theater to the HDMI ARC connector
on the TV.
If your TV has a DVI connector, you can use an
•
HDMI/DVI adapter to connect to TV. However,
some of the features may not be available.
EN
7
Page 10
Note
When your home theater and TV are connected
TV
•
through HDMI ARC, an audio connection is not
required (see 'Option 1: Connect to TV through
HDMI (ARC)' on page 7 ) .
Option 3: Connect to the TV through
composite video
Basic quality video
If your TV does not have HDMI connectors, use
a composite video connection. A composite
connection does not support high-defi nition video.
1 Using a composite video cable, connect the
VIDEO connector on your home theater to
the VIDEO IN connector on the TV.
• The composite video connector might
be labeled AV IN , COMPOSITE , or
BASEBAND .
2 Connect an audio cable to hear the TV audio
through your home theater (see 'Connect
audio from TV and other devices' on page 8 ) .
3 When you watch TV programs, press
SOURCE on your home theater repeatedly
to select the correct audio input.
4 When you watch videos, switch your TV to
the correct video input. For details, see the
TV user manual.
TV
Option 1: Connect audio through a digital
optical cable
Best quality audio
1 Using an optical cable, connect the OPTICAL
connector on your home theater to the
OPTICAL OUT connector on the TV or
other device.
• The digital optical connector might be
labeled SPDIF or SPDIF OUT .
TV
Option 2: Connect audio through a digital
coaxial cable
Good quality audio
1 Using a coaxial cable, connect the COAXIAL
connector on your home theater to the
COAXIAL/DIGITAL OUT connector on the
TV or other device.
• The digital coaxial connector might be
labeled DIGITAL AUDIO OUT .
Connect audio from TV and
other devices
Play audio from TV or other devices through your
home theater speakers.
Use the best quality connection available on your
TV, home theater, and other devices.
8 EN
Page 11
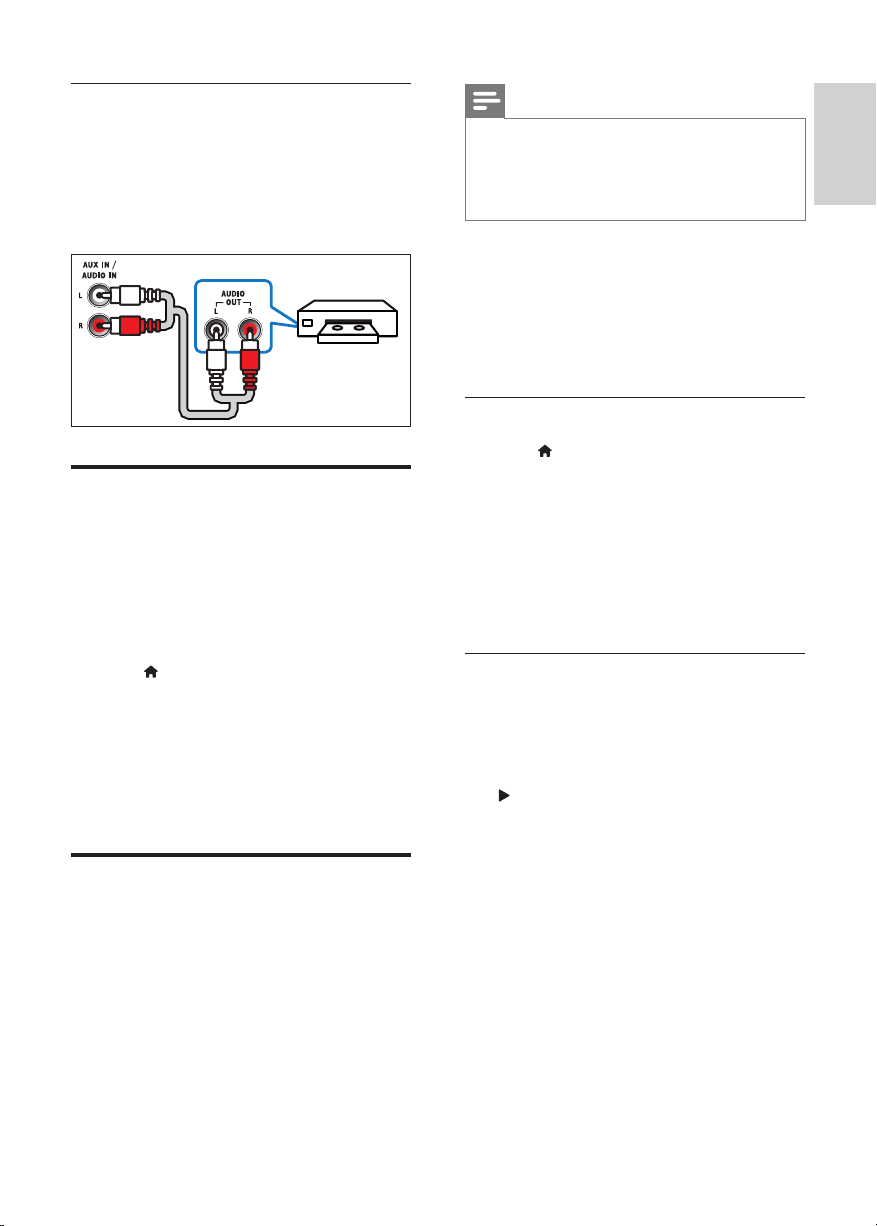
Option 3: Connect audio through analog
audio cables
Basic quality audio
1 Using an analog cable, connect the AUX
connectors on your home theater to the
AUDIO OUT connectors on the TV or other
device.
VCR
Note
Depending on the manufacturer, HDMI-CEC is
•
known by many names. For information on your
device, see the user manual of the device.
• Philips does not guarantee 100% interoperability
with all HDMI-CEC devices.
Before you start
• Connect your home theater to the HDMI-
CEC compliant device through HDMI
connection.
• Make the necessary connections described in
the quick start guide, and then switch the TV
to the correct source for your home theater.
English
Set up speakers
Set up the speakers manually to experience
customized surround sound.
Before you start
Make the necessary connections described in the
quick start guide, and then switch the TV to the
correct source for your home theater.
1 Press ( Home ).
2 Select [Setup] , and then press OK .
3 Select [Audio] > [Speaker setup]
4 Enter the distance for each speaker, and
then listen to the test tones and change
the volume. Experiment with the speaker
positions to fi nd the ideal setting.
Set up EasyLink (HDMI-CEC
control)
This home theater supports Philips EasyLink,
which uses the HDMI-CEC (Consumer Electronics
Control) protocol. EasyLink-compliant devices that
are connected through HDMI can be controlled
by a single remote control.
Enable EasyLink
1 Press ( Home ).
2 Select [Setup] , and then press OK .
3 Select [EasyLink] > [EasyLink] > [On] .
4 On your TV and other connected devices,
turn on HDMI-CEC control. For details, see
the user manual of the TV or other devices.
• On your TV, set the audio output to
'Amplifi er' (instead of TV speakers). For
details, see the TV user manual.
EasyLink controls
With EasyLink, you can control your home theater,
TV, and other connected HDMI-CEC compliant
devices with a single remote control.
• [One Touch Play] (One-touch play): When a
video disc is in the disc compartment, press
( Play ) to wake up the TV from standby, and
then play a disc.
• [One Touch Standby] (One-touch standby):
If one-touch standby is enabled, your home
theater can switch to standby with the
remote control of the TV or other HDMICEC devices.
• [System Audio Control] (System audio
control): If system audio control is enabled,
the audio of the connected device is output
through your home theater speakers
automatically when you play the device.
• [Audio Input Mapping] (Audio input
mapping): If system audio control does not
work, map the connected device to the
correct audio input connector on your home
theater (see 'Set up the audio' on page 10 ) .
EN
9
Page 12
Note
• To change the EasyLink control settings, press
( Home ), select [Setup] > [EasyLink] .
Set up the audio
If you cannot hear the audio output of a
connected device through your home theater
speakers, check that you have enabled Easylink on
all the devices (see 'Enable EasyLink' on page 9 ) .
Then, set up the EasyLink audio control.
1 Press ( Home ).
2 Select [Setup] , and then press OK .
3 Select [EasyLink] > [System Audio Control]
> [On] .
• To play the audio from the TV speakers,
select [Off] , and skip the following steps.
4 Select [EasyLink] > [Audio Input Mapping] .
5 Follow the onscreen instructions to map the
connected device to the audio inputs on your
home theater.
• If you connect your home theater to the
TV through an HDMI ARC connection,
make sure that the TV audio is mapped
to the ARC input on your home theater.
Before you start
• For software updates, make sure that the
network router has access to the Internet
with high-speed connection and is not
restricted by fi rewalls or other security
systems.
• Make the necessary connections described in
the quick start guide, and then switch the TV
to the correct source for your home theater.
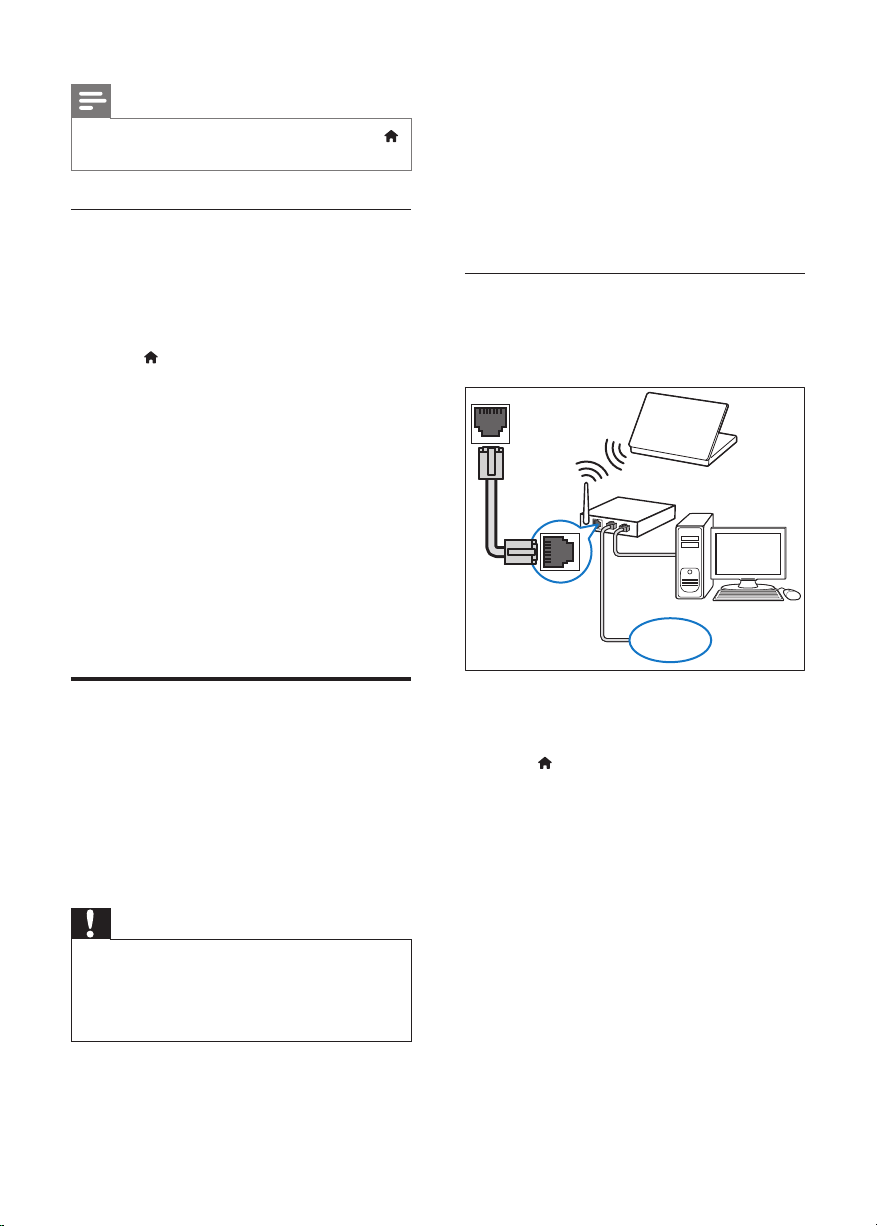
Set up the wired network
What you need
• A network cable (RJ45 straight cable).
• A network router (with DHCP enabled).
LAN
www
Connect and set up a home
network
Connect your home theater to a network router
through wired or wireless network connection,
and enjoy:
• Streamed multimedia content
• BD-Live applications
• Software update
Caution
Familiarize yourself with the network router,
•
media server software and networking
principles. If necessary, read documentation that
accompanies the network components. Philips is
not responsible for lost, damaged, or corrupt data.
10 EN
1 Using a network cable, connect the LAN
connector on your home theater to the
network router.
2 Press ( Home ).
3 Select [Setup] , and then press OK .
4 Select [Network] > [Network installation]
> [Wired (Ethernet)] .
5 Follow the onscreen instructions to complete
the setup.
• If connection fails, select [Retry] , and
then press OK .
6 Select [Finish] , and then press OK to exit.
• To view the network settings, select
[Setup] > [Network] > [View network
settings] .
Page 13
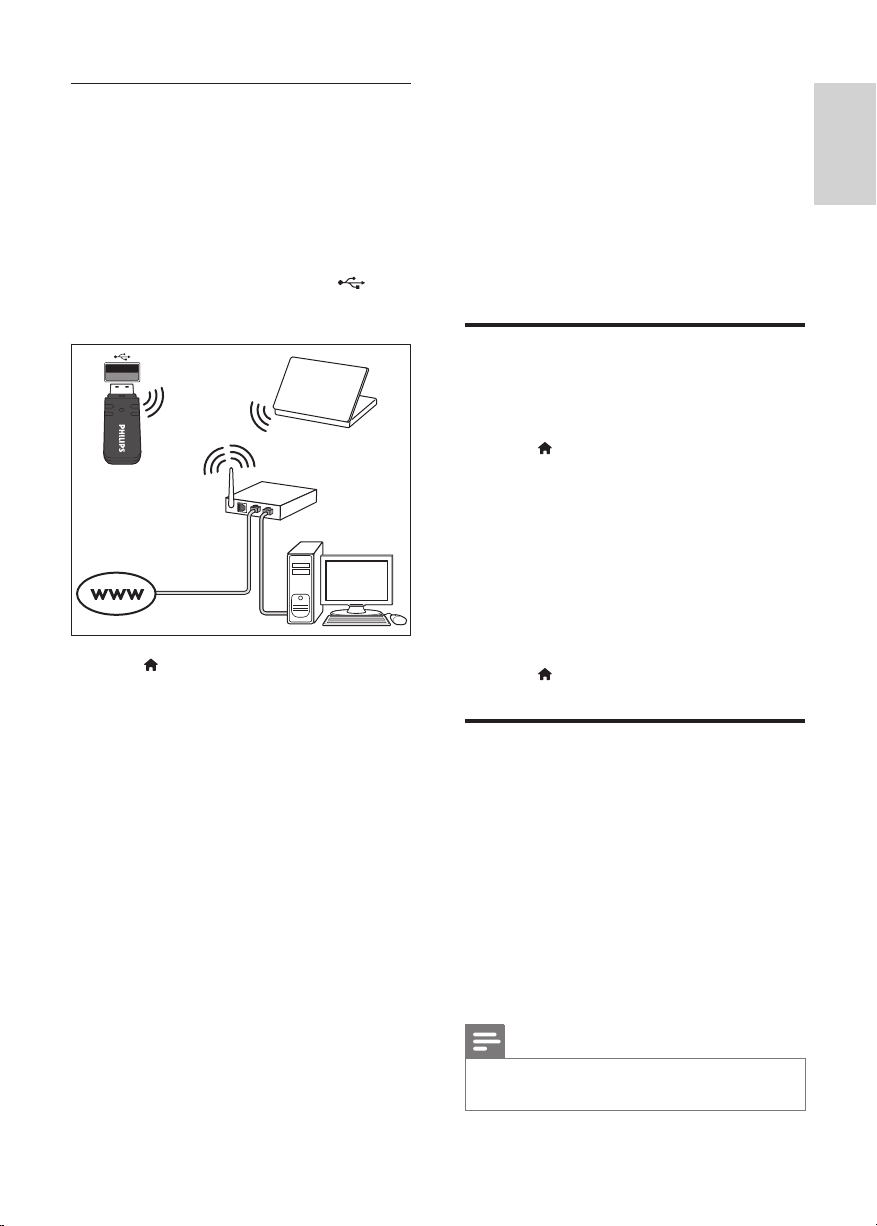
Set up the wireless network
Your home theater is Wi-Fi ready. Connect a Wi-Fi
dongle for easy access to a wireless network.
What you need
• A network router (with DHCP enabled). For
best wireless performance, coverage, and
compatibility, use 802.11n router;
• Connect a Wi-Fi dongle (Model: Philips
WUB1110, sold separately) to the
connector on your home theater.
1 Press ( Home ).
2 Select [Setup] , and then press OK .
3 Select [Network] > [Network installation]
> [Wireless (Wi-Fi)] , and then press OK .
4 Follow the onscreen instructions to select
and set up the wireless network.
• If connection fails, select [Retry] , and
then press OK .
5 Select [Finish] , and then press OK to exit.
• To view the network settings, select
[Setup] > [Network] > [View wireless
settings] .
4 Use your home theater
This section helps you use the home theater to
play media from a wide range of sources.
Before you start
• Make the necessary connections described in
the Quick start guide and the user manual.
• Switch the TV to the correct source for the
home theater.
Access the home menu
The home menu provides easy access to
connected devices, setup and other useful features
in your home theater.
1 Press ( Home ).
» The home menu is displayed.
2 Press the Navigation buttons and OK to
select the following:
• [play Disc] : Start disc play.
• [browse USB] : Access the USB content
browser
• [browse PC] : Access the computer
content browser.
• [Setup] : Access menus to change video,
audio and other settings.
3 Press ( Home ) to exit.
Discs
Your home theater can play DVDs, VCDs, CDs, and
Blu-ray discs. It can also play discs that you’ve made
at home, such as CD-R discs of photos and music.
1 Inser t a disc into the home theater.
2 If the disc does not play automatically, press DISC
or select [play Disc] from the home menu.
3 Use the remote control to control play (see
'Remote control' on page 5 ) .
• It is normal to hear a little noise when
you play a Blu-ray disc. This does not
mean that your home theater is faulty.
English
Note
•
To avoid fl ickering, change the brightness of the
display .
EN
11
Page 14
Play buttons
Button Action
Navigation
buttons
OK Confi rm an entr y or selection.
( Play )
/
/
AUDIO Select an audio language or channel.
SUBTITLE Select subtitle language for video.
DISC /
POP-UP
MENU
OPTIONS Access the advanced options when
REPEAT Select or turn off repeat mode.
Navigate menus.
Up/Down: Rotate the picture
clockwise or counter-clockwise.
Left/Right: Flip the picture vertically
or horizontally.
Start or resume play.
Pause play.
Stop play.
Skip to the previous or next track,
chapter or fi le.
When a video is paused, search
backwards or forward.
Access or exit the disc menu.
you play your audio, video, or media
fi les (see 'Audio, video, and picture
options' on page 14 ) .
1 Using the high speed HDMI cable, connect
your home theater to a 3D compatible TV.
2 Make sure that the 3D video setting is
enabled. Press
[Video] > [Watch 3D video] > [Auto] .
• To play 3D discs in 2D mode, select [Off] .
( Home ), select [Setup] >
3 Play a Blu-ray 3D disc and put on the 3D glasses.
• During video search and in cer tain play
modes, the video is displayed in 2D. The
video display returns to 3D when you
resume play.
Bonus View on Blu-ray
On Blu-ray discs that suppor t the Bonus View,
enjoy extra content such as commentaries in a
small screen window. Bonus View is also known as
picture-in-picture.
1 Enable Bonus View in the Blu-ray disc menu.
2 While you play the movie, press OPTIONS .
» The options menu is displayed.
3 Select [PIP selection] > [PIP] .
• Depending on the video, PIP menu [1] or
[2] is displayed.
• To disable Bonus View, select [Off] .
4 Select [2nd audio language] or [2nd Subtitle
Language] .
5 Select the language, and then press OK .
Synchronize picture and sound
If the audio and video are not synchronized, delay
the audio to match the video.
1 Press SOUND SETTINGS .
2 Select AUD SYNC , and then press OK .
3 Press the Navigation buttons (up/down) to
synchronize the audio with the video.
4 Press OK to confi rm.
Play Blu-ray 3D disc
Your home theater can play Blu-ray 3D video. Read
the 3D health warning before playing a 3D disc.
What you need
• A 3D TV.
• A pair of 3D glasses that are compatible with
your 3D TV.
• A 3D Blu-ray video
• A high speed HDMI cable (preferably version
1.4)
12 EN
BD-Live on Blu-ray
Access additional features on the Blu-ray discs with
BD-Live content, such as internet chats with the
director, the latest movie trailers, games, wallpaper,
and ringtones.
BD-Live services and content vary from disc to disc.
What you need
• Blu-ray disc with BD-Live content
• a USB storage device, with at least 1 GB of
memory
1 Connect your home theater to a home
network with Internet access (see 'Connect
and set up a home network' on page 10 ) .
2 Connect a USB storage device to your home
theater.
3 Press ( Home ) and select [Setup] .
4 Select [Advanced] > [BD-Live security] >
[Off] to enable BD-Live.
• To disable BD-Live, select [On] .
Page 15
5 Select the BD-Live icon in the disc menu, and
then press OK .
» BD-Live starts to load. The loading time
depends on the disc and your internet
connection.
6 Press the Navigation buttons to navigate BD-
Live, and then press OK to select an option.
Note
To clear the memor y on the storage device,
•
press
( Home ), select [Setup] > [Advanced]
> [Clear memory] .
Data fi les
Your home theater can play pictures, audio and
video fi les contained in a disc or a USB storage
device. Before you play a fi le, check that the fi le
format is supported by your home theater (see
'File formats' on page 20 ) .
1 Play the fi les from a disc or USB storage device.
2 To stop play, press .
• To resume the video from where you
stopped, press
• To play the video from the start, press .
Note
To play DivX DRM protected fi les, connect your
•
home theater to a TV through an HDMI cable.
( Play ).
1 While playing video, press SUBTITLE to
select a language.
2 For DivX or RMVB/RM videos, if the subtitles
do not appear correctly, continue the
following steps to change the character set.
3 Press OPTIONS .
» The options menu is displayed.
4 Select [Character set] , and then select a
character set that supports the subtitle.
Asia Pacifi c and China
Character
Set
[Standard] Albanian, Danish, Dutch, English,
[Chinese] Simplifi ed Chinese
[Chinese-
Traditional]
[Korean] English and Korean
Language
Finnish, French, Gaelic, German,
Italian, Kurdish (Latin), Norwegian,
Portuguese, Spanish, Swedish, Turkish
Traditional Chinese
VOD code for DivX
Before you purchase DivX videos and play them
on your home theater, register the home theater
on www.divx.com using the DivX VOD code.
1 Press ( Home ).
2 Select [Setup] , and then press OK .
3 Select [Advanced] > [DivX® VOD Code] .
» The DivX VOD registration code for
your home theater is displayed.
English
Subtitles
If your video has subtitles in multiple languages,
select a subtitle language.
Note
Make sure that the subtitle fi le has the exact
•
same name as the video fi le. For example, if the
video fi le is named 'movie.avi', name the subtitle
fi le as 'movie.sr t' or 'movie.sub'.
• Your home theater suppor ts the following fi le
formats: .srt, .sub, .txt, .ssa, .ass, smi, and .sami. If
the subtitles do not appear correctly, change the
character set.
USB storage devices
Enjoy pictures, audio, and video stored on a USB
storage device such as an MP4 player or digital camera.
What you need
• A USB storage device that is formatted for
FAT or NTFS fi le systems, and complies with
the Mass Storage Class.
• A media fi le in one of the supported fi le
formats (see 'File formats' on page 20 ) .
Note
If you use a USB extension cable, USB HUB, or
•
USB multi-reader, the USB storage device may
not be recognized.
EN
13
Page 16

1 Connect a USB storage device to the
( USB ) connector on your home theater.
2 Press ( Home ).
3 Select [browse USB] , and then press OK .
» A content browser is displayed.
4 Select a fi le, and then press OK .
5 Press the play buttons to control play (see
'Play buttons' on page 12 ) .
Audio, video, and picture options
Use advanced features when you play pictures, audio
and video fi les from a disc or a USB storage device.
Audio options
While playing audio, repeat an audio track, a disc,
or a folder.
1 Press OPTIONS repeatedly to cycle through
the following functions:
• RPT TRK / RPT FILE : Repeat the current
track or fi le.
• RPT DISC / RPT FOLD : Repeat all the
tracks on the disc or the folder.
• RPT RDOM : Play audio tracks in random
order.
• RPT OFF : Turn off the repeat mode.
Video options
While watching video, select options such as
subtitles, audio language, time search, and picture
settings. Depending on the video source, some
options are not available.
1 Press OPTIONS .
» The video options menu is displayed.
2 Press the Navigation buttons and OK to
select and change:
• [Audio language] : Select audio language
for video.
• [Subtitle Language] : Select subtitle
language for video.
• [Subtitle shift] : Change the subtitle
position on the screen.
• [Info] : Display information about what is
playing.
• [Character set] : Select a character set
that supports the DivX subtitle.
• [Time search] : Skip to a specifi c par t of the
video by entering the time of the scene.
• [2nd audio language] : Select the second
audio language for Blu-ray video.
• [2nd Subtitle Language] : Select the second
subtitle language for Blu-ray video.
• [Titles] : Select a specifi c title.
• [Chapters] : Select a specifi c chapter.
• [Karaoke] : Change the karaoke settings.
• [Angle list] : Select a different camera angle.
• [Menus] : Display the disc menu.
• [PIP selection] : Display Picture-in-Picture
window when playing a Blu-ray disc that
supports the Bonus View.
• [Zoom] : Zoom into a video scene or
picture. Press the Navigation buttons
(left/right) to select a zoom factor.
• [Repeat] : Repeat a chapter or title.
• [Repeat A-B] : Mark two points within a
chapter or track to repeat play, or turn
off the repeat mode.
• [Picture settings] : Select a predefi ned
color setting.
Picture options
While viewing a picture, zoom into the picture,
rotate it, add animation to a slideshow, and change
the picture settings.
1 Press OPTIONS .
» The picture options menu appears.
2 Press the Navigation buttons and OK to
select and change the following settings:
• [Rotate +90] : Rotate the picture 90
degree clockwise.
• [Rotate -90] : Rotate the picture 90
degree counter-clockwise.
• [Zoom] : Zoom into a video scene or
picture. Press the Navigation buttons
(left/right) to select a zoom factor.
• [Info] : Display picture information.
• [Duration per slide] : Select the display
speed for each picture in a slide show.
• [Slide animation] : Select animation for
the slide show.
• [Picture settings] : Select a predefi ned
color setting.
• [Repeat] : Repeat a selected folder.
Musical slideshow
If the picture and audio fi les are from the same
disc or USB storage device, you can create a
musical slideshow.
1 Select an audio track, and then press OK .
14 EN
Page 17
2 Press BACK , and go to the picture folder.
3 Select a picture, and then press ( Play ) to
start the slideshow.
4 Press to stop slideshow.
5 Press again to stop music.
Note
Make sure that the picture and audio formats
•
are supported by your home theater (see 'File
formats' on page 20 ) .
Radio
Listen to FM radio on your home theater, and
store up to 40 radio stations.
Note
AM and digital radio are not suppor ted.
•
• If no stereo signal is detected, or if fewer than
fi ve stations are found, you are prompted to
install the radio stations again.
1 Connect the FM antenna to the ANTENNA FM
on your home theater (if not already connected).
• For the best reception, place the antenna
away from the TV or other sources of
radiation.
2 Press RADIO .
» If you have already installed the radio stations,
the last channel that you listened to is played.
» If you have not installed any radio
stations, the message AUTO
INSTALL...PRESS PLAY appears on
the display panel. Press
( Play ).
3 Use the remote control to listen or to
change radio stations.
Button Action
/
or
Alphanumeric
buttons
Navigation
buttons
Select a preset radio station.
Left/Right: Search for a radio
station.
Up/Down: Fine tune a radio
frequency.
BACK
OPTIONS Manual:
SUBTITLE Toggle between the stereo and
Press to stop the installation of
radio stations.
Press and hold to erase the
preset radio station.
1) Press
Press
preset. 3) Press
again to store the radio station.
Automatic: Press and hold for
three seconds to reinstall the
radio stations.
mono sounds.
OPTIONS . 2)
/ to select your
OPTIONS
Tuning grid
In some countries, you can toggle the FM tuning
grid between 50 kHz and 100 kHz. Switching the
tuning grid erases all preset radio stations.
1 Press RADIO .
2 Press .
3 Press and hold ( Play ) to toggle between 50
kHz or 100 kHz.
MP3 player
Connect a MP3 player to play audio fi les.
What you need
• An MP3 player.
• A 3.5mm stereo audio cable.
1 Using the 3.5mm stereo audio cable, connect
the MP3 player to the MUSIC iLINK
connector on your home theater.
2 Press AUDIO SOURCE repeatedly until
MUSIC I-LINK appears on the display panel.
3 Press the buttons on the MP3 player to select
and play audio fi les.
English
EN
15
Page 18

Browse PC through DLNA
Access and play the pictures, audio and video fi les
from a computer or media server on the home
network through your home theater.
Before you start
• Install a DLNA-compliant media server
application on your device. Make sure that
you download an application that works best
for you. For example,
• Windows Media Player 11 or higher for PC
• Twonky Media Server for Mac or PC
• Enable media sharing of fi les. For details,
check the user manual of the media server
software software.
1 Connect your home theater to a home
network . For better video quality, use wired
connection whenever possible.
2 Connect the computer and other DLNA-
compatible devices to the same home
network.
3 Press ( Home ).
4 Select [browse PC] , and then press OK .
» A content browser is displayed.
5 Select a device on the network.
» The folders in the selected device are
displayed. Depending on the media
server, the folder names may vary.
• If you cannot see the folders, make sure
that you enable media sharing on the
selected device so that the content is
available for sharing.
6 Select a fi le, and then press OK .
• Some media fi les may not play due
to compatibility issues. Check the fi le
formats supported by your home theater.
7 Press the play buttons to control play (see
'Play buttons' on page 12 ) .
Karaoke
Available only in selected model and region
Play a Karaoke disc on your home theater and sing
along with the music.
What you need
• A Karaoke microphone.
• Karaoke discs.
Caution
To prevent loud feedback or unexpected noise,
•
turn the microphone volume to the minimum
before you connect the microphone to your
home theater.
1 Connect a karaoke microphone to the MIC
connector on your home theater.
2 Switch your TV to the correct source for
your home theater.
3 Make sure that audio post processing is
enabled on your home theater (see 'Speaker
settings' on page 19 ) .
4 While playing a karaoke disc, press OPTIONS .
» The options menu is displayed.
5 Select [Karaoke] , and then press OK .
» The karaoke setup menu is displayed.
6 Press the Navigation buttons (up/down) and
OK to change the following settings:
• [Microphone] : Turn the microphone on
or off.
• [Microphone volume] : Change the
microphone volume.
• [Echo] : Change the echo level.
• [Key] : Change the pitch to match your voice.
Choose sound
This section helps you choose the ideal sound for
your video or music.
1 Press SOUND SETTINGS .
2 Press the Navigation buttons (left/ right) to
access the sound options on the display.
Sound settings Description
SOUND Select a sound mode.
SURROUND Select surround sound or stereo
TREBLE Change the high frequency
MID Change the middle frequency
BASS Change the low frequency output.
AUD SYNC Delay the audio to match the
sound.
output.
output.
video.
3 Select an option, and then press OK .
16 EN
Page 19
4 Press BACK to exit.
If you do not press a button within a minute,
the menu exits automatically.
Sound mode
Select predefi ned sound modes to suit your video
or music.
1 Press SOUND SETTINGS .
2 Select SOUND , and then press OK .
3 Press the Navigation buttons (up/down) to
select a setting on the display:
• MOVIE : Enjoy a cinematic audio
experience, specially enhanced for
movies.
• MUSIC : Recreate the original recording
environment of your music, in the studio
or at a concert.
• ORIGINAL : Experience the original
sound of your movies and music, without
added sound effects.
• NEWS : Hear every word with optimized
speech and clear vocals.
• GAMING : Enjoy thrilling arcade sounds,
ideal for action-packed video games or
loud parties.
4 Press OK to confi rm.
Surround sound mode
Experience an immersive audio experience with
surround sound modes.
1 Press SOUND SETTINGS .
2 Select SURROUND , and then press OK .
3 Press the Navigation buttons (up/down) to
select a setting on the display:
• AUTO : Surround sound based on the
audio stream.
• MULTI-CH : Immersive multi-channel
sound for an enhanced movie
experience.
• STEREO : Two-channel stereo sound. Ideal
for listening to music.
4 Press OK to confi rm.
5 Change settings
The home theater settings are already confi gured
for optimal performance. Unless you have a reason
to change a setting, we recommend that you keep
the default setting.
Note
You cannot change a setting that is grayed out.
•
• To return to the previous menu, press
BACK . To exit the menu, press
Language settings
1 Press ( Home ).
2 Select [Setup] , and then press OK .
3 Select [Preference] , and then press OK .
4 Press the Navigation buttons and OK to
select and change:
• [Menu language] : Select a display
language for menu.
• [Audio] : Select an audio language for discs.
• [Subtitle] : Select a subtitle language for discs.
• [Disc menu] : Select a menu language for
discs.
Note
If your preferred disc language is not available,
•
select [Others] from the list, and enter the 4-digit
language code found at the end of this user manual .
• If you select a language that is not available on a
disc, the home theater uses the default language
of the disc.
( Home ).
English
EN
17
Page 20

Picture and video settings
Parental control settings
1 Press ( Home ).
2 Select [Setup] , and then press OK .
3 Select [Video] , and then press OK .
4 Press the Navigation buttons and OK to
select and change:
• [TV display] : Select a picture format to fi t
the TV screen.
• [HDMI video] : Select the resolution of
video signal that is output from HDMI OUT
(ARC) on your home theater. To enjoy the
selected resolution, make sure that your TV
supports the selected resolution.
• [HDMI Deep Color] : Recreate the natural
world on your TV screen by displaying
vivid images using billion colors. Your home
theater must be connected to a Deep
Color enabled TV through an HDMI cable.
• [Picture settings] : Select pre defi ned
color settings for the video display.
• [Watch 3D video] : Set HDMI video to
support 3D or 2D video.
Note
If you change a setting, make sure that the TV
•
supports the new setting.
Audio settings
1 Press ( Home ).
2 Select [Setup] , and then press OK .
3 Select [Audio] , and then press OK .
4 Press the Navigation buttons and OK to
select and change:
• [Night mode] : For quiet listening, decrease
the volume of loud sounds on your home
theater. Night mode is only available for
Dolby-encoded DVD and Blu-ray discs.
• [HDMI Audio] : Set the HDMI audio
output from your TV, or disable HDMI
audio output from the TV.
1 Press ( Home ).
2 Select [Setup] , and then press OK .
3 Select [Preference] , and then press OK .
4 Press the Navigation buttons and OK to
select and change:
• [Change Password] : Set or change your
password for parental control access.
If you do not have a password or have
forgotten your password, enter 0000 .
• [Parental control] : Restrict access to discs
that are recorded with age ratings. To play
all discs, irrespective of the ratings, select
8 or [Off] .
Display settings
1 Press ( Home ).
2 Select [Setup] , and then press OK .
3 Select [Preference] , and then press OK .
4 Press the Navigation buttons and OK to
select and change:
• [Auto subtitle shift] : Enable or disable
automatic repositioning of subtitles on
TVs that support this feature.
• [Display panel] : Set the brightness of the
home theater front panel display.
• [VCD PBC] : Enable or disable the content
menu navigation of VCD and SVCD discs
with Play Back Control feature.
18 EN
Page 21

Energy saving settings
6 Update software
1 Press ( Home ).
2 Select [Setup] , and then press OK .
3 Select [Preference] , and then press OK .
4 Press the Navigation buttons and OK to
select and change:
• [Screen saver] : Switch the home theater
to screen saver mode after 10 minutes
of inactivity.
• [Auto standby] : Switch the home theater
to standby after 30 minutes of inactivity.
This timer works only when a disc or
USB play is paused or stopped.
• [Sleep timer] : Set the duration of the sleep
timer so that the home theater is switched
to standby after the specifi ed period.
Speaker settings
1 Press ( Home ).
2 Select [Setup] , and then press OK .
3 Select [Advanced] , and then press OK .
4 Press the Navigation buttons and OK to
select and change:
• [Enhanced audio] : Select [On] to enable
audio post processing at the speaker and
enable karaoke settings (if your product
supports Karaoke). To play the original
audio of the disc, select [Off] .
Philips continually tries to improve its products.
To get the best features and suppor t, update your
home theater with the latest software.
Compare the version of your current software with
the latest version on www.philips.com/support. If
the current version is lower than the latest version
available on the Philips support website, upgrade
your home theater with the latest software.
Caution
Do not install a lower version of software than
•
the current version installed on your product.
Philips is not liable for problems caused due to
software downgrade.
Check software version
Check the version of the current software installed
on your home theater.
1 Press ( Home ).
2 Select [Setup] , and then press OK .
3 Select [Advanced] > [Version information] .
» The software version is displayed.
English
Tip
Enable audio post processing before you select a
•
predefi ned sound mode (see 'Sound mode' on page 17 ) .
Restore default settings
1 Press ( Home ).
2 Select [Setup] , and then press OK .
3 Select [Advanced] > [Restore default
settings] , and then press OK .
4 Select [OK] , and then press OK to confi rm.
» Your home theater is reset to its default
settings except for some settings such
as parental control and DivX VOD
registration code.
Update software through USB
What you need
• A USB fl ash drive that is FAT or NTFS-
formatted, with at least 75MB of memory. Do
not use a USB hard drive.
• A computer with Internet access.
• An archive utility that supports the ZIP fi le
format.
Step 1: Download the latest software
1 Connect a USB fl ash drive to your computer.
2 In your web browser, go to www.philips.com/
support.
3 At the Philips Support website, fi nd your
product and locate the Software and drivers .
» The software update is available as a zip fi le.
EN
19
Page 22

4 Save the zip fi le in the root directory of your
USB fl ash drive.
5 Use the archive utility to extract the software
update fi le in the root directory.
» The fi les are extracted under the UPG_
ALL folder of your USB fl ash drive.
6 Disconnect the USB fl ash drive from your
computer.
Step 2: Update the software
7 Product specifications
Note
Specifi cations and design are subject to change
•
without notice.
Caution
Do not switch off the home theater or remove
•
the USB fl ash drive during the update.
1 Connect the USB fl ash drive containing the
downloaded fi le to your home theater.
• Make sure that the disc compartment is
closed and no disc inside.
2 Press ( Home ).
3 Select [Setup] , and then press OK .
4 Select [Advanced] > [Software update] > [USB] .
5 Follow the onscreen instructions to confi rm
the update.
» Once complete, the home theater
automatically switches off and restarts. If
it does not, disconnect the power cord
for a few seconds and then reconnect it.
Update software through the
Internet
1 Connect your home theater to a home network
with a high-speed Internet access (see 'Connect
and set up a home network' on page 10 ) .
2 Press ( Home ).
3 Select [Setup] , and then press OK .
4 Select [Advanced] > [Software update] >
[Network] .
» If an upgrade media is detected, you are
prompted to start or cancel the update.
5 Follow the onscreen instructions to confi rm
the update.
» Once complete, the home theater
automatically switches off and restarts. If
it does not, disconnect the power cord
for a few seconds and then reconnect it.
Region codes
The type plate on the back or bottom of the
home theater shows which regions it supports.
Country
Asia Pasific, Taiwan,
Korea
DVD BD
AA
Media formats
• AVCHD, BD, BD-R/ BD-RE, BD-Video, DVD-
Video, DVD+R/+RW, DVD-R/-RW, DVD+R/-R
DL, CD-R/CD-RW, Audio CD, Video CD/SVCD,
Picture fi les, MP3 media, WMA media, DivX
Plus HD media, USB storage device
• RMVB (Available only in Asia Pacifi c and China)
File formats
• Audio: .aac, .mka, .mp3, .wma, .wav, .mp4, .m4a
• Video:
• .avi, .divx, .mp4, .mkv, .asf, .wmv, .mpg, .mpeg,
• .rmvb, .rm (Available only in Asia Pacifi c
• Picture: .jpg, .jpeg, .gif, .png
Audio formats
Your home theater supports the following audio
fi les.
Extension Container Audio
.mp3 MP3 MP3 32 kbps ~
.wma ASF WMA 64 kbps ~
and China)
Bit rate
codec
320 kbps
160 kbps
20 EN
Page 23

Extension Container Audio
Bit rate
codec
.aac AAC AAC, HE-
192 kbps
AAC
.wav WAV PCM 1.4 Mbps
.m4a MKV AAC 192 kbps
.mka MKA PCM 27.648
Mbps
.mka MKA Dolby Digital 640 kbps
.mka MKA DTS core 1.54 Mbps
.mka MKA MPEG 912 kbps
.mka MKA MP3 32 kbps ~
320 kbps
.mka MKA WMA 64 kbps ~
160 kbps
.mka MKA AAC, HE-
192 kbps
AAC
Video formats
If you have a high defi nition TV, your home theater
allows you to play your video fi les with:
• Resolution: 1920 x 1080 pixels at
• Frame rate: 6 ~ 30 frames per second.
.avi fi les in AVI container
Audio codec Video codec Bit rate
PCM, Dolby
Digital, DTS
core, MP3,
WMA
.divx fi les in AVI container
Audio codec Video codec Bit rate
PCM, Dolby
Digital, MP3,
WMA
DivX 3.11,
10 Mbps max
DivX 4.x,
DivX 5.x,
DivX 6.x
MPEG 1, MPEG 2 20 Mbps (peak
40 Mbps)
MPEG 4 ASP 10 Mbps max
H.264/AVC
HP@4.1/4.0;
20 Mbps (peak
40 Mbps)
MP@3.2/3.1/3.0
WMV9 20 Mbps
DivX 3.11,
10 Mbps max
DivX 4.x, DivX 5.x,
DivX 6.x
MPEG 1, MPEG 2 20 Mbps (peak
40 Mbps)
MPEG 4 ASP 10 Mbps max
.mp4 or .m4v fi les in MP4 container
Audio
Video codec Bit rate
codec
Dolby
Digital,
MPEG 1, MPEG 220 Mbps (peak
40 Mbps)
MPEG,
MP3, AAC,
HE-AAC
MPEG 4 ASP 10 Mbps max
H.264/AVC
HP@4.1/4.0;
20 Mbps (peak
40 Mbps)
MP@3.2/3.1/3.0
.mkv fi les in MKV container
Audio codec Video codec Bit rate
PCM, Dolby
Digital, DTS
MPEG 1,
MPEG 2
20 Mbps (peak
40 Mbps)
core, MPEG,
MP3, WMA,
AAC, HEAAC
MPEG 4 ASP 10 Mbps max
H.264/AVC
HP@4.1/4.0;
20 Mbps (peak
40 Mbps)
MP@3.2/3.1/3.0
WMV9 20 Mbps
.asf and .wmv fi les in ASF container
Audio
Video codec Bit rate
codec
PCM,
MPEG 4 ASP 10 Mbps max
Dolby
Digital,
MP3, WMA
H.264/AVC
HP@4.1/4.0;
20 Mbps (peak
40 Mbps)
MP@3.2/3.1/3.0
WMV9 20 Mbps
.mpg and .mpeg fi les in PS container
Audio
Video codec Bit rate
codec
PCM, DTS
core, MPEG,
MPEG 1,
MPEG 2
20 Mbps (peak 40
Mbps)
MP3
MPEG 1,
MPEG 2
20 Mbps (peak 40
Mbps)
English
EN
21
Page 24

.rm and .rmvb fi les in RM container (Available
only in Asia Pacifi c and China)
Audio codec Video
AAC,
COOK
codec
RV30, RV40 20 Mbps (peak 40
Bit rate
Mbps)
Main unit
• Power supply: 110-240 V~, 50-60 Hz
• Power consumption: 110 W
• Standby power consumption: 0.9 W - 0.5 W
• Dimensions (WxHxD): 360 x 58 x 325 mm
• Weight: 2.62 kg
Amplifi er
• Total output power: 600W RMS (30% THD)
• Frequency response: 20 Hz-20 kHz / ±3 dB
• Signal-to-noise ratio: > 65 dB (CCIR) /
(A-weighted)
• Input sensitivity:
• AUX: 2 V
• Music iLink: 1 V
Video
• Signal system: PAL / NTSC
• HDMI output: 480i/576i, 480p/576p, 720p,
1080i, 1080p, 1080p24
Audio
• S/PDIF Digital audio input:
• Coaxial: IEC 60958-3
• Optical: TOSLINK
• Sampling frequency:
• MP3: 32 kHz, 44.1 kHz, 48 kHz
• WMA: 44.1 kHz, 48 kHz
• Constant bit rate:
• MP3: 32 kbps - 320 kbps
• WMA: 48 kbps - 192 kbps
Radio
• Tuning range:
• Europe/Russia/China: FM 87.5-108 MHz
(50 kHz)
• Asia Pacifi c/Latin America: FM 87.5-108
MHz (50/100 kHz)
• Signal-to-noise ratio: FM > 45 dB
• Frequency response: FM 180 Hz-12.5 kHz /
±3 dB
USB
• Compatibility: Hi-Speed USB (2.0)
• Class suppor t: USB Mass Storage Class (MSC)
• File system: FAT16, FAT32, NTFS
• Maximum memory support: < 160 GB
Subwoofer
• Output power: 100 W RMS (30% THD)
• Impedance: 4 ohm
• Speaker drivers: 133 mm (5.25") woofer
• Dimensions (WxHxD): 160 x 267.5 x 265
mm
• Weight: 2.55 kg
Speakers
Center speaker:
• Output power: 100 W RMS (30% THD)
• Speaker impedance: 4 ohm
• Speaker drivers: 1 x 63.5 mm (2.5") woofer
• Dimensions (WxHxD): 160 x 85 x 95 mm
• Weight: 0.37 kg
Front/Rear speaker:
• Output power: 4 x 100 W RMS (30% THD)
• Speaker impedance: 4 ohm
• Speaker drivers: 1 x 76.2 mm (3") twin driver
• Dimensions (WxHxD):
• Speakers: 85 x 160 x 95mm
• Tall speakers: 240 x 1007 x 240 mm
• Weight:
• Speakers: 0.35 kg/each
• Tall speakers: 1.57 kg/each
Remote control batteries
• 2 x AAA-R03-1.5 V
Laser
• Laser Type (Diode): InGaN/AIGaN (BD),
AIGaInP (DVD/CD)
• Wave length: 405 +7 nm/-7 nm (BD), 655
+10 nm/-10 nm (DVD), 790 +10 nm/-20 nm
(CD)
• Output power (Max. ratings): 20 mW (BD), 6
mW (DVD), 7 mW (CD)
22 EN
Page 25

8 Troubleshooting
Warning
Risk of electric shock. Never remove the casing
•
of the product.
To keep the warranty valid, never try to repair the
product yourself.
If you have problems using this product, check the
following points before you request service. If you
still have a problem, get suppor t at www.philips.
com/support.
• Set up the audio for the connected device
(see 'Set up the audio' on page 10 ) .
• Reset your home theater to its factory settings
(see 'Restore default settings' on page 19 ) ,
then switch it off and switch on again.
• On your home theater, press SOURCE
repeatedly to select the correct audio input.
Distorted sound or echo.
• If you play audio from the TV through the
home theater, make sure that the TV is muted.
Audio and video are not synchronized.
• 1) Press SOUND SETTINGS . 2) Press
the Navigation buttons (left/right) to select
AUD SYNC , and then press OK . 3) Press
the Navigation buttons (up/down) to
synchronize the audio with the video.
English
Main unit
The buttons on the home theater do not work.
• Disconnect the home theater from the power
supply for a few minutes, then reconnect.
Picture
No picture.
• Make sure that the TV is switched to the
correct source for the home theater.
No picture on a TV connected through HDMI.
• Make sure that you use a High Speed HDMI
cable to connect the home theater and TV. Some
Standard HDMI cables do not display properly
for some images, 3D video, or Deep Color.
• Make sure that the HDMI cable is not faulty. If
it is faulty, replace it with a new cable.
• Press ( Home ) and then 731 on the remote
control to restore the default picture resolution.
• Change the HDMI video setting, or wait for
10 seconds for auto recovery (see 'Picture
and video settings' on page 18 ) .
Disc does not play high-defi nition video.
• Make sure that the disc contains high-
defi nition video.
• Make sure that the TV supports high-
defi nition video.
• Use an HDMI cable to connect to the TV.
Sound
No sound from home theater speakers.
• Connect the audio cable from your home
theater to your TV or other devices. You do
not need a separate audio connection when
the home theater and TV are connected
through an HDMI ARC connection.
Play
Cannot play a disc.
• Clean the disc.
• Make sure that the home theater suppor ts the
type of disc (see 'Media formats' on page 20 ) .
• Make sure that the home theater supports
the region code of the disc .
• If the disc is a DVD±RW or DVD±R disc,
make sure that it is fi nalized.
Cannot play a DivX fi le.
• Make sure that the DivX fi le is encoded
according to the 'Home Theater Profi le' with
the DivX encoder.
• Make sure that the DivX fi le is complete.
DivX or RMVB/RM subtitles do not display correctly.
• Make sure that the subtitle fi le name is the
same as the movie fi le name (see 'Subtitles'
on page 13 ) .
• Select the correct character set: 1) Press
OPTIONS . 2) Select [Character set] . 3) Select
the supported character set. 4) Press OK .
Cannot read the contents of a USB storage device.
• Make sure that the format of the USB storage
device is compatible with the home theater.
• Make sure that the fi le system on the USB
storage device is supported by the home theater.
'No entry' or 'x' sign appears on the TV.
• The operation is not possible.
EasyLink does not work.
• Make sure that the home theater is
connected to a Philips brand EasyLink TV, and
the EasyLink option is turned on (see 'Set up
EasyLink (HDMI-CEC control)' on page 9 ) .
EN
23
Page 26

When you switch on the TV, the home theater
automatically switches on.
• This behavior is normal when you are using
Philips EasyLink (HDMI-CEC). To make the
home theater work independently, switch off
EasyLink.
Cannot access BD-Live features.
• Make sure that the home theater is
connected a home network with internet
access (see 'Connect and set up a home
network' on page 10 ) .
• Make sure that the network is set up. Use
a wired network installation (see 'Set up
the wired network' on page 10 ) or wireless
network installation (see 'Set up the wireless
network' on page 11 ) .
• Make sure that the Blu-ray disc supports BD-
Live features.
• Clear memory storage (see 'BD-Live on Blu-
ray' on page 12 ) .
My 3D video played in 2D mode.
• Make sure that your home theater is
connected to a 3D TV through an HDMI
cable.
• Make sure that the disc is a Blu-ray 3D disc,
and the Blu-ray 3D video option is on (see
'Play Blu-ray 3D disc' on page 12 ) .
TV screen is black when you play a Blu-ray 3D
video or a DivX copy protected video.
• Make sure that the home theater is
connected to the TV through an HDMI cable.
• Switch to the correct HDMI source on the
TV.
Network
Wireless network distorted or not found.
• Make sure that the wireless network is not
disturbed by microwave ovens, DECT phones,
or other neighboring Wi-Fi devices.
• Place the wireless router and the home
theater within fi ve meters of each other.
• Use a USB extension cable to connect the
Wi-Fi dongle to the home theater.
• If the wireless network does not work
properly, tr y a wired network installation (see
'Set up the wireless network' on page 11 ) .
9 Notice
This section contains the legal and trademark
notices.
Copyright
This item incorporates copy protection technology
that is protected by U.S. patents and other
intellectual property rights of Rovi Corporation.
Reverse engineering and disassembly are
prohibited.
Compliance
This product incorporates proprietary technology
under license from Verance Corporation and is
protected by U.S. Patent 7,369,677 and other
U.S. and worldwide patents issued and pending
as well as copyright and trade secret protection
for certain aspects of such technology. Cinavia is
a trademark of Verance Corporation. Copyright
2004-2010 Verance Corporation. All rights
reserved by Verance. Reverse engineering or
disassembly is prohibited.
Cinavia notice
This product uses Cinavia technology to limit the
use of unauthorized copies of some commerciallyproduced fi lm and videos and their soundtracks.
When a prohibited use of an unauthorized copy is
detected, a message will be displayed and playback
or copying will be interrupted.
More information about Cinavia technology
is provided at the Cinavia Online Consumer
Information Center at http://www.cinavia.com. To
request additional information about Cinavia by
mail, send a postcard with your mailing address to:
Cinavia Consumer Information Center, P.O. Box
86851, San Diego, CA, 92138, USA.
24 EN
Page 27

Open source software
Trademarks
Philips Electronics Singapore Pte Ltd hereby offers
to deliver, upon request, a copy of the complete
corresponding source code for the copyrighted
open source software packages used in this
product for which such offer is requested by the
respective licenses. This offer is valid up to three
years after product purchase to anyone in receipt
of this information. To obtain source code, please
contact open.source@philips.com. If you prefer not
to use email or if you do not receive confi rmation
receipt within a week after mailing to this email
address, please write to "Open Source Team,
Philips Intellectual Property & Standards, P.O. Box
220, 5600 AE Eindhoven, The Netherlands". If you
do not receive timely confi rmation of your letter,
please email to the email address above. The texts
of the licenses and acknowledgements for open
source software used in this product are included
on a separate leafl et.
RMVB end user agreement
(Asia Pacifi c and China only)
Notes to End User :
By using this product with RealNetworks software
and services, the end user agrees to the following
terms of REALNETWORKS, INC:
• End User may only use the software for
private, non-commercial use in accordance
with the terms of RealNetworks EULA .
• End User is not allowed to modify, translate,
reverse engineer, decompile, dissemble or
use other means to discover the source
code or otherwise replicate the functionality
of the Real Format Client Code, except to
the extent that this restriction is expressly
prohibited by applicable law.
• RealNetworks Inc. disclaims all warranties
and conditions other than those set forth in
this Agreement which are in lieu of all other
warranties, whether express and implied,
including but not limited to any implied
warranties or conditions of merchantability
and fi tness for a particular purpose; and
effectively exclude all liability for indirect,
special, incidental and consequential damages,
such as but not limited to lost profi ts.
"Blu-ray 3D" and "Blu-ray 3D" logo are trademarks
of Blu-ray Disc Association.
BONUSVIEW™
'BD LIVE' and 'BONUSVIEW' are trademarks of
Blu-ray Disc Association.
Java and all other Java trademarks and logos are
trademarks or registered trademarks of Sun
Microsystems, Inc. in the United States and/or
other countries.
Manufactured under license under U.S. Patent
Nos: 5,956,674; 5,974,380; 6,226,616; 6,487,535;
7,392,195; 7,272,567; 7,333,929; 7,212,872 & other
U.S. and worldwide patents issued & pending.
DTS-HD, the Symbol, & DTS-HD and the Symbol
together are registered trademarks & DTS-HD
Master Audio | Essential is a trademark of DTS, Inc.
Product includes software.
Reserved.
Manufactured under license from Dolby
Laboratories. Dolby and the double-D symbol are
trademarks of Dolby Laboratories.
DTS, Inc. All Rights
English
EN
25
Page 28

DivX , DivX Certifi ed , DivX Plus HD
and associated logos are trademarks of Rovi
Corporation or its subsidiaries and are used under
license.
ABOUT DIVX VIDEO: DivX
format created by DivX, LLC, a subsidiary of Rovi
Corporation. This is an offi cial DivX Certifi ed
device that plays DivX video. Visit divx.com for
more information and software tools to convert
your fi les into DivX videos.
ABOUT DIVX VIDEO-ON-DEMAND: This DivX
Certifi ed
play purchased DivX Video-on-Demand (VOD)
movies. To obtain your registration code, locate the
DivX VOD section in your device setup menu. Go
to vod.divx.com for more information on how to
complete your registration.
device must be registered in order to
is a digital video
10 Index
2
2nd audio language 12
2nd subtitle language 12
3
3D disc in 2D mode 12
3D safety 3
3D video 12
5
5.1 speakers 6
HDMI, the HDMI logo, and High-Defi nition
Multimedia Interface are trademarks or registered
trademarks of HDMI licensing LLC in the United
States and other countries.
DLNA , the DLNA Logo and DLNA CERTIFIED
are trademarks, service marks, or certifi cation
marks of the Digital Living Network Alliance.
Real RMVB logo is a trademark or a registered
trademark of RealNetworks, Inc.
CLASS 1
LASER PRODUCT
A
advanced settings 19
amplifi er 22
audio connection (analog cable) 9
audio connection (coaxial cable) 8
audio connection (HDMI ARC) 7
audio connection (optical cable) 8
audio formats 20
audio from other devices 8
audio input mapping 10
audio language 17
audio options 14
audio post processing 19
audio settings 18
audio setup 10
auto standby 19
auto subtitle shift 18
B
batteries 22
BD-Live 12
Blu-ray 11
Bonus View 12
brightness 18
browse PC 16
26 EN
Page 29

C
change password 18
character set 13
clear BD-Live memory 12
connect to TV 7
connectors 4
control buttons (disc) 12
control buttons (USB) 12
copyright protection 24
customer support 3
D
data fi les 13
deep color 18
default settings 19
disc language 17
disc menu 17
display panel 18
disposal 3
DivX 13
DLNA 16
E
Easylink (HDMI-CEC) 9
eject disc 4
enhanced audio 19
environment 3
F
factory settings 19
FAQs 3
fi le formats 20
H
HDMI ARC 7
HDMI audio 18
HDMI-CEC 9
home menu 11
home network 10
I
internet 10
K
karaoke 16
karaoke 16
M
main unit 4
manual setup 9
media formats 20
menu language 17
MP3 15
musical slideshows 14
N
network 10
night mode 18
O
one-touch play 9
one-touch standby 9
options 14
P
parental control 18
PBC (play back control) 18
picture options 14
picture resolution 18
picture settings 18
picture-in-picture 12
play disc 11
play from PC 16
play music 15
play radio 15
play USB storage device 13
power settings 19
predefi ned sound mode 17
preference 17
program radio stations 15
R
radio 15
recycling 3
region codes 20
remote control 5
repeat 14
English
EN
27
Page 30

S
shuffl e 14
sleep timer 19
slide animation 14
software update 19
software version 19
sound 16
speaker position 6
speaker setup 9
speaker specifi cations 20
subtitle language 17
subtitle position 18
surround sound 17
synchronize picture and sound 12
system audio control 10
T
troubleshooting (network) 24
troubleshooting (picture) 23
troubleshooting (play) 23
troubleshooting (sound) 23
tune radio stations 15
tuning grid 15
U
update software (through Internet) 20
update software (through USB) 19
USB storage device 13
user manual 3
V
VCD 18
video connection (composite video) 8
video connection (HDMI ARC) 7
video connection (standard HDMI) 7
video formats 22
video options 14
video settings 18
VOD code (DivX) 13
W
watch 3D 12
wired network 10
wireless network 11
28 EN
Page 31

Daftar kandungan
1 Penting 2
Keselamatan 2
Jagaan produk anda
Jagaan alam sekitar
Amaran kesihatan bagi 3D
Bantuan dan sokongan
5 Tukar tetapan 19
Tetapan bahasa 19
Tetapan gambar dan video
Tetapan audio
Tetapan kawalan ibu bapa
3
3
3
3
Tetapan paparan
Tetapan penjimatan tenaga
Tetapan pembesar suara
Kembalikan tetapan lalai
19
19
19
20
20
20
20
2 Teater rumah anda 4
Unit utama 4
Penyambung
Kawalan jauh
4
5
3 Sambung dan sediakan 6
Sambung pembesar suara 6
Sambung kepada TV
Sambungkan audio daripada TV dan
peranti lain
Sediakan pembesar suara
Sediakan EasyLink (kawalan HDMI-CEC)
Sambungkan dan sediakan rangkaian rumah
7
8
9
9
10
4 Gunakan teater rumah anda 12
Akses menu utama 12
Cakera
Fail data
Peranti storan USB
Pilihan audio, video, da gambar
Radio
pemain MP3
Semak imbas PC melalui DLNA
Video YouTube
Album web Picasa
Karaoke
Pilih bunyi
12
13
14
14
16
16
16
17
17
17
18
6 Kemas kinikan perisian 21
Semak versi perisian 21
Kemas kini perisian melalui USB
Kemas kini perisian melalui internet
7 Speksifi kasi produk 22
8 Menyelesaikan masalah 25
9 Notis 27
Hak cipta 27
Pematuhan
Perisian sumber terbuka
RMVB end user agreement (Asia Pacifi c
and China only)
Tanda dagangan
10 Indeks 29
21
21
Bahasa Melayu
27
27
27
28
MS-MY
1
Page 32

1 Penting
Baca dan faham semua arahan sebelum anda
gunakan produk anda. Jika kerosakan terjadi
disebabkan oleh kegagalan mematuhi arahan,
jaminan tidak dikenakan.
Keselamatan
Risiko kejutan elektrik atau kebakaran!
• Jangan sekali-kali dedahkan produk dan
aksesori kepada hujan atau air. Jangan sekalikali letakkan bekas cecair, seperti pasu, hampir
dengan produk. Jika cecair tertumpah pada
atau ke dalam produk, putuskan sambungan
dengan alur keluar kuasa dengan serta mer ta.
Hubungi Penjagaan Pelanggan Philips agar
produk diperiksa sebelum digunakan.
• Jangan sekali-kali letakkan produk dan aksesori
berhampiran nyalaan terbuka atau sumber
haba lain, termasuk cahaya matahari langsung.
• Jangan sekali-kali masukkan objek ke dalam
slot pengalihudaraan atau bukaan lain pada
teater rumah.
• Apabila plag sesalur kuasa atau pengganding
perkakas digunakan sebagai peranti putus
sambungan, peranti putus sambungan
tersebut akan tetap sedia beroperasi.
• Putuskan sambungan produk daripada alur
keluar kuasa jika berlaku ribut petir.
• Apabila anda memutuskan sambungan kord
kuasa, sentiasa tarik palamnya, dan bukan
kabelnya.
Risiko litar pintas atau kebakaran!
• Sebelum anda menyambungkan produk
kepada alur keluar kuasa, pastikan bahawa
voltan kuasa sepadan dengan nilai yang dicetak
di belakang atau bahagian bawah produk
tersebut. Jangan sekali-kali sambungkan produk
kepada alur keluar kuasa jika voltannya berbeza.
Risiko kecederaan atau kerosakan teater rumah!
• Bagi produk yang boleh dilekapkan pada
dinding, gunakan hanya pendakap lekapan
dinding yang dibekalkan sahaja. Kukuhkan
lekapan dinding pada dinding yang boleh
menyokong gabungan berat produk
dan lekapan dinding. Koninklijke Philips
Electronics N.V. tidak menanggung sebarang
tanggungjawab terhadap pemasangan dinding
yang tidak wajar, kecederaan atau kerosakan.
• Bagi pembesar suara dengan dirian, gunakan
hanya dirian yang dibekalkan. Pasangkan dirian
pada pembesar suara dengan ketat. Letakkan
dirian yang dipasangkan pada permukaan
mendatar dan sama rata yang boleh menyokong
berat gabungan pembesar suara dan dirian.
• Jangan sekali-kali letakkan produk atau
sebarang objek pada kord kuasa atau
kelengkapan elektrik yang lain.
• Jika produk diangkut dalam suhu di bawah 5°C,
buka bungkusan produk dan tunggu sehingga
suhunya sepadan dengan suhu bilik sebelum
menyambungkannya dengan alur keluar kuasa.
• Sinaran laser boleh nampak dan tak nampak
apabila dibuka. Elakkan pendedahan kepada
pancaran.
• Jangan sentuh kanta optik cakera di dalam
petak cakera.
• Bahagian-bahagian produk ini mungkin dibuat
daripada kaca. Kendalikan dengan berhati-hati
untuk mengelakkan kecederaan dan kerosakan.
Risiko pemanasan melampau!
• Jangan pasang produk dalam ruangan terkurung.
Sentiasa tinggalkan ruang sekurang-kurangnya 4
inci di sekeliling produk untuk pengalihudaraan.
Pastikan langsir atau objek lain tidak menutup
slot pengalihudaraan pada produk tersebut.
Risiko pencemaran!
• Jangan campurkan bateri (lama dengan yang
baru, atau karbon dengan alkali, dll.).
• Bahaya letupan jika bateri tidak diganti dengan
yang betul. Ganti hanya dengan jenis yang
sama atau setara.
• Keluarkan bateri jika telah kebabisan atau
jika kawalan jauh tidak akan digunakan buat
tempoh masa yang lama.
• Bateri mengandungi bahan kimia, jadi ia
hendaklah dilupuskan dengan betul.
Risiko tertelan bateri!
• Produk/alat kawalan jauh mungkin mengandungi
bateri jenis syiling/butang, yang boleh ditelan.
Jauhkan bateri daripada jangkauan kanak-kanak
pada setiap masa! Jika tertelan, bateri ini boleh
mengakibatkan kecederaan serius atau kematian.
Kelecuran dalaman yang teruk boleh berlaku
dalam masa dua jam selepas tertelan bateri ni.
• Jika anda mengesyaki bahawa bateri telah
tertelan atau termasuk ke dalam mana-mana
bahagian badan, dapatkan rawatan perubatan
dengan segera.
• Apabila anda menukar bateri, pastikan semua
bateri baru dan lama jauh dari jangkauan
kanak-kanak. Pastikan petak bateri telah ditutup
dengan kemas selepas anda mengganti bateri.
2 MS-MY
Page 33

• Jika petak bateri tidak dapat ditutup dengan
kemas, berhenti menggunakan produk ini.
Jauhkan ia dari jangkauan kanak-kanak dan
hubungi pengeluar.
Sila pastikan diri anda termaklum mengenai peraturan
setempat berkenaan kutipan berasingan bateri kerana
pelupusan yang betul membantu mencegah akibat
yang negatif kepada alam sekitar dan kesihatan manusia.
Jagaan produk anda
• Jangan letakkan sebarang objek selain
daripada cakera ke dalam petak cakera.
• Jangan masukkan cakera yang meleding atau
merekah ke dalam petak cakera.
• Keluarkan cakera daripada petak cakera
jika anda tidak menggunakan produk untuk
tempoh masa yang lama.
• Hanya gunakan kain mikrogentian untuk
membersihkan produk.
Jagaan alam sekitar
Produk anda direka bentuk dan dikilangkan dengan
menggunakan bahan dan komponen yang berkualiti
tinggi, yang boleh dikitar semula dan digunakan semula.
Apabila simbol tong beroda yang dipangkah ini
dilekatkan pada sesuatu produk, ia bermakna
produk tersebut diliputi oleh Arahan Eropah
2002/96/EC. Sila pastikan diri anda termaklum
mengenai sistem kutipan berasingan setempat bagi
produk elektrik dan elektronik.
Sila bertindak menurut peraturan setempat anda
dan jangan buang produk lama anda dengan sisa
rumah anda yang biasa.
Cara membuang produk lama anda yang betul
akan membantu mencegah potensi akibat negatif
terhadap alam sekitar dan kesihatan manusia.
Produk anda mengandungi bateri yang diliputi
oleh Arahan Eropah 2006/66/EC, yang tidak boleh
dilupuskan bersama sisa rumah yang biasa.
Amaran kesihatan bagi 3D
Jika anda atau keluarga anda mempunyai sejarah
mengalami epilepsi atau sawan fotosensitif,
jumpalah doktor sebelum mendedahkan diri anda
kepada sumber cahaya berkelip, jujukan imej deras
atau tontonan 3D.
Untuk mengelakkan ketidakselesaan seperti pening,
sakit kepala atau disorientasi, kami mengesyorkan
agar anda tidak menonton 3D dalam tempoh
masa yang panjang. Jika anda mengalami sebarang
ketidakselesaan, hentikan menonton 3D dan jangan
dengan serta merta melakukan perkara yang
mungkin berbahaya (seperti memandu kereta)
sehingga gejala telah hilang. Jika gejala berterusan,
jangan teruskan menonton 3D tanpa merujuk
kepada doktor terlebih dahulu.
Ibu bapa hendaklah mengawasi anak mereka ketika
menonton 3D dan memastikan mereka tidak
mengalami ketidakselesaan seperti yang disebutkan
di atas. Tontonan 3D tidak disyorkan bagi kanakkanak di bawah umur enam tahun kerana sistem
penglihatan mereka masih belum lagi berkembang
dengan sempurna.
Bantuan dan sokongan
Philips menyediakan sokongan dalam talian yang
meluas. Lawati laman web kami di www.philips.
com/support untuk:
• memuat turun manual pengguna lengkap
• mencetak panduan permulaan pantas
• menonton tutorial video (tersedia hanya
untuk model terpilih)
• mencari jawapan untuk soalan lazim (FAQ)
• menghantar soalan kepada kami melalui e-mel
• berbual dengan wakil sokongan kami.
Ikuti arahan pada laman web ini untuk memilih bahasa
anda, lalu masukkan nombor model produk anda.
Di samping itu, anda juga boleh menghubungi Pusat
Layanan Pelanggan Philips di negara anda. Sebelum
anda menghubungi Philips, catatkan nombor
model dan nombor siri produk anda. Anda boleh
menemui maklumat ini di bahagian belakang atau
bawah produk anda.
Bahasa Melayu
MS-MY
3
Page 34

2 Teater rumah anda
Tahniah atas pembelian anda dan selamat
menggunakan Philips! Untuk mendapatkan manfaat
sepenuhnya daripada sokongan yang ditawarkan
oleh Philips, daftar produk anda di www.philips.
com/welcome.
a ( USB )
• Input audio, video atau gambar daripada
peranti storan USB.
• Sambung kepada dongle Wi-Fi (Model:
Philips WUB1110, dijual berasingan).
b MIC
Input audio daripada mikrofon.
c MUSIC iLINK
Input audio daripada pemain MP3.
Unit utama
Bahagian ini mengandungi gambaran keseluruhan
unit utama.
a Kompartmen cakera
b Panel paparan
c ( Buka/Tutup )
Buka atau tutup petak cakera, atau keluarkan
cakera.
d ( Main/Jeda )
Mula, jeda atau sambung semula main.
e SOURCE
Pilih sumber audio atau video untuk teater
rumah ini.
f ( Bersedia-Hidup )
Hidupkan teater rumah atau alihkan kepada
siap sedia.
Penyambung
Bahagian ini mengandungi gambaran keseluruhan
penyambung yang ada dengan teater rumah anda.
Penyambung hadapan
Penyambung belakang
FM
ANTENNA
a AC MAINS
Sambung ke bekalan kuasa.
b AUDIO IN - AUX
Sambung kepada output audio analog pada
TV atau peranti analog.
c VIDEO OUT
Sambung kepada input video komposit pada
TV.
d HDMI OUT (ARC)
Sambung kepada input HDMI pada TV.
e LAN
Sambung kepada input LAN pada modem
atau penghala jalur lebar.
f DIGITAL IN - OPTICAL
Sambung kepada output audio optik pada TV
atau peranti digital.
g DIGITAL IN - COAXIAL
Sambung kepada output audio sepaksi pada
TV atau peranti digital.
h ANTENNA FM
Input isyarat dari antena. (Antena tetap FM
bagi sesetengah model)
i SPEAKERS
Sambung kepada pembesar suara dan
subwufer yang dibekalkan.
4 MS-MY
Page 35

Kawalan jauh
Bahagian ini mengandungi gambaran keseluruhan
alat kawalan jauh.
1
2
3
4
5
6
7
8
9
10
11
12
13
14
15
16
17
18
19
20
21
a ( Bersedia-Hidup )
• Hidupkan teater rumah atau alihkan
kepada siap sedia.
• Apabila EasyLink didayakan, tekan dan
tahan selama sekurang-kurangnya tiga
saat untuk mengalihkan semua peranti
bersambung yang akur HDMI CEC
kepada siap sedia.
b ( Laman utama )
Akses menu utama.
c Butang sumber
• DISC / POP-UP MENU : Beralih ke
sumber cakera. Akses atau keluar daripada
menu cakera ketika anda memainkan
cakera.
• RADIO : Beralih ke radio FM.
• AUDIO SOURCE : Pilih sumber input
audio.
d BACK
• Kembali ke skrin menu sebelumnya.
• Dalam mod radio, tekan dan tahan untuk
memadam stesen radio yang telah praset.
e Butang navigasi
• Navigasi menu.
• Dalam mod radio, tekan kiri atau kanan
untuk memulakan carian automatik.
• Dalam mod radio, tekan atas atau bawah
untuk menala frekuensi radio.
f OK
Sahkan entri atau pemilihan.
g / ( Sebelumnya/Seterusnya )
• Langkau ke trek sebelum atau seterusnya,
bab atau fail.
• Dalam mod radio, pilih stesen radio
pratetap.
h ( Henti ) / ( Eject / Buka/Tutup )
• Hentikan main.
• Tekan dan tahan selama tiga saat untuk
membuka atau menutup petak cakera,
atau mengeluarkan cakera.
i / ( Pantas ke Belakang / Pantas ke
Hadapan )
Cari ke belakang atau ke hadapan. Tekan
berulang kali untuk menukar kelajuan carian.
j +/- ( Kelantangan )
Naikkan atau kurangkan kelantangan.
k SOUND SETTINGS
Akses atau keluar daripada pilihan bunyi.
Bahasa Melayu
MS-MY
5
Page 36

l Butang abjad angka
Masukkan angka atau huruf (menggunakan
entri gaya SMS).
m REPEAT
Pilih atau matikan mod ulang.
n TOP MENU
Akses menu utama cakera.
o OPTIONS
• Akses lebih banyak pilihan mainan sambil
memainkan cakera atau peranti storan
USB.
• Dalam mod radio, tetapkan stesen radio.
p ( Main )
Mulakan atau sambung semula main.
q ( Jeda )
Jedakan main.
r ( Senyap )
Bisukan atau pulihkan kelantangan.
s AUDIO
Pilih bahasa atau saluran audio.
t SUBTITLE
Pilih bahasa sari kata bagi video.
u Butang berwarna
Pilih tugasan atau pilihan bagi cakera Blu-ray.
3 Sambung dan sediakan
Bahagian ini membantu anda menghubungkan
teater rumah anda kepada TV dan peranti yang
lain, kemudian buat persediaannya.
Untuk maklumat tentang sambungan asas
teater rumah anda dan aksesorinya, rujuk
panduan permulaan ringkas. Untuk mendapatkan
panduan interaktif yang menyeluruh, lihat www.
connectivityguide.philips.com.
Catatan
Untuk pengenalan dan pengadaran bekalan,
•
lihat plat jenis di bahagian belakang atau bawah
produk.
• Sebelum anda membuat atau menukar sebarang
sambungan, pastikan semua peranti telah
ditanggalkan daripada alur keluar kuasa.
Sambung pembesar suara
Kabel pembesar suara adalah berkod warna agar
mudah disambung. Untuk menyambungkan pembesar
suara dengan teater rumah anda, padankan warna
kabel pembesar suara dengan yang pada penghubung.
Kedudukan pembesar suara memainkan peranan
penting dalam menyediakan kesan bunyi keliling.
Untuk kesan terbaik, tempatkan semua pembesar
suara ke arah kedudukan tempat duduk dan
letakkannya pada paras telinga anda (semasa duduk).
6 MS-MY
Page 37

Catatan
Bunyi keliling bergantung kepada faktor seperti
•
bentuk dan saiz bilik, jenis dinding dan siling, tingkap
dan permukaan pemantul, dan akustik pembesar
suara. Buat ujian dengan kedudukan pembesar suara
untuk mendapatkan tetapan optimum untuk anda.
Ikuti garis panduan umum ini untuk penempatan
pembesar suara.
1 Kedudukan tempat duduk:
Ini adalah pusat kawasan anda mendengar.
2 FRONT CENTER pembesar suara (hadapan
tengah):
Tempatkan pembesar suara tengah betulbetul di hadapan kedudukan tempat duduk,
sama ada di atas atau di bawah TV anda.
3 FRONT LEFT pembesar suara (hadapan kiri)
dan FRONT RIGHT (hadapan kanan):
Tempatkan pembesar suara di kiri dan
kanan di bahagian hadapan, dan pada jarak
yang sama daripada pembesar suara tengah.
Pastikan pembesar suara kiri, kanan dan
tengah berada pada jarak yang sama daripada
tempat duduk anda.
4 REAR LEFT pembesar suara (belakang kiri)
dan REAR RIGHT (belakang kanan):
Tempatkan pembesar suara belakang di
sebelah kiri dan kanan kedudukan tempat
duduk anda, sama ada sebaris dengannya atau
agak ke belakang sedikit.
5 SUBWOOFER (subwufer):
Tempatkan subwufer sekurang-kurangnya satu
meter di sebelah kiri atau kanan TV. Tinggalkan
ruang lebih kurang 10 sentimeter dari dinding.
Sambung kepada TV
Sambung teater rumah anda kepada TV untuk
menonton video. Anda boleh mendengar audio TV
menerusi pembesar suara teater rumah anda.
Gunakan sambungan kualiti terbaik yang tersedia
pada teater rumah dan TV anda.
Pilihan 1: Sambung ke TV melalui HDMI
(ARC)
Video dengan kualiti terbaik
Teater rumah anda menyokong HDMI versi 1.4
- Saluran Kembali Audio (Audio Return Channel ARC). Jika TV anda patuh HDMI ARC, anda boleh
mendengar audio TV menerusi teater rumah anda
menggunakan satu kabel HDMI sahaja.
1 Menggunakan kabel HDMI Berkelajuan Tinggi,
sambung penyambung HDMI OUT (ARC)
pada teater rumah anda kepada penyambung
HDMI ARC pada TV.
• Penyambung HDMI ARC pada TV
mungkin dilabel dengan cara berbeza.
Untuk butiran, lihat manual pengguna TV.
2 Pada TV anda, hidupkan operasi HDMI-CEC.
Untuk butiran, lihat manual pengguna TV.
• Jika anda tidak dapat mendengar audio
TV melalui teater rumah anda, Buat
persediaan audio secara manual (lihat
'Sediakan audio' di halaman 10 ) .
Bahasa Melayu
TV
Pilihan 2: Sambungkan ke TV menerusi
HDMI standard
Video dengan kualiti terbaik
Jika TV anda tidak patuh HDMI ARC, sambungkan
teater rumah anda kepada TV melalui sambungan
HDMI standard.
1 Menggunakan kabel HDMI Berkelajuan Tinggi,
sambung penyambung HDMI OUT (ARC)
pada teater rumah anda kepada penyambung
HDMI pada TV.
2 Sambungkan kabel audio untuk mendengar
audio TV menerusi teater rumah anda (lihat
'Sambungkan audio daripada TV dan peranti
lain' di halaman 8 ) .
3 Pada TV anda, hidupkan operasi HDMI-CEC.
Untuk butiran, lihat manual pengguna TV.
MS-MY
7
Page 38

• Jika anda tidak dapat mendengar audio
TV melalui teater rumah anda, Buat
persediaan audio secara manual (lihat
'Sediakan audio' di halaman 10 ) .
TV
Catatan
Jika TV anda mempunyai penyambung DVI,
•
anda boleh menggunakan penyesuai HDMI/DVI
untuk menyambung kepada TV. Bagaimanapun,
sesetengah ciri mungkin tidak tersedia.
TV
Pilihan 3: Menyambung kepada TV melalui
video komposit
Video berkualiti asas
Jika TV anda tidak mempunyai penyambung HDMI,
gunakan sambungan komposit video. Sambungan
komposit tidak menyokong video defi nisi tinggi.
1 Menggunakan kabel video komposit,
sambungkan penyambung VIDEO pada teater
rumah anda kepada penyambung VIDEO IN
pada TV.
• Penyambung video komposit mungkin
berlabel AV IN , COMPOSITE , atau
BASEBAND .
2 Sambungkan kabel audio untuk mendengar
audio TV menerusi teater rumah anda (lihat
'Sambungkan audio daripada TV dan peranti
lain' di halaman 8 ) .
3 Bila anda menonton program TV, tekan
SOURCE pada teater rumah anda berkali-kali
untuk memilih input audio yang betul.
4 Apabila anda menonton video, alihkan TV
anda kepada input video yang betul. Untuk
butiran, lihat manual pengguna TV.
Sambungkan audio daripada TV
dan peranti lain
Mainkan audio daripada TV atau peranti lain
melalui pembesar suara teater rumah anda.
Gunakan sambungan kualiti terbaik yang tersedia
pada TV anda, teater rumah, dan peranti lain.
Catatan
Apabila teater rumah dan TV anda
•
disambungkan melalui HDMI ARC, sambungan
audio tidak diperlukan (lihat 'Pilihan 1: Sambung
ke TV melalui HDMI (ARC)' di halaman 7 ) .
Pilihan 1: Sambung audio melalui kabel
optik digital
Audio dengan kualiti terbaik
1 Menggunakan kabel optik, sambungkan
penyambung OPTICAL pada teater rumah
anda kepada penyambung OPTICAL OUT
pada TV atau peranti lain.
• Penyambung optik digital mungkin
berlabel SPDIF atau SPDIF OUT .
TV
8 MS-MY
Page 39

Pilihan 2: Sambungkan audio melalui kabel
sepaksi digital
Audio berkualiti baik
1 Menggunakan kabel sepaksi, sambungkan
penyambung COAXIAL pada teater rumah
anda kepada penyambung COAXIAL/
DIGITAL OUT pada TV atau peranti lain.
• Penyambung sepaksi digital mungkin
berlabel DIGITAL AUDIO OUT .
1 Tekan ( Laman utama ).
2 Pilih [Persediaan] , kemudian tekan OK .
3 Pilih [Audio] > [Sediaan pembesar suara]
4 Masukkan jarak bagi setiap pembesar suara,
dan kemudian dengar nada ujian dan ubah
kelantangan. Uji kedudukan pembesar suara
untuk mendapatkan tetapan terbaik.
Sediakan EasyLink (kawalan
HDMI-CEC)
Teater rumah ini menyokong Philips EasyLink, yang
menggunakan protokol HDMI-CEC (Kawalan
Elektronik Pengguna). Peranti yang akur EasyLink
yang bersambung melalui HDMI boleh dikawal
dengan alat kawalan jauh yang sama.
Pilihan 3: Sambungkan audio melalui kabel
audio analog
Audio berkualiti asas
1 Menggunakan kabel analog, sambungkan
penyambung AUX pada teater rumah anda
kepada penyambung AUDIO OUT pada TV
atau peranti lain.
VCR
Sediakan pembesar suara
Sediakan pembesar suara secara manual untuk
mengalami bunyi keliling tersuai.
Sebelum anda bermula
Buat sambungan yang diperlukan seper ti yang
diterangkan dalam panduan permulaan pantas dan
kemudian ubah TV kepada sumber yang betul dari
teater rumah anda.
Catatan
Bergantung pada pengilang, HDMI-CEC dikenali
•
dengan banyak nama. Untuk mendapat maklumat
mengenai peranti anda, lihat manual pengguna
peranti.
• Philips tidak menjamin 100% kesalingfungsian
dengan semua peranti HDMI-CEC.
Sebelum anda bermula
• Sambungkan teater rumah anda ke peranti
yang serasi dengan HDMI-CEC melalui
sambungan HDMI.
• Buat sambungan yang diperlukan seper ti yang
diterangkan dalam panduan permulaan pantas
dan kemudian ubah TV kepada sumber yang
betul dari teater rumah anda.
Dayakan EasyLink
1 Tekan ( Laman utama ).
2 Pilih [Persediaan] , kemudian tekan OK .
3 Pilih [EasyLink] > [EasyLink] > [Hidup] .
4 Pada TV anda dan peranti lain yang
bersambung, hidupkan kawalan HDMI-CEC.
Untuk mendapatkan butiran, lihat manual
pengguna TV atau peranti lain.
• Pada TV anda, tetapkan output audio
kepada 'Amplifi er' (dan bukannya
pembesar suara TV). Untuk butiran, lihat
manual pengguna TV.
Bahasa Melayu
MS-MY
9
Page 40

Kawalan EasyLink
Dengan EasyLink, anda boleh mengawal teater
rumah anda, TV dan peranti serasi HDMI-CEC
bersambung yang lain dengan satu alat kawalan jauh.
• [Main Satu Sentuhan] (Mainan satu
sentuhan): Apabila cakera video berada di
dalam ruang cakera, tekan
membangunkan TV daripada siap sedia dan
kemudian mainkan cakera.
• [Siap Sedia Satu Sentuhan] (Siap sedia satu
sentuhan): Jika siap sedia satu sentuhan
didayakan, teater rumah anda boleh beralih
kepada siap sedia dengan alat kawalan jauh TV
atau peranti-peranti HDMI-CEC yang lain.
• [Kawalan Audio Sistem] (Kawalan audio
sistem):Jika kawalan audio sistem didayakan,
audio daripada peranti bersambung
dikeluarkan melalui pembesar suara teater
rumah anda secara automatik apabila anda
memainkan peranti tersebut.
• [Pemetaan Input Audio] (Pemetaan input
audio): Jika kawalan audio sistem tidak berfungsi,
petakan peranti bersambung ke penyambung
input audio yang betul pada teater rumah anda
(lihat 'Sediakan audio' di halaman 10 ) .
Catatan
• Untuk menukar tetapan kawalan EasyLink, tekan
( Laman utama ), pilih [Persediaan] > [EasyLink] .
( Main ) untuk
Sediakan audio
Jika anda tidak boleh mendengar output audio
peranti bersambung menerusi pembesar suara
teater rumah anda, semak sama ada anda telah
mendayakan Easylink pada semua peranti (lihat
'Dayakan EasyLink' di halaman 9 ) . Kemudian,
sediakan kawalan audio EasyLink.
1 Tekan ( Laman utama ).
2 Pilih [Persediaan] , kemudian tekan OK .
3 Pilih [EasyLink] > [Kawalan Audio Sistem] >
[Hidup] .
• Untuk memainkan audio daripada
pembesar suara TV, pilih [Mati] , dan
langkau langkah berikut.
4 Pilih [EasyLink] > [Pemetaan Input Audio] .
5 Ikuti arahan atas skrin untuk memetakan
peranti bersambung ke input audio pada
teater rumah anda.
• Jika anda sambung teater rumah anda ke
TV menerusi sambungan HDMI ARC ,
pastikan audio TV telah dipetakan kepada
input ARC pada teater rumah anda.
Sambungkan dan sediakan
rangkaian rumah
Sambungkan teater rumah anda ke penghala
rangkaian melalui sambungan rangkaian berwayar
atau wayarles, dan nikmati:
• YouTube Leanback
• Album web Picasa
• Kandungan multimedia distrim
• Aplikasi BD-Live
• Kemas kini perisian
Awas
Biasakan diri anda dengan penghala rangkaian,
•
perisian pelayan media dan prinsip rangkaian. Jika
perlu, baca dokumentasi yang mengiringi komponen
rangkaian. Philips tidak bertanggungjawab atas data
yang hilang, rosak atau tercemar.
Sebelum anda bermula
• Bagi kemas kini perisian, pastikan penghala
rangkaian dapat mengakses Internet dengan
sambungan berkelajuan tinggi dan tidak disekat
oleh tembok api atau sistem keselamatan yang lain.
• Buat sambungan yang diperlukan seper ti yang
diterangkan dalam panduan permulaan pantas
dan kemudian ubah TV kepada sumber yang
betul dari teater rumah anda.
10 MS-MY
Page 41

Sediakan rangkaian berwayar
Apa yang anda perlukan
• Kabel rangkaian (kabel lurus RJ45).
• Penghala rangkaian (dengan DHCP didayakan).
LAN
www
1 Menggunakan kabel rangkaian, sambungkan
penyambung LAN pada teater rumah anda
ke penghala rangkaian.
2 Tekan ( Laman utama ).
3 Pilih [Persediaan] , kemudian tekan OK .
4 Pilih [Rangkaian] > [Pemasangan rangkaian]
> [Berwayar (Ethernet)] .
5 Ikuti arahan pada skrin untuk menyelesaikan
persediaan.
• Jika sambungan gagal, pilih [Cuba lagi] ,
kemudian tekan OK .
6 Pilih [Selesai] , dan kemudian tekan OK untuk
keluar.
• Untuk melihat tetapan rangkaian, pilih
[Persediaan] > [Rangkaian] > [Lihat
tetapan rangkaian] .
1 Tekan ( Laman utama ).
2 Pilih [Persediaan] , kemudian tekan OK .
3 Pilih [Rangkaian] > [Pemasangan rangkaian] >
[Wayarles (Wi-Fi)] , dan kemudian tekan OK .
4 Ikuti arahan atas skrin untuk memilih dan
menyediakan rangkaian wayarles.
• Jika sambungan gagal, pilih [Cuba lagi] ,
kemudian tekan OK .
5 Pilih [Selesai] , dan kemudian tekan OK untuk
keluar.
• Untuk melihat tetapan rangkaian, pilih
[Persediaan] > [Rangkaian] > [Lihat
tetapan wayarles] .
Bahasa Melayu
Sediakan rangkaian wayarles
Teater rumah anda adalah sedia Wi-Fi. Sambungkan
dongle Wi-Fi untuk akses mudah ke rangkaian wayarles.
Apa yang anda perlukan
• Penghala rangkaian (dengan DHCP didayakan).
Untuk prestasi, liputan dan keserasian wayarles
terbaik, gunakan penghala 802.11n;
• Sambung dongle Wi-Fi (Model: Philips
WUB1110 yang dijual berasingan) pada
penyambung
pada teater rumah anda.
MS-MY
11
Page 42

4 Gunakan teater
rumah anda
Bahagian ini membantu anda dalam menggunakan
teater rumah untuk memainkan media daripada
berbagai-bagai sumber.
Sebelum anda bermula
• Buat sambungan yang diperlukan seper ti yang
dihuraikan dalam panduan Permulaan Ringkas
dan manual pengguna.
• Tukar TV kepada sumber yang betul bagi
teater rumah ini.
Akses menu utama
Menu utama menyediakan akses mudah terhadap
peranti bersambung, persediaan dan ciri-ciri lain
yang berguna dalam teater rumah anda.
1 Tekan ( Laman utama ).
» Menu utama dipaparkan.
2 Tekan Butang navigasi dan OK untuk memilih
yang berikut:
• [Main Cakera] : Mulakan mainan cakera.
• [semak imbas USB] : Akses penyemak
imbas kandungan USB
• [semak imbas PC] : Akses penyemak
imbas kandungan komputer.
• [YouTube] : Akses halaman YouTube
Leanback.
• [Picasa] : Akses album web Picasa.
• [Persediaan] : Akses menu untuk menukar
video, audio dan tetapan lain.
3 Tekan ( Laman utama ) untuk keluar.
Cakera
3 Gunakan alat kawalan jauh untuk mengawal
mainan (lihat 'Kawalan jauh' di halaman 5 ) .
• Sedikit bunyi bising memang biasa
kedengaran ketika anda memainkan
cakera Blu-ray. Ini tidak bermakna teater
rumah anda rosak.
Catatan
Untuk mengelakkan kerlipan, ubah kecerahan
•
paparan .
Mainkan butang
Butang Tindakan
Butang
navigasi
OK Sahkan entri atau pemilihan.
( Main )
/
/
AUDIO Pilih bahasa atau saluran audio.
SUBTITLE Pilih bahasa sari kata bagi video.
DISC / POP-
UP MENU
OPTIONS Akses pilihan lanjutan apabila anda
REPEAT Pilih atau matikan mod ulang.
Navigasi menu.
Atas/Bawah: Putar gambar mengikut
arah jam atau melawan arah jam.
Kiri/Kanan: Terbalikkan foto secara
menegak atau mendatar.
Mulakan atau sambung semula main.
Jedakan main.
Hentikan main.
Langkau ke trek sebelum atau
seterusnya, bab atau fail.
Apabila video dijeda, buat carian ke
belakang atau ke hadapan.
Akses atau keluar daripada menu
cakera.
memainkan fail audio, video, atau
media anda (lihat 'Pilihan audio,
video, da gambar' di halaman 14 ) .
Teater rumah anda boleh memainkan cakera DVD,
VCD, CD, dan Blu-ray. Ia juga boleh memainkan
cakera yang anda buat sendiri, seperti cakera CD-R
yang mengandungi foto, video dan muzik.
1 Masukkan cakera ke dalam teater rumah.
2 Jika cakera tidak bermain secara automatik,
tekan DISC atau pilih [Main Cakera] daripada
menu utama.
12 MS-MY
Segerakkan gambar dengan bunyi.
Jika audio dan video tidak segerak, tunda audio
agar sepadan dengan video.
1 Tekan SOUND SETTINGS .
2 Pilih AUD SYNC , kemudian tekan OK .
3 Tekan Butang navigasi (naik/turun) untuk
menyegerak audio dengan video.
4 Tekan OK untuk mengesahkan.
Page 43

Mainkan cakera 3D Blu-ray
Teater rumah anda boleh memainkan video
3D Blu-ray. Baca amaran kesihatan 3D sebelum
memainkan cakera 3D.
Apa yang anda perlukan
• TV 3D.
• Sepasang kaca mata 3D yang serasi dengan
TV 3D anda.
• Video 3D Blu-ray
• Kabel HDMI kelajuan tinggi (sebaik-baiknya
versi 1.4)
1 Menggunakan kabel HDMI berkelajuan tinggi,
sambungkan teater rumah anda ke TV serasi 3D.
2 Pastikan tetapan video 3D didayakan. Tekan
( Laman utama ), pilih [Persediaan] > [Video]
> [Tonton video 3D] > [Auto] .
• Untuk memainkan cakera 3D dalam mod
2D, pilih [Mati] .
3 Mainkan cakera Blu-ray 3D dan pakai cermin
mata 3D.
• Semasa carian video dan dalam mod
mainan tertentu, video dipaparkan dalam
2D. Paparan video kembali ke 3D apabila
anda meneruskan mainan.
Bonus View pada Blu-ray
Pada cakera Blu-ray yang menyokong Bonus View,
alami kandungan tambahan seperti ulasan dalam
tetingkap skrin kecil. Bonus View juga dikenali
sebagai gambar dalam gambar.
1 Dayakan Bonus View dalam menu cakera Blu-ray.
2 Semasa anda memainkan fi lem, tekan OPTIONS .
» Menu pilihan dipaparkan.
3 Pilih [Pilihan PIP] > [PIP] .
• Bergantung pada video, menu PIP [1]
atau [2] akan dipaparkan.
• Untuk menyahdayakan Bonus View, pilih
[Mati] .
4 Pilih [Bahasa audio ke-2] atau [Bahasa sari
kata ke-2] .
5 Pilih bahasa, kemudian tekan OK .
BD-Live pada Blu-ray
Pada cakera Blu-ray dengan kandungan BD-Live,
akses ciri tambahan, seperti bualan internet dengan
pengarah, gazet wayang terkini, permainan, kertas
hias dinding, dan nada dering.
Perkhidmatan dan kandungan BD-Live berbeza
dari satu cakera ke cakera lain.
Apa yang anda perlukan
• Cakera Blu-ray dengan kandungan BD-Live
• peranti storan USB, dengan sekurang-
kurangnya 1GB memori.
1 Sambungkan teater rumah anda kepada
rangkaian rumah berakses Internet (lihat
'Sambungkan dan sediakan rangkaian rumah'
di halaman 10 ) .
2 Sambung peranti storan USB kepada teater
rumah anda.
3 Tekan ( Laman utama ) dan pilih
[Persediaan] .
4 Pilih [Lanjutan] > [Keselamatan BD-Live] >
[Mati] untuk mendayakan BD-Live.
• Untuk menyahdayakan BD-Live, pilih
[Hidup] .
5 Pilih ikon BD-Live pada menu cakera,
kemudian tekan OK .
» BD-Live mula dimuatkan. Masa memuat
bergantung pada cakera dan sambungan
internet anda.
6 Tekan Butang navigasi untuk menavigasi BD-
Live dan kemudian tekan OK untuk memilih
pilihan.
Catatan
Untuk mengosongkan memori pada peranti
•
storan, tekan
[Persediaan] > [Lanjutan] > [Kosongkan
memori] .
( Laman utama ), pilih
Fail data
Teater rumah anda boleh memainkan gambar, fail
audio dan video yang terkandung dalam cakera atau
peranti storan USB. Sebelum memainkan fail, semak
sama ada format fail tersebut disokong oleh teater
rumah anda (lihat 'Format fail' di halaman 22 ) .
1 Mainkan fail dari cakera atau peranti storan USB.
2 Untuk menghentikan mainan, tekan .
• Untuk menyambung kembali video dari
tempat anda berhenti, tekan
• Untuk memainkan video dari mula, tekan .
( Main ).
Bahasa Melayu
MS-MY
13
Page 44

Catatan
Untuk memainkan fail DivX yang dilindungi
•
DRM, sambungkan teater rumah anda ke TV
melalui kabel HDMI.
Sari kata
Jika video anda mengandungi sari kata dalam
berbilang bahasa, pilih satu bahasa sari kata.
Kod VOD bagi DivX
Sebelum membeli video DivX dan memainkannya
pada teater rumah anda, daftarkan teater rumah anda
di www.divx.com menggunakan kod DivX VOD.
1 Tekan ( Laman utama ).
2 Pilih [Persediaan] , kemudian tekan OK .
3 Pilih [Lanjutan] > [Kod VOD DivX®] .
» Kod pendaftaran DivX VOD bagi teater
rumah anda akan dipaparkan.
Catatan
Pastikan fail sari kata mempunyai nama fail yang
•
betul-betul sama dengan fail video. Contohnya,
jika fail video bernama 'movie.avi', namakan fail
sari kata sebagai 'movie.srt' atau 'movie.sub'.
• Teater rumah anda menyokong format fail yang
berikut: .srt, .sub, .txt, .ssa, .ass, smi dan .sami. Jika
sari kata tidak muncul dengan betul, tukar set
aksara.
1 Semasa memainkan video, tekan SUBTITLE
untuk memilih bahasa.
2 Untuk video DivX atau RMVB/RM, jika sari kata
tidak muncul dengan betul, teruskan langkahlangkah berikut untuk menukar set aksara.
3 Tekan OPTIONS .
» Menu pilihan dipaparkan.
4 Pilih [Set aksara] , lalu pilih set aksara yang
menyokong sari kata.
Asia Pasifi k dan China
Set Aksara Bahasa
[Standard] Albania, Denmark, Belanda,
[Bahasa
China]
[Bahasa
ChinaTradisional]
[Bahasa
Korea]
Inggeris, Finland, Perancis, Gaelic,
Jerman, Itali, Kurdish (Latin),
Norway, Portugis, Sepanyol,
Sweden, Turki
Cina Mudah
Cina Tradisional
Inggeris dan Korea
Peranti storan USB
Nikmati gambar, audio dan video yang disimpan
pada peranti storan USB seper ti pemain MP4 atau
kamera digital.
Apa yang anda perlukan
• Peranti storan USB yang telah diformat
bagi sistem fail FAT, DOS atau NTFS, dan
mematuhi Kelas Penyimpanan Massa.
• Fail media merupakan salah satu format fail yang
disokong (lihat 'Format fail' di halaman 22 ) .
Catatan
Jika anda menggunakan kabel sambungan USB,
•
USB HUB, atau pembaca berbilang USB, peranti
storan USB mungkin tidak akan dikenali.
1 Sambungkan peranti storan USB ke penyambung
( USB ) pada teater rumah anda.
2 Tekan ( Laman utama ).
3 Pilih [semak imbas USB] , kemudian tekan OK .
» Penyemak imbas kandungan dipaparkan.
4 Pilih fail, kemudian tekan OK .
5 Tekan butang-butang mainan untuk mengawal
mainan (lihat 'Mainkan butang' di halaman 12 ) .
Pilihan audio, video, da gambar
Gunakan ciri lanjutan apabila anda memainkan
gambar, fail audio dan video dari cakera atau
peranti storan USB.
14 MS-MY
Page 45

Pilihan audio
Semasa memainkan audio, ulangi trek, cakera atau
folder audio.
1 Tekan OPTIONS berulang kali untuk beralih
antara fungsi-fungsi berikut:
• RPT TRK / RPT FILE : Ulangi trek atau fail
semasa.
• RPT DISC / RPT FOLD : Ulangi semua
trek pada cakera atau folder.
• RPT RDOM : Mainkan trek audio dalam
susunan rawak.
• RPT OFF : Matikan mod ulangan.
Pilihan video
Semasa menonton video, pilih pilihan seperti
sari kata, bahasa audio, carian masa, dan tetapan
gambar. Bergantung kepada sumber video,
beberapa pilihan tidak tersedia.
1 Tekan OPTIONS .
» Menu pilihan video dipaparkan.
2 Tekan Butang navigasi dan OK untuk memilih
dan tukar:
• [Bahasa audio] : Pilih bahasa sari kata bagi
audio.
• [Bahasa sari kata] : Pilih bahasa sari kata
bagi video.
• [Anjakan sari kata] : Laraskan kedudukan
sari kata pada skrin.
• [Maklumat] : Memaparkan maklumat
mengenai apa yang sedang dimainkan.
• [Set aksara] : Pilih set aksara yang
menyokong sari kata DivX.
• [Carian masa] : Langkau ke bahagian
tertentu video dengan memasukkan
masa adegan.
• [Bahasa audio ke-2] : Pilih bahasa audio
kedua bagi video Blu-ray.
• [Bahasa sari kata ke-2] : Pilih bahasa sari
kata kedua bagi video Blu-ray.
• [Tajuk] : Pilih tajuk tertentu.
• [Bab] : Pilih bab tertentu.
• [Karaoke] : Laraskan tetapan karaoke.
• [Senarai sudut] : Pilih sudut kamera yang
berbeza.
• [Menu] : Paparkan menu cakera.
• [Pilihan PIP] : Paparkan tetingkap Gambar
dalam Gambar ketika memainkan cakera
3D Blu-ray yang menyokong Bonus View.
• [Zum] : Zum kepada adegan video atau
gambar. Tekan Butang navigasi (kiri/kanan)
untuk memilih faktor zum.
• [Ulang] : Ulangi bab atau tajuk.
• [Ulang A-B] : Tandakan dua titik dalam bab
atau trek untuk mengulangi mainan, atau
matikan mod ulangan.
• [Tetapan gambar] : Pilih tetapan warna
yang telah dipratakrif.
Pilihan gambar
Semasa melihat gambar, zum ke dalam gambar,
putarkan, tambah animasi kepada tayangan slaid,
dan tukar tetapan gambar.
1 Tekan OPTIONS .
» Menu pilihan gambar akan muncul.
2 Tekan Butang navigasi dan OK untuk memilih
dan menukar tetapan berikut:
• [Putar +90] : Putar gambar 90 darjah
mengikut arah jam.
• [Putar -90] : Putar gambar 90 darjah
melawan arah jam.
• [Zum] : Zum kepada adegan video atau
gambar. Tekan Butang navigasi (kiri/kanan)
untuk memilih faktor zum.
• [Maklumat] : Paparkan maklumat gambar.
• [Tempoh setiap slaid] : Pilih kelajuan
paparan setiap gambar dalam tayangan slaid.
• [Animasi slaid] : Pilih animasi bagi
tayangan slaid.
• [Tetapan gambar] : Pilih tetapan warna
yang telah dipratakrif.
• [Ulang] : Ulang folder yang dipilih.
Tayangan slaid muzikal
Jika gambar atau fail audio daripada cakera
yang sama atau peranti storan USB, anda boleh
membuat tayangan slaid muzikal.
1 Pilih trek audio, kemudian tekan OK .
2 Tekan BACK , dan pergi ke folder gambar.
3 Pilih gambar, lalu tekan ( Main ) untuk
memulakan tayangan slaid.
4 Tekan untuk menghentikan pertunjukan
slaid.
5 Tekan sekali lagi untuk menghentikan muzik.
Catatan
Pastikan format gambar dan audio disokong oleh
•
teater rumah anda (lihat 'Format fail' di halaman
22 ) .
Bahasa Melayu
MS-MY
15
Page 46

Radio
Dengar radio FM pada teater rumah anda, dan
simpan sehingga 40 stesen radio.
Catatan
Radio AM dan digital tidak disokong.
•
• Jika tiada isyarat radio yang dikesan, atau jika
kurang daripada lima stesen dijumpai, anda akan
digesa untuk memasang stesen radio sekali lagi.
Grid penalaan
Di sesetengah negara, anda boleh togol grid talaan
FM antara 50 kHz dan 100 kHz. Menukarkan grid
talaan akan memadamkan semua stesen radio yang
telah dipraset.
1 Tekan RADIO .
2 Tekan .
3 Tekan dan tahan ( Main ) untuk togol antara
50 kHz atau 100 kHz.
1 Panjangkan antena FM di bahagian belakang
teater rumah anda dan tempatkannya jauh
dari TV atau sumber radiasi yang lain.
2 Tekan RADIO .
» Jika anda telah pun memasang stesen
radio, saluran terakhir yang anda dengar
akan dimainkan.
» Jika anda belum lagi memasang
sebarang stesen radio, mesej AUTO
INSTALL...PRESS PLAY akan muncul
pada panel paparan. tekan
( Main ).
3 Gunakan alat kawalan jauh untuk mendengar
atau menukar stesen radio.
Butang Tindakan
/
atau
Butang
abjad angka
Butang
navigasi
BACK
OPTIONS Manual:
SUBTITLE Togol antara bunyi stereo dan
Pilih stesen radio pratetap.
Kiri/Kanan: Cari stesen radio.
Atas/Bawah: Tala haluskan frekuensi
radio.
Tekan untuk menghentikan
pemasangan stesen radio.
Tekan dan tahan untuk memadam
stesen radio pratetap.
1) Tekan
/ untuk memilih praset anda.
3) Tekan
untuk menyimpan stesen radio.
Automatik: Tekan dan tahan selama
tiga saat untuk memasang semula
stesen radio.
mono.
OPTIONS . 2) Tekan
OPTIONS sekali lagi
pemain MP3
Sambungkan pemain MP3 untuk memainkan fail
audio.
Apa yang anda perlukan
• Pemain MP3.
• Kabel audio stereo 3.5mm.
1 Menggunakan kabel audio stereo 3.5mm,
sambungkan pemain MP3 kepada penyambung
MUSIC iLINK pada teater rumah anda.
2 Tekan AUDIO SOURCE berulang kali sehingga
MUSIC I-LINK muncul pada panel paparan.
3 Gunakan butang pada pemain MP3 anda
untuk memilih dan memainkan fail audio.
Semak imbas PC melalui DLNA
Akses dan mainkan gambar, fail audio dan video
dari komputer atau pelayan media pada rangkaian
rumah melalui teater rumah anda.
Sebelum anda bermula
• Pasang aplikasi pelayan media yang patuh
DLNA pada peranti anda. Pastikan bahawa
anda memuat turun aplikasi yang paling sesuai
untuk anda. Contohnya,
• Windows Media Player 11 atau lebih
tinggi bagi PC
• Twonky Media Server untuk Mac atau PC
• Dayakan perkongsian media bagi fail.
Untuk mendapatkan butiran, semak manual
pengguna pada perisian pelayan media.
1 Sambung teater rumah anda kepada
rangkaian rumah anda . Untuk mendapat
kualiti video yang lebih baik, sebaik-baiknya
gunakan sambungan berwayar.
16 MS-MY
Page 47

2 Sambungkan komputer dan peranti serasi DLNA
yang lain kepada rangkaian rumah yang sama.
3 Tekan ( Laman utama ).
4 Pilih [semak imbas PC] , kemudian tekan OK .
» Penyemak imbas kandungan dipaparkan.
5 Pilih peranti pada rangkaian.
» Folder dalam peranti yang dipilih akan
dipaparkan. Bergantung kepada pelayan
media, nama foldernya mungkin berbeza.
• Jika anda tidak dapat melihat folder ini,
pastikan anda mendayakan perkongsian
media pada peranti yang dipilih agar
kandungannya tersedia untuk dikongsi.
6 Pilih fail, kemudian tekan OK .
• Sesetengah fail media mungkin tidak
dapat dimainkan kerana isu keserasian.
Semak format fail yang disokong oleh
teater rumah anda.
7 Tekan butang-butang mainan untuk mengawal
mainan (lihat 'Mainkan butang' di halaman 12 ) .
Video YouTube
Nikmati video YouTube melalui teater rumah anda.
1 Sambungkan teater rumah anda kepada
rangkaian rumah dengan akses Internet
berkelajuan tinggi (lihat 'Sambungkan dan
sediakan rangkaian rumah' di halaman 10 ) .
2 Tekan ( Laman utama ).
3 Pilih [YouTube] , kemudian tekan OK .
» Halaman YouTube Leanback dipaparkan.
4 Ikut arahan atas skrin untuk menyemak imbas
halaman YouTube ini.
5 Gunakan alat kawalan jauh untuk memilih dan
menavigasi aplikasi.
Butang Tindakan
Butang
navigasi
Atas: Akses papan kekunci atas skrin.
Bawah: Akses butang main balik atas skrin.
Kiri/Kanan: Pilih video daripada senarai
main.
Album web Picasa
Akses Album Web Picasa Web melalui teater
rumah anda.
Apa yang anda perlukan
• Akaun dengan Album Web Picasa.
1 Sambungkan teater rumah anda kepada
rangkaian rumah berakses Internet (lihat
'Sambungkan dan sediakan rangkaian rumah'
di halaman 10 ) .
2 Tekan ( Laman utama ).
3 Pilih [Picasa] , kemudian tekan OK .
4 Log masuk ke akaun web Picasa anda.
• Kali pertama anda log masuk, pilih [Pengguna
baru] , lalu masukkan nama pengguna dan
kata laluan anda. Simpan maklumat log
masuk anda untuk penggunaan seterusnya.
• Jika anda telah log masuk sebelum ini,
pilih nama pengguna yang disimpan dan
masukkan kata laluan.
5 Pilih opsyen atas skrin untuk melihat album
atau foto.
6 Tekan ( Laman utama ) untuk keluar
daripada menu Picasa.
Lihat tayangan slaid
1 Pilih [Foto saya] daripada menu Picasa, lalu
tekan OK .
» Album foto dalam Album Web Picasa
anda dipaparkan.
2 Pilih foto, lalu tekan OK untuk melihat foto
dalam skrin penuh.
3 Tekan OK semula untuk melihat foto dalam
tayangan slaid.
4 Semasa melihat tayangan slaid,
tekan OPTIONS untuk mengakses lebih
banyak opsyen main.
5 Tekan BACK untuk kembali ke skrin
sebelumnya.
Bahasa Melayu
• Jika anda tidak menekan butang dalam
masa beberapa saat, butang dan menu
atas skrin akan hilang secara automatik.
6 Tekan ( Laman utama ) untuk keluar dari
halaman YouTube.
Karaoke
Hanya tersedia dalam model dan di kawasan terpilih
Mainkan cakera Karaoke pada teater rumah anda
dan menyanyilah mengikut muzik.
MS-MY
17
Page 48

Apa yang anda perlukan
• Mikrofon Karaoke.
• Cakera Karaoke.
Awas
Untuk mengelakkan bunyi yang kuat dan tak
•
dijangka, turunkan kelantangan mikrofon kepada
yang minimum sebelum anda menyambung
mikrofon kepada teater rumah anda.
1 Sambungkan mikrofon karaoke kepada
penyambung MIC pada teater rumah anda.
2 Alihkan TV anda kepada sumber HDMI yang
betul bagi teater rumah anda.
3 Pastikan pasca pemprosesan audio didayakan
pada teater rumah anda (lihat 'Tetapan
pembesar suara' di halaman 20 ) .
4 Semasa memainkan cakera Karaoke, tekan
OPTIONS .
» Menu pilihan dipaparkan.
5 Pilih [Karaoke] , kemudian tekan OK .
» Menu persediaan karaoke akan dipaparkan.
6 Tekan Butang navigasi (atas/bawah) dan OK
untuk memilih tetapan berikut:
• [Mikrofon] : Hidupkan atau matikan mikrofon.
• [Kelantangan mikrofon] : Ubah
kelantangan mikrofon.
• [Gema] : Laraskan tahap gema.
• [Kunci] : Ubah nada agar sepadan dengan
suara anda.
AUD SYNC Tunda audio agar sepadan
dengan video.
3 Buat pilihan, kemudian tekan OK .
4 Tekan BACK untuk keluar.
Jika anda tidak menekan sebarang butang
selama satu minit, menu akan keluar secara
automatik.
Mod bunyi
Pilih mod bunyi yang dipratetapkan untuk
disesuaikan dengan video atau muzik anda.
1 Tekan SOUND SETTINGS .
2 Pilih SOUND , kemudian tekan OK .
3 Tekan Butang navigasi (atas/bawah) untuk
memilih tetapan pada paparan:
• MOVIE : Nikmati pengalaman audio
bagaikan benar-benar di panggung wayang,
ditingkatkan khusus untuk wayang gambar.
• MUSIC : Cipta kembali suasana rakaman
asal muzik anda, di dalam studio atau
ketika menghadiri konsert.
• ORIGINAL : Alami bunyi asal wayang dan
muzik anda, tanpa kesan bunyi tambahan.
• NEWS : Dengarkan setiap perkataan
dengan pertuturan dioptimumkan dan
vokal yang jelas.
• GAMING : Nikmati bunyi arked yang
menyeronokkan, yang ideal untuk
permainan video penuh aksi atau parti
yang lantang.
4 Tekan OK untuk mengesahkan.
Pilih bunyi
Bahagian ini membantu anda memilih bunyi yang
sempurna untuk video atau muzik anda.
1 Tekan SOUND SETTINGS .
2 Tekan Butang navigasi (kiri/kanan) untuk
mengakses pilihan bunyi pada paparan.
Tetapan bunyi Perihalan
SOUND Pilih mod bunyi.
SURROUND Pilih bunyi keliling atau bunyi stereo.
TREBLE Laraskan output frekuensi tinggi.
MID Laraskan output frekuensi
pertengahan.
BASS Laraskan output frekuensi rendah.
18 MS-MY
Mod bunyi surround
Alami pengalaman audio perendaman dengan mod
bunyi surround.
1 Tekan SOUND SETTINGS .
2 Pilih SURROUND , kemudian tekan OK .
3 Tekan Butang navigasi (atas/bawah) untuk
memilih tetapan pada paparan:
• AUTO : Bunyi keliling berdasarkan strim
audio.
• MULTI-CH : Bunyi berbilang saluran
yang mengelilingi persekitaran untuk
pengalaman fi lem yang dipertingkatkan.
• STEREO : Bunyi stereo dua saluran. Sesuai
untuk mendengar muzik.
4 Tekan OK untuk mengesahkan.
Page 49

5 Tukar tetapan
Tetapan teater rumah telah pun dikonfi gurasikan
untuk prestasi optimum. Melainkan anda
mempunyai sebab untuk menukar tetapan, kami
syorkan anda mengekalkan tetapan lalai.
Catatan
Anda tidak boleh mengubah tetapan yang telah
•
dikelabukan.
• Untuk kembali ke menu sebelumnya, tekan
BACK . Untuk keluar daripada menu, tekan
( Laman utama ).
4 Tekan Butang navigasi dan OK untuk memilih
dan tukar:
• [Paparan TV] : Pilih format gambar yang
muat pada skrin TV.
• [Video HDMI] : Pilih resolusi isyarat video
yang keluar dari HDMI OUT (ARC)
pada teater rumah anda. Untuk dapat
menggunakan resolusi yang dipilih, pastikan
TV anda menyokong resolusi tersebut.
• [HDMI Deep Color] : Dapatkan dunia
semula jadi pada skrin TV anda dengan
memaparkan imej terang menggunakan
berbilion warna. Teater rumah anda mesti
disambungkan ke TV berdaya Warna
Pekat melalui kabel HDMI.
• [Tetapan gambar] : Pilih tetapan warna
yang dipratakrif untuk paparan video.
• [Tonton video 3D] : Tetapkan video HDMI
untuk menyokong video 3D atau 2D.
Tetapan bahasa
1 Tekan ( Laman utama ).
2 Pilih [Persediaan] , kemudian tekan OK .
3 Pilih [Keutamaan] , kemudian tekan OK .
4 Tekan Butang navigasi dan OK untuk memilih
dan tukar:
• [Bahasa menu] : Pilih bahasa paparan
untuk menu.
• [Audio] : Pilih bahasa audio untuk cakera.
• [Sari kata] : Pilih bahasa sari kata untuk
cakera.
• [Menu cakera] : Pilih bahasa menu untuk
cakera.
Catatan
Jika bahasa cakera yang anda kehendaki tidak
•
tersedia, pilih [Lain-lain] pada senarai dan
masukkan kod bahasa 4 digit yang boleh didapati
pada penghujung manual pengguna ini .
• Jika anda memilih bahasa yang tidak tersedia
pada cakera, teater rumah akan menggunakan
bahasa lalai cakera.
Tetapan gambar dan video
1 Tekan ( Laman utama ).
2 Pilih [Persediaan] , kemudian tekan OK .
3 Pilih [Video] , kemudian tekan OK .
Catatan
Jika anda hendak menukar tetapan, pastikan
•
bahawa TV menyokong tetapan baru ini.
Tetapan audio
1 Tekan ( Laman utama ).
2 Pilih [Persediaan] , kemudian tekan OK .
3 Pilih [Audio] , kemudian tekan OK .
4 Tekan Butang navigasi dan OK untuk memilih
dan tukar:
• [Mod malam] : Untuk mendengar dengan
tenang, kurangkan kelantangan bunyi
yang kuat pada teater rumah anda. Mod
malam hanya tersedia bagi cakera DVD
berkod Dolby dan Blu-ray.
• [Audio HDMI] : Tetapkan output audio
HDMI dari TV anda, atau nyahdayakan
output audio HDMI dari TV.
Tetapan kawalan ibu bapa
1 Tekan ( Laman utama ).
2 Pilih [Persediaan] , kemudian tekan OK .
3 Pilih [Keutamaan] , kemudian tekan OK .
4 Tekan Butang navigasi dan OK untuk memilih
dan tukar:
Bahasa Melayu
MS-MY
19
Page 50

• [Tukar kata laluan] : Tetapkan atau tukar kata
laluan anda untuk akses kawalan ibu bapa.
Jika anda tidak mempunyai kata laluan atau
terlupa kata laluan anda, masukkan 0000 .
• [Kawalan ibu bapa] : Hadkan akses kepada
cakera yang dirakam dengan pengadaran
umur. Untuk memainkan semua cakera, tanpa
mengira pengadaran, pilih 8 atau [Mati] .
Tetapan paparan
1 Tekan ( Laman utama ).
2 Pilih [Persediaan] , kemudian tekan OK .
3 Pilih [Keutamaan] , kemudian tekan OK .
4 Tekan Butang navigasi dan OK untuk memilih
dan tukar:
• [Anjak sari kata automatik] : Dayakan
atau nyahdayakan pengalihan automatik
kedudukan sari kata pada TV yang
menyokong ciri ini.
• [Panel paparan] : Tetapkan kecerahan
paparan panel depan teater rumah.
• [VCD PBC] : Dayakan atau nyahdayakan
navigasi menu kandungan bagi cakera VCD
dan SVCD dengan ciri Kawalan Main Balik.
Tetapan penjimatan tenaga
1 Tekan ( Laman utama ).
2 Pilih [Persediaan] , kemudian tekan OK .
3 Pilih [Keutamaan] , kemudian tekan OK .
4 Tekan Butang navigasi dan OK untuk memilih
dan tukar:
• [Penyelamat skrin] : Alihkan teater rumah
kepada mod gambar skrin selepas 10
minit tanpa aktiviti.
• [Auto siap sedia] : Alihkan teater rumah
kepada siap sedia selepas 30 minit tanpa
aktiviti. Pemasa ini berfungsi hanya apabila
mainan cakera atau USB dijeda atau
dihentikan.
• [Pemasa tidur] : Tetapkan tempoh masa
pemasa tidur supaya teater rumah dialih
kepada siap sedia selepas tempoh masa
yang ditentukan.
Tetapan pembesar suara
1 Tekan ( Laman utama ).
2 Pilih [Persediaan] , kemudian tekan OK .
3 Pilih [Lanjutan] , kemudian tekan OK .
4 Tekan Butang navigasi dan OK untuk memilih
dan tukar:
• [Audio dipertingkatkan] : Pilih [Hidup]
untuk mendayakan pasca pemprosesan
audio pada pembesar suara dan
mendayakan tetapan karaoke (jika produk
anda menyokong Karaoke). Untuk
memainkan audio asal cakera ini, pilih [Mati] .
Petua
Dayakan pasca pemprosesan audio sebelum anda
•
memilih mod suara yang dipratakrif (lihat 'Mod bunyi'
di halaman 18 ) .
Kembalikan tetapan lalai
1 Tekan ( Laman utama ).
2 Pilih [Persediaan] , kemudian tekan OK .
3 Pilih [Lanjutan] > [Kembalikan tetapan lalai] ,
dan kemudian tekan OK .
4 Pilih [OK] , dan kemudian tekan OK untuk
mengesahkan.
» Teater rumah anda diset semula kepada
tetapan lalainya kecuali bagi tetapan
tertentu seperti kawalan ibu bapa dan
kod pendaftaran DivX VoD.
20 MS-MY
Page 51

6 Kemas kinikan perisian
Philips sentiasa cuba untuk memperbaiki produkproduknya. Untuk mendapatkan ciri-ciri dan
sokongan terbaik, kemas kini teater rumah anda
dengan perisian terkini.
Bandingkan versi perisian semasa anda dengan versi
terkini pada www.philips.com/support. Jika versi
semasa adalah lebih rendah daripada versi terbaru
yang tersedia di laman web sokongan Philips, naik
taraf teater rumah anda dengan perisian terkini.
Awas
Jangan pasang versi perisian yang lebih rendah
•
daripada versi semasa yang dipasang pada produk
anda. Philips tidak bertanggungjawab terhadap
masalah yang disebabkan oleh turun taraf perisian.
Semak versi perisian
Semak versi perisian semasa yang dipasang pada
teater rumah anda.
1 Tekan ( Laman utama ).
2 Pilih [Persediaan] , kemudian tekan OK .
3 Pilih [Lanjutan] > [Maklumat versi] .
» Versi perisian dipaparkan.
4 Simpan fail zip dalam direktori induk peranti
denyar USB anda.
5 Gunakan utiliti arkib untuk mengekstrak fail
kemas kini perisian dalam direktori induk.
» Fail diekstrak di bawah folder UPG_ALL
pemacu denyar USB anda.
6 Tanggalkan peranti denyar USB daripada
komputer anda.
Langkah 2: Kemas kini perisian
Awas
Jangan matikan teater rumah atau tanggalkan
•
pemacu denyar USB sepanjang kemas kini.
1 Sambung peranti storan USB yang
mengandungi fail yang dimuat turun kepada
teater rumah anda.
• Pastikan ruang cakera ditutup dan tiada
cakera di dalamnya.
2 Tekan ( Laman utama ).
3 Pilih [Persediaan] , kemudian tekan OK .
4 Pilih [Lanjutan] > [Kemas kini perisian] > [USB] .
5 Ikuti arahan atas skrin untuk mengesahkan
kemas kini.
» Apabila selesai, teater rumah akan mati
dan bermula semula secara automatik. Jika
tidak, tanggalkan kord kuasa buat beberapa
saat dan kemudian sambungkan kembali.
Bahasa Melayu
Kemas kini perisian melalui USB
Apa yang anda perlukan
• Pemacu denyar USB berformat FAT atau
NTFS, dengan sekurang-kurangnya 75MB
memori. Jangan gunakan pemacu keras USB.
• Komputer dengan akses kepada Internet.
• Utiliti arkib yang menyokong format fail ZIP.
Langkah 1: Muat turun perisian terkini
1 Sambungkan peranti denyar USB kepada
komputer anda.
2 Pada penyemak imbas Web anda, pergi ke
www.philips.com/support.
3 Di laman web Sokongan Philips, dapatkan
produk anda dan cari Perisian dan pemacu .
» Kemas kini tersedia dalam bentuk fail zip.
Kemas kini perisian melalui internet
1 Sambungkan teater rumah anda kepada
rangkaian rumah dengan akses Internet
berkelajuan tinggi (lihat 'Sambungkan dan
sediakan rangkaian rumah' di halaman 10 ) .
2 Tekan ( Laman utama ).
3 Pilih [Persediaan] , kemudian tekan OK .
4 Pilih [Lanjutan] > [Kemas kini perisian] >
[Rangkaian] .
» Jika naik taraf media dikesan, anda digesa untuk
memulakan atau membatalkan kemas kini.
5 Ikuti arahan atas skrin untuk mengesahkan
kemas kini.
» Apabila selesai, teater rumah akan mati
dan bermula semula secara automatik. Jika
tidak, tanggalkan kord kuasa buat beberapa
saat dan kemudian sambungkan kembali.
MS-MY
21
Page 52

7 Speksifikasi produk
Format audio
Teater rumah anda menyokong fail audio berikut.
Catatan
Spesifi kasi dan reka bentuk tertakluk kepada
•
perubahan tanpa notis.
Kod rantau
Plat jenis pada bahagian bawah atau belakang
teater rumah menunjukkan kawasan mana yang
disokongnya.
Negara
Asia Pasifik, Taiwan,
Korea
DVD BD
AA
Format media
• AVCHD, BD, BD-R/ BD-RE, BD-Video,
DVD-Video, DVD+R/+RW, DVD-R/-RW,
DVD+R/-R DL, CD-R/CD-RW, Audio CD,
Video CD/SVCD, Fail gambar, Media MP3,
Media WMA, Media DivX Plus HD, Peranti
storan USB
• RMVB (Tersedia hanya di Asia Pasifi k dan
China)
Format fail
• Audio: .aac, .mka, .mp3, .wma, .wav, .mp4, .m4a
• Video:
• .avi, .divx, .mp4, .mkv, .asf, .wmv, .mpg,
.mpeg,
• .rmvb, .rm (Tersedia hanya di Asia Pasifi k
• Gambar : .jpg, .jpeg, .gif, .png
dan China)
Sambungan Bekas Kodek
audio
MP3 MP3 MP3 32 kbps ~ 320
.wma ASF WMA 64 kbps ~ 160
.aac AAC AAC, HE-
AAC
.wav WAV PCM 1.4 Mbps
.m4a MKV AAC 192 kbps
.mka MKA PCM 27.648 Mbps
.mka MKA Dolby
Digital
.mka MKA Teras DTS 1.54 Mbps
.mka MKA MPEG 912 kbps
.mka MKA MP3 32 kbps ~ 320
.mka MKA WMA 64 kbps ~ 160
.mka MKA AAC,
HE-AAC
Kadar bit
kbps
kbps
192 kbps
640 kbps
kbps
kbps
192 kbps
Format video
Jika anda mempunyai TV defi nisi tinggi, teater
rumah anda membenarkan anda memainkan fail
video anda dengan:
• Resolusi: 1920 x 1080 piksel pada
• Kadar bingkai: 6 ~ 30 bingkai per saat.
Fail .avi dalam bekas AVI
Kodek audio Kodek video Kadar bit
PCM, Dolby
Digital, Teras DTS,
MP3, WMA
DivX 3.11,
DivX 4.x,
DivX 5.x,
DivX 6.x
MPEG 1, MPEG 220Mbps
MPEG 4 ASP Maksimum
H.264/AVC
HP@4.1/4.0;
MP@3.2/3.1/3.0
WMV9 20 Mbps
Maksimum
10Mbps
(puncak
40Mbps)
10Mbps
20Mbps
(puncak
40Mbps)
22 MS-MY
Page 53

Fail .divx dalam bekas AVI
Fail .asf dan .wmv dalam bekas ASF
Kodek
audio
PCM,
Dolby
Digital,
MP3,
WMA
Fail .mp4 atau .m4v dalam bekas MP4
Kodek
audio
Dolby
Digital,
MPEG,
MP3, AAC,
HE-AAC
Fail .mkv dalam bekas MKV
Kodek video Kadar bit
DivX 3.11,
DivX 4.x,
DivX 5.x, DivX 6.x
MPEG 1, MPEG 2 20Mbps
MPEG 4 ASP Maksimum
Kodek video Kadar bit
MPEG 1, MPEG 2 20Mbps
MPEG 4 ASP Maksimum
H.264/AVC
HP@4.1/4.0;
MP@3.2/3.1/3.0
Maksimum
10Mbps
(puncak
40Mbps)
10Mbps
(puncak
40Mbps)
10Mbps
20Mbps
(puncak
40Mbps)
Kodek
audio
PCM,
Dolby
Digital,
MP3,
WMA
Fail .mpg dan .mpeg dalam bekas PS
Kodek audio Kodek video Kadar bit
PCM, teras
DTS, MPEG,
MP3
Fail .rm dan .rmvb dalam bekas RM (Tersedia
hanya di Asia Pasifi k dan China)
Kodek audio Kodek
AAC,
COOK
Kodek video Kadar bit
MPEG 4 ASP Maksimum
H.264/AVC
HP@4.1/4.0;
MP@3.2/3.1/3.0
WMV9 20 Mbps
MPEG 1,
MPEG 2
MPEG 1,
MPEG 2
video
RV30, RV40 20Mbps (puncak
10Mbps
20Mbps
(puncak
40Mbps)
20Mbps (puncak
40Mbps)
20Mbps (puncak
40Mbps)
Kadar bit
40Mbps)
Bahasa Melayu
Kodek audio Kodek video Kadar bit
PCM, Dolby
Digital, Teras
DTS, MPEG,
MP3, WMA,
AAC, HEAAC
MPEG 1,
MPEG 2
MPEG 4 ASP Maksimum
H.264/AVC
HP@4.1/4.0;
MP@3.2/3.1/3.0
WMV9 20 Mbps
20Mbps
(puncak
40Mbps)
10Mbps
20Mbps
(puncak
40Mbps)
Amplifi er
• Jumlah kuasa output: 600 W RMS (30% THD)
• Respons frekuensi: 20 Hz-20 kHz / ±3 dB
• Nisbah isyarat-hingar : > 65 dB (CCIR) /
(diberatkan A)
• Kepekaan input:
• AUX: 2 V
• Music iLink: 1 V
Video
• Sistem isyarat: PAL / NTSC
• Output HDMI: 480i/576i, 480p/576p, 720p,
1080i, 1080p, 1080p24
MS-MY
23
Page 54

Audio
• Input audio S/PDIF Digital:
• Sepaksi: IEC 60958-3
• Optik: TOSLINK
• Frekuensi pensampelan:
• MP3: 32 kHz, 44.1 kHz, 48 kHz
• WMA: 44.1 kHz, 48 kHz
• Kadar bit tetap:
• MP3: 32 kbps - 320 kbps
• WMA: 48 kbps - 192 kbps
Radio
• Julat penalaan:
• Eropah/Rusia/China: FM 87.5-108 MHz
(50 kHz)
• Asia Pasifi k/Amerika Latin: FM 87.5-108
MHz (50/100 kHz)
• Nisbah isyarat-hingar : FM > 45 dB
• Respons frekuensi: FM 180 Hz-12.5 kHz /
±3 dB
USB
• Keserasian: USB Kelajuan tinggi (2.0)
• Sokongan kelas: Kelas Penyimpanan Massa
USB (MSC)
• Sistem fail: FAT16, FAT32, NTFS
• Sokongan memori maksimum: < 160GB
Unit utama
• Bekalan kuasa: 110-240 V~, 50-60 Hz
• Penggunaan kuasa: 110 W
• Penggunaan kuasa tunggu sedia: 0.9 W - 0.5
W
• Dimensi (LxTxD): 360 x 58 x 325 mm
• Berat: 2.62 kg
Pembesar Suara
Pembesar suara tengah:
• Kuasa output: 100 W RMS (30% THD)
• Impedans pembesar suara: 4 ohm
• Pemacu pembesar suara: 1 x wufer 63.5 mm
(2.5")
• Dimensi (LxTxD): 160 x 85 x 95 mm
• Berat: 0.37 kg
Pembesar suara Hadapan/Belakang:
• Kuasa output: 4 x 100 W RMS (30% THD)
• Impedans pembesar suara: 4 ohm
• Pemacu pembesar suara: 1 x pemacu kembar
76.2 mm (3")
• Dimensi (LxTxD):
• Pembesar suara: 85 x 160 x 95mm
• Pembesar suara tinggi: 240 x 1007 x 240
mm
• Berat:
• Pembesar suara: 0.35 kg setiap satu
• Pembesar suara tinggi: 1.57 kg setiap satu
Bateri alat kawalan jauh
• 2 x AAA-R03-1.5 V
Laser
• Jenis Laser (Diod): InGaN/AIGaN (BD),
AIGaInP (DVD/CD)
• Panjang gelombang: 405 +7 nm/-7 nm (BD),
655 +10 nm/-10 nm (DVD), 790 +10 nm/20 nm (CD)
• Kuasa output (Maksimum pengadaran):
20mW (BD), 6mW (DVD), 7mW (CD)
Subwufer
• Kuasa output: 100 W RMS (30% THD)
• Impedans: 4 ohm
• Pemacu pembesar suara: Wufer 133 mm
(5.25")
• Dimensi (LxTxD): 160 x 267.5 x 265 mm
• Berat: 2.55 kg
24 MS-MY
Page 55

8 Menyelesaikan
masalah
Amaran
Risiko kejutan elektrik. Jangan keluarkan sarung
•
produk ini.
Supaya jaminan tetap sah, jangan cuba baiki sistem
ini sendiri.
Jika anda mempunyai masalah menggunakan
produk ini, periksa perkara yang berikut sebelum
anda memohon perkhidmatan. Jika anda masih
mempunyai masalah, dapatkan sokongan di www.
philips.com/support.
Unit utama
Butang pada teater rumah tidak berfungsi.
• Tanggalkan sambungan teater rumah daripada
bekalan kuasa selama beberapa minit,
kemudian sambung semula.
Gambar
Tiada gambar.
• Pastikan TV dialihkan ke sumber yang betul
bagi teater rumah ini.
Tiada gambar pada TV yang bersambung melalui
HDMI.
• Pastikan anda menggunakan kabel HDMI
Berkelajuan Tinggi untuk menyambungkan
teater rumah dan TV. Sesetengah kabel HDMI
standard tidak memaparkan imej tertentu,
video 3D, atau Deep Color dengan betul.
• Pastikan kabel HDMI tidak rosak. Jika ia rosak,
ganti dengan kabel baru.
• Tekan ( Laman utama ) lalu 731 pada alat
kawalan jauh untuk mengembalikan resolusi
lalai bagi gambar.
• Tukar tetapan video HDMI, atau tunggu selama
10 saat untuk pemulihan automatik. (lihat
'Tetapan gambar dan video' di halaman 19 )
Cakera tidak memainkan video defi nisi tinggi.
• Pastikan cakera mengandungi video defi nisi tinggi.
• Pastikan sokongan TV mengandungi video
defi nisi tinggi.
• Gunakan kabel HDMI untuk menyambung
kepada TV.
Bunyi
Tiada bunyi daripada pembesar suara teater rumah.
• Sambung kabel audio daripada teater rumah
anda kepada TV anda atau peranti-peranti
lain. Anda tidak memerlukan sambungan
audio berasingan apabila teater rumah dan TV
disambung menerusi sambungan HDMI ARC .
• Sediakan audio bagi peranti yang bersambung
(lihat 'Sediakan audio' di halaman 10 ) .
• Set semula teater rumah anda kepada
tetapan kilangnya (lihat 'Kembalikan tetapan
lalai' di halaman 20 ) , kemudian matikannya
dan hidupkannya semula.
• Pada teater rumah anda, tekan SOURCE
berulang kali untuk memilih input audio yang
betul.
Bunyi atau gema terherot.
• Jika anda memainkan audio daripada TV
melalui teater rumah, pastikan TV dibisukan.
Audio dan video tidak segerak.
• 1) Tekan SOUND SETTINGS . 2) Tekan
Butang navigasi (kiri/kanan) untuk memilih
AUD SYNC , dan kemudian tekan OK . 3)
Tekan Butang navigasi (atas/bawah) untuk
menyegerak audio dengan video.
Main
Tidak dapat memainkan cakera.
• Bersihkan cakera.
• Pastikan bahawa teater rumah menyokong jenis
cakera (lihat 'Format media' di halaman 22 ) .
• Pastikan bahawa teater rumah menyokong
kod rantau cakera .
• Jika cakera adalah cakera DVD±RW atau
DVD±, pastikan ia diselesaikan.
Tidak dapat memainkan fail DivX.
• Pastikan bahawa fail DivX dikodkan menurut
‘Profi l Teater Rumah' dengan pengekod DivX.
• Pastikan fail DivX adalah lengkap.
Sari kata DivX atau RMVB/RM tidak dipaparkan
dengan betul.
• Pastikan nama fail sari kata sama dengan nama
fail fi lem (lihat 'Sari kata' di halaman 14 ) .
• Pilih set aksara yang betul: 1) Tekan
OPTIONS . 2) Pilih [Set aksara] . 3) Pilih set
aksara yang disokong. 4) Tekan OK .
Tidak dapat membaca kandungan peranti storan
USB.
• Pastikan bahawa format peranti storan USB
serasi dengan teater rumah ini.
• Pastikan bahawa sistem fail pada peranti
storan USB disokong oleh teater rumah.
Bahasa Melayu
MS-MY
25
Page 56

Tanda 'Tiada entri' atau 'x' muncul pada TV.
• Operasi tidak boleh dijalankan.
EasyLink tidak berfungsi.
• Pastikan teater rumah disambungkan kepada
TV EasyLink berjenama Philips dan pilihan
EasyLink akan dihidupkan (lihat 'Sediakan
EasyLink (kawalan HDMI-CEC)' di halaman
9 ) .
Apabila anda menghidupkan TV, teater rumah
secara automatik akan hidup.
• Tingkah laku ini adalah normal apabila anda
menggunakan Philips EasyLink (HDMI-CEC).
Untuk memastikan teater rumah berfungsi
secara bebas dan berasingan, matikan
EasyLink.
Saya tidak dapat mengakses ciri BD-Live.
• Pastikan bahawa teater rumah telah
disambungkan kepada rangkaian rumah
dengan akses internet (lihat 'Sambungkan dan
sediakan rangkaian rumah' di halaman 10 ) .
• Pastikan bahawa rangkaian telah disediakan.
Gunakan pemasangan rangkaian berwayar
(lihat 'Sediakan rangkaian berwayar' di
halaman 11 ) atau pemasangan rangkaian
wayarles (lihat 'Sediakan rangkaian wayarles'
di halaman 11 ) .
• Pastikan bahawa cakera Blu-ray menyokong
ciri BD-Live.
• Kosongkan storan memori (lihat 'BD-Live
pada Blu-ray' di halaman 13 ) .
Video 3D saya dimainkan dalam mod 2D.
• Pastikan bahawa teater rumah anda telah
disambung kepada TV 3D melalui kabel
HDMI.
• Pastikan bahawa cakera adalah cakera Blu-
ray 3D, dan pilihan Blu-ray video 3D telah
dihidupkan (lihat 'Mainkan cakera 3D Blu-ray'
di halaman 13 ) .
Skrin TV menjadi hitam apabila anda memainkan
video 3D Blu-ray atau video dilindung salin DivX.
• Pastikan bahawa teater rumah telah
disambung kepada TV melalui kabel HDMI.
• Tukar kepada sumber HDMI yang betul pada
TV.
Main balik yang lemah pada YouTube Leanback
atau Picasa.
• Pastikan bahawa teater rumah telah
disambungkan ke rangkaian rumah dan telah
disediakan dengan betul (lihat 'Sambungkan
dan sediakan rangkaian rumah' di halaman
10 ) .
• Pastikan bahawa kelajuan sambungan internet
lebih daripada 2 MBPS akan menghasilkan
prestasi optimum.
Rangkaian
Rangkaian wayarles herot atau tidak dijumpai.
• Pastikan bahawa rangkaian wayarles tidak
diganggu oleh ketuhar gelombang mikro,
telefon DECT, atau peranti Wi-Fi yang
berdekatan.
• Tempatkan penghala wayarles dan teater
rumah dalam lingkungan lima meter antara
keduanya.
• Gunakan kabel sambungan USB untuk
menyambung dongle Wi-Fi kepada teater
rumah.
• Jika rangkaian wayarles tidak berfungsi dengan
betul, cuba pemasangan berwayar (lihat
'Sediakan rangkaian wayarles' di halaman 11 ) .
26 MS-MY
Page 57

9 Notis
Perisian sumber terbuka
Bahagian ini mengandungi notis undang-undang
dan tanda dagangan.
Hak cipta
Produk ini mengandungi teknologi perlindungan
hak cipta yang dilindungi oleh paten A.S. dan hak
harta intelek lain Rovi Corporation. Kejuruteraan
undur dan penyahhimpunan adalah dilarang.
Pematuhan
Produk ini termasuk teknologi proprietari dengan
kebenaran daripada Verance Corporation dan
dilindungi oleh Paten AS 7,369,677 dan paten seluruh
dunia lain yang telah dikeluarkan dan yang belum
selesai, di samping perlindungan hak cipta dan rahsia
dagangan bagi aspek tertentu teknologi tersebut.
Cinavia adalah tanda dagangan Verance Corporation.
Hak Cipta 2004-2010 Verance Corporation. Semua
hak terpelihara bagi Verance. Kejuruteraan balikan
atau pembukaan pemasangan adalah dilarang.
Notis Cinavia
Produk ini menggunakan teknologi Cinavia untuk
mengehadkan penggunaan salinan tanpa izin
beberapa fi lem dan video serta trek bunyinya yang
diterbitkan secara dagangan. Apabila penggunaan
salinan yang dilarang dikesan, mesej akan dipaparkan
dan main semula atau penyalinan akan terganggu.
Maklumat lanjut mengenai teknologi Cinavia ada
disediakan oleh Pusat Maklumat Pengguna Cinavia
Dalam Talian di http://www.cinavia.com. Untuk
memohon maklumat tambahan mengenai Cinavia
melalui pos, hantarkan poskad berserta alamat pos
anda ke: Cinavia Consumer Information Center,
P.O. Box 86851, San Diego, CA, 92138, USA.
Philips Electronics Singapore Pte Ltd dengan ini
menawarkan untuk menghantar, apabila diminta,
salinan kod sumber lengkap yang sepadan bagi pakej
perisian sumber terbuka berhak cipta yang baginya
tawaran seumpama ini diminta oleh lesen yang
berkaitan. Tawaran ini sah sehingga tiga tahun selepas
pembelian produk kepada sesiapa yang menerima
maklumat ini. Untuk mendapatkan kod sumber, sila
hubungi open.source@philips.com. Jika anda lebih
suka untuk tidak menggunakan e-mel atau jika anda
tidak menerima pengesahan penerimaan dalam
masa seminggu selepas menulis ke alamat e-mel ini,
sila hantar surat kepada "Open Source Team, Philips
Intellectual Property & Standards, P.O. Box 220,
5600 AE Eindhoven, The Netherlands". Jika anda
tidak menerima pengesahan penerimaan surat anda
pada masa yang sepatutnya, sila hantar e-mel ke
alamat e-mel di atas. Teks untuk lesen dan perakuan
bagi perisian sumber terbuka yang digunakan dalam
produk ini disertakan pada risalah berasingan.
RMVB end user agreement
(Asia Pacifi c and China only)
Notes to End User :
By using this product with RealNetworks software
and services, the end user agrees to the following
terms of REALNETWORKS, INC:
• End User may only use the software for
private, non-commercial use in accordance
with the terms of RealNetworks EULA .
• End User is not allowed to modify, translate,
reverse engineer, decompile, dissemble or
use other means to discover the source
code or otherwise replicate the functionality
of the Real Format Client Code, except to
the extent that this restriction is expressly
prohibited by applicable law.
• RealNetworks Inc. disclaims all warranties
and conditions other than those set forth in
this Agreement which are in lieu of all other
warranties, whether express and implied,
including but not limited to any implied
warranties or conditions of merchantability
and fi tness for a particular purpose; and
effectively exclude all liability for indirect,
special, incidental and consequential damages,
such as but not limited to lost profi ts.
Bahasa Melayu
MS-MY
27
Page 58

Tanda dagangan
"Blu-ray 3D" dan logo "Blu-ray 3D" adalah tanda
dagangan Blu-ray Disc Association.
BONUSVIEW™
'BD LIVE' dan 'BONUSVIEW' adalah tanda
dagangan Persatuan Blu-ray Disc.
Java dan semua tanda dagangan serta logo Java
yang lain adalah tanda dagangan atau tanda
dagangan berdaftar Sun Microsystems, Inc. di
Amerika Syarikat dan/atau negara lain.
Dikilangkan di bawah lesen Paten A.S. No. Paten:
5,956,674, 5,974,380; 6,226,616; 6,487,535; 7,392,195;
7,272,567; 7,333,929; 7,212,872 & paten A.S. dan
seluruh dunia yang lain yang telah dikeluarkan &
yang masih menunggu kelulusan. DTS-HD, Simbol,
& DTS-HD dan Simbolnya bersama-sama adalah
tanda dagangan berdaftar & DTS-HD Master Audio
| Essential adalah tanda dagangan DTS, Inc. Produk
termasuk perisian.
DTS, Inc. Semua Hak Terpelihara.
Corporation atau subsidiarinya dan digunakan di
bawah lesen.
TENTANG DIVX PLUS® HD: DivX® adalah
format video digital yang dicipta oleh DivX, Inc.
Ini adalah peranti DivX Certifi ed® rasmi yang
memainkan video DivX, termasuk video DivX®
Plus HD (H.264/.MKV) sehingga 1080p dan
kandungan premium. Lawati www.divx.com untuk
mendapatkan maklumat lanjut dan alat perisian
untuk menukar fail anda menjadi video DivX.
TENTANG DIVX VIDEO: DivX® adalah format
video digital yang dicipta oleh DivX, LLC, subsidiari
Rovi Corporation. Ini adalah peranti rasmi DivX
Certifi ed® yang memainkan video DivX. Lawati
www.divx.com untuk mendapatkan maklumat
lanjut dan alat perisian untuk menukar fail anda
menjadi video DivX.
MENGENAI VIDEO ATAS PERMINTAAN DIVX:
Peranti DivX Certifi ed® ini mestilah didaftarkan
sebelum ia dapat memainkan fi lem Video atas
Permintaan (VOD) DivX. Untuk mendapatkan
kod pendaftaran anda, cari bahagian DivX VOD
dalam menu persediaan peranti anda. Pergi ke vod.
divx.com untuk mendapatkan maklumat lanjut
mengenai cara menyelesaikan pendaftaran anda.
HDMI, dan logo HDMI, dan High-Defi nition
Multimedia Interface adalah tanda dagangan atau
tanda dagangan berdaftar LLC melesenkan HDMI
di Amerika Syarikat dan negara-negara lain.
DLNA , Logo DLNA dan DLNA CERTIFIED
adalah tanda dagangan, tanda khidmat, atau tanda
pensijilan Digital Living Network Alliance.
Dikilangkan di bawah lesen daripada Dolby
Laboratories. Dolby dan simbol D berganda adalah
tanda dagangan Dolby Laboratories.
Diliputi oleh satu atau lebih paten AS yang berikut:
7,295,673; 7,460,668; 7,515,710; 7,519,274.
DivX®, DivX Certifi ed®, DivX Plus® HD dan
logo yang berkaitan adalah tanda dagangan Rovi
28 MS-MY
Logo Real RMVB ialah tanda dagangan atau tanda
dagangan berdaftar RealNetworks, Inc.
CLASS 1
LASER PRODUCT
Page 59

10 Indeks
A
alam sekitar 3
Album web Picasa 17
amplifi er 23
animasi slaid 15
anjak sari kata automatik 20
audio daripada peranti lain 8
audio dipertingkatkan 20
Audio HDMI 19
B
bahasa audio 19
bahasa audio ke-2 13
bahasa cakera 19
bahasa menu 19
bahasa sari kata 19
bahasa sari kata ke-2 13
bateri 24
BD-Live 13
Blu-ray 12
bunyi 18
bunyi keliling 18
butang kawalan (cakera) 12
butang kawalan (USB) 12
C
cakera 3D dalam mod 2D 13
connectors 4
G
gambar dalam gambar 13
grid penalaan 16
H
HDMI ARC 7
HDMI-CEC 9
I
internet 10
K
karaoke 17
karaoke 17
kawalan audio sistem 10
kawalan ibu bapa 19
kawalan jauh 5
kecerahan 20
kedudukan pembesar suara 6
kedudukan sari kata 20
keluarkan cakera 4
kemas kini perisian 21
kemas kini perisian (melalui Internet) 21
kemas kini perisian (melalui USB) 21
keselamatan 3D 3
keutamaan 19
kitar semula 3
kocok 15
kod rantau 22
kod VOD (DivX) 14
kosongkan memori BD-Live 13
Bahasa Melayu
D
DivX 13
DLNA 16
E
Easylink (HDMI-CEC) 9
F
fail data 13
format audio 22
format fail 22
format media 22
format video 23
M
mainan satu sentuhan 10
mainkan cakera 12
mainkan dari PC 16
mainkan muzik 16
mainkan peranti storan USB 14
mainkan radio 16
manual pengguna 3
menu cakera 19
menu utama 12
mod bunyi dipratakrif 18
mod malam 19
MP3 16
MS-MY
29
Page 60

P
panel paparan 20
Paparan Bonus 13
pasca pemprosesan audio 20
PBC (play back control) 20
pelupusan 3
pemasa tidur 20
pembesar suara 5.1 6
pemetaan input audio 10
pencarisilapan (gambar) 25
pencarisilapan (main) 25
pencarisilapan (rangkaian) 26
penyelesaian masalah (bunyi) 25
peranti penyimpanan USB 14
perlindungan hak cipta 27
persediaan audio 10
persediaan manual 9
persediaan pembesar suara 9
pilihan 14
pilihan audio 15
pilihan gambar 15
pilihan video 15
program radio stations 16
R
radio 16
rangkaian 10
rangkaian berwayar 11
rangkaian rumah 10
rangkaian wayarles 11
resolusi gambar 19
T
tala stesen radio 16
tayangan slaid muzikal 15
tetapan audio 19
tetapan gambar 19
tetapan kilang 20
tetapan kuasa 20
tetapan lalai 20
tetapan lanjutan 20
tetapan video 19
tonton 3D 13
tukar kata laluan 19
U
ulang 15
unit utama 4
V
VCD 20
versi perisian 21
Video 3D 13
Video YouTube 17
W
warna pekat 19
S
sambung kepada TV 7
sambungan audio (HDMI ARC) 7
sambungan audio (kabel analog) 9
sambungan audio (kabel optik) 8
sambungan audio (kabel sepaksi) 9
sambungan video (HDMI ARC) 7
sambungan video (HDMI standard) 7
sambungan video (video komposit) 8
segerakkan gambar dan bunyi 12
semak imbas PC 16
set aksara 14
siap sedia auto 20
siap sedia satu sentuhan 10
Soalan Lazim 3
sokongan pelanggan 3
spesifi kasi pembesar suara 22
30 MS-MY
Page 61

Language Code
Page 62

© 2012 Koninklijke Philips Electronics N.V.
All rights reserved.
sgpjp_1211/98_MKII_v1
 Loading...