

Page 1
Soundbar
HTL1030
Page 2

Content
General Information ................................................3
Safety Instructions
Warnings
Care & Safety Information
Installation
Speaker Placement ................................................4
Input Connections ................................................5
Remote Control ................................................6
Playing TV Audio ................................................7
Play from a USB Storage Device ................................................7
Play From Radio ................................................8
Playing through Bluetooth ................................................8
Trouble Shooting ................................................9
Specification ..............................................10
Warranty ..............................................11
Accessories
Qty.
1. 2 RCA to 2 RCA Cable 1
2. User Manual 1
3. Remote Control 1
4. Rowel Plug + Screw 2 Each
5. Wall Mounting Marker slip 1
2
Page 3
General Information
Safety Instructions
Please read carefully the
Safety Mark on the Back side
This mark is intended to alert
the users from the non isolated
dangerous voltage within the
product that may be of sufficient
magnitude to constitute a risk of
electric shock to persons
This mark is intended to alert
the user for important operating
!
and servicing instruction
Warnings
* Avoid sustained periods on
high-volume use, and do not turn the
volume to maximum level while using
high output signal, such as Mobile Phone
or DVD, etc., as this will cause distortion
and may damage the loudspeaker cones.
* Please switch off the system from the wall
socket, when not in use.
* Please unplug the system from the
AC outlet when unused for a long time
* Do not open the cover or back panel to
avoid electronic shock or any other
accidents. No user-serviceable parts are
inside.
* Only for indoor use.
* Plug the system to the AC outlet with
the right voltage marked on the back
panel of the Sound Bar.
Care and safety information
Avoid high temperatures, moisture,
water and dust
– Apparatus should not be exposed to
dripping or splashing of liquid.
– Do not place any sources of danger on
the Bar (e.g. liquid filled
objects, lighted candles).
– Do not install near heat sources.
Do not block any ventilation
openings
– Place the apparatus in a location with
adequate ventilation to prevent
internal heat build up. Allow at least
100cm (4 inches) of free space all
around the apparatus for adequate
ventilation.
– At high volume the back cover of Bar
becomes hot. Do not touch it.
Care of the cabinet
– Use a soft cloth slightly moistened
to clean the cabinet. Do not use a
solution containing alcohol, spirits,
ammonia or abrasives.
Installation
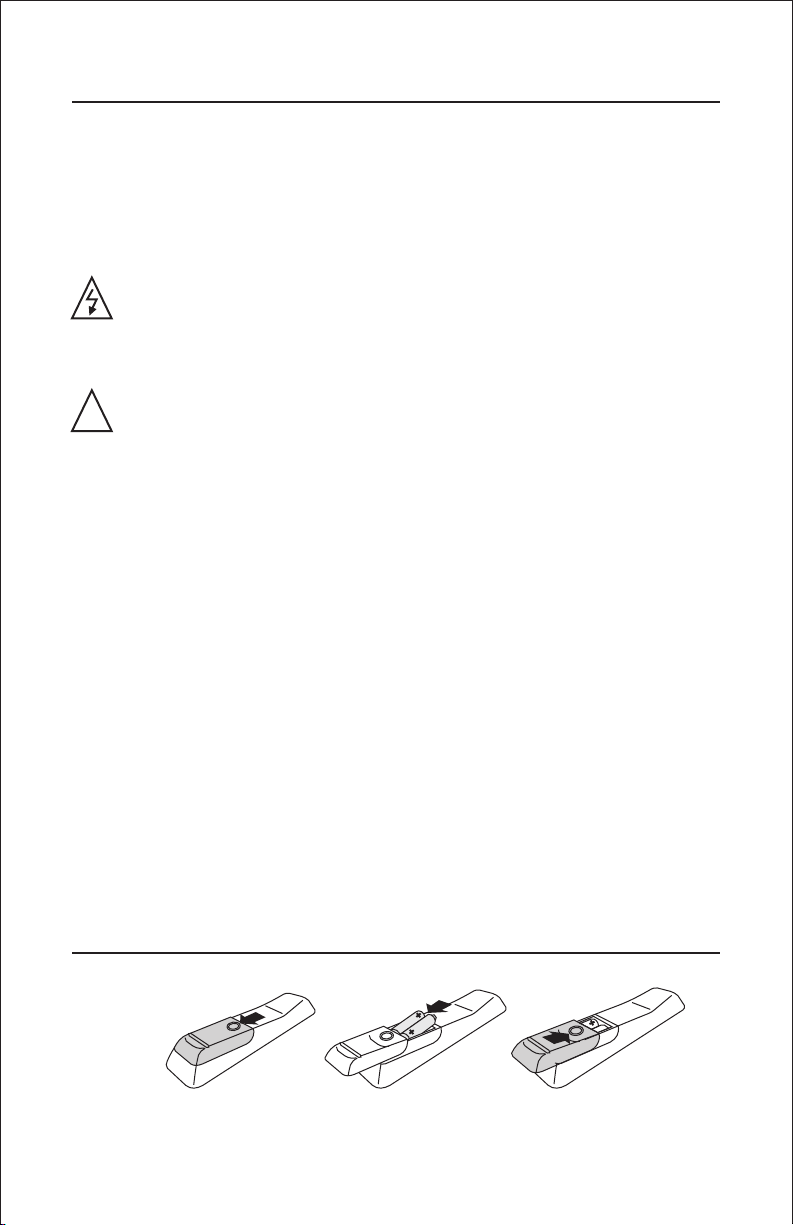
Remote
*(Use AAA X 2 Battery)
*Battery not provided
33
Page 4

Soundbar Placement
A
Placement
SOUND BAR
• Place Speaker Bar on top of a table or mount it on the wall.
• Place it at a height that is closest to the listening ear-level.
• Position Speaker Bar so that it is directly parallel to the listening area.
B
Wall Mounting
Get ready with wall mounting arrangement using provided accessories.
MARK HOLES WITH MARKING STRIP
a
Wall Wall Wall
DRILL HOLES & PUT ROWELS PLUGS
b
FIX SCREW AND HANG BAR UNIT
4
c
Page 5

Input Connections
A
Connect audio from TV
Audio Out
Headphone
Jack
LED TV
FM ANTENNA
L
AUX
IN
R
LED TV
AUX
FM ANTENNA
Note :
Do not attach soundbar with Earphone / Headphone jack of LED TV.
It may effect the sound and reliability of Soundbar.
B
Connect audio from Satellite Receiver
Video
L
AUX
IN
R
LED TV
Audio Out
FM ANTENNA
SATELLITE RECEIVER
C
Connect from USB
L
IN
R
FM ANTENNA
L
AUX
IN
R
USB
5
Page 6

Remote Control
1
2
3
4
5
6
7
8
1.
Switches system ON or to STANDBY
2. MUTE
Mute or restore volume
3. VOL+ VOL-
9
10
11
Increase or decrease volume
4.
(a) Play previous file in USB
(b) Tuning down in radio mode
5.
Play and Pause USB / Bluetooth
6. NUMERIC KEYS
Press number key to play directly MP3 files
12
13
14
(Eg. To play 57th song press 5 then 7)
In radio mode key in station frequency
7. EQ
Select preset sound modes in USB / Bluetooth
8.
To rewind
9. SOURCE
To select desired input USB/FM/AUX IN/BT
10. REPEAT
Repeats a track or the entire USB
15
11.
16
(a) Play next file in USB
(b) Tuning up in radio mode
12. SOURCE KEYS
USB* - Switch to USB storage device
AUX - Select an audio input
FM - Switch to FM radio
BT - Play on bluetooth mode
13. SCAN
Auto Scan & store station in memory
14. TUN – /+
Up and Down preset channel on FM mode
15.
To forward
16.
Stop Play in USB mode
* Available when connected.
Note : Equalizer works in USB & Bluetooth mode only.
Recording not works in HTL1030.
6
Page 7

Playing TV Audio
You can enjoy a theatre experience, just attach TV output to your Sound Bar
AUX IN.
1. Select source from you source key on remote.
2. Display shown AUX.
Button Action
VOL– Volume Decrease
VOL+ Volume Increase
Mute To Mute / Unmute Sound
Play from a USB Storage Device
The Soundbar is fitted with a USB connector that allow you to listen music.
1. Connect the USB storage device to the Soundbar.
2. It auto shifts to USB mode.
3. Display shows USB.
4. Then song number will appear on display.
(eg. if you listening sixteenth songs 016 will appear)
5. Use number key to select song directly or +10 key.
Button Action
Select previous or next track
Start, pause or resume Play
To rewind and fast forward
Numeric Buttons Select and song to play
Repeat Repeat track or the entire USB
EQ Select a predefined sound effect
7
Page 8

Play from Radio
1. Press source key to select FM.
2. Display shows FM frequency (eg. 104.0).
3. Press following buttons to control play.
Button Action
Search for a radio station
– TUN + TUN Select a preset radio station
SCAN Press to auto scan the radio station
Numeric Keys Key in station frequency (i.e. for 104.6 press 1046)
Note - While autoscan turn off your TV/DVD or other radiation source.
For best reception, while listening to radio, turn off TV/DVD or other
radiation source.
Play through Bluetooth
You can enjoy music wireless with Bluetooth.
1. Select Source.
2. Display Shown blue (Flashing).
3. Pair "your Bluetooth device with Soundbar name Philips HTL1030.
4. Display stops flashing, once Bluetooth device is paired.
Now your system is ready to play through Bluetooth. Control all
function from your device eg. , , .
Button Action
VOL– Volume Decrease
VOL+ Volume Increase
Mute To Mute / Unmute Sound
8
Page 9

Troubleshooting
WARNING
Under no circumstances should you try to repair the system yourself, as this will
invalidate the warranty. Do not open the system as there is a risk of electric shock.
If a fault occurs, first check the points listed below before taking the system for repair.
If you are unable to remedy the problem by following these hints, consult your
dealer or PHILIPS for help.
Problem Solution
No power. — Check if the AC power cord is properly
No sound or distorted sound. — Adjust the volume.
The remote control does not function — Reduce the distance between the remote
Properly. control and the system.
Low hum or buzz sound. — Place the product as far away as possible
The content of the USB flash drive — The USB flash drive format is not compatible
cannot be read with the system.
Slow operation of the USB Flash — Large file size of high memory USB flash drive
drive takes longer time to read and play.
inserted into the AC mains socket.
— Select the correct source
to choose the equipment that you want
to hear through the System.
— Replace the batteries with new ones.
— Point the remote control directly toward the
IR sensor (located on front panel of the
Soundbar).
— Check that the batteries are loaded correctly.
— Switch off system for 30 seconds
and then restart
from electrical devices that may be
causing interference.
— Check power supply voltage and consult
electrician
Drive is formatted with a different file system
which is not supported by this unit (e.g. NTFS)
Cannot detect USB flash drive — Take out USB drive insert it again properly.
FM not properly tuned — Match with local frequency
FM reception not good — While listening radio turn off TV/DVD
Bluetooth — Reduce the distance between system and your
or other radiation source.
— Extend antenna wire
device.
— Re-Pair the device.
9
Page 10

Product Specifications*
Total System Power 30W RMS
Speaker Bar Power 15W Per Channel
Separation >30db
SNR >60db
Audio Input Socket RCA Type
Power Consumption 13 W
Bluetooth Range Upto 10 Mtrs.
Speaker 1 Way, 2 Speakers
Speaker Size 3"
Impedance 4 Ohm
Frequency Range 150 Hz to 15 KHz
Dimension 715 x 110 x 92 (WXHXD)
Weight 3.3 Kg.
USB
Class Support UMS (USB Mass Storage Class)
Capacity upto 16 GB
File Format MP3
* Specification subject to change without prior notice.
Measured under specific conditions.
10
Page 11

This Philips Sound Bar is warranted against any defect due to defective materials
or workmanship for 12 months from the date of purchase. Should a defect
develop during the period of warranty, Gibson Innovations India Private
Limited undertake to repair the apparatus FREE OF CHARGE through the
dealer from whom it has been purchased or at any of the Philips Authorised
Service Centres.
The warranty is not valid in case :
1. Proof of purchase is not accompanied with this warranty card.
2. The warranty card is not completed immediately after purchase.
3. The apparatus is not used according to this manual.
4. Defects are caused by improper or reckless use.
5. Any repairs are done by persons other than Philips Authorised service centre.
7. The serial number is tampered with.
8. Defects due to causes beyond control like lightning, abnormal voltage, acts of
God or while in transit to the purchaser’s residence.
All consumables and parts susceptible to normal wear and tear are not covered
under warranty.
Please fill the following for your reference and warranty validity:-
Week/S. No.______________________Bill No. __________________________
Date of Purchase: __________________________________________________
Dealer's name: ____________________________________________________
Dealers Stamp: ____________________________________________________
Customer’s name & address: _________________________________________
Model No.: _______________________________________________________
Dealer's Signature: _________________________________________________
Gibson Innovations India Private Limited,
4th Floor, Block-1, Vatika Business Park, Sec-49, Sohna Road, Gurgaon-122018,
Haryana, India
The Philips trademark and Philips shield emblem are registered
trademarks of koninklijke Philips N.V. used under license.
This product has been manufactured by and sold under the
responsibility of Gibson Innovations India Private Ltd. and
Gibson Innovations India private Ltd. is the warrantor in relation
to this product.
11
Page 12

HTL1030_94_UM_V1.00
www.philips.com
 Loading...