

For product support, visit
Para obtener asistencia técnica, visite
Pour en savoir plus sur l’assistance sur les produits, visitez le site
www.philips.com/support
HTB3525B
Manuel d'utilisationUser manual
Manual del usuario
EN: For further assistance, call the customer support service in your country.
• To obtain assistance in the U.S.A ., Canada, Puerto Rico, or the U.S. Virgin Islands, contact
Philips Customer Care Center at 1-866-310-0744
• To obtain assistance in Mexico, contact Philips Customer Care Center at 01 800 839 1989;
Mexico city: 5887-9736
ES: Para obtener mas informacion, llame al servicio de soporte al cliente de su pais.
• Para obtener asistencia en los Estados Unidos, en Canada, Puer to Rico o en las Islas Virgenes de los Estados
Unidos, comuniquese con Centro de atencion al cliente de Philips al 1-866-310-0744
• Solo para Mexico CENTRO DE ATENCION A CLIENTES LADA, 01 800 839 1989 Solo Para Mexico;
Mexico city: 5887-9736
FR: Pour obtenir de l’aide supplementaire, communiquez avec le centre de service a la clientele de votre pays.
• Pour obtenir de l’aide aux Etats-Unis, au Canada, a Puerto Rico ou aux lles Vierges americaines, communiquez
avec le centre de service a la clientele Philips au : 1-866-310-0744
• Pour obtenir l’aide au Mexique, entrez en contact avec le centre de soin de client de Philips a 01 800 839 1989;
Mexico city: 5887-9736
For Product recycling information, please visit - www.recycle.philips.com
Para obtener información de productos de reciclaje, por favor visite - www.recycle.philips.com
Pour tout renseignement sur le recyclage des produits, veuillez visiter - www.recycle.philips.com
HTB3525B_F7_UM_V1.0.indb 1 12/10/2013 6:03:53 PM

HTB3525B_F7_UM_V1.0.indb 2 12/10/2013 6:03:53 PM

English
Contents
1 Important 2
Important safety instructions 2
Care for your product 3
Care of the environment 4
3D health warning 4
Help and support 4
2 Your SoundStage 5
Main unit 5
Remote control 5
Connectors 6
3 Place your SoundStage 8
4 Connect and set up 9
Connect to TV 9
Connect audio from TV and other
devices 10
Set up EasyLink (HDMI-CEC control) 11
Connect and set up a home network 12
5 Use your SoundStage 14
Access the home menu 14
Discs 14
Play audio through Bluetooth 16
Play music via NFC 16
Data les 16
USB storage devices 17
Audio, video, and picture options 18
Radio 19
MP3 player 20
Enjoy Internet services 20
Netix 20
VUDU 21
YouTube videos 21
Browse PC through DLNA 21
Choose sound 23
Picture and video settings 25
Audio settings 25
Parental control settings 26
Display settings 26
Energy saving settings 26
Speaker settings 26
Restore default settings 27
7 Update software 28
Check software version 28
Update software through USB 28
Update software through the Internet 29
8 Productspecications 30
Region codes 30
Media formats 30
File formats 30
Bluetooth 30
Audio formats 30
Video formats 31
Amplier 32
Video 32
Audio 32
Radio 32
USB 33
Main unit 33
Speakers 33
Subwoofer 33
Remote control batteries 33
Laser 33
9 Troubleshooting 34
10 Notice 37
Copyright 37
Notice of compliance 37
Open source software 38
Trademarks 38
11 Language code 40
6 Change settings 25
Language settings 25
HTB3525B_F7_UM_V1.0.indb 1 12/10/2013 6:03:53 PM
12 Index 41
EN
1
1 Important
Read and understand all instructions before you
use your product. If damage is caused by failure
to follow instructions, the warranty does not
apply.
Important safety instructions
• Read these instructions.
• Keep these instructions.
• Heed all warnings.
• Follow all instructions.
• Do not use this apparatus near water.
• Clean only with dry cloth.
• Do not block any ventilation openings.
Install in accordance with the
manufacturer's instructions.
• Do not install near any heat sources
such as radiators, heat registers, stoves, or
other apparatus (including ampliers) that
produce heat.
• Do not defeat the safety purpose of
the polarized or grounding-type plug. A
polarized plug has two blades with one
wider than the other. A grounding type
plug has two blades and a third grounding
prong. The wide blade or the third prong
are provided for your safety. If the provided
plug does not t into your outlet, consult
an electrician for replacement of the
obsolete outlet.
• Protect the power cord from being
walked on or pinched, particularly at plugs,
convenience receptacles, and the point
where they exit from the apparatus.
• Only use attachments/accessories
specied by the manufacturer.
• Use only with the cart, stand, tripod,
bracket or table specied by the
manufacturer or sold with the apparatus.
When a cart is used, use caution when
moving the cart/apparatus combination to
avoid injury from tip-over.
• Unplug this apparatus during lightning
storm or when unused for long periods of
time.
• Refer all servicing to qualied service
personnel. Servicing is required when
the apparatus has been damaged in any
way, such as power-supply cord or plug
is damaged, liquid has been spilled or
objects have fallen into the apparatus, the
apparatus has been exposed to rain or
moisture, does not operate normally, or
has been dropped.
• Battery usage CAUTION - To prevent
battery leakage which may result in bodily
injury, proper ty damage, or damage to the
unit:
• Install all batteries correctly, + and - as
marked on the unit.
• Do not mix batteries (old and new or
carbon and alkaline, etc.).
• Remove batteries when the unit is not
used for a long time.
• The batteries shall not be exposed to
excessive heat such as sunshine, re or
the like.
• Perchlorate Material - special handling
may apply. See www.dtsc.ca.gov/
hazardouswaste/perchlorate.
• The product/remote control may contain
a coin/button type battery, which can be
swallowed. Keep the battery out of reach
of children at all times! If swallowed, the
battery can cause serious injury or death.
Severe internal burns can occur within two
hours of ingestion.
2
EN
HTB3525B_F7_UM_V1.0.indb 2 12/10/2013 6:03:53 PM
English
• If you suspect that a battery has been
swallowed or placed inside any part of the
body, seek immediate medical attention.
• When you change the batteries, always
keep all new and used batteries out of
reach of children. Ensure that the battery
compartment is completely secure after
you replace the battery.
• If the battery compar tment cannot be
completely secured, discontinue use of the
product. Keep out of reach of children and
contact the manufacturer.
• Apparatus shall not be exposed to
dripping or splashing.
• Do not place any sources of danger on
the apparatus (for example. liquid lled
objects, lighted candles).
• This apparatus may contain lead and
mercury. Dispose according to local, State
or Federal laws. For disposal or recycling
information, please contact your local
authorities. For additional assistance on
recycling options, please contact www.
mygreenelectronics.com or www.eiae.org
or www.recycle.philips.com.
• Where the MAINS plug or an appliance
coupler is used as the disconnect device,
the disconnect device shall remain readily
operable.
• Do not place this apparatus on the
furniture that is capable of being tilted by a
child and an adult leaning, pulling, standing
or climbing on it. A falling apparatus can
cause serious injury or even death.
• This apparatus should not be placed in a
built-in installation such as a bookcase or
rack unless proper ventilation is provided.
Make sure to leave a space of 7.8 inches
(20cm) or more around this apparatus.
• Caution - Use of controls or adjustments
or performance of procedures other
than those specied herein may result in
hazardous radiation exposure.
Class II equipment symbol
This symbol indicates that the unit has a double
insulation system.
This 'bolt of lightning' indicates uninsulated
material within your unit may cause an electrical
shock. For the safety of everyone in your
household, please do not remove product
covering.
The 'exclamation point' calls attention to
features for which you should read the enclosed
literature closely to prevent operating and
maintenance problems.
WARNING: To reduce the risk of re or
electric shock, this apparatus should not be
exposed to rain or moisture and objects lled
with liquids, such as vases, should not be placed
on this apparatus.
CAUTION: To prevent electric shock, match
wide blade of plug to wide slot, fully inser t.
Care for your product
• Do not insert any objects other than discs
into the disc compartment.
• Do not insert warped or cracked discs into
the disc compartment.
• Remove discs from the disc compartment
if you are not using the product for an
extended period of time.
• Use only microber cloth to clean the
product.
3
EN
HTB3525B_F7_UM_V1.0.indb 3 12/10/2013 6:03:54 PM

Care of the environment
Your product is designed and manufactured
with high quality materials and components,
which can be recycled and reused. Please
visit www.recycle.philips.com for additional
information on a recycling center in your area.
Never dispose of your product with other
household waste. Please inform yourself about
the local rules on the separate collection of
electrical and electronic products and batteries.
The correct disposal of these products helps
prevent potentially negative consequences on
the environment and human health.
The batteries supplied do not contain the heavy
metals mercury and cadmium. Nevertheless,
in many areas batteries may not be disposed
of with your household waste. Please ensure
you dispose of batteries according to local
regulations.
For perchlorate material, special handling may
apply. Visit www.dtsc.ca.gov/hazardouswaste/
perchlorate.
3D health warning
• If you or your family has a history of
epilepsy or photosensitive seizures, consult
a medical professional before exposing
yourself to ashing light sources, rapid
image sequences or 3D viewing.
• To avoid discomfort such as dizziness,
headache or disorientation, we
recommend not watching 3D for extended
periods of time. If you experience any
discomfort, stop watching 3D and do
not immediately engage in any potentially
hazardous activity (for example driving a
car) until your symptoms have disappeared.
If symptoms persist, do not resume
watching 3D without consulting a medical
professional rst.
• Parents should monitor their children
during 3D viewing and ensure they do not
experience any discomfort as mentioned
above. Watching 3D is not recommended
for children under six years of age as their
visual system is not fully developed yet.
Help and support
Philips provides extensive online support. Visit
our website at www.philips.com/support to:
• download the complete user manual
• print the quick start guide
• watch video tutorials (available only for
selected models)
• nd answers to frequently answered
questions (FAQs)
• email us a question
• chat with our support representative.
Follow the instructions on the website to select
your language, and then enter your product
model number.
Alternatively, you can contact Philips Consumer
Care in your country. Before you contact
Philips, note down the model number and
serial number of your product. You can nd this
information on the back or bottom of your
product.
4
EN
HTB3525B_F7_UM_V1.0.indb 4 12/10/2013 6:03:54 PM
English
2 Your
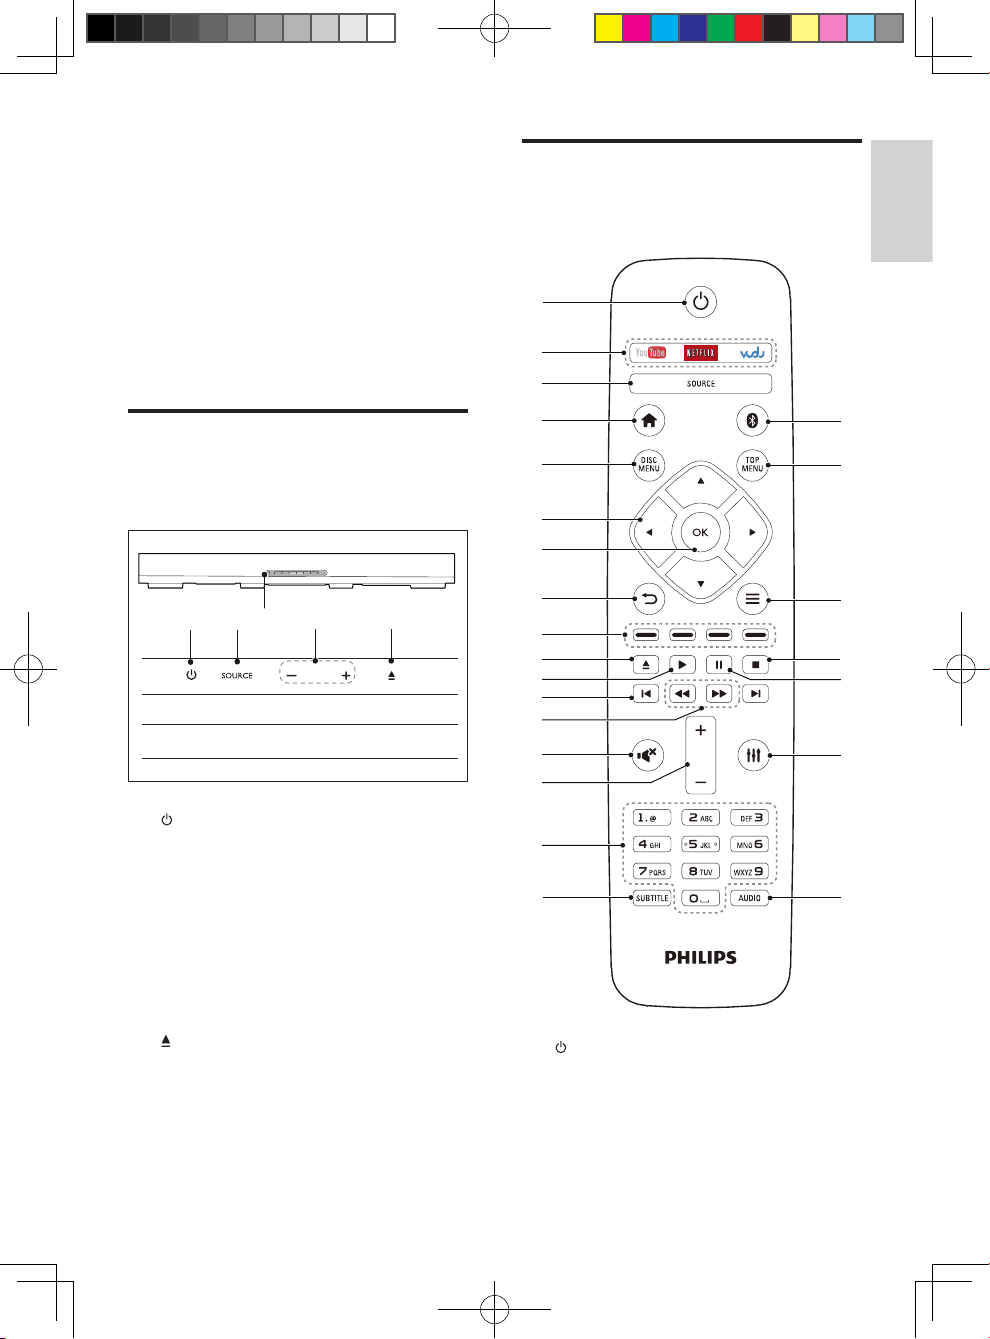
Remote control
SoundStage
Congratulations on your purchase, and
welcome to Philips! To fully benet from the
support that Philips offers(e.g. notication
of product software upgrade), register your
product at www.philips.com/welcome.
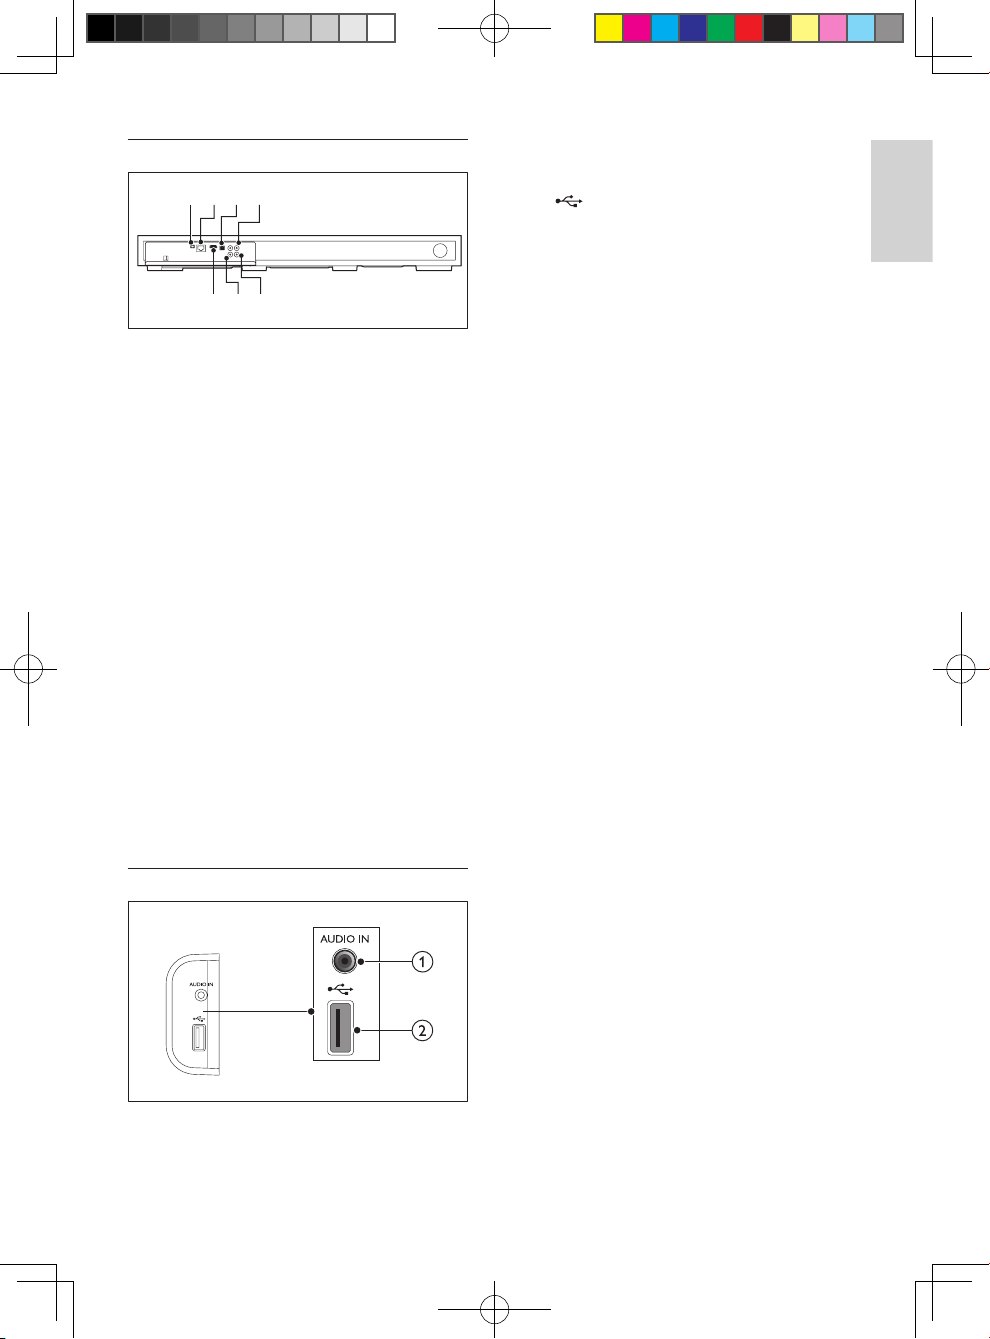
Main unit
This section includes an overview of the main
unit.
a
b
dc
e
This section includes an overview of the
remote control.
a
b
c
d
e
f
g
h
i
j
k
l
m
n
o
x
w
v
u
t
s
a
Switch the SoundStage on or to standby.
b SOURCE
Select an audio, video, radio source or
Bluetooth mode for the SoundStage.
c Disc compartment
d -/+
Decrease or increase volume.
e
Open or close the disc compartment.
HTB3525B_F7_UM_V1.0.indb 5 12/10/2013 6:03:54 PM
p
q
a
• Switch the SoundStage on or to
standby.
• When EasyLink is enabled, press
and hold for at least three seconds
EN
r
5

to switch all connected HDMI CEC
compliant devices to standby.
b Online service buttons
• YouTube: Access online videos from
YouTube.
• NETFLIX: Access online videos and TV
episodes from Netix.
• VUDU: Access online videos from
VUDU.
c SOURCE
Select a source: disc/HDMI ARC/audio
input/USB for the SoundStage.
d
Access the home menu.
e DISC MENU
• Access or exit the disc menu when
you play a disc.
f Navigation buttons
• Navigate menus.
• In radio mode, press left or right to
start auto search.
• In radio mode, press up or down to
tune the radio frequency.
g OK
Conrm an entry or selection.
h
• Return to a previous menu screen.
• In radio mode, press and hold to erase
the current preset radio stations.
i Color buttons
Select tasks or options for Blu-ray discs.
j
Open or close the disc compartment.
k
Start or resume play.
l /
• Skip to the previous or next track,
chapter or le.
• In radio mode, select a preset radio
station.
m /
Search backwards or forward. Press
repeatedly to change the search speed.
n
Mute or restore volume.
o +/-
Increase or decrease volume.
p Alphanumeric buttons
Enter values or letters (using SMS style
entry).
q SUBTITLE
Select subtitle language for video.
r AUDIO
Select an audio language or channel.
s
Access or exit sound options.
t
Pause play.
u
Stop play.
v
• Access more play options while playing
a disc or a USB storage device.
• In radio mode, set a radio station.
w TOP MENU
Access the main menu of a disc.
x
Switch to Bluetooth mode.
Note
• Selection of radio or a source is inactivated when you
play BD-Java or access Internet services.
Connectors
This section includes an overview of the
connectors available on your SoundStage.
6
EN
HTB3525B_F7_UM_V1.0.indb 6 12/10/2013 6:03:56 PM
English
Rear connectors
ab c d
fe
g
a FM ANTENNA
Connect to the supplied FM antenna.
b ETHERNET
Connect to the ETHERNET input on a
broadband modem or router.
c OPTICAL IN
Connect to an optical audio output on the
TV or a digital device.
d VIDEO OUT
Connect to the composite video input on
the TV.
e COAXIAL IN
Connect to a coaxial audio output on the
TV or a digital device.
f AUX IN
Connect to an analog audio output on the
TV or an analog device.
g HDMI OUT (ARC)
Connect to the HDMI input on the TV.
Audio input from an MP3 player (3.5mm
jack).
b
• Audio, video or picture input from a
USB storage device.
• Access BD-Live.
Side connectors
a AUDIO IN
7
EN
HTB3525B_F7_UM_V1.0.indb 7 12/10/2013 6:03:57 PM
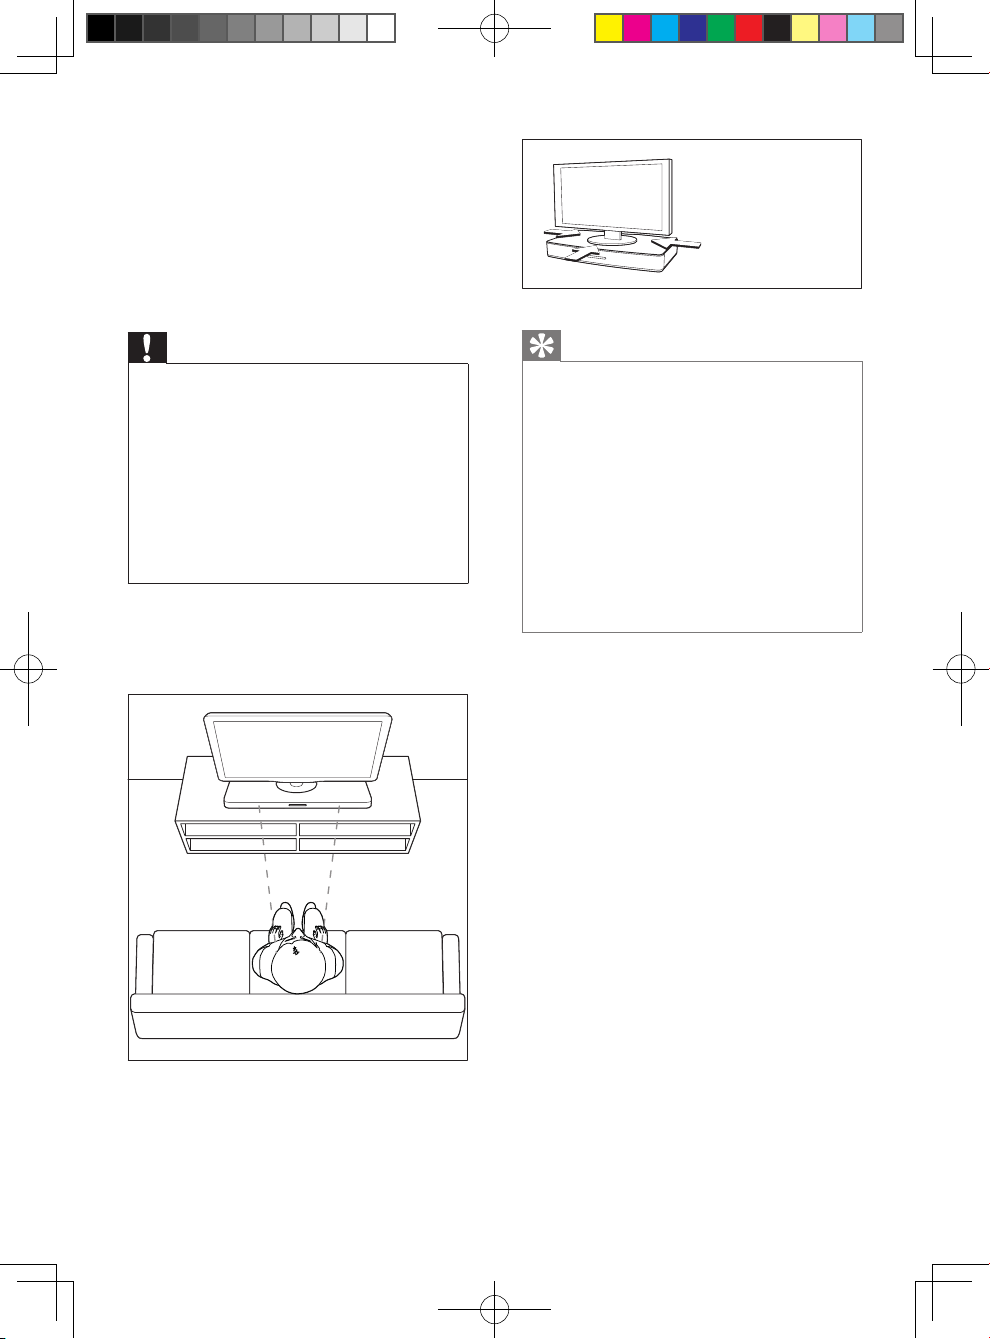
3 Place your
SoundStage
This SoundStage is designed to be placed under
your TV.
Caution
• The SoundStage is designed for TVs that weigh no
more than 22 kg. Most 42" or smaller TVs and some
of 55" TVs meet this requirement. Do not place a CRT
type TV on the SoundStage.
• Do not place the SoundStage on an unstable cart,
stand, bracket or table. Otherwise, the SoundStage may
fall, causing serious injury to a child or adult and serious
damage to the product.
• Make sure the ventilation openings on the rear panel
are not blocked.
• Do not change the position of the SoundStage after
placing your TV on top of it.
1 Place the SoundStage on any at and
stable surface near your TV. Then place
your TV on the top of the SoundStage.
Tip
• If the TV base is too large to put on top of the
SoundStage, place the SoundStage in another location
such as on an open shelf under the TV, but keep it close
to your TV so the audio cable will reach. You can also
mount your TV on the wall above the SoundStage.
• If your TV comes with an anti-tip device, install it
according to the manufacturer's instructions and adjust
the tether after placing the TV on top the SoundStage.
• If placing the SoundStage in a cabinet or on a shelf, for
optimum audio performance, make sure the font of
the SoundStage as close as possible to the front edge
of the shelf.
• If placing the SoundStage backed up to a wall, make
sure there is at least a distance of 1 inch between the
wall and the rear of the SoundStage.
2 Make sure the TV base is centered on it
and not hanging over any of its edges.
8
EN
HTB3525B_F7_UM_V1.0.indb 8 12/10/2013 6:03:57 PM

English
4 Connect and set
up
This section helps you connect your
SoundStage to a TV and other devices, and then
set it up.
For information about the basic connections of
your SoundStage and accessories, see the Quick
start guide.
Note
• For identication and supply ratings, see the type plate
at the back or bottom of the product.
• Before you make or change any connections, make sure
that all devices are disconnected from the power outlet.
Connect to TV
Connect your SoundStage to a TV to watch
videos. You can listen to the TV audio through
your SoundStage.
Use the best quality connection available on
your SoundStage and TV.
TV
1 Using a High Speed HDMI cable, connect
the HDMI OUT (ARC) connector on your
SoundStage to the HDMI ARC connector
on the TV.
• The HDMI ARC connector on the TV
might be labeled differently. For details,
see the TV user manual.
2 On your TV, turn on HDMI-CEC
operations. For details, see the TV user
manual.
• HDMI-CEC is a feature that enables
CEC compliant devices that are
connected through HDMI to be
controlled by a single remote control,
such as volume control for both the TV
and the SoundStage.
3 If you cannot hear the TV audio through
your SoundStage, set up the audio
manually (see 'Set up the audio' on page
12).
Option 1: Connect to TV through HDMI (ARC)
Best quality video
Your SoundStage supports HDMI version
with Audio Return Channel (ARC). If your
TV is HDMI ARC compliant, you can hear the
TV audio through your SoundStage by using a
single HDMI cable.
Option 2: Connect to TV through standard HDMI
Best quality video
If your TV is not HDMI ARC compliant, connect
your SoundStage to the TV through a standard
HDMI connection.
TV
9
EN
HTB3525B_F7_UM_V1.0.indb 9 12/10/2013 6:03:57 PM
1 Using a High Speed HDMI cable, connect
the HDMI OUT (ARC) connector on your
SoundStage to the HDMI connector on
the TV.
2 Connect an audio cable to hear the TV
audio through your SoundStage (see
'Connect audio from TV and other devices'
on page 10).
3 On your TV, turn on HDMI-CEC
operations. For details, see the TV user
manual.
• HDMI-CEC is a feature that enables
CEC compliant devices that are
connected through HDMI to be
controlled by a single remote control,
such as volume control for both the
TV and the SoundStage (see 'Set up
EasyLink (HDMI-CEC control)' on
page 11).
4 If you cannot hear the TV audio through
your SoundStage, set up the audio
manually (see 'Set up the audio' on page
12).
Note
• If your TV has a DVI connector, you can use an HDMI/
DVI adapter to connect to TV. However, some of the
features may not be available.
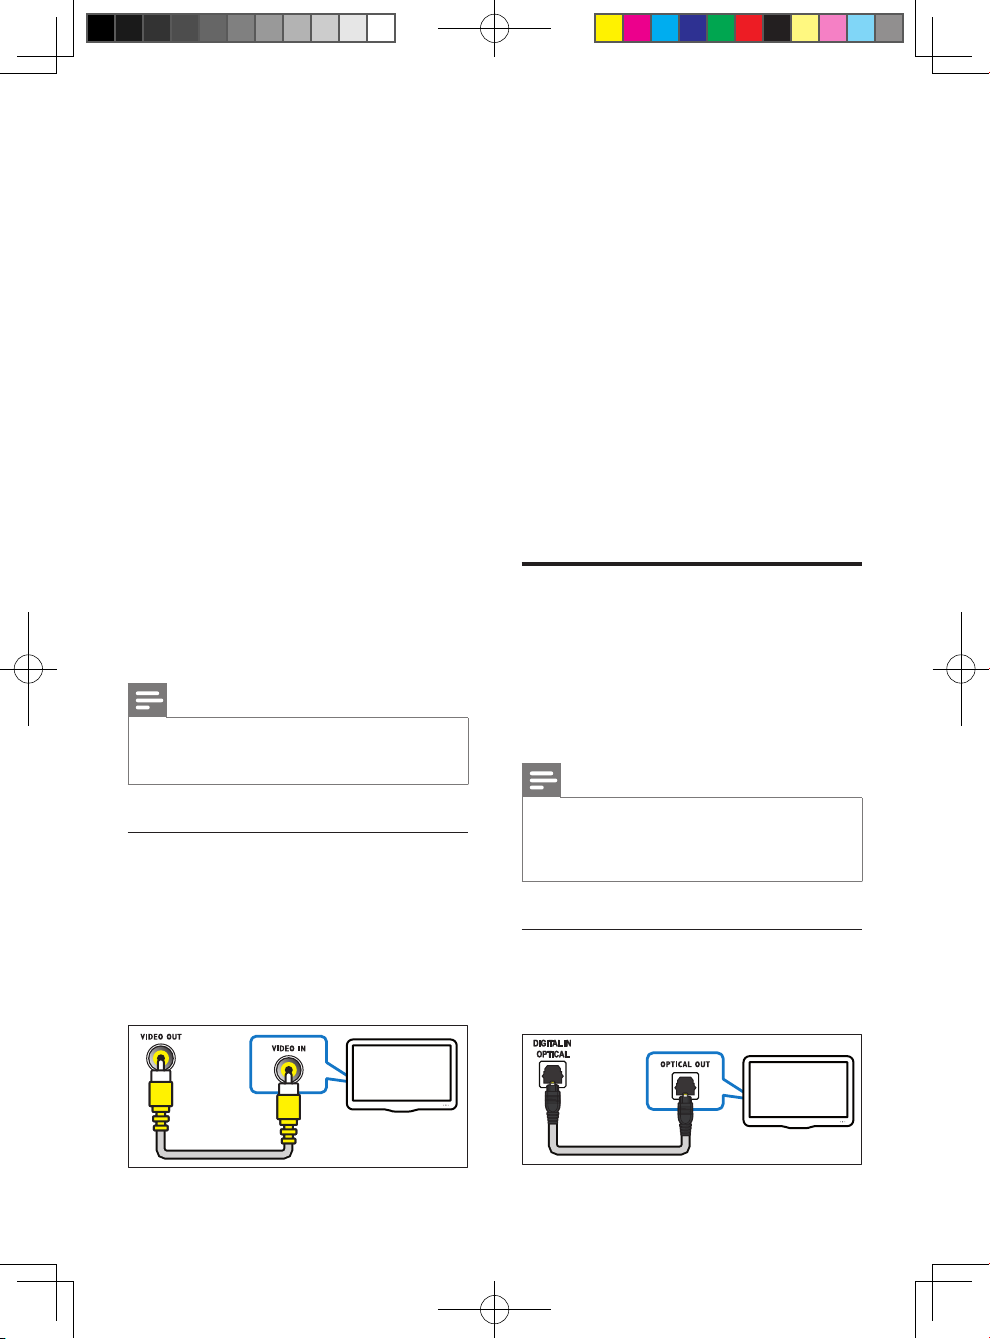
Option 3: Connect to the TV through composite video
Basic quality video
If your TV does not have HDMI connectors, use
a composite video connection. A composite
connection does not support high-denition
video.
1 Using a composite video cable, connect
the VIDEO OUT connector on your
SoundStage to the VIDEO IN connector
on the TV.
• The composite video connector might
be labeled AV IN, COMPOSITE, or
BASEBAND.
2 Connect an audio cable to hear the TV
audio through your SoundStage (see
'Connect audio from TV and other devices'
on page 10).
3 When you watch TV programs, press
SOURCE on your SoundStage repeatedly
to select the correct audio input.
4 When you watch videos, switch your TV to
the correct video input. For details, see the
TV user manual.
Connect audio from TV and other devices
Play audio from TV or other devices through
your SoundStage.
Use the best quality connection available on
your TV, SoundStage, and other devices.
Note
• When your SoundStage and TV are connected through
HDMI ARC, an audio connection is not required (see
'Option 1: Connect to TV through HDMI (ARC)' on
page 9).
Option 1: Connect audio through a digital optical cable
Best quality audio
TV
10
EN
HTB3525B_F7_UM_V1.0.indb 10 12/10/2013 6:03:58 PM
TV
English
1 Using an optical cable, connect the
OPTICAL IN connector on your
SoundStage to the OPTICAL OUT
connector on the TV or other device.
• The digital optical connector might be
labeled SPDIF or SPDIF OUT.
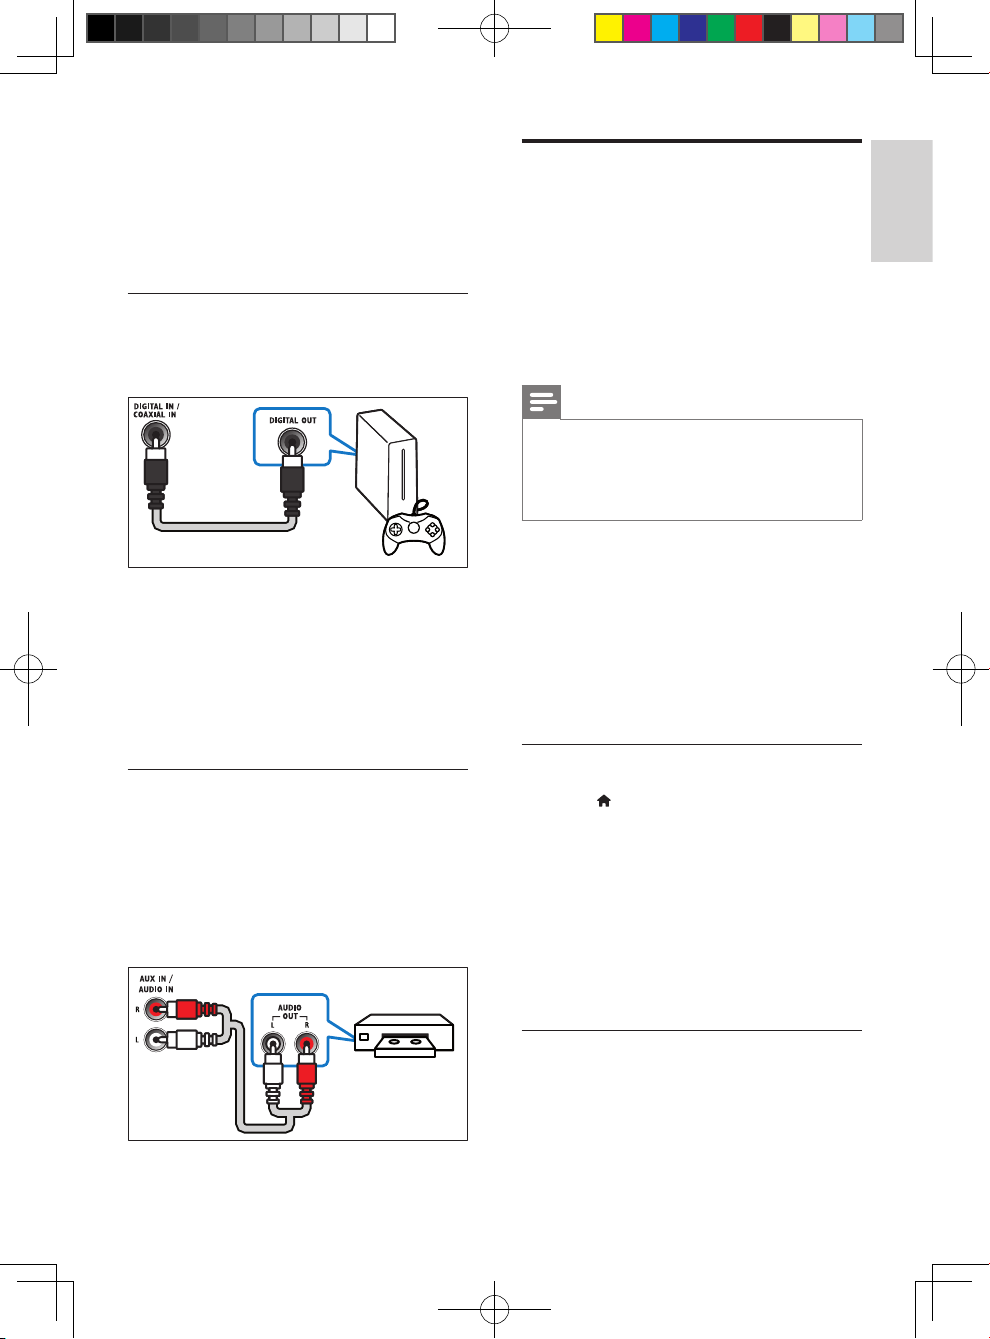
Option 2: Connect audio through a digital coaxial cable
Good quality audio
Set up EasyLink (HDMI-CEC control)
This SoundStage supports Philips EasyLink,
which uses the HDMI-CEC (Consumer
Electronics Control) protocol. EasyLinkcompliant devices that are connected through
HDMI can be controlled by a single remote
control.
Note
• Depending on the manufacturer, HDMI-CEC is known
by many names. For information on your device, see
the user manual of the device.
• Philips does not guarantee 100% interoperability with
all HDMI-CEC devices.
1 Using a coaxial cable, connect the
COAXIAL IN connector on your
SoundStage to the COAXIAL/DIGITAL
OUT connector on the TV or other
device.
• The digital coaxial connector might be
labeled DIGITAL AUDIO OUT.
Option 3: Connect audio through analog audio cables
Basic quality audio
1 Using an analog cable, connect the AUX
IN connector on your SoundStage to the
AUDIO OUT connectors on the TV or
other device.
VCR
Before you start
• Connect your SoundStage to the HDMICEC compliant device through HDMI
connection.
• Make the necessary connections described
in the quick start guide, and then switch
the TV to the correct source for your
SoundStage.
Enable EasyLink
1 Press .
2 Select [Setup], and then press OK.
3 Select [EasyLink] > [EasyLink] > [On] .
4 On your TV and other connected devices,
turn on HDMI-CEC control. For details, see
the user manual of the TV or other devices.
• On your TV, set the audio output to
'Amplier' (instead of TV speakers).
For details, see the TV user manual.
EasyLink controls
With EasyLink, you can control your
SoundStage, TV, and other connected HDMICEC compliant devices with a single remote
control.
11
EN
HTB3525B_F7_UM_V1.0.indb 11 12/10/2013 6:03:58 PM
• [One Touch Play] (One-touch play): When
a video disc is in the disc compartment,
press to wake up the TV from standby,
and then play a disc.
• [One Touch Standby] (One-touch
standby): If one-touch standby is enabled,
your SoundStage can switch to standby
with the remote control of the TV or other
HDMI-CEC devices.
• [System Audio Control] (System
audio control): If system audio control
is enabled, the audio of the connected
device is output through your SoundStage
automatically when you play the device.
• [Audio Input Mapping] (Audio input
mapping): If system audio control does not
work, map the connected device to the
correct audio input connector on your
SoundStage (see 'Set up the audio' on
page 12).
Note
• To change the EasyLink control settings, press , select
[Setup] > [EasyLink].
Set up the audio
If you cannot hear the audio output of a
connected device through your SoundStage, do
the following:
• Check that you have enabled EasyLink on
all the devices (see 'Enable EasyLink' on
page 11), and
• on your TV, set the audio output to
"Amplier" (instead of TV speakers). For
details, see the TV user manual, and
• setup the EasyLink audio control.
1 Press .
2 Select [Setup], and then press OK.
3 Select [EasyLink] > [System Audio
Control] > [On].
• To play the audio from the TV
speakers, select [Off], and skip the
following steps.
4 Select [EasyLink] > [Audio Input
Mapping].
5 Follow the onscreen instructions to map
the connected device to the audio inputs
on your SoundStage.
• If you connect your SoundStage to the
TV through an HDMI ARC connection,
make sure that the TV audio is mapped
to the ARC input on your SoundStage.
Connect and set up a home network
Connect your SoundStage to a network router
for a network setup, and enjoy:
• Streamed multimedia content (see 'Browse
PC through DLNA' on page 21)
• BD Live applications (see 'BD-Live on Bluray' on page 15)
• Software update (see 'Update software
through the Internet' on page 29)
Caution
• Familiarize yourself with the network router, media
server software and networking principles. If necessary,
read documentation that accompanies the network
components. Philips is not responsible for lost, damaged,
or corrupt data.
Before you start
• For software updates, make sure that the
network router has access to the Internet
with high-speed connection and is not
restricted by rewalls or other security
systems.
• Make the necessary connections described
in quick start guide, and then switch the TV
to the correct source for your SoundStage.
Set up the wired network
What you need
• A network cable (RJ45 straight cable).
• A network router (with DHCP enabled).
12
EN
HTB3525B_F7_UM_V1.0.indb 12 12/10/2013 6:03:58 PM
English
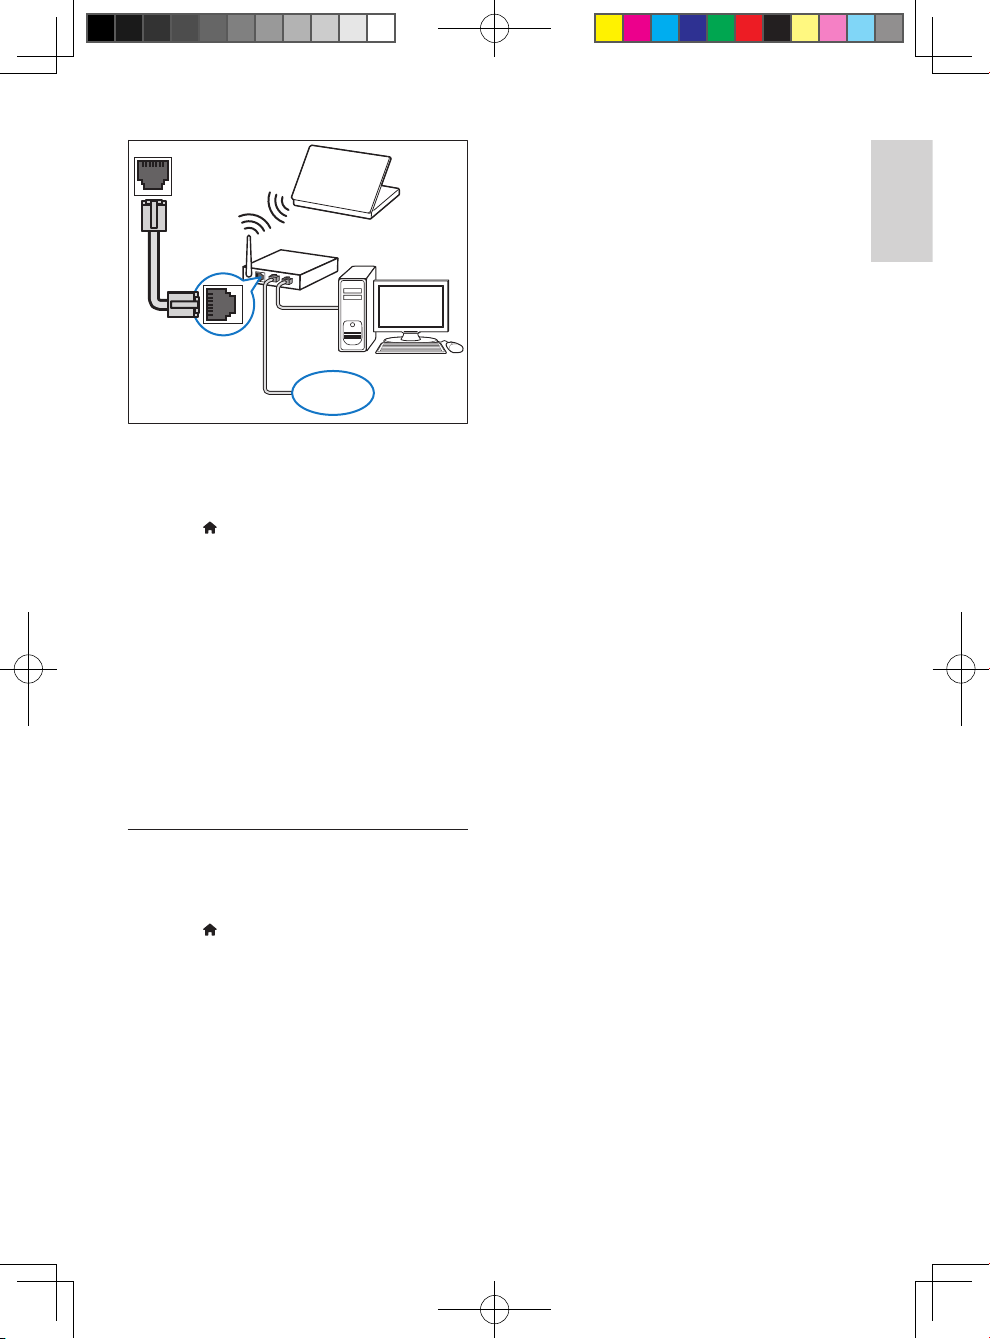
ETHERNET
www
1 Using a network cable, connect the
ETHERNET connector on your
SoundStage to the network router.
2 Press .
3 Select [Setup], and then press OK.
4 Select [Network] > [Network
installation] > [Wired (Ethernet)].
5 Follow the onscreen instructions to
complete the setup.
• If connection fails, select [Retry], and
then press OK.
6 Select [Finish], and then press OK to exit.
• To view the network settings, select
[Setup] > [Network] > [View
network settings].
Personalize the network name
Name your SoundStage to easily identify it on
your home network.
1 Press .
2 Select [Setup], and then press OK.
3 Select [Network] > [Name your
Product:].
4 Press the Alphanumeric buttons to enter
the name.
5 Select [Done], and then press OK to exit.
13
EN
HTB3525B_F7_UM_V1.0.indb 13 12/10/2013 6:03:58 PM
5 Use your
SoundStage
This section helps you use the SoundStage to
play media from a wide range of sources.
Before you start
• Make the necessary connections described
in Quick start guide and User manual.
• Switch the TV to the correct source for
the SoundStage.
you’ve made at home, such as CD-R discs of
photos, videos, and music.
1 Insert a disc into the SoundStage.
2 If the disc does not play automatically,
select [play Disc] from the home menu.
3 Use the remote control to control play
(see 'Play buttons' on page 14).
• It is normal to hear a little noise when
you play a Blu-ray disc. This does not
mean that your SoundStage is faulty.
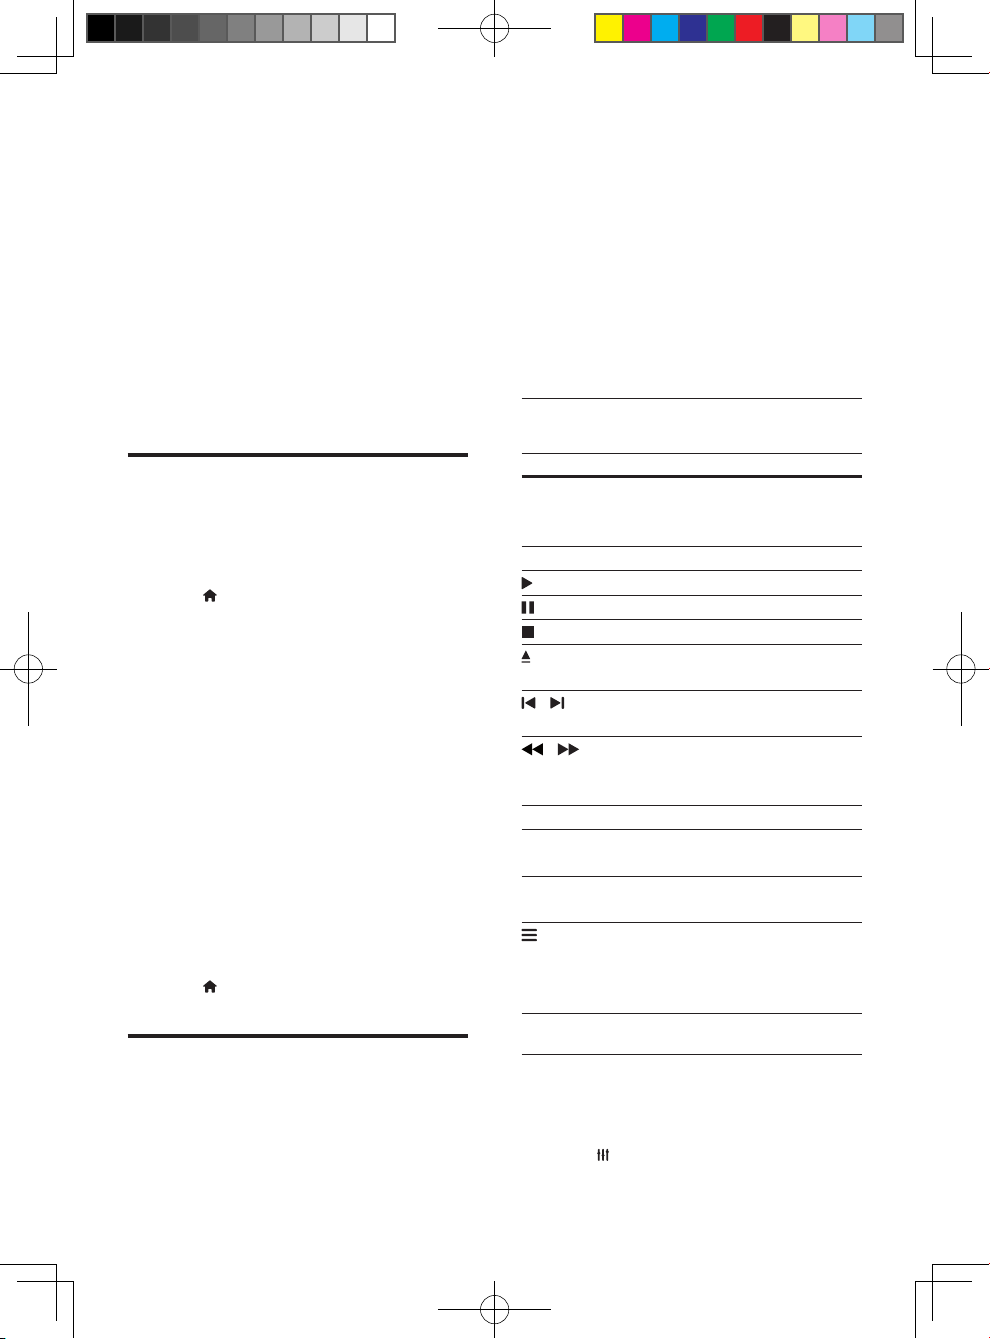
Play buttons
Access the home menu
The home menu provides easy access to
connected devices, setup and other useful
features in your SoundStage.
1 Press .
» The home menu is displayed.
2 Press the Navigation buttons and OK to
select the following:
• [play Disc]: Start disc play.
• [browse USB]: Access the USB
content browser.
• [YouTube]: Access YouTube service.
• [Netix]: Access Netix service.
• [VUDU]: Access VUDU service.
• [Picasa]: Access Picasa web albums.
• [AccuWeather]: Access online weather
forecasting service worldwide.
• [browse PC]: Access the computer
content browser.
• [Setup]: Access menus to change video,
audio and other settings.
3 Press to exit.
Button Action
Navigation
buttons
OK Conrm an entry or selection.
(Play) Start or resume play.
Pause play.
/ Skip to the previous or next track,
/ Search fast backwards or forward.
SUBTITLE Select subtitle language for video.
DISC
MENU
TOP
MENU
Navigate menus.
Up/Down: Rotate the picture
clockwise or counter-clockwise.
Stop play.
Open or close the disc
compartment.
chapter or le.
When a video is paused, search
slow backwards or forward.
Access or exit the disc menu.
Access the main menu of a disc.
Access the advanced options
when you play your audio, video,
or media les (see 'Audio, video,
and picture options' on page 18).
Discs
Your SoundStage can play DVDs, VCDs, CDs,
and Blu-ray discs. It can also play discs that
Synchronize picture and sound
If the audio and video are not synchronized,
delay the audio to match the video.
1 Press .
14
EN
HTB3525B_F7_UM_V1.0.indb 14 12/10/2013 6:03:59 PM

English
2 Press the Navigation buttons (left/right) to
select [Audio sync], and then press OK.
3 Press the Navigation buttons (up/down)
to synchronize the audio with the video.
4 Press OK to conrm.
Play Blu-ray 3D disc
Your SoundStage can play Blu-ray 3D video.
Read the 3D health warning before playing a
3D disc.
What you need
• A 3D TV
• A pair of 3D glasses that are compatible
with your 3D TV
• A 3D Blu-ray video
• A high speed HDMI cable
1 Using the high speed HDMI cable, connect
your SoundStage to a 3D compatible TV.
2 Make sure that the 3D video setting is
enabled. Press , select [Setup] > [Video]
> [Watch 3D video] > [Auto].
• To play 3D discs in 2D mode, select
[Off].
3 Play a Blu-ray 3D disc and put on the 3D
glasses.
• During video search and in certain play
modes, the video is displayed in 2D.
The video display returns to 3D when
you resume play.
Note
• To avoid ickering, change the brightness of the display.
Bonus View on Blu-ray
On Blu-ray discs that support the Bonus View,
enjoy extra content such as commentaries in a
small screen window. Bonus View is also known
as picture-in-picture.
1 Enable Bonus View in the Blu-ray disc
menu.
2 While you play the movie, press .
» The options menu is displayed.
3 Select [PIP selection] > [PIP].
• Depending on the video, PIP menu [1]
or [2] is displayed.
• To disable Bonus View, select [Off].
4 Select [2nd audio language] or [2nd
Subtitle Language].
5 Select the language, and then press OK.
BD-Live on Blu-ray
Access additional features on the Blu-ray discs
with BD-Live content, such as internet chats
with the director, the latest movie trailers,
games, wallpaper, and ringtones.
BD-Live services and content vary from disc to
disc.
What you need
• Blu-ray disc with BD-Live content
• a USB storage device, with at least 1 GB of
memory
1 Connect your SoundStage to a home
network with Internet access.
2 Connect a USB storage device to the
connector at the right side of your
SoundStage for BD-Live download.
3 Press and select [Setup] > [Advanced]
> [BD-Live security] > [Off].
• To disable BD-Live, select [On].
4 Select the BD-Live icon in the disc menu,
and then press OK.
» BD-Live starts to load. The loading
time depends on the disc and your
internet connection.
5 Press the Navigation buttons to navigate
BD-Live, and then press OK to select an
option.
Note
• To clear the memor y on the storage device, press ,
select [Setup] > [Advanced] > [Clear memory].
15
EN
HTB3525B_F7_UM_V1.0.indb 15 12/10/2013 6:03:59 PM
Play audio through Bluetooth
Through Bluetooth, connect the SoundStage
with your Bluetooth device (such as an iPad,
iPhone, iPod touch, Android phone, or laptop),
and then you can listen to the audio les stored
on the device through your SoundStage.
What you need
• A Bluetooth device which supports
Bluetooth prole A2DP, AVRCP and with
Bluetooth version as 2.1 + EDR.
• The operational range between the
SoundStage and a Bluetooth device is
approximately 10 meters (30 feet).
1 Press to select Bluetooth mode.
» [BT] is displayed on the display panel.
2 On the Bluetooth device, switch on
Bluetooth, search for and select the name
of your SoundStage to start connection
(see the user manual of the Bluetooth
device on how to enable Bluetooth).
• If prompted for a password, enter
"0000".
3 Wait until you hear a beep sound from this
product.
» When the Bluetooth connection
succeeds, [BT_RE] is displayed on the
display panel.
» If the connection fails, [BT] on the
display panel is still displayed.
4 Select and play audio les or music on
your Bluetooth device.
• During play, if a call is coming, music
play is paused.
• If music streaming is interrupted, place
the Bluetooth device closer to the
SoundStage.
5 To exit Bluetooth, select other source.
• When your switch back to Bluetooth
mode, Bluetooth connection remains
active.
Note
• The music streaming may be interrupted by obstacles
between the device and SoundStage, such as wall,
metallic casing that covers the device, or other devices
nearby that operate in the same frequency.
• If you want to connect your SoundStage with another
Bluetooth device, press and hold on the remote
control to disconnect the currently connected
Bluetooth device.
Play music via NFC
NFC (Near Field Communication) is a
technology that enables short-range wireless
communication between NFC-enabled devices,
such as mobile phones.
What you need
• A Bluetooth device with NFC function.
• For pairing, tap the NFC device on the
NFC tag of this product.
• The operational range between the main
unit (left and right speakers) and a NFC
device is approximately 10 meters (30
feet).
1 Enable NFC on your Bluetooth device (see
the user manual of your device for details).
2 Tap the NFC device on the NFC tag of
this product until you hear a beep sound
from this product.
» The NFC device is connected to
this product via Bluetooth. [BT] is
displayed.
3 Select and play audio les or music on
your NFC device.
• To break the connection, tap the
NFC device with the NFC tag on this
product again.
Datales
Your SoundStage can play pictures, audio and
video les contained in a disc or a USB storage
16
EN
HTB3525B_F7_UM_V1.0.indb 16 12/10/2013 6:03:59 PM
English
device. Before you play a le, check that the le
format is supported by your SoundStage (see
'File formats' on page 30).
1 Play the les from a disc or USB storage
device.
2 To stop play, press .
• To resume the video from where you
stopped, press .
• To play the video from the start, press
OK.
Note
• To play DivX DRM protected les, connect your
SoundStage to a TV through an HDMI cable.
Subtitles
If your video has subtitles in multiple languages,
select a subtitle language.
Note
• Make sure that the subtitle le has the exact same
name as the video le. For example, if the video le is
named 'movie.avi', name the subtitle le as 'movie.srt'
or 'movie.sub'.
• Your SoundStage suppor ts the following le formats:
.srt, .sub, .txt, .ssa, .ass, smi, and .sami. If the subtitles do
not appear correctly, change the character set.
Character
Set
[Standard] English, Albanian, Danish,
[Central
Europe]
[Cyrillic] Bulgarian, Belorussian, English,
[Greek] Greek
[Baltic] Estonian, Latvian and Lithuanian
Language
Dutch, Finnish, French, Gaelic,
German, Italian, Kurdish (Latin),
Norwegian, Portuguese, Spanish,
Swedish and Turkish
Albanian, Croat, Czech, Dutch,
English, German, Hungarian, Irish,
Polish, Romanian, Slovak, Slovene
and Serbian
Macedonian, Moldavian, Russian,
Serbian and Ukrainian
VOD code for DivX
Before you purchase DivX videos and play
them on your SoundStage, register the
SoundStage on www.divx.com using the DivX
VOD code.
1 Press .
2 Select [Setup], and then press OK.
3 Select [Advanced] > [DivX® VOD Code].
» The DivX VOD registration code for
your SoundStage is displayed.
1 While playing video, press SUBTITLE to
select a language.
USB storage devices
2 For DivX videos, if the subtitles do not
appear correctly, continue the following
steps to change the character set.
3 Press .
» The options menu is displayed.
4 Select [Character set], and then select a
character set that supports the subtitle.
HTB3525B_F7_UM_V1.0.indb 17 12/10/2013 6:03:59 PM
Enjoy pictures, audio, and video stored on a
USB storage device such as an MP4 player or
digital camera.
What you need
• A USB storage device that is formatted for
FAT or NTFS le systems, and complies
with the Mass Storage Class.
• A media le in one of the supported le
formats (see 'File formats' on page 30).
17
EN

Note
• If you use a USB extension cable, USB HUB, or USB
multi-reader, the USB storage device may not be
recognized.
1 Connect a USB storage device to the
(USB) connector on your SoundStage.
2 Press .
3 Select [browse USB], and then press OK.
» A content browser is displayed.
4 Select a le, and then press OK.
5 Press the play buttons to control play (see
'Play buttons' on page 14).
Audio, video, and picture options
Use advanced features when you play pictures,
audio and video les from a disc or a USB
storage device.
Audio options
While playing audio, repeat an audio track, a
disc, or a folder.
1 Press repeatedly to cycle through the
following functions:
• Repeat the current track or le.
• Repeat all the tracks on the disc or the
folder.
• Turn off the repeat mode.
• [Info]: Display information about what
is playing.
• [Audio language]: Select audio
language for video.
• [Subtitle Language]: Select subtitle
language for video.
• [Subtitle shift]: Change the subtitle
position on the screen.
• [Character set]: Select a character set
that supports the DivX subtitle.
• [Time search]: Skip to a specic par t
of the video by entering the time of
the scene.
• [2nd audio language]: Select the
second audio language for Blu-ray
video.
• [2nd Subtitle Language]: Select the
second subtitle language for Blu-ray
video.
• [Titles]: Select a specic title.
• [Chapters]: Select a specic chapter.
• [Angle list]: Select a different camera
angle.
• [Menus]: Display the disc menu.
• [PIP selection]: Display Picture-inPicture window when playing a Blu-ray
disc that supports the Bonus View.
• [Zoom]: Zoom into a video scene or
picture. Press the Navigation buttons
(left/right) to select a zoom factor.
• [Repeat]: Repeat a chapter or title.
• [Repeat A-B]: Mark two points within a
chapter or track to repeat play, or turn
off the repeat mode.
• [Picture settings]: Select a predened
color setting.
Video options
While watching video, select options such
as subtitles, audio language, time search, and
picture settings. Depending on the video source,
some options are not available.
1 Press .
» The video options menu is displayed.
2 Press the Navigation buttons and OK to
select and change:
18
EN
HTB3525B_F7_UM_V1.0.indb 18 12/10/2013 6:03:59 PM
Picture options
While viewing a picture, zoom into the picture,
rotate it, add animation to a slideshow, and
change the picture settings.
1 Press .
» The picture options menu appears.
2 Press the Navigation buttons and OK to
select and change the following settings:

English
• [Info]: Display picture information.
• [Rotate +90]: Rotate the picture 90
degree clockwise.
• [Rotate -90]: Rotate the picture 90
degree counter-clockwise.
• [Zoom]: Zoom into a video scene or
picture. Press the Navigation buttons
(left/right) to select a zoom factor.
• [Duration per slide]: Select the display
speed for each picture in a slide show.
• [Slide animation]: Select animation for
the slide show.
• [Picture settings]: Select a predened
color setting.
• [Repeat]: Repeat a selected folder.
Musical slideshow
If the picture and audio les are from the same
disc or USB storage device, you can create a
musical slideshow.
1 Select an audio track, and then press OK.
2 Press , and go to the picture folder.
3 Select a picture, and then press to start
the slideshow.
4 Press to stop slideshow.
5 Press again to stop music.
Note
• Make sure that the picture and audio formats are
supported by your SoundStage (see 'USB' on page 33).
Radio
Listen to FM radio on your SoundStage, and
store up to 40 radio stations.
Note
• AM and digital radio are not supported.
• If no stereo signal is detected, you are prompted to
install the radio stations again.
1 Connect the FM antenna to FM
ANTENNA on your SoundStage.
• For the best reception, place the
antenna away from your TV or other
sources of radiation.
2 Press SOURCE repeatedly to select radio
source.
» If you have already installed the radio
stations, the last channel that you
listened to is played.
» If you have not installed any radio
stations, the message [AUTO
INSTALL...PRESS PLAY] appears on
the display panel. Press to install
radio stations.
3 Use the remote control to select or to
change radio stations.
Play buttons
Button Action
/
or
Alphanumeric
buttons
Navigation
buttons
SUBTITLE Toggle between the stereo
Select a preset radio station.
Left/Right: Search for a radio
station.
Up/Down: Fine tune a radio
frequency.
Press to stop the installation
of radio stations.
Press and hold to erase the
preset radio station.
Manual: 1) Press . 2) Press
/ to select your preset.
3) Press again to store the
radio station.
Automatic: Press and hold for
three seconds to reinstall the
radio stations.
and mono sounds.
19
EN
HTB3525B_F7_UM_V1.0.indb 19 12/10/2013 6:04:00 PM

Tuning grid
In some countries, you can toggle the FM tuning
grid between 50 kHz and 100 kHz.
1 Press SOURCE repeatedly to select radio
source.
2 Press .
3 Press and hold to toggle between
50 kHz or 100 kHz.
MP3 player
Connect a MP3 player to play audio les.
What you need
• An MP3 player.
• A 3.5mm stereo audio cable.
1 Using the 3.5mm stereo audio cable,
connect the MP3 player to the AUDIO IN
connector on your SoundStage.
• If you use 6.5mm stereo audio cable,
connect the MP3 player to your
SoundStage using a 3.5mm - 6.5mm
converter jack.
2 Press AUDIO.
3 Press the buttons on the MP3 player to
select and play audio les.
Enjoy Internet services
With the SoundStage, you can access online
services, such as movies, pictures and music.
What you need
• A high-speed Internet connection to the
SoundStage (see 'Connect and set up a
home network' on page 12).
1 Press .
» The home menu is displayed.
2 Select an Internet service, and press OK.
• [Netix]: an online subscription service
streaming movies & TV episodes over
the Internet
• [YouTube]: a video-sharing service
• [Picasa]: an online photo album
• [VUDU]: an online movie service
• [AccuWeather]: an online weather
forecasting service worldwide
Netix
Use Netix to stream movies and TV episodes
through your SoundStage. You can also rent
videos from online stores.
For more information on Netix services, visit
www.netix.com.
1 Connect your SoundStage to a home
network with high-speed Internet access.
(see 'Connect and set up a home network'
on page 12)
2 Press NETFLIX.
» The Netix home page is displayed.
3 Use the remote control to navigate and
start a video play.
» If you have not activated your
SoundStage to play videos from
Netix, an activation code is displayed.
» If you have activated your SoundStage,
skip step 5.
4 On your computer, visit www.netix.com/
activate to activate your SoundStage with
the activation code.
• You need to sign in as Netix member..
5 To exit Netix, press .
Note
• To deactivate Netix from your SoundStage, press
, and then select [Setup] > [Deactivation] >
[Netix]. [Deactivation]
• When you contact Netix customer service, you may
ask to provide the ESN (electronic serial number) of
your SoundStage. To display the ESN, press , and then
select [Setup] > [Advanced] > [NetixESN].
20
EN
HTB3525B_F7_UM_V1.0.indb 20 12/10/2013 6:04:00 PM
English
VUDU
Use VUDU to stream movies through your
SoundStage. VUDU provides on-demand videos
and rich internet applications.
For more information on VUDU services, visit
www.vudu.com.
1 Connect your SoundStage to a home
network with high-speed Internet access.
(see 'Connect and set up a home network'
on page 12)
2 Press VUDU.
» The VUDU home page is displayed.
3 If you have activated your SoundStage, skip
steps 5 and 6.
4 Select 'Free HD' to acquire an activation
code.
5 On your computer, when you receive the
VUDU conrmation email in your inbox,
click the activation link provided and
follow the prompts through the activation
process.
6 Use the remote control to navigate and
start a video play.
7 To exit VUDU, press .
Note
• To deactivate VUDU from your SoundStage, press
, and then select [Setup] > [Advanced] >
[Deactivation] > [VUDU].
YouTube videos
Enjoy YouTube videos through your SoundStage.
1 Connect your SoundStage to a home
network with a high-speed Internet access.
(see 'Connect and set up a home network'
on page 12)
2 Press YouTube.
» The YouTube Leanback page is
displayed.
3 Follow the onscreen instructions to
browse the YouTube page.
4 Use the remote control to select and
navigate the application.
Button Action
Navigation
buttons
• If you do not press a button within
Up: Access the onscreen
keyboard.
Down: Access the onscreen
playback buttons.
Left/Right: Select a video from the
playlist.
few seconds, the onscreen buttons and
menu exit automatically.
5 Press to exit YouTube page.
Browse PC through DLNA
Access and play the pictures, audio and video
les from a computer or media server on the
home network through your SoundStage.
Before you start
• Install a DLNA-compliant media server
application on your device. Make sure that
you download an application that works
best for you. For example,
• Windows Media Player 11 or higher
for PC
• Twonky Media Server for Mac or PC
• Enable media sharing of les. For ease of
use, we have included the steps for the
following applications:
• Windows Media Player 11 (see
'Microsoft Windows Media Player 11'
on page 22)
• Windows Media Player 12 (see
'Microsoft Windows Media Player 12'
on page 22)
• Twonky Media for Mac (see 'Macintosh
OS X Twonky Media (v4.4.2)' on page
23)
21
EN
HTB3525B_F7_UM_V1.0.indb 21 12/10/2013 6:04:00 PM

Note
• For additional help on these applications or other
media servers, check the user manual of the media
server software software.
Set up media server software
To enable media sharing, set up the media
server software.
Before you start
• Connect your SoundStage to a home
network. (see 'Connect and set up a home
network' on page 12) For better video
quality, use wired connection whenever
possible.
• Connect the computer and other DLNAcompatible devices to the same home
network.
• Make sure that your PC rewall allows
you to run Media Player programs (or
the rewall’s exemption list has the media
server software included).
• Switch on your computer and the router.
Microsoft Windows Media Player 11
1 Start Windows Media Player on your PC.
2 Click the Library tab, and then select
Media Sharing.
3 The rst time you select Media Sharing on
your PC,a pop-up screen appears. Check
the Share my media box and click OK.
» The Media Sharing screen is displayed.
4 In the Media Sharing screen, make sure
that you see a device marked as Unknown
Device.
» If you don't see an unknown device
after a minute or so, check that
your PC rewall is not blocking the
connection.
5 Select the unknown device and click Allow.
» A green tick appears next to the
device.
6 By default, Windows Media Player shares
from these folders: My Music, My Pictures,
and My Videos. If your les are in other
folders, select Library > Add to Library.
» The Add to Library screen is displayed.
• If necessary, select Advanced options
to display a list of monitored folders.
7 Select My folders and those of others I
can access, and then click Add.
8 Follow the onscreen instructions to add
the other folders that contain your media
les.
Microsoft Windows Media Player 12
1 Start Windows Media Player on your PC.
2 In Windows Media Player, click the Stream
tab, and then select Turn on media
streaming.
» The Media streaming options screen
is displayed.
3 Click Turn on media streaming.
» You return to Windows Media Player
screen.
4 Click the Stream tab and select More
streaming options.
» The Media streaming options screen
is displayed.
5 Make sure that you see a media program
in the Local network screen.
» If you don't see a media program,
check that your PC rewall is not
blocking the connection.
6 Select the media program and click
Allowed.
» A green arrow appears next to the
media program.
7 By default, Windows Media Player shares
from these folders: My Music, My Pictures,
and My Videos. If your les are in other
folders, click the Organize tab and select
Manage libraries > Music.
» The Music Library Locations screen is
displayed.
8 Follow the onscreen instructions to add
the other folders that contain your media
les.
22
EN
HTB3525B_F7_UM_V1.0.indb 22 12/10/2013 6:04:00 PM

English
Macintosh OS X Twonky Media (v4.4.2)
1 Visit www.twonkymedia.com to purchase
the software, or download a free 30-day
trial to your Macintosh.
2 Start Twonky Media on the Macintosh.
3 In the Twonky Media Server screen, select
Basic Setup and First Steps.
» The First steps screen is displayed.
4 Type a name for your media server, and
then click Save changes.
5 Back in the Twonky Media screen, select
Basic Setup and Sharing.
» The Sharing screen is displayed.
6 Browse and select folders to share, and
then select Save Changes.
» Your Macintosh rescans the folders
automatically so that they are ready to
share.
PlaylesfromyourPC
Note
• Before you play multimedia content from the computer,
make sure that the SoundStage is connected to the
home network, and the media server software is
properly set up.
1 Press .
2 Select [browse PC], and then press OK.
» A content browser is displayed.
3 Select a device on the network.
» The folders in the selected device are
displayed. Depending on the media
server, the folder names may vary.
• If you cannot see the folders, check
that you have enabled media sharing
on the selected device so that the
content is available for sharing.
4 Select a le, and then press OK.
• Some media les may not play
due to compatibility issues. Check
the le formats supported by your
SoundStage.
5 Press the play buttons to control play (see
'Play buttons' on page 14).
Choose sound
This section helps you choose the ideal sound
for your video or music.
1 Press .
2 Press the Navigation buttons (left/right) to
access the sound options on the display.
Sound
options
[Surround] Select surround sound or stereo
[Sound] Select a sound mode.
[Audio
sync]
[Auto
volume]
Description
sound.
Delay the audio to match the
video.
Reduce sudden changes in
volume, for example, during TV
commercials.
3 Select an option, and then press OK.
4 Press to exit.
• If you do not press a button within a
minute, the menu exits automatically.
Surround sound mode
Experience an immersive audio experience with
surround sound modes.
1 Press .
2 Select [Surround], and then press OK.
3 Press the Navigation buttons (up/down)
to select a setting from your display:
• [Auto]: Surround sound based on the
audio stream.
• [Virtual Surround]: Virtual surround.
• [Stereo]: 2-channel stereo sound. Ideal
for listening to music.
4 Press OK to conrm.
23
EN
HTB3525B_F7_UM_V1.0.indb 23 12/10/2013 6:04:00 PM

Sound mode
Select predened sound modes to suit your
video or music.
1 Make sure that audio post processing is
enabled at the speakers (see 'Speaker
settings' on page 26).
2 Press .
3 Select [Sound], and then press OK.
4 Press the Navigation buttons (up/down)
to select a setting on the display:
• [Auto]: Automatically select a sound
setting based on the sound stream.
• [Balanced]: Experience the original
sound of your movies and music,
without added sound effects.
• [Powerful]: Enjoy thrilling arcade
sounds, ideal for action-packed videos
and loud parties.
• [Bright]: Spice up your dull movies and
music with added sound effects.
• [Clear]: Hear every detail in your
music and clear voices in your movies.
• [Warm]: Experience spoken words
and music vocals in comfort.
• [Personal]: Personalize the sound
based on your preferences.
5 Press OK to conrm.
1 Press .
2 Select [Auto volume], and then press OK.
3 Press the Navigation buttons (up/down)
to select [On] or [Off].
4 Press OK to conrm.
Equalizer
Change the high frequency (treble), mid
frequency (mid), and low frequency (bass)
settings of the SoundStage.
1 Press .
2 Select [Sound] > [Personal], and then
press Navigation buttons (right).
3 Press the Navigation buttons (up/down)
to change bass, mid or treble frequency.
4 Press OK to conrm.
Auto volume
Turn on auto volume to reduce sudden changes
in volume, for example, during TV commercials.
24
EN
HTB3525B_F7_UM_V1.0.indb 24 12/10/2013 6:04:00 PM
English
6 Change settings
Picture and video settings
The SoundStage settings are already congured
for optimal performance. Unless you have a
reason to change a setting, we recommend that
you keep the default setting.
Note
• You cannot change a setting that is grayed out.
• To return to the previous menu, press . To exit the
menu, press .
Language settings
1 Press .
2 Select [Setup], and then press OK.
3 Select [Preference], and then press OK.
4 Press the Navigation buttons and OK to
select and change:
• [Menu language]: Select a display
language for menu.
• [Audio]: Select an audio language for
discs.
• [Keyboard layout]: Select a keyboard
in your language.
• [Subtitle]: Select a subtitle language
for discs.
• [Disc menu]: Select a menu language
for discs.
1 Press .
2 Select [Setup], and then press OK.
3 Select [Video], and then press OK.
4 Press the Navigation buttons and OK to
select and change:
• [Tv type]: If the video does not appear
correctly, select a TV type (color
system).
• [TV display]: Select a picture format to
t the TV screen.
• [HDMI video]: Select the resolution of
video signal that is output from HDMI
OUT (ARC) on your SoundStage.
To enjoy the selected resolution,
make sure that your TV supports the
selected resolution.
• [HDMI Deep Color]: Recreate the
natural world on your TV screen by
displaying vivid images using billion
colors. Your SoundStage must be
connected to a Deep Color enabled
TV through an HDMI cable.
• [Picture settings]: Select pre dened
color settings for the video display.
• [Watch 3D video]: Set HDMI video to
support 3D or 2D video.
Note
• If you change a setting, make sure that the TV suppor ts
the new setting.
Note
• If your preferred disc language is not available, select
[Others] from the list, and enter the 4-digit language
code found at the end of this user manual (see
'Language code' on page 40).
• If you select a language that is not available on a disc,
the SoundStage uses the default language of the disc.
Audio settings
1 Press .
2 Select [Setup], and then press OK.
3 Select [Audio], and then press OK.
4 Press the Navigation buttons and OK to
select and change:
25
EN
HTB3525B_F7_UM_V1.0.indb 25 12/10/2013 6:04:00 PM

• [Night mode]: For quiet listening,
decrease the volume of loud sounds
on your SoundStage. Night mode is
only available in DVDs and Blu-ray
discs with Dolby Digital, Dolby Digital
Plus, and Dolby True HD soundtracks.
• [HDMI Audio]: Set the HDMI audio
output from your TV, or disable HDMI
audio output from the TV.
• [Default sound settings]: Restore
the equalizer settings of all the sound
modes to the default values.
Parental control settings
1 Press .
2 Select [Setup], and then press OK.
3 Select [Preference], and then press OK.
4 Press the Navigation buttons and OK to
select and change:
• [Change Password]: Set or change
your password for parental control
access. If you do not have a password
or have forgotten your password, enter
0000.
• [Parental control]: Restrict access
to discs that are recorded with age
ratings. To play all discs, irrespective of
the ratings, select 8 or [Off].
panel of the SoundStage. If you select
[Auto off], after 10 seconds of button
inactivity, the display will automatically
switch off.
• [VCD PBC]: Enable or disable the
content menu navigation of VCD and
SVCD discs with Play Back Control
feature.
Energy saving settings
1 Press .
2 Select [Setup], and then press OK.
3 Select [Preference], and then press OK.
4 Press the Navigation buttons and OK to
select and change:
• [Screen saver]: Switch the SoundStage
to screen saver mode after 10 minutes
of inactivity.
• [Auto standby]: Switch the SoundStage
to standby after 30 minutes of
inactivity. This timer works only when a
disc or USB play is paused or stopped.
• [Sleep timer]: Set the duration of the
sleep timer so that the SoundStage is
switched to standby after the specied
period.
Speaker settings
Display settings
1 Press .
2 Select [Setup], and then press OK.
1 Press .
2 Select [Setup], and then press OK.
3 Select [Preference], and then press OK.
4 Press the Navigation buttons and OK to
select and change:
• [Auto subtitle shift]: Enable or disable
automatic repositioning of subtitles on
TVs that support this feature.
• [Display panel]: Set a brightness level
(100%, 70% or 40%) on the display
26
EN
HTB3525B_F7_UM_V1.0.indb 26 12/10/2013 6:04:01 PM
3 Select [Advanced], and then press OK.
4 Press the Navigation buttons and OK to
select and change:
• [Enhanced audio]: Select [On] to
enable audio post processing at the
speaker and enable karaoke settings
(if your product supports Karaoke).
To play the original audio of the disc,
select [Off].
English
Tip
• Enable audio post processing before you select a
predened sound mode (see 'Sound mode' on page
24).
Restore default settings
1 Press .
2 Select [Setup], and then press OK.
3 Select [Advanced] > [Restore default
settings], and then press OK.
4 Select [OK], and then press OK to
conrm.
» Your SoundStage is reset to its default
settings except for some settings such
as parental control and DivX VOD
registration code.
27
EN
HTB3525B_F7_UM_V1.0.indb 27 12/10/2013 6:04:01 PM
7 Update software
Philips continually tries to improve its products.
To get the best features and support, update
your SoundStage with the latest software.
Compare the version of your current software
with the latest version on www.philips.com/
support. If the current version is lower than the
latest version available on the Philips support
website, upgrade your SoundStage with the
latest software.
Caution
• Do not install a lower version of software than the
current version installed on your product. Philips is not
liable for problems caused due to software downgrade.
Step 1: Download the latest software
1 Connect a USB ash drive to your
computer.
2 In your web browser, go to www.philips.
com/support.
3 At the Philips Support website, nd your
product and locate the Software and
drivers.
» The software update is available as a
zip le.
4 Save the zip le in the root directory of
your USB ash drive.
5 Use the archive utility to extract the
software update le in the root directory.
» The les are extracted under the
UPG_ALL folder of your USB ash
drive.
6 Disconnect the USB ash drive from your
computer.
Check software version
Check the version of the current software
installed on your SoundStage.
1 Press .
2 Select [Setup], and then press OK.
3 Select [Advanced] > [Version
information].
» The software version is displayed.
Update software through USB
What you need
• A USB ash drive that is FAT or NTFSformatted, with at least 256MB of memory.
Do not use a USB hard drive.
• A computer with Internet access.
• An archive utility that supports the ZIP le
format.
28
EN
Step 2: Update the software
Caution
• Do not switch off the SoundStage or remove the USB
ash drive during the update.
1 Connect the USB ash drive containing the
downloaded le to your SoundStage.
• Make sure that the disc compartment
is closed and no disc inside.
2 Press .
3 Select [Setup], and then press OK.
4 Select [Advanced] > [Software update]
> [USB].
5 Follow the onscreen instructions to
conrm the update.
» Update process takes about 5 minutes
to complete.
HTB3525B_F7_UM_V1.0.indb 28 12/10/2013 6:04:01 PM

English
Update software through the Internet
1 Connect your SoundStage to a home
network with a high-speed Internet access.
(see 'Connect and set up' on page 9)
2 Press .
3 Select [Setup], and then press OK.
4 Select [Advanced] > [Software update] >
[Network].
» If an upgrade media is detected, you
are prompted to start or cancel the
update.
» Downloading of the upgrading le may
take long, depending on your home
network condition.
5 Follow the onscreen instructions to
conrm the update.
» Update process takes about 5 minutes
to complete.
» Once complete, the SoundStage
automatically switches off and restarts.
If it does not, disconnect the power
cord for a few seconds and then
reconnect it.
29
EN
HTB3525B_F7_UM_V1.0.indb 29 12/10/2013 6:04:01 PM

8 Product
• Picture: .jpg, .jpeg, .jpe, .gif, .png
specifications
Note
• Specications and design are subject to change without
notice.
Region codes
The type plate on the back or bottom of the
SoundStage shows which regions it supports.
Country
USA, Canada
DVD BD
1
Media formats
• AVCHD, BD, BD-R/ BD-RE, BD-Video,
DVD-Video, DVD+R/+RW, DVD-R/-RW,
DVD+R/-R DL, CD-R/CD-RW, Audio CD,
Video CD/SVCD, Picture les, MP3 media,
WMA media, DivX Plus HD media, USB
storage device
File formats
• Audio:
• .aac, .mka, .mp3, .wma, .wav, .mp4, .m4a,
.ac, .ogg
• .ra (Available only in Asia Pacic and
China)
• Video:
• .avi, .divx, .mp4, .m4v, .mkv, .asf, .wmv,
.m2ts, .mpg, .mpeg, .v, .3gp
• .rmvb, .rm, .rv (Available only in Asia
Pacic and China)
AA
Bluetooth
• Bluetooth proles: A2DP, AVRCP
• Bluetooth version: 2.1 + EDR
Audio formats
Your SoundStage supports the following audio
les.
(.ralesaresupportedonlyinAsiaPacicand
China)
Extension Container Audio
codec
.mp3 MP3 MP3 Upto 320
.wma ASF WMA Upto 192
.aac AAC AAC ,
HEAAC
.wav WAV PCM 27.648
.m4a MKV AAC 192 kbps
.mka MKA PCM 27.648
Dolby
Digital
DTS
core
MPEG 912 kbps
MP3 Upto 320
WMA Upto 192
AAC ,
HE-
AAC
.ra RM AAC,
HE-
AAC
Bit rate
kbps
kbps
Upto 192
kbps
Mbps
Mbps
640 kbps
1.54 Mbps
kbps
kbps
Upto 192
kbps
Upto 192
kbps
30
EN
HTB3525B_F7_UM_V1.0.indb 30 12/10/2013 6:04:01 PM

English
Cook 96469 bps
.ac FLAC FLAC Upto 24
bps
.ogg OGG Vorbis Variable
bit rate,
maximum
block size
4096
MP3 Upto 320
kbps
Video formats
If you have a high denition TV, your
SoundStage allows you to play your video les
with:
• Resolution: 1920 x 1080 pixels at
• Frame rate: 6 ~ 30 frames per second.
.avilesinAVIcontainer
Audio
codec
PCM,
Dolby
Digital,
DTS core,
MP3,
WMA
MPEG 1, MPEG 2 40 Mbps
MPEG 4 SP / ASP 38.4
H.264/AVC upto
WMV9 45 Mbps
.divxlesinAVIcontainer
Audio codec Video codec Bit rate
PCM, Dolby
Digital, MP3,
WMA
Video codec Bit rate
DivX 3.11, DivX 4.x,
DivX 5.x, DivX 6.x
10 Mbps
max
Mbps
25 Mbps
HiP@4.2
DivX 3.11,
DivX 4.x, DivX 5.x,
DivX 6.x
10
Mbps
max
Audio codec Video codec Bit rate
Dolby Digital,
MPEG, MP3, AAC,
MPEG 1,
MPEG 2
40
Mbps
HE-AAC, Dolby
Digital Plus
MPEG 4 ASP 38.4
Mbps
H.264/AVC
HiP@4.2
25
Mbps
.mkvlesinMKVcontainer
Audio codec Video codec Bit rate
PCM, Dolby Digital,
DivX Plus HD30 Mbps
DTS core, MPEG,
MP3, WMA, AAC,
HE-AAC, Dolby
Digital Plus
MPEG 1,
40 Mbps
MPEG 2
MPEG 4 ASP 38.4
Mbps
H.264/AVC
25 Mbps
HiP@4.2
WMV9 45 Mbps
.m2tslesinMKVcontainer
Audio codec Video
codec
PCM, Dolby Digital,
DTS core, MPEG,
MPEG 1,
MPEG 2
Bit rate
40
Mbps
MP3, WMA, AAC,
HE-AAC, Dolby
Digital Plus
MPEG 4 ASP 38.4
Mbps
H.264/AVC
HiP@4.2
25
Mbps
WMV9 45
Mbps
.asflesinASFcontainer
.mp4or.m4vlesinMP4container
31
EN
HTB3525B_F7_UM_V1.0.indb 31 12/10/2013 6:04:01 PM

Audio codec Video codec Bit rate
Dolby Digital, MP3,
WMA, Dolby
Digital Plus
.mpgand.mpeglesinPScontainer
Audio codec Video codec Bit rate
PCM, DTS core,
MPEG, MP3
.vlesinFLVcontainer
Audio
codec
MP3, AAC H.264/AVC upto
H.263 38.4 Mbps
.3gplesin3GPcontainer
Audio
codec
AAC, HEAAC
H.264/AVC upto
MPEG 4
ASP
H.264/AVC
HiP@4.2
WMV9 45 Mbps
MPEG 1,
MPEG 2
Video codec Bit rate
HiP@4.2
Video codec Bit rate
MPEG 4 ASP 38.4 Mbps
HiP@4.2
38.4
Mbps
25 Mbps
40
Mbps
25 Mbps
25 Mbps
max
• Total output power: 80 W RMS (10%
THD)
• Frequency response: 20 Hz-20 kHz /
± 3 dB
• Signal-to-noise ratio: > 65 dB (CCIR) /
(A-weighted)
• Input sensitivity:
• AUX: 2 V rms
• AUDIO IN: 1 V rms
Video
• Signal system: PAL / NTSC
• HDMI output: 480i/576i, 480p/576p, 720p,
1080i, 1080p, 1080p24
Audio
• S/PDIF Digital audio input:
• Coaxial: IEC 60958-3
• Optical: TOSLINK
• Sampling frequency:
• MP3: 32 kHz, 44.1 kHz, 48 kHz
• WMA: 44.1 kHz, 48 kHz
• Constant bit rate:
• MP3: 32 kbps - 320 kbps
• WMA: 48 kbps - 192 kbps
.rm,.rv,and.rmvblesinRMcontainer
(AvailableonlyinAsiaPacicandChina)
Audio codec Video codec Bit rate
AAC, COOK RV30, RV40 40 Mbps
Amplier
• FTC total output power: 42 W
• Speaker: 13 W (1% THD, 4 ohm,
300 Hz - 9 kHz)
• Subwoofer: 16 W (1% THD, 4 ohm,
30 Hz - 100 Hz)
32
EN
HTB3525B_F7_UM_V1.0.indb 32 12/10/2013 6:04:01 PM
Radio
• Tuning range:
• Europe/Russia/China: FM 87.5108 MHz (50 kHz)
• Asia Pacic/Latin America: FM 87.5108 MHz (50/100 kHz)
• Signal-to-noise ratio: FM 50 dB
• Frequency response: FM 180 Hz-12.5 kHz
/ ± 3 dB

English
USB
Laser
• Compatibility: Hi-Speed USB (2.0)
• Class support: USB Mass Storage Class
(MSC)
• File system: FAT16, FAT32, NTFS
• USB port: 5V , 1A
Main unit
• Power supply: 120 V~, 60 Hz
• Power consumption: 40 W
• Standby power consumption: ≤ 0.5 W
• Dimensions (WxHxD): 701 x 70 x 317
mm
• Weight: 6.8 kg
• Operating temperature and humidity:
0°C to 45°C, 5% to 90% humidity for all
climates
• Storage temperature and humidity: -40°C
to 70°C, 5% to 95%
Speakers
• Output power: 2 x 20 W RMS (10% THD)
• Speaker impedance: 4 ohm
• Speaker drivers: 2 x racetrack (1.5" x 5") +
2 x 1" tweeter
• Laser Type (Diode): InGaN/AIGaN (BD),
AIGaInP (DVD/CD)
• Wave length: 405 ± 7 nm (BD), 660 ± 10
nm (DVD), 785 ± 10 nm (CD)
• Output power (Max. ratings): 20 mW
(BD), 6 mW (DVD), 7 mW (CD)
Subwoofer
• Output power: 40 W RMS (10% THD)
• Impedance: 4 ohm
• Speaker drivers: 105mm (4") woofer
Remote control batteries
• 2 x AAA-R03-1.5 V
33
EN
HTB3525B_F7_UM_V1.0.indb 33 12/10/2013 6:04:01 PM

9 Troubleshooting
Warning
• Risk of electric shock. Never remove the casing of the
product.
To keep the warranty valid, never try to repair
the product yourself.
If you have problems using this product, check
the following points before you request service.
If you still have a problem, get support at www.
philips.com/support.
Main unit
The buttons on the SoundStage do not work.
• Disconnect the SoundStage from the
power supply for a few minutes, then
reconnect.
• Make sure that the touch buttons surface
is not in contact with any conductive
material, like water drop, metal, etc.
Picture
No picture.
• Make sure that the TV is switched to the
correct source for the SoundStage.
No picture on a TV connected through HDMI.
• Make sure that you use a High Speed
HDMI cable to connect the SoundStage
and TV. Some Standard HDMI cables do
not display properly for some images, 3D
video, or Deep Color.
• Make sure that the HDMI cable is not
faulty. If it is faulty, replace it with a new
cable.
• Press and then 731 on the remote
control to restore the default picture
resolution.
• Change the HDMI video setting, or wait
for 10 seconds for auto recovery (see
'Picture and video settings' on page 25).
Discdoesnotplayhigh-denitionvideo.
• Make sure that the disc contains highdenition video.
• Make sure that the TV supports highdenition video.
• Use an HDMI cable to connect to the TV.
Sound
No sound from SoundStage.
• Connect the audio cable from your
SoundStage to your TV or other devices.
However, you do not need a separate
audio connection when the SoundStage
and TV are connected through an HDMI
ARC connection.
• Set up the audio for the connected device
(see 'Set up the audio' on page 12).
• Reset your SoundStage to its factory
settings (see 'Restore default settings' on
page 27), and then switch it off and switch
on again.
• On your SoundStage, press SOURCE
repeatedly to select the correct audio
input.
Distorted sound or echo.
• If you play audio from the TV through
the SoundStage, make sure that the TV is
muted.
Audio and video are not synchronized.
• 1) Press . 2) Press the Navigation
buttons (left/right) to select [Audio
sync], and then press OK. 3) Press
the Navigation buttons (up/down) to
synchronize the audio with the video.
Play
Cannot play a disc.
• Clean the disc.
• Make sure that the SoundStage supports
the type of disc (see 'Media formats' on
page 30).
• Make sure that the SoundStage supports
the region code of disc (see 'Region codes'
on page 30).
34
EN
HTB3525B_F7_UM_V1.0.indb 34 12/10/2013 6:04:01 PM

English
• If the disc is a DVD± RW or DVD± R disc,
make sure that it is nalized.
CannotplayaDivXle.
• Make sure that the DivX le is encoded
according to the 'Home Theater Prole'
with the DivX encoder.
• Make sure that the DivX le is complete.
DivX do not display correctly.
• Make sure that the subtitle le name is the
same as the movie le name.
• Select the correct character set: 1) Press
. 2) Select [Character set]. 3) Select the
supported character set. 4) Press OK.
Cannot read the contents of a USB storage
device.
• Make sure that the format of the USB
storage device is compatible with the
SoundStage.
• Make sure that the le system on the
USB storage device is supported by the
SoundStage.
'No entry' or 'x' sign appears on the TV.
• The operation is not possible.
EasyLink does not work.
• Make sure that the SoundStage is
connected to a Philips brand EasyLink TV,
and the EasyLink option is turned on.
• For TVs from different manufacturers, the
HDMI CEC could be called differently.
Check theTV user manual on how to
enable it.
When you switch on the TV, the SoundStage
automatically switches on.
• This behavior is normal when you are using
Philips EasyLink (HDMI-CEC). To make the
SoundStage work independently, switch off
EasyLink.
Cannot access BD-Live features.
• Make sure that the SoundStage is
connected to the network.
• Make sure that the network is set up.
• Make sure that the Blu-ray disc supports
BD-Live features.
• Clear memory storage (see 'BD-Live on
Blu-ray' on page 15).
My 3D video played in 2D mode.
• Make sure that your SoundStage is
connected to a 3D TV through an HDMI
cable.
• Make sure that the disc is a Blu-ray 3D disc,
and the Blu-ray 3D video option is on (see
'BD-Live on Blu-ray' on page 15).
TV screen is black when you play a Blu-ray 3D
video or a DivX copy protected video.
• Make sure that the SoundStage is
connected to the TV through an HDMI
cable.
• Switch to the correct HDMI source on
the TV.
Cannot download video from an online video
store.
• Make sure that your SoundStage is
connected to the TV through an HDMI
cable.
• Make sure that the USB storage device
is formatted, has enough memory to
download the video.
• Make sure that you have paid for the video,
and it is within the rental period.
• Make sure that the network connection is
good.
• Visit the video store website for more
information.
Bluetooth
A device cannot connect with the SoundStage.
• The device does not support the
compatible proles required for the
SoundStage.
• You have not enabled the Bluetooth
function of the device. See the user manual
of the device on how to enable the
function.
• The device is not correctly connected.
Connect the device correctly (see 'Play
audio through Bluetooth' on page 16).
• The SoundStage is already connected with
another Bluetooth device. Disconnect the
connected device, then try again.
Quality of audio play from a connected
Bluetooth device is poor.
35
EN
HTB3525B_F7_UM_V1.0.indb 35 12/10/2013 6:04:01 PM

• The Bluetooth reception is poor. Move
the device closer to the SoundStage, or
remove any obstacle between the device
and the SoundStage.
The connected Bluetooth device connects and
disconnects constantly.
• The Bluetooth reception is poor. Move
the device closer to the SoundStage, or
remove any obstacle between the device
and the SoundStage.
• Turn off Wi-Fi function on the Bluetooth
device to avoid interference.
• For some Bluetooth, the Bluetooth
connection can be deactivated
automatically to save power. This does not
indicate any malfunction of the SoundStage.
36
EN
HTB3525B_F7_UM_V1.0.indb 36 12/10/2013 6:04:02 PM

English
10 Notice
Notice of compliance
This section contains the legal and trademark
notices.
Copyright
This item incorporates copy protection
technology that is protected by U.S. patents
and other intellectual property rights of
Rovi Corporation. Reverse engineering and
disassembly are prohibited.
This product incorporates proprietar y
technology under license from Verance
Corporation and is protected by U.S. Patent
7,369,677 and other U.S. and worldwide
patents issued and pending as well as copyright
and trade secret protection for certain aspects
of such technology. Cinavia is a trademark of
Verance Corporation. Copyright 2004-2010
Verance Corporation. All rights reserved by
Verance. Reverse engineering or disassembly is
prohibited.
Cinavia notice
This product uses Cinavia technology to
limit the use of unauthorized copies of some
commercially-produced lm and videos and
their soundtracks. When a prohibited use of an
unauthorized copy is detected, a message will
be displayed and playback or copying will be
interrupted.
More information about Cinavia technology
is provided at the Cinavia Online Consumer
Information Center at http://www.cinavia.com.
To request additional information about Cinavia
by mail, send a postcard with your mailing
address to: Cinavia Consumer Information
Center, P.O. Box 86851, San Diego, CA, 92138,
USA.
The device complies with the FCC rules, Part
15 and with 21 CFR 1040.10.Operation is
subject to the following two conditions:
a This device may not cause harmful
interference, and
b This device must accept any interference
received, including interference that may
cause undesired operation.
FCC rules
This equipment has been tested and found
to comply with the limits for a Class B digital
device, pursuant to part 15 of the FCC Rules.
These limits are designed to provide reasonable
protection against harmful interference in a
residential installation. This equipment generates,
uses and can radiate radio frequency energy
and, if not installed and used in accordance
with the instruction manual, may cause harmful
interference to radio communications.
However, there is no guarantee that
interference will not occur in a particular
installation. If this equipment does cause harmful
interference to radio or television reception,
which can be determined by turning the
equipment off and on, the user is encouraged
to try to correct the interference by one or
more of the following measures:
• Relocate the receiving antenna.
• Increase the separation between
equipment and receiver.
• Connect the equipment into an outlet on
a circuit different from that to which the
receiver is connected.
• Consult the dealer or an experienced
radio/TV technician for help.
FCC Radiation Exposure Statement:This
equipment complies with FCC radiation
exposure limits set forth for an uncontrolled
environment. This equipment should be installed
and operated with a minimum distance of
20cm between the radiator and your body.
This transmitter must not be co-located or
37
EN
HTB3525B_F7_UM_V1.0.indb 37 12/10/2013 6:04:02 PM

operated in conjunction with any other antenna
or transmitter.
Warning: Changes or modications made to
this equipment not expressly approved by
Philips may void the FCC authorization to
operate this equipment.
Model number: PHILIPS HTB3525B/F7
Trade Name: Philips
Responsible Party:P&F USA, Inc. PO Box 2248
Alpharetta, GA 30023-2248; 1-866-310-0744
Canada:
This Class B digital apparatus complies with
Canadian ICES-003.
This device complies with Industry Canada
RSS-210. Operation is subject to the following
two conditions: (1) this device may not cause
interference, and (2) this device must accept
any interference, including interference that may
cause undesired operation of the device.
The device meets the exemption from the
routine evaluation limits in section 2.5 of RSS
102 and compliance with RSS-102 RF exposure,
users can obtain Canadian information on RF
exposure and compliance.
This transmitter must not be co-located or
operating in conjunction with any other antenna
or transmitter. This equipment should be
installed and operated with a minimum distance
of 20 centimeters between the radiator and
your body.
conrmation receipt within a week after mailing
to this email address, please write to "Open
Source Team, Philips Intellectual Property &
Standards, P.O. Box 220, 5600 AE Eindhoven,
The Netherlands." If you do not receive timely
conrmation of your letter, please email to the
email address above.
Trademarks
"Blu-ray 3D " and "Blu-ray 3D " logo are
trademarks of Blu-ray Disc Association.
'DVD Video' is a trademark of DVD Format/
Logo Licensing Corporation.
Manufactured under license from Dolby
Laboratories. Dolby and the double-D symbol
are trademarks of Dolby Laboratories.
Open source software
Open source software
Philips Electronics Hong Kong Ltd. hereby offers
to deliver, upon request, a copy of the complete
corresponding source code for the copyrighted
open source software packages used in this
product for which such offer is requested by
the respective licenses.
This offer is valid up to three years after
product purchase to anyone in receipt of this
information. To obtain source code, please
contact open.source@philips.com. If you prefer
not to use email or if you do not receive
38
EN
HTB3525B_F7_UM_V1.0.indb 38 12/10/2013 6:04:03 PM
Manufactured under license under U.S. Patent
Nos: 5,956,674; 5,974,380; 6,226,616; 6,487,535;
7,392,195; 7,272,567; 7,333,929; 7,212,872
& other U.S. and worldwide patents issued
& pending. DTS-HD, the Symbol, & DTSHD and the Symbol together are registered
trademarks & DTS-HD Master Audio | Essential
is a trademark of DTS, Inc. Product includes
software. DTS, Inc. All Rights Reserved.

English
DivX , DivX Certied , DivX Plus HD
and associated logos are trademarks of Rovi
Corporation or its subsidiaries and are used
under license.
ABOUT DIVX VIDEO: DivX is a digital video
format created by DivX, LLC, a subsidiary
of Rovi Corporation. This is an ofcial DivX
Certied device that plays DivX video. Visit
divx.com for more information and software
tools to convert your les into DivX videos.
ABOUT DIVX VIDEO-ON-DEMAND: This
DivX Certied device must be registered
in order to play purchased DivX Video-onDemand (VOD) movies. To obtain your
registration code, locate the DivX VOD section
in your device setup menu. Go to vod.divx.com
for more information on how to complete your
registration.
DivX Certied to play DivX and DivX Plus
HD (H.264/MKV) video up to 1080p HD
including premium content.
The terms HDMI and HDMI High-Denition
Multimedia Interface, and the HDMI Logo are
trademarks or registered trademarks of HDMI
Licensing LLC in the United States and other
countries.
Vudu is a trademark of VUDU, Inc.
CLASS 1
LASER PRODUCT
The Bluetooth word mark and logos are
registered trademarks owned by Bluetooth
SIG, Inc. and any use of such marks by Philips
is under license. Other trademarks and trade
names are those of their respective owners.
Netix and the Netix logo are trademarks or
registered trademarks of Netix, Inc.
39
EN
HTB3525B_F7_UM_V1.0.indb 39 12/10/2013 6:04:03 PM

11 Language code
Abkhazian 6566
Afar 6565
Afrikaans 6570
Amharic 6577
Arabic 6582
Armenian 7289
Assamese 6583
Avestan 6569
Aymara 6589
Azerhaijani 6590
Bahasa Melayu 7783
Bashkir 6665
Belarusian 6669
Bengali 6678
Bihari 6672
Bislama 6673
Bokmål, Norwegian 7866
Bosanski 6683
Brezhoneg 6682
Bulgarian 6671
Burmese 7789
Castellano, Español 6983
Catalán 6765
Chamorro 6772
Chechen 6769
Chewa; Chichewa; Nyanja 7889
9072
Ё᭛
Chuang; Zhuang 9065
Church Slavic; Slavonic 6785
Chuvash 6786
Corsican 6779
Česky 6783
Dansk 6865
Deutsch 6869
Dzongkha 6890
English 6978
Esperanto 6979
Estonian 6984
Euskara 6985
6976
Faroese 7079
Français 7082
Frysk 7089
Fijian 7074
Gaelic; Scottish Gaelic 7168
Gallegan 7176
Georgian 7565
Gikuyu; Kikuyu 7573
Guarani 7178
Gujarati 7185
Hausa 7265
Herero 7290
Hindi 7273
Hiri Motu 7279
Hrwatski 6779
Ido 7379
Interlingua (International)7365
Interlingue 7365
Inuktitut 7385
Inupiaq 7375
Irish 7165
Íslenska 7383
Italiano 7384
Ivrit 7269
Japanese 7465
Javanese 7486
Kalaallisut 7576
Kannada 7578
Kashmiri 7583
Kazakh 7575
Kernewek 7587
Khmer 7577
Kinyarwanda 8287
Kirghiz 7589
Komi 7586
Korean 7579
Kuanyama; Kwanyama 7574
Kurdish 7585
Lao 7679
Latina 7665
Latvian 7686
Letzeburgesch; 7666
Limburgan; Limburger 7673
Lingala 7678
Lithuanian 7684
Luxembourgish; 7666
Macedonian 7775
Malagasy 7771
Magyar 7285
Malayalam 7776
Maltese 7784
Manx 7186
Maori 7773
Marathi 7782
Marshallese 7772
Moldavian 7779
Mongolian 7778
Nauru 7865
Navaho; Navajo 7886
Ndebele, North 7868
Ndebele, South 7882
Ndonga 7871
Nederlands 7876
Nepali 7869
Norsk 7879
Northern Sami 8369
North Ndebele 7868
Norwegian Nynorsk; 7878
Occitan; Provencal 7967
Old Bulgarian; Old Slavonic 6785
Oriya 7982
Oromo 7977
Ossetian; Ossetic 7983
Pali 8073
Panjabi 8065
Persian 7065
Polski 8076
Po
rtuguês 8084
Pushto 8083
Russian 8285
Quechua 8185
Raeto-Romance 8277
Romanian 8279
Rundi 8278
Samoan 8377
Sango 8371
Sanskrit 8365
Sardinian 8367
Serbian 8382
Shona 8378
Shqip 8381
Sindhi 8368
Sinhalese 8373
Slovensky 8373
Slovenian 8376
Somali 8379
Sotho; Southern 8384
South Ndebele 7882
Sundanese 8385
Suomi 7073
Swahili 8387
Swati 8383
Svenska 8386
Tagalog 8476
Tahitian 8489
Tajik 8471
Tamil 8465
Tatar 8484
Telugu 8469
Thai 8472
Tibetan 6679
Tigrinya 8473
To nga (Tonga Islands) 8479
Tsonga 8483
Tswana 8478
Türkçe 8482
Tu rkmen 8475
Tw i 8487
Uighur 8571
Ukrainian 8575
Urdu 8582
Uzbek 8590
Vietnamese 8673
Volapuk 8679
Walloon 8765
Welsh 6789
Wolof 8779
Xhosa 8872
Yiddish 8973
Yo ruba 8979
Zulu 9085
40
HTB3525B_F7_UM_V1.0.indb 40 12/10/2013 6:04:04 PM
EN

English
12 Index
2
2nd audio language 15
2nd subtitle language 15
3
3D safety 4
A
advanced settings 26
amplier 32
audio from other devices 10
audio language 25
audio options 18
audio post processing 26
audio settings 25
auto standby 26
auto subtitle shift 26
auto volume 24
B
batteries 33
BD-Live 15
Bonus View 15
brightness 26
E
eject disc 5
enhanced audio 26
F
factory settings 27
FAQs 4
leformats 30
H
HDMI audio 25
home network 12
I
internet 12
L
language code 40
M
main unit 5
media formats 30
menu language 25
musical slideshows 19
N
C
change password 26
clear BD-Live memory 15
control buttons (disc) 14
control buttons (USB) 14
customer support 4
D
deep color 25
default settings 27
disc language 25
disc menu 25
display panel 26
HTB3525B_F7_UM_V1.0.indb 41 12/10/2013 6:04:04 PM
network 12
night mode 25
O
options 18
P
parental control 26
PBC (play back control) 26
picture options 18
picture resolution 25
picture settings 25
EN
41

picture-in-picture 15
play USB storage device 17
power settings 26
predenedsoundmode 24
R
remote control 5
repeat 18
S
shufe 18
sleep timer 26
slide animation 18
sound 23
speakerspecications 30
subtitle language 25
subtitle position 26
surround sound 23
synchronize picture and sound 14
T
troubleshooting (picture) 34
troubleshooting (play) 34
troubleshooting (sound) 34
tuning grid 20
U
update software (through Internet) 29
USB storage device 17
user manual 4
V
VCD 26
video connection (composite video) 10
video formats 32
video options 18
video settings 25
W
wired network 12
42
EN
HTB3525B_F7_UM_V1.0.indb 42 12/10/2013 6:04:04 PM

Español
Contenido
1 Importante 2
Instrucciones de seguridad impor tantes 2
Protección del producto 4
Cuidado del medio ambiente 4
Advertencia de salud sobre la
visualización de imágenes en 3D 4
Ayuda y asistencia técnica 4
6 Cambio de los ajustes 29
Conguración del idioma 29
Conguración de imagen y video 29
Conguración de audio 30
Conguración de control para padres 30
Ajustes de pantalla 30
Conguración de ahorro de energía 31
Conguración del altavoz 31
Restauración de la conguración
predeterminada 31
2 Su SoundStage 6
Unidad principal 6
Control remoto 6
Conectores 8
3 Colocación del SoundStage 9
4 Conectarycongurar 10
Conexión con el televisor 10
Conexión de audio desde el televisor
y otros dispositivos 11
Congurar EasyLink (control HDMI-
CEC) 12
Conectar y congurar una red doméstica 14
5 Utilización del SoundStage 16
Acceso al menú de inicio 16
Discos 16
Reproducción de audio a través de
Bluetooth 18
Reproducción de música a través de
NFC 19
Archivos de datos 19
Unidades de almacenamiento USB 20
Opciones de audio, video e imagen 20
Radio 22
Reproductor de MP3 23
Uso de los servicios de Internet 23
Netix 23
VUDU 24
Videos de YouTube 24
Búsqueda en la PC mediante DLNA 25
Selección de sonido 27
7 Actualización de software 32
Comprobación de la versión del software 32
Actualización de software vía USB 32
Actualización de software vía Internet 33
8 Especicacionesdelproducto 34
Códigos de región 34
Formatos multimedia 34
Formatos de archivo 34
Bluetooth 34
Formatos de audio 34
Formatos de video 35
Amplicador 36
Video 36
Audio 36
Radio 36
USB 37
Unidad principal 37
Altavoces 37
Subwoofer 37
Baterías del control remoto 37
Láser 37
9 Solución de problemas 38
10 Aviso 41
Derechos de propiedad intelectual 41
Aviso de cumplimiento 41
Software de código abierto 42
Marcas comerciales 42
11 Código de idioma 44
12 Índice 45
1
ES
HTB3525B_F7_UM_V1.0.indb 1 12/10/2013 6:04:04 PM

1 Importante
Lea y asegúrese de comprender todas las
instrucciones antes de usar el producto. La
garantía no cubre los daños producidos por no
haber seguido las instrucciones.
Instrucciones de seguridad
importantes
• Lea estas instrucciones.
• Conserve estas instrucciones.
• Preste atención a todas las advertencias.
• Siga todas las instrucciones.
• No utilice este aparato cerca del agua.
• Utilice únicamente un paño seco para la
limpieza.
• No bloquee las aperturas de ventilación.
Realice la instalación de acuerdo con las
indicaciones del fabricante.
• No realice la instalación cerca de fuentes
de calor como radiadores, rejillas de
calefacción, estufas u otros equipos que
produzcan calor (incluso amplicadores).
• Utilice el conector polarizado o con
conexión a tierra de conformidad con
las normas de seguridad. Un enchufe
polarizado cuenta con dos álabes, uno
más ancho que el otro. Los conectores
a tierra tienen dos conductores y una
tercera terminal de contacto para la
conexión a tierra. El conductor ancho
o la tercera terminal de contacto con
conexión a tierra se proveen para mayor
seguridad. Si el enchufe suministrado no
encaja correctamente en el tomacorriente,
consulte a un electricista para reemplazar
la toma.
• Proteja el cable de alimentación. Evite
pisar o doblar el cable, en particular a la
altura del conector y las terminales de
contacto del aparato.
• Utilice sólo los accesorios que especica
el fabricante.
• Utilice sólo el carrito, el soporte, el
trípode y la mesa que indica el fabricante
y los que incluye el equipo. Tenga cuidado
cuando transporte el equipo en el carrito
para evitar caídas y posibles lesiones.
• Desenchufe el equipo durante tormentas
eléctricas o cuando no se utilice por un
período prolongado.
• Todos los trabajos de servicio técnico
deben ser realizados por personal de
servicio calicado. Solicite el servicio de
asistencia técnica cuando, por ejemplo, el
cable de alimentación o el conector están
dañados, si se derramó líquido o cayeron
objetos dentro del aparato, si el equipo
estuvo expuesto a la lluvia o humedad, si
no funciona normalmente o si se cayó.
• PRECAUCIÓN: para evitar que las
baterías se sulfaten y puedan ocasionar
lesiones, daños materiales o en la unidad:
• Instale todas las baterías de forma
correcta, de acuerdo con los signos +
y - marcados en la unidad.
• No utilice baterías de distintas clases
(nuevas y usadas o de carbono y
alcalinas, etc.).
• Extraiga las pilas cuando no utilice la
unidad durante un período prolongado.
• No exponga las baterías a
temperaturas altas como las que
emiten la luz solar, el fuego u otros
elementos similares.
• Este producto contiene perclorato
y puede requerir un método de
manipulación especial. Visite www.dtsc.
ca.gov/hazardouswaste/perchlorate.
• El producto/control remoto puede
contener una batería tipo botón o moneda
fácil de tragar. Siempre mantenga las
2
ES
HTB3525B_F7_UM_V1.0.indb 2 12/10/2013 6:04:04 PM

Español
baterías lejos del alcance de los niños. En
caso de ingestión la batería podría causar
lesiones graves o la muerte. Puede haber
quemaduras internas graves en un plazo de
dos horas tras la ingestión.
• Si sospecha que una batería se ha ingerido
o introducido en cualquier parte del
cuerpo, consulte inmediatamente a un
médico.
• Al cambiar las baterías, mantenga siempre
las baterías nuevas y usadas lejos del
alcance de los niños. Verique que el
compartimiento de la batería esté bien
cerrado luego de reemplazar la batería.
• Si el compartimiento de la batería no
puede cerrarse, discontinúe el uso del
producto. Manténgalo lejos del alcance de
los niños y comuníquese con el fabricante.
• No exponga el equipo a goteos ni
salpicaduras.
• No coloque el aparato cerca de fuentes
de peligro (por ejemplo, objetos que
contengan líquidos o velas encendidas).
• Este aparato puede contener plomo
y mercurio. Cumpla con la normativa
local, estatal o nacional sobre eliminación
de productos. Comuníquese con
las autoridades locales para solicitar
información sobre la eliminación o el
reciclaje de productos. Para obtener
más información sobre las opciones de
reciclaje disponibles, ingrese en cualquiera
de los siguientes sitios web: www.
mygreenelectronics.com, www.eiae.org,
www.recycle.philips.com.
• Si el conector de alimentación u otro
conector se utilizan como dispositivos de
desconexión, deben estar accesible y fáciles
de operar.
• No coloque este aparato sobre muebles
que adultos o niños puedan tirar, inclinar
o utilizar para subirse sobre ellos. Si el
aparato se cae, puede causar heridas
graves o incluso la muerte.
• Este aparato no debe ubicarse en una
instalación cerrada como una estantería o
un rack, a menos que esté adecuadamente
ventilada. Verique que haya un espacio
mínimo de 20 cm (7,8 pulg) alrededor del
aparato.
• Precaución: si se llevan a cabo
procedimientos de control o ajuste
distintos de los que se mencionan aquí,
puede generar exposición a radiación
peligrosa.
Símbolo de equipo de Clase II
Este símbolo indica que la unidad tiene un
sistema de doble aislamiento.
Conozca estos símbolos de seguridad
El símbolo del rayo indica que los componentes
sin aislamiento dentro de la unidad pueden
generar descargas eléctricas. Para la seguridad
de todas las personas de su hogar, no retire la
cubierta del producto.
El signo de exclamación indica las características
del producto que pueden provocar problemas
de funcionamiento y mantenimiento. Por eso, se
recomienda leer el manual de instrucciones.
ADVERTENCIA: Para reducir el riesgo de
incendios o descargas eléctricas, no exponga el
aparato a la lluvia ni a la humedad, ni coloque
sobre él objetos que contengan líquidos (por
ejemplo, jarrones).
PRECAUCIÓN: Para evitar descargas eléctricas,
el conductor ancho debe introducirse por
completo en la ranura adecuada.
3
ES
HTB3525B_F7_UM_V1.0.indb 3 12/10/2013 6:04:05 PM

Protección del producto
• No introduzca ningún objeto que no sean
discos en la bandeja de discos.
• No introduzca ningún disco deformado o
roto en la bandeja de discos.
• Extraiga los discos de la bandeja si sabe
que no utilizará el producto durante un
período prolongado.
• Utilice únicamente un paño de microbra
para limpiar el producto.
Cuidado del medio ambiente
Este producto ha sido diseñado y fabricado
con materiales y componentes de alta calidad
que pueden reciclarse y reutilizarse. Visite
www.recycle.philips.com para obtener más
información sobre los centros de reciclaje de
su zona.
Nunca deseche el producto con el resto de la
basura doméstica. Infórmese sobre las normas
locales sobre la recolección selectiva de baterías
y productos eléctricos y electrónicos. La
eliminación correcta de este tipo de productos
ayuda a evitar consecuencias potencialmente
negativas para el medio ambiente y la salud
humana.
Las baterías suministradas no contienen los
materiales pesados mercurio y cadmio. Sin
embargo, en muchas áreas no se pueden
eliminar baterías junto con los desechos
domésticos. Asegúrese de eliminar las baterías
según las normativas locales.
Este producto contiene perclorato y puede
requerir un método de manipulación especial.
Visite www.dtsc.ca.gov/hazardouswaste/
perchlorate.
Advertencia de salud sobre la
visualización de imágenes en
3D
• Si en la familia existen antecedentes de
epilepsia o convulsiones por fotofobia,
consulte a un médico antes de exponerse
a fuentes de luz intermitentes, secuencias
de imágenes rápidas o imágenes en 3D.
• Para evitar malestares tales como mareos,
dolores de cabeza o desorientación,
recomendamos no mirar contenido 3D
por períodos prolongados. Si siente algún
malestar, deje de mirar las imágenes
en 3D y espere hasta que los síntomas
desaparezcan para realizar cualquier
actividad que implique riesgos (por
ejemplo, conducir un automóvil). Si los
síntomas persisten, consulte a un médico
antes de volver a mirar contenido 3D.
• Los padres deben supervisar a sus
hijos mientras miran contenido 3D y
cerciorarse de que no sufran ninguno
de los malestares mencionados. Se
recomienda que los menores de 6 años
no vean imágenes en 3D debido a que su
sistema visual aún no está completamente
desarrollado.
Ayuda y asistencia técnica
Philips brinda un amplio soporte en línea. Visite
nuestro sitio web en www.philips.com/support
para:
• descargar el manual del usuario completo
• imprimir la guía de inicio rápido
• ver tutoriales de video (solo disponible
para modelos seleccionados)
• buscar respuestas a preguntas frecuentes
(FAQ)
• enviarnos un correo electrónico con una
pregunta
• chatear con nuestro representante de
soporte.
4
ES
HTB3525B_F7_UM_V1.0.indb 4 12/10/2013 6:04:05 PM

Español
Siga las instrucciones del sitio web para
seleccionar su idioma e ingrese el número de
modelo de su producto.
También puede comunicarse con el servicio de
atención al cliente de Philips en su país. Antes
de comunicarse con Philips, anote el número de
modelo y el número de serie de su producto.
Puede buscar esta información en la parte
posterior o inferior del producto.
5
ES
HTB3525B_F7_UM_V1.0.indb 5 12/10/2013 6:04:05 PM

2 Su SoundStage
Control remoto
Felicitaciones por su compra y bienvenido a
Philips. Para poder beneciarse por completo
de los servicios de asistencia técnica de
Philips (por ejemplo, las noticaciones de
actualizaciones de software del producto),
registre su producto en www.philips.com/
welcome.
Unidad principal
En esta sección se incluye una descripción de la
unidad principal.
a
b
dc
e
En esta sección se incluye una descripción del
control remoto.
a
b
c
d
e
f
g
h
i
j
k
l
m
n
o
x
w
v
u
t
s
a
Enciende el SoundStage o cambia al modo
de espera.
b SOURCE
Selecciona una fuente de audio, video o
radio o el modo Bluetooth del SoundStage.
c Compartimiento para el disco
d -/+
Reduce o aumenta el volumen.
e
Abre o cierra el compartimento de discos.
6
ES
HTB3525B_F7_UM_V1.0.indb 6 12/10/2013 6:04:06 PM
p
q
a
• Enciende el SoundStage o cambia al
modo de espera.
• Si EasyLink está activado, manténgalo
pulsado durante al menos tres
segundos para pasar todos los
r

Español
dispositivos conectados compatibles
con HDMI CEC al modo de espera.
b Botones de servicios en línea
• YouTube: accede a videos en línea de
YouTube.
• NETFLIX: accede a videos en línea y
programas de televisión de Netix.
• VUDU: accede a videos en línea de
VUDU.
c SOURCE
Selecciona una fuente: disc/HDMI ARC/
entrada de audio/USB para el SoundStage.
d
Accede al menú de inicio.
e DISC MENU
• Accede al menú o sale del menú del
disco durante la reproducción.
f Botones de navegación
• Permite navegar por los menús.
• En el modo de radio, pulse la tecla
izquierda o la derecha para iniciar la
búsqueda automática.
• En el modo de radio, pulse arriba o
abajo para sintonizar la frecuencia.
g OK
Permite conrmar la entrada o selección.
h
• Vuelve a la pantalla del menú anterior.
• En el modo de radio, mantenga
pulsado para borrar la emisora de
radio preestablecida.
i Botones de color
Selecciona tareas u opciones para los
discos Blu-ray.
j
Abre o cierra el compartimento de discos.
k
Inicia o reanuda la reproducción.
l /
• Pasa la pista, capítulo o archivo anterior
o siguiente.
• En el modo de radio, selecciona una
emisora de radio presintonizada.
m /
Busca hacia atrás o hacia delante. Pulse
varias veces para incrementar la velocidad
de búsqueda.
n
Silencia o restaura el volumen.
o +/-
Aumenta o disminuye el volumen.
p Botones alfanuméricos
Permite introducir números o letras
(mediante el sistema de escritura SMS).
q SUBTITLE
Permite seleccionar el idioma de los
subtítulos para los videos.
r AUDIO
Selecciona un idioma o canal de audio.
s
Ingresa o sale de las opciones de sonido.
t
Hace una pausa en la reproducción.
u
Detiene la reproducción.
v
• Permite acceder a más opciones de
reproducción mientras se reproduce
el contenido del disco o unidad de
almacenamiento USB.
• En el modo de radio, permite jar una
estación de radio.
w TOP MENU
Permite acceder al menú principal de un
disco.
x
Cambia al modo Bluetooth.
7
ES
HTB3525B_F7_UM_V1.0.indb 7 12/10/2013 6:04:07 PM

Nota
• La selección de un radio o una fuente no se encuentra
activa cuando reproduce BD-Java o accede a los
servicios de internet.
Conectores
Conectores laterales
Esta sección incluye una descripción general de
los conectores disponibles en el SoundStage.
Conectores de la parte posterior
ab c d
fe
g
a FM ANTENNA
Conector de la antena FM incluida.
b ETHERNET
Se conecta a la entrada de ETHERNET de
un router o módem de banda ancha.
c OPTICAL IN
Se conecta a la salida de audio óptica del
televisor o de un dispositivo digital.
d VIDEO OUT
Se conecta a la entrada de video
compuesto del televisor.
e COAXIAL IN
Se conecta a la salida de audio coaxial del
televisor o de un dispositivo digital.
f AUX IN
Se conecta a la salida de audio analógica
del televisor o de un dispositivo analógico.
g HDMI OUT (ARC)
Se conecta a la entrada HDMI del televisor.
a AUDIO IN
Entrada de audio de un reproductor de
MP3 (toma de 3,5 mm).
b
• Entrada de audio, video o imágenes de
un dispositivo de almacenamiento USB.
• Acceso a BD-Live.
8
ES
HTB3525B_F7_UM_V1.0.indb 8 12/10/2013 6:04:08 PM

Español
3 Colocación del
SoundStage
Este SoundStage se ha diseñado para colocarse
debajo del televisor.
2 Asegúrese de que la base de televisor está
centrada y no se inclina sobre alguno de
sus bordes.
Precaución
• El SoundStage se ha diseñado para televisores que no
pesen más de 22 kg. La mayoría de televisores de 42"
o más pequeños y algunos televisores de 55" cumplen
con este requisito. No coloque un televisor tipo CRT
en el SoundStage.
• No coloque el SoundStage en un carrito, balda,
soporte o mesa que sean inestables. De lo contrario, el
SoundStage podría caerse y provocar heridas graves a
un niño o un adulto y daños graves al producto.
• Asegúrese de que las aberturas de ventilación del panel
trasero no estén bloqueadas.
• No cambie la posición del SoundStage después de
colocar su televisor encima.
1 Coloque el SoundStage en cualquier
supercie plana y estable cerca de
su televisor. A continuación coloque
su televisor en la parte superior del
SoundStage.
Sugerencia
• Si la base del televisor es demasiado grande para
ponerla encima del SoundStage, coloque el SoundStage
en otra ubicación, como una balda debajo del televisor,
pero manténgalo cerca del televisor para que el cable
de audio alcance. También puede colocar su televisor en
la pared encima del SoundStage.
• Si su televisor incorpora un dispositivo para que no se
vuelque, instálelo de acuerdo con las instrucciones del
fabricante y ajuste la cinta de sujeción tras colocar el
televisor encima del SoundStage.
• Si coloca el SoundStage en un mueble o una estantería,
para un rendimiento de audio óptimo, asegúrese de
que la parte frontal del SoundStage está lo más cerca
posible del borde frontal de la estantería.
• Si coloca el SoundStage en una pared, asegúrese de
que hay al menos una distancia de 1 pulgada entre la
pared y la parte trasera del SoundStage.
ES
HTB3525B_F7_UM_V1.0.indb 9 12/10/2013 6:04:08 PM
9

4 Conectar y
configurar
Esta sección le ayuda a conectar el SoundStage
a un televisor o a otros dispositivos, y también a
congurarlo.
Para obtener información sobre las conexiones
básicas del SoundStage y los accesorios,
consulte la guía de inicio rápido.
Nota
• Consulte la placa de identicación ubicada en la parte
trasera o inferior del producto para obtener más
información acerca de las clasicaciones de energía.
• Asegúrese de que todos los dispositivos estén
desenchufados antes de realizar o cambiar una
conexión.
Conexión con el televisor
Conecte el SoundStage a un televisor para ver
videos. Puede escuchar el sonido del televisor a
través del SoundStage.
Use la conexión de mejor calidad disponible en
el SoundStage y el televisor.
Opción 1: conexión al televisor a
través de HDMI (ARC)
Calidad de video óptima
El SoundStage es compatible con versión
HDMI con Audio Return Channel (ARC). Si
el televisor es compatible con HDMI ARC,
podrá oír el sonido del televisor a través del
SoundStage utilizando un solo cable HDMI.
TV
1 Enchufe el conector HDMI OUT (ARC)
del SoundStage al conector HDMI ARC de
su televisor mediante un cable HDMI de
alta velocidad.
• El conector HDMI ARC del televisor
puede tener una etiqueta distinta. Para
obtener más información, consulte el
manual del usuario del televisor.
2 En el televisor, encienda las operaciones
HDMI-CEC. Para obtener más información,
consulte el manual del usuario del televisor.
• HDMI-CEC es una función que
permite controlar los dispositivos
compatibles con CEC que están
conectados vía HDMI con un único
control remoto; por ejemplo, permite
controlar el volumen del televisor y el
SoundStage.
3 Si no se oye el sonido del televisor a
través del SoundStage, congure el sonido
manualmente (consulte 'Congurar el
audio' en la página 13).
Opción 2: conectar al televisor a
través de HDMI estándar
Calidad de video óptima
Si su televisor no es compatible con HDMI
ARC, conéctelo al SoundStage mediante una
conexión HDMI estándar.
10
ES
HTB3525B_F7_UM_V1.0.indb 10 12/10/2013 6:04:08 PM

Español
Si el televisor no tiene conectores HDMI,
use una conexión de video compuesta. Las
TV
conexiones compuestas no son compatibles
con los videos de alta denición.
1 Enchufe el conector HDMI OUT (ARC)
del SoundStage al conector HDMI de su
televisor mediante un cable HDMI de alta
velocidad.
2 Conecte un cable de audio para oír el
televisor a través del SoundStage (consulte
'Conexión de audio desde el televisor y
otros dispositivos' en la página 11).
3 En el televisor, encienda las operaciones
HDMI-CEC. Para obtener más información,
consulte el manual del usuario del televisor.
• HDMI-CEC es una función que
permite controlar los dispositivos
compatibles con CEC que están
conectados vía HDMI con un único
control remoto; por ejemplo, permite
controlar el volumen del televisor y
el SoundStage. (consulte 'Congurar
EasyLink (control HDMI-CEC)' en la
página 12)
4 Si no se oye el sonido del televisor a
través del SoundStage, congure el sonido
manualmente. (consulte 'Congurar el
audio' en la página 13)
TV
1 Con un cable de video compuesto,
conecte el conector VIDEO OUT del
SoundStage al conector VIDEO IN del
televisor.
• Es posible que el conector de video
compuesto esté rotulado con las
etiquetas AV IN, COMPOSITE o
BASEBAND.
2 Conecte un cable de audio para oír el
televisor a través del SoundStage (consulte
'Conexión de audio desde el televisor y
otros dispositivos' en la página 11).
3 Cuando vea programas de televisión,
pulse SOURCE en el SoundStage varias
veces para seleccionar la entrada de audio
correcta.
4 Cuando vea videos, cambie el televisor a
la entrada de video correcta. Para obtener
más información, consulte el manual del
usuario del televisor.
Nota
• Si su televisor tiene un conector DVI, puede usar
un adaptador de HDMI a DVI para conectarlo al
televisor. Sin embargo, es posible que algunas de las
características no estén disponibles.
Opción 3: conexión al televisor a
través de video compuesto
Calidad de video básica
HTB3525B_F7_UM_V1.0.indb 11 12/10/2013 6:04:09 PM
Conexión de audio desde el
televisor y otros dispositivos
Reproduzca el audio del televisor o el audio de
otros dispositivos a través del SoundStage.
Utilice el método de conexión de mayor calidad
disponible en el televisor, en el SoundStage y en
otros dispositivos.
11
ES

Nota
• Cuando el SoundStage y el televisor están conectados
a través de HDMI ARC, no es necesario utilizar una
conexión de audio. (consulte 'Opción 1: conexión al
televisor a través de HDMI (ARC)' en la página 10)
Opción 1: conexión del audio a través
de un cable óptico digital
Calidad de audio óptima
TV
Opción 3: conexión de audio a través
de cables de audio analógicos
Calidad de audio básica
1 Mediante un cable analógico, conecte
el conector AUX IN del SoundStage al
conector AUDIO OUT del televisor o a
los conectores de otro dispositivo.
VCR
1 Mediante un cable óptico, conecte el
conector OPTICAL IN del SoundStage al
conector OPTICAL OUT del televisor o
al conector de otro dispositivo.
• El conector óptico digital puede tener
la etiqueta SPDIF o SPDIF OUT.
Opción 2: conexión del audio a través
de un cable coaxial digital
Buena calidad de audio
1 Mediante un cable coaxial, conecte el
conector COAXIAL IN del SoundStage al
conector COAXIAL/DIGITAL OUT del
televisor o de otro dispositivo.
• El conector coaxial digital puede tener
la etiqueta DIGITAL AUDIO OUT.
CongurarEasyLink(control
HDMI-CEC)
Este SoundStage es compatible con Philips
EasyLink, que utiliza el protocolo HDMI-CEC
(Consumer Electronics Control). Los equipos
compatibles con EasyLink que se conectan a
través de HDMI pueden controlarse por medio
de un único control remoto.
Nota
• Dependiendo del fabricante, HDMI-CEC se conoce
con muchos nombres. Para obtener información
sobre el dispositivo, consulte el manual del usuario del
dispositivo.
• Philips no garantiza una interoperatividad total con
todos los dispositivos HDMI-CEC.
Procedimientos preliminares
• Conecte el SoundStage al dispositivo
compatible con HDMI-CEC a través de la
conexión HDMI.
• Realice las conexiones necesarias descritas
en la guía de inicio rápido. Luego, cambie
la entrada del TV a la fuente correcta en el
SoundStage.
12
ES
HTB3525B_F7_UM_V1.0.indb 12 12/10/2013 6:04:09 PM

Español
Habilitar Easylink
1 Pulse .
2 Seleccione [Conguración] y, a
continuación, pulse OK.
3 Seleccione [EasyLink] > [EasyLink] >
[Encendido].
4 En el televisor y otros dispositivos
conectados, encienda el control de HDMICEC. Para obtener detalles, consulte el
manual del usuario del televisor o de los
otros dispositivos.
• En el televisor, congure la salida de
audio a "Amplicador" (en lugar de los
altavoces del televisor). Para obtener
más información, consulte el manual
del usuario del televisor.
Controles de EasyLink
Con EasyLink, puede controlar el SoundStage,
el televisor y otros dispositivos compatibles con
HDMI-CEC conectados, con un solo control
remoto.
• [Reproducción con un solo botón]
(Reproducción de un toque): cuando haya
un disco de video en la bandeja, pulse
para encender el televisor desde el modo
de espera y, a continuación, reproduzca el
disco.
• [Modo de espera con un solo botón]
(Modo de espera de un toque): si el modo
de espera con un solo toque está activado
en el SoundStage, puede pasar al modo de
espera con el control remoto del televisor
u otros dispositivos HDMI-CEC.
• [Control de audio del sistema] (Control
de audio del sistema): si el control de
audio del sistema está activado, el audio
del dispositivo conectado se transmitirá
automáticamente a través de los altavoces
del SoundStage una vez que reproduzca el
dispositivo.
• [Asignación de entrada de audio]
(Asignación de entradas de audio):si el
control de audio del sistema no funciona,
asigne el dispositivo conectado al conector
de entrada de audio correspondiente en el
SoundStage (consulte 'Congurar el audio'
en la página 13).
Nota
• Para cambiar la conguración de control de EasyLink,
pulse , seleccione [Conguración] > [EasyLink].
Congurarelaudio
Si no se oye el sonido de un dispositivo
conectado a través de los altavoces del
SoundStage, haga lo siguiente:
• Compruebe que ha activado EasyLink en
todos los dispositivos (consulte 'Habilitar
Easylink' en la página 13) y,
• en el TV, ajuste la salida de audio en
"Amplier" (Amplicador) (en lugar de
hacerlo en los altavoces del TV). Para
obtener más información, consulte el
manual de usuario del televisor y
• congure el control de audio EasyLink.
1 Pulse .
2 Seleccione [Conguración] y, a
continuación, pulse OK.
3 Seleccione [EasyLink] > [Control de
audio del sistema] > [Encendido].
• Para reproducir audio desde los
altavoces del televisor, seleccione
[Apagado] y omita los siguientes pasos.
4 Seleccione [EasyLink] > [Asignación de
entrada de audio].
5 Siga las instrucciones en pantalla para
asignar el dispositivo conectado a las
entradas de audio del SoundStage.
• Si conecta su SoundStage al televisor
a través de una conexión HDMI ARC,
verique que el audio del televisor
se asigne a la entrada ARC del
SoundStage.
13
ES
HTB3525B_F7_UM_V1.0.indb 13 12/10/2013 6:04:09 PM

Conectaryconguraruna
red doméstica
Conecte el SoundStage a un router para
congurar la red y disfrute de:
• Transmisión de contenido multimedia
(consulte 'Búsqueda en la PC mediante
DLNA' en la página 25)
• Aplicaciones BD-Live (consulte 'Acceso a
BD-Live en Blu-ray' en la página 18)
• Actualización de software (consulte
'Actualización de software vía Internet' en
la página 33)
Precaución
• Familiarícese con el router de red, el software de
servidor de medios y los principios de conexión de
red. De ser necesario, lea la información suministrada
con los componentes de la red. Philips no se hace
responsable por los datos perdidos o dañados.
Procedimientos preliminares
• Para acceder a la actualización de software,
el router de red debe tener acceso a
Internet de alta velocidad y no debe
encontrarse restringido por rewalls u
otros sistemas de seguridad.
• Realice las conexiones necesarias descritas
en la guía de inicio rápido. Luego, cambie
la entrada del TV a la fuente correcta en el
SoundStage.
Instalación de una red con cables
Requisitos:
• Un cable de red (cable de línea directa
RJ45).
• Un router de red (con DHCP habilitado).
ETHERNET
www
1 Con un cable de red, conecte el conector
ETHERNET del SoundStage al router de
red.
2 Pulse .
3 Seleccione [Conguración] y, a
continuación, pulse OK.
4 Seleccione [Red] > [Instalación de red] >
[Con cable (Ethernet)].
5 Siga las instrucciones en pantalla para
completar la conguración.
• Si se produce algún error en la
conexión, seleccione [Reintentar] y, a
continuación, pulse OK.
6 Seleccione [Finalizar] y, a continuación,
pulse OK para salir.
• Para ver la conguración de red,
seleccione [Conguración] > [Red] >
[Ver los ajustes de red].
Personalizar el nombre de red
Proporcione un nombre al SoundStage para
identicarlo fácilmente en la red doméstica.
1 Pulse .
2 Seleccione [Conguración] y, a
continuación, pulse OK.
3 Seleccione [Red] > [Nombre del
producto:].
4 Pulse Botones alfanuméricos para ingresar
el nombre.
14
ES
HTB3525B_F7_UM_V1.0.indb 14 12/10/2013 6:04:10 PM

Español
5 Seleccione [Completo] y, a continuación,
pulse OK para salir.
15
ES
HTB3525B_F7_UM_V1.0.indb 15 12/10/2013 6:04:10 PM

5 Utilización del
Discos
SoundStage
En esta sección, lo ayudaremos a utilizar el
SoundStage para reproducir medios de una
amplia variedad de fuentes.
Procedimientos preliminares
• Realice las conexiones necesarias que se
describen en la guía de inicio rápido y en
este manual del usuario.
• En el televisor, seleccione la fuente
correspondiente al SoundStage.
Acceso al menú de inicio
El menú de inicio proporciona un acceso
sencillo a los dispositivos conectados, la
conguración y otras funciones útiles del
SoundStage.
1 Pulse .
» Aparecerá el menú de inicio.
2 Pulse Botones de navegación y OK para
seleccionar:
• [reproducir Disco]: Reproduzca el
disco.
• [buscar USB]: acceder al explorador
de contenido USB
• [YouTube]: acceder al servicio de
YouTube.
• [Netix]: acceder al servicio de Netix.
• [VUDU]: acceder al servicio de VUDU.
• [Picasa]: Accede a los álbumes web de
Picasa.
• [AccuWeather]: acceder a un servicio
de pronóstico meteorológico en línea
a nivel mundial.
• [buscar PC]: acceder al explorador de
contenido de la computadora.
• [Conguración]: acceso a los menús
para cambiar la conguración de video,
audio y de otros tipos.
3 Pulse para salir.
El SoundStage puede reproducir discos DVD,
VCD, CD y Blu-ray. También reproduce discos
caseros, como discos CD-R con fotos, videos y
música.
1 Inserte un disco en el SoundStage.
2 Si el disco no se reproduce
automáticamente, seleccione [reproducir
Disco] en el menú de inicio.
3 Utilice el control remoto para controlar
la reproducción. (consulte 'Botones de
reproducción' en la página 16)
• Es normal escuchar un ruido leve
durante la reproducción de un
disco Blu-ray. Esto no signica que el
SoundStage está defectuoso.
Botones de reproducción
Botón Acción
Botones de
navegación
OK Permite conrmar la entrada
(Reproducción)
Hace una pausa en la
Detiene la reproducción.
/ Pasa la pista, capítulo o
Permite navegar por los
menús.
Arriba/abajo: Gira la imagen
en el sentido de las agujas
del reloj o en el sentido
contrario.
o selección.
Inicia o reanuda la
reproducción.
reproducción.
Abre o cierra el
compartimento de discos.
archivo anterior o siguiente.
16
ES
HTB3525B_F7_UM_V1.0.indb 16 12/10/2013 6:04:10 PM

Español
Botón Acción
/ Busca hacia atrás o hacia
delante rápidamente.
Cuando un video está
en pausa, permite buscar
lentamente hacia atrás o
adelante.
SUBTITLE Permite seleccionar el
idioma de los subtítulos para
los videos.
DISC MENU Accede o sale del menú del
disco.
TOP MENU Permite acceder al menú
principal de un disco.
Accede a las opciones
avanzadas durante la
reproducción de audio,
video o archivos multimedia
(consulte 'Opciones de
audio, video e imagen' en la
página 20).
• Un par de gafas 3D compatibles con su
televisor 3D
• Un video 3D Blu-ray
• Un cable HDMI de alta velocidad
1 Use el cable HDMI de alta velocidad para
conectar el SoundStage a un televisor
compatible con 3D.
2 Compruebe que la conguración de video
de 3D esté habilitada. Pulse , seleccione
[Conguración] > [Video] > [Ver video
3D] > [Automático].
• Para reproducir discos 3D en modo
2D, seleccione [Apagado].
3 Reproduzca un disco Blu-ray 3D y póngase
los lentes 3D.
• Durante la búsqueda de video y en
ciertos modos de reproducción, el
video se muestra en 2D. La pantalla
de video vuelve al modo 3D cuando
reanuda la reproducción.
Sincronización de imagen y sonido
Si el audio y el video no están sincronizados,
puede retrasar el audio para que se
corresponda con el video.
1 Pulse .
2 Pulse los Botones de navegación
(izquierda / derecha) para seleccionar
[Sincronización de audio] y, a continuación,
pulse OK.
3 Pulse el botón Botones de navegación
(arriba/abajo) para sincronizar el audio con
el video.
4 Pulse OK para conrmar.
Reproducir discos Blu-ray 3D.
El SoundStage permite reproducir video Blu-ray
en 3D. Lea la advertencia de salud de 3D antes
de reproducir un disco 3D.
Requisitos:
• Un televisor 3D
Nota
• Para evitar el parpadeo, cambie el brillo de la pantalla.
Utilización de Bonus View en Blu-ray
En discos Blu-ray compatibles con Vista de
extras, disfrute de contenido adicional como
comentarios en una pequeña ventana de la
pantalla. Bonus View también se conoce como
Picture-in-Picture.
1 Habilite Vista de extras en el menú del
disco Blu-ray.
2 Mientras reproduce películas, pulse .
» Aparecerá el menú de opciones.
3 Seleccione [Selección de PIP] > [PIP].
• Según el video, se mostrarán los menús
PIP [1] o [2].
• Para deshabilitar Vista de extras,
seleccione [Apagado].
4 Seleccione [2º idioma de audio] o [2º
idioma de subtítulos].
ES
17
HTB3525B_F7_UM_V1.0.indb 17 12/10/2013 6:04:10 PM

5 Seleccione un idioma y, a continuación,
pulse OK.
Acceso a BD-Live en Blu-ray
Acceda a funciones adicionales en los discos
Blu-ray con contenido de BD-Live, como chats
de Internet con el director, últimos avances de
películas, juegos, fondos de pantalla y tonos de
llamada.
Los servicios de BD-Live y el contenido pueden
variar de un disco a otro.
Requisitos:
• un Disco Blu-ray con contenido de BDLive
• un dispositivo de almacenamiento USB con
1 GB de memoria como mínimo
1 Conecte el SoundStage a una red
doméstica con acceso a Internet.
2 Conecte un dispositivo de almacenamiento
USB al conector del lado derecho del
SoundStage para descargar BD-Live.
3 Pulse y seleccione [Conguración]
> [Avanzada] > [Seguridad BD-Live] >
[Apagado].
• Para deshabilitar BD-Live, seleccione
[Encendido].
4 Seleccione el icono de BD-Live en el menú
del disco y, a continuación, pulse OK.
» BD-Live comenzará a cargarse. El
tiempo de carga dependerá del disco y
de la conexión a Internet.
5 Pulse Botones de navegación para navegar
por BD-Live y, a continuación, pulse OK
para seleccionar una opción.
Nota
• Para borrar la memoria en el dispositivo de
almacenamiento, pulse , seleccione [Conguración]
> [Avanzada] > [Borre la memoria].
Reproducción de audio a
través de Bluetooth
A través de Bluetooth, conecte el SoundStage
al dispositivo Bluetooth (como un iPad, iPhone,
iPod touch, teléfono Android o portátil)
y podrás escuchar los archivos de audio
almacenados en el dispositivo a través del
SoundStage.
Requisitos:
• Un dispositivo Bluetooth compatible con
el perl Bluetooth A2DP, AVRCP y con la
versión de Bluetooth 2.1 + EDR.
• El alcance de funcionamiento entre el
SoundStage y un dispositivo Bluetooth es
de unos 10 metros (30 pies).
1 Pulse para seleccionar el modo
Bluetooth.
» Aparece [BT] en el panel de
visualización.
2 En el dispositivo Bluetooth, active la
función Bluetooth, busque y seleccione el
nombre de su SoundStage para iniciar la
conexión (consulte el manual de usuario
del dispositivo Bluetooth para saber cómo
se activa la función Bluetooth).
• Si se le solicita una contraseña,
introduzca "0000".
3 Espera hasta oír un pitido en el producto.
» Cuando la conexión Bluetooth se
establezca correctamente, se mostrará
[BT_RE] en el panel de visualización.
» Si la conexión falla, se seguirá
mostrando [BT] en el panel de
visualización.
4 Seleccione y reproduzca archivos de audio
o música en el dispositivo Bluetooth.
• Durante la reproducción, si se recibe
una llamada, la reproducción de música
se pone en pausa.
• Si se interrumpe la transmisión
de música, acerque el dispositivo
Bluetooth al SoundStage.
18
ES
HTB3525B_F7_UM_V1.0.indb 18 12/10/2013 6:04:10 PM

Español
5 Para salir del modo Bluetooth, seleccione
otra fuente.
• Al volver al modo Bluetooth, la
conexión Bluetooth permanecerá
activa.
Nota
• La transmisión de música se puede interrumpir si hay
obstáculos entre el dispositivo y el SoundStage, como
una pared, una carcasa metálica que cubra el dispositivo
u otro dispositivo cercano que funcione en la misma
frecuencia.
• Si desea conectar el SoundStage a otro dispositivo
Bluetooth, mantenga pulsado en el control remoto
para desconectar el dispositivo Bluetooth conectado
actualmente.
Reproducción de música a
través de NFC
NFC (Near Field Communication) es una
tecnología que permite la comunicación
inalámbrica de corto alcance entre dispositivos
con NFC, como los teléfonos móviles.
Requisitos:
• Un dispositivo Bluetooth con función NFC.
• Para realizar el emparejamiento, toque el
dispositivo con NFC en la etiqueta NFC
de este producto.
• El alcance de funcionamiento entre la
unidad principal (altavoces izquierdo y
derecho) y un dispositivo con NFC es de
10 metros (30 pies) aproximadamente.
1 Active la función NFC en el dispositivo
Bluetooth (consulte el manual de usuario
del dispositivo para obtener información).
2 Toque el dispositivo con NFC en la
etiqueta NFC de este producto hasta que
oiga un pitido.
» El dispositivo con NFC está conectado
a este producto mediante Bluetooth.
Se muestra [BT].
3 Seleccione y reproduzca archivos de audio
o música en el dispositivo con NFC.
• Para cancelar la conexión, vuelva a
tocar el dispositivo con NFC con la
etiqueta NFC en este producto.
Archivos de datos
El SoundStage permite reproducir archivos de
imagen, audio y video que estén en un disco
o dispositivo de almacenamiento USB. Antes
de reproducir un archivo, compruebe que el
formato es compatible con el SoundStage
(consulte 'Formatos de archivo' en la página
34).
1 Reproduzca archivos desde un disco o un
dispositivo de almacenamiento USB.
2 Para detener la reproducción, pulse .
• Para reanudar el video desde el punto
en el que se detuvo, pulse .
• Para reproducir el video desde el
principio, pulse OK.
Nota
• Para reproducir archivos DivX protegidos con DRM,
conecte el SoundStage al televisor mediante un cable
HDMI.
Subtítulos
Si su video tiene subtítulos en varios idiomas,
seleccione un idioma para los subtítulos.
Nota
• Asegúrese de que el archivo con los subtítulos tenga
exactamente el mismo nombre que el archivo de
video. Por ejemplo, si el nombre del archivo de video
es "movie.avi", guarde el archivo de subtítulos como
"movie.srt" o "movie.sub".
• El SoundStage es compatible con los siguientes
formatos de archivo: .srt, .sub, .txt, .ssa, .ass, .smi y .sami.
Si los subtítulos no aparecen correctamente, cambie el
conjunto de caracteres.
1 Mientras reproduce el video, pulse
SUBTITLE para seleccionar un idioma.
19
ES
HTB3525B_F7_UM_V1.0.indb 19 12/10/2013 6:04:10 PM

2 Para videos DivX, si los subtítulos no
aparecen correctamente, siga los pasos a
continuación para cambiar el conjunto de
caracteres.
3 Pulse .
» Aparecerá el menú de opciones.
4 Seleccione [Conjunto de caracteres] y,
a continuación, seleccione el conjunto de
caracteres compatible con los subtítulos.
Conjunto
de
caracteres
[Estándar] Inglés, albanés, danés, holandés,
[Europa
central]
[Cirílico] Búlgaro, bielorruso, inglés,
[Griego] Griego
[Báltico] Estonio, letón y lituano
Idioma
nlandés, francés, gaélico, alemán,
italiano, curdo (latín), noruego,
portugués, español, sueco y turco
Albanés, croata, checo, holandés,
inglés, alemán, húngaro, irlandés,
polaco, rumano, eslovaco, esloveno
y serbio
macedonio, moldavo, ruso serbio
y ucraniano
código VOD para DivX
Antes de comprar videos DivX y reproducirlos
en el SoundStage, registre el SoundStage en
www.divx.com con el código de DivX VOD.
1 Pulse .
2 Seleccione [Conguración] y, a
continuación, pulse OK.
3 Seleccione [Avanzada] > [Código DivX®
VOD].
» Aparecerá el código de registro de
DivX VOD del SoundStage.
Unidades de almacenamiento
USB
Disfrute de imágenes, audio y video almacenado
en un dispositivo de almacenamiento USB
como un reproductor de MP4 o cámara digital.
Requisitos:
• Una unidad de almacenamiento USB
compatible con el sistema de archivos FAT
o NTFS y los sistemas de almacenamiento
masivo.
• Un archivo de medios de uno de los
formatos de archivo compatibles (consulte
'Formatos de archivo' en la página 34).
Nota
• Si usa un cable de extensión USB, USB HUB o
multilector USB, es posible que no se reconozca el
dispositivo de almacenamiento USB.
1 Conecte un dispositivo de almacenamiento
USB al conector (USB) del
SoundStage.
2 Pulse .
3 Seleccione [buscar USB] y, a continuación,
pulse OK.
» Aparecerá un explorador de
contenido.
4 Seleccione un archivo y, a continuación,
pulse OK.
5 Pulse los botones de reproducción para
controlar la reproducción (consulte
'Botones de reproducción' en la página
16).
Opciones de audio, video e
imagen
Use las opciones avanzadas durante la
reproducción de archivos de imagen, audio
y video desde un disco o un dispositivo de
almacenamiento USB.
20
ES
HTB3525B_F7_UM_V1.0.indb 20 12/10/2013 6:04:11 PM

Español
Opciones de audio
Durante la reproducción de audio puede
repetir una pista, un disco o una carpeta.
1 Pulse varias veces para desplazarse por
las siguientes funciones:
• Repite la pista o el archivo actual.
• Repite todas las pistas del disco o la
carpeta.
• Apaga el modo de repetición.
Opciones de video
Durante la reproducción de video, seleccione
las opciones de subtítulos, idioma de audio,
búsqueda de tiempo y ajustes de imagen, entre
otras. Según la fuente de video, es posible que
algunas opciones no estén disponibles.
1 Pulse .
» Aparecerá el menú de opciones de
video.
2 Pulse Botones de navegación y OK para
seleccionar y cambiar:
• [Información]: Muestra información
sobre la reproducción en curso.
• [Idioma de audio]: Selecciona el
idioma de audio para el video.
• [Idioma de subtítulos]: Permite
seleccionar el idioma de los subtítulos
para los videos.
• [Cambio de subtítulos]: Ajusta la
posición de los subtítulos en la pantalla.
• [Conjunto de caracteres]: Seleccione
un grupo de caracteres que admitan
los subtítulos DivX.
• [Búsqueda de tiempo]: Pasa
rápidamente a una sección especíca
del video si se introduce el tiempo
exacto de la escena.
• [2º idioma de audio]: Selecciona un
segundo idioma de audio para los
videos Blu-ray.
• [2º idioma de subtítulos]: Selecciona
un segundo idioma para los subtítulos
de los videos Blu-ray.
• [Títulos]: Selecciona un título
especíco.
• [Capítulos]: Selecciona un capítulo
especíco.
• [Lista de ángulos]: Selecciona un
ángulo de cámara diferente.
• [Menús]: Muestra el menú del disco.
• [Selección de PIP]: Muestra la ventana
Picture-in-Picture al reproducir un
disco Blu-ray compatible con Bonus
View.
• [Acercar]: Amplía una escena de video
o imagen. Pulse el botón Botones de
navegación (izquierda/derecha) para
seleccionar el grado de zoom.
• [Repetir]: Repite un capítulo o un
título.
• [Repetir A-B]: Marca dos puntos de
un capítulo o una pista para repetir su
reproducción, o desactiva el modo de
repetición.
• [Ajustes de imagen]: Selecciona un
ajuste de color predenido.
Opciones de imagen
Mientras mira una imagen puede agrandarla,
rotarla, agregarle animación a una presentación
de diapositivas y modicar los ajustes de
imagen.
1 Pulse .
» Aparecerá el menú de opciones de
imagen.
2 Pulse Botones de navegación y OK para
seleccionar y cambiar los siguientes ajustes:
• [Información]: Muestra la información
de la imagen.
• [Rotar +90]: Gira la imagen 90 grados
hacia la derecha.
• [Rotar -90]: Gira la imagen 90 grados
hacia la izquierda.
• [Acercar]: Amplía una escena de video
o imagen. Pulse el botón Botones de
navegación (izquierda/derecha) para
seleccionar el grado de zoom.
21
ES
HTB3525B_F7_UM_V1.0.indb 21 12/10/2013 6:04:11 PM

• [Duración por diapositiva]: Selecciona
la velocidad de visualización de
cada imagen en una secuencia de
dispositivas.
• [Animación con diapositivas]:
Selecciona una animación para la
secuencia de diapositivas.
• [Ajustes de imagen]: Selecciona un
ajuste de color predenido.
• [Repetir]: Vuelve a reproducir el
contenido de la carpeta seleccionada.
Secuencia de diapositivas con música
Si los archivos de imagen y audio son del
mismo disco o dispositivo de almacenamiento
USB, puede crear una secuencia de diapositivas
con música.
1 Seleccione una pista de audio y pulse OK.
2 Pulse y acceda a la carpeta de
imágenes.
3 Seleccione una foto y, a continuación,
pulse para iniciar la reproducción de la
secuencia.
4 Pulse para detener la secuencia de
diapositivas.
5 Pulse nuevamente para detener la
reproducción de música.
Nota
• Asegúrese de que los formatos de audio e imagen son
compatibles con el SoundStage (consulte 'USB' en la
página 37).
Radio
Escuche la radio FM en el SoundStage y
almacene hasta 40 emisoras de radio.
Nota
• Las emisoras de radio AM y digitales no son
compatibles.
• Si no se detecta una señal de estéreo, se le indicará que
instale las emisoras de radio nuevamente.
1 Conecte la antena FM a FM ANTENNA
del SoundStage.
• Para obtener una recepción óptima,
coloque la antena lejos del televisor u
otras fuentes de radiación.
2 Pulse SOURCE varias veces para
seleccionar la fuente de radio.
» Si ya instaló las estaciones de radio,
comenzará a reproducirse el último
canal que escuchó.
» Si todavía no instaló emisoras de
radio, en la pantalla aparecerá el
mensaje [AUTO INSTALL...PRESS
PLAY] (Instalación automática...pulse
Reproducir). Pulse para instalar
emisoras de radio.
3 Use el control remoto para seleccionar o
cambiar emisoras de radio.
Botones de reproducción
Botón Acción
/
O bien
Botones
alfanuméricos
Botones de
navegación
Púlselo para detener la
Manténgalo pulsado para
Seleccione una presintonía.
Izquierda/ derecha: Busque una
emisora de radio.
Arriba/abajo: Sintonice una
frecuencia de radio.
instalación de emisoras de
radio.
borrar la emisora de radio
presintonizada.
22
ES
HTB3525B_F7_UM_V1.0.indb 22 12/10/2013 6:04:11 PM

Español
Botón Acción
SUBTITLE Alterna entre los modos
Manual: 1) Pulse . 2) Pulse
/ para seleccionar su
presintonía. 3) Pulse otra
vez para almacenar la emisora
de radio.
Automático: manténgalo
pulsado durante tres segundos
para volver a instalar las
emisoras de radio.
estéreo y mono.
Intervalo de sintonización
En algunos países, puede cambiar los intervalos
de sintonización FM entre 50 kHz y100 kHz.
1 Pulse SOURCE varias veces para
seleccionar la fuente de radio.
2 Pulse .
3 Mantenga pulsado para alternar entre
50 kHz o 100 kHz.
Reproductor de MP3
Conecte un reproductor MP3 para reproducir
archivos de audio.
Requisitos:
• Un reproductor de MP3.
• Un cable de audio estéreo de 3,5 mm
1 Conecte el reproductor MP3 al conector
AUDIO IN en el SoundStage mediante el
cable de audio estéreo de 3,5 mm.
• Si utiliza el cable de audio estéreo de
6,5 mm, conecte el reproductor de
MP3 al SoundStage con el conversor
de 3,5 mm a 6,5 mm.
2 Pulse AUDIO.
3 Pulse los botones del reproductor de MP3
para seleccionar y reproducir archivos de
audio.
Uso de los servicios de
Internet
Con el SoundStage, puede acceder a servicios
en línea, como películas, imágenes y música.
Requisitos:
• Una conexión a Internet de alta velocidad
en el SoundStage (consulte 'Conectar y
congurar una red doméstica' en la página
14).
1 Pulse .
» Aparecerá el menú de inicio.
2 Seleccione un servicio de Internet y
presione OK.
• [Netix]: un servicio de suscripción
en línea que ofrece transmisión de
películas y series de televisión a través
de Internet
• [YouTube]: un servicio para compartir
videos
• [Picasa]: un álbum de fotos en línea
• [VUDU]: un servicio de películas en
línea
• [AccuWeather]: un servicio de
pronóstico meteorológico en línea a
nivel mundial.
Netix
Use Netix para transmitir películas y
programas de televisión a través del
SoundStage. También puede alquilar videos
desde tiendas en línea.
Para obtener más información sobre los
servicios de Netix, visite www.netix.com.
1 Conecte el SoundStage a una red
doméstica con acceso a Internet de alta
velocidad. (consulte 'Conectar y congurar
una red doméstica' en la página 14)
2 Pulse NETFLIX.
» Aparecerá la página principal de
Netix.
23
ES
HTB3525B_F7_UM_V1.0.indb 23 12/10/2013 6:04:11 PM

3 Use el control remoto para iniciar la
reproducción de un video.
» Si no ha activado el SoundStage para
reproducir videos de Netix, aparecerá
un código de activación.
» Si ya activó el SoundStage, omita el
paso 5.
4 Desde su computadora, ingrese en
www.netix.com/activate para activar el
SoundStage con el código correspondiente.
• Debe iniciar sesión como un miembro
de Netix.
5 Para salir de Netix, pulse .
Nota
• Para desactivar Netix desde el SoundStage, pulse
y, a continuación, seleccione [Conguración] >
[Desactivación] > [Netix]. [Desactivación]
• Al ponerse en contacto con el servicio al cliente
de Netix, se le puede solicitar el número de serie
electrónico (ESN) de su SoundStage. Para ver el
número ESN, pulse y seleccione [Conguración] >
[Avanzada] > [NetixESN].
VUDU
Use VUDU para transmitir películas a través
del SoundStage. VUDU proporciona videos a
pedido y aplicaciones de Internet enriquecidas.
Para obtener más información sobre los
servicios de VUDU, visite www.vudu.com.
1 Conecte el SoundStage a una red
doméstica con acceso a Internet de alta
velocidad. (consulte 'Conectar y congurar
una red doméstica' en la página 14)
2 Pulse VUDU.
» Aparecerá la página principal de VUDU.
3 Si ya activó el SoundStage, omita los pasos
5 y 6.
4 Para obtener un código de activación,
seleccione "Free HD".
5 En su computadora, una vez recibida la
conrmación por correo electrónico de
VUDU, haga clic en el enlace de activación
proporcionado y siga las instrucciones en
pantalla durante el proceso de activación.
6 Use el control remoto para iniciar la
reproducción de un video.
7 Para salir de Vudu, pulse .
Nota
• Para desactivar VUDU desde el SoundStage, pulse
y, a continuación, seleccione [Conguración] >
[Avanzada] > [Desactivación] > [VUDU].
Videos de YouTube
Disfrute de videos de YouTube a través del
SoundStage.
1 Conecte el SoundStage a una red
doméstica con acceso a Internet de alta
velocidad. (consulte 'Conectar y congurar
una red doméstica' en la página 14)
2 Pulse YouTube.
» Se mostrará la pantalla de YouTube
Leanback.
3 Siga las instrucciones en pantalla para
navegar por la página de YouTube.
4 Use el control remoto para seleccionar y
navegar por la aplicación.
Botón Acción
Botones
de
navegación
• Si no presiona ningún botón luego
Arriba: accede al teclado en
pantalla.
Abajo: accede a los botones de
reproducción en pantalla.
Izquierda/derecha: selecciona un
video de la lista de reproducción.
de algunos segundos, los botones
24
ES
HTB3525B_F7_UM_V1.0.indb 24 12/10/2013 6:04:11 PM

Español
y el menú en pantalla desaparecen
automáticamente.
5 Pulse para salir de la página de YouTube.
Búsqueda en la PC mediante
DLNA
Acceda a los archivos de imagen, audio y video
de una computadora o un servidor de medios
de la red doméstica y reprodúzcalos a través
del SoundStage.
Procedimientos preliminares
• Instale en el dispositivo una aplicación
de servidor de medios que cumpla con
DLNA. Asegúrese de descargar una
aplicación que funcione bien para usted.
Por ejemplo,
• Windows Media Player 11 o superior
para PC
• Twonky Media Server para Mac o PC
• Habilite la opción de archivo compartidos
de medios. Para facilitar el uso, hemos
incluido pasos para las siguientes
aplicaciones:
• Reproductor de Windows Media 11
(consulte 'Reproductor Microsoft
Windows Media Player 11' en la
página 25)
• Reproductor de Windows Media 12
(consulte 'Reproductor Microsoft
Windows Media Player 12' en la
página 26)
• Twonky Media para Mac (consulte
'Twonky Media (v4.4.2) de Macintosh
OS X' en la página 26)
Nota
• Para obtener más ayuda para estas aplicaciones u otros
servidores de medios, consulte el manual de usuario del
software de servidor de medios.
Conguracióndesoftwaredel
servidor multimedia
Para activar el uso compartido de contenido
multimedia debe congurar el software de
servidor multimedia correctamente.
Procedimientos preliminares
• Conecte el SoundStage a una red
doméstica. (consulte 'Conectar y
congurar una red doméstica' en la página
14) Para disfrutar de una mejor calidad
de video, cuando sea posible use una
conexión por cable.
• Conecte la computadora y los otros
dispositivos compatibles con DLNA a la
misma red doméstica.
• Asegúrese de que el rewall de la
computadora le permita ejecutar los
programas de reproducción multimedia (o
asegúrese de que la lista de excepciones
de rewall incluya el software de servidor
de medios).
• Encienda la computadora y el router.
Reproductor Microsoft Windows Media
Player 11
1 Ejecute el programa Windows Media
Player en la computadora.
2 Seleccione la cha Biblioteca y, a
continuación, seleccione Uso compartido
de multimedia.
3 La primera vez que seleccione la opción
Uso compartido de multimedia en su
PC,aparecerá una ventana emergente. Tilde
la opción Compartir mi multimedia con: y
haga clic en Aceptar.
» Aparecerá la pantalla de Uso
compartido de multimedia.
4 En la pantalla Uso compartido de
multimedia, verique que haya un
dispositivo marcado como Dispositivo
desconocido.
» Si no aparece un dispositivo
desconocido después de un minuto
aproximadamente, verique que el
25
ES
HTB3525B_F7_UM_V1.0.indb 25 12/10/2013 6:04:11 PM

rewall de la computadora no esté
bloqueando la conexión.
5 Seleccione el dispositivo desconocido y
haga clic en Permitir.
» Aparecerá una marca verde en la
casilla que se encuentra junto al
dispositivo.
6 De forma predeterminada Windows Media
Player comparte archivos de las carpetas:
Mi música, Mis imágenes y Mis vídeos.
Si los archivos se encuentran en otras
carpetas, seleccione Biblioteca > Agregar
a la biblioteca.
» Aparecerá la pantalla Agregar a la
biblioteca.
• Si es necesario, seleccione Opciones
avanzadas para ver una lista de las
carpetas disponibles.
7 Seleccione Mis carpetas y las de otras
personas a las que puedo obtener acceso
y, a continuación, haga clic en Agregar...
8 Siga las instrucciones que guran en la
pantalla para agregar las otras carpetas que
contienen los archivos multimedia.
Reproductor Microsoft Windows Media
Player 12
1 Ejecute el programa Windows Media
Player en la computadora.
2 En Windows Media Player, seleccione
la cha Transmitir y, a continuación,
seleccione Activar la transmisión por
secuencias de multimedia.
» Aparecerá la pantalla Opciones
de transmisión por secuencias de
multimedia.
3 Haga clic en Activar la transmisión por
secuencias de multimedia.
» Volverá a la pantalla principal de
Windows Media Player.
4 Haga clic en la cha Transmitir y
seleccione Más opciones de transmisión.
» Aparecerá la pantalla Opciones
de transmisión por secuencias de
multimedia.
5 Verique que aparezca un programa
multimedia en la pantalla de la red local.
» Si no aparece un programa multimedia,
verique que el rewall de la
computadora no esté bloqueando la
conexión.
6 Seleccione el programa multimedia local y
haga clic en Permitidos.
» Aparecerá una echa verde al lado del
programa multimedia.
7 De forma predeterminada Windows Media
Player comparte archivos de las carpetas:
Mi música, Mis imágenes y Mis vídeos.
Si sus archivos se encuentran en otras
carpetas, seleccione la cha Organizar y,
a continuación, seleccione Administrar
bibliotecas > Música.
» Aparecerá la pantalla Ubicaciones de
bibliotecas.
8 Siga las instrucciones que guran en la
pantalla para agregar las otras carpetas que
contienen los archivos multimedia.
Twonky Media (v4.4.2) de Macintosh OS
X
1 Ingrese en www.twonkymedia.com para
adquirir el software o descargar una
versión gratuita de prueba por 30 días en
su Mac.
2 Ejecute el programa Twonky Media en su
Mac.
3 En la pantalla del servidor de Twonky
Media, seleccione Basic setup
(Conguración básica) y First Steps
(Primeros pasos).
» Aparecerá la pantalla seleccionada.
4 Ingrese el nombre del servidor multimedia
y, a continuación, haga clic en Save changes
(Guardar cambios).
5 En la pantalla principal de Twonky Media,
seleccione Basic Setup (Conguración
básica) y, a continuación, Sharing
(Compartir).
» Aparecerá la pantalla Sharing
(Compartir).
26
ES
HTB3525B_F7_UM_V1.0.indb 26 12/10/2013 6:04:12 PM

Español
6 Busque y elija las carpetas que desea
compartir y seleccione Save Changes
(Guardar cambios).
» La computadora Macintosh volverá a
escanear las carpetas automáticamente
para que estén listas para compartir.
Reproducción de archivos de la PC
Nota
• Antes de reproducir contenido multimedia desde la
computadora, asegúrese de que el SoundStage esté
conectado a la red doméstica y que el software del
servidor de medios esté congurado correctamente.
1 Pulse .
2 Seleccione [buscar PC] y, a continuación,
pulse OK.
» Aparecerá un explorador de
contenido.
3 Seleccione un dispositivo de la red.
» Se muestran las carpetas del
dispositivo seleccionado. Dependiendo
del servidor de medios, es posible que
el nombre de la carpeta varíe.
• Si no puede ver las carpetas,
compruebe que ha activado el
uso compartido de medios en el
dispositivo seleccionado para poder
compartir el contenido.
4 Seleccione un archivo y, a continuación,
pulse OK.
• Es posible que algunos archivos de
medios no se reproduzcan debido
a problemas de compatibilidad.
Compruebe los formatos de archivo
compatibles con el SoundStage.
5 Pulse los botones de reproducción para
controlar la reproducción (consulte
'Botones de reproducción' en la página
16).
Selección de sonido
En esta sección, lo ayudaremos a elegir el
sonido ideal para sus videos o su música.
1 Pulse .
2 Pulse los Botones de navegación (izquierda
/ derecha) para acceder a las opciones de
sonido en la pantalla.
Opciones de
sonido
[Surround] Selecciona el sonido
[Sonido] Permite seleccionar un
[Sincronización
de audio]
[Volumen
automático]
Descripción
envolvente o estéreo.
modo de sonido.
Retrasa el audio para
sincronizarlo con el video.
Reducir cambios repentinos
de volumen, por ejemplo,
durante los anuncios
comerciales en televisión.
3 Seleccione una opción y pulse OK.
4 Pulse para salir.
• Si no presiona un botón en el plazo
de un minuto, el menú se cerrará
automáticamente.
Modos de sonido envolvente
Disfrute de una increíble experiencia de audio
con los modos de sonido envolvente.
1 Pulse .
2 Seleccione [Surround] y, a continuación,
pulse OK.
3 Pulse Botones de navegación (arriba/
abajo) para seleccionar un ajuste para su
pantalla:
• [Automático]: sonido envolvente
según la transmisión de sonido.
• [Virtual Surround]: Surround virtual
• [Estéreo]: sonido estéreo de 2 canales.
Ideal para escuchar música.
4 Pulse OK para conrmar.
27
ES
HTB3525B_F7_UM_V1.0.indb 27 12/10/2013 6:04:12 PM

Modo de sonido
Seleccione modos de sonidos predeterminados
que se adapten a sus videos y su música.
1 Compruebe que el postprocesamiento
de audio esté habilitado en los altavoces
(consulte 'Conguración del altavoz' en la
página 31).
2 Pulse .
3 Seleccione [Sonido] y, a continuación, pulse
OK.
4 Pulse Botones de navegación (arriba /
abajo) para seleccionar un ajuste en la
pantalla:
• [Automático]: selecciona
automáticamente el ajuste de sonido
según la transmisión de sonido.
• [Balanceado]: experimente el sonido
original de las películas y la música sin
efectos de audio agregados.
• [Potente]: disfrute de sonidos
emocionantes de arcade; ideal para
videos llenos de acción o estas
ruidosas.
• [Brillo]: añada un poco de diversión a
las películas y la música más aburridas
incorporando efectos de sonido.
• [Claro]: escuche cada detalle de la
música y disfrute de diálogos claros en
las películas.
• [Cálido]: disfrute de los diálogos y las
voces de la música con comodidad.
• [Personal]: personalice el sonido según
sus preferencias.
5 Pulse OK para conrmar.
3 Pulse los Botones de navegación (arriba/
abajo) para cambiar la frecuencia de los
graves, medios o agudos.
4 Pulse OK para conrmar.
Volumen automático
Encienda el volumen automático para reducir
los cambios repentinos de volumen, por
ejemplo, durante los anuncios comerciales en
televisión.
1 Pulse .
2 Seleccione [Volumen automático] y, a
continuación, pulse OK.
3 Pulse los botonesBotones de navegación
(arriba/abajo) para seleccionar [Encendido]
o [Apagado].
4 Pulse OK para conrmar.
Ecualizador
Cambie la conguración de alta frecuencia
(agudos), frecuencia media (medios) y baja
frecuencia (graves) del SoundStage.
1 Pulse .
2 Seleccione [Sonido] > [Personal]y, a
continuación, pulse Botones de navegación
(derecha).
28
ES
HTB3525B_F7_UM_V1.0.indb 28 12/10/2013 6:04:12 PM

Español
6 Cambio de los
ajustes
Los ajustes del SoundStage ya están
congurados para un rendimiento óptimo. A
menos que tenga una razón para cambiar la
conguración, le recomendamos mantener la
conguración predeterminada.
Nota
• Si el idioma de disco que busca no se encuentra
disponible, seleccione [Otros] en la lista, e ingrese el
código de idioma de cuatro dígitos correspondiente.
Los códigos de idioma se encuentran al nal de este
manual (consulte 'Código de idioma' en la página 44).
• Si selecciona un idioma que no está disponible en
un disco, el sistema de SoundStage utilizará el idioma
predeterminado de ese disco.
Nota
• Los ajustes que aparecen atenuados no pueden
cambiarse.
• Para volver al menú anterior, pulse . Para salir del
menú, pulse .
Conguracióndelidioma
1 Pulse .
2 Seleccione [Conguración] y, a
continuación, pulse OK.
3 Seleccione [Preferencias] y, a continuación,
pulse OK.
4 Pulse Botones de navegación y OK para
seleccionar y cambiar:
• [Idioma del menú]: selecciona un
idioma en pantalla para el menú.
• [Audio]: selecciona un idioma de audio
para los discos.
• [Diseño del teclado]: selecciona un
teclado en su idioma.
• [Subtítulos]: selecciona un idioma para
los subtítulos de los discos.
• [Menú del disco]: selecciona un idioma
de menú para los discos.
Conguracióndeimageny
video
1 Pulse .
2 Seleccione [Conguración] y, a
continuación, pulse OK.
3 Seleccione [Video] y, a continuación, pulse
OK.
4 Pulse Botones de navegación y OK para
seleccionar y cambiar:
• [Tv type]: selecciona un tipo de TV
(sistema de color) si el video no se
muestra correctamente.
• [Pantalla de TV]: selecciona un formato
de imagen que se ajuste a la pantalla
del televisor.
• [Video HDMI]: selecciona la
resolución de la señal de video que se
transmite desde HDMI OUT (ARC)
al SoundStage. Para disfrutar de la
resolución seleccionada, compruebe
que el televisor sea compatible con
dicha resolución.
• [HDMI Deep Color]: recrea el mundo
natural de la pantalla del televisor
mostrando imágenes intensas con
miles de millones de colores. El
SoundStage debe estar conectado a un
televisor con Deep Color mediante un
cable HDMI.
• [Ajustes de imagen]: selecciona la
conguración de color previamente
denida para la visualización del video.
29
ES
HTB3525B_F7_UM_V1.0.indb 29 12/10/2013 6:04:12 PM

• [Ver video 3D]: congura el video
HDMI para admitir video 3D o 2D.
Nota
• Si modica el ajuste, verique que el televisor admita el
nuevo ajuste.
Conguracióndeaudio
1 Pulse .
2 Seleccione [Conguración] y, a
continuación, pulse OK.
3 Seleccione [Audio] y, a continuación, pulse
OK.
4 Pulse Botones de navegación y OK para
seleccionar y cambiar:
• [Modo nocturno]: para una escucha
relajada, disminuye el volumen de
sonidos fuertes en el SoundStage. El
modo nocturno solo está disponible
en discos DVD y Blu-ray con bandas
sonoras en Dolby Digital, Dolby Digital
Plus, y Dolby True HD.
• [Audio HDMI]: congura la salida
de audio HDMI desde el televisor o
deshabilita la salida de audio HDMI
desde el televisor.
• [Ajustes de sonido predet.]: restablece
los ajustes de ecualizador de todos
los modos de sonido a sus valores
predeterminados.
Conguracióndecontrol
para padres
1 Pulse .
2 Seleccione [Conguración] y, a
continuación, pulse OK.
3 Seleccione [Preferencias] y, a continuación,
pulse OK.
4 Pulse Botones de navegación y OK para
seleccionar y cambiar:
• [Cambiar contraseña]: congura o
cambia su contraseña de acceso a
control para padres. Si no tiene una
contraseña o la olvidó, ingrese 0000.
• [Control para padres]: restringe el
acceso a los discos grabados con
clasicación de edad. Para reproducir
todos los discos, independientemente
de la clasicación, seleccione el nivel 8
o [Apagado].
Ajustes de pantalla
1 Pulse .
2 Seleccione [Conguración] y, a
continuación, pulse OK.
3 Seleccione [Preferencias] y, a continuación,
pulse OK.
4 Pulse Botones de navegación y OK para
seleccionar y cambiar:
• [Cambio de subtítulos
automático]: habilita o deshabilita
el reposicionamiento automático
de subtítulos en los televisores
compatibles con esta función.
• [Panel de pantalla]: ajusta el nivel
de brillo (100 %, 70% o 40%) en el
panel de visualización del SoundStage.
Si selecciona [Auto Off] (Apagado
automático), después de 10 segundos
de inactividad del botón, la pantalla se
apagará automáticamente.
• [VCD PBC]: habilita o deshabilita la
navegación del menú de contenido
de los discos de VCD y SVCD con la
función Play Back Control (Control de
reproducción).
30
ES
HTB3525B_F7_UM_V1.0.indb 30 12/10/2013 6:04:12 PM

Español
Conguracióndeahorrode
energía
1 Pulse .
2 Seleccione [Conguración] y, a
continuación, pulse OK.
3 Seleccione [Preferencias] y, a continuación,
pulse OK.
4 Pulse Botones de navegación y OK para
seleccionar y cambiar:
• [Protector de pantalla]: activa el
modo de protector de pantalla del
SoundStage después de 10 minutos de
inactividad.
• [Modo de espera automático]: activa
el modo de espera del SoundStage
después de 30 minutos de inactividad.
Este temporizador funciona solo
cuando un disco o una reproducción
por USB está en pausa o detenida.
• [Temporizador]: ajusta la duración
del temporizador de desconexión
para que el SoundStage se ponga en
modo de espera después del periodo
especicado.
audio original del disco, seleccione
[Apagado].
Sugerencia
• Habilite el post-procesamiento de audio antes de
seleccionar un modo de sonido predenido (consulte
'Modo de sonido' en la página 28).
Restauración de la
conguraciónpredeterminada
1 Pulse .
2 Seleccione [Conguración] y, a
continuación, pulse OK.
3 Seleccione [Avanzada] > [Restablecer
conguraciónpredet.] y, a continuación,
pulse OK.
4 Seleccione [OK] y, a continuación, pulse
OK para conrmar.
» El SoundStage vuelve a la conguración
predeterminada, excepto para algunas
conguraciones, como control para
padres y código de registro DivX VoD.
Conguracióndelaltavoz
1 Pulse .
2 Seleccione [Conguración] y, a
continuación, pulse OK.
3 Seleccione [Avanzada] y, a continuación,
pulse OK.
4 Pulse Botones de navegación y OK para
seleccionar y cambiar:
• [Audio optimizado]: Seleccione
[Encendido] para habilitar el postprocesamiento de audio en el
altavoz y habilitar la conguración del
karaoke (si el producto es compatible
con Karaoke). Para reproducir el
31
ES
HTB3525B_F7_UM_V1.0.indb 31 12/10/2013 6:04:12 PM

7 Actualización de
software
Philips trata de mejorar continuamente sus
productos. Para disponer de las mejores
funciones y asistencia, actualice el SoundStage
con el software más reciente.
Compare la versión actual de su software con
la última versión disponible en www.philips.
com/support. Si la versión actual es inferior a la
versión más reciente disponible en el sitio web
de asistencia de Philips, actualice el SoundStage
con el software más reciente.
Precaución
• No instale una versión menor del software que la
versión actualmente instalada en el producto. Philips
no es responsable de los problemas provocados por
versiones anteriores del software.
Comprobación de la versión
del software
Compruebe la versión del software actual
instalado en el SoundStage.
1 Pulse .
2 Seleccione [Conguración] y, a
continuación, pulse OK.
3 Seleccione [Avanzada] > [Información de
la versión.].
» Aparecerá la versión del software.
• Una unidad ash USB formateada en
modo FAT o NTFS con al menos 256 MB
de memoria. No use un disco duro con
conexión USB.
• Una computadora con acceso a Internet.
• Una utilidad de archivo que admita
formato ZIP.
Paso 1: descargue el software más
reciente
1 Conecte una memoria de almacenamiento
USB a su computadora.
2 En su navegador web, acceda a www.
philips.com/support.
3 En el sitio web de asistencia de Philips,
encuentre su producto y acceda a
Software y controladores.
» La actualización de software está
disponible en un archivo .zip.
4 Guarde el archivo .zip en el directorio raíz
del dispositivo de almacenamiento USB.
5 Use la utilidad de archivo para extraer el
archivo de actualización de software en el
directorio raíz.
» Los archivos se extraerán a la carpeta
UPG_ALL de su unidad ash USB.
6 Desconecte la unidad de almacenamiento
USB de la computadora.
Paso 2: actualice el software
Precaución
• No apague el sistema de SoundStage ni extraiga la
unidad ash USB durante la actualización.
Actualización de software vía
USB
Requisitos:
32
ES
HTB3525B_F7_UM_V1.0.indb 32 12/10/2013 6:04:12 PM
1 Conecte el dispositivo de almacenamiento
USB que contiene el archivo descargado
en el SoundStage.
• Compruebe que el compartimento
de discos esté cerrado y no tenga un
disco en el interior.

Español
2 Pulse .
3 Seleccione [Conguración] y, a
continuación, pulse OK.
4 Seleccione [Avanzada] > [Actualización
de software] > [USB].
5 Siga las instrucciones en pantalla para
conrmar la actualización.
» El proceso de actualización toma
alrededor de 5 minutos.
Actualización de software vía
Internet
1 Conecte el SoundStage a una red
doméstica con acceso a Internet de alta
velocidad. (consulte 'Conectar y congurar'
en la página 10)
2 Pulse .
3 Seleccione [Conguración] y, a
continuación, pulse OK.
4 Seleccione [Avanzada] > [Actualización
de software] > [Red].
» Si el sistema detecta un soporte de
actualización, le solicitará que inicie o
cancele la actualización.
» La descarga del archivo de
actualización podría tomar más
tiempo, según la condición de su red
doméstica.
5 Siga las instrucciones en pantalla para
conrmar la actualización.
» El proceso de actualización toma
alrededor de 5 minutos.
» Cuando la actualización se haya
completado, el SoundStage se apagará
y volverá a encenderse de forma
automática. De no ser así, desconecte
el cable de alimentación durante unos
segundos y conéctelo nuevamente.
33
ES
HTB3525B_F7_UM_V1.0.indb 33 12/10/2013 6:04:12 PM

8 Especificaciones
del producto
• .avi, .divx, .mp4, .m4v, .mkv, .asf, .wmv,
.m2ts, .mpg, .mpeg, .v, .3gp
• .rmvb, .rm, .rv (disponibles solo en Asia
Pacíco y China)
• Imagen: .jpg, .jpeg, .jpe, .gif, .png
Nota
• Las especicaciones y el diseño están sujetos a
modicaciones sin previo aviso.
Códigos de región
La placa que se encuentra en la base o la parte
posterior del sistema de SoundStage indica las
regiones compatibles.
Country
USA, Canada
DVD BD
1
AA
Formatos multimedia
• AVCHD, BD, BD-R/ BD-RE, BD de video,
DVD de video, DVD+R/+RW, DVD-R/RW, DVD+R/-R DL, CD-R/CD-RW, CD
de audio, CD/SVCD de video, archivos
de imágenes, archivos multimedia MP3,
WMA y DivX Plus HD, y unidades de
almacenamiento USB
Formatos de archivo
• Audio
• .aac, .mka, .mp3, .wma, .wav, .mp4, .m4a,
.ac, .ogg
• .ra (disponible solo en Asia Pacíco y
China)
• Video:
Bluetooth
• Perles Bluetooth: A2DP, AVRCP
• Versión de Bluetooth: 2.1 + EDR
Formatos de audio
El SoundStage admite los siguientes archivos de
audio.
(los archivos .ra solo son compatibles en Asia
PacícoyChina)
Ex-
Con-
ten-
tene-
sión
dor
.mp3 MP3 MP3 Hasta 320 kbps
.wma ASF WMA Hasta 192 kbps
.aac AAC AAC ,
.wav WAV PCM 27,648 Mbps
.m4a MKV AAC 192 kbps
.mka MKA PCM 27,648 Mbps
Dolby
DTS
MPEG 912 kbps
MP3 Hasta 320 kbps
WMA Hasta 192 kbps
AAC ,
.ra RM AAC ,
Cook 96469 bps
Codec
de
audio
HEAAC
Digital
core
HEAAC
HEAAC
Frecuencia de bits
Hasta 192 kbps
640 kbps
1,54 Mbps
Hasta 192 kbps
Hasta 192 kbps
34
ES
HTB3525B_F7_UM_V1.0.indb 34 12/10/2013 6:04:13 PM

Español
.ac FLAC FLAC Hasta 24 bps
.ogg OGG Vorbis Frecuencia de bits
variable, tamaño de
bloque máximo 4096
MP3 Hasta 320 kbps
Formatos de video
Codec de audio Codec de
video
Dolby Digital,
MPEG, MP3, AAC,
MPEG 1,
MPEG 2
Frecuencia
de bits
40 Mbps
HE-AAC, Dolby
Digital Plus
MPEG 4 ASP 38,4 Mbps
H.264/AVC
25 Mbps
HiP de 4.2
Si tiene un televisor de alta denición, el
SoundStage le permite reproducir archivos de
video con:
• Resolución de 1920 x 1080 píxeles a
• Tasa de cuadros de 6 ~ 30 cuadros por
segundo.
Archivos con extensión .avi en formato AVI
Codec de
audio
PCM,
Dolby
Codec de video Frecuencia
de bits
DivX 3.11, DivX 4.x,
DivX 5.x, DivX 6.x
10 Mbps
(máx.)
Digital,
DTS core,
MP3,
WMA
MPEG 1, MPEG 2 40 Mbps
MPEG 4 SP / ASP 38,4 Mbps
H.264/AVC hasta HiP
25 Mbps
de 4.2
WMV9 45 Mbps
Archivos con extensión .divx en formato AVI
Codec de
audio
PCM, Dolby
Digital, MP3,
WMA
Codec de video Frecuencia
de bits
DivX 3.11,
DivX 4.x,
10 Mbps
(máx.)
DivX 5.x,
DivX 6.x
Archivos con extensión .mkv en formato MKV
Codec de audio Codec de
video
PCM, Dolby
DivX Plus HD30 Mbps
Frecuencia
de bits
Digital, DTS core,
MPEG, MP3,
WMA, AAC,
HE-AAC, Dolby
Digital Plus
MPEG 1,
40 Mbps
MPEG 2
MPEG 4 ASP 38,4 Mbps
H.264/AVC
25 Mbps
HiP de 4.2
WMV9 45 Mbps
Archivos .m2ts en formato contenedor MKV
Codec de audio Codec de
video
PCM, Dolby Digital,
DTS core, MPEG,
MPEG 1,
MPEG 2
Frecuencia
de bits
40 Mbps
MP3, WMA, AAC,
HE-AAC, Dolby
Digital Plus
MPEG 4 ASP 38,4 Mbps
H.264/AVC
25 Mbps
HiP de 4.2
WMV9 45 Mbps
Archivos con extensión .mp4 o .m4v con
Archivos .asf en contenedor ASF
formato MP4
35
ES
HTB3525B_F7_UM_V1.0.indb 35 12/10/2013 6:04:13 PM

Codec de audio Codec de
video
Dolby Digital,
MP3, WMA,
Dolby Digital Plus
H.264/AVC
WMV9 45 Mbps
Archivos con extensión .mpg y .mpeg en
formato PS
Codec de audio Codec de
PCM, DTS core,
MPEG, MP3
MPEG 4
ASP
HiP de 4.2
video
MPEG 1,
MPEG 2
Frecuencia
de bits
38,4 Mbps
25 Mbps
Frecuencia
de bits
40 Mbps
• Altavoz: 13 W (1% THD, 4 ohm,
300 Hz - 9 kHz)
• Subwoofer: 16 W (1% THD, 4 ohm,
30 Hz - 100 Hz)
• Potencia de salida total: 80 W RMS (10 %
THD)
• Respuesta de frecuencia: 20 Hz-20 kHz /
± 3 dB
• Relación señal/ruido: > 65 dB (CCIR) /
(ponderado A)
• Sensibilidad de entrada:
• AUX: 2 V RMS
• AUDIO IN: 1 V RMS
Video
Archivos.venformatocontenedorFLV
Codec de
audio
MP3,
AAC
H.263 38,4 Mbps
Archivos .3gp en formato contenedor 3GP
Codec de
audio
AAC ,
HE-AAC
H.264/AVC hasta
Archivos .rm, .rv y .rmvb en formato
contenedor RM (disponible solo en Asia
PacícoyChina)
Codec de
audio
AAC, COOK RV30, RV40 40 Mbps
Codec de video Frecuencia de
bits
H.264/AVC hasta
HiP de 4.2
Codec de video Frecuencia de
MPEG 4 ASP 38,4 Mbps
HiP de 4.2
Codec de
video
25 Mbps
bits
25 Mbps máx.
Frecuencia de
bits
Amplicador
• Potencia de salida total de FTC: 42 W
• Sistema de señal: PAL/NTSC
• Salida HDMI: 480i/576i, 480p/576p, 720p,
1080i, 1080p, 1080p24
Audio
• Entrada de audio digital S/PDIF:
• Coaxial: IEC 60958-3
• Óptica: TOSLINK
• Frecuencia de muestreo:
• MP3: 32 kHz, 44.1 kHz, 48 kHz
• WMA: 44,1 kHz, 48 kHz
• Frecuencia de bits constante:
• MP3: 32 kbps - 320 kbps
• WMA: 48 kbps - 192 kbps
Radio
• Zona de sintonización:
• Europa / Rusia / China: FM 87,5-
108 MHz (50 kHz)
• Pacíco asiático / América Latina: FM
87,5-108 MHz (50 / 100 kHz)
• Relación señal/ruido: FM 50 dB
• Respuesta de frecuencia: FM 180 Hz 12,5 kHz / ± 3dB
36
ES
HTB3525B_F7_UM_V1.0.indb 36 12/10/2013 6:04:13 PM

Español
USB
Láser
• Compatibilidad: USB (2.0) de alta velocidad
• Compatibilidad de clase: UMS (clase de
almacenamiento masivo USB)
• Sistema de archivos: FAT16, FAT32, NTFS
• Puerto USB: 5 V , 1 A
Unidad principal
• Fuente de alimentación: 120 V~, 60 Hz
• Consumo de energía: 40 W
• Consumo en modo de espera: ≤ 0,5 W
• Dimensiones (An x Al x Pr): 701 x 70 x
317 mm
• Peso: 6,8 kg
• Temperatura y humedad de
funcionamiento: de 0 °C a 45 °C, del 5 %
al 90 % de humedad para todos los climas
• Temperatura y humedad de
almacenamiento: de -40 °C a 70 °C, del
5 % al 95 %
Altavoces
• Potencia de salida: 2 x 20 W RMS (10 %
THD)
• Impedancia: 4 ohm
• Controladores de altavoces: 2 circuitos de
gama media (1,5" x 5") + 2 tweeter de 1"
• Tipo de láser (diodo): InGaN/AIGaN (BD),
AIGaInP (DVD/CD)
• Longitud de la onda: 405 ± 7 nm (BD),
660 ± 10 nm (DVD), 785 ± 10 nm (CD)
• Potencia de salida (máxima) : 20 mW (BD),
6 mW (DVD), 7 mW (CD)
Subwoofer
• Potencia de salida: 40 W RMS (10 % THD)
• Impedancia: 4 ohm
• Controladores de altavoces: woofer de
105 mm (4")
Baterías del control remoto
• 2 x AAA-R03 (1,5 V)
37
ES
HTB3525B_F7_UM_V1.0.indb 37 12/10/2013 6:04:13 PM

9 Solución de
problemas
Advertencia
• Riego de shock eléctrico. No quite nunca la carcasa del
producto.
Si desea mantener la validez de la garantía,
nunca intente reparar el sistema por su propia
cuenta.
Si tiene algún problema a la hora de utilizar
este producto, compruebe los siguientes puntos
antes de solicitar una reparación. Si aún tiene
problemas, obtenga asistencia en www.philips.
com/support.
• Verique que el cable HDMI no esté
dañado. Si está dañado, reemplácelo por
un cable nuevo.
• Pulse y, a continuación, 731 en el control
remoto para restaurar la resolución de
imagen predenida.
• Cambie el ajuste de video HDMI o espere
10 segundos hasta que se complete
la recuperación automática (consulte
'Conguración de imagen y video' en la
página 29).
El disco no reproduce videos en alta
denición.
• Asegúrese de que el disco contenga video
de alta denición.
• Asegúrese de que el televisor admita video
de alta denición.
• Use un cable HDMI para la conexión con
el televisor.
Unidad principal
Los botones del SoundStage no funcionan.
• Desconecte el SoundStage de la toma
de alimentación durante unos minutos y
vuelva a conectarlo.
• Asegúrese de que la supercie de los
botones táctiles no está en contacto con
ningún material conductor, como gotas de
agua, metal, etc.
Imagen
No hay imagen.
• Asegúrese de que el televisor tenga
seleccionada la fuente correcta para el
SoundStage.
No hay imagen en el televisor conectado a
través de HDMI.
• Asegúrese de que utilizó un cable
HDMI de alta velocidad para conectar el
SoundStage con el televisor. Algunos cables
HDMI comunes no muestran bien algunas
imágenes, videos 3D o Deep Color.
Sound
El SoundStage no emite sonido.
• Conecte el cable de audio entre el
SoundStage y el televisor u otro dispositivo.
Sin embargo, no necesita una conexión de
audio independiente si el SoundStage y el
televisor están conectados a través de una
conexión HDMI ARC.
• Conguración del audio de los dispositivos
conectados (consulte 'Congurar el audio'
en la página 13).
• Restablezca el SoundStage a los ajustes
de fábrica (consulte 'Restauración de la
conguración predeterminada' en la página
31), apáguelo y, a continuación, vuelva a
encenderlo.
• En el SoundStage, pulse SOURCE varias
veces para seleccionar la entrada de audio
correcta.
Sonido distorsionado o eco.
• Si reproduce el audio del televisor a través
del SoundStage, verique que el televisor
esté en silencio.
El audio y el video no están sincronizados.
• 1) Pulse . 2) Pulse Botones de
navegación (izquierda/derecha) para
38
ES
HTB3525B_F7_UM_V1.0.indb 38 12/10/2013 6:04:13 PM

Español
seleccionar [Sincronización de audio]
y, a continuación, pulse OK. 3·) Pulse
Botones de navegación (arriba/abajo) para
sincronizar el audio con el video.
Reproducción
No se puede reproducir el disco.
• Limpie el disco.
• Asegúrese de que el SoundStage sea
compatible con el tipo de disco (consulte
'Formatos multimedia' en la página 34).
• Asegúrese de que el SoundStage sea
compatible con el código de región del
disco (consulte 'Códigos de región' en la
página 34).
• Si el disco es DVD± RW o DVD± R,
verique que esté nalizado.
No se puede reproducir un archivo DivX.
• Asegúrese de que el archivo DivX esté
codicado de acuerdo con el 'perl de
Home Theater' con el codicador de DivX.
• Controle que el archivo DivX esté
completo.
Los subtítulos DivX no se ven correctamente.
• Verique que el nombre del archivo con
los subtítulos sea el mismo que el del
archivo de la película.
• Seleccione el conjunto de caracteres
correcto: 1) Presione . 2) Seleccione
[Conjunto de caracteres]. 3) Seleccione
el conjunto de caracteres compatible. 4)
Pulse OK.
No se puede leer el contenido de la unidad de
almacenamiento USB.
• Asegúrese de que el formato del
dispositivo de almacenamiento USB sea
compatible con el SoundStage.
• Asegúrese de que el sistema de archivos
del dispositivo de almacenamiento USB sea
compatible con el SoundStage.
Aparecerá el mensaje "No hay entrada" o "x"
en el televisor.
• No puede realizarse la operación.
La función EasyLink no funciona.
• Asegúrese de que el SoundStage esté
conectado a un televisor Philips con
EasyLink y que la opción EasyLink esté
activada.
• Para televisores de otros fabricantes, el
HDMI CEC podría tener otro nombre.
Consulte el manual de usuario del televisor
para obtener información de cómo
activarlo.
Cuando enciende el televisor, el SoundStage se
enciende automáticamente.
• Esto es normal cuando se usa un
dispositivo Philips EasyLink (HDMI-CEC).
Para que el SoundStage funcione de
manera independiente, desactive EasyLink.
No se puede acceder a las funciones de BDLive.
• Asegúrese de que el SoundStage esté
conectado a la red.
• Verique que la red esté instalada.
• Verique que el disco Blu-ray sea
compatible con la función BD-Live.
• Libere espacio en la memoria (consulte
'Acceso a BD-Live en Blu-ray' en la página
18).
El video 3D se reproduce en el modo 2D.
• Asegúrese de que el SoundStage esté
conectado a un televisor 3D mediante un
cable HDMI.
• Verique que el disco sea Blu-ray 3D y
que la opción de video Blu-ray 3D esté
activada (consulte 'Acceso a BD-Live en
Blu-ray' en la página 18).
La pantalla del televisor se pone negra al
reproducir un video 3D Blu-ray o una copia
de un video DivX protegido.
• Asegúrese de que el SoundStage esté
conectado al televisor mediante un cable
HDMI.
• Cambie a la fuente correcta de HDMI en
el televisor.
No se pueden descargar videos de tiendas de
video en línea.
• Asegúrese de que el SoundStage esté
conectado al televisor mediante un cable
HDMI.
• Asegúrese de que el dispositivo de
almacenamiento USB esté formateado y
39
ES
HTB3525B_F7_UM_V1.0.indb 39 12/10/2013 6:04:13 PM

tenga suciente memoria para descargar
el video.
• Para poder ver el video debe abonar el
precio correspondiente y el período de
alquiler no debe haber caducado.
• Asegúrese de que la conexión de red sea
buena.
• Visite el sitio web de la tienda de video en
línea para obtener más información.
Bluetooth
Un dispositivo no se conecta al SoundStage.
• El dispositivo no admite los perles
compatibles necesarios para el SoundStage.
• No has activado la función Bluetooth del
dispositivo. Consulta el manual de usuario
del dispositivo para saber cómo activar
esta función.
• El dispositivo no está conectado
correctamente. Conecta el dispositivo
correctamente (consulte 'Reproducción de
audio a través de Bluetooth' en la página
18).
• El SoundStage ya está conectado a otro
dispositivo Bluetooth. Desconecta el
dispositivo conectado y, luego, inténtalo
nuevamente.
La calidad de la reproducción de audio desde
undispositivoBluetoothesdeciente.
• La recepción de Bluetooth es débil. Acerca
el dispositivo al SoundStage o retira
cualquier obstáculo que haya entre ellos.
El dispositivo Bluetooth conectado se conecta
y desconecta continuamente.
• La recepción de Bluetooth es débil. Acerca
el dispositivo al SoundStage o retira
cualquier obstáculo que haya entre ellos.
• Desactiva la función Wi-Fi del dispositivo
Bluetooth para evitar interferencias.
• En algunos dispositivos Bluetooth, la
conexión Bluetooth se puede desactivar
automáticamente para ahorrar energía.
Esto no indica un mal funcionamiento del
SoundStage.
40
ES
HTB3525B_F7_UM_V1.0.indb 40 12/10/2013 6:04:13 PM

Español
10 Aviso
Esta sección contiene avisos sobre asuntos
legales y marcas registradas.
postal con su dirección de correo a: Centro de
información al consumidor de Cinavia, P.O. Box
86851, San Diego, CA, 92138, EE. UU
Aviso de cumplimiento
Derechos de propiedad
intelectual
Este producto ofrece tecnología de protección
contra copias protegida por patentes de
Estados Unidos y otros derechos de propiedad
intelectual de Rovi Corporation. Queda
prohibido realizar tareas de ingeniería inversa y
desarmar el producto.
Este producto contiene tecnología de
propiedad bajo la licencia de Verance
Corporation y está protegido por la patente
7.369.677 de los Estados Unidos y otras
patentes, tanto emitidas como pendientes,
de Estados Unidos y otros países, además
de protección de derechos de autor y de
secretos comerciales para aspectos particulares
de dicha tecnología. Cinavia es una marca
registrada de Verance Corporation. Copyright
2004-2010 Verance Corporation. Todos los
derechos reservados por Verance. Se prohíbe el
desarmado y el desensamblaje de la unidad.
Aviso Cinavia
Este producto utiliza tecnología Cinavia para
limitar el uso de copias no autorizadas de
algunas películas y videos producidos de forma
comercial y sus respectivas bandas sonoras.
Cuando se detecta el uso prohibido de una
copia no autorizada, aparecerá un mensaje y se
interrumpirá la reproducción o copia.
Para obtener más información acerca de
la tecnología Cinavia, visite el Centro de
información al consumidor de Cinavia en http://
www.cinavia.com. Si desea solicitar información
adicional por correo a Cinavia, envíe una tarjeta
Este dispositivo cumple con el artículo 15 de
la normativa de la FCC y con 21 CFR 1040.10.
El funcionamiento está sujeto a las siguientes
condiciones:
a El dispositivo no debe causar
interferencias nocivas y
b debe recibir todo tipo de interferencias,
incluso las que originan un
funcionamiento indeseado.
Normas de la Comisión Federal de
Comunicaciones (FCC)
Este equipo se ha probado y se ha determinado
que cumple con los límites para un dispositivo
digital clase B, de acuerdo con el apartado 15
de las normativas de la FCC. Estos límites están
destinados a ofrecer una protección razonable
contra interferencias dañinas dentro de una
instalación residencial. Este equipo genera, utiliza
y puede emitir energía de radiofrecuencia. Si no
se instala y utiliza de conformidad con el manual
de instrucciones, puede ocasionar interferencias
perjudiciales en las comunicaciones de radio.
Sin embargo, no existe garantía de que no se
producirá interferencia en una instalación en
particular. Si este equipo provoca interferencias
perjudiciales en la recepción de radio o
televisión, lo que puede determinarse al
encender y apagar el equipo, se recomienda
al usuario intentar corregir la interferencia
mediante una o varias de las siguientes medidas:
• Cambie la posición de la antena receptora.
• Aumente la distancia entre el equipo y el
receptor.
• Conecte el equipo a un tomacorriente de
un circuito diferente al que está conectado
el receptor.
41
ES
HTB3525B_F7_UM_V1.0.indb 41 12/10/2013 6:04:14 PM

• Para obtener ayuda, comuníquese con el
distribuidor o con un técnico de radio o
televisión calicado.
Normas sobre la exposición a campos de
radiación de la FCC: este equipo cumple con la
normativa que regula los límites de exposición
a la radiación de FCC para ambientes no
controlados. Este equipo debe instalarse y
utilizarse con una distancia mínima de 20 cm
entre el radiador y el cuerpo. No coloque este
aparato cerca de otros transmisores o antenas,
ni lo utilice con este tipo de dispositivos.
Advertencia: los cambios o las modicaciones
que se realicen en este equipo sin la aprobación
expresa de Philips pueden anular la autorización
de FCC para utilizarlo.
Número de modelo: PHILIPS HTB3525B/F7
Nombre comercial: Philips
Parte responsable: P&F USA, Inc. PO Box 2248
Alpharetta, GA 30023-2248; 1-866-310-0744
Canadá:
Este aparato digital de clase B cumple con la
regulación canadiense ICES-003.
Este dispositivo cumple con Industry Canada
RSS-210. El funcionamiento queda sujeto a las
siguientes dos condiciones: (1) este dispositivo
no debe producir interferencias, y (2) debe
recibir todo tipo de interferencia, incluso
aquellas que pueden causar un funcionamiento
no deseado del dispositivo.
El dispositivo cumple con la exención de límites
en la evaluación de rutina en la sección 2.5 de
RSS 102 y cumple con la exposición RSS-102
RF, los usuarios pueden obtener información
canadiense sobre la exposición y cumplimiento
de RF.
No coloque este aparato cerca de otros
transmisores o antenas, ni lo utilice junto a este
tipo de dispositivos. Este equipo se debe instalar
y manejar a una distancia mínima de 20 cm
entre el radiador y su cuerpo.
Software de código abierto
Software de código abierto
Por medio del presente, Philips Electronics
Hong Kong Ltd. se compromete a entregar
una copia completa del código fuente
correspondiente a los paquetes de software
de código abierto protegidos por derechos
de propiedad intelectual utilizados en este
producto a los titulares de licencias que así lo
soliciten.
Esta oferta es válida dentro de los tres años
posteriores a la adquisición del producto
para cualquier persona que conozca esta
información. Para obtener el código fuente,
envíe un mensaje de correo electrónico a la
siguiente dirección: open.source@philips.com. Si
preere no comunicarse por correo electrónico
o si no recibe la conrmación de recepción del
mensaje dentro de la semana posterior al envío,
escriba a "Open Source Team, Philips Intellectual
Property & Standards, P.O. Box 220, 5600 AE
Eindhoven, The Netherlands". Si no recibe
conrmación oportuna de recepción de su
carta, envíe un mensaje de correo electrónico a
la dirección que se mencionó anteriormente.
Marcas comerciales
"Blu-ray 3D " y el logotipo de "Blu-ray 3D
" son marcas comerciales de Blu-ray Disc
Association.
'DVD Video' es una marca comercial de DVD
Format/Logo Licensing Corporation.
42
ES
HTB3525B_F7_UM_V1.0.indb 42 12/10/2013 6:04:14 PM

Español
Fabricado en virtud de una licencia de Dolby
Laboratories. Dolby y el símbolo de doble D
son marcas comerciales de Dolby Laboratories.
Fabricado con licencia de acuerdo con
Números de patente: 5.956.674; 5.974.380;
6.226.616; 6.487.535; 7.392.195; 7.272.567;
7.333.929; 7.212.872 y otras patentes de
Estados Unidos y de todo el mundo publicadas
y pendientes. DTS-HD, Symbol, DTS-HD y
Symbol conjuntamente son marcas comerciales
registradas y DTS-HD Master Audio | Essential
es una marca comercial de DTS, Inc. El
producto incluye el software. DTS, Inc. Todos
los derechos reservados.
DivX , DivX Certied , DivX Plus HD y los
logotipos asociados son marcas registradas de
Rovi Corporation o sus subsidiarias y se utilizan
con licencia.
SOBRE VIDEO DIVX: DivX es un formato
de video digital creado por DivX, LLC, una
subsidiaria de Rovi Corporation. Este es un
dispositivo certicado ocialmente por DivX
Certied que reproduce videos DivX. Para
obtener más información sobre DivX y acceder
a las herramientas de software disponibles para
convertir archivos al formato de video DivX,
visite divx.com.
ACERCA DE DIVX VIDEO-ON-DEMAND:
este dispositivo DivX Certied debe estar
registrado para poder reproducir películas
DivX Video-on-Demand (VOD). Para obtener
el código de registro, consulte la sección
DivX VOD en el menú de conguración
de su dispositivo. Ingrese en vod.divx.com
para obtener más información sobre cómo
completar el proceso de registro.
Certicación DivX para reproducir videos
DivX y DivX Plus HD (H.264/MKV) de hasta
1080 p y contenido de alta calidad
Los términos HDMI y HDMI High-Denition
Multimedia Interface, y el logotipo de HDMI
son marcas comerciales o marcas registradas de
HDMI Licensing LLC en los Estados Unidos y
otros países.
La marca nominativa Bluetooth y los logotipos
son marcas comerciales registradas propiedad
de Bluetooth SIG, Inc., Philips utiliza siempre
estas marcas con licencia. Las demás marcas
y nombres comerciales pertenecen a sus
respectivos propietarios.
Netix y el logotipo de Netix son marcas
comerciales o marcas registradas de Netix, Inc.
Vudu es una marca registrada de VUDU, Inc.
CLASS 1
LASER PRODUCT
43
ES
HTB3525B_F7_UM_V1.0.indb 43 12/10/2013 6:04:15 PM

11 Código de
idioma
Abkhazian 6566
Afar 6565
Afrikaans 6570
Amharic 6577
Arabic 6582
Armenian 7289
Assamese 6583
Avestan 6569
Aymara 6589
Azerhaijani 6590
Bahasa Melayu 7783
Bashkir 6665
Belarusian 6669
Bengali 6678
Bihari 6672
Bislama 6673
Bokmål, Norwegian 7866
Bosanski 6683
Brezhoneg 6682
Bulgarian 6671
Burmese 7789
Castellano, Español 6983
Catalán 6765
Chamorro 6772
Chechen 6769
Chewa; Chichewa; Nyanja 7889
9072
Ё᭛
Chuang; Zhuang 9065
Church Slavic; Slavonic 6785
Chuvash 6786
Corsican 6779
Česky 6783
Dansk 6865
Deutsch 6869
Dzongkha 6890
English 6978
Esperanto 6979
Estonian 6984
Euskara 6985
6976
Faroese 7079
Français 7082
Frysk 7089
Fijian 7074
Gaelic; Scottish Gaelic 7168
Gallegan 7176
Georgian 7565
Gikuyu; Kikuyu 7573
Guarani 7178
Gujarati 7185
Hausa 7265
Herero 7290
Hindi 7273
Hiri Motu 7279
Hrwatski 6779
Ido 7379
Interlingua (International)7365
Interlingue 7365
Inuktitut 7385
Inupiaq 7375
Irish 7165
Íslenska 7383
Italiano 7384
Ivrit 7269
Japanese 7465
Javanese 7486
Kalaallisut 7576
Kannada 7578
Kashmiri 7583
Kazakh 7575
Kernewek 7587
Khmer 7577
Kinyarwanda 8287
Kirghiz 7589
Komi 7586
Korean 7579
Kuanyama; Kwanyama 7574
Kurdish 7585
Lao 7679
Latina 7665
Latvian 7686
Letzeburgesch; 7666
Limburgan; Limburger 7673
Lingala 7678
Lithuanian 7684
Luxembourgish; 7666
Macedonian 7775
Malagasy 7771
Magyar 7285
Malayalam 7776
Maltese 7784
Manx 7186
Maori 7773
Marathi 7782
Marshallese 7772
Moldavian 7779
Mongolian 7778
Nauru 7865
Navaho; Navajo 7886
Ndebele, North 7868
Ndebele, South 7882
Ndonga 7871
Nederlands 7876
Nepali 7869
Norsk 7879
Northern Sami 8369
North Ndebele 7868
Norwegian Nynorsk; 7878
Occitan; Provencal 7967
Old Bulgarian; Old Slavonic 6785
Oriya 7982
Oromo 7977
Ossetian; Ossetic 7983
Pali 8073
Panjabi 8065
Persian 7065
Polski 8076
rtuguês 8084
Po
Pushto 8083
Russian 8285
Quechua 8185
Raeto-Romance 8277
Romanian 8279
Rundi 8278
Samoan 8377
Sango 8371
Sanskrit 8365
Sardinian 8367
Serbian 8382
Shona 8378
Shqip 8381
Sindhi 8368
Sinhalese 8373
Slovensky 8373
Slovenian 8376
Somali 8379
Sotho; Southern 8384
South Ndebele 7882
Sundanese 8385
Suomi 7073
Swahili 8387
Swati 8383
Svenska 8386
Tagalog 8476
Tahitian 8489
Tajik 8471
Tamil 8465
Tatar 8484
Telugu 8469
Thai 8472
Tibetan 6679
Tigrinya 8473
To nga (Tonga Islands) 8479
Tsonga 8483
Tswana 8478
Türkçe 8482
Tu rkmen 8475
Tw i 8487
Uighur 8571
Ukrainian 8575
Urdu 8582
Uzbek 8590
Vietnamese 8673
Volapuk 8679
Walloon 8765
Welsh 6789
Wolof 8779
Xhosa 8872
Yiddish 8973
Yo ruba 8979
Zulu 9085
44
HTB3525B_F7_UM_V1.0.indb 44 12/10/2013 6:04:16 PM
ES

Español
12 Índice
especicacionesdealtavoz 34
expulsión de discos 6
2
2do. idioma de audio 17
2do. idioma de subtítulos 17
A
actualizar software (vía Internet) 33
ajustes de imagen 29
ajustes predeterminados 31
ajustes predeterminados 31
amplicador 36
animación de diapositiva 21
atención al cliente 4
audio de otros dispositivos 11
audio HDMI 30
B
baterías 37
BD-Live 18
Bonus View 17
borrar memoria de BD-Live 18
botones de control (disco) 16
botones de control (USB) 16
brillo 30
C
cambio de contraseña 30
cambio de subtítulos automático 30
código de idioma 44
conexión de video (video compuesto) 11
conguraciónavanzada 31
conguracióndeaudio 30
conguracióndeenergía 31
conguracióndevideo 29
control paterno 30
control remoto 6
D
deep color 29
E
F
formatos de archivo 34
formatos de video 36
formatos multimedia 34
G
grilla de sintonización 23
I
idioma de audio 29
idioma del disco 29
idioma del menú 29
idioma subtítulos 29
Internet 14
M
manual del usuario 4
menú del disco 29
modo de espera automático 31
modo de sonido predeterminado 28
modo nocturno 30
O
opciones 20
opciones de audio 21
opciones de imagen 21
opciones de video 21
optimización de audio 31
orden aleatorio 21
P
panel de visualización 30
PBC (control de reproducción) 30
picture-in-picture 17
posprocesamiento de audio 31
Preguntas frecuentes 4
R
red 14
red con cables 14
45
ES
HTB3525B_F7_UM_V1.0.indb 45 12/10/2013 6:04:16 PM

red doméstica 14
repetición 21
reproducir unidad de almacenamiento USB 20
resolución de imagen 29
resolución de problemas (imagen) 38
S
secuencia de diapositivas con música 22
seguridad 3D 4
sincronización de imagen y sonido 17
solución de problemas (reproducir) 39
solución de problemas (sonido) 38
sonido 27
surround sound 27
T
Temporizador 31
U
ubicación de los subtítulos 30
unidad de almacenamiento USB 20
unidad principal 6
V
VCD 30
volumen automático 28
46
ES
HTB3525B_F7_UM_V1.0.indb 46 12/10/2013 6:04:16 PM

Français
Table des matières
1 Important 2
Consignes de sécurité importantes 2
Précautions d'utilisation de votre appareil 4
Respect de l'environnement 4
Avertissement pour la santé relatif à la 3D 4
Aide et soutien 5
6 Modicationdesréglages 29
Paramètres de langue 29
Paramètres vidéo et d'image 29
Paramètres audio 30
Paramètres du contrôle parental 30
Paramètres d'afchage 30
Paramètres d'économie d'énergie 31
Paramètres des haut-parleurs 31
Restauration des paramètres par défaut 31
2 Votre SoundStage 6
Unité principale 6
Télécommande 6
Connecteurs 8
3 Installation du SoundStage 9
4 Raccordementetconguration 10
Raccordement au téléviseur 10
Connexion du signal audio du
téléviseur ou d'autres périphériques 11
Conguration d'EasyLink (protocole
HDMI-CEC) 12
Conguration d'un réseau domestique
et connexion au réseau 14
5 Utilisation du SoundStage 16
Accès au menu d'accueil 16
Disques 16
Lecture de contenu audio par
connexion Bluetooth 18
Lecture de musique par NFC 19
Fichiers de données 19
Dispositifs de stockage USB 20
Options vidéo, audio et photo 20
Radio 22
Lecteur MP3 23
Protez de services Internet 23
Netix 23
VUDU 24
Vidéos YouTube 24
Parcourir l'ordinateur par DLNA 25
Réglage du son 27
7 Mise à jour logicielle 32
Vérication de la version du logiciel 32
Mise à jour logicielle à l'aide d'une clé
USB 32
Mise à jour logicielle sur Internet 33
8 Spécicationsduproduit 34
Codes de région 34
Formats des supports 34
Formats de chiers 34
Bluetooth 34
Formats audio 34
Formats vidéo 35
Amplicateur 36
Vidéo 36
Audio 36
Radio 36
USB 36
Unité principale 36
Haut-parleurs 37
Haut-parleur d'extrêmes graves 37
Piles de la télécommande 37
Laser 37
9 Dépannage 38
10 Avis 41
Droits d'auteur 41
Avis de conformité 41
Logiciel libre 42
Marques de commerce 42
11 Code de langue 44
12 Index 45
FR-CA
HTB3525B_F7_UM_V1.0.indb 1 12/10/2013 6:04:16 PM
1

1 Important
Lisez attentivement toutes les instructions avant
d'utiliser le téléviseur. Si des dommages sont
causés par le non-respect des instructions, la
garantie ne sera pas applicable.
Consignes de sécurité
importantes
• Lisez ces instructions.
• Conservez ces instructions.
• Tenez compte de tous les avertissements.
• Suivez toutes les instructions.
• N'utilisez pas cet appareil près de l'eau.
• Nettoyez l'appareil avec un chiffon sec
seulement.
• N'obstruez aucune prise de ventilation.
Installez l'appareil en conformité avec les
instructions du fabricant.
• N'installez pas l'appareil près d'une
source de chaleur comme un radiateur,
un registre de chaleur ou un autre appareil
(incluant les amplicateurs) qui produit de
la chaleur.
• Ne passez pas outre les instructions de
sécurité concernant la che polarisée
ou la che de mise à la terre. Une che
polarisée est composée de deux broches
dont l'une est plus large que l'autre. Une
che de mise à la terre est composée de
deux broches et d'une broche de masse.
La broche plus large et la broche de
masse visent à assurer votre sécurité. Si la
che fournie ne peut être insérée dans la
prise, consultez un électricien pour qu'il
remplace votre prise désuète.
• Protégez le cordon d'alimentation de
façon à ce qu'il ne puisse pas être écrasé
ou pincé; vériez particulièrement les
ches, les prises et la sortie du l dans
l'appareil.
• Utilisez seulement les accessoires
spéciés par le fabricant.
• Utilisez seulement le chariot, le support,
le trépied ou la table spéciés par le
fabricant ou vendu avec l'appareil. Si
vous utilisez un chariot, faites attention
lorsque vous le déplacez an d'éviter de
vous blesser en cas de renversement de
l'appareil.
• Débranchez cet appareil pendant les
orages avec éclairs ou s'il n'est pas utilisé
pendant de longues périodes.
• Toute réparation doit être faite par
un technicien qualié. Une réparation
est nécessaire quand l'appareil a été
endommagé, par exemple, quand le
cordon ou la che d'alimentation ont
été endommagés, quand un objet a
été introduit dans l'appareil ou quand
l'appareil a été mouillé, exposé à la pluie
ou à l'humidité, qu'il ne fonctionne pas
correctement ou qu'il a été échappé.
• AVERTISSEMENT relatif à l'utilisation de
piles – An d'éviter une fuite des piles
pouvant entraîner des blessures ou des
dommages matériels :
• Installez toutes les piles correctement
en alignant les pôles + et - tel
qu'indiqué sur l'appareil.
• Ne combinez pas des piles différentes
(neuves et usagées, au carbone et
alcalines, etc.).
• Retirez les piles lorsque l'appareil n'est
pas utilisé pendant une longue période.
• Les piles intégrées ne doivent pas être
exposées à une chaleur excessive,
comme les rayons du soleil ou le feu.
• Produits contenant du perchlorate :
une manipulation particulière peut être
requise. Consulter www.dtsc.ca.gov/
hazardouswaste/perchlorate.
2
FR-CA
HTB3525B_F7_UM_V1.0.indb 2 12/10/2013 6:04:16 PM

Français
• L'appareil ou sa télécommande peuvent
contenir une pile bouton qu'un enfant
pourrait avaler. Gardez ce type de pile hors
de portée des enfants à tout moment!
En cas d'ingestion, la pile peut provoquer
des blessures sérieuses voire la mort. De
graves brûlures internes peuvent survenir
dans les deux heures suivant l'ingestion.
• Si vous croyez qu'une pile a été ingérée
ou introduite dans le corps de quelqu'un,
consultez immédiatement votre médecin.
• Lorsque vous changez les piles, assurezvous que les piles neuves et usagées sont
hors de portée des enfants. Une fois le
changement de pile effectué, assurez-vous
que son compartiment est bien fermé et
sécurisé.
• Si vous ne parvenez pas à sécuriser le
compartiment de la pile, cessez d'utiliser
l'appareil. Gardez l'appareil hors de portée
des enfants et communiquez avec le
fabricant.
• N'exposez pas l'appareil aux
éclaboussures, ni aux déversements.
• Ne placez aucune source de danger sur
l'appareil (par exemple des objets remplis
de liquide ou des bougies allumées).
• Cet appareil peut contenir du plomb et
du mercure. Mettez l'appareil au rebut
conformément aux lois municipales,
provinciales ou fédérales. Pour en savoir
plus sur la mise au rebut ou sur le
recyclage, veuillez communiquer avec les
autorités locales. Pour de plus amples
renseignements sur les diverses possibilités
de recyclage, visitez les sites www.
mygreenelectronics.com, www.eiae.org ou
www.recycle.philips.com.
• Si la che d'alimentation ou un coupleur
d'appareil est utilisé comme dispositif de
découplage, celui-ci doit rester facilement
accessible.
• Ne placez pas cet appareil sur un meuble
qu'un enfant pourrait faire basculer
ou qu'un adulte pourrait renverser
involontairement en s'appuyant ou en
grimpant dessus ou encore en le tirant. La
chute d'un appareil peut provoquer des
blessures graves, voire la mort.
• Cet appareil ne doit pas être placé
dans un meuble encastré comme une
bibliothèque ou une étagère, à moins
que l'emplacement offre une ventilation
sufsante. Veillez à garder un espace
dégagé d'au moins 20 cm (7,8 po) autour
de cet appareil.
• Avertissement : L'utilisation de commandes
ou de réglages ou de toute autre
procédure que celles indiquées dans
le présent document risque d'exposer
l'utilisateur à des radiofréquences.
Symbole d'équipement de classe II
Ce symbole signie que l'appareil sur lequel il
est apposé est doté d'une double isolation.
Sachez reconnaître ces symboles de sécurité
Ce symbole «d'éclair» signale des matériaux
non isolés présents dans votre appareil et
pouvant causer un choc électrique. Pour assurer
la sécurité des membres de votre famille,
veuillez ne pas enlever le couvercle du produit.
Les «points d'exclamation» ont pour but
d'attirer votre attention sur des caractéristiques
à propos desquelles vous devez lire
attentivement la documentation accompagnant
l'appareil an d'éviter tout problème de
fonctionnement et d'entretien.
AVERTISSEMENT : an de réduire les risques
d'incendie ou de choc électrique, n'exposez pas
FR-CA
HTB3525B_F7_UM_V1.0.indb 3 12/10/2013 6:04:17 PM
3

cet appareil à la pluie ou à l'humidité. Ne posez
pas dessus d'objets remplis de liquides, tels que
des vases.
ATTENTION : pour éviter les chocs
électriques, introduisez la broche la plus large
de la che dans la borne correspondante de la
prise et poussez à fond.
rebut avec les déchets ménagers. Veuillez vous
assurer de mettre les piles au rebut selon les
règlements locaux.
Pour les produits contenant du perchlorate,
une manipulation particulière peut être requise.
Visitez le site www.dtsc.ca.gov/hazardouswaste/
perchlorate.
Précautions d'utilisation de
votre appareil
• N'insérez aucun objet autre qu'un disque
dans le logement du disque.
• N'insérez pas de disques gondolés ou fêlés
dans le logement du disque.
• Retirez les disques du logement du disque
lorsque vous n'utilisez pas l'appareil
pendant une période prolongée.
• Utilisez seulement un chiffon en microbre
pour nettoyer l'appareil.
Respect de l'environnement
Votre produit a été conçu et fabriqué avec des
matériaux et des composants de grande qualité,
qui peuvent être recyclés et réutilisés. Visitez
le site www.recycle.philips.com pour savoir
comment trouver un centre de recyclage dans
votre région.
Ne jetez pas ce produit avec les autres
ordures ménagères. Renseignez-vous sur les
règles régissant la collecte locale des produits
électriques et électroniques et des piles. La mise
au rebut adéquate de ces produits contribue
à réduire le risque de conséquences négatives
pour l'environnement et la santé humaine.
Les piles fournies ne contiennent pas de
métaux lourds comme le mercure et le
cadmium. Néanmoins, dans un grand nombre
de localités, il est interdit de mettre les piles au
Avertissement pour la santé
relatif à la 3D
• Si vous ou des membres de votre famille
avez des antécédents d'épilepsie ou de
malaises liés à la photosensibilité, consultez
un professionnel de la santé avant de
vous exposer à des sources lumineuses
clignotantes, à des séquences d'images
rapides ou à des images en 3D.
• Pour éviter toute gêne telle que vertiges,
maux de tête ou désorientation, nous
vous recommandons d'éviter de regarder
du contenu 3D pendant des périodes
prolongées. Si vous ressentez une gêne,
cessez de regarder le contenu 3D et
attendez que tous les symptômes aient
disparu avant d'entreprendre une activité
pouvant présenter un danger, par exemple
conduire. Si les symptômes persistent,
ne reprenez pas le visionnement de
contenu 3D avant d'avoir consulté un
professionnel de la santé.
• Il est du devoir des parents de superviser
leurs enfants lorsqu'ils visionnent du
contenu 3D an de s'assurer qu'ils
ne ressentent aucun malaise tel que
mentionné ci-dessus. Le visionnement
de contenu 3D est déconseillé pour
les enfants âgés de moins de six ans
car leur appareil visuel n'est pas encore
complètement développé.
4
FR-CA
HTB3525B_F7_UM_V1.0.indb 4 12/10/2013 6:04:17 PM

Français
Aide et soutien
Philips propose un service complet à la clientèle
en ligne. Visitez notre site Web à l'adresse www.
philips.com/support pour pouvoir :
• télécharger le guide d'utilisation complet
• imprimer le guide de démarrage rapide
• regarder des didacticiels vidéo (pour
certains modèles seulement)
• trouver des réponses aux questions les
plus fréquentes (FAQ)
• nous envoyer une question par courriel
• clavarder avec un de nos représentants du
service à la clientèle
Suivez les instructions sur le site Web pour
sélectionner votre langue, ensuite entrez le
numéro de modèle de votre produit.
Vous pouvez également communiquer avec le
service à la clientèle de Philips de votre pays.
Avant de communiquer avec Philips, notez
le numéro de modèle et le numéro de série
de votre produit. Vous pouvez trouver cette
information à l'arrière de votre appareil.
FR-CA
HTB3525B_F7_UM_V1.0.indb 5 12/10/2013 6:04:17 PM
5

2 Votre
Télécommande
SoundStage
Nous vous félicitons de votre achat et vous
souhaitons la bienvenue chez Philips! Pour
proter pleinement du soutien offert par Philips,
par exemple les avis de mise à niveau logicielle,
enregistrez votre produit à l'adresse www.
philips.com/welcome.
Unité principale
L'unité principale est présentée dans cette
section.
a
b
dc
e
La télécommande est présentée dans cette
section.
a
b
c
d
e
f
g
h
i
j
k
l
m
n
o
x
w
v
u
t
s
a
Permet d'allumer votre système
SoundStage ou de le mettre en veille.
b SOURCE
Sélectionnez une source audio, vidéo
ou radio ou le mode Bluetooth pour le
SoundStage.
c Logement du disque
d -/+
Pour augmenter ou baisser le volume.
e
Pour ouvrir ou fermer le logement du
disque.
6
FR-CA
HTB3525B_F7_UM_V1.0.indb 6 12/10/2013 6:04:18 PM
p
q
a
• Permet d'allumer votre système
SoundStage ou de le mettre en veille.
• Avec EasyLink activé, maintenir enfoncé
pendant au moins trois secondes pour
r

Français
mettre en veille tous les appareils
HDMI-CEC branchés
b Boutons de services en ligne
• YouTube : accéder à des vidéos en
ligne sur YouTube.
• NETFLIX : accéder à des vidéos
et des séries TV en ligne offerts par
Netix.
• VUDU : accéder à des vidéos en ligne
sur VUDU.
c SOURCE
Sélectionner une source : disque /
HDMI ARC / entrée audio / USB pour le
SoundStage.
d
Accéder au menu d'accueil
e DISC MENU
• Accéder au menu du disque ou le
quitter en cours de lecture
f Touches de navigation
• Naviguer dans les menus
• En mode radio, appuyez sur la touche
gauche ou droite pour démarrer la
recherche automatique.
• En mode radio, appuyer vers le
haut ou le bas pour syntoniser une
fréquence
g OK
Conrmer une entrée ou une sélection
h
• Revenir au menu précédent
• En mode radio, maintenir enfoncée
cette touche pour effacer les stations
de radio préréglées
i Boutons de couleur
Sélectionner des tâches ou des options
dans les disques Blu-ray.
j
Pour ouvrir ou fermer le logement du
disque.
k
Démarrer ou reprendre la lecture
l /
• Aller à la piste, au chapitre ou au
chier suivant ou précédent
• En mode radio, sélectionner une
station de radio préréglée
m /
Effectuer des recherches vers l'arrière ou
l'avant Appuyez sur la touche plusieurs fois
pour changer la vitesse de recherche.
n
Couper ou rétablir le son
o +/-
Augmenter ou baisser le volume
p Boutons alphanu mériques
Entrer des valeurs ou des lettres (entrée
de style SMS)
q SUBTITLE
Sélectionner la langue des sous-titres d'une
vidéo
r AUDIO
Sélectionner un canal ou une langue audio
s
Accéder aux options audio ou les quitter
t
Mettre la lecture en pause.
u
Arrêter la lecture
v
• Afcher plus d'options pendant la
lecture d'un disque ou d'un dispositif
de stockage USB
• En mode radio, sélectionner une
station de radio
w TOP MENU
Accéder au menu principal d'un disque
x
Permet de passer en mode Bluetooth.
FR-CA
HTB3525B_F7_UM_V1.0.indb 7 12/10/2013 6:04:19 PM
7

Remarque
• La sélection d'une radio ou d'une source est désactivée
lors de l'utilisation de BD-Java ou des services Internet.
Connecteurs
Connecteurs latéraux
Les connecteurs de votre SoundStage sont
présentés dans cette section.
Connecteurs arrière
ab c d
fe
g
a FM ANTENNA
Connexion à l'antenne FM fournie.
b ETHERNET
Brancher l'entrée ETHERNET d'un
modem large bande ou d'un routeur.
c OPTICAL IN
Brancher la sortie audio optique du
téléviseur ou d'un appareil numérique
d VIDEO OUT
Brancher l'entrée vidéo composite du
téléviseur
e ENTRÉE COAXIALE
Permet la connexion à la sortie audio
coaxiale du téléviseur ou d'un autre
appareil numérique
f AUX IN
Brancher la sortie audio analogique
du téléviseur ou d'un autre appareil
analogique
g HDMI OUT (ARC)
Brancher l'entrée HDMI du téléviseur
a AUDIO IN
Entrée audio d'un lecteur MP3 (prise de
3,5 mm).
b
• Entrée audio, vidéo ou image pour
dispositif de stockage USB
• Accéder à BD-Live.
8
FR-CA
HTB3525B_F7_UM_V1.0.indb 8 12/10/2013 6:04:20 PM

Français
3 Installation du
SoundStage
Ce SoundStage a été conçu pour être placé
sous votre téléviseur.
2 Assurez-vous que la base du téléviseur
est centrée par rapport à l'appareil et
qu'aucun bord ne dépasse.
Mise en garde
• Le SoundStage est conçu pour les téléviseurs dont le
poids est inférieur à 22 kg. C'est le cas de la plupart des
téléviseurs de 107 cm (42") ou plus petits, ainsi que de
certains téléviseurs de 140 cm (55"). Ne placez pas un
téléviseur à tube cathodique sur le SoundStage.
• Ne placez pas le SoundStage sur un plateau, un support
ou un bras instable. Le SoundStage pourrait tomber
et blesser gravement un enfant ou un adulte et/ou
endommager le produit.
• Assurez-vous que les prises de ventilation sur le
panneau arrière ne sont pas obstruées.
• Ne changez pas la position du SoundStage après avoir
placé votre téléviseur dessus.
1 Placez le SoundStage sur une surface
plane et stable à proximité de votre
téléviseur. Ensuite, placez le téléviseur sur le
SoundStage.
Conseil
• Si le téléviseur est trop grand pour être placé sur
le SoundStage, placez ce dernier à un autre endroit,
par exemple sur une étagère sous le téléviseur, mais
toujours à proximité an de pouvoir connecter le câble
audio. Vous pouvez également xer votre téléviseur sur
le mur au-dessus du SoundStage.
• Si votre téléviseur est doté d'un dispositif anti-
basculement, installez-le conformément aux instructions
du fabricant et réglez le câble d'attache après avoir
placé le téléviseur sur le SoundStage.
• Si vous placez le SoundStage dans une armoire ou sur
une étagère et pour garantir des performances audio
optimales, assurez-vous de placer l'avant du SoundStage
aussi près que possible du rebord de l'étagère.
• Si vous placez le SoundStage contre un mur, maintenez
une distance d'au moins 1 pouce entre le mur et
l'arrière du SoundStage.
FR-CA
HTB3525B_F7_UM_V1.0.indb 9 12/10/2013 6:04:20 PM
9

4 Raccordement
et configuration
Cette section vous aidera à brancher votre
SoundStage sur un téléviseur ou sur d'autres
appareils et ensuite à le congurer.
Pour en savoir plus sur les branchements de
base de votre SoundStage et de ses accessoires,
consultez le guide de démarrage rapide.
Remarque
• Consultez la plaque signalétique apposée derrière ou
sous l'appareil pour l'identication du modèle et les
spécications d'alimentation.
• Avant d'effectuer un branchement ou de le modier,
assurez-vous qu'aucun périphérique n'est branché sur
la prise électrique.
Raccordement au téléviseur
Pour pouvoir regarder des vidéos, branchez
votre SoundStage sur un téléviseur. Vous pouvez
également diffuser le son du téléviseur sur le
SoundStage.
Utilisez la plus haute qualité de connexion
disponible sur votre SoundStage et votre
téléviseur.
Option 1 : connexion HDMI (ARC)
au téléviseur
Qualité vidéo optimale
Votre SoundStage prend en charge la version
HDMI avec Audio Return Channel (ARC). Si
votre téléviseur est compatible avec la norme
HDMI ARC, vous pouvez diffuser le son du
téléviseur sur les haut-parleurs du SoundStage à
l'aide d'un seul câble HDMI.
TV
1 Si vous utilisez un câble HDMI haute
vitesse, raccordez le connecteur HDMI
OUT (ARC) de votre SoundStage au
connecteur HDMI ARC du téléviseur.
• Le connecteur HDMI ARC du
téléviseur peut être étiqueté
différemment. Pour en savoir plus,
consultez le manuel d'utilisation du
téléviseur.
2 Activez le protocole HDMI-CEC sur votre
téléviseur. Pour en savoir plus, consultez le
manuel d'utilisation du téléviseur.
• Le protocole HDMI-CEC active les
appareils CEC connectés par câble
HDMI, de façon à ce que vous puissiez
les commander au moyen d'une
télécommande unique. Vous pouvez
par exemple régler le volume du
téléviseur et du SoundStage.
3 Si vous ne pouvez pas entendre le son
du téléviseur sur les haut-parleurs du
SoundStage, vous devez procéder à une
conguration manuelle (voir 'Conguration
des paramètres audio' page 13).
Option 2 : connexion HDMI standard
au téléviseur
Qualité vidéo optimale
Si votre téléviseur n'est pas compatible avec
la norme HDMI ARC, utilisez une connexion
HDMI standard pour y brancher votre
SoundStage.
10
FR-CA
HTB3525B_F7_UM_V1.0.indb 10 12/10/2013 6:04:20 PM
 Loading...