

Page 1
Register your product and get support at
www.philips.com/welcome
HSB2313/12
EN User manual
DA Brugervejledning
DE Benutzerhandbuch
EL ƆƣƷƥƩƱƟƤƩƯ ƷƱƞƳƧƲ
FI Käyttöopas
FR Mode d’emploi
IT Manuale utente
NL Gebruiksaanwijzing
Page 2

8 Troubleshooting 23
Contents
9 Appendix 24
1 Important 4
Safety 4
Notice 4
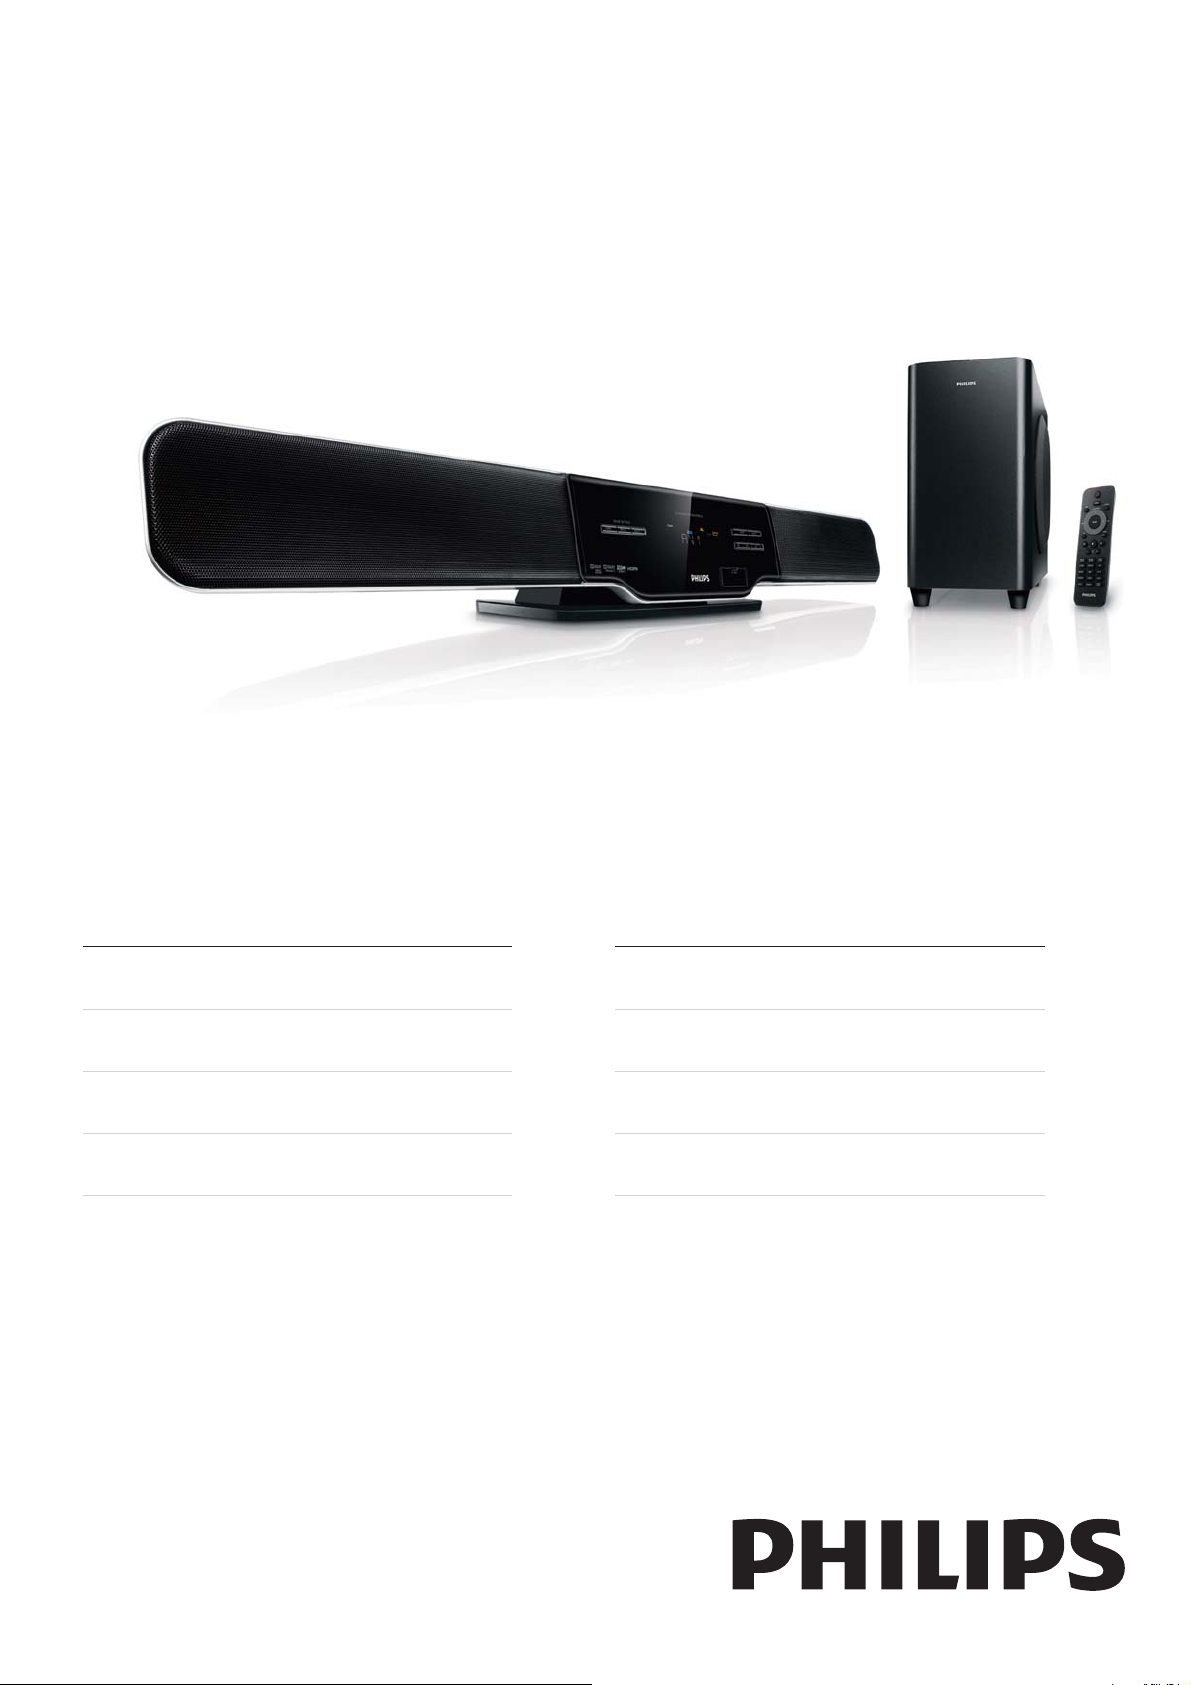
2 Your home theater system 7
Introduction 7
What’s in the box 7
Overview of the main unit 8
Overview of the remote control 9
3 Get started 11
Attach speakers to the main unit 11
Attach the stand 11
Connect AV devices 12
Connect power 15
Prepare the remote control 16
Turn on 16
Set clock 17
Enable Easylink 17
Mount to a wall 24
English
4 Play 18
Play from USB 18
Play connected AV devices 18
5 Adjust volume level and sound effect
19
Adjust volume level 19
Select a sound effect 19
Mute sound 19
Enable audio sync 19
6 Use more of your home theater
system
Set timer 20
Set sleep time 20
20
7 Product information 21
Product information 21
USB playability information 21
EN
3
Page 3

1 Important
Safety
Read and understand all instructions •
before you use the apparatus. If damage is
caused by failure to follow instructions, the
warranty does not apply.
Never insert objects into the ventilation •
slots or other openings on the apparatus.
Never remove the casing of this apparatus. •
Place the apparatus on a fl at, hard and •
stable surface.
Place the set in a location with adequate •
ventilation to prevent internal heat buildup in your system. Allow at least 10 cm (4
inches) clearance from the rear and the
top of the unit and 5 cm (2 inches) from
each sides.
The ventilation shall not be impeded by •
covering the ventilation opening with items
such as newspapers, table-cloths, curtains,
etc.
The apparatus shall not be exposed to •
dripping or splashing.
Never expose the apparatus to direct •
sunlight, naked fl ames or heat.
Ensure that you always have easy access •
to the power cord, plug or adaptor to
disconnect this apparatus from the power.
Use only the supplied mounting hardware •
for a safe and secure installation.
Wall mounting of the apparatus should •
only be performed by qualifi ed personal.
The apparatus must only be mounted
on an appropriate wall bracket and on a
wall that can safely hold the weight of the
apparatus. Improper wall mounting can
result in severe injury or damage.
Clean the apparatus with soft, damp cloth. •
Never use substances such as alcohol,
chemicals or household cleaners on the
apparatus.
Know these safety symbols
This ‘bolt of lightning’ indicates uninsulated
material within your unit may cause an electrical
shock. For the safety of everyone in your
household, please do not remove product
covering.
The ‘exclamation point’ calls attention to
features for which you should read the enclosed
literature closely to prevent operating and
maintenance problems.
WARNING: To reduce the risk of fi re or electric
shock, this apparatus should not be exposed to
rain or moisture and objects fi lled with liquids,
such as vases, should not be placed on this
apparatus.
CAUTION: To prevent electric shock, match
wide blade of plug to wide slot, fully insert.
Norge
Typeskilt fi nnes på apparatens bakside.
Observer: Nettbryteren er sekundert innkoplet.
Den innebygde netdelen er derfor ikke
fraktoplet nettet så lenge apparatet er tilsluttet
nettkontakten.
For å redusere faren for brann eller elektrisk
støt, skal apparatet, ikke utsettes for regn eller
fuktighet.
Notice
4
EN
Page 4

This product complies with the radio
interference requirements of the European
Community.
This product complies with the requirements
of the following directives and guidelines:
2004/108/EC + 2006/95/EC
Environmental information
All unnecessary packaging has been omitted.
We have tried to make the packaging easy to
separate into three materials: cardboard (box),
polystyrene foam (buffer) and polyethylene
(bags, protective foam sheet.)
Your system consists of materials which can
be recycled and reused if disassembled by
a specialized company. Please observe the
local regulations regarding the disposal of
packaging materials, exhausted batteries and old
equipment.
potentially negative consequences on the
environment and human health.
Your product contains batteries covered by the
European Directive 2006/66/EC, which cannot
be disposed of with normal household waste.
When you see the crossed-out wheel bin
symbol with the chemical symbol ‘Pb’, it means
that the batteries comply with the requirement
set by the directive for lead:
Please inform yourself about the local rules on
separate collection of batteries. The correct
disposal of batteries helps prevent potentially
negative consequences on the environment and
human health.
English
Your product is designed and manufactured
with high quality materials and components,
which can be recycled and reused.
When you see the crossed-out wheel bin
symbol attached to a product, it means the
product is covered by the European Directive
2002/96/EC:
Never dispose of your product with other
household waste. Please inform yourself about
the local rules on the separate collection of
electrical and electronic products. The correct
disposal of your old product helps prevent
HDMI, and HDMI logo and High-Defi nition
Multimedia Interface are trademarks or
registered trademarks of HDMI licensing LLC.
The making of unauthorized copies of copyprotected material, including computer
programs, fi les, broadcasts and sound
recordings, may be an infringement of
copyrights and constitute a criminal offence.
This equipment should not be used for such
purposes.
EN
5
Page 5

Manufactured under license from Dolby
Laboratories.
Dolby and the double-D symbol are
trademarks of Dolby Laboratories.
Manufactured under license from Dolby
Laboratories.
Dolby, Pro Logic, and the double-D symbol are
trademarks of Dolby Laboratories.
Other trademarks and trade names are those
of their respective owners.
This apparatus includes this label:
The type plate is located on the back of the apparatus.•
Note
6
EN
Page 6

2 Your home
theater system
Congratulations on your purchase, and
welcome to Philips! To fully benefi t from the
support that Philips offers, register your product
at www.Philips.com/welcome.
Introduction
With the home theater system, you can
Get superb sound performance when you •
watch TV, DVDs, listen to music, or play
games.
Enjoy MP3/WMA music directly from your •
portable USB device.
Enjoy high defi nition performance from •
HDMI (High Defi nition Multimedia
Interface) devices such as Blu-ray Disc
players, digital receivers, game consoles etc.
English
What’s in the box
Check and identify the contents of your
package:
Main unit•
Speakers (x 2)•
Digital subwoofer•
Remote control (with battery)•
Table stand•
Wall mount bracket and screws (x4)•
AV cable •
Coaxial cable•
AV switch cable•
SCART switch cable•
EN
7
Page 7
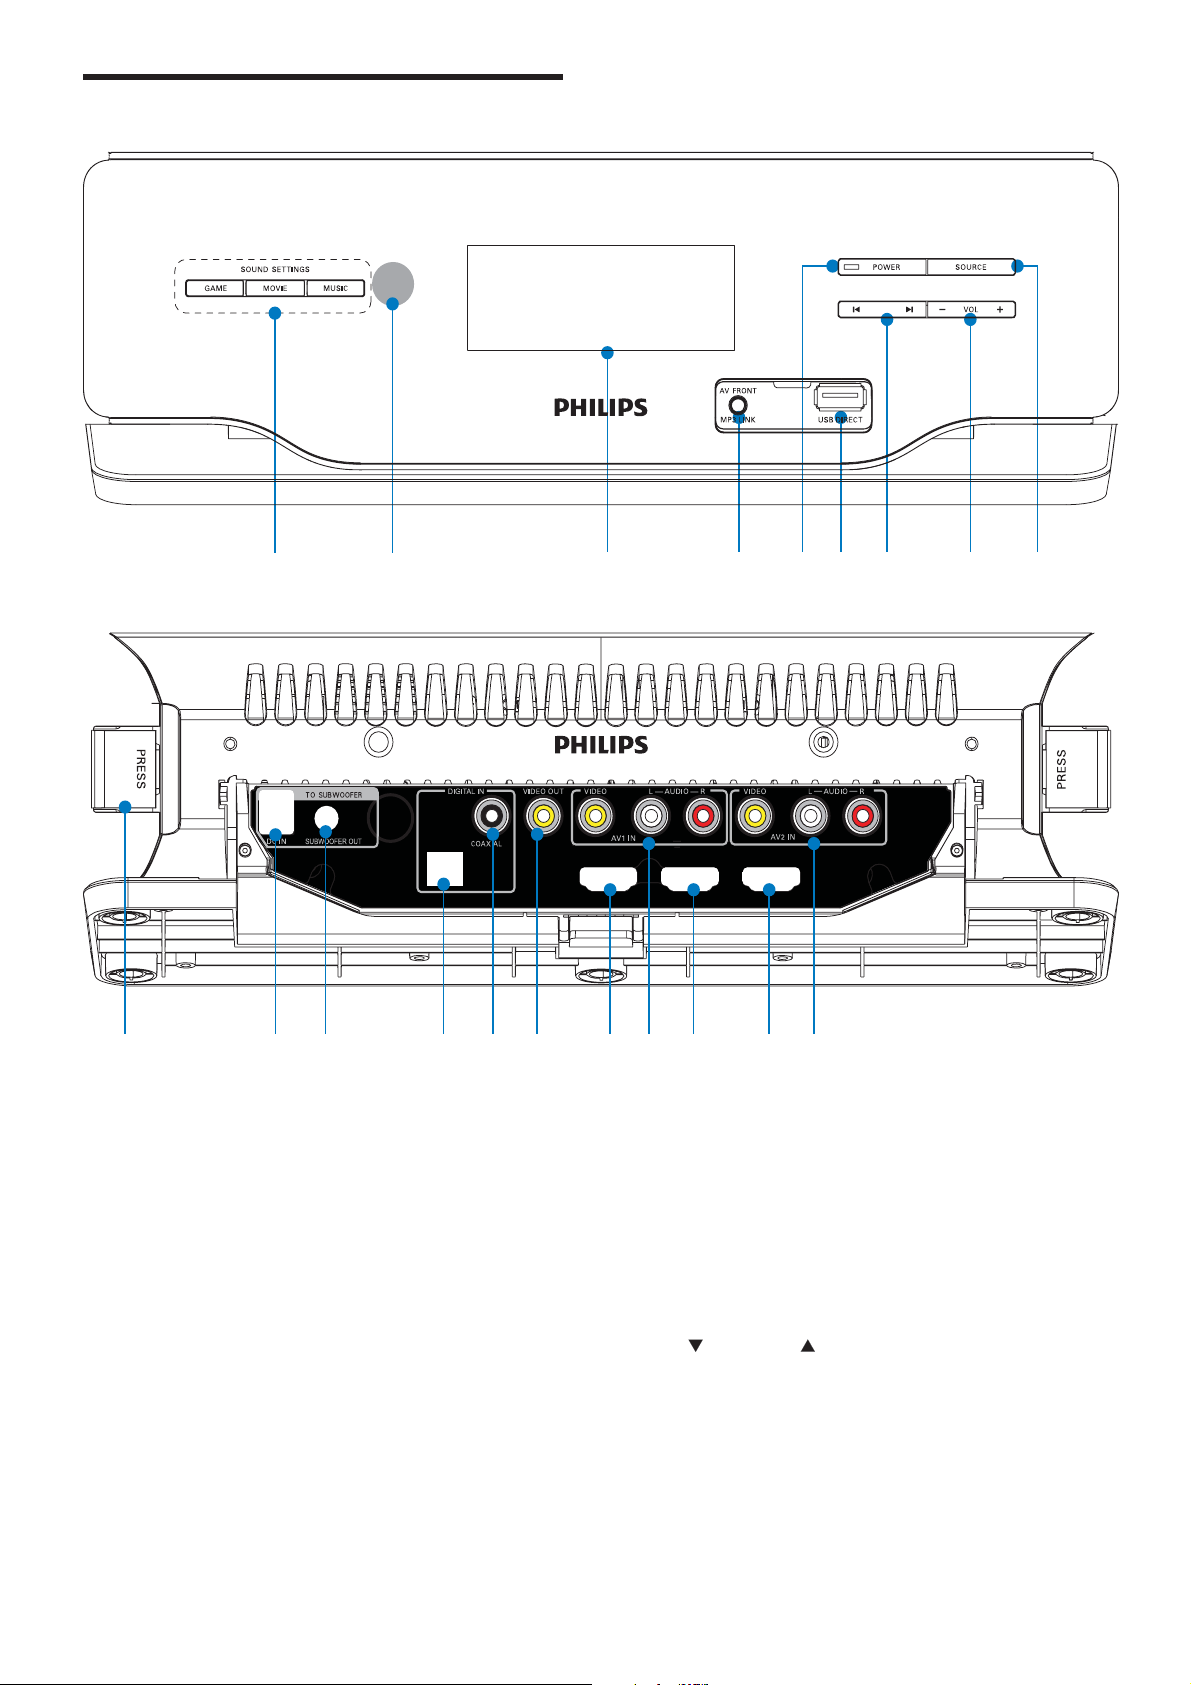
Overview of the main unit
a b
j k l m
c g he id f
OPTICAL
a SOUND SETTINGS (GAMES, MOVIE,
MUSIC)
Select a sound effect.•
b IR sensor
c Display panel
Show current status.•
d AV FRONT / MP3 LINK
AV input socket on the front panel.•
Jack for an external audio device.•
HDMI OUTHDMI IN 1 HDMI IN 2
o q tn p r s
e POWER
Turn on the unit, switch it to standby •
mode, or switch it to Eco Power
Standby.
f USB DIRECT
Socket for a USB mass storage device.•
g
PRESET
Skip to the previous/next track in the •
USB device.
8
EN
h - VOL +
Adjust volume.•
Adjust time.•
Page 8
i SOURCE
Select a source.•
j PRESS
Detach speakers from the main unit.•
Overview of the remote
control
English
k DC IN
Power supply socket.•
l SUBWOOFER OUT
Subwoofer out socket.•
m DIGITAL IN - OPTICAL
Optical audio input socket.•
n DIGITAL IN - COAXIAL
Coaxial audio input socket.•
o VIDEO OUT
Socket for composite video output.•
p HDMI IN 1
HDMI input socket.•
q AV1 IN ( VIDEO ,AUDIO L/R )
AV input sockets.•
r HDMI IN 2
HDMI input socket.•
s HDMI OUT
HDMI output socket.•
t AV2 IN ( VIDEO ,AUDIO L/R )
AV input sockets.•
y
x
w
v
u
t
s
r
q
p
o
a
b
c
d
e
f
g
h
i
j
k
l
m
n
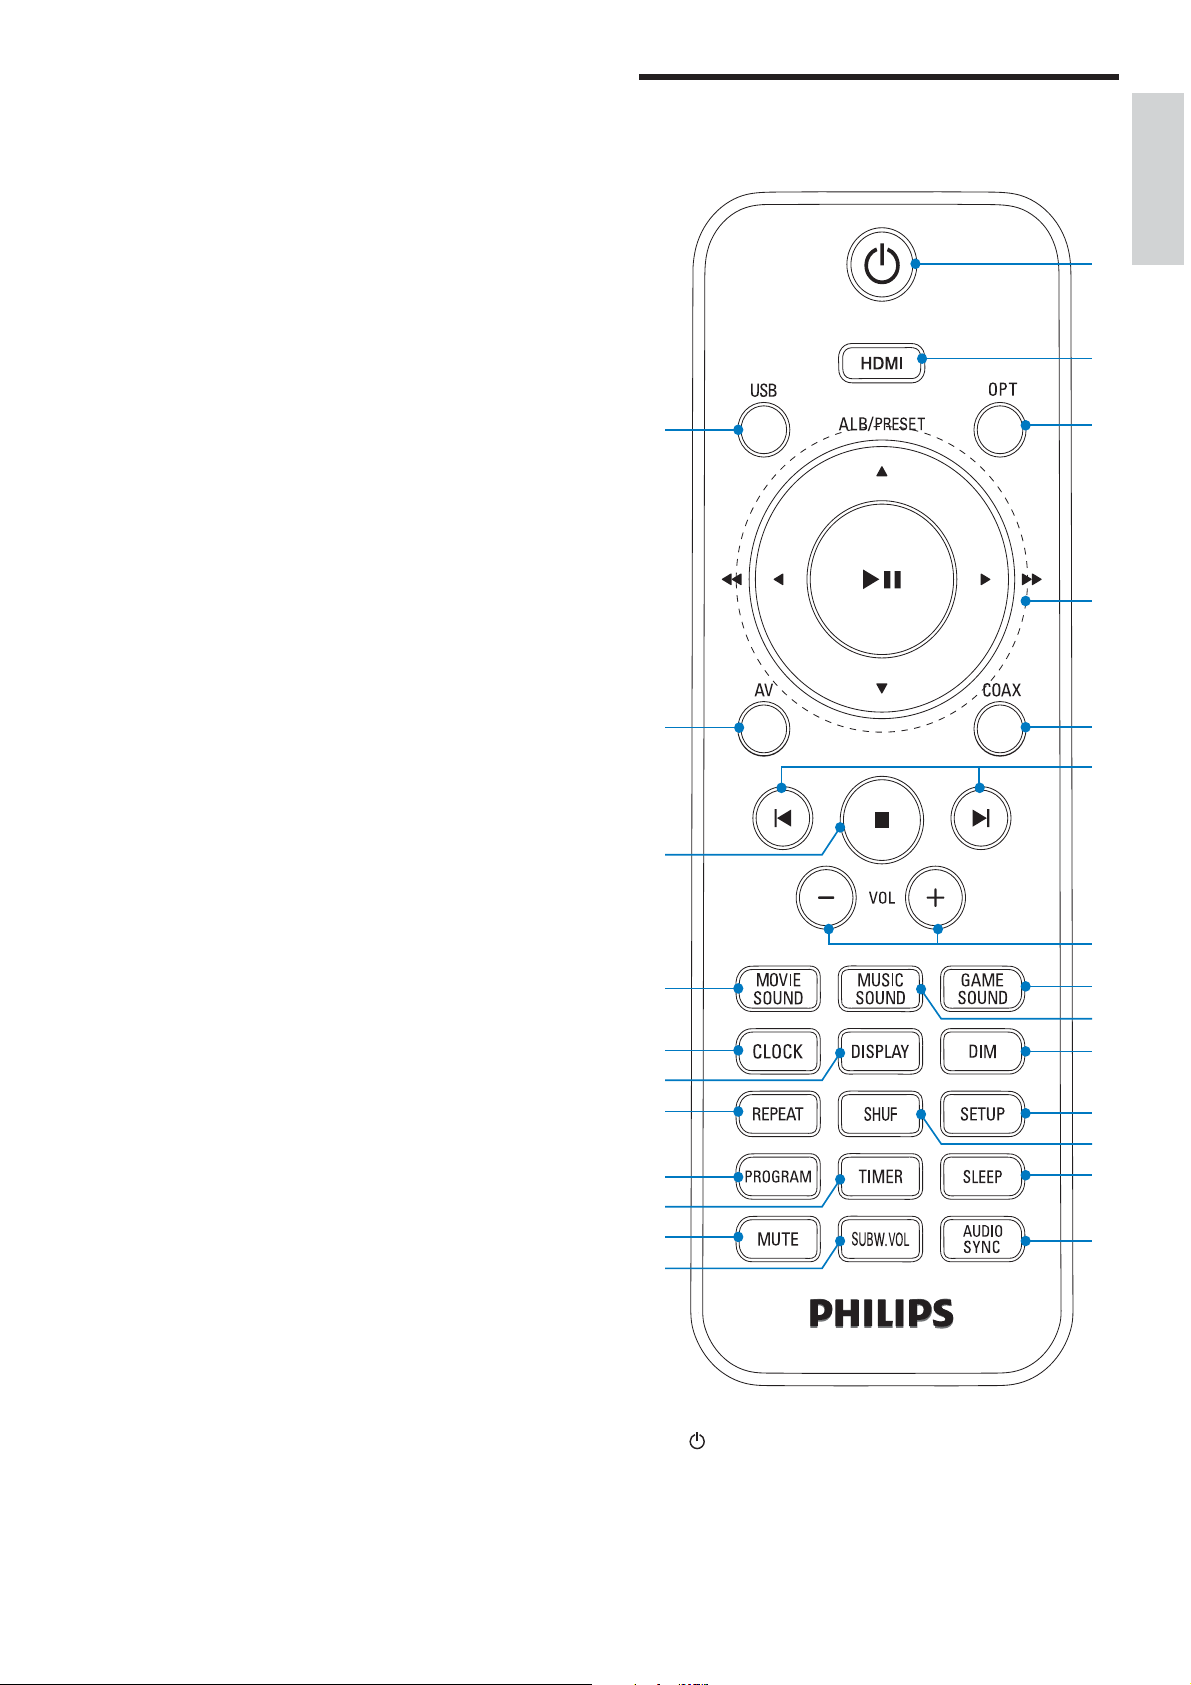
a
Turn on the unit, switch it to standby •
mode, or switch it to Eco Power
Standby.
EN
9
Page 9

b HDMI
p MUTE
Select an HDMI audio input source.•
Mutes volume.•
c OPT
Select Optical audio input source..•
d Navigation buttons
• ALB/PRESET/
Skip to the previous/next album
(folder) in the USB device
•
/ , /
Fast reverse or fast forward within a
track in the USB device.
•
Start or pause USB play.
e COAX
Select Coaxial audio input source.•
f
/
Skip to the previous/next track in the •
USB device.
g VOL +/-
Adjust volume.•
Adjust time.•
h GAME SOUND
Select a game sound setting.•
i MUSIC SOUND
Select an equalizer setting.•
q TIMER
Set the alarm timer.•
r PROGRAM
Program tracks in a USB device.•
s REPEAT
Select a repeat play mode for the •
connected USB device.
t DISPLAY
Select display information during play.•
u CLOCK
Set the clock.•
View the clock.•
v MOVIE SOUND
Select a movie sound setting.•
w
Stop play.•
x AV
Select AV source.•
y USB
Select the USB source.•
j DIM
Select different levels of display •
brightness.
k SETUP
Enable/disable Easylink.•
l SHUF
Play tracks in the USB device •
randomly.
m SLEEP
Set the sleep timer.•
n AUDIO SYNC
Synchronize audio and video.•
o SUBW. VOL
Adjust subwoofer volume.•
10
EN
Page 10

3 Get started
Caution
Use of controls or adjustments or performance of •
procedures other than herein may result in hazardous
radiation exposure or other unsafe operation.
English
Always follow the instructions in this chapter in
sequence.
If you contact Philips, you will be asked for the
model and serial number of this apparatus. The
model number and serial number are on the
back of the apparatus. Write the numbers here:
Model No. __________________________
Serial No. ___________________________
Attach speakers to the main
unit
1
Place the main unit on a soft and fl at
surface.
Ensure that the bottom side faces •
upwards.
3 Repeat step 2 to attach the right speaker.
Attach the stand
Slide the supplied table stand onto the
1
bottom of the main unit.
2 Attach the left speaker to the left side of
the main unit.
EN
11
Page 11

Tip
You can also mount the apparatus on a wall.•
Connect AV devices
Note
The type of devices and connections in the following •
instructions are for reference only.
•
When you connect cables, ensure that the color of the
plug matches the color of the socket.
Connect TV
If you connect the home theater system to
your TV, you can enjoy the superb sound
performance while watching TV.
1 If the TV has a digital output socket,
connect the supplied coaxial cable
(orange) from the TV to the DIGITAL IN
-COAXIAL socket on the system.
OPTICAL
Tip
It is unnecessary to connect the yellow video •
connectors.
If your TV has SCART socket, connect •
the supplied SCART switch cable to
the SCART socket on the TV and
the VIDEO OUTPUT socket on the
system.
HDMI OUTHDMI IN 1 HDMI IN 2
Not used
LR
TV
AUDIO OUT
OPTICAL
HDMI OUTHDMI IN 1 HDMI IN 2
AUDIO OUT
(DIGITAL)
TV
You can also connect the system to •
the TV by using the supplied AV cable
(see below illustration).
SCART IN
OPTICAL
HDMI OUTHDMI IN 1 HDMI IN 2
TV
12
EN
Page 12

If your TV connected to a set-top-•
box (to convert analog signal into
digital signal), connect the supplied
AV cable to AV output sockets on the
set-top-box and the AV1 IN or AV2
IN sockets.
Connect DVD player
If you connect your DVD player and TV to the
home theater system, you can enjoy superb
sound performance during watching DVD
movie.
a Connect the system to the TV. (see
‘Connect TV’ on page 13)
b Connect the supplied AV cable to the AV1
IN or AV2 IN sockets on the system and
the AV OUT sockets on the DVD player.
English
OPTICAL
HDMI OUTHDMI IN 1 HDMI IN 2
AUDIO OUT
AUDIO VIDEO
L
R
You can also connect the supplied •
AV switch cable to the AV FRONT
socket fi rst, then connect the AV cable
to the AV output sockets on the DVD
player.
Connect game console
If you connect your game console and TV to
the home theater system, you can enjoy the
superb sound performance while playing game.
1 Connect the system to the TV. (see
‘Connect TV’ on page 13)
2 Connect an MP3 Link cable (not supplied)
to the AV FRONT socket on the system
and the AV OUT socket on the game
console.
EN
13
Page 13

HDMI OUTHDMI IN 2
You can connect the AV output •
sockets on a game console to the
AV1 IN or AV2 IN sockets on the
system.
OPTICAL
HDMI OUTHDMI IN 1 HDMI IN 2
AUDIO OUT
AUDIO VIDEO
L
R
Connect HDMI supported devices
HDMI (High Defi nition Muiltimedia Interface)
is a digital interface that supports both audio
and video transmission through a single cable.
If you connect your HDMI-compliant DVD
players and TV to the home theater system, you
can watch DVDs or Blu-ray discs that contain
HD (High-Defi nition) content. This connection
provides the best picture quality.
Note
Some TVs do not support HDMI audio transmission.•
You can also connect the supplied •
AV switch cable to the AV FRONT
socket fi rst, then connect the AV cable
to the AV output sockets on the DVD
player.
OPTICAL
HDMI OUTHDMI IN 1 HDMI IN 2
TV
1 Connect an HDMI cable (not supplied) to
the HDMI OUT socket on the DVD player
and HDMI IN 1 or HDMI IN 2 socket on
the system.
2 Connect another HDMI cable (not
supplied) to the HDMI OUT socket on
the system and the HDMI IN socket on
the TV.
If your TV has only a DVI(Digital •
Visual Interface) connection, connect
through a HDMI/DVI adaptor. An
extra audio connection is needed to
complete this connection.
14
EN
Page 14

3 Press HDMIto select HDMI 1 or HDMI 2.
Tip
Connect coax supported devices
The home theater system can decode digital
audio signal. You can connect the system to your
digital amplifi er or receiver.
OPTICAL
HDMI OUTHDMI IN 1 HDMI IN 2
Amplifier
DIGITAL OUT
1 Connect the supplied coaxial cable to the
COAXIAL socket on the system and the
COAXIAL/DIGITAL output socket on the
connected device.
You can connect an optical cable (not •
supplied) to the OPTICAL socket
on the system and the COAXIAL/
DIGITAL output socket on the
connected device.
You can connect all the devices to the home theater •
system at the same time.
Connect power
Caution
Risk of product damage! Ensure that the power supply •
voltage corresponds to the voltage printed on the back
or the underside of the product.
•
Risk of electric shock! When you unplug the AC power,
always pull the plug from the socket. Never pull the
cord.
Note
Before connecting AC power, ensure you have •
completed all other connections.
1 Connect one end of the power plug to the
DC IN and SUBWOOFER OUT socket
on the main unit.
English
EN
15
Page 15

Prepare the remote control
Caution
Risk of explosion! Keep batteries away from heat, •
sunshine or fi re. Never discard batteries in fi re.
•
Risk of decreased battery life! Never mix different
brands or types of batteries.
•
Risk of product damage! When the remote control is
not used for long periods, remove the batteries.
Note
Perchlorate Material - special handling may apply. See •
www.dtsc.ca.gov/hazardouswaste/perchlorate.
1 Open the battery compartment.
2 Insert 2 AAA battery with correct polarity
(+/-) as indicated.
OPTICAL
HDMI OUTHDMI IN 1 HDMI IN 2
3 Close the battery compartment.
2 Connect the other end to the wall outlet.
Turn on
1
Press .
The unit switches to the last selected »
source.
• To switch to standby mode:
16
1 Press .
Clock is displayed (if have set).»
The clock (if set) is displayed.
• To switch to Eco Power Standby mode:
EN
Page 16

1 Press for over 3 seconds.
The backlight on the display panel »
turns off.
The blue Eco Power indicator lights up.»
Set clock
1
In the standby mode, press and hold
CLOCK to enter the clock setting mode.
» Clock is displayed and the hour digits
begin to blink.
2 Press + VOL - to set the hour.
3 Press CLOCK to confi rm
The minute digits begin to blink.»
4 Press + VOL - to set the minute.
5 Press CLOCK to confi rm the clock setting.
English
Enable Easylink
EasyLink uses the HDMI CEC (Consumer
Electronics Control) industry standard protocol
to share functionality with all HDMI CEC
compliant devices over HDMI. It enables the
connected devices to control each other with a
single remote control.
Note
EasyLink (HDMI CEC) is only applicable with certain •
criteria. Terms and conditions may vary by product.
Consult your product dealer for information.
•
Philips does not guarantee 100% interoperability with
all HDMI CEC devices.
1 Press SETUP for over 3 seconds.
‘Easylink On’ is displayed.»
To disable Easylink, press and hold »
SETUP until “Easylink Off’ is displayed.
EN
17
Page 17

4 Play
Play from USB
2 To return to normal play, press REPEAT
until the selected function is no longer
displayed.
Random play
Note
• Ensure that the USB device contains playable music.
(see ‘USB playability information’ on page 23)
1 Flip open the cover on the front panel.
2 Insert the USB plug of a USB device into
the
socket.
1 Press SHUF.
All tracks are played randomly.»
2 To return to normal play, press SHUF again.
Tip
The repeat and shuffl e functions cannot be activated at •
the same time.
Program tracks
You can arrange the playback order of the
tracks. You can store up to 20 tracks.
1 In stop mode, press PROGRAM to activate
the programming mode.
» [01 P-00] is displayed.
2 Press ALB/PRESET/ to select the album
where the track is located.
3 Press USB to select the USB source.
The total number of tracks is displayed.»
4 Press ALB/PRESET/ to select a folder.
5 Press / to select a fi le.
6 Press to start play.
During play, press and hold •
to search fast backward or forward.
Press•
Repeat play
to pause or resume play.
or
1 During play, press REPEAT repeatedly to
select:
» [REPEAT] (repeat): play the current
track repeatedly.
3 Press / to select a track number
to program, then press PROGRAM to
confi rm.
» [P-X] is displayed, where “X” is the
current position in the program.
4 Repeat steps 2 to 3 to select and store all
tracks to program.
5 Press to play the programmed tracks.
To erase the program, press •
PROGRAM in stop mode.
Play connected AV devices
Note
• Ensure that you have made the necessary AV
connections. (see ‘Connect AV devices’ on page 13)
» [REPEAT ALL] (repeat all): play all
tracks repeatedly.
18
EN
1 Press AV, HDMI, or COAX/OPT to select
an AV source.
Page 18

5 Adjust volume
• [NORMAL] (normal)
level and sound
effect
Adjust volume level
1
During play, press VOL +/- to increase/
decrease the volume level.
Adjust subwoofer volume
1 Press SUBW. VOL to adjust the subwoofer
volume.
Select a sound effect
Select equalizer settings
1 During USB play, press MUSIC SOUND
repeatedly to select:
• [POP] (pop)
• [JAZZ] (jazz)
• [ROCK] (rock)
• [CLASSIC] (classic)
• [NORMAL] (normal)
Mute sound
During play, press MUTE to mute/unmute
1
sound.
Enable audio sync
English
Note
You cannot use different sound effects at the same •
time.
Select a game sound effect
1 During play, press GAME SOUND
repeatedly to select:
• [SHOOTING] (shooting)
• [SPORT] (sport)
• [RACING] (racing)
• [ARCADE] (arcade)
• [NORMAL] (normal)
Select a movie sound effect
1 During play, press MOVIE SOUND
repeatedly to select:
• [DRAMA] (drama)
• [SCIENCE FICTION] (science
fi ction)
• [ACTION] (action)
• [CONCERT] (concert)
If the video signal sent to the TV is slower than
the audio streams, you can synchronize audio
and video by delaying the audio output.
1 Press AUDIO SYNC repeatedly to select
a delay time: 10, 20, 30 ...100, 110 ...190,
200.
To disable audio sync, press • AUDIO
SYNC repeatedly to select OFF.
EN
19
Page 19

6 Use more of
your home
theater system
Set timer
The home theater system can turn on
automatically at a set time.
1 Ensure that you have set the clock
correctly.
2 In standby mode, press and hold TIMER.
The TIMER is displayed and hour digits »
begin to blink.
3 Press + VOL - to set the hour.
4 Press TIMER to confi rm.
The minute digits begin to blink.»
5 Press + VOL - to set the minute.
6 Press TIMER to confi rm.
The mode indicator begins to blink.»
7 Press + VOL - to select [ON] (on).
A clock icon appears on the display.»
The system turns on automatically »
at the set time and switches to USB
mode.
To deactivate the alarm timer, repeat »
steps above and select [OFF] (off)
mode.
Set sleep time
1
When the system is turned on, press
SLEEP repeatedly to select a set period of
time (in minutes).
The system turns off automatically in »
the selected time.
20
EN
Page 20

7 Product
Amplifi er
Rated Output Power 180W + 120W RMS
information
Note
Product information is subject to change without prior •
notice.
Product information
General information
AC power 220 - 230V,
50Hz
Operation Power
Consumption
Standby Power Consumption <10W
Eco Standby Power
Consumption
USB Direct Full Speed
70W
<1W
Ver1.1
Frequency Response 20 - 20000 Hz
Signal to Noise Ratio >65dB
AV1, 2 Input 1.0V RMS 20kohm
Front AV Input 1.0V RMS 20kohm
Coaxial Input 1V RMS 75ohm
Total Harmonic
Distortion
<1%
L/R speakers
Speaker
Impedance
Speaker Driver 1.5” mediant+1.5” tweeter
Sensitivity >82dB/m/W
3ohm (mediant) + 3ohm(
tweeter)
Subwoofer
Speaker Impedance 3ohm*subwoofer
Speaker Driver 6.5” subwoofer
Sensitivity >78dB/m/W
English
Dimensions (W x H x D)
Main unit and speakers
Subwoofer
Weight
With Packing
Main unit and speakers
Subwoofer
800 x 90 x
95mm
180 x 330 x
340mm
9.5 kg
1.8 Kg
5.2 kg
USB playability information
Compatible USB devices:
USB fl ash memory (USB 2.0 or •
USB1.1)
USB fl ash players (USB 2.0 or USB1.1)•
Memory cards (requires an additional •
card reader to work with the home
theater system)
Supported formats:
EN
21
Page 21

USB or memory fi le format FAT12, •
FAT16, FAT32 (sector size: 512 bytes)
MP3 bit rate (data rate): 32-320 Kbps •
and variable bit rate
WMA v9 or earlier•
Directory nesting up to a maximum •
of 8 levels
Number of albums/ folders: maximum •
99
Number of tracks/titles: maximum 999•
File name in Unicode UTF8 •
(maximum length: 128 bytes)
Unsupported formats:
Empty albums: an empty album is an •
album that does not contain MP3/
WMA fi les, and is not be shown in the
display.
Unsupported fi le formats are skipped. •
For example, Word documents (.doc)
or MP3 fi les with extension .dlf are
ignored and not played.
AAC, WAV, PCM audio fi les•
DRM protected WMA fi les (.wav, •
.m4a, .m4p, .mp4, .aac)
WMA fi les in Lossless format•
22
EN
Page 22

8 Troubleshooting
Warning
Never remove the casing of this apparatus. •
To keep the warranty valid, never try to repair
the system yourself.
If you encounter problems when using this
apparatus, check the following points before
requesting service. If the problem remains
unsolved, go to the Philips web site www.
philips.com/welcome. When you contact Philips,
ensure that the apparatus is nearby and the
model number and serial number are available.
No power
Ensure that the AC adaptor of the main •
unit is connected properly.
Ensure that there is power at the AC •
outlet.
No sound
Adjust the volume.•
Check that the speakers are connected •
correctly.
If there is no sound in the USB mode, •
ensure that you have connected a USB
device that contains playable music.
If there is no sound in the AV mode, •
ensure that you have connected AV
devices to the system correctly.
Remote control does not work
Before you press any function button, fi rst •
select the source with the remote control.
Reduce the distance between the remote •
control and the system.
Insert the batteries with its polarities (+/– •
signs) aligned as indicated.
Replace the battery.•
Aim the remote control directly at the •
sensor on the front of the system.
Cannot display some fi les in USB device
The number of folders or fi les in the USB •
device has exceeded a certain limit. This
phenomenon is not a malfunction.
The formats of these fi les are not •
supported.
USB device not supported
The USB device is incompatible with the •
system. Try another one.
Timer does not work
Set the clock correctly.•
Switch on the timer.•
Clock/timer setting erased
Power has been interrupted or the power •
cord has been disconnected.
Reset the clock/timer.•
No picture on HDMI connection.
Check if the HDMI cable is faulty. Replace a •
new HDMI cable.
Check if connected devices are authorized •
HDMI compatible. If not, the audio/video
signal may not be output.
No sound on HDMI connection.
You may not hear any sound if the •
connected device is non-HDCP compliant
or only DVI-compatible.
English
EN
23
Page 23

9 Appendix
Mount the main unit and speakers
Caution
Mount to a wall
Caution
Risk of product damage! Always consult professional •
personnel to safely mount the product to a wall.
•
Risk of injury! Ensure that no supply ducts such as gas,
water or electricity are harmed when you drill the
holes.
What’s in the supplied mounting kit
To fi nd a suitable mounting location, make the •
necessary physical and wireless connections.
•
Mount the main unit and speakers to a solid concrete
wall or plaster board wall only!
You can use the supplied bracket to mount the
main unit and speakers to the wall.
1 Align the bracket in the chosen location
on a wall. Use a pencil to mark the drilling
positions.
1 x wall mount bracket for the main unit and
speakers
4 x screws
What else you’ll need
Electric drill•
Screwdriver•
Pencil•
2 Drill holes as marked.
3 Secure 2 supplied screws in the holes, but
leave 5mm between the screw head and
the wall.
24
EN
Page 24

4 Secure the wall mount bracket onto the
main unit with 2 supplied screws.
English
5 Hook the main unit and speakers in place.
EN
25
Page 25

© 2009 Koninklijke Philips Electronics N.V.
All rights reserved.
 Loading...