

Philips HR7805/04, HR7805/02, HR7805/01 User Manual [it]
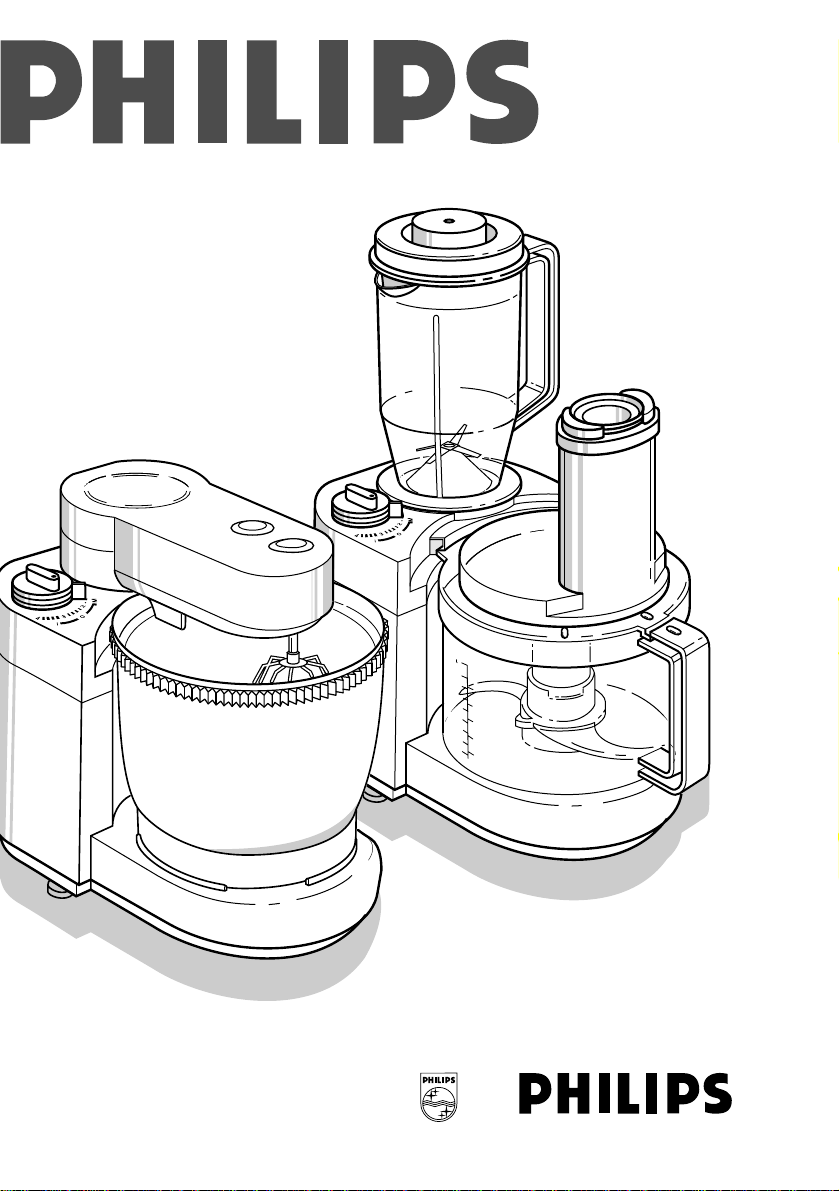
ombi 3000
0,5
10
1
1/2
20
35
25
20
15
10
0.5
25
poi
Phkjds

English Page 3
Français Page 16
Deutsch Seite 29
Nederlands Pagina 43
Italiano Pagina 56
Português Página 70
2
3
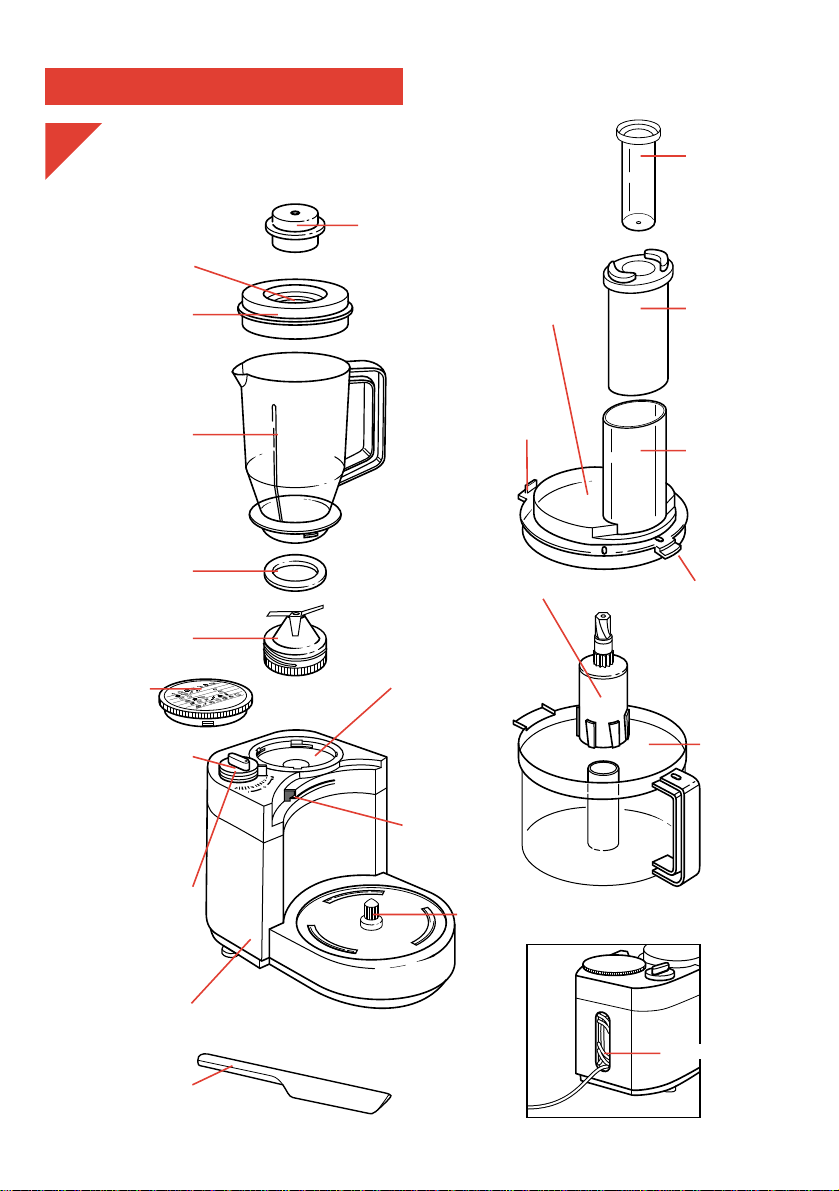
English
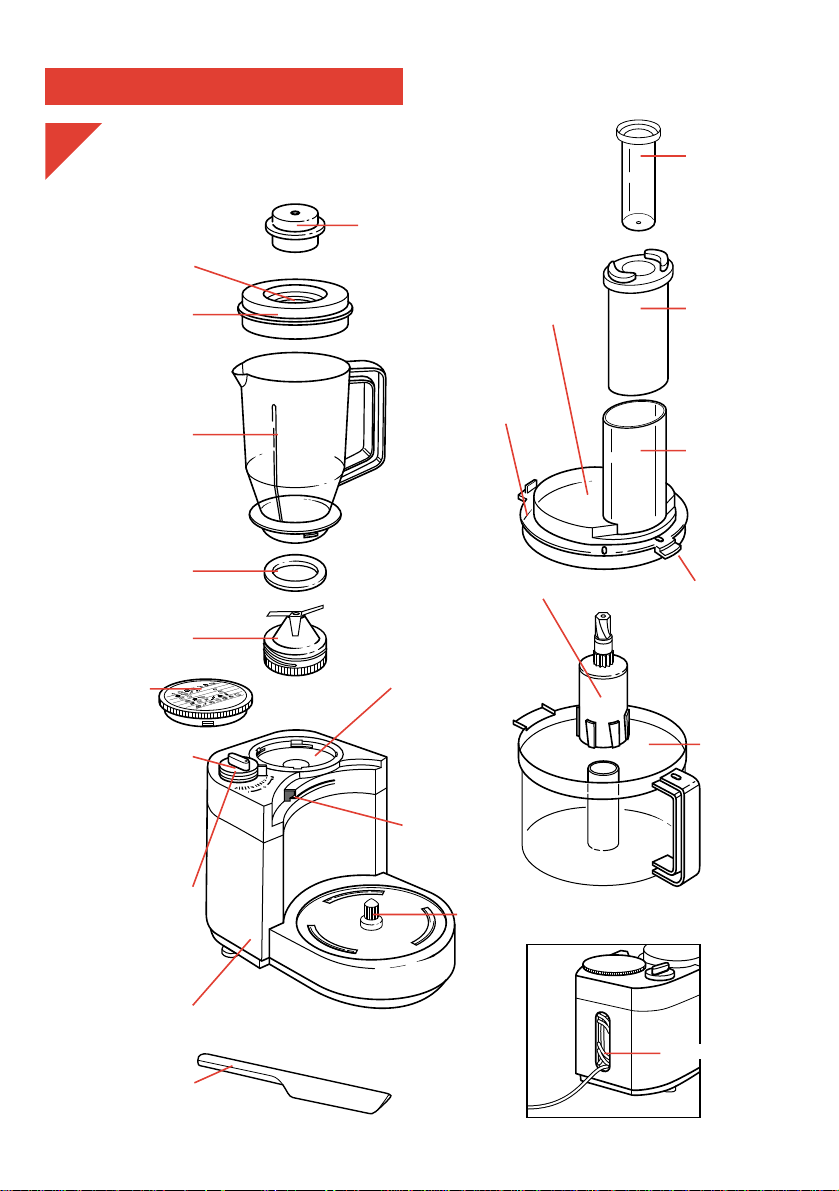
Opening in the lid
Stopper
Mounting hole
for blender jar
and top-piece
Safety lock
Drive shaft
Pushing guide
Pusher
Food chute
Lip of cover
(fits into
handgrip
spacing to
guarantee safe
operation)
Bowl
Cord storage
Cover
Ridge of cover
(locks and
unlocks the built-
in safety lock)
Coupling
for metal blade
and discs
Lid
Blender jar
®
Rubber sealing ring
Blade unit
Screw-cap
Switch
O = off
| = on
(continuous
operation)
M = "Moment"
(release = stop)
Speed control
(continuously
variable)
1 = minimum
4 = maximum
Spatula
Motor housing
1a
4
Automatic Safety Shut-Off (resettable)
Please read these instructions carefully before
using the appliance.
To prevent the hazard of damage due to
overheating, your appliance is equipped with an
automatic safety device which will automatically
shut-off the mains power if necessary.
If the instructions below are followed strictly you
can safely switch on again after a 15 minute
cooling-down period.
If the appliance suddenly stops:
1. First remove the mains plug from the wall
socket.
2. Secondly set the switch to position O.
3. Allow a cooling-down period of min.
15 minutes.
4. Insert the mains plug into the wall socket.
5. Set the switch to position |.
Contact your Philips dealer or an authorised
Philips Service Centre if the safety shut-off is
activated repeatedly.
Metal blade £
Protective cap
Slicing disc
§
(double-sided)
| = thin
[ = thick
Grating disc
¶
(double-sided)
| = medium
[ = coarse
Grating disc
•
for fine and very
fine grating
(double-sided)
| = very fine
[ = fine
Storage box
for discs
Bowl (for mixing,
whisking and
kneading)
Stirrer
√
Kneading hooks ƒ
Whisk ≈
Release knob
for whisk
Release knob for
stirrer and
kneading hooks
Top-piece
(for mixing,
whisking and
kneading)
Gear wheel
to drive the bowl
for mixing,
whisking and
kneading)
3 Positions knob
Insert opening for
whisk
Insert opening for
stirrer
Insert openings
for kneading
hooks
I release
(placing or removing toppiece)
II swing up/down (placing
or removing stirrer, whisk or
kneading hooks)
III fixed (working position)
1b
Important
• Read the instructions in conjunction with
the illustrations before using the
appliance.
• Do not leave the appliance operating
unattended.
• Do not allow children to operate the
appliance.
• Care must be taken when handling the
metal blade, the blender blade and the
slicing disc as these are very sharp.
• Remove the protective cap from the
metal blade before use.
• Let the rotating parts come to a complete
stop before opening the cover.
• Never put your fingers or e.g. a spatula
into the food chute or into the blender jar
while operating.
• Remove the mains plug from the wall
socket after use.
• If the mains cord of this appliance is
damaged, it must be replaced by the
special cord.
Apply to your Philips dealer or to the
Philips organization in your country.
• Prior to initial use, wash all the parts
which come into contact with food.
• Never immerse the motor housing or the
top-piece for mixing/kneading/whisking
in water or any other liquid. Do not rinse
either.
• When mixing or blending fluids, do not
fill above the maximum level indication
on the bowl or the blender jar.
• Do not exceed the maximum quantities
and processing times indicated in the
tables of pages 12-14.
• Place the lid on the bowl in the right
manner. The built-in safety lock then
becomes unlocked and the appliance can
be switched on.
• Keep these instructions for future
reference.
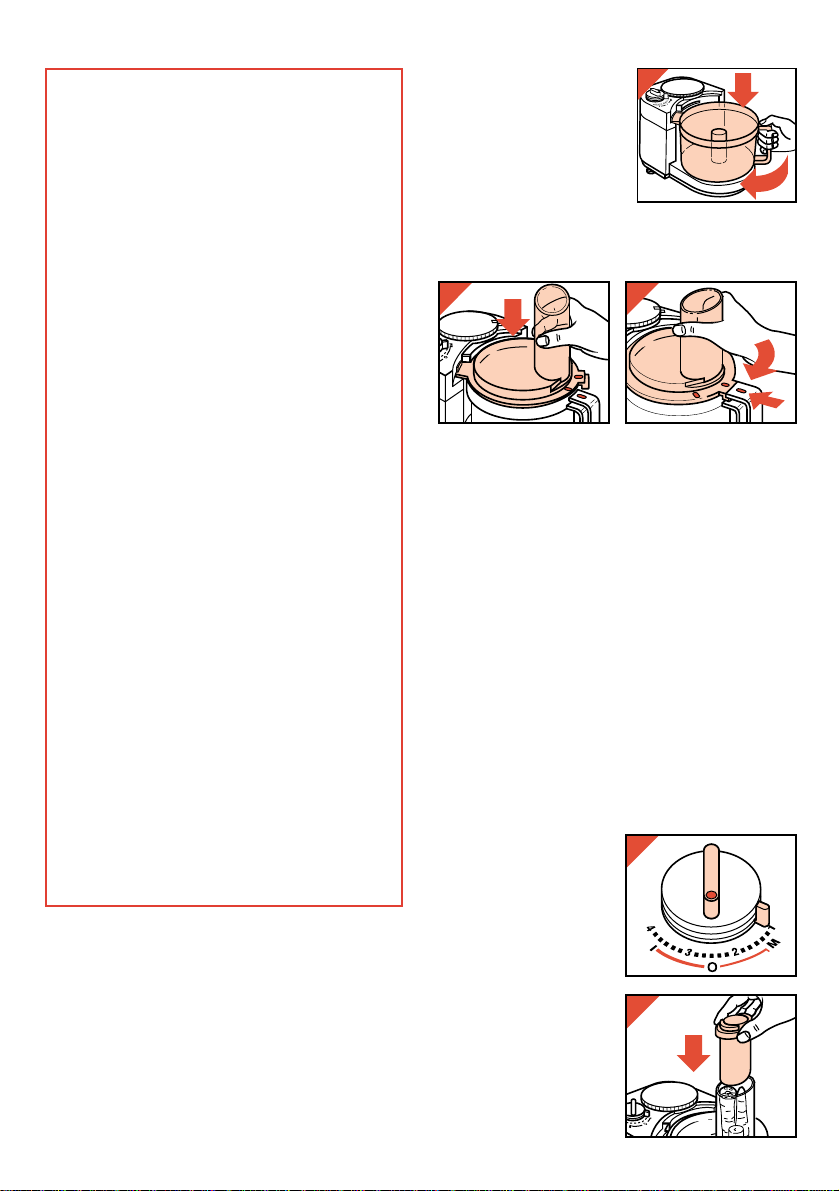
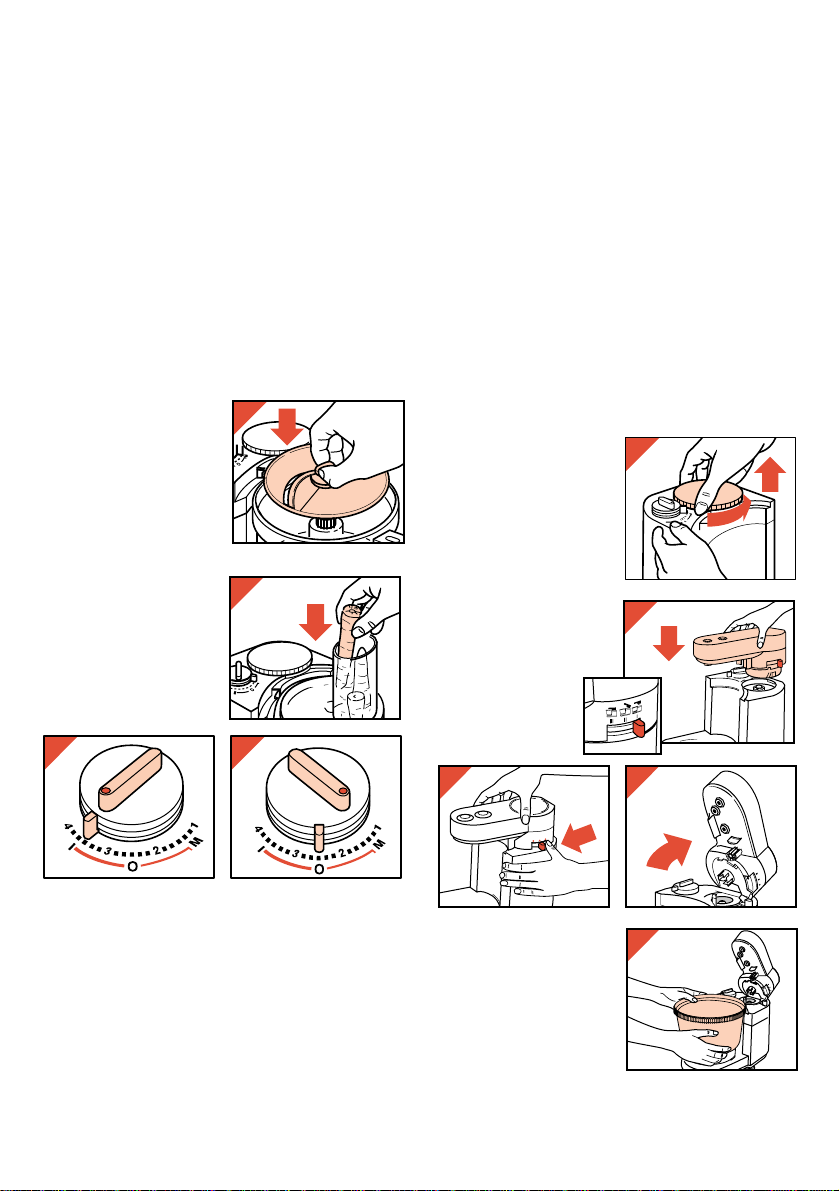
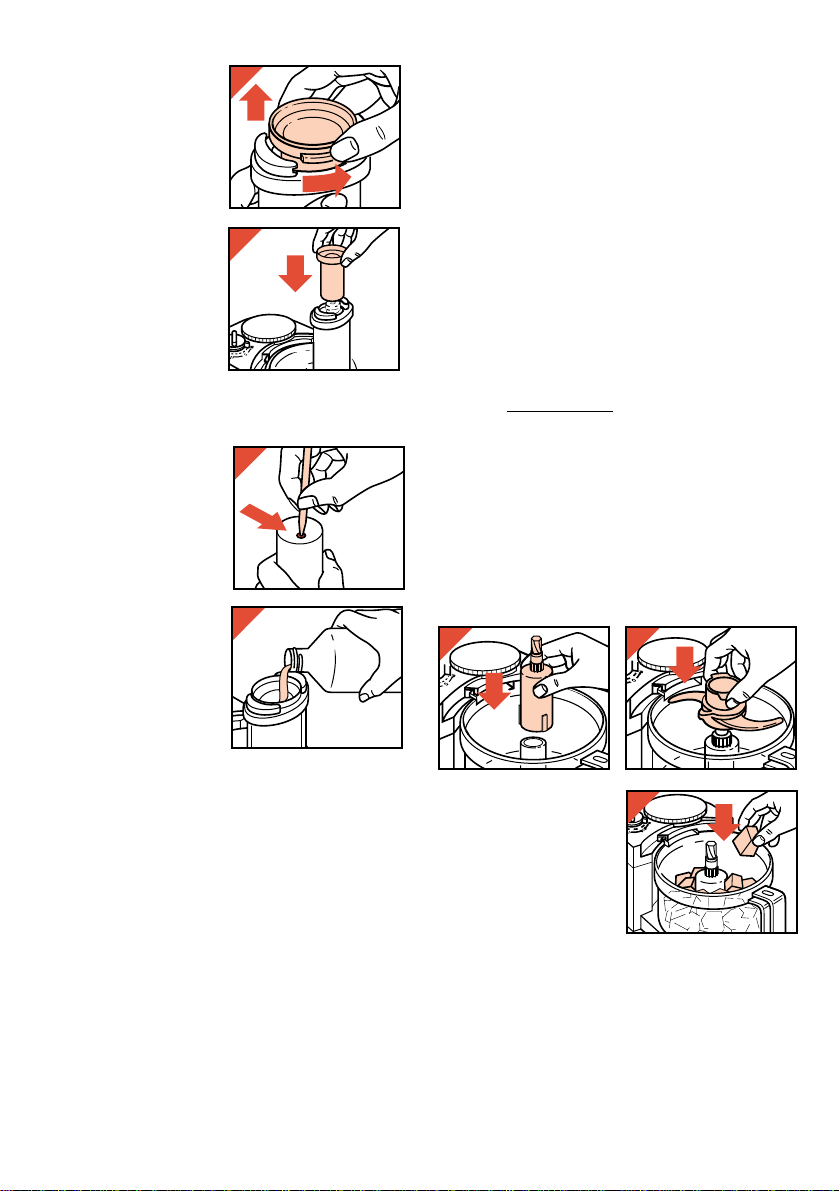
Positioning the bowl
- Move the handle in
the direction of the
arrow (2) until it stops.
Positioning the cover
- Move the cover firmly in the direction of the
arrow (fig. 4) until it stops and the markings on
the cover lip and on the bowl (hand grip) meet.
Built-in safety lock
Only if in the right manner (see indication marks)
- the cover has been screwed onto the bowl, and
also
- either the blender jar, top-piece for
mixing/kneading/whisking or the screw-cap
has been screwed onto on the blender jar
mounting hole, the built-in safety lock is
released so that the appliance can be switched
on.
For that reason, please give figs. 3 and 4 extra
attention!
After use
- Set the switch to
position O.
- Now you can release
the cover from the bowl
by turning the cover
anti-clockwise.
Food chute and pusher
• Use the pusher to feed
ingredients through the
food chute.
5
5
2
1
2
3 4
6
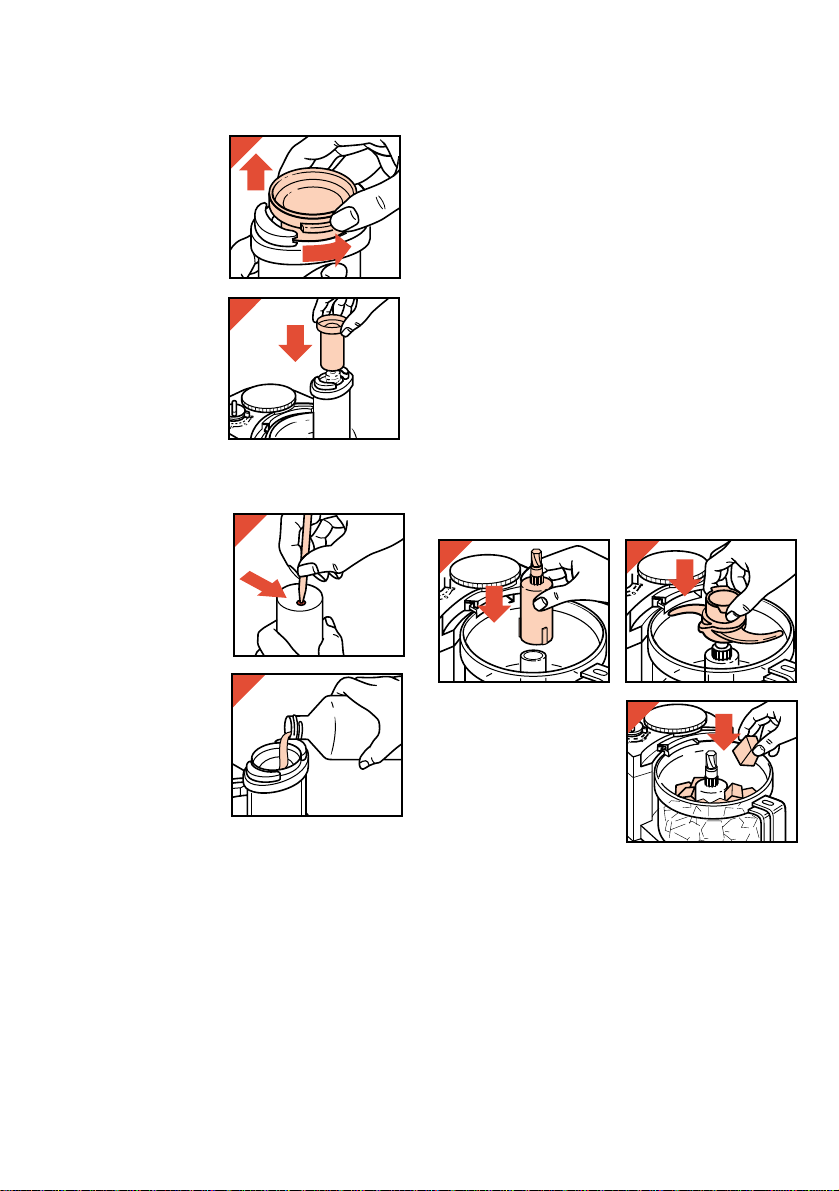
• You can keep the pusher in the food chute to
serve as a stopper while operating. This will
prevent splashing and making dust.
• The pusher is
equipped with a
pushing guide.
- The pushing guide
can be released from
(and fixed onto) the
pusher by rotating
(fig. 7).
If released, the
pushing guide and
the smaller filling
opening can be useful
when processing e.g.
carrots, and if the
portion is too small to
fill the food chute
(fig. 8).
Please note: use the pushing guide only if the
pusher is in the food chute.
- At the bottom side of
the pushing guide you
will find an indication
where you can pierce
a small opening,
using a pointed object
(fig. 9).
Through this opening
you can from time to
time add small
quantities of liquid
(e.g oil while making
mayonnaise) (fig. 10).
- There are level
indications (ml) on the
pushing guide for
measuring liquids.
Accessories (see pages 94, 95)
When ordering items for replacement or to expand
the possibilities of your appliance please refer to
the service number or type number.
• Standard accessories are:
- metal blade
- slicing disc fine/thick (double-sided)
- grating disc medium/coarse (double-sided)
- grating disc fine/very fine (double-sided)
- whisk
- kneading hooks
- coupling
- spatula
- pusher with pushing guide
- blender accessory
- storage box for discs
- stirrer
• Also available as optional extras
(Please ask your dealer if the extra accessories
are available in this country.)
- grating/slicing combined disc (medium/medium)
- grating disc, single-sided (extra-fine)
- chipper disc (French fries, turnip cabbage)
- citrus press accessory
- juice extractor accessory
- potato peeler disc
- chopper accessory.
Metal blade £
Take care: the cutting edges are very sharp!
• The metal blade is suitable for chopping,
mixing, blending, puréeing and making dough
for pastry and shortbread.
- Successively position
the bowl (fig. 2), the
coupling (fig. 11) and
then the metal blade
(fig. 12).
- Put the ingredients
into the bowl (fig. 13).
- Place the cover (fig. 3, 4) and put the pusher
into the food chute (fig. 6).
Tips:
• Pre-cut large pieces into cubes of about 3 cm
(or 1").
• Avoid overprocessing due to excessive
operation. (Also when using the M ("Moment")
setting.)
• When chopping (hard) cheese, take care not to
keep the motor running too long. Then the
cheese could get warm and turn lumpy.
• If food should get caught around the metal
blade, or when particles of food should stick to
6
7
2
1
8
9
10
11 12
13
the inside of the bowl:
- first switch the appliance off,
- take the cover from the bowl
- and remove the food from the metal blade or
from the bowl using the spatula.
• Do not chop very hard ingredients, such as
coffee beans, nutmeg and lumps of ice: these
would blunt the metal blade.
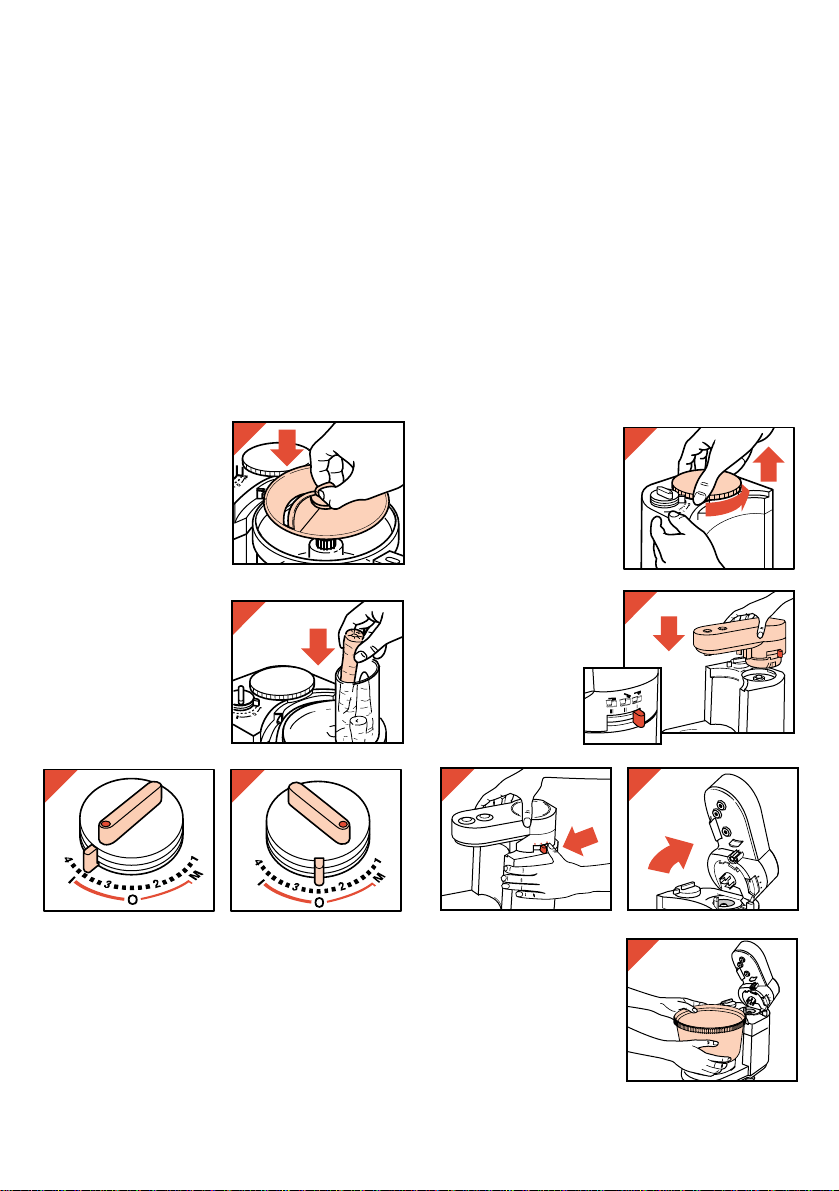
Slicing disc § and grating discs • / ¶
Take care: the cutting edges of the slicing disc
are very sharp! Therefore, always hold the disc
by its central holder.
- Put on the bowl and the coupling (fig. 2, 11).
- Position the disc with
the side to be used
facing upwards. (With
double-sided discs:
| for thin slicing or fine
grating;
[ for thick slicing or
coarse grating.)
(Fig. 14.)
- Place the cover
(fig. 3, 4).
- Feed the ingredients
into the food chute
(fig. 15).
- Put the pusher on top
of the food (fig. 6) and
press lightly.
- For grating set the speed control to position 3
or 4 and the switch to position | (fig. 16).
- For slicing set the speed control to position 2
or 3 and the switch to position M (fig. 17).
(Also refer to the table on pages 12 - 14.)
- Press the ingredients downwards using the
pusher (fig. 6). Apply steady and moderate
pressure.
Especially when processing e.g. carrots it is
advisable to use the pushing guide (fig. 7).
Tips:
• Pre-cut large pieces to make them feed into the
chute.
• Fill the food chute evenly for the best results.
• Empty the bowl every now and then when
processing large amounts.
Whisk ≈, Stirrer √, Kneading hooks ƒ
• The whisk is suitable for airy whipping eggs,
white of egg, "toppings" for desserts, instant
pudding, cream and batter for cake.
• The stirrer is especially suitable for mixing dried
fruit into batter for fruit cake and for folding-in
flour into sponge-cake batter.
• The kneading hooks are especially designed for
kneading dough with yeast (e.g. for bread) and
dough for shortbread.
- Unscrew the covering
plate (fig. 18).
- Place the top-piece
(fig. 19). Ensure that
the 3-positions switch
is in rear position
when doing so.
- Set the 3-positions
switch to central
position (fig. 20).
- Set the top-piece into
slanted position
(fig. 21).
- Place the bowl
(fig. 22).
7
16 17
19
•
§
14
15
18
2
1
2120
22
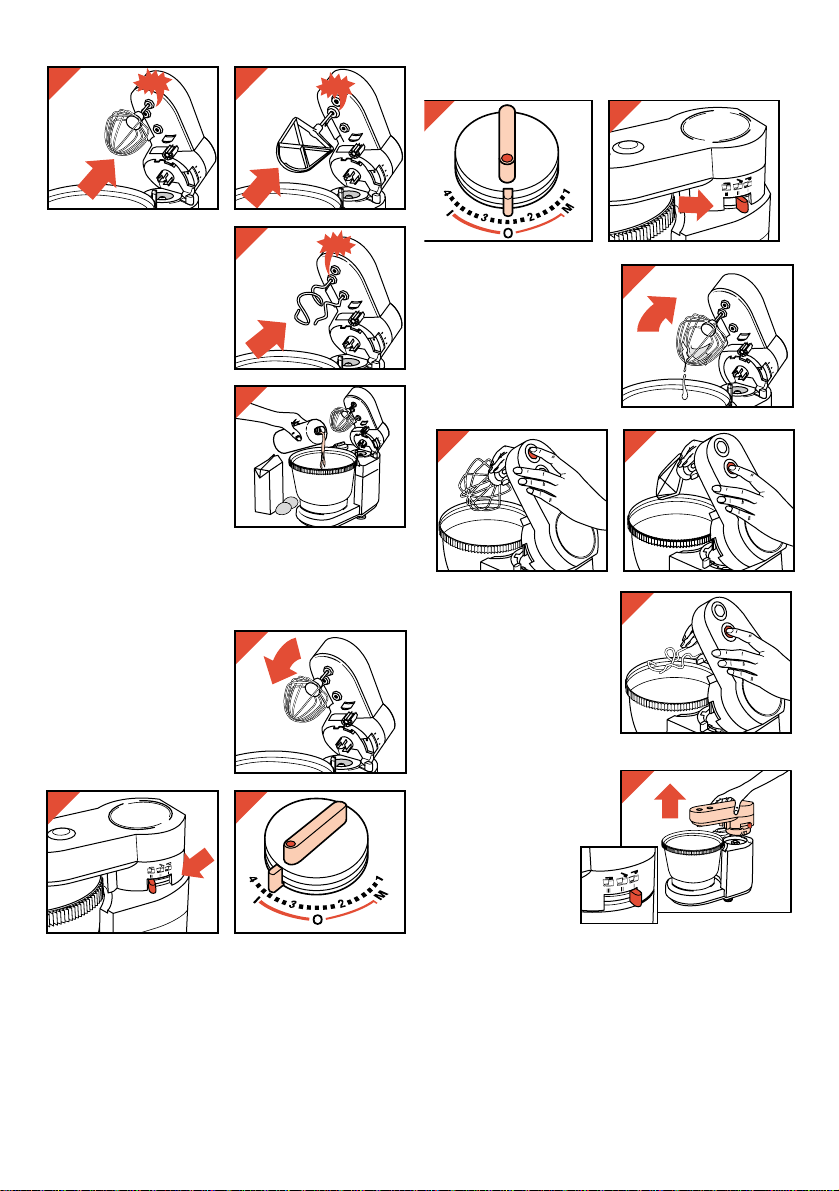
- Place either the whisk
(fig. 23), the stirrer
(fig. 24) or the two
kneading hooks
(fig. 25).
Push firmly into place!
("Click!")
- Put the ingredients
into the bowl (fig. 26).
Tip:
When using the kneading hooks, first pour the
liquid(s) into the bowl.
Then add the dry ingredients.
- Press the top-piece
downwards (fig. 27).
- Set the 3-positions switch in forward position
(fig. 28).
- Set the switch to position | and the speed
control to speed 3-4 (fig. 29). (Please also refer
to the table on pages 12 - 14.)
After use:
- Set the switch to
position O (fig. 30).
- Set the 3-positions
switch to the central
position (fig. 31).
- Set the top-piece into
slanted position
(fig. 32).
- Release the whisk
(fig. 33), the stirrer
(fig. 34) or the
kneading hooks
(fig. 35) by pressing
the release button.
If you wish to remove
the top-piece:
- First set the
3-positions
switch to position
I (fig. 36).
- Then pull the
top-piece straight
upwards.
8
23
0
31
29
36
C
I
K
L
C
24
C
I
K
L
C
25
C
I
K
L
C
26
27
28
32
33 34
35

Recipe for two loaves of (white) bread
1000 g flour for (white) bread, 30 g soft butter or
margarine, 50 g new yeast (for dried yeast: see
instructions on packaging), approx. 600 cc water
(35-40° C / 95-104° F), 20 g salt, 20 g sugar,
2 black aluminium baking tins
(approx. 30 cm / 12" long).
- Make the appliance ready for use as described.
- First put the water, sugar and yeast into the
bowl. After that, add the other ingredients.
- Let the appliance operate for max. 8 minutes.
- Switch off. Transfer the dough from the bowl
into a separate (large) bowl and cover it with a
damp cloth.
- Allow the dough to rise in a moderate warm
temperature (35-40° C / 95-104° F, e.g. in a
pre-warmed oven or on a radiator) for approx.
20 minutes.
- After the dough has risen, beat it flat and shape
it into a ball.
- Place the dough back into the separate bowl
and cover it with the damp cloth. Allow it to rise
in a moderate warm temperature for another
20-30 minutes.
- After this period, beat it flat and divide it into two
portions. Roll it into the shape of the baking
tins.
- Grease the inside walls of the baking tins.
- Put the dough into the baking tins and cover
them with the damp cloth. Allow the dough to
rise in a moderate warm temperature for
another 45 minutes.
- Remove the cloth. Place the baking tin with the
dough in a low position in a pre-heated
(approx. 225 °C / 440 °F) oven.
- Bake at 225 °C / 440 °F for approx. 35 minutes.
Tips
• Also when using bread-mix, closely follow the
above mentioned instructions on kneading,
processing and baking for the best results.
• When using wholemeal flour, take
approx. 700 cc of water and bake for
approx. 40 minutes.
9
Blender accessory ®
Important
• The blender accessory can only operate if
the bowl with cover and the blender jar have
been placed correctly.
• Never attempt to process food in the
blender jar and in the foodprocessor bowl
simultaneously.
• Before use: do not insert the plug into the
wall socket until the blender jar with blade
unit and lid are correctly mounted on to the
motor unit.
• After use: remove the mains plug from the
wall socket before detaching the blender jar
from the motor unit.
• This accessory is suitable for very fine
blending and puréeing. (E.g. soups, sauces,
milkshake, baby food, vegetables, fruit, thin
batters, paté.) If necessary, cut solid
ingredients into smaller pieces before
putting into the blender jar.
• Do not fill with ingredients hotter than 80° C
(approx. 175° F).
• To prevent spillage, do not overfill.
Maximum jar capacity for liquids is 1⁄2
litre
(= approx. 0.9 pint).
• Never remove the lid while the blender is
operating.
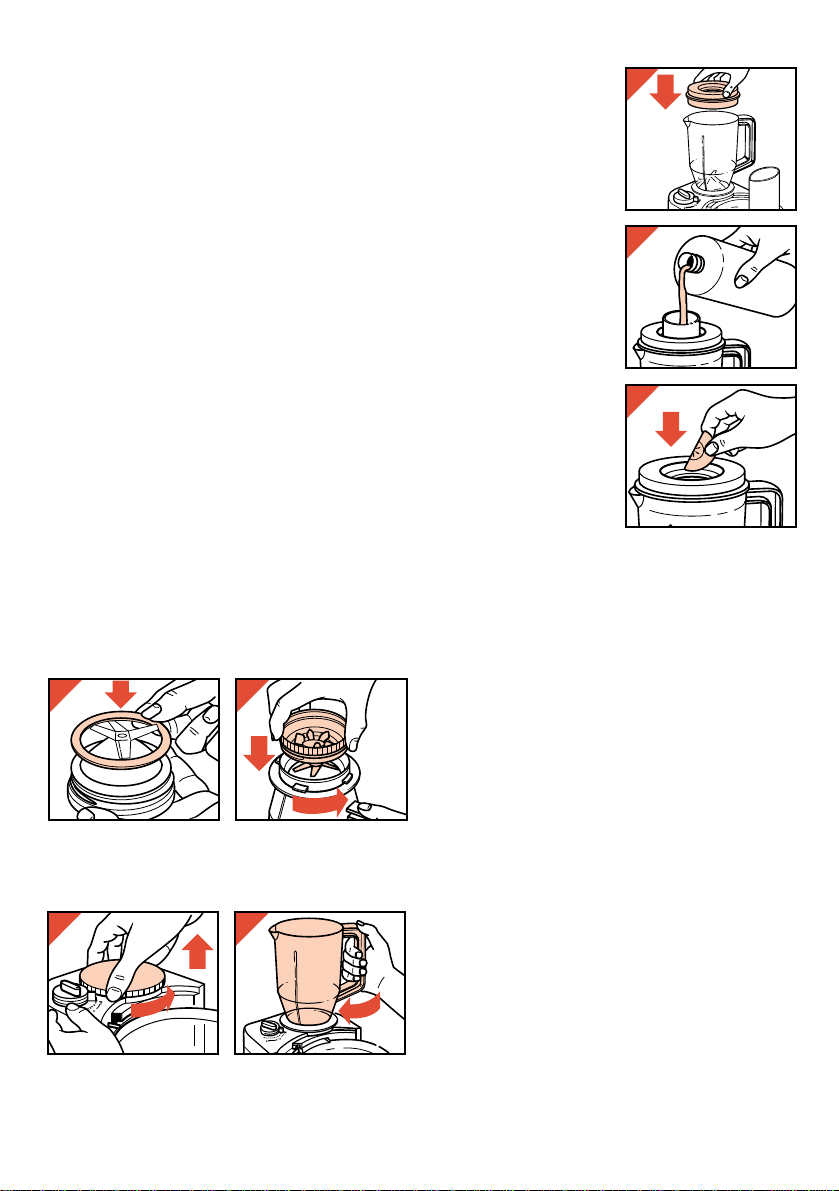
Assembling
- Position the rubber sealing ring on the rim of
the blade unit (fig. 37).
- Mount the blade unit on to the jar by turning it
firmly (!) anti-clockwise until locked (fig. 38).
- Unscrew the covering plate (fig. 39).
- Turn the jar clockwise until locked (fig. 40).
- Place the lid onto the
jar (fig. 41).
For disassembling
proceed in reverse.
Tips:
• Liquid ingredients (e.g.
oil for the preparation
of mayonnaise) can be
added through the
small aperture in the
stopper when placed
upside down (fig. 42).
• The opening in the lid
can be used for adding
ingredients when the
motor is running.
Unlock the stopper by
turning (fig. 43).
• If blending is
prolonged the results
will generally be finer.
• From time to time, it
may be necessary to
interrupt the blending
and remove particles
sticking onto the jar.
First set the switch to position O and unplug.
Then remove the lid.
Use a soft spatula. Keep this at a safe distance
(approx. 2 cm or 1") from the blades.
10
41
42
43
37
39 40
1
38
1
2
2

Blender recipes
MMilkshake (2 - 3 persons)
21⁄2 dl apple juice, 11⁄2 dl cold milk,150 g vanilla ice-
cream, 11⁄2 tablespoonfuls of orange lemonade
syrup.
Put all ingredients into the blender and blend for
approx. 1 minute.
MPine-apple soda (2 - 3 persons)
21⁄2 dl pine-apple juice, 11⁄2 dl orange juice,
2 tablespoonfuls of lemon juice, soda,
2 tablespoonfuls of orange liqueur to taste.
Put all ingredients except the soda into the
blender and blend for approx. 15 seconds. Fill the
glasses up with soda.
MChicken liver paté
Approx. 150 g soft butter, 1 chopped onion,
350 g chicken livers, 1 dl chicken broth,
1
⁄4 teaspoonful of salt, 1⁄2 teaspoonful of paprika
powder, 1⁄2 teaspoonful of curry powder, pepper to
taste, 1⁄2 teaspoonful of Worcester sauce,
2 tablespoonfuls of Cognac brandy or Port wine,
100 g shelled walnuts.
Heat 1 tablespoonful of butter and fry the onion
until golden brown. Fry the chicken livers for
3-5 minutes. Then add the chicken broth. Let the
mixture cool down for some time. Then blend it
together with the herbs, salt, pepper and
Worcester sauce. Do not switch off. Add the soft
butter in portions. Finally, pour in the Cognac
brandy or Port wine. Scoop the paté into a paté
pot and garnish with walnuts. Let the paté cool
down until cold through and through. Serve with
toast.
MTomato soup
1 kg tomato, 5 dl broth, 1 tablespoonful of butter,
2 chopped onions, 3 tablespoonfuls of flour,
11⁄4 dl double cream, pepper to taste, some celery,
parsley and thyme.
Heat the butter and fry the chopped onions until
golden brown.
Cut the tomatoes into pieces. Purée the tomatoes
(in two portions) together with the pepper, celery,
parsley, thyme and flour. Add the mixture to the
fried onions. Pour in the broth.
While stirring, heat up and boil the soup for
approx. 3 minutes.
Whip the double cream until stiff. Put the soup into
the plates and garnish with the whipped cream
and chopped parsley.
Cleaning
• Always remove the plug from the wall socket
before cleaning the motor housing. The motor
housing may be wiped with a damp cloth.
Never immerse the motor housing in water.
Never pour water over it.
• Wash the items which have been in contact
with the food in warm soapy water immediately
after use. Do not clean in a dishwasher.
• Take care when cleaning the metal blade and
slicing disc: the cutting edges are very sharp!
• Ensure that the cutting edges do not come into
contact with hard objects as this might make
them blunt.
Symbols on pages 12 - 14
£ = metal blade
§ = slicing disc
¶ = grating disc
≈ = whisk
ƒ = kneading hooks
√ = stirrer
® = blender
1112131415


The appliance does not function as expected?
If your food processor should not function properly, please read through the following list. Also refer to
the corresponding sections in these instructions for use!
Problem:
-The switch does not work.
-Disappointing results with chopping, cutting or
grating.
-Disappointing results with whisking white of
egg.
-Disappointing results with whipping cream.
Possible solution:
-Position bowl and/or cover correctly and turn
in the indicated direction.
(You will hear "Click!")
-Position the blender or screw-cap correctly
and turn in the indicated direction.
-When kneading, whipping or mixing in the
open bowl (using the top-piece): set the
3-positions switch to position |||.
-Select appropriate speed. Please refer to the
indications on the appliance and to these
instructions for use.
-If required, add some lemon juice or salt.
-Process cream which is at refrigerator
temperature (approx. 6 °C / 43 °F).
FOR U.K. ONLY:
This appliance is supplied with a non-rewireable
13 A plug. The plug must never be used without
the fuse cover being in place.
If a replacement fuse cover is required it must
be of the same type or colour as the coloured
insert around the fuse cover. Replacement
fuse covers are available from Electrical
Retailers or direct from Philips,
tel. No. 0181 - 689 - 2166 Ext. 8014.
Replacement 3A fuses must be BSI or ASTA
BS 1362 approved.
Important safety information
If the non-rewireable plug is not suitable for the
socket outlets in your home it can be removed
and replaced by a plug of the correct type.
The non-rewireable plug must be cut from the
mains cord, the fuse removed, and the plug
safely discarded to prevent further use.
The removed plug can be hazardous if inserted
into a live mains socket.
Fitting a Plug
IMPORTANT
The wires in the mains lead are coloured in
accordance with the following code:
BLUE - NEUTRAL
BROWN - LIVE
As the colours of the wires in the mains lead of
this appliance may not correspond with the
markings identifying the terminals in your plug,
proceed as follows:
The wire which is coloured BLUE must be
connected to the terminal which is marked with
the letter “N” or coloured BLACK.
The wire which is coloured BROWN must be
connected to the terminal which is marked with
the letter “L” or coloured RED.
DO NOT CONNECT either of these wires to
the earth terminal in the plug which is marked
with the letter “E” or by the earth symbol E or
coloured GREEN, or GREEN AND YELLOW.
If a 13 amp. 3 pin plug is fitted it must be an
"approved plug" conforming to BS1363-1986.
Note: If the terminals of the plug are
unmarked or if you are in any doubt
consult a qualified electrician.
16
Français
Ouverture dans le
couvercle
Bouchon
Trou de
montage
du bol mixeur
et du bloc de
commande
Interrupteur de
sécurité
Axe d’entraînement
Guide
poussoir
Poussoir
Cheminée
Doigt de
sécurité
Bol
Rangement du
cordon
Couvercle
du bol
Languette du
couvercle (doit
être engagée
dans la poignée
du bol)
Entraîneur
pour le couteau
et les disques
Couvercle
Bol blender
®
Joint d’étanchéité
en caoutchouc
Ensemble couteau
Couvercle à
visser
Commutateur
O = arrêt
I = marche (en
continu)
M = “momentané”
(relâché = arrêt)
Sélecteur de vitesse
(variable en continu)
1 = minimum
4 = maximum
Spatule
Bloc moteur
1a

17
Dispositif de sécurité automatique (réarmable)
Veuillez lire ces instructions attentivement
avant d’utiliser l’appareil.
Afin d’éviter tout dommage dû à une surchauffe,
l’appareil est équipé d’un dispositif de sécurité
automatique qui coupe automatiquement
l’alimentation en cas de besoin.
Si vous suivez scrupuleusement les indications cidessous, vous pouvez remettre en marche votre
appareil après une période de refroidissement de
15 minutes.
Votre appareil s’arrête brusquement:
1. Premièrement, débranchez l’appareil.
2. Deuxièmement, mettez le commutateur sur la
position O (arrêt).
3. Attendez 15 minutes que l’appareil refroidisse.
4. Branchez l’appareil.
5. Mettez le commutateur sur la position I (marche).
Veuillez contacter votre revendeur Philips ou un
réparateur indépendant agréé Philips en cas de
répétition intempestive du dispositif de sécurité
automatique.
Couteau £
Gaine de
protection
Disque à trancher
§
(réversible)
I = fin
[ = épais
Disque à râper
¶
(réversible)
I = moyen
[ = gros
Disque à râper
• fin et très fin
(réversible)
| = très fin
[ = fin
Boîte de
rangement des
disques
Bol
Mélangeur
√
Crochets à
pétrir
ƒ
Fouet ≈
Bouton de
déverrouillage du fouet
Bouton de déverrouillage
du mélangeur et des
crochets à pétrir
Bloc de
commande
(pour mixer,
fouetter et pétrir)
Roue
d’engrenage du
bol (pour mixer,
fouetter et pétrir)
Commutateur
3 positions
Trou d’insertion du
fouet
Trou d’insertion du
mélangeur
Trous d’insertion des
crochets à pétrir
I déverrouillage (pour mettre
en place ou retirer le bloc de
commande)
II position haut/bas (pour
mettre ou retirer le mélangeur,
le fouet ou les crochets à pétrir)
III fixé (fonctionnement)
1b

Important
• Lisez ces recommandations en même
temps que les illustrations avant
d’utiliser votre appareil.
• Ne laissez pas l’appareil fonctionner
sans surveillance.
• Ne laissez pas les enfants utiliser
l’appareil.
• Faites très attention en prenant les
couteaux et les disques tranchants, car
ils sont très aiguisés.
• Enlevez la gaine de protection du
couteau avant utilisation. Remettez-la
après nettoyage.
• Attendez l’arrêt total des parties en
rotation avant d’ouvrir le couvercle.
• Ne mettez jamais vos doigts ou tout
autre objet dans la cheminée de
remplissage.
• Débranchez l’appareil après utilisation.
• Si le cordon d’alimentation de l’appareil
est endommagé, il doit être remplacé par
un cordon équivalent. Adressez-vous à
votre revendeur Philips ou au réparateur
agréé Philips Appareils Domestiques de
votre région.
• Avant la première utilisation, nettoyez
toutes les parties en contact avec les
aliments.
• N’immergez jamais l’ensemble moteur
dans l’eau ni dans aucun autre liquide.
Ne le rincez pas non plus.
• Quand vous mixez ou mélangez des
liquides, ne dépassez pas le repère de
remplissage maximum du bol.
• Ne dépassez pas les quantités maximum
et les temps d’utilisation indiqués dans
les tableaux des pages 25-27.
• Placez correctement le couvercle du bol
(avec le bloc moteur) pour qu’il
déverrouille l’interrupteur de sécurité,
permettant ainsi la mise en marche du
moteur.
• Gardez ce mode d’emploi pour usage
ultérieur.
Mise en place du bol
- Poussez la poignée
dans le sens de la
flèche jusqu’au déclic.
Mise en place du couvercle
- Faites tourner le couvercle dans le sens de la
flèche (fig. 4), jusqu’à ce que les marques sur le
couvercle et sur le bol (poignée) coïncident.
Interrupteur de sécurité intégré
L’interrupteur de sécurité est déverrouillé et
l’appareil peut être mis en marche, uniquement si:
- le couvercle a bien été vissé sur le bol, et
- le bol mixeur ou le couvercle à visser ont
bien été positionnés.
Suivez donc bien les illustrations des fig. 3 et 4.
Après utilisation
- Mettez le commutateur
sur la position O.
- Retirez le couvercle du
bol en le faisant tourner
dans le sens inverse
des aiguilles d’une
montre.
Cheminée de remplissage et poussoir
• Utilisez le poussoir
pour introduire les
aliments dans la
cheminée.
• Vous pouvez laisser le
poussoir dans la
cheminée pour éviter
les éclaboussures
pendant l’utilisation.
18
5
2
1
2
3 4
6
• Le poussoir est
équipé d’un guide.
- Le guide poussoir
peut être retiré du
poussoir (et fixé à
nouveau) en tournant.
Vous pouvez utiliser
le guide poussoir et la
petite ouverture pour
les carottes par
exemple, ou si vous
ne remplissez pas
entièrement la
cheminée (fig. 8).
Nota: Le poussoir
ne doit être utilisé
que lorsque le guide
poussoir est dans la cheminée.
- A la partie inférieure
du guide poussoir,
vous trouverez un
repère où vous
pouvez percer un petit
trou en utilisant un
objet pointu (fig. 9).
Cette ouverture vous
permet d’ajouter de
petites quantités de
liquide (par ex. de
l’huile lors de la
préparation d’une
mayonnaise) (fig. 10).
- Des indications de
niveau (ml) sur le
guide poussoir vous
permettent de
mesurer les liquides.
Accessoires (voir pages 94, 95)
Dans le cas de commande d’accessoires en
remplacement ou supplémentaires pour votre
appareil, veuillez vous référer aux n° prévus en
service.
• Les accessoires standard sont:
- couteau
- disque à trancher fin/épais (réversible)
- disque à râper moyen/gros (réversible)
- disque à râper fin/très fin (réversible)
- fouet
- crochets à pétrir
- entraîneur
- mélangeur
- spatule
- poussoir avec guide poussoir
- accessoire mixer
- coffret de rangement des disques
• D’autres accessoires sont disponibles en
option
(Demandez à votre revendeur si ces
accessoires sont disponibles dans votre pays.)
- disque double combiné pour émincer/râper
(moyen)
- disque à 1 face utile pour râper (extra fin)
- disque coupe-frites
- accessoire presse-agrumes
- accessoire centrifugeuse
- disque épluche pommes de terre
- accessoire hachoir
Pour tout renseignement concernant les
accessoires vous pouvez contacter notre
Service Consommateurs Philips
Tel (1) 64 80 54 54.
Couteau £
Faites attention: les lames sont très coupantes!
• Avec le couteau, vous pouvez hacher,
mélanger, mixer, faire la purée et les pâtes à
pain ou à gâteaux.
- Mettez successivement en place le bol
(fig. 2), l’entraîneur
(fig. 11), et le couteau
(fig. 12).
- Mettez les ingrédients
dans le bol (fig. 13).
- Emboîtez le couvercle
(fig. 3,4) et mettez le
poussoir dans le cheminée (fig. 6).
Conseils:
• Précoupez vos aliments en dés de 3 cms de
côté.
• Evitez de trop remplir le bol (même sur la
position M).
• Lorsque vous hachez du fromage (dur), ne
laissez pas tourner le moteur trop longtemps,
car le fromage pourrait s’échauffer et devenir
19
7
8
9
10
2
1
11 12
13
grumeleux.
• Si des aliments s’enroulent autour du couteau
ou collent au bol:
- débranchez d’abord l’appareil,
- retirez le couvercle,
- enlevez-les ensuite avec la spatule.
• Ne hachez pas des ingrédients trop durs tels
que des grains de café, des noix de muscade
ou des glaçons: cela pourrait émousser les
lames du couteau.
Disques pour trancher § et râper • / ¶
Faites attention: les lames du disque à
trancher sont très coupantes! Pour tenir le
disque, prenez-le toujours par la prise centrale en
plastique.
- Mettez en place le bol et l’entraîneur (fig. 2, 11).
- Placez le disque avec
la face à utiliser
dirigée vers le haut.
| pour émincer ou
râper fin;
[ pour émincer ou
râper épais. (Fig. 14.)
- Mettez le couvercle
(fig. 3, 4).
- Mettez les aliments
dans la cheminée de
remplissage (fig. 15).
- A l’aide du poussoir,
appuyez légèrement
sur les aliments
(fig. 6).
- Pour râper, mettez le
sélecteur de vitesse
sur la position 3 ou 4
et le commutateur sur I (fig. 16).
- Pour émincer, mettez le sélecteur de vitesse
sur la position 2 ou 3 et le commutateur sur M
(fig. 17). (Voir aussi tableau pages 25-27.)
- Appuyez de façon régulière et modérée sur le
poussoir (fig. 6).
Il est conseillé d’utiliser le guide poussoir
spécialement quand vous préparez des
carottes (fig. 7).
Conseils
• Coupez les aliments grossièrement pour les
introduire dans la cheminée de remplissage.
• Remplissez la cheminée de façon régulière
pour obtenir de meilleurs résultats.
• Videz le bol fréquemment lorsque vous traitez
d’importantes quantités d’aliments.
Fouet ≈, mélangeur √, crochets à pétrir ƒ
• Avec le fouet, vous pouvez battre des oeufs
entiers, monter des blancs en neige, faire des
glaçages pour desserts, des puddings
instantanés et de la crème.
• Avec le mélangeur, vous pouvez préparer de la
pâte à cake avec des fruits secs et de la pâte à
gâteaux.
• Avec les crochets à pétrir, vous pouvez
préparer de la pâte à
pain.
- Dévissez le couvercle
(fig. 18).
- Mettez en place le
bloc commande
(fig. 19). Assurez-vous
que le
commutateur
3 positions soit
sur la position
arrière pendant
cette opération.
- Mettez le commutateur
3 positions au centre
(fig. 20).
- Relevez le bloc de
commande (fig. 21).
- Mettez en place le bol
(fig. 22).
20
16 17
19
•
§
14
15
18
2
1
2120
22

- Mettez en place le
fouet (fig. 23), le
mélangeur (fig. 24) ou
les deux crochets
(fig. 25).
Appuyez fermement
(clic).
- Mettez les ingrédients
dans le bol (fig. 26).
Conseil
Quand vous utilisez les crochets à pétrir, mettez
tout d’abord le liquide dans le bol, puis ajoutez les
autres ingrédients.
- Abaissez le bloc de
commande (fig. 27).
- Mettez le commutateur 3 positions en avant
(fig. 28).
- Mettez le commutateur sur I et le sélecteur de
vitesse sur la position 3-4 (fig. 29). (Voir
également tableau pages 25 à 28).
Après utilisation
- Mettez le commutateur
sur O (fig. 30).
- Mettez le commutateur
3 positions au centre
(fig. 31).
- Relevez le bloc de
commande (fig. 32).
- Retirez le fouet
(fig. 33), le mélangeur
(fig. 34) ou les
crochets (fig. 35) en
appuyant sur le bouton
de déverrouillage.
Si vous désirez retirer
le bloc de commande:
- Mettez tout d’abord le
commutateur 3
positions sur I
(fig. 36).
- Puis tirez le bloc
de commande
vers le haut.
21
23
30
29
36
C
I
K
L
C
24
C
I
K
L
C
31
25
26
27
28
C
I
K
L
C
32
33 34
35

Recette pour deux pains blancs
1 kg de farine à pain (blanche), 30 g de beurre
mou ou de margarine, 50 g de levure fraîche (ou
sèche: voir instructions sur emballage), 0,6 l d’eau
(35-40° C), 20 g de sel, 20 g de sucre, 2 plaques
à pâtisserie en aluminium (de 30 cm de long
environ).
- Préparez l’appareil comme décrit ci-dessus.
- Mettez tout d’abord l’eau, le sucre et la levure
dans le bol. Puis, ajoutez les autres ingrédients.
- Laissez l’appareil fonctionner pendant 8 minu-
tes maximum.
- Arrêtez l’appareil. Transvasez la pâte du bol
dans un plat plus large et couvrez-la avec un
torchon humide.
- Laissez lever la pâte à température moyenne
(35-40° C, par exemple dans un four préchauffé
ou sur un radiateur) pendant 20 minutes.
- Une fois la pâte levée, étalez-la et roulez-la en
boule.
- Remettez la pâte dans un plat et couvrez-la
avec un torchon humide. Laissez-la lever à
température moyenne pendant encore
20-30 minutes.
- Ensuite, étalez-la et séparez-la en deux
portions. Roulez-la dans la forme des plats de
cuisson.
- Graissez l’intérieur des plats.
- Mettez la pâte dans les plats de cuisson et
couvrez-la avec un torchon humide. Laissez-là
lever à température moyenne pendant encore
45 minutes.
- Enlevez le torchon. Mettez les plats avec la
pâte sur la grille en position basse dans le four
préchauffé (environ 225° C).
- Faites cuire à 225° C pendant environ
35 minutes.
Conseils
• Même si vous préparez du pain complet,
suivez scrupuleusement les instructions cidessus afin d’obtenir les meilleurs résultats.
• Quand vous utilisez de la farine complète,
mettez 0,7 l d’eau et faites cuire pendant
environ 40 minutes.
22

Accessoire mixer ®
Important
• L’accessoire mixer peut fonctionner
uniquement si le bol avec son couvercle et
le bol mixer ont été placés correctement.
• Ne faites jamais de préparations dans le bol
du mixer et du robot simultanément.
• Avant utilisation: ne branchez pas l’appareil
avant d’avoir correctement positionné le bol
du mixer avec l’ensemble couteau et le
couvercle sur le bloc moteur.
• Après utilisation: débranchez l’appareil
avant d’enlever le bol du mixer du bloc
moteur.
• Cet accessoire vous permet de mixer et de
faire de la purée. (Ex. soupes, sauces,
milkshake, bouillie pour bébé, légumes,
fruits, pâtes fines, pâtés.) Si nécessaire,
coupez les aliments en petits morceaux
avant de les mettre dans le bol du mixer.
• Ne remplissez pas avec des ingrédients
chauds supérieurs à 80° C.
• Ne retirez jamais le couvercle pendant le
fonctionnement du mixer.
• Ne dépassez pas la capacité de 1⁄2litre afin
d’éviter les débordements.
Assemblage
- Mettez en place le joint en caoutchouc sur le
bord de l’ensemble couteau (fig. 37).
- Montez l’ensemble couteau sur le bol en tournant fermement dans le sens inverse des aiguilles d’une montre jusqu’au verrouillage (fig. 38).
- Dévissez le couvercle (fig. 39).
- Tournez le bol dans le sens horaire jusqu’au
verrouillage (fig. 40).
- Placez le couvercle
sur le bol (fig. 41).
Pour désassembler,
procédez en sens
inverse.
Conseils
• Les ingrédients
liquides (par ex. l’huile
pour la préparation de
la mayonnaise)
peuvent être ajoutés
par l’ouverture du
bouchon (fig. 42).
• L’ouverture dans le
couvercle peut servir
pour ajouter des
ingrédients quand le
moteur est en marche.
Déverrouillez le
bouchon en tournant
(fig. 43).
• Plus l’opération est
prolongée, plus la
préparation est liquide.
• De temps en temps, il
peut être nécessaire
d’arrêter l’opération afin de retirer les particules
collées sur le bol.
Mettez d’abord le commutateur sur O et
débranchez l’appareil.
Puis retirez le couvercle.
Utilisez une spatule. Tenez-la à une distance
suffisante des lames.
23
37
38
1
41
42
43
2
39 40
2
1

Recettes pour mixer
MMilkshake (2-3 personnes)
21⁄2 dl de jus de pomme, 11⁄2 dl de lait froid,
150 g de glace à la vanille, 11⁄2 cuillère à soupe de
sirop d’orange.
Mettez tous les ingrédients dans le mixer et mixez
pendant 1 minute environ.
MSoda à l’ananas (2-3 personnes)
21⁄2 dl de jus d’ananas, 11⁄2 dl de jus d’orange,
2 cuillères à soupe de jus de citron, soda,
2 cuillères à soupe de liqueur d’orange.
Mettez tous les ingrédients sauf le soda dans le
mixer et mixez pendant 15 secondes environ.
Remplissez les verres avec le soda.
MPâté de foies de volaille
150 g de beurre mou, 1 oignon haché, 350 g de
foies de volaille, 1 dl de bouillon de volaille, sel,
paprika, curry, poivre, 1⁄2 cuillère à café de sauce
Worcester, 2 cuillères à soupe de Cognac ou de
Porto, 100 g de noix écalées.
Faites chauffer 1 cuillère à soupe de beurre et
frire l’oignon jusqu’à ce qu’il brunisse. Faites
revenir les foies de volaille pendant 3-5 minutes.
Puis ajoutez le bouillon de volaille.
Laissez le mélange refroidir quelques instants.
Puis mixez ensemble avec les herbes, le sel, le
poivre et la sauce Worcester. Ajoutez le beurre
mou sans arrêter l’appareil.
Ensuite, versez le Cognac ou le Porto.
Versez la préparation dans une terrine et
garnissez de noix. Laissez le pâté refroidir
uniformément. Servez avec des toasts.
MSoupe à la tomate
1 kg de tomates, 5 dl de bouillon, 1 cuillère à
soupe de beurre, 2 oignons hachés, 3 cuillères à
soupe de farine, 11⁄4 dl de crème double, poivre,
céleri, persil et thym.
Faites fondre le beurre et frire les oignons jusqu’à
ce qu’ils brunissent.
Coupez les tomates. Mixez-les avec le poivre, le
céleri, le persil, le thym et la farine. Ajoutez le
mélange aux oignons frits. Versez le bouillon.
Tout en mélangeant, faites chauffer et bouillir la
soupe pendant 3 minutes environ.
Fouettez la crème jusqu’à durcissement. Mettez la
soupe dans les assiettes et garnissez de crème
fouettée et de persil haché.
Nettoyage
• Débranchez toujours l’appareil avant de le
nettoyer.
Le bloc moteur peut être nettoyé avec un
chiffon humide.
N’immergez jamais le bloc moteur dans l’eau.
Ne le passez pas sous l’eau.
• Lavez immédiatement après utilisation les
accessoires en contact avec les aliments, à
l’eau chaude savonneuse. Ne mettez pas au
lave-vaisselle.
• Faites attention en nettoyant le couteau et le
disque à émincer: leurs lames sont très
coupantes.
• Evitez de cogner les lames contre des objets
durs car cela les émousserait.
• Le mécanisme du fouet peut être facilement
démonté pour faciliter le nettoyage.
Symboles sur les pages 25 - 27
£ = Couteau
§ = Disque à trancher
¶ = Disque à râper
≈ = Fouet
ƒ = Crochets à pétrir
√ = Mélangeur
® = Blender
2425262728

 Loading...