

Page 1

2
English Page 3
Français Page 18
Deutsch Seite 33
Nederlands Pagina 48
Italiano Pagina 63
Español Página 78
Português Página 93
Ελληνικά Σελίδα 108
Page 2

3
T
N
O
G
L
H
I
J
K
Y
Q
D
C
B
M
R
F
E
U
V
W
X
S
A
P
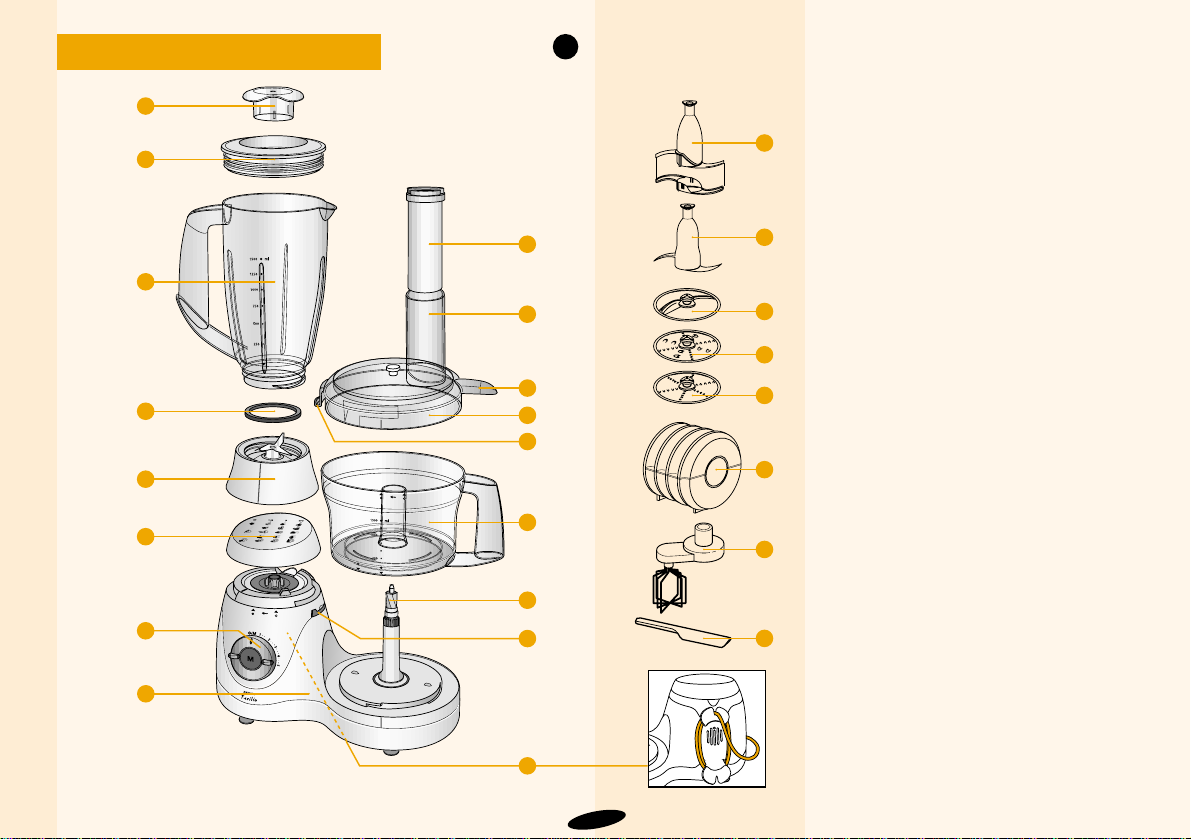
General description (fig. 1)
A Motor unit
B Bowl
C Lid of bowl
D Peg of lid (activates and deactivates the
safety lock)
E Projection (covers the opening in the
handle)
F Built-in safety lock
G Blade £
H Slicing disc §
I Grating disc • (coarse)
J Grating disc ¶ (fine)
K Beater ß
L Kneading accessory ©
M Driving shaft
N Chute
O Double pusher
P Speed control
O = Off
1 - 2 - 3 - 4 - 5 variable speed control
(1 = lowest speed; 5 = highest speed)
M = Moment/Pulse button (appliance
runs as long as button is pressed)
Q Storage box for discs
R Cord clip (for fixing the cord when
wrapped)
S Screw cap (for closing the attaching hole
for the blender jar when it is not used)
Blender accessories ®
T Stopper
U Lid
V Blender jar
W Rubber sealing ring
X Knife unit
Y Spatula
1
English
Page 3

Automatic resettable cut-out
Read these instructions carefully before you start using the
appliance
To prevent damage due to overheating, your appliance has been
equipped with an automatic cut-out system. In case of overheating, this
system will automatically cut off the power supply to the appliance.
If you follow the instructions below, you can switch on the appliance
again after you have let it cool down for 15 minutes.
If your appliance suddenly stops running:
- Pull the mains plug out of the socket
- Set the switch to position O
- Let the appliance cool down for 15 minutes
- Put the mains plug back in the socket
- Switch on the appliance again.
Please contact your Philips dealer or an authorised Philips service centre
if the automatic cut-out system is activated time and again.
Symbols on the appliance
To the left of the symbols on the appliance representing the various
applications you will find an icon of the accessory to be used. Above
this icon, the most appropriate speed for that particular application has
been indicated: M (= pulse setting) or speeds 1 to 5 (see table on
pages 13-15).
Important
• Read the directions for use and look at the illustrations before you
start using the appliance.
• Remove the protective cover from the blade each time you use it.
• Be very careful when you pick up the blade, the knife of the
blender and the slicing/grating discs. They are very sharp!
• Thoroughly clean the parts that will come into contact with food
before you use the appliance for the first time.
• Place the lid on the bowl in the right position. The built-in safety
lock will now be deblocked and you will be able to turn on the
appliance.
• Note that if both the blender and the bowl have been correctly
mounted, only the blender will function.
• Never let the appliance run unattended.
• Never let children run the appliance.
• When you are mixing or blending liquids, do not exceed the
maximum content indicated on the bowl or the blender (top line of
the graduation).
• Do not exceed the maximum amounts and processing times
indicated in the table.
• Wait until moving parts have stopped running before you remove
the lid of the appliance.
• Never put your fingers or objects (e.g. a spatula) in the chute while
the appliance is running. Only the double pusher is to be used for
this purpose.
• Never put your fingers or objects (e.g. a spatula) in the blender
unless you have unplugged the appliance first.
• Never immerse the motor unit in water or any other liquid. Do not
rinse it either.
• Unplug the appliance after use.
• If the mains cord of this appliance is damaged, it must only be
replaced by Philips or their service representative, as special tools
and/or parts are required.
• Keep these directions for use for future reference.
4
Page 4

1
2
3
CLICK
4
CLICK
5
CLICK
6
7
8
9
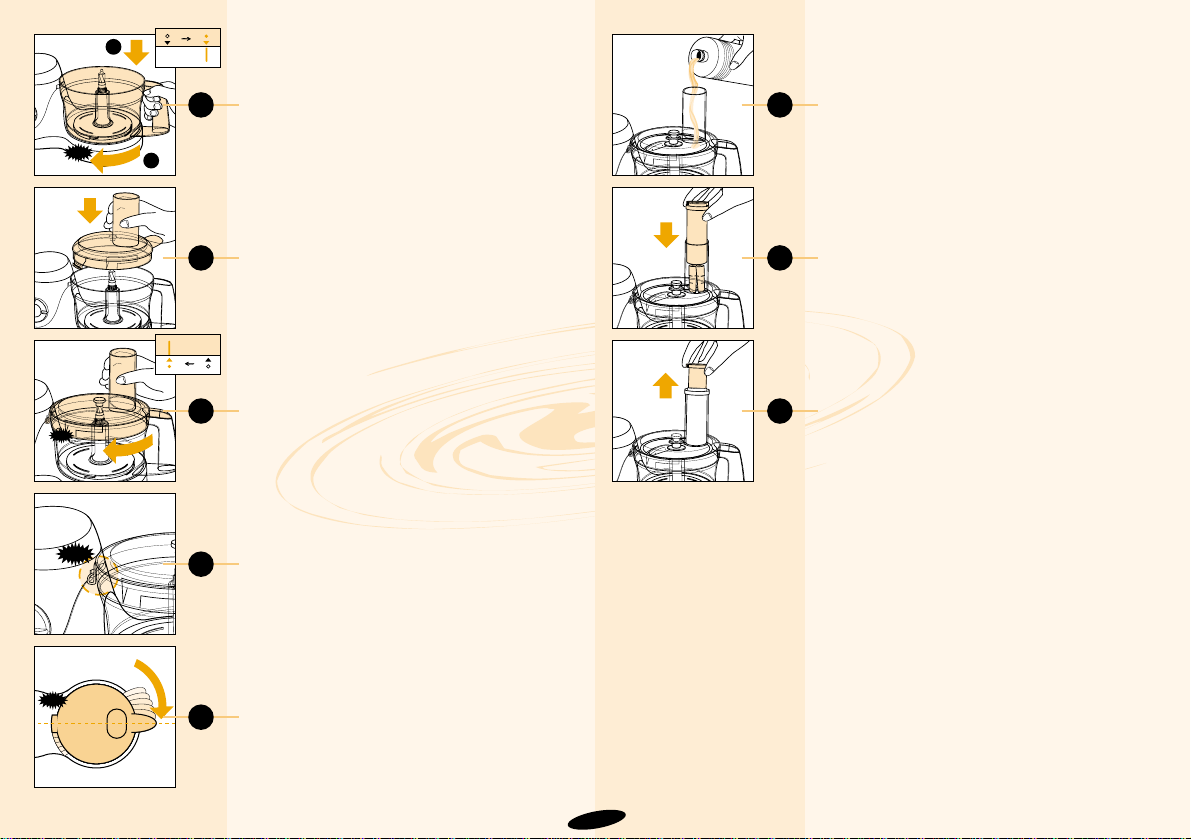
Placing the bowl (B) (fig. 2)
- Put the bowl on the food processor as
shown (1)
- Turn the handle in the direction of the
arrow until the bowl cannot be moved any
further and you hear a ‘click’(2).
Placing the lid (C)
- Put the lid on the bowl as shown in fig. 3.
- Turn the lid with some force in the direction
of the arrow until the lid will not move any
further and you hear a ‘click’ (fig. 4-5).
- Make sure that the mark on the lid and the
arrow on the bowl are directly opposite
each other. The projection of the lid will
now cover the opening in the handle of the
bowl (fig. 6).
Chute (N) and pusher (O)
• The chute can be used to add liquid and
solid ingredients (fig. 7).
• Use the pusher to push ingredients through
the chute (fig. 8).
• You can also use the pusher to close the
chute while the appliance is running to
prevent dust or drops of liquid from
escaping through the chute.
• The pusher has been provided with a
second small pusher.
- This small pusher can be removed (fig. 9)
to create a narrower chute.
- A narrower chute may be handy when you
want to cut e.g. carrots or when the amount
of ingredients used is too small to use the
normal chute.
Please note that you should only use the
small pusher when the larger pusher has
been placed in the chute.
Built-in safety lock (F)
The motor unit as well as the accessories
have been provided with marks. The
appliance will only function if the arrow on
the appliance is placed directly opposite the
mark on the lid (C) and on other accessories.
In this position, the projection of the lid and
of the accessories will cover the opening in
the handle of the bowl.
5
CLICK
2
Page 5

10
11
12
How to use the appliance
Note: the appliance will only function if
• The screw cap (S) or the blender (T-X)
have been properly mounted onto the
motor unit (A) and
• The bowl (B) and the accessories (lid (C),
citrus press or juice extractor) have been
placed on the motor unit in accordance
with the instructions in this booklet.
• If both the blender and the bowl have been
mounted correctly onto the motor unit, only
the blender will function.
Set the speed control (P) to the position
indicated in the tables on pages 13-15 and
switch the appliance on. When you have
doubts about the right speed, always select
the highest speed (setting 5).
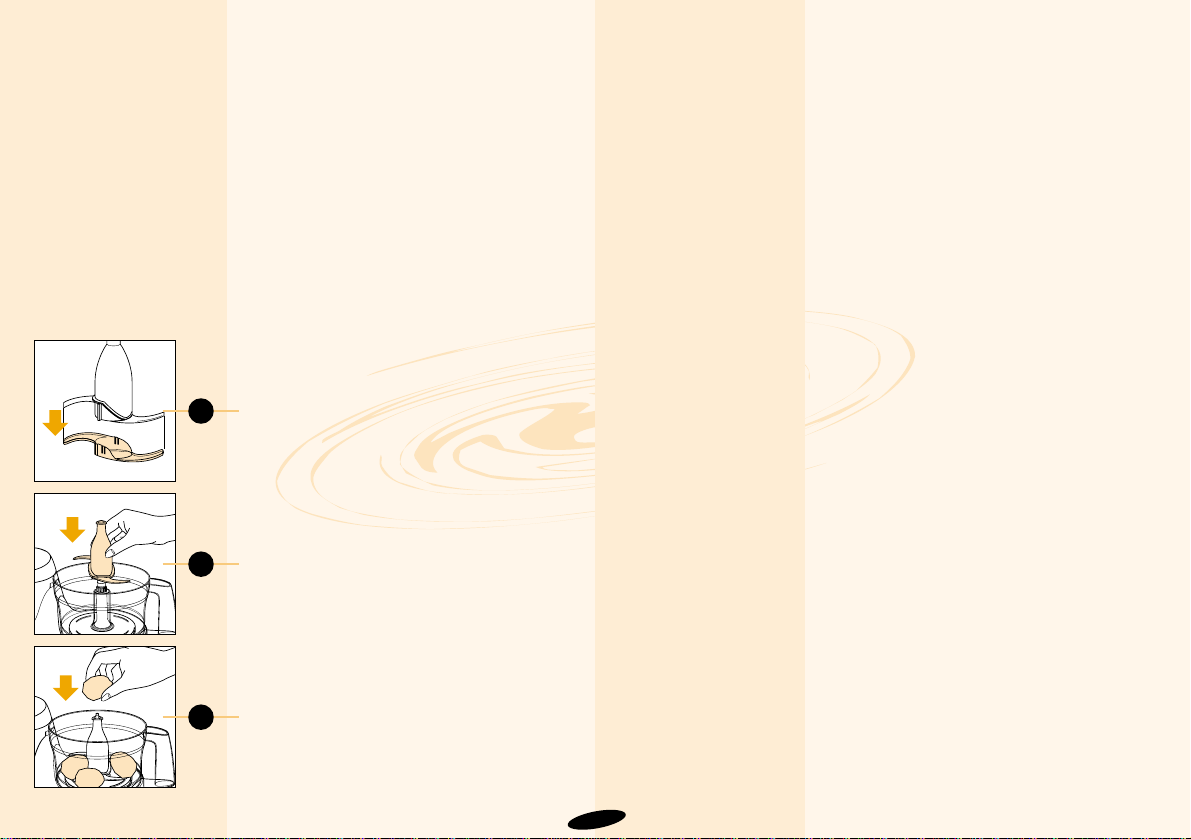
Blade (G) £
Be careful: the cutting edges of the blade
are very sharp!
• The blade can be used for chopping,
mixing, blending, pureeing and preparing
puff pastry, crumble and shortcrust pastry.
- Remove the protective cover from the
blade (fig. 10).
- Put the bowl on the motor unit (fig. 2) and
fit the blade onto the driving shaft (fig. 11).
- Put the ingredients in the bowl (fig. 12).
- Fasten the lid onto the bowl and put the
pusher in the chute.
- Set the speed control (P) to the position
indicated in the table and switch the
appliance on. If you have doubts about the
correct speed, always select the highest
speed (position 5).
- Applications/recipes mentioned in the table
will be ready after 10-60 seconds.
Tips:
• It is better not to chop large chunks with
the blade; pre-cut them into pieces of
approximately 3 cm before putting them in
the food processor.
• The appliance chops very quickly; let it run
for short periods at a time, also when you
are using the pulse setting (M), to prevent
the food from becoming too finely chopped.
• Do not let the appliance run for too long
when you are chopping (hard) cheese; the
cheese will get too hot and will start to melt
and become lumpy.
• If food sticks to the blade or to the inside of
the bowl:
- turn the appliance off;
- remove the lid from the bowl;
- remove the ingredients from the blade or
the inside of the bowl with a spatula.
• Do not chop very hard ingredients like
coffee beans, nutmeg and ice cubes. They
could cause the blade to get blunt. Check
the table for the appropriate speed and
setting.
6
Page 6

13
CLICK
14
15
M
M
1
2
3
4
5
16
17
18
19
1
2
CLICK
20
21
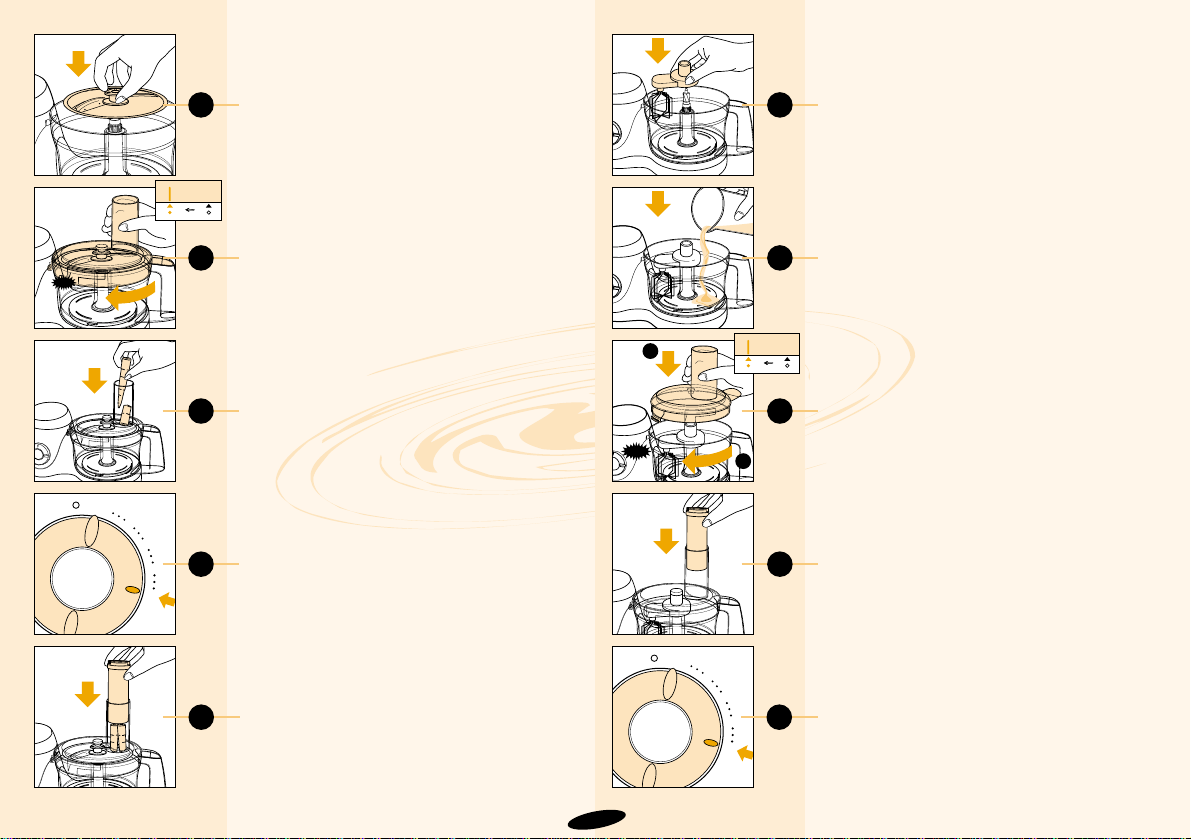
Slicing disc (H)
§ and grating discs
(I, coarse) • and (J, fine) ¶
Be careful with the discs: the cutting
edges are very sharp!
Only grasp the plastic part in the middle of
the discs.
- Put the bowl on the motor unit (fig. 2).
- Put the slicing or grating disc in place
(fig. 13).
- Put the lid on the bowl (fig. 14).
- Put the ingredients in the chute (fig. 15).
- Press the pusher lightly onto the
ingredients in the chute.
- For grating and slicing: set the speed
control to position 5 (maximum speed)
(fig. 16).
- If you want to cut soft vegetables or fruits,
you can also select a lower speed setting.
See table.
- Press the ingredients slowly and steadily
down with the pusher (fig. 17). We advise
you to use the narrow chute and the small
pusher for cutting ingredients like carrots.
Tips:
• Pre-cut large chunks to make them fit into
the chute.
• Fill the chute evenly for the best results.
• When you have to cut large amounts of
food, process only small batches at a time
and empty the bowl regularly between
batches.
Beater (K) ß
You can use the beater to beat eggs, egg
whites, toppings for desserts, instant
pudding and whipping cream.
Do not use the beater for making batter or
cake mixture!
- Put the bowl on the motor unit (fig. 2) and
attach the beater to the driving shaft
(fig. 18).
- Put the ingredients in the bowl (fig. 19) and
fasten the lid onto the bowl (fig. 20).
- Put the pusher in the chute to close it
(fig. 21).
- Set the speed control (P) to the position
indicated in the table and switch the
appliance on. If you have doubts about the
correct speed, always select the highest
speed (position 5) (fig. 22).
- Applications/recipes mentioned in the table
will be ready after 2-5 minutes.
7
M
M
1
2
3
4
5
22
Page 7

23
24
CLICK
1
2
25
26
27
28
1
2
CLICK
29
Kneading accessory (L)
©
• The kneading accessory can be used for
kneading bread dough and for mixing
batters and cake mixtures.
- Put the bowl on the motor unit (fig. 2) and
fit the kneading accessory onto the driving
shaft (fig. 23).
- Put the ingredients in the bowl (fig. 24) and
fasten the lid onto the bowl (fig. 25).
- Put the pusher in the chute to close it
(fig. 26).
- Set the speed control (P) to position 5
(= maximum speed) (fig. 27). The dough,
batter or cake mixture will be ready after
1 - 3 minutes.
Citrus press, general description
Citrus press accessories µ
AA Cone
AB Sieve
The citrus press accessories can only be
used with the Philips HR 7727 food
processor.
Assembly
- Put the bowl on the motor unit (fig. 2) and
put the sieve (AB) on the bowl (fig. 28).
- Turn the sieve in the direction of the arrow
(fig. 29) until the peg of the safety lock
snaps home in the motor unit. Make sure
that the projection of the sieve covers the
opening in the handle of the bowl
completely (fig. 30).
8
AAA
B
CLICK
30
M
1
2
M
3
4
5
Page 8

31
M
M
1
2
3
4
5
32
33
34
- Put the cone (AA) in place (fig. 31) and
press it home lightly.
- Turn on the food processor and set the
speed control to position 3 (fig. 32).
- Press one half of a citrus fruit firmly onto
the rotating cone (fig. 33).
• Stop pressing from time to time to remove
pulp from the sieve. When you do so,
switch off the appliance and remove the
bowl along with the sieve and the cone.
After use
- Remove the bowl along with the citrus
press accessories to prevent juice from
leaking onto the appliance.
- Remove the pulp from the cone and the
sieve.
- Rinse the bowl, cone and sieve
immediately after use. You can then wash
them in hot water with washing-up liquid or
put them in the dishwasher. Do not use any
abrasives, scouring pads, etc.
• Certain ingredients may cause
discolorations on the surface of the
accessories. This does not have a negative
effect; the discolorations usually disappear
after some time.
Juice extractor, general description
Juice extractor accessories
4
AC Filter AE Pusher
AD Pulp sieve AF Lid
The juice extractor accessories can only
be used with the Philips HR 7727 food
processor.
Assembly
- Put the bowl on the motor unit (fig. 2).
- Put the filter (AC) in the pulp sieve (AD)
(fig. 34).
- Put the pulp sieve in the right position
(fig. 35).
9
35
Page 9

36
CLICK
37
38
39
40
41
- Put the lid (AF) on the bowl. Turn the lid in
the direction of the arrow until the peg of
the safety lock snaps home in the motor
unit (fig. 36). Make sure that the projection
of the lid covers the opening in the handle
of the bowl completely (fig. 37).
How to use the juice extractor
- Switch the food processor on and select
the highest speed (position 5).
- Drop the fruit or vegetables into the juice
extractor through the chute (fig. 38).
- Press the fruit or vegetables firmly down
with the pusher. Keep the pusher in the
chute as much as possible to prevent
spattering (fig. 39).
- Let the appliance run for another 20
seconds to obtain any juice still left in the
fruit.
- To avoid spilling juice on the appliance,
remove the bowl along with the juice
extractor accessories after use (fig. 40).
Tips:
• Before you use the juice extractor:
- cut carrots, white radishes, etc.;
- peel citrus fruits, pineapples, melons, etc.;
- stone cherries, plums, apricots, peaches
etc.
• Always switch on the appliance before you
put the fruit in the juice extractor.
• Switch off the appliance from time to time
to remove pulp from the pulp sieve and the
filter.
• Do not process large amounts of food at
the same time. Switch off the appliance if it
starts to vibrate strongly and clean the pulp
sieve and the filter before you switch it on
again.
Blender (T - X)
®
Important:
• The appliance can be used with or
without the blender attached to the
motor unit. If you use the appliance
without the blender, the appliance
will not function if the screw cap (S)
has not been screwed onto the
attaching hole for the blender.
• Before use: do not put the mains plug
in the socket until you have attached
the blender jar (V), the lid (U) and the
knife unit (X) to the motor unit in the
correct way.
• After use: unplug the appliance
before you remove the blender jar
from the motor unit.
• The blender can be used for pureeing
very finely and for blending. It can be
used for e.g. soups, sauces,
milkshakes, baby food, vegetables,
fruit, thin batter, puree, etc. If
necessary, cut solid ingredients into
smaller pieces before you put them in
the blender.
• Do not fill the blender jar with
ingredients that are hotter than 80 °C.
• To prevent spilling, do not put more
than 1.5 litres of liquid in the blender
jar.
• Never remove the lid while the
blender is running.
Assembly and disassembly
- Put the rubber sealing ring (W) around the
edge of the knife unit (X) (fig. 41).
- Turn the knife unit to the left to attach it to
the blender jar (V) (fig. 42). Make sure it is
firmly fixed!
10
1
2
42
CLICK
1
2
Page 10

2
43
1
2
44
45
47
46
M
M
1
2
3
4
5
48
M
M
1
2
3
4
5
49
50
2
1
51
- Remove the screw cap (S) (fig. 43).
- Mount the blender jar onto the attaching
hole and turn it in the direction of the arrow
until it is firmly fixed (fig. 44).
Warning: do not exert too much pressure on
the handle of the blender jar.
- Press the lid into place (fig. 45).
- Attach the stopper by pressing it down and
turning it in the direction of the arrows until
it is firmly attached (fig. 46).
• To detach the blender, follow these steps
in reverse order and opposite direction.
How to use the blender
- Put the ingredients in the blender jar
(fig. 47).
- Switch on the appliance by setting the
speed control to the recommended speed
(fig. 48) or by pressing the pulse button (M)
(fig. 49). If you have any doubt about the
correct speed, always select the highest
speed (position 5). Check the table for the
appropriate speed and setting.
- Applications/recipes mentioned in the table
will be ready after 10 seconds - 2 minutes.
Tips:
• Liquid ingredients (for example oil for
making mayonnaise) can be poured into
the blender jar through the hole in the
stopper which has been put in the lid
upside down (fig. 50).
• The opening in the lid can be used to add
ingredients while the appliance is running.
To do so, unscrew the stopper and remove
it from the lid (fig. 51-52).
• The longer you let the appliance run, the
finer the blending result will usually be.
• It may be necessary to switch off the
appliance from time to time to remove
pieces of food sticking to the inside of the
blender jar.
-Switch off the appliance and unplug it;
-Remove the stopper and the lid;
-Remove pieces sticking to the inside of
the blender jar with a soft spatula. Keep
the spatula at a safe distance from the
knives (approximately 2 cm).
11
52
1
1
2
Page 11

53
2
1
3
54
55
Cleaning
• Always unplug the appliance before you
start cleaning the motor unit.
• You can clean the motor unit with a damp
cloth. Do not immerse the motor unit in
water and do not rinse it either.
• Always clean the parts that have come into
contact with food in hot water with
washing-up liquid immediately after use.
• Clean the blade, the knife unit of the
blender and the slicing disc very carefully.
The cutting edges are very sharp!
• Make sure that the cutting edges of the
blade and the slicing disc do not come into
contact with hard objects: this could cause
them to become blunt.
• The gearwheels of the beater can be
detached and cleaned very easily
(fig. 53-54).
• Certain ingredients may cause
discolorations on the surface of the
accessories. This does not have a negative
effect; the discolorations usually disappear
after some time.
• Wrap the (excess) mains cord around the
reel on the back of the appliance (fig. 55).
12
Page 12

13
Apples, carrots, celeriac
- grating/slicing
Apples, carrots, celeriac,
grapes
Batter (pancake)
- whisking
Breadcrumbs
- chopping
Butter cream (crème au
beurre)
Cheese (Parmesan)
- grating
Cheese (Gouda)
- grating
Chocolate
- chopping
Dough (tarts, pies,
dumplings)
- kneading
Dough (bread)
- kneading
500 g
500 g
500 ml
milk
100 g
300 g
200 g
200 g
200 g
300 g
flour
700 g
flour
5 / M
5
5
5
5
5
3
M / 5
5
5
Cut the fruit/vegetables into pieces that fit into the chute. Fill the chute with
the pieces and grate them while pressing the pusher lightly.
Cut the fruit/vegetables into pieces that fit into the chute and press them
into the juice extractor with the pusher
First pour the milk into the blender and then add the dry ingredients. Mix
the ingredients approx. 1 minute. If necessary, repeat this procedure max.
2 times. Then stop for a few minutes to allow the appliance to cool down to
ambient temperature.
Use dry, crisp bread
Use soft butter for a light result
Use a piece of rindless Parmesan and cut it into pieces that fit into the
chute
Cut the cheese into pieces that fit into the chute. Press carefully with the
pusher.
Use hard, plain chocolate. Break into pieces of 2 cm. Use the pulse setting
(M) during the first few seconds and then switch to max. speed to chop
very finely.
Use cold margarine and cold water. Put flour into the bowl and add the
margarine cut into pieces of 2 cm. Mix at max. speed until the dough has
become crumbly, then add cold water while mixing. Stop as soon the
dough starts to turn into a ball. Allow the dough to cool before further processing.
Mix warm water with yeast and sugar. Add flour, butter and salt and knead
the dough for approx. 90 seconds. Leave to rise for 30 minutes.
Salads, raw
vegetables
Vegetable/fruit
cocktails
Pancakes,
waffles, crêpes
Breadcrumbed
dishes, au gratin
dishes
Desserts, pastry,
toppings
Garnishing,
soups, sauces,
au gratin dishes
Sauces, pizzas,
au gratin dishes,
fondue
Garnishing, sauces,
pastry, puddings,
mousses
Fruit tarts, apple
dumplings, pies,
quiches.
Bread
§ / ¶
4
®
£
£
•
•
£
£
©
Ingredients Max. Speed Accessory Procedure Applications
quantity setting
Page 13

14
Dough (pizza)
- kneading
Dough (yeast)
- kneading
Dough (shortcrust)
- kneading
Egg whites
- whisking
Fruit (e.g. apples, peaches,
bananas)
- chopping
- pureeing
Herbs (e.g. parsley)
- chopping
Leeks, cucumbers,
carrots
- slicing
Lemons, oranges and
grapefruits
- pressing
Mayonnaise
- emulsifying
Meats, fish, poultry
- lean meat
- streaky meat
700 g
flour
500 g
flour
500 g
flour
4 egg
whites
500 g
700 g
75 g
min.
1 piece
1 kg fruit
3 eggs
500 g
400 g
5
5
5
4 - 5
M
5
5 / M
5 / M
3
2-5
5 / M
5 / M
Same procedure as for bread dough. Knead the dough for approx. 1 minute.
First mix yeast, warm milk and some sugar. Add flour, sugar, salt, eggs
and soft margarine. Knead the dough until it stops sticking to the bowl
(takes approx. 1 minute). Leave it to rise for 30 minutes.
Use cold margarine, cut into pieces of 2 cm. Put all the ingredients in the
bowl and knead until the dough has turned into a ball. Allow the dough to
cool before further processing.
Use the eggs at room temperature.
Note: Use at least two egg whites
Tip: Add a little lemon juice to prevent the fruit from discolouring
Add some liquid to obtain a smooth puree.
Wash and dry the herb(s) before chopping
Fill the chute with leeks, pieces of cucumber or carrots and press carefully
with the pusher.
Cut the fruit in halves and press them carefully onto the cone of the citrus
press
Use all ingredients at room temperature. Note: use at least one big egg,
two smal eggs or two big egg yolks.
First remove sinews and (fish) bones. Cut the meat/fish into cubes of 3
cm. Use the pulse setting for a coarser chopping result.
Pizzas, tarts
Luxury bread
Apple pies, sweet
biscuits, open fruit
flans
Puddings, soufflés,
meringues
Salads
Sauces, jams,
puddings, baby food
Sauces, soups,
garnishing, herb
butter
Soups, salads,
quiches.
Juices, vitamin
drinks, sorbets
French fries,
salads, fondue,
garnishing and
barbecue sauces.
Steaks tartare,
hamburgers
Minced meat
£ / ©
©
£
ß
£
®
£
§
µ
£
£
£
Ingredients Max. Speed Accessory Procedure Applications
quantity setting
Page 14

15
Milkshakes
- blending
Mixture (sponge)
- whisking
Mixture (cake)
- mixing
Nuts
- chopping
Onions
- chopping
- slicing
Peas, beans (cooked)
- pureeing
Potatoes, cooked
- pureeing
Soups
- blending
Vegetables
- chopping
Vegetables and meats
(cooked)
- pureeing
Whipping cream
- whipping
250 ml
milk
3 eggs
4 eggs
250 g
500 g
500 g
500 g
750 g
potatoes
500 ml
500 g
500 g
400 ml
5
1/5
5
5 / M
5 / M
5 / M
5
2-4
5
5
5
2-4
Puree the fruit (e.g. bananas, strawberries) with sugar and lemon juice.
Add milk and some ice cream and mix well.
Ingredients at room temperature. Whisk the mixture of eggs and sugar at
max. speed until stiff. Then add the sifted flour. Continue whisking carefully at speed 1.
Ingredients at room temperature. Mix the softened butter and the sugar
until the mixture is smooth and creamy. Then add milk, eggs and flour
respectively.
Use the pulse setting (M) for coarse chopping or max. speed for fine chopping.
Peel the onions and cut them into 4 pieces. Note: use at least 100 g.
Peel the onions and cut them into pieces that fit into the chute. Note: use
at least 100 g.
Use cooked beans or peas. If necessary, add some liquid to improve the
consistency of the mixture.
Do not overcook the potatoes. The amount of milk necessary depends on
the kind of potato used. Use warm milk (max. 80°C). Add the milk slowly
while the metal blade is rotating.
Use cooked vegetables
Pre-cut into cubes of 3 cm and chop them with the blade.
For coarse puree, add only a little liquid. For fine puree, keep adding liquid
until the mixture is smooth enough.
Use cream that has been cooled in the refrigerator.
Note: use at least 125 ml cream.
Sponge cakes, Swiss
rolls, pastry
Various cakes
Salads, bread,
almond paste,
puddings
Salads, cooked food
Purees, soups
Oven dishes,
puree
Soups, sauces
Soups, raw
vegetables, salads
Baby and infant food
Garnishing, cream,
pastry, ice cream
mixtures
®
ß / ©
£
£
£
§
®
£
®
£
®
ß
Ingredients Max. Speed Accessory Procedure Applications
quantity setting
Page 15

16
Parts
The following items are standard
accessories:
- Bowl (B)
- Lid (C)
- Blade £ (G)
- Slicing disc § (H)
- Grating disc • (coarse) (I)
- Grating disc ¶ (fine) (J)
- Beater ß (K)
- Kneading accessory © (L)
- Double pusher (O)
- Storage box (Q)
- Blender (T-X)
- Spatula (Y)
- Citrus press µ (AA-AB)
- Juice extractor 4 (AC-AF)
The following additional
accessories are available:
- Potato grating disc
(n°. 4822 690 10139)
- Single-sided slicing disc for
French fries and e.g. Swedish
turnip HR 2912
(n°. 4822 690 10141).
Ask your supplier if these
accessories are also available in
your country. If you want to order
additional parts or replacements,
please mention the relevant
service and/or type numbers.
4822 418 10343
4822 418 10342
4203 065 61850
4822 462 11055
4203 065 61990
4822 422 01336
4203 065 61880
4203 065 61870
4203 065 61890
4203 065 61900
4203 065 61920
4203 065 61980
4203 065 61960
4203 065 61970
4203 065 61930
4203 065 61940
4203 065 61950
4203 065 61860
4203 065 61820
4203 065 61810
4203 065 61830
4203 065 61840
Page 16

17
You are not satisfied with the way the appliance functions?
If the appliance does not function the way you expect it to, consult the following table and read the relevant sections in the directions for use!
Possible solution:
Turn bowl and/or lid in the direction indicated as far as possible (until you hear a ‘click’).
Make sure that the arrows on the bowl and on the appliance as well as on the bowl and on the lid are
placed directly opposite each other (see fig. 2 and 6).
Make sure that the blender jar or the screw cap have been properly placed and turn them in the direction
indicated as far as possible.
This is probably the automatic cut-out system that has cut off the power supply to the appliance because
it has overheated.
- Unplug the appliance
- Set the switch to position O
- Let the appliance cool down for 15 minutes
- Put the mains plug back in the socket
- Switch on the appliance again.
If the automatic cut-out system is activated repeatedly, contact your Philips dealer or the Philips Service
Centre in your country.
Select the correct speed. Look at the indications on the appliance and in the directions for use.
You can try adding some lemon juice or salt. Make sure the beater and the bowl are grease-free and
select the right speed.
Use the beater. Use cooled whipping cream (approximately 6 °C).
Only use the beater to whip cream, eggs/egg whites and liquids. Do not use it to prepare batter, cake
mixture or dough!
Follow the instructions given in the directions for use carefully. Never add too much water.
Always use the accessory indicated in the table.
Do not exceed the maximum kneading time indicated.
Problem:
The switch does not function
The appliance has suddenly stopped running
The chopping, slicing or grating
result is not optimal
The result when whisking eggs is
not optimal
The result when whipping cream
is not optimal
The beater slips or bends
The dough is swung around in
the bowl
Page 17

18
1
Description générale (fig.1)
A Bloc moteur
B Bol
C Couvercle du bol
D Doigt de sécurité du bol (active et dés-
active l’interrupteur de sécurité)
E Ergot du bol (couvre l’orifice de la
poignée)
F Interrupteur de sécurité incorporé
G Couteau £
H Disque à émincer §
I Disque à râper • (gros)
J Disque à râper ¶ (fin)
K Batteur ß
L Accessoire de pétrissage ©
M Axe d’entraînement
N Cheminée de remplissage
O Poussoir (double)
P Sélecteur de vitesse
O = Arrêt
1 à 5 = réglage variable des vitesses
(1 = vitesse minimum, 5 = vitesse
maximum)
M = Touche Eclair (impulsions)
(l’appareil est en marche tant que vous
appuyez sur le bouton)
Q Boite de rangement des diques à raper
R Enrouleur de cordon avec serre câble
(pour maintenir le câble enroulé)
S Capuchon fileté (pour couvrir l’ouvertu-
re ou se fixe le bol mélangeur lorsqu’on
ne l’utilise pas)
Accessoires du bol mélangeur ®
T Bouchon
U Couvercle
V Bol mélangeur
W Joint en caoutchouc
X Couteaux
Y Spatule
T
N
O
G
L
H
I
J
K
Y
Q
D
C
B
M
R
F
E
U
V
W
X
S
A
P
Français
Page 18

Interrupteur automatique de sécurité
Lisez ces instructions attentivement avant d’utiliser l’appareil.
L’appareil est équipé d’un interrupteur automatique afin d’éviter qu’il
s’abîme en cas de surchauffe. En cas de surchauffe, ce dispositif coupe
automatiquement l’alimentation électrique de l’appareil. Vous pouvez
remettre l’appareil en marche après l’avoir laissé refroidir pendant 15
minutes, en suivant les instructions ci-dessous :
Si votre appareil s’arrête brusquement :
- Débranchez l’appareil
- Mettez l’interrupteur sur la position O
- Laissez refroidir l’appareil 15 minutes
- Branchez à nouveau l’appareil
- Remettez l’appareil en marche
Consultez votre revendeur ou un Centre Service Agréé Philips si l’inter-
rupteur de sécurité se déclenche trop fréquemment.
Symboles
A gauche des symboles qui figurent sur l’appareil et qui indiquent les
différentes utilisations, se trouve une icône de l’accessoire à utiliser.
Au-dessus de cette icône est indiquée la vitesse la plus appropriée pour
cette utilisation : M (= impulsions) ou les vitesses 1 à 5 (voir le tableau
sur les pages 28-30).
Important
• Lisez ces recommandations ainsi que les illustrations avant d’utiliser
votre appareil.
• Enlevez la gaine de protection du couteau avant chaque utilisation.
• Faites très attention en prenant le couteau et les disques à
émincer/râper car ils sont très aiguisés et tranchants.
• Avant la première utilisation, nettoyez toutes les pièces en contact
avec les aliments.
• Placez correctement le couvercle du bol pour qu’il déverrouille
l’interrupteur de sécurité, permettant ainsi la marche du moteur.
• Notez que si le mélangeur et le bol ont été montés correctement, seul
le mélangeur fonctionnera.
• Ne laissez pas fonctionner l’appareil sans surveillance.
• Ne laissez jamais les enfants utiliser l’appareil.
• Quand vous mixez ou mélangez des liquides, ne dépassez pas le
repère de remplissage maximum du bol ou du mélangeur (trait
supérieur de graduation).
• Ne dépassez pas les quantités maximums et les temps d’utilisation
indiqués dans le tableau.
• Attendez l’arrêt complet des parties en rotation avant de retirer le
couvercle.
• Ne mettez jamais vos doigts ou tout autre objet, par ex. la spatule,
dans la cheminée de remplissage ni dans le bol mélangeur sans
avoir au préalable débranché l’appareil.
• N’immergez jamais l’ensemble moteur dans l’eau ni dans aucun
autre liquide. Ne le rincez pas non plus.
• Débranchez l’appareil après son utilisation.
• Si le cordon d’alimentation de l’appareil est endommagé, il doit être
remplacé par un cordon équivalent. Adressez-vous à votre revendeur
ou à un Centre Service Agréé Philips qui seuls possédent la
compétence et les pièces nécessaires à la réparation.
• Conservez ce mode d’emploi pour usage ultérieur.
19
Page 19

CLICK
2
3
CLICK
4
CLICK
5
CLICK
6
7
8
9
Pour mettre en place le bol (B) (fig. 2)
- Placez le bol sur le bloc moteur (1).
- Tournez à fond la poignée dans le sens de
la flèche jusqu’à ce que vous entendiez un
“clic” (2).
Pour mettre le couvercle en place (C)
- Mettez le couvercle sur le bol (fig. 3)
- Tournez fermement le couvercle à fond
dans le sens de la flèche jusqu’à ce que
vous entendiez un “clic” (fig. 4-5).
- Assurez-vous de faire coïncider le repère
du couvercle et la flèche du bol. L’ergot du
couvercle recouvre alors l’ouverture de la
poignée du bol (fig. 6).
La cheminée de remplissage (N) et le
poussoir (O)
• La cheminée de remplissage peut être
utilisée pour ajouter du liquide et des
ingrédients solides (fig. 7).
• Utilisez le poussoir pour pousser les
ingrédients dans la cheminée (fig. 8).
• Le poussoir peut également servir à fermer
la cheminée pendant que l’appareil est en
marche, pour empêcher toute projection.
• Le poussoir est en deux parties. Le petit
poussoir libére une cheminée de plus
faible diamètre et peut être utilisé pour
ajouter des ingrédients dont les dimensions
sont trop réduites (par exemple : carrotes,
etc..) pour utiliser la cheminée standard
(fig. 9).
Nota : Le petit poussoir ne peut être utilisé que si le grand poussoir est déjà en
place dans la cheminée.
Verrouillage de sûreté incorporé (F)
Le bloc moteur et certains accessoires
comportent des repères. L’appareil ne peut
fonctionner que si la flèche du bloc moteur
coïncide exactement avec le repère du
couvercle (C ) ainsi que les autres
accessoires. Dans cette position, l’ergot (E)
du couvercle et/ou accessoire couvre
l’ouverture de la poignée du bol.
20
1
2
Page 20

10
11
12
Utilisation de l’appareil
Remarque : l’appareil ne peut fonctionner
que si :
• le capuchon fileté (S) ou le mélangeur (T X) ont été montés correctement sur le bloc
moteur (A) et si le bol (B) et le couvercle
(C) ont été positionnés sur le bloc moteur
selon les instructions de ce livret.
• Si le mélangeur et le bol ont été montés
correctement sur le bloc moteur, le
mélangeur seul fonctionnera.
Positionnez le sélecteur de vitesse (N) sur la
position indiquée dans le tableau (pages 28-
30) et mettez l’appareil en marche. Si vous
hésitez sur la vitesse à utiliser, choisissez
toujours la vitesse la plus élevée (position 5).
Le couteau (G)
£
Attention : les lames du couteau sont
très aiguisées et tranchantes !
• Le couteau peut être utilisé pour hacher,
mélanger, mixer, réduire en purée et pour
préparer les pâtes feuilletées, brisées et
sablées.
- Enlevez la gaine de protection du couteau
(fig. 10).
- Placez le bol sur le bloc moteur (fig. 2) et
positionnez le couteau sur l’axe
d’entraînement (fig. 11).
- Mettez les ingrédients dans le bol (fig. 12).
- Fixez le couvercle sur le bol et introduisez
le poussoir dans la cheminée d’alimentation.
- Tournez le sélecteur de vitesse (N) sur la
position indiquée dans le tableau et mettez
l’appareil en marche. Si vous hésitez sur le
choix de la vitesse, choisissez toujours la
vitesse la plus élevée (position 5).
• Les préparations indiquées dans les
recettes sont généralement prêtes en 10 à
60 secondes.
Conseils:
• Il est préférable de ne pas hacher de gros
morceaux avec le couteau. Coupez-les en
dés d’environ 3 cm de côté avant de les
mettre dans le mélangeur.
• L’appareil hache très rapidement. Ne le
faites pas tourner trop longtemps : les
aliments seraient hachés trop fins. De
même lorsque vous utilisez la touche
Eclair (M).
• Ne laissez pas tourner l’appareil trop
longtemps lorsque vous hachez du
fromage (à pâte dure) : le fromage
chaufferait trop, commencerait à fondre et
à devenir pâteux.
• Si des aliments s’enroulent autour du
couteau ou collent à la paroi du bol :
• débranchez d’abord l’appareil
• retirez le couvercle du bol
• enlevez ensuite les aliments avec la
spatule.
• Ne hachez pas des ingrédients trop durs
tels que des grains de café, des noix de
muscade ou des glaçons : cela pourrait
émousser les lames du couteau.
Reportez-vous au tableau pour la vitesse
et le réglage appropriés.
21
Page 21

13
CLICK
14
15
M
M
1
2
3
4
5
16
17
18
19
1
2
CLICK
20
21
Disque à émincer (H)
§ et à râper (I, fin)
• (J, gros) ¶
Attention : les lames du disque sont très
aiguisées !
Saisissez toujours le disque par la partie en
plastique au centre du disque.
- Placez le bol sur le bloc moteur (fig. 2).
- Positionnez le disque à émincer ou à râper
(fig. 13).
- Placez le couvercle sur le bol (fig. 14).
- Mettez les ingrédients dans la cheminée
d’alimentation (fig. 15).
- Appuyez légèrement sur les ingrédients
avec le poussoir.
- Pour émincer et râper : réglez le sélecteur
de vitesse sur la position 5 (vitesse
maximum) (fig.16).
- Si vous désirez trancher des légumes
tendres ou des fruits, vous pouvez
également choisir une vitesse inférieure
(voir le tableau).
- Poussez les ingrédients lentement et
régulièrement avec le poussoir (fig.17).
Utilisez, de préférence, le petit diamêtre
lorsque vous coupez des légumes tels que
les carottes.
Conseils :
• Coupez les aliments grossièrement pour
les introduire dans la cheminée.
• Remplissez la cheminée de façon régulière
pour obtenir les meilleurs résultats.
• Si vous devez traiter d’importantes
quantités d’aliments, ne traitez que des
petites portions à la fois et videz le bol
fréquemment.
Le fouet (K)
ß
Vous pouvez vous servir du fouet pour battre
des œufs, des blancs d’œufs, des garnitures
de desserts, des flancs et de la crème
fouettée.
Ne vous servez pas du fouet pour faire
une pâte ou des mélanges pour gâteaux !
- Placez le bol sur le bloc moteur (fig. 2) et
fixez le fouet sur l’axe d’entraînement
(fig. 18).
- Mettez les aliments dans le bol (fig. 19) et
fixez le couvercle sur le bol (fig. 20).
- Mettez le poussoir dans la cheminée
(fig. 21).
- Tournez le sélecteur de vitesse (P) sur la
position indiquée dans le tableau et mettez
l’appareil en marche. Si vous hésitez sur le
choix de la vitesse, choisissez toujours la
vitesse la plus élevée (position 5) (fig. 22).
• Les préparations indiquées dans les
recettes sont généralement prêtes en 2 à 5
minutes.
22
M
M
1
2
3
4
5
22
Page 22

23
24
CLICK
1
2
25
26
27
28
1
2
CLICK
29
Accessoire de pétrissage (L)
©
• L’accessoire de pétrissage sert à pétrir de
la pâte à pain, à mélangeur de la pâte à
frire ou les ingrédients pour un gâteau.
- Placez le bol sur le bloc moteur (fig. 2) et
fixez l’accessoire de pétrissage sur l’axe
d’entraînement (fig. 23).
- Mettez les ingrédients dans le bol (fig. 24)
et fixez le couvercle sur le bol (fig. 25).
- Mettez le poussoir dans la cheminée
(fig. 26).
- Tournez le sélecteur de vitesse (P) sur la
position 5 (= vitesse maximum) (fig. 27). La
pâte ou le mélange sont prêts en une
minute.
Presse-agrumes
Presse-agrumes : accessoires
µ
AA Cône
AB Tamis
Les accessoires du presse-agrumes ne
peuvent être utilisés que sur le robot
Philips de type HR 7727.
Assemblage
- Positionnez le bol sur le bloc moteur (fig.2)
et placez le tamis ainsi que le cône (AB)
sur le bol (fig.28).
- Tournez le tamis dans le sens de la flèche
(fig.29) jusqu’à ce que le doigt de sécurité
s’engage dans son logement. Le bec du
tamis doit venir se positionner au-dessus
de la poignée du bol (fig.30).
23
AAA
B
CLICK
30
M
1
2
M
3
4
5
Page 23

31
M
M
1
2
3
4
5
32
33
34
- Mettez le cône (AA) en place (fig.31) en
pressant délicatement dessus.
- Mettez le moteur en marche en placant le
sélecteur sur la position 3 (fig.32).
- Appuyez fermement la moitié d’un citron ou
d’une orange sur le cône rotatif (fig.33).
• De temps en temps arrêtez le
fonctionnement pour retirer la pulpe du
tamis. Puis arrêtez l’appareil pour enlevez
le bol et le tamis.
Après utilisation
- Pour éviter de faire couler du jus, retirez le
bol avec le presse-agrumes.
- Enlevez la pulpe du cône et du tamis.
- Rincez immédiatement les éléments après
utilisation. Vous pourrez ensuite les laver
dans de l’eau chaude savonneuse.
N’utilisez pas de tampons, produits
abrasifs, etc..
• Certains agrumes peuvent entrainer une
coloration ou une décoloration des
accessoires en matières plastiques. Ceci
est normal et n’a aucun effet négatif sur
l’utilisation. En général ceci disparait au
bout de quelques temps.
Centrifugeuse
Centrifugeuse : accessoires
44
AC Filtre AE Poussoir
AD Tamis AF Couvercle
Les accessoires de la centrifugeuse ne
peuvent être utilisés que sur le robot
Philips de type HR 7727.
Assemblage
- Positionnez le bol sur le bloc moteur (fig.2).
- Placez le filtre (AC) sur le tamis (AD)
(fig.34).
- Placez l’ensemble dans le bol (fig.35).
24
35
Page 24

36
CLICK
37
38
39
40
41
- Fermez à l’aide du couvercle (AF). Tournez
le couvercle dans le sens de la flèche
(fig.36) jusqu’à ce que le doigt de sécurité
s’engage dans son logement. Le bec du
tamis doit venir se positionner au-dessus
de la poignée du bol (fig.37).
Comment utiliser la centrifugeuse
- Mettez le moteur en marche en placant le
sélecteur sur la position 5 (vitesse Maxi).
- Introduisez les fruits ou autres ingrédients
dans la cheminé (fig.38).
- Appuyez sur les fruits à l’aide du poussoir.
Laissez le poussoir dans la cheminée le
plus longtemps possible afin d’éviter
d’eventuelles éclaboussures (fig.39).
- Laissez l’appareil en fonctionnement
pendant encore 20 secondes afin de
recueillir un maximum de jus.
- Afin d’éviter toute éclaboussure de jus,
retirez toujours après usage l’ensemble bol
et accessoires (fig.40).
Conseils :
• Avant d’utiliser la centrifugeuse :
- coupez les carottes, les radis, etc.
- pelez les citrons, oranges, pamplemouses,
etc.
- dénoyautez les cerises, les pêches, les
abricots, etc.
• Mettez toujours en marche le bloc moteur
et la centrifugeuse avant d’introduire les
aliments.
• Arrêtez l’appareil de temps à autre afin de
retirer la pulpe du tamis.
• Ne mettez pas trop de fruits ou de légumes
à la fois. Si l’appareil se met à vibrer
anormalement, arrêtez immediatement
l’appareil ; nettoyez le tamis et le filtre
avant de remettre en marche à nouveau.
Le mélangeur (T-X) ®
Important :
• L’appareil ne peut fonctionner que si le
mélangeur est fixé sur le bloc moteur ou
si le capuchon fileté (S) est bien fixé
sur l’ouverture de raccordement du
mélangeur.
• Avant toute utilisation : ne branchez pas
l’appareil avant d’avoir installé
correctement sur le bloc moteur, le bol
mélangeur (V) , le couvercle (U) et
l’ensemble couteaux (X).
• Après utilisation : débranchez l’appareil
avant de retirer le bol mélangeur du
bloc moteur.
• Le mélangeur peut être utilisé pour
réduire en purée ou pour mélanger. Il
peut servir par exemple pour les
soupes, les sauces, les milk-shakes,
les aliments de bébés, les légumes, les
fruits, les pâtes fluides, la purée etc. Si
nécessaire, coupez les ingrédients
solides en morceaux plus petits avant
de les mettre dans le mélangeur.
• Ne mettez pas dans le mélangeur des
ingrédients à une température
supérieure à 80° C.
• Pour éviter tout débordement, ne mettez
pas plus de 1,5 litres de liquide dans le
bol .
• Ne retirez jamais le couvercle du bol
mélangeur pendant son
fonctionnement.
Montage et démontage
- Disposez le joint (W) autour du rebord de
l’ensemble couteau (X) (fig.41).
- Faites tourner le couteau vers la gauche
pour le fixer sur le bol mélangeur (V) (fig.
42). Assurez-vous qu’il est correctement
enclenché !
25
1
2
42
CLICK
1
2
Page 25

43
1
2
44
45
47
46
M
M
1
2
3
4
5
48
M
M
1
2
3
4
5
49
50
2
1
51
- Retirez le capuchon fileté (S) (fig. 43).
- Montez le bol mélangeur sur l’ouverture de
raccordement et tournez-le dans le sens de
la flèche jusqu’à son enclenchement
(fig. 44).
Attention : n’exercez pas une pression trop
importante sur la poignée du bol mélangeur.
- Positionnez le couvercle en appuyant
dessus (fig. 45).
- Fixez le bouchon en le tournant dans le
sens des flèches jusqu’à blocage (fig. 46).
• Pour retirer le mélangeur, procédez dans
l’ordre et dans le sens inverses.
Utilisation du mélangeur
- Mettez les ingrédients dans le bol
mélangeur (fig. 47).
- Mettez l’appareil en marche en réglant le
sélecteur de vitesses sur la vitesse
recommandée (fig. 48) ou en appuyant sur
la touche Eclair (M) (fig. 49). Si vous
hésitez sur le choix de la vitesse,
choisissez toujours la vitesse maximum
(position 5). Consultez le tableau pour la
vitesse et le réglage appropriés.
• Les préparations indiquées dans les
recettes sont généralement prêtes en 10
secondes à 2 minutes.
Conseils :
• Les ingrédients liquides (par exemple pour
une mayonnaise) peuvent être versés dans
le bol par l’ouverture du bouchon qui se
trouve sur le couvercle (retounez le
bouchon : voir fig. 50).
• L’ouverture du couvercle peut servir à
ajouter des ingrédients pendant le
fonctionnement de l’appareil. Pour cela,
dévissez le bouchon et retirez-le du
couvercle (fig. 51-52).
• Plus vous laissez l’appareil tourner
longtemps, plus le mélange que vous
obtenez est fin.
• Il peut s’avérer nécessaire d’arrêter
l’appareil de temps à autres pour retirer les
aliments collés le long des parois du verre
du mélangeur.
- Arrêtez l’appareil et débranchez-le.
- Retirez le bouchon et le couvercle.
- Avec une spatule douce, retirez les
morceaux collés sur les parois du verre du
mélangeur Tenez la spatule éloignée des
couteaux (environ 2 cm).
26
52
2
1
1
2
Page 26

53
2
1
3
54
55
Nettoyage
• Débranchez toujours l’appareil avant de
nettoyer le bloc moteur.
• Le bloc moteur peut être nettoyé avec un
chiffon humide. N’immergez jamais le bloc
moteur dans l’eau. Ne le placez pas sous
l’eau.
• Lavez immédiatement après utilisation les
accessoires en contact avec les aliments, à
l’eau chaude savonneuse.
• Faites attention en nettoyant le couteau et
le disque à émincer/râper. Leurs lames
sont très aiguisées !
• Evitez de cogner les lames contre des
objets durs car cela les émousserait.
• Les roues d’entraînement du fouet peuvent
être retirées et lavées très facilement
(fig. 53-54).
• Certains aliments peuvent provoquer une
décoloration sur la surface des
accessoires. Cela est sans importance.
Les décolorations disparaissent
habituellement en peu de temps.
• Enroulez le cordon d’alimentation (en
excédant) autour de l’enrouleur au dos de
l’appareil (fig. 55).
27
Page 27

28
Pommes, carottes, céleri
- émincer, râper
Pommes, carottes, céleri,
raisins
Pâte (à crêpes)
- fouet
Chapelure
- hacher
Crème au beurre
Fromage (parmesan)
- râper
Fromage (gouda)
- râper
Chocolat
- hacher
Pâte (tartes, pâtés en croûte,
beignets)
- pétrir
Pâte (pain)
- pétrir
Pâte (pizza)
- pétrir
500 g
500 g
500 ml lait
100 g
300 g
200 g
200 g
200 g
300 g farine
700 g farine
700 g farine
5 / M
5
5
5
5
5
M / 5
M / 5
5
5
5
Coupez les fruits ou les légumes grossièrement pour les introduire dans la
cheminée. Remplissez la cheminée et râpez-les en appuyant doucement
sur le poussoir.
Coupez les fruits ou les légumes grossièrement pour les introduire dans la
cheminée. Remplissez la cheminée et appuyez sur le poussoir pour extraire le jus.
Versez d’abord le lait dans le mélangeur, puis ajoutez les ingrédients
secs. Mélangez pendant 1 minute environ. Eventuellement répétez l’opération une ou deux. Laissez le moteur se refroidir entre deux opérations
Utilisez du pain sec, croustillant
Prenez du beurre mou pour obtenir une crème légère.
Utilisez un morceau de parmesan sans croûte et coupez-le en morceaux
pour les introduire dans la cheminée.
Coupez le fromage en morceaux pour les introduire dans la cheminée.
Appuyez doucement sur le poussoir.
Utilisez du chocolat noir, dur. Cassez en morceaux de 2 cm. Utilisez la
touche Eclair pendant quelques secondes et passez ensuite à la vitesse
maximum pour hacher très fin.
Utilisez de la margarine et de l’eau froides. Versez la farine dans le bol et
ajoutez la margarine coupée en morceaux de 2 cm. Mélangez à la vitesse
maximum jusqu’à ce que la pâte devienne friable, puis ajoutez de l’eau
froide tout en mélangeant. Arrêtez dès que la pâte commence à former
une boule. Laissez la pâte refroidir avant de vous en servir.
Mélangez la levure et le sucre avec de l’eau chaude. Ajoutez la farine, le
beurre et le sel et pétrissez la pâte pendant 1
1
⁄2 min. Laissez lever 30 min.
Même opération que pour la pâte à pain.
Salades, légumes
crus
Cocktails de
fruits/légumes
Crêpes, gaufres
Plats panés, gratins
Desserts, pâtisserie,
garnitures.
Garnitures, soupes,
sauces, gratins.
Sauces, pizzas,
gratins, fondue.
Garnitures, sauces,
pâtisseries, flans,
mousses
Tartes aux fruits,
beignets aux
pommes, pâtés,
quiches
Pain
Pizzas, tartes
§ / ¶
4
®
£
£
•
•
£
£
©
£ / ©
Ingrédients Quantité Rég- Acces- Utilisation Usages
maximum lage et soire
vitesse
Page 28

29
Pâte (au levain)
- pétrir
Pâte (brisée)
- pétrir
Blancs d’œufs
- fouetter
Fruits (par ex. pommes,
pêches, bananes)
- hacher
- purée
Herbes (par ex. persil)
- hacher
Poireaux, concombres,
carottes
- émincer min.
Citron, orange, pamplemousse
Mayonnaise
- émulsionner
Viandes, poisson, volaille
- viande maigre
- viande persillée
Milkshakes
- mélanger
500 g farine
500 g farine
4 blancs
d’œufs
500 g
700 g
75 g
1 pièce
1 kg de fruit
3 œufs
500 g
400 g
250 ml lait
5
5
4 - 5
M
5
5 / M
5 / M
3
2 / 5
5 / M
5 / M
2
Mélangez d’abord la levure, du lait chaud et un peu de sucre. Ajoutez la
farine, le sucre, le sel, les œufs et de la margarine molle. Pétrissez la pâte
jusqu’à ce qu’elle ne colle plus au bol. Laissez lever 30 minutes.
Utilisez de la margarine froide et coupez-la en morceaux de 2 cm. Mettez
tous les ingrédients dans le bol et pétrissez jusqu’à ce que la pâte devienne une boule (1 min. environ). Laissez la pâte refroidir avant de vous en
servir.
Utilisez les œufs à température ambiante. Remarque : utilisez au moins
deux blancs d’œufs.
Conseil : ajoutez un peu de jus de citron pour empêcher la décoloration
des fruits.
Ajoutez du liquide pour une purée plus onctueuse.
Lavez et séchez les herbes avant de les hacher.
Remplissez la cheminée de poireaux, de dés de concombre ou de carottes et appuyez doucement avec le poussoir.
Appuyez fermement la moitié du fruit sur le cône rotatif.
Tous les ingrédients doivent être à température ambiante. Remarque :
utilisez au minimum un gros œuf, deux petits œufs ou deux gros jaunes
d’œufs.
Retirez d’abord les nerfs, les os, les arêtes. Coupez la viande/le poisson
en dés de 3 cm. Utilisez la touche Eclair pour un hachage plus grossier.
Réduisez en purée le fruit (par ex. bananes, fraises) avec du sucre et du
jus de citron. Ajoutez du lait et de la crème glacée et mélangez bien.
Pain brioché
Tourte aux pommes,
biscuits, tartes aux
fruits
Entremets, soufflés,
meringues
Salades
Sauces, confitures,
flans, aliments pour
bébés
Sauces, soupes,
garnitures, beurre
aux herbes.
Soupes, salades,
quiches
Pommes frites,
salades, fondue,
garnitures et sauces
de barbecue.
Steaks tartare,
hamburgers, viande
hachée.
©
£
ß
£
®
£
§
µ
£
£
£
®
Ingrédients Quantité Rég- Acces- Utilisation Usages
maximum lage et soire
vitesse
Page 29

30
Mélange (babas)
- fouetter
Mélange (gâteaux)
- mixer
Noix
- hacher
Oignons
- hacher
- émincer
Petits pois, haricots (cuits)
- purée
Pommes de terre
bouillies
- purée
Soupe
- mixer
Légumes
- hacher
Légumes et viandes (cuits)
- purée
Crème fouettée
- fouetter
3 œufs
4 œufs
250 g
500 g
500 g
500 g
750 g de
pommes de
terre
500 ml
500 g
500 g
400 ml
3 - 5
1/5
5 / M
5 / M
5 / M
5
2 - 4
5
5
5
2 - 4
Utilisez des ingrédients à température ambiante. Faites monter les œufs
et le sucre en neige à vitesse maximum. Ajoutez alors la farine tamisée et
continuez à fouetter avec précaution à la vitesse 1.
Utilisez des ingrédients à température ambiante. Mélangez le beurre
ramolli et le sucre jusqu’à ce que le mélange soit onctueux et crémeux.
Ajoutez ensuite, dans l’ordre, le lait, les œufs et la farine.
Utilisez la touche Eclair (M) pour un hachage grossier et la vitesse maximum pour un hachage fin.
Pelez les oignons et coupez-les en quatre. Remarque : utilisez au moins
100 g.
Pelez les oignons et coupez-les en morceaux pour les introduire dans la
cheminée. Remarque : utilisez au moins 100 g.
Utilisez les légumes cuits. Si nécessaire, ajoutez du liquide pour améliorer
la consistance du mélange.
Ne cuisez pas trop les pommes de terre. La quantité de lait nécessaire
dépend de la qualité des pommes de terre utilisées. Utilisez du lait chaud
(80° C max.) Ajoutez le lait lentement tout en faisant tourner le couteau.
Utilisez des légumes cuits
Découpez en cubes de 3 cm et hachez avec le couteau.
Pour obtenir une purée épaisse, ajoutez peu de liquide. Pour une purée
fine, ajoutez du liquide jusqu’à ce que le mélange soit suffisamment onctueux.
Utilisez de la crème préalablement refroidie dans le réfrigérateur.
Remarque : utilisez au moins 125 ml de crème liquide
Babas, génoise
roulée, pâtisserie
Divers gâteaux
Salades, pain,
frangipane,
entremets
Salades, plats
cuisinés
Purées, soupes
Plats au four, purée
Soupes, sauces
Soupes, légumes
crus, salades
Aliments pour bébés
Garnitures, crèmes,
pâtisserie, mélanges
de crèmes glacées
ß / ©
£
£
£
§
®
£
®
£
®
ß
Ingrédients Quantité Rég- Acces- Utilisation Usages
maximum lage et soire
vitesse
Page 30

31
Accessoires
Les éléments suivants sont les
accessoires standard :
- Bol (B)
- Couvercle (C )
- Couteau
£ (G)
- Disque à émincer § (H)
- Disque à râper • (gros) (I)
- Disque à râper ¶ (fin) (J)
- Batteur ß (K)
- Accessoire à pétrir © (L)
- Poussoir double (O)
- Melangeur ® (T-X)
- Spatule (Y)
- Presse-agrumes µ (AA-AB)
- Centrifugeuse 4 (AC-AF)
Les accessoires supplémentaires suivants sont disponibles
en option :
- disque à râper les pommes de
terre (gâteaux aux pommes de
terre) (n°. 4822 690 10139)
- disque à râper des pommes de
terre frites par ex. HR 2912
(N˚ 4822 690 10141).
Demandez à votre revendeur ou
Centre Service Agréé Philips si
ces accessoires sont disponibles.
Si vous désirez commander des
accessoires supplémentaires ou
les remplacer, mentionnez les
numéros de service.
4822 418 10343
4822 418 10342
4203 065 61850
4822 462 11055
4203 065 61990
4822 422 01336
4203 065 61880
4203 065 61870
4203 065 61890
4203 065 61900
4203 065 61920
4203 065 61980
4203 065 61960
4203 065 61970
4203 065 61930
4203 065 61940
4203 065 61950
4203 065 61860
4203 065 61820
4203 065 61810
4203 065 61830
4203 065 61840
Page 31

32
Vous n’êtes pas satisfait du fonctionnement de l’appareil ?
Consultez le tableau suivant et lisez les sections appropriées dans la notice d’utilisation !
Solution possible
Tournez le bol et/ou le couvercle dans la direction indiquée, aussi loin que possible (jusqu’à ce que vous
entendiez un ‘clic’).
Vérifiez que les flèches du bol et de l’appareil coïncident ainsi que celles du bol et du couvercle (voir fig.
2 et 6).
Assurez-vous que le bol du mélangeur ou le capuchon fileté ont été placés correctement et tournez-les
dans le sens indiqué, jusqu’à son enclenchement.
La sécurité électrique a coupé l’alimentation
- débranchez l’appareil
- positionnez le sélecteur de vitesse sur O
- laissez l’appareil refroidir pendant 15 minutes
- branchez à nouveau l’appareil
- remettez l’appareil en marche
Si le système d’interruption automatique continue à se déclencher, contactez votre Centre de Service
Agréé.
Choisissez la bonne vitesse.
Reportez-vous aux indications sur l’appareil ou aux instructions d’utilisation.
Essayez d’ajouter du jus de citron ou du sel. Assurez-vous que le batteur et le bol ne sont pas gras et
choisissez la bonne vitesse.
Utilisez le fouet. Utilisez de la crème à fouetter préalablement refroidie (environ 6° C).
N’utilisez le fouet que pour fouetter de la crème, des œufs, du blanc d’œuf et des liquides. Ne l’utilisez
pas pour préparer de la pâte ou des gâteaux.
Suivez attentivement les instructions du mode d’emploi. N’ajoutez jamais trop d’eau.
Utilisez toujours l’accessoire indiqué dans le tableau.
Ne dépassez pas le temps maximum de pétrissage indiqué.
Problème:
Le sélecteur ne fonctionne pas
L’appareil s’est arrêté brusquement
Vous avez haché, émincé ou râpé
et le résultat n’est pas parfait
Les œufs ne sont pas bien battus
La crème n’est pas bien fouettée
Le fouet glisse ou se plie
La pâte tourne en boule dans le
bol
Page 32
33
Allgemeine Beschreibung (Abb. 1)
A Motorgehäuse
B Schüssel
C Deckel zur Schüssel
D Haken zur Sicherheitsverriegelung
E Vorsprung, verschließt die Öffnung im
Griff
F Integrierte Sicherheitsverriegelung
G Messer £
H Schneidscheibe §
I Raspelscheibe, grob •
J Raspelscheibe, fein ¶
K Schneebesen ß
L Kneteinsatz ©
M Antriebswelle
N Einfüllöffnung
O Doppelter Stopfer
P Geräteschalter mit stufenlosem
Geschwindigkeitsregler
0 = Aus
1 = Minimal-Geschwindigkeit bis
5 = Maximal-Geschwindigkeit
M = Momentschalter
(Loslassen = Aus)
Q Kassette für Schneid- und
Raspelscheiben
R Kabelaufwicklung zum Fixieren von
überschüssigem Kabel
S Schutzverschluß, verschließt die
Öffnung, wenn der Mixbecher nicht
aufgesetzt ist
Mixbecher-Aufsatz ®
T Einsatz für den Deckel
U Deckel zum Mixbecher
V Mixbecher
W Dichtungsring aus Gummi
X Messereinheit
Y Spatel
1
T
N
O
G
L
H
I
J
K
Y
Q
D
C
B
M
R
F
E
U
V
W
X
S
A
P
Deutsch
Page 33

Der automatische Überhitzungsschutz
Lesen Sie diese Anweisung vor dem ersten Gebrauch bitte sorgfäl-
tig durch.
Um Schäden durch Überhitzung zu vermeiden, ist dieses Gerät mit
einem automatischen Überhitzungsschutz versehen, der, falls erforderlich, den Strom ausschaltet. Wenn Sie die nachstehenden Hinweise
genau befolgen, ist das Gerät nach 15 Minuten wieder betriebsbereit.
Wenn das Gerät plötzlich stillsteht,
gehen Sie Schritt für Schritt wie folgt vor.
- Ziehen Sie den Stecker aus der Steckdose.
- Stellen Sie den Geräteschalter auf Position 0.
- Lassen Sie das Gerät mindestens 15 Minuten abkühlen.
- Stecken Sie den Stecker wieder in die Steckdose.
- Schalten Sie das Gerät wieder ein.
Wenn der automatische Überhitzungsschutz das Gerät wiederholt aus-
schaltet, so wenden Sie sich bitte an Ihren Philips-Händler oder das
Philips Service Center in Ihrem Lande.
Die Symbole auf dem Gerät
Auf dem Gerät sehen Sie links von den Symbolen für die Anwendung
ein Symbol für den jeweils zu verwendenden Aufsatz. Über dem
Symbol ist die für diese Anwendung angemessene Geschwindigkeit
angezeigt, also M für die Momentschaltung bzw. die Geschwindigkeiten
zwischen 1 und 5 (vgl. die Tabelle, Seiten 43 bis 45).
Wichtig
• Lesen Sie die Gebrauchsanweisung sorgfältig durch und sehen Sie
sich die Abbildungen an, bevor Sie das Gerät zum ersten Mal
benutzen.
• Nehmen Sie vor jedem Gebrauch den Schneidschutz von den
Messern ab.
• Gehen Sie vorsichtig mit dem Messer sowie der Schneid- und
Raspelscheibe und mit der Messereinheit des Mixbecher-Aufsatzes
um; sie sind sehr scharf!
• Waschen Sie vor dem ersten Gebrauch sorgfältig alle Teile ab, die mit
Lebensmitteln in Berührung kommen.
• Achten Sie auf den richtigen Sitz des Deckels der Schüssel. Erst
dann ist die Sicherheitsverriegelung entriegelt, so daß Sie das Gerät
einschalten können.
• Hinweis: Wenn sowohl die Schüssel wie der Mixbecher aufgesetzt
sind, ist nur der Mixbecher betriebsbereit.
• Lassen Sie das Gerät während des Betriebs nicht unbeaufsichtigt.
• Achten Sie darauf, daß Kinder nicht mit dem Gerät hantieren.
• Füllen Sie die Schüssel und den Mixbecher niemals höher als bis zur
obersten Markierung, wenn Sie Flüssigkeiten verarbeiten.
• Überschreiten Sie niemals die Mengen und die Zeiten, die in der
Tabelle aufgeführt sind.
• Lassen Sie stets die rotierenden Teile zum Stillstand kommen, bevor
Sie den Deckel abnehmen.
• Stecken Sie niemals Ihre Finger oder irgendwelche Gegenstände,
auch nicht den Spatel, in die Einfüllöffnung der Schüssel, solange
das Gerät eingeschaltet ist. Nur der doppelte Stopfer (O) darf dazu
verwendet werden.
• Stecken Sie niemals Ihre Finger oder irgendwelche Gegenstände,
auch nicht den Spatel, in den Mixbecher, bevor Sie den Stecker aus
der Steckdose genommen haben.
• Tauchen Sie das Motorgehäuse niemals in Wasser oder in eine
andere Flüssigkeit; spülen Sie es auch nicht unter fließendem
Wasser ab.
• Ziehen Sie nach jedem Gebrauch den Netzstecker aus der Steckdose.
• Wenn das Netzkabel defekt oder beschädigt ist, muß es von einer
durch Philips autorisierten Werkstatt ersetzt werden, da für die
Reparatur Spezial-Werkzeug und/oder spezielle Teile benötigt
werden.
• Bewahren Sie diese Gebrauchsanweisung zur späteren Einsicht
sorgfältig auf.
34
Page 34
1
2
3
CLICK
4
CLICK
5
CLICK
6
7
8
9
Aufsetzen der Schüssel (B) (Abb. 2)
- Setzen Sie die Schüssel auf das Gerät
(Abb. 2, 1).
- Drehen Sie den Griff in Pfeilrichtung bis er
einrastet (“Klick”) (Abb. 2, 2).
Aufsetzen des Deckels (C) auf die
Schüssel
- Setzen Sie den Deckel auf die Schüssel,
wie in Abb. 3 gezeigt.
- Drehen Sie den Deckel fest in Pfeilrichtung,
bis er hörbar einrastet (“Klick”) (Abb. 4
und 5).
- Achten Sie darauf, daß die Markierungen
auf dem Deckel und auf der Schüssel
übereinstimmen. Die Öffnung im Griff der
Schüssel wird nun durch den Vorsprung im
Deckel verschlossen (Abb. 6).
Einfüllöffnung (N) und Stopfer (O)
• Durch die Einfüllöffnung lassen sich
flüssige und feste Zutaten in die Schüssel
geben (Abb. 7).
• Verwenden Sie nur den Stopfer, um die
Zutaten anzudrücken (Abb. 8).
• Wenn Sie während des Betriebs den
Stopfer in der Einfüllöffnung lassen,
verhindern Sie Spritzer oder
Staubentwicklung während des Betriebs.
• Der Stopfer enthält einen zweiten,
kleineren Stopfer.
- Dieser kleinere Stopfer kann
herausgenommen werden (Abb. 9). Damit
kann die Einfüllöffnung enger gemacht
werden.
- Eine engere Einfüllöffnung ist praktisch,
wenn z.B. Möhren verarbeitet werden
sollen oder eine Portion für die weite
Einfüllöffnung zu klein ist.
Hinweis: Verwenden Sie den kleineren
Stopfer nur dann, wenn zuvor der weitere
Stopfer eingesetzt worden ist.
Die integrierte Sicherheitsverriegelung (F)
Das Motorgehäuse (A) und die Aufsätze
sind mit Markierungen versehen. Nur wenn
sich die Markierungen auf dem
Motorgehäuse und dem Deckel (C) bzw.
den anderen Aufsätzen gegenüberstehen,
ist das Gerät betriebsbereit.
In dieser Position bedeckt der Vorsprung (E)
auf dem Deckel die Öffnung im Griff der
Schüssel.
35
CLICK
2
Page 35
10
11
12
Der Gebrauch des Geräts mit aufgesetzter Schüssel
Hinweis:
Das Gerät läßt sich nur dann in Betrieb setzen, wenn ...
- der Schutzverschluß (S) oder der
Mixbecher-Aufsatz (T bis X) richtig auf die
Motoreinheit (A) aufgesetzt sind und
zugleich
- die Schüssel (B) und der Deckel (C), die
Zitruspresse oder der Entsafter genau
nach den Angaben in dieser
Gebrauchsanweisung aufgesetzt sind.
• Wenn sowohl der Mixbecher wie die
Schüssel aufgesetzt sind, funktioniert nur
der Mixbecher.
Stellen Sie den Geräteschalter (P) auf die
Position, die in der Tabelle (Seiten 43-45)
empfohlen wird, und schalten Sie dann das
Gerät ein. Wenn Sie nicht genau wissen,
welche Geschwindigkeit Sie wählen sollen,
so schalten Sie immer auf Position 5.
Messer (G) £
VORSICHT: Die Schneiden sind sehr
scharf!
• Das Messer kann zum Schneiden, Mixen,
Mischen, Pürieren und zum Kneten von
Küchen-, Pizza- und Brotteig verwendet
werden.
- Nehmen Sie den Schneidschutz vom
Messer (Abb. 10).
- Setzen Sie nacheinander die Schüssel
(Abb. 2) auf das Motorgehäuse, und dann
das Messer auf die Antriebswelle (Abb. 11).
- Geben Sie die Zutaten in die Schüssel
(Abb. 12).
- Setzen Sie den Deckel auf die Schüssel,
und setzen Sie den Stopfer in die
Einfüllöffnung.
- Stellen Sie am Geräteschalter (P) die
empfohlene Geschwindigkeit ein (vgl. die
Tabelle), und schalten Sie das Gerät ein.
Wenn Sie nicht genau wissen, welche
Geschwindigkeit Sie wählen sollen, so
schalten Sie immer auf Position 5.
Hinweise:
• Füllen Sie nicht zu große Teile ein.
Schneiden Sie Stücke in Würfel von ca. 3
cm Kantenlänge vor.
• Das Gerät schneidet sehr schnell.
Bearbeiten Sie darum die Zutaten nicht zu
lange, selbst wenn Sie die Schalterstellung
M verwenden, damit das Ergebnis nicht zu
fein ausfällt.
• Wenn Sie (Hart-)Käse schnitzeln, dann
lassen Sie den Motor nicht zu lange laufen.
Der Käse könnte sich erwärmen und
klumpig werden.
• Wenn Lebensmittel am Messer kleben oder
sich an der Wand der Schüssel absetzen,
so ...
- schalten Sie zuerst das Gerät aus,
- nehmen Sie den Deckel von der Schüssel
ab und
- entfernen Sie die Lebensmittelreste nur mit
Hilfe des Spatels.
• Mahlen Sie keine zu harten Substanzen
wie Kaffeebohnen, Muskatnüsse oder
Eiswürfel; davon kann das Messer stumpf
werden.
Orientieren Sie sich in der Tabelle über die
angemessene Einstellung.
36
Page 36
13
CLICK
14
15
M
M
1
2
3
4
5
16
17
18
19
1
2
CLICK
20
21
Schneidscheibe (H)
§ und Raspel-
scheiben (I, grob) • und (J, fein) ¶
Vorsicht beim Umgang mit den Scheiben:
Die Schneiden sind sehr scharf!
Fassen Sie die Einsätze darum immer nur
am Kunststoff-Mittelteil an.
- Setzen Sie die Schüssel ein (Abb. 2).
- Setzen Sie die Schneid- oder
Raspelscheibe (Abb. 13) ein.
- Setzen Sie den Deckel auf die Schüssel
(Abb. 14).
- Geben Sie die Zutaten durch die
Einfüllöffnung (Abb. 15).
- Drücken Sie vorsichtig mit dem Stopfer
nach.
- Zum Raspeln und Schneiden stellen Sie
den Geräteschalter (P) auf Position 5
(= maximale Geschwindigkeit) (Abb. 16).
- Zum Schneiden von weichem Obst und
Gemüse können Sie auch eine geringere
Geschwindigkeit einstellen. (Vgl. Tabelle.)
- Drücken Sie die Zutaten mit dem Stopfer
langsam unter leichtem Druck abwärts. Es
empfiehlt sich, bei Zutaten wie Möhren die
engere Einfüllöffnung mit dem kleineren
Stopfer zu benutzen (Abb. 17).
Hinweise:
• Schneiden Sie große Stücke vor, damit sie
gut in die Einfüllöffnung passen.
• Das beste Ergebnis erhalten Sie, wenn Sie
die Einfüllöffnung gleichmäßig füllen.
• Leeren Sie hin und wieder die Schüssel,
wenn Sie größere Mengen verarbeiten.
Schneebesen (K) ß
• Den Schneebesen können Sie zum
Schlagen von Eiern, Eiweiß und
Schlagsahne, zum Anrühren von
Instantpuddings und Garnituren zu
Desserts verwenden.
Verwenden Sie den Schneebesen niemals zum Bearbeiten von Brot- und
Kuchenteig!
- Setzen Sie die Schüssel auf das
Motorgehäuse (Abb. 2) und bringen Sie
den Schneebesen auf der Antriebswelle an
(Abb. 18).
- Geben Sie die Zutaten in die Schüssel
(Abb. 19), und setzen Sie den Deckel
ordnungsgemäß auf die Schüssel
(Abb. 20).
- Verschließen Sie die Einfüllöffnung
(Abb. 21) mit dem Stopfer.
- Stellen Sie den Geräteschalter (P) auf die
in der Tabelle empfohlene Position, und
schalten Sie das Gerät ein. Wenn Sie nicht
genau wissen, welche Geschwindigkeit Sie
wählen sollen, so schalten Sie immer auf
Position 5 (Abb. 22).
• Für die in der Tabelle ausgeführten
Zubereitungen benötigen Sie ca. 2 bis 5
Minuten.
37
M
M
1
2
3
4
5
22
Page 37
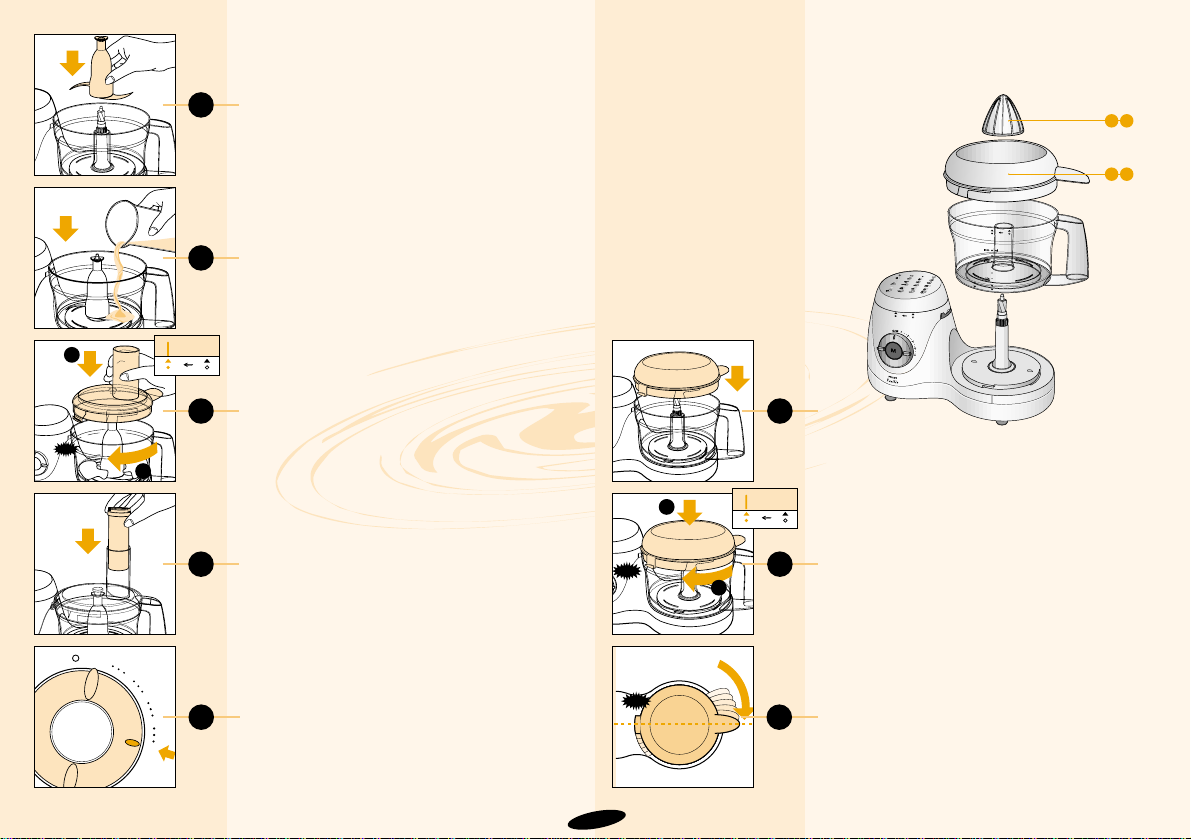
23
24
CLICK
1
2
25
26
27
28
1
2
CLICK
29
Kneteinsatz (L)
©
• Der Kneteinsatz ist geeignet, Kuchen- und
Brotteig zuzubereiten.
- Setzen Sie die Schüssel auf das
Motorgehäuse (Abb. 2), und dann den
Kneteinsatz auf die Antriebswelle (Abb. 23).
- Geben Sie danach die Zutaten in die
Schüssel (Abb. 24), und setzen Sie den
Deckel auf die Schüssel (Abb. 25).
- Verschließen Sie die Einfüllöffnung mit
dem Stopfer (Abb. 26).
- Stellen Sie den Geräteschalter (P) auf
Position 5 (= maximale Geschwindigkeit)
(Abb. 27).
- Der Teig ist nach ca. 1 bis 3 Minuten fertig.
Zitruspresse Allgemeine Beschreibung
Zitruspresse - Einzelteile µ
AA Presskegel
AB Saftsieb
Der Zitruspresse-Aufsatz kann nur mit
der Küchenmaschine Philips HR 7727
verwendet werden.
Zusammensetzen
- Setzen Sie die Schüssel auf das
Motorgehäuse (Abb. 2) und danach das
Saftsieb (AB) auf die Schüssel (Abb. 28).
- Drehen Sie das Saftsieb im Uhrzeigersinn
(Abb. 29, 2), bis der Haken (D) der
Sicherheitsverriegelung im Motorgehäuse
einrastet (“Klick”). Vergewissern Sie sich,
daß der Vorsprung am Saftsieb die
Öffnung im Griff völlig verschließt (Abb. 30).
38
AAA
B
CLICK
30
M
1
2
M
3
4
5
Page 38
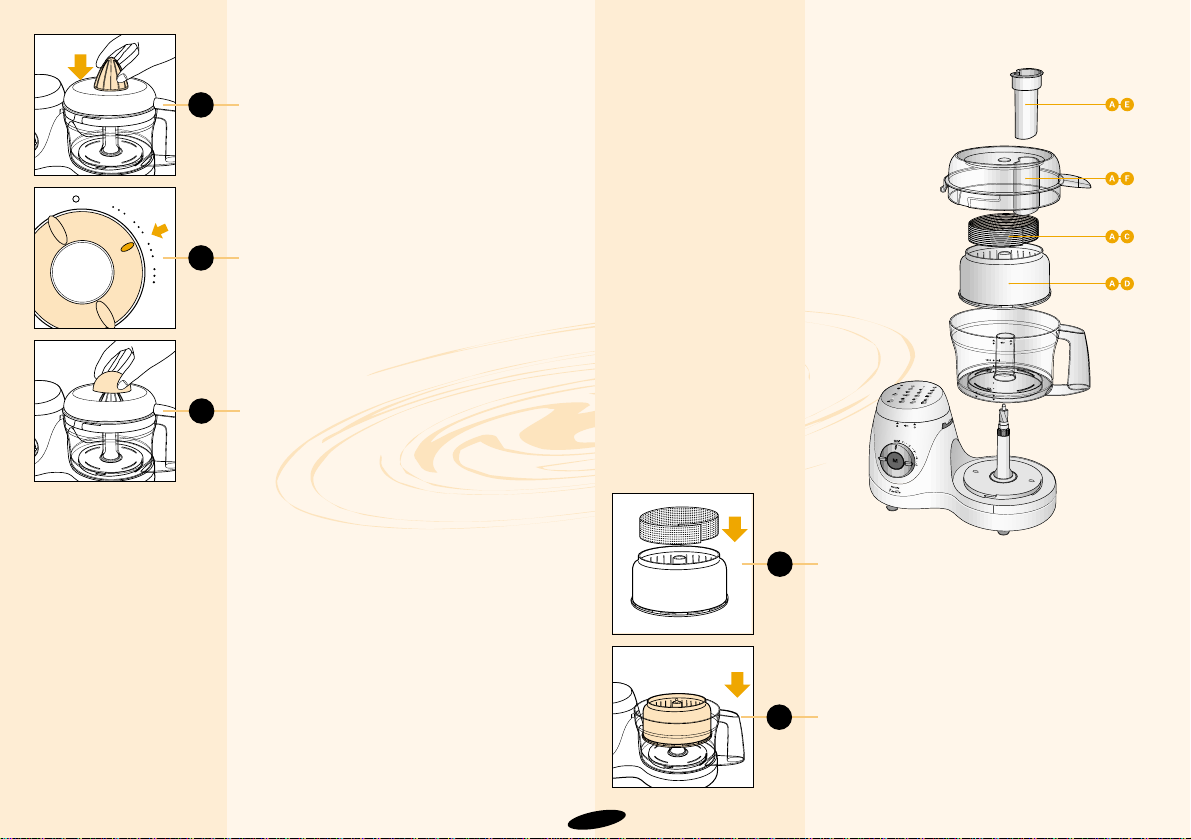
31
M
M
1
2
3
4
5
32
33
34
- Setzen Sie den Presskegel (AA) unter
gleichmäßigem Druck ein (Abb. 31).
- Schalten Sie das Gerät ein, und stellen Sie
den Geräteschalter auf Position 3
(Abb. 32).
- Drücken Sie eine halbe Zitrusfrucht auf den
sich drehenden Presskegel (Abb. 33).
• Unterbrechen Sie von Zeit zu Zeit das
Auspressen, und entfernen Sie das
Fruchtfleisch vom Saftsieb. Schalten Sie
hierzu das Gerät aus, und nehmen Sie die
Schüssel mit der Zitruspresse vom Gerät.
Nach Gebrauch
- Nehmen Sie die Schüssel zusammen mit
der Zitronenpresse vom Gerät, damit kein
Saft auf das Gerät tropft.
- Entfernen Sie das Fruchtfleisch von
Presskegel und Saftsieb.
- Spülen Sie die Schüssel, den Presskegel
und das Saftsieb aus. Sie können hierzu
heißes Wasser nehmen, dem Sie bei
Bedarf etwas Spülmittel zugesetzt haben.
Diese Teile können auch im Geschirrspüler
gereinigt werden. Verwenden Sie aber
keine Scheuermittel.
• Einige Zutaten können an der Oberfläche
der Aufsätze eine Verfärbung verursachen.
Dies beeinträchtigt nicht die Funktion des
Geräts. Die Verfärbung vergeht meist nach
einiger Zeit.
Entsafter. Allgemeine Beschreibung
Entsafter - Einzelteile 4
AC
Filter AE Stopfer
AD Saftsieb AF Deckel
Der Entsafter-Aufsatz kann nur mit der
Küchenmaschine Philips HR 7727 verwendet werden.
Zusammensetzen
- Setzen Sie die Schüssel auf das
Motorgehäuse (Abb. 2).
- Setzen Sie den Filter (AC) in das Saftsieb
(AD) (Abb. 34) ein.
- Setzen Sie das Saftsieb mit dem Filter in der
Schüssel auf die Antriebswelle (Abb. 35).
39
35
Page 39
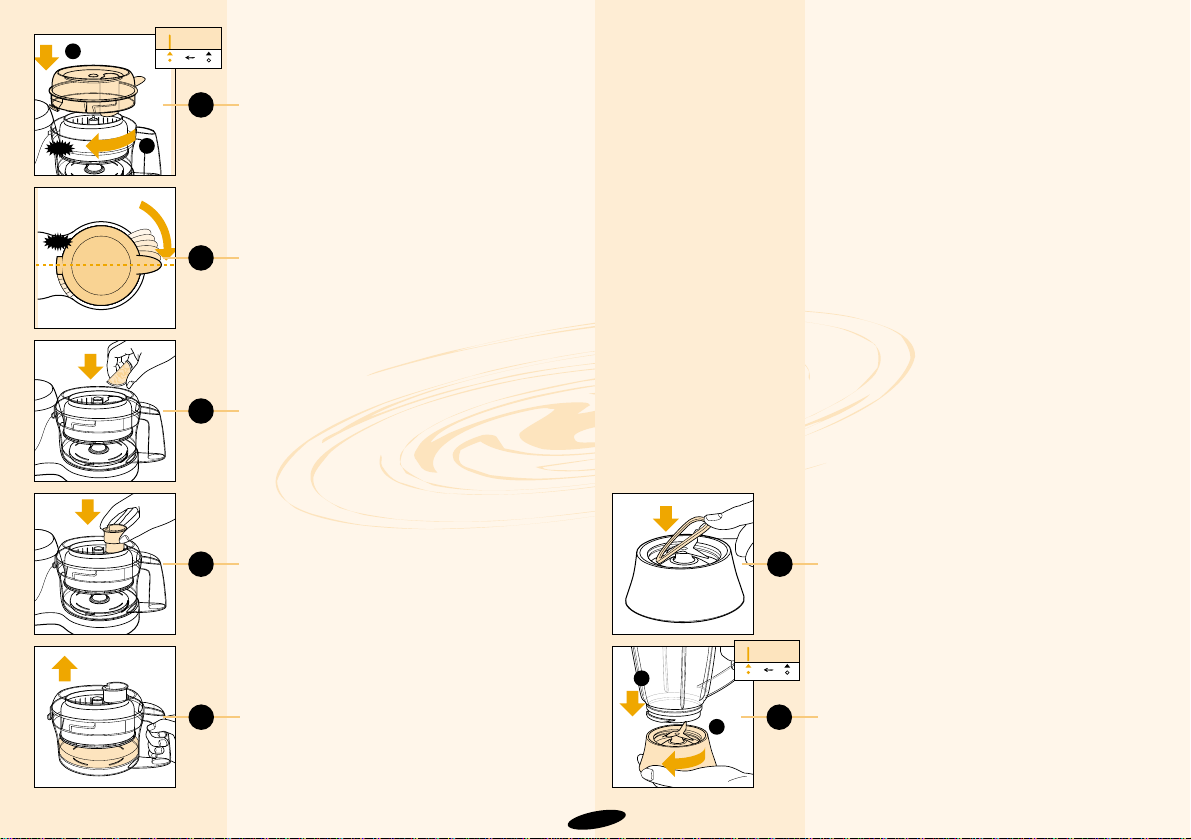
CLICK
36
CLICK
37
38
39
40
41
- Setzen Sie den Deckel (AF) auf die
Schüssel. Drehen Sie den Deckel im
Uhrzeigersinn (Abb. 36, 2), bis der Haken
(D) der Sicherheitsverriegelung im
Motorgehäuse einrastet (“Klick”).
Vergewissern Sie sich, daß der Vorsprung
am Saftsieb die Öffnung im Griff völlig
verschließt (Abb. 37).
Der Gebrauch des Entsafters
- Schalten Sie das Gerät ein, und stellen Sie
den Geräteschalter auf Position 5 (=
maximale Geschwindigkeit).
- Geben Sie das Obst und/oder Gemüse
durch die Einfüllöffnung in den EntsafterAufsatz (Abb. 38).
- Drücken Sie das Füllgut fest mit dem
Stopfer (AE) hinunter. Behalten Sie den
Stopfer solange wie möglich in der
Einfüllöffnung, um Spritzer zu vermeiden
(Abb. 39).
- Lassen Sie das Gerät zum Abschluß noch
ca. 20 Sekunden weiterlaufen, damit aller
Saft herausrinnt.
- Nehmen Sie den Entsafter-Aufsatz
zusammen mit der Schüssel vom Gerät,
damit nichts auf das Gerät herabtropft
(Abb. 40).
Hinweise:
• Bereiten Sie das Obst/Gemüse wie folgt vor:
- Schneiden Sie Möhren, Rettich und andere
feste Früchte vor.
- Schälen Sie Zitrusfrüchte, Ananas,
Melonen usw.
- Entkernen Sie Stein- und Kernobst wie Kirschen, Pflaumen, Aprikosen und Pfirsiche.
• Schalten Sie stets das Gerät ein, bevor Sie
den Entsafter-Aufsatz füllen.
• Schalten Sie das Gerät von Zeit zu Zeit
aus, um das Saftsieb und den Filter zu
säubern.
• Verarbeiten Sie nicht zu große Mengen auf
einmal. Schalten Sie das Gerät aus, wenn
es zu stark vibriert, und reinigen Sie das
Saftsieb und den Filter, bevor sie das
Gerät erneut einschalten.
Mixbecher-Aufsatz ® (T bis X)
Wichtig:
• Das Gerät kann mit oder ohne den
Mixbecher-Aufsatz verwendet werden.
Schrauben Sie den Schutzverschluß (S)
in die Öffnung für den MixbecherAufsatz, wenn Sie den Mixbecher nicht
aufgesetzt haben. Das Gerät funktioniert
sonst nicht.
• Setzen Sie vor Gebrauch den Mixbecher
(V), den Deckel (U) und die Messereinheit (X) korrekt auf das Motorgehäuse, bevor Sie den Stecker in die
Steckdose stecken.
• Nach dem Gebrauch: Ziehen Sie den
Stecker aus der Steckdose, bevor Sie
den Mixbecher-Aufsatz vom Gerät
abnehmen.
• Dieser Aufsatz ist zum Mischen und
feinen Pürieren verwendbar. Sie können
mit ihm z.B. Suppen, Soßen,
Milchshakes, Babynahrung, Gemüse,
Obst, Pfannkuchenteig und Püree
zubereiten. Schneiden Sie größere Teile
bei Bedarf in kleine Stücke, bevor Sie
diese Zutaten in den Mixbecher geben.
• Füllen Sie keine Zutaten ein, die heißer
sind als 80° C.
• Der Mixbecher faßt maximal 1,5 l
Flüssigkeit. Füllen Sie niemals mehr ein,
um Spritzer zu vermeiden.
• Nehmen Sie den Deckel niemals bei
laufendem Gerät vom Mixbecher.
40
1
2
42
1
2
Page 40
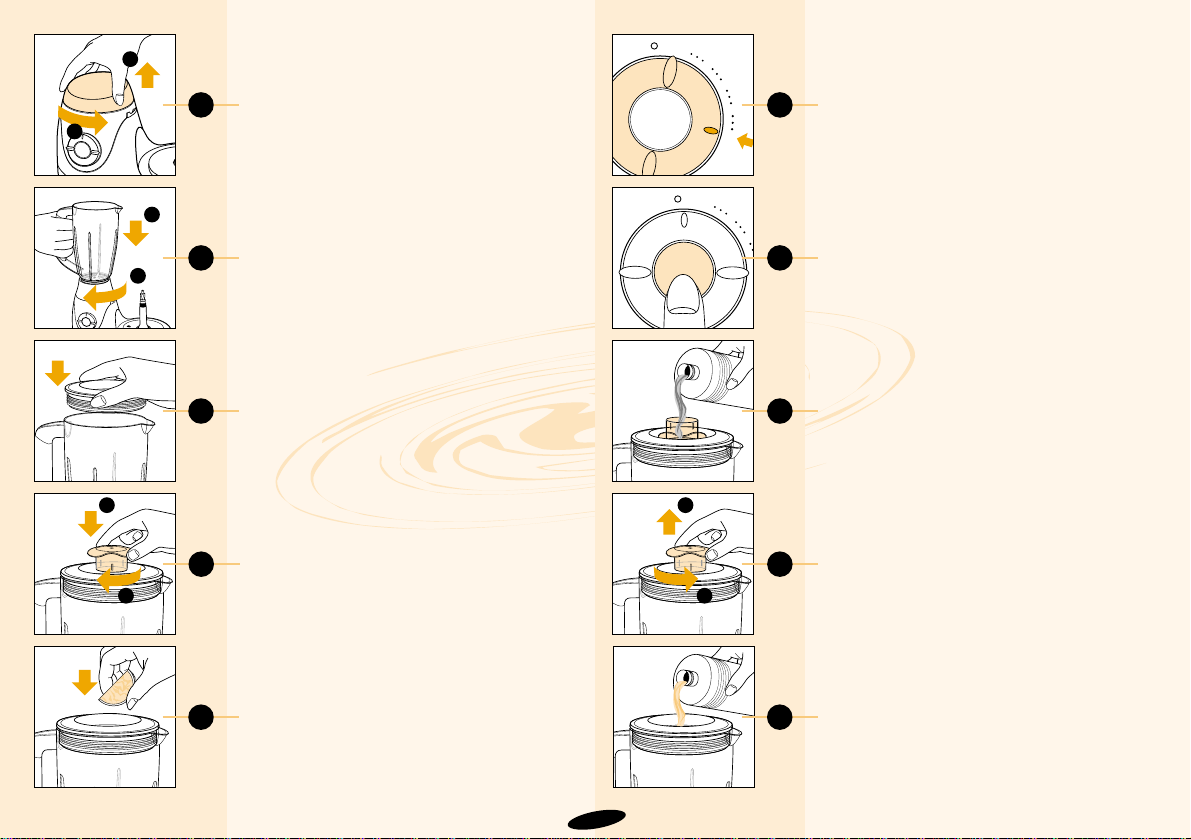
43
1
2
44
45
47
46
M
M
1
2
3
4
5
48
M
M
1
2
3
4
5
49
50
2
1
51
Zusammensetzen und
Auseinandernehmen des
Mixbecher-Aufsatzes
- Legen Sie den Dichtungsring (W) auf den
Rand der Messereinheit (X) (Abb. 41).
- Schrauben Sie dann die Messereinheit im
Pfeilrichtung (Abb. 42, 2) fest auf den
Mixbecher (V).
- Schrauben Sie den Schutzverschluß (S)
vom Motorgehäuse ab (Abb. 43).
- Setzen Sie den Mixbecher mit der
Messereinheit unter Drehung im Uhrzeigersinn auf das Motorgehäuse (Abb. 44).
Vorsicht: Drehen Sie nicht zu stark an dem
Griff des Mixbechers!
- Drücken Sie den Deckel (U) auf den
Mixbecher (V) (Abb. 45).
- Drücken Sie den Einsatz (T) des Deckels
ein (Abb. 46, 1) und drehen Sie ihn gegen
den Uhrzeigersinn (Abb. 46, 2) fest.
• Zum Auseinandernehmen verfahren Sie in
umgekehrter Reihenfolge.
Der Gebrauch des Mixbecher-Aufsatzes
- Geben Sie die Zutaten in den Mixbecher
(Abb. 47).
- Stellen Sie den Geräteschalter auf die
erforderliche Geschwindigkeit (Abb. 48),
oder drücken Sie den Momentschalter M
(Abb. 49). Wenn Sie nicht genau wissen,
welche Geschwindigkeit Sie wählen sollen,
so schalten Sie immer auf Position 5 (vgl.
die Tabelle).
• Für die in der Tabelle aufgeführten Zubereitungen benötigen Sie ca. 10 Sekunden
bis 2 Minuten.
Hinweise:
• Flüssige Zutaten, z.B. Öl zur Mayonnaise,
geben Sie zu, indem Sie den Einsatz des
Deckels umdrehen und die Flüssigkeit
durch die Öffnung im Einsatz laufen lassen
(Abb. 50).
• Durch die Öffnung im Deckel lassen sich
Zutaten einfüllen, während sich die Messereinheit dreht. Nehmen Sie dazu den
Einsatz im Deckel heraus (Abb. 51
und 52).
• Im allgemeinen erhalten Sie ein feineres
Ergebnis, je länger Sie den Motor laufen
lassen.
• Unterbrechen Sie bei längerer Anwendung
von Zeit zu Zeit den Mixvorgang, um
Zutaten, die sich an den Wänden des
Mixbechers festgesetzt haben, wie folgt zu
entfernen:
- Schalten Sie das Gerät aus, und ziehen
Sie den Stecker aus der Steckdose.
- Nehmen Sie den Deckel mit dem Einsatz
vom Mixbecher ab.
- Entfernen Sie Zutaten, die an der Wand
des Mixbechers kleben, mit einem weichen
Spatel (Y). Halten Sie ca. 2 cm Abstand zu
der Messereinheit.
41
52
2
1
1
2
Page 41
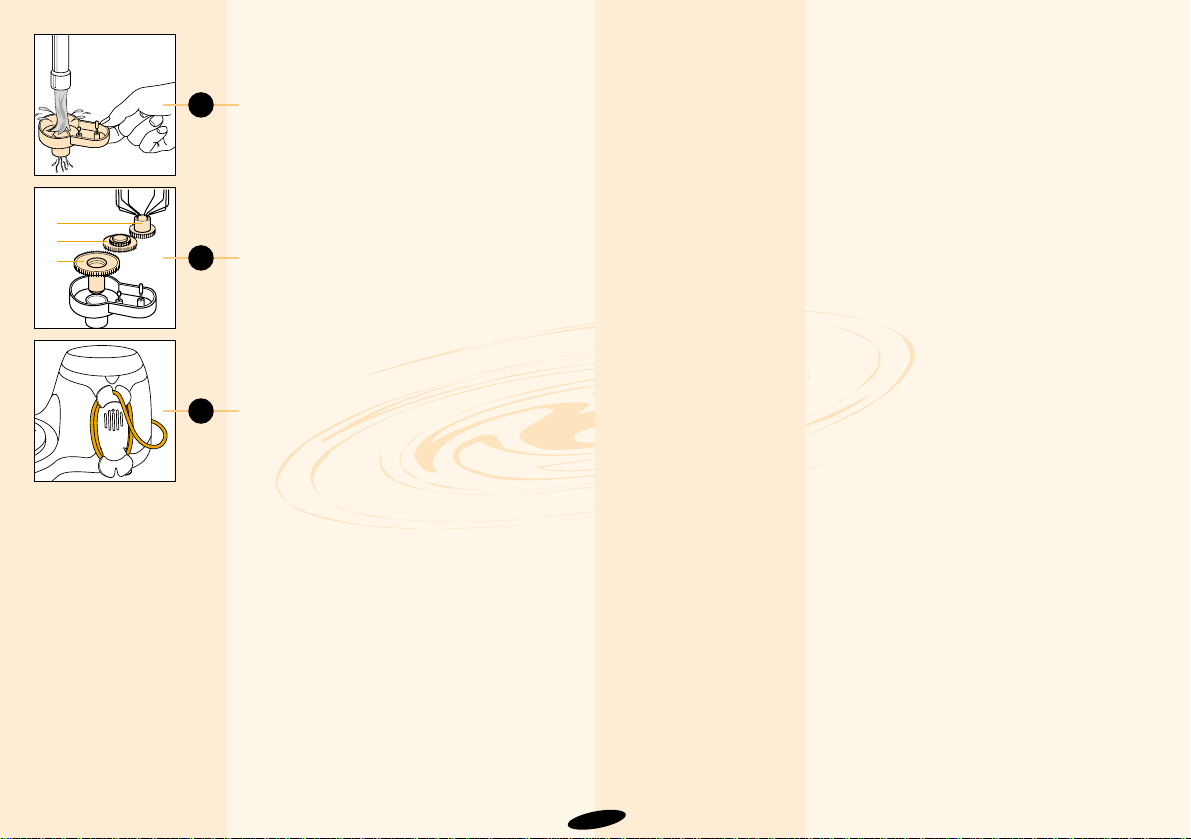
53
2
1
3
54
55
Reinigen
• Ziehen Sie vor der Reinigung des
Motorgehäuses den Stecker aus der
Steckdose.
• Das Motorgehäuse kann mit einem
feuchten Tuch abgewischt werden.
Tauchen Sie das Motorgehäuse nie in
Wasser, und lassen Sie auch nie
fließendes Wasser darüber laufen.
• Spülen Sie alle Teile, die mit Lebensmitteln
in Berührung gekommen sind, sofort nach
Gebrauch in warmem Wasser, dem Sie
etwas Spülmittel zugesetzt haben.
• Seien Sie vorsichtig bei der Reinigung des
Messers, der Messereinheit und des
Schneid- und Raspeleinsatzes. Die
Schneiden sind sehr scharf!
• Setzen Sie stets wieder den Schneidschutz
auf das Messer (G), wenn sich das Messer
nicht im Gerät befindet!
• Geben Sie acht, daß die Schneiden nicht
mit harten Gegenständen in Berührung
kommen, die sie schartig und stumpf
machen können.
• Die Zahnräder des Schneebesens können
zur Reinigung leicht entnommen werden
(Abb. 53 und 54).
• Einige Zutaten können an der Oberfläche
der Aufsätze eine Verfärbung verursachen.
Dies beeinträchtigt nicht die Funktion des
Geräts. Die Verfärbung vergeht meist nach
einiger Zeit.
• Wickeln Sie überschüssiges Netzkabel um
die Kabelwinde an der Rückseite des
Motorgehäuses und fixieren Sie das Kabel
in der dafür vorgesehenen Kerbe (Abb. 55).
42
Page 42

43
Äpfel, Möhren, Sellerie
- Raspeln
- Schneiden
Biskuitteig
- Schlagen
Buttercreme
Eischnee
- Schlagen
Fleisch, Fisch, Geflügel
- mager
- durchwachsen
Fleisch mit Gemüse
- Mixen
Gemüse
- Zerkleinern
Gurken, Möhren, Lauch
- Schneiden
Hefeteig
- Rühren
Hülsenfrüchte
Kartoffeln, gekocht
Käse: Parmesan
- Raspeln
500 g
3 Eier
300 g
4 Eiweiß
500 g
400 g
500 g
500 g
1 Stk. mind.
500 g Mehl
500 g
750 g
200 g
5 / M
1 - 5
5
4 - 5
5 / M
5 / M
5
5
5 / M
5
5
2 - 4
5
Das Obst/Gemüse in Stücke schneiden, die durch die Einfüllöffnung passen.
Dann die Stücke unter leichtem Druck mit dem Stopfer raspeln.
Zutaten mit Raumtemperatur verwenden. Eier und Zucker bei maximaler
Geschwindigkeit steif schlagen. Geben Sie dann gesiebtes Mehl hinzu.
Bei Position 1 weiterrühren.
Mit weicher Butter erhalten Sie eine leichte Creme.
Eiweiß mit Raumtemperatur verarbeiten. Mindestens 2 Eiweiß nehmen.
Zuvor Fleisch von Sehnen bzw. Fisch von Gräten lösen.
Fleisch bzw. Fisch in Stücke von ca. 3 cm Kantenlänge schneiden.
Für ein groberes Resultat den Momentschalter (M) benutzen.
Für grobes Püree nur wenig Flüsssigkeit zufügen. Für feines Püree Flüssigkeit langsam zufügen, bis ein feines, glattes Püree entstanden ist.
In Würfel von ca. 3 cm Kantenlänge vorschneiden.
Einfüllöffnung mit dem Gemüse ausfüllen. Mit dem Stopfer leicht
nachdrücken.
Zuerst Hefe, warme Milch und etwas Zucker mischen. Mehl, Salz, Eier
und weiche Butter/Margarine zufügen. Kneten Sie den Teig ca. 1 Minute,
bis er nicht mehr an der Wand der Schüssel haftet . - Vor der Verarbeitung
30 Minuten gehen lassen.
Gekochte Erbsen oder Bohnen verwenden. Bei Bedarf etwas Flüssigkeit
zufügen.
Kartoffeln nicht zu weich kochen. Auf 80° C erhitzte Milch langsam auf das
laufende Messer zugeben. Die Menge richtet sich nach der Kartoffelsorte.
Parmesan ohne Rinde verwenden. In Stücke schneiden, die in die Einfüllöffnung passen.
Salate, Rohkost
Kuchen,
Kleingebäck,
Biskuitrollen
Desserts, Gebäck,
Garnituren
Pudding, Soufflé,
Baisers
Hackbraten, Tartar,
Mett, Frikadellen.
Hackfleisch, Wurst
Baby- und
Kindernahrung
Rohkost, Salate,
Suppen
Suppen, Salate,
Quiche
Feinbrot
Püree, Suppen
Eintopf, Püree
Suppen, Soßen,
Aufläufe, Gratins
4
ß / ©
£
ß
£
£
®
£
§
©
®
£
¶
Anwendung Höchst- Schal- Zubehör Zubereitung Anwendungs-
menge ter- beispiele
position
Page 43

44
Käse: Gouda u.a.
- Raspeln
Kräuter, z.B. Petersilie
- Schneiden
Mayonnaise
- Emulgieren
Milchshake
- Mixen
Mürbeteig I
- Kneten
Mürbeteig II
- Kneten
Nüsse / Mandeln
- Zerkleinern
Obst, z.B. Äpfel, Pfirsiche,
Bananen
- Zerkleinern
- Pürieren
Paniermehl
- Zerkleinern
200 g
75 g
3 Eier
250 ml
Milch
500 g Mehl
300 g Mehl
250 g
500 g
700 g
100 g
3
5 / M
2 - 5
5
5
5
5 / M
M
5
5
Den Käse in Stücke schneiden, die durch die Einfüllöffnung passen.
Kräuter waschen und gründlich abtrocknen.
Alle Zutaten mit Raumtemperatur. Hinweis: Verwenden Sie wenigstens ein
großes Ei, zwei kleine Eier oder zwei große Eigelb.
Pürieren Sie das Obst (z.B. Erdbeeren, Banen) mit Zucker und Zitronensaft.
Geben Sie Milch und Speiseeis hinzu, und mischen Sie gut durch.
Kalte Butter/Margarine in Stücke von ca. 2 cm Kantenlänge schneiden.
Alle Zutaten zugleich in die Schüssel geben. Mischen, bis der Teig zu
einer Kugel wird. Vor der Weiterverarbeitung im Kühlschrank kühlen.
Kalte Butter/Margarine und kaltes Wasser verwenden. Das Mehl in die
Schüssel geben.
Butter/Margarine in Stücke von ca. 2 cm Kantenlänge darauflegen.
Mischen, bis der Teig krümelig ist. Dann, während des Rührens nach und
nach kaltes Wasser zufügen.
Ausschalten, sobald der Teig zur Kugel wird. Vor der weiteren Verarbeitung im Kühlschrank kühlen.
Momentschalter (M) für grobes, Position 2 für feines Ergebnis.
Hinweis: Etwas Zitronensaft hinzugefügt verhindert, daß sich das Obst
verfärbt.
Geben Sie bei Bedarf etwas Flüssigkeit hinzu.
Verwenden Sie trockenes Brot oder trockene Brötchen. Drücken Sie leicht
mit dem Stopfer nach.
Salate, Pizzas,
Fondue
Soßen, Suppen,
Garnitur,
Kräuterbutter
Pommes frites,
Salate
Milchshakes
Obsttorten, Kekse
Obsttorten, Kuchen,
Quiche, Pasteten
Salate, Garnituren,
Brot, Gebäck,
Desserts
Obstsalate
Saucen, Konfitüren,
Pudding,
Babynahrung
Panierte Speisen,
Gratins
¶
£
£
®
£
£
£
£
®
£
Anwendung Höchst- Schal- Zubehör Zubereitung Anwendungs-
menge ter- beispiele
position
Page 44

45
Obst- und Gemüsesäfte
- Auspressen
Pfannkuchenteig
- Schlagen
Pizzateig
- Kneten
Rührteig
- Mischen
Schlagsahne
- Schlagen
Schokolade
- Zerkleinern
Suppen
- Mischen
Weißbrot
- Kneten
Zitrussäfte
- Auspressen
Zwiebeln
- Zerkleinern
- Schneiden
500 g
500 ml
Milch
700 g Mehl
4 Eier
400 ml
200 g
500 ml
700 g Mehl
1000 g
500 g
500 g
5
5
5
5
2 - 4
M / 5
5
5
3
5 / M
5 / M
Obst/Gemüse in Stücke schneiden, die durch die Einfüllöffnung passen.
Mit dem Stopfer in den Entsafter-Aufsatz drücken.
Geben Sie zuerst die Milch in den Mixbecher, danach die trockenen Zutaten. Mischen Sie die Zutaten ca. 1 Minute. Wiederholen Sie den Vorgang
bei Bedarf zweimal. Lassen Sie alles bei Zimmertemperatur abkühlen.
Siehe unter „Weißbrot“. - Kneten Sie den Teig ca. 1 Minute lang.
Zutaten mit Raumtemperatur verarbeiten. Mischen Sie die weiche Butter
und den Zucker, bis die Mischung geschmeidig und sahnig ist. Geben Sie
dann die Milch, die Eier und das Mehl hinzu.
Im Kühlschrank gekühlte Sahne verwenden. Hinweis: Mindestens 125 ml
nehmen.
Reine, harte Schokolade in Stücke von ca. 2 cm Kantenlänge brechen.
Mit Momentschalter (M) beginnen. Zum Feinraspeln nach wenigen Sekunden auf maximale Geschwindigkeit schalten.
Gekochtes Gemüse verwenden.
Warmes Wasser mit Hefe und etwas Zucker mischen. Geben Sie Mehl,
Butter und Salz hinzu, und kneten Sie den Teig ca. 90 Sekunden. Den
Teig 30 Minuten gehen lassen.
Die Zitrusfrüchte halbieren. Die Hälften mit leichtem Druck auf den Presskegel drücken.
Zwiebeln schälen und in 4 Stücke teilen. Mindestens 100 g verarbeiten.
Obst-/Gemüsesäfte
Pfannkuchen,
Waffeln, Crêpes
Pizzas
Gebäck
Creme, Eiscreme,
Garnituren, Gebäck
Garnituren, Soßen,
Gebäck, Pudding,
Mousse
Suppen, Soßen
Brot
Zitronen-, Orangenund Pampelmusensaft
Salate, Kochgerichte
4
®
£ / ©
£
ß
£
®
©
µ
£
§
Anwendung Höchst- Schal- Zubehör Zubereitung Anwendungs-
menge ter- beispiele
position
Page 45
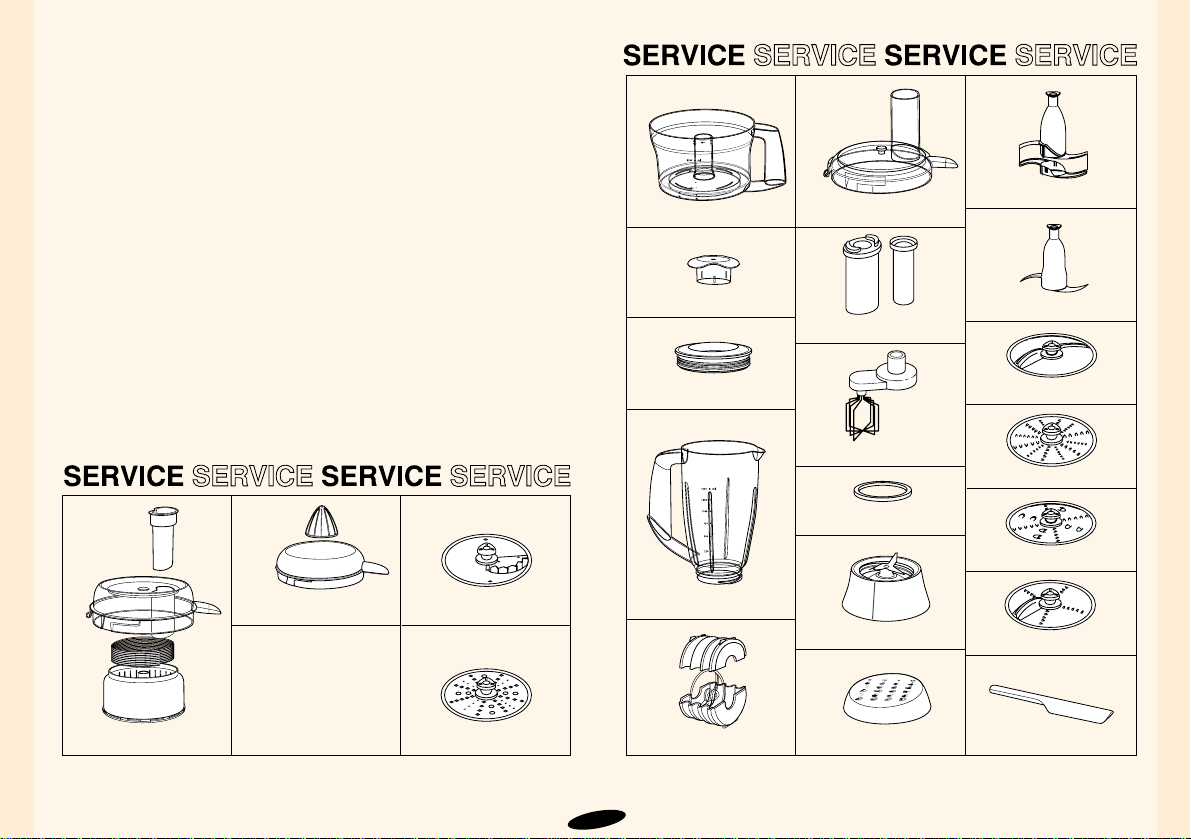
46
Teileliste
Standardzubehör:
- Schüssel (B)
- Deckel £ (C)
- Messer (G)
- Schneidscheibe § (H)
- Raspelscheibe • grob (I)
- Raspelscheibe ¶ fein (J)
- Schneebesen ß (K)
- Doppelter Stopfer (O)
- Kassette für Schneid-und
Raspelscheiben (Q)
- Mixbecher-Aufsatz ® (T bis X)
- Spatel (Y)
- Zitruspresse µ (AA bis AB)
- Entsafter 4 (AC bis AF)
Sonderzubehör:
- Kartoffelreibescheibe für Reibekuchen (in der Bundesrepublik
Deutschland Standardzubehör)
(n°. 4822 690 10139)
- Einseitige Schnetzelscheibe für
Pommes frites und Kohlrabic
HR 2912
(Service-Nr. 4822 690 10141)
Fragen Sie Ihren Händler, unter
Angabe der Servicenummer, ob
das gewünschte Teil in Ihrem
erhältlich ist, oder wenden Sie
sich an das Philips Service Center
in Ihrem Lande.
4822 418 10343
4822 418 10342
4203 065 61850
4822 462 11055
4203 065 61990
4822 422 01336
4203 065 61880
4203 065 61870
4203 065 61890
4203 065 61900
4203 065 61920
4203 065 61980
4203 065 61960
4203 065 61970
4203 065 61930
4203 065 61940
4203 065 61950
4203 065 61860
4203 065 61820
4203 065 61810
4203 065 61830
4203 065 61840
Page 46

47
Wenn das Gerät nicht zu Ihrer Zufriedenheit arbeitet
Sollte das Gerät nicht zufriedenstellend funktionieren, so lesen Sie bitte die folgende Liste durch. Schauen Sie auch nochmals in die entsprechenden Abschnitte der Gebrauchsanweisung.
Mögliche Lösung:
Drehen Sie Schüssel und/oder Deckel fest, bis sie hörbar einrasten (“Klick”).
Achten Sie darauf, daß die Pfeile auf der Schüssel und am Motorgehäuse sich gegenüberstehen (Abb. 2
und 6).
Prüfen Sie, ob der Mixbecher und die Messereinheit richtig aufgesetzt sind. Drehen Sie sie nochmals
nach der Anweisung fest.
Vermutlich hat der Überhitzungsschutz das Gerät automatisch ausgeschaltet.
- Ziehen Sie den Stecker aus derSteckdose.
- Stellen Sie den Geräteschalter auf 0.
- Lassen Sie das Gerät mindestens 15 Minuten abkühlen.
- Stecken Sie den Stecker wieder in die Steckdose
- Schalten Sie das Gerät wieder ein.
Wenn der automatische Überhitzungsschutz das Gerät wiederholt ausschaltet, so wenden Sie sich bitte
an Ihren Philips-Händler oder das Philips Service Center in Ihrem Lande.
Stellen Sie die richtige Geschwindigkeit ein. Schauen Sie nach den Angaben auf dem Gerät oder in der
Gebrauchsanweisung.
Sie können versuchen, etwas Zitronensaft oder Salz hinzuzufügen.
Achten Sie darauf, daß die Schüssel und der Schneebesen völlig fettfrei sind, und wählen Sie die angemessene Geschwindigkeit.
Verwenden Sie den Schneebesen. Verwenden Sie gekühlte Sahne (ca. 6° C).
Verwenden Sie den Schneebesen nur zum Schlagen von Eiern/Eiweiß und Sahne sowie zum Verarbeiten
von Flüssigkeiten, nicht aber für die Zubereitung von Teig.
Halten Sie sich strikt an die Angaben in den Rezepten. Geben Sie niemals zu viel Wasser hinzu.
Verwenden Sie nur die Teile, die in der Tabelle aufgeführt sind.
Überschreiten Sie nicht die maximale Knetzeit.
Problem
Geräteschalter reagiert nicht
Gerät steht plötzlich still
Das Resultat ist beim Schneiden,
Raspeln oder Zerkleinern nicht optimal
Das Resultat ist beim Eierschlagen
nicht optimal
Das Resultat ist beimSchlagen von
Sahne nicht optimal
Der Schneebesen rutscht oder biegt
sich
Der Teig wird in der Schüssel herumgeschleudert
Page 47
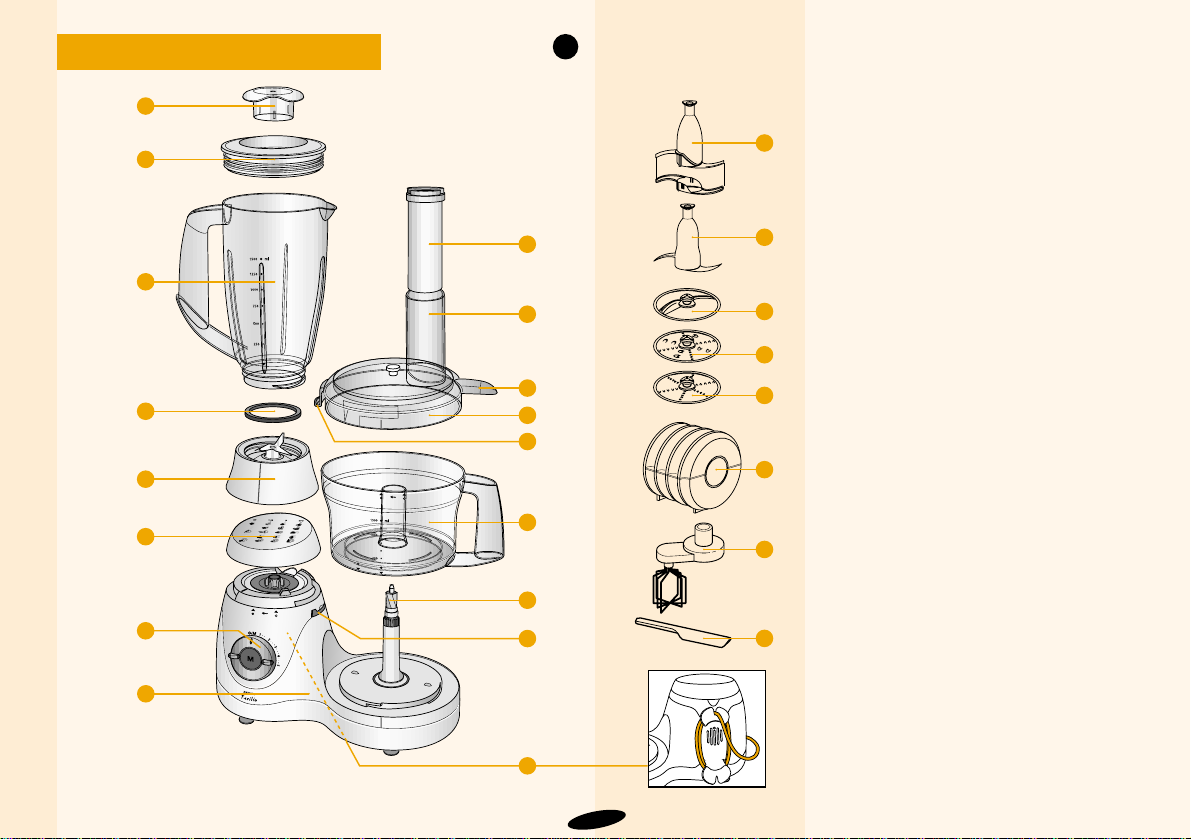
48
Algemene beschrijving (fig. 1)
A Motorgedeelte
B Kom
C Deksel van kom
D Nok van deksel (schakelt de
ingebouwde beveiliging in en uit)
E Afsluitklepje
(sluit de opening in het handvat af)
F Ingebouwde beveiliging
G Sikkelmes £
H Snijschijf §
I Raspschijf • (grof)
J Raspschijf ¶ (fijn)
K Klopper ß
L Kneedhulpstuk ©
M Aandrijfas
N Vulopening
O Stamper met aandrukhulpje
P Snelheidschakelaar
O = Uit
1 - 2 - 3 - 4 - 5
variabele snelheidsregeling (1 = laagste
snelheid, 5 = hoogste snelheid)
M = Moment/Pulse
(loslaten: motor stopt)
Q Opbergdoos voor schijven
R Snoerklem (netsnoer er omheen
wikkelen en vastklemmen)
S Draaideksel voor afsluiten montage-
opening
Mengkan hulpstukken ®
T Afsluitdeksel
U Deksel
V Mengkan
W Rubber afsluitring
X Messenblok
Y Spatel
1
T
N
O
G
L
H
I
J
K
Y
Q
D
C
B
M
R
F
E
U
V
W
X
S
A
P
Nederlands
Page 48

Automatische Beveiliging (opnieuw instelbaar)
Lees deze aanwijzingen nauwkeurig voordat u het apparaat in
gebruik neemt.
Om schade als gevolg van oververhitting te voorkomen, is uw apparaat
uitgerust met een automatische beveiliging. Deze zal zonodig de stroom
onderbreken.
Als de onderstaande instructies precies worden opgevolgd, kan het
apparaat na een afkoelingsperiode van 15 minuten weer worden
ingeschakeld.
Als het apparaat opeens stopt:
- Trek de stekker uit het stopcontact;
- zet de schakelaar op stand O;
- laat het apparaat tenminste 15 minuten afkoelen;
- steek de stekker in het stopcontact;
- schakel het apparaat weer in.
Neem contact op met uw Philips leverancier of met een erkend Philips
Service Centrum als de automatische beveiliging telkens opnieuw in
werking treedt.
Symbolen op het apparaat
Op het apparaat staat links van de symbolen van de diverse toepassingen een afbeelding van het te gebruiken hulpstuk.
Daarboven wordt aangegeven in welke stand u het apparaat het best
kunt gebruiken; stand M (“Pulse”) of op de snelheden 1 - 5 (zie ook de
tabel op pagina 58 - 60).
Belangrijk
• Lees de gebruiksaanwijzing en bekijk alle tekeningen voordat u
het apparaat in gebruik neemt.
• Verwijder vóór het gebruik het beschermhoesje van het sikkelmes.
• Pas op bij het beetpakken van het sikkelmes, het mes van de
mengkan en de snijschijven. Deze zijn zeer scherp!
• Was alle onderdelen die met voedsel in aanraking komen af
vóórdat u het apparaat in gebruik neemt.
• Plaats het deksel op de juiste manier op de kom. Dan wordt de
ingebouwde beveiliging ontgrendeld en kan het apparaat worden
ingeschakeld.
•Let op: als de blender en de kom gelijktijdig en juist zijn
gemonteerd, dan werkt alleen de blender.
• Laat het apparaat niet zonder toezicht werken.
• Laat kinderen niet het apparaat bedienen.
• Als u vloeistoffen klopt of mengt, vul dan de kom of de mengkan
niet hoger dan de bovenste streep van de maatverdeling.
• Overschrijd niet de maximale hoeveelheden en bewerkingstijden,
zoals aangegeven in de tabel.
• Laat de draaiende delen altijd eerst tot stilstand komen vóórdat u
het deksel open draait.
• Steek nooit uw vingers of bijvoorbeeld een spatel in de vulopening
terwijl het apparaat is ingeschakeld. Alleen de meegeleverde
stamper is hiervoor geschikt.
• Steek nooit uw vingers of bijvoorbeeld een spatel in de mengkan,
tenzij u eerst de stekker uit het stopcontact heeft genomen.
• Dompel het motorgedeelte nooit in water of in een andere
vloeistof. Spoel het ook niet af.
• Haal na gebruik de stekker uit het stopcontact.
• Indien het snoer van dit apparaat is beschadigd, dient het
uitsluitend te worden vervangen door een door Philips daartoe
aangewezen reparateur, omdat voor de reparatie speciale
gereedschappen en/of onderdelen vereist zijn.
• Bewaar deze gebruiksaanwijzing.
49
Page 49
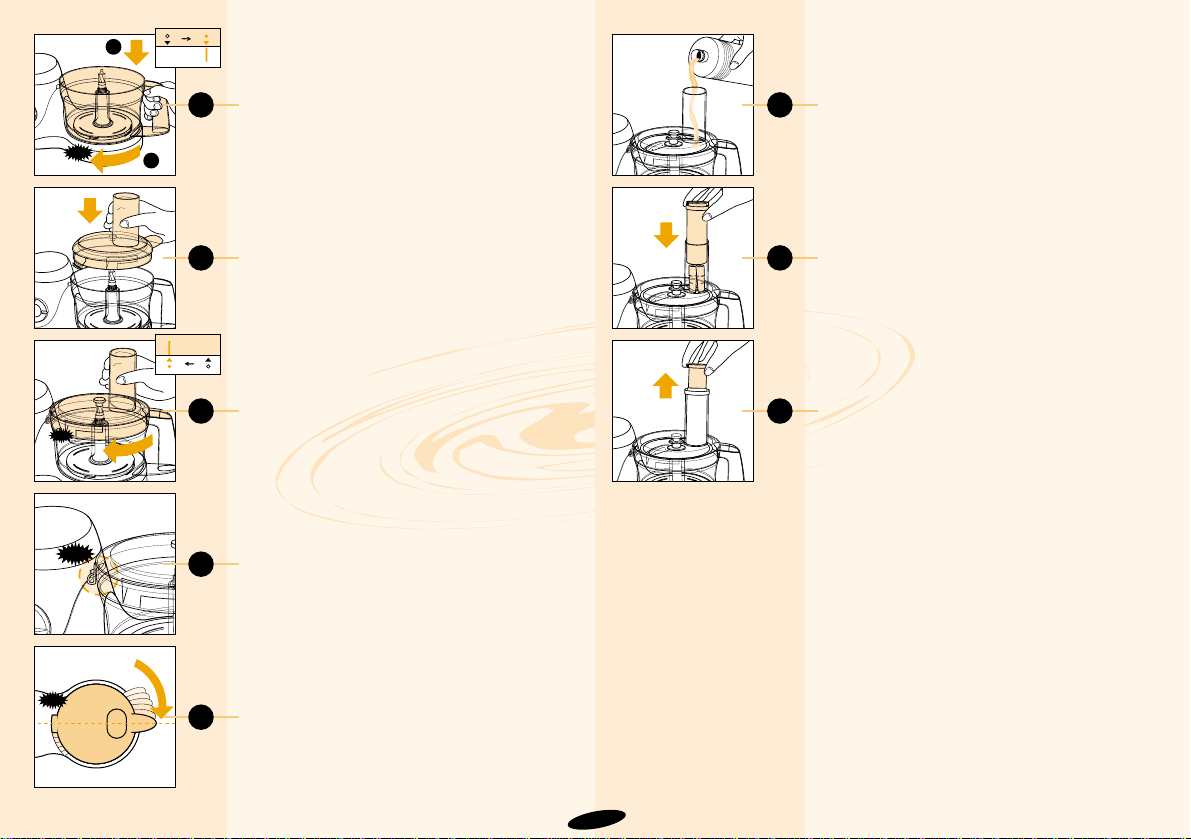
1
2
3
CLICK
4
CLICK
5
CLICK
6
7
8
9
Kom (B) plaatsen (fig. 2)
- Zet de kom op zijn plaats, zoals
aangegeven (1).
- Draai de handgreep in de richting van de
pijl, tot de kom niet verder kan ("Klik!") (2).
Deksel (C) plaatsen
- Zet het deksel op de kom zoals in fig. 3
wordt aangegeven.
- Draai het deksel met enige kracht in de
richting van de pijl tot het deksel niet verder
kan ("Klik!") (fig. 4-5).
- Let erop dat het streepje op het deksel en
de pijl op de kom recht tegenover elkaar
staan.
Het afsluitklepje van het deksel staat nu
precies boven de handgreep van de kom
(fig. 6).
Vulopening (N) en stamper (O)
• De vulopening kan gebruikt worden om
vloeistoffen en vaste ingrediënten toe te
voegen (fig. 7).
• Gebruik de stamper om ingrediënten door
de vulopening in te voeren (fig. 8).
• U kunt tijdens het gebruik de stamper in de
vulopening zetten om deze af te sluiten. Zo
voorkomt u spatten en stuiven.
• De stamper is voorzien van een
aandrukhulpje.
- U kunt het aandrukhulpje verwijderen om
zo een kleinere vulopening te creëren (fig.
9).
- De kleinere vulopening kan handig zijn,
bijvoorbeeld bij het snijden van worteltjes
of bij een hoeveelheid die te klein is om de
normale vulopening te vullen.
Let op: Gebruik het aandrukhulpje alleen
wanneer de stamper in de vulopening is
geplaatst.
Ingebouwde beveiliging (F)
Zowel het apparaat als de accessoires zijn
gemarkeerd met pijlen. Alleen wanneer de
pijlen van het apparaat tegenover het
streepje van de accessoires staan, kan het
apparaat werken. In deze positie staan ook
het uitstekende afsluitklepje van het deksel
(C) en van de accessoires precies boven de
opening in het handvat van de kom.
50
CLICK
2
Page 50
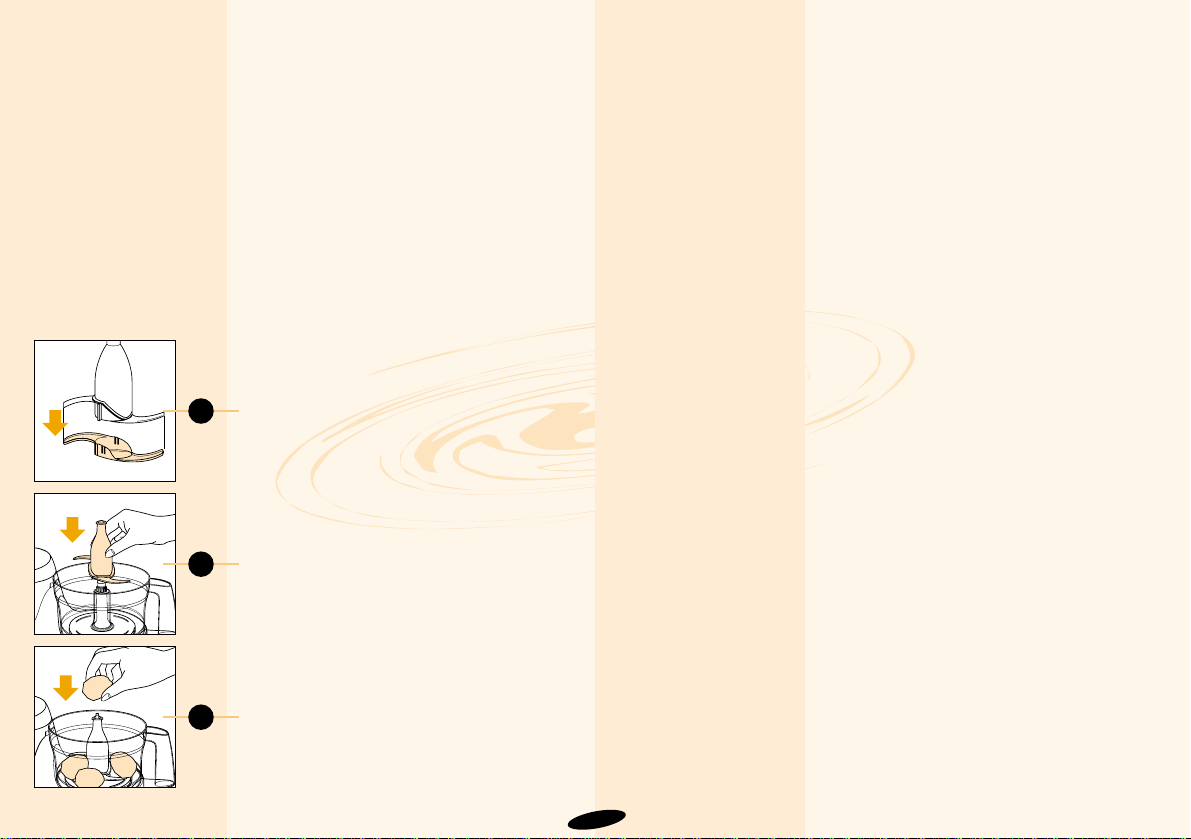
10
11
12
Bediening van het apparaat
Let op: het apparaat kan alleen werken
wanneer:
• de draaideksel (S) of de mengkan (T-X)
goed zijn gemonteerd op het
motorgedeelte (A), en
• de kom (B) en de accessoires (deksel C,
citruspers of sapcentrifuge) op de juiste
manier zijn geplaatst. Volg daartoe de
aanwijzingen in dit boekje.
• Als de blender en de kom gelijktijdig en
juist zijn gemonteerd, dan werkt alleen de
blender.
Zet de snelheidsregelaar (P) in de stand die
in de tabel op pagina 26 - 28 wordt
aanbevolen en schakel het apparaat in. Kies
bij twijfel altijd de hoogste snelheid (stand 5).
Sikkelmes (G) £
Pas op: de snijkanten zijn erg scherp!
• Het sikkelmes is geschikt voor hakken,
mixen, mengen, pureren en het bereiden
van korstdeeg, kruimeldeeg en
zandtaartdeeg.
- Haal het plastic beschermkapje van het
sikkelmes (fig. 10).
- Plaats de kom (fig. 2) en daarna het
sikkelmes (fig. 11).
- Doe de ingrediënten in de kom (fig. 12).
- Plaats het deksel op de kom en zet de
stamper in de vulopening.
- Zet de snelheidsregelaar (P) in de stand
die in de tabel wordt aanbevolen en
schakel het apparaat in. Kies bij twijfel altijd
de hoogste snelheid (stand 5).
- Ingrediënten/recepten vermeld in de tabel,
zijn klaar na 10 - 60 seconden.
Tips:
• Grote stukken kunt u het best voorsnijden
tot blokjes van ongeveer 3 cm.
• Het voedsel kan al snel tè fijn gehakt
worden: laat het apparaat dus niet te lang
achtereen werken! (Ook niet als u de
pulse-stand M gebruikt).
• Let er bij het hakken van (harde) kaas op,
dat u het apparaat niet te lang achtereen
laat draaien. De kaas wordt dan te warm
waardoor het gaat smelten en klonteren.
• Als voedsel om het sikkelmes is
geslingerd, of wanneer stukjes voedsel
tegen de binnenkant van de kom kleven:
- schakel dan eerst het apparaat uit;
- neem het deksel van de kom;
- verwijder de ingrediënten van het
sikkelmes of van de kom met
behulp van een spatel.
• Hak geen zeer harde ingrediënten, zoals
koffiebonen, nootmuskaat en ijsklontjes:
deze kunnen het sikkelmes bot maken.
Voor de meest geschikte snelheid en de
juiste wijze van inschakelen: zie de tabel.
51
Page 51
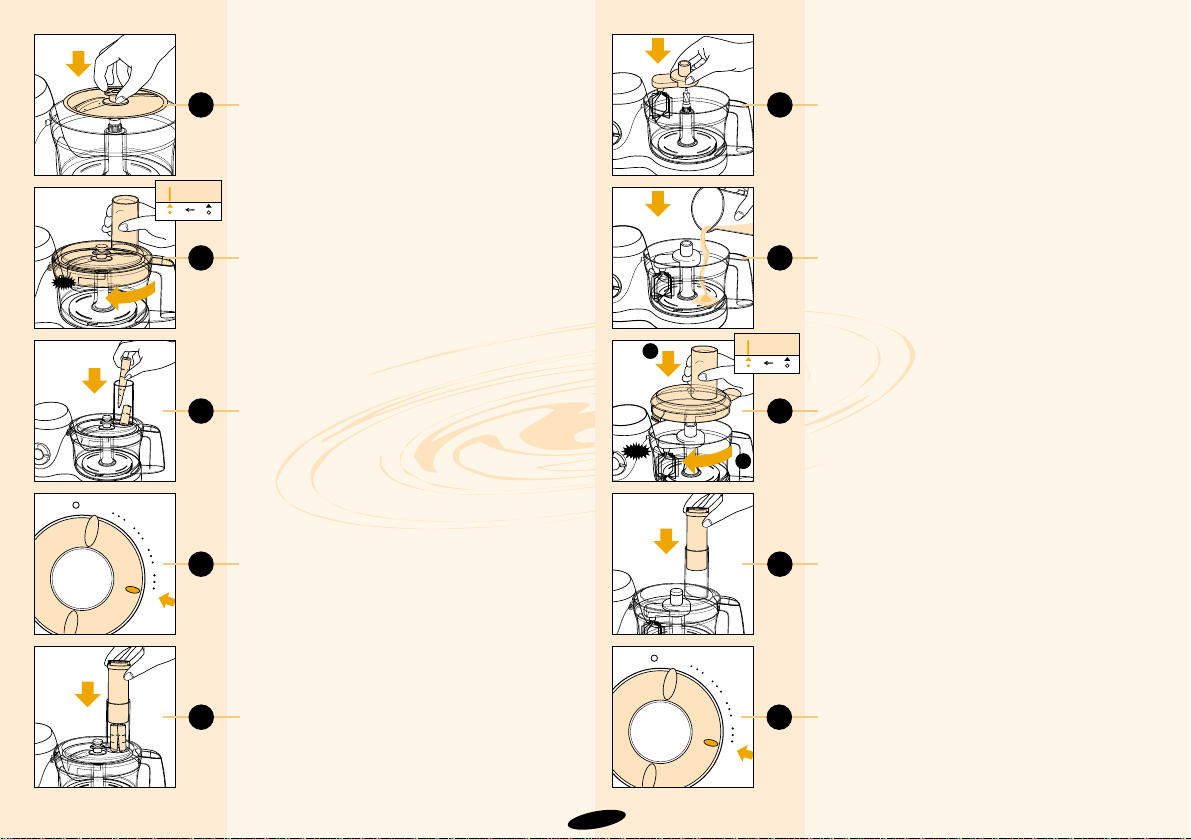
13
CLICK
14
15
M
M
1
2
3
4
5
16
17
18
19
1
2
CLICK
20
21
Snijschijf (H)
§ en raspschijven (I, grof)
• en (J, fijn) ¶
Pas op: de snijranden zijn erg scherp!
Pak de snijschijf daarom altijd vast bij het
kunststof middenstuk.
- Plaats de kom (fig. 2).
- Plaats de snijschijf of de raspschijf (fig. 13).
- Plaats het deksel (fig. 14).
- Doe de ingrediënten in de vulopening
(fig. 15).
- Plaats de stamper op de ingrediënten en
druk deze lichtjes aan.
- Voor raspen en snijden: zet de
snelheidsregelaar op 5 (= maximale
snelheid) (fig. 16).
- Wanneer u zachtere groente of fruit wilt
snijden, kunt u ook een lagere snelheid
kiezen (zie ook de tabel).
- Druk de ingrediënten rustig en gelijkmatig
omlaag met de stamper (fig. 17).
Vooral wanneer u bijvoorbeeld worteltjes
verwerkt, is het aan te raden het
aandrukhulpje te gebruiken.
Tips:
• Snij te grote stukken voedsel vóór, zodat
ze goed in de vulopening passen.
• Vul de opening gelijkmatig voor de beste
resultaten.
• Verdeel grote hoeveelheden in kleinere
porties en maak de kom regelmatig
tussendoor leeg.
Klopper (K) ß
• De klopper kunt u gebruiken voor het
luchtig opkloppen van eieren, eiwit,
“toppings” voor desserts, instant pudding
en slagroom.
Let op: gebruik de klopper niet voor het
bereiden van beslag.
- Plaats eerst de kom (fig. 2) en hang
vervolgens de klopper aan de aandrijfas
(fig. 18).
- Doe dan de ingrediënten in de kom (fig. 19)
en plaats het deksel (fig. 20).
- Zet de stamper in de vulopening om deze
af te sluiten (fig. 21).
- Zet de snelheidsregelaar (P) in de stand
die in de tabel wordt aanbevolen en
schakel het apparaat in. Kies bij twijfel altijd
de hoogste snelheid (stand 5) (fig. 22).
- Ingrediënten/recepten vermeld in de tabel,
zijn klaar na 2 - 5 minuten.
52
M
M
1
2
3
4
5
22
Page 52
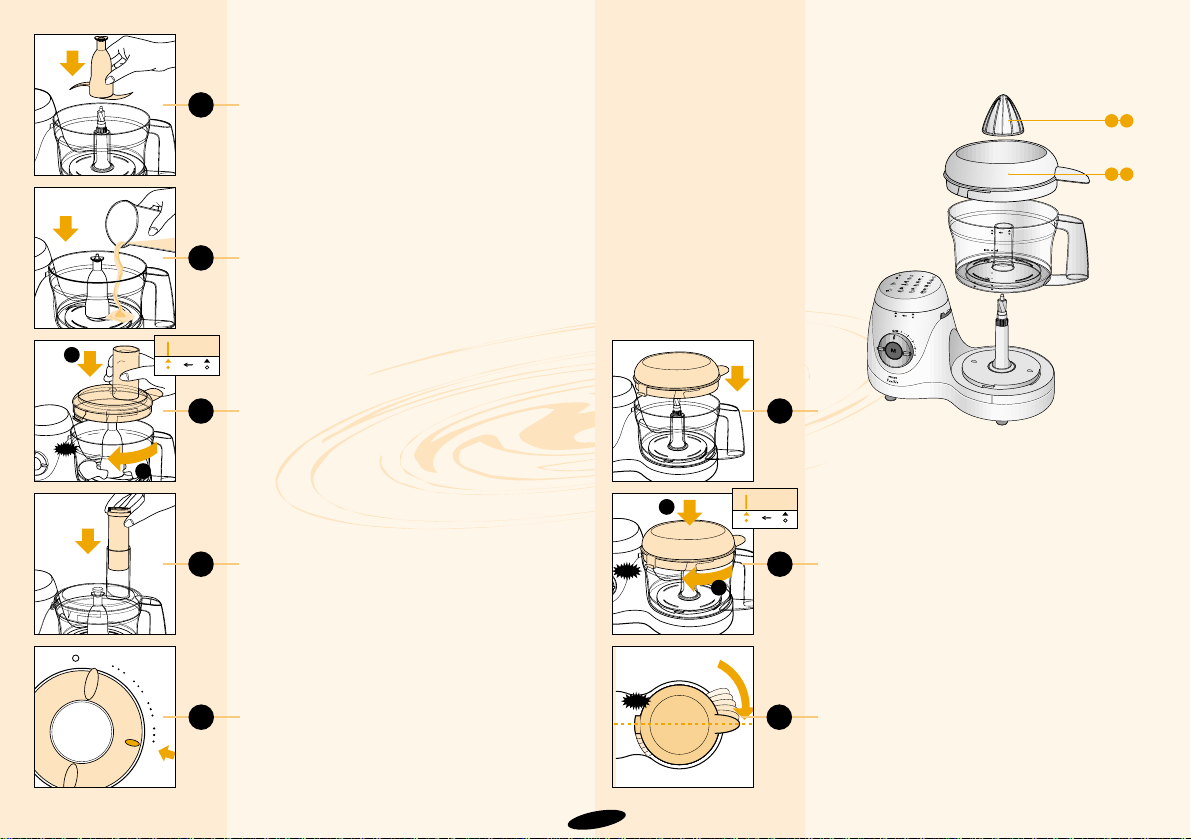
23
24
CLICK
1
2
25
26
27
28
1
2
CLICK
29
Kneedhulpstuk (L)
©
• Het kneedhulpstuk is geschikt voor het
kneden van brooddeeg en het mengen van
beslag.
- Plaats eerst de kom (fig. 2) en dan het
kneedhulpstuk (fig. 23).
- Doe de ingrediënten in de kom (fig. 24) en
plaats het deksel (fig. 25).
- Zet de stamper in de vulopening om deze
af te sluiten (fig. 26).
- Zet de snelheidsregelaar (P) in de stand 5
(= maximale snelheid) (fig. 27). Na 1 - 3
minuten is het deeg klaar.
De citruspers, algemene beschrijving
Citruspers hulpstukken µ
AA Perskegel
AB Sapzeef
- De citruspers-hulpstukken kunnen
uitsluitend worden gebruikt bij Philips
foodprocessor type HR 7727.
Montage
- Plaats eerst de kom (fig. 2) en dan de
sapzeef (AB) (fig. 28).
- Draai de sapzeef in de richting van de pijl
(fig. 29), totdat het lipje voor de beveiliging in de uitsparing in het motorhuis
klikt. Zorg er voor dat het afsluitklepje
van de zeef precies boven de opening in
het handvat van de kom staat (fig. 30).
53
AAA
B
CLICK
30
M
1
2
M
3
4
5
Page 53
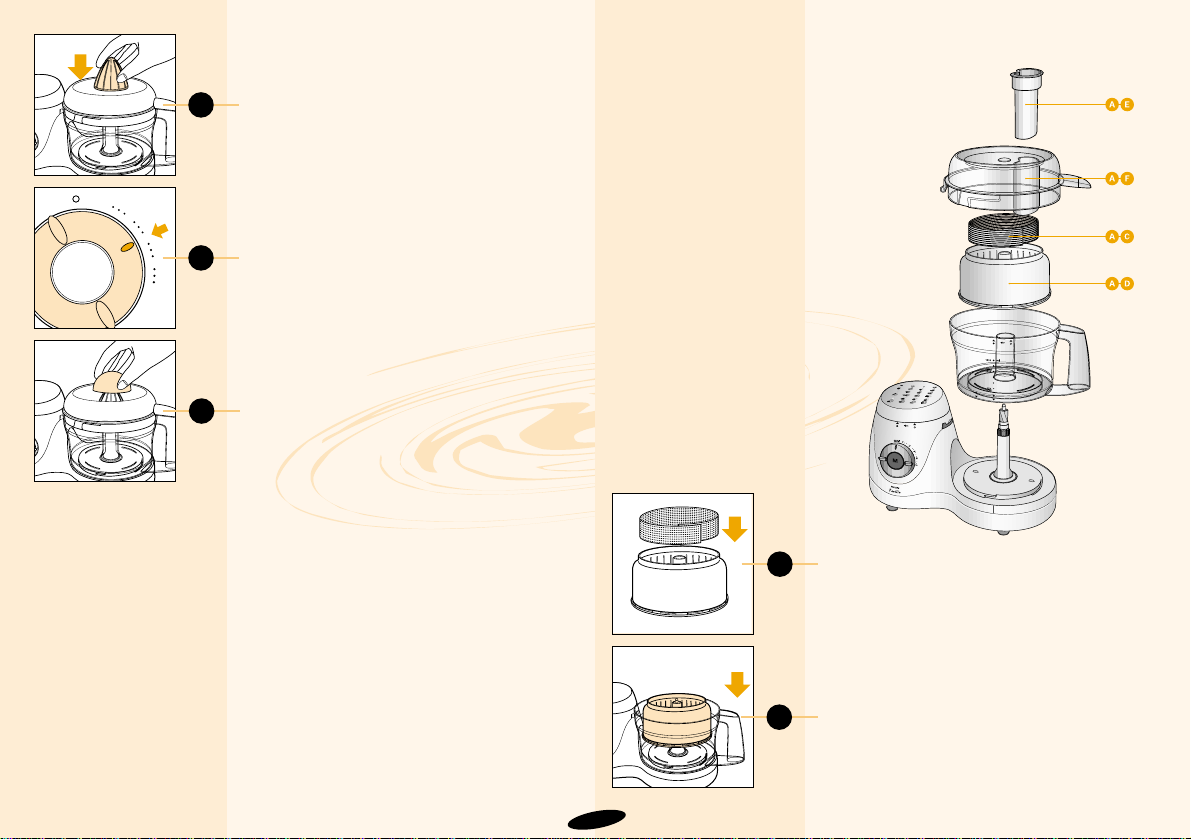
31
M
M
1
2
3
4
5
32
33
34
- Plaats de kegel (AA) (fig. 31). Even
aandrukken.
- Schakel de foodprocessor in. Kies stand 3
(fig. 32).
- Duw een doorgesneden citrusvrucht stevig
op de draaiende kegel (fig. 33).
• Onderbreek het persen van tijd tot tijd om
pulp uit de sapzeef te verwijderen. Schakel
dan eerst de motor uit en verwijder de kom
samen met de sapzeef en de kegel voordat
u de zeef leeg.
Na gebruik
- Verwijder de kom samen met de
citruspers-hulpstukken om te voorkomen
dat u op het apparaat morst.
- Verwijder de pulp van de kegel en uit de
sapzeef.
- Spoel de gebruikte onderdelen meteen af.
U kunt ze daarna afwassen in heet sop of
in de afwasmachine. Gebruik geen
schuursponzen, schuurmiddelen e.d.
• Bepaalde ingrediënten kunnen enige
verkleuring veroorzaken. Dit heeft geen
nadelige invloed en de verkleuring
verdwijnt meestal na korte tijd weer.
De sapcentrifuge, algemene beschrijving
Sapcentrifuge hulpstukken
4
AC Filter AE Stamper
AD Pulpzeef AF Deksel
• De sapcentrifuge-hulpstukken kunnen
uitsluitend worden gebruikt bij Philips
foodprocessor type HR 7727.
Montage
- Plaats eerst de kom (fig. 2).
- Breng het filter (AC) aan in de pulpzeef
(AD) (fig. 34).
- Zet de pulpzeef op zijn plaats (fig. 35).
54
35
Page 54
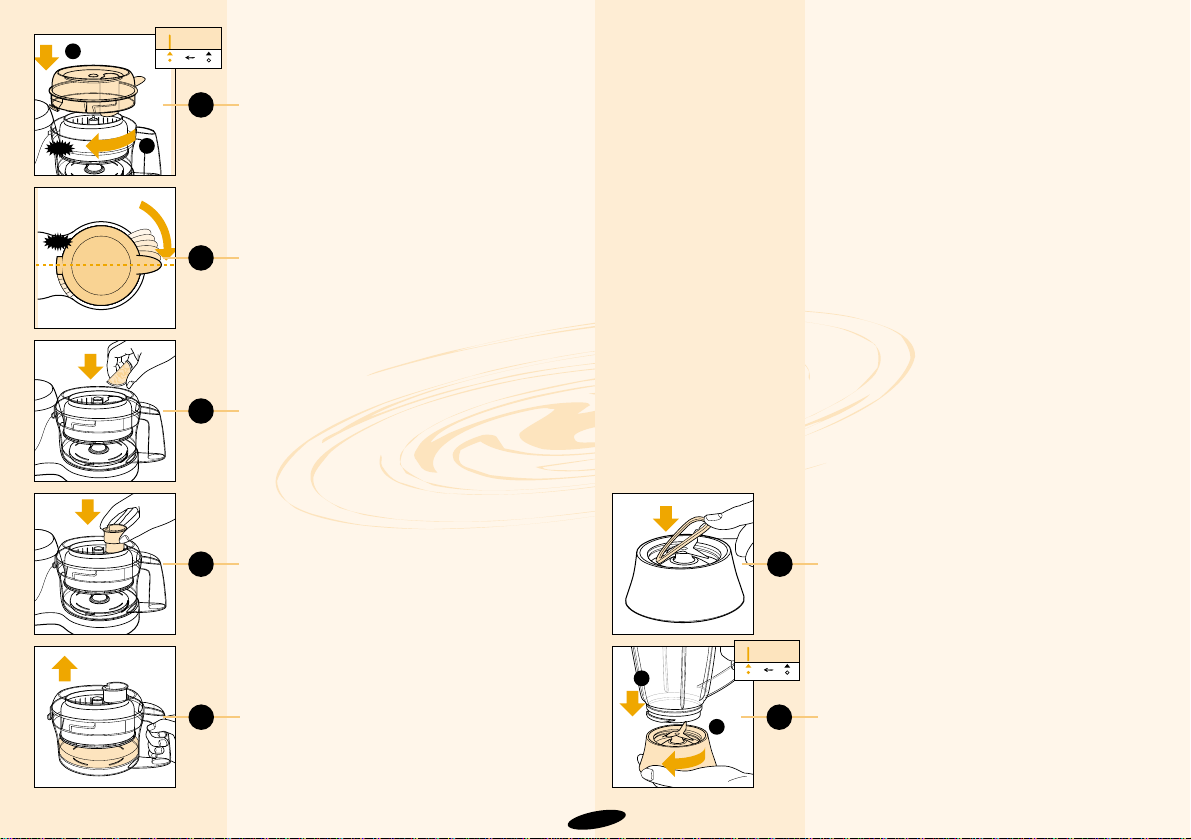
36
CLICK
37
38
39
40
41
- Plaats het deksel (AF) op de kom. Draai
het deksel in de richting van de pijl totdat
het lipje voor de beveiliging in de uitsparing
in het motorhuis klikt (fig. 36). Zorg ervoor
dat het afsluitklepje precies boven de
opening in het handvat van de kom staat
(fig. 37).
Hoe gebruikt u de sapcentrifuge?
- Schakel de foodprocessor in en kies de
hoogste snelheid (stand 5).
- Laat de vruchten e.d. via de vulopening in
de sapcentrifuge vallen (fig. 38).
- Druk de vruchten e.d. met de stamper (AE)
aan. Houd de stamper zoveel mogelijk in
de vulopening om spatten te voorkomen
(fig. 39).
- Laat het apparaat nog 20 sec. werken om
het laatste sap te verkrijgen.
- Om te voorkomen dat u op het apparaat
morst, verwijdert u na gebruik de kom
samen met de sapcentrifuge-hulpstukken
(fig. 40).
Tips:
• Voordat u centrifugeert: snij wortelen,
rettich e.d. in stukken, schil citrusvruchten,
ananas, meloen, en verwijder de pitten van
kersen, pruimen, abrikozen, perziken e.d.
• Schakel altijd éérst de motor in. Doe
daarna de ingrediënten in de
sapcentrifuge.
• Onderbreek van tijd tot tijd het
centrifugeren om pulp uit de pulpzeef en
van het filter te verwijderen.
• Verwerk niet te grote porties. Stop zodra
het apparaat sterk gaat trillen. Maak dan
de pulpzeef en het filter schoon.
Mengkan (T - X)
®
Belangrijk
• Het apparaat kan mèt of zonder
mengkan gebruikt worden. Als u het
apparaat zonder mengkan gebruikt,
dan dient wel altijd draaideksel (S)
geplaatst te zijn. Anders zal het
apparaat niet werken.
• Vóór het gebruik: steek de stekker
pas in het stopcontact nadat de
mengkan (V) met deksel (U) en het
messenblok (X) op de juiste manier
op het motorgedeelte zijn bevestigd.
• Na het gebruik: haal de stekker uit
het stopcontact vóórdat u de
mengkan van het motorgedeelte
neemt.
• De mengkan is geschikt voor fijn
pureren en mengen. Bijvoorbeeld:
soepen, sauzen, milkshakes,
babyvoeding, groenten, fruit, dun
beslag, puree, etc. Snij zonodig vaste
ingrediënten in kleinere stukjes
alvorens ze in de kan te doen.
• Vul de kan niet met ingrediënten die
warmer zijn dan 80 °C.
• Voorkom morsen: doe niet meer dan
1,5 liter vloeistof in de mengkan.
• Verwijder nooit het deksel terwijl de
mengkan werkt.
Montage en demontage van de mengkan
- Leg de rubber afsluitring (W) in de rand
van het messenblok (fig. 41).
- Draai het messenblok linksom vast aan de
mengkan (fig. 42). Stevig vastdraaien!
55
1
2
42
CLICK
1
2
Page 55
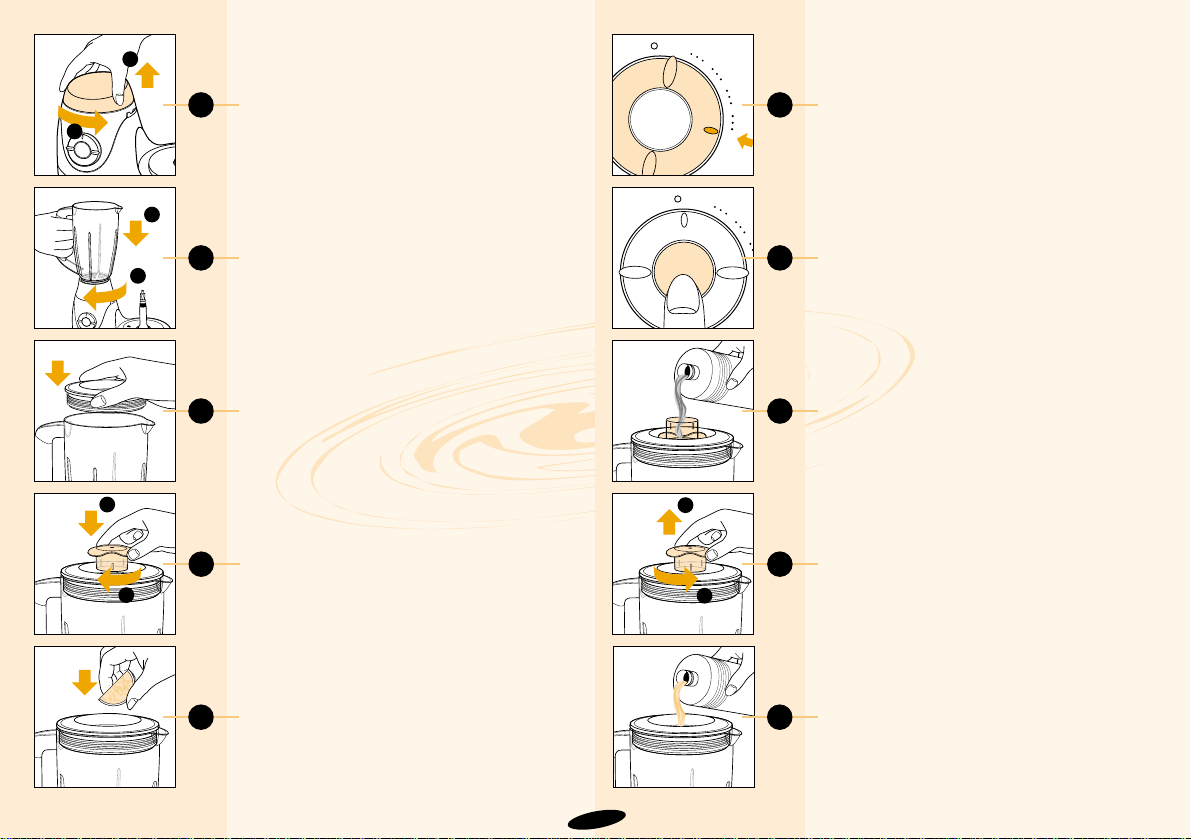
2
43
1
2
44
45
47
46
M
M
1
2
3
4
5
48
M
M
1
2
3
4
5
49
50
2
1
51
- Draai het draaideksel los (fig. 43).
- Zet de mengkan op de montage-opening.
Draai de mengkan vast in de richting van
de pijl (fig. 44).
Waarschuwing: Forceer de handgreep van
de mengkan niet.
- Druk het deksel op zijn plaats (fig. 45).
- Bevestig het afsluitdeksel: omlaag duwen
en in de richting van de pijl draaien tot het
vast zit (fig. 46).
• Het uit elkaar nemen van het apparaat
verloopt in omgekeerde volgorde en
richting.
Gebruik van de mengkan
- Doe de ingrediënten in de gemonteerde
mengkan (fig. 47).
- Schakel het apparaat in door de snelheidsregelaar in de aanbevolen stand te zetten
(fig. 48) of door de pulse-knop M in te
drukken (fig. 49). Kies bij twijfel altijd de
hoogste snelheid (stand 5). Voor de meest
geschikte snelheid en de juiste manier van
inschakelen: zie de tabel.
- Ingrediënten/recepten vermeld in de tabel,
zijn klaar na 10 seconden - 2 minuten.
Tips:
• Vloeibare ingrediënten (b.v. olie voor de
bereiding van mayonaise) kunt u door het
gaatje gieten van het op de kop geplaatste
afsluitdeksel (fig. 50).
• De bijvulopening in het deksel kan worden
gebruikt om ingrediënten toe te voegen
terwijl de motor draait.
U kunt het afsluitdeksel hiertoe losdraaien
en verwijderen (fig. 51, 52).
• Naarmate u het apparaat langer laat
werken, wordt het resultaat over het
algemeen fijner.
• Het kan nodig zijn van tijd tot tijd even te
stoppen om stukjes los te maken die vast
blijven zitten aan de kan.
- Schakel eerst het apparaat uit en haal de
stekker uit het stopcontact.
- Verwijder dan het veiligheidsdeksel en het
deksel.
Gebruik een zachte spatel om de
ingrediënten los te maken. Houd de spatel
op veilige afstand (ca. 2 cm) van de
messen.
56
52
1
1
2
Page 56
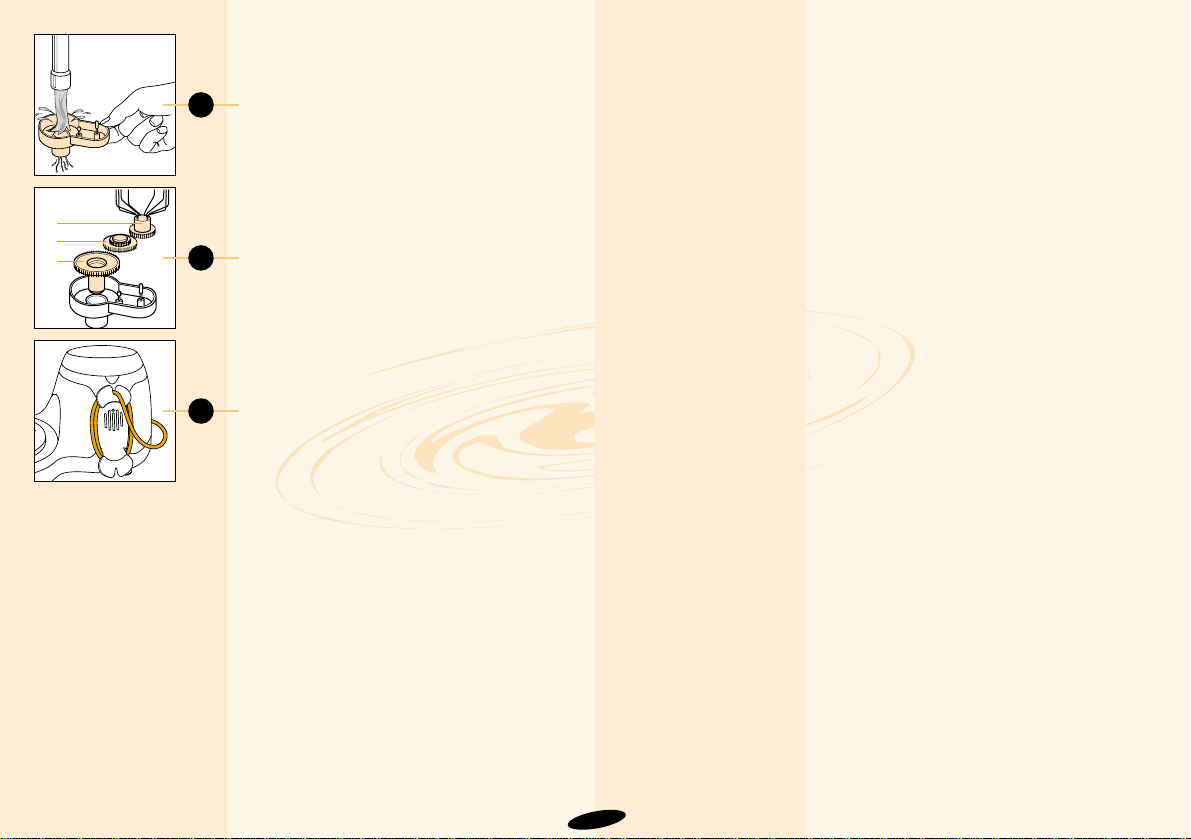
53
2
1
3
54
55
Schoonmaken
• Haal altijd de stekker uit het stopcontact,
voordat u het motorgedeelte gaat
schoonmaken.
• U kunt het motorgedeelte schoonmaken
met een vochtige doek. Dompel het
motorgedeelte niet in water en spoel het
niet af.
• Maak de delen die met voedsel in
aanraking zijn gekomen meteen na gebruik
schoon in warm sop.
• Maak het sikkelmes, het messenblok van
de mengkan en de snijkant van de
snijschijf voorzichtig schoon. Pas op: de
snijranden zijn erg scherp!
• Zorg ervoor dat de snijranden van het
sikkelmes en van de snijschijf niet met
harde voorwerpen in aanraking komen:
hierdoor zouden ze bot kunnen worden.
• De tandwielen van de klopper kunnen
eenvoudig van hun plaats worden
genomen, zodat u ze goed kunt
schoonmaken (fig. 53, 54).
• Bepaalde ingrediënten kunnen wat
verkleuring van het kunststof veroorzaken.
Dit heeft geen nadelige invloed en de
verkleuring verdwijnt meestal na korte tijd
weer.
• Wikkel het (overtollige) netsnoer om de
haspel aan de achterzijde van het apparaat
(fig. 55).
57
Page 57

58
Groente en vlees (gekookt)
- pureren
Beslag (biscuit)
- kloppen
Beslag (cake)
- kloppen
Beslag (pannenkoeken)
- kloppen
Paneermeel
- hakken
Parmezaanse kaas
- raspen
Kaas (Goudse)
- raspen
Chocolade
- hakken
Crèmes
Deeg (pie- of korstdeeg)
- kneden
Deeg (brood)
- kneden
500 gram
3 eieren
4 eieren
500 ml melk
100 gram
200 gram
200 gram
200 gram
300 gram
300 gram
bloem
700 gram
bloem
5
1/5
5
5
5
5
3
M / 5
5
5
5
Grof: een weinig vocht toevoegen. Fijn: indien nodig wat vocht toevoegen
totdat de puree gelijkmatig genoeg is.
Ingrediënten op kamertemperatuur. Klop mengsel van eieren en suiker
stijf op maximum snelheid. Hierna de gezeefde bloem toevoegen en
voorzichtig mengen op minimale snelheid.
Ingrediënten op kamertemperatuur.
Meng zachte boter en suiker tot een gelijkmatige substantie. Voeg
achtereenvolgens melk, eieren en bloem toe.
Schenk eerst de melk in de mengbeker. Voeg daarna de droge
ingrediënten toe. Mix het mengesel ongeveer 1 minuut. Indien nodig
herhaalt u deze procedure max. 2 keer. Alvorens het apparaat opnieuw te
gebruiken, laat het tot kamertemperatuur afkoelen (dit duurt enkele
minuten).
Gebruik droog, bros brood.
Gebruik korstloze kaas en snij deze in stukken die door de vulopening
passsen.
Snij de kaas in stukken die door de vulopening passen. Voorzichtig met de
stamper aandrukken.
Gebruik harde, pure chocolade. Breek in stukjes van 2 cm. Eerst enkele
keren stand M. Daarna voor fijn resultaat maximale snelheid.
Gebruik zachte boter voor een luchtig resultaat.
Gebruik koude boter/margarine en koud water. Doe de bloem in de kom;
boter/margarine in stukjes van 2 cm erop. Meng op maximale snelheid
totdat het mengsel kruimelig wordt. Hierna tijdens het mengen water
toevoegen. Stop als het deeg een bal vormt. Koel het deeg voordat u het
verder verwerkt.
Meng eerst warm water met gist en suiker. Voeg bloem, boter en zout toe
en kneed het deeg ongeveer 90 seconden. 30 min. laten rijzen.
Babyvoeding,
peutervoeding.
Diverse taarten,
Swiss Roll, gebakjes.
Diverse taarten.
pannenkoeken,
wafels, flensjes.
Paneren, gratineren.
Garnering, soep,
sauzen, gratineren.
Sauzen, pizza,
gratineren, fondue.
Garnering, sauzen,
gebak, pudding,
mousse.
Gebak, desserts,
toppings.
Vruchtentaart,
appelbollen,
pasteien,
quiche.
Brood.
®
ß / ©
£
®
£
•
•
£
£
£
©
Ingrediënten Max. Snel- Hulpstuk Bereidingswijze Toepassingen
hoeveel- heid
heid
Page 58

59
Deeg (pizza)
- kneden
Deeg (gist)
- kneden
Deeg (zandtaart)
- kneden
Eiwit
- kloppen
Fruit
(bv. appel, perzik, banaan)
- hakken
- pureren
Kruiden (peterselie)
- hakken
Prei, wortel, komkommer
- snijden
Mayonaise
- emulgeren
Vlees, vis, gevogelte
- mager
- doorregen
Milkshake
- mengen
Noten
- hakken
700 gram
bloem
500 gram
bloem
500 gram
bloem
eiwit van 4
eieren
500 gram
700 gram
75 gram
min. 1 stuk
3 eieren
500 gram
400 gram
250 ml melk
250 gram
5
5
5
4 - 5
M
5
5 / M
5 / M
2 - 5
5 / M
5 / M
5
5 / M
Zie bereidingswijze brooddeeg. Kneed het deeg ongeveer 1 minuut.
Meng eerst gist, warme melk en wat suiker. Voeg bloem, suiker, zout,
eieren en zachte margarine toe. Kneed het deeg tot het niet meer aan de
wand blijft kleven (dit duurt ongeveer 1 minuut). Laat 30 min. rijzen.
Gebruik koude margarine, gesneden in stukjes van 2 cm. Alle ingrediënten
tegelijkertijd in de kom doen en mixen tot een deegbal ontstaat. Laten
afkoelen voor verdere verwerking.
Gebruik eieren op kamertemperatuur. Let op: gebruik tenminste eiwit van
2 eieren.
Tip: voeg wat citroensap toe om verkleuren te voorkomen.
Voeg wat vloeistof toe voor een gelijkmatige puree.
Kruiden eerst wassen en drogen.
Doe prei, komkommer of wortel in de vulopening en druk voorzichtig aan
met de stamper.
Gebruik alle ingrediënten op kamertemperatuur. Let op: gebruik tenminste
1 groot ei, twee kleine eieren of twee grote eidooiers.
Verwijder eerst zenen, graten en botjes. Snijd het vlees/de vis in stukken
van 3 cm.
Hak op stand M voor grof resultaat.
Pureer het fruit (bv. banaan, aardbeien) met suiker en citroensap. Melk en
wat ijs toevoegen en goed mengen.
Gebruik M voor een grof resultaat en de maximale snelheid (5) voor een
fijn resultaat.
Pizza, taart.
Luxe brood.
Appeltaart, vlaai,
zoete koekjes.
Pudding, soufflé,
schuimgebak.
Salades.
Sauzen, jam,
pudding, babyvoeding
Sauzen, soep,
garnering,
kruidenboter.
Soep, salades,
hartige taart.
Bij patat, salades,
fondue, garnering en
barbecuesaus.
Tartaartjes,
hamburgers.
Gehakt, worst.
Salades, brood,
amandelspijs,
pudding.
£ / ©
©
£
ß
£
®
£
§
£
£
£
®
£
Ingrediënten Max. Snel- Hulpstuk Bereidingswijze Toepassingen
hoeveel- heid
heid
Page 59

60
Aardappelen (gekookt)
- pureren
Erwten, bonen (gekookt)
- pureren
Soep
- mengen
Groenten
- hakken
Uien
- hakken
- snijden
Appels, wortels,
knolselderij
- snijden/raspen
Slagroom
- kloppen
Citroen, sinaasappels,
grapefruits
- uitpersen
Appels, wortels,
knolselderij, druiven
750 gram
aardappelen
500 gram
500 ml
500 gram
500 gram
500 gram
500 gram
400 ml
1000 gram
fruit
500 gram
2-4
5
5
5
5 / M
5 / M
5 / M
2-4
3
5
De aardappelen niet té gaar koken. De hoeveelheid melk hangt af van de
aardappelsoort. Gebruik warme melk (max. 80°C). Melk langzaam
toevoegen terwijl het mes draait.
Gebruik gekookte bonen of erwten. Voeg wat vocht toe voor een
gelijkmatig resultaat.
Gebruik gekookte groenten.
Vóórsnijden in blokjes van 3 cm.
Pellen en vóórsnijden in 4 stukken. Let op: gebruik minstens 100 gram
uien.
Pel en snij de ui in stukken zodat deze door de vulopening kan. Let op:
gebruik minstens 100 gram uien.
Snij het fruit/de groenten in stukjes, doe die in de vulopening en druk
voorzichtig aan met de stamper.
Neem slagroom op koelkasttemperatuur.
Let op: minimaal 125 ml verwerken.
Snij de vruchten in twee stukken en druk ze voorzichtig op de perskegel
van de citruspers.
Snij het fruit/de groenten in stukjes en doe ze in de vulopening.
Aandrukken met de stamper in de sapcentrifuge.
Puree.
Puree, soep.
Soep, sauzen.
Soep, rauwkost,
salades.
Bij salades en
gerechten.
Salades, rauwkost.
Garnering, crèmes,
pasteien, ijs, mixen.
Sap, vitaminedrankjes, sorbet en
bij de thee.
Groente/fruitcocktails.
£
®
®
£
£
§
§ / ¶
ß
µ
4
Ingrediënten Max. Snel- Hulpstuk Bereidingswijze Toepassingen
hoeveel- heid
heid
Page 60
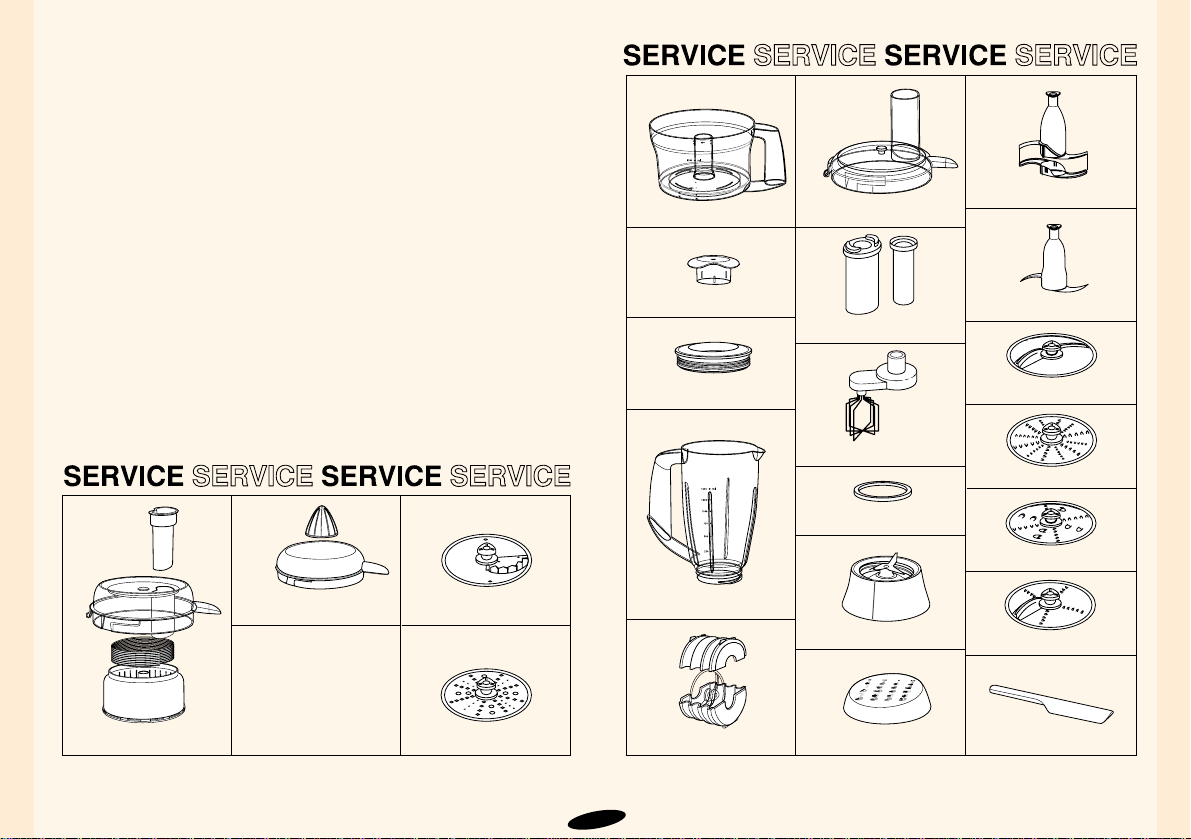
61
Onderdelen
De volgende onderdelen behoren
tot de standaarduitrusting:
- Kom (B)
- Deksel (C)
- Sikkelmes £ (G)
- Snijschijf § (H)
- Raspschijf • (grof) (I)
- Raspschijf ¶ (fijn) (J)
- Klopper ß (K)
- Kneedhulpstuk © (L)
- Stamper met aandrukhulpje (O)
- Opbergdoos (Q)
- Mengkan (T - X)
- Spatel (Y)
- Citruspers µ (AA-AB)
- Sapcentrifuge 4 (AC-AF)
Daarnaast zijn ook de volgende
onderdelen leverbaar:
- Aardappel raspschijf
(n°. 4822 690 10139)
- enkelzijdige snijschijf voor frietjes en bijv. koolraap HR 2912
(nr. 4822 690 10141).
Vraag uw leverancier of deze
accessoires ook in uw land
leverbaar zijn. Wilt u extra of
vervangende onderdelen
bestellen, schrijf dan de
bijbehorende service en/of
typenummers op.
4822 418 10343
4822 418 10342
4203 065 61850
4822 462 11055
4203 065 61990
4822 422 01336
4203 065 61880
4203 065 61870
4203 065 61890
4203 065 61900
4203 065 61920
4203 065 61980
4203 065 61960
4203 065 61970
4203 065 61930
4203 065 61940
4203 065 61950
4203 065 61860
4203 065 61820
4203 065 61810
4203 065 61830
4203 065 61840
Page 61

62
Werkt uw apparaat niet naar wens?
Als uw apparaat niet volgens de verwachtingen functioneert, lees dan het volgende lijstje even door.
Raadpleeg ook de betreffende gedeelten in de gebruiksaanwijzing!
Mogelijke oplossing:
- Kom en/of deksel goed plaatsen en zo ver mogelijk draaien in de aangegeven richting (u hoort dan
"Klik!").
Zorg dat de pijlen op de kom en de pijlen op het apparaat, evenals de pijlen op de kom en de pijlen op
het deksel precies tegenover elkaar staan (zie fig. 2 en 6).
-Mengkan of draaideksel goed plaatsen en zo ver mogelijk draaien in de aangegeven richting.
Wellicht is de automatische veiligheidsschakelaar, die de stroom
uitschakelt zodra de temperatuur te hoog wordt, in werking getreden.
- Trek de stekker uit het stopcontact;
- zet de schakelaar op stand O;
- laat het apparaat tenminste 15 minuten afkoelen;
- steek de stekker in het stopcontact;
- schakel het apparaat weer in.
Mocht het apparaat zichzelf regelmatig automatisch uitschakelen, wendt u zich dan tot uw Philipsleverancier, of tot het Philips Servicecentrum in uw land.
- Kies de juiste snelheid. Zie de aanwijzingen op het apparaat en in deze gebruiksaanwijzing.
- Voeg desgewenst wat citroensap of zout toe, zorg ervoor dat klopper en kom vetvrij zijn en kies de juiste
snelheid.
- Gebruik de klopper ß. Verwerk slagroom op koelkasttemperatuur (ca. 6 °C).
- Met deze klopper alleen slagroom, ei(wit) en vloeistoffen kloppen.
Niet gebruiken voor beslag of deeg!
- Volg de aanwijzingen in deze gebruiksaanwijzing nauwkeurig op. Voeg nooit teveel water toe.
- Gebruik altijd het aangegeven hulpstuk.
- Kneed niet langer dan de aangegeven tijd.
Probleem:
- De schakelaar werkt niet.
- Het apparaat houdt plotseling op
te werken
- Resultaat bij hakken, snijden of
raspen is niet optimaal.
- Resultaat bij het kloppen van eiwit
is niet optimaal.
- Resultaat bij kloppen van
slagroom is niet optimaal.
- De klopper slipt of verbuigt.
- Bij het kneden slingert deeg rond
in de kom.
Page 62
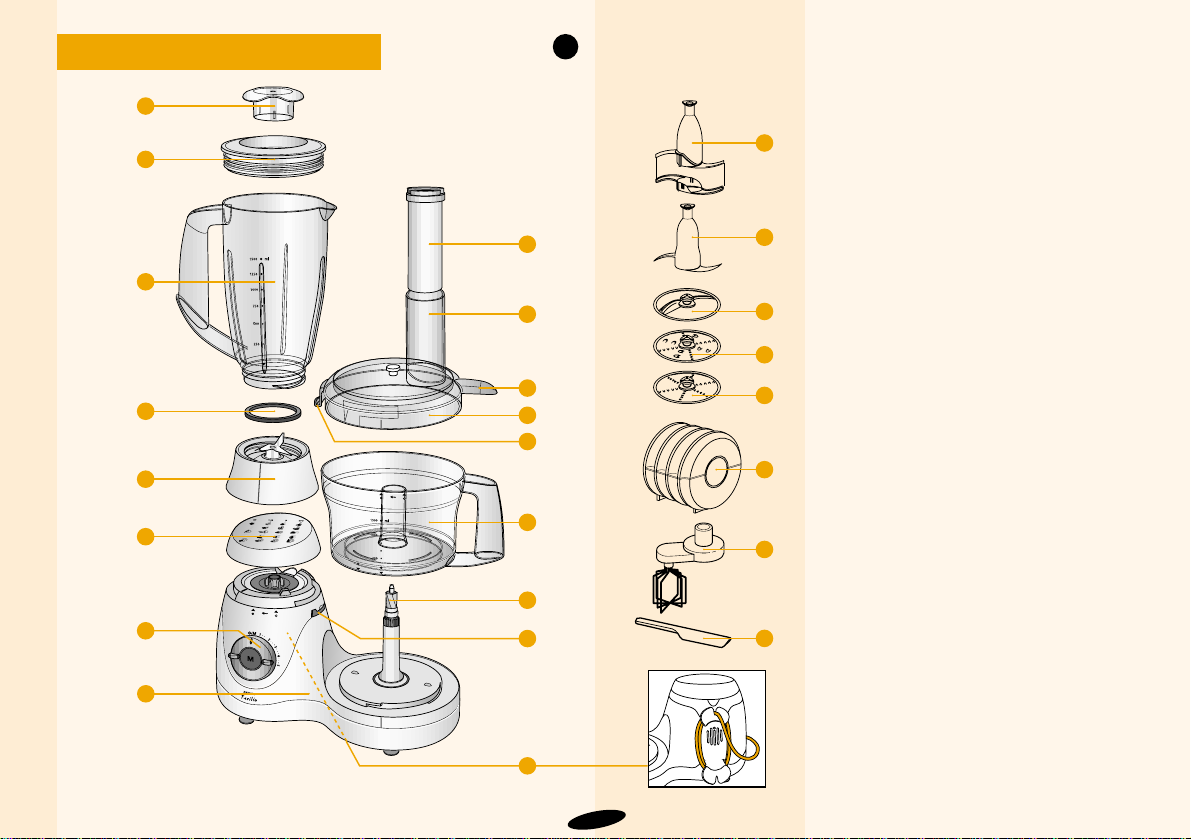
63
Descrizione generale (fig. 1)
A Blocco motore
B Vaso
C Coperchio del vaso
D Linguetta del coperchio (per bloccare e
sbloccare il dispositivo di sicurezza)
E Beccuccio (per coprire l’apertura
dell’impugnatura)
F Dispositivo di sicurezza incorporato
G Lama £
H Disco per affettare §
I Disco per grattugiare • (grosso)
J Disco per grattugiare ¶ (fine)
K Frusta ß
L Accessorio per impastare ©
M Albero motore
N Apertura per inserimento cibo
O Doppio pestello
P Controllo velocità
O = OFF
1-2-3-4-5 = controllo velocità
(1 = velocità minima, 5 = velocità
massima)
M = “funzionamento ad intermittenza”
(l’apparecchio funziona tenendo premuto
il pulsante
Q Scatola per riporre i dischi
R Gancio (per fissare il cavo arrotolato)
S Cappuccio a vite (per chiudere il foro del
vaso del frullatore quando non viene
usato)
Accessori del frullatore ®
T Tappo
U Coperchio
V Vaso frullatore
W Guarnizione in gomma
X Coltello
Y Spatola
1
T
N
O
G
L
H
I
J
K
Y
Q
D
C
B
M
R
F
E
U
V
W
X
S
A
P
Italiano
Page 63

Arresto automatico di sicurezza
Prima di usare l’apparecchio, leggete con attenzione le istruzioni
per l’uso.
Per evitare danni dovuti a surriscaldamento, l’apparecchio è dotato di un
dispositivo automatico di sicurezza che, all’occorrenza, blocca
l’erogazione di energia elettrica.
Seguendo le istruzioni sotto riportate, potrete riaccendere l’apparecchio
dopo averlo lasciato raffreddare per circa 15 minuti.
Se l’apparecchio si spegne all’improvviso:
• Togliete la spina dalla presa di corrente.
• Mettete l’interruttore in posizione O.
• Lasciate raffreddare l’apparecchio per almeno 15 minuti.
• Rimettete la spina nella presa di corrente.
• Riaccendete l’apparecchio.
Nel caso l’arresto di sicurezza automatico dovesse intervenire troppo
frequentemente, consultate il vostro negoziante di fiducia o un Centro di
Assistenza Philips.
Simboli sull’apparecchio
A sinistra dei simboli posti sull’apparecchio, corrispondenti a ciascuna
applicazione, è riprodotta un’icona con l’accessorio da utilizzare.
Sopra l’icona, è indicata la velocità più adeguata per quella particolare
applicazione: M (funzionamento ad intermittenza), oppure da 1 a 5
(vedere tabella, pagg. 73-75).
Importante
• Prima di usare l’apparecchio, leggete attentamente le istruzioni per
l’uso e osservate le illustrazioni.
• Togliete il cappuccio di protezione prima di usare le lame.
• Fate attenzione alla lama, al coltello del frullatore e ai dischi per
affettare e grattugiare perché sono estremamente affilati.
• Pulite accuratamente le parti a contatto con il cibo prima di usare
l’apparecchio per la prima volta.
• Mettete il coperchio nella corretta posizione. Il dispositivo
automatico di sicurezza sarà quindi sbloccato e voi potrete utilizzare
l’apparecchio.
• Nel caso in cui sia il frullatore che il vaso siano montati
correttamente, funzionerà soltanto il frullatore.
• Non allontanatevi mentre l’apparecchio è in funzione.
• Tenete l’apparecchio lontano dalla portata dei bambini.
• Quando amalgamate o frullate i liquidi non superate l’indicazione del
livello massimo indicato sul vaso (linea superiore)
• Non superate le quantità massime e i tempi indicati sulla tabella.
• Non togliete il coperchio fino a quando le parti rotanti non sono
completamente ferme.
• Non infilate mai la mano o la spatola nell’apertura di inserimento cibo
mentre l’apparecchio è in funzione. A tale proposito, utilizzate
esclusivamente l’apposito pestello.
• Non infilate mai la mano o la spatola nel frullatore mentre
l’apparecchio è in funzione. Ricordatevi di togliere sempre la spina
dalla presa.
• Non immergete mai il blocco motore nell’acqua o in altri liquidi,
nemmeno per risciacquarlo.
• Dopo l’uso, staccate sempre la spina dalla presa.
• Se il cavo di alimentazione di questo apparecchio si dovesse
rovinare, occorrerà farlo sostituire da un Centro Assistenza
autorizzato Philips perchè occorrono speciali attrezzature e/o
ricambi.
• Conservate queste istruzioni per ulteriori consultazioni.
64
Page 64
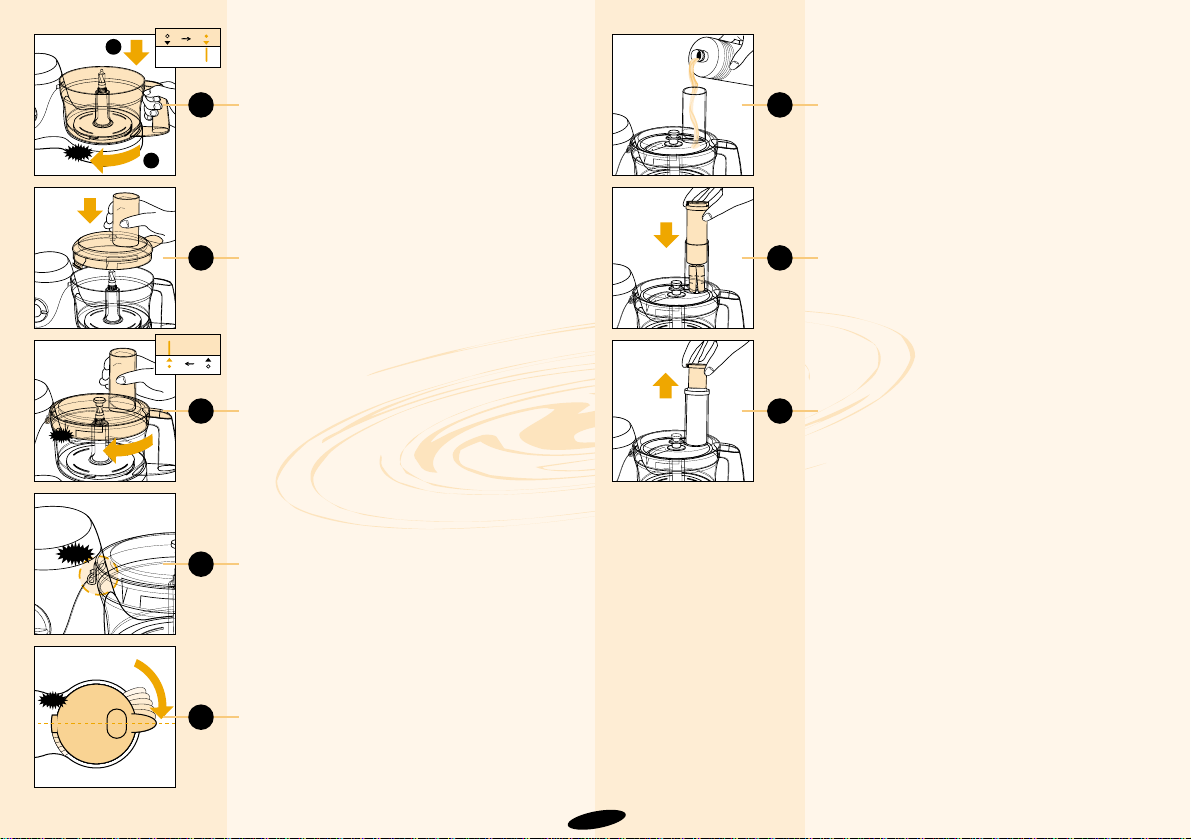
CLICK
2
3
CLICK
4
CLICK
5
CLICK
6
7
8
9
Come posizionare il vaso (B) (fig. 2)
- Posizionate il vaso come indicato (1).
- Ruotate l’impugnatura in direzione della
freccia fino a quando si arresta con un
“click!” (2).
Come posizionare il coperchio (C)
- Posizionate il coperchio sul vaso come
indicato nella fig. 3.
- Ruotate il coperchio nella direzione della
freccia fino a quando non si blocca con un
“click!” (fig. 4-5).
- Assicuratevi che la tacca sul coperchio e la
freccia sul vaso siano poste una di fronte
all’altra. A questo punto il beccuccio del
coperchio coprirà l’apertura dell’impugnatura del vaso (fig. 6).
Apertura per l’inserimento del cibo (N) e
pestello (O)
• L’apertura può essere utilizzata per aggiungere ingredienti liquidi o solidi (fig. 7).
• Utilizzate il pestello per premere gli
ingredienti (fig. 8).
• Il pestello può essere usato anche per
chiudere l’apertura durante il
funzionamento dell’apparecchio, evitando
schizzi e fuoriuscite di prodotto.
• Il pestello è fornito di un secondo pestello,
di dimensioni ridotte, che può essere tolto
per creare un’apertura più stretta (fig. 9).
• Quest’apertura più ridotta può essere utile
per affettare le carote oppure per trattare
piccoli quantitativi di prodotto.
Attenzione : il pestello più piccolo può
essere usato soltanto dopo avere
posizionato in modo corretto il pestello
più grande sull’apertura.
Dispositivo di sicurezza incorporato (F)
Sia il blocco motore che gli accessori sono
provvisti di tacche. L’apparecchio potrà
funzionare soltanto se la freccia posta sul
gruppo motore si trova esattamente di fronte
alla tacca riportata sul coperchio (C) e sugli
altri accessori. In questa posizione, il
beccuccio del coperchio coprirà l’apertura
dell’impugnatura del vaso.
65
1
2
Page 65
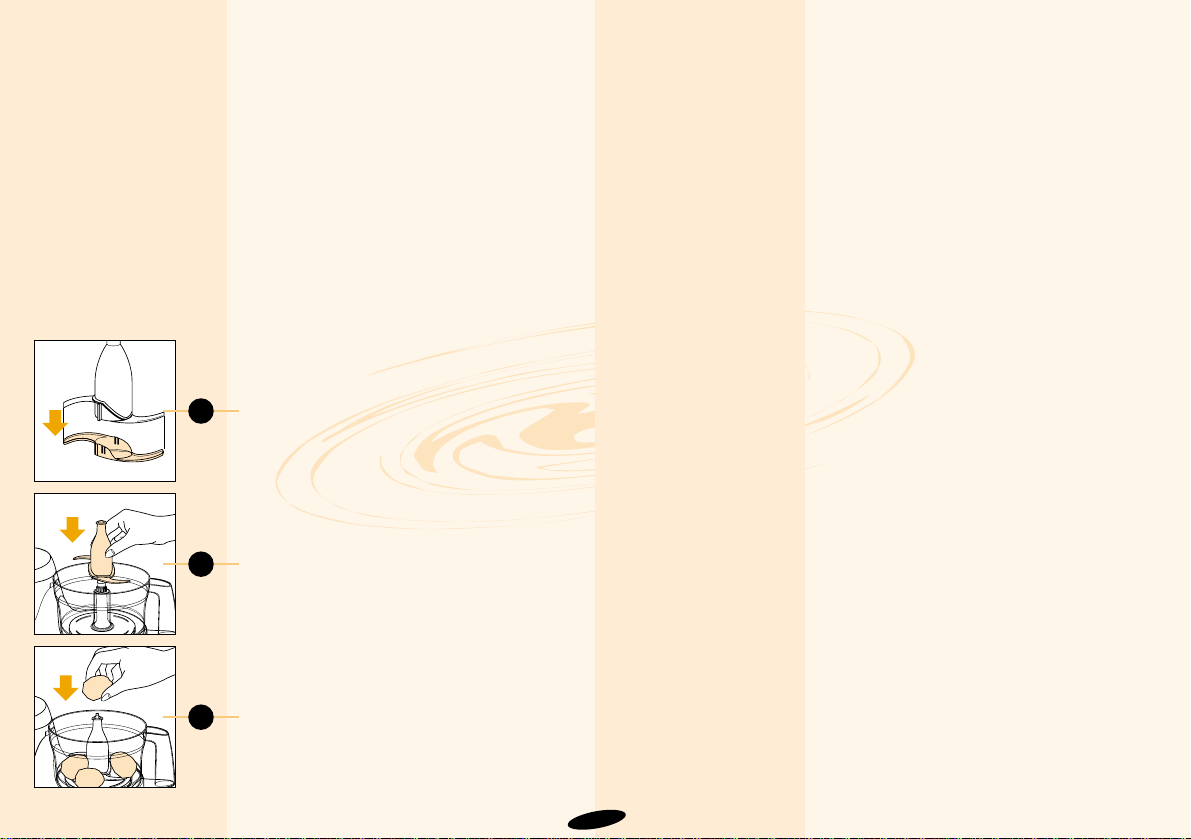
10
11
12
Come usare l’apparecchio
Nota: L’apparecchio funziona soltanto se:
• Il cappuccio a vite (S) o il frullatore (T-X)
sono stati montati correttamente sul blocco
motore (A) e:
• il vaso (B) e gli accessori (coperchio (C),
spremiagrumi o centrifuga) sono stati
montati sul blocco motore conformemente
alle istruzioni fornite in questo manuale.
• Nel caso in cui sia il frullatore che il vaso
siano montati correttamente sul blocco
motore, funzionerà soltanto il frullatore.
Impostate la velocità (P) secondo quanto
suggerito dalle tabelle nelle pagine da 73 a
75 e accendete l’apparecchio. In caso di
dubbi sulla velocità da utilizzare, selezionate
sempre la massima (numero 5).
Lama (G) £
Attenzione: i bordi della lama sono molto
taglienti.
• La lama è adatta per tritare, mescolare,
amalgamare, frullare, ridurre in purè e
preparare torte e biscotti.
- Togliete il cappuccio di protezione dalla
lama (fig. 10)
- Inserite il vaso sul blocco motore (fig. 2) e
inserite la lama sull’albero (fig. 11).
- Impostate la velocità (P) secondo le
indicazioni fornite dalla tabella e accendete
l’apparecchio. In caso di dubbi sulla
velocità da utilizzare, selezionate sempre
quella massima (numero 5).
- Le applicazioni/ricette menzionate nella
tabella saranno pronte dopo 10-60
secondi.
Consigli:
• Evitate di tagliare pezzi troppo grossi;
tagliate gli ingredienti in cubetti di circa 3
cm. prima di introdurli nel vaso.
• L’apparecchio taglia e sminuzza in
pochissimo tempo: evitate quindi di far
funzionare l’apparecchio troppo a lungo,
anche utilizzando il tasto M.
• Quando grattugiate il formaggio, abbiate
cura di non far funzionare il motore troppo
a lungo; il formaggio potrebbe riscaldarsi e
formare dei grumi.
• Se il cibo dovesse raccogliersi attorno alla
lama o alle pareti del vaso:
- spegnete l’apparecchio;
- togliete il coperchio dal vaso;
- togliete il cibo dalle lame e dalle pareti
usando l’apposita spatola.
• Non tritate ingredienti molto duri, come ad
esempio chicchi di caffè, noce moscata e
cubetti di ghiaccio per evitare di
danneggiare la lama. Consultate la tabella
per individuare la velocità più appropriata.
66
Page 66
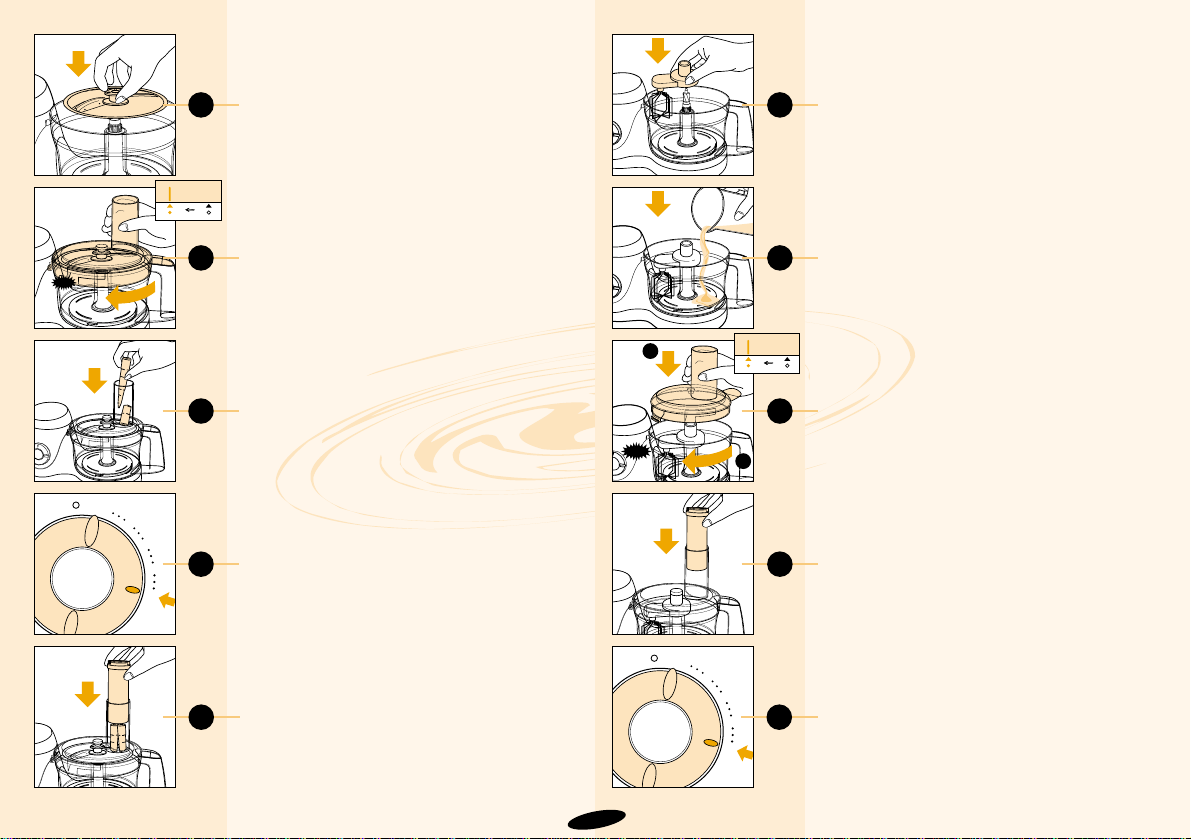
13
CLICK
14
15
M
M
1
2
3
4
5
16
17
18
19
1
2
CLICK
20
21
Disco per affettare (H)
§ e dischi per
grattugiare (I - grosso) • e (J - fine) ¶
Attenzione: i bordi dei dischi sono molto
taglienti.
Per maneggiare i dischi, utilizzate sempre
l’apposita presa in plastica posta al centro.
- Posizionate il vaso sul blocco motore
(fig. 2)
- Inserite il disco per affettare o per
grattugiare (fig. 13)
- Mettete il coperchio sul vaso (fig. 14)
- Inserite gli ingredienti attraverso l’apertura
di inserimento (fig. 15)
- Premete delicatamente gli ingredienti con il
pestello.
- Per affettare e grattugiare: selezionate la
velocità 5 (massima) (fig. 16)
- Se volete tagliare verdure morbide oppure
frutta, potete selezionare anche una
velocità inferiore. Vedere la tabella.
- Esercitate una pressione moderata ma
costante con il pestello. Vi consigliamo di
usare il pestello più piccolo per tagliare
ingredienti come carote ecc. (fig. 17).
Consigli:
• Tagliate i pezzi più grossi per facilitarne
l’introduzione attraverso l’apertura.
• Riempite l’apertura di inserimento in modo
uniforme per ottenere risultati migliori.
• Nel caso di grossi quantitativi di cibo da
affettare o grattugiare, inserite poco cibo
alla volta e svuotate più volte il vaso.
Frusta (K) ß
La frusta è adatta per sbattere le uova,
montare gli albumi o la panna, preparare
farciture, budini e creme.
Attenzione: non usate la frusta per fare la
pasta o le torte!
- Posizionate il vaso sul blocco motore
(fig. 2) e quindi la frusta sull’albero (fig. 18).
- Introducete gli ingredienti nel vaso (fig. 19)
e mettete il coperchio sul vaso (fig. 20).
- Inserite il pestello per chiudere l’apertura
(fig. 21).
- Impostate la velocità (P) prescelta in base
alla tabella e accendete l’apparecchio. In
caso di dubbi sulla velocità da utilizzare,
selezionate sempre quella massima
(numero 5) (fig. 22).
• Le applicazioni/ricette menzionate nella
tabella saranno pronte dopo 2-5 minuti.
67
M
M
1
2
3
4
5
22
Page 67
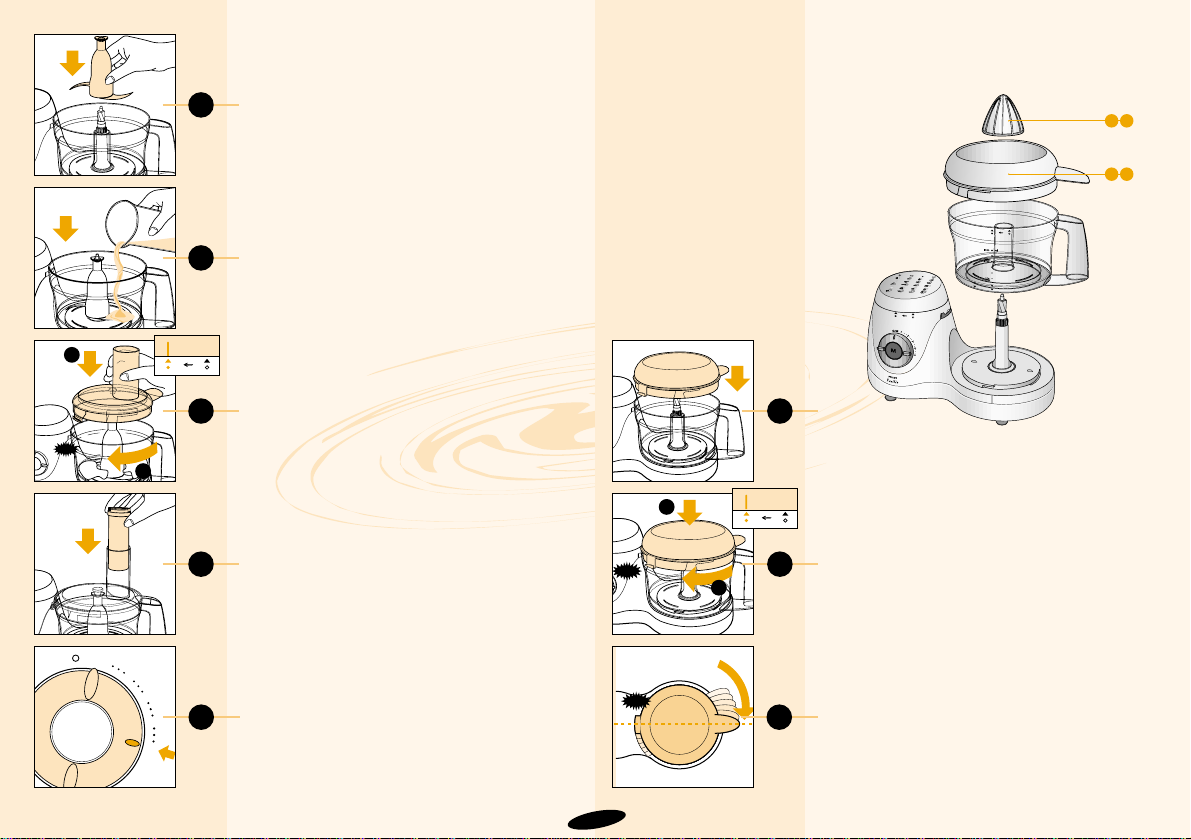
23
24
CLICK
1
2
25
26
27
28
1
2
CLICK
29
Accessorio per impastare (L)
©
• L’accessorio per impastare è adatto per
preparare pasta da pane e miscele per
torte.
- Posizionate il vaso sul blocco motore
(fig. 2) e successivamente l’accessorio per
impastare sull’albero (fig. 23).
- Inserite gli ingredienti nel vaso (fig. 24) e
mettete il coperchio (fig. 25).
- Usate il pestello per chiudere l’apertura
(fig. 26).
- Impostate la velocità 5 (= velocità
massima) (fig. 27). La pasta o la miscela
per torte sarà pronta nel giro di 1-3 minuti.
Spremiagrumi - Descrizione generale
Accessori spremiagrumi µ
AA Cono
AB Setaccio
Gli accessori dello spremiagrumi
possono essere utilizzati esclusivamente
con il robot da cucina Philips HR 7727.
Montaggio
• Inserite prima il vaso sul blocco motore
(fig. 2) e quindi il setaccio (AB) sul vaso
(fig. 28).
• Ruotate il setaccio nella direzione della
freccia (fig. 29) fino a quando la linguetta
del dispositivo di sicurezza scatta in
posizione sul blocco motore. Verificate che
il beccuccio del setaccio copra
completamente l’apertura dell’impugnatura
del vaso (fig. 30).
68
AAA
B
CLICK
30
M
1
2
M
3
4
5
Page 68
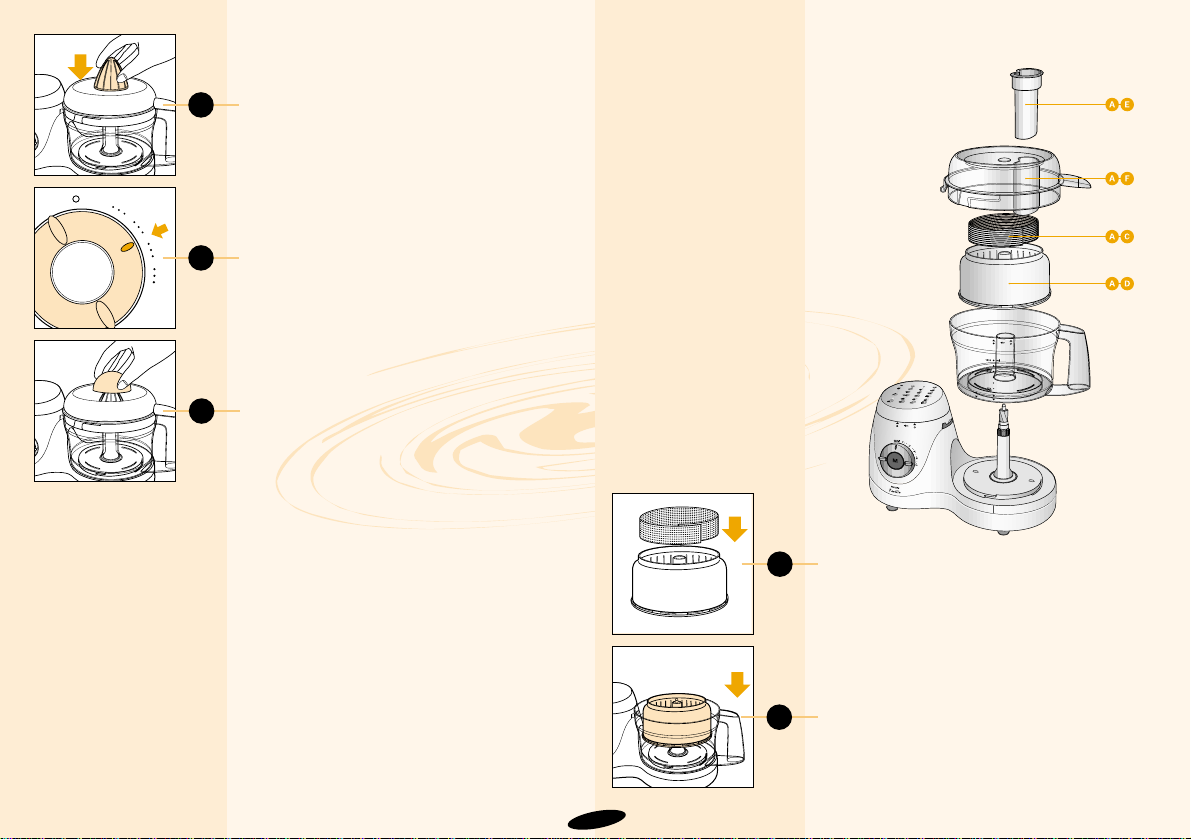
31
M
M
1
2
3
4
5
32
33
34
- Posizionate il cono (AA) (fig. 31) e
premetelo delicatamente.
- Ruotate l’apparecchio e impostate la
velocità 3 (fig. 32).
- Premete con decisione metà frutto sul cono
rotante (fig. 33).
• Interrompete ogni tanto la pressione per
togliere la polpa dal setaccio. Per fare ciò,
staccate l’apparecchio dalla presa e
togliete il vaso insieme al setaccio e al
cono.
Dopo l’uso
- Togliete il vaso insieme agli accessori
spremiagrumi per evitare che il succo
fuoriesca nell’apparecchio.
- Togliete la polpa dal cono e dal setaccio.
- Risciacquate il vaso, il cono e il setaccio
immediatamente dopo l’uso. Per lavare i
pezzi, utilizzate acqua calda con
detergente liquido oppure la lavastoviglie.
Non usate sostanze abrasive, pagliette
ecc.
• Alcuni ingredienti potrebbero far sbiadire gli
accessori. Questo fenomeno non ha
ripercussioni negative e svanirà nel giro di
poco tempo.
Accessori centrifuga 4
AC Filtro AE Pestello
AD Setaccio polpa AF Coperchio
Gli accessori della centrifuga possono
essere utilizzati esclusivamente con il
robot da cucina Philips HR 7727.
Montaggio
• Inserite il vaso sul blocco motore (fig. 2) e
quindi il filtro (AC) nel setaccio della polpa
(AD) (fig. 34).
• Posizionate il setaccio in modo corretto
(fig. 35).
69
35
Page 69
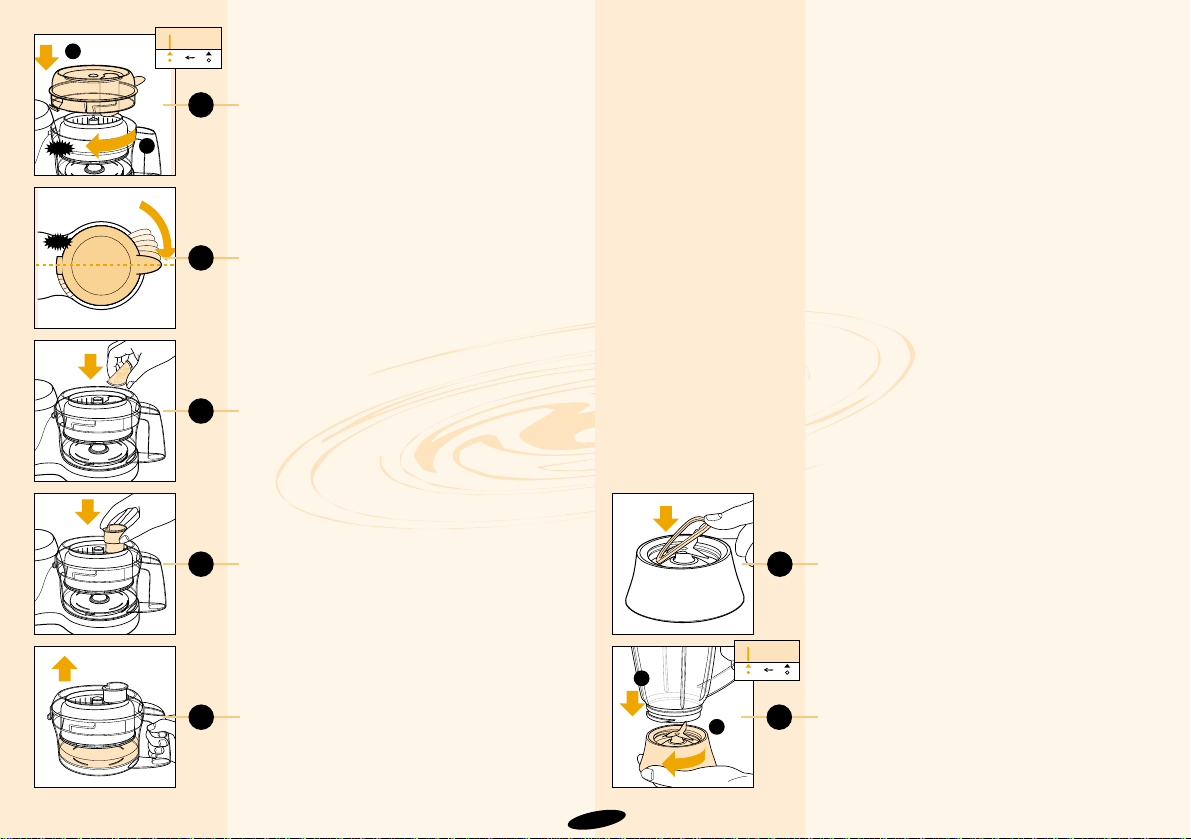
36
CLICK
37
38
39
40
41
- Mettete il coperchio (AF) sul vaso. Ruotate
il coperchio nella direzione della freccia
fino a quando la linguetta del dispositivo di
sicurezza scatta in posizione sul blocco
motore. Verificate che il beccuccio del
coperchio copra completamente l’apertura
dell’impugnatura del vaso (fig. 37).
Come usare la centrifuga
- Accendete l’apparecchio e selezionate la
massima velocità (pos. 5).
- Infilate la frutta o la verdura attraverso
l’apposita apertura (fig. 38).
- Premete la frutta o la verdura utilizzando il
pestello. Cercate di tenere quanto più
possibile chiusa l’apertura inserendo il
pestello, per evitare schizzi e fuoriuscite di
prodotto (fig. 39).
- Lasciate in funzione l’apparecchio per altri
20 secondi per spremere tutto il succo
contenuto nella frutta o nella verdura.
- Per evitare la fuoriuscita di succo
sull’apparecchio, togliete il contenitore
insieme agli accessori della centrifuga
subito dopo l’uso (fig. 40).
Consigli:
• Prima di usare la centrifuga, tagliate a
pezzi le carote, il sedano ecc. , pelate gli
agrumi, i meloni ecc. e snocciolate ciliege,
prugne, albicocche, pesche ecc.
• Accendete sempre l’apparecchio prima di
introdurre la frutta nella centrifuga.
• Spegnete l’apparecchio ogni tanto per
togliere la polpa dal setaccio e dal filtro.
• Non centrifugate grossi quantitativi di frutta
e/o verdura alla volta. Spegnete
l’apparecchio nel caso iniziasse a vibrare
violentemente e pulite accuratamente il
setaccio e il filtro prima di riaccenderlo.
Frullatore (T - X) ®
importante
• L’apparecchio può essere usato con o
senza il frullatore collegato al gruppo
motore. L’apparecchio senza frullatore,
tuttavia, funzionerà soltanto dopo aver
opportunamente inserito il cappuccio a
vite sul foro previsto per l’attacco del
frullatore.
• Prima dell’uso: inserite la spina nella
presa di corrente solo dopo aver
montato correttamente il vaso (V), il
coperchio (U) e il coltello (X) sul blocco
motore.
• Dopo l’uso: togliere la spina dalla presa
prima di togliere il vaso dal gruppo
motore.
• Il frullatore può essere usato per
ottenere un purè molto fine e per
frullare normalmente. Potrete quindi
preparare zuppe, salse, frullati, cibi per
bambini, creme, purè ecc. Se
necessario, tagliate a pezzetti gli
ingredienti prima di introdurli nel
frullatore.
• Non utilizzate ingredienti con
temperatura superiore a 80°C.
• Per evitare gli schizzi, non mettete più
di 1,5 l. di liquido nel vaso del frullatore.
• Non togliete mai il coperchio mentre
l’apparecchio è in funzione.
Montaggio e smontaggio
• Inserite la guarnizione in gomma (W)
attorno al bordo del gruppo coltello (X)
(fig. 41).
• Ruotate il coltello verso sinistra per
attaccarlo al vaso del frullatore (V) (fig. 42).
Controllate che sia fissato saldamente.
70
1
2
42
CLICK
1
2
Page 70
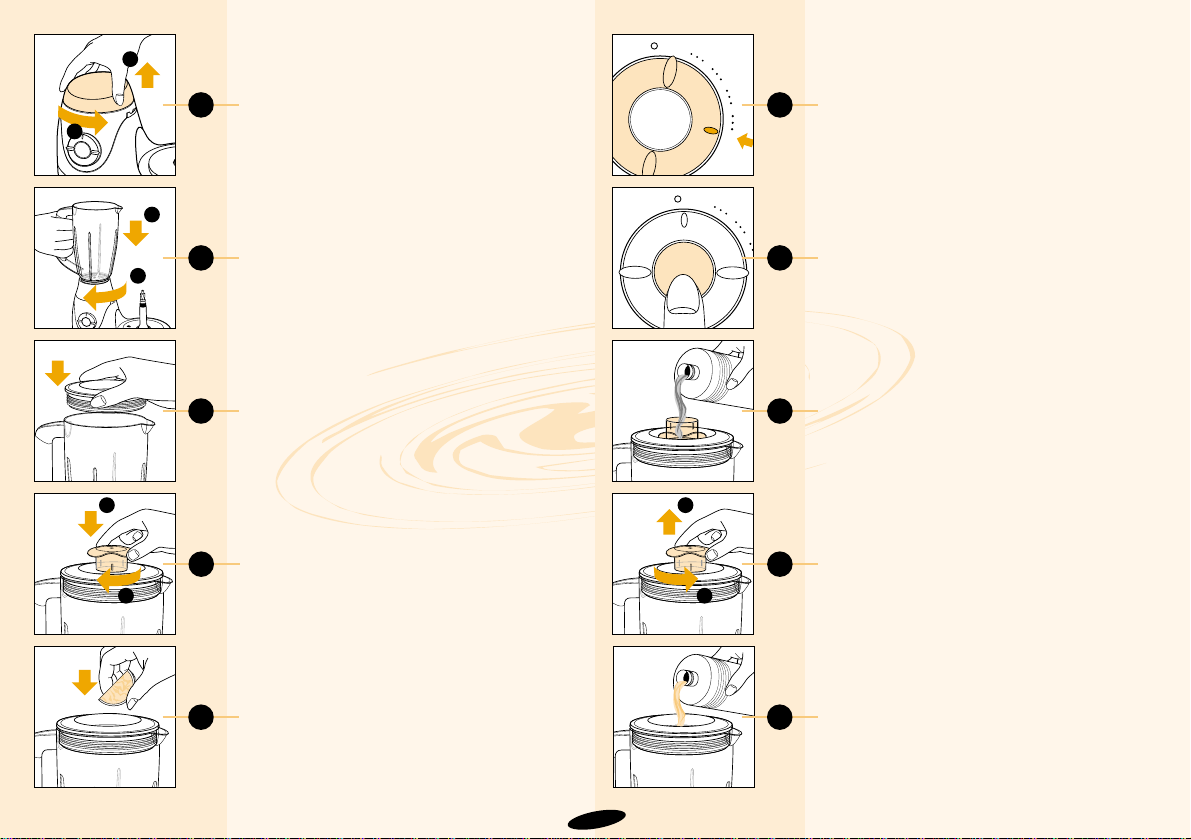
2
43
1
2
44
45
47
46
M
M
1
2
3
4
5
48
M
M
1
2
3
4
5
49
50
2
1
51
- Togliete il cappuccio a vite (S) (fig. 43).
- Inserite il vaso sull’apposito foro e ruotatelo
nella direzione della freccia fino a quando
sarà saldamente fissato (fig. 44).
Attenzione: non esercitate troppa pressione
sul manico del vaso.
- Mettete il coperchio, premendo
leggermente (fig. 45).
- Montate il tappo premendolo verso il basso
e ruotatelo nella direzione delle frecce fino
a quando sarà saldamente fissato (fig. 46).
• Per togliere il frullatore, procedete in senso
inverso.
Come usare il frullatore
- Inserite gli ingredienti nel vaso del frullatore
(fig. 47).
- Accendete l’apparecchio impostando la
velocità consigliata (fig. 48) oppure
premendo il pulsante a intermittenza (M)
(fig. 49). In caso di dubbi sulla velocità da
utilizzare, selezionate sempre la massima
(numero 5). Utilizzate la tabella per
scegliere la velocità più appropriata.
• Le applicazioni/ricette menzionate nella
tabella saranno pronte dopo un tempo
variabile fra i 10 secondi e i 2 minuti.
Consigli:
• Per introdurre gli ingredienti liquidi (ad
esempio l’olio per la maionese), potete
utilizzare il foro posto nel tappo, dopo
averlo capovolto (fig. 50).
• L’apertura posta sul coperchio può essere
usata per aggiungere gli ingredienti
lasciando l’apparecchio in funzione. Svitate
a tale scopo il tappo e toglietelo del
coperchio (figg. 51, 52).
• Più a lungo lascerete in funzione
l’apparecchio e più fine sarà il prodotto
ottenuto.
• Ricordate di spegnere ogni tanto
l’apparecchio per togliere gli eventuali
pezzetti rimasti attaccati alle pareti del
frullatore.
• Spegnete l’apparecchio e togliete la spina.
• Togliete il tappo e il coperchio.
• Togliete i pezzi attaccati alle pareti
utilizzando la spatola e tenendola ad una
certa distanza dal coltello (circa 2 cm.)
71
52
1
1
2
Page 71
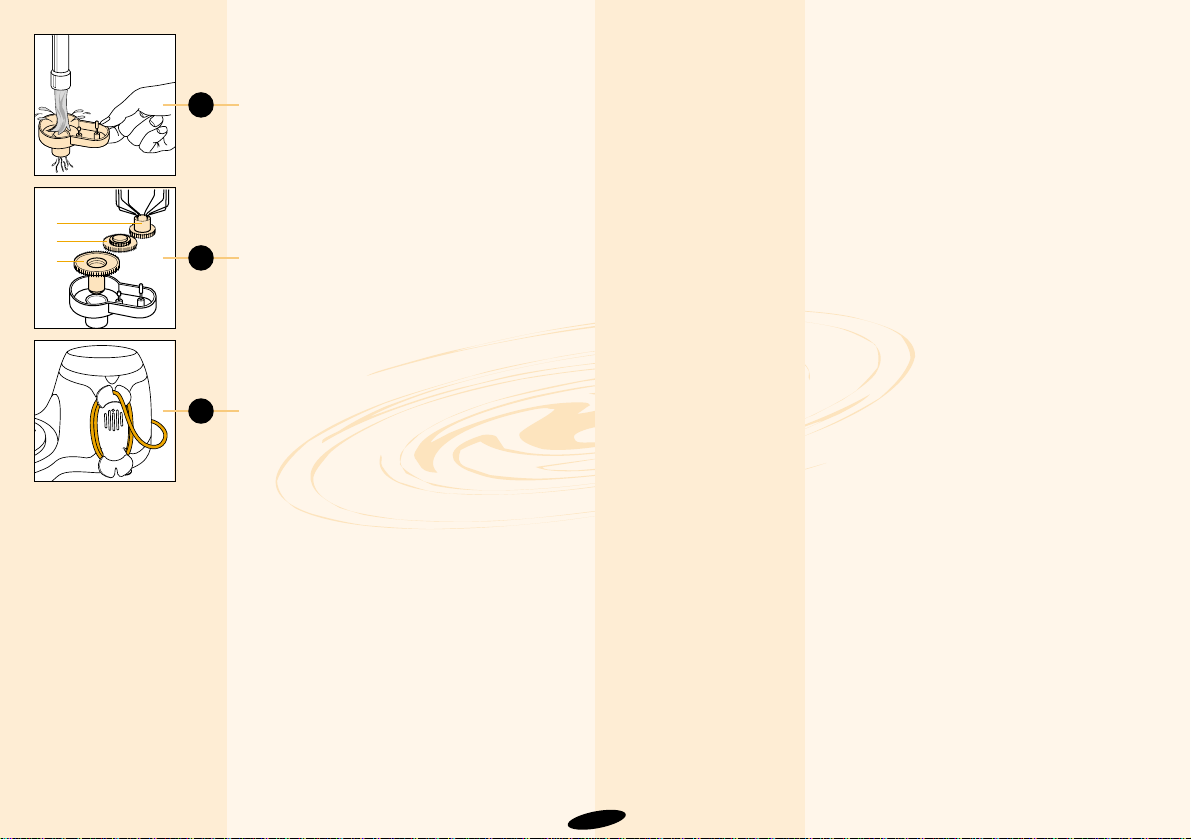
53
2
1
3
54
55
Pulizia
• Prima di pulire il blocco motore, togliete
sempre la spina dalla presa di corrente.
• Il blocco motore può essere pulito con un
panno umido. Non immergete né
risciacquate mai il motore nell’acqua.
• Lavate i pezzi che sono venuti a contatto
con il cibo con acqua saponata subito
dopo averli utilizzati.
• Fate attenzione quando pulite la lama, il
coltello del frullatore e i dischi: le lame
sono molto taglienti!
• Assicuratevi che i bordi taglienti della lama
e dei dischi non urtino oggetti duri perché
potrebbero danneggiarsi.
• Gli ingranaggi della frusta possono essere
facilmente smontati per la pulizia (figg. 53,
54).
• Alcuni ingredienti potrebbero far sbiadire gli
accessori. Questo fenomeno non ha
ripercussioni negative e svanirà nel giro di
poco tempo.
• Arrotolate in cavo in eccedenza attorno
all’apposito gancio posto sul retro
dell’apparecchio (fig. 55).
72
Page 72

73
Mele, carote, sedano
- Grattuggiare
- Affettare
Mele, carote, sedano, uva
Pastella (pancake)
- Frullare
Pangrattato
- Grattugiare
Creme al burro
Formaggio (Parmigiano)
- Grattugiare
Formaggio (Gouda)
- Grattugiare
Cioccolato
- Tritare
Pasta (torte, dolci, fagottini)
- Impastare
Pasta (pane)
- Impastare
Pasta (pizza)
- Impastare
500 g.
500 g.
500 ml. latte
100 g.
300 g.
200 g.
200 g.
200 g.
300 g. di
farina
700 g. di
farina
700 g. di
farina
5 / M
5
5
5
5
5
3
M / 5
5
5
5
Tagliate a pezzetti gli ingredienti. Riempire l’apertura con i pezzetti e grattugiare premendo delicatamente con il pestello
Tagliate a pezzetti gli ingredienti e introduceteli nell’apertura premendo
con l’apposito pestello.
Versate prima il latte e poi gli altri ingredienti. Miscelate gli ingredienti per
circa 1 minuto. Se necessario, ripetere l’operazione 2 volte. Fermatevi poi
per pochi minuti per permettere all’apparecchio di raffreddarsi.
Usate pane secco.
Usate burro morbido per ottenere un migliore risultato
Usate pezzetti di formaggio senza crosta
Tagliate il formaggio a pezzetti e premete delicatamente con il pestello
Usate cioccolato fondente, ridotto in cubetti di 2 cm. Utilizzate il pulsante
M per i primi secondi, poi passate alla velocità massima per tritarlo finemente.
Utilizzate margarina e acqua fredda. Mettete la farina nel vaso e
aggiungete la margarina tagliata a cubetti di 2 cm. Mescolate a vel. max.
fino ad ottenere un ammasso di briciole, quindi aggiungete l’acqua fredda
con l’apparecchio in funzione. Spegnete non appena avrete ottenuto una
palla. Lasciate raffreddare la pasta prima di lavorarla ulteriormente.
Mescolate l’acqua tiepida con il lievito e lo zucchero. Aggiungete la farina,
il burro ed il sale e impastate per circa 90 secondi. Lasciate lievitare per
30 minuti.
Stessa procedura utilizzata per la pasta da pane. Impastate la farina per
circa 1 minuto.
Insalate, crudité
Cocktails di frutta e
verdura
Pancake, waffles,
crêpes
Cibi impanati, piatti al
gratin
Dessert, dolci,
farciture
Guarnizione,
minestre, sughi, piatti
al gratin
Sughi, pizza, piatti al
gratin, fonduta
Guarnizioni, creme,
dolci, budini,
mousse
Torte alla frutta,
quiches, dolci.
Pane
Pizza, focaccia.
¶
§
4
®
£
£
≠
≠
£
£
©
£ / ©
Ingredienti Q.tà max. Interr. Accessori Procedura Applicazioni
e velocità
Page 73

74
Pasta (lievitata)
- Impastare
Pasta (pasticcini)
- Impastare
Albumi
- Montare
Frutta (mele, pesche, banane)
- Affettare
- Purè
Erbe (prezzemolo)
- Tritare
Cetrioli, carote, porri
- Affettare
Limoni, arance e pompelmi
- Spremere
Maionese
- Emulsionare
Carne, pesce, pollo
- carne magra
- carne grassa
Frappé
- Frullare
500 g.di
farina
500 g di
farina
4 albumi
500 g.
700 g.
75 g.
min. 1
pezzo
1 kg.
3 uova
500 g.
400 g.
250 ml. latte
5
5
4-5
M
5
5 / M
5 / M
3
2 - 5
5 / M
5 / M
5
Mescolate il lievito con il latte tiepido e un po’ di zucchero. Aggiungete la
farina, lo zucchero, il sale, le uova e la margarina ammorbidita. Impastate
fino a quanto la pasta si attacca alle pareti del vaso. Lasciate lievitare per
30 minuti.
Mescolate il lievito con il latte tiepido e un pò di zucchero. Aggiungete la
farina, lo zucchero, il sale, le uova e la margarina ammorbidita. Impastate
fino a quando la pasta si attacca alle pareti del vaso (occorrerà 1 minuto
circa). Lasciate lievitare per 30 minuti.
Usate uova a temperatura ambiente. Nota: Montate almeno due albumi
per volta
Aggiungete del succo di limone per non fare annerire la frutta
Lavate e asciugate con cura le erbe prima di tritarle
Riempite l’apertura con pezzetti di porro, carota o cetriolo e premete delicatamente con il pestello
Tagliate a metà la frutta e appoggiateli sul cono dello spremiagrumi, premendo delicatamente.
Utilizzate ingredienti a temperatura ambiente. Nota: usate almeno un uovo
intero oppure due tuorli.
Togliete le ossa e le lische. Tagliate la carne o il pesce in cubetti di 3 cm.
Usate il tasto M per tritare grossolanamen-te
Riducete la frutta in purè (banane, fragole ecc.), unite lo zucchero, il succo
di limone, il latte e un po’ di gelato. Frullate con cura.
Pane speciale
Pasticcini alla frutta,
biscotti, dolci alla
frutta
Budini, soufflé,
meringhe
Macedonie
Marmellate, salse,
cibo per bambini
Salse, insalate, torte
salate
Zuppe, insalate, torte
salate
Succhi di frutta,
bevande vitaminiche,
sorbetti.
Patatine fritte,
insalate, fonduta,
salse, guarnizione
Tartara, hamburger,
carne trita
©
£
ß
£
®
£
§
µ
£
£
£
®
Ingredienti Q.tà max. Interr. Accessori Procedura Applicazioni
e velocità
Page 74

75
Miscela (pan di spagna)
- Sbattere
Miscela (torta)
- Sbattere
Noci, frutta secca Tritare
Cipolle
- tritare
- affettare
Piselli, fagioli (cotti)
Ridurre in purè
Patate lesse
- Ridurre in purè
Zuppe
- Frullare
Verdure
- Tagliare
Verdura e carne (cotte)
- Ridurre in purè
Panna montata
- Montare
3 uova
4 uova
250 g.
500 g.
500 g.
500 g.
750 g.
di patate
500 ml.
500 g.
500 g.
400 ml.
3 - 5
1/5
5 / M
5 / M
5 / M
5
2 - 4
5
5
5
2 - 4
Usate ingredienti a temperatura ambiente. Sbattete le uova con lo zucchero alla vel. max. fino ad ottenere un composto ben sodo. Aggiungete la
farina setacciata e continuate a frullare a vel. 1
Usate ingredienti a temperatura ambiente. Sbattete il burro morbido e lo
zucchero fino ad ottenere un composto cremoso. Aggiungete il latte, quindi le uova e la farina.
Usate il tasto M per tritare grossolanamente oppure la vel. max. per un
composto più fine
Pelate le cipolle e tagliatele in 4. Usatene almeno 100 g.
Pelate le cipolle, tagliatele a pezzi e introducetele nel vaso. Usatene
almeno 100 g.
Usate piselli o fagioli cotti, Se necessario, aggiungete un po’ di liquido fino
a raggiungere la consistenza desiderata
Cuocete le patate al dente. La quantità di latte dipende dal tipo di patate
utilizzate. Usate latte tiepido (max. 80°C) e aggiungetelo lentamente
tenendo la lama in funzione
Usate verdure cotte
Riducete in cubetti di 3 cm. e tagliate con la lama
Per un purè più grosso, aggiungete poco liquido. Per un purè più fine, continuate ad aggiungere liquidi fino ad ottenere la consistenza desiderata
Usate panna ben fredda.
Nota: Montate almeno 125 ml. di panna alla volta
Pan di spagna,
pasticcini
Torte
Insalate, pane, torta,
budini
Insalate, cibi cotti
Purè, zuppe
Purè, piatti al forno
Zuppe, salse
Zuppe, crudité,
insalate
Pappe per bambini
Guarnizioni, creme,
budini, mousse
ß / ©
£
£
£
§
®
£
®
£
®
ß
Ingredienti Q.tà max. Interr. Accessori Procedura Applicazioni
e velocità
Page 75
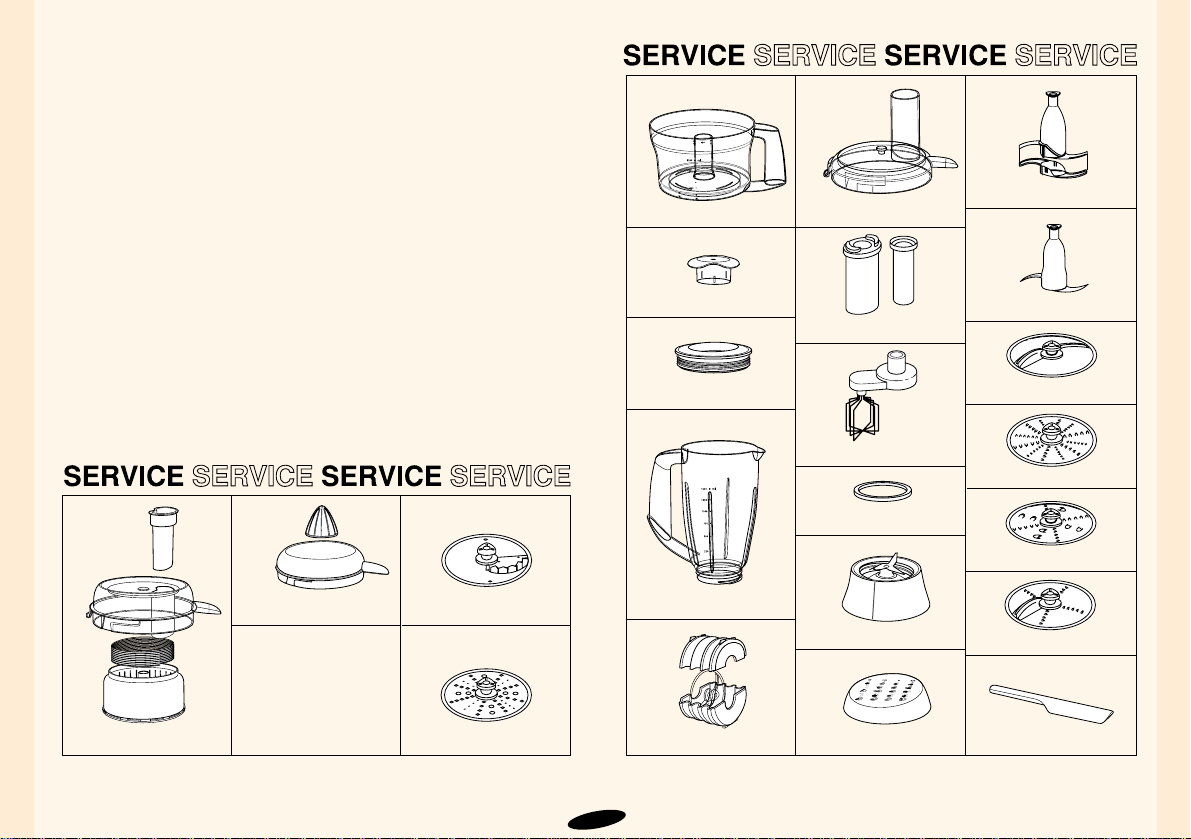
76
Accessori
Vengono elencati qui di seguito gli
accessori standard:
- Vaso (B)
- Coperchio (C)
- Lama (G)
- Disco per affettare (H)
- Disco per grattugiare (grosso) (I)
- Disco per grattugiare (fine) (J)
- Frusta (K)
- Accessorio per impastare (L)
- Doppio pestello (O)
- Scatola per dischi (Q)
- Frullatore (T-X)
- Spatola (Y)
- Spremiagrumi µ (AA-AB)
- Centrifuga 4(AC-AF)
Sono inoltre disponibili i seguenti
accessori aggiuntivi:
- Disco per patate a bastoncino
(n°. 4822 690 10139)
- Disco semplice per patatine a
fiammifero HR 2912
(n˚ 4822 690 10141)
Rivolgetevi al vostro rivenditore di
fiducia per sapere se tali accessori
sono disponibili anche nel vostro
paese.
Per ordinare gli accessori aggiuntivi o sostituire quelli standard,
citare sempre il numero di riferimento e/o il codice.
4822 418 10343
4822 418 10342
4203 065 61850
4822 462 11055
4203 065 61990
4822 422 01336
4203 065 61880
4203 065 61870
4203 065 61890
4203 065 61900
4203 065 61920
4203 065 61980
4203 065 61960
4203 065 61970
4203 065 61930
4203 065 61940
4203 065 61950
4203 065 61860
4203 065 61820
4203 065 61810
4203 065 61830
4203 065 61840
Page 76

77
L’apparecchio non funziona come dovrebbe?
Se il vostro apparecchio non dovesse funzionare bene, leggete quanto sotto riportato e studiate con attenzione le istruzioni corrispondenti.
Possibile soluzione
Ruotate il vaso e/o il coperchio nella direzione indicata (fino a quando sentite un click!).
Controllate che le frecce sul vaso e sull’apparecchio e quelle sul vaso e sul coperchio siano poste una
di fronte all’altra (ved. fig. 2 e 6).
Controllate il corretto posizionamento del vaso del frullatore o del cappuccio a vite e ruotateli nella
direzione indicata fino a quando si bloccano.
Si tratta probabilmente del dispositivo di sicurezza che ha interrotto automaticamente l’erogazione di
corrente a causa di un surriscaldamento.
Togliete la spina dalla presa.
Mettete l’interruttore in posizione O.
Lasciate raffreddare l’apparecchio per circa 15 minuti.
Rimettete la spina nella presa.
Riaccendete l’apparecchio.
Nel caso in cui il dispositivo di sicurezza intervenisse troppo spesso, contattate un rivenditore
autorizzato Philips o un centro di assistenza Philips.
Selezionate la giusta velocità. Fate riferimento alle istruzioni riportate nel manuale o direttamente
sull’apparecchio.
Provate ad aggiungere del succo di limone o un pizzico di sale. Controllate che il vaso e la frusta siano
perfettamente puliti e selezionate la giusta velocità.
Usate la frusta. La panna deve essere ben fredda (circa 6°C).
Usate la frusta soltanto per montare la panna o gli albumi o per miscelare prodotti liquidi. Non usatela
per preparare pasta, miscele per torta o pastelle.
Attenetevi alle istruzioni fornite. Non aggiungete troppa acqua. Usate sempre l’accessorio indicato sulla
tabella. Non impastate troppo a lungo (vedere i tempi consigliati).
Problema
L’interruttore non funziona
L’apparecchio si blocca
all’improvviso
L’apparecchio non taglia, trita o
grattugia in modo soddisfa-cente
L’apparecchio non monta bene gli
albumi a neve
L’apparecchio non monta bene la
panna
La frusta scivola o si piega
La pasta si attacca ai bordi esterni
del vaso
Page 77
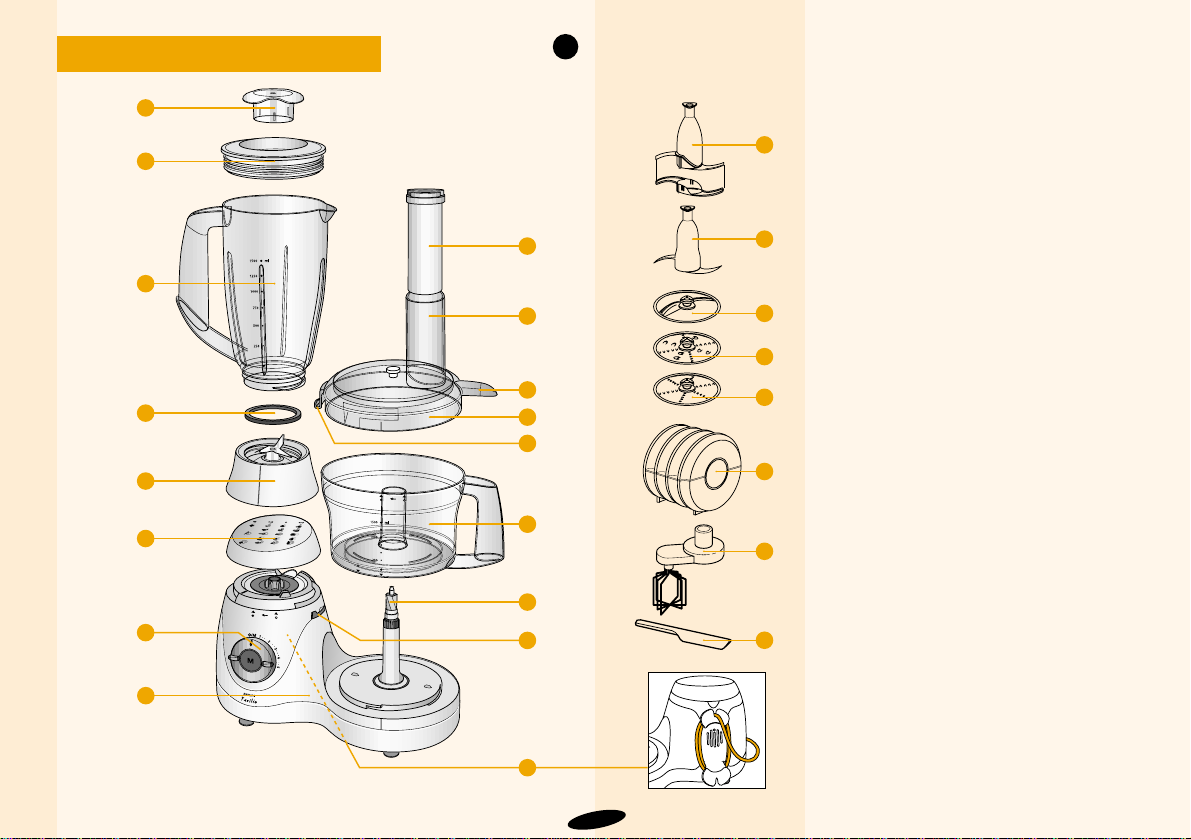
78
Descripción general (fig. 1)
A Unidad motora
B Recipiente
C Tapa del recipiente
D Reborde de la tapa (cierra y abre el
incorporado cierre de seguridad)
E Saliente (Tapa la abertura del asa)
F Cierre de seguridad
G Cuchilla £
H Disco rebanado §
I Disco rallado grueso •
J Disco rallado fino ¶
K Agitador ß
L Accesorio amasador ©
M Eje conductor
N Conducto
O Empujador doble
P Control de velocidad
0 = Paro
1-2-3-4-5 = Control variable de la
velocidad
(1 = Velocidad mínima, 5 = Velocidad
máxima)
M = Marcha “Turbo”/Pulsador (El aparato
funciona mientras el pulsador está
presionado)
Q Caja para almacenar los discos
R Alojamiento para enrollar el cable de
red
S Tapa roscada (Para cerrar el agujero de
fijación de la jarra trituradora cuando esta
no está usándose)
Accesorios trituradores ®
T Obturador
U Tapa
V Jarra trituradora
W Anillo de goma para cierre hermético
X Unidad de cuchillas
Y Espátula
1
T
N
O
G
L
H
I
J
K
Y
Q
D
C
B
M
R
F
E
U
V
W
X
S
A
P
Español
Page 78

Desconectador automático y autorearmable
Antes de empezar a utilizar el aparato, lean cuidadosamente estas
instrucciones.
Para evitar los deterioros debidos a sobrecalentamientos, su aparato ha
sido equipado con un sistema de desconexión automática. En caso de
sobrecalentamiento, este sistema desconectará automáticamente la
entrada de corriente al aparato.
Si siguen las instrucciones indicadas a continuación, podrán volver a
poner en marcha el aparato después de haberlo dejado enfriar 15
minutos.
Si su aparato súbitamente deja de funcionar :
- Desenchufen el aparato de la red.
- Coloquen el interruptor en la posición O.
- Dejen que el aparato se enfríe 15 minutos.
- Vuelvan a enchufar el aparato a la red.
- Vuelvan a poner en marcha el aparato.
Contacten con su distribuidor Philips o con un autorizado Centro de
Servicio Philips si el sistema de desconexión automática se activa
repetidamente.
Símbolos sobre el aparato
A la izquierda de los símbolos de las diferentes aplicaciones pueden
ver una imagen del accesorio a ser usado.
Sobre esta imagen ha sido indicada la velocidad más apropiada para
esa aplicación en particular : M “Turbo” (= ajuste pulsante) o
Velocidades desde 1 a 5 (Ver la tabla, pág. 88-90).
Importante
• Antes de empezar a utilizar el aparato, lean las instrucciones y
miren las ilustraciones.
• Quiten la funda protectora de la cuchilla metálica cada vez que
vayan a usarla.
• Tengan mucho cuidado al manejar la cuchilla metálica, la cuchilla
de la jarra trituradora y los discos para rebanar / rallar.
¡ Están muy afilados !.
• Antes de usar el aparato por primera vez, laven todas las piezas que
hayan de entrar en contacto con los alimentos.
• Coloquen de modo correcto la tapa sobre el recipiente.
El incorporado cierre de seguridad quedará entonces desactivado y
podrán poner el aparato en funcionamiento.
• Tengan en cuenta que la jarra trituradora solo funcionará si tanto el
recipiente como la propia jarra trituradora han sido correctamente
montados.
• No permitan nunca que el aparato funcione sin vigilancia.
• No dejen nunca que los niños utilicen el aparato.
• Cuando mezclen o trituren líquidos, no excedan el contenido
máximo indicado en el recipiente o en la jarra trituradora
(Línea superior de la graduación).
• No excedan las cantidades ni los tiempos de proceso máximos
indicados en las tablas.
• Esperen a que se paren completamente las partes giratorias antes
de quitar la tapa.
• No metan nunca sus dedos u objetos (Por ejemplo, una espátula) en
el conducto durante el funcionamiento.
Para esta función, solo puede usarse el empujador doble.
• No metan nunca sus dedos u objetos (Por ejemplo, una espátula) en
la jarra trituradora a menos que, primero, hayan desenchufado el
aparato de la red.
• No sumerjan nunca la unidad motora en agua ni en cualquier otro
líquido. No la enjuagen tampoco.
• Después del uso, desenchufen el aparato de la red.
• Si el cable de red de este aparato es dañado, solo puede ser
reemplazado por la Organización Philips o por un taller de servicio
autorizado por ella, ya que se requieren herramientas y/o piezas
especiales.
• Conserven estas instrucciones para futuras consultas.
79
Page 79
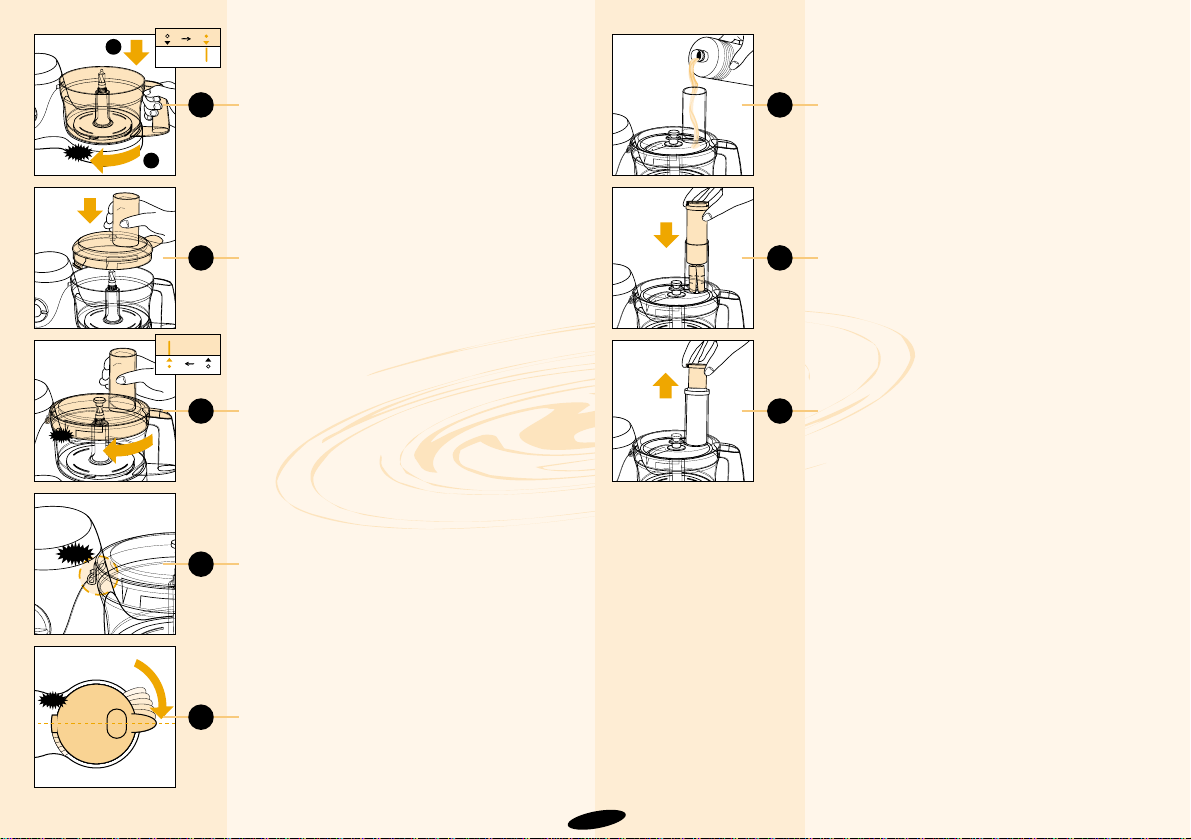
1
2
3
CLICK
4
CLICK
5
CLICK
6
7
8
9
Posicionamiento del recipiente (B) (fig. 2)
- Posicionen el recipiente sobre el Robot de
Cocina tal como se indica (1).
- Hagan girar el asa en la dirección de la
flecha hasta llegar a tope y oír un “click”
(2).
Posicionamiento de la tapa (C)
- Posicionen la tapa sobre el recipiente tal
como se indica en la fig. 3.
- Hagan girar con alguna fuerza la tapa en la
dirección de la flecha hasta llegar a tope y
oír un “click” (figs. 4 - 5).
- Asegúrense de que coincidan la marca
sobre la tapa y la flecha sobre el
recipiente. El saliente de la tapa cubrirá
entonces la abertura del asa del recipiente
(fig. 6).
Conducto (N) y empujador (O)
• El conducto puede ser usado para añadir
ingredientes líquidos y sólidos (fig. 7).
• Usen el empujador para hacer avanzar los
ingredientes a través del conducto (fig. 8).
• Para evitar el polvo o que gotas de líquido
se escapen a través del conducto, también
pueden usar el empujador para cerrar el
conducto durante el funcionamiento.
• El empujador está equipado con un
segundo empujador pequeño.
- Este empujador pequeño puede quitarse
(fig. 9) para lograr un conducto más
estrecho.
- Un conducto más estrecho puede ser útil
cuando deseen, por ejemplo, cortar
zanahorias o cuando la cantidad de
ingredientes usada sea demasiado
pequeña para usar el conducto normal.
Nota : Usen el empujador pequeño solo
cuando el empujador más grande haya
sido colocado en el conducto.
Incorporado cierre de seguridad (F)
La unidad motora así como los accesorios
están provistos de marcas. El aparato solo
funcionará si la flecha sobre el aparato
coincide con la marca sobre la tapa (C) y
sobre otros accesorios. En esta posición, el
saliente de la tapa y de los accesorios
taparan la abertura del asa del recipiente.
80
CLICK
2
Page 80
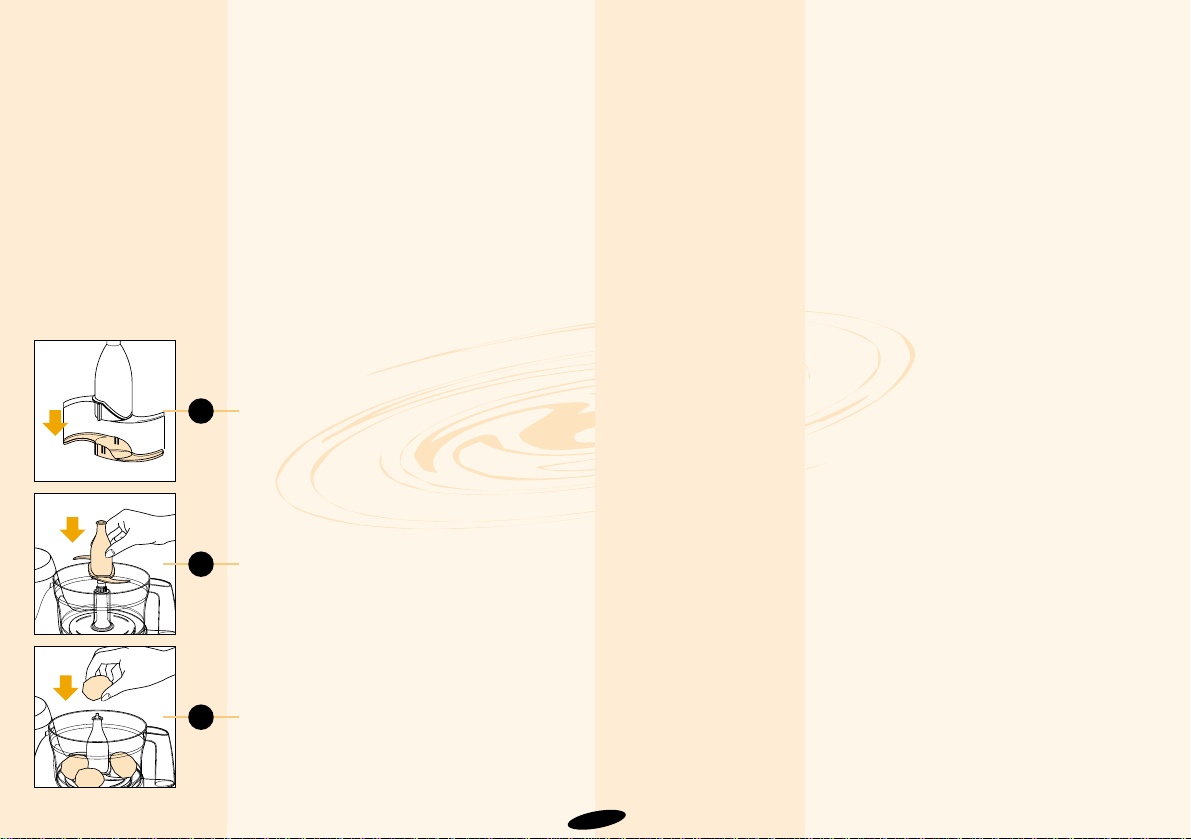
10
11
12
Cómo usar el aparato
Notas: - El aparato solo funcionará si :
• La tapa roscada (S) o la jarra trituradora
(T-X) han sido adecuadamente montada
sobre la unidad motora (A) y
• El recipiente (B) y los accesorios [Tapa
(C), exprimidor o licuadora) han sido
montados en la unidad motora de acuerdo
con las instrucciones de este folleto.
• La jarra trituradora solo funcionará si tanto
el recipiente y como la propia jarra
trituradora han sido correctamente
montados en la unidad motora.
Ajusten el selector de la velocidad (P) a la
posición indicada en las tablas (pág. 88-90)
y pongan en marcha el aparato. Cuando
tengan dudas sobre la velocidad correcta,
seleccionen siempre la velocidad más alta
(Posición 5).
Cuchilla (G) £
¡ Tengan cuidado ya que los filos
cortantes están muy afilados !
• La cuchilla sirve para picar, mezclar,
triturar, hacer puré y preparar pasta para
buñuelos, pasta para pastelería y
panecillos.
- Quiten la cubierta protectora de la cuchilla
(fig. 10).
- Coloquen el recipiente en la unidad motora
(fig. 2) y fijen la cuchilla sobre el eje
conductor (fig. 11).
- Pongan los ingredientes en el recipiente
(fig. 12).
- Fijen la tapa sobre el recipiente y pongan
el empujador en el conducto.
- Ajusten el control de la velocidad (P) en la
posición indicada en la tabla y pongan el
aparato en marcha.
Si tienen dudas sobre la velocidad
correcta, seleccionen siempre la velocidad
más alta (Posición 5).
• Las aplicaciones / recetas mencionadas en
la tabla estarán listas después de 10 - 60
segundos.
Consejos
• Es mejor no picar trozos grandes con la
cuchilla.
Córtenlos a trozos de unos 3 cm antes de
ponerlos en el Robot de Cocina.
• El aparato pica muy rápidamente. Para
evitar que los ingredientes se piquen
demasiado finamente, háganlo funcionar a
cortos períodos a la vez incluso cuando
estén usando la posición M “Turbo”.
• Cuando piquen queso (duro), tengan
cuidado de no mantener el
motor funcionando demasiado tiempo, ya
que se corre el riesgo de que el queso se
funda y forme masa.
• Si los alimentos se agarran a la cuchilla o
al interior del recipiente :
- Paren el aparato.
- Saquen la tapa del recipiente
- Utilizando una espátula, quiten los
ingredientes de la cuchilla o del recipiente.
• No trituren ingredientes muy duros, tales
como granos de café, nuez moscada o
cubitos de hielo, ya que podrían mellar la
cuchilla metálica. Consulten la tabla para la
adecuada velocidad y ajuste.
81
Page 81
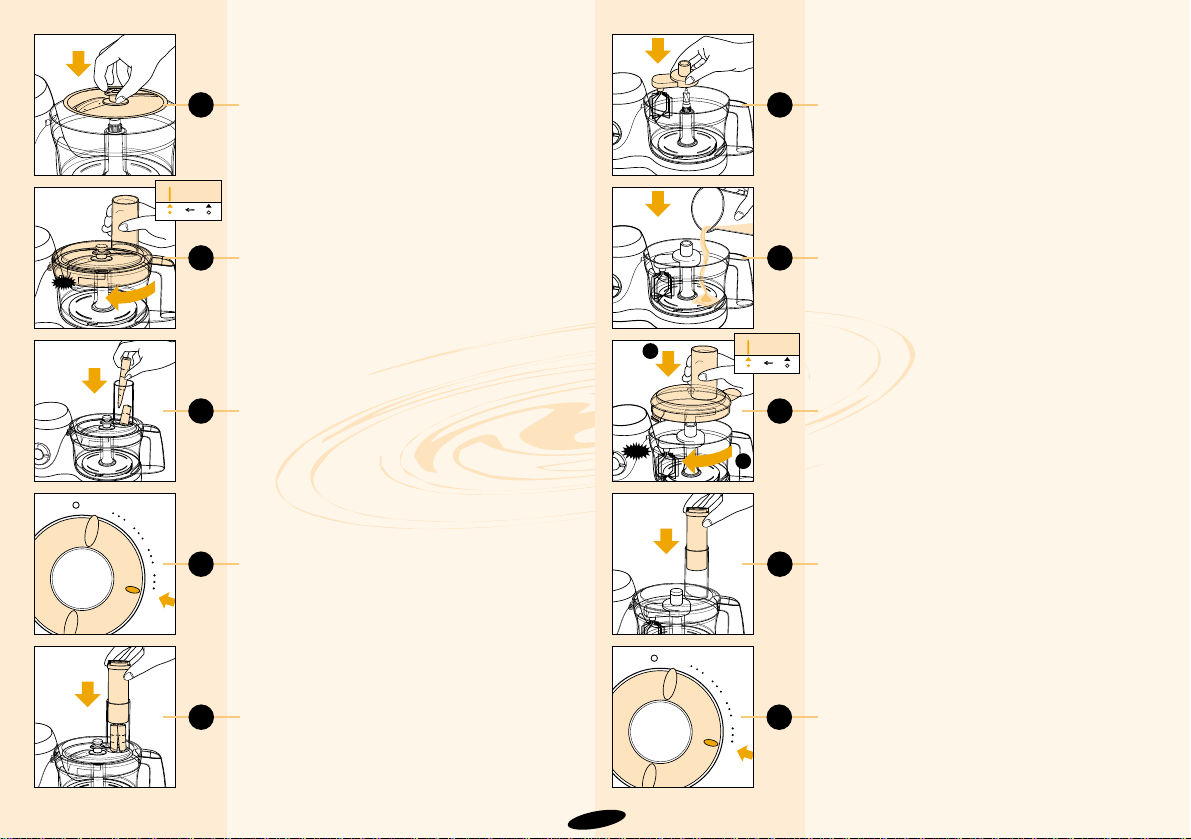
13
CLICK
14
15
M
M
1
2
3
4
5
16
17
18
19
1
2
CLICK
20
21
Disco para rebanar (H)
§ y discos para
rallar (I, grueso) • y (J, fino) ¶
¡ Tengan cuidado con los discos ya que
los filos están muy afilados! Cojan solo la
pieza plástica del centro de los discos.
- Coloquen el recipiente en la unidad motora
(fig. 2).
- Coloquen el disco para rebanar o para
rallar en su lugar (fig. 13).
- Coloquen la tapa en el recipiente (fig. 14).
- Introduzcan los ingredientes en el
conducto (fig. 15).
- Presionen el empujador ligeramente sobre
los ingredientes colocados en el conducto.
- Para rallar y rebanar : Coloquen el control
de velocidad en la posición 5 (Velocidad
máxima) (fig. 16).
- Si quieren cortar vegetales blandos o
frutas, también pueden seleccionar una
posición de menor velocidad. Vean la
tabla.
- Utilizando el empujador, presionen los
ingredientes suave y firmemente hacia
abajo (fig. 17). Les aconsejamos usar el
conducto estrecho y el empujador pequeño
para cortar ingredientes como zanahorias .
Consejos
• Corten previamente las piezas grandes
para facilitar su introducción en el
conducto.
• Llenen uniformemente el conducto de los
alimentos a fin de obtener los mejores
resultados.
• Cuando deban cortar grandes cantidades
de alimentos, procesen solo pequeñas
partes de los mismos a la vez y vacíen
cada vez el recipiente.
Agitador (K) ß
Pueden usar el agitador para batir huevos
enteros, claras de huevo, acabados
superiores para postres, pudines
instantáneos y batir nata.
Nota : ¡ No usen el agitador para hacer
pasta culinaria o mezcla para pastelería !
- Coloquen el recipiente en la unidad motora
(fig. 2) y fijen el agitador al eje conductor
(fig. 18).
- Pongan los ingredientes en el recipiente
(fig. 19) y fijen la tapa sobre el recipiente
(fig. 20).
- Para aislarlos, coloquen el empujador en el
conducto (fig. 21).
- Ajusten el control de la velocidad (P) en la
posición indicada en las tablas y pongan
en marcha el aparato. Si tienen dudas
sobre la velocidad correcta, seleccionen
siempre la velocidad más alta (Posición 5)
(fig. 22).
• Las aplicaciones / recetas mencionadas en
la tabla estarán listas después de 2 - 5
minutos.
82
M
M
1
2
3
4
5
22
Page 82
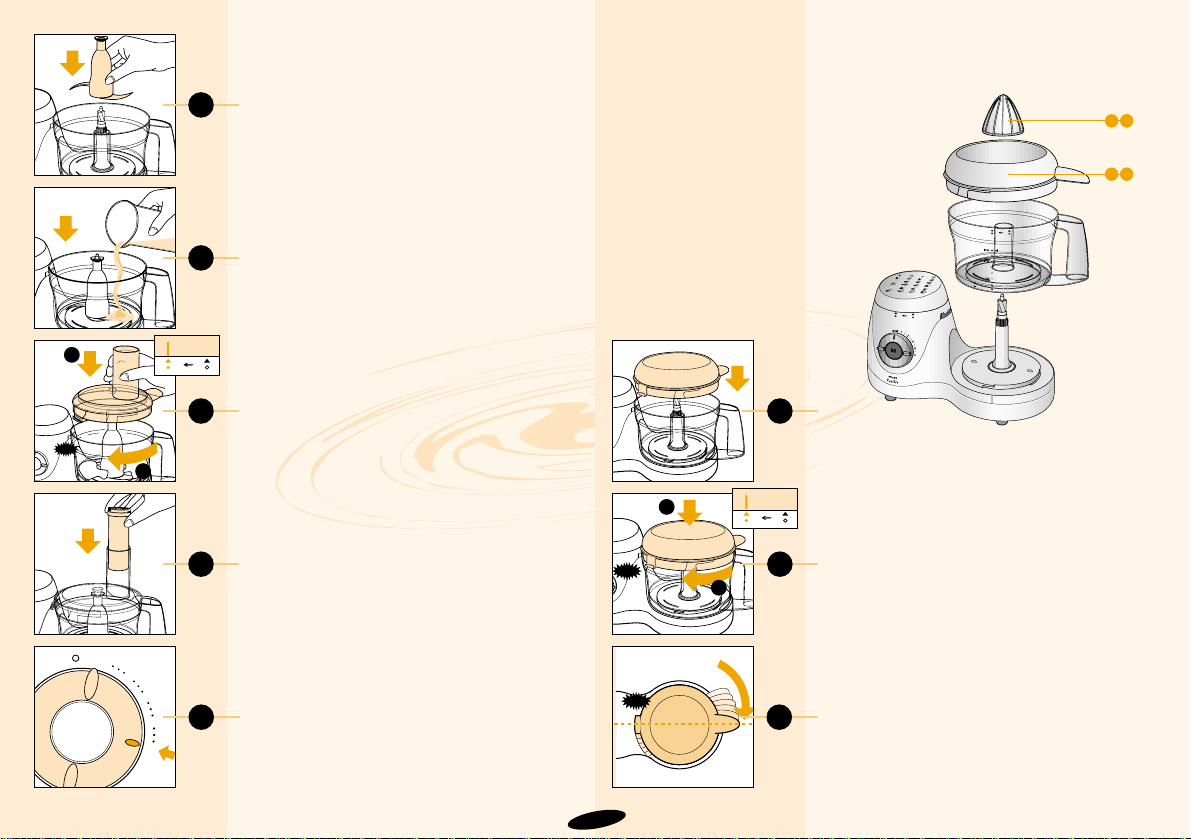
23
24
CLICK
1
2
25
26
27
28
1
2
CLICK
29
Accesorio amasador (L)
©
• El accesorio amasador puede usarse para
amasar pasta para pan y para mezclar
pastas culinarias y mezclas para
pastelería.
- Coloquen el recipiente en la unidad motora
(fig. 2) y fijen el accesorio amasador al eje
conductor (fig. 23).
- Pongan los ingredientes en el recipiente
(fig. 24) y fijen la tapa sobre el recipiente
(fig. 25).
- Para cerrarlo, pongan el empujador en el
conducto (fig. 26).
- Ajusten el control de la velocidad (P) a la
posición 5 (= Velocidad máxima)(fig. 25).
La pasta para pan, la pasta culinaria o la
mezcla para pastelería estarán listas
después de 1-3 minutos.
Exprimidor. Descripción general
Accesorios del exprimidor µ
AA Cono
AB Tamiz
Los accesorios del exprimidor solo
pueden ser usados con el Robot de
Cocina Philips HR 7727.
Montaje
- Coloquen el recipiente en la unidad motora
(fig. 2) y pongan el tamiz (AB) en el
recipiente (fig. 28).
- Hagan girar el tamiz en la dirección de la
flecha (fig. 29) hasta que la espiga del
cierre de seguridad se aloje en la unidad
motora. Asegúrense de que el saliente del
tamiz cubre completamente la abertura del
asa del recipiente (fig. 30).
83
AAA
B
CLICK
30
M
1
2
M
3
4
5
Page 83
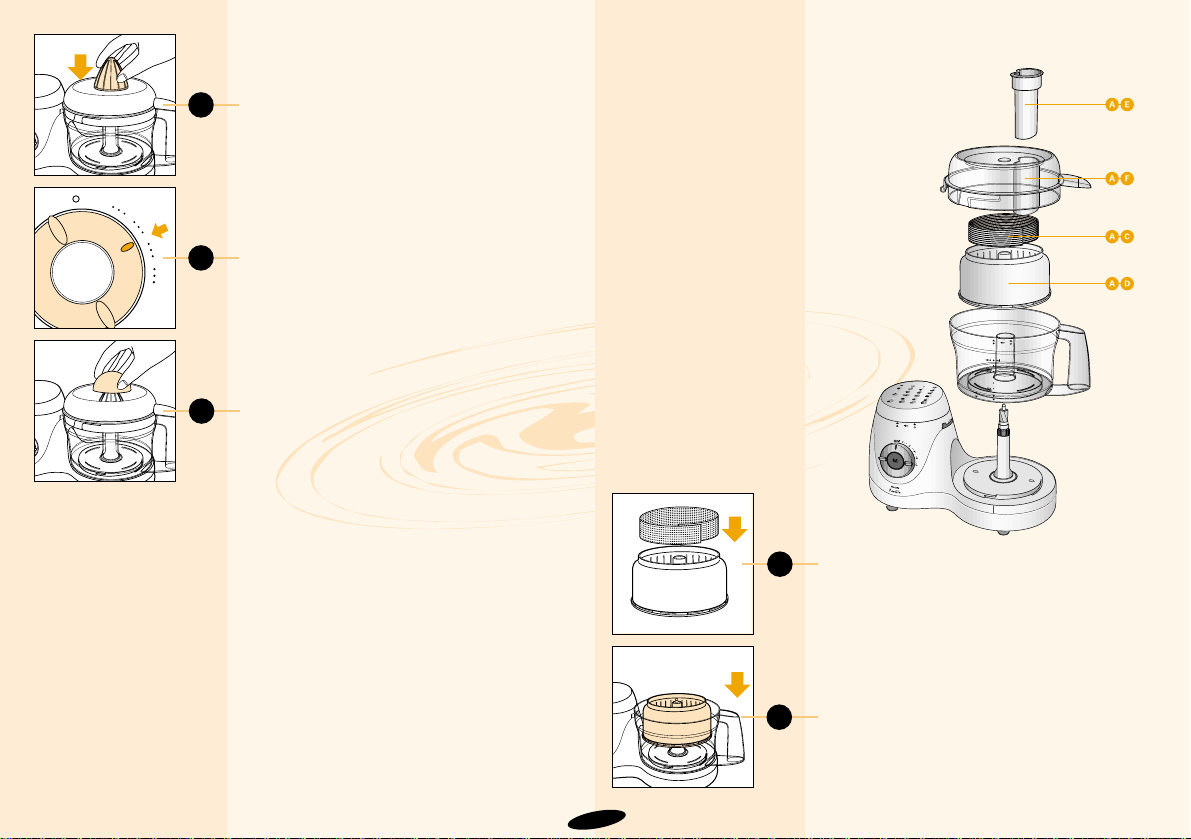
31
M
M
1
2
3
4
5
32
33
34
- Coloquen el cono (AA) en su lugar (fig. 31)
y presiónenlo ligeramente hasta el límite.
- Pongan en marcha el Robot de Cocina y
ajusten el selector de la velocidad a la
posición 3 (fig. 32).
- Presionen firmemente la mitad de un
cítrico sobre el cono rotativo (fig. 33).
- Dejen de presionar de vez en cuando para
eliminar la pulpa del tamiz. Al hacerlo,
paren el aparato y quiten el recipiente junto
con el tamiz y el cono.
Después del uso
- Para evitar goteos de zumo sobre el
aparato, quiten el recipiente junto con los
accesorios del exprimidor.
- Quiten la pulpa del cono y del tamiz.
- Enjuaguen el recipiente, el cono y el tamiz
inmediatamente después del uso. Pueden
entonces lavarlos en agua caliente con
líquido limpiador o pónganlos en un
lavavajillas. No usen ningún abrasivo,
almohadillas desengrasadoras, etc.
• Ciertos ingredientes pueden causar
decoloración sobre la superficie de los
accesorios. Ello no tiene ningún efecto
negativo y esta decoloración normalmente
desaparece después de algún tiempo.
Licuadora 4. Descripción general
Accesorios de la licuadora 4
AC Filtro AE Empujador
AD Tamiz de la pulpa AF Tapa
Los accesorios de la licuadora solo
pueden ser usados con el Robot de
Cocina Philips HR 7727.
Montaje
- Coloquen el recipiente en la unidad motora
(fig. 2).
- Pongan el filtro (AC) en el tamiz de la
pulpa (AD)(fig. 34).
- Coloquen el tamiz de la pulpa en la
posición correcta (fig. 35).
84
35
Page 84
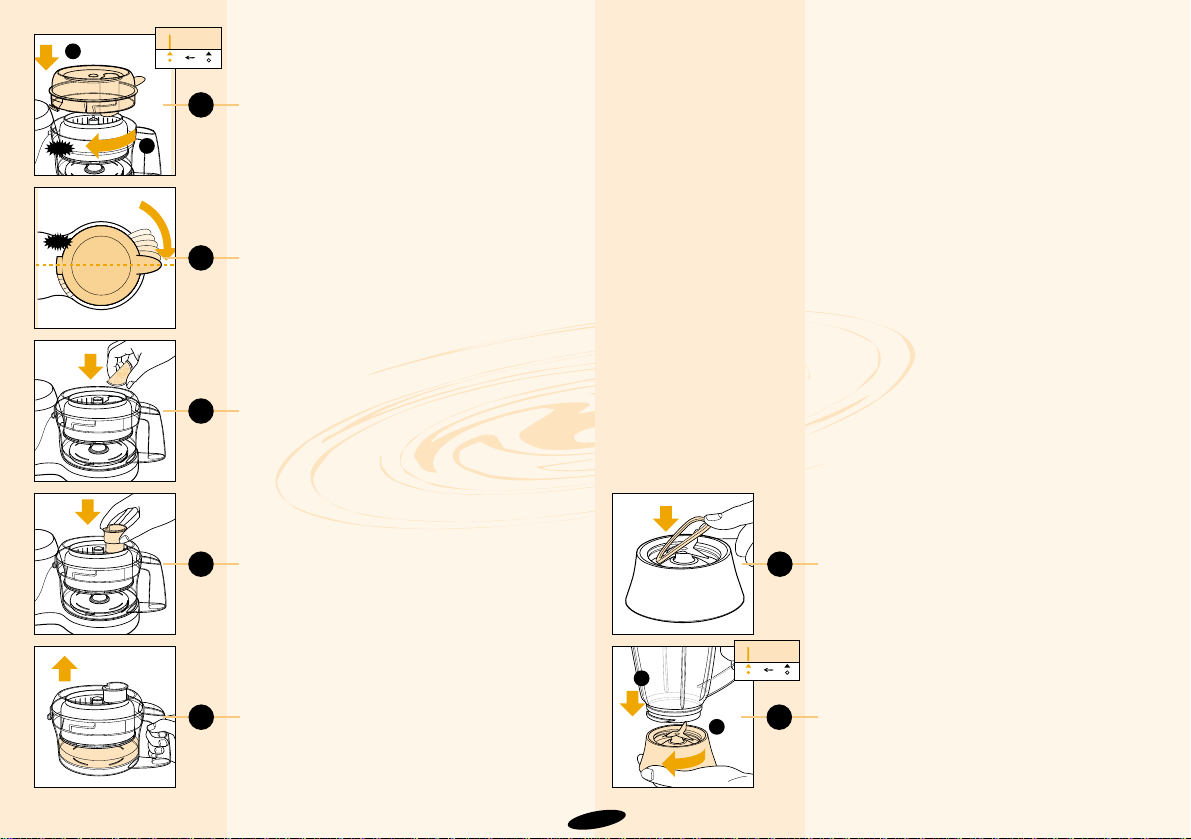
36
CLICK
37
38
39
40
41
- Coloquen la tapa (AF) sobre el recipiente.
Hagan girar la tapa en la dirección de la
flecha hasta que la espiga del cierre de
seguridad se aloje en la unidad motora
(fig. 36).
Asegúrense de que el saliente de la tapa
cubre completamente la abertura del asa del
recipiente (fig. 37).
Cómo usar la licuadora
- Pongan en marcha el Robot de Cocina y
ajusten el selector de la velocidad a la
posición 5.
- A través del conducto, dejen caer la fruta o
los vegetales en la licuadora (fig. 38).
- Presionen firmemente la fruta o los vegetales
hacia abajo con el empujador. Mantengan el
empujador en el conducto para evitar, en lo
posible, las salpicaduras (fig. 39).
- Dejen que el aparato gire durante otros 20
segundos para obtener cualquier zumo que
todavía salga de la fruta.
- Para evitar goteos de zumo sobre el aparato,
quiten el recipiente junto con los accesorios
de la licuadora después del uso (fig. 40).
Consejos
• Antes de usar la licuadora :
- Corten las zanahorias, rábanos blancos, etc.
- Monden los cítricos, piñas, melones, etc.
- Quiten los huesos de las cerezas, ciruelas,
albaricoques, melocotones, etc.
• Pongan siempre en marcha el aparato antes
de poner fruta en la licuadora.
• Paren el aparato de vez en cuando para
quitar la pulpa del tamiz y del filtro.
• No procesen grandes cantidades de
alimentos al mismo tiempo. Paren el aparato
si empieza a vibrar fuertemente y limpien el
tamiz de la pulpa y el filtro antes de volver a
ponerlo en marcha.
Jarra trituradora (T - X) ®
Importante
• El aparato puede ser usado con o sin
la jarra trituradora fijada a la unidad
motora. Si lo usan sin la jarra
trituradora, el aparato no funcionará si
la tapa roscada (S) no ha sido roscada
sobre el agujero de fijación para la
jarra trituradora.
• Antes del uso: No enchufen el aparato
a la red hasta que hayan fijado, de
modo correcto, la jarra trituradora (V),
la tapa (U) y la unidad de cuchillas (X)
en la unidad motora.
• Después del uso: Desenchufen el
aparato de la red antes de desmontar
la jarra trituradora de la unidad motora.
• La jarra trituradora es adecuada para
hacer purés muy finos y para triturar.
Puede ser usada, por ejemplo, para
sopas, salsas, batidos de leche,
comida para bebés, vegetales, frutas,
pastas finas, purés, etc. Si es necesario, corten los ingredientes sólidos a
trozos más pequeños antes de ponerlos dentro de la jarra trituradora.
• No la llenen con ingredientes a
temperaturas superiores a 80 ºC.
• Para prevenir derrames, no pongan
más de 1’5 litros en la jarra trituradora.
• No quiten nunca la tapa mientras la
jarra trituradora esté en funcionamiento.
Montaje y desmontaje
- Posicionen el anillo de goma para cierre
hermético (W) alrededor del reborde de la
unidad de cuchillas (X) (fig. 41).
- Hagan girar la unidad de cuchillas hacia la
izquierda para fijarla a la jarra trituradora
(V) (fig. 42). ¡ Asegúrense de que está
fijada firmemente !
85
1
2
42
CLICK
1
2
Page 85
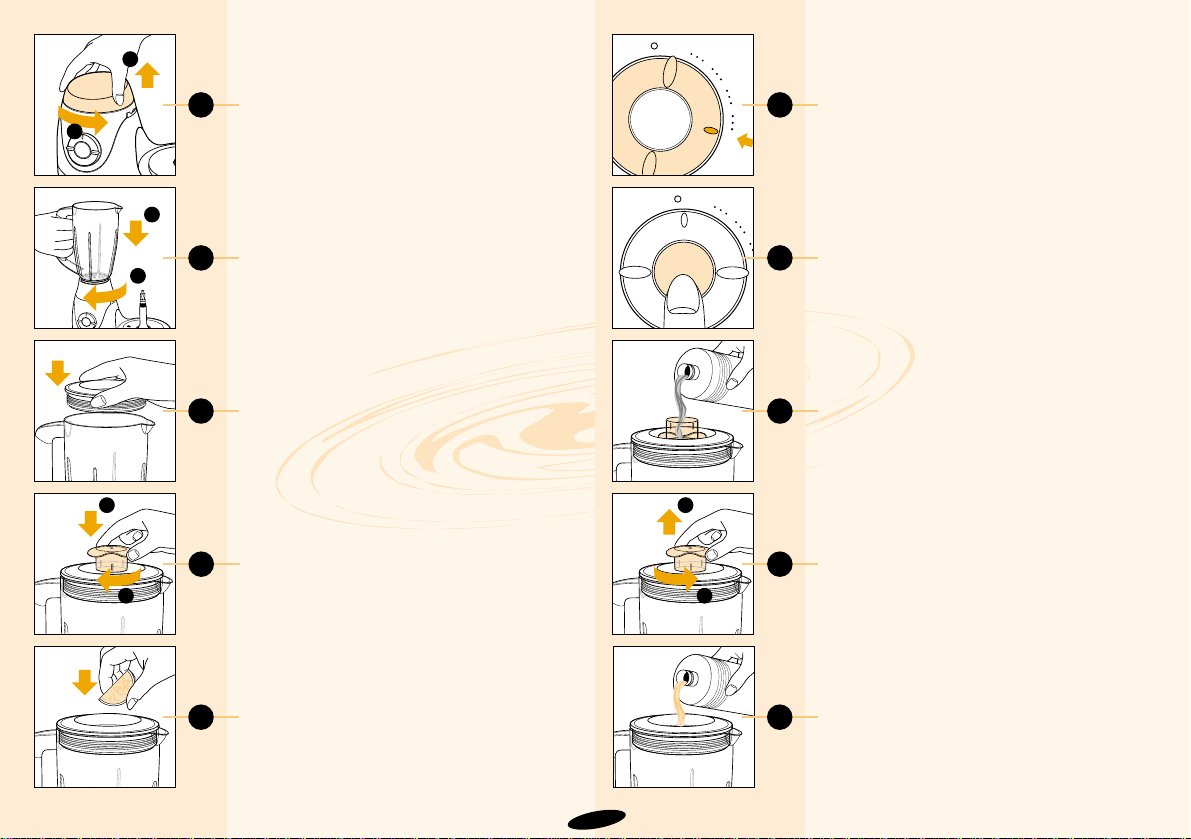
43
1
2
44
45
47
46
M
M
1
2
3
4
5
48
M
M
1
2
3
4
5
49
50
2
1
51
- Quiten la tapa roscada (S) (fig. 43).
- Monten la jarra trituradora en el agujero de
montaje y gírenla en la dirección de la
flecha hasta que quede firmemente fijada
(fig. 44).
Aviso : No ejerzan demasiada presión sobre la empuñadura de la jarra trituradora.
- Presionen la tapa en su lugar (fig. 45).
- Fijen el obturador presionándolo hacia
abajo y haciéndolo girar en la dirección de
la flecha hasta que quede firmemente
fijado (fig. 46).
• Para desmontar la jarra trituradora, sigan
estos pasos en orden inverso y dirección
opuesta.
Como usar la jarra trituradora
- Pongan los ingredientes en la jarra
trituradora (fig. 47).
- Pongan el aparato en marcha ajustando el
selector de la velocidad a la velocidad
recomendada (fig. 48) o presionando el
pulsador M “Turbo” (fig. 49). Si tienen
alguna duda sobre la velocidad correcta,
seleccionen siempre la velocidad más alta
(Posición 5). Para la apropiada velocidad y
ajuste, consulten la tabla.
• Las aplicaciones / recetas mencionadas en
la tabla estarán listas después de 10 segundos - 2 minutos.
Consejos
• Los ingredientes líquidos (por ejemplo,
aceite para la preparación de mayonesa)
pueden ser añadidos a la jarra trituradora a
través del agujero del obturador el cual han
de haber colocado en la tapa de forma
invertida (fig. 50).
• La abertura de la tapa puede usarse para
añadir ingredientes mientras el aparato
está en funcionamiento.
Para hacerlo, desenrosquen el obturador y
quítenlo de la tapa (figs. 51 - 52).
• Cuanto más dejen que funcione el aparato,
los resultados del triturado serán, normalmente, más finos.
• De vez en cuando, puede ser necesario
parar el aparato para quitar trozos de
alimentos pegados al interior de la jarra
trituradora.
- Paren el aparato y desenchúfenlo de la
red.
- Quiten el obturador y la tapa.
- Usando un espátula blanda, quiten los
trozos pegados al interior de la jarra
trituradora. Mantengan la espátula a una
distancia segura de las cuchillas (unos
2 cm).
86
52
2
1
1
2
Page 86
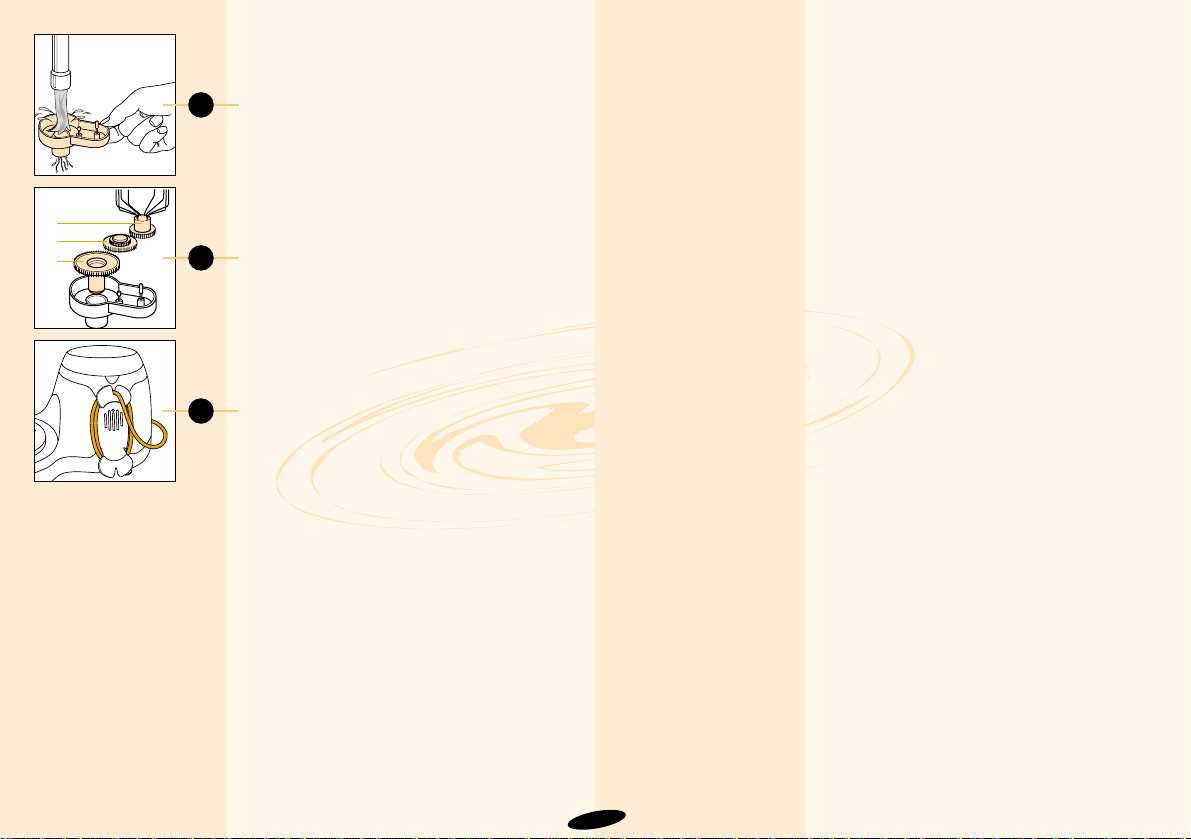
53
2
1
3
54
55
Limpieza
• Antes de limpiar la unidad motora,
desenchufen siempre el aparato de la red.
• La unidad motora puede frotarse con un
paño húmedo.
No sumerjan nunca la unidad motora en
agua ni echen ésta sobre ella.
• Laven siempre las piezas que hayan
estado en contacto con los alimentos con
agua caliente con un liquido limpiador
inmediatamente después de haberlas
usado.
• Limpien con mucho cuidado la cuchilla, la
unidad de cuchillas de la jarra trituradora y
el disco para rebanar.
¡ Sus bordes cortantes están muy afilados !
• Asegúrense de que los bordes cortantes
de la cuchilla y del disco para rebanar no
entren en contacto con objetos duros, ya
que podrían mellarse.
• El engranaje del accesorio agitador puede
ser fácilmente
desmontado para poder limpiarlo
completamente (figs. 53 - 54).
• Ciertos ingredientes pueden causar
decoloración sobre la superficie de los
accesorios. Ello no tiene ningún efecto
negativo y esta decoloración normalmente
desaparece después de algún tiempo.
• Enrollen el (exceso de) cable de red
alrededor del alojamiento de la parte
trasera del aparato (fig. 55).
87
Page 87

88
Batidos de leche
- triturado
Carne, pescado, ave.
- carne magra
- carne entreverada
Cebollas
- picado
- rebanado
Chocolate
- picado
Fruta (por ejemplo, manzanas,
melocotones, plátanos)
- picado
- hacer puré
Frutos secos
- picado
Guisantes, judías (cocidos)
- hacer puré
Hierbas
- picado
Huevos (Claras)
- agitado
Limones, naranjas, pomelos
- exprimido
250 ml
leche
500 g
400 g
500 g
500 g
200 g
500 g
700 g
250 g
500 g
75 g
4 claras de
huevo
1 kg
fruta
5
5 / M
5 / M
5 / M
5 / M
M / 5
M
5
5 / M
5
5 / M
4 - 5
3
Hagan puré con la fruta (por ejemplo, plátanos, fresas) con azúcar y zumo
de limón. Añadan leche y un poco de helado y mezclen bien.
Primero quiten los nervios o tendones y los huesos o espinas. Corten la
carne / pescado a dados de 3 cm. Usen la posición M “Turbo” para
obtener un picado grueso.
Monden las cebollas y córtenlas en 4 trozos. Nota : Usen, al menos, 100 g
Monden las cebollas y córtenlas a trozos que pasen por el conducto.
Nota : Usen, al menos, 100 g
Usen chocolate duro y sin mezcla. Rómpanlo a trozos de 2 cm. Para
picarlo muy finamente, usen la posición M “Turbo” durante unos pocos
segundos iniciales y cambien entonces a la velocidad máxima.
Consejos : Añadan un poco de zumo de limón para evitar la decoloración
de la fruta.
Añadan un poco de líquido para obtener un puré más suave.
Usen la posición M “Turbo” para un picado grueso o la velocidad máxima
para un picado fino.
Usen judías o guisantes cocidos. Si es necesario, añadan un poco de
líquido para mejorar la consistencia de la mezcla
Laven y sequen la(s) hierba(s) antes de picarla(s)
Usen huevos a temperatura ambiente. Nota : Usen al menos dos claras
de huevo
Corten la fruta por la mitad y presiónenla cuidadosamente sobre el cono
del exprimidor
Bistecs tártaros
hamburguesas.
Carne picada.
Ensaladas,
comida cocida.
Guarniciones,
salsas, pastelería,
pudines, mousses
Ensaladas.
Salsas, pudines de
compota, comida de
bebes.
Ensaladas, pan,
pasta de almendras,
pudines.
Purés, sopas.
Salsas, sopas,
guarniciones,
mantequilla a las
hierbas.
Pudines,
souffles,
merengues
Zumos, bebidas
vitamínicas,
sorbetes.
®
£
£
£
§
£
£
®
£
®
£
ß
µ
Ingredientes Cantidad Inte- Accesorio Procedimiento Aplicaciones
máxima rruptor
y velocidad
Page 88

89
Mantequilla cremosa
(crème au beurre)
Manzanas, Zanahorias,
Arracacha
- rallado / rebanado
Manzanas, Zanahorias,
Arracacha, Uva
Mayonesa
- emulsionado
Mezcla (masa)
- agitado
Mezcla (pastel)
- mezclado
Migas de pan
- picado
Nata batida
- batido
Pasta culinaria (con grasa o
mantequilla)
- amasado
Pasta culinaria
(levadura)
- amasado
Pasta culinaria (pan)
- amasado
300 g
500 g
500 g
3 huevos
3 huevos
4 huevos
100 g
400 ml
500 g
harina
500 g
harina
700 g
harina
5
5 / M
5
2 - 5
1 / 5
5
5
2 - 4
5
5
5
Usen mantequilla blanda para un resultado ligero.
Corten las frutas/vegetales a trozos que pasen por el conducto. Llenen el
conducto con los trozos y rállenlos mientras presionan ligeramente con el
empujador.
Corten las frutas/vegetales a trozos que pasen por el conducto y presiónenlos en la licuadora con el empujador.
Usen todos los ingredientes a temperatura ambiente. Nota : Usen, al
menos, un un huevo grande, dos huevos pequeños o dos yemas de
huevos grandes.
Ingredientes a temperatura ambiente. Agiten la mezcla de huevos y azúcar a la máxima velocidad hasta que se espese. Añadan entonces la harina tamizada. Continúen agitando con cuidado a la velocidad 1.
Ingredientes a temperatura ambiente. Mezclen la mantequilla ablandada y
el azúcar hasta que la mezcla esté suave y cremosa. Añadan leche,
huevos y harina respectivamente.
Usen pan seco y crujiente.
Usen nata que haya sido enfriada en el frigorífico. Nota : Usen, al menos,
125 g de nata.
Usen margarina fría, cortada a trozos de 2 cm. Pongan todos los ingredientes en el recipiente y amasen hasta que la pasta se haga una bola.
Dejen que la pasta se enfríe antes de seguir el proceso.
Primero mezclen levadura, leche caliente y un poco de azúcar. Añadan
harina, azúcar, sal, huevos y margarina blanda. Amasen la pasta hasta
que deje de pegarse al recipiente. Dejen que suba durante 30 minutos.
Mezclen agua caliente con levadura y azúcar. Añadan harina, mantequilla y
sal y amasen la pasta durante 1
1
⁄2 minutos. Déjenla subir durante 30 minutos.
Postres, pastelería,
acabados.
Ensaladas,
vegetales crudos
Cócteles de
frutas/vegetales
Patatas fritas a
la francesa, fondues,
guarniciones, salsas
para barbacoas.
Masa de
pastelillos,
rollos suizos,
pastelería.
Diferentes
pasteles.
Platos con migas de
pan, platos
gratinados.
Guarniciones,
nata, pastelería
mezclas para
helados.
Empanadas de
manzana, dulces
bizcochos,
flanes de fruta.
Pan delicioso.
Pan.
£
§ / ¶
4
£
ß / ©
£
£
ß
£
©
©
Ingredientes Cantidad Inte- Accesorio Procedimiento Aplicaciones
máxima rruptor
y velocidad
Page 89

90
Pasta culinaria
(pastelillos)
- batido
Pasta culinaria
(pizza)
- amasado
Pasta culinaria (tartas,
empanadas, pudines de
carne o fruta
- amasado
Patatas
(cocidas)
- hacer puré
Puerros, pepinos,
zanahorias
- rebanado
Queso (Parmesano)
- rallado
Queso (Gouda)
- rallado
Sopas
- triturado
Vegetales
- picado
Vegetales y carnes (cocidos)
- hacer puré
500 ml
leche
700 g
harina
300 g
harina
750 g
patatas
1 pieza
mínimo
200 g
200 g
500 ml
500 g
500 g
5
5
5
2-4
5 / M
5
3
5
5
5
Primero viertan la leche en la jarra trituradora y añadan entonces los
ingredientes secos. Mezclen los ingredientes aproximadamente durante 1
minuto. Si es necesario, repitan este procedimiento, como máximo, 2
veces. Paren entonces durante unos pocos minutos para permitir que el
aparato se enfríe a temperatura ambiente.
El mismo procedimiento que la pasta culinaria para pan. Amasen la pasta
durante aproximadamente 1 minuto.
Usen margarina fría y agua fría. Pongan harina en el recipiente y añadan
la margarina cortada a trozos de 2 cm. Mezclen a la velocidad máxima
hasta que la pasta se haga migas y añadan entonces agua fría mientras
mezclan. Paren tan pronto como la pasta empiece a hacerse una bola.
Dejen que la pasta se enfríe antes de seguir el proceso.
No cuezan demasiado las patatas. La cantidad necesaria de leche depende del tipo de patatas usado. Usen leche caliente (Máximo 80 ºC). Añadan lentamente la leche mientras la cuchilla metálica esté girando.
Llenen el conducto con puerros, trozos de pepino o zanahorias y presiónenlos cuidadosamente con el empujador
Usen un trozo de queso Parmesano sin corteza y córtenlo a trozos que
pasen por el conducto.
Corten el queso a trozos que pasen por el conducto. Presiónenlo cuidadosamente con el empujador.
Usen vegetales cocidos.
Córtenlos previamente a dados de 3cm y píquenlos con la cuchilla.
Para un puré grueso, añadan solo un poco de líquido. Para un puré fino,
sigan añadiendo líquido hasta que la mezcla esté suficientemente suave.
Pastelillos,
barquillos,
crepés.
Pizzas, tartas.
Tartas de fruta,pudines de manzana,
empanadas, quiches.
Platos al horno,
purés.
Sopas, ensaladas,
quiches.
Guarniciones, sopas,
salsas, platos
gratinados.
Salsas, pizzas,
platos
gratinados,
fondues.
Sopas, salsas.
Sopas,
vegetales crudos
ensaladas.
Comida para
bebes y niños.
®
£ / ©
£
£
§
•
•
®
£
®
Ingredientes Cantidad Inte- Accesorio Procedimiento Aplicaciones
máxima rruptor
y velocidad
Page 90
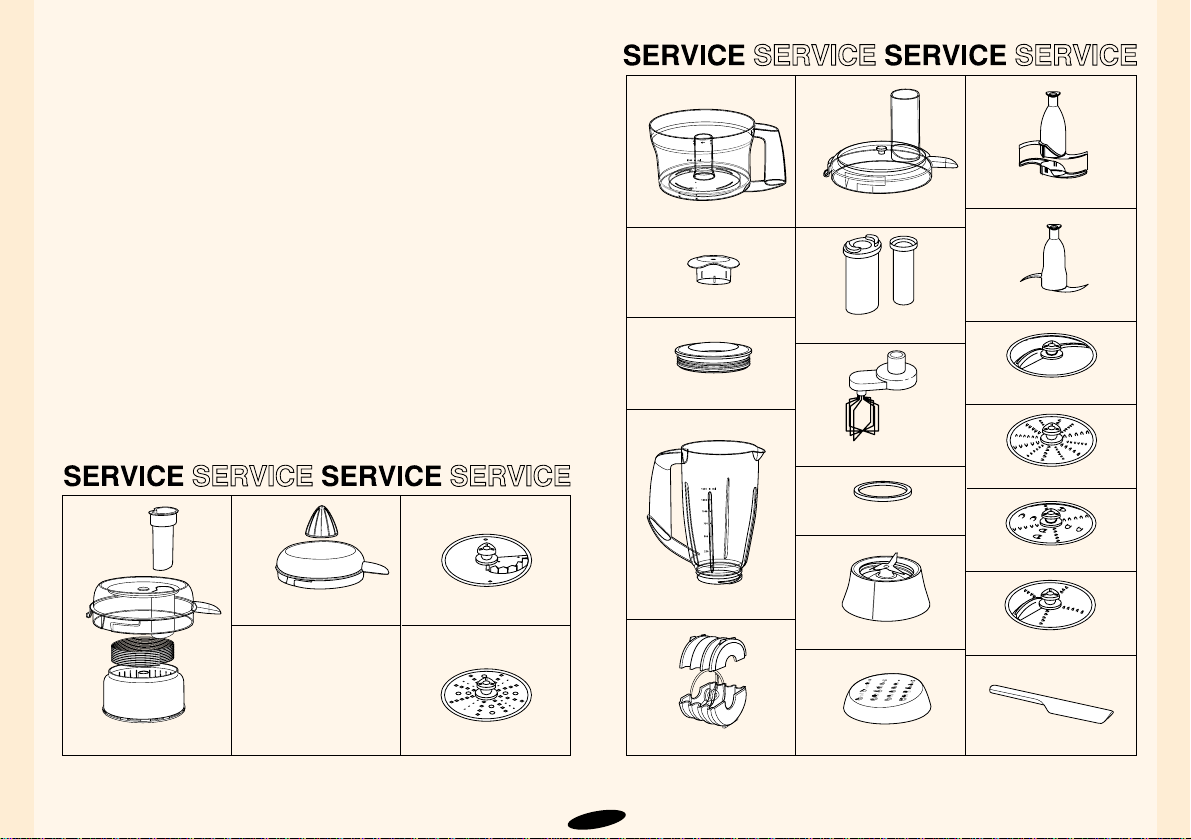
91
Piezas
Los siguientes artículos son
accesorios normales :
- Recipiente (B)
- Tapa (C)
- Cuchilla £ (G)
- Disco rebanado § (H)
- Disco rallado grueso • (I)
- Disco rallado fino ¶ (J)
- Agitador ß (K)
- Accesorio amasador © (L)
- Empujador doble (O)
- Caja para almacenar los discos
(Q)
- Triturador ® (T-X)
- Espátula (Y)
- Exprimidor µ (AA-AB)
- Licuadora 4 (AC-AF)
Están disponibles los siguientes
accesorios adicionales :
- Disco para rallar patatas (Nº de
servicio 4822 690 10139)
- Disco rebanador de una cara
(Tipo HR 2912) para patatas a la
francesa y, por ejemplo, nabos
suecos (Nº de servicio
4822 690 10141).
Pregunten a su proveedor si estes
accesorios también están
disponibles en su país. Si desean
pedir artículos adicionales o para
sustitución, mencionen el
adecuado numero de servicio y /
de tipo.
4822 418 10343
4822 418 10342
4203 065 61850
4822 462 11055
4203 065 61990
4822 422 01336
4203 065 61880
4203 065 61870
4203 065 61890
4203 065 61900
4203 065 61920
4203 065 61980
4203 065 61960
4203 065 61970
4203 065 61930
4203 065 61940
4203 065 61950
4203 065 61860
4203 065 61820
4203 065 61810
4203 065 61830
4203 065 61840
Page 91

92
¿ No están satisfechos con el modo como funciona el aparato ?
¡ Si el aparato no funciona del modo que esperaban, consulten la siguiente tabla y lean las adecuadas secciones del Modo de Empleo !
Posible solución :
Hagan girar el recipiente y / o la tapa en la dirección indicada y tanto como sea posible (Hasta que
oigan un “click”). Asegúrense de que las flechas del recipiente y las del aparato así como las del
recipiente y las de la tapa estén encaradas una con la otra (Ver figs. 2 y 6).
Asegúrense de que la jarra trituradora o la tapa roscada han sido adecuadamente colocadas y háganlas
girar en la dirección indicada y tanto como sea posible.
Es probable que el sistema de desconexión automática haya cortado el suministro de corriente al
aparato debido a que este se haya sobrecalentado.
- Desenchufen el aparato de la red.
- Coloquen el interruptor en la posición O.
- Dejen que el aparato se enfríe durante 15 minutos.
- Vuelvan a enchufar el aparato a la red.
- Vuelvan a poner en marcha el aparato.
Contacten con su distribuidor Philips o con un autorizado Centro de Servicio Philips de su país si el
sistema de desconexión automática se activa repetidamente.
Seleccionen la velocidad correcta. Miren las indicaciones del aparato y del Modo de Empleo.
Pueden probar añadiendo un poco de zumo de limón o de sal. Asegúrense de que el agitador y el
recipiente estén libres de grasa y seleccionen la velocidad adecuada.
Usen el agitador. Usen nata fría para batir (Aproximadamente 6 ºC).
Usen el agitador solo para batir nata, huevos / claras de huevo y líquidos. ¡ No lo usen para preparar
pasta culinaria, mezcla para pastelillos o masa !
Sigan cuidadosamente las instrucciones dadas en el Modo de Empleo. No añadan nunca demasiada
agua. Usen siempre el accesorio indicado en la tabla. No excedan el indicado tiempo máximo de
amasado.
Problema :
El interruptor no funciona
El aparato deja repentinamente de
funcionar
El resultado del picado, rebanado
o rallado no es óptimo
El resultado no es óptimo al agitar
huevos
El resultado no es óptimo al batir
nata
El agitador se suelta o se dobla
La masa gira alrededor del
recipiente
Page 92
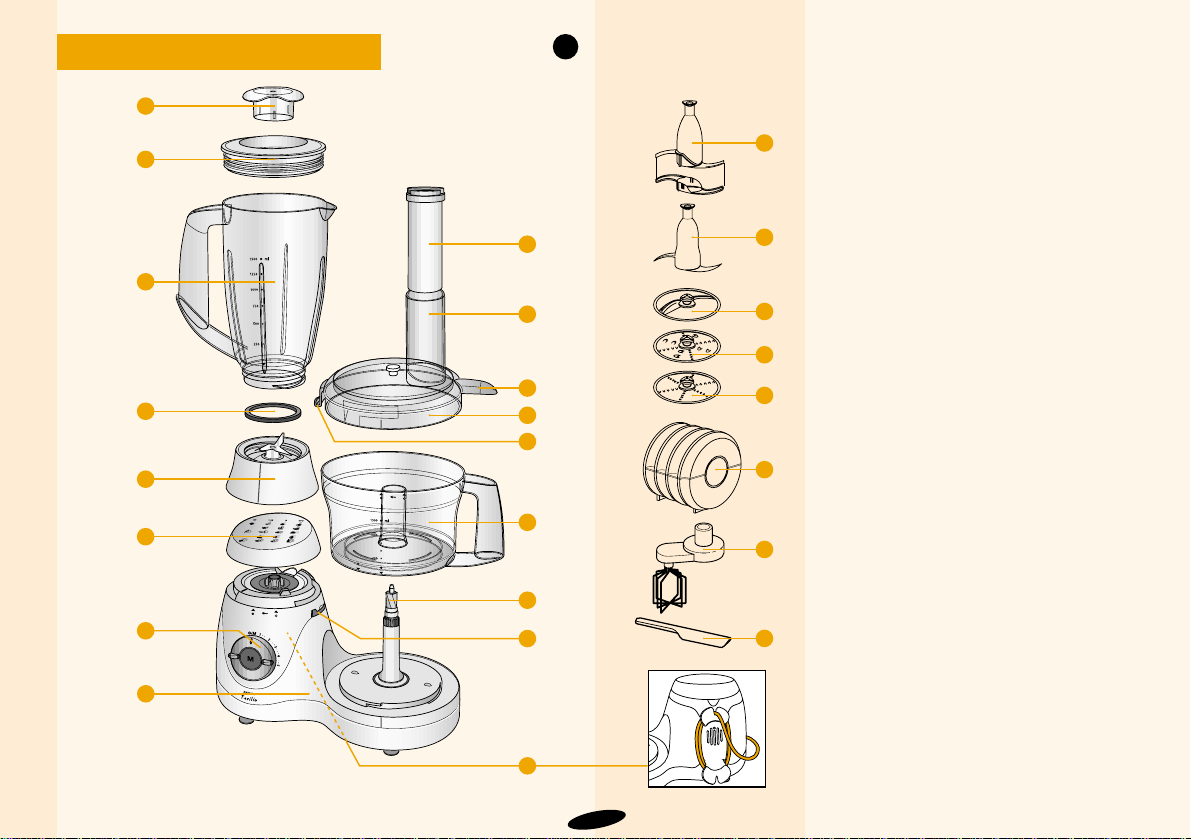
93
Descrição geral (fig. 1)
A Unidade do motor
B Tigela
C Tampa da tigela
D Fixação da tampa (activa e desactiva o
fecho de segurança)
E Aba (tapa a abertura da pega)
F Fecho de segurança incorporado
G Lâmina £
H Disco de cortar §
I Disco de ralar • (grosso)
J Disco de ralar ¶ (fino)
K Varas ß
L Batedor ©
M Veio do motor
N Tubo
O Pressor duplo
P Controlo da velocidade
O = Desligado
1 - 2 - 3 - 4 - 5 controlo da variação de
velocidade
(1 = velocidade mais baixa; 5 = velocidade mais alta)
M = ‘Moment’/Batimento (a máquina
trabalha nesta posição enquanto
mantiver o botão premido)
Q Caixa para guardar os discos
R Mola para o fio (para prender o cabo
depois de enrolado)
S Protecção da unidade de corte (para
cobrir o veio motor do copo misturador
quando este não estiver a ser utilizado)
Acessórios do copo misturador ®
T Tampão
U Cobertura
V Copo misturador
W Anel vedante de borracha
X Unidade de corte
Y Espátula
1
T
N
O
G
L
H
I
J
K
Y
Q
D
C
B
M
R
F
E
U
V
W
X
S
A
P
Português
Page 93

Dispositivo automático de segurança
Leia atentamente estas instruções antes de utilizar o aparelho pela
primeira vez.
Para evitar danos provocados por sobreaquecimento, este aparelho está
equipado com um sistema automático de corte de energia. Se se
verificar um sobreaquecimento, esse sistema interrompe o fornecimento
de corrente à máquina. Se respeitar as instruções que se seguem,
poderá voltar a ligar a máquina após um período de arrefecimento de 15
minutos.
Se a máquina deixar subitamente de trabalhar:
- Retire a ficha da tomada
- Coloque o botão na posição O
- Deixe a máquina arrefecer durante 15 minutos
- Volte a ligar à corrente
- Ligue a máquina.
Se o dispositivo automático de segurança disparar sucessivas vezes,
queira contactar o seu distribuidor Philips ou um Centro de Serviço
Autorizado Philips.
Símbolos na máquina
Do lado esquerdo dos símbolos da máquina, representando as várias
aplicações, encontrará a indicação do acessório a utilizar.
Sobre essa indicação apresenta-se, ainda, a velocidade mais adequada
para o tipo de aplicação: M (= batimento) ou as velocidades de 1 a 5
(ver tabela, pag. 103-105).
Importante
• Leia cuidadosamente as instruções e observe as ilustrações antes
de utilizar o aparelho pela 1ª vez.
• Retire a cobertura de protecção da lâmina sempre que for utilizar a
máquina.
• Tenha muito cuidado ao manusear as lâminas e os discos porque
se trata de peças metálicas muito afiadas.
• Antes da primeira utilização, lave todas as peças que entrem em
contacto com os alimentos a processar.
• Coloque a tampa na tigela, na posição correcta. O fecho de
segurança incorporado ficará desbloqueado e a máquina estará
pronta a ser ligada.
• Se o copo misturador e a tigela estiverem correctamente colocados,
só trabalhará o copo misturador.
• Nunca deixe a máquina a trabalhar sozinha.
• Nunca permita que as crianças mexam na máquina.
• Quando estiver a bater ou a misturar líquidos, não exceda os limites
máximos indicados na tigela ou no copo misturador (linha superior
da escala).
• Não exceda as quantidades máximas e os tempos de
processamento indicados na tabela.
• Não retire a tampa da máquina sem verificar se todas as peças
rotativas estão totalmente imobilizadas.
• Nunca ponha a mão ou objectos (p.ex. uma espátula) dentro do
tubo dos alimentos com a máquina em funcionamento. Sirva-se
unicamente do acessório (pressor duplo) fornecido para empurrar
os alimentos.
• Nunca ponha a mão ou objectos (p.ex. uma espátula) dentro do
copo misturador sem antes desligar a máquina.
• Nunca mergulhe o corpo da máquina em água ou outro líquido.
Também não deverá enxaguá-la.
• Quando terminar, retire a ficha da tomada de corrente.
• Se o cabo eléctrico deste aparelho estiver danificado, apenas
deverá ser substituído pela Philips ou pelos seus serviços de
assistência, uma vez que serão necessárias ferramentas especiais
e/ou peças.
• Guarde estas instruções para uma eventual consulta futura.
94
Page 94
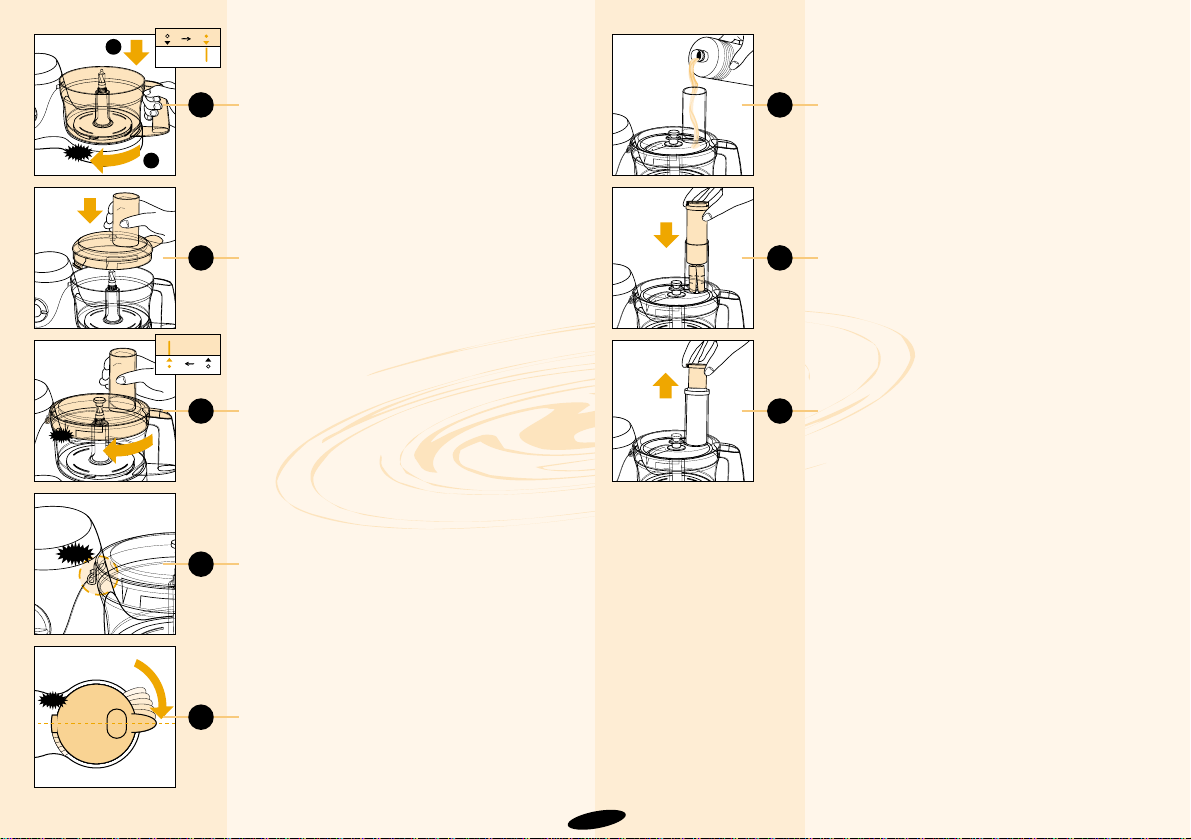
1
2
3
CLICK
4
CLICK
5
CLICK
6
7
8
9
Colocação da tigela (B) (fig. 2)
- Coloque a tigela sobre a máquina
conforme indicado (1)
- Rode a pega na direcção da seta até sentir
a tigela prender e ouvir um ‘clique’ (2).
Colocação da tampa (C)
- Coloque a tampa na tigela conforme se
indica na fig. 3.
- Rode a tampa, exercendo alguma força, na
direcção da seta, até a sentir prender e
ouvir um ‘clique’ (fig. 4-5).
- Certifique-se que a marca da tampa e a
seta da tigela ficam em posições opostas
uma à outra. A aba da tampa ficará a
tapar a abertura da pega da tigela (fig. 6).
Tubo (N) e pressor dos alimentos (O)
• Sirva-se do tubo para adicionar os
ingredientes, líquidos ou sólidos (fig. 7).
• Sirva-se do pressor para empurrar os
ingredientes dentro do tubo (fig. 8).
• Durante o processamento, o pressor pode
ser mantido sobre os alimentos a servir de
tampão. Evitar-se-á, assim, derrames e
salpicos bem como a formação de poeiras.
• O pressor tem um segundo pressor mais
pequeno.
- Este pressor pequeno pode ser retirado
(fig. 9) para estreitar o tubo dos alimentos.
- Um tubo dos alimentos mais estreito
poderá ser útil quando se pretende cortar
cenouras, por exemplo, ou quando a
quantidade de alimentos utilizada é muito
pequena para o tubo normal.
Tenha em atenção que só deverá utilizar
o pressor mais pequeno quando o
pressor maior estiver colocado dentro do
tubo para os alimentos.
Fecho de segurança incorporado (F)
O motor e os acessórios apresentam
algumas marcas indicadoras. A máquina só
funciona se a seta do aparelho estiver
colocada exactamente na direcção oposta à
marca da tampa (C) e dos outros
acessórios. Nessa posição, a aba da tampa
e os acessórios cobrirão a abertura da pega
da tigela.
95
CLICK
2
Page 95
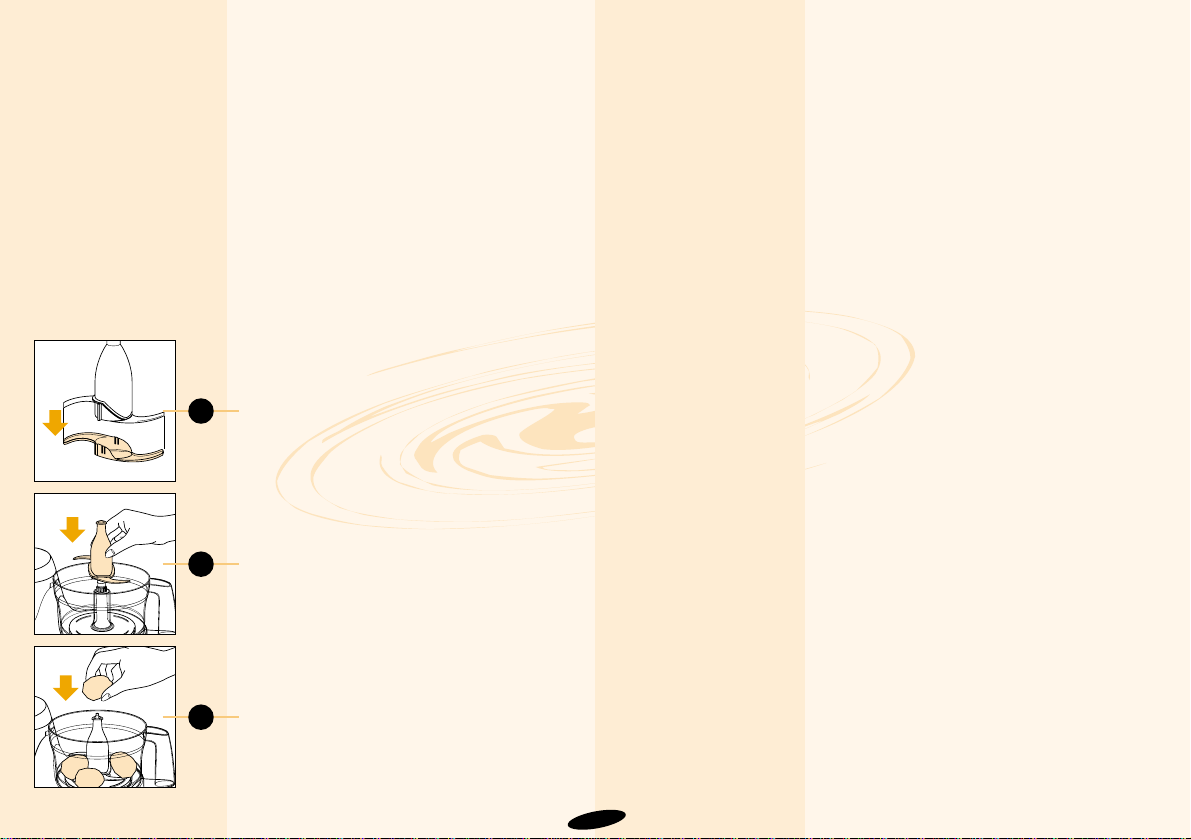
10
11
12
Como utilizar a máquina
Nota: a máquina só trabalha se
• A protecção da unidade de corte (S) ou o
copo misturador (T-X) estiverem montados
correctamente sobre a unidade do motor
(A) e
• A tigela (B) e os acessórios (tampa (C),
espremedor ou acessórios para sumos)
estiverem colocados sobre o motor de
acordo com as instruções deste modo de
emprego.
• Se o copo misturador e a tigela estiverem
correctamente colocados, só o copo
misturador entrará em funcionamento.
Coloque o botão da velocidade (P) na
posição indicada nas tabelas das pág. 103 e
105 e ligue a máquina. Se tiver dúvidas
sobre a velocidade adequada, seleccione
sempre a velocidade mais alta (posição 5).
Lâmina (G) £
Tenha cuidado: os rebordos da lâmina
são muito afiados!
• A lâmina pode ser usada para cortar,
bater, misturar, reduzir a puré e preparar
massas fôfas, massa de bolacha ou
massas estaladiças.
- Retire a protecção da lâmina antes de a
usar (fig. 10).
- Coloque a tigela sobre a unidade do motor
(fig. 2) e encaixe a lâmina no veio motor
(fig. 11).
- Ponha os ingredientes na tigela (fig. 12).
- Aperte a tampa da tigela e introduza o
pressor no tubo dos alimentos.
- Seleccione a velocidade pretendida (botão
P), conforme indicação da tabela, e ligue a
máquina. Se tiver dúvidas sobre a
velocidade mais adequada, opte sempre
pela velocidade mais alta (posição 5)
- As aplicações/receitas mencionadas na
tabela ficam prontas em 10 a 60 segundos.
Sugestões:
• Não é conveniente cortar pedaços muito
grandes com a lâmina; antes de deitar os
alimentos na tigela, corte-os previamente
em pedaços com cerca de 3 cm.
• A máquina trabalha muito depressa; faça-a
funcionar por períodos curtos, mesmo
quando se serve da posição de batimento
(M), para evitar que os alimentos fiquem
demasiado picados.
• Se estiver a cortar queijo (curado, duro),
não deixe a máquina a trabalhar durante
muito tempo; o queijo poderá aquecer
muito, começar a derreter e ficar com
grumos.
• Se ficarem alimentos presos na lâmina ou
se ficarem restos de comida agarrados às
paredes da tigela:
- comece por desligar a máquina;
- retire a tampa da tigela;
- retire os alimentos da lâmina ou da tigela
com o auxílio da espátula.
• Não corte alimentos muito duros, tais como
grãos de café, avelãs e cubos de gelo
porque poderão deixar a lâmina romba.
Consulte a tabela fornecida neste manual
e verifique as velocidades e tempos
correctos.
96
Page 96
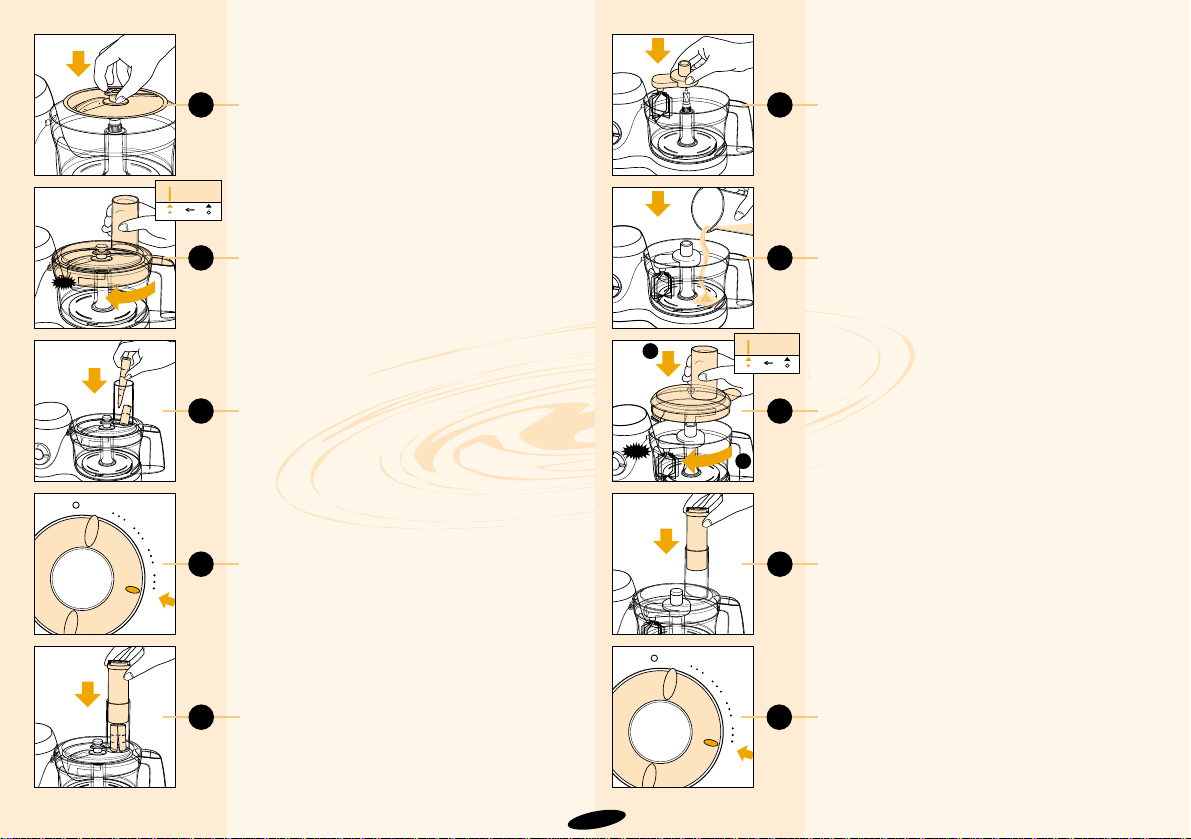
13
CLICK
14
15
M
M
1
2
3
4
5
16
17
18
19
1
2
CLICK
20
21
Disco para cortar (H)
§ e discos para
ralar (I, grosseiro) • e (J, fino) ¶
Tenha cuidado com os discos: os
rebordos são muito afiados!
Segure os discos apenas pela peça central
de plástico.
- Coloque a tigela sobre a unidade do motor
(fig. 2).
- Coloque o disco para cortar ou o disco
para ralar em posição (fig. 13).
- Coloque a tampa na tigela (fig. 14).
- Ponha os ingredientes no tubo dos
alimentos (fig. 15).
- Introduza o pressor no tubo e empurre os
alimentos fazendo um pouco de pressão.
- Para ralar e cortar: seleccione a velocidade
5 (velocidade máxima) (fig. 16).
- Se quiser cortar legumes ou fruta madura,
também poderá seleccionar uma
velocidade mais baixa. Consulte a tabela.
- Vá comprimindo e empurrando
suavemente os alimentos através do tubo
(fig. 17). Aconselha-se a utilização do tubo
mais estreito e do pressor mais pequeno
para cortar cenouras, por exemplo.
Sugestões:
• Antes de deitar os alimentos, corte-os
previamente de modo a caberem no tubo.
• Para obter melhores resultados, é
conveniente encher o tubo.
• Se tiver que trabalhar grandes
quantidades, faça-o por fases e vá
esvaziando a tigela entre os vários
processamentos.
Batedeira (K) ß
A batedeira pode servir para bater ovos,
claras, coberturas para sobremesas, fazer
pudins instantâneos e bater natas.
Não se sirva da batedeira para fazer massas para bolos!
- Coloque a tigela sobre a unidade do motor
(fig. 2) e introduza o batedor no veio
(fig. 18).
- Coloque os ingredientes na tigela (fig. 19)
e aperte a tampa da tigela (fig. 20).
- Coloque o pressor no tubo dos alimentos
para o vedar (fig. 21).
- Seleccione a velocidade (botão P) de
acordo com o indicado nas tabelas e ligue
a máquina. Se tiver dúvidas quanto à
velocidade mais adequada, seleccione
sempre a velocidade mais alta (posição 5)
(fig. 22).
- As aplicações/receitas mencionadas na
tabela ficam prontas em 2 a 5 minutos.
97
M
M
1
2
3
4
5
22
Page 97
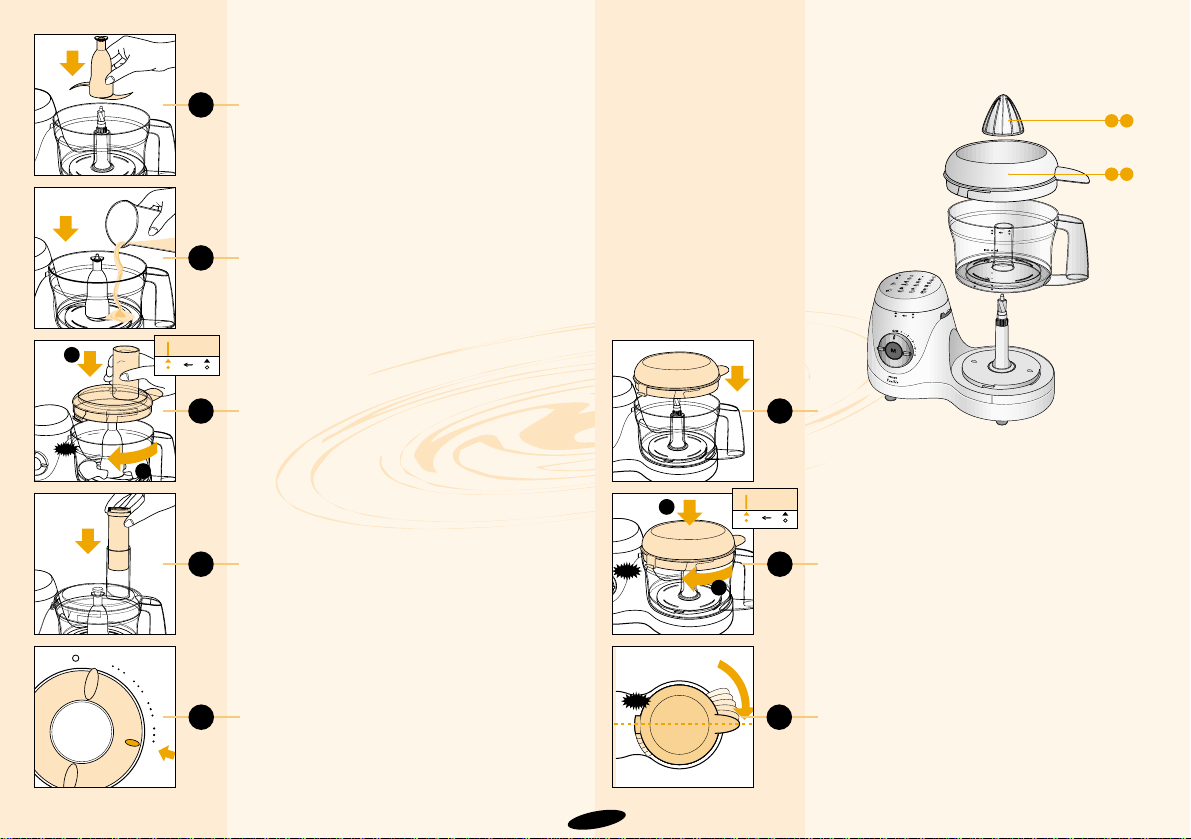
23
24
CLICK
1
2
25
26
27
28
1
2
CLICK
29
Varas de amassar (L)
©
• As varas de amassar podem ser utilizadas
para bater massa de pão e para outros
tipos de massas e misturas para bolos.
- Coloque a tigela sobre a unidade do motor
(fig. 2) e encaixe as varas no veio do motor
(fig. 23).
- Coloque os ingredientes na tigela (fig. 24)
e aperte a tampa (fig. 25).
- Coloque o pressor no tubo dos alimentos
para o vedar (fig. 26).
- Posicione o botão selector da velocidade
(P) em 5 (= velocidade máxima) (fig. 27). A
massa ou a mistura para bolos ficarão
prontas passados 1 a 3 minutos.
Espremedor de citrinos, descrição geral
Acessórios do espremedor de citrinos µ
AA Cone
AB Crivo
Os acessórios do espremedor de citrinos
só podem ser usados com a máquina
Philips HR 7727.
Montagem
- Coloque a tigela sobre a unidade do motor
(fig. 2) e ponha o crivo (AB) na tigela
(fig. 28).
- Rode o crivo na direcção da seta (fig. 29)
até encaixar o fecho de segurança na
unidade do motor. Certifique-se que a aba
do crivo fica a cobrir completamente a
abertura da pega da tigela (fig. 30).
98
AAA
B
CLICK
30
M
1
2
M
3
4
5
Page 98
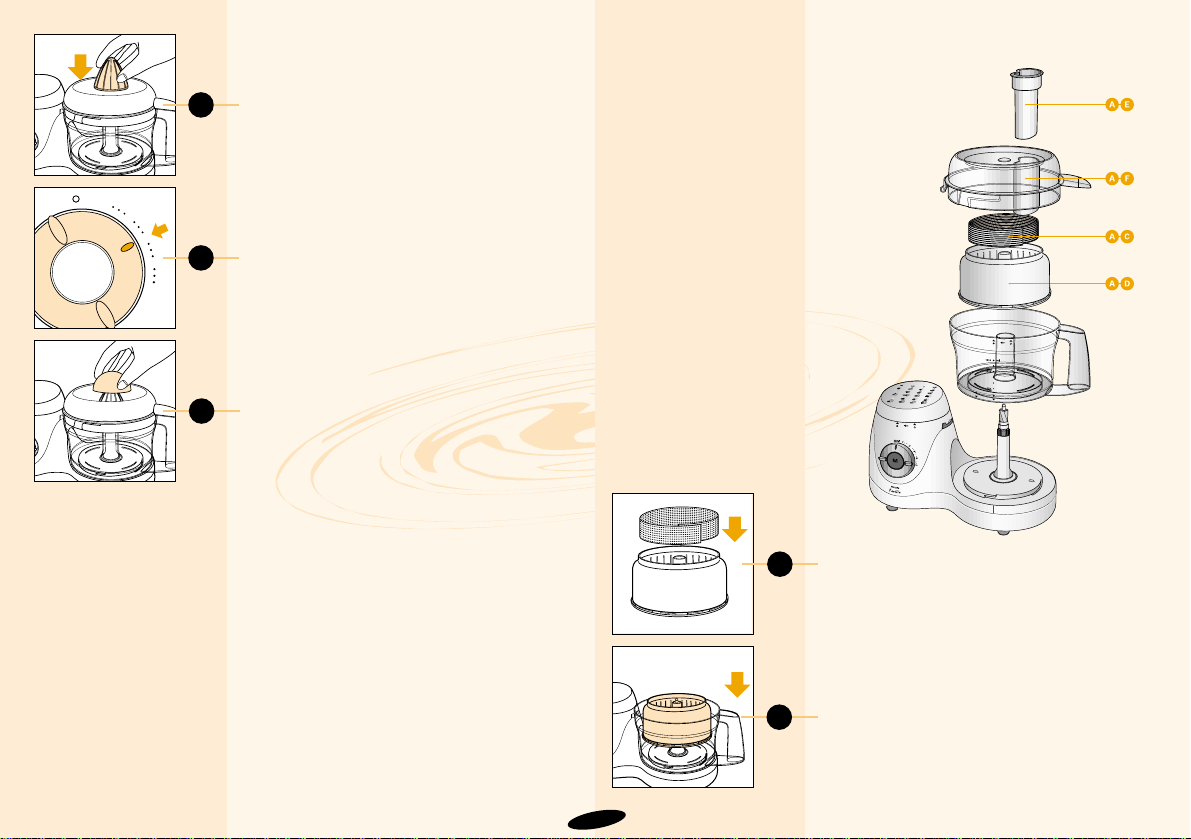
31
M
M
1
2
3
4
5
32
33
34
- Coloque o cone (AA) em posição (fig. 31) e
pressione ligeiramente para o encaixar.
- Ligue a máquina e posicione na velocidade
3 (fig. 32).
- Coloque a fruta cortada ao meio sobre o
cone em movimento, fazendo pressão
(fig. 33).
• De vez em quando, alivie a pressão para
retirar a polpa que se vai juntando no crivo.
Quando o fizer, desligue a máquina e
retire a tigela com o cone e o crivo.
Após a utilização
- Retire a tigela com os acessórios do
espremedor para evitar que o sumo pingue
para dentro da máquina.
- Retire a polpa do cone e do crivo.
- Enxague a tigela, o cone e o crivo logo
após a utilização. Poderá, depois, lavá-los
em água quente com um pouco de
detergente ou meter na máquina da loiça.
Não utilize produtos de limpeza abrasivos,
esfregões, etc.
• Certos ingredientes poderão dar origem à
descoloração da camada exterior dos
acessórios. Não há problema; essa
descoloração vai desaparecendo com o
tempo.
Extractor de sumos , descrição geral
Acessórios do extractor de sumos
AC Filtro AE Pressor
AD Crivo da polpa AF Tampa
Os acessórios do extractor de sumos só
podem ser utilizados na máquina Philips
HR 7727.
Montagem
- Coloque a tigela sobre a unidade do motor
(fig. 2).
- Coloque o filtro (AC) sobre o crivo (AD)
(fig. 34).
- Coloque o crivo da polpa na posição
correcta (fig. 35).
99
35
Page 99
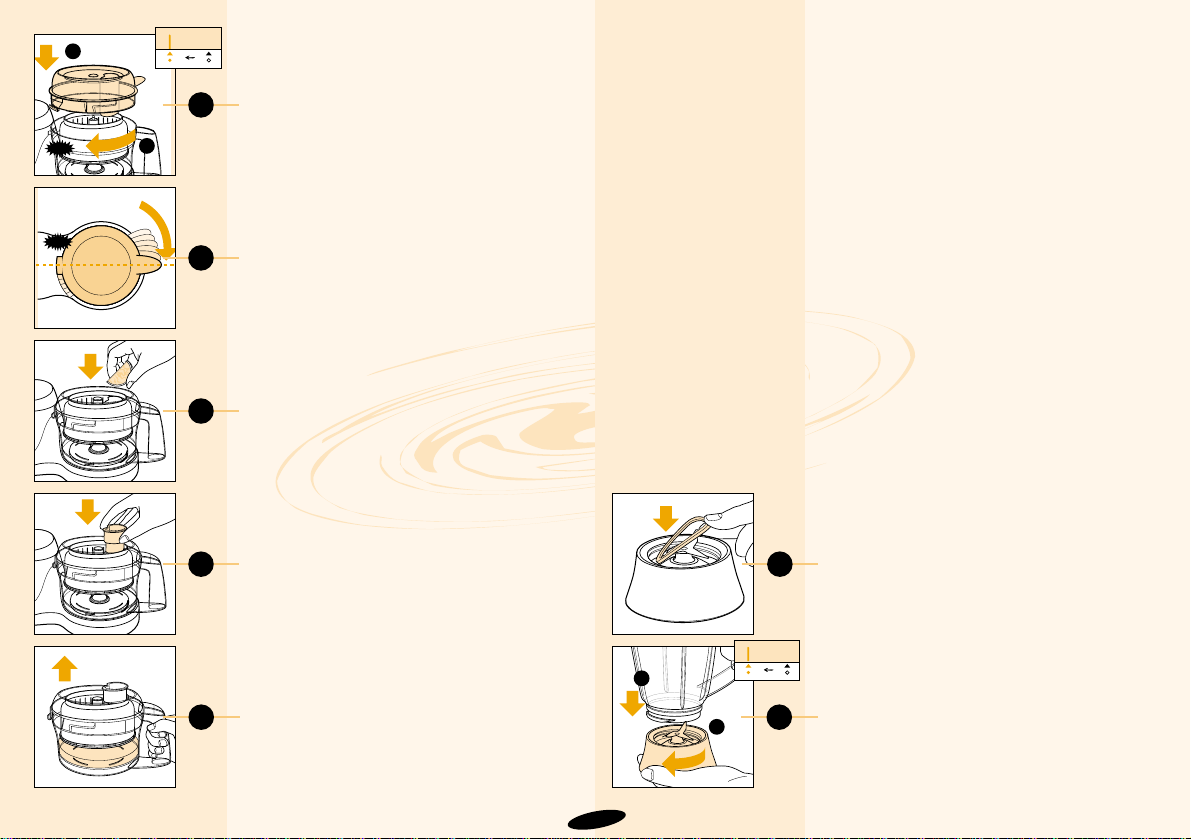
36
CLICK
37
38
39
40
41
- Coloque a tampa (AF) sobre a tigela. Rode a
tampa na direcção da seta até encaixar o
fecho de segurança na unidade do motor
(fig. 36). Certifique-se que a aba da tampa
fica a cobrir completamente a abertura da
pega da tigela (fig. 37).
Como utilizar o extractor de sumos
- Ligue a máquina e seleccione a velocidade
mais alta (posição 5).
- Deite a fruta ou os legumes no extractor de
sumos, através do tubo (fig. 38).
- Empurre a fruta ou os legumes com firmeza,
utilizando o pressor. Mantenha o pressor
dentro do tubo para evitar derrames ou
salpicos (fig. 39).
-Deixe a máquina trabalhar durante mais 20
segundos para extrair todo o sumo.
- Para evitar que o sumo verta para dentro da
máquina, retire a tigela com os acessórios
logo após a sua utilização (fig. 40).
Sugestões:
• Antes de se servir do extractor de sumos:
- corte as cenouras, os rabanetes, etc.;
- descasque os citrinos, o ananás, o melão,
etc.;
- tire o caroço às cerejas, às ameixas,
damascos, pêssegos, etc.
• Ligue sempre primeiro a máquina antes de
colocar a fruta no extractor de sumos.
• De vez em quando, desligue a máquina para
retirar a polpa acumulada no crivo e no filtro.
• Não processe grandes quantidades de uma
só vez. Desligue a máquina se ela começar a
vibrar muito e limpe o crivo e o filtro antes de
voltar a ligar.
Liquidificador (T - X) ®
Importante:
• A máquina pode ser usada com ou sem
o copo misturador acoplado ao motor.
Se utilizar a máquina sem o copo
misturador, ela não funcionará se a
protecção da lâmina (S) não estiver
colocada sobre o encaixe de
acoplamento do copo.
• Antes de utilizar: não ligue a ficha na
tomada de corrente sem ter colocado
antes o copo misturador (V), a tampa
(U) e a lâmina de corte (X) na unidade
do motor, na posição correcta.
• Após a utilização: desligue da corrente
antes de retirar o copo misturador da
unidade do motor.
• O liquidificador pode ser utilizado para
fazer purés finos e para misturar
ingredientes. Serve para sopas, molhos,
batidos, comida para bébés, vegetais,
fruta, massas leves, purés, etc. Se
necessário, corte os alimentos sólidos
em pedaços pequenos antes de os
colocar no copo misturador.
• Não encha o copo misturador com
ingredientes que estejam a uma
temperatura superior a 80ºC.
• Para evitar derrames, não deite mais de
1.5 litros de líquido no copo misturador.
• Nunca retire a tampa com o copo em
funcionamento.
Montagem e desmontagem
- Coloque o anel vedante de borracha (W) à
volta do rebordo da unidade de corte (X)
(fig. 41).
- Rode a unidade de corte para a esquerda
para lhe acoplar o copo misturador (V)
(fig. 42). Certifique-se que fica bem firme.
100
1
2
42
CLICK
1
2
Page 100
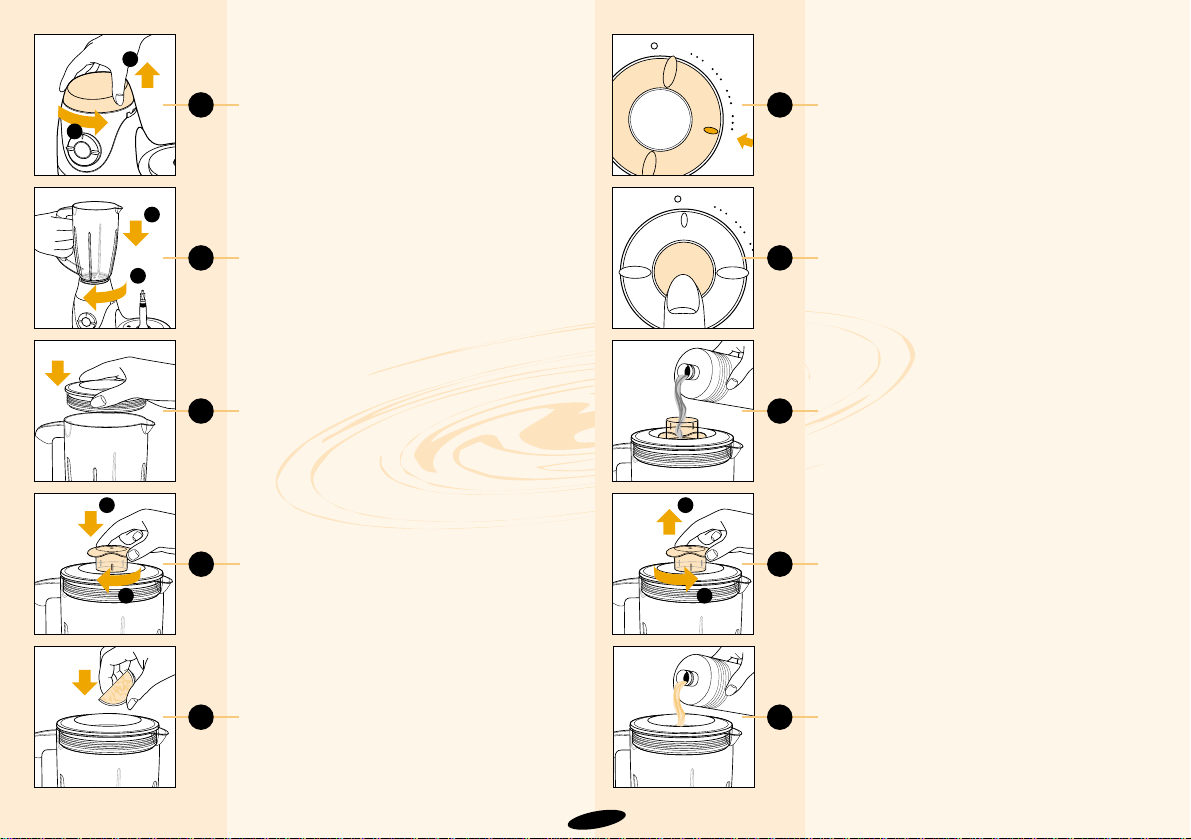
2
43
1
2
44
45
47
46
M
M
1
2
3
4
5
48
M
M
1
2
3
4
5
49
50
2
1
51
- Retire a protecção da unidade de corte (S)
(fig. 43).
- Coloque o copo misturador no orifício de
acoplamento e rode na direcção da seta
até ficar preso (fig. 44).
Aviso: não faça demasiada força sobre a
pega do copo misturador.
- Encaixe a tampa no seu lugar (fig. 45).
- Encaixe o tampão, empurrando-o com
firmeza e rodando na direcção das setas
até ficar bem preso (fig. 46).
. Para retirar o copo, siga estas instruções
pela ordem inversa e na direcção contrária.
Como utilizar o liquidificador
- Deite os ingredientes no copo misturador
(fig. 47).
- Ligue a máquina na velocidade
recomendada (fig. 48) ou premindo o botão
de batimento (M) (fig. 49). Se tiver dúvidas
quanto à velocidade a aplicar, seleccione
sempre a velocidade mais alta (posição 5).
Consulte a tabela para verificar a
velocidade e tempos adequados.
- As aplicações/receitas mencionadas na
tabela ficam prontas entre 10 segundos a 2
minutos.
Sugestões:
• Os ingredientes líquidos (por exemplo, o
óleo para fazer maionese) podem ser
deitados no copo misturador através da
abertura do tampão que foi colocado na
tampa virado para baixo (fig. 50).
• A abertura da tampa pode ser usada para
juntar ingredientes com a máquina em
funcionamento. Para isso, desaperte o
tampão e retire-o da tampa (fig. 51-52).
• Quanto mais tempo deixar a máquina
trabalhar, mais finos serão os resultados.
• De vez em quando poderá ser necessário
desligar a máquina para retirar alguns
restos que se tenham acumulado no
interior do copo.
- Desligue a máquina e retire a ficha da
tomada.
- Retire o tampão e a tampa.
- Remova os alimentos que estejam
pegados no interior do copo misturador
com a ajuda duma espátula macia.
Mantenha a espátula a uma distância
segura da lâmina (cerca de 2 cm).
101
52
1
1
2
 Loading...