

Philips HR3865, HR3866, HR3868 User Manual
© 2016 Koninklijke Philips N.V.
All rights reserved.
4240 002 02841
1
a
b
c
d
e
f
g
m
i
jkl
HR3868
h
HR3865, HR3866
HR3868
EN User manual 5
ET Kasutusjuhend 13
LT Vartotojo vadovas 21
LV Lietotāja rokasgrāmata 29
PL Instrukcja obsługi 37
RO Manual de utilizare 46
3
4
7
6
1
4
2
3
8
3
1
5
2
6
2
3
1
4
5
1
2 3
4
5 6
4
4
6
2
2
1
3
5
8
9
10
7
HR3868

5
English
EN
• Do not immerse the
appliance in water or any
other liquid.
• Check if the voltage
indicated on the
appliance corresponds to
the local mains voltage
before you connect the
appliance.
• Do not use the appliance
if the plug, the mains
cord or the protecting
cover are damaged or has
visible cracks. If the mains
cord is damaged, you
must have it replaced by
Philips, a service centre
authorized by Philips or
similarly qualied persons
in order to avoid a hazard.
• Make sure the lid and
measuring cup are
properly assembled to
the blender jar before you
use the appliance.
• This appliance shall not
be used by children. Keep
the appliance and its cord
out of reach of children.
1 Welcome
Congratulations on your purchase and
welcome to Philips! To fully benet
from the support that Philips oers,
register your product at
www.philips.com/welcome.
Read this user manual carefully before
you use the appliance and save it for
future reference.
Warning
• Do not touch the
sharp blades when the
appliance is plugged in.
If the blades get stuck,
unplug the appliance
before you remove the
ingredients. Be careful
when handling the sharp
cutting blades, emptying
the bowl and during
cleaning.
• Switch o and unplug the
appliance from the power
supply before:
- Removing it from
the stand, changing
accessories or
approaching parts that
move in use.
- Assembling,
disassembling or
cleaning it.
- It is left unattended.

6
EN
• In order to avoid a hazard
due to inadvertent
resetting of the thermal
cut-out, this appliance
must not be supplied
through an external
switching device, such as
a timer, or connected to
a circuit that is regularly
switched on and o by
the utility.
• Do not put the jar on the
main unit if the motor
coupling is still running.
• Do not take out the jar
from the main unit if
the blade is not totally
stopped.
• The blender can not be
used without load or
with a minimum quantity
of ingredient or liquid
(250 ml). Putting too less
ingredients or liquid can
cause damage to the
blender.
• The blender must be
operated with the rubber
pad. Do not remove the
rubber pad on top of the
motor unit
• This appliance can be
used by persons with
reduced physical, sensory
or mental capabilities or
lack of experience and
knowledge if they have
been given supervision
or instruction concerning
use of the appliance in
a safe way and if they
understand the hazards
involved.
• Children should be
supervised to ensure that
they do not play with the
appliance.
• Be careful if hot liquid
is poured into the food
processor or blender as
it can be ejected out of
the appliance due to a
sudden steaming.
• Never assemble or
disassemble the blender
jar to the motor base
while the power is on.
• This appliance is
intended for household
use only.
• Read the cleaning
procedure from “User
Manual” before use.

7
English
EN
Blender
Warning
• Never reach into the
blender jar with your
ngers or an object while
the appliance is running.
• If the blade unit gets
stuck, unplug the
appliance before you
remove the ingredients
that block the blades.
Caution
• To prevent spillage, do
not put more than 2 litres
of liquid in the blender
jar, especially when you
process at a high speed.
Do not put more than
2 litres in the blender jar
when you process hot
liquids or ingredients that
tend to foam.
• Do not operate the
appliance for multiple
batches of recipes. Let
the appliance to cool
down for 30 minutes
before you continue
operating again.
Caution
• Never use any
accessories or parts from
other manufacturers or
that Philips does not
specically recommend. If
you use such accessories
or parts, your guarantee
becomes invalid.
• Do not exceed the
maximum indication on
the blender jar.
• Do not exceed the
maximum quantities
and processing times
indicated in the relevant
table (Fig. 7).
• If food sticks to the wall of
the blender jar, switch o
the appliance and unplug
it. Then use a spatula to
remove the food from the
wall.
• Never ll the blender jar
with hot ingredients.
• The appliance can only
be switched on if the
blender jar is assembled
on the motor unit
correctly.
8
EN
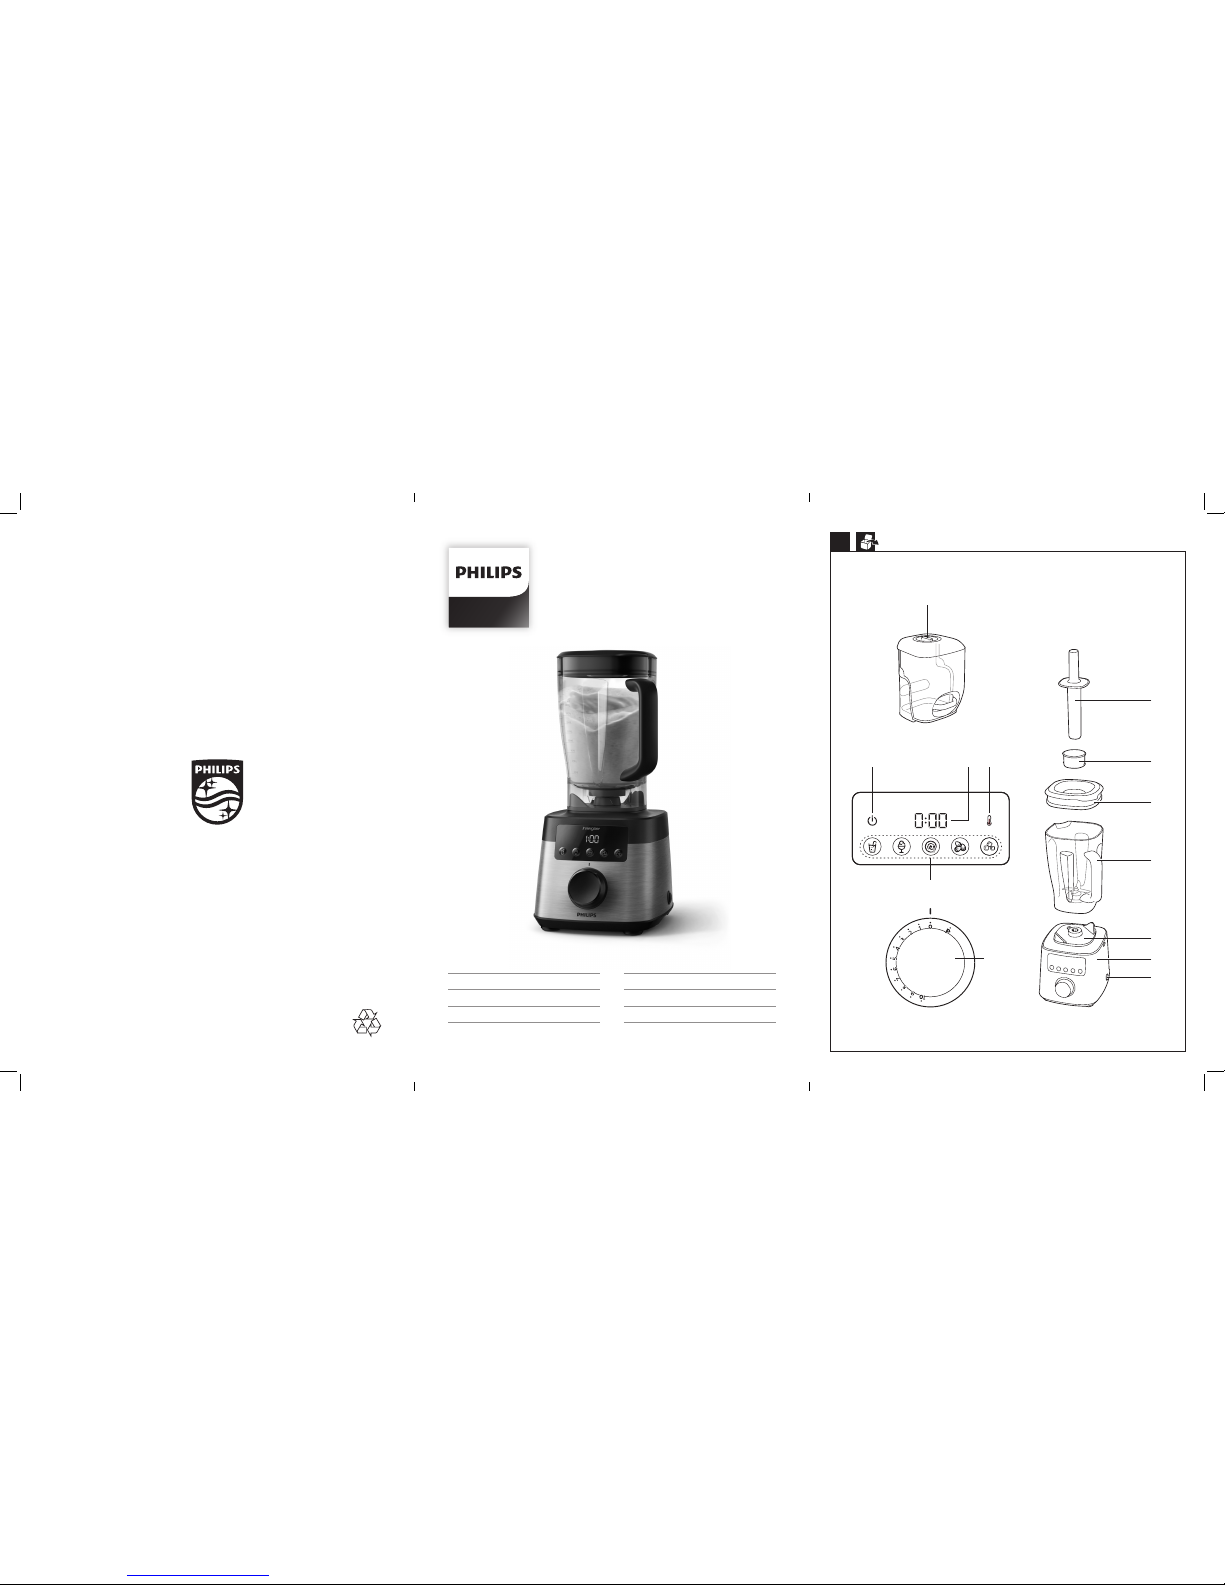
2 Overview (Fig. 1)
Main unit
a Tamper
b Measuring cup
c Blender lid
d Blender jar
e Rubber pad
f Motor unit
g Power switch
Control panel
h Speed selector (Rotary knob)
0: switch o the blender
1-10: switch on the blender and
select a blending speed
setting
P: pulse setting
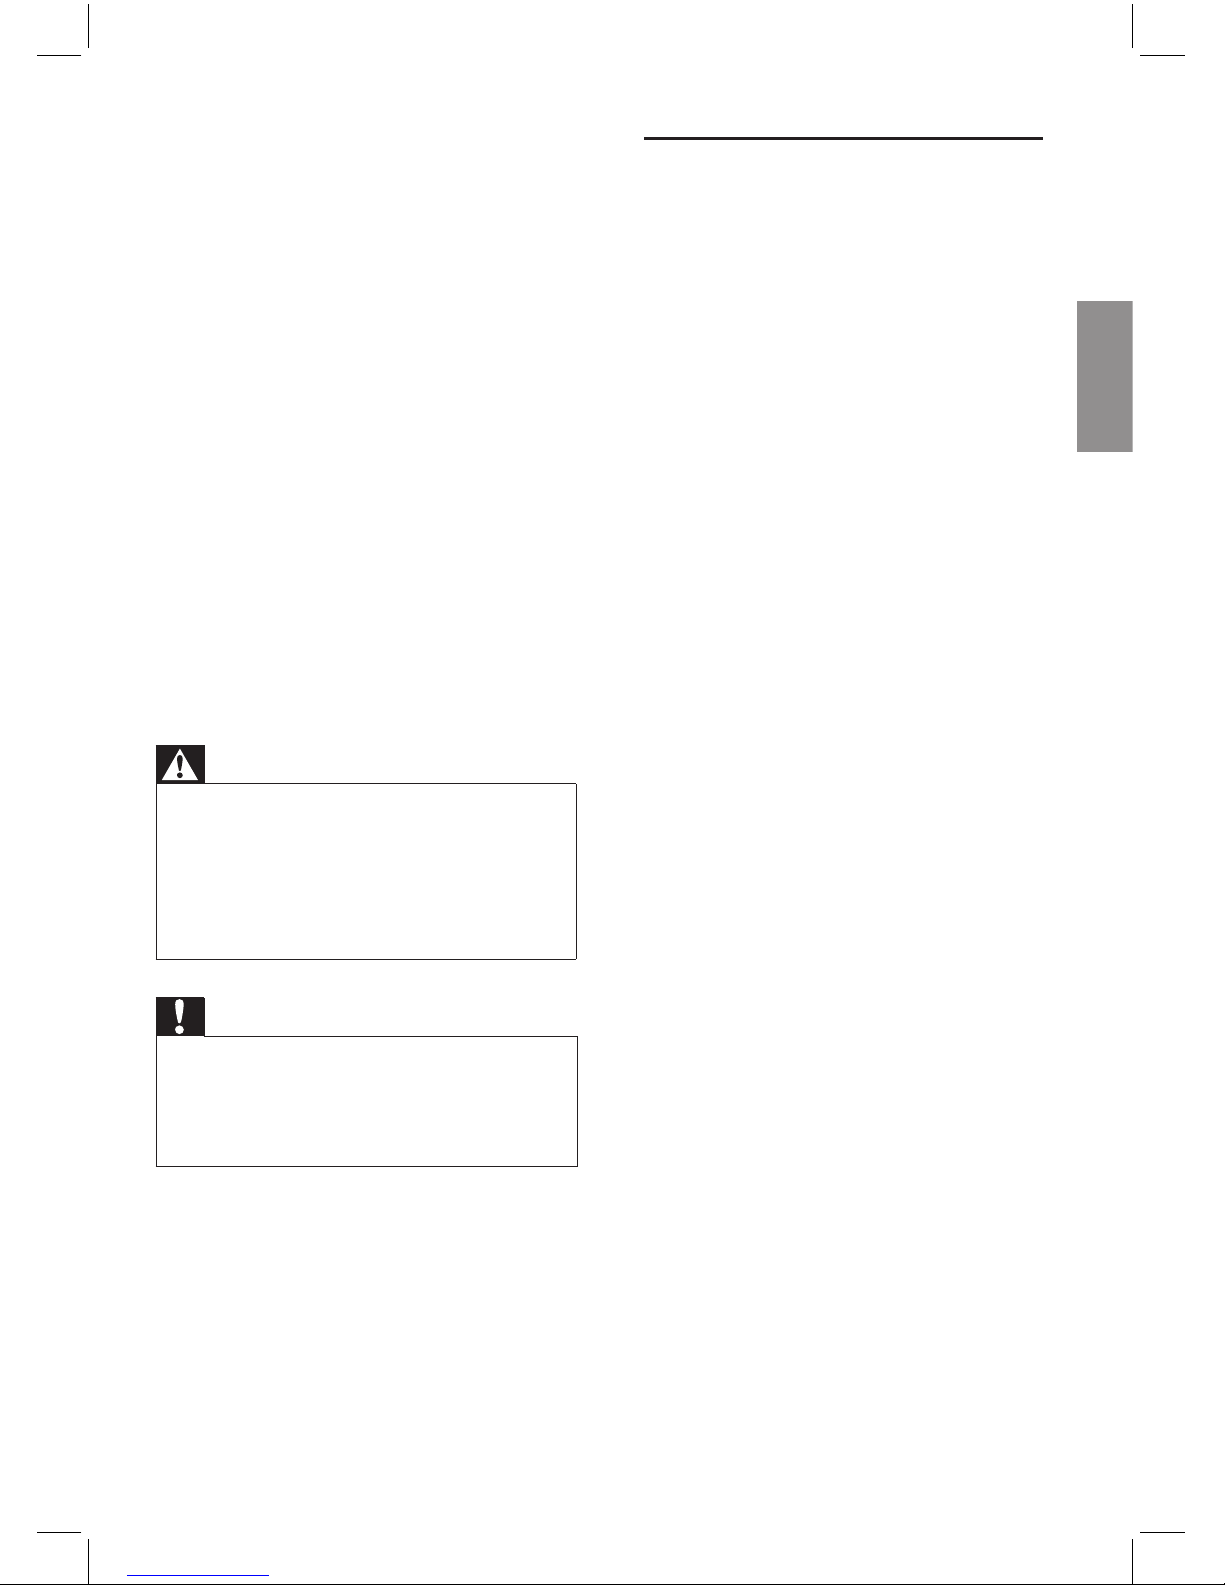
i Program LED and button
Smoothie
Frozen dessert
Soup
Nut
Ice crushing
j Overheat warning LED
k Timer (M:SS)
l Sleep LED
m Dome (HR3868 only)
• Always make sure the
lid is properly closed/
assembled on the jar
and the measuring cup is
inserted properly in the
lid before you switch on
the appliance.
• Noise level: Lc = 89 dB [A]
Electromagnetic elds
(EMF)
This Philips appliance complies with all
standards regarding electromagnetic
elds (EMF). If handled properly and
according to the instructions in this user
manual, the appliance is safe to use
based on scientic evidence available
today.
Recycling
This symbol means that this product
shall not be disposed of with normal
household waste (2012/19/EU).
Follow your country’s rules for the
separate collection of electrical and
electronic products. Correct disposal
helps prevent negative consequences
for the environment and human health.

9
English
EN
Overload protection
The overheat warning LED
(thermometer icon) ashes when the
blender is overloaded. If the blender
continues working with heavy load,
the message “Hot” displays when it
is fully overloaded. The blender will
automatically stop working.
Note: if the temperature of the
appliance is too high or the appliance
is overused, the message “Hot” displays
directly and the blender will also stop
working.
To reset your blender in case of
overload and auto stop protection,
follow the steps below:
1
Switch o the blender and then
unplug it.
2
Remove some of the ingredients to
reduce the load.
3
Allow the appliance to cool down
for 30 minutes.
4
Connect the power plug to the wall
outlet and switch on the blender.
Blender jar
The jar is designed for processing
various recipes like smoothie, juice,
sauce, grain milk, soup, puree, frozen
dessert, ice crushing, nut butter,
chopping or grinding dry ingredients.
If the jar is used for grinding dry
ingredients, the jar wall will be
scratched and become cloudy. There
is no negative impact on the blending
performance and no food safety
concern. It is still safe to use.
3 Before first use
Before you use the blender for the rst
time, thoroughly clean the parts that
come into contact with food.
If the timer shows “---”, turn the rotary
knob to speed 0 and place the jar on
the motor unit.
Built-in safety lock
This feature ensures that you can only
switch on the appliance if you have put
the blender jar correctly on the motor
unit. If the blender jar is put correctly,
the built-in safety lock is unlocked.
When the blender jar is not placing well
on the motor unit, the message “Err”
displays.
To reset your blender in this case, follow
the steps below:
1
Switch o the blender. Make sure
the rotary knob is at “0”.
2
Switch on the blender.
Auto stop
Your blender will be automatically
turned o after 4 minutes of continuous
operation. This can avoid potential
problems due to prolonged usage.

10
EN
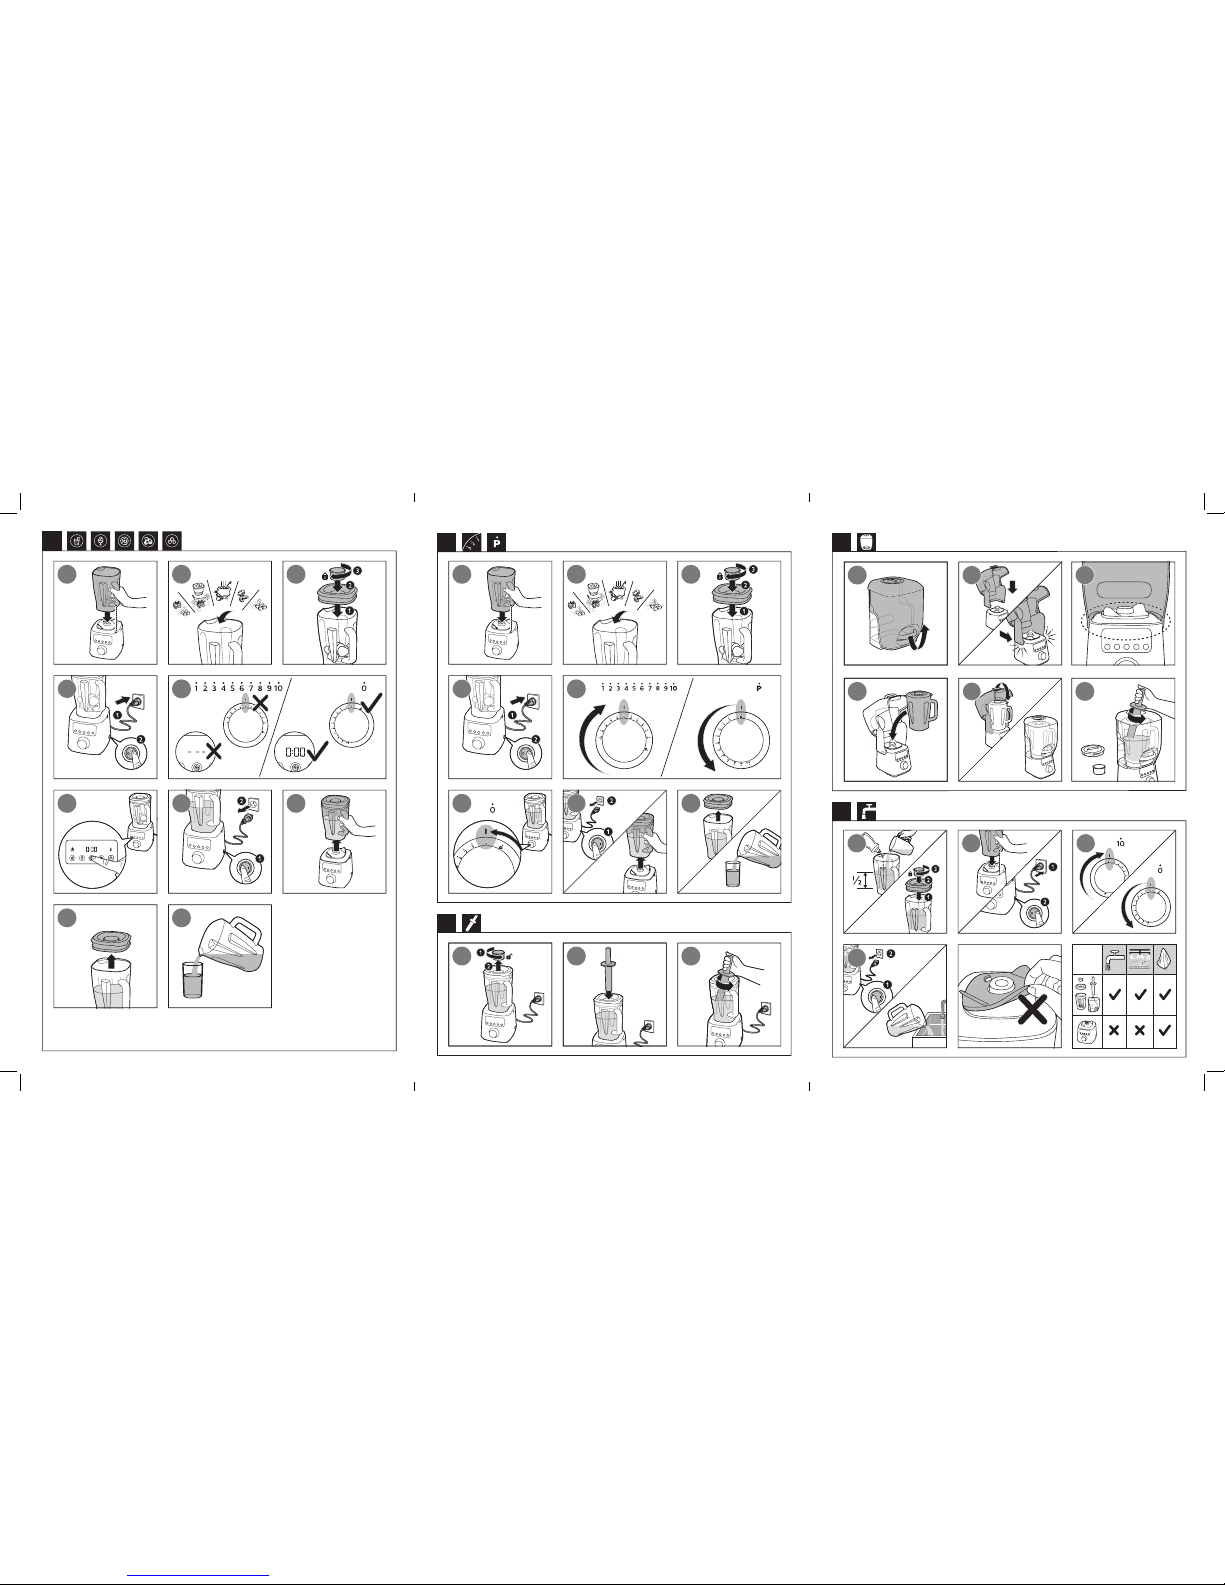
5 Manual blending
mode (Fig. 3)
1
Assemble your blender jar as
indicated.
2
Put the ingredients in the jar.
3
Insert the measuring cup and close
the lid.
4
Put the plug in the wall outlet and
switch on the blender.
5
Turn the knob to a speed setting as
needed.
» The blender starts blending.
» The timer starts counting up.
• To switch to pulse blending
mode during the blending
process, turn the knob to P
several times.
6
Turn the knob to speed 0 to stop
blending.
» Let the blender cool down for
5 minutes after blending.
7
Switch o the blender and unplug
it. Then remove the blender jar from
the motor unit.
8
Open the lid and pour out the
ingredients from the blender jar.
6 Sleep mode
Your blender will go into sleep mode
after 3 minutes when there is no
operation and sleep LED (power LED) is
on. You can wake up the appliance and
start manual blending by turning rotary
knob to a speed setting needed.
4 Preset blending
mode (Fig. 2)
1
Assemble your blender jar as
indicated.
2
Put the ingredients in the jar.
3
Insert the measuring cup and close
the lid.
4
Put the plug in the wall outlet and
switch on the blender.
» The timer shows 0:00 and
program LEDs turn on. The
appliance is ready to use.
5
Select a program by pressing a
program button on the panel.
» The blender starts blending as
programmed.
» The timer starts counting down.
• See table 1 for purposes and
blending time of dierent
programs.
• To stop the current blending
program, press the selected
program button again.
• To switch to manual blending
mode during the blending
process, turn the knob to a
speed setting as needed.
• To switch to pulse mode during
the blending process, turn the
knob to P several times.
6
Switch o the blender and unplug it
after blending.
» The blender stops blending
when the timer reaches 0:00.
7
Remove the blender jar from the
motor unit.
8
Open the lid and pour out the
ingredients from the blender jar.
11
English
EN
7 Use the tamper
(Fig. 4)
You can use the tamper to process
very thick mixtures or recipes with less
liquid which cannot be processed well
in a normal blender, e.g. nut butters,
frozen dessert or puree vegetables. The
tamper helps circulation by preventing
air formed.
The tamper is used to stir and push
ingredients into the blades when the
blender is on.
Note: Use the tamper only when the lid
is assembled correctly to the jar to avoid
tamper hitting the blades.
Tips: You can move the tamper up and
down, turn around or push it toward
the side or corner of the jar to help
ingredients circulate.
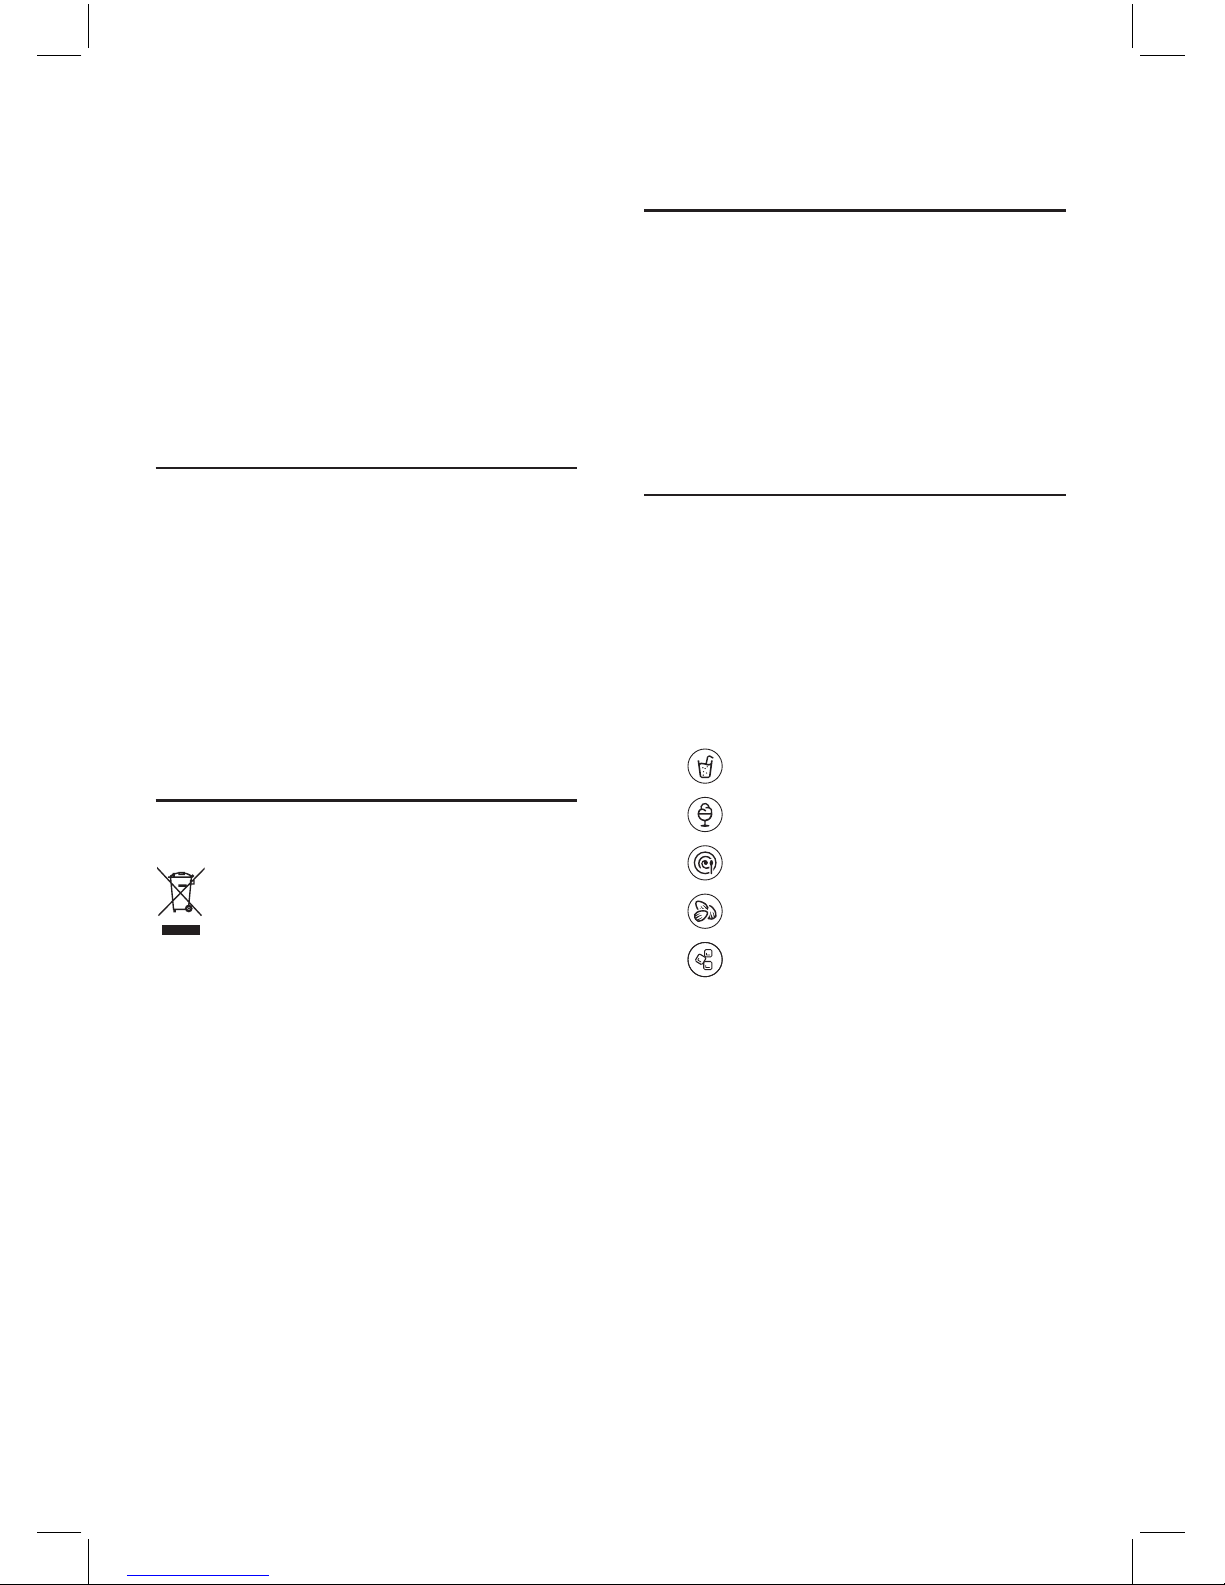
8 Use the dome
(HR3868 only)
(Fig. 5)
You can use the dome to reduce the
noise during blending.
Follow the steps to assemble and use
the dome as indicated in g. 5.
9 Cleaning (Fig. 6)
Warning
• Before you clean the appliance, unplug it.
• Refer to Fig. 6 for information on cleaning the
parts with water, dishwashing machine and/or
moist cloth.
• Do not remove the rubber pad on top of the
motor unit.
Caution
• Make sure that the cutting edges of the blades
do not come into contact with hard objects.
This may cause the blade to get blunt.
• The cutting edges are sharp. Be careful when
you clean the blade units.
1
Clean the motor unit with a moist
cloth.
2
Clean the other parts in hot water
(< 60°C) with some washing-up
liquid or in a dishwasher.
3
Store the appliance and
accessories in a dry place after
cleaning.
Quick cleaning
Follow the steps below to clean the
blender jar easier.
1
Pour lukewarm water (not more
than 1 liters) and a few drops
of washing-up liquid into the
blender jar.
2
Insert the measuring cup and
close the lid.
3
Turn the knob to speed 10. Let
the blender run for 30 seconds or
until the blender jar is clean.
4
After use, switch o the blender
and then unplug the appliance.
5
Remove the blender jar and rinse
it with clean water.

12
EN
10 Guarantee and service
If you have a problem, need service, or need information, see www.philips.com/
support or contact the Philips Consumer Care Center in your country. The phone
number is in the worldwide guarantee leaet. If there is no Consumer Care Center in
your country, go to your local Philips dealer.
Table 1
Program
Smoothie
Frozen
dessert
Soup
Nuts
Ice
crushing
Purpose Blend anything
like fruits,
vegetables,
frozen fruits,
yoghurt, oat,
seeds, herbs
into thick
and creamy
smoothie
Blend
frozen
fruits and
yoghurt into
delicious
frozen
dessert
Blend
vegetables
into hot
and silky
soup in
4 minutes
only
Grind
whole nuts
into nely
chopped
result
Crush ice
cubes
within few
pulse
Blending
time
1 min 2 min 4 min 30 sec 4 pulse
Suggested
recipe
Spinach with
pineapple
and banana
smoothie
Frozen
strawberry
with
yoghurt ice
cream
Creamy
tomato
soup
Grinding
almond
Mango
and
orange
with
crushed
ice
Recipe
Ingredients:
950g minced pork
20g scallion
Procedure:
1. Put the minced pork and scallion into jar.
2. Blend the recipe for 10 seconds at speed 10.

13
Eesti
ET
- selle järelevalveta
jätmist.
• Ärge kastke seadet vette
ega mõne muu vedeliku
sisse.
• Enne seadme
ühendamist vooluvõrku
kontrollige, kas seadmele
märgitud toitepinge
vastab kohaliku
elektrivõrgu pingele.
• Ärge kasutage seadet,
kui pistik, toitejuhe või
kaitsekate on kahjustatud
või neil on nähtavaid
mõrasid. Kui toitejuhe
on rikutud, siis ohtlike
olukordade vältimiseks
tuleb lasta toitejuhe
vahetada Philipsi
hoolduskeskuses,
Philipsi volitatud
hoolduskeskuses või
kvalitseeritud isikul.
• Enne seadme kasutamist
veenduge, et kaas ja
mõõtenõu on korralikult
kannmikseri kannu küljes.
• Lapsed ei tohi seda
seadet kasutada. Hoidke
seade ja selle toitejuhe
lastele kättesaamatus
kohas.
1 Tere tulemast
Õnnitleme ostu puhul ja tervitame
Philipsi poolt! Philipsi pakutava
tootetoe eeliste täielikuks kasutamiseks
registreerige oma toode veebilehel
www.philips.com/welcome.
Enne seadme kasutamist lugege seda
kasutusjuhendit hoolikalt ja hoidke see
edaspidiseks alles.
Hoiatus
• Kui seade on elektrivõrku
ühendatud, ärge teravaid
terasid puudutage.
Kui lõiketerad kiiluvad
kinni, eemaldage seade
vooluvõrgust, enne
kui asute eemaldama
koostisaineid. Olge
ettevaatlik teravate
lõiketerade käsitsemisel,
nõu tühjendamisel ja
puhastamise ajal.
• Lülitage seade välja
ja eemaldage see
vooluvõrgust enne:
- selle aluselt
eemaldamist,
tarvikute vahetamist
või kasutamise ajal
liikuvatele osadele
lähenemisel;
- selle kokkupanemist,
lahtivõtmist või
puhastamist;

14
ET
• Et ära hoida vigastusi,
mis võivad tekkida
termilise ohutuslüliti
ettekavatsematu
lähtestamise tagajärjel,
ei tohi seda seadet
ühendada ei välise
lülitusseadmega, nagu nt
taimeriga, ega ühendada
skeemiga, mida
elektrivõrk korrapäraselt
sisse-välja lülitab.
• Ärge asetage kannu
põhiseadmele, kui
mootori liitmik veel
töötab.
• Ärge võtke kannu
põhiseadmelt ära, kui tera
ei ole täielikult peatunud.
• Kannmikserit ei tohi
kasutada tühjalt või
minimaalse koguse
toiduainete või
vedelikuga (250 ml). Liiga
väike kogus toiduaineid
või vedelikku võib
kannmikserit kahjustada.
• Kannmikserit tuleb
kasutada kummist
padjakesega.
Ärge eemaldage
kummist padjakest
mootorisektsiooni peal
• Seda seadet võivad
kasutada füüsilise,
meele- või vaimse
puudega isikud või
isikud, kellel puuduvad
kogemused ja teadmised,
kui neid valvatakse
või neile on antud
juhendid seadme ohutu
kasutamise kohta ja nad
mõistavad sellega seotud
ohte.
• Lapsi tuleks jälgida,
et nad ei mängiks
seadmega.
• Olge ettevaatlik kuuma
vedeliku valamisel
köögikombaini või
kannmikserisse, sest
see võib ootamatu
aurutamise tõttu
seadmest välja paiskuda.
• Ärge pange kannmikseri
kannu mootorialusele ega
võtke sealt ära, kui see on
sisse lülitatud.
• Seade on mõeldud
kasutamiseks vaid
kodumajapidamises.
• Enne kasutamist
tutvuge kasutusjuhendi
puhastustoimingute
osaga.

15
Eesti
ET
• Seadet saab sisse lülitada
ainult siis, kui kannmikseri
kann on õigesti mootori
külge paigaldatud.
Kannmikser
Hoiatus
• Ärge kunagi pange sõrmi
ega muid objekte töötava
kannmikseri kannu.
• Lõiketerade
ummistumisel tõmmake
enne lõiketera
tõkestavate koostisainete
eemaldamist toitepistik
seinakontaktist välja.
Ettevaatust
• Mahaloksumise
vältimiseks ärge pange
kannmikseri kannu
rohkem kui 2 liitrit
vedelikku, eriti kui
kavatsete kasutada
suure kiirusega režiimi.
Ärge täitke kannmikseri
kannu üle 2 liitri piiri,
kui mikserdate kuumi
vedelikke või vahustuvaid
toiduaineid.
Ettevaatust
• Ärge kunagi kasutage
teiste tootjate poolt
tehtud tarvikuid või osi,
mida Philips ei ole eriliselt
soovitanud. Selliste
tarvikute või osade
kasutamisel kaotab
garantii kehtivuse.
• Ärge ületage kannmikseri
kannule märgitud
maksimaaltaseme
märgendit.
• Ärge ületage vastavas
tabelis toodud
toiduainete koguseid
ega töötlemise kestust
(joonis 7)
• Kui toiduained kleepuvad
mikserikannu seintele,
lülitage seade välja
ja eemaldage see
elektrivõrgust. Seejärel
kasutage toiduainete
anuma seintelt
eemaldamiseks spaatlit.
• Ärge kasutage
mikserikannu
kuumade koostisainete
töötlemiseks.
16
ET
2 Ülevaade
(joonis 1)
Põhiseade
a Tambits
b Mõõtenõu
c Kannmikseri kaas
d Kannmikseri kann
e Kummist padjake
f Mootor
g Toitelüliti
Juhtpaneel
h Kiiruseselektor (ketas)
0: lülitab kannmikseri välja
1-10: lülitab kannmikseri sisse ja
valib segamiskiiruse
P: impulss-seadistus
i Programmi LED ja nupp
Smuuti
Külmutatud magustoit
Supp
Pähkel
Jää purustamine
j
Ülekuumenemise hoiatuse
valgusdiood
k Taimer (M:SS)
l Puhkerežiimi LED
m Kuppel (ainult HR3868)
3 Enne esimest
kasutamist
Enne kannmikseri esmakordset
kasutuselevõttu peske kõik
toiduainetega kokkupuutuvad osad
hoolikalt puhtaks.
Kui taimer näitab “ --- “, keerake ketas
kiirusele 0 ja asetage kann mootorile.
• Ärge pange seadmesse
retseptide mitmekordseid
koguseid. Enne jätkamist
laske seadmel 30 minutit
jahtuda.
• Veenduge alati, et kaas
oleks korralikult kannule
peale pandud või külge
pandud ja mõõtetass
oleks korralikult kaane
küljes, enne kui seadme
sisse lülitate.
• Müratase: Lc = 89 dB [A]
Elektromagnetväljad
(EMF)
SeePhilipsi seade vastab kõikidele
elektromagnetilisi välju (EMF)
käsitlevatele standarditele. Kui seadet
käsitsetakse õigesti ja käesolevale
kasutusjuhendile vastavalt, on seda
tänapäeval käibelolevate teaduslike
teooriate järgi ohutu kasutada.
Ringlussevõtt
See sümbol tähendab, et seda toodet ei
tohi visata tavaliste olmejäätmete hulka
(2012/19/EL).
Järgige elektriliste ja elektrooniliste
toodete lahuskogumise kohalikke
eeskirju. Õigel viisil kasutusest
kõrvaldamine aitab ära hoida võimalikke
kahjulikke tagajärgi keskkonnale ja
inimese tervisele.

17
Eesti
ET
2
Eemaldage osa komponentidest, et
nõu ei oleks liiga täis.
3
Laske seadmel 30 minutit jahtuda.
4
Ühendage toitepistik seinakontakti
ja lülitage kannmikser sisse.
Kannmikseri kann
Kann on mõeldud erinevate retseptide
valmistamiseks, nagu smuuti, mahl,
kaste, teravilja piim, supp, püree,
külmutatud magustoit, jää purustamine,
pähklivõi, kuivade toiduainete
hakkimine või peenestamine.
Kui kannu kasutatakse kuivade
toiduainete peenestamiseks, saab kann
kriimustada ja muutub häguseks. See ei
mõju negatiivselt peenestustulemusele
ega toiduohutusele. Seda on ikka ohutu
kasutada.
4 Eelseadistatud
segamisrežiim
(joon. 2)
1
Pange kannmikseri kann kokku,
nagu näidatud.
2
Pange koostisained kannu.
3
Sisestage mõõtenõu ning sulgege
kaas.
4
Sisestage pistik seinakontakti ja
lülitage kannmikser sisse.
» Taimer näitab „0:00“ ja
programmi LED-id süttivad.
Seade on kasutamiseks valmis.
5
Valige programm, vajutades
programminuppu paneelil.
» Kannmikser hakkab töötama
vastavalt programmile.
» Taimer hakkab loendama.
Sisseehitatud ohutuslukk
Sisseehitatud ohutuslukk tagab, et
seadet on võimalik sisse lülitada üksnes
siis, kui kannmikseri kann on õigesti
mootorile paigaldatud. Kui kannmikseri
kann on õigesti paigaldatud, vabaneb
sisseehitatud ohutuslukk.
Kui kannmikseri kann ei ole korralikult
mootoril, kuvatakse teade „Err“.
Sellisel juhul kannmikseri
lähtestamiseks tehke järgmist:
1
Lülitage kannmikser välja.
Veenduge, et ketas on asendis „0“.
2
Lülitage kannmikser sisse.
Automaatpeatus
Teie kannmikser lülitub automaatselt
välja pärast 4 minuti pikkust pidvat
kasutamist. Nii välditakse kauakestvast
kasutamisest tekkida võivaid võimalikke
ohtusid.
Ülekoormuskaitse
Kui kannmikser on ülekoormatud,
vilgub ülekuumenemise hoiatuse LED
(termomeetri ikoon). Kui kannmikser
jätkab suure koormusega töötamist,
ilmub selle täielikul ülekoormamisel
teade „Hot“ (Kuum). Kannmikser peatub
automaatselt.
Märkus. Kui seadme temperatuur on
liiga kõrge või kui seadet on liiga palju
kasutatud, kuvatakse kohe teade
„Hot“ (Kuum) ja kannmikser lõpetab
töötamise.
Seadme lähtestamiseks ülekoormuse ja
automaatse väljalülitumise korral tehke
järgmist:
1
Lülitage seade välja ja eemaldage
elektrivõrgust.

18
ET
• Impulss-segamisrežiimi sisse
lülitamiseks segamise ajal
keerake juhtnupp mitu korda
asendisse P.
6
Segamise peatamiseks keerake
juhtnupp kiirusele „0“.
» Pärast segamist laske
kannmikseril viis minutit jahtuda.
7
Lülitage kannmikser välja
ja eemaldage toitejuhe
seinakontaktist. Seejärel eemaldage
kannmikseri kann mootori küljest.
8
Avage kaas ja kallake koostisained
kannmikseri kannust välja.
6 Puhkerežiim
Kannmikser läheb puhkerežiimi,
kui 3 minutit ei ole midagi tehtud ja
puhkerežiimi LED (toite LED) põleb.
Seadet üles äratada ja käsitsi segamist
alustada saate siis, kui keerate
pöördnupu vajalikule kiirusele.
7 Kasutage
tambitsat (joon. 4)
Tambitsat võite kasutada väga paksude
segude või retseptide töötlemiseks,
mida ei saa tavalises kannmikseris
korralikult töödelda, nt pähklivõi,
külmutatud magustoit või püreestatud
juurviljad. Tambits aitab kaasa
ringlemisele, vältides õhu tekkimist.
Tambitsat kasutatakse koostisosade
segamiseks ja lõiketerade vahele
lükkamiseks, kui kannmikser on sisse
lülitatud.
Märkus. Tambitsa kokkupuute
vältimiseks teradega kasutage tambitsat
ainult siis, kui kaas on kannule õigesti
paigaldatud.
• Vt tabelist 1 eri programmide
otstarvet ja segamisaegu.
• Käimasoleva segamisprogrammi
peatamiseks vajutage veel kord
programminuppu.
• Käsitsi segamisrežiimi sisse
lülitamiseks segamisprotsessi
ajal keerake juhtnupp vajalikule
kiirusele.
• Impulssrežiimi sisse lülitamiseks
segamisprotsessi ajal keerake
juhtnupp mitu korda asendisse
P.
6
Lülitage kannmikser välja ja võtke
pistik seinakontaktist pärast
segamist välja.
» Kannmikser lõpetab segamise,
kui taimeri loendur jõuab
väärtuseni 0:00.
7
Eemaldage segamisnõu mootori
küljest.
8
Avage kaas ja kallake koostisained
kannmikseri kannust välja.
5 Käsitsi
segamisrežiim
(joon. 3)
1
Pange kannmikseri kann kokku
nagu näidatud.
2
Pange koostisained kannu.
3
Sisestage mõõtenõu ning sulgege
kaas.
4
Sisestage pistik seinakontakti ja
lülitage kannmikser sisse.
5
Keerake juhtnupp vajaliku kiiruse
asendisse.
» Kannmikser hakkab segama.
» Taimer hakkab loendama.
19
Eesti
ET
Nõuanded. Koostisainete ringlemise
abistamiseks võite tambitsat liigutada
üles ja alla, keerata või lükata kannu
külje või nurga suunas.
8 Kasutage kuplit
(ainult HR3868)
(joon. 5)
Kuplit saate kasutada müra
vähendamiseks segamisel.
Järgige samme kupli kokkupanemiseks
ja kasutamiseks, nagu näidatud
joonisel 5.
9 Puhastamine
(joonis 6)
Hoiatus
• Enne seadme puhastamist eemaldage seade
elektrivõrgust.
• Vt jooniseid 6, et saada teavet osade
puhastamise kohta vee, nõudepesumasina ja/
või niiske lapiga.
• Ärge eemaldage kummist padjakest
mootorisektsiooni peal.
Ettevaatust
• Veenduge, et terade lõikeservad ei puutu
kokku kõvade esemetega. See võib
põhjustada tera nüristumist.
• Lõikeservad on teravad. Olge terade
puhastamisel ettevaatlik.
1
Puhastage mootorit niiske lapiga.
2
Puhastage teised osad
pesuvahendit sisaldavas
kuumas vees (< 60 °C) või
nõudepesumasinas.
3
Hoidke seadet ja tarvikuid pärast
puhastamist kuivas kohas.
Kiirpuhastus
Järgige alltoodud samme mikseri
kannu kergemaks puhastamiseks.
1
Kallake kannmikseri kannu
toasooja vett (mitte rohkem
kui 1 liitrit) ja paar tilka
pesemisvedelikku.
2
Sisestage mõõtenõu ning sulgege
kaas.
3
Keerake juhtnupp kiirusele 10.
Laske kannmikseril töötada
30 sekundit või kuni kannmikseri
kann on puhas.
4
Pärast kasutamist lülitage
kannmikser välja ja eemaldage
elektrivõrgust.
5
Eemaldage kann ja loputage
seda puhta veega.
 Loading...