

Page 1
1
HR2380, HR2381
HR2382
16 15 13 12
14
11
10
1
9
2
3
8
4
5
7
Specifications are subject to change without notice.
© 2018 Koninklijke Philips N.V.
All rights reserved.
3000 030 22481 A
6
2
1 2 3
EN User manual 5 23 ﺮﺑﺭﺎﮐ ﯼﻨﻫﺍﺭ FA
31 ﻡﺪﺨﺘﺴﳌﺍ ﻞﻴﻟﺩ AR
45
Page 2
3
4
5
5
3
4
1
2
26
27
28
2
1
29
6
10
7
12
14 15 16
1
2
18
19
20
8
9
30
31
32
1311
17
21
22
23
24
25
Page 3
ENGLISH
Table of Contents
Important 6
Electromagnetic elds (EMF) 8
Recycling 8
Guarantee and support 8
Introduction 9
Product overview (Fig. 1) 9
Control panel overview (Fig. 2) 9
Available Accessories 10
Shaping discs 10
Disassembling and cleaning before rst use 10
Assembling 10
Using the Pasta maker 11
Start preparation 11
Starting the pasta making program 12
Cleaning 13
Storage 13
Troubleshooting 13
5
Page 4

6
ENGLISH
Important
Read this user manual carefully before you use the appliance and save it for future
reference.
- Before you connect the appliance to the power, make sure
that the voltage indicated on the bottom of the appliance
corresponds to the local power voltage.
- In order to avoid a hazard due to inadvertent resetting of the
thermal cut-out, this appliance must not be supplied through
an external switching device, such as a timer, or connected to
a circuit that is regularly switched on and o by the utility.
- To avoid risk of electric shock or damage, do not rinse or soak
the main unit.
- Before you insert the plug into the power outlet, make sure
that the appliance is assembled correctly.
- If the power cord, the plug, or other parts are damaged, do
not use the appliance.
- If the power cord is damaged, you must have it replaced by
Philips, a service center authorized by Philips or similarly
quali ed persons to avoid a hazard.
- This appliance is not intended for use by persons (including
children) with reduced physical, sensory or mental
capabilities, or lack of experience and knowledge, unless
they have been given supervision or instruction concerning
use of the appliance by a person responsible for their safety.
- Children should be supervised to ensure that they do not
play with the appliance.
- Cleaning and user maintenance shall not be made by
children without supervision.
- Always disconnect the appliance from the supply if it is
left unattended and before assembling, disassembling or
cleaning.
- Switch o the appliance and disconnect from supply before
changing accessories or approaching parts that move in use.
- Before using the appliance for the rst time, disassemble and
wash the accessories thoroughly.
Page 5

ENGLISH
- This appliance is intended for normal household use only. It
is not intended for use in environments such as sta kitchens
of shops, o ces, farms or other work environments. Nor is
it intended to be used by clients in hotels, motels, bed and
breakfasts and other residential environments.
- Do not use this appliance on an unstable or uneven surface.
- To better protect the lifetime of the appliance, we
recommend to stop the device for 15 minutes, if it was used
for 45 minutes continuously.
- If you intend to use the appliance continuously, clean the
shaping disc with the supplied cleaning tool each time after
use. For cleaning ease, do not soak the shaping disc into the
water directly.
- Unplug the appliance when not in use.
- Do not put heavy objects on the appliance.
- Do not move the appliance while it is operating.
- To prevent a short circuit or an electric shock, do not pour
water or any liquid onto the display.
- Do not use a dishwasher to clean the appliance.
- Never reach into the mixing chamber when the appliance is
plugged in.
- Make sure to tighten the front panel knobs during assembly.
- Make sure the appliance is not plugged in when assembling
the appliance.
- Make sure that all the parts (including the chamber lid) are
well assembled before plugging in.
- Do not shake or move the appliance when it is weighing the
our.
- Do not put any object on the appliance when it is weighing
the our.
- Do not put less than 200g or more than 600g of our in the
chamber.
- Pour in the liquid slowly through the water slot after the
appliance starts mixing.
- Do not put any ingredients that are 60°C / 140°F or
above into the pasta maker, nor place the pasta maker
7
Page 6

8
ENGLISH
in surroundings with high temperature (60°C / 140°F), for
instance in a high temperature sterilization. This will damage
the appliance.
- Never pour water into the mixing chamber before you place
the chamber lid onto the chamber.
- Do not pour any liquids into the safety switch hole.
- Do not select the extrusion only program before the dough
mixing is complete. Otherwise, this will damage the pasta
maker.
- Do not use a scourer, caustic cleaners, or cleaners (for
examples, gasoline, alcohol, and propanol) to clean the
appliance.
- Clean the appliance each time after use, or the appliance
might not operate properly.
- Take extra caution when cleaning the appliance to avoid
getting cut by any sharp edges.
- Do not insert any objects into the device.
Electromagnetic elds (EMF)
This Philips appliance complies with all applicable standards and regulations regarding
electromagnetic elds.
Recycling
- Do not throw away the product with the normal household waste at the end of its
life, but hand it in at an o cial collection point for recycling. By doing this, you help to
preserve the environment.
- Follow your country’s rules for the separate collection of electrical and electronic
products. Correct disposal helps prevent negative consequences for the environment
and human health.
Guarantee and support
If you have need information or support, please visit www.philips.com/support or read
the separate worldwide guarantee lea et.
Page 7
ENGLISH
Introduction
Congratulations on your purchase, and welcome to Philips!
To fully bene t from the support that Philips o ers, register your product at
www.philips.com/welcome.
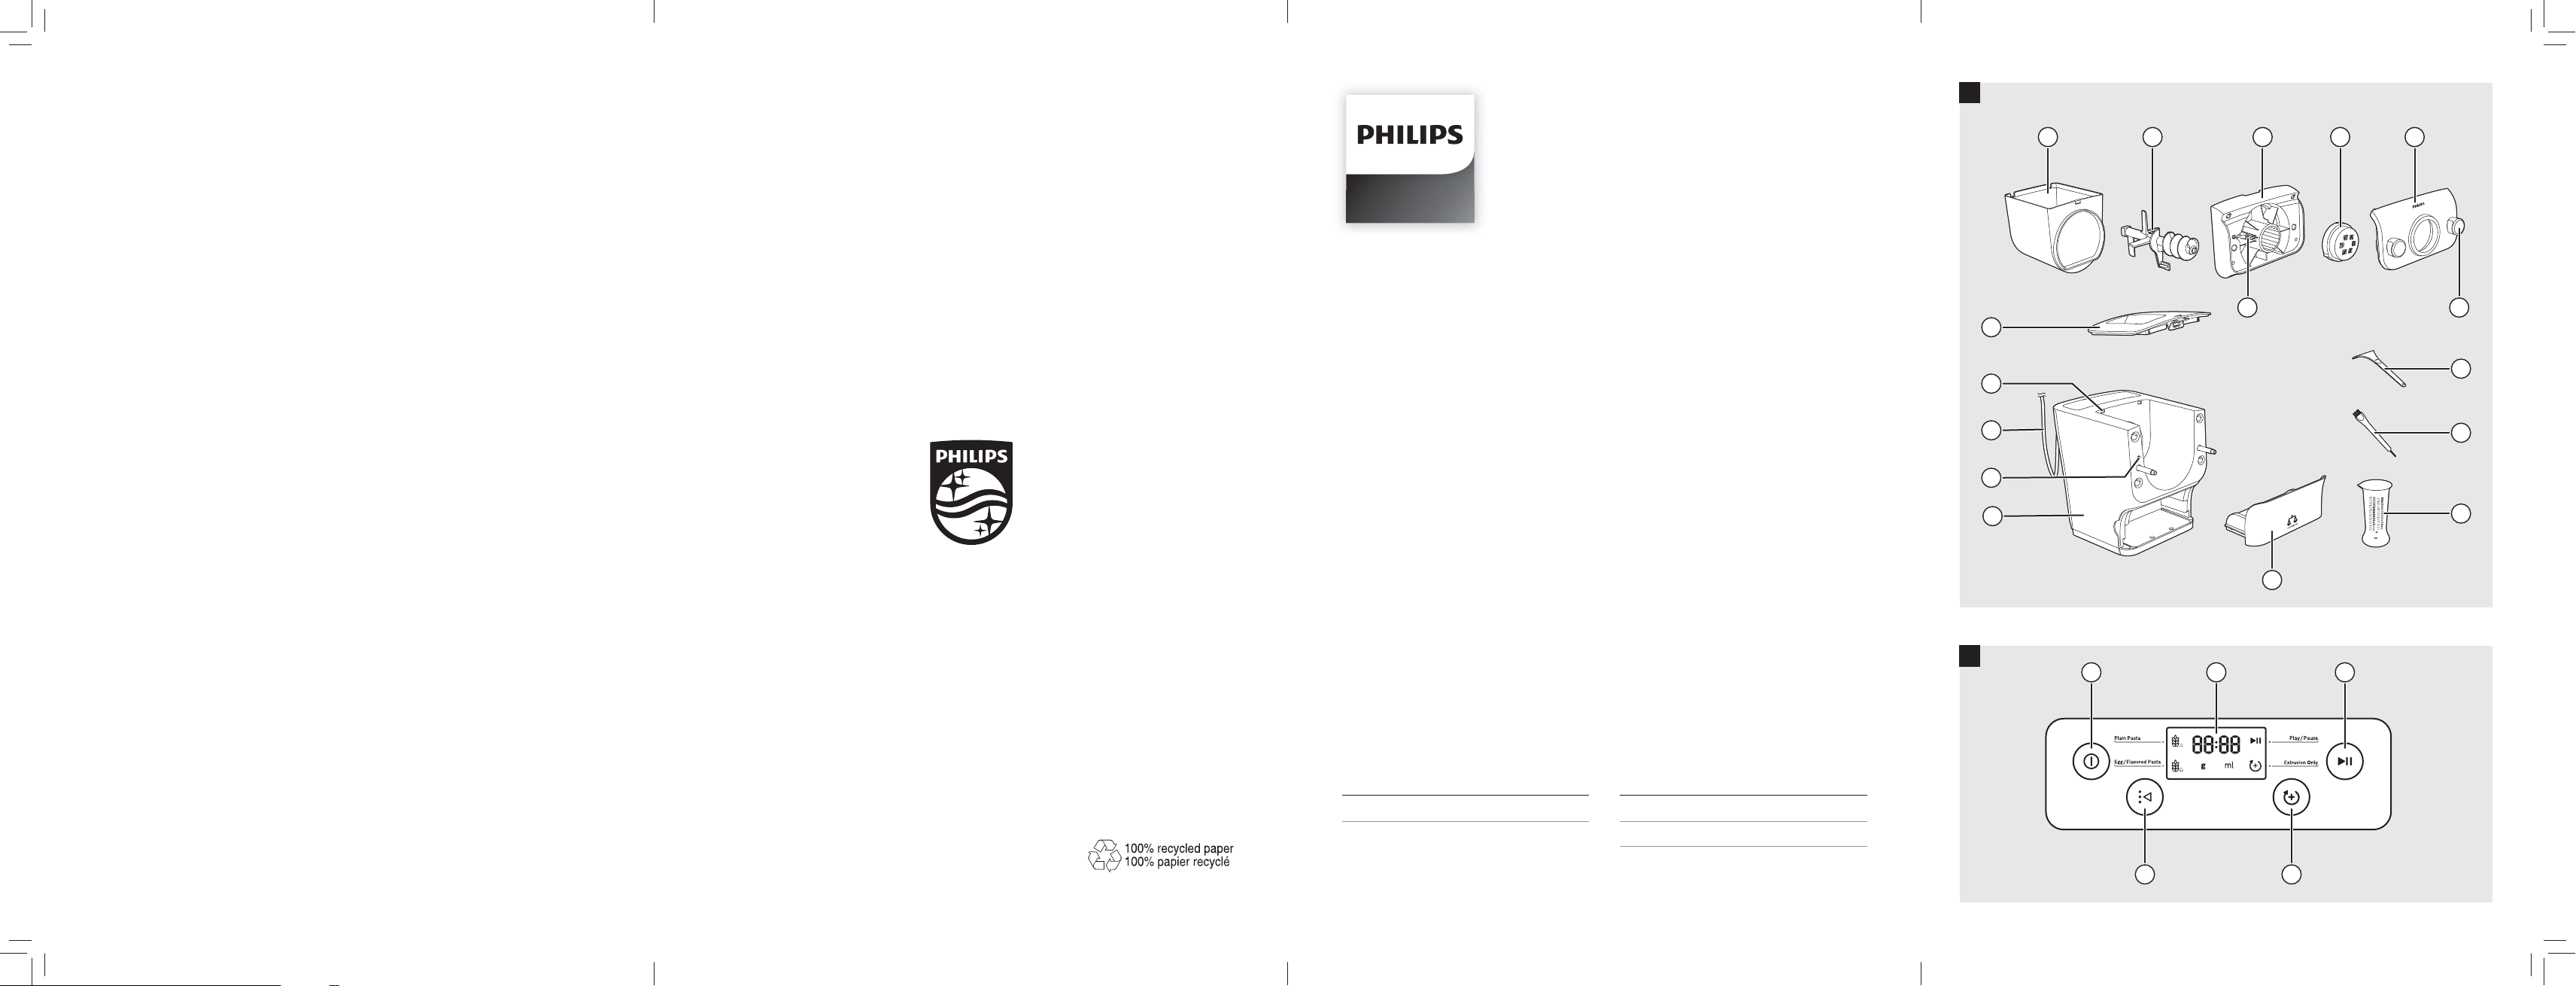
Product overview (Fig. 1)
9
a
Mixing chamber lid
Safety switch hole of the mixing
b
chamber lid
c
Power cord
d
Disc holder safety switch
e
Main unit
f
Shaping disc storage
g
Water cup
h
Cleaning brush
i
Pasta cutter
j
Front panel knobs
k
Front panel
l
Shaping disc
m
Disc holder
n
Disc holder safety switch lever
o
Mixing paddle
p
Mixing chamber
Control panel overview (Fig. 2)
a
On/o button
b
Display
c
Start/pause button
This appliance allows you to make the pasta you need in the way you want.
Default pasta making function
Choose a program with the Program selection button, and then press the
Start/pause button.
Applies when making pasta with the scaling function.
Extrusion only function
Press the Extrusion only button, and then the Start/pause button.
Applies when there is leftover dough in the mixing chamber, and you want some
extra extrusion.
Skip-scaling function
Press and hold the Start/pause button for 5 seconds.
Applies when the device jumps into error mode or when you need to skip the
scale function and start the mixing process directly.
d
Extrusion only button
e
Program selection button
Page 8
10
ENGLISH
Available Accessories
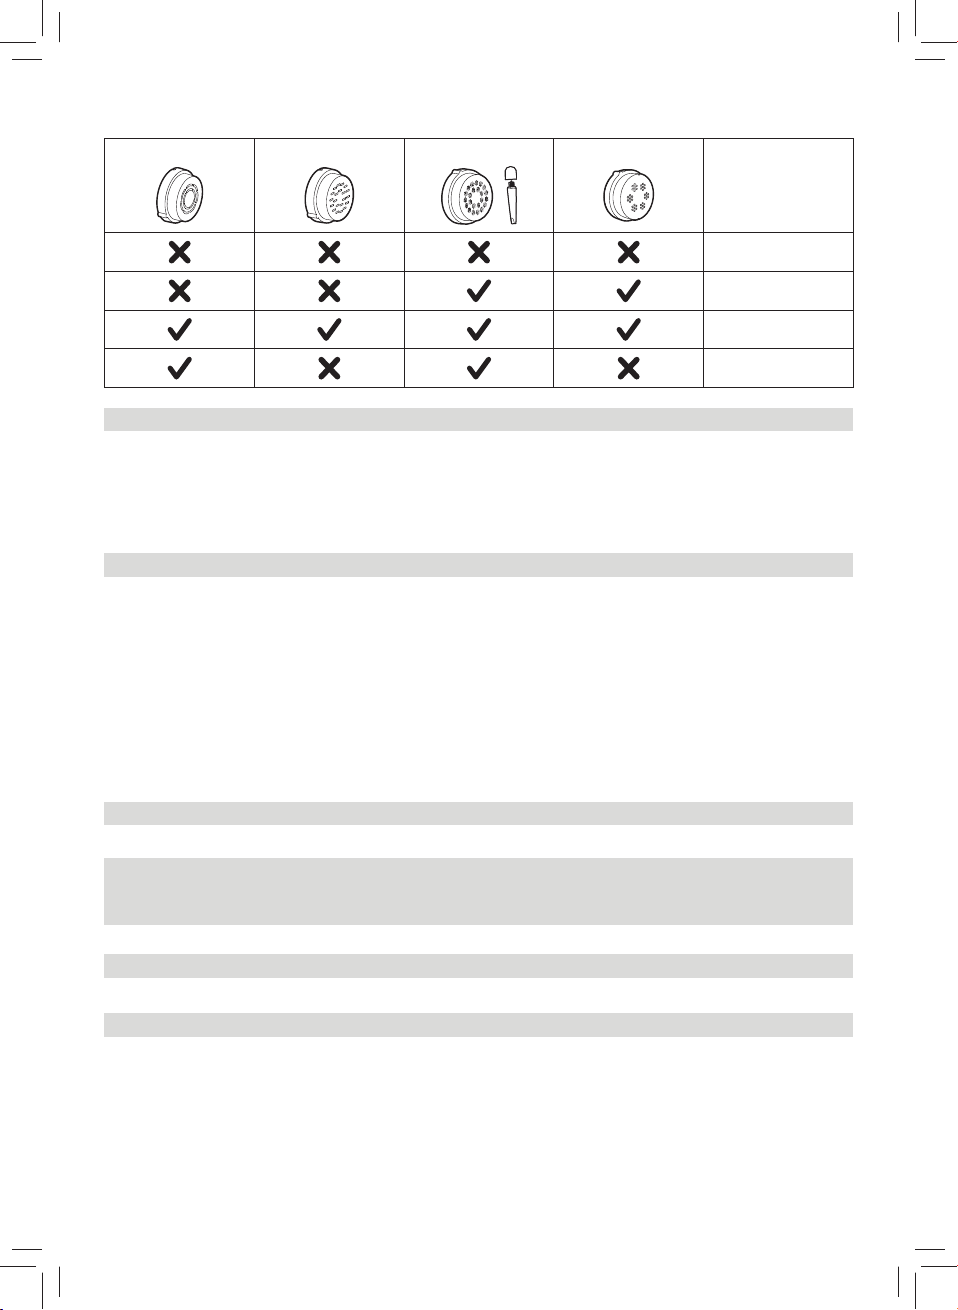
Shaping discs
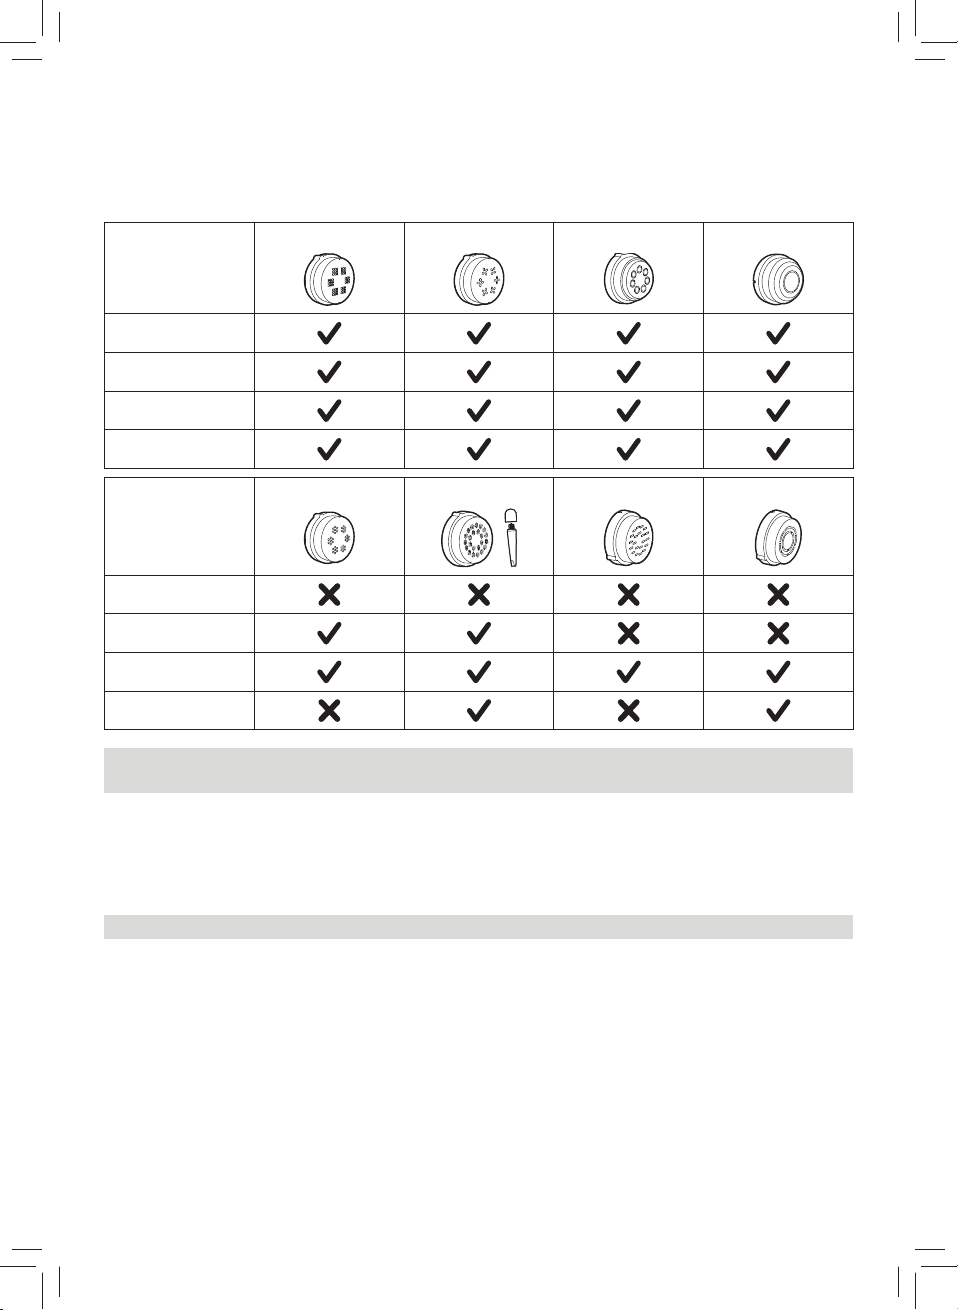
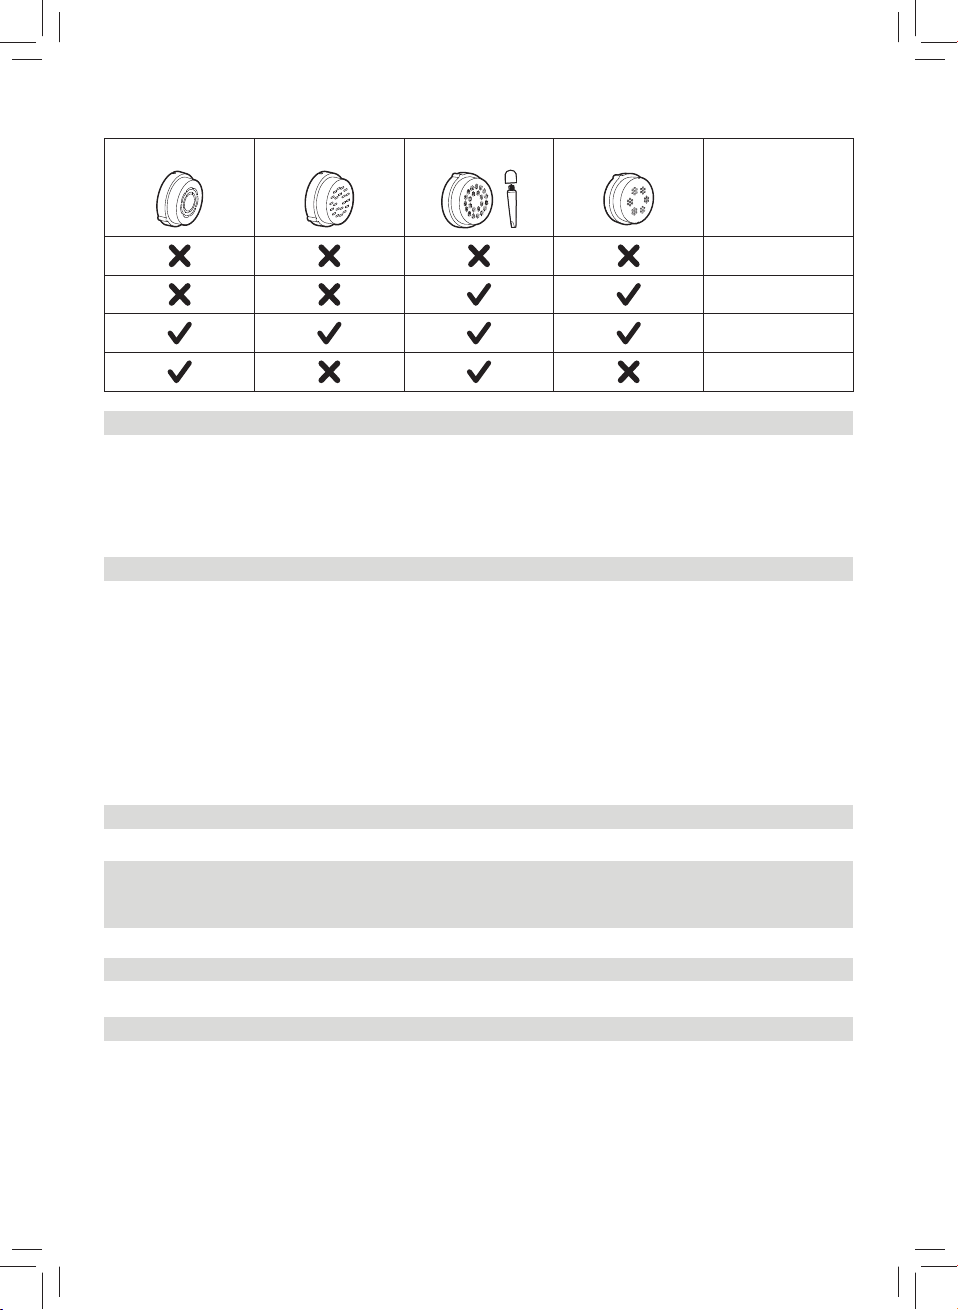
Spaghetti
HR2380
HR2381
HR2382
HR2382/13
Thick Spaghetti
HR2380
HR2381
HR2382
HR2382/13
Note: Cleaning tool of the angel hair shaping disc is only supplied with the angel hair
shaping disc.
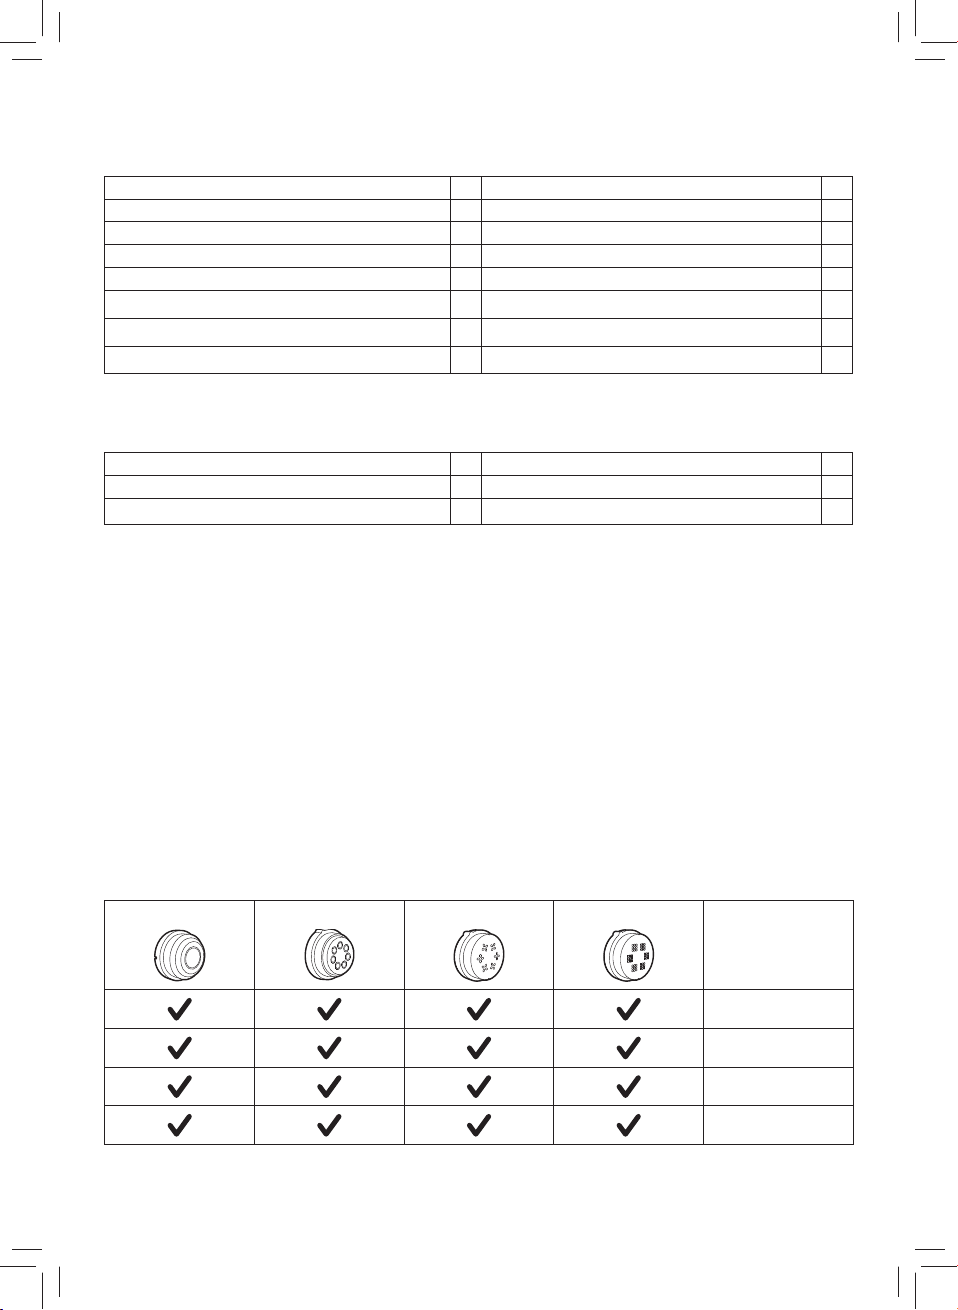
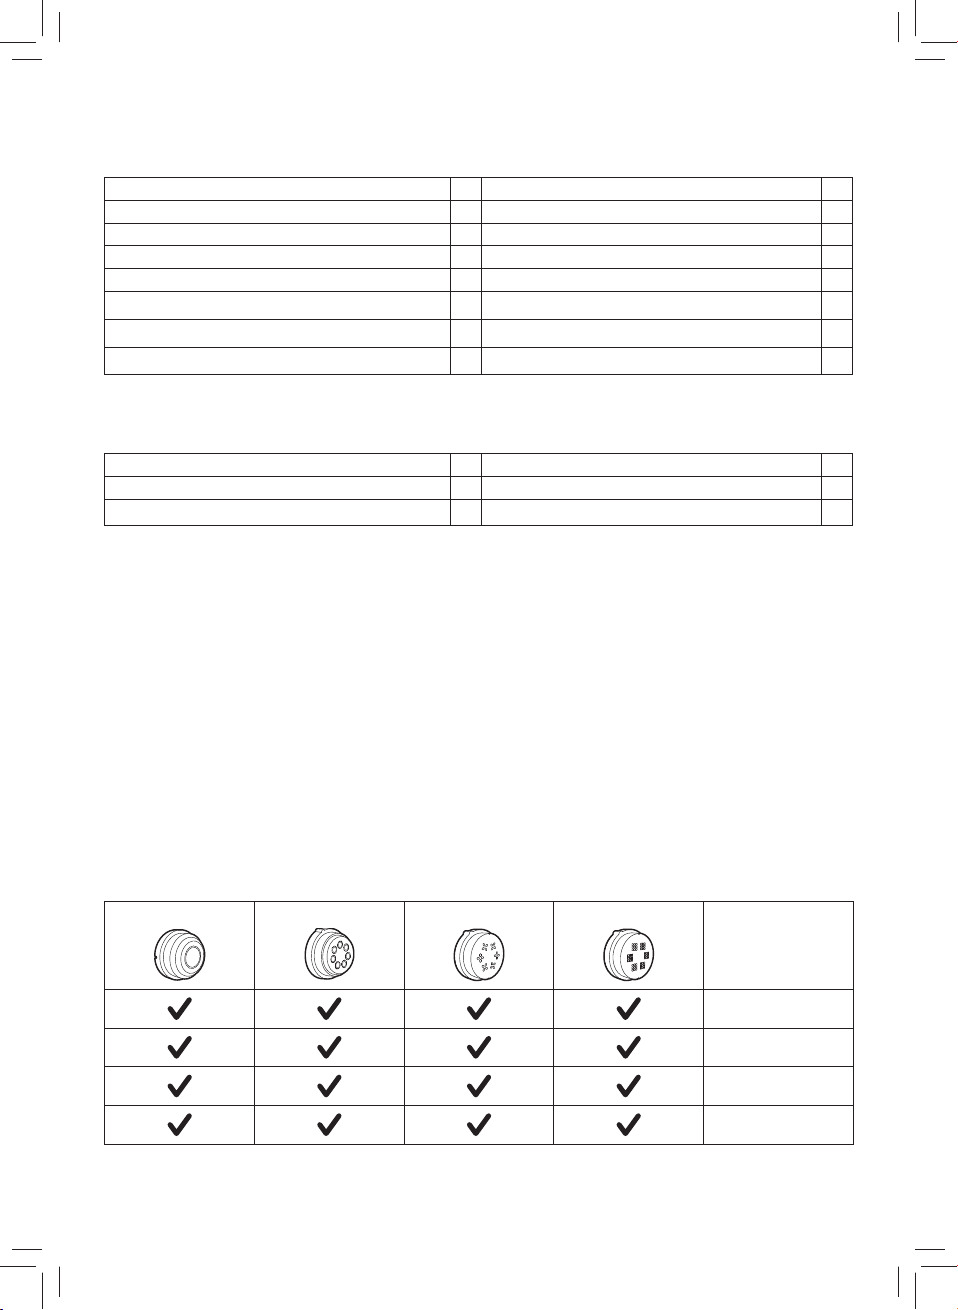
Fettuccine
Angel hair
Penne
Tagliatelle
Lasagna
Pappardelle
Disassembling and cleaning before rst use
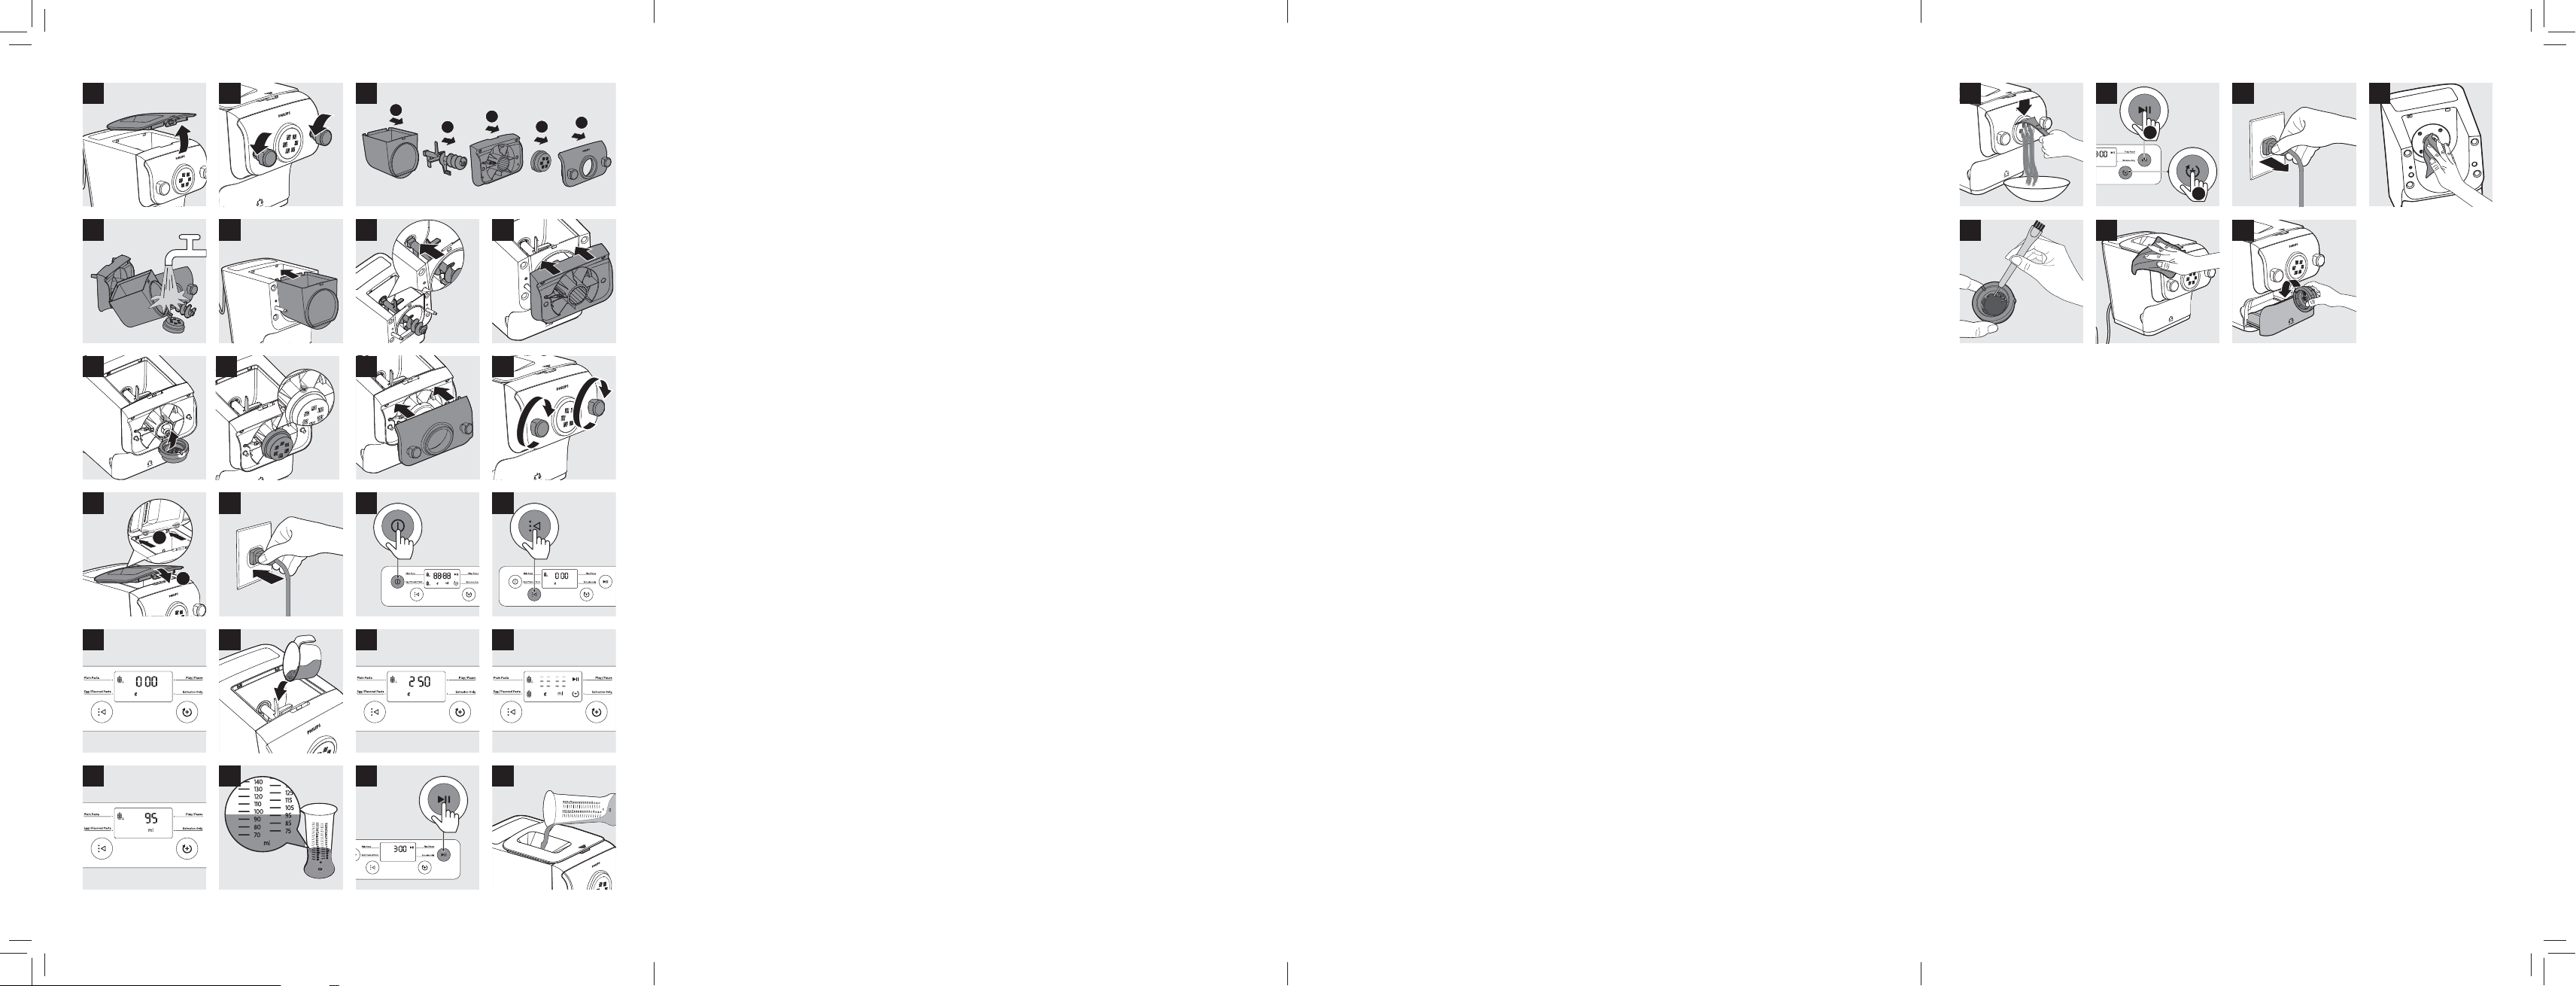
1 Remove the mixing chamber lid. (Fig. 3)
2 Loosen the front panel control knobs. (Fig. 4)
Note: The front panel is heavy. Take extra caution when removing it.
3 Disassemble the front panel, the shaping disc, the shaping disc holder, the mixing
paddle, and the mixing chamber in order. (Fig. 5)
4 Clean all detachable parts, and wipe them dry. (Fig. 6)
Assembling
1 Push the mixing chamber into the appliance. (Fig. 7)
2 Point the mixing paddle to the hole in the main unit. Insert the mixing paddle all the
way into the main unit. (Fig. 8)
3 Attach the disc holder onto the appliance. (Fig. 9)
Page 9
ENGLISH
4 Put the shaping disc onto the disc holder , and make sure it is rmly xed on the disc
holder. (Fig. 10)
Note: Make sure the inner cavity of the shaping disc and disc holder is properly tted.
(Fig. 11)
5 Attach the front panel to the main unit. (Fig. 12)
Note:
Make sure the front panel is completely fastened before using the appliance.
The front panel is heavy. Take extra caution when assembling it.
6 Fasten the front panel control knobs. (Fig. 13)
Note: If the front panel or the shaping disc is not properly assembled, a safety switch
will prevent the appliance from working.
7 Close the mixing chamber lid. (Fig. 14)
Note: If the mixing chamber lid is not properly installed, the safety switch will prevent
the appliance from working.
Using the Pasta maker
Start preparation
1 Put the plug in the power socket. The pasta maker sound once, and all indicators ash
once.
(Fig. 15)
Note: Make sure that all the parts are well assembled before plugging in.
2 Press the On/o button to turn on the appliance. (Fig. 16)
3 Select the pasta type with the Program selection button. (Fig. 17)
Program Tip Optional recipe
Plain pasta/noodle Pasta with our and water
only
Egg or avoured
pasta/noodle
Pasta with our and egg liquid
All kinds of avored pasta
Wheat noodle
Durum noodle
Wheat pasta
Durum pasta
Carrot pasta/noodle
Tomato pasta/noodle
Soba
Beet pasta/noodle
11
Note: For more recipes, refer to the recipe book.
4 Remove the mixing chamber lid. (Fig. 3)
5 Wait until 0:00 displays on the screen. (Fig. 18)
6 Pour the our into the chamber. (Fig. 19)
Note
The appliance automatically weighs and displays the amount of our. The weight
measurement will blink until you are in the right range. (Fig. 20)
Do not put less than 200g or more than 600g of our in the chamber.
Page 10

12
ENGLISH
Some recipes (for example cookies, gluten free pasta) require you to skip the
weighing part. In this case, press the Start/pause button for 5 seconds, and the
appliance will start mixing and extruding directly.
7 Close the chamber lid. (Fig. 14)
Note
If you press a button without closing the lid, the chamber closing sign will appear.
(Fig. 21)
Insert the two hooks into the appliance rst, and then push the lid against the
main unit.
The appliance will not start working if the chamber lid is not properly closed.
During the pasta making process, if you open the chamber lid, the appliance will
stop working. Assemble the lid and press the Start/pause button to start the
operation again.
8 When the lid is closed, the needed amount of liquid is displayed. (Fig. 22)
9 Use the supplied water cup to measure the amount of liquid according to the
indication on the display. (Fig. 23)
Note
Make sure to measure the liquid volume at eye level on a at surface.
When making the egg mixture, crack the egg into the water cup. Add water up to
the required amount, and then whisk the water and egg to combine.
If preferred, 2 eggs can be used instead of 1, but make sure that the overall amount
of liquid suggested is not exceeded.
For a better accuracy please use a kitchen scale to measure the liquid.
Starting the pasta making program
1 Press the Start/pause button to start mixing, and the mixing time starts to count
down. (Fig. 24)
2 After the mixing starts, slowly pour in the liquid along the entire length of the slot in
the lid. (Fig. 25)
Note: During dough mixing, do not add other ingredients after you have poured in
the liquid. Otherwise, it will a ect the result of the pasta texture.
3 After the pasta maker nishes mixing, it will beep once and start extruding pasta after
a few seconds. Use the pasta cutter to cut the pasta into the length you need.(Fig. 26)
Note: If the ratio of liquid and our is not correct, the extrusion will not succeed.
Please refer to the recipe book for more recipes.
4 After the pasta making is complete, if you notice some leftover dough inside
the chamber, you can press the Extrusion only button rst, and then press the
Start/pause button for extra extrusion. (Fig. 27)
Note: The cooking time of the pasta varies depending on personal preferences, pasta
shapes, and number of servings.
Important!
The pasta recipes provided in the recipe book have been tested for success. If you
experiment with or use other pasta recipes, the our and water/egg ratios will need to
be adjusted. The pasta maker will not operate successfully if you do not adjust the new
recipe accordingly.
Page 11

ENGLISH
Note
To ensure the quality of the pasta, use gluten our to make pasta. Follow the
recommended proportion to add the ingredients.
Seasonal changes and using ingredients from di erent regions may a ect the
our/water ratio. You may adjust based on the recommended proportion.
When making egg pasta or vegetable pasta, make sure you whisk the egg mixture
or vegetable juice evenly with the water before pouring into the chamber through
the slot in the lid. When adding ingredients, make sure the ingredient is in a liquid
form.
See the recipe book provided for additional pasta recipe variations.
When making gluten free pasta/noodles or cookies, do not follow the
recommended liquid amount indicated by the appliance.
13
Cleaning
1 Disconnect the plug from the power outlet. (Fig. 28)
2 Remove the mixing chamber lid. (Fig. 3)
3 Loosen the front panel control knobs. (Fig. 4)
Note: The front panel is heavy. Take extra caution when removing it.
4 Disassemble the front panel, the shaping disc, the shaping disc holder, the mixing
paddle, and the mixing chamber in order. (Fig. 5)
5 Use a dry cloth to clean our residue on the main unit. (Fig. 29)
6 Clean the shaping disc with the supplied cleaning tool to remove the dough residues.
After that, you can clean it with water. (Fig. 30)
Note: For the spaghetti, thick spaghetti, angel hair and fettuccine shaping discs, let
the discs air-dry 2 to 4 hours. Then use the corresponding cleaning tool to poke out
the dough in the holes.
7 Clean all detachable parts, and wipe them dry. (Fig. 6)
8 Use a dry cloth to clean the control panel, and the exterior of the pasta mak
(Fig. 31)
er.
Storage
1 Unplug the appliance and let it cool down.
Note: Make sure all parts are clean and dry before storing.
2 You can store the shaping discs in the storage drawer. (Fig. 32)
Troubleshooting
This chapter summarizes the most common problems you could encounter with the
appliance. If you are unable to solve the problem with the information below, visit
www.philips.com/support for a list of frequently asked questions or contact the
Consumer Care Center in your country.
Page 12
14
ENGLISH
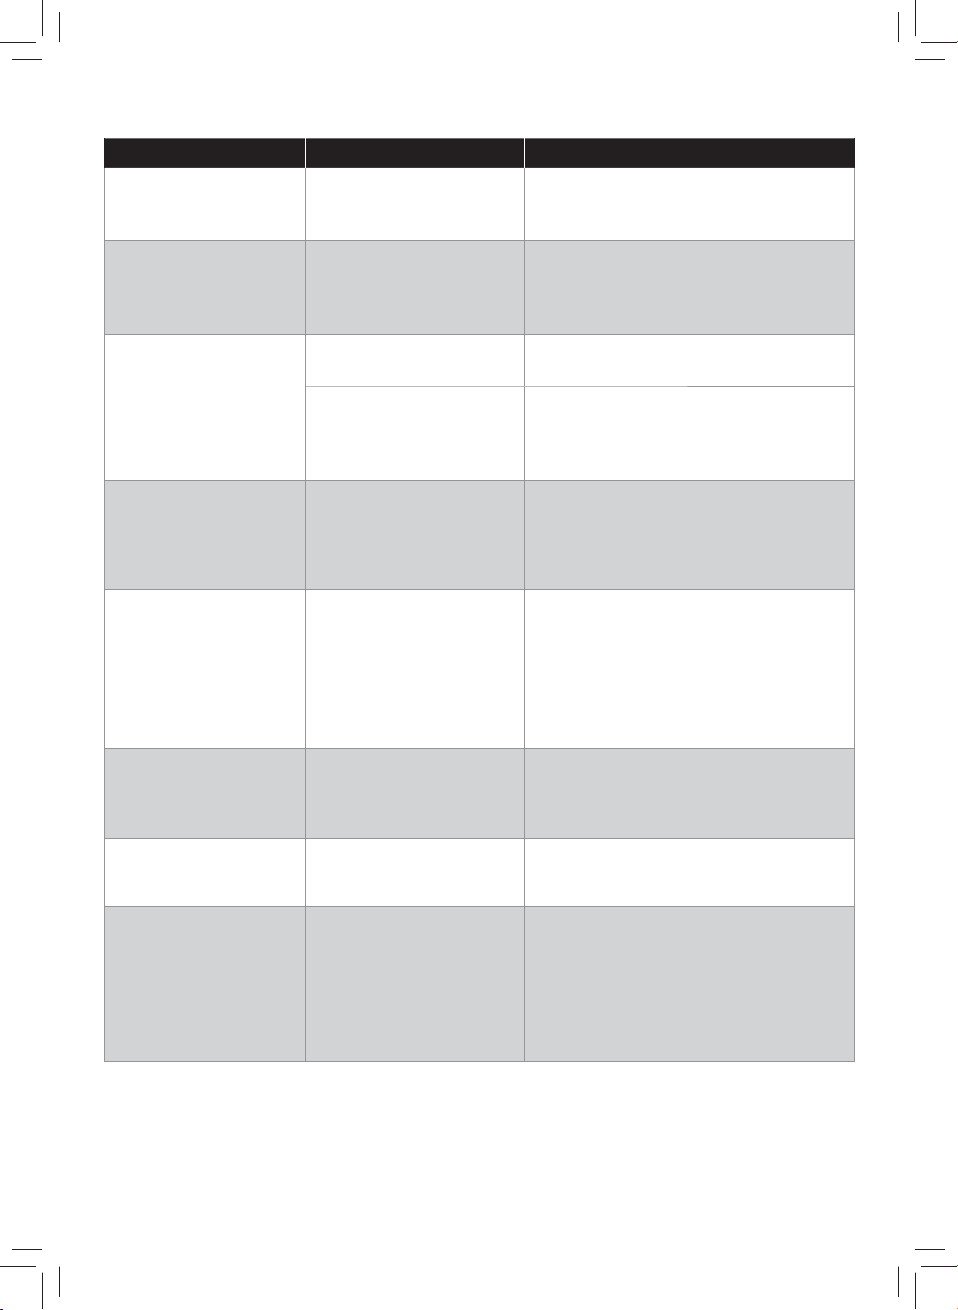
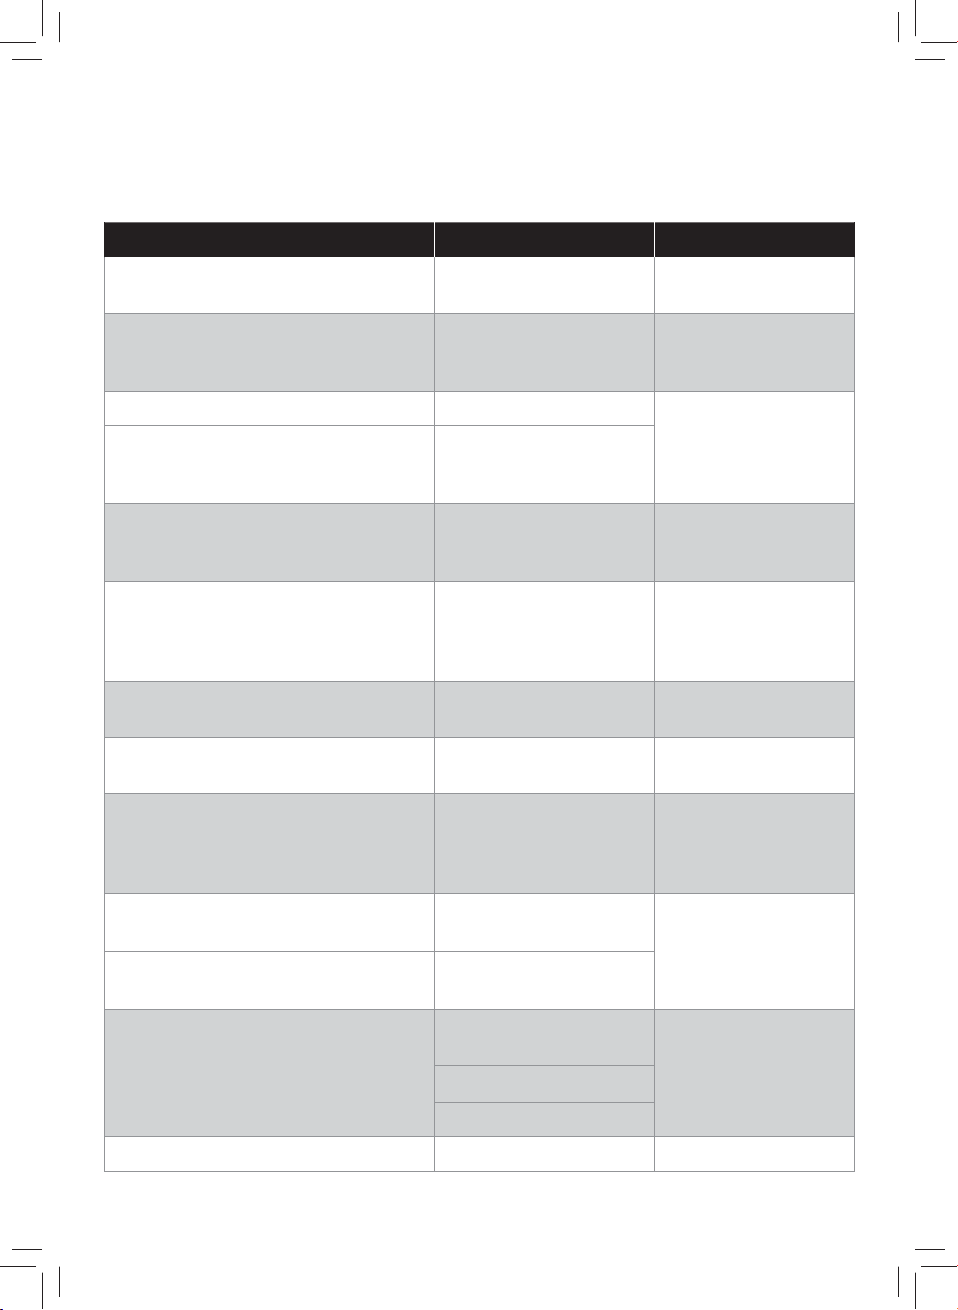
Problem Cause Solution
The indicators do not
light up.
After pressing the
On/o button the
appliance sounds but
does not work.
The safety switch is
triggered and the
appliance suddenly
stopped or suddenly
restarts during the
processing.
During processing,
the appliance stops
working when you
open the lid.
During processing,
the appliance stops.
There is no alarm
sound or ashes.
When weighing the
our, the weight
shown on the screen
changes all the time.
Small amount of
water is leaking out
from the appliance.
Unable to make pasta
successfully with the
liquid calculation
function.
The power plug is not
connected correctly.
The mixing chamber,
the shaping disc, or
the front panel is
assembled incorrectly.
The front panel knob is
loose.
Excessive ingredients in
the pasta maker.
For safety reasons,
the appliance always
stops working when
the lid is opened during
processing.
The pasta maker has
overheated due to long
continuous working
time.
You are touching the
appliance or the power
cord.
Water is added before
the program starts.
The required liquid
amount indicated on
the display screen does
not apply to some
recipes (for example
cookies, gluten free
pasta).
Check whether the power plug is
plugged correctly and the outlet is
working properly.
Make sure you follow the user
manual to assemble all parts
correctly.
Make sure the front panel is securely
assembled.
The maximum amount of our used
for each batch is 600g. If more than
600g is added, reduce the amount
of our before next batch.
If you need to resume the previous
operation, close the lid properly, and
press the Start/pause button.
Disconnect from the power source,
and allow the pasta maker to cool
down. To better protect the lifetime
of the appliance, the continuous
working time should be less than
45 minutes. You can restart using the
appliance after 15 minutes of rest.
When the appliance is weighing the
our, do not touch the appliance or
the power cord.
Follow the user manual instructions
to add water right after the program
starts.
These recipes require you to skip the
liquid calculation part. In this case,
press the Start/pause button for 5
seconds, and the appliance will start
mixing and extruding directly.
Page 13
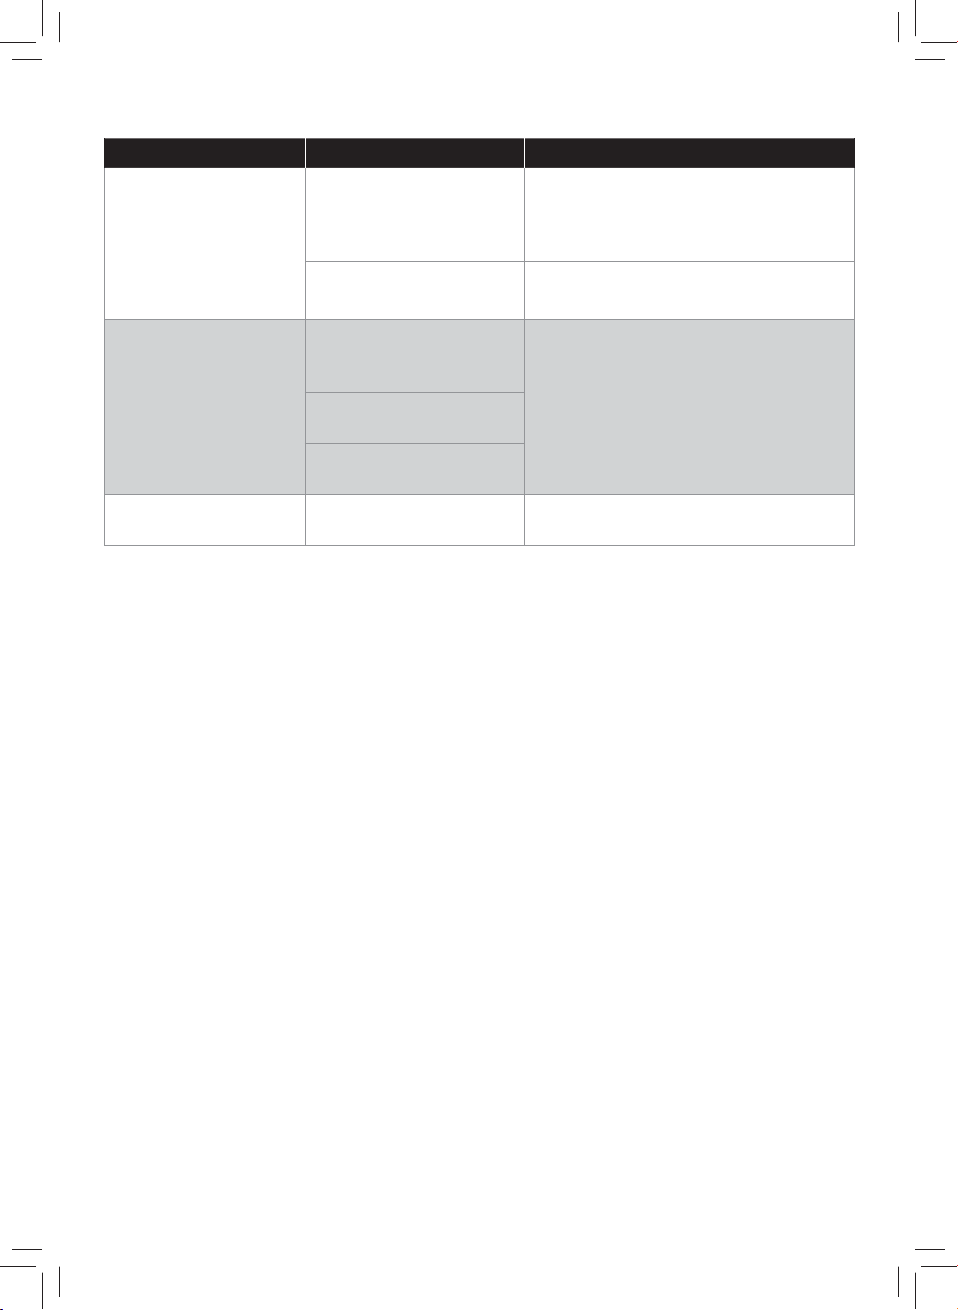
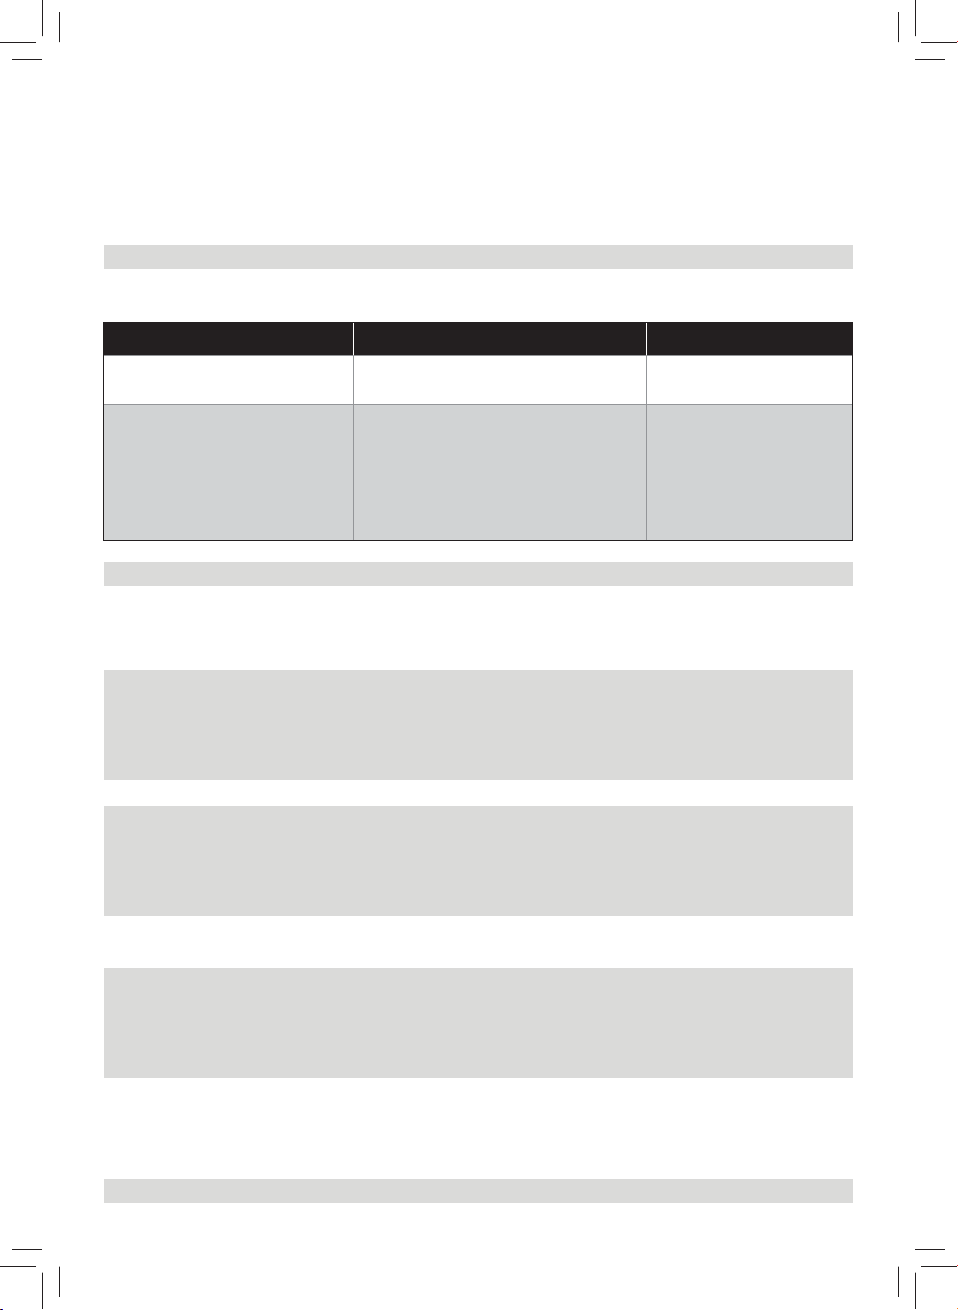
Problem Cause Solution
Attach the disc holder to the main
E1 displays on the
screen.
The appliance stops
during processing,
E2 displays on the
screen, the indicators
are ashing quickly,
and the alarm
sounds.
EEE displays on the
screen.
The shaping disc is not
attached.
The lid is not in place or
not properly attached.
The mixing paddle may
be blocked by some
foreign objects.
The dough may be too
dry.
The wrong program is
selected.
The appliance
malfunctions.
unit, attach the shaping disc properly
and x the front panel properly to
the device.
Attach the lid properly.
Disconnect from the power source,
clean the pasta maker, and follow
the user manual again to restart the
pasta making.
Contact the service center.
ENGLISH
15
Page 14
ﯽﺳﺭﺎﻓ
16
ﻭ
ﺪﺷﺎﺑ ﻩﺪﺷ ﺰﯾﺮﭘ ﺩﺭﺍﻭ ﺢﯿﺤﺻ ﺭﻮﻃ ﻪﺑ ﻪﺧﺎﺷﻭﺩ ﺪﯿﻨﮐ ﯽﺳﺭﺮﺑ
.
ﺪﻨﮐ ﺭﺎﮐ ﺖﺳﺭﺩ ﺰﯾﺮﭘ
.
ﺖﺳﺍ ﻩﺪﺸﻧ ﻞﺼﺘﻣ ﺖﺳﺭﺩ ﻪﺧﺎﺷﻭﺩ
ﻝﺎﮑﺷﺍﺖﻠﻋﻞﺣ ﻩﺍﺭ
.
ﺪﻧﻮﺷ ﯽ ﻦﺷﻭﺭ ﺎﻫﺮﮕﻧﺎﺸﻧ
ﺮﺑﺭﺎﮐ ﯼﻨﻫﺍﺭ ﯼﺎﻫ ﻞﻤﻌﻟﺍﺭﻮﺘﺳﺩ ،ﺕﺎﻌﻄﻗ ﺢﯿﺤﺻ ﻥﺩﺮﮐ ﺭﺍﻮ ﺳ ﯼﺍﺮﺑ
.
ﺪﯿﻨﮐ ﻝﺎﺒﻧﺩ ﺍﺭ
.
ﺪﺷﺎﺑ ﻩﺪﺷ ﺭﺍﻮ ﺳ ﻢﮑﺤﻣ ﯽﯾﻮﻠﺟ ﻞﻨﭘ ﺪﯿﻨﮐ ﺖﻗﺩ
،ﺩﺮﮐ ﻩﺩﺎﻔﺘﺳﺍ ﻥﺍﻮﺗ ﯽﻣ ﺭﺎﺑ ﺮﻫ ﯼﺍﺮﺑ ﻪﮐ ﯼﺩﺭﺁ ﺭﺍﺪﻘﻣ ﮐﺍﺪﺣ
ﻞﺒﻗ ،ﺪﯾﺍ ﻩﺩﺮﮐ ﻪﻓﺎﺿﺍ ﻡﺮﮔ
ﺪﯾﺪﻨﺒﺑ ﺖﺳﺭﺩ ﺍﺭ ﺏﺭﺩ ،ﺪﯾﺮﯿﮕﺑﴎﺯﺍ ﺍﺭ ﯽﻠﺒﻗ ﺕﺎﯿﻠﻤﻋ ﺖﺳﺍ ﻡﺯﻻ ﺮﮔ ﺍ
.
ﺩﻮﺷ ﮏﻨﺧ ﺯﺎﺳﺎﺘﺳﺎﭘ ﺪﯿﻫﺩ ﻩﺯﺎﺟﺍ ﻭ ﺪﯿﺸﮑﺑ ﻕﺮﺑ ﺯﺍ ﺍﺭ ﻩﺎﮕﺘﺳﺩ
ﻡﻭﺍﺪﻣ ﺭﺎﮐ ﻥﺎﻣﺯ ،ﻩﺎﮕﺘﺳﺩ ﺮﺗ ﯽﻧﻻﻮﻃ ﺮﻤﻋ ﻭ ﱰﺸﯿﺑ ﺖﻇﺎﻔﺣ ﯼﺍﺮﺑ
ﻪﻘﯿﻗﺩ
ﺖﺳﺩ ﻕﺮﺑ ﻢﯿﺳ ﺎﯾ ﻩﺎﮕﺘﺳﺩ ﻪﺑ ،ﺪﻨﮐ ﯽﻣ ﻥﺯﻭ ﺍﺭ ﺩﺭﺁ ﻩﺎﮕﺘﺳﺩ ﯽﺘﻗﻭ
ﺭﺩ .
ﺪﯾﻮﺷ ﺩﺭ ﻊﯾﺎﻣ ﺭﺍﺪﻘﻣ ﻪﺒﺳﺎﺤﻣ ﻪﻠﺣﺮﻣ ﺯﺍ ﺎﻫﺭﻮﺘﺳﺩ ﻦﯾﺍ ﯼﺍﺮﺑ
ﺭﺎﺸﻓ ﺍﺭ (ﺚﮑﻣ/ﻉﻭﴍ
ﻪﻠﺣﺮﻣ ﺩﺭﺍﻭ ﻢﯿﻘﺘﺴﻣ ﻩﺎﮕﺘﺳﺩ ﺎﺗ ﺪﯾﺭﺍﺪﻬﮕﻧ ﻪﯿﻧﺎﺛ
600 ﺯﺍ
ﱰﺸﯿﺑ ﺮﮔ ﺍ .ﺖﺳﺍ ﻡﺮﮔ
.
ﺪﯿﻨﮐ ﻢﮐ ﺍﺭ ﻥﺁ ،ﺪﻌﺑ ﻪﻠﺣﺮﻣ ﺯﺍ
.
ﺪﯿﻫﺩ ﺭﺎﺸﻓ ﺍﺭ ﺚﮑﻣ/ﻉﻭﴍ ﻪﻤﮐﺩ ﻭ
15 ﺯﺍ
ﺪﻌﺑ ﺪﯿﻧﺍﻮﺗ ﯽﻣ .ﺪﺷﺎﺑ ﻪﻘﯿﻗﺩ
.
ﺪﯾﺯﺍﺩﺮﭙﺑ ﻩﺎﮕﺘﺳﺩ ﺯﺍ ﻩﺩﺎﻔﺘﺳﺍ ﻪﺑ ،ﺖﺣﺍﱰﺳﺍ
ﻪﺑ
،ﻪﻣﺎﻧﺮﺑ ﻉﻭﴍ ﺯﺍ ﺪﻌﺑ ﺖﺳﺭﺩ ﺏﺁ
.
ﺪﯿﻨﮐ ﻪﻌﺟﺍﺮﻣ ﺮﺑﺭﺎﮐ ﯼﻨﻫﺍﺭ ﯼﺎﻫ ﻞﻤﻌﻟﺍﺭﻮﺘﺳﺩ
) Start/pause
.
ﺩﻮﺷ ﺩﺍﻮﻣ ﻥﺩﺭﻭﺁ ﻥﻭﺮﯿﺑ ﻭ ﻥﺩﺮﮐ ﻁﻮﻠﺨﻣ
600
45 ﺯﺍ
ﱰﻤﮐ ﺪﯾﺎﺑ
ﻥﺩﻭﺰﻓﺍ ﯼﺍﺮﺑ
ﻪﻤﮐﺩ ﺖﻟﺎﺣ ﻦﯾﺍ
5 ﻭ
ﻪﺤﻔﺻ ،ﻥﺩﺮﮐ ﻁﻮﻠﺨﻣ ﻪﻈﻔﺤﻣ
ﺭﺍﻮ ﺳ ﺖﺳﺭﺩ ﯽﯾﻮﻠﺟ ﻞﻨﭘ
.
ﺩﺭﺍﺩ ﺩﻮﺟﻭ ﺯﺎﺳﺎﺘﺳﺎﭘ ﺭﺩ ﯽﻓﺎﺿﺍ ﺩﺍﻮﻣ
ﺭﺩ
ﻩﺎﮕﺘﺳﺩ ﺏﺭﺩ ﯽﺘﻗﻭ ،ﯽﻨﻤﯾﺍ
.
ﺩﻮﺷ ﯽﻣ ﻒﻗﻮﺘﻣ ﺭﺎﮐ ،ﺩﻮﺷ ﺯﺎﺑ ﺭﺎﮐ ﻦﯿﺣ
ﺶﯿﺑ ﺯﺎﺳﺎﺘﺳﺎﭘ ،ﯽﻧﻻﻮﻃ ﻩﺩﺎﻔﺘﺳﺍ ﻞﯿﻟﺩ ﻪﺑ
ﻕﺮﺑ ﻢﯿﺳ ﺎﯾ ﻩﺎﮕﺘﺳﺩ ﯼﻭﺭ ﺷ ﺖﺳﺩ
.
ﺪﯿﻧﺰﻧ
ﻩﺪﺷ ﻪﻓﺎﺿﺍ ﺏﺁ ،ﻪﻣﺎﻧﺮﺑ ﻉﻭﴍ ﺯﺍ ﻞﺒﻗ
ﯼﻭﺭ ﻩﺪﺷ ﻩﺩﺍﺩ ﻥﺎﺸﻧ ﻡﺯﻻ ﻊﯾﺎﻣ ﺭﺍﺪﻘﻣ
ﺎﻫﺭﻮﺘﺳﺩ ﯽﺧﺮﺑ ﯼﺍﺮﺑ ﺶﯾﺎ ﻪﺤﻔﺻ
ﻭ ﺎﻫ
ﻩﺩﺍﺩ
ﯽﮐﻮﮐ ،ﻝﺎﺜﻣ ﯼﺍﺮﺑ) ﺖﺴﯿﻧ ﺐﺳﺎﻨﻣ
ﺎﯾ ﻩﺪﻨﻫﺩ ﻞﮑﺷ
.
ﺪﻧﺍ ﻩﺪﺸﻧ
.
ﺖﺳﺍ ﻞﺷ ﯽﯾﻮﻠﺟ ﻞﻨﭘ ﭻﯿﭘ
ﻞﯾﻻﺩ ﻪﺑ
.
ﻩﺪﺷ ﻡﺮﮔ ﺪﺣ ﺯﺍ
ﺖﺳﺍ
.
.
.(
ﻦﺗﻮﻠﮔ ﻥﻭﺪﺑ ﯼﺎﻫﺎﺘﺳﺎﭘ
/
ﻦﺷﻭﺭ ﻪﻤﮐﺩ ﻥﺩﺍﺩ ﺭﺎﺸﻓ ﺯﺍ ﺲﭘ
ﯽﻟﻭ ﺪﻫﺩ ﯽﻣ ﺍﺪﺻ ﻩﺎﮕﺘﺳﺩ ،ﺵﻮﻣﺎﺧ
ﯼﺯﺍﺪﻧﺍ ﻩﺍﺭ ﯽﻨﻤﯾﺍ ﺪﯿﻠﮐ ،ﺭﺎﮐ ﻦﯿﺣ ﺭﺩ
ﯽﻧﺎﻬﮔﺎﻧ ﺭﻮﻃ ﻪﺑ ﻩﺎﮕﺘﺳﺩ ﻭ ﻩﺪﺷ
ﻦﺷﻭﺭ ﻭ ﺵﻮﻣﺎﺧ ﻥﺎﻬﮔﺎﻧ ﺎﯾ ﻒﻗﻮﺘﻣ
،ﺏﺭﺩ ﻥﺪﺷ ﺯﺎﺑ ﺎﺑ ،ﺭﺎﮐ ﻦﯿﺣ ﺭﺩ
.
.
ﺩﻮﺷ ﯽﻣ ﻒﻗﻮﺘﻣ ﺭﺎﮐ ﻦﯿﺣ ﺭﺩ ﻩﺎﮕﺘﺳﺩ
ﯼﺮﮕﻧﺎﺸﻧ ﺎﯾ ﺭﺍﺪﺸﻫ ﮓﻧﺯ ﯼﺍﺪﺻ ﭻﯿﻫ
ﻩﺩﺍﺩ ﻥﺎﺸﻧ ﻥﺯﻭ ،ﺩﺭﺁ ﻦﯾﺯﻮﺗ ﻡﺎﮕﻨﻫ
ﺮﯿﯿﻐﺗ ﺐﺗﺮﻣ ﺶﯾﺎ
ﺖﺳﺍ
ﺖﺸﻧ ﻩﺎﮕﺘﺳﺩ ﺯﺍ ﺏﺁ ﯽﻤﮐ ﺭﺍﺪﻘﻣ
ﺖﺳﺍ
ﺎﺘﺳﺎﭘ ﻪﯿﻬﺗ ،ﻊﯾﺎﻣ ﻪﺒﺳﺎﺤﻣ ﺩﺮﮑﻠﻤﻋ ﺎﺑ
.
ﺪﻨﮐ ﯽ ﺭﺎﮐ
.
ﺩﻮﺷ ﯽﻣ
ﺩﻮﺷ ﯽﻣ ﻒﻗﻮﺘﻣ ﻩﺎﮕﺘﺳﺩ
.
ﺩﺭﺍﺪﻧ ﺩﻮﺟﻭ
ﻪﺤﻔﺻ ﯼﻭﺭ ﻩﺪﺷ
.
ﺪﻨﮐ ﯽﻣ
.
ﺪﻨﮐ ﯽﻣ
.
ﺩﻮﺷ ﯽ ﻡﺎﺠﻧﺍ ﺖﺳﺭﺩ
ﻞﮑﺷ ﻪﺤﻔﺻ ،ﺪﯿﻨﮐ ﻞﺼﺘﻣ ﯽﻠﺻﺍ ﻪﻧﺪﺑ ﻪﺑ ﺍﺭ ﻪﺤﻔﺻ ﻩﺪﻧﺭﺍﺪﻬﮕﻧ
ﻪﺑ
ﻢﮑﺤﻣ ﺍﺭ ﯽﯾﻮﻠﺟ ﻞﻨﭘ
ﯼﻨﻫﺍﺭ ﻭ ﻩﺩﺮﮐ ﺰﯿ ﺍﺭ ﺯﺎﺳﺎﺘﺳﺎﭘ ،ﺪﯿﺸﮑﺑ ﻕﺮﺑ ﺯﺍ ﺍﺭ ﻩﺎﮕﺘﺳﺩ
ﻭ
ﻩﺩﺮﮐ ﻞﺼﺘﻣ ﺖﺳﺭﺩ ﺍﺭ ﻩﺪﻨﻫﺩ
.
ﺪﯿﯾﺎ ﻞﺻﻭ ﻩﺎﮕﺘﺳﺩ
.
ﺪﯿﻨﮐ ﻞﺼﺘﻣ ﺖﺳﺭﺩ ﺍﺭ ﺏﺭﺩ
.
ﺪﯿﻨﮐ ﻝﺎﺒﻧﺩ ﺯﺎﺳﺎﺘﺳﺎﭘ ﺎﺑ ﺭﺎﮐ ﯼﺍﺮﺑ ﺍﺭ ﺮﺑﺭﺎﮐ
.
ﺪﯾﺮﯿﮕﺑ ﺱﺎ ﺕﺎﻣﺪﺧ ﺰﮐﺮﻣ ﺎﺑ
.
ﺖﺴﯿﻧ ﻞﺼﺘﻣ ﻩﺪﻨﻫﺩ ﻞﮑﺷ ﻪﺤﻔﺻ
ﻞﺼﺘﻣ ﺖﺳﺭﺩ ﺎﯾ ﺖﺴﯿﻧ ﺶﯾﺎﺟ ﴎ ﺏﺭﺩ
.
ﺖﺳﺍ ﻩﺪﺸﻧ
ﺎﺑ
ﻥﺩﺮﮐ ﻁﻮﻠﺨﻣ ﻩﺮﭘ ﺖﺳﺍ ﻦﮑﻤﻣ
ﺩﺍﻮﻣ
.
ﺪﺷﺎﺑ ﻩﺪﺷ ﺩﻭﺪﺴﻣ ﯽﺟﺭﺎﺧ
.
ﺪﺷﺎﺑ ﮏﺸﺧ ﯽﻠﯿﺧ ﺮﯿﻤﺧ ﺖﺳﺍ ﻦﮑﻤﻣ
.
ﺖﺳﺍ ﻩﺪﺷ ﺏﺎﺨﺘﻧﺍ ﻩﺎﺒﺘﺷﺍ ﻪﻣﺎﻧﺮﺑ
.
ﺪﻨﮐ ﯽ ﺭﺎﮐ ﺖﺳﺭﺩ
ﻩﺎﮕﺘﺳﺩ
.
ﺩﻮﺷ ﯽﻣ ﻩﺩﺍﺩ ﻥﺎﺸﻧ ﻪﺤﻔﺻ ﯼﻭﺭ
،ﺩﻮﺷ ﯽﻣ ﻒﻗﻮﺘﻣ ﺭﺎﮐ ﻦﯿﺣ ﺭﺩ ﻩﺎﮕﺘﺳﺩ
ﻩﺩﺍﺩ ﻥﺎﺸﻧ ﻪﺤﻔﺻ ﯼﻭﺭ
ﮏﻤﺸﭼ ﻊﯾﴎ ﺎﻫﺮﮕﻧﺎﺸﻧ ،ﺩﻮﺷ ﯽﻣ
ﺭﺩ
ﺍﺪﺻ ﻪﺑ ﺭﺍﺪﺸﻫ ﮓﻧﺯ ﻭ ﺪﻨﻧﺯ ﯽﻣ
.
ﺪﯾﺁ ﯽﻣ
ﻩﺩﺍﺩ ﻥﺎﺸﻧ ﻪﺤﻔﺻ ﯼﻭﺭ
EEE
.
ﺩﻮﺷ ﯽﻣ
E1
E2
Page 15

ﯽﺳﺭﺎﻓ
17
ﻪﻤﮐﺩ ﺲﭙﺳ ﻭ (ﻥﺩﺭﻭﺁ ﻥﻭﺮﯿﺑ
،ﺪﯿﻨﮐ ﻩﺩﺎﻔﺘﺳﺍ ﺎﯾ ﻥﺎﺤﺘﻣﺍ ﺍﺭ ﯼﺮﮕﯾﺩ ﯼﺎﺘﺳﺎﭘ ﻪﯿﻬﺗ ﺭﻮﺘﺳﺩ ﺪﯿﻫﺍﻮﺧ ﯽﻣ ﺮﮔﺍ .ﺖﺳﺍ ﻪﺘﻓﺮﮔ ﺭﺍﺮﻗ ﺶﯾﺎﻣﺯﺁ ﺩﺭﻮﻣ ﻭ ﻩﺪﺷ ﻪﺋﺍﺭﺍ ﯼﺰﭙﺷﺁ ﺏﺎﺘﮐ ﺭﺩ ﺎﺘﺳﺎﭘ ﻪﯿﻬﺗ ﺭﻮﺘﺳﺩ
.
ﺪﯾﱪﺑ ﺭﺎﮐ ﻪﺑ ﺍﺭ ﻩﺪﺷ ﻪﯿﺻﻮﺗ ﺖﺒﺴﻧ ،ﺩﺍﻮﻣ ﻥﺩﻭﺰﻓﺍ ﯼﺍﺮﺑ .ﺪﯿﻨﮐ ﻩﺩﺎﻔﺘﺳﺍ ﺎﺘﺳﺎﭘ ﻪﯿﻬﺗ ﯼﺍﺮﺑ ﻦﺗﻮﻠﮔ ﺩﺭﺁ ﺯﺍ ،ﺎﺘﺳﺎﭘ ﺖﯿﻔﯿﮐ ﺯﺍ ﻥﺎﻨﯿﻤﻃﺍ ﯼﺍﺮﺑ
ﻢﯿﻈﻨﺗ ﻩﺪﺷ ﻪﯿﺻﻮﺗ ﺖﺒﺴﻧ ﻖﺒﻃ ﺮﺑ ﺪﯿﻧﺍﻮﺗ ﯽﻣ .ﺩﺭﺍﺬﮕﺑ ﺮﯿﺛﺎﺗ ﺏﺁ/ﺩﺭﺁ ﺖﺒﺴﻧ ﺮﺑ ﺖﺳﺍ ﻦﮑﻤﻣ ﻒﻠﺘﺨﻣ ﻖﻃﺎﻨﻣ ﺭﺩ ﺩﺍﻮﻣ ﺯﺍ ﻩﺩﺎﻔﺘﺳﺍ ﻭ ﻞﺼﻓ ﺕﺍﺮﯿﯿﻐﺗ
ﻍﺮﻣ ﻢﺨﺗ ﻁﻮﻠﺨﻣ ،ﺏﺭﺩ ﻞﺧﺍﺩ ﺭﺎﯿﺷ ﻖﯾﺮﻃ ﺯﺍ ﻪﻈﻔﺤﻣ ﺭﺩ ﺩﺍﻮﻣ ﺨﯾﺭ ﺯﺍ ﻞﺒﻗ ﺪﯿﻨﮐ ﺖﻗﺩ ،ﺕﺎﺠﯾﺰﺒﺳ ﯼﺎﺘﺳﺎﭘ ﺎﯾ ﻍﺮﻣ ﻢﺨﺗ ﯼﺎﺘﺳﺎﭘ ﻪﯿﻬﺗ ﻡﺎﮕﻨﻫ
) Extrusion only
.
ﺪﻨﮐ ﯽ ﺭﺎﮐ ﺖﺳﺭﺩ ﺯﺎﺳﺎﺘﺳﺎﭘ ،ﺪﯿﻨﮑﻧ ﻢﯿﻈﻨﺗ ﺪﯾﺪﺟ ﺭﻮﺘﺳﺩ ﺭﺩ ﺍﺭ ﺩﺍﻮﻣ ﺖﺒﺴﻧ ﺮﮔﺍ .ﺩﻮﺷ ﻢﯿﻈﻨﺗ ﺪﯾﺎﺑ ﻍﺮﻣ ﻢﺨﺗ/ﺏﺁ ﻭ ﺩﺭﺁ ﺖﺒﺴﻧ
.
ﺪﻨﺷﺎﺑ ﻊﯾﺎﻣ ﺖﻟﺎﺣ ﻪﺑ ﺩﺍﻮﻣ ﺪﯿﻨﮐ ﺖﻗﺩ ،ﺩﺍﻮﻣ ﻥﺩﻭﺰﻓﺍ ﻡﺎﮕﻨﻫ .ﺪﯿﻧﺰﺑ ﻢﻫ ﺏﺁ ﺎﺑ ﺖﺧﺍﻮﻨﮑﯾ ﺭﻮﻃ ﻪﺑ ﺍﺭ ﺕﺎﺠﯾﺰﺒﺳ
ﺪﯿﻨﮑﻧ ﻪﺟﻮﺗ ﻩﺎﮕﺘﺳﺩ ﻂﺳﻮﺗ ﻩﺪﺷ ﻩﺩﺍﺩ ﻥﺎﺸﻧ ﻊﯾﺎﻣ ﺭﺍﺪﻘﻣ ﻪﺑ ،ﻦﺗﻮﻠﮔ ﻥﻭﺪﺑ ﻝﺩﻮﻧ/ﺎﺘﺳﺎﭘ ﺎﯾ ﯽﮐﻮﮐ ﻪﯿﻬﺗ ﻡﺎﮕﻨﻫ
ﻪﻤﮐﺩ ﺍﺪﺘﺑﺍ ﺪﯿﻧﺍﻮﺗ ﯽﻣ ،ﺪﯾﺪﯾﺩ ﻪﻈﻔﺤﻣ ﻞﺧﺍﺩ ﺭﺩ ﺮﯿﻤﺧ ﺭﺍﺪﻘﻣ ﺮﮔﺍ ،ﺪﺷ ﻡﺎ ﺎﺘﺳﺎﭘ ﻪﯿﻬﺗ ﯽﺘﻗﻭ
(27
) .
ﻞﮑﺷ
ﺪﻧﻮﺷ ﺝﺭﺎﺧ ﺩﺍﻮﻣ ﻪﯿﻘﺑ ﺎﺗ ﺪﯿﻫﺩ ﺭﺎﺸﻓ ﺍﺭ ﺚﮑﻣ/ﻉﻭﴍ
.
ﺖﺳﺍ ﺕﻭﺎﻔﺘﻣ ﺮﻈﻧ ﺩﺭﻮﻣ ﺱﺮﭘ ﺩﺍﺪﻌﺗ ﻭ ﺎﺘﺳﺎﭘ ﻞﮑﺷ ،ﺷ ﺖﯾﻮﻟﻭﺍ ﻪﺑ ﻪﺘﺴﺑ ﺎﺘﺳﺎﭘ ﺖﺨﭘ ﻥﺎﻣﺯ
ﺪﯿﻨﮐ ﻪﻌﺟﺍﺮﻣ ﯼﺰﭙﺷﺁ ﺏﺎﺘﮐ ﻪﺑ ،ﺎﺘﺳﺎﭘ ﻞﺘﺨﻣ ﻉﺍﻮﻧﺍ ﻪﯿﻬﺗ ﯼﺍﺮﺑ
:
ﻪﺟﻮﺗ
ﻪﺟﻮﺗ
.
ﺪﯿﻨﮐ
ﺏﺁ ﺎﯾ
.
.
ﻥﺩﺮﮐ ﺰﯿ
) .
ﻞﮑﺷ
ﺪﯿﺸﮑﺑ ﺰﯾﺮﭘ ﺯﺍ ﺍﺭ ﻪﺧﺎﺷ ﻭﺩ
) .
ﻞﮑﺷ
ﺪﯾﺭﺍﺩﺮﺑ ﺍﺭ ﻥﺩﺮﮐ ﻁﻮﻠﺨﻣ ﻪﻈﻔﺤﻣ ﺏﺭﺩ
) .
ﻞﮑﺷ
ﺪﯿﻨﮐ ﻞﺷ ﺍﺭ ﯽﯾﻮﻠﺟ ﻞﻨﭘ ﻝﱰﻨﮐ ﯼﺎﻫ ﭻﯿﭘ
.
ﺪﯿﻨﮐ ﻁﺎﯿﺘﺣﺍ ﻥﺁ ﻥﺩﺮﮐ ﺍﺪﺟ ﻡﺎﮕﻨﻫ .ﺖﺳﺍ ﻦﯿﮕﻨﺳ ﯽﯾﻮﻠﺟ ﻞﻨﭘ :ﻪﺟﻮﺗ
) .
ﻞﮑﺷ
) .
ﻞﮑﺷ
ﺪﯿﻨﮐ ﺰﯿ ﺏﺁ ﺎﺑ ﺍﺭ ﻥﺁ ﺪﯿﻧﺍﻮﺗ ﯽﻣ ﻥﺁ ﺯﺍ ﺪﻌﺑ .ﺩﻮﺷ ﮎﺎﭘ ﺮﯿﻤﺧ ﻩﺪﻧﯿﻗﺎﺑ ﺎﺗ ﺪﯿﻨﮐ ﺰﯿ ﻩﺪﺷ ﻪﺋﺍﺭﺍ ﻥﺩﺮﮐ ﺰﯿ ﺭﺍﺰﺑﺍ ﺎﺑ ﺍﺭ ﻩﺪﻨﻫﺩ ﻞﮑﺷ ﻪﺤﻔﺻ
ﺰﯿ ﺭﺍﺰﺑﺍ ﺯﺍ ﺲﭙﺳ
ﺪﯿﻨﮐ ﺍﺪﺟ ﺐﯿﺗﺮﺗ ﻪﺑ ﺍﺭ ﻥﺩﺮﮐ ﻁﻮﻠﺨﻣ ﻪﻈﻔﺤﻣ ﻭ ﻥﺩﺮﮐ ﻁﻮﻠﺨﻣ ﻩﺮﭘ ،ﻩﺪﻨﻫﺩ ﻞﮑﺷ ﻪﺤﻔﺻ ﻩﺪﻧﺭﺍﺪﻬﮕﻧ ،ﻩﺪﻨﻫﺩ ﻞﮑﺷ ﻪﺤﻔﺻ
) .
ﻞﮑﺷ
ﺪﯿﻨﮐ ﺰﯿ ﺍﺭ ﯽﻠﺻﺍ ﻪﻧﺪﺑ ﯼﻭﺭ ﺩﺭﺁ ﻩﺪﻧﯿﻗﺎﺑ ﮏﺸﺧ ﻪﭼﺭﺎﭘ ﮏﯾ ﺎﺑ
.
ﺪﻧﻮﺷ ﮏﺸﺧ ﺍﻮﻫ ﺭﺩ ﺖﻋﺎﺳ
4 ﺎﺗ 2 ﺎﻫ
ﻪﺤﻔﺻ ﺪﯿﻫﺩ ﻩﺯﺎﺟﺍ ،ﯽﻨﯿﭼﻮﺗﻮﻓ ﻭ ﮎﺯﺎﻧ ،ﻢﯿﺨﺿ ﯽﺘﮔﺎﭙﺳﺍ ،ﯽﺘﮔﺎﭙﺳﺍ ﯼﺎﻫ ﻪﺤﻔﺻ ﯼﺍﺮﺑ :ﻪﺟﻮﺗ
.
ﺪﯿﻨﮐ ﻩﺩﺎﻔﺘﺳﺍ ﺎﻫ ﺥﺍﺭﻮﺳ ﻞﺧﺍﺩ ﺮﯿﻤﺧ ﻥﺩﺮﮐ ﺝﺭﺎﺧ ﯼﺍﺮﺑ ﻪﻃﻮﺑﺮﻣ ﻥﺩﺮﮐ
) .
ﻞﮑﺷ
.
)
ﺪﯿﻨﮐ ﺰﯿ ﺍﺭ ﺯﺎﺳﺎﺘﺳﺎﭘ ﯽﻧﻭﺮﯿﺑ ﺖﻤﺴﻗ ﻭ ﻝﱰﻨﮐ ﻞﻨﭘ ،ﮏﺸﺧ ﻪﭼﺭﺎﭘ ﮏﯾ ﺎﺑ
ﻞﮑﺷ
ً
ﺪﯿﻨﮐ ﮏﺸﺧ
ﻼﻣﺎﮐ ﻭ ﻩﺩﺮﮐ ﺰﯿ ﺍﺭ ﻥﺪﺷ ﺍﺪﺟ ﻞﺑﺎﻗ ﺕﺎﻌﻄﻗ ﻪﻤﻫ
،ﯽﯾﻮﻠﺟ ﻞﻨﭘ
!
4
ﻢﻬﻣ
1 (28
2 (3
3 (4
4 (5
5 (29
6 (30
7 (6
8 (31
.
ﺪﻨﺷﺎﺑ ﮏﺸﺧ ﻭ ﻩﺩﻮﺑ ﺰﯿ ﻩﺎﮕﺘﺳﺩ ﺕﺎﻌﻄﻗ ﻪﻤﻫ ﺪﯿﻨﮐ ﯽﺳﺭﺮﺑ ،ﻩﺎﮕﺘﺳﺩ ﯼﺭﺍﺪﻬﮕﻧ ﻭ ﻥﺩﺮﮐ ﻊﻤﺟ ﺯﺍ ﻞﺒﻗ :ﻪﺟﻮﺗ
) .
ﻞﮑﺷ
ﺪﯿﻫﺩ ﺭﺍﺮﻗ ،ﯼﺭﺍﺪﻬﮕﻧ ﯼﻮﺸﮐ ﺭﺩ ﺍﺭ ﻩﺪﻨﻫﺩ ﻞﮑﺷ ﯼﺎﻫ ﻪﺤﻔﺻ ﺪﯿﻧﺍﻮﺗ ﯽﻣ
ﺎﺑ ﺍﺭ
ﻞﮑﺸﻣ ﺪﯿﻧﺍﻮﺗ ﯽ ﺮﮔﺍ .ﺖﺳﺍ ﻩﺪﺷ ﻩﺪﻧﺎﺠﻨﮔ ﺶﺨﺑ ﻦﯾﺍ ﺭﺩ ﺪﯾﺁ ﺶﯿﭘ ﺷ ﯼﺍﺮﺑ ﻩﺎﮕﺘﺳﺩ ﺎﺑ ﺭﺎﮐ ﻡﺎﮕﻨﻫ
ﺭﺩ
ﯼﱰﺸﻣ ﺕﺎﻣﺪﺧ ﺰﮐﺮﻣ ﺎﺑ ﺎﯾ ﺪﯿﻨﮐ ﺪﯾﺩﺯﺎﺑ ﻝﻭﺍﺪﺘﻣ ﺕﻻﺍﺆﺳ ﺖﺴﯿﻟ ﯼﺍﺮﺑ
www.philips.com/support
ﯼﺭﺍﺪﻬﮕﻧ
ﺩﻮﺷ ﮏﻨﺧ ﺎﺗ ﺪﯿﻨﮐ ﱪﺻ ﻭ ﺪﯿﺸﮑﺑ ﺰﯾﺮﭘ ﺯﺍ ﺍﺭ ﻩﺎﮕﺘﺳﺩ
ﯽﺑﺎﯾ ﺐﯿﻋ
ً
ﻻﻮﻤﻌﻣ ﺖﺳﺍ ﻦﮑﻤﻣ ﻪﮐ ﯽﺗﻻﺎﮑﺷﺍ ﺯﺍ ﯼﺍ ﻪﺻﻼﺧ
ﺖﯾﺎﺳ ﺯﺍ ،ﺪﯿﻨﮐ ﻑﺮﻃﺮﺑ ﺮﯾﺯ ﺕﺎﻋﻼﻃﺍ
.
ﺪﯾﺮﯿﮕﺑ ﺱﺎ ﺩﻮﺧ
ﺭﻮﺸﮐ
1 .
2 (32
Page 16

ﯽﺳﺭﺎﻓ
18
.
ﺪﻨﺷﺎﺑ ﻩﺪﺷ ﺭﺍﻮﺳ ﺪﯾﺎﺑ ﺕﺎﻌﻄﻗ ﻪﻤﻫ ،ﻩﺎﮕﺘﺳﺩ ﻥﺩﺯ ﻕﺮﺑ ﻪﺑ ﺯﺍ ﻞﺒﻗ :ﻪﺟﻮﺗ
) .
ﻞﮑﺷ
ﺩﻮﺷ ﻦﺷﻭﺭ ﻩﺎﮕﺘﺳﺩ ﺎﺗ ﺪﯿﻫﺩ ﺭﺎﺸﻓ ﺍﺭ (ﺵﻮﻣﺎﺧ/ﻦﺷﻭﺭ
(17
) .
ﻞﮑﺷ
ﺪﯿﻨﮐ ﺏﺎﺨﺘﻧﺍ (ﻪﻣﺎﻧﺮﺑ ﺏﺎﺨﺘﻧﺍ
ﻪﻣﺎﻧﺮﺑ ﻪﺘﮑﻧ ﯼﺭﺎﯿﺘﺧﺍ ﻪﯿﻬﺗ ﺭﻮﺘﺳﺩ
ﻩﺩﺎﺳ ﯼﺎﺘﺳﺎﭘ/ﻝﺩﻮﻧ
ﯽﻏﺮﻣ ﻢﺨﺗ ﺎﯾ ﺭﺍﺩ ﻢﻌﻃ ﯼﺎﺘﺳﺎﭘ/ﻝﺩﻮﻧ
) .
ﻞﮑﺷ
ﺩﺮﯿﮔ ﺭﺍﺮﻗ ﻥﺯﻭ ﺢﯿﺤﺻ ﻩﺩﻭﺪﺤﻣ ﺭﺩ ﯽﺘﻗﻭ ﺎﺗ ﺪﻧﺯ
ﻪﻤﮐﺩ ﺖﻟﺎﺣ ﻦﯾﺍ ﺭﺩ .ﺪﯾﻮﺷ ﺩﺭ ﻦﯾﺯﻮﺗ ﻪﻠﺣﺮﻣ ﺯﺍ ﺩﻮﺷ ﯽﻣ ﻪﺘﺳﺍﻮﺧ ﺷ ﺯﺍ (ﻦﺗﻮﻠﮔ ﻥﻭﺪﺑ ﯼﺎﺘﺳﺎﭘ ،ﺎﻫ ﯽﮐﻮﮐ ﻝﺎﺜﻣ ﯼﺍﺮﺑ
.
ﺩﻮﺷ ﺩﺍﻮﻣ ﻥﺩﺭﻭﺁ ﻥﻭﺮﯿﺑ ﻭ ﻥﺩﺮﮐ ﻁﻮﻠﺨﻣ ﻪﻠﺣﺮﻣ ﺩﺭﺍﻭ ﻢﯿﻘﺘﺴﻣ ﻩﺎﮕﺘﺳﺩ ﺎﺗ ﺪﯾﺭﺍﺪﻬﮕﻧ ﻪﯿﻧﺎﺛ
ﻒﻗﻮﺘﻣ ﻩﺎﮕﺘﺳﺩ ،ﺪﯿﻨﮐ ﺯﺎﺑ ﺍﺭ ﻪﻈﻔﺤﻣ ﺏﺭﺩ ﺮﮔﺍ ،ﺎﺘﺳﺎﭘ ﻪﯿﻬﺗ ﻦﯿﺣ ﺭﺩ .ﺪﻨﮐ ﯽ ﺭﺎﮐ ﻪﺑ ﻉﻭﴍ ﻩﺎﮕﺘﺳﺩ ،ﺪﺷﺎﺑ ﻩﺪﺸﻧ ﻪﺘﺴﺑ ﺖﺳﺭﺩ ﻪﻈﻔﺤﻣ ﺏﺭﺩ ﺮﮔﺍ
.
ﺪﻨﮐ ﺭﺎﮐ ﻪﺑ ﻉﻭﴍ ﻩﺭﺎﺑﻭﺩ ﺎﺗ ﺪﯿﻫﺩ ﺭﺎﺸﻓ ﺍﺭ
ﺪﻧﻮﺷ ﻁﻮﻠﺨﻣ ﺎﺗ ﺪﯿﻧﺰﺑ ﻢﻫ ﺍﺭ ﻍﺮﻣ ﻢﺨﺗ ﻭ ﺏﺁ ﺲﭙﺳ ﻭ ﺪﯿﻨﮐ ﻪﻓﺎﺿﺍ ﺏﺁ ﻡﺯﻻ ﺭﺍﺪﻘﻣ ﺎﺗ .ﺪﯿﻨﮑﺸﺑ ﺏﺁ ﻪﻧﯿﭘ ﺭﺩ ﺍﺭ ﻍﺮﻣ ﻢﺨﺗ ،ﻍﺮﻣ ﻢﺨﺗ ﻁﻮﻠﺨﻣ ﻪﯿﻬﺗ ﯼﺍﺮﺑ
ﺩﻮﺸﻧ ﱰﺸﯿﺑ ﻩﺪﺷ ﻪﯿﺻﻮﺗ ﺭﺍﺪﻘﻣ ﺯﺍ ﻊﯾﺎﻣ ﯽﻠﮐ ﺭﺍﺪﻘﻣ ﺪﯾﻮﺷ ﱧﻤﻄﻣ ﯽﻟﻭ ﺪﯾﺰﯾﺮﺑ ﻍﺮﻣ ﻢﺨﺗ
ﯽﻣ
) .
ﻞﮑﺷ
ﺩﻮﺷ ﯽﻣ ﺮﻫﺎﻇ ﻪﻈﻔﺤﻣ ﺏﺭﺩ ﺴﺑ ﺖﻣﻼﻋ ،ﺪﯿﻫﺩ ﺭﺎﺸﻓ ﺏﺭﺩ ﺴﺑ ﻥﻭﺪﺑ ﺍﺭ ﯼﺍ ﻪﻤﮐﺩ ﺮﮔﺍ
) .
ﻞﮑﺷ
ﺪﯿﻨﮐ ﻩﺩﺎﻔﺘﺳﺍ ﻊﯾﺎﻣ ﺭﺍﺪﻘﻣ ﯼﺮﯿﮔ ﻩﺯﺍﺪﻧﺍ ﺖﻬﺟ ﻪﻧﺎﺧﺰﭙﺷﺁ ﯼﻭﺯﺍﺮﺗ ﮏﯾ ﺯﺍ ﱰﺸﯿﺑ ﺖﻗﺩ ﯼﺍﺮﺑ
ﺏﺁ ﻭ ﺩﺭﺁ ﺎﺑ ﻂﻘﻓ ﺎﺘﺳﺎﭘ
ﻍﺮﻣ ﻢﺨﺗ ﻭ ﺩﺭﺁ ﺎﺑ ﺎﺘﺳﺎﭘ
ﺭﺍﺩ ﻢﻌﻃ ﯼﺎﻫﺎﺘﺳﺎﭘ ﻉﺍﻮﻧﺍ
ﮏﻤﺸﭼ ﻥﺯﻭ .ﺪﻫﺩ ﯽﻣ ﺶﯾﺎ ﻭ ﻩﺩﺮﮐ ﻥﺯﻭ ﺍﺭ ﺩﺭﺁ ﺭﺍﺪﻘﻣ ﺭﺎﮐﺩﻮﺧ ﺭﻮﻃ ﻪﺑ ﻩﺎﮕﺘﺳﺩ
ﺪﯾﺰﯾﺮﻧ ﻪﻈﻔﺤﻣ ﺭﺩ ﺩﺭﺁ ﻡﺮﮔ
ﺭﺎﺸﻓ ﯽﻠﺻﺍ ﻪﻧﺪﺑ ﯼﻭﺭ ﺍﺭ ﺏﺭﺩ ﺲﭙﺳ ﻭ ﺪﯿﻨﮐ ﻩﺎﮕﺘﺳﺩ ﺩﺭﺍﻭ ﺍﺭ ﮏﮕﻨﭼ ﻭﺩ ﻝﻭﺍ
ﺪﯿﻫﺩ
(
ﺚﮑﻣ/ﻉﻭﴍ
ﻞﮑﺷ
ﺪﯾﺭﺍﺩﺮﺑ ﺶﯾﺎ ﻪﺤﻔﺻ ﯼﻭﺭ ﺮﮕﻧﺎﺸﻧ ﺎﺑ ﻖﺑﺎﻄﻣ ﺍﺭ ﻡﺯﻻ ﺏﺁ ﺭﺍﺪﻘﻣ ﻩﺪﺷ ﻪﺋﺍﺭﺍ ﺏﺁ ﻪﻧﯿﭘ ﺎﺑ
) Program selection
.
ﺪﯿﻨﮐ ﻪﻌﺟﺍﺮﻣ ﯼﺰﭙﺷﺁ ﺏﺎﺘﮐ ﻪﺑ ،ﱰﺸﯿﺑ ﯼﺎﻫﺭﻮﺘﺳﺩ ﯼﺍﺮﺑ :ﻪﺟﻮﺗ
) .
ﻞﮑﺷ
ﺪﯾﺭﺍﺩﺮﺑ ﺍﺭ ﻥﺩﺮﮐ ﻁﻮﻠﺨﻣ ﻪﻈﻔﺤﻣ ﺏﺭﺩ
) .
ﻞﮑﺷ
ﺩﻮﺷ ﻩﺩﺍﺩ ﻥﺎﺸﻧ ﻪﺤﻔﺻ ﯼﻭﺭ
600 ﺯﺍ
ﱰﺸﯿﺑ ﺎﯾ ﻡﺮﮔ
5 ﻭ
ﻩﺩﺍﺩ ﺭﺎﺸﻓ ﺍﺭ (ﺚﮑﻣ/ﻉﻭﴍ
) Start/pause
) .
ﺩﻮﺷ ﯽﻣ ﻩﺩﺍﺩ ﻥﺎﺸﻧ ﺯﺎﯿﻧ ﺩﺭﻮﻣ ﻊﯾﺎﻣ ﺭﺍﺪﻘﻣ ،ﺪﺷ ﻪﺘﺴﺑ ﺏﺭﺩ ﯽﺘﻗﻭ
ﺪﯾﺮﯿﮕﺑ ﻩﺯﺍﺪﻧﺍ ﻑﺎﺻ ﺢﻄﺳ ﮏﯾ ﯼﻭﺭ ﻭ ﻢﺸﭼ ﺎﺑ ﺍﺭ ﻊﯾﺎﻣ ﺭﺍﺪﻘﻣ
ﻪﻤﮐﺩ ﻭ ﺪﯿﻨﯿﺒﺑ ﺍﺭ ﺏﺭﺩ .ﺩﻮﺷ ﯽﻣ
1
ﯼﺎﺟ ﻪﺑ ﻍﺮﻣ ﻢﺨﺗ
) On/o
ﻪﻤﮐﺩ ﺎﺑ ﺍﺭ ﺎﺘﺳﺎﭘ ﻉﻮﻧ
ﻡﻭﺭﻭﺩ ﻡﺪﻨﮔ ﻝﺩﻮﻧ
ﻡﻭﺭﻭﺩ ﻡﺪﻨﮔ ﯼﺎﺘﺳﺎﭘ
ﺞﯾﻮﻫ ﯼﺎﺘﺳﺎﭘ/ﻝﺩﻮﻧ
ﯽﮕﻧﺮﻓ ﻪﺟﻮﮔ ﯼﺎﺘﺳﺎﭘ/ﻝﺩﻮﻧ
ﺭﺪﻨﻐﭼ ﯼﺎﺘﺳﺎﭘ/ﻝﺩﻮﻧ
0:00 ﺎﺗ
) .
ﻞﮑﺷ
ﺪﯾﺰﯾﺮﺑ ﻪﻈﻔﺤﻣ ﺭﺩ ﺍﺭ ﺩﺭﺁ
200 ﺯﺍ
)
ﺎﻫﺭﻮﺘﺳﺩ ﯽﺧﺮﺑ ﺭﺩ
) pause
) .
ﻞﮑﺷ
ﺪﯾﺪﻨﺒﺑ ﺍﺭ ﻪﻈﻔﺤﻣ ﺏﺭﺩ
2
،ﻞﯾﺎ ﺕﺭﻮﺻ ﺭﺩ
ﻡﺪﻨﮔ ﻝﺩﻮﻧ
ﻡﺪﻨﮔ ﯼﺎﺘﺳﺎﭘ
ﺎﺑﻮﺳ ﻝﺩﻮﻧ
ﻪﻤﮐﺩ
ﺪﯿﻨﮐ ﱪﺻ
ﻪﺟﻮﺗ
(20
.
ﱰﻤﮐ
Start/
ﻪﺟﻮﺗ
(21
.
ﻪﺟﻮﺗ
.
.
.
.
2 (16
3
4 (3
5 (18
6 (19
7 (14
8 (22
9 (23
ﺯﺎﺳﺎﺘﺳﺎﭘ ﻪﻣﺎﻧﺮﺑ ﻉﻭﴍ
) .
ﻞﮑﺷ
ﺩﻮﺷ ﻉﻭﴍ ﻥﺩﺮﮐ ﻁﻮﻠﺨﻣ ﺱﻮﮑﻌﻣ ﺵﺭﺷ ﻭ ﻩﺪﺷ ﺯﺎﻏﺁ ﻥﺩﺮﮐ ﻁﻮﻠﺨﻣ ﺎﺗ ﺪﯿﻫﺩ ﺭﺎﺸﻓ ﺍﺭ (ﺚﮑﻣ/ﻉﻭﴍ
) .
ﻞﮑﺷ
ﺪﯾﺰﯾﺮﺑ ﺏﺭﺩ ﯼﻭﺭ ﺭﺎﯿﺷ ﻝﻮﻃ ﻞﮐ ﺭﺩ ﻡﺍﺭﺁ ﺍﺭ ﺏﺁ ،ﺪﺷ ﻉﻭﴍ ﻥﺩﺮﮐ ﻁﻮﻠﺨﻣ ﻪﮑﻧﺁ ﺯﺍ ﺪﻌﺑ
.
ﺩﺭﺍﺬﮔ ﯽﻣ ﺮﯿﺛﺎﺗ ﺎﺘﺳﺎﭘ ﺖﻓﺎﺑ ﺮﺑ ،ﺕﺭﻮﺼﻨﯾﺍﺮﯿﻏ ﺭﺩ .ﺪﯿﻨﮑﻧ ﻪﻓﺎﺿﺍ
ﻥﺩﺍﺩ ﺵﺮﺑ ﯼﺍﺮﺑ ﺎﺘﺳﺎﭘ ﻩﺪﻨﻫﺩ ﺵﺮﺑ ﺯﺍ .ﺪﻨﮐ ﯽﻣ ﺎﺘﺳﺎﭘ ﻥﺩﺮﮐ ﺝﺭﺎﺧ ﻪﺑ ﻉﻭﴍ ﻪﯿﻧﺎﺛ ﺪﻨﭼ ﺯﺍ ﺪﻌﺑ ﻭ ﺪﻧﺯ ﯽﻣ ﻕﻮﺑ ﺭﺎﺑ ﮏﯾ ،ﺪﺷ ﻁﻮﻠﺨﻣ ﺎﺘﺳﺎﭘ ﺮﯿﻤﺧ ﻪﮑﻧﺁ ﺯﺍ ﺲﭘ
.
ﺪﯿﻨﮐ ﻪﻌﺟﺍﺮﻣ ﯼﺰﭙﺷﺁ ﺏﺎﺘﮐ ﻪﺑ ﱰﺸﯿﺑ ﯼﺎﻫﺭﻮﺘﺳﺩ ﯼﺍﺮﺑ
ً
ﺎﻔﻄﻟ .ﺩﻮﺑ ﺪﻫﺍﻮﺨﻧ ﺰﯿﻣﺁ ﺖﯿﻘﻓﻮﻣ ﺎﺘﺳﺎﭘ ﺝﻭﺮﺧ ،ﺪﺷﺎﺒﻧ ﺢﯿﺤﺻ ﺩﺭﺁ ﻭ ﺏﺁ ﺖﺒﺴﻧ ﺮﮔﺍ :ﻪﺟﻮﺗ
ﯼﺮﮕﯾﺩ ﺩﺍﻮﻣ ،ﺏﺁ ﺨﯾﺭ ﺯﺍ ﺲﭘ ،ﺮﯿﻤﺧ ﻥﺩﺮﮐ ﻁﻮﻠﺨﻣ ﻦﯿﺣ ﺭﺩ :ﻪﺟﻮﺗ
(26
ﻞﮑﺷ).ﺪﯿﻨﮐ ﻩﺩﺎﻔﺘﺳﺍ ﺮﻈﻧ ﺩﺭﻮﻣ ﻝﻮﻃ
) Start/pause
ﻪﻤﮐﺩ
ﻪﺑ ﺎﺘﺳﺎﭘ
1 (24
2 (25
3
Page 17
ﯽﺳﺭﺎﻓ
19
ﻪﻟﺩﺭﺎﭘﺎﭘ
ﻪﻠﺗﺎﯿﻟﺎﺗ
.
ﺩﻮﺷ ﯽﻣ ﻪﺿﺮﻋ ﯽﮕﻧﺮﻓ ﻪﺘﺷﺭ ﺪﯿﻟﻮﺗ ﻪﺤﻔﺻ ﺎﺑ ﻩﺍﺮﻤﻫ ﻂﻘﻓ ﯽﮕﻧﺮﻓ ﻪﺘﺷﺭ ﺪﯿﻟﻮﺗ ﻪﺤﻔﺻ ﻥﺩﺮﮐ ﺰﯿ ﺭﺍﺰﺑﺍ :ﻪﺟﻮﺗ
ﯽﮕﻧﺮﻓ ﻪﺘﺷﺭ
ﻢﯿﺨﺿ ﯽﺘﮔﺎﭙﺳﺍ
ﻩﺩﺎﻔﺘﺳﺍ ﻦﯿﻟﻭﺍ ﺯﺍ ﻞﺒﻗ ﻥﺩﺮﮐ ﺰﯿ ﻭ ﯼﺯﺎﺳ ﻩﺩﺎﯿﭘ
) .
ﻞﮑﺷ
ﺪﯾﺭﺍﺩﺮﺑ ﺍﺭ ﻥﺩﺮﮐ ﻁﻮﻠﺨﻣ ﻪﻈﻔﺤﻣ ﺏﺭﺩ
) .
ﻞﮑﺷ
ﺪﯿﻨﮐ ﻞﺷ ﺍﺭ ﯽﯾﻮﻠﺟ ﻞﻨﭘ ﻝﱰﻨﮐ ﯼﺎﻫ ﭻﯿﭘ
.
ﺪﯿﻨﮐ ﻁﺎﯿﺘﺣﺍ ﻥﺁ ﻥﺩﺮﮐ ﺍﺪﺟ ﻡﺎﮕﻨﻫ .ﺖﺳﺍ ﻦﯿﮕﻨﺳ ﯽﯾﻮﻠﺟ ﻞﻨﭘ :ﻪﺟﻮﺗ
) .
ﻞﮑﺷ
ﺪﯿﻨﮐ ﺍﺪﺟ ﺐﯿﺗﺮﺗ ﻪﺑ ﺍﺭ ﻥﺩﺮﮐ ﻁﻮﻠﺨﻣ ﻪﻈﻔﺤﻣ ﻭ ﻥﺩﺮﮐ ﻁﻮﻠﺨﻣ ﻩﺮﭘ ،ﻩﺪﻨﻫﺩ ﻞﮑﺷ ﻪﺤﻔﺻ ﻩﺪﻧﺭﺍﺪﻬﮕﻧ ،ﻩﺪﻨﻫﺩ ﻞﮑﺷ ﻪﺤﻔﺻ ،ﯽﯾﻮﻠﺟ ﻞﻨﭘ
(6
) .
ﻞﮑﺷ
) .
ﻞﮑﺷ
ﺪﯿﻨﮐ ﯽﻠﺻﺍ ﻪﻧﺪﺑ ﺩﺭﺍﻭ ﻞﻣﺎﮐ ﺍﺭ ﻥﺩﺮﮐ ﻁﻮﻠﺨﻣ ﻩﺮﭘ .ﺪﯾﺮﯿﮕﺑ ﯽﻠﺻﺍ ﻪﻧﺪﺑ ﺭﺩ ﺥﺍﺭﻮﺳ ﻪﺑ ﻭﺭ ﺍﺭ ﻥﺩﺮﮐ ﻁﻮﻠﺨﻣ ﻩﺮﭘ
(10
) .
ﻞﮑﺷ
ﺪﺷﺎﺑ ﻪﺘﻓﺮﮔ ﺎﺟ ﻪﺤﻔﺻ ﻩﺪﻧﺭﺍﺪﻬﮕﻧ ﺭﺩ ﻢﮑﺤﻣ ﺭﻮﻃ ﻪﺑ ﺪﯾﻮﺷ ﱧﻤﻄﻣ ﻭ ﻩﺩﺮﮐ ﻪﺤﻔﺻ ﻩﺪﻧﺭﺍﺪﻬﮕﻧ ﺩﺭﺍﻭ ﺍﺭ ﻩﺪﻨﻫﺩ ﻞﮑﺷ ﻪﺤﻔﺻ
(11
) .
ﻞﮑﺷ
ﺪﻨﺷﺎﺑ ﻩﺪﺷ ﺭﺍﻮﺳ ﺖﺳﺭﺩ ﻪﺤﻔﺻ ﻩﺪﻧﺭﺍﺪﻬﮕﻧ ﻭ ﻩﺪﻨﻫﺩ ﻞﮑﺷ ﻪﺤﻔﺻ ﯽﻠﺧﺍﺩ ﺭﺎﯿﺷ ﺪﯾﻮﺷ ﱧﻤﻄﻣ :ﻪﺟﻮﺗ
ﺪﺷﺎﺑ ﻩﺪﺷ ﻪﺘﺴﺑ ﻢﮑﺤﻣ
ﺪﯿﻨﮐ ﻁﺎﯿﺘﺣﺍ ﻥﺁ ﻥﺩﺮﮐ ﺭﺍﻮﺳ ﻡﺎﮕﻨﻫ .ﺖﺳﺍ ﻦﯿﮕﻨﺳ ﯽﯾﻮﻠﺟ ﻞﻨﭘ
.
ﺪﻨﮐ ﯽﻣ ﯼﺮﯿﮔﻮﻠﺟ ﻩﺎﮕﺘﺳﺩ ﻥﺩﺮﮐ ﺭﺎﮐ ﺯﺍ ﯽﻨﻤﯾﺍ ﺪﯿﻠﮐ ،ﺪﻨﺷﺎﺑ ﻩﺪﺸﻧ ﺭﺍﻮﺳ ﺖﺳﺭﺩ ﻩﺪﻨﻫﺩ ﻞﮑﺷ ﻪﺤﻔﺻ ﺎﯾ ﯽﯾﻮﻠﺟ ﻞﻨﭘ ﺮﮔﺍ :ﻪﺟﻮﺗ
.
ﺪﻨﮐ ﯽﻣ ﯼﺮﯿﮔﻮﻠﺟ ﻩﺎﮕﺘﺳﺩ ﻥﺩﺮﮐ ﺭﺎﮐ ﺯﺍ ﯽﻨﻤﯾﺍ ﺪﯿﻠﮐ ،ﺪﺷﺎﺑ ﻩﺪﺸﻧ ﻪﺘﺴﺑ ﺖﺳﺭﺩ ﻥﺩﺮﮐ ﻁﻮﻠﺨﻣ ﻪﻈﻔﺤﻣ ﺏﺭﺩ ﺮﮔﺍ :ﻪﺟﻮﺗ
ً
ﻭ
ﻼﻣﺎﮐ
ﺪﯿﻨﮐ ﮏﺸﺧ
) .
ﻞﮑﺷ
(9
ﻩﺩﺮﮐ ﺰﯿ ﺍﺭ ﻥﺪﺷ ﺍﺪﺟ ﻞﺑﺎﻗ ﺕﺎﻌﻄﻗ ﻪﻤﻫ
ﺪﯿﻫﺩ ﺭﺎﺸﻓ ﻩﺎﮕﺘﺳﺩ ﻞﺧﺍﺩ ﻪﺑ ﺍﺭ ﻥﺩﺮﮐ ﻁﻮﻠﺨﻣ ﻪﻈﻔﺤﻣ
) .
ﻞﮑﺷ
ﺪﯿﻨﮐ ﻞﺼﺘﻣ ﻩﺎﮕﺘﺳﺩ ﻪﺑ ﺍﺭ ﻪﺤﻔﺻ ﻩﺪﻧﺭﺍﺪﻬﮕﻧ
) .
ﻞﮑﺷ
ﺪﯿﻨﮐ ﻞﺼﺘﻣ ﯽﻠﺻﺍ ﻪﻧﺪﺑ ﻪﺑ ﺍﺭ ﯽﯾﻮﻠﺟ ﻞﻨﭘ
ً
ﻼﻣﺎﮐ
ﯽﯾﻮﻠﺟ ﻞﻨﭘ ﺪﯿﻨﮐ ﯽﺳﺭﺮﺑ ،ﻩﺩﺎﻔﺘﺳﺍ ﺯﺍ ﻞﺒﻗ
) .
ﻞﮑﺷ
ﺪﯿﻨﮐ ﻢﮑﺤﻣ ﺍﺭ ﯽﯾﻮﻠﺟ ﻞﻨﭘ ﻝﱰﻨﮐ ﯼﺎﻫ ﭻﯿﭘ
) .
ﻞﮑﺷ
ﺪﯾﺪﻨﺒﺑ ﺍﺭ ﻥﺩﺮﮐ ﻁﻮﻠﺨﻣ ﻪﻈﻔﺤﻣ ﺏﺭﺩ
HR2380
HR2381
HR2382
HR2382/13
ﻥﺩﺮﮐ ﺭﺍﻮﺳ
:
ﻪﺟﻮﺗ
.
.
1 (3
2 (4
3 (5
4
1 (7
2 (8
3
4
5 (12
6 (13
7 (14
ﺯﺎﺳﺎﺘﺳﺎﭘ ﺯﺍ ﻩﺩﺎﻔﺘﺳﺍ
ﯼﺯﺎﺳ ﻩﺩﺎﻣﺁ ﻉﻭﴍ
) .
ﻞﮑﺷ
ﺪﻨﻧﺯ ﯽﻣ ﮏﻤﺸﭼ ﺭﺎﺑ ﮏﯾ ﺎﻫﺮﮕﻧﺎﺸﻧ ﻪﻤﻫ ﻭ ﺪﻫﺩ ﯽﻣ ﺍﺪﺻ ﺭﺎﺒﮑﯾ ﺯﺎﺳﺎﺘﺳﺎﭘ .ﺪﯿﻧﺰﺑ ﻕﺮﺑ ﺰﯾﺮﭘ ﻪﺑ ﺍﺭ ﻪﺧﺎﺷﻭﺩ
1 (15
Page 18
20
ﯽﺳﺭﺎﻓ
(1
ﻞﮑﺷ) ﻩﺎﮕﺘﺳﺩ ﯽﻠﮐ ﯼﺎ
(
ﻥﺩﺭﻭﺁ ﻥﻭﺮﯿﺑ
ﺪﯿﻫﺩ ﺭﺎﺸﻓ ﺍﺭ (ﺚﮑﻣ/ﻉﻭﴍ
ﺪﯿﻫﺩ ﺭﺎﺸﻓ ﺍﺭ (ﺚﮑﻣ/ﻉﻭﴍ
ﺪﯾﻮﺷ ﻥﺩﺮﮐ ﻁﻮﻠﺨﻣ ﻪﻠﺣﺮﻣ ﺩﺭﺍﻭ ﻢﯿﻘﺘﺴﻣ ﻭ ﺪﯾﻮﺷ ﺩﺭ ﻦﯾﺯﻮﺗ ﺩﺮﮑﻠﻤﻋ ﺯﺍ ﺪﯿﻫﺍﻮﺧ ﯽﻣ ﺎﯾ ﺪﻫﺩ ﯽﻣ ﺎﻄﺧ ﻩﺎﮕﺘﺳﺩ ﻪﮐ ﺖﺳﺍ ﯽﺘﻗﻭ ﯼﺍﺮﺑ
ﺎﺘﺳﺎﭘ ﻩﺪﻨﻫﺩ ﺵﺮﺑ
ﯽﯾﻮﻠﺟ ﻞﻨﭘ ﯼﺎﻫ ﭻﯿﭘ
ﯽﯾﻮﻠﺟ ﻪﺤﻔﺻ
ﻩﺪﻨﻫﺩ ﻞﮑﺷ ﻪﺤﻔﺻ
ﻪﺤﻔﺻ ﻩﺪﻧﺭﺍﺪﻬﮕﻧ
ﻪﺤﻔﺻ ﻩﺪﻧﺭﺍﺪﻬﮕﻧ ﯽﻨﻤﯾﺍ ﺪﯿﻠﮐ ﻡﺮﻫﺍ
ﻥﺩﺮﮐ ﻁﻮﻠﺨﻣ ﻩﺮﭘ
ﻥﺩﺮﮐ ﻁﻮﻠﺨﻣ ﻪﻈﻔﺤﻣ
i
j
k
l
m
n
o
p
ﻥﺩﺮﮐ ﻁﻮﻠﺨﻣ ﻪﻈﻔﺤﻣ ﺏﺭﺩ ﯽﻨﻤﯾﺍ ﺪﯿﻠﮐ ﺥﺍﺭﻮﺳ
(2
) Extrusion only
ﻪﻣﺎﻧﺮﺑ ﺏﺎﺨﺘﻧﺍ ﻪﻤﮐﺩ
) Start/pause
ﺪﯿﻨﮐ ﺝﺭﺎﺧ ﺍﺭ ﺩﺍﻮﻣ ﻪﯿﻘﺑ ﺪﯿﻫﺍﻮﺨﺑ ﻭ ﺖﺳﺍ ﻩﺪﻧﺎﻣ ﯽﻗﺎﺑ ﻥﺩﺮﮐ ﻁﻮﻠﺨﻣ ﻪﻈﻔﺤﻣ ﺭﺩ ﺮﯿﻤﺧ ﯼﺭﺍﺪﻘﻣ ﻪﮐ ﺖﺳﺍ ﯽﺘﻗﻭ ﯼﺍﺮﺑ
ﻪﻤﮐﺩ ﺲﭙﺳ ﻭ ﺪﯿﻨﮐ ﺏﺎﺨﺘﻧﺍ ﯼﺍ ﻪﻣﺎﻧﺮﺑ ،(ﻪﻣﺎﻧﺮﺑ ﺏﺎﺨﺘﻧﺍ
) Start/pause
d
ﻪﻤﮐﺩ
e
.
ﺪﯿﻨﮐ ﻪﯿﻬﺗ ﺎﺘﺳﺎﭘ ﺪﯿﻫﺍﻮﺧ ﯽﻣ ﻪﮐ ﯽﺷﻭﺭ ﻪﺑ ﺪﻫﺩ ﯽﻣ ﻥﺎﮑﻣﺍ ﺷ ﻪﺑ ﻩﺎﮕﺘﺳﺩ ﻦﯾﺍ
ﺩﻮﺷ ﯽﻣ ﻡﺎﺠﻧﺍ ﻦﯾﺯﻮﺗ ﺎﺑ ﺯﺎﺘﺳﺎﭘ ﻪﯿﻬﺗ ﻪﮐ
ﻪﻤﮐﺩ ﺲﭙﺳ ﻭ ﻩﺩﺍﺩ ﺭﺎﺸﻓ ﺍﺭ (ﻥﺩﺭﻭﺁ ﻥﻭﺮﯿﺑ
ﺪﯾﺭﺍﺪﻬﮕﻧ ﻪﯿﻧﺎﺛ
5
ﻭ ﻩﺩﺍﺩ ﺭﺎﺸﻓ ﺍﺭ (ﺚﮑﻣ/ﻉﻭﴍ
) Program selection
ﻥﺩﺮﮐ ﻁﻮﻠﺨﻣ ﻪﻈﻔﺤﻣ ﺏﺭﺩ
ﻪﺤﻔﺻ ﻩﺪﻧﺭﺍﺪﻬﮕﻧ ﯽﻨﻤﯾﺍ ﺪﯿﻠﮐ
ﯽﻠﺻﺍ ﻪﻧﺪﺑ
ﻩﺪﻨﻫﺩ ﻞﮑﺷ ﻪﺤﻔﺻ ﯼﺭﺍﺪﻬﮕﻧ ﻞﺤﻣ
ﺏﺁ ﻪﻧﯿﭘ
ﻩﺪﻨﻨﮐ ﺰﯿ ﺱﺮﺑ
ﻞﮑﺷ) ﻝﱰﻨﮐ ﻞﻨﭘ ﯽﻠﮐ ﯼﺎ
ﺵﻮﻣﺎﺧ/ﻦﺷﻭﺭ ﻪﻤﮐﺩ
ﺚﮑﻣ/ﻉﻭﴍ ﻪﻤﮐﺩ
ﺎﺘﺳﺎﭘ ﻪﯿﻬﺗ ﺽﺮﻓ ﺶﯿﭘ ﺩﺮﮑﻠﻤﻋ
ﯽﻧﺎﻣﺯ ﯼﺍﺮﺑ
ﻥﺩﺭﻭﺁ ﻥﻭﺮﯿﺑ ﺩﺮﮑﻠﻤﻋ
) Extrusion only
ﻦﯾﺯﻮﺗ ﺯﺍ ﻥﺪﺷ ﺩﺭ ﺩﺮﮑﻠﻤﻋ
) Start/pause
ﻕﺮﺑ ﻢﯿﺳ
ﺮﮕﺸﯾﺎ
ﻪﻤﮐﺩ ﺎﺑ
.
.
.
ﻪﻤﮐﺩ
ﻪﻤﮐﺩ
a
b
c
d
e
f
g
h
a
b
c
.
.
.
ﺎﯿﻧﺍﺯﻻ
ﺩﻮﺟﻮﻣ ﯽﺒﻧﺎﺟ ﻡﺯﺍﻮﻟ
ﻩﺪﻨﻫﺩ ﻞﮑﺷ ﯼﺎﻫ ﻪﺤﻔﺻ
ﻪﻨﭘ
ﯽﻨﯿﭼﻮﺗﻮﻓ
ﯽﺘﮔﺎﭙﺳﺍ
HR2380
HR2381
HR2382
HR2382/13
Page 19

ﯽﺳﺭﺎﻓ
ﺪﯿﻧﺰﻧ ﺖﺳﺩ ﻥﺩﺮﮐ ﻁﻮﻠﺨﻣ ﻪﻈﻔﺤﻣ ﻪﺑ ،ﺖﺳﺍ ﻞﺼﺘﻣ ﻕﺮﺑ ﻪﺑ ﻩﺎﮕﺘﺳﺩ ﯽﺘﻗﻭ
ﺪﻧﻮﺷ ﻢﮑﺤﻣ ﯽﯾﻮﻠﺟ ﻞﻨﭘ ﯼﺎﻫ ﭻﯿﭘ ﺪﯿﻨﮐ ﺖﻗﺩ ،ﻥﺩﺮﮐ ﺭﺍﻮﺳ ﻦﯿﺣ ﺭﺩ
ﺪﺷﺎﺒﻧ ﻞﺼﺘﻣ ﻕﺮﺑ ﻪﺑ ﻩﺎﮕﺘﺳﺩ ﺪﯿﻨﮐ ﺖﻗﺩ ،ﻩﺎﮕﺘﺳﺩ ﻥﺩﺮﮐ ﺭﺍﻮﺳ ﻡﺎﮕﻨﻫ
ﺪﻨﺷﺎﺑ ﻩﺪﺷ ﺭﺍﻮﺳ ﺪﯾﺎﺑ (ﻪﻈﻔﺤﻣ ﺏﺭﺩ ﻪﻠﻤﺟ ﺯﺍ) ﺕﺎﻌﻄﻗ ﻪﻤﻫ ،ﻩﺎﮕﺘﺳﺩ
ﻥﺩﺯ ﻕﺮﺑ ﻪﺑ ﺯﺍ ﻞﺒﻗ
ﺪﯿﻫﺪﻧ ﺖﮐﺮﺣ ﺎﯾ ﻥﺎﮑﺗ ﺪﻨﮐ ﯽﻣ ﻥﺯﻭ ﺍﺭ ﺩﺭﺁ ﻪﮐ ﯽﻟﺎﺣ ﺭﺩ ﺍﺭ ﻩﺎﮕﺘﺳﺩ
ﺪﯿﻫﺪﻧ ﺭﺍﺮﻗ ﻥﺁ ﯼﻭﺭ ﯽﺌﯿﺷ ﺪﻨﮐ ﯽﻣ ﻥﺯﻭ ﺍﺭ ﺩﺭﺁ ﻩﺎﮕﺘﺳﺩ ﻪﮐ ﯽﻟﺎﺣ ﺭﺩ
ﺪﯾﺰﯾﺮﻧ ﻪﻈﻔﺤﻣ ﺭﺩ ﺩﺭﺁ ﻡﺮﮔ
600 ﺯﺍ
ﱰﺸﯿﺑ ﺎﯾ ﻡﺮﮔ
200 ﺯﺍ
ﱰﻤﮐ
ﺪﯿﻨﮐ ﺩﺭﺍﻭ ﺏﺁ ﺭﺎﯿﺷ ﺯﺍ ﻡﺍﺭﺁ ﺍﺭ ﻊﯾﺎﻣ ،ﺩﺮﮐ ﻥﺩﺮﮐ ﻁﻮﻠﺨﻣ ﻪﺑ ﻉﻭﴍ ﻩﺎﮕﺘﺳﺩ ﯽﺘﻗﻭ
ﺯﺎﺳﺎﺘﺳﺎﭘ ﻭ ﺪﯾﺰﯾﺮﻧ ﺯﺎﺳﺎﺘﺳﺎﭘ ﺭﺩ ﺮﺗﻻﺎﺑ ﺎﯾ ﺖﯾﺎﻬﻧﺭﺎﻓ ﻪﺟﺭﺩ
ﻂﯿﺤﻣ ﺭﺩ ﻝﺎﺜﻣ ﯼﺍﺮﺑ ،ﺪﯿﻫﺪﻧ ﺭﺍﺮﻗ (ﺖﯾﺎﻬﻧﺭﺎﻓ ﻪﺟﺭﺩ
140/
.
ﺪﻧﺎﺳﺭ ﯽﻣ ﺐﯿﺳﺁ ﻩﺎﮕﺘﺳﺩ ﻪﺑ ﺭﺎﮐ ﻦﯾﺍ .ﻻﺎﺑ ﯼﺎﻣﺩ ﺎﺑ ﻥﺩﺮﮐ ﻞﯾﱰﺳﺍ
140/
ﺩﺍﺮﮕﯿﺘﻧﺎﺳ ﻪﺟﺭﺩ
ﺩﺍﺮﮕﯿﺘﻧﺎﺳ ﻪﺟﺭﺩ
60
ﺎﻣﺩ ﺎﺑ ﯼﺍ ﻩﺩﺎﻣ ﭻﯿﻫ
60)
ﻻﺎﺑ ﯼﺎﻣﺩ ﺎﺑ ﻂﯿﺤﻣ ﺭﺩ
ﺪﯾﺰﯾﺮﻧ ﻥﺩﺮﮐ ﻁﻮﻠﺨﻣ ﻪﻈﻔﺤﻣ ﻞﺧﺍﺩ ﻪﺑ ﺍﺭ ﺏﺁ ،ﻪﻈﻔﺤﻣ ﺏﺭﺩ ﻥﺩﺍﺩ ﺭﺍﺮﻗ ﺯﺍ ﻞﺒﻗ ﺰﮔﺮﻫ
ﺪﯾﺰﯾﺮﻧ ﯽﻨﻤﯾﺍ ﺪﯿﻠﮐ ﺥﺍﺭﻮﺳ ﻞﺧﺍﺩ ﻪﺑ ﯽﻌﯾﺎﻣ ﭻﯿﻫ
ﺯﺎﺳﺎﺘﺳﺎﭘ ﻪﺑ ﺕﺭﻮﺼﻨﯾﺍﺮﯿﻏ ﺭﺩ .ﺪﯿﻨﮑﻧ ﺏﺎﺨﺘﻧﺍ ﺍﺭ ﻥﺩﺭﻭﺁ ﻥﻭﺮﯿﺑ ﻪﻣﺎﻧﺮﺑ ،ﺖﺳﺍ ﻩﺪﺸﻧ ﻞﻣﺎﮐ ﺮﯿﻤﺧ ﻪﯿﻬﺗ ﻪﮑﻧﺁ ﺯﺍ ﻞﺒﻗ
.
ﺪﺳﺭ ﯽﻣ ﺐﯿﺳﺁ
ﻥﺩﺮﮐ ﺰﯿ ﯼﺍﺮﺑ (ﻝﻮﻧﺎﭘﻭﺮﭘ ﻭ ﻞﮑﻟﺍ ،ﻦﯾﺰﻨﺑ ﻞﺜﻣ) ﺮﮕﯾﺩ ﯼﺎﻫ ﻩﺪﻨﯾﻮﺷ ﺎﯾ ﺭﻭﺁﺯﻮﺳ ﻩﺪﻨﯾﻮﺷ ،ﯽﯾﻮﺸﻓﺮﻇ ﻢﯿﺳ ﺯﺍ
.
ﺪﯿﻨﮑﻧ ﻩﺩﺎﻔﺘﺳﺍ ﻩﺎﮕﺘﺳﺩ
ﺪﻨﮑﻧ ﺭﺎﮐ ﺖﺳﺭﺩ ﺖﺳﺍ ﻦﮑﻤﻣ ﻪﻧﺮﮔﻭ ﺪﯿﻨﮐ ﺰﯿ ﺍﺭ ﻩﺎﮕﺘﺳﺩ ،ﻩﺩﺎﻔﺘﺳﺍ ﺭﺎﺑ ﺮﻫ ﺯﺍ ﺪﻌﺑ
ﺩﻮﺸﻧ ﻩﺪﯾﺮﺑ ﺰﯿﺗ ﯼﺎﻫ ﻪﺒﻟ ﺎﺑ ﻥﺎﺘﺘﺳﺩ ﺪﯿﻨﮐ ﺖﻗﺩ ﻩﺎﮕﺘﺳﺩ ﻥﺩﺮﮐ ﺰﯿ ﻡﺎﮕﻨﻫ
ﺪﯿﻨﮑﻧ ﺩﺭﺍﻭ ﻩﺎﮕﺘﺳﺩ ﺭﺩ ﯽﺌﯿﺷ ﭻﯿﻫ
21
.
-
.
-
.
-
.
-
.
-
.
-
.
-
.
-
ﺍﺭ
-
.
-
.
-
-
-
.
-
.
-
.
-
(EMF)
.
ﺩﺭﺍﺩ ﺖﻘﺑﺎﻄﻣ ﯽﺴﯿﻃﺎﻨﻐﻣﻭﱰﮑﻟﺍ ﯼﺎﻫ ﻥﺍﺪﯿﻣ ﺮﯾﺬﭘﺩﺮﺑﺭﺎﮐ ﯼﺎﻫﺩﺭﺍﺪﻧﺎﺘﺳﺍ ﻭ ﻦﯿﻧﺍﻮﻗ ﻪﯿﻠﮐ ﺎﺑ
ﺩﻮﺧ ﯽﻠﺤﻣ ﺖﻓﺎﯾﺯﺎﺑ ﻭ ﯼﺭﻭﺁ ﻊﻤﺟ ﻦﯿﻧﺍﻮﻗ ﻖﺒﻃ ﺍﺭ ﺭﺎﮐ ﻦﯾﺍ ﻪﮑﻠﺑ ﺪﯾﺯﺍﺪﻧﺎﯿﻧ ﺭﻭﺩ ﯽﮕﻧﺎﺧ ﯽﻟﻮﻤﻌﻣ ﯼﺎﻫ ﻪﻟﺎﺑﺯ ﺎﺑ ﻩﺍﺮﻤﻫ ﺍﺭ ﻥﺁ ،ﻩﺎﮕﺘﺳﺩ ﺮﻤﻋ ﻥﺎﯾﺎﭘ ﺯﺍ ﺲﭘ
.
ﺪﯾﺍ ﻩﺩﺮﮐ ﮏﻤﮐ ﺩﻮﺧ ﺖﺴﯾﺯ ﻂﯿﺤﻣ ﻆﻔﺣ ﻪﺑ ﺖﻘﯿﻘﺣ ﺭﺩ ﺭﺎﮐ ﻦﯾﺍ ﺎﺑ .ﺪﯿﻫﺩ ﻡﺎﺠﻧﺍ
ﯽﻔﻨﻣ ﺕﺍﺮﯿﺛﺎﺗ ﺯﺍ ،ﺢﯿﺤﺻ ﺧﺍﺪﻧﺍ ﺭﻭﺩ .ﺪﯿﯾﺎ ﻡﺍﺪﻗﺍ ﯽﮑﯿﻧﻭﱰﮑﻟﺍ ﻭ ﯽﮑﯾﱰﮑﻟﺍ ﺕﻻﻮﺼﺤﻣ ﯼﺭﻭﺁ ﻊﻤﺟ ﻪﺑ ﺖﺒﺴﻧ ﺩﻮﺧ ﺭﻮﺸﮐ ﻦﯿﻧﺍﻮﻗ ﻖﺒﻃ ﺮﺑ ﺹﻮﺼﺧ ﻦﯾﺍ ﺭﺩ
.
ﺪﻨﮐ ﯽﻣ ﯼﺮﯿﮔﻮﻠﺟ ﻥﺎﺴﻧﺍ ﺖﻣﻼﺳ ﻭ ﺖﺴﯾﺯ ﻂﯿﺤﻣ ﯼﻭﺭ
ﯽﺴﯿﻃﺎﻨﻐﻣﻭﱰﮑﻟﺍ ﻥﺍﺪﯿﻣ
Philips
ﺖﻧﺿ ﻭ ﯽﻧﺎﺒﯿﺘﺸﭘ
.
ﺪﯿﻨﮐ ﻪﻌﻟﺎﻄﻣ ﺍﺭ ﯽﻧﺎﻬﺟ ﻪﻣﺎﻧ ﺖﻧﺿ ﮒﺮﺑ ﺎﯾ ﺪﯿﻨﮐ ﻪﻌﺟﺍﺮﻣ www.philips.com/support ﺖﯾﺎﺳ ﻪﺑ
!
ﻢﯿﯾﻮﮔ ﯽﻣ ﮏﯾﱪﺗ ﻝﻮﺼﺤﻣ ﻦﯾﺍ ﺪﯾﺮﺧ ﯼﺍﺮﺑ ﺷ ﻪﺑ .ﺪﯾﺪﻣﺁ ﺵﻮﺧ
.
ﺪﯿﻨﮐ ﺖﺒﺛ www.philips.com/welcome ﺖﯾﺎﺳ ﺭﺩ ﺍﺭ ﺩﻮﺧ ﻩﺎﮕﺘﺳﺩ ،
Philips
ً
ﺎﻔﻄﻟ ،ﯽﻧﺎﺒﯿﺘﺸﭘ ﺎﯾ ﺕﺎﻋﻼﻃﺍ ﺖﻓﺎﯾﺭﺩ ﯼﺍﺮﺑ
Philips
ﺵﻭﺮﻓ ﺯﺍ ﺲﭘ ﺕﺎﻣﺪﺧ ﺯﺍ ﻪﻨﯿﻬﺑ ﻩﺩﺎﻔﺘﺳﺍ ﯼﺍﺮﺑ
ﺕﻻﻮﺼﺤﻣ ﯼﺎﯿﻧﺩ ﻪﺑ
ﻩﺎﮕﺘﺳﺩ ﻦﯾﺍ
ﺖﻓﺎﯾﺯﺎﺑ
ﺮﺑ
ﻪﻣﺪﻘﻣ
-
-
Page 20

ﯽﺳﺭﺎﻓ
22
.
ﺪﯾﺭﺍﺩ ﻪﮕﻧ ﺩﻮﺧ ﺩﺰﻧ ﯼﺪﻌﺑ ﺕﺎﻌﺟﺍﺮﻣ ﯼﺍﺮﺑ ﺍﺭ ﻥﺁ ﻭ ﺪﯿﻧﺍﻮﺨﺑ ﺖﻗﺩ ﻪﺑ ﺍﺭ ﻨﻫﺍﺭ ﻪﭼﱰﻓﺩ ﻦﯾﺍ ،ﻩﺎﮕﺘﺳﺩ ﺯﺍ ﻩﺩﺎﻔﺘﺳﺍ ﺯﺍ ﻞﺒﻗ
ﮊﺎﺘﻟﻭ ﺎﺑ ﻩﺎﮕﺘﺳﺩ ﺮﯾﺯ ﺭﺩ ﻩﺪﺷ ﻩﺩﺍﺩ ﻥﺎﺸﻧ ﮊﺎﺘﻟﻭ ﻪﮐ ﺪﯾﻮﺷ ﱧﻤﻄﻣ ،ﻕﺮﺑ ﺰﯾﺮﭘ ﻪﺑ ﻩﺎﮕﺘﺳﺩ ﻪﺧﺎﺷﻭﺩ ﻥﺩﺯ ﺯﺍ ﻞﺒﻗ
.
ﺪﺷﺎﺑ ﻪﺘﺷﺍﺩ ﺖﻘﺑﺎﻄﻣ ﯽﻠﺤﻣ
ﻖﯾﺮﻃ ﺯﺍ ﺪﯾﺎﺒﻧ ﻩﺎﮕﺘﺳﺩ ﻦﯾﺍ ،ﯽﺗﺭﺍﺮﺣ ﻊﻄﻗ ﺪﯿﻠﮐ ﯼﺪﻤﻋﺮﯿﻏ ﻥﺪﺷ ﻝﺎﻌﻓ ﺖﻠﻋ ﻪﺑ ﺮﻄﺧ ﺯﻭﺮﺑ ﺯﺍ ﯼﺮﯿﮔﻮﻠﺟ ﯼﺍﺮﺑ
.
ﺩﻮﺷ ﯽﻣ ﻞﺻﻭ ﻭ ﻊﻄﻗ ﺐﺗﺮﻣ ﻥﺁ ﻕﺮﺑ ﻪﮐ ﺩﻮﺷ ﻞﺻﻭ ﯼﺭﺍﺪﻣ ﻪﺑ ﺎﯾ ﺩﻮﺷ ﻪﯾﺬﻐﺗ ﺮﻤﯾﺎﺗ ﺪﻨﻧﺎﻣ ﯽﺟﺭﺎﺧ ﭻﯿﯾﻮﺳ ﮏﯾ
ﺪﯿﻨﮐ ﯼﺭﺍﺩﺩﻮﺧ ﺏﺁ ﺭﺩ ﯽﻠﺻﺍ ﻪﻧﺪﺑ ﻥﺩﺍﺩ ﺭﺍﺮﻗ ﺎﯾ ﺴﺷ ﺯﺍ ،ﯽﮔﺪﯾﺩ ﺐﯿﺳﺁ ﺎﯾ ﯽﮕﺘﻓﺮﮔ ﻕﺮﺑ ﺯﺍ ﯼﺮﯿﮔﻮﻠﺟ ﯼﺍﺮﺑ
ﺪﺷﺎﺑ ﻩﺪﺷ ﺭﺍﻮﺳ ﺢﯿﺤﺻ ﺭﻮﻃ ﻪﺑ ﻩﺎﮕﺘﺳﺩ ﺪﯾﻮﺷ ﱧﻤﻄﻣ ،ﻕﺮﺑ ﺰﯾﺮﭘ ﺭﺩ ﻪﺧﺎﺷﻭﺩ ﻥﺩﺮﮐ ﺩﺭﺍﻭ ﺯﺍ ﻞﺒﻗ
ﺪﯿﻨﮑﻧ ﻩﺩﺎﻔﺘﺳﺍ ﻩﺎﮕﺘﺳﺩ ﺯﺍ ،ﺪﺷﺎﺑ ﻩﺪﯾﺩ ﺐﯿﺳﺁ ﺎﻫ ﺖﻤﺴﻗ ﺮﯾﺎﺳ ﺎﯾ ﻪﺧﺎﺷﻭﺩ ،ﻕﺮﺑ ﻢﯿﺳ ﺮﮔ ﺍ
ﯼﺎﻫ ﯽﮔﺪﻨﯾﺎ ﺩﺰﻧ ﺍﺭ ﻥﺁ ،ﺮﻄﺧ ﺯﻭﺮﺑ ﺯﺍ ﯼﺮﯿﮔﻮﻠﺟ ﯼﺍﺮﺑ ﺖﺳﺍ ﻩﺪﯾﺩ ﺐﯿﺳﺁ ﻕﺮﺑ ﻢﯿﺳ ﻪﮐ ﯽﺗﺭﻮﺻﺭﺩ
.
ﺪﯿﻨﮐ ﺾﯾﻮﻌﺗ ﺺﺼﺨﺘﻣ ﺹﺎﺨﺷﺍ ﺎﯾ
Philips
ﺯﺎﺠﻣ ﺕﺎﻣﺪﺧ ﺰﮐﺮﻣ
ﺎﯾ ﺪﺷﺎﺑ ﻩﺪﺷ ﻩﺩﺍﺩ ﺵﺯﻮﻣﺁ ﺎﻬﻧﺁ ﻪﺑ ﻩﺎﮕﺘﺳﺩ ﺯﺍ ﻩﺩﺎﻔﺘﺳﺍ ﻞﻤﻌﻟﺍﺭﻮﺘﺳﺩ ﻪﮑﻨﯾﺍ ﺮﮕﻣ ﺪﻨﻨﮐ ﻩﺩﺎﻔﺘﺳﺍ ﻩﺎﮕﺘﺳﺩ ﻦﯾﺍ ﺯﺍ
.ﺪﻨﯾﺎ ﻩﺩﺎﻔﺘﺳﺍ ﻥﺁ ﺯﺍ ﺩﺭﺍﺩ ﻩﺪﻬﻋ ﻪﺑ ﺍﺭ ﺎﻬﻧﺁ ﺯﺍ ﺖﺒﻗﺍﺮﻣ ﻪﮐ ﯼﺩﺮﻓ ﺮﻈﻧ ﺮﯾﺯ
ﻩﺎﮕﺘﺳﺩ ﻪﺧﺎﺷﻭﺩ ،ﻥﺁ ﻥﺩﺮﮐ ﺰﯿ ﺎﯾ ﻥﺩﺮﮐ ﺯﺎﺑ ،ﻥﺩﺮﮐ ﺭﺍﻮﺳ ﺯﺍ ﻞﺒﻗ ﻭ ﻩﺎﮕﺘﺳﺩ ﺯﺍ ﻩﺩﺎﻔﺘﺳﺍ ﻡﺪﻋ ﻡﺎﮕﻨﻫ ﻪﺸﯿﻤﻫ
.
ﺪﯿﺸﮑﺑ ﻕﺮﺑ ﺯﺍ
ﺵﻮﻣﺎﺧ ﺍﺭ ﻩﺎﮕﺘﺳﺩ ،ﺪﻨﻨﮐ ﯽﻣ ﺖﮐﺮﺣ ﻩﺩﺎﻔﺘﺳﺍ ﻡﺎﮕﻨﻫ ﻪﮐ ﯼﺍ ﻪﻤﯿﻤﺿ ﺕﺎﻌﻄﻗ ﺎﯾ ﯽﺒﻧﺎﺟ ﻡﺯﺍﻮﻟ ﺾﯾﻮﻌﺗ ﺯﺍ ﻞﺒﻗ
.
ﺪﯿﺸﮑﺑ ﻕﺮﺑ ﺯﺍ ﺍﺭ ﻪﺧﺎﺷﻭﺩ ﻭ ﻩﺩﺮﮐ
ﺪﯿﯾﻮﺸﺑ ﻞﻣﺎﮐ ﻭ ﻩﺩﺮﮐ ﺍﺪﺟ ﺍﺭ ﯽﺒﻧﺎﺟ ﻡﺯﺍﻮﻟ ﻪﻤﻫ ،ﺭﺎﺑ ﻦﯿﻟﻭﺍ ﯼﺍﺮﺑ ﻩﺎﮕﺘﺳﺩ ﺯﺍ ﻩﺩﺎﻔﺘﺳﺍ ﺯﺍ ﻞﺒﻗ
ﯽﯾﺎﻫ ﻂﯿﺤﻣ ﺭﺩ ﻩﺩﺎﻔﺘﺳﺍ ﯼﺍﺮﺑ ﻩﺎﮕﺘﺳﺩ ﻦﯾﺍ .ﺖﺳﺍ ﻩﺪﺷ ﯽﺣﺍﺮﻃ ﯽﮕﻧﺎﺧ ﯼﺩﺎﻋ ﻑﺭﺎﺼﻣ ﯼﺍﺮﺑ ﻂﻘﻓ ﻩﺎﮕﺘﺳﺩ ﻦﯾﺍ
ﻩﺩﺎﻔﺘﺳﺍ ﯼﺍﺮﺑ .ﺖﺳﺍ ﻩﺪﺸﻧ ﻪﺘﺧﺎﺳ ﯼﺭﺎﮐ ﯼﺎﻫ ﻂﯿﺤﻣ ﺮﯾﺎﺳ ﻭ ﺭﺎﮐ ﺮﺗﺎﻓﺩ ،ﺎﻫ ﻩﺎﮕﺷﻭﺮﻓ ﯼﺰﭙﺷﺁ ﻂﯿﺤﻣ ﻥﻮﭽﻤﻫ
ٔ
.
ﺪﺷﺎﺑ ﯽ ﺐﺳﺎﻨﻣ ﯽﻧﻮﮑﺴﻣ ﯼﺎﻫ ﻂﯿﺤﻣ ﺮﯾﺎﺳ ﻭ ﺎﻫ ﻞﺘﻫ ﻪﻧﺎﺤﺒﺻ ﻭ ﻕﺎﺗﺍ ﯼﺎﻫ ﺲﯾﻭﴎ ،ﺎﻫ ﻞﺘﻣ ،ﺎﻫ ﻞﺘﻫ ﺭﺩ ﻥﺎﯾﱰﺸﻣ
ﺪﯿﻨﮑﻧ ﻩﺩﺎﻔﺘﺳﺍ ﻑﺎﺻﺎﻧ ﻭ ﺭﺍﻮﻤﻫﺎﻧ ﺢﻄﺳ ﯼﻭﺭ ﺮﺑ ﻩﺎﮕﺘﺳﺩ ﻦﯾﺍ ﺯﺍ
ﻩﺩﺎﻔﺘﺳﺍ ﻩﺎﮕﺘﺳﺩ ﺯﺍ ﻡﻭﺍﺪﻣ ﻪﻘﯿﻗﺩ
ﻩﺪﻨﻫﺩ ﻞﮑﺷ ﻪﺤﻔﺻ ،ﻩﺩﺎﻔﺘﺳﺍ ﺯﺍ ﺪﻌﺑ ﺭﺎﺑ ﺮﻫ ،ﺪﯿﻨﮐ ﻩﺩﺎﻔﺘﺳﺍ ﻡﻭﺍﺪﻣ
ﺏﺁ ﺭﺩ
ﻩﺪﻨﻫﺩ ﻞﮑﺷ ﻪﺤﻔﺻ ﻢﯿﻘﺘﺴﻣ ﻥﺩﺍﺩ ﺭﺍﺮﻗ ﺯﺍ ،ﻥﺩﺮﮐ ﺰﯿ ﯼﺍﺮﺑ .ﺪﯿﻨﮐ ﺰﯿ ﻩﺪﺷ ﻪﺋﺍﺭﺍ ﻥﺩﺮﮐ ﺰﯿ ﺭﺍﺰﺑ ﺍ
45
ﺮﮔ ﺍ ﻢﯿﻨﮐ ﯽﻣ ﻪﯿﺻﻮﺗ ،ﻩﺎﮕﺘﺳﺩ ﺮﺗ ﯽﻧﻻﻮﻃ ﺮﻤﻋ ﻭ ﱰﺸﯿﺑ ﺖﻇﺎﻔﺣ ﯼﺍﺮﺑ
.
ﺪﯿﻨﮐ ﻒﻗﻮﺘﻣ ﺍﺭ ﻥﺁ ﻪﻘﯿﻗﺩ
ﺭﻮﻃ ﻪﺑ ﻩﺎﮕﺘﺳﺩ ﺯﺍ ﺪﯿﻫﺍﻮﺧ ﯽﻣ ﺮﮔ ﺍ
15
.
،ﺖﺳﺍ ﻩﺪﺷ
ﺪﯿﻨﮐ ﯼﺭﺍﺩﺩﻮﺧ
ﺪﯿﻨﮐ ﺍﺪﺟ ﻕﺮﺑ ﺯﺍ ﺍﺭ ﻥﺁ ،ﺪﯿﻨﮐ ﯽ ﻩﺩﺎﻔﺘﺳﺍ ﻩﺎﮕﺘﺳﺩ ﺯﺍ ﯽﺘﻗﻭ
ﺪﯾﺭﺍﺬﮕﻧ ﻩﺎﮕﺘﺳﺩ ﯼﻭﺭ ﺍﺭ ﻦﯿﮕﻨﺳ ﺀﺎﯿﺷﺍ
ﺪﯿﻨﮑﻧ ﺎﺠﺑﺎﺟ
ﺪﻨﮐ ﯽﻣ ﺭﺎﮐ ﻪﮐ ﯽﻟﺎﺣ ﺭﺩ ﺍﺭ ﻩﺎﮕﺘﺳﺩ
ﺪﯿﻨﮐ ﯼﺭﺍﺩﺩﻮﺧ ﺮﮕﺸﯾﺎ ﯼﻭﺭ ﯼﺮﮕﯾﺩ ﻊﯾﺎﻣ ﺮﻫ ﺎﯾ ﺏﺁ ﺨﯾﺭ ﺯﺍ ،ﯽﮕﺘﻓﺮﮔ ﻕﺮﺑ ﺎﯾ ﻩﺎﺗﻮﮐ ﻝﺎﺼﺗﺍ ﺯﺍ ﯼﺮﯿﮔﻮﻠﺟ ﯼﺍﺮﺑ
ﺪﯿﻨﮑﻧ ﻩﺩﺎﻔﺘﺳﺍ ﯽﯾﻮﺸﻓﺮﻇ ﻦﯿﺷﺎﻣ ﺯﺍ ﻩﺎﮕﺘﺳﺩ ﻥﺩﺮﮐ ﺰﯿ ﯼﺍﺮﺑ
ﻢﻬﻣ
.
.
.
،Philips
ﺍﺭ
.
.
ﺎﺑ ﺍﺭ
.
.
.
.
.
-
-
-
-
-
-
- ﺪﯾﺎﺒﻧ ﺪﻧﺭﺍﺪﻧ ﯽﻫﺎﮔﺁ ﻭ ﻪﺑﺮﺠﺗ ﺎﯾ ﺪﻨﺘﺴﯿﻧ ﺭﺍﺩﺭﻮﺧﺮﺑ ﯽﻓﺎﮐ ﯽﻨﻫﺫ ﻭ ﯽﺴﺣ ،ﯽﻤﺴﺟ ﯽﯾﺎﻧﺍﻮﺗ ﺯﺍ ﻪﮐ ﯼﺩﺍﺮﻓﺍ ﻭ ﻥﺎﮐﺩﻮﮐ
- .ﺪﻨﻨﮐ ﯽ ﯼﺯﺎﺑ ﻩﺎﮕﺘﺳﺩ ﺎﺑ ﺪﯾﻮﺷ ﱧﻤﻄﻣ ﺎﺗ ﺪﯿﺷﺎﺑ ﻪﺘﺷﺍﺩ ﺮﻈﻧ ﺮﯾﺯ ﺍﺭ ﻥﺎﮐﺩﻮﮐ
- .ﺩﻮﺷ ﻡﺎﺠﻧﺍ ﺕﺭﺎﻈﻧ ﻥﻭﺪﺑ ﻥﺎﮐﺩﻮﮐ ﻂﺳﻮﺗ ﺪﯾﺎﺒﻧ ﻩﺎﮕﺘﺳﺩ ﺯﺍ ﺖﺒﻗﺍﺮﻣ ﻭ ﻥﺩﺮﮐ ﺰﯿ
-
-
-
-
-
-
-
-
-
-
-
-
Page 21
ﺐﻟﺎﻄﻣ ﺖﺳﺮﻬﻓ
ﯽﺳﺭﺎﻓ
23
22
21 (EMF)
21
21
21
20 (1
20 (2
20
20
19
19
19
19
18
17
17
17
ﻩﺩﺎﻔﺘﺳﺍ ﻦﯿﻟﻭﺍ ﺯﺍ ﻞﺒﻗ ﻥﺩﺮﮐ ﺰﯿ ﻭ ﯼﺯﺎﺳ ﻩﺩﺎﯿﭘ
ﯽﺴﯿﻃﺎﻨﻐﻣﻭﱰﮑﻟﺍ ﻥﺍﺪﯿﻣ
ﺖﻧﺿ ﻭ ﯽﻧﺎﺒﯿﺘﺸﭘ
ﻞﮑﺷ) ﻩﺎﮕﺘﺳﺩ ﯽﻠﮐ ﯼﺎ
ﻞﮑﺷ) ﻝﱰﻨﮐ ﻞﻨﭘ ﯽﻠﮐ ﯼﺎ
ﺩﻮﺟﻮﻣ ﯽﺒﻧﺎﺟ ﻡﺯﺍﻮﻟ
ﻩﺪﻨﻫﺩ ﻞﮑﺷ ﯼﺎﻫ ﻪﺤﻔﺻ
ﻥﺩﺮﮐ ﺭﺍﻮﺳ
ﺯﺎﺳﺎﺘﺳﺎﭘ ﺯﺍ ﻩﺩﺎﻔﺘﺳﺍ
ﯼﺯﺎﺳ ﻩﺩﺎﻣﺁ ﻉﻭﴍ
ﺯﺎﺳﺎﺘﺳﺎﭘ ﻪﻣﺎﻧﺮﺑ ﻉﻭﴍ
ﻥﺩﺮﮐ ﺰﯿ
ﯼﺭﺍﺪﻬﮕﻧ
ﯽﺑﺎﯾ
ﻢﻬﻣ
ﺖﻓﺎﯾﺯﺎﺑ
ﻪﻣﺪﻘﻣ
ﺐﯿﻋ
Page 22
ﺔﻴﺑﺮﻌﻟﺍ
24
ﲇﻀﻔﺘﻓ ،ﻩﺎﻧﺩﺃ ﺓﺩﺭﺍﻮﻟﺍ ﺕﺎﻣﻮﻠﻌﳌﺍ ﺔﻄﺳﺍﻮﺑ ﺔﻠﻜﺸﳌﺍ
.
ﻙﺪﻠﺑ ﰲ ﻚﻠﻬﺘﺴﳌﺍ ﺔﻣﺪﺧ ﺰﻛﺮ ﲇﺼﺗﺍ ﻭﺃ ﺔﻟﻭﺍﺪﺘﳌﺍ ﺔﻠﺌﺳﻷﺍ ﺔﺎﻗ ﲆﻋ ﻉﻼﻃﻼﻟ www.philips.com/support ﺓﺭﺎﻳﺰﺑ
ﺬﺧﺄﳌﺍ ﻥﺄﺑﻭ ﺢﻴﺤﺼﻟﺍ ﻞﻜﺸﻟﺎﺑ ﻝﻮﺻﻮﻣ ﺔﻗﺎﻄﻟﺍ ﺲﺒﻘﻣ ﻥﺃ ﻦﻣ ﺪﻛﺄﺗ
ّ
ﻞﺣ ﻦﻣ ﻲﻨﻜﻤﺘﺗ ﻝﺎﺣ ﰲ .ﺯﺎﻬﺠﻟﺍ ﻡﺍﺪﺨﺘﺳﺍ ﺪﻨﻋ ﺎﻬﻓﺩﺎﺼﺗ ﺪﻗ ﻲﺘﻟﺍ
.
ﺐﺠﻳ ﻛ ﻞﻤﻌﻳ
ﻞﻜﺸﻟﺎﺑ
ً
ﻻﻮﺻﻮﻣ
ﺎﻬﺣﻼﺻﺇﻭ ﺀﺎﻄﺧﻷﺍ ﻑﺎﺸﻜﺘﺳﺍ
ﺲﻴﻟ ﺔﻗﺎﻄﻟﺍ ﺲﺒﻘﻣ
.
ﺢﻴﺤﺼﻟﺍ
ً
ﺎﻋﻮﻴﺷ ﻛﻷﺍ ﻞﻛﺎﺸﳌﺍ ﻞﺼﻔﻟﺍ ﺍﺬﻫ ﺺّﺨﻠﻳ
ﺔﻠﻜﺸﳌﺍﺐﺒﺴﻟﺍﻞﺤﻟﺍ
.
ﺀﴤﺗ ﻻ ﺕﺍﴍﺆﳌﺍ
ﻞﻜﺸﻟﺎﺑ ﺎﻬﻠﻛ ﺀﺍﺰﺟﻷﺍ ﻊﻤﺠﻟ ﻡﺪﺨﺘﺴﳌﺍ ﻞﻴﻟﺩ ﻉﺎﺒﺗﺍ ﻦﻣ ﺪﻛﺄﺗ
.
ﺍًﺪﻴﺟ ﺎﻬﺘﻴﺒﺜﺗﻭ ﺔّﻴﻣﺎﻣﻷﺍ ﺔﺣﻮﻠﻟﺍ ﻊﻤﺟ ﲆﻋ ﺹﺮﺣﺍ
ﺔﻌﻓﺩ ﻞﻜﻟ ﺎﻬﻣﺍﺪﺨﺘﺳﺍ ﻦﻜ ﻲﺘﻟﺍ ﻖﻴﻗﺪﻟﺍ ﺔﻴﻤﻜﻟ ﴡﻗﻷﺍ ﺪﺤﻟﺍ ﻥﺇ
ﺔﻴﻤﻛ ﻞﻠﻘﻓ ،ﻍ
ﻅﺎﻔﺤﻠﻟ .ﺩﱪﺘﻟ ﺎﻬﻛﺮﺗﺍﻭ ﺔﻗﺎﻄﻟﺍ ﺭﺪﺼﻣ ﻦﻋ ﺎﺘﺳﺎﺒﻟﺍ ﻀﺤﺗ ﺔﻟﺁ
ﺪﻌﺑ ﺍًﺩﺪﺠﻣ ﺯﺎﻬﺠﻟﺍ ﻡﺍﺪﺨﺘﺳﺍ ﻚﻨﻜ .ﺔﻘﻴﻗﺩ
،ٍﻥﺍﻮﺛ
600 ﻦﻣ
ﺔﻘﻳﺮﻄﺑ ﺀﺎﻄﻐﻟﺍ ﻖِﻠﻏﺄﻓ ،ﺔﻘﺑﺎﺴﻟﺍ ﺔﻴﻠﻤﻌﻟﺍ ﻑﺎﻨﺌﺘﺳﺍ ﺕﺩﺭﺃ ﺍﺫﺇ
ﺖﻗﻭ ﺯﻭﺎﺠﺘﻳ ﻻﺃ ﺐﺠﻳ ،ﻞﻀﻓﺃ ﻞﻜﺸﺑ ﺯﺎﻬﺠﻟﺍ ﻞﻤﻋ ﺓﱰﻓ ﲆﻋ
.
ﻖﻴﻗﺪﻟﺍ ﻥﺯﻭ ﺱﺎﻴﻗ ﺀﺎﻨﺛﺃ ﺔﻗﺎﻄﻟﺍ ﻚﻠﺳ ﻭﺃ ﺯﺎﻬﺠﻟﺍ ﺲﻤﻠﺗ ﻻ
ﻞﻴﻐﺸﺗ ﺀﺪﺑ ﺪﻌﺑ ﺀﺎﳌﺍ ﺔﻓﺎﺿﻹ ﻡﺪﺨﺘﺴﳌﺍ ﻞﻴﻟﺩ ﺕﺍﺩﺎﺷﺭﺇ ﻊﺒﺗﺍ
ﰲ .
ﻞﺋﺎﺴﻟﺍ ﺏﺎﺴﺘﺣﺍ ﺀﺰﺟ ﻲﻄﺨﺗ ﺕﺎﻔﺻﻮﻟﺍ ﻩﺬﻫ ﻚﻨﻣ ﺐﻠﻄﺘﺗ
5
ﺓﺪﳌ ﺖﻗﺆﻣ ﻑﺎﻘﻳﺇ/ﺀﺪﺑ ﺭﺰﻟﺍ ﲆﻋ ﻂﻐﺿﺍ ،ﺔﻟﺎﺤﻟﺍ ﻩﺬﻫ
ﻛ ﺃ ﺔﻓﺎﺿﺇ ﺖ ﺍﺫﺇ .ﻍ
.
ﺔﻴﻟﺎﺘﻟﺍ ﺔﻌﻓﺪﻟﺍ ﺔﻓﺎﺿﺇ ﻞﺒﻗ ﻖﻴﻗﺪﻟﺍ
.
ﺖﻗﺆﻣ ﻑﺎﻘﻳﺇ/ﺀﺪﺑ ﺭﺰﻟﺍ ﲆﻋ ﻂﻐﺿﺍﻭ ،ﺔﺤﻴﺤﺻ
ً
.
ﺓﴍﺎﺒﻣ ﺩﺮﻄﻟﺍﻭ ﻂﻠﺨﻟﺎﺑ ﺯﺎﻬﺠﻟﺍ ﺃﺪﺒﻴﺳﻭ
45
.
ﺔﻘﻴﻗﺩ
600
ﻞﺻﺍﻮﺘﳌﺍ ﻪﻠﻴﻐﺸﺗ
15
ﺓﺪﳌ ﻪﺘﺣﺍﺭﺇ
.
ﺢﻴﺤﺼﻟﺍ
ﻞﺼﻓﺍ
.
ﺞﻣﺎﻧﱪﻟﺍ
ﻀﺤﺗ ﺹﺮﻗ ﻭﺃ ﻂﻠﺨﻟﺍ ﺓﺮﺠﺣ ﻊﻴﻤﺠﺗ ﻢﺗ
ﻞﻜﺸﺑ ﺔﻴﻣﺎﻣﻷﺍ ﺔﺣﻮﻠﻟﺍ ﻭﺃ
ٍ
.
ﻮﺧﺭ ﺔﻴﻣﺎﻣﻷﺍ ﺔﺣﻮﻠﻟﺍ ﺡﺎﺘﻔﻣ
ﰲ
ﻲﻫ
ﺕﺎﻧﻮﻜﳌﺍ ﻦﻣ ﺔﻃﺮﻔﻣ ﺔﻴﻤﻛ ﻊﺿﻭ ﻢﺗ
ﺯﺎﻬﺠﻟﺍ ﻒﻗﻮﺘﻳ ،ﺔﻣﻼﺴﻟﺎﺑ ﺔﻘ
ﺀﺎﻨﺛﺃ ﺀﺎﻄﻐﻟﺍ ﺢﺘﻓ ﺪﻨﻋ ﺎًﺍﺩ ﻞﻤﻌﻟﺍ ﻦﻋ
ﻞﻜﺸﺑ ﺎﺘﺳﺎﺒﻟﺍ ﻀﺤﺗ ﺔﻟﺁ ﺓﺭﺍﺮﺣ ﺖﻌﻔﺗﺭﺍ
ﺔﻠﻳﻮﻃ ﺓﱰﻔﻟ ﺎﻬﻠﻴﻐﺸﺗ ﺔﺠﻴﺘﻧ ﻁﺮﻔﻣ
.
ﺔﻗﺎﻄﻟﺍ ﻚﻠﺳ ﻭﺃ ﺯﺎﻬﺠﻟﺍ ﺲﻤﻠﺗ ﺖﻧﺃ
.
ﺞﻣﺎﻧﱪﻟﺍ ﻞﻴﻐﺸﺗ ﺀﺪﺑ ﻞﺒﻗ ﺀﺎﳌﺍ ﺔﻓﺎﺿﺇ ﺖ
ﺔﺑﻮﻠﻄﳌﺍ ﻞﺋﺎﺴﻟﺍ ﺔﻴﻤﻛ ﻖﺒﻄﻨﺗ ﻻ
ﺾﻌﺑ ﲆﻋ ﺔﺷﺎﺸﻟﺍ ﲆﻋ ﺔﺿﻭﺮﻌﳌﺍﻭ
ﺰﻴﻛﻮﻜﻟﺍ ،ﻝﺎﺜﳌﺍ ﻞﻴﺒﺳ ﲆﻋ) ﺕﺎﻔﺻﻮﻟﺍ
.(
ﺗﻮﻠﻐﻟﺍ ﻦﻣ ﺔﻴﻟﺎﺨﻟﺍ
ﺎﺘﺳﺎﺒﻟﺍ ﻝﺎﻜﺷﺃ
.
ﺢﻴﺤﺻ ﻏ
.
ﺎﺘﺳﺎﺒﻟﺍ ﻀﺤﺗ
ّ
ﻠﻌﺘﻣ ﺏﺎﺒﺳﻷ
.
ﺕﺎﻧﻮﻜﳌﺍ ﺔﺠﻟﺎﻌﻣ
.
ﺓﺮﻤﺘﺴﻣﻭ
ﺎﺘﺳﺎﺒﻟﺍﻭ
ﻑﺎﻘﻳﺇ/ﻞﻴﻐﺸﺗ ﺭﺰﻟﺍ ﲆﻋ ﻂﻐﻀﻟﺍ ﺪﻌﺑ
ﻻ
ﻦﻜﻟﻭ ﺎًﺗﻮﺻ ﺯﺎﻬﺠﻟﺍ ﺭﺪﺼﻳ ،ﻞﻴﻐﺸﺗ
ﻦﻜﻟﻭ ﻞﻴﻐﺸﺘﻟﺍ ﺪﻴﻗ ﻥﺎﻣﻷﺍ ﺡﺎﺘﻔﻣ
ﻪﻠﻴﻐﺸﺗ ﺪﻴﻋﺃ ﻭﺃ ﺓﺄﺠﻓ ﻒﻗﻮﺗ ﺯﺎﻬﺠﻟﺍ
.
ﺔﻟﺁ
ﺔﻧﻭﺮﻜﻌﳌﺍ ﻀﺤﺗ ﺀﺎﻨﺛﺃ ﺓﺄﺠﻓ
ﺯﺎﻬﺠﻟﺍ ﻒﻗﻮﺘﻳ ،ﺕﺎﻧﻮﻜﳌﺍ ﺔﺠﻟﺎﻌﻣ ﺀﺎﻨﺛﺃ
.
ﺀﺎﻄﻐﻟﺍ ﺢﺘﻓ ﺪﻨﻋ ﻞﻤﻌﻟﺍ ﻦﻋ
.
ﻀﺤﺘﻟﺍ ﺔﻴﻠﻤﻋ ﺀﺎﻨﺛﺃ ﺯﺎﻬﺠﻟﺍ ﻒﻗﻮﺗ
.
ﺾﻴﻣﻭ ﻭﺃ ﺭﺍﺬﻧﺇ ﺕﻮﺻ ﻱﺃ ﺭﺪﺼﻳ
ﺔﺷﺎﺸﻟﺍ ﲆﻋ ﺽﻭﺮﻌﳌﺍ ﻥﺯﻮﻟﺍ
.
ﻖﻴﻗﺪﻟﺍ ﻥﺯﻭ ﺱﺎﻴﻗ ﺪﻨﻋ ﺎًﺍﺩ
ﻦﻣ
ﺀﺎﳌﺍ ﻦﻣ ﺔﻠﻴﻠﻗ ﺔﻴﻤﻛ ﺏﴪﺘﺗ
ﻊﻣ
ﺡﺎﺠﻨﺑ ﺎﺘﺳﺎﺒﻟﺍ ﻀﺤﺗ ﺭﺬﻌﺘﻳ
.
ﻞﺋﺎﺴﻟﺍ ﺏﺎﺴﺘﺣﺍ ﺔﻔﻴﻇﻭ
.
ﻞﻤﻌﻳ
.
ﺯﺎﻬﺠﻟﺍ
ﻐﺘﻳ
ّ
ﻝﺎﻜﺷﺃ ﻀﺤﺗ ﺹﺮﻗ ﺖّﺒﺛﻭ ،ﺔﻴﺴﻴﺋﺮﻟﺍ ﺓﺪﺣﻮﻟﺎﺑ ﺹﺮﻘﻟﺍ ﻞﻣﺎﺣ ﺖّﺒﺛ
.
ﺯﺎﻬﺠﻟﺍ ﰲ
ﻡﺎﻜﺣﺈﺑ ﺔﻴﻣﺎﻣﻷﺍ ﺔﺣﻮﻠﻟﺍ ﺖّﺒﺛ ﻢﺛ ،ﻡﺎﻜﺣﺈﺑ ﺎﺘﺳﺎﺒﻟﺍ
.
ﺢﻴﺤﺻ
ﻞﻜﺸﺑ ﺀﺎﻄﻐﻟﺍ ﺖّﺒﺛ
ٍ
ﻞﻴﻟﺩ ﻊﺒﺗﺍﻭ ﺎﻬ
ّ
ﻔﻈﻧﻭ ،ﺔﻗﺎﻄﻟﺍ ﺭﺪﺼﻣ ﻦﻋ ﺎﺘﺳﺎﺒﻟﺍ ﻀﺤﺗ ﺔﻟﺁ ﻞﺼﻓﺍ
.
ﺔﻟﻵﺍ ﻞﻴﻐﺸﺗ ﺓﺩﺎﻋﻹ ﺍًﺩﺪﺠﻣ ﻡﺪﺨﺘﺴﳌﺍ
.
ﺔﻧﺎﻴﺼﻟﺍ ﺰﻛﺮ ﻞﺼﺗﺍ
.
ﺖّﺒﺜﻣ ﻏ ﺎﺘﺳﺎﺒﻟﺍ ﻝﺎﻜﺷﺃ ﻀﺤﺗ ﺹﺮﻗ ﻥﺇ
ﻢﺘﻳ ﻭﺃ ﻪﻧﺎﻜﻣ ﰲ ﺀﺎﻄﻐﻟﺍ ﻊﺿﻭ ﻢﺘﻳ
.
ﺢﻴﺤﺻ
ﻞﻜﺸﺑ ﻪﺘﻴﺒﺜﺗ
ٍ
ﺩﻮﺟﻭ ﺀﺍﺮﺟ ﺔﻘﻟﺎﻋ ﻂﻠﺨﻟﺍ ﺓﺎﺷﺮﻓ ﻥﻮﻜﺗ ﺪﻗ
.
ﺔﺒﻳﺮﻐﻟﺍ ﻡﺎﺴﺟﻷﺍ ﺾﻌﺑ
.
ﺍًﺪﺟ ﺎًﻓﺎﺟ ﺔﻨﻴﺠﻌﻟﺍ ﻥﻮﻜﺗ ﺪﻗ
.
ﺢﻴﺤﺼﻟﺍ ﻏ ﺞﻣﺎﻧﱪﻟﺍ ﺪﻳﺪﺤﺗ ﻢﺗ
.
ﺯﺎﻬﺠﻟﺍ ﰲ ﻞﻄﻋ ﺔ
.
E1
ﺔﺷﺎﺸﻟﺍ ﲆﻋ
ﺀﺎﻨﺛﺃ ﻞﻤﻌﻟﺍ ﻦﻋ ﺯﺎﻬﺠﻟﺍ ﻒﻗﻮﺗ
E2
ﺔﺷﺎﺸﻟﺍ ﲆﻋ
ﺭﺪﺼﻳﻭ ﺔﻋﴪﺑ ﺕﺍﴍﺆﳌﺍ ﺾﻣﻮﺗﻭ
.
ﺔﺷﺎﺸﻟﺍ ﲆﻋ
ﺮﻬﻈﻳ ،ﻞﻴﻐﺸﺘﻟﺍ
.
ﺎًﺗﻮﺻ ﻪﻴﺒﻨﺘﻟﺍ
EEE
ﺮﻬﻈﻳ
ﺮﻬﻈﻳ
Page 23

ﺔﻴﺑﺮﻌﻟﺍ
25
ﻝﻮﻄﻟﺎﺑ ﺎﺘﺳﺎﺒﻟﺍ ﻊﻴﻄﻘﺘﻟ ﺎﺘﺳﺎﺒﻟﺍ ﻊﻴﻄﻘﺗ ﺓﺍﺩﺃ ﻡﺪﺨﺘﺳﺍ .ﺔﻠﻴﻠﻗ
ﻦﻣ
ﺪﻳﺰﻣ ﲆﻋ ﻝﻮﺼﺤﻠﻟ ﺕﺎﻔﺻﻮﻟﺍ ﺐّﻴﺘﻛ ﺔﻌﺟﺍﺮﻣ ﻰﺟﺮﻳ .ﺔﺤﻴﺤﺻ ﻖﻴﻗﺪﻟﺍﻭ ﻞﺋﺎﺴﻟﺍ ﺔﺒﺴﻧ ﻦﻜﺗ ﻝﺎﺣ ﰲ ﺢﻴﺤﺻ ﻞﻜﺸﺑ ﺩﺮﻄﻟﺍ ﺔﻴﻠﻤﻋ
ﺭﺰﻟﺍ ﲆﻋ ﻂﻐﻀﻟﺍ ﻢﺛ ،ًﻻﻭﺃ ﻂﻘﻓ ﺩﺮﻄﻟﺍ ﺭﺰﻟﺍ ﲆﻋ ﻂﻐﻀﻟﺍ ﻚﻨﻜﻤﻴﻓ ،ﺓﺮﺠﺤﻟﺍ ﻞﺧﺍﺩ ﺠﻋ ﺕﻼﻀﻓ ﺩﻮﺟﻭ ﺖﻈﺣﻻ ﺍﺫﺇ ،ﺎﺘﺳﺎﺒﻟﺍ ﻀﺤﺗ ﺀﺎﻬﺘﻧﺍ ﺪﻌﺑ
/
ﻩﺎﻴﳌﺍﻭ ﻖﻴﻗﺪﻟﺍ ﺐَﺴﻧ ﻞﻳﺪﻌﺗ ﱃﺇ ﺝﺎﺘﺤﺘﺴﻓ ،ﻯﺮﺧﺃ ﺎﺘﺳﺎﺑ ﺕﺎﻔﺻﻭ ﺖﻣﺪﺨﺘﺳﺍ ﻭﺃ ﺎﻬﺘﺑﺮﺠﺘﺑ ﺖﻤﻗ ﺍﺫﺇ .ﺕﺎﻔﺻﻮﻟﺍ ﺐّﻴﺘﻛ ﰲ ﺓﺮﻓﻮﺘﳌﺍ ﺎﺘﺳﺎﺒﻟﺍ ﺕﺎﻔﺻﻭ ﺡﺎﺠﻧ ﺭﺎﺒﺘﺧﺍ ﻢﺗ
ﺎﻬﺑ ﴅﻮﳌﺍ ﺐﺴﻨﻠﻟ ﺎًﻘﻓﻭ ﻞﻳﺪﻌﺘﻟﺍ ﱃﺇ ﺮﻄﻀﺗ ﺪﻗ ﺍﺬﻟ .ﺀﺎﳌﺍ ﱃﺇ ﻖﻴﻗﺪﻟﺍ ﺔﺒﺴﻧ ﰲ ﺔﻔﻠﺘﺨﻣ ﻖﻃﺎﻨﻣ ﻦﻣ ﺕﺎﻧﻮﻜﻣ ﻡﺍﺪﺨﺘﺳﺍﻭ ﺔﻴﻤﺳﻮﳌﺍ ﺕﺍ
ﺔﺤﺘﻓ ﱪﻋ ﺓﺮﺠﺤﻟﺍ ﰲ ﻪﺒﻜﺳ ﻞﺒﻗ ﻩﺎﻴﳌﺍ ﻊﻣ
ﻭﺎﺴﺘﻣ
ٍ
ﺯﺎﻬﺠﻟﺍ ﲆﻋ ﺎﻬﻴﻟﺇ ﺭﺎﺸﳌﺍﻭ ﺎﻬﺑ ﴅﻮﳌﺍ ﻞﺋﺎﺴﻟﺍ ﺔﻴﻤﻛ ﻊﺒﺘﺗ ﻻ ،ﺗﻮﻠﻐﻟﺍ ﻦﻣ ﺔﻴﻟﺎﺧ ﺰﻴﻛﻮﻛ ﻭﺃ ﺰﻟﺩﻮﻧ/ﺎﺘﺳﺎﺑ ﻀﺤﺗ ﺪﻨﻋ
ﻥﺍﻮﺛ ﺪﻌﺑ ﺎﺘﺳﺎﺒﻟﺍ ﺩﺮﻄﺑ ﺃﺪﺒﺗﻭ ﺓﺪﺣﺍﻭ ﺓﺮﻣ ﺎًﺗﻮﺻ ﺭﺪﺼﺘﺳ ،ﻂﻠﺨﻟﺍ ﻦﻣ ﺎﺘﺳﺎﺒﻟﺍ ﻀﺤﺗ ﺔﻟﺁ ﺀﺎﻬﺘﻧﺍ ﺪﻌﺑ
ٍ
(26
(27
.
ﺺﺼﺤﻟﺍ ﺩﺪﻋﻭ ﺎﺘﺳﺎﺒﻟﺍ ﻝﺎﻜﺷﺃﻭ ،ﺔﻴﺼﺨﺸﻟﺍ ﺕﻼﻴﻀﻔﺘﻟﺍ ﲆﻋ ﺎﺘﺳﺎﺒﻟﺍ ﻮﻬﻃ ﺖﻗﻭ ﺪﻤﺘﻌﻳ :ﺔﻈﺣﻼﻣ
.
ﺎﻬﻟ ﺎًﻘﻓﻭ ﺪﻳﺪﺠﻟﺍ ﺔﻔﺻﻮﻟﺍ ﻞﻳﺪﻌﺘﺑ ﻢﻘﺗ ﺍﺫﺇ ﺡﺎﺠﻨﺑ ﺎﺘﺳﺎﺒﻟﺍ ﻀﺤﺗ ﺔﻟﺁ ﻞﻤﻌﺗ ﻦﻟ .ﺾﻴﺒﻟﺍ
ﺕﺎﻧﻮﻜﳌﺍ ﺔﻓﺎﺿﻹ ﺎﻬﺑ ﴅﻮﳌﺍ ﺐﺴﻨﻟﺍ ﻊﺒﺗﺍ .ﺎﻫﻀﺤﺘﻟ ﺗﻮﻠﻐﻟﺍ
ﻞﻜﺸﺑ ﺭﺎﻀﺨﻟﺍ ﺼﻋ ﻭﺃ ﺾﻴﺒﻟﺍ ﺞﻳﺰﻣ ﻂﻠﺧ ﲆﻋ ﺹﺮﺣﺍ ،ﺭﺎﻀﺨﻟﺎﺑ ﺎﺘﺳﺎﺒﻟﺍ ﻭﺃ ﺾﻴﺒﻟﺎﺑ ﺎﺘﺳﺎﺒﻟﺍ ﻀﺤﺗ ﺪﻨﻋ
.
ﺔﻠﺋﺎﺳ ﻥﻮﻜﺗ ﻥﺃ ﲆﻋ ﺹﺮﺣﺍ ،ﺕﺎﻧﻮﻜﳌﺍ ﺔﻓﺎﺿﺇ ﺪﻨﻋﻭ .ﺀﺎﻄﻐﻟﺍ
ﺔﻋّﻮﻨﺘﳌﺍ ﺎﺘﺳﺎﺒﻟﺍ ﺕﺎﻔﺻﻭ ﻦﻣ ﺪﻳﺰﳌ ﺮّﻓﻮﺘﳌﺍ ﺕﺎﻔﺻﻮﻟﺍ ﺐّﻴﺘﻛ ﻊﺟﺍﺭ
ﻢﻗﺭ ﺓﺭﻮﺼﻟﺍ
) .
ﰲﺎﺿﺇ ﺩﺮﻃ ﲆﻋ ﻝﻮﺼﺤﻠﻟ ﺖﻗﺆﻣ ﻑﺎﻘﻳﺇ/ﺀﺪﺑ
ﻖﻴﻗﺩ ﻡﺪﺨﺘﺳﺍ ،ﺔﻧﻭﺮﻜﻌﳌﺍ ﺓﺩﻮﺟ ﻥﻀﻟ
) .
ﺓﺭﻮﺼﻟﺍ
ﻢﺘﺗ ﻦﻟ :ﺔﻈﺣﻼﻣ
ﻐﺘﻟﺍ ﺮﺛﺆﺗ ﺪﻗ
ّ
ﻩﺪﻳﺮﺗ ﻱﺬﻟﺍ
.
ﺕﺎﻔﺻﻮﻟﺍ
ﺔﻈﺣﻼﻣ
ﻒﻴﻈﻨﺘﻟﺍ
) .
ﻢﻗﺭ ﺓﺭﻮﺼﻟﺍ
ﻢﻗﺭ ﺓﺭﻮﺼﻟﺍ
.
ﺎﻬﺘﻟﺍﺯﺇ ﺀﺎﻨﺛﺃ ﺪﻳﺪﺸﻟﺍ ﺭﺬﺤﻟﺍ
) .
ﻢﻗﺭ ﺓﺭﻮﺼﻟﺍ
ﻢﻗﺭ ﺓﺭﻮﺼﻟﺍ
َﺘﻋﺎﺳ ﺑ ﺎﻣ ﺡﻭﺍﱰﺗ ﺓﺪﳌ ﺀﺍﻮﻬﻟﺍ ﺔﻄﺳﺍﻮﺑ ﻒﺠﺗ ﻲﻨﻴﺸﺗﻮﺘﻴﻔﻟﺍﻭ ﺍًﺪﺟ ﺔﻌﻴﻓﺮﻟﺍ ﻲﺘﻴﻏﺎﺒﺴﻟﺍﻭ ﺔﻜﻴﻤﺴﻟﺍ ﻲﺘﻴﻏﺎﺒﺴﻟﺍﻭ ﻲﺘﻴﻏﺎﺒﺴﻟﺍ ﻝﺎﻜﺷﺃ ﻀﺤﺗ ﺹﺍﺮﻗﺃ ﻉَﺩ :ﺔﻈﺣﻼﻣ
ﻞﺴﻠﺴﺘﻟﺎﺑ ﻂﻠﺨﻟﺍ ﺓﺮﺠﺣﻭ ﻂﻠﺨﻟﺍ ﺓﺍﺩﺃﻭ ﻞﻴﻜﺸﺘﻟﺍ ﺹﺮﻗ ﻞﻣﺎﺣﻭ ﻞﻴﻜﺸﺘﻟﺍ ﺹﺮﻗﻭ ﺔﻴﻣﺎﻣﻷﺍ ﺔﺣﻮﻠﻟﺍ
) .
ﻢﻗﺭ ﺓﺭﻮﺼﻟﺍ
) .
ﺀﺎﳌﺎﺑ ﻪﻔﻴﻈﻨﺗ ﺎﻫﺪﻌﺑ ﻚﻨﻜ .ﺠﻌﻟﺍ ﺎﻳﺎﻘﺑ ﺔﻟﺍﺯﻹ ﺔﻘﻓﺮﳌﺍ ﻒﻴﻈﻨﺘﻟﺍ ﺓﺍﺩﺃ ﺔﻄﺳﺍﻮﺑ ﻞﻴﻜﺸﺘﻟﺍ ﺹﺮﻗ ﻒﻴﻈﻨﺘﺑ ﻢﻗ
) .
ﻢﻗﺭ ﺓﺭﻮﺼﻟﺍ
ﺎﺘﺳﺎﺒﻟﺍ ﻀﺤﺗ ﺔﻟﺁ ﻦﻣ ﻲﺟﺭﺎﺨﻟﺍ ﺀﺰﺠﻟﺍﻭ ﻢﻜﺤﺘﻟﺍ ﺔﺣﻮﻟ ﻒﻴﻈﻨﺘﻟ ﺔﻓﺎﺟ ﺵﻗ ﺔﻌﻄﻗ ﻡﺪﺨﺘﺳﺍ
ﺔﻴﺳﺎﺳﻷﺍ ﺓﺪﺣﻮﻟﺍ
.
ﻦﻣ ﺠﻌﻟﺍ ﺝﺍﺮﺧﻹ ﺔﺒﺳﺎﻨﳌﺍ ﻒﻴﻈﻨﺘﻟﺍ ﺓﺍﺩﺃ ﻡﺪﺨﺘﺳﺍ ﻢﺛ .ﺕﺎﻋﺎﺳ 4ﻭ
ﺕﺎﺤﺘﻔﻟﺍ
ﻢﻗﺭ ﺓﺭﻮﺼﻟﺍ
ﻦﻋ ﻖﻴﻗﺪﻟﺍ ﺎﻳﺎﻘﺑ ﻒﻴﻈﻨﺘﻟ ﺔﻓﺎﺟ ﺵﻗ ﺔﻌﻄﻗ ﻡﺪﺨﺘﺳﺍ
) .
ﺎًﻣﺎ ﺎﻬﻔﻴﻔﺠﺘﻟ ﺎﻬﺤﺴﻣﺍﻭ ﺎﻬﻠﻛ ﻚﻔﻠﻟ ﺔﻠﺑﺎﻘﻟﺍ ﺀﺍﺰﺟﻷﺍ ﻒﻴﻈﻨﺘﺑ ﻢﻗ
ﺔﻗﺎﻄﻟﺍ ﺬﺧﺄﻣ ﻦﻋ ﺔﻗﺎﻄﻟﺍ ﺲﺒﻘﻣ ﻞﺼﻓﺍ
) .
ﻢﻗﺭ ﺓﺭﻮﺼﻟﺍ
) .
ﱠ
ﺥﻮﺗ .ﺔﻠﻴﻘﺛ ﺔﻴﻣﺎﻣﻷﺍ ﺔﺣﻮﻠﻟﺍ ﻥﺇ :ﺔﻈﺣﻼﻣ
ﻂﻠﺨﻟﺍ ﺓﺮﺠﺣ ﺀﺎﻄﻏ ﻝِﺯﺃ
ﺔﻴﻣﺎﻣﻷﺍ ﺔﺣﻮﻠﻟﺎﺑ ﻢّﻜﺤﺘﻟﺍ ﺢﻴﺗﺎﻔﻣ
3
4
!
ﻡﺎﻫ
.
.
.
.
1 (28
2 (3
ّ
3 (4
ﻚﻓ
ّ
4 (5
ﻚﻓ
5 (29
6 (30
7 (6
8 (31
ﻢﻗﺭ ﺓﺭﻮﺼﻟﺍ
ﻦﻳﺰﺨﺘﻟﺍ
ﺩﱪﻴﻟ ﻪﻛﺮﺗﺍﻭ ﺔﻗﺎﻄﻟﺍ ﺭﺪﺼﻣ ﻦﻋ ﺯﺎﻬﺠﻟﺍ ﻞﺼﻓﺍ
.
ﺎﻬﻨﻳﺰﺨﺗ ﻞﺒﻗ ﺔﻓﺎﺟﻭ ﺔﻔﻴﻈﻧ ﻊﻄﻘﻟﺍ ﻞﻛ ﻥﺃ ﻦﻣ ﺪﻛﺄﺗ :ﺔﻈﺣﻼﻣ
) .
ﻦﻳﺰﺨﺘﻟﺍ ﺝﺭﺩ ﰲ ﺎﺘﺳﺎﺒﻟﺍ ﻝﺎﻜﺷﺃ ﻀﺤﺗ ﺹﺍﺮﻗﺃ ﻦﻳﺰﺨﺗ ﻚﻨﻜ
1 .
2 (32
Page 24
26
ﺔﻴﺑﺮﻌﻟﺍ
ﺔﻧﻭﺮﻜﻌﳌﺍ ﻀﺤﺗ ﺔﻟﺁ ﻡﺍﺪﺨﺘﺳﺍ
ﻀﺤﺘﻟﺍ ﺀﺪﺑ
) .
ﻢﻗﺭ ﺓﺭﻮﺼﻟﺍ
ﺢﻤﻘﻟﺍ ﻊﻣ ﺰﻟﺩﻮﻧ
ﺐﻠﺼﻟﺍ ﺢﻤﻘﻟﺍ ﻊﻣ ﺰﻟﺩﻮﻧ
ﺢﻤﻘﻟﺍ ﻊﻣ ﺎﺘﺳﺎﺑ
ﺐﻠﺼﻟﺍ ﺢﻤﻘﻟﺍ ﻊﻣ ﺎﺘﺳﺎﺑ
ﺭﺰﺠﻟﺍ ﻊﻣ ﺰﻟﺩﻮﻧ/ﺎﺘﺳﺎﺑ
ﻢﻃﻄﻟﺍ ﻊﻣ ﺰﻟﺩﻮﻧ/ﺎﺘﺳﺎﺑ
ﺀﺍﺩﻮﺴﻟﺍ ﺔﻄﻨﺤﻟﺍ ﻊﻣ ﺰﻟﺩﻮﻧ
ﺭﺪﻨﻤﺸﻟﺍ ﻊﻣ ﺰﻟﺩﻮﻧ/ﺎﺘﺳﺎﺑ
) .
ﻢﻗﺭ ﺓﺭﻮﺼﻟﺍ
ﺭﺰﻟﺍ ﲆﻋ ﻂﻐﺿﺍ ،ﺔﻟﺎﺤﻟﺍ ﻩﺬﻫ ﰲ .ﻥﺯﻮﻟﺍ ﺱﺎﻴﻗ ﺔﻴﻠﻤﻋ ﻲﻄﺨﺗ (ﺗﻮﻠﻐﻟﺍ ﻦﻣ ﺔﻴﻟﺎﺨﻟﺍ ﺎﺘﺳﺎﺒﻟﺍﻭ ﺰﻴﻛﻮﻜﻟﺍ ،ﻝﺎﺜﳌﺍ
ﻊّﻤﺟ .ﺓﺮﺠﺤﻟﺍ ﺀﺎﻄﻏ ﺖﺤﺘﻓ ﺍﺫﺇ ﻞﻤﻌﻟﺍ ﻦﻋ ﺯﺎﻬﺠﻟﺍ ﻒﻗﻮﺘﻴﺳ ،ﺎﺘﺳﺎﺒﻟﺍ ﻀﺤﺗ ﺔﻴﻠﻤﻋ ﺀﺎﻨﺛﺃ .ﺢﻴﺤﺼﻟﺍ ﻞﻜﺸﻟﺎﺑ ﺀﺎﻄﻐﻟﺍ ﻕﻼﻏﺇ ﻢﺘﻳ ﺎﻣ ﻞﻤﻌﻟﺎﺑ ﺯﺎﻬﺠﻟﺍ ﺃﺪﺒﻳ ﻦﻟ
ﺢﻴﺤﺼﻟﺍ
ﻬﺟﺰﳌ ﺾﻴﺒﻟﺍﻭ ﻩﺎﻴﳌﺍ ﻂﻠﺧﺍ ﻢﺛ ،ﺏﻮﻠﻄﳌﺍ ﻯﻮﺘﺴﳌﺍ ﱃﺇ ﻩﺎﻴﳌﺍ ﻒِﺿﺃ
ﺔﺣﱰﻘﳌﺍ ﻞﺋﺎﺴﻟﺍ ﺔﻴﻤﻛ ﱄﺟﺇ ﻲﻄﺨﺗ ﻡﺪﻋ ﲆﻋ ﺹﺮﺣﺍ ﻦﻜﻟ ،ﻚﻟﺫ ﻞّﻀﻔﺗ ﺖﻨﻛ ﺍﺫﺇ ﺓﺪﺣﺍﻭ ﺔﻀﻴﺑ ﻦﻣ
ﺓﺪﺣﺍﻭ ﺓﺮﻣ ﺕﺍﴍﺆﳌﺍ ﻞﻛ ﺾﻣﻮﺗﻭ ،ﺓﺪﺣﺍﻭ ﺓﺮﻣ ﺎًﺗﻮﺻ ﺎﺘﺳﺎﺒﻟﺍ ﻀﺤﺗ ﺔﻟﺁ ﺭﺪﺼﺗ .ﺔﻗﺎﻄﻟﺍ ﺬﺧﺄﻣ ﰲ ﺲﺑﺎﻘﻟﺍ ﻊﺿ
.
ﺔﻗﺎﻄﻟﺍ ﺭﺪﺼ ﺯﺎﻬﺠﻟﺍ ﻞﻴﺻﻮﺗ ﻞﺒﻗ ﺔﺤﻴﺤﺻ ﺔﻘﻳﺮﻄﺑ ﺔﻌ
) .
ﻢﻗﺭ ﺓﺭﻮﺼﻟﺍ
ﻕﺎﻄﻨﻟﺍ ﰲ ﺢﺒﺼﺗ ﻥﺃ ﱃﺇ ﻖﻴﻗﺪﻟﺍ ﺱﺎﻴﻗ ﴍﺆﻣ ﺾﻣﻮﻴﺳ .ﺎًﻴﺋﺎﻘﻠﺗ ﻪﺘﻴﻤﻛ ﺽﺮﻌﻳﻭ ﻖﻴﻗﺪﻟﺍ ﻥﺯﻭ ﺱﺎﻴﻘﺑ ﺯﺎﻬﺠﻟﺍ ﻡﻮﻘﻳ
) .
ﻢﻗﺭ ﺓﺭﻮﺼﻟﺍ
ﻢﻗﺭ ﺓﺭﻮﺼﻟﺍ
ﻂﻘﻓ ﻩﺎﻴﳌﺍﻭ ﻖﻴﻗﺪﻟﺍ ﻊﻣ ﺎﺘﺳﺎﺑ
ﻂﻘﻓ ﺾﻴﺒﻟﺍ ﺽﺎﻴﺑﻭ ﻖﻴﻗﺪﻟﺍ ﻊﻣ ﺎﺘﺳﺎﺑ
ﺔﻬ
.
ﺕﺎﻔﺻﻮﻟﺍ ﺐّﻴﺘﻛ ﺔﻌﺟﺍﺮﻣ ﻚﻨﻜ ،ﺔﻴﻓﺎﺿﺇ ﺕﺎﻔﺻﻭ ﲆﻋ ﻝﻮﺼﺤﻠﻟ :ﺔﻈﺣﻼﻣ
ﺓﺮﺠﺤﻟﺍ ﰲ ﻖﻴﻗﺪﻟﺍ ﻦﻣ ﻍ
ً
.
ﺓﴍﺎﺒﻣ ﺩﺮﻄﻟﺍﻭ ﻂﻠﺨﻟﺎﺑ ﺯﺎﻬﺠﻟﺍ ﺃﺪﺒﻴﺳﻭ ،ٍﻥﺍﻮﺛ
ﺀﺎﻄﻐﻟﺍ ﻕﻼﻏﺇ ﺔﻣﻼﻋ ﺮﻬﻈﺘﺴﻓ ،ﺀﺎﻄﻐﻟﺍ ﻕﻼﻏﺇ ﻥﻭﺩ ﻦﻣ ﺭﺯ ﲆﻋ ﻂﻐﻀﻟﺎﺑ ﺖﻤﻗ ﺍﺫﺇ
ﺔﻴﺴﻴﺋﺮﻟﺍ ﺓﺪﺣﻮﻟﺍ ﲆﻋ ﻡﺎﻜﺣﺈﺑ ﺀﺎﻄﻐﻟﺍ ﻖﻠﻏﺃ ﻢﺛ ،ًﻻﻭﺃ
.
ﺍًﺩﺪﺠﻣ ﺔﻴﻠﻤﻌﻟﺍ ﺀﺪﺒﻟ ﺖﻗﺆﻣ ﻑﺎﻘﻳﺇ/ﺀﺪﺑ ﺭﺰﻟﺍ ﲆﻋ ﻂﻐﺿﺍﻭ ﺀﺎﻄﻐﻟﺍ
ﻢﻗﺭ ﺓﺭﻮﺼﻟﺍ
) .
ﺔﺷﺎﺸﻟﺍ ﲆﻋ ﺽﻭﺮﻌﳌﺍ ﴍﺆﻤﻠﻟ ﺎًﻘﻓﻭ ﻞﺋﺎﺴﻟﺍ ﺔﻴﻤﻛ ﺱﺎﻴﻘﻟ ﻖﻓﺮﳌﺍ ﻩﺎﻴﳌﺍ ﺏﻮﻛ ﻡﺪﺨﺘﺳﺍ
ﻮﺘﺴﻣ ﺢﻄﺳ ﲆﻋ ﺩﻮﺟﻮﻣ ﻮﻫﻭ ﻌﻟﺍ ﻯﻮﺘﺴﻣ ﲆﻋ ﻞﺋﺎﺴﻟﺍ ﻯﻮﺘﺴﻣ ﺱﺎﻴﻗ ﻦﻣ ﺪﻛﺄﺗ
ٍ
ﺯﺎﻬﺠﻟﺍ ﻞﻴﻐﺸﺘﻟ ﻞﻴﻐﺸﺗ ﻑﺎﻘﻳﺇ/ﻞﻴﻐﺸﺗ ﺭﺰﻟﺍ ﲆﻋ ﻂﻐﺿﺍ
(17
ﻢﻗﺭ ﺓﺭﻮﺼﻟﺍ
ّ
ﺎﺘﺳﺎﺒﻟﺍ ﻉﺍﻮﻧﺃ ﻞﻛ
ﻜﻨﳌﺍ
ﻢﻗﺭ ﺓﺭﻮﺼﻟﺍ
600 ﻦﻣ
) .
ﺎﻬﻴﻟﺇ ﺝﺎﺘﺤﺗ ﻲﺘﻟﺍ ﻞﺋﺎﺴﻟﺍ
.
ﻩﺎﻴﳌﺍ ﺏﻮﻛ ﰲ ﺾﻴﺒﻟﺍ ﴪﻛﺍ ،ﺾﻴﺒﻟﺍ ﺞﻳﺰﻣ ﻂﻠﺧ ﺪﻨﻋ
ﻞﺋﺎﺴﻟﺍ ﺔﻴﻤﻛ ﺱﺎﻴﻘﻟ ﺦﺒﻄﳌﺍ ﻥﺍﺰﻴﻣ ﻡﺍﺪﺨﺘﺳﺍ ﻰﺟﺮﻳ ،ﲆﻋﺃ ﺔﻗﺪﻟ
ﻤﺠﻣ ﻊﻄﻘﻟﺍ ﻞﻛ ﻥﺃ ﻦﻣ ﺪﻛﺄﺗ :ﺔﻈﺣﻼﻣ
ّ
) .
ﺞﻣﺎﻧﺮﺑ ﺪﻳﺪﺤﺗ ﺭﺰﻟﺍ ﺔﻄﺳﺍﻮﺑ ﺎﺘﺳﺎﺒﻟﺍ ﻉﻮﻧ ﺩﺪﺣ
ﻢﻗﺭ ﺓﺭﻮﺼﻟﺍ
) .
ﺔﺷﺎﺸﻟﺍ ﲆﻋ
ﻢﻗﺭ ﺓﺭﻮﺼﻟﺍ
ﻛﺃ ﻭﺃ ﻍ
ﻞﻴﺒﺳ ﲆﻋ) ﺕﺎﻔﺻﻮﻟﺍ ﺾﻌﺑ ﻚﻨﻣ ﺐﻠﻄﺘﺗ
ﻢﻗﺭ ﺓﺭﻮﺼﻟﺍ
ﺔﻴﻤﻛ ﺮﻬﻈﺗ ،ﺎًﻘﻠﻐﻣ ﺀﺎﻄﻐﻟﺍ ﻥﻮﻜﻳ ﺎﻣﺪﻨﻋ
ﺰﻟﺩﻮﻨﻟﺍ/ﺔﻬّﻜﻨﻣ ﻏ ﺎﺘﺳﺎﺑ
ّ
ﺾﻴﺒﻟﺎﺑ/ﺔﻬ
ﻜﻨﻣ
) .
ﻂﻠﺨﻟﺍ ﺓﺮﺠﺣ ﺀﺎﻄﻏ ﻝِﺯﺃ
0:00
ﺮﻬﻈﻳ ﻰﺘﺣ ﺮﻈﺘﻧﺍ
) .
ﺓﺮﺠﺤﻟﺍ ﰲ ﻖﻴﻗﺪﻟﺍ ﺐﻜﺳﺍ
200 ﻦﻣ
5
ﺯﺎﻬﺠﻟﺍ ﰲ ﻖﻔﺨﻟﺍ
ً
ﻻﺪﺑ َﺘﻀﻴﺑ ﻡﺍﺪﺨﺘﺳﺍ ﻦﻜ
ﻞﻗﺃ ﻊَﻀﺗ ﻻ
ﺓﺪﳌ ﺖﻗﺆﻣ ﻑﺎﻘﻳﺇ/ﺀﺪﺑ
) .
ﺓﺮﺠﺤﻟﺍ ﺀﺎﻄﻏ ﻖِﻠﻏﺃ
َ
ﺍﺩﺃ ﻞِﺧﺩﺃ
ﺰﻟﺩﻮﻧ/ﺎﺘﺳﺎﺑ
ﺞﻣﺎﻧﱪﻟﺍﺔﺤﻴﺼﻧﺔﻳﺭﺎﻴﺘﺧﺍ ﺔﻔﺻﻭ
ﺔﻈﺣﻼﻣ
(20
.
ﺔﻈﺣﻼﻣ
(21
.
ﺔﻈﺣﻼﻣ
.
.
.
.
1 (15
2 (16
3
4 (3
5 (18
6 (19
7 (14
8 (22
9 (23
ﺎﺘﺳﺎﺒﻟﺍ ﻀﺤﺗ ﺞﻣﺎﻧﺮﺑ ﻞﻴﻐﺸﺗ ﺀﺪﺑ
) .
ﻢﻗﺭ ﺓﺭﻮﺼﻟﺍ
.
ﺎﺘﺳﺎﺒﻟﺍ ﻡﺍﻮﻗ ﰲ ﻚﻟﺫ ﺮﺛﺆﻴﺳ ،ّﻻﺇﻭ .ﻞﺋﺎﺴﻟﺍ ﺐﻜﺳ ﺪﻌﺑ ﻯﺮﺧﺃ ﺕﺎﻧﻮﻜﻣ ﻱﺃ ﻒِﻀﺗ ﻻ ،ﺠﻌﻟﺍ ﻂﻠﺧ ﺀﺎﻨﺛﺃ :ﺔﻈﺣﻼﻣ
ﻂﻠﺨﻟﺍ ﺖﻗﻮﻟ ﱄﺯﺎﻨﺘﻟﺍ ﺪﻌﻟﺍ ﺃﺪﺒﻴﺳﻭ ،ﻂﻠﺨﻟﺍ ﺀﺪﺒﻟ ﺖﻗﺆﻣ ﻑﺎﻘﻳﺇ/ﺀﺪﺑ ﺭﺰﻟﺍ ﲆﻋ ﻂﻐﺿﺍ
) .
ﻢﻗﺭ ﺓﺭﻮﺼﻟﺍ
ﺀﺎﻄﻐﻟﺍ ﺔﺤﺘﻓ ﻝﻮﻃ ﲆﻋ ﺀﻂﺒﺑ ﻞﺋﺎﺴﻟﺍ ﺐﻜﺳﺍ ،ﻂﻠﺨﻟﺍ ﺀﺪﺑ ﺪﻌﺑ
1 (24
2 (25
Page 25
ﺔﻴﺑﺮﻌﻟﺍ
27
ﻪﻠﻳﺩﺭﺎﺑﺎﺑ
ﲇﻴﺗﺎﻴﻟﺎﺗ
.
ﻂﻘﻓ ﺹﺮﻘﻟﺍ ﺍﺬﻫ ﻊﻣ ﺍًﺪﺟ ﺔﻌﻴﻓﺮﻟﺍ ﻲﺘﻴﻏﺎﺒﺴﻟﺍ ﻀﺤﺗ ﺹﺮﻘﺑ ﺔﺻﺎﺨﻟﺍ ﻒﻴﻈﻨﺘﻟﺍ ﺓﺍﺩﺃ ﻓﻮﺗ ﻢﺘﻳ :ﺔﻈﺣﻼﻣ
ﺍًﺪﺟ ﺔﻌﻴﻓﺭ ﻲﺘﻴﻏﺎﺒﺳ
ﺔﻜﻴﻤﺳ ﻲﺘﻴﻏﺎﺒﺳ
HR2380
HR2381
HR2382
HR2382/13
ﱃﻭﻷﺍ ﺓﺮﻤﻠﻟ ﻡﺍﺪﺨﺘﺳﻻﺍ ﻞﺒﻗ ﻒﻴﻈﻨﺘﻟﺍﻭ ﻚﻔﻟﺍ
) .
ﻢﻗﺭ ﺓﺭﻮﺼﻟﺍ
ﻢﻗﺭ ﺓﺭﻮﺼﻟﺍ
) .
ﻢﻗﺭ ﺓﺭﻮﺼﻟﺍ
.
ﺎﻬﺘﻟﺍﺯﺇ ﺀﺎﻨﺛﺃ ﺪﻳﺪﺸﻟﺍ ﺭﺬﺤﻟﺍ
) .
ﻞﺴﻠﺴﺘﻟﺎﺑ ﻂﻠﺨﻟﺍ ﺓﺮﺠﺣﻭ ﻂﻠﺨﻟﺍ ﺓﺍﺩﺃﻭ ﻞﻴﻜﺸﺘﻟﺍ ﺹﺮﻗ ﻞﻣﺎﺣﻭ ﻞﻴﻜﺸﺘﻟﺍ ﺹﺮﻗﻭ ﺔﻴﻣﺎﻣﻷﺍ ﺔﺣﻮﻠﻟﺍ
(6
ﻢﻗﺭ ﺓﺭﻮﺼﻟﺍ
) .
ﺎًﻣﺎ ﺎﻬﻔﻴﻔﺠﺘﻟ ﺎﻬﺤﺴﻣﺍﻭ ﺎﻬﻠﻛ ﻚﻔﻠﻟ ﺔﻠﺑﺎﻘﻟﺍ ﺀﺍﺰﺟﻷﺍ ﻒﻴﻈﻨﺘﺑ ﻢﻗ
َ
ﺥﻮﺗ ﺍﺬﻟ .ﺔﻠﻴﻘﺛ ﺔﻴﻣﺎﻣﻷﺍ ﺔﺣﻮﻠﻟﺍ ﻥﺇ :ﺔﻈﺣﻼﻣ
ﻂﻠﺨﻟﺍ ﺓﺮﺠﺣ ﺀﺎﻄﻏ ﻝِﺯﺃ
ﺔﻴﻣﺎﻣﻷﺍ ﺔﺣﻮﻠﻟﺎﺑ ﻢّﻜﺤﺘﻟﺍ ﺢﻴﺗﺎﻔﻣ
ﻊﻴﻤﺠﺘﻟﺍ
) .
ﻢﻗﺭ ﺓﺭﻮﺼﻟﺍ
) .
ﻢﻗﺭ ﺓﺭﻮﺼﻟﺍ
(11
.
ﺯﺎﻬﺠﻟﺍ ﻞﻤﻋ ﻥﻭﺩ ﻥﺎﻣﻷﺍ ﺡﺎﺘﻔﻣ ﻝﻮﺤﻴﺴﻓ ،ﺢﻴﺤﺻ ﻞﻜﺸﺑ ﺎﺘﺳﺎﺒﻟﺍ ﻝﺎﻜﺷﺃ ﻀﺤﺗ ﺹﺮﻗ ﻭﺃ ﺔﻴﻣﺎﻣﻷﺍ ﺔﺣﻮﻠﻟﺍ ﻊﻴﻤﺠﺗ ﻢﺘﻳ ﺍﺫﺇ :ﺔﻈﺣﻼﻣ
ﻢﻗﺭ ﺓﺭﻮﺼﻟﺍ
) .
ﺔﻴﺳﺎﺳﻷﺍ ﺓﺪﺣﻮﻟﺍ ﰲ ﻂﻠﺨﻟﺍ ﺓﺍﺩﺃ ﻞِﺧﺩﺃ ﻢﺛ .ﺔﻴﺳﺎﺳﻷﺍ ﺓﺪﺣﻮﻟﺍ ﻂﺳﻭ ﺔﺤﺘﻔﻟﺍ ﻮﺤﻧ ﻂﻠﺨﻟﺍ ﺓﺍﺩﺃ ﻪﻴﺟﻮﺘﺑ ﻢﻗ
(10
ﺢﻴﺤﺼﻟﺍ ﻞﻜﺸﻟﺎﺑ ﻥﺎﻋﻮﺿﻮﻣ ﺹﺮﻘﻟﺍ ﻞﻣﺎﺣﻭ ﺎﺘﺳﺎﺒﻟﺍ ﻝﺎﻜﺷﺃ ﻀﺤﺗ ﺹﺮﻘﻟ ﲇﺧﺍﺪﻟﺍ ﻒﻳﻮﺠﺘﻟﺍ ﻥﺃ ﻦﻣ ﺪّﻛﺄﺗ :ﺔﻈﺣﻼﻣ
.
ﺯﺎﻬﺠﻟﺍ ﻞﻤﻋ ﻥﻭﺩ ﻥﺎﻣﻷﺍ ﺡﺎﺘﻔﻣ ﻝﻮﺤﻴﺴﻓ ،ﺢﻴﺤﺻ ﻞﻜﺸﺑ ﻂﻠﺨﻟﺍ ﺓﺮﺠﺣ ﺀﺎﻄﻏ ﺖﻴﺒﺜﺗ ﻢﺘﻳ ﺫﺇ :ﺔﻈﺣﻼﻣ
ﻢﻗﺭ ﺓﺭﻮﺼﻟﺍ
) .
ﻡﺎﻜﺣﺈﺑ ﺖّﺒﺜﻣ ﻪﻧﺃ ﻦﻣ ﺪﻛﺄﺗﻭ ،ﺹﺮﻘﻟﺍ ﻞﻣﺎﺣ ﰲ ﺎﺘﺳﺎﺒﻟﺍ ﻝﺎﻜﺷﺃ ﻀﺤﺗ ﺹﺮﻗ ﻊَﺿ
ﻢﻗﺭ ﺓﺭﻮﺼﻟﺍ
ﺯﺎﻬﺠﻟﺍ ﻡﺍﺪﺨﺘﺳﺍ ﻞﺒﻗ ﻡﺎﻜﺣﺈﺑ ﺔﻴﻣﺎﻣﻷﺍ ﺔﺣﻮﻠﻟﺍ ﺖﻴﺒﺜﺗ ﲆﻋ ﺹﺮﺣﺍ
ﺎﻬﻌﻴﻤﺠﺗ ﺀﺎﻨﺛﺃ ﺪﻳﺪﺸﻟﺍ ﺭﺬﺤﻟﺍ
ﻢﻗﺭ ﺓﺭﻮﺼﻟﺍ
ﺯﺎﻬﺠﻟﺍ ﰲ ﺎﻬﺘﻴﺒﺜﺘﻟ ﻂﻠﺨﻟﺍ ﺓﺮﺠﺣ ﻊﻓﺩﺍ
(9
) .
ﺔﻴﺳﺎﺳﻷﺍ ﺓﺪﺣﻮﻟﺎﺑ ﺔﻴﻣﺎﻣﻷﺍ ﺔﺣﻮﻠﻟﺍ ﻞﺻﻮﺑ ﻢﻗ
) .
) .
ﻢﻗﺭ ﺓﺭﻮﺼﻟﺍ
ﺔﻴﻣﺎﻣﻷﺍ ﺔﺣﻮﻠﻟﺎﺑ ﻢّﻜﺤﺘﻟﺍ ﺢﻴﺗﺎﻔﻣ ﺖﻴﺒﺜﺘﺑ ﻢﻗ
ﺯﺎﻬﺠﻟﺎﺑ ﺹﺮﻘﻟﺍ ﻞﻣﺎﺣ ﺐّﻛﺭ
َ
ﺥﻮﺗ ﺍﺬﻟ .ﺔﻠﻴﻘﺛ ﺔﻴﻣﺎﻣﻷﺍ ﺔﺣﻮﻠﻟﺍ ﻥﺇ
) .
ﻢﻗﺭ ﺓﺭﻮﺼﻟﺍ
ﻂﻠﺨﻟﺍ ﺓﺮﺠﺣ ﺀﺎﻄﻏ ﻖِﻠﻏﺃ
:
ﺔﻈﺣﻼﻣ
1 (3
ّ
2 (4
ﻚﻓ
ّ
3 (5
ﻚﻓ
4
1 (7
2 (8
3
4
5 (12
.
.
6 (13
7 (14
Page 26
28
ﺔﻴﺑﺮﻌﻟﺍ
(1
ﺓﺭﻮﺼﻟﺍ) ﺞﺘﻨﳌﺍ ﻝﻮﺣ ﺔﻣﺎﻋ ﺔﺤﳌ
ﺎﺘﺳﺎﺒﻟﺍ ﻊﻴﻄﻘﺗ ﺓﺍﺩﺃ
ﺔﻴﻣﺎﻣﻷﺍ ﺔﺣﻮﻠﻟﺍ ﺢﻴﺗﺎﻔﻣ
ﺔﻴﻣﺎﻣﻷﺍ ﺔﺣﻮﻠﻟﺍ
ﺎﺘﺳﺎﺒﻟﺍ ﻝﺎﻜﺷﺃ ﻀﺤﺗ ﺹﺮﻗ
ﺹﺮﻘﻟﺍ ﻞﻣﺎﺣ
ﺹﺮﻘﻟﺍ ﻞﻣﺎﺣ ﻥﺎﻣﺃ ﺡﺎﺘﻔﻣ ﺾﺒﻘﻣ
ﻂﻠﺨﻟﺍ ﺓﺍﺩﺃ
ﻂﻠﺨﻟﺍ ﺓﺮﺠﺣ
"
ﻂﻘﻓ ﺩﺮﻄﻟﺍ" ﺭﺰﻟﺍ
ﺞﻣﺎﻧﱪﻟﺍ ﺪﻳﺪﺤﺗ ﺭﺯ
ً
ﺓﴍﺎﺒﻣ ﻂﻠﺨﻟﺍ ﺔﻴﻠﻤﻋ ﺀﺪﺑﻭ ﺱﺎﻴﻘﻟﺍ ﻲﻄﺨﺗ ﺔﻔﻴﻇﻭ ﻡﺍﺪﺨﺘﺳﺍ ﻲﻄﺨﺗ ﺪﻳﺮﺗ ﺎﻣﺪﻨﻋ ﻭﺃ ﺄﻄﺨﻟﺍ ﻊﺿﻭ ﰲ ﺯﺎﻬﺠﻟﺍ
i
j
k
l
m
n
o
p
(2
ﺓﺭﻮﺼﻟﺍ) ﻢّﻜﺤﺘﻟﺍ ﺔﺣﻮﻟ ﻝﻮﺣ ﺔﻣﺎﻋ ﺔﺤﳌ
d
e
.
ﻚﺒﺳﺎﻨﺗ ﻲﺘﻟﺍ ﺔﻘﻳﺮﻄﻟﺎﺑﻭ ﻩﺪﻳﺮﺗ ﻱﺬﻟﺍ ﺎﺘﺳﺎﺒﻟﺍ ﻉﻮﻧ ﻀﺤﺘﺑ ﺯﺎﻬﺠﻟﺍ ﺍﺬﻫ ﻚﻟ ﺢﻤﺴﻳ
ﺖﻗﺆﻣ ﻑﺎﻘﻳﺇ/ﺀﺪﺑ ﺭﺰﻟﺍ ﲆﻋ ﻂﻐﺿﺍ ﻢﺛ ،ﺞﻣﺎﻧﺮﺑ ﺪﻳﺪﺤﺗ ﺭﺰﻟﺍ ﺔﻄﺳﺍﻮﺑ ﺎًﺠﻣﺎﻧﺮﺑ ﱰﺧﺍ
ﺖﻗﺆﻣ ﻑﺎﻘﻳﺇ/ﺀﺪﺑ ﺭﺰﻟﺍ ﲆﻋ
ﺔﻴﻓﺎﺿﺇ ﺩﺮﻃ ﺔﻴﻠﻤﻋ ﺀﺍﺮﺟﺇ ﺪﻳﺮﺗﻭ ،ﻂﻠﺨﻟﺍ ﺓﺮﺠﺣ ﰲ ﺠﻋ ﺕﻼﻀﻓ ﺩﻮﺟﻭ ﺪﻨﻋ
5
ﻥﺍﻮﺛ
ٍ
ﻂﻠﺨﻟﺍ ﺓﺮﺠﺣ ﺀﺎﻄﻏ ﻥﺎﻣﺃ ﺡﺎﺘﻔﻣ ﺔﺤﺘﻓ
ﺹﺮﻘﻟﺍ ﻞﻣﺎﺣ ﻥﺎﻣﺃ ﺡﺎﺘﻔﻣ
ﺎﺘﺳﺎﺒﻟﺍ ﻝﺎﻜﺷﺃ ﻀﺤﺗ ﺹﺮﻗ ﻦﻳﺰﺨﺗ
ﺖﻗﺆﻣ ﻑﺎﻘﻳﺇ/ﻞﻴﻐﺸﺗ ﺭﺰﻟﺍ
ﺔﻴﺿﺍﱰﻓﻻﺍ ﺎﺘﺳﺎﺒﻟﺍ ﻀﺤﺗ ﺔﻔﻴﻇﻭ
ﺱﺎﻴﻘﻟﺍ ﺔﻔﻴﻇﻭ ﺔﻄﺳﺍﻮﺑ ﺎﺘﺳﺎﺒﻟﺍ ﻀﺤﺗ ﺪﻨﻋ
ﻂﻐﺿﺍ ﻢﺛ ،ﻂﻘﻓ ﺩﺮﻄﻟﺍ ﺭﺰﻟﺍ ﲆﻋ ﻂﻐﺿﺍ
ﺓﺪﳌ ﺖﻗﺆﻣ ﻑﺎﻘﻳﺇ/ﺀﺪﺑ ﺭﺰﻟﺍ ﲆﻋ ﺭﺍﺮﻤﺘﺳﺎﺑ ﻂﻐﺿﺍ
ﻂﻠﺨﻟﺍ ﺓﺮﺠﺣ ﺀﺎﻄﻏ
ﺔﻗﺎﻄﻟﺍ ﻚﻠﺳ
ﺔﻴﺴﻴﺋﺮﻟﺍ ﺓﺪﺣﻮﻟﺍ
ﺀﻠﻟ ﺏﻮﻛ
ﻒﻴﻈﻨﺘﻟﺍ ﺓﺎﺷﺮﻓ
ﻑﺎﻘﻳﻹﺍ/ﻞﻴﻐﺸﺘﻟﺍ ﺭﺯ
ﺔﺷﺎﺸﻟﺍ
.
ﻂﻘﻓ ﺩﺮﻄﻟﺍ ﺔﻔﻴﻇﻭ
.
ﺱﺎﻴﻘﻟﺍ ﻲﻄﺨﺗ ﺔﻔﻴﻇﻭ
ﻞﺧﺪﻳ ﺎﻣﺪﻨﻋ
.
a
b
c
d
e
f
g
h
a
b
c
.
.
.
ﺎﻴﻧﺍﺯﻻ
ﻲّﻨﻴﺑ
ﺓﺮﻓﻮﺘﳌﺍ ﺕﺎﻘﺤﻠﳌﺍ
ﻞﻴﻜﺸﺘﻟﺍ ﺹﺍﺮﻗﺃ
ﻲﺘﻴﻏﺎﺒﺳﻲﻨﻴﺸﺗﻮﺘﻴﻓ
HR2380
HR2381
HR2382
HR2382/13
Page 27

ﺔﻴﺑﺮﻌﻟﺍ
29
ً
ﻪﻌﻴﻤﺠﺗ ﺀﺎﻨﺛﺃ ﺔﻗﺎﻄﻟﺍ ﺭﺪﺼ
ﻻﻮﺻﻮﻣ ﺲﻴﻟ ﺯﺎﻬﺠﻟﺍ ﻥﺃ ﻦﻣ ﺪﻛﺄﺗ
ﺔﻗﺎﻄﻟﺍ ﺭﺪﺼ ﺯﺎﻬﺠﻟﺍ ﻞﻴﺻﻮﺗ ﻞﺒﻗ ﺔﺤﻴﺤﺻ ﺔﻘﻳﺮﻄﺑ ﺔﻌّﻤﺠﻣ (ﺓﺮﺠﺤﻟﺍ ﺀﺎﻄﻏ ﺎﻬﻴﻓ ﺎ) ﻊﻄﻘﻟﺍ ﻞﻛ ﻥﺃ ﻦﻣ ﺪﻛﺄﺗ
ﺰﻬﺗ ﻻ
ّ
ﻱﺃ ﻊَﻀﺗ ﻻ
ﻞﻗﺃ ﻊَﻀﺗ ﻻ
ﻖﻴﻗﺪﻟﺍ ﻥﺯﻭ ﺱﺎﻴﻗ ﺀﺎﻨﺛﺃ ﺯﺎﻬﺠﻟﺍ ﲆﻋ ﺽﺮﻏ
ﺓﺮﺠﺤﻟﺍ ﰲ ﻖﻴﻗﺪﻟﺍ ﻦﻣ ﻍ
ﻖﻴﻗﺪﻟﺍ ﻥﺯﻭ ﺱﺎﻴﻗ ﺀﺎﻨﺛﺃ ﻪﻛّﺮﺤﺗ ﻭﺃ ﺯﺎﻬﺠﻟﺍ
600 ﻦﻣ
ﻛ ﺃ ﻭﺃ ﻍ
200 ﻦﻣ
ﻂﻠﺨﻟﺎﺑ ﺯﺎﻬﺠﻟﺍ ﺃﺪﺒﻳ ﻥﺃ ﺪﻌﺑ ﻩﺎﻴﳌﺍ ﺔﺤﺘﻓ ﱪﻋ ﺀﻂﺒﺑ ﻞﺋﺎﺴﻟﺍ ﺐﻜﺳﺍ
،ﺎﺘﺳﺎﺒﻟﺍ ﻀﺤﺗ ﺔﻟﺁ ﰲ ﻛ ﺃ ﻭﺃ ﺖﻳﺎﻬﻧﺮﻬﻓ ﺔﺟﺭﺩ
ﲆﻋ (
ﺖﻳﺎﻬﻧﺮﻬﻓ ﺔﺟﺭﺩ
140 /
.
ﺯﺎﻬﺠﻟﺎﺑ ﺭﴐ ﻕﺎﺤﻟﺇ ﱃﺇ ﻚﻟﺫ ﻱﺩﺆﻴﺴﻓ .ﺔﻴﻟﺎﻌﻟﺍ ﺓﺭﺍﺮﺤﻟﺍ ﺔﺟﺭﺩ ﲆﻋ ﻞﻤﻌﻳ ﻢﻴﻘﻌﺗ ،ﻝﺎﺜﳌﺍ ﻞﻴﺒﺳ
ﺔﻳﻮﺌﻣ ﺔﺟﺭﺩ
140 /
60)
ﺔﻳﻮﺌﻣ ﺔﺟﺭﺩ
ﺔﻌﻔﺗﺮﻣ ﻪﺗﺭﺍﺮﺣ ﺔﺟﺭﺩ ﻥﻮﻜﺗ ﻥﺎﻜﻣ ﰲ ﺓﺧﻷﺍ ﻩﺬﻫ ﻊَﻀﺗ
60
ﺎﻬﺗﺭﺍﺮﺣ ﻎﻠﺒﺗ ﺕﺎﻧﻮﻜﻣ ﻱﺃ ﻊَﻀﺗ ﻻ
ﺓﺮﺠﺤﻟﺍ ﺀﺎﻄﻏ ﻊﺿﻭ ﻞﺒﻗ ﻂﻠﺨﻟﺍ ﺓﺮﺠﺣ ﰲ ﺀﺎﳌﺍ ﺐﻜﺴﺗ ﻻ
ﻥﺎﻣﻷﺍ ﺡﺎﺘﻔﻣ ﺔﺤﺘﻓ ﰲ ﺔﻠﺋﺎﺳ ﺓﺩﺎﻣ ﻱﺃ ﺐﻜﺴﺗ ﻻ
ﻀﺤﺗ ﺔﻟﺂﺑ ﺭﴬﻟﺍ ﻕﺎﺤﻟﺇ ﱃﺇ ﻚﻟﺫ ﻱﺩﺆﻴﺴﻓ ،ﻻﺇﻭ .ﻞﻣﺎﻜﻟﺎﺑ ﺠﻌﻟﺍ ﻂﻠﺧ ﺀﺎﻬﺘﻧﺍ ﻞﺒﻗ ﻂﻘﻓ ﺩﺮﻄﻟﺍ ﺞﻣﺎﻧﺮﺑ ﺩﺪﺤﺗ ﻻ
.
ﺎﺘﺳﺎﺒﻟﺍ
ﻝﻮﻧﺎﺑﻭﱪﻟﺍﻭ ﻝﻮﺤﻜﻟﺍﻭ ﻦﻳﺰﻨﺒﻟﺍ ﻞﺜﻣ) ﻒﻴﻈﻨﺗ ﻞﺋﺍﻮﺳ ﻱﺃ ﻭﺃ ﺓﺩﺎﺣ ﻒﻴﻈﻨﺗ ﻞﺋﺍﻮﺳ ﻭﺃ ﺔﻨﺸﺧ ﲇﺟ ﺔﻔﻴﻟ ﻡﺪﺨﺘﺴﺗ ﻻ
.
ﺯﺎﻬﺠﻟﺍ ﻒﻴﻈﻨﺘﻟ
ﺢﻴﺤﺼﻟﺍ ﻞﻜﺸﻟﺎﺑ ﻞﻤﻌﻳ ﻻ ﺪﻗ ﻻﺇﻭ ،ﻡﺍﺪﺨﺘﺳﺍ ﻞﻛ ﺪﻌﺑ ﺯﺎﻬﺠﻟﺍ ﻒﻴﻈﻨﺘﺑ ﻢﻗ
َ
ﺓﺩﺎﺤﻟﺍ ﻑﺍﺮﻃﻷﺎﺑ ﺡﺮﺟ ﻭﺃ ﺔﺑﺎﺻﺇ ﻱﻷ ﺽّﺮﻌﺘﻟﺍ ﻱﺩﺎﻔﺘﻟ ﺯﺎﻬﺠﻟﺍ ﻒﻴﻈﻨﺗ ﺀﺎﻨﺛﺃ ﺪﻳﺪﺸﻟﺍ ﺭﺬﺤﻟﺍ
ﺥﻮﺗ
ﺯﺎﻬﺠﻟﺍ ﰲ ﻡﺎﺴﺟﺃ ﻱﺃ ﻝﺎﺧﺩﺈﺑ ﻢﻘﺗ ﻻ
(EMF)
.
ﺔﻴﺴﻴﻃﺎﻨﻐﳌﺍ ﻝﻮﻘﺤﻠﻟ ﺽّﺮﻌﺘﻟﺎﺑ ﺔﻘﻠﻌﺘﳌﺍﻭ ﻖﻴﺒﻄﺘﻠﻟ ﺔﻠﺑﺎﻘﻟﺍ ﻧﺍﻮﻘﻟﺍﻭ ﻳﺎﻌﳌﺍ ﻞﻛ ﻊﻣ ﺍﺬﻫ
ﺔﻴﺴﻴﻃﺎﻨﻐﻣﻭﺮﻬﻜﻟﺍ ﻝﻮﻘﺤﻟﺍ
Philips
ﺯﺎﻬﺟ ﻖﻓﺍﻮﺘﻳ
.
-
.
-
.
-
.
-
.
-
.
-
ﻻﻭ
-
.
-
.
-
-
(
-
.
-
.
-
.
-
ﺮﻳﻭﺪﺘﻟﺍ ﺓﺩﺎﻋﺇ
،ﻚﻟﺬﺑ ﻡﺎﻴﻘﻟﺍ ﱪﻋ .ﻩﺮﻳﻭﺪﺗ ﺓﺩﺎﻋﻹ ﻲﻤﺳﺭ ﻊﻴﻤﺠﺗ ﺰﻛﺮﻣ ﱃﺇ ﻪﻤﻴﻠﺴﺗ ﱃﺇ ﺪﻤﻋﺍ ﻞﺑ ،ﻪﻠﻤﻋ ﺓﱰﻓ ﺀﺎﻬﺘﻧﺍ ﺪﻨﻋ ﺔﻳﺩﺎﻌﻟﺍ ﺔﻴﻟﺰﻨﳌﺍ ﺕﺎﻳﺎﻔﻨﻟﺍ ﻊﻣ ﺞﺘﻨﳌﺍ ﻦﻣ ﺺﻠﺨﺘﺗ ﻻ
.
ﺔﺌﻴﺒﻟﺍ ﲆﻋ ﺔﻈﻓﺎﺤﳌﺍ ﰲ ﻢﻫﺎﺴﺗ ﺖﻧﺃ
ﺐﻗﺍﻮﻌﻟﺍ ﻊﻨﻣ ﰲ ﺔﺤﻴﺤﺻ ﺔﻘﻳﺮﻄﺑ ﺕﺎﻳﺎﻔﻨﻟﺍ ﻦﻣ ﺺﻠﺨﺘﻟﺍ ﺪﻋﺎﺴﻳ .ﺔﻠﺼﻔﻨﻣ ﺔﻘﻳﺮﻄﺑ ﺔﻴﺋﺎﺑﺮﻬﻜﻟﺍﻭ ﺔﻴﻧﻭﱰﻜﻟﻹﺍ ﺕﺎﺠﺘﻨﳌﺍ ﻊﻤﺠﻟ ﻙﺪﻠﺑ ﰲ
.
ﺹﺎﺨﺷﻷﺍ ﺔﺤﺻﻭ ﺔﺌﻴﺒﻟﺍ ﲆﻋ ﺔﻴﺒﻠﺴﻟﺍ
ﺓﺪﻤﺘﻌﳌﺍ ﻧﺍﻮﻘﻟﺍ ﻊﺒﺗﺍ
ﻢﻋﺪﻟﺍﻭ ﻥﻀﻟﺍ
.
ﻞﺼﻔﻨﳌﺍ ﻲﳌﺎﻌﻟﺍ ﻥﻀﻟﺍ ﺐّﻴﺘﻛ ﺃﺮﻗﺍ ﻭﺃ www.philips.com/support ﺓﺭﺎﻳﺰﺑ ﻞﻀﻔﺘﻓ ،ﻢﻋﺪﻟﺍ ﻭﺃ ﺕﺎﻣﻮﻠﻌﳌﺍ ﱃﺇ ﺔﺟﺎﺤﺑ ﺖﻨﻛ ﺍﺫﺇ
ﺔﻣﺪﻘﻣ
ً
ﺎﺒﺣﺮﻣﻭ ،ﺞﺘﻨﳌﺍ ﻚﺋﺍﴍ ﲆﻋ ﺎﻨﻴﻧﺎﻬﺗ
ﻪﻣﺪﻘﺗ ﻱﺬﻟﺍ ﻢﻋﺪﻟﺍ ﻦﻣ ﻞﻣﺎﻜﻟﺎﺑ ﺓﺩﺎﻔﺘﺳﻼﻟ
.
www.philips.com/welcome ﰲ ﻚﺠﺘﻨﻣ ﻞﻴﺠﺴﺘﺑ ﻢﻗ ،
!Philips ﰲ ﻚﺑ
Philips
-
-
Page 28

ﺔﻴﺑﺮﻌﻟﺍ
30
ً
.
ﻼﺒﻘﺘﺴﻣ ﻪﻴﻟﺇ ﻉﻮﺟﺮﻠﻟ ﻪﺑ ﻆﻔﺘﺣﺍﻭ ﺯﺎﻬﺠﻟﺍ ﻡﺍﺪﺨﺘﺳﺍ ﻞﺒﻗ ﺔﻳﺎﻨﻌﺑ ﺍﺬﻫ ﻡﺪﺨﺘﺴﳌﺍ ﻞﻴﻟﺩ ﺃﺮﻗﺍ
ﺪﻬﺠﻟﺍ ﻊﻣ ﺯﺎﻬﺠﻟﺍ ﻦﻣ ﲇﻔﺴﻟﺍ ﺀﺰﺠﻟﺍ ﰲ ﻪﻴﻟﺇ ﺭﺎﺸﳌﺍ ﺎﺑﺮﻬﻜﻟﺍ ﺪﻬﺠﻟﺍ ﻖﻓﺍﻮﺗ ﻦﻣ ﺪﻛﺄﺗ ،ﺔﻗﺎﻄﻟﺎﺑ ﺯﺎﻬﺠﻟﺍ ﻞﻴﺻﻮﺗ ﻞﺒﻗ
.
ﺔﻴﻠﺤﳌﺍ ﺔﻗﺎﻄﻠﻟ ﺎﺑﺮﻬﻜﻟﺍ
ﺯﺎﻬﺠﻟﺍ ﺍﺬﻫ ﺪﻳﻭﺰﺗ ﻢﺘﻳ ﻻﺃ ﺐﺠﻳ ،ﺪﺼﻗ ﻏ ﻦﻋ ﻱﺭﺍﺮﺤﻟﺍ ﻊﻃﺎﻘﻟﺍ ﻴﻌﺗ ﺓﺩﺎﻋﺇ ﻦﻋ ﻢﺟﺎﻧ ﺮﻄﺧ ﻱﺃ ﻱﺩﺎﻔﺗ ﻑﺪﻬﺑ
ﻑﺎﻘﻳﺇﻭ ﺎﻬﻠﻴﻐﺸﺗ ﻢﺘﻳ ﺔﻴﺋﺎﺑﺮﻬﻛ ﺓﺮﺋﺍﺪﺑ ﻪﻠﻴﺻﻮﺗ ﻭﺃ ،ًﻼﺜﻣ ﺖﻗﺆﳌﺎﻛ ،ﻲﺟﺭﺎﺧ ﻞﺻﻭﻭ ﻞﺼﻓ ﺯﺎﻬﺟ ﺔﻄﺳﺍﻮﺑ ﺔﻗﺎﻄﻟﺎﺑ
.
ﺓﺍﺩﻷﺍ ﻦﻣ ﻢﻈﺘﻨﻣ ﻞﻜﺸﺑ ﺎﻬﻠﻴﻐﺸﺗ
ﻩﺎﻴﳌﺍ ﰲ ﺎﻬﻌﻘﻨﺗ ﻭﺃ ﺔﻴﺴﻴﺋﺮﻟﺍ ﺓﺪﺣﻮﻟﺍ ﻒﻄﺸﺗ ﻻ ،ﺭﴐ ﻭﺃ ﺔﻴﺋﺎﺑﺮﻬﻛ ﺔﻣﺪﺻ ﺙﻭﺪﺣ ﺮﻄﺧ ﻱﺩﺎﻔﺘﻟ
ﺔﺤﻴﺤﺻ ﺔﻘﻳﺮﻄﺑ ﻊّﻤﺠﻣ ﺯﺎﻬﺠﻟﺍ ﻥﺃ ﻦﻣ ﺪﻛﺄﺗ ،ﺔﻗﺎﻄﻟﺍ ﺬﺧﺄﻣ ﰲ ﺲﺒﻘﳌﺍ ﻝﺎﺧﺩﺇ ﻞﺒﻗ
ﻯﺮﺧﺃ ﺀﺍﺰﺟﺃ ﻭﺃ ﺲﺑﺎﻘﻟﺍ ﻭﺃ ﺔﻗﺎﻄﻟﺍ ﻚﻠﺳ ﻒﻠﺗ ﻝﺎﺣ ﰲ ﺯﺎﻬﺠﻟﺍ ﻡﺪﺨﺘﺴﺗ ﻻ
ﻞﺒﻗ ﻦﻣ ﻝﱠﻮﺨﻣ ﺔﻣﺪﺧ ﺰﻛﺮﻣ ﻭﺃ
ً
،ﺔﻳﺪﺴﺠﻟﺍ ﺕﺍﺭﺪﻘﻟﺍ ﰲ
ﻢﻫﺎﻄﻋﺃ ﻭﺃ ﻝﻭﺆﺴﻣ ﺺﺨﺷ ﻢﻬﻴﻠﻋ ﻑﴍﺃ ﺍﺫﺇ ﻻﺇ ،ﺔﻓﺮﻌﳌﺍ ﻭﺃ ﺓﱪﺨﻟﺍ ﻢﻬﺼﻘﻨﺗ ﻦﻳﺬﻟﺍ ﻭﺃ ،ﺔﻴﻠﻘﻌﻟﺍ ﻭﺃ ﺔﻴﺴﺤﻟﺍ ﻭﺃ
ﺎﺼﻘﻧ ﻥﻮﻧﺎﻌﻳ ﻦﻳﺬﻟﺍ (ﻝﺎﻔﻃﻷﺍ ﻚﻟﺫ ﰲ ﺎ) ﺩﺍﺮﻓﻷﺍ ﻞﺒﻗ ﻦﻣ ﻡﺍﺪﺨﺘﺳﻼﻟ
Philips
.
ﻢﻬﺘﻣﻼﺳ ﲆﻋ ﻅﺎﻔﺤﻟﺍ ﻑﺪﻬﺑ ﻚﻟﺫﻭ ،ﺯﺎﻬﺠﻟﺍ ﻡﺍﺪﺨﺘﺳﺎﺑ ﻖﻠﻌﺘﺗ ﺕﺍﺩﺎﺷﺭﺇ
ﻞﺒﻗ ﻦﻣ ﻪﻟﺍﺪﺒﺘﺳﺍ ﺐﺠﻴﻓ ،ًﺎﻔﻟﺎﺗ ﺔﻗﺎﻄﻟﺍ ﻚﻠﺳ ﻥﺎﻛ ﺍﺫﺇ
.
ﺮﻄﺧ ﻱﺃ ﺐﻨﺠﺘﻟ ﻠﻫﺆﻣ ﺹﺎﺨﺷﺃ
ﺪﻌﻣ ﻏ ﺯﺎﻬﺠﻟﺍ ﺍﺬﻫ
ّ
ﺯﺎﻬﺠﻟﺎﺑ ﻢﻬﺒﻌﻟ ﻥﻭﺩ ﻝﻭﺆﺤﻠﻟ ﻝﺎﻔﻃﻷﺍ ﺔﺒﻗﺍﺮﻣ ﺐﺠﻳ
ﺔﺒﻗﺍﺮﻣ ﻥﻭﺩ ﻦﻣ ﺔﻧﺎﻴﺼﻟﺍ ﻝﻋﺃ ﻭﺃ ﻒﻴﻈﻨﺘﻟﺎﺑ ﻡﺎﻴﻘﻟﺍ ﻝﺎﻔﻃﻷﺍ ﲆﻋ ﺐﺠﻳ ﻻ
ﻒﻴﻈﻨﺘﻟﺍ ﻭﺃ ﻚﻔﻟﺍ ﻭﺃ ﻊﻴﻤﺠﺘﻟﺍ ﻞﺒﻗ ﻭﺃ ﺔﺒﻗﺍﺮﻣ ﻥﻭﺪﺑ ﻙﺮُﺗ ﺍﺫﺇ ﺔﻗﺎﻄﻟﺎﺑ ﺪﻳﻭﺰﺘﻟﺍ ﺓﺪﺣﻭ ﻦﻋ ﺯﺎﻬﺠﻟﺍ ﺎًﺍﺩ ﻞﺼﻓﺍ
ﻙﺮﺤﺘﺗ ﻲﺘﻟﺍ ﻊﻄﻘﻟﺎﺑ ﻙﺎﺴﻣﻹﺍ ﻭﺃ ﺕﺎﻘﺤﻠﳌﺍ ﻴﻐﺗ ﻞﺒﻗ ﺔﻗﺎﻄﻟﺎﺑ ﺪﻳﻭﺰﺘﻟﺍ ﺓﺪﺣﻭ ﻦﻋ ﻪﻠﺼﻓﺍﻭ ﺯﺎﻬﺠﻟﺍ ﻞﻴﻐﺸﺗ ﻒﻗﻭﺃ
.
ﻡﺍﺪﺨﺘﺳﻻﺍ ﺀﺎﻨﺛﺃ
ّ
ﻚﻔﺑ ﻢﻗ
ﺪﻌﻣ ﺯﺎﻬﺠﻟﺍ ﺍﺬﻫ
ّ
ﻔﻇﻮﳌﺍ ﺦﺑﺎﻄﻣ ﻞﺜﻣ ﻦﻛﺎﻣﺃ ﰲ ﻡﺍﺪﺨﺘﺳﻼﻟ
ﰲ
ﺀﻼﻤﻌﻟﺍ ﻞﺒﻗ ﻦﻣ ﻡﺍﺪﺨﺘﺳﻼﻟ ﺎًﻀﻳﺃ ﺍﺪﻌﻣ ﺲﻴﻟﻭ .ﻞﻤﻌﻟﺍ ﺕﺎﺌﻴﺑ ﻦﻣ ﺎﻫﻏ ﻭﺃ ﻉﺭﺍﺰﳌﺍ ﻭﺃ ﺐﺗﺎﻜﳌﺍ ﻭﺃ ﺮﺟﺎﺘﳌﺍ
.
ﺔﻴﻨﻜﺴﻟﺍ ﻦﻛﺎﻣﻷﺍ ﻦﻣ ﺎﻫﻏﻭ ﺭﺎﻄﻓﻹﺍﻭ ﻡﻮﻨﻠﻟ ﺔﺼﺼﺨﳌﺍ ﻦﻛﺎﻣﻷﺍﻭ ﺓﻐﺼﻟﺍ ﻕﺩﺎﻨﻔﻟﺍﻭ ﻕﺩﺎﻨﻔﻟﺍ
45
ﺔﻘﻴﻗﺩ
ﺓﺪﳌ ﺭﺍﺮﻤﺘﺳﺎﺑ ﻪﻣﺍﺪﺨﺘﺳﺍ ﻝﺎﺣ ﰲ ﺔﻘﻴﻗﺩ
ﱃﻭﻷﺍ ﺓﺮﻤﻠﻟ ﺯﺎﻬﺠﻟﺍ ﻡﺍﺪﺨﺘﺳﺍ ﻞﺒﻗ ﺔﻳﺎﻨﻌﺑ ﺎﻬﻠﺴﻏﺍﻭ ﺕﺎﻘﺤﻠﳌﺍ
ﺪﻌﻣ ﻏ ﻮﻫﻭ .ﻂﻘﻓ ﻱﺩﺎﻌﻟﺍ ﱄﺰﻨﳌﺍ ﻡﺍﺪﺨﺘﺳﻼﻟ
ّ
ﺮﻘﺘﺴﻣ ﻏ ﻭﺃ
15
ﻮﺘﺴﻣ ﻏ ﺢﻄﺳ ﲆﻋ ﺯﺎﻬﺠﻟﺍ ﺍﺬﻫ ﻡﺪﺨﺘﺴﺗ ﻻ
ٍ
ﺓﺪﳌ ﻪﻓﺎﻘﻳﺈﺑ ﺢﺼﻨﻧ ،ﻞﻀﻓﺃ ﺔﻘﻳﺮﻄﺑ ﺯﺎﻬﺠﻟﺍ ﺮﻤﻋ ﺔﻳﺤﻟ
ﺔﻘﻓﺮﳌﺍ ﻒﻴﻈﻨﺘﻟﺍ ﺓﺍﺩﺄﺑ ﻞﻴﻜﺸﺘﻟﺍ ﺹﺮﻗ ﻒﻴﻈﻨﺘﺑ ﻢﻘﻓ ،ﺮﻤﺘﺴﻣﻭ ﻞﺻﺍﻮﺘﻣ ﻞﻜﺸﺑ ﺯﺎﻬﺠﻟﺍ ﻡﺍﺪﺨﺘﺳﺍ ﻱﻮﻨﺗ ﺖﻨﻛ ﺍﺫﺇ
.
ﺓﴍﺎﺒﻣ ﺀﺎﳌﺎﺑ ﻞﻴﻜﺸﺘﻟﺍ ﺹﺮﻗ ﺮﻤﻐﺗ ﻻ ،ﺢﻳﺮﻣ ﻒﻴﻈﻨﺘﻟ .ﻪﻣﺍﺪﺨﺘﺳﺍ ﺪﻌﺑ ﺓﺮﻣ ﻞﻛ
ﻪﻣﺍﺪﺨﺘﺳﺍ ﻡﺪﻋ ﺀﺎﻨﺛﺃ ﺔﻗﺎﻄﻟﺍ ﺭﺪﺼﻣ ﻦﻋ ﺯﺎﻬﺠﻟﺍ ﻞﺼﻓﺍ
ﺯﺎﻬﺠﻟﺍ ﲆﻋ ﺔﻠﻴﻘﺛ ﺎًﺿﺍﺮﻏﺃ ﻊﻀﺗ ﻻ
ﻞﻴﻐﺸﺘﻟﺍ ﺪﻴﻗ ﻥﻮﻜﻳ ﺎﻣﺪﻨﻋ ﺯﺎﻬﺠﻟﺍ ﻙﺮﺤﺗ ﻻ
ﺔﺷﺎﺸﻟﺍ ﲆﻋ ﻞﺋﺎﺳ ﻱﺃ ﻭﺃ ﻩﺎﻴﳌﺍ ﺐﻜﺴﺗ ﻻ ،ﺔﻴﺋﺎﺑﺮﻬﻛ ﺔﻣﺪﺻ ﻭﺃ ﺔﻴﺋﺎﺑﺮﻬﻛ ﺓﺭﺍﺩ ﴫﻗ ﻝﻮﺼﺣ ﻱﺩﺎﻔﺘﻟ
ﺔﻳﻼﺟ ﻡﺪﺨﺘﺴﺗ ﻻ
ﺪﺷ ﲆﻋ ﺹﺮﺣﺍ
ّ
ﺔﻗﺎﻄﻟﺍ ﺭﺪﺼ
ﺯﺎﻬﺠﻟﺍ ﻒﻴﻈﻨﺘﻟ
ً
ﻼﺼﺘﻣ ﺯﺎﻬﺠﻟﺍ ﻥﻮﻜﻳ ﺎﻣﺪﻨﻋ ﻂﻠﺨﻟﺍ ﺓﺮﺠﺣ ﺲﻤﻠﺗ ﻻ
ﻊﻴﻤﺠﺘﻟﺍ ﺀﺎﻨﺛﺃ ﺔّﻴﻣﺎﻣﻷﺍ ﺔﺣﻮﻠﻟﺍ ﺢﻴﺗﺎﻔﻣ
ﻡﺎﻫ
.
.
.
ﻭﺃ Philips
.
.
.
.
ﰲ
.
.
ﰲ
.
.
.
.
.
.
.
-
-
-
-
-
-
-
-
-
-
-
-
-
-
-
-
-
-
-
-
-
-
-
Page 29
ﺕﺎﻳﻮﺘﺤﳌﺍ
ﺔﻴﺑﺮﻌﻟﺍ
31
30
29 (EMF)
29
29
29
28 (1
28 (2
28
28
27
27
26
26
26
25
25
24
ﺔﻴﺴﻴﻃﺎﻨﻐﻣﻭﺮﻬﻜﻟﺍ ﻝﻮﻘﺤﻟﺍ
ﺮﻳﻭﺪﺘﻟﺍ ﺓﺩﺎﻋﺇ
ﻢﻋﺪﻟﺍﻭ ﻥﻀﻟﺍ
ﺓﺭﻮﺼﻟﺍ) ﺞﺘﻨﳌﺍ ﻝﻮﺣ ﺔﻣﺎﻋ ﺔﺤﳌ
ﺓﺭﻮﺼﻟﺍ) ﻢّﻜﺤﺘﻟﺍ ﺔﺣﻮﻟ ﻝﻮﺣ ﺔﻣﺎﻋ ﺔﺤﳌ
ﺓﺮﻓﻮﺘﳌﺍ ﺕﺎﻘﺤﻠﳌﺍ
ﻞﻴﻜﺸﺘﻟﺍ ﺹﺍﺮﻗﺃ
ﱃﻭﻷﺍ ﺓﺮﻤﻠﻟ ﻡﺍﺪﺨﺘﺳﻻﺍ ﻞﺒﻗ ﻒﻴﻈﻨﺘﻟﺍﻭ ﻚﻔﻟﺍ
ﺔﻧﻭﺮﻜﻌﳌﺍ ﻀﺤﺗ ﺔﻟﺁ ﻡﺍﺪﺨﺘﺳﺍ
ﻀﺤﺘﻟﺍ ﺀﺪﺑ
ﺎﺘﺳﺎﺒﻟﺍ ﻀﺤﺗ ﺞﻣﺎﻧﺮﺑ ﻞﻴﻐﺸﺗ ﺀﺪﺑ
ﻒﻴﻈﻨﺘﻟﺍ
ﺎﻬﺣﻼﺻﺇﻭ ﺀﺎﻄﺧﻷﺍ ﻑﺎﺸﻜﺘﺳﺍ
ﻡﺎﻫ
ﺔﻣﺪﻘﻣ
ﻊﻴﻤﺠﺘﻟﺍ
ﻦﻳﺰﺨﺘﻟﺍ
Page 30

 Loading...