

Page 1
商品の使い方や修理に関するご相談窓口
フィリップスサポートセンター
0120-944-859
受付時間: 9:00 〜 18:00
(土・日・祝日及び年末年始を除く)
メール: [email protected]
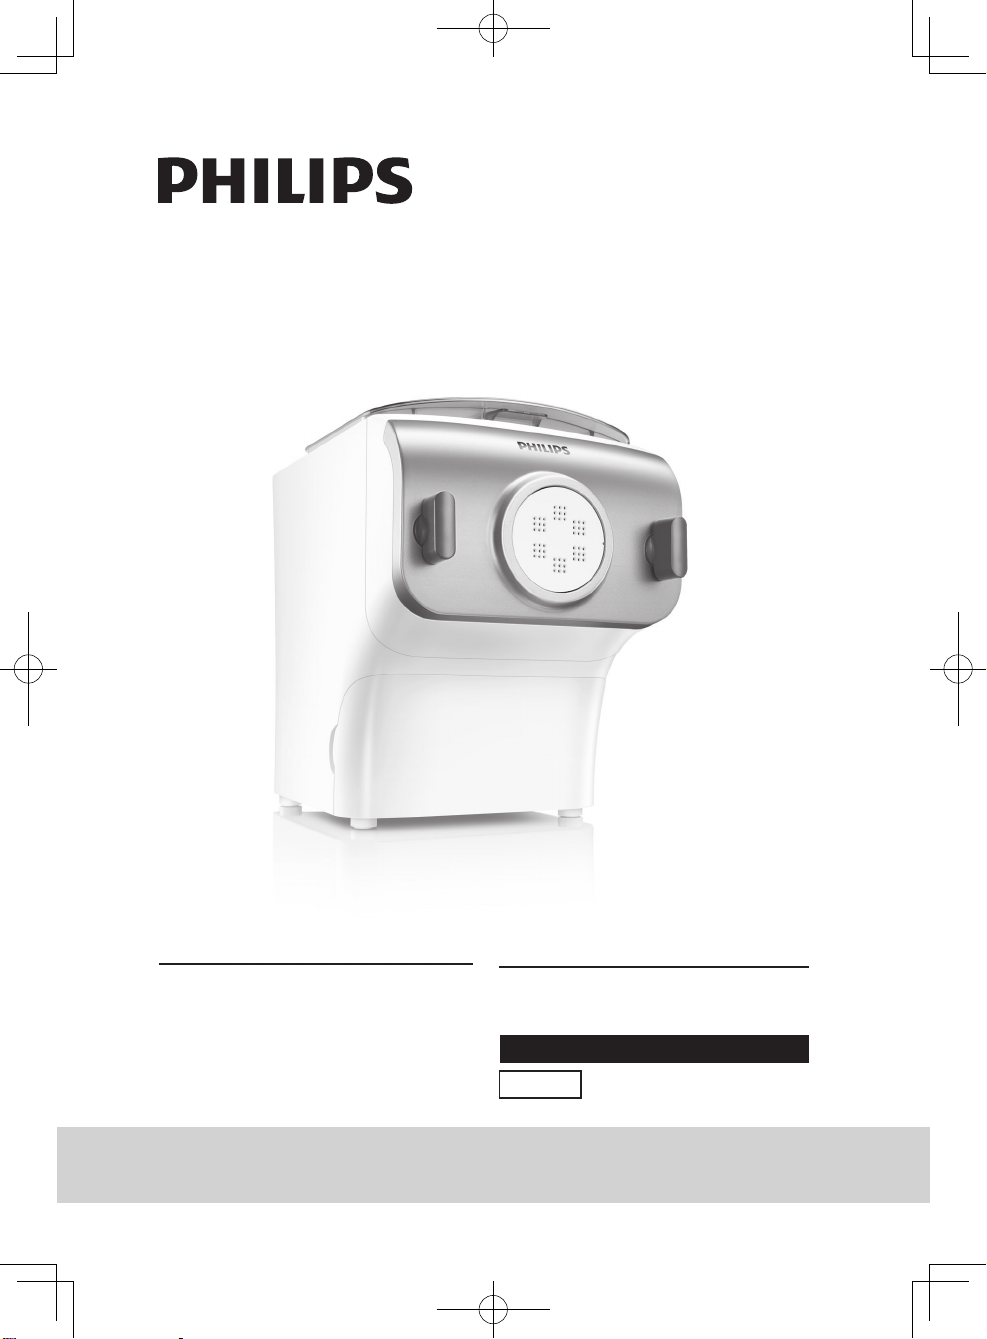
フィリップス ヌードルメーカー
品番
保証書付
HR2365/01
取 扱 説 明 書
保証書は、この取扱説明書の最終ページについ
ておりますので販売店で記入を受けてください。
1.6 mm角麺の製麺用キャップは、製品本体に取り付けられております。
はじめてお使いになる前にすべてのアクセサリー類を一度洗ってからご使用ください。
Page 2
フィリップス ヌードルメーカー (Noodle Maker) をお買い上げいただき、まことに
ありがとうございます。長い間ご愛用いただくために、ご使用前にこの取扱説明
書をよくお読みのうえ、正しくお使いください。
また、お読みになった後は、お使いになる方がいつでも見られるところに必ず保
管してください。
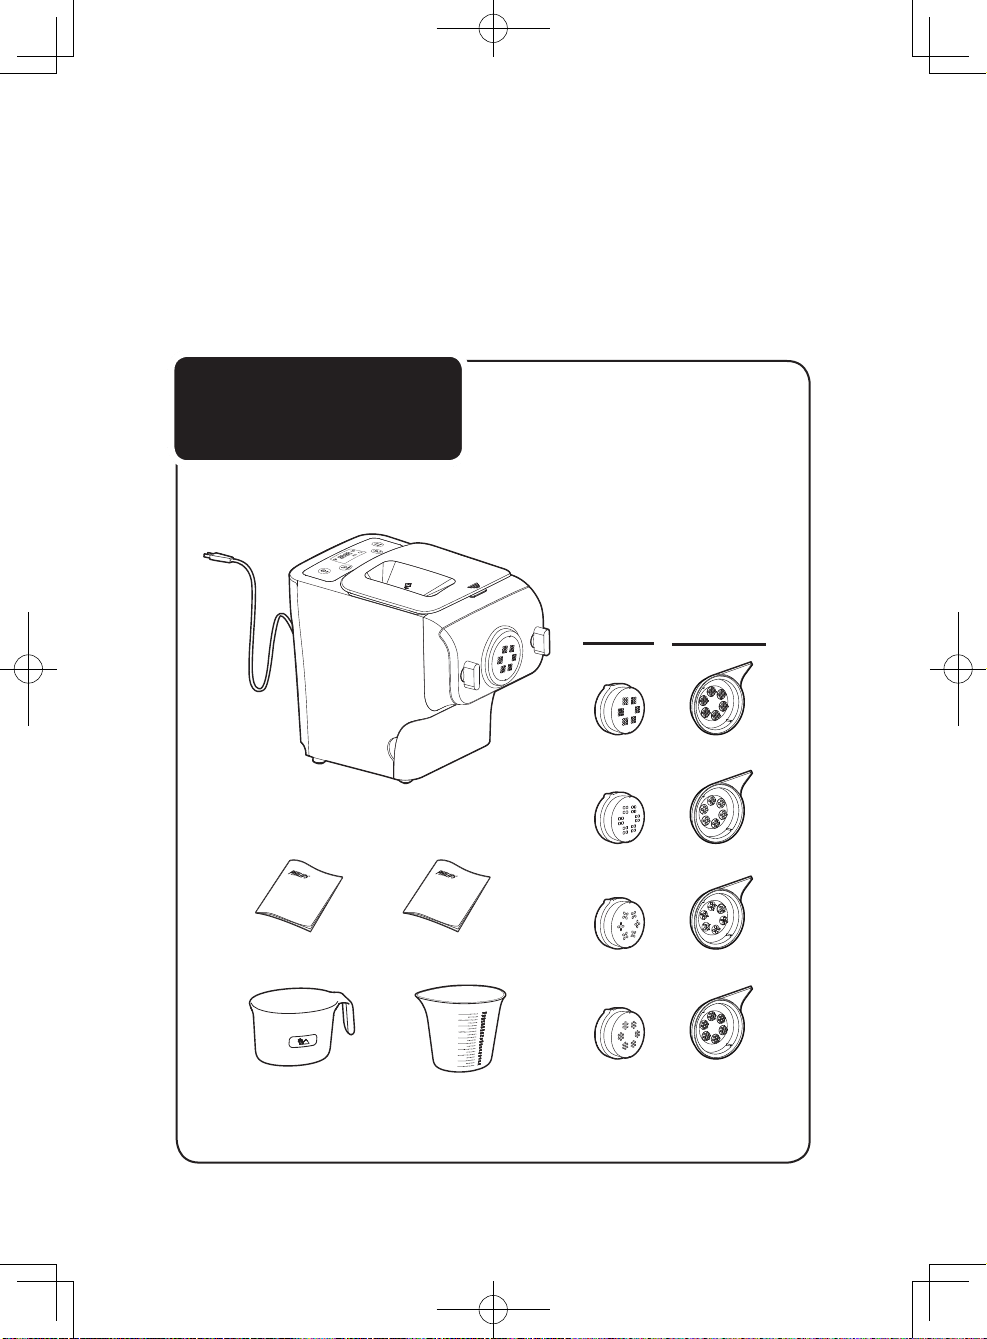
商品のご確認
製品本体
取扱説明書 レシピブック
計量カップ(粉用)
計量カップ(水用)
商品をご確認ください
製麺用
キャップ
1.6mm
角麺
2.5mm
角麺
1.6mm
平麺
クリーニング
キット
2mm
丸麺
※ 改良の為、仕様を予告なく変更することがあります。
※ 1.6mm 角麺製麺用キャップは製品に取り付けられています。
2
Page 3
目 次
● は じ め に
● ご 使 用 方 法
● 困 っ た と き
● 英 文 解 説
商品のご確認 ………………………………… 2
目次 …………………………………………… 3
必ずお守りください ………………………… 4
各部の名称 …………………………………… 6
初めてお使いいただく前に ………………… 8
準備する …………………………………… 10
ヌードルメーカーの使用 ………………… 12
お手入れ方法 ……………………………… 16
レシピ ……………………………………… 19
故障かな?と思ったら …………………… 20
Guidance in English ……………………
22
〜 42
● 保 証
保証とアフターサービス ………………… 43
仕様/フィリップスサポートセンター …… 44
無料修理規定……………………………… 45
保証書……………………………………… 46
3
Page 4

必ずお守り
ください
安 全 上 の ご 注 意
● ここに示した注意事項は、安全に関する重要な
内容ですので、必ず守ってください。
● 誤った取扱いをしたときに想定される内容を
「警告」と「注意」とに区分けしています。
○ 絵表示について
○ 絵表示の例
● 本製品の改造はしない。また、修理
技術者以外の人は、分解したり修理
をしない。火災、感電、ケガの原因と
なります。修理はフィリップスサポート
センターにご相談ください。
● お手入れの際は必ず電源プラグ部を
コンセントから抜く。また、濡れた手
で抜き差ししない。感電やケガをする
ことがあります。
● 電源コードや電源プラグ部が傷んだ
り、コンセントの差し込みが緩いとき
は使用しない。感電・ショート・発火
の原因になります。
● 電源コードを無理に曲げたり、引っ
張ったり、ねじったり、たばねたり、重
い物を載せたり、挟み込んだり、加工
したりしない。電源コードが破損し、
火災・感電の原因となります。
● 製品本体を水につけたり、水をかけ
たりしない。故障や、ショート・感電
の原因になります。
記号は、「危険、警告、注意」を示します。
図の中や近くに具体的な注意内容を示します。
人が死亡または重傷を負う可能性が想定される内容。
警告
人が傷害を負う可能性及び物的損害のみの発生が
注意
想定される内容。
• 記号は、してはいけない「禁止」を示します。図の中や近くに具体的
な禁止内容(左図の場合は分解禁止)を示します。
• 記号は、必ずしていただく「強制」を示します。図の中や近くに具体的
な強制内容(左図の場合は電源プラグをコンセントから抜くこと)を
示します。
警 告
● 乳幼児の手の届くところに本製品を置
かないでください。また、お子様など、取
扱いに不慣れな方だけで使わせないで
ください。やけど・感電・けがをするおそ
れがあります。
● 異臭、異音が出たり、落下や破損したと
きはコンセントから電源プラグ部を抜く。
そのまま使用すると、事故の原因になり
ます。必ず使用を中止し、フィリップスサ
ポートセンターにご相談ください。
● 雷が鳴ったら、製品本体や電源プラグ部
に触らない。感電の原因となります。
● 電源プラグ部はコンセントに確実に
差し込む。差し込みが不完全な場合、感
電・発火の原因となります。
● 本製品の内部に金属物や燃えやすいも
のを入れない。事故や故障の原因となり
ます。
4
Page 5

警 告
● 使用後はコンセントから電源プラグ部
を抜く。火災、感電の原因となります。
● 電源は交流 100V、定格 15A 以上の
コンセントを単独で使用する。延長
コードは使用しないでください。
● 運転中は製麺用ケースの中に手や指
を入れない。けがをするおそれがあり
ます。
注 意
● 電源プラグ部を抜くときは、電源
コード部を持たずに必ず先端の電源
プラグ部を持って引き抜く。感電
やショートして発火することがあります。
● 電源プラグ部にピンやゴミを付着
させない。感電・ショート、発火の原
因になります。
● 不安定な場所の上に置かない。ぐらつ
く台や傾いた所などの不安定な場所
に置くと、落ちたり、倒れたりしてケガ
の原因となります。
● 壁や家具などに接触させた状態で使
用しない。製品の周辺は少なくとも
10cm 以上空けて使用してください。熱
により、変色、変形、火災の原因となり
ます。
● 電源プラグをタイマー機器等に接続し
てのご使用は止めてください。
● 本製品より煙があがっている場合は、
すぐにコンセントから電源プラグ部を
抜く。
● 製品本体の上に物を載せない。重
みで外装が変形したり破損するな
ど、故障の原因となることがありま
す。また、載せたものが落下したり
倒れたりし、事故や故障の原因と
なります。
● 置く場所に注意する。油煙や湯気が当
たる場所に置かない。温度が高くなる
場所や、熱を発生する機器のそばに置
かない。直射日光の当たる高温の場
所に置かない。湿度やほこりの多い場
所に置かない。事故や故障の原因とな
ります。
使 用 上 の ご 注 意
本製品は、家庭用調理器です。それ以外の目的で使用しないでください。
1.
電源プラグをコンセントに接続する前に部品が正しく取り付けられているかご確認ください。
2.
はじめてお使いになる前にすべてのアクセサリー類を一度洗ってからご使用ください。
3.
製品本体、及びすべてのアクセサリーのお手入れには、食洗機はご使用しないでください。
4.
製品の動作中に電源プラグを抜かないでください。
5.
製品を末永くお使いいただくために、連続使用する場合は 45 分を目安に、15 分程度の間隔を空け
6.
てご使用ください。
すべてのアクセサリーはご使用の度に清掃し、水に浸したまま放置しないでください。
7.
使用中は製品本体を動かさないでください。
8.
5
Page 6
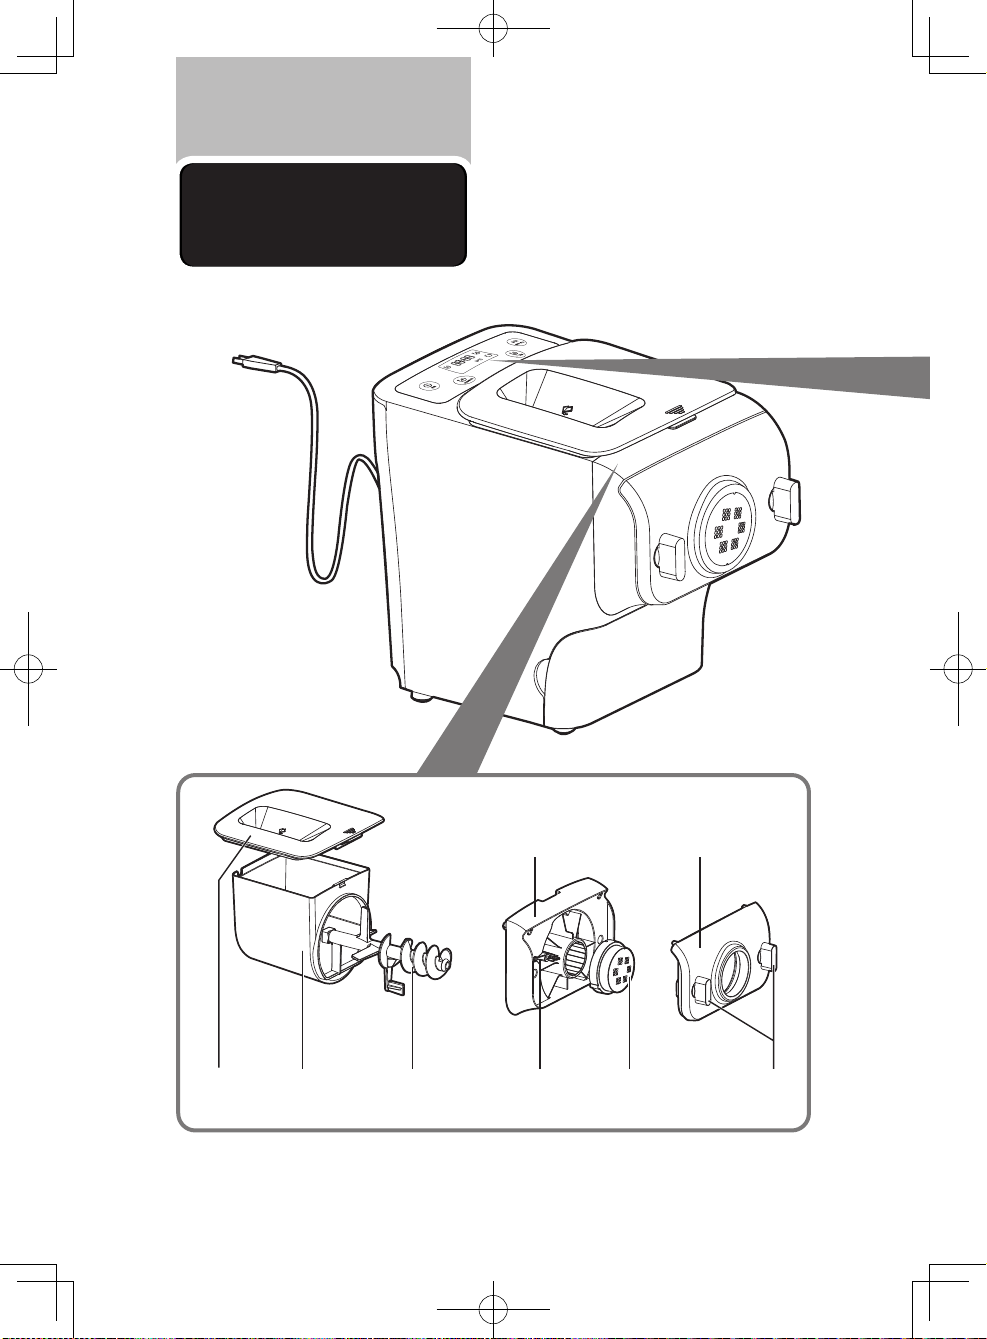
各部の名称
カバー
製麺用ケース 製麺棒
キャップホルダー
キャップホルダーの
安全スイッチレバー
6
製麺用
キャップ
前面パネル
前面パネルの
つまみ
Page 7
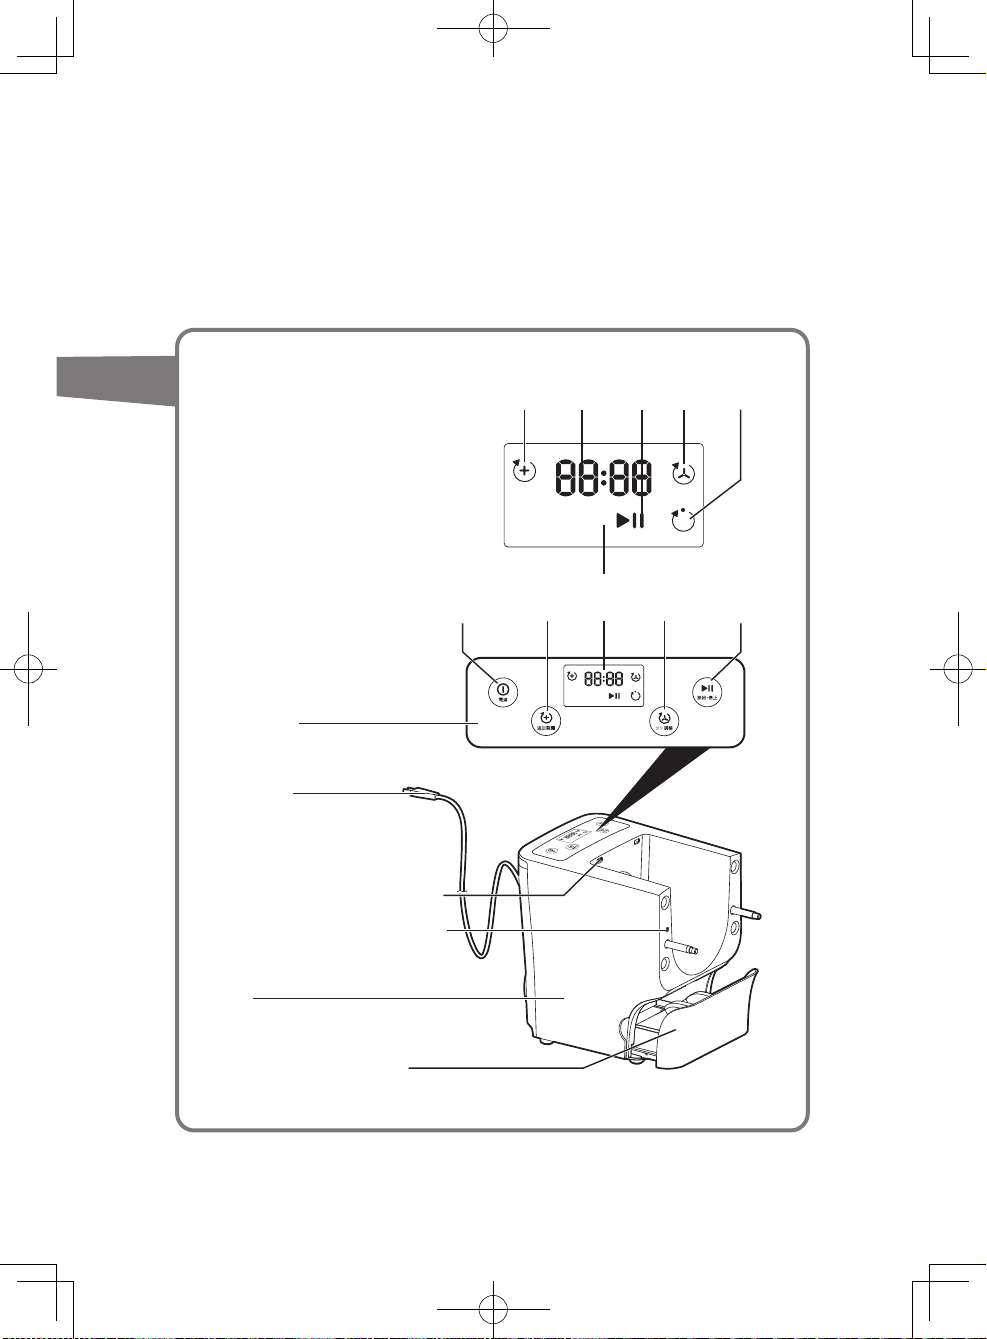
追加製麺
サイン
タイマー表示開始・
停止サイン
生地こね
サイン 製麺サイン
操作パネル
電源コード
製麺用ケースの安全スイッチ穴
キャップホルダーの安全スイッチ
本体
製麺用キャップ収納トレイ
電源ボタン
追加製麺
ボタン
ディスプレイ画面コシ調整
ボタン
開始/停止
ボタン
7
Page 8
初めてお使い
いただく前に
● 本体は水ですすいだり、水に浸けたりしないでください。
● スチール製のたわし、苛性ソーダや研磨剤を含む洗剤を使用しないでください。
プラスチックの表面に傷がつき、ヌードルメーカーの寿命に影響を及ぼします。
● お手入れの際は部品のふちや角で指を怪我をしないようご注意ください。
注意
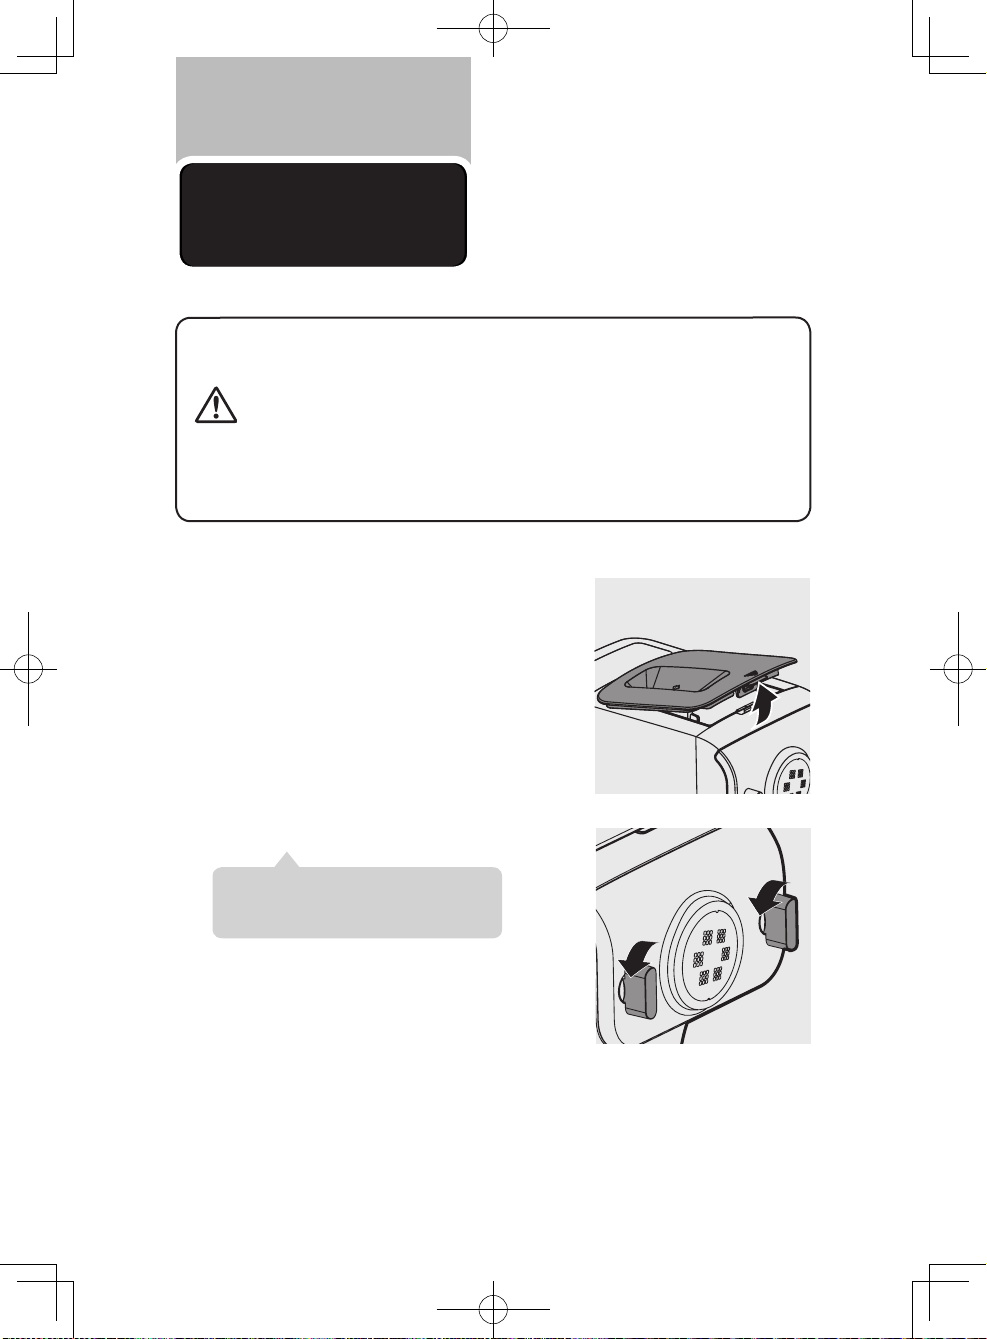
本体から製麺用ケースのカバーを取り外
1
します。
● すべての部品とアクセサリーを取り出します。
● 初めて使用する前にすべての部品とアクセサリーを掃除します(「お手入れ方法」を参照)。
● すべての部品とアクセサリーのお手入れには食洗機はご使用しないでください。
前面パネルのつまみを緩めます。
2
※ 前面パネルは重たくなっております。
取り外される際には十分お気をつけくだ
さい。
8
Page 9

前面パネル、製麺用キャップ、キャップホ
2
3
4
5
1
3
ルダー、製麺棒、製麺用ケースを、図に示
す順序で取り外します。
上記で取り外した部品をすべて洗い、
4
よく拭いて乾かします。
9
Page 10

準備する
1
2
● 組み立て後は、前面パネルのつまみがしっかり締まっていることを確認してください。
● 電源プラグ部がコンセントに差し込まれていないことを確認してください。
注意
製麺用ケースを本体に押し込みます。
1
製麺棒を本体の穴に向け、本体にしっか
2
りと差し込みます。
●ヌードルメーカーを使用する前に、すべての部品とアクセサリーが完全に乾いていること
を確認します。
ヌードルメーカーは以下の手順に
沿って組み立ててください。
キャップホルダーを本体に取り付けます。
3
※ ❶ キャップホルダーの安全スイッチ
※ ❷ キャップホルダーの安全スイッチレバー
※ キャップホルダーの安全スイッチ❶と安
全スイッチレバー❷が右図の位置にある
ことを確認してください。
10
Page 11
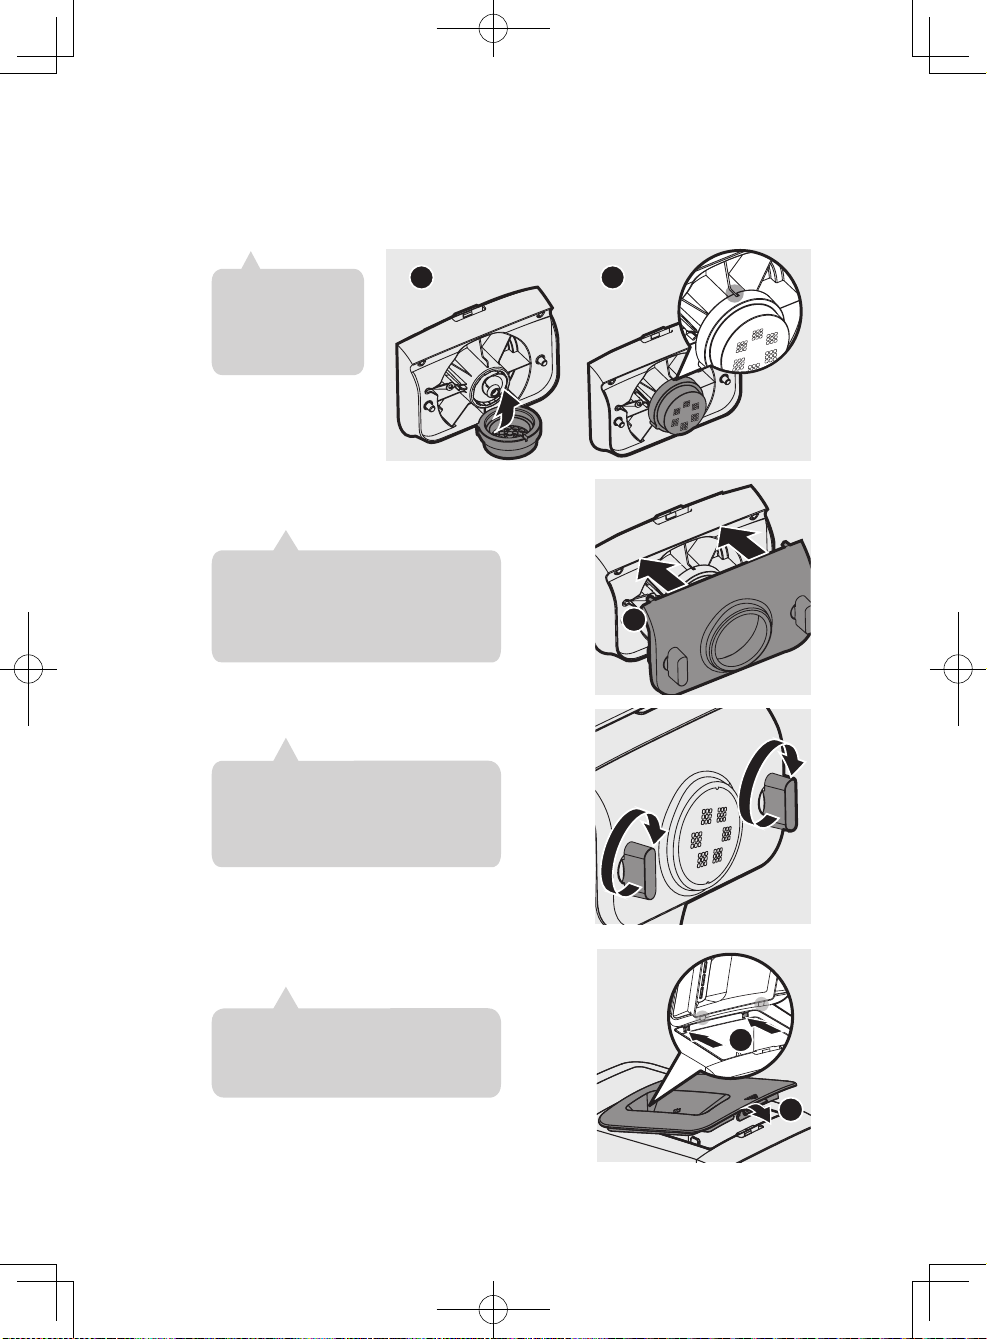
❶ 製麺用キャップをキャップホルダー
1
1
2
4
に取り付け、❷しっかり固定されているこ
とを確認します。
※ 製麺用キャップと
キャップホルダー
の溝(凹凸)が合う
ようにセットしてく
ださい。
前面パネルを本体に取り付けます。
5
※ ❶ キャップホルダーの安全スイッチレバー
※ 機器を使用する前に、前面パネルが完全
に固定されていることを確認してください。
※ 前面パネルは重たくなっております。
取り外される際には十分お気をつけくだ
さい。
前面パネルのつまみを締めます。
6
※ 前面パネルがしっかりと固定されない場
合、または製麺用キャップが正しく固定さ
れていない場合は、キャップホルダーの
安全スイッチレバーが押されずに本機が
作動しません。
1
2
製麺用ケースのカバーをしっかり閉めま
7
す。
※ 製麺用ケースのカバーを右図の❶と❷に
はめてください。カバーが❶と❷に入って
いない場合、安全スイッチが押されずに、
本機が作動しません。
11
Page 12
ヌードルメーカー
の使用
● 粉や水は正しい順序で製麺用ケースに入れるようにしてください。 まず粉を製麺用ケースに入れてから、
製麺用ケースのカバーをしっかり閉めます。 ヌードルメーカーを始動し、カバーの開口部全体に沿わせて
水をゆっくり注ぎます。
● 製麺用ケースの中に、粉と水を最初から決して混ぜないようにしてください。各手順に従い麺づくりをお楽
しみください。
●ヌードルメーカーには材料を入れ過ぎないでください。 材料の入れ過ぎは機器が故障す
る原因になります。 1 回に使用できる粉は最大 500g です。
●ヌードルメーカーに 60°C 以上の材料を入れたり、高温(60°C 以上)になる場所(高温滅
菌器内など)に置かないでください。 機器が変形する原因になります。
注意
※ 製麺後、製麺用ケース内に生地が多少残ることがありますが異常ではありません。
1
● 水は必ず、製麺用ケースのカバーを閉めてから注ぐようにしてください。安全スイッチの穴
に液体を入れないでください。
材料の準備
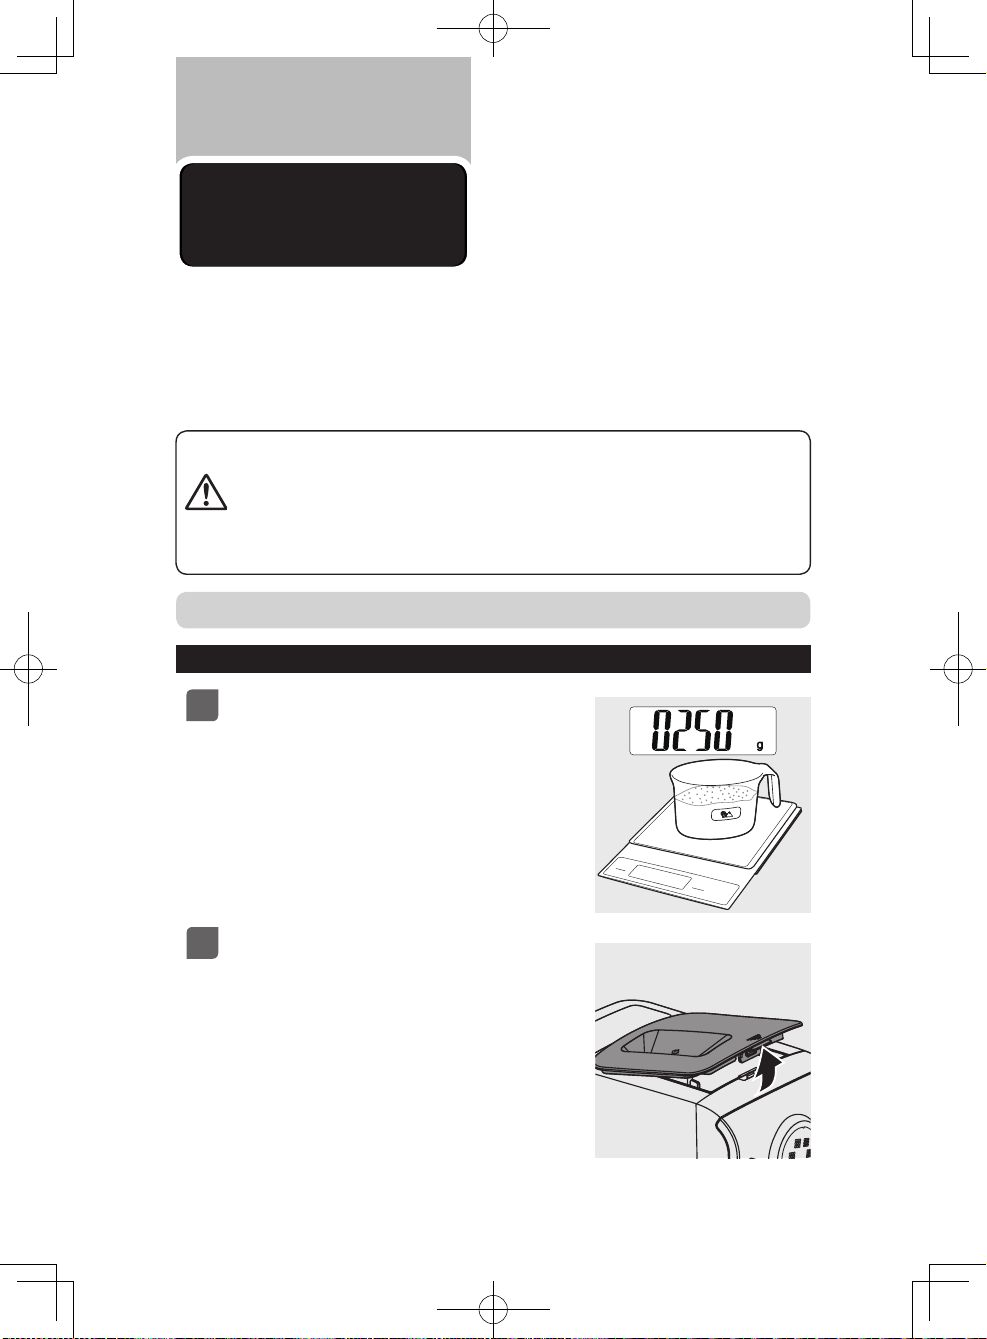
粉の計量にはキッチンスケールを使用
してください。 粉 250g は 1 〜 2 人前、
粉 500g は 3 〜 4 人前です。
製麺用ケースのカバーを外します。
2
12
Page 13

製麺用ケースに粉を入れます。
1
2
3
製麺用ケースのカバーをしっかり閉め
4
ます。
※ 製麺用ケースのカバーをしっかり閉めます。右図
に沿って、❶の溝に入れた後に、カバーをゆっくり
❷の溝に入れながら閉めてください。
※ 製麺用ケースのカバーがきちんと閉まっていない
と、機器は作動しません。作動中に製麺用ケースの
カバーが開いたり緩んだ場合、機器は自動的に一
時停止します。
ヌードルメーカーのレシピ(19 ペー
5
ジ)を参照し、付属の計量カップ(水用)
を使用して必要量の水を量ります。 た
とえば、うどんは小麦粉 250g に対して
水 90cc です。
90cc
※ 水はまだ入れません。本機を始動し、粉を混ぜ始め
たタイミングで、カバーの開口部全体に沿わせて水
をゆっくり注ぎます。
※ 正確に水を量るためには、キッチンスケールを使用
してください。
※ ヌードルメーカーには粉や水など液体状の食材以
外は入れないでください。故障の原因となります。
13
Page 14
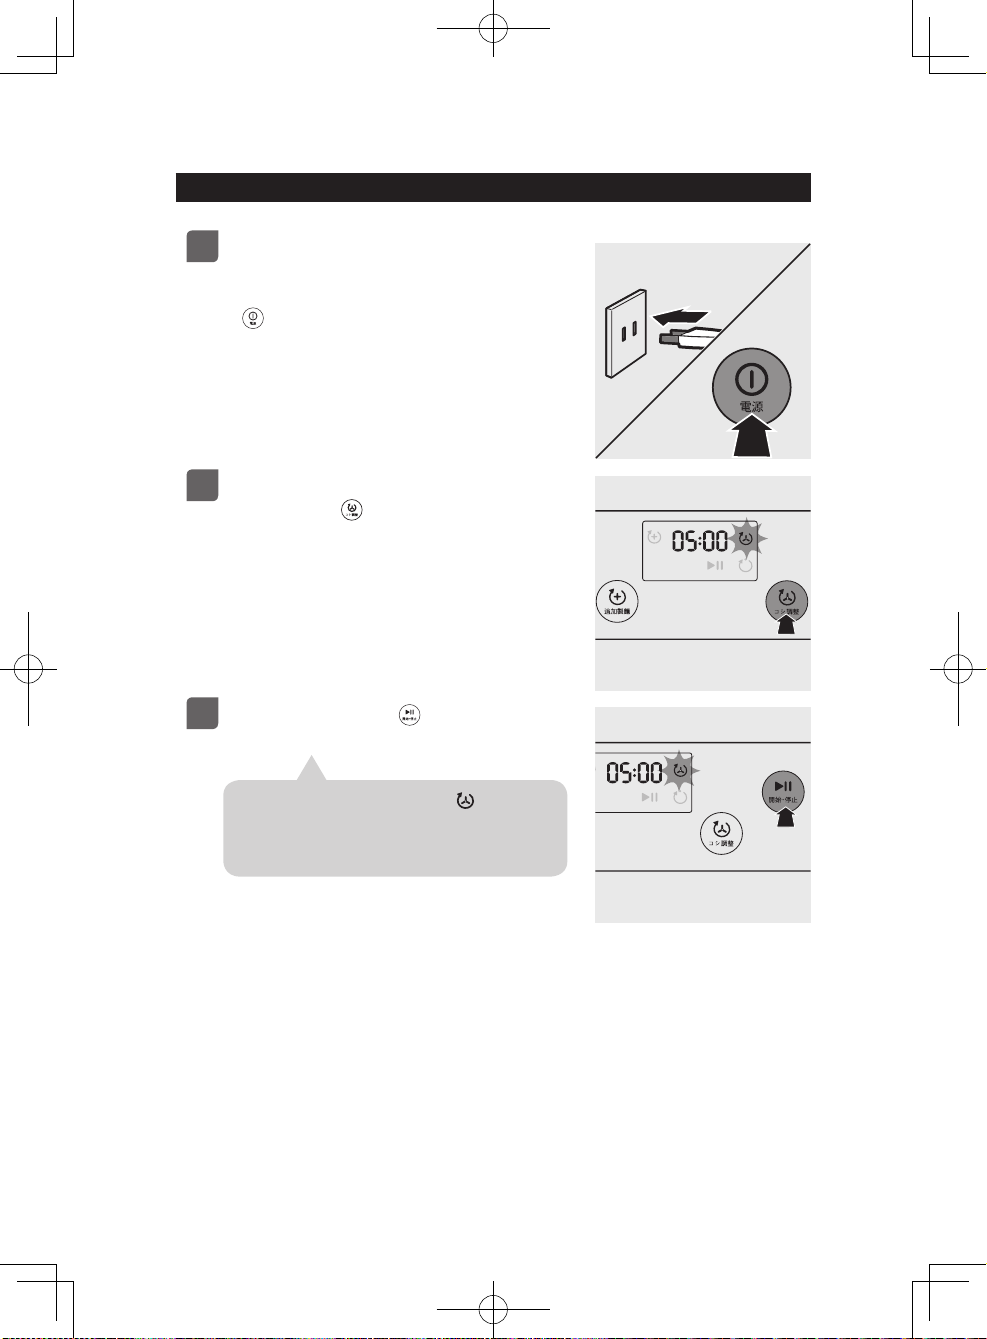
ヌードルメーカーの設定
電源コードをコンセントにつなぎます。
1
アラーム音が 1 回鳴り、すべての表示
が 1 回点滅します。その後、電源ボタン
)を押してください。ディスプレイ
(
が表示されます。
こね時間の基本設定は 5 分です。コシ
2
調整ボタン ( ) を押して、こね時間
を 5、6、7、8 分に設定します。うどんや
パスタなどは、こね時間を増やすとコ
シが増します。お好みに合わせて、調整
してください。
開始/停止ボタン( )を押して作動
3
を開始します。
※ アラーム音が一回鳴り、こね表示( )の点滅が
開始されます。
※ 選択したこね時間からカウントダウンが開始され
ます。
14
Page 15

こね動作が始まったら、水などの液体
4
をカバーの開口部全体に沿わせて
ゆっくり注ぎます。
※ こね動作中、水を注いだ後は、粉を追加しないでく
ださい。 後から追加すると麺の質感に影響が出て
しまいます。
※ こね動作が終了すると、製麺準備のため、10 秒間ア
ラーム音が鳴り、機器が一時停止します。 製麺表示
(
) の点滅が開始
します。10 秒経過後、
機器は自動的に製麺
を開始します。麺を
受けるお皿やトレー
などを準備してお待
ちください。
※ 生地が固まりになってしまうと製麺棒にくっつき製
麺できません。季節や材料に応じて、固まりになら
ないよう適宜水の量を調整しながらゆっくりと注い
でください。
製麺が始まったら、付属のクリーニン
5
グキットを使用して、お好きな長さに
カットしてください。
※ 製麺用キャップに沿って、クリーニングキットを上から下に動かしていただくと麺を切ること
ができます。
※ 製麺時間は、材料の分量やお使いになる製麺用キャップによって異なります。
※ 製麺中に自動センサーが作動するため、製麺時間は異なります。製麺開始後に 1 〜最大 3 回
製麺棒が逆回転をし、残りの生地を拾い上げます。これは製麺をするための動作であり、故障
ではありません。
※ 粉の配合や製麺のタイミングにより、麺の表面にざらつきがみられることがあります。
※ 粉に対して水の比率が多すぎる場合、うまく製麺ができない場合は電源を切って、材料を破棄
して作り直してください。
製麺が完了したとき、製麺用ケース内に生地が残っている場合は、追
6
加製麺ボタン(
)を押した後、開始・停止ボタン( )ことで、さら
に製麺を行うことができます。 追加製麺のカウントダウンタイマーは
3 分です。
15
Page 16
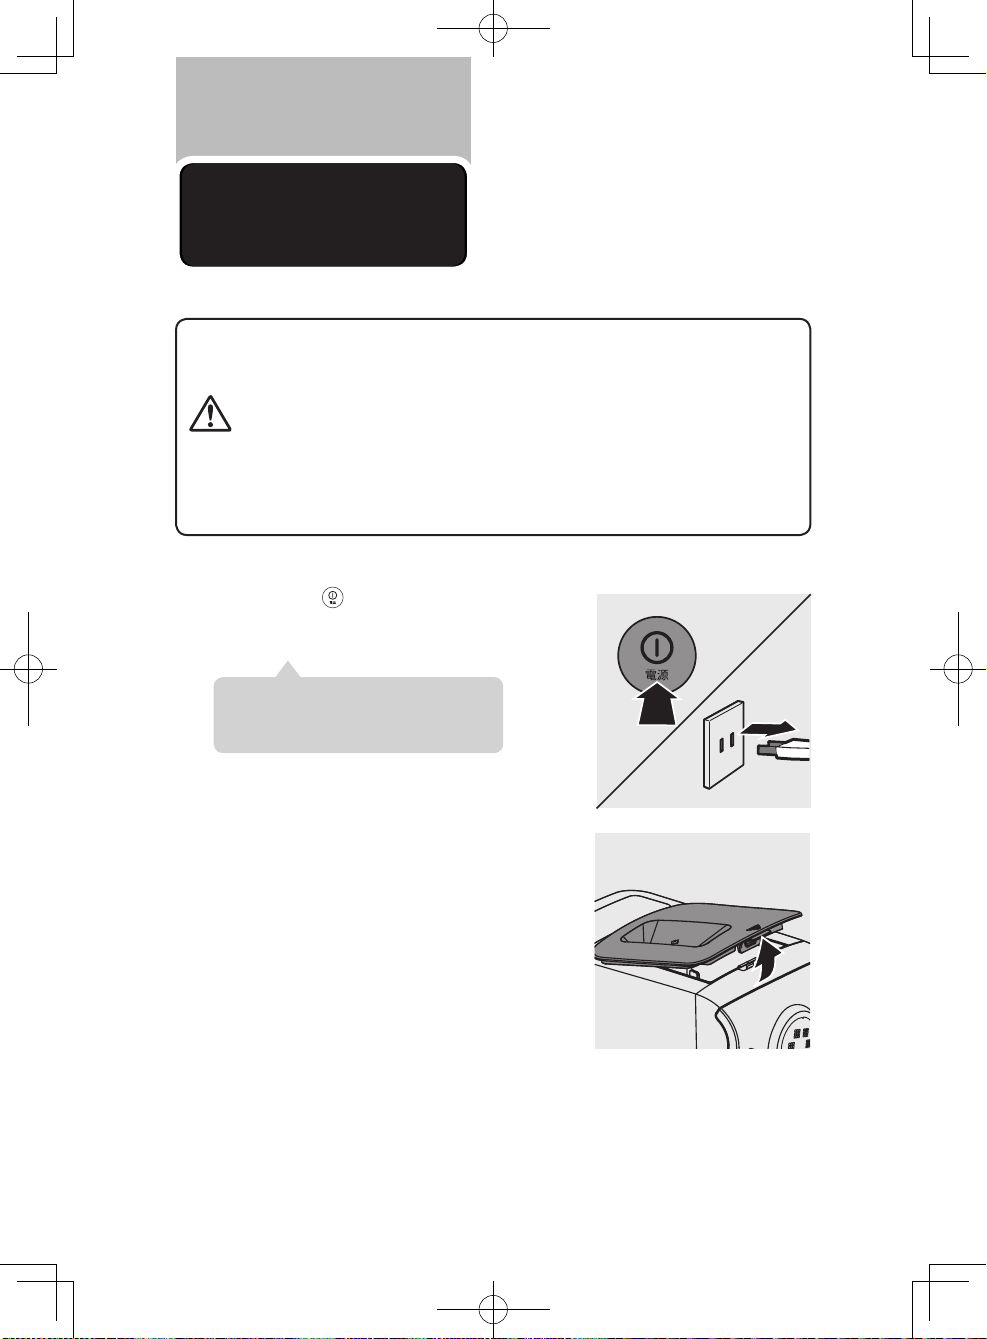
お手入れ方法
● 掃除や分解を行う前に、電源コードをコンセントから抜いてください。
● 本体を水に浸さないでください。
● スチール製のたわし、苛性ソーダや研磨剤を含む洗剤(ガソリン、アルコール、プロパノー
ルなど)は使用しないでください。
注意
1
● 本体、及びすべての部品とアクセサリーはご使用ごとにお手入れをしてください。製品の
故障の原因となる可能性がございます。
● お手入れの際は部品のふちや角で指を怪我をしないようご注意ください。
● すべての部品とアクセサリーのお手入れには食洗機はご使用しないでください。
電源ボタン( )を押してヌードルメー
カーの電源がオフになったことを確認し、
コンセントから電源コードを抜きます。
※ ヌードルメーカーが動作中に電源コード
を抜かないでください。故障の原因となり
ます。
本体から製麺用ケースのカバーを矢印
2
( 右図 ) の方向に持ち上げて取り外しま
す。
16
Page 17
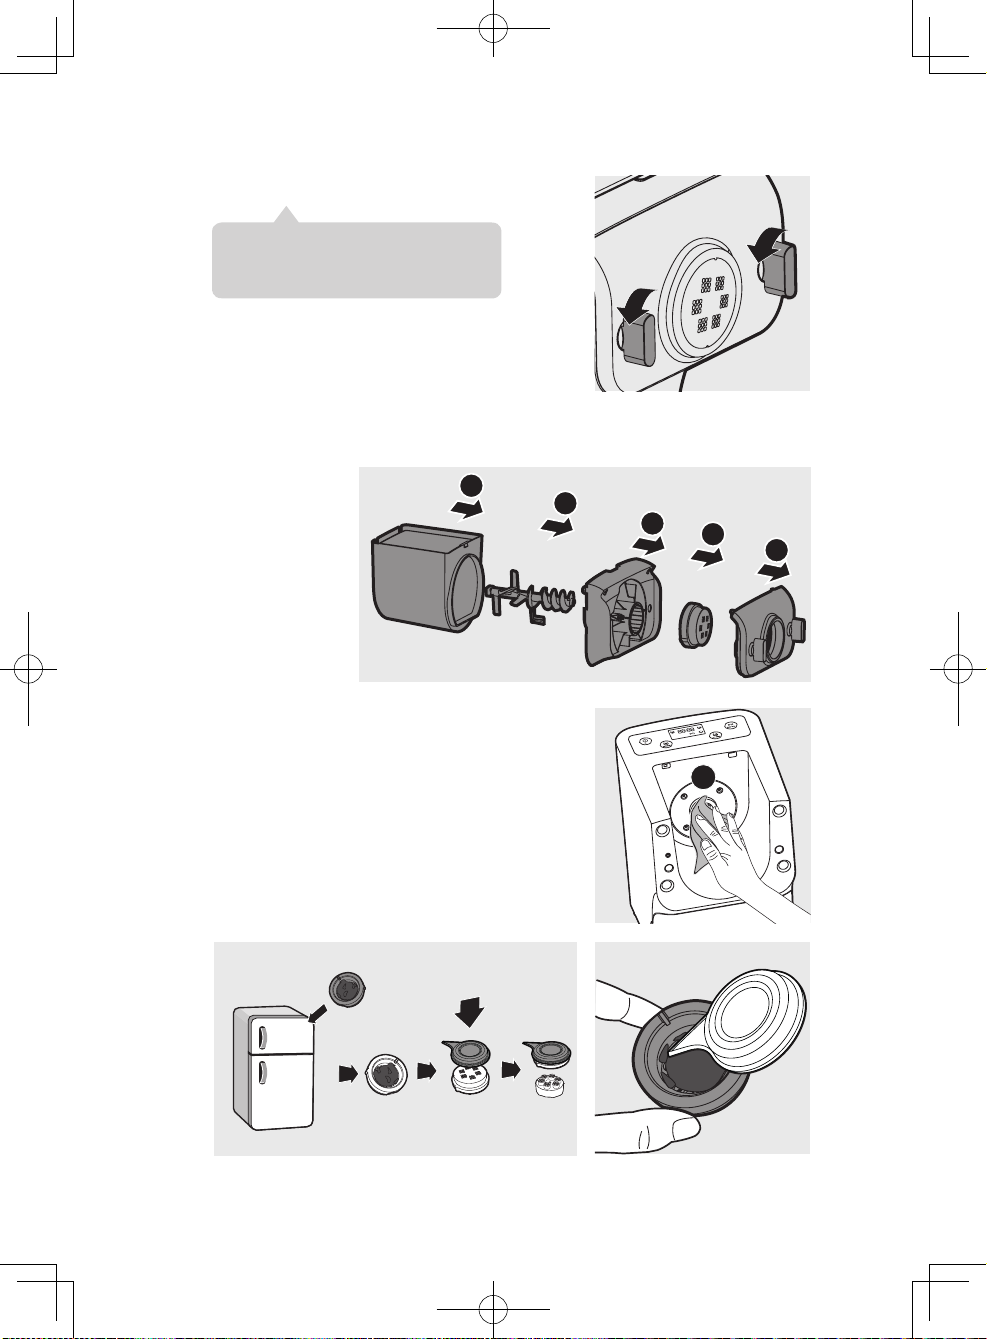
前面パネルのつまみを緩めます。
2
3
4
5
1
3
※ 前面パネルは重たくなっております。
取り外される際には十分お気をつけくだ
さい。
前面パネル、製麺用キャップ、キャップホルダー、製麺棒、製麺用ケースを、
4
図に示す順序で取り外します。
製麺棒を差し込んだ本体の穴(❶)に残った粉は、乾
5
いた布などで掃除します。
付属のクリーニングキットで製麺用キャップを掃除し、
6
生地の残りを取り除きます。 その後は、水で洗い流せ
ます。
※ 製麺用キャップを冷凍庫に 2 時間ほど入れおくと、掃
除しやすくなります。 冷凍庫で冷やした後、クリーニン
グキットを下の絵のようにはめると残った生地を掃除
することができます。
17
1
Page 18
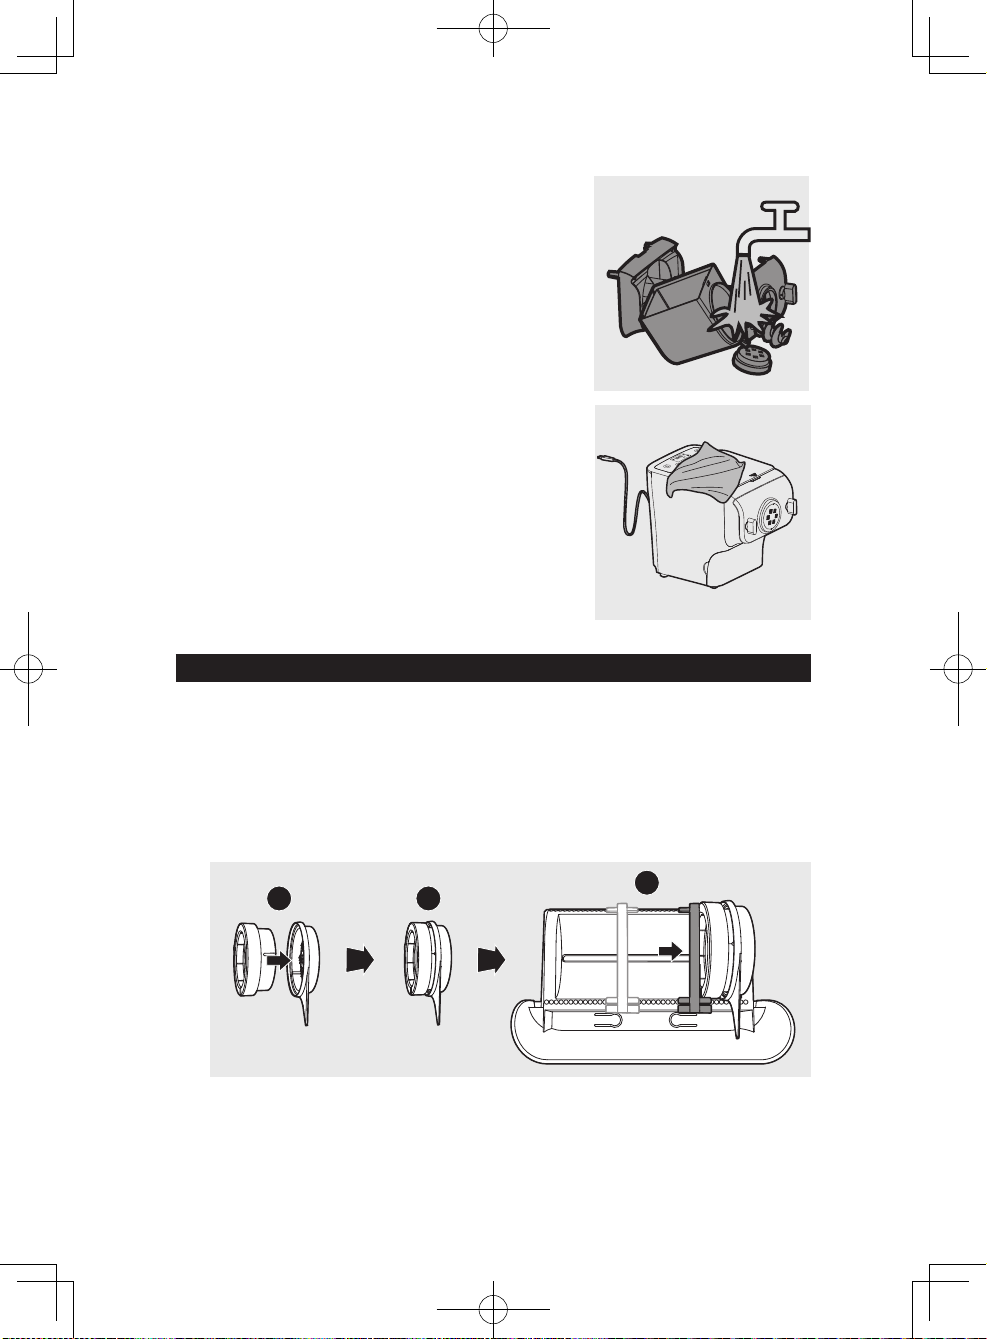
前ページ4で取り外した部品をすべて
7
洗います。
本体、操作パネル、本体表面は、乾いた
8
布で拭きます。
※ 掃除が済んだら、すべての部品と製麺用キャップを乾
かしてから、次の使用のために組み立ててください。
製麺用キャップ収納トレイ
❶ 製麺用キャップと❷クリーニングキットの溝(凹凸)が合うようにセッ
1
トしてください。 セットした❶と❷を図のように収納トレイに入れます。
❸トレイ内のバーを動かすことで、製麺用キャップとクリーニングツー
ルを固定することが可能です。
※ トレイに収納する前に、製麺用キャットとクリーニングキットが完全に乾いていることを確認してく
ださい。
1
2
18
3
Page 19
詳しいレシピはレシピブックを
ご覧ください。
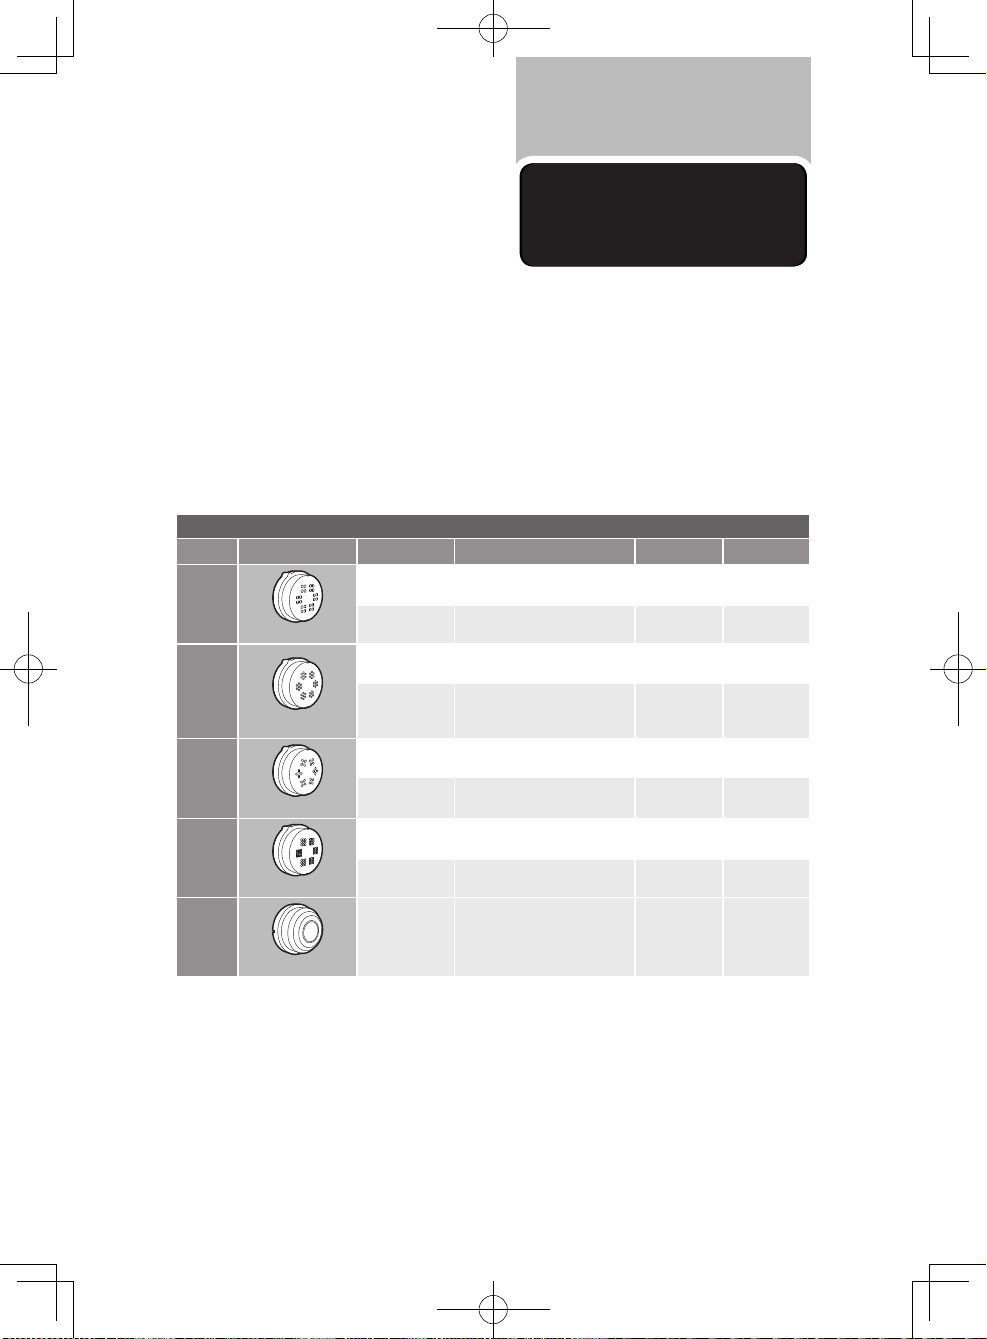
レシピ
※ 上質な麺を作るためには、 推奨されている量に従って材料を追加してください。
※ 季節や材料の産地に応じて、粉や水の量は適宜調節してください。
※ 卵入りの麺を作るときは、製麺用ケースに入れる前に卵はよく泡だててください。
※ ラーメンを作るときは、最初にベーキングパウダーを沸騰したお湯に混ぜてから、規定の量の冷水に注ぎ、
60 度以下に冷ましてからしてから製麺用ケースに注いでください。
※ 塩を加えるときは、冷水に混ぜてよくかき混ぜてください。
※ お買い求めの製品により、付属の製麺用キャップが異なります。
※ 本製品には 0.8mm シートの製麺用キャップは同梱されていません。0.8mm シートは別売りでお買い求
めいただくことが可能です(型番 HR2435/01)。
粉と水の割合
麺の種類 製麺用キャップ * 粉 液体 その他の材料 麺の量(目安)
うどん
2.5mm 角麺
ラーメン
2mm 丸麺
パスタ
1.6mm 平麺
そば
1.6mm 角麺
うどん粉 250g 冷水 90cc 塩 2g
うどん粉 500g 冷水 180cc 塩 4g
強力粉 250g
強力粉 500g
薄力粉 75g
強力粉 175g
薄力粉 150g
強力粉 350g
強力粉 175g
そば粉 75g
強力粉 350g
そば粉 150g
冷水 70cc
重曹を混ぜた湯 20cc
冷水 140cc
重曹を混ぜた湯 40cc
M サイズの卵 1 個を冷水 40cc
で溶く(合わせて 90cc)
M サイズの卵 2 個を冷水 80cc
で溶く(合わせて 180cc)
冷水 90cc 塩 3g
冷水 180cc 塩 6g
*
300g
(1〜2 人前)
600g
(3〜4 人前)
塩 2g
重曹 2g
塩 3g
重曹 4g
塩 1g
塩 2g
300g
(1〜2 人前)
600g
(3〜4 人前)
300g
(1〜2 人前)
600g
(3〜4 人前)
300g
(1〜2 人前)
600g
(3〜4 人前)
餃子の皮
0.8mm シート
強力粉 250g 冷水 95cc 塩 3g
※ 各レシピ(餃子の皮を除く)では、お好みの製麺キャップをお使いいただけます。
※ 上記以外のレシピについては、付属のレシピブックをご覧いただくか、上記レシピを参考に配合をご調
整ください。
19
Page 20
故障かな?
と思ったら
ディスプレイ画面が表示点灯しない。
▶ 電源プラグが正しく差し込まれていない。
電源プラグが正しく差し込まれているかどうかを確認してください。
▶ 電源ボタンが押されていない。
電源ボタン(
開始/停止ボタン( )押すと、アラーム音は鳴るが作動しない。
▶ 製麺用ケースが正しく取り付けられていない。
製麺用キャップまたは前面パネルが正しく取り付けられていない。
製麺用ケースの安全スイッチ、もしくはキャップホルダーの安全スイッチが作動している可能性が
あります。取扱説明書の記載内容に従って、すべての部品を正しく取り付けてください。
安全スイッチが作動し、製麺中、機器が突然停止したり、突然再作動する。
▶ 前面パネルのつまみが緩んでいる。
前面パネルが正しく取り付けられていることを確認してください。
▶ 材料を入れすぎている。
1 回に使用できる粉は最大 500g までです。500g 以上入れている場合は粉を減らしてから使用くだ
さい。
)を押してください。
故障かな?と思ったら、お調べください。
製麺中、機器が停止する。 アラーム音が鳴らない。
▶ 長時間連続作動させたため、ヌードルメーカーが過熱している。
電源コードをコンセントから抜いて、ヌードルメーカーの温度が下がるまでお待ちください。
製品を末永くお使いいただくために、連続使用する場合は 45 分を目安に、15 分程度の間隔を空
けてご使用ください。
20
Page 21
製麺中に機器が停止し、ディスプレイに “EEEE”という表示が点滅しながらアラー
ムが鳴る。
▶ 製麺棒に異物が詰まっている。
生地が乾燥し過ぎている。
電源コードをコンセントから抜いて、すべての部品とアクセサリーを掃除してください。その後、取
扱説明書の記載内容を再度確認してから製麺を再開してください。
製麺用ケース内に多量の生地が残っている。
▶ 使用前に粉が湿っていたか、生地の水分が多過ぎた。
小麦粉は乾いた状態で保管してください。 取扱説明書の記載内容に従って、製麺を再開してくだ
さい。
▶ 製麺用ケース、製麺棒、製麺用キャップが、使用前にきれいに掃除されていない。
使用前に、すべての部品がきれいになっていることを確認してください。
▶ 製麺棒または製麺用ケースが湿っている。
使用前に、すべての部品が乾いていることを確認してください。
▶ 水を注ぐタイミングが正しくない。
粉の種類が適切でない。
取扱説明書の記載内容に従って、製麺してください。
機器から少量の水が漏れる。
▶ 本機の動作開始前に水が加えられた。
水は粉を入れ、プログラム開始後に加えてください。
製麺棒は回転し続けているが、麺が出てこない。
▶ 粉と水の割合が正しくない。
電源コードをコンセントから抜いて、ヌードルメーカーを掃除してください。その後、取扱説明書の
記載内容を再度確認してから製麺を再開してください。
21
Page 22
Congratulations on your purchase, and welcome to Philips!
To fully benefit from the support that Philips offers, register your product at
www.Philips.com/welcome.
Read this user manual carefully before you install and use the unit. Save it for
future reference.
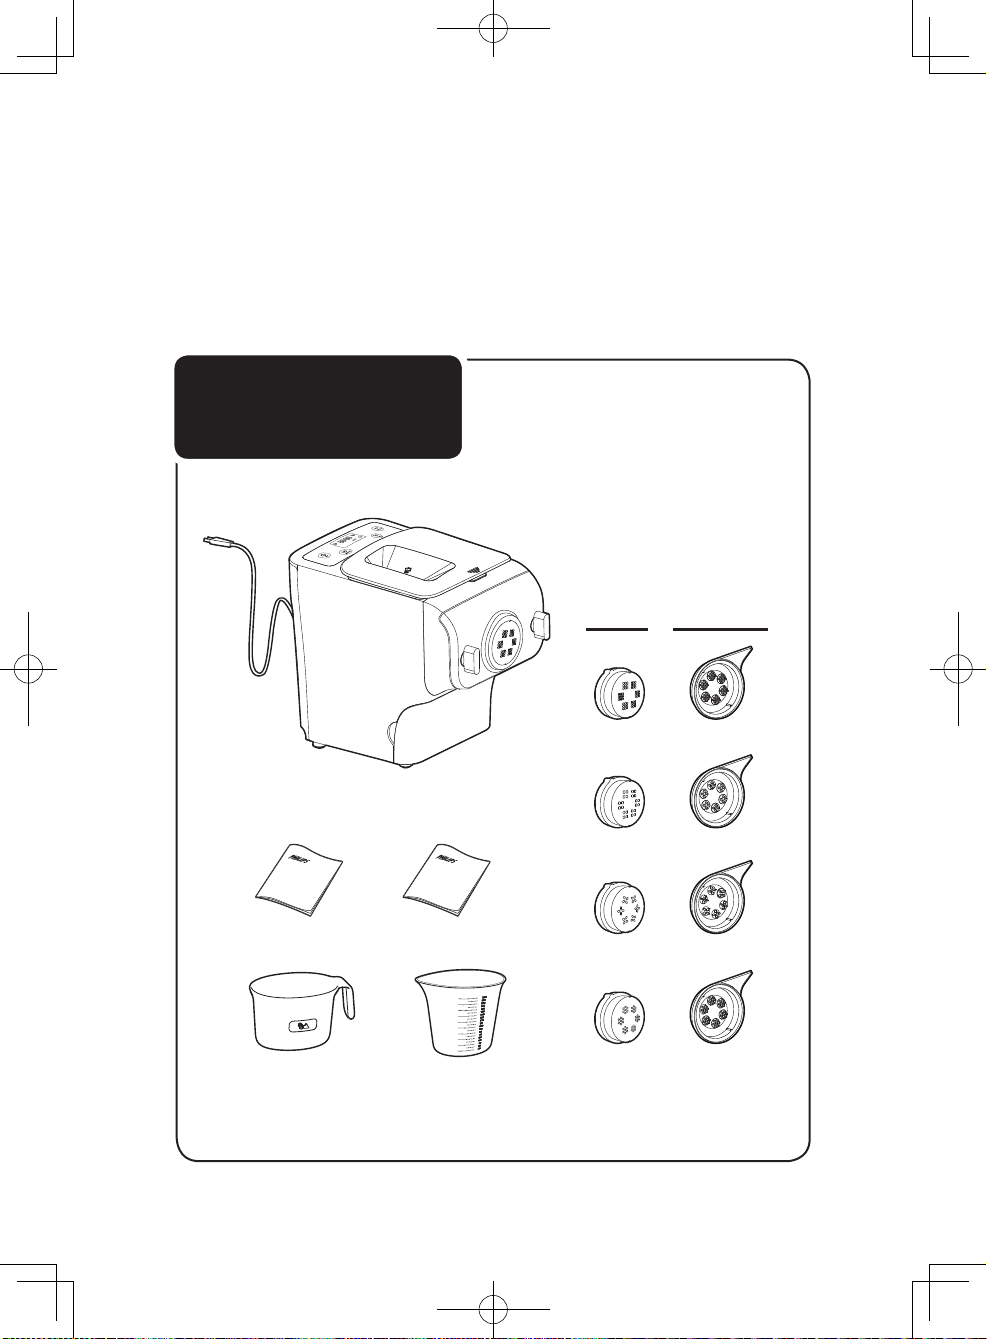
What's in the box
Main unit
1.6mm
square
2.5mm
User manual
Flour cup
The 1.6mm shaping disc is assembled on the appliance upon purchase.
Recipe book
Water cup
Specifications are subject to change without notice.
square
1.6mm
flat
2mm
round
Shaping
discs
Cleaning tool
22
Page 23
Contents
What's in the box ���������� 22
Contents …………………………………… 23
Important ………………………………… 24
Overview …………………………………… 26
Disassembling and cleaning
before first use …………………………… 28
Assembling ………………………………… 30
Using the noodle maker …………………… 32
Cleaning …………………………………… 36
Recipes …………………………………… 39
Troubleshooting …………………………… 40
Product information ……………………… 42
Recycling …………………………………… 42
Guarantee and service …………………… 42
23
Page 24
Safety
Important
● Read this user manual carefully before you use
the appliance, and save it for future reference.
Warnings
● Before you connect the appliance to the power, make sure that the voltage indicated on the bottom
of the appliance corresponds to the local power voltage.
● Make sure that the plug is firmly inserted into the power outlet.
● Make sure that your hands are dry before you insert the plug into the po
● Never connect this appliance to a timer switch, to avoid a hazardous situation.
● Before you insert the plug into the power outlet, make sure that the appliance is assembled correctly.
● If the power cord, the plug, or other parts are damaged, do not use the appliance.
● If the power cord is damaged, you must have it replaced by Philips, a service center authorized by
Philips or similarl
● Do not replace parts of the appliance yourself.
● This appliance is not intended for use by persons (including children) with reduced physical, sensory
or mental capabilities, or lack of experience and knowledge, unless they have been given supervision
or instructions concerning use of the appliance by a person responsible for their safety.
● For their safety
cord out of the reach of children.
● To prevent any accidents, do not use the appliance if it is damaged for any reasons.
y qualified persons to avoid a hazard.
, do not allow children to play with the appliance. Keep the appliance and its power
wer outlet.
EMF
This Philips appliance complies with all applicable standards and regulations regarding
exposure to electromagnetic fields.
24
Page 25
Safety
● Before using the appliance for the first time, disassemble and wash the accessories thoroughly (see
“Disassemble and cleaning before first use” section.)
● The appliance is intended for household use only.
● Do not use this appliance on an unstable or uneven surface.
● Keep the appliance and its power cord out of the reach of children.
● Do not disconnect the power cord before processing is comple
disconnect the power cord before you perform other operations.
● To better protect the lifetime of the appliance, we recommend the continuous working time to be
less than 45 minutes. You can restart using the appliance after 15 minutes.
● If you intend to use the appliance continuously, clean the shaping disc with the supplied cleaning tool
each time after use.
● Do not bent the power code forcibly, jerk, twist, bundle nor put a heavy goods.
● When hearing thunder, do not touch the appliance or power plug.
● Do not put metal or flammable objects in the mixing chamber.
● Plug off the power cord when you are not using the appliance.
● Do not use the appliance near flammable objects such as
● Pull out the power plug immediately when you detect smoke.
● When taking off the power cord, do not pull the cable but grab the plug part.
● Keep the power plug clean.
● Do not put heavy objects on the appliance.
● This appliance is designed as consumer kitchen appliance. Do not use for the purpose.
● Do not move the appliance while it is operating.
● Disconnect the power and r
● Do not immerse the main unit in water.
● Place the appliance to a dry and well ventilated place after use.
● To prevent a short circuit or an electric shock, do not pour water or any liquid into the safety switch.
● Do not use dish washer to clean the machine and the accessories.
For cleaning ease, do not soak the shaping disc into the water directly.
emove the power cord before cleaning or disassembling this appliance.
te. If you have to stop processing,
table cloth or draper.
25
Page 26
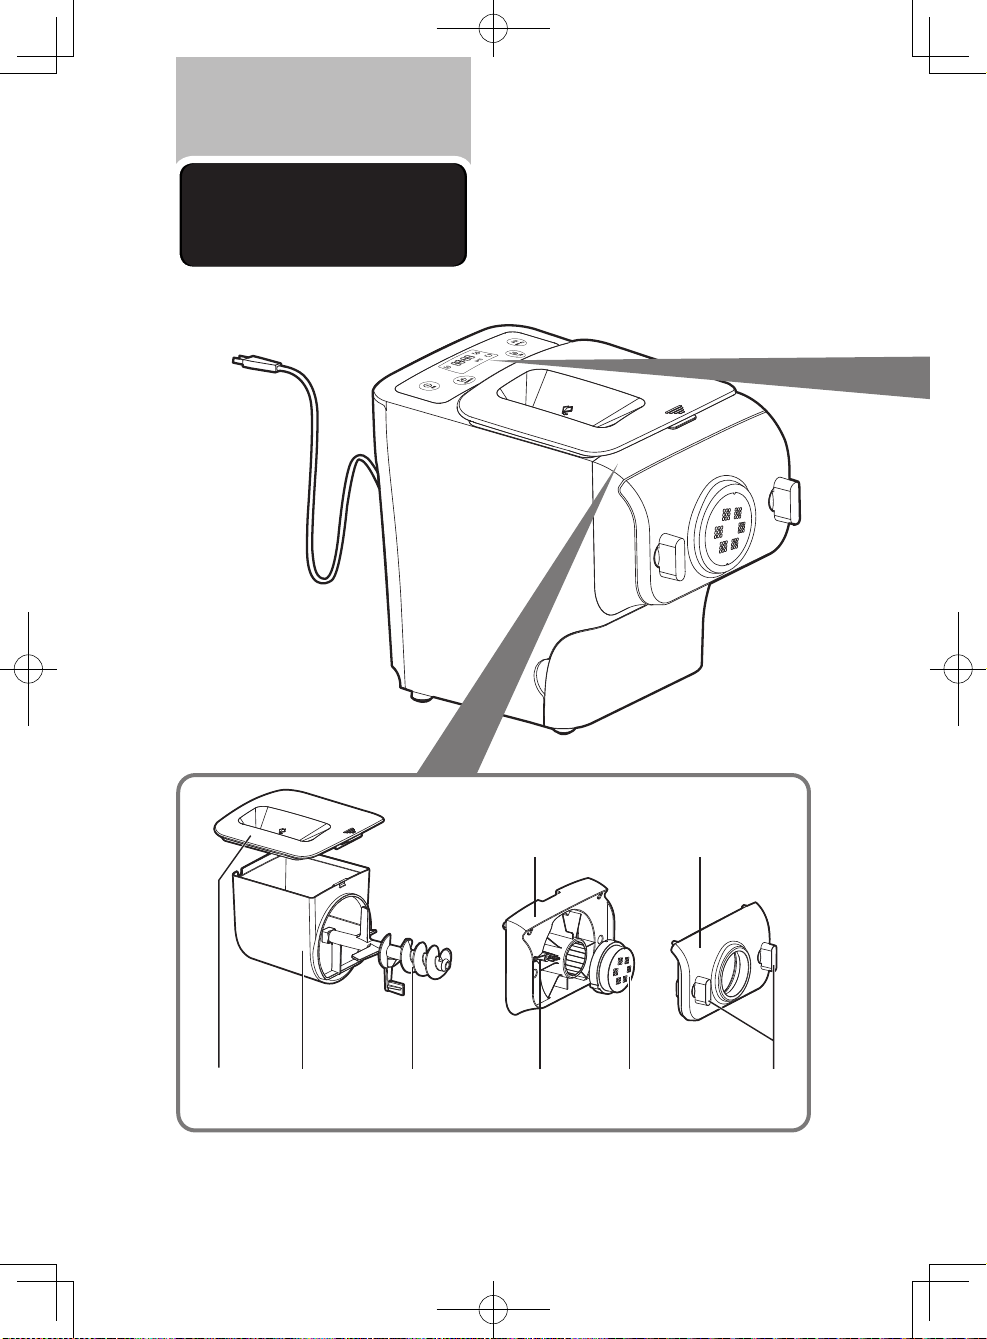
Overview
Mixing
chamber lid
Mixing
chamber
Mixing
paddle
Disc holder Front panel
Shaping discsDisc holder safety
switch lever
26
Front
panel knob
Page 27
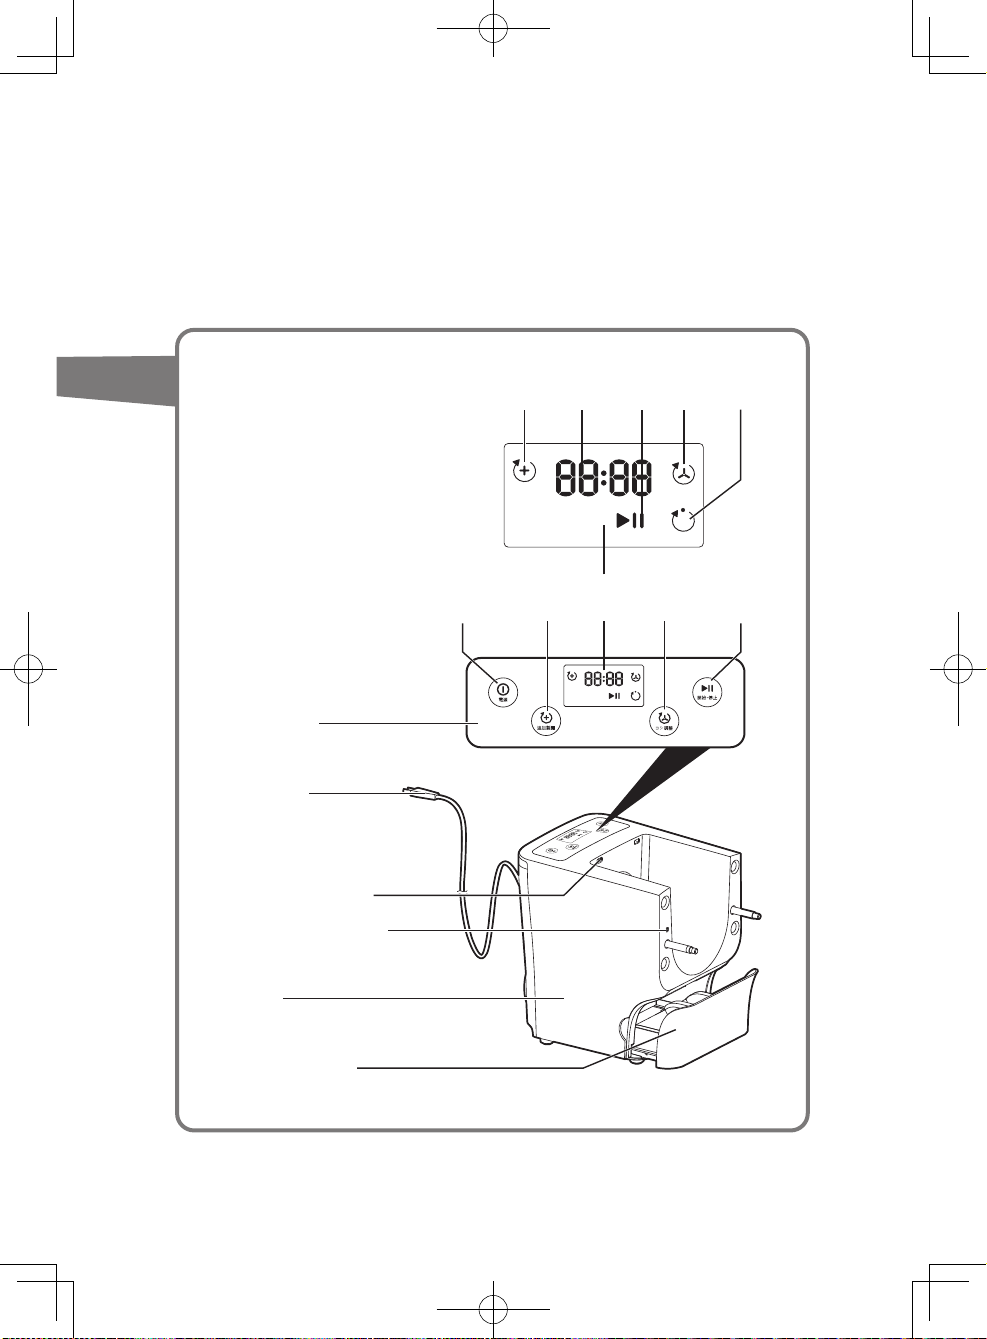
Extra extrusion
indicator
Timer
display
Start/pause
indicator
Kneading
indicator
Extrusion
indicator
Control panel
Power cord
Safety switch hole of
the mixing chamber lid
Disc holder safety switch
Main unit
Shaping discs storage
Power on/off
button
Extra extrusion
button
Display
screen
Bounciness
control button
Start/pause
button
27
Page 28
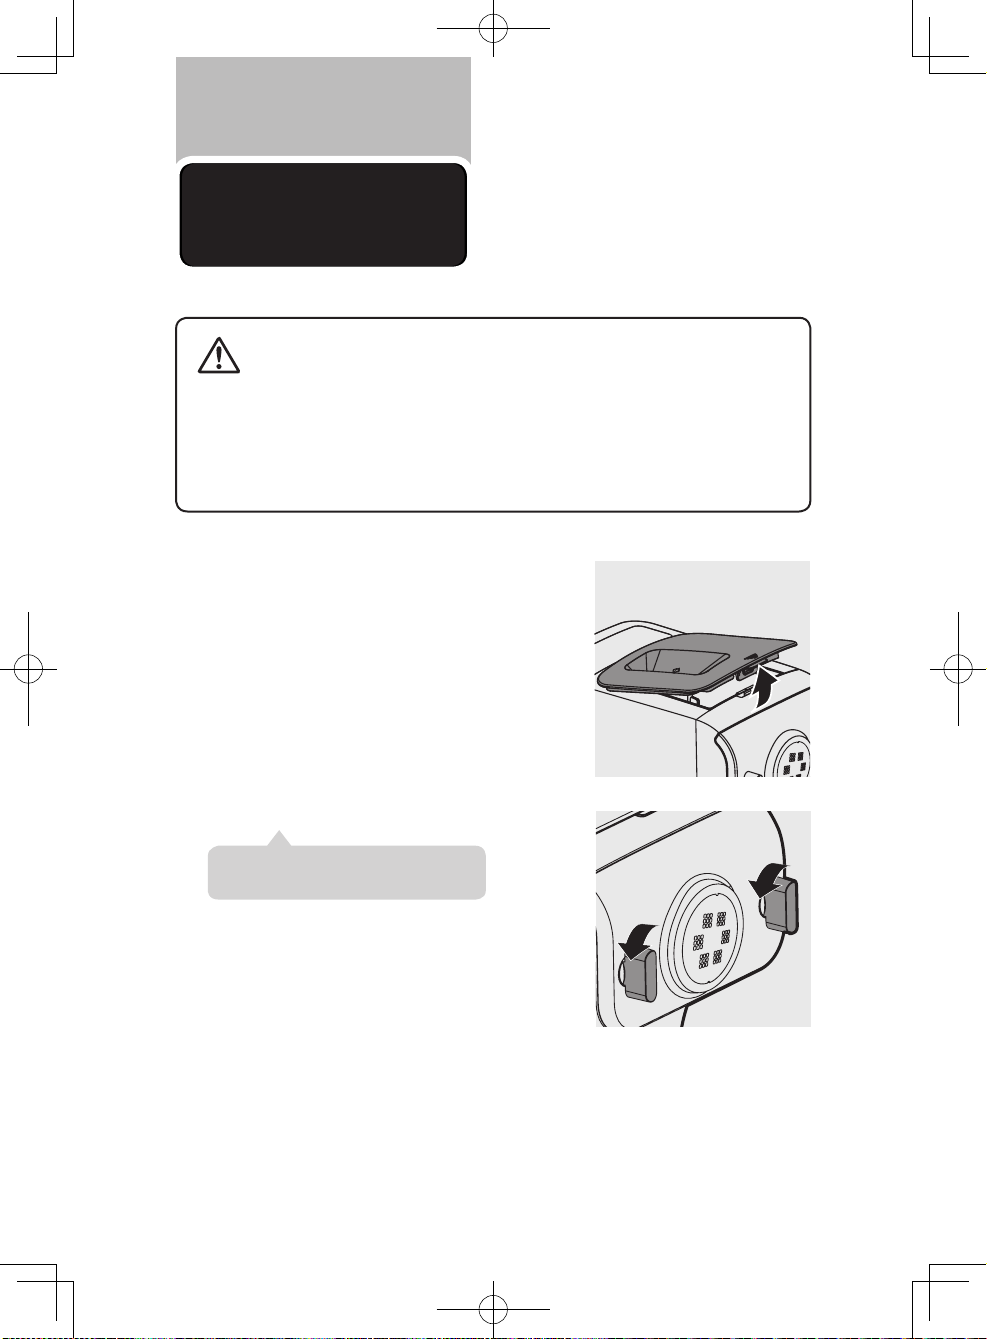
Disassembling and
cleaning
before first use
● Do not use water to rinse nor soak the main unit.
● Do not use a scourer or similar cleaners as these will scratch the plastic surface and affect
Caution
Remove the chamber lid from the appliance.
1
the lifetime of the noodle maker.
● Take extra caution when cleaning the parts to avoid getting cut by the edges.
● Take out all the parts and accessories.
● Clean the parts and accessories before first use (see “
● Do not use dish washer to clean the machine and the accessories.
Cleaning” section).
Loosen the front panel control knob.
2
※ The front panel is heavy. Take extra caution
when removing it.
28
Page 29
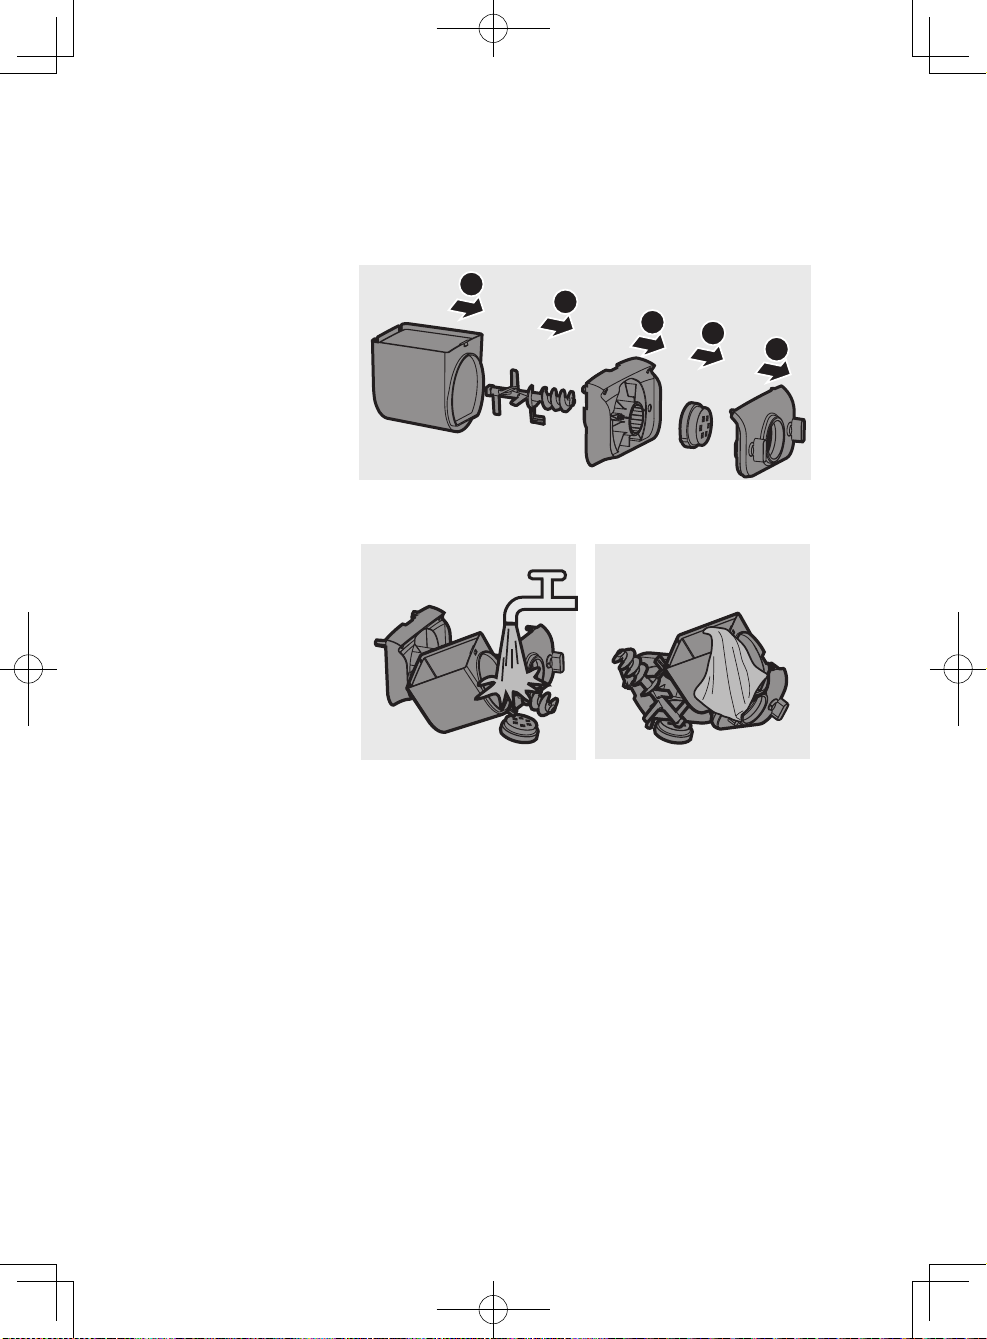
Disassemble the front panel, the shaping
2
3
4
5
1
3
disc, the shaping disc holder, the mixing
paddle, and the mixing chamber in order.
Clean all detachable parts, and wipe them
4
dry.
29
Page 30
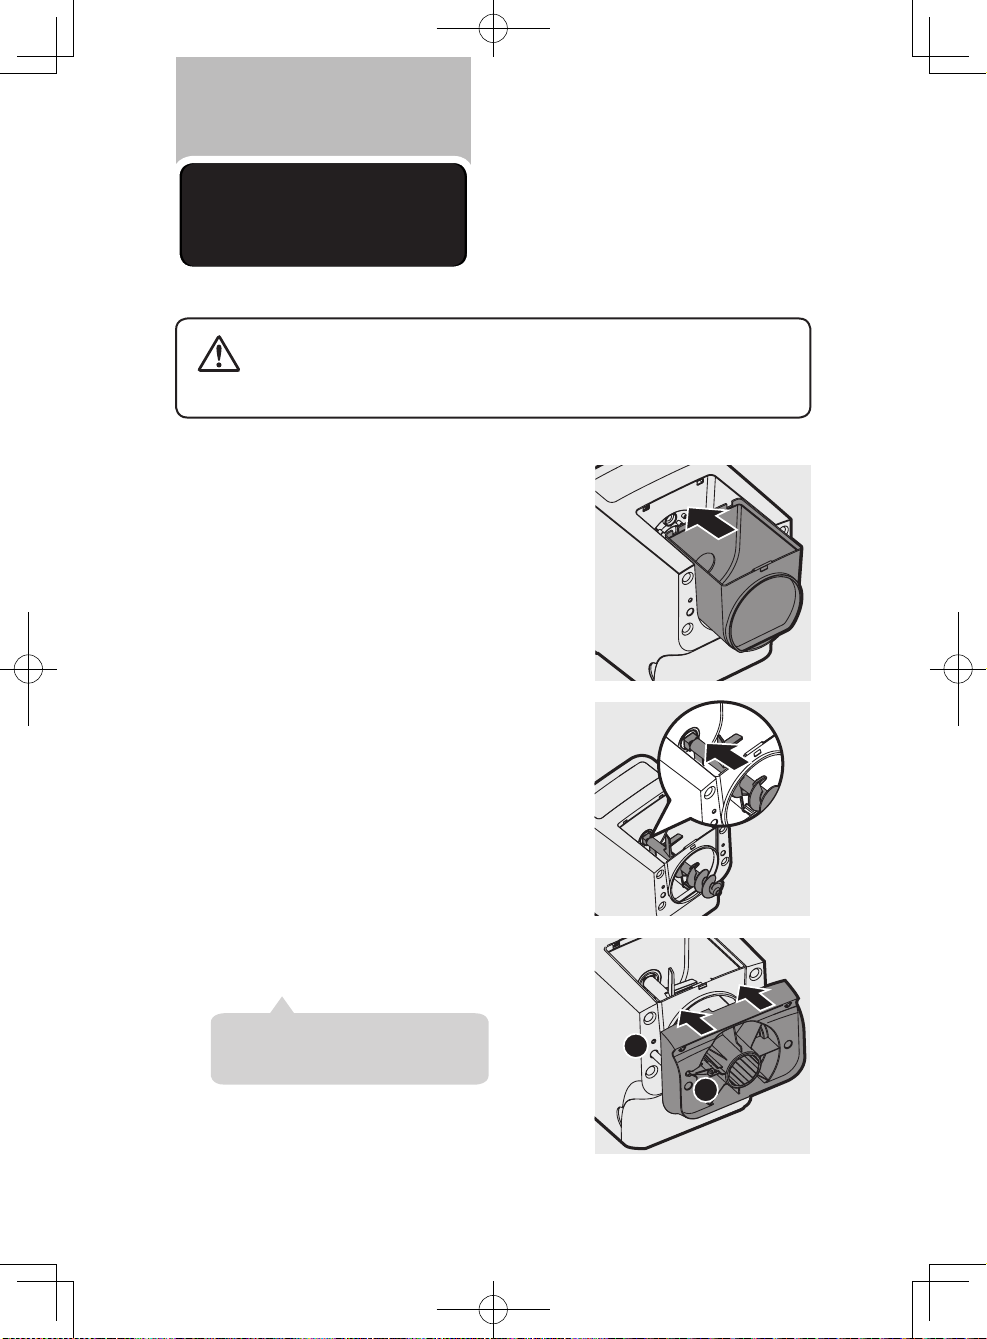
Assembling
1
2
● Make sure to tighten the front panel knob during assembling.
● Make sure the appliance is not plugged in when assembling the appliance.
Caution
Push the mixing chamber into the appliance.
1
Point the mixing paddle to the hole in the
2
main unit. Insert the mixing paddle all the
way into the main unit.
● Before using the noodle maker, make sure all parts and accessories are completely dry.
Follow below assembling steps to
install the noodle maker.
Attach the disc holder onto the appliance.
3
※ ❶ Disc holder safety switch
※ ❷ Disc holder safety switch lever
※ Check that the safety switch ❶ and safety
switch lever ❷ are set as shown in the
right image.
30
Page 31
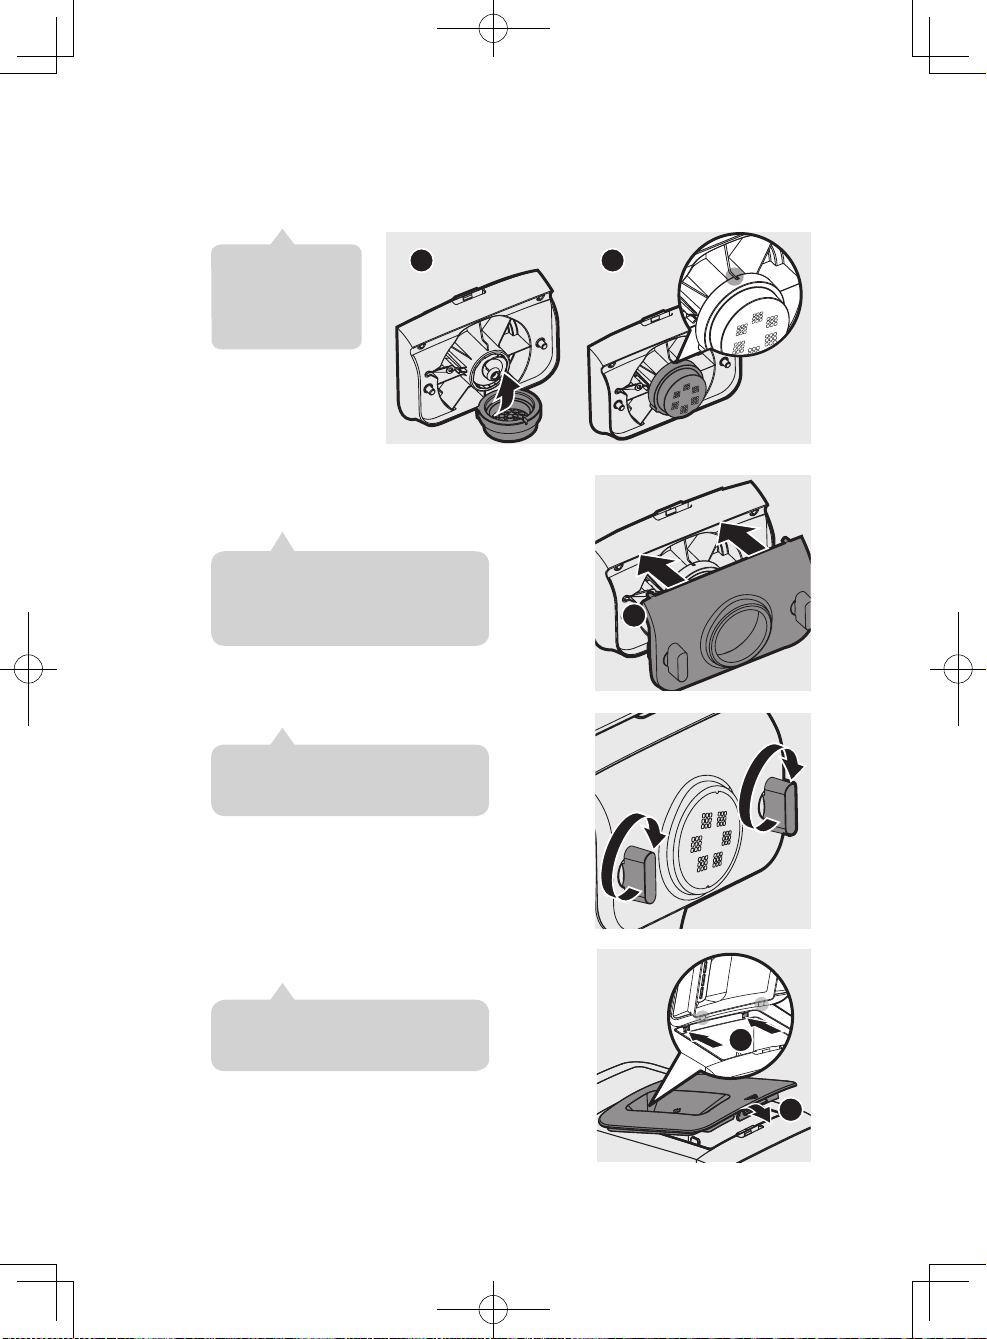
Put the shaping disc onto the disc holder ❶ , and make sure it is firmly fixed
1
1
2
4
on the disc holder ❷ .
※ Make sure the
abyss of the shaping
disc and the disc
holders is properly
fitted.
Attach the front panel to the main unit.
5
※ ❶ Disc holder safety switch lever
※ Make sure the front panel is completely
fastened before using the appliance.
※ The front panel is heavy. Take extra caution
when assembling it.
Fasten the front panel control knob.
6
※ If the front panel or the shaping disc is not
properly assembled, the safety switch will
prevent the appliance from working.
1
2
Close the chamber lid properly.
7
※ If the chamber lid is not properly installed,
the safety switch will prevent the appliance
from working.
31
Page 32
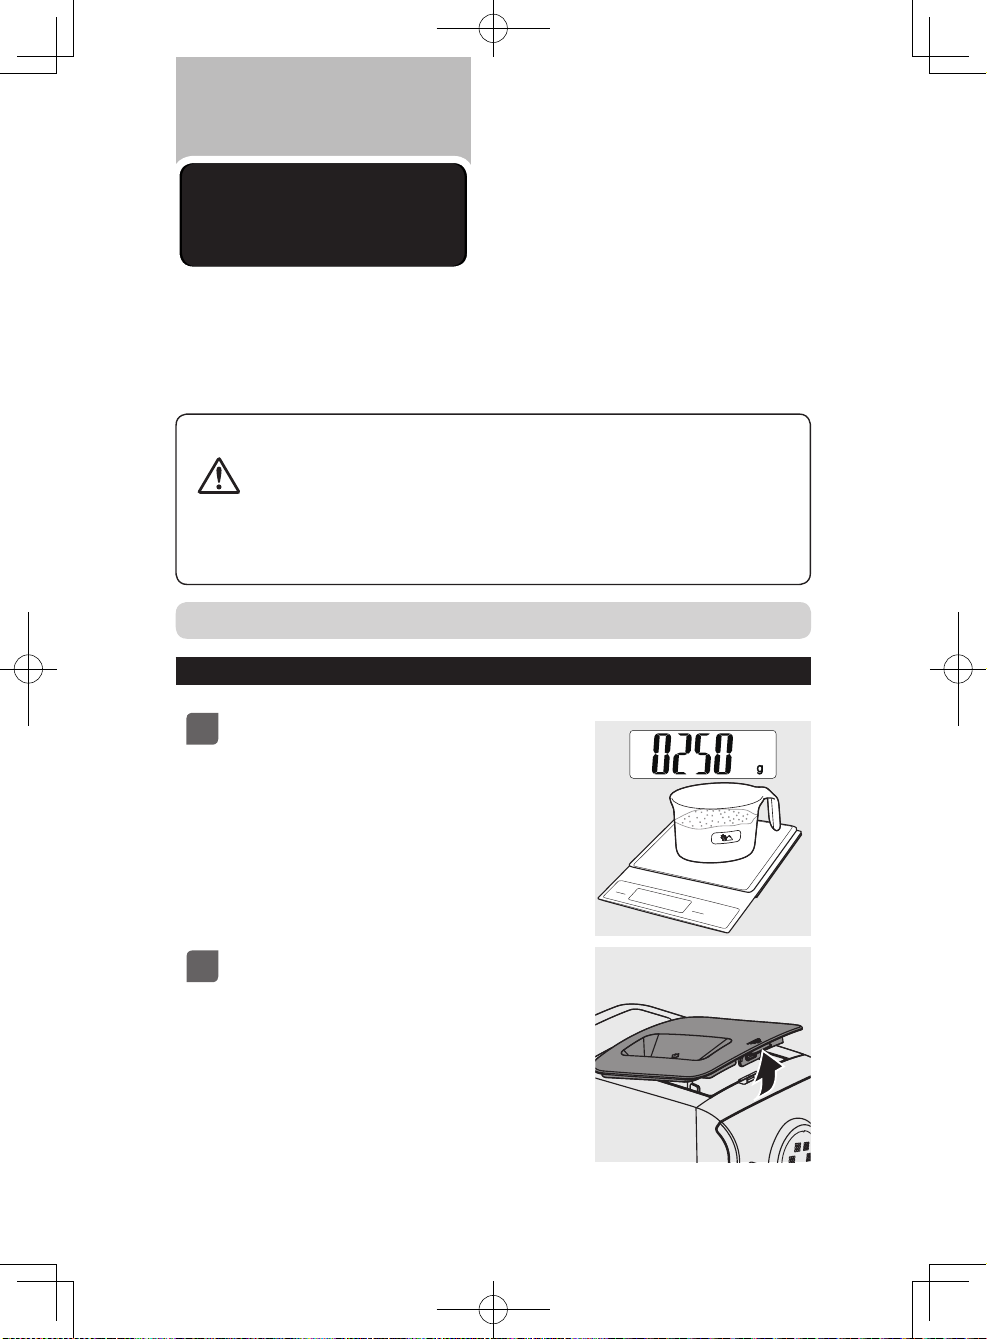
Using the noodle
maker
● Make sure to follow the right order to add flour and water into the chamber. Put in the flour into the
chamber first, then place the chamber lid onto the chamber. Start the noodle maker, and then slowly pour
water along the entire length of the opening in the lid.
● Do not pour water into the mixing chamber before turnning on the noodle maker. Follow the instruction
carefully to enjoy home made
● Never put in excessive ingredients in the noodle maker. Otherwise, it will damage the
appliance. The maximum amount of flour used for each batch is 500g.
● Do not put in any ingredients that are 60°C or above to the noodle maker, nor place
Cautions
※ After processing, it is normal to find some leftover dough inside the mixing chamber.
1
the noodle maker in surroundings with high temperature (60°C), for instance in a high
temperature sterilization. This will deform the appliance.
● Never pour in
any liquids into the safety switch hole.
Use a kitchen scale to measure the flour.
For instance, 250g flour is for 1-2 servings;
500g flour is for 3-4 servings.
noodles.
water before you place the chamber lid onto the chamber. Do not pour in
Preparing the ingredients
Remove the chamber lid.
2
32
Page 33
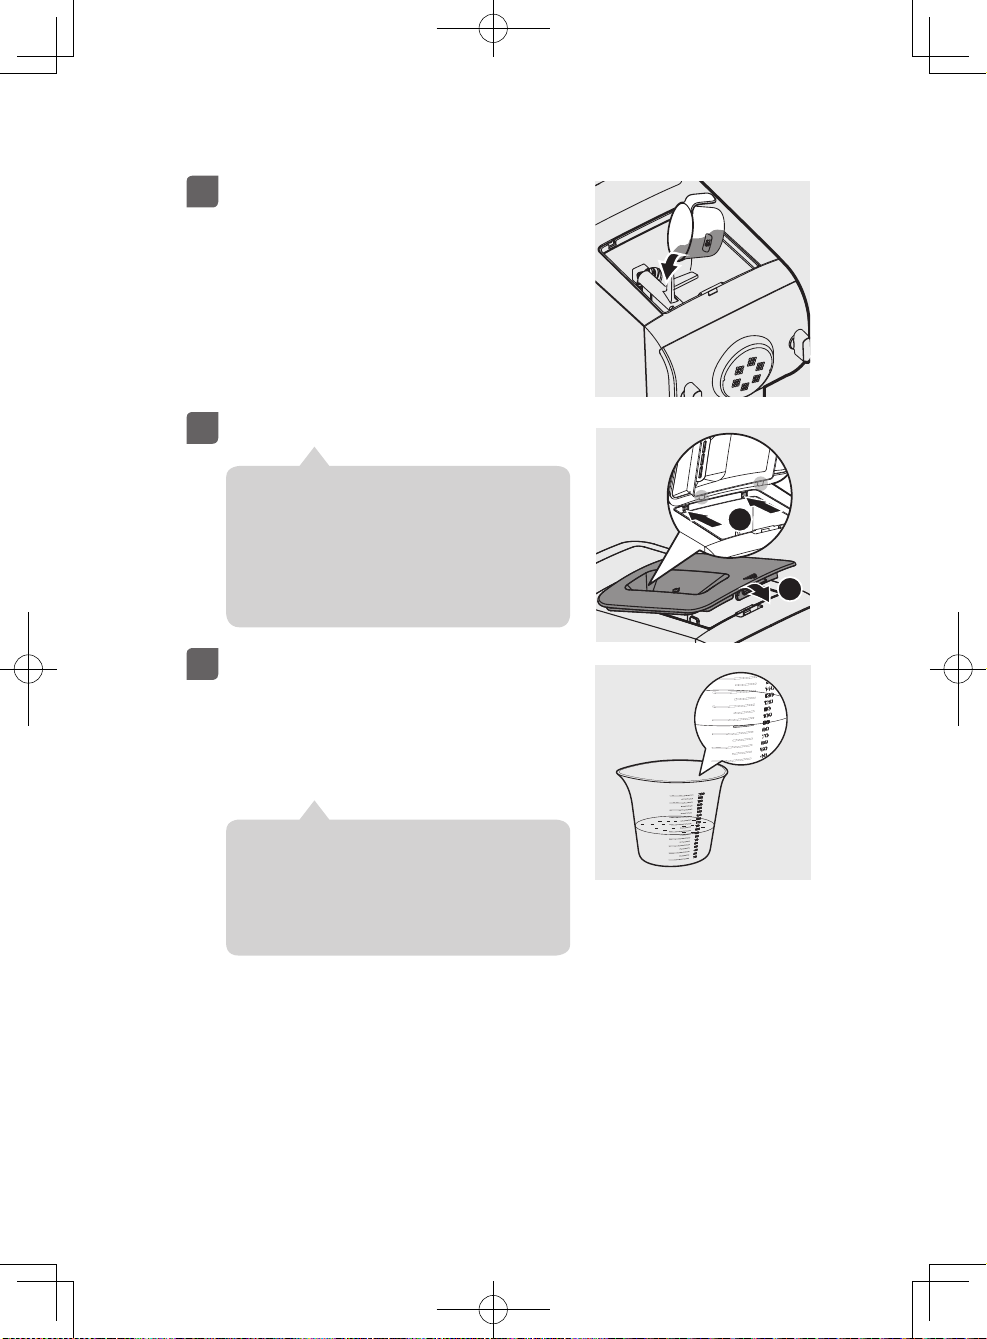
Pour the flour into the chamber.
1
2
3
Close the chamber lid properly.
4
※ If the chamber lid is not closed properly, the appliance
will not start processing. If the chamber lid is open or
loose during processing, the appliance will automatically
pause the processing.
※ The appliance will not work if the chamber lid is not
properly closed. During the noodle making process,
if the chamber lid becomes loose, the appliance will
automatically stop working.
Refer to the “Noodle-making recipe
5
table” on page 39 and measure the
required amount of water by using the
provided water cup. For instance, measure
90cc water to make Undo noodles with
250g flour.
90cc
※ Do not pour water into the mixing chamber before
turning on the noodle maker.
※ To measure the water volume accurately, please use a
kitchen scale.
※ Do not put flour or liquid into the noodle maker as
this may damage the appliance.
33
Page 34
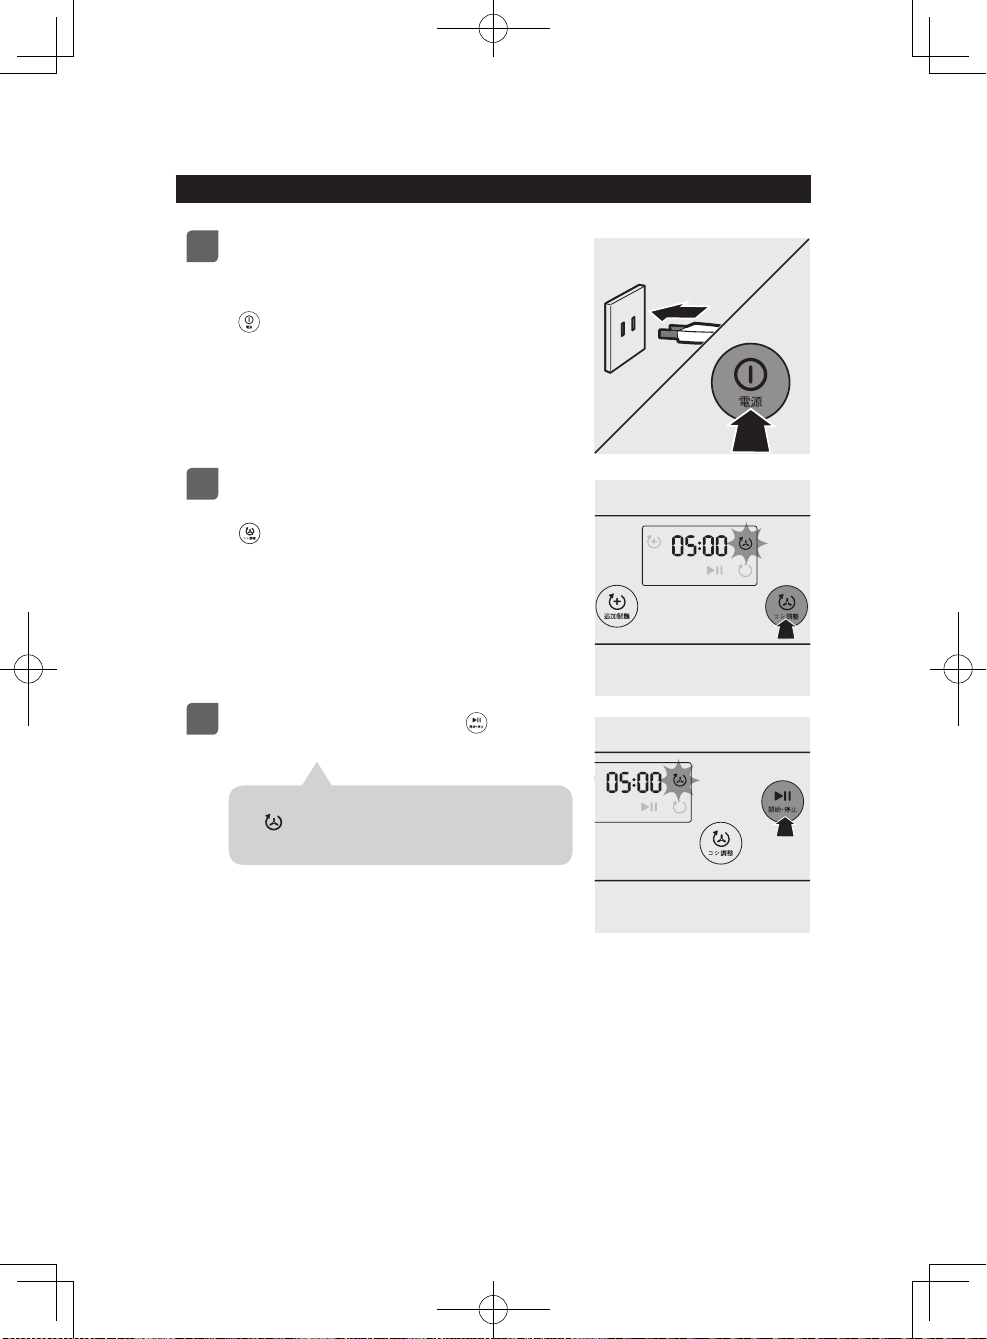
Selecting the noodle making program
Connect to the power. The noodle maker
1
will sound once, and all indicators will
flash once. Press the power on/off button
( ) to switch on the noodle maker. The
display light up.
The default kneading time is 5 minutes.
2
Press the bounciness control button
( ) to set the kneading time from 5 to
8 minutes. You can adjust the kneading
time for different types of noodles and
your own preference. .
Press the start/pause button ( ) to
3
start processing.
※ The appliance beeps once, and the kneading indicator
(
) starts flashing.
※ The selected kneading time starts to count down.
34
Page 35
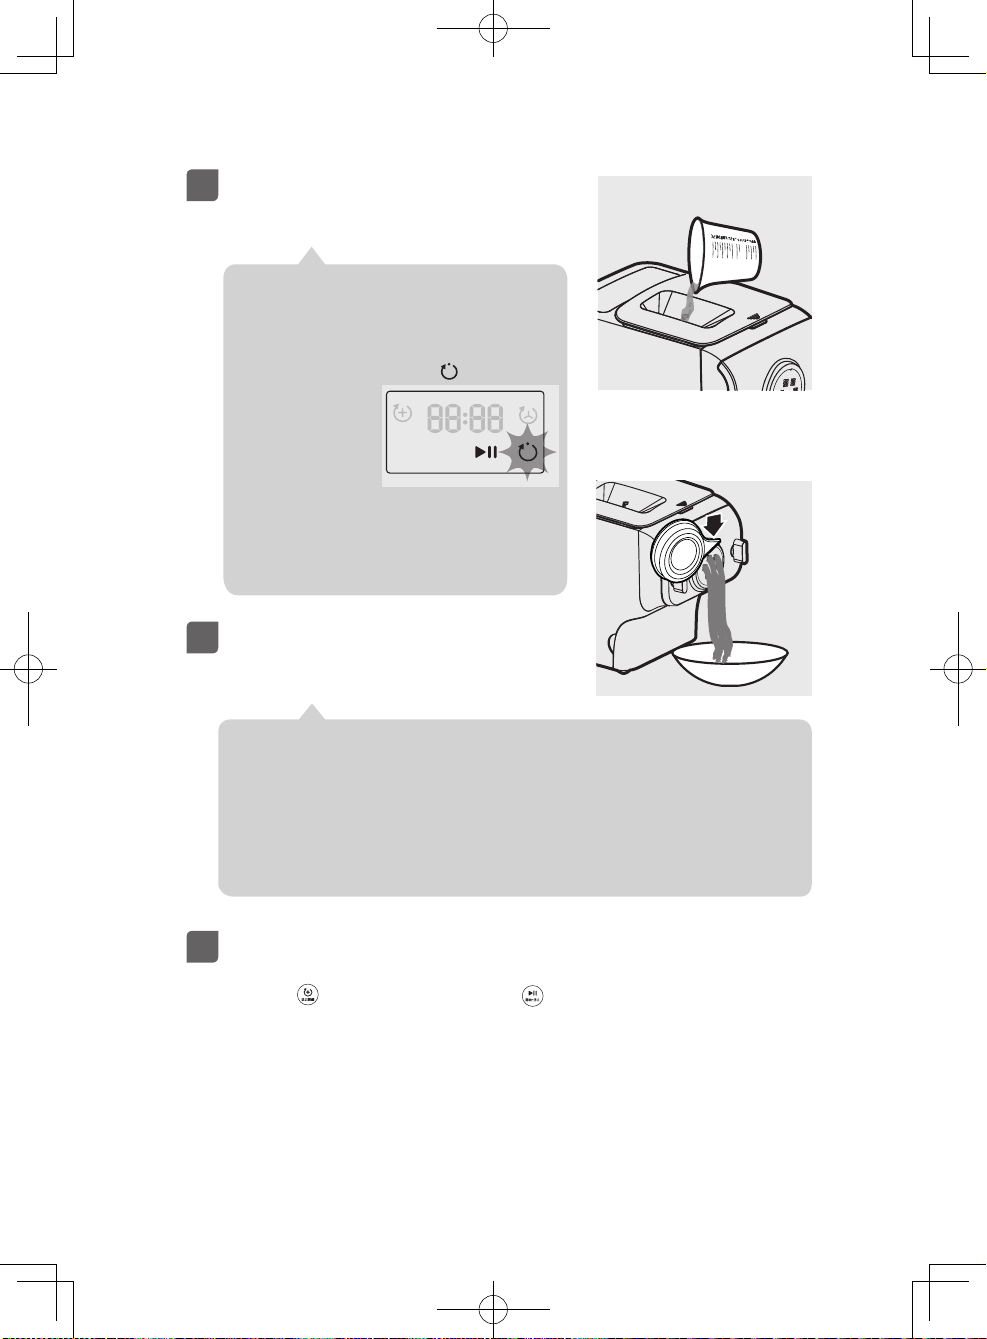
After the kneading starts, slowly pour in
4
the liquid along the entire length of the
slot in the lid.
※ Do not add in other ingredients after you have poured
in the water during kneading. Otherwise, it will affect the
result of the noodle texture.
※ When the kneading process is finished, the appliance
beeps and pauses for 10 seconds to prepare for
extruding. The extruding indicator (
After 10 seconds,
the appliance will
automatically start
extruding noodles. Put
the dish or tray under
the shaping disc to
collect the extruded
noodles.
※ Noodles cannot be extruded when the dough is stiff and
sticks to the mixing paddle. Adjust The flour/liquid ratio
based on the flour you are using, or the seasonality which
affects the dough quality.
After the program is finished, cut the
5
) starts flashing.
noodles into the desired length with the
supplied cleaning tool.
※ Move the cleaning tool downwards to cut the noodles.
※ The extruding time depends on the amount of ingredients in the mixing chamber.
※ Due to the auto-sensing technology during extrusion, the total extrusion time varies from 6 mins to
14 mins, and the mixing paddle will be moving backward one to three times to pick up dough for
further extrusion. This is not a machine error.
※ You may find some f
※ If the ratio of water and flour is not correct, the extrusion will not succeed. In this case please
prepare the ingredients from scratch.
ine noodle threads on the noodle surface. This is normal.
After the noodle making is complete, if you notice there are some
6
leftover doughs inside the chamber, you can press the extra-extruding
button ( ) and press start/pause ( ) for extra extrusion. The
countdown timer of the extra-extruding program is 3 minutes.
35
Page 36
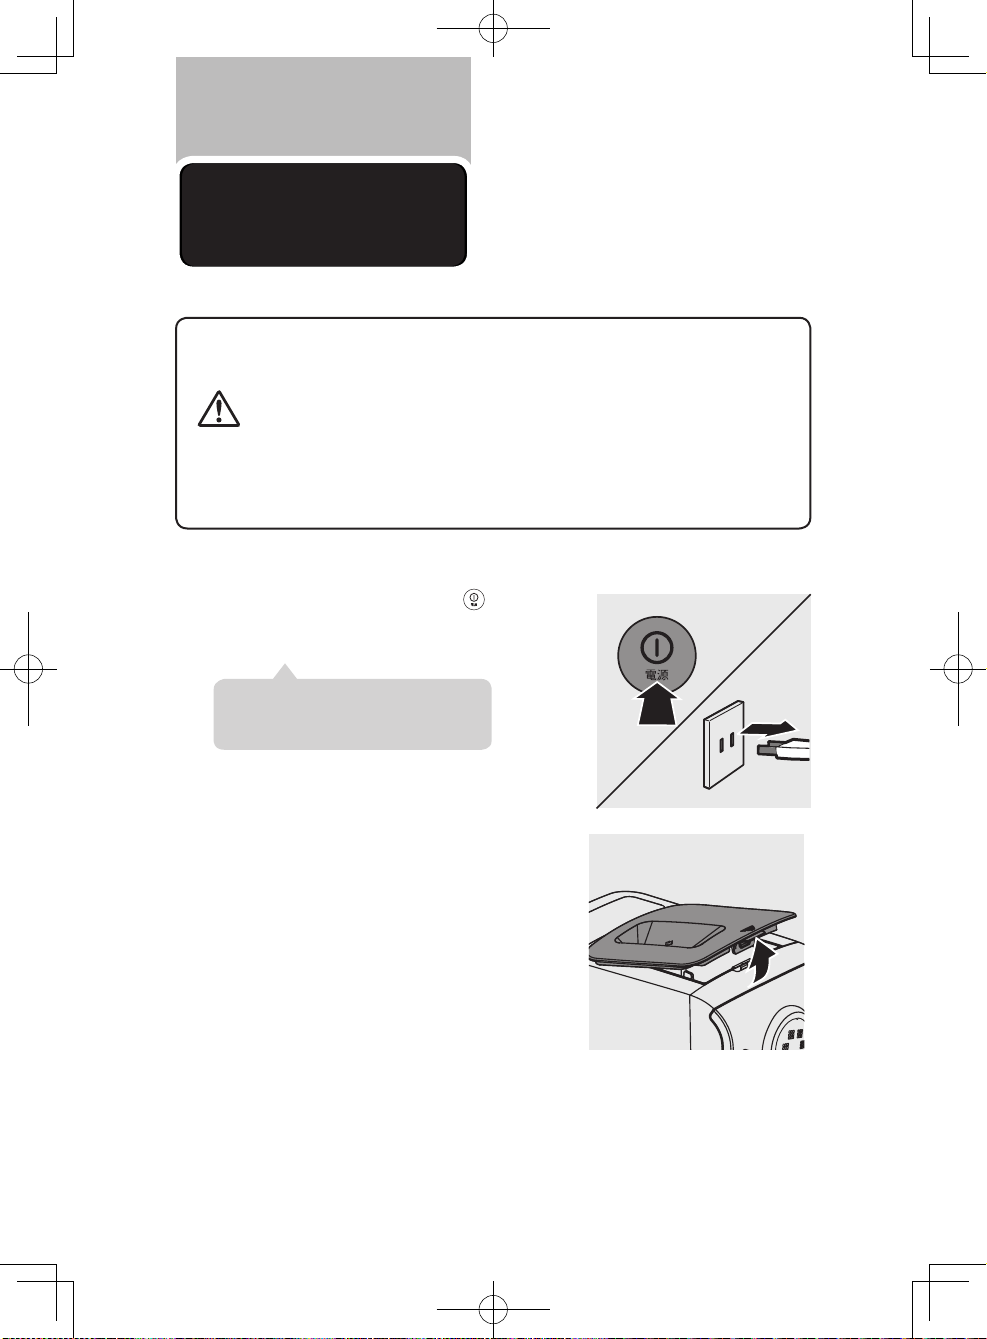
Cleaning
● Disconnect the power and remove the power cord before cleaning or disassembling this
appliance.
● Do not immerse the main unit in water.
● Do not use a scourer, caustic cleaners, or abrasive cleaners ( for examples, gasoline, alcohol,
Cautions
Press the power on/off button ( ) to turn
1
off the noodle maker, and then disconnect it
from the power outlet.
and propanol) to clean the appliance.
● Clean the appliance each time after use, or the appliance might have malfunctions.
● Take extra caution when cleaning t
● Do not use dish washer to clean the machine and the accessories.
※ Do not unplug the appliance while it is
operating, as it may cause damage to the
appliance.
he appliance to avoid getting cut the the edges.
Remove the chamber lid from the
2
appliance.
36
Page 37
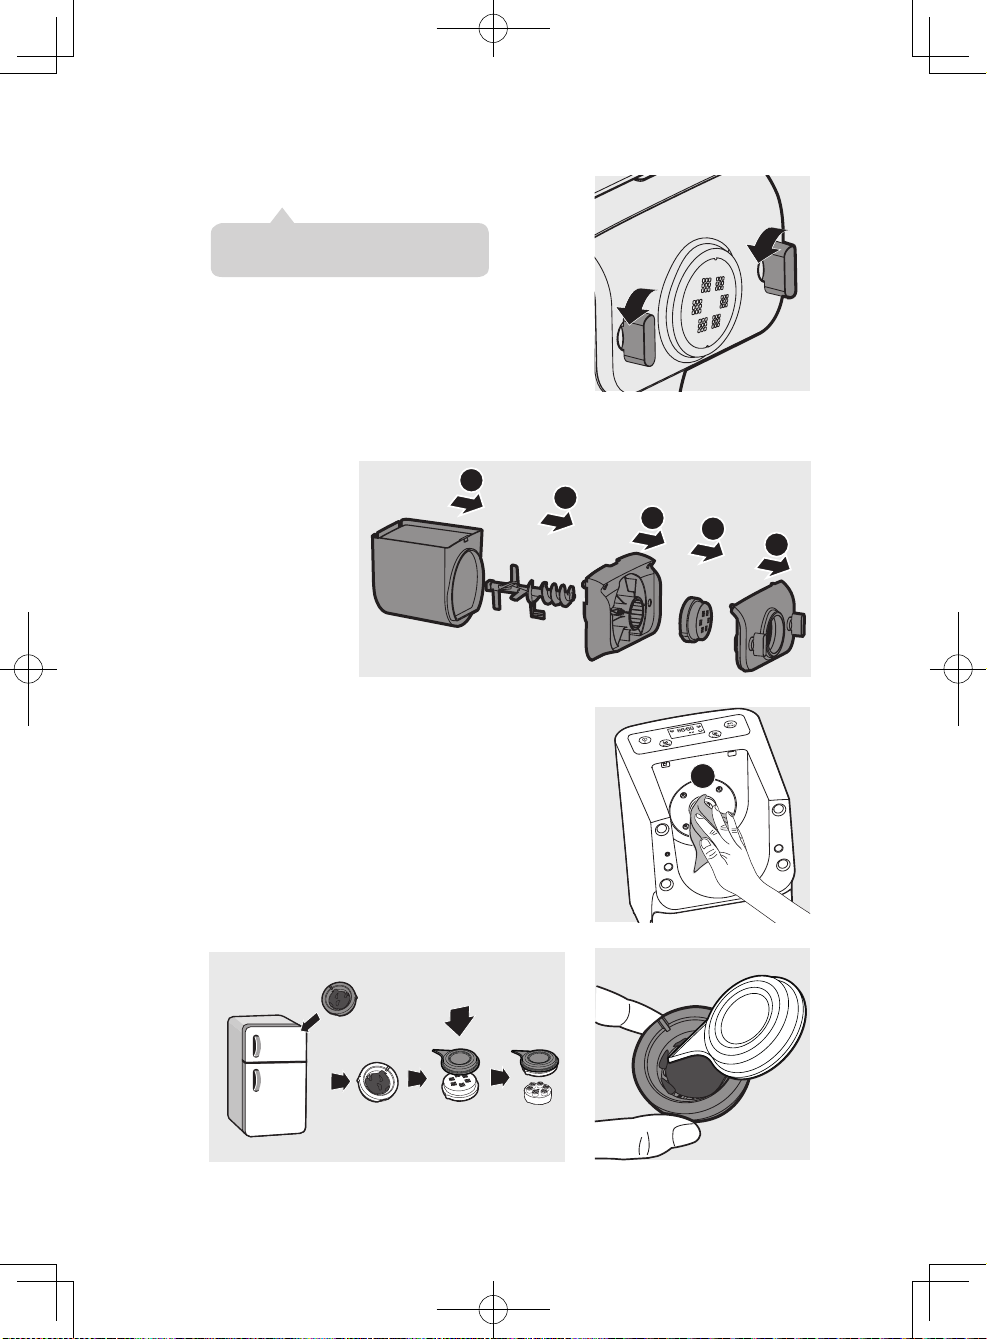
Loosen the front panel control knob.
2
3
4
5
1
3
※ The front panel is heavy. Take extra caution
when removing it.
Disassemble the front panel, the shaping disc, the shaping disc holder, the
4
mixing paddle, and the mixing chamber in order.
Use a dry cloth to clean flour residue in
5
the hole (❶) where the mixing paddle is
placed.
1
Clean the shaping disc with the supplied
6
cleaning tool to remove the dough residues.
After that, you can clean it with water.
※ For better cleaning result, put the shaping disc into the
freezer for 2 hours. Then use the cleaning tool to poke the
dough in the holes out.
37
Page 38
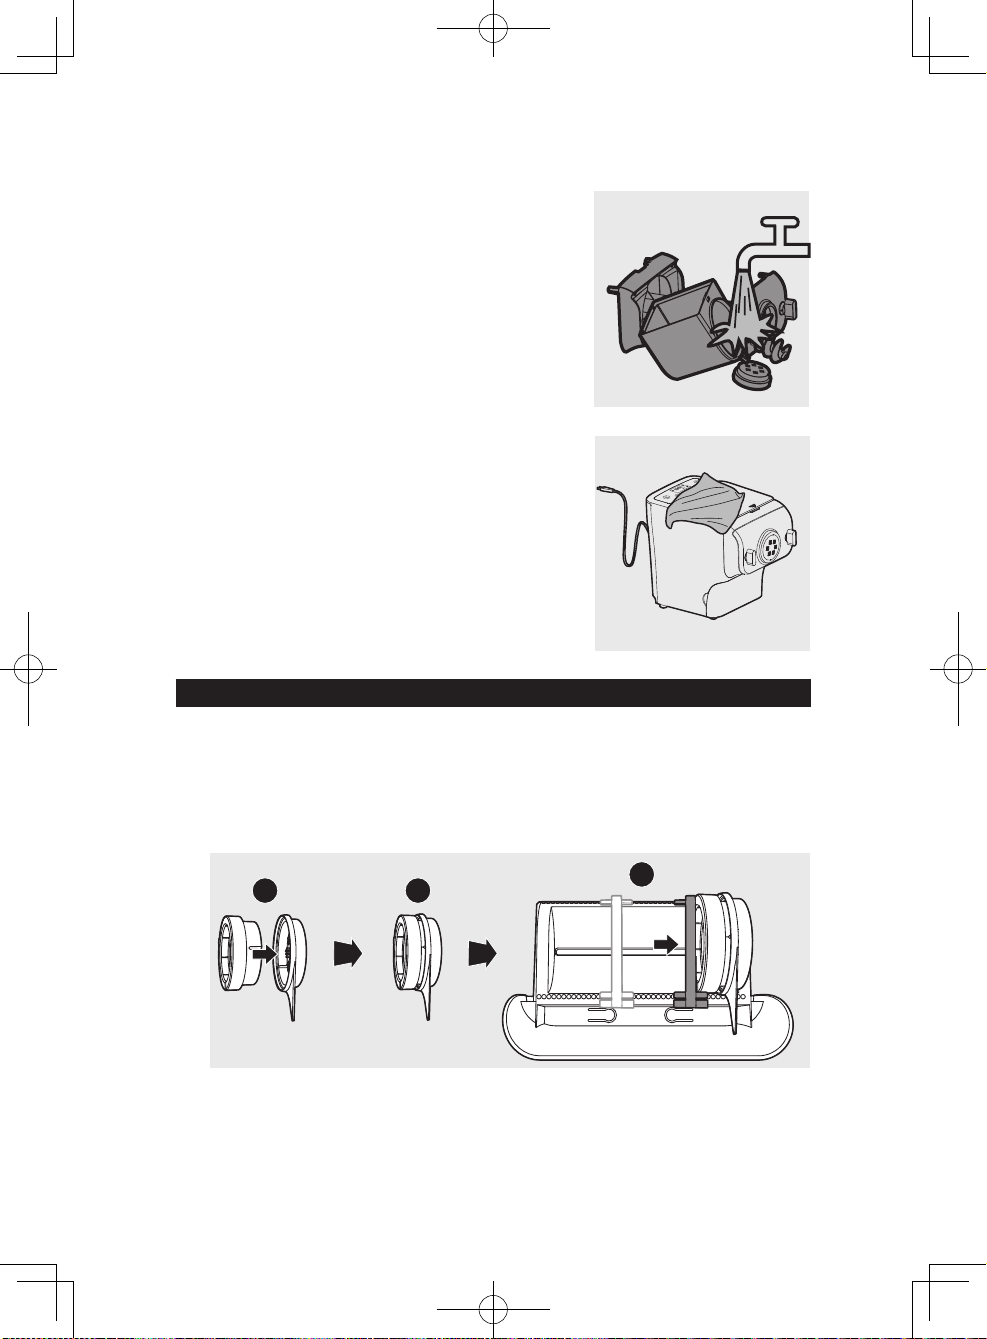
Clean all detachable parts.
7
Use a dry cloth to clean the main unit,
8
control panel, and the exterior of the
noodle maker.
※ After cleaning, make sure all par ts and the shaping disc
storage are dry. Assemble the noodle maker back for next
use.
Storing the shaping discs and cleaning tools
Insert the shaping disc ❶ and cleaning tool ❷ together. Put ❶ and ❷ into
1
the storage drawer. Move the sliding bar ❸ to fasten the shaping discs and
cleaning tools.
※ Make sure the cleaning tools and shaping discs are dry before putting them into the storage drawer.
1
2
38
3
Page 39
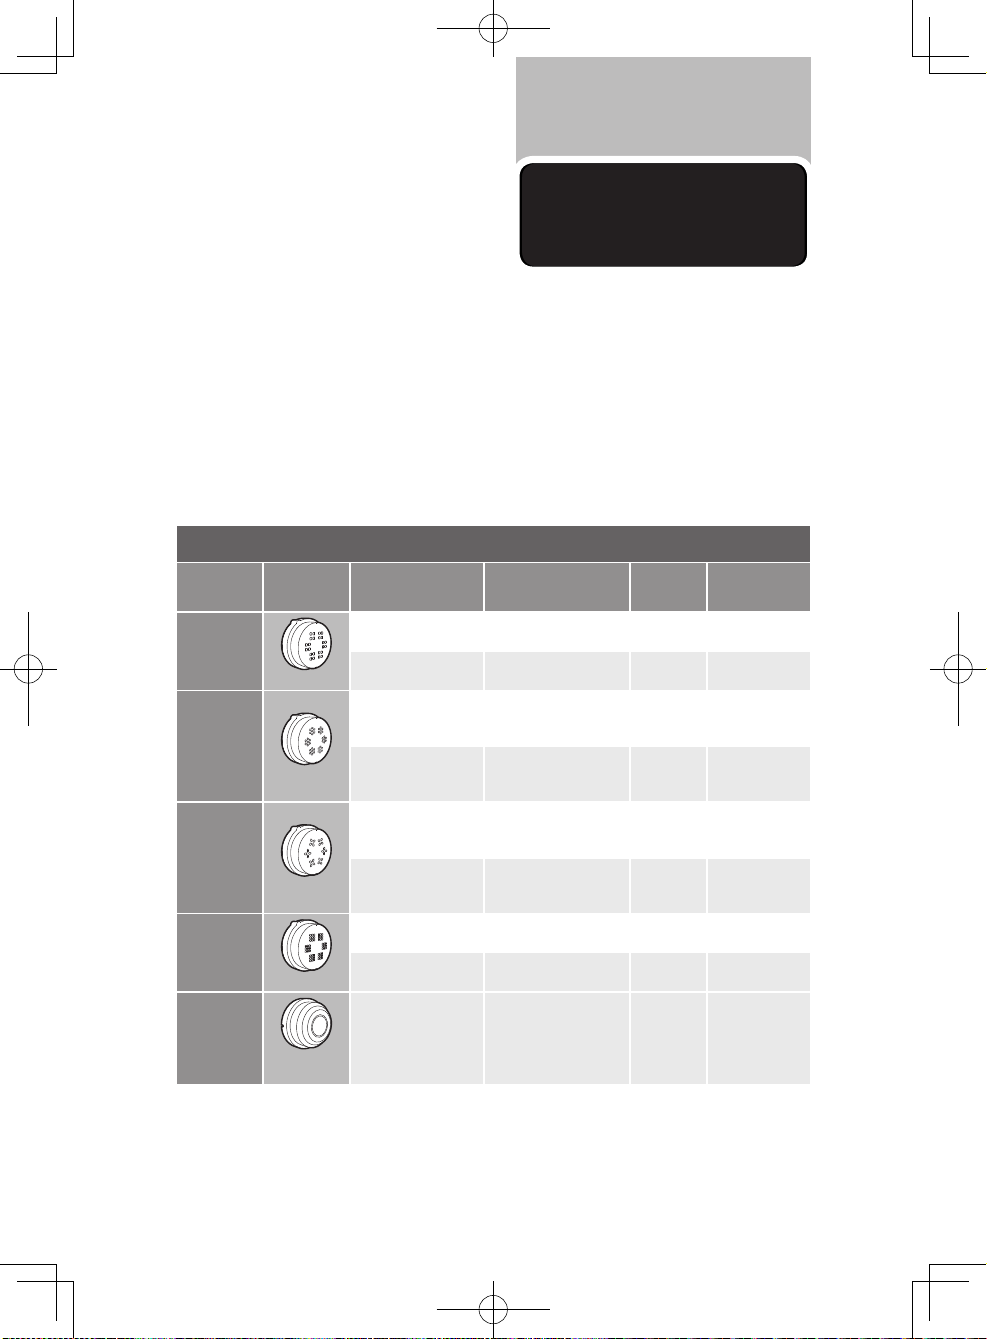
Refer to the recipe booklet for
detailed recipes.
Recipes
※ To guarantee the quality of the noodle, use gluten flour to make noodle. Follow the recommended proportion
to add the ingredients.
※ Seasonal changes and using ingredients from different regions may affect the flour/water ratio. You may adjust
based on the recommended proportion.
※ When making the egg noodle or vegetable noodle, make sure y
ou whisk the egg mixture or vegetable juice
evenly before pouring into the chamber.
※ When making Ramen, mix hot water with the baking powder first, and then pour the hot water into the
suggested amount of cold water. Do not pour the hot water directly into the mixing chamber.
※ To add salt, you can either mix it with the flour or liquid.
※ The 0.8mm sheet shaping disc is sold separately (HR2435/01).
Flour/water ratio table
Noodle type Shaping disc* Flour Liquid
Udon
2.5mm square
Ramen
2mm round
Pasta
1.6mm flat
Soba
1.6mm square
250g Udon flour 90cc cold water 2g salt
500g Udon flour 180cc cold water 4g salt
250g Hard/bread flour
500g Hard/bread flour
75g Soft/weak flour
175g Hard/ bread flour
150g Soft/weak flour
350g Hard/ bread flour
175g Hard/break flour
Soba flour 75g
350g Hard/ bread flour
Soba flour 150g
Cold water 70cc
Hot water 20cc with the
baking powder
Cold water 140cc
Hot water 40cc with the
baking powder
Mix 1 medium size egg
into cold water 40cc. the
total amount to be 90cc.
Mix 2 medium size eggs
into cold water 80cc. the
total amount to be 180cc.
Cold water 90cc 3g salt
Cold water 180cc 6g salt
Other
ingredients
2g salt
2g baking
powder
4g salt
4g baking
powder
1g salt
2g salt
noodle/pasta
quantity
300g
(For 1-2 servings)
600g
(For 3-4 servings)
300g
(For 1-2 servings)
600g
(For 3-4 servings)
300g
(For 1-2 servings)
600g
(For 3-4 servings)
300g
(For 1-2 servings)
600g
(For 3-4 servings)
Dumpling skin
0.8mm
flat sheet
250g Hard/bread flour Cold water 95cc 3g salt
※ The recipes can be shared among different shaping discs except the one for the dumpling skin.
※ For recipes other than the above, please refer to the recipe booklet or adjust the flour and water ratio based on
the above recipe.
39
Page 40
Troubleshooting
Check this chapter if you encounter
problems when using the appliance.
The indicators do not light up.
▶ The power plug is connected incorrectly.
Check whether the power plug is plugged correctly.
▶ The power button is not pressed.
Press the power on/off button (
).
After pressing the start/pause button ( ) the appliance sounds but it does
not work.
▶ The chamber is assembled incorrectly.
The shaping disc, or the front panel is assembled incorrectly.
Make sure you follow the user manual to assemble all parts correctly.
The safety switch is triggered and the appliance suddenly stops or suddenly
restarts during the processing.
▶ The front panel knob is loosen.
Make sure the front panel is securely assembled.
▶ Excessive ingredients in the noodle maker.
The maximum amount of flour used for each batch is 500g. If more than 500g is added, please reduce the
amount of flour before next batch.
During processing, the appliance stops. There is no alarm sound or flashes.
▶ The noodle maker is overheat due to long continuous working time.
Disconnect from the power, and allow the noodle maker to cool down. To better protect the lifetime
of the appliance, the continuous working time should be less than 45 minutes. You can restart using the
appliance after 15 minutes.
40
Page 41
The appliance stops during processing, then EEEE is displayed on the screen, the
indicators are flashing quickly, and the alarm sounds.
▶ The mixing paddle can be blocked by some foreign objects.
The dough can be too dry.
The wrong program is selected.
Disconnect from the power, clean the noodle maker, and follow the user manual again to restart the
noodle making.
Too much leftover dough inside the chamber.
▶ The flour is either exposed to moisture before use, or the dough is too wet.
Keep your flour dry during storage. Follow the user manual to restart the noodle making.
▶ The chamber, the mixing paddle, the shaping disc are not cleaned properly before use.
Make sure all parts are clean before use.
▶ The mixing paddle or the chamber is still wet.
Make sure all parts are dr y before use.
▶ Water is not
The flour type is not suitable.
Follow the user manual to make noodle.
poured in the right order.
Small amount of water is leaking out from the appliance.
▶ Water is added before the program starts.
Follow the user manual to add water right after the program starts.
The mixing paddle is running idle, and there is no noddle coming out.
▶ The ratio of the flour and water is incorrect.
Disconnect from the power, clean the noodle maker, and follow the user manual again to restart the
noodle making.
41
Page 42
Product
information
Model HR2365/01
Motor power 200W
Rated voltage AC100V (50/60Hz)
Dimensions (L x W x H) 215mm x 343mm x 300mm
Weight 7.8kg
※ For rated voltage and frequency information, refer to the typeplate on the product. Product information is
subjected to change without prior notice.
Recycling
Do not throw away the appliance with normal household waste at the end of
its life, but hand it in at an official collection point for recycling. By doing this, you
help to preserve the environment.
Guarantee and
service
If you have a problem, need service or need information, see www.philips.com/support or
contact the Philips Consumer Care Center in your country.
42
Page 43
保証書と修理サービスについて
(必ずお読みください)
アフターサービス
保証期間 お買い上げ日から 2 年間
対象部分
製品本体
※ 計量カップ(粉)、計量カップ(水)、 クリーニン
保証と
グキット、製麺用キャップ除く
〈保証書・最終ページに付属〉
● 保証書は、必ず「お買い上げ日・販売店名」等の記入をお確かめのうえ、販売店から受け取っていただき内
容をよくお読みのあと大切に保管してください。
【補修用性能部品の最低保有期間】
● 補修用性能部品の最低保有期間は製造打ち切り後 6 年です。
● 性能部品とは、その製品の機能を維持するために必要な部品です。
【ご不明な点や修理に関するご相談は】
● 修理に関するご相談ならびにご不明な点は、フィリップスサポートセンターにお問い合わせください。
【修理を依頼されるときは】
● 修理をご依頼される前に、この取扱説明書をよくお読みいただき、再度点検ください。尚、異常のあるとき
はご使用を中止し、フィリップスサポートセンターへご依頼ください。
【保証期間中は】
● 製品に保証書を添えてフィリップスサポートセンターにご連絡ください。
保証書の記載内容により無料修理いたします。
【保証期間が過ぎているときは】
● 修理によって製品の機能が維持できる場合は、補修用性能部品の保有期間内であれば、ご希望により有
料で修理させていただきます。
【海外での本製品の保証について】
● この製品は、日本国内用に設計されているため海外では使用できません。
【お客様の個人情報のお取り扱いについて】
● お受けしましたお客様の個人情報は、株式会社フィリップスエレクトロニクスジャパンのホームページ
http://www.philips.co.jp/ に掲載されている「お客様の個人情報の取り扱いについての当社の方針」に基づ
き適切に管理いたします。
43
Page 44
便 利 メ モ
お買い上げ日
年 月 日
お買い上げ
店名
TEL.( )
ご使用の時、このような症状はありませんか?
● 本体にさわると時々電気を感じる。
● こげくさい臭いがする。
● 電源コード部を動かすと通電したり、しなかったりする。
● その他の異常、故障がある。
このような症状の時は、故障や事故防止のため、スイッチを切り、電源プラグを
コンセントから外して、必ずフィリップスサポートセンターにご相談ください。
仕 様
品 番 HR2365/01
消 費 電 力 200W
定 格 電 圧 AC100V (50/60Hz)
サ イ ズ 215 (W) x 343 (D) x 300 (H) mm
本 体 質 量 7.8kg
※ 改良の為、仕様を予告なく変更することがあります。
● フィリップス製品の修理受付はフィリップスサポートセンターにお申し出ください。
● 修理サービス等についておわかりにならないことは、下記にお問い合わせください。
お問い合わせ
フィリップスサポートセンター
〒 283-0013 千葉県東金市士農田 17-9
受付時間:平日 9:00 〜 18:00 (土・日・祝日・夏期休暇・年末年始を除く)
フィリップス コンシューマー ライフスタイル事業部
0120-944-859
ホームページアドレス http://www.philips.co.jp/
44
Page 45
無料修理規定
〈無料修理規定〉
1. 取扱説明書の注意書に従った正常な使用状態で保証期間内に故障した場
合には、無料修理します。
2. 保証期間内に故障して無料修理をお受けになる場合には、フィリップスサ
ポートセンターにご依頼ください。なお、商品を直接メーカーへ送付した
場合の送料等はお客様の負担となります。
3. 保証期間内でも次の場合には有料修理になります。
① 使用上の誤り及び不当な修理や改造による故障及び損傷。
② お買い上げ後の輸送、移動、落下等による故障及び損傷。
③ 火災、地震、水害、落雷、その他の天災地変、公害や異常電圧による故障及び損傷。
④ 一般家庭以外(例えば、業務用の長時間使用)に使用された場合の故障及び損傷。
⑤ 保証書の提示がない場合。
⑥ 保証書にお買い上げ年月日、お客様名、販売店名の記入のない場合、或は字句を書き
換えられた場合。
※ 保証書は、本書に明示した条件のもとにおいて無料修理をお約束するも
のです。従って保証書を発行している者(保証責任者)、及びそれ以外の事
業者に対するお客様の法律上の権利を制限するものではありません。
保証期間経過後の修理についてご不明の場合は、フィリップスサポートセ
ンターにお問い合わせください。
※ 保証期間経過後の修理・補修用性能部品の保有期間について詳しくは取
扱説明書の保証とアフターサービスの項目をご覧ください。
※ お客様にご記入いただいた個人情報(保証書の控え)は保証期間内のサー
ビス活動及びその後の安全点検活動のために利用させていただく場合が
ございます。ご了承ください。また個人情報は、株式会社フィリップスエレク
トロニクスジャパンのホームページ http://www.philips.co.jp/ に掲載されて
いる「お客様の個人情報の取り扱いについての当社の方針」に基づき適切
に管理いたします。
45
Page 46
保証書
フィリップス ヌードルメーカー 保証書
持込修理
CERTIFIC AT E O F P U R C H A S E
この保 証 書は 、「 無料 修 理規定 」記載 内 容で 無料修 理を 行うことをお 約束 するもので す。お 買 い上
げの 日から下 記 期間 中 に故 障 が発 生した 場合 は、本書をご用 意い ただ き、フィリップ スサポ ートセ
ンターにご 連絡くだ さい。お客様にご 記入 いただ いた 個人情 報( 保証書 の 控え)は、株式 会社フィリッ
プスエレクトロニクスジャパンのホ ームペ ージ h ttp: //w ww. phi lip s. co .jp / に 掲載されている「お
客様 の 個人 情 報の取り扱い につ いての 当社の 方針」に基 づき 適切 に管 理 いたします。
品名 ヌードルメーカー
品番 HR2365/01
保証期間 お買い上げ日より2 年
製品本体
対象部分
※ 計量カップ(粉)、計量カップ(水)、クリーニングキット、製麺用キ
ャップ除く
お買い上げ日 年 月 日
ご住所〒
お客様
ご芳名
電話番号
販売店名・住所・電話番号
★販売店
★ 保 証 書は 再 発行しませんの で、大 切に保 管してください。
★ ご 販 売店 様 へ : この 保証 書 はお客 様 へのアフター サ ービスの 実施と責任を 明確 に するもの で
す。贈答 品、記念 品の場 合も 含めて必 ず 記入捺 印してお 客 様にお 渡しください。
お問い合わせ
フィリップスサポートセンター
〒 283-0013 千葉県東金市士農田 17-9
受付時間:平日 9:00 〜 18:00 (土・日・祝日・夏期休暇・年末年始を除く)
この印刷物は再生紙を使用しております。
0120-944-859
46
4241.210.1560.4
Page 47
Page 48
© 2014 Koninklijke Philips N.V.
 Loading...