

Philips HR1386 User Manual
HR 1386

2
English Page 4
• Keep pages 3 and 26 open when reading
these operating instructions.
Français Page 6
• Dépliez les pages 3 et 26 en lisant le mode
d'emploi.
Deutsch Seite 8
• Schlagen Sie beim Lesen der
Gebrauchsanweisung Seite 3 und 26 auf.
Nederlands Pagina 10
• Sla bij het lezen van de gebruiksaanwijzing
pagina 3 en 26 op.
Italiano Pagina 12
• Prima di usare l'apparecchio, aprite le pagina 3
e 26 e leggete attentamente le istruzioni per
l'uso.
Español Página 14
• Desplegar las páginas 3 y 26 al leer las
instrucciones de manejo.
Português Página 16
• Durante a leitura do modo de emprêgo,
desdobre e verifique as pág. 3 e 26.
Dansk Side 18
• Hold side 3 og 26 opslået mens De læser
brugsanvisningen.
Norsk Side 20
• Slå opp på side 3 og 26 før De leser videre.
Svenska Sid 22
• Ha sidan 3 och sidan 26 utvikt när ni läser
bruksanvisningen.
Suomi Sivu 24
• Pidä sivu 3 ja 26 auki samalla kun luet
käyttöohjetta.
3
E
I
J
G
F
H
B
A
D
C
2

4
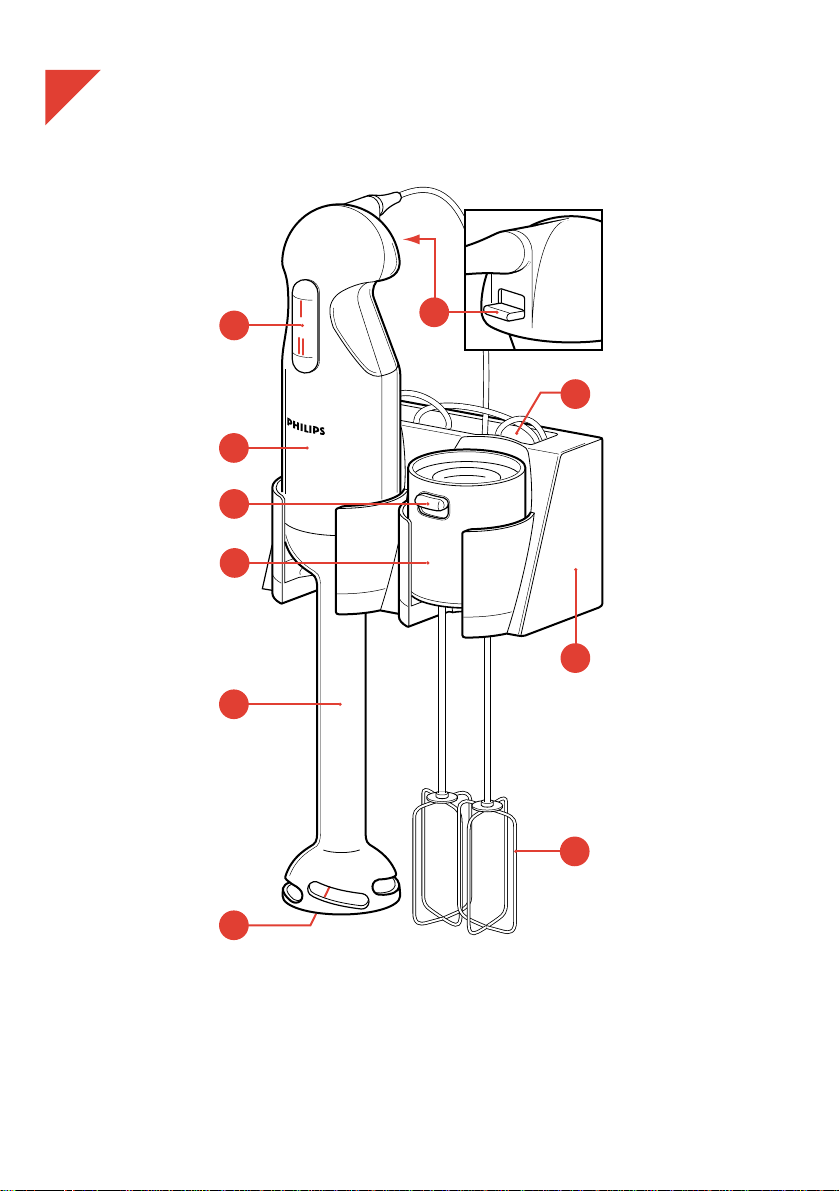
General description (fig. 1)
A Safety switch
B Speed selector
I = Low speed, I I = High speed
C Motor unit
D Bar blender attachment
E Bar blender blades
F Beaters coupler
G Beaters release button
H Beaters
I Wall holder with screws and rawlplugs
J Cord storage
K Mixing beaker
Making ready for use
Bar blender
- Screw the bar blender attachment in the
direction of the arrow until tight (fig. 2). (To
remove: screw in opposite direction.)
Beaters
- Insert the beaters in the holes of the coupler
and press to fix ("Click!") (fig. 3).
- Screw the coupler in the direction of the arrow
until tight (fig. 4). (To remove: screw in
opposite direction.)
Switching on/off
- Put the ingredients into the mixing beaker
provided.
- Put the ingredients in a bowl.
- Insert the mains plug into a wall socket.
- First lower the beaters or blades into the
ingredients.
- Then switch the motor on:
Push upwards and hold the safety switch with
the thumb of your free hand (fig. 5).
Set the speed selector to the required position
with the index finger of the hand with which you
are holding the appliance (fig. 6).
• Once the appliance is switched on you need
only to keep the speed selector pressed in.
• If you wish to change speed during operation,
slide your finger over the speed selector.
Ensure to keep the speed selector pressed in,
because otherwise you will have to push the
safety switch upwards again.
• When the appliance is switched off the safety
switch is reset automatically.
- To switch off simply release the speed selector
(fig. 7).
Tips
• Beaters.
Use the beaters for mixing batters (for (thin)
pancakes, wafers, biscuits, cake, puff pastry,
etc.), creams, toppings, instant pudding, egg
white or whole egg, mayonnaise, sauces and
soups, for puréeing potatoes and for whipping
double cream.
Select speed I first and then if possible switch
over to speed I I to prevent splashing. For airy
whipping (especially egg white) use speed I I .
For small quantities you can also fix only one
beater and mix in e.g. a drinking glass.
Important
• Read the instructions carefully in
conjunction with the illustrations before
using the appliance.
• Avoid damage. Before connecting please
check if the voltage indicated on the
appliance corresponds to the mains
voltage in your home (110-127 V,
220-230V or 240 V).
• Do not use the appliance when the mains
cord, the plug or other components are
damaged. If the mains cord of this
appliance is damaged, it must only be
replaced by Philips or their service
representative, as special tools and/or
parts are required.
• The blades are sharp! Do not hold the
blades. Remove the mains plug from the
wall socket before attaching or removing
the bar blender accessory. Keep the
appliance away from children.
• Do not lay down or hang the appliance
where it can fall or be pulled into water
(tub, sink). However, if the appliance has
accidentally fallen into water: do not
touch it! Unplug immediately.
• Always fix the beaters or the bar blender
accessory on to the mixer before you
connect it to the mains.
• Lower the beaters or the bar blender
accessory into the ingredients before
switching on.
• Use the high-shaped mixing beaker
provided, filled no higher than 2/3 of its
maximum contents, to prevent spatting
and spillage.
• Never immerse or rinse the main unit in
water.
English

• Bar blender. Use the bar blender accessory
e.g. for chopping or blending uncooked or
cooked vegetables (dry or with water) or fruit,
and for making soup, purée, mayonnaise,
milkshake, sauces, diet and baby or infant food.
Select speed I first to prevent splashing. Where
possible switch over to speed II.
During use, move the blades unit through the
ingredients. (Do not lift it too high, to prevent
spattering!)
Please note: this appliance is not suitable for
kneading (yeast) dough, shortbread dough and
minced meat. For such heavy applications we
advise you to use a Philips food processor.
Cleaning
- Operate the beaters or blades in soapy water
for a short time.
- Switch off and remove the mains plug from the
wall socket.
- Disassemble the beater or bar blender
attachments from the motor unit.
- Beaters: Depress the ejector knob to release
the beaters (fig. 8).
You may clean the beaters in hot soapy water.
They may also be cleaned in a dishwasher.
- Beaters coupler: Clean with a damp cloth only.
- Bar blender attachment: Do not fully immerse
the attachment. The end with the blades may
be cleaned with hot soapy water using a
washing-up brush.
You can wipe the bar clean with a damp cloth.
- Motor unit: Clean with a damp cloth only.
Wall mounting
You can hang the appliance on the wall, using the
wallrack. Select an appropriate spot, preferably
close to a wall socket.
Keep sufficient free space (min. 25 cm or 10"
above the wallrack and about 20 cm or 8" below
it). You can use the wallrack as a template to
mark the spots for drilling holes. The distance
between the hole markings should be 100 mm
(centre to centre) (fig. 9).
For mounting onto a brick or stone wall, plaster or
tiles: drill two 5 mm (0.2") holes using a masonry
drill and insert the provided plugs.
Let the screw heads protrude 5 mm (fig. 10) and
slide the wallrack into position (fig. 11).
For U.K. only:
This appliance is supplied with a non-rewirable
13 Amp. plug. The plug must never be used
without the fuse cover being in place.
If a replacement fuse cover is required, it must be
of the same type or colour as the coloured insert
around the fuse cover.
Replacement fuse covers are available from
Electrical Retailers or direct from Philips, tel.
0181 689 2166, extension 8014.
Replacement 3 Amp. fuses must be BSI or ASTA
BS 1362 approved.
Important safety information
If the non-rewirable plug is not suitable for the
socket outlets in your home, it can be removed
and replaced by a plug of the correct type.
The non-rewirable plug must be cut from the
mains cord, the fuse removed, and the plug safely
discarded to prevent further use.
The removed plug can be hazardous if inserted
into a live mains socket.
5
Wiring Instructions U.K.
"IMPORTANT"
The wires in the mains lead are coloured in
accordance with the following code:
Blue - neutral
Brown - live
As the colours of the wires in the mains lead
of this appliance may not correspond with the
markings identifying the terminals in your plug,
proceed as follows:
The wire which is coloured Blue must be
connected to the terminal which is marked
with the letter "N" or coloured Black.
The wire which is coloured Brown must be
connected to the terminal which is marked
with the letter "L" or coloured Red.
DO NOT CONNECT either of these wires to
the earth terminal in the plug which is marked
with the letter "E" or by the earth symbol E or
coloured GREEN, or GREEN AND YELLOW.
Note: If the terminals of the plug are
unmarked or if you are in any doubt
consult a qualified electrician.

6
Description générale (fig. 1).
A Interrupteur de sécurité
B Sélecteur de vitesse
| = vitesse lente
|| = vitesse rapide
C Bloc moteur.
D Elément batteur plongeur
E Lames du batteur plongeur
F Pièce de jonction de l'élément mixeur
G Bouton éjecteur des fouets
H Fouets
I Support mural avec vis et chevilles
J Compartiment de rangement du cordon
K Bol à mixer
Préparation à l'emploi
Batteur plongeur
- Fixez l'élément batteur plongeur en le tournant
dans la direction indiquée par la flèche (fig. 2).
(Pour retirer: tourner en sens inverse.)
Fouets
- Introduisez les fouets dans les trous de la pièce
de jonction et serrez-les ("clic") (fig. 3).
- Fixez la pièce de jonction en le tournant dans la
direction indiquée par la flèche (fig. 4). (Pour
retirer : tourner en sens inverse.)
Mise en marche/à l'arrêt
- Mettez les ingrédients dans le bol à mixer fourni
avec l’appareil.
- Branchez l'appareil.
- Placez les fouets ou les lames dans les
ingrédients.
- Mettez le moteur en marche :
Poussez l'interrupteur de sécurité vers le haut
avec le pouce de votre main libre (fig. 5) et
maintenez-le dans cette position.
Placez le sélecteur de vitesse dans la position
souhaitée avec l'index de la main avec laquelle
vous tenez l'appareil (fig. 6).
• Une fois l'appareil en marche, il suffit de
continuer à appuyer sur le sélecteur de vitesse.
• Si vous désirez changer de vitesse pendant
que l'appareil est en marche, faites glisser votre
index sur le sélecteur de vitesse.
Ne relâchez pas le sélecteur de vitesse, sinon
vous devrez repositionner l'interrupteur de
sécurité vers le haut.
• Lorsque l'appareil est mis à l'arrêt, l'interrupteur
de sécurité reprend automatiquement sa
position initiale.
- Pour mettre l'appareil à l'arrêt, il suffit de
relâcher le sélecteur de vitesse (fig. 7).
Attention
• Lisez le mode d'emploi et étudiez les
illustrations avant la première mise en
service de l'appareil.
• Evitez tout endommagement. Avant de
brancher l'appareil, assurez-vous que le
voltage indiqué sur la plaque
signalétique correspond au voltage du
réseau de votre habitation. (110-127 V,
220-230 V ou 240 V).
• En cas de défection du cordon, de la
prise ou d'autres éléments, n'utilisez pas
l'appareil. Si le cordon secteur de votre
appareil est endommagé, il doit
impérativement être remplacé par un
réparateur indépendant agréé Philips car
des équipements et des composants
spécifiques sont exigés.
• Ne touchez pas aux lames de l'appareil:
elles sont extrêmement tranchantes.
Assurez-vous de débrancher l'appareil
avant de mettre en place ou de retirer
l'élément batteur plongeur. Ne laissez
pas l'appareil à la portée des enfants.
• Veillez à ne pas placer ou accrocher
l'appareil à un endroit où il risquerait de
tomber dans l'eau ou d'y être entraîné
(évier, un bac à lessive). Si, par
malchance, l'appareil tombe quand
même dans l'eau: ne le touchez pas!
Débranchez immédiatement.
• Ne branchez l'appareil que si vous avez
mis en place les fouets ou l'élément
batteur plongeur.
• Placez les fouets ou le batteur plongeur
dans les ingrédients avant de mettre
l'appareil en marche.
• Utilisez le bol à mixer de forme haute
fourni avec l’appareil. Remplissez le bol
jusqu’au 2/3 de son contenu maximum
pour éviter les éclaboussures et les
débordements.
• N'immergez jamais l'appareil dans l'eau;
ne le rincez pas non plus.
Français

Conseils
• Fouets
Utilisez les fouets pour mélanger des pâtes
(crêpes, galettes, gaufres, biscuits, cakes, pâte
brisée, etc.), des crèmes, des sauces pour
desserts, des puddings minute, des oeufs, des
blancs d'oeuf, des mayonnaises, des sauces et
des soupes, pour faire la purée de pommes de
terre et pour battre la crème chantilly.
Commencez à la vitesse | et, si possible,
passez à la vitesse || pour éviter des
éclaboussures. Pour les mélanges légers
(notamment les blancs d'oeuf), utilisez la
vitesse ||.
Si vous voulez mélanger une petite quantité
d'ingrédients, vous pouvez prendre un seul
fouet et battre votre mélange par exemple dans
un verre.
• Batteur plongeur
Avec l'élément batteur plongeur, vous pouvez
hacher et couper des légumes crus ou cuits
(avec ou sans liquide), couper des fruits, les
réduire en purée, faire des purées de pommes
de terre, des mayonnaises, des sauces, des
aliments pour bébés ou pour régimes.
Commencez à la vitesse | pour éviter des
éclaboussures. Si possible, passez à la
vitesse ||.
Lors du fonctionnement, remuez le batteur
plongeur dans les ingrédients. (Ne le relever
pas trop haut afin d'éviter des éclaboussures.)
N.B.: Ne pas utiliser cet appareil pour preparer ou
mélanger des pâtes à levure ou sablés ni de la
viande hachée. Pour ces applications plus
dificiles, il est recommandé d'utiliser un robot
Philips.
Nettoyage
- Faites fonctionner pendant quelque temps les
fouets / les lames dans une eau savonneuse.
- Mettez l'appareil à l'arrêt et débranchez-le.
- Retirez l'élément mixeur ou batteur plongeur du
bloc moteur.
- Les fouets: Détachez les fouets à l'aide du
bouton éjecteur et retirez-les de l'appareil
(fig. 8).
Vous pouvez laver les fouets dans une eau
savonneuse très chaude ou bien dans le lavevaisselle.
L'élément mixeur: nettoyez seulement avec un
chiffon humide.
- l'élément batteur plongeur: ne l'immergez pas
entièrement dans l'eau.
La partie contenant les lames peut être lavée
dans une eau savonneuse très chaude.
Vous pouvez utiliser un brosse à laver la
vaisselle.
L'élément plongeur peut être nettoyé avec un
chiffon humide.
- Bloc moteur: nettoyez seulement avec un
chiffon humide.
Fixation murale
A l'aide du support mural, l'appareil peut être
accroché au mur. Choisissez un endroit
approprié, de préférence près d'une prise
électrique. Laissez un espace suffisant autour de
l'appareil (environ 25 cm au-dessus du support
mural et environ 20 cm au-dessous). Pour
marquer les trous à percer, tenez le support mural
contre le mur. La distance entre les trous doit être
de 100 mm (du centre au centre) (fig. 9).
Pour accrocher le support mural à un mur en
pierre, percez deux trous de 5 mm à l'aide d'une
broche à pierre et utilisez les chevilles livrées
avec l'appareil.
Laissez les têtes de vis dépasser de 5 mm
(fig. 10) et mettez le support mural en place
(fig. 11).
7

8
Allgemeine Beschreibung (Abb. 1)
A Sicherheitsschalter
B Geschwindigkeitsregler
I = Geringe Geschwindigkeit
II = Hohe Geschwindigkeit
C Motoreinheit
D Mixeraufsatz
E Mixermesser
F Quirlaufsatz
G Auswurftaste für die Quirle
H Quirle
I Wandhalterung mit Schrauben und Dübeln
J Kabelfach
K Mixbecher
Vorbereitung zum Gebrauch
Stabmixer
- Schrauben Sie den Mixeraufsatz in
Pfeilrichtung fest an (Abb. 2).
Abschrauben: In die Gegenrichtung drehen.
Quirle
- Setzen Sie die Quirle in die Löcher am
Quirlaufsatz (Abb. 3), und drücken Sie sie fest
hinein ("Klick").
- Schrauben Sie den Quirlaufsatz in Pfeilrichtung
fest an (Abb. 4)
Abschrauben: In die Gegenrichtung drehen.
Ein- und Ausschalten
- Geben Sie die Zutaten in den mitgelieferten
Mixbecher.
- Stecken Sie den Stecker in die Steckdose.
- Stecken Sie dann den Mixer oder die Quirle
ganz in die Zutaten.
- Schalten Sie jetzt den Motor ein:
Schieben Sie den Sicherheitsschalter aufwärts
und halten Sie ihn mit dem Daumen der freien
Hand fest (Abb. 5).
Stellen Sie mit dem Zeigefinger der Hand, die
das Gerät hält, den Geschwindigkeitsregler auf
die gewünschte Position (Abb. 6).
• Wenn das Gerät jetzt eingeschaltet ist,
brauchen Sie nur noch den Geschwindigkeitsregler eingedrückt zu halten. Den Sicherheitsschalter können Sie loslassen.
• Wenn Sie die Geschwindigkeit ändern wollen,
so verschieben Sie den Geschwindigkeitsregler
einfach mit Ihrem Finger. Lassen Sie den Schalter gedrückt, sonst müssen Sie vorher wieder
den Sicherheitsschalter aufwärts schieben.
- Das Gerät wird ausgeschaltet, indem Sie den
Geschwindigkeitsregler loslassen.
• Wird das Gerät ausgeschaltet, so rastet der
Sicherheitsschalter automatisch wieder ein.
Wichtig
• Lesen Sie diese Gebrauchsanweisung
sorgfältig durch, und sehen Sie sich
dabei die Abbildungen an, bevor Sie das
Gerät zum ersten Mal benutzen.
• Prüfen Sie vor Inbetriebnahme, ob die
Spannungsangabe auf dem Gerät mit der
örtlichen Netzspannung übereinstimmt
(110-127 V, 220-230 V, oder 240 V).
• Machen Sie das Gerät gebrauchsfertig,
indem Sie den Stab an die Motoreinheit
schrauben, bevor Sie den Stecker in die
Steckdose stecken.
• Verwenden Sie das Gerät nicht, wenn
das Netzkabel defekt oder beschädigt ist.
Wenn das Netzkabel defekt oder
beschädigt ist, muß es von einer durch
Philips autorisierten Werkstatt ersetzt
werden, da für die Reparatur SpezialWerkzeug und/oder spezielle Teile
benötigt werden.
• Schrauben Sie stets das Zubehör
(Zerkleinerer, Quirle) in die Motoreinheit,
bevor Sie den Stecker in die Steckdose
stecken.
• Ziehen Sie stets den Stecker aus der
Steckdose, bevor Sie das Zubehör von
der Motoreinheit abnehmen.
• Die Messer sind sehr scharf. Vermeiden
Sie jede Berührung mit ihnen, besonders
wenn das Gerät an das Netz
angeschlossen ist.
• Halten Sie das Gerät von Kindern fern.
• Plazieren Sie das Gerät stets so, daß es
nicht in Wasser fallen kann, z.B. in eine
Schüssel oder ein Spülbecken. Sollte
dies dennoch einmal geschehen, so
greifen Sie nicht ins Wasser. Ziehen Sie
sofort den Stecker aus der Steckdose.
• Geben Sie die Zutaten in ein Gefäß mit
hohem Rand, um Spritzer zu vermeiden.
• Verwenden Sie den mitgelieferten hohen
Mixbecher. Füllen Sie ihn nicht höher als
2/3 voll, um Spritzer zu vermeiden.
• Tauchen Sie die Motoreinheit niemals in
Wasser. Reinigen Sie sie auch nicht im
Geschirrspüler.
Deutsch

• Vorsicht beim Umgang mit den Messern. Sie
sind sehr scharf!
Der Stab kann mit einem feuchten Tuch
abgewischt werden.
- Motoreinheit: Darf nur mit einem feuchten Tuch
abgewischt werden.
Wandhalterung
Mit der Wandhalterung können Sie Ihr Gerät an
geeigneter Stelle einer Wand aufhängen, am
besten in der Nähe einer Steckdose.
Halten Sie über der Wandhalterung ca. 25 cm und
unterhalb ca. 20 cm frei. Sie können zuvor mit der
Wandhalterung die Bohrlöcher markieren. Der
Abstand zwischen der Mitte der Bohrungen
beträgt 100 mm.
Vor dem Anbringen auf einer Stein-, Ziegel- oder
Fliesenwand bohren Sie mit einem 5-mmSteinbohrer Löcher und setzen die beigefügten
Dübel ein. Lassen Sie die Schraubenköpfe 5 mm
vorstehen, und hängen Sie die Wandhalterung
ein.
Hinweise
• Quirle
Verwenden Sie die Quirle, um Teig für Waffeln,
Crêpes, Biskuit und lockeres Gebäck
zuzubereiten, sowie für Crême, Schlagsahne,
Garnierungen, Pudding, Eierschnee,
Mayonnaise, Kartofelpüree, Soßen und
Suppen.
Stellen Sie den Geschwindigkeitsregler zuerst
auf Position I, und stellen Sie später, falls
erforderlich, auf Position II. So verhindern Sie,
daß die Zutaten spritzen. Um Eiweiß und
andere Zutaten gut schaumig zu schlagen,
verwenden Sie Position II.
Für kleinere Mengen können Sie auch einen
einzigen Quirl in einem kleinen Gefäß, z.B.
einem Trinkglas, verwenden.
• Mixer
Verwenden Sie das Mixerzubehör z.B. zum
Zerkleinern oder Mixen von rohem oder
gekochtem Gemüse und Obst, mit oder ohne
Zugabe von Wasser, für Suppen, Püree,
Mayonnaise, Milchshakes, Soßen, für Diät- und
Babykost.
Stellen Sie den Geschwindigkeitsregler zuerst
auf Position I, und stellen Sie später, falls
erforderlich, auf Position II.
Heben Sie den Mixer nicht hoch, sonst spritzt
es! Führen Sie die Messereinheit während des
Gebrauchs nur durch die Zutaten.
Wichtig: Das Gerät ist nicht geeignet, einen
schweren Brot- oder Kuchenteig zu kneten oder
Fleisch zu zerkleinern. Hierfür empfehlen wir die
Verwendung einer Philips Küchenmaschine.
Reinigen
- Lassen Sie Mixermesser bzw. Quirle, ohne den
Aufsatz mit einzutauchen, eine kurze Zeit in
Wasser laufen, dem Sie ein wenig Spülmittel
zugefügt haben.
- Schalten Sie das Gerät aus, und ziehen Sie
den Stecker aus der Steckdose.
- Nehmen Sie das Zubehörteil von der
Motoreinheit ab.
- Quirle: Drücken Sie die Auslösetaste (Abb. 8).
Die Quirle können im Spülwasser oder im
Geschirrspüler gereinigt werden.
- Quirlaufsatz: Wischen Sie dieses Teil mit einem
feuchten Tuch ab.
- Mixeraufsatz: Tauchen Sie dieses Teil nicht
ganz unter Wasser.
Das Ende mit den Mixermessern kann mit Hilfe
einer Spülbürste in Wasser gereinigt werden.
9
 Loading...