

Philips HR1040 User Manual
Always here to help you
Register your product and get support at
www.philips.com/welcome
HR1040
User manual

1


ENGLISH 6
ESPAÑOL 23
ITALIANO 40
PORTUGUÊS 58
88
101
HR1040

6
ENGLISH
Introduction
Congratulations on your purchase and welcome to Philips!
This HomeCooker has been developed to help you cook a vast array
of dishes and gives you long-lasting performance. It has been designed
to allow easy cleaning and all accessories (except the safety ring) are
dishwasher-proof.
Some of the advantages of your HomeCooker:
- Time saving: The HomeCooker allows you to do other things during
cooking. So you can enjoy other things you like and cook at the same
time.
- No burned food: The stirrer prevents your food from burning on the
bottom. Furthermore the appliance stops heating automatically when
the set temperature has been reached and the set time has elapsed.
- Versatile: You can melt, keep warm, simmer, boil, steam, fry with or
without the stirrer.
- Very user-friendly: The simple user interface allows you to easily adjust
the settings at the touch of a button.
- Portable: The HomeCooker has a compact design, which allows you
to take it with you and cook anywhere you have electricity and a wall
socket (e.g. at a campsite, in a summer house or on your patio).
- Safe: The HomeCooker has a safety ring around the heating plate to
prevent nger burning.
Special benets of product registration
You have bought a culinary tool for life and we want to ensure that you
remain satised. We would like you to register your purchase so that we
can stay in contact with you and you can receive additional recipes from
use. Register within 3 months to receive benets including:
- Fresh ideas for recipes via email.
- Tips to use and maintain your HomeCooker.
- Special offers for accessories and other products.
Please visit www.philips.com/welcome to register your HomeCooker.
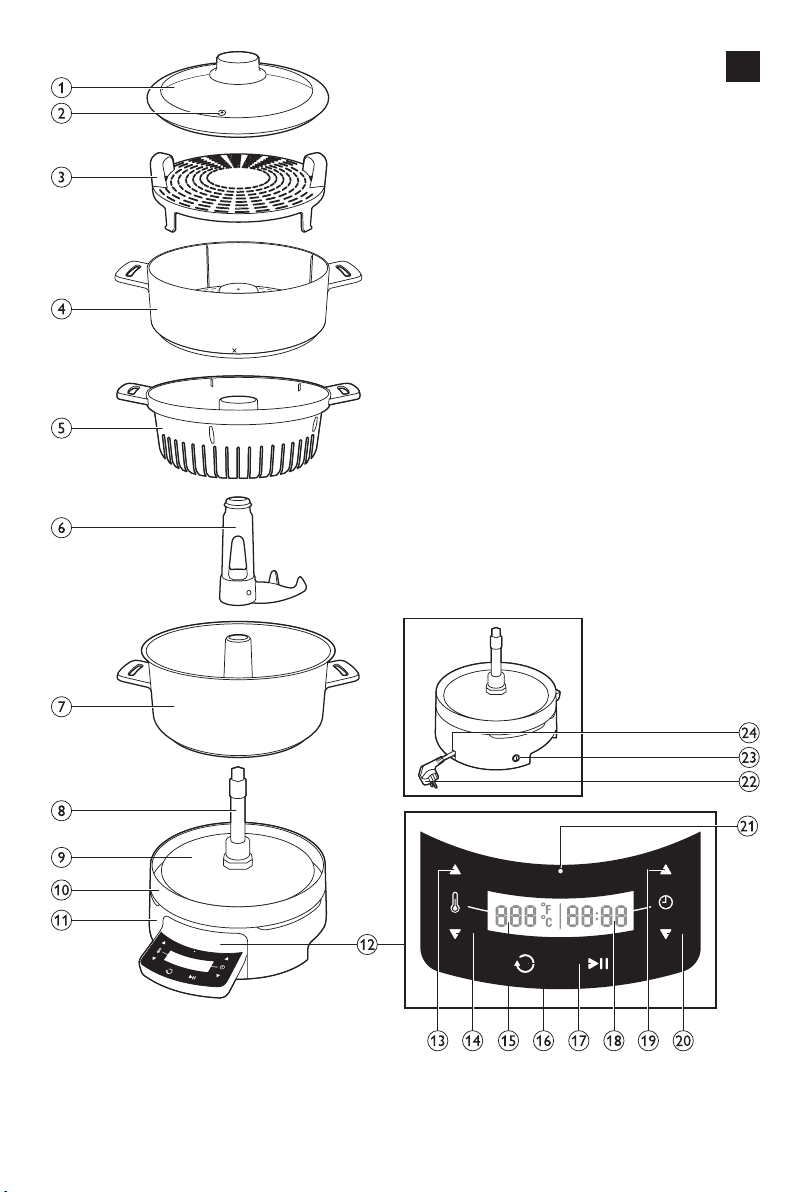
General description (Fig. 1)
1 Glass lid
2 Steam vent
3 Steaming tray
4 Steaming basket
5 Pasta insert
6 Stirrer
7 Pot
8 Spindle
9 Heating plate
10 Removable safety ring
11 Base
12 Control panel with display
13 Temperature increase button
14 Temperature decrease button
15 Temperature indication (°C or °F)
16 Stirrer on/off button
17 Start/pause button
18 Set time indication

ENGLISH 7
19 Time increase button
20 Time decrease button
21 ’Heating plate hot’ light
22 Mains cord with plug
23 On/off button
24 Cord storage compartment
Important
Read this user manual carefully before you use the
appliance and save it for future reference.
Danger
-
Never use the appliance on an induction
cooker, stove, gas stove, oven or other
cooking appliances.
- Never immerse the base in water or any other liquid,
nor rinse it under the tap.
Warning
-
Check if the voltage indicated on the appliance
corresponds to the local mains voltage before you
connect the appliance.
-
Only connect the appliance to an earthed wall socket.
- Do not operate the appliance by means of an
external timer or a separate remote control system.
- This appliance is not intended to be operated by
means of an external timer or separate remotecontrol system.
- Do not use the appliance if the plug, the mains cord
or other parts are damaged.
- If the mains cord is damaged, you must have it
replaced by Philips, a service centre authorised by
Philips or similarly qualied persons in order to avoid
a hazard.
- The appliance can be used by children aged 8 or
above and by persons with reduced physical, sensory
or mental capabilities or lack of experience and
knowledge if they have been given instructions in safe
use of the appliance or supervision to establish safe
use and if they have been made aware of the hazards
involved.
- Do not allow children to play with the appliance.

ENGLISH8
- keep the appliance and its mains cord out of reach
of children aged 8 or under when the appliance is
switched on or cooling down.
- Children aged 8 or above are only allowed to clean
the appliance under supervision.
- Do not let the mains cord hang over the edge of the
surface or worktop on which the appliance stands.
- Keep the appliance and the mains cord away from
hot surfaces.
- Leave at least 10cm free space behind and on both
sides of the appliance.
- Do not place objects close to the appliance when it
is operating.
- Always fully unwind the mains cord before you plug
in the appliance.
- Never let the appliance operate without the pot on
the base.
- The appliance becomes very hot and stays hot for a
long time after cooking. When the red ‘heating plate
hot’ indication light on the control panel lights up, the
heating plate is hot and must not be touched.
- Never remove the safety ring when the heating plate
is on or hot.
- Keep long hair, jewelry, loose clothing etc. away from
the stirrer.
- The temperature of accessible surfaces is high when
the appliance is operating.
- Overheated oil and fat may catch re.
Caution
- This appliance is intended for normal household use
only. It is not intended for use in environments such
as staff kitchens of shops, ofces, farms or other
work environments. Nor is it intended to be used by
clients in hotels, motels, bed and breakfasts and other
residential environments.
- If the appliance is used improperly or for professional
or semi-professional purposes or if it is not used
according to the instructions in the user manual, the
guarantee becomes invalid and Philips refuses any
liability for damage caused.

ENGLISH 9
- Never use any accessories or parts from other
manufacturers or that Philips does not specically
recommend. If you use such accessories or parts,
your guarantee becomes invalid.
- Only use the pot in combination with its original
base. Do not use the pot on an induction cooker,
stove or other cooking device.
- Only use the steaming basket, the pasta insert and
steaming tray in combination with the original base
and pot.
- Only cover the pot, the steaming basket or the pasta
insert with the lid supplied. Never use a towel or
something similar for this purpose.
- Always place the appliance on a dry, at and stable
surface.
- Do not place the appliance near or
underneath objects that would be damaged by
steam, such as walls and cupboards.
- Do not use the appliance to deep fry food.
- Do not use the appliance or any of its parts in the
microwave.
- You can blend the ingredients in the pot with a hand
blender, but only if you remove the stirrer from the
pot rst.
- Do not exceed the MAX indication on the pot
(3 litres).
- Always make sure that the steaming slots in the
steaming baskets and steaming tray are free from fat,
food remnants and dirt.
- Only use a moist cloth to clean the base.
- Never let the appliance operate when the pot is
empty.
- Always use the lid when you want to steam food.
- Consult the recipe book for the correct quantities
and cooking times.
- Always use oven mitts if you want to handle the
appliance while it is operating or still hot.
- Always remove the lid carefully and away from you.
Let condensation drip off the lid into the pot to
avoid scalding.

ENGLISH10
- Beware of the hot steam that comes out of the
steam vent in the lid during cooking or out of the pot
when you remove the lid. When you check the food,
always use kitchen utensils with long handles.
- When you switch off and/or unplug the appliance,
the red ‘heating plate hot’ indication light goes out.
However, the heating plate may still be hot. Always let
the heating plate cool down completely before you
handle or clean the base.
- Always press the buttons on the control panel with
your ngertips. Do not use your nails to prevent
damage to the protection foil.
- Always carry the pot
- Always hold
the steaming basket, the pasta insert and
by its handles.
the steaming tray by their handles when they contain
hot food.
- Do not move the appliance while it is operating.
- Never clean the safety ring in the dishwasher.
- Always check
if the food is properly cooked before you eat it.
Electromagnetic elds (EMF)
This Philips appliance complies with all standards
regarding electromagnetic elds (EMF). If handled
properly and according to the instructions in this user
manual, the appliance is safe to use based on scientic
evidence available today.
Overheat protection
The HomeCooker is equipped with overheat
protection. If the appliance overheats, it switches off
automatically. Unplug the appliance and let it cool down
to ambient temperature. Then put the mains plug back
into the wall socket and press the on/off button to
switch on the appliance again.
ENGLISH 11
Before rst use
1 Remove all packaging materials from the appliance and the
protection foil from the control panel.
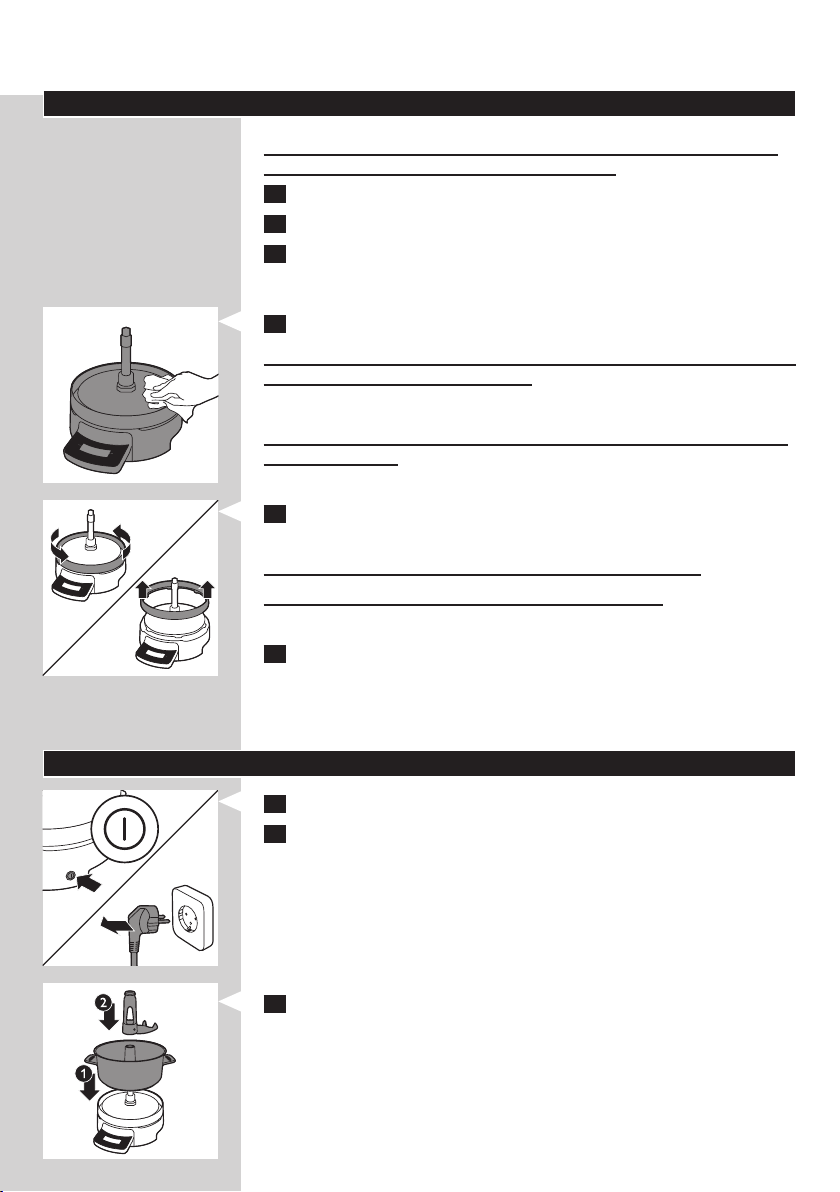
2 Thoroughly clean the parts that come into contact with food before
you use the appliance for the rst time (see chapter ‘Cleaning’).
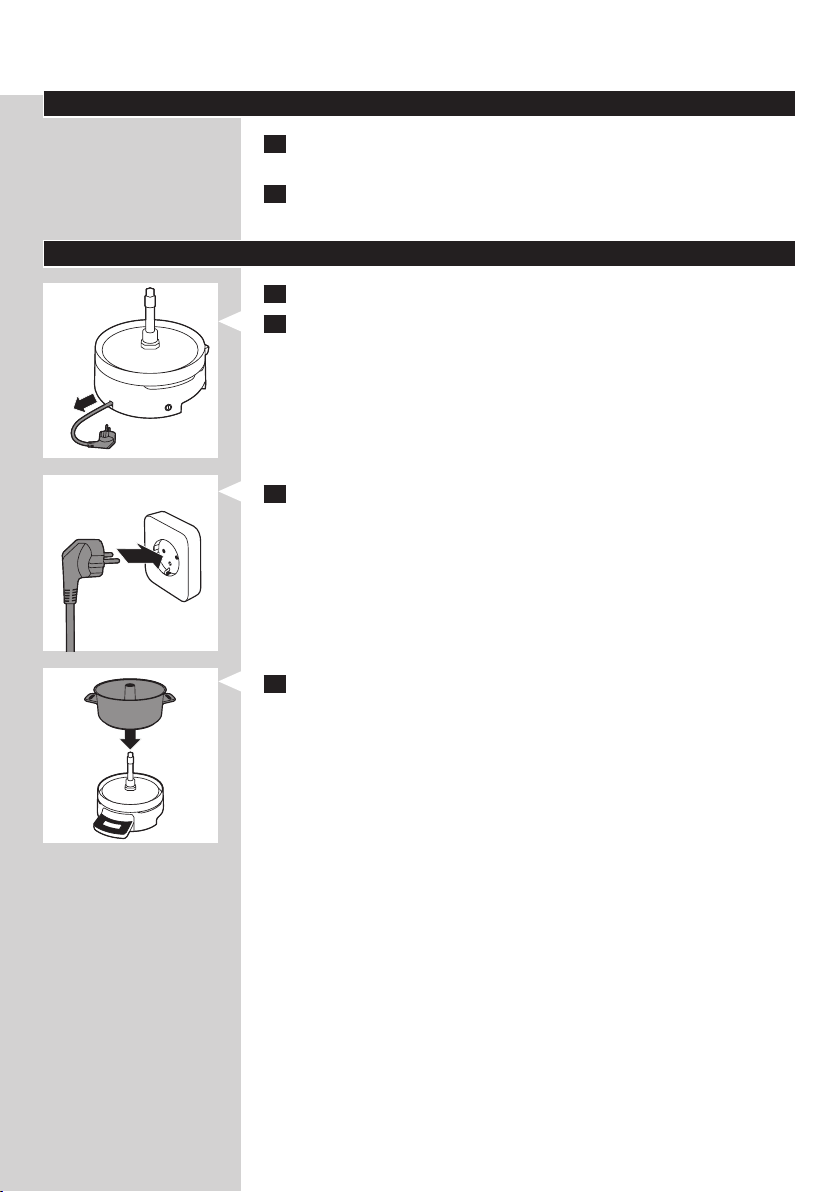
Preparing for use
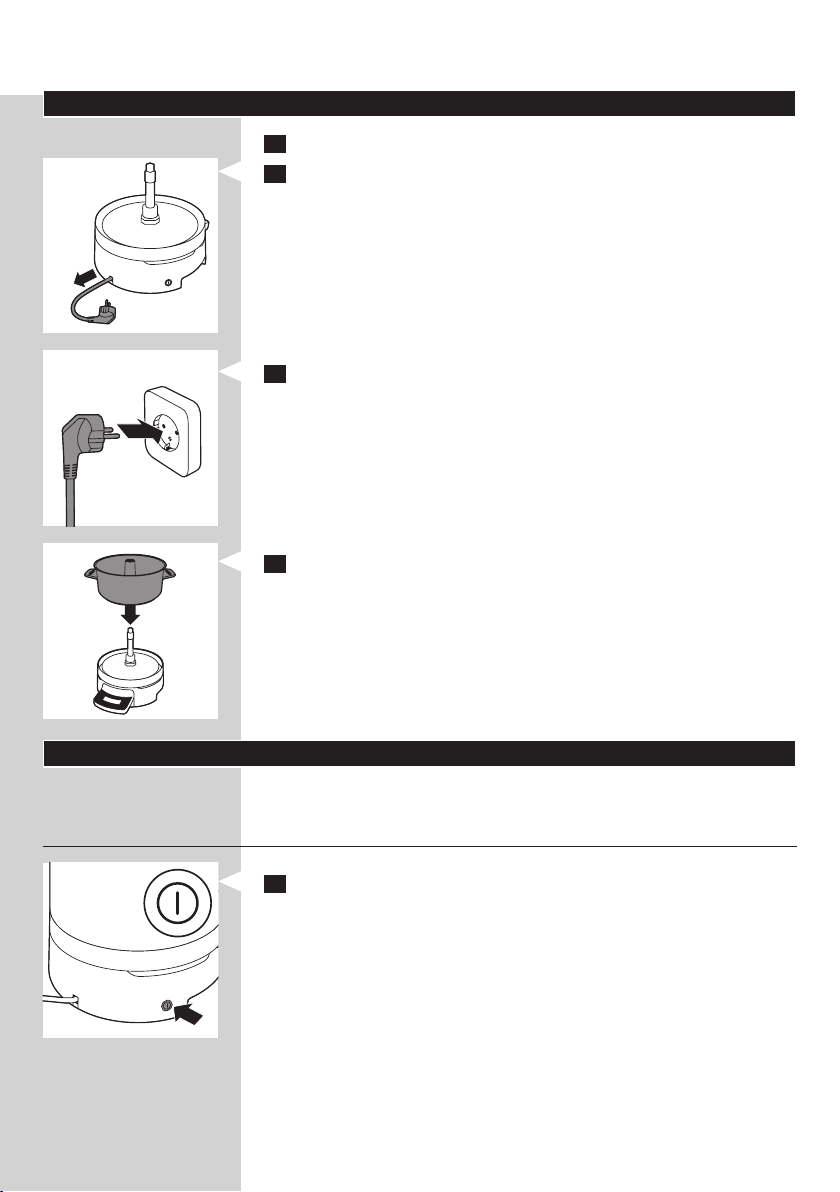
1 Put the appliance on a dry, at and stable surface.
2 Pull the mains cord out of the cord storage compartment.
3 Put the mains plug in the wall socket.
4 Place the pot on the base.
ENGLISH12
Using the appliance
For cooking and steaming tips and recipes, see the recipe book and visit
our website www.philips.com/homecooker.
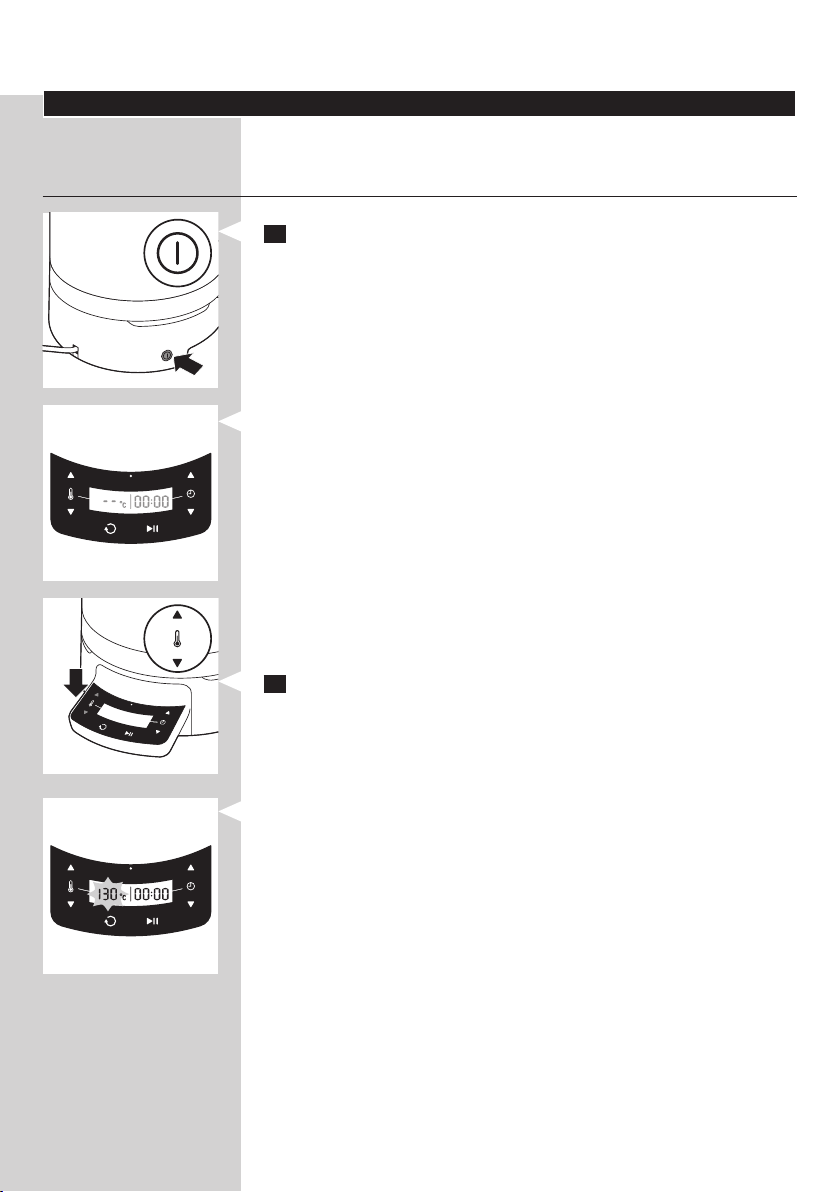
Using the control panel
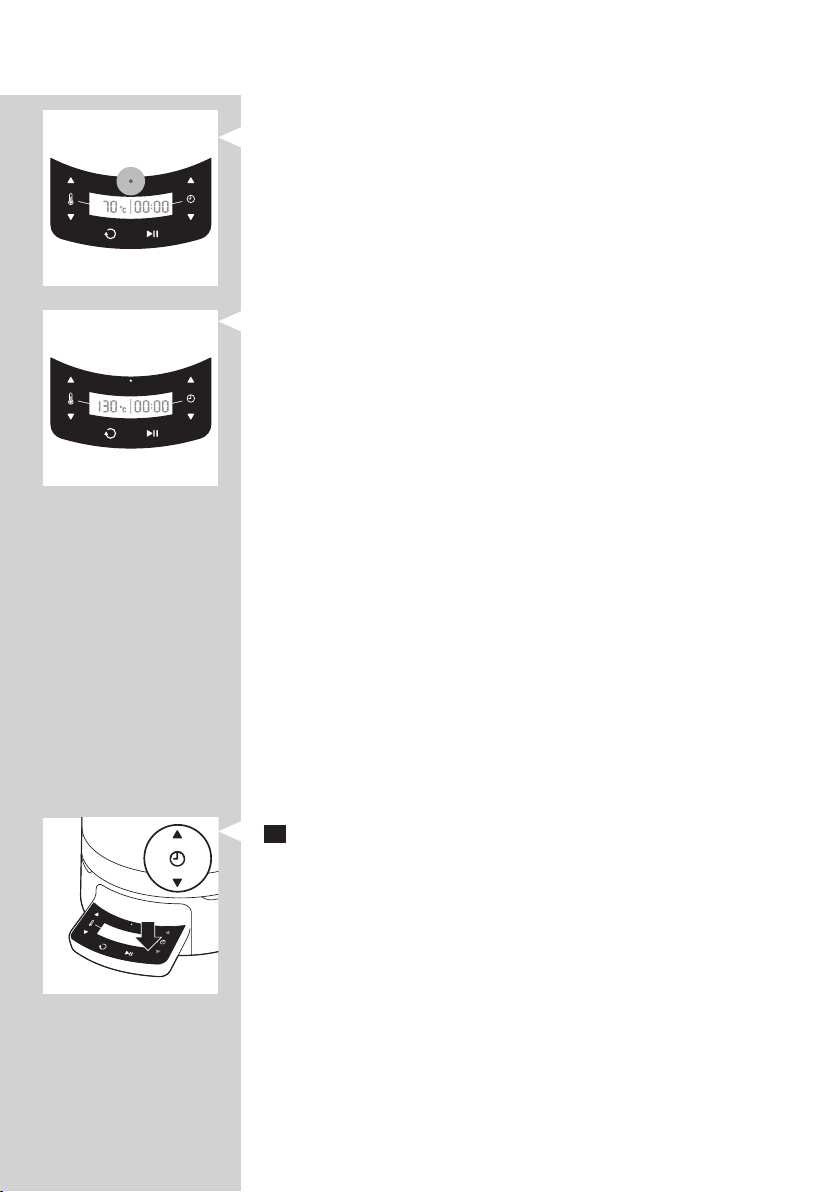
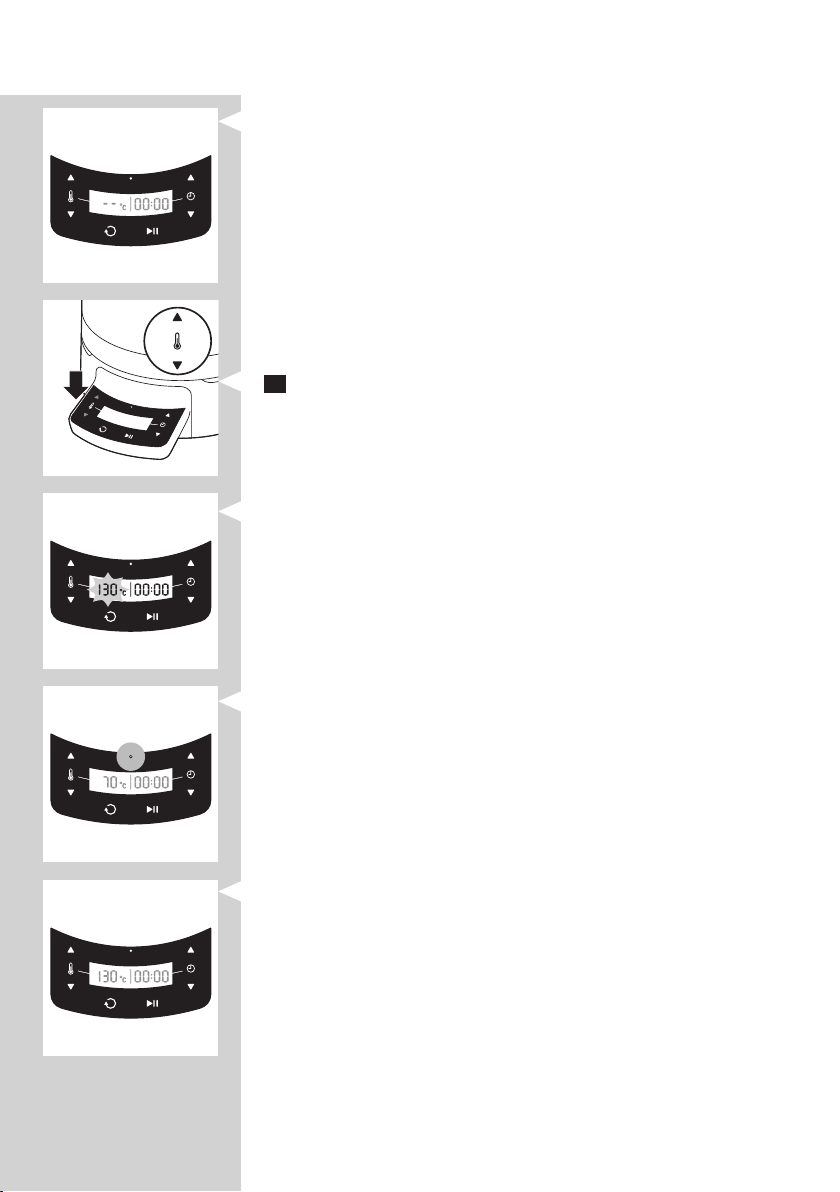
1 Press the on/off button.
, The temperature shown on the display is ‘- -’ and the time shown is
00:00.
Note: If you do not use the appliance for 10 minutes, it goes into standby
mode to save energy. In this mode, the start/pause button ashes every 10
seconds. If you want to switch the appliance back on, press the start/pause
button.
Note: If the appliance is still hot but is cooling down, it goes into standby mode
to save energy. The ‘heating plate hot’ light lights up as long as the plate is hot.
If you want to switch the appliance back on, press the start/pause button.
Note: If you switch off the appliance or if you unplug the appliance, the
‘heating plate hot’ light goes out. However, the heating plate may still be hot.
2 Press the temperature increase or decrease button one or more
times to set the required temperature.
, The set temperature is shown on the display. The temperature ashes
to indicate that the appliance is changing the temperature.
ENGLISH 13
, When the red ‘heating plate hot’ light on the display lights up, the
heating plate is hot and must not be touched.
, When the heating plate or bottom of the pot has nally reached the
set temperature, the temperature on the display stops ashing. The
appliance maintains the set temperature while you can do something
else.
Note: Due to the different ambient temperature it might happen that the
temperature display starts ashing again.
Note: If you press the temperature increase and decrease buttons briey at the
same time, the temperature is reset to zero (‘- -’).
Note: If you press the temperature increase and decrease buttons at the same
time for 3 seconds, you can switch from °C to °F and back.
Note: You can also adjust the temperature while the appliance is operating. If
you set a higher temperature, the temperature light starts ashing again.
Temperature settings
- Melting: 40°C/104°F*
- Keeping warm: 70°C/158°F*
- Simmering: 90°C/194°F*
- Boiling: 110°C/230°F*
- Steaming: 130°C/266°F*
- Frying: 175°C/347°F*
- Turbo: 250°C/482°F** (to heat up ingredients quickly or to roast large
amounts of ingredients)
* indicates temperature on the bottom of the pot
* * indicates temperature on heating plate
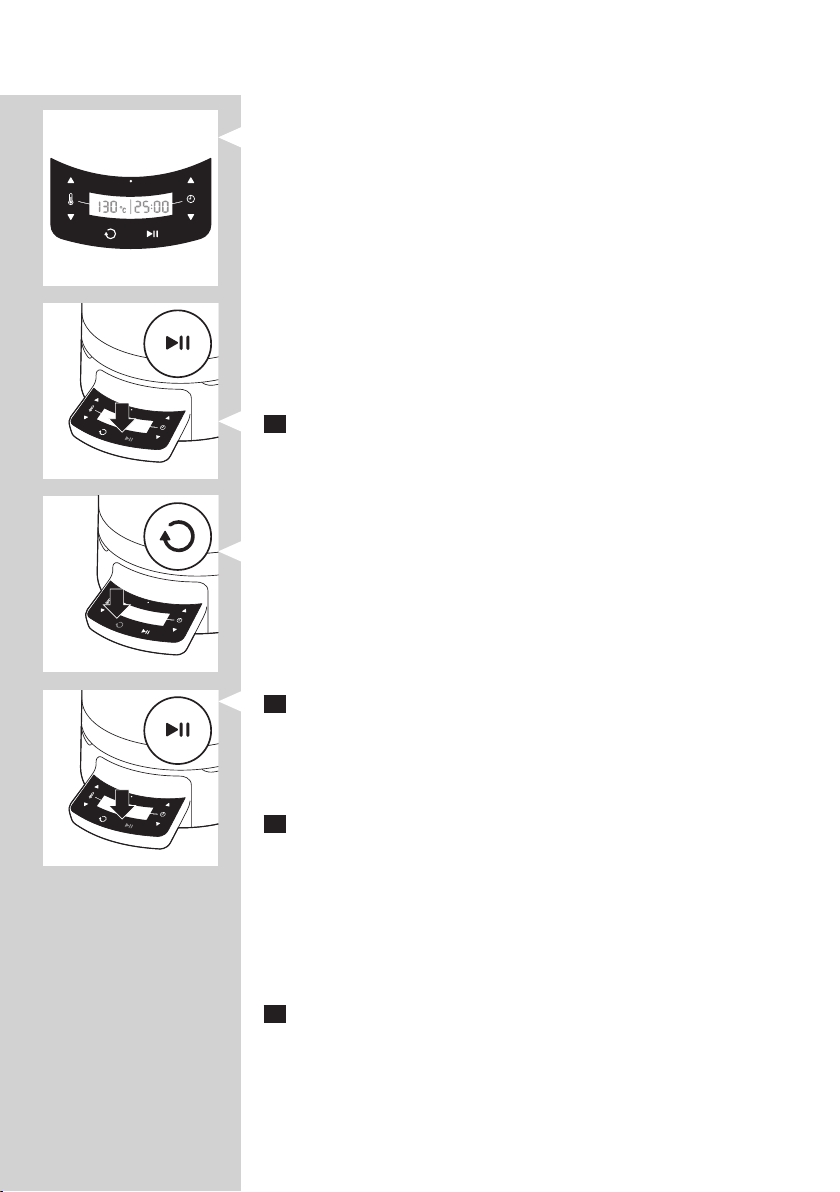
3 Press the timer increase or decrease buttons to set the required
cooking time. You can set a time from 1 to 99 minutes.
ENGLISH14
, The set time is shown on the display.
Note: The longer you keep the button pressed, the faster the time is put
forward or backward.
Note: You can also adjust the time while the appliance is operating.
Note: If you press the timer increase and decrease button briey at the same
time, the time is reset to 00:00.
Tip: When you have become more familiar with the appliance and when you
want to prepare your own recipes, you can also use it without setting the
timer. In that case, the time starts counting up from zero and the appliance
continues to operate for 99 minutes or until you switch it off yourself. If you
press the pause button while cooking without setting the timer, the timer is
reset to 00:00.
4 Press the start/pause button to start the cooking process.
, The time on the display is counted down (in minutes and seconds)
and the start/pause button ashes slowly to indicate that the
appliance is operating.
, The appliance starts to heat up.
, The stirrer starts rotating.
Note: If you want to switch off the stirrer to cook for instance potatoes or if
you want to steam, press the stirrer on/off button. To activate the stirrer again,
press the stirrer on/off button again.
Note: To deactivate the stirrer, press the stirrer on/off button right after you
switched on the appliance.
5 If you want to interrupt the cooking process, press the start/pause
button.
, The start/pause button lights up continuously and the time on the
display stops counting down or up.
Note: If you did not set a cooking time, the display shows 00:00.
6 To resume the cooking process, press the start/pause button again.
, The time on the display starts counting down or up again and the
start/pause button starts ashing again.
Note: If you did not set a cooking time, the display starts counting up from 0
again when you press the start/pause button.
Note: If you do not resume the cooking process within 10 minutes, the
appliance goes into standby mode. In this mode, the start/pause button ashes
every 10 seconds.
7 When the set time has elapsed, the appliance beeps and the start/
pause button lights up continuously. Press any button to stop the
beeping.

ENGLISH 15
Melting, keep warm, simmering, boiling, and frying with stirrer
1 Place the stirrer on the cone in the pot.
Note: For easy assembly, always put the stirrer in the pot before you add the
ingredients.
2 Put the ingredients you want to prepare in the pot. If necessary, add
water (e.g. to cook potatoes).
Caution: Make sure the ingredients in the pot do not exceed the MAX
indication.
Note: Certain ingredients may cause discolouration. If you spill ingredients on
the outside of the appliance, wipe away the spills immediately.
Tip: For cooking times and temperatures, see the recipe book.
3 If desired, put the lid on the pot.
4 Follow the instructions in section ‘Using the control panel’.
5 When the set time has elapsed, remove the ingredients from the pot
with a spatula or a scoop. Press any button to stop the beeping.
Note: You can blend the ingredients in the pot with a hand blender, but only if
you remove the stirrer from the pot rst.
Note: If you want to remove the stirrer, never touch the hot ingredients and
only touch the top of the stirrer.
6 Switch off and unplug the appliance.
Caution: When you switch off and/or unplug the appliance, the red
‘heating plate hot’ indication light goes out. However, the heating plate
may still be hot. Always let the heating plate cool down completely
before you handle or clean the base.
Steaming and boiling without stirrer
1 Remove the stirrer from the cone in the pot.
ENGLISH16
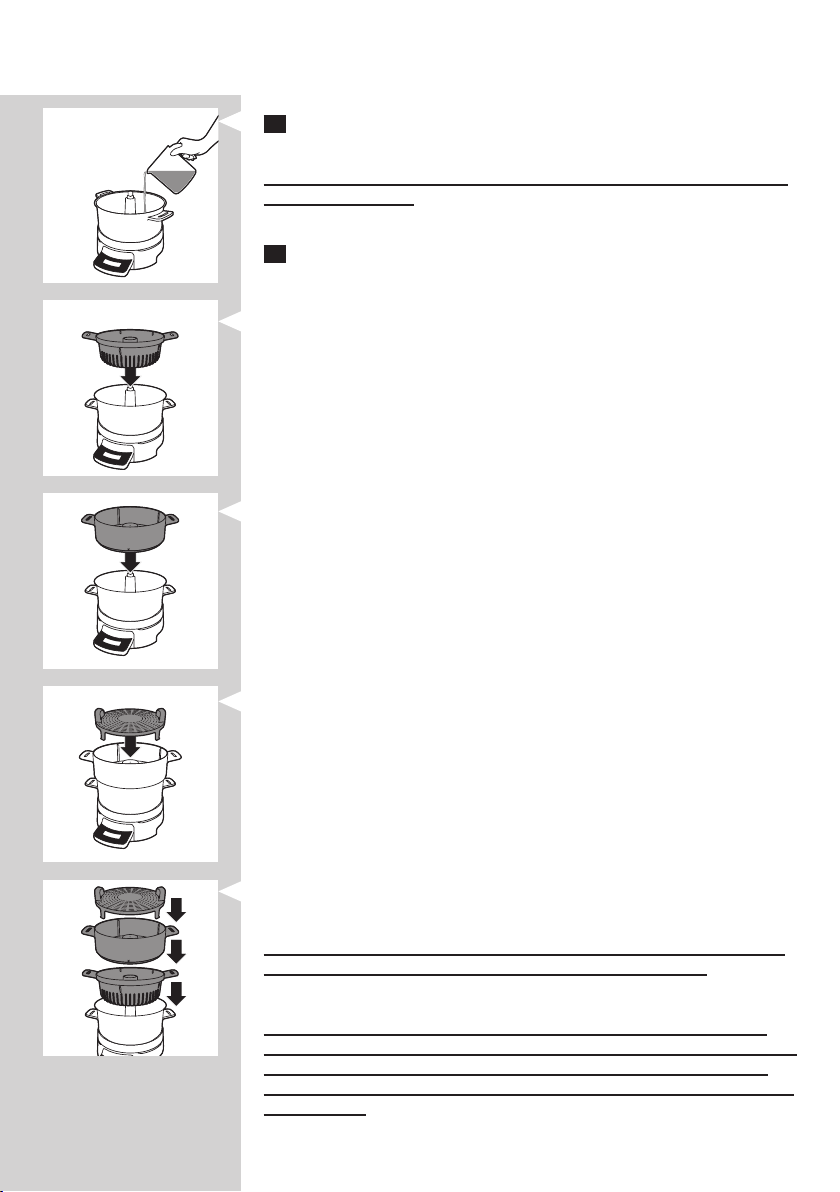
2 Pour water into the pot. For the quantity of water, see the recipe
book.
Caution: Make sure the water and ingredients in the pot do not exceed
the MAX indication.
3 Put the ingredients you want to prepare in the steaming basket, the
pasta insert and/or the steaming tray. Put the steaming basket, the
pasta insert and the steaming tray in place.
- Put the pasta insert in the pot. Use the pasta insert to steam large
ingredients.
- Put the steaming basket on the pot. Use the steaming basket to steam
smaller ingredients.
- Put the steaming tray in the steaming basket. Use the steaming tray to
steam delicate ingredients, e.g. sh.
- You can also use the steaming basket, the pasta insert and the steaming
tray at the same time.
Caution: Make sure that you place the steaming basket, the pasta insert
and the steaming tray properly and that they do not wobble.
Caution: Make sure that you put the food in the steaming basket, the
pasta insert and the steaming tray in such a way that there is some space
between the pieces and that some of the steaming slots stay clear to
allow optimal steam ow. Do not overload the steaming baskets and the
steaming tray.
ENGLISH 17
Note: Certain ingredients may cause discolouration. If you spill ingredients on
the outside of the appliance, wipe away the spills immediately.
Tip: For steaming and boiling times and temperatures, see the recipe book.
Tip: For the best taste, do not prepare sh and other ingredients at the same
time.
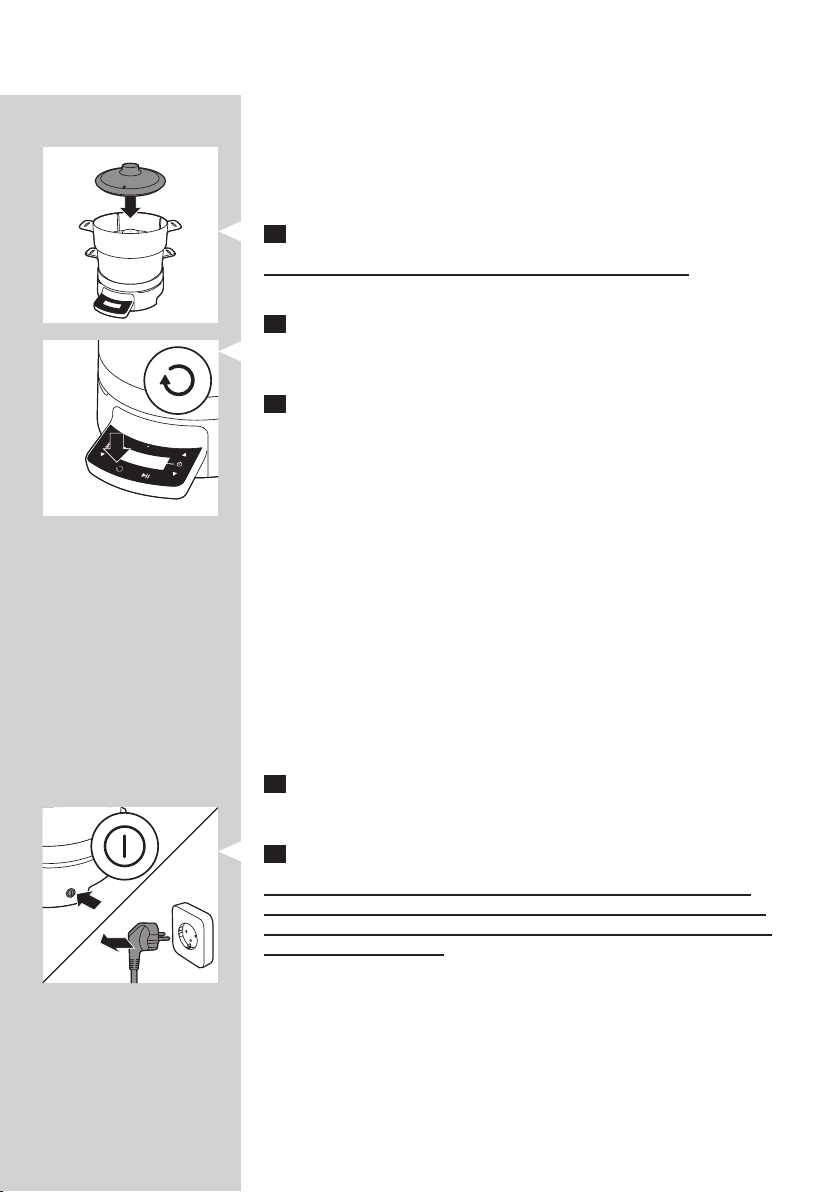
4 Put the lid on the pot.
Caution: Always use the lid when you want to steam food.
5 Follow the instructions in section ‘Using the control panel’.
Note: After you have switched on the appliance, press the stirrer on/off button
to deactivate the stirrer motor.
6 If you want to steam ingredients that require different steaming
times, you can do this in the following way:
- Set the timer to the longest steaming time.
- Put the food that requires the longest steaming time in the large
steaming basket (according recipe book).
- Let the appliance operate until the time on the display is equal to the
shorter steaming time.
- Press the start/pause button to pause the appliance. Do not pause
longer than 10 minutes to prevent the appliance from going into
standby mode.
- Carefully remove the lid with oven mitts.
- Place the steaming basket containing the ingredients requiring the
shorter steaming time on the pot.
- Put the lid on the steaming basket.
- Press the start/pause button again and let the appliance operate until
the set time has elapsed.
Tip: For more information on the steaming and boiling times of ingredients, see
the recipe book.
7 When the set time has elapsed, remove the ingredients from the
steaming basket, the pasta insert and/or the steaming tray with a
spatula or scoop. Press any button to stop the beeping.
8 Switch off and unplug the appliance.
Caution: When you switch off and/or unplug the appliance, the red
‘heating plate hot’ light goes out. However, the heating plate may still
be hot. Always let the heating plate cool down completely before you
handle or clean the base.
ENGLISH18
Cleaning
Never use scouring pads, abrasive cleaning agents or aggressive liquids
such as petrol or acetone to clean the appliance.
1 Switch off and unplug the appliance.
2 Let the appliance cool down.
3 Clean the pot, the stirrer, the steaming basket, the pasta insert and
the steaming tray with warm water and some washing-up liquid or in
the dishwasher.
4 Wipe the base and the heating plate with a moist cloth.
Danger: Never immerse the base in water, nor rinse it under the tap. Do
not clean it in the dishwasher either.
Caution: Always keep the heating plate dry, as dampness and steam lead
to rust formation.
5 Remove the safety ring from time to time for extra thorough
cleaning. Wipe the safety ring with a moist cloth.
Never remove the safety ring when the heating plate is hot.
Caution: Never clean the safety ring in the dishwasher.
6 Wipe all parts of the appliance dry with a tea towel.
Note: If there are scale deposits on the heating plate, remove them with white
vinegar (4% acetic acid). Then wipe away the vinegar residues with a soft cloth
moistened with fresh water.
Storage
1 Switch off and unplug the appliance.
2 Let the appliance cool down.
3 Put the pot on the base (1) and put the stirrer on the cone (2).
ENGLISH 19
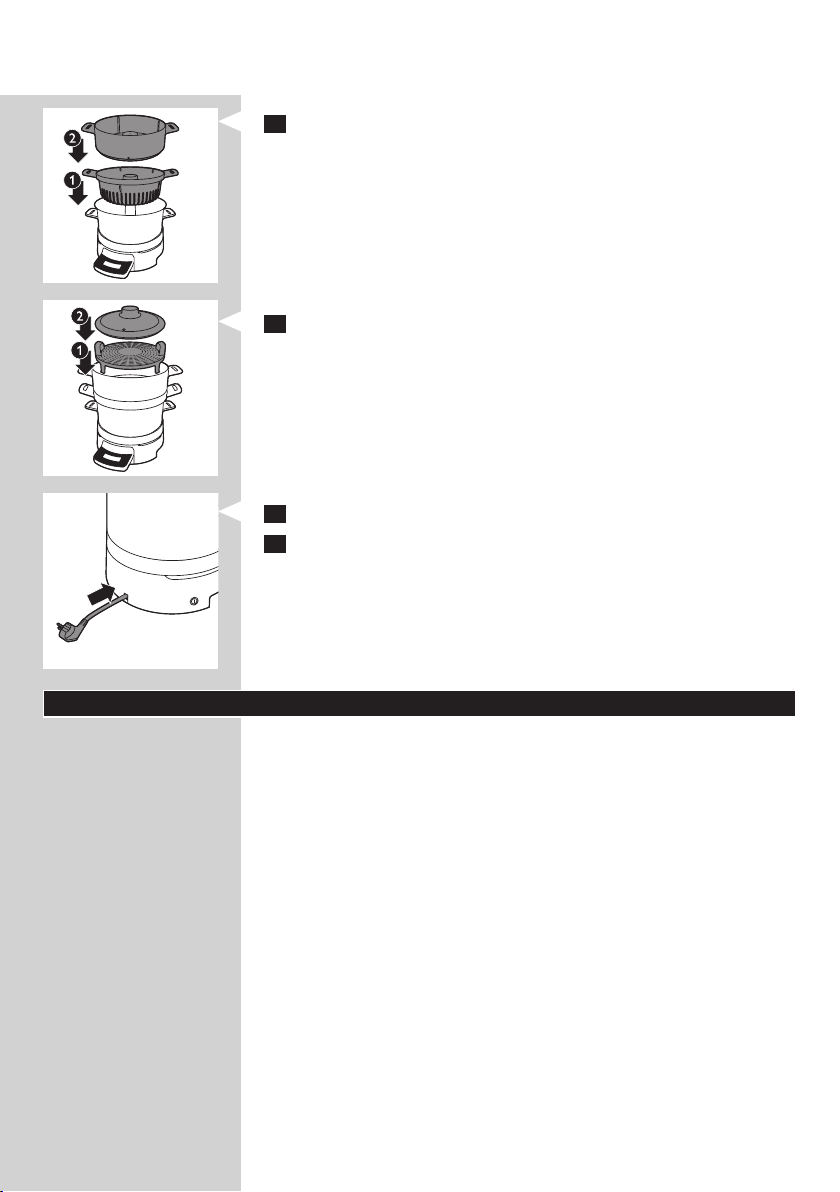
4 Put the pasta insert in the pot (1) and put the steaming basket on
the pasta insert (2).
5 Put the steaming tray in the steaming basket (1) and put the lid on
the steaming basket (2).
6 Push the mains cord into the cord storage compartment.
7 Store the appliance on a dry, at and stable surface, preferably on the
working top in your kitchen.
Ordering accessories
To purchase accessories for this appliance, please visit our online shop at
www.shop.philips.com/service. If the online shop is not available in
your country, go to your Philips dealer or a Philips service centre. If you
have any difculties obtaining accessories for your appliance, please contact
the Philips Consumer Care Centre in your country. You nd its contact
details in the worldwide guarantee leaet.
Tip: You can also use the HomeCooker in combination with the specially
designed Cutting tower (HR1055/HR1056). This Cutting tower shreds and
slices vegetable like cucumbers, carrots, potatoes, leeks and onions as well as
certain kinds of cheese and meat and ejects the processed ingredients straight
into the HomeCooker pot. You can order the Cutting tower in the online shop
at www.shop.philips.com/service by looking for HR1055/HR1056 or at
www.philips.com/homecooker.

ENGLISH20
Guarantee and service
Philips guarantees its products for two years after the date of purchase.
Defects due to faulty materials and poor workmanship will be repaired or
the product will be replaced at Philips’ expense, provided that convincing
proof of purchase is provided.
Replacement products and repaired parts are guaranteed for the remaining
time of the guarantee or a period of six months, whichever is longer.
The guarantee does not apply to any defect that results from an accident,
misuse, improper maintenance or that is due to normal wear and tear.
The terms of the guarantee do not exclude, restrict or modify your
statutory rights.
If you believe your product is defective, please contact your local
Consumer Care hotline. You will nd the Consumer Care hotline phone
numbers on www.philips.com/support.
Environment
- Do not throw away the appliance with the normal household waste
at the end of its life, but hand it in at an ofcial collection point for
recycling. By doing this, you help to preserve the environment.
Troubleshooting
This chapter summarises the most common problems you could
encounter with the appliance. If you are unable to solve the problem with
the information below, contact your local Consumer Care hotline. You nd
the Consumer Care hotline phone numbers on www.philips.com/support.

Problem Possible cause Solution
ENGLISH 21
The appliance
does not work
Not all the food is
steamed/cooked.
The food is too
dark.
I want to change
the temperature
during cooking.
The appliance is not plugged
in.
The appliance is not
switched on.
You did not press the star t/
pause button.
The appliance was in
standby mode, but you
thought it was switched
off and pressed the on/off
button in an attempt to
switch it on, but in fact you
switched it off.
The mains cord is damaged. If the mains cord is damaged, you must have it
Some pieces of food in
the pot, steaming baskets
or steaming tray are larger
than others and/or require
a longer steaming/cooking
time than others.
You put too much food in
the steaming baskets and on
the steaming tray.
You did not put the lid
on the appliance (or not
properly on the appliance)
when you were steaming.
The temerparture is not hot
enough.
You set a too high
temperature or a too long
cooking time.
This is possible. Press the temperature increase or decrease button
Put the plug in the wall socket.
Press the on/off button on the side of the base to
switch on the appliance.
Press the start/pause button to start the cooking or
steaming process.
Press the on/off button once more to switch on
the appliance.
replaced by Philips, a service centre authorised by
Philips or similarly qualied persons in order to
avoid a hazard.
Set a longer steaming/cooking time. When you
use both steaming baskets and the steaming tray,
you can easily prepare ingredients with different
steaming times (see chapter ‘Using the appliance’,
section ‘Steaming and boiling without stirrer’).
Make sure you put the food in the steaming baskets
and on the steaming tray in such a way that there is
some space between the pieces and that some of
the steaming slots stay clear to allow optimal steam
ow. Please consult the recipe book for the correct
quantities.
Always place the lid properly on the appliance
when you are steaming, otherwise a lot of steam
escapes and the food is not steamed properly.
Always let the appliance heat to the right
temperature before you steam the food.
Set a lower cooking temperature and/or a shorter
cooking time. Please consult the recipe book for
the correct temperature.
during cooking until the display shows the desired
temperature.

ENGLISH22
Problem Possible cause Solution
The appliance
produces some
smoke.
The stirrer blocks. You put too many
The message ‘Err’
appears on the
display.
The display shows
°C, but I want to
work with °F.
The heating plate and/or pot
are not completely clean.
The appliance may produce
some smoke when you use
it for the rst time.
ingredients in the pot.
During roasting a piece
of meat got stuck on the
bottom of the pot.
An error has occurred. Have the appliance checked by a service centre
This is possible. Press the temperature increase and decrease
Make sure you clean the heating plate and the pot
properly after each use.
It is normal for a new product to produce an
unpleasant smell or emit some smoke when it
is rst used.This is because new electric motors
have a safety lacquering on the motor windings,
which emit this unpleasant smell or even smoke,
when they get warm during the rst uses. This
phenomenon stops after you have used the
appliance a few times.
Remove the ingredients and give the stirrer a light
push. Do not overload the pot.
Give the stirrer a slight push.
authorised by Philips.
button at the same time for 3 seconds to switch
from °C to °F and back again.

ESPAÑOL
Introducción
Enhorabuena por la adquisición de este producto, y bienvenido a Philips
Este HomeCooker ha sido desarrollado para ayudarle a cocinar una amplia
gama de platos y le brinda un rendimiento duradero. Ha sido diseñado
para permitir limpiar fácilmente y todos los accesorios (excepto el anillo de
seguridad) se pueden lavar en lavavajillas.
Algunas de las ventajas de su HomeCooker:
- Ahorro de tiempo: el HomeCooker le permite hacer otras cosas
mientras cocina. Así podrá disfrutar de otras cosas que le gustan y
cocinar al mismo tiempo.
- Los alimentos no se queman: el agitador evita que su alimento
se pegue al fondo. Además, el aparato detiene el calentamiento
automáticamente cuando se alcanza la temperatura establecida y el
tiempo determinado ha transcurrido.
- Versátil: puede fundir, mantener comida caliente, hervir a fuego lento,
cocer, cocinar al vapor y freír con o sin el agitador.
- Muy fácil de usar: la sencilla interfaz de usuario le permite ajustar
fácilmente la conguración con solo tocar un botón.
- Portátil: el HomeCooker tiene un diseño compacto, que le permite
llevárselo consigo y cocinar dondequiera que disponga de electricidad
y una toma de corriente (por ejemplo en un camping, en una casa de
verano o en el patio).
- Seguro: el HomeCooker tiene un anillo de seguridad alrededor de la
placa de calentamiento para impedir que se queme los dedos.
Benecios especiales de registrar el producto
Ha adquirido un accesorio de cocina de por vida y queremos asegurarnos
de que esté satisfecho. Nos gustaría que registrase su compra para que
podamos seguir en contacto y que pueda recibir los servicios y ventajas
que le ofrecemos. Regístrese en los tres meses posteriores a la fecha de
compra para disfrutar de ventajas como:
- Nuevas recetas por correo electrónico.
- Consejos para utilizar y mantener su HomeCooker.
- Ofertas especiales de accesorios y otros productos.
Por favor visite www.welcome.philips.com/welcome_es_ES.html
para registrar su HomeCooker.
23
Descripción general (g. 1)
1 Tapa de cristal
2 Oricio de salida del vapor
3 Bandeja de cocina al vapor
4 Cesto de cocina al vapor
5 Complemento para pasta
6 Agitador
7 Recipiente
8 Eje
9 Placa de calentamiento
10 Anillo de seguridad extraíble
11 Base
12 Panel de control con display
13 Botón de aumento de la temperatura

ESPAÑOL24
14 Botón de disminución de temperatura
15 Indicador de temperatura (°C o °F)
16 Botón de encendido/apagado del agitador
17 Botón de inicio/pausa
18 Indicador de tiempo establecido
19 Botón de aumento de hora
20 Botón de disminución de hora
21 Luz de ‘Placa de calentamiento caliente’
22 Cable de alimentación con clavija
23 Botón de encendido/apagado
24 Compartimento para guardar el cable
Importante
Antes de usar el aparato, lea atentamente este manual
de usuario y consérvelo por si necesitara consultarlo en
el futuro.
Peligro
- Nunca utilice el aparato en una cocina de
inducción, cocina convencional, cocina a gas,
horno ni demás instalaciones de cocina.
- No sumerja nunca la base en agua ni otros líquidos,
ni la enjuague bajo el grifo.
Advertencia
- Antes de enchufar el aparato, compruebe si el voltaje
indicado en el mismo se corresponde con el voltaje
de red local.
- Conecte el aparato sólo a un enchufe con toma de
tierra.
- No utilice el aparato por medio de un reloj externo
ni un sistema de control remoto separado.
- Este aparato no está diseñado para funcionar con
un temporizador externo o un sistema de control
remoto adicional.
- No utilice el aparato si el enchufe, el cable de
alimentación u otras piezas están dañados.
- Si el cable de alimentación está dañado, debe ser
sustituido por Philips o por un centro de servicio
autorizado por Philips, con el n de evitar situaciones
de peligro.
- Este aparato puede ser usado por niños a partir de 8
años y por personas con su capacidad física, psíquica
o sensorial reducida y por quienes no tengan los

ESPAÑOL 25
conocimientos y la experiencia necesarios sin son
instruidos acerca del uso del aparato o supervisados
para garantizar un uso seguro y siempre que sepan
los riesgos que conlleva su uso.
- No permita que los niños jueguen con el aparato.
- Mantenga el aparato y su cable de alimentación fuera
del alcance de niños menores de 8 años cuando esté
encendido o se esté enfriando.
- Los niños de 8 años o más solo puede limpiar el
aparato bajo supervisión.
- No deje que el cable de alimentación cuelgue del
borde de la mesa o encimera donde esté colocado
el aparato.
- Mantenga el aparato y el cable de alimentación lejos
de supercies calientes.
- Deje al menos 10 cm de espacio libre por detrás y a
ambos lados del aparato.
- No coloque objetos cerca del aparato cuando esté
en funcionamiento.
- Desenrolle completamente el cable de alimentación
antes de enchufar el aparato a la toma de corriente.
- Nunca permita que el aparato funcione sin la olla en
la base.
- El aparato se calienta mucho y permanece caliente
durante mucho tiempo después de cocinar. Cuando
el piloto rojo ‘placa de calentamiento caliente’
se ilumine en el panel de control, la placa de
calentamiento está caliente y no debe tocarse.
- Nunca retire el anillo de seguridad cuando la placa
de calentamiento esté encendida o caliente.
- Mantenga pelo largo, joyas, ropa suelta, etc. lejos del
agitador.
- La temperatura de las supercies circundantes es alta
cuando el aparato está en funcionamiento.
- El aceite y la grasa recalentados pueden incendiarse.

ESPAÑOL26
Precaución
- Este aparato está diseñado sólo para un uso
doméstico normal, no para un uso en entornos
como las cocinas de los comercios, ocinas, granjas
u otros entornos laborales. Tampoco lo deben usar
los clientes de hoteles, moteles, hostales en los
que se ofrecen desayunos ni clientes de entornos
residenciales de otro tipo.
- Si se utiliza el aparato de forma incorrecta, con nes
profesionales o semiprofesionales, o de un modo
que no esté de acuerdo con las instrucciones de
uso, la garantía quedará anulada y Philips no aceptará
responsabilidades por ningún daño.
- No utilice nunca accesorios o piezas de otros
fabricantes o que no hayan sido especícamente
recomendados por Philips. La garantía queda anulada
si utiliza tales piezas o accesorios.
- Utilice la olla únicamente junto con su base original.
No utilice la olla en una cocina de inducción, cocina
convencional ni otra instalación de cocina.
- Utilice la cesta de vapor, el complemento para pasta
y la bandeja de vapor únicamente junto con la base y
la olla originales.
- Cubra la olla, la cesta de vapor o el complemento
para pasta únicamente con la tapa suministrada.
Nunca utilice toallas ni nada semejante para este n.
- Coloque siempre el aparato sobre una supercie
seca, plana y estable.
- No coloque el aparato debajo o cerca de objetos a
los que pudiera perjudicarles el vapor, como paredes
o armarios.
- No utilice el aparato para freír alimentos.
- No utilice el aparato ni ninguna de sus piezas en el
microondas.
- Puede mezclar los ingredientes en la olla con una
batidora de varilla, pero sólo si primero retira el
agitador de la olla.
- No exceda la indicación MAX de la olla (3 litros).
- Asegúrese siempre de que las ranuras de vapor de
los cestos y la bandeja de vapor estén limpios de
grasa, restos de alimentos y suciedad.

ESPAÑOL 27
- Utilice sólo un paño húmedo para limpiar la base.
- Nunca permita que el aparato funcione con la olla
vacía.
- Utilice siempre la tapa cuando desee cocinar
alimentos al vapor.
- Consulte en el libro de recetas las cantidades y
tiempos de cocción correctos.
- Use siempre guantes de cocina si desea cambiar de
sitio el aparato mientras funciona o si todavía está
caliente.
- Cuando quite la tapa, hágalo siempre con cuidado y
manténgase alejado del aparato. Deje que las gotas
de condensación caigan de la tapa a la olla para evitar
quemaduras.
- Tenga cuidado con el vapor caliente que sale por la
espita de vapor de la tapa durante la cocción o de
la olla cuando retire la tapa. Cuando compruebe la
comida, utilice siempre utensilios de cocina con asas
largas.
- Cuando apaga y/o desenchufa el aparato, el piloto
rojo ‘placa de calentamiento caliente’ se apaga.
Sin embargo, la placa de calentamiento todavía
puede estar caliente. Deje siempre que la placa de
calentamiento se enfríe completamente antes de
manipularla o limpiar la base.
- Pulse siempre los botones del panel de control con
la punta de los dedos. No utilice las uñas para evitar
daños en la película de protección.
- Transporte siempre la olla sujetándola por sus asas.
- Sujete siempre la cesta de cocina al vapor, el
complemento para pasta y la bandeja de vapor por
sus asas cuando contengan alimentos calientes.
- No mueva el aparato mientras está en
funcionamiento.
- Nunca limpie el anillo de seguridad en el lavavajillas.
- Compruebe siempre si los alimentos están
correctamente cocinados antes de comerlos.

ESPAÑOL28
Campos electromagnéticos (CEM)
Este aparato Philips cumple todos los estándares
sobre campos electromagnéticos (CEM). Si se utiliza
correctamente y de acuerdo con las instrucciones de este
manual, el aparato se puede usar de forma segura según
los conocimientos cientícos disponibles hoy en día.
Protección contra el sobrecalentamiento
El HomeCooker está equipado con una protección
contra el sobrecalentamiento. Si el aparato se recalienta,
se apaga automáticamente. Desenchufe el aparato
y deje que se enfríe a temperatura ambiente. A
continuación vuelva a enchufar la clavija en la toma de
corriente y pulse el botón de encendido/apagado para
volver a encender el aparato.
Antes de utilizarlo por primera vez
1 Retire todos los materiales de embalaje del aparato y la película de
protección del panel de control.
2 Antes de usar el aparato por primera vez, limpie bien las piezas que
van a entrar en contacto con los alimentos (consulte el capítulo
‘Limpieza’).
ESPAÑOL 29
Preparación para su uso
1 Coloque el aparato sobre una supercie seca, plana y estable.
2 Saque el cable de alimentación del compartimento de cable.
3 Enchufe la clavija de red a la toma de corriente.
4 Coloque la olla en la base.
Uso del aparato
Para obtener consejos y recetas de cocina y cocina al vapor, consulte el
libro de recetas y visite nuestro sitio web www.philips.com/homecooker.
Uso del panel de control
1 Pulse el botón de encendido/apagado.
ESPAÑOL30
, La temperatura indicada en la pantalla es ‘- -’ y la hora 00:00.
Nota: Si no utiliza el aparato durante 10 minutos, entra en modo de espera
para ahorrar energía. En este modo, el botón de inicio/pausa destella cada 10
segundos. Si desea volver a encender el aparato, pulse el botón de inicio/pausa.
Nota: Si el aparato está todavía caliente pero está enfriándose, entra en modo
de espera para ahorrar energía. El piloto de ‘placa de calentamiento caliente’
se ilumina siempre que la placa esté caliente. Si desea volver a encender el
aparato, pulse el botón de inicio/pausa.
Nota: Si apaga el aparato o lo desenchufa, el piloto de ‘placa de calentamiento
caliente’ se apaga. Sin embargo, la placa de calentamiento todavía puede estar
caliente.
2 Pulse el botón de aumento o disminución de temperatura una o
varias veces para determinar la temperatura deseada.
, La temperatura establecida se muestra en la pantalla. La temperatura
destella para indicar que el aparato está cambiando de temperatura.
, Cuando el piloto rojo de ‘placa de calentamiento caliente’ de la
pantalla se ilumina, la placa de calentamiento está caliente y no debe
tocarse.
, Cuando la placa de calentamiento o el fondo de la olla alcanzan la
temperatura establecida, el indicador de temperatura de la pantalla
deja de destellar. El aparato mantiene la temperatura determinada
mientras usted hace otras cosas.
Nota: Debido a la diferencia de temperatura ambiente puede suceder que el
indicador de temperatura empiece a destellar otra vez.
Nota: Si pulsa los botones de aumento y disminución de temperatura
brevemente al mismo tiempo, la temperatura se pone a cero (‘- -’).
Nota: Si pulsa los botones de aumento y disminución de temperatura durante
3 segundos al mismo tiempo, puede cambiar de °C a °F y viceversa.
 Loading...