

Philips HQT784 User Manual [da]

ENGLISH 4
DEUTSCH 12
NORSK 20
SVENSKA 27
SUOMI 35
DANSK 43
HQT764
3
Important
◗ Check if the voltage indicated on the
powerplug corresponds to the mains voltage
in your home before you connect the
appliance.
◗ Make sure that the appliance does not get
wet.
◗ This appliance is only designed for trimming
the human beard.Do not use the appliance
for any other purpose.
◗ Keep the appliance out of the reach of
children.
◗ Charge and store the appliance at a
temperature between 15cC and 35cC.
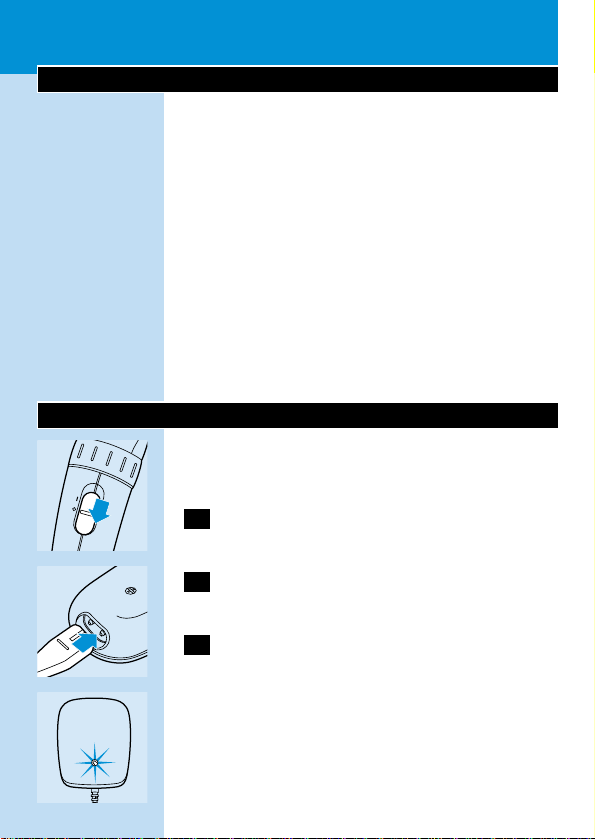
Charging
Charge the appliance fully before you start using
it for the first time.
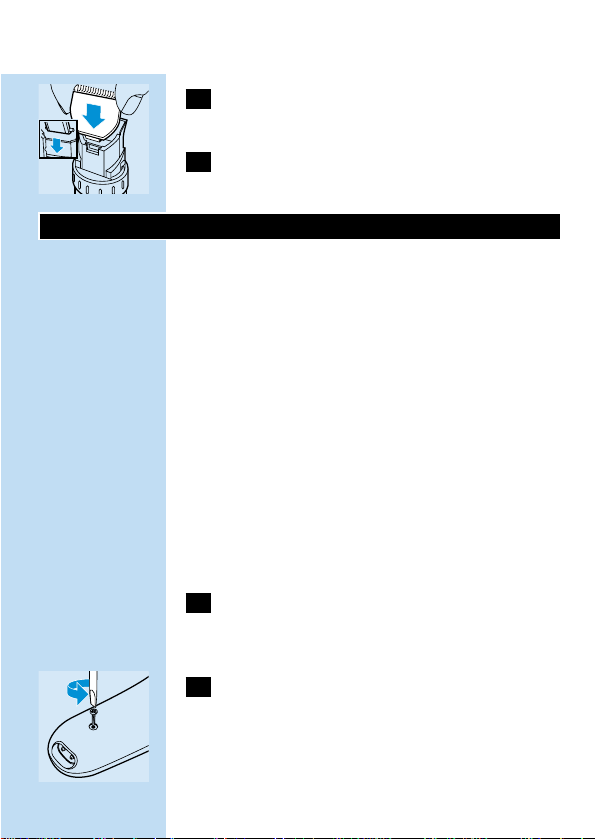
C
1 Make sure the appliance is switched off.
C
2 Insert the appliance plug into the
appliance.
3 Put the powerplug in the wall socket.
C
◗ The green pilot light on the poweplug will go
on to indicate that the appliance is charging.
It will take approx.14 hours to fully charge the
battery.
ENGLISH4
CHARGE

Do not charge the appliance for more than
24 hours.
A fully charged appliance has a cordless trimming
time of up to 50 minutes.
◗ The appliance does not run from the mains.
When the battery is empty,charge it as
described above.
Optimise the lifetime of the rechargeable
battery
When the appliance has been charged for the
first time, we advise you to use it until the battery
is completely empty.
Do not recharge the appliance in between the
trimming sessions.
Continue using the appliance until the motor
almost stops running during a session.Then
recharge the battery.Follow this procedure at
least twice a year.
Trimming
Always comb the beard and/or moustache with a
fine comb before you start trimming.
If you are trimming for the first time, be careful
Do not move the trimmer too fast.Make smooth
and gentle movements.
ENGLISH 5
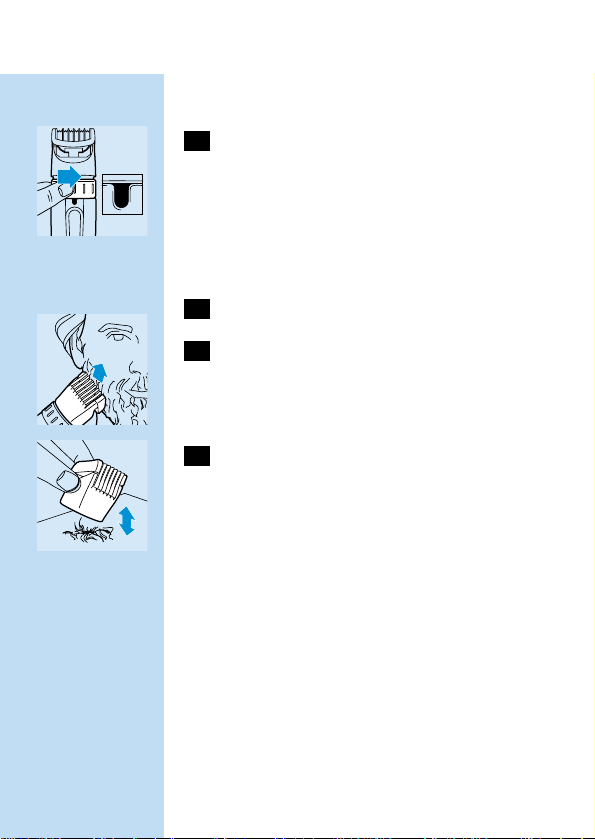
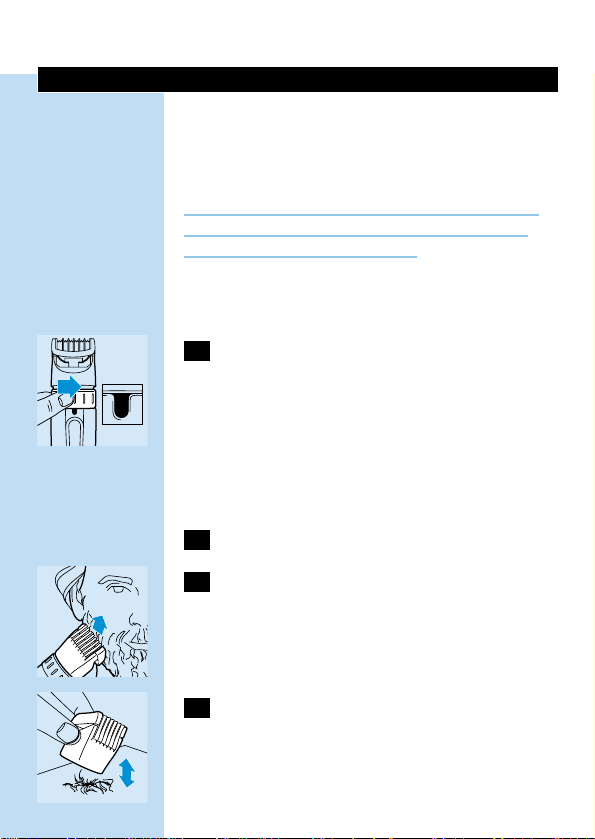
Trimming with comb attachment
C
1 Turn the Precision Zoom Lock`to the
desired trimming length setting (see table).
The setting will appear in the window below the
Precision Zoom Lock`.
B
If you are trimming for the first time, start by using
the maximum trimming length setting: setting 9.
2 Switch the appliance on.
C
3 To trim in the most effective way,move
the trimmer against the direction of hair
growth.Make sure the surface of the comb
always stays in contact with the skin.
C
4 If a lot of hair has accumulated in the
comb,remove the comb attachment and
blow and/or shake the hair out of the
comb.The selected trimming length setting
will not change when you do this.
ENGLISH6
9
9
Trimming length settings table
Trimming with the unique 'stubble
look' setting
C
◗ Using setting 1 will result in a 'stubble look'.
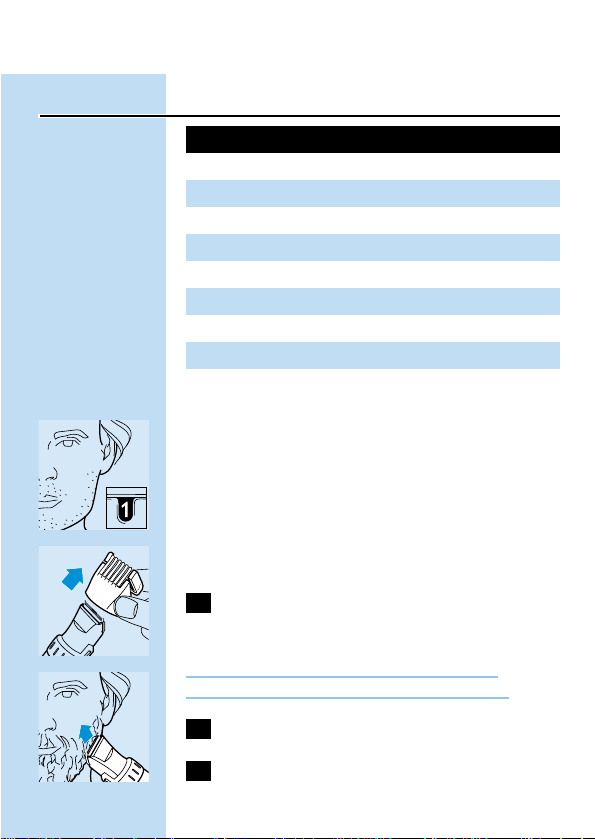
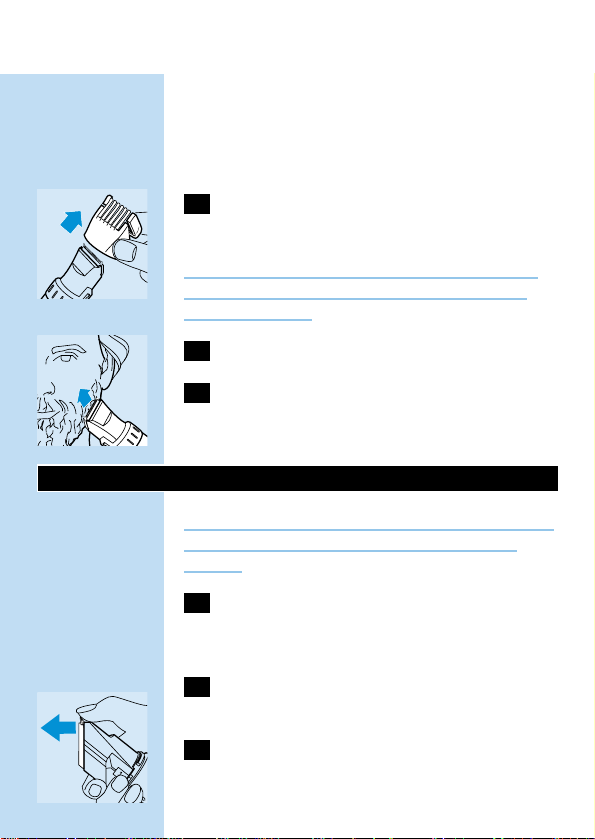
Trimming without comb attachment
Full beards and single hairs
C
1 Remove the comb attachment by pulling it
off the appliance.
Never pull at the flexible top of the comb
attachment.Always pull at the bottom part.
2 Switch the appliance on.
C
3 Make well-controlled movements.Touch
the hair lightly with the trimmer.
ENGLISH 7
resulting beard length
1.5 mm
2.5 mm
4.0 mm
5.5 mm
7.5 mm
9.5 mm
12.0 mm
15.0 mm
18.0 mm
setting
1
2
3
4
5
6
7
8
9
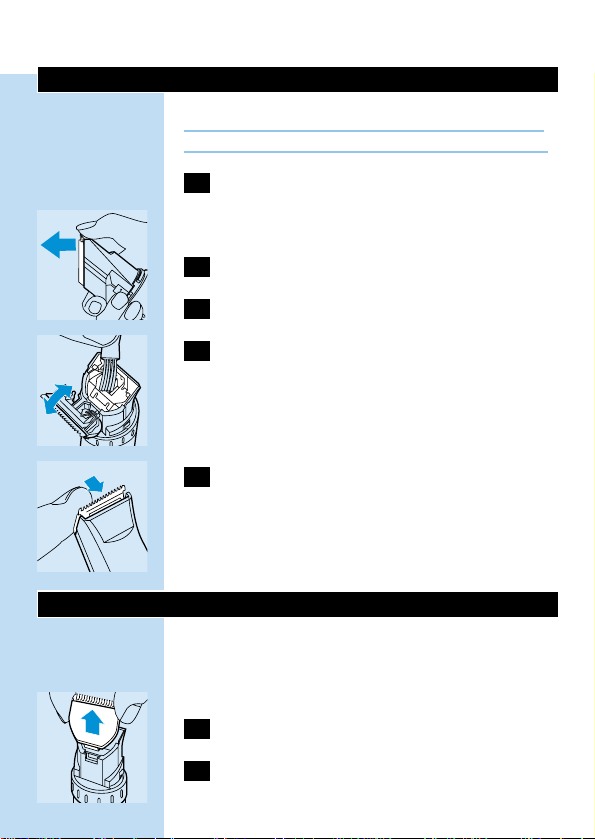
Cleaning
Do not use abrasives,scourers or liquids such as
alcohol,petrol or acetone to clean the appliance.
1 Make sure the appliance is switched off
and disconnected from the mains before
you start cleaning it.
2 Remove the comb attachment.
C
3 Open the cutting unit.
C
4 Clean the cutting unit and the inside of the
appliance with the brush supplied.
C
5 Close the cutting unit by pushing it back
onto the appliance until you hear a click.
The appliance does not need any lubrication.
Replacing the cutting unit
A worn or damaged cutting unit should only be
replaced with an original Philishave cutting unit,
available from authorised Philips service centres.
1 Open the cutting unit.
C
2 Remove the old cutting unit by pulling it
upwards.
ENGLISH8
C
3 Place the two lugs of the new cutting unit
into the guiding slots.
4 Push the cutting unit back onto the
appliance until you hear a click.
Environment
To protect the environment,this appliance has
been equipped with a nickel-metal-hydride
battery which contains less than 0.01% cadmium.
Remove the rechargeable battery when you
discard the appliance.
Do not throw the battery away with the normal
household waste but hand it in at an official
collection point.
You can also take the appliance to a Philips
service centre, where the staff will be happy to
help you remove the battery and dispose of it in
an environmentally safe way.
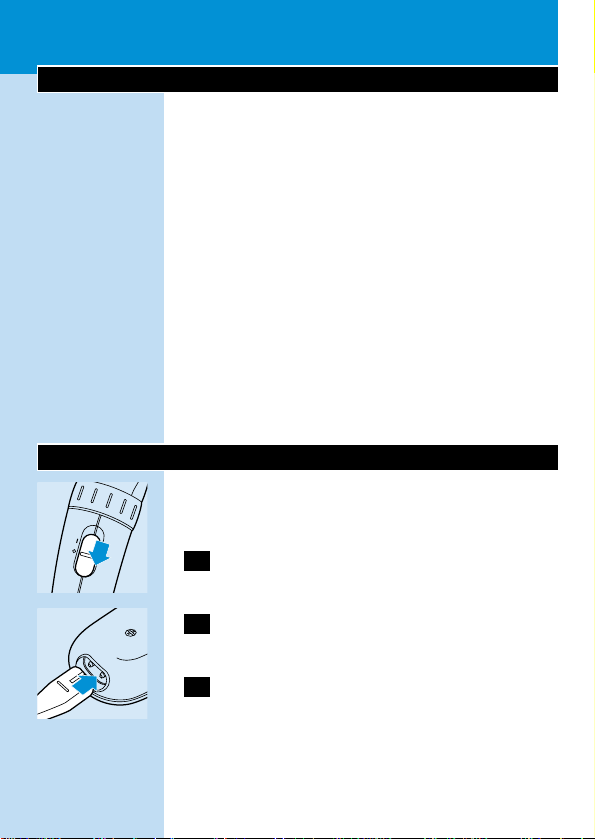
1 Disconnect the appliance from the mains
and let the appliance run until the motor
stops.
C
2 Undo the screw in the housing of the
trimmer.
ENGLISH 9

C
3 Separate the 2 housing parts by means of a
screwdriver.
C
4 Insert the screwdriver into the small slot
in the printed circuit board marked with
an arrow. Push the screwdriver down until
parts of the printed circuit board break
off.
C
5 Remove the battery-holder including the
rechargeable battery.
C
6 Separate the rechargeable battery from
the battery-holder.
Do not connect the appliance to the mains again
after it has been opened!
ENGLISH10

Guarantee & service
If you need information or if you have a
problem,please visit the Philips Web site at
www.philips.com or contact the Philips Customer
Care Centre in your country (you will find its
phone number in the worldwide guarantee
leaflet).If there is no Customer Care Centre in
your country,turn to your local Philips dealer or
contact the Service Department of Philips
Domestic Appliances and Personal Care BV.
ENGLISH 11
Wichtig
◗ Prüfen Sie,bevor Sie das Gerät in Betrieb
nehmen,ob die Spannungsangabe auf dem
Steckernetzgerät mit der örtlichen
Netzspannung übereinstimmt.
◗ Achten Sie darauf,dass das Gerät nicht nass
wird.
◗ Das Gerät ist nur zum Schneiden von
menschlichen Bärten bestimmt.Benutzen Sie
es niemals für andere Zwecke.
◗ Halten Sie das Gerät außer Reichweite von
Kindern.
◗ Laden Sie das Gerät nur bei
Umgebungstemperaturen zwischen 15cC und
35cC.Bewahren Sie es auch bei Temperaturen
in diesem Bereich auf.
Den Akku aufladen
Laden Sie den Akku voll auf,bevor Sie das Gerät
zum ersten Mal benutzen.
C
1 Achten Sie darauf,dass das Gerät
ausgeschaltet ist.
C
2 Stecken Sie den Gerätestecker in das
Gerät.
3 Stecken Sie dann das Steckernetzgerät in
die Steckdose.Wenn das Steckernetzgerät
dieses Gerätes beschädigt ist,verwenden
Sie sich bitte an Ihren Kundendienst
DEUTSCH12

C
◗ Die grüne Kontroll-Lampe auf dem
Steckernetzgerät zeigt an,dass der Akku
geladen wird.
Nach ca.14 Stunden ist der Akku voll aufgeladen.
Lassen Sie das Gerät nicht länger als 24 Stunden
am Netz.
Mit dem voll aufgeladenen Akku können Sie das
Gerät ca.50 Minuten
◗ Das Gerät kann nicht direkt am Netz
betrieben werden.Ist der Akku leer,so laden
Sie ihn bitte wie oben beschrieben auf.
Verlängern Sie die Nutzungsdauer Ihres
Akkus
Wir empfehlen Ihnen,das Gerät nach dem ersten
Laden des Akkus so lange zu benutzen,bis der
Akku völlig leer ist.
Laden Sie den Akku nicht zwischen den
verschiedenen Anwendungen nach..
Warten Sie immer solange bis der Motor bei
einer Anwendung anhält.Setzen Sie die
angefangene Arbeit mit dem Gerät am Netz fort,
und laden Sie den Akku erst dann wieder auf.Vgl.den folgenden Abschnitt.Lassen Sie das Gerät
mindestens zweimal jährlich laufen,bis der Akku
leer ist.
DEUTSCH 13
CHARGE
Den Bart schneiden
Kämmen Sie den Bart/den Schnurbart vor dem
Gebrauch des Geräts stets mit einem feinen
Kamm aus.
Seien Sie bei der ersten Anwendung besonders
vorsichtig. Gehen Sie langsam, mit ruhigen und
kontrollierten Bewegungen vor.
Bartschneiden mit dem ScherkammAufsatz
C
1 Stellen Sie zunächst den Justierring`auf
die Position,die der gewünschten
Bartlänge entspricht.- Vgl.die Tabelle.
Die eingestellte Position können Sie im Fenster
unter dem Justierring`ablesen.
B
Beginnen Sie bei der ersten Anwendung des
Geräts mit der längsten Barthaarlänge: Position 9.
2 Schalten Sie das Gerät ein.
C
3 Den besten Erfolg erzielen Sie,wenn Sie
das Gerät gegen die natürliche
Bartwuchsrichtung führen.Achten Sie
darauf,dass der Kamm stets Kontakt zur
Haut behält.
C
4 Hat sich viel Barthaar im Kamm
angesammelt,so ziehen Sie den
Scherkamm-Aufsatz vom Gerät,und blasen
oder schütteln Sie das Haar aus dem
DEUTSCH14
9
9

Aufsatz.Die eingestellte Barthaarlänge
wird dabei nicht verändert.
Tabelle der Barthaarlängen
3-Tage-Bart schneiden
C
◗ Die Anwendung bei Position 1 ergibt einen
3-Tage-Bart.
DEUTSCH 15
Resultierende Barthaarlänge
1,5 mm
2,5 mm
4,0 mm
5,5 mm
7,5 mm
9,5 mm
12,0 mm
15,0 mm
18,0 mm
Position
1
2
3
4
5
6
7
8
9
Verwendung ohne den ScherkammAufsatz
Vollbart konturieren und einzelne Haare
zurückschneiden
C
1 Ziehen Sie den Scherkamm-Aufsatz vom
Gerät.
Ziehen Sie niemals an dem biegsamen Oberteil
des Scherkamm-Aufsatzes. Ziehen Sie stets an
dem unteren Teil.
2 Schalten Sie das Gerät ein.
C
3 Gehen Sie mit ruhigen und gleichmäßigen
Bewegungen vor.Berühren Sie die
Barthaare nur leicht mit dem Gerät.
Reinigung
Verwenden Sie zum Reinigen keine Scheuermittel
oder Lösungsmittel wie Alkohol,Benzin oder
Azeton.
1 Achten Sie darauf,daß das Gerät
ausgeschaltet und nicht ans Netz
angeschlossen ist.
2 Nehmen Sie den Scherkamm-Aufsatz vom
Gerät ab.
C
3 Klappen Sie die Schneideeinheit auf.
DEUTSCH16

C
4 Reinigen Sie die Schneideeinheit und das
Innere des Geräts mit der beiliegenden
Bürste.
C
5 Schließen Sie die Schneideeinheit,indem
Sie sie auf das Gerät zurück drücken,bis
Sie ein Geräusch ("Klick") hören.
Das Gerät braucht nicht geölt zu werden
Ersatz der Schneideeinheit
Eine verbrauchte oder beschädigte
Schneideeinheit darf nur durch eine original
Philips Schneideeinheit ersetzt werden.Wenden
Sie sich an das Philips Service Center.
1 Klappen Sie die Schneideeinheit auf.
C
2 Ziehen Sie die alte Schneideeinheit vom
Gerät ab.
C
3 Setzen Sie die beiden Laschen der neuen
Schneideeinheit in die Führungsschlitze am
Gerät.
4 Drücken Sie die Schneideeinheit an,bis Sie
ein Geräusch ("Klick") hören.
DEUTSCH 17
 Loading...