

Philips HQ7415/19, HQ7415/16, HQ7415/33, HQ7415 User Manual

ENGLISH 4
FRANÇAIS 13
ESPAÑOL 22
PORTUGUÊS 31
46
54
HQ7415
á«Hô©dGá«Hô©dG
Important
Read these instructions for use carefully before
using the appliance and save them for future
reference.
◗ Only use the powerplug supplied to connect
the appliance to the mains.
◗ The powerplug transforms 100-240 volts to a
safe low voltage of less than 24 volts.
◗ Only use the powerplug that comes with the
appliance to guarantee safe transformation.
◗ The powerplug contains a transformer. Do
not cut off the powerplug to replace it with
another plug, as this will cause a hazardous
situation.
◗ If the powerplug is damaged, always have it
replaced by one of the original type in order
to avoid a hazard.
◗ Store and use the appliance at a temperature
between 5cC and 35cC.
C
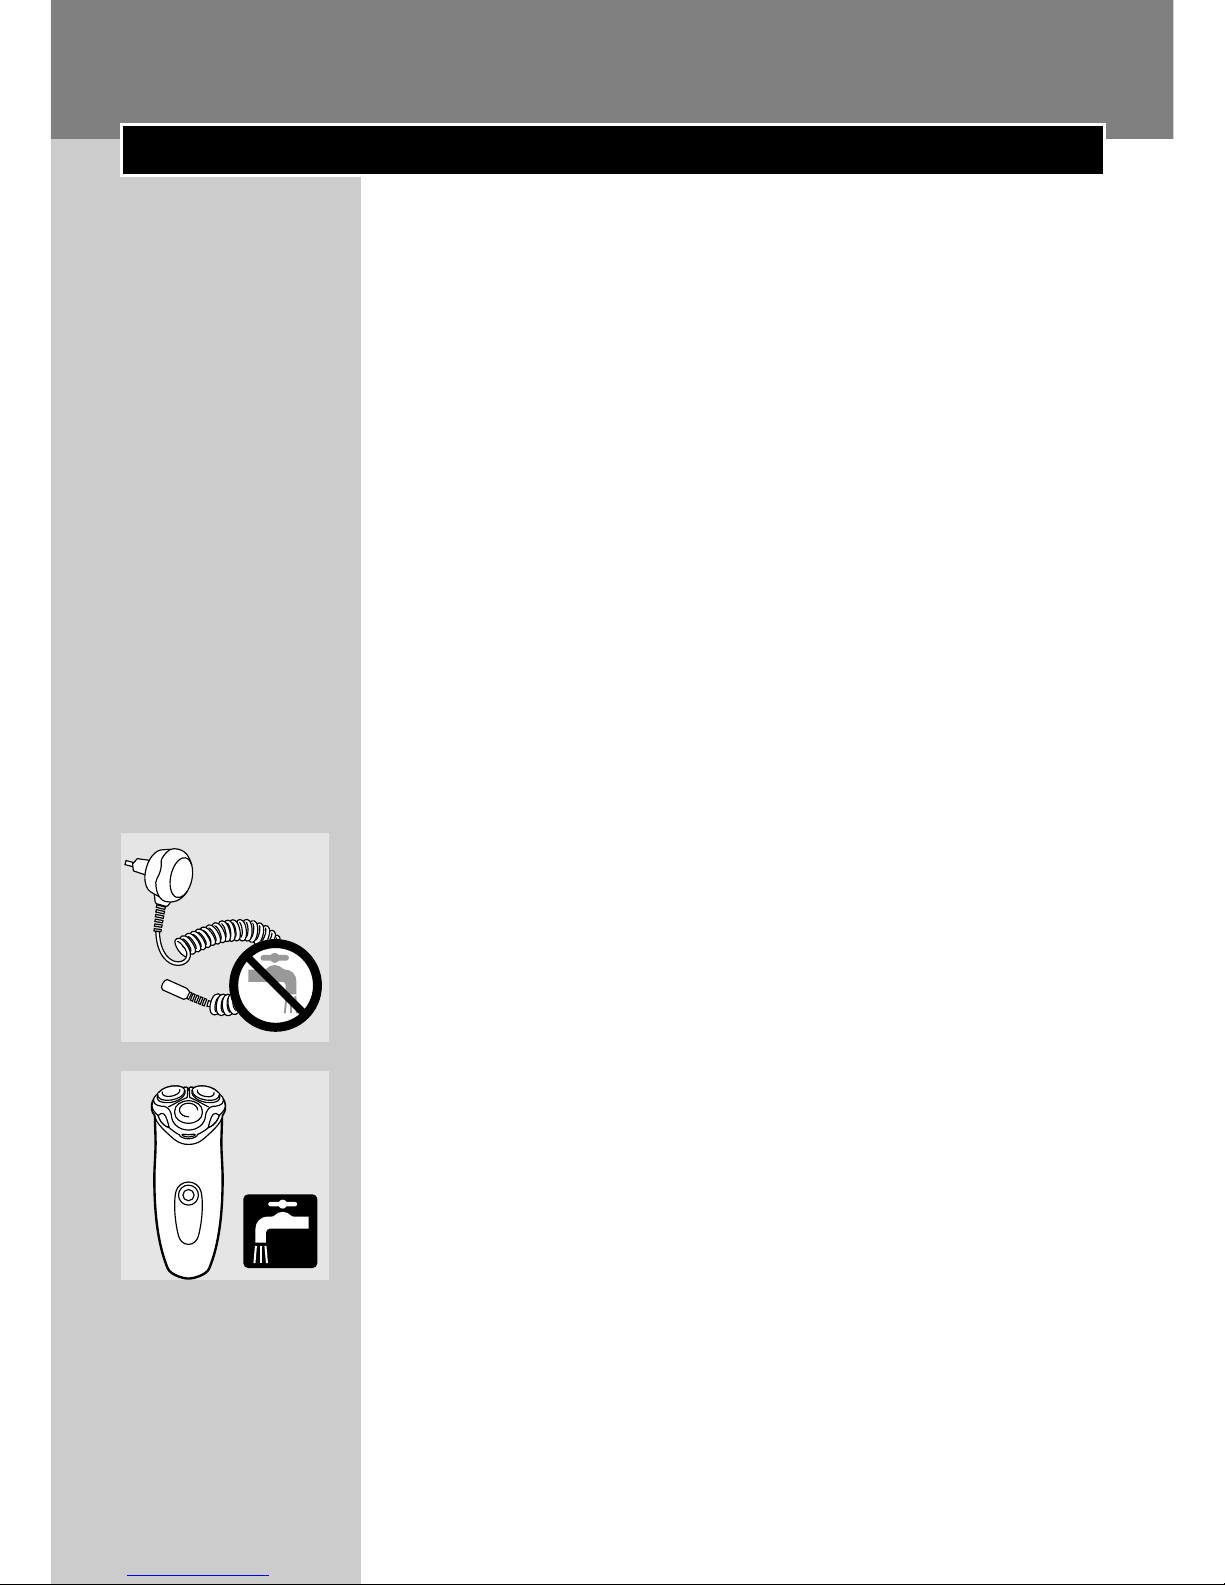
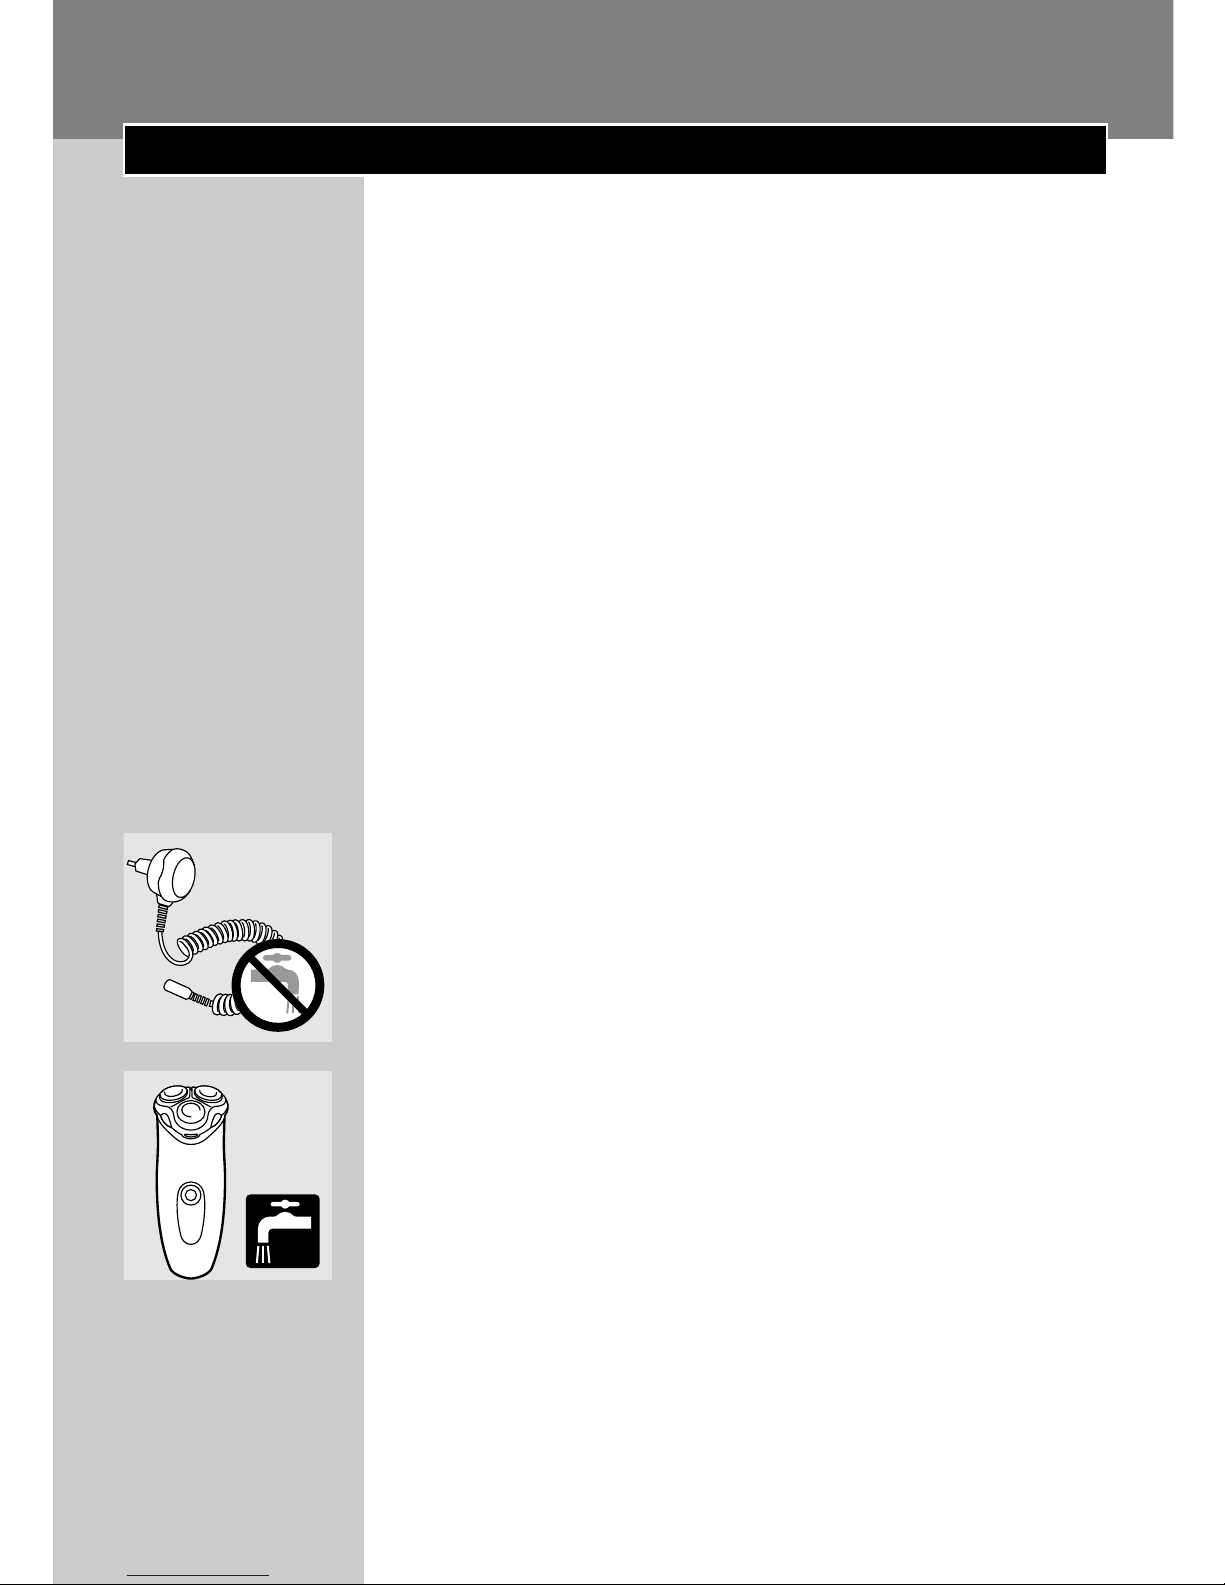
◗ Make sure the powerplug does not get wet.
◗ Always unplug the shaver before cleaning it
under the tap.
C
◗ The appliance complies with the
internationally approved IEC safety regulations
and can be safely cleaned under the tap.
Be careful with hot water. Always check if the
water is not too hot, to prevent your hands from
getting burnt.
ENGLISH4
Using the appliance
C
1 Put the appliance plug in the shaver.
2 Put the powerplug in the wall socket.
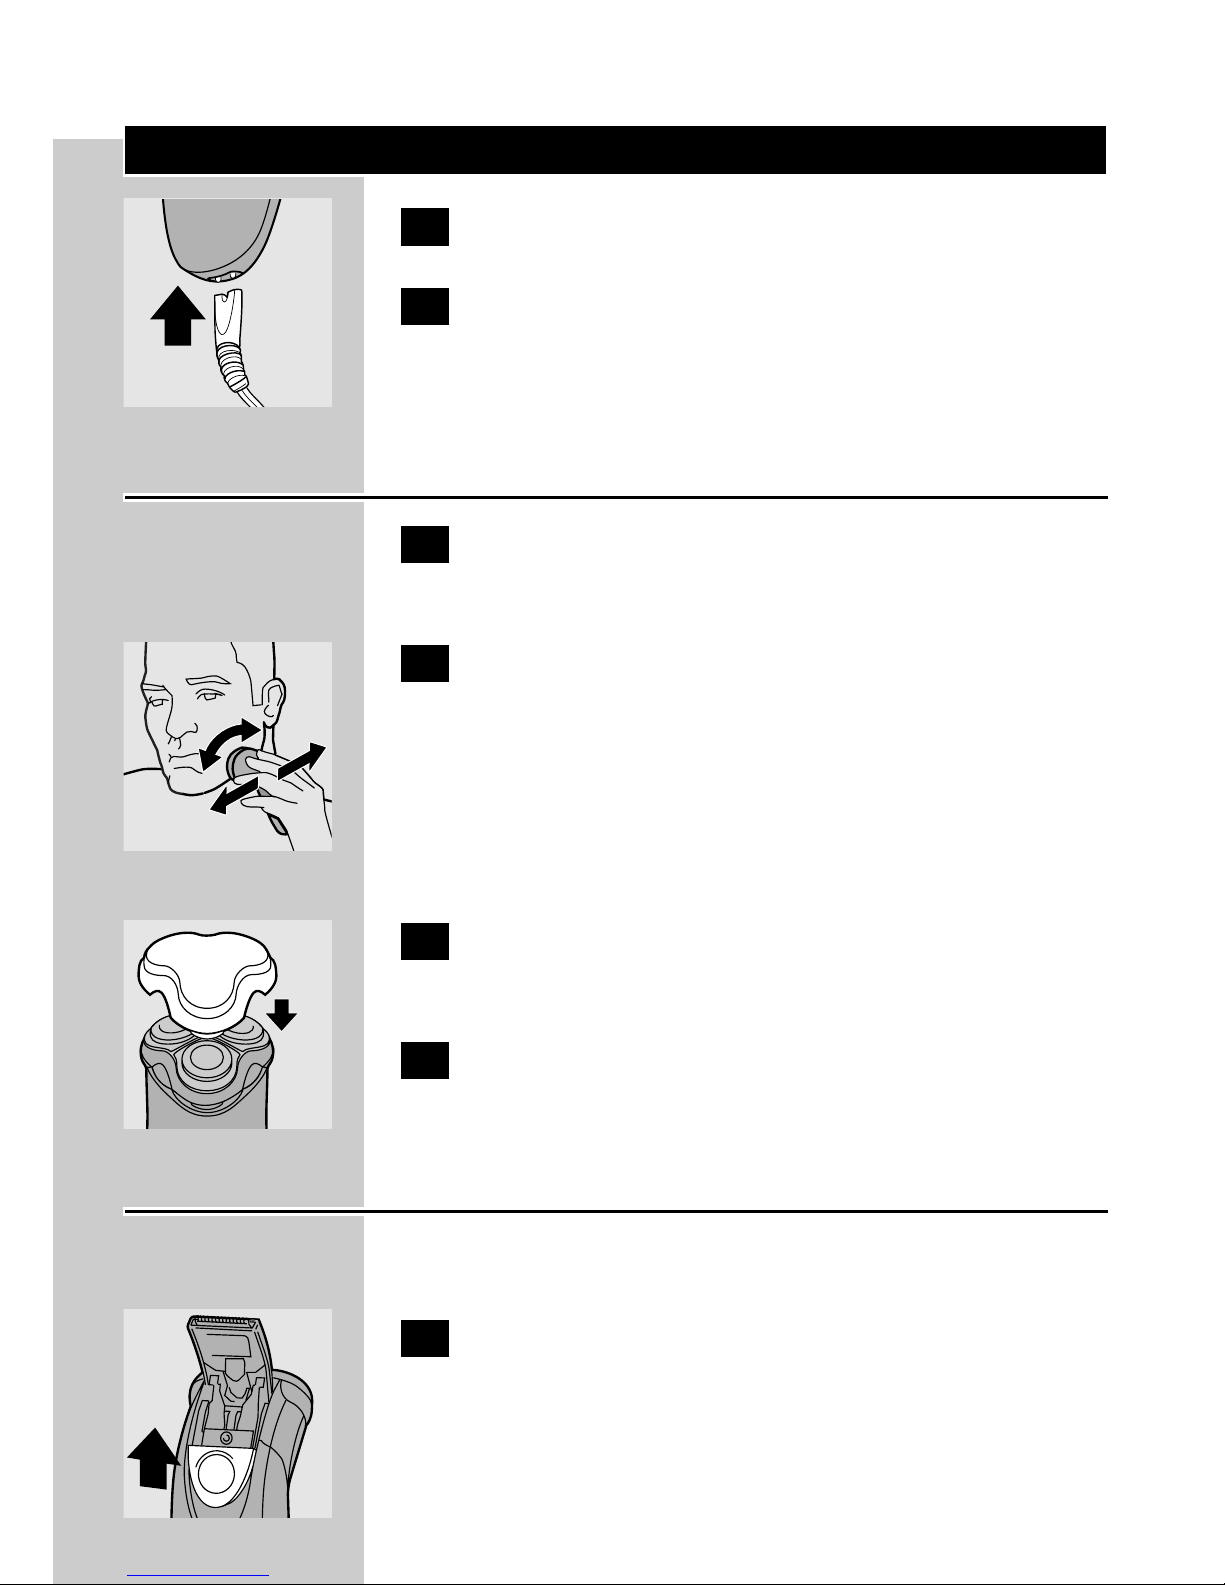
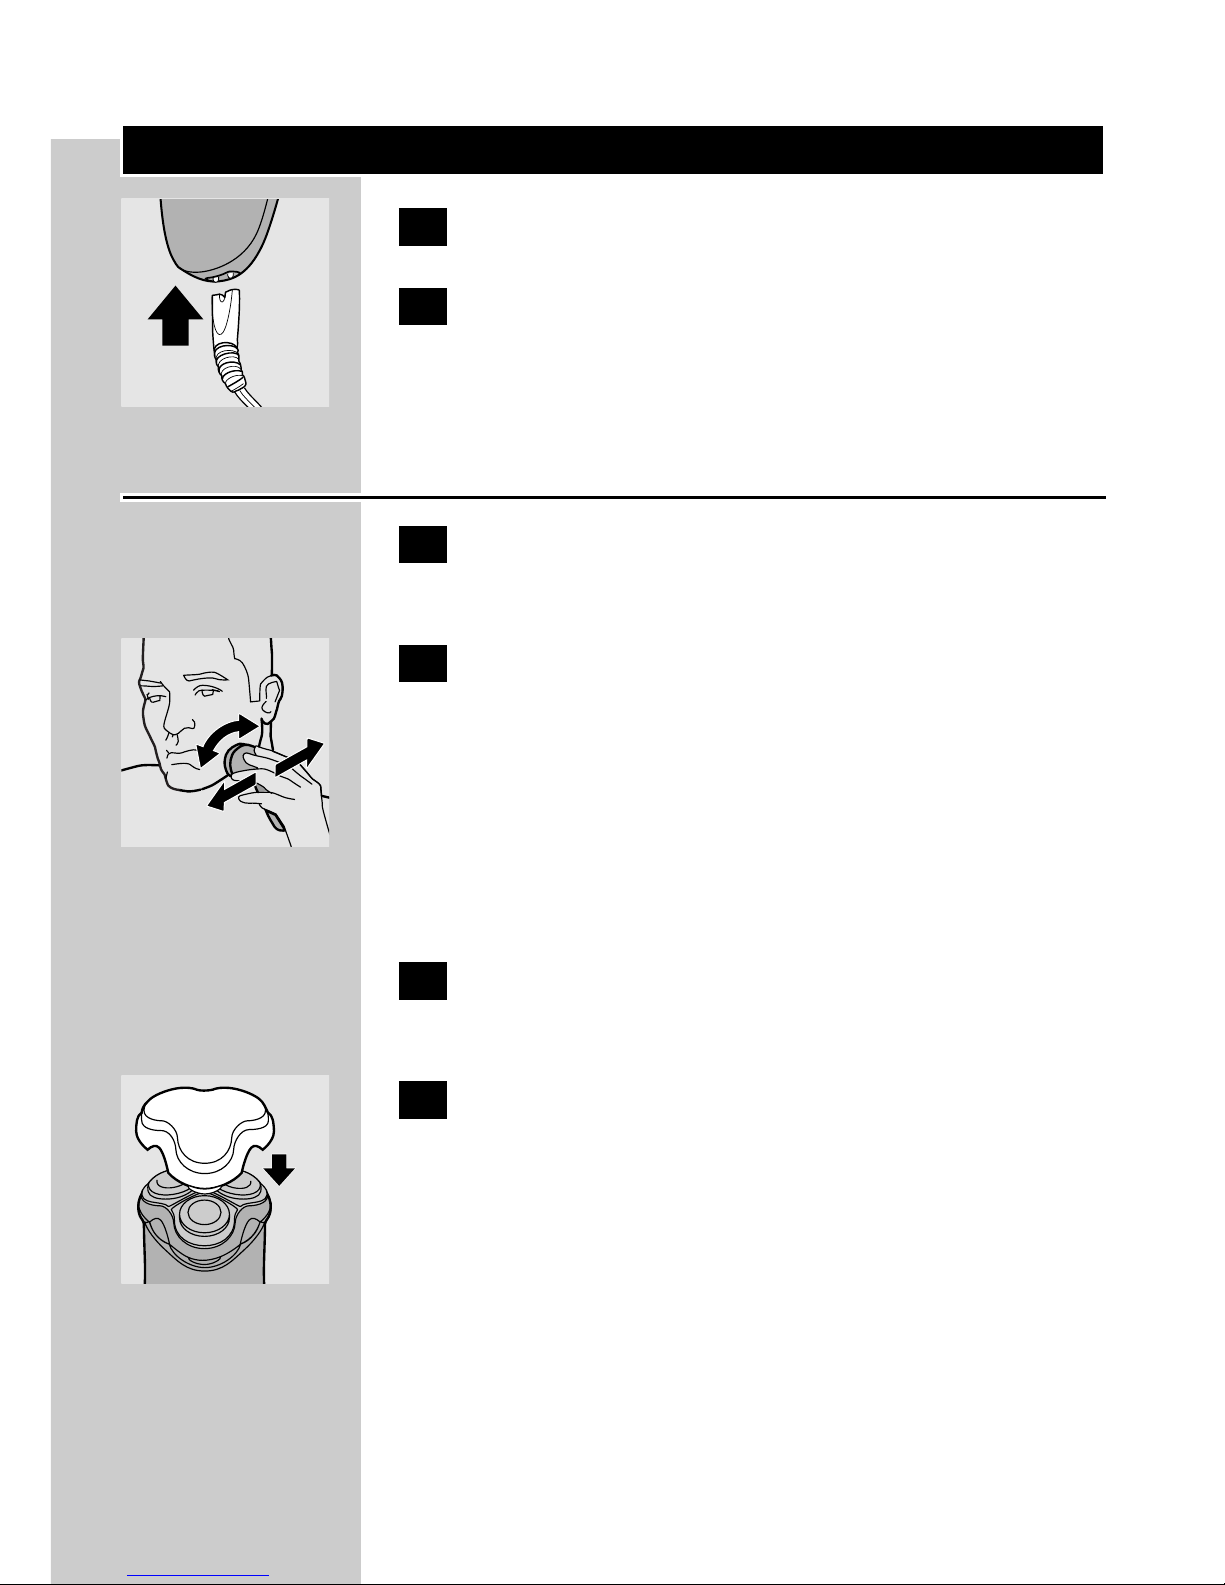
Shaving
1 Switch the shaver on by pressing the on/off
button once.
C
2 Move the shaving heads quickly over your
skin, making both straight and circular
movements.
Shaving on a dry face gives the best results.
Your skin may need 2 or 3 weeks to get
accustomed to the Philips system.
3 Switch the shaver off by pressing the on/off
button once.
C
4 Put the protection cap on the shaver every
time you have used it, to prevent damage.
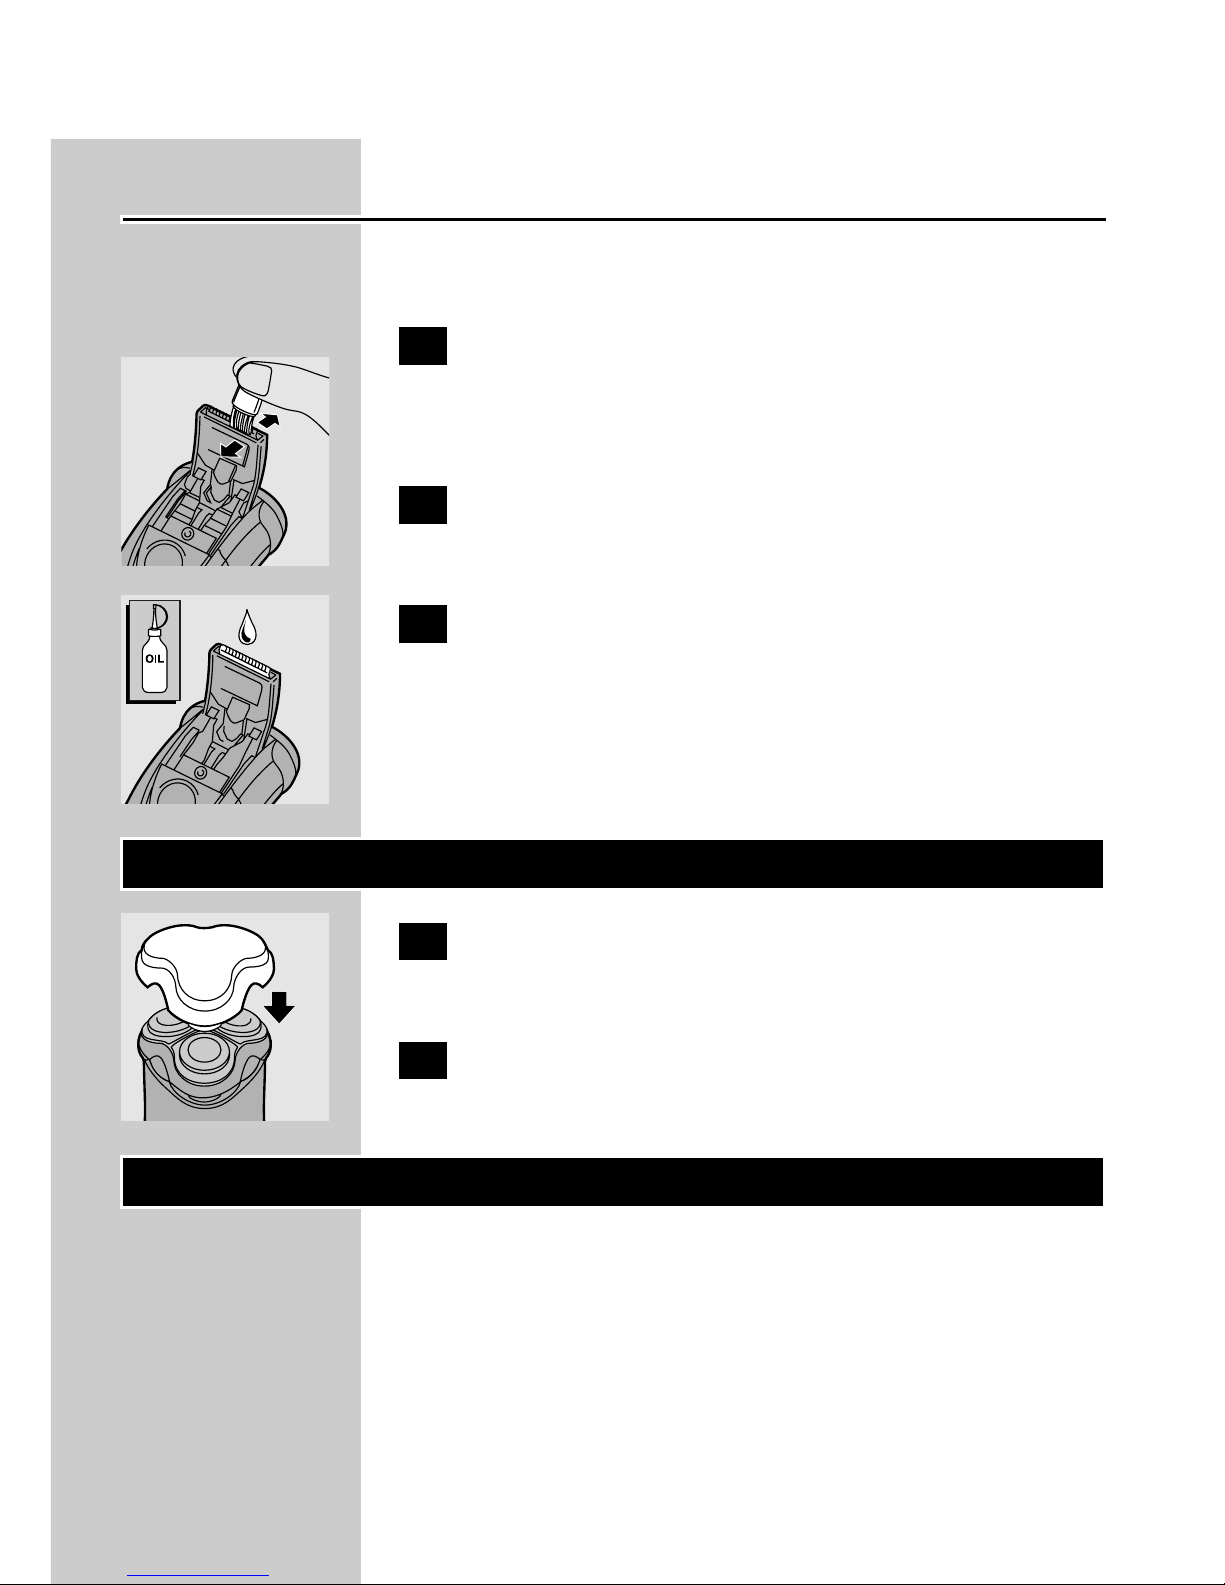
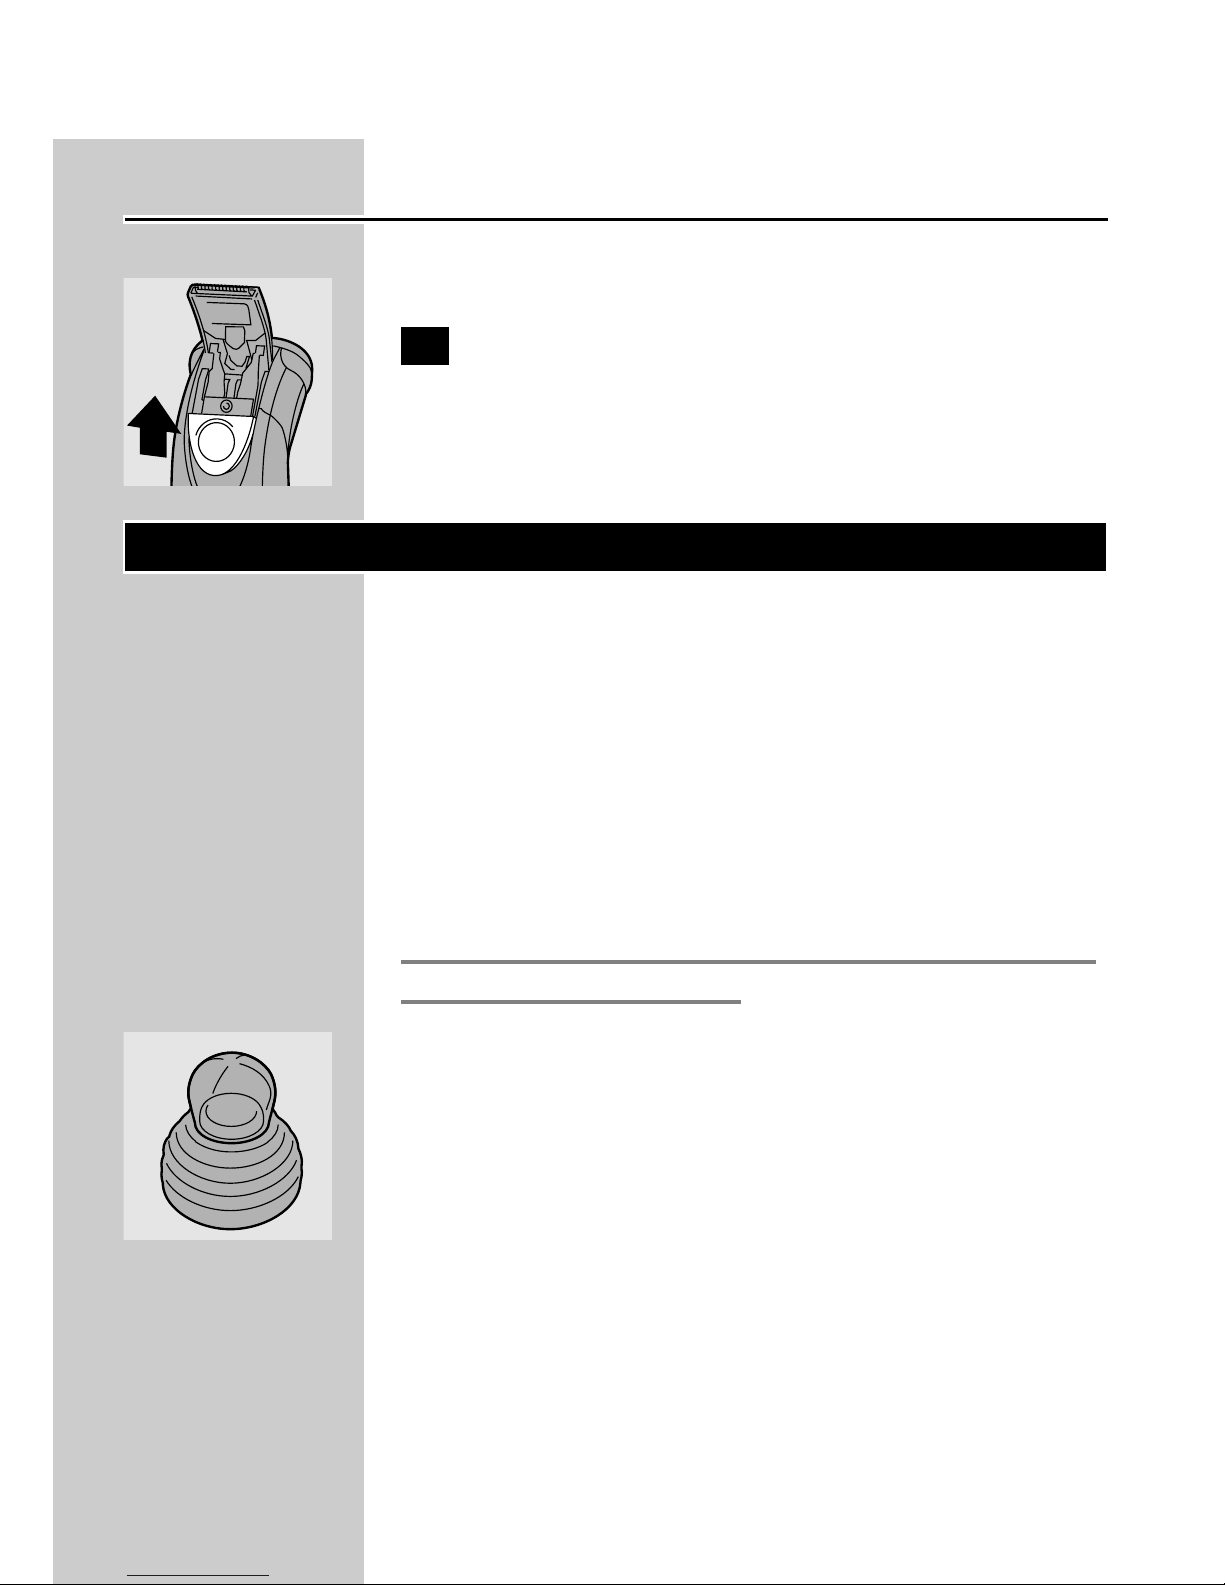
Trimming
For grooming sideburns and moustache.
C
1 Open the trimmer by pushing the slide
upwards.
The trimmer can be activated while the motor is
running.
ENGLISH 5
Cleaning and maintenance
Regular cleaning guarantees better shaving
performance.
The easiest and most hygienic way to clean the
appliance is to rinse the shaving unit and the hair
chamber with hot water every time you have
used the appliance.
Be careful with hot water. Always check if the
water is not too hot, to prevent your hands from
getting burnt.
C
◗ For easy and optimal cleaning, the Philips
Action Clean (shaving head cleaner, type
HQ100) is available.Ask your Philips dealer
for information.
B
The Philips Action Clean may not be available in
all countries. Contact the Customer Care Centre in
your country about the availability of this
accessory.
You can also clean the shaver in the following
way:
Every day: shaving unit
When you clean the appliance, it is not necessary
to take the shaving heads (cutters and guards)
apart. If you want to take them apart, be sure not
to mix up the cutters and guards, since grinding of
the cutters in the guards only guarantees optimal
performance for each matching set.
ENGLISH6
If you accidentally mix up the sets, it could take
several weeks before optimal shaving
performance is restored.
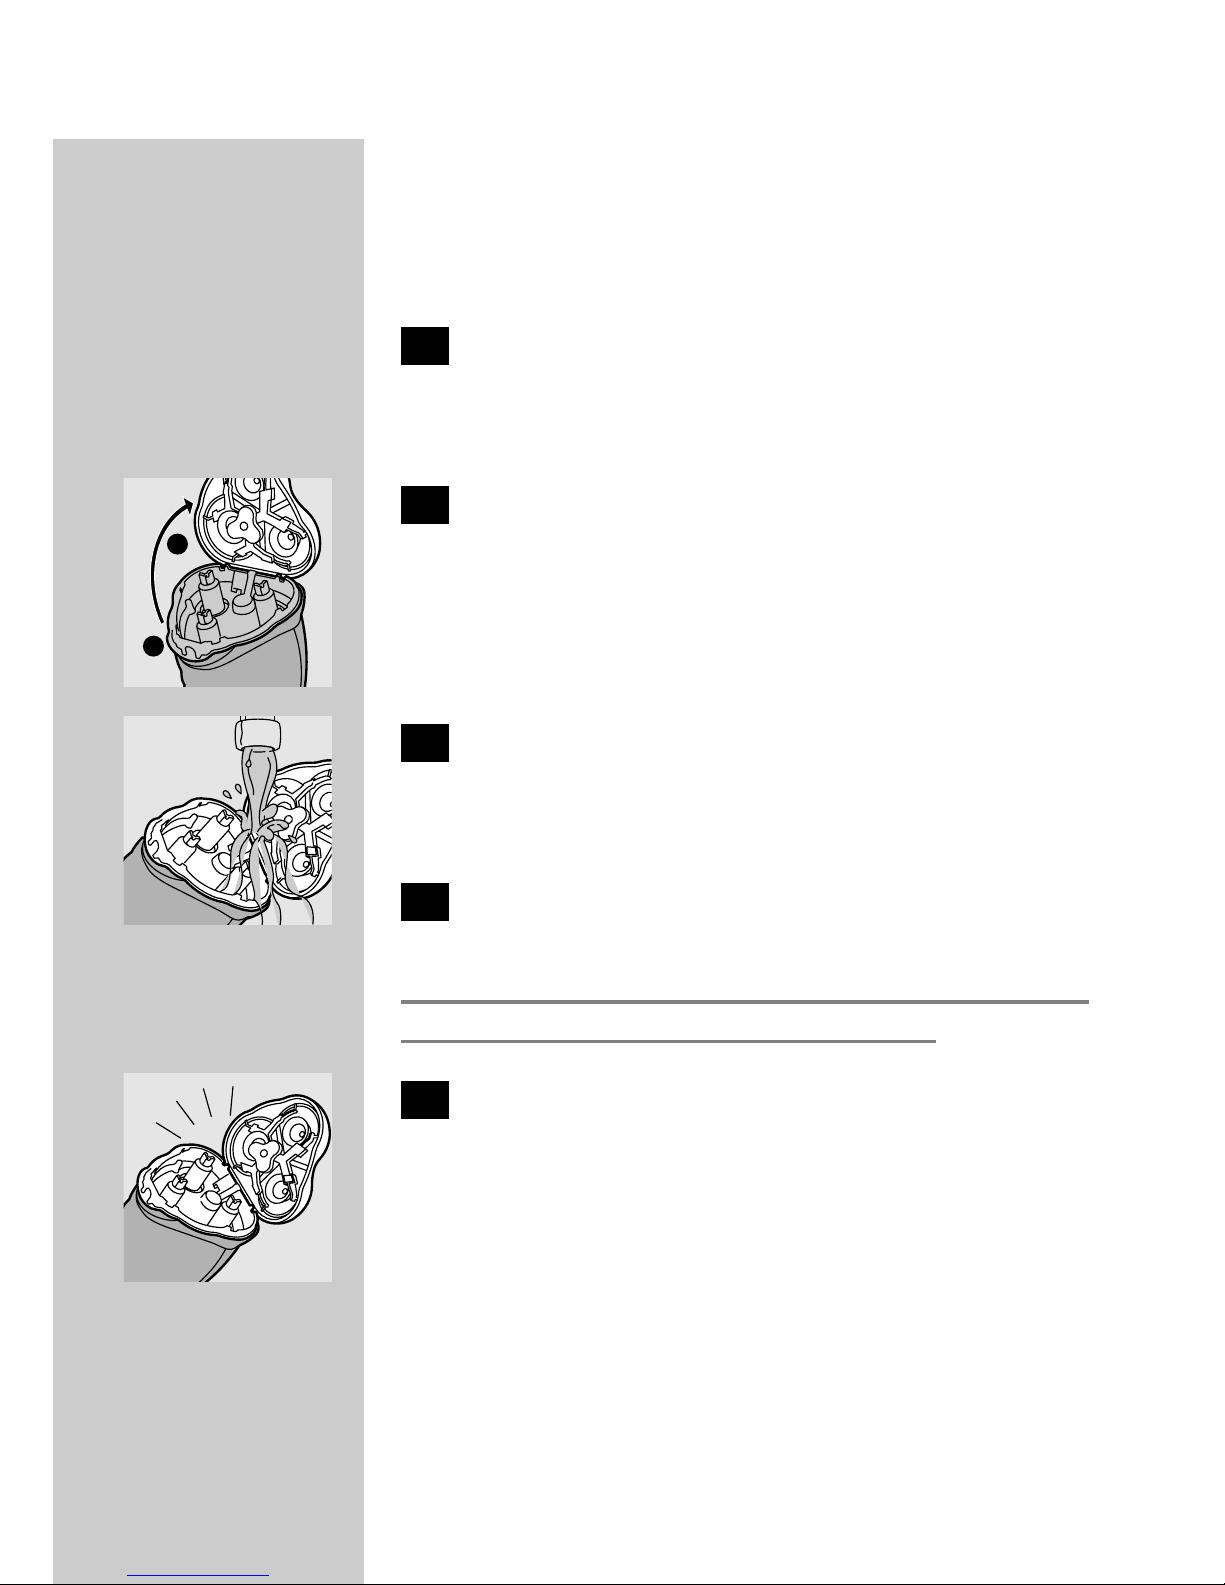
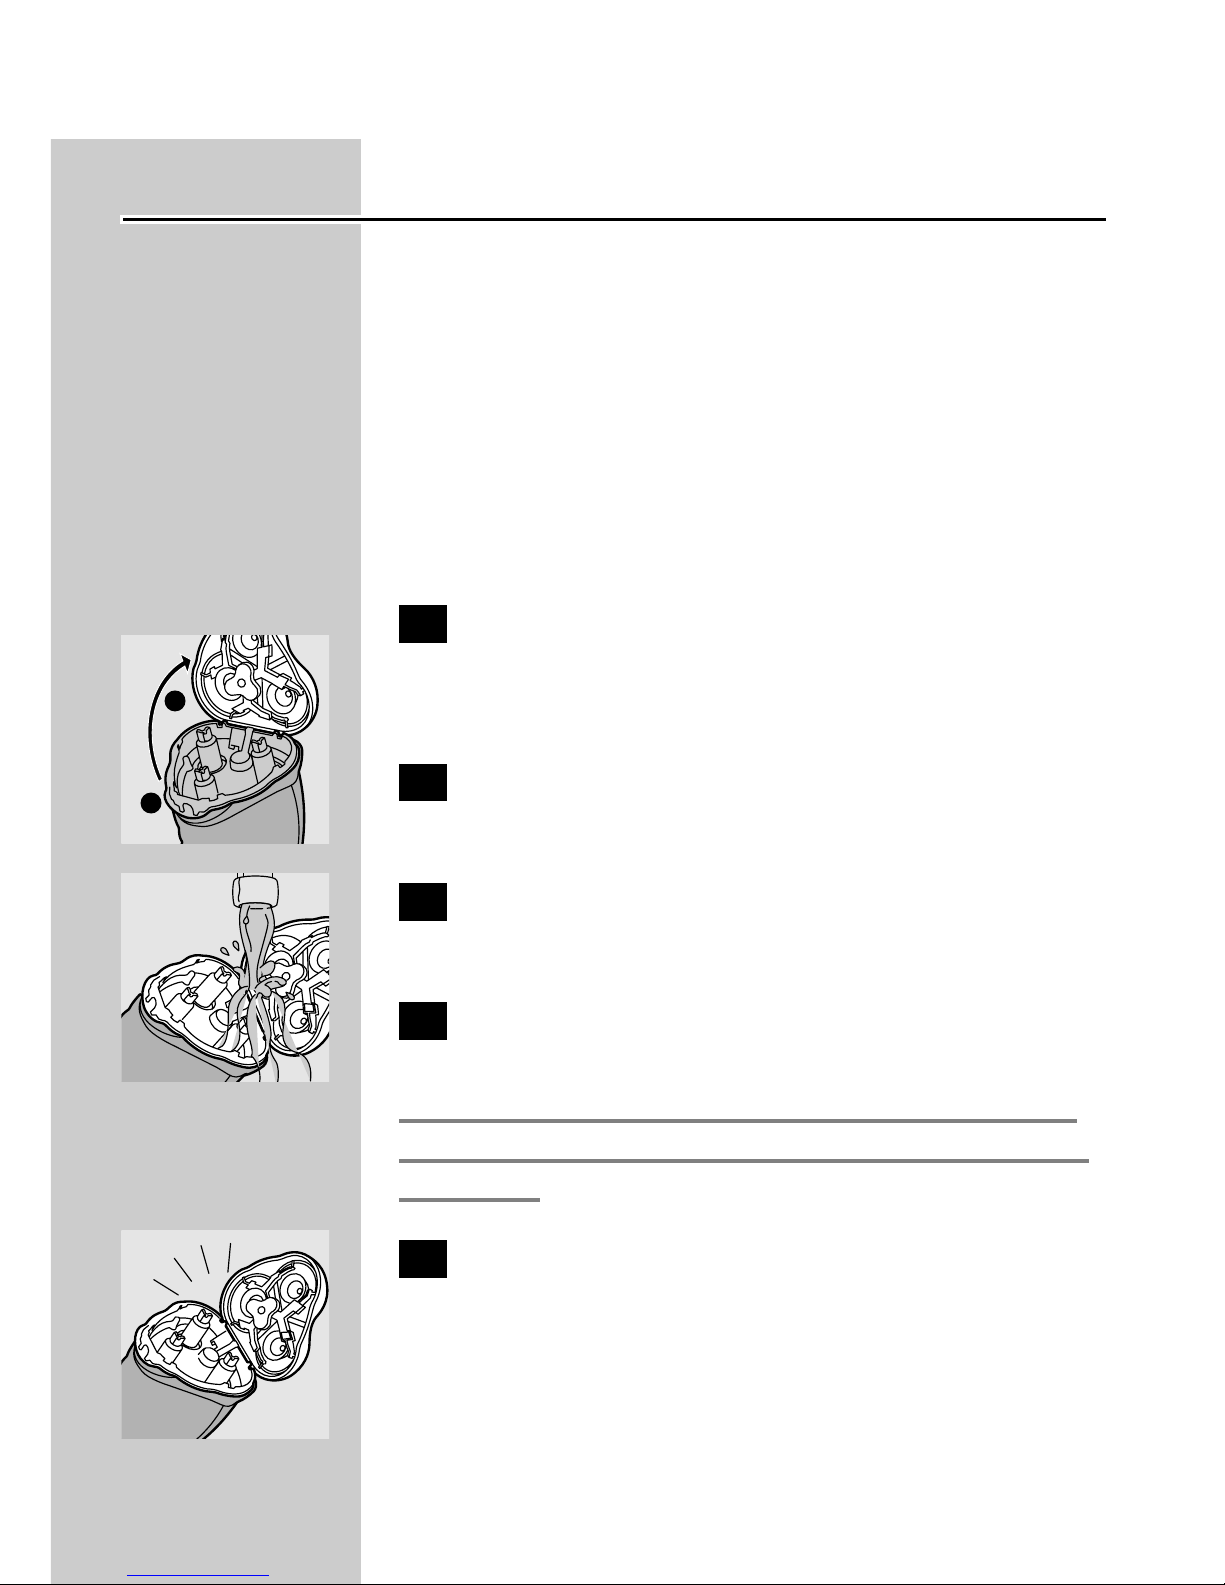
1 Switch the shaver off, remove the
powerplug from the wall socket and pull
the appliance plug out of the shaver.
C
2 Press the release button (1) and open the
shaving unit (2).
C
3 Clean the shaving unit and the hair
chamber by rinsing them under a hot tap
for some time.
4 Close the shaving unit and shake off excess
water.
Never dry the shaving unit with a towel or tissue
as this may damage the shaving heads.
C
5 Open the shaving unit again and leave it
open to let the appliance dry completely.
You can also clean the hair chamber without
water by using the brush supplied.
ENGLISH 7
1
2
Trimmer
Clean the trimmer every time you have used it.
1 Switch the shaver off, remove the
powerplug from the wall socket and pull
the appliance plug out of the shaver.
C
2 Clean the trimmer with the brush
supplied.
C
3 Lubricate the trimmer teeth with a drop
of sewing machine oil every six months.
Storage
C
1 Put the protection cap on the shaver to
prevent damage.
2 The appliance can be stored in the pouch
supplied.
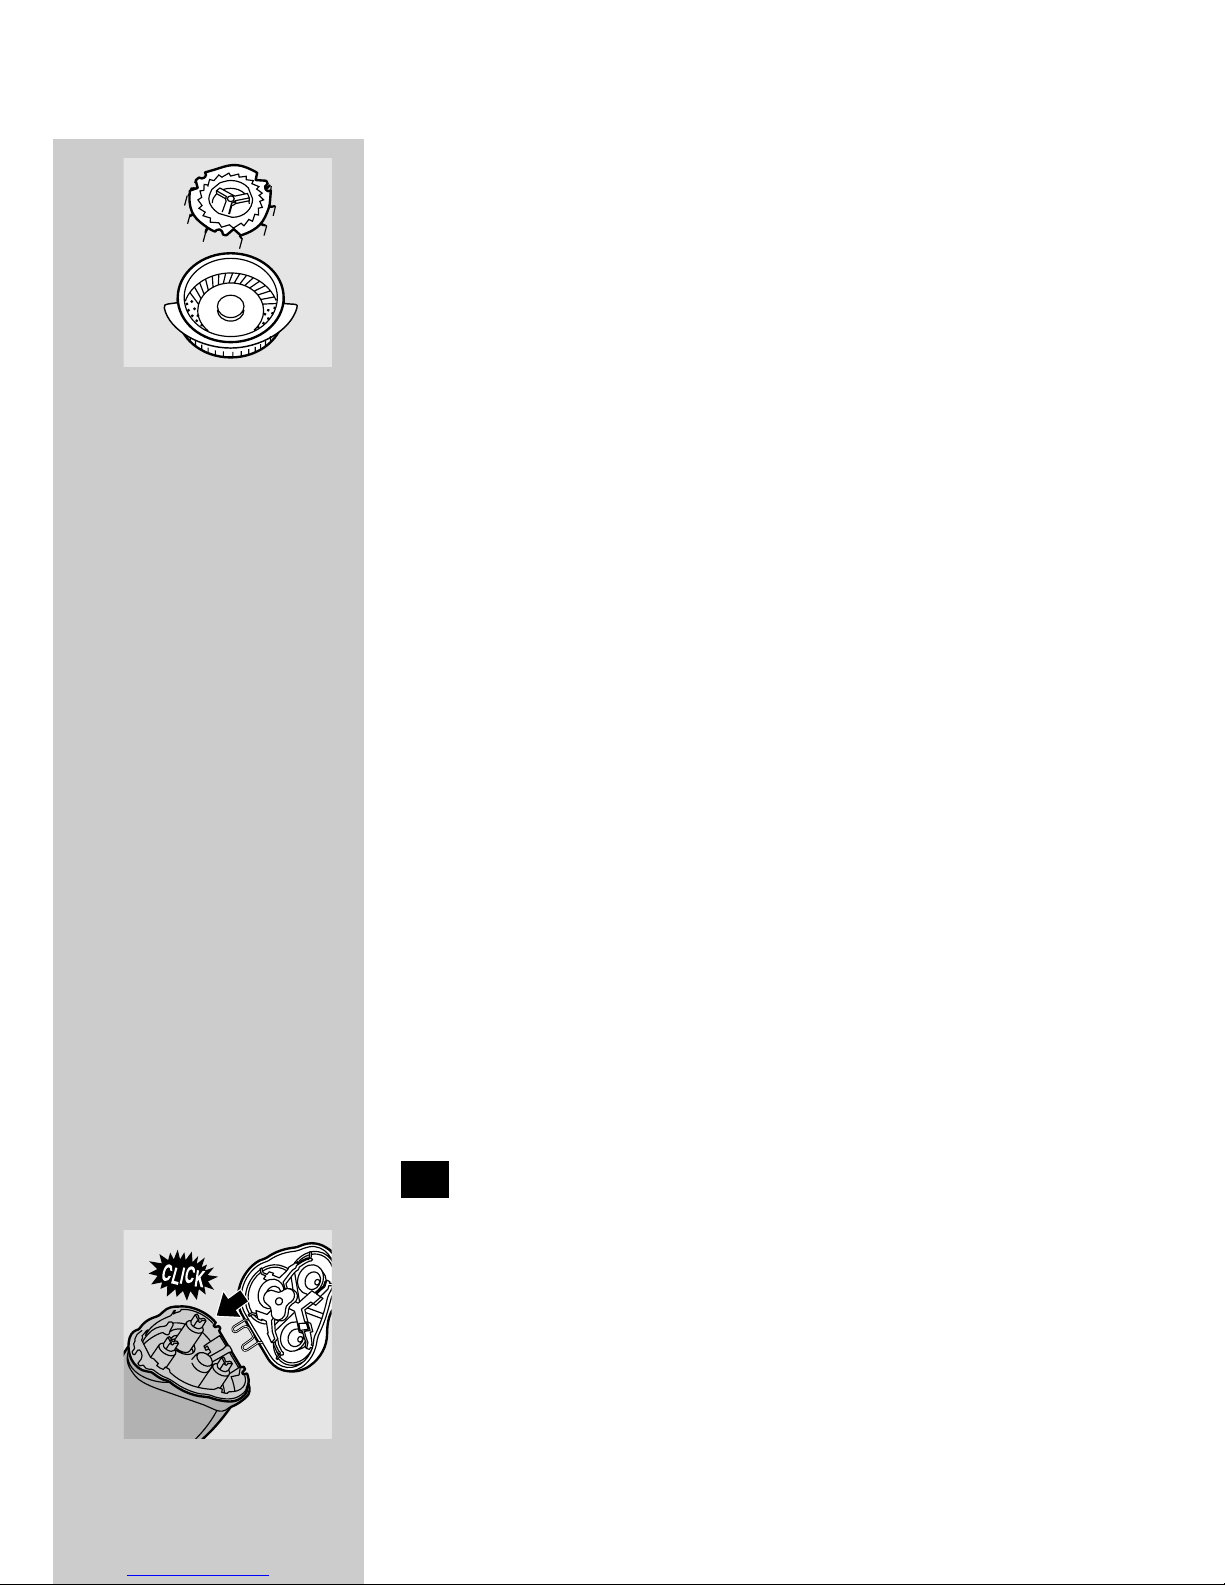
Replacement
Replace the shaving heads every 2 years for
optimal shaving results.
Replace damaged or worn shaving heads with
HQ6 Philips Quadra shaving heads only.
ENGLISH8

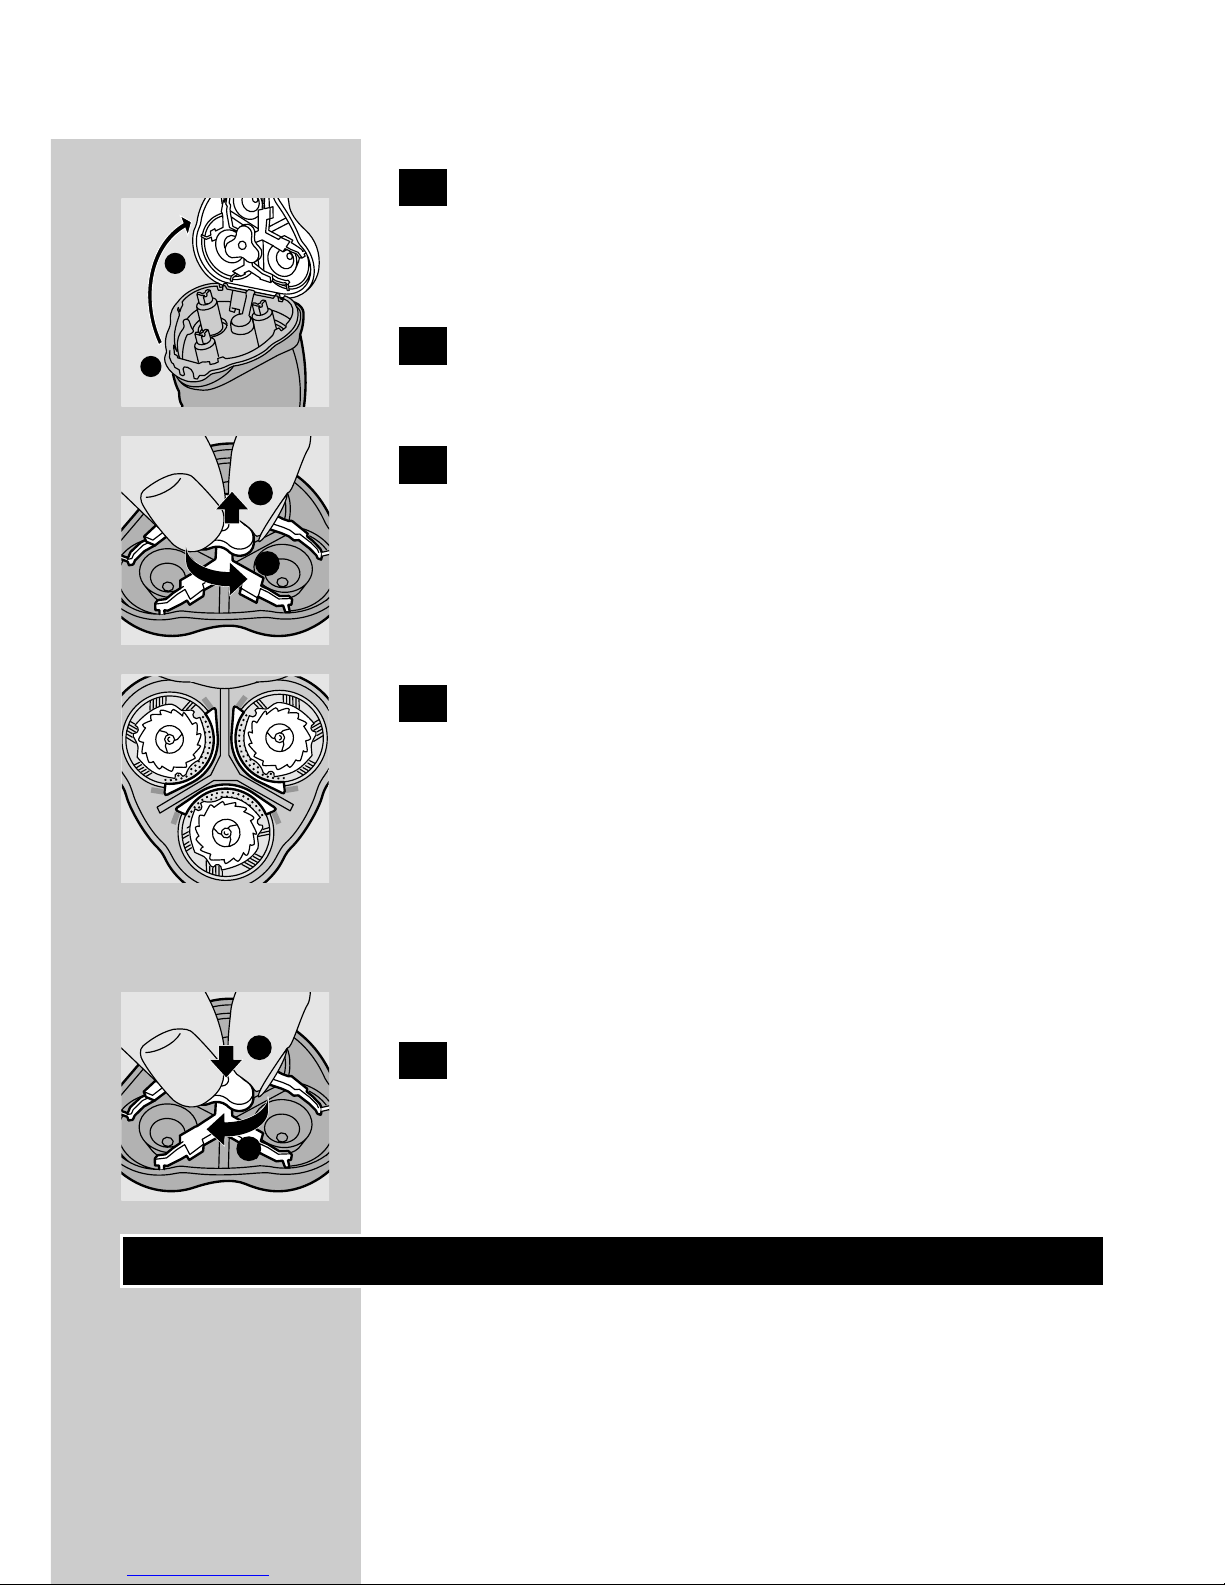
1 Switch the shaver off, remove the
powerplug from the wall socket and pull
the appliance plug out of the shaver.
C
2 Press the release button (1) and open the
shaving unit (2).
C
3 Turn the wheel anticlockwise (1) and
remove the retaining frame (2).
C
4 Remove the shaving heads and place new
ones in the shaving unit in such a way that
the parts with the small holes point
towards the centre of the shaving unit.
Make sure that the projections of the shaving
heads fit exactly into the recesses.
C
5 Put the retaining frame back into the
shaving unit, press the wheel (1) and turn it
clockwise (2).
Accessories
The following accessories are available:
- HQ8000 powerplug.
- HQ6 Philips Quadra shaving heads.
- HQ100 Philips Action Clean (shaving head
cleaner).
- HQ101 Philips Action Clean refill (shaving head
cleaning liquid).
ENGLISH 9
1
2
1
2
1
2

- HQ110 Philips shaving head cleaner (shaving
head cleaning spray).
Guarantee & service
If you need information or if you have a problem,
please visit the Philips Web site at
www.philips.com or contact the Philips Customer
Care Centre in your country (you will find its
phone number in the worldwide guarantee
leaflet). If there is no Customer Care Centre in
your country, turn to your local Philips dealer or
contact the Service Department of Philips
Domestic Appliances and Personal Care BV.
Troubleshooting
1 Reduced shaving performance
B
Cause 1: the shaving heads are dirty.The shaver
has not been rinsed long enough or the water
used was not hot enough.
◗ Clean the shaver thoroughly before you
continue shaving (see chapter 'Cleaning and
maintenance').
B
Cause 2: long hairs are obstructing the shaving
heads.
C
◗ Remove the retaining frame from the shaving
unit by turning the wheel anticlockwise.
◗ Remove the shaving heads from the shaving
unit.
ENGLISH10
1
2
C
◗ Remove the hairs from the cutters and guards
with the brush supplied.
Do not clean more than one cutter and guard at
a time, since they are all matching sets. If you
accidentally mix up the cutters and guards, it may
take several weeks before optimal shaving
performance is restored.
◗ Put the shaving heads back into the shaving
unit. Put the retaining frame back into the
shaving unit, press the wheel and turn it
clockwise.
B
Cause 3: the shaving heads are damaged or worn.
◗ Remove the retaining frame.
◗ Remove the old shaving heads from the
shaving unit and replace them with new ones.
Damaged or worn shaving heads (cutters and
guards) may only be replaced with original HQ6
Philips Quadra shaving heads.
◗ Put the retaining frame back into the shaving
unit, press the wheel and turn it clockwise.
2 The shaving unit has come off the shaver.
C
◗ If the shaving unit becomes detached from the
shaver, check whether the hinge spring is still
properly attached, i.e. has not come loose and
does not show any cracks or damage. If the
hinge spring is still properly attached, the
shaving unit can be easily put back on the
shaver again.
ENGLISH 11

However, if the hinge spring has come loose, is
cracked or damaged, contact your Philips dealer
or the nearest Philips service centre to have the
hinge spring replaced in order to avoid damage
to your shaver.
ENGLISH12
Important
Avant d'utiliser l'appareil, lisez les instructions cidessous et conservez ce mode d'emploi pour un
usage ultérieur.
◗ Utilisez exclusivement le chargeur fourni pour
connecter l'appareil.
◗ Le chargeur transforme le 100-240 V en une
tension de sécurité de 24 V.
◗ Pour des raisons de sécurité, utilisez
uniquement le chargeur fourni avec l'appareil.
◗ Le chargeur est doté d'un transformateur.
N'essayez pas de remplacer la fiche du
chargeur pour éviter tout accident.
◗ Lorsque le chargeur est endommagé,
remplacez-le par un chargeur d'origine pour
éviter tout accident.
◗ Chargez et utilisez l'appareil à une
température comprise entre 5cC et 35cC.
C
◗ Veillez à ce que le chargeur ne soit pas exposé
à l'humidité.
◗ Débranchez toujours le rasoir avant de le
nettoyer à l'eau.
C
◗ Ce rasoir est conforme aux normes
internationales IEC et il peut être nettoyé en
toute sécurité à l'eau.
Faites attention que l'eau ne soit pas trop chaude
pour ne pas vous brûler.
FRANÇAIS 13
Utilisation de l'appareil
C
1 Enfoncez la fiche dans le rasoir.
2 Mettez le chargeur dans la prise de
courant.
Rasage
1 Mettez le rasoir en marche en appuyant
sur le bouton marche/arrêt une fois.
C
2 Déplacez rapidement les têtes de rasage
sur la peau en effectuant des mouvements
rectilignes et circulaires.
Les meilleurs résultats de rasage sont obtenus sur
peau sèche.
Votre peau peut avoir besoin de 2-3 semaines
pour s'habituer au système Philips.
3 Arrêtez le rasoir en appuyant sur le
bouton marche/arrêt une fois.
C
4 Remettez le capot protecteur sur le rasoir
après chaque utilisation pour éviter tout
dommage.
FRANÇAIS14
Tondeuse
Pour tailler les favoris et la moustache.
C
1 Dégagez la tondeuse en faisant glisser
l'interrupteur vers le haut.
La tondeuse peut être mise en service pendant
que le moteur fonctionne.
Nettoyage et entretien
Nettoyez régulièrement l'appareil pour obtenir de
meilleurs résultats de rasage.
Pour nettoyer l'appareil simplement et d'une
façon hygiénique, rincez l'unité de rasage et le
compartiment à poils sous l'eau la plus chaude
possible après chaque emploi.
Faites attention que l'eau ne soit pas trop chaude
pour ne pas vous brûler.
C
◗ Pour un nettoyage facile et rapide des têtes,
vous pouvez utiliser l'Action Clean de Philips
(type HQ100), disponible auprès de votre
revendeur ou Centre Service Agréé Philips.
B
Il est possible que l'Action Clean de Philips ne soit
pas disponible dans tous les pays. Pour plus
d'informations, contactez le Service
Consommateurs Philips de votre pays.
Vous pouvez également nettoyer le rasoir de la
manière suivante :
FRANÇAIS 15
Chaque jour: unité de rasage
Quand vous nettoyez l'appareil il n'est pas
nécessaire de démonter les têtes de rasage
(couteaux et grilles). Si vous désirez cependant le
faire, n'intervertissez pas les couteaux et les grilles
car elles sont affûtées par paires. Si vous les
intervertissez, plusieurs semaines peuvent être
nécessaires avant de retrouver une qualité de
rasage optimale.
1 Arrêtez l'appareil, enlevez le chargeur de la
prise de courant, et tirez la fiche hors du
rasoir.
C
2 Appuyez sur le bouton de déverrouillage
(1) et ouvrez l'unité de rasage (2).
C
3 Rincez l'unité de rasage sous l'eau la plus
chaude possible.
4 Fermez l'unité de rasage et secouez l'eau
du rasoir.
Ne séchez jamais l'unité de rasage à l'aide d'une
serviette, car cela pourrait endommager les têtes
de rasage.
C
5 Ouvrez l'unité de rasage à nouveau et
laissez-la ouverte pour sécher l'appareil
complètement.
Vous pouvez également nettoyer le
compartiment à poils à l'aide de la brosse fournie
avec l'appareil.
FRANÇAIS16
1
2

Tondeuse
Nettoyez la tondeuse après chaque utilisation.
1 Arrêtez l'appareil, enlevez le chargeur de la
prise de courant, et tirez la fiche hors du
rasoir.
C
2 Nettoyez la tondeuse avec la brosse
fournie.
C
3 Tous les six mois, lubrifiez la tondeuse à
l'aide d'une gouttelette d'huile pour
machine à coudre.
Rangement
C
1 Placez le capot de protection pour éviter
toute détérioration.
2 L'appareil peut être rangé dans l'étui
fourni.
Remplacement
Pour un résultat de rasage optimal, remplacez les
têtes de rasage tous les deux ans.
Remplacez les têtes de rasage endommagées ou
usagées exclusivement par des têtes de rasage
Philips HQ6 Quadra.
FRANÇAIS 17
1 Arrêtez l'appareil, enlevez le chargeur de la
prise de courant et tirez la fiche hors du
rasoir.
C
2 Appuyez sur le bouton de déverrouillage
(1) et ouvrez l'unité de rasage (2).
C
3 Tournez la molette dans le sens inverse
des aiguilles d'une montre (1) et retirez la
plaque de fermeture (2).
C
4 Enlevez les têtes de rasage et placez les
nouvelles têtes de rasage de telle façon
que les parties avec les petits trous soient
orientées vers le milieu dans l'unité de
rasage.
Veillez à ce que les petites ailettes qui dépassent
des têtes de rasage tombent exactement dans les
renfoncements.
C
5 Assemblez à nouveau l'unité de rasage en
remontant la plaque de fermeture. Pressez
la molette (1) et tournez-la dans le sens
des aiguilles d'une montre (2).
Accessoires
Les accessoires suivants sont disponibles:
- Chargeur HQ8000.
- Têtes de rasage Philips Quadra HQ6.
- Philips Action Clean HQ100 (nettoyeur de
têtes de rasage)
FRANÇAIS18
1
2
1
2
1
2
 Loading...