

HQ7340
1 2 3 4
5
9 10 11 12
13 14 15 16
17 18 19 20
21 22 23 24
6 7 8
25

ENGLISH
4222.002.5105.1
2/7
Introduction
Congratulations on your purchase and welcome
to Philips! To fully benet from the support that
Philips offers, register your product at www.philips.
com/welcome.
Important
Read this user manual carefully before you use the
appliance and save it for future reference.
Danger
Make sure the adapter does not get wet.
-
Warning
The adapter contains a transformer. Do not cut
off the adapter to replace it with another plug,
as this causes a hazardous situation.
This appliance is not intended for use by
persons (including children) with reduced
physical, sensory or mental capabilities, or lack
of experience and knowledge, unless they
have been given supervision or instruction
concerning use of the appliance by a person
responsible for their safety.
Children should be supervised to ensure that
they do not play with the appliance.
Caution
Do not use the shaver or the adapter if it is
damaged.
Only use the adapter supplied.
If the adapter is damaged, always have it
replaced with one of the original type in order
to avoid a hazard.
Charge, use and store the shaver at a
temperature between 5°C and 35°C.
Always unplug the shaver before you clean it
under the tap.
Be careful with hot water. Always check if the
water is not too hot, to avoid burning your
hands.
The appliance complies with the internationally
approved IEC safety regulations and can be
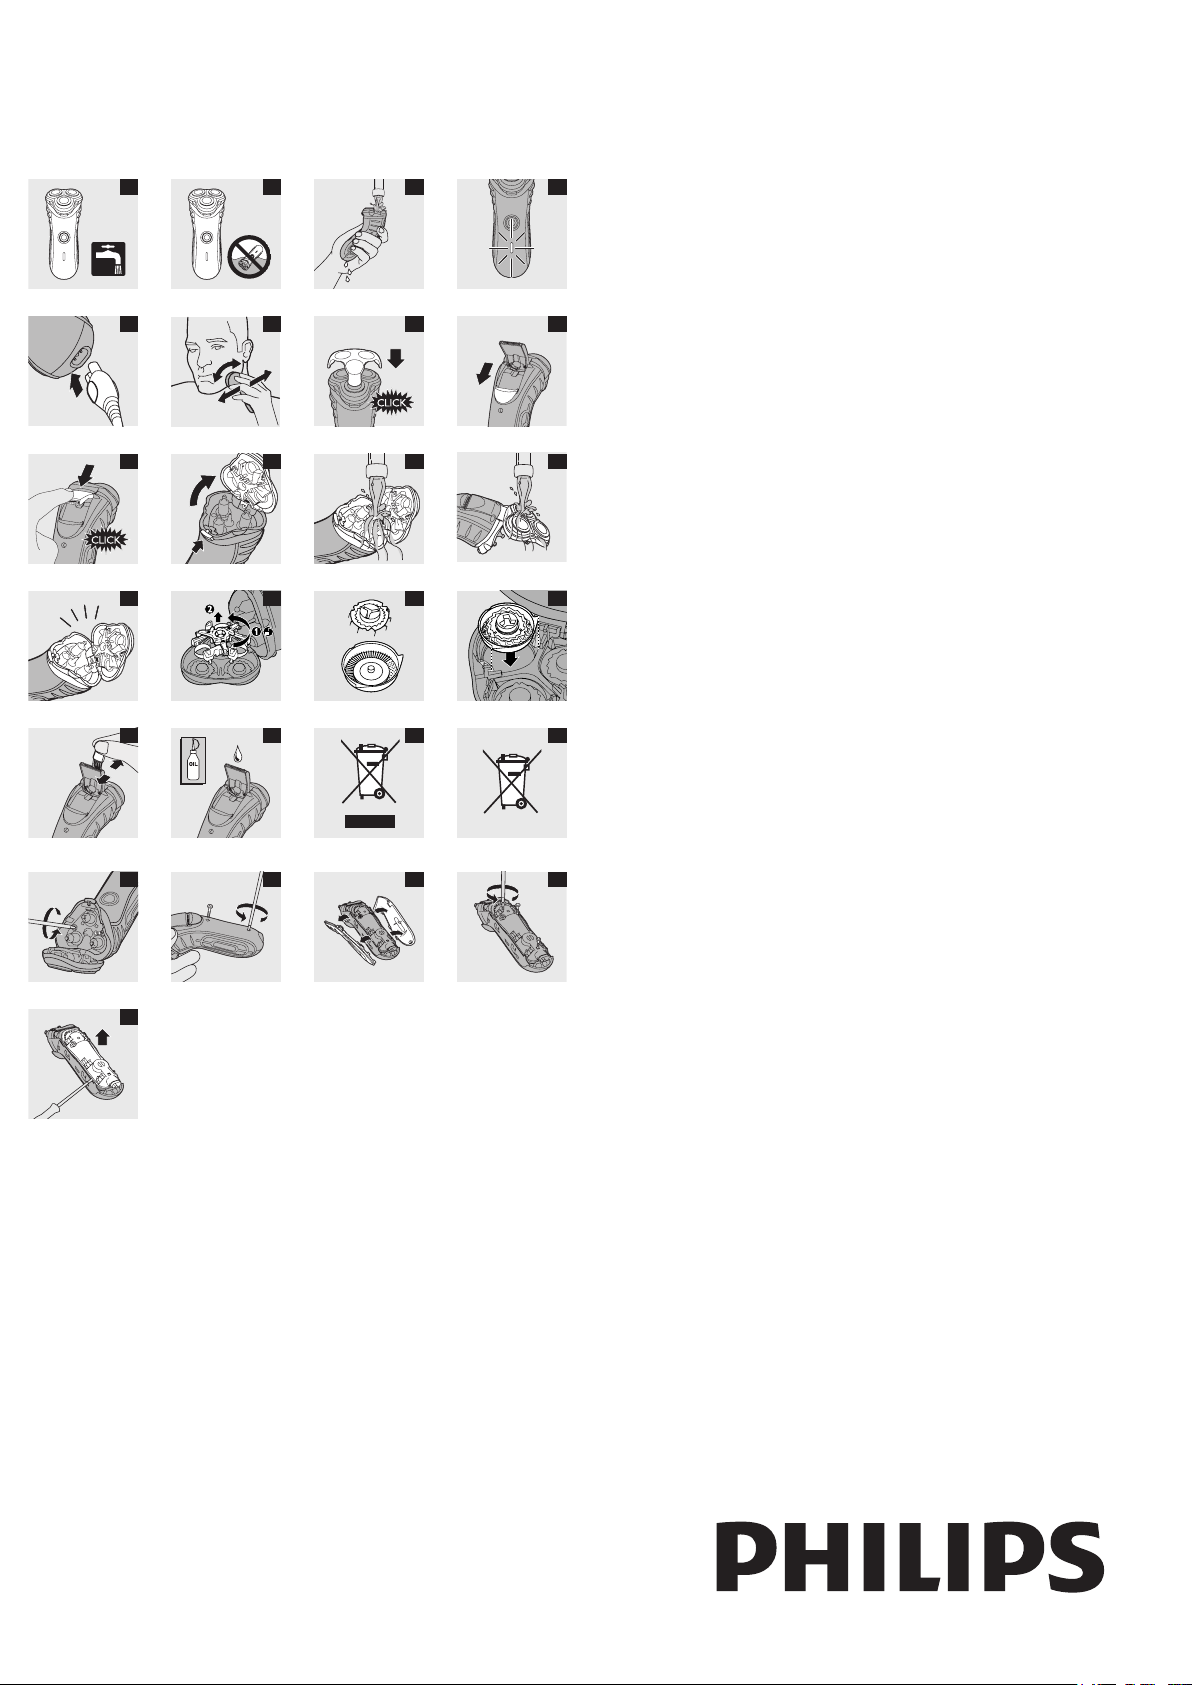
safely cleaned under the tap (Fig. 1).
This washable shaver is not suitable for shaving
in the shower.
Do not immerse the shaver in water (Fig. 2).
Water may leak from the socket at the
bottom of the appliance when you rinse it.
This is normal and not dangerous because all
electronics are enclosed in a sealed power unit
inside the shaver (Fig. 3).
General
The adapter transforms 100-240 volts to a safe
low voltage of less than 24 volts.
Electromagnetic elds (EMF)
This Philips appliance complies with all standards
regarding electromagnetic elds (EMF). If handled
properly and according to the instructions in this
user manual, the appliance is safe to use based on
scientic evidence available today.
Charging
Make sure the appliance is switched off when you
start to charge it.
Charging takes at least 8 hours.
You can also shave without charging by connecting
the shaver to the mains.
Charge indications
Charging
When you start charging the empty shaver, the
charging light goes on (Fig. 4).
Battery fully charged
When the battery is fully charged, the charging
-
light starts ashing.
When you unplug the shaver, the charging light
goes out.
Cordless shaving time
After charging, the shaver has a cordless shaving
time of up to 35 minutes.
Charging the appliance
Charge the appliance when the motor stops or
starts running slower.
1 Put the appliance plug in the shaver (Fig. 5).
2 Put the adapter in the wall socket.
3 Remove the adapter from the wall socket and
pull the appliance plug out of the shaver when
the battery is fully charged.
Using the appliance
Shaving
1 Press the on/off button once to switch on the
shaver.
The power-on lights go on.
,
2 Move the shaving heads over your skin. Make
both straight and circular movements (Fig. 6).
Shaving on a dry face gives the best results.
Your skin may need 2 or 3 weeks to get
accustomed to the Philips shaving system.
3 Press the on/off button once to switch off the
shaver.
The power-on lights go out.
,
4 Clean the shaver (see chapter ‘Cleaning and
maintenance’).
5 Put the protection cap on the shaver every
time you have used it, to prevent damage to
the shaving heads (Fig. 7).
Trimming
You can use the trimmer to groom your sideburns
and moustache.
1 Push the slide downwards to open the
trimmer (Fig. 8).
The trimmer can be activated while the motor is
running.
2 Close the trimmer after
trimming (‘click’) (Fig. 9).
Cleaning and maintenance
Regular cleaning guarantees better shaving
performance.
Be careful with hot water. Always check if the
water is not too hot, to avoid burning your hands.
Note: Water may leak from the socket at the bottom
of the appliance when you rinse it. This is normal and
not dangerous.
Every day: shaving unit and hair
chamber
1 Switch off the shaver, remove the adapter
from the wall socket and pull the appliance
plug out of the shaver.
2 Press the release button to open the shaving
unit (Fig. 10).
3 Rinse the hair chamber and the inside of
the shaving unit under a hot tap for some
time (Fig. 11).
4 Rinse the outside of the shaving unit (Fig. 12).
5 Close the shaving unit and shake off excess
water.
Never dry the shaving unit with a towel or tissue,
as this may damage the shaving heads.
6 Open the shaving unit again and leave it open
to let the appliance dry completely (Fig. 13).
You can also clean the hair chamber without water
by using the brush supplied.
Every six months: shaving heads
1 Open the shaving unit, turn the lock
anticlockwise (1) and remove the retaining
frame (2) (Fig. 14).
2 Clean the cutters and guards with the brush
supplied (Fig. 15).
Note: Do not clean more than one cutter and
guard at a time, since they are all matching sets.
If you accidentally mix up the cutters and guards,
it could take several weeks before optimal shaving
performance is restored.
3 Put the shaving heads back into the
shaving unit. Put the retaining frame back
into the shaving unit and turn the lock
clockwise (Fig. 16).
4 Close the shaving unit.
Trimmer
Clean the trimmer every time you have used it.
1 Switch off the shaver, remove the adapter
from the wall socket and pull the appliance
plug out of the shaver.
2 Clean the trimmer with the brush
supplied (Fig. 17).
3 Lubricate the trimmer teeth with a drop of
sewing machine oil every six months (Fig. 18).
Storage
Put the protection cap on the shaver to
prevent damage to the shaving heads (Fig. 7).
Replacement
Replace the shaving heads every two years for
optimal shaving results.
Replace damaged or worn shaving heads with
HQ8 Philips shaving heads only.
Note: Do not mix up the cutters and the guards to
guarantee optimal shaving performance.
1 Switch off the shaver, remove the adapter
from the wall socket and pull the appliance
plug out of the shaver.
2 Press the release button to open the shaving
unit.
3 Turn the lock anticlockwise (1) and remove
the retaining frame (2) (Fig. 14).
4 Remove the shaving heads and place new
ones in the shaving unit. Put the retaining
frame back into the shaving unit and turn the
lock clockwise (Fig. 16).
Make sure that the projections of the shaving
heads t exactly into the recesses.
5 Close the shaving unit.
Accessories
The following accessories are available:
HQ8500/HQ8000 adapter.
HQ8 Philips Shaving Heads.
HQ8010 car cord.
-
Note: Some accessories may not be available in all
countries. Contact the Consumer Care Centre in your
country about the availability of the accessories.
Environment
Do not throw away the appliance with the
normal household waste at the end of its life,
but hand it in at an ofcial collection point for

recycling. By doing this, you help to preserve
4222.002.5105.1
3/7
the environment (Fig. 19).
The built-in rechargeable lithium (Li-ion)
battery contains substances that may pollute
the environment. Always remove the battery
before you discard and hand in the appliance
at an ofcial collection point. Dispose of
the battery at an ofcial collection point
for batteries. If you have trouble removing
the battery, you can also take the appliance
to a Philips service centre. The staff of this
centre will remove the battery for you and
will dispose of it in an environmentally safe
way (Fig. 20).
Removing the rechargeable battery
Only remove the rechargeable battery if it is
completely empty.
1 Remove the adapter from the wall socket and
pull the appliance plug out of the shaver.
2 Let the shaver run until it stops, undo the
two screws in the hair chamber and remove
it (Fig. 21).
3 Undo the two screws at the back of the
shaver and remove the back panel of the
housing (Fig. 22).
4 Pull the side panels off the sealed power
unit (Fig. 23).
5 Undo the three screws in the sealed power
unit (Fig. 24).
6 Remove the back panel of the sealed power
unit with a screwdriver (Fig. 25).
7 Remove the rechargeable battery.
Be careful, the battery strips are very sharp.
Do not connect the shaver to the mains again
after you have removed the battery.
Guarantee & service
If you need service or information or if you have a
problem, please visit the Philips website at www.
philips.com or contact the Philips Consumer Care
Centre in your country (you nd its phone number
in the worldwide guarantee leaet). If there is no
Consumer Care Centre in your country, go to your
local Philips dealer.
Guarantee restrictions
The shaving heads (cutters and guards) are
not covered by the terms of the international
guarantee because they are subject to wear.
Problem Cause Solution
Reduced
shaving
performance
The shaving heads
are dirty. You have
not rinsed the
Clean the shaver thoroughly before
you continue shaving. See chapter
‘Cleaning and maintenance’.
shaver long enough
or the water you
used was not hot
enough.
Long hairs obstruct
the shaving heads.
Clean the cutters and guards with
the brush supplied. See chapter
‘Cleaning and maintenance’, section
‘Every six months: shaving heads’.
The shaving heads
are damaged or
Replace the shaving heads. See
chapter ‘Replacement’.
worn.
The shaver
does not
The rechargeable
battery is empty.
Recharge the appliance. See
chapter ‘Charging’.
work when
I press
the on/off
button.
The shaving
unit has
come off the
shaver.
The appliance is not
connected to the
mains.
The shaving unit has
not been placed
correctly.
Put the appliance plug in the shaver
and put the adapter in the wall
socket.
If the shaving unit becomes
detached from the shaver, you can
easily put it back by inserting the
hinge into the slot in the rim of the
hair chamber and pushing it home
until it locks into place (‘click’).
Troubleshooting
This chapter summarises the most common
problems you could encounter with the
appliance. If you are unable to solve the problem
with the information below, contact the Consumer
Care Centre in your country.

ESPAÑOL
4222.002.5105.1
4/7
Introducción
Enhorabuena por la compra de este producto y
bienvenido a Philips. Para sacar el mayor partido
de la asistencia que Philips le ofrece, registre su
producto en www.philips.com/welcome.
Importante
Antes de usar el aparato, lea atentamente este
manual de usuario y consérvelo por si necesitara
consultarlo en el futuro.
Peligro
Asegúrese de que el adaptador no se moje.
-
Advertencia
El adaptador incorpora un transformador. No
corte el adaptador para sustituirlo por otra
clavija, ya que podría provocar situaciones de
peligro.
Este aparato no debe ser usado por personas
(adultos o niños) con su capacidad física,
psíquica o sensorial reducida, ni por quienes
no tengan los conocimientos y la experiencia
necesarios, a menos que sean supervisados o
instruidos acerca del uso del mismo por una
persona responsable de su seguridad.
Asegúrese de que los niños no jueguen con
este aparato.
Precaución
No utilice la afeitadora ni el adaptador si están
dañados.
Utilice únicamente el adaptador que se
suministra.
Si el adaptador está dañado, sustitúyalo siempre
por otro del modelo original para evitar
situaciones de peligro.
Cargue, utilice y guarde la afeitadora a una
temperatura entre 5°C y 35°C.
Desenchufe siempre la afeitadora antes de
limpiarla bajo el grifo.
Tenga cuidado con el agua caliente.
Compruebe siempre que el agua no esté
demasiado caliente para evitar quemarse las
manos.
El aparato cumple las normas de seguridad
IEC aprobadas internacionalmente y se puede
limpiar bajo el grifo de forma segura (g. 1).
Esta afeitadora lavable no es apropiada para
afeitarse en la ducha.
No sumerja la afeitadora en agua (g. 2).
Cuando enjuague el aparato es posible que
-
salga agua por el oricio de su parte inferior.
Esto es normal y no es peligroso, ya que todos
los sistemas electrónicos están dentro de la
unidad motora hermética en el interior de la
afeitadora (g. 3).
General
El adaptador transforma la corriente de 100
-
- 240 voltios en un bajo voltaje de seguridad
inferior a 24 voltios.
Campos electromagnéticos (CEM)
Este aparato Philips cumple todos los estándares
sobre campos electromagnéticos (CEM). Si
se utiliza correctamente y de acuerdo con las
instrucciones de este manual, el aparato se puede
usar de forma segura según los conocimientos
cientícos disponibles hoy en día.
Carga
Asegúrese de que el aparato esté apagado cuando
comience a cargarlo.
La afeitadora tarda al menos 8 horas en cargarse.
También puede afeitarse sin recargar la afeitadora,
enchufándola a la red eléctrica.
Indicaciones de carga
Carga
Cuando empiece a cargar la afeitadora
descargada, el piloto de carga se
iluminará (g. 4).
Batería completamente cargada
Cuando la batería esté completamente cargada,
el piloto de carga comenzará a parpadear.
Cuando desenchufe la afeitadora, el piloto de carga
se apagará.
Tiempo de afeitado sin cable
Después de cargarla, la afeitadora proporciona un
tiempo de afeitado sin cable de hasta 35 minutos.
Carga del aparato
Cargue el aparato cuando el motor se pare o
empiece a funcionar más despacio.
1 Conecte la clavija del aparato a la
afeitadora (g. 5).
2 Enchufe el adaptador a la toma de corriente.
3 Cuando la batería esté completamente
cargada, desenchufe el adaptador de la red y
la clavija del aparato de la afeitadora.
Uso del aparato
Afeitado
1 Pulse el botón de encendido/apagado una vez
para encender la afeitadora.
El piloto de encendido se encenderá.
,
2 Desplace los cabezales de afeitado sobre
la piel, haciendo movimientos rectos y
circulares (g. 6).
Para obtener los mejores resultados, aféitese con
la piel seca.
Puede que su piel necesite de 2 a 3 semanas para
acostumbrarse al sistema de afeitado Philips.
3 Pulse el botón de encendido/apagado una vez
para apagar la afeitadora.
El piloto de encendido se apagará.
,
4 Limpie la afeitadora (consulte el capítulo
“Limpieza y mantenimiento”).
5 Después de usar la afeitadora, coloque
siempre la tapa protectora para evitar que se
deterioren los cabezales de afeitado (g. 7).
Cómo recortar la barba
Puede utilizar el cortapatillas para recortar
las patillas y el bigote.
1 Deslice el botón hacia abajo para abrir el
cortapatillas (g. 8).
El cortapatillas se puede activar con el motor de la
afeitadora en funcionamiento.
2 Cierre el cortapatillas después de usarlo (oirá
un “clic”) (g. 9).
Limpieza y mantenimiento
Una limpieza frecuente garantiza mejores
resultados en el afeitado.
Tenga cuidado con el agua caliente. Compruebe
siempre que el agua no esté demasiado caliente
para evitar quemarse las manos.
Nota: Cuando enjuague el aparato es posible que
salga agua por el oricio de su parte inferior. Esto es
normal y no es peligroso.
Todos los días: unidad de afeitado y
cámara de recogida del pelo
1 Apague la afeitadora, desenchufe el adaptador
de la red y la clavija del aparato de la
afeitadora.
2 Pulse el botón de liberación para abrir la
unidad de afeitado (g. 10).
3 Enjuague de vez en cuando bajo el grifo la
cámara de recogida del pelo y el interior de la
unidad de afeitado (g. 11).
4 Enjuague el exterior de la unidad de
afeitado (g. 12).
5 Cierre la unidad de afeitado y sacuda el
exceso de agua.
No seque nunca la unidad de afeitado con una
toalla o un paño, ya que esto podría dañar los
cabezales de afeitado.
6 Vuelva a abrir la unidad de afeitado
y déjela abierta para que se seque
completamente (g. 13).
También puede limpiar la cámara de recogida del
pelo sin agua con el cepillo que se suministra.
Cada seis meses: cabezales de afeitado
1 Abra la unidad de afeitado, gire el cierre de
seguridad en sentido contrario al de las agujas
del reloj (1) y saque el marco de retención
(2) (g. 14).
2 Limpie las cuchillas y los protectores con el
cepillo que se suministra (g. 15).
Nota: No limpie más de una cuchilla y su protector
al mismo tiempo, ya que forman conjuntos entre sí. Si
mezcla accidentalmente las cuchillas y los protectores,
puede que tarde varias semanas en volver a obtener
el óptimo rendimiento en el afeitado.
3 Coloque de nuevo los cabezales de afeitado
en la unidad de afeitado. Vuelva a colocar el
marco de retención en la unidad de afeitado y
gire el cierre de seguridad en el sentido de las
agujas del reloj (g. 16).
4 Cierre la unidad de afeitado.
Cortapatillas
Limpie el cortapatillas cada vez que lo utilice.
1 Apague la afeitadora, desenchufe el adaptador
de la red y la clavija del aparato de la
afeitadora.
2 Limpie el cortapatillas con el cepillo que se
suministra (g. 17).
3 Cada seis meses lubrique los dientes del
cortapatillas con una gota de aceite de
máquina de coser (g. 18).
Cómo guardar el aparato
Para evitar deterioros en los cabezales de
afeitado, coloque la tapa protectora en la
afeitadora (g. 7).
Sustitución
Para lograr un resultado óptimo de afeitado,
cambie los cabezales de afeitado cada dos años.
Sustituya los cabezales de afeitado gastados o
deteriorados sólo por cabezales de afeitado Philips
HQ8.
Nota: No mezcle las cuchillas y los protectores entre
sí, con el n de garantizar un rendimiento óptimo en
el afeitado.
1 Apague la afeitadora, desenchufe el adaptador
de la red y la clavija del aparato de la
afeitadora.

2 Pulse el botón de liberación para abrir la
4222.002.5105.1
5/7
unidad de afeitado.
3 Gire el cierre de seguridad en sentido
contrario al de las agujas del reloj (1) y saque
el marco de retención (2) (g. 14).
4 Extraiga los cabezales de afeitado y coloque
los nuevos en la unidad de afeitado. Coloque
de nuevo el marco de retención en la unidad
de afeitado y gire el cierre de seguridad en el
sentido de las agujas del reloj (g. 16).
Asegúrese de que los salientes de los cabezales
de afeitado encajan exactamente en las ranuras.
5 Cierre la unidad de afeitado.
Accesorios
Están disponibles los siguientes accesorios:
Adaptador HQ8500/HQ8000.
Cabezales de afeitado Philips HQ8.
Cable para el coche HQ8010
-
Nota: Puede que algunos accesorios no estén
disponibles en todos los países. Póngase en contacto
con el centro de atención al cliente de su país para
consultar la disponibilidad de estos accesorios.
Medio ambiente
Al nal de su vida útil, no tire el aparato junto
con la basura normal del hogar. Llévelo a un
punto de recogida ocial para su reciclado.
De esta manera ayudará a conservar el medio
ambiente (g. 19).
La batería recargable de litio (iones de litio)
incorporada contiene sustancias que pueden
contaminar el medio ambiente. Quite siempre
la batería antes de deshacerse del aparato
y de llevarlo a un punto de recogida ocial.
Deposite la batería en un lugar de recogida
ocial. Si no puede sacar la batería, puede llevar
el aparato a un servicio de asistencia técnica
de Philips. El personal del mismo extraerá
la batería y se deshará de ella de forma no
perjudicial para el medio ambiente (g. 20).
Cómo extraer la batería recargable
Quite la batería recargable sólo si está
completamente descargada.
1 Desenchufe el adaptador de la toma de
corriente y saque la clavija de la afeitadora.
2 Deje que la afeitadora funcione hasta que
se pare, desatornille los dos tornillos de la
cámara de recogida del pelo y quítela (g. 21).
3 Desatornille los dos tornillos de la parte
posterior de la afeitadora y quite el panel
posterior de la carcasa (g. 22).
4 Quite los paneles laterales de la unidad
motora hermética (g. 23).
5 Desatornille los tres tornillos de la unidad
motora hermética (g. 24).
6 Quite el panel posterior de la unidad
motora hermética con ayuda de un
destornillador (g. 25).
7 Extraiga la batería recargable.
Tenga cuidado con las tiras de la batería ya que
están muy aladas.
No conecte la afeitadora a la red una vez quitada
la batería.
Garantía y servicio
Si necesita información o si tiene algún problema,
visite la página Web de Philips en www.philips.com,
o póngase en contacto con el Servicio de Atención
al Cliente de Philips en su país (hallará el número
de teléfono en el folleto de la garantía mundial). Si
no hay Servicio de Atención al Cliente de Philips
en su país, diríjase a su distribuidor local Philips.
Restricciones de la garantía
Los cabezales de afeitado (cuchillas y protectores)
no están cubiertos por las condiciones de la
garantía internacional debido a que están sujetos a
desgaste.
Guía de resolución de problemas
En este capítulo se resumen los problemas más
frecuentes que pueden surgir. Si no puede resolver
el problema con la siguiente información, póngase
en contacto con el Servicio de Atención al Cliente
de su país.
Problema Causa Solución
Menor
rendimiento
en el
afeitado
Los cabezales de
afeitado están sucios.
No ha enjuagado
la afeitadora
Limpie bien el aparato antes
de seguir afeitándose. Consulte
el capítulo “Limpieza y
mantenimiento”.
durante el tiempo
suciente o el agua
utilizada no estaba
lo sucientemente
caliente.
Hay pelos largos
obstruyendo los
cabezales de afeitado.
Limpie las cuchillas y los
protectores con el cepillo
suministrado. Consulte la sección
“Cada seis meses: cabezales de
afeitado” del capítulo “Limpieza y
mantenimiento”.
Los cabezales
de afeitado
están gastados o
Sustituya los cabezales de
afeitado. Consulte el capítulo
“Sustitución”.
deteriorados.
La afeitadora
no funciona
La batería recargable
está descargada.
Recargue el aparato. Consulte el
capítulo “Carga”.
cuando
pulso el
botón de
encendido/
apagado.
El aparato no está
conectado a la red.
Conecte la clavija del aparato a
la afeitadora y el adaptador a la
toma de corriente.
La unidad
de afeitado
se ha
soltado de la
afeitadora.
No se ha colocado
correctamente la
unidad de afeitado.
Si la unidad de afeitado se suelta
de la afeitadora, puede volver a
encajarla fácilmente insertando la
bisagra en la ranura del borde de
la cámara de recogida del pelo y
presionando hasta que encaje en
su sitio.

PORTUGUÊS DO BRASIL
4222.002.5105.1
6/7
Introdução
Parabéns pela sua compra e bem-vindo à Philips!
Para aproveitar ao máximo o suporte oferecido
pela Philips, registre o produto em www.philips.
com/welcome.
Importante
Leia este manual atentamente antes de usar o
aparelho e guarde-o para consultas futuras.
Perigo
-
Verique se o adaptador não está molhado.
Aviso
O adaptador contém um transformador. Não
retire o adaptador para substituí-lo por outro
plugue, pois isso pode causar uma situação de
risco.
Este aparelho não deve ser usado por pessoas
(inclusive crianças) com capacidades físicas,
mentais ou sensoriais reduzidas ou pouca
experiência e conhecimento, a menos que
sejam supervisionadas ou instruídas sobre o
uso do aparelho por uma pessoa responsável
por sua segurança.
Crianças pequenas devem ser supervisionadas
-
para que não brinquem com o aparelho.
Cuidado
Não use o barbeador nem o adaptador se
-
estiverem danicados.
Só use o adaptador fornecido.
-
Se o adaptador estiver danicado, substitua-o
sempre por um original para evitar situações
de risco.
Carregue, use e guarde o barbeador a uma
temperatura entre 5°C e 35°C.
Sempre desconecte o barbeador antes de lavá-
lo em água corrente.
Tome cuidado com água quente. Sempre
-
verique se a água não está muito quente para
evitar queimaduras nas mãos.
O aparelho está em conformidade com
as regulamentações de segurança da
IEC aprovadas internacionalmente e
pode ser lavado com segurança em água
corrente (g. 1).
Este barbeador lavável não é adequado para o
uso durante o banho.
Não mergulhe o barbeador na água (g. 2).
É possível que vaze água pela tomada na parte
inferior do aparelho quando você lavá-lo.
Isso é normal e não representa perigo, pois
todos os componentes eletrônicos estão
em uma unidade vedada, no interior do
barbeador (g. 3).
Geral
O adaptador transforma a tensão de 100-240
-
volts em uma tensão segura, inferior a 24 volts.
Campos eletromagnéticos
Este aparelho Philips atende a todos os padrões
relacionados a campos eletromagnéticos. Se
manuseado adequadamente e de acordo com as
instruções deste manual do usuário, a utilização
do aparelho é segura baseando-se em evidências
cientícas atualmente disponíveis.
Carregamento
Verique se o aparelho está desligado quando for
carregá-lo.
O carregamento leva, no mínimo, 8 horas.
Você também pode se barbear sem precisar
recarregar a bateria, conectando o aparelho à
corrente elétrica.
Indicadores de carga
Carregamento
Quando o barbeador está descarregado, a luz
piloto de recarga acende quando você inicia o
carregamento (g. 4).
Bateria totalmente carregada
Quando a bateria está totalmente carregada, a
luz piloto de recarga começa a piscar.
Quando você desconecta o barbeador da tomada,
a luz piloto de recarga apaga.
Duração do barbear sem o
Depois de carregado, o barbeador oferece um
tempo de operação sem o de até 35 minutos.
Carregamento do aparelho
Carregue o aparelho quando o motor parar ou
começar a funcionar mais lentamente.
1 Conecte o plugue do aparelho ao
barbeador (g. 5).
2 Conecte o adaptador à tomada da parede.
3 Quando a bateria estiver totalmente
carregada, desconecte o adaptador da tomada
elétrica e retire o plugue do barbeador.
Utilização do aparelho
Barbear
1 Pressione o botão liga/desliga para ligar o
barbeador.
A luz piloto indicadora de energia acende.
,
2 Mova as cabeças de corte sobre a pele. Faça
movimentos retos e circulares (g. 6).
O barbear com o rosto seco oferece os melhores
resultados.
Talvez sua pele precise de duas a três semanas para
se acostumar ao sistema de barbear da Philips.
3 Pressione o botão liga/desliga para desligar o
barbeador.
A luz piloto indicadora de energia apaga.
,
4 Lave o barbeador (consulte o capítulo
‘Limpeza e manutenção’).
5 Coloque a tampa de proteção no barbeador
toda vez que utilizá-lo, para evitar que as
cabeças de corte sejam danicadas (g. 7).
Aparar
Você poderá usar o aparador nas costeletas e no
bigode.
1 Pressione o controle deslizante para baixo
para abrir o aparador (g. 8).
O aparador pode ser ativado durante o
funcionamento do motor.
2 Feche o aparador após usá-lo (você ouvirá
um ‘clique’) (g. 9).
Limpeza e manutenção
Limpezas regulares garantem o melhor
desempenho do barbeador.
Tome cuidado com água quente. Sempre verique
se a água não está muito quente para evitar
queimaduras nas mãos.
Nota: É possível que vaze água pela tomada na
parte inferior do aparelho quando você lavá-lo. Isso é
normal e não representa perigo.
Diariamente: unidade de corte e
câmara coletora de pêlos.
1 Desligue o aparelho, desconecte o adaptador
da tomada da parede e retire o plugue do
barbeador.
2 Pressione o botão de liberação para abrir a
unidade de corte. (g. 10)
3 Lave a câmara coletora de pêlos e a parte
interna da unidade de corte em água quente
da torneira por alguns instantes (g. 11).
4 Lave a parte externa da unidade de
corte (g. 12).
5 Feche a unidade de corte e agite o aparelho
para retirar o excesso de água.
Para não danicar as cabeças de corte, nunca
seque a unidade de corte com toalha ou pano.
6 Reabra a unidade de corte e deixe-a aberta
para que o aparelho que completamente
seco (g. 13).
Você também pode limpar a câmara coletora de
pêlos usando a escova fornecida em vez de água.
A cada seis meses: cabeças de corte
1 Abra a unidade de corte, gire a trava no
sentido anti-horário (1) e retire a estrutura
de retenção (2) (g. 14).
2 Limpe os cortadores e protetores com a
escova fornecida (g. 15).
Nota: Não lave mais de um cortador e de um
protetor por vez, já que eles todos são conjuntos
correspondentes. Se você acidentalmente misturar os
cortadores e protetores, pode levar várias semanas
até que o desempenho ideal do barbear seja
restaurado.
3 Encaixe novamente as cabeças de corte na
unidade de corte. Coloque a estrutura de
retenção na unidade de corte e gire a trava
no sentido horário (g. 16).
4 Feche a unidade de corte.
Aparador
Lave o aparador toda vez que usá-lo.
1 Desligue o aparelho, desconecte o adaptador
da tomada da parede e retire o plugue do
barbeador.
2 Lave o aparador com a escova
fornecida (g. 17).
3 Lubrique os dentes do aparador pingando
uma gota de óleo lubricante a cada seis
meses (g. 18).
Para guardar a aparelho
Encaixe a tampa de proteção no barbeador
para evitar que as cabeças de corte sejam
danicadas (g. 7).
Substituição
Troque as cabeças de corte a cada dois anos para
obter os melhores resultados.
Substitua cabeças de corte danicadas ou
desgastadas somente por cabeças de corte HQ8
Philips.
Nota: Para garantir o desempenho ideal, não misture
cortadores e protetores.
1 Desligue o aparelho, desconecte o adaptador
da tomada da parede e retire o plugue do
barbeador.
2 Pressione o botão de liberação para abrir a
unidade de corte.
3 Gire a trava no sentido anti-horário (1) e
retire a estrutura de retenção (2) (g. 14).
4 Remova as cabeças de corte e coloque
as novas na unidade de corte. Coloque a
estrutura de retenção na unidade de corte e
gire a trava no sentido horário (g. 16).

Certique-se de que as saliências das cabeças de
4222.002.5105.1
7/7
corte se encaixam corretamente nos espaços.
5 Feche a unidade de corte.
Acessórios
Os seguintes acessórios estão disponíveis:
Adaptador HQ8500/HQ8000.
Cabeças de corte HQ8 Philips.
Fio veicular HQ8010.
-
Nota: Alguns acessórios podem não estar disponíveis
em todos os países. Entre em contato com o
Atendimento ao Cliente do seu país para se informar
sobre a disponibilidade de acessórios.
Meio ambiente
Não descarte o aparelho com o lixo
-
doméstico no nal de sua vida útil. Leve-o a
um posto de coleta ocial para que possa ser
reciclado. Com esse ato, você ajuda a preservar
o meio ambiente (g. 19).
A bateria interna recarregável de lítio (Li-
ion) contém substâncias que podem poluir o
meio ambiente. Sempre remova a bateria do
aparelho antes de descartá-lo e levá-lo a um
posto ocial de coleta. Descar te as baterias
em um posto ocial de coleta de baterias. Se
tiver diculdade em removê-la, você também
poderá levar o aparelho a uma assistência
técnica Philips, que fará esse procedimento e
descartará a bateria em um local seguro ao
meio ambiente (g. 20).
Remoção da bateria recarregável
Apenas remova a bateria recarregável se ela
estiver totalmente descarregada.
1 Remova o adaptador da tomada da parede e
desconecte o plugue do barbeador.
2 Deixe o barbeador funcionando até que ele
pare. Remova os dois parafusos da câmara
coletora de pêlos e retire-a (g. 21).
3 Remova os dois parafusos atrás do barbeador
e retire a parte traseira (g. 22).
4 Retire as laterais da unidade vedada (g. 23).
5 Remova os três parafusos da unidade
vedada (g. 24).
6 Remova a parte posterior da unidade vedada
com uma chave de fenda (g. 25).
7 Remova a bateria recarregável.
Tenha cuidado, pois os os de metal da bateria são
muito aados.
Não conecte o barbeador à corrente elétrica
após remover a bateria.
Garantia e assistência técnica
Se necessitar de informações ou se tiver algum
problema, visite a página da Philips em www.
philips.com ou contate o Atendimento ao
Consumidor Philips através dos números de
telefone mencionados no folheto de garantia
mundial ou dirija-se à Assistência Técnica Philips
mais próxima.
Restrições da garantia
As cabeças de corte (cortadores e protetores)
não estão cobertas pelos termos da garantia
internacional por estarem sujeitas ao desgaste.
Problema Causa Solução
Desempenho
insatisfatório do
barbeador
As cabeças de
corte estão sujas.
Você não lavou
o barbeador o
Lave completamente o barbeador
antes de continuar a se barbear.
Consulte o capítulo ‘Limpeza e
manutenção’.
suciente ou a
água usada não
estava quente o
bastante.
Pêlos longos
obstruem as
cabeças de corte.
Lave os cortadores e os
protetores com a escova fornecida.
Consulte o capítulo ‘Limpeza e
manutenção’, seção ‘A cada seis
meses: cabeças de corte’.
As cabeças de
corte estão
Troque as cabeças de corte.
Consulte o capítulo ‘Substituição’.
danicadas ou
gastas.
O barbeador
não funciona
quando
A bateria
recarregável está
descarregada.
Recarregue o aparelho. Consulte o
capítulo ‘Carregamento’.
pressiono o
botão liga/
desliga.
A unidade
de corte
desencaixou do
barbeador.
O aparelho não
está conectado à
corrente elétrica.
A unidade
de corte não
foi colocada
corretamente.
Insira o plugue no aparelho e
conecte o adaptador à tomada da
parede.
Se a unidade de corte
desencaixar do barbeador, você
poderá facilmente reencaixá-la.
Para isso, insira a ar ticulação no
slot na borda da câmara coletora
de pêlos e pressione-a até que
trave (você ouvirá um ‘clique’).
Resolução de problemas
Este capítulo resume os problemas mais comuns
que você pode encontrar ao usar o aparelho. Se
não conseguir resolver o problema com as
informações abaixo, entre em contato com a
Assistência Técnica Autorizada Philips Walita mais
próxima.
 Loading...