

Page 1
HP 930
Page 2

English Page 4
• Keep page 3 open when reading these
operating instructions.
Français Page 10
• Pour le mode d'emploi: dépliez la page 3.
Deutsch Seite 16
• Schlagen Sie beim Lesen der
Gebrauchsanweisung Seite 3 auf.
Nederlands Pagina 22
• Sla bij het lezen van de gebruiksaanwijzing
pagina 3 op.
Dansk Side 28
• Hold side 3 opslået mens De læser
brugsanvisningen.
Norsk Side 34
• Slå opp på side 3 før De leser videre.
Svenska Sid 40
• Ha sidan 3 utvikt när ni läser bruksanvisningen.
2
Page 3

3
5
H
ON
K
J
SM
U
P
Q T
Y
R
V
W
X
ml
400
300
200
100
B
C
A
F
G
I
E
D
L
Page 4
Teeth for a lifetime with Philips/Jordan
Clean and healthy teeth give the security and
confidence of good appearance.
Furthermore, keeping one's teeth for a lifetime is
the ultimate goal of dental care. Your own daily
dental hygiene as well as the efforts of your
dentist and other professionals are aimed at this.
Philips/Jordan strongly supports this objective.
To safeguard healthy teeth and gums, proper and
frequent removal of plaque in all areas of the
mouth is required.
What is dental plaque?
Dental plaque is the main cause for dental
diseases.
It is a soft and sticky film which continually
develops on teeth, especially in hard to reach
areas as along the teeth line and in between
teeth.
It has almost the same colour as teeth and is
therefore hardly visible.
As long as plaque is still soft, it can be easily
removed.
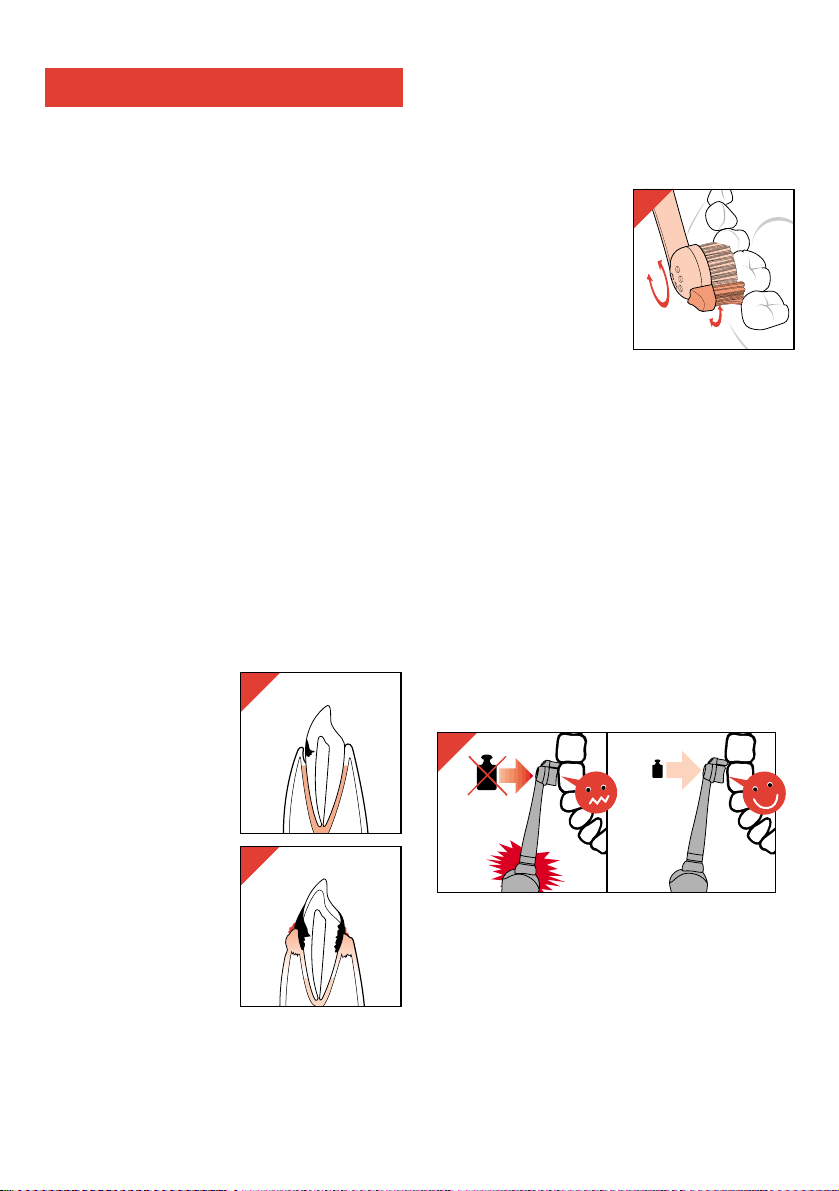
What are the effects of plaque?
The bacteria in the plaque produce an acid which
can dissolve the enamel of the teeth and the
dentine beneath it. This will cause dental decay
(caries) (fig. 1).
The bacteria also form
substances which may
cause inflammation of
the gums (gingivitis) or
decay of the supporting
tissue (periodontis).
Inflamed gums are
generally red and
swollen and often bleed
when the teeth are
brushed (fig. 2).
Thorough and regular
removal of plaque in all
areas of the mouth will
prevent gingivitis from
starting and will help
stop the spread of
periodontitis.
Philips/Jordan 2-Action plaque remover
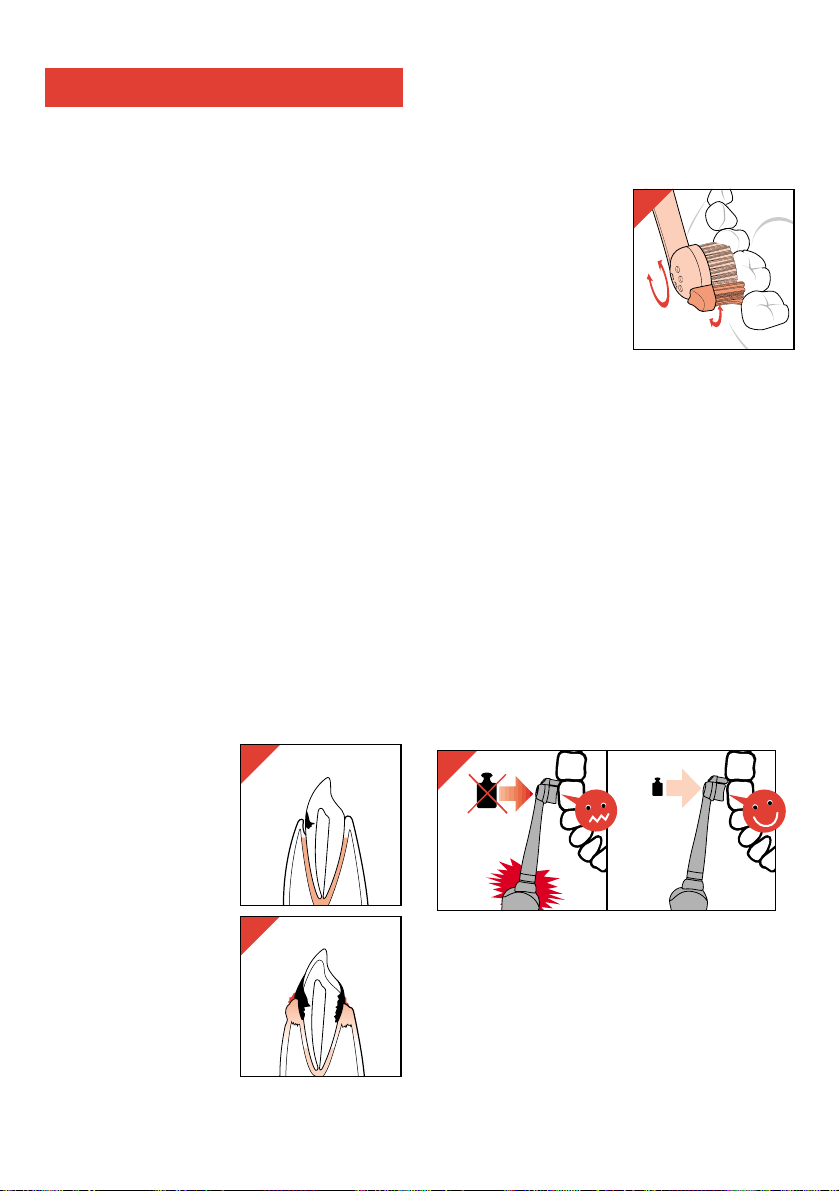
2-Action Brush
The power of this new developed plaque removal
system is in the double performance of the
oscillating brush.
Fast oscillating
movements combined
with the additional active
tip movements in the
space between the
teeth, result in a
thorough and highly
effective cleaning of
every area of the teeth
(fig. 3).
Controlled Pressure
Proper cleaning technique requires excellent
handling of a brush as it is a balancing act
between applied pressure and movements.
Too much pressure may damage both teeth and
gums, causes unneccessary wear of the brush
and also reduces the effectiveness of the
brushing operation.
The Controlled Pressure system helps you to
control applying the correct pressure when
brushing your teeth.
When the pressure level is exeeded, the brush
actively warns you by a sudden change in the
position of its neck.
This may occur often when first time used.
Clinical tests show that the Controlled Pressure
will assist you in developing effective electrical
brushing techniques for cleaning at the right
pressure, within a few days (fig. 4).
English
4
1
2
3
CLICK
4
CLICK
CLICK
Page 5

Oral water jet
The oral water jet by Philips is an additional
device to assist you in the daily care for your
teeth. It gives your mouth a delightfully fresh
feeling, particularly when mouthwash has been
added to the water.
1-jet/6-jet system
• The oral water jet can help remove food and
beginnings of (soft) plaque from less accessible
places, such as the gaps between teeth. For
this, one single, powerful, pulsating jet is used
(fig. 33).
This jet can also be used to rinse away plaque,
which has first been detached from the teeth by
means of the rechargeable toothbrush, a
toothpick, a coil brush or dental floss.
∂ Six pulsating water jets can be used to
massage the gums (fig. 42).
This helps stimulate blood circulation and can
improve the health of the gum tissue.
5
Important
General
• If the mains cord of this appliance is
damaged, it must be replaced by the
original type only.
Please apply to your Philips dealer or
to the Philips organisation in your
country for replacement.
Rechargeable toothbrush:
• First charging: at least 16 hours.
• For optimum brushing efficiency and
for hygiene: replace the click-on
brushes as soon as the hairs begin to
stand out or at least every three
months.
• It is advisable to use your electrical
toothbrush twice a day for at least two
minutes.
• For long life it is important to fully run
down the electrical toothbrush and
then recharge for 12 hours at least
every 6 months.
• The mains plug on the charging unit is
made in accordance with the latest
European standards. Although safe the
pins may be loose in a standard UK
shaver socket. Please make sure a
close connection is made. If you
require to connect to a normal 3 pin
socket use a suitable adapter.
• The built-in rechargeable battery
contains substances which may
pollute the environment.
When eventually discarding your
appliance please remove the built-in
rechargeable battery (fig. 21-23) and
dispose of it at an officially assigned
refuse site or otherwise according to
national regulations. Please refer to
section “Protecting the environment”.
Oral Water Jet:
• When using the Oral Water Jet for the
first time or after a long time of disuse it
may be necessary to start the water
flowing by setting the volume control to
the maximum setting (5) and the jet tip
nozzle to position • (for one-jet
operation). Within 10 to 20 seconds the
water should start to flow.
Page 6
General Description (fig. 5)
Rechargeable toothbrush:
A 2-Action brush head
B Oscillating brush
C Active tip
D Coloured identification ring (click-on)
E Drive shaft
F ”Controlled Pressure” bending head
G On/off switch (button)
H Brushes storage compartment - for 2-
Action brush heads
I Inner container for Aand P
Oral Water Jet:
J Water container
K Water container lid
L Jet tips storage compartment
M Handle
N Handle holder
O Water hose
P Jet tip (can be clicked on to the handle)
Q On/off button (“Power”)
R Volume control ring
SS
Water switch (“Stop/Start”)
T MAX button
U Nozzle (adjust by rotating)
•= one jet (cleaning)
∂ = six jets (massage)
General:
V Mains cord with plug
W Bracket (with screws and rawlplugs) for wall-
mounting
X Mains cord storage
Y Storage compartment lid
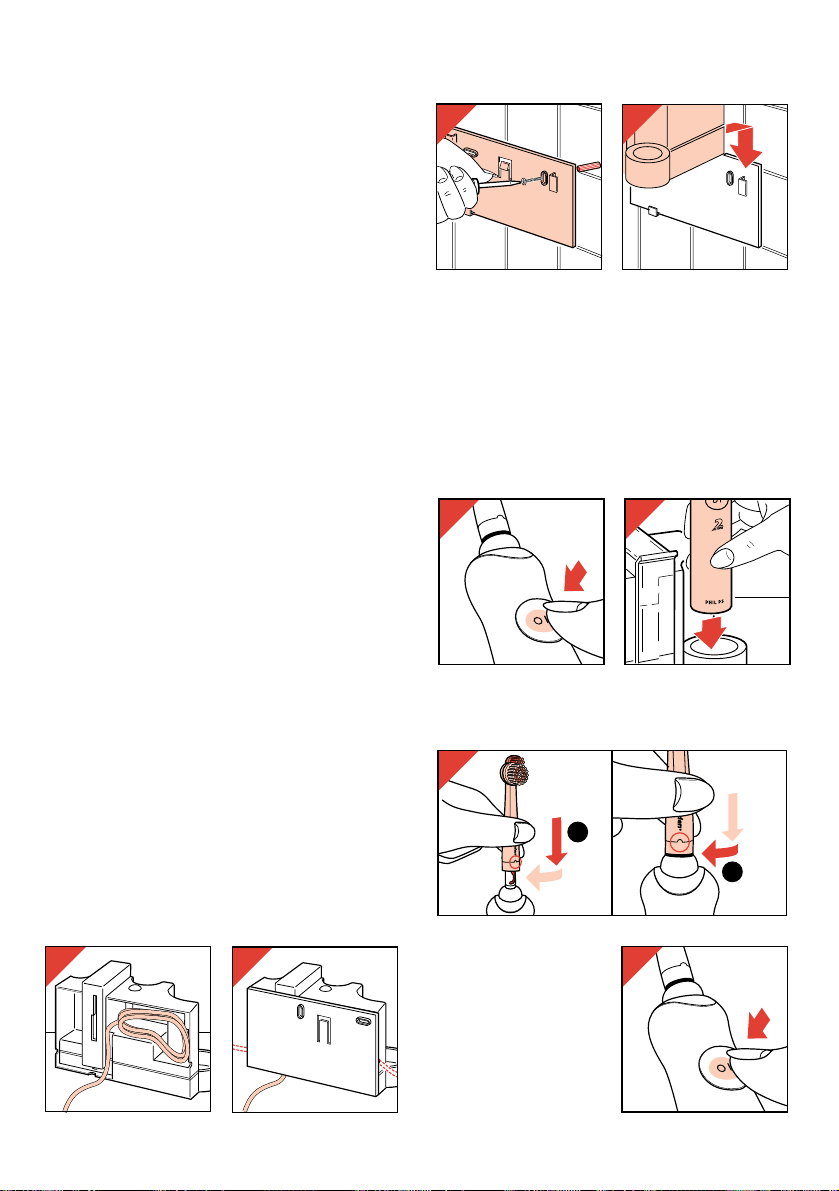
Bathroom use
• Using the mounting plate, mount the charge unit
to a wall where it cannot accidentally fall into
water.
• As the toothbrush itself is waterproof you may
choose to use it while having a shower or bath.
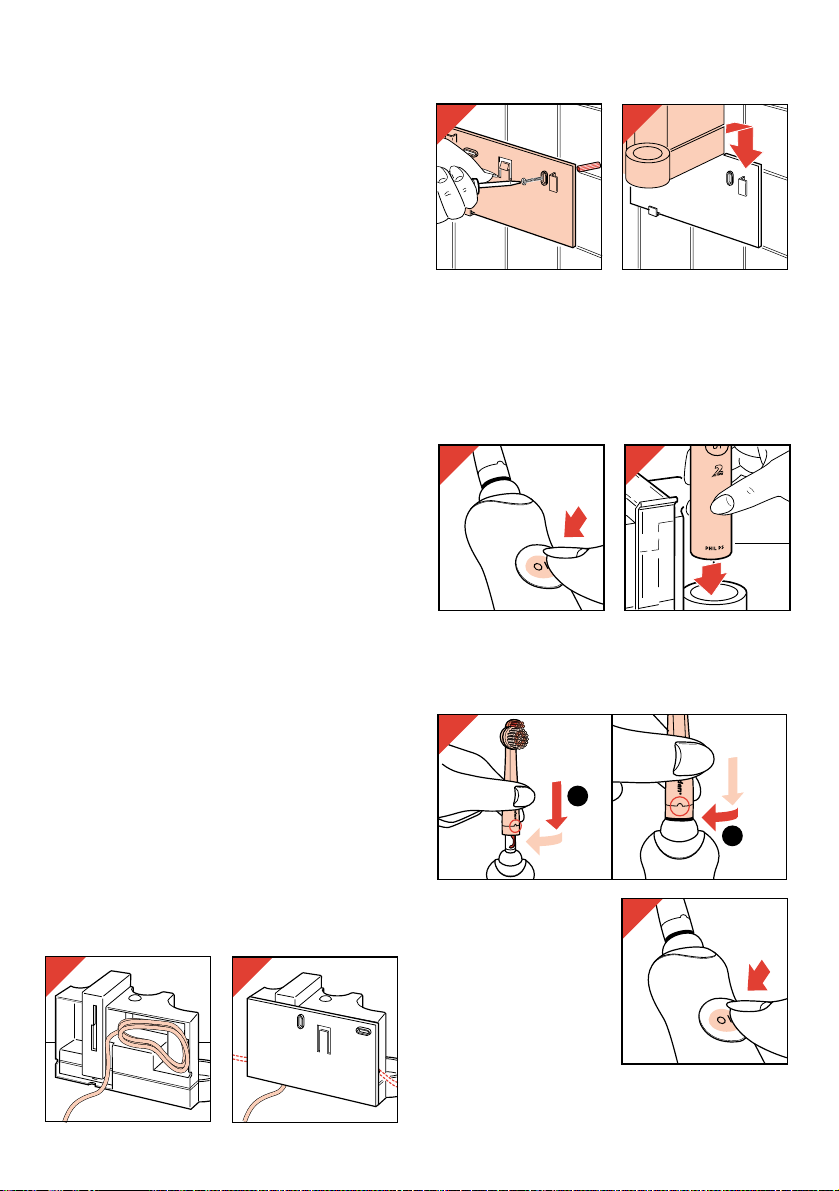
Cord storage (fig. 6-7)
Wall mounting (fig. 8-9)
Rechargeable toothbrush
How to charge (fig. 10-11).
• Before first use charge for at least 16 hours.
• In normal use, the toothbrush is recharged after
each use by just placing it back into the
connected charge unit.
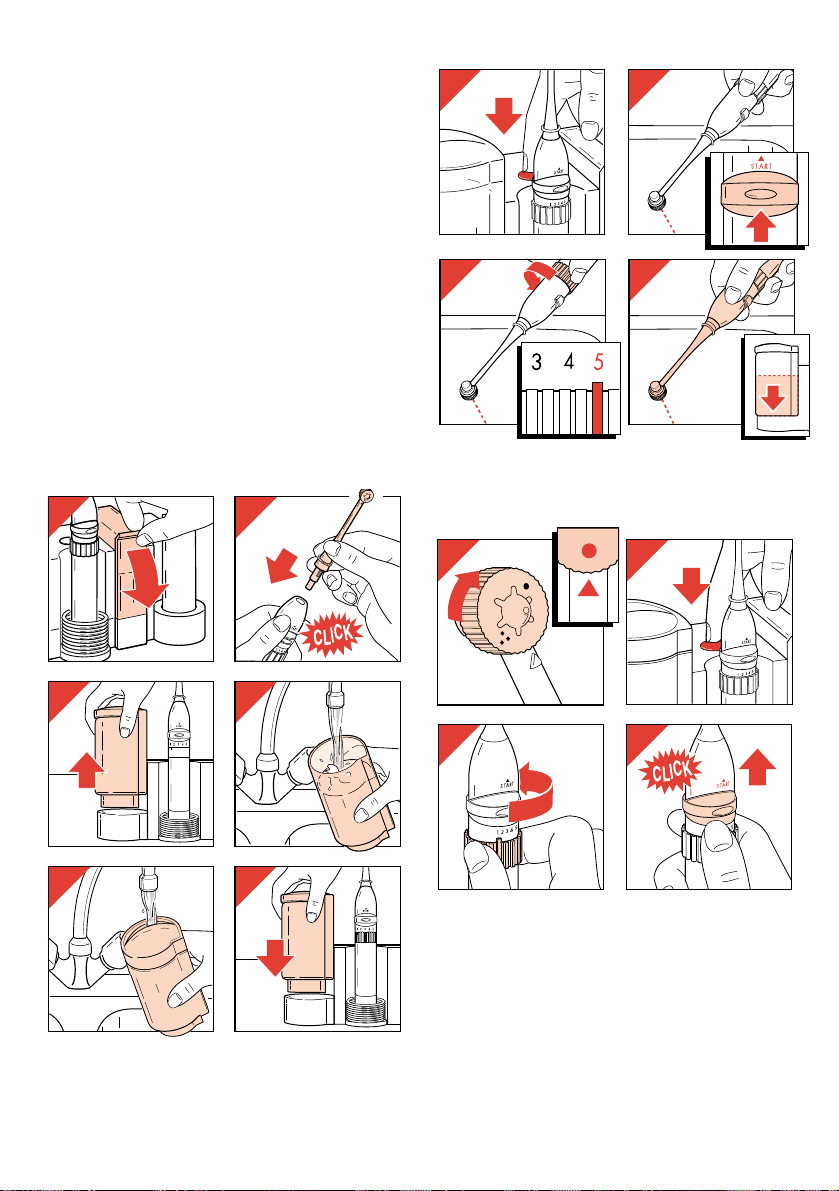
How to use (fig. 12-16)
- Position (push and turn) the 2-Action brush
head on to the appliance (fig. 12).
- Press button (G) to
switch on (fig. 13).
6
6
7
9
8
11
CLICK
10
12
CLICK
13
1
2
Page 7
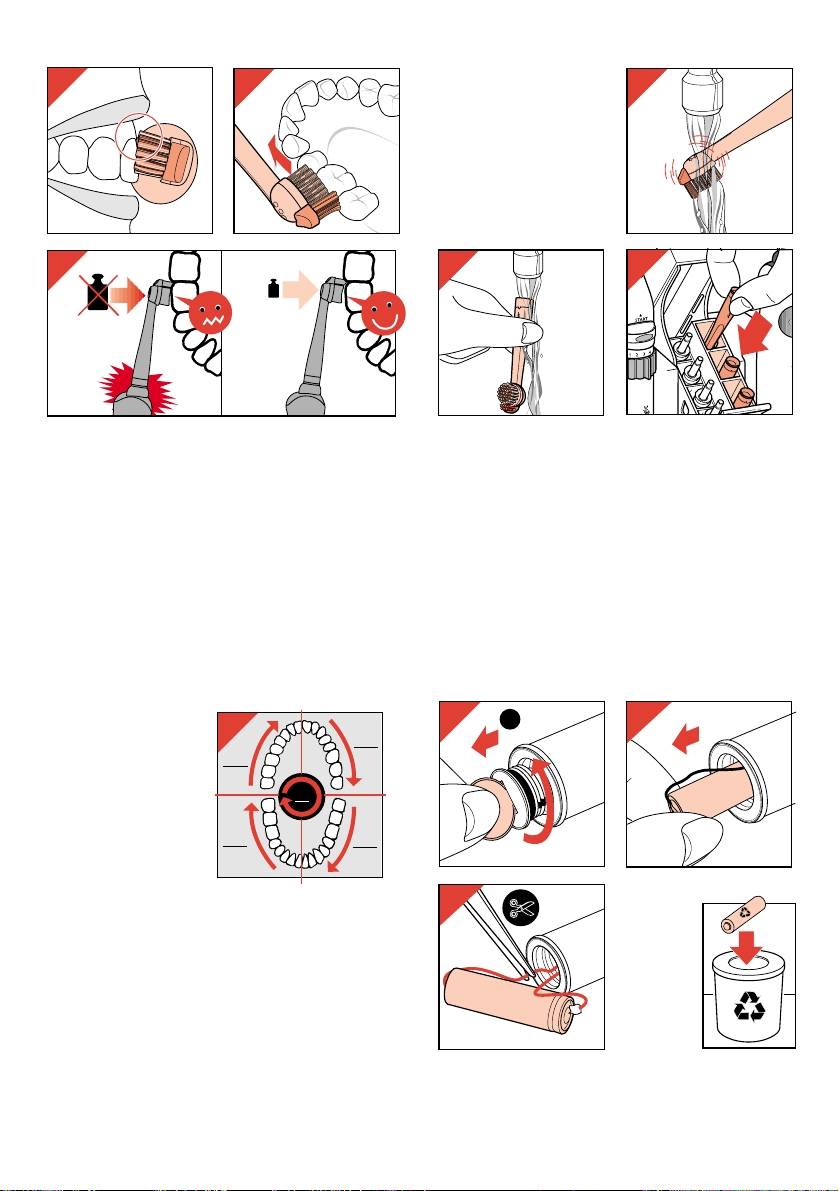
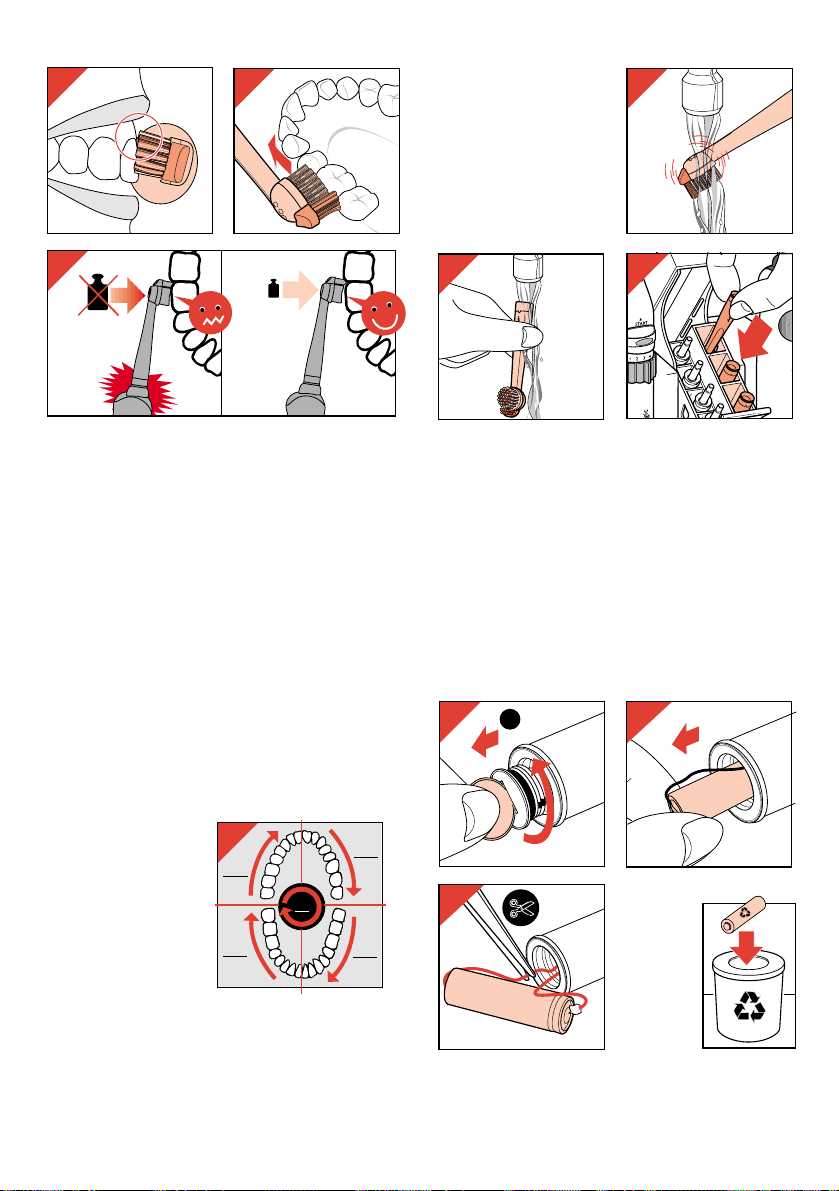
• Let the toothbrush do the work for you: just
guide the bristle carefully along the teeth. The
active tip will find its own way and enter into the
spaces in between the teeth. Ensure that the
brush touches the entire tooth surface as well
as a small section of the gums (fig. 14-15).
• If the head clicks backwards during brushing,
this means that you have applied too much
pressure (fig. 16).
• Also refer to the provided Tooth Brushing
Instructions card.
Minimum brushing time: 2 minutes (fig. 17)
Two minutes is regarded to be the minimum time
required for effective
plaque removal and
gum massage.
For even better
results you may
decide to brush
longer.
Remember that
fluoride in toothpaste
also needs some
time to act.
After brushing your
teeth (fig. 18-20)
- Switch the toothbrush
on and rinse it clean in
lukewarm (max.
60 °C) water.
Replacement 2-Action brush heads
For replacement, new 2-Action brush heads are
available from your dealer under type n°. HP 790.
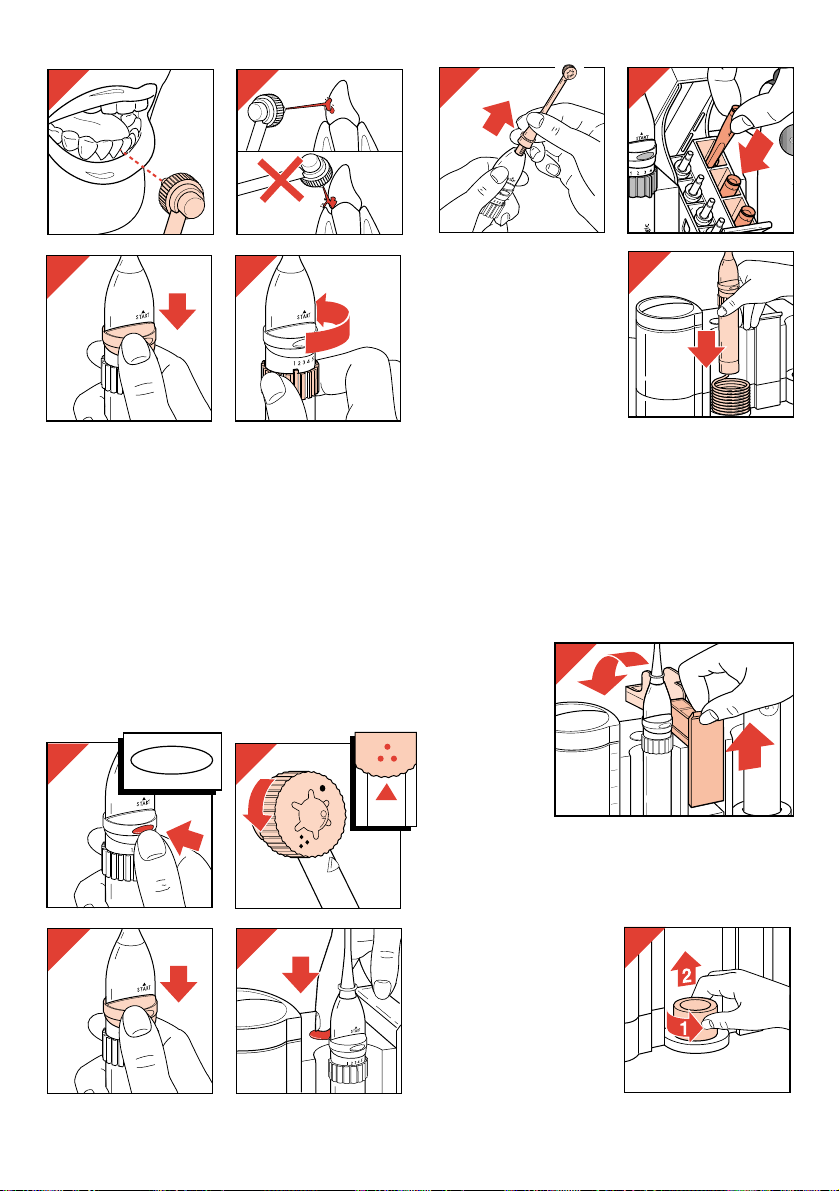
Protecting the environment
To remove the built-in rechargeable battery when
eventually discarding your appliance: see
fig. 21-23.
• Please note: You can also take the appliance to
a Philips Service Centre. The staff will be happy
to help you.
• Before removing the battery should be
completely empty of charge. Let the appliance
run until the motor stops.
7
15
14
CLICKCLICK
16
17
2
min.
30
sec.
30
sec.
30
sec.
30
sec.
18
19
20
21
22
23
2
Page 8
• Please note: Only unscrew the bottom for
battery removal.
The toothbrush may not be watertight anymore
after the bottom has been unscrewed. For that
reason the guarantee is void after opening the
toothbrush.
An undamaged sticker at the bottom side
indicates that the appliance has not been
opened.
Oral Water Jet
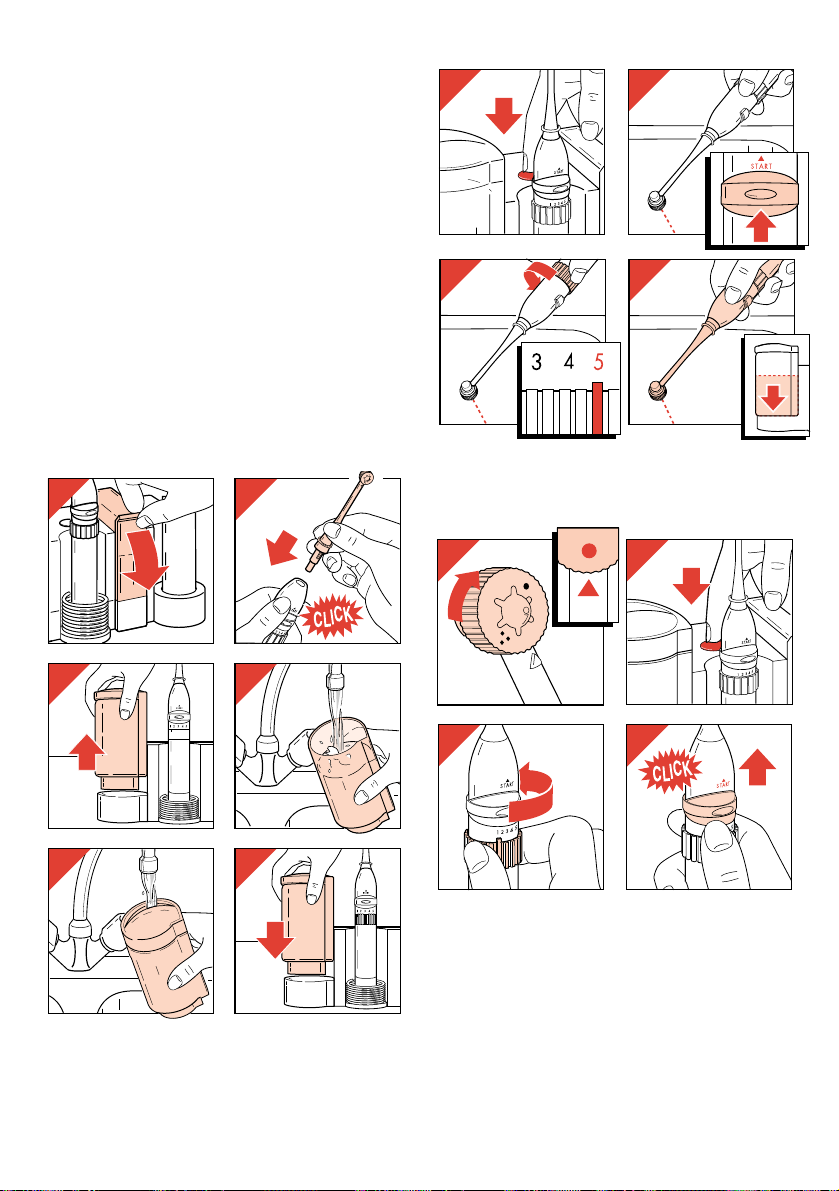
Before first use (fig. 24-32)
(and also when the appliance has not been used
for a couple of days)
Before daily use (fig. 24-28)
Mouthwash for extra freshness
You may add a mouthwash to the water. After
using mouthwash, fill the water reservoir with
clean (unmixed) water and pump all the water out
of the appliance and into the wash basin.
How to use (fig. 33-47)
- Select position • for cleaning (fig. 33).
- Bend over the wash basin and hold the jet tip
close to your teeth.
- Guide the water jet on to the front sides and the
back sides of the teeth, the gums, and
particularly to the spaces between your teeth to
remove remaining particles of food (fig. 37).
• Ensure that the water jet is at a straight
angle with the teeth (fig. 38). Do not direct
the water jet in such manner that it
penetrates the gums.
8
29
30
31
32
33
34
35
36
24
25
26
27
27A
28
Page 9
• Before changing the position of the jet tip in
your mouth you may switch off the water supply
using the water switch (fig. 39).
• You can always adjust the water volume by
rotating the control ring (fig. 40).
• While you are still getting accustomed to the
Water Jet (and also if gum inflammation
trouble you) low water volume is advisable.
• ”MAX”. If you wish maximum jet power for a
short time (esp. when cleaning under
bridgework) you can press the MAX button
(fig. 41). Release the button to switch back to
the set water volume.
- After cleaning, set the nozzle to position ∂ for
gums massage (fig. 42).
Extra jet tips
Extra jet tips (for
replacement or
extension) are
available as an option
at Philips Service
Centres.
Cleaning
• Before cleaning, remove the mains plug from
the wall socket.
• Do not use abrasive or aggressive cleaning
aids, scourers, alcohol, acetone, etc.
• You can clean the appliance with a damp cloth
(if required using some detergent).
• The storage compartment is removable and can
be washed (also dishwasher safe) (fig. 48).
• Rechargeable toothbrush:
The toothbrush may be cleaned in lukewarm
(soapy) water.
• Oral Water Jet:
The hand grip holder
(fig. 49) and the water
reservoir may be
washed up in hot
soapy water and
rinsed under the tap.
These items can also
be cleaned in a
dishwasher.
9
39
40
47
46
45
m
l
4
0
0
3
0
0
2
0
0
1
2
48
49
41
MAX
42
43
44
37
38
Page 10
Des dents pour la vie avec Philips/Jordan
Une dentition propre et saine vous permet d'être
sûr de vous-même et d'avoir confiance dans
votre physique.
Mais l'hygiène dentaire quotidienne a aussi pour
objectif de vous aider à conserver vos propres
dents jusqu'à la fin de vos jours. Les efforts de
votre dentiste et autres professionnels ont le
même but.
Philips/Jordan soutient vigoureusement cet objectif.
Pour conserver des dents et des gencives saines,
il faut éliminer fréquemment et correctement la
plaque dentaire.
Qu'est ce que la plaque dentaire?
La plaque dentaire est la cause principale des
maladies dentaires. C'est un film souple et collant
qui se développe en permanence sur les dents,
en particulier dans les régions difficiles à
atteindre telles que la base de la dent ou les
espaces inter-dentaires.
Elle est presque de la même couleur que les
dents, et donc difficilement visible.
Tant que la plaque reste souple, elle s'enlève
facilement.
Quels sont les effets de la plaque?
Les bactéries de la plaque génèrent un acide qui
peut dissoudre l'émail des dents et la dentine qui
se trouve derrière. Cela provoque la détérioration
des dents (caries) (fig. 1).
Les bactéries forment aussi des substances qui
peuvent causer une
inflammation des
gencives (gingivite) ou
détruire le tissu de
soutien (périodontite).
Les gencives
enflammées sont
généralement rouges et
gonflées et saignent
souvent lorsqu'on se
brosse les dents (fig. 2).
Une élimination
minutieuse et régulière
de la plaque dans toutes
les zones de la cavité
buccale permet d'éviter
la gingivite avant même
son apparition et aide à
stopper la périodontite.
La brosse 2-Action anti-plaque Philips/Jordan
Brosse 2-Action
La puissance de ce nouveau système anti-plaque
réside dans la double action de la brosse
oscillante.
Les mouvements
oscillatoires rapides
combinés avec les
mouvements de la
pointe active dans les
espaces interdentaux
permettent de nettoyer
soigneusement et très
efficacement toutes les
zones des dents (fig. 3).
Contrôle de la pression
Une bonne technique de nettoyage nécessite une
excellente manipulation de la brosse car tout est
une question d'équilibre entre la force appliquée
et les mouvements. Une pression trop importante
peut endommager les dents et les gencives, user
inutilement la brossette et donc nuire à l'efficacité
du brossage.
Le système de contrôle de la pression vous aide
à contrôler la pression que vous appliquez
lorsque vous vous brossez les dents.
Si la pression est trop forte, la brosse vous
prévient de manière active en modifiant
brusquement la position de son manche.
Cela peut se produire souvent lors de la première
utilisation.
Les tests cliniques montrent que le contrôle de
pression vous aide à développer en quelques
jours une technique de brossage électrique
efficace (fig. 4).
Français
10
1
2
3
CLICK
4
CLICK
CLICK
Page 11

Hydropulseur
L’hydropulseur Philips est un instrument utile et
efficace pour prendre soin de vos dents. Il donne
une agréable sensation de fraîcheur et de bien
être, surtout lorsque l’eau est additionnée d’une
solution spéciale bain de bouche.
Système 1 jet / 6 jets
• L’hydropulseur peut déloger le reste des
aliments et la plaque débutante dans les
recoins même les moins accessibles, tels que
les espaces entre les dents et les molaires. Un
seul jet puissant est utilisé (fig. 33).
Ce jet peut également servir à rincer la plaque
dentaire préalablement détachée à l’aide de la
brosse à dents, d’un cure dents ou d’un fil
dentaire.
∂ Six jets simultanés peuvent être utilisés pour
masser les gencives (fig. 42).
Ce qui permet de stimuler la circulation du sang
et d’améliorer l’irrigation des tissus.
11
Important
Général
• Si le cordon d’alimentation de
l’appareil est endommagé, il doit être
remplacé par un cordon équivalent.
Adressez-vous à votre revendeur
Philips ou au réparateur agréé Philips
Appareils Domestiques de votre
région.
Brosse à dents rechargeable :
• Première mise en charge : au moins 16
heures.
• Pour une efficacité de brossage et une
hygiène optimales, les têtes de brossage
2-Action doivent être remplacées dès
que les poils commencent à s'écarter ou
au moins tous les trois mois.
• Nous vous recommandons d'utiliser
votre brosse à dents deux fois par jour
pendant au moins deux minutes.
• Les accumulateurs rechargeables de
votre appareil contiennent des produits
nocifs pour l’environnement.
Il est donc recommandé, lorsque vous
souhaitez vous débarrasser de votre
appareil, de le déposer dans un endroit
assigné à cet effet. Voir chapitre
“Protection de l’environnement”.
Hydropulseur :
• Lorsque vous utilisez l’appareil pour la
première fois, ou après une longue
période d’inutilisation, il peut être
nécessaire d’amorcer la pompe en
positionnant le contrôle de pression au
maximum (5) et le réglage de jet sur la
position “Mono jet”. Au bout de 10 à 20
secondes, l’eau sortira par la buse.
Page 12
Description générale (fig. 5)
A Tête de brossage 2-Action
B Brosse oscillante
C Pointe active
D Bague d'identification colorée (encliquable)
E Tige d'entraînement
F Tête flexible à contrôle de pression
G Interrupteur marche/arrêt (bouton)
H Compartiment de rangement des brosses
pour deux têtes de brossage 2-Aaction
I Boîtier intérieur pour Aet P
Hydropulseur :
J Réservoir d’eau
K Couvercle
L Compartiment de rangement des buses
M Poignée
N Support poignée
O Tuyau
P Buse
Q Commutateur marche/arrêt
R Contrôleur de débit
S Sélecteur de pression marche/arrêt
(pression d’eau)
T ”MAX pression”
U Molette (réglage de jet)
• = monojet (nettoyage)
∂ = 6 jets (massage)
Général :
V Cordon d’alimentation
W Support mural (avec vis)
X Compartiment rangement cordon
Y Enrouleur cordon
Utilisation dans une salle de bain
• Montez la platine de l'unité de chargement sur
un mur où celle-ci ne risque pas de tomber
dans l'eau par accident.
• La brosse à dents elle-même étant étanche,
vous pouvez l'utiliser sous la douche ou dans
votre bain.
Rangement du cordon (fig. 6 - 7)
Montage mural (fig. 8 - 9)
Brosse à dents rechargeable
Charge (fig. 10 - 11)
• Avant la première utilisation, l'appareil doit
être mis en charge pendant au moins 16
heures.
• En mode d'utilisation normale, la brosse à dents
se recharge après chaque utilisation lorsque
vous la replacez dans l'unité de chargement
connectée.
Procédure d'utilisation (fig. 12 - 16)
- Positionnez (enfoncez et tournez) la tête de
brosse double action sur l'appareil (fig. 12).
- Appuyez sur le bouton
(G) pour mettre en
marche (fig. 13).
12
6
7
9
8
11
CLICK
10
12
CLICK
13
1
2
Page 13
• Laissez la brosse à dent travailler à votre place:
il vous suffit de la guider soigneusement le long
des dents. La pointe active trouve son propre
chemin et pénètre dans les espaces
interdentaux. La brosse doit toucher toute la
surface des dents ainsi qu'une faible partie des
gencives (fig. 14 - 15).
• Si la tête revient en arrière en cours de
brossage, cela signifie que vous avez appuyé
trop fort (fig. 16).
• Consultez aussi la notice d'instructions de
brossage.
Temps minimum de brossage: 2 minutes
(fig. 17)
Une durée de deux minutes est considéré comme
le temps minimum nécessaire pour éliminer
efficacement la plaque et masser les gencives.
Pour obtenir des résultats encore meilleurs, vous
pouvez décider de
vous brosser les
dents plus
longtemps.
N'oubliez pas que le
fluorure contenu
dans la pâte
dentifrice met un
certain temps pour
agir.
Après le brossage
(fig. 18 - 20)
- Mettez votre brosse
en marche et rincez-la
à l'eau tiède
(60°C maximum).
Remplacement des têtes de brosse 2-Action
Vous pouvez vous procure des têtes de brosse
2-Action de rechange chez votre fournisseur,
sous la référence HP 790.
Protection de l'environnement
Pour démonter la pile rechargeable intégrée si
vous jetez votre appareil, voir fig. 21 - 23.
• Note : vous pouvez également envoyer votre
appareil à un Centre Service Agréé. Le
personnel se fera un plaisir de vous aider.
• Avant d'être démontée, la pile doit être
complètement vide. Laissez l'appareil
fonctionner jusqu'à ce que le moteur s'arrête.
13
15
14
CLICKCLICK
16
17
2
min.
30
sec.
30
sec.
30
sec.
30
sec.
18
19
20
21
22
23
2
Page 14
• Note : Pour démonter la pile, il suffit de dévisser
le fond de l'appareil. Lorsque le fond est
dévissé, la brosse à dents n'est plus étanche.
C'est pourquoi la garantie est annulée lorsque
la brosse a été ouverte.
Une étiquette est collée sous le fond de
l'appareil pour témoigner du fait qu'il n'a pas été
ouvert.
Hydropulseur
Avant la première utilisation (fig. 24 - 32)
(et quand l’appareil n’a pas été utilisé pendant
quelques jours)
Avant utilisation - chaque jour (fig. 24 - 28)
Bain de bouche
Vous pouvez également ajouter à l’eau du
réservoir un bain de bouche. Après utilisation du
bain de bouche, il vous suffit de rincer l’appareil
en le faisant fonctionner à l’au claire.
Utilisation (fig. 33 - 47)
- Mettez le sélecteur en position marche
(fig. 33).
- Penchez-vous au-dessus du lavabo et
introduisez la buse dans la bouche.
- Orientez le jet sur le devant et à l’arrière des
dents, et plus particulièrement vers les
interstices pour éliminer les résidus
alimentaires (fig. 37).
• Assurez-vous que le jet d’eau soit
perpendiculaire aux dents (fig. 38). Evitez
de diriger le jet sur les gencives.
14
29
30
31
32
33
34
35
36
24
25
26
27
27A
28
Page 15

• Vous pouvez modifier la pression et le
positionnement du jet en cours d’utilisation, soit
en arrêtant à l’aide du sélecteur de pression
(fig. 39), soit en réglant le contrôleur de débit
sur la position qui vous convient (fig. 40).
• Pendant un certain temps d’accoutumance,
il est souhaitable d’utiliser des pressions
faibles (surtout si vous souffrez
d’inflammation des gencives).
•”MAX”. Si vous désirez un maximum de
pression durant un court instant, vous pouvez
utiliser le bouton “MAX” (fig. 41). Lorsque vous
relâchez le bouton, la pression revient
automatiquement à la pression normale
d’utilisation.
- Après nettoyage, positionnez la molette en
position ∂ (fig. 42).
Remplacement des
buses
Les buses de rechange
sont disponibles chez
votre revendeur Philips
ou dans les Centres
Service agréés.
Nettoyage
• Débranchez l’appareil avant toute opération de
nettoyage.
• N’utilisez pas de produits abrasifs ou produits
tels que alcool, acétone, etc.
• Vous pouvez nettoyer l’appareil avec un chiffon
humide (si besoin avec un détergent).
• Le compartiment de rangement et son
couvercle peuvent être enlevés pour être lavés
(dans le lave-vaisselle par ex.) (fig. 48).
• Brosse à dents rechargeable :
Le corps de brosse peut être nettoyé à l’eau tiède
(éventuellement savonneuse).
• Hydropulseur :
Le support de poignée
de l’hydropulseur
(fig. 49) peut se retirer
ainsi que le réservoir et
se nettoyer à l’eau
savonneuse.
Ces accessoires
peuvent également être
lavés au lave-vaisselle.
15
39
40
47
46
45
m
l
4
0
0
3
0
0
2
0
0
1
2
48
49
41
MAX
42
43
44
37
38
Page 16

Lebenslang gesunde Zähne durch
Philips/Jordan
Saubere und gesunde Zähne geben Ihnen ein
Gefühl der Sicherheit und der Gewißheit gut
auszusehen.
Tägliche Zahnpflege ist eine Voraussetzung, Ihre
eigenen Zähne ein Leben lang zu behalten. Auch
Ihr Zahnarzt bemüht sich darum. Philips/Jordan
unterstützt diese Bemühungen.
Regelmäßige und gründliche Entfernung der
Plaque ist wichtig, um Zähne und Zahnfleisch
gesund zu erhalten.
Was ist "Plaque"?
Die Plaque ist Hauptursache für
Zahnerkrankungen.
Plaque entsteht als ein weicher Belag, der sich
besonders an den schwer erreichbaren Stellen
entwickelt, z.B. an den Zahnrändern und in den
Zahnzwischenräumen. Er hat fast die gleiche
Farbe wie die Zähne und ist darum schwer
sichtbar.
Solange die Plaque weich ist, kann sie leicht
entfernt werden.
Die Folgen der Plaque
Die in der Plaque enthaltenen Bakterien scheiden
eine Säure ab, die den Zahnschmelz und das
Zahnbein darunter, das Dentin, auflösen kann. In
der Folge kommt es zum Zahnverfall, zur Karies
(Abb. 1).
Die Bakterien können noch andere schädliche
Stoffe absondern, die eine Entzündung des
Zahnfleisches
(Gingivitis) oder der
Wurzelhaut
(Periodontitis)
verursachen können.
Entzündetes Zahnfleisch
ist meistens rot
geschwollen und blutet
oft beim Zähneputzen
(Abb. 2).
Eine gründliche
Entfernung der Plaque
überall in der
Mundhöhle ist die beste
Vorbeugung gegen
Zahnfleischentzündung
und die Entstehung
einer
Wurzelhautentzündung.
Der Philips/Jordan 2-Action Plaqueentferner
Die 2-Action Bürste
Das neuentwickelte System besteht in einer
zweifachen Wirkung der oszillierenden/
rotierenden Bürste.
Schnelle oszillierende/
rotierende Bewegungen
der Bürste werden durch
die Arbeit der
Interdentalbürste in den
Zahnzwischenräumen
ergänzt. Das führt
überall an den Zähnen
zu einer intensiven und
gründlichen Reinigung
(Abb. 3).
Druckkontrolle
Gründliches und zugleich schonendes
Zähneputzen verlangt ein ausgewogenes
Verhältnis zwischen den Putzbewegungen und
dem Druck auf die Bürste.
Übermäßiger Druck kann Zähne und Zahnfleisch
schädigen, mindert die Wirkung der Zahnbürste
und führt dazu, daß die Bürste vorzeitig erneuert
werden muß.
Die Druckkontrolle verhilft zum richtigen Druck
beim Zähneputzen.
Wenn Sie die Bürste zu stark gegen Zähne und
Zahnfleisch drücken, federt die Bürste zurück.
Das kann anfangs öfters geschehen.
Klinische Tests zeigen, daß die Druckkontrolle
innerhalb weniger Tage zu einem richtigen und
wirksamen Druck beim Zähneputzen verhilft
(Abb. 4).
Deutsch
16
1
2
3
CLICK
4
CLICK
CLICK
Page 17

Die Munddusche
Die Philips Munddusche ist eine praktische Hilfe
für Ihre tägliche Mund- und Zahnpflege. Ihre
Anwendung vermittelt Ihnen ein Gefühl der
Frische, besonders, wenn Sie dem Wasser
Mundwasser zufügen.
1-Strahl/6-Strahl-System
• Speisereste und weiche Plaque werden mit
dem Strahl der Munddusche von schwer
zugänglichen Stellen, z.B. aus Zahnfugen,
gelöst. Dazu verwenden Sie den einzelnen,
kräftigen, pulsierenden Strahl (Abb. 33).
Dieser Strahl ist auch geeignet, weiche Plaque
auszuspülen, die zuvor mit der aufladbaren
Zahnbürste, einem Zahnstocher oder mit
Zahnseide abgelöst wurde.
∂ Mit sechs pulsierenden Wasserstrahlen
können Sie Ihr Zahnfleisch massieren
(Abb. 42).
So wird die Durchblutung und damit die
Gesundheit des Zahnfleisches gefördert.
17
Wichtig
Allgemeines:
• Wenn das Netzkabel defekt oder
beschädigt ist, muß es durch ein
Original Philips Netzkabel ersetzt
werden. Wenden Sie sich an Ihren
Philips-Händler oder an die PhilipsOrganisation in Ihrem Lande.
Die aufladbare Zahnbürste:
• Vor dem ersten Gebrauch mindestens
16 Stunden aufladen.
• Zum Erhalt der Wirkung und aus
hygienischen Gründen: Wechseln Sie
die 2-Action Bürstenköpfe aus, wenn
die Borsten auswärts stehen,
spätestens aber alle 3 Monate.
• Es wird empfohlen, die elektrische
Zahnbürste zweimal täglich
mindestens 2 Minuten lang
anzuwenden.
Für NiCd-Akku:
Der eingebaute Nickel/Cadmium-Akku
enthält Substanzen, welche die Umwelt
gefährden können.
Sorgen Sie bitte dafür, daß dieser Akku
nicht in den normalen Hausmüll
gelangt. Nehmen Sie ihn am Ende der
Lebensdauer des Geräts heraus (Abb.
21 bis 23) und geben Sie ihn bei den
offiziellen Sammelstellen oder bei einer
unserer Kundendienststellen ab. Wir
kümmern uns dann um eine
ordnungsgemäße Entsorgung. (Vgl.
den Abschnitt “Umweltschutz”.)
Für Bundesrepublik Deutschland:
Für NiMH-Akku:
Zum Schutz der Umwelt ist Ihre
elektrische Zahnbürste mit einem
eingebauten aufladbaren Nickel-
Hydrid-Akku ausgerüstet, der keine
Schwermetalle enthält.
Sorgen Sie bitte trotzdem dafür, daß
dieser Akku nicht in den normalen
Hausmüll gelangt. Geben Sie ihn am
Ende seiner Lebensdauer bei den
offiziellen Sammelstellen oder bei einer
unserer Kundendienststellen ab. Wir
kümmern uns dann um eine
ordnungsgemäße Entsorgung. (Vgl.
Abschnitt “Umweltschutz”.)
Munddusche:
• Bevor Sie die Munddusche zum ersten
Mal oder nach längerer Zeit wieder
benutzen, kann es nötig werden, den
Wahlschalter auf die maximale Position
(5) und den Düsenaufsatz auf Position •
zu stellen. Nach 10 bis 20 Sekunden
wird dann das Wasser fließen.
Page 18

Allgemeine Beschreibung (Abb. 5)
A 2-Action Bürstenaufsatz
B Oszillierende Bürste
C Interdentalbürste
D Farbliche Kennzeichnung, aufsteckbarer
Ring
E Antriebswelle
F Druckkontrolle mit zurückfederndem
Bürstenkopf
G Ein-/Ausschalter, Druckschalter
H Behälter für 2-Action-Bürsten
I Einsatz zum Behälter for A und P
Munddusche:
J Wasserbehälter
K Deckel das Wasserbehälters
L Düsenbehälter
M Griff
N Griffhalter
O Wasserschlauch
P Düsenaufsatz, in den Griff einzusetzen
Q Ein-/Ausschalter
R Kontrollring für den Wasserdruck
S Schalter für die Wasserzufuhr (Ein/Aus)
T MAX-Taste
U Düse
• = ein Strahl (Reinigung)
∂ = sechs Strahlen (Massage)
Allgemein:
V Netzkabel mit Stecker
W Wandhalterung mit Schrauben und Dübeln
X Kabelfach
Y Deckel des Kabelfachs
Gebrauch im Badezimmer
• Stellen Sie das Ladegerät so auf, bzw. bringen
Sie es so an, daß es nicht ins Wasser fallen
kann.
• Die Zahnbürste selbst ist wasserdicht und kann
auch in der Badewanne oder unter der Dusche
verwendet werden.
Unterbringung des Netzkabels (Abb. 6 und 7)
Wandhalterung (Abb. 8 und 9)
Die aufladbare Zahnbürste
Aufladen (Abb. 10 und 11)
• Laden Sie den Akku vor dem ersten
Gebrauch mindestens 16 Stunden auf.
• Bei täglichem Gebrauch kann die Zahnbürste
nach jeder Verwendung in das Ladegerät
zurückgestellt und der Akku dadurch
aufgeladen werden.
Gebrauch der aufladbaren Zahnbürste
(Abb. 12 bis 16)
- Setzen Sie unter leichtem Druck und Drehen
einen 2-Action-Bürstenaufsatz auf das Gerät
(Abb. 12).
- Drücken Sie den Ein-/
Ausschalter (G)
(Abb. 13).
18
6
7
9
8
11
CLICK
10
12
CLICK
13
1
2
Page 19

• Die Zahnbürste nimmt Ihnen die Putzbewegung
ab. Führen Sie nur die Bürste an den Zähnen
vorbei. Die Interdentalbürste sucht sich ihren
Weg in die Zahnzwischenräume. Die Borsten
müssen nur die volle Oberfläche der Zähne und
einen Teil des Zahnfleisches erreichen
(Abb 14-15).
• Wenn der Bürstenaufsatz während des
Zähneputzens in eine gerade Stellung
zurückfedert (Abb. 16), haben Sie zu starken
Druck ausgeübt.
• Beachten Sie die bei beigefügte Karte mit
Instruktionen zum Zähneputzen.
Minimale Anwendungszeit: 2 Minuten
(Abb. 17)
Zur gründlichen Mundpflege sollten Sie Zähne
und Zahnfleisch
jedesmal mindestens
2 Minuten putzen.
Längeres Bürsten
führt zu einem
gründlicheren
Ergebnis.
Vor allem fluorierte
Zahncremes
benötigen einige Zeit
zu Einzuwirkung.
Nach dem
Zähneputzen
(Abb. 18 bis 20)
- Schalten Sie die
Zahnbürste ein und
spülen Sie sie in
lauwarmem Wasser
von max. 60 °C ab.
Ersatzbürsten
Neue 2-Action-Bürstenaufsätze sind bei Ihrem
Händler unter der Typenbezeichnung HP 790
erhältlich.
Umweltschutz
Wenn Sie Ihr Gerät zu gegebener Zeit außer
Betrieb nehmen, muß der Akku
herausgenommen werden. Vgl. hierzu die Abb.
21 bis 23.
• Sie können Sie das Gerät mit dem Akku auch
zum Philips Service Centre schicken, wo man
sich gern der Entsorgung annimmt.
• Der Akku muß bei der Entnahme völlig leer
sein. Lassen Sie hierzu das Gerät laufen, bis
der Motor anhält.
19
15
14
CLICKCLICK
16
17
2
min.
30
sec.
30
sec.
30
sec.
30
sec.
18
19
20
21
22
23
2
Page 20

• Schrauben Sie dann nur den Boden der
Zahnbürste auf. Entfernen Sie den integrierten
Akku, und geben Sie ihn bei einer autorisierten
Sammelstelle ab.
Die Zahnbürste ist danach nicht mehr
wasserdicht. Die Garantie erlischt darum,
sobald die Zahnbürste geöffnet worden ist.
Ein unbeschädigter Aufkleber am Boden der
Zahnbürste zeigt an, daß das Gerät nicht
geöffnet worden ist.
Die Munddusche
Vorbereitung zum ersten Gebrauch
(Abb. 24 bis 32) und dann, wenn das Gerät einige
Tage lang nicht gebraucht wurde.
Vor dem täglichen Gebrauch (Abb. 24 bis 36)
Erfrischung mit Mundwasser
Sie können dem Wasser der Munddusche
Mundwasser zusetzen. Füllen Sie den
Wasserbehälter anschließend mit reinem
Leitungswasser, und pumpen Sie dieses Wasser
in ein Waschbecken.
Die Anwendung der Munddusche
(Abb. 33 bis 47)
- Stellen Sie die Düse auf Position • (= ein
Strahl) (Abb. 33).
- Setzen Sie die Düse dicht an Ihre Zähne.
Beugen Sie sich über ein Waschbecken, und
schalten Sie das Gerät ein.
- Führen Sie den Wasserstrahl über die
Außenseite Ihrer Zähne, dann über die
Innenseite, über das Zahnfleisch und
besonders intensiv über die Zahnfugen, um
Speisereste zu entfernen (Abb. 37).
• Achten Sie darauf, daß der Wasserstrahl
senkrecht auf die Zahnreihe trifft (Abb. 38).
Halten Sie die Düse so, daß der Strahl nicht
in die Zahntaschen zwischen Zähnen und
Zahnfleisch trifft.
20
29
30
31
32
33
34
35
36
24
25
26
27
27A
28
Page 21

Wenn Sie die Stellung der Düse in der
Mundhöhle ändern wollen, ist es ratsam, die
Wasserzufuhr am Schalter (R) zu unterbrechen
(Abb. 39).
Stellen Sie den Kontrollring auf den
gewünschten Wasserdruck (Abb. 40).
• Während der Eingewöhnungszeit und bei
entzündetem Zahnfleisch ist ein niedriger
Wasserdruck zu empfehlen.
•“MAX-Taste”: Wenn Sie kurzfristig einen
besonders starken Wasserstrahl anwenden
wollen, drücken Sie den MAX-Schalter
(Abb. 41). Das ist besonders angebracht unter
Zahnbrücken.Sobald Sie den Schalter
loslassen, kehrt der Wasserstrahl zur
eingestellten Stärke zurück.
- Stellen Sie nach Reinigung der Zähne die
Düse zur Massage des Zahnfleischs auf
Position ∂ (Abb. 42).
Neue bzw.
zusätzliche Düsen
Ersatzdüsen und
zusätzliche Düsen
können Sie über das
Philips Service Center
beziehen.
Reinigung
• Ziehen Sie vor jeder Reinigung den Stecker
aus der Steckdose.
• Verwenden Sie keine Scheuerpulver oder
Lösungsmittel wie Alkohol oder Aceton.
• Sie können das Gerät mit einem feuchten Tuch
abwischen, auf das Sie bei Bedarf etwas
Spülmittel aufgetragen haben.
• Die Behälter und Deckel können abgenommen
und getrennt gereinigt werden - auch im
Geschirrspüler (Abb. 48).
• Aufladbare Zahnbürste:
Die Zahnbürste kann in lauwarmem Wasser
gereinigt werden, dem Sie etwas Spülmittel
beifügen können.
• Munddusche:
Der Griffhalter (Abb. 49)
und der Wasserbehälter
können in heißem
Wasser ausgewaschen
und unter der
Wasserleitung
ausgespült werden.
Diese Teile können
auch im Geschirrspüler
gereinigt werden.
39
40
47
46
45
m
l
4
0
0
3
0
0
2
0
0
1
2
48
49
41
MAX
42
43
44
37
38
21
Page 22

Een leven lang een goed gebit met Philips
Schone en gezonde tanden geven u een gevoel
van zekerheid en zelfvertrouwen.
Maar uw dagelijkse tandverzorging heeft ook tot
doel uw tanden en kiezen uw leven lang te
behouden. Ook de inspanningen van uw tandarts
en mondhygiënist zijn hierop gericht.
Philips ondersteunt dit van harte.
Om u te verzekeren van een gaaf gebit en
gezond tandvlees, is goede en frequente
verwijdering van tandplak noodzakelijk.
Wat is tandplak?
Tandplak is de belangrijkste oorzaak van
gebitsaandoeningen.
Het is een zacht, kleverig laagje dat voortdurend
op de tanden en kiezen wordt afgezet, vooral in
moeilijk te bereiken gedeelten zoals langs de
randen van het tandvlees en tussen de tanden en
kiezen.
Het heeft ongeveer dezelfde kleur als de tanden
en kiezen en is daardoor nauwelijks zichtbaar.
Zolang de plak nog zacht is, kan deze
gemakkelijk worden verwijderd.
Wat zijn de gevolgen van tandplak?
De bacteriën in tandplak produceren een zuur dat
het glazuur en het zich daaronder bevindende
tandbeen van de tanden en kiezen kan oplossen.
Op deze manier onstaat tandbederf (cariës)
(fig. 1).
Bovendien vormen de bacteriën nog schadelijke
stoffen die ontsteking van het tandvlees
(gingivitis) of
aantasting van het
steunweefsel
(parodontitis) kunnen
veroorzaken.
Ontstoken tandvlees
is vaak rood en
gezwollen, en bloedt
gemakkelijk bij het
poetsen (fig. 2).
Als u tandplak
grondig en regelmatig
uit alle delen van de
mondholte verwijdert,
voorkomt u het
ontstaan van gingivitis
en helpt u de
uitbreiding van
paradontitis een halt
toe te roepen.
Philips 2-Action plaque remover
2-Action borstel
De kracht van dit nieuw ontwikkelde systeem
voor het verwijderen van tandplak ligt vooral in de
dubbele werking van de oscillerende borstel.
Snelle draaibewegingen van de borstel,
gecombineerd met het
borstelen van de
ruimten tussen de
tanden door de als extra
toegevoegde “Active
tip”, resulteren in
grondige en uiterst
effectieve reiniging van
elk gedeelte van de
tanden en kiezen
(fig. 3).
Controlled Pressure
Voor een goede techniek bij het tandenpoetsen is
de juiste hantering van de borstel vereist: een
samenspel van aandrukkracht en bewegingen.
Overmatige druk kan beschadiging van gebit en
tandvlees veroorzaken, en leidt ertoe dat uw
borstel voortijdig vervangen moet worden.
Bovendien wordt het poetsen hierdoor minder
effectief.
“Controlled Pressure ” helpt u de aandrukkracht
tijdens het poetsen onder controle te houden.
Als de borstel te hard tegen tanden, kiezen of
tandvlees wordt gedrukt, waarschuwt de borstel u
doordat de stand van de borstelhals plotseling
verandert.
Dit gebeurt vaak als men het apparaat de eerste
keer gebruikt.
Klinische tests tonen aan dat Controlled Pressure
u zal helpen binnen een paar dagen een
effectieve borsteltechniek te ontwikkelen, waarbij
u poetst met de juiste druk (fig. 4).
Nederlands
22
1
3
2
CLICK
4
CLICK
CLICK
Page 23

Monddouche
Ook de Philips monddouche is een plezierig
hulpmiddel bij de dagelijkse mondverzorging. Het
gebruik ervan geeft een heerlijk fris gevoel: vooral
wanneer aan het water een mondwater wordt
toegevoegd.
1-straal/6-straals systeem
• Op moeilijk bereikbare plaatsen, zoals tussen
de tanden en kiezen, kunnen voedselresten en
beginnende (zachte) tandplak worden
verwijderd. Hiervoor gebruikt u de krachtig
pulserende straal (fig. 33).
Ook kunt u hiermee de tandplak wegspuiten,
die eerst is losgemaakt met behulp van de
oplaadbare tandenborstel, een tandenstoker,
een spiraalborsteltje of tanddraad (“floss”).
∂ Met een zestal pulserende waterstraaltjes
kunt u het tandvlees masseren (fig. 42). Dit
heeft een goede doorbloeding tot gevolg en
draagt bij tot de gezondheid van het weefsel.
23
Belangrijk
Algemeen:
• Indien het snoer van dit apparaat is
beschadigd, dient het uitsluitend door
het originele type te worden vervangen.
Wend u daarvoor tot uw Philips
leverancier op tot de Philips organisatie
in uw land.
Oplaadbare tandenborstel:
• Eerste keer opladen: tenminste 16 uur.
• Voor de beste resultaten bij het poetsen
en omwille van de hygiëne: vervang de
opsteekborsteltjes zodra de haartjes uit
elkaar gaan staan, of tenminste elke drie
maanden.
• Het verdient aanbeveling de elektrische
tandenborstel tweemaal per dag
tenminste 2 minuten te gebruiken.
•
º
De ingebouwde oplaadbare batterij
bevat stoffen die schadelijk kunnen
zijn voor het milieu.
Als u te zijner tijd het apparaat afdankt,
verwijder dan de ingebouwde
oplaadbare batterij (fig. 21-23) en lever
deze in op een door de overheid daartoe
aangewezen plaats of anderszins
volgens wettelijk voorschrift. Zie
hoofdstuk “Milieu”.
Monddouche:
• Voor het eerste gebruik, of wanneer u de
monddouche lang niet hebt gebruikt,
kan het nodig zijn het uitstromen van het
water op gang te brengen door de
volumeregelaar zover mogelijk open te
draaien (stand 5) en de sproeikop in
stand • (voor één straal) te zetten. Het
water begint nu binnen 10 à 20 seconden
te stromen.
Page 24

Algemene beschrijving (fig. 5)
Oplaadbare tandenborstel
A 2-Action opsteekborstel
B Oscillerende borstel
C Active tip
D Gekleurde identificatiering (vastklikken)
E Opsteekas
F ”Controlled Pressure” knikkop
G Aan/Uit schakelaar (drukknop)
H Opbergvak voor twee 2-Action
opsteekborstels
I Houder voor A en P
Monddouche:
J Waterreservoir
K Deksel van waterreservoir
L Opbergplaats voor mondstukjes
M Handgreep
N Houder van handgreep
O Waterslang
P Mondstukje (wordt op de handgreep
vastgeklikt)
Q Aan/uit schakelaar (“Power”)
R Volumeregelaar (draairing)
S Waterschakelaar (“Stop/Start”)
T MAX knop
U Sproeikop (instelbaar door draaien)
• = één straal (reinigen)
∂ = zes stralen (massage)
Algemeen:
V Snoer met stekker
W Montageplaat (met schroeven en pluggen)
voor wandbevestiging
X Snoeropbergplaats
Y Deksel van opbergplaats
In de badkamer
• Monteer de oplaadunit met behulp van de
montageplaat aan een wand. Kies daarvoor een
plaats vanwaar hij niet in het water kan vallen.
• De tandenborstel zelf is waterdicht. U kunt de
tandenborstel dus desgewenst gebruiken
tijdens het douchen of baden.
Snoer opbergen (fig. 6-7)
Bevestigen aan de wand (fig. 8-9)
Oplaadbare tandenborstel
Opladen (fig. 10-11)
• Vóór het eerste gebruik tenminste 16 uur
opladen.
• Als het apparaat normaal in gebruik is, laadt u
het na elk gebruik opnieuw op door de
tandenborstel in de oplaadunit terug te zetten.
Gebruik (fig. 12-16)
- Plaats (duw en draai) de 2-Action
opsteekborstel op het apparaat (fig. 12).
- Druk op knop (G) om
de tandenborstel in te
schakelen (fig. 13).
24
9
8
6
7
11
CLICK
10
12
CLICK
13
1
2
Page 25

• Laat de borstel het werk doen: leid het borsteltje
alleen maar zorgvuldig langs de tanden en
kiezen. De Active tip vindt zelf zijn weg naar de
ruimtes tussen de tanden en kiezen. Zorg ervoor
dat het borsteltje zowel het hele oppervlak van
de tanden en kiezen bestrijkt, als een klein
gedeelte van het tandvlees (fig. 14-15).
• Als de borstelhals tijdens het borstelen met een
klik in de rechte stand komt, heeft u te hard
gedrukt (fig. 16).
• Zie ook de meegeleverde kaart met
Tandenpoets-instructies.
Minimale poetstijd:
2 minuten (fig. 17)
Twee minuten wordt
beschouwd als de
minimale tijd die vereist
is om plak doeltreffend
te verwijderen en het
tandvlees te masseren.
Voor nog betere
resultaten kunt u
natuurlijk langer poetsen.
Houd er ook rekening mee dat fluoride in
tandpasta enige tijd nodig heeft om in te werken.
Na het tandenpoetsen
(fig. 18-20)
- Schakel de
tandenborstel in en
spoel hem schoon
onder de kraan.
Gebruik lauwwarm
water (max. 60 °C).
Nieuwe 2-Action opsteekborstels
Voor vervanging zijn nieuwe 2-Action opsteekborstels bij uw leverancier verkrijgbaar onder
typenr. HP 790.
Milieu
Voor het verwijder en van de ingebouwde
oplaadbare batterij bij afdanken van het apparaat:
zie fig. 21-23.
• N.B. U kunt het apparaat ook naar een Philips
Service Centrum brengen: daar verzorgt men
dit graag voor u.
• Vóórdat u de batterij verwijdert, dient deze
geheel leeg te zijn. Laat het apparaat werken
totdat de motor stopt.
25
15
14
CLICKCLICK
16
17
2
min.
30
sec.
30
sec.
30
sec.
30
sec.
20
18
19
21
22
23
2
Page 26

• N.B.: Schroef de onderzijde van het apparaat
alleen los wanneer u de batterij wilt verwijderen.
Het is mogelijk dat het apparaat niet meer
waterdicht is nadat u de onderzijde heeft
losgeschroefd. De garantie vervalt dan ook
wanneer de onderzijde wordt losgeschroefd.
Als de sticker aan de onderzijde onbeschadigd
is, toont dit aan dat het apparaat niet is
geopend.
Monddouche
Voor het eerste gebruik (fig. 24-32)
(en ook als u het apparaat enkele dagen niet hebt
gebruikt)
Voor dagelijks gebruik (fig. 24-28)
Mondwater voor extra verfrissing
U kunt desgewenst wat mondwater aan het water
toevoegen.
Indien u mondwater heeft gebruikt: vul na gebruik
het waterreservoir met schoon (onvermengd)
water en spuit het apparaat geheel leeg in de
wasbak.
Gebruik (fig. 33-47)
- Kies stand • voor het schoonmaken van het
gebit (fig. 33).
- Buig u voorover boven de wasbak en houd het
mondstuk bij het gebit.
- Leid de waterstraal langs de voor- en
achterzijde van uw tanden en kiezen, het
tandvlees, en vooral langs de ruimten tussen de
tanden en kiezen om voedselresten te
verwijderen (fig. 37).
• Richt de waterstraal onder een rechte hoek
op de tanden en kiezen (fig. 38). Spuit niet in
de aanhechting van het tandvlees.
26
29
30
33
34
35
36
31
32
24
25
26
27
27A
28
Page 27

• Voordat u de positie van het mondstukje in de
mond verandert, kunt u de watertoevoer
uitschakelen met de waterschakelaar (fig. 39).
• U kunt het watervolume altijd tijdens het gebruik
wijzigen door de instelring te draaien (fig. 40).
• Zet de regelaar voor het watervolume in een
lage stand gedurende de gewenningsfase
(en ook bij ontsteking van het tandvlees).
• ”MAX”. Als u gedurende korte tijd maximum
watervolume wilt toepassen (m.n. bij het
schoonspuiten onder brugwerk), kunt u de MAX
knop indrukken (fig. 41). Wanneer u de knop
loslaat, schakelt het apparaat terug op het
ingestelde watervolume.
• Nadat het gebit is schoongemaakt, zet u de
sproeikop in stand ∂ voor massage van het
tandvlees (fig. 42).
Mondstukjes
(bij)bestellen?
Losse mondstukjes
(voor vervanging of
uitbreiding) zijn
verkrijgbaar bij Philips
Service Centra.
Schoonmaken
• Neem voor het schoonmaken van het apparaat
de stekker uit het stopcontact.
• Gebruik geen schurende of agressieve
schoonmaakmiddelen, schuursponsjes of
schuurdoekjes, alcohol, aceton e.d.
• U kunt het apparaat schoonmaken met een
vochtige doek (desgewenst met wat
afwasmiddel).
• U kunt de opbergplaats verwijderen om deze
apart af te wassen (ook in een
vaatwasmachine) (fig. 48).
• Oplaadbare tandenborstel:
U kunt de tandenborstel schoonmaken in
lauwwarm water of sop.
• Monddouche:
U kunt de houder van
de handgreep (fig. 49)
en het waterreservoir
afwassen in heet sop
en vervolgens
afspoelen onder de
kraan.
U kunt deze delen ook
schoonmaken in de
vaatwasser.
39
40
41
MAX
42
43
44
46
45
m
l
4
0
0
3
0
0
2
0
0
1
2
48
49
47
37
38
27
Page 28

Tænder for livet med Philips/Jordan.
Rene og sunde tænder giver både selvtillid og
velvære og er samtidig utroligt vigtigt for et godt
udseende.
Men den daglige tandpleje og regelmæssige
tandlægebesøg er også en forudsætning for, at vi
kan beholde vore egne tænder hele livet.
Det vil Philips/Jordan meget gerne være med til
at sikre, og en af de allervigtigste faktorer for at
bevare sunde tænder og sundt tandkød er
grundig og regelmæssig fjernelse af
plakbelægninger.
Hvad er plak ?
Plakbelægninger er hovedårsagen til de fleste
tandsygdomme.
Plak er et blødt, klæbrigt lag, som hele tiden
udvikler sig på vore tænder og som især er svær
at fjerne ved tandkødslinierne og mellem
tænderne. Den har næsten samme farve som
tænderne og er derfor svær at se.
Men så længe belægningerne er bløde, kan de
nemt fjernes.
Hvilken virkning har plakbelægninger ?
Bakterierne i plakbelægningerne producerer en
syre, der kan opløse emaljen på tænderne samt
angribe tandbenet og dermed forårsage huller i
tænderne (Karies) (fig. 1).
Udover syren danner bakterierne også andre
skadelige stoffer, som
kan medføre
betændelse i tandkødet
eller angreb af vævet
omkring tanden
(Paradentose).
Tandkødet bliver rødt og
opsvulmet ved
betændelse, og det vil
ofte bløde fra tandkødet,
når man børster tænder
(fig. 2).
Men regelmæssig og
omhyggelig fjernelse af
belægningerne
forhindrer begyndende
tandkødsbetændelse og
er dermed med til at
forebygge Paradentose.
Philips/Jordan 2-Action plakfjerner.
2-Action-børste.
Styrken i dette nyudviklede system til effektiv
fjernelse af plak ligger i den dobbeltvirkende
oscillerende (roterende)
børste.
Kombinationen af de
hurtige, roterende
bevægelser samtidig
med den interdentale
børstes bevægelser i
tandmellemrummene
(vipper fra side til side)
resulterer i en grundig
og særdeles effektiv
rensning af hele tanden (fig. 3).
Kontrolleret børstetryk.
En forudsætning for effektiv tandrensningsteknik
er korrekt brug af tandbørsten, da det er en
balance mellem tryk og bevægelser. For hårdt
tryk kan skade både tænder og tandkød, men
også slide børsten unødigt og dermed reducere
dens effektivitet. Det kontrollerede børstetryk
gør, at man hurtigt og nemt finder ud af, hvor
hårdt man skal trykke, når man børster tænder.
Så snart børsten trykkes for hårdt mod tænderne,
advares man ved, at børstehalsen pludselig
ændrer stilling (den “klikker” tilbage).
Dette kan ske ret tit de første gange, tandbørsten
bruges.
Kliniske forsøg har imidlertid bevist, at man i løbet
af ganske få dage lærer en korrekt og effektiv
børsteteknik med elektrisk tandbørste, takket
være det kontrollerede børstetryk (fig. 4).
Dansk
28
1
2
3
CLICK
4
CLICK
CLICK
Page 29

Tandspuler
Philips elektriske tandspuler er et praktisk
hjælpemiddel til den daglige tandpleje. Det giver
en dejlig frisk fornemmelse, især hvis man
kommer lidt mundskyllemiddel i vandet.
1-stråle/6-stråle system.
• Tandspuleren fjerner madrester og begyndende
(bløde) belægninger fra vanskeligt tilgængelige
steder som f.eks. mellemrummene mellem
tænderne. Hertil anvendes en enkelt kraftig
pulserende stråle (fig. 33).
Denne stråle kan også anvendes til at fjerne
belægninger, som først er løsnede ved hjælp af
tandbørste, tandstikker, spiralbørste eller
tandtråd.
∂ Til massage af tandkødet benyttes seks pulserende vandstråler (fig. 42). Dette stimulerer
blodcirkulationen og holder tandkødet sundt.
29
Vigtigt.
Generelt:
• Hvis netledningen til dette apparat er
beskadiget må den kun udskiftes til
den samme specielle ledning. Henvend
Dem til Deres Philips forhandler eller
direkte til Philips.
Opladelig tandbørste:
• Første opladning: Mindst 16 timer.
• For hele tiden at opnå optimal
tandbørstning og hygiejne bør 2-Action
børstehovederne udskiftes mindst hver
3. måned, eller så snart børstehårene
begynder at stritte.
• Det anbefales, at De bruger Deres
elektriske tandbørste i mindst 2
minutter - to gange om dagen.
• Det indbyggede, genopladelige batteri
indeholder substanser, der kan skade
miljøet.
Når De derfor til sin tid skal kassere
apparatet, bedes De tage det
genopladelige batteri ud (fig. 21-23) og
aflevere det på et officielt
opsamlingssted for brugte batterier. Se
også afsnittet “Miljø-beskyttelse”.
Tandspuler:
• Når tandspuleren tages i brug første
gang, eller hvis den ikke har været
anvendt i længere tid, kan det være
nødvendigt at sætte ringen til
regulering af vandtrykket i maximum
stilling (5) og stråledysen i stilling
• (en
enkelt pulserende stråle). I løbet af
10-20 sekunder kommer der vand ud af
stråledysen.
Page 30

Generel beskrivelse (fig. 5).
A 2-Action børstehoved
B Oscillerende (roterende) børste
C Interdental børste (vipper fra side til side)
D Farvet identifikationsring ("klikkes" på)
E Drivaksel
F Bøjelig børstehals - “kontrolleret
børstetryk”
G Tænd/sluk (trykknap)
H Opbevaringsrum til to 2-Action
børstehoveder
I Invendig del til Aog P
Tandspuler:
J Vandtank
K Låg til vandtank
L Opbevaringsrum til stråledyser
M Håndgreb
N Holder til håndgreb
O Vandslange
P Stråleforsats (kan “klikkes” fast på
håndtaget)
Q Tænd/Sluk-knap (“Power”)
R Ring til regulering af vandtryk
S Vandknap (“Stop/Start”)
T MAX-knap
U Stråledyse (reguleres ved af dreje den):
• = en enkelt pulserende vandstråle
(rensning)
∂ = seks pulserende vandstråler
(massage)
Generelt:
V Ledning med netstik
W Vægbeslag (med skruer og rawlplugs)
X Opbevaringsrum til netledning
Y Låg til opbevaringsrum
Ved brug i badeværelset.
• Vægbeslaget til opladeren monteres på en væg,
hvor opladeenheden ikke risikerer at falde ned i
vand.
• Selve tandbørsten er vandtæt og kan derfor
også bruges, når man er i bad/brusebad.
Opbevaring af netledningen (fig. 6-7)
Montering på væg (fig. 8-9)
Genopladelig tandbørste.
Sådan oplades apparatet (fig. 10-11).
• Før tandbørsten tages i brug første gang,
skal den oplades i mindst 16 timer.
• Herefter oplades tandbørsten hver gang, den
har været brugt ved blot at sætte den tilbage i
opladeren (der er tilsluttet lysnettet).
Sådan anvendes tandbørsten (fig. 12-16)
- Sæt (tryk og drej) 2-Action børstehovedet på
apparatet (fig. 12).
- Tænd for tandbørsten
ved at trykke på
knappen (G) (fig. 13).
30
6
7
9
8
11
CLICK
10
12
CLICK
13
1
2
Page 31

• Lad tandbørsten gøre arbejdet: Man behøver
blot styre børsten omhyggeligt langs med
tænderne. Den interdentale børste finder selv
vej ind mellem tænderne. Sørg for, at børsten
berører hele tandoverfladen og lidt af tandkødet
(fig. 14-15).
• Hvis børstehovedet "klikker" bagover, er trykket
for hårdt (fig. 16).
• Se også de medleverede børsteinstruktioner.
Mindst 2 minutters tandbørstning (fig. 17).
2 minutter anses for at være den mindste tid, det
tager for effektivt at
fjerne plakbelægninger
og massere
tandkødet. Ønskes et
endnu bedre resultat,
forlænges børstetiden
lidt.
Husk også at fluortandpasta behøver
længere tid for at virke
effektivt.
Efter tandbørstningen
(fig. 18-20).
- Tænd tandbørsten og
rens den i varmt vand
(max. 60 °C).
Udskiftning af 2-Action børstehovederne.
Nye 2-Action børstehoveder kan købes hos
Deres forhandler under typenr. HP 790.
Miljøbeskyttelse.
Inden tandbørsten til sin tid kasseres, tages det
indbyggede genopladelige batteri ud.
Se fig. 21-23.
• De kan også aflevere hele apparatet direkte til
Philips, hvor man med glæde vil hjælpe Dem.
• Før batteriet tages ud, skal det være helt
afladet. Lad motoren køre, indtil den stopper af
sig selv.
31
15
14
CLICKCLICK
16
17
2
min.
30
sec.
30
sec.
30
sec.
30
sec.
18
19
20
21
22
23
2
Page 32

• Bemærk: Skru kun bunden af, når batteriet skal
tages ud. Når først bunden har været skruet af,
er motorenheden muligvis ikke længere
vandtæt, hvorfor garantien i så fald bortfalder.
Et ubeskadiget selvklæbende mærke på siden
af apparatet viser, at det ikke har været åbnet.
Tandspuler.
Før tandspuleapparatet tages i brug første
gang (fig. 24-32) (eller hvis det ikke har været
anvendt i nogle dage).
Før den daglige brug af apparatet (fig. 24-28).
Mundskyllemiddel for at opnå ekstra friskhed:
Kom eventuelt lidt mundskyllemiddel i vandet.
Efter De har brugt mundskyllemiddel, fyldes
vandtanken igen op med rent (ublandet) vand,
hvorefter alt vandet pumpes ud af apparatet og
ned i håndvasken.
Sådan bruges tandspuleren (fig. 33-47):
- Vælg stilling • for rensning (fig. 33).
- Hold hovedet ind over håndvasken og hold
stråledysen tæt ind imod tænderne.
- Før vandstrålen mod tændernes for- og
bagside, mod tandkødet og især ind i
mellemrummene mellem tænderne for at fjerne
eventuelle madrester (fig. 37).
• Sørg for at vandstrålen rammer lige ind på
tænderne (fig. 38). Pas på, at strålen ikke
rammer direkte på tandkødet.
32
29
30
31
32
33
34
35
36
24
25
26
27
27A
28
Page 33

• Det tilrådes at slukke for vandstrålen
(fig. 39), mens man ændrer strålens retning.
• Man kan altid ændre vandtrykket ved at dreje
på ringen for regulering (fig. 40).
• Indtil De har vænnet Dem til at bruge
vandspuleren (eller hvis De har tendens til
tandkødsbetændelse), tilrådes det at
indstille på lavt vandtryk.
• ”MAX”. Hvis De for en kort periode ønsker
maksimalt vandtryk (f.eks. ved rensning under
tandbroer), trykkes på MAX-knappen (fig. 41).
Når De igen slipper knappen, går vandtrykket
tilbage til den oprindelige stilling.
- Når tænderne er rensede, sættes stråledysen i
stilling ∂ til massage af tandkødet (fig. 42).
Ekstra
stråleforsatser:
Ekstra forsatser (for
udskiftning eller
udvidelse) kan købes
hos Deres forhandler.
Rengøring:
• Før De begynder at rengøre apparatet, skal
stikket tages ud af stikkontakten.
• Brug aldrig skrappe rengørings- eller skuremidler, sprit, acetone o.lign.
• Apparatet kan rengøres med en fugtig klud (om
nødvendigt dyppet i et mildt rengøringsmiddel).
• Opbevaringsrummet kan tages af og vaskes i
varmt sæbevand (tåler opvaskemaskine)
(fig. 48).
• Den genopladelige tandbørste:
Tandbørsten kan rengøres i lunkent (sæbe)vand.
• Tandspuleren:
Holderen til
håndgrebene (fig. 49)
og vandtanken kan
vaskes i varmt
sæbevand og derefter
skylles af under
vandhanen.
Disse dele kan også
kommes i opvaskemaskinen.
33
39
40
47
46
45
m
l
4
0
0
3
0
0
2
0
0
1
2
48
49
41
MAX
42
43
44
37
38
Page 34

Tenner for livet med Philips/Jordan
Rene og friske tenner gjør deg mer selvsikker og
er en forutsetning for et attraktivt utseende.
Daglig stell av tennene sikter også mot at
tennene skal vare hele livet. Den innsats som din
tannlege og annet fagpersonell yter har også
dette som mål.
Philips/Jordan støtter sterkt dette syn. For å sikre
friske tenner og tannkjøtt er riktig og regelmessig
fjerning av plakk nødvendig.
Hva er plakk?
Plakk er hovedgrunnen til tannsykdommer. Det er
et mykt og klebrig belegg som utvikles
kontinuerlig på tennene, spesielt på plasser der
det er vanskelig å komme til. Slik som langs
tannlinjen og mellom tennene. Det har nesten
den samme fargen som tennene og er derfor lite
synlig. Så lenge belegget er mykt, kan det lett
fjernes.
Hva er virkningen av plakk?
Bakteriene i tannbelegget produserer en syre
som kan løse opp emaljen på tennene og
tannbenet. Dette vil forårsake tannråte (caries)
(fig. 1).
Bakteriene danner også
andre skadelige
substanser som kan
forårsake betennelse i
tannkjøttet (gingivitis)
eller forråtnelse av
støttevevet
(periodontitis).
Betent tannkjøtt er
vanligvis rødt og hovent
og blør ofte når tennene
pusses (fig. 2).
Gjennom regelmessig
fjerning av plakk i alle
områder av munnen vil
dette hindre at
betennelse (gingivitis)
oppstår og vil hjelpe til å
stoppe spredningen av
periodontitis.
Philips/Jordan Double Action plakkfjerner
Double Action børste
Effekten til dette nyutviklede plakkfjernings
systemet er å finne i dobbelteffekten til den
oscillerende børsten. De
raske oscillerende
bevegelsene kombinert
med
tilleggsbevegelsene til
Active tip i
mellomrommet mellom
tennene, resulterer i en
grundig og effektiv
rengjøring av alle
tennene (fig. 3).
Automatisk kontroll av børstetrykket
Riktig rengjøringsteknikk forutsetter perfekt
håndtering av børsten og er en balansegang
mellom tilført trykk og bevegelse. For stort trykk
kan ødelegge både tennene og tannkjøttet og
forårsake unødvendig slitasje på børsten og også
redusere effektiviteten av børstingen.
Automatisk kontroll av børstetrykket hjelper deg å
kontrollere at riktig trykk blir brukt under
børstingen av tennene. Når trykk-nivået blir
overskredet vil børsten aktivt varsle deg ved hjelp
av en plutselig endring av vinkelen på børsten.
Dette kan ofte skje ved de første gangers bruk.
Kliniske tester har vist at automatisk kontroll av
børstetrykket vil hjelpe deg i løpet av få dager til å
utvikle en effektiv børsteteknikk for elektriske
tannbørster (fig. 4).
Norsk
34
1
2
3
CLICK
4
CLICK
CLICK
Page 35

Vannspyler
Vannspyleren fra Philips er en ekstra enhet for å
hjelpe Dem i det daglige vedlikeholdet av Deres
tenner. Den gir munnen en behagelig, frisk
følelse, spesielt hvis munnskyllevann er blitt tilsatt
vannet.
En stråle/seks stråle system
• Vannspyleren kan hjelpe Dem å fjerne
matrester og begynnelsen til (mykt) plakk fra
vanskelig tilgjengelige steder, slik som
mellomrommet mellom tennene. Til dette bruk
er en enkelt kraftig stråle best å bruke (fig. 33).
Denne strålen kan også brukes til å skylle bort
plakk som først er blitt løsnet fra tennene ved
hjelp av den oppladbare tannbørsten,
tannpirker, tanntråd e.l.
∂ Seks pulserende vannstråler kan brukes til
å massere tannkjøttet (fig. 42). Dette hjelper og
stimulerer blodsirkulasjonen og kan forbedre
helsetilstanden til tannkjøttet.
35
Viktig
Generelt
• Hvis nettledningen på dette apparatet
blir skadet, må den erstattes med en
spesialledning. Henvend Dem til Deres
Philipsforhandler eller direkte til
Philips.
Oppladbar tannbørste:
• Første lading: Minst 16 timer.
• For optimal hygiene- og børsteeffekt:
Bytt Double Action børstene så snart
hårene begynner å spre seg eller minst
hver tredje måned.
• Det anbefales å bruke Deres elektriske
børste 2 ganger pr. dag i minst 2
minutter.
• Det innebygde, oppladbare batteriet
inneholder stoffer som kan forurense
omgivelsene.
Ved eventuell kassering av apparatet,
vennligst fjern det innebygde
oppladbare batteriet (fig. 21-23) og
forsikre Dem om at batteriet er adskilt
fra vanlig husholdningsavfall og at det
blir kassert på en offentlig anvist plass.
Vennligst se avsnitt "Miljø".
Vannspyler
• Når tannspyleren tas i bruk for første
gang eller etter et langt opphold, kan
det være nødvendig for å få vannet til å
komme at man setter vannkontrollen til
maksimum (5) og tannspyler
munnstykket til posisjon • (for en stråle
innstilling). I løpet av 10-20 sekunder
skulle vannet begynne å komme.
Page 36

Generell beskrivelse (fig. 5)
A Double Action børste
B Oscillerende børste
C Active tip
D Fargede identifikasjonsringer (klikkes på)
E Drivaksel
F Automatisk kontroll av børstetrykket
(hodet bøyer seg)
G På-/av-bryter (knapp)
H Oppbevaring for børster - for to Double
Action børster
I Innerbeholder for Aog P.
Vannspyler
J Vannbeholder
K Lokk til vannbeholder
L Oppbevaringsplass for spylemunnstykker
M Håndtak
N Håndtak holder
O Vannslange
P Spylemunnstykker (kan settes på
håndtaket)
Q På-/Av-bryter (strømnett)
R Vannkontroll ring
S Vannbryter (stopp/start)
T MAX bryter
U Munnstykke (justering ved å vri)
• = en stråle (rengjøring)
∂= seks stråler (massasje)
Generelt:
V Nettledning
W Holder (med skruer og plugger) for
veggmontering
X Oppbevaringsplass for nettledning
Y Lokk til oppbevaringsplass for nettledning
Ved bruk på badet
• Bruk monteringsplaten, og monter ladeenheten
på et sted hvor den ved et uhell ikke kan falle i
vann.
• Da selve tannbørsten er vanntett kan De bruke
den mens De tar en dusj eller et bad.
Oppbevaringsplass for ledning (fig. 6-7)
Veggmontering (fig. 8-9)
Oppladbar tannbørste
Lading (fig. 10-11)
• Før første gangs bruk, lad tannbørsten i
minst 16 timer.
• Ved normal bruk lades tannbørsten etter hver
gang ved å plassere den tilbake i den tilkoblede
ladeenheten.
Hvordan bruke tannbørsten? (fig. 12-16)
- Sett (skyv og vri) Double Action børsten på
apparatet (fig. 12).
- Trykk på knappen (G)
for å slå på apparatet
(fig. 13).
36
6
7
9
8
11
CLICK
10
12
CLICK
13
1
2
Page 37

• La tannbørsten gjøre arbeidet for Dem. Bare før
børsten langs tennene. Active tip vil finne sin
egen vei og komme til i mellomrommene
mellom tennene. Forsikre Dem om at børsten
berører hele tannens overflate så vel som en
liten del av tannkjøttet (fig. 14-15).
• Hvis hodet klikker bakover i løpet av børstingen,
betyr dette at De har brukt et for stort trykk
(fig. 16).
• Se også det medfølgende instruksjonskortet.
Minimum børstetid: 2 minutter (fig. 17)
To minutter er regnet for å være den minste tid
for effektivt å fjerne
tannbelegg og
massere tannkjøttet.
For enda bedre
resultat kan De
bestemme Dem for å
børste lengre. Husk at
fluor tannkrem også
trenger noe tid for å
virke.
Etter børsting av
tennene (fig. 18-20)
- Slå tannbørsten på og
skyll den ren i lunkent
vann (maks. 60 °C).
Bytte av Double Action børster
For erstatning, er nye Double Action børster
tilgjengelige fra din forhandler under type
nr. HP 790.
Miljø
For å fjerne det innebygde oppladbare batteriet
ved eventuell kasting av apparatet, se fig. 21-23.
• NB! Du kan levere produktet til et Philips
servicesenter. Betjeningen der vil bli glade for å
kunne hjelpe deg.
• Før batteriet fjernes skal det være helt tomt. La
apparatet gå helt til motoren stopper.
37
15
14
CLICKCLICK
16
17
2
min.
30
sec.
30
sec.
30
sec.
30
sec.
18
19
20
21
22
23
2
Page 38

• NB! Skru bare ut bunnen for å fjerne batteriet.
Tannbørsten vil ikke være vanntett lenger etter
at bunnen har vært løsnet. På grunn av dette er
garantien ugyldig hvis tannbørsten er blitt åpnet.
En uskadet merkelapp på bunnen viser at
apparatet ikke har blitt åpnet.
Vannspyler
Før første gangs bruk (fig. 24-32)
(også når apparatet ikke er blitt brukt på noen
dager).
Før daglig bruk (fig. 24-28).
Skyllevann for ekstra friskhet
De kan tilsette skyllevann til vannet. Etter bruk av
skyllevann, fyll vannbeholderen med rent
(ublandet) vann og pump alt vannet gjennom
apparatet og ned i vasken.
Hvordan bruke apparatet? (fig. 33-47)
- Velg posisjon • for rengjøring (fig. 33).
- Bøy Dem over vasken og hold munnstykket
nær tennene.
- Før vannspyleren på forsiden og på baksiden
av tennene, gommen og spesielt til
mellomrommet mellom tennene for å fjerne
eventuelle matrester (fig. 37).
• Forsikre Dem om at vannspyleren står
vinkelrett til tennene (fig. 38). Pek ikke med
vannspyleren på en slik at måte at den
skader tannkjøttet.
38
29
30
31
32
33
34
35
36
24
25
26
27
27A
28
Page 39

• Før De bytter posisjon på munnstykket i
munnen kan De slå av vanntilførselen ved hjelp
av vannbryteren (fig. 39).
• De kan også justere vannmengden ved å vri på
vannkontroll ringen (fig. 40).
• Mens De fortsatt venner Dem til vannspyleren (også hvis tannkjøttbetennelse
plager Dem) anbefales lav vannmengde.
• "MAX" hvis De ønsker maksimal spylekraft en
kort stund (f.eks. ved rengjøring under
tannbroer) kan De trykke på MAX knappen
(fig. 41). Slipp knappen for å gå tilbake til
innstilt vannmengde.
- Etter rengjøring sett munnstykket til posisjon ∂
for tannkjøttmassasje (fig. 42).
Ekstra munnstykker
Ekstra munnstykker
(for bytte eller
utvidelse) er tilgjengelig
som ekstrautstyr fra
Deres forhandler.
Rengjøring
• Før rengjøring trekk ut støpselet fra
stikkontakten.
• Bruk ikke skurende eller aggressive
rengjøringsmidler slik som skurepulver,
alkohol, aceton etc.
• De kan rengjøre apparatet med en fuktig klut
(hvis nødvendig med noe vaskemiddel).
• Oppbevaringsbeholderen for munnstykker er
avtagbar og kan vaskes (også i oppvaskmaskinen) (fig. 48).
• Oppladbar tannbørste:
Tannbørsten kan vaskes i lunkent (såpe) vann.
• Vannspyler:
Håndtaks holderen
(fig. 49) og
vannbeholderen kan
vaskes i varmt
såpevann og skylles
under springen. Disse
delene kan også vaskes
i oppvaskmaskinen.
39
39
40
47
46
45
m
l
4
0
0
3
0
0
2
0
0
1
2
48
49
41
MAX
42
43
44
37
38
Page 40

Läs först hela bruksanvisningen! Spara den!
Spara köpbevis och kvitto!
Tänder för hela livet med Philips/Jordan
Rena och friska tänder påverkar utseendet
positivt och ger därmed ökat självförtroende.
Men den dagliga skötseln syftar också till att få
behålla de egna tänderna genom hela livet, vilket
även tandläkaren och tandhygienistens åtgärder
syftar till.
Philips/Jordan ger ett starkt stöd till denna
intention.
För att säkerställa friska tänder och tandkött
krävs att plaken avlägsnas ofta och regelbundet.
Vad är plak?
Plak är huvudorsaken till tandsjukdomar.
Plak är ett mjukt och klibbigt lager som
fortlöpande bildas på tänderna främst på ställen
där det är svårt att komma åt för rengöring t ex
nere vid tandhalsarna och mellan tänderna.
Den har nästan samma färg som tänderna och
därför svår att upptäcka.
Så länge plaken är mjuk är det lätt att få bort den.
Vad har plak för inverkan?
Bakterierna i plaken producerar en syra, som
angriper tändernas emalj och pulpan, karies
bildas, fig 1.
Bakteriern bildar också
ämnen, som kan orsaka
inflamation i tandköttet
(gingititis) och som kan
skada vävnaden
(periodontis) som håller
tänderna vid käkbenet.
Inflammerat tandkött är
rött och svullet och det
blöder ofta i vid
tandborstning, fig 2.
Noggrann och
regelbunden borttagning
av plak i alla delar av
munnen förebygger
bildandet av gingivitis
och minskar risken för
spridningen av
periodontis.
Philips/Jordan en dubbelverkande
plakborttagare
Dubbelverkan
Effektiviteten i detta nyutvecklade
plakborttagningssystem ligger i den dubbla
funktionen hos den oscillerande borsten.
Snabba oscillerande
rörelser kombinerat med
ytterligare en aktivt rörlig
borsttopp för
mellanrummet mellan
tänderna, ger som
resultat en noggrann
och mycket effektiv
rengöring av tändernas
samtliga ytor, fig 3.
Borsttryckkontroll
En bra rengöringsteknik förutsätter att
tandborsten hanteras på rätt sätt. Detta betyder
att borstningen utförs med rätt balans mellan
borsttrycket mot tänderna och borstens rörelser.
För hårt borsttryck kan ge skador på både
tandkött och tänder. Dessutom förkortas
livslängden på borsten. Borstningen blir också
mindre effektiv med för högt tryck.
Borsttryckkontrollen gör att dessa nackdelar kan
undvikas.
Vid för hårt tryck kommer borsten att plötsligt vika
undan och på så sätt varna.
Denna situation kommer antagligen att uppstå
ofta i början.
Kliniska tester har visat att kontrollerat borsttryck
ger god hjälp att hitta en bra teknik vid
användning av elektrisk tandborste med rätt tryck
redan efter några dagars användning, fig 4.
Svenska
40
1
2
3
CLICK
4
CLICK
CLICK
Page 41

Tandspolare
Tandspolaren är ytterligare ett hjälpmedel för den
dagliga tandvården.
Den ger en behaglig känsla av renhet i munnen.
speciellt om munvatten används.
1-stråles/6-stråles system
• Tandspolaren hjälper till att avlägsna
matrester och mjuk plack från sådana områden
i munnen som inte är så lätta att komma åt, t
ex mellanrummen mellan tänderna. För detta
ändamål används en enda kraftigt pulserande
stråle, fig 33. Denna stråle kan även användas
för att skölja ur plack som har frigjorts från
tänderna med hjälp av tandborste, tandstickor
eller tandtråd.
∂ Sex pulserande strålar används för att
massera tandköttet, fig 42.
Detta hjälper till att stimulera blodcirkulationen
och kan förbättra hälsotillståndet i tandköttets
vävnader.
41
Viktigt
Allmänt
• Om sladden på denne apparat skadas
måste den ersättas med en
specialsladd, vilken tillhandahålls av
Philips eller av deras serviceombud.
Laddbar tandborste:
• Före första användning skall batteriet
laddas 16 timmar.
• För optimal borstverkan och av
hygieniska skäl bör den
dubbelverkande tandborsten bytas när
borsten börjar spreta, dock minst en
gång var 3:e månad.
• Det är lämpligt att borsta tänderna med
den elektriska tandborsten två gånger
om dagen under minst två minuter
vardera gången.
• Det inbyggda laddbara batteriet
innehåller ämnen som ev kan påverka
miljön.
Avlägsna därför batteriet då apparaten
tjänat ut (fig 21 - 23)och deponera det
enligt gällande lokala föreskrifter. Se
avsnittet: "Med tanke på miljön".
Tandspolare:
• När tandspolaren används för första
gången eller inte har använts under
lång tid kan det vara nödvändigt att
starta vattenstrålen genom att sätta
reglaget för vattenmängden på maxläge, 5, och omkopplaren till läge • .
Inom 10 till 20 sekunder börjar vattnet
att rinna.
Page 42

Tandborstens delar. Fig 5.
A Dubbelverkande tandborste.
B Oscillerande borste.
C Aktiv borsttopp.
D Färgmarkering.
E Handtag med inbyggd motor och batterier.
F Huvud med borsttryckkontroll. Huvudet
viker sig bakåt vid för högt borsttryck.
G Start/stopp-knapp.
H Förvaringsutrymme för 2 st
dubbelverkande tandborstar.
I Innerkassett till Aoch P.
Tandspolaren:.
J Vattenbehållare.
K Lock till vattenbehållaren.
L Förvaringsutrymme för strålmunstycken.
M Handtag.
N Hållare till handtaget.
O Vattenslang.
P Strålmunstycke, klickas fast på handtaget.
Q Strömbrytare, till/från.
R Reglage för vattenmängden.
S Knapp för vattnet, stop/start.
T MAX knapp.
U Omkopplare, vattenstrålning regleras med
vridning
• = en stråle, för tandspolning
∂= sex strålar, för massage.
Gemensamt:
V Nätsladd.
W Vägghållare med skruv och plugg för
montering.
X Utrymme för förvaring av nätsladden.
Y Lock till förvaringsutrymmet.
Användning i badrum
• Ställ inte batteriladdaren eller montera den inte
så att den av misstag kan falla i vatten.
• Handtaget (E) är vattentätt och kan användas
medan du duschar eller badar.
Förvaring av nätsladden, fig 6 - 7
Väggmontage, fig 8 - 9
Laddbar tandborste.
Laddning av batteriet, fig 10 - 11.
• Före första användning skall batteriet laddas
minst 16 timmar.
• Normalt kan handtaget placeras i
stativet/batteriladdaren för laddning efter varje
tandborstning. På så sätt är tandborsten alltid
klar att användas.
Användning, fig 12 - 16
- Sätt på en dubbelverkande tandborste, tryck in
och vrid, fig 12.
- Starta med ett tryck
på start/stoppknappen (G), fig 13.
42
6
7
9
8
11
CLICK
10
12
CLICK
13
1
2
Page 43

• Låt tandborsten göra jobbet. För endast
tandborsten sakta över tänderna. Den aktiva
borsttoppen hittar själv vägen in mellan
tänderna. Se till att borsten täcker hela tandens
yta och en liten del av tandköttet (fig 14 - 15).
• Om borsthuvudet klickar bakåt under
borstningen så är trycket mot tänderna för stort,
fig 16.
• Läs även medföljande tandborstinstruktion.
Minimum borstningstid är 2 minuter, fig 17
Två minuter är
minimum för att
effektivt avlägsna
plak och ge
tandköttet lämplig
massage.
Längre tids borstning
ger bättre resultat.
Tandkräm med fluor
behöver viss tid för
att verka.
När du borstat färdigt,
fig 18 - 20
- Starta tandborsten och
håll den under varmt,
max 60 °C, rinnande
vatten.
Extra dubbelverkande tandborstar
Reservtandborstar finns att köpa. Typnumret är
HP 790.
För att skydda miljön
När apparaten en dag kasseras skall batteriet tas
ur och deponeras på av myndigheterna
föreskrivet sätt. Hur batterierna tas ur framgår av
fig 21 - 23.
• Märk: När apparaten skall kasseras kan den
alltid lämnas in till Philips eller deras
serviceombud, som tar hand om den på
föreskrivet sätt.
• Innan batteriet tas ur skall det var helt urladdat.
Starta apparaten och låt den gå tills den
stannar.
43
15
14
CLICKCLICK
16
17
2
min.
30
sec.
30
sec.
30
sec.
30
sec.
18
19
20
21
22
23
2
Page 44

• OBS! Botten får endast skruvas loss för att ta ur
batteriet när apparaten skall kasseras.
Efter att botten en gång varit borttagen är
apparaten troligen inte längre vattentät. Därför
gäller inte leverantörens ansvarsåtaganden om
inrepp gjorts i apparaten.
Är typskyltsetiketten i botten orörd, är detta ett
tecken på att inga ingrepp gjorts.
Tandspolare
Före första användning, fig 24 - 32
och även när tandspolaren inte har använts under
några dagar.
Före den dagliga användningen, fig 24 - 28
Munvatten
Du kan droppa munvatten i vattnet i
tandspolarens vattenbehållare. Efter användning
är det viktigt att tandspolare görs ren. Fyll
vattenbehållaren med rent vatten och pumpa ur
allt vatten genom tandspolaren ner i handfatet.
Användning, fig 33 - 47.
- Välj läge • för tandspolning, fig 33.
- Böj dig över ett handfat och håll
strålmunstycket nära tänderna.
- Rikta vattenstrålen mot tändernas fram- och
baksidor, mot tandköttet och speciellt in mellan
tänderna för att spola bort matrester, etc,
fig 37.
• Se till att vattenstrålen spolar i rät vinkel
mot tänderna, fig 38. Rikta inte
vattenstrålen så att den kan skada
tandköttet.
44
29
30
31
32
33
34
35
36
24
25
26
27
27A
28
Page 45

• Innan du ändrar läget på munstycket inne i
munnen, kan du stänga av vattenflödet med
knappen för vatten, fig 39.
• Du kan ändra vattenmängden med det
roterande reglaget, fig 40.
• Innan du vant dig vid tandspolaren bör du
använda mindre vattenmängd, vilket också
är lämpligt om tandköttet är inflammerat.
• " MAX". Om du önskar maximum
spolningseffekt för en kort stund, t ex för att
spola under tandbryggor, kan du trycka på
MAX-knappen, fig 41. Släpp knappen för att
återgå till det tidigare valda vattenmängden.
- Efter tandspolningen, sätt munstycket i läge ∂
för massage av tandköttet, fig 42.
Extra
strålmunstycken.
Extra strålmunstycken
finns att köpa.
Rengöring
• Drag först ut stickproppen ur vägguttaget.
• Använd inte aggressiva eller repande
rengöringsmedel, Scotch-Brite, sprit, aceton
etc.
• Du kan torka av apparaten med en väl
urvriden, fuktig trasa, om nödvändigt med
lämpligt rengöringsmedel.
• Förvaringsutrymmet för strålmunstyckena är
löstagbart och kan diskas, även i diskmaskin,
fig 48.
• Laddbar tandborste:
Handtaget kan tvättas i ljummet vatten med
tvättmedel.
• Tandspolare:
Hållaren till handtaget
(fig 49) samt vattenbehållaren kan diskas i
varmt vatten med
diskmedel och sköljas
under rinnade vatten.
Dessa delar kan även
diskas i diskmaskin.
45
39
40
47
46
45
m
l
4
0
0
3
0
0
2
0
0
1
2
48
49
41
MAX
42
43
44
37
38
Page 46

4203 000 43231
;
 Loading...