

Philips HP6518/00, HP6518 User Manual
HP6518
1
131211
1098
765
432
252423
222120
191817
161514
29
282726

ENGLISH
Introduction
Congratulations on your purchase and welcome
to Philips! To fully benet from the support that
Philips offers, register your product at www.philips.
com/welcome.
With your new Satinelle ICE PREMIUM you
can remove unwanted hairs quickly, easily and
effectively. The combination of the ceramic epilating
system with the contour-following skin cooler
and the new sonic massaging system constitutes
a revolution in epilation. Thanks to the natural
numbing effect of ice and massaging, the new
Satinelle ICE PREMIUM makes epilation more
comfortable and less painful than ever. The result
is a silky-smooth skin and a hair growth reduction
of up to 50%, assuming you use the appliance
regularly (every 4 weeks).
The Satinelle ICE PREMIUM is suitable for all body
parts and comes with a sensitive area cap that has
been specially developed for epilating sensitive
areas (underarms, bikini line).
The rapidly rotating epilating discs catch even the
shortest hairs (down to 0.5 millimetre!) and pull
them out by the roots. As a result, your skin stays
smooth for up to four weeks and regrowth is soft
and downy.
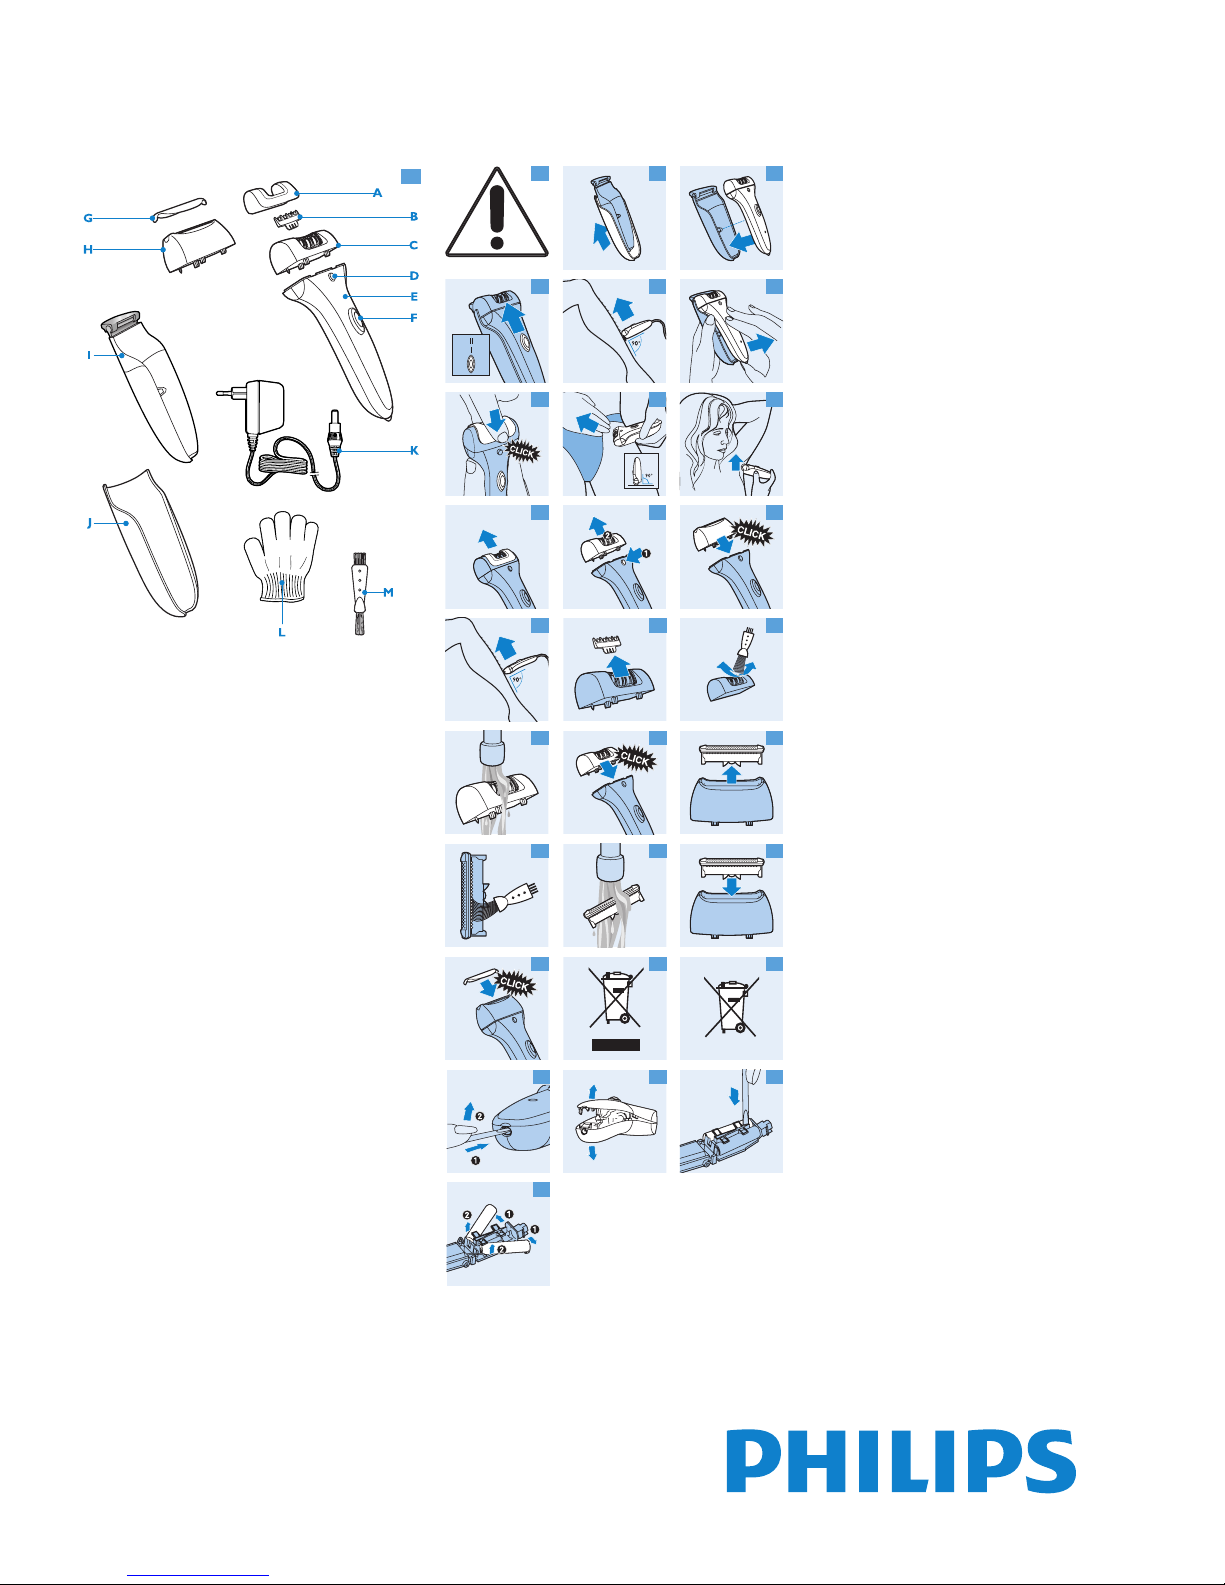
General description (Fig. 1)
A Sensitive area cap
B Massaging element
C Epilating head
D Release button
E Appliance
F On/off slide
G Protective cap of shaving head
H Shaving head
I Leg skin cooler with pivoting cooling head
J Insulating sleeve for leg skin cooler
K Adapter
L Peeling glove
M Cleaning brush
Not shown: Pouch
Important
Read this user manual carefully before you use the
appliance and save it for future reference.
Danger
Keep the appliance and the adapter dry.
Do not use the appliance near or over a
washbasin or bath lled with water
Do not use the appliance in the bath or in the
shower.
If you use the appliance in the bathroom, do
not use an extension cord.
Warning
Check if the mains voltage indicated on the
appliance corresponds to the local mains
voltage before you connect the appliance.
Only use the appliance in combination with the
adapter supplied.
Do not use the appliance if the adapter or the
appliance itself is damaged.
If the adapter is damaged, always have it
replaced with one of the original type in order
to avoid a hazard.
The adapter contains a transformer. Do not cut
off the adapter to replace it with another plug,
as this causes a hazardous situation.
This appliance is not intended for use by
persons (including children) with reduced
physical, sensory or mental capabilities, or lack
of experience and knowledge, unless they
have been given supervision or instruction
concerning use of the appliance by a person
responsible for their safety.
-
-
-
-
-
-
-
-
-
-
-
Children should be supervised to ensure that
they do not play with the appliance.
Caution
Only epilate the underarms and bikini line with
the sensitive area cap attached.
To prevent damage and injuries, keep the
running appliance away from scalp hair,
eyebrows, eyelashes, clothes, threads, cords,
brushes etc.
Do not use the appliance on irritated skin or
skin with varicose veins, rashes, spots, moles
(with hairs) or wounds without consulting your
doctor rst. People with a reduced immune
response or people who suffer from diabetes
mellitus, haemophilia or immunodeciency
should also consult their doctor rst.
Your skin may become a little red and irritated
the rst few times you use the epilator. This
phenomenon is absolutely normal and quickly
disappears. As you use the appliance more
often, your skin gets used to epilation, skin
irritation decreases and regrowth becomes
thinner and softer. If the irritation has not
disappeared within three days, we advise you
to consult a doctor.
Always check the shaving head before you use
the appliance. Do not use the shaving head if
the foil is damaged, as this may cause injury.
Do not use the peeling glove immediately
before or after epilation.
The appliance contains two NiMH
rechargeable batteries that may harm the
environment if not disposed of properly. See
chapter ‘Environment’.
Do not expose the appliance to temperatures
lower than 5°C or higher than 35°C.
General
Regular massages with the peeling glove may
help to prevent ingrowing hairs.
Regular cleaning and proper maintenance
ensure optimal results and a long life for the
appliance.
Electromagnetic elds (EMF)
This Philips appliance complies with all standards
regarding electromagnetic elds (EMF). If handled
properly and according to the instructions in this
user manual, the appliance is safe to use based on
scientic evidence available today.
Charging
You can run the appliance directly from the mains
or you can use it without the cord when the
batteries have been charged.
Charge the batteries at least 16 hours before you
use the appliance for a cordless operating time
of up to 20 minutes.
Do not charge the appliance for more than 24
hours.
1 Make sure the appliance is switched off while
charging.
2 Insert the appliance plug into the bottom of
the appliance and put the adapter in the wall
socket.
The charging light goes on and stays on to
indicate that the appliance is charging.
The charging light does not go out or change
colour when the appliance is fully charged.
Optimising the lifetime of the batteries
After you have charged the appliance for the
rst time, do not recharge it between epilating
or shaving sessions. Continue to use it and only
recharge it when the battery is (almost) empty.
Discharge the batteries completely twice a year
by letting the motor run until it stops.
-
-
-
-
-
-
-
-
-
-
-
,
-
-
Do not keep the appliance plugged into a wall
socket all the time.
If the appliance has not been used for a long
time, it must be recharged for 16 hours.
Preparing for use
Freezing the leg skin cooler
1 Put the skin cooler WITHOUT the insulating
sleeve in the freezer or freezing compartment
(***) at least 4 hours before you start to
epilate. When the uid has turned completely
blue, the skin cooler is ready for use.
Make sure the outside of the skin cooler is
completely dry before you freeze it.
Tip: You can store the skin cooler in the freezer
permanently.
Using the appliance
General information about epilation
Epilation is easier just after a bath or shower.
Make sure your skin is completely dry when
you start to epilate.
When you use the appliance for the rst
time, we advise you to try it out on an area
with only light hair growth. This helps you get
accustomed to the epilation process.
For optimal epilating results, the hairs should
not be longer than 10 millimetres (Fig. 2)
To epilate longer hairs: (Fig. 2)
shorten the hairs to a maximum length of
10mm with a trimmer. In this case, you can
start to epilate right away.
shave the hairs completely. In this case you can
start to epilate after a few days (the hairs must
be at least 0.5mm long).
Your skin may become a little red and
irritated the rst few times you use the
epilator. This phenomenon is absolutely
normal and quickly disappears. As you use
the appliance more often, your skin gets used
to epilation, skin irritation decreases and
regrowth becomes thinner and softer. If the
irritation has not disappeared within three
days, we advise you to consult a doctor.
We advise you to epilate before you go to
bed at night, as this allows any skin irritation
that may develop to diminish overnight.
Corded use
You can also use the appliance from the mains.
However, to avoid damage to the batteries, only
use the appliance from the mains when the
batteries are empty.
1 To run the appliance from the mains when
the batteries are empty, switch off the
appliance and connect it to the mains. Wait
a few seconds before you switch on the
appliance.
Epilating with the leg skin cooler
Only use the leg skin cooler to epilate your legs.
Make sure your skin is clean, entirely dry and free
from grease. Do not use any cream before you
start to epilate.
1 Slide the insulating sleeve onto the skin
cooler. (Fig. 3)
The insulating sleeve prevents an unpleasant
sensation of coldness in your hand while you use
the appliance. It also keeps the skin cooler cold as
long as possible.
Sometimes the pivoting cooling head freezes onto
the skin cooler and does not move when you
take the skin cooler from the freezer. The pivoting
cooling head starts to pivot again after you have
passed it over your leg a few times.
-
-
,
,
,
,
-
-
,
,
4203.000.6186.1
2/7

2 Snap the appliance onto the skin
cooler (Fig. 4).
3 Select the desired speed to switch on the
appliance (Fig. 5).
Select speed I for areas with little hair growth and
for areas where bones are located directly beneath
the skin, such as knees and ankles.
Select speed II for larger areas with stronger hair
growth.
4 Stretch your skin with your free hand to
make the hairs stand upright.
5 Place the appliance perpendicularly onto
the skin with the epilating head pointing
forward. Move the appliance against the
direction of hair growth at a moderate
speed. (Fig. 6)
Make sure both the epilating discs and the skin
cooler are in proper contact with the skin.
Press the appliance lightly onto the skin.
If you are not completely satised with the
epilation result, try moving the epilator more
slowly over your skin.
6 Use the tab on the bottom end of the
appliance to remove the appliance from the
skin cooler (Fig. 7).
Epilating without the leg skin cooler
If you do not want to use the skin cooler, for
instance because you have grown accustomed
to the sensation of epilation, you can also use
the appliance without the skin cooler.
Make sure that you place the epilator
perpendicularly onto your skin and that you
move it against the direction of hair growth.
Epilating the underarms and bikini line
Your epilator comes with a sensitive area cap that
reduces the number of active epilating discs. This
makes the appliance ideal for epilating the more
delicate areas of the body, such as the underarms
and bikini line.
Note: You get the best results when the hairs are not
too long (max.1cm).
Do not use the leg skin cooler to epilate your
underarms and bikini line.
1 Put the sensitive area cap on the epilating
head (Fig. 8).
The sensitive area cap can only be tted onto the
appliance in one way.
2 Switch on the appliance by selecting the
desired speed. (Fig. 5)
We advise you to use speed II.
3 Stretch the skin with your free hand.
4 Place the appliance perpendicularly onto
your skin, with the on/off slide pointing in the
direction in which you are going to move the
appliance.
5 Move the appliance slowly over the skin,
against the direction of the hair growth.
Epilate your bikini line as shown in the
gure (Fig. 9).
Epilate your underarms as shown in the
gure (Fig. 10).
6 For a cool sensation, you can dab the area
you have just epilated with a cloth soaked in
cold water.
7 Remove the sensitive area cap from the
epilator after use (Fig. 11).
Shaving
You can use the shaving head to shave sensitive
body parts, such as your underarms and bikini line.
,
,
,
-
-
With the shaving head, you obtain a smooth result
in a comfortable and gentle way.
1 Make sure the appliance is switched off.
2 Remove the skin cooler (Fig. 7).
3 Press the release button (1) and pull the
epilating head off the appliance (2) (Fig. 12).
4 Place the shaving head on the appliance and
press it onto the appliance until it snaps home
(‘click’) (Fig. 13).
5 Switch on the appliance by selecting speed II.
6 Place the shaving head onto your skin and
move the appliance slowly and smoothly
against the direction of hair growth. Press the
appliance lightly (Fig. 14).
Using the peeling glove
Use the peeling glove in the shower.
Regular massages with the peeling glove may help
to prevent ingrown hairs. Do not use the peeling
glove immediately before or after epilation.
Cleaning and maintenance
Never rinse the adapter or the appliance itself
with water.
Do not use any corrosive detergents, scouring
pads or cloths, petrol, acetone etc. to clean the
appliance.
1 Make sure the appliance is switched off and
disconnected from the mains.
2 Remove the leg skin cooler from the
appliance and slide the insulating sleeve off
the skin cooler.
3 Clean the pivoting cooling head of the leg
skin cooler with the brush supplied or with a
moist cloth after each use.
Make sure the outside of the skin cooler is
completely dry before you freeze it again.
Cleaning the epilating head
Clean the epilating head after every use.
1 Make sure the appliance is switched off and
disconnected from the mains.
2 Remove the epilating head (Fig. 12).
Press the release button (1) and pull the epilating
head off the appliance (2).
3 Remove the massaging element (Fig. 15).
4 Clean all accessible parts, including the
bottom of the epilating head and the epilating
discs, with the brush (Fig. 16).
5 You can also rinse the epilating head (not the
appliance!) under the tap to clean it more
thoroughly (Fig. 17).
Never try to detach the epilating discs from the
epilating head.
6 Reattach the massaging element to the
epilating head. Then place the epilating head
on the appliance and press it until it snaps
home (‘click’) (Fig. 18).
The epilating head only ts onto the appliance in
one way.
Cleaning the shaving head
Clean the shaving head after every use.
1 Make sure the appliance is switched off and
disconnected from the mains.
2 Remove the shaving head.
3 Pull the cutter unit out of the shaving
head. (Fig. 19)
4 Brush the hairs off the cutter unit and the
shaving head. Make sure that you also brush
away any hairs that have collected under the
trimmers (Fig. 20).
5 You can also rinse the cutter unit and the rest
of the shaving head (not the appliance!) under
the tap (Fig. 21).
6 Put the cutter unit back into the shaving head
and snap the shaving head back onto the
appliance (‘click’) (Fig. 22).
Do not exert pressure on the shaving foil to
avoid damage.
7 Rub a drop of sewing machine oil onto the
trimmers and shaving foil of the cutter unit
twice a year.
Storage
1 Put the protective cap on the shaving head
(‘click’). (Fig. 23)
2 Store the appliance and the accessories in the
pouch.
Replacement
If you use the shaving head several times a week,
replace the cutter unit (type HP6193) after one or
two years of use or if it is damaged.
Environment
Do not throw away the appliance with the
normal household waste at the end of its life,
but hand it in at an ofcial collection point for
recycling. By doing this, you help to preserve
the environment (Fig. 24).
The built-in rechargeable batteries contain
substances that may pollute the environment.
Always remove the batteries before you
discard and hand in the appliance at an ofcial
collection point. Dispose of the batteries at
an ofcial collection point for batteries. If you
have trouble removing the batteries, you can
also take the appliance to a Philips service
centre. The staff of this centre will remove the
batteries for you and will dispose of them in an
environmentally safe way (Fig. 25).
1 Remove the adapter from the wall socket and
let the appliance run until the batteries are
empty.
2 Remove the epilating head (Fig. 12).
3 Hold the appliance in your hand and open it
with a screwdriver (Fig. 26).
4 Pull the two housing halves apart with
your thumbs until the snap connections
break (Fig. 27).
5 Remove all components (motor unit and the
printed circuit board unit) from the housing
halves.
6 Insert a screwdriver between the plastic
battery holder and the batteries (Fig. 28).
7 Remove the batteries from the plastic battery
holder and the printed circuit board (Fig. 29).
Do not try to reassemble the appliance in order
to run it from the mains. This is dangerous (Fig. 2).
Guarantee & service
If you need service or information or if you
have a problem, please visit the Philips website at
www.philips.com or contact the Philips Consumer
Care Centre in your country (you nd its phone
number in the worldwide guarantee leaet). If
there is no Consumer Care Centre in your country,
go to your local Philips dealer.
-
-
4203.000.6186.1
3/7
 Loading...