

Page 1
Satinelle Ice Premium
HP6503
Page 2

2
Page 3

3
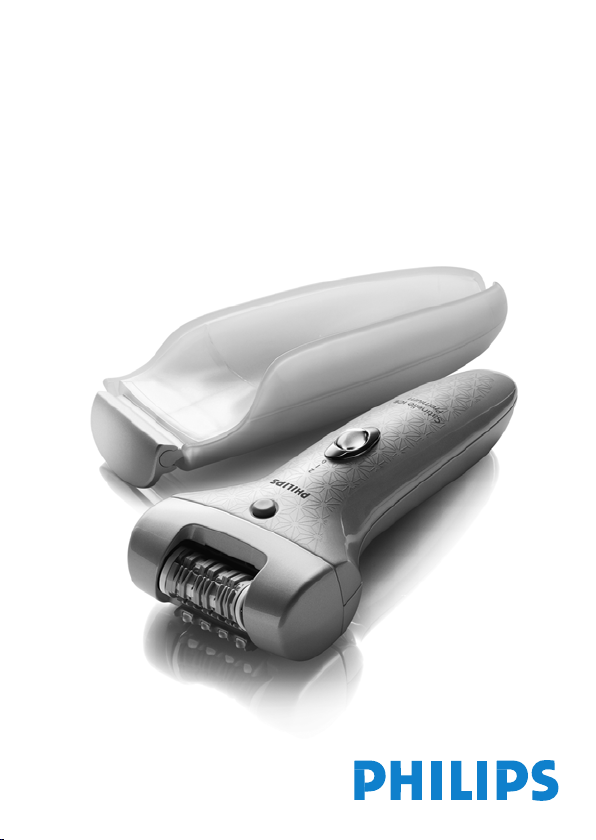
1
Page 4

4
Page 5

ENGLISH 6
DANSK 19
DEUTSCH 32
FRANÇAIS 46
SUOMI
ITALIANO 73
NEDERLANDS
NORSK 102
SVENSKA
60
115
87
HP6503
Page 6

6
ENGLISH
Introduction
With your new Satinelle ICE PREMIUM you can remove unwanted hairs
quickly, easily and effectively. The combination of the ceramic epilating
system with the contour-following skin cooler and the new
sonic massaging system constitutes a revolution in epilation. Thanks to the
natural numbing effect of ice and massaging, the new Satinelle ICE
PREMIUM makes epilation more comfortable and less painful than ever.
The result is a silky-smooth skin and a hair growth reduction of up to
50%, assuming you use the appliance regularly (every 4 weeks).
The Satinelle ICE PREMIUM is suitable for all body parts and comes with
a skin cooler that has been specially developed for epilating sensitive
areas (underarms, bikini line). These areas can be particularly sensitive to
pain, which this special skin cooler helps to diminish.
The rapidly rotating epilating discs catch even the shortest hairs (down to
0.5 millimetre!) and pull them out by the roots. As a result, your skin stays
smooth for up to four weeks and regrowth is soft and downy.
General description (Fig. 1)
A Insulating sleeve for skin cooler
B Leg skin cooler with pivoting cooling head
C Skin cooler for underarms and bikini line
D Shaving head
E Protective cap of shaving head
F Massaging element
G Epilating head
H Appliance
I Charging light
J Adapter
K Cleaning brush
L Exfoliating body puff
M Stand
Important
Read this user manual carefully before you use the appliance and save it
for future reference.
Page 7

ENGLISH 7
Check if the voltage indicated on the adapter corresponds to the
,
local mains voltage before you connect the appliance.
Only use the appliance in combination with the adapter supplied.
,
Do not use the appliance if the adapter or the appliance itself is
,
damaged.
If the adapter is damaged, always have it replaced with one of the
,
original type in order to avoid a hazard.
The adapter contains a transformer. Do not cut off the adapter to
,
replace it with another plug, as this causes a hazardous situation.
Keep the appliance and the adapter dry.
,
Keep the appliance out of the reach of children.
,
Do not expose the appliance to temperatures lower than 5°C or
,
higher than 35°C.
To prevent damage and injuries, keep the running appliance away
,
from your scalp hair, eyebrows, eyelashes, clothes, threads, cords,
brushes etc.
This appliance contains two NiMh rechargeable batteries that may
,
harm the environment if not disposed of properly.
Do not use the appliance on irritated skin or skin with varicose
,
veins, rashes, spots, moles (with hairs) or wounds without
consulting your doctor rst. People with a reduced immune
response or people who suffer from diabetes mellitus, Raynaud’s
disease or immunodeciency should contact their doctor rst.
Electromagnetic elds
This Philips appliance complies with all standards regarding
electromagnetic elds (EMF). If handled properly and according to
the instructions in this user manual, the appliance is safe to use based on
scientic evidence available today.
Charging
You can run the appliance directly from the mains or you can use it
without the cord when the batteries have been charged.
Charge the batteries at least 16 hours before you use the appliance for a
cordless operating time of up to 20 minutes.
Page 8

ENGLISH8
Do not charge the appliance for more than 24 hours.
1 Make sure the appliance is switched off while charging.
2 Insert the appliance plug into the bottom of the appliance and put
the adapter in the wall socket.
The charging light goes on and stays on to indicate that the
,
appliance is charging.
The charging light does not go out or change colour when the
appliance is fully charged.
3 For more convenient charging, you can put the appliance in
the stand (‘click’) (Fig. 2).
Optimising the lifetime of the batteries
After you have charged the appliance for the rst time, do not
recharge it between epilating or shaving sessions. Continue to use it
and only recharge it when the battery is (almost) empty.
Discharge the batteries completely twice a year by letting the motor
run until it stops.
Do not keep the appliance plugged into a wall socket all the time.
If the appliance has not been used for a long time, it must be
recharged for 16 hours.
Preparing for use
Freezing the skin cooler
1 Put the skin cooler WITHOUT the insulating sleeve in the freezer
or freezing compartment (***) at least 4 hours before you start to
epilate. When the uid has turned completely blue, the skin cooler
is ready for use.
Make sure the outside of the skin cooler is completely dry before you
freeze it.
Tip: You can store the skin cooler in the freezer permanently.
Page 9

ENGLISH 9
Using the appliance
General information about epilation
,
Epilation is easier just after a bath or shower. Make sure your skin
is completely dry when you start to epilate.
When you use the appliance for the rst time, we advise you to try
,
it out on an area with only light hair growth. This helps you get
accustomed to the epilation process.
For optimal epilating results, the hairs should not be longer than
,
10 millimetres (Fig. 3)
To epilate longer hairs: (Fig. 3)
,
shorten the hairs to a maximum length of 10mm with a trimmer. In
this case, you can start to epilate right away.
shave the hairs completely. In this case you can start to epilate after a
few days (the hairs must be at least 0.5mm long).
Your skin may become a little red and irritated the rst few times
,
you use the epilator. This phenomenon is absolutely normal
and quickly disappears. As you use the appliance more often, your
skin gets used to epilation, skin irritation decreases and
regrowth becomes thinner and softer. If the irritation has not
disappeared within three days, we advise you to consult a doctor.
We advise you to epilate before you go to bed at night, as
,
this allows any skin irritation that may develop to diminish
overnight.
Corded use
Do not run the appliance from the mains when the battery is fully
charged.
1 To run the appliance from the mains, switch off the appliance and
connect it to the mains. Wait a few seconds before you switch on
the appliance.
Epilating with the leg skin cooler
Make sure your skin is clean, entirely dry and free from grease. Do not
use any cream before you start to epilate.
Page 10

ENGLISH10
1 Slide the insulating sleeve onto the skin cooler. (Fig. 4)
The insulating sleeve prevents an unpleasant sensation of coldness in your
hand while you use the appliance. It also keeps the skin cooler cold as
long as possible.
Sometimes the pivoting cooling head freezes onto the skin cooler and
does not move when you take the skin cooler from the freezer. The
pivoting cooling head starts to pivot again after you have passed it over
your leg a few times.
2 Snap the appliance onto the skin cooler (Fig. 5).
3 Insert the appliance plug into the bottom of the appliance and put
the adapter in the wall socket.
4 Select the desired speed to switch on the appliance (Fig. 6).
Select speed I for areas with little hair growth and for areas where bones
are located directly beneath the skin, such as knees and ankles.
Select speed II for larger areas with stronger hair growth.
5 Stretch your skin with your free hand to make the hairs stand
upright.
6 Place the appliance perpendicularly onto the skin with the epilating
head pointing forward. Move the appliance against the direction of
hair growth at a moderate speed. (Fig. 7)
Make sure both the epilating discs and the skin cooler are in proper
contact with the skin.
Press the appliance lightly onto the skin.
If you are not completely satised with the epilation result, try
,
moving the epilator more slowly over your skin.
7 Use the tab on the bottom end of the appliance to remove the
appliance from the skin cooler (Fig. 8).
Epilating with the skin cooler for underarms and bikini line
The special skin cooler for the underarms and the bikini line reduces the
number of active epilating discs. Combined with the large cooling surface,
this skin cooler makes epilating sensitive areas less painful. You get the best
results when the hairs are not too long (max. 1cm).
Page 11

ENGLISH 11
1 Slide the insulating sleeve onto the skin cooler. (Fig. 9)
2 Snap the appliance onto the skin cooler (Fig. 10).
3 Switch on the appliance by selecting the desired speed. (Fig. 6)
We advise you to use speed I.
4 To epilate the underarm area, place one arm behind your head to
stretch the skin. Then place the appliance perpendicularly onto the
skin with the hand of the other arm (Fig. 11).
5 To epilate the bikini line, stretch the skin with your free hand and
place the appliance perpendicularly onto your skin. Do not exert
any pressure (Fig. 12).
6 Move the appliance slowly across the skin against the direction of
hair growth.
7 Use the tab on the bottom end of the appliance to remove the
appliance from the skin cooler for underarms and bikini
line (Fig. 13).
Epilating without skin cooler
If you do not want to use the skin cooler, for instance because you
,
have grown accustomed to the sensation of epilation, you can also
use the appliance without the skin cooler.
Make sure that you place the epilator perpendicularly onto your
,
skin and that you move it against the direction of hair growth.
Using the exfoliating body puff
Use the exfoliating body puff in the shower.
Regular massages with the puff may help to prevent ingrown hairs. Do
not use the puff immediately before or after epilation.
Shaving
You can use the shaving head to shave sensitive body parts, such as your
underarms and bikini line. With the shaving head, you obtain a smooth
result in a comfortable and gentle way.
1 Make sure the appliance is switched off.
Page 12

ENGLISH12
2 Remove the skin cooler (Fig. 8).
3 Remove the epilating head (Fig. 14).
Press the release button (1) and move the epilating head in the direction
of the arrow (2).
4 Place the shaving head on the appliance and press it onto the
appliance until it snaps home (‘click’) (Fig. 15).
5 Switch on the appliance by selecting speed II.
6 Place the shaving head onto your skin and move the appliance
slowly and smoothly against the direction of hair growth. Press the
appliance lightly (Fig. 16).
Cleaning and maintenance
Never rinse the adapter or the appliance itself with water.
Do not use any corrosive detergents, scouring pads or cloths, petrol,
acetone etc. to clean the appliance.
1 Make sure the appliance is switched off and unplugged.
2 Remove the skin cooler from the appliance and slide the insulating
sleeve off the skin cooler.
3 Clean the pivoting cooling head of the leg skin cooler with the
brush supplied or with a moist cloth after each use.
Make sure the outside of the skin cooler is completely dry before
you freeze it again.
Cleaning the epilating head
Clean the epilating head after every use.
1 Make sure the appliance is switched off and unplugged.
2 Remove the epilating head (Fig. 14).
Press the release button (1) and move the epilating head in the direction
of the arrow (2).
3 Remove the massaging element (Fig. 17).
Page 13

ENGLISH 13
4 Clean all accessible parts, including the bottom of the epilating head
and the epilating discs, with the brush (Fig. 18).
5 You can also rinse the epilating head (not the appliance!) under the
tap to clean it more thoroughly (Fig. 19).
Never try to detach the epilating discs from the epilating head.
6 Reattach the massaging element to the epilating head. Then place
the epilating head on the appliance and press it until it snaps home
(‘click’) (Fig. 20).
The epilating head only ts onto the appliance in one way.
Cleaning the shaving head
Clean the shaving head after every use.
1 Make sure the appliance is switched off and unplugged.
2 Remove the shaving head.
3 Pull the cutter unit out of the shaving head. (Fig. 21)
4 Brush the hairs off the cutter unit and the shaving head. Make sure
that you also brush away any hairs that have collected under the
trimmers (Fig. 22).
5 You can also rinse the cutter unit and the rest of the shaving head
(not the appliance!) under the tap (Fig. 23).
6 Put the cutter unit back into the shaving head and snap the shaving
head back onto the appliance (‘click’) (Fig. 24).
Do not exert pressure on the shaving foil to avoid damage.
7 Rub a drop of sewing machine oil onto the trimmers and shaving
foil of the shaving unit twice a year.
Storage
Put the protective cap on the shaving head (‘click’). (Fig. 25)
1
2 Store the appliance and the accessories in the pouch.
3 You can also store the appliance in the stand (Fig. 2).
Page 14

ENGLISH14
Replacement
If you use the shaving head several times a week, replace the cutter unit
(type HP6193) after one or two years of use or if it is damaged.
Environment
Do not throw away the appliance with the normal household waste
-
at the end of its life, but hand it in at an ofcial collection point for
recycling. By doing this, you help to preserve the
environment (Fig. 26).
The built-in rechargeable batteries contain substances that may
pollute the environment. Always remove the batteries before you
discard and hand in the appliance at an ofcial collection point.
Dispose of the batteries at an ofcial collection point for batteries. If
you have trouble removing the batteries, you can also take the
appliance to a Philips service centre. The staff of this centre will
remove the batteries for you and will dispose of them in an
environmentally safe way.
1 Remove the adapter from the wall socket and let the appliance run
until the batteries are empty.
2 Remove the epilating head (Fig. 14).
3 Hold the appliance in your hand and open it with a
screwdriver (Fig. 27).
4 Pull the two housings halves apart with you thumbs until the snap
connections break (Fig. 28).
5 Remove all components (motor unit and the printed circuit board
unit) from the housing halves.
6 Insert a screwdriver between the plastic battery holder and the
batteries (Fig. 29).
7 Remove the batteries from the plastic battery holder and the
printed circuit board (Fig. 30).
Page 15

ENGLISH 15
Do not try to reassemble the appliance in order to run it from the
mains. This is dangerous (Fig. 3).
Guarantee & service
If you need information or if you have a problem, please visit the Philips
website at www.philips.com or contact the Philips Customer Care
Centre in your country (you nd its phone number in the worldwide
guarantee leaet). If there is no Customer Care Centre in your country,
go to your local Philips dealer or contact the Service Department of
Philips Domestic Appliances and Personal Care BV.
Troubleshooting
Problem Possible cause Solution
Reduced
epilating
performance.
You moved the
epilator in the
wrong direction.
You placed the
epilating head on
the skin at the
wrong angle.
The epilating
head did not
touch the skin.
You moistened
your skin with
water or a
cream or other
skincare product
prior to epilation.
Move the appliance against the
direction of hair growth.
Make sure you place the appliance
perpendicularly onto the skin.
Make sure both the epilating head
and the skin cooler are in proper
contact with your skin during
epilation.
Make sure your skin is entirely dry
and free from grease. Do not put
any cream, body milk or other
skincare product on your skin
before you start to epilate.
Page 16

ENGLISH16
Problem Possible cause Solution
The appliance
does not work.
Skin irritation
occurs.
The skin cooler
for underarms
and bikini line
was on the
appliance when
you epilated
your legs.
Appliance have
been moved too
fast over the skin
The batteries are
empty.
The socket to
which the
appliance is
connected is not
live.
The appliance is
not switched on.
You did not
attach the
epilating
head correctly.
You used the
epilator for the
rst time or after
a long period of
disuse.
Only use the leg skin cooler to
epilate your legs.
Move the appliance at moderate
speed over the skin
Charge the batteries.
Make sure the socket you use is
live. If you use a socket in a
bathroom cabinet, you may need
to switch on the light to activate
the socket.
Switch on the appliance.
Place the epilating head on the
appliance and press it onto the
appliance until it snaps home
(‘click’).
Some skin irritation may occur the
rst few times you use the
appliance. This is absolutely normal
and usually disappears quickly. For
tips to reduce skin irritation, see
the rst section of chapter ‘Using
the appliance’. Also make sure you
keep the epilating head clean.
Page 17

Problem Possible cause Solution
The skin cooler
is not cold
enough.
The pivoting
cooling head of
the leg skin
cooler does
not move.
It is not
possible to
remove the
epilating head.
You have applied
too much
pressure to the
appliance
You did not
freeze the skin
cooler long
enough.
You did not put
the skin cooler in
the freezer or
freezing
compartment.
The skin cooler
did not touch
the skin.
The pivoting
cooling head is
frozen.
You did not
move the
epilating head in
the right
direction.
Do not use any pressure when
moving the appliance over skin
Put the skin cooler without the
insulating sleeve in the freezer or
freezing compartment (***) for at
least 4 hours. When the colour of
the uid has changed from white
to completely blue, the skin cooler
is ready for use.
Put the skin cooler without the
insulating sleeve in the freezer or
freezing compartment (***) for at
least 4 hours. Do not store the
skin cooler in the refrigerator.
Make sure the skin cooler is
always in proper contact with
your skin during epilation.
Pass the skin cooler over your leg
a few times to make it pivot again.
Always make sure the outside of
the skin cooler is completely dry
before you freeze it.
Press the release button and
move the epilating head in the
direction of the arrow (g. 14) to
remove it.
ENGLISH 17
Page 18

ENGLISH18
Problem Possible cause Solution
It is not
possible to
remove the
shaving head.
Reduced
shaving
performance.
Stronger skin
irritation than
usual after
shaving.
You did move
the shaving head
in the right
direction.
The shaving
head is dirty.
The cutter unit is
damaged or
worn.
The cutter unit is
damaged or
worn.
Press the release button and
move the shaving head in the
direction of the arrow (g. 14) to
remove it.
Switch off the appliance, unplug it
and remove the shaving head.
Then clean the cutter unit and the
shaving head with the cleaning
brush supplied. Remove any hairs
that are stuck under the trimmers.
Replace the cutter unit.
Replace the cutter unit.
Page 19

DANSK
Introduktion
Med din nye Satinelle ICE PREMIUM kan du hurtigt og effektivt fjerne
uønsket hårvækst. Kombinationen af det nye keramiske epileringssystem
med kølende, konturfølgende iselement og massagesystemet udgør en
revolution inden for epilering. Takket være isens naturligt bedøvende
effekt og massagen, bliver epilering med den nye Satinelle ICE PREMIUM
mere behagelig og mindre smertefuld end nogensinde. Resultatet er
silkeblød hud og op til 50% nedsat hårvækst, forudsat at du anvender
apparatet regelmæssigt (hver 4. uge).
Satinelle ICE PREMIUM er velegnet til alle kropszoner og leveres med et
iselement, der er specielt udviklet til at fjerne hår på følsomme områder
(armhuler, bikinilinje). Disse områder kan være specielt følsomme over for
smerte, hvilket iselementet hjælper med til at mindske.
De hurtigt roterende pincetskiver fanger selv de korteste hår (ned til
0,5 mm!) og trækker dem ud med rod. Huden forbliver glat og blød i op
til 4 uger, og den nye hårvækst er blød og dunet.
Generel beskrivelse (g. 1)
19
A Isolerende kappe til iselement
B Iselement til ben med vipbart hoved
C Iselement til armhuler og bikinilinje
D Shaverhoved
E Beskyttelsesdæksel til shaverhoved
F Massageelement
G Epilatorhoved
H Apparat
I Opladeindikator med lys
J Adapter
K Rensebørste
L ”Body Puff”-eksfolieringssvamp
M Stander
Vigtigt
Læs denne brugsvejledning omhyggeligt igennem, inden apparatet tages i
brug, og gem den til eventuelt senere brug.
Page 20

DANSK20
Før der sluttes strøm til apparatet, kontrolleres det, om
,
spændingsangivelsen på adapteren svarer til den lokale netspænding.
Brug kun apparatet sammen med den medfølgende adapter.
,
Brug ikke apparatet, hvis adapteren eller selve apparatet er
,
beskadiget.
Hvis adapteren beskadiges, skal den altid udskiftes med en original
,
adapter af samme type for at undgå enhver risiko.
Adapteren indeholder en transformer. Adapteren må ikke klippes af
,
og udskiftes med et andet stik, da dette kan være meget risikabelt.
Både apparat og adapter skal holdes tørre.
,
Hold apparatet uden for børns rækkevidde.
,
Udsæt ikke apparatet for temperaturer under 5°C eller over 35°C.
,
For at undgå skader og uheld, skal apparatet altid holdes i sikker
,
afstand fra hovedhår, øjenbryn, øjenvipper, tøj, snore, ledninger,
børster o.lign., når det er tændt.
Apparatet indeholder to genopladelige NiMH-batterier, som kan
,
være skadelige for miljøet, hvis de ikke bortskaffes på korrekt vis.
Brug aldrig apparatet på irriteret hud eller på hud med åreknuder,
,
udslæt, hudafskrabninger, lipenser, (behårede) modermærker eller
sår uden først at rådføre dig med lægen. Spørg ligeledes lægen til
råds, hvis du har nedsat immunforsvar eller lider af sukkersyge eller
Raynauds syndrom.
Elektromagnetiske felter
Dette Philips-apparat overholder alle standarder for elektromagnetiske
felter (EMF). Ved korrekt anvendelse i overensstemmelse med
instruktionerne i denne brugsvejleding, er apparatet sikkert at anvende,
ifølge den videnskabelige viden, der er tilgængelig i dag.
Opladning
Apparatet kan både anvendes via lysnettet eller uden ledning, når
batterierne er opladede.
Batterierne skal oplades i mindst 16 timer, hvilket giver en ledningsfri
brugstid på op til 20 minutter.
Oplad aldrig apparatet i mere end 24 timer i træk.
Page 21

DANSK 21
1 Apparatet skal være slukket under opladning.
2 Sæt apparatstikket i kontakten i bunden af apparatet, og slut
adapteren til lysnettet.
Opladeindikatoren lyser for at vise, at apparatet oplades.
,
Opladeindikatoren slukker ikke og skifter ikke farve, når apparatet er
fuldt opladet.
3 Sæt apparatet i standeren (“klik”) for mere praktisk
opladning (g. 2).
Sådan forlænges batteriets levetid
Efter opladning af apparatet første gang, skal det ikke genoplades, hver
-
gang det har været i brug. Fortsæt blot med at anvende apparatet og
vent med at genoplade det, til batteriet er (næsten) tomt.
Aad batteriet helt et par gange om året ved at lade motoren køre,
til den stopper af sig selv.
Lad ikke apparatet være konstant tilsluttet lysnettet.
Hvis apparatet ikke har været brugt i en længere periode, skal det
genoplades i 16 timer.
Klargøring
Nedfrysning af iselement
1 Læg iselementet i fryser eller fryseboks (***) UDEN
beskyttelseskappen i mindst 4 timer før epileringen. Når væsken er
blevet helt blå, er iselementet klar til brug.
Sørg for, at iselementets overade er helt tør, inden det nedfryses.
TipsIselementet kan opbevares permanent i fryseren.
Sådan bruges apparatet
Generel information om epilering
Det er lettest at bruge epilatoren lige efter et kar- eller brusebad,
,
men huden skal være helt tør, inden du starter.
Page 22

DANSK22
Første gang apparatet bruges, anbefales det at begynde et sted med
,
let hårvækst. På denne måde vænner du dig gradvist til epileringen.
For at få det bedste epileringsresultat må hårene ikke være længere
,
end 10 mm (g. 3)
Epilering af længere hår: (g. 3)
,
Afkort hårene til maks. 10 mm med en trimmer. Herefter kan du
påbegynde epileringen.
Barbér hårene helt af. Herefter kan du påbegynde epilering efter et
par dage (hårene skal mindst være 0,5 mm lange).
Huden bliver måske lidt rød og irriteret de første par gange
,
epilatoren anvendes. Dette er helt normalt og vil hurtigt forsvinde.
Efterhånden som huden vænner sig til behandlingen, bliver den
mindre irriteret og hårene, der gror ud igen, vil være blødere og
tyndere. Hvis en eventuel hudirritation ikke er forsvundet efter
3 dage, bør du kontakte lægen.
Vi anbefaler, at du bruger epilatoren, før du går i seng om aftenen,
,
så eventuel hudirritation har tid til at dæmpes i løbet af natten.
Brug med ledning
Brug ikke apparatet via lysnettet, når batteriet er fuldt opladet.
1 Hvis apparatet skal bruges med netledningen, skal det slukkes og
tilsluttes stikkontakten. Vent et par sekunder, før du tænder
apparatet.
Epilering med iselement til ben
Sørg for at huden er ren, helt tør og fri for fedtstoffer. Undlad at bruge
nogen former for creme umiddelbart før epilering.
1 Sæt beskyttelseskappen på iselementet. (g. 4)
Beskyttelseskappen modvirker ubehag ved kulde i hånden under brug af
apparatet. Den holder også iselementet koldt i længere tid.
Det vipbare hoved kan være frosset fast til iselementet, så det ikke kan
bevæge sig, når iselementet kommer direkte fra fryseren. Det vipbare
hoved bliver bevægeligt igen, når det har været ført hen over benet et par
gange.
Page 23

DANSK 23
2 Klik iselementet på epilatoren (g. 5).
3 Sæt apparatstikket i kontakten i bunden af apparatet, og slut
adapteren til lysnettet.
4 Tænd apparatet ved at vælge den ønskede hastighed (g. 6).
Vælg hastighed I til områder med let hårvækst og områder, hvor der er
knogler lige under huden, f.eks. knæ og ankler.
Vælg hastighed II til større områder med kraftigere hårvækst.
5 Stræk huden ud med den frie hånd, så hårene rejser sig.
6 Placér apparatet vinkelret på huden med epilatorhovedet pegende
fremad. Bevæg apparatet mod hårenes vækstretning i et moderat
tempo. (g. 7)
Sørg for, at begge pincetskiver og iselementet har fuld kontakt med huden.
Tryk apparatet let mod huden.
Hvis du ikke er helt tilfreds med resultatet, så prøv at bevæge
,
epilatoren lidt langsommere over huden.
7 Brug tappen i bunden af apparatet til at adskille apparat og
iselement (g. 8).
Epilering med iselementet til armhuler og bikinilinje
Det specielle iselement til armhuler og bikinilinje mindsker antallet af
aktive pincetskiver. Kombineret med den store køleade gør dette
iselement epilering af følsomme områder mindre smertefuld. Du får det
bedste resultat, hvis hårene ikke er for lange (maks. 1 cm).
1 Sæt beskyttelseskappen på iselementet. (g. 9)
2 Klik iselementet på epilatoren (g. 10).
3 Tænd apparatet ved at vælge den ønskede hastighed. (g. 6)
Det anbefales at vælge hastighed I.
4 Epilering af armhulerne: Hold den ene arm bag hovedet for at
strække huden ud. Placér derefter apparatet vinkelret på huden
med den anden hånd (g. 11).
Page 24

DANSK24
5 Epilering af bikinilinjen: Stræk huden ud med den frie hånd, og
placér epilatoren vinkelret på huden. Undgå at trykke den mod
huden (g. 12).
6 Epilatoren føres langsomt hen over huden imod hårenes
vækstretning.
7 Brug tappen i bunden af apparatet til at adskille apparat og
iselement til epilering af armhuler og bikini-linje (g. 13).
Epilering uden iselement
Epilatoren kan også anvendes uden iselement, hvis du f.eks. har
,
vænnet dig til følelsen.
Sørg for, at du placerer epilatoren vinkelret på huden og fører den
,
imod hårenes vækstretning.
”Body-Puff”
Brug eksfolieringssvampen i brusebadet.
Regelmæssig massage med eksfolieringssvampen er en god hjælp til at
undgå indgroede hår. Bør dog ikke anvendes umiddelbart før eller efter
epilering.
Barbering
Shaverhovedet kan anvendes til barbering af følsomme kropsdele, f.eks.
armhuler og bikinilinje. Med shaverhovedet opnår du et glat resultat på en
behagelig og blid måde.
1 Kontrollér, at apparatet er slukket.
2 Tag iselementet af (g. 8).
3 Tag epilatorhovedet af (g. 14).
Tryk på udløserknappen (1) og træk epilatorhovedet i pilens retning (2).
4 Sæt shaverhovedet på apparatet og tryk, indtil det klikker på
plads (g. 15).
5 Tænd apparatet ved at vælge hastighed II.
Page 25

DANSK 25
6 Placér shaverhovedet mod huden, og før langsomt og blidt
apparatet imod hårenes vækstretning med et let tryk (g. 16).
Rengøring og vedligeholdelse
Undlad at rengøre adapteren eller selve apparatet med vand.
Brug aldrig ætsende rengøringsmidler, skuremidler, ståluldssvampe,
benzin, acetone eller lignende til rengøring af apparatet.
1 Sørg for, at apparatet er slukket, og stikket er taget ud af
stikkontakten.
2 Tag iselementet af epilatoren og beskyttelseskappen af iselementet.
3 Rengør det vipbare kølehoved på iselementet til ben med den
medfølgende børste eller en fugtig klud efter hver brug.
Sørg for, at iselementets overade er helt tør, inden det nedfryses.
Rengøring af epilatorhovedet
Rengør epileringshovedet, hver gang det har været brugt.
1 Sørg for, at apparatet er slukket, og stikket er taget ud af
stikkontakten.
2 Tag epilatorhovedet af (g. 14).
Tryk på udløserknappen (1) og træk epilatorhovedet i pilens retning (2).
3 Fjern massageelementet (g. 17).
4 Rengør alle tilgængelige dele med børsten, inkl. bunden af
epileringshovedet og pincetskiverne (g. 18).
5 Du kan også skylle epileringshovedet (ikke apparatet!) under
vandhanen for at rengøre det grundigt (g. 19).
Prøv aldrig at fjerne pincetskiverne fra epilatorhovedet.
6 Fastgør massageelementet på epileringshovedet igen. Anbring
derefter epileringshovedet på apparatet og tryk på det, indtil det
klikker på plads (g. 20).
Epilatorhovedet kan kun påsættes på én måde.
Page 26

DANSK26
Rengøring af shaverhovedet
Rengør shaverhovedet hver gang det har været brugt.
1 Sørg for, at apparatet er slukket, og stikket er taget ud af
stikkontakten.
2 Tag shaverhovedet af.
3 Træk skæreenheden ud af shaverhovedet. (g. 21)
4 Børst skærenhed og shaverhoved fri for hår. Vær særlig omhyggelig
med at fjerne de hår, der har samlet sig under trimmerne (g. 22).
5 Du kan også skylle skærenheden og resten af shaverhovedet (ikke
apparatet!) under vandhanen (g. 23).
6 Sæt skærenheden tilbage på shaverhovedet og klik det tilbage på
apparatet (g. 24).
Tryk ikke på skærfolien, da den ellers kan blive beskadiget.
7 Smør trimmere og skærfolien med en dråbe symaskineolie et par
gange om året.
Opbevaring
Sæt beskyttelsesdækslet på shaverhovedet (“klik”). (g. 25)
1
2 Opbevar epilator og tilbehør i posen.
3 Du kan også opbevare apparatet i standeren (g. 2).
Udskiftning
Hvis du bruger shaverhovedet ere gange om ugen, bør skærenheden
(type HP6193) udskiftes efter 1 eller 2 år, eller hvis en af delene er
beskadiget.
Miljøhensyn
Apparatet må ikke smides ud sammen med det almindelige
-
husholdningsaffald, når det til sin tid kasseres. Aevér det i stedet på
Page 27

DANSK 27
en kommunal genbrugsstation. På den måde er du med til at beskytte
miljøet (g. 26).
De indbyggede genopladelige batterier indeholder stoffer, der kan
-
forurene miljøet. Fjern altid batterierne, inden du til sin tid kasserer
apparatet og aeverer det på en genbrugsstation. Aevér batterierne
på et ofcielt indsamlingssted for brugte batterier. Kan du ikke få
batterierne ud, kan du indlevere apparatet til Philips, som vil sørge for
at tage batterierne ud og bortskaffe dem på en miljømæssig forsvarlig
måde.
1 Tag adapteren ud af stikkontakten, og lad apparatet køre, indtil
batterierne er opbrugt.
2 Tag epilatorhovedet af (g. 14).
3 Hold apparatet i hånden, og luk det op med en
skruetrækker (g. 27).
4 Træk apparatets to dele fra hinanden med tommelngrene til
“snap-on” tappene brækker af (g. 28).
5 Tag alle komponenterne ud (motorenhed og printkort med
batterier) af de to halvdele.
6 Indsæt en skruetrækker mellem plastbatteriholderen og
batterierne (g. 29).
7 Fjern batterierne fra plastbatteriholderen og printkortet (g. 30).
Du må ikke forsøge at samle apparatet igen for at bruge det med
netledningen. Dette er farligt (g. 3).
Reklamationsret og service
For alle yderligere oplysninger eller ved eventuelle problemer med
apparatet henvises til Philips’ hjemmeside på adressen www.philips.com
eller det lokale Philips Kundecenter (telefonnumre ndes i vedlagte
“World-Wide Guarantee” folder). Hvis der ikke ndes et kundecenter i
dit land, bedes du venligst kontakte din lokale Philips-forhandler eller
Serviceafdelingen i Philips Domestic Appliances and Personal Care BV.
Page 28

DANSK28
Fejlnding
Problem Mulig årsag Løsning
Nedsat
epileringsevne.
Apparatet
fungerer ikke.
Du har bevæget
epilatoren i den
forkerte retning.
Du har placeret
epilatorhovedet
mod huden i en
forkert vinkel.
Epilatorhovedet
var ikke i
berøring med
huden.
Du havde fugtet
huden med
vand, creme
eller et andet
hudplejeprodukt
før epileringen.
Iselementet til
armhuler og
bikini-linje var
påsat, da du
epilerede
benene.
Apparatet er
blevet kørt for
hurtigt hen over
huden
Batterierne er
brugt op.
Bevæg altid apparatet imod
hårenes vækstretning.
Sørg for at placere apparatet
vinkelret mod huden.
Sørg for, at epilatorhoved og
iselement har fuld kontakt med
huden under epilering.
Sørg for at huden er fuldstændig
tør og fedtfri. Du må ikke smøre
huden med fugtighedscreme
eller noget andet
hudplejeprodukt, før du
begynder epileringen.
Brug kun det specielle iselement
beregnet til ben, når du epilerer
benene.
Kør apparatet hen over huden
ved en moderat hastighed
Oplad batterierne.
Page 29

Problem Mulig årsag Løsning
Der opstår
hudirritation.
Iselementet er
ikke koldt nok.
Der er ikke
strøm i
kontakten.
Der er ikke
tændt for
apparatet.
Epilatorhovedet
var ikke sat
rigtigt på.
Det er første
gang du
benytter
epilatoren, eller
fordi du har
holdt en
længere pause.
Du har trykket
apparatet for
hårdt mod
huden
Iselementet
havde ikke ligget
længe nok i
fryseren.
Sørg for, at der er strøm i
kontakten. Anvender du en
integreret stikkontakt i et
badeværelsesskab/kabinet, skal
lyset på badeværelset ofte
tændes for at aktivere denne.
Tænd for apparatet.
Sæt epilatorhovedet på
apparatet og tryk, indtil det
klikker på plads.
Der kan opstå hudirritation de
første par gange du bruger
apparatet. Dette er fuldstændigt
normalt og ophører sædvanligvis
hurtigt. Læs første del af afsnittet
“Brug af apparatet” for at få et
par gode råd om nedsat
hudirritation. Sørg også for at
holde epilatorhovedet rent.
Undlad at trykke for hårdt, når
du fører apparatet hen over
huden
Læg iselementet uden
beskyttelseskappe i fryser eller
isboks (***) i mindst 4 timer.
Når al væsken har skiftet farve
fra hvid til blå, er iselementet
klart til brug.
DANSK 29
Page 30

DANSK30
Problem Mulig årsag Løsning
Det vipbare
hoved til
iselementet til
benene bevæger
sig ikke.
Epilatorhovedet
kan ikke tages af.
Shaverhovedet
kan ikke tages af.
Nedsat
barberingsevne.
Iselementet har
ikke ligget i
fryser eller
fryseboks.
Iselementet var
ikke i berøring
med huden.
Iselementets
vipbare hoved
er frosset fast.
Du trak
epilatorhovedet
i den forkerte
retning.
Du trak
shaverhovedet i
den forkerte
retning.
Shaverhovedet
er ikke rent.
Læg iselementet uden
beskyttelseskappe i fryser eller
isboks (***) i mindst 4 timer.
Det er ikke nok at lægge
iselementet i køleskabet.
Sørg for, at iselementet altid er i
kontakt med huden under
epileringen.
Bevæg iselementet et par gange
hen over benet, indtil det
begynder at vippe igen. Sørg
altid for, at iselementets
overade er helt tør, før du
lægger det i fryseren.
Tryk på udløserknappen, og
bevæg epilatorhovedet i pilens
retning (g. 14) for at fjerne det.
Tryk på udløserknappen, og
bevæg shaverhovedet i pilens
retning (g. 14) for at fjerne det.
Sluk for apparatet, tag stikket ud
af stikkontakten og fjern
shaverhovedet. Rengør derefter
skærenhed og shaverhoved med
den medfølgende rensebørste.
Fjern alle de hår, der sidder fast
under trimmerne.
Page 31

Problem Mulig årsag Løsning
Stærkere
hudirritation end
normalt efter
barbering.
Skærenheden er
beskadiget eller
slidt.
Skærenheden er
beskadiget eller
slidt.
Udskift skærenheden.
Udskift skærenheden.
DANSK 31
Page 32

32
DEUTSCH
Einführung
Mit Ihrem neuen Epiliergerät Satinelle ICE PREMIUM werden lästige
Haare schnell, einfach und gründlich entfernt. Die Kombination des neuen
Keramik-Pinzettensystems mit dem Skin Cooler, der sich perfekt allen
Konturen anpasst, und dem Massagesystem stellt eine wahre Revolution
auf dem Gebiet der Epilation dar. Die schmerzlindernde Wirkung von Eis
und Massage macht das Epilieren mit dem neuen Satinelle ICE PREMIUM
angenehmer und schmerzfreier denn je. Das Ergebnis ist seidenglatte
Haut. Bei regelmäßiger Anwendung (alle 4 Wochen) reduziert sich der
Haarwuchs um bis zu 50 %.
Satinelle ICE PREMIUM eignet sich für alle Körperpartien und ist mit
einem Skin Cooler ausgestattet, der speziell für die Enthaarung
empndlicher Partien (Achseln, Bikinizone) entwickelt wurde. Diese
Bereiche sind besonders schmerzempndlich, was mithilfe des speziellen
Skin Cooler gelindert wird.
Die schnell rotierenden Pinzetten erfassen selbst die kürzesten Härchen
von nur einem halben Millimeter Länge und entfernen sie an der Wurzel.
Anschließend bleibt Ihre Haut bis zu 4 Wochen glatt.
Die nachwachsenden Härchen sind weich und fein.
Allgemeine Beschreibung (Abb. 1)
A Iso-Hülle für Skin Cooler
B Skin Cooler mit beweglichem Kopf
C Skin Cooler für Achselhöhlen und Bikinizone
D Ladyshave-Aufsatz
E Schutzkappe für Ladyshave-Aufsatz
F Massage-Element
G Epilierkopf
H Das Gerät
I Ladeanzeige
J Adapter
K Reinigungsbürste
L Körperpeeling-Pegeschwamm
M Ladestation
Page 33

DEUTSCH 33
Wichtig
Lesen Sie diese Bedienungsanleitung vor dem Gebrauch des Geräts
aufmerksam durch und bewahren Sie sie für eine spätere Verwendung auf.
Überprüfen Sie vor dem ersten Gebrauch, ob die Spannungsangabe
,
auf dem Adapter mit der örtlichen Netzspannung übereinstimmt.
Benutzen Sie das Gerät nur mit dem mitgelieferten Adapter.
,
Benutzen Sie das Gerät nicht, wenn der Adapter oder das Gerät
,
selbst beschädigt oder defekt ist.
Wenn der Adapter defekt oder beschädigt ist, darf er nur durch ein
,
Original-Ersatzteil ausgetauscht werden, um Gefährdungen zu
vermeiden.
Der Adapter enthält einen Transformator. Ersetzen Sie den Adapter
,
keinesfalls durch einen anderen Stecker, da dies möglicherweise den
Benutzer gefährden kann.
Gerät und Adapter dürfen nicht mit Flüssigkeiten in Berührung
,
kommen.
Halten Sie das Gerät außerhalb der Reichweite von Kindern.
,
Setzen Sie das Gerät keinen Temperaturen unter 5 °C oder über
,
35 °C aus.
Halten Sie das eingeschaltete Gerät fern von Kopfhaar, Wimpern
,
und Augenbrauen, sowie von Kleidung, Borsten, Fäden und Drähten,
um Verletzungen und Beschädigungen zu vermeiden.
Das Gerät enthält zwei NiMH-Akkus, die vorschriftsmäßig entsorgt
,
werden müssen, um Umweltschäden zu vermeiden.
Bei Hautreizungen, Krampfadern, Ausschlag, Pickeln, (behaarten)
,
Muttermalen oder Wunden sollte das Gerät nicht verwendet
werden, ohne vorher einen Arzt zu konsultieren. Gleiches gilt bei
Patienten mit geschwächter Immunabwehr, Diabetes, dem RaynaudSyndrom oder einer Immunschwächekrankheit. In diesen Fällen
sollten Sie unbedingt zunächst ein Arzt konsultieren.
Elektromagnetische Felder
Dieses Philips Gerät erfüllt sämtliche Normen bezüglich elektromagnetischer
Felder (EMF). Nach aktuellen wissenschaftlichen Erkenntnissen ist das
Gerät sicher im Gebrauch, sofern es ordnungsgemäß und entsprechend
den Anweisungen in dieser Bedienungsanleitung gehandhabt wird.
Page 34

DEUTSCH34
Laden
Sie können das Gerät direkt am Netz betreiben oder bei vollständig
geladenen Akkus ohne Kabel benutzen.
Laden Sie die Akkus zunächst mindestens 16 Stunden lang auf, um das
Gerät für max. 20 Minuten schnurlos benutzen zu können.
Laden Sie das Gerät nicht länger als 24 Stunden.
1 Achten Sie darauf, dass das Gerät während des Auadens
ausgeschaltet ist.
2 Führen Sie den Gerätestecker in die Buchse im Gerät, und stecken
Sie den Adapter in eine Steckdose.
Die Ladeanzeige leuchtet dauerhaft und zeigt an, dass das Gerät
,
aufgeladen wird.
Die Ladeanzeige schaltet sich nicht aus bzw. ändert nicht ihre Farbe,
wenn das Gerät vollständig aufgeladen ist.
3 Stellen Sie das Gerät zum Laden einfach in die Ladestation (Sie
hören ein Klicken) (Abb. 2).
Die Lebensdauer der Akkus optimieren
Laden Sie das Gerät vor der ersten Benutzung vollständig auf. Laden
Sie es aber nicht nach jedem Gebrauch neu auf. Verwenden Sie es so
lange, bis die Akkus (fast) leer sind.
Entladen Sie die Akkus zweimal pro Jahr vollständig, indem Sie das
Gerät so lange laufen lassen, bis es zum Stillstand kommt.
Lassen Sie das Gerät nicht ständig an der Steckdose angeschlossen.
Wenn das Gerät längere Zeit nicht verwendet wurde, muss es erneut
16 Stunden lang aufgeladen werden.
Für den Gebrauch vorbereiten
Skin Cooler einfrieren
1 Legen Sie vor dem Epilieren den Skin Cooler OHNE Iso-Hülle für
mindestens 4 Stunden in das Tiefkühlgerät oder das Tiefkühlfach
(***). Sobald sich die Flüssigkeit vollständig blau färbt, kann der Skin
Cooler verwendet werden.
Page 35

DEUTSCH 35
Vergewissern Sie sich, dass der Skin Cooler vollkommen trocken ist, bevor
Sie ihn einfrieren.
Tipp: Sie können den Skin Cooler auch ständig im Tiefkühlgerät bzw. -fach
aufbewahren.
Das Gerät benutzen
Allgemeine Hinweise zum Epilieren
Das Epilieren ist nach einem Dusch- oder Vollbad am leichtesten.
,
Achten Sie darauf, dass Ihre Haut vor der Anwendung vollständig
trocken ist.
Wenn Sie das Gerät zum ersten Mal benutzen, empehlt es sich, es
,
zunächst an einer Stelle mit geringer Behaarung auszuprobieren,
damit Sie sich an das Epilieren gewöhnen.
Für optimale Ergebnisse beim Epilieren sollten die Haare nicht
,
länger als 10 mm sein (Abb. 3).
Zum Epilieren längerer Haare: (Abb. 3)
,
schneiden Sie das Haar mit einem Langhaarschneider auf eine Länge
von max. 10 mm vor. Anschließend können Sie mit dem Epilieren
beginnen.
rasieren Sie die Haare vollständig. Nach ein paar Tagen können Sie mit
dem Epilieren beginnen (die Haare müssen mindestens 0,5 mm lang
sein).
Nach den ersten Anwendungen kann Ihre Haut möglicherweise mit
,
Rötungen oder Reizungen reagieren. Dies ist völlig normal und
sollte sich bald legen, sobald Sie sich an das Epilieren gewöhnt
haben und die nachwachsenden Haare feiner und weicher werden.
Sollte die Hautirritation nicht innerhalb von 3 Tagen wieder
abklingen, konsultieren Sie Ihren Arzt.
Wir empfehlen das Epilieren vor dem Schlafengehen. So kann eine
,
möglicherweise auftretende Hautreizung über Nacht abklingen.
Verwendung mit Kabel
Betreiben Sie das Gerät bei voll aufgeladenen Akkus nicht am
Stromnetz.
Page 36

DEUTSCH36
1 Um das Gerät am Netz zu betreiben, schalten Sie das Gerät aus
und schließen es am Stromnetz an. Warten Sie einen Moment,
bevor Sie das Gerät wieder einschalten.
Epilieren mit dem Skin Cooler für Beine
Ihre Haut sollte sauber, fettfrei und absolut trocken sein, wenn Sie das
Gerät benutzen. Verwenden Sie vor dem Epilieren keine Cremes.
1 Schieben Sie die Iso-Hülle auf das Kühlelement. (Abb. 4)
Die Hülle verhindert, dass Sie während des Epilierens ein unangenehmes
Kältegefühl in der Hand verspüren, und hält den Skin Cooler länger kalt.
Es kann vorkommen, dass der bewegliche Kopf am Kühlelement festfriert
und sich nicht mehr bewegen lässt, wenn Sie das Kühlelement aus dem
Tiefkühlgerät nehmen. Nachdem Sie den Kopf des Kühlelements
mehrmals über das Bein geführt haben, dreht er sich wieder.
2 Drücken Sie das Gerät auf das Kühlelement (Abb. 5).
3 Führen Sie den Gerätestecker in die Buchse im Gerät, und stecken
Sie den Adapter in eine Steckdose.
4 Wählen Sie zum Einschalten des Geräts die gewünschte
Geschwindigkeit (Abb. 6).
Wählen Sie die normale Geschwindigkeit I für Hautpartien mit geringer
Behaarung und für Hautpartien über Knochen, z. B. Knie und Knöchel.
Wählen Sie Geschwindigkeitsstufe II für größere Hautpartien mit
stärkerer Behaarung.
5 Straffen Sie die Haut mit Ihrer freien Hand, damit sich die Haare
aufrichten.
6 Setzen Sie das Gerät senkrecht auf die Haut, und achten Sie darauf,
dass der Epilierkopf nach vorne zeigt. Führen Sie das Gerät langsam
gegen die Haarwuchsrichtung. (Abb. 7)
Achten Sie darauf, dass sowohl die Epilierpinzetten als auch das
Kühlelement ständigen Kontakt mit der Haut haben.
Drücken Sie das Gerät leicht auf die Haut.
Wenn Sie mit dem Ergebnis der Epilation nicht zufrieden sind,
,
führen Sie das Epiliergerät etwas langsamer über Ihre Haut.
Page 37

DEUTSCH 37
7 Verwenden Sie die Lasche an der Geräteunterseite, um den Skin
Cooler vom Gerät zu trennen (Abb. 8).
Epilieren mit dem Skin Cooler für Achseln und Bikinizone
Bei Verwendung des speziellen Skin Coolers für Achseln und Bikinizone
wird die Anzahl der aktiven Pinzetten reduziert. In Kombination mit der
größeren Kühläche minimiert dieser Skin Cooler das Schmerzempnden
dieser empndlichen Hautpartien. Die besten Ergebnisse erzielen Sie,
wenn die Haare nicht zu lang sind (max. 1 cm).
1 Schieben Sie die Iso-Hülle auf das Kühlelement. (Abb. 9)
2 Drücken Sie das Gerät auf das Kühlelement (Abb. 10).
3 Schalten Sie das Gerät ein, indem Sie die gewünschte
Geschwindigkeit wählen. (Abb. 6)
Wir empfehlen Geschwindigkeit I.
4 Legen Sie zum Epilieren im Achselbereich einen Arm hinter den
Kopf und straffen Sie die Haut. Mit der Hand des anderen Arms
setzen Sie das Gerät senkrecht auf die Haut (Abb. 11).
5 Um die Bikinizone zu epilieren, straffen Sie die Haut mit einer Hand
und setzen Sie mit der anderen Hand das Gerät senkrecht auf die
Haut, ohne dabei Druck auszuüben (Abb. 12).
6 Führen Sie das Gerät langsam gegen die Haarwuchsrichtung über
Ihre Haut.
7 Verwenden Sie die Lasche an der Geräteunterseite, um den Skin
Cooler für Achselhöhlen und Bikinizone vom Gerät zu
trennen (Abb. 13).
Epilieren ohne Skin Cooler
,
Wenn Sie den Skin Cooler nicht verwenden möchten, weil Sie z. B.
an das Epilieren gewöhnt sind, können Sie das Gerät auch ohne
Skin Cooler benutzen.
Achten Sie darauf, das Epiliergerät senkrecht auf die Haut zu setzen
,
und gegen die Haarwuchsrichtung zu bewegen.
Page 38

DEUTSCH38
Den Körperpeeling-Pegeschwamm verwenden
Verwenden Sie den Körperpeeling-Pegeschwamm während des
Duschens.
Regelmäßige Massagen mit einem Luffa-Schwamm können verhindern,
dass Härchen in die Haut einwachsen. Verwenden Sie aber den LuffaSchwamm nicht unmittelbar vor oder nach dem Epilieren.
Rasieren
Zum Rasieren empndlicher Hautpartien, z. B. Achsel- und Bikinibereich,
können Sie den Ladyshave-Aufsatz verwenden. Mit diesem Aufsatz
erzielen Sie bequem und sanft eine glatte Rasur.
1 Achten Sie darauf, dass das Gerät ausgeschaltet ist.
2 Nehmen Sie den Skin Cooler ab (Abb. 8).
3 Nehmen Sie den Epilierkopf vom Gerät ab (Abb. 14).
Drücken Sie auf die Entriegelungstaste (1), und schieben Sie den
Epilierkopf in Pfeilrichtung (2).
4 Setzen Sie den Ladyshave-Aufsatz auf, und drücken Sie ihn auf das
Gerät, bis er hörbar einrastet (Abb. 15).
5 Schalten Sie das Gerät ein, indem Sie Geschwindigkeit II wählen.
6 Setzen Sie den Ladyshave-Aufsatz auf die Haut, und führen Sie das
Gerät langsam und unter leichtem Druck gegen die
Haarwuchsrichtung über die Haut (Abb. 16).
Reinigung und Wartung
Spülen Sie den Adapter und das Gerät selbst niemals mit Wasser ab.
Verwenden Sie zum Reinigen des Geräts keine scharfen Wasch-, Spül-
oder Scheuermittel bzw. Scheuerschwämme, auch keine Lösungsmittel
wie Alkohol, Azeton, Benzin usw.
1 Überprüfen Sie, ob das Gerät tatsächlich ausgeschaltet und von der
Steckdose getrennt ist.
2 Nehmen Sie den Skin Cooler ab, und entfernen Sie die Iso-Hülle.
Page 39

DEUTSCH 39
3 Reinigen Sie den beweglichen Kopf des Skin Coolers für die Beine
nach jedem Gebrauch mit der mitgelieferten Bürste oder einem
feuchten Tuch.
Vergewissern Sie sich, dass der Skin Cooler vollkommen trocken ist, bevor
Sie ihn einfrieren.
Den Epilierkopf reinigen
Der Epilierkopf sollte nach jeder Verwendung gereinigt werden.
1 Überprüfen Sie, ob das Gerät tatsächlich ausgeschaltet und von der
Steckdose getrennt ist.
2 Nehmen Sie den Epilierkopf vom Gerät ab (Abb. 14).
Drücken Sie auf die Entriegelungstaste (1), und schieben Sie den
Epilierkopf in Pfeilrichtung (2).
3 Entfernen Sie das Massage-Element (Abb. 17).
4 Reinigen Sie alle zugänglichen Teile, einschließlich der Unterseite
des Epilierkopfes und der Pinzetten, mit der Bürste (Abb. 18).
5 Der Epilierkopf (nicht das Gerät!) kann auch durch vorsichtiges
Spülen unter ießendem Wasser noch gründlicher gereinigt
werden (Abb. 19).
Versuchen Sie nicht, die Epilierpinzetten vom Epilierkopf abzunehmen.
6 Bringen Sie das Massage-Element wieder am Epilierkopf an. Setzen
Sie anschließend den Epilierkopf fest auf das Gerät, bis er hörbar
einrastet (Abb. 20).
Der Epilierkopf lässt sich nur in einer Richtung auf das Gerät setzen.
Den Ladyshave-Aufsatz reinigen
Der Ladyshave-Aufsatz sollte nach jeder Verwendung gereinigt werden.
1 Überprüfen Sie, ob das Gerät tatsächlich ausgeschaltet und von der
Steckdose getrennt ist.
2 Nehmen Sie den Ladyshave-Aufsatz ab.
3 Ziehen Sie die Schneideeinheit vom Ladyshave-Aufsatz
ab. (Abb. 21)
Page 40

DEUTSCH40
4 Bürsten Sie die Haare von der Schneideeinheit und vom Ladyshave-
Aufsatz ab. Entfernen Sie auch die Härchen, die sich möglicherweise
unter den Messern angesammelt haben (Abb. 22).
5 Die Schneideeinheit und die übrigen Teile des Ladyshave-Aufsatzes
(nicht das Gerät!) können auch durch vorsichtiges Spülen unter
ießendem Wasser gereinigt werden (Abb. 23).
6 Setzen Sie die Schneideeinheit wieder in den Ladyshave-Aufsatz
und drücken Sie diesen wieder auf das Gerät, bis er hörbar
einrastet (Abb. 24).
Vermeiden Sie jeden Druck auf die Scherfolie, damit diese nicht
beschädigt wird.
7 Reiben Sie alle 6 Monate einen Tropfen Nähmaschinenöl auf
Schermesser und Scherfolie.
Aufbewahrung
Setzen Sie die Schutzkappe auf den Ladyshave-Aufsatz (sie rastet
1
hörbar ein). (Abb. 25)
2 Bewahren Sie das Gerät und die Zusatzteile in der mitgelieferten
Tasche auf.
3 Sie können das Gerät auch in der Ladestation aufbewahren (Abb. 2).
Ersatz
Wenn Sie den Ladyshave-Aufsatz mehrmals wöchentlich benutzen, sollten
Sie die Schneideeinheit (HP6193) alle ein bis zwei Jahre auswechseln bzw. wenn diese Teile defekt sind.
Umweltschutz
Werfen Sie das Gerät am Ende der Lebensdauer nicht in den
-
normalen Hausmüll. Bringen Sie es zum Recycling zu einer ofziellen
Sammelstelle. Auf diese Weise tragen Sie zum Umweltschutz
bei (Abb. 26).
Page 41

DEUTSCH 41
Die integrierten Akkus enthalten Substanzen, die die Umwelt
gefährden können. Entfernen Sie die Akkus, bevor Sie das Gerät an
einer ofziellen Recyclingstelle abgeben. Geben Sie die gebrauchten
Akkus bei einer Batteriesammelstelle ab. Falls Sie beim Entfernen der
Akkus Probleme haben, können Sie das Gerät auch an ein Philips
Service-Center geben. Dort werden die Akkus ausgebaut und
umweltgerecht entsorgt.
1 Ziehen Sie den Adapter aus der Steckdose und lassen Sie das Gerät
laufen, bis die Akkus leer sind.
2 Nehmen Sie den Epilierkopf vom Gerät ab (Abb. 14).
3 Halten Sie das Gerät in Ihrer Hand und öffnen Sie es mit einem
Schraubendreher (Abb. 27).
4 Ziehen Sie mit beiden Händen das Gerätegehäuse auseinander, bis
die Schnappverbindungen brechen (Abb. 28).
5 Nehmen Sie alle Bauteile aus den Gerätehälften heraus
(Motoreinheit und Platine).
6 Führen Sie einen Schraubendreher zwischen den Akkuhalter aus
Kunststoff und die Akkus (Abb. 29).
7 Entfernen Sie die Akkus aus dem Akkuhalter und die
Platine (Abb. 30).
Versuchen Sie nicht, das Gerät wieder zusammenzusetzen, um es
anschließend über das Stromnetz zu betreiben. Das ist
gefährlich! (Abb. 3)
Garantie und Kundendienst
Benötigen Sie weitere Informationen oder treten Probleme auf, wenden
Sie sich bitte an Ihren Philips-Händler oder setzen Sie sich mit einem
Philips Service-Center in Ihrem Land in Verbindung (Telefonnummer siehe
Garantieschrift). Besuchen Sie auch die Philips Website (www.philips.com).
Sie können auch direkt die Service-Abteilung von Philips Domestic
Appliances and Personal Care BV kontaktieren.
Page 42

DEUTSCH42
Fehlerbehebung
Problem Mögliche Ursache Lösung
Geringere
Leistung beim
Epilieren.
Sie haben das
Epiliergerät in die
falsche Richtung
bewegt.
Der Epilierkopf
wurde im falschen
Winkel auf die Haut
gesetzt.
Der Epilierkopf hatte
keinen Kontakt mit
der Haut.
Sie haben die Haut
mit Wasser
angefeuchtet bzw.
eine Creme oder ein
anderes
Hautpegeprodukt
vor dem Epilieren
angewendet.
Der Skin Cooler für
Achseln und
Bikinizone bendet
sich auf dem Gerät,
während Sie Ihre
Beine epilieren.
Das Gerät wurde zu
schnell über die Haut
geführt.
Bewegen Sie das Gerät immer
gegen die Haarwuchsrichtung.
Achten Sie darauf, dass Sie das
Gerät senkrecht auf die Haut
aufsetzen.
Achten Sie darauf, dass sowohl
der Epilierkopf als auch der
Skin Cooler ständigen Kontakt
mit der Haut haben.
Achten Sie darauf, dass Ihre
Haut vollkommen trocken und
fettfrei ist. Verwenden Sie vor
dem Epilieren keine Cremes,
Körperlotionen oder andere
Hautpegeprodukte.
Verwenden Sie für das
Epilieren der Beine nur den
Skin Cooler für Beine.
Führen Sie das Gerät
langsamer über die Haut.
Page 43

Problem Mögliche Ursache Lösung
Das Gerät
funktioniert
nicht.
Es treten
Hautreizungen
auf.
Die Akkus sind leer. Laden Sie die Akkus auf.
Die verwendete
Steckdose
funktioniert nicht.
Das Gerät wurde
nicht eingeschaltet.
Der Epilierkopf
wurde nicht
ordnungsgemäß
aufgesetzt.
Sie haben das
Epiliergerät zum
ersten Mal oder nach
einer längeren Pause
verwendet.
Sie haben zu viel
Druck auf das Gerät
ausgeübt.
Überprüfen Sie, ob die
verwendete Steckdose
tatsächlich funktioniert. Wenn
Sie eine Steckdose in einem
Badezimmerschrank
verwenden, müssen Sie
möglicherweise zunächst das
Licht einschalten, um die
Steckdose zu aktivieren.
Schalten Sie das Gerät ein.
Setzen Sie den Epilierkopf auf,
und drücken Sie ihn auf das
Gerät, bis er hörbar einrastet.
Bei den ersten Anwendungen
des Geräts können
möglicherweise Hautreizungen
auftreten. Dies ist normal und
sollte bald abklingen. Nähere
Informationen zum Vermeiden
von Hautreitzungen nden Sie
im ersten Abschnitt des
Kapitels ‘Das Gerät benutzen’.
Achten Sie zudem darauf, den
Epilierkopf sauber zu halten.
Üben Sie keinen Druck aus,
wenn Sie das Gerät über die
Haut führen.
DEUTSCH 43
Page 44

DEUTSCH44
Problem Mögliche Ursache Lösung
Der Skin
Cooler wurde
nicht
ausreichend
gekühlt.
Der
bewegliche
Kopf des Skin
Cooler für
Beine lässt sich
nicht bewegen.
Der
Epilierkopf
lässt sich nicht
abnehmen.
Sie haben den Skin
Cooler nicht lange
genug im Gefrierfach
aufbewahrt.
Sie haben den Skin
Cooler nicht im
Tiefkühlfach oder
Tiefkühlgerät
aufbewahrt.
Der Skin Cooler
hatte keinen Kontakt
mit der Haut.
Der bewegliche Kopf
ist festgefroren.
Sie haben den
Epilierkopf nicht in
die richtige Richtung
bewegt.
Legen Sie vor dem Epilieren
den Skin Cooler OHNE IsoHülle für mindestens 4
Stunden in das Tiefkühlgerät
oder das Tiefkühlfach (***).
Sobald sich die Farbe der
Flüssigkeit vollständig von weiß
in blau ändert, kann der Skin
Cooler verwendet werden.
Legen Sie vor dem Epilieren
den Skin Cooler OHNE IsoHülle für mindestens 4
Stunden in das Tiefkühlgerät
oder das Tiefkühlfach (***).
Bewahren Sie den Skin Cooler
nicht im Kühlschrank auf.
Achten Sie darauf, dass der
Skin Cooler während des
Epilierens immer Kontakt mit
der Haut hat.
Führen Sie den Skin Cooler
mehrmals über das Bein.
Anschließend dreht sich der
bewegliche Kopf wieder.
Achten Sie darauf, dass der
Skin Cooler tatsächlich
vollkommen trocken ist, bevor
Sie ihn einfrieren.
Drücken Sie auf die
Entriegelungstaste, und
schieben Sie den Epilierkopf in
Pfeilrichtung (Abb. 14).
Page 45

Problem Mögliche Ursache Lösung
Der
LadyshaveAufsatz lässt
sich nicht
abnehmen.
Die
Rasierleistung
lässt nach.
Ungewöhnlich
starke
Hautreizungen
nach dem
Rasieren.
Sie haben den
Ladyshave-Aufsatz
richtig herum
angebracht.
Der LadyshaveAufsatz ist
verschmutzt.
Die Schneideeinheit
ist beschädigt oder
abgenutzt.
Die Schneideeinheit
ist beschädigt oder
abgenutzt.
Drücken Sie auf die
Entriegelungstaste, und
schieben Sie den LadyshaveAufsatz in Pfeilrichtung
(Abb. 14), um ihn abnehmen
zu können.
Schalten Sie das Gerät aus und
ziehen Sie den Netzstecker,
bevor Sie den LadyshaveAufsatz entfernen. Reinigen Sie
anschließend die
Schneideeinheit und den
Ladyshave-Aufsatz mit der
mitgelieferten
Reinigungsbürste. Entfernen
Sie auch Härchen, die sich
möglicherweise unter den
Messern angesammelt haben.
Tauschen Sie die
Schneideeinheit aus.
Tauschen Sie die
Schneideeinheit aus.
DEUTSCH 45
Page 46

FRANÇAIS46
Introduction
Le nouvel épilateur Satinelle ICE PREMIUM permet une épilation rapide,
facile et efcace. Avec son nouveau système céramique, son applicateur
de froid épousant chaque contour du corps et son nouveau système de
massage Sonic, il révolutionne l’épilation. En effet, la sensation de massage
et l’effet naturellement anesthésiant de la glace garantissent une épilation
plus douce et moins douloureuse. Résultat : une peau douce comme de
la soie et une diminution de la repousse jusqu’à 50 %, à condition de vous
épiler régulièrement (toutes les 4 semaines).
L’épilateur Satinelle ICE PREMIUM est adapté à l’épilation de toutes les
parties du corps et est doté d’un applicateur de froid spécialement conçu
pour l’épilation des zones sensibles (aisselles et maillot) car il réduit la
sensation de douleur ressentie.
Les disques rotatifs attrapent même les poils les plus courts (jusqu’à un
demi millimètre !) et les éliminent à la racine, laissant votre peau douce
pendant quatre semaines environ. Le poil repousse doux et plus n.
Description générale (g. 1)
A Applicateur de froid
B Applicateur de froid avec tête pivotante pour l’épilation des jambes
C Applicateur de froid pour aisselles et maillot
D Tête de rasage
E Capot de protection pour la tête de rasage
F Système de massage
G Tête d’épilation
H Appareil
I Voyant de charge
J Adaptateur
K Brosse de nettoyage
L Éponge exfoliante
M Support
Important
Lisez attentivement ce mode d’emploi avant d’utiliser l’appareil et
conservez-le pour un usage ultérieur.
Page 47

FRANÇAIS 47
Avant de brancher l’appareil, vériez que la tension indiquée sur
,
l’adaptateur correspond à la tension du secteur.
Utilisez l’appareil uniquement avec l’adaptateur fourni.
,
N’utilisez pas l’appareil lorsque celui-ci ou l’adaptateur est
,
endommagé.
Si l’adaptateur est endommagé, remplacez-le toujours par un
,
adaptateur de même type pour éviter tout accident.
L’adaptateur contient un transformateur. N’essayez pas de
,
remplacer la che de l’adaptateur pour éviter tout accident.
Évitez de mouiller l’appareil et l’adaptateur.
,
Tenez l’appareil hors de portée des enfants.
,
Conservez votre appareil à une température comprise entre 5 °C
,
et 35 °C.
Pour prévenir tout dommage ou blessure, évitez de faire
,
fonctionner l’appareil près de vos cheveux, de vos sourcils et cils,
ainsi qu’à proximité de vêtements, ls, câbles, brosses, etc.
Cet appareil contient deux piles rechargeables NiMh qui peuvent
,
nuire à l’environnement si elles ne sont pas déposées à un endroit
assigné à cet effet.
N’utilisez pas l’appareil sans avoir consulté votre médecin si votre
,
peau est irritée ou si vous souffrez de varices, rougeurs, tâches de
vin (avec pilosité) ou blessures. Les mêmes recommandations
s’appliquent aux personnes ayant une immunité réduite ou
souffrant du diabète, de la maladie de Raynaud ou
d’immunodécience.
Champs électromagnétiques
Cet appareil Philips est conforme à toutes les normes relatives aux
champs électromagnétiques (CEM). Il répond aux règles de sécurité
établies sur la base des connaissances scientiques actuelles s’il est
manipulé correctement et conformément aux instructions de ce mode
d’emploi.
Charge
L’appareil peut fonctionner directement sur secteur ou être utilisé sans le
cordon lorsque les piles ont été chargées.
Page 48

FRANÇAIS48
Avant d’utiliser l’appareil, chargez les piles pendant au moins 16 heures
pour bénécier d’une autonomie sans l de 20 minutes environ.
Ne chargez jamais l’appareil pendant plus de 24 heures.
1 Arrêtez toujours l’appareil avant de le charger.
2 Insérez la petite che dans l’appareil et l’adaptateur dans la prise de
courant.
Le voyant de charge s’allume pour indiquer que l’appareil est en
,
charge.
Le voyant de charge ne s’éteint pas ou ne change pas de couleur
lorsque l’appareil est complètement chargé.
3 Pour une charge pratique, vous pouvez placer l’appareil sur le
support (clic) (g. 2).
Optimisation de la durée de vie des piles
Après avoir chargé l’appareil pour la première fois, vous ne devez pas
le recharger entre les séances d’épilation ou de rasage. Continuez à
utiliser l’appareil et rechargez-le uniquement lorsque les piles sont
(presque) vides.
Déchargez complètement les piles deux fois par an en laissant
l’appareil fonctionner jusqu’à l’arrêt du moteur.
Évitez de laisser l’appareil branché sur le secteur en permanence.
Si vous n’avez pas utilisé l’appareil pendant une longue période,
rechargez-le pendant 16 heures.
Avant utilisation
Congélation de l’applicateur de froid
1 Placez l’applicateur de froid SANS le manchon dans le congélateur
(***), au moins 4 heures avant de commencer l’épilation. Dès que le
liquide est devenu complètement bleu, l’applicateur peut être utilisé.
Assurez-vous que l’applicateur de froid est parfaitement sec avant de le
mettre au congélateur.
Conseil : L’applicateur de froid doit être conservé dans votre congélateur.
Page 49

FRANÇAIS 49
Utilisation de l’appareil
Informations générales relatives à l’épilation
Les poils sont plus faciles à enlever après un bain ou une douche.
,
Cependant, veillez à ce que votre peau soit complètement sèche
avant de commencer l’épilation.
Lors de votre première utilisation, nous vous conseillons d’essayer
,
l’épilateur sur une zone comportant peu de poils pour vous
familiariser avec l’appareil.
Pour un résultat optimal, la longueur des poils ne doit pas être
,
supérieure à 10 millimètres (g. 3).
Pour épiler les poils plus longs : (g. 3)
,
tondez les poils jusqu’à une longueur maximale de 10 mm à l’aide
d’une tondeuse. Dans ce cas, vous pouvez commencer l’épilation
immédiatement.
rasez les poils complètement. Dans ce cas, vous pouvez commencer
-
l’épilation après quelques jours (la longueur des poils doit être d’au
moins 0,5 mm).
Lors des premières utilisations, il est possible que la peau rougisse
,
ou s’irrite légèrement. Il s’agit d’une réaction normale qui
disparaîtra rapidement. La gêne ressentie au début diminuera
progressivement à chaque utilisation. Au fur et à mesure, votre peau
s’habituera et la repousse sera plus ne. Cependant, si l’irritation
persiste au-delà de trois jours, consultez votre médecin.
Il est conseillé de s’épiler le soir, an de laisser les éventuelles
,
irritations disparaître pendant la nuit.
Fonctionnement sur secteur
N’utilisez pas l’appareil sur secteur si les piles sont complètement
chargées.
1 Pour utiliser l’appareil sur secteur, éteignez-le et branchez-le sur le
secteur. Patientez quelques secondes avant d’allumer l’appareil.
Page 50

FRANÇAIS50
Épilation à l’aide de l’applicateur de froid pour jambes
Assurez-vous que votre peau est propre, complètement sèche et non
grasse. N’appliquez aucune crème avant l’épilation.
1 Glissez l’applicateur de froid sur l’épilateur. (g. 4)
L’applicateur de froid atténue la douleur lorsque vous vous épilez et il ne
se réchauffe pas trop rapidement.
Lorsque vous retirez l’applicateur de froid du congélateur, il arrive parfois
que la tête pivotante gelée adhère à l’applicateur de froid. Dans ce cas,
passez la tête pivotante plusieurs fois sur votre jambe jusqu’à ce qu’elle
recommence à fonctionner.
2 Fixez l’applicateur de froid sur l’appareil (g. 5).
3 Insérez la petite che dans l’appareil et l’adaptateur dans la prise de
courant.
4 Mettez l’appareil en marche en sélectionnant la vitesse de votre
choix (g. 6).
Sélectionnez la vitesse I pour les zones où les poils sont plus ns et pour
les zones osseuses comme les genoux et les chevilles.
Sélectionnez la vitesse II pour les zones plus étendues, avec des poils plus
épais.
5 Tendez la peau avec votre main libre pour redresser les poils.
6 Placez l’appareil perpendiculairement à la peau, orientez la tête
d’épilation vers l’avant, puis faites glisser l’épilateur à une vitesse
modérée dans le sens inverse de la pousse des poils. (g. 7)
Assurez-vous que les disques rotatifs et l’applicateur de froid soient en
contact avec votre peau.
Exercez une légère pression sur la peau.
Si vous n’êtes pas satisfaite du résultat, faites glisser l’épilateur plus
,
lentement sur votre peau.
7 Pour retirer l’applicateur de froid, appuyez sur la languette située
en bas de l’appareil (g. 8).
Page 51

FRANÇAIS 51
Épilation des aisselles et du maillot à l’aide de l’applicateur
de froid
L’applicateur de froid spécique pour les aisselles et le maillot a un
nombre moindre de disques rotatifs actifs. La plus grande surface de
refroidissement rend l’épilation des zones délicates du corps beaucoup
moins douloureuse. Pour une épilation optimale, les poils ne doivent pas
être trop longs (1 cm max.).
1 Glissez l’applicateur de froid sur l’épilateur (g. 9)
2 et xez-le (g. 10).
3 Mettez l’appareil en marche en sélectionnant la vitesse de votre
choix. (g. 6)
Nous vous conseillons d’utiliser la vitesse I.
4 Pour l’épilation des aisselles, mettez un bras derrière la tête pour
tendre la peau au maximum et placez-y l’épilateur
perpendiculairement à l’aide de votre main libre (g. 11).
5 Pour l’épilation du maillot, tendez la peau d’une main et placez-y
l’épilateur perpendiculairement, sans exercer de pression (g. 12).
6 Déplacez l’épilateur lentement sur la peau, dans le sens inverse de
la pousse des poils.
7 Pour retirer l’applicateur de froid pour aisselles et maillot, appuyez
sur la languette située en bas de l’appareil (g. 13).
Épilation sans l’applicateur de froid
Vous pouvez également utiliser l’épilateur sans l’applicateur de
,
froid, si vous vous êtes habituée à la sensation d’épilation par
exemple.
Placez l’épilateur perpendiculairement à la peau et déplacez-le dans
,
le sens inverse de la pousse des poils.
Utilisation de l’éponge exfoliante
Utilisez l’éponge exfoliante sous la douche.
Page 52

FRANÇAIS52
Un massage régulier de la peau avec l’éponge atténue le risque de
repousse de poils incarnés. N’utilisez pas l’éponge exfoliante
immédiatement avant ou après l’épilation.
Rasoir
Vous pouvez utiliser la tête de rasage pour les zones sensibles comme les
aisselles et le maillot. La tête de rasage, confortable et efcace, garantit
d’excellents résultats.
1 Assurez-vous que l’appareil est éteint.
2 Retirez l’applicateur de froid (g. 8).
3 Retirez la tête d’épilation (g. 14).
Appuyez sur le bouton de déverrouillage (1) et faites glisser la tête
d’épilation dans le sens de la èche (2).
4 Placez la tête de rasage sur l’appareil et exercez une pression
jusqu’à ce qu’elle s’enclenche (clic) (g. 15).
5 Mettez l’appareil en marche en sélectionnant la vitesse II.
6 Placez la tête de rasage sur la peau et déplacez l’épilateur
lentement dans le sens inverse de la pousse des poils en exerçant
une légère pression (g. 16).
Nettoyage et entretien
Ne rincez jamais l’appareil ou l’adaptateur à l’eau.
N’utilisez pas de produits abrasifs, de tampons à récurer, d’essence,
d’acétone, etc. pour nettoyer l’appareil.
1 Assurez-vous que l’appareil est éteint et débranché.
2 Ôtez l’applicateur de froid de l’appareil et retirez le manchon.
3 Nettoyez la tête pivotante de l’applicateur de froid pour jambes
avec la brosse fournie ou avec un chiffon humide après chaque
utilisation.
Assurez-vous que l’applicateur de froid est parfaitement sec avant de le
remettre au congélateur.
Page 53

FRANÇAIS 53
Nettoyage de la tête d’épilation
Nettoyez la tête d’épilation après chaque utilisation.
1 Assurez-vous que l’appareil est éteint et débranché.
2 Retirez la tête d’épilation (g. 14).
Appuyez sur le bouton de déverrouillage (1) et faites glisser la tête
d’épilation dans le sens de la èche (2).
3 Retirez le système de massage (g. 17).
4 À l’aide de la brosse fournie, nettoyez toutes les parties accessibles,
y compris le bas de la tête d’épilation et les disques rotatifs (g. 18).
5 Vous avez également la possibilité de rincer la tête d’épilation (pas
l’appareil !) sous le robinet pour un nettoyage en
profondeur (g. 19).
N’essayez pas de retirer les disques rotatifs de la tête d’épilation.
6 Fixez le système de massage sur la tête d’épilation, puis placez cette
dernière sur l’appareil et exercez une pression jusqu’à ce qu’elle
s’enclenche (clic) (g. 20).
Elle ne peut être xée sur l’appareil que dans une seule position.
Nettoyage de la tête de rasage
Nettoyez la tête de rasage après chaque utilisation.
1 Assurez-vous que l’appareil est éteint et débranché.
2 Retirez la tête de rasage.
3 Appuyez légèrement sur le bloc tondeuse pour le séparer de la
tête de rasage. (g. 21)
4 À l’aide d’une brosse, retirez les poils du bloc tondeuse et de la
tête de rasage, ainsi que ceux restés sous les tondeuses (g. 22).
5 Vous avez également la possibilité de rincer le bloc tondeuse et la
tête de rasage (pas l’appareil !) sous le robinet (g. 23).
6 Replacez le bloc tondeuse sur la tête de rasage, puis encliquetez
cette dernière sur l’appareil (clic) (g. 24).
Page 54

FRANÇAIS54
N’exercez aucune pression sur la grille de rasage an d’éviter toute
détérioration.
7 Deux fois par an, appliquez une goutte d’huile pour machine à
coudre sur les tondeuses et la grille de l’unité de rasage.
Rangement
Placez le capot de protection sur la tête de rasage (clic). (g. 25)
1
2 Conservez l’appareil et les accessoires dans la housse.
3 Vous pouvez également ranger l’appareil sur le support (g. 2).
Remplacement
Si vous utilisez la tête de rasage plusieurs fois par semaine, remplacez le
bloc tondeuse (type HP6193) une fois par an ou tous les deux ans, ou
dès qu’il est endommagé.
Environnement
Lorsqu’il ne fonctionnera plus, ne jetez pas l’appareil avec les ordures
-
ménagères, mais déposez-le à un endroit assigné à cet effet, où il
pourra être recyclé. Vous contribuerez ainsi à la protection de
l’environnement (g. 26).
Les piles rechargeables intégrées contiennent des substances qui
peuvent nuire à l’environnement. Veillez à toujours retirer les piles
avant de mettre le rasoir au rebut ou de le déposer à un endroit
assigné à cet effet. Déposez les piles usagées à un endroit assigné à
cet effet. Si vous n’arrivez pas à les retirer de l’appareil, vous pouvez
apporter l’appareil dans un Centre Service Agréé Philips qui prendra
toute l’opération en charge pour préserver l’environnement.
1 Débranchez l’adaptateur de la prise secteur et laissez l’appareil
fonctionner jusqu’à ce que les piles soient vides.
2 Retirez la tête d’épilation (g. 14).
3 Tenez l’appareil à la main et ouvrez-le à l’aide d’un
tournevis (g. 27).
Page 55

FRANÇAIS 55
4 Utilisez vos pouces pour séparer les deux parties du boîtier ainsi
que les connexions (g. 28).
5 Retirez tous les composants (bloc moteur et circuit imprimé) des
deux parties du boîtier.
6 Insérez un tournevis entre le support plastique des piles et les
piles (g. 29).
7 Retirez les piles du support plastique et du circuit imprimé (g. 30).
N’essayez pas de réassembler l’appareil pour le brancher sur le secteur
car cela est dangereux (g. 3).
Garantie et service
Si vous souhaitez obtenir des informations supplémentaires ou si vous
rencontrez un problème, visitez le site Web de Philips à l’adresse
www.philips.com ou contactez le Service Consommateurs Philips de
votre pays (vous trouverez le numéro de téléphone correspondant sur le
dépliant de garantie internationale). S’il n’existe pas de
Service Consommateurs Philips dans votre pays, renseignez-vous auprès
de votre revendeur local ou contactez le « Service Department of
Philips Domestic Appliances and Personal Care BV ».
Dépannage
Problème Cause possible Solution
Résultats
d’épilation peu
satisfaisants.
Vous n’avez pas
déplacé la tête de
l’épilateur dans le
sens inverse de la
pousse du poil.
L’angle entre la
tête d’épilation et
la peau était
incorrect.
Déplacez l’appareil dans le sens
inverse de la pousse des poils.
Placez l’épilateur
perpendiculairement à la peau.
Page 56

FRANÇAIS56
Problème Cause possible Solution
L’appareil ne
fonctionne
pas.
La tête d’épilation
ne touchait pas la
peau.
Votre peau est
mouillée ou vous
avez appliqué une
crème ou un autre
produit
cosmétique avant
l’épilation.
Vous avez utilisé
l’applicateur de
froid spécique
aux aisselles et au
maillot pour vous
épiler les jambes.
Vous avez effectué
des mouvements
trop rapides lors
de l’utilisation de
l’appareil.
Les piles sont
plates.
La prise sur
laquelle l’appareil
est branché n’est
pas alimentée.
Assurez-vous que la tête
d’épilation et l’applicateur de
froid sont en contact avec la
peau pendant l’épilation.
Faites en sorte que la peau soit
complètement sèche et non
grasse. N’appliquez aucune
crème, lait corporel ou autre
produit cosmétique avant
l’épilation.
Veillez à utiliser l’applicateur de
froid pour jambes.
Déplacez l’appareil à une vitesse
modérée sur la peau.
Chargez les piles.
Assurez-vous que la prise utilisée
est bien alimentée. Si vous utilisez
la prise de la salle de bain, il peut
être nécessaire d’allumer la
lumière pour activer la prise.
Page 57

Problème Cause possible Solution
Ma peau est
irritée.
L’applicateur
de froid n’est
pas
sufsamment
froid.
L’appareil n’est pas
allumé.
Vous n’avez pas
installé la tête
d’épilation
correctement.
Vous avez utilisé
l’épilateur pour la
première fois ou
après une longue
période
d’inutilisation.
Vous avez exercé
une pression trop
forte sur l’appareil.
Vous n’avez pas
laissé l’applicateur
de froid
sufsamment
longtemps au
congélateur.
Vous n’avez pas
placé l’applicateur
de froid dans le
congélateur ou le
freezer.
Allumez l’appareil.
Placez la tête d’épilation sur
l’appareil et exercez une pression
jusqu’à ce qu’elle s’enclenche
(clic).
Lors des premières utilisations, il
est possible que la peau rougisse
ou s’irrite légèrement. Il s’agit
d’une réaction normale qui
disparaîtra rapidement. Pour
obtenir de plus amples
informations à ce sujet, reportezvous au chapitre « Utilisation de
l’appareil ». Veillez également à ce
que la tête d’épilation soit
toujours propre.
N’exercez aucune pression
lorsque vous déplacez l’appareil
sur la peau.
Placez l’applicateur de froid sans
le manchon dans le congélateur
(***) pendant au moins 4 heures.
Une fois que le liquide blanc est
devenu bleu, vous pouvez utiliser
l’applicateur.
Placez l’applicateur de froid sans
le manchon dans le congélateur
(***) pendant au moins 4 heures.
Ne conservez pas l’applicateur
de froid dans le réfrigérateur.
FRANÇAIS 57
Page 58

FRANÇAIS58
Problème Cause possible Solution
La tête
pivotante de
l’applicateur
de froid pour
jambes reste
immobile.
Impossible de
retirer la tête
d’épilation.
Impossible de
retirer la tête
de rasage.
Les résultats
de rasage ne
sont pas
satisfaisants.
L’applicateur de
froid ne touchait
pas la peau.
La tête pivotante
est gelée.
Vous n’avez pas
fait glisser la tête
d’épilation dans le
bon sens.
Vous n’avez pas
fait glisser la tête
de rasage dans le
bon sens.
La tête de rasage
est sale.
Le bloc tondeuse
est endommagé
ou usé.
Assurez-vous que l’applicateur de
froid est en contact avec la peau
pendant l’épilation.
Passez-la plusieurs fois sur votre
jambe jusqu’à ce qu’elle
recommence à fonctionner.
Assurez-vous que l’applicateur de
froid est parfaitement sec avant
de le congeler.
Appuyez sur le bouton de
déverrouillage et faites glisser la
tête d’épilation dans le sens de la
èche (g. 14).
Appuyez sur le bouton de
déverrouillage et faites glisser la
tête de rasage dans le sens de la
èche (g. 14).
Arrêtez l’appareil, débranchez-le
et retirez la tête de rasage.
Ensuite, nettoyez le bloc
tondeuse et la tête de rasage à
l’aide de la brosse de nettoyage
fournie. Retirez les poils
éventuellement pris sous les
tondeuses.
Remplacez le bloc tondeuse.
Page 59

Problème Cause possible Solution
Irritation de la
peau plus
forte que
d’habitude
après rasage.
Le bloc tondeuse
est endommagé
ou usé.
Remplacez le bloc tondeuse.
FRANÇAIS 59
Page 60

60
60 SUOMI
Johdanto
Uudella Satinelle ICE PREMIUM -epilaattorilla voit poistaa ihokarvat
nopeasti, helposti ja tehokkaasti. Keraamisen pinsettilevyjärjestelmän, ihoa
myötäilevän jäähdytyselementin ja uuden äänihierontajärjestelmän
yhdistelmä muuttaa epilointia vallankumouksellisesti. Satinelle ICE
PREMIUM -epilaattorin luonnollisesti viilentävän ja hierovan vaikutuksen
ansiosta ihokarvojen poistaminen on entistä miellyttävämpää ja
kivuttomampaa. Kun käytät laitetta säännöllisesti (kerran kuussa), saat
silkinsileän ihon ja jopa 50 % vähemmän takaisin kasvavia ihokarvoja.
Satinelle ICE PREMIUM -epilaattoria voi käyttää koko vartalolle, ja mukana
toimitetaan erityisesti herkkien ihoalueiden, kuten kainaloiden tai
bikinirajan, ajamiseen tarkoitettu kivuntunnetta lievittävä Skin Cooler jäähdytyselementti.
Nopeasti pyörivät pinsettilevyt nyppivät lyhyetkin karvat (jopa puolen
millimetrin pituiset) ja poistavat ne juurineen. Tämän ansiosta iho pysyy
pehmeänä jopa neljä viikkoa ja kasvava uusi karva on pehmeää ja hentoa.
Laitteen osat (Kuva 1)
A Jäähdytyselementin suojakotelo
B Säärien jäähdytyselementti, jossa on joustava pää
C Kainaloiden ja bikinirajan jäähdytyselementti
D Ajopää
E Ajopään suojus
F Hierontaelementti
G Epilointipää
H Laite
I Latauksen merkkivalo
J Latauslaite
K Puhdistusharja
L Kuorintatyyny
M Teline
Tärkeää
Lue tämä käyttöopas huolellisesti ennen käyttöä ja säilytä se vastaisen
varalle.
Page 61

SUOMI 61
Tarkista, että latauslaitteen jännitemerkintä vastaa paikallista
,
verkkojännitettä, ennen kuin yhdistät laitteen sähköverkkoon.
Käytä laitetta vain mukana tulevan latauslaitteen kanssa.
,
Älä käytä laitetta, jos latauslaite tai laite on vaurioitunut.
,
Jos latauslaite on vaurioitunut, vaihda vaaratilanteiden välttämiseksi
,
tilalle aina alkuperäisen tyyppinen latauslaite.
Latauslaite sisältää jännitemuuntajan. Älä vaihda latauslaitteen tilalle
,
toisenlaista pistoketta, jotta et aiheuta vaaratilannetta.
Suojaa laite ja latauslaite kosteudelta.
,
Pidä laite poissa lasten ulottuvilta.
,
Älä pidä laitetta alle 5 C:n tai yli 35 C:n lämpötilassa.
,
Älä pidä käynnissä olevaa laitetta esimerkiksi hiusten, silmäripsien,
,
kulmakarvojen, vaatteiden, johtojen tai harjojen lähellä, ettet
loukkaa itseäsi tai aiheuta vahinkoa.
Laite sisältää kaksi ladattavaa NiMH-paristoa, jotka voivat olla
,
ympäristölle haitallisia, ellei niitä hävitetä asianmukaisesti.
Älä käytä laitetta, jos iho on ärtynyt tai jos ihossa on suonikohjuja,
,
näppylöitä, luomia (joissa on ihokarvoja) tai haavoja, ennen kuin olet
kysynyt lääkäriltä. Myös henkilöiden, joiden vastustuskyky on
alentunut, diabeetikoiden ja verenvuototautia tai immuunikatoa
sairastavien on ensin kysyttävä neuvoa lääkäriltä.
Sähkömagneettiset kentät
Tämä Philips-laite vastaa kaikkia sähkömagneettisia kenttiä (EMF) koskevia
standardeja. Jos laitetta käytetään oikein ja tämän käyttöohjeen ohjeiden
mukaisesti, sen käyttäminen on turvallista tämänhetkisten tieteellisten
tutkimusten perusteella.
Lataaminen
Voit käyttää laitetta suoraan verkkovirralla tai voit käyttää sitä ilman
virtajohtoa, kun paristot on ladattu.
Lataa paristoja vähintään 16 tunnin ajan, jotta voit käyttää laitetta ilman
virtajohtoa 20 minuutin ajan.
Älä lataa laitetta yli 24 tuntia.
1 Varmista, että latauksen aikana laitteen virta on katkaistu.
Page 62

62
SUOMI62
2 Kytke latauslaitteen pistoke laitteen pohjassa olevaan tuloliittimeen
ja kytke sen jälkeen latauslaite seinässä olevaan pistorasiaan.
Latausvalo syttyy ja palaa osoituksena laitteen latautumisesta.
,
Latausvalo ei sammu tai muuta väriä, kun paristot on ladattu täyteen.
3 Laitteen voi kätevästi ladata myös telineessä. Aseta laite telineeseen
siten, että se napsahtaa paikalleen (Kuva 2).
Paristojen käyttöiän pidentäminen
Laitteen ensimmäisen latauksen jälkeen älä lataa sitä uudelleen
käyttökertojen välillä, vaan jatka sen käyttöä ja lataa se vasta sitten, kun
paristot ovat (lähes) tyhjät.
Käytä paristot täysin tyhjäksi kaksi kertaa vuodessa antamalla
moottorin käydä niin kauan, että se pysähtyy.
Älä pidä laitetta jatkuvasti liitettynä pistorasiaan.
Jos laite on ollut käyttämättä pitkään, lataa sitä täydet 16 tuntia.
-
Käyttöönotto
Skin Cooler -jäähdytyselementin jäädyttäminen
1 Aseta jäähdytyselementti ILMAN suojakoteloa pakastimeen tai
pakastuslokeroon (***) vähintään neljä (4) tuntia ennen epiloinnin
aloittamista. Kun neste on muuttunut kokonaan siniseksi,
jäähdytyselementti on käyttövalmis.
Pakastimeen laitettavan jäähdytyselementin ulkopinnan on oltava täysin
kuiva.
Vinkki: Voit säilyttää jäähdytyselementtiä pakastimessa jatkuvasti.
Käyttö
Yleistä tietoa ihokarvojen poistosta
Ihokarvat on helpointa poistaa kylvyn tai suihkun jälkeen. Ihon on
,
kuitenkin oltava täysin kuiva, kun ihokarvojen poisto aloitetaan.
Kun laitetta käytetään ensimmäisen kerran, kannattaa aloittaa
,
sellaisesta kohdasta, jossa on vain vähän ihokarvoja. Tällä tavoin voit
totutella vähitellen ihokarvojen poistoon.
Page 63

SUOMI 63
Jotta epilointitulos olisi optimaalinen, karvat eivät saa olla pidempiä
,
kuin 10 mm (Kuva 3).
Pidempien karvojen epilointi: (Kuva 3)
,
Lyhennä karvat alle 10 mm pituisiksi trimmerillä. Tämän jälkeen voit
aloittaa epiloinnin.
Ajele karvat kokonaan. Tämän jälkeen voit käyttää epilaattoria
muutaman päivän kuluttua (karvojen on oltava vähintään 0,5 mm
pituisia).
Iho saattaa hieman aristaa tai punoittaa muutaman ensimmäisen
,
ihokarvojen poistokerran jälkeen. Tämä on aivan normaali ilmiö ja
häviää nopeasti. Kun laitetta käytetään useammin, iho tottuu
ihokarvojen poistoon, ihon ärsytys vähenee ja takaisin kasvavat
ihokarvat muuttuvat pehmeämmiksi ja ohuemmiksi. Jos ihon ärsytys
ei häviä kolmessa vuorokaudessa, ota yhteys lääkäriin.
Hyvä hetki ihokarvojen poistoon on illalla ennen nukkumaanmenoa,
,
jolloin epiloinnin aikana mahdollisesti ärtynyt iho ehtii rauhoittua
yön aikana.
Käyttö virtajohdon kanssa
Älä käytä laitetta verkkovirralla silloin kun paristot on ladattu täyteen.
1 Kun käytät laitetta verkkovirralla, katkaise laitteen virta ja kytke se
sähköverkkoon. Odota muutama sekunti, ennen kuin käynnistät
laitteen.
Ihokarvojen poisto sääristä jäähdytyselementin avulla
Varmista, että iho on puhdas ja kuiva ja että se ei ole rasvainen. Älä käytä
voiteita juuri ennen ihokarvojen poistoa.
1 Vedä suojakotelo jäähdytyselementin päälle. (Kuva 4)
Suojakotelo estää kättä tuntemasta epämiellyttävää kylmyyttä laitetta
käytettäessä ja pitää jäähdytyselementin viileänä mahdollisimman pitkään.
Joustava pää saattaa toisinaan jäätyä kiinni jäähdytyselementtiin, jolloin se
ei liiku, kun otat jäähdytyselementin pakastimesta. Kääntyvä pää alkaa
toimia uudelleen, kun vedät sitä muutaman kerran säärtä vasten.
2 Paina laite jäähdytyselementin päälle (Kuva 5).
63
Page 64

64
SUOMI64
3 Kytke latauslaitteen pistoke laitteen pohjassa olevaan tuloliittimeen
ja kytke sen jälkeen latauslaite seinässä olevaan pistorasiaan.
4 Käynnistä laite valitsemalla haluamasi nopeus (Kuva 6).
Valitse nopeus I alueille, joilla ihokarvat ovat ohuita ja/tai joilla luu on heti
ihon alla. Tällaisia alueita ovat esimerkiksi polvet ja nilkat.
Valitse nopeus II suurille alueille ja/tai alueille, joissa karvankasvu on
voimakkaampaa.
5 Venytä iho vapaalla kädellä kireäksi niin, että ihokarvat nousevat
pystyyn.
6 Aseta laite kohtisuorassa ihoa vasten siten, että epilointipää osoittaa
eteenpäin. Liikuta laitetta ihokarvojen kasvusuuntaa vastaan siten,
että liukukytkin osoittaa itseäsi kohti. (Kuva 7)
Tarkista, että pinsettilevyt ja jäähdytyselementti koskettavat ihoa kunnolla.
Paina laitetta kevyesti ihon vasten.
Jos et ole täysin tyytyväinen ajotulokseen, liikuta epilaattoria
,
hitaammin iholla.
7 Irrota jäähdytyselementti laitteesta vetämällä laitteen päässä
olevasta kielekkeestä (Kuva 8).
Kainaloiden ja bikinirajan epilointi Skin Cooler jäähdytyselementin avulla
Kainaloita ja bikinirajaa varten erikseen täsmäepilointiin suunniteltu pää
vähentää tarvittavien aktiivisten pinsettilevyjen määrää. Jäähdytyselementin
jäähdytysala on lisäksi laaja, joten ihokarvojen poistaminen aroilta
ihoalueilta on aiempaa kivuttomampaa. Saavutat parhaan tuloksen, kun
karvat eivät ole liian pitkät (enintään 1 cm:n pituiset).
1 Vedä suojakotelo jäähdytyselementin päälle. (Kuva 9)
2 Paina laite jäähdytyselementin päälle (Kuva 10).
3 Käynnistä laite valitsemalla haluamasi nopeus. (Kuva 6)
Suosittelemme nopeutta I.
4 Kun haluat poistaa kainalokarvat, nosta toinen käsivarsi pään taakse.
Kun iho on kireällä, aseta laite kohtisuoraan ihoa vasten (Kuva 11).
Page 65

SUOMI 65
5 Kun haluat poistaa ihokarvat bikinirajasta, venytä ihoa vapaalla
kädellä ja aseta laite kohtisuoraan ihoa vasten kuitenkaan laitetta
painamatta (Kuva 12).
6 Siirrä laitetta hitaasti iholla vasten ihokarvojen kasvusuuntaa.
7 Irrota jäähdytyselementti laitteesta vetämällä laitteen päässä
olevasta kielekkeestä (Kuva 13).
Ihokarvojen poistaminen ilman Skin Cooler jäähdytyselementtiä
Jos et halua käyttää jäähdytyselementtiä, koska olet jo esimerkiksi
,
tottunut epilointiin, voit käyttää laitetta myös ilman
jäähdytyselementtiä.
Varmista, että laite on kohtisuoraan ihoa vasten ja että liikutat sitä
,
vasten karvojen kasvusuuntaa.
Kuorintatyynyn käyttäminen
Kuori iho kuorintatyynyllä suihkussa.
Ihon säännöllinen hierominen kuorintatyynyllä saattaa estää ihokarvojen
sisäänkasvamisen. Älä käytä kuorintatyynyä ennen ihokarvojen poistamista
äläkä heti sen jälkeen.
Ihokarvojen poisto
Voit ajaa karvat vartalon aroilta alueilta käyttämällä ajopäätä esimerkiksi
kainaloiden ja bikinirajan alueella. Ajopäällä saat miellyttävällä ja
hellävaraisella tavalla sileän tuloksen.
1 Varmista, että laitteesta on katkaistu virta.
2 Irrota jäähdytyselementti (Kuva 8).
3 Irrota epilointipää (Kuva 14).
Paina vapautuspainiketta (1) ja siirrä epilointipäätä siinä olevan nuolen
osoittamaan suuntaan (2).
4 Aseta ajopää laitteeseen ja paina sitä laitteeseen, kunnes se
napsahtaa paikalleen (Kuva 15).
5 Käynnistä laite valitsemalla nopeus II.
65
Page 66

66
SUOMI66
6 Aseta ajopää ihoa vasten ja siirrä laitetta hitaasti ja pehmeästi
vasten karvojen kasvusuuntaa. Paina laitetta samalla
kevyesti (Kuva 16).
Puhdistus ja hoito
Älä koskaan huuhtele latauslaitteen pistoketta tai laitetta vedellä.
Älä käytä laitteen puhdistamiseen puhdistusliinoja tai alkoholia, asetonia,
bensiiniä ym. mahdollisesti syövyttäviä aineita.
1 Tarkista, että laitteesta on katkaistu virta ja ettei se ole kytkettynä
virtalähteeseen.
2 Irrota jäähdytyselementti laitteesta ja vedä suojakotelo pois
jäähdytyselementistä.
3 Puhdista säärien jäähdytyselementin kääntyvä pää laitteen mukana
tulevalla harjalla tai kostealla liinalla jokaisen käyttökerran jälkeen.
Pakastimeen laitettavan jäähdytyselementin ulkopinnan on oltava täysin
kuiva.
Epilointipään puhdistaminen
Puhdista epilointipää aina käytön jälkeen.
1 Tarkista, että laitteesta on katkaistu virta ja ettei se ole kytkettynä
virtalähteeseen.
2 Irrota epilointipää (Kuva 14).
Paina vapautuspainiketta (1) ja siirrä epilointipäätä siinä olevan nuolen
osoittamaan suuntaan (2).
3 Irrota hierontaelementti (Kuva 17).
4 Harjaa puhtaaksi kaikki näkyvät osat mukaan lukien epilointipään
pohja ja pinsettilevyt (Kuva 18).
5 Voit myös huuhdella epilointipään (ei laitetta) juoksevalla vedellä,
jotta se puhdistuu kauttaaltaan (Kuva 19).
Älä yritä irrottaa pinsettilevyjä epilointipäästä.
Page 67

SUOMI 67
6 Kiinnitä hierontaelementti takaisin epilointipäähän. Aseta sitten
epilointipää laitteeseen ja paina sitä, kunnes se napsahtaa
paikalleen (Kuva 20).
Epilointipään voi asentaa laitteeseen vain yhdellä tavalla.
Ajopään puhdistus
Puhdista ajopää aina käytön jälkeen.
1 Tarkista, että laitteesta on katkaistu virta ja ettei se ole kytkettynä
virtalähteeseen.
2 Irrota ajopää.
3 Vedä teräyksikkö irti ajopäästä. (Kuva 21)
4 Harjaa kaikki ihokarvat pois teräyksiköstä ja ajopäästä. Harjaa
ihokarvat huolellisesti pois myös ohjauskammoista (Kuva 22).
5 Voit myös huuhdella teräyksikön ja ajopään (ei laitetta) juoksevalla
vedellä (Kuva 23).
6 Aseta teräyksikkö takaisin ajopäähän ja paina ajopäätä laitteeseen,
kunnes se napsahtaa paikoilleen (Kuva 24).
Varo painamasta teräverkkoa, ettei se vahingoitu.
7 Lisää ajopään ohjauskampoihin ja teräverkkoon pisara
ompelukoneöljyä kahdesti vuodessa.
Säilytys
Napsauta ajopään suojus paikalleen. (Kuva 25)
1
2 Säilytä laite ja tarvikkeet säilytyspussissa.
3 Voit säilyttää laitetta myös telineessä (Kuva 2).
67
Varaosat
Jos käytät ajopäätä useita kertoja viikossa, vaihda teräyksikkö (mallissa
HP6193) uuteen viimeistään 1–2 vuoden kuluttua. Vaihda osa aiemmin, jos
se on vaurioitunut.
Page 68

68
SUOMI68
Ympäristöasiaa
Älä hävitä vanhoja laitteita tavallisen talousjätteen mukana, vaan
toimita ne valtuutettuun kierrätyspisteeseen. Näin autat vähentämään
ympäristölle aiheutuvia haittavaikutuksia (Kuva 26).
Kiinteissä akuissa on saastuttavia aineita. Poista akut aina ennen laitteen
hävittämistä ja vie laite valtuutettuun kierrätyspisteeseen. Hävitä akut
valtuutetussa akkujen kierrätyspisteessä. Jos akkujen poistaminen on
hankalaa, voit viedä laitteen Philipsin valtuuttamaan huoltoliikkeeseen.
Huoltoliikkeen henkilökunta poistaa akut ja hävittää ne
ympäristöystävällisellä tavalla.
1 Irrota latauslaite pistorasiasta ja anna laitteen käydä, kunnes paristot
ovat tyhjät.
2 Irrota epilointipää (Kuva 14).
3 Pidä laitetta kädessäsi ja avaa se ruuvitaltalla (Kuva 27).
4 Vedä peukaloilla kotelon puoliskoja irti toisistaan, niin että liitos
rikkoutuu (Kuva 28).
5 Poista kotelon puoliskoista kaikki osat (moottori ja piirikortti).
6 Aseta ruuvitaltta muovisen paristokotelon ja paristojen
väliin (Kuva 29).
7 Poista paristot muovisesta paristokotelosta ja
piirikortista (Kuva 30).
Älä yritä koota laitetta siten, että se toimisi verkkovirralla, sillä se on
vaarallista (Kuva 3).
Takuu & huolto
Jos haluat lisätietoja tai laitteen suhteen on ongelmia, käy Philipsin
Internet-sivuilla osoitteessa www.philips.com tai ota yhteys Philipsin
asiakaspalveluun (puhelinnumero löytyy takuulehtisestä). Voit myös ottaa
yhteyden Philips-myyjään tai Philipsin valtuuttamaan huoltoliikkeeseen tai
suoraan Philips Domestic Appliances and Personal Care BV:n huoltoosastoon.
Page 69

Vianmääritys
Ongelma Mahdollinen syy Ratkaisu
Huonontunut
epilointitulos.
Laite ei toimi. Paristot ovat tyhjät. Lataa paristot.
Epilaattoria on
liikutettu väärään
suuntaan.
Epilointipää on
asetettu iholle
väärään kulmaan.
Epilointipää ei kosketa
ihoa.
Iho oli kostea tai sille
oli levitetty voidetta
tai jotakin muuta
ihonhoitotuotetta
ennen epilointia.
Kainaloiden ja
bikinirajojen
epilointiin tarkoitettu
jäähdytyselementti on
laitteessa myös
säärien ajamisen
aikana.
Laitetta on liikutettu
iholla liian nopeasti.
Pistorasiaan ei tule
virtaa.
Liikuta aina laitetta hiusten
kasvusuuntaa vastaan.
Varmista, että laite on
epiloitaessa kohtisuoraan
ihoa vasten.
Tarkista, että pinsettilevyt
ja jäähdytyselementti
koskettavat ihoa kunnolla.
Varmista, että iho on
täysin kuiva ja että se ei
ole rasvainen. Älä käytä
voiteita juuri ennen
ihokarvojen poistoa.
Käytä säärien
jäähdytyselementtiä vain
säärien epilointiin.
Liikuta laitetta iholla
kohtuullisella vauhdilla.
Varmista, että pistorasiaan
tulee virtaa. Kylpyhuoneen
pistorasian aktivoiminen
saattaa edellyttää valojen
sytyttämistä.
SUOMI 69
69
Page 70

70
SUOMI70
Ongelma Mahdollinen syy Ratkaisu
Laite ei käynnisty. Käynnistä laite.
Iholla ilmenee
ärsytystä.
Jäähdytyselementti
ei ole tarpeeksi
kylmä.
Epilointipää on
kiinnitetty väärin.
Olet ehkä käyttänyt
laitetta ensimmäistä
kertaa tai pitkän
tauon jälkeen.
Laitteeseen on
kohdistunut liikaa
painetta.
Jäähdytyselementtiä ei
ole jäähdytetty
tarpeeksi kauan.
Aseta ajopää laitteeseen
ja paina sitä laitteeseen,
kunnes se napsahtaa
paikalleen.
Iho saattaa hieman aristaa
tai punoittaa muutaman
ensimmäisen ihokarvojen
poistokerran jälkeen.
Tämä on aivan normaali
ilmiö ja häviää nopeasti.
Lisävinkkejä ihoärsytyksen
vähentämiseen on ohjeen
kohdassa Käyttö.
Epilointipään huolellinen
puhdistus jokaisen
käyttökerran jälkeen on
myös tärkeää.
Älä paina laitetta, kun
liikutat sitä iholla.
Aseta jäähdytyselementti
ILMAN suojakoteloa
pakastuslokeroon (***)
vähintään neljä tuntia
ennen epiloinnin
aloittamista. Kun neste on
muuttunut siniseksi,
jäähdytyselementti on
valmis käytettäväksi.
Page 71

Ongelma Mahdollinen syy Ratkaisu
Säärien
jäähdytyselementin
kääntyvä pää ei
liiku.
Epilointipää ei
irtoa.
Epilointipää ei
irtoa.
Jäähdytyselementtiä ei
ole pidetty
pakastimessa tai
pakastelokerossa.
Jäähdytyselementti ei
kosketa ihoa.
Jäähdytyselementin
kääntyvä pää saattaa
olla jäässä.
Et liikuta
epilointipäätä oikeaan
suuntaan.
Et liikuta
epilointipäätä oikeaan
suuntaan.
Aseta jäähdytyselementti
ILMAN suojakoteloa
pakastuslokeroon (***)
vähintään neljä tuntia
ennen epiloinnin
aloittamista. Älä
kuitenkaan säilytä sitä
jääkaapissa.
Varmista, että
jäähdytyselementti
koskettaa kunnolla ihoa
epiloinnin aikana.
Kääntyvä pää alkaa toimia
uudelleen, kun vedät sitä
muutaman kerran sääriä
pitkin. Varmista, että
jäähdytyselementin
ulkopuoli on täysin kuiva
ennen pakastamista.
Irrota epilointipää
painamalla
vapautuspainiketta ja
siirtämällä epilointipäätä
siinä olevan nuolen
osoittamaan suuntaan
(kuva 14).
Irrota ajopää painamalla
vapautuspainiketta ja
siirtämällä ajopäätä siinä
olevan nuolen
osoittamaan suuntaan
(kuva 14).
SUOMI 71
71
Page 72

SUOMI72
Ongelma Mahdollinen syy Ratkaisu
Huonontunut
ajotulos.
Tavallista
voimakkaampi
ihoärsytys
ihokarvojen
poiston jälkeen.
Ajopää on likainen. Katkaise laitteen virta,
irrota pistoke pistorasiasta
ja irrota ajopää. Puhdista
sitten teräyksikkö ja
ajopää mukana
toimitetulla harjalla. Poista
ohjauskampojen alle
jumiutuneet ihokarvat.
Teräyksikkö on
vaurioitunut tai
kulunut.
Teräyksikkö on
vaurioitunut tai
kulunut.
Vaihda teräyksikkö.
Vaihda teräyksikkö.
Page 73

ITALIANO
Introduzione
Il nuovo Satinelle ICE PREMIUM consente di rimuovere i peli superui in
modo semplice, rapido ed efcace. Il sistema di epilazione in ceramica,
il refrigerante antidolore che si adatta perfettamente al vostro corpo e il
nuovo sistema di massaggio sonico sono una novità assoluta. Grazie al
naturale effetto di intorpidimento del ghiaccio e del massaggio, il nuovo
Satinelle ICE PREMIUM rende l’epilazione più piacevole e meno dolorosa.
La pelle sarà liscia come la seta e con l’uso regolare (ogni quattro
settimane) potrete ridurre la crescita dei peli del 50%.
Satinelle ICE PREMIUM è indicato per tutte le parti del corpo ed è
provvisto anche di un refrigerante antidolore sviluppato appositamente
per l’epilazione delle zone sensibili (ascelle, linea bikini). Queste zone
infatti sono particolarmente sensibili al dolore, che lo speciale refrigerante
contribuisce a ridurre.
I dischi epilatori rotanti permettono di catturare anche i peli più cor ti
(anche solo mezzo millimetro) rimuovendoli alla radice. Il risultato è una
pelle liscia e vellutata per quattro settimane e una ricrescita dei peli più
morbidi e meno ispidi.
Descrizione generale (g. 1)
73
A Custodia protettiva per refrigerante antidolore
B Refrigerante antidolore per le gambe con testina basculante
C Refrigerante antidolore per ascelle e linea bikini
D Testina di rasatura
E Cappuccio protettivo per testina di rasatura
F Elemento massaggiante
G Testa epilatoria
H Apparecchio
I Spia di ricarica
J Adattatore
K Spazzolina per la pulizia
L Spugna esfoliante per il corpo
M Supporto
Page 74

74
ITALIANO74
Importante
Prima di utilizzare l’apparecchio, leggete attentamente il presente manuale
e conservatelo per eventuali riferimenti futuri.
Prima di collegare l’apparecchio, vericate che la tensione riportata
,
sull’adattatore corrisponda alla tensione disponibile.
Utilizzate l’apparecchio esclusivamente con l’adattatore in
,
dotazione.
Non utilizzate l’apparecchio nel caso in cui l’adattatore o
,
l’apparecchio stesso fossero danneggiati.
Nel caso in cui l’adattatore fosse danneggiato, dovrà essere
,
sostituito esclusivamente con un adattatore originale al ne di
evitare situazioni pericolose.
L’adattatore contiene un trasformatore. Non tagliate l’adattatore
,
per sostituirlo con un’altra spina onde evitare situazioni pericolose.
Non bagnate l’apparecchio e l’adattatore.
,
Tenete l’apparecchio fuori dalla portata dei bambini.
,
Non esponete l’apparecchio a temperature inferiori a 5°C o
,
superiori a 35°C.
Al ne di evitare danni o lesioni, tenete l’apparecchio in funzione
,
lontano da capelli, ciglia, sopracciglia, vestiti, li, corde, spazzole ecc.
L’apparecchio contiene due batterie ricaricabili NiMH che
,
potrebbero danneggiare l’ambiente se smaltite in modo non
corretto.
Non utilizzate l’apparecchio su pelle irritata o in caso di vene
,
varicose, eruzioni cutanee, foruncoli, nei (con peli), ferite o
escoriazioni senza previa consultazione del medico. Si consiglia ai
pazienti con risposta immunitaria ridotta, affetti da diabete mellito,
malattia di Raynaud o immunodecienza di consultare prima un
medico.
Campi elettromagnetici (EMF)
Questo apparecchio Philips è conforme a tutti gli standard relativi ai
campi elettromagnetici (EMF). Se utilizzato in modo
appropriato seguendo le istruzioni contenute nel presente manuale
utente, l’apparecchio consente un utilizzo sicuro come confermato dai
risultati scientici attualmente disponibili.
Page 75

ITALIANO 75
Come ricaricare l’apparecchio
È possibile utilizzare l’apparecchio direttamente a corrente oppure senza
cavo dopo aver ricaricato le batterie.
Caricate le batterie per almeno 16 ore prima di utilizzare l’apparecchio
senza cavo per un periodo di 20 minuti.
Non caricate l’apparecchio per più di 24 ore.
1 Controllate che l’apparecchio sia spento durante l’operazione di
carica.
2 Inserite lo spinotto nella presa interna dell’apparecchio e
l’adattatore nella presa di corrente.
Quando l’apparecchio viene ricaricato, la spia di ricarica si accende
,
e resta accesa.
La spia di ricarica non si spegne o non cambia colore quando
l’apparecchio è completamente carico.
3 Per una ricarica più comoda, potete inserire l’apparecchio
nel supporto facendolo scattare in posizione (g. 2).
Come ottimizzare la durata delle batterie
Dopo aver caricato l’apparecchio per la prima volta, evitate di
ricaricarlo fra un uso e l’altro. Continuate ad usarlo e ricaricatelo solo
quando la batteria è (quasi) scarica.
Scaricate completamente le batterie due volte all’anno, facendo
-
funzionare il motore no a quando si spegne.
Non lasciate l’apparecchio sempre collegato alla presa di corrente.
Se l’apparecchio non viene usato per un lungo periodo, dovrà essere
ricaricato per 16 ore.
75
Predisposizione dell’apparecchio
Congelamento del refrigerante antidolore
1 Sistemate il refrigerante antidolore SENZA la custodia protettiva
nel freezer o nel congelatore (***) almeno 4 ore prima
Page 76

76
ITALIANO76
dell’epilazione. Quando il uido è completamente blu, il refrigerante
antidolore è pronto per l’uso.
Assicuratevi che l’esterno del refrigerante antidolore sia perfettamente
asciutto prima di congelarlo.
Consiglio: Potete conservare il refrigerante antidolore sempre nel freezer.
Modalità d’uso dell’apparecchio
Informazioni generali sull’epilazione
,
L’epilazione risulta più facile se effettuata subito dopo la doccia o il
bagno. Assicuratevi che la pelle sia perfettamente asciutta prima di
iniziare l’epilazione.
Se utilizzate l’apparecchio per la prima volta, si consiglia di
,
cominciare con una zona in cui la crescita dei peli sia limitata; in
questo modo vi abituerete più facilmente a questo metodo di
epilazione.
Per ottenere ottimi risultati, la lunghezza dei peli non dovrebbe
,
superare i 10 millimetri (g. 3)
Per rimuovere peli più lunghi: (g. 3)
,
accorciateli a una lunghezza massima di 10 mm aiutandovi con un
regolatore di peli prima di eseguire l’operazione di depilazione.
radete i peli. In questo caso potete depilarvi dopo qualche giorno
(i peli devono essere lunghi almeno 0,5 mm).
,
Le prime volte che userete l’epilatore, la pelle potrebbe arrossarsi
o irritarsi leggermente. Si tratta di un fenomeno del tutto normale
e destinato a scomparire rapidamente, non appena la pelle si sarà
abituata all’epilazione e i peli saranno più sottili e morbidi. Qualora
l’irritazione persista per più di tre giorni, consultate il medico.
Vi consigliamo di epilarvi alla sera, prima di andare a letto, in modo
,
che l’eventuale irritazione possa diminuire nel corso della notte.
Con cavo
Non mettete in funzione l’apparecchio con la spina inserita quando la
batteria è completamente carica.
Page 77

ITALIANO 77
1 Per utilizzare l’apparecchio direttamente dalla corrente, spegnetelo
e collegatelo a una presa. Attendete qualche secondo prima di
accenderlo.
Epilazione con refrigerante antidolore per le gambe
Assicuratevi che la pelle sia pulita, asciutta e priva di sostanze grasse.
Non applicate alcuna crema prima dell’epilazione.
1 Inserite la custodia protettiva sul refrigerante antidolore. (g. 4)
La protezione previene una fastidiosa sensazione di freddo alle mani
mentre si utilizza l’apparecchio e mantiene il refrigerante antidolore
freddo il più a lungo possibile.
A volte la testina basculante può congelarsi sul refrigerante antidolore e
non si muove quando togliete il refrigerante dal freezer. Sarà sufciente
passare la testina basculante sulle gambe alcune volte per rimetterla in
funzione.
2 Inserite l’apparecchio sul refrigerante antidolore no a farlo
scattare in posizione (g. 5).
3 Inserite lo spinotto nella presa interna dell’apparecchio e
l’adattatore nella presa di corrente.
4 Selezionate la velocità desiderata per accendere
l’apparecchio (g. 6).
Selezionate la velocità I per le zone con pochi peli e in prossimità di
ginocchia e caviglie.
Selezionate la velocità II per le zone più estese e con peli più grossi.
5 Tendete la pelle con la mano libera in modo che i peli si sollevino.
6 Posizionate l’apparecchio perpendicolarmente sulla pelle con la
testina epilatoria rivolta in avanti e fatelo scorrere in direzione
contraria a quella di crescita dei peli a velocità moderata. (g. 7)
Vericate che i dischi epilatori e il refrigerante antidolore siano a contatto
con la pelle.
esercitando una leggera pressione.
Se non siete soddisfatte dell’epilazione ottenuta, provate a far
,
scorrere l’epilatore più lentamente sulla pelle.
77
Page 78

78
7 Utilizzate la scheda sull’estremità inferiore dell’apparecchio per
rimuoverlo dal refrigerante antidolore (g. 8).
Epilazione con il refrigerante antidolore per ascelle e zona bikini
Lo speciale refrigerante antidolore per le ascelle e la linea bikini riduce il
numero dei dischi epilatori attivi. Grazie anche all’ampia supercie
refrigerante, il refrigerante antidolore rende meno dolorosa l’epilazione
nelle zone sensibili. Otterrete risultati migliori se i peli non sono troppo
lunghi (max. 1 cm)
1 Inserite la custodia protettiva sul refrigerante antidolore. (g. 9)
2 Inserite l’apparecchio sul refrigerante antidolore no a farlo
scattare in posizione (g. 10).
3 Accendete l’apparecchio selezionando la velocità desiderata. (g. 6)
Si consiglia di usare la velocità I.
4 Per epilare le ascelle, mettete un braccio dietro la testa per tendere
la pelle; quindi, appoggiate l’apparecchio perpendicolarmente sulla
pelle, usando l’altra mano (g. 11).
5 Per epilare la linea bikini, tendete la pelle con la mano libera e
appoggiate l’apparecchio perpendicolarmente sulla pelle, senza
esercitare alcuna pressione (g. 12).
6 Fate scorrere l’apparecchio sulla pelle, nel senso opposto alla
crescita dei peli.
7 Utilizzate la linguetta sulla parte inferiore dell’apparecchio per
rimuoverlo dal refrigerante antidolore per ascelle e zona
bikini (g. 13).
Epilazione senza refrigerante antidolore
Se, ad esempio, siete ormai abituate alla sensazione di epilazione,
,
potete utilizzare l’apparecchio senza refrigerante antidolore.
Utilizzate l’epilatore perpendicolarmente sulla pelle e fatelo
,
scorrere in direzione contraria a quella di crescita del pelo.
Page 79

ITALIANO 79
Uso della spugnetta esfoliante per il corpo
Utilizzate la spugnetta esfoliante per il corpo durante la doccia.
Massaggiate regolarmente la pelle con una spugnetta per evitare la
crescita di peli sottocutanei. Non utilizzate la spugna immediatamente
prima o subito dopo l’epilazione.
Modalità di rasatura
Potete usare la testina di rasatura per depilare le parti sensibili del corpo,
come le ascelle e la linea bikini. Con la testina di rasatura la vostra pelle
rimarrà liscia e vellutata, in modo semplice e delicato.
1 Controllate che l’apparecchio sia spento.
2 Rimuovete il refrigerante antidolore (g. 8).
3 Rimuovere la testina epilatoria (g. 14)
Premete il pulsante di sgancio (1) e spostate la testina epilatoria nella
direzione della freccia (2).
4 Posizionate la testina di rasatura sull’apparecchio premendo no a
farla scattare in posizione (g. 15).
5 Accendete l’apparecchio selezionando la velocità II.
6 Appoggiate la testina di rasatura sulla pelle e fate scorrere
delicatamente l’apparecchio in direzione opposta a quella di crescita
dei peli, esercitando una leggera pressione (g. 16).
Pulizia e manutenzione
Non immergete l’adattatore o l’apparecchio nell’acqua.
Per pulire l’apparecchio non utilizzate detergenti corrosivi, spugnette
abrasive, benzina, acetone ecc.
1 Vericate che l’apparecchio sia spento e che il cavo di alimentazione
sia scollegato dalla presa di corrente.
2 Rimuovete il refrigerante antidolore dall’apparecchio e togliete la
relativa protezione.
79
Page 80

80
ITALIANO80
3 Pulite la testina refrigerante rotante del refrigerante antidolore per
le gambe con una spazzolina o con un panno umido subito dopo
l’uso.
Assicuratevi che l’esterno del refrigerante antidolore sia perfettamente
asciutto prima di congelarlo.
Pulizia della testina epilatoria
Pulite la testina di rasatura dopo l’uso.
1 Vericate che l’apparecchio sia spento e che il cavo di alimentazione
sia scollegato dalla presa di corrente.
2 Rimuovere la testina epilatoria (g. 14)
Premete il pulsante di sgancio (1) e spostate la testina epilatoria nella
direzione della freccia (2).
3 Rimuovete l’elemento massaggiante (g. 17).
4 Pulite tutte le parti accessibili, compresa la zona inferiore della
testina di rasatura e i dischi di epilazione, con una
spazzolina (g. 18).
5 Potete anche pulire la testina di rasatura (non l’apparecchio!) in
modo più accurato sotto l’acqua corrente (g. 19).
Non cercate di rimuovere i dischi epilatori dalla testina.
6 Reinserite l’elemento massaggiante nella testina di rasatura, quindi
posizionate la testina di rasatura sull’apparecchio e premetela no a
bloccarla in posizione (g. 20).
La testina epilatoria può essere inserita in un solo modo.
Pulizia della testina rasoio
Pulite la testina di rasatura dopo l’uso.
1 Vericate che l’apparecchio sia spento e che il cavo di alimentazione
sia scollegato dalla presa di corrente.
2 Togliete la testina di rasatura.
3 Rimuovete l’unità di rasatura estraendola dalla testina di
rasatura. (g. 21)
Page 81

ITALIANO 81
4 Eliminate i peli dall’unità e dalla testina di rasatura usando la
spazzolina. Ricordate di eliminare anche i peli rimasti sotto il
regolatore (g. 22).
5 Potete anche sciacquare l’unità e il resto della testina di rasatura
(non l’apparecchio!) sotto l’acqua corrente (g. 23).
6 Riposizionate l’unità di rasatura nella testina di rasatura no a
bloccare quest’ultima in posizione (g. 24).
Non esercitate pressione sulla lamina per evitare di danneggiarla.
7 Lubricate le testine e la lamina di rasatura della testina due volte
all’anno, con una goccia di olio per macchina per cucire.
Come riporre l’apparecchio
Inserite il cappuccio di protezione sulla testina di rasatura no a
1
bloccarlo. (g. 25)
2 Riponete l’apparecchio e gli accessori nella custodia.
3 È anche possibile riporre l’apparecchio nel supporto (g. 2).
Sostituzione
Se usate la testina di rasatura più volte ogni settimana, sostituite l’unità di
rasatura (tipo HP6193) dopo uno o due anni o se i componenti sono
danneggiati.
Tutela dell’ambiente
Per contribuire alla tutela dell’ambiente, non smaltite
-
l’apparecchio insieme ai riuti domestici ma consegnatelo a un centro
di raccolta ufciale (g. 26).
Le batterie ricaricabili integrate contengono sostanze potenzialmente
nocive per l’ambiente. Rimuovete sempre le batterie prima di smaltire
l’apparecchio e consegnarlo a un centro di raccolta ufciale. Smaltite
le batterie in un apposito centro di raccolta. In caso di difcoltà
durante la rimozione delle batterie, consegnate l’apparecchio a un
81
Page 82

82
ITALIANO82
centro di assistenza Philips, che si occuperà della rimozione e del
corretto smaltimento dell’apparecchio.
1 Togliete l’adattatore dalla presa a muro e lasciate in funzione
l’apparecchio no a scaricare completamente le batterie.
2 Rimuovere la testina epilatoria (g. 14)
3 Tenete l’apparecchio in mano e apritelo con un cacciavite (g. 27).
4 Aprite le due metà con i pollici, no a quando si romperanno i
collegamenti a molla (g. 28).
5 Rimuovete tutti i componenti (gruppo motore e gruppo batteria-
circuito stampato).
6 Inserite il cacciavite tra il supporto in plastica della batteria e le
batterie (g. 29).
7 Rimuovete le batterie dal supporto e dal circuito stampato (g. 30).
Non tentate di rimontare l’apparecchio al ne di utilizzarlo dalla presa
di corrente in quanto potrebbe essere pericoloso (g. 3)
Garanzia e assistenza
Per ulteriori informazioni o eventuali problemi, visitate il sito Web Philips
all’indirizzo www.philips.com oppure contattate il Centro Assistenza
Clienti Philips locale (il numero di telefono è riportato nell’opuscolo della
garanzia). Qualora non fosse disponibile un Centro Assistenza Clienti
locale, rivolgetevi al rivenditore autorizzato Philips oppure contattate il
Reparto assistenza Philips Domestic Appliances & Personal Care BV.
Page 83

Risoluzione dei guasti
Problema Possibile causa Soluzione
Capacità
epilatoria
ridotta.
Avete azionato
l’epilatore nella
direzione sbagliata.
Avete posizionato la
testina epilatoria sulla
pelle a
un’angolazione errata.
La testina epilatoria
non ha aderito alla
pelle
Avete inumidito la
pelle con acqua o
avete applicato una
crema o un altro
prodotto per la cura
del corpo prima
dell’epilazione.
Il refrigerante
antidolore per ascelle
e zona bikini è stato
applicato
sull’apparecchio
durante l’epilazione
delle gambe.
Muovete sempre
l’apparecchio nel senso
opposto a quello della
crescita.
Posizionate l’apparecchio
perpendicolarmente sulla
pelle.
Vericate che la testina
epilatoria e il refrigerante
antidolore siano a contatto
con la pelle durante
l’epilazione.
Assicuratevi che la pelle sia
asciutta e priva di sostanze
grasse. Non stendete sulla
pelle creme, latte per il corpo
o altri prodotti simili prima
dell’epilazione.
Utilizzate solo il refrigerante
antidolore per epilare le
gambe.
ITALIANO 83
83
Page 84

84
ITALIANO84
Problema Possibile causa Soluzione
L’apparecchio è stato
spostato troppo
rapidamente sulla
pelle
L’apparecchio
non funziona.
La pelle si irrita. Avete utilizzato
Le batterie sono
scariche.
La presa di corrente
a cui è collegato
l’apparecchio non
funziona.
L’apparecchio non è
acceso.
Non avete
ssato correttamente
la testina epilatoria.
l’epilatore per la
prima volta o dopo
un lungo periodo di
inutilizzo.
Muovere l’apparecchio a
velocità moderata sulla pelle
Ricaricate le batterie.
Vericate che la presa
utilizzata funzioni. Se utilizzate
una presa di corrente
disponibile sul mobiletto del
bagno, potrebbe essere
necessario spegnere la luce
per attivare la presa.
Accendete l’apparecchio.
Posizionate la testina
epilatoria sull’apparecchio
premendo no a farla
scattare in posizione.
Le prime volte che utilizzate
l’apparecchio, la pelle
potrebbe irritarsi
leggermente. Si tratta di un
fenomeno del tutto normale
che di solito scompare
rapidamente. Per
suggerimenti su come ridurre
l’irritazione della pelle,
consultate la prima sezione
del capitolo “Modalità d’uso
dell’apparecchio”. Mantenete
pulita la testina epilatoria.
Page 85

Problema Possibile causa Soluzione
Il refrigerante
antidolore non
è abbastanza
freddo.
La testina
refrigerante
basculante del
refrigerante
antidolore non
funziona.
Avete applicato
troppa pressione
sull’apparecchio
Non avete congelato
a sufcienza il
refrigerante
antidolore.
Non avete riposto il
refrigerante
antidolore nel freezer
o nel congelatore.
Il refrigerante
antidolore non ha
aderito alla pelle.
La testina
refrigerante
basculante è
congelata.
Non utilizzate alcuna
pressione mentre muovete
l’apparecchio sulla pelle
Riponete il refrigerante
antidolore senza la custodia
protettiva nel freezer o nel
congelatore (***) per
almeno 4 ore. Quando il
colore del liquido cambia da
bianco a blu, il refrigerante
antidolore è pronto per l’uso.
Sistemate il refrigerante
antidolore senza la
protezione nel freezer o nel
congelatore (***) per
almeno 4 ore. Non
conservate il refrigerante
antidolore nel frigorifero.
Vericate che il refrigerante
antidolore sia sempre a
contatto con la pelle durante
l’epilazione.
Passate il refrigerante
antidolore sulle gambe alcune
volte per far basculare
nuovamente la testina.
Controllate che la parte
esterna del refrigerante
antidolore sia perfettamente
asciutta prima di congelarla.
ITALIANO 85
85
Page 86

ITALIANO86
Problema Possibile causa Soluzione
Non è possibile
rimuovere la
testina di
rasatura.
Non è possibile
rimuovere la
testina di
rasatura.
Prestazioni di
rasatura ridotte.
Dopo la
rasatura, la
pelle è più
irritata del
solito.
La testina epilatoria
non è stata spostata
nella direzione errata.
La testina di rasatura
è stata spostata nella
direzione sbagliata.
La testina di rasatura
è sporca.
L’unità di rasatura è
danneggiata o
usurata.
L’unità di rasatura è
danneggiata o
usurata.
Premete il pulsante di rilascio
e spostate la testina epilatoria
nella direzione della freccia
(g. 14) per rimuoverla.
Premete il pulsante di rilascio
e spostate la testina di
rasatura nella direzione della
freccia (g. 14) per
rimuoverla.
Spegnete l’apparecchio,
scollegatelo e rimuovete la
testina di rasatura. Pulite
l’unità e la testina di rasatura
con la spazzola in dotazione.
Eliminate con la spazzola i
peli depositati sotto il
regolatore dei peli.
Sostituite l’unità di rasatura.
Sostituite l’unità di rasatura.
Page 87

NEDERLANDS
Inleiding
Met uw nieuwe Satinelle ICE PREMIUM kunt u ongewenste haartjes snel,
gemakkelijk en doeltreffend verwijderen. De combinatie van het
keramische epileersysteem met de contourvolgende huidkoeler en het
nieuwe sonische massagesysteem vormt een revolutie in epileren. Door
de natuurlijk verdovende werking van ijs en massage, zorgt de nieuwe
Satinelle ICE PREMIUM ervoor dat epileren prettiger en minder pijnlijk is
dan ooit. Het resultaat is een zijdezachte huid en tot wel 50% minder
haargroei, indien u het apparaat regelmatig (om de 4 weken) gebruikt.
De Satinelle ICE PREMIUM is geschikt voor het epileren van alle delen
van het lichaam en wordt geleverd met een huidkoeler die speciaal is
ontwikkeld voor het epileren van gevoelige delen van het lichaam (oksels,
bikinilijn). Deze gebieden kunnen bijzonder pijngevoelig zijn en de speciale
huidkoeler helpt deze pijn verminderen.
De sneldraaiende epileerschijfjes grijpen zelfs de kortste haartjes (tot een
halve millimeter!) en verwijderen ze met wortel en al. Hierdoor blijft uw
huid tot wel vier weken glad en zijn de haartjes die na enige tijd
terugkomen donzig zacht.
Algemene beschrijving (g. 1)
87
A Beschermhuls voor huidkoeler
B Huidkoeler voor de benen met meebewegend koelhoofd
C Huidkoeler voor oksels en bikinilijn
D Scheerhoofd
E Beschermkap voor scheerhoofd
F Massage-element
G Epileerhoofd
H Apparaat
I Oplaadlampje
J Adapter
K Reinigingsborsteltje
L Puffspons
M Standaard
Page 88

88
NEDERLANDS88
Belangrijk
Lees deze gebruiksaanwijzing zorgvuldig door voordat u het apparaat gaat
gebruiken. Bewaar de gebruiksaanwijzing om deze indien nodig te kunnen
raadplegen.
Controleer of het voltage aangegeven op de adapter overeenkomt
,
met de plaatselijke netspanning voordat u het apparaat aansluit.
Gebruik het apparaat uitsluitend in combinatie met de bijgeleverde
,
adapter.
Gebruik het apparaat niet indien de adapter of het apparaat zelf
,
beschadigd is.
Indien de adapter beschadigd is, laat deze dan altijd vervangen door
,
een van het oorspronkelijke type om gevaar te voorkomen.
De adapter bevat een transformator. Knip de adapter niet af om
,
deze te vervangen door een andere stekker, aangezien dit een
gevaarlijke situatie oplevert.
Houd het apparaat en de adapter droog.
,
Houd het apparaat buiten het bereik van kinderen.
,
Stel het apparaat niet bloot aan een temperatuur lager dan 5°C of
,
hoger dan 35°C.
Voorkom lichamelijk letsel of beschadiging: houd het ingeschakelde
,
apparaat uit de buurt van hoofdhaar, wimpers, wenkbrauwen,
kleding, draden, snoeren, borstels enz.
Het apparaat bevat twee oplaadbare NiMH-accu’s die schadelijk
,
kunnen zijn voor het milieu als ze niet op de juiste wijze worden
afgedankt.
Gebruik het apparaat niet zonder eerst uw huisarts te raadplegen
,
indien de te epileren huid geïrriteerd is of wanneer er zich
spataderen, uitslag, puistjes, moedervlekken (met haren) of wondjes
op bevinden. Raadpleeg ook eerst uw huisarts wanneer uw
weerstand verminderd is of wanneer u aan suikerziekte, de ziekte
van Raynaud of immunodeciëntie lijdt.
Elektromagnetische velden
Dit Philips-apparaat voldoet aan alle richtlijnen met betrekking tot
elektromagnetische velden (EMV). Mits het apparaat op de juiste wijze en
Page 89

NEDERLANDS 89
volgens de instructies in deze gebruiksaanwijzing wordt gebruikt, is het
veilig te gebruiken volgens het nu beschikbare wetenschappelijke bewijs.
Opladen
U kunt het apparaat direct op netspanning gebruiken of u kunt het
zonder snoer gebruiken wanneer de accu’s zijn opgeladen.
Laad de accu’s minstens 16 uur op voor u het apparaat gaat gebruiken.
Vervolgens kunt u het apparaat maximaal 20 minuten zonder snoer
gebruiken.
Laad het apparaat niet langer dan 24 uur op.
1 Zorg ervoor dat het apparaat uitgeschakeld is tijdens het opladen.
2 Steek het apparaatstekkertje in de onderkant van het apparaat en
steek de adapter in het stopcontact.
Het oplaadlampje gaat branden en blijft branden om aan te geven
,
dat het apparaat wordt opgeladen.
Het oplaadlampje gaat niet uit en verandert niet van kleur wanneer het
apparaat volledig is opgeladen.
3 U kunt het apparaat in de houder plaatsen (‘klik’) om het opladen
makkelijker te maken (g. 2).
De levensduur van de accu’s optimaliseren
Laad het apparaat niet op tussen epileersessies of scheersessies nadat
u het apparaat voor de eerste keer hebt opgeladen. Gebruik het
apparaat totdat de accu (bijna) leeg is en laad het dan pas op.
Ontlaad de accu’s twee keer per jaar volledig door de motor te laten
lopen tot deze stopt.
Laat het apparaat niet voortdurend op netspanning aangesloten
zitten.
Als het apparaat lange tijd niet is gebruikt, moet het gedurende
16 uur worden opgeladen.
89
Page 90

90
NEDERLANDS90
Klaarmaken voor gebruik
Huidkoeler invriezen
1 Plaats de huidkoeler ZONDER de beschermhuls in de vriezer of in
het vriesvak (***) van uw koelkast. Laat de huidkoeler hier ten
minste 4 uur liggen voordat u gaat epileren. Wanneer de vloeistof
volledig blauw is geworden, is de huidkoeler klaar voor gebruik.
Zorg ervoor dat de buitenzijde van de huidkoeler volledig droog is voor
u deze invriest.
Tip: U kunt de huidkoeler ook permanent in de vriezer of het vriesvak
bewaren.
Het apparaat gebruiken
Algemene informatie over epileren
Haren zijn gemakkelijker te epileren net nadat u een bad of douche
,
hebt genomen. Uw huid moet echter wel geheel droog zijn bij het
epileren.
Wanneer u het apparaat voor de eerste keer gebruikt, raden we u
,
aan het eerst uit te proberen op een stukje huid met lichte
beharing. Dit helpt u gewend te raken aan het epileren.
Voor een optimaal epileerresultaat moeten de haren niet langer zijn
,
dan 10 millimeter (g. 3)
Het epileren van langere haren: (g. 3)
,
Scheer de haren met een tondeuse af tot een maximale lengte van
10 mm. Nu kunt u meteen beginnen met epileren.
Scheer de haren helemaal af. Nu kunt u na een paar dagen beginnen
met epileren (de haren moeten ten minste 0,5 mm lang zijn).
Uw huid kan de eerste paar keer dat u dit apparaat gebruikt wat
,
rood en geïrriteerd zijn. Dit is een volstrekt normaal verschijnsel,
dat snel verdwijnt. Naarmate u het apparaat vaker gebruikt, raakt
uw huid gewend aan het epileren en vermindert de huidirritatie en
groeien de haren dunner en zachter terug. Als de huidirritatie na
drie dagen nog niet is verdwenen, adviseren we u een arts te
raadplegen.
Page 91

NEDERLANDS 91
Epileer bij voorkeur ‘s avonds voordat u naar bed gaat. Eventuele
,
huidirritatie kan dan ‘s nachts wegtrekken.
Met snoer te gebruiken
Gebruik het apparaat niet op netspanning wanneer de accu volledig is
opgeladen.
1 Om het apparaat op netspanning te gebruiken, schakelt u het
apparaat uit en steekt u de stekker in het stopcontact. Wacht
enkele seconden voordat u het apparaat inschakelt.
Epileren met de huidkoeler voor de benen
Zorg ervoor dat uw huid schoon, helemaal droog en niet vet is. Gebruik
geen crème voordat u gaat epileren.
1 Schuif de beschermhuls om de huidkoeler. (g. 4)
De beschermhuls voorkomt een onaangenaam koud gevoel in uw hand
terwijl u het apparaat gebruikt en houdt de huidkoeler zo lang mogelijk
koud.
Het kan voorkomen dat het meebewegende koelhoofd aan de
huidkoeler vastvriest en niet meer kan bewegen wanneer u de huidkoeler
uit de vriezer of het vriesvak haalt. Het koelhoofd zal weer gaan
meebewegen nadat u het apparaat enkele keren over uw been heen en
weer hebt bewogen.
2 Klik het apparaat op de huidkoeler (g. 5).
3 Steek het apparaatstekkertje in de onderkant van het apparaat en
steek de adapter in het stopcontact.
4 Schakel het apparaat in door de gewenste snelheid te
selecteren (g. 6).
Kies snelheid I voor gebieden met lichte beharing en/of waar het bot zich
direct onder de huid bevindt, zoals de knieën en enkels.
Kies snelheid II voor grotere gebieden met sterkere beharing.
5 Trek de huid met uw vrije hand strak, zodat de haartjes goed
rechtop staan.
91
Page 92

92
NEDERLANDS92
6 Plaats het apparaat loodrecht op de huid met het epileerhoofd naar
voren gericht. Beweeg het apparaat tegen de haargroeirichting in.
Doe dit niet te snel maar ook niet traag. (g. 7)
Zorg ervoor dat zowel de epileerschijfjes als de huidkoeler goed contact
maken met uw huid.
Druk het apparaat licht op de huid.
Als u niet helemaal tevreden bent over het resultaat, beweeg de
,
epilator dan langzamer over uw huid.
7 Gebruik het lipje aan de onderkant van het apparaat om het
apparaat van de huidkoeler te verwijderen (g. 8).
Epileren met de huidkoeler voor oksels en bikinilijn
De speciale huidkoeler voor de oksels en de bikinilijn vermindert het
aantal actieve epileerschijfjes en heeft een groot koeloppervlak. Hierdoor
maakt deze speciale huidkoeler het epileren van gevoelige delen van het
lichaam minder pijnlijk. U bereikt de beste resultaten als de haartjes niet al
te lang zijn (max. 1 cm).
1 Schuif de beschermhuls om de huidkoeler. (g. 9)
2 Klik het apparaat op de huidkoeler (g. 10).
3 Schakel het apparaat in door de gewenste snelheid te
kiezen. (g. 6)
Wij adviseren u snelheid I te gebruiken.
4 Om uw oksels te epileren, legt u een arm achter uw hoofd om de
huid strak te trekken en plaatst u het apparaat met uw andere hand
loodrecht op de huid (g. 11).
5 Om de bikinilijn te epileren, trekt u de huid met uw vrije hand strak
en plaatst u het apparaat loodrecht op de huid. Oefen geen druk
uit (g. 12).
6 Beweeg het apparaat langzaam over de huid tegen de richting van
de haargroei in.
Page 93

NEDERLANDS 93
7 Gebruik het lipje aan de onderkant van het apparaat om het
apparaat van de huidkoeler voor oksels en bikinilijn te
verwijderen (g. 13).
Epileren zonder huidkoeler
Als u geen gebruik wenst te maken van de huidkoeler, omdat u
,
bijvoorbeeld al gewend bent aan het gevoel van epileren, kunt u het
apparaat gebruiken zonder de huidkoeler.
Zorg dat u het apparaat loodrecht op uw huid plaatst en dat u het
,
tegen de richting van de haargroei in beweegt.
Puffspons gebruiken
Gebruik de puffspons tijdens het douchen.
Regelmatig masseren met de puffspons kan helpen voorkomen dat
haartjes gaan ingroeien. Gebruik de puffspons niet vlak voor of vlak na
het epileren.
Scheren
U kunt het scheerhoofd gebruiken om de gevoelige delen van uw
lichaam, zoals de oksels en de bikinilijn, te scheren. Met het scheerhoofd
bereikt u op een aangename en zachte manier een glad resultaat.
1 Zorg ervoor dat het apparaat is uitgeschakeld.
2 Verwijder de huidkoeler (g. 8).
3 Verwijder het epileerhoofd (g. 14).
Druk op de ontgrendelknop (1) en schuif het epileerhoofd in de richting
van de pijl (2).
4 Plaats het scheerhoofd op het apparaat en druk het aan totdat het
vastklikt (‘klik’) (g. 15).
5 Schakel het apparaat in door snelheid II te kiezen.
6 Plaats het scheerhoofd op uw huid en beweeg het apparaat
langzaam over de huid, tegen de haargroeirichting in, terwijl u lichte
druk uitoefent (g. 16).
93
Page 94

94
NEDERLANDS94
Schoonmaken en onderhoud
Spoel de adapter en het apparaat zelf nooit af onder de kraan.
Gebruik geen bijtende schoonmaakmiddelen, schuursponsjes of -
doekjes, benzine, aceton en dergelijke om het apparaat schoon te
maken.
1 Zorg ervoor dat het apparaat is uitgeschakeld en de stekker uit het
stopcontact is getrokken.
2 Verwijder de huidkoeler van het apparaat en schuif de
beschermhuls van de huidkoeler.
3 Maak het meebewegende koelhoofd van de huidkoeler voor de
benen na ieder gebruik schoon met het bijgeleverde borsteltje of
een vochtige doek.
Zorg ervoor dat de buitenzijde van de huidkoeler volledig droog is voor
u deze opnieuw invriest.
Epileerhoofd schoonmaken
Maak het epileerhoofd na elk gebruik schoon.
1 Zorg ervoor dat het apparaat is uitgeschakeld en de stekker uit het
stopcontact is getrokken.
2 Verwijder het epileerhoofd (g. 14).
Druk op de ontgrendelknop (1) en schuif het epileerhoofd in de richting
van de pijl (2).
3 Verwijder het massage-element (g. 17).
4 Maak alle bereikbare delen schoon met het borsteltje, ook de
onderkant van het epileerhoofd en de epileerschijfjes (g. 18).
5 U kunt het epileerhoofd (niet het apparaat!) ook afspoelen onder
de kraan om het epileerhoofd grondiger te reinigen (g. 19).
Probeer nooit de epileerschijfjes uit het epileerhoofd te verwijderen.
6 Bevestig het massage-element weer op het epileerhoofd. Plaats
vervolgens het epileerhoofd op het apparaat en druk het aan totdat
het vastklikt (‘klik’) (g. 20).
Page 95

NEDERLANDS 95
Het epileerhoofd kan slechts op één manier op het apparaat worden
bevestigd.
Scheerhoofd schoonmaken
Maak het scheerhoofd na elk gebruik schoon.
1 Zorg ervoor dat het apparaat is uitgeschakeld en de stekker uit het
stopcontact is getrokken.
2 Verwijder het scheerhoofd.
3 Trek het knipelement uit het scheerhoofd. (g. 21)
4 Borstel de haren van het knipelement en het scheerhoofd af. Zorg
er ook voor dat u de haartjes wegborstelt die zich mogelijk onder
de tondeuses hebben opgehoopt (g. 22).
5 U kunt het knipelement en de rest van het scheerhoofd (niet het
apparaat!) ook afspoelen onder de kraan (g. 23).
6 Plaats het knipelement terug in het scheerhoofd en duw het
scheerhoofd terug op het apparaat totdat het vastklikt
(‘klik’) (g. 24).
Oefen geen druk uit op het scheerblad om beschadiging te voorkomen.
7 Smeer de tondeuses en het scheerblad twee keer per jaar in met
een druppeltje naaimachineolie.
Opbergen
Plaats de beschermkap op het scheerhoofd (‘klik’). (g. 25)
1
2 Bewaar het apparaat en de accessoires in het etui.
3 U kunt het apparaat ook in de houder bewaren (g. 2).
95
Vervangen
Vervang het knipelement (type HP6193) iedere een à twee jaar wanneer
u het scheerhoofd meerdere keren per week gebruikt of wanneer dit
onderdeel beschadigd is.
Page 96

96
NEDERLANDS96
Milieu
Gooi het apparaat aan het einde van zijn levensduur niet weg met
het normale huisvuil, maar lever het in op een door de overheid
aangewezen inzamelpunt om het te laten recyclen. Op die manier
levert u een bijdrage aan een schonere leefomgeving (g. 26).
De ingebouwde accu’s bevatten stoffen die schadelijk kunnen zijn
voor het milieu. Verwijder de accu’s altijd voordat u het apparaat
afdankt en inlevert op een door de overheid aangewezen
inzamelpunt. Lever de accu’s in op een ofcieel inzamelpunt voor
batterijen. Als u problemen ondervindt bij het verwijderen van de
accu’s, kunt u met het apparaat ook naar een Philips-servicecentrum
gaan. Medewerkers van dit centrum verwijderen dan de accu’s voor u
en zorgen ervoor dat deze op milieuvriendelijke wijze worden
verwerkt.
1 Haal de adapter uit het stopcontact en laat het apparaat lopen
totdat de accu’s leeg zijn.
2 Verwijder het epileerhoofd (g. 14).
3 Houd het apparaat in uw hand en open het apparaat met een
schroevendraaier (g. 27).
4 Trek de beide huishelften uit elkaar met uw duimen totdat de
klikverbindingen breken (g. 28).
5 Verwijder alle onderdelen (de motorunit en de printplaatunit) uit
de huishelften.
6 Steek een schroevendraaier tussen de plastic accuhouder en de
accu’s (g. 29).
7 Verwijder de accu’s uit de plastic accuhouder en de
printplaat (g. 30).
Probeer het apparaat niet opnieuw in elkaar te zetten om het op
netspanning te gebruiken. Dit is gevaarlijk (g. 3).
Page 97

NEDERLANDS 97
Garantie & service
Als u informatie nodig hebt of als u een probleem hebt, bezoek dan de
Philips-website (www.philips.com), of neem contact op met het Philips
Customer Care Centre in uw land (u vindt het telefoonnummer in het
‘worldwide guarantee’-vouwblad). Als er geen Customer Care Centre in
uw land is, ga dan naar uw Philips-dealer of neem dan contact op met de
afdeling Service van Philips Domestic Appliances and Personal Care BV.
Problemen oplossen
Probleem Mogelijke oorzaak Oplossing
Het
epileerresultaat
gaat achteruit.
U hebt de epilator in de
verkeerde richting
bewogen.
U hebt het epileerhoofd
onder een verkeerde
hoek op de huid
geplaatst.
Het epileerhoofd was
niet in contact met de
huid.
U hebt uw huid
bevochtigd met water of
u hebt een crème of een
ander
huidverzorgingsproduct
aangebracht voordat u
ging epileren.
Beweeg het apparaat
altijd tegen de
haargroeirichting in.
Plaats het apparaat
steeds loodrecht op de
huid.
Zorg ervoor dat zowel
de epileerschijfjes als de
huidkoeler goed contact
maken met uw huid.
Uw huid moet volledig
droog zijn en mag niet
vettig zijn. Smeer geen
crème, bodymilk of een
ander
huidverzorgingsproduct
op uw huid voordat u
gaat epileren.
97
Page 98

98
NEDERLANDS98
Probleem Mogelijke oorzaak Oplossing
Het apparaat
werkt niet.
De huidkoeler voor
oksels en bikinilijn zat op
het apparaat toen u uw
benen epileerde.
U hebt het apparaat te
snel over uw huid
bewogen.
De accu’s zijn leeg. Laad de accu’s op.
Het stopcontact waarop
het apparaat is
aangesloten werkt niet.
Het apparaat is niet
ingeschakeld.
U hebt het epileerhoofd
niet goed op het
apparaat bevestigd.
Gebruik uitsluitend de
huidkoeler voor benen
wanneer u uw benen
epileert.
Beweeg het apparaat
niet te snel, maar ook
niet te traag over uw
huid.
Zorg ervoor dat er
stroom op het
stopcontact staat. Als u
een stopcontact in een
badkamerkast gebruikt,
dient u mogelijk het licht
in te schakelen om
stroom te hebben.
Schakel het apparaat in.
Plaats het epileerhoofd
op het apparaat en druk
het aan totdat het
vastklikt (‘klik’).
Page 99

NEDERLANDS 99
Probleem Mogelijke oorzaak Oplossing
Er treedt
huidirritatie op.
De huidkoeler
is niet koud
genoeg.
U hebt de epilator voor
de eerste keer gebruikt
of het is lang geleden dat
u deze hebt gebruikt.
U hebt te veel druk op
het apparaat uitgeoefend.
De huidkoeler heeft niet
lang genoeg in de vriezer
of het vriesvak van de
koelkast gelegen.
De eerste keren dat u
het apparaat gebruikt,
kan zich enige
huidirritatie voordoen.
Dit is een volstrekt
normaal verschijnsel, dat
gewoonlijk snel verdwijnt.
Tips om huidirritatie te
verminderen vindt u in
het eerste gedeelte van
het hoofdstuk ‘Het
apparaat gebruiken’.
Zorg ervoor dat het
epileerhoofd schoon
blijft.
Oefen geen druk uit
wanneer u het apparaat
over de huid beweegt.
Plaats de huidkoeler
zonder de beschermhuls
in de vriezer of het
vriesvak van uw koelkast
(***). Laat de huidkoeler
hier ten minste 4 uur
liggen voordat u gaat
epileren. Wanneer de
vloeistof volledig blauw is
geworden, is de
huidkoeler klaar voor
gebruik.
99
Page 100

100
NEDERLANDS100
Probleem Mogelijke oorzaak Oplossing
Het koelhoofd
van de
huidkoeler voor
de benen
beweegt niet
mee.
Het
epileerhoofd
kan niet worden
verwijderd.
Het
scheerhoofd
kan niet worden
verwijderd.
De huidkoeler heeft niet
in de vriezer of het
vriesvak van de koelkast
gelegen.
De huidkoeler was niet
in contact met de huid.
Het koelhoofd is
bevroren.
U hebt het epileerhoofd
in de verkeerde richting
bewogen.
U hebt het scheerhoofd
in de verkeerde richting
bewogen.
Plaats de huidkoeler
zonder de beschermhuls
ten minste 4 uur in de
vriezer of het vriesvak
van uw koelkast (***).
Plaats de huidkoeler niet
gewoon in de koelkast.
Zorg ervoor dat de
huidkoeler altijd goed
contact maakt met uw
huid tijdens het epileren.
Wrijf de huidkoeler
enkele keren over uw
been om het koelhoofd
weer te laten bewegen.
Zorg ervoor dat de
buitenzijde van de
huidkoeler altijd volledig
droog is voor u deze
invriest.
Druk op de
ontgrendelknop en schuif
het epileerhoofd in de
richting van de pijl
(g. 14) om het te
verwijderen.
Druk op de
ontgrendelknop en schuif
het scheerhoofd in de
richting van de pijl (g.
14) om het te
verwijderen.
 Loading...