

Page 1
Satin ICE
HP6479, HP6475, HP6473
Page 2
234
Page 3
Page 4

Page 5

ENGLISH 6
POLSKI 14
ROMÂNĂ 23
РУССКИЙ 31
ČESKY 41
MAGYAR 49
SLOVENSKY 58
УКРАЇНСЬКІЙ 66
HRVATSKI 75
EESTI 83
LATVISKI 91
LIETUVIŠKAI 99
SLOVENŠČINA 107
БЪЛГАРСКИ 115
SRPSKI 124
HP6479, HP6475, HP64 73
Page 6

Introduction
◗ With your new Satin ICE you can remove unwanted hairs quickly,
easily and effectively.The combination of the proven epilating disc
system with the newly developed contour-following skin cooler
constitutes a revolution in epilation.Thanks to the natural
numbing effect of ice on the skin, the new Satin ICE makes
epilation more comfortable and less painful than ever.The result
is a silky-smooth skin and a hair growth reduction of up to 50%,
assuming you use the appliance regularly (every 4 weeks).
◗ The Satin ICE is particularly suitable for the legs.Type HP6479
also comes with a skin cooler that has been specially developed
for epilating sensitive areas (underarms, bikini line).These areas
are particularly sensitive to pain, which this special skin cooler
helps to diminish.
◗ The rapidly rotating epilating discs catch even the shortest hairs
(up to half a millimetre!) and pull them out by the roots.As a
result, your skin stays smooth for up to four weeks and regrowth
is soft and downy.
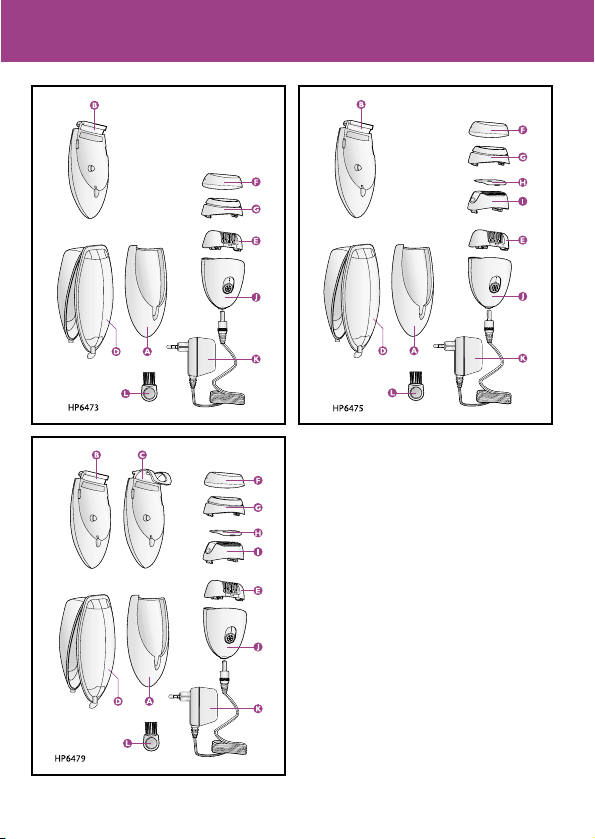
General description
A Protective sleeve for skin cooler
B Leg skin cooler with pivoting cooling head
C Skin cooler for underarms and bikini line (HP6479 only)
D Freezer cassette
E Epilating head
F Protective cap of exfoliating head
G Exfoliating head
H Protective cap of shaving head (HP6479 and HP6475 only)
I Shaving head (HP6479 and HP6475 only)
J Appliance
K Adapter
L Cleaning brush
ENGLISH6
Page 7

Important
Read these instructions for use carefully before using the appliance and
save them for future reference.
◗ Check if the voltage indicated on the adapter corresponds to the
local mains voltage before you connect the appliance.
◗ Only use the appliance in combination with the adapter supplied.
◗ Do not use the appliance if the adapter or the appliance itself is
damaged.
◗ If the adapter is damaged, always have it replaced by one of the
original type in order to avoid a hazard.
◗ The adapter contains a transformer. Do not cut off the adapter to
replace it with another plug, as this will cause a hazardous
situation.
◗ Keep the appliance and the adapter dry.
◗ Keep the appliance out of the reach of children.
◗ Do not expose the appliance to temperatures lower than 5cC or
higher than 35cC.
◗ To prevent damage and injuries, keep the running appliance away
from your hair, eyebrows, eyelashes, clothes, threads, cords,
brushes etc.
◗ Do not use the appliance on irritated skin or skin with varicose
veins, rashes, spots, moles (with hairs) or wounds without
consulting your doctor first. People with a reduced immune
response, e.g. during pregnancy, or people suffering from diabetes
mellitus, Raynaud's disease or immunodeficiency should contact
their doctor first.
◗ Noiselevel: L= 75.8 dB(A)
Preparing for use
Freezing the skin cooler
1 Remove the protective sleeve from the skin cooler (fig.1).
2 Put the skin cooler WITHOUT the protective sleeve in the freezer
cassette and put it in the freezer or freezing compartment (***) at
least 6 hours before you start epilating (fig. 2).
ENGLISH 7
Page 8

Make sure the outside of the skin cooler is completely dry before you
freeze it.
◗ Tip:You can store the skin cooler in the freezer permanently.
Using the appliance
General information about epilation
◗ Epilation is easier just after taking a bath or shower. Make sure
your skin is completely dry when you start epilating.
◗ When you use the appliance for the first time, we advise you to try
it out on an area with only light hair growth to get accustomed to
the epilation process.After epilation you can apply a mild cream or
body milk to soothe your skin and reduce skin irritation.
◗ Before epilating longer hairs on sensitive skin areas,shorten them
with a trimmer or a pair of scissors.
◗ We advise you to epilate before going to bed at night,as this will
allow any skin irritation that may develop to diminish overnight.
◗ Your skin may become a little red and irritated the first few times
you use the epilator.This phenomenon is absolutely normal and
will quickly disappear. As you use the appliance more often, your
skin will get used to epilation, skin irritation will decrease and
regrowth will become thinner and softer. If the irritation has not
disappeared within three days, we advise you to consult a doctor.
◗ Epilation can lead to ingrown hairs or minor skin injuries, which
may cause inflammations due to penetration of bacteria into the
skin. It is therefore important to clean the epilating head very
carefully after each use.
Epilating the legs
Make sure your skin is clean, entirely dry and free from grease. Do not
use any cream before you start epilating.
1 Slide the protective sleeve onto the skin cooler (fig. 3).
The protective sleeve prevents an unpleasant sensation of coldness in
your hand while using the appliance.
ENGLISH8
Page 9

Occasionally the pivoting head may freeze onto the skin cooler and
doesn't move when you take the skin cooler from the freezer.The
pivoting head will start pivoting again after you have passed it over your
leg a few times.
2 Snap the appliance onto the skin cooler (fig. 4).
3 Insert the appliance plug into the inlet socket and put the adapter
in the wall socket.
4 Switch the appliance on by selecting the desired speed (fig. 5).
Select speed I for areas with little hair growth and for areas where
bones are located directly beneath the skin, such as knees and ankles.
Select speed II for larger areas with stronger hair growth.
5 Stretch your skin with your free hand to make the hairs stand
upright.
6 Place the appliance perpendicularly onto the skin and move it
against the direction of hair growth (fig. 6).
Make sure both the epilating discs and the skin cooler are in proper
contact with the skin.
Do not press the appliance onto the skin.
Epilating underarms and bikini line (HP6479 only)
The special skin cooler for the underarms and bikini line reduces the
number of active epilating discs. Combined with the large cooling
surface, this skin cooler makes epilating sensitive areas less painful.You
will get the best results when the hairs are not too long (max. 1 cm).
1 Slide the protective sleeve onto the skin cooler (fig. 7).
2 Snap the appliance onto the skin cooler (fig. 8).
3 Switch the appliance on by selecting the desired speed (fig. 9).
We advise you to use speed II.
4 To epilate the underarm area, place one arm behind your head to
stretch the skin and place the appliance perpendicularly onto the
skin with the hand of the other arm (fig. 10).
ENGLISH 9
Page 10

5 To epilate the bikini line, stretch the skin with your free hand and
place the appliance perpendicularly onto your skin, without
exerting any pressure (fig.11).
6 Move the appliance slowly across the skin against the direction of
hair growth.
Shaving (HP6479 and HP6475 only)
You can use the shaving head to shave delicate body parts, such as your
underarms and bikini line.With the shaving head you will obtain a
smooth result in a comfortable and gentle way.
1 Make sure the appliance is switched off.
2 Remove the skin cooler.
3 Remove the epilating head (fig. 12).
Grab the epilating head by the ribbed sections and move it in the
direction of the arrow indicated on the epilating head.
4 Place the shaving head on the appliance and move it against the
direction of the arrow indicated on the shaving head until it snaps
home (fig. 13).
The shaving head can only be fitted onto the appliance in one way.
5 Switch the appliance on by selecting the desired speed.
We advise you to use speed I.
6 Place the shaving head onto your skin and move the appliance
slowly and smoothly against the direction of hair growth, while
pressing it lightly.
Exfoliating
Using the exfoliating head regularly improves the appearance of the
skin and reduces the risk of ingrown hairs. Do not use the exfoliating
head immediately before or within two days after epilation.
Only use the exfoliating head on your legs, not on your underarms or
bikini line.
ENGLISH10
Page 11

Only use the exfoliating head on your legs, not on your underarms or
bikini line.
1 Make sure the appliance is switched off.
2 Remove the skin cooler.
3 Remove the epilating head (fig. 12).
Grab the epilating head by the ribbed sections and move it in the
direction of the arrow indicated on the epilating head.
4 Place the exfoliating head on the appliance and move it against
the direction of the arrow indicated on the exfoliating head until
it snaps home (fig. 14).
The exfoliating head can only be fitted onto the appliance in one way.
5 Switch the appliance on.
Use speed I or II, depending on the required exfoliating intensity. We
recommend exfoliating each leg for 1-3 minutes.
- Use the exfoliating head once or twice a week to improve the
appearance of your skin.
- Don't use any cream, foam, gel or lotion just before or during
exfoliation.
- Don't use the exfoliating head immediately before or within two
days after epilation.
- For hygienic reasons, the exfoliating head should only be used by
one person.
- We advise you to exfoliate before going to bed at night, as this will
allow any skin irritation that may develop to diminish overnight.
- Apply a mild cream or body milk after exfoliating.
Cleaning and maintenance
Never rinse the adapter plug or the appliance itself with water.
Do not use any corrosive detergents,scouring pads or cloths, petrol,
acetone etc. to clean the appliance.
1 Make sure the appliance is switched off and unplugged.
ENGLISH 11
Page 12

2 Remove the skin cooler from the appliance and slide the
protective sleeve off the skin cooler.
3 Clean the skin cooler, the appliance and the protective sleeve
with a moist cloth.
4 Clean the pivoting cooling head of the leg skin cooler with a
brush or moist cloth after each use (fig. 15).
Make sure the outside of the skin cooler is completely dry before
freezing it again.
5 Remove the epilating head (fig. 12).
Grab the epilating head by the ribbed sections and move it in the
direction of the arrow indicated on the epilating head.
6 Clean all accessible parts and the epilating discs with the brush
(fig. 16).
Never try to detach the epilating discs from the appliance.
7 Place the epilating head on the appliance and move it against the
direction of the arrow indicated on the epilating head until it
snaps home (fig. 17).
The epilating head can only be fitted onto the appliance in one way.
Cleaning the shaving head (HP6479 and HP6475 only)
1 Make sure the appliance is switched off and unplugged.
2 Remove the shaving foil.
3 Clean the hair chamber and the cutter block with the brush
(fig. 18).
Do not exert pressure on the shaving foil to avoid damaging it.
◗ Rub a drop of sewing machine oil onto the trimmers and shaving
foil of the shaving head twice a year.
ENGLISH12
Page 13

Cleaning the exfoliating head
1 Switch the appliance off.
2 Remove the exfoliating head by moving it in the direction of the
arrow indicated on the exfoliating head.
3 Clean the exfoliating head with the brush regularly (fig. 19).
You can clean the exfoliating head more thoroughly by rinsing it under
the tap.
Never rinse the adapter or the epilator itself with water.
Storage
1 Put the protective caps back onto the shaving head and
exfoliating head after use.
2 Store the appliance and the accessories in the pouch.
3 Put the skin cooler in the freezer cassette.
Replacement
B
HP6479 and HP6475 only
◗ When you use the shaving head several times a week, replace the
shaving foil (type HP6116) and the cutter block (type HP2911)
after one or two years of use or if these parts are damaged.
Guarantee & service
If you need information or if you have a problem, please visit the Philips
website at www.philips.com or contact the Philips Customer Care
Centre in your country (you will find its phone number in the
worldwide guarantee leaflet). If there is no Customer Care Centre in
your country, turn to your local Philips dealer or contact the Service
Department of Philips Domestic Appliances and Personal Care BV.
ENGLISH 13
Page 14

Wstęp
◗ Dzięki nowemu depilatorowi Satin ICE możesz szybko,łatwo i
skutecznie usuwać zbędne włosy. Połączenie wypróbowanego
systemu tarcz depilujących z opracowanym ostatnio
ochładzaczem skóry stanowi rewolucję w dziedzinie depilacji.
Wykorzystując naturalny, znieczulający wpływowi lodu na skórę,
nowy depilator Satin ICE czyni depilację bardziej komfortową i
mniej bolesną niż zawsze. Skóra staje się jedwabiście gładka, zaś
wzrost włosów zmniejsza się nawet o 50%, pod warunkiem, że
będziesz używać urządzenia regularnie (co 4 tygodnie).
◗ Satin ICE jest szczególnie odpowiedni do depilacji nóg. Model
HP6479 wyposażony jest również w ochładzacz skóry,specjalnie
zaprojektowany do depilacji jej wrażliwych obszarów (pod pachami
i w okolicach pachwin).Obszary te są szczególnie narażone na ból,
który ochładzacz skóry pomaga wyraźnie zmniejszyć.
◗ Szybko obracające się dyski depilujące wychwytują nawet
najkrótsze włoski (o długości do pół milimetra!) i wyciągają je
wraz z cebulką.W rezultacie skóra pozostaje aksamitnie gładka
nawet przez cztery tygodnie, zaś odrastające włoski są miękkie i
rzadsze.
Opis ogólny
A Ochronna tuleja na ochładzacz skóry
B Ochładzacz skóry nóg z obracającą się głowicą chłodzącą
C Ochładzacz skóry dla obszarów pod pachami i w okolicach pachwin
(tylko dla modelu HP6479)
D Kaseta do zamrażania ochładzacza skóry
E Głowica depilująca
F Kapturek ochronny głowicy złuszczającej
G Głowica złuszczająca
H Kapturek ochronny głowicy golącej (tylko dla modeli HP6479 i
HP6475)
I Głowica goląca (tylko dla modeli HP6479 i HP6475)
J Urządzenie
K Zasilacz
L Szczoteczka do czyszczenia
14
POLSKI
Page 15

15
Ważne
Przed pierwszym użyciem urządzenia zapoznaj się dokładnie z instrukcją
jego obsługi i zachowaj ją na przyszłość, do ewentualnej konsultacji.
◗ Przed podłączeniem urządzenia upewnij się, czy napięcie podane
na zasilaczu jest zgodne z napięciem w sieci elektrycznej.
◗ Korzystaj z urządzenia wyłącznie z użyciem dołączonego
zasilacza.
◗ Nie wolno korzystać z urządzenia,jeśli uszkodzony jest zasilacz
lub samo urządzenie.
◗ Jeśli uszkodzony jest zasilacz,wówczas dla zachowania
bezpieczeństwa należy zastąpić go zasilaczem oryginalnym.
◗ Zasilacz wyposażony jest w transformator. Nie odcinaj zasilacza
w celu zastąpienia go inną wtyczką, może to spowodować
powstanie niebezpiecznych sytuacji.
◗ Urządzenie i zasilacz zawsze utrzymuj w stanie suchym.
◗ Przechowuj urządzenie w miejscu niedostępnym dla małych
dzieci.
◗ Nie narażaj urządzenia na działanie temperatur niższych niż 5cC
lub wyższych niż 35cC.
◗ W celu uniknięcia skaleczeń lub uszkodzeń, trzymaj włączone
urządzenie z dala od włosów,brwi, rzęs,ubrania, drutów,
przewodów, szczotek.
◗ Nie korzystaj z urządzenia w przypadku skóry podrażnionej lub
skóry z żylakami, wysypką,krostami, pieprzykami (z włosami) lub
z ranami - bez wcześniejszej konsultacji z lekarzem. Osoby o
obniżonej odporności, np.w okresie ciąży lub cierpiące na
cukrzycę, chorobę Raynauda lub wrodzone obniżenie odporności
powinny najpierw skonsultować się z lekarzem.
◗ Poziom hałasu: L= 75.8 dB(A).
Przygotowanie do użycia
Zamrażanie nasadki chłodzącej
1 Zdejmij osłonkę z nasadki chłodzącej (Rys. 1).
POLSKI
Page 16

16
2 Umieść ochładzacz skóry BEZ ochronnej tulei w kasecie do
zamrażania i włóż ją do zamrażarki lub przedziału zamrażalnika
(***) na co najmniej 6 godzin przed depilacją (Rys. 2).
Przed zamrożeniem, sprawdź, czy zewnętrzna część nasadki chłodzącej
jest zupełnie sucha.
◗ Wskazówka: Możesz stale przechowywać nasadkę chłodzącą w
zamrażarce.
Użycie urządzenia
Ogólne uwagi na temat depilacji
◗ Depilacja jest łatwiejsza tuż po kąpieli lub prysznicu.W chwili
rozpoczęcia depilacji skóra musi być całkowicie sucha.
◗ Przed pierwszym użyciem urządzenia radzimy wypróbować je na
obszarze o małym owłosieniu, aby przyzwyczaić się do zabiegu
depilacji. Po depilacji możesz wetrzeć w skórę łagodny krem lub
mleczko do ciała, przyniesie to skórze ulgę i zmniejszy jej
podrażnienie.
◗ Dłuższe włosy na wrażliwych obszarach skóry przed
przystąpieniem do depilacji przytnij trymerem lub nożyczkami.
◗ Zalecamy przeprowadzanie depilacji wieczorem, przed snem,
ponieważ wszelkie ewentualne objawy podrażnienia mogą ustąpić
w ciągu nocy.
◗ Podczas kilku pierwszych zastosowań depilatora skóra może być
zaczerwieniona i podrażniona. Zjawisko to jest absolutnie
normalne i szybko zaniknie. Im częściej korzystamy z z
urządzenia, tym szybciej skóra przyzwyczai się do depilacji,
podrażnienie zmniejszy się, a odrastające włoski będą cieńsze i
bardziej miękkie. Jeśli podrażnienie nie ustąpi w ciągu trzech dni,
zalecamy skontaktować się z lekarzem.
◗ Depilacja może powodować wrastanie włosów lub nieznaczne
uszkodzenia skóry, co z kolei może wywoływać stany zapalne,
spowodowane wnikaniem w skórę bakterii.Dlatego też bardzo
ważne jest czyszczenie głowicy depilującej po każdym użyciu
depilatora.
POLSKI
Page 17

17
Depilacja nóg
Upewnij się, czy skóra jest czysta i nienatłuszczona. Nie używaj kremu
bezpośrednio przed depilacją.
1 Nasuń na ochładzacz skóry ochronną tuleję (Rys. 3).
Osłonka chroni przed nieprzyjemnym wrażeniem chłodu odbieranym
przez ręce podczas korzystania z depilatora.
Czasami ruchoma głowica może przymarznąć do ochładzacza skóry i
po wyjęciu go z zamrażalnika głowica nie obraca się. Po kilkukrotnym
przesunięciu głowicy po nodze zacznie się ona ponownie obracać.
2 Dołącz nasadkę chłodzącą do depilatora (Rys. 4).
3 Wetknij małą wtyczkę do gniazdka wejściowego urządzenia,
natomiast zasilacz - do gniazdka sieciowego.
4 Włącz urządzenie, wybierając odpowiednią prędkość obrotów
(Rys. 5).
Wybierz prędkość I w przypadku skóry z małą ilością włosów, a także
miejsc, gdzie kości znajdują się tuż pod skórą,czyli na kolanach i
kostkach.
Wybierz prędkość II do depilacji rozleglejszych miejsc o silniejszym
owłosieniu.
5 Wolną ręką napnij skórę tak, by włoski stanęły pionowo.
6 Ustaw urządzenie prostopadle do powierzchni skóry i przesuwaj
nim w kierunku przeciwnym do kierunku wzrostu włosków
(Rys. 6).
Sprawdź, czy zarówno dyski depilujące, jak i nasadka chłodząca, mają
właściwy kontakt ze skórą.
Nie przyciskaj urządzenia do skóry.
Depilacja obszarów pod pachami i w okolicach pachwin
(tylko dla modelu HP6479)
Specjalny ochładzacz skóry do obszarów pod pachami i w okolicach
pachwin zmniejsza liczbę aktywnych tarcz depilujących. Dzięki dużej
powierzchni chłodzenia niniejszy ochładzacz skóry czyni depilację mniej
POLSKI
Page 18

18
bolesną. Najlepsze wyniki osiągniesz, poddając depilacji niezbyt długie
włosy (maksymalnie 1 cm).
1 Nasuń na ochładzacz skóry ochronną tuleję (Rys. 7).
2 Dołącz nasadkę chłodzącą do depilatora (Rys. 8).
3 Włącz urządzenie, wybierając odpowiednią prędkość obrotów
(Rys. 9).
Zalecana jest prędkość II.
4 Aby wydepilować skórę pod pachą, załóż rękę za głowę,aby
rozciągnąć skórę i, trzymając urządzenie drugą ręką, przyłóż je
prostopadle do skóry (Rys. 10).
5 Aby wydepilować obszary w okolicach pachwin, wolną ręką
napnij skórę i skieruj urządzenie prostopadle w stosunku do
skóry,nie wywierając przy tym nacisku (Rys. 11).
6 Przesuwaj urządzenie powoli po skórze w kierunku przeciwnym,
do kierunku wzrostu włosków.
Golenie (tylko dla modeli HP6479 i HP6475)
Możesz korzystać z głowicy golącej w celu usunięcia owłosienia z
wrażliwych partii ciała, takich jak obszary pod pachami i w okolicach
bikini. Dzięki pomocy głowicy golącej uzyskasz gładką skórę w sposób
wygodny i bezbolesny.
1 Sprawdź, czy urządzenie jest wyłączone.
2 Zdejmij nasadkę chłodzącą.
3 Zdejmij głowicę depilującą (Rys. 12).
Uchwyć głowicę depilacyjną za części żebrowane i przesuń ją w
kierunku wskazanym przez umieszczoną na niej strzałkę.
4 Umieść na urządzeniu głowicę golącą i przesuń ją w kierunku
przeciwnym do wskazanego strzałką, aż głowica znajdzie się na
swoim miejscu (Rys. 13).
Głowica goląca może być zamontowana na urządzeniu tylko w jeden
sposób.
POLSKI
Page 19

19
5 Włącz urządzenie, wybierając odpowiednią prędkość obrotów.
Zalecana jest prędkość I.
6 Umieść głowicę golącą na skórze i, lekko dociskając, powoli i
płynnie przesuwaj urządzenie w kierunku przeciwnym do
kierunku wzrostu włosów.
Złuszczanie
Regularne używanie głowicy złuszczającej poprawia wygląd skóry i
zmniejsza ryzyko wrastania włosów.Nie używaj głowicy złuszczającej tuż
przed depilacją oraz przez dwa dni po depilacji.
Głowicy złuszczającej używaj tylko do nóg, a nie do obszarów pod
pachami i w okolicach pachwin.
1 Sprawdź, czy urządzenie jest wyłączone.
2 Zdejmij nasadkę chłodzącą.
3 Zdejmij głowicę depilującą (Rys. 12).
Uchwyć głowicę depilacyjną za części żebrowane i przesuń ją w
kierunku wskazanym przez umieszczoną na niej strzałkę.
4 Umieść na urządzeniu głowicę złuszczająca i przesuń ją w
kierunku przeciwnym do wskazanego strzałką, aż głowica znajdzie
się na swoim miejscu (Rys. 14).
Głowicę złuszczającą można założyć na urządzenie tylko w jeden
sposób.
5 Włącz urządzenie.
Zależnie od wymaganej intensywności złuszczania wybierz prędkość I
lub II. Złuszczanie skóry na jednej nodze powinno trwać od 1 do 3
minut.
- Aby poprawić wygląd skóry, należy korzystać z głowicy złuszczającej
raz lub dwa razy w tygodniu.
- Nie używaj żadnych kremów,pianki, żelu lub płynu tuż przed ani
podczas złuszczania.
- Nie używaj głowicy złuszczającej tuż przed depilacją oraz przez dwa
dni po depilacji.
POLSKI
Page 20

20
- Ze względów higienicznych głowicy złuszczającej może używać
tylko jedna osoba.
- Zalecamy przeprowadzanie złuszczania wieczorem,przed snem,
ponieważ pora nocna będzie sprzyjała ustąpieniu ewentualnych
podrażnień.
- Po zakończeniu złuszczania wetrzyj w skórę łagodny krem lub
mleczko do ciała.
Czyszczenie i konserwacja urządzenia
Nigdy nie płucz ładowarki lub samego urządzenia wodą.
Nie używaj żadnych żrących środków, szorujących zmywaków,
benzyny, acetonu,itp.
1 Upewnij się, że urządzenie zostało wyłączone i wtyczka została
wyjęta z gniazdka sieciowego.
2 Zdejmij nasadkę chłodzącą z depilatora i zsuń z nasadki osłonkę
3 Oczyść wilgotną szmatką nasadkę chłodzącą, urządzenie i
osłonkę.
4 Po każdym użyciu oczyść obracającą się głowicę chłodzącą skóry
nóg szczoteczką lub wilgotną szmatką (Rys. 15).
Zanim ponownie zamrozisz ochładzacz skóry, sprawdź, czy jego
zewnętrzna powierzchnia jest zupełnie sucha.
5 Zdejmij głowicę depilującą (Rys. 12).
Uchwyć głowicę depilacyjną za części żebrowane i przesuń ją w
kierunku wskazanym przez umieszczoną na niej strzałkę.
6 Wyczyść wszystkie dostępne elementy i dyski szczoteczką
(Rys. 16).
Nie próbuj wyjmować dysków z urządzenia.
7 Umieść na urządzeniu głowicę depilującą i przesuń ją w kierunku
przeciwnym do wskazanego strzałką, aż głowica znajdzie się na
swoim miejscu (Rys. 17).
Głowica depilująca może być zamontowana na urządzeniu tylko w
jeden sposób.
POLSKI
Page 21

21
Czyszczenie głowicy golącej (tylko dla modeli HP6479 i
HP6475)
1 Upewnij się, że urządzenie zostało wyłączone i wtyczka została
wyjęta z gniazdka sieciowego.
2 Zdejmij metalową folię z głowicy golącej.
3 Wyczyść szczoteczką ostrze i pojemnik na ścięte włoski (Rys. 18).
Aby nie uszkodzić folii, nie wywieraj na nią nacisku.
◗ Na trymery i folię golącą upuść dwa razy w roku kropelkę oleju
do konserwacji maszyn do szycia.
Czyszczenie głowicy złuszczającej
1 Wyłącz urządzenie.
2 Zdejmij głowicę złuszczającą, przesuwając ją w kierunku
wskazanym przez umieszczoną na niej strzałkę.
3 Za pomocą dołączonej szczoteczki regularnie czyść głowicę
złuszczającą (Rys. 19).
Głowicę złuszczającą można oczyścić dokładniej, opłukując ją pod
kranem.
Zasilacza lub samego depilatora nie wolno płukać w strumieniu
bieżącej wody.
Przechowywanie
1 Po użyciu załóż ponownie kapturki ochronne na głowicę golącą i
głowicę złuszczającą.
2 Przechowuj depilator i akcesoria w etui.
3 Umieść nasadkę chłodzącą w przeznaczonej dla niej kasetce.
POLSKI
Page 22

22
Wymiana
B
Tylko dla modeli HP6479 i HP6475
◗ Jeśli korzystasz z głowicy golącej kilka razy w tygodniu, po roku
lub dwóch latach używania wymień metalową blaszkę do golenia
(HP6116) oraz blok nożyka (HP2911); wymiany należy dokonać
również wtedy, gdy części te zużyją się.
Gwarancja i serwis
Jeśli chcesz skorzystać z serwisu lub potrzebujesz informacji, bądź jeśli
masz jakiś problem, odwiedź naszą stronę w Internecie: www.philips.pl
lub skontaktuj się z Działem Obsługi Klienta firmy Philips (numer
telefonu znajdziesz w ulotce gwarancyjnej).
POLSKI
Page 23

Introducere
◗ Cu noul dumneavoastră Satin ICE puteţi îndepărta firele de păr
nedorite rapid, uşor şi eficient.Combinaţia între sistemul
cunoscut de discuri epilatoare şi noul aplicator de răcire ce
urmăreşte conturul pielii constituie o adevărată inovaţie în
domeniul epilării. Graţie efectului natural de amorţire a pielii
datorat gheţii, noul epilator Satin ICE face ca epilarea să fie mai
confortabilă şi mai puţin dureroasă ca niciodată.Astfel, pielea
dumneavoastră va fi mătăsoasă,iar părul se va rări cu până la 50%
dacă veţi folosi aparatul în mod regulat,o dată la 4 săptămâni.
◗ Satin ICE este indicat în special pentru epilarea picioarelor.
Modelul HP6479 este dotat cu un aplicator de răcire a pielii
special conceput pentru epilarea zonelor sensibile (zona axilară,
inghinală).Aceste zone sunt mai sensibile la durere, de aceea
folosirea aplicatorului special de răcire a pielii diminuează această
senzaţie.
◗ Discurile rotative rapide prind şi cele mai scurte fire de păr (până
la o jumătate de milimetru!) şi le smulg din rădăcină. Ca urmare,
pielea dumneavoastră rămâne netedă pe o durată de până la patru
săptămâni, iar firele de păr care cresc din nou sunt subţiri şi fine.
Descriere generală
A Manşon pentru aplicator de răcire a pielii
B Aplicator de răcire pentru picioare cu cap de răcire pivotant
C Aplicator de răcire pentru zona axilară şi inghinală (doar HP6479)
D Casetă de congelare
E Cap epilator
F Capac de protecţie pentru cap de exfoliere
G Cap de exfoliere
H Capac de protecţie pentru cap de radere (doar HP6479 şi HP6475)
I Cap de radere (doar HP6479 şi HP6475)
J Aparat
K Adaptor
L Perie de curăţare
23
ROMÂNĂ
Page 24

24
Important
Citiţi cu atenţie aceste instrucţiuni înainte de a utiliza aparatul şi
păstraţi-le pentru consultări ulterioare.
◗ Verificaţi ca tensiunea indicată pe adaptor să corespundă tensiunii
locale, înainte de conectarea aparatului.
◗ Folosiţi aparatul doar cu adaptorul furnizat.
◗ Nu folosiţi aparatul dacă adaptorul sau epilatorul este deteriorat.
◗ Dacă adaptorul este deteriorat, înlocuiţi-l cu unul original pentru
a evita orice accident.
◗ Adaptorul are un transformator. Nu încercaţi să-l înlocuiţi cu altul
pentru a evita eventualele accidente.
◗ Feriţi aparatul şi adaptorul de contactul cu apă.
◗ Nu lăsaţi aparatul la îndemâna copiilor.
◗ Nu expuneţi aparatul la temperaturi sub 5 cC sau mai mari de
35 cC.
◗ Pentru a preveni deteriorarea aparatului sau eventualele
accidente, aveţi grijă să nu vă prindeţi genele, sprâncenele sau
părul în aparat şi nici haine, aţe, cabluri, perii etc., când acesta
funcţionează.
◗ Nu folosiţi aparatul dacă suprafaţa pielii este iritată sau dacă aveţi
varice, eczeme, cicatrici,aluniţe (cu păr) sau răni, fără a consulta
în prealabil medicul de familie.Acelaşi lucru este valabil şi pentru
persoanele cu imunitate scăzută, de ex.în cazul femeilor gravide
sau persoanele care suferă de diabet, hemofilie sau
imunodeficienţă.
◗ Nivel de zgomot: Lc= 75.8 dB [A]
Pregătire pentru utilizare
Congelarea aplicatorului de răcire a pielii
1 Scoateţi manşonul protector de pe aplicatorul de răcire (fig. 1).
2 Puneţi aplicatorul de răcire fără manşonul protector în caseta de
congelare şi introduceţi-l apoi în congelator sau în sertarul de
congelare (***) cu cel puţin 6 ore înaintea epilării (fig. 2).
ROMÂNĂ
Page 25

25
Asiguraţi-vă că partea exterioară a aplicatorului de răcire este uscată
înainte de congelare.
◗ Sugestie: puteţi ţine permanent aplicatorul de răcire în frigider.
Utilizarea aparatului
Informaţii generale despre epilare
◗ Firele de păr pot fi smulse mai uşor dacă faceţi un duş înainte.
Când începeţi să vă epilaţi, pielea trebuie să fie perfect uscată.
◗ Când vă epilaţi prima dată, vă sfătuim să începeţi cu o zonă cu
mai puţin păr pentru a vă acomoda cu metoda de epilare. După
epilare, puteţi aplica o cremă sau un lapte de corp pentru a calma
pielea şi a reduce eventualele iritaţii.
◗ Pentru epilarea firelor mai lungi de pe zonele sensibile,vă
recomandăm să scurtaţi părul cu un aparat de tuns sau cu
foarfeca.
◗ Vă sfătuim să vă epilaţi înainte de a merge la culcare seara, pentru
a lăsa timp eventualei iritaţii să dispară în timpul nopţii.
◗ Pielea se poate înroşi şi se poate irita după primele epilări.Acest
fenomen este absolut normal şi va dispărea repede. Pe măsură ce
veţi folosi aparatul, pielea se va obişnui cu epilarea, iritaţiile vor fi
mai reduse, iar părul ce va creşte din nou va fi mai subţire şi mai
fin. Dacă iritaţia nu dispare după trei zile, vă sfătuim să consultaţi
un medic.
◗ Epilarea poate duce la creşterea unor fire sub piele sau a unor
zgârieturi superficiale ce pot favoriza inflamaţii,cauzate de
pătrunderea bacteriilor sub piele. De aceea este important să
curăţaţi capul epilator după fiecare utilizare.
Epilarea picioarelor
Pielea trebuie să fie curată, uscată şi degresată. Nu folosiţi creme
înainte de a începe epilarea.
1 Culisaţi manşonul protector pe aplicatorul de răcire a pielii (fig. 3).
ROMÂNĂ
Page 26

26
Manşonul protector are rolul de a vă proteja mâna de senzaţia
neplăcută de rece din timpul utilizării aparatului împreună cu aplicatorul.
Capul pivotant poate îngheţa pe aplicatorul de răcire a pielii şi nu se
mai mişcă când scoateţi aplicatorul din congelator. Capul pivotant va
reîncepe pivotarea după ce îl treceţi de câteva ori pe picior.
2 Fixaţi aparatul pe aplicatorul de răcire (fig. 4).
3 Introduceţi fişa aparatului în mufă şi adaptorul în priză.
4 Porniţi aparatul selectând viteza dorită (fig. 5).
Selecţionaţi viteza I pentru zonele cu păr puţin şi pentru zonele osoase
cum ar fi genunchii şi gleznele.
Selecţionaţi viteza II pentru zonele mai mari cu păr mai mult.
5 Întindeţi pielea cu mâna liberă pentru a ridica firele de păr.
6 Poziţionaţi aparatul perpendicular pe piele şi deplasaţi-l în sens
invers creşterii părului (fig.6).
Atât discurile epilatoare cât şi aplicatorul de răcire trebuie să atingă pielea.
Nu apăsaţi aparatul prea tare pe piele.
Epilarea zonei axilare şi inghinale (doar HP6479)
Aplicatorul special de răcire a pielii pentru zona axilară şi inghinală
reduce numărul discurilor epilatoare active. Combinat cu suprafaţa
mare de răcire, acest aplicator ajută la epilarea zonelor sensibile fără ca
acest procedeu să mai fie atât de dureros.Veţi obţine cele mai bune
rezultate dacă firele de păr nu sunt prea lungi (max. 1 cm.).
1 Culisaţi manşonul protector pe aplicatorul de răcire a pielii (fig. 7).
2 Fixaţi aparatul pe aplicatorul de răcire (fig. 8).
3 Porniţi aparatul selectând viteza dorită (fig. 9).
Vă sfătuim să folosiţi viteza II.
4 Pentru epilarea zonei axilare, ridicaţi braţul după cap pentru a
întinde pielea şi poziţionaţi aparatul perpendicular pe piele cu
cealaltă mână (fig. 10).
ROMÂNĂ
Page 27

27
5 Pentru epilarea zonei inghinale, întindeţi pielea cu mâna şi
poziţionaţi aparatul perpendicular pe piele, fără a exercita vreo
presiune (fig. 11).
6 Mişcaţi aparatul încet pe suprafaţa pielii în sens invers creşterii
firelor de păr.
Radere (doar HP6479 şi HP6475)
Puteţi folosi capul de radere pentru a rade zonele sensibile ale pielii
cum sunt axilele şi zona inghinală. Cu ajutorul capului de radere veţi
obţine un rezultat neted într-un mod confortabil şi neagresiv.
1 Aparatul trebuie să fie oprit.
2 Scoateţi aplicatorul de răcire.
3 Scoateţi capul epilator (fig. 12).
Prindeţi capul epilator de secţiunile striate şi culisaţi-l în direcţia săgeţii
indicată pe acesta.
4 Fixaţi capul de radere pe aparat culisându-l în sens invers direcţiei
indicate de săgeata de pe acesta (fig. 13).
Capul de radere poate fi montat doar într-o singură direcţie.
5 Porniţi aparatul selectând viteza dorită.
Vă sfătuim să folosiţi viteza I.
6 Poziţionaţi capul de radere pe piele şi deplasaţi aparatul încet şi
uniform în sensul invers creşterii firelor de păr, exercitând o
uşoară presiune.
Exfoliere
Utilizarea capului de exfoliere regulat îmbunătăţeşte aspectul pielii şi
reduce riscul creşterii firelor sub piele. Nu folosiţi capul de exfoliere
imediat înainte sau două zile după epilare.
Folosiţi capul de exfoliere doar pentru picioare, nu şi pentru axile sau
inghinal.
ROMÂNĂ
Page 28

28
1 Aparatul trebuie să fie oprit.
2 Scoateţi aplicatorul de răcire.
3 Scoateţi capul epilator (fig. 12).
Prindeţi capul epilator de secţiunile striate şi culisaţi-l în direcţia săgeţii
indicată pe acesta.
4 Puneţi capul de exfoliere pe aparat şi împingeţi-l în sens invers
săgeţii până se fixează (fig. 14).
Capul de exfoliere se poate fixa într-o singură direcţie.
5 Porniţi aparatul.
Alegeţi viteza I sau II, în funcţie de intensitatea exfolierii. Recomandăm
ca exfolierea să dureze 1-3 minute pentru fiecare picior.
- Pentru a îmbunătăţi aspectul pielii, folosiţi capul de exfoliere o dată
sau de două ori pe săptămână.
- Nu folosiţi creme, spume, geluri sau loţiuni înainte sau în timpul
exfolierii.
- Nu folosiţi capul de exfoliere înainte şi în următoarele două zile
după epilare.
- Din motive de igienă, capul de exfoliere ar trebui folosit de o
singură persoană.
- Vă recomandăm să recurgeţi la procedeul de exfoliere înainte de a
merge la culcare seara, întrucât eventualele iritaţii ale pielii dispar
până a doua zi.
- După exfoliere, aplicaţi o cremă sau un lapte de corp.
Curăţare şi întreţinere
Nu clătiţi niciodată adaptorul sau aparatul cu apă.
Nu folosiţi agenţi abrazivi de curăţare, bureţi de sârmă,benzină,
acetonă etc. pentru a curăţa aparatul.
1 Asiguraţi-vă că aparatul este oprit şi scos din priză.
2 Demontaţi aplicatorul de răcire a pielii din aparat şi scoateţi
manşonul protector de pe aplicator.
ROMÂNĂ
Page 29

29
3 Curăţaţi aplicatorul de răcire, aparatul şi manşonul protector cu
o cârpă umedă.
4 Curăţaţi capul de răcire pivotant al aplicatorului de răcire pentru
picioare cu o periuţă sau o cârpă umedă după fiecare utilizare
(fig. 15).
Aveţi grijă ca exteriorul aplicatorului să fie complet uscat înainte de a-l
congela din nou.
5 Scoateţi capul epilator (fig. 12).
Prindeţi capul epilator de secţiunile striate şi culisaţi-l în direcţia săgeţii
indicată pe acesta.
6 Curăţaţi toate componentele accesibile şi discurile epilatoare cu
periuţa furnizată (fig. 16).
Nu încercaţi să desprindeţi discurile epilatoare din aparat.
7 Poziţionaţi capul de epilare pe aparat şi deplasaţi-l în sens invers
săgeţii de pe acesta până se fixează (fig. 17).
Capul de epilare poate fi montat doar într-o singură direcţie.
Curăţarea capului de radere (doar HP6479 şi HP6475)
1 Asiguraţi-vă că aparatul este oprit şi scos din priză.
2 Scoateţi sita de radere.
3 Curăţaţi compartimentul de colectare a părului şi cuţitele cu o
periuţă (fig. 18).
Pentru a evita deteriorarea sitei nu exercitaţi nici o presiune asupra
acesteia.
◗ Ungeţi unităţile de tăiere şi sita de radere cu o picătură de ulei
pentru maşina de cusut.
ROMÂNĂ
Page 30

30
Curăţarea capului de exfoliere
1 Opriţi aparatul.
2 Pentru a scoate capul de exfoliere, culisaţi-l în direcţia săgeţii de
pe acesta.
3 Curăţaţi regulat capul de exfoliere cu periuţa (fig. 19).
Pentru a curăţa capul de exfoliere temeinic, clătiţi-l sub jet de apă.
Nu clătiţi niciodată adaptorul sau epilatorul cu apă.
Depozitare
1 Puneţi capacele de protecţie pe capul de radere şi pe cel de
exfoliere după utilizare.
2 Depozitaţi aparatul şi accesoriile în borseta furnizată.
3 Introduceţi aplicatorul de răcire a pielii în caseta de congelare.
Înlocuire
B
Doar HP6479 şi HP6475
◗ Dacă folosiţi capul de radere de câteva ori pe săptămână,înlocuiţi
sita de radere (model HP6116) şi ansamblul cuţit (model
HP2911) după un an sau doi de utilizare sau dacă aceste
componente sunt deteriorate.
Garanţie şi service
Pentru informaţii suplimentare sau în cazul altor probleme, vă rugăm să
vizitaţi site-ul Philips www.philips.com sau să contactaţi Departamentul
Clienţi din ţara dumneavoastră (veţi găsi numărul de telefon în garanţia
internaţională). Dacă în ţara dumneavoastră nu există un astfel de
departament, contactaţi furnizorul dumneavoastră Philips sau
Departamentul Service pentru Aparate Electrocasnice şi Produse de
Îngrijire Personală Philips.
ROMÂNĂ
Page 31

Введение
◗ С помощью нового эпилятора Satin ICE вы сможете быстро,
просто и эффективно удалять нежелательный волосяной
покров с вашей кожи. Комбинация прекрасно
зарекомендовавшей себя системы эпилирующих дисков с
недавно разработанным повторяющим контуры тела
устройством оптимального охлаждения кожи производит
настоящую революцию в эпиляции. Благодаря естественному
эффекту уменьшения чувствительности кожи в результате
воздействия холода, новый эпилятор Satin ICE делает
эпиляцию более удобной и менее болезненной чем когдалибо. В результате регулярного использования эпилятора
(каждые 4 недели) у вас будет шелковистая, гладкая кожа и
уменьшение роста волос на 50%.
◗ Эпилятор Satin ICE ройством охлаждения кожи, которое
было специально разработано для удаления волосков на
чувствительных участках тела (в подмышечных впадинах и
вдоль линии бикини). Эти области особенно чувствительны к
боли, которую специальное устройство охлаждения кожи
помогает значительно уменьшать.
◗ Быстро вращающиеся эпилирующие диски захватывают даже
самые короткие волоски (до половины миллиметра!) и быстро
удаляют их с корнем. В результате ваша кожа будет
оставаться гладкой до четырех недель, а подрастающие
волоски будут тонкими и мягкими.
Общее описание
A Защитный рукав для устройства охлаждения кожи
B Устройство охлаждения кожи ног с поворачивающейся
охлаждающей насадкой
C Устройство охлаждения кожи в подмышечных впадинах и
вдоль линии бикини (только для модели HP6479)
D Кассета для замораживания
E Эпиляционная головка
F Защитная крышка насадки для отшелушивания
G Насадка для отшелушивания
31
РУССКИЙ
Page 32

32
H Защитная крышка бритвенной головки (только для моделей
HP6479 и HP6475)
I Бритвенная головка (только для моделей HP6479 и HP6475)
J Прибор
K Адаптер
L Щеточка для очистки
Внимание
Прежде чем начать пользоваться прибором, внимательно
ознакомьтесь с настоящим руководством и сохраните настоящее
руководство по эксплуатации в качестве справочного материала.
◗ Перед подключением прибора убедитесь, что номинальное
напряжение, указанное на адаптере, соответствует
напряжению электросети у вас дома.
◗ Пользуйтесь прибором только в комбинации с входящим в
комплект поставки адаптером.
◗ Запрещается пользоваться прибором,если адаптер или сам
эпилятор неисправен.
◗ При повреждении сетевого адаптера всегда заменяйте его
оригинальным сетевым адаптером, чтобы обеспечить
безопасную эксплуатацию прибора.
◗ В адаптере имеется трансформатор. Чтобы обеспечить
безопасную эксплуатацию прибора, не отрезайте адаптер для
замены его адаптером другого типа.
◗ Содержите прибор и адаптер сухими.
◗ Храните прибор в местах, недоступных для детей.
◗ Не подвергайте прибор воздействию температур ниже 5cC
или выше 35cC.
◗ Во избежание повреждений или травм держите включенный
прибор подальше от волос на голове, бровей, ресниц,
одежды, ниток,проводов, щеток и т.д.
◗ Не пользуйтесь прибором на участках с раздраженной кожей,
при варикозном расширении вен, при наличии на коже сыпи,
родинок (с волосками), пятен или ран, не
проконсультировавшись предварительно с врачом. Лицам с
пониженным иммунитетом, что бывает,например, во время
РУССКИЙ
Page 33

33
беременности, при сахарном диабете, гемофилии и
иммунодефицитных состояниях, пользоваться прибором
можно также только после консультации с врачом.
◗ Уровень шума Lc= 75.8 дБ [A]
Подготовка прибора к работе
Замораживание устройства охлаждения кожи
1 Снимите защитный футляр с устройства охлаждения кожи
(рис. 1).
2 Поместите устройство охлаждения кожи БЕЗ защитного
рукава в кассету для замораживания, а кассету в морозильник
или морозильное отделение (***) по крайней мере, на 6 часов
прежде, чем вы приступите к процессу эпиляции (рис. 2).
Перед замораживанием наружная поверхность устройства
охлаждения должна быть абсолютно сухой.
◗ Совет. Вы можете хранить устройство охлаждения в
морозильнике постоянно.
Как пользоваться прибором
Общие сведения об эпиляции
◗ Процедура эпиляции облегчается сразу же после душа или
ванны. Однако ваша кожа должна быть абсолютно сухой.
◗ Для того чтобы освоить процесс эпиляции, мы рекомендуем
вам при первом пользовании прибором попробовать его на
участке с незначительным ростом волос. После пользования
прибором вы можете нанести на кожу мягкий крем или
молочко для тела, чтобы успокоить кожу и уменьшить
раздражение.
◗ До удаления длинных волосков или волосков на
чувствительных участках, подстригите их с помощью
триммера или ножниц.
РУССКИЙ
Page 34

34
◗ Мы рекомендуем проводить процедуру эпиляции перед тем,
как вы ложитесь спать, что позволит уменьшить во время сна
любое возможное раздражение кожи.
◗ После первых нескольких процедур пользования эпилятором
могут появиться зуд и покраснение кожи. Это обычное
явление, которое вскоре пройдет. При более частом
использовании, ваша кожа привыкнет к эпиляции, а волоски
станут мягче и тоньше. Если же в течение трех дней
раздражение не исчезнет,вам следует обратиться к врачу.
◗ Эпиляция может привести к врастанию волос или
незначительным повреждениям кожи, что может вызвать
воспаление из-за проникновения бактерий в кожу. Поэтому
важно чистить головку эпилятора очень тщательно перед
каждым использованием.
Ноги (эпиляция)
Убедитесь в том, что ваша кожа чистая, совершенно сухая и не
покрыта жиром. Перед началом эпиляции не пользуйтесь кремами.
1 Стяните защитный рукав с устройства охлаждения кожи
(рис. 3).
Защитный рукав предохраняет от неприятного ощущения холода в
руке при использовании прибора.
Иногда поворачивающаяся охлаждающая насадка примерзает к
устройству охлаждения кожи и теряет подвижность после
извлечения устройства охлаждения кожи из морозильника.
Поворачивающаяся охлаждающая насадка снова обретет
подвижность после того как вы несколько раз проведете насадкой
по ноге.
2 Присоедините эпилятор к устройству охлаждения кожи
(рис. 4).
3 Вставьте вилку прибора в гнездо адаптера и вставьте адаптер
в розетку электросети.
4 Включите прибор, выбрав желаемую скорость (рис. 5).
РУССКИЙ
Page 35

35
Установите скорость I для участков тела со слабым ростом волос и
участков, где кости расположены непосредственно под кожей,
таких, как колени и лодыжки.
На участках большей площади с более сильным ростом волос
устанавливайте скорость II.
5 С усилием натяните кожу свободной рукой так, чтобы
волоски поднялись.
6 Поставьте эпилятор перпендикулярно на кожу и
перемещайте прибор в направлении, противоположном росту
волос (рис. 6).
Убедитесь в том, что оба эпилирующих диска и устройство
охлаждения касаются кожи.
Не прижимайте эпилятор к коже.
Удаление волосков в подмышечных впадинах и вдоль
линии бикини (только для модели HP6479)
Специальное устройство охлаждения кожи в подмышечных
впадинах и вдоль линии бикини уменьшает количество активных
эпилирующих дисков. В сочетании с большой поверхностью
охлаждения, устройство охлаждения кожи делает менее
болезненными ощущения чувствительных к эпиляции областей. Для
получения наилучших результатов волоски должны быть не
слишком длинными (не более 1 см длиной).
1 Стяните защитный рукав с устройства охлаждения кожи
(рис. 7).
2 Присоедините эпилятор к устройству охлаждения кожи
(рис. 8).
3 Включите прибор, выбрав желаемую скорость (рис. 9).
Рекомендуется установить скорость II.
4 При проведении процедуры эпиляции подмышечной
области, заведите одну руку за голову, чтобы растянуть кожу,
и поместите прибор перпендикулярно на кожу другой рукой
(рис. 10).
РУССКИЙ
Page 36

36
5 При проведении процедуры эпиляции линии бикини,
свободной рукой растяните кожу и поместите прибор
перпендикулярно на кожу другой рукой, не прижимая его
слишком сильно (рис. 11).
6 Медленно перемещайте эпилятор по коже в направлении,
обратном направлению роста волосков.
Бритье (только для модели HP6479 и HP6475)
Для удаления волосков на деликатных участках тела, например, в
подмышечных впадинах и вдоль линии бикини, вы можете
пользоваться бритвенной головкой. Ваша кожа станет гладкой
после мягкой и удобной обработки с помощью бритвенной
головки.
1 Убедитесь, что прибор выключен.
2 Отсоедините устройство охлаждения кожи от эпилятора.
3 Снимите эпиляционную головку (рис. 12).
Возьмитесь за ребристую панель эпиляционной головки и
перемещайте ее по стрелке на эпиляционной головке.
4 Установите бритвенную головку на прибор и двигайте ее в
направлении, противоположном указанному стрелкой на
бритвенной головке, до щелчка (рис. 13).
Бритвенная головка может быть зафиксирована на приборе только
в одном положении.
5 Включите прибор, выбрав желаемую скорость.
Рекомендуется установить скорость I.
6 Приложите бритвенную головку к коже и медленно, плавно
перемещайте прибор в направлении, обратном росту
волосков, легко нажимая.
РУССКИЙ
Page 37

37
Отшелушивание
Регулярное использование насадки для отшелушивания улучшает
внешний вид кожи и уменьшает риск врастания волос. Не
пользуйтесь насадкой для отшелушивания непосредственно перед
эпиляцией или между двумя сеансами эпиляции.
Используйте насадку для отшелушивания только для ухода за
кожей ног, не обрабатывайте подмышечные впадины или линию
бикини.
1 Убедитесь, что прибор выключен.
2 Отсоедините устройство охлаждения кожи от эпилятора.
3 Снимите эпиляционную головку (рис. 12).
Возьмитесь за ребристую панель эпиляционной головки и
перемещайте ее по стрелке на эпиляционной головке.
4 Установите насадку для отшелушивания на прибор и
двигайте ее в направлении, противоположном указанному
стрелкой на насадке для отшелушивания, до щелчка (рис. 14).
Насадка для отшелушивания может быть зафиксирована на
приборе только в одном положении.
5 Включите прибор.
Используйте скоростной режим I или II в зависимости от желаемой
интенсивности отшелушивания. Мы рекомендуем проводить
процедуру отшелушивания для каждой ноги в течение 1 - 3 минут.
- Для поддержания хорошего внешнего вида кожи, пользуйтесь
насадкой для отшелушивания один или два раза в неделю.
- Не используйте каких-либо кремов, пен, гелей или лосьонов
непосредственно перед отшелушиванием или во время
отшелушивания.
- Не пользуйтесь головкой для отшелушивания непосредственно
перед эпиляцией или в течение двух дней после эпиляции.
- Из гигиенических соображений головкой для отшелушивания
должен пользоваться только один человек.
РУССКИЙ
Page 38

38
- Мы рекомендуем проводить процедуру отшелушивания перед
тем, как вы ложитесь спать, что позволит уменьшить во время
сна любое возможное раздражение кожи.
- После проведения процедуры отшелушивания воспользуйтесь
смягчающим кремом или молочком для тела.
Очистка и уход
Запрещается ополаскивать адаптер или сам эпилятор водой.
Не пользуйтесь для очистки прибора абразивные средства,
металлические мочалки, ацетон, бензин, и т.д.
1 Убедитесь что прибор выключен и отсоединен от
электросети.
2 Отсоедините устройство охлаждения кожи от
электроприбора и стяните защитный рукав с устройства
охлаждения кожи.
3 Очистите устройство охлаждения кожи, электроприбор и
защитный рукав влажной тканью.
4 Производите очистку поворачивающейся охлаждающей
насадки устройства охлаждения кожи ног с помощью
щеточки или влажной ткани после каждого сеанса (рис. 15).
Проследите чтобы внешняя поверхность устройства охлаждения
кожи была абсолютно сухой, прежде чем опять охладить его в
морозильнике.
5 Снимите эпиляционную головку (рис. 12).
Возьмитесь за ребристую панель эпиляционной головки и
перемещайте ее по стрелке на эпиляционной головке.
6 Очистите все доступные части и эпилирующие диски с
помощью щетки (рис. 16).
Запрещается снимать эпилирующие диски с прибора.
7 Установите эпиляционную головку на прибор и двигайте ее в
направлении, противоположном указанному стрелкой на
эпиляционной головке, до щелчка (рис. 17).
РУССКИЙ
Page 39

39
Эпиляционная головка может быть зафиксирована на приборе
только в одном положении.
Очистка бритвенной головки (только для моделей
HP6479 и HP6475)
1 Убедитесь что прибор выключен и отсоединен от
электросети.
2 Снимите бритвенную сетку
3 Очистите волососборник и бритвенный блок с помощью
щетки (рис. 18).
Во избежание поломки не нажимайте на бритвенную сетку.
◗ Дважды в год наносите по капле масла для швейной машины
на триммеры и бритвенную сетку бритвенной головки.
Очистка насадки для отшелушивания
1 Выключите прибор.
2 Снимите насадку для отшелушивания, потянув ее в
направлении по стрелке на головке для отшелушивания.
3 Регулярно производите очистку насадки для отшелушивания
с помощью щеточки (рис. 19).
Более тщательно насадку для отшелушивания можно очистить,
промыв ее под краном.
Не ополаскивайте адаптер или сам прибор для эпиляции водой.
Хранение
1 После использования наденьте защитную крышку на
бритвенную головку и/или насадку для отшелушивания.
2 Храните прибор и его принадлежности в футляре.
3 Поместите устройство охлаждения кожи в кассету для
замораживания.
РУССКИЙ
Page 40

40
Замена
B
Только для моделей HP6479 и HP6475
◗ При использовании бритвенной головки несколько раз в
неделю, произведите замену бритвенной фольги (модель
HP6116) и режущего блока (модель HP2911) через один или
два года после начала использования, или в случае их
повреждения.
Гарантия и обслуживание
По поводу дополнительной информации или в случае
возникновения каких-либо проблем обращайтесь на веб-сайт
компании «Филипс» по адресу www.philips.com или в центр
компании «Филипс» по обслуживанию потребителей в вашей
стране (вы найдете его номер телефона на международном
гарантийном талоне). Если подобный центр в вашей стране
отсутствует, обратитесь в вашу местную торговую организацию
компании «Филипс» или сервисное отделение компании Philips
Domestic Appliances and Personal Care BV.
РУССКИЙ
Page 41

Úvod
◗ Vaším novým epilátorem Satin ICE odstraníte nežádoucí chloupky
rychle, snadno a efektivně.Kombinace osvědčeného kotoučkového
systému s nově vyvinutým chladičem pokožky, který sleduje obrysy
pokožky, představuje revoluci v epilaci.Díky přirozenému
mrazicímu efektu ledu na pokožce,epilace novým přístrojem Satin
ICE, učiní epilaci ještě komfortnější a méně bolestivou než kdykoli
předtím.Výsledkem je hedvábně hladká pokožka a potlačení růstu
nových chloupků až o 50 % za předpokladu, že přístroj budete
používat pravidelně (každé 4 týdny).
◗ Epilátor Satin ICE je přednostně vhodný pro epilaci nohou.Typ
HP6479 rovněž přichází s chladičem pokožky, který byl speciálně
vyvinut pro epilaci citlivých oblastí (podpaží nebo míst viditelných
při nošení plavek bikini).Tyto oblasti jsou obzvláště citlivé vůči
bolestivosti, kterou tento speciální chladič potlačuje na minimum.
◗ Rychle rotující epilační kotoučky zachytí i nejkratší chloupky
(0,5 mm) a odstraní je až od kořínků.Výsledkem je, že vaše
pokožka zůstává jemná a tak vydrží až čtyři týdny, než narostou
nové chloupky, které jsou však jemné a měkké.
Všeobecný popis
A Ochranný obal pro chladič pokožky
B Chladič pokožky nohou s otočnou chladicí hlavou
C Chladič pokožky pro mimořádně citlivé oblasti (pouze HP6479)
D Mrazicí kazeta
E Epilační hlava
F Ochranný kryt exfoliační hlavy
G Exfoliační hlava
H Ochranný kryt holicí hlavy (pouze HP6479 a HP6475)
I Holicí hlava (pouze HP6479 a HP6475)
J Přístroj
K Adaptérová zástrčka
L Čisticí kartáček
41
ČESKY
Page 42

42
Důležité
Před použitím přístroje pročtěte pečlivě tento návod a uschovejte ho
pro případné pozdější nahlédnutí.
◗ Dříve než přístroj připojíte do sítě zkontrolujte, zda napětí na
adaptérové zástrčce souhlasí s napětím ve vaší světelné síti.
◗ Přístroj používejte vždy jen s dodanou adaptérovou zástrčkou.
◗ Pokud by byl poškozen přístroj nebo jeho adaptérová zástrčka,
vyřaďte přístroj z provozu.
◗ Pokud by byl poškozena adaptérová zástrčka, musí být vždy
nahražena originálním náhradním dílem, abyste předešli možnému
nebezpečí.
◗ Adaptérová zástrčka obsahuje transformátor. Nikdy ji proto
nesmíte nahradit jiným typem adaptérové zástrčky, což by mohlo
vést k nebezpečné situaci.
◗ Přístroj i adaptérovou zástrčku udržujte v suchu.
◗ Zajistěte, aby přístroj byl mimo dosah dětí.
◗ Přístroj nevystavujte teplotám nižším, než 5cC nebo vyšším než
35cC.
◗ Abyste předešli případnému poškození,dbejte na to, aby přístroj,
pokud je v chodu, nebyl v blízkosti vlasů, řas,obočí, tkanin,nití,
kartáčů apod.
◗ Pokud by vaše pokožka byla podrážděná, vykazovala křečové žíly
nebo jiná poškození, poraďte se nejprve se svým lékařem. Osoby
se zhoršeným imunitním systémem, například během těhotenství,
diabetikové nebo osoby s jinými obtížemi by se měly rovněž
nejprve poradit se svým lékařem.
◗ Hladina hluku: Lc=75,8 dB (A)
Příprava k použití
Použití ochlazovače pokožky
1 Z ochlazovače pokožky sejměte ochranný obal (obr. 1).
2 Vložte chladič pokožky BEZ ochranného obalu do mrazicí kazety
a kazetu vložte do mrazničky třídy *** a ponechte ji tam nejméně
6 hodin než začnete s epilací (obr. 2).
ČESKY
Page 43

43
Zkontrolujte, že vnější povrch ochlazovače pokožky je před zmrazením
zcela suchý.
◗ Doporučení: Ochlazovač pokožky můžete ponechávat v
mrazničce trvale.
Použití přístroje
Všeobecné informace o epilaci
◗ Epilace je snazší po vykoupání nebo po osprchování.Dbejte však
na to, aby byla pokožka před začátkem epilace zcela suchá.
◗ Pokud se epilujete poprvé, doporučujeme vám vyzkoušet epilaci
nejdříve v místě s nižší intenzitou růstu chloupků, abyste
epilačnímu procesu přivykli. Po epilaci můžete na pokožku
aplikovat jemný krém nebo tělové mléko abyste pokožku zjemnili
a zmírnili její podráždění.
◗ Než začnete epilovat delší chloupky v citlivých oblastech, zkraťte
je zastřihovačem nebo nůžkami.
◗ Doporučujeme realizovat epilaci večer než ulehnete do postele.
V průběhu noci se pak případné podráždění pokožky již zklidní.
◗ Po prvních epilacích může vaše pokožka mírně zčervenat a jevit
určité podráždění.Tento jev je zcela normální a zakrátko zmizí. Po
několika epilacích si na tento způsob vaše pokožka zvykne,
podráždění pokožky se zmenší a nové chloupky budou dorůstat
tenčí a jemnější. Kdyby podráždění pokožky do tří dnů nezmizelo,
poraďte se se svým lékařem.
◗ Epilace může vést k zarůstání chloupků nebo k mírnému
poškození pokožky, což může mít za následek proniknutí bakterií
do pokožky. Proto je velmi důležité, abyste epilační hlavu po
každém použití pečlivě vyčistili.
Epilace nohou
Přesvědčte se, že je vaše pokožka zcela suchá a není na ni nanesena
žádná mast nebo krém.Těsně před epilací žádné krémy nepoužívejte.
1 Ochranný obal nasuňte na chladič pokožky (obr.3).
ČESKY
Page 44

44
Ochranný obal zabraňuje nepříjemnému pocitu chladu ve vaší ruce
během používání přístroje.
Náhodně může otočná hlava přimrznout na chladič pokožky a způsobit,
že se nepohybuje když chladič pokožky vyjmete z mrazničky. Otočná
hlava se začne pohybovat brzy poté,když ji několikrát posunete po
oblasti nohou, které epilujete.
2 Nasaďte přístroj na chladič pokožky (obr. 4).
3 Zasuňte přívod od adaptérové zástrčky do zásuvky na přístroji a
adaptérovou zástrčku zasuňte do síťové zásuvky.
4 Zapojte přístroj volbou vhodné rychlosti otáčení (obr.5).
Pro místa s menším vzrůstem chloupků nebo místa, kde jsou přímo pod
pokožkou kosti (například koleno nebo kotník) zvolte rychlost I.
Rychlost II zvolte pro větší plochy nebo místa s větším porostem
chloupků.
5 Volnou rukou napínejte pokožku tak, aby se chloupky
napřimovaly.
6 Přístroj držte kolmo k pokožce a pohybujte jím proti směru růstu
chloupků (obr. 6).
Dbejte na to, aby epilační kotoučky a ochlazovač pokožky byly v těsném
kontaktu s pokožkou.
Na přístroj při epilaci netlačte.
Epilace v podpaží a v místech, viditelných při nošení
plavek bikini (pouze HP6479)
Speciální chladič pokožky pro tyto oblasti redukuje počet aktivních
epilačních kotoučků.Ve spolupráci s velkým povrchem chlazené plochy
tak činí epilaci citlivých oblastí méně bolestivou. Nejlepších výsledků
dosáhnete, když epilované chloupky nebudou příliš dlouhé (max. 1 cm).
1 Ochranný obal nasuňte na chladič pokožky (obr.7).
2 Nasaďte přístroj na chladič pokožky (obr. 8).
3 Zapojte přístroj volbou vhodné rychlosti otáčení (obr.9).
Doporučujeme vám zvolit rychlost II.
ČESKY
Page 45

45
4 K vyholení oblastí podpaží dejte jednu ruku za hlavu, abyste
pokožku v podpaží napnuli a druhou rukou veďte přístroj kolmo
k pokožce (obr. 10).
5 Při epilaci oblastí, viditelných při nošení plavek bikini, napínejte
pokožku volnou rukou a držte přístroj kolmo k pokožce a to bez
jakéhokoli tlaku (obr. 11).
6 Pohybujte zvolna přístrojem po pokožce proti směru růstu
chloupků.
Holení (pouze HP6479 a HP6475)
Holicí hlavici můžete použít k holení citlivých oblastí těla, jako je oblast
podpaží a oblast míst, viditelných při nošení plavek bikini. Pomocí holicí
hlavy můžete získat ještě lepší výsledky komfortním a jemnějším
způsobem.
1 Přesvědčte se, že je přístroj vypnutý.
2 Sejměte ochlazovač pokožky.
3 Sejměte epilační hlavu (obr.12).
Uchopte epilační hlavu za žebrovanou část a posuňte ji ve směru šipky
na epilační hlavě.
4 Umístěte holicí hlavici na přístroj a posuňte ji proti směru šipky
na hlavici až zaklapne (obr. 13).
Holicí hlavici lze na přístroj nasadit pouze v jedné poloze.
5 Zapojte přístroj volbou vhodné rychlosti otáčení.
Doporučujeme použít rychlost I.
6 Přiložte holicí hlavici na pokožku a pohybujte přístrojem proti
směru růstu chloupků. Přístroj přitlačujte pouze lehce.
Exfoliace
Exfoliační hlavu používejte pravidelně, abyste zlepšili vzhled pokožky a
zredukovali možnost zarůstání chloupků. Exfoliační hlavu ale
nepoužívejte bezprostředně před epilací nebo ve dvou dnech po
ČESKY
Page 46

46
Exfoliační hlavu používejte výhradně pro nohy, ale nikoli pro podpaží
nebo pro místa, viditelná při nošení plavek bikini.
1 Přesvědčte se, že je přístroj vypnutý.
2 Sejměte ochlazovač pokožky.
3 Sejměte epilační hlavu (obr.12).
Uchopte epilační hlavu za žebrovanou část a posuňte ji ve směru šipky
na epilační hlavě.
4 Umístěte exfoliační hlavu na přístroj a otočte jí proti směru šipky
na exfoliační hlavě dokud nezaklapne (obr. 14).
Exfoliační hlava může být na přístroj upevněna pouze jedním způsobem.
5 Zapněte přístroj.
Použijte rychlost I nebo II, v závislosti na požadované intenzitě exfoliace.
Doporučujeme exfoliovat každou nohu po dobu 1 až 3 minut.
- Exfoliační hlavu používejte jednou nebo dvakrát týdně, abyste
zlepšili vzhled vaší pokožky.
- Nepoužívejte žádné krémy, pěny, gely nebo lotiony před exfoliací
nebo v jejím průběhu.
- Nepoužívejte exfoliační hlavu bezprostředně před nebo během
dvou dnů po epilaci.
- Z hygienických důvodů by exfoliační hlava měla být používána
pouze jednou osobou.
- Exfoliaci doporučujeme realizovat večer před ulehnutím, protože
případné podráždění pokožky se může v průběhu noci
minimalizovat.
- Po exfoliaci můžete na pokožku aplikovat jemný krém nebo pleťové
mléko.
Čištění a údržba
Nikdy nesmíte mýt adaptérovou zástrčku nebo celý přístroj pod
vodou.
K čištění nepoužívejte žádné chemikálie jako je benzín nebo acetón a
také žádné abrasivní čisticí prostředky.
ČESKY
Page 47

47
1 Přesvědčte se, že je přístroj vypnutý a odpojený od sítě.
2 Sejměte z přístroje chladič pokožky a stáhněte z něj ochranný
obal.
3 Vyčistěte chladič pokožky,přístroj a ochranný obal vlhkým
hadříkem.
4 Vyčistěte otočnou chladicí hlavu chladiče pokožky na nohou
pomocí kartáčku nebo navlhčeného hadříku a to po každém
použití (obr. 15).
Přesvědčte se, že je vnější strana chladiče pokožky zcela suchá dříve, než
začnete chladič znovu mrazit.
5 Sejměte epilační hlavu (obr.12).
Uchopte epilační hlavu za žebrovanou část a posuňte ji ve směru šipky
na epilační hlavě.
6 Vyčistěte všechny přístupné díly a epilační kotoučky kartáčkem
(obr. 16).
Epilační kotoučky se nikdy nepokoušejte vyjmout z přístroje.
7 Umístěte epilační hlavu na přístroj a otočte jí proti směru šipky
na epilační hlavě dokud nezaklapne (obr. 17).
Epilační hlavici lze nasadit pouze v jednom směru.
Čištění holicí hlavy (pouze u HP6479 a HP6475)
1 Přesvědčte se, že je přístroj vypnutý a odpojený od sítě.
2 Sejměte holicí fólii.
3 Vyčistěte kartáčkem holicí fólii i komoru pro odstřižené chloupky
(obr. 18).
Na holicí fólii příliš netlačte abyste ji nepoškodili.
◗ Dvakrát ročně kápněte kapku oleje na šicí stroje na zastřihovač a
na holicí fólii.
ČESKY
Page 48

48
Čištění exfoliační hlavy
1 Vypněte přístroj.
2 Sejměte exfoliační hlavu tak, že jí otočíte ve směru šipky na
exfoliační hlavě.
3 Exfoliační hlavu pravidelně čistěte kartáčkem (obr. 19).
Ještě důkladněji vyčistíte exfoliační hlavu tak, že ji umyjete pod tekoucí
vodou.
Nikdy nesmíte adaptérovou zástrčku epilátoru oplachovat vodou.
Uchovávání přístroje
1 Na holicí hlavu i na exfoliační hlavu nasaďte po použití ochranný
kryt.
2 Přístroj i jeho příslušenství uchovávejte v pouzdru.
3 Chladič pokožky vložte do chladicí kazety.
Výměna dílů
B
Pouze HP6479 a HP6475
◗ Pokud používáte holicí hlavu několikrát týdně, doporučujeme vám
vyměnit po jednom nebo po dvou letech provozu holicí fólii (typ
HP6116) a nožový blok (typ HP2911).Výměna je samozřejmě
nutná ihned, pokud se některý z těchto dílů poškodí.
Záruka & servis
Pokud byste potřebovali jakoukoli informaci nebo měli nějaký problém,
podívejte se na internetovou stránku www. philips.com, případně
kontaktujte Informační středisko firmy Philips, jehož telefonní číslo
naleznete na letáčku s celosvětovou zárukou. Pokud není Informační
středisko ve vaší blízkosti, můžete kontaktovat místního dodavatele
výrobků Philips nebo Service Depar tment of Philips Domestic
Appliances and Personal Care BV.
ČESKY
Page 49

Bevezetés
◗ Az Új Satin ICE epilátorral könnyen,gyorsan és hatékonyan
távolíthatja el a nem kívánt szőrszálakat.Az epiláló tárcsarendszer
és az újonnan kifejlesztett kontúrkövető bőrhűsítő kombinációja
forradalmi változást jelent az epilálás területén.A jég természetes
érzéstelenítő hatásának köszönhetően az Új Satin ICE epilátorral
az epilálás/szőrtelenítés kényelmesebb és kellemesebb,mint
valaha.Az eredmény pedig a selyemfinomságú bőr és az 50%-al
csökkenő szőrnövekedés, a rendszeres, 4 hetenkénti használat
következtében.
◗ A Satin ICE főleg a lábak szőrtelenítésére alkalmas.A HP 6479
típushoz azonban egy speciálisan, érzékeny területek epilálásához
kifejlesztett bőrhűsítőt kínálunk (hónalj, bikini vonal).Ezek a
területek különösen érzékenyek a fájdalomra,mely fájdalom ezzel
a különleges bőrhűsítővel csökkenthető.
◗ A gyorsan pörgő epilálótárcsák a legrövidebb (fél milliméteres!)
szőrszálakat is elérik, és gyökerestül kihúzzák őket. Bőre így négy
héten át sima marad, s puha,piheszerű szőr kezd majd visszanőni.
Általános leírás
A Bőrhűsítő védőburkolat
B Láb bőrhűsítő, forgó hűsítő fejjel
C Bőrhűsítő hónaljhoz, bikinivonalhoz (csak HP 6479 típushoz)
D Fagyasztó kazetta
E Szőrtelenítő fej
F Védőkupak exfoliáló / hámlasztó fejhez
G Exfoliáló / hámlasztó fej
H Védőkupak borotvafejhez (csak HP6479 és HP6475 típusokhoz)
I Borotvafej
J Készülék
K Hálózati csatlakozó dugó
L Tisztító kefe
MAGYAR 49
Page 50

Fontos megjegyzések
A készülék használatba vétele előtt olvassa el a használati útmutatót.
Őrizze meg az útmutatót későbbi használatra.
◗ A készülék csatlakoztatása előtt ellenőrizze, hogy a tápegységen
feltüntetett feszültségérték megegyezik-e a helyi hálózati
feszültséggel.
◗ Feltétlenül a készülékhez kapott tápegységet használja.
◗ Soha ne használja a készüléket, ha a készülék vagy a hálózati
csatlakó kábel illetve dugó sérült.
◗ Ha az adapter meghibásodott, a kockázatok elkerülése érdekében
mindig eredeti típusú adapterre cseréltesse ki.
◗ A hálózati csatlakozó dugó egy transzformátort tartalmaz. Ne
távolítsa el a dugót és ne cserélje le másik dugóra,
veszélyeztetheti biztonságát,illetve készüléke működését.
◗ Mindig tartsa szárazon a készüléket és a hálózati csatlakozó
kábelt ill. dugót.
◗ A készüléket gyermekek elől elzárva tartsa.
◗ Ne tegye ki a készüléket 5cC-nál alacsonyabb vagy 35cC -nál
magasabb hőmérséklet hatásának.
◗ A sérülések megelőzése érdekében a működő készüléket tartsa
távol a hajától, szemöldökétől, szempillájától, ruházatától,
fonalaktól, vezetékektől, keféktől,stb.
◗ Ne használja a készüléket irritált,viszeres, kiütéses,foltos,
anyajegyes (szorrel) vagy sebes borön anélkül, hogy elozoleg
orvosával ne konzultálna.
◗ Zajszint: Lc= 75.8 dB [A]
Előkészítés használatra
A bőrhűsítő hűtése
1 Vegye le a bőrhűsítő védőburkolatát (ábra 1).
2 Epilálás előtt tegye a bőrhűsítőt a fagyasztó kazettába, a
VÉDŐKUPAK NÉLKÜL, majd helyezze legalább 6 óra hosszára a
fagyasztóba, vagy a fagyasztórekeszbe (***) (ábra 2).
MAGYAR50
Page 51

A bőrhűsítő külseje hűtés előtt teljesen száraz legyen.
◗ Tanács:A bőrhűsítőt tartósan is tárolhatja a mélyhűtőben.
A készülék használata
Általános információk az epilálásról
◗ Közvetlenül fürdés vagy zuhanyozás után könnyebben megy a
szőrtelenítés. Ügyeljen rá azonban, hogy bőre az epiláláskor
teljesen száraz legyen.
◗ Javasoljuk, hogy első alkalommal gyenge szőrzetű bőrfelületen
próbálja ki a készüléket, hogy hozzászokjon az epiláláshoz.
Szőrtelenítés után bőrnyugtató krémmel vagy testápolóval
nyugtathatja bőrét és enyhítheti az epilálás bőringerlő hatását.
◗ Ha érzékeny testrészen hosszabb szőrök epilálására készül,
először kissé csökkentse hosszukat, olló vagy hajnyíró
segítségével.
◗ A legjobb este, lefekvés előtt végezni a szőrtelenítést, mivel így
reggelre enyhül az esetleges bőrgyulladás.
◗ Az epilátor használatakor az első néhány alkalommal kissé
pirossá, gyulladttá válhat a bőre. Ez teljesen természetes,hamar
megszűnő jelenség. Néhány epilálás után bőre hozzászokik a
szőrtelenítéshez, a bőringerlő hatás mérséklődik, a kinövő
szőrszálak pedig vékonyabbak és puhábbak lesznek.Ha a
bőrgyulladás nem szűnik meg három napon belül, akkor javasolt
orvoshoz fordulni.
◗ Epiláláskor apróbb sérülések,szőrszál benővések előfordulhatnak,
melyek gyulladást okozhatnak.Ezek, a bőrbe behatoló bakteriális
fertőzéseknek tulajdoníthatók. Ezért nagyon fontos, hogy az
epilálófejet minden használat után gondosan megtisztítsa.
A lábszár epilálása
Bőre legyen tiszta, tökéletesen száraz és zsírmentes. Szőrtelenítés előtt
ne kenjen bőrére semmilyen krémet.
MAGYAR 51
Page 52

1 Csúsztassa a védőburkolatot a bőrhűsítőre (ábra 3).
A védőburkolatnak köszönhetően nem lesz kellemetlen hidegérzet a
kezében a készülék használatakor.
Előfordulhat, hogy a fagyasztóból kivéve a bőrhűsítő forgófej nem
mozog, mert a bőrhűsítőhöz fagyott. Húzza át a lábán néhányszor és a
bőrhűsítő forgófej ismét forogni kezd.
2 Pattintsa a készüléket a bőrhűsítőre (ábra 4).
3 Csatlakoztassa a hálózati kábelt a készülékhez, majd a hálózati
csatlakozó dugót a fali konnektorba.
4 Kapcsolja be a készüléket és válasszon megfelelő fordulatszámot
(ábra 5).
A kevés szőrrel borított helyeket és a közvetlenül a csont fölött lévő
bőrfelületeket (ilyen például a térd és a boka) I-es fokozaton
szőrtelenítse.
A nagyobb, erősebb szőrzetű területekre használja a II fordulatszámot.
5 Egyik kezével feszítse meg bőrét úgy, hogy a szőrszálak felfelé
álljanak.
6 A bőréhez merőlegesen tartott készüléket tolja a szőr
növekedésével ellentétes irányba (ábra 6).
Ügyeljen rá, hogy az epilálótárcsák és a bőrhűsítő egyaránt jól
érintkezzenek bőrével.
Ne nyomja a bőréhez a készüléket.
A hónalj és bikinivonal epilálása (csak HP 6479 típusnál)
A hónaljhoz és bikinivonalhoz kifejlesztett speciális bőrhűsítő
csökkentett számú tárcsarendszerrel működik. Nagy bőrhűsítő
felületének köszönhetően kevésbé fájdalmas az érzékeny területek
epilálása.A legjobb eredmény akkor érhető el, ha a szőrszálak hossza
nem haladja meg az 1 centimétert.
1 Csúsztassa a védőburkolatot a bőrhűsítőre (ábra 7).
2 Pattintsa a készüléket a bőrhűsítőre (ábra 8).
MAGYAR53
Page 53

3 Kapcsolja be a készüléket és válasszon megfelelő fordulatszámot
(ábra 9).
II-es fokozat használatát javasoljuk.
4 Hónalj szőrtelenítése esetén kezét a feje mögé emelve feszítse
meg a hónaljbőrt, másik kezével pedig illessze a készüléket
merőlegesen a bőrhöz (ábra 10).
5 Bikinivonal szőrtelenítésekor,szabad kezével feszítse meg a bőrt
és helyezze az epilátort - nyomás nélkül - merőlegesen a bőrre
(ábra 11).
6 A készüléket lassan, a szőr növekedésével ellentétes irányban
mozgassa.
Borotválás (csak HP 6479 és HP 6475 típusoknál)
A borotvafej a kényes testrészek,például a hónaljak és a bikinivonal
szőrzetének borotválására szolgál. Bőrét így kényelmes és kíméletes
módon teheti simává.
1 Vigyázzon, hogy a készülék ki legyen kapcsolva.
2 Vegye le a bőrhűsítőt.
3 Vegye le az epiláló fejet (ábra 12).
Fogja meg az epilálófejet a recés részénél, és tolja a rajta látható nyíllal
jelzett irányba.
4 Illessze a borotvafejet a készülékre, és a rajta lévő nyíl irányával
szembe tolva pattintsa a helyére (ábra 13).
A borotvafejet csak egyféle képpen lehet a készülékre erősíteni.
5 Kapcsolja be a készüléket és válasszon megfelelő fordulatszámot.
I-es fokozat használatát javasoljuk.
6 Illessze a borotvafejet a bőréhez, és a készüléket lassan, finoman,
enyhén a bőrre nyomva mozgassa a szőr növekedésével ellentétes
irányban.
MAGYAR 54
Page 54

Exfoliálás / Hámlasztás
Az exfoliáló fej használatával rendszeresen ápolhatja bőrét és
megakadályozhatja az esetleges szőr benövéseket. Ne használja az
exfoliáló fejet közvetlenül epilálás előtt, illetve 2 nappal utána.
Csak a lábán használja a hámtalanító fejet. Ne használja a hónalj bőrén
illetve a bikinivonalon.
1 Vigyázzon, hogy a készülék ki legyen kapcsolva.
2 Vegye le a bőrhűsítőt.
3 Vegye le az epiláló fejet (ábra 12).
Fogja meg az epilálófejet a recés részénél, és tolja a rajta látható nyíllal
jelzett irányba.
4 Helyezze az exfoliáló fejet a készülékre és mozgassa a fejen
található nyíl ellenébe, a fejet így kattinthatja a helyére (ábra 14).
A hámlasztó fejet csak egyféleképpen rögzítheti a készülékhez.
5 Kapcsolja be a készüléket.
A kívánt exfoliáló intenzitás eléréséhez, használja az I vagy II fokozatot.A
lábak hámtalanításához 1-3 perces időtartam ajánlott.
- Az ápolt láb bőrének érdekében használja az exfoliáló fejet hetente
egyszer vagy kétszer.
- Ne használjon semmiféle krémet, habot, zselét vagy testápolót
hámtalanítás előtt vagy alatt.
- Ne használja az exfoliáló fejet közvetlenül epilálás előtt vagy 2
nappal utána.
- Higiéniai okokból az exfoliáló fejet csak egy személy használja.
- A legjobb este, lefekvés előtt végezni a hámtalanítást, mivel így
reggelre enyhül az esetleges bőrgyulladás.
- Exfoliálás után hidratáló krémmel kenje be a felületet.
MAGYAR54
Page 55

Tisztítás és karbantartás
Soha ne öblítse vízzel a tápegységet vagy a készüléket.
Ne használjon maró tisztítószereket,súrolólapot vagy -ruhát, benzint,
acetont stb. a készülék tisztításához.
1 Bizonyosodjon meg róla, hogy a készüléket kikapcsolta és a
hálózati csatlakozó dugót kihúzta a fali konnektorból.
2 Vegye le a készülékről a bőrhűsítőt, s húzza le annak
védőburkolatát.
3 Tisztítsa meg nedves ruhával a bőrhűsítőt, a készüléket és a
védőburkolatot.
4 Minden használat után tisztítsa meg a bőrhűsítő forgófejet, kefével
vagy nedves ruhával (ábra 15).
Ügyeljen arra, hogy a bőrhűsítő teljesen száraz legyen, mielőtt újra
lefagyasztaná.
5 Vegye le az epiláló fejet (ábra 12).
Fogja meg az epilálófejet a recés részénél, és tolja a rajta látható nyíllal
jelzett irányba.
6 Tisztítson meg a kefével minden elérhető alkatrészt és a
forgótárcsákat (ábra 16).
Ne próbálja meg leszerelni a forgótárcsákat a készülékről.
7 Helyezze az epiláló fejet a készülékre és mozgassa az epiláló fejen
található nyíl ellenébe, így kattinthatja a fejet a helyére (ábra 17).
Az epilálófej csak egyféle módon erősíthető a készülékre.
A borotvafej tisztítása (csak HP 6479 és HP 6475
típusoknál)
1 Bizonyosodjon meg róla, hogy a készüléket kikapcsolta és a
hálózati csatlakozó dugót kihúzta a fali konnektorból.
2 Vegye le a borotvaszitát.
MAGYAR 55
Page 56

3 Tisztítsa ki a szőrgyűjtő kamrát és a vágóegységet a kefével
(ábra 18).
Ne nyomja meg a borotvaszitát, mer t megsérülhet.
◗ Évente kétszer kenje meg egy csepp varrógépolajjal a
vágóelemeket és a borotvafej szitáját.
Az exfoliáló fej tisztítása
1 Kapcsolja ki a készüléket.
2 Távolítsa el az exfoliáló fejet, a fejen található nyíl irányába
történő mozgatással.
3 Rendszeresen tisztítsa az exfoliáló fejet (ábra 19).
Az exfoliáló fejet alaposabban is megtisztíthatja folyó víz alatt.
Soha ne merítse vízbe a készüléket, vagy a hálózati csatlakozó dugót.
Tárolás
1 Használat után mindig helyezze a védőkupakot a borotvára, illetve
az exfoliáló fejre.
2 A készüléket és tartozékait a tasakban tárolja.
3 A bőrhűsítőt helyezze a hűtőkazettába.
Csere
B
Csak HP 6479 és HP 6475 típusoknál
◗ Amennyiben a borotvafejet hetente többször használja,úgy
szükséges, hogy cserélje a borotválkozó szitát (HP 6116) és a
vágó egységet (HP 2911) évente vagy kétévente, illetve ha ezek a
részek meghibásodnak.
MAGYAR56
Page 57

Jótállás és szerviz
Javíttatás, tájékozódás vagy bármilyen probléma esetén látogassa meg a
www.philips.com Philips Web-lapot,vagy lépjen érintkezésbe a helyi
Philips Vevőszolgálattal (a telefonszámot megtalálja a világ minden
részére kiterjedő garancialevélen). Ha lakóhelyén nincs Vevőszolgálat,
forduljon a helyi Philips szaküzlethez vagy lépjen érintkezésbe a Philips
Háztartási Készülékek és Testápolás BV Osztályával.
MAGYAR 57
Page 58

Úvod
◗ Pomocou Vášho nového epilátora Satin ICE dokážete rýchlo,
účinne a jemne odstrániť neželané chĺpky. Kombinácia systému
overených epilačných diskov a novovyvinutého chladiča,ktorý
sleduje kontúry pokožky, predstavuje revolúciu v epilácii.Vďaka
prirodzenému znecitlivejúcemu účinku ľadu,je epilácia so Satin
ICE pohodlnejšia a menej bolestivá ako kedykoľvek predtým.
Výsledkom je hodvábne hladká pokožka a obmedzenie zarastania
chĺpkov až o 50%,ak predpokladáme pravidelné použitie epilátora
(každé 4 týždne).
◗ Satin ICE je zvlášť vhodný na epiláciu nôh. Model HP6479 je
dodávaný s chladičom, určeným na epiláciu citlivej pokožky
(podpažie, oblasť bikín).Tieto miesta sú zvlášť citlivé na bolesť.
Špeciálny chladič ich citlivosť pomáha znížiť.
◗ Rýchlo sa otáčajúce epilačné disky zachytia aj najkratšie chĺpky (aj
chĺpky dlhé iba pol milimetra!) a rýchlo ich odstránia aj s
korienkom.Výsledkom epilácie je,že Vaša pokožka zostane hladká
až štyri týždne a nové chĺpky sú mäkké a jemné.
Opis zariadenia
A Ochranný obal na chladič pokožky
B Chladič pokožky nôh s výkyvnou chladiacou hlavou
C Chladič pokožky podpažia a oblasti bikín (len model HP6479)
D Mraziaca kazeta
E Hlava na epiláciu
F Ochranný kryt pre hlavu na exfoliáciu
G Hlava na exfoliáciu
H Ochranný kryt pre holiacu hlavu (len model HP6479 a HP6475)
I Holiaca hlava (len model HP6479 a HP6475)
J Telo strojčeka
K Adaptér
L Kefka na čistenie
SLOVENSKY58
Page 59

Dôležité upozornenie
Pred použitím zariadenia si pozorne prečítajte tento návod a odložte si
ho na neskoršie použitie.
◗ Pred pripojením zariadenia do siete skontrolujte, či napätie
uvedené na adaptére zodpovedá napätiu v sieti.
◗ Zariadenie smiete pripojiť do siete len prostredníctvom
dodaného adaptéra.
◗ Ak je adaptér alebo zariadenie poškodené,nesmiete ho používať.
◗ Ak je poškodený adaptér, nechajte ho vymeniť za niektorý z
originálnych typov, aby ste predišli nebezpečným situáciám.
◗ Súčasťou adaptéra je transformátor. Neoddeľte adaptér a
nepokúšajte sa nahradiť ho inou koncovkou,pretože by ste
spôsobili nebezpečnú situáciu.
◗ Zariadenie a adaptér nesmú prísť do styku s vodou.
◗ Zariadenie odkladajte mimo dosahu detí.
◗ Zariadenie nevystavujte teplotám nižším ako 5°C, ani vyšším ako
35°C.
◗ Aby ste predišli poškodeniu a poraneniu,nepribližujte sa so
zapnutým zariadením ku vlasom, mihalniciam, obočiu, šatám,
káblom, kefám atď.
◗ Zariadenie nepoužívajte na epiláciu podráždenej pokožky,
pokožky s kŕčovými žilami,vyrážkami, bradavicami, materskými
znamienkami (s chĺpkami), pred epiláciou sa obráťte na svojho
lekára. Ľudia s oslabenou imunitou,napr. počas tehotenstva, alebo
ľudia trpiaci na cukrovku, Raynaudovou chorobou,prípadne
imunitnú nedostatočnosť, by tiež mali najskôr navštíviť svojho
lekára.
◗ Úroveň hluku:Lc= 75.8 dB [A].
Príprava na použitie
Zmrazovanie chladiča pokožky
1 Chladič pokožky vyberte z ochranného obalu (obr.1).
2 Chladič BEZ ochranného oblau vložte do mraziacej kazety a tú
pred epiláciou vložte aspoň na 6 hodín do mrazničky (***) (obr. 2).
SLOVENSKY 59
Page 60

Pred vložením do mrazničky sa presvedčite, či je vonkajšok chladiča
pokožky úplne suchý.
◗ Rada: Chladič pokožky môžete pravidelne odkladať do mrazničky.
Použitie zariadenia
Všeobecné informácie o epilácii
◗ Epilácia je jednoduchšia po kúpaní alebo sprche. Pred epiláciou
však pokožka musí byť suchá.
◗ Ak používate zariadenie na epiláciu prvýkrát, odporúčame Vám,
aby ste zariadenie vyskúšali na ploche pokožky s redším
porastom a zistili, ako si pokožka na epiláciu privyká. Po epilácii
môžete použiť jemný krém alebo telové mlieko na upokojenie
pokožky a zníženie jej podráždenia.
◗ Pred epiláciou dlhších chĺpkov na citlivých miestach chĺpky
skráťte strojčekom na zastrihávania,alebo nožnicami.
◗ Odporúčame Vám epiláciu uskutočniť pred spaním, aby sa cez
noc znížilo prípadné podráždenie pokožky, vyvolané epiláciou.
◗ Po prvých epiláciách sa Vaša pokožka môže začervenať a
podráždiť. Je to normálny jav, ktorý čoskoro odznie. Keď budete
používať epilátor pravidelne,Vaša pokožka si na epiláciu privykne,
nepodráždi sa a nové chĺpky narastú tenšie a jemnejšie.Ak
podráždenie pokožky neprejde ani po troch dňoch, odporúčame
Vám navštíviť lekára.
◗ Epilácie môže spôsobiť zarastanie chĺpkov a drobné poranenia
pokožky. Do poranenej pokožky môžu preniknúť baktérie a
spôsobiť zápal. Preto je dôležité po každom použití epilačnú hlavu
dôkladne očistiť.
Epilácia nôh
Uistite sa, že Vaša pokožka je čistá, úplne suchá a nie je mastná. Pred
začiatkom epilácie nepoužívajte žiaden krém.
1 Na chladič pokožky nasuňte ochranný obal (obr.3).
Ochranný obal počas epilácie chráni Vašu ruku pred nepríjemným
pocitom chladu.
SLOVENSKY60
Page 61

V niektorých prípadoch môže výkyvná hlava v mrazničke primrznúť ku
telu chladiča.Výkyvná hlava sa znovu začne pohybovať, keď chladičom
niekoľkokrát prejdete po pokožke nôh.
2 Chladič pokožky nasaďte do zariadenia (obr.4).
3 Koncovku kábla pripojte do otvoru v strojčeku a adaptér do
siete.
4 Zariadenie zapnete nastavením požadovanej rýchlosti pomocou
vypínača (obr. 5).
Rýchlosť I používajte na epiláciu plôch s redším ochlpením a oblastí, kde
sa kosť nachádza tesne pod povrchom pokožky, ako napr. kolená a
členky.
Rýchlosť II zvolte pri epilácii väčších plôch s hustejší porastom.
5 Pomocou voľnej ruky napnite pokožku, aby sa chĺpky vzpriamili.
6 Zariadenie oprite kolmo na povrch pokožky a pohybujte ním
proti smeru, v ktorom rastú chĺpky (obr.6).
Postarajte sa, aby sa epilačné disky a chladič riadne dotýkali pokožky.
Zariadenie netlačte na pokožku.
Epilácia pokožky podpažia a oblasti bikín (len model
HP6479)
Špeciálny chladič pokožky podpažia a oblasti bikín znižuje počet
aktívnych epilačných diskov.Veľká chladiaca plocha znižuje bolestivosť
epilácie citlivých častí pokožky. Najlepšie výsledky dosiahnete, ak
epilované chĺpky nie sú priveľmi dlhé (max. 1 cm).
1 Na chladič pokožky nasuňte ochranný obal (obr.7).
2 Chladič pokožky nasaďte do zariadenia (obr.8).
3 Zariadenie zapnete nastavením požadovanej rýchlosti pomocou
vypínača (obr. 9).
Odporúčame Vám použiť rýchlosť II.
4 Pri epilácia podpažia položte ruku za hlavu, aby ste napli pokožku,
a druhou rukou priložte zariadenie kolmo ku pokožke (obr. 10).
SLOVENSKY 61
Page 62

5 Pri epilácii oblasti bikín napnite pokožku voľnou rukou a strojček
priložte kolmo ku pokožke ale nepritláčajte ho (obr. 11).
6 Zariadením pomaly pohybujte po povrchu pokožky proti smeru
rastu chĺpkov.
Holenie (len modely HP6479 a HP6475)
Holiacu hlavu môžete použiť na holenie citlivých častí tela, napr.
podpažia a oblasti bikín. Pomocou tejto hlavy jemne a pohodlne
pokožku oholíte nahladko.
1 Uistite sa, že zariadenie je vypnuté.
2 Vyberte chladič pokožky.
3 Odpojte hlavu na epiláciu (obr.12).
Hlavu na epiláciu uchopte za ryhovanú plochu a posuňte ju v smere
šipky znázornenej na hlave na epiláciu.
4 Na zariadenie nasaďte hlavu na holenie a zatlačte ju proti smeru
šipky, zobrazenej na hlave na holenie, kým nezapadne (obr. 13).
Holiacu hlavu môžete na zariadenie pripojiť len v jednom smere.
5 Zariadenie zapnete nastavením požadovanej rýchlosti pomocou
vypínača.
Odporúčame Vám použiť rýchlosť I.
6 Holiacu hlavu priložte na pokožku. Jemne pritlačte zariadenie,
pomaly a hladko ním pohybujte proti smeru rastu chĺpkov.
Exfoliácia
Pravidelné používanie hlavy na exfoliáciu zlepšuje vzhľad pokožky a
znižuje riziko zarastania chĺpkov. Nepoužívajte hlavu na exfoliáciu tesne
pred, ani v priebehu nasledujúcich dvoch dní po epilácii.
Hlavu na exfoliáciu použite len na pokožku nôh, nikdy nie na podpažie a
oblasť bikín.
1 Uistite sa, že zariadenie je vypnuté.
SLOVENSKY62
Page 63

2 Vyberte chladič pokožky.
3 Odpojte hlavu na epiláciu (obr.12).
Hlavu na epiláciu uchopte za ryhovanú plochu a posuňte ju v smere
šipky znázornenej na hlave na epiláciu.
4 Na zariadenie nasaďte hlavu na exfoliáciu a zatlačte ju proti
smeru šipky, zobrazenej na hlave na holenie, kým nezapadne
(obr. 14).
Hlavu na exfoliáciu môžete na strojček nasadiť len v určitom smere.
5 Zapnite zariadenie.
Zvoľte rýchlosť I alebo II v závislosti od požadovanej intenzity exfoliácie.
Odporúčaná dĺžka exfoliácie pokožky jednej nohy je 1-3 minuty.
- Na zlepšenie vzhľadu pokožky je potrebné opakovať exfoliáciu
jeden až dvakrát týždenne.
- Pred ani počas exfoliácie nepoužívajte žiaden krém, penu, gél ani
pleťovú vodu.
- Hlavu na exfoliáciu nepoužívajte tesne pred, ani v priebehu
nasledujúcich dvoch dní po epilácii.
- Z hygienických dôvodov by hlavu na exfoliáciu mala používať len
jedna osoba.
- Odporúčame Vám exfoliáciu uskutočniť pred spaním, aby sa cez
noc znížilo prípadné podráždenie pokožky.
- Po exfoliácii použite jemný krém alebo telové mlieko.
Čistenie a údržba
Zariadenie ani adaptér nikde neoplachujte pod tečúcou vodou.
Pri čistení zariadenia nepoužívajte žiadné agresívne čistiace prostriedky,
drsné hubky, alebo tkaniny na umývanie,benzín, acetón atď.
1 Skontrolujte, či je kulma vypnutá a odpojená zo siete.
2 Zo zariadenia vyberte chladič pokožky a stiahnite z neho
ochranný obal.
3 Chladič pokožky,zariadenie a ochranný obal očistite navlhčenou
tkaninou.
SLOVENSKY 63
Page 64

4 Výkyvnú hlavu chladiča pokožky nôh po každom použití očistite
kefkou alebo navlhčenou tkaninou (obr. 15).
Skôr, ako chladič pokožky vložíte do mrazničky, skontrolujte, či je jeho
vonkajšok úplne suchý,
5 Odpojte hlavu na epiláciu (obr.12).
Hlavu na epiláciu uchopte za ryhovanú plochu a posuňte ju v smere
šipky znázornenej na hlave na epiláciu.
6 Pomocou kefky očistite epilačné disky a všetky súčiastky, ku
ktorým máte prístup (obr. 16).
Nikdy sa nepokúšajte odpojiť epilačné disky zo zariadenia.
7 Hlavu na epiláciu nasaďte späť na zariadenie a zatlačte ju proti
smeru, ktorý označuje šipka na epilačnej hlave, aby zapadla na
miesto (obr. 17).
Epilačnú hlavu môžete zasunúť a pripojiť len v jednom smere.
Čistenie holiacej hlavy (len modely HP6479 a HP6475)
1 Skontrolujte, či je kulma vypnutá a odpojená zo siete.
2 Odložte holiacu fóliu.
3 Pomocou kefky očistite priestor, v ktorom sa zhromažďujú
ostrihané chĺpky, a strihací blok (obr. 18).
Netlačte priveľmi na holiacu fóliu, aby ste ju nepoškodili
◗ Dvakrát ročne kvapnite kvapku oleja na šijacie stroje na rezače a
holiacu fóliu hlavy na holenie.
Čistenie hlavy na exfoliáciu
1 Vypnite zariadenie.
2 Hlavu na exfoliáciu odpojte tak, že ňou pohnete v smere šipky,
ktorá je na hlave znázornená.
3 Hlavu na exfoliáciu pravidelne čistite kefkou (obr. 19).
Hlavu na exfoliáciu očistíte dôkladnejšie, ak ju opláchnete pod tečúcou
vodou.
SLOVENSKY64
Page 65

Nikdy neoplachujte pod vodou adaptér ani strojček.
Odkladanie
1 Po použití nasaďte na hlavu na holenie a na hlavu na exfoliáciu ich
ochranný kryt.
2 Zariadenie a doplnky odkladajte do puzdra.
3 Chladič pokožky vložte do zmrazovacej krabičky.
Výmena
B
Len model HP6479 a HP6475
◗ Ak zariadenie používate viackrát týždenne, vymeňte holiacu fóliu
(model HP6116) a strihací blok (HP2911) každý rok, alebo dva,
prípadne ak sú tieto súčiastky poškodené.
Záruka a servis
Ak potrebujete informácie, alebo máte problém,prosíme Vás, aby ste
navštívili www stránku spoločnosti Philips - www.philips.com, alebo sa
obrátili na Centrum služieb zákazníkom spoločnosti Philips vo Vašej
krajine (telefónne číslo Centra nájdete v priloženom celosvetovo
platnom záručnom liste). Ak sa vo Vašej krajine toto Centrum
nenachádza, obráťte sa na miestneho predajcu výrobkov Philips, alebo
kontaktujte Oddelenie služieb Philips - divízia domáce spotrebiče a
osobná starostlivosť.
SLOVENSKY 65
Page 66

Вступ
◗ З новим " Satin ICE " ви можете позбутися небажаного
волосся швидко, легко та ефективно.Комбінація перевіреної
системи з епіляційним диском із новою розробкою,
охолоджувачем шкіри, що пристосовується до контуру,є
революцією в епіляції.Завдяки природному ефекту
"заморожування" шкіри новий Satin ICE робить епіляцію більш
зручною та менш болючою. Наслідком є шовковиста гладкість
шкіри ти знижений до 50% ріст волосся за регулярного
застосування (раз на 4 тижні).
◗ Satin ICE зокрема підходить для ніг.Модель HP6479 також
комплектується охолоджувачем шкіри, спеціально
розробленим для епіляції чутливих місць (пахв, лінії бікіні).Ці
місця особливо чутливі до болю, і спеціальний охолоджувач
шкіри допомагає втамувати цей біль.
◗ Епіляційні диски, що швидко обертаються, захоплюють навіть
найкоротше волосся (до 0,5 мм!) та видаляють його з
коренем. Як наслідок, Ваша шкіра залишиться гладкою до
чотирьох тижнів, і нове волосся буде м'яким, як пух.
Загальний опис
A Захисна муфта для охолоджувача шкіри
B Охолоджувач шкіри ніг з плаваючою охолоджувальною
головкою
C Охолоджувач шкіри пахв та лінії бікіні (тільки в моделі HP6479)
D Касета для холодильника
E Епіляційна голівка
F Захисний ковпачок злущувальної насадки
G Злущувальна насадка
H Захисний ковпачок для бритвеної головки (тільки HP6479 і
HP6475)
I Бритвена головка (тільки HP6479 і HP6475)
J Пристрій
K Адаптер
L Щітка для чищення
УКРАЇНСЬКІЙ66
Page 67

Увага!
Прочитайте цю інструкцію уважно перед використанням пристрою
та зберігайте для подальшого використання.
◗ Перевірте, чи відповідає напруга, вказана на адаптері, напрузі у
вашій мережі, перед тим, як підключати пристрій.
◗ Використовуйте пристрій виключно з адаптером, що
додається.
◗ Не використовуйте пристрій, якщо адаптер або сам пристрій
пошкоджено.
◗ Якщо блок живлення пошкоджений, завжди замінюйте його
на такий же самий новий для запобігання виникнення
пожежі.
◗ В адаптері міститься трансформатор.Не від'єднуйте адаптер,
щоб замінити його іншим штепселем, оскільки це може
призвести до небезпечної ситуації.
◗ Тримайте пристрій та адаптер сухими.
◗ Тримайте прилад в місцях, недоступних для дітей.
◗ Не допускайте, щоб пристрій зберігався при температурі
нижче 5cC або вище 35cC.
◗ Щоб попередити пошкодження предметів і травмування
людей, тримайте працюючий прилад на безпечній відстані від
волосся, брів, вій, одежі, ниток, мотузок, щіток і т.і.
◗ Не використовуйте пристрій для епіляції подразненої шкіри,
шкіри з варикозними венами, висипом, плямами, родимками
(з волоссям) чи порізами, не порадившись попередньо з
лікарем. Особам зі зниженим імунним відгуком, наприклад,
внаслідок вагітності, та особам, що страждають на цукровий
діабет, захворювання Райно чи імунодефіцит спершу треба
порадитися з лікарем.
◗ Рівень шуму: Lc= 75.8 dB [A]
УКРАЇНСЬКІЙ 67
Page 68

Підготовка до використання
Заморожування пристрою для охолодження шкіри
1 Зніміть захисний чохол з охолоджувача шкіри (рис. 1).
2 Покладіть охолоджувач шкіри БЕЗ захисної муфти у касету
морозильника та покладіть касету у морозильник (***)
щонайменше за 6 годин до початку епіляції (рис.2).
Перед заморожуванням пристрою для охолодження шкіри
перевірте, щоб його зовнішні поверхні були цілком сухі.
◗ Корисна порада: Пристрій для охолодження шкіри можна
постійно зберігати у морозильній камері.
Застосування пристрою
Загальна інформація з приводу епіляції
◗ Епіляцію легше проводити зразу після ванни чи душа.
Переконайтеся, що шкіра є повністю сухою, перед початком
епіляції.
◗ Коли Ви робите епіляцію вперше, ми радимо Вам спробувати
пристрій на місцях з невеликою кількістю волосся, для
звикання до процесу епіляції. Після епіляції Ви можете
застосувати м'який крем чи молочко для заспокоювання
Вашої шкіри та щоб уникнути подразнення.
◗ Перед епіляцією довгого волосся на чутливих ділянках шкіри
обріжте волосся машинкою для підстригання або ножицями.
◗ Ми радимо Вам проводити епіляцію увечері, оскільки це
дозволить зникнути будь-якому подразненню, що може
виникнути, протягом ночі.
◗ При першому використанні епілятора Ваша шкіра може трохи
почервоніти та може виникнути невеличке подразнення.Це
явище є абсолютно нормальним та швидко зникає. Якщо Ви
застосовуєте пристрій частіше, шкіра звикає до епіляції,
подразнення зменшується, і волосся, що виростає знову, стає
більш тонким та м'яким. Якщо подразнення не зникає
протягом трьох днів, ми радимо звернутися до лікаря.
УКРАЇНСЬКІЙ68
Page 69

◗ Епіляція може призвести до вростання волосся та невеликого
травмування шкіри, що може викликати запалювання
внаслідок проникання бактерій у шкіру.Тому важливо чистити
епіляційну головку дуже ретельно після кожного
використання.
Депіляція ніг
Впевніться, що ваша шкіра чиста, повністю суха та не жирна. Не
використовуйте ніяких кремів перед епіляцією.
1 Насуньте захисну муфту на охолоджувач шкіри (рис. 3).
Захисна муфта усуває неприємні відчуття холоду у руці підчас
застосування пристрою.
Плаваюча головка може примерзнути до охолоджувача й не
рухатися, коли ви візьмете охолоджувач із холодильника.Плаваюча
головка плаватиме знову після того, як ви кілька разів проведете
нею по нозі.
2 Надіньте пристрій на охолоджувач шкіри (рис. 4).
3 Вставте штекер у гніздо на пристрої і адаптер - у розетку.
4 Вибором необхідної швидкості ввімкніть епілятор (рис. 5).
Виберіть швидкість І для ділянок із невеликою кількістю волосся
Вибирайте швидкість ІІ для ділянок із більшою кількістю волосся.
5 Вільною рукою натягніть шкіру так, щоб волосся піднялося.
6 Поставте пристрій перпендикулярно на шкіру та рухайте
проти напрямку росту волосся (рис. 6).
Переконайтеся, що епіляційні диски та охолоджувач добре
контактують зі шкірою.
Не вдавлюйте прилад у шкіру.
Епіляція пахв і лінії бікіні (тільки HP6479)
Спеціальний охолоджувач шкіри для пахв та лінії бікіні зменшує
кількість активних дисків-епіляторів. Завдяки великій поверхні
охолоджування цей спеціальний охолоджувач тамує біль у чутливих
УКРАЇНСЬКІЙ 69
Page 70

місцях.Ви можете отримати найкращий результат, якщо волосся не
дуже довго (макс. 1 см).
1 Насуньте захисну муфту на охолоджувач шкіри (рис. 7).
2 Надіньте пристрій на охолоджувач шкіри (рис. 8).
3 Вибором необхідної швидкості ввімкніть епілятор (рис. 9).
Ми рекомендуємо використовувати швидкість "II".
4 Для епіляції пахв покладіть одну руку за голову, щоб розтягти
шкіру, та встановіть пристрій перпендикулярно до шкіри,
тримаючи його в іншій руці (рис. 10).
5 Для епіляції лінії бікіні натягніть шкіру вільною рукою та
встановіть пристрій перпендикулярно до шкіру, не надто
натискаючи (рис. 11).
6 Повільно рухайте прилад вздовж шкіри проти напрямку росту
волосся.
Бритвена головка (тільки HP6479 і HP6475)
Ви можете застосовувати спеціальну насадку для гоління чутливих
частин тіла - пахв та лінії бікіні. Із насадкою для гоління Ви
отримаєте гладку шкіру зручним та безболісним способом.
1 Переконайтеся, що пристрій вимкнено.
2 Зніміть пристрій для охолодження шкіри.
3 Зніміть головку для епіляції (рис. 12).
Візьміть епіляційну голівку за ребристу частину та просувайте у
напрямку стрілки на епіляційній голівці.
4 Встановіть насадку для гоління на пристрій та просувайте
проти напрямку стрілки на насадці для гоління, поки вона не
зафіксується (рис. 13).
Насадка для гоління може бути встановлена на пристрій лише в
один спосіб.
УКРАЇНСЬКІЙ70
Page 71

5 Вибором необхідної швидкості ввімкніть епілятор.
Ми рекомендуємо використовувати швидкість I.
6 Встановіть насадку для гоління на шкіру та просувайте
пристрій потроху проти напрямку росту волосся, легко
притискаючи його до шкіри.
Злущування
Регулярне застосування злущувальної насадки покращує вигляд
шкіри та знижує ризик вростання волосся.Не застосовуйте
злущувальну насадку безпосередньо або впродовж двох днів після
епіляції.
Застосовуйте злущувальну насадку тільки для ніг, а не для пахв чи
лінії бікіні.
1 Переконайтеся, що пристрій вимкнено.
2 Зніміть пристрій для охолодження шкіри.
3 Зніміть головку для епіляції (рис. 12).
Візьміть епіляційну голівку за ребристу частину та просувайте у
напрямку стрілки на епіляційній голівці.
4 Встановіть злущувальну насадку на пристрій та просувайте
проти напрямку стрілки на насадці, поки вона не зафіксується
(рис. 14).
Злущувальна насадка може бути встановлена на пристрій лише
одним чином.
5 Увімкніть пристрій.
Виберіть швидкість І чи ІІ для потрібної інтенсивності злущування.Ми
радимо проводити злущування на ногах 1-3 хвилини.
- Застосовуйте злущувальну насадку один раз чи двічі на тиждень
для покращення вигляду шкіри.
- Не застосовуйте крем, піну, гель чи лосьйон перед злущуванням
або підчас злущування.
- Не застосовуйте злущувальну насадку безпосередньо або
впродовж двох днів після епіляції.
УКРАЇНСЬКІЙ 71
Page 72

- З міркувань гігієни злущувальну насадку повинна
використовувати лише одна особа.
- Ми радимо проводити злущування ввечері перед сном, тому що
будь-яке подразнення шкіри зникне за ніч.
- Після злущування нанесіть на шкіру м'який крем чи молочко.
Чищення та обслуговування
Ніколи не мийте пристрій чи блок живлення водою.
Для чистки приладу забороняється використовувати миючі
засоби, які викликають корозію, прокладки або тканина для
протирки, бензин, ацетон і т.і.
1 Переконайтеся, що пристрій вимкнено, і штепсель витягнено
з розетки.
2 Зніміть охолоджувач шкіри з пристрою та зніміть захисну
муфту з охолоджувача.
3 Почистіть охолоджувач шкіри, пристрій та захисну муфту
вологою ганчіркою.
4 Чистіть плаваючу охолоджуючу головку охолоджувача шкіри
ніг щіткою або вологою ганчіркою після кожного
використання (рис. 15).
Переконайтеся, що зовнішня частина охолоджувача повністю суха,
перед тим, як класти його до холодильника знову.
5 Зніміть головку для епіляції (рис. 12).
Візьміть епіляційну голівку за ребристу частину та просувайте у
напрямку стрілки на епіляційній голівці.
6 Почистіть всі частини, до яких є доступ, а також епіляційні
диски щіткою (рис. 16).
Ні у якому разі не робіть спроби зняти з приладу епіляційні
диски.
7 Встановіть епіляційну насадку на пристрій та просувайте
проти напрямку стрілки на насадці, поки вона не зафіксується
(рис. 17).
УКРАЇНСЬКІЙ72
Page 73

Епіляційна насадка може бути встановлена на пристрій лише одним
чином.
Чищення бритвеної головки (тільки HP6479 і HP6475)
1 Переконайтеся, що пристрій вимкнено, і штепсель витягнено
з розетки.
2 Зніміть фольгу для гоління
3 Почистіть щіткою камеру для збирання волосся і блок лез
(рис. 18).
Не натискайте на фольгу щоб не пошкодити її.
◗ Наносіть краплю машинного мастила (для швейної машинки)
на ріжучий пристрій та фольгу насадки для гоління двічі на
рік.
Чищення злущувальної насадки
1 Вимкніть прилад.
2 Зніміть злущувальну насадку,просуваючи її у напрямку стрілки
на насадці.
3 Регулярно чистіть злущувальну насадку щіткою (рис. 19).
Ви можете чистити злущувальну насадку ретельніше, промиваючи її
під краном.
Ніколи не занурюйте адаптер чи сам епілятор у воду.
Зберігання
1 Надіньте захисні ковпачки на бритвену головку та
злущувальну насадку після використання.
2 Зберігайте прилад у футлярі.
3 Покладіть охолоджувач шкіри у касету морозильника.
УКРАЇНСЬКІЙ 73
Page 74

Заміна
B
Тільки HP6479 і HP6475
◗ При використанні бритвеної головки декілька разів на
тиждень заміняйте фольгу (модель HP6116) та ріжучий блок
(модель HP2911) через кожні два роки використання або у
випадку пошкодження.
Гарантія та обслуговування
Якщо Вам необхідна інформація або у Вас виникли проблеми,
зверніться до веб-сторінки компанії "Philips" - www.philips.com, або
зверніться до Центру обслуговування клієнтів компанії "Philips" у
Вашій країні (телефон Ви можете знайти на гарантійному
талоні).Якщо у Вашій країні немає Центру обслуговування клієнтів,
зверніться до місцевого ділера або зв'яжіться з Сервісним відділом
"Philips Domestic Appliаnces аnd Personаl Cаre BV".
УКРАЇНСЬКІЙ74
Page 75

Uvod
◗ S Vašim novim Satin ICE možete ukloniti neželjene dlačice brzo,
lako i efektno.Kombinacija epilacijskih diskova i novo razvijenog
sistema hladjenja kože donosi revoluciju u epilaciju. Zahvaljujući
prirodnom efektu ukočenosti kože pod utjecajem hladnoće, novi
Satin ICE pretvara epilaciju u lagan i bezbolan proces.Rezultat je
glatka koža i redukcija rasta novih dlačica za 50%,uz uvjet da
aparat koristite redovito (svaka 4 tjedna).
◗ Satin ICE je posebno pogodan za noge.Tip HP6497 takodjer
dolazi sa hladilom kože koje je specijalno dizajnirano za epilaciju
osjetljivih područja (ispod pauha, bikini zona).Ova područja su
posebno osjetljiva na bol, što se sa ovim specijalnim hladilom
kože smanjuje na najmanju mjeru.
◗ Brzo rotirajući epilacijski diskovi hvataju i najkraće dlačice (i do
pola milimetra!) i izvlače ih s korijenom. Kao rezultat, koža ostaje
glatka i do četiri tjedna, a ponovno narasle dlačice su meke i
tanke.
Opći opis
A Zaštitna navlaka za hladilo kože
B Hladilo kože za noge s rotirajućom glavom
C Hladilo kože za bikini zonu i zonu ispod pazuha
D Spremište za hladnjak
E Glava epilatora
F Zaštitna kapa za glavu za guljenje
G Glava za guljenje
H Zaštitna kapa glave za brijanje (HP6479 i HP6475)
I Brijaća glava (HP6479 i HP6475)
J Aparat
K Adapter/napajač
L Četkica za čišćenje
Važno
Prije uporabe aparata pažljivo pročitajte ove upute i sačuvajte ih za
buduću uporabu.
HRVATSKI 75
Page 76

◗ Prije nego što uključite aparat, provjerite da li mrežni napon
naveden na napajaču/adapteru odgovara naponu Vaše lokalne el.
mreže.
◗ Aparat koristite samo s isporučenim napajačem/adapterom.
◗ Ne koristite aparat ukoliko su adapter ili sam aparat oštećeni.
◗ Ako se adapter ošteti,uvijek ga zamijenite s originalnim kako bi
izbjegli potencijalno opasne situacije.
◗ Adapter sadrži transformator. Nikada ne režite kabel kako bi
spojili neki drugi adapter, to može prouzročiti opasne situacije.
◗ Držite aparat i adapter suhima.
◗ Držite sušilo van dohvata djece.
◗ Nemojte izlagati aparat temperaturama nižim od 5cC ili višim od
35cC.
◗ Kako bi izbjegli moguće štete ili ozljede, aparat u radu držite dalje
od kose, obrva, trepavica, odjeće, raznih niti i vezica, četki,itd.
◗ Nemojte koristiti aparat bez konzultacije s liječnikom ako imate
nadraženu kožu,proširene vene, osip,madeže (s dlačicama) ili
ranice. Osobe smanjenog imuniteta, primjerice, trudnice ili osobe
koje pate od dijabetesa, Raynaudove bolesti ili imunodeficijencije
trebale bi se posavjetovati s liječnikom.
◗ Razina buke: Lc= 75.8 dB [A]
Priprema za uporabu
Zamrzavanje rashlađivača kože
1 Skinite zaštitni okvir s rashlađivača (Slika 1).
2 Stavite hladilo kože BEZ zaštitne navlake u spremište za hladnjak i
stavite ga u zamrzivač (***) barem 6 sati prije početka epilacije
(Slika 2).
Pazite da površina rashlađivača kože bude potpuno suha prije stavljanja
u zamrzivač.
◗ Savjet: Rashlađivač kože možete stalno držati u zamrzivaču.
HRVATSKI76
Page 77

Uporaba
Opće informacije o epilaciji
◗ Epilacija je lakša odmah nakon tuširanja ili kupanja. Prije epilacije
provjerite da li Vam je koža potpuno suha.
◗ Kada prvi puta koristite aparat, savjetujemo Vam da ga isprobate
na dijelu kože s malo dlačica kako biste se navikli na proces
epilacije. Nakon epilacije možete nanijeti blagu kremu ili mlijeko
za tijelo da biste ublažili nadraženost kože.
◗ Prije epilacije dužih dlačica na osjetljivim područjima kože,
skrattite ih trimerom ili škaricama.
◗ Savjetujemo da epilaciju napravite navečer prije spavanja, jer će se
tada moguća nadraženost kože smanjiti preko noći.
◗ Nakon prvih nekoliko uporaba može se pojaviti slabije crvenilo i
nadraženost kože.Ta pojava je sasvim normalna i brzo nestaje.
Uslijed češćih uporaba koža se navikava na epilaciju, nadraženost
se smanjuje, a novonarasle dlačice postaju tanje i mekše.Ako
nadraženost ne nestane za tri dana, savjetujemo da se obratite
liječniku.
◗ Epilacija može dovesti do urasatanja dlačica ili do laših ozljeda
kože, što može prouzročiti crvenilo.Zbog toga je vrlo važno da
očistite epilacijsku glavu svaki put nakon korištenja.
Epilacija nogu
Prije epilacije provjerite je li koža u potpunosti suha. Nemojte nanositi
kremu.
1 Pomaknite zaštitnu navlaku na hladilo kože (Slika 3).
Zaštitni okvir sprječava neugodno hlađenje u ruci tijekom uporabe
aparata.
Povremeno se rotirajuća glava može zamrznuti na hladilo kože te
postati nepomična. Glava će postati pomična nakon što nekoliko puta
predjete njome preko nogu.
2 Stavite aparat na rashlađivač kože (Slika 4).
HRVATSKI 77
Page 78

3 Umetnite utikač kabela u aparat te adapter u zidnu utičnicu.
4 Uključite aparat biranjem željene brzine (Slika 5).
Odaberite brzinu I za područja s manje dlačica, te za područja gdje se
kosti nalaze direktno ispod kože, kao što su koljena ili gležnjevi.
Odaberite brzinu II za veća područja s jačim izrastom.
5 Slobodnom rukom jako zategnite kožu kako bi dlačice stajale
uspravno.
6 Postavite aparat na kožu u okomitom položaju i pomičite ga u
smjeru suprotnom od rasta dlačica (Slika 6).
Provjerite da li su epilacijski diskovi i rashlađivač kože u odgovarajućem
kontaktu s kožom.
Ne pritišćite aparat na kožu.
Epilacija ispod pazuha i bikini zone
Specijalno hladilo kože za područja ispod pazuha i bikini zonu reduciran
broj aktivnih epilacijskih diskova. Kombinirano sa velikom površinom
hladjenja, hladilo kože pretvara epilaciju u manje bolan proces. Najbolje
rezultate ćete postići ako dlačice nisu preduge (max. 1 cm).
1 Pomaknite zaštitnu navlaku na hladilo kože (Slika 7).
2 Stavite aparat na rashlađivač kože (Slika 8).
3 Uključite aparat biranjem željene brzine (Slika 9).
Savjetujemo brzinu II.
4 Za epilaciju područja ispod pazuha, stavite ruku iza glave da biste
napeli kožu,te stavite aparat okomito na kožu s rukom na drugoj
ruci (Slika 10).
5 Za epilaciju bikini zone, napnite kožu Vašom slobodnom rukom te
stavite aparat okomito na kožu, bez primjene sile (Slika 11).
6 Polagano povlačite aparat preko kože, u smjeru suprotnom od
smjera rasta dlačica.
HRVATSKI78
Page 79

Brijanje (HP6479 i HP6475)
Brijaću glavu možete rabiti za brijanje osjetljivih dijelova tijela, kao što su
područja ispod pazuha i bikini zona. S brijaćom glavom ćete dobiti
glatku kožu na ugodan i nježan način.
1 Budite sigurni da je aparat isključen.
2 Skinite rashlađivač kože.
3 Skinite glavu za depilaciju (Slika 12).
Uhvatite glavu za epilaciju za dio s ispupčenjima i povucite ju u smjeru
strelice na glavi za epilaciju.
4 Stavite brijaću glavu na aparat i povucite ju u smjeru suprotnom
od strelice na brijaćoj glavi dok ne sjedne na svoje mjesto
(Slika 13).
Brijaća glava se može staviti na aparat samo u jednom smjeru.
5 Uključite aparat biranjem željene brzine.
Savjetujemo brzinu I.
6 Stavite brijaću glavu na kožu te lagano i mirno pomaknite aparat u
smjeru suprotnom od smjera rasta dlačica uz lagano pritiskanje.
Ljuštenje kože
Regularno korištenje glave za ljuštenje poboljšava stanje kože i smanjuje
rizik od urastanja dlačica.Ne koristite glavu za ljuštenje prije ili dva dana
nakon epilacije
Glavu za ljuštenje koristite samo na nogama, ne i na područjima ispod
pazuha ili bikini zoni.
1 Budite sigurni da je aparat isključen.
2 Skinite rashlađivač kože.
3 Skinite glavu za depilaciju (Slika 12).
Uhvatite glavu za epilaciju za dio s ispupčenjima i povucite ju u smjeru
strelice na glavi za epilaciju.
HRVATSKI 79
Page 80

4 Staviteglavu za ljuštenje na aparat te ju pomičite u obrnuto od
smjera strelice naznačene na glavi,sve dok ne legne u ležište
(Slika 14).
Glava se može staviti na aparat samo na jedan način.
5 Uključite aparat.
Koristite brzinu Iili II, ovisno o željenom intenzitetu ljuštenja.
Preporučamo tretman nogu od 1-3 minute.
- Koristite glavu za ljuštenje jednom ili dva puta tjedno kako bi
pobljšali opće stanje Vaše kože.
- No koristite nikakve kreme, gelove ili losione prije korištenja glave ili
odmah nakon.
- Ne koristite glavu za ljuštenje odmah prije tretmana ili dva dana
nakon epilacije.
- Zbog higijenskih razloga, glavu za ljuštenje treba koristiti samo jedna
osoba.
- Preporučamo korištenje glave prije spavanje, kako bi se moguća
iritacija kože razvila i otklonila tijekom noći.
- Koristite mlijeko za kožu ili mliječnu kremu nakon tretmana.
Čišćenje i održavanje
Aparat ili utikač adaptera nemojte nikada ispirati vodom.
Ne koristite korozivna sredstva za pranje, abrazivne spužve ili krpe,
benzin, aceton,itd.
1 Budite sigurni da je aparat isključen i adpater izvučen iz zidne
utičnice.
2 Odvojite rashlađivač od aparata i skinite zaštitni okvir s
rashlađivača kože.
3 Očistite rashlađivač, aparat i zaštitni okvor vlažnom krpom.
4 Čistite rotirajuću glavu hladila kože za noge s priloženom
četkicom ili mekom tkaninom poslije svake uporabe (Slika 15).
Budite sigurni da su vanjske stijenke hladila kože potpuno suhe prije
nego ponovno zamrznete hladilo.
HRVATSKI80
Page 81

5 Skinite glavu za depilaciju (Slika 12).
Uhvatite glavu za epilaciju za dio s ispupčenjima i povucite ju u smjeru
strelice na glavi za epilaciju.
6 Četkom očistite sve dostupne dijelove i diskove za depilaciju
(Slika 16).
Nikada nemojte pokušavati odvojiti diskove za depilaciju od aparata.
7 Stavite glavu za epilaciju na aparat te ju pomičitu u smjeru
obrnutim od smjera strelice na glavi,sve dok ne sjedne u ležište
(Slika 17).
Glava za epilaciju se može staviti na aparat samo na jedan način.
Čišćenje brijaće glave (HP6479 i HP6475)
1 Budite sigurni da je aparat isključen i adpater izvučen iz zidne
utičnice.
2 Izvadite foliju za brijanje.
3 Četkom očistite jedinicu s noževima i prostor za dlačice (Slika 18).
Da biste izbjegli oštećenje folije za brijanje, nemojte ju pritiskati.
◗ Dva puta godišnje utrljajte kapljicu ulja za šivaće mašine na nožiće
i foliju za brijanje brijaće glave.
Čišćenje glave za ljuštenje
1 Isključite aparat.
2 Odvojite glavu za ljuštenje pomicanjem u smjeru strelice
naznačene na glavi.
3 Čistite glavu priloženom četkicom (Slika 19).
Glavo možete očistiti temeljitije tako da ju isperete ispod mlaza vode.
Nikada ne ispirite adapter ili sam aparat ispod mlaza vode.
HRVATSKI 81
Page 82

Pohranjivanje
1 Stavite zaštitne kape nazad na brijaću glavu i na glavu za ljuštenje.
2 Aparat i pribor spremite u torbicu.
3 Stavite rashlađivač u kasetu.
Zamjena dijelova
B
HP6479 i HP6475
◗ Ako koristite brijaću glavu nekoliko puta na tjedan, zamijenite
brijaću mrežicu (HP6116) i brijaći blok (HP2911) nakon jedne ili
dvije godine uporabe ili ako se ti dijelovi oštete.
Jamstvo i servis
Ako Vam je potrebna informacija ili imate problem, posjetite Philips web
stranicu www.philips.com ili se obratite Philips predstavništvu u Vašoj
zemlji (brojeve telefona pronaći ćete u priloženom jamstvenom listu).
Ako u Vašoj zemlji nema takvog predstavništva, obratite se prodavatelju
ili ovlaštenom servisu.
HRVATSKI82
Page 83

Sissejuhatus
◗ Uue Satinelle Massage abil saate soovimatud karvad eemaldada
kiiresti, lihtsalt ning efektiivselt. Kombinatsioonis
pinsettkettasüsteemi ja uudse kehakontuure järgiva nahajahutiga
on toimunud revolutsioon epileerimisajaloos.Tänu jää
naturaalsele tuimestusefektile on uue Satin ICE seadmega
epileerimine palju mugavam ja valmistab vähem valu.Tulemuseks
saate siidjalt sileda naha ja karvakasv väheneb kuni 50%, kui
kasutate seadet korrapäraselt (iga nelja nädala tagant).
◗ Satin ICE on eriti sobiv jalgade epieleerimiseks. Mudelil HP6479
on ka nahajahuti, mis on spetsiaalselt ettenähtud tundlike
piirkondade epileerimiseks (kaenlaalused, bikiinipiir). Need alad on
eriti tundlikud valu suhtes ning spetsiaalne nahajahuti aitab
valutunnet vähendada.
◗ Kiiresti pöörlevad pintsettkettad haaravad ka kõige lühemad
karvad (enam kui pool millimeetrit!) ja tõmbavad need juurtega
välja.Tulemuseks saate sileda naha enam kui neljaks nädalaks ja
tagasi kasvavad karvad on pehmed ja udejad.
Seadme osad
A Nahajahuti kaitsehülss
B Jalanaha jahuti pöörleva jahutipeaga
C Nahajahuti kaenlaaluste ja bikiinipiiri epileerimiseks (ainult HO6479)
D Külmutuskassett
E Epileerpea
F Koorimispea kaitsekate
G Koorimispea
H Raseerimispea kaitsekate (ainult HP6479 ja HP6475)
I Raseerimispea (ainult HP6479 ja HP6475)
J Seade
K Adapter
L Puhastamishari
EESTI 83
Page 84

Tähtis
Lugege kasutusõpetus hoolikalt läbi ja hoidke alles edasiseks kasutamiseks.
◗ Enne seadme sisselülitamist kontrollige, kas adapterile märgitud
voolutugevus vastab teie vooluvõrgu pingele.
◗ Seadet kasutage ainult koos kaasasoleva adapteriga.
◗ Ärge kasutage seadet, kui adapter või seade on vigastatud.
◗ Vigastatud adapter vahetage alati ainult originaalmudeli vastu
vältimaks ohtlikke olukordi.
◗ Adapteris on transformaator. Ohtlike olukordade vältimiseks ärge
lõigake adapterilt pistikult ära,et seda teisega asendada.
◗ Hoidke seade ja adapter veest eemal.
◗ Hoidke laste eest.
◗ Ärge hoidke seadet temperatuuril, mis on madalam kui 5cC või
kõrgem kui 35cC.
◗ Kahjustuste ja vigastuste ennetamiseks hoidke töötavat seadet
piisavalt kaugel oma juustest, kulmudest, ripsmetest,rõivastest,
niitidest-lõngadest, juhtmetest,harjadest jne.
◗ Ärge kasutage seadet, kui nahk on ärritatud ning juhul,kui säärtel
on veenikomusid,vinne, sünnimärke (karvadega) või haavu, pidage
esmalt nõu arstiga. Inimesed,kellel on vähendatud immuunsus,
näit. raseduse ajal,või kes põevad diabeeti, hemofiiliat või
immuunpuudulikkust, peaksid eelnevalt arstiga nõu pidama.
◗ Müra tase: Lc = 75.8 dB [A]
Ettevalmistus kasutamiseks
Nahajahuti külmutamine
1 Eemaldage kaitsehülss nahajahutilt (joon 1).
2 Pange enne epileerimise alustamist nahajahuti ILMA kaitsehülsita
külmutuskassetti ja pange see külmikusse või jääkappi (***)
vähemalt 6 tunniks (joon 2).
Veenduge enne nahajahuti sügavkülma asetamist, et see on täiesti kuiv.
◗ Nõuanne:Te võite nahajahutit kogu aeg sügavkülmikus hoida.
EESTI84
Page 85

Seadme kasutamine
Epileerimisest üldse
◗ Epileerimine on lihtsam otsekohe peale dušši või vanni.
Kontrollige, et teie nahk on täiesti kuiv enne epileerima
hakkamist.
◗ Esmakordsel epileerimiskorral soovitame alustada kohast,kus on
vähem karvu, et tutvuda epileerimistoiminguga.Pärast epileerimist
võite nahale määrida pehmendavat niisutavat kreemi, mis rahustab
nahka ja leevendab ärritust.
◗ Enne tundlikelt piirkondadelt pikemate karvade epileerimist
kärpige neid piirli või kääridega.
◗ Soovitame epileerida õhtul, enne magama heitmist.Nahaärritus
väheneb öö jooksul.
◗ Peale esimesi kordi võib nahk muutuda kergelt tundlikuks või
pisut punetada. See nähtus on loomulik reaktsioon ja kaob varsti.
Epilaatorit sagedamini kasutades harjub nahk epileerimisega ja
karvad, mis tagasi kasvavad, on õrnemad ja pehmemad. Kui
nahaärritus ei ole kolme päeva jooksul kadunud,soovitame
pöörduda arsti poole.
◗ Epileerimine võib põhjustada karvade sissekasvamist või väikseid
nahakahjustusega seotud põletikke, mille tekitavad läbi naha
tunginud pisikud. Seepärast tuleb pärast iga kasutuskorda
epileerpeasid hoolikalt puhastada.
Jalgade epileerimine
Veenduge, et naha piirkond, kust karvu eemaldatakse, oleks täiesti puhas
ja kuiv. Ärge kasutage enne epileerimist mingeid kreeme.
1 Paigutage kaitsehülss nahajahutile (joon 3).
Kaitsehülss hoiab käes ära ebameeldiva külmatunde, seniks kuni Te
seadet kasutate.
Võib juhtuda, et pöörlev pea on nahajahuti külge külmunud ja ei pöörle.
See hakkab uuesti pöörlema, kui paigutate selle mõneks minutiks vastu
jalga.
EESTI 85
Page 86

2 Kinnitage seade nahajahuti peale (joon 4).
3 Pange seadmepistik sisendpistikupessa ja adapter
seinapistikupessa.
4 Lülitage seade sisse, valides sobiva kiiruse (joon 5).
Valige kiirusasend I nende piirkondade epileerimiseks, kus karvad on
õhemad ja kus luu on otse naha all, näit. põlved või pahkluud.
Suuremate nahapindade ja jämedamate karvade jaoks valige kiirusasend II.
5 Pingutage vaba käega nahka, et karvad hoiaksid rohkem püsti.
6 Pange epileerpea täisnurga all vastu nahka ja liigutage seda
vastupidiselt karvade kasvamissuunale (joon 6).
Kontrollige, et pintsettkettad ja nahajahuti oleksid kontaktis nahaga.
Ärge suruge seadet vastu nahka.
Kaenlaaluste ja bikiinipiiri epileerimine (HP6479)
Spetsiaalne kaenlaaluste ja bikiinipiiri nahajahuti vähendab aktiivsete
pintsettketaste arvu. Suur jahutuspind muudab epileerimise tundlikes
piirkondades vähem valulikuks. Parema tulemuse saate, kui karvad ei ole
liiga pikad (amks 1 cm).
1 Paigutage kaitsehülss nahajahutile (joon 7).
2 Kinnitage seade nahajahuti peale (joon 8).
3 Lülitage seade sisse, valides sobiva kiiruse (joon 9).
Soovitame kasutada 2. kiirust.
4 Kaenlaaluste epileerimiseks tõstke üks käsi pea taha, et nahk
tõmbuks pingule ja pange teise käega seade täisnurga all nahale
(joon 10).
5 Bikiinipiiri epileerimisel pingutage nahka vaba käega ja pange
seade risti vastu nahka vajutamata ja jõudu kasutamata (joon 11).
6 Liigutage seadet aeglaselt nahal edasi vastu karvade kasvamise
suunda.
EESTI86
Page 87

Raseerimine
Raseerimispead saate kasutada delikaatsete kehaosade raseerimiseks,
nagu näiteks kaenlaalused ja bikiinipiir. Raseerimispeaga saavutate hea
tulemuse mugaval ja õrnal viisil.
1 Kontrollige, kas seade on välja lülitatud.
2 Võtke nahajahuti välja.
3 Võtke epileerpea maha (joon 12).
Võtke kinni epileerpea ribilisest osast ja libistage noole suunas seadmelt
maha.
4 Pange raseerimispea seadmele ja lükake vastupidiselt noolega
märgistatud suunale, kuni see lukustub oma kohale (joon 13).
Raseerimispea sobib seadmele ainult ühte pidi.
5 Lülitage seade sisse, valides sobiva kiiruse.
Soovitame kasutada 1. kiirust.
6 Pange raseerimispea nahale ja liigutage seadet aeglaselt
vastukarva, samaaegselt kergelt vajutades.
Koorimine
Koorimisotsiku korrapärane kasutamine parandab naha seisundit ja
vähendab karvade sissekasvamise riski. Ärge kasutage koorimisotsikut
kohe pärast või kahe päeva jooksul pärast epileerimist.
Kasutage koorimisotsikut ainult jalanaha, mitte kaenlaaluste või bikiinipiiri
hooldamiseks.
1 Kontrollige, kas seade on välja lülitatud.
2 Võtke nahajahuti välja.
3 Võtke epileerpea maha (joon 12).
Võtke kinni epileerpea ribilisest osast ja libistage noole suunas seadmelt
maha.
EESTI 87
Page 88

4 Pange koorimisotsik seadmele ja lükake vastupidiselt noolega
osutatud suunale, kuni koorimisotsik kohale klõpsab (joon 14).
Koorimisotsik sobib seadmele ainult ühes asendis.
5 Lülitage seade sisse.
Kasutage kiirust I või II, sõltuvalt koorimise intensiivsusest. Soovitame iga
jala koorimistoimingu kestuseks 1-3 minutit.
- Kasutage koorimisotsikut kord või kaks nädalas naha seisundi
parandamiseks.
- Ärge kasutage mingit kreemi, vahtu, geeli ega vedelikku enne või
koorimistoimingu ajal.
- Ärge kasutage koorimisotsikut kohe pärast või kahe päeva jooksul
pärast epileerimist.
- Hügieeniline on kui koorimisotsikut kasutab ainult üks isik.
- Soovitame koorimistoimingut teha enne magamaheitmist, öö
jooksul kaob tekkinud nahaärritus.
- Pärast koorimist kasutage ihupiima või kreemi.
Puhastamine ja hooldus
Ärge loputage adapterpistikut või seadet veega.
Ärge kasutage söövitavaid puhastusvahendeid, küürimiskäsnu ega -
lappe, bensiini, atsetooni jms.
1 Veenduge, et seade oleks väljalülitatud ja voolutoitest väljas.
2 Eemaldage nahajahuti seadmelt ja libistage kaitsehülss nahajahutilt
maha.
3 Puhastage nahajahutit, seadet ja kaitsehülssi niiske lapiga.
4 Puhastage jalajahuti pöörlevat pead harja või niiske lapiga pärast
iga kasutuskorda (joon 15).
Kontrollige, et nahajahuti välispind oleks kuiv enne selle külmutamist.
5 Võtke epileerpea maha (joon 12).
Võtke kinni epileerpea ribilisest osast ja libistage noole suunas seadmelt
maha.
EESTI88
Page 89

6 Puhastage ligipääsetavad osad ja epileerimisterad harjaga (joon 16).
Ärge kunagi püüdke epileerimisterasid seadmest välja võtta.
7 Pange epileerpea seadmele ja lükake noolega osutatud suunas,
kuni epileerpea kohale klõpsab (joon 17).
Epileerpea sobib seadmele ainult ühtpidi.
Raseerimispea puhastamine (ainult HP6479 ja HP6475)
1 Veenduge, et seade oleks väljalülitatud ja voolutoitest väljas.
2 Eemaldage raseerimisfoolium.
3 Puhastage karvakamber ja lõikeplokk harjaga (joon 18).
Vigastuste vältimiseks ärge tarvitage jõudu ega vajutage
raseerimisfooliumile.
◗ Kaks korda aastas hõõruge piirlid ja raseerimisfoolium üle tilga
õmblusmasinaõliga.
Koorimisotsiku puhastamine
1 Lülitage seade välja.
2 Tõmmake koorimisotsikut seda noolega osutatud suunas
tõmmates.
3 Puhastage korrapäraselt koorimisotsikut harjaga (joon 19).
Koorimisotsiku põhjalikumaks puhastamiseks võite seda voolava vee all
loputada.
Ärge kunagi loputage adapterit ega epilaatorit veega.
Hoidmine
1 Pange pärast kasutamist raseerimispeale ja koorimisotsikule
kaitsekate peale.
2 Hoidke seadet ja lisatarvikuid vutlaris.
3 Pange nahajuahuti külmutuskassetti.
EESTI 89
Page 90

Osade vahetus
B
Ainult HP6479 ja HP6475
◗ Kui kasutate raseerimispead mitu korda nädalas, vahetage
raseerimisfooliumi (mudel HP6116) ja lõikeplokki (mudel
HP2911) pärast ühte või kahte kasutusaastat või kui need osad
on vigastada saanud.
Garantii ja teenindus
Kui Te vajate informatsiooni või on Teil probleemid tekkinud, külastage
Philips Web lehekülge www.philips.com või võtke ühendus teie maa
Philipsi hoolduskeskusega (lisainfot ja telefoninumbrid leiate
garantiitalongilt). Kui Teie maal ei ole Philipsi hoolduskeskust, pöörduge
Philipsi toodete müüja poole või võtke ühendus Philipsi
koduhooldusseadmete ja isikliku hoolduse BV teenindusosakonnaga.
EESTI90
Page 91

Ievads
◗ Ar jauno Satin ICE ātri, vienkārši un efektīvi atbrīvosieties no
nevēlamiem matiņiem. Pārbaudītās epilācijas disku sistēmas un
jaunā virsmai piegulošā ādas dzesētāja apvienojums ir radījis
revolūciju epilācijas jomā.Pateicoties ledus dabiskajam ādas
jutīguma mazināšanas efektam, jaunais Satin ICE padara epilāciju
ērtāku un nesāpīgāku nekā iepriekš. Regulāri lietojot ierīci (reizi
četrās nedēļās), rezultāts ir izcili gluda āda un par 50% samazināta
matiņu augšana.
◗ Satin ICE ir īpaši piemērots kāju epilēšanai. Modeļa HP6479
komplektā iekļauts arī ādas dzesētājs, kas ir īpaši radīts jutīgu
ķermeņa zonu (padušu un bikini zonas) epilēšanai. Šīs zonas ir
īpaši pakļautas sāpēm, ko palīdz samazināt šis īpašais ādas
dzesētājs.
◗ Ātri rotējošie epilācijas diski satver pat vissīkākos matiņus (pat
pusmilimetru īsus!) un izrauj tos ar visu sakni. Pēc tam āda ir
gluda gandrīz četras nedēļas un ataugušie matiņi ir mīksti un
pūkaini.
Vispārējs apraksts
A Ādas dzesētāja aizsarguzmava
B Kāju ādas dzesētājs ar grozāmu dzesēšanas galviņu
C Padušu un bikini zonas ādas dzesētājs (tikai modelim HP6479)
D Sasaldēšanas kārba
E Epilācijas galviņa
F Lobīšanas galviņas aizsargvāciņš
G Lobīšanas galviņa
H Skūšanas galviņas aizsargvāciņš (tikai modeļiem HP6479 un
HP6475)
I Skūšanas galviņa (tikai modeļiem HP6479 un HP6475)
J Ierīce
K Adapters
L Birstīte tīrīšanai
LATVISKI 91
Page 92

Svarīgi
Pirms ierīces lietošanas rūpīgi izlasiet šīs pamācības un saglabājiet tās
turpmākām uzziņām.
◗ Pirms ierīces pievienošanas elektrotīklam pārbaudiet,vai uz
adaptera norādītais spriegums atbilst elektrotīkla spriegumam
jūsu mājā.
◗ Lietojiet ierīci tikai kopā ar komplektā iekļauto adapteru.
◗ Nelietojiet ierīci, ja bojāts tās adapters vai pati ierīce.
◗ Ja adapters ir bojāts, nomainiet to ar tāda paša modeļa detaļu
Philips pilnvarotā apkopes centrā, lai izvairītos no bīstamām
situācijām.
◗ Adapterā ir iekļauts strāvas pārveidotājs. Nemēģiniet nogriezt
adapteru, lai nomainītu to ar citu kontaktspraudni, jo var rasties
bīstama situācija.
◗ Rūpējieties, lai ierīce un adapters vienmēr ir sauss.
◗ Glabājiet ierīci vietā, kur tai nevar piekļūt bērni.
◗ Nelietojiet ierīci, ja vides temperatūra ir zemāka par 5cC vai
augstāka par 35cC.
◗ Lai novērstu nelaimes gadījumus un ierīces bojājumus, turiet
ieslēgtu ierīci atstatus no galvas matiem, skropstām un uzacīm,kā
arī apģērba, diegiem,vadiem, sukām u.tml.
◗ Nelietojiet ierīci uz sakairinātas ādas vai ādas ar paplašinātām
vēnām, izsitumiem,pūtītēm, dzimumzīmēm (ar matiņiem) vai
rētām bez iepriekšējas konsultēšanās ar ārstu. Cilvēkiem ar
novājinātu imūnsistēmu, piemēram, grūtniecības laikā, vai tiem, kas
cieš no cukura diabēta, Reinolda slimības vai imūnsistēmas
deficīta, arī vajadzētu vispirms konsultēties ar savu ārstu.
◗ Trokšņa līmenis: Lc = 75.8 dB [A]
Sagatavošana lietošanai
Ādas dzesētāja sasaldēšana
1 Noņemiet aizsarguzmavu no ādas dzesētāja (zīm. 1).
2 Pirms sākat epilāciju, ielieciet ādas dzesētāju BEZ aizsarguzmavas
LATVISKI92
Page 93

sasaldēšanas kārbā un atstājiet to saldētavā vai saldēšanas
nodalījumā (***) vismaz 6 stundas (zīm. 2).
Pirms ādas dzesētāja sasaldēšanas pārliecinieties, vai tā virsma ir pilnīgi
sausa.
◗ Padoms: ādas dzesētāju iespējams pastāvīgi glabāt saldētavā.
Ierīces lietošana
Vispārīga informācija par epilāciju
◗ Epilācija visvienkāršāk veicama tūlīt pēc vannas vai dušas.
Raugieties, lai pirms epilācijas āda būtu pilnīgi sausa.
◗ Lietojot ierīci pirmo reizi, iesakām to izmēģināt uz ādas ar nelielu
matiņu daudzumu, lai pierastu pie epilācijas procesa. Lai
nomierinātu ādu un mazinātu ādas kairinājumu, pēc epilācijas varat
lietot maigu krēmu vai ķermeņa pieniņu.
◗ Pirms epilējat garus matiņus jutīgās ķermeņa zonās, saīsiniet tos ar
trimeru vai šķērēm.
◗ Iesakām veikt epilāciju tieši pirms gulētiešanas, lai ādas
kairinājums, kas var rasties,pa nakti mazinātos.
◗ Lietojot epilatoru pirmo reizi, āda var kļūt nedaudz sarkana un
sakairināta. Šīs pazīmes ātri izzūd,tiklīdz āda pierod pie epilācijas,
un matiņi kļūst tievāki un mīkstāki. Ja kairinājums neizzūd trīs
dienu laikā, iesakām vērsties pie ārsta.
◗ Epilācija var izraisīt matiņu ieaugšanu vai nelielus ādas
ievainojumus, kas, baktērijām iekļūstot ādā, var radīt iekaisumu.
Tādēļ ir svarīgi pēc katras lietošanas reizes rūpīgi notīrīt epilācijas
galviņu.
Kāju epilācija
Raugieties, lai āda būtu tīra, pilnīgi sausa un nesasvīdusi. Pirms epilācijas
nelietojiet nekādu krēmu.
1 Uzbīdiet aizsarguzmavu uz ādas dzesētāja (zīm. 3).
Aizsarguzmava novērš nepatīkamu aukstuma sajūtu, kamēr turat ierīci
rokā.
LATVISKI 93
Page 94

Reizēm ādas dzesētāja grozāmā galviņa var sasalt un nekustēties, kad
izņemat ādas dzesētāju no saldētāja. Grozāmā galviņa sāks kustēties pēc
tam, kad dažas reizes pārvilksiet ar to pa kāju.
2 Nostipriniet ierīci uz ādas dzesētāja (zīm. 4).
3 Iespraudiet elektrovada kontakttapu ierīces kontaktligzdā un
adapteru sienas kontaktrozetē.
4 Ieslēdziet ierīci, izvēloties nepieciešamo ātrumu (zīm.5).
Izvēlieties I ātrumu, epilējot ādu ar nelielu matiņu daudzumu,kā arī
vietās, kur kauli atrodas tieši zem ādas, piemēram, ceļgalos un potītēs.
Izvēlieties II ātrumu ādai ar biezākiem matiņiem.
5 Ar brīvo roku nostiepiet ādu tā, lai matiņi saslietos stāvus.
6 Novietojiet ierīci perpendikulāri ādai un virziet to pretēji matiņu
augšanas virzienam (zīm. 6).
Raugieties, lai epilēšanas diski un ādas dzesētājs saskaras ar ādu.
Nespiediet epilatoru pie ādas ar spēku.
Padušu un bikini zonas epilēšana (tikai modelim HP6479)
Īpašais padušu un biokini zonas ādas dzesētājs samazina aktīvo epilācijas
disku skaitu. Šī īpašība apvienojumā ar lielo dzesēšanas virsmu padara
jutīgo zonu epilēšanu ar šo ādas dzesētāju nesāpīgāku.Vislabākos
rezultātus var sasniegt, ja matiņi nav pārāk gari ( maks. 1 cm).
1 Uzbīdiet aizsarguzmavu uz ādas dzesētāja (zīm. 7).
2 Nostipriniet ierīci uz ādas dzesētāja (zīm. 8).
3 Ieslēdziet ierīci, izvēloties nepieciešamo ātrumu (zīm.9).
Ieteicams izmantot otro (II) ātrumu.
4 Lai epilētu paduses, aizlieciet vienu roku aiz galvas,lai nostieptu
ādu, un ar otru roku novietojiet ierīci perpendikulāri uz ādas
(zīm. 10).
5 Epilējot bikini zonu, ar brīvo roku iztiepiet ādu un novietojiet
ierīci perpendikulāri ādai, nelietojot spēku (zīm.11).
LATVISKI94
Page 95

6 Lēni virziet ierīci pa ādu pretēji matiņu augšanas virzienam.
Skūšana (tikai modeļiem HP6479 un HP6475)
Varat izmantot skūšanas galviņu, lai noskūtu jutīgas ķermeņa daļas,
piemēram, paduses un bikini zonu. Izmantojot skūšanas galviņu, ērti un
maigi iegūsiet gludu ādu.
1 Pārliecinieties, vai ierīce ir izslēgta.
2 Noņemiet ādas dzesētāju.
3 Noņemiet epilācijas galviņu (zīm. 12).
Satveriet epilācijas galviņu aiz rievotās daļas un virziet to uz epilācijas
galviņas esošās bultiņas norādītajā virzienā.
4 Uzlieciet skūšanas galviņu ierīcei un virziet to pretēji uz skūšanas
galviņas esošās bultiņas norādītajam virzienam, līdz tā nostiprinās
(zīm. 13).
Skūšanas galviņu var pievienot ierīcei tikai vienā veidā.
5 Ieslēdziet ierīci, izvēloties nepieciešamo ātrumu.
Ieteicams izmantot pirmo (I) ātrumu.
6 Novietojiet skūšanas galviņu uz ādas un, viegli piespiežot,lēni un
vienmērīgi virziet ierīci pretēji matiņu augšanas virzienam.
Atmirušās ādas nolobīšana
Regulāra lobīšanas galviņas lietošana uzlabo ādas izskatu un samazina
matiņu ieaugušanas risku. Nelietojiet lobīšanas galviņu tieši pirms
epilācijas vai divas dienas pēc tās.
Izmantojiet lobīšanas galviņu tikai kāju, nevis padušu vai bikini zonas
kopšanai.
1 Pārliecinieties, vai ierīce ir izslēgta.
2 Noņemiet ādas dzesētāju.
3 Noņemiet epilācijas galviņu (zīm. 12).
LATVISKI 95
Page 96

Satveriet epilācijas galviņu aiz rievotās daļas un virziet to uz epilācijas
galviņas esošās bultiņas norādītajā virzienā.
4 Uzlieciet lobīšanas galviņu uz ierīces un virziet pretēji uz lobīšanas
galviņas esošās bultiņas norādītajam virzienam, līdz tā nostiprinās
(zīm. 14).
Lobīšanas galviņu var uzlikt ierīcei tikai vienā veidā.
5 Ieslēdziet ierīci.
Atkarībā no vajadzīgās lobīšanas intensitātes izvēlieties I vai II ātrumu.
Iesakām veikt ādas lobīšanu katrai kājai 1-3 minūtes.
- Lietojiet lobīšanas galviņu reizi vai divas nedēļā, lai uzlabotu ādas
izskatu.
- Pirms ādas lobīšanas vai tās laikā nelietojiet nekādus krēmus, putas,
želejas vai losjonus.
- Neveiciet ādas lobīšanu tieši pirms epilācijas vai divas dienas pēc tās.
- Higiēnas apsvērumu dēļ lobīšanas galviņa jālieto tikai vienai personai.
- Iesakām veikt ādas nolobīšanu vakarā pirms gulētiešanas, lai pa nakti
mazinātos ādas kairinājums, kas varētu rasties.
- Pēc ādas lobīšanas lietojiet krēmu vai ķermeņa pieniņu.
Tīrīšana un kopšana
Nekad neskalojiet strāvas pārveidotāja kontaktspraudni vai ierīci
ūdenī.
Tīrīšanai neizmantojiet koroziju izraisošus mazgāšanas līdzekļus,
skrāpējošus piederumus vai drānu, benzīnu, acetonu u.tml.
1 Pārliecinieties, ka ierīce ir izslēgta un atvienota no elektrotīkla.
2 Noņemiet ādas dzesētāju no ierīces un novelciet aizsarguzmavu
no ādas dzesētāja.
3 Tīriet ādas dzesētāju, ierīci un aizsarguzmavu ar mitru drānu.
4 Pēc katras lietošanas reizes notīriet kāju ādas dzesētāja grozāmo
galviņu ar birstīti vai mitru drānu (zīm. 15).
Pārliecinieties, ka ādas dzesētāja virsma ir pilnīgi sausa, pirms to vēlreiz
sasaldējat.
LATVISKI96
Page 97

5 Noņemiet epilācijas galviņu (zīm. 12).
Satveriet epilācijas galviņu aiz rievotās daļas un virziet to uz epilācijas
galviņas esošās bultiņas norādītajā virzienā.
6 Notīriet epilācijas diskus un visas pieejamās ierīces daļas ar
komplektā iekļauto birstīti (zīm. 16).
Nekādā ziņā nemēģiniet atvienot epilācijas diskus no ierīces.
7 Uzlieciet epilācijas galviņu uz ierīces un virziet pretēji uz epilācijas
galviņas esošās bultiņas norādītajam virzienam, līdz tā nostiprinās
(zīm. 17).
Epilācijas galviņu var pievienot ierīcei tikai vienā veidā.
Skūšanas galviņas tīrīšana (tikai modeļiem HP6479 un
HP6475)
1 Pārliecinieties, ka ierīce ir izslēgta un atvienota no elektrotīkla.
2 Noņemiet skūšanas galviņas sietiņu.
3 Izslaukiet matiņu nodalījumu un asmeņu bloku ar komplektā
iekļauto birstīti (zīm. 18).
Lai nesabojātu skūšanas galviņas sietiņu, rīkojieties ar to, nelietojot spēku.
◗ Divas reizes gadā ieziediet trimerus un skūšanas galviņas sietiņu
ar pilienu šujmašīnu eļļas.
Lobīšanas galviņas tīrīšana
1 Izslēdziet ierīci.
2 Noņemiet lobīšanas galviņu, pagriežot to uz lobīšanas galviņas
esošās bultiņas norādītajā virzienā.
3 Regulāri tīriet lobīšanas galviņu ar komplektā iekļauto birstīti
(zīm. 19).
Pamatīgāku lobīšanas galviņas tīrīšanu var veikt, noskalojot to tekošā
ūdenī.
Nekādā ziņā neskalojiet tekošā ūdenī strāvas pārveidotāju vai
epilatoru.
LATVISKI 97
Page 98

Glabāšana
1 Pēc lietošanas uzlieciet aizsargvāciņus skūšanas galviņai un
lobīšanas galviņai.
2 Ierīci un tās piederumus glabājiet somiņā.
3 Ievietojiet ādas dzesētāju sasaldēšanas kārbā.
Nomaiņa
B
Tikai modeļiem HP6479 un HP6475
◗ Ja lietojat skūšanas galviņu vairākas reizes nedēļā, nomainiet
skūšanas sietiņu (modelim HP6116) un asmeņu bloku (modelim
HP2911) pēc viena vai diviem gadiem, ja šīs detaļas ir bojātas.
Garantija un apkope
Ja nepieciešama palīdzība vai informācija, lūdzu,izmantojiet Philips
tīmekļa vietni www.philips.com vai sazinieties ar Philips pakalpojumu
centru savā valstī (tā tālruņa numurs atrodams pasaules garantijas
bukletā). Ja jūsu valstī nav Philips pakalpojumu centra, lūdziet palīdzību
Philips preču izplatītājiem vai Philips Mājturības un personīgās higiēnas
ierīču nodaļas pakalpojumu dienestam.
LATVISKI98
Page 99

Įžanga
◗ Su naujuoju Satin ICE galite pašalinti nepageidaujamus plaukelius
greitai, paprastai ir efektyviai. Išbandytos epiliacinių diskų sistemos
ir naujai sukurto atkartojančio kūno linijas odos vėsintuvo derinys
yra tikra revoliucija epiliavime. Dėka natūraliai sustingdančio ledo
efekto ant odos, naujasis Satin ICE padaro epiliaciją daug kartų
malonesne ir žymiai mažiau skausminga nei bet kada. Rezultatai šilko švelnumo oda ir plaukų sumažėjimas iki 50%,naudojant
aparatą reguliariai (kas 4 savaites)
◗ Satin ICE yra ypač tinkamas kojų epiliacijai. HP6479 modelyje taip
pat yra odos vėsintuvas, kuris buvo specialiai sukurtas jautrių
plotų epiliacijai (pažastims ir bikini linijai). Šie plotai yra ypatingai
jautrūs skausmui, kurį specialus odos vėsintuvas padeda
susilpninti.
◗ Greitai besisukantys epiliaciniai diskai sugriebia ir išrauna net
trumpiausius plaukelius (virš pusės milimetro!).Dėl to jūsų oda
lieka švelni net iki keturių savaičių, o plaukai atauga švelnūs ir
silpni.
Bendras aprašymas
A Apsauganti mova odos vėsintuvas
B Kojų odos vėsintuvas su slankiojančia vėsinimo galvute
C Odos vėsintuvas pažastims ir bikini linijai (tik HP6479)
D Vėsinimo kasetė
E Epiliuojanti galvutė
F Apsauginis gobtuvėlis galvutei, šalinančiai negyvą epiderminį sluoksnį
G Galvutė, šalinanti negyvą epiderminį sluoksnį
H Apsauginis gobtuvėlis skutimosi galvutei (tik HP6479 ir HP6475)
I Skutimosi galvutė (tik HP6479 ir HP6475)
J Aparatas
K Adapteris
L Valymo šepetėlis
LIETUVIŠKAI 99
Page 100

Svarbu žinoti
Prieš pradedant naudoti aparatą, atidžiai perskaitykite šias instrukcijas ir
saugokite jas tolesniam naudojimui.
◗ Prieš pajungdami aparatą patikrinkite, ar įtampa, pažymėta ant
adapterio,atitinka jūsų namų elektros tinklo įtampą.
◗ Aparatą naudokite tik su rinkinyje esančiu adapteriu.
◗ Nenaudokite aparato,jei adapteris ar pats aparatas yra sugedęs.
◗ Jei yra pažeistas adapteris, vengiant rizikuoti, jis visada turi būti
pakeistas originaliu adapteriu.
◗ Adapteris turi transformatorių. Nepašalinkite adapterio, norėdami
jį pakeisti kitu jungikliu, nes tai gali sukelti pavojų.
◗ Aparatą ir adapterį laikykite sausai.
◗ Aparatą laikykite vaikams nepasiekiamoje vietoje.
◗ Nenaudokite aparato,esant žemesnei, negu 5cC arba aukštesnei,
negu 35cC temperatūrai.
◗ Vengiant sužalojimų, nekiškite veikiančio aparato prie savo plaukų,
antakių, blakstienų,rūbų, siūlų,laidų, šepečių ir t.t.
◗ Nenaudokite prietaiso ant sudirgintos odos, odos su
išsiplėtusiomis venomis, išbertos, spuoguotos,apgamuotos (su
plaukeliais) arba žaizdotos, nepasikonsultavę su gydytoju.
◗ Triukšmo lygis: Lc= 75.8 dB [A]
Pasiruošimas naudojimui
Odos vėsintuvo atšaldymas
1 Nuo odos vėsintuvo nuimkite apsauginį įdėklą (pav.1).
2 Patalpinkite odos vėsintuvą BE apsauginės movos į šaldymo
kasetę ir įdėkite į šaldymo kamerą arba šaldymo skyrių (***) bent
6 valandoms prieš epiliavimą (pav. 2).
Prieš šaldydamos, įsitikinkite, kad odos vėsintuvo išorė yra visiškai sausa.
◗ Patarimas. Odos vėsintuvą šaldiklyje galite laikyti nuolat.
LIETUVIŠKAI100
 Loading...