

Page 1

HP6342, HP6341
A
1
B
C
D
2 3 4
E
F
G
H
5 6 7
8 9 10
11 12 13
14 15 16
17 18
19
OIL
20
21
Page 2

ENGLISH
2
4203.000.6693.1
Introduction
Congratulations on your purchase and welcome to
Philips! To fully benet from the support that Philips offers,
register your product at www.philips.com/welcome.
With your new Philips Ladyshave you can quickly, easily
and comfortably remove unwanted body hair. You can use
the Ladyshave either dry or wet. If you shave while taking
a bath or shower, we advise you to use soap or shaving
foam for the most comfortable shave. After use, you can
clean the Ladyshave under the tap or with the cleaning
brush for extra hygiene.
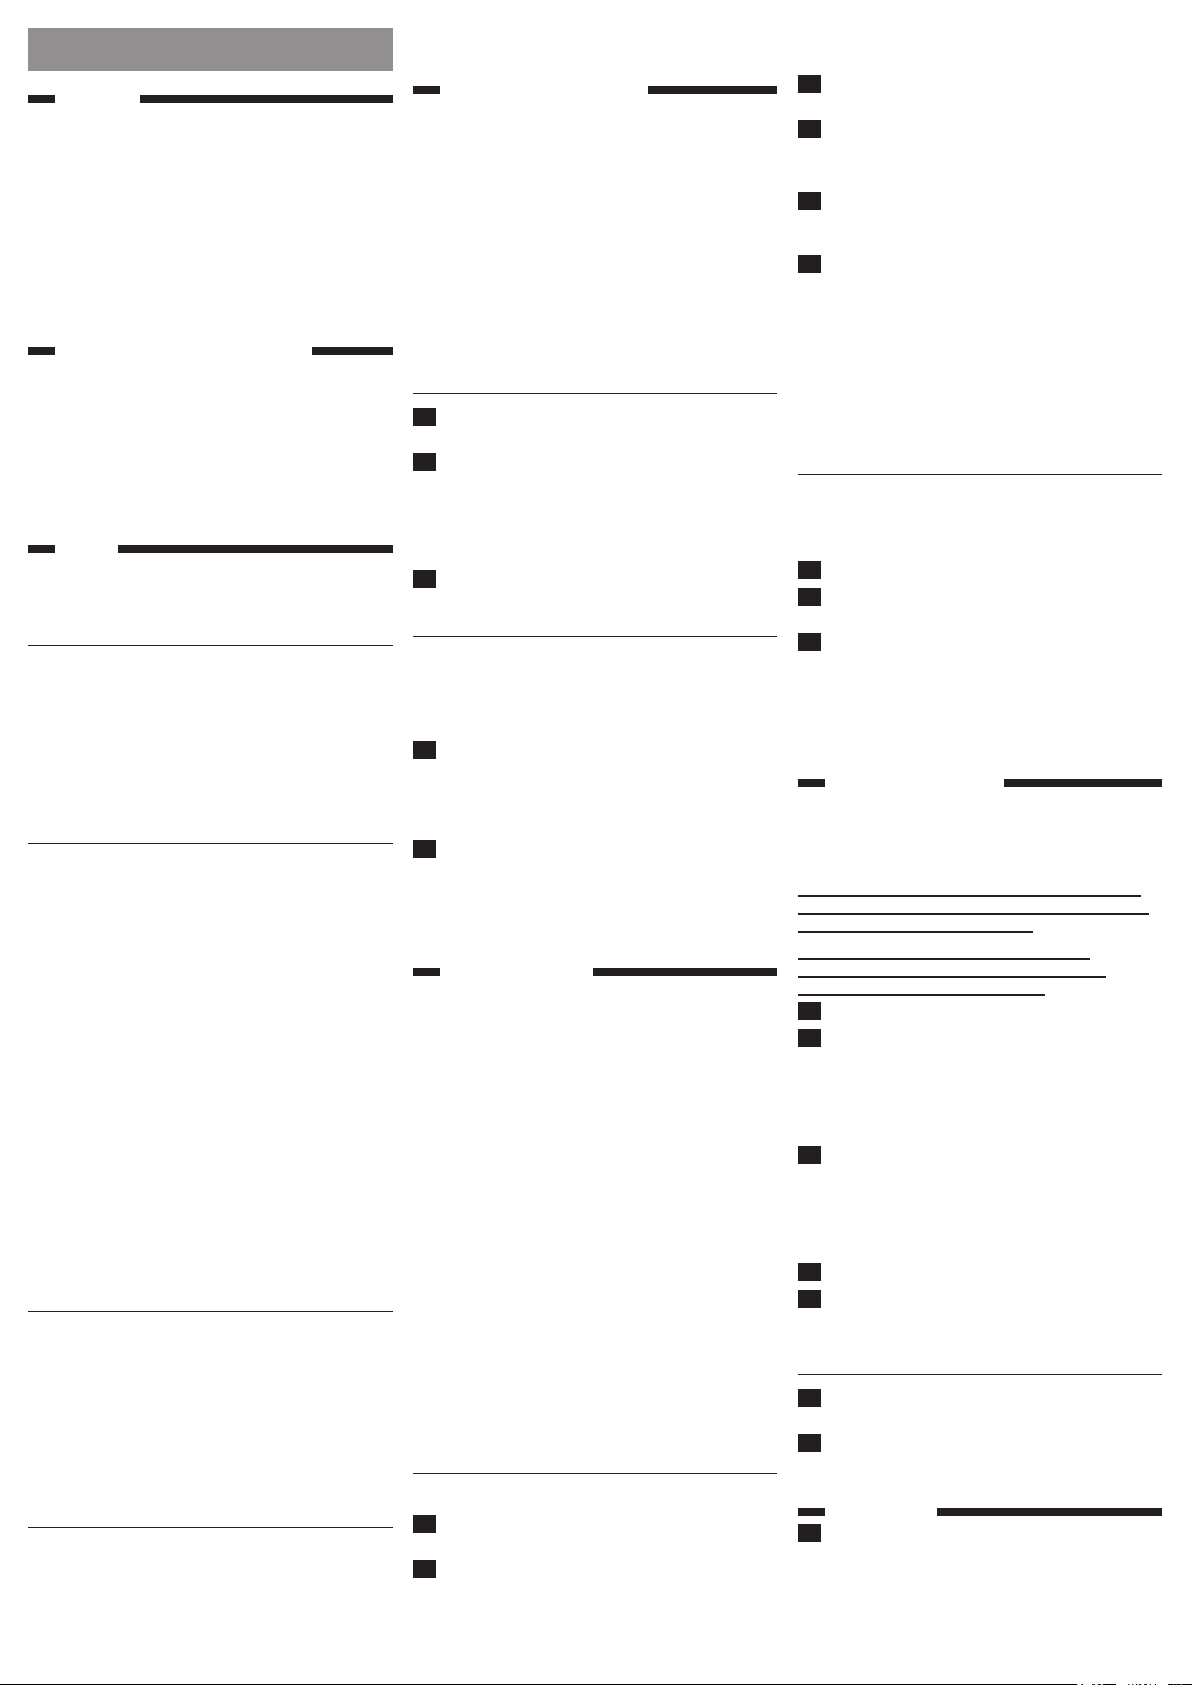
General description (Fig. 1)
A Shaving unit with shaving foil and pre-trimmer
B Shaving head
C On/off slide
D Battery compartment cover
E Protection cap
F Efciency cap (HP6342 only)
G 3mm trimming comb (HP6342 only)
H Cleaning brush
Not shown: Pouch (HP6342 only)
Important
Read this user manual carefully before you use the
appliance and save it for future reference.
Warning
- This appliance is not intended for use by persons
(including children) with reduced physical, sensory
or mental capabilities, or lack of experience and
knowledge, unless they have been given supervision
or instruction concerning use of the appliance by a
person responsible for their safety.
- Children should be supervised to ensure that they
do not play with the appliance.
Caution
- Make sure your hands and the appliance are dry
when you insert the batteries.
- Do not clean the Ladyshave with water above
shower temperature (max. 35°C).
- Be careful with hot water. Always check if the water
is not too hot, to prevent your hands from getting
burnt.
- Use and store the appliance at a temperature
between 15°C and 35°C.
- Do not use the appliance, the shaving unit, the
efciency cap (HP6342 only) or the trimming comb
(HP6342 only) if it is damaged or broken, as this may
cause injury.
- Never use any accessories or parts from other
manufacturers or that Philips does not specically
recommend. If you use such accessories or par ts,
your guarantee becomes invalid.
- Do not expose the Ladyshave to direct sunlight.
- This appliance is only intended to be used by
women to shave and trim their body hair. It is not
intended for shaving or trimming scalp hair or for
any other purpose.
General
- The appliance can be safely used in the bath or
shower and cleaned under the tap (Fig. 2).
- To keep the Ladyshave watertight:
1 Make sure that the rubber sealing ring of the battery
holder stays clean and undamaged.
2 Apply some vaseline to the rubber sealing ring from
time to time.
Electromagnetic eld (EMF)
- This Philips appliance complies with all standards
regarding electromagnetic elds (EMF). If handled
properly and according to the instructions in this
user manual, the appliance is safe to use based on
scientic evidence available today.
Preparing for use
The Ladyshave runs on two AA 1.5 volt alkaline batteries.
We advise you to use Philips LR6 PowerLife batteries.
They supply sufcient energy for approx. 40 minutes of
shaving.
Note: Make sure that your hands are dry when you
insert the batteries.
To avoid damage due to battery leakage:
- Do not expose the appliance to direct sunlight.
- Do not expose the appliance to temperatures higher
than 35°C.
- Remove the batteries if you are not going to use the
appliance for a month or more.
- Do not leave empty batteries in the appliance.
Inserting batteries
1 To remove the battery compartment cover, pull it
off the appliance (Fig. 3).
2 Put the batteries in the battery holder (Fig. 4).
Note: Make sure that the + and - poles of the batteries
point in the right direction.
3 Push the battery compartment cover back onto the
appliance (‘click’) (Fig. 5).
Attaching/detaching attachments
HP6342 comes with the protection cap, the efciency
cap and the trimming comb. HP6340 comes with the
protection cap. All attachments can be attached and
detached in the same way.
1 To attach a cap or comb, carefully push it onto
the appliance. Make sure the recess of the comb is
aligned with the front of the appliance (Fig. 6).
2 To detach a cap or comb, carefully pull it off the
appliance (Fig. 7).
Note: Do not hold the comb by its teeth when you pull it.
Using the appliance
The Ladyshave is suitable for:
- Shaving the underarms
- Shaving the legs
- Shaving the bikini line
- Trimming the bikini line (HP6342 only)
Use on wet skin
You can use the Ladyshave on wet skin, while you have a
bath or shower. To achieve the best result, lather your skin
with soap or shaving cream beforehand.
Use on dry skin
If you prefer to use the Ladyshave dry, make sure that
your skin is clean and completely dry.
Note: in principle, there is no difference in using
the appliance on wet skin and using it on dry skin. You can
simply choose which method you like best.
Note: Do not apply alcohol based-lotions to the skin directly
before or after shaving. If you want, you can apply some
talcum powder.
Note: Do not press the shaving head too hard onto the skin,
as this has a negative effect on shaving performance and
may cause some skin irritation.
Shaving
Legs and bikini line
1 Press the on/off slide upwards to switch on the
appliance (Fig. 8).
2 Hold the appliance at an angle of approximately 70°.
Make sure that the shaving foil and pre-trimmer are
fully in contact with your skin (Fig. 9).
3 Stretch the skin with your free hand to make the
hairs stand upright.
4 Move the appliance gently over the skin against the
direction of hair growth (Fig. 10).
Underarms
1 When you shave the underarm area, place one arm
behind your head to stretch the skin (Fig. 11).
2 Move the Ladyshave gently over the skin. To achieve
the best result, move the Ladyshave up and down
and from left to right (Fig. 12).
Efciency cap (HP6342 only)
If you are new to shaving, you can use the efciency
cap to help you place the Ladyshave on the skin at the
optimum angle. When the efciency cap is placed at on
the skin, the shaving foil and trimmer are fully in contact
with the skin. This helps to get perfect results.
Trimming (HP6342 only)
If the hair you want to shave is longer than 10mm, pre-
trim the hair with the trimming comb to a length of 3mm
for an optimal shaving performance.
1 Attach the trimming comb onto the appliance.
2 Press the on/off slide upwards to switch on the
appliance (Fig. 8).
3 Move the appliance against the direction of hair
growth. Make sure that the surface of the comb is
in full contact with the skin at all times (Fig. 13).
Note: You will achieve the best result if you trim under dry
conditions.
Cleaning and maintenance
Regular cleaning and proper maintenance ensure optimal
results and guarantee a long life for the appliance.
Clean the Ladyshave after each use.
Do not clean, rinse or immerse the Ladyshave in water
if the cover of the battery holder is not closed properly.
Never use scouring pads, abrasive cleaning agents or
aggressive liquids such as petrol or acetone to clean the
appliance.
1 Switch off the appliance (Fig. 14).
2 Remove the shaving unit from the appliance to
clean the hair chamber, the shaving unit and the
shaving head (Fig. 15).
Note: Do not exert too much pressure on the shaving foil to
avoid damage.
3 To clean the shaving unit, rinse it under the tap or
use the cleaning brush (Fig. 16).
Note: Do not clean the appliance with water above shower
temperature.
4 Rinse the hairs off the appliance (Fig. 17).
5 Make sure the appliance is completely dry before
you reattach the shaving unit (Fig. 18).
Maintenance
1 Lubricate the shaving foil with a drop of sewing
machine oil twice a year (Fig. 19).
2 Apply some vaseline to the rubber sealing ring from
time to time to keep the Ladyshave watertight.
Storage
1 Put the protection cap on the appliance.
Note: The protection cap prevents the shaving head from
becoming damaged.
2 HP6342 only: Store the appliance and accessories in
the pouch supplied.
Replacement
If you use the Ladyshave more than once a week, we
advise you to replace the shaving unit after one or two
years or when it is damaged.
The shaving unit, the cover of the battery compar tment,
the cleaning brush, the caps and the comb can be
replaced. If you need to replace one or more parts, go to
your Philips dealer or an authorised Philips service centre.
Environment
- Non-rechargeable batteries contain substances
that may pollute the environment. Do not throw
away non-rechargeable batteries with the normal
household waste, but dispose of them at an ofcial
collection point for batteries. Always remove the
non-rechargeable batteries before you discard
and hand in the appliance at an ofcial collection
point (Fig. 20).
- Do not throw away the appliance with the normal
household waste at the end of its life, but hand it in
at an ofcial collection point for recycling. By doing
this, you help to preserve the environment (Fig. 21).
Guarantee and service
If you need service or information or if you have a
problem, please visit the Philips website at www.philips.
com or contact the Philips Consumer Care Centre
in your country (you nd its phone number in the
Page 3

worldwide guarantee leaet). If there is no Consumer
3
4203.000.6693.1
Care Centre in your country, go to your local Philips
dealer.
Troubleshooting
This chapter summarises the most common problems
you could encounter with the appliance. If you are unable
to solve the problem with the information below, contact
the Consumer Care Centre in your country.
Problem Cause Solution
The appliance is
not performing
as well as it
should.
The shaving unit
is dirty.
Remove the
shaving unit and
clean it under
the tap or with
the cleaning
brush. Remove
any hairs that
might be stuck
under the
trimmer.
The appliance
runs too slowly
(and produces
an odd sound).
More skin
irritation than
usual.
The appliance
does not work.
You put the
appliance on the
skin at a wrong
angle.
The batteries are
nearly empty.
The shaving unit
is dirty.
The shaving unit
needs to be
lubricated.
The shaving foil
is damaged or
worn.
The batteries are
empty.
You have
not placed
the batteries in
the battery
compartment
correctly.
Make sure
that you put
the appliance
on the skin
at an angle
of 70° (see
chapter ‘Using
the appliance’,
section
‘Shaving’).
Replace the
batteries.
Clean the
shaving unit.
Lubricate the
shaving unit
with a few
drops of sewing
machine oil.
Replace the
shaving unit.
Replace the
batteries.
Put the
batteries in the
compartment
in accordance
with the + and
- indications
in the
compartment.
The appliance
fell into the
water while
the battery
compartment
was open.
You have
not attached
the battery
compartment
cover properly.
Push the
battery
compartment
cover onto
the appliance
(‘click’).
Let the
appliance
dry. Do not
reattach
the battery
comportment
cover until the
inside of the
appliance is
completely dry.
Page 4
DEUTSCH
4
4203.000.6693.1
Einführung
Herzlichen Glückwunsch zu Ihrem Kauf und willkommen
bei Philips! Um die Unterstützung von Philips optimal
nutzen zu können, registrieren Sie Ihr Produkt bitte unter
www.philips.com/welcome.
Mit Ihrem neuen Philips Ladyshave können Sie lästiges
Körperhaar schnell, leicht und bequem entfernen. Sie
können den Ladyshave auf trockener oder nasser Haut
benutzen. Zur Rasur auf nasser Haut (beispielsweise
beim Duschen oder Baden) empehlt es sich, Seife oder
Rasierschaum zu verwenden. Für zusätzliche Hygiene
reinigen Sie den Ladyshave nach Gebrauch unter
ießendem Wasser oder mit der Reinigungsbürste.
Allgemeine Beschreibung (Abb. 1)
A Schereinheit mit Scherfolie und Vor-Schneideaufsatz
B Ladyshave-Aufsatz
C Ein-/Ausschalter
D Batteriefachabdeckung
E Schutzkappe
F Funktionskappe (nur HP6342)
G 3 mm Kammaufsatz (nur HP6342)
H Reinigungsbürste
Nicht abgebildet: Tasche (nur HP6342)
Wichtig
Lesen Sie diese Bedienungsanleitung vor dem Gebrauch
des Geräts aufmerksam durch, und bewahren Sie sie für
eine spätere Verwendung auf.
Warnhinweis
- Dieses Gerät ist für Benutzer (einschl. Kinder) mit
eingeschränkten physischen, sensorischen oder
psychischen Fähigkeiten bzw. ohne jegliche Erfahrung
oder Vorwissen nur dann geeignet, wenn eine
angemessene Aufsicht oder ausführliche Anleitung
zur Benutzung des Geräts durch eine verantwortliche
Person sichergestellt ist.
- Achten Sie darauf, dass Kinder nicht mit dem Gerät
spielen.
Achtung
- Ihre Hände müssen beim Einsetzen der Batterien
völlig trocken sein.
- Reinigen Sie den Ladyshave nicht mit Wasser über
normaler Duschtemperatur (maximal 35° C).
- Gehen Sie vorsichtig mit heißem Wasser um. Achten
Sie darauf, dass das Wasser nicht zu heiß ist und Sie
sich nicht die Hände verbrühen.
- Benutzen und verwahren Sie das Gerät bei
Temperaturen zwischen 15 °C und 35 °C.
- Verwenden Sie das Gerät, die Schereinheit,
die Funktionskappe (nur HP6342) oder den
Kammaufsatz (nur HP6342) nicht, wenn
Beschädigungen erkennbar sind. So vermeiden Sie
Verletzungen.
- Verwenden Sie keine Zubehörteile anderer
Hersteller oder solche, die von Philips nicht
ausdrücklich empfohlen werden. Falls Sie derar tiges
Zubehör benutzen, erlischt die Garantie.
- Setzen Sie den Ladyshave nicht direktem Sonnenlicht
aus.
- Dieses Gerät ist ausschließlich zum Rasieren und
Schneiden von weiblichem Köperhaar vorgesehen. Es
ist nicht zum Rasieren oder Schneiden von Kopfhaar
oder für andere Zwecke vorgesehen.
Allgemeines
- Dieses Gerät kann ohne Bedenken unter der
Dusche oder in der Badewanne benutzt sowie unter
ießendem Wasser gereinigt werden (Abb. 2).
- Damit Ihr Ladyshave wasserdicht bleibt:
1 Achten Sie darauf, dass der Gummi-Dichtungsring
des Batteriefachs stets sauber und unbeschädigt
bleibt.
2 Geben Sie von Zeit zu Zeit ein wenig Vaseline auf
den Gummiring.
Elektromagnetische Felder (EMF; Electro
Magnetic Fields)
- Dieses Philips Gerät erfüllt sämtliche Normen
bezüglich elektromagnetischer Felder (EMF). Nach
aktuellen wissenschaftlichen Erkenntnissen ist das
Gerät sicher im Gebrauch, sofern es ordnungsgemäß
und entsprechend den Anweisungen in dieser
Bedienungsanleitung gehandhabt wird.
Zum Gebrauch vorbereiten
Der Ladyshave benötigt 2 Alkali-Batterien vom Typ
AA 1,5 V. Wir empfehlen Ihnen, Philips LR6 PowerLife-
Batterien zu verwenden; sie liefern genügend Energie für
eine Anwendungsdauer von 40 Minuten.
Hinweis: Achten Sie darauf, dass Ihre Hände beim Einlegen
der Batterien trocken sind.
So vermeiden Sie Schäden durch auslaufende Batterien:
- Setzen Sie das Gerät nicht direktem Sonnenlicht aus.
- Setzen Sie das Gerät keinen Temperaturen über
35 °C aus.
- Nehmen Sie die Batterien heraus, wenn Sie das
Gerät voraussichtlich einen Monat oder länger nicht
verwenden.
- Lassen Sie leere Batterien nicht im Gerät.
Batterien einlegen
1 Ziehen Sie die Batteriefachabdeckung vom
Gerät (Abb. 3).
2 Setzen Sie die Batterien in das Batteriefach
ein (Abb. 4).
Hinweis: Achten Sie darauf, dass die Polung (+) bzw. (-)
auf den Batterien mit den Markierungen im Batteriefach
übereinstimmt.
3 Schieben Sie die Batteriefachabdeckung wieder auf
das Gerät. Sie rastet hörbar ein (Abb. 5).
Die Aufsätze befestigen und abnehmen
Der HP6342 verfügt über eine Schutzkappe, eine
Funktionskappe und einen Kammaufsatz. Der HP6340
verfügt über eine Schutzkappe. Alle Aufsätze können auf
dieselbe Art und Weise aufgesetzt und abgenommen
werden.
1 Um eine Kappe oder einen Kammaufsatz zu
befestigen, schieben Sie sie/ihn vorsichtig auf das
Gerät. Vergewissern Sie sich, dass die Aussparung
des Kammaufsatzes zur Vorderseite des Geräts
zeigt (Abb. 6).
2 Um eine Kappe oder einen Kammaufsatz
abzunehmen, ziehen Sie sie/ihn vorsichtig vom
Gerät ab (Abb. 7).
Hinweis: Halten Sie den Kammaufsatz nicht an seinen
Zähnen, wenn Sie ihn abziehen.
Das Gerät benutzen
Dieser Ladyshave eignet sich zum:
- Rasieren der Achselhöhlen
- Rasieren der Beine
- Rasieren der Bikinizone
- Trimmen der Bikinizone (nur HP6342)
Auf nasser Haut verwenden
Sie können den Ladyshave auf nasser Haut verwenden,
während Sie duschen oder baden. Die besten Ergebnisse
erzielen Sie, wenn Sie zuvor Rasiercreme oder Seife auf
die Haut auftragen.
Auf trockener Haut verwenden
Wenn Sie Ihren Ladyshave lieber auf trockener Haut
benutzen, muss Ihre Haut sauber und vollkommen
trocken ist.
Hinweis: In Prinzip gibt es keinen Unterschied zwischen der
Verwendung des Geräts auf nasser und trockener Haut. Sie
können einfach wählen, welche Methode Sie bevorzugen.
Hinweis: Tragen Sie unmittelbar vor und nach der Rasur
keine alkoholhaltige Lotion auf die Haut auf. Sie können
jedoch etwas Talkumpuder anwenden.
Hinweis: Drücken Sie den Scherkopf nicht zu stark auf
die Haut, da dies die Rasierleistung beeinträchtigt und zu
Hautirritationen führen kann.
Rasieren
Beine und Bikini-Zone
1 Schieben Sie den Ein-/Ausschalter nach oben, um
das Gerät einzuschalten (Abb. 8).
2 Halten Sie das Gerät in einem Winkel von ungefähr
70°. Vergewissern Sie sich, dass die Scherfolie und
der Vor-Schneideaufsatz stets Kontakt zur Haut
haben (Abb. 9).
3 Straffen Sie die Haut mit der freien Hand, damit
sich die Haare aufrichten.
4 Führen Sie das Gerät sanft entgegen der
Haarwuchsrichtung über die Haut (Abb. 10).
Achselhöhlen
1 Straffen Sie Ihre Haut, indem Sie den freien Arm
beim Rasieren der Achselhöhlen hinter Ihren Kopf
legen (Abb. 11).
2 Führen Sie den Ladyshave sanft über die Haut. Für
ein optimales Ergebnis bewegen Sie den Ladyshave
auf und ab und von links nach rechts (Abb. 12).
Funktionskappe (nur HP6342)
Wenn Sie zum ersten Mal rasieren, hilft Ihnen die
Funktionskappe dabei, den Ladyshave im richtigen Winkel
auf die Haut zu setzen. Wenn die Funktionskappe ach
auf die Haut gesetzt wird, haben die Scherfolie und der
Schneideaufsatz stets Kontakt mit der Haut. Dies hilft,
perfekte Ergebnisse zu erzielen.
Trimmen (nur HP6342)
Wenn das Haar, das Sie rasieren wollen, länger als 10 mm
ist, schneiden Sie es zunächst mit dem Kammaufsatz
auf eine Länge von 3 mm. So erhalten Sie optimale
Rasierergebnisse.
1 Setzen Sie den Kammaufsatz auf das Gerät.
2 Schieben Sie den Ein-/Ausschalter nach oben, um
das Gerät einzuschalten (Abb. 8).
3 Führen Sie das Gerät immer gegen die
Haarwuchsrichtung. Stellen Sie sicher, dass die
Oberäche des Kammaufsatzes stets Kontakt mit
der Haut hat (Abb. 13).
Hinweis: Das beste Ergebnis erzielen Sie, wenn Sie unter
trockenen Bedingungen schneiden.
Reinigung und Wartung
Regelmäßige Reinigung und Wartung gewährleisten
optimale Ergebnisse und eine lange Lebensdauer des
Geräts.
Reinigen Sie den Ladyshave nach jedem Gebrauch.
Prüfen Sie, ob die Abdeckung des Batteriefachs dicht
verschlossen ist, bevor Sie den Ladyshave reinigen, ihn
abspülen oder in Wasser eintauchen.
Benutzen Sie zum Reinigen des Geräts keine
Scheuerschwämme und -mittel oder aggressive
Flüssigkeiten wie Benzin oder Azeton.
1 Schalten Sie das Gerät aus (Abb. 14).
2 Nehmen Sie die Schereinheit vom Gerät, um die
Haarauffangkammer, die Schereinheit und den
Scherkopf zu reinigen (Abb. 15).
Hinweis: Vermeiden Sie übermäßigen Druck auf die
Scherfolie, damit diese nicht beschädigt wird.
3 Um die Schereinheit zu reinigen, spülen Sie sie
unter ießendem Wasser ab, oder verwenden Sie
die Reinigungsbürste (Abb. 16).
Hinweis: Reinigen Sie das Gerät nicht mit Wasser über
Duschtemperatur.
4 Spülen Sie die Haare vom Gerät ab (Abb. 17).
5 Vergewissern Sie sich, dass das Gerät vollständig
trocken ist, bevor Sie die Schereinheit wieder
befestigen (Abb. 18).
Wartung
1 Geben Sie zweimal jährlich einen Tropfen
Nähmaschinenöl auf die Scherfolie (Abb. 19).
2 Geben Sie von Zeit zu Zeit ein wenig Vaseline
auf die Gummidichtung. So bleibt der Ladyshave
wasserdicht.
Aufbewahrung
1 Setzen Sie die Schutzkappe auf das Gerät.
Hinweis: Die Schutzkappe verhindert Beschädigungen des
Scherkopfs.
Page 5

2 Nur HP6342: Bewahren Sie das Gerät und die
5
4203.000.6693.1
Zubehörteile in der mitgelieferten Tasche auf.
Ersatz
Wenn Sie den Ladyshave mehr als einmal pro Woche
verwenden, empfehlen wir Ihnen, die Schereinheit nach
ein bis zwei Jahren zu ersetzen oder wenn sie beschädigt
ist.
Die Schereinheit, die Abdeckung des Batteriefachs, die
Reinigungsbürste, die Kappen und der Kammaufsatz
können ersetzt werden. Wenn Sie Teile austauschen
müssen, wenden Sie sich an Ihren Philips Händler oder ein
autorisiertes Philips Service-Center.
Umweltschutz
- Nicht wiederauadbare Batterien enthalten
Substanzen, die die Umwelt gefährden können.
Entsorgen Sie nicht wiederauadbare Batterien nicht
über den gewöhnlichen Hausmüll, sondern geben
Sie sie an einer ofziellen Sammelstelle für Batterien
ab. Entfernen Sie die nicht wiederauadbaren
Batterien, bevor Sie das Gerät an einer ofziellen
Recyclingstelle abgeben (Abb. 20).
- Geben Sie das Gerät am Ende der Lebensdauer
nicht in den normalen Hausmüll. Bringen Sie es zum
Recycling zu einer ofziellen Sammelstelle. Auf diese
Weise tragen Sie zum Umweltschutz bei (Abb. 21).
Garantie und Kundendienst
Benötigen Sie weitere Informationen oder treten
Probleme auf, besuchen Sie bitte die Philips Website
(www.philips.com), oder setzen Sie sich mit einem
Philips Service-Center in Ihrem Land in Verbindung
(Telefonnummer siehe internationale Garantieschrift).
Sollte es in Ihrem Land kein Service-Center geben,
wenden Sie sich bitte an Ihren Philips Händler.
Fehlerbehebung
In diesem Kapitel sind die häugsten Probleme aufgeführt,
die beim Gebrauch Ihres Geräts auftreten können.
Sollten Sie ein Problem mithilfe der nachstehenden
Informationen nicht beheben können, wenden Sie sich
bitte an das Philips Service-Center in Ihrem Land.
Problem Ursache Lösung
Das Gerät funktioniert nicht so
wie es sollte.
Die Schereinheit ist
verschmutzt.
Nehmen Sie die
Schereinheit ab,
und reinigen Sie sie
unter ießendem
Wasser oder mit
der Reinigungsbürste. Entfernen
Sie Haare, die sich
möglicherweise
unter dem Trimmer
angesammelt
haben.
Problem Ursache Lösung
Das Gerät funktioniert nicht.
Das Gerät ist ins
Wasser gefallen,
während das
Batteriefach offen
war.
Die Batterien sind
leer.
Sie haben
die Batterien
nicht
richtig in das
Batteriefach
eingelegt.
Sie haben
die Batteriefachabdeckung nicht
ordnungs-
gemäß
befestigt.
Tauschen Sie die
Batterien gegen
neue aus.
Setzen Sie die
Batterien entsprechend den
Markierungen im
Batteriefach ein.
Schieben Sie die
Batteriefachabdeckung auf das Gerät. Sie muss dabei
hörbar einrasten.
Lassen Sie das
Gerät trocknen.
Befestigen Sie die
Batteriefachabdeckung nicht, bevor
das Innere des
Geräts vollständig
trocken ist.
Das Gerät läuft
zu langsam
(und erzeugt
ungewöhnliche
Geräusche).
Die Haut ist
stärker irritier t als
gewöhnlich.
Sie setzen
das Gerät
in einem
falschen
Winkel auf
die Haut.
Die Batterien sind fast
leer.
Die Schereinheit ist
verschmutzt.
Die Schereinheit
muss geölt
werden.
Die Scherfolie ist
beschädigt
oder abgenutzt.
Achten Sie darauf,
das Gerät in einem
Winkel von 70° auf
die Haut zu setzen
(siehe Abschnitt
“Rasieren” im
Kapitel “Das Gerät
benutzen”).
Tauschen Sie die
Batterien gegen
neue aus.
Reinigen Sie die
Schereinheit.
Ölen Sie die Schereinheit mit einigen
Tropfen Nähmaschinenöl.
Wechseln Sie die
Schereinheit aus.
Page 6

FRANÇAIS
6
4203.000.6693.1
Introduction
Félicitations pour votre achat et bienvenue dans l’univers
Philips ! Pour proter pleinement de l’assistance Philips,
enregistrez votre produit sur le site à l’adresse suivante :
www.philips.com/welcome.
Avec votre nouveau rasoir féminin de Philips, vous pouvez
raser rapidement et efcacement les poils disgracieux.
Vous pouvez utiliser le rasoir féminin sur peau sèche ou
humide. Si vous vous rasez sous la douche, nous vous
recommandons d’utiliser du savon ou de la mousse pour
un rasage plus doux. Après utilisation, nettoyez le rasoir
féminin sous l’eau du robinet ou avec une brosse de
nettoyage pour une hygiène optimale.
Description générale (fig. 1)
A Unité de rasage avec grille et tête de prérasage
B Tête de rasoir
C Bouton marche/arrêt
D Couvercle du compartiment à pile
E Etui de protection
F Accessoire efcacité (HP6342 uniquement)
G Sabot 3 mm (HP6342 uniquement)
H Brosse de nettoyage
Non illustrée : trousse (HP6342 uniquement)
Important
Lisez attentivement ce mode d’emploi avant d’utiliser
l’appareil et conservez-le pour un usage ultérieur.
Avertissement
- Cet appareil n’est pas destiné à être utilisé par
des personnes (notamment des enfants) dont les
capacités physiques, sensorielles ou intellectuelles
sont réduites, ou par des personnes manquant
d’expérience ou de connaissances, à moins que
celles-ci ne soient sous surveillance ou qu’elles n’aient
reçu des instructions quant à l’utilisation de l’appareil
par une personne responsable de leur sécurité.
- Veillez à ce que les enfants ne puissent pas jouer avec
l’appareil.
Attention
- Veillez à avoir les mains sèches et à bien sécher
l’appareil avant d’insérer les piles.
- Lorsque vous nettoyez le rasoir féminin, la
température de l’eau ne doit pas dépasser celle de
l’eau de votre douche (max. 35° C).
- Veillez à ce que l’eau ne soit pas trop chaude pour
ne pas vous brûler.
- Conservez l’appareil à une température comprise
entre 15 °C et 35 °C.
- An d’éviter tout accident, n’utilisez pas l’appareil,
la tête de rasage, l’éccessoire efcacité (HP6342
uniquement) ou le sabot bikini (HP6342
uniquement) s’ils sont endommagés ou cassés.
- N’utilisez jamais d’accessoires, ni de pièces d’autres
fabricants ou qui n’ont pas été spéciquement
recommandés par Philips. Votre garantie ne sera pas
valable en cas d’utilisation de tels accessoires ou
pièces.
- N’exposez pas le rasoir féminin directement aux
rayons du soleil.
- Cet appareil est uniquement destiné au rasage et à
l’épilation des femmes. Il ne convient pas à la tonte
des cheveux ni à aucune autre utilisation.
Général
- L’appareil peut être utilisé dans le bain ou sous
la douche et nettoyé à l’eau courante en toute
sécurité (g. 2).
- Pour que l’appareil reste étanche :
1 Assurez-vous que l’anneau en caoutchouc du
compartiment à piles reste propre et ne présente
pas de dommages.
2 Appliquez de temps à autre un peu de vaseline sur
l’anneau en caoutchouc.
Champ électromagnétique (CEM)
- Cet appareil Philips est conforme à toutes les
normes relatives aux champs électromagnétiques
(CEM). Il répond aux règles de sécurité établies sur
la base des connaissances scientiques actuelles s’il
est manipulé correctement et conformément aux
instructions de ce mode d’emploi.
Avant l’utilisation
Le rasoir féminin fonctionne avec deux piles alcalines de
type AA 1,5 V. Il est fortement recommandé d’utiliser les
piles Philips LR6 PowerLife. Elles offrent une autonomie
d’environ 40 minutes de rasage.
Remarque : Veillez à avoir les mains sèches avant
d’insérer les piles.
Pour éviter tout dommage dû à une fuite de la pile :
- N’exposez pas l’appareil directement aux rayons du
soleil.
- N’exposez pas l’appareil à des températures
supérieures à 35 °C.
- Retirez les piles si vous n’utilisez pas l’appareil
pendant un mois ou plus.
- Retirez toujours les piles usées de l’appareil.
Installation des piles
1 Pour retirer le couvercle du compartiment à pile,
détachez-le de l’appareil (g. 3).
2 Insérez les piles dans le compartiment à
piles (g. 4).
Remarque : Veillez à respecter la polarité des piles.
3 Replacez le couvercle du compartiment des piles
sur l’appareil en le faisant glisser jusqu’à ce qu’il
s’enclenche (clic) (g. 5).
Fixation et retrait des accessoires
HP6342 est fourni avec l’étui de protection, l’accessoire
efcacité et le sabot bikini. HP6340 est fourni avec l’étui
de protection. Tous les accessoires peuvent être xés et
retirés de la même façon.
1 Pour xer l’étui ou le sabot, poussez-les
soigneusement sur l’appareil. Assurez-vous que le
renfoncement du sabot est aligné avec l’avant de
l’appareil (g. 6).
2 Pour retirer l’étui ou le sabot, enlevez-les
soigneusement de l’appareil (g. 7).
Remarque : Ne tenez pas le sabot bikini par ses dents
lorsque vous le retirez.
Utilisation de l’appareil
Le rasoir féminin est recommandé pour :
- Rasage des aisselles
- Rasage des jambes
- Rasage du maillot
- Tonte du maillot (HP6342 uniquement)
À utiliser sur peau humide
Vous pouvez utiliser le Ladyshave sur peau humide,
pendant que vous prenez un bain ou une douche. Pour
obtenir un résultat optimal, savonnez dans un premier
temps votre peau avec du savon ou une mousse de
rasage.
À utiliser sur peau sèche
Si vous préférez utiliser le rasoir féminin sur peau sèche,
assurez-vous que votre peau est propre et complètement
sèche.
Remarque : En principe, il n’existe pas de différence
d’utilisation de l’appareil sur peau mouillée ou sur peau
sèche. Il vous suft de choisir la méthode qui vous convient
le mieux.
Remarque : N’appliquez pas de lotions à base d’alcool sur
la peau immédiatement avant ou après le rasage. Si vous le
souhaitez, vous pouvez appliquer un peu de talc.
Remarque : N’exercez pas de pression trop forte sur la peau
avec la tête de rasoir. Cela peut nuire aux performances de
rasage et peut causer des irritations de la peau.
Rasoir
Jambes et maillot
1 Faites glisser le bouton marche/arrêt vers l’avant
pour mettre l’appareil en marche (g. 8).
2 Maintenez l’appareil à un angle d’environ 70°.
Assurez-vous que la grille et la tête de prérasage
sont en contact parfait avec la peau (g. 9).
3 Avec votre main libre, tendez la peau pour
redresser les poils.
4 Passez l’appareil lentement sur la peau dans le sens
inverse de la pousse des poils (g. 10).
Aisselles
1 Lorsque vous vous rasez les aisselles, placez le bras
derrière la tête an de tendre la peau (g. 11).
2 Déplacez le rasoir féminin lentement sur la peau.
Pour obtenir un résultat optimal, déplacez l’appareil
de haut en bas et de gauche à droite (g. 12).
Adaptateur efcace (HP6342 uniquement)
Si vous découvrez le rasage, vous pouvez utiliser
l’accessoire efcacité pour les débutantes an de placer
correctement le rasoir féminin sur la peau, à l’angle
optimal. Lorsque l’accessoire efcacité est à plat sur la
peau, la grille et la tondeuse sont toujours en contact
avec la peau, ce qui garantit des résultats parfaits.
Tondeuse bikini (HP6342 uniquement)
Si la longueur des poils que vous souhaitez raser dépasse
10 mm, coupez-les au préalable avec le sabot à une
longueur de 3 mm pour des performances de rasage
optimales.
1 Fixez le sabot sur l’appareil.
2 Faites glisser le bouton marche/arrêt vers l’avant
pour mettre l’appareil en marche (g. 8).
3 Déplacez l’appareil dans le sens inverse de la
pousse des poils. Assurez-vous que la surface
du sabot bikini est toujours en contact avec la
peau (g. 13).
Remarque : Pour des résultats optimaux, tondez sur peau
sèche.
Nettoyage et entretien
Le nettoyage régulier et l’entretien correct de votre
appareil assurent des résultats optimaux et garantissent
une longue durée de fonctionnement.
Nettoyez le rasoir féminin après chaque utilisation.
Ne nettoyez pas, ne rincez pas ou n’immergez
pas le rasoir féminin dans l’eau si le couvercle du
compartiment à piles n’est pas correctement fermé.
N’utilisez jamais d’éponges à récurer, de produits
abrasifs ou de détergents agressifs tels que l’essence ou
l’acétone pour nettoyer l’appareil.
1 Éteignez l’appareil (g. 14).
2 Retirez la tête de rasage de l’appareil pour nettoyer
le compartiment à poils et la tête de rasoir (g. 15).
Remarque : N’exercez aucune pression sur la grille de
rasage an d’éviter toute détérioration.
3 Pour nettoyer la tête de rasage, rincez-la
sous le robinet ou utilisez la brossette de
nettoyage (g. 16).
Remarque : Lorsque vous nettoyez l’appareil, la température
de l’eau ne doit pas dépasser celle de l’eau de votre douche.
4 Ôtez les poils de l’appareil (g. 17).
5 Assurez-vous que l’appareil est complètement sec
avant de replacer la tête de rasage (g. 18).
Entretien
1 Appliquez une goutte d’huile pour machine à
coudre sur la grille deux fois par an (g. 19).
2 Appliquez de temps à autre un peu de vaseline sur
l’anneau en caoutchouc pour que l’appareil reste
étanche.
Rangement
1 Placez l’étui de protection sur l’appareil.
Remarque : L’étui de protection évite la détérioration de la
tête de rasoir.
2 HP6342 uniquement : conservez l’appareil et les
accessoires dans la trousse de rangement.
Remplacement
Si vous utilisez le rasoir féminin plus d’une fois par
semaine, nous vous conseillons de remplacer la tête
de rasage au bout d’un an ou deux, ou lorsqu’elle est
endommagée.
La tête de rasage, le couvercle du compartiment à piles,
la brossette de nettoyage, l’étui et le sabot bikini peuvent
être remplacés. Si vous devez remplacer un ou plusieurs
Page 7

éléments, adressez-vous à votre revendeur Philips ou à un
7
4203.000.6693.1
Centre Service Agréé Philips.
Environnement
- Les piles non rechargeables contiennent des
substances qui peuvent nuire à l’environnement. Ne
jetez pas les piles non rechargeables avec les ordures
ménagères, mais déposez-les à un endroit prévu à
cet effet. Retirez toujours les piles non rechargeables
avant de mettre l’appareil au rebut et de le déposer à
un endroit prévu à cet effet (g. 20).
- Lorsqu’il ne fonctionnera plus, ne jetez pas l’appareil
avec les ordures ménagères, mais déposez-le à
un endroit assigné à cet effet, où il pourra être
recyclé. Vous contribuerez ainsi à la protection de
l’environnement (g. 21).
Garantie et service
Si vous souhaitez obtenir des informations
supplémentaires ou faire réparer l’appareil, ou si vous
rencontrez un problème, rendez-vous sur le site Web
de Philips à l’adresse www.philips.com ou contactez le
Service Consommateurs Philips de votre pays (vous
trouverez le numéro de téléphone correspondant sur
le dépliant de garantie internationale). S’il n’existe pas
de Service Consommateurs Philips dans votre pays,
renseignez-vous auprès de votre revendeur Philips local.
Dépannage
Ce chapitre présente les problèmes les plus courants
que vous pouvez rencontrer avec votre appareil.
Si vous ne parvenez pas à résoudre le problème
à l’aide des informations ci-dessous, contactez le
Service Consommateurs Philips de votre pays.
Problème Cause Solution
L’appareil ne
fonctionne pas
aussi bien qu’il
devrait.
La tête de
rasage est sale.
Retirez la tête
de rasage et
nettoyez-la sous
le robinet ou
avec la brossette
de nettoyage.
Retirez les poils
éventuellement
pris sous la
tondeuse.
Problème Cause Solution
Les piles n’ont
pas été placées
correctement
dans le
compartiment
à piles.
Vous n’avez pas
correctement
xé le
couvercle du
compartiment
à piles.
L’appareil est
tombé dans
l’eau alors que
le compartiment à piles
était ouvert.
Placez les
piles dans le
compartiment
à piles
conformément
à la polarité
indiquée dans le
compartiment.
Positionnez le
couvercle du
compartiment à
piles sur l’appareil
en le faisant glisser
jusqu’à ce qu’il
s’enclenche (clic).
Laissez sécher
l’appareil. Ne
remettez pas
le couvercle du
compartiment à
piles avant que
l’intérieur de
l’appareil ne soit
sec.
L’appareil
fonctionne trop
lentement (et
produit un son
étrange).
La peau est
plus irritée que
d’habitude.
L’appareil ne
fonctionne pas.
L’angle de
l’appareil sur
la peau est
incorrect.
Les piles sont
presque vides.
La tête de
rasage est sale.
La tête de
rasage doit être
lubriée.
La grille de
rasage est
endommagée
ou usée.
Les piles sont
vides.
Veillez à placer
l’appareil sur
la peau à un
angle de 70°
(voir la rubrique
« Rasage »
du chapitre
« Utilisation de
l’appareil »).
Remplacez les
piles.
Nettoyez la tête
de rasage.
Appliquez
quelques gouttes
d’huile pour
machine à coudre
sur la tête de
rasage.
Remplacez la tête
de rasage.
Remplacez les
piles.
Page 8

ITALIANO
8
4203.000.6693.1
Introduzione
Congratulazioni per l’acquisto e benvenuti in Philips! Per
trarre il massimo vantaggio dall’assistenza Philips, registrate
il vostro prodotto su www.philips.com/welcome.
Con il nuovo Philips Ladyshave potrete eliminare in modo
pratico e veloce i peli superui con la pelle bagnata o
asciutta. Se volete radervi mentre fate il bagno o la doccia,
è consigliabile usare del sapone o della schiuma da barba
per una rasatura più dolce. Dopo l’uso risciacquate il
Ladyshave sotto il rubinetto o usate la spazzolina per la
pulizia per la massima igiene.
Descrizione generale (fig. 1)
A Unità di rasatura con la lamina di rasatura e pre-
rinitore
B Testina di rasatura
C Cursore on/off
D Coperchio del vano batteria
E Cappuccio di protezione
F Testina ad alta efcacia (solo HP6342)
G Pettine rinitore da 3 mm (solo HP6342)
H Spazzolina per la pulizia
Non illustrato: astuccio (solo HP6342)
Importante
Prima di utilizzare l’apparecchio, leggete attentamente il
presente manuale e conservatelo per eventuali riferimenti
futuri.
Avviso
- L’apparecchio non è destinato a persone (inclusi
bambini) con capacità mentali, siche o sensoriali
ridotte, fatti salvi i casi in cui tali persone abbiano
ricevuto assistenza o formazione per l’uso
dell’apparecchio da una persona responsabile della
loro sicurezza.
- Adottate le dovute precauzioni per evitare che i
bambini giochino con l’apparecchio.
Attenzione
- Assicuratevi che le mani e l’apparecchio siano
perfettamente asciutti prima di inserire le batterie.
- Non pulite il Ladyshave con acqua troppo calda
(max. 35°C)
- Prestate particolare attenzione quando utilizzate
l’acqua calda: vericate sempre che non sia troppo
calda per evitare di scottarvi.
- Utilizzate e riponete l’apparecchio a una temperatura
compresa tra 15 °C e 35 °C.
- Non usate l’apparecchio, l’unità di rasatura, la testina
ad alta efcacia (solo HP6342) o il pettine rinitore
(solo HP6342) se è danneggiato o rotto, poiché
questo potrebbe causare ferite.
- Non usate mai accessori o parti di altri produttori o
non specicatamente consigliati da Philips. Nel caso
in cui utilizziate detti accessori o parti, la garanzia
decade.
- non esponete il Ladyshave ai raggi diretti del sole.
- Questo apparecchio è stato progettato solo per
le donne e per la rasatura e rinitura dei loro peli
superui. Non può essere utilizzato per radere o
rinire i capelli o per qualsiasi altro scopo.
Indicazioni generali
- L’apparecchio può essere usato senza problemi nel
bagno o nella doccia e pulito sotto il rubinetto (g. 2).
- Per mantenere impermeabile il vostro Ladyshave:
1 Controllate che la guarnizione in gomma dello
scomparto batterie sia pulita e non danneggiata.
2 Applicate periodicamente della vaselina sulla
guarnizione in gomma.
Campo elettromagnetico (EMF)
- Questo apparecchio Philips è conforme a tutti gli
standard relativi ai campi elettromagnetici (EMF).
Se utilizzato in modo appropriato seguendo le
istruzioni contenute nel presente manuale dell’utente,
l’apparecchio consente un utilizzo sicuro come
confermato dai risultati scientici attualmente
disponibili.
Predisposizione dell’apparecchio
Ladyshave funziona con 2 batterie alcaline AA da 1,5 V. Vi
raccomandiamo di usare batterie Philips LR6 PowerLife,
che consentono un’autonomia di rasatura di circa 40
minuti.
Nota Assicuratevi di avere le mani perfettamente asciutte
prima di inserire le batterie.
Per evitare danni dovuti a eventuali perdite delle batterie:
- Non esponete l’apparecchio ai raggi diretti del sole.
- Non esponete l’apparecchio a temperature superiori
a 35 °C.
- Rimuovete le batterie se prevedete di non usare
l’apparecchio per più di un mese.
- Non lasciate le batterie scariche all’interno
dell’apparecchio.
Inserimento delle batterie
1 Per rimuovere il coperchio del vano batterie,
estraetelo dall’apparecchio (g. 3).
2 Inserite le batterie nello scomparto batterie (g. 4).
Nota Controllate che la direzione dei poli +/- delle
batterie sia corretta.
3 Fate scorrere il coperchio del vano batterie
sull’apparecchio no a bloccarlo in posizione (g. 5).
Collegamento/scollegamento degli accessori
Il modello HP6342 è dotato di un cappuccio di
protezione, di una testina ad alta efcacia e di un pettine
rinitore. Il modello HP6340 è dotato di cappuccio di
protezione. Tutti gli accessori possono essere inseriti ed
estratti allo stesso modo.
1 Per inserire una testina o un
pettine, spingerla delicatamente sull’apparecchio.
Assicuratevi che la parte concava del
pettine sia allineata con la parte anteriore
dell’apparecchio (g. 6).
2 Per staccare una testina o un pettine, estraeteli
delicatamente dall’apparecchio (g. 7).
Nota Non tenete il pettine per i denti quando lo tirate.
Modalità d’uso dell’apparecchio
Il Ladyshave è adatto per:
- Rasatura delle ascelle
- Rasatura delle gambe
- Rasatura della zona bikini.
- Rinitura della zona bikini (solo HP6342)
Utilizzo su pelle bagnata
Potete usare il Ladyshave sulla pelle bagnata, mentre fate il
bagno o sotto la doccia. Per ottenere un risultato migliore,
insaponate la pelle o utilizzate della schiuma da barba
prima dell’utilizzo.
Utilizzo su pelle asciutta
Se preferite usare il Ladyshave sulla pelle asciutta,
controllate che la pelle sia pulita e perfettamente asciutta.
Nota Di fatto non vi è alcuna differenza nell’utilizzo
dell’apparecchio su pelle bagnata o asciutta. Potete scegliere
semplicemente il metodo che più adatto a voi.
Nota non applicate lozioni a base di alcool sulla pelle subito
prima o subito dopo la rasatura. Eventualmente potete
applicare del borotalco.
Nota Non premete la testina di rasatura con troppa forza
sulla pelle poiché questo ha un effetto negativo sulle
prestazioni di rasatura e potrebbe causare l’irritazione della
pelle.
Modalità di depilazione
Gambe e zona bikini
1 Impostate il cursore on/off verso l’alto per
accendere l’apparecchio (g. 8).
2 Tenete l’apparecchio a un angolo di circa 70°.
Assicuratevi che la lamina di rasatura e il pre-
rinitore siano totalmente a contatto con la
pelle (g. 9).
3 Tendete la pelle con la mano libera per sollevare i
peli.
4 Passate delicatamente l’apparecchio sulla pelle, nel
senso opposto alla crescita dei peli (g. 10).
Ascelle
1 Per radervi le ascelle, mettete il braccio dietro la
testa, in modo da tendere la pelle (g. 11).
2 Passate il Ladyshave delicatamente sopra la pelle.
Per ottenere un risultato migliore, spostate il
Ladyshave verso l’alto, verso il basso, a sinistra e a
destra (g. 12).
Testina ad alta efcacia (solo HP6342)
Se non avete dimestichezza con la rasatura, è consigliabile
utilizzare la testina ad alta efcacia per un’angolazione
ottimale del Ladyshave sulla pelle. Quando la testina ad
alta efcacia è posizionata in orizzontale sulla pelle, la
lamina di rasatura e il rinitore sono completamente
a contatto con la cute. Questo consente di ottenere
risultati ottimali.
Rinitura (solo HP6342)
Se i peli da radere sono più lunghi di 10 mm, riniteli
prima con il pettine rinitore a una lunghezza di 3 mm
per prestazioni di rasatura ottimali.
1 Fate scorrere il pettine rinitore sull’apparecchio.
2 Impostate il cursore on/off verso l’alto per
accendere l’apparecchio (g. 8).
3 Spostate sempre l’apparecchio nel senso opposto
a quello della crescita. Controllate che la supercie
del pettine sia sempre perfettamente a contatto
con la pelle (g. 13).
Nota La rinitura su pelle asciutta consente di ottenere
prestazioni ottimali.
Pulizia e manutenzione
Una pulizia regolare e una corretta manutenzione
garantiscono ottimi risultati e una maggiore durata
dell’apparecchio.
Pulite il Ladyshave dopo ogni utilizzo.
Non pulite, sciacquate o immergete il Ladyshave in
acqua se il coperchio del comparto batterie non è
chiuso correttamente.
Non usate prodotti o sostanze abrasive o detergenti
aggressivi, come benzina o acetone, per pulire
l’apparecchio.
1 Spegnete l’apparecchio (g. 14).
2 Rimuovete l’unità di rasatura dall’apparecchio per
pulire il vano di raccolta peli, l’unità di rasatura e la
testina di rasatura (g. 15).
Nota Non esercitate troppa pressione sulla lamina per
evitare di danneggiarla.
3 Per pulire l’unità di rasatura, risciacquatela sotto
acqua corrente o usate la spazzolina per la
pulizia (g. 16).
Nota Non pulite l’apparecchio con acqua a una temperatura
superiore a quella che utilizzate per la doccia.
4 Sciacquate i peli dall’apparecchio (g. 17).
5 Accertatevi che l’apparecchio sia completamente
asciutto prima di reinserire l’unità di
rasatura (g. 18).
Manutenzione
1 Lubricate due volte l’anno la lamina di
rasatura con una goccia di olio per macchina da
cucire (g. 19).
2 Applicate ogni tanto della vaselina sulla guarnizione
in gomma per mantenere impermeabile il
Ladyshave.
Conservazione
1 Mettete il cappuccio di protezione sull’apparecchio.
Nota Il cappuccio di protezione evita danni alla testina di
rasatura.
2 Solo HP6342: riponete l’apparecchio e gli accessori
nella custodia in dotazione.
Sostituzione
Se utilizzate il Ladyshave due o più volte la settimana, è
consigliabile sostituire l’unità di rasatura dopo uno o due
anni oppure in caso di danni.
Page 9

L’unità di rasatura, il coperchio del vano batterie, la
9
4203.000.6693.1
spazzolina per la pulizia, le testine e il pettine possono
essere sostituiti. Se dovete sostituire una o più parti,
recatevi presso il vostro rivenditore Philips o presso un
centro assistenza Philips autorizzato.
Tutela dell’ambiente
- Le batterie non ricaricabili contengono sostanze
potenzialmente nocive per l’ambiente. Non smaltite
le batterie non ricaricabili insieme ai comuni riuti
domestici, ma consegnatele a un apposito centro di
raccolta ufciale. Rimuovete sempre le batterie non
ricaricabili prima dello smaltimento e consegnate
l’apparecchio a un centro di raccolta ufciale (g. 20).
- Per contribuire alla tutela dell’ambiente, non
smaltite l’apparecchio insieme ai riuti domestici, ma
consegnatelo a un centro di raccolta ufciale (g. 21).
Garanzia e assistenza
Se avete bisogno di assistenza o informazioni o in caso
di problemi, visitate il sito Web Philips all’indirizzo www.
philips.com oppure contattate il Centro Assistenza Clienti
Philips del vostro Paese (per conoscere il numero di
telefono consultate l’opuscolo della garanzia). Se nel
vostro Paese non esiste un Centro Assistenza Clienti,
rivolgetevi al vostro rivenditore Philips.
Risoluzione dei guasti
In questo capitolo vengono riportati i problemi più
ricorrenti legati all’uso dell’apparecchio. Se non riuscite
a risolvere i problemi con le informazioni seguenti, vi
preghiamo di contattare il Centro Assistenza Clienti
Philips del vostro paese.
Problema Causa Soluzione
L’apparecchio
non funziona
come
dovrebbe.
L’unità di rasatura
è sporca.
Rimuovete
l’unità di
rasatura, lavatela
sotto l’acqua
corrente
o usate la
spazzolina
per la pulizia.
Rimuovete gli
eventuali peli
incastrati sotto il
rinitore.
Problema Causa Soluzione
Il coperchio del
vano batterie
non è stato
posizionato
correttamente.
L’apparecchio
è caduto
nell’acqua
mentre il vano
batterie era
aperto.
Fate scorrere il
coperchio del
vano batterie
sull’apparecchio
no a bloccarlo
in posizione.
Lasciate asciugare l’apparecchio.
Non reinserite
il coperchio del
vano batterie
nché l’interno
dell’apparecchio
non è completamente asciutto.
L’apparecchio
funziona troppo
lentamente (e
produce un
suono strano).
La pelle è più
irritata del
solito.
L’apparecchio
non funziona.
L’apparecchio
viene appoggiato
sulla pelle ad
un’angolazione
errata.
Le batterie sono
quasi scariche.
L’unità di rasatura
è sporca.
L’unità di rasatura
deve essere
lubricata.
La lamina della
testina di rasatura
è danneggiata o
usurata.
Le batterie sono
scariche.
Posizionate l’apparecchio sulla
pelle ad un angolo di 70° (vedere il capitolo
“Modalità d’uso
dell’apparecchio”, sezione
“Rasatura”).
Sostituite le
batterie.
Pulite l’unità di
rasatura.
Lubricate
l’unità di
rasatura con
qualche goccia
di olio per
macchina da
cucire.
Sostituite l’unità
di rasatura.
Sostituite le
batterie.
Non avete
posizionato
correttamente
le batterie nel
relativo vano.
Mettete
le batterie
nel vano
rispettando le
indicazioni + e -.
Page 10

NEDERLANDS
10
4203.000.6693.1
Inleiding
Gefeliciteerd met uw aankoop en welkom bij Philips! Als
u volledig wilt proteren van de ondersteuning die Philips
biedt, registreer uw product dan op www.philips.com/
welcome.
Met uw nieuwe Philips Ladyshave kunt u snel, gemakkelijk
en op een aangename manier ongewenst lichaamshaar
verwijderen. U kunt de Ladyshave zowel nat als droog
gebruiken. Als u het apparaat gebruikt terwijl u in bad
zit of onder de douche staat, raden we u aan zeep of
scheerschuim te gebruiken om het scheren zo aangenaam
mogelijk te maken. Na gebruik kunt u de Ladyshave onder
de kraan afspoelen of met het schoonmaakborsteltje
schoonmaken voor extra hygiëne.
Algemene beschrijving (fig. 1)
A Scheerunit met scheerblad en voortrimmer
B Scheerhoofd
C Aan/uitknop
D Kap van het batterijvak
E Beschermkap
F Efciëntie-opzetkap (alleen HP6342)
G 3mm-trimkam (alleen HP6342)
H Schoonmaakborsteltje
Niet afgebeeld: etui (alleen HP6342)
Belangrijk
Lees deze gebruiksaanwijzing zorgvuldig door
voordat u het apparaat gaat gebruiken. Bewaar de
gebruiksaanwijzing om deze indien nodig te kunnen
raadplegen.
Waarschuwing
- Dit apparaat is niet bedoeld voor gebruik door
personen (waaronder kinderen) met verminderde
lichamelijke, zintuiglijke of geestelijke vermogens,
of die gebrek aan ervaring of kennis hebben, tenzij
iemand die verantwoordelijk is voor hun veiligheid
toezicht op hen houdt of hun heeft uitgelegd hoe het
apparaat dient te worden gebruikt.
- Houd toezicht op jonge kinderen om te voorkomen
dat ze met het apparaat gaan spelen.
Let op
- Zorg ervoor dat uw handen en het apparaat droog
zijn wanneer u de batterijen plaatst.
- Spoel de Ladyshave niet af met water dat heter is
dan douchetemperatuur (max. 35°C).
- Wees voorzichtig met heet water. Controleer altijd of
het water niet te heet is om te voorkomen dat u uw
handen verbrandt.
- Gebruik en bewaar het apparaat bij een temperatuur
tussen 15°C en 35°C.
- Gebruik het apparaat, de scheerunit, de efciëntieopzetkap (alleen HP6342) of de trimkam (alleen
HP6342) niet als deze beschadigd of kapot zijn,
omdat dit verwondingen kan veroorzaken.
- Gebruik geen accessoires of onderdelen van
andere fabrikanten of die niet speciek door Philips
worden aanbevolen. Als u dergelijke accessoires of
onderdelen gebruikt, vervalt de garantie.
- Stel de Ladyshave niet bloot aan direct zonlicht.
- Dit apparaat is alleen bedoeld om te worden
gebruikt door vrouwen om hun lichaamshaar te
scheren en te trimmen. Het apparaat is niet bedoeld
voor het scheren of trimmen van hoofdhaar of voor
andere doeleinden.
Algemeen
- Het apparaat kan veilig in bad of onder de douche
worden gebruikt en onder de kraan worden
schoongemaakt (g. 2).
- Om de Ladyshave waterdicht te houden moet u het
volgende doen:
1 Zorg ervoor dat de rubberen afdichtring van de
batterijhouder schoon en onbeschadigd blijft.
2 Breng af en toe wat vaseline aan op de rubberen
afdichtring.
Elektromagnetische velden (EMV)
- Dit Philips-apparaat voldoet aan alle richtlijnen met
betrekking tot elektromagnetische velden (EMV).
Mits het apparaat op de juiste wijze en volgens de
instructies in deze gebruiksaanwijzing wordt gebruikt,
is het veilig te gebruiken volgens het nu beschikbare
wetenschappelijke bewijs.
Klaarmaken voor gebruik
De Ladyshave werkt op twee AA 1,5-volt
alkalinebatterijen. We raden u aan Philips LR6 PowerLifebatterijen te gebruiken. Deze bevatten voldoende energie
voor ongeveer 40 minuten scheren.
Opmerking: Zorg ervoor dat uw handen droog zijn wanneer
u de batterijen plaatst.
U kunt schade door lekkende batterijen als volgt
voorkomen:
- Stel het apparaat niet bloot aan direct zonlicht.
- Stel het apparaat niet bloot aan temperaturen boven
35°C.
- Verwijder de batterijen als u het apparaat een maand
of langer niet gaat gebruiken.
- Laat nooit lege batterijen in het apparaat zitten.
Batterijen plaatsen
1 Om het deksel van het batterijvak te verwijderen,
trekt u het van het apparaat af (g. 3).
2 Plaats de batterijen in de batterijhouder (g. 4).
Opmerking: Zorg ervoor dat de + en - polen van de
batterijen in de juiste richting wijzen.
3 Duw het deksel van het batterijvak weer op het
apparaat (‘klik’) (g. 5).
Opzetstukken bevestigen/verwijderen
De HP6342 wordt geleverd met een beschermkap, een
efciëntie-opzetkap en een trimkam. De HP6340 wordt
geleverd met een beschermkap. Alle opzetstukken kunnen
op dezelfde manier worden bevestigd en verwijderd.
1 U bevestigt een kap of kam door deze voorzichtig
op het apparaat te duwen. Zorg ervoor dat de
uitsparing van de kam zich op één lijn bevindt met
de voorzijde van het apparaat (g. 6).
2 U verwijdert een kap of kam door deze voorzichtig
van het apparaat te trekken (g. 7).
Opmerking: Houd de kam niet bij zijn tanden vast wanneer
u eraan trekt.
Het apparaat gebruiken
De Ladyshave is geschikt voor:
- Het scheren van de oksels
- Het scheren van de benen
- Het scheren van de bikinilijn
- Het trimmen van de bikinilijn (alleen HP6342)
Op een natte huid gebruiken
U kunt de Ladyshave gebruiken op een natte huid,
terwijl u een bad neemt of doucht. U bereikt het beste
resultaat door uw huid eerst in te zepen met zeep of
scheerschuim.
Op een droge huid gebruiken
Als u er de voorkeur aan geeft de Ladyshave te gebruiken
op een droge huid, zorg er dan voor dat uw huid schoon
en goed droog is.
Opmerking: in principe is er geen verschil tussen gebruik van
het apparaat op een natte huid en gebruik op een droge
huid. U kunt zelf bepalen welke methode u het beste bevalt.
Opmerking: Smeer vlak voor of na het scheren uw huid niet
in met lotions die alcohol bevatten. Als u wilt, kunt u wat
talkpoeder aanbrengen op uw huid.
Opmerking: Druk het scheerhoofd niet te hard op uw huid
omdat dit een negatief effect heeft op de scheerprestaties
van het apparaat en omdat dit huidirritatie kan veroorzaken.
Scheren
Benen en bikinilijn
1 Schuif de aan/uitknop omhoog om het apparaat in
te schakelen (g. 8).
2 Houd het apparaat onder een hoek van ongeveer
70° vast. Zorg ervoor dat het scheerblad en
de voortrimmer volledig in contact zijn met de
huid (g. 9).
3 Trek de huid met uw vrije hand strak, zodat de
haartjes rechtop staan.
4 Beweeg het apparaat voorzichtig over de huid,
tegen de richting van de haargroei in (g. 10).
Oksels
1 Plaats bij het scheren van uw oksels één arm achter
uw hoofd om de huid strak te trekken (g. 11).
2 Beweeg de Ladyshave voorzichtig over de huid.
U bereikt het beste resultaat door de Ladyshave
omhoog en omlaag en van links naar rechts te
bewegen (g. 12).
Efciëntie-opzetkap (alleen HP6342)
Als u geen ervaring hebt met scheren, kunt u de
efciëntie-opzetkap gebruiken om u te helpen de
Ladyshave onder de meest optimale hoek op de huid
te plaatsen. Wanneer de efciëntie-opzetkap plat op de
huid ligt, hebben het scheerblad en de trimmer volledig
contact met de huid. Dit zorgt voor perfecte resultaten.
Trimmen (alleen HP6342)
Als het haar dat u wilt scheren langer is dan 10 mm, kunt
u het haar voortrimmen met de trimkam op een lengte
van 3 mm voor een optimaal scheerresultaat.
1 Bevestig de trimkam op het apparaat.
2 Schuif de aan/uitknop omhoog om het apparaat in
te schakelen (g. 8).
3 Beweeg het apparaat tegen de haargroeirichting in.
Zorg ervoor dat het oppervlak van de kam altijd
volledig contact maakt met de huid (g. 13).
Opmerking: U bereikt het beste resultaat als de trimmer
onder droge omstandigheden wordt gebruikt.
Schoonmaken en onderhoud
Uw apparaat gaat het langst mee en levert het beste
resultaat indien u het apparaat regelmatig schoonmaakt
en goed onderhoudt.
Maak de Ladyshave na ieder gebruik schoon.
Als de batterijhouder niet goed is gesloten, maak
de Ladyshave dan niet schoon met water, spoel het
apparaat niet af en dompel het niet in water.
Gebruik nooit schuursponzen, schurende
schoonmaakmiddelen of agressieve vloeistoffen zoals
benzine of aceton om het apparaat schoon te maken.
1 Schakel het apparaat uit (g. 14).
2 Verwijder de scheerunit van het apparaat om de
haarkamer, de scheerunit en het scheerhoofd
schoon te maken (g. 15).
Opmerking: Oefen niet te veel druk uit op het scheerblad
om beschadiging te voorkomen.
3 Om de scheerunit schoon te maken, spoelt
u deze onder de kraan af of gebruikt u het
schoonmaakborsteltje (g. 16).
Opmerking: Maak het apparaat niet schoon met water dat
heter is dan douchetemperatuur.
4 Spoel de haren van het apparaat af (g. 17).
5 Zorg ervoor dat het apparaat helemaal droog is
voordat u de scheerunit opnieuw bevestigt (g. 18).
Onderhoud
1 Smeer het scheerblad twee keer per jaar met een
druppeltje naaimachineolie (g. 19).
2 Breng af en toe wat vaseline aan op de rubberen
afdichtring om de Ladyshave waterdicht te houden.
Opbergen
1 Plaats de beschermkap op het apparaat.
Opmerking: De beschermkap voorkomt beschadiging aan
het scheerhoofd.
2 Alleen HP6342: bewaar het apparaat en de
accessoires in het bijgeleverde etui.
Vervangen
Als u de Ladyshave meer dan één keer per week gebruikt,
raden we u aan de scheerunit na een of twee jaar te
vervangen of als deze beschadigd is.
De scheerunit, het deksel van het batterijvak, het
schoonmaakborsteltje, de kappen en de kam kunnen
worden vervangen. Ga naar uw Philips-dealer of een door
Page 11

Philips geautoriseerd servicecentrum als een of meer
11
4203.000.6693.1
onderdelen moeten worden vervangen.
Milieu
- Niet-oplaadbare batterijen bevatten stoffen die
schadelijk kunnen zijn voor het milieu. Gooi nietoplaadbare batterijen niet weg met het normale
huisvuil, maar lever ze apart in op een ofcieel
aangewezen inzamelpunt voor batterijen. Verwijder
de niet-oplaadbare batterijen altijd voordat u
het apparaat afdankt en inlevert op een ofcieel
aangewezen inzamelpunt (g. 20).
- Gooi het apparaat aan het einde van zijn levensduur
niet weg met het normale huisvuil, maar lever het in
op een door de overheid aangewezen inzamelpunt
om het te laten recyclen. Op die manier levert u een
bijdrage aan een schonere leefomgeving (g. 21).
Garantie en service
Als u service of informatie nodig hebt of als u een
probleem hebt, bezoek dan de Philips-website (www.
philips.com) of neem contact op met het Philips
Consumer Care Centre in uw land (u vindt het
telefoonnummer in het ‘worldwide guarantee’-vouwblad).
Als er geen Consumer Care Centre in uw land is, ga dan
naar uw lokale Philips-dealer.
Problemen oplossen
Dit hoofdstuk behandelt in het kort de problemen die u
kunt tegenkomen tijdens het gebruik van het apparaat. Als
u er niet in slaagt het probleem op te lossen met behulp
van de onderstaande informatie, neem dan contact op
met het Consumer Care Centre in uw land.
Probleem Oorzaak Oplossing
Het apparaat
functioneert
niet zoals zou
moeten.
De scheerunit
is vuil.
Verwijder de
scheerunit en spoel
deze af onder de
kraan of maak de
scheerunit schoon
met het schoonmaakborsteltje.
Verwijder ook de
haartjes die zich
mogelijk onder de
trimmer hebben
verzameld.
Probleem Oorzaak Oplossing
U hebt het
deksel van
het batterijvak
niet goed
bevestigd.
Het apparaat
is in het water
gevallen terwijl
het batterijvak
was geopend.
Duw het deksel van
het batterijvak op
het apparaat (‘klik’).
Laat het apparaat
drogen. Bevestig
het deksel van het
batterijvak pas weer
op het apparaat
als de binnenkant
helemaal droog is.
Het apparaat
werkt te
langzaam
(en maakt
een vreemd
geluid).
Meer
huidirritatie
dan anders.
Het apparaat
werkt niet.
U hebt het
apparaat
onder een
verkeerde
hoek op de
huid geplaatst.
De batterijen
zijn bijna leeg.
De scheerunit
is vuil.
De scheerunit
moet worden
gesmeerd.
Het
scheerblad is
beschadigd of
versleten.
De accu’s zijn
leeg.
U hebt de
batterijen niet
goed in het
batterijvak
geplaatst.
Zorg ervoor dat u
het apparaat onder
een hoek van 70°
op de huid plaatst
(zie ‘Scheren’ in
hoofdstuk ‘Het
apparaat gebruiken’).
Vervang de
batterijen.
Maak de scheerunit
schoon.
Smeer de scheerunit
met enkele druppels
naaimachineolie.
Vervang de
scheerunit.
Vervang de
batterijen.
Plaats de batterijen
in het batterijvak
volgens de + en aanduidingen in het
batterijvak.
 Loading...