

Page 1
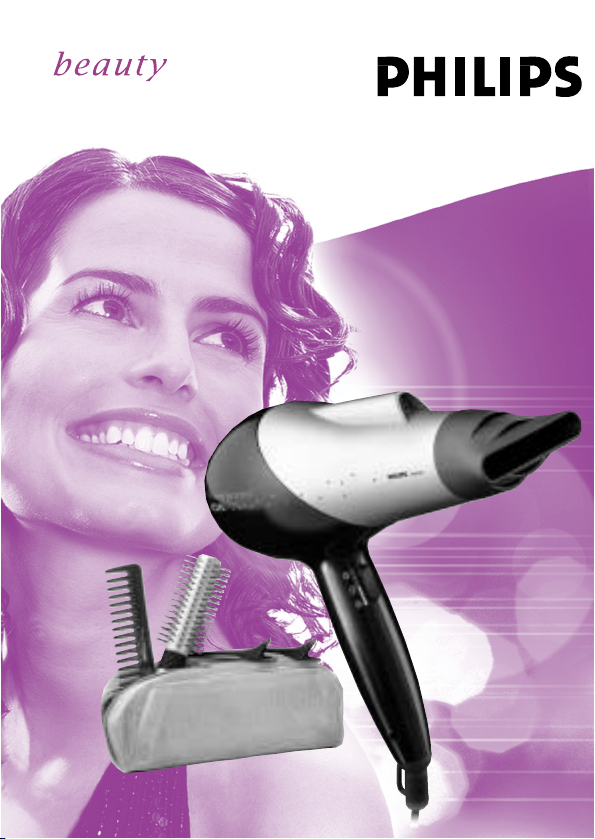
Powerprotect ION
HP4898/01
Page 2

234
Page 3
Page 4

Page 5

ENGLISH 6
DEUTSCH 17
FRANÇAIS 29
NEDERLANDS 41
ESPAÑOL 53
ITALIANO 65
PORTUGUÊS 77
TÜRKÇE 88
HP4898/01
5
Page 6

Introduction
The Philips Powerprotect ION has been specially
designed to meet your personal needs, giving you
frizz-free, beautiful and shiny hair.The ioniser
inside the hairdryer emits negatively charged ions
that surround your hair. Negative ions reduce the
build-up of static electricity and help to keep your
hair in good condition, making it frizz-free and
smooth.
Scientific tests have shown that drying at a too
high temperature can lead to overdrying. Hair
that has been overdried, feels coarse and looks
dull and frizzy.Whereas normal hairdryers can
heat up the hair to very high temperatures
(approx. 80cC), the Powerprotect ION features
the Powerprotect System.This system offers
gentle drying at a lower and caring temperature
of 57cC, reducing the risk of overheating the hair.
Combined with an ultra-strong airflow, the system
dries your hair ultra-quickly,giving it the lustre,
body and richness you love.
For more information on this hairdryer or any
other Philips beauty product, visit our website:
www.philips.com/beauty.
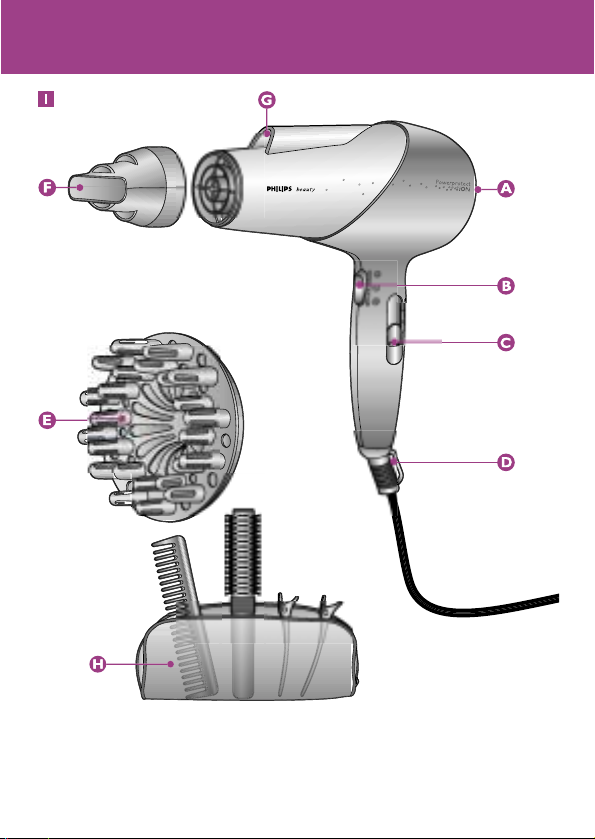
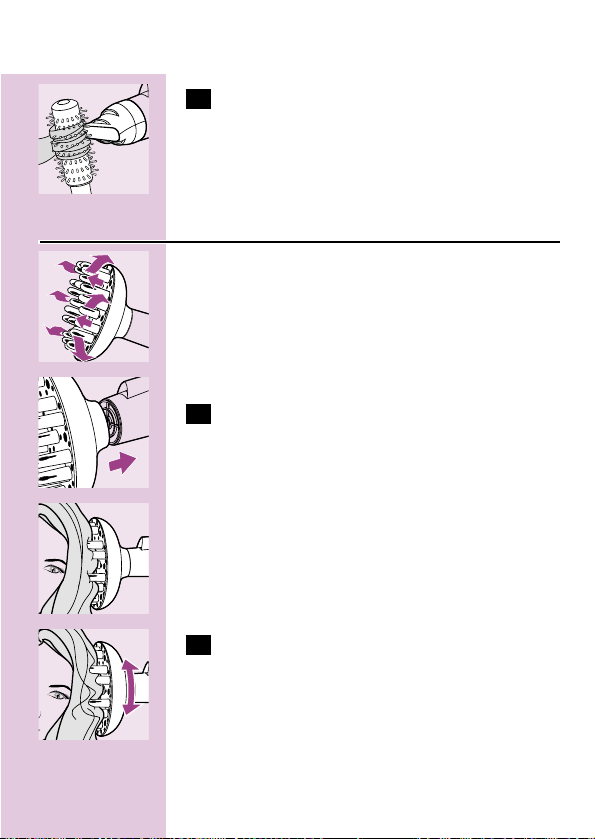
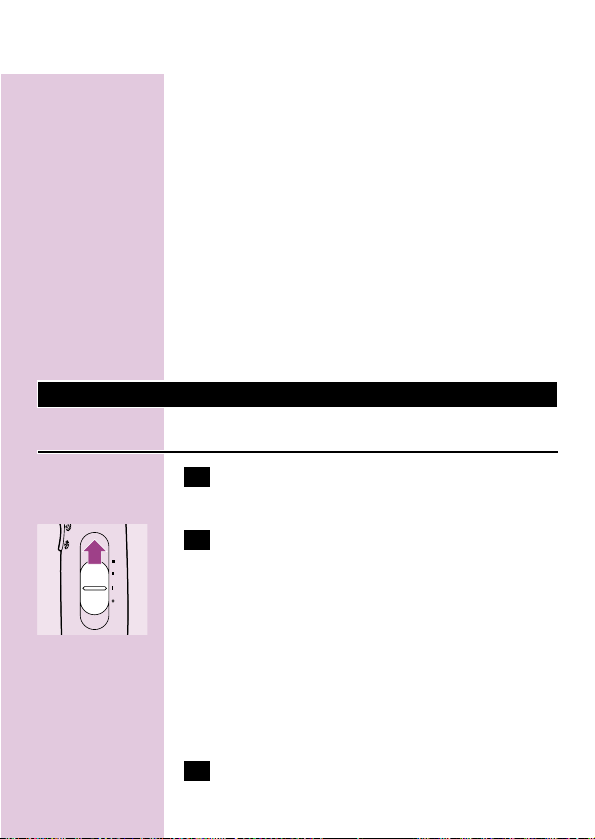
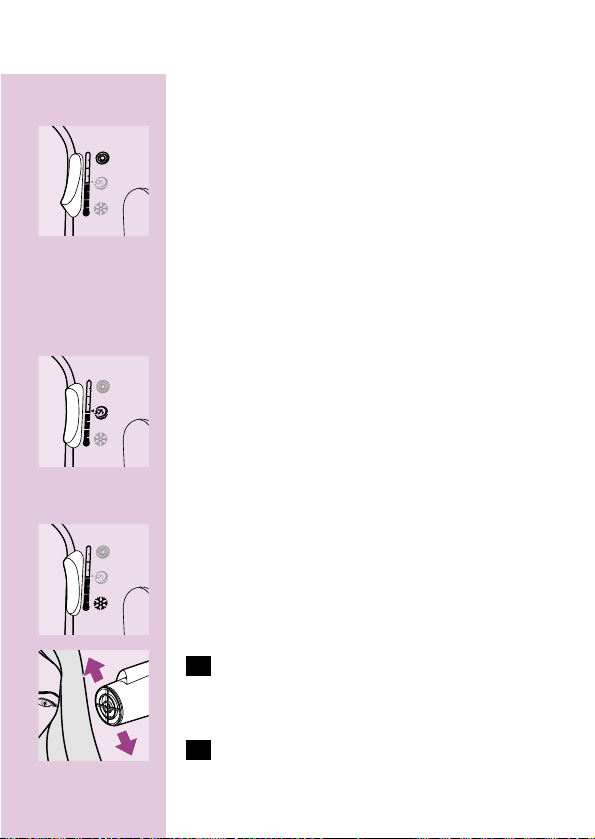
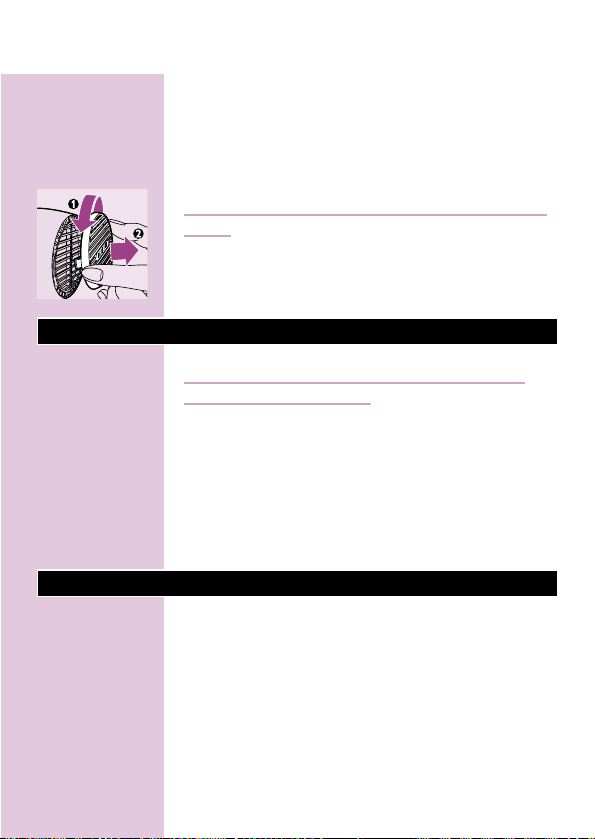
General description (fig. 1)
A Air inlet grille
B Rocker switch for temperature settings
- ‡ Quick-Dry setting
- · Protect setting
- — Cool setting
ENGLISH6
Page 7

C Airflow and on/off slide
- O = off
- I = Low airflow especially intended for
styling
- II = Medium airflow for drying and styling
- III = Ultra-strong airflow for fast drying
D Hanging loop
E Volume diffuser
F Concentrator
G Ion generator
H Professional haircare set
- Round brush
-Comb
- Hairclips
- Pouch
Important
Read these instructions for use carefully before
using the appliance and save them for future
reference.
◗ Check if the voltage indicated on the
appliance corresponds to the local mains
voltage before you connect the appliance.
◗ Check the condition of the mains cord
regularly. Do not use the appliance if the plug,
the cord or the appliance itself is damaged.
◗ If the mains cord is damaged, it must be
replaced by Philips, a service centre
authorised by Philips or similarly qualified
persons in order to avoid a hazard.
◗ Keep this appliance away from water! Do not
use this product near or over water
ENGLISH 7
Page 8

contained in baths, washbasins, sinks etc.
When used in a bathroom, unplug the
appliance after use since the proximity of
water presents a risk, even when the
hairdryer is switched off.
◗ For additional protection, we advise you to
install a residual current device (RCD) with a
rated residual operating current not
exceeding 30mA in the electrical circuit
supplying the bathroom.Ask your installer for
advice.
◗ Keep the appliance out of the reach of
children.
◗ Never block the air grilles.
◗ If the appliance overheats, it will switch off
automatically. Unplug the appliance and let it
cool down for a few minutes.Before you
switch the appliance on again, check the grilles
to make sure they are not blocked by fluff,
hair, etc.
◗ Always switch the appliance off before putting
it down, even if it is only for a moment.
◗ Always unplug the appliance after use.
◗ Do not wind the mains cord round the
appliance.
◗ You may notice a characteristic odour when
using this hairdryer.This is caused by the ions
that are generated and it is not harmful to the
human body.
◗ Do not probe the ion generator with metal
objects.
ENGLISH8
Page 9
Using the appliance
Drying
1 Put the plug in the wall socket.
C
2 Switch the appliance on by selecting the
desired setting:
O= Off
I = Low airflow especially intended for styling
II = Medium airflow for drying and styling
III = Ultra-strong airflow for fast drying
The ions will be generated automatically.
3 Select the desired temperature setting by
pressing the rocker switch.
The Quick-Dry setting
C
◗ ‡ The Quick-Dry setting enables you to dry
shower-wet hair very quickly.
It is recommended to use the Quick-Dry setting
only on shower-wet hair and to select the Protect
setting when the hair is almost dry in order to
reduce the risk of overdrying.
The Protect setting
C
◗ · The Protect setting gently dries the hair at
a caring temperature of 57cC.
ENGLISH 9
Page 10
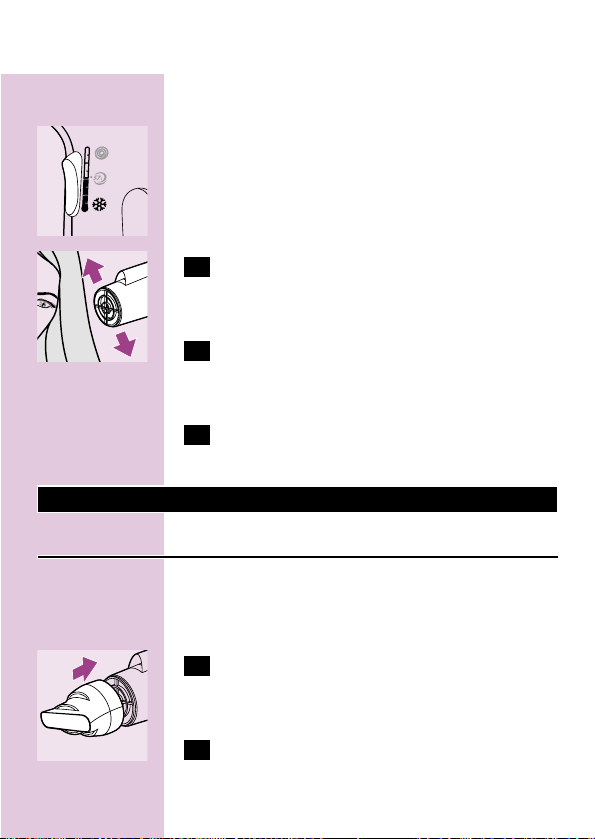
The Cool setting
C
◗ — The Cool setting fixes the style you have
created.
For long-lasting styling results, set the rocker
switch to the Cool setting and direct the cool
airflow at your hair to fix your style.
C
4 Dry your hair by making brushing
movements with the hairdryer at a small
distance from the hair.
5 Select the highest airflow speed (III) in
combination with the Quick-Dry or
Protect setting for ultra-quick drying.
6 Select a lower airflow speed (I-II) for
drying short hair or styling your hair.
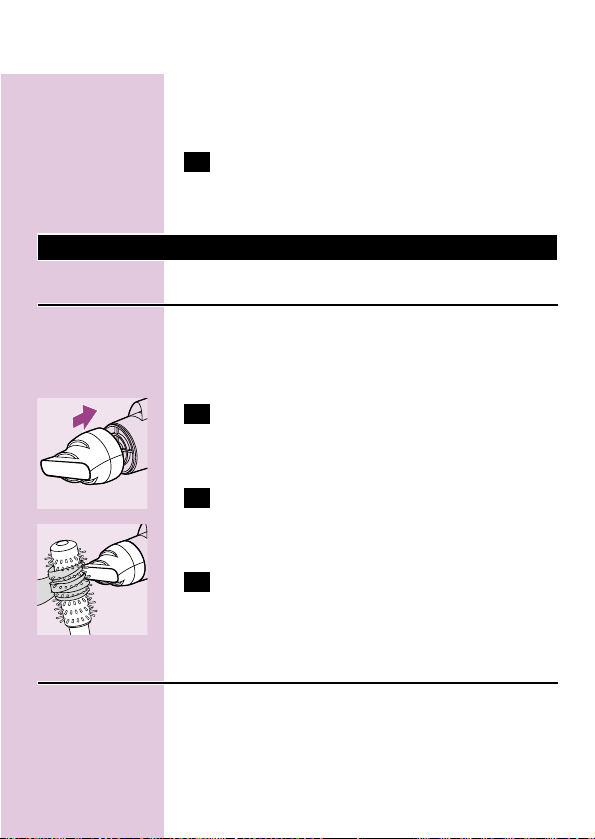
Attachments
Concentrator
The concentrator enables you to direct the
airflow straight at the brush or comb with which
you are styling your hair.
C
1 Connect the concentrator by simply
snapping it onto the appliance. Disconnect
it by pulling it off.
2 Switch the appliance on by setting the
airflow slide to position I, II or III.
ENGLISH10
Page 11
C
3 While you are drying your hair with the
concentrator, you can use a brush or comb
to style your hair.
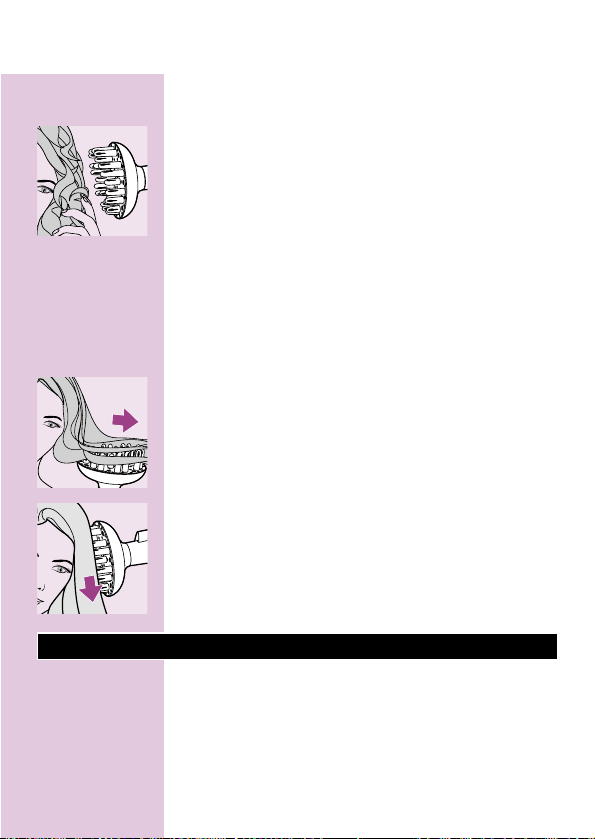
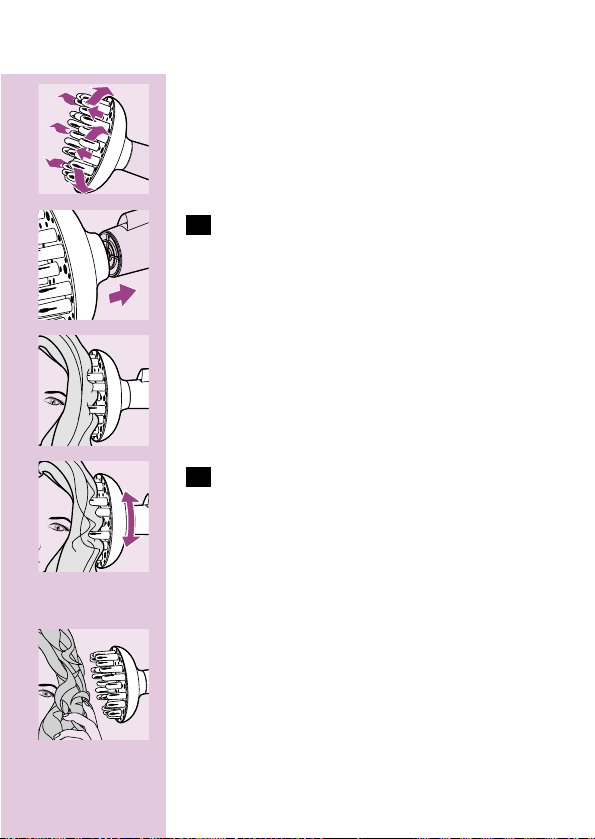
Volume diffuser
The volume diffuser has been specially developed
to gently dry both straight and curly or wavy hair.
C
◗ The volume diffuser emits a gentle airflow and
allows you to give your style volume and
bounce.
C
1 Connect the diffuser by simply snapping it
onto the appliance and align the arrows on
the diffuser and the barrel. Disconnect it
by pulling it off.
C
◗ To add volume at the roots, insert the pins
into your hair in such a way that they touch
your scalp.
C
2 Make rotating movements with the
appliance to distribute the warm air evenly
through your hair.
ENGLISH 11
Page 12
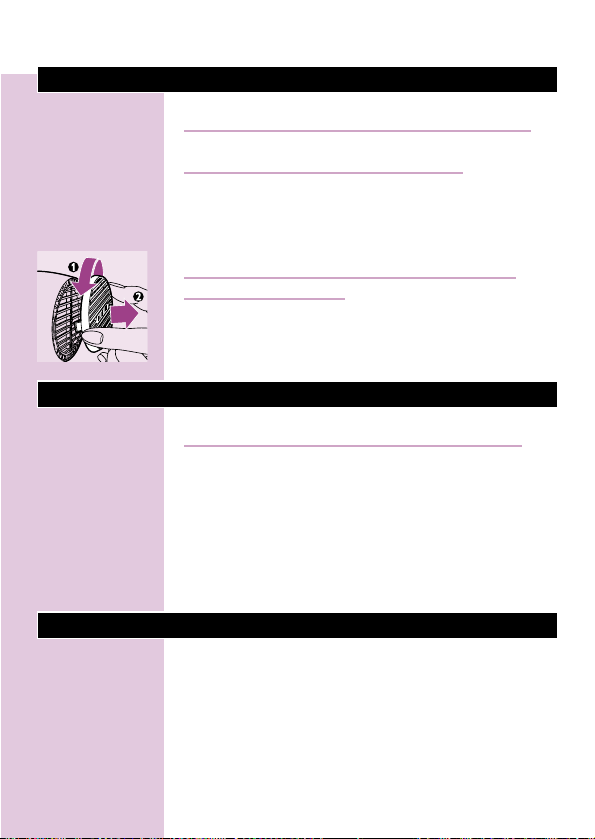
Curly or wavy hair
C
◗ When you are styling curly or wavy hair, hold
the diffuser at a distance of 10-15 cm from
your head to let the hair dry gradually.
- In the meantime you can style your hair with
your free hand or with a comb.
- You can also scrunch locks of hair in your
hand to model the curls and waves while drying.
This will prevent the curls from sagging or
becoming frizzy.
Long hair
C
◗ To dry long hair,you can spread out locks of
hair on top of the diffuser.
C
◗ Alternatively, you can comb the hair
downwards with the pins of the diffuser while
drying.
Styling and drying tips
Here is one style you can create easily and gently
with the Philips Powerprotect ION hairdryer.As
you become more familiar with the appliance, you
will discover many other ways to create great
styles. Just use your imagination!
ENGLISH12
Page 13

1 After washing and conditioning your hair
as usual, start drying it by dabbing the wet
hair with a towel, then comb it through
carefully.
2 Place the diffuser in your hair so that the
tips of the air pins touch your scalp.By
making circular movements with the
diffuser, the hair will be lifted towards the
base of the diffuser and the air pins will
dry the hair from the roots upwards.This
will add more volume to your hair.
Continue drying until your hair is dry at
the roots.
3 Set the airflow to a lower position and
continue drying until your hair is
completely dry.Use a comb or brush to
style your hair in the desired way while
drying.
4 To create volume at the hair ends, hold the
diffuser in horizontal position and place
some locks of hair on the base of the
diffuser between the air pins and leave
them there for a while.The gentle airflow
will prevent your curls or waves from
being blown out of style while drying.
5 Finish off with the cool airflow to fix your
style.
Set the rocker switch to the Cool setting and
direct the cool airflow at your hair.
ENGLISH 13
Page 14
Cleaning
Always unplug the appliance before cleaning it.
Never rinse the appliance with water.
◗ Clean the appliance with a dry cloth.
◗ Clean the attachments with a moist cloth or
by rinsing them under the tap.
Remove the attachments from the appliance
before cleaning them.
C
◗ The air inlet grille is detachable to allow easy
cleaning.
Storage
Always unplug the appliance before storing it.
◗ Put the appliance in a safe place and let it cool
down.
◗ Do not wind the mains cord round the
appliance.
◗ The appliance can be stored by hanging it
from its hanging loop.
Replacement
◗ If the mains cord is damaged, it must be
replaced by Philips, a service centre
authorised by Philips or similarly qualified
persons in order to avoid a hazard.
◗ Always return the appliance to a service
centre authorised by Philips for examination
ENGLISH14
Page 15

or repair. Repair by unqualified people could
cause an extremely hazardous situation for
the user.
Guarantee & service
If you need information or if you have a
problem, please visit the Philips website at
www.philips.com or contact the Philips Customer
Care Centre in your country (you will find its
phone number in the worldwide guarantee
leaflet). If there is no Customer Care Centre in
your country, turn to your local Philips dealer or
contact the Service Department of Philips
Domestic Appliances and Personal Care BV.
ENGLISH 15
Page 16

Solution
Perhaps the socket to which the appliance has been
connected is not live:
Make sure the socket is live.
The appliance may have overheated and switched itself
off:
Unplug the appliance and let it cool down for a few
minutes. Before you switch the appliance on again,check
the grilles to make sure they are not blocked by fluff,
hair, etc.
The appliance may not be suitable for the voltage to
which it has been connected:
Make sure that the voltage indicated on the type plate
of the appliance corresponds to the local mains voltage.
The mains cord of the appliance may be damaged:
If the mains cord is damaged, it must be replaced by
Philips, a service centre authorised by Philips or similarly
qualified persons in order to avoid a hazard.
Problem
The appliance does
not work at all.
Troubleshooting
If problems should arise with your hairdryer and you are unable to
solve them by means of the troubleshooting guide below, please
contact the nearest Philips service centre or the Philips Customer
Care Centre in your country.
ENGLISH16
Page 17

Einleitung
Der Philips Powerprotect ION wurde für Ihre
persönlichen Bedürfnisse entwickelt und verleiht
Ihrem Haar Schönheit und Glanz, denn es
zerzaust nicht. Der Haartrockner stößt negativ
geladene Partikel (Ionen) aus, die vom Luftstrom
absorbiert werden und das Haar umgeben.
Negative Ionen reduzieren die Bildung statischer
Aufladung, so dass Ihr Haar gepflegt, weich und
leicht kämmbar bleibt.
Wissenschaftliche Studien haben gezeigt, dass zu
hohe Temperaturen zu Austrocknung der Haare
führen kann.Ausgetrocknetes Haar fühlt sich rauh
an, sieht stumpf und kraus aus.Während die
gängigen Haartrockner das Haar auf sehr hohe
Temperaturen erhitzen können (ca. 80cC), ist der
Powerprotect ION mit dem PowerprotectSystem ausgestattet, das Ihr Haar bei einer
niedrigeren Temper atur von 57cC sanft und
schonend trocknet und das Risiko von zu stark
erhitztem Haar reduziert. In Kombination mit
einem extra starken Luftstrom trocknet das
Powerprotect-System Ihr Haar besonders schnell
und verleiht ihm Glanz,Volumen und Fülle.
Für weitere Informationen zu diesem
Haartrockner und zu anderen Produkten der
Philips Beauty-Serie besuchen Sie bitte unsere
Website:www.philips.com/beauty
DEUTSCH 17
Page 18

Komponenten (Abbildung 1)
A Lufteinlassgitter
B Kippschalter zur Temperatureinstellung
- ‡ Schnelltrocknung
- · Pflegetrocknung
- — Kaltluft
C Schiebeschalter für Ein/Aus und Luftstrom
-O= Aus
- I = Schwacher Luftstrom zum Stylen
- II = Mittelstarker Luftstrom zum Trocknen
und Stylen
- III = Besonders starker Luftstrom zum
schnellen Trocknen
D Aufhängeöse
E Diffusor
F Stylingdüse
G Ionen-Auslass
H Professionelles Haarpflegeset
- Rundbürste
- Kamm
- Haarklammern
- Tasche
Wichtig
Lesen Sie diese Bedienungsanleitung vor dem
ersten Gebrauch des Geräts sorgfältig durch und
bewahren Sie sie zur späteren Einsichtnahme auf.
◗ Prüfen Sie, bevor Sie das Gerät in Betrieb
nehmen, ob die Spannungsangabe auf dem
Gerät mit der örtlichen Netzspannung
übereinstimmt.
DEUTSCH18
Page 19

◗ Überprüfen Sie das Netzkabel regelmäßig auf
Unversehrtheit.Verwenden Sie das Gerät
keinesfalls, wenn der Netzstecker, das
Netzkabel oder das Gerät selbst defekt ist.
◗ Wenn das Netzkabel defekt oder beschädigt
ist, darf es nur von einem Philips ServiceCenter oder einer von Philips autorisierten
Werkstatt ausgetauscht werden,um ein
Sicherheitsrisiko zu vermeiden.
◗ Halten Sie das Gerät von Wasser fern!
Verwenden Sie es niemals in der Nähe von
Wasser oder über mit Wasser gefüllten
Waschbecken, Spülbecken oder Badewannen.
Ziehen Sie nach jedem Gebrauch im
Badezimmer sofort den Stecker aus der
Steckdose.Auch ein ausgeschaltetes Gerät ist
in der Nähe von Wasser eine Gefahr, solange
sich der Stecker in der Steckdose befindet.
◗ Der Einbau einer
Fehlerstromschutzeinrichtung mit einem
Nennauslösestrom von maximal 30 mA in den
betreffenden Stromkreis bietet zusätzlichen
Schutz. Lassen Sie sich von Ihrem
Elektroinstallateur beraten.
◗ Halten Sie das Gerät außer Reichweite von
Kindern.
◗ Blockieren Sie niemals das Lufteinlassgitter.
◗ Bei Überhitzung wird das Gerät automatisch
ausgeschaltet. Ziehen Sie dann den Stecker
aus der Steckdose und lassen Sie das Gerät
einige Minuten abkühlen. Danach kann es
wieder eingeschaltet werden. Prüfen Sie zuvor,
ob das Lufteinlassgitter z. B. durch Flusen oder
Haare verstopft ist.
DEUTSCH 19
Page 20
◗ Schalten Sie das Gerät immer aus, wenn Sie es
auch nur für einen Augenblick aus der Hand
legen.
◗ Ziehen Sie nach jedem Gebrauch den
Netzstecker aus der Steckdose.
◗ Wickeln Sie das Netzkabel nicht um das
Gerät.
◗ Beim Gebrauch des Geräts nehmen Sie
möglicherweise einen bestimmten Geruch
wahr. Dieser Geruch wird von den erzeugten
Ionen verursacht und ist vollkommen harmlos.
◗ Stecken Sie keine Metallgegenstände in den
Ionen-Auslass.
Benutzung des Geräts
Das Haar trocknen
1 Stecken Sie den Netzstecker in die
Steckdose.
C
2 Schalten Sie das Gerät ein, indem Sie die
gewünschte Einstellung wählen:
O= Aus
I = Schwacher Luftstrom zum Stylen
II = Mittelstarker Luftstrom zum Trocknen und
Stylen
III = Besonders starker Luftstrom zum schnellen
Trocknen
Die Ionen werden automatisch erzeugt.
3 Wählen Sie mit dem Kippschalter die
gewünschte Temperatur.
DEUTSCH20
Page 21
Schnelltrocknung
C
◗ ‡ Die Einstellung "Schnelltrocknung"
ermöglicht das schnelle Trocknen frisch
gewaschener Haare.
Die Schnelltrocknung sollte nur für frisch
gewaschenes Haar verwendet werden. Sie sollten
die Pflegeeinstellung verwenden, wenn die Haare
fast trocken sind, um eine Austrocknung zu
vermeiden.
Pflegetrocknung
C
◗ · Die Pflegeeinstellung trocknet das Haar
sanft bei einer Temperatur von 57c C.
Kaltluft
C
◗ — Die Kaltlufteinstellung dient dem Fixieren
Ihrer Frisur.
Ihre Frisur wird haltbarer,wenn Sie nach dem
Stylen einen Kaltluftstrom auf die Haare richten.
C
4 Trocknen Sie die Haare, indem Sie den
Haartrockner mit bürstenförmigen
Bewegungen dicht am Haar vorbeiführen.
5 Wählen Sie die höchste Gebläsestufe (III)
in Verbindung mit der
Temperatureinstellung "Schnelltrocknung"
DEUTSCH 21
Page 22
oder "Pflege", um das Haar ultraschnell zu
trocknen.
6 Wählen Sie eine niedrigere Gebläsestufe
(I-II), um kurzes Haar zu trocknen oder
Ihre Haare zu stylen.
Die Aufsätze
Stylingdüse
Mit der Stylingdüse können Sie den Luftstrom
gezielt auf die Bürste oder den Kamm richten, mit
der bzw. dem Sie Ihr Haar stylen.
C
1 Die Stylingdüse wird auf das Gerät
aufgesetzt und rastet ein. Zum Abnehmen
wird sie einfach abgezogen.
2 Schalten Sie das Gerät ein, indem Sie den
Schiebeschalter in Position I, II oder III
bringen.
C
3 Während Sie Ihr Haar mit der Stylingdüse
trocknen, können Sie es mit Kamm oder
Bürste stylen.
Der Diffusor
Der Diffusor wurde zum schonenden Trocknen
glatter sowie lockiger oder welliger Haare
entwickelt.
DEUTSCH22
Page 23
C
◗ Der Diffusor produziert einen sanften
Luftstrom und verleiht Ihrer Frisur Volumen
und Elastizität.
C
1 Der Diffusor lässt sich einfach auf das
Gerät stecken; dabei sollten die Pfeile am
Diffusor an denen auf dem Haartrockner
ausgerichtet sein.
C
◗ Setzen Sie die Diffusorfinger so in das Haar,
dass sie die Kopfhaut berühren. So erhalten
Sie vom Haaransatz her volles Volumen.
C
2 Machen Sie drehende Bewegungen mit
dem Gerät, um die warme Luft gleichmäßig
auf alle Haare zu verteilen.
Lockiges oder welliges Haar
C
◗ Halten Sie den Diffusor auf 10 bis 15 cm
Abstand vom Kopf, wenn Sie lockiges oder
welliges Haar stylen, damit das Haar langsam
trocknet.
- Dabei können Sie die Haare mit den Fingern
der freien Hand oder mit einem Kamm stylen.
- Sie können auch einzelne Haarsträhnen beim
DEUTSCH 23
Page 24
Trocknen mit der freien Hand kneten, um das
Haar zu modellieren. Die Locken fallen dadurch
locker.
Langes Haar
C
◗ Zum Trocknen langer Haare können Sie
Strähnen auf dem Diffusor ausbreiten.
C
◗ Sie können das Haar beim Trocknen auch mit
den Diffusorfingern nach unten kämmen.
Hinweise zum Trocknen und Stylen
Hier eine Frisur,die Sie schnell und einfach mit
dem Haartrockner Philips Powerprotect ION
kreieren können. Sobald Sie sich mit dem Gerät
vertraut gemacht haben, werden Sie noch viele
Frisiermöglichkeiten entdecken. Lassen Sie Ihrer
Fantasie freien Lauf!
1 Waschen und konditionieren Sie Ihr Haar
wie üblich.Trocknen Sie das Haar mit
einem Handtuch vor und kämmen Sie es
sorgfältig durch.
2 Setzen Sie die Diffusorfinger so in das
Haar, dass die Spitzen die Kopfhaut
DEUTSCH24
Page 25

berühren. Indem Sie den Diffusor
kreisförmig bewegen,wird das Haar
angehoben, und die Diffusorfinger
trocknen Ihr Haar vom Ansatz an und
verleihen Ihrer Frisur mehr Volumen.
Setzen Sie das Trocknen fort, bis das Haar
an den Wurzeln ganz trocken ist.
3 Stellen Sie eine niedrigere Gebläsestufe ein
und fahren Sie fort, bis die Haare
vollständig trocken sind. Mit einem Kamm
oder einer Bürste können Sie die Haare
beim Trocknen stylen.
4 An den Haarspitzen können Sie mehr
Volumen erzielen, indem Sie den Diffusor
waagerecht halten und einige Strähnen auf
die Basis des Diffusors legen. Nach einiger
Zeit trocknet der sanfte Luftstrom die
Haare und verhindert gleichzeitig, dass die
Locken oder Wellen ihre Form verlieren.
5 Fixieren Sie die Frisur abschließend mit
einem kalten Luftstrom.
Stellen Sie den Kippschalter auf Kaltluft und
richten Sie den kühlen Luftstrom auf das Haar.
Reinigung
Trennen Sie das Gerät vor dem Reinigen immer
vom Stromnetz.
Spülen Sie das Gerät nie mit Wasser.
DEUTSCH 25
Page 26
◗ Reinigen Sie das Gerät mit einem trockenen
Tu c h .
◗ Reinigen Sie die Aufsätze mit einem feuchten
Tuch oder spülen Sie sie unter fließendem
Wasser ab.
Nehmen Sie die Aufsätze vor dem Reinigen vom
Gerät.
C
◗ Das Lufteinlassgitter lässt sich zum Reinigen
abnehmen.
Aufbewahrung
Trennen Sie das Gerät immer vom Stromnetz
bevor Sie es wegräumen.
◗ Lassen Sie das Gerät an einem sicheren Ort
abkühlen.
◗ Wickeln Sie das Netzkabel nicht um das
Gerät.
◗ Das Gerät kann an der Öse hängend
aufbewahrt werden.
Ersatzteile
◗ Wenn das Netzkabel defekt oder beschädigt
ist, darf es nur von einem Philips ServiceCenter oder einer von Philips autorisierten
Werkstatt ausgetauscht werden,um ein
Sicherheitsrisiko zu vermeiden.
◗ Wenden Sie sich zur Prüfung oder zur
Reparatur des Geräts immer an ein Philips
Service Center.Unsachgemäß ausgeführte
Reparaturen gefährden den Benutzer.
DEUTSCH26
Page 27

Garantie und Kundendienst
Benötigen Sie weitere Informationen oder treten
Probleme auf, wenden Sie sich bitte an Ihren
Philips-Händler oder setzen Sie sich mit einem
Philips Service-Center in Ihrem Land in
Verbindung (Tel. Nr. 0180/5356767). Besuchen Sie
auch die Philips Website www.philips.com.
DEUTSCH 27
Page 28

Lösung
Möglicherweise führt die Steckdose, an die das Gerät
angeschlossen ist, keinen Strom.
Stellen Sie sicher, dass die Steckdose Strom führt.
Das Gerät hat sich möglicherweise überhitzt und
deshalb ausgeschaltet.
Trennen Sie das Gerät vom Stromnetz und lassen Sie es
einige Minuten abkühlen. Prüfen Sie vor dem erneuten
Einschalten des Geräts, ob das Lufteinlassgitter durch
Flusen, Haare usw. blockiert ist.
Das Gerät ist für die Spannung des Stromnetzes nicht
geeignet.
Prüfen Sie, ob die Spannungsangabe auf dem Typenschild
des Geräts mit der örtlichen Netzspannung
übereinstimmt.
Das Netzkabel des Geräts ist beschädigt.
Wenn das Netzkabel defekt oder beschädigt ist, darf es
nur von einem Philips Service-Center oder einer von
Philips autorisierten Werkstatt ausgetauscht werden, um
ein Sicherheitsrisiko zu vermeiden.
Problem
Das Gerät funktioniert
nicht.
Fehlerbehebung
Treten Probleme bei der Benutzung des Haartrockners auf, die Sie
mit Hilfe der folgenden Informationen nicht beheben können, setzen
Sie sich bitte mit dem Philips Service Center in Ihrem Land in
Verbindung.
DEUTSCH28
Page 29
Introduction
Ce sèche-cheveux Powerprotect ION de Philips a
été spécialement conçu pour satisfaire vos
besoins et pour vous aider à obtenir des cheveux
brillants et sans frisottis. Le générateur d'ions à
l'intérieur du sèche-cheveux émet des ions
chargés négativement qui enveloppent les
cheveux. Les ions négatifs réduisent l'électricité
statique et rendent les cheveux soyeux, lisses et
brillants.
Des tests scientifiques ont prouvé que le séchage
des cheveux à une température élevée peut
mener à la déshydratation des cheveux. Les
cheveux desséchés deviennent drus et ternes.
Alors que les sèche-cheveux classiques sèchent
les cheveux à une température élevée (environ
80cC), Powerprotect ION est doté du Système
Powerprotect. Ce système assure un séchage en
douceur à une température de soin de 57cC,
tout en prévenant la déshydratation des cheveux.
Avec un flux d'air ultra puissant, ce système sèche
vos cheveux d'une manière ultra rapide tout en
assurant la douceur,la brillance et la santé de vos
cheveux.
Pour plus d'informations sur ce produit ou sur
d'autres produits Philips, visitez notre site web à:
www.philips.com/beauty.
FRANÇAIS 29
Page 30

Description générale (fig. 1)
A Grille d'entrée d'air
B Commutateur pour réglage de température
- ‡ Position Séchage rapide
- · Position de Protection
- — Position Air froid
C Flux d'air et bouton coulissant marche/arrêt
-O= arrêt
- I = Flux d'air doux spécialement conçu pour
coiffer vos cheveux
- II = Flux d'air moyen pour sécher et coiffer
vos cheveux
- III = Flux d'air ultra puissant pour sécher
rapidement vos cheveux
D Anneau de suspension
E Diffuseur de volume
F Concentrateur
G Générateur d'ions
H Trousse professionnelle de coiffure
- Brosse ronde
- Peigne
- Barrettes
-Etui
Important
Lisez les instructions du mode d'emploi avant
d'utiliser l'appareil et conservez-les pour un usage
ultérieur.
◗ Avant de brancher l'appareil, vérifiez que la
tension indiquée sur l'appareil correspond
bien à la tension de votre secteur.
FRANÇAIS30
Page 31

◗ Vérifiez régulièrement le cordon
d'alimentation. N'utilisez pas l'appareil si la
fiche, le cordon ou l'appareil lui-même est
endommagé.
◗ Si le cordon d'alimentation est endommagé, il
ne doit être remplacé que par Philips, par un
Centre Service Agréé ou par une personne
qualifiée pour éviter tout accident.
◗ Tenez l'appareil à l'écart de l'eau. Ne l'utilisez
pas près d'une baignoire, d'un lavabo ou d'un
évier. Si vous utilisez l'appareil dans la salle de
bain, débranchez-le après usage car la
proximité de l'eau peut présenter un risque
pour l'utilisateur même si l'appareil est à
l'arrêt.
◗ Pour plus de protection, il est conseillé de
brancher l'appareil sur une prise de courant
protégée par un disjoncteur différentiel de
30mA maxi, si vous utilisez l'appareil dans la
salle de bains. Demandez conseil à votre
électricien.
◗ Tenez l'appareil hors de portée des enfants.
◗ Veillez à ne jamais obstruer les grilles d'entrée
d'air.
◗ En cas de surchauffe, l'appareil se mettra
automatiquement à l'arrêt. Débranchez alors
l'appareil et attendez quelques minutes afin
qu'il refroidisse.Après avoir vérifié que la
grille d'entrée d'air ne soit pas obstruée par
des peluches ou des cheveux etc., vous
pouvez à nouveau brancher l'appareil.
◗ Arrêtez toujours l'appareil avant de le poser,
même si vous le faites pour un court instant.
FRANÇAIS 31
Page 32

◗ Débranchez toujours l'appareil après
utilisation.
◗ Afin de ne pas vriller le cordon d'alimentation,
ne l'enroulez pas autour de l'appareil.
◗ Lors de l'utilisation, le sèche-cheveux, à cause
des ions générés, peut dégager une odeur
spécifique. Cela n'est pas nocif pour votre
santé.
◗ Ne dirigez pas le générateur d'ions vers des
objets métalliques.
Mode d'emploi
Séchage
1 Branchez l'appareil.
C
2 Mettez l'appareil en marche en réglant le
bouton sur la position désirée:
O = Arrêt
I = Flux d'air doux spécialement conçu pour
coiffer vos cheveux
II = Flux d'air moyen pour sécher et coiffer vos
cheveux
III = Flux d'air ultra puissant pour sécher
rapidement vos cheveux
Les ions seront générés immédiatement.
3 Sélectionnez la température souhaitée en
appuyant sur le commutateur.
FRANÇAIS32
Page 33

Position Séchage rapide
C
◗ ‡ La touche Séchage rapide permet de
sécher rapidement les cheveux mouillés.
Nous vous recommandons d'utiliser la touche
Séchage rapide seulement sur les cheveux
mouillés et d'utiliser le réglage de Protection
lorsque les cheveux sont presque secs pour
réduire le risque de déshydratation.
Position de Protection
C
◗ · Le réglage de Protection sèche doucement
les cheveux à une température de soin de
57cC.
Position Air froid
C
◗ — Le réglage Air froid vous aide à fixer votre
coiffure.
Pour des résultats de longue durée, réglez le
commutateur sur la position Air froid et dirigez un
flux d'air froid vers vos cheveux pour fixer votre
coiffure.
C
4 Séchez vos cheveux avec des mouvements
de brossage en tenant l'appareil près de
vos cheveux.
5 Sélectionnez la vitesse maximale (III) et les
touches Séchage rapide ou Protection
pour sécher rapidement vos cheveux.
FRANÇAIS 33
Page 34

6 Sélectionnez un réglage inférieur (I-II) pour
sécher les cheveux courts ou modeler vos
cheveux.
Accessoires
Concentrateur d'air
Le concentrateur vous permet de diriger le flux
d'air vers la brosse ou le peigne avec lequel vous
modelez vos cheveux.
C
1 Fixez le concentrateur sur l'appareil.
Détachez-le en tirant dessus.
2 Mettez l'appareil en marche en réglant le
bouton sur la position I, II ou III.
C
3 Pendant que vous séchez vos cheveux avec
le concentrateur d'air, vous pouvez utiliser
une brosse ou un peigne pour modeler
vos cheveux.
Diffuseur volume
Le diffuseur a été spécialement conçu pour
sécher en douceur les cheveux lisses et bouclés
ou ondulés.
C
◗ Le diffuseur émet un flux d'air doux et vous
permet de donner du volume à votre coiffure.
FRANÇAIS34
Page 35

C
1 Fixez le diffuseur sur l'appareil en alignant
les flèches au-dessus du diffuseur et de la
barre. Détachez-le en tirant dessus.
C
◗ Pour donner du volume aux racines, faites
pénétrer les pointes du diffuseur dans vos
cheveux jusqu'à ce qu'elles touchent le cuir
chevelu.
C
2 Faites des mouvements circulaires avec
l'appareil pour diffuser l'air chaud dans vos
cheveux.
Cheveux bouclés ou ondulés
C
◗ Quand vous bouclez ou ondulez vos cheveux,
tenez le diffuseur à une distance de 10 à 15
cm de la tête pour laisser les cheveux sécher
graduellement.
- Pendant ce temps, vous pouvez modeler vos
cheveux avec l'autre main ou à l'aide d'un peigne.
- Vous pouvez aussi frotter les mèches avec les
doigts pour modeler les boucles ou les
ondulations pendant le séchage. Celà évitera aux
boucles de tomber ou de créper.
FRANÇAIS 35
Page 36

Cheveux longs
C
◗ Pour sécher les cheveux longs,vous pouvez
répandre quelques mèches au-dessus du
diffuseur.
C
◗ Sinon, vous pouvez peigner vos cheveux vers
le bas avec les picots du diffuseur pendant le
séchage.
Suggestions de coiffures et séchage
Vous trouverez ci-dessous une coiffure que vous
pouvez créer avec votre sèche-cheveux
Powerprotect ION de Philips. Au fur et à mesure
que vous vous familiarisez avec l'appareil, vous
découvrirez beaucoup plus de possibilités pour
obtenir de belles coiffures. Utilisez votre
imagination!
1 Après avoir lavé vos cheveux,séchez-les
légèrement avec une serviette pour qu'ils
restent humides et ensuite démêlez-les
doucement.
2 Faites pénétrer les pointes du diffuseur
dans vos cheveux jusqu'à ce qu'elles
touchent le cuir chevelu. En faisant des
mouvements circulaires avec le diffuseur,
les cheveux seront levés de la base vers le
FRANÇAIS36
Page 37

haut.Ainsi vous donnerez plus de volume
aux racines. Continuez le séchage jusqu'à
ce que les cheveux soient secs à la racine.
3 Réglez le flux d'air sur une position
inférieure et séchez complètement vos
cheveux. Utilisez une brosse ou un peigne
pour modeler vos cheveux pendant le
séchage.
4 Pour donner du volume aux extrémités
des cheveux, tenez le diffuseur
horizontalement et mettez quelques
mèches sur la base du diffuseur parmi les
picots et laissez-les quelques instants. Le
flux d'air doux évite que le cheveu soit
cassé pendant le séchage.
5 Dirigez un flux d'air froid vers les cheveux
pour fixer la coiffure.
Réglez le commutateur sur la position Air froid et
dirigez un flux d'air froid vers les cheveux.
Nettoyage
Débranchez toujours l'appareil avant de le
nettoyer.
Ne rincez jamais l'appareil à l'eau.
◗ Nettoyez l'appareil avec un chiffon sec.
◗ Nettoyez les accessoires avec un chiffon
humide ou rincez-les à l'eau.
FRANÇAIS 37
Page 38

Retirez les accessoires de l'appareil avant de les
nettoyer.
C
◗ La grille d'entrée d'air est détachable pour
faciliter le nettoyage.
Rangement
Débranchez toujours l'appareil avant de le ranger.
◗ Posez l'appareil dans un endroit sûr et laissez-
le refroidir.
◗ Afin de ne pas vriller le cordon, ne l'enroulez
pas autour de l'appareil.
◗ L'appareil peut être rangé en l'accrochant par
son anneau de suspension.
Remplacement
◗ Si le cordon d'alimentation est endommagé, il
ne doit être remplacé que par Philips, par un
Centre Service Agréé ou par une personne
qualifiée pour éviter tout accident.
◗ Pour des contrôles ou des réparations,
adressez-vous toujours à un Centre Service
Agréé Philips. En effet, une réparation par une
personne non qualifiée pourrait présenter un
danger pour l'utilisateur.
FRANÇAIS38
Page 39

Garantie et service
Pour plus d'informations, visitez notre Philips Web
site : www.philips.com ou veuillez contacter
le Service Consommateurs Philips de votre pays
(vous trouverez le numéro de téléphone dans le
dépliant sur la garantie internationale). S'il n'y a
aucun Service Consommateurs Philips dans votre
pays, contactez votre distributeur ou le Service
Department of Philips Domestic Appliances et
Personal Care BV.
FRANÇAIS 39
Page 40

Solution
La prise n'est peut-être pas alimentée.
Vérifiez si la prise est sous tension.
L'appareil a probablement surchauffé et s'est arrêté
automatiquement:
Débranchez l'appareil et attendez quelques minutes
qu'il refroidisse. Avant de le brancher à nouveau, vérifiez
que la grille ne soit pas bloquée par de peluches,
cheveux, etc.
L'appareil n'a probablement pas été connecté sur la
tension correcte:
Assurez-vous que la tension indiquée sur l'appareil
correspond bien à la tension de votre secteur.
Le cordon d'alimentation de l'appareil est probablement
endommagé:
Si le cordon d'alimentation est endommagé, il ne doit
être remplacé que par Philips, par un Centre Service
Agréé ou par une personne qualifiée pour éviter tout
accident.
Problème
L'appareil ne
fonctionne pas.
Dépannage
Si vous avez des problèmes avec votre sèche-cheveux et vous ne
pouvez pas les résoudre à l'aide du petit guide ci-dessous, adressezvous à un Centre Service Agréé Philips ou au Service
Consommateurs Philips de votre pays.
FRANÇAIS40
Page 41

Inleiding
De Philips Powerprotect ION is speciaal
ontworpen om aan uw persoonlijke wensen te
voldoen en u mooi, glanzend en antistatisch haar
te geven. De ionisator in de haardroger
produceert negatief geladen ionen die uw haar
omgeven. Negatieve ionen zorgen ervoor dat uw
haar minder statisch wordt en helpen om uw haar
in goede conditie te houden, zodat het soepel en
glad wordt.
Wetenschappelijk onderzoek heeft uitgewezen
dat drogen op een te hoge temperatuur het haar
kan uitdrogen. Haar dat te sterk gedroogd is, voelt
ruw aan en ziet er dof en pluizig uit.Terwijl
gewone haardrogers het haar tot zeer hoge
temperaturen van wel 80cC verhitten, is de
Powerprotect ION uitgerust met het
Powerprotect systeem. Dit systeem droogt het
haar op zachte wijze bij een lagere,
haarvriendelijke temperatuur van 57cC, waardoor
het risico op oververhitting van het haar
aanzienlijk kleiner is. Gecombineerd met een
ultrasterke luchtstroom die het haar ultrasnel
droogt, geeft het Powerprotect systeem uw haar
de glans, het volume en de weelderigheid waar u
van houdt.
Bezoek onze website (www.philips.com/beauty)
voor meer informatie over deze haardroger of
andere Philips beauty producten.
NEDERLANDS 41
Page 42

Algemene beschrijving
A Luchtinlaatrooster
B Temperatuurknop
- ‡ Sneldroogstand
- · Beschermende stand
- — Koele stand
C Luchtsnelheid- en aan/uitknop
- O = uit
- I = lage luchtsnelheid speciaal bedoeld om
te stylen
- II = gemiddelde luchtsnelheid voor zacht
drogen en stylen.
- III = ultrahoge luchtsnelheid voor snel drogen
D Ophangoog
E Volumediffusor
F Concentrator
G Ionen-generator
H Professionele haarverzorgingsset
- Ronde borstel
- Kam
- Haarclips
- Opbergetui
Belangrijk
Lees deze gebruiksaanwijzing zorgvuldig door
voordat u het apparaat gaat gebruiken. Bewaar de
gebruiksaanwijzing om hem indien nodig te
kunnen raadplegen.
◗ Controleer voordat u het apparaat gaat
gebruiken of het voltage aangegeven op het
apparaat overeenkomt met de netspanning in
uw woning.
NEDERLANDS42
Page 43

◗ Controleer regelmatig of het netsnoer niet
beschadigd is. Gebruik het apparaat niet
langer indien de stekker, het snoer of het
apparaat zelf beschadigd is.
◗ Indien het netsnoer beschadigd is, moet het
vervangen worden door Philips, een door
Philips geautoriseerd servicecentrum of
personen met vergelijkbare kwalificaties om
gevaar te voorkomen.
◗ Houd dit apparaat uit de buurt van water!
Gebruik dit apparaat niet in de buurt van of
boven een bad, wasbak, gootsteen enz.Als het
apparaat in de badkamer wordt gebruikt, haal
de stekker dan na gebruik altijd uit het
stopcontact omdat de nabijheid van water
gevaar kan opleveren,zelfs als de haardroger
uitgeschakeld is.
◗ Voor extra veiligheid adviseren we u een
aardlekschakelaar met een waarde van max.
30 mA te installeren in de elektrische groep
die de badkamer van stroom voorziet.
Raadpleeg uw installateur.
◗ Houd het apparaat uit de buurt van kinderen.
◗ Blokkeer nooit de luchtroosters.
◗ Als het apparaat oververhit raakt, schakelt het
zichzelf uit. Haal de stekker uit het
stopcontact en laat het apparaat een paar
minuten afkoelen. Controleer of de
luchtroosters niet verstopt zitten met pluizen,
haar e.d. voordat u het apparaat weer
inschakelt.
◗ Schakel het apparaat uit voordat u het
neerlegt, al is het maar voor even.
NEDERLANDS 43
Page 44

◗ Haal na gebruik altijd de stekker uit het
stopcontact.
◗ Wikkel het netsnoer niet om het apparaat.
◗ Het is mogelijk dat u een specifieke geur ruikt
wanneer u deze haardroger gebruikt. Deze
specifieke geur wordt veroorzaakt door de
ionen die het apparaat produceert en is niet
schadelijk voor het menselijk lichaam.
◗ Steek geen metalen voorwerpen in de ionen-
generator.
Gebruik van het apparaat
Drogen
1 Steek de stekker in het stopcontact.
C
2 Schakel het apparaat in door de gewenste
luchtsnelheid in te stellen:
O= uit
I = lage luchtsnelheid speciaal bedoeld om te
stylen
II = gemiddelde luchtsnelheid voor zacht
drogen en stylen.
III = ultrahoge luchtsnelheid voor snel drogen
De ionen worden automatisch geproduceerd.
3 Kies de gewenste temperatuurstand door
op de temperatuurknop te drukken.
NEDERLANDS44
Page 45

Sneldroogstand
C
◗ Met de sneldroogstand ‡ kunt u nat haar
zeer snel drogen.
We raden u aan de sneldroogstand alleen te
gebruiken op nat haar.Selecteer de
beschermende stand wanneer het haar bijna
droog is, om uitdroging van het haar te
voorkomen.
Beschermende stand
C
◗ De beschermende stand · droogt uw haar
op zachte wijze bij een haarvriendelijke
temperatuur van 57cC.
Koele stand
C
◗ Met de koele stand — kunt u het gecreëerde
kapsel fixeren.
Voor een langdurig stylingresultaat kunt u de
temperatuurknop op de koele stand zetten en de
koele luchtstroom op uw haar richten om het
kapsel te fixeren.
C
4 Droog uw haar door borstelbewegingen
met de droger te maken op korte afstand
van uw haar.
5 Selecteer de hoogste luchtsnelheidstand
(III) in combinatie met de sneldroogstand
NEDERLANDS 45
Page 46

of de beschermende stand om het haar
ultrasnel te drogen.
6 Selecteer een lagere luchtsnelheidstand (I
of II) voor het drogen van kort haar en om
uw haar in model te brengen.
Hulpstukken
Concentrator
De concentrator stelt u in staat de luchtstroom te
richten op de borstel of kam waarmee u uw haar
in model aan het brengen bent.
C
1 U kunt de concentrator op het apparaat
bevestigen door hem erop te klikken. U
verwijdert dit hulpstuk door het van de
uitstroomopening af te trekken.
2 Schakel het apparaat in door de
luchtsnelheidknop op stand I, II of III te
zetten.
C
3 Tijdens het drogen met de concentrator
kunt u een borstel of kam gebruiken om
uw haar in model te brengen.
Volumediffusor
De volumediffusor is speciaal ontwikkeld om
zowel steil als golvend of krullend haar op zachte
wijze te drogen.
NEDERLANDS46
Page 47

C
◗ Met de zachte luchtstroom uit de
volumediffusor kunt u uw kapsel meer volume
en veerkracht geven.
C
1 Bevestig de diffusor door hem op het
apparaat te klikken. U verwijdert dit
hulpstuk door het van het apparaat af te
trekken.
C
◗ Voor meer volume vanaf de wortels, steek de
pennen in uw haar tot ze uw hoofdhuid raken.
C
2 Maak ronddraaiende bewegingen met het
apparaat om de warme lucht gelijkmatig
door het haar te verspreiden.
Krullend of golvend haar
C
◗ Als u golvend of krullend haar in model
brengt, houd de diffusor dan 10 tot 15 cm van
uw hoofd en laat het haar geleidelijk droog
worden.
- Ondertussen kunt u uw haar in model
brengen met uw vrije hand of een kam.
- U kunt de haarlokken ook met uw hand
NEDERLANDS 47
Page 48

kneden om de golven of krullen tijdens het
drogen in model te brengen. Dit voorkomt dat
de krullen uitzakken of pluizig worden.
Lang haar
C
◗ Lang haar kunt u drogen door de lokken
bovenop de diffusor uit te spreiden.
C
◗ U kunt het haar ook tijdens het drogen met
de pennen van de diffusor naar beneden
kammen.
Tips voor drogen en stylen
Hieronder staat beschreven hoe u uw haar op
eenvoudige en haarvriendelijke wijze in model
kunt brengen met de Philips Powerprotect ION
haardroger. Naarmate u meer vertrouwd raakt
met het apparaat, zult u nog vele andere
manieren ontdekken om geweldige kapsels te
creëren. Gebruik gewoon uw fantasie!
1 Dep uw haar droog met een handdoek en
kam het goed door, nadat u het op de
gebruikelijke wijze heeft gewassen en met
een conditioner heeft behandeld.
NEDERLANDS48
Page 49

2 Plaats de diffusor in uw haar zodat de
pennen uw hoofdhuid raken. Maak
ronddraaiende bewegingen met de diffusor
zodat het haar opgetild wordt in de
richting van de diffusor en de lucht die uit
de pennen stroomt het haar vanaf de
wortels droogt. Hierdoor krijgt uw haar
meer volume. Ga door met drogen totdat
het haar bij de wortels droog is.
3 Schakel nu terug naar een lagere
luchtsnelheid en ga door met drogen tot
uw haar helemaal droog is. Gebruik een
kam of borstel om uw haar tijdens het
drogen in het gewenste model te brengen.
4 Om het haar bij de uiteinden meer volume
te geven, moet u de diffusor horizontaal
houden en een paar haarlokken tussen de
pennen op de diffusor plaatsen en ze daar
even laten liggen voordat u hetzelfde met
de volgende lokken doet.De zachte
luchtstroom van de diffusor zal
voorkomen dat uw golven of krullen uit
model raken door het drogen.
5 Gebruik als laatste de koele luchtstroom
om uw kapsel te fixeren.
Zet de temperatuurknop op de koele stand en
richt de luchtstroom op uw haar om het te
fixeren.
NEDERLANDS 49
Page 50

Schoonmaken
Haal altijd de stekker uit het stopcontact voordat
u het apparaat gaat schoonmaken.
Spoel het apparaat nooit schoon met water.
◗ Maak het apparaat schoon met een droge
doek.
◗ De hulpstukken kunnen met een vochtige
doek of onder de kraan worden
schoongemaakt.
Verwijder de hulpstukken van het apparaat
voordat u ze schoonmaakt.
C
◗ Het luchtinlaatrooster is afneembaar zodat
het makkelijk schoon te maken is.
Opbergen
Haal altijd de stekker uit het stopcontact voordat
u het apparaat opbergt.
◗ Leg het apparaat op een veilige plaats en laat
het afkoelen.
◗ Wikkel het netsnoer niet om het apparaat.
◗ Het apparaat kan worden opgeborgen door
het op te hangen aan het ophangoog.
Vervangen
◗ Indien het netsnoer beschadigd is, moet het
vervangen worden door Philips, een door
Philips geautoriseerd servicecentrum of
NEDERLANDS50
Page 51

personen met vergelijkbare kwalificaties om
gevaar te voorkomen.
◗ Als het apparaat niet (goed) meer
functioneert, breng het dan naar een door
Philips geautoriseerd servicecentrum.
Reparatie door niet deskundige personen kan
voor de gebruiker een gevaarlijke situatie
opleveren.
Garantie & service
Als u informatie nodig heeft of als u een
probleem heeft, bezoek dan de Philips website
(www.philips.com),of neem contact op met het
Philips Customer Care Centre in uw land (u vindt
het telefoonnummer in het 'worldwide
guarantee' vouwblad).
Als er geen Customer Care Centre in uw land is,
ga dan naar uw Philips dealer of neem contact op
met de afdeling Service van Philips Domestic
Appliances and Personal Care BV.
NEDERLANDS 51
Page 52

Oplossing
Misschien werkt het stopcontact niet.
Controleer of er spanning op het stopcontact staat.
Misschien heeft het apparaat zichzelf uitgeschakeld.
Haal de stekker uit het stopcontact en laat het apparaat
een paar minuten afkoelen. Controleer voordat u het
apparaat weer inschakelt of de luchtroosters niet
verstopt zitten met pluizen, haar enz.
Misschien is het apparaat niet geschikt voor de
plaatselijke netspanning.
Controleer of het voltage aangegeven op het apparaat
overeenkomt met de plaatselijke netspanning.
Misschien is het netsnoer van het apparaat beschadigd.
Indien het netsnoer beschadigd is, moet het vervangen
worden door Philips, een door Philips geautoriseerd
servicecentrum of personen met vergelijkbare
kwalificaties om gevaar te voorkomen.
Probleem
Het apparaat doet het
helemaal niet.
Problemen oplossen
Als u een probleem heeft met uw haardroger en u er niet in slaagt
dit probleem op te lossen met behulp van de informatie in dit
hoofdstuk, neem dan contact op met het dichtstbijzijnde Philips
servicecentrum of met het Philips Customer Care Centre in uw
land.
NEDERLANDS52
Page 53

Introducción
El Powerprotect ION de Philips ha sido
especialmente diseñado para satisfacer sus
necesidades, dejando un pelo sano, bonito y
brillante. El ionizador situado en el interior del
secador emite iones con carga negativa que
envuelven el pelo. Los iones negativos reducen la
formación de electricidad estática y ayudan a
mantener el pelo en buenas condiciones, sano y
suave.
Diversas pruebas científicas han demostrado que
secar el cabello a una temperatura demasiado
elevada puede secarlo en exceso. Si esto sucede,
el cabello se queda fosco y con un aspecto
apagado y encrespado. Mientras que los
secadores normales calientan el pelo a
temperaturas muy elevadas (aproximadamente
80cC), el Powerprotect ION incorpora el sistema
Powerprotect. Este sistema seca sin dañar a una
temperatura baja y suave de 57cC, reduciendo así
el riesgo de sobrecalentar el cabello. Este sistema,
combinado con un flujo de aire extra fuerte, seca
el cabello rápidamente, dándole el brillo, el
cuerpo y la riqueza que usted desea.
Si desea obtener más información sobre este
secador o cualquier otro producto de belleza de
Philips, visite nuestra página web:
www.philips.com/beauty
ESPAÑOL 53
Page 54

Descripción general (fig.1)
A Rejilla de entrada de aire
B Interruptor para las posiciones de
temperatura
- ‡ Posición de secado rápido
- · Posición de protección
- — Posición de aire frío
C Flujo de aire y botón deslizante de
marcha/parada (on/off)
- O = desconectado
- I = Flujo de aire suave especialmente
indicado para moldear
- II = Flujo de aire medio para secar y
moldear
- III = Flujo de aire extra fuerte para secar
rápidamente
D Anilla para colgar
E Difusor de volumen
F Concentrador
G Generador de iones
H Set de peluquería profesional
- Cepillo redondo
- Peine
- Horquillas
- Funda
Importante
Lea atentamente estas instrucciones de uso antes
de utilizar el aparato y consérvelas por si
necesitara consultarlas en el futuro.
◗ Antes de conectar el aparato, compruebe si el
voltaje indicado en él se corresponde con el
voltaje local.
ESPAÑOL54
Page 55

◗ Compruebe regularmente el estado del cable
de red. No utilice el aparato si la clavija, el
cable o el mismo aparato están dañados.
◗ Si el cable de red estuviera dañado, deberá ser
sustituido por Philips o por un centro de
servicio autorizado por Philips o por personal
cualificado para evitar situaciones de peligro.
◗ ¡Mantenga este aparato lejos del agua! No lo
use cerca del agua de bañeras, lavabos,
fregaderos,etc. Cuando lo use en un cuarto
de baño, desenchufe el aparato después de
usarlo, ya que la proximidad del agua
representa un riesgo aunque el secador esté
apagado.
◗ Como protección adicional, le aconsejamos
que instale en el circuito eléctrico que
suministre al cuarto de baño un dispositivo de
corriente residual (RCD) con una corriente
residual operativa que no supere los 30 mA.
Consulte a su electricista.
◗ Mantenga el aparato fuera del alcance de los
niños.
◗ No bloquee nunca las rejillas del aire.
◗ Si el aparato se calienta en exceso, se apagará
automáticamente. Desenchufen el aparato y
dejen que se enfríe durante unos minutos.
Antes de volver a poner en marcha el aparato,
comprueben la rejilla para asegurarse de que
no esté bloqueada por pelusas, pelos, etc.
◗ Apague siempre el aparato cuando lo deje en
algún sitio aunque sólo sea por un momento.
◗ Desenchufen siempre el aparato después de
usarlo.
ESPAÑOL 55
Page 56

◗ No enrolle el cable de red alrededor del
aparato.
◗ Es posible que note un olor característico
cuando utilice este secador. Esto se debe a los
iones que se generan y no son nocivos para el
cuerpo humano.
◗ No pruebe el generador de iones con objetos
metálicos.
Cómo usar el aparato
Secado
1 Enchufe el aparato a la red.
C
2 Conecte el aparato seleccionando la
posición deseada:
O = desconectado
I = Flujo de aire suave especialmente indicado
para moldear
II = Flujo de aire medio para secar y moldear
III = Flujo de aire extra fuerte para secar
rápidamente
Los iones se generarán automáticamente.
3 Seleccione la posición de temperatura que
desee pulsando el interruptor.
ESPAÑOL56
Page 57

La posición de secado rápido
C
◗ ‡ La posición de secado rápido le permite
secar el pelo muy mojado con gran rapidez.
Se recomienda utilizar la posición de secado
rápido sólo sobre el pelo muy mojado y
seleccionar la posición de protección cuando el
pelo esté casi seco, para reducir el riesgo de un
secado excesivo.
La posición de protección
C
◗ · La posición de protección permite secar
suavemente el cabello a una temperatura de
57cC.
La posición de aire frío
C
◗ — La posición de aire frío fija el peinado
creado.
Para obtener un resultado más duradero, coloque
el interruptor en la posición de aire frío y dirija el
aire frío al cabello, para fijar el peinado.
C
4 Seque el pelo a la vez que lo cepilla y con
el secador a poca distancia del cabello.
5 Para conseguir un secado ultrarrápido,
seleccione la máxima velocidad de flujo de
aire (III) y la posición de secado rápido o
de protección.
ESPAÑOL 57
Page 58

6 Seleccione una velocidad de flujo de aire
menor (I-II) para secar el pelo corto o
para peinar su cabello.
Accesorios
Boquilla concentradora
La boquilla concentradora le permite dirigir el
flujo de aire directamente sobre el cepillo o el
peine con el que está moldeando su cabello.
C
1 Para montar la boquilla concentradora,
simplemente presiónenla en el aparato.
Para quitarla, tiren de ella.
2 Conecte el aparato deslizando el botón de
flujo de aire a la posición I, II ó III.
C
3 Mientras seca el pelo con la boquilla
concentradora, puede utilizar un cepillo o
un peine para moldear el cabello.
Difusor de volumen
El difusor de volumen ha sido especialmente
diseñado para secar suavemente tanto el pelo liso
como el rizado u ondulado.
C
◗ El difusor de volumen emite aire suave y
permite dar a su cabello volumen y vitalidad.
ESPAÑOL58
Page 59

C
1 Conecte el difusor simplemente fijándolo
al aparato y alinee las flechas del difusor
con el cilindro.Para desconectarlo, tire de
él.
C
◗ Para añadir volumen desde las raíces,
introduzcan las púas en su cabello de modo
que lleguen a tocar el cuero cabelludo.
C
2 Mueva el aparato en círculos para
distribuir el aire caliente de manera
uniforme por el cabello.
Pelo rizado u ondulado
C
◗ Cuando moldee cabello ondulado o rizado,
mantenga el difusor a una distancia de 10-15
cm de la cabeza para permitir que el cabello
se seque de manera gradual.
- Mientras tanto, puede peinar el pelo con la
mano que le queda libre o con un peine.
- También pueden trabajar mechones de
cabello con la mano para dar forma a los rizos y
las ondulaciones durante el secado. Ello evitará
que los rizos se aflojen o se encrespen.
ESPAÑOL 59
Page 60

Cabello largo
C
◗ Para secar el cabello largo, puede extender
mechones de pelo encima del difusor.
C
◗ Si lo prefiere, puede peinar el cabello de
arriba a abajo con las púas del difusor
mientras lo está secando.
Consejos para moldear y secar el cabello
Éste es un peinado que puede crear fácilmente y
sin dañar el cabello con el secador Powerprotect
ION de Philips.A medida que se vaya
familiarizando con el aparato, descubrirá otras
maneras de crear bonitos peinados. Sólo tiene
que dar rienda suelta a su imaginación.
1 Después de haber lavado y acondicionado
el cabello de la forma habitual, séquelo con
una toalla y péinelo con cuidado.
2 Coloque el difusor en el cabello, de
manera que las puntas de las púas toquen
el cuero cabelludo.Al mover el difusor en
círculos, el cabello subirá hacia la base del
difusor y el aire que sale de las púas secará
el cabello desde la raíz hacia arriba. De
ESPAÑOL60
Page 61

esta forma, el cabello conseguirá más
volumen. Siga secando así hasta que el pelo
esté seco en las raíces.
3 Fije el flujo de aire en la posición más baja
y siga secando hasta que el pelo esté
completamente seco. Utilice el peine o el
cepillo para moldear el cabello como
quiera mientras lo está secando.
4 Para dar volumen a las puntas, coloque el
difusor en horizontal y coloque algunos
mechones sobre la base del difusor, entre
las púas del mismo, y déjelos así un
momento. El suave flujo de aire evitará
que, al secarlos, los rizos o las ondas se
alboroten y queden despeinados.
5 Termine con aire frío para fijar su peinado.
Coloque el interruptor en la posición de aire frío
y dirija el aire frío al cabello, para fijar el peinado.
Limpieza
Desenchufe siempre el aparato antes de limpiarlo.
No limpie nunca el aparato con agua.
◗ Limpie el aparato con un paño seco.
◗ Limpie los accesorios con un paño húmedo o
aclarándolos bajo el grifo.
Quite los accesorios del aparato antes de
limpiarlos.
ESPAÑOL 61
Page 62

C
◗ Para facilitar la tarea de limpieza, la rejilla de
entrada de aire es desmontable.
Almacenamiento
Desenchufe siempre el aparato antes de
guardarlo.
◗ Ponga el aparato en un lugar seguro y deje
que se enfríe.
◗ No enrolle el cable de red alrededor del
aparato.
◗ El aparato puede guardarse colgándolo de su
anilla.
Sustitución
◗ Si el cable de red estuviera dañado, deberá ser
sustituido por Philips o por un centro de
servicio autorizado por Philips para evitar
situaciones de peligro.
◗ Para revisiones o reparaciones, lleve siempre
el aparato a un Servicio de Asistencia Técnica
de Philips. Las reparaciones llevadas a cabo
por personal no cualificado pueden dar lugar a
situaciones extremadamente peligrosas para
el usuario.
ESPAÑOL62
Page 63

Garantía y servicio
Si necesita información o si tiene algún problema,
visite la página web de Philips en
www.philips.com,o póngase en contacto con el
Servicio Philips de Atención al Cliente de su país
(hallará el número de teléfono en el folleto de la
Garantía Mundial). Si en su país no hay Servicio
Philips de Atención al Cliente, póngase en
contacto con su distribuidor local Philips o con el
Service Department of Philips Domestic
Appliances and Personal Care BV.
ESPAÑOL 63
Page 64

Solución
Quizás la toma de corriente donde está enchufado el
aparato no está activa.
Asegúrese de que la toma está activa.
Puede que el aparato se haya sobrecalentado y se haya
desconectado automáticamente.
Desenchufe el aparato y deje que se enfríe durante
unos minutos.Antes de volver a conectar el aparato,
compruebe las rejillas para asegurarse de que no están
obstruidas por pelusas, pelos, etc.
Puede que el aparato no sea adecuado para el voltaje al
que está conectado.
Asegúrese de que el voltaje indicado en la placa del
modelo del aparato se corresponde con el voltaje de
red local.
Puede que el cable de red del aparato esté deteriorado.
Si el cable de red estuviera dañado, deberá ser
sustituido por Philips o por un centro de servicio
autorizado por Philips para evitar situaciones de peligro.
Problema
El aparato no funciona.
Guía de resolución de problemas
Si surgieran problemas con su secador imposibles de resolver con
esta guía, póngase en contacto con el centro de servicio Philips más
cercano o con el Centro de Atención al Cliente de Philips de su país.
ESPAÑOL64
Page 65

Introduzione
Il Philips Powerprotect ION è stato realizzato
appositamente per soddisfare ogni vostra
esigenza, per regalarvi capelli lucidi e setosi, senza
traccia di crespo. Lo ionizzatore inserito
nell'apparecchio emette ioni caricati
negativamente che circondano i capelli. Gli ioni
negativi riducono la formazione di elettricità
statica e aiutano a mantenere i capelli in buone
condizioni, eliminando la sensazione di crespo e
rendendoli lucidi e setosi.
Test scientifici hanno dimostrato che asciugando i
capelli a una temperatura eccessiva, si rischia di
surriscaldarli troppo. I capelli asciugati a una
temperatura eccessiva appaiono secchi, crespi e
opachi. Mentre i normali asciugacapelli possono
raggiungere temperature elevate (circa 80cC), il
Powerprotect ION, provvisto dello speciale
Powerprotect System, offre un'asciugatura più
delicata, alla temperatura di 57cC, riducendo il
rischio di surriscaldare troppo i capelli. Grazie a
questo dispositivo, unito a un potente getto d'aria,
l'apparecchio permette di asciugare i capelli con
grande rapidità, lasciando i capelli morbidi, lucidi e
pieni di vita. Come li avete sempre sognati!
Per ulteriori informazioni su questo apparecchio o
altri prodotti Philips beauty,visitate il nostro sito
web: www.philips.com/beauty.
ITALIANO 65
Page 66

Descrizione generale (fig. 1)
A Griglia ingresso aria
B Interruttore oscillante per impostazione
temperatura
- ‡ Impostazione Quick-dry
- · Impostazione Protect
- — Impostazione aria fredda
C Cursore on/off e getto aria
- O = off
- I = Getto d'aria delicato, particolarmente
indicato per lo styling
- II = Getto d'aria medio, per asciugare e per
lo styling
- III = Getto d'aria forte, per asciugare
rapidamente
D Gancio per appendere
E Diffusore di volume
F Concentratore
G Generatore di ioni
H Set professionale per la cura dei capelli
- Spazzola rotonda
- Pettine
- Clip per capelli
- Custodia
Importante
Prima di usare l'apparecchio leggete queste
istruzioni e conservatele per eventuali riferimenti
futuri.
◗ Prima di collegare l'apparecchio,controllate
che la tensione indicata sull'apparecchio
corrisponda a quella della rete locale.
ITALIANO66
Page 67

◗ Controllate periodicamente le condizioni del
cavo di alimentazione. Non usate
l'apparecchio nel caso in cui la spina, il cavo o
l'apparecchio stesso fossero danneggiati.
◗ Nel caso il cavo di alimentazione fosse
danneggiato, dovrà essere sostituito da Philips,
presso un Centro Autorizzato Philips o
personale comunque qualificato, per evitare
situazioni a rischio.
◗ Tenete l'apparecchio lontano dall'acqua! Non
usate l'asciugacapelli vicino a vasche da bagno
e lavandini o in presenza di acqua.Se usate
l'apparecchio in bagno,togliete sempre la
spina dalla presa dopo l'uso in quando la
presenza dell'acqua può risultare comunque
pericolosa, anche quando l'apparecchio è
spento.
◗ Per una maggiore protezione, vi consigliamo di
installare sul circuito elettrico della stanza da
bagno un dispositivo di protezione contro la
corrente residua (RCD) in modo che questa
non superi i 30 mA. Chiedete consiglio al
vostro elettricista di fiducia.
◗ Tenete l'apparecchio fuori dalla portata dei
bambini.
◗ Non bloccate mai le apertura della griglia.
◗ Tenete l'apparecchio lontano dall'acqua! Non
utilizzatelo nei pressi di vasche da bagno,
lavandini ecc.; se lo usate in bagno,staccate
sempre la spina dopo aver asciugato i capelli
perché l'acqua rappresenta un pericolo anche
quando l'apparecchio è spento.
◗ Spegnete sempre l'apparecchio prima di
appoggiarlo, anche se solo per un istante.
ITALIANO 67
Page 68

◗ Staccate sempre la spina dopo l'uso.
◗ Non avvolgete il cavo di alimentazione
attorno all'apparecchio.
◗ Usando l'apparecchio,potreste avvertire uno
strano odore. E' causato dagli ioni che
vengono generati ed è assolutamente innocuo
per l'organismo umano.
◗ Non toccate il generatore di ioni con oggetti
metallici.
Come usare l'apparecchio
Come asciugare i capelli
1 Inserite la spina nella presa.
C
2 Accendete l'apparecchio selezionando
l'impostazione desiderata:
O = off
I = getto d'aria delicato, particolarmente
indicato per lo styling
II = getto d'aria medio, per asciugare e per lo
styling
III = getto d'aria forte, per asciugare
rapidamente
Gli ioni verranno generati automaticamente.
3 Selezionate la temperatura desiderata,
premendo l'apposito interruttore.
ITALIANO68
Page 69

Impostazione Quick-dry
C
◗ ‡ L'impostazione Quick-dry permette di
asciugare rapidamente i capelli molto bagnati.
Vi consigliamo di usare l'impostazione Quick-dry
solo sui capelli molto bagnati per poi passare
all'impostazione Protect quando i capelli sono
quasi asciutti. In questo modo ridurrete il rischio
di surriscaldamento.
Impostazione Protect
C
◗ · L'impostazione Protect permette di
asciugare delicatamente i capelli ad una
temperatura di 57 cC.
Impostazione Cool
C
◗ — L'impostazione aria fredda serve per fissare
le acconciature appena create.
Per ottenere risultati duraturi, selezionate
l'impostazione aria fredda e dirigete il getto d'aria
fredda sui capelli, per fissare l'acconciatura.
C
4 Asciugate i capelli spazzolando i capelli con
l'asciugacapelli, tenendo l'apparecchio ad
una certa distanza dai capelli.
5 Selezionate la velocità massima del getto
d'aria (III) insieme all'impostazione Quickdry o Protect per asciugare i capelli nel
modo più rapido.
ITALIANO 69
Page 70

6 Selezionate una velocità inferiore (I o II)
per asciugare i capelli corti o procedere
allo styling.
Accessori
Concentratore del flusso d'aria
Il concentratore permette di dirigere il flusso
d'aria direttamente alla spazzola o al pettine che
state utilizzando per lo styling.
C
1 Per inserire il concentratore,infilatelo
direttamente sull'apparecchio. Per
toglierlo, basterà tirare.
2 Accendete l'apparecchio posizionando il
cursore del getto d'aria sulla posizione I, II
o III.
C
3 Asciugando i capelli con il concentratore,
potete usare la spazzola o il pettine per
mettere in piega i capelli.
Diffusore
Il diffusore di volume è stato studiato per
asciugare con la massima delicatezza i capelli lisci,
mossi o ricci.
C
◗ Il diffusore di volume eroga un getto d'aria
delicato e permette di dare volume ai capelli.
ITALIANO70
Page 71

C
1 Per inserire il diffusore,infilatelo
semplicemente sull'apparecchio e allineate
le frecce sul diffusore e sul cilindro. Per
toglierlo, basterà tirarlo.
C
◗ Per dare volume alle radici,infilate le dita
dell'accessorio fra i capelli, in modo tale che
tocchino la cute.
C
2 Cercate di compiere movimenti circolari
con l'apparecchio,per distribuire l'aria
tiepida in modo uniforme fra i capelli.
Capelli mossi o ricci
C
◗ Per la messa in piega dei capelli ricci o
ondulati, tenete il diffusore ad una distanza di
10-15 cm dalla testa, e lasciate che i capelli si
asciughino in modo graduale.
- Nel frattempo potete creare la vostra
acconciatura preferita usando le dita oppure un
pettine.
- Afferrate le ciocche e stringetele fra le dita
per ottenere ricci e onde durante l'asciugatura e
per evitare che i capelli diventino crespi.
ITALIANO 71
Page 72

Capelli lunghi
C
◗ Per asciugare i capelli lunghi, potete mettere le
ciocche dei capelli sopra il diffusore.
C
◗ In alternativa, potete pettinare i capelli
procedendo verso il basso con i denti
dell'apparecchio,durante l'asciugatura.
Messa in piega e consigli per l'asciugatura
Ecco uno stile che potrete creare in modo
semplice e delicato con il vostro asciugacapelli
Philips Powerprotect ION. Man mano che
acquisterete familiarità con l'apparecchio,
scoprirete com'è facile realizzare splendide
acconciature, sempre diverse. Basterà usare la
fantasia!
1 Dopo aver lavato i capelli e applicato il
balsamo, tamponateli con un asciugamano
per eliminare l'eccesso d'acqua. Poi
pettinateli con cura.
2 Appoggiate il diffusore sui capelli in modo
che la punta dei dentini dell'aria tocchi il
cuoio capelluto. Compiendo movimenti
circolari con il diffusore, i capelli verranno
ITALIANO72
Page 73

sollevati verso la base dell'apparecchio e i
dentini asciugheranno le ciocche dalle
radici in su, regalando maggior volume ai
capelli. Continuate ad asciugare fino a
quando i capelli saranno asciutti alle radici.
3 Selezionate un getto d'aria meno potente
e continuate fino ad asciugare
completamente i capellil. Usate un pettine
o una spazzola per mettere in piega i
capelli come desiderate durante
l'asciugatura.
4 Per creare maggior volume sulle punte,
tenete il diffusore in posizione orizzontale
e appoggiate alcune ciocche sulla base del
diffusore, fra i dentini dell'aria, lasciandoli in
questa posizione per alcuni secondi. Il
getto d'aria delicato eviterà di rovinare i
riccioli o le onde durante l'asciugatura.
5 Completate l'asciugatura con un getto
d'aria freddo,per fissare l'acconciatura.
Mettete l'interruttore girevole sull'impostazione
Cool e dirigete il getto d'aria fredda sui capelli.
Pulizia
Togliete sempre la spina dalla presa prima di
pulire l'apparecchio.
Non risciacquate mai l'apparecchio sotto l'acqua.
◗ Pulite l'apparecchio con un panno asciutto.
ITALIANO 73
Page 74

◗ Pulite gli accessori con un panno umido
oppure risciacquandoli sotto l'acqua corrente.
Prima di pulire gli accessori, toglieteli
dall'apparecchio.
C
◗ La griglia di ingresso aria può essere tolta per
facilitare la pulizia.
Come riporre l'apparecchio
Togliete sempre la spina dalla presa prima di
riporre l'apparecchio.
◗ Appoggiate l'apparecchio in un luogo sicuro e
lasciatelo raffreddare.
◗ Non avvolgete il cavo di alimentazione
attorno all'apparecchio.
◗ L'apparecchio può essere appeso con
l'apposito gancio.
Sostituzione
◗ Nel caso il cavo di alimentazione fosse
danneggiato, dovrà essere sostituito da Philips,
presso un Centro Autorizzato Philips o
personale comunque qualificato, per evitare
situazioni a rischio.
◗ Per qualunque controllo o riparazione,
l'apparecchio dovrà essere affidato a un
centro d'assistenza autorizzato Philips.
L'intervento di manodopera non qualificata
potrebbe compromettere la sicurezza
dell'utente.
ITALIANO74
Page 75

Garanzia e Assistenza
Se necessitate di assistenza o ulteriori
informazioni, vi preghiamo di visitare il sito
www.philips.com oppure di contattare il Centro
Assistenza Clienti Philips del vostro paese (per
conoscere il numero di telefono, vedere
l'opuscolo della garanzia).
Qualora nel vostro paese non ci fosse un Centro
Assistenza Clienti, rivolgetevi al vostro rivenditore
autorizzato oppure contattate il Service
Department of Philips Domestic Appliances and
Personal Care BV.
ITALIANO 75
Page 76

Soluzione
Può darsi che la presa alla quale avete collegato
l'apparecchio non funzioni.
Verificate che la presa funzioni.
Può darsi che l'apparecchio si sia spento
automaticamente in seguito ad un surriscaldamento.
Togliete la spina dalla presa e lasciate raffreddare
l'apparecchio per alcuni minuti. Prima di riaccendere
l'apparecchio, controllate che le griglie dell'aria non siano
bloccate da cotone, capelli ecc.
Può darsi che l'apparecchio non sia indicato per il tipo di
tensione al quale è stato collegato:
Controllate che la tensione indicata sulla targhetta
dell'apparecchio corrisponda a quella della rete locale.
Il cavo di alimentazione potrebbe essere danneggiato.
Nel caso il cavo di alimentazione fosse danneggiato,
dovrà essere sostituito da Philips, presso un Centro
Autorizzato Philips o personale comunque qualificato,
per evitare situazioni a rischio.
Problema
L'apparecchio non
funziona.
Localizzazione guasti
Nel caso sorgessero problemi con il vostro asciugacapelli, non
risolvibili con l'aiuto della tabella di localizzazione guasti, vi preghiamo
di rivolgervi al Centro Assistenza Philips più vicino oppure al Philips
Customer Care Centre del vostro paese.
ITALIANO76
Page 77

Introdução
O novo Philips Powerprotect ION foi
especialmente concebido para ir ao encontro das
suas necessidades pessoais, permitindo-lhe ter um
cabelo bonito, brilhante e sem estar encrespado.
O ionizador integrado no secador emite iões de
carga negativa que envolvem o cabelo. Os iões
negativos reduzem a formação de electricidade
estática e ajudam a manter o cabelo em boas
condições, libertando-o do aspecto frizado e
tornando-o macio.
Testes científicos comprovaram que a secagem do
cabelo a temperaturas muito altas pode levar ao
seu ressequimento. Um cabelo ressequido fica
crespo, baço e frizado. Enquanto que os
secadores normais podem aquecer o cabelo com
temperaturas muito elevadas (aprox. 80cC),o
Powerprotect ION apresenta o Powerprotect
System. Este sistema permite a secagem suave,
numa temperatura baixa e de tratamento a
57cC, reduzindo o risco de sobreaquecimento do
cabelo. Juntamente com um fluxo de ar ultraforte, o sistema seca o cabelo muito rapidamente,
conferindo-lhe o brilho, o corpo e a riqueza de
que tanto gosta.
Para mais informações sobre este secador ou
qualquer outro produto Philips beauty, visite o
site: www.philips.com/beauty.
PORTUGUÊS 77
Page 78

Descrição geral (fig. 1)
A Grelha de entrada do ar
B Botão para regulação da temperatura
- ‡ Secagem rápida
- · Protecção
- — Ar frio
C Fluxo de ar e Interruptor
- O = off (desligado)
- I = Fluxo de ar fraco especial para modelar
- II = Fluxo de ar médio para secar e modelar
- III = Fluxo de ar ultra forte para secar rápido
D Argola de suspensão
E Difusor de volume
F Concentrador
G Gerador de iões
H Estojo profissional
- Escova redonda
- Pente
-Molas
- Bolsa
Importante
Antes de usar, leia estas instruções com atenção e
guarde-as para uma eventual consulta futura.
◗ Antes de ligar, verifique se a voltagem indicada
no aparelho corresponde à corrente eléctrica
local.
◗ Verifique regularmente as condições do fio.
Não se sirva do secador se a ficha, o fio ou o
próprio aparelho estiverem estragados.
◗ Se o fio se estragar, deverá ser substituído
PORTUGUÊS78
Page 79

pela Philips, por um concessionário autorizado
pela Philips ou por pessoal devidamente
qualificado para se evitarem situações
gravosas para o utilizador.
◗ Não aproxime o secador da água! Não utilize
perto ou sobre banheiras, lavatórios,bacias,
etc. contendo água. Quando usar na casa de
banho, desligue da corrente após cada
utilização, uma vez que a proximidade da água
representa sempre um risco, mesmo se o
aparelho estiver desligado.
◗ Para maior segurança, aconselha-se a
instalação de um dispositivo de corrente
residual (disjuntor), com uma taxa de
corrente residual não superior a 30 mA,no
circuito eléctrico que fornece a casa de
banho.Aconselhe-se com o seu electricista.
◗ Mantenha fora do alcance das crianças.
◗ Nunca obstrua as grelhas de entrada do ar.
◗ Se o secador aquecer demasiado, desligar-se-á
automaticamente. Desligue da corrente e
deixe arrefecer durante alguns minutos.Antes
de voltar a ligar à corrente, verifique se a
grelha não está obstruída por pêlos, cabelos,
etc.
◗ Sempre que poisar o secador, mesmo que seja
apenas por breves instantes,desligue-o.
◗ Quando terminar, desligue sempre da
corrente.
◗ Não enrole o fio à volta do secador.
◗ Quando utiliza o secador poderá notar um
odor característico. Esse cheiro é provocado
pelos iões que são gerados mas não é
prejudicial para o ser humano.
PORTUGUÊS 79
Page 80

◗ Não toque no gerador de iões com objectos
metálicos.
Utilização
Secagem
1 Ligue a ficha à tomada eléctrica.
C
2 Ligue o secador, seleccionando a regulação
pretendida:
O = 'Off' (desligado)
I = Fluxo de ar fraco especial para modelar
II = Fluxo de ar médio para secar e modelar
III = Fluxo de ar ultra-forte para secar rápido
Os iões são gerados automaticamente.
3 Seleccione a temperatura desejada
premindo o botão rotativo.
Regulação para Secagem Rápida
C
◗ ‡ A regulação 'Quick-Dry' permite secar
muito rapidamente o cabelo molhado do
duche.
Recomenda-se a regulação 'Secagem Rápida'
apenas para cabelos molhados do duche e a
regulação 'Protect' quando o cabelo já estiver
quase seco para se reduzir o risco de um
aquecimento excessivo do cabelo.
PORTUGUÊS80
Page 81

Regulação 'Protect'
C
◗ · A regulação 'Protect' seca suavemente o
cabelo com uma temperatura de tratamento a
57cC.
Regulação Ar Frio
C
◗ — A regulação Ar Frio fixa o penteado que
acabou de criar.
Para que os resultados durem mais tempo, regule
o botão para a posição 'Cool' e direccione um
fluxo de ar frio para o cabelo para fixar o
penteado.
C
4 Seque o cabelo efectuando movimentos de
escovagem com o secador a uma curta
distância do cabelo.
5 Seleccione o fluxo de ar mais elevado (III),
em combinação com a regulação 'QuickDry' ou 'Protect', para secar uma secagem
ultra rápida.
6 Seleccione um fluxo de ar mais fraco (I ou
II) para secar cabelos curtos ou para dar
um retoque no penteado.
PORTUGUÊS 81
Page 82

Acessórios
Concentrador do ar
O bico concentrador permite direccionar o fluxo
de ar directamente sobre a escova ou sobre o
pente com que estiver a secar e modelar o
cabelo.
C
1 Para ligar o concentrador, basta encaixá-lo
no secador. Para desligar, puxe para fora.
2 Ligue o secador e seleccione a regulação I,
II ou III para o fluxo de ar.
C
3 Quando estiver a secar o cabelo com o
concentrador, pode usar uma escova ou
um pente para modelar o cabelo.
Difusor de volume
O difusor de volume foi especialmente concebido
para secar de forma suave tanto cabelos lisos
como cabelos encaracolados ou ondulados.
C
◗ O difusor de volume emite um fluxo de ar
suave e permite dar volume e movimento ao
cabelo.
C
1 Ligue o difusor, encaixando-o no secador e
alinhando as setas do difusor com a barra.
Para desmontar, simplesmente puxe-o para
fora.
PORTUGUÊS82
Page 83

C
◗ Para dar volume às raízes, introduza os dentes
do difusor no cabelo de modo a tocarem o
couro cabeludo.
C
2 Efectue movimentos circulares com o
secador para distribuir uniformemente o
ar quente por todo o cabelo.
Cabelos encaracolados ou ondulados
C
◗ Quando estiver a trabalhar em cabelos
ondulados ou frisados, mantenha o difusor a
uma distância de 10-15 cm da cabeça para que
o cabelo seque gradualmente.
- Enquanto isso, poderá ir penteando o cabelo
com a mão livre ou com um pente.
- Também pode amachucar madeixas de
cabelo na mão e moldar caracóis ou ondas
enquanto o seca. Desta forma, os caracóis não
descaiem nem ficam frisados.
Cabelos compridos
C
◗ Para secar cabelos compridos, estique as
madeixas de cabelo sobre o difusor.
PORTUGUÊS 83
Page 84

C
◗ Em alternativa, pode pentear o cabelo de cima
para baixo usando os dentes do difusor.
Sugestões para modelar e secar
Temos aqui um penteado que poderá criar com
facilidade e suavidade, usando o seu secador
Philips Powerprotect ION. À medida que se for
familiarizando com o secador,descobrirá muitas
outras formas de criar grandes penteados. Basta
usar a sua imaginação!
1 Depois de lavar e tratar o cabelo como
habitualmente, seque-o ligeiramente com
uma toalha, sem esfregar, e penteie
cuidadosamente.
2 Coloque o difusor sobre o cabelo de
modo que as pontas dos dentes toquem o
couro cabeludo.Efectuando movimentos
circulares com o difusor, o cabelo será
levantado para a base do difusor e o ar
que sai dos pinos secará o cabelo da raíz
para cima.Assim, o cabelo ganhará mais
volume. Continue a secar até que o cabelo
fique seco nas raízes.
3 Regule o fluxo de ar para uma posição
mais baixa e continue até o cabelo ficar
completamente seco. Use um pente ou
PORTUGUÊS84
Page 85

uma escova para modelar o cabelo da
forma pretendida.
4 Para criar volume nas pontas, mantenha o
difusor na posição horizontal e disponha
algumas madeixas de cabelo na base do
difusor, entre os dentes de saída do ar, e
deixe ficar durante alguns instantes. O
fluxo de ar suave evitará que os caracóis
ou as ondas sejam soprados e se
desmanchem durante a secagem.
5 Termine com um fluxo de ar frio para fixar
o penteado.
Regule o botão para a regulação 'Ar Frio' e
direccione o fluxo de ar frio para o cabelo.
Limpeza
Antes de proceder à limpeza, desligue sempre da
corrente.
Nunca passe o secador por água.
◗ Limpe o secador com um pano seco.
◗ Limpe os acessórios com um pano húmido ou
enxaguando-os à torneira.
Retire os acessórios do secador antes de os
limpar.
C
◗ A grelha de entrada do ar desmonta-se para
facilitar a limpeza.
PORTUGUÊS 85
Page 86

Arrumação
Antes de guardar, desligue sempre da corrente.
◗ Coloque o secador num local seguro e deixe-
o arrefecer.
◗ Não enrole o fio à volta do secador.
◗ O secador pode ser pendurado pelo aro de
suspensão.
Substituição
◗ Se o fio se estragar, deverá ser substituído
pela Philips, por um concessionário autorizado
pela Philips ou por pessoal devidamente
qualificado para se evitarem situações
gravosas para o utilizador.
◗ Para verificações ou reparações, dirija-se
sempre a um concessionário autorizado pela
Philips.As reparações efectuadas por pessoal
não qualificado poderão originar situações
extremamente gravosas para o utilizador.
Garantia e assistência
Se necessitar de informações ou se tiver algum
problema, por favor visite o endereço da Philips
em www.philips.pt ou contacte o Centro de
Informação ao Consumidor Philips do seu país
(os números de telefone encontram-se no
folheto da garantia mundial).
Se não existir um desses Centros no seu País,
dirija-se a um agente Philips ou contacte o
Departamento de Service da Philips Domestic
Appliances and Personal Care BV.
PORTUGUÊS86
Page 87

Solução
Provavelmente a tomada onde o secador está ligado
não tem corrente:
Verifique se a tomada tem corrente.
O secador pode ter sobreaquecido e ter-se desligado
automaticamente.
Desligue o secador da corrente e deixe-o arrefecer
durante alguns minutos. Antes de voltar a ligá-lo,
verifique as grelhas para se certificar que não estão
obstruídas por pêlos, cabelos, etc.
O secador pode não ser adequado para a voltagem
onde está a ser ligado:
Certifique-se que a voltagerm indicada na placa de tipo
do secador corresponde à corrente eléctrica local.
O fio do secador pode estar estragado:
Se o fio se estragar, deverá ser substituído pela Philips,
por um concessionário autorizado pela Philips ou por
pessoal devidamente qualificado para se evitarem
situações gravosas para o utilizador.
Problema
O secador não
funciona.
Resolução de problemas
Se ocorrerem problemas com o seu secador e não for capaz de os
resolver através deste guia, por favor contacte o concessionário
autorizado Philips mais próximo ou o Centro de Informação ao
Consumidor do seu país.
PORTUGUÊS 87
Page 88

Giriş
Philips Powerprotect İyon saç kurutma makinesi
kişisel ihtiyaçlarınıza cevap verecek şekilde dizayn
edilerek canlı, parlak güzel görünümlü saçlara sahip
olmanızı sağlar. Negatif iyonlar statik elektriğin
oluşmasını azaltarak saçınıza sağlıklı ve güzel
görünüm kazandırır.
Bilimsel testler göstermiştir ki; sürekli yüksek ısıda
kurutulan saçlarda, aşırı kuruluk görülebilir.Aşırı
kuruyan saçlar kalınlaşır, sönük ve yıpranmış
görünür. Normal saç kurutma makineleri saçı çok
yüksek derecelerde (yaklaşık 80cC) ısıtsada Philips
Powerprotect İyon Powerprotect sistemine
sahiptir. Bu sistem, 57cC'lik daha düşük bir ısıda
kurutma yaparak, saçın aşırı ısınma riskini azaltır.
Ultra güçlü hava akımıyla desteklenmiş bu
teknoloji, bu cihazı tüm saç kurutma makinelerinin
en hızlısı yapmaktadır. Sonuç, parlayan güzel saçlar!
Saç Kurutma cihazı ve diğer Philips güzellik
ürünleri hakkında detaylı bilgiye
www.philips.com.tr web sitesinden ulaşabilirsiniz.
Genel tanım (şek. 1)
A Hava giriş deliği
B Isı ayarları için dönen düğme
- ‡ Çabuk-Kurutma ayarı
- · Koruma ayarı
- — Ilık ayar
C Hava akımı ve açma/kapama sürgüsü
- O = kapalı
TÜRKÇE88
Page 89

- I = Şekil vermek için özel olarak tasarlanmış
düşük hava akımı
- II = Kurutmak ve şekil vermek için orta hava
ayarı
- III = Hızlı kurutma için ultra güçlü hava akımı
D Asma halkası
E Hacim veren difüzör
F Dar fön başlığı
G İyon üretici
H Profesyonel saç bakım seti
- Yuvarlak fırça
-Tarak
- Saç klipsleri
- Kılıf
Önemli
Cihazı kullanmadan önce, kullanım ile ilgili bu
talimatları dikkatlice okuyun ve ileride başvurmak
için saklayın.
◗ Cihazı prize takmadan önce, cihaz üzerinde
belirtilen voltajın yerel şebeke voltajıyla
uygunluğunu kontrol edin.
◗ Elektrik kordonunu düzenli olarak kontrol
edin. Cihazın elektrik kordonu,fişi veya kendisi
hasar görürse kesinlikle kullanmayın.
◗ Cihazın elektrik kordonu herhangi bir şekilde
zarar görmüşse, yalnız Philips orjinal cihazlar
kullanılarak orjinal parçaları ile yetkili Philips
servislerinde değiştirilmelidir.
◗ Bu cihazı sudan uzak tutun! Bu ürünü banyo,
lavabo vb.suyla dolu yerlerin yakınında veya
TÜRKÇE 89
Page 90

üzerinde kullanmayın. Eğer banyoda
kullanırsanız, cihaz kapalı olduğunda dahi, suya
yakın olması belirli bir risk oluşturacağından,
kullanım sonrasında cihazın fişini çekin.
◗ İleri güvenlik önlemleri için, elektrik devresine,
banyoyu destekleyen 30mA'i geçmeyen
alternatif bir çalışma akımıyla, alternatif bir
akım cihazı (RCD) kurmanızı tavsiye ederiz.
Tavsiye için elektrikçinize danışın.
◗ Cihazı çocukların ulaşabilecekleri yerlerden
uzak tutun.
◗ Hava giriş deliklerini her zaman açık tutun.
◗ Cihaz aşırı ısınırsa, otomatik olarak
kapanacaktır. Cihazın fişini prizden çekerek
birkaç dakika soğumasını bekleyin. Fişi prize
takmadan önce, giriş deliğinin toz zerrecikleri,
saç vb. ile tıkalı olmadığından emin olun.
◗ Cihazı kullanmadığınız zamanlarda mutlaka
kapatın.
◗ Kullanımdan sonra her zaman cihazı kapatın.
◗ Kordonu cihazın etrafına sarmayın.
◗ Bu saç kurutma cihazını kullanırken
karakteristik bir koku duyacaksınız. Bu koku
İyonlar oluşurken çıkarılan kokudur.Ve insan
vücudu için zararlı değildir.
◗ İyon üreticiyi metal cisimlere değdirmeyin.
TÜRKÇE90
Page 91

Cihazın Kullanımı
Kurutma
1 Cihazın fişini duvar prizine takın.
C
2 İstenilen ayarı seçerek cihazı çalıştırın:
O = Kapalı
I = Şekil vermek için özel olarak tasarlanmış
düşük hava akımı
II = Kurutmak ve şekil vermek için orta hava
ayarı
III = Hızlı kurutma için ultra güçlü hava akımı
İyonlar otomatik olarak oluşur.
3 Dönen düğmeye basarak istenilen hava
ayarını seçin.
Çabuk-kurutma ayarı
C
◗ ‡ Çabuk-Kurutma ayarı, duş sonrası ıslak
saçlarınızı çabucak kurutmanızı sağlar.
Çabuk-Kurutma ayarının, duş sonrası ıslak
saçlarınızı kurutma işlemini hızlandırmak amacıyla
ve saç hemen hemen kurumaya başladığında, aşırı
kuruma riskini azaltmak için Koruma ayarını
kullanmanız tavsiye edilir.
Koruma ayarı
C
◗ · Koruma ayarı 57cC'lik ısıda hafif kurutma
işlemi yapar.
TÜRKÇE 91
Page 92

Ilık ayar
C
◗ — Ilık ayar, yarattığınız şekli korur, sabitler.
Saçınızın şeklini uzun süre koruması için, dönen
düğmeyi Ilık ayarına getirin ve verdiğiniz şekli
korumak için, saçınıza ılık hava akımı doğrultun.
C
4 Saçınızı, cihazı saçınızdan kısa bir mesafede
uzak tutarak, dairesel hareketler yaparak
kurutun.
5 Ultra-hızlı kurutma için, Çabuk-Kurutma
ayarına uygun olarak en yüksek hava akımı
hızını (III) seçin.
6 Kısa saçı kurutmak veya saçınıza şekil
vermek için, düşük hava akımı hızını (I-II)
seçin.
Aparatlar
Dar Fön Başlığı
Dar fön başlığı, hava akımını saçınıza şekil verdiğiniz
fırça veya tarağa direkt olarak yöneltmenizi sağlar.
C
1 Dar Fön Başlığını kolaylıkla cihaza
bastırarak takabilirsiniz. çekerek cihazdan
ayırabilirsiniz.
2 Hava akımı sürgüsünü I, II veya III
pozisyonuna getirerek cihazı çalıştırın.
TÜRKÇE92
Page 93

C
3 Saçınızı dar fön başlığı ile kuruturken,
saçınıza şekil vermek için fırça veya tarak
kullanabilirsiniz.
Hacim veren difüzör
Hacim veren difüzör, düz ve kıvırcık veya dalgalı
saçları kurutmak için özel olarak geliştirilmiştir.
C
◗ Hacim veren difüzör, hafif bir hava akımı
üfleyerek saçınıza hacim ve canlılık kazandırır.
C
1 Difüzörü basitçe iterek cihaza takın.
Difüzör ve cihazın ucunda bulunan okları
aynı hizaya getirin.Yerinden çıkarmak için
çekin.
C
◗ Saç diplerine hacim vermek istediğinizde cihazı
difüzör iğneleri başınıza değecek şekilde
saçınıza tutunuz.
C
2 Ilık havayı eşit olarak saça dağıtmak için,
cihazla beraber dairesel hareketler
uygulayın.
TÜRKÇE 93
Page 94

Kıvırcık veya dalgalı saç
C
◗ Kıvırcık ve dalgalı saçlara şekil verirken, saçı
kademe kademe kurutmak için, difüzörü
başınızdan 10-15 cm uzakta tutun.
- Aynı anda, saçınıza serbest kalan elinizle veya
bir tarakla şekil verebilirsiniz.
- Saçınızı tutamlar halinde de difüzörün içine
koyarak kurutabilirsiniz. Böylece sık ve uzun süre
dayanan bukleler/dalgalar elde edebilirsiniz.
Uzun Saç
C
◗ Uzun saçı kurutmak için, saç tutamlarını
difüzör üzerinde yayabilirsiniz.
C
◗ Alternatif olarak, difüzörün çubukları ile saçı
aşağı doğru tarayarak kurutabilirsiniz.
Şekil verme ve kurutma için ipuçları
İşte, Philips Powerprotect İyon saç kurutma
makinesiyle kolayca yaratabileceğiniz saç
şekillerinden biri. Cihaza alışmaya başladıkça,
mükemmel şekiller yaratmak için daha bir çok yol
olduğunu keşfedeceksiniz. Sadece yaratıcılığınızı
kullanın!
TÜRKÇE94
Page 95

1 Saçınızı her zamanki gibi yıkayıp
kremledikten sonra, bir havlu ile saçınızdaki
ıslaklığı alın ve tarakla dikkatlice tarayın.
2 Difüzörü saçlarınıza, iğne uçları kafa
derinize değecek şekilde yerleştirin.
Difüzör ile dairesel hareketler yapmak, saçı
difüzörün tabanına doğru kaldıracak ve
iğne hava girişlerinin saçı kökünden
yukarıya doğru kurutmasını sağlayacaktır.
Bu saçınıza daha çok hacim katacaktır.
Saçlarınız köklerine kadar kuruyuncaya dek
kurutma işlemine devam edin.
3 Hava akımını daha düşük bir pozisyona
getirin ve saçınız tamamen kuruyuncaya
kadar kurutmaya devam edin.Kurutma
esnasında, saçınıza istenildiği gibi şekil
vermek için tarak veya fırça kullanın.
4 Saç diplerinde hacim yaratmak için,
difüzörü yatay pozisyonda tutun ve
difüzörün tabanına iğne hava delikleri
arasına bir tutam saç yerleştirin ve bir süre
orada bırakın. Hafif hava akımı,kurutma
esnasında dalgalarınızın şeklinin
bozulmasına engel olacaktır.
5 Verdiğiniz şekli korumak için, kurutma
işlemini ılık hava akımıyla bitirin.
Dönen düğmeyi, Ilık ayarına getirin ve verdiğiniz
şekli korumak için saçınıza ılık hava akımı
doğrultun.
TÜRKÇE 95
Page 96

Temizleme
Cihazı temizlemeden önce, her zaman fişini
prizden çekin.
Cihazı asla su ile durulamayın.
◗ Cihazı kuru bir bezle silerek
temizleyebilirsiniz.
◗ Aparatları nemli bir bezle silerek veya musluk
suyu altında yıkayarak temizleyin.
Temizlemeden önce aparatları cihazdan ayırın.
C
◗ Kolay temizlik için, çıkartılabilir hava giriş
deliği.
Saklama
Cihazı saklamadan önce, her zaman fişini prizden
çekin.
◗ Cihazı güvenli bir yere koyun ve soğumaya
bırakın.
◗ Kordonu cihazın etrafına sarmayın.
◗ Cihaz asma halkasından asılarak saklanabilir.
Değiştirme
◗ Cihazın elektrik kordonu herhangi bir şekilde
zarar görmüşse, yalnız Philips orjinal cihazlar
kullanılarak orjinal parçaları ile yetkili Philips
servislerinde değiştirilmelidir.
◗ Cihazın kontrolü veya tamiratı için, her zaman
yetkili bir Philips servis merkezine götürün.
TÜRKÇE96
Page 97

Yetkili olmayan kişilerce yapılan tamirat,
kullanıcı için tehlikeli durumlara sebep olabilir.
Garanti & servis
Bir bilgiye ihtiyacınız olursa veya bir probleminiz
olursa, lütfen www.philips.com.tr adresinden
Philips web sitesini ziyaret edin veya ülkenizdeki
Philips Tüketici Danışma Merkezini arayın.Telefon
numarasını Uluslararası Garanti kitapçığında
bulabilirsiniz). Eğer ülkenizde Tüketici Danışma
Merkezi yoksa, yerel Philips bayinize baş vurun
veya Philips Ev Aletleri ve Kişisel Bakım Servis
Departmanı BV ile iletişim kurun. 0800 261 33 02
TÜRKÇE 97
Page 98

Çözüm
Cihazın bağlandığı priz çalışmıyor olabilir:
Prizin çalışıyor olduğundan emin olun.
Cihaz aşırı ısınmış ve kendiliğinden kapanmış olabilir:
Cihazın fişini prizden çekerek birkaç dakika soğumasını
bekleyin. Cihazın fişini tekrar prize takmadan önce, giriş
deliklerinin saç veya tozdan tıkanmadığından emin olun.
Cihaz bağlı bulunduğu voltajla uygunluk sağlamıyor
olabilir:
Cihazı prize takmadan önce, cihazın model plakasında
belirtilen voltajın yerel şebeke voltajıyla uygunluğunu
kontrol edin.
Cihazın elektrik kordonu hasar görmüş olabilir:
Cihazın elektrik kordonu herhangi bir şekilde zarar
görmüşse, yalnız Philips orjinal cihazlar kullanılarak orjinal
parçaları ile yetkili Philips servislerinde değiştirilmelidir.
Sorun
Cihaz çalışmıyor.
Sorun giderme
Saç şekillendirme cihazınızla sorun yaşarsanız ve bu sorunları
aşağıdaki sorun giderme rehberiyle çözüme ulaştıramazsanız, lütfen
en yakın Philips servis merkeziyle veya ülkenizdeki Philips Müşteri
Hizmetleri Merkezi ile iletişim kurun.
TÜRKÇE98
Page 99

99
Page 100

100
 Loading...