

Philips HMP7001 Quick start guide
Register your product and get support at
www.philips.com/welcome
HMP7001
User manual

EN Please refer to the safety information before using the product.
Trademark notice
HDMI, the HDMI logo, and High-Definition Multimedia Interface are trademarks or registered trademarks of HDMI
licensing LLC in the United States and other countries.
Manufactured under license from Dolby Laboratories. Dolby and the double-D symbol are trademarks of Dolby
Laboratories.
This item incorporates copy protection technology that is protected by U.S. patents and other intellectual property
rights of Rovi Corporation. Reverse engineering and disassembly are prohibited. ABOUT DIVX VIDEO: DivX
®
is
a digital video format created by DivX, LLC, a subsidiary of Rovi Corporation. This is an official DivX Certified®
device that plays DivX video. Visit divx.com for more information and software tools to convert your files into DivX
videos. ABOUT DIVX VIDEO-ON-DEMAND: This DivX Certified® device must be registered in order to play
purchased DivX Video-on-Demand (VOD) movies. To obtain your registration code, locate the DivX VOD section
in your device setup menu. Go to vod.divx.com for more information on how to complete your registration.. DivX
®
Certified
to play DivX® and DivX Plus® HD (H.264/MKV) video up to 1080p HD including premium content.
DivX®, DivX Certified®, DivX Plus® HD and associated logos are trademarks of Rovi Corporation or its subsidiaries
and are used under license.
Manufactured under license under U.S. Patent Nos: 5,956,674; 5,974,380; 6,487,535 & other U.S. and worldwide
patents issued & pending. DTS, the Symbol, & DTS and the Symbol together are registered trademarks & DTS
2.0+Digital Out is a trademark of DTS, Inc. Product includes software. © DTS, Inc. All Rights Reserved.
DLNA®,
the DLNA Logo and DLNA CERTIFIED
®
are trademarks, ser vice marks, or certification marks of the
Digital Living Network Alliance.
The Wi-Fi CERTIFIED Logo is a certification mark of the Wi-Fi Alliance.
English
Register your product and get support at
www.philips.com/welcome
HMP7000
3EN
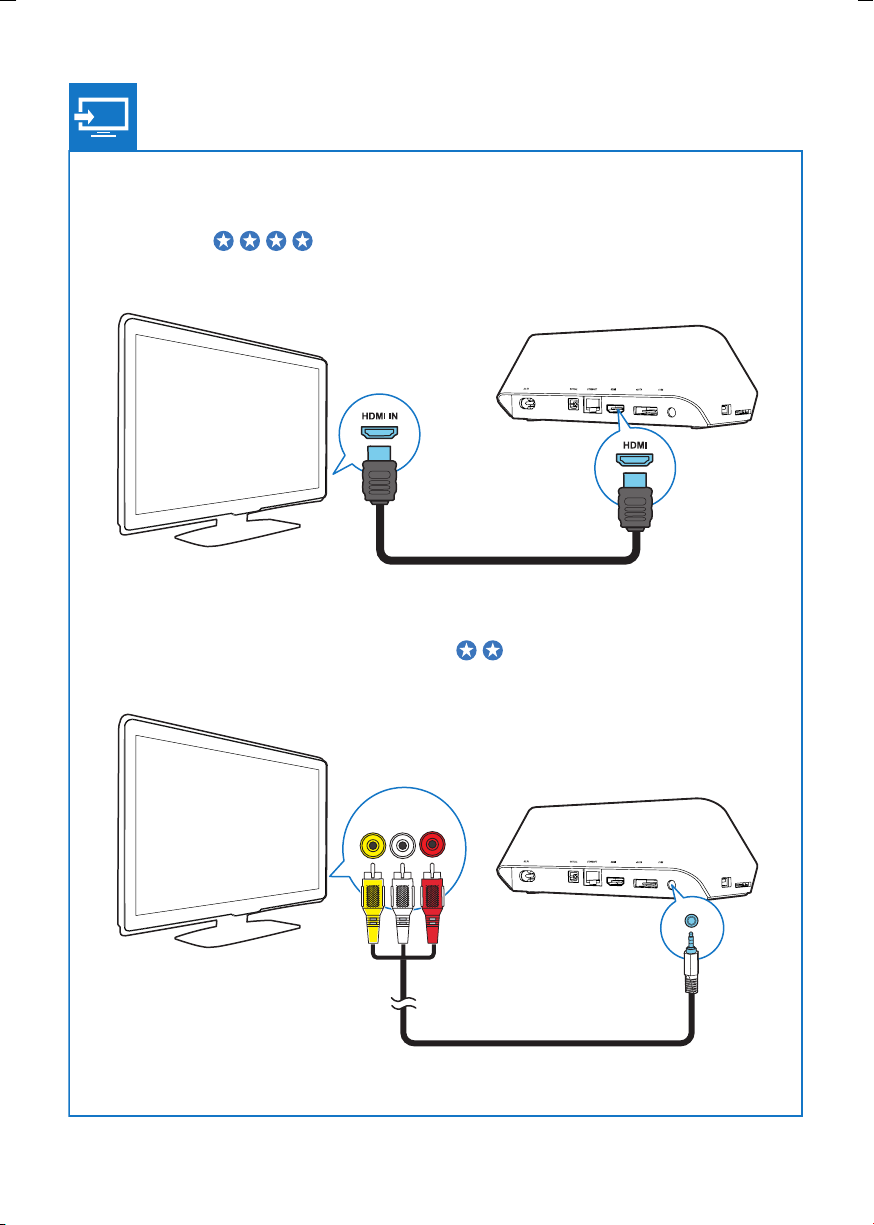
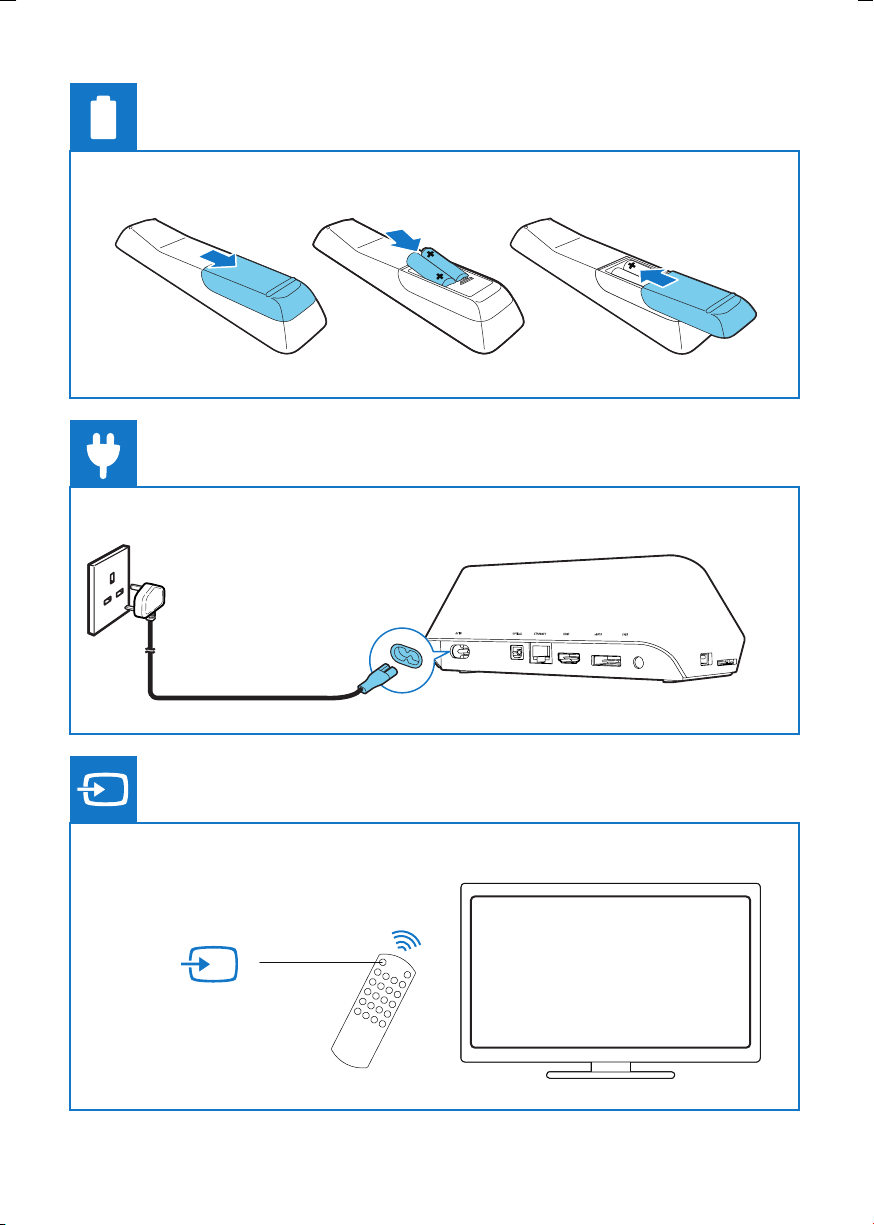
HDMI
English
SOURCE
TV
AV / HDMI
TV OUT + AUDIO OUT
LRVIDEO
4 EN
CVBS
English
SOURCE
AV / HDMI
TV
5EN
BE
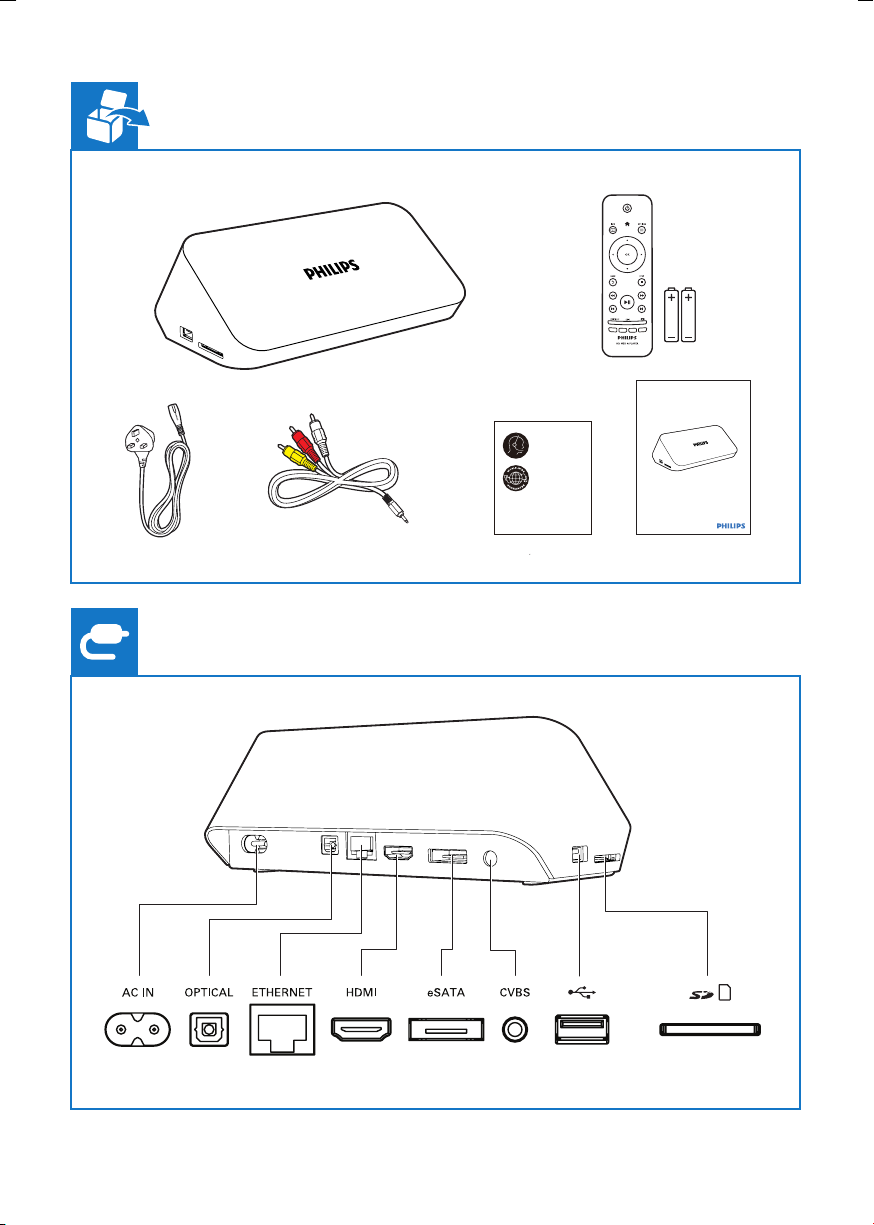
USB
USB Card
NetTV
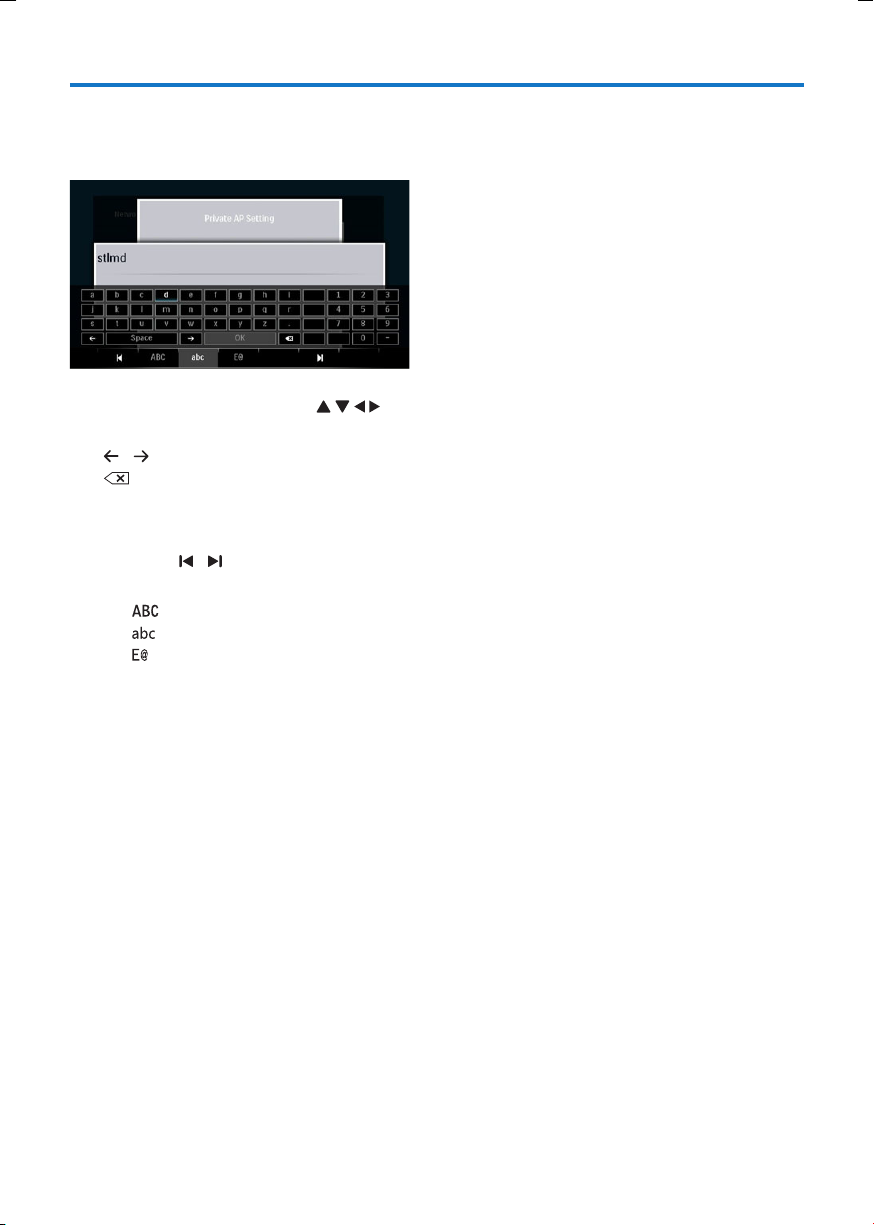
US
NetworkSetup
Card
Esata
sata
6 EN
NetTV
NetworkSetup
US B Card Esata
Private AP SettingPrivate AP Setting
NetTV
Ethernet
Wireless
Network Info
NetworkSet up
7EN

Contents
1 Control and play 10
Text entry 11
2 Play options 12
Video options 12
Audio option 13
Photo options 13
3 File browsing 14
Browse all les 14
Browse movie les 15
Browse music les 16
Browse photo les 16
4 Manageles 18
Basic operations 18
5 Set up a network 20
Connect to the Internet 20
Wired network setup 21
6 Play from online services 22
Manage your applications 22
7 Play from your home network 24
Play media from an Android device 24
Play media les from a computer (DLNA) 26
8 Playa3Dmediale 28
2D to 3D conversion 28
9 Other setup 29
System 29
Audio 30
Video 30
Network 30
MISC 31
10 EasyLink 32
8 EN

11 Update software 33
Update software through the Internet 33
Update software through USB 33
12 Troubleshooting 34
13 Specication 35
9EN

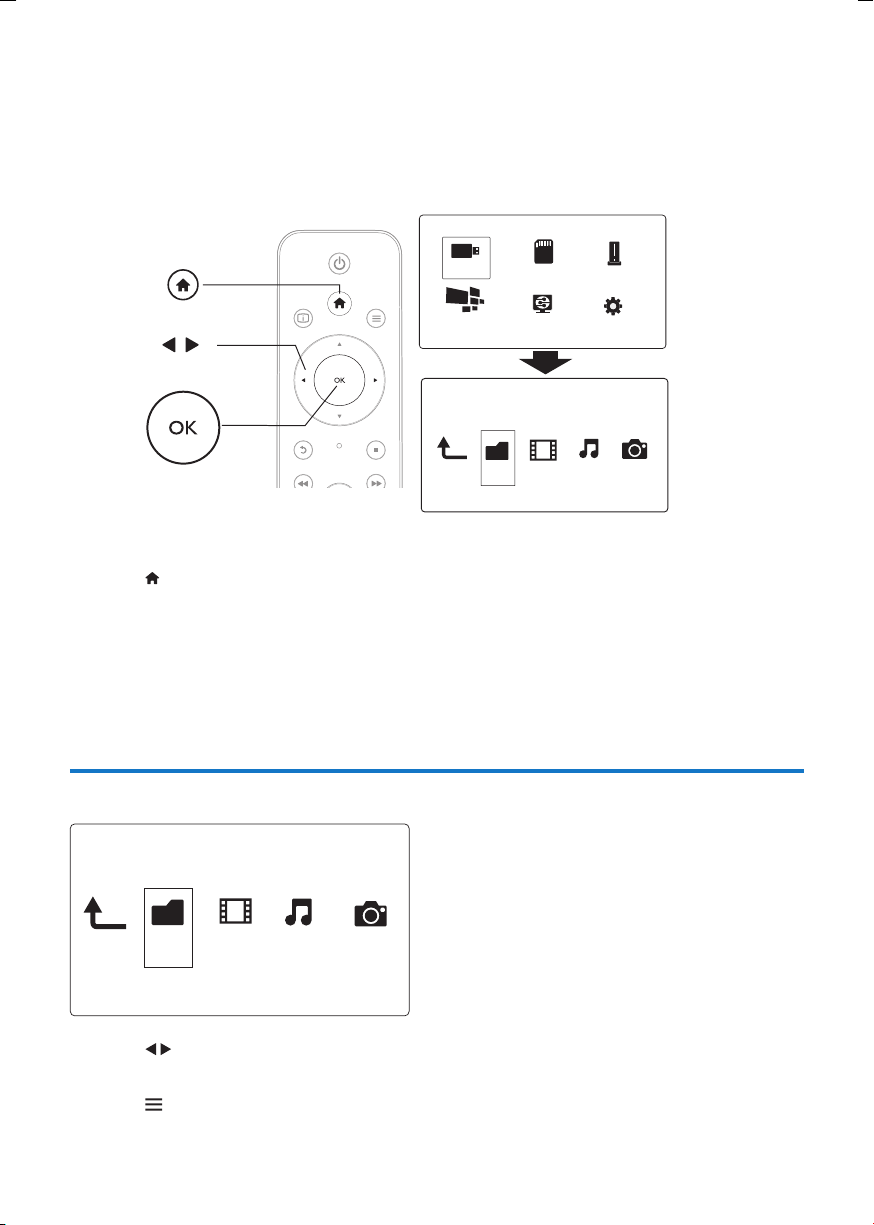
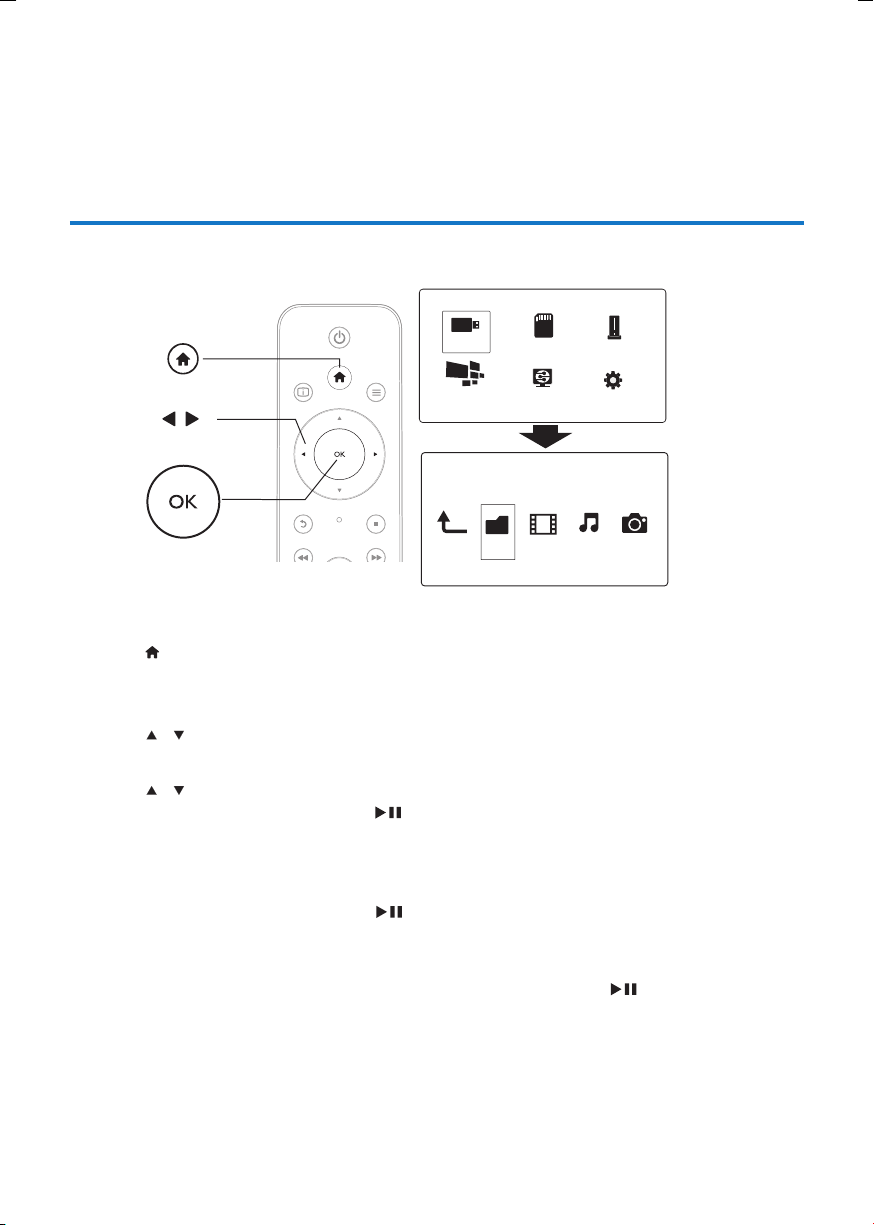
1 Control and play
Use your remote control to control the play.
Function Buttons / Actions
Stop the play.
Pause or resume the play.
Skip to the previous/ next media
le.
Return to the home page.
Zoom in or out. Press repeatedly.
Search backward/forward fast. Press
Access subtitle settings. SUBTITLE
Rotate a photo. Press
Navigate menus.
Conrm a selection or entry. OK
Access option menus during play
or in the le list.
Access the le editing menu in the
le folder list.
Display current playback
information.
Return to the previous menu.
/
To pan through an enlarged
photo, press
.
/ repeatedly to
select a speed.
/ .
EDIT
Note
You can only play DivX videos that were rented or purchased with DivX® registration code in this player. (Refer to "Setup' >
•
"MISC" > [DivX
• Subtitle les with the following lename extensions (.srt, .smi, .sub, .ssa, .ass, .txt) are supported but not displayed in the le list.
• The subtitle lename has to be the same as the lename of the DivX video (the le extension excluded).
• The DivX video le and the subtitle le must be saved under the same directory.
10 EN
®
VOD Code])
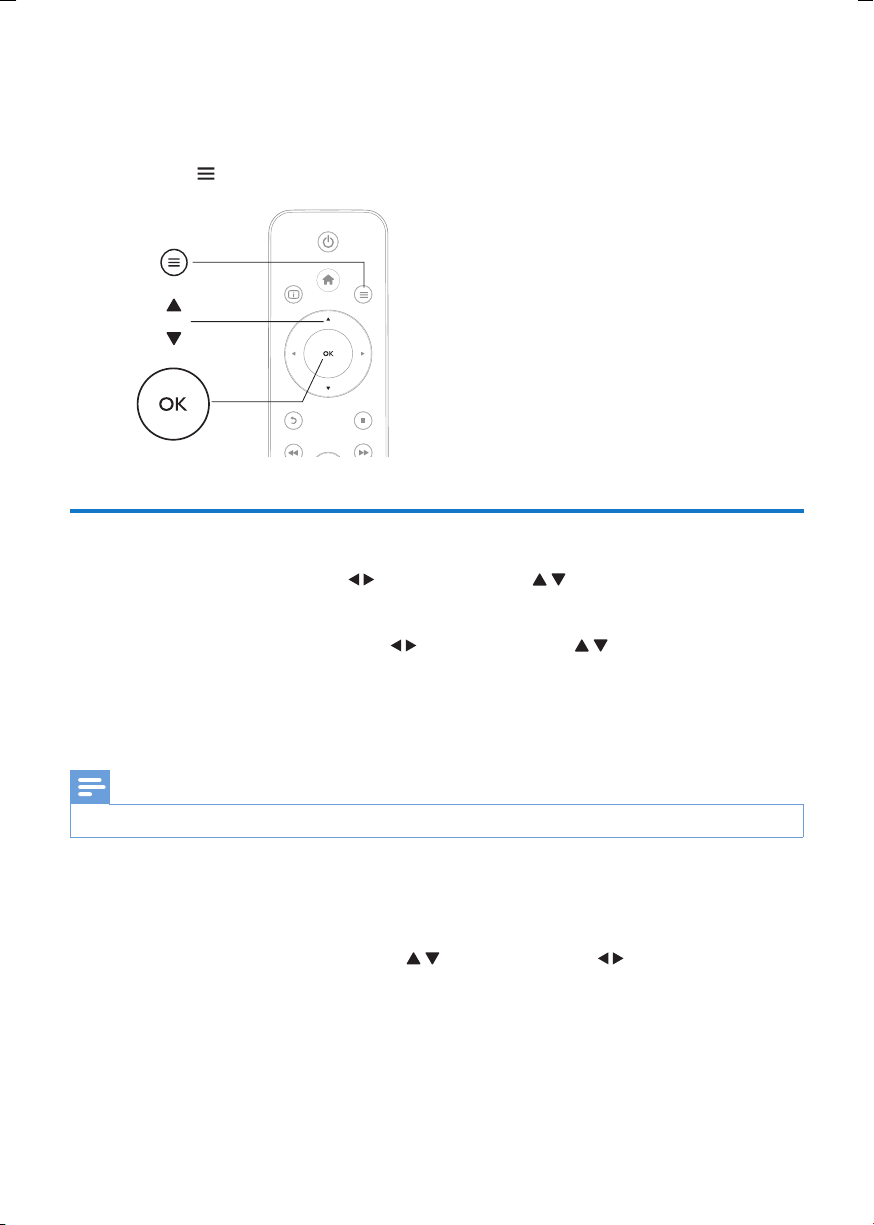
Text entry
With the onscreen keyboard, use the remote control to enter text.
1 On the remote control, press to move to a key, press OK to select the letter or symbol.
2 Do the following to select input options:
/ : Move the cursor to the left or right.
: Delete the entry before the cursor.
3 When the text entry is complete, select OK on the onscreen keyboard to exit.
To select input mode,
• Select
» On the onscreen keyboard, current input mode is highlighted.
/ on the onscreen keyboard.
: English input in upper case
: English input in low case
: symbols
11EN
2 Play options
During play, press to access the option items.
a
b
c
Video options
[Subtitle]: Adjust subtitle settings. Press to select an item and to adjust values. Then press OK
to conrm.
[Audio]: Select an audio language.
[GOTO]: Skip play to the specic time. Press
OK to conrm.
[Repeat Title]: Repeat the current title.
[Repeat All]: Repeat the movie le.
[Repeat Off]: Turn off a repeat mode.
to select an item and to adjust values. Then press
Note
To use 3D related functions, connect this player to a 3D TV through an HDMI cable.
•
[2D]: Restore a video to 2D format.
[3D Simulation] (3D simulation): Convert a 2D video to 3D format.
[3D Side by Side] (3D side by side): Convert a video in side by side format to 3D format.
[3D Top Bottom] (3D top bottom): Convert a video in top and bottom format to 3D format.
[Video Setting]: Adjust the video settings. Press
press OKto conrm.
12 EN
to select an item and to adjust values. Then
Audio option
[Repeat Off]: Turn off a repeat mode.
[Repeat One]: Repeat the current music le.
[Repeat All]: Repeat all the music ies.
[ShufeLoop]: Play music les in a random loop.
Photo options
[Slide Timing]: Set a display interval for a slideshow.
[Slide Transition]: Select a transition effect for a slideshow.
[Repeat Off]: Turn off a repeat mode.
[Repeat All]: Repeat all the photo ies.
[ShufeLoop]: Play photo les in a random loop.
[Background Music]: Select and play a music le during slideshow.
Note
To use 3D related functions, connect this player to a 3D TV through an HDMI cable.
•
[2D]: Restore a photo to 2D format.
[3D Auto] (3D Auto): Convert a 2D photo to 3D format.
[3D Side by Side] (3D side by side): Convert a photo in side by side format to 3D format.
[3D Top Bottom] (3D top bottom): Convert a photo in top and bottom format to 3D format.
[Video Setting]: Adjust the video settings.
13EN
3 File browsing
a
b
c
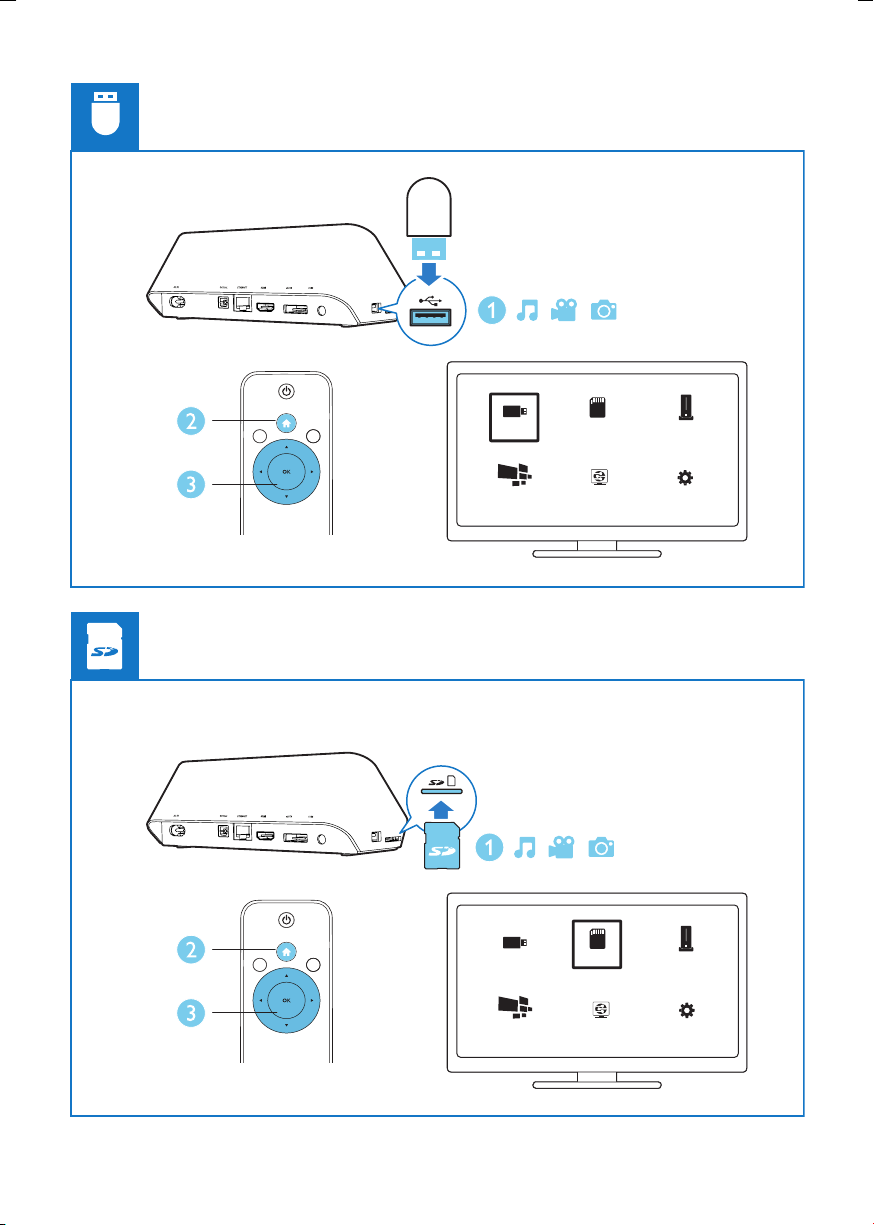
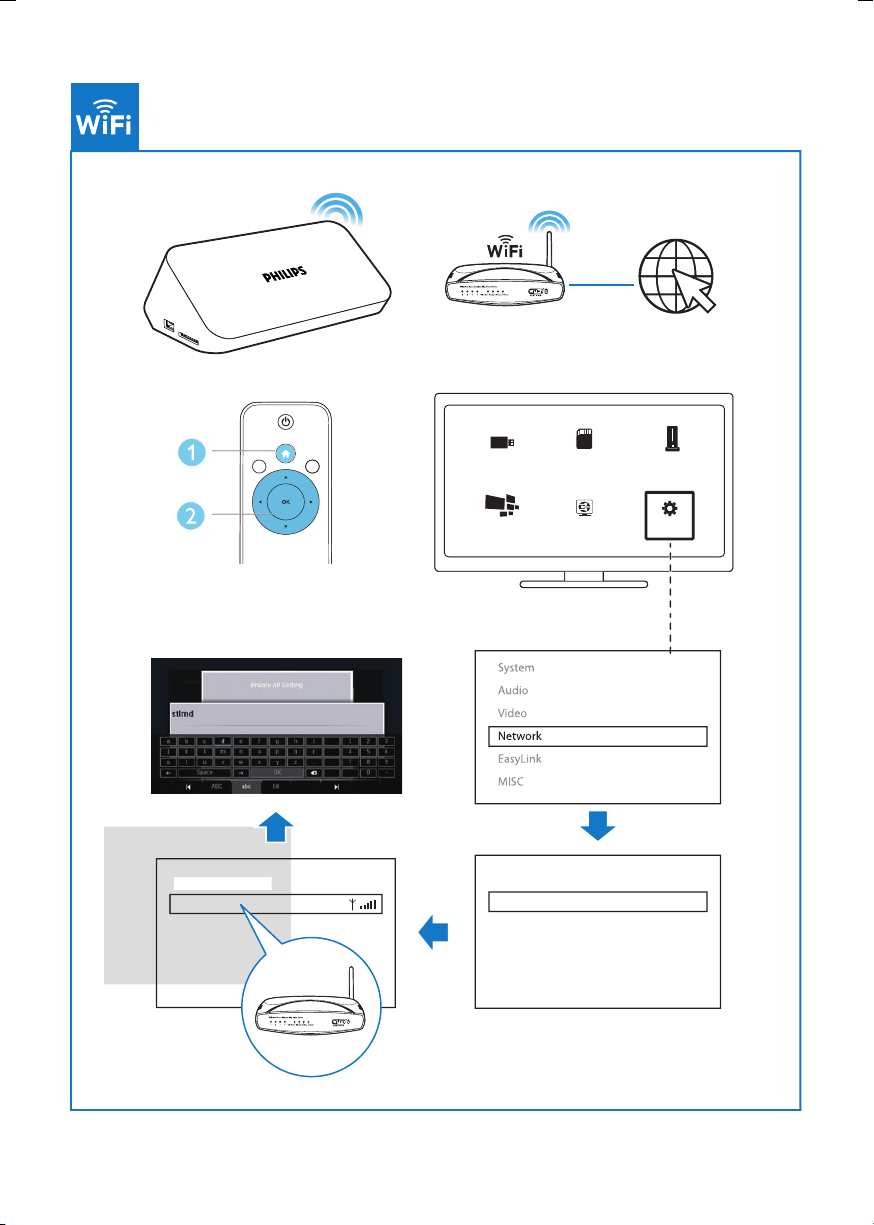
You can browse media les stored in a USB/SD storage device.
1 Press .
2 Select [USB]/ [Card] / [Esata].
3 Select a mode to browse media les.
• [Folder]
• [Movies]
• [Music]
• [Photos]
Browseallles
USB
NetTV
Card
Network
Folder Movies Music Photo
Esata
Setup
Folder Movies MusicPhoto
1 Press to select [Folder] and press OK to conrm.
2 Select your USB/SD storage device and press OK.
3 Press in the le browser.
14 EN
4 Press / to select a mode to view or arrange les.
[Thumbnails]: Display thumbnails of les or folder.
[List]: Display les or folder in a list.
[Preview]: Display les or folders with a preview window.
[All Media] Display all media les.
[Movies]: Display movie les.
[Photos]: Display photo les.
[Music]: Display music les.
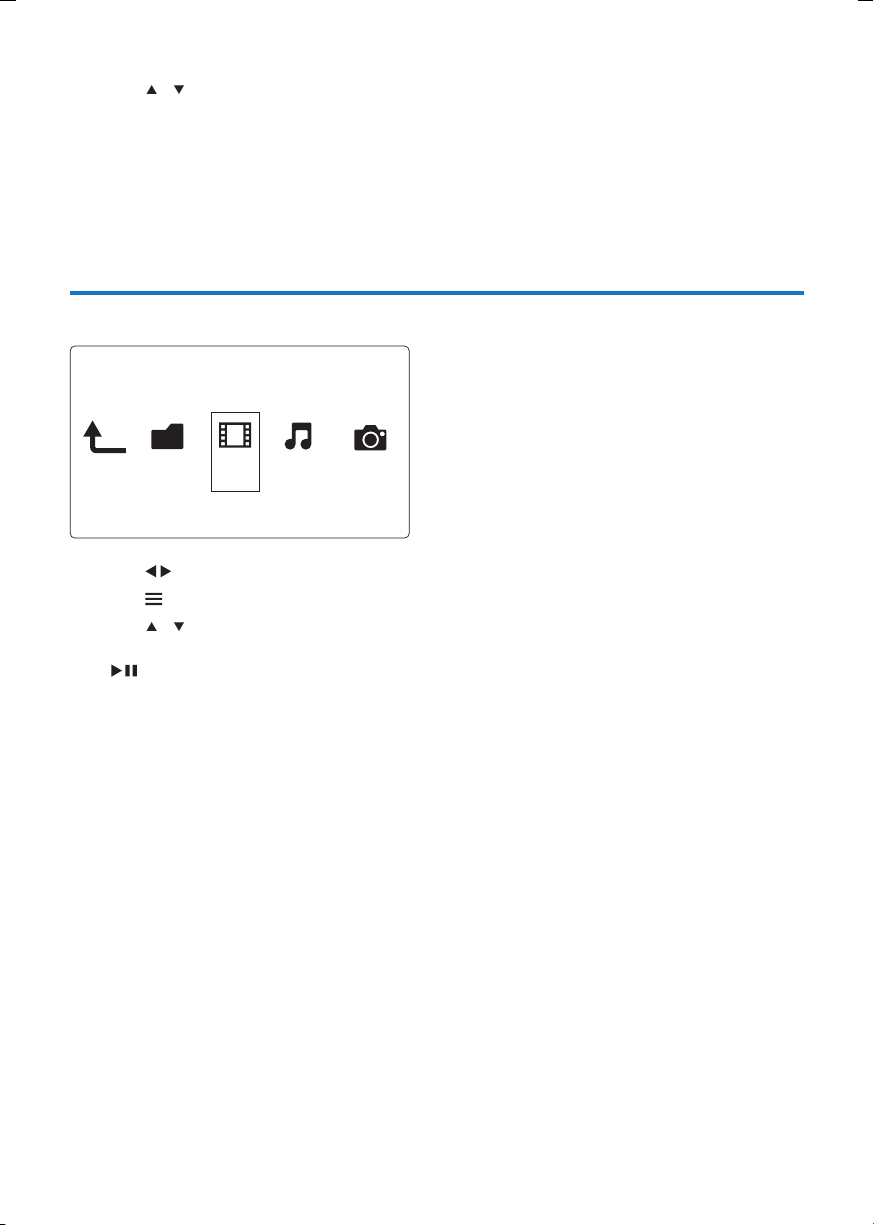
Browsemovieles
Folder Movies Music Photo
1 Press to select [Movies] and press OK to conrm.
2 Press in the le browser.
3 Press / to select a mode to view or arrange les.
[Search]: Search movie les. Follow on screen instruction to type in key words in the mini keyboard and
press
[Thumbnails]: Display thumbnails of movie les.
[List]: Display movie les in a list.
[Preview]: Display les or folders with a preview window.
[All Movies]: Display all movies les.
[Show DVDs]: Display all DVD content les.
[Flash Animation]: Display all ash les.
[Go to Folder]: Go to the folder where the selected le is placed.
[Name]: List movies les in an alphabetical order of their names.
[Size]: List movies les in the ascending order of their sizes.
[Most Viewed]: List most viewed movie les.
[Recently Added]: List recently added movie les.
to start search.
15EN
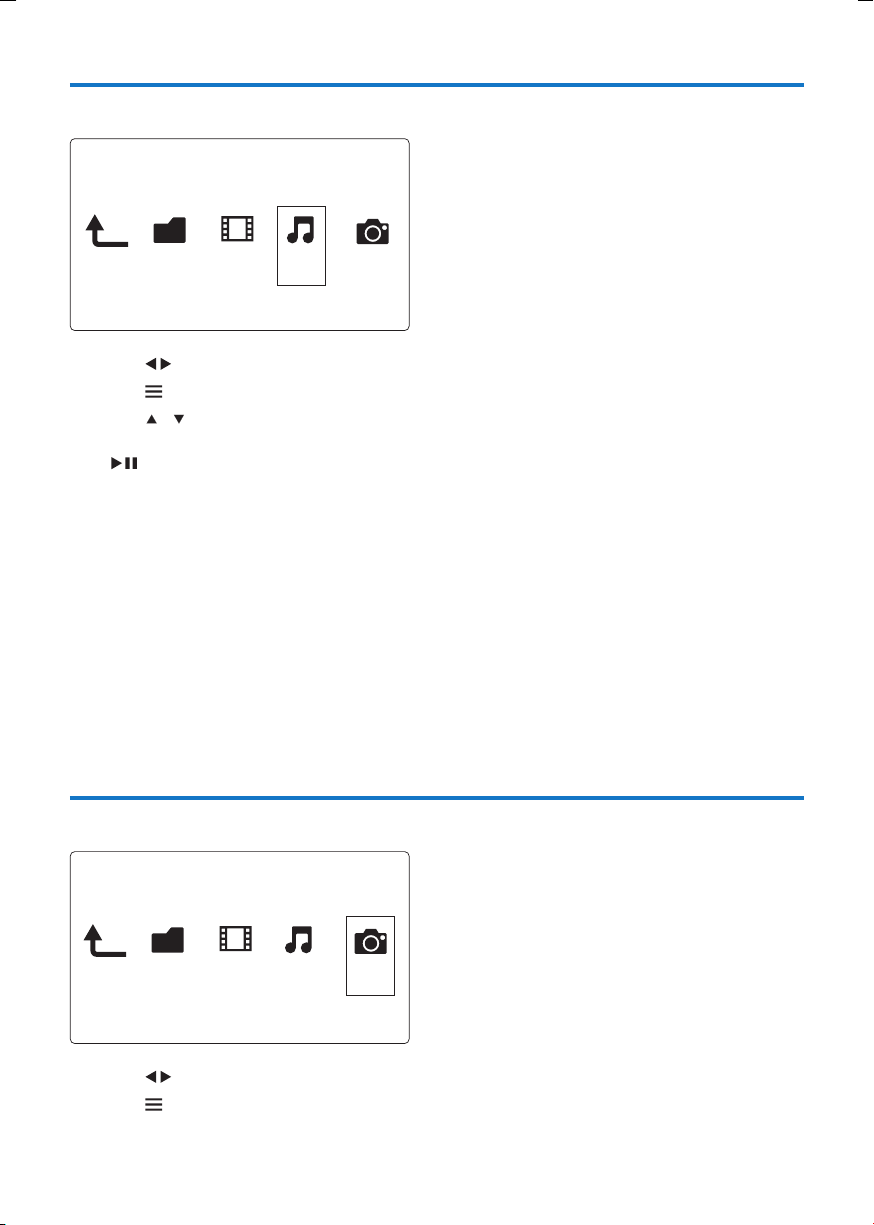
Browsemusicles
Folder Movies MusicPhoto
1 Press to select [Music] and press OK to conrm.
2 Press in the le browser.
3 Press / to select a mode to view or arrange les.
[Search]: Search music les. Follow on screen instruction to type in key words in the mini keyboard and
press
[Thumbnails]: Display thumbnails of music les.
[List]: Display music les in a list.
[Preview]: Display music les with a preview window.
[Go to Folder]: Go to the folder where the selected le is placed.
[All Songs]: Display all music les.
[Albums]: Display music les by albums.
[Artists]: Display music les by artists.
[Genres]: Sort music les by genres.
[Years]: Sort music les by years.
[Playlists]: Display play lists.
[Recently Played]: List recently played music les.
[Recently Added]: List recently added music les.
[Name]: List music les in an alphabetical order of their names.
to start search.
Browsephotoles
Folder Movies MusicPhoto
1 Press to select [Photos]and press OK to conrm.
2 Press in the le browser.
16 EN

3 Press / to select a mode to view or arrange les.
[Search]: Search photo les. Follow on-screen instruction to type in key words in the mini keyboard and
press
[Thumbnails]: Display thumbnails of photo les or folder.
[List]: Display les or folder in a list.
[Preview]: Display les or folders with a preview window.
[Photo Directory]: Display photo les in the directory mode.
[Leaf Folder View]: Display photo les in the folder mode with a preview of a contained photo.
[Date view]: Sort photo les by date modied.
[All Photos]: Display all photos les.
[Albums]: Sort photo les by albums.
[Name]: List photo les in an alphabetical order of their names.
[Recently Added]: List recently added photo les.
[Recently Played]: List recently played photo les.
to start search.
17EN
4 Manage files
a
b
c
You can manage media les on the storage device.
Basic operations
USB
NetTV
Card
Network
Folder Movies Music Photo
Esata
Setup
1 Press .
2 Select [USB]/ [Card] / [Esata] >[Folder].
3 Select a par tition of your USB/SD storage device and press OK.
4 Press / to select a le or folder and press [Edit].
» The le editing menu is displayed.
5 Press / to select your operation and press OK to conrm.
[Copy]: Select a destination and press
» The selected le or folder is copied to the destination.
[Delete]: Select [Yes] and press OK to conrm.
» The selected le or folder is deleted.
[Move]: Select a destination and press
» The selected le or folder is moved to the destination.
[Rename]
1 Select [Rename] to edit the name in the mini keyboard, and then press to conrm.
2 Select [OK] and press OK to apply the new name.
to conrm.
to conrm.
18 EN
Usethelelist
[Multiple Select]
1 Press / to select a le or folder and press to add to the list.
2 Press [Edit]when you complete adding les and folders.
3 Select an operation.
[Copy] Select the destination and press to conrm.
[Delete] Select [Yes] and press OK to delete the selected les or folders.
[Move] Select the destination and press
[Save Playlist] • Select [OK] to save a play list.
• Select [Rename] to edit the name in the mini keyboard, and then press
to conrm.
[Save Photo Album] • Select [OK] to save a photo album.
• Select [Rename] to edit the name in the mini keyboard, and then press
to conrm.
Note
• Press and hold for two seconds to remove a connected storage device safely.
to conrm.
19EN
 Loading...