

Page 1

HI 515/25/29/35/45
Azur Excel Plus
Page 2

2
English Page 4
• Keep page pages 3 and 50 open when reading these operating
instructions.
Dansk Side 12
• Hold side 3 og 50 opslået mens De læser brugsanvisningen.
Norsk Side 20
• Slå opp på side 3 og 50 før De leser videre.
Svenska Sid 27
• Ha sidan 3 och 50 utvikt när ni läser bruksanvisningen.
Suomi Sivu 35
• Pidä sivut 3 ja 50 auki samalla kun luet käyttöohjetta.
Deutsch Seite 42
• Schlagen Sie beim Lesen der Gebrauchsanweisung Seiten 3
und 50 auf.
Page 3
3
4
0
1
4
3
5
6
4
0
1
4
3
5
6
4
0
1
4
3
5
6
1
J
G
D
N
L
K
H
HI 525
HI 529
HI 535
HI 545
MAX
HI 525/29/35
HI 545
HI 515
M
FF
EEE
BBB
CCC
H
H
H
O
I
O
F
B
E
C
A
Page 4

Important
• Please read these instructions in conjunction with the
illustrations before using the appliance.
• Before using for the first time, check if the voltage rating on
the typeplate corresponds to the mains voltage in your home.
• Never use the appliance if it is damaged in any way.
• Take care that children cannot touch the iron when hot and
that they cannot pull the mains cord.
• The ejected steam is hot and therefore hazardous. Never direct
the steam towards people.
• Remove the plug from the socket before filling the iron with
water or pouring out the remaining water after use.
• Never immerse the iron in water.
• When you have finished ironing, and also when leaving the
iron even for a short while:
- set the steam control to position O;
- stand the iron on its end;
- remove the mains plug from the wall socket.
• To take optimum care of your iron always store the iron
standing on its end.
• Some parts of the iron have been slightly greased and as a
result the iron may slightly smoke when switched on for the
first time. After a short while, however, this will cease.
• Before using for the first time remove any sticker or protective
foil from the soleplate. Clean the soleplate with a soft cloth.
• Do not put vinegar or other descaling agents into the water
reservoir.
• Do not use chemically descaled water.
• The cordset should not be allowed to touch the soleplate when
it is hot.
• If the mains cord of this appliance is damaged, it must be
replaced by the original type only.
Please apply to your Philips dealer or to the Philips
organisation in your country for replacement
• This appliance is not intended for use by young
children or infirm persons without supervision.
• Young children should be supervised to ensure that
they do not play with the appliance.
English
4
Page 5

5
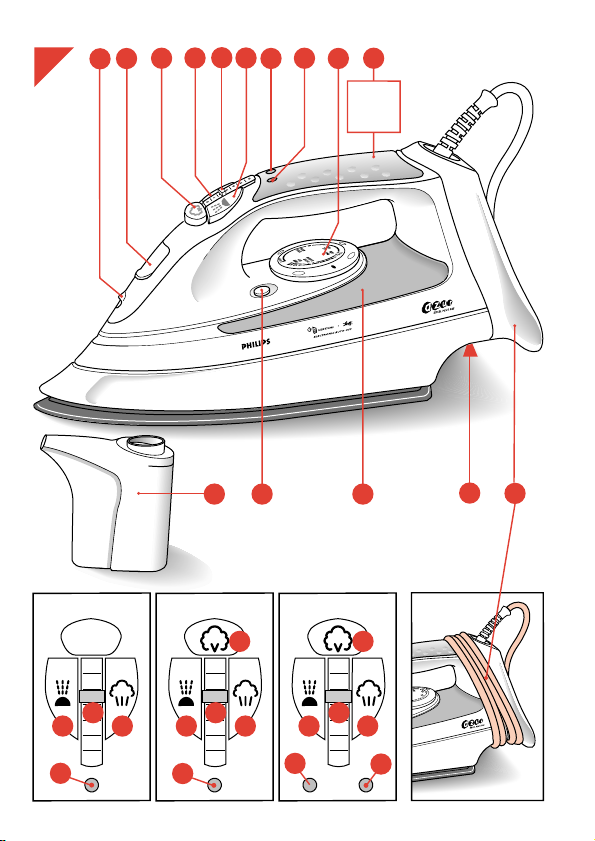
General description (fig. 1)
A Temperature control (rotate)
B Steam control (slide)
O = no steam
1 = minimum steam output
6 = maximum steam output
C Spray button T (press)
D Spray nozzle
E Shot of Steam button 9 (press)
F Turbo Steam button 0 (press) (types HI 525/29/35/45)
G Filling funnel for filling with water without spillage
H Temperature pilot light (amber)
I “Self clean” button (press)
J Water window
K Cord storage
L Type plate
M Measuring beaker
N “Soft touch” hand grip (types HI 525/29/35/45)
O “Auto Stop” pilot light (red) (type HI 545)
Filling with water (for steam-ironing and spraying)
• Please fill this iron with normal tap water before using for the first time.
• For refilling, you can also use tapwater. However, if the water is very
hard (hardness higher than 17 °DH / 211⁄4°Clarke), it is advisable to
use distilled water.
- Remove the mains plug from the wall socket before filling the iron.
Set the steam control (B) to position O (= no steam).
- Stand the iron on its end and open the filling funnel (fig. 2).
- Pour water (max. 250 ml) into the filling aperture (fig. 3).
Use the measuring beaker with spout for this purpose.
- Close the filling funnel (fig. 4).
Ironing temperature
• Always check first to see whether a label with ironing instructions is
attached to the article to be ironed. (See table.)
Follow these ironing instructions in all cases.
Page 6

6
• If ironing instructions are missing but you do know the kind of fabric,
then see the table.
• The table is valid for the materials only and is not applicable to any
applied finish, gloss etc.
Textile to which some kind of finish has been applied (gloss, wrinkle,
relief etc.) can best be ironed at lower temperatures.
• Sort the laundry out according to ironing temperature first: wool with
wool, cotton with cotton, etc.
• The iron heats up quicker than it cools down. Therefore, start ironing
the articles requiring the lowest temperature such as those made of
synthetic fibres.
• If the fabric consists of various kinds of fibres, you must always select
the lowest ironing temperature of the composition of those fibres.
B
C
D
Z
Synthetic
fibres, e.g.
acryl,
viscose,
polyamide
(nylon),
polyester
Silk
Wool
Cotton
Linen
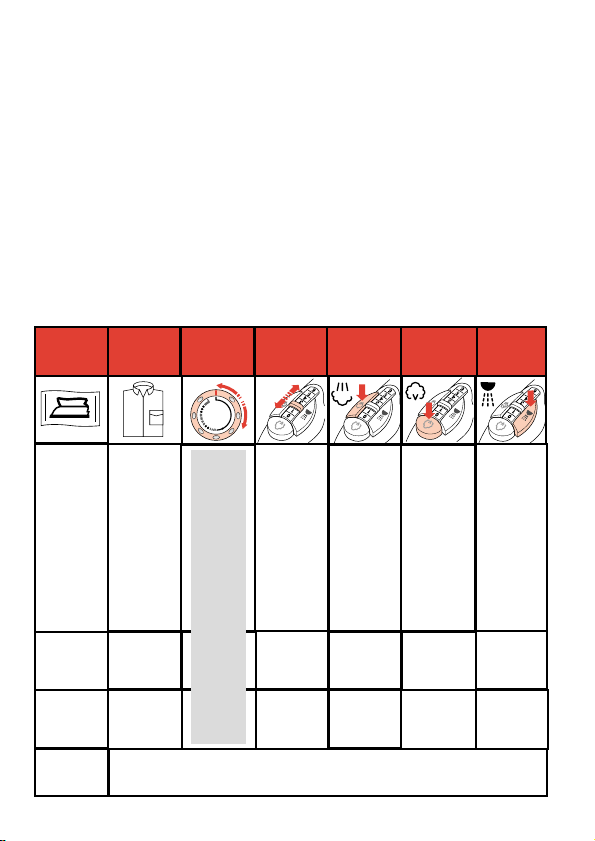
0
1-2
3 - 6
F
F
F
0
0
0
T
T
T
Please note that Z on the label means:
“This article cannot be ironed!”
Fabric table
Instructions
on label
Fabric Temperature
control
Steam
control
Shot of
steam
Turbo
steam
Spray
MIN
AA
AA
11
AA
AA
AA
AA
AA
AA
22
AA
AA
33
MAX
X
X
X
F
F
O
|
O
X
A
M
LINEN
HILO
COTONE
ALGODON
LANA
LANA
SETA
SEDA
NYLON
NYLON
Page 7

7
(E.g. an article consisting of "60% polyester and 40% cotton" should be
ironed at the temperature indicated for polyester (1) and without
steam.)
If you do not know what kind(s) of fabric(s) the article has been made
of, find a spot which will be invisible when wearing or using the article.
Try out the ironing temperature which is most suitable there. (Start at a
relatively low temperature.)
• Pure woollen fabrics (100% wool) may be pressed with the iron set to a
steam position. Preferably set the steam control to maximum position
and use a dry pressing cloth.
When steam-ironing woollen fabrics, shining of the fabric may occur.
This can be prevented by turning the article inside out and ironing the
reverse side.
• Velvet and other textures which rapidly acquire shiny spots should be
ironed in one direction only (with the nap) applying light pressure.
Always keep the iron moving.
• Iron the reverse side of synthetic materials and silk to prevent shining
spots. Do not use the spray to prevent stains.
Setting the temperature
- Stand the iron on its end.
- Set the temperature control (A) to the correct ironing temperature as
indicated in the ironing instructions or in the table. (See fig. 5.)
- Insert the mains plug into the wall socket.
- After the amber temperature pilot light (H) first has gone out and has
come on again, you may start ironing.
• The amber pilot light will come on from time to time during ironing.
• If you set the temperature control to a lower setting after ironing at a
high temperature, do not begin again before the amber pilot light has
come on and gone out again.
Spraying T
At any temperature by pushing on the spray button T (C) a couple of
times the laundry can be damped down (fig. 6).
Ensure that there is enough water in the water reservoir.
Page 8

8
Steam-ironing
• As indicated on the temperature control (A) and the table, steamironing is only possible at higher ironing temperatures:
2 or 3 for moderate steam
3 for maximum steam.
• With conventional steam irons, water may leak from the soleplate if a
too low temperature has been selected. This will then cause stains.
However, your new steam iron features "Drip Stop" steam shut-off:
the iron will automatically stop steaming at too low temperatures.
When this happens, you can hear "Click".
Set the temperature control (A) to the advised position.
Steaming will commence as soon as the appropriate temperature has
been reached.
• Ensure that there is enough water in the water reservoir.
- Stand the iron on its end.
- Set the temperature control (A) at the required position within the
"steam area" (2 to MAX) (fig. 7).
- Insert the mains plug into the wall socket.
- After the amber temperature pilot light (H) first has gone out and has
come on again, you may start ironing.
- Slide the steam control (B) to the required position (fig. 8).
Turbo steam 0 (types HI 525/29/35/45 only)
This feature provides extra steam to remove stubborn creases. The extra
steam works as long as the turbo knob is kept pressed-in.
- Press and hold the Turbo steam button 0 (F) for a few seconds (fig. 9).
Then release the button.
• Do not keep the button pressed-in for more than 10 seconds without
interruption.
Allow at least one minute interval before applying Turbo Steam again.
If the amber temperature pilot light (H) comes on, this indicates that the
iron is heating up again.
- Wait for the amber pilot light to go out. Then you can recommence
ironing.
Page 9

9
Shot of Steam 9
By pressing button 9 (E) a powerful "shot" of steam is emitted from the
soleplate (fig. 10).
This can be very useful e.g. when removing stubborn creases.
The "shot" of steam facility can be used only while ironing with high
ironing temperature (positions ranging from 2 to MAX).
Vertical position
“Shot of steam” 9 can also be applied when holding the iron in a vertical
position (fig. 11).
This is useful for removing creases from hanging clothes, curtains, etc.
Ironing without steam
For ironing without steam proceed as described for steam-ironing.
However, the steam control (B) should remain in position O (= no steam).
“Auto stop” (automatic safety shut-off)
(type HI 545 only)
If the iron is left motionless for more than 30 seconds, the power element
will switch off automatically.
To indicate that the iron has shut off, the red “Auto Stop” pilot light (O) will
start blinking and a sound signal will be audible (fig. 12).
In a horizontal position, this will happen after 30 seconds.
In a vertical position, this will happen after 8 minutes.
- When picking up the iron again, the red “Auto Stop” pilot light (O) will
go out.
The amber temperature pilot light (H) will come on. This indicates that
the iron is heating up again.
- Wait for the amber pilot light to go out. Then you can recommence
ironing.
Page 10

10
Maintenance
• It is important to apply "self-cleaning" at least every two weeks to
remove scale etc.
• The harder the water the more the iron should be self-cleaned.
- Set the steam control (B) to position O.
- Stand the iron on its end.
- Open the filling funnel and fill the water reservoir up to the MAX
indication.
- Close the filling funnel.
- Set the temperature control (A) to MAX.
- Insert the mains plug into the wall socket.
- Allow the iron to heat up until the amber temperature pilot light (H) first
goes out and then comes on again.
- Remove the plug from the wall socket.
- Hold the iron horizontally over the sink.
- Press button "Self clean" (I) (fig. 13).
Boiling water and steam will now be ejected from the holes in the
soleplate.
Impurities and scale (if any) are washed away with it.
- Move the iron forwards and backwards while this happens.
- Release button "Self clean" after one minute or when the water
reservoir has become empty.
- Stand the iron on its end.
- Insert the mains plug into the wall socket and let the iron heat up
again.
- Move the iron over a (preferably) old piece of cloth.
This is to ensure that the soleplate will be dry during storage.
Cleaning
- Before cleaning remove the mains plug from the wall socket and allow
the iron to cool down sufficiently.
- Scale and other setting can be wiped off the soleplate with a damp
cloth and some non-scratching (fluid) abrasive.
Keep the soleplate smooth: avoid hard contact with metal objects.
- The upper part of the appliance can be cleaned with a damp cloth.
- From time to time clean the inside of the water reservoir by filling with
water and shaking. Then pour the water back out.
Page 11

11
Storage
- Remove the mains plug from the wall socket.
- Pour any remaining water out of the water reservoir (fig. 14).
- Set the steam control to position O.
- Stand the iron upright and let it cool down sufficiently.
- The mains cord can be wound around the cord storage (fig. 15).
Allow a generous loop of cord before starting the windings around the
cord storage.
- Always store the iron standing on its end (fig. 16).
Regularly check if the mains cord is still in a good and safe condition.
Page 12

12
Vigtigt.
• Læs brugsanvisningen og studèr illustrationerne, inden strygejernet tages i brug.
• Før strygejernet tages i brug, kontrolleres det, at spændingsangivelsen på typeskiltet svarer til den lokale netspænding.
• Brug aldrig strygejernet, hvis det på nogen måde er beskadiget.
• Sørg for at børn ikke kan komme i nærheden af strygejernet,
når det er varmt, og at de ikke kan komme til at trække i
netledningen.
• Dampen, der slippes ud er meget varm. Må derfor aldrig rettes
direkte mod mennesker, da dette kan være farligt.
• Tag altid stikket ud af stikkontakten, før der fyldes vand i
vandtanken og når overskydende vand hældes ud efter brug.
• Nedsænk aldrig strygejernet i vand.
• Når De er færdig med at stryge, eller forlader strygejernet - selv
for en kort stund - skal De altid huske at:
- sætte dampvælgeren i stilling O;
- stille strygejernet på højkant;
- tage stikket ud af stikkontakten.
• For at passe bedst muligt på strygejernet, skal det altid opbevares stående på højkant.
• Visse dele af strygejernet er smurt med lidt fedtstof, hvilket kan
forårsage lidt røgudvikling, første gang strygejernet tages i
brug. Dette varer dog kun et kort øjeblik.
• Før De tager strygejernet i brug første gang, fjernes eventuelle
klæbemærker/beskyttelsesfolie fra strygesålen. Tør derefter
strygesålen af med en blød klud.
• Kom aldrig eddikesyre eller andre afkalkningsmidler ned i
vandtanken.
• Brug ikke kemisk afkalket vand.
• Pas på at netledningen ikke kommer i nærheden af den varme
strygesål.
• Hvis netledningen beskadiges, må den kun udskiftes med en ny
original ledning af samme type.
Henvend Dem venligst til Deres forhandler eller til Philips, hvis
netledningen skal udskiftes.
Dansk
Page 13

13
Generel beskrivelse (fig. 1).
A Temperaturvælger (drejelig)
B Dampmængdeknap (skydeknap)
O = ingen damp
1 = minimal damp
6 = maksimal damp
C Spray-knap T (tryk)
D Spraydyse
E Dampskuds-knap 9 (tryk)
F Turbodamp-knap 0 (tryk) (type HI 525/29/35/45)
G Påfyldningstragt (for vandpåfyldning uden vandspild)
H Kontrollampe for temperatur (gul)
I ”Selv-rens” knap (tryk)
J ”Vandvindue”
K Ledningsholder
L Typeskilt
M Målebæger
N ”Soft touch” håndtag (type HI 525/29/35/45)
O ”Auto Stop” kontrollampe (rød) (type HI 545)
Vandpåfyldning (for dampstrygning og spraying (fugtning).
• Første gang, De tager strygejernet i brug, skal det fyldes med
almindeligt postevand.
• Ved efterfølgende påfyldninger kan De også anvende almindeligt
postevand, men hvis vandet er meget hårdt (d.v.s. en hårdhedsgrad
over 17oDH), anbefales det at bruge destilleret vand.
- Tag altid stikket ud af stikkontakten før vandpåfyldning.
Sæt dampvælgeren (B) i stilling O (= ingen damp).
- Stil strygejernet på højkant og luk påfyldningstragten op (fig. 2).
- Hæld vand (max. 2 1/2 dl) ned i påfyldningsåbningen (fig. 3). Brug det
medleverede målebæger med tud.
- Luk påfyldningstragten (fig. 4).
Strygetemperatur.
• Kontrollèr altid først, om der er en strygeanvisning i det tøj, der skal
stryges. (Se tabellen).
Page 14
B
C
D
Z
Syntetiske
fibre
(f.eks.
acryl,
Iviscose,
polyamid
(nylon),
polyester
Silke
Uld
Bomuld
Linned
0
1-2
3 - 6
F
F
F
0
0
0
T
T
T
Bemærk at Z på tøjmærkningen betyder:
“Tåler ikke strygning”.
14
Følg under alle omstændigheder en sådan anvisning.
• Hvis der ingen mærkning er i tøjet, men De kender tekstilarten, kan De
følge anvisningerne i tabellen.
• Tabellen er kun gældende for de nævnte tekstiler og tager ikke højde
for eventuelle efterbehandlinger af tøjet som f.eks. glans, rynker, tryk
etc. - Det anbefales altid at stryge specialbehandlede stoffer ved lavere
temperatur end angivet.
• Sortèr tøjet efter strygetemperatur, inden De begynder at stryge - uld
sammen med uld, bomuld sammen med bomuld o.s.v.
• Strygejernet varmes hurtigere op, end det afkøles. Begynd derfor med
at stryge det tøj, der skal have den laveste temperatur, f.eks. syntetiske
stoffer.
TABEL
Instruktion
på tøjmærket
Materiale Temperatur-
indstilling
Damp-
indstilling
Dampskud Turbo
damp
Spray
MIN
AA
AA
11
AA
AA
AA
AA
AA
AA
22
AA
AA
33
MAX
X
X
X
F
F
O
|
O
X
A
M
LINEN
HILO
COTONE
ALGODON
LANA
LANA
SETA
SEDA
NYLON
NYLON
Page 15

15
• Hvis tøjet består af blandingstekstiler, vælges temperaturen for det
tekstil, der kræver den laveste strygetemperatur (f.eks. skal et stof, der
består af “60% polyester og 40% bomuld”, stryges ved den temperatur,
der er angivet for polyester (1) og uden damp).
Ved man ikke, hvilket materiale tøjet er lavet af, vælges et sted på tøjet,
der ikke ses, når det bæres eller bruges. Prøv her at finde frem til den
bedst egnede strygetemperatur (begynd med en relativ lav temperatur).
• Ren uld (100% uld) kan stryges med damp. Det anbefales at sætte
dampvælgeren til maksimum og bruge et tørt strygeklæde.
Ved dampstrygning af ren uld, kan tøjet komme til at skinne. Dette
undgås, hvis man stryger det på vrangen.
• Fløjl og andre stoffer, som let bliver blanke, stryges hele tiden i samme
retning (med luven) med et let tryk. Hold hele tiden strygejernet i
bevægelse.
• Syntetiske stoffer og silke stryges på vrangen for at undgå blanke
pletter. Undlad at bruge damp, da det kan give skjolder på tøjet.
Temperaturindstilling.
- Stil strygejernet på højkant.
- Indstil temperaturknappen (A) til den korrekte strygetemperatur, som
angivet på tøjmærket eller i tabellen (se fig. 5).
- Sæt stikket i stikkontakten (og tænd).
- Når den gule kontrollampe (H) er slukket og tændt igen, kan strygningen
påbegyndes.
• Under strygningen vil kontrollampen tænde og slukke med jævne
mellemrum.
• Har man strøget med en høj temperatur og sætter temperaturvælgeren
til et lavere niveau, skal man vente med at fortsætte strygningen til den
gule kontrollampe er slukket og tændt igen.
Spraying (fugtning). T
Ved at trykke nogle gange på spray-knappen T (C) kan man fugte tøjet
uanset temperaturindstillingen (fig. 6).
Sørg for at der er tilstrækkeligt med vand i vandtanken.
Page 16

16
Dampstrygning.
• Som vist på temperaturvælgeren (A) og i tabellen, kan dampstrygning
kun finde sted ved højere temperaturer:
2 eller 3 for moderat (normal) damp,
3 for kraftig (maksimal) damp.
• Ved brug af almindelige dampstrygejern kan der dryppe vand ud af
strygesålen, hvis den valgte temperatur er for lav.
Det vil give pletter på tøjet.
Dette nye strygejern har imidlertid en indbygget “dryp-stop”-funktion, der
automatisk “slukker” for muligheden for dampstrygning ved lavere temperaturer. Når det sker, høres et “klik”. Sæt da temperaturvælgeren (A) i
den anbefalede stilling. Dampstrygning vil igen være mulig, så snart den
nødvendige temperatur er nået.
• Sørg for at der er tilstrækkeligt med vand i vandtanken.
- Stil strygejernet på højkant.
- Sæt temperaturknappen (A) i den nødvendige stilling indenfor
“dampområdet” (2 til MAX) (fig. 7).
- Sæt stikket i stikkontakten (og tænd).
- Vent til den gule kontrollampe (H) slukker og tænder igen.
- Skyd dampvælgeren (B) til den ønskede stilling (fig. 8).
Turbodamp 0 (kun type HI 525/29/535/545)
Denne funktion giver ekstra damp, så man kan fjerne genstridige folder.
Den ekstra damp virker, så længe turbo-knappen er trykket ind.
- Tryk på Turbodampknappen 0 (F) og hold den nedtrykket i nogle
sekunder (fig. 9). Slip derefter knappen.
• Hold aldrig Turbodampknappen nedtrykket uden afbrydelse i mere end
10 sekunder.
Vent mindst 1 minut før Turbodampknappen atter aktiveres. Hvis den
gule kontrollampe (H) tænder, betyder det, at strygejernet varmer op
igen.
- Vent til den gule kontrollampe slukker. Når det sker, kan De igen
begynde at stryge.
Page 17

17
Dampskud. 9
Ved tryk på knappen 9 (E) kommer der et kragtigt “dampskud” ud af
strygesålen (fig. 10).
Dette kan være meget nyttigt, hvis man skal glatte besværlige folder ud.
“Damskud” kan kun frembringes, hvis strygejernet har en høj temperatur
(mellem 2 til MAX).
Opretstående stilling.
Man kan også fremkalde “dampskud”9 når strygejernet står eller holdes i
opretstående stilling (fig. 11).
Dette er specielt praktisk, når man ønsker at fjerne folder fra tøj, der
hænger på bøjle, gardiner eller lignende.
Tørstrygning.
Tørstrygning (d.v.s. uden damp) foretages på nøjagtig samme måde som
beskrevet for dampstrygning bortset fra, at dampvælgeren (B) skal være
sat i stilling O (= ingen damp).
“Auto Stop” (automatisk sikkerhedsafbryder)
(kun type HI 545).
Hvis strygejernet står uden at være i bevægelse i mere end 30 sekunder,
slukker varmelegemet automatisk.
For at indikere dette, begynder den røde “Auto Stop” kontrollampe (O) at
blinke samtidig med, at der høres et lydsignal (fig. 12).
Står strygejernet på højkant sker dette efter 30 sekunder, og står det
vandret, går der 8 minutter.
Når strygejernet igen løftes op, slukker den røde “Auto Stop” kontrollampe (O).
Den gule temperatur-kontrollampe (H) tænder og indikerer, at strygejernet
varmer op igen.
- Så snart den gule kontrollampe slukker, kan strygningen genoptages.
Page 18

18
Vedligeholdelse.
• Det er vigtigt at udføre “selv-rensning” af strygejernet mindst hver anden
uge for at fjerne kalkdannelser o.lign.
• Jo hårdere vandet er, desto oftere skal strygejernet selvrenses.
- Sæt dampvælgeren (B) i stilling O.
- Stil strygejernet på højkant.
- Luk vandpåfyldningstragten op og fyld vandtanken til MAX.
markeringen.
- Luk påfyldningstragten.
- Sæt temperaturvælgeren (A) på MAX.
- Sæt stikket i stikkontakten (og tænd).
- Lad strygejernet varme op indtil den gule kontrollampe (H) først slukker
og derefter tænder igen.
- Tag stikket ud af stikkontakten.
- Hold strygejernet vandret over køkkenvasken.
- Tryk på “SELF CLEAN” knappen (I) (fig. 13).
- Der vil nu komme kogende vand og damp ud af hullerne i strygesålen,
og eventuelle urenheder og kalkrester vil samtidig blive skyllet med ud
(fig. 8).
- Bevæg samtidig strygejernet frem og tilbage.
- ”SELF CLEAN” knappen slippes igen efter ca. 1 minut eller når vandtanken er tom.
- Anbring strygejernet på højkant.
- Sæt stikket i stikkontakten (tænd) og lad strygejernet varme op.
- Bevæg strygejernet hen over et (gammelt) stykke stof, for at sikre, at
strygesålen igen er helt tør.
Rengøring.
- Før De begynder at rengøre strygejernet, skal stikket være taget ud af
stikkontakten og strygejernet være tilstrækkeligt afkølet.
- Kalk og andre belægninger på strygesålen kan tørres af med en fugtig
klud og lidt ikke-ridsende, flydende rengøringsmiddel.
Hold strygesålen ren og glat: Undgå kontakt med metalgenstande.
- Den øverste del af strygejernet kan rengøres med en fugtig klud.
- Fra tid til anden kan vandtanken rengøres indvendigt ved at fylde den
med vand og ryste strygejernet. Derefter hældes vandet ud igen.
Page 19

19
Opbevaring.
- Tag stikket ud af stikkontakten.
- Hæld eventuel resterende vand ud af vandtanken (fig. 14).
- Sæt dampvælgeren i stilling O.
- Anbring strygejernet på højkant og lad det afkøle helt.
- Netledningen kan vikles op omkring ledningsholderen (fig. 15).
- Opbevar altid strygejernet stående på højkant (fig. 16).
Kontrollèr med regelmæssige mellemrum, at netledningen ikke er
beskadiget.
Page 20

20
Viktig
• Les bruksanvisningen nøye og se godt på bildene før De tar
apparatet i bruk.
• Før første gangs bruk kontroller at spenningen på apparatets
typeplate stemmer overens med nettspenningen i Deres hjem.
• Bruk ikke apparatet, hvis det på noen måte er skadet.
• Vær forsiktig slik at barn ikke kan komme i berøring med jernet,
eller trekke i nettledningen når jernet er varmt.
• Dampen som kommer ut er varm og kan derfor være skadelig.
Rett aldri dampen mot noen.
• Trekk ut nettledningen fra stikkontakten før strykejernet fylles
med vann eller når man heller ut resterende vann etter bruk.
• Dypp aldri jernet i vann.
• Når De har avsluttet strykingen, også når De forlater
strykejernet for en kort stund:
- Sett dampkontrollen til posisjon 0.
- Sett jernet i vertikal posisjon.
- Trekk ut nettledningen av stikkontakten.
• For å ta best mulig vare på Deres strykejern, oppbevar det alltid
stående på hælen.
• Noen av strykejernets deler har fått litt olje og som et resultat
av dette, kan jernet ryke litt første gang det slås på. Dette vil gi
seg etter en kort stund.
• Før De tar jernet i bruk for første gang, påse at alle merkelapper
eller beskyttelsesfolie på strykesålen er fjernet. Rengjør
strykesålen med en myk klut.
• Fyll ikke jernet med eddik eller andre antikalkmidler.
• Bruk ikke kjemisk avkalket vann.
• Ledningen må ikke komme i kontakt med sålen når den er varm.
• Hvis nettledningen på dette apparatet blir skadet, må den kun
erstattes med en original ledning. Vennligst ta kontakt med
Deres Philips forhandler eller direkte til Philips i Deres land.
Norsk
Page 21

21
Generell beskrivelse (fig. 1)
A Termostatknapp (dreibar)
B Dampknapp (skyvbar)
O = ingen damp
1 = lite damp
6 = mye damp
C Dynkeknapp T (trykk)
D Dynker
E Superdamp 9 (trykk)
F Turbodamp 0 (trykk) (bare for typene HI 525/29/35/45)
G Påfyllingsåpning, for å fylle på vann uten søl
H Temperaturindikator (gul)
I Selvrenseknapp (trykk)
J Vannbeholder med vindu
K Ledningsvinne
L Typeplate
M Målebeger
N Mykt håndtak (bare for typene HI 525/29/35/45)
O "Auto Stop" lampe (rød) (bare for type HI 545)
Påfylling av vann (for dampstryking og dynking)
• Dampjernet skal fylles med vanlig vann fra springen før første gangs
bruk.
• Ved etterfylling kan De også bruke vann rett fra springen. Hvis vannet er
meget hardt (hardhet høyere enn 17 °DH/21 °Clarke), er det å anbefale
å bruke destillert vann.
- Trekk støpselet ut av stikkontakten før fylling av jernet.
Sett dampkontrollen (B) til posisjon O (= ingen damp).
- Sett strykejernet på høykant og åpne påfyllingsåpningen (fig. 2).
- Hell vann (max. 250 ml) i påfyllingsåpningen (fig. 3). Bruk målebegeret
med helletut til dette.
- Lukk påfyllingsåpningen (fig. 4).
Stryketemperaturer
• Sjekk først på det plagget som skal strykes om det står noen instruks
om stryking. (Se tabell). Følg alltid disse strykeinstruksjonene.
Page 22

B
C
D
Z
Syntetiske
fibre
f.eks.
akryl
viskose
polyamid
(nylon)
polyester
Silke
Ull
Bomull
Lin
0
2
3 - 6
F
F
F
0
0
0
T
T
T
NB!: Dette merket betyr må ikke strykes!
22
• Hvis det ikke finnes noen instruks om stryking, men De vet hva slags
stoff det er, kan tabellen være til hjelp.
• Tabellen omhandler kun grunnmateriale og ikke eventuelle
overflatebehandlinger. Tekstiler som er overflatebehandlet (glanset,
rynket etc.) bør strykes på en noe lavere temperatur.
• Sorter først tøyet etter stryketemperaturen: ull med ull, bomull med
bomull etc.
• Jernet oppvarmes fortere enn det avkjøles. Begynn med å stryke det
som skal ha lavest temperatur først, slik som syntetiske stoffer og
fortsett med høyere temperaturer etter hvert.
Tabell
Stryke-
instruksjon
Tekstil Temperatur-
innstilling
Damp-
innstilling
Super-
damp
Turbo-
damp
Dynk
MIN
AA
AA
11
AA
AA
AA
AA
AA
AA
22
AA
AA
33
MAX
X
X
X
F
F
O
|
O
X
A
M
LINEN
HILO
COTONE
ALGODON
LANA
LANA
SETA
SEDA
NYLON
NYLON
Page 23

23
• Hvis stoffet inneholder forskjellige fibre, må De alltid velge den laveste
innstillingen for denne kombinasjonen (f.eks. et plagg inneholder: 60 %
polyester og 40 % bomull skal dette strykes med temperaturen indikert
for polyester (1) og uten damp).
Hvis De ikke vet hva slags stoff(er) det er, finn en liten bit som ikke er
synlig og prøv hvilken temperatur som er best. (Start med en relativt lav
temperatur).
• Rene ullprodukter (100 % ull) kan dampstrykes med jernet i
dampstilling. Det anbefales at De setter dampkontrollen til max og
bruker et tørt presseklede.
Ved dampstryking av ullprodukter, kan De unngå å få blankt stoff hvis
De damper på vrangen.
• Fløyel og andre stoffer som lett blir blanke, bør strykes kun i en retning
(med hårene) med et lett press. Hold jernet i bevegelse hele tiden.
• Stryk på vrangen av syntetiske materialer og silke for å hindre blanke
flekker. Bruk ikke dynkknappen da dette også kan sette flekker.
Temperaturinnstilling
- Plasser jernet i vertikal stilling.
- Still termostatknappen (A) på riktig stryketemperatur som indikert i
strykeinstruksjonen eller tabellen (se fig. 5).
- Sett støpselet i stikkontakten.
- Etter at den gule indikatorlampen (H) har slokket og tennes igjen kan De
starte strykingen.
• Den gule indikatorlampen vil tennes av og til under stryking.
• Hvis De setter termostatknappen til en lavere innstilling, begynn ikke
strykingen før den gule indikatorlampen har tent og slokket igjen.
Dynking T
Ved alle temperaturer kan De ved å trykke noen ganger på
dynkeknappen T ( C ) fukte stoffet (fig. 6). Forviss Dem om at det er nok
vann i vannbeholderen.
Page 24

24
Dampstryking
• Som vist på termostatknappen (A) og i tabellen er dampstryking bare
mulig på høyere stryketemperaturer.
2 eller 3 for moderat damp.
3 for maks. damp.
• Hos konvensjonelle dampstrykejern kan vann lekke fra sålen hvis en for
lav stryketemperatur er blitt valgt. Dette vil forårsake flekker. Deres nye
dampstrykejern har egenskapen "Drip Stop" damp-stopp. Strykejernet
vil automatisk slutte å dampe ved for lav temperatur. Hvis dette skjer vil
De høre et "klikk". Sett termostatknappen (A) til anbefalt posisjon.
Dampingen vil begynne igjen så snart tilstrekkelig temperatur er
oppnådd.
• Påse at det er nok vann i vannbeholderen.
- Plasser jernet vertikalt.
- Sett termostatknappen (A) på ønsket posisjon innen "dampområdet"
(2 til MAX) (fig. 7).
- Sett støpselet i stikkontakten.
- Vent en liten stund til den gule indikatorlampen (H) slokker og tennes
igjen. De kan begynne strykingen.
- Skyv dampknappen (B) til anbefalt posisjon (fig. 8).
Turbodamp 0 (bare for typene HI 525/29/35/45)
Noen ganger holder det ikke med superdamp. For disse tilfellene finnes
det en innstilling for ekstra kraftig "Turbodamp". Så lenge turboknappen
trykkes inn kommer det ekstra damp.
- Trykk og hold turbodamp-knappen 0 inne i noen sekunder (fig. 9). Slipp
deretter knappen.
• Hold ikke knappen inntrykket i mer enn 10 sekunder uten avbrudd. La
det gå minst ett minutt mellom hver gang man bruker turbodamp.
Hvis den gule temperaturindikatoren (H) begynner å lyse viser dette at
strykejernet varmes opp igjen.
- Vent til den gule lampen slokker. De kan fortsette strykingen.
Page 25

25
Superdamp 9
Ved å trykke på knappen 9 (E) vil det komme et intenst dampstøt fra
sålen (fig. 10). Dette kan være nyttig når man skal fjerne gjenstridige
folder. Dampstøtet kan bare brukes når termostaten er innstilt på høy
stryketemperatur (fra posisjon 2 til MAX).
Vertikal posisjon
Superdamp kan også brukes når jernet holdes i en vertikal posisjon
(fig. 11). Dette kan være meget anvendelig for å fjerne folder fra
hengende klær, gardiner etc.
Stryking uten damp
For stryking uten damp gjør som beskrevet for dampstryking. Imidlertid
må dampknappen (B) forbli i posisjon O (=ingen damp).
"Auto Stop" (automatisk sikkerhetsbryter) (Bare for Type HI 545)
Hvis strykejernet forlates stillestående i mer enn 30 sekunder vil
varmeelementet slå seg automatisk av. For å vise dette vil den røde
indikatorlampen "Auto Stop" (O) begynne å blinke og samtidig vil De høre
et lydsignal (fig. 12).
I horisontal posisjon vil dette skje etter 30 sekunder og i vertikal posisjon
etter 8 minutter.
- Når jernet blir tatt opp igjen vil den røde indikatorlampen "Auto Stop"
slokke og den gule temperaturindikatoren (H) begynne å lyse. Dette
viser at jernet igjen blir varmet opp.
- Vent til det gule lyset har slokket. De kan fortsette strykingen.
Vedlikehold
• Det er viktig å bruke "selvrensing" minst hver annen uke for å fjerne
kalk, lo etc.
• Desto hardere vann, desto oftere må "selvrensing" brukes.
- Sett dampkontrollen (B) til posisjon O.
- Sett jernet i vertikal posisjon.
Page 26

- Åpne påfyllingsåpningen og fyll vannbeholderen til MAX-merket med vann.
- Lukk påfyllingsåpningen.
- Sett termostatknappen (A) til MAX..
- Sett støpselet i stikkontakten.
- Vent til jernet er varmet opp og den gule indikatorlampen (H) først
slokker og deretter tennes igjen.
- Trekk ut nettledningen.
- Hold jernet horisontalt over en vask.
- Trykk ned knappen "Self Clean" (I) (fig. 13).
Kokende vann og damp vil nå komme ut fra hullene i sålen.
Urenheter og kalk (hvis det er noen) vil komme ut samtidig.
- Beveg jernet frem og tilbake mens dette pågår.
- Slipp "Self Clean" knappen.
- Sett strykejernet vertikalt.
- Sett støpselet i stikkontakten og la jernet bli varmt igjen.
- Beveg jernet over en gammel klut.
Det resterende vannet i dampkammeret vil nå fordampe og komme ut
av hullene i strykesålen.
Rengjøring
- Før rengjøring trekk ut støpselet fra stikkontakten og la strykejernet
avkjøles tilstrekkelig.
- Kalk og andre avleiringer kan tørkes av med en fuktig klut og litt ikke
ripende (flytende) skuremiddel.
Hold sålen glatt: unngå hard kontakt med metall.
- Overdelen av strykejernet kan rengjøres med en fuktig klut.
- Fra tid til annen rens innsiden av vannbeholderen ved å fylle den med
vann og riste den. Hell så vannet ut.
Oppbevaring
- Trekk ut støpselet fra stikkontakten.
- Hell ut det resterende vannet fra vannbeholderen (fig. 14).
- Sett dampkontrollen til posisjon O.
- Sett strykejernet vertikalt og la det avkjøles tilstrekkelig.
- Nettledningen kan nå snurres opp på ledningsvinnen (fig. 15).
- Oppbevar alltid strykejernet vertikalt (fig. 16).
Kontroller med jevne mellomrom at nettledningen er sikker og i orden.
26
Page 27

27
Viktigt
• Före användning, kontrollera att uppgiften om spänning, Volt,
som finns angiven på typskylten, stämmer med den spänning
du har i ditt hem. Om så inte är fallet vänd dig till inköpsstället.
• Använd inte strykjärnet om det på något sätt är skadat.
• Se till att inte små barn kan komma åt ångstrykjärnet när det är
varmt eller att de kan dra i nätsladden.
• Den utströmmande ångan är hett och därfor farlig. Rikta aldrig
ångan mot människor.
• Drag ut stickproppen ur vägguttaget innan du fyller på eller
tömmer ut vatten efter användning.
• Doppa aldrig ångstrykjärnet i vatten, inte heller vid rengöring.
• KOM IHÅG! När du strukit färdigt och även när du lämnar
ångstrykjärnet utan uppsikt för bara en kort stund:
- Dra ut stickproppen ur vägguttaget
- Ställ ångratten i läge 0.
- Ställ strykjärnet upprätt på parkeringshälen.
Observera: Ångstrykjärnet skall inte förvaras stående på
stryksulan. Det finns då risk för att stryksulan missfärgas och
skadas bl a på grund av korrosion. Se avsnittet “Förvaring”.
• Vissa delar i ångstrykjärnet är lätt inoljade vid leverans vilket
gör att någon rökutveckling uppstår när järnet värms första
gången. Detta är helt ofarligt och upphör efter en liten stund.
• Innan du använder ångstrykjärnet första gången, avlägsna ev
etikett eller skyddsfolie från stryksulan och torka av den med
en mjuk trasa.
• Fyll aldrig i avkalkningsmedel i vattentanken och försök inte att
kalka av med ättika.
• Använd inte vatten, som du själv avkalkat med kemiska medel.
• Sladden får inte komma emot den heta stryksulan.
• När du stryker böjs och nöts sladden hela tiden. Den blir därför
förbrukad på relativt kort tid. Kontrollera sladden regelbundet
och låt fackman byta den om du misstänker fel. Sladden får
bara ersättas av orginaltyp vilken tillhandahålles av Philips eller
deras serviceombud.
Svenska
Läs först hela bruksanvisningen och studera samtidigt illustrationerna!
Spara bruksanvisningen! Spara köpbevis och kvitto!
Page 28

28
Ångstrykjärnets viktigaste delar, fig. 1
A Termostatratt, för inställning av stryktemperatur (vrid).
B Ångreglage, för inställning av ånga (skjut).
O = ingen ånga.
1 = minimal ånga.
6 = maximal ånga.
C Sprayknapp T (tryck).
D Spraymunstycke.
E Ångpuff 9 (tryck).
F Turboånga 0 (tryck). Finns endast på typ HI525/29/35/45.
G Påfyllningsöppning med skjutlucka för att undvika att vatten stänker
ut under strykning.
H Bärnstensfärgad signallampa för temperatur.
I Självrensningsknapp “• Self clean”.
J Vattentank genomskinlig.
K Sladdvinda.
L Typskylt.
M Mätbägare.
N “Soft grip” handtag. Finns endast på typ HI525/29/35/45.
O Röd signallampa. “Automatstopp” . Finns endast på typ HI545.
Påfyllning av vatten för ångstrykning och sprayning
• Första gången du använder ångstrykjärnet skall det fyllas med vanligt
kranvatten.
• Du kan också i fortsättningen använda kranvatten om dess hårdhet inte
överstiger 17°DH. Vid högre hårdhet bör du använda avhärdat eller
destillerat vatten. Använd endast destillerat eller avhärdat vatten, som
finns att köpa i slutna förpackningar.
Använd inte vatten, som du själv avhärdar med kemiska medel.
Gör så här:
- Dra ut stickproppen ur vägguttaget innan du fyller vatten i strykjärnet.
Skjut ångreglaget (B) till läge O = ångan avstängd.
- Ställ ångstrykjärnet upprätt på parkeringshälen och öppna skjutluckan
för påfyllningsöppningen, fig 2.
- Häll vatten genom påfyllningsöppningen, max. 250 ml, fig. 3.
Använd medföljande mätbägare för detta ändamål.
- Stäng skjutluckan till påfyllningsöppningen, fig 4.
Page 29

B
C
D
Z
Syntetiska
material
t ex: acetat,
akryl,
polyamid
(nylon),
polyester,
viskos
(rayon)
Silke
Ylle
Bomull
Linne
0
1-2
3 - 6
F
F
F
0
0
0
T
T
T
Observera: Z på etiketten betyder: “ Detta plagg får ej strykas”
29
Stryketemperatur
• Se efter om det finns tvätt/strykråd i de plagg du skall stryka. Se tabell.
Följ alltid dessa råd.
• Finns det inga instruktioner i plagget men du vet vilken slags textil det är
frågan om så kan du ställa in rätt temperatur med hjälp av tabellen
nedan.
• Tabellen gäller för vanliga tyger utan speciell ytstruktur såsom plisering,
apperatur etc. Sådana tyger bör i allmänhet strykas med lägre
temperatur.
• Sortera plaggen innan du börjar stryka: ylle med ylle, bomull med
bomull o s v.
Tabell
Tvätt/
strykråd
Material
Termostat-
rattens
läge
Ångregla-
gets läge
Ångpuff Turbo
ånga
Spray
MIN
AA
AA
11
AA
AA
AA
AA
AA
AA
22
AA
AA
33
MAX
X
X
X
F
F
O
|
O
X
A
M
LINEN
HILO
COTONE
ALGODON
LANA
LANA
SETA
SEDA
NYLON
NYLON
Page 30

30
• Strykjärnet värms upp fortare än det svalnar. Börja därför med att stryka
de plagg som kräver lägsta temperaturen och övergå sedan till högre
och högre temperatur.
• Är plagget gjort av ett tyg, som består av flera olika sorters fibrer, t ex
bomull och polyester, s k blandtyger, måste alltid temperaturen ställas in
för det material som kräver lägst temperatur. I nämnda exempel måste
alltså temperaturen för polyester ( • ) ställas in (ingen ånga).
Om du inte vet av vilket material tyget består, måste du prova dig fram.
Sök ett dolt ställe i plagget och prova först med låg temperatur och
sedan med högre och högre tills du hittar den bästa.
• Helylletyger (100%) ull kan pressas med torr pressduk. Ställ in
ångreglaget för högsta ångavgivning.
Blanka ställen på ylleplagg kan undvikas om plagget vänds ut och in
och stryks på avigsidan.
• Sammet och andra tyger som lätt blir blanka skall strykas i en riktning,
med luggen, och med lätt tryck. Strykjärnet måste alltid hållas i rörelse.
• Syntetiska material och siden bör strykas på avigsidan för att undvika
blanka ställen. Använda inte spray för att undvika fläckar.
Inställning av temperaturen
- Ställ strykjärnet upprätt på parkeringshälen.
- Vrid termostatratten (A) i rätt läge enligt tvätt/strykråden i plaggen, eller
enligt i tabellen, se fig 5.
- Sätt i stickproppen i vägguttaget.
- Vänta tills den bärnstensfärgade signallampan (H) för temperatur
slocknat och åter tänts. Därefter kan du börja stryka.
- Medan du stryker kommer de bärnstensfärgade signallampan att
upprepade gånger tändas och släckas, vilket är normalt.
- Om du ställer termostatratten för en lägre temperatur efter att en högre
varit inställd, måste du vänta tills den bärnstensfärgade signallampan
åter tänds.
Spray T
Genom att trycka några gånger på sprayknappen T (C) kan tyget fuktas
vid vilken inställd temperatur som helst, fig 6.
För att kunna spraya måste det finnas vatten i vattentanken.
Page 31

31
Ångstrykning
• Av märkningen på termostatratten (A) samt av tabellen framgår det att
ångstrykning är möjlig endast om temperaturen är tillräckligt hög:
2 eller 3 för normal ånga.
3 maximal ånga.
• Med ett vanligt ångstrykjärn kan vatten läcka ut från stryksulan om den
inte är tillräckligt varm vilket kan förorsaka fläckar.
Ditt nya strykjärn har en finess “Dropp stopp”. Dropp stoppet fungerar
på så sätt att om temperaturen blir för låg på stryksulan så upphör
ångtillförseln. När detta inträffar kan du höra ett “klick” i strykjärnet. Vrid
termostatratten (A) till rekommenderat läge. Ångstrykningen kan
fortsätta så snart rätt temperatur uppnåtts.
• Kontrollera att det finns tillräckligt med vatten i vattentanken.
Gör så här:
- Ställ strykjärnet upprätt på parkeringshälen.
- Ställ termostatratten (A) i rätt läge inom ångsektorn t ex på 2 till MAX,
fig 7.
- Sätt stickproppen i vägguttaget.
- Vänta tills den bärnstensfärgade signallampan (H) för temperatur
slocknat och åter tänts, nu kan du starta strykningen.
- Skjut ångreglaget (B) i önskat läge, fig 8.
Turboånga 0 på strykjärn typ HI 525/29/35/45
Ibland kanske inte ens “ångpuff” är tillräckligt effektiv.
Vid dessa tillfällen är den kraftfulla funktionen med “turboånga” nödvändig. Funktionen för extra ånga fungerar så länge turbo-knappen hålls
intryckt.
- Tryck och håll knappen för turboånga 0 (F) intryckt några sekunder,
fig 9. Släpp sedan knappen.
• Håll inte knappen intryckt i mer än 10 sekunder utan avtrott.
Vänta i ca en minut innan du använder turboånga igen.
Den bärnstensfärgade kontrollampan(H) tänds. Detta innebär att
strykjärnet värms upp igen.
- Vänta till dess den bärnstensfärgade kontrollampan slocknar. Nu kan du
fortsätta strykningen.
Page 32

Ångpuff 9
Genom att trycka på knappen 9 (E) ångpuff kommer en kraftig puff av
ånga genom stryksulan, fig 10.
Detta är mycket effektivt för att avlägsna svåra skrynklor.
Ångpuffen kan endast användas vid hög temperatur med termostatratten
inställd i läge från 2 till MAX.
Vertikalt läge
“ Ångpuff” 9 kan också åstadkommas genom att hålla strykjärnet i
vertikalt läge, fig 11.
Detta är användbart för att avlägsna skrynklor på t ex hängande kläder
eller gardiner.
Torrstrykning
Torrstrykning går till på samma sätt som ångstrykning men då skall
ångratten (B) stå i läge (O) = ångan avstängd.
Automatiskt avstängning endast på strykjärn typ HI 545
Om strykjärnet får stå stilla på längre än 30 sekunder stängs värmeelementet av automatiskt.
För att markera detta börjar den röda signallampan “Auto stop” (O) blinka
samtidigt som en ljudsignal hörs, fig 12.
I horisontellt läge inträffar detta efter 30 sekunder.
I vertikalt läge inträffar detta efter 8 minuter.
När du rör på strykjärnet för att börja stryka igen slocknar den röda
signallampan “Auto stop” (O).
Den bärnstensfärgade signallampan (H) för temperatur tänds. Strykjärnet
värms nu upp.
- Du kan börja stryka när den bärnstensfärgade signallampan slocknat.
Skötsel
• Det är viktigt att utföra “self-cleaning” för att avlägsna kalk och
smutspartiklar. Detta bör utföras var fjortonde dag vid normal
regelbunden användning.
32
Page 33

33
• Ju hårdare vatten du använder ju oftare måste du avkalka.
Gör så här:
- Skjut ångreglaget (B) till läge O.
- Ställ ångstrykjärnet i upprätt läge på parkeringshälen.
- Öppna påfyllningsluckan och fyll vattentanken till MAX indikeringen med
vatten.
- Stäng påfyllningsluckan.
- Ställ termostatratten (A) i läge MAX.
- Sätt i stickproppen i vägguttaget.
- Låt järnet värmas upp tills den bärnstensfärgade signallampan (H)
slocknat och åter tänts.
- Dra ut stickproppen ur vägguttaget.
- Håll strykjärnet i vågrätt läge över en diskho.
- Tryck på självrensningsknappen (I), fig 13.
Nu strömmar kokande vatten och ånga ut genom ånghålen i stryksulan.
Kalk och andra avlagringar spolas ut med vattnet.
- Rör strykjärnet fram och tillbaka samtidigt som du trycker på knappen.
- Släpp självrensningsknappen.
- Ställ ångstrykjärnet i upprätt läge på parkeringshälen.
- Sätt i stickproppen i vägguttaget och låt strykjärnet värmas upp igen.
- Stryk med ångstrykjärnet över något gammalt tygstycke.
Resten av vattnet förångas nu och ångan strömmar ut genom ånghålen
i stryksulan.
Häll aldrig avkalkningsmedel eller ättika i vattentanken.
Rengöring
- Innan rengöring dra först ut stickproppen ur vägguttaget och låt
strykjärnet kallna.
- Beläggningar på stryksulan kan i allmänhet avlägsnas med en trasa
fuktad med vatten och diskmedel, som skall vara av icke repande slag.
Håll stryksulan slät. Skrapa aldrig med hårda metallföremål ex
verktyg eller kniv.
- Strykjärnets överdel kan torkas av med en fuktig väl urvriden trasa.
- Nu och då bör vattentanken sköljas ur. Fyll den till hälften med vatten,
skaka strykjärnet och häll ut vattnet
- Du får aldrig doppa strykjärnet i vatten eller spola det.
Page 34

34
Förvaring.
- Dra ut stickproppen ur vägguttaget.
- Töm ut allt resterande vatten ur vattentanken, fig 14.
- Skjut ångreglaget till läge O.
- Ställ ångstrykjärnet i upprätt läge på parkeringshälen och låt det kallna.
- Sladden kan lindas upp på sladdvindan, fig 15.
- Förvara alltid ångstrykjärnet i upprätt läge på parkeringshälen,
fig 16.
Kontrollera regelbundet att nätsladden är hel. Misstänks att den är på
något sätt skadad skall den bytas.
Page 35

35
Tärkeää
• Lue käyttöohje ja katsele kuvat, ennen kuin alat käyttää laitetta.
• Tarkista ennen käyttöönottoa, että arvokilven jännitemerkintä
vastaa paikallista verkkojännitettä.
•Älä käytä laitetta, jos se on jollain tavoin vahingoittunut.
• Pidä huoli, etteivät lapset pääse koskemaan kuumaa
höyryrautaa tai vetämään liitosjohdosta.
• Laitteesta purkautuva höyry on vaarallisen kuumaa. Älä
koskaan suuntaa hoÿryä ihmisiin päin.
• Irrota pistotulppa pistorasiasta, ennen kuin täytät tai tyhjennät
vesisäiliön.
•Älä upota höyryrautaa veteen.
• Kun lopetat silittämisen tai poistut hetkeksikin höyryraudan
vierestä:
- aseta höyrynvalitsin asentoon O;
- aseta rauta pystyyn seisontatuen varaan;
- irrota pistotulppa pistorasiasta.
• Säilytä höyryrauta aina pystyasennossa, niin se pysyy hyvänä.
• Jotkut höyryraudan osat on öljytty ja siksi raudasta saattaa
lähteä hieman käryä ensimmäisellä käyttökerralla. Tämä loppuu
kuitenkin nopeasti.
• Poista pohjasta mahdollinen tarra tai suojakelmu ennen
käyttöönottoa. Pyyhi pohja puhtaaksi pehmeällä liinalla.
•Älä kaada vesisäiliöön etikkaa tai kalkinpoistoaineita.
•Älä käytä kemiallisesti puhdistettua vettä.
• Pidä huoli, ettei liitosjohto kosketa raudan kuumaa pohjaa.
• Tarkista liitosjohdon kunto säännöllisesti. Jos tämän laitteen
verkkoliitosjohto vaurioituu, se on korvattava erikoisjohdolla.
Ota yhteys lähimpään Philips-myyjään.
• Jos laite on pudonnut veteen, irrota ensin pistotulppa
pistorasiasta, ennen kuin nostat laitteen vedestä.
•Älä jätä laitetta lasten ulottuville.
• Irrota pistotulppa pistorasiasta aina ennen hoito- ja
puhdistustoimenpiteitä.
• Varo laitteen kuumaa pintaa, laitteesta purkautuvaa kuumaa
ilmaa tai höyryä.
•Älä käytä laitetta epävarmalla työtasolla.
Suomi
Page 36

• Pidä huoli, etteivät terävät kulmat, kuumuus tai kemikaalit pääse
vahingoittamaan liitosjohtoa.
•Älä taivuta liitosjohtoa tiukalle mutkalle.
• Anna raudan jäähtyä ennen kuin laitat sen kaappiin.
Laitteen osat (kuva 1)
A Lämpötilanvalitsin (käännettävä)
B Höyrynvalitsin (käännettävä)
O = ei höyryä
1 = vähiten höyryä
6 = eniten höyryä
C Suihkutuspainike T (painettava)
D Suihkutussuutin
E Höyrysuihkauspainike 9 (painettava)
F Lisähöyrypainike 0 (painettava) (mallit HI 525/29/35/45)
G Täyttösuppilo estää veden roiskumisen täytettäessä
H Lämpötilan merkkivalo (keltainen)
I ”Itsepuhdistus”-painike (painettava)
J Ikkuna
K Johtokela
L Arvokilpi
M Mittamuki
N Pehmeä kädensija (mallit HI 525/29/35/45)
O Automaattikatkaisun merkkivalo (punainen) (malli HI 545)
Vesisäiliön täyttö (höyrysilitystä ja suihkutusta varten)
• Täytä vesisäiliö vesijohtovedellä ennen ensimmäistä käyttökertaa.
• Voit käyttää vesijohtovettä myös uudelleen täyttämiseen. Vain jos vesi
on erittäin kovaa (yli 17° DH), on parempi käyttää puhdistettua vettä.
- Irrota pistotulppa pistorasiasta ennen vesisäiliön täyttämistä.
Aseta höyrynvalitsin (B) asentoon O (= ei höyryä).
- Aseta höyryrauta pystyyn seisontatuen varaan ja avaa täyttösuppilo
(kuva 2).
- Kaada täyttöaukkoon vettä (enintään 250 ml) (kuva 3).
Käytä apuna mukana olevaa mittamukia.
- Sulje täyttösuppilo (kuva 4).
36
Page 37

B
C
D
Z
Teko-
kuidut
esim.:
asetaatti,
akryyli,
polyamidi
(nailon),
polyesteri,
viskoosi.
Silkki
Villa
Puuvilla
Pellava
0
2
3 - 6
F
F
F
0
0
0
T
T
T
Huom. Merkki Z tarkoittaa: “Tätä vaatetta ei voi silittää!”
37
Silityslämpötila
• Tarkista aina ensin, onko silitettävässä vaatekappaleessa silitysohjetta.
(Katso taulukkoa.)
Noudata aina tätä silitysohjetta.
• Jos silitysohjetta ei ole, mutta tunnet tekstiilin laadun, katso silloin
taulukosta.
• Taulukko koskee varsinaista valmistusmateriaalia eikä mahdollisesti
käytettyä pintakäsittelyä, kiiltoa yms. Materiaalit, joihin on käytetty jotain
pintakäsittelyä (kiiltoa, rypistystä, kohokuviointia yms.), on paras silittää
käyttäen hieman alempaa lämpötilaa.
• Lajittele vaatteet ensin silityslämpötilan mukaan: villaiset yhteen,
puuvillaiset yhteen jne.
Taulukko
Silitys-
ohje
Tekstiili Lämpöti-
lan-
valitsin
Höyryn-
valitsin
Höyry-
suihkaus
Lisä-
höyrya
Suihkutus
MIN
AA
AA
11
AA
AA
AA
AA
AA
AA
22
AA
AA
33
MAX
XX
X
F
F
O
|
O
X
A
M
LINEN
HILO
COTONE
ALGODON
LANA
LANA
SETA
SEDA
NYLON
NYLON
Page 38

38
• Höyryrauta kuumenee nopeammin kuin se jäähtyy. Silittäminen
kannattaa sen tähden aloittaa alinta lämpötilaa vaativista vaatteista,
esim. tekokuituisista.
• Jos vaatteissa on käytetty erilaisia materiaaleja, on lämpötila valittava
alinta lämpötilaa vaativan materiaalin mukaan.
(Esim. vaate, joka sisältää “60 % polyesteriä ja 40 % puuvillaa”, on
silitettävä polyesterin lämpötilan mukaan (1) ja ilman höyryä.)
Ellet tunne vaatekappaleen materiaalia, kokeile silitystä varovasti jostain
sellaisesta kohdasta, joka ei näy. (Aloita matalasta lämpötilasta.)
• Villavaatteet (100 % villaa) voidaan silittää höyryasennolla. Valitse
mieluiten korkein höyryasento ja käytä kuivaa silitysliinaa.
Villa alkaa silitettäessä helposti kiiltää. Vaate kannattaa kääntää
nurinpäin ja silittää nurjalta puolelta.
• Sametti ja muut helposti kiiltävät materiaalit kannattaa silittää vain
yhteen suuntaan ja vain kevyesti painaen.
Pidä höyryrauta koko ajan liikkeessä.
• Silitä tekokuidut ja silkki nurjalta puolelta, etteivät ne ala kiiltää. Älä
käytä suihkutusta, ettei niihin jää läikkiä.
Lämpötilan valinta
- Aseta höyryrauta pystyyn seisontatuen varaan.
- Aseta lämpötilanvalitsin (A) oikeaan asentoon silitysohjeen tai taulukon
mukaan. (Katso kuvaa 5.)
- Työnnä pistotulppa pistorasiaan.
- Voit aloittaa silittämisen, kun keltainen merkkivalo (H) on sammunut ja
syttynyt uudelleen.
• Merkkivalo syttyy ja sammuu aina välillä silittämisen aikana.
• Jos asetat valitsimen alemmalle lämpötilalle silitettyäsi ensin
korkeammalla lämpötilalla, älä ala silittää ennen kuin merkkivalo on
syttynyt ja sammunut uudelleen.
SuihkutusT
Vaatteet voidaan kostuttaa kaikissa lämpötiloissa painamalla
suihkutuspainiketta T (C) muutaman kerran (kuva 6).
Vesisäiliössä tulee olla riittävästi vettä.
Page 39

Höyrysilitys
• Lämpötilanvalitsimen (A) merkeistä ja taulukosta näkyy, että höyrysilitys
on mahdollista vain korkeammissa lämpötiloissa:
2 tai 3 normaali höyry
3 maksimi höyry.
• Tavalliset höyryraudat saattavat valuttaa vettä, jos olet valinnut liian
matalan lämpötilan. Vesi saattaa jättää läikkiä vaatteisiin. Tässä
uudessa höyryraudassa on “Drip Stop”-järjestelmä: Höyryn tulo
katkeaa automaattisesti, jos lämpötila on liian matala. Kun näin
tapahtuu, kuulet “napsahduksen”. Aseta lämpötilanvalitsin suositeltuun
asentoon. Höyryä alkaa tulla, heti kun sopiva lämpötila on saavutettu.
• Vesisäiliössä tulee olla riittävästi vettä.
- Aseta höyryrauta pystyyn seisontatuen varaan.
- Aseta lämpötilanvalitsin “höyryalueella” haluamaasi asentoon (merkkien
2 ja MAX välillä) (kuva 7).
- Työnnä pistotulppa pistorasiaan.
- Odota hetki, että keltainen merkkivalo (H) sammuu ja syttyy uudelleen.
- Aseta höyrynvalitsin (B) haluamaasi asentoon (kuva 8).
Lisähöyry 0 (mallit HI 525/29/35/45)
Joskus höyrysuihkauskaan ei riitä. Näitä tilanteita varten on käytettävissä
lisähöyryasento. Lisähöyry virtaa niin kauan kuin turbopainike pidetään
pohjassa.
- Pidä lisähöyrypainiketta 0 (F) painettuna muutama sekunti (kuva 9).
Vapauta sitten painike.
• Älä paina painiketta yhtäjaksoisesti yli 10 sekuntia.
Pidä välillä vähintään yhden minuutin tauko, ennen kuin painat
uudelleen lisähöyrypainiketta. Jos keltainen merkkivalo (H) syttyy, tämä
osoittaa, että höyryrauta lämpiää uudelleen.
- Odota, kunnes keltainen merkkivalo on sammunut. Sen jälkeen voit
jatkaa silittämistä.
Höyrysuihkaus 9
Kun painat painiketta 9 (E), höyryraudan pohjasta tulee runsaasti höyryä
(kuva 10).
39
Page 40

40
Tätä voidaan käyttää poistamaan itsepäiset laskokset.
Höyrysuihkausta voidaan käyttää vain silitettäessä korkealla lämpötilalla
(asennot 2 - MAX).
Pystyasento
Höyrysuihkausta voi käyttää myös raudan ollessa pystyasennossa
(kuva 11).
Tällä tavalla voidaan suoristaa esim. verhoja.
Silittäminen ilman höyryä
Silittäminen ilman höyryä tapahtuu muuten samalla tavalla kuin
höyrysilitys, mutta höyrynvalitsin tulee jättää asentoon O (= ei höyryä).
Automaattikatkaisu
(vain malli HI 545)
Jos höyryrauta on liikuttamatta yli 30 sekuntia, lämpövastuksen toiminta
katkeaa automaattisesti.
Tällöin punainen merkkivalo (O) alkaa vilkkua ja kuuluu merkkiääni
(kuva 12).
Höyryraudan ollessa vaaka-asennossa tämä tapahtuu 30 sekunnin
kuluttava.
Höyryraudan ollessa pystyasennossa tämä tapahtuu 8 minuutin kuluttava.
Kun jälleen liikutat rautaa, punainen merkkivalo (O) sammuu. Keltainen
merkkivalo (H) syttyy. Tämä osoittaa, että höyryrauta on alkanut
uudelleen kuumentua.
- Voit jatkaa silittämistä, kun keltainen merkkivalo on sammunut.
Hoito
• Kalkki tulisi poistaa höyryraudasta vähintään kaksi kertaa kuukaudessa
käyttämällä “itsepuhdistusta”.
• Mitä kovempaa vesi on, sitä useammin höyryrauta tulisi puhdistaa.
- Aseta höyrynvalitsin (B) asentoon O.
- Aseta rauta pystyyn seisontuen varaan.
- Avaa täyttösuppilo ja kaada vesisäiliöön vettä MAX-merkkiin asti.
- Sulje täyttösuppilo.
Page 41

- Aseta lämpötilanvalitsin (A) asentoon MAX.
- Työnnä pistotulppa pistorasiaan.
- Anna raudan lämmetä, kunnes keltainen merkkivalo (H) ensin sammuu
ja syttyy sitten uudelleen.
- Irrota pistotulppa pistorasiasta.
- Pidä rautaa vaakasuorassa pesualtaan päällä.
- Paina “itsepuhdistus”-painiketta (I) (kuva 13).
- Pohjan höyryaukoista alkaa tulla kuumaa vettä ja höyryä. Samalla
epäpuhtaudet ja kalkki (jos sitä on) huuhtoutuvat pois.
- Heiluta rautaa samalla edestakaisin.
- Vapauta “itsepuhdistus”-painike, minuutin kuluttua tai kun höyryn tulo
lakkaa.
- Aseta höyryrauta pystyyn seisontatuen varaan.
- Työnnä pistotulppa pistorasiaan ja anna raudan kuumentua uudelleen.
- Liikuta rautaa jonkin (mieluiten) vanhan kankaan päällä.
Näin varmistetaan, että pohja on kuiva ennen säilytystä.
Puhdistus
- Irrota pistotulppa pistorasiasta ja anna höyryraudan jäähtyä ennen
puhdistusta.
- Pohjaan tarttunut kalkki tai lika voidaan poistaa kostealla liinalla ja
naarmuttamattomalla (nestemäisellä) puhdistusaineella.
Varo pohjan naarmuuntumista: pohja ei saisi koskettaa metallia.
- Höyryraudan vaippa voidaan pyyhkiä kostealla liinalla.
- Puhdista vesisäiliö silloin tällöin täyttämällä vesisäiliö vedellä ja
ravistelemalla rautaa. Kaada sitten vesi pois.
Säilytys
- Irrota pistotulppa pistorasiasta.
- Kaada vesisäiliöön mahdollisesti jäänyt vesi pois (kuva 14).
- Aseta höyrynvalitsin asentoon O.
- Aseta höyryrauta pystyyn seisontatuen varaan ja anna jäähtyä riittävästi.
- Liitosjohto voidaan kiertää johtokelan ympärille (kuva 15). Jätä johdon
alkuun riitävästi löysää.
- Säilytä höyryrauta pystyasennossa seisontatuen varassa (kuva 16).
Tarkista liitosjohdon kunto säännöllisesti.
Oikeus muutoksiin varataan.
41
Page 42

42
Wichtig
• Lesen Sie diese Gebrauchsanweisung sorgfältig durch, und
sehen Sie sich dabei die Abbildungen an, bevor Sie das Gerät
zum ersten Mal benutzen.
• Prüfen Sie vor Inbetriebnahme, ob die Spannungsangabe auf
dem Typenschild mit der örtlichen Netzspannung
übereinstimmt.
• Benutzen Sie das Gerät niemals, wenn es in irgend einer
Hinsicht defekt oder beschädigt ist.
• Schließen Sie das Gerät nur an eine Schuko-Steckdose an.
• Achten Sie darauf, daß Kinder nicht die heiße Bügelsohle
berühren und das Bügeleisen am Netzkabel hinunterreißen
können.
• Vorsicht: Der aus der Bügelsohle austretende Dampf ist sehr
heiß. Richten Sie ihn niemals auf sich oder andere Personen.
• Ziehen Sie den Stecker aus der Steckdose, bevor Sie das
Bügeleisen mit Wasser füllen oder das restliche Wasser
ausgießen.
• Tauchen Sie das Bügeleisen niemals in Wasser.
• Wenn Sie das Bügeln beenden oder, sei es nur für kurze Zeit,
unterbrechen ...
- stellen Sie den Dampfregler auf Position O,
- stellen Sie das Bügeleisen aufrecht auf seine Rückseite,
- ziehen Sie den Stecker aus der Steckdose.
• Stellen Sie das Bügeleisen immer auf seine Rückseite, um
Beschädigungen zu vermeiden.
• Einige Teile des Bügeleisens sind leicht eingefettet und können
beim ersten Gebrauch etwas Rauch entwickeln. Das geht nach
kurzer Zeit vorbei.
• Entfernen Sie vor dem ersten Gebrauch alle Aufkleber und die
Schutzfolie von der Bügelsohle. Reinigen Sie die Bügelsohle
mit einem weichen Tuch.
• Füllen Sie niemals Essig oder ein Entkalkungsmittel in den
Wasserbehälter.
• Verwenden Sie kein chemisch enthärtetes Wasser.
Deutsch
Page 43

• Achten Sie darauf, daß das Netzkabel nicht mit der heißen
Bügelsohle in Berührung kommt.
• Wenn das Netzkabel defekt oder beschädigt ist, muß es durch
ein original Philips-Netzkabel ersetzt werden. Wenden Sie sich
an Ihren Philips-Händler oder an die Philips-Organisation in
Ihrem Lande.
Allgemeine Beschreibung (Abb. 1)
A Temperaturregler, Drehschalter
B Dampfregler, Schiebeschalter
O = kein Dampf
1 = wenig Dampf
6 = viel Dampf
C Sprühknopf T , Druckschalter
D Sprühdüse
E Dampfstoß 9 , Druckschalter
F Turbo Steam 0 , Druckschalter (Nur Typen HI 525/29/35/45)
G Einfülltrichter. Vermeidet es, Wasser vorbeizugießen.
H Kontrollampe für die Temperatur, bernsteingelb
I “Self clean”, Druckschalter für automatische Reinigung
J Wasserstandsanzeige
K Kabelaufwicklung
L Typenschild
M Meßbecher
N “Softgrip” Griff (Nur Typen HI 525/29/35/45)
O “Auto Stop” Kontrollampe, rot (Nur Type HI 545)
Füllen des Wasserbehälters zum Dampfbügeln und Sprühen
• Sie können den Wasserbehälter einfach mit Leitungswasser füllen.
- Ziehen Sie vor dem Einfüllen des Wassers den Stecker aus der Steckdose.
- Stellen Sie den Dampfregler auf O (= kein Dampf).
- Stellen Sie das Bügeleisen auf seine Rückseite, und öffnen Sie den
Einfülltrichter (G) (Abb. 2).
- Gießen Sie max. 250 ml durch die Öffnung (Abb. 3). Verwenden Sie
hierfür den Meßbecher mit Ausguß.
- Schließen Sie den Einfülltrichter (Abb. 4)
43
Page 44

B
C
D
Z
Synthetics
Acetat
Viskose,
Polyamid
(Nylon)
Polyester
Seide
Wolle
Baum-
wolle
Leinen
0
1-2
3 - 6
9
9
9
0
0
0
T
T
T
Wichtig! Z auf einem Etikett bedeutet:
“Dieses Teil darf nicht gebügelt werden.”
44
Bügeltemperatur
• Prüfen Sie zuerst immer, ob das zu bügelnde Wäschestück ein Etikett
mit Bügelvorschriften enthält (siehe Tabelle).
Befolgen Sie diese Bügelvorschriften in jedem Falle.
• Wenn die Bügelvorschrift fehlt und Sie die Textilart kennen, so schauen
Sie in der Tabelle nach.
• Die Tabelle gilt nur für die oben aufgeführten Materialien, nicht aber für
appretiertes, chemisch behandeltes Material (knitterfrei, mit Glanz,
Relief o.ä), das bei niedrigerer Temperatur gebügelt werden muß.
• Sortieren Sie das Bügelgut zuvor nach der erforderlichen
Bügeltemperatur: Wolle zu Wolle, Baumwolle zu Baumwolle usw.
Tabelle der Textilarten
Bügel-
vorschrift
Textilart Temperatur-
regler
Dampfregler Dampfstoß Turbo
Steam
Dampf-
sprühen
MIN
AA
AA
11
AA
AA
AA
AA
AA
AA
22
AA
AA
33
MAX
XX
X
F
F
O
|
O
X
A
M
LINEN
HILO
COTONE
ALGODON
LANA
LANA
SETA
SEDA
NYLON
NYLON
Page 45

45
• Das Bügeleisen ist schneller aufgeheizt als abgekühlt. Beginnen Sie
deshalb mit den Textilien, die nur eine niedrige Temperatur vertragen,
z.B. mit den Synthetics.
• Bei Mischgeweben müssen Sie stets die Temperatur für die Faser
einstellen, welche die niedrigste Temperatur verlangt. Ein Wäscheteil
aus 60% Polyester und 40% Baumwolle muß ohne Dampf bei der
Einstellung (1) für Polyester gebügelt werden.
Wenn Sie nicht wissen, woraus das zu bügelnde Teil besteht, so
suchen Sie eine Stelle, die bei normalem Gebrauch nicht sichtbar ist,
und probieren Sie dort, welche Bügeltemperatur angemessen ist.
Beginnen Sie immer mit der niedrigsten Temperaturstufe.
• Rein wollene Textilien (100% Wolle) sollten mit einer Dampfeinstellung
gebügelt werden. Am besten bügeln Sie mit maximaler Temperatur und
verwenden ein trockenes Bügeltuch.
Bügeln Sie Wollsachen von links, von der Rückseite. So vermeiden Sie,
daß die Oberfläche nach dem Bügeln glänzt.
• Samt und andere Gewebe, die beim Bügeln rasch glänzende Stellen
annehmen, sollten Sie nur in eine Richtung (“mit dem Strich”) und mit
nur leichtem Druck bügeln.Halten Sie das Bügeleisen dabei ständig in
Bewegung.
• Bügeln Sie Synthetics und Seide stets von links, um glänzende Stellen
zu vermeiden. Verwenden Sie keine Sprays; das kann Flecken
verursachen.
Temperaturregelung
- Stellen Sie das Bügeleisen auf seine Rückseite.
- Stellen Sie den Temperaturregler (A) auf die gemäß Bügelvorschrift
oder Tabelle erforderliche Bügeltemperatur (Abb. 5).
- Stecken Sie den Stecker in die Steckdose.
- Wenn die bernsteingelbe Kontrollampe (H) einmal aus- und wieder
angegangen ist, können Sie mit dem Bügeln beginnen.
• Während des Bügelns geht die Kontrollampe von Zeit zu Zeit wieder an
und aus.
• Wenn Sie beim Bügeln auf eine niedrigere Temperatur herabschalten,
so bügeln Sie erst dann weiter, wenn die Kontrollampe erneut
aufleuchtet und wieder ausgegangen ist.
Page 46

46
Einsprühen der Wäsche T
Sie können die Wäsche bei jeder Temperatureinstellung einsprühen,
indem Sie den Sprühknopf T (C) mehrmals drücken (Abb. 6).
Achten Sie darauf, daß genügend Wasser im Wasserbehälter ist.
Dampfbügeln
• Wie der Dampfregler (A) und die Tabelle anzeigen, ist Dampfbügeln nur
bei höheren Bügeltemperaturen möglich:
2 oder 3 bei wenig Dampf
3 bei viel Dampf.
• Wenn die Temperatur zu niedrig ist, tritt bei den üblichen Bügeleisen
Wasser aus der Bügelsohle aus. Das schadet der Bügelsohle. Ihr neues
Bügeleisen ist mit “Tropf-Stop” ausgerüstet: Ist die Temperatur zu
niedrig, wird die Dampfzufuhr automatisch unterbrochen. Sie hören
dann ein deutliches Klicken.
Stellen Sie dann den Temperaturregler (A) auf die empfohlene
Temperatur.
Sobald die erforderliche Temperatur erreicht ist, wird wieder Dampf
zugeführt.
• Achten Sie darauf, daß genügend Wasser im Wasserbehälter ist.
- Stellen Sie das Bügeleisen auf seine Rückseite.
- Stellen Sie den Temperaturregler (A) auf die erforderliche
Bügeltemperatur im Dampfbereich (2 bis MAX ) (Abb. 7).
- Stecken Sie den Stecker in die Steckdose.
- Wenn die bernsteingelbe Kontrollampe (H) einmal aus- und wieder
angegangen ist, können Sie zu bügeln beginnen.
- Schieben Sie den Dampfregler (B) auf die erforderliche Position (Abb. 8).
Turbo Steam (Nur Typen HI 525/29/35/45)
Diese Möglichkeit sorgt für zusätzlichen Dampf zum Entfernen
hartnäckiger Falten. Zusätzlicher Dampf wird solange abgegeben, wie die
Turbo-Taste eingedrückt wird.
- Halten Sie den Schalter 0 (F) für einige Sekunden gedrückt (Abb. 9).
Lassen Sie dann den Schalter wieder los.
Page 47

47
• Halten Sie den Schalter niemals länger als 10 Sekunden
ununterbrochen gedrückt.
Halten Sie zwischen zwei Dampfstößen mindestens eine Minute Pause
ein. Wenn die gelbe Kontrollampe (H) aufleuchtet, zeigt sie an, daß die
Bügelsohle wieder aufgeheizt wird.
- Warten Sie, bis die bernsteingelbe Kontrollampe erlischt. Dann können
Sie weiterbügeln.
Dampfstoß 9
Wenn Sie den Druckschalter 9 (E) drücken, gibt die Bügelsohle einen
starken Dampfstrahl ab (Abb. 10).
Das kann z.B. nützlich sein, um hartnäckige Knitterfalten zu beseitigen.
Der Dampfstoß kann nur abgegeben werden, wenn der Temperaturregler
auf eine hohe Temperatur (2 bis MAX) eingestellt ist.
Hängende Textilien aufdämpfen
Vorhänge und Kleidungsstücke (Jacken, Kleider, Mäntel) können
hängend mit senkrecht gehaltenem Bügeleisen aufgedämpft werden
(Abb. 11).
Ohne Dampf bügeln
Gehen Sie wie oben beschrieben vor. Der Dampfregler (B) muß dabei
jedoch in Position O stehen (= kein Dampf).
Sicherheitsschalter “Auto stop”
(Nur Type HI 545)
Wenn das eingeschaltete Bügeleisen länger als 30 Sekunden unbewegt
in waagerechter Stellung verbleibt, wird das Heizelement automatisch
ausgeschaltet.
Es blinkt dann die rote “Auto Stop”-Kontrollampe (O), und ein Signalton
ist zu hören (Abb. 12).
Steht das Bügeleisen in horizontaler Stellung, geschieht das nach 30 Sekunden; steht das Bügeleisen aufrecht, so geschieht das nach 8 Minuten.
Page 48

48
Nehmen Sie das Bügeln wieder auf, so erlischt die rote Kontrollampe und
die bernsteingelbe Kontrollampe für die Temperatur (H) leuchtet auf. Dies
zeigt an, daß das Bügeleisen wieder aufgeheizt wird.
Wenn diese Kontrollampe erloschen ist, können Sie wieder zu bügeln
beginnen.
Wartung und Pflege
• Es ist wichtig, wenigstens alle 14 Tage einmal eine Selbstreinigung
durchzuführen, um Ablagerungen wie Kalkstein zu entfernen.
• Je härter das verwendete Wasser, um so häufiger ist die
Selbstreinigung notwendig.
- Stellen Sie den Dampfregler (B) auf Position O.
- Stellen Sie das Bügeleisen auf seine Rückseite.
- Öffnen Sie den Einfülltrichter, und füllen Sie den Wasserbehälter bis zur
Markierung MAX.
- Schließen Sie den Einfülltrichter.
- Stellen Sie den Temperaturregler (A) auf MAX.
- Stecken Sie den Stecker in die Steckdose.
- Lassen Sie das Bügeleisen warm werden, bis die bernsteingelbe
Kontrollampe (H) einmal aus- und wieder angegangen ist.
- Ziehen Sie den Stecker aus der Steckdose.
- Halten Sie das Bügeleisen waagerecht über das Spülbecken.
- Drücken Sie den Schalter (I) “Self clean” (Abb. 13).
- Nun treten kochendes Wasser und Dampf aus der Bügelsohle aus.
Eventuelle Verunreinigungen und Ablagerungen werden so
herausgespült.
- Bewegen Sie das Bügeleisen dabei hin und her.
- Lassen Sie den Schalter (I) “Self clean” nach einer Minute los, oder
wenn der Wasserbehälter völlig leer ist.
- Stellen Sie das Bügeleisen auf seine Rückseite.
- Stecken Sie den Stecker wieder in die Steckdose, und lassen Sie das
Bügeleisen aufheizen.
- Führen Sie das Bügeleisen über ein gebrauchtes Stück Stoff, damit die
Bügelsohle trocken ist, wenn Sie das Bügeleisen fortstellen.
Page 49

49
Reinigung
- Ziehen Sie vor dem Reinigen den Netzstecker aus der Steckdose, und
lassen Sie das Bügeleisen völlig abkühlen.
- Ablagerungen an der Bügelsohle können mit einem feuchten Tuch
abgewischt werden, auf das Sie bei Bedarf etwas flüssiges Spülmittel
auftragen können.
Halten Sie die Bügelsohle glatt; vermeiden Sie eine unsanfte
Berührung mit Metallgegenständen.
- Der obere Teil des Bügeleisens kann mit einem feuchten Tuch
abgewischt werden.
- Reinigen Sie von Zeit zu Zeit das Innere des Wasserbehälters. Füllen
Sie ihn mit Wasser und schütteln Sie ihn. Gießen Sie das Wasser
danach aus.
Aufbewahrung
- Ziehen Sie den Stecker aus der Steckdose.
- Gießen Sie eventuell im Wasserbehälter verbliebenes Wasser aus
(Abb. 14).
- Stellen Sie den Dampfregler auf O.
- Stellen Sie das Bügeleisen auf seine Rückseite, und lassen Sie es völlig
abkühlen.
- Das Netzkabel können Sie um die Kabelaufwicklung (K) wickeln
(Abb. 15).
- Bewahren Sie das Bügeleisen stets auf seiner Rückseite stehend
auf (Abb. 16).
Prüfen Sie regelmäßig den Zustand des Netzkabels.
Page 50

50
11
15
2
4
8
11
13
14
16
3
HI 545
12
9 10
5 7
MAX
6
Page 51

51
Page 52

4239 000 44183
u
www.philips.com
 Loading...